这是本节的多页打印视图。
点击此处打印.
返回本页常规视图.
软件工具
使用 Docker 运行开箱即用的软件与工具
PostgreSQL 是世界上最流行的数据库,有无数的软件构建于 PostgreSQL 之上,围绕 PostgreSQL 生态,或服务于 PostgreSQL 本身,例如
- 使用 PostgreSQL 作为首选数据库的 “应用软件”
- 服务于 PostgreSQL 软件开发与管理的 “工具软件”
- 基于 PostgreSQL 的上层数据库,兼容分支等 “数据库软件”
Pigsty 提供了一系列 Docker Compose 模板,帮助用户一键拉起这些软件应用,开箱即用:
| 名称 |
官方网站 |
类型 |
状态 |
端口 |
默认域名 |
说明 |
| Supabase |
Supabase |
数据库 |
GA |
8000 |
supa.pigsty |
基于PG的开源 Firebase 替代,后端平台 |
| PolarDB |
PolarDB |
数据库 |
GA |
5532 |
|
开源的 RAC 版 PostgreSQL,国产信创稻草人 |
| FerretDB |
FerretDB |
数据库 |
GA |
27017 |
|
基于PG的 开源 MongoDB 替代 |
| MinIO |
MinIO |
数据库 |
GA |
9000 |
sss.pigsty |
开源S3对象存储替代 |
| EdgeDB |
EdgeDB |
数据库 |
TBD |
|
|
基于PostgreSQL的图数据库 |
| NocoDB |
NocoDB |
应用软件 |
GA |
8080 |
noco.pigsty |
开源的 Airtable 替代 |
| Odoo |
Odoo |
应用软件 |
GA |
8069 |
odoo.pigsty |
开源的企业级ERP系统 |
| Dify |
Dify |
应用软件 |
GA |
8001 |
dify.pigsty |
AI工作流编排平台,LLMOPS |
| Jupyter |
Jupyter |
应用软件 |
GA |
|
lab.pigsty |
Python开发与数据分析笔记本 |
| Gitea |
Gitea |
应用软件 |
GA |
8889 |
git.pigsty |
私有,可靠高效的 DevOps 代码托管平台 |
| Wiki |
Wiki.js |
应用软件 |
GA |
9002 |
wiki.pigsty |
开源且可扩展的 Wiki 软件 |
| GitLab |
GitLab |
应用软件 |
TBD |
|
|
开源 GitHub,企业级代码托管平台 |
| Mastodon |
Mastodon |
应用软件 |
TBD |
|
|
开源去中心化社交网站 |
| Keycloak |
Keycloak |
应用软件 |
TBD |
|
|
开源的身份认证与访问控制组件 |
| Harbour |
Harbour |
应用软件 |
TBD |
|
|
企业级 Docker/K8S 镜像仓库 |
| Confluence |
Confluence |
应用软件 |
TBD |
|
|
企业级知识管理库 |
| Jira |
Jira |
应用软件 |
TBD |
|
|
企业级项目管理工具 |
| Zabbix |
Zabbix 7 |
应用软件 |
TBD |
|
|
企业级全家桶监控平台 |
| Grafana |
Grafana |
应用软件 |
TBD |
|
|
企业级数据可视化与面板平台 |
| Metabase |
Metabase |
应用软件 |
GA |
9004 |
mtbs.pigsty |
快速对多种数据源内的数据进行分析 |
| ByteBase |
ByteBase |
应用软件 |
GA |
8887 |
ddl.pigsty |
数据库模式变更工具 |
| Kong |
Kong |
开发套件 |
GA |
8000 |
api.pigsty |
基于Nginx/OpenResty的API网关 |
| PostgREST |
PostgREST |
开发套件 |
GA |
8884 |
api.pigsty |
自动从PG模式中生成RestAPI |
| pgAdmin4 |
pgAdmin4 |
PG工具 |
GA |
8885 |
adm.pigsty |
PostgreSQL GUI 管理工具 |
| pgWeb |
pgWeb |
PG工具 |
GA |
8886 |
cli.pigsty |
PostgreSQL 网页客户端工具 |
| SchemaSpy |
SchemaSpy |
PG工具 |
TBD |
|
|
生成PostgreSQL模式图的工具 |
| pgBadger |
pgBadger |
PG工具 |
TBD |
|
|
分析PostgreSQL |
| pg_exporter |
pg_exporter |
PG工具 |
GA |
9630 |
|
暴露PostgreSQL与Pgbouncer的监控指标 |
如何使用这些软件模板?
使用这些软件模板需要在
节点 上安装
DOCKER 模块,中国大陆用户可能还要配置 DockerHub 代理,详见
教程。
1 - Kong:企业级开源 API 网关
拉起基于 Nginx 与 OpenResty 的强力开源 API 网关,并使用 PostgreSQL 与 Redis 作为其后端状态存储
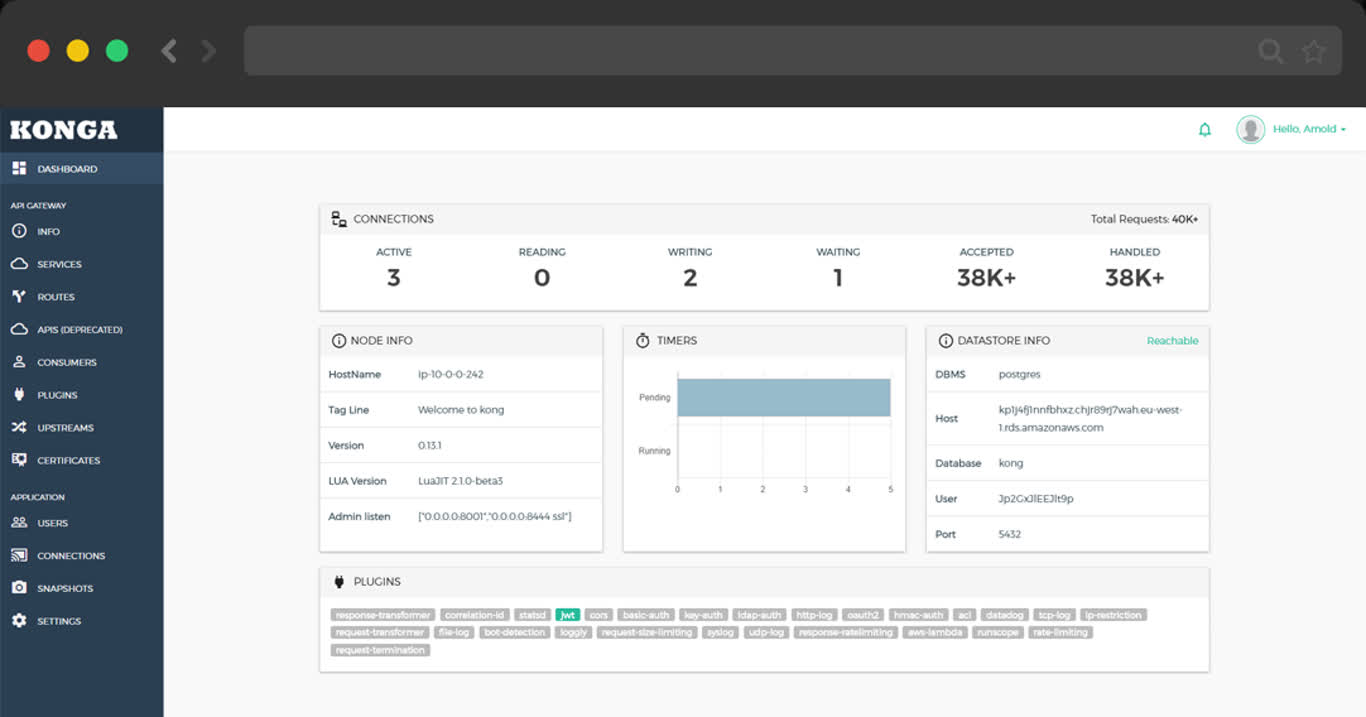
TL;DR
cd app/kong ; docker-compose up -d
make up         # pull up kong with docker-compose
make ui         # run swagger ui container
make log        # tail -f kong logs
make info       # introspect kong with jq
make stop       # stop kong container
make clean      # remove kong container
make rmui       # remove swagger ui container
make pull       # pull latest kong image
make rmi        # remove kong image
make save       # save kong image to /tmp/kong.tgz
make load       # load kong image from /tmp
Scripts
- Default Port: 8000
- Default SSL Port: 8443
- Default Admin Port: 8001
- Default Postgres Database:
postgres://dbuser_kong:DBUser.Kong@10.10.10.10:5432/kong
# postgres://dbuser_kong:DBUser.Kong@10.10.10.10:5432/kong
- { name: kong, owner: dbuser_kong, revokeconn: true , comment: kong the api gateway database }
- { name: dbuser_kong, password: DBUser.Kong , pgbouncer: true , roles: [ dbrole_admin ] }
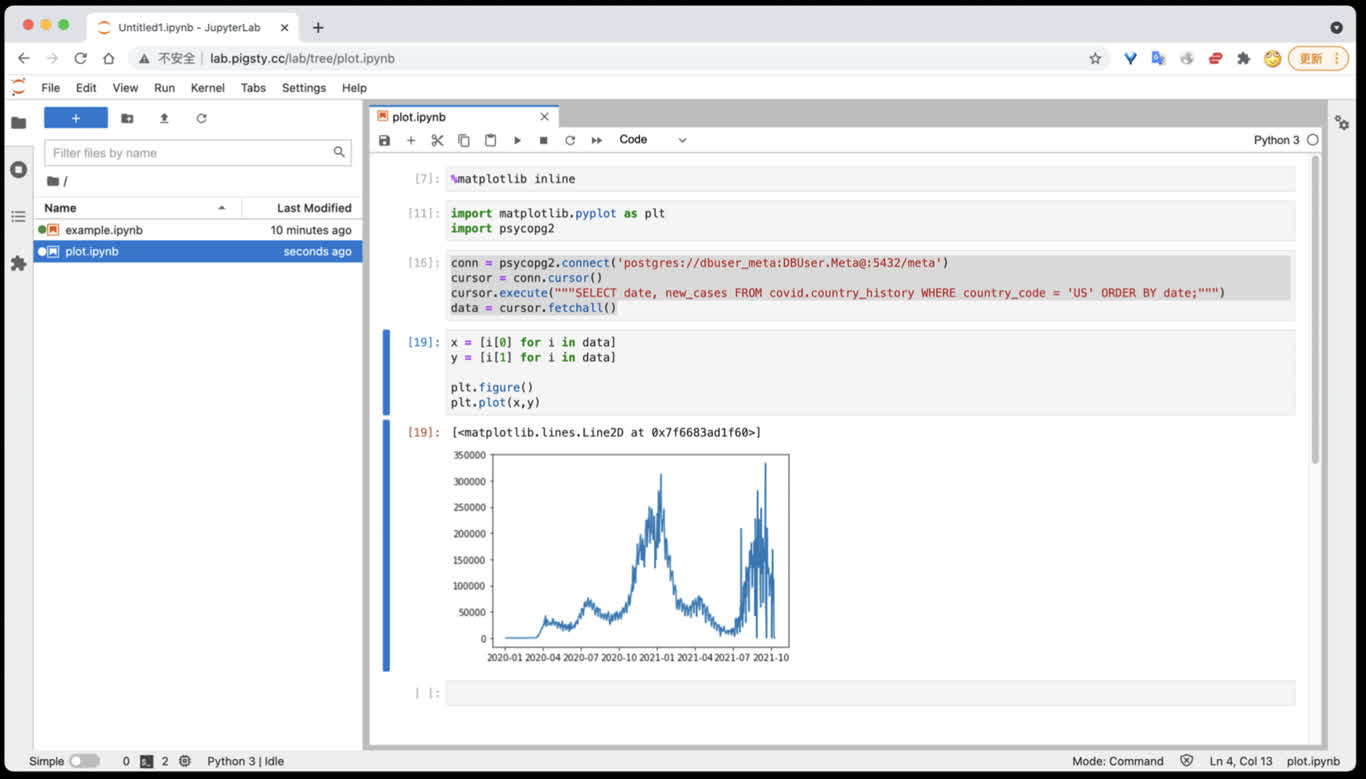
2 - Jupyter:数据分析笔记本与AI IDE
使用 Jupyter Lab 并访问 PostgreSQL 数据库,并组合使用SQL与Python的能力进行数据分析。
本文需要更新
Jupyter Lab 是基于 IPython Notebook 的完整数据科学研发环境,可用于数据分析与可视化。
因为JupyterLab提供了Web Terminal功能,因此在默认安装中不启用,需要主动使用 infra-jupyter.yml 在元节点上进行部署。
数据分析环境:Jupyter
Jupyter Lab 是一站式数据分析环境,下列命令将在 8887 端口启动一个Jupyter Server.
docker run -it --restart always --detach --name jupyter -p 8888:8888 -v "${PWD}":/tmp/notebook jupyter/scipy-notebook
docker logs jupyter # 打印日志,获取登陆的Token
访问 http://10.10.10.10:8888/ 即可使用 JupyterLab,(需要填入自动生成的Token)。
您也可以使用 infra-jupyter.yml 在管理节点裸机上启用Jupyter Notebook。
太长不看
./infra-jupyter.yml # 在管理节点上安装 Jupyter Lab,使用8888端口,OS用户jupyter,默认密码 pigsty
./infra-jupyter.yml -e jupyter_domain=lab.pigsty.cc  # 使用另一个域名(默认为lab.pigsty)
./infra-jupyter.yml -e jupyter_port=8887             # 使用另一个端口(默认为8888)
./infra-jupyter.yml -e jupyter_username=osuser_jupyter jupyter_password=pigsty2 # 使用不同的操作系统用户与密码
Jupyter配置
默认值
jupyter_username: jupyter       # os user name, special names: default|root (dangerous!)
jupyter_password: pigsty        # default password for jupyter lab (important!)
jupyter_port: 8888              # default port for jupyter lab
jupyter_domain: lab.pigsty      # domain name used to distinguish jupyter
jupyter_username
Jupyter使用的操作系统用户, 类型:bool,层级:G,默认值为:"jupyter"
其他用户名亦同理,但特殊用户名default会使用当前执行安装的用户(通常为管理员)运行 Jupyter Lab,这会更方便,但也更危险。
jupyter_password
Jupyter Lab的密码, 类型:bool,层级:G,默认值为:"pigsty"
如果启用Jupyter,强烈建议修改此密码。加盐混淆的密码默认会写入~jupyter/.jupyter/jupyter_server_config.json。
jupyter_port
Jupyter监听端口, 类型:int,层级:G,默认值为:8888。
启用JupyterLab时,Pigsty会使用jupyter_username 参数指定的用户运行本地Notebook服务器。
此外,需要确保配置node_packages_meta_pip 参数包含默认值 'jupyterlab'。
Jupyter Lab可以从Pigsty首页导航进入,或通过默认域名 lab.pigsty 访问,默认监听于8888端口。
jupyter_domain
Jupyter域名, 类型:string,层级:G,默认值为:lab.pigsty。
该域名会被写入 /etc/nginx/conf.d/jupyter.conf 中,作为Jupyter服务的监听域名。
Jupyter剧本
infra-jupyter
infra-jupyter.yml 剧本用于在元节点上加装 Jupyter Lab服务
Jupyter Lab 是非常实用的Python数据分析环境,但自带Web Shell,风险较大,需要使用专用剧本显式安装。
使用说明:参照 Jupyter配置 中的说明调整配置清单,然后执行此剧本即可。
如果您在生产环境中启用了Jupyter,请务必修改Jupyter的密码
在Jupyter中访问PostgreSQL数据库
您可以直接使用 psycopg2 驱动访问 PostgreSQL 数据库
import psycopg2
conn = psycopg2.connect('postgres://dbuser_meta:DBUser.Meta@:5432/meta')
cursor = conn.cursor()
cursor.execute("""SELECT date, new_cases FROM covid.country_history WHERE country_code = 'CN';""")
data = cursor.fetchall()
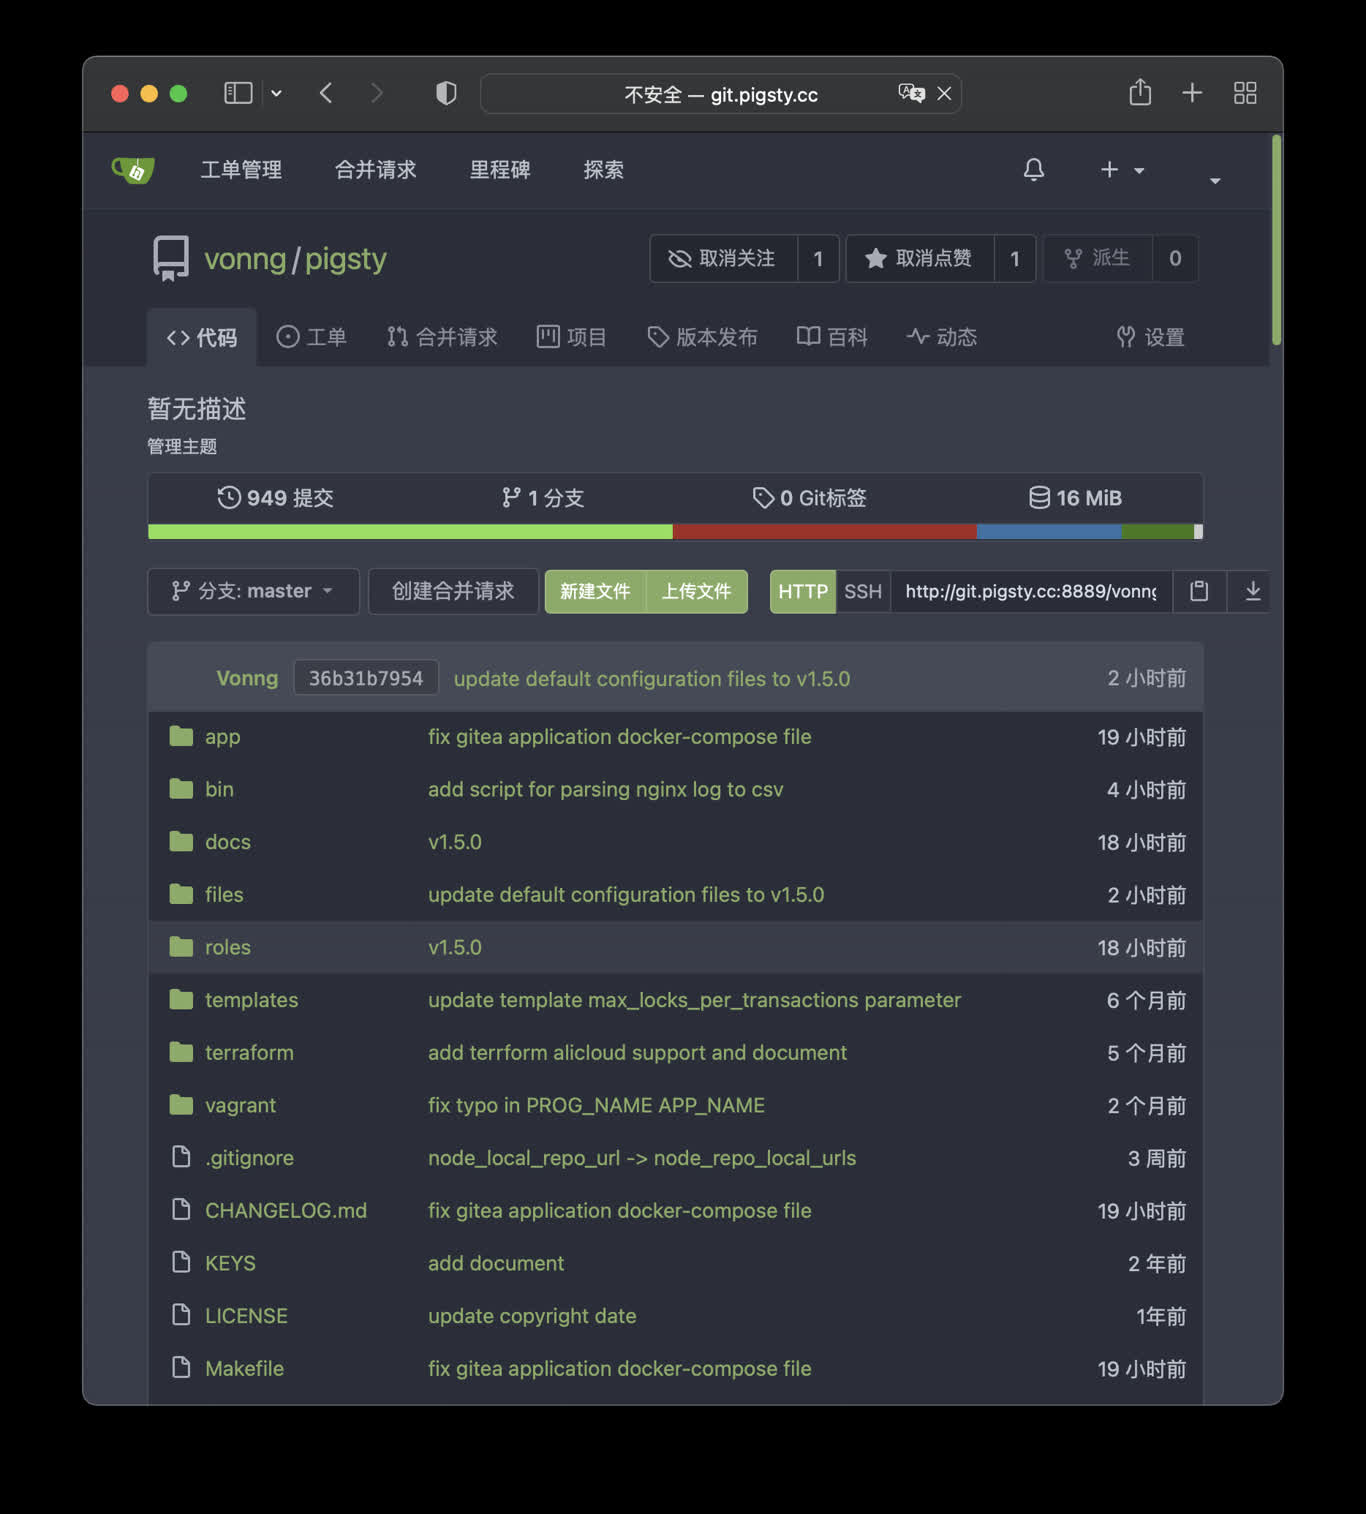
3 - Gitea:自建简易代码托管平台
使用Docker拉起Gitea,并使用Pigsty的PG作为外部的元数据库
公开Demo地址:http://git.pigsty.cc
太长;不看
cd ~/pigsty/app/gitea; make up
在本例中,Gitea 默认使用 8889 端口,您可以访问以下位置:
http://git.pigsty 或 http://10.10.10.10:8889
make up      # pull up gitea with docker-compose in minimal mode
make run     # launch gitea with docker , local data dir and external PostgreSQL
make view    # print gitea access point
make log     # tail -f gitea logs
make info    # introspect gitea with jq
make stop    # stop gitea container
make clean   # remove gitea container
make pull    # pull latest gitea image
make rmi     # remove gitea image
make save    # save gitea image to /tmp/gitea.tgz
make load    # load gitea image from /tmp
使用外部的PostgreSQL
Pigsty默认使用容器内的 Sqlite 作为元数据存储,您可以让 Gitea 通过连接串环境变量使用外部的PostgreSQL
# postgres://dbuser_gitea:DBUser.gitea@10.10.10.10:5432/gitea
db:   { name: gitea, owner: dbuser_gitea, comment: gitea primary database }
user: { name: dbuser_gitea , password: DBUser.gitea, roles: [ dbrole_admin ] }
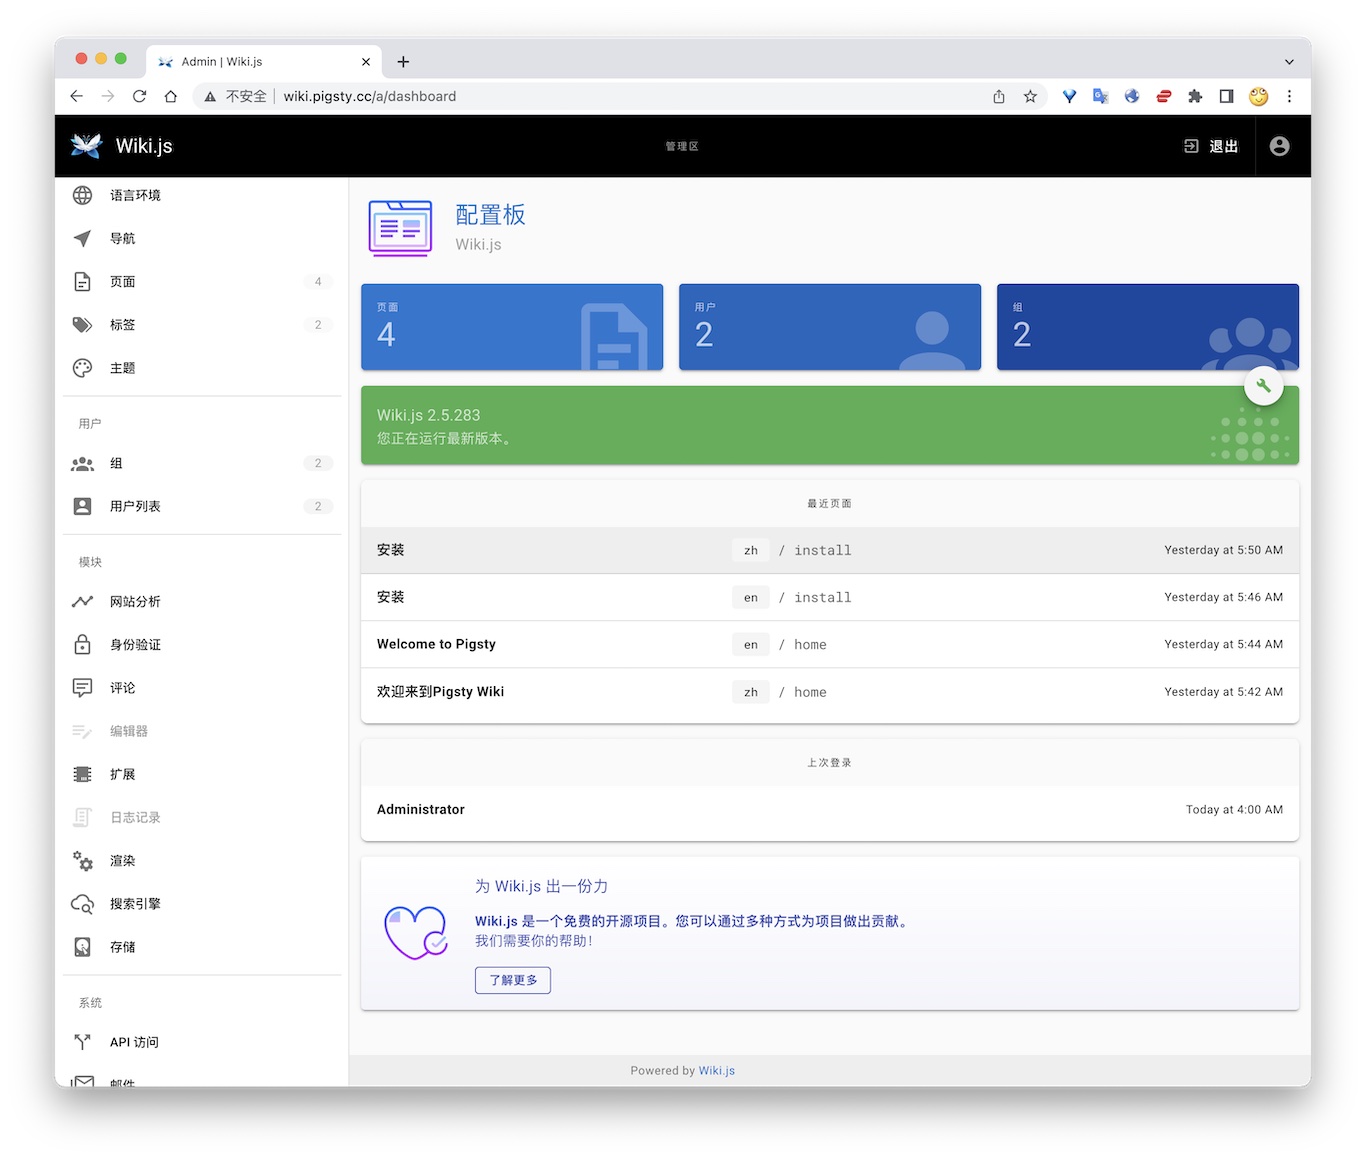
4 - Wiki.js:搭建你自己的维基百科
如何使用 Wiki.js 搭建你自己的开源维基百科,并使用 Pigsty 管理的PG作为持久数据存储
公开Demo地址:http://wiki.pigsty.cc
太长;不看
cd app/wiki ; docker-compose up -d
准备数据库
# postgres://dbuser_wiki:DBUser.Wiki@10.10.10.10:5432/wiki
- { name: wiki, owner: dbuser_wiki, revokeconn: true , comment: wiki the api gateway database }
- { name: dbuser_wiki, password: DBUser.Wiki , pgbouncer: true , roles: [ dbrole_admin ] }
bin/createuser pg-meta dbuser_wiki
bin/createdb   pg-meta wiki
容器配置
version: "3"
services:
  wiki:
    container_name: wiki
    image: requarks/wiki:2
    environment:
      DB_TYPE: postgres
      DB_HOST: 10.10.10.10
      DB_PORT: 5432
      DB_USER: dbuser_wiki
      DB_PASS: DBUser.Wiki
      DB_NAME: wiki
    restart: unless-stopped
    ports:
      - "9002:3000"
Access
- Default Port for wiki: 9002
# add to nginx_upstream
- { name: wiki  , domain: wiki.pigsty.cc , endpoint: "127.0.0.1:9002"   }
./infra.yml -t nginx_config
ansible all -b -a 'nginx -s reload'
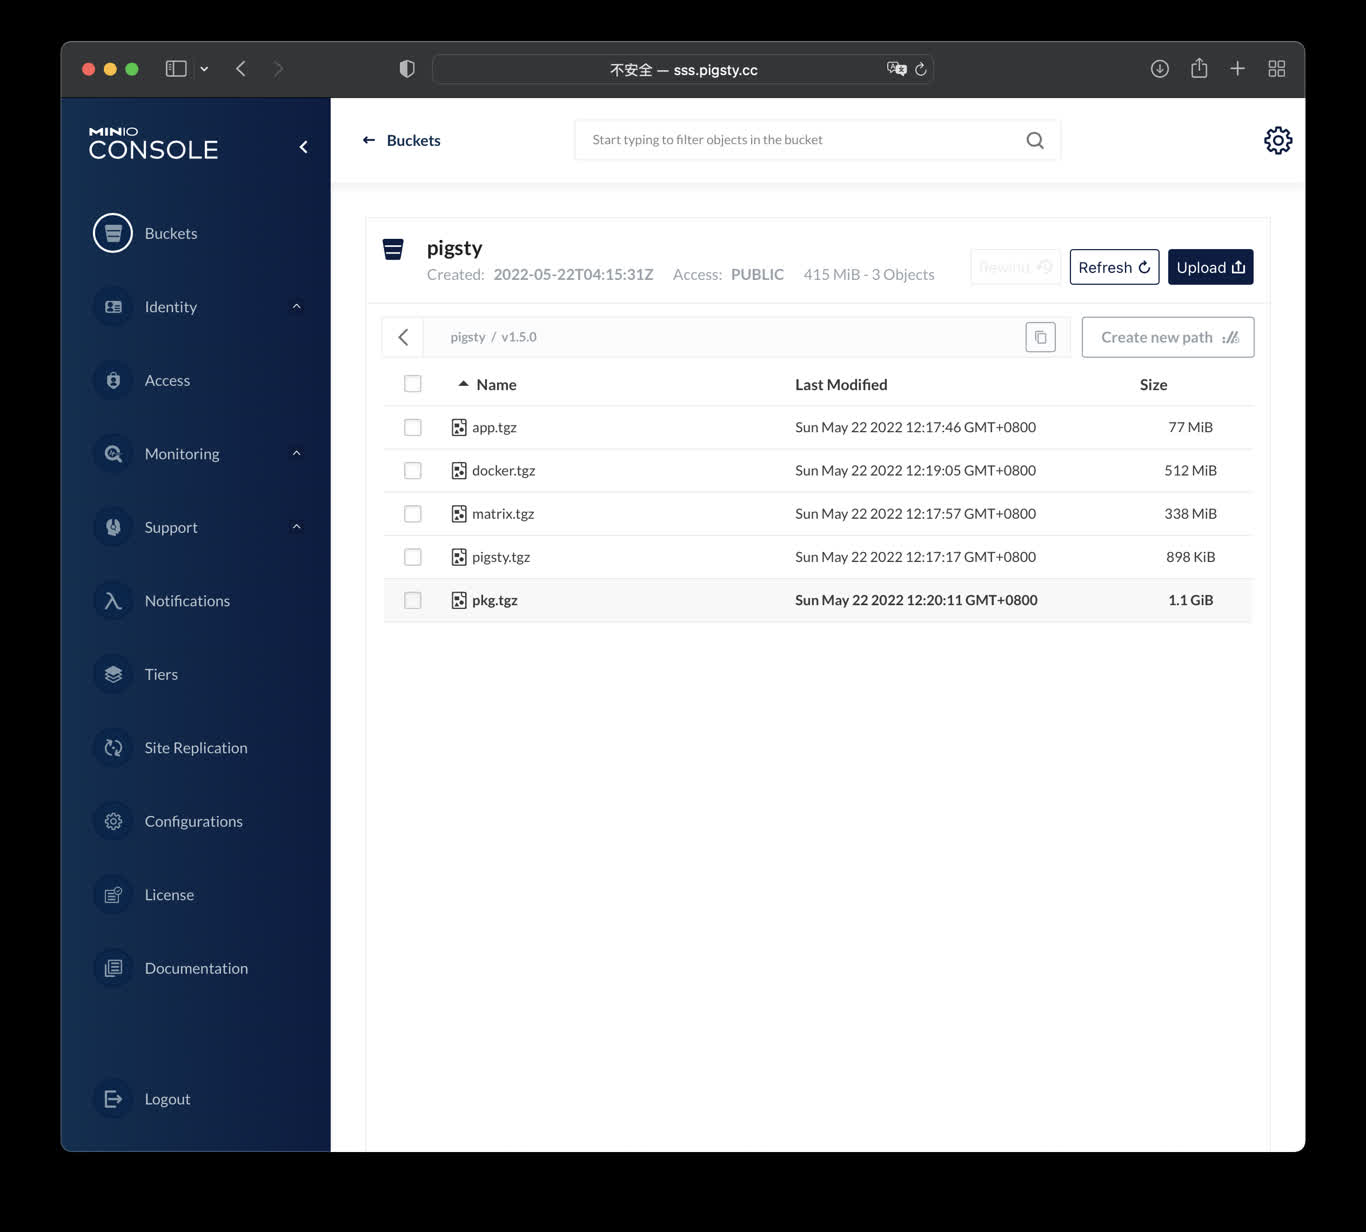
5 - Minio:开源S3,简单对象存储服务
使用Docker拉起Minio,即刻拥有你自己的对象存储服务。
公开Demo地址:http://sss.pigsty.cc
默认用户名: admin / pigsty.minio
太长;不看
Launch minio (s3) service on 9000 & 9001
cd ~/pigsty/app/minio ; docker-compose up -d
docker run -p 9000:9000 -p 9001:9001 \
  -e "MINIO_ROOT_USER=admin" \
  -e "MINIO_ROOT_PASSWORD=pigsty.minio" \
  minio/minio server /data --console-address ":9001"
visit http://10.10.10.10:9000 with user admin and password pigsty.minio
make up         # pull up minio with docker-compose
make run        # launch minio with docker
make view       # print minio access point
make log        # tail -f minio logs
make info       # introspect minio with jq
make stop       # stop minio container
make clean      # remove minio container
make pull       # pull latest minio image
make rmi        # remove minio image
make save       # save minio image to /tmp/minio.tgz
make load       # load minio image from /tmp
6 - ByteBase:PG模式迁移工具
使用Docker拉起Bytebase,对PG的模式进行版本化管理
ByteBase
ByteBase是一个进行数据库模式变更的工具,以下命令将在元节点 8887 端口启动一个ByteBase。
mkdir -p /data/bytebase/data;
docker run --init --name bytebase --restart always --detach --publish 8887:8887 --volume /data/bytebase/data:/var/opt/bytebase \
    bytebase/bytebase:1.0.4 --data /var/opt/bytebase --host http://ddl.pigsty --port 8887
访问 http://10.10.10.10:8887/ 或 http://ddl.pigsty 即可使用 ByteBase,您需要依次创建项目、环境、实例、数据库,即可开始进行模式变更。 公开Demo地址: http://ddl.pigsty.cc
公开Demo地址:http://ddl.pigsty.cc
默认用户名与密码: admin / pigsty
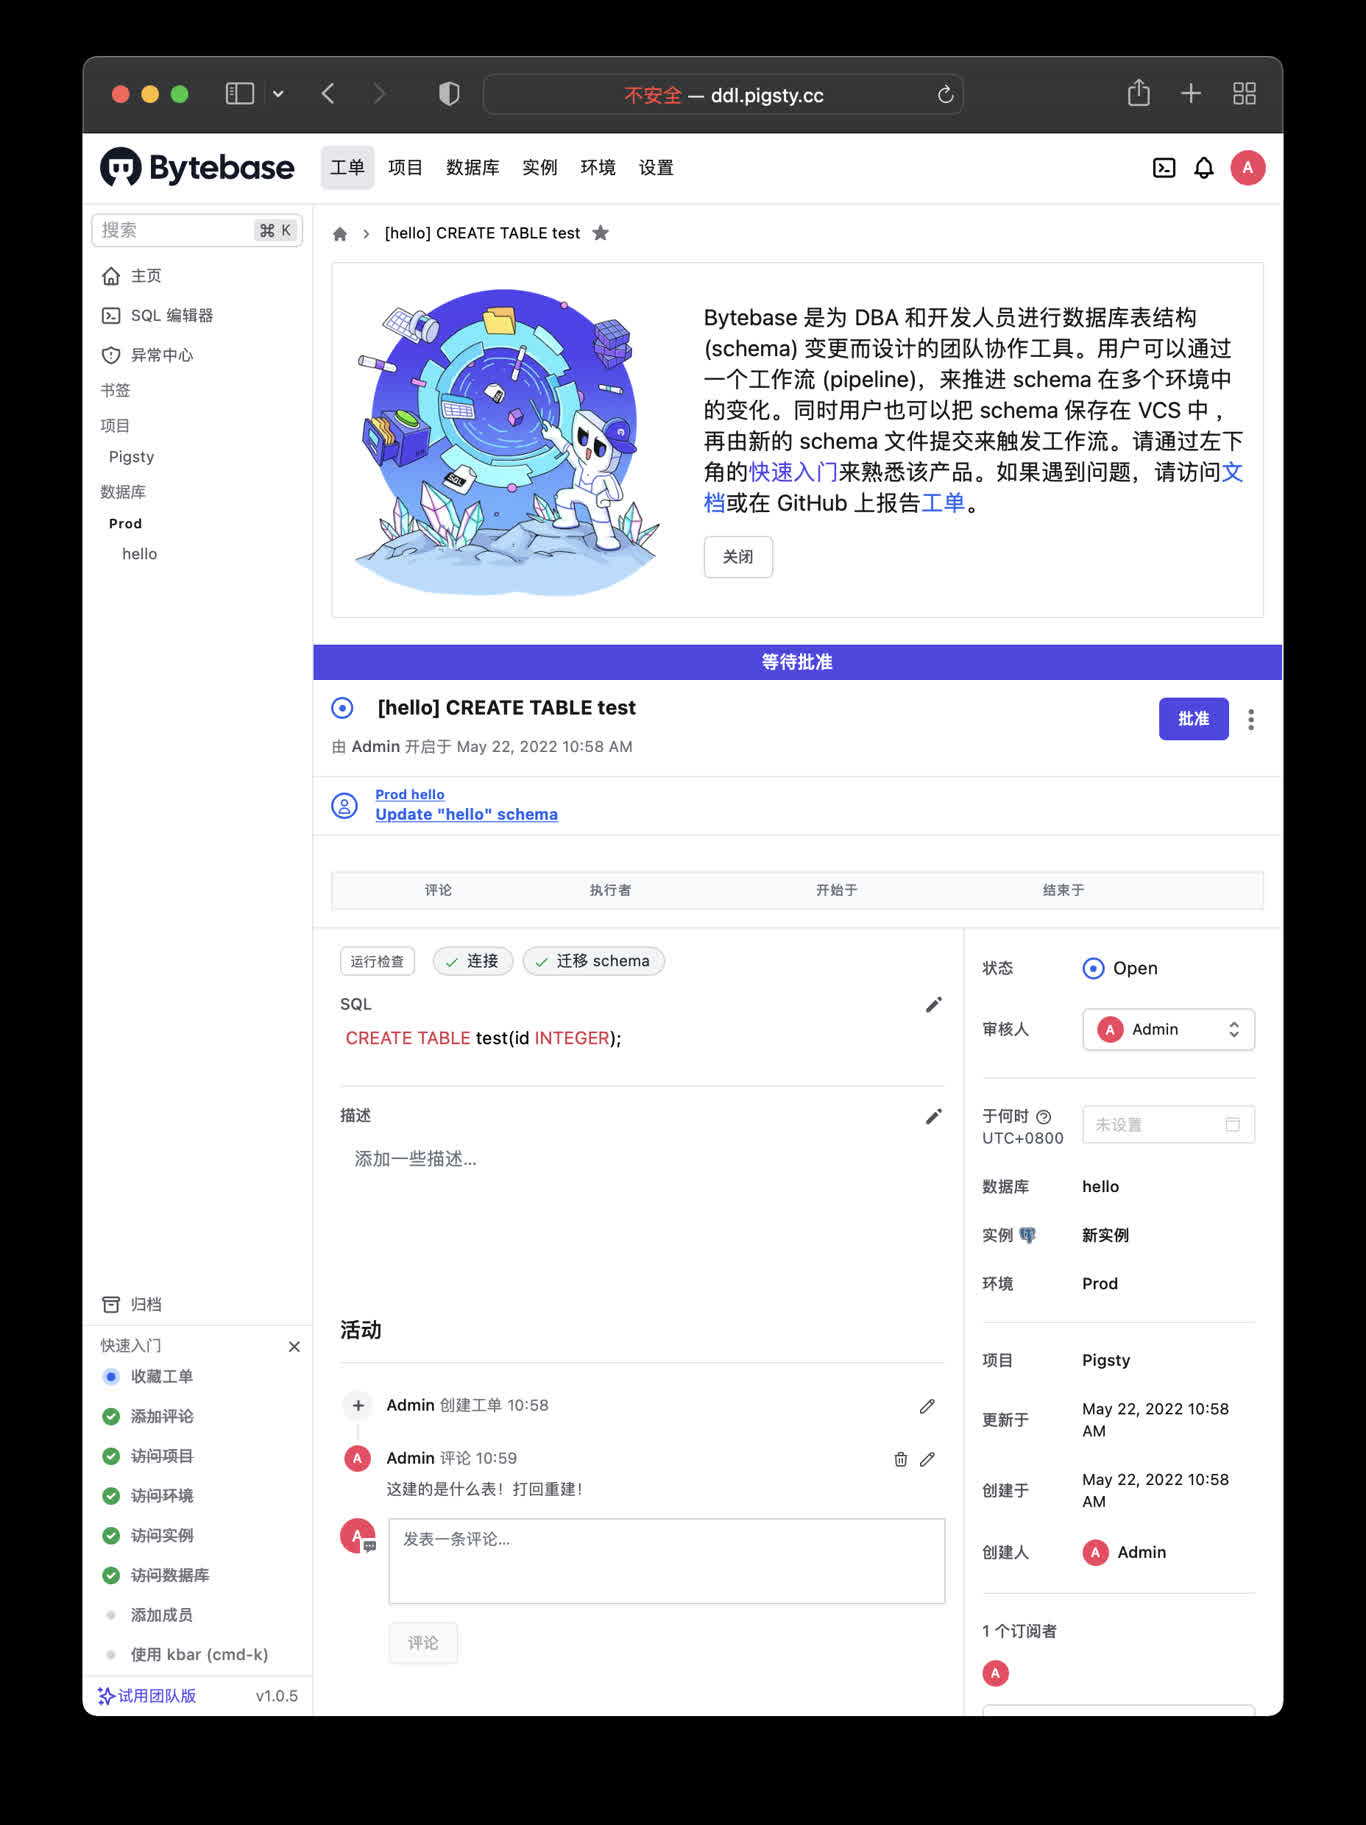
Bytebase概览
Schema Migrator for PostgreSQL
Visit http://ddl.pigsty or http://10.10.10.10:8887
make up         # pull up bytebase with docker-compose in minimal mode
make run        # launch bytebase with docker , local data dir and external PostgreSQL
make view       # print bytebase access point
make log        # tail -f bytebase logs
make info       # introspect bytebase with jq
make stop       # stop bytebase container
make clean      # remove bytebase container
make pull       # pull latest bytebase image
make rmi        # remove bytebase image
make save       # save bytebase image to /tmp/bytebase.tgz
make load       # load bytebase image from /tmp
使用外部的PostgreSQL
Bytebase use its internal PostgreSQL database by default, You can use external PostgreSQL for higher durability.
# postgres://dbuser_bytebase:DBUser.Bytebase@10.10.10.10:5432/bytebase
db:   { name: bytebase, owner: dbuser_bytebase, comment: bytebase primary database }
user: { name: dbuser_bytebase , password: DBUser.Bytebase, roles: [ dbrole_admin ] }
if you wish to user an external PostgreSQL, drop monitor extensions and views & pg_repack
DROP SCHEMA monitor CASCADE;
DROP EXTENSION pg_repack;
After bytebase initialized, you can create them back with /pg/tmp/pg-init-template.sql
psql bytebase < /pg/tmp/pg-init-template.sql
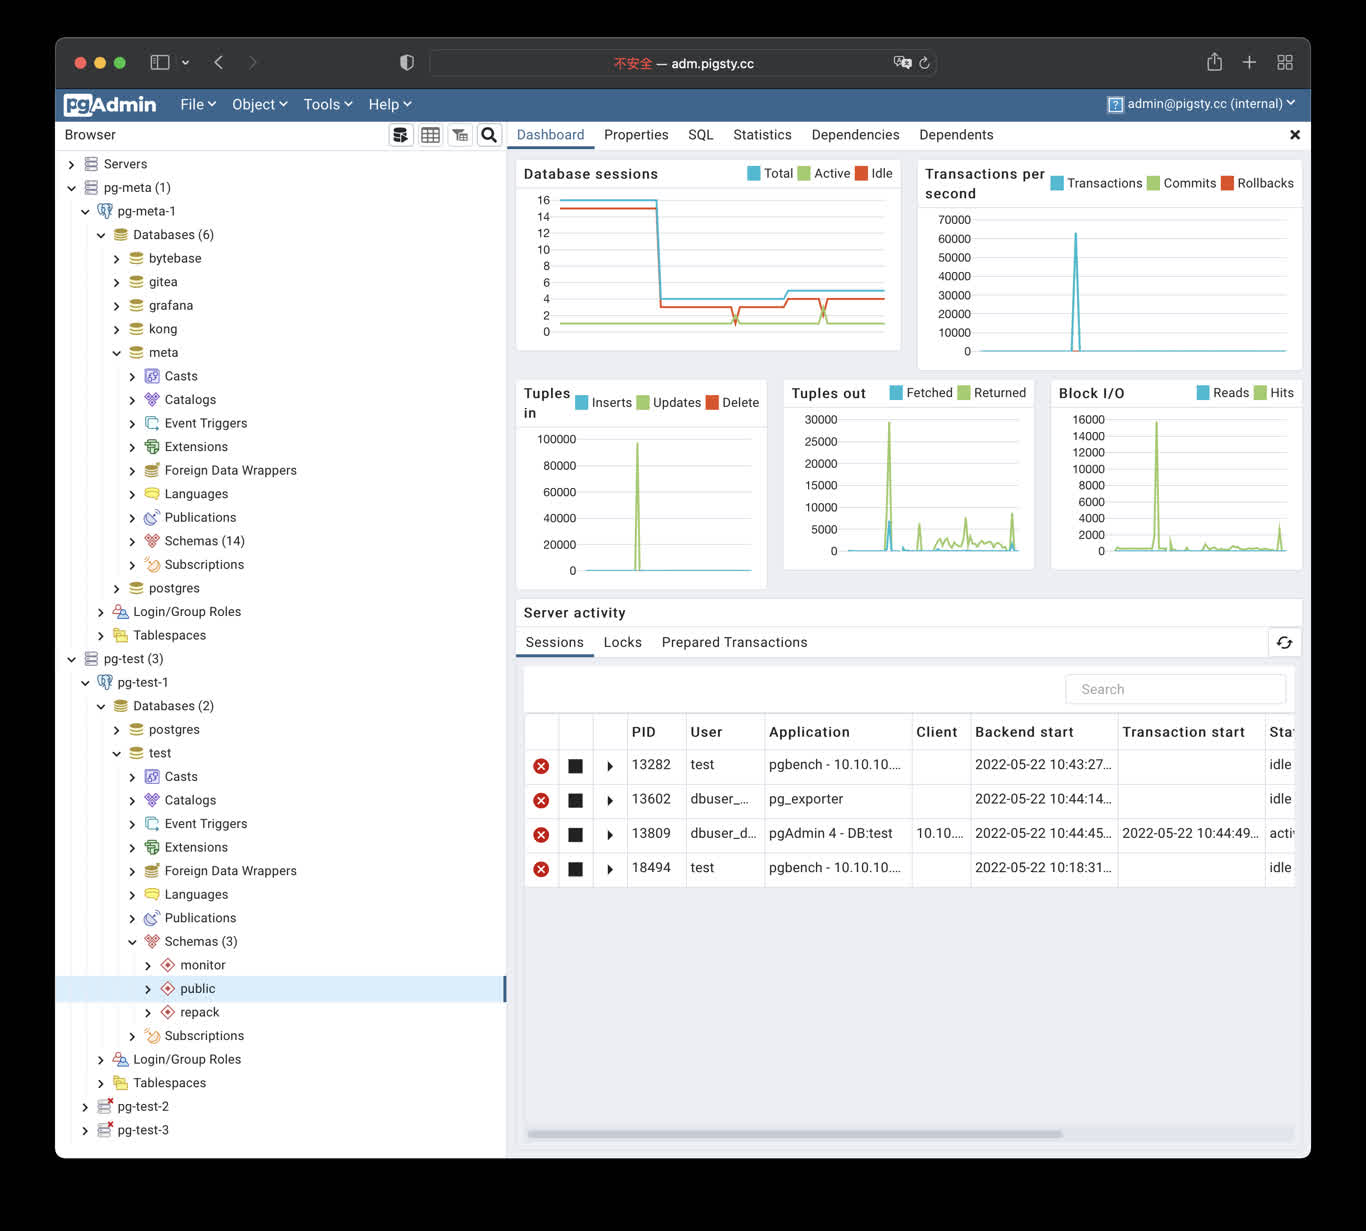
7 - PGAdmin4:用GUI管理PG数据库
使用Docker拉起PgAdmin4,并加载Pigsty服务器列表
PgAdmin4 是一个实用的PostgreSQL管理工具,执行以下命令可在管理节点拉起 pgadmin服务:
cd ~/pigsty/app/pgadmin ; docker-compose up -d
默认分配 8885 端口,使用域名: http://adm.pigsty 访问, Demo:http://adm.pigsty.cc。
默认用户名:admin@pigsty.cc,密码:pigsty。
Demo
公开Demo地址:http://adm.pigsty.cc
默认用户名与密码: admin@pigsty.cc / pigsty
太长;不看
cd ~/pigsty/app/pgadmin   # 进入应用目录
make up                   # 拉起pgadmin容器
make conf view            # 加载Pigsty服务器列表文件至Pgadmin容器内并加载
Pigsty的Pgadmin应用模板默认使用8885端口,您可以通过以下地址访问:
http://adm.pigsty 或 http://10.10.10.10:8885
默认用户名与密码: admin@pigsty.cc / pigsty
make up         # pull up pgadmin with docker-compose
make run        # launch pgadmin with docker
make view       # print pgadmin access point
make log        # tail -f pgadmin logs
make info       # introspect pgadmin with jq
make stop       # stop pgadmin container
make clean      # remove pgadmin container
make conf       # provision pgadmin with pigsty pg servers list
make dump       # dump servers.json from pgadmin container
make pull       # pull latest pgadmin image
make rmi        # remove pgadmin image
make save       # save pgadmin image to /tmp/pgadmin.tgz
make load       # load pgadmin image from /tmp
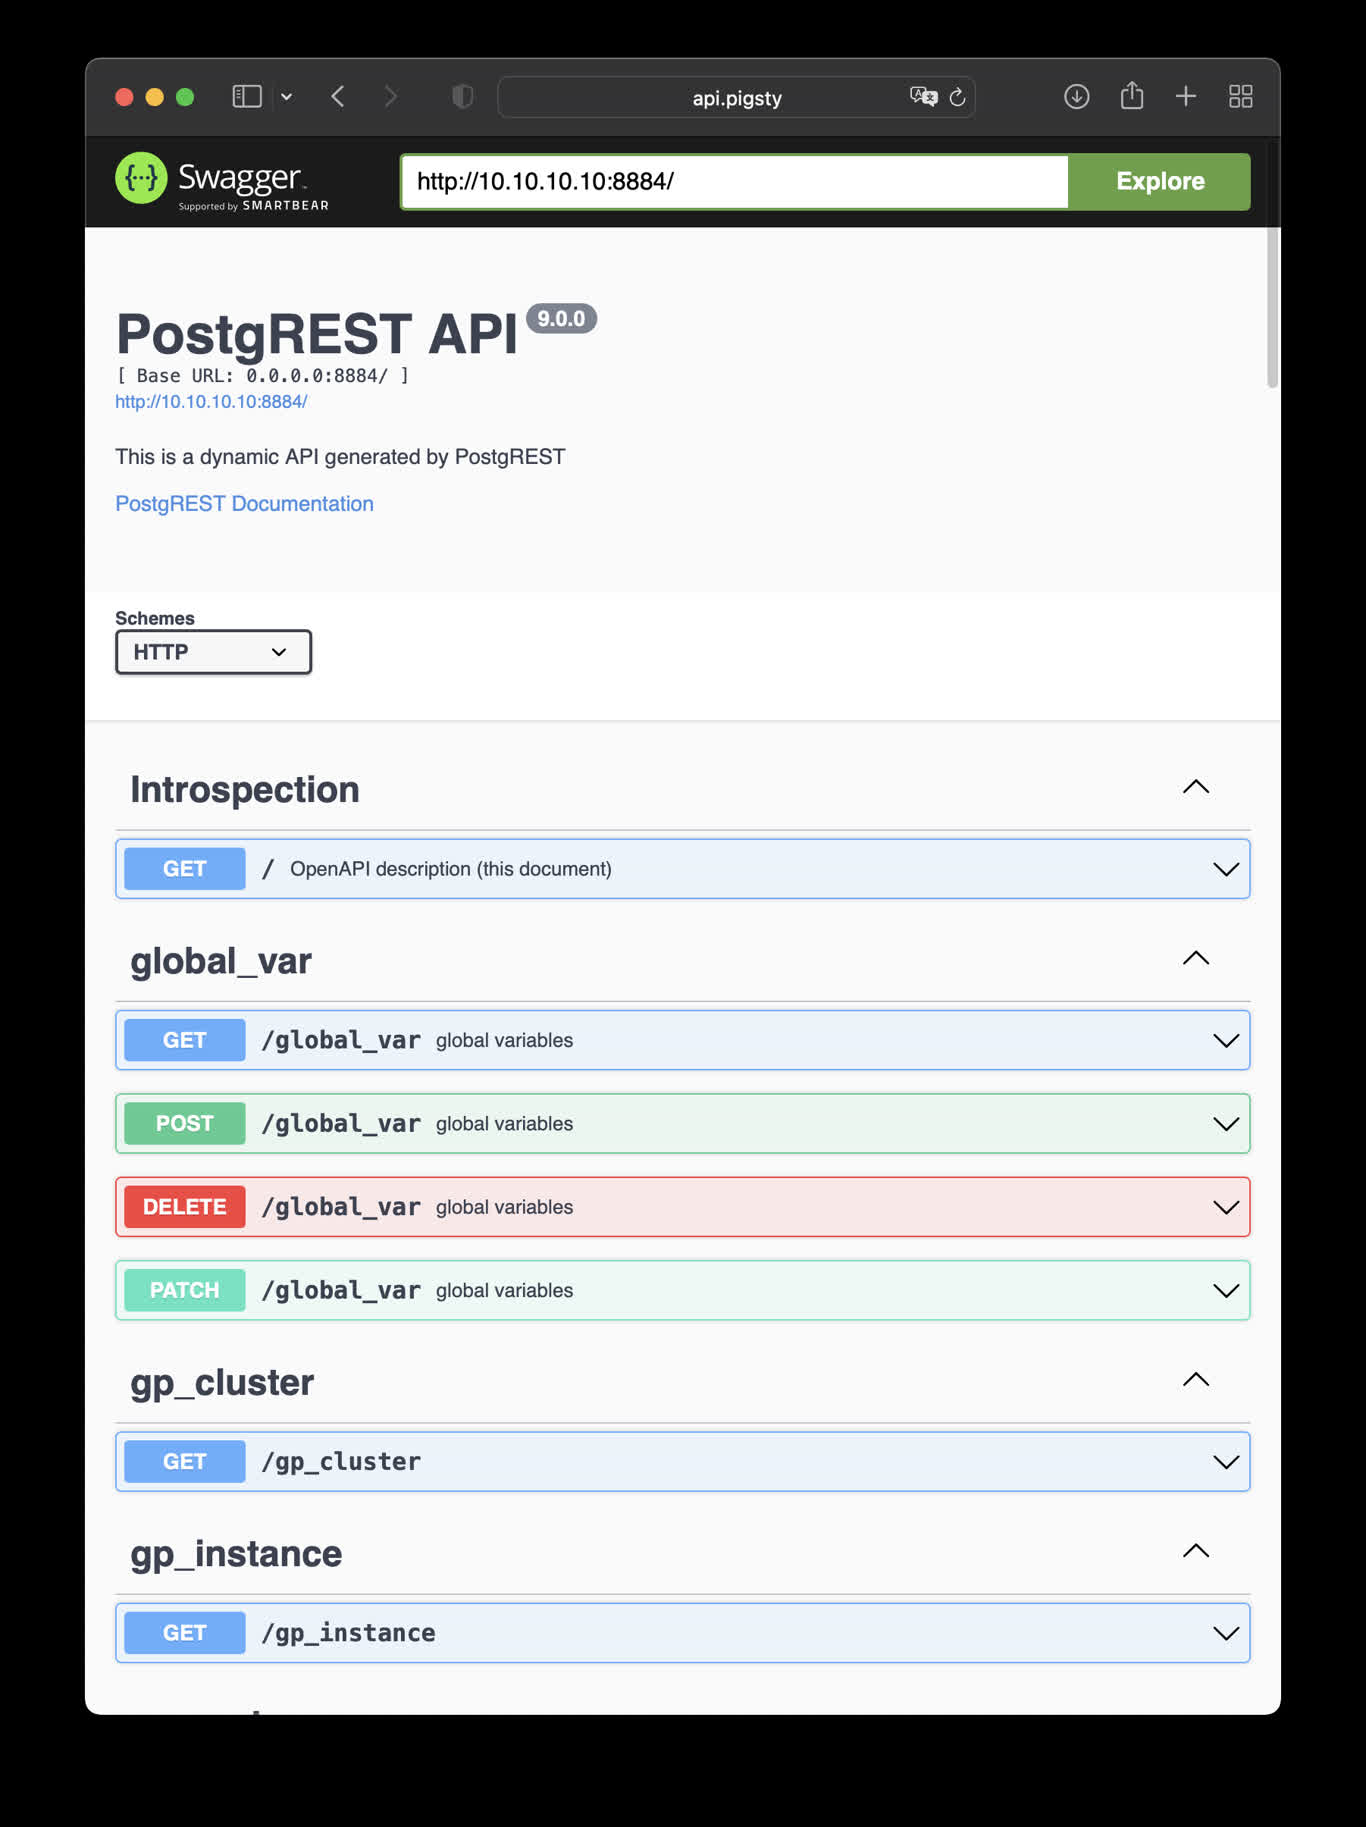
8 - PostgREST:自动生成REST API
使用Docker拉起PostgREST,自动根据PostgreSQL模式生成后端REST API
PostgREST
PostgREST是一个自动根据 PostgreSQL 数据库模式生成 REST API的二进制组件。
例如,以下命令将使用docker拉起 postgrest (本地 8884 端口,使用默认管理员用户,暴露Pigsty CMDB模式)
docker run --init --name postgrest --restart always --detach --publish 8884:8081 postgrest/postgrest
访问 http://10.10.10.10:8884 会展示所有自动生成API的定义,并自动使用 Swagger Editor 暴露API文档。
如果您想要进行增删改查,设计更精细的权限控制,请参考 Tutorial 1 - The Golden Key,生成一个签名JWT。
This is an example of creating pigsty cmdb API with PostgREST
cd ~/pigsty/app/postgrest ; docker-compose up -d
http://10.10.10.10:8884 is the default endpoint for PostgREST
http://10.10.10.10:8883 is the default api docs for PostgREST
make up         # pull up postgrest with docker-compose
make run        # launch postgrest with docker
make ui         # run swagger ui container
make view       # print postgrest access point
make log        # tail -f postgrest logs
make info       # introspect postgrest with jq
make stop       # stop postgrest container
make clean      # remove postgrest container
make rmui       # remove swagger ui container
make pull       # pull latest postgrest image
make rmi        # remove postgrest image
make save       # save postgrest image to /tmp/postgrest.tgz
make load       # load postgrest image from /tmp
Swagger UI
Launch a swagger OpenAPI UI and visualize PostgREST API on 8883 with:
docker run --init --name postgrest --name swagger -p 8883:8080 -e API_URL=http://10.10.10.10:8884 swaggerapi/swagger-ui
# docker run -d -e API_URL=http://10.10.10.10:8884 -p 8883:8080 swaggerapi/swagger-editor # swagger editor
Check http://10.10.10.10:8883/
9 - SchemaSPY:PG模式可视化
使用 SchemaSPY 镜像解析 PostgreSQL 数据库模式,生成可视化报表
使用以下docker生成数据库模式报表,以CMDB为例:
docker run -v /www/schema/pg-meta/meta/pigsty:/output andrewjones/schemaspy-postgres:latest -host 10.10.10.10 -port 5432 -u dbuser_dba -p DBUser.DBA -db meta -s pigsty
然后访问 http://h.pigsty/schema/pg-meta/meta/pigsty 即可访问Schema报表
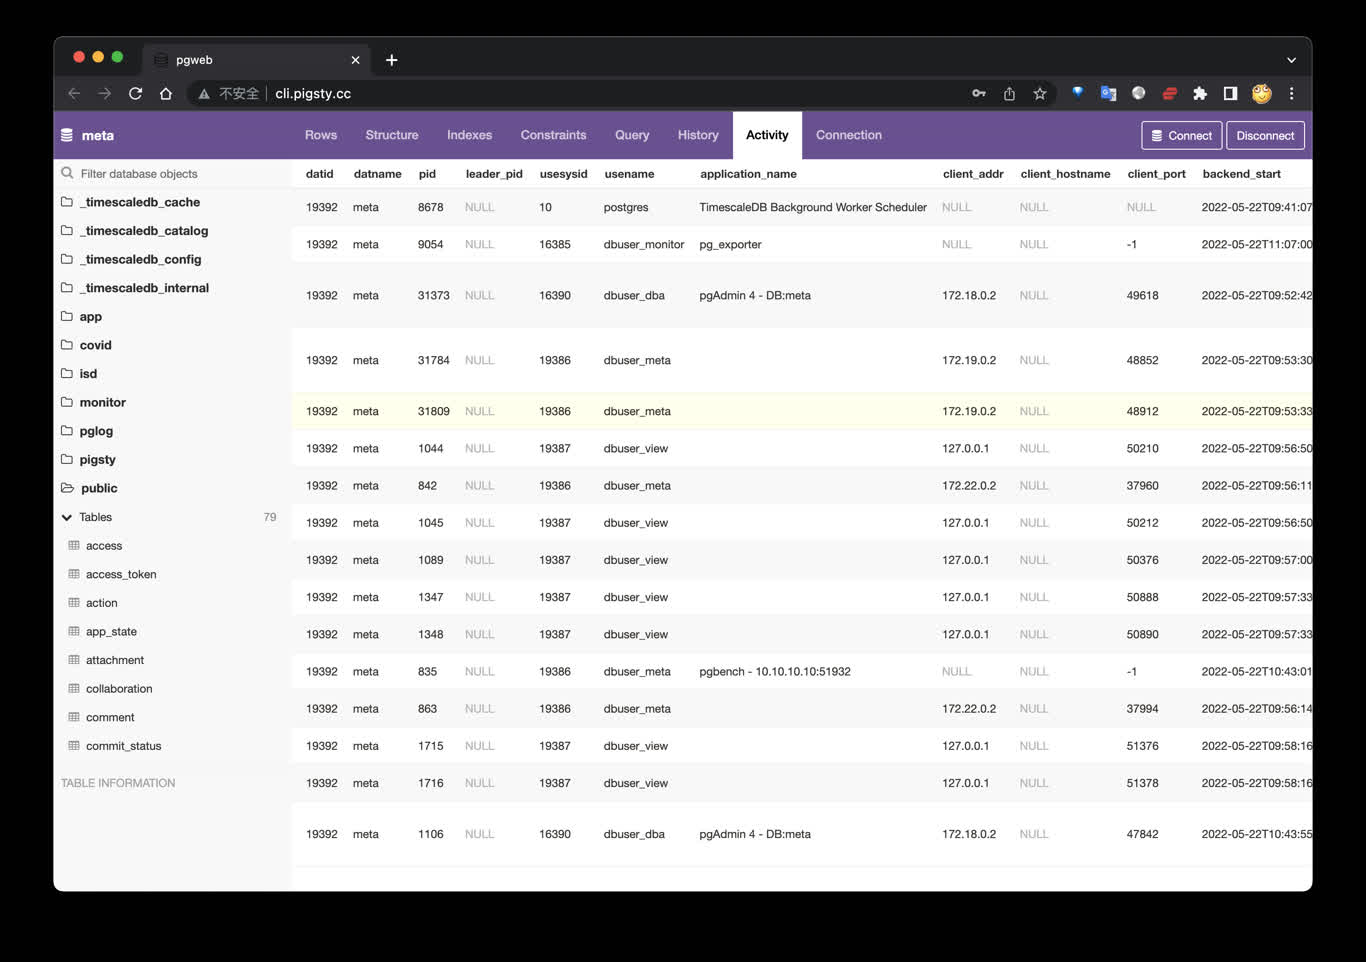
10 - PGWeb:从浏览器访问PostgreSQL
使用Docker拉起PGWEB,以便从浏览器进行小批量在线数据查询
PGWeb客户端工具
PGWeb是一款基于浏览器的PG客户端工具,使用以下命令,在元节点上拉起PGWEB服务,默认为主机8886端口。可使用域名: http://cli.pigsty 访问,公开Demo:http://cli.pigsty.cc。
# docker stop pgweb; docker rm pgweb
docker run --init --name pgweb --restart always --detach --publish 8886:8081 sosedoff/pgweb
用户需要自行填写数据库连接串,例如默认CMDB的连接串:
postgres://dbuser_dba:DBUser.DBA@10.10.10.10:5432/meta?sslmode=disable
公开Demo地址:http://cli.pigsty.cc
使用Docker Compose拉起PGWEB容器:
cd ~/pigsty/app/pgweb ; docker-compose up -d
接下来,访问您本机的 8886 端口,即可看到 PGWEB 的UI界面: http://10.10.10.10:8886
您可以尝试使用下面的URL连接串,通过 PGWEB 连接至数据库实例并进行探索。
postgres://dbuser_meta:DBUser.Meta@10.10.10.10:5432/meta?sslmode=disable
postgres://test:test@10.10.10.11:5432/test?sslmode=disable
快捷方式
make up         # pull up pgweb with docker-compose
make run        # launch pgweb with docker
make view       # print pgweb access point
make log        # tail -f pgweb logs
make info       # introspect pgweb with jq
make stop       # stop pgweb container
make clean      # remove pgweb container
make pull       # pull latest pgweb image
make rmi        # remove pgweb image
make save       # save pgweb image to /tmp/pgweb.tgz
make load       # load pgweb image from /tmp
11 - Discourse:开源技术论坛
如何搭建开源的论坛软件 Discourse,并使用 Pigsty 管理的 PG 作为后端数据库存储?
搭建开源论坛Discourse,需要调整配置 app.yml ,重点是SMTP部分的配置
Discourse配置样例
templates:
  - "templates/web.china.template.yml"
  - "templates/postgres.template.yml"
  - "templates/redis.template.yml"
  - "templates/web.template.yml"
  - "templates/web.ratelimited.template.yml"
## Uncomment these two lines if you wish to add Lets Encrypt (https)
# - "templates/web.ssl.template.yml"
# - "templates/web.letsencrypt.ssl.template.yml"
expose:
  - "80:80"   # http
  - "443:443" # https
params:
  db_default_text_search_config: "pg_catalog.english"
  db_shared_buffers: "768MB"
env:
  LC_ALL: en_US.UTF-8
  LANG: en_US.UTF-8
  LANGUAGE: en_US.UTF-8
  EMBER_CLI_PROD_ASSETS: 1
  UNICORN_WORKERS: 4
  DISCOURSE_HOSTNAME: forum.pigsty
  DISCOURSE_DEVELOPER_EMAILS: 'fengruohang@outlook.com,rh@vonng.com'
  DISCOURSE_SMTP_ENABLE_START_TLS: false
  DISCOURSE_SMTP_AUTHENTICATION: login
  DISCOURSE_SMTP_OPENSSL_VERIFY_MODE: none
  DISCOURSE_SMTP_ADDRESS: smtpdm.server.address
  DISCOURSE_SMTP_PORT: 80
  DISCOURSE_SMTP_USER_NAME: no_reply@mail.pigsty.cc
  DISCOURSE_SMTP_PASSWORD: "<password>"
  DISCOURSE_SMTP_DOMAIN: mail.pigsty.cc
volumes:
  - volume:
      host: /var/discourse/shared/standalone
      guest: /shared
  - volume:
      host: /var/discourse/shared/standalone/log/var-log
      guest: /var/log

hooks:
  after_code:
    - exec:
        cd: $home/plugins
        cmd:
          - git clone https://github.com/discourse/docker_manager.git
run:
  - exec: echo "Beginning of custom commands"
  # - exec: rails r "SiteSetting.notification_email='no_reply@mail.pigsty.cc'"
  - exec: echo "End of custom commands"
然后,执行以下命令,拉起Discourse即可。
12 - GitLab:企业级开源代码托管平台
如何自建企业级开源代码托管平台 GitLab,并使用 Pigsty 管理的 PG 作为后端数据库存储?
样例:开源代码仓库:Gitlab
请参考Gitlab Docker部署文档 完成Docker部署。
export GITLAB_HOME=/data/gitlab

sudo docker run --detach \
  --hostname gitlab.example.com \
  --publish 443:443 --publish 80:80 --publish 23:22 \
  --name gitlab \
  --restart always \
  --volume $GITLAB_HOME/config:/etc/gitlab \
  --volume $GITLAB_HOME/logs:/var/log/gitlab \
  --volume $GITLAB_HOME/data:/var/opt/gitlab \
  --shm-size 256m \
  gitlab/gitlab-ee:latest

sudo docker exec -it gitlab grep 'Password:' /etc/gitlab/initial_root_password