这是本节的多页打印视图。
点击此处打印 .
返回本页常规视图 .
Pigsty 中文文档 v4.2 “P ostgreSQL I n G reat STY le”: P ostgres, I nfras, G raphics, S ervice, T oolbox, it’s all Y ours.
—— 开箱即用、本地优先的 PostgreSQL 发行版,开源 RDS 替代
仓库 | 演示 | 博客 | 论坛 | 微信 | EN Docs
快速上手 最新版本的 Pigsty:curl -fsSL https://repo.pigsty.cc/get | bash -s v4.2.2
关于 功能特性 | 历史沿革 | 活动新闻 | 加入社区 | 隐私政策 | 开源协议 | 赞助我们 | 服务订阅
概念 系统架构 | 集群模型 | 监控系统 | IaC | HA | PITR | 服务接入 | 安全加固
上手 单机安装 | 离线安装 | 资源准备 | 声明配置 | 执行剧本 | 安全考量 | 常见问题
部署 架构规划 | 资源准备 | 生产部署 | 沙箱环境 | Vagrant | Terraform
参考 操作系统 | 扩展列表 | 文件结构 | 同类产品 | 成本参考 | 应用模板 | 配置模板
模块 PGSQL | INFRA | NODE | ETCD | MINIO | REDIS | FERRET | DOCKER | PILOT
1 - PIGSTY 2 - 关于 了解 Pigsty 项目本身的方方面面:功能特性、历史发展,开源协议,隐私政策,社区活动与新闻。
2.1 - 亮点特性 Pigsty 的价值主张与亮点功能特性。
“P ostgreSQL I n G reat STY le”: P ostgres, I nfras, G raphics, S ervice, T oolbox, it’s all Y ours.
—— 开箱即用、本地优先的 PostgreSQL 发行版,开源 RDS 替代
价值主张
总览 Pigsty 是一个更好的本地开源 RDS for PostgreSQL 替代:
开箱即用的RDS :从内核到RDS发行版,在 EL/Debian/Ubuntu 下提供 13-18 版本的生产级 PG 数据库服务。丰富的扩展插件 :提供无可比拟的 451 扩展,提供开箱即用的分布式的时序地理空间图文向量多模态数据库能力。灵活的模块架构 :灵活组合,自由扩展:Redis/Etcd/MinIO/Mongo;可独立使用,监控现有RDS/主机/数据库。惊艳的观测能力 :基于现代可观测性技术栈 Prometheus/Grafana,提供令人惊艳,无可比拟的数据库观测能力。验证过的可靠性 :故障自愈的高可用架构:硬件故障自动切换,流量无缝衔接。并提供自动配置的 PITR 兜底删库!简单易用可维护 :声明式API,GitOps就位,傻瓜式操作,Database/Infra-as-Code 以及管理SOP封装管理复杂度!扎实的安全实践 :加密备份一应俱全,自带基础ACL最佳实践。只要硬件与密钥安全,您无需操心数据库的安全性!广泛的应用场景 :低代码数据应用开发,或使用预置的 Docker Compose 模板,一键拉起使用PostgreSQL的海量软件!开源的自由软件 :以云数据库1/10不到的成本拥有与更好的数据库服务!帮您真正“拥有”自己的数据,实现自主可控!PostgreSQL 整合了生态中的工具与最佳实践:
开箱即用的 PostgreSQL 发行版,深度整合地理、时序、分布式、图、向量、搜索、AI等 451 个 扩展插件 ! 运行于裸操作系统之上,无需容器支持,支持主流操作系统: EL 8/9/10, Ubuntu 22.04/24.04 以及 Debian 12/13。 基于 patroni , haproxy , 与 etcd ,打造故障自愈的高可用架构:硬件故障自动切换,流量无缝衔接。 基于 pgBackRest 与可选的 MinIO 集群提供开箱即用的 PITR 时间点恢复,为软件缺陷与人为删库兜底。 基于 Ansible 提供声明式的 API 对复杂度进行抽象,以 Database-as-Code 的方式极大简化了日常运维管理操作。 Pigsty用途广泛,可用作完整应用运行时,开发演示数据/可视化应用,大量使用 PG 的软件可用 Docker 模板一键拉起。 提供基于 Vagrant 的本地开发测试沙箱环境,与基于 Terraform 的云端自动部署方案,开发测试生产保持环境一致。 部署并监控专用的 Redis (主从,哨兵,集群),MinIO,Etcd,Haproxy,MongoDB (FerretDB ) 集群 开箱即用的RDS 让您立刻在本地拥有生产级的PostgreSQL数据库服务!
PostgreSQL 是一个足够完美的数据库内核,但它需要更多工具与系统的配合才能成为一个足够好的数据库服务(RDS),Pigsty 帮助 PostgreSQL 完成这一步飞跃。
Pigsty 为您解决使用 PostgreSQL 中会遇到的各种难题:内核扩展安装,连接池,负载均衡,服务接入,高可用 / 自动故障切换,日志收集,指标监控,告警,备份恢复,PITR,访问控制,参数调优,安全加密,证书签发,NTP,DNS,参数调优,配置管理,CMDB,管理预案… 您无需再为这些细节烦心劳神!
Pigsty 支持 PostgreSQL 13 ~ 18 主干内核与其他兼容分支,可运行于 EL / Debian / Ubuntu 以及 兼容操作系统发行版 上,在 x86_64 与 ARM64 芯片架构上可用,且无需容器支持。
除了数据库内核与大量开箱即用的扩展插件以外,Pigsty 还提供了数据库服务所需的完整基础设施与运行时,以及本地沙箱 / 生产环境 / 云 IaaS 自动部署方案。
Pigsty 可以一键从裸机开始拉起整套环境,触达软件交付的最后一公里。普通研发运维均可快速上手并兼职进行数据库管理,无需数据库专家即可自建企业级RDS服务!
丰富的扩展插件 超融合多模态,一切皆用 PostgreSQL,一个PG替换所有数据库!
PostgreSQL 的灵魂在于其丰富的 扩展生态 451 扩展
插件间可以产生 协同效应 PostGIS TimescaleDB Citus PGVector ParadeDB pg_duckdb pg_mooncake
使用 PostgreSQL 单一组件替代 MySQL,Kafka,ElasticSearch,MongoDB,以及大数据分析技术栈已经成为一种最佳实践 —— 单一数据库选型能够显著降低系统复杂度,极大提高研发效能与敏捷性,实现程度惊人的软硬件,研发/运维人力降本增效。
灵活的模块架构 灵活组合,自由扩展,多数据库支持,监控现有RDS/主机/数据库
Pigsty 中的组件被抽象可独立部署的 模块 INFRANODEPGSQLETCD
除了上述四个 核心模块 之外,Pigsty 还提供一系列选装功能模块:MINIOREDISDOCKER
此外,Pigsty 还提供 PG 兼容 / 衍生内核的支持,您可以使用 BabelfishIvorySQLOpenHaloDBOrioleDB
不仅如此,你还可以使用 FerretDBSupabasePolarDBGPSQLKAFKA ,DUCKDB ,VICTORIA ,TIGERBEETLE ,KUBERNETES ,CONSUL ,JUPYTER ,GREENPLUM ,CLOUDBERRY ,MYSQL , …
惊艳的观测能力 使用现代开源可观测性技术栈,提供无与伦比的监控最佳实践!
Pigsty 提供了基于开源的 Grafana / Prometheus 现代可观测性技术栈做 监控
Pigsty 所管理的任何组件都会被自动纳入监控之中,包括主机节点,负载均衡 HAProxy,数据库 Postgres,连接池 Pgbouncer,元数据库 ETCD,KV缓存 Redis,对象存储 MinIO,……,以及整套监控基础设施本身。大量的 Grafana 监控面板与预置告警规则会让你的系统观测能力有质的提升,当然,这套系统也可以被复用于您的应用监控基础设施,或者监控已有的数据库实例或 RDS。
无论是故障分析还是慢查询优化、无论是水位评估还是资源规划,Pigsty 为您提供全面的数据支撑,真正做到数据驱动。在 Pigsty 中,超过三千类监控指标被用于描述整个系统的方方面面,并被进一步加工、聚合、处理、分析、提炼并以符合直觉的可视化模式呈现在您的面前。从全局大盘总览,到某个数据库实例中单个对象(表,索引,函数)的增删改查详情都能一览无余。您可以随意上卷下钻横向跳转,浏览系统现状与历史趋势,并预测未来的演变。
此外,Pigsty的监控系统模块部分还可以 独立使用
访问 截图画廊 在线演示
久经考验的可靠性 开箱即用的高可用与时间点恢复能力,确保你的数据库坚如磐石!
对于软件缺陷或人为误操作造成的删表删库,Pigsty 提供了开箱即用的 PITR 时间点恢复能力,无需额外配置即默认启用。只要存储空间管够,基于 pgBackRest 的基础备份与 WAL 归档让您拥有快速回到过去任意时间点的能力。您可以使用本地目录/磁盘,亦或专用的 MinIO 集群或 S3 对象存储服务保留更长的回溯期限,丰俭由人。
更重要的是,Pigsty 让高可用与故障自愈成为 PostgreSQL 集群的标配,基于 patroni, etcd, 与 haproxy 打造的 高可用故障自愈架构 ,让您在面对硬件故障时游刃有余:主库故障自动切换的 RTO < 45s(可配置),一致性优先模式下确保数据零损失 RPO = 0。只要集群中有任意实例存活,集群就可以对外提供完整的服务,而客户端只要连接至集群中的任意节点,即可获得完整的服务。
Pigsty 内置了 HAProxy 负载均衡器用于自动流量切换,提供 DNS/VIP/LVS 等多种接入方式供客户端选用。故障切换与主动切换对业务侧除零星闪断外几乎无感知,应用不需要修改连接串重启。极小的维护窗口需求带来了极大的灵活便利:您完全可以在无需应用配合的情况下滚动维护升级整个集群。硬件故障可以等到第二天再抽空善后处置的特性,让研发,运维与 DBA 都能安心睡个好觉。
许多大型组织与核心机构已经在生产环境中长时间使用 Pigsty ,最大的部署有 25K CPU 核心与 200+ PostgreSQL 超大规格实例;在这一部署案例中,六七年内经历了数十次硬件故障与各类事故,DBA 换了几茬,但依然可以保持比 99.999% 更高的可用性战绩。
简单易用可维护 Infra as Code, 数据库即代码,声明式的API将数据库管理的复杂度来封装。
Pigsty 使用声明式的接口对外提供服务,将系统的可控制性拔高到一个全新水平:用户通过配置清单告诉 Pigsty “我想要什么样的数据库集群”,而不用去操心到底需要怎样去做。从效果上讲,这类似于 K8S 中的 CRD 与 Operator,但 Pigsty 可用于任何节点上的数据库与基础设施:不论是容器,虚拟机,还是物理机。
无论是创建/销毁集群,添加/移除从库,还是新增数据库/用户/服务/扩展/黑白名单规则,您只需要修改配置清单并运行 Pigsty 提供的幂等剧本,而 Pigsty 负责将系统调整到您期望的状态。
用户无需操心配置的细节,Pigsty将自动根据机器的硬件配置进行调优,您只需要关心诸如集群叫什么名字,有几个实例放在哪几台机器上,使用什么配置模版:事务/分析/核心/微型,这些基础信息,研发也可以自助服务。但如果您愿意跳入兔子洞中,Pigsty 也提供了丰富且精细的控制参数,满足最龟毛 DBA 的苛刻定制需求。
除此之外,Pigsty 本身的安装部署也是一键傻瓜式的,所有依赖被预先打包,在安装时可以无需互联网访问。而安装所需的机器资源,也可以通过 Vagrant 或 Terraform 模板自动获取,让您在十几分钟内就可以从零在本地笔记本或云端虚拟机上拉起一套完整的 Pigsty 部署。本地沙箱环境可以跑在1核2G的微型虚拟机中,提供与生产环境完全一致的功能模拟,可以用于开发、测试、演示与学习。
扎实的安全实践 加密备份一应俱全,只要硬件与密钥安全,您无需操心数据库的安全性。
Pigsty 针对高标准,严要求的企业级场景设计 ,采用业界领先的 安全最佳实践 保护您的数据安全(机密性/完整性/可用性),默认配置下的安全性便足以满足绝大多数场景下的合规要求。
Pigsty 会创建自签名的 CA (或使用您提供的 CA)签发证书,加密网络通信。需要保护的敏感管理页面与API端点都受到密码保护。
数据库备份使用 AES 算法加密,数据库密码使用 scram-sha-256 算法加密,并提供插件强制执行密码强度策略。
Pigsty 提供了一套开箱即用,简单易用,便于扩展的 ACL HBA
Pigsty 默认启用数据库校验和避免静默数据腐坏,通过从库副本提供坏块兜底。提供 CRIT 数据零丢失配置模板,使用 watchdog 确保为高可用 Fencing 兜底。
您可以通过 audit 插件审计数据库操作,系统与数据库日志全部收集备查,以满足合规要求。
Pigsty 正确配置 SELinux 与防火墙配置,并遵循最小权限原则设计操作系统用户组与文件权限,确保系统安全基线符合合规要求。
而且在 Etcd,MinIO 等附属可选组件上的安全上也毫不妥协,etcd 与 minio 均使用 RBAC 模型与 TLS 加密通信,确保系统整体安全性。
合理配置的系统通过等保三级/SOC2毫无问题,只要您遵循安全性最佳实践,内网部署并合理配置安全组与防火墙,数据库安全性将不再是您的痛点。
广泛的应用场景 使用预置的Docker模板,一键拉起使用PostgreSQL的海量软件!
在各类数据密集型应用中,数据库往往是最为棘手的部分。例如 Gitlab 企业版与社区版的核心区别就是底层 PostgreSQL 数据库的监控与高可用,如果您已经有了足够好的本地 PG RDS,完全可以拒绝为软件自带的土法手造数据库组件买单。
Pigsty 提供了 Docker 模块 Compose 模板
Pigsty 也提供了与 PostgreSQL 紧密联系的应用开发工具集:PGAdmin4、PGWeb、ByteBase、PostgREST、Kong、以及 EdgeDB、FerretDB、Supabase
Pigsty 为您的 AI 应用提供了一个功能强大的运行时,您的 Agent 可以在这个环境中利用 PostgreSQL 与可观测性世界的强大能力,快速构建起一个数据驱动的智能体。
开源的自由软件 Pigsty是基于 Apache-2.0 开源的自由软件,由热爱 PostgreSQL 的社区成员用热情浇灌
Pigsty 是完全 开源免费 溢价
很多用户选择上云,正是因为自己搞不定数据库;很多用户使用 RDS,是因为别无他选。
我们将打破云厂商的垄断,为用户提供一个云中立的,更好的
Pigsty 本身旨在用数据库自动驾驶软件,替代大量无趣的人肉数据库运维工作,但再好的软件也没法解决所有的问题。
总会有一些的冷门低频疑难杂症需要专家介入处理。这也是为什么我们也提供专业的 订阅服务 用爱发电
2.2 - 历史沿革 Pigsty 项目的由来与动机,过去发展的历史,未来的目标与愿景。
历史起源 Pigsty 项目始于 2018 ~ 2019 年,起源于 探探
探探在技术上极有品味,使用 PostgreSQL 与 Go 作为核心技术栈。
探探整个系统架构参照 Instagram ,一切围绕 PostgreSQL 数据库设计。
直到几百万日活,几百万 TPS,几百 TB 数据的量级下,数据组件 只用了 PostgreSQL
探探这种深度使用 PostgreSQL 特性的非典型研发模式,对工程师与DBA的水平提出了极高的要求。
而 Pigsty ,就是我们用这种真实世界的大规模,高标准数据库集群场景打磨出的开源项目 ——
沉淀着我们作为顶尖 PostgreSQL 专家的经验与最佳实践。
发展过程 在最开始,Pigsty 并没有现在这样的愿景、目标与版图。而是为了提供一个供我们自己使用的 PostgreSQL 监控系统。
我们调研了市面上所有的方案,开源的、商业的、云的,datadog, pgwatch,…… ,没有一个能满足我们对于可观测性的需求。
因此我决定自己动手,基于 Grafana 与 Prometheus 自己动手打造一个,这就是 Pigsty 的前身与雏形。
Pigsty 作为监控系统的效果相当惊艳,帮助我们解决了无数管理问题。
随后,研发人员希望在本地的开发机上也有这样的监控系统,于是我们使用 Ansible 编写了置备剧本,将这套系统从一次性建设任务转变为了可重复使用,可复制的软件。
新版本允许用户使用 Vagrant 和 Terraform,用 Infra as Code 的方式快速拉起本地 DevBox 开发机,或生产环境服务器,并自动完成 PostgreSQL 与监控系统的部署。
接下来,我们重新设计了生产环境的 PostgreSQL 架构,引入了 Patroni 与 pgBackRest 解决了数据库的 高可用 时间点恢复 迁移
Pigsty 是我们做给自己使用的软件,“Eat dog food”最大的好处就是,我们自己既是开发者也更是用户 ——
我们自己作为甲方用户,非常了解自己需要什么,也不会在自己的需求上偷懒,更不用担心自己的工作全自动化后被开。
我们解决了一个又一个的问题,并将解决方案沉淀到 Pigsty 里。Pigsty 的定位,也从一个监控系统,逐渐发展成为一个开箱即用的 PostgreSQL 数据库发行版。
随即我们决定将 Pigsty 开源,并开始了一系列的技术分享与宣传,也开始有各行各业的外部用户使用起 Pigsty 并提出反馈意见。
全职创业 在 2022 年,Pigsty 项目获得了由陆奇博士发起的奇绩创坛的种子轮投资,我得以全职出来做这件事情。
作为一个开源项目,Pigsty 的发展相当不赖,在全职创业这几年里,Pigsty 在 Github 上的 Star 数从几百增长到了 4600+;上了 HN 头条推荐,增长开始滚起雪球。
2025 年 11 月,Pigsty 荣获 PostgreSQL 生态大会颁发的 Magneto Award 。2026 年,Pigsty 子项目 PGEXT.CLOUD 投中 PGCon.Dev 2026 演讲。
Pigsty 成为第一个站上这个 PostgreSQL 核心生态大会舞台上的中国开源项目。
从前 Pigsty 只能跑在 CentOS 7 上,现今已经基本覆盖了所有主流 Linux 发行版 (EL, Debian, Ubuntu),支持 14 个操作系统平台。
支持的 PG 大版本覆盖 13 - 18,维护,收录整合了 PG 生态中的 444 扩展插件。
其中,我本人维护了这里超过一半(270+)的扩展插件,并提供开箱即用的 RPM/DEB 包。
算上 Pigsty 本身,“基于开源,回馈开源”,为 PG 生态做一些贡献。
Pigsty 的定位,也在不断发展的过程中,从一个 PostgreSQL 数据库发行版,进一步扩展到了 开源云数据库 。它真正对标的是云厂商的整个云数据库品牌。
公有云的反叛者 AWS、Azure、GCP、Aliyun 等公有云厂商为初创企业提供了许多便利,但它们是闭源的,并迫使用户以高额费用租赁基础资源。
我们认为,优秀的数据库服务,应该和优秀的数据库内核一样,普及到每一个用户手中,而不是必须花费高昂的代价去向赛博领主租赁。
云计算的敏捷与弹性价值主张很好,但它应该是自由、开源、普惠、本地优先的 ——
我们认为云计算宇宙中需要一个代表开源价值观的解决方案,在不牺牲云带来好处的前提下,将基础设施的控制权交还给用户。
因此,我们也在引领着一场 下云的运动与战役
我们的愿景 我希望,未来的世界人人都有自由使用优秀服务的事实权利,而不是只能被圈养在几个赛博领主公有云巨头厂商的地盘上当赛博佃户甚至赛博农奴。
这正是 Pigsty要做的事 —— 一个更好的,开源免费的RDS替代 。让用户能够在任何地方(包括云服务器)上,一键拉起比云RDS更好的数据库服务。
Pigsty 是对 PostgreSQL 的彻底补完,更是对云数据库的辛辣嘲讽 。
它本意是“猪圈”,但也是 P ostgres I n G reat STY le 的缩写,即“全盛状态下的 PostgreSQL ”。
Pigsty 本身是一款完全开源免费的软件,能够让您在没有数据库专家的情况下,自建水平达到 90 分的 PostgreSQL 数据库服务。
我们靠提供 精品咨询服务
建设良好的系统也许跑个几年都不会遇到需要 “兜底” 的问题,但数据库的问题一但出现就不是小问题。
很多时候,专家的经验更是能够一言化腐朽为神奇,而我们为有需求的客户提供这样的精品咨询
—— 我们认为这是一种更加公正、合理、可持续的模式。
关于团队 我是冯若航,Pigsty 的作者,Pigsty 的所有代码几乎都由我 一人开发
软件领域依然存在个人英雄主义,独一无二的个体才能够创造出独一无二的作品 —— 我希望 Pigsty 成为这样的作品。
如果您对我感兴趣,这里是我的个人主页:https://vonng.com/
《墨天轮风云人物访谈录 —— 冯若航 》
《90后,辞职创业,说要卷死云数据库 》
2.3 - 活动新闻 与 Pigsty 和 PostgreSQL 相关的活动事件与新闻,以及最新活动预告!
最近新闻 2026-02-28 : Pigsty v4.2 正式发布!七款内核批量更新
2026-02-12 : Pigsty v4.1 正式发布!第一批支持 PostgreSQL 18.2 的发行版
2026-02-04 : Extension for Everyone 主题入选 PGCon.Dev 2026 演讲!
2026-02-03 : Pigsty v4.0 正式发布! 迈入 Agent 时代!
2026-01-30 : PIG v1.0 正式发布! 与 PGEXT.CLOUD 扩展目录同步上线
2025-12-02 : Pigsty v3.7.0 发布! PG18 成为默认版本,437 扩展,EL10/Debian13 支持
2025-11-29 : Pigsty 荣获 PostgreSQL Magneto Award !
第八届 PostgreSQL 生态大会(杭州) 演讲主题:“A World-Grade Postgres Meta Distribution”、AI 数据库考量、PostgreSQL 交付最佳实践 2025-08-15 : Pigsty v3.6.1 发布! 例行 PG 小版本更新,PGDG 中国区域镜像
2025-08-04 : Pigsty v3.6.0 发布! PostgreSQL 元发行版
2025-06-16 : Pigsty v3.5.0 发布! PG18 Beta 支持,421 扩展,监控升级,代码重构
2025-04-21 : Pigsty v3.4 发布! MySQL 兼容性
2025-03-07 : Pigsty v3.3.0 发布! 404 扩展
2025-01 : Pigsty v3.2.x 发布系列(v3.2.0 ~ v3.2.2)
390 扩展,Omnigres,Mooncake,Citus13/PG17,扩展管理 CLI,Grafana 强化,ARM64 扩展补完 发布说明:v3.2.2 / v3.2.1 / v3.2.0 PostgreSQL 包管理器 pig 发布!
2024-11 : Pigsty v3.1.0 发布! PG 17 上位,Supabase 自建,ARM/Ubuntu24 支持
2024-08 ~ 2024-10 : Pigsty v3.0.x 发布系列(v3.0.0 ~ v3.0.4)
2024-08 : Pigsty 补充软件仓库,提供 254 个额外的开箱即用的二进制 RPM/DEB 扩展!
PGCon.Dev 2024 参会记!
2024-05 : Pigsty v2.7 发布!
2024-02 : Pigsty v2.6 发布!
版本发布 Pigsty 发布注记
版本 发布时间 摘要 地址 v4.2.2 2026-03-23 Insforge 应用自建,Infra 包批量更新,新增 pdu,pgdog v4.2.2 v4.2.1 2026-03-06 弃用 PG 13 支持,464 扩展 v4.2.1 v4.2.0 2026-02-28 例行小版本更新,六大 PG 内核集中更新 v4.2.0 v4.1.0 2026-02-12 操作系统与数据库小版本更新,Agent Native CLI,批量 Bug 修复 v4.1.0 v4.0.0 2026-01-28 Victoria 可观测性,安全加固,JUICE/VIBE 模块,Apache-2.0 v4.0.0 v3.7.0 2025-12-02 PG18 成为默认,437 扩展,EL10/Debian13,PGEXT.CLOUD v3.7.0 v3.6.1 2025-08-15 例行 PG 小版本更新,PGDG 中国区域镜像 v3.6.1 v3.6.0 2025-07-30 pgactive,MinIO/ETCD 改进,安装简化,配置梳理 v3.6.0 v3.5.0 2025-06-16 PG18 Beta,421 扩展,监控升级,代码重构 v3.5.0 v3.4.1 2025-04-05 OpenHalo,OrioleDB,MySQL兼容性,pgAdmin改进 v3.4.1 v3.4.0 2025-03-30 备份增强,自动Certbot证书,Ivory跨平台,AGE扩展 v3.4.0 v3.3.0 2025-02-24 404扩展,Odoo/Dify/Supabase应用模板,DocumentDB支持 v3.3.0 v3.2.2 2025-01-23 390扩展,Omnigres支持,Mooncake,Citus13与PG17支持 v3.2.2 v3.2.1 2025-01-12 350扩展,Ivory4,Citus强化,Odoo模板 v3.2.1 v3.2.0 2024-12-24 扩展管理 CLI ,Grafana 强化,ARM64 扩展补完 v3.2.0 v3.1.0 2024-11-22 PG 17 作为默认大版本,配置简化,Ubuntu 24 与 ARM 支持,MinIO 改进 v3.1.0 v3.0.4 2024-10-30 PG 17 扩展,OLAP 全家桶,pg_duckdb v3.0.4 v3.0.3 2024-09-27 PostgreSQL 17,Etcd 运维优化,IvorySQL 3.4,PostGIS 3.5 v3.0.3 v3.0.2 2024-09-07 精简安装模式,PolarDB 15支持,监控视图更新 v3.0.2 v3.0.1 2024-08-31 例行问题修复,Patroni 4支持,Oracle兼容性改进 v3.0.1 v3.0.0 2024-08-25 333个扩展插件,可插拔内核,MSSQL,Oracle,PolarDB 兼容性 v3.0.0 v2.7.0 2024-05-20 扩展大爆炸,新增20+强力扩展插件,与多款Docker应用 v2.7.0 v2.6.0 2024-02-28 PG 16 作为默认大版本,引入 ParadeDB 与 DuckDB 等扩展 v2.6.0 v2.5.1 2023-12-01 例行小版本更新,PG16重要扩展支持 v2.5.1 v2.5.0 2023-09-24 Ubuntu/Debian支持:bullseye, bookworm, jammy, focal v2.5.0 v2.4.1 2023-09-24 Supabase/PostgresML支持与各种新扩展:graphql, jwt, pg_net, vault v2.4.1 v2.4.0 2023-09-14 PG16,监控RDS,服务咨询支持,新扩展:中文分词全文检索/图/HTTP/嵌入等 v2.4.0 v2.3.1 2023-09-01 带HNSW的PGVector,PG 16 RC1, 文档翻新,中文文档,例行问题修复 v2.3.1 v2.3.0 2023-08-20 主机VIP, ferretdb, nocodb, MySQL存根, CVE修复 v2.3.0 v2.2.0 2023-08-04 仪表盘 & 置备重做,UOS 兼容性 v2.2.0 v2.1.0 2023-06-10 支持 PostgreSQL 12 ~ 16beta v2.1.0 v2.0.2 2023-03-31 新增 pgvector 支持,修复 MinIO CVE v2.0.2 v2.0.1 2023-03-21 v2 错误修复,安全增强,升级 Grafana 版本 v2.0.1 v2.0.0 2023-02-28 架构大升级,兼容性、安全性、可维护性显著增强 v2.0.0 v1.5.1 2022-06-18 Grafana 安全性修复 v1.5.1 v1.5.0 2022-05-31 Docker 应用程序支持 v1.5.0 v1.4.1 2022-04-20 错误修复 & 英文文档完整翻译 v1.4.1 v1.4.0 2022-03-31 MatrixDB 支持,分离 INFRA/NODES/PGSQL/REDIS模块 v1.4.0 v1.3.0 2021-11-30 PGCAT 重整 & PGSQL 增强 & Redis Beta支持 v1.3.0 v1.2.0 2021-11-03 默认 PGSQL 版本升级至 14 v1.2.0 v1.1.0 2021-10-12 主页, JupyterLab, PGWEB, Pev2 & pgbadger v1.1.0 v1.0.0 2021-07-26 v1 正式版, 监控系统重整 v1.0.0 v0.9.0 2021-04-04 Pigsty 图形界面, 命令行界面, 日志集成 v0.9.0 v0.8.0 2021-03-28 服务置备,定制对外暴露的数据库服务 v0.8.0 v0.7.0 2021-03-01 仅监控部署,监控现有 PostgreSQL 实例 v0.7.0 v0.6.0 2021-02-19 架构增强,将PG与Consul解耦 v0.6.0 v0.5.0 2021-01-07 支持在配置中定义业务数据库/用户 v0.5.0 v0.4.0 2020-12-14 支持 PostgreSQL 13,添加官方文档 v0.4.0 v0.3.0 2020-10-22 虚拟机置备方案正式定稿 v0.3.0 v0.2.0 2020-07-10 PG监控系统第六版正式发布 v0.2.0 v0.1.0 2020-06-20 在生产仿真测试环境中验证通过 v0.1.0 v0.0.5 2020-08-19 离线安装模式:无需互联网访问即可交付 v0.0.5 v0.0.4 2020-07-27 将 Ansible 剧本重构为 Role Refactor playbooks into ansible roles v0.0.4 v0.0.3 2020-06-22 接口设计改进 v0.0.3 v0.0.2 2020-04-30 首次提交 v0.0.2 v0.0.1 2019-05-15 概念原型 v0.0.1
会议与演讲 日期 类型 活动 主题 2025-11-29 获奖&演讲 第八届 PostgreSQL 生态大会(杭州) PostgreSQL Magneto Award,世界级 Postgres 元发行版 2025-05-16 闪电演讲 PGConf.Dev 2025(蒙特利尔) Extension Delivery: 让您的 PGEXT 触达用户 2025-05-12 主题演讲 PGEXT.DAY, PGCon.Dev 2025 PostgreSQL 生态中缺失的包管理器与扩展仓库 2025-04-19 实战工坊 PostgreSQL 数据库技术峰会 使用 Pigsty 部署 PG 生态伙伴:Dify, Odoo, Supabase 2025-04-11 直播主持 OSCHINA 数智Talk 刷屏的 MCP 是炒作还是革命? 2025-01-15 直播分享 开源老将与新秀第四期 PostgreSQL 扩展吞噬数据库世界?PG包管理器 pig 与自建 RDS Pigsty 2025-01-09 颁奖典礼 OSCHINA 2024 年度杰出贡献专家 年度杰出贡献专家 2025-01-06 圆桌论坛 中国 PostgreSQL 数据库生态大会 PostgreSQL 扩展正在吞噬数据库世界 2024-11-23 播客 技术乱炖 Podcast 来自 Linux 基金会:为什么最近都在关注"卡脖子"? 2024-08-21 媒体专访 蓝色科技浪潮 Pigsty 作者冯若航专访:简化PG管理,推动中国开源社区 2024-08-15 技术大会 GOTC 全球开源技术峰会 PostgreSQL AI/ML/RAG 扩展生态与最佳实践 2024-07-12 主题演讲 第十三届 PG 中国技术大会 数据库世界的未来:扩展,服务,与 Postgres 2024-05-31 非正式会议 PGCon.Dev 2024 全球 PG 开发者大会 Unconference 内置 Prometheus 指标导出器 2024-05-28 专题研讨 PGCon.Dev 2024 全球 PG 开发者大会 扩展峰会 Extension in Core & Binary Packing 2024-05-10 直播辩论 三人行·云计算泥石流系列 第三期 公有云是骗局吗? 2024-04-17 直播辩论 三人行·云计算泥石流系列 第二期 云数据库是智商税吗? 2024-04-16 圆桌论坛 Cloudflare Immerse 深圳 赛博菩萨圆桌论坛 2024-04-12 技术大会 2024 数据技术嘉年华 Pigsty:解决 PostgreSQL 运维难题 2024-03-31 直播辩论 三人行·云计算泥石流系列 第一期 罗永浩卖云,我们却在下云? 2024-01-24 直播主持 OSCHINA 开源漫谈 第九期 DBA 会被云干掉吗? 2023-12-20 直播辩论 开源漫谈第七期 上云 or 下云,割韭菜还是降本增效? 2023-11-24 技术大会 大模型时代的向量数据库 圆桌讨论:大模型时代向量数据库新未来 2023-09-08 人物专访 墨天轮风云人物访谈 冯若航:不想当段子手的技术狂,不是一位好的开源创始人 2023-08-16 技术大会 DTCC 2023 DBA之夜:PostgreSQL vs MySQL的开源协议问题 2023-08-09 直播辩论 开源漫谈第一期 MySQL vs PostgreSQL,谁是世界第一? 2023-07-01 技术大会 SACC 2023 专题研讨会8:FinOps实践:云成本管理与优化 2023-05-12 线下活动 PostgreSQL中国社区 温州站线下沙龙 PG With DB4AI: 向量数据库 PGVECTOR & AI4DB: 数据库自动驾驶 Pigsty 2023-04-08 技术大会 数据库嘉年华 2023 更好的开源RDS替代:Pigsty 2023-04-01 技术大会 PostgreSQL中国社区 西安站线下沙龙 PG高可用与容灾最佳实践 2023-03-23 公开直播 Bytebase x Pigsty 管理 PostgreSQL 的最佳实践: Bytebase x Pigsty 2023-03-04 技术大会 PostgreSQL中国技术大会 炮打 RDS,Pigsty v2.0 发布 2023-02-01 技术大会 DTCC 2022 开源 RDS 替代:开箱即用、自动驾驶的数据库发行版 Pigsty 2022-07-21 直播辩论 云吞噬开源,那开源有机会反击吗? 云吞噬开源,那开源有机会反击吗? 2022-07-04 人物专访 专题采访:创造者说 90 后,辞职创业,说要卷死云数据库 2022-06-28 公开直播 贝斯的圆桌趴 |DBA 福音 - SQL 审核最佳实践 2022-06-12 公开路演 奇绩创坛 S22 路演日 好用省钱的数据库发行版 Pigsty 2022-06-05 视频直播 PG中文社区直播分享 Pigstyv1.5快速上手新特性介绍与生产集群搭建
2.4 - 发展规划 未来功能的规划,新功能的发布节奏,待办事项列表。
版本发布策略 Pigsty 使用语义化版本号,<主版本>.<次版本>.<修订号>。Alpha / Beta / RC 版本会在版本号后添加后缀,如 -a1,-b1,-c1。
主版本更新意味着不兼容的基础性变化与重大新特性;次版本更新通常表示普通功能特性更新,较小的API变动;修订版本更新意味着 Bug 修复与软件包版本更新。
Pigsty 计划每年发布一次主版本更新,次版本更新通常跟随 PostgreSQL 小版本更新节奏,在 PostgreSQL 新版本发布后最迟一个月内跟进。
Pigsty 通常每年计划 4 - 6 个小版本,完整发布历史请参考 发行注记
使用具体的版本号进行部署
Pigsty 使用 main 主干分支进行开发,请始终使用带有版本号的 Release
除非您清楚知道自己在做什么,否则请勿使用 GitHub 的 main 分支,总是检出特定版本使用。
列入考虑的新特性 这里是我们的 活跃议题 路线图
扩展插件与软件包 关于扩展支持的路线图,可以在这里找到:https://pgext.cloud/e/roadmap
考虑纳入 暂不考虑 2.5 - 加入社区 Pigsty 是一个 Build in Public 的项目,我们在 GitHub 上非常活跃,中文区用户主要活跃于微信群组中。
GitHub 我们的 GitHub 仓库地址是:https://github.com/pgsty/pigsty ,欢迎点个 ⭐️ 关注
我们欢迎任何人 提交新 Issue 或创建 Pull Request ,提出功能建议并参与 Pigsty 贡献。
请注意,关于 Pigsty 文档的问题,请在 github.com/Vonng/pigsty.cc 仓库中提交 Issue 。
微信群组 中文区用户主要活跃于微信群组中,目前有七个活跃的群组,1群-4群已经满员,其他群需要添加小助手微信拉入。
加入微信社群,请用搜索 “Pigsty小助手”,(微信号 pigsty-cc) 备注或发送 “加群” ,小助手会将您拉入群组中。
海外社群 Telegram: https://t.me/joinchat/gV9zfZraNPM3YjFh
Discord: https://discord.gg/j5pG8qfKxU
您也可以通过邮件联系我: rh@vonng.com
社区求助 当您使用 Pigsty 遇到问题时,可以向社区求助,您提供的信息越丰富,就越有可能在社区得到帮助。
请参考 社区求助指南 ,尽可能提供足够的信息,以便社区成员帮助您解决问题。以下是求助提问的参考模板:
发生了什么事? (必选项 )
Pigsty版本号与操作系统版本 (必选项 )
$ grep version pigsty.yml
$ cat /etc/os-release
$ uname -a
一些云厂商对标准操作系统发行版进行了定制,您可以告诉我们使用的是哪一家云厂商的什么操作系统镜像。
如果您在安装操作系统后对环境进行了定制与修改,或者在您的局域网中有特定的安全规则与防火墙配置,也请在提问时告知我们。
Pigsty配置文件
请不要忘记抹掉任何敏感信息:密码,内部密钥,敏感配置等。
cat ~/pigsty/pigsty.yml
你期待发生什么?
请描述正常情况下应该发生什么事情,实际发生的情况与期待的情况有何偏离?
如何复现此问题?
请尽可能详细地告诉我们复现此问题的方法与步骤。
监控截图
如果你在使用 Pigsty 提供的监控系统,可以提供 相关 的截图。
错误日志
请尽可能提供与错误有关的日志。请不要粘贴类似 “Failed to start xxx service” 之类没有信息量的内容 。
您可以从 Grafana / VictoriaLogs 中查询日志,或从以下位置获取日志:
Syslog: /var/log/messages (rhel) or /var/log/syslog (debian) Postgres: /pg/log/postgres/* Patroni: /pg/log/patroni/* Pgbouncer: /pg/log/pgbouncer/* Pgbackrest: /pg/log/pgbackrest/* journalctl -u patroni
journalctl -u <service name>
您已经搜索过 Issue/网站/FAQ了吗?
在 FAQ 中,我们提供了许多常见问题的解答,请在提问前检查
您也可以从 Github Issue 与 Discussion 中搜索相关问题:
有什么其他信息是我们需要知道的吗?
您提供的信息与上下文越丰富,我们越有可能帮助您解决问题。
2.6 - 隐私政策 Pigsty 软件与网站会收集哪些用户数据,以及我们将如何处理您的数据并保护您的隐私权?
Pigsty软件 当您安装 Pigsty 软件时,如果在网络隔离的环境中使用离线软件包安装,我们不会收到任何关于您的数据 。
如果您选择在线安装,那么在下载相关软件包时,我们的服务器或云供应商的服务器会自动在日志中记录来访机器的 IP 地址和/或主机名,和您下载的软件包名称。
除非法律要求,我们不会与其他组织共享这些信息。(实话说,吃饱了撑着才会去看这些东西)
Pigsty 使用的主域名为:pigsty.io pigsty.cc
Pigsty网站 当您访问我们的网站时,我们的服务器会自动在 Nginx 日志中记录您的 IP 地址和/或主机名。
仅当您决定通过完成调查或在我们的某个网站上注册为用户来向我们发送此类信息时,我们才会存储您的电子邮件地址、姓名和地点等信息
我们收集这些信息是为了帮助我们改进网站内容、定制网页布局以及出于技术和支持目的联系人员。除非法律要求,我们不会与其他组织共享您的电子邮件地址。
本网站使用 Google Analytics,这是 Google, Inc.(“Google”)提供的一项网络分析服务。谷歌分析使用“cookies”,即放置在您计算机上的文本文件,帮助网站分析用户如何使用该网站。
cookie 生成的有关您使用网站的信息(包括您的 IP 地址)将被传输至 Google 位于美国的服务器并由其存储。谷歌将使用这些信息来评估您对网站的使用情况,为网站运营商编制网站活动报告,并提供与网站活动和互联网使用相关的其他服务。
如果法律要求,或者第三方代表 Google 处理信息,Google 还可能会将此信息传输给第三方。 Google 不会将您的 IP 地址与 Google 持有的任何其他数据关联起来。
您可以通过在浏览器上选择适当的设置来拒绝使用 cookie,但请注意,如果您这样做,您可能无法使用本网站的全部功能。使用本网站即表示您同意 Google 以上述方式和目的处理有关您的数据。
如果您对此政策有任何疑问或意见,或要求删除个人数据,您可以通过发送邮件至 rh@vonng.com 与我们联系
2.7 - 开源协议 Pigsty 使用的开源协议 —— Apache-2.0,它授予您什么样的权利,又有哪些限制?
协议摘要 Pigsty 项目主体使用 Apache-2.0 开源许可证;Pigsty 文档网站使用 CC by 4.0 许可证。
项目协议地址:https://github.com/pgsty/pigsty/blob/main/LICENSE
Pigsty 项目主体 Pigsty 软件主体采用 Apache License 2.0
本协议授权您 本协议不提供 本协议的条件
Pigsty 文档网站 Pigsty 的文档与网站(包括但不限于:pigsty.cc pigsty.io pgsty.com Creative Commons Attribution 4.0 International (CC BY 4.0) 许可证。
CC BY 4.0 是一种知识共享许可证,允许您自由地分享与演绎本站的内容,但是您必须给出 适当的署名 指出是否有对原始内容进行了修改
本协议授权您 本协议不提供 本协议的条件
SBOM 清单 以下为 Pigsty 项目所使用或相关的开源软件及其开源协议。
451 个 PostgreSQL 扩展插件的许可证请参考 PostgreSQL 扩展许可证清单
必要性等级说明:
必选 :提供 Pigsty 关键性核心能力,不提供关闭停用选项建议 :Pigsty 默认启用 的组件,可以通过配置选项停用可选 :Pigsty 默认支持但不启用的组件,可通过配置启用Apache-2.0 许可证原文
Apache License
Version 2.0, January 2004
http://www.apache.org/licenses/
TERMS AND CONDITIONS FOR USE, REPRODUCTION, AND DISTRIBUTION
1. Definitions.
"License" shall mean the terms and conditions for use, reproduction,
and distribution as defined by Sections 1 through 9 of this document.
"Licensor" shall mean the copyright owner or entity authorized by
the copyright owner that is granting the License.
"Legal Entity" shall mean the union of the acting entity and all
other entities that control, are controlled by, or are under common
control with that entity. For the purposes of this definition,
"control" means (i) the power, direct or indirect, to cause the
direction or management of such entity, whether by contract or
otherwise, or (ii) ownership of fifty percent (50%) or more of the
outstanding shares, or (iii) beneficial ownership of such entity.
"You" (or "Your") shall mean an individual or Legal Entity
exercising permissions granted by this License.
"Source" form shall mean the preferred form for making modifications,
including but not limited to software source code, documentation
source, and configuration files.
"Object" form shall mean any form resulting from mechanical
transformation or translation of a Source form, including but
not limited to compiled object code, generated documentation,
and conversions to other media types.
"Work" shall mean the work of authorship, whether in Source or
Object form, made available under the License, as indicated by a
copyright notice that is included in or attached to the work
(an example is provided in the Appendix below).
"Derivative Works" shall mean any work, whether in Source or Object
form, that is based on (or derived from) the Work and for which the
editorial revisions, annotations, elaborations, or other modifications
represent, as a whole, an original work of authorship. For the purposes
of this License, Derivative Works shall not include works that remain
separable from, or merely link (or bind by name) to the interfaces of,
the Work and Derivative Works thereof.
"Contribution" shall mean any work of authorship, including
the original version of the Work and any modifications or additions
to that Work or Derivative Works thereof, that is intentionally
submitted to Licensor for inclusion in the Work by the copyright owner
or by an individual or Legal Entity authorized to submit on behalf of
the copyright owner. For the purposes of this definition, "submitted"
means any form of electronic, verbal, or written communication sent
to the Licensor or its representatives, including but not limited to
communication on electronic mailing lists, source code control systems,
and issue tracking systems that are managed by, or on behalf of, the
Licensor for the purpose of discussing and improving the Work, but
excluding communication that is conspicuously marked or otherwise
designated in writing by the copyright owner as "Not a Contribution."
"Contributor" shall mean Licensor and any individual or Legal Entity
on behalf of whom a Contribution has been received by Licensor and
subsequently incorporated within the Work.
2. Grant of Copyright License. Subject to the terms and conditions of
this License, each Contributor hereby grants to You a perpetual,
worldwide, non-exclusive, no-charge, royalty-free, irrevocable
copyright license to reproduce, prepare Derivative Works of,
publicly display, publicly perform, sublicense, and distribute the
Work and such Derivative Works in Source or Object form.
3. Grant of Patent License. Subject to the terms and conditions of
this License, each Contributor hereby grants to You a perpetual,
worldwide, non-exclusive, no-charge, royalty-free, irrevocable
(except as stated in this section) patent license to make, have made,
use, offer to sell, sell, import, and otherwise transfer the Work,
where such license applies only to those patent claims licensable
by such Contributor that are necessarily infringed by their
Contribution(s) alone or by combination of their Contribution(s)
with the Work to which such Contribution(s) was submitted. If You
institute patent litigation against any entity (including a
cross-claim or counterclaim in a lawsuit) alleging that the Work
or a Contribution incorporated within the Work constitutes direct
or contributory patent infringement, then any patent licenses
granted to You under this License for that Work shall terminate
as of the date such litigation is filed.
4. Redistribution. You may reproduce and distribute copies of the
Work or Derivative Works thereof in any medium, with or without
modifications, and in Source or Object form, provided that You
meet the following conditions:
(a) You must give any other recipients of the Work or
Derivative Works a copy of this License; and
(b) You must cause any modified files to carry prominent notices
stating that You changed the files; and
(c) You must retain, in the Source form of any Derivative Works
that You distribute, all copyright, patent, trademark, and
attribution notices from the Source form of the Work,
excluding those notices that do not pertain to any part of
the Derivative Works; and
(d) If the Work includes a "NOTICE" text file as part of its
distribution, then any Derivative Works that You distribute must
include a readable copy of the attribution notices contained
within such NOTICE file, excluding those notices that do not
pertain to any part of the Derivative Works, in at least one
of the following places: within a NOTICE text file distributed
as part of the Derivative Works; within the Source form or
documentation, if provided along with the Derivative Works; or,
within a display generated by the Derivative Works, if and
wherever such third-party notices normally appear. The contents
of the NOTICE file are for informational purposes only and
do not modify the License. You may add Your own attribution
notices within Derivative Works that You distribute, alongside
or as an addendum to the NOTICE text from the Work, provided
that such additional attribution notices cannot be construed
as modifying the License.
You may add Your own copyright statement to Your modifications and
may provide additional or different license terms and conditions
for use, reproduction, or distribution of Your modifications, or
for any such Derivative Works as a whole, provided Your use,
reproduction, and distribution of the Work otherwise complies with
the conditions stated in this License.
5. Submission of Contributions. Unless You explicitly state otherwise,
any Contribution intentionally submitted for inclusion in the Work
by You to the Licensor shall be under the terms and conditions of
this License, without any additional terms or conditions.
Notwithstanding the above, nothing herein shall supersede or modify
the terms of any separate license agreement you may have executed
with Licensor regarding such Contributions.
6. Trademarks. This License does not grant permission to use the trade
names, trademarks, service marks, or product names of the Licensor,
except as required for reasonable and customary use in describing the
origin of the Work and reproducing the content of the NOTICE file.
7. Disclaimer of Warranty. Unless required by applicable law or
agreed to in writing, Licensor provides the Work (and each
Contributor provides its Contributions) on an "AS IS" BASIS,
WITHOUT WARRANTIES OR CONDITIONS OF ANY KIND, either express or
implied, including, without limitation, any warranties or conditions
of TITLE, NON-INFRINGEMENT, MERCHANTABILITY, or FITNESS FOR A
PARTICULAR PURPOSE. You are solely responsible for determining the
appropriateness of using or redistributing the Work and assume any
risks associated with Your exercise of permissions under this License.
8. Limitation of Liability. In no event and under no legal theory,
whether in tort (including negligence), contract, or otherwise,
unless required by applicable law (such as deliberate and grossly
negligent acts) or agreed to in writing, shall any Contributor be
liable to You for damages, including any direct, indirect, special,
incidental, or consequential damages of any character arising as a
result of this License or out of the use or inability to use the
Work (including but not limited to damages for loss of goodwill,
work stoppage, computer failure or malfunction, or any and all
other commercial damages or losses), even if such Contributor
has been advised of the possibility of such damages.
9. Accepting Warranty or Additional Liability. While redistributing
the Work or Derivative Works thereof, You may choose to offer,
and charge a fee for, acceptance of support, warranty, indemnity,
or other liability obligations and/or rights consistent with this
License. However, in accepting such obligations, You may act only
on Your own behalf and on Your sole responsibility, not on behalf
of any other Contributor, and only if You agree to indemnify,
defend, and hold each Contributor harmless for any liability
incurred by, or claims asserted against, such Contributor by reason
of your accepting any such warranty or additional liability.
END OF TERMS AND CONDITIONS
APPENDIX: How to apply the Apache License to your work.
To apply the Apache License to your work, attach the following
boilerplate notice, with the fields enclosed by brackets "[]"
replaced with your own identifying information. (Don't include
the brackets!) The text should be enclosed in the appropriate
comment syntax for the file format. We also recommend that a
file or class name and description of purpose be included on the
same "printed page" as the copyright notice for easier
identification within third-party archives.
Copyright (C) 2018-2026 Ruohang Feng, @Vonng (rh@vonng.com)
Licensed under the Apache License, Version 2.0 (the "License");
you may not use this file except in compliance with the License.
You may obtain a copy of the License at
http://www.apache.org/licenses/LICENSE-2.0
Unless required by applicable law or agreed to in writing, software
distributed under the License is distributed on an "AS IS" BASIS,
WITHOUT WARRANTIES OR CONDITIONS OF ANY KIND, either express or implied.
See the License for the specific language governing permissions and
limitations under the License.
2.8 - 赞助我们 Pigsty 的赞助者,投资人名单,感谢你们对本项目的支持!
赞助我们 Pigsty 是一个开源免费的自由软件,由 PostgreSQL 社区成员用热情浇灌而成,旨在整合 PostgreSQL 生态的力量,推广 PostgreSQL 的普及。
如果我们的工作帮到了您,请考虑赞助或者支持一下我们的项目:
直接打钱赞助我们,用最直接有力的鼓舞表达您的真挚支持! 考虑采购我们的 技术支持服务 通过文章,讲座,视频分享您使用 Pigsty 的案例与经验。 允许我们在 “这些用户使用了Pigsty” 中提及您的组织。 向有需求的朋友,同事与客户提名/推荐我们的项目与服务。 关注我们的 微信公众号 天使投资人 Pigsty 是由 奇绩创坛
赞助者 感谢我们的赞助者 Vercel,为 Pigsty 网站提供了赞助与网站托管基础设施。
2.9 - 行业案例 Pigsty 在各个领域与行业的客户/应用案例
根据 Google Analytics PV 与下载量,Pigsty 目前有约 10 万用户 ,一半来自中国大陆,一半来自全球其他地区。
遍布互联网、云计算、金融、自动驾驶、制造业、科技创新、ISV 与军工等多个行业。
如果您在 使用 Pigsty 并且愿意与我们分享您的案例与 Logo,欢迎联系我们,我们提供一次的免费咨询支持。
互联网 探探 :两百台+物理机,用于 PostgreSQL 与 Redis 服务
哔哩哔哩 :用于支持 PostgreSQL 创新业务
云厂商 Bitdeer :比特小鹿,提供 PG DBaaS
Oracle OCI :使用 Pigsty 交付 PostgreSQL 集群。
金融行业 AirWallex :监控 200+ GCP PostgreSQL 数据库
影视行业 影视飓风 :自建 PG RDS / Victoria Metrics
自动驾驶 Momenta :自动驾驶,管理自建 PostgreSQL 集群
制造业 华峰集团 :使用 Pigsty 交付 PostgreSQL 集群作为化工时序数据仓库
科技创新 北京领雾科技 :云上 PostgreSQL 下云自建
Motphys :自建 PostgreSQL 支持 Gitlab
赛陇生物科技 :自建 Supabase
杭州零码科技 :自建 PostgreSQL
ISV 内蒙古豪德天沐科技有限公司
上海元芳
DSG
军工 北京某部队
上海某部队
电科36所
机械工业研究所
航天一院
2.10 - 订阅服务 Pigsty 专业版/企业版订阅服务:当您遇到与 PostgreSQL 和 Pigsty 有关的疑难杂症时,订阅服务可以为您兜底。
Pigsty 旨在聚集PG生态的合力,并用自动驾驶的数据库管控软件帮助用户用好世界上 最流行
尽管 Pigsty 本身已经解决了 PG 使用中的诸多问题。但想真正达到企业级服务的质量,原厂提供的专家支持与兜底服务不可或缺。
我们深知专业的商业支持服务对于企业客户的重要性,因此,Pigsty 企业版在开源版本的基础上提供了一系列增值服务,帮助用户更好地用好 PostgreSQL 与 Pigsty,供有需求的客户按需选用。
如果您有下列需求,欢迎考虑 Pigsty 订阅服务:
在关键场景中运行数据库,需要严格 SLA 保障兜底。 希望对 Pigsty 与 PostgreSQL 相关疑难杂症提供兜底。 希望获取关于 PostgreSQL / Pigsty 生产环境最佳实践的指导。 希望有专家帮助解读监控图表,分析定位性能瓶颈与故障根因,给出意见。 希望根据现有资源与业务需求,规划满足安全/容灾/合规要求的数据库架构。 需要将其他数据库迁移至 PostgreSQL 数据库,或对历史遗留实例迁移与改造。 建设基于Prometheus / Grafana 技术栈的可观测性体系,数据大盘,可视化应用。 希望支持国产信创操作系统/国产信创 ARM 芯片架构,提供中文/本地化界面支持。 下云并寻求 RDS for PostgreSQL 的开源替代 —— 云中立,无供应商锁定的解决方案。 希望获取关于 Redis / ETCD / MinIO,以及 TimescaleDB / Citus 等扩展的专业支持。 希望将 Pigsty 作为 SaaS / PaaS / DBaaS 对外销售,或基于此发行版提供技术服务/云服务。 订阅计划 除了 开源版 专业版 企业版
开源免费 无规模限制,无质保承诺
许可协议:Apache-2.0
PG支持:18
架构支持:x86_64
OS支持:三系最新小版本
EL 9.7 Debian 12.13 Ubuntu 22.04.5 功能:核心模块
SLA:无 SLA 承诺
社区公益支持答疑:
支持:无人天支持选项
仓库:全球CF托管仓库
起售价:150,000 ¥ / 年 普通用户的默认之选
许可协议:商业许可证
PG支持:17, 18
架构支持:x86_64,Arm64
OS支持:五系大小版本
EL 8 / 9 兼容 Debian 12 Ubuntu 22 / 24 功能:所有模块 (信创除外)
SLA:工作日时效内响应
提供专家咨询服务:
支持:每年包含 1 人天
交付:标准离线软件包
仓库:中国大陆镜像站
起售价:400,000 ¥ / 年 严格 SLA 的关键场景
许可协议:商业许可证
PG支持:12 - 18+
架构支持:x86_64,Arm64
OS支持:按需定制
EL, Debian, Ubuntu 云上 Linux 操作系统 国产操作系统与ARM 功能:所有模块
SLA:7 x 24 (< 1h)
提供企业级专家咨询服务:
软件缺陷修复 疑难杂症分析 专家答疑解惑 备份合规建议 升级路径支持 性能瓶颈定位 年度架构评估 扩展插件收录 DBaaS & OEM 用例 支持:每年包含 2 人天
仓库:中国大陆镜像站
交付:定制离线软件包
信创:PolarDB-O 支持
Pigsty开源版 Pigsty 开源版使用 Apache-2.0 Issue 。
针对开源版本,我们提供 PostgreSQL 18 在 EL 9.6,Debian 12.11,Ubuntu 22.04.5 三个精准操作系统发行版最新小版本上的预制标准离线软件包(作为对开源的支持,同时提供 Debian 12 的 Arm64 离线软件包)。
使用 Pigsty 开源版本,可以让初级研发工程师 / 运维工程师拥有专业 DBA 70%+ 的能力,在缺少数据库专家的情况下,也能够轻松搭建一个高可用,高性能,易维护,安全可靠的 PostgreSQL 数据库集群。
代号 操作系统发行版版本 x86_64Arm64PG17 PG16 PG15 PG14 PG13 EL9 RHEL 9 / Rocky9 / Alma9 el9.x86_64U22 Ubuntu 22.04 (jammy) u22.x86_64D12 Debian 12 (bookworm) d12.x86_64d12.aarch64
Pigsty专业版 专业版订阅: 起售价格 ¥ 150,000 / 年
Pigsty 专业版订阅提供了完整的功能模块,以及对于 Pigsty 本身的质保。关于 PostgreSQL 本身与扩展插件的缺陷,我们将尽最大努力通过 PostgreSQL 全球开发者社区进行反馈与修复。
Pigsty 专业版构建于开源版基础之上,完全兼容开源版本的所有功能,并提供额外的功能模块,与更为宽广的数据库 / 操作系统版本兼容选项:我们将针对五个主流操作系统发行版的 所有小版本 提供构建选项。
Pigsty 专业版包含了对 最近两个 PostgreSQL 大版本(18,17)的支持,提供两个大版本中的所有可用的扩展插件,确保您可以通过滚动升级的方式,平滑迁移到最新的 PostgreSQL 大版本上。
Pigsty 专业版订阅允许您使用中国大陆镜像站点软件仓库,无需翻墙代理即可访问;同时我们将针对您使用的精准操作系统大小版本定制离线软件安装包,确保在断网环境下也能正常安装交付,做到自主可控。
Pigsty 专业版订阅提供了标准的专家咨询服务,包括疑难杂症分析,DBA 答疑解惑,备份合规建议等,我们承诺在工作日(5x8)时效内响应您的问题,并且每年提供 1 人天支持,以及可选的人天加购选项。
Pigsty 专业版使用商业许可证,提供额外的功能模块、技术支持与质保服务。
Pigsty 专业版的起售价格 ¥150,000 / 年 ,相当于 9 vCPU 的 AWS 高可用 RDS PG 年费, 或月薪 一万元 的初级运维工程师。
代号 操作系统发行版版本 x86_64Arm64PG17 PG16 PG15 PG14 PG13 EL9 RHEL 9 / Rocky9 / Alma9 el9.x86_64el9.aarch64EL8 RHEL 8 / Rocky8 / Alma8 / Anolis8 el8.x86_64el8.aarch64U24 Ubuntu 24.04 (noble) u24.x86_64u24.aarch64U22 Ubuntu 22.04 (jammy) u22.x86_64u22.aarch64D12 Debian 12 (bookworm) d12.x86_64d12.aarch64
Pigsty企业版 企业版订阅: 起售价格 ¥ 400,000 / 年
Pigsty 企业版订阅包含 Pigsty 专业版订阅提供的全部服务内容,和以下增值服务项:
Pigsty 企业版订阅提供最为广泛的数据库/操作系统版本支持范围,包括对过保操作系统(EL7, U20, D11),国产操作系统,云厂商操作系统,以及过保数据库大版本(从 PG 13 开始)的延长支持,以及对 Arm64 架构芯片的完整支持。
Pigsty 企业版订阅提供了信创,国产化解决方案,允许您在 Pigsty 中使用 PolarDB v2.0 (此内核许可需单独采购)内核替换原生 PostgreSQL 内核,以满足国产化合规要求。
Pigsty 企业版订阅提供了更高标准的企业级咨询服务,承诺 7x24 提供 (< 1h) 的响应时间 SLA,并可提供更多种类的咨询支持:版本升级,性能瓶颈定位,年度架构评估,扩展插件收录等。
Pigsty 企业版订阅每年自带 2 人天支持,以及可选的人天加购选项,用于解决各种更为棘手复杂耗时的问题。
Pigsty 企业版允许您将 Pigsty 用于 DBaaS 用途,建设云数据库服务对外出售。
Pigsty 企业版的起步价格为 ¥400,000 / 年 ,相当于 24 vCPU 的 AWS 高可用 RDS 年费,或月薪 三万元 的运维专家。
代号 操作系统发行版版本 x86_64PG17 PG16 PG15 PG14 PG13 PG12 Arm64PG17 PG16 PG15 PG14 PG13 PG12 EL9 RHEL 9 / Rocky9 / Alma9 el9.x86_64el9.arm64EL8 RHEL 8 / Rocky8 / Alma8 / Anolis8 el8.x86_64el8.arm64U24 Ubuntu 24.04 (noble) u24.x86_64u24.arm64U22 Ubuntu 22.04 (jammy) u22.x86_64u22.arm64D12 Debian 12 (bookworm) d12.x86_64d12.arm64D11 Debian 11 (bullseye) d12.x86_64d11.arm64U20 Ubuntu 20.04 (focal) d12.x86_64u20.arm64EL7 RHEL7 / CentOS7 / UOS … d12.x86_64el7.arm64
Pigsty订阅说明 功能差异
Pigsty 专业版/企业版相比开源版本,包含以下额外功能:
命令行管理工具 : 解锁 Pigsty 命令行工具( pig )的完整功能系统定制能力 :针对精确的主流Linux操作系统发行版大小版本提供预制的离线安装包离线安装能力 :在没有互联网访问的环境中(断网环境)实现 Pigsty 的完整安装PG内核多版本 :允许用户自由指定并安装 PostgreSQL 生命周期内大版本的内核(13 - 17)内核替换能力 :允许用户使用其他 PostgreSQL 系兼容内核,替换原生 PG 内核,以及离线安装这些内核的能力扩展支持能力 :针对 451 个可用 PG Extension,提供 PG 13-18 在主流操作系统上开箱即用的安装能力。完整功能模块 :提供所有功能模块:Supabase MinIO DuckDB Kafka Kubernetes, VictoriaMetrics & VictoriaLogs 国产操作系统支持 :提供国产信创操作系统支持选项(仅限企业版订阅 )国产ARM架构支持 :提供国产 ARM64 架构支持选项(仅限企业版订阅 )中国大陆镜像仓库 :无需科学上网即可顺畅安装,提供境内 YUM/APT 仓库镜像与 DockerHub 访问代理。中文界面支持 :监控系统中文版界面支持(Beta)付费模式
Pigsty 订阅采用按年付费的模式,签订合同后,从合同约定日起计算一年的有效期。订阅合同到期前如果继续打款则视为自动续订。
连续订阅有折扣,第一次续签(第二年)享受 95 折优惠,第二次以及后续的续签享受订阅费用 9 折优惠,一次性订阅三年以上整体费用享受 85 折优惠。
在年度订阅合同终止后,您可以选择不续签订阅服务,Pigsty 将不再提供软件更新,技术支持,咨询服务,但您仍然可以继续使用已经安装版本的 Pigsty 专业版软件。
如果您订阅了 Pigsty 专业服务并选择不续订,在重新订阅时 无需 补齐中断期间的订阅费用,但所有折扣与优惠将重置。
Pigsty 的定价策略确保用户物有所值 —— 您可以立即获得顶尖 DBA 的数据库架构建设方案与管理最佳实践,并由其提供咨询答疑与服务支持兜底;
而付出的成本相比于全职雇佣数据库专家或使用云数据库极具竞争力。以下是市场上 企业级数据库专业服务市场定价参考 :
体面数据库专业服务的公允价格是 1 ~ 2 万元 / 年 ,计费单位为 vCPU ,即一个 CPU 线程(1 Intel 核 = 2 vCPU 线程)。
而 Pigsty 提供国内顶尖的 PostgreSQL 专家服务,并采用 按节点计费 的模式,在当下常见的高核数服务器节点上,能为用户带来无可比拟的 降本增效 体验。
Pigsty专家服务 除了 Pigsty 订阅,Pigsty 还提供按需采购的 Pigsty x PostgreSQL 专家服务 —— 业界顶级数据库专家坐堂问诊。
专家顾问:300,000 ¥ / 三年
在三年内,提供 10 次关于 PostgreSQL 与 Pigsty 的复杂案例处理,以及不限量答疑。
专家支持:30,000 ¥ / 人·天
业界顶级专家现场支持,可用于架构咨询,故障分析,问题排查,数据库体检,监控解读,迁移评估,教学培训,上下云参谋等连续耗时场景。
专家咨询:3000 ¥ / 例
咨询任何您想要了解的问题,关于 Pigsty, PostgreSQL,数据库,云计算,AI……
数据库老司机,云计算泥石流与您分享行业顶级洞察、认知与研判。
挂专家号:300 ¥ / 问题
给出一个关于 PostgreSQL / Pigsty / 数据库相关的问题的快速诊断意见与答复,不超过 5 分钟。
服务主体 Pigsty 目前由作者 冯若航 独资运营维护,商业主体为:
海南诸夏云数据有限公司 / 91460000MAE6L87B94 海口龙华辟技数据中心 / 92460000MAG0XJ569B 海口龙华越航科技中心 / 92460000MACCYGBQ1N PIGSTY® 与 PGSTY® 为海口龙华越航科技中心的注册商标。
商务咨询请发送邮件至 rh@vonng.com RuohangFeng。
Pigsty 是奇绩创坛 S22 被投项目,原主体 磐吉云数(北京)科技有限责任公司 已经清算剥离 Pigsty 业务,与 Pigsty 无关。
2.11 - 常见问题 解答关于 Pigsty 项目本身的常见问题。
Pigsty 是什么,不是什么? Pigsty 是一个 PostgreSQL 数据库发行版,本地优先的开源 RDS 云数据库解决方案。
Pigsty 不是数据库管理系统(DBMS),而是管理 DBMS 的工具,发行版,解决方案,与最佳实践。
类比:数据库是车,那么 DBA 是司机,RDS 是出租车服务,Pigsty 则是自动驾驶软件。
Pigsty 解决什么问题? 用好数据库的能力 极为稀缺:要么高薪聘请数据库专家自建(雇司机),或从云厂商以天价租赁 RDS(打车),但现在你有新的选项:Pigsty(自动驾驶)。
Pigsty 帮用户用好数据库:让用户在没有 DBA 的情况下,以不到 RDS 1 / 10 的成本,自建质量效率更优的本地云数据库服务!
Pigsty 的目标用户是谁? Pigsty 有两类典型目标用户,基本盘是 中大型公司 超大规模自建企业级/生产级 PostgreSQL RDS / DBaaS 服务。
Pigsty 通过极致的可定制性,可以实现最苛刻场景的数据库管理需求,并提供企业级的支持与服务保障。
与此同时,Pigsty 也针对个人开发者,缺乏 DBA 中小企业以及开源社区提供 “开箱即用” 的 PG RDS 自建方案。
Pigsty 为什么能帮您用好数据库? Pigsty 沉淀了顶尖专家在最复杂,最大规模的甲方 PostgreSQL 场景中打磨得到的经验与最佳实践,产品化为可复制的软件:
一次性解决扩展安装,高可用,链接池,监控,备份恢复,参数优化,IaC 批量管理,一键安装,自动化运维等诸多问题。提前规避诸多陷阱,避免重复踩坑。
Pigsty 为何比 RDS 好用? Pigsty 提供远超 RDS 的特性集与基础设施支持,包括 451 扩展插件与 8+ 内核支持。
Pigsty 提供 PG 生态中独一无二的专业级监控系统,与久经复杂场景打磨考验的架构最佳实践,简单易用。
且用探探,苹果,阿里等顶级甲方场景打磨而成,用激情与热爱持续浇灌,深度与成熟度绝非 RDS 大锅饭可比。
Pigsty 为何比 RDS 省钱? Pigsty 允许您使用 10 ¥/核·月的纯硬件资源,运行 400¥-1400¥/核·月的 RDS 云数据库,并省去 DBA 的工资。通常,成规模的 Pigsty 部署总拥有成本(TCO)能比 RDS 低 90% 以上。
Pigsty 能够同时降低软件许可/服务/人力的开销,自建无需加人,让您将成本花在刀刃上。
Pigsty 对研发有什么帮助? Pigsty 整合了 PG 生态最全的扩展(451),提供了 All in PG 解决方案:单一组件替代 Redis, Kafka, MySQL, ES, 向量数据库, OLAP / 大数据分析等专用组件。
极大提高研发效能与敏捷性的同时降低复杂度成本,而且研发能在 Pigsty 的加持下实现自助管理,自主 DevOps,无需 DBA。
Pigsty 对运维有什么帮助? Pigsty 故障自愈的高可用架构确保硬件故障无需当场处理,让运维与 DBA 睡个好觉;监控助力问题分析与性能优化;IaC 赋能超大规模集群自动化管理。
运维在 Pigsty 加持下能兼职 DBA ,而 DBA 则可以跳过系统建设阶段,节省大量工时并专注于高价值工作,或喝茶看报,学习PG。
Pigsty 的作者是谁? Pigsty 主体由冯若航一人开发,这是一位专注于 PostgreSQL 领域 10 年的开源贡献者,数据库专家与布道师,
曾任职于阿里,探探,苹果,全栈专家。现为一人公司创始人,提供专业咨询服务。
同时他也是技术 KOL,微信数据库个人公众号榜首 《非法加冯》 的主理人,全网粉丝六万+。
Pigsty 的生态位与影响力如何? Pigsty 全球 PostgreSQL 生态中最有影响力的中国开源项目,共有约十万用户,一半来自海外。
Pigsty 也是 PostgreSQL 生态最活跃的开源项目之一,目前在扩展分发与监控系统上占据碾压性优势。
PGEXT.Cloud
Pigsty 目前是 PostgreSQL 生态的主要发行版之一,也是云厂商 RDS 的挑战者,目前已经广泛应用于军工,政企,医疗,互联网,金融,制造业等各个行业。
Pigsty 适合什么规模的客户? Pigsty 源于超大规模 PostgreSQL 自动化管理的需求,但已针对易用性进行深度优化,缺乏专业 DBA 能力的个人开发者与中小型企业也可以轻松上手使用。
最大规模部署为 25K vCPU,450万QPS,六年+,最小规模部署可完整运行于 1c1g 虚拟机上作为 Demo / Devbox 使用。
Pigsty 提供哪些能力? Pigsty 专注于整合 PostgreSQL 生态,提供 PostgreSQL 的最佳实践,但同时也支持一系列与 PostgreSQL 配合良好的开源软件。例如:
Etcd, Redis, MinIO, DuckDB, Prometheus FerretDB, Babelfish, IvorySQL, PolarDB, OrioleDB OpenHalo, Supabase, Greenplum, Dify, Odoo, … Pigsty 适用于哪些场景? 运行大规模 PostgreSQL 集群用于业务 自建 RDS,对象存储,缓存,数仓,Supabase, … 自建 Odoo,Dify,Wiki,GitLab 等企业级应用 运行监控基础设施,监控现有数据库与主机 同时组合使用多种 PG 扩展插件 大屏开发与交互式数据应用 Demo,数据可视化,Web 建站 Pigsty 开源免费吗? Pigsty 是 100% 的开源软件 + 自由软件,在遵循开源许可证的前提下,您可以将其免费地,自由的用于各种商业目的。
我们珍视软件自由,对于非 DBaaS / OEM 用例,我们执行更为宽松的等效 Apache 2.0 许可证。请参阅许可证以获取更多详细信息。
Pigsty 提供商业支持吗? Pigsty 软件本身开源免费,并提供丰俭由人的商业订阅,为 Pigsty & PostgreSQL 提供质保。
订阅提供更宽广的 OS/PG/芯片架构支持范围,以及专家咨询与支持。
Pigsty 商业订阅交付业界顶尖的管理/技术经验/解决方案,
帮助您节省宝贵的时间,替您扛雷,并为疑难杂症兜底。
Pigsty 支持国产信创吗? Pigsty 软件本身不属于数据库,不受信创名录限制,且已有多个部队用例。但 Pigsty 开源版不提供任何形式的信创支持。
商业版订阅提供与阿里云合作的国产信创解决方案,支持使用具有信创资质的 PolarDB-O(需单独采购)作为 RDS 内核,能够运行于信创操作系统/芯片环境。
Pigsty 可以换 Logo 贴牌为自己的产品吗? 再分发 Pigsty 时,您必须保留原作品中的版权声明、专利声明、商标声明和归属声明,
并且需要在修改的文件中附上显著的变更说明,同时保留 LICENSE 文件的内容。
在此前提下,您可以更换 PIGSTY 的 Logo 与商标,但不得宣传为 “自己原创的作品”。
我们在企业版本中提供对 OEM 与贴牌的商业授权支持。
Pigsty 的服务主体 Pigsty 是奇绩创坛 S22 被投项目,原主体 磐吉云数(北京)科技有限责任公司 已经清算剥离 Pigsty 业务,与 Pigsty 无关。
Pigsty 目前由作者冯若航个人独资运营维护,商业主体为:
海南诸夏云数据有限公司 / 91460000MAE6L87B94 海口龙华辟技数据中心 / 92460000MAG0XJ569B 海口龙华越航科技中心 / 92460000MACCYGBQ1N PIGSTY® 与 PGSTY® 为海口龙华越航科技中心的注册商标。
2.12 - 发布注记 Pigsty 历史版本发布说明
Pigsty 当前的最新稳定版本为 v4.2.2
版本 发布日期 摘要 发布页面 v4.2.2 2026-03-23 Insforge 应用自建,Infra 包批量更新,新增 pdu,pgdog,tigerfs v4.2.2 v4.2.1 2026-03-06 移除 PG13 支持,新增扩展,问题修复 v4.2.1 v4.2.0 2026-02-28 例行小版本更新,六大 PG 内核集中更新 v4.2.0 v4.1.0 2026-02-12 大小版本更新支持,Agent-Native CLI,默认防火墙安全策略收紧 v4.1.0 v4.0.0 2026-01-28 Victoria 可观测性,安全加固,JUICE/VIBE 模块,容器支持,Apache-2.0 v4.0.0 v3.7.0 2025-12-02 PG18 成为默认,437 个扩展,EL10 与 Debian13 支持,PGEXT.CLOUD v3.7.0 v3.6.1 2025-08-15 例行 PG 小版本更新,PGDG 中国区域镜像,EL9,D13 存根 v3.6.1 v3.6.0 2025-07-30 pgactive,MinIO / ETCD 改进,安装简化,配置梳理 v3.6.0 v3.5.0 2025-06-16 PG18 beta,421 扩展,监控升级,代码重构 v3.5.0 v3.4.1 2025-04-05 OpenHalo & OrioleDB,MySQL兼容,pgAdmin改进 v3.4.1 v3.4.0 2025-03-30 备份改进,自动证书,AGE,Ivory 全平台,本地化,架构与参数改进 v3.4.0 v3.3.0 2025-02-24 404 扩展,扩展目录,App 剧本,Nginx 定制,DocumentDB 支持 v3.3.0 v3.2.2 2025-01-23 390扩展,Omnigres支持,Mooncake,Citus13与PG17支持 v3.2.2 v3.2.1 2025-01-12 350扩展,Ivory4,Citus强化,Odoo模板 v3.2.1 v3.2.0 2024-12-24 扩展管理 CLI ,Grafana 强化,ARM64 扩展补完 v3.2.0 v3.1.0 2024-11-24 PG 17 升默认大版本,配置简化,Ubuntu24与ARM 支持,Supabase,MinIO 改进 v3.1.0 v3.0.4 2024-10-30 PG 17 扩展,OLAP 全家桶,pg_duckdb v3.0.4 v3.0.3 2024-09-27 PostgreSQL 17,Etcd 运维优化,IvorySQL 3.4,PostGIS 3.5 v3.0.3 v3.0.2 2024-09-07 精简安装模式,PolarDB 15支持,监控视图更新 v3.0.2 v3.0.1 2024-08-31 例行问题修复,Patroni 4支持,Oracle兼容性改进 v3.0.1 v3.0.0 2024-08-25 333个扩展插件,可插拔内核,MSSQL,Oracle,PolarDB 兼容性 v3.0.0 v2.7.0 2024-05-20 扩展大爆炸,新增20+强力扩展插件,与多款Docker应用 v2.7.0 v2.6.0 2024-02-28 PG 16 作为默认大版本,引入 ParadeDB 与 DuckDB 等扩展 v2.6.0 v2.5.1 2023-12-01 例行小版本更新,PG16重要扩展支持 v2.5.1 v2.5.0 2023-09-24 Ubuntu/Debian支持:bullseye, bookworm, jammy, focal v2.5.0 v2.4.1 2023-09-24 Supabase/PostgresML支持与各种新扩展:graphql, jwt, pg_net, vault v2.4.1 v2.4.0 2023-09-14 PG16,监控RDS,服务咨询支持,新扩展:中文分词全文检索/图/HTTP/嵌入等 v2.4.0 v2.3.1 2023-09-01 带HNSW的PGVector,PG 16 RC1, 文档翻新,中文文档,例行问题修复 v2.3.1 v2.3.0 2023-08-20 主机VIP, ferretdb, nocodb, MySQL存根, CVE修复 v2.3.0 v2.2.0 2023-08-04 仪表盘 & 置备重做,UOS 兼容性 v2.2.0 v2.1.0 2023-06-10 支持 PostgreSQL 12 ~ 16beta v2.1.0 v2.0.2 2023-03-31 新增 pgvector 支持,修复 MinIO CVE v2.0.2 v2.0.1 2023-03-21 v2 错误修复,安全增强,升级 Grafana 版本 v2.0.1 v2.0.0 2023-02-28 架构大升级,兼容性、安全性、可维护性显著增强 v2.0.0 v1.5.1 2022-06-18 Grafana 安全性修复 v1.5.1 v1.5.0 2022-05-31 Docker 应用程序支持 v1.5.0 v1.4.1 2022-04-20 错误修复 & 英文文档完整翻译 v1.4.1 v1.4.0 2022-03-31 MatrixDB 支持,分离 INFRA/NODES/PGSQL/REDIS模块 v1.4.0 v1.3.0 2021-11-30 PGCAT 重整 & PGSQL 增强 & Redis Beta支持 v1.3.0 v1.2.0 2021-11-03 默认 PGSQL 版本升级至 14 v1.2.0 v1.1.0 2021-10-12 主页, JupyterLab, PGWEB, Pev2 & pgbadger v1.1.0 v1.0.0 2021-07-26 v1 正式版, 监控系统重整 v1.0.0 v0.9.0 2021-04-04 Pigsty 图形界面, 命令行界面, 日志集成 v0.9.0 v0.8.0 2021-03-28 服务置备,定制对外暴露的数据库服务 v0.8.0 v0.7.0 2021-03-01 仅监控部署,监控现有 PostgreSQL 实例 v0.7.0 v0.6.0 2021-02-19 架构增强,将PG与Consul解耦 v0.6.0 v0.5.0 2021-01-07 支持在配置中定义业务数据库/用户 v0.5.0 v0.4.0 2020-12-14 支持 PostgreSQL 13,添加官方文档 v0.4.0 v0.3.0 2020-10-22 虚拟机置备方案正式定稿 v0.3.0 v0.2.0 2020-07-10 PG监控系统第六版正式发布 v0.2.0 v0.1.0 2020-06-20 在生产仿真测试环境中验证通过 v0.1.0 v0.0.5 2020-08-19 离线安装模式:无需互联网访问即可交付 v0.0.5 v0.0.4 2020-07-27 将 Ansible 剧本重构为 Role v0.0.4 v0.0.3 2020-06-22 接口设计改进 v0.0.3 v0.0.2 2020-04-30 首次提交 v0.0.2 v0.0.1 2019-05-15 概念原型 v0.0.1
v4.2.2 亮点特性
Insforge 2.0.1 自建模板 Infra 软件包批量更新,MinIO/MCLI 更新至 20260321 新增 infra 软件包: tigerfs, pgstream, sql-studio, rainfog, crush 更新 PG 工具:数据恢复 pdu,连接池 pgdog 更新 PG 扩展:pg_search, pgsentinel, pg_track_optimizer, pgcollection, pg_ttl_index, pg_clickhouse 更新 PG 内核:IvorySQL 5.1 -> 5.3 PostgreSQL 软件包更新
包名 旧版本 新版本 备注 pg_search 0.21.12 0.22.2 pgsentinel 1.4.0 1.4.1 仅更新 rpm pg_track_optimizer 0.9.1 0.9.2 pgcollection 1.0.0 2.0.0 pg_ttl_index 2.0.0 3.0.0 pg_clickhouse 0.1.4 0.1.5 pdu 3.0.25.12 新增 pgdog 0.1.32 新增
基础设施软件包更新
名称 旧版本 新版本 备注 grafana12.4.0 12.4.1 pgbackrest_exporter0.22.0 0.23.0 redis_exporter1.81.0 1.82.0 victoria-logs1.47.0 1.48.0 vlagent1.47.0 1.48.0 vlogscli1.47.0 1.48.0 victoria-traces0.7.1 0.8.0 duckdb1.4.4 1.5.0 pg_timetable6.2.0 6.3.0 pgschema1.4.2 1.7.4 pgstream- 1.0.1 新增 tigerbeetle0.16.75 0.16.77 grafana-victorialogs-ds0.26.2 0.26.3 grafana-infinity-ds3.7.3 3.7.4 caddy2.11.1 2.11.2 npgsqlrest3.10.0 3.11.1 postgrest14.5 14.7 opencode1.2.17 1.2.27 pev21.20.2 1.21.0 golang1.26.0 1.26.1 vector0.53.0 0.54.0 rclone1.73.1 1.73.2 code-server4.109.5 4.112.0 code1.109.4 1.112.0 seaweedfs4.15 4.17 uv0.10.8 0.10.12 codex0.110.0 0.116.0 v2ray5.44.1 5.47.0 sabiql1.6.2 1.8.2 sql-studio- 0.1.51 新增 rainfrog- 0.3.17 新增 agentsview0.10.0 0.15.0 crush- 0.51.2 新增 tigerfs- 0.5.0 新增 victoria-metrics1.137.0 1.138.0 victoria-metrics-cluster1.137.0 1.138.0 vmutils1.137.0 1.138.0 hugo0.157.0 0.158.0 rustfs1.0.0-alpha.85 1.0.0-alpha.89 mysqld_exporter0.18.0 0.19.0 pg_exporter1.2.0 1.2.1 pig1.3.1 1.3.2 minio20260214 20260321 mcli20260213 20260321 claude2.1.68 2.1.81 ivroysql5.1 5.3
校验和
0d9f907ff626203578c687d1418b38ba pigsty-pkg-v4.2.2.d12.aarch64.tgz
4129baf773c3005f4d697cf452f927a0 pigsty-pkg-v4.2.2.d12.x86_64.tgz
40d5a0d9c2a97615bf0421bae42458ae pigsty-pkg-v4.2.2.d13.aarch64.tgz
cf91113a2296ad11fff79802ac9b1483 pigsty-pkg-v4.2.2.d13.x86_64.tgz
dbccfeb3978ffb928bd0b501c3c0d42d pigsty-pkg-v4.2.2.el10.aarch64.tgz
8c848a4e3fa93c2455285fbcad5ddd78 pigsty-pkg-v4.2.2.el10.x86_64.tgz
7c15c9a36f7d2dd740019c20e8c75a4b pigsty-pkg-v4.2.2.el9.aarch64.tgz
7d6e9e529236a0db2382f42660790ed9 pigsty-pkg-v4.2.2.el9.x86_64.tgz
8f64bb14885ce330603172b186062671 pigsty-pkg-v4.2.2.u22.aarch64.tgz
16d4c36c9e1ff848848c34a257b1025c pigsty-pkg-v4.2.2.u22.x86_64.tgz
401230741af5b04f163ffc8e688315ab pigsty-pkg-v4.2.2.u24.aarch64.tgz
5312aa0841694fc560778b9377a32c89 pigsty-pkg-v4.2.2.u24.x86_64.tgz
cabeeb898b56b26c0855f33d5e60411a pigsty-v4.2.2.tgz
v4.2.1 这是一个维护版本,新增了 3 个扩展插件,
主要变更
新增扩展 :pg_eviltransform 加入 GIS 包组,pg_pinyin 加入 FTS 包组,pg_qos 加入 Admin 包组 —— 均支持 PG 14–18。移除 PG13 :所有平台变体(EL7/8/9/10、Debian 12/13、Ubuntu 22/24,x86_64 与 aarch64)中的 pgdg13、pgdg13-nonfree 仓库条目和 PG13 包别名(pg13-*)全部移除。配置模板(fat.yml、pro.yml、dev.yml、el.yml、debian.yml)不再引用 PG13 包或仓库。扩展版本注释更新为仅覆盖 PG 14–18。 Percona 仓库 :Origin URL 从 ppg-18.1 更新为 ppg-18.3,跟踪最新 Percona PostgreSQL 发行版。Nginx 仓库 :Debian/Ubuntu 平台上 Nginx 上游 APT 仓库的模块标签从 infra 修正为 nginx。UV Venv 修复 :roles/node/tasks/pkg.yml 现在会先检查虚拟环境是否已存在,避免重复执行 uv venv 导致的冗余创建或重新置备报错。Docker 镜像 :Pigsty Docker 镜像基础包中新增 less。Demo 配置 :el.yml 和 debian.yml 示例配置的默认防火墙规则新增 5432 端口,支持直接访问 PostgreSQL。兼容性说明
PostgreSQL 13 已于 2025-11-13 到达生命周期终点 。
PGDG YUM 仓库已经归档移除 pg13 / pg12 目录。
如果您在 EL 系统上安装 Pigsty (即使没有使用 PG 13 版本),也有可能因为仓库访问失败而导致安装或更新失败。
您可以选择直接使用 Pigsty v4.2.1,或者手工修改 roles/node_id/vars/ 您对应操作系统 repo_upstream_default 变量,移除仓库定义中的 pg13 一行即可。
此外,EL8 仍然在 Pigsty 的兼容操作系统中,但从此版本开始将不再发布 el8 的离线软件包。
本版本没有其他破坏性 API 或配置变更。
7 个提交 ,84 文件变更,+4,925 / -5,351 行(v4.2.0..v4.2.1,2026-03-04 ~ 2026-03-06)
PostgreSQL 软件包更新
包名 旧版本 新版本 备注 timescaledb 2.25.1 2.25.2 vchord 1.1.0 1.1.1 新增 clang 构建依赖,修复错误 vchord_bm25 0.3.0-1 0.3.0-2 修复版本注入问题 aggs_for_vecs 1.4.0 1.4.1 pg_search 0.21.9 0.21.12 pg_pinyin - 0.0.2 新增扩展 pg_eviltransform - 0.0.2 新增扩展 pg_qos - 1.0.0 新增扩展,QoS 资源治理
基础设施软件包更新
名称 旧版本 新版本 备注 asciinema3.1.0 3.2.0 grafana-infinity-ds3.7.2 3.7.3 victoria-metrics1.136.0 1.137.0 victoria-metrics-cluster1.136.0 1.137.0 vmutils1.136.0 1.137.0 hugo0.155.3 0.157.0 opencode1.2.15 1.2.17 rustfs1.0.0-alpha.83 1.0.0-alpha.85 seaweedfs4.13 4.15 tigerbeetle0.16.74 0.16.75 uv0.10.4 0.10.8 codex0.105.0 0.110.0 claude2.1.59 2.1.68 xray- 26.2.6 新增 gost- 2.12.0 新增 sabiql- 1.6.2 新增 agentsview- 0.10.0 新增
校验和
262b7671424a38b208872582fe835ef8 pigsty-v4.2.1.tgz
62edcca1d1e572a247be018e1c26eda8 pigsty-pkg-v4.2.1.d12.aarch64.tgz
1d55367e2fd9106e6f18b7ee112be736 pigsty-pkg-v4.2.1.d12.x86_64.tgz
f122b1e5ba8a7ae8e3dc6e6dd53eba65 pigsty-pkg-v4.2.1.d13.aarch64.tgz
617a76bfc8df8766e78abf24339152eb pigsty-pkg-v4.2.1.d13.x86_64.tgz
908509b350403ad1a4a27a88795fee06 pigsty-pkg-v4.2.1.el10.aarch64.tgz
70cb4afd90ed7aea6ab43a264f8eb4a8 pigsty-pkg-v4.2.1.el10.x86_64.tgz
98fbd67334f5c674b12e6af81ef76923 pigsty-pkg-v4.2.1.el9.aarch64.tgz
687fa741ccd9dcf611a2aa964bcf1de8 pigsty-pkg-v4.2.1.el9.x86_64.tgz
a2a30f4b1146b3e79be91d5be57615b6 pigsty-pkg-v4.2.1.u22.aarch64.tgz
7a1f571bd8526106775c175ba728eee1 pigsty-pkg-v4.2.1.u22.x86_64.tgz
a5574071bac1955798265f71ad73c3d4 pigsty-pkg-v4.2.1.u24.aarch64.tgz
59a7632c650a3c034f1fe6cd589d7ab5 pigsty-pkg-v4.2.1.u24.x86_64.tgz
v4.2.0 亮点特性
离线小版本跟进 PostgreSQL 紧急小版本:18.3、17.9、16.13、15.17、14.22。 PostgreSQL 扩展总数达到 461 个。 PG 内核更新:Babelfish、AgensGraph、pgEdge、OriolePG、OpenHalo、Cloudberry。 Babelfish 模板切换到 Pigsty 自建维护的 PG17 兼容版本,移除对 WiltonDB 仓库的依赖。 更新 Supabase 镜像与自建模板至最新版本,使用自行维护的 MinIO 分支 pgsty/minio 主要变更
mssql 模板切换到 Babelfish PG17 默认:pg_version: 17,pg_packages: [babelfish, pgsql-common, sqlcmd],并移除额外 mssql repo 依赖。pg_home_map 调整:mssql 指向 /usr/babelfish-$v/,gpsql 指向 /usr/local/cloudberry,统一内核路径语义。package_map 新增 cloudberry 独立映射,并修复 babelfish* 组件别名到版本化包名(RPM/DEB)。Redis 默认主目录从 /data 调整为 /data/redis;部署阶段阻止旧默认值继续使用,redis_remove 增加旧路径兼容清理。 configure 支持 -o 绝对路径输出并自动建目录;区域探测改为三态(境内/境外/离线回退),修复 behind_gfw() 卡住问题。修复 Debian/Ubuntu 默认仓库 URL(updates/backports/security 对应关系)与中国区镜像组件字段,避免节点初始化拉包失败。 Supabase 应用栈例行升级(含 PostgREST 14.5、Vector 0.53.0 等)并补齐 S3 协议访问密钥变量。 Rich/Sample 模板显式补全 dbuser_meta 默认值;node.sh 中 systemd 自动补全逻辑简化。 pgbackrest 初始化增加重试(2 次、间隔 5 秒),缓解 stanza-create 与 archive-push 锁竞争失败。Vibe 模板更新:内置 @anthropic-ai/claude-code、@openai/codex、happy-coder 等 npm 工具,默认示例补入 age 扩展。 PG 软件更新
PostgreSQL 18.3, 17.9, 16.13, 15.17, 14.22 RPM Changelog 2026-02-27 DEB Changelog 2026-02-27 核心升级:timescaledb 2.25.0 -> 2.25.1,citus 14.0.0-3 -> 14.0.0-4,pg_search -> 0.21.9 新增/重建:pgedge 17.9,spock 5.0.5,lolor 1.2.2,snowflake 2.4,babelfish 5.5.0,cloudberry 2.0.0 内核配套:oriolepg 17.11 -> 17.16,orioledb beta12 -> beta14,openhalo 14.10 -> 1.0(14.18) 包名 旧版本 新版本 备注 timescaledb2.25.0 2.25.1 citus14.0.0-3 14.0.0-4 使用最新官方版本重新构建 age1.7.0 1.7.0 新增 PG 17 的 1.7.0 版本支持 pgmq1.10.0 1.10.1 当前没有该扩展包 pg_search0.21.7 / 0.21.6 0.21.9 RPM/DEB 旧版本不同 oriolepg17.11 17.16 OriolePG 内核更新 orioledbbeta12 beta14 配套 OriolePG 17.16 openhalo14.10 1.0 更新并重命名,14.18 pgedge- 17.9 新增多主边缘分布式内核 spock- 5.0.5 新增,pgEdge 核心扩展 lolor- 1.2.2 新增,pgEdge 核心扩展 snowflake- 2.4 新增,pgEdge 核心扩展 babelfishpg- 5.5.0 新增 BabelfishPG 包组 babelfish- 5.5.0 新增 Babelfish 兼容包 antlr4-runtime413- 4.13 新增 Babelfish 依赖运行时 cloudberry- 2.0.0 仅 RPM 构建 pg_background- 1.8 仅 DEB 构建
基础设施软件更新
名称 旧版本 新版本 grafana12.3.2 12.4.0 prometheus3.9.1 3.10.0 mongodb_exporter0.47.2 0.49.0 victoria-metrics1.135.0 1.136.0 victoria-metrics-cluster1.135.0 1.136.0 vmutils1.135.0 1.136.0 victoria-logs1.45.0 1.47.0 vlagent1.45.0 1.47.0 vlogscli1.45.0 1.47.0 loki3.6.5 3.6.7 promtail3.6.5 3.6.7 logcli3.6.5 3.6.7 grafana-victorialogs-ds0.24.1 0.26.2 grafana-victoriametrics-ds0.21.0 0.23.1 grafana-infinity-ds3.7.0 3.7.2 redis_exporter1.80.2 1.81.0 etcd3.6.7 3.6.8 dblab0.34.2 0.34.3 tigerbeetle0.16.72 0.16.74 seaweedfs4.09 4.13 rustfs1.0.0-alpha.82 1.0.0-alpha.83 uv0.10.0 0.10.4 kafka4.1.1 4.2.0 npgsqlrest3.7.0 3.10.0 postgrest14.4 14.5 caddy2.10.2 2.11.1 rclone1.73.0 1.73.1 pev21.20.1 1.20.2 genai-toolbox0.25.0 0.27.0 opencode1.1.59 1.2.15 claude2.1.37 2.1.59 codex0.104.0 0.105.0 code1.109.2 1.109.4 code-server4.108.2 4.109.2 nodejs24.13.1 24.14.0 pig1.1.2 1.3.0 stalwart- 0.15.5 maddy- 0.8.2
API变化
pg_mode 增加 agens 与 pgedge。mssql 默认配置改为 pg_version: 17 + pg_packages: [babelfish, pgsql-common, sqlcmd]。pg_home_map 与 package_map 的内核/包别名映射更新(Babelfish / OpenHalo / IvorySQL / Cloudberry / pgEdge 家族)。redis_fs_main 默认值改为 /data/redis,并新增部署保护与移除兼容策略。configure 输出路径与区域探测逻辑更新,增加离线回退告警;SSH 探测统一超时参数。grafana.ini.j2 跟进 Grafana 12.4 新配置项与废弃项调整。兼容性说明
存量 Redis 配置如果仍使用 redis_fs_main: /data,请先改为 /data/redis 再执行部署。 Grafana 12.4 后 data link 合并行为变化,本版本已将关键链接下沉到字段 override 规避冲突;如有自定义看板,建议同步检查。 26 个提交 ,122 文件变更,+2,116 / -2,215 行(v4.1.0..v4.2.0,2026-02-15 ~ 2026-02-28)
校验和
24a90427a7e7351ca1a43a7d53289970 pigsty-v4.2.0.tgz
d980edf5eeb0419d4f1aa7feb0100e14 pigsty-pkg-v4.2.0.d12.aarch64.tgz
24bc237d841457fbdcc899e1d0a3f87e pigsty-pkg-v4.2.0.d12.x86_64.tgz
e395b38685e2ecbe9c3a2850876d9b7b pigsty-pkg-v4.2.0.d13.aarch64.tgz
c5c8776f9bead9f29528b26058801f83 pigsty-pkg-v4.2.0.d13.x86_64.tgz
28ea40434bd06135fc8adc0df1c8407d pigsty-pkg-v4.2.0.el10.aarch64.tgz
58ad715ac20dc1717d1687daecfcf625 pigsty-pkg-v4.2.0.el10.x86_64.tgz
008f955439ea311581dd0ebcf5b8bd34 pigsty-pkg-v4.2.0.el8.aarch64.tgz
2acfd127a517b09f07540f808fe9547a pigsty-pkg-v4.2.0.el8.x86_64.tgz
58e62a92f35291a40e3f05839a1b6bc4 pigsty-pkg-v4.2.0.el9.aarch64.tgz
d311bfdf5d5f60df5fe6cb3d4ced4f9c pigsty-pkg-v4.2.0.el9.x86_64.tgz
c98972fe9226657ac1faa7b72a22498b pigsty-pkg-v4.2.0.u22.aarch64.tgz
44a174ee9ba030ac1ea386cf0b85f6e7 pigsty-pkg-v4.2.0.u22.x86_64.tgz
143e404f4681c7d0bbd78ef7982cd652 pigsty-pkg-v4.2.0.u24.aarch64.tgz
00dfa86f477f3adff984906211ab3190 pigsty-pkg-v4.2.0.u24.x86_64.tgz
v4.1.0 curl https://pigsty.cc/get | bash -s v4.1.0
72 个提交 ,252 文件变更,+5,744 / -5,015 行(v4.0.0..v4.1.0,2026-02-02 ~ 2026-02-13)
亮点特性
新增 7 个扩展,总计 451 个扩展支持。 pig 从传统脚本接口升级为 Agent-Native CLI (1.0.0 -> 1.1.0),支持主动暴露上下文并提供 JSON/YAML 输出。pig 新增 PostgreSQL / OS 大小版本更新 统一能力(覆盖 major/minor 升级流程)。pg_exporter 升级到 v1.2.0 (1.1.2 -> 1.2.0),并修复 PG17/18 指标链路与单位换算。防火墙默认安全策略更新:node_firewall_mode 默认改为 zone,node_firewall_public_port 默认从 [22,80,443,5432] 收敛为 [22,80,443]。 PostgreSQL 小版本更新:18.2、17.8、16.12、15.16、14.21。 EL 默认小版本更新到 EL 9.7 / EL 10.1,Debian 默认小版本更新到 12.13 / 13.3。 集中修复 PGSQL / PGCAT Grafana 看板可用性:$dsn 动态数据源、schema 级跳转、Age 指标、链接映射与语义一致性。 新增 Mattermost 一键应用模板,支持数据库、目录、门户与可选 PGFS/JuiceFS 方案。 重构 infra-rm 卸载逻辑,新增 deregister 分段清理能力,可回收 Victoria target、Grafana datasource、Vector 日志配置。 优化 PostgreSQL 默认 autovacuum 阈值,减少小表高频 vacuum/analyze。 修复 FD 上限链路:新增 fs.nr_open=8M 并统一 LimitNOFILE=8M,避免 systemd/setrlimit 导致服务启动失败。 调整 Vibe 默认体验:Jupyter 默认关闭,Claude Code 改由 npm 包统一安装管理。 版本更新
Pigsty 版本:v4.0.0 -> v4.1.0 pig CLI:1.0.0 -> 1.1.0(Agent-Native + 大小版本更新支持)pg_exporter:1.1.2 -> 1.2.0默认 EL 小版本:9.6/10.0 -> 9.7/10.1 默认 Debian 小版本:12.12/13.1 -> 12.13/13.3 扩展更新
RPM Changelog 2026-02-12 DEB Changelog 2026-02-12 timescaledb 2.24.0 -> 2.25.0 pg_search 0.21.4 -> 0.21.7 pgmq 1.9.0 -> 1.10.0 pg_textsearch 0.4.0 -> 0.5.0 pljs 1.0.4 -> 1.0.5 pg_track_optimizer 0.9.1(新增) nominatim_fdw 1.1.0(新增) pg_utl_smtp 1.0.0(新增) pg_strict 1.0.2(新增) pgmb 1.0.0(新增) pg_pwhash(新增支持) informix_fdw(新增支持) INFRA 组件版本
Infra Changelog 2026-02-12
软件包 版本 软件包 版本 victoria-metrics 1.135.0 victoria-logs 1.45.0 vector 0.53.0 grafana 12.3.2 alertmanager 0.31.1 etcd 3.6.7 duckdb 1.4.4 pg_exporter 1.2.0 pig 1.1.0 claude 2.1.37 opencode 1.1.59 uv 0.10.0 code-server 4.108.2 caddy 2.10.2 hugo 0.155.2 cloudflared 2026.2.0 headscale 0.28.0
API变化
io_method / io_workers 模板生效条件从 pg_version >= 17 更正为 pg_version >= 18。idle_replication_slot_timeout / initdb --no-data-checksums 的 PG18 守卫条件修正。maintenance_io_concurrency 生效范围放宽至 PG13+。autovacuum_vacuum_threshold:oltp/crit/tiny 从 50 提升到 500,olap 提升到 1000。autovacuum_analyze_threshold:oltp/crit/tiny 从 50 提升到 250,olap 提升到 500。checkpoint_completion_target 默认从 0.90 提升到 0.95。Node tuned 模板新增 fs.nr_open=8388608,并统一 fs.file-max / fs.nr_open / LimitNOFILE 层级关系。 postgres、patroni、minio 的 systemd LimitNOFILE 从 16777216 调整为 8388608。 node_sysctl_params 默认加入 fs.nr_open: 8388608。node_firewall_mode 默认值从 none 调整为 zone:默认启用防火墙,内网信任,公网仅开放 node_firewall_public_port;如需完全自管防火墙请设为 none。node_firewall_public_port 默认值从 [22,80,443,5432] 调整为 [22,80,443],数据库端口 5432 需要按需显式添加。注意防火墙规则为“只增不删”,存量节点若已放行 5432 需手工移除;单机体验模板(如 meta / vibe)会显式覆盖并保留 5432 以便远程使用。bin/validate 新增 pg_databases[*].parameters 与 pg_hba_rules[*].order 校验支持,并修复 HBA 错误未正确返回失败的问题。infra-rm.yml 新增 deregister、config、env 等分段标签。Vibe 默认 jupyter_enabled=false,npm_packages 默认加入 @anthropic-ai/claude-code、happy-coder,并新增 CLAUDE_CODE_EXPERIMENTAL_AGENT_TEAMS=1。 PgBouncer 参数别名收敛:pool_size_reserve -> pool_reserve,pool_max_db_conn -> pool_connlimit。 兼容性修复(去重归并)
注:同一问题的重复回补(反复引入后再次修复)仅计一次,以下按问题域归并。 修复 Redis replicaof 判空逻辑与 systemd 停止行为。 修复 pg_migration 脚本 schema/table/sequence 全限定、标识符 quoting 与日志格式字符串安全问题。 修复 pgsql role handler 重启对象与变量使用错误。 修复 blackbox 配置文件名清理项与 pgAdmin pgpass 文件格式。 pg_exporter 启动改为非阻断,避免 exporter 启动失败拖慢主流程。VIP 地址解析逻辑简化,未显式 CIDR 时默认掩码 24。 MinIO 健康检查重试从 3 提升到 5。 节点主机名设置改用 hostname 模块,替代 shell 调用。 修复 app/electric 与 app/pg_exporter 的 .env 格式为标准 KEY=VALUE。 修复 pigsty.yml 的 pg_crontab 语法错误。 更新 ETCD 文档,明确默认 TLS 与可选 mTLS 的语义差异。 修复 repo-add 参数传递、Debian 中国镜像组件兼容性、bin/psql.py 的 Python3 兼容性。 加固 redis exporter 凭据文件权限,减少敏感信息暴露风险。 pgsql-user.yml 隐藏用户凭据日志输出并对敏感步骤启用 no_log。修复 pg_monitor 注册 Victoria target 的 gate 条件。 pg_remove 备份清理改为集群级目录,避免误删其他集群备份。提交清单(v4.0.0..v4.1.0,共 72,2026-02-02 ~ 2026-02-13)
7410de401 v4.1.0 release
fa31213ce conf(node): default firewall to zone with single-node 5432 override
bb8382c58 update default extension list to 451
770d01959 hide user credential in pgsql-user playbook
7219a896c pg_monitor: fix victoria registration gate conditions
084c98432 remove one cluster in backup dir during pg_remove
7005617f1 pgsql: drop legacy pgbouncer pool parameter aliases
f8165a886 docs(roles): fix typos and align juice role documentation
06a589218 chore(meta): normalize platform versions for current lint schema
e0a208248 fix(roles): harden redis exporter file permissions
fd0469881 terraform/vagrant: parameterize aliyun region/zone, fix vagrant scripts
74c59aabe grafana: fix dashboard links, descriptions, and overrides
443e58724 conf: clean legacy params and fix template references
536c4b39d adjust grafana dashboard dead links
f3b9866ce grafana(pgsql): fix panel typos and title consistency
bcb69be11 grafana(pgsql): fix drilldown links and variable mappings
1ce4374a1 grafana: fill pglog panel titles and normalize wording
2d127f9f4 grafana: fix minio traffic metrics and pigsty dashboard links
9d3ca0118 grafana: align victoria instance dashboards with query scope
55bc61622 grafana: fix infra dashboard copy, links, and table semantics
607b75535 grafana(node): fix panel drilldown links and clean dashboard metadata
1321de532 grafana(redis): fix dashboard links and blocked-clients panel semantics
91e0c8437 fix(grafana): correct Redis alert drill-down dashboard links
0fde78c02 fix(tooling): improve Python3 compatibility and enforce vagrant scale lower bound
fa3454a52 fix(bootstrap): use Debian-compatible components for CN apt mirror
36c95c749 fix(cli): restore repo-add execution and HBA validation failure propagation
797385929 add macbook local vagrant image override
f9c928e32 fix(grafana): restore reverted dashboard bugfixes
c11af8b6a Bump version to v4.1.0
307a236ba update extension list
f17024807 override el9/u24 vagrant box for convient testing
c2ada1283 terraform: bump Aliyun Debian images to 12.13/13.3
25bd8210f fix(node): add daemon_reload to systemd tasks for keepalived, chronyd, and cron
6f2576fd0 fix(node): set default fs.nr_open via node_sysctl_params
43a71245e add pg_bgwriter_buffers_backend for pg 17-
da832a47b fix(monitor): keep checkpointer metrics for checkpoint stats
90434ca8a fix(monitor): add pg_bgwriter fallback for checkpointer metrics
e2d75e787 fix(monitor): use pg_checkpointer metrics for checkpoint stats
a0b7474f8 fix grafana dashboard metrics and lengend
27ddacbc6 vagrant: refresh box selector and OS shortcuts
26e108788 fix(monitor): correct unit for time metrics scaled by pg_exporter
ee90044b5 fix(pgsql): correct min_parallel scan size params in oltp/crit templates
d439464b2 pgsql: fix pg_version guards for PG18-only settings
26320f120 docs: recommend RockyLinux 10.1
1e9b9f33a terraform: bump Aliyun Rocky images to 9.7/10.1
d6e9c7122 monitor: optimize table/index bloat estimators
42d45d32e fix(grafana): align panel semantics across node/infra/redis
3972d2c45 fix(grafana/pgsql): align dashboard semantics for query monitoring
cb52375ac bump checkpoint_completion_target from 0.90 to 0.95
13115a95d fix legend in pgsql-persist checkpoint panel
102cd2edb fix(pg_migration): make template logging format-safe
c402f0e6d fix: correct io_method/io_workers version guard from PG17 to PG18
3bf676546 vibe: disable jupyter by default and install claude-code via npm_packages
613c4efa9 fix: set fs.nr_open in tuned profiles and reduce LimitNOFILE to 8M
07e499d4d new app conf template matter most
4cc68ed61 Refine infra removal playbook
7cfb98f69 fix: app docker .env file format
9b36b1875 Fix config templates and validation
318d85e6e Simplify VIP parsing and make pg_exporter non-blocking
571cd9e70 Use hostname module for nodename
de98f073c Fix blackbox config filename and pgpass format
4bff01100 Fix redis replicaof guard and systemd stop
38445b68d minio: increase health check retries
c99854969 docs(etcd): clarify TLS vs mTLS
41229124a fix pgsql roles typo
e575d17c6 fix pg_migration scripts to use fully qualified identifiers
ec4207202 fix pgsql-schema broken links
a237e6c99 tune autovacuum threshold to reduce small table vacuum frequency
e80754760 fix pgcat-database links to pgcat-table https://github.com/pgsty/pigsty/issues/690
0060f5346 fix pgsql-database / pgsql-databases age metric fix https://github.com/pgsty/pigsty/issues/695
43cdf72bc fix pigsty.yml typo
0d9db7b08 fix: update datasource to $dsn - fix https://github.com/pgsty/pigsty/issues/692#issuecomment-3835461620
致谢
感谢 @l2dy 为本项目提出诸多改进意见与 Issue。 校验和
8bc75e8df0e3830931f2ddab71b89630 pigsty-v4.1.0.tgz
da10de99d819421630f430d01bc9de62 pigsty-pkg-v4.1.0.d12.aarch64.tgz
e1f2ed2da0d6b8c360f9fa2faaa7e175 pigsty-pkg-v4.1.0.d12.x86_64.tgz
382bb38a81c138b1b3e7c194211c2138 pigsty-pkg-v4.1.0.d13.aarch64.tgz
13ceaa728901cc4202687f03d25f1479 pigsty-pkg-v4.1.0.d13.x86_64.tgz
92d061de4d495d05d42f91e4283e7502 pigsty-pkg-v4.1.0.el10.aarch64.tgz
be629ea91adf86bbd7e1c59b659d0069 pigsty-pkg-v4.1.0.el10.x86_64.tgz
c14be706119ba33dd06c71dda6c02298 pigsty-pkg-v4.1.0.el8.aarch64.tgz
0c8b6952ffc00e3b169896129ea39184 pigsty-pkg-v4.1.0.el8.x86_64.tgz
cfcc63b9ecc525165674f58f9365aa19 pigsty-pkg-v4.1.0.el9.aarch64.tgz
34f733080bfa9c8515d1573c35f3e870 pigsty-pkg-v4.1.0.el9.x86_64.tgz
ad52ce9bf25e4d834e55873b3f9ada51 pigsty-pkg-v4.1.0.u22.aarch64.tgz
300b2185c61a03ea7733248e526f3342 pigsty-pkg-v4.1.0.u22.x86_64.tgz
2e561e6ae9abb14796872059d2f694a8 pigsty-pkg-v4.1.0.u24.aarch64.tgz
c462bb4cb2359e771ffcad006888fbd4 pigsty-pkg-v4.1.0.u24.x86_64.tgz
v4.0.0 curl https://pigsty.cc/get | bash -s v4.0.0
318 个提交 ,604 文件变更,+118,655 / -327,552 行,发布页面: https://github.com/pgsty/pigsty/releases/tag/v4.0.0
亮点特性
可观测性革命 : Prometheus → VictoriaMetrics(10x 性能提升),Loki + Promtail → VictoriaLogs + Vector安全加固 : 自动生成强密码、etcd RBAC、防火墙/SELinux 模式、权限收紧、Nginx Basic Auth容器支持 :支持在 Docker 容器中运行 Pigsty 本身新增模块 :JUICE,提供将 PG 挂载为文件系统并进行 PITR 的能力新增模块 :VIBE,提供 Claude Code、JupyterLab、VS Code Server、Node.js 的配置与可观测性数据库管理 : pg_databases state(create/absent/recreate)、strategy 瞬间克隆数据库PITR 与分叉 : /pg/bin/pg-fork CoW 瞬间克隆、pg-pitr 增强支持 PITR 前备份高可用增强 : pg_rto_plan 提供四档 RTO 预置参数(fast/norm/safe/wide),pg_crontab 定时任务多云 Terraform : AWS、Azure、GCP、Hetzner、DigitalOcean、Linode、Vultr、腾讯云模板许可证变更 : AGPL-3.0 → Apache-2.0基础设施软件包更新
MinIO 开始使用 pgsty/minio fork RPM/DEB
软件包 版本 软件包 版本 victoria-metrics 1.134.0 victoria-logs 1.43.1 vector 0.52.0 grafana 12.3.1 alertmanager 0.30.1 etcd 3.6.7 duckdb 1.4.4 pg_exporter 1.1.2 pgbackrest_exporter 0.22.0 blackbox_exporter 0.28.0 node_exporter 1.10.2 minio 20251203 pig 1.0.0 claude 2.1.19 opencode 1.1.34 uv 0.9.26 asciinema 3.1.0 prometheus 3.9.1 pushgateway 1.11.2 juicefs 1.4.0 code-server 4.100.2 caddy 2.10.2 hugo 0.154.5 cloudflared 2026.1.1 headscale 0.27.1
新增模块
JUICE 模块 :JuiceFS 分布式文件系统,使用 PostgreSQL 作为元数据引擎,支持利用 PITR 恢复文件系统VIBE 模块 :AI 辅助编程沙箱环境(整合了 Code-Server、JupyterLab、Node.js 与 Claude Code)Code-Server:浏览器中的 VS Code JupyterLab:交互式计算环境 Node.js:JavaScript 运行时环境 Claude Code:AI 编程助手 CLI 配置,内置 OpenTelemetry 可观测性 PostgreSQL 扩展
新扩展 : pg_textsearch 0.4.0, pg_clickhouse 0.1.3, pg_ai_query 0.1.1, etcd_fdw , pg_ttl_index 0.1.0, pljs 1.0.4, pg_retry 1.0.0, pg_weighted_statistics 1.0.0, pg_enigma 0.5.0, pglinter 1.0.1, documentdb_extended_rum 0.109, mobilitydb_datagen 1.3.0
重要更新 : timescaledb 2.24.0, pg_search 0.21.4, citus 14.0.0, documentdb 0.109, age 1.7.0, pg_duckdb 1.1.1, vchord 1.0.0, vchord_bm25 0.3.0, pg_biscuit 2.2.2, pg_anon 2.5.1, wrappers 0.5.7, pg_vectorize 0.26.0, pg_session_jwt 0.4.0, pg_partman 5.4.0, pgmq 1.9.0, pg_bulkload 3.1.23, pg_timeseries 0.2.0, pg_convert 0.1.0, pgBackRest 2.58
破坏性变更
可观测性栈
旧组件 新组件 Prometheus VictoriaMetrics Loki VictoriaLogs Promtail Vector
参数变更
移除 替代 node_disable_firewallnode_firewall_mode (off/none/zone)node_disable_selinuxnode_selinux_mode (disabled/permissive/enforcing)pg_pwd_enc已移除,统一使用 scram-sha-256 infra_pip_packagesnode_pip_packagescode_home/jupyter_homevibe_data
默认值变更
参数 变化 grafana_cleantrue → false effective_io_concurrency1000 → 200 install.yml重命名为 deploy.yml
可观测性
使用全新的 VictoriaMetrics 替代 Prometheus,用几分之一的资源实现数倍的性能 使用全新的日志收集方案:VictoriaLogs + Vector,取代 Promtail + Loki 统一调整了所有组件的日志格式,PG 日志使用 UTC 时间戳(log_timezone) 调整了 PostgreSQL 日志的轮换方式,使用按周循环截断日志轮转模式 在 PG 日志中记录超过 1MB 的临时文件分配,在特定模版中启用 PG 17/18 日志新参数 新增了 Nginx / Syslog / PG CSV / Pgbackrest / Grafana / Redis / etcd / MinIO 等日志的 Vector 解析配置 注册数据源现在会在所有 Infra 节点上进行,Victoria 数据源将自动注册入 Grafana 新增 grafana_pgurl 参数,允许指定 Grafana 使用 PG 作为后端存储元数据库 新增 grafana_view_password 参数,指定 Grafana Meta 数据源使用的密码 pgbackrest_exporter 的默认选项现在设置 120 秒的内部缓存间隔(原本为 600s)grafana_clean 参数的默认值现在由 true 改为 false,即默认不清除新增指标收集器 pg_timeline,收集更实时的时间线指标 pg_timeline_id pg_exporter 更新至 1.1.2,新增 pg_timeline 采集器,修复大量历史遗留问题新增 node-vector 仪表盘,监控 Vector 日志收集器状态 新增 node-juice 仪表盘,监控 JuiceFS 分布式文件系统状态 新增 claude-code 仪表盘,监控 Claude Code AI 编程助手使用情况 PGSQL Cluster/Instance 仪表盘新增版本横幅显示 所有仪表盘使用 compact JSON 格式,大幅减少文件体积 接口改进
install.yml 剧本现在重命名为 deploy.yml 以更符合语义新增 vibe.yml 剧本,用于部署 VIBE AI 编程沙箱环境 pg_databases 数据库制备功能改进添加删库能力:可以使用 state 字段指定 create, absent, recreate 三种状态 添加克隆能力:数据库定义中使用 strategy 参数指定克隆方法 支持较新版本引入的 locale 配置参数:locale_provider,icu_locale,icu_rules,builtin_locale 支持 is_template 参数,将数据库标记为模板数据库 添加了更多类型检查,避免了字符类参数的注入 允许在 extension 中指定 state: absent 以删除扩展 pg_users 用户制备功能改进,新增参数 admin,类似 roles,但是带有 ADMIN OPTION 权限可以转授pg_hba 支持 order 字段,允许指定 HBA 规则的排序优先级,支持 IPv6 的 localhost 访问新增 infra_extra_services 参数用于首页额外服务入口导航 参数优化
pg_io_method 参数:auto, sync, worker, io_uring 四种方式可选,默认 workermaintenance_io_concurrency 设置为 100(如果使用 SSD)effective_io_concurrency 从 1000 减小为 200file_copy_method 参数为 PG18 默认设置为 clone,提供瞬间克隆数据库的能力idle_replication_slot_timeout 默认 7d,crit 模板 3dlog_lock_failures:oltp, crit 模版开启track_cost_delay_timing:olap, crit 模版开启log_connections:oltp/olap 开启认证日志,crit 开启全部日志新增 pg_rto_plan 参数,整合 Patroni 与 HAProxy 的 RTO 相关配置(fast/norm/safe/wide) pg_crontab 参数:为 postgres dbsu 配置定时任务对于 PG17+,如果 pg_checksums 开关关闭,在 Patroni 初始化集群时显式禁用校验和 Crit 模板启用 Patroni 严格同步模式 PITR 默认 archive_mode 改为 preserve,确保恢复后保留归档能力 pg-pitr 支持恢复前自动备份数据修复了 duckdb.allow_community_extensions 总是生效的问题 允许通过 node_firewall_intranet 指定 HBA 信任的 “内网网段” 现在 pg_hba 与 pgbouncer_hba 支持 IPv6 的 localhost 访问 架构改进
在 Infra 节点上,设置固定的 /infra 软连接指向 Infra 数据目录 /data/infra 现在 Infra 的数据默认放置于 /data/infra 目录下,这使得在容器中使用更为便利 本地软件仓库现在放置于 /data/nginx/pigsty,/www 现在作为软链接指向 /data/nginx 确保兼容 DNS 解析记录现在放置于 /infra/hosts 目录下,解决了 Ansible SELinux 竞态问题 默认首页域名从 h.pigsty 更名为 i.pigsty,新增中文首页支持 新增了 /pg/bin/pg-fork 脚本,用于快速创建 CoW 副本数据库实例 调整 /pg/bin/pg-pitr 脚本,现在可以用于实例级别的 PITR 恢复,支持恢复前自动备份 新增 /pg/bin/pg-drop-role 脚本,用于安全删除用户角色 新增 bin/pgsql-ext 脚本,用于安装 PostgreSQL 扩展 恢复 pg-vacuum 和 pg-repack 脚本 新增剧本 juice.yml:部署 JuiceFS 分布式文件系统实例 新增剧本 vibe.yml:部署 VIBE AI 编程沙箱环境(含 Code-Server、JupyterLab、Claude Code) 显式安装 cron/cronie 包,确保定时任务功能在最小化安装的系统上可用 UV Python 包管理器从 infra 模块迁移至 node 模块,新增 node_uv_env 参数指定虚拟环境路径 pg_remove/pg_pitr 移除 etcd 元数据的任务,现在不再依赖 admin_ip 管理节点,而在 etcd 集群上执行36 节点仿真模板 simu 简化为 20 节点的版本 适配上游变化,移除 PGDG sysupdate 仓库,移除 EL 系统上所有 llvmjit 的相关包 为 EPEL 10 / PGDG 9/10 仓库使用操作系统完整版本号(major.minor) 允许在仓库定义中指定 meta 参数,覆盖 yum 仓库的定义元数据 确保 Vagrant libvirt 模板默认带有 128GB 磁盘,以 xfs 挂载于 /data 确保 pgbouncer 不再将 0.0.0.0 监听地址修改为 * 新增 10 节点、Citus 等 Vagrant 配置模板 恢复 EL7 系统兼容性支持 多云 Terraform 模板:AWS、Azure、GCP、Hetzner、DigitalOcean、Linode、Vultr、腾讯云 安全改进
configure 现在支持 -g 参数自动生成随机强密码,避免使用默认密码带来的安全隐患更改了 MinIO 模块的默认密码,避免与众所周知的默认密码冲突 移除 node_disable_firewall,新增 node_firewall_mode,支持 off, none, zone 三种模式 移除 node_disable_selinux,新增 node_selinux_mode,支持 disabled, permissive, enforcing 三种模式 为 HAProxy、Nginx、DNSMasq、Redis 等组件配置了正确的 SELinux 上下文 启用了针对 etcd 的 RBAC,每个集群现在只能管理自己的 PostgreSQL 数据库集群 etcd root 密码现在放置于 /etc/etcd/etcd.pass 文件中,仅对管理员可读 将 admin_ip 添加到 Patroni API 允许访问的 IP 列表白名单中 总是创建 admin 系统用户组,patronictl 配置收紧为仅限 admin 组用户访问 新增 node_admin_sudo 参数,允许指定/调整数据库管理员的 sudo 权限模式(all/nopass) 收回了所有非 root 用户对可执行脚本的拥有权限 新增 Nginx Basic Auth 支持,可以为 Nginx Server 设置可选的 HTTP Basic Auth 修复 ownca 证书有效期问题,确保了 Chrome 可以识别自签名证书 新增 vip_auth_pass 参数用于 VRRP 认证 修复了若干 ansible copy content 字段为空时报错的问题 修复了 pg_pitr 中遗留的一些问题,确保 Patroni 集群恢复时没有竞态条件 使用 mode 0700 保护 files/pki/ca 目录 问题修复
修复 ownca 证书有效期 Chrome 兼容性问题 修复 Vector 0.52 syslog_raw 解析问题 修复 pg_pitr 多副本 clonefrom 时序问题 修复 Ansible SELinux dnsmasq 竞态条件 修复 EL9 aarch64 patroni & llvmjit 问题 修复 Debian groupadd 路径问题 修复空 sudoers 文件生成问题 修复 pgbouncer pid 路径(/run/postgresql) 修复 duckdb.allow_community_extensions 始终生效问题 因上游问题隐藏 EL8 上的 pg_partman 扩展 修复 HAProxy 服务模板变量路径 修复 Redis remove 任务变量名 移除 MinIO reload handler 无效处理器 修正 vmetrics_port 默认值为 8428 修复 pg-failover-callback 脚本处理所有 Patroni 回调事件 修复 pg-vacuum 事务块处理逻辑 添加 PG16+ 并行逻辑复制支持 修复 FerretDB 证书配置和服务重启策略 修正 Polar Exporter 监控指标类型定义 修复代理环境变量未传递问题 修复移除模式下 postgres 服务配置 更新 Docker 默认数据目录路径 修复 EL10 系统上的缓存问题 修复 etcd/MinIO 移除时 systemd 服务和 DNS 条目清理 新增参数
参数 类型 默认值 说明 node_firewall_modeenum none (v4.0) 防火墙模式:off/none/zone(v4.1 起默认 zone) node_selinux_modeenum permissive SELinux 模式 node_firewall_intranetstring - HBA 信任的内网网段 node_admin_sudoenum nopass 管理员 sudo 权限级别 pg_io_methodenum worker I/O 方法:auto/sync/worker/io_uring pg_rto_plandict - RTO 预设:fast/norm/safe/wide pg_crontablist [] postgres dbsu 定时任务 vip_auth_passstring - VRRP 认证密码 grafana_pgurlstring - Grafana PG 后端连接字符串 grafana_view_passwordstring DBUser.Viewer Grafana Meta 数据源密码 infra_extra_serviceslist [] 首页额外服务入口 juice_cachepath /data/juice JuiceFS 共享缓存目录 juice_instancesdict {} JuiceFS 实例定义 vibe_datapath /fs VIBE 工作空间目录 code_enabledbool true 是否启用 Code-Server code_portport 8443 Code-Server 监听端口 code_datapath /data/code Code-Server 数据目录 code_passwordstring Vibe.Coding Code-Server 登录密码 code_galleryenum openvsx 扩展市场:openvsx/microsoft jupyter_enabledbool true 是否启用 JupyterLab jupyter_portport 8888 JupyterLab 监听端口 jupyter_datapath /data/jupyter JupyterLab 数据目录 jupyter_passwordstring Vibe.Coding JupyterLab 登录 Token jupyter_venvpath /data/venv Python 虚拟环境路径 claude_enabledbool true 是否启用 Claude Code 配置 claude_envdict {} Claude Code 额外环境变量 nodejs_enabledbool true 是否启用 Node.js 安装 nodejs_registrystring '' npm registry,自动配置中国镜像 node_uv_envpath /data/venv 节点 UV 虚拟环境路径,空则跳过 node_pip_packagesstring '' UV 虚拟环境中安装的 pip 包
兼容性
操作系统 x86_64 aarch64 EL 8/9/10 ✅ ✅ Debian 11/12/13 ✅ ✅ Ubuntu 22.04/24.04 ✅ ✅
PostgreSQL : 13, 14, 15, 16, 17, 18
校验和
9f42b8c64180491b59bd03016c26e8ca pigsty-v4.0.0.tgz
db9797c3c8ae21320b76a442c1135c7b pigsty-pkg-v4.0.0.d12.aarch64.tgz
1eed26eee42066ca71b9aecbf2ca1237 pigsty-pkg-v4.0.0.d12.x86_64.tgz
03540e41f575d6c3a7c63d1d30276d49 pigsty-pkg-v4.0.0.d13.aarch64.tgz
36a6ee284c0dd6d9f7d823c44280b88f pigsty-pkg-v4.0.0.d13.x86_64.tgz
f2b6ec49d02916944b74014505d05258 pigsty-pkg-v4.0.0.el10.aarch64.tgz
73f64c349366fe23c022f81fe305d6da pigsty-pkg-v4.0.0.el10.x86_64.tgz
287f767fbb66a9aaca9f0f22e4f20491 pigsty-pkg-v4.0.0.el8.aarch64.tgz
c0886aab454bd86245f3869ef2ab4451 pigsty-pkg-v4.0.0.el8.x86_64.tgz
094ab31bcf4a3cedbd8091bc0f3ba44c pigsty-pkg-v4.0.0.el9.aarch64.tgz
235ccba44891b6474a76a81750712544 pigsty-pkg-v4.0.0.el9.x86_64.tgz
f2791c96db4cc17a8a4008fc8d9ad310 pigsty-pkg-v4.0.0.u22.aarch64.tgz
3099c4453eef03b766d68e04b8d5e483 pigsty-pkg-v4.0.0.u22.x86_64.tgz
49a93c2158434f1adf0d9f5bcbbb1ca5 pigsty-pkg-v4.0.0.u24.aarch64.tgz
4acaa5aeb39c6e4e23d781d37318d49b pigsty-pkg-v4.0.0.u24.x86_64.tgz
v3.7.0 亮点特性
PostgreSQL 18 深度支持,成为默认 PG 大版本,扩展已就位! 新增 EL10 / Debian 13 操作系统支持,总数达 14 个! 新增 PostgresQL 扩展数量,总数达到 437 个! 支持了 Ansible 2.19 破坏性重构以后的版本! Supabase,PolarDB, IvorySQL, Percona 内核更新至最新版本! 优化了 PG 默认参数的设置逻辑,更充分利用资源。 版本更新
PostgreSQL 18.1, 17.7, 16.11, 15.15, 14.20, 13.23 Patroni 4.1.0 Pgbouncer 1.25.0 pg_exporter 1.0.3 pgbackrest 2.57.0 Supabase 2025-11 PolarDB 15.15.5.0 FerretDB 2.7.0 DuckDB 1.4.2 Etcd 3.6.6 pig 0.7.4 更多软件版本更新信息,请参考:
API变化
为并行执行的相关参数设置了更合理的优化策略,详见 调参说明 在 rich 与 full 模板中,不再默认安装 citus 扩展,因为 citus 尚未支持 PG 18 PG 参数模板中,新增 duckdb 系列扩展存根。 为 min_wal_size, max_wal_size, max_slot_wal_keep_size 设置 200,2000,3000 GB 的封顶上限值。 为 temp_file_limit 设置 200 GB 的封顶上限,OLAP 设置为 2 TB。 适当增大连接池默认链接数量 新增 prometheus_port 参数,且默认值为 9058,避开与 EL10 RHEL Web Console 端口的冲突。 修改 alertmanager_port 参数的默认值为 9059,避开与 Kafka SSL 端口的潜在冲突。 新增 pg_pkg 的 pg_pre 子任务,在安装 PG 包前移除 el9+ 上导致 LLVM 冲突的 bpftool, python3-perf 在 Debian / Ubuntu 的默认仓库定义中新增 llvm 仓库模块 修复了 infra-rm.yml 移除软件包的逻辑 兼容性修复
修复了 Ubuntu/Debian 信任 CA 时 Warning 返回码错误的问题。 修复了 Ansible 2.19 引入的大量兼容性问题,确保在新老版本上正常运行。 为 seq 类变量添加了 int 类型转换,确保兼容 将大量 with_items 修改为 loop 语法,确保兼容 为密钥交换变量添加一层列表嵌套,避免在新版本下针对字符串进行字符迭代。 将 range 用例显式转换为 list 后使用 修改了 name,port 等标记保留的变量命名 将 play_hosts 修改为 ansible_play_hosts 为部分字符串类型添加了 string 强制类型转换,避免运行时错误。 EL10 逻辑适配: 修复了 EL10 缺少 ansible-collection-community-crypto 无法生成密钥的问题 修复了 EL10 缺少 ansible 逻辑包的问题 移除 modulemd_tools flamegraph timescaledb-tool 使用 java-21-openjdk 替代 java-17-openjdk aarch64 YUM 仓库名称问题 Debian 13 逻辑适配 使用 bind9-dnsutils 替代 dnsutils Ubuntu 24 修复 临时移除了上游依赖崩溃的 tcpdump 包 校验和
e00d0c2ac45e9eff1cc77927f9cd09df pigsty-v3.7.0.tgz
987529769d85a3a01776caefefa93ecb pigsty-pkg-v3.7.0.d12.aarch64.tgz
2d8272493784ae35abeac84568950623 pigsty-pkg-v3.7.0.d12.x86_64.tgz
090cc2531dcc25db3302f35cb3076dfa pigsty-pkg-v3.7.0.d13.x86_64.tgz
ddc54a9c4a585da323c60736b8560f55 pigsty-pkg-v3.7.0.el10.aarch64.tgz
d376e75c490e8f326ea0f0fbb4a8fd9b pigsty-pkg-v3.7.0.el10.x86_64.tgz
8c2deeba1e1d09ef3d46d77a99494e71 pigsty-pkg-v3.7.0.el8.aarch64.tgz
9795e059bd884b9d1b2208011abe43cd pigsty-pkg-v3.7.0.el8.x86_64.tgz
08b860155d6764ae817ed25f2fcf9e5b pigsty-pkg-v3.7.0.el9.aarch64.tgz
1ac430768e488a449d350ce245975baa pigsty-pkg-v3.7.0.el9.x86_64.tgz
e033aaf23690755848db255904ab3bcd pigsty-pkg-v3.7.0.u22.aarch64.tgz
cc022ea89181d89d271a9aaabca04165 pigsty-pkg-v3.7.0.u22.x86_64.tgz
0e978598796db3ce96caebd76c76e960 pigsty-pkg-v3.7.0.u24.aarch64.tgz
48223898ace8812cc4ea79cf3178476a pigsty-pkg-v3.7.0.u24.x86_64.tgz
v3.6.1 curl https://repo.pigsty.cc/get | bash -s v3.6.1
亮点特性
PostgreSQL 17.6, 16.10, 15.14, 14.19, 13.22, 以及 18 Beta 3 支持 在中国大陆地区使用 Pigsty 提供的 PGDG APT/YUM 镜像解决更新断供问题。 新的网站首页: https://pgsty.com 增加了 el10, debian 13 的实现存根,以及 el10 的 Terraform 镜像 基础设施软件包更新
Grafana 12.1.0 pg_exporter 1.0.2 pig 0.6.1 vector 0.49.0 redis_exporter 1.75.0 mongo_exporter 0.47.0 victoriametrics 1.123.0 victorialogs: 1.28.0 grafana-victoriametrics-ds 0.18.3 grafana-victorialogs-ds 0.19.3 grafana-infinity-ds 3.4.1 etcd 3.6.4 ferretdb 2.5.0 tigerbeetle 0.16.54 genai-toolbox 0.12.0 数据库软件包更新
API变更
从 node_kernel_modules 默认值中移除 br_filter 内核模块。 在添加 PGDG YUM 源时使用操作大版本号,不再使用小版本号。 校验和
045977aff647acbfa77f0df32d863739 pigsty-pkg-v3.6.1.d12.aarch64.tgz
636b15c2d87830f2353680732e1af9d2 pigsty-pkg-v3.6.1.d12.x86_64.tgz
700a9f6d0db9c686d371bf1c05b54221 pigsty-pkg-v3.6.1.el8.aarch64.tgz
2aff03f911dd7be363ba38a392b71a16 pigsty-pkg-v3.6.1.el8.x86_64.tgz
ce07261b02b02b36a307dab83e460437 pigsty-pkg-v3.6.1.el9.aarch64.tgz
d598d62a47bbba2e811059a53fe3b2b5 pigsty-pkg-v3.6.1.el9.x86_64.tgz
13fd68752e59f5fd2a9217e5bcad0acd pigsty-pkg-v3.6.1.u22.aarch64.tgz
c25ccfb98840c01eb7a6e18803de55bb pigsty-pkg-v3.6.1.u22.x86_64.tgz
0d71e58feebe5299df75610607bf428c pigsty-pkg-v3.6.1.u24.aarch64.tgz
4fbbab1f8465166f494110c5ec448937 pigsty-pkg-v3.6.1.u24.x86_64.tgz
083d8680fa48e9fec3c3fcf481d25d2f pigsty-v3.6.1.tgz
v3.6.0 curl https://repo.pigsty.cc/get | bash -s v3.6.0
亮点特性
全新文档站: https://doc.pgsty.com 新增 pgsql-pitr 剧本与备份/恢复教程,改善 PITR 体验, 新增内核支持:Percona PG TDE (PG17) 优化 Supabase 自建体验,更新至最新版本,并解决了一系列官方模板的问题 简化安装步骤,默认使用在线安装,更加高效简单,bootstrap 过程(安装ansible)嵌入安装脚本中 设计改进
改善了 Etcd 模块的实现,新增独立的 etcd-rm.yml 剧本与扩缩容 SOP 脚本。 改善了 MinIO 模块的实现,支持 HTTP 模式,创建不同属性的三个桶供开箱即用 重新调整梳理了所有配置模板,使用更为便利 针对中国大陆使用速度更快的 Docker Registry 镜像站 优化了 tuned 操作系统参数模板,针对现代硬件与 NVMe 磁盘优化 新增扩展 pgactive 用于多主复制与亚秒级故障切换 调整 pg_fs_main / pg_fs_backup 默认值,简化文件目录结构设计 问题修复
修复了 pgbouncer 配置文件的错误 by @housei-zzy 修复了 OrioleDB 在 Debian 平台上的问题 修复了 tuned shm 配置参数的问题 离线软件包直接使用 PGDG 源,避免使用断开同步的镜像站点 修复了 IvorySQL libxcrypt 依赖的问题 替换了破损与缓慢的 EPEL 软件仓库站点 修复了 haproxy_enabled 标记位的功能 基础设施软件包更新
新增 Victoria Metrics / Victoria Logs 相关包
genai-toolbox 0.9.0 (new) victoriametrics 1.120.0 -> 1.121.0 (重构) vmutils 1.121.0 (重命名 victoria-metrics-utils) grafana-victoriametrics-ds 0.15.1 -> 0.17.0 victorialogs 1.24.0 -> 1.25.1 (重构) vslogcli 1.24.0 -> 1.25.1 vlagent 1.25.1 (新增) grafana-victorialogs-ds 0.16.3 -> 0.18.1 prometheus 3.4.1 -> 3.5.0 grafana 12.0.0 -> 12.0.2 vector 0.47.0 -> 0.48.0 grafana-infinity-ds 3.2.1 -> 3.3.0 keepalived_exporter 1.7.0 blackbox_exporter 0.26.0 -> 0.27.0 redis_exporter 1.72.1 -> 1.77.0 rclone 1.69.3 -> 1.70.3 数据库软件包更新
PostgreSQL 18 Beta2 更新 pg_exporter 1.0.1,更新至最新依赖并提供 Docker 镜像 pig 0.6.0,更新了最新扩展与仓库列表,带有 pig install 子命令 vip-manager 3.0.0 -> 4.0.0 ferretdb 2.2.0 -> 2.3.1 dblab 0.32.0 -> 0.33.0 duckdb 1.3.1 -> 1.3.2 etcd 3.6.1 -> 3.6.3 ferretdb 2.2.0 -> 2.4.0 juicefs 1.2.3 -> 1.3.0 tigerbeetle 0.16.41 -> 0.16.50 pev2 1.15.0 -> 1.16.0 PG扩展包更新
OrioleDB 1.5 beta12 OriolePG 17.11 plv8 3.2.3 -> 3.2.4 postgresql_anonymizer 2.1.1 -> 2.3.0 pgvectorscale 0.7.1 -> 0.8.0 wrappers 0.5.0 -> 0.5.3 supautils 2.9.1 -> 2.10.0 citus 13.0.3 -> 13.1.0 timescaledb 2.20.0 -> 2.21.1 vchord 0.3.0 -> 0.4.3 pgactive 2.1.5 (new) documentdb 0.103.0 -> 0.105.0 pg_search 0.17.0 API变更
pg_fs_backup:重命名为 pg_fs_backup,默认值为 /data/backups。pg_rm_bkup:重命名为 pg_rm_backup,默认值为 true。pg_fs_main:现在默认值调整为 /data/postgres。nginx_cert_validity:新增参数,用于控制 Nginx 自签名证书的有效期,默认为 397d。minio_buckets:默认值调整为创建名为 pgsql、meta、data 的三个桶。minio_users:移除 dba 用户,新增 s3user_meta 和 s3user_data 用户,分别对应 meta 和 data 桶。minio_https:新增参数,允许配置 MinIO 使用 HTTP 模式。minio_provision:新增参数,允许跳过 MinIO 置备阶段(跳过桶和用户的创建)。minio_safeguard:新增参数,启用后会在执行 minio-rm.yml 时中止操作。minio_rm_data:新增参数,控制在执行 minio-rm.yml 时是否删除 minio 数据目录。minio_rm_pkg:新增参数,控制在执行 minio-rm.yml 时是否卸载 minio 软件包。etcd_learner:新增参数,允许 etcd 以学习者身份初始化。etcd_rm_data:新增参数,控制在执行 etcd-rm.yml 时是否删除 etcd 数据目录。etcd_rm_pkg:新增参数,控制在执行 etcd-rm.yml 时是否卸载 etcd 软件包。校验和
df64ac0c2b5aab39dd29698a640daf2e pigsty-v3.6.0.tgz
cea861e2b4ec7ff5318e1b3c30b470cb pigsty-pkg-v3.6.0.d12.aarch64.tgz
2f253af87e19550057c0e7fca876d37c pigsty-pkg-v3.6.0.d12.x86_64.tgz
0158145b9bbf0e4a120b8bfa8b44f857 pigsty-pkg-v3.6.0.el8.aarch64.tgz
07330d687d04d26e7d569c8755426c5a pigsty-pkg-v3.6.0.el8.x86_64.tgz
311df5a342b39e3288ebb8d14d81e0d1 pigsty-pkg-v3.6.0.el9.aarch64.tgz
92aad54cc1822b06d3e04a870ae14e29 pigsty-pkg-v3.6.0.el9.x86_64.tgz
c4fadf1645c8bbe3e83d5a01497fa9ca pigsty-pkg-v3.6.0.u22.aarch64.tgz
5477ed6be96f156a43acd740df8a9b9b pigsty-pkg-v3.6.0.u22.x86_64.tgz
196169afc1be02f93fcc599d42d005ca pigsty-pkg-v3.6.0.u24.aarch64.tgz
dbe5c1e8a242a62fe6f6e1f6e6b6c281 pigsty-pkg-v3.6.0.u24.x86_64.tgz
v3.5.0 亮点特性
支持 PG 18 (Beta),扩展更新,总数达到 421 个 OrioleDB 与 OpenHalo 内核在全平台上可用 可使用 pig do 子命令代替 bin 脚本 Supabase 自建加强,解决若干遗留问题,例如复制延迟与密钥分发 代码重构与架构优化,优化了 Postgres 与 Pgbouncer 默认参数 更新了 Grafana 12, pg_exporter 1.0 与相关插件,翻修面板 curl https://repo.pigsty.cc/get | bash -s v3.5.0
支持 PostgreSQL 18 通过 pg_exporter 1.0.0 支持 PG18 监控指标 通过 pig 0.4.1 支持 PG18 安装 Alias。 提供 pg18 配置模板 重构 pgsql 模块 PGSQL 重构,将 PG 监控抽离为单独的 pg_monitor 角色,移除 clean 逻辑 去除冗余重复的任务,合并同类项,精简配置。移除 dir/utils 任务块 所有扩展默认安装至 extensions 模式中(与 supabase 安全实践保持一致) 重命名模板文件,移除所有 .j2 后缀 为所有模板中的 monitor 函数添加 SET 命令清空 search_path,遵循 Supabase 安全最佳实践。 调整 pgbouncer 默认参数,增大默认链接池大小,设置链接池清理查询。 新增参数 pgbouncer_ignore_param ,允许配置 pgbouncer 忽略的参数列表 新增任务 pg_key 用于生成 pgsodium 所需的服务端密钥 针对 PG 17 默认启用 sync_replication_slots 重新调整了子任务标签,使其更符合配置小节的拆分逻辑 重构 pg_remove 模块 重命名参数:pg_rm_data, pg_rm_bkup, pg_rm_pkg 用于控制删除的内容 重新调整角色代码结构,使用更清楚的标签进行划分 新增 pg_monitor 模块 pgbouncer_exporter 现在不再和 pg_exporter 共享配置文件新增了 TimescaleDB, Citus,pg_wait_event 的监控指标。 使用 pg_exporter 1.0.0 ,更新了 PG16/17/18 相关监控指标。 使用更为紧凑,全新设计的指标收集器配置文件。 Supabase 加强 (感谢来自 @lawso017 的贡献!) 将 Supabase 容器镜像与数据库模式更新至最新版本 现在默认支持 pgsodium 服务端密钥加载 通过 supa-kick 定时任务解决 logflare 无法及时更新复制进度的问题 为 monitor 模式中的函数添加 set search_path 子句以遵循安全最佳实践 CLI 新增 pig do 命令,允许通过命令行工具替代 bin/ 中的 Shell 脚本 监控系统更新 更新 Grafana 大版本至 12.0.0,更新相关插件/数据源软件包 更新 Postgres 数据源 uid 命名方式(以适应新的 uid 长度限制与字符限制) 新增了 Static Datasource 更新了现有 Dashboard,修复若干遗留问题 基础设施软件包更新
pig 0.4.2 duckdb 1.3.0 etcd 3.6.0 vector 0.47.0 minio 20250422221226 mcli 20250416181326 pev 1.5.0 rclone 1.69.3 mtail 3.0.8 (new) 可观测性软件包更新
grafana 12.0.0 grafana-victorialogs-ds 0.16.3 grafana-victoriametrics-ds 0.15.1 grafana-infinity-ds 3.2.1 grafana_plugins 12.0.0 prometheus 3.4.0 pushgateway 1.11.1 nginx_exporter 1.4.2 pg_exporter 1.0.0 pgbackrest_exporter 0.20.0 redis_exporter 1.72.1 keepalived_exporter 1.6.2 victoriametrics 1.117.1 victoria_logs 1.22.2 数据库软件包更新
PostgreSQL 17.5, 16.9, 15.13, 14.18, 13.21 PostgreSQL 18beta1 支持 pgbouncer 1.24.1 pgbackrest 2.55 pgbadger 13.1 Postgres 扩展包更新
spat 0.1.0a4 新扩展 pgsentinel 1.1.0 新扩展 pgdd 0.6.0 (pgrx 0.14.1) 新扩展 convert 0.0.4 (pgrx 0.14.1) 新扩展 pg_tokenizer.rs 0.1.0 (pgrx 0.13.1) pg_render 0.1.2 (pgrx 0.12.8) pgx_ulid 0.2.0 (pgrx 0.12.7) pg_idkit 0.3.0 (pgrx 0.14.1) pg_ivm 1.11.0 orioledb 1.4.0 beta11 新增 debian/ubuntu 支持 openhalo 14.10 新增 debian/ubuntu 支持 omnigres 20250507 (在 d12/u22 编译最新版本失败) citus 12.0.3 timescaledb 2.20.0 (移除 PG14 支持) supautils 2.9.2 pg_envvar 1.0.1 pgcollection 1.0.0 aggs_for_vecs 1.4.0 pg_tracing 0.1.3 pgmq 1.5.1 tzf-pg 0.2.0 (pgrx 0.14.1) pg_search 0.15.18 (pgrx 0.14.1) anon 2.1.1 (pgrx 0.14.1) pg_parquet 0.4.0 (0.14.1) pg_cardano 1.0.5 (pgrx 0.12) -> 0.14.1 pglite_fusion 0.0.5 (pgrx 0.12.8) -> 14.1 vchord_bm25 0.2.1 (pgrx 0.13.1) vchord 0.3.0 (pgrx 0.13.1) pg_vectorize 0.22.1 (pgrx 0.13.1) wrappers 0.4.6 (pgrx 0.12.9) timescaledb-toolkit 1.21.0 (pgrx 0.12.9) pgvectorscale 0.7.1 (pgrx 0.12.9) pg_session_jwt 0.3.1 (pgrx 0.12.6) -> 0.12.9 pg_timetable 5.13.0 ferretdb 2.2.0 documentdb 0.103.0 (新增 aarch64支持) pgml 2.10.0 (pgrx 0.12.9) sqlite_fdw 2.5.0 (fix pg17 deb) tzf 0.2.2 0.14.1 (rename src) pg_vectorize 0.22.2 (pgrx 0.13.1) wrappers 0.5.0 (pgrx 0.12.9) 校验和
ab91bc05c54b88c455bf66533c1d8d43 pigsty-v3.6.0.tgz
4c9fabc2d1f0ed733145af2b6aff2f48 pigsty-pkg-v3.5.0.d12.x86_64.tgz
796d47de12673b2eb9882e527c3b6ba0 pigsty-pkg-v3.5.0.el8.x86_64.tgz
a53ef2cede1363f11e9faaaa43718fdc pigsty-pkg-v3.5.0.el9.x86_64.tgz
36da28f97a845fdc0b7bbde2d3812a67 pigsty-pkg-v3.5.0.u22.x86_64.tgz
8551b3e04b38af382163e6857778437d pigsty-pkg-v3.5.0.u24.x86_64.tgz
v3.4.1 GitHub 发布页面:v3.4.1
在 EL 系统上增加了对 MySQL 协议兼容 PostgreSQL 内核的支持:openHalo 在 EL 系统上增加了对 OLTP 增强 PostgreSQL 内核的支持:orioledb 优化了 pgAdmin 9.2 应用模板,具有自动服务器列表更新和 pgpass 密码填充功能 将 PG 默认最大连接数增加到 250、500、1000 从 EL8 中删除了有依赖错误的 mysql_fdw 扩展 基础设施更新
pig 0.3.4 etcd 3.5.21 restic 0.18.0 ferretdb 2.1.0 tigerbeetle 0.16.34 pg_exporter 0.8.1 node_exporter 1.9.1 grafana 11.6.0 zfs_exporter 3.8.1 mongodb_exporter 0.44.0 victoriametrics 1.114.0 minio 20250403145628 mcli 20250403170756 扩展更新
将 pg_search 升级到 0.15.13 将 citus 升级到 13.0.3 将 timescaledb 升级到 2.19.1 将 pgcollection RPM 升级到 1.0.0 将 pg_vectorize RPM 升级到 0.22.1 将 pglite_fusion RPM 升级到 0.0.4 将 aggs_for_vecs RPM 升级到 1.4.0 将 pg_tracing RPM 升级到 0.1.3 将 pgmq RPM 升级到 1.5.1 校验和
471c82e5f050510bd3cc04d61f098560 pigsty-v3.4.1.tgz
4ce17cc1b549cf8bd22686646b1c33d2 pigsty-pkg-v3.4.1.d12.aarch64.tgz
c80391c6f93c9f4cad8079698e910972 pigsty-pkg-v3.4.1.d12.x86_64.tgz
811bf89d1087512a4f8801242ca8bed5 pigsty-pkg-v3.4.1.el9.x86_64.tgzz
9fe2e6482b14a3e60863eeae64a78945 pigsty-pkg-v3.4.1.u22.x86_64.tgz
v3.4.0 GitHub 发布页面:v3.4.0
介绍博客:Pigsty v3.4 MySQL 兼容性和全面增强
新功能
增加了新的 pgBackRest 备份监控指标和仪表板 增强了 Nginx 服务器配置选项,支持自动 Certbot 签发 现在优先使用 PostgreSQL 内置的 C/C.UTF-8 区域设置 IvorySQL 4.4 现在在所有平台上完全支持(RPM/DEB 在 x86/ARM 上) 增加了新的软件包:Juicefs、Restic、TimescaleDB EventStreamer Apache AGE 图数据库扩展现在在 EL 上完全支持 PostgreSQL 13–17 改进了 app.yml playbook:无需额外配置即可启动标准 Docker 应用 升级 Supabase、Dify 和 Odoo 应用模板到最新版本 增加 electric 应用模板,本地优先的 PostgreSQL 同步引擎 基础设施包
+restic 0.17.3+juicefs 1.2.3+timescaledb-event-streamer 0.12.0Prometheus 3.2.1AlertManager 0.28.1blackbox_exporter 0.26.0node_exporter 1.9.0mysqld_exporter 0.17.2kafka_exporter 1.9.0redis_exporter 1.69.0pgbackrest_exporter 0.19.0-2DuckDB 1.2.1etcd 3.5.20FerretDB 2.0.0tigerbeetle 0.16.31vector 0.45.0VictoriaMetrics 1.113.0VictoriaLogs 1.17.0rclone 1.69.1pev2 1.14.0grafana-victorialogs-ds 0.16.0grafana-victoriametrics-ds 0.14.0grafana-infinity-ds 3.0.0PostgreSQL 相关
Patroni 4.0.5PolarDB 15.12.3.0-e1e6d85bIvorySQL 4.4pgbackrest 2.54.2pev2 1.14Babelfish 13.17PostgreSQL 扩展
pgspider_ext 1.3.0(新扩展)apache age 13–17 el rpm (1.5.0)timescaledb 2.18.2 → 2.19.0citus 13.0.1 → 13.0.2documentdb 1.101-0 → 1.102-0pg_analytics 0.3.4 → 0.3.7pg_search 0.15.2 → 0.15.8pg_ivm 1.9 → 1.10emaj 4.4.0 → 4.6.0pgsql_tweaks 0.10.0 → 0.11.0pgvectorscale 0.4.0 → 0.6.0 (pgrx 0.12.5)pg_session_jwt 0.1.2 → 0.2.0 (pgrx 0.12.6)wrappers 0.4.4 → 0.4.5 (pgrx 0.12.9)pg_parquet 0.2.0 → 0.3.1 (pgrx 0.13.1)vchord 0.2.1 → 0.2.2 (pgrx 0.13.1)pg_tle 1.2.0 → 1.5.0supautils 2.5.0 → 2.6.0sslutils 1.3 → 1.4pg_profile 4.7 → 4.8pg_snakeoil 1.3 → 1.4pg_jsonschema 0.3.2 → 0.3.3pg_incremental 1.1.1 → 1.2.0pg_stat_monitor 2.1.0 → 2.1.1ddl_historization 0.7 → 0.0.7(错误修复)pg_sqlog 3.1.7 → 1.6(错误修复)pg_random 删除开发后缀(错误修复)asn1oid 1.5 → 1.6table_log 0.6.1 → 0.6.4接口变更
增加了新的 Docker 参数:docker_data 和 docker_storage_driver(#521 由 @waitingsong 提供) 增加了新的基础设施参数:alertmanager_port,让您指定 AlertManager 端口 增加了新的基础设施参数:certbot_sign,在 nginx 初始化期间申请证书?(默认为 false) 增加了新的基础设施参数:certbot_email,指定通过 Certbot 请求证书时使用的邮箱 增加了新的基础设施参数:certbot_options,指定 Certbot 的额外参数 更新 IvorySQL,从 IvorySQL 4.4 开始将其默认二进制文件放在 /usr/ivory-4 下 将 pg_lc_ctype 和其他区域相关参数的默认值从 en_US.UTF-8 更改为 C 对于 PostgreSQL 17,如果使用 UTF8 编码与 C 或 C.UTF-8 区域,PostgreSQL 的内置本地化规则现在优先 configure 自动检测 PG 版本和环境是否都支持 C.utf8,并相应调整区域相关选项将默认 IvorySQL 二进制路径设置为 /usr/ivory-4 更新 pg_packages 的默认值为 pgsql-main patroni pgbouncer pgbackrest pg_exporter pgbadger vip-manager 更新 repo_packages 的默认值为 [node-bootstrap, infra-package, infra-addons, node-package1, node-package2, pgsql-utility, extra-modules] 从 /etc/profile.d/node.sh 中删除 LANG 和 LC_ALL 环境变量设置 现在使用 bento/rockylinux-8 和 bento/rockylinux-9 作为 EL 的 Vagrant box 镜像 增加了新别名 extra_modules,包含额外的可选模块 更新 PostgreSQL 别名:postgresql、pgsql-main、pgsql-core、pgsql-full GitLab 仓库现在包含在可用模块中 Docker 模块已合并到基础设施模块中 node.yml playbook 现在包含 node_pip 任务,在每个节点上配置 pip 镜像pgsql.yml playbook 现在包含 pgbackrest_exporter 任务,用于收集备份指标Makefile 现在允许使用 META/PKG 环境变量增加 /pg/spool 目录作为 pgBackRest 的临时存储 默认禁用 pgBackRest 的 link-all 选项 默认为 MinIO 仓库启用块级增量备份 错误修复
修复 pg-backup 中的退出状态码(#532 由 @waitingsong 提供) 在 pg-tune-hugepage 中,限制 PostgreSQL 仅使用大页面(#527 由 @waitingsong 提供) 修复 pg-role 任务中的逻辑错误 纠正大页面配置参数的类型转换 修复 slim 模板中 node_repo_modules 的默认值问题 校验和
768bea3bfc5d492f4c033cb019a81d3a pigsty-v3.4.0.tgz
7c3d47ef488a9c7961ca6579dc9543d6 pigsty-pkg-v3.4.0.d12.aarch64.tgz
b5d76aefb1e1caa7890b3a37f6a14ea5 pigsty-pkg-v3.4.0.d12.x86_64.tgz
42dacf2f544ca9a02148aeea91f3153a pigsty-pkg-v3.4.0.el8.aarch64.tgz
d0a694f6cd6a7f2111b0971a60c49ad0 pigsty-pkg-v3.4.0.el8.x86_64.tgz
7caa82254c1b0750e89f78a54bf065f8 pigsty-pkg-v3.4.0.el9.aarch64.tgz
8f817e5fad708b20ee217eb2e12b99cb pigsty-pkg-v3.4.0.el9.x86_64.tgz
8b2fcaa6ef6fd8d2726f6eafbb488aaf pigsty-pkg-v3.4.0.u22.aarch64.tgz
83291db7871557566ab6524beb792636 pigsty-pkg-v3.4.0.u22.x86_64.tgz
c927238f0343cde82a4a9ab230ecd2ac pigsty-pkg-v3.4.0.u24.aarch64.tgz
14cbcb90693ed5de8116648a1f2c3e34 pigsty-pkg-v3.4.0.u24.x86_64.tgz
v3.3.0 可用扩展总数增加到 404 PostgreSQL 二月小版本更新:17.4、16.8、15.12、14.17、13.20 新功能:app.yml 脚本,用于自动安装 Odoo、Supabase、Dify 等应用。 新功能:在 infra_portal 中进一步自定义 Nginx 配置。 新功能:增加 Certbot 支持,快速申请免费 HTTPS 证书。 新功能:pg_default_extensions 现在支持纯文本扩展列表。 新功能:默认仓库现在包含 mongo、redis、groonga、haproxy 等。 新参数:node_aliases,为节点添加命令别名。 修复:解决 Bootstrap 脚本中的默认 EPEL 仓库地址问题。 改进:为 Debian Security 仓库添加阿里云镜像。 改进:IvorySQL 内核的 pgBackRest 备份支持。 改进:PolarDB 的 ARM64 和 Debian/Ubuntu 支持。 pg_exporter 0.8.0 现在支持 pgbouncer 1.24 中的新指标。 新功能:git、docker、systemctl 等常用命令的自动补全 #506 #507 由 @waitingsong 提供。 改进:优化 pgbouncer 配置模板中的 ignore_startup_parameters #488 由 @waitingsong 提供。 新主页设计:Pigsty 的网站现在拥有全新的外观。 扩展目录:RPM/DEB 二进制包的详细信息和下载链接。 扩展构建:pig CLI 现在自动设置 PostgreSQL 扩展构建环境。 更多版本信息请参考 GitHub 发布页面 。
v3.2.2 变更内容
升级IvorySQL至4.2版本(基于PostgreSQL 17.2) 为PolarDB内核添加Arm64和Debian支持 在默认infra_packages中添加certbot和certbot-nginx 增加pgbouncer的max_prepared_statements参数至256 移除pgxxx-citus包别名 在pg_extensions中默认隐藏pgxxx-olap类别(因为存在两对扩展冲突) v3.2.1 亮点特性
PG扩展插件数量提升至350个,新增强力Rust扩展anon。 IvorySQL支持更新至PG17兼容的4.0版本 使用Pigsty编译的Citus,TimescaleDB与PGroonga。 添加Odoo一键自建模板与新app.yml剧本 新增 13 扩展插件:
新增 pg_anon 2.0.0 新增 omnisketch 1.0.2 新增 ddsketch 1.0.1 新增 pg_duration 1.0.1 新增 ddl_historization 0.0.7 新增 data_historization 1.1.0 新增 schedoc 0.0.1 新增 floatfile 1.3.1 新增 pg_upless 0.0.3 新增 pg_task 1.0.0 新增 pg_readme 0.7.0 新增 vasco 0.1.0 新增 pg_xxhash 0.0.1 更新扩展版本
lower_quantile 1.0.3 quantile 1.1.8 sequential_uuids 1.0.3 pgmq 1.5.0 (subdir) floatvec 1.1.1 pg_parquet 0.2.0 wrappers 0.4.4 pg_later 0.3.0 topn fix for deb.arm64 add age 17 on debian powa + pg17, 5.0.1 h3 + pg17 ogr_fdw + pg17 age + pg17 1.5 on debian pgtap + pg17 1.3.3 repmgr topn + pg17 pg_partman 5.2.4 credcheck 3.0 ogr_fdw 1.1.5 ddlx 0.29 postgis 3.5.1 tdigest 1.4.3 pg_repack 1.5.2 v3.2.0 亮点特性
Pigsty 命令行工具:pig 提供五大发行版上 390 个扩展 的 ARM64 扩展支持 Supabase 发布周最新版本更新,全发行版均可自建。 Grafana 更新至 11.4 ,新增 infinity 数据源。 软件包变化
新增扩展
更新扩展
pgvectorscale 0.4.0 -> 0.5.1 pg_parquet 0.1.0 -> 0.1.1 pg_polyline 0.0.1 pg_cardano 1.0.2 -> 1.0.3 pg_vectorize 0.20.0 pg_duckdb 0.1.0 -> 0.2.0 pg_search 0.13.0 -> 0.13.1 aggs_for_vecs 1.3.1 -> 1.3.2 pgoutput 被标记为新的 PostgreSQL Contrib 扩展基础设施
新增 promscale 0.17.0 新增 grafana-plugins 11.4 新增 grafana-infinity-plugins 新增 grafana-victoriametrics-ds 新增 grafana-victorialogs-ds vip-manager 2.8.0 -> 3.0.0 vector 0.42.0 -> 0.43.0 grafana 11.3 -> 11.4 prometheus 3.0.0 -> 3.0.1 (软件包名从 prometheus2 变更为 prometheus) nginx_exporter 1.3.0 -> 1.4.0 mongodb_exporter 0.41.2 -> 0.43.0 VictoriaMetrics 1.106.1 -> 1.107.0 VictoriaLogs 1.0.0 -> 1.3.2 pg_timetable 5.9.0 -> 5.10.0 tigerbeetle 0.16.13 -> 0.16.17 pg_export 0.7.0 -> 0.7.1 缺陷修复
el8.aarch64 添加 python3-cdiff 修复 patroni 依赖错漏问题 el9.aarch64 添加 timescaledb-tools ,修复官方仓库缺失问题 el9.aarch64 添加 pg_filedump ,修复官方仓库缺失问题 移除扩展
pg_mooncake 因为与 pg_duckdb 冲突而被移除。pg_top 因为出现太多版本出现缺失,因质量问题而淘汰。hunspell_pt_pt 因为与 PG 官方字典文件冲突而被淘汰。pg_timeit 因为无法在 AARCH64 架构上使用而被淘汰。pgdd 因为缺乏维护,PG 17 与 pgrx 版本老旧而被标记为弃用。old_snapshot 与 adminpack 被标记为 PG 17 不可用。pgml 被设置为默认不下载不安装。API变化
repo_url_packagesgrafana_plugin_cache 参数弃用,现在 Grafana 插件通过操作系统包管理器进行安装grafana_plugin_list 参数弃用,现在 Grafana 插件通过操作系统包管理器进行安装原名为 prod 的 36 节点仿真模板现在重命名为 simu。 原本在 node_id/vars 针对每个发行版代码生成的配置,现在同样针对 aarch64 生成。 infra_packages 中默认添加命令行管理工具 pigconfigure 命令同样会修改自动生成配置文件中 pgsql-xxx 别名的版本号。adminpack 在 PG 17 中被移除,因此从 Pigsty 默认扩展中被移除。问题修复
软件包校验和
8fdc6a60820909b0a2464b0e2b90a3a6 pigsty-v3.2.0.tgz
d2b85676235c9b9f2f8a0ad96c5b15fd pigsty-pkg-v3.2.0.el9.aarch64.tgz
649f79e1d94ec1845931c73f663ae545 pigsty-pkg-v3.2.0.el9.x86_64.tgz
c42da231067f25104b71a065b4a50e68 pigsty-pkg-v3.2.0.d12.aarch64.tgz
ebb818f98f058f932b57d093d310f5c2 pigsty-pkg-v3.2.0.d12.x86_64.tgz
24c0be1d8436f3c64627c12f82665a17 pigsty-pkg-v3.2.0.u22.aarch64.tgz
0b9be0e137661e440cd4f171226d321d pigsty-pkg-v3.2.0.u22.x86_64.tgz
v3.1.0 亮点特性
PostgreSQL 17 现已成为默认使用的主要版本 (17.2) Ubuntu 24.04 系统支持 arm 架构支持:EL9, Debian12, Ubuntu 22.04 Supabase 一键自建,新的剧本 supabase.yml MinIO 最佳实践改进,配置模板与 Vagrant 模板 提供了一系列开箱即用的配置模板与文档说明。 允许在 configure 过程中使用 -v|--version 指定使用的 PG 大版本。 调整 PG 默认插件策略:默认安装 pg_repack, wal2json 以及 pgvector 三个关键扩展。 大幅简化 repo_packages 本地软件源构建逻辑,允许在 repo_packages 中使用软件包组别名 提供了 Babelfish,IvorySQL,PolarDB 的软件源镜像,简化三者的安装。 默认启用数据库校验和。 修复 ETCD 与 MINIO 日志面板 软件升级
PostgreSQL 17.2, 16.6, 15.10, 14.15, 13.18, 12.22 PostgreSQL 扩展版本变动请参考:/ext/ Patroni 4.0.4 MinIO 20241107 / MCLI 20241117 Rclone 1.68.2 Prometheus: 2.54.0 -> 3.0.0 VictoriaMetrics 1.102.1 -> 1.106.1 VictoriaLogs v0.28.0 -> 1.0.0 vslogcli 1.0.0 MySQL Exporter 0.15.1 -> 0.16.0 Redis Exporter 1.62.0 -> 1.66.0 MongoDB Exporter 0.41.2 -> 0.42.0 Keepalived Exporter 1.3.3 -> 1.4.0 DuckDB 1.1.2 -> 1.1.3 etcd 3.5.16 -> 3.5.17 tigerbeetle 16.8 -> 0.16.13 API变更
repo_upstream: 针对每个具体的操作系统发行版生成默认值:roles/node_id/varsrepo_packages: 允许使用 package_map 中定义的别名。repo_extra_packages: 新增未指定时的默认值,允许使用 package_map 中定义的别名。pg_checksum: 默认值修改为 true,默认打开。pg_packages: 默认值修改为:postgresql, wal2json pg_repack pgvector, patroni pgbouncer pgbackrest pg_exporter pgbadger vip-managerpg_extensions: 默认值修改为空数组 []。infra_portal: 允许为 home 服务器指定 path,替代默认的本地仓库路径 nginx_home (/www)校验和
e62f9ce9f89a58958609da7b234bf2f2 pigsty-v3.1.0.tgz
v3.0.4 特性
针对 PostgreSQL 17 编译了所有支持的 Pigsty 扩展插件 提供了全新的 OLAP 扩展支持:pg_duckdb 与 pg_parquet 简化并优化了最新版本 Supabase 自建的流程 新增参数 docker_image,允许在 Docker 安装后自动拉取镜像。 扩展
欢迎查阅我们最新的 PostgreSQL 扩展目录: /ext/
统计项 总计 PGDG PIGSTY MISC MISS PG17 PG16 PG15 PG14 PG13 PG12 EL系统扩展 338 134 130 4 7 298 334 336 328 319 310 Deb系统扩展 326 109 143 74 19 290 322 324 316 307 300 RPM 软件包 313 122 129 4 6 275 309 311 303 294 285 DEB 软件包 298 93 142 64 19 264 294 296 288 279 272
版本升级
新的PGSQL扩展
升级与跟进PG扩展
pg_search 0.11.0 pg_analytics 0.2.0 plv8 3.2.3 supautils 2.5.0 icu_ext 1.9.0 redis_fdw 17 pg_failover_slots 1.1.0 pg_later 0.1.3 plprql 1.0.0 pg_vectorize 0.18.3 unit 7.7 -> 7.9 log_fdw 1.4 pg_duckdb 0.1.0 pg_graphql 1.5.9 (+17) pg_jsonschema 0.3.2 (+17) pgvectorscale 0.4.0 (+17) wrappers 0.4.3 +pg17 pg_ivm 1.9 pg_timeseries 0.1.6 pgmq 1.4.4 pg_protobuf 16 17 pg_uuidv7 1.6 pg_readonly pgddl 0.28 pg_safeupdate pg_stat_monitor 2.1 pg_profile 4.7 system_stats 3.2 pg_auth_mon 3.0 login_hook 1.6 logerrors 2.1.3 pg-orphaned pgnodemx 1.7 sslutils 1.4 (deb+pg16,17) timestamp9 (deb) 修复不支持PG16/17的扩展
pg_mon pg_uri agg_for_vecs quantile lower_quantile pg_protobuf acl pg_emailaddr pg_zstd smlar geohash pgsmcrypto (+17) pg_tiktoken (+17) pg_idkit (+17) 基础设施软件包
Grafana 11.3 duckdb 1.1.2 etcd 3.5.16 ferretdb 1.24.0 minio 20241013133411 mcli 2024101313411 pushgateway 1.10 tigerbeetle 0.16.8 mongodb_exporter 0.41.2 redis_exporter 1.64.1 vector 0.41.1 vip-manager 2.7 sealos 5.0.1 v3.0.3 特性
提供对最新发布的 PostgreSQL 17 支持。 优化了 etcd 配置,监控,与告警规则 (Oracle兼容的)IvorySQL 3.4 支持,与 PostgreSQL 16.4 同步 版本升级
PostGIS 3.5 Grafana 11.2 duckdb 1.1 pg_search 0.10.2 pg_analytics 0.1.4 v3.0.2 特性
精简安装模式 :使用 slim.yml 进行最精简的 HA PGSQL 部署。PolarDB PG 15 的原生支持。优化 monitor.pg_table_bloat 与 monitor.pg_index_bloat,使用安全定义包装函数规避 PolarDB 统计视图权限问题。 在各模块的监控注册阶段,尊重 prometheus_enabled 与 grafana_enabled 配置选项,关闭时不再注册。 在 /etc/profile.d/pgsql.sh 中添加 PGDATABASE 与 PGPORT 环境变量,设置为 pg_primary_db(默认postgres) 变更
在 Pigsty PGSQL 仓库中移除 PolarDB 11 与 CloudberryDB 1.5.4 的 RPM/APT 包。 使用专用的仓库分发 PolarDB 15 与 CloudberryDB 1.6.0 的 RPM/APT 包。 问题修复
修复 Redis 的 /etc/tmp.files.d 文件名错误。 在管理 pgbouncer 用户时,设置 PGHOST 与 PGPORT 环境变量。 临时移除 pg_snakeoil 扩展支持,因为 EL8 上游源 clamv 出现依赖缺失问题。 移除 pgsql 角色的 Notify / Handler,以兼容更老的 Ansible 2.9 版本。 v3.0.1 特性改进
PolarDB Oracle 兼容性模式支持(需要第三方商业闭源内核) 使用 Oracle 兼容的 SQL 语法改写监控视图与相关 SQL 语句 Patroni 4 支持与适配 新增扩展 pg_analytics,通过 duckdb 为 PG 加装分析能力 添加新扩展:odbc_fdw 与 jdbc_fdw,提供通用的外部数据源连接能力 仓库添加新内核 cloudberrydb (Greenplum 原班开发者的开源分支) 仓库添加新工具 walminer,从WAL(replica等级)中提取原始 SQL。(高级特性需自行购买License) 更新执行计划可视化工具 Pev2 版本至 1.12.1 新增Grafana插件:volkovlabs-rss-datasource 在PGCAT databases监控面板中添加了已安装和待安装的扩展插件 PGSQL 主库初始化后,会重启一次以便 pg_param & pg_files 生效,因此 Supabase PG / PolarDB 集群置备后无需重启。 问题修复
修复了 Grafana 11.1.4 面板插件默认不加载的问题 修复了特定操作系统上 BlackBox Exporter Ping 探针失效的问题 确保 /var/run/postgresql 与 /var/run/redis 临时目录总是在重启后自动创建 修复了 cache.yml 剧本没有正确移除老旧的 patroni 3.0.4 RPM 包问题 修复了个别告警规则中的描述信息错误 移除了 Patroni 配置文件中过时的 Bootstrap User/HBA 参数 v3.0.0 亮点特性
Pigsty v3 提供了史无前例的 333 121 个扩展 RPM包 133 个 DEB包
- timescaledb periods temporal_tables emaj table_version pg_cron pg_later pg_background pg_timetable
- postgis pgrouting pointcloud pg_h3 q3c ogr_fdw geoip #pg_geohash #mobilitydb
- pgvector pgvectorscale pg_vectorize pg_similarity pg_tiktoken pgml #smlar
- pg_search pg_bigm zhparser hunspell
- hydra pg_lakehouse pg_duckdb duckdb_fdw pg_fkpart pg_partman plproxy #pg_strom citus
- pg_hint_plan age hll rum pg_graphql pg_jsonschema jsquery index_advisor hypopg imgsmlr pg_ivm pgmq pgq #rdkit
- pg_tle plv8 pllua plprql pldebugger plpgsql_check plprofiler plsh #pljava plr pgtap faker dbt2
- prefix semver pgunit md5hash asn1oid roaringbitmap pgfaceting pgsphere pg_country pg_currency pgmp numeral pg_rational pguint ip4r timestamp9 chkpass #pg_uri #pgemailaddr #acl #debversion #pg_rrule
- topn pg_gzip pg_http pg_net pg_html5_email_address pgsql_tweaks pg_extra_time pg_timeit count_distinct extra_window_functions first_last_agg tdigest aggs_for_arrays pg_arraymath pg_idkit pg_uuidv7 permuteseq pg_hashids
- sequential_uuids pg_math pg_random pg_base36 pg_base62 floatvec pg_financial pgjwt pg_hashlib shacrypt cryptint pg_ecdsa pgpcre icu_ext envvar url_encode #pg_zstd #aggs_for_vecs #quantile #lower_quantile #pgqr #pg_protobuf
- pg_repack pg_squeeze pg_dirtyread pgfincore pgdd ddlx pg_prioritize pg_checksums pg_readonly safeupdate pg_permissions pgautofailover pg_catcheck preprepare pgcozy pg_orphaned pg_crash pg_cheat_funcs pg_savior table_log pg_fio #pgpool pgagent
- pg_profile pg_show_plans pg_stat_kcache pg_stat_monitor pg_qualstats pg_store_plans pg_track_settings pg_wait_sampling system_stats pg_meta pgnodemx pg_sqlog bgw_replstatus pgmeminfo toastinfo pagevis powa pg_top #pg_statviz #pgexporter_ext #pg_mon
- passwordcheck supautils pgsodium pg_vault anonymizer pg_tde pgsmcrypto pgaudit pgauditlogtofile pg_auth_mon credcheck pgcryptokey pg_jobmon logerrors login_hook set_user pg_snakeoil pgextwlist pg_auditor noset #sslutils
- wrappers multicorn mysql_fdw tds_fdw sqlite_fdw pgbouncer_fdw mongo_fdw redis_fdw pg_redis_pubsub kafka_fdw hdfs_fdw firebird_fdw aws_s3 log_fdw #oracle_fdw #db2_fdw
- orafce pgtt session_variable pg_statement_rollback pg_dbms_metadata pg_dbms_lock pgmemcache #pg_dbms_job #babelfish
- pglogical pgl_ddl_deploy pg_failover_slots wal2json wal2mongo decoderbufs decoder_raw mimeo pgcopydb pgloader pg_fact_loader pg_bulkload pg_comparator pgimportdoc pgexportdoc #repmgr #slony
- gis-stack rag-stack fdw-stack fts-stack etl-stack feat-stack olap-stack supa-stack stat-stack json-stack
Pigsty v3 允许您更换 PostgreSQL 内核,目前支持了 SQL Server 兼容的 Babelfish (线缆协议级仿真),Oracle 兼容的 IvorySQL,以及 PG 版的 RAC PolarDB;此外,现在自托管 Supabase 也在 Debian 系统中可用。
您可以让 Pigsty 中带有 HA,IaC,PITR,监控的生产级 PostgreSQL 集群仿真 MSSQL (via Babelfish),Oracle via (IvorySQL),Oracle RAC (via PolarDB), MongoDB(via FerretDB),以及 Firebase (via Supabase)。
我们现在提供 Pigsty Pro 专业版
使用以下命令快速安装体验:
curl -fsSL https://repo.pigsty.cc/get | bash
cd ~/pigsty; ./bootstrap; ./configure; ./install.yml
重大变更
本次 Pigsty 发布调整大版本号,从 2.x 升级到 3.0,带有一些重大变更:
首要支持操作系统调整为:EL 8 / EL 9 / Debian 12 / Ubuntu 22.04
EL7 / Debian 11 / Ubuntu 20.04 等系统进入弃用阶段,不再提供支持 有在这些系统上运行需求的用户请考虑我们的 订阅服务 默认使用在线安装,不再提供离线软件包,从而解决操作系统小版本兼容性问题。
bootstrap 过程现在不再询问是否下载离线安装包,但如果 /tmp/pkg.tgz 存在,仍然会自动使用离线安装包。有离线安装需求请自行制作离线软件包或考虑我们的 订阅服务 Pigsty 使用的上游软件仓库进行统一调整,地址变更,并对所有软件包进行 GPG 签名与校验
标准仓库: https://repo.pigsty.io/{apt/yum} 国内镜像: https://repo.pigsty.cc/{apt/yum} API 参数变更与配置模板变更
EL 系与 Debian 系配置模板现在收拢统一,有差异的参数统一放置于 roles/node_id/vars/ 配置目录变更,所有配置文件模板统一放置在 conf 目录下,并分为 default, dbms, demo, build 四大类。 其他新特性
PG OLAP 分析能力史诗级加强:DuckDB 1.0.0,DuckDB FDW,以及 PG Lakehouse,Hydra 移植至 Deb 系统中。 PG 向量检索与全文检索能力加强:Vectorscale 提供 DiskANN 向量索引,Hunspell 分词字典支持,pg_search 0.8.6。 帮助 ParadeDB 解决了软件包构建问题,现在我们在 Debian/Ubuntu 上也能提供这一扩展。 Supabase 所需的扩展在 Debian/Ubuntu 上全部可用,Supabase 现在可在全OS上自托管。 提供了场景化预置扩展堆栈的能力,如果您不知道安装哪些扩展,我们准备了针对特定应用场景的扩展推荐包(Stack)。 针对所有 PostgreSQL 生态的扩展,制作了元数据表格、文档、索引、名称映射,针对 EL与Deb 进行对齐,确保扩展可用性。 为了解决 DockerHub 被 Ban 的问题,我们加强了 proxy_env 参数的功能并简化其配置方式。 建设了一个专用的新软件仓库,提供了 12-17 版本的全部扩展插件,其中,PG16的扩展仓库会在 Pigsty 默认的版本中实装。 现有软件仓库升级改造,使用标准的签名与校验机制,确保软件包的完整性与安全性。APT 仓库采用新的标准布局通过 reprepro 构建。 提供了 1,2,3,4,43 节点的沙箱环境:meta, dual, trio, full, prod,以及针对 7 大 OS Distro 的快捷配置模板。 PG Exporter 新增了 PostgreSQL 17 与 pgBouncer 1.23 新监控指标收集器的定义,与使用这些指标的 Grafana Panel 监控面板修缮,修复了各种问题,为 PGSQL Pgbouncer 与 PGSQL Patroni 监控面板添加了日志仪表盘。 使用全新的 cache.yml Ansible 剧本,替换了原有制作离线软件包的 bin/cache 与 bin/release-pkg 脚本。 API变更
新参数选项: pg_mode 现在支持的模式有 pgsql, citus, gpsql, mssql, ivory, polar,用于指定 PostgreSQL 集群的模式pgsql: 标准 PostgreSQL 高可用集群citus: Citus 水平分布式 PostgreSQL 原生高可用集群gpsql: 用于 Greenplum 与 GP 兼容数据库的监控(专业版)mssql: 安装 Babelfish,提供 Microsoft SQL Server 兼容性模式的标准 PostgreSQL 高可用集群,线缆协议级支持,扩展不可用ivory: 安装 IvorySQL 提供的 Oracle 兼容性 PostgreSQL 高可用集群,Oracle语法/数据类型/函数/存储过程兼容,扩展不可用 (专业版)polar: 安装 PolarDB for PostgreSQL (PG RAC)开源版本,提供国产化数据库能力支持,扩展不可用。(专业版) 新参数: pg_parameters,用于在实例级别指定 postgresql.auto.conf 中的参数,覆盖集群配置,实现不同实例成员的个性化配置。 新参数: pg_files,用于将额外的文件拷贝到PGDATA数据目录,针对需要License文件的商业版PostgreSQL分叉内核设计。 新参数: repo_extra_packages,用于额外指定需要下载的软件包,与 repo_packages 共同使用,便于指定OS版本独有的扩展列表。 参数重命名: patroni_citus_db 重命名为 pg_primary_db,用于指定集群中的主要数据库(在 Citus 模式中使用) 参数强化:proxy_env 中的代理服务器配置会写入 Docker Daemon,解决科学上网问题,configure -x 选项会自动在配置中写入当前环境中的代理服务器配置。 参数强化:infra_portal 参数现在支持指定 path 选项,对外暴露本机上的目录,提供web服务。 参数强化:repo_url_packages 中的 repo.pigsty.io 会在区域为中国时自动替换为 repo.pigsty.cc,解决科学上网问题,此外,现在可以指定下载后的文件名称。 参数强化:pg_databases.extensions 中的 extension 字段现在可以支持字典与扩展名字符串两种模式,字典模式提供 version 支持,允许安装特定版本的扩展。 参数强化:repo_upstream 参数如果没有显式覆盖定义,将从 rpm.ymldeb.ymlrepo_upstream_default 提取对应系统的默认值。 参数强化:repo_packages 参数如果没有显式覆盖定义,将从 rpm.ymldeb.ymlrepo_packages_default 提取对应系统的默认值。 参数强化:infra_packages 参数如果没有显式覆盖定义,将从 rpm.ymldeb.ymlinfra_packages_default 提取对应系统的默认值。 参数强化:node_default_packages 参数如果没有显式覆盖定义,将从 rpm.ymldeb.ymlnode_packages_default 提取对应系统的默认值。 参数强化:pg_packages 与 pg_extensions 中的扩展现在都会从 rpm.ymldeb.ymlpg_package_map 执行一次查找与翻译。 参数强化:node_packages 与 pg_extensions 参数中指定的软件包在安装时会升级至最新版本, node_packages 中现在默认值变为 [openssh-server],帮助修复 OpenSSH CVE 参数强化:pg_dbsu_uid 会自动根据操作系统类型调整为 26 (EL)或 543 (Debian),避免了手工调整。 设置了 pgbouncer 默认参数,max_prepared_statements = 128 启用了事物池化模式下的准备语句支持,并设置 server_lifetime 为 600, 修改了 patroni 模板默认参数,统一增大 max_worker_processes +8 可用后端进程,提高 max_wal_senders 与 max_replication_slots 至 50,并增大 OLAP 模板临时文件的大小限制为主磁盘的 1/5 版本升级
截止至发布时刻,Pigsty 主要组件的版本升级如下:
Pigsty 重新编译了所有 PostgreSQL 扩展插件,PostgreSQL 扩展插件的最新版本,可用的 333 个扩展插件请参考 扩展列表
新应用
Pigsty 现在提供开箱即用的 Dify 与 Odoo 两款使用 PostgreSQL 软件的 Docker Compose 模板:
Dify : AI智能体工作流编排与 LLMOps,使用 PostgreSQL 作为元数据库,PGVector 作为向量存储。Odoo : 企业级开源 ERP 系统,使用 PostgreSQL 作为底层数据库。Pigsty 专业版现在提供试点的 Kubernetes 部署支持与 Kafka KRaft 集群部署与监控支持
KUBEKAFKA问题修复
修复了 Ubuntu / Debian 系统中,节点重启后可能出现的 postgresql-common 服务自动启动替代默认数据库集群的缺陷 通过 node_packages 中的默认值 [openssh-server],CVE-2024-6387 可以在 Pigsty 安装过程中被自动修复。 修复了 Loki 解析 Nginx 日志标签基数过大导致的内存消耗问题。 修复了 EL8 系统中上游 Ansible 依赖变化导致的 bootstrap 失效问题(python3.11-jmespath 升级至 python3.12-jmespath) v2.7.0 亮点特性
新增了大量强力扩展插件,特别是一些使用 rust 与 pgrx 进行开发的强力扩展:
当然,也有一些使用原生 C 和 C++ 开发的强力扩展:
parquet_s3_fdw 1.1.0:从 S3 存取 Parquet 格式文件,作为湖仓之用plv8 3.2.2:使用 V8 引擎,允许在 PostgreSQL 中使用 Javascript 语言编写存储过程md5hash 1.0.1:用于存储原生MD5哈希数据类型,而非文本。pg_tde 1.0 alpha:PostgreSQL 的实验性加密存储引擎。pg_dirtyread 2.6:从 PostgreSQL 表中读取未清理的死元组,用于脏读新的 deb PGDG 扩展:pg_roaringbitmap, pgfaceting, mobilitydb, pgsql-http, pg_hint_plan, pg_statviz, pg_rrule 新的 rpm PGDG 扩展:pg_profile, pg_show_plans, 使用 PGDG 的 pgsql_http, pgsql_gzip, pg_net, pg_bigm 替代 Pigsty 维护的 RPM。 新特性
允许 Pigsty 在特定 Docker 虚拟机镜像中运行。 针对 Ubuntu 与 EL 系操作系统发行版准备了 INFRA & PGSQL 模块的 arm64 软件包 新安装脚本,可从 cloudflare 下载软件,可以指定版本,提供更完善的提示信息。 新增的 PGSQL PITR 监控面板,用于在 PITR 过程中提供更好的可观测性 针对在 Docker 虚拟机镜像中运行 Pigsty 进行了一系列铺垫与准备。 新增了 防呆设计 ,避免在非 Pigsty 纳管的节点上运行 pgsql.yml 剧本 (AdamYLK ) 针对每个支持的发行版大版本配置了独立的配置文件:el7, el8, el9, debian11, debian12, ubuntu20, ubuntu22 软件版本升级
PostgreSQL 16.3 Patroni 3.3.0 pgBackRest 2.51 VIP-Manager v2.5.0 Haproxy 2.9.7 Grafana 10.4.2 Prometheus 2.51 Loki & Promtail: 3.0.0 (警告:大版本非兼容性变更!) Alertmanager 0.27.0 BlackBox Exporter 0.25.0 Node Exporter 1.8.0 pgBackrest Exporter 0.17.0 duckdb 0.10.2 etcd 3.5.13 minio-20240510014138 / mcli-20240509170424 pev2 v1.8.0 -> v1.11.0 pgvector 0.6.1 -> 0.7.0pg_tle: v1.3.4 -> v1.4.0 hydra: v1.1.1 -> v1.1.2 duckdb_fdw: v1.1.0 重新针对 libduckdb 0.10.2 进行编译 pg_bm25 0.5.6 -> pg_search 0.7.0 pg_analytics: 0.5.6 -> 0.6.1 pg_graphql: 1.5.0 -> 1.5.4 pg_net 0.8.0 -> 0.9.1 pg_sparse (deprecated) Docker应用模板
缺陷修复
修复了 pg_exporters 角色中的变量空白问题。 修复了 minio_cluster 变量没有在全局配置中注释掉的问题 修复了 EL7 模板中的 postgis34 插件名称问题,应该使用 postgis33 修复了 EL8 python3.11-cryptography 依赖名的问题,上游现在变更为 python3-cryptography。 修复了 /pg/bin/pg-role 无法在非交互式 Shell 模式下获取操作系统用户名的问题 修复了 /pg/bin/pg-pitr 无法正确提示 -X -P 选项的问题 API变更
新参数 node_write_etc_hosts,用于控制是否向目标节点的 /etc/hosts 文件写入静态 DNS 解析记录 新增了 prometheus_sd_dir 参数,用于指定 Prometheus 静态服务发现的目标文件目录 configure 脚本新增了 -x|--proxy 参数,用于将当前环境的代理信息写入配置文件 by @waitingsong in https://github.com/Vonng/pigsty/pull/405 不再使用 Promtail & Loki 解析 Infra 节点上的 Nginx 日志细节标签,因为这样会导致标签基数爆炸。 在 Prometheus 配置中使用 alertmanager API v2 替代 v1 在 PGSQL 模块中,使用 /pg/cert/ca.crt 代替 /etc/pki/ca.crt,降低对节点根证书的依赖。 新的贡献者
完整的变更日志 : https://github.com/Vonng/pigsty/compar
离线软件包校验和
ec271a1d34b2b1360f78bfa635986c3a pigsty-pkg-v2.7.0.el8.x86_64.tgz
f3304bfd896b7e3234d81d8ff4b83577 pigsty-pkg-v2.7.0.debian12.x86_64.tgz
5b071c2a651e8d1e68fc02e7e922f2b3 pigsty-pkg-v2.7.0.ubuntu22.x86_64.tgz
v2.6.0 亮点特性
软件配置变更
使用 node_repo_modules 替换 node_repo_method 参数,并移除 node_repo_local_urls 参数。 暂时关闭 Grafana 统一告警功能,避免 “Database Locked” 错误。 新增 node_repo_modules 参数,用于指定在节点上添加的上游仓库源。 移除 node_local_repo_urls,其功能由 node_repo_modules & repo_upstream 替代。 移除 node_repo_method 参数,其功能由 node_repo_modules 替代。 在 repo_upstream 添加新的 local 源,并通过 node_repo_modules 使用,替代 node_local_repo_urls 的功能 重排 node_default_packages,infra_packages,pg_packages,pg_extensions 参数默认值。 在 repo_upstream 中替换 repo_upstream.baseurl 时,如果 EL8/9 PGDG小版本特定的仓库可用,使用 major.minor 而不是 major 替换 $releasever,提高小版本兼容性。 软件版本升级
Grafana 10.3 Prometheus 2.47 node_exporter 1.7.0 HAProxy 2.9.5 Loki / Promtail 2.9.4 minio-20240216110548 / mcli-20240217011557 etcd 3.5.11 Redis 7.2.4 Bytebase 2.13.2 DuckDB 0.10.0 FerretDB 1.19 Metabase:新Docker应用模板 PostgreSQL扩展插件
PostgreSQL 小版本升级: 16.2, 15.6, 14.11, 13.14, 12.18 PostgreSQL 16: 现在被提升为默认主版本 pg_exporter 0.6.1:安全修复 Patroni 3.2.2 pgBadger 12.4 pgBackRest 2.50 vip-manager 2.3.0 PostGIS 3.4.2 TimescaleDB 2.14.1 向量扩展 PGVector 0.6.0:新增并行创建 HNSW 索引功能 新增扩展插件 duckdb_fdw v1.1 ,支持读写 DuckDB 数据 v1.1 新增扩展插件 pgsql-gzip ,用于支持 Gzip 压缩解压缩 v1.0.0 新增扩展插件 pg_sparse ,高效处理稀疏向量(ParadeDB) v0.5.6 新增扩展插件 pg_bm25 ,用于支持高质量全文检索 BM25 算法的插件(ParadeDB) v0.5.6 新增扩展插件 pg_analytics ,支持 SIMD 与列式存储的PG分析插件(ParadeDB) v0.5.6 升级AIML插件 pgml 至 v2.8.1,新增 PG 16 支持。 升级列式存储插件 hydra 版本至 v1.1.1,新增 PG 16 支持。 升级图扩展插件 age 至 v1.5.0,新增 PG 16 支持。 升级GraphQL插件 pg_graphql 版本至 v1.5.0 ,支持 Supabase。 330e9bc16a2f65d57264965bf98174ff pigsty-v2.6.0.tgz
81abcd0ced798e1198740ab13317c29a pigsty-pkg-v2.6.0.debian11.x86_64.tgz
7304f4458c9abd3a14245eaf72f4eeb4 pigsty-pkg-v2.6.0.debian12.x86_64.tgz
f914fbb12f90dffc4e29f183753736bb pigsty-pkg-v2.6.0.el7.x86_64.tgz
fc23d122d0743d1c1cb871ca686449c0 pigsty-pkg-v2.6.0.el8.x86_64.tgz
9d258dbcecefd232f3a18bcce512b75e pigsty-pkg-v2.6.0.el9.x86_64.tgz
901ee668621682f99799de8932fb716c pigsty-pkg-v2.6.0.ubuntu20.x86_64.tgz
39872cf774c1fe22697c428be2fc2c22 pigsty-pkg-v2.6.0.ubuntu22.x86_64.tgz
v2.5.1 跟进 PostgreSQL v16.1, v15.5, 14.10, 13.13, 12.17, 11.22 小版本例行更新。
现在 PostgreSQL 16 的所有重要扩展已经就位(新增 pg_repack 与 timescaledb 支持)
软件更新:PostgreSQL to v16.1, v15.5, 14.10, 13.13, 12.17, 11.22 Patroni v3.2.0 PgBackrest v2.49 Citus 12.1 TimescaleDB 2.13 Grafana v10.2.0 FerretDB 1.15 SealOS 4.3.7 Bytebase 2.11.1 移除 PGCAT 监控面板中查询对 monitor 模式前缀(允许用户将 pg_stat_statements 扩展装到别的地方) 新的配置模板 wool.yml,为阿里云免费99 ECS 单机针对设计。 为 EL9 新增 python3-jmespath 软件包,解决 Ansible 依赖更新后 bootstrap 缺少 jmespath 的问题 31ee48df1007151009c060e0edbd74de pigsty-pkg-v2.5.1.el7.x86_64.tgz
a40f1b864ae8a19d9431bcd8e74fa116 pigsty-pkg-v2.5.1.el8.x86_64.tgz
c976cd4431fc70367124fda4e2eac0a7 pigsty-pkg-v2.5.1.el9.x86_64.tgz
7fc1b5bdd3afa267a5fc1d7cb1f3c9a7 pigsty-pkg-v2.5.1.debian11.x86_64.tgz
add0731dc7ed37f134d3cb5b6646624e pigsty-pkg-v2.5.1.debian12.x86_64.tgz
99048d09fa75ccb8db8e22e2a3b41f28 pigsty-pkg-v2.5.1.ubuntu20.x86_64.tgz
431668425f8ce19388d38e5bfa3a948c pigsty-pkg-v2.5.1.ubuntu22.x86_64.tgz
v2.5.0 curl https://get.pigsty.cc/latest | bash
亮点特性
Ubuntu / Debian 支持: bullseye, bookworm, jammy, focal
使用CDN repo.pigsty.cc 软件源,提供 rpm/deb 软件包下载。
Anolis 操作系统支持( 兼容 EL 8.8 )。
使用 PostgreSQL 16 替代 PostgreSQL 14 作为备选主要支持版本
新增了 PGSQL Exporter / PGSQL Patroni 监控面板,重做 PGSQL Query 面板
扩展更新:
PostGIS 版本至 3.4( EL8/EL9 ),EL7 仍使用 PostGIS 3.3 移除 pg_embedding,因为开发者不再对其进行维护,建议使用 pgvector 替换。 新扩展(EL):点云插件 pointcloud 支持,Ubuntu原生带有此扩展。 新扩展(EL): imgsmlr, pg_similarity,pg_bigm 用于搜索。 重新编译 pg_filedump 为 PG 大版本无关的软件包。 新收纳 hydra 列存储扩展,不再默认安装 citus 扩展。 软件更新:
Grafana 更新至 v10.1.5 Prometheus 更新至 v2.47 Promtail/Loki 更新至 v2.9.1 Node Exporter 更新至 v1.6.1 Bytebase 更新至 v2.10.0 patroni 更新至 v3.1.2 pgbouncer 更新至 v1.21.0 pg_exporter 更新至 v0.6.0 pgbackrest 更新至 v2.48.0 pgbadger 更新至 v12.2 pg_graphql 更新至 v1.4.0 pg_net 更新至 v0.7.3 ferretdb 更新至 v0.12.1 sealos 更新至 4.3.5 Supabase 支持更新至 20231013070755 Ubuntu 支持说明
Pigsty 支持了 Ubuntu 22.04 (jammy) 与 20.04 (focal) 两个 LTS 版本,并提供相应的离线软件安装包。
相比 EL 系操作系统,一些参数的默认值需要显式指定调整,详情请参考 ubuntu.yml
repo_upstream:按照 Ubuntu/Debian 的包名进行了调整repo_packages:按照 Ubuntu/Debian 的包名进行了调整node_repo_local_urls:默认值为 ['deb [trusted=yes] http://${admin_ip}/pigsty ./']node_default_packages :zlib -> zlib1g, readline -> libreadline-devvim-minimal -> vim-tiny, bind-utils -> dnsutils, perf -> linux-tools-generic,新增软件包 acl,确保 Ansible 权限设置正常工作 infra_packages:所有含 _ 的包要替换为 - 版本,此外 postgresql-client-16 用于替换 postgresql16pg_packages:Ubuntu 下惯用 - 替代 _,不需要手工安装 patroni-etcd 包。pg_extensions:扩展名称与EL系不太一样,Ubuntu下缺少 passwordcheck_cracklib 扩展。pg_dbsu_uid: Ubuntu 下 Deb 包不显式指定uid,需要手动指定,Pigsty 默认分配为 543API变更
默认值变化:
repo_modules 现在的默认值为 infra,node,pgsql,redis,minio,启用所有上游源
repo_upstream 发生变化,现在添加了 Pigsty Infra/MinIO/Redis/PGSQL 模块化软件源
repo_packages 发生变化,移除未使用的 karma,mtail,dellhw_exporter,移除了 PG14 主要扩展,新增了 PG16 主要扩展,添加了 virtualenv 包。
node_default_packages 发生变化,默认安装 python3-pip 组件。
pg_libs: timescaledb 从 shared_preload_libraries 中移除,现在默认不自动启用。
pg_extensions 发生变化,不再默认安装 Citus 扩展,默认安装 passwordcheck_cracklib 扩展,EL8,9 PostGIS 默认版本升级至 3.4
- pg_repack_${pg_version}* wal2json_${pg_version}* passwordcheck_cracklib_${pg_version}*
- postgis34_${pg_version}* timescaledb-2-postgresql-${pg_version}* pgvector_${pg_version}*
Patroni 所有模板默认移除 wal_keep_size 参数,避免触发 Patroni 3.1.1 的错误,其功能由 min_wal_size 覆盖。
87e0be2edc35b18709d7722976e305b0 pigsty-pkg-v2.5.0.el7.x86_64.tgz
e71304d6f53ea6c0f8e2231f238e8204 pigsty-pkg-v2.5.0.el8.x86_64.tgz
39728496c134e4352436d69b02226ee8 pigsty-pkg-v2.5.0.el9.x86_64.tgz
e3f548a6c7961af6107ffeee3eabc9a7 pigsty-pkg-v2.5.0.debian11.x86_64.tgz
1e469cc86a19702e48d7c1a37e2f14f9 pigsty-pkg-v2.5.0.debian12.x86_64.tgz
cc3af3b7c12f98969d3c6962f7c4bd8f pigsty-pkg-v2.5.0.ubuntu20.x86_64.tgz
c5b2b1a4867eee624e57aed58ac65a80 pigsty-pkg-v2.5.0.ubuntu22.x86_64.tgz
v2.4.1 Supabase 支持:开源的 Firebase 替代,现可使用 Pigsty 本地托管的 PostgreSQL 实例作为数据存储。PostgresML 支持:使用SQL完成经典机器学习算法,训练、微调、调用大语言模型(hugging face)。FerretDB v1.10 支持,在 PostgreSQL 上提供 MongoDB API与协议兼容能力。GraphQL扩展: pg_graphql JWT支持扩展:pgjwt 密钥存储扩展: vault 数据恢复扩展:pg_filedump 图数据库扩展:Apache age 中文分词扩展:zhparser 高效位图扩展:pg_roaringbitmap 向量嵌入替代:pg_embedding 可信语言扩展:pg_tle HTTP客户端扩展:pgsql-http 异步HTTP扩展: pg_net 列式存储引擎:hydra 其他PGDG扩展:新收录8个由PGDG维护的扩展插件,Pigsty支持的插件总数达到 150+ 。 PostgreSQL 16 内核支持,监控云端 RDS / PolarDB for PostgreSQL。 亮点特性
Supabase 支持:开源的 Firebase 替代,现可使用 Pigsty 托管的 PostgreSQL 实例存储数据。PostgresML 支持:在 PostgreSQL 运行各类模型(hugging face),向量操作,经典机器学习算法。GraphQL支持扩展: pg_graphql 异步HTTP客户端扩展: pg_net JWT支持扩展:pgjwt 密钥存储扩展: vault 将 FerretDB 版本升级至 v1.10 新增组件:pg_filedump 减少 EL9 离线软件包的大小,移除非必须依赖项 proj-data* 修复了 Patroni 3.1.1 的错误 efabe7632d8994f3fb58f9838b8f9d7d pigsty-pkg-v2.5.0.el7.x86_64.tgz # 1.1G
ea78957e8c8434b120d1c8c43d769b56 pigsty-pkg-v2.5.0.el8.x86_64.tgz # 1.4G
4ef280a7d28872814e34521978b851bb pigsty-pkg-v2.5.0.el9.x86_64.tgz # 1.3G
v2.4.0 使用 bash -c "$(curl -fsSL https://get.pigsty.cc/latest)" 快速上手。
最新特性
PostgreSQL 16 正式发布,Pigsty提供支持。 可以监控云数据库,RDS for PostgreSQL,以及 PolarDB,提供全新的 PGRDS 监控面板 正式提供商业支持与咨询服务。并发布首个 LTS 版本,为订阅客户提供最长5年的支持。 新扩展插件: Apache AGE, openCypher graph query engine on PostgreSQL 新扩展插件: zhparser, full text search for Chinese language 新扩展插件: pg_roaringbitmap, roaring bitmap for PostgreSQL 新扩展插件: pg_embedding, hnsw alternative to pgvector 新扩展插件: pg_tle, admin / manage stored procedure extensions 新扩展插件: pgsql-http, issue http request with SQL interface 新增插件: pg_auth_mon pg_checksums pg_failover_slots pg_readonly postgresql-unit pg_store_plans pg_uuidv7 set_user Redis改进:支持 Redis 哨兵监控,配置主从集群的自动高可用。 API变化
新增参数,REDIS.redis_sentinel_monitor,用于指定 Sentinel 集群监控的主库列表 问题修复
修复 Grafana 10.1 注册数据源时缺少 uid 的问题 MD5 (pigsty-pkg-v2.4.0.el7.x86_64.tgz) = 257443e3c171439914cbfad8e9f72b17
MD5 (pigsty-pkg-v2.4.0.el8.x86_64.tgz) = 41ad8007ffbfe7d5e8ba5c4b51ff2adc
MD5 (pigsty-pkg-v2.4.0.el9.x86_64.tgz) = 9a950aed77a6df90b0265a6fa6029250
v2.3.1 使用 bash -c "$(curl -fsSL https://get.pigsty.cc/latest)" 快速开始。
最新特性
pgvector 更新至 0.5,添加 hnsw 算法支持。支持 PostgreSQL 16 RC1 (el8/el9) 默认包中添加了 SealOS 用于快速部署Kubernetes集群。 问题修复
修复了 infra.repo.repo_pkg 任务:当 repo_packages 中包名包含 * 时,下载可能会受到 /www/pigsty 现有内容的影响。 将 vip_dns_suffix 的默认值由 .vip 调整为空字符串,即集群本身的名称将默认作为节点集群的 L2 VIP modprobe watchdog and chown watchdog if patroni_watchdog_mode is required当 pg_dbsu_sudo = limit and patroni_watchdog_mode = required 时,授予数据库 dbsu 以下命令的 sudo 执行权限/usr/bin/sudo /sbin/modprobe softdog:在启动 Patroni 服务时确保 softdog 内核模块启用/usr/bin/sudo /bin/chown {{ pg_dbsu }} /dev/watchdog: 在启动 Patroni 服务时,确保 watchdog 属主正确 文档更新
向英文文档中添加了更新内容。 添加了简体中文版本的内置文档,修复了 pigsty.cc 文档站的中文文档。 软件更新
PostgreSQL 16 RC1 for EL8/EL9 PGVector 0.5.0,支持 hnsw 索引 TimescaleDB 2.11.2 grafana 10.1.0 loki & promtail 2.8.4 redis-stack 7.2 on el7/8 mcli-20230829225506 / minio-20230829230735 ferretdb 1.9 sealos 4.3.3 pgbadger 1.12.2 ce69791eb622fa87c543096cdf11f970 pigsty-pkg-v2.3.1.el7.x86_64.tgz
495aba9d6d18ce1ebed6271e6c96b63a pigsty-pkg-v2.3.1.el8.x86_64.tgz
38b45582cbc337ff363144980d0d7b64 pigsty-pkg-v2.3.1.el9.x86_64.tgz
v2.3.0 相关文章:《Pigsty v2.3 发布:应用生态丰富 》
发布注记:https://github.com/Vonng/pigsty/releases/tag/v2.3.0
使用 bash -c "$(curl -fsSL https://get.pigsty.cc/latest)" 快速开始。
亮点特性
INFRA: 添加了对 NODE/PGSQL VIP 的监控支持 PGSQL: 通过小版本升级修复了 PostgreSQL CVE-2023-39417 : 15.4, 14.9, 13.12, 12.16,以及 Patroni v3.1.0 NODE: 允许用户使用 keepalived 为一个节点集群绑定 L2 VIP REPO: Pigsty 专用 yum 源优化精简,全站默认使用 HTTPS: get.pigsty.ccdemo.pigsty.cc APP: 升级 app/bytebase 版本至 v2.6.0, app/ferretdb 版本至 v1.8;添加新的应用模板:nocodb ,开源的 Airtable。 REDIS: 升级版本至 v7.2,并重制了 Redis 监控面板。 MONGO: 添加基于 FerretDB 1.8 实现的基本支持。 MYSQL: 添加了 Prometheus / Grafana / CA 中的代码存根,便于后续纳管。 API变化
新增一个新的参数组 NODE.NODE_VIP:包含 8 个新参数
NODE.VIP.vip_enabled:在此节点集群上启用 vip 吗?NODE.VIP.vip_address:ipv4 格式的节点 vip 地址,如果启用了 vip,则必需NODE.VIP.vip_vrid:必需,整数,1-255 在相同 VLAN 中应该是唯一的NODE.VIP.vip_role:master/backup,默认为备份,用作初始角色NODE.VIP.vip_preempt:可选,true/false,默认为 false,启用 vip 抢占NODE.VIP.vip_interface:节点 vip 网络接口监听,eth0 默认NODE.VIP.vip_dns_suffix:节点 vip dns 名称后缀,默认为空字符串NODE.VIP.vip_exporter_port:keepalived 导出器监听端口,默认为 9650MD5 (pigsty-pkg-v2.3.0.el7.x86_64.tgz) = 81db95f1c591008725175d280ad23615
MD5 (pigsty-pkg-v2.3.0.el8.x86_64.tgz) = 6f4d169b36f6ec4aa33bfd5901c9abbe
MD5 (pigsty-pkg-v2.3.0.el9.x86_64.tgz) = 4bc9ae920e7de6dd8988ca7ee681459d
v2.2.0 相关文章:《Pigsty v2.2 发布 —— 监控系统大升级 》
发布注记:https://github.com/Vonng/pigsty/releases/tag/v2.2.0
快速开始: bash -c "$(curl -fsSL https://get.pigsty.cc/latest)"
亮点特性
监控面板重做: https://demo.pigsty.cc Vagrant沙箱重做: 支持 libvirt 与新的配置模板 Pigsty EL Yum 仓库: 统一收纳零碎 RPM,简化安装构建流程。 操作系统兼容性: 新增信创操作系统 UOS-v20-1050e 支持 新的配置模板:42 节点的生产仿真配置 统一使用官方 PGDG citus 软件包(el7) 软件升级
PostgreSQL 16 beta2 Citus 12 / PostGIS 3.3.3 / TimescaleDB 2.11.1 / PGVector 0.44 patroni 3.0.4 / pgbackrest 2.47 / pgbouncer 1.20 grafana 10.0.3 / loki/promtail/logcli 2.8.3 etcd 3.5.9 / haproxy v2.8.1 / redis v7.0.12 minio 20230711212934 / mcli 20230711233044 Bug修复
修复了 Docker 组权限的问题 29434bd 将 infra 操作系统用户组作为额外的组,而不是首要用户组。 修复了 Redis Sentinel Systemd 服务的自动启用状态 5c96feb 放宽了 bootstrap & configure 的检查,特别是当 /etc/redhat-release 不存在的时候。 升级到 Grafana 10,修复了 Grafana 9.x CVE-2023-1410 在 CMDB pglog 模式中添加了 PG 14 - 16 的 command tags 与 错误代码。 API变化
新增1个变量
INFRA.NGINX.nginx_exporter_enabled: 现在用户可以通过设置这个参数来禁用 nginx_exporter 。默认值变化:
repo_modules: node,pgsql,infra : redis 现在由 pigsty-el 仓库提供,不再需要 redis 模块。repo_upstream:新增 pigsty-el: 与具体EL版本无关的RPM: 例如 grafana, minio, pg_exporter, 等等…… 新增 pigsty-misc: 与具体EL版本有关的RPM: 例如 redis, prometheus 全家桶,等等…… 移除 citus: 现在 PGDG 中有完整的 EL7 - EL9 citus 12 支持 移除 remi: redis 现在由 pigsty-el 仓库提供,不再需要 redis 模块。 repo_packages:ansible python3 python3-pip python3-requests python3-jmespath python3.11-jmespath dnf-utils modulemd-tools # el7: python36-requests python36-idna yum-utils grafana loki logcli promtail prometheus2 alertmanager karma pushgateway node_exporter blackbox_exporter nginx_exporter redis_exporter redis etcd minio mcli haproxy vip-manager pg_exporter nginx createrepo_c sshpass chrony dnsmasq docker-ce docker-compose-plugin flamegraph lz4 unzip bzip2 zlib yum pv jq git ncdu make patch bash lsof wget uuid tuned perf nvme-cli numactl grubby sysstat iotop htop rsync tcpdump netcat socat ftp lrzsz net-tools ipvsadm bind-utils telnet audit ca-certificates openssl openssh-clients readline vim-minimal postgresql13* wal2json_13* pg_repack_13* passwordcheck_cracklib_13* postgresql12* wal2json_12* pg_repack_12* passwordcheck_cracklib_12* timescaledb-tools postgresql15 postgresql15* citus_15* pglogical_15* wal2json_15* pg_repack_15* pgvector_15* timescaledb-2-postgresql-15* postgis33_15* passwordcheck_cracklib_15* pg_cron_15* postgresql14 postgresql14* citus_14* pglogical_14* wal2json_14* pg_repack_14* pgvector_14* timescaledb-2-postgresql-14* postgis33_14* passwordcheck_cracklib_14* pg_cron_14* postgresql16* wal2json_16* pgvector_16* pg_squeeze_16* postgis34_16* passwordcheck_cracklib_16* pg_cron_16* patroni patroni-etcd pgbouncer pgbadger pgbackrest pgloader pg_activity pg_partman_15 pg_permissions_15 pgaudit17_15 pgexportdoc_15 pgimportdoc_15 pg_statement_rollback_15* orafce_15* mysqlcompat_15 mongo_fdw_15* tds_fdw_15* mysql_fdw_15 hdfs_fdw_15 sqlite_fdw_15 pgbouncer_fdw_15 multicorn2_15* powa_15* pg_stat_kcache_15* pg_stat_monitor_15* pg_qualstats_15 pg_track_settings_15 pg_wait_sampling_15 system_stats_15 plprofiler_15* plproxy_15 plsh_15* pldebugger_15 plpgsql_check_15* pgtt_15 pgq_15* pgsql_tweaks_15 count_distinct_15 hypopg_15 timestamp9_15* semver_15* prefix_15* rum_15 geoip_15 periods_15 ip4r_15 tdigest_15 hll_15 pgmp_15 extra_window_functions_15 topn_15 pg_background_15 e-maj_15 pg_catcheck_15 pg_prioritize_15 pgcopydb_15 pg_filedump_15 pgcryptokey_15 logerrors_15 pg_top_15 pg_comparator_15 pg_ivm_15* pgsodium_15* pgfincore_15* ddlx_15 credcheck_15 safeupdate_15 pg_squeeze_15* pg_fkpart_15 pg_jobmon_15 repo_url_packages:node_default_packages:lz4,unzip,bzip2,zlib,yum,pv,jq,git,ncdu,make,patch,bash,lsof,wget,uuid,tuned,nvme-cli,numactl,grubby,sysstat,iotop,htop,rsync,tcpdump netcat,socat,ftp,lrzsz,net-tools,ipvsadm,bind-utils,telnet,audit,ca-certificates,openssl,readline,vim-minimal,node_exporter,etcd,haproxy,python3,python3-pip infra_packagesgrafana,loki,logcli,promtail,prometheus2,alertmanager,karma,pushgateway node_exporter,blackbox_exporter,nginx_exporter,redis_exporter,pg_exporter nginx,dnsmasq,ansible,postgresql15,redis,mcli,python3-requests PGSERVICE in .pigsty 被移除了,取而代之的是 PGDATABASE=postgres,这用户只需 IP 地址就可以从管理节点访问特定实例。目录结构变化:
bin/dns and bin/ssh 现在被移动到 vagrant/ 目录中。MD5 ( pigsty-pkg-v2.2.0.el7.x86_64.tgz) = 5fb6a449a234e36c0d895a35c76add3c
MD5 ( pigsty-pkg-v2.2.0.el8.x86_64.tgz) = c7211730998d3b32671234e91f529fd0
MD5 ( pigsty-pkg-v2.2.0.el9.x86_64.tgz) = 385432fe86ee0f8cbccbbc9454472fdd
v2.1.0 相关文章:Pigsty v2.1 发布:向量扩展 / PG12-16 支持
发布注记:https://github.com/Vonng/pigsty/releases/tag/v2.1.0
Highlight
PostgreSQL 16 beta 支持, 以及 12 ~ 15 的支持. 为 PG 12 - 15 新增了 PGVector 扩展支持,用于存储 AI 嵌入。 为 Grafana 添加了额外6个默认的扩展面板/数据源插件。 添加 bin/profile 脚本用于执行远程 Profiling ,生成火焰图。 添加 bin/validate 用于校验 pigsty.yml 配置文件合法性。 添加 bin/repo-add 用于快速向节点添加软件源定义。 PostgreSQL 16 可观测性:添加了 pg_stat_io 支持与相关监控面板 软件升级
PostgreSQL 15.3 , 14.8, 13.11, 12.15, 11.20, and 16 beta1 pgBackRest 2.46 / pgbouncer 1.19 Redis 7.0.11 Grafana v9.5.3 Loki / Promtail / Logcli 2.8.2 Prometheus 2.44 TimescaleDB 2.11.0 minio-20230518000536 / mcli-20230518165900 Bytebase v2.2.0 改进增强
当添加本地用户的公钥时,所有的 id*.pub 都会被添加到远程机器上(例如椭圆曲线算法生成的密钥文件) v2.0.2 https://github.com/Vonng/pigsty/releases/tag/v2.0.2
亮点
使用开箱即用的 pgvector
变更
新扩展插件 pgvector 修复 MinIO CVE-2023-28432 ,使用 20230324 新提供的 policy API. 为 DNSMASQ systemd 服务添加动态重载命令 更新 PEV 版本至 v1.8 更新 grafana 版本至 v9.4.7 更新 MinIO 与 MCLI 版本至 20230324 更新 bytebase 版本至 v1.15.0 更新监控面板并修复死链接 更新了阿里云 Terraform 模板,默认使用 RockyLinux 9 使用 Grafana v9.4 的 Provisioning API 为众多管理任务添加了 asciinema 视频 修复了 EL8 PostgreSQL 的破损依赖:移除 anonymizer_15 faker_15 pgloader MD5 ( pigsty-pkg-v2.0.2.el7.x86_64.tgz) = d46440a115d741386d29d6de646acfe2
MD5 ( pigsty-pkg-v2.0.2.el8.x86_64.tgz) = 5fa268b5545ac96b40c444210157e1e1
MD5 ( pigsty-pkg-v2.0.2.el9.x86_64.tgz) = c8b113d57c769ee86a22579fc98e8345
v2.0.1 https://github.com/Vonng/pigsty/releases/tag/v2.0.1
安全性改进,与对 v2.0.0 的 BUG 修复。
改进
更换猪头 logo 以符合 PostgreSQL 商标政策。 将 grafana 版本升级至 v9.4,界面更佳且修复了 bug。 将 patroni 版本升级至 v3.0.1,其中包含了一些 bug 修复。 修改:将 grafana systemd 服务文件回滚到 rpm 默认的版本。 使用缓慢的 copy 代替 rsync 来复制 grafana 仪表板,更加可靠。 增强:bootstrap 执行后会添加回默认 repo 文件。 添加 asciinema 视频,用于各种管理任务。 安全增强模式:限制监控用户权限。 新的配置模板:dual.yml,用于双节点部署。 在 crit.yml 模板中启用 log_connections 和 log_disconnections。 在 crit.yml 模板中的 pg_libs 中启用 $lib/passwordcheck。 明确授予 pg_monitor 角色监视视图权限。 从 dbuser_monitor 中移除默认的 dbrole_readonly 以限制监控用户的权限 现在 patroni 监听在 {{ inventory_hostname }} 而不是 0.0.0.0 现在你可以使用 pg_listen 控制 postgres/pgbouncer 监听的地址 现在你可以在 pg_listen 中使用 ${ip}, ${lo}, ${vip} 占位符 将 Aliyun terraform 镜像从 centos 7.9 提升到 rocky Linux 9 将 bytebase 版本升级到 v1.14.0 BUG修复
为 alertmanager 添加缺失的 advertise 地址。 解决使用 bin/pgsql-user 创建数据库用户时,pg_mode 变量缺失问题。 在 redis.yml 中为 Redis 集群加入任务添加 -a password 选项。 在 infra-rm.yml.remove infra data 任务中补充缺失的默认值。 修复 prometheus 监控对象定义文件的属主为 prometheus 用户。 使用 管理员用户 而不是 root 去删除 DCS 中的元数据。 修复了由 grafana 9.4 bug 导致的问题:Meta数据源缺失。 注意事项
EL8 pgdg 上游官方源处于依赖破损状态,请小心使用。涉及到的软件包: postgis33_15, pgloader, postgresql_anonymizer_15*, postgresql_faker_15
如何升级?
cd ~/pigsty; tar -zcf /tmp/files.tgz files; rm -rf ~/pigsty # backup files dir and remove
cd ~; bash -c " $( curl -fsSL https://get.pigsty.cc/latest) " # get latest pigsty source
cd ~/pigsty; rm -rf files; tar -xf /tmp/files.tgz -C ~/pigsty # restore files dir
Checksums
MD5 ( pigsty-pkg-v2.0.1.el7.x86_64.tgz) = 5cfbe98fd9706b9e0f15c1065971b3f6
MD5 ( pigsty-pkg-v2.0.1.el8.x86_64.tgz) = c34aa460925ae7548866bf51b8b8759c
MD5 ( pigsty-pkg-v2.0.1.el9.x86_64.tgz) = 055057cebd93c473a67fb63bcde22d33
特别感谢 @cocoonkid 提供的反馈。
v2.0.0 相关文章:
Pigsty v2.0.0 正式发布!
从v2.0.0开始,PIGSTY 现在是 “PostgreSQL In Great STYle"的首字母缩写,即"全盛状态的PostgreSQL”。
curl -fsSL https://get.pigsty.cc/latest | bash
Download directly from GitHub Release bash -c " $( curl -fsSL https://raw.githubusercontent.com/Vonng/pigsty/master/bin/get) "
# or download tarball directly with curl (EL9)
curl -L https://github.com/Vonng/pigsty/releases/download/v2.0.0/pigsty-v2.0.0.tgz -o ~/pigsty.tgz
curl -L https://github.com/Vonng/pigsty/releases/download/v2.0.0/pigsty-pkg-v2.0.0.el9.x86_64.tgz -o /tmp/pkg.tgz
# EL7: https://github.com/Vonng/pigsty/releases/download/v2.0.0/pigsty-pkg-v2.0.0.el7.x86_64.tgz
# EL8: https://github.com/Vonng/pigsty/releases/download/v2.0.0/pigsty-pkg-v2.0.0.el8.x86_64.tgz
亮点
完美整合 PostgreSQL 15, PostGIS 3.3, Citus 11.2, TimescaleDB 2.10,分布式地理时序超融合数据库。 OS兼容性大幅增强:支持 EL7,8,9,以及 RHEL, CentOS, Rocky, OracleLinux, AlmaLinux等兼容发行版。 安全性改进:自签名CA,全局网络流量SSL加密,密码scram-sha-256认证,备份采用AES加密,重制的HBA规则系统。 Patroni升级至3.0,提供原生的高可用 Citus 分布式集群支持,默认启用FailSafe模式,无惧DCS故障致全局主库瘫痪。 提供基于 pgBackRest 的开箱即用的时间点恢复 PITR 支持,默认支持本地文件系统与专用MinIO/S3集群备份。 新模块 ETCD,可独立部署,简易扩缩容,自带监控高可用,彻底取代 Consul 作为高可用 PG 的 DCS。 新模块 MINIO,可独立部署,支持多盘多节点部署,用作S3本地替代,亦用于集中式 PostgreSQL 备份仓库。 大幅精简配置文件参数,无需默认值即可使用;模板自动根据机器规格调整主机与PG参数,HBA/服务的定义更简洁泛用。 受 Grafana 与 MinIO 影响,软件协议由 Apache License 2.0 变更为 AGPL 3.0 兼容性
支持 EL7, EL8, EL9 三个大版本,并提供三个版本对应的离线软件包,默认开发测试环境由EL7升级至EL9。 支持更多EL兼容Linux发行版:RHEL, CentOS, RockyLinux, AlmaLinux, OracleLinux等… 源码包与离线软件包的命名规则发生改变,现在版本号,操作系统版本号,架构都会体现在包名中。 PGSQL: PostgreSQL 15.2, PostGIS 3.3, Citus 11.2, TimescaleDB 2.10 现可同时使用,协同工作。PGSQL: Patroni 升级至 3.0 版本,作为 PGSQL 的高可用组件。默认使用 ETCD 作为 DCS,取代 Consul,减少一个 Consul Agent 失效点。 因为 vip-manager 升级至 2.1 并使用 ETCDv3 API,彻底弃用 ETCDv2 API,Patroni同理 提供原生的高可用 Citus 分布式集群支持。使用完全开源所有功能的 Citus 11.2。 默认启用FailSafe模式,无惧DCS故障致全局主库瘫痪。 PGSQL: 引入 pgBackrest v2.44 提供开箱即用的 PostgreSQL 时间点恢复 PITR 功能默认使用主库上的备份目录创建备份仓库,滚动保留两天的恢复窗口。 默认备选备份仓库为专用 MinIO/S3 集群,滚动保留两周的恢复窗口,本地使用需要启用 MinIO 模块。 ETCD 现在作为一个独立部署的模块,带有完整的扩容/缩容方案与监控。MINIO 现在成为一个独立部署的模块,支持多盘多节点部署,用作S3本地替代,亦可用作集中式备份仓库。NODE 模块现在包含 haproxy, docker, node_exporter, promtail 功能组件chronyd 现在取代 ntpd 成为所有节点默认的 NTP 服务。HAPROXY 现从属于 NODE 的一部分,而不再是 PGSQL 专属,可以 NodePort 的方式对外暴露服务。 现在 PGSQL 模块可以使用专用的集中式 HAPROXY 集群统一对外提供服务。 INFRA 模块现在包含 dnsmasq, nginx, prometheus, grafana, loki 等组件Infra 模块中的 DNSMASQ 服务器默认启用,并添加为所有节点的默认 DNS 服务器之一。 添加了 blackbox_exporter 用于主机 PING 探测,pushgateway 用于批处理任务指标。 loki 与 promtail 现在使用 Grafana 默认的软件包,使用官方的 Grafana Echarts 面板插件提供针对 PostgreSQL 15 的新增可观测性位点的监控支持,添加 Patroni 监控 软件版本升级PostgreSQL 15.2 / PostGIS 3.3 / TimescaleDB 2.10 / Citus 11.2 Patroni 3.0 / Pgbouncer 1.18 / pgBackRest 2.44 / vip-manager 2.1 HAProxy 2.7 / Etcd 3.5 / MinIO 20230131022419 / mcli 20230128202938 Prometheus 2.42 / Grafana 9.3 / Loki & Promtail 2.7 / Node Exporter 1.5 安全性
启用了一个完整的本地自签名CA:pigsty-ca,用于签发内网组件所使用的证书。 创建用户/修改密码的操作将不再会在日志文件中留下痕迹。 Nginx 默认启用 SSL 支持(如需HTTPS,您需要在系统中信任pigsty-ca,或使用Chrome thisisunsafe) ETCD 全面启用 SSL 加密客户端与服务端对等通信 PostgreSQL 添加并默认启用了 SSL 支持,管理链接默认都使用SSL访问。 Pgbouncer 添加了 SSL 支持,出于性能考虑默认不启用。 Patroni 添加了 SSL 支持,并默认限制了管理 API 只能从本机与管理节点使用密码认证方可访问。 PostgreSQL 的默认密码认证方式由 md5 改为 scram-sha-256。 Pgbouncer添加了认证查询支持,可以动态管理连接池用户。 pgBackRest 使用远端集中备份存储仓库时,默认使用 AES-256-CBC 加密备份数据。 提供高安全等级配置模板:强制使用全局 SSL,并要求使用管理员证书登陆。 所有默认HBA规则现在全部在配置文件中显式定义。 可维护性
现有的配置模板可根据机器规格(CPU/内存/存储)自动调整优化。 现在可以动态配置 Postgres/Pgbouncer/Patroni/pgBackRest 的日志目录:默认为:/pg/log/<type>/ 原有的 IP 地址占位符 10.10.10.10 被替换为一个专用变量:${admin_ip},可在多处引用,便于切换备用管理节点。 您可以指定 region 来使用不同地区的上游镜像源,以加快软件包的下载速度。 现在允许用户定义更细粒度的上游源地址,您可以根据不同的EL版本、架构,以及地区,使用不同的上游源。 提供了阿里云与AWS中国地区的 Terraform 模板,可用于一键拉起所需的 EC2 虚拟机。 提供了多种不同规格的 Vagrant 沙箱模板:meta, full, el7/8/9, minio, build, citus 添加了新的专用剧本:pgsql-monitor.yml 用于监控现有的 Postgres 实例或 RDS。 添加了新的专用剧本:pgsql-migration.yml ,使用逻辑复制无缝迁移现有实例至 Pigsty管理的集群。 添加了一系列专用 Shell 实用命令,封装常见运维操作,方便用户使用。 优化了所有 Ansible Role 的实现,使其更加简洁、易读、易维护,无需默认参数即可使用。 允许在业务数据库/用户的层次上定义额外的 Pgbouncer 参数。 API变更
Pigsty v2.0 进行了大量变更,新增64个参数,移除13个参数,重命名17个参数。
新增的参数
INFRA.META.admin_ip : 主元节点 IP 地址INFRA.META.region : 上游镜像区域:default|china|europeINFRA.META.os_version : 企业版 Linux 发行版本:7,8,9INFRA.CA.ca_cn : CA 通用名称,默认为 pigsty-caINFRA.CA.cert_validity : 证书有效期,默认为 20 年INFRA.REPO.repo_enabled : 在 infra 节点上构建本地 yum 仓库吗?INFRA.REPO.repo_upstream : 上游 yum 仓库定义列表INFRA.REPO.repo_home : 本地 yum 仓库的主目录,通常与 nginx_home ‘/www’ 相同INFRA.NGINX.nginx_ssl_port : https 监听端口INFRA.NGINX.nginx_ssl_enabled : 启用 nginx https 吗?INFRA.PROMTETHEUS.alertmanager_endpoint : altermanager 端点(ip|domain):端口格式NODE.NODE_TUNE.node_hugepage_ratio : 内存 hugepage 比率,默认禁用,值为 0NODE.HAPROXY.haproxy_service : 要公开的 haproxy 服务列表PGSQL.PG_ID.pg_mode : pgsql 集群模式:pgsql,citus,gpsqlPGSQL.PG_BUSINESS.pg_dbsu_password : dbsu 密码,默认为空字符串表示没有 dbsu 密码PGSQL.PG_INSTALL.pg_log_dir : postgres 日志目录,默认为 /pg/data/logPGSQL.PG_BOOTSTRAP.pg_storage_type : SSD|HDD,默认为 SSDPGSQL.PG_BOOTSTRAP.patroni_log_dir : patroni 日志目录,默认为 /pg/logPGSQL.PG_BOOTSTRAP.patroni_ssl_enabled : 使用 SSL 保护 patroni RestAPI 通信?PGSQL.PG_BOOTSTRAP.patroni_username : patroni rest api 用户名PGSQL.PG_BOOTSTRAP.patroni_password : patroni rest api 密码(重要:请更改此密码)PGSQL.PG_BOOTSTRAP.patroni_citus_db : 由 patroni 管理的 citus 数据库,默认为 postgresPGSQL.PG_BOOTSTRAP.pg_max_conn : postgres 最大连接数,auto 将使用推荐值PGSQL.PG_BOOTSTRAP.pg_shmem_ratio : postgres 共享内存比率,默认为 0.25,范围 0.1~0.4PGSQL.PG_BOOTSTRAP.pg_rto : 恢复时间目标,故障转移的 ttl,默认为 30sPGSQL.PG_BOOTSTRAP.pg_rpo : 恢复点目标,默认最多丢失 1MB 数据PGSQL.PG_BOOTSTRAP.pg_pwd_enc : 密码加密算法:md5|scram-sha-256PGSQL.PG_BOOTSTRAP.pgbouncer_log_dir : pgbouncer 日志目录,默认为 /var/log/pgbouncerPGSQL.PG_BOOTSTRAP.pgbouncer_auth_query : 如果启用,查询 pg_authid 表以检索 biz 用户,而不是填充用户列表PGSQL.PG_BOOTSTRAP.pgbouncer_sslmode : pgbouncer 客户端的 SSL:disable|allow|prefer|require|verify-ca|verify-fullPGSQL.PG_BOOTSTRAP.pg_service_provider : 专用的 haproxy 节点组名称,或者默认为本地节点的空字符串PGSQL.PG_BOOTSTRAP.pg_default_service_dest : 如果 svc.dest=‘default’,则为默认服务目标PGSQL.PG_BACKUP.pgbackrest_enabled : 启用 pgbackrest 吗?PGSQL.PG_BACKUP.pgbackrest_clean : 初始化期间删除 pgbackrest 数据吗?PGSQL.PG_BACKUP.pgbackrest_log_dir : pgbackrest 日志目录,默认为 /pg/logPGSQL.PG_BACKUP.pgbackrest_method : pgbackrest 备份仓库方法,local 或 minioPGSQL.PG_BACKUP.pgbackrest_repo : pgbackrest 备份仓库配置PGSQL.PG_DNS.pg_dns_suffix : pgsql dns 后缀,默认为空字符串PGSQL.PG_DNS.pg_dns_target : auto, primary, vip, none 或 ad hoc ipETCD.etcd_seq : etcd 实例标识符,必需ETCD.etcd_cluster : etcd 集群和组名称,默认为 etcdETCD.etcd_safeguard : 防止清除正在运行的 etcd 实例吗?ETCD.etcd_clean : 在初始化期间清除现有的 etcd 吗?ETCD.etcd_data : etcd 数据目录,默认为 /data/etcdETCD.etcd_port : etcd 客户端端口,默认为 2379ETCD.etcd_peer_port : etcd 对等端口,默认为 2380ETCD.etcd_init : etcd 初始集群状态,新建或已存在ETCD.etcd_election_timeout : etcd 选举超时,默认为 1000msETCD.etcd_heartbeat_interval : etcd 心跳间隔,默认为 100msMINIO.minio_seq : minio 实例标识符,必须参数MINIO.minio_cluster : minio 集群名称,默认为 minioMINIO.minio_clean : 初始化时清理 minio 吗?默认为 falseMINIO.minio_user : minio 操作系统用户,默认为 minioMINIO.minio_node : minio 节点名模式MINIO.minio_data : minio 数据目录,使用 {x…y} 来指定多个驱动器MINIO.minio_domain : minio 外部域名,默认为 sss.pigstyMINIO.minio_port : minio 服务端口,默认为 9000MINIO.minio_admin_port : minio 控制台端口,默认为 9001MINIO.minio_access_key : 根访问密钥,默认为 minioadminMINIO.minio_secret_key : 根秘密密钥,默认为 minioadminMINIO.minio_extra_vars : minio 服务器的额外环境变量MINIO.minio_alias : 本地 minio 部署的别名MINIO.minio_buckets : 待创建的 minio 存储桶列表MINIO.minio_users : 待创建的 minio 用户列表移除的参数
INFRA.CA.ca_homedir : CA 主目录,现在固定为 /etc/pki/INFRA.CA.ca_cert : CA 证书文件名,现在固定为 ca.keyINFRA.CA.ca_key : CA 密钥文件名,现在固定为 ca.keyINFRA.REPO.repo_upstreams : 已被 repo_upstream 替代PGSQL.PG_INSTALL.pgdg_repo : 现在由节点 playbooks 负责PGSQL.PG_INSTALL.pg_add_repo : 现在由节点 playbooks 负责PGSQL.PG_IDENTITY.pg_backup : 未使用且与部分名称冲突PGSQL.PG_IDENTITY.pg_preflight_skip : 不再使用,由 pg_id 替代DCS.dcs_name : 由于使用 etcd 而被移除DCS.dcs_servers : 被 ad hoc 组 etcd 替代DCS.dcs_registry : 由于使用 etcd 而被移除DCS.dcs_safeguard : 被 etcd_safeguard 替代DCS.dcs_clean : 被 etcd_clean 替代重命名的参数
nginx_upstream -> infra_portalrepo_address -> repo_endpointpg_hostname -> node_id_from_pgpg_sindex -> pg_grouppg_services -> pg_default_servicespg_services_extra -> pg_servicespg_hba_rules_extra -> pg_hba_rulespg_hba_rules -> pg_default_hba_rulespgbouncer_hba_rules_extra -> pgb_hba_rulespgbouncer_hba_rules -> pgb_default_hba_rulesvip_mode -> pg_vip_enabledvip_address -> pg_vip_addressvip_interface -> pg_vip_interfacenode_packages_default -> node_default_packagesnode_packages_meta -> infra_packagesnode_packages_meta_pip -> infra_packages_pipnode_data_dir -> node_dataChecksums
MD5 (pigsty-pkg-v2.0.0-rc1.el7.x86_64.tgz) = af4b5db9dc38c860de609956a8f1f0d3
MD5 (pigsty-pkg-v2.0.0-rc1.el8.x86_64.tgz) = 5b7152e142df3e3cbc06de30bd70e433
MD5 (pigsty-pkg-v2.0.0-rc1.el9.x86_64.tgz) = 1362e2a5680fc1a3a014cc4f304100bd
特别感谢意大利用户 @alemacci 在 SSL加密,备份,多操作系统发行版适配与自适应参数模版上的贡献!
v1.5.1 亮点
重要:修复了PG14.0-14.3中 CREATE INDEX|REINDEX CONCURRENTLY 可能导致索引数据损坏的问题。
Pigsty v1.5.1 升级默认PostgreSQL版本至 14.4 强烈建议尽快更新。
软件升级
postgres 升级至 to 14.4 haproxy 升级至 to 2.6.0 grafana 升级至 to 9.0.0 prometheus 升级至 2.36.0 patroni 升级至 2.1.4 问题修复
修复了pgsql-migration.yml中的TYPO 移除了HAProxy配置文件中的PID配置项 移除了默认软件包中的 i686 软件包 默认启用所有Systemd Redis Service 默认启用所有Systemd Patroni Service API变更
grafana_database 与 grafana_pgurl 被标记为过时API,将从后续版本移除New Apps
wiki.js : 使用Postgres搭建本地维基百科 FerretDB : 使用Postgres提供MongoDB API v1.5.0 亮点概述
完善的Docker支持:在管理节点上默认启用并提供诸多开箱即用的软件模板:bytebase, pgadmin, pgweb, postgrest, minio等。 基础设施自我监控:Nginx, ETCD, Consul, Prometheus, Grafana, Loki 自我监控 CMDB升级:兼容性改善,支持Redis集群/Greenplum集群元数据,配置文件可视化。 服务发现改进:可以使用Consul自动发现所有待监控对象,并纳入Prometheus中。 更好的冷备份支持:默认定时备份任务,添加pg_probackup备份工具,一键创建延时从库。 ETCD现在可以用作PostgreSQL/Patroni的DCS服务,作为Consul的备选项。 Redis剧本/角色改善:现在允许对单个Redis实例,而非整个Redis节点进行初始化与移除。 详细变更列表
监控面板
CMDB Overview:可视化Pigsty CMDB Inventory。 DCS Overview:查阅Consul与ETCD集群的监控指标。 Nginx Overview:查阅Pigsty Web访问指标与访问日志。 Grafana Overview:Grafana自我监控 Prometheus Overview:Prometheus自我监控 INFRA Dashboard进行重制,反映基础设施整体状态 监控架构
现在允许使用 Consul 进行服务发现(当所有服务注册至Consul时) 现在所有的Infra组件会启用自我监控,并通过infra_register角色注册至Prometheus与Consul中。 指标收集器 pg_exporter 更新至 v0.5.0,添加新功能,scale 与 default,允许为指标指定一个倍乘因子,以及指定默认值。 pg_bgwriter, pg_wal, pg_query, pg_db, pgbouncer_stat 关于时间的指标,单位由默认的毫秒或微秒统一缩放至秒。pg_table 中的相关计数器指标,现在配置有默认值 0,替代原有的NaN。pg_class指标收集器默认移除,相关指标添加至 pg_table 与 pg_index 收集器中。pg_table_size 指标收集器现在默认启用,默认设置有300秒的缓存时间。部署方案
新增可选软件包 docker.tgz,带有常用应用镜像:Pgadmin, Pgweb, Postgrest, ByteBase, Kong, Minio等。 新增角色ETCD,可以在DCS Servers指定的节点上自动部署ETCD服务,并自动纳入监控。 允许通过 pg_dcs_type 指定PG高可用使用的DCS服务,Consul(默认),ETCD(备选) 允许通过 node_crontab 参数,为节点配置定时任务,例如数据库备份、VACUUM,统计收集等。 新增了 pg_checksum 选项,启用时,数据库集群将启用数据校验和(此前只有crit模板默认启用) 新增了pg_delay选项,当实例为Standby Cluster Leader时,此参数可以用于配置一个延迟从库 新增了软件包 pg_probackup,默认角色replicator现在默认赋予了备份相关函数所需的权限。 Redis部署现在拆分为两个部分:Redis节点与Redis实例,通过redis_port参数可以精确控制一个具体实例。 Loki 与 Promtail 现在使用 frpm 制作的 RPM软件包进行安装。 DCS3配置模板现在使用一个3节点的pg-meta集群,与一个单节点的延迟从库。 软件升级
升级 PostgreSQL 至 14.3 升级 Redis 至 6.2.7 升级 PG Exporter 至 0.5.0 升级 Consul 至 1.12.0 升级 vip-manager 至 v1.0.2 升级 Grafana 至 v8.5.2 升级 Loki & Promtail 至 v2.5.0,使用frpm打包。 问题修复
修复了Loki 与 Promtail 默认配置文件名的问题 修复了Loki 与 Promtail 环境变量无法正确展开的问题 对英文文档进行了一次完整的翻译与修缮,文档依赖的JS资源现在直接从本地获取,无需互联网访问。 API变化
新参数
node_data_dir : 主要的数据挂载路径,如果不存在会被创建。node_crontab_overwrite : 覆盖 /etc/crontab 而非追加内容。node_crontab: 要被追加或覆盖的 node crontab 内容。nameserver_enabled: 在这个基础设施节节点上启用 nameserver 吗?prometheus_enabled: 在这个基础设施节节点上启用 prometheus 吗?grafana_enabled: 在这个基础设施节节点上启用 grafana 吗?loki_enabled: 在这个基础设施节节点上启用 loki 吗?docker_enable: 在这个基础设施节点上启用 docker 吗?consul_enable: 启用 consul 服务器/代理吗?etcd_enable: 启用 etcd 服务器/客户端吗?pg_checksum: 启用 pg 集群数据校验和吗?pg_delay: 备份集群主库复制重放时的应用延迟。参数重制
现在 *_clean 是布尔类型的参数,用于在初始化期间清除现有实例。
*_safeguard 也是布尔类型的参数,用于在执行任何剧本时,避免清除正在运行的实例。
pg_exists_action -> pg_cleanpg_disable_purge -> pg_safeguarddcs_exists_action -> dcs_cleandcs_disable_purge -> dcs_safeguard参数重命名
node_ntp_config -> node_ntp_enablednode_admin_setup -> node_admin_enablednode_admin_pks -> node_admin_pk_listnode_dns_hosts -> node_etc_hosts_defaultnode_dns_hosts_extra -> node_etc_hostsnode_dns_server -> node_dns_methodnode_local_repo_url -> node_repo_local_urlsnode_packages -> node_packages_defaultnode_extra_packages -> node_packagesnode_packages_meta -> node_packages_metanode_meta_pip_install -> node_packages_meta_pipnode_sysctl_params -> node_tune_paramsapp_list -> nginx_indexesgrafana_plugin -> grafana_plugin_methodgrafana_cache -> grafana_plugin_cachegrafana_plugins -> grafana_plugin_listgrafana_git_plugin_git -> grafana_plugin_githaproxy_admin_auth_enabled -> haproxy_auth_enabledpg_shared_libraries -> pg_libsdcs_type -> pg_dcs_typev1.4.1 日常错误修复 / Docker 支持 / 英文文档
现在,默认在元节点上启用 docker。您可以使用它启动海量的各类软件
现在提供英文文档。
Bug 修复
v1.4.0 架构
将系统解耦为4大类别:INFRA、NODES、PGSQL、REDIS,这使得pigsty更加清晰、更易于扩展。 单节点部署 = INFRA + NODES + PGSQL 部署pgsql集群 = NODES + PGSQL 部署redis集群 = NODES + REDIS 部署其他数据库 = NODES + xxx(例如 MONGO、KAFKA…待定) 可访问性
为中国大陆提供CDN。 使用 bash -c "$(curl -fsSL http://get.pigsty.cc/latest)" 获取最新源代码。 使用新的 download 脚本下载并提取包。 监控增强
将监控系统分为5大类别:INFRA、NODES、REDIS、PGSQL、APP 默认启用日志记录 模型和标签为所有仪表板添加了一个隐藏的ds prometheus数据源变量,因此您只需选择一个新的数据源而不是修改Grafana数据源和仪表板。 为所有指标添加了一个ip标签,并将其用作数据库指标和节点指标之间的连接键。 INFRA监控Infra主仪表板:INFRA概览 添加日志仪表板:日志实例 PGLOG分析和PGLOG会话现在被视为一个示例Pigsty APP。 NODES监控应用如果您完全不关心数据库,现在可以单独使用Pigsty作为主机监控软件! 包括4个核心仪表板:节点概览 & 节点集群 & 节点实例 & 节点警报 为节点引入新的身份变量:node_cluster 和 nodename 变量pg_hostname现在意味着将主机名设置为与postgres实例名相同,以保持向后兼容性 变量nodename_overwrite 控制是否用nodename覆盖节点的主机名 变量nodename_exchange 将nodename写入彼此的/etc/hosts 所有节点指标引用都经过修订,通过ip连接 节点监控目标在/etc/prometheus/targets/nodes下单独管理 PGSQL监控增强完全新的PGSQL集群,简化并专注于集群中的重要内容。 新仪表板PGSQL数据库是集群级对象监控。例如整个集群而不是单个实例的表和查询。 PGSQL警报仪表板现在只关注pgsql警报。 PGSQL Shard已添加到PGSQL中。 Redis监控增强 MatrixDB支持
通过pigsty-matrix.yml playbook可以部署MatrixDB(Greenplum 7) MatrixDB监控仪表板:PGSQL MatrixDB 添加示例配置:pigsty-mxdb.yml 监控增强
将监控系统分为5大类别:INFRA、NODES、REDIS、PGSQL、APP 默认启用日志记录 模型和标签为所有仪表板添加了一个隐藏的ds prometheus数据源变量,因此您只需选择一个新的数据源而不是修改Grafana数据源和仪表板。 为所有指标添加了一个ip标签,并将其用作数据库指标和节点指标之间的连接键。 INFRA监控Infra主仪表板:INFRA概览 添加日志仪表板:日志实例 PGLOG分析和PGLOG会话现在被视为一个示例Pigsty APP。 NODES监控应用如果您完全不关心数据库,现在可以单独使用Pigsty作为主机监控软件! 包括4个核心仪表板:节点概览 & 节点集群 & 节点实例 & 节点警报 为节点引入新的身份变量:node_cluster 和 nodename 变量pg_hostname现在意味着将主机名设置为与postgres实例名相同,以保持向后兼容性 变量nodename_overwrite 控制是否用nodename覆盖节点的主机名 变量nodename_exchange 将nodename写入彼此的/etc/hosts 所有节点指标引用都经过修订,通过ip连接 节点监控目标在/etc/prometheus/targets/nodes下单独管理 PGSQL监控增强完全新的PGSQL集群,简化并专注于集群中的重要内容。 新仪表板PGSQL数据库是集群级对象监控。例如整个集群而不是单个实例的表和查询。 PGSQL警报仪表板现在只关注pgsql警报。 PGSQL Shard已添加到PGSQL中。 Redis监控增强 MatrixDB支持
通过pigsty-matrix.yml playbook可以部署MatrixDB(Greenplum 7) MatrixDB监控仪表板:PGSQL MatrixDB 添加示例配置:pigsty-mxdb.yml 置备改进
现在 pigsty 的工作流如下:
infra.yml ---> 在单一的元节点上安装 pigsty
| 然后将更多节点加入 pigsty 的管理下
|
nodes.yml ---> 为 pigsty 准备节点(节点设置、dcs、node_exporter、promtail)
| 然后选择一个 playbook 在这些节点上部署数据库集群
|
^--> pgsql.yml 在已准备好的节点上安装 postgres
^--> redis.yml 在已准备好的节点上安装 redis
infra-demo.yml =
infra.yml -l meta +
nodes.yml -l pg-test +
pgsql.yml -l pg-test +
infra-loki.yml + infra-jupyter.yml + infra-pgweb.yml
nodes.yml:用于设置和准备 pigsty 的节点,在节点上设置 node、node_exporter、consul agent node-remove.yml 用于节点注销pgsql.yml:现在只在已准备好的节点上工作pgsql-remove 现在只负责 postgres 本身(dcs 和节点监控由 node.yml 负责)添加一系列新选项以在 greenplum/matrixdb 中重用 postgres 角色 redis.yml:现在在已准备好的节点上工作而 redis-remove.yml 现在从节点上移除 redis。 pgsql-matrix.yml 现在在已准备好的节点上安装 matrixdb(Greenplum 7)。软件升级
PostgreSQL 14.2 PostGIS 3.2 TimescaleDB 2.6 Patroni 2.1.3 (Prometheus 指标 + 故障转移插槽) HAProxy 2.5.5 (修复统计错误,更多指标) PG 导出器 0.4.1 (超时参数等) Grafana 8.4.4 Prometheus 2.33.4 Greenplum 6.19.4 / MatrixDB 4.4.0 Loki 现在作为 rpm 包提供,而不是 zip 存档。 错误修复
删除 patroni 的 consul 依赖,这使其更容易迁移到新的 consul 集群 修复 prometheus bin/new 脚本的默认数据目录路径:从 /export/prometheus 更改为 /data/prometheus 在 vip-manager systemd 服务中添加重新启动秒数 修复错别字和任务 API 变更
新增变量
node_cluster:节点集群的身份变量nodename_overwrite:如果设置,则 nodename 将设置为节点的主机名nodename_exchange:交换 play 主机之间的节点主机名(在 /etc/hosts 中)node_dns_hosts_extra:可以通过单个实例/集群轻松覆盖的额外静态 dns 记录patroni_enabled:如果禁用,postgres & patroni 的引导过程不会在 postgres 角色期间执行pgbouncer_enabled:如果禁用,pgbouncer 在 postgres 角色期间不会启动pg_exporter_params:生成监控目标 url 时为 pg_exporter 提供的额外 url 参数。pg_provision:布尔值变量,表示是否执行 postgres 角色的资源配置部分(模板,数据库,用户)no_cmdb:用于 infra.yml 和 infra-demo.yml 播放书,不会在元节点上创建 cmdb。MD5 (app.tgz) = f887313767982b31a2b094e5589a75ea
MD5 (matrix.tgz) = 3d063437c482d94bd7e35df1a08bbc84
MD5 (pigsty.tgz) = e143b88ebea1474f9ebaffddc6072c49
MD5 (pkg.tgz) = 73e8f5ce995b1f1760cb63c1904fb91b
v1.3.1 监控
PGSQL & PGCAT 仪表盘改进 优化 pgcat 实例 & pgcat 数据库的布局 在 pgsql 实例仪表盘中添加关键指标面板,与 pgsql 集群保持一致 在 pgcat 数据库中添加表/索引膨胀面板,移除 pgcat 膨胀仪表盘 在 pgcat 数据库仪表盘中添加索引信息 修复在 grafana 8.3 中的损坏面板 在 nginx 主页中添加 redis 索引 部署
新的 infra-demo.yml 剧本用于一次性引导 使用 infra-jupyter.yml 剧本部署可选的 jupyter lab 服务器 使用 infra-pgweb.yml 剧本部署可选的 pgweb 服务器 在 meta 节点上新的 pg 别名,可以从 admin 用户启动 postgres 集群(除了 postgres) 根据 timescaledb-tune 的建议调整所有 patroni 配置模板中的 max_locks_per_transactions 在配置模板中添加 citus.node_conninfo: 'sslmode=prefer' 以便在没有 SSL 的情况下使用 citus 在 pgdg14 包列表中添加所有扩展(除了 pgrouting) 将 node_exporter 升级到 v1.3.1 将 PostgREST v9.0.0 添加到包列表。从 postgres 模式生成 API。 错误修复
Grafana 的安全漏洞(升级到 v8.3.1 问题 ) 修复 pg_instance & pg_service 在 register 角色中从剧本的中间开始时的问题 修复在没有 pg_cluster 变量存在的主机上 nginx 主页渲染问题 在升级到 grafana 8.3.1 时修复样式问题 v1.3.0 【功能增强】Redis 部署(集群、哨兵、主从) 【功能增强】Redis 监控Redis 总览仪表盘 Redis 集群仪表盘 Redis 实例仪表盘
-【功能增强】 监控:PGCAT 大修 新仪表盘:PGCAT 实例 新仪表盘:PGCAT 数据库仪表盘 重做仪表盘:PGCAT 表格 【功能增强】 监控:PGSQL 增强新面板:PGSQL 集群,添加 10 个关键指标面板(默认切换) 新面板:PGSQL 实例,添加 10 个关键指标面板(默认切换) 简化 & 重新设计:PGSQL 服务 在 PGCAT & PGSL 仪表盘之间添加交叉引用
-【功能增强】 监控部署 现在 grafana 数据源在仅监控部署期间自动注册
-【功能增强】 软件升级 将 PostgreSQL 13 添加到默认包列表 默认升级到 PostgreSQL 14.1 添加 greenplum rpm 和依赖项 添加 redis rpm & 源代码包 将 perf 添加为默认包 v1.2.0 【功能增强】默认使用 PostgreSQL 14 版本 【功能增强】默认使用 TimescaleDB 2.5 扩展现在 timescaledb 和 postgis 默认在 cmdb 中启用 【功能增强】 新增仅监控模式:仅通过可连接的 URL,您可以使用 pigsty 监控现有的 pg 实例 pg_exporter 将在本地的 meta 节点上部署 新仪表板 PGSQL Cluster Monly 用于远程集群 【功能增强】软件升级grafana 升级到 8.2.2 pev2 升级到 v0.11.9 promscale 升级到 0.6.2 pgweb 升级到 0.11.9 新增扩展:pglogical、pg_stat_monitor、orafce
-【功能增强】自动检测机器规格并使用适当的 node_tune 和 pg_conf 模板
-【功能增强】重做与膨胀相关的视图,现在公开更多信息
-【功能增强】删除 timescale 和 citus 的内部监控
-【功能增强】新剧本 pgsql-audit.yml 用于创建审计报告
-【BUG修复】现在 pgbouncer_exporter 资源所有者是 {{ pg_dbsu }} 而不是 postgres
-【BUG修复】 修复在执行 REINDEX TABLE CONCURRENTLY 时 pg_exporter 在 pg_table pg_index 上的重复指标
-【功能增强】现在所有配置模板都减少到两个:auto 和 demo。(已删除:pub4, pg14, demo4, tiny, oltp) 如果 vagrant 是默认用户,则配置 pigsty-demo,否则使用 pigsty-auto。 如何从 v1.1.1 升级
在 1.2.0 中没有 API 变更。您仍然可以使用旧的 pigsty.yml 配置文件 (PG13)。
对于基础设施部分,重新执行 repo 将完成大部分工作。
至于数据库,您仍然可以使用现有的 PG13 实例。就地升级在涉及到像 PostGIS 和 Timescale 这样的扩展时非常棘手。我强烈推荐使用逻辑复制进行数据库迁移。
新的剧本 pgsql-migration.yml 将使这一过程变得容易得多。它将创建一系列的脚本,帮助您近乎零停机时间地迁移您的集群。
v1.1.1 【功能增强】 用 timescale 版本替换 timescaledb 的 apache 版本 【功能增强】 升级 prometheus 到 2.30 【BUG修复】 现在 pg_exporter 配置目录的属主是 {{ pg_dbsu }},而不再是 prometheus 如何从v1.1.0升级?
这个版本的主要变动是 TimescaleDB,使用 TimescaleDB License (TSL)的官方版本替代了 PGDG 仓库中的 Apache License v2 的版本。
stop/pause postgres instance with timescaledb
yum remove -y timescaledb_13
[ timescale_timescaledb]
name = timescale_timescaledb
baseurl = https://packagecloud.io/timescale/timescaledb/el/7/$basearch
repo_gpgcheck = 0
gpgcheck = 0
enabled = 1
yum install timescaledb-2-postgresql13
v1.1.0 【增强功能】 增加 pg_dummy_filesize 以创建文件系统空间占位符 【增强功能】 主页大改版 【增强功能】 增加 Jupyter Lab 整合 【增强功能】 增加 pgweb 控制台整合 【增强功能】 增加 pgbadger 支持 【增强功能】 增加 pev2 支持,解释可视化工具 【增强功能】 增加 pglog 工具 【增强功能】 更新默认的 pkg.tgz 软件版本:PostgreSQL 升级至 v13.4(支持官方的 pg14) pgbouncer 升级至 v1.16(指标定义更新) Grafana 升级至 v8.1.4 Prometheus 升级至 v2.2.29 node_exporter 升级至 v1.2.2 haproxy 升级至 v2.1.1 consul 升级至 v1.10.2 vip-manager 升级至 v1.0.1 API 变更
nginx_upstream 现在持有不同的结构。(不兼容)新的配置条目:app_list,渲染至主页的导航条目 新的配置条目:docs_enabled,在默认服务器上设置本地文档 新的配置条目:pev2_enabled,设置本地的 pev2 工具 新的配置条目:pgbadger_enabled,创建日志概要/报告目录 新的配置条目:jupyter_enabled,在元节点上启用 Jupyter Lab 服务器 新的配置条目:jupyter_username,指定运行 Jupyter Lab 的用户 新的配置条目:jupyter_password,指定 Jupyter Lab 的默认密码 新的配置条目:pgweb_enabled,在元节点上启用 pgweb 服务器 新的配置条目:pgweb_username,指定运行 pgweb 的用户 将内部标记 repo_exist 重命名为 repo_exists 现在 repo_address 的默认值为 pigsty 而非 yum.pigsty 现在 haproxy 的访问点为 http://pigsty 而非 http://h.pigsty v1.0.1 2021-09-14
文档更新 错误修复:pgsql-remove 不会移除主实例 错误修复:用 pg_cluster + pg_seq 替换 pg_instanceStart-At-Task 可能因为 pg_instance 未定义而失败 错误修复:从默认共享预加载库中移除 cituscitus 会强制 max_prepared_transaction 的值为非零 错误修复:在 configure 中进行 ssh sudo 检查:现在使用 ssh -t sudo -n ls 进行权限检查 笔误修复:pg-backup 脚本的笔误 警报调整:移除 NTP 合理性检查警报(与 ClockSkew 重复) 导出器调整:移除 collector.systemd 以减少开销 v1.0.0 v1 正式发布,监控系统全面改进
亮点
监控系统全面改进在 Grafana 8.0 上新增仪表盘 新的度量定义,增加 PG14 支持 简化的标签系统:静态标签集:(job, cls, ins) 新的警报规则与衍生度量 同时监控多个数据库 实时日志搜索 & csvlog 分析 链接丰富的仪表盘,点击图形元素进行深入|汇总 架构变更将 citus 和 timescaledb 加入默认安装部分 增加对 PostgreSQL 14beta2 的支持 简化 haproxy 管理页面索引 通过添加新的角色 register 来解耦基础设施和 pgsql 添加新角色 loki 和 promtail 用于日志记录 为管理员节点上的管理员用户添加新角色 environ 以设置环境 默认使用 static 服务发现用于 prometheus(而不是 consul) 添加新角色 remove 以优雅地移除集群和实例 升级 prometheus 和 grafana 的配置逻辑 升级到 vip-manager 1.0,node_exporter 1.2,pg_exporter 0.4,grafana 8.0 现在,每个实例上的每个数据库都可以自动注册为 grafana 数据源 将 consul 注册任务移到 register 角色,更改 consul 服务标签 添加 cmdb.sql 作为 pg-meta 基线定义(CMDB & PGLOG) 应用框架可扩展框架用于新功能 核心应用:PostgreSQL 监控系统:pgsql 核心应用:PostgreSQL 目录浏览器:pgcat 核心应用:PostgreSQL Csvlog 分析器:pglog 添加示例应用 covid 用于可视化 covid-19 数据 添加示例应用 isd 用于可视化 isd 数据 其他添加 jupyterlab,为数据科学提供完整的 python 环境 添加 vonng-echarts-panel 以恢复对 Echarts 的支持 添加 wrap 脚本 createpg,createdb,createuser 添加 cmdb 动态库存脚本:load_conf.py,inventory_cmdb,inventory_conf 移除过时的剧本:pgsql-monitor,pgsql-service,node-remove 等…. API 变更
新变量: node_meta_pip_install 新变量: grafana_admin_username 新变量: grafana_database 新变量: grafana_pgurl 新变量: pg_shared_libraries 新变量: pg_exporter_auto_discovery 新变量: pg_exporter_exclude_database 新变量: pg_exporter_include_database 变量重命名: grafana_url 为 grafana_endpoint Bug 修复
修复默认时区 Asia/Shanghai (CST) 问题 修复 pgbouncer & patroni 的 nofile 限制 当执行标签 pgbouncer 时,pgbouncer 的用户列表和数据库列表将会被生成 v0.9.0 v0.9极大简化了安装流程,进行了大量日志相关改进,开发了命令行工具(Beta),并修复了一系列问题。
新功能
一键安装模式:
/bin/bash -c " $( curl -fsSL https://pigsty.cc/install) "
开发命令行工具 pigsty-cli封装常用Ansible命令,目前pigsty-cli处于Beta状态
使用Loki与Promtail收集日志:
默认收集Postgres,Pgbouncer,Patroni日志 新增部署脚本infra-loki.yml 与 pgsql-promtail.yml 定义基于日志的监控指标 使用Grafana制作日志相关可视化面板。 监控组件可以使用二进制安装,使用files/get_bin.sh下载监控二进制组件。
飞升模式:
当集群元节点初始化完成后,可以使用bin/upgrade升级为动态Inventory
使用pg-meta上的数据库代替YAML配置文件。
问题修复
集中修复日志相关问题:修复了HAProxy健康检查造成PG日志中大量 connection reset by peer的问题。 修复了HAProxy健康检查造成Patroni日志中大量出现Connect Reset Exception的问题 修复了Patroni日志时间戳格式,去除毫秒时间戳,附加完整时区信息。 为dbuser_monitor配置1秒的log_min_duration_statement,避免监控查询出现在日志中。 重构Grafana角色在保持API不变的前提下重构Grafana角色。 使用CDN下载预打包的Grafana插件,加速插件下载 其他问题修复修复了pgbouncer-create-user 未能正确处理 md5 密码的问题。 完善了数据库与用户创建SQL模版中参数空置检查。 修复了 NODE DNS配置时如果手工中断执行,DNS配置可能出错的问题。 重构了Makefile快捷方式 Makefile 中的错别字 参数变更
node_disable_swap 默认为 False,默认不会关闭SWAP。node_sysctl_params 不再有默认修改的系统参数。grafana_plugin 的默认值install 现在意味着当插件缓存不存在时,从CDN下载。repo_url_packages 现在从 Pigsty CDN 下载额外的RPM包,解决墙内无法访问的问题。proxy_env.no_proxy现在将Pigsty CDN加入到NOPROXY列表中。grafana_customize 现在默认为false,启用意味着安装Pigsty Pro版UI(默认不开源所以不要启用)node_admin_pk_current,新增选项,启用后会将当前用户的~/.ssh/id_rsa.pub添加至管理员的Key中loki_clean:新增选项,安装Loki时是否清除现有数据loki_data_dir:新增选项,指明安装Loki时的数据目录promtail_enabled 是否启用Promtail日志收集服务?promtail_clean 是否在安装promtail时移除已有状态信息?promtail_port promtail使用的默认端口,默认为9080promtail_status_file 保存Promtail状态信息的文件位置promtail_send_url 用于接收日志的loki服务endpointv0.8.0 v0.8 针对 服务(Service) 接入部分进行了彻底的重做。现在除了默认的primary, replica服务外,用户可以自行定义新的服务。服务的接口可以支持多种不同的实现,例如L4 DPKG VIP可作为Haproxy的替代品与Pigsty集成。同时,针对用户反馈的一些问题进行了集中处理与改进。
改动内容
v0.8是供给方案定稿版本,此后供给系统的API将保持稳定。
API变更
原有vip与haproxy角色的所有配置项,现在迁移至service角色中。
#------------------------------------------------------------------------------
# SERVICE PROVISION
#------------------------------------------------------------------------------
pg_weight : 100 # default load balance weight (instance level)
# - service - #
pg_services : # how to expose postgres service in cluster?
# primary service will route {ip|name}:5433 to primary pgbouncer (5433->6432 rw)
- name : primary # service name {{ pg_cluster }}_primary
src_ip : "*"
src_port : 5433
dst_port : pgbouncer # 5433 route to pgbouncer
check_url : /primary # primary health check, success when instance is primary
selector : "[]" # select all instance as primary service candidate
# replica service will route {ip|name}:5434 to replica pgbouncer (5434->6432 ro)
- name : replica # service name {{ pg_cluster }}_replica
src_ip : "*"
src_port : 5434
dst_port : pgbouncer
check_url : /read-only # read-only health check. (including primary)
selector : "[]" # select all instance as replica service candidate
selector_backup : "[? pg_role == `primary`]" # primary are used as backup server in replica service
# default service will route {ip|name}:5436 to primary postgres (5436->5432 primary)
- name : default # service's actual name is {{ pg_cluster }}-{{ service.name }}
src_ip : "*" # service bind ip address, * for all, vip for cluster virtual ip address
src_port : 5436 # bind port, mandatory
dst_port: postgres # target port : postgres|pgbouncer|port_number , pgbouncer(6432) by default
check_method: http # health check method : only http is available for now
check_port: patroni # health check port : patroni|pg_exporter|port_number , patroni by default
check_url : /primary # health check url path, / as default
check_code : 200 # health check http code, 200 as default
selector : "[]" # instance selector
haproxy : # haproxy specific fields
maxconn : 3000 # default front-end connection
balance : roundrobin # load balance algorithm (roundrobin by default)
default_server_options : 'inter 3s fastinter 1s downinter 5s rise 3 fall 3 on-marked-down shutdown-sessions slowstart 30s maxconn 3000 maxqueue 128 weight 100'
# offline service will route {ip|name}:5438 to offline postgres (5438->5432 offline)
- name : offline # service name {{ pg_cluster }}_replica
src_ip : "*"
src_port : 5438
dst_port : postgres
check_url : /replica # offline MUST be a replica
selector : "[? pg_role == `offline` || pg_offline_query ]" # instances with pg_role == 'offline' or instance marked with 'pg_offline_query == true'
selector_backup : "[? pg_role == `replica` && !pg_offline_query]" # replica are used as backup server in offline service
pg_services_extra : [] # extra services to be added
# - haproxy - #
haproxy_enabled : true # enable haproxy among every cluster members
haproxy_reload : true # reload haproxy after config
haproxy_policy : roundrobin # roundrobin, leastconn
haproxy_admin_auth_enabled : false # enable authentication for haproxy admin?
haproxy_admin_username : admin # default haproxy admin username
haproxy_admin_password : admin # default haproxy admin password
haproxy_exporter_port : 9101 # default admin/exporter port
haproxy_client_timeout : 3h # client side connection timeout
haproxy_server_timeout : 3h # server side connection timeout
# - vip - #
vip_mode : none # none | l2 | l4
vip_reload : true # whether reload service after config
# vip_address: 127.0.0.1 # virtual ip address ip (l2 or l4)
# vip_cidrmask: 24 # virtual ip address cidr mask (l2 only)
# vip_interface: eth0 # virtual ip network interface (l2 only)
新增选项
# - localization - #
pg_encoding : UTF8 # default to UTF8
pg_locale : C # default to C
pg_lc_collate : C # default to C
pg_lc_ctype : en_US.UTF8 # default to en_US.UTF8
pg_reload : true # reload postgres after hba changes
vip_mode : none # none | l2 | l4
vip_reload : true # whether reload service after config
移除选项
haproxy_check_port # Haproxy相关参数已经被Service定义覆盖
haproxy_primary_port
haproxy_replica_port
haproxy_backend_port
haproxy_weight
haproxy_weight_fallback
vip_enabled # vip_enabled参数被vip_mode覆盖
服务管理
pg_services 与 pg_services_extra 定义了集群中的服务 ,每一个服务的定义结构如下例所示:
一个服务必须指定以下内容:
名称 :服务的完整名称以数据库集群名为前缀,以service.name为后缀,通过-连接。例如在pg-test集群中name=primary的服务,其完整服务名称为pg-test-primary。
端口 :在Pigsty中,服务默认采用NodePort的形式对外暴露,因此暴露端口为必选项。但如果使用外部负载均衡服务接入方案,您也可以通过其他的方式区分服务。
选择器 :选择器指定了服务的成员,采用JMESPath的形式,从所有集群实例成员中筛选变量。默认的[]选择器会选取所有的集群成员。
此外selector_backup会选择或标记用于backup的实例列表(当集群中所有其他成员失效时方才接管服务)
# default service will route {ip|name}:5436 to primary postgres (5436->5432 primary)
- name : default # service's actual name is {{ pg_cluster }}-{{ service.name }}
src_ip : "*" # service bind ip address, * for all, vip for cluster virtual ip address
src_port : 5436 # bind port, mandatory
dst_port: postgres # target port : postgres|pgbouncer|port_number , pgbouncer(6432) by default
check_method: http # health check method : only http is available for now
check_port: patroni # health check port : patroni|pg_exporter|port_number , patroni by default
check_url : /primary # health check url path, / as default
check_code : 200 # health check http code, 200 as default
selector : "[]" # instance selector
haproxy : # haproxy specific fields
maxconn : 3000 # default front-end connection
balance : roundrobin # load balance algorithm (roundrobin by default)
default_server_options : 'inter 3s fastinter 1s downinter 5s rise 3 fall 3 on-marked-down shutdown-sessions slowstart 30s maxconn 3000 maxqueue 128 weight 100'
数据库管理
数据库现在可以对locale的细分选项:lc_ctype与lc_collate分别进行指定。支持这一功能的主要原因是PG的扩展插件pg_trgm需要在lc_ctype!=C的环境中才能正常支持中文。
旧接口定义
pg_databases :
- name : meta # name is the only required field for a database
owner : postgres # optional, database owner
template : template1 # optional, template1 by default
encoding : UTF8 # optional, UTF8 by default
locale : C # optional, C by default
allowconn : true # optional, true by default, false disable connect at all
revokeconn : false # optional, false by default, true revoke connect from public # (only default user and owner have connect privilege on database)
tablespace : pg_default # optional, 'pg_default' is the default tablespace
connlimit : -1 # optional, connection limit, -1 or none disable limit (default)
extensions : # optional, extension name and where to create
- {name: postgis, schema : public}
parameters : # optional, extra parameters with ALTER DATABASE
enable_partitionwise_join : true
pgbouncer : true # optional, add this database to pgbouncer list? true by default
comment : pigsty meta database # optional, comment string for database
新的接口定义
pg_databases :
- name : meta # name is the only required field for a database
# owner: postgres # optional, database owner
# template: template1 # optional, template1 by default
# encoding: UTF8 # optional, UTF8 by default , must same as template database, leave blank to set to db default
# locale: C # optional, C by default , must same as template database, leave blank to set to db default
# lc_collate: C # optional, C by default , must same as template database, leave blank to set to db default
# lc_ctype: C # optional, C by default , must same as template database, leave blank to set to db default
allowconn : true # optional, true by default, false disable connect at all
revokeconn : false # optional, false by default, true revoke connect from public # (only default user and owner have connect privilege on database)
# tablespace: pg_default # optional, 'pg_default' is the default tablespace
connlimit : -1 # optional, connection limit, -1 or none disable limit (default)
extensions : # optional, extension name and where to create
- {name: postgis, schema : public}
parameters : # optional, extra parameters with ALTER DATABASE
enable_partitionwise_join : true
pgbouncer : true # optional, add this database to pgbouncer list? true by default
comment : pigsty meta database # optional, comment string for database
v0.7.0 v0.7 针对接入已有数据库实例 进行了改进,现在用户可以采用 仅监控部署(Monly Deployment) 模式使用Pigsty。同时新增了专用于管理数据库与用户、以及单独部署监控的剧本,并对数据库与用户的定义进行改进。
Features
Bug Fix
API变更
新增选项
prometheus_sd_target : batch # batch|single 监控目标定义文件采用单体还是每个实例一个
exporter_install : none # none|yum|binary 监控Exporter的安装模式
exporter_repo_url : '' # 如果设置,这里的REPO连接会加入目标的Yum源中
node_exporter_options : '--no-collector.softnet --collector.systemd --collector.ntp --collector.tcpstat --collector.processes' # Node Exporter默认的命令行选项
pg_exporter_url : '' # 可选,PG Exporter监控对象的URL
pgbouncer_exporter_url : '' # 可选,PGBOUNCER EXPORTER监控对象的URL
移除选项
exporter_binary_install : false # 功能被 exporter_install 覆盖
定义结构变更
pg_default_roles # 变化细节参考 用户管理。
pg_users # 变化细节参考 用户管理。
pg_databases # 变化细节参考 数据库管理。
重命名选项
pg_default_privilegs -> pg_default_privileges # 很明显这是一个错别字
仅监控模式
有时用户不希望使用Pigsty供给方案,只希望使用Pigsty监控系统管理现有PostgreSQL实例。
Pigsty提供了仅监控部署(monly, monitor-only模式,剥离供给方案部分,可用于监控现有PostgreSQL集群。
仅监控模式的部署流程与标准模式大体上保持一致,但省略了很多步骤
在元节点 上完成基础设施初始化的部分与标准流程保持一致,仍然通过./infra.yml完成。 不需要在数据库节点 上完成 基础设施初始化 。 不需要在数据库节点 上执行数据库初始化的绝大多数任务,而是通过专用的./pgsql-monitor.yml 完成仅监控系统部署。 实际使用的配置项大大减少,只保留基础设施相关变量,与 监控系统相关的少量变量。 数据库管理
Database provisioning interface enhancement #33
旧接口定义
pg_databases : # create a business database 'meta'
- name : meta
schemas : [ meta] # create extra schema named 'meta'
extensions : [ {name : postgis}] # create extra extension postgis
parameters : # overwrite database meta's default search_path
search_path : public, monitor
新的接口定义
pg_databases :
- name : meta # name is the only required field for a database
owner : postgres # optional, database owner
template : template1 # optional, template1 by default
encoding : UTF8 # optional, UTF8 by default
locale : C # optional, C by default
allowconn : true # optional, true by default, false disable connect at all
revokeconn : false # optional, false by default, true revoke connect from public # (only default user and owner have connect privilege on database)
tablespace : pg_default # optional, 'pg_default' is the default tablespace
connlimit : -1 # optional, connection limit, -1 or none disable limit (default)
extensions : # optional, extension name and where to create
- {name: postgis, schema : public}
parameters : # optional, extra parameters with ALTER DATABASE
enable_partitionwise_join : true
pgbouncer : true # optional, add this database to pgbouncer list? true by default
comment : pigsty meta database # optional, comment string for database
接口变更
Add new options: template , encoding, locale, allowconn, tablespace, connlimit Add new option revokeconn, which revoke connect privileges from public for this database Add comment field for database 数据库变更
在运行中集群中创建新数据库可以使用pgsql-createdb.yml剧本,在配置中定义完新数据库后,执行以下剧本。
./pgsql-createdb.yml -e pg_database = <your_new_database_name>
通过-e pg_datbase=告知需要创建的数据库名称,则该数据库即会被创建(或修改)。具体执行的命令参见集群主库/pg/tmp/pg-db-{{ database.name}}.sql文件。
用户管理
User provisioning interface enhancement #34
旧接口定义
pg_users :
- username : test # example production user have read-write access
password : test # example user's password
options : LOGIN # extra options
groups : [ dbrole_readwrite ] # dborole_admin|dbrole_readwrite|dbrole_readonly
comment : default test user for production usage
pgbouncer : true # add to pgbouncer
新接口定义
pg_users :
# complete example of user/role definition for production user
- name : dbuser_meta # example production user have read-write access
password : DBUser.Meta # example user's password, can be encrypted
login : true # can login, true by default (should be false for role)
superuser : false # is superuser? false by default
createdb : false # can create database? false by default
createrole : false # can create role? false by default
inherit : true # can this role use inherited privileges?
replication : false # can this role do replication? false by default
bypassrls : false # can this role bypass row level security? false by default
connlimit : -1 # connection limit, -1 disable limit
expire_at : '2030-12-31' # 'timestamp' when this role is expired
expire_in : 365 # now + n days when this role is expired (OVERWRITE expire_at)
roles : [ dbrole_readwrite] # dborole_admin|dbrole_readwrite|dbrole_readonly
pgbouncer : true # add this user to pgbouncer? false by default (true for production user)
parameters : # user's default search path
search_path : public
comment : test user
接口变更
username field rename to namegroups field rename to rolesoptions now split into separated configration entries:
login, superuser, createdb, createrole, inherit, replication,bypassrls,connlimitexpire_at and expire_in optionspgbouncer option for user is now false by default用户管理
在运行中集群中创建新数据库可以使用pgsql-createuser.yml剧本,在配置中定义完新数据库后,执行以下剧本。
./pgsql-createuser.yml -e pg_user = <your_new_user_name>
通过-e pg_user=告知需要创建的数据库名称,则该数据库即会被创建(或修改)。具体执行的命令参见集群主库/pg/tmp/pg-user-{{ user.name}}.sql文件。
v0.6.0 v0.6 对数据库供给方案进行了修改与调整,根据用户的反馈添加了一系列实用功能与修正。针对监控系统的移植性进行优化,便于与其他外部数据库供给方案对接。
BUG修复
修复了新版本Patroni重启后会重置PG HBA的问题 修复了PG Overview Dashboard标题中的别字 修复了沙箱集群pg-test的默认主库,原来为pg-test-2,应当为pg-test-1 修复了过时代码注释 功能改进
改造Prometheus与监控供给方式允许在无基础设施的情况下对已有PG集群进行监控部署,便于监控系统与其他供给方案集成。#11 基于Inventory渲染所有监控对象的静态列表,用于静态服务发现。#11 Prometheus添加了静态对象模式,用于替代动态服务发现,集中进行身份管理 #11 监控Exporter现在添加了service_registry选项,Consul服务注册变为可选项 #13 Exporter现在可以通过拷贝二进制的方式直接安装:exporter_binary_install,#14 Exporter现在具有xxx_enabled选项,控制是否启用该组件。 Haproxy供给重构与改进 #8 新增了全局HAProxy管理界面导航,默认域名h.pigsty 允许将主库加入只读服务集中,当集群中所有从库宕机时自动承接读流量。 #8 允许位Haproxy实例管理界面启用认证 haproxy_admin_auth_enabled 允许通过配置项调整每个服务对应后端的流量权重. #10 访问控制模型改进。#7 添加了默认角色dbrole_offline,用于慢查询,ETL,交互式查询场景。 修改默认HBA规则,允许dbrole_offline分组的用户访问pg_role == 'offline'及pg_offline_query == true的实例。 软件更新 Release v0.6PostgreSQL 13.2 Prometheus 2.25 PG Exporter 0.3.2 Node Exporter 1.1 Consul 1.9.3 更新默认PG源:PostgreSQL现在默认使用浙江大学的镜像,加速下载安装 接口变更
新增选项
service_registry : consul # 服务注册机制:none | consul | etcd | both
prometheus_options : '--storage.tsdb.retention=30d' # prometheus命令行选项
prometheus_sd_method : consul # Prometheus使用的服务发现机制:static|consul
prometheus_sd_interval : 2s # Prometheus服务发现刷新间隔
pg_offline_query : false # 设置后将允许dbrole_offline角色连接与查询该实例
node_exporter_enabled : true # 设置后将安装配置Node Exporter
pg_exporter_enabled : true # 设置后将安装配置PG Exporter
pgbouncer_exporter_enabled : true # 设置后将安装配置Pgbouncer Exporter
dcs_disable_purge : false # 双保险,强制 dcs_exists_action = abort 避免误删除DCS实例
pg_disable_purge : false # 双保险,强制 pg_exists_action = abort 避免误删除数据库实例
haproxy_weight : 100 # 配置实例的相对负载均衡权重
haproxy_weight_fallback : 1 # 配置集群主库在只读服务中的相对权重
移除选项
prometheus_metrics_path # 与 exporter_metrics_path 重复
prometheus_retention # 功能被 prometheus_options 覆盖
v0.5.0 Pigsty 现在有了官方网站啦:pigsty.cc 🎉 !
亮点特性
Pigsty官方 文档站 正式上线! 添加了数据库模板的定制支持,用户可以通过配置文件定制所需的数据库内部对象。 对默认 访问控制 模型进行了改进 重构了HBA管理的逻辑,现在将由Pigsty替代Patroni直接负责生成HBA 将Grafana监控系统的供给方案从sqlite改为JSON文件静态Provision 将pg-cluster-replication面板加入Pigsty开源免费套餐。 最新的经过测试的离线安装包:pkg.tgz (v0.5) 定制数据库
您是否烦恼过单实例多租户的问题?比如总有研发拿着PostgreSQL当MySQL使,明明是一个Schema就能解决的问题,非要创建一个新的数据库出来,在一个实例中创建出几十个不同的DB。
不要忧伤,不要心急。Pigsty已经提供数据库内部对象的Provision方案,您可以轻松地在配置文件中指定所需的数据库内对象,包括:
角色 数据库属主 额外的模式 额外的扩展插件 数据库级的自定义配置参数 数据库属主 额外的模式 额外的扩展插件 数据库级的自定义配置参数 默认权限默认情况下这里配置的权限会应用至所有由 超级用户 和 管理员用户创建的对象上。 默认扩展 默认模式 配置样例
# 通常是每个DB集群配置的变量
pg_users :
- username : test
password : test
comment : default test user
groups : [ dbrole_readwrite ] # dborole_admin|dbrole_readwrite|dbrole_readonly
pg_databases : # create a business database 'test'
- name : test
extensions : [ {name : postgis}] # create extra extension postgis
parameters : # overwrite database meta's default search_path
search_path : public,monitor
# 通常是整个环境统一配置的全局变量
# - system roles - #
pg_replication_username : replicator # system replication user
pg_replication_password : DBUser.Replicator # system replication password
pg_monitor_username : dbuser_monitor # system monitor user
pg_monitor_password : DBUser.Monitor # system monitor password
pg_admin_username : dbuser_admin # system admin user
pg_admin_password : DBUser.Admin # system admin password
# - default roles - #
pg_default_roles :
- username : dbrole_readonly # sample user :
options : NOLOGIN # role can not login
comment : role for readonly access # comment string
- username: dbrole_readwrite # sample user : one object for each user
options : NOLOGIN
comment : role for read-write access
groups : [ dbrole_readonly ] # read-write includes read-only access
- username: dbrole_admin # sample user : one object for each user
options : NOLOGIN BYPASSRLS # admin can bypass row level security
comment : role for object creation
groups : [ dbrole_readwrite,pg_monitor,pg_signal_backend]
# NOTE: replicator, monitor, admin password are overwritten by separated config entry
- username : postgres # reset dbsu password to NULL (if dbsu is not postgres)
options : SUPERUSER LOGIN
comment : system superuser
- username : replicator
options : REPLICATION LOGIN
groups : [ pg_monitor, dbrole_readonly]
comment : system replicator
- username : dbuser_monitor
options : LOGIN CONNECTION LIMIT 10
comment : system monitor user
groups : [ pg_monitor, dbrole_readonly]
- username : dbuser_admin
options : LOGIN BYPASSRLS
comment : system admin user
groups : [ dbrole_admin]
- username : dbuser_stats
password : DBUser.Stats
options : LOGIN
comment : business read-only user for statistics
groups : [ dbrole_readonly]
# object created by dbsu and admin will have their privileges properly set
pg_default_privilegs :
- GRANT USAGE ON SCHEMAS TO dbrole_readonly
- GRANT SELECT ON TABLES TO dbrole_readonly
- GRANT SELECT ON SEQUENCES TO dbrole_readonly
- GRANT EXECUTE ON FUNCTIONS TO dbrole_readonly
- GRANT INSERT, UPDATE, DELETE ON TABLES TO dbrole_readwrite
- GRANT USAGE, UPDATE ON SEQUENCES TO dbrole_readwrite
- GRANT TRUNCATE, REFERENCES, TRIGGER ON TABLES TO dbrole_admin
- GRANT CREATE ON SCHEMAS TO dbrole_admin
- GRANT USAGE ON TYPES TO dbrole_admin
# schemas
pg_default_schemas : [ monitor]
# extension
pg_default_extensions :
- { name: 'pg_stat_statements', schema : 'monitor' }
- { name: 'pgstattuple', schema : 'monitor' }
- { name: 'pg_qualstats', schema : 'monitor' }
- { name: 'pg_buffercache', schema : 'monitor' }
- { name: 'pageinspect', schema : 'monitor' }
- { name: 'pg_prewarm', schema : 'monitor' }
- { name: 'pg_visibility', schema : 'monitor' }
- { name: 'pg_freespacemap', schema : 'monitor' }
- { name: 'pg_repack', schema : 'monitor' }
- name : postgres_fdw
- name : file_fdw
- name : btree_gist
- name : btree_gin
- name : pg_trgm
- name : intagg
- name : intarray
# postgres host-based authentication rules
pg_hba_rules :
- title : allow meta node password access
role : common
rules :
- host all all 10.10.10.10/32 md5
- title : allow intranet admin password access
role : common
rules :
- host all +dbrole_admin 10.0.0.0/8 md5
- host all +dbrole_admin 172.16.0.0/12 md5
- host all +dbrole_admin 192.168.0.0/16 md5
- title : allow intranet password access
role : common
rules :
- host all all 10.0.0.0/8 md5
- host all all 172.16.0.0/12 md5
- host all all 192.168.0.0/16 md5
- title : allow local read-write access (local production user via pgbouncer)
role : common
rules :
- local all +dbrole_readwrite md5
- host all +dbrole_readwrite 127.0.0.1/32 md5
- title : allow read-only user (stats, personal) password directly access
role : replica
rules :
- local all +dbrole_readonly md5
- host all +dbrole_readonly 127.0.0.1/32 md5
pg_hba_rules_extra : []
# pgbouncer host-based authentication rules
pgbouncer_hba_rules :
- title : local password access
role : common
rules :
- local all all md5
- host all all 127.0.0.1/32 md5
- title : intranet password access
role : common
rules :
- host all all 10.0.0.0/8 md5
- host all all 172.16.0.0/12 md5
- host all all 192.168.0.0/16 md5
pgbouncer_hba_rules_extra : []
数据库模板
权限模型
v0.5 改善了默认的权限模型,主要是针对单实例多租户的场景进行优化,并收紧权限控制。
撤回了普通业务用户对非所属数据库的默认CONNECT权限 撤回了非管理员用户对所属数据库的默认CREATE权限 撤回了所有用户在public模式下的默认创建权限。 供给方式
原先Pigsty采用直接拷贝Grafana自带的grafana.db的方式完成监控系统的初始化。
这种方式虽然简单粗暴管用,但不适合进行精细化的版本控制管理。在v0.5中,Pigsty采用了Grafana API完成了监控系统面板供给的工作。
您所需的就是在grafana_url中填入带有用户名密码的Grafana URL。
因此,监控系统可以背方便地添加至已有的Grafana中。
v0.4.0 第二个公开测试版v0.4现已正式发行!
监控系统
Pigsty v0.4对监控系统进行了整体升级改造,精心挑选了10个面板作为标准的Pigsty开源内容。同时,针对Grafana 7.3的不兼容升级进行了大量适配改造工作。使用升级的pg_exporter v0.3.1作为默认指标导出器,调整了监控报警规则的监控面板连接。
Pigsty开源版
Pigsty开源版选定了以下10个Dashboard作为开源内容。其他Dashboard作为可选的商业支持内容提供。
PG Overview PG Cluster PG Service PG Instance PG Database PG Query PG Table PG Table Catalog PG Table Detail Node 尽管进行了少量阉割,这10个监控面板所涵盖的内容仍然可以吊打所有同类软件。
软件升级
Pigsty v0.4进行了大量软件适配工作,包括:
Upgrade to PostgreSQL 13.1, Patroni 2.0.1-4, add citus to repo. Upgrade to pg_exporter 0.3.1 Upgrade to Grafana 7.3, Ton’s of compatibility work Upgrade to prometheus 2.23, with new UI as default Upgrade to consul 1.9 其他改进
Update prometheus alert rules Fix alertmanager info links Fix bugs and typos. add a simple backup script 离线安装包
v0.4的离线安装包(CentOS 7.8)已经可以从Github下载:pkg.tgz v0.3.0 首个Pigsty公开测试版本现在已经释出!
监控系统
Pigsty v0.3 包含以下8个监控面板作为开源内容:
PG Overview PG Cluster PG Service PG Instance PG Database PG Table Overview PG Table Catalog Node 离线安装包
v0.3 离线安装包(CentOS 7.8)已经可以从Github下载:pkg.tgz 2.13 - 同类对比 本文列出了与 Pigsty 生态位有重叠的产品与项目,并比较其在特性上的差异。
与 RDS 对比 Pigsty 是使用 Apache-2.0 开源的本地优先 RDS 替代,可以部署在您自己的物理机/虚拟机上,也可以部署在云服务器上。
因此,我们选择了全球份额第一的亚马逊云 AWS RDS for PostgreSQL ,以及中国市场份额第一的阿里云 RDS for PostgreSQL 作为参照对象。
阿里云 RDS 与 AWS RDS 均为闭源云数据库服务,通过租赁模式,仅在公有云上对外提供,以下对比基于最新的 PostgreSQL 16 主干版本进行,对比截止日期为 2024 年 2 月份。
功能特性 指标 Pigsty Aliyun RDS AWS RDS 大版本支持 13 - 18 13 - 18 13 - 18 只读从库 读写分离 快慢分离 异地灾备 延迟从库 负载均衡 连接池 高可用 时间点恢复 指标监控 日志采集 可视化系统 告警聚合通知
重要扩展 这里列出了一些重要扩展,对比基于最新的 PostgreSQL 16 主干版本进行,截止至 2024-02-28
扩展名称 Pigsty RDS / PGDG 官方仓库阿里云 RDS AWS RDS 加装扩展 地理空间 雷达点云 向量嵌入 机器学习 时序扩展 水平分布式 列存扩展 全文检索 图数据库 GraphQL OLAP 消息队列 DuckDB 模糊分词 CDC抽取 膨胀治理
AWS RDS PG 可用扩展 AWS RDS for PostgreSQL 16 可用扩展(已刨除PG自带扩展)
name pg16 pg15 pg14 pg13 pg12 pg11 pg10 amcheck 1.3 1.3 1.3 1.2 1.2 yes 1 auto_explain yes yes yes yes yes yes yes autoinc 1 1 1 1 null null null bloom 1 1 1 1 1 1 1 bool_plperl 1 1 1 1 null null null btree_gin 1.3 1.3 1.3 1.3 1.3 1.3 1.2 btree_gist 1.7 1.7 1.6 1.5 1.5 1.5 1.5 citext 1.6 1.6 1.6 1.6 1.6 1.5 1.4 cube 1.5 1.5 1.5 1.4 1.4 1.4 1.2 dblink 1.2 1.2 1.2 1.2 1.2 1.2 1.2 dict_int 1 1 1 1 1 1 1 dict_xsyn 1 1 1 1 1 1 1 earthdistance 1.1 1.1 1.1 1.1 1.1 1.1 1.1 fuzzystrmatch 1.2 1.1 1.1 1.1 1.1 1.1 1.1 hstore 1.8 1.8 1.8 1.7 1.6 1.5 1.4 hstore_plperl 1 1 1 1 1 1 1 insert_username 1 1 1 1 null null null intagg 1.1 1.1 1.1 1.1 1.1 1.1 1.1 intarray 1.5 1.5 1.5 1.3 1.2 1.2 1.2 isn 1.2 1.2 1.2 1.2 1.2 1.2 1.1 jsonb_plperl 1 1 1 1 1 null null lo 1.1 1.1 1.1 1.1 1.1 1.1 1.1 ltree 1.2 1.2 1.2 1.2 1.1 1.1 1.1 moddatetime 1 1 1 1 null null null old_snapshot 1 1 1 null null null null pageinspect 1.12 1.11 1.9 1.8 1.7 1.7 1.6 pg_buffercache 1.4 1.3 1.3 1.3 1.3 1.3 1.3 pg_freespacemap 1.2 1.2 1.2 1.2 1.2 1.2 1.2 pg_prewarm 1.2 1.2 1.2 1.2 1.2 1.2 1.1 pg_stat_statements 1.1 1.1 1.9 1.8 1.7 1.6 1.6 pg_trgm 1.6 1.6 1.6 1.5 1.4 1.4 1.3 pg_visibility 1.2 1.2 1.2 1.2 1.2 1.2 1.2 pg_walinspect 1.1 1 null null null null null pgcrypto 1.3 1.3 1.3 1.3 1.3 1.3 1.3 pgrowlocks 1.2 1.2 1.2 1.2 1.2 1.2 1.2 pgstattuple 1.5 1.5 1.5 1.5 1.5 1.5 1.5 plperl 1 1 1 1 1 1 1 plpgsql 1 1 1 1 1 1 1 pltcl 1 1 1 1 1 1 1 postgres_fdw 1.1 1.1 1.1 1 1 1 1 refint 1 1 1 1 null null null seg 1.4 1.4 1.4 1.3 1.3 1.3 1.1 sslinfo 1.2 1.2 1.2 1.2 1.2 1.2 1.2 tablefunc 1 1 1 1 1 1 1 tcn 1 1 1 1 1 1 1 tsm_system_rows 1 1 1 1 1 1 1.1 tsm_system_time 1 1 1 1 1 1 1.1 unaccent 1.1 1.1 1.1 1.1 1.1 1.1 1.1 uuid-ossp 1.1 1.1 1.1 1.1 1.1 1.1 1.1
Aliyun RDS PG 可用扩展 阿里云 RDS for PostgreSQL 16 可用扩展(已刨除PG自带扩展)
name pg16 pg15 pg14 pg13 pg12 pg11 pg10 ali_desc bloom 1 1 1 1 1 1 1 提供一种基于布鲁姆过滤器的索引访问方法。 btree_gin 1.3 1.3 1.3 1.3 1.3 1.3 1.2 提供一个为多种数据类型和所有enum类型实现B树等价行为的GIN操作符类示例。 btree_gist 1.7 1.7 1.6 1.5 1.5 1.5 1.5 提供一个为多种数据类型和所有enum类型实现B树等价行为的GiST操作符类示例。 citext 1.6 1.6 1.6 1.6 1.6 1.5 1.4 提供一种大小写不敏感的字符串类型。 cube 1.5 1.5 1.5 1.4 1.4 1.4 1.2 提供一种数据类型来表示多维立方体。 dblink 1.2 1.2 1.2 1.2 1.2 1.2 1.2 跨库操作表。 dict_int 1 1 1 1 1 1 1 附加全文搜索词典模板的示例。 earthdistance 1.1 1.1 1.1 1.1 1.1 1.1 1.1 提供两种不同的方法来计算地球表面的大圆距离。 fuzzystrmatch 1.2 1.1 1.1 1.1 1.1 1.1 1.1 判断字符串之间的相似性和距离。 hstore 1.8 1.8 1.8 1.7 1.6 1.5 1.4 在单一PostgreSQL值中存储键值对。 intagg 1.1 1.1 1.1 1.1 1.1 1.1 1.1 提供一个整数聚集器和一个枚举器。 intarray 1.5 1.5 1.5 1.3 1.2 1.2 1.2 提供一些有用的函数和操作符来操纵不含空值的整数数组。 isn 1.2 1.2 1.2 1.2 1.2 1.2 1.1 按照一个硬编码的前缀列表对输入进行验证,也被用来在输出时连接号码。 ltree 1.2 1.2 1.2 1.2 1.1 1.1 1.1 用于表示存储在一个层次树状结构中的数据的标签。 pg_buffercache 1.4 1.3 1.3 1.3 1.3 1.3 1.3 提供一种方法实时检查共享缓冲区。 pg_freespacemap 1.2 1.2 1.2 1.2 1.2 1.2 1.2 检查空闲空间映射(FSM)。 pg_prewarm 1.2 1.2 1.2 1.2 1.2 1.2 1.1 提供一种方便的方法把数据载入到操作系统缓冲区或者PostgreSQL缓冲区。 pg_stat_statements 1.1 1.1 1.9 1.8 1.7 1.6 1.6 提供一种方法追踪服务器执行的所有SQL语句的执行统计信息。 pg_trgm 1.6 1.6 1.6 1.5 1.4 1.4 1.3 提供字母数字文本相似度的函数和操作符,以及支持快速搜索相似字符串的索引操作符类。 pgcrypto 1.3 1.3 1.3 1.3 1.3 1.3 1.3 为PostgreSQL提供了密码函数。 pgrowlocks 1.2 1.2 1.2 1.2 1.2 1.2 1.2 提供一个函数来显示一个指定表的行锁定信息。 pgstattuple 1.5 1.5 1.5 1.5 1.5 1.5 1.5 提供多种函数来获得元组层的统计信息。 plperl 1 1 1 1 1 1 1 提供perl过程语言。 plpgsql 1 1 1 1 1 1 1 提供SQL过程语言。 pltcl 1 1 1 1 1 1 1 提供tcl过程语言。 postgres_fdw 1.1 1.1 1.1 1 1 1 1 跨库操作表。 sslinfo 1.2 1.2 1.2 1.2 1.2 1.2 1.2 提供当前客户端提供的 SSL 证书的有关信息。 tablefunc 1 1 1 1 1 1 1 包括多个返回表的函数。 tsm_system_rows 1 1 1 1 1 1 1 提供表采样方法SYSTEM_ROWS。 tsm_system_time 1 1 1 1 1 1 1 提供了表采样方法SYSTEM_TIME。 unaccent 1.1 1.1 1.1 1.1 1.1 1.1 1.1 文本搜索字典,它能从词位中移除重音(附加符号)。 uuid-ossp 1.1 1.1 1.1 1.1 1.1 1.1 1.1 提供函数使用几种标准算法之一产生通用唯一标识符(UUID)。 xml2 1.1 1.1 1.1 1.1 1.1 1.1 1.1 提供XPath查询和XSLT功能。
性能对比 指标 Pigsty Aliyun RDS AWS RDS 最佳性能 PGTPC on NVME SSD 评测 sysbench oltp_rwRDS PG 性能白皮书 sysbench oltp 场景 每核 QPS 4000 ~ 8000存储规格:最高档容量 32TB / NVME SSD 32 TB / ESSD PL3 64 TB / io2 EBS Block Express 存储规格:最高档IOPS 4K随机读:最大3M,随机写 2000~350K 4K随机读:最大 1M 16K随机IOPS: 256K 存储规格:最高档延迟 4K随机读:75µs,随机写 15µs 4K随机读:200µs 500µs / 推断为16K随机IO 存储规格:最高档可靠性 UBER < 1e-18,折合18个9 MTBF: 200万小时 5DWPD,持续三年 可靠性 9个9, 合 UBER 1e-9 存储与数据可靠性 持久性 :99.999%,5个9 (0.001% 年故障率) io2 说明 存储规格:最高档成本 31.5 ¥/TB·月 ( 5年质保均摊 / 3.2T / 企业级 / MLC ) 3200¥/TB·月 (原价 6400¥,包月4000¥) 3年预付整体打5折才有此价格 1900 ¥/TB·月 使用最大规格 65536GB / 256K IOPS 最大优惠
可观测性 Pigsty 提供了近 3000 类监控指标,提供了 50+ 监控面板,覆盖了数据库监控、主机监控、连接池监控、负载均衡监控等方方面面,为用户提供无与伦比的可观测性体验。
Pigsty 提供了 638 与 PostgreSQL 有关的监控指标,而 AWS RDS 只有 99 个,阿里云 RDS 更是只有个位数指标:
此外,也有一些项目提供了监控 PostgreSQL 的能力,但都相对比较简单初级:
可维护性 指标 Pigsty Aliyun RDS AWS RDS 系统易用性 简单 简单 简单 配置管理 配置文件 / CMDB 基于 Ansible Inventory 可使用 Terraform 可使用 Terraform 变更方式 幂等剧本 基于 Ansible Playbook 控制台点击操作 控制台点击操作 参数调优 自动根据节点适配 四种预置模板 OLTP, OLAP, TINY, CRIT Infra as Code 原生支持 可使用 Terraform 可使用 Terraform 可定制参数点 Pigsty Parameters 283 个服务与支持 提供商业订阅支持兜底 提供售后工单支持 提供售后工单支持 无互联网部署 可离线安装部署 N/A N/A 数据库迁移 提供从现有v10+ PG实例基于逻辑复制不停机迁移至Pigsty托管实例的剧本 提供上云辅助迁移 Aliyun RDS 数据同步
成本 经验上看,软硬件资源的部分 RDS 单位成本是自建的 5 ~ 15 倍,租售比通常在一个月。详情请参考 成本分析
要素 指标 Pigsty Aliyun RDS AWS RDS 成本 软件授权/服务费用 免费,硬件约 20 - 40 ¥/核·月 200 ~ 400 ¥/核·月 400 ~ 1300 ¥/核·月 服务支持费用 服务约 100 ¥/ 核·月 包含在 RDS 成本中
其他本地数据库管控软件 一些提供管理 PostgreSQL 能力的软件与供应商
其他 Kubernetes Operator Pigsty 拒绝在生产环境中使用 Kubernetes 管理数据库,因此与这些方案在生态位上存在差异。
PGO StackGres CloudNativePG TemboOperator PostgresOperator PerconaOperator Kubegres KubeDB KubeBlocks 更多信息请参阅:
2.13.1 - 成本对比 本文提供了一组成本数据,供您评估 Pigsty 自建,使用云数据库 RDS 所需的成本,以及常规的 DBA 薪酬参考。
总体概览 EC2 核·月 RDS 核·月 DHH 自建核月价格(192C 384G) 25.32 初级开源数据库DBA参考工资 15K/人·月 IDC自建机房(独占物理机: 64C384G) 19.53 中级开源数据库DBA参考工资 30K/人·月 IDC自建机房(容器,超卖500%) 7 高级开源数据库DBA参考工资 60K/人·月 UCloud 弹性虚拟机(8C16G,有超卖) 25 ORACLE 数据库授权 10000 阿里云 弹性服务器 2x内存(独占无超卖) 107 阿里云 RDS PG 2x内存(独占) 260 阿里云 弹性服务器 4x内存(独占无超卖) 138 阿里云 RDS PG 4x内存(独占) 320 阿里云 弹性服务器 8x内存(独占无超卖) 180 阿里云 RDS PG 8x内存(独占) 410 AWS C5D.METAL 96C 200G (按月无预付) 100 AWS RDS PostgreSQL db.T2 (2x) 440 AWS C5D.METAL 96C 200G (预付三年) 80 AWS RDS PostgreSQL db.M5 (4x) 611 AWS C7A.METAL 192C 384G (预付三年) 104.8 AWS RDS PostgreSQL db.R6G (8x) 786
RDS成本参考 付费模式 价格 折合每年(万¥) IDC自建(单物理机) ¥7.5w / 5年 1.5 IDC自建(2~3台组HA) ¥15w / 5年 3.0 ~ 4.5 阿里云 RDS 按需 ¥87.36/时 76.5 阿里云 RDS 月付(基准) ¥4.2w / 月 50 阿里云 RDS 年付(85折) ¥425095 / 年 42.5 阿里云 RDS 3年付(5折) ¥750168 / 3年 25 AWS 按需 $25,817 / 月 217 AWS 1年不预付 $22,827 / 月 191.7 AWS 3年全预付 12w$ + 17.5k$/月 175 AWS 中国/宁夏按需 ¥197,489 / 月 237 AWS 中国/宁夏1年不预付 ¥143,176 / 月 171 AWS 中国/宁夏3年全预付 ¥647k + 116k/月 160.6
我们可以对比一下自建与云数据库的成本差异:
方式 折合每年(万元) IDC托管服务器 64C / 384G / 3.2TB NVME SSD 660K IOPS (2~3台) 3.0 ~ 4.5 阿里云 RDS PG 高可用版 pg.x4m.8xlarge.2c, 64C / 256GB / 3.2TB ESSD PL3 25 ~ 50 AWS RDS PG 高可用版 db.m5.16xlarge, 64C / 256GB / 3.2TB io1 x 80k IOPS 160 ~ 217
ECS 成本参考 排除 NVMe SSD / ESSD PL3 后的纯算力价格对比 以阿里云为例,纯算力包月模式的价格是自建基准的 5 ~ 7 倍,预付五年的价格是自建的 2 倍
付费模式 单价(¥/核·月) 相对于标准价格 自建溢价倍率 按量付费(1.5倍) ¥ 202 160 % 9.2 ~ 11.2 包月(标准价格) ¥ 126 100 % 5.7 ~ 7.0 预付一年(65折) ¥ 83.7 66 % 3.8 ~ 4.7 预付二年(55折) ¥ 70.6 56 % 3.2 ~ 3.9 预付三年(44折) ¥ 55.1 44 % 2.5 ~ 3.1 预付四年(35折) ¥ 45 35 % 2.0 ~ 2.5 预付五年(30折) ¥ 38.5 30 % 1.8 ~ 2.1 DHH @ 2023 ¥ 22.0 探探 IDC 自建 ¥ 18.0
含 NVMe SSD / ESSD PL3 情况下的等效价格对比 包含常用规格后的 NVMe SSD 规格之后,纯算力包月模式的价格是自建基准的 11 ~ 14 倍,预付五年的价格是自建的 9 倍左右。
付费模式 单价(¥/核·月) + 40GB ESSD PL3 自建溢价比例 按量付费(1.5倍) ¥ 202 ¥ 362 14.3 ~ 18.6 包月(标准价格) ¥ 126 ¥ 286 11.3 ~ 14.7 预付一年(65折) ¥ 83.7 ¥ 244 9.6 ~ 12.5 预付二年(55折) ¥ 70.6 ¥ 230 9.1 ~ 11.8 预付三年(44折) ¥ 55.1 ¥ 215 8.5 ~ 11.0 预付四年(35折) ¥ 45 ¥ 205 8.1 ~ 10.5 预付五年(30折) ¥ 38.5 ¥ 199 7.9 ~ 10.2 DHH @ 2023 ¥ 25.3 探探 IDC 自建 ¥ 19.5
DHH案例:192核配12.8TB Gen4 SSD (1c:66);探探案例: 64核配3.2T Gen3 MLC SSD (1c:50)。
云上价格每核配比40GB ESSD PL3(1核:4x内存:40x磁盘)计算。
EBS成本参考 评估因素 本地 PCI-E NVME SSD Aliyun ESSD PL3 AWS io2 Block Express 容量 32TB 32 TB 64 TB IOPS 4K随机读:600K ~ 1.1M 4K随机写 200K ~ 350K 4K随机读:最大 1M 16K随机IOPS: 256K 延迟 4K随机读:75µs 4K随机写:15µs 4K 随机读: 200µs 随机IO:500µs 上下文推断为16K 可靠性 UBER < 1e-18,折合18个9 MTBF: 200万小时 5DWPD,持续三年 数据可靠性 9个9 存储与数据可靠性 持久性 :99.999%,5个9 (0.001% 年故障率) io2 说明 成本 **16 ¥/TB·**月 ( 5年均摊 / 3.2T MLC ) 5 年质保,¥3000 零售 **3200¥/TB·**月 (原价 6400¥,包月4000¥) 3年预付整体打5折才有此价格 **1900 ¥/TB·**月 使用最大规格 65536GB 256K IOPS 最优惠状态 SLA 5年质保 出问题直接换新 Aliyun RDS SLA 可用性 99.99%: 月费 15% 99%: 月费 30% 95%: 月费 100%Amazon RDS SLA 可用性 99.95%: 月费 15% 99%: 月费 25% 95%: 月费 100%
S3成本参考 Date $/GB·月 ¥/TB·5年 HDD ¥/TB SSD ¥/TB 2006 .030.150 63000 2800 2010 .110.140 58800 1680 2012 .120.095 39900 420 15400 2014 .040.030 12600 371 9051 2016 .120.023 9660 245 3766 2023 .120.023 9660 105 280 其他参考价 高性能存储 顶配底折价 与采购NVMe SSD 价格参考 S3 Express 0.160 67200 DHH 12T 1400 EBS io2 0.125 + IOPS 114000 Shannon 3.2T 900
下云合集 曾几何时,“上云 “近乎成为技术圈的政治正确,整整一代应用开发者的视野被云遮蔽。就让我们用实打实的数据分析与亲身经历,讲清楚公有云租赁模式的价值与陷阱 —— 在这个降本增效的时代中,供您借鉴与参考 —— 请看 《云计算泥石流:合订本 》
云基础资源篇
云商业模式篇
下云奥德赛篇
云故障复盘篇
RDS翻车篇
云厂商画像篇
2.13.2 - 开源影响力 PG 生态开源项目的影响力比较,以 GitHub Star 数为主要指标。
中国 PostgreSQL 生态项目影响力 GitHub Star 数降序排列,最后更新时间为北京时间 2026-03-21。
PostgreSQL 发行版影响力指标 按 GitHub Star 数降序排列(商业产品无公开 Star 的统一置后),最后更新时间为北京时间 2026-03-21。
其他资源 3 - 概念 理解 Pigsty 的核心概念、架构设计与设计理念,掌握高可用、备份恢复、安全合规等关键能力。
Pigsty 是一个可移植、可扩展的开源 PostgreSQL 发行版,用于在本地环境中构建生产级数据库服务,方便进行声明式配置和自动化。它拥有庞大的生态系统,提供了一整套工具、脚本和最佳实践,让 PostgreSQL 真正达到企业级 RDS 的服务水准。
Pigsty 名字源自 P ostgreSQL I n G reat STY le,也可理解为 P ostgres, I nfras, G raphics, S ervice, T oolbox, it’s all Y ours —— 属于您的 PostgreSQL 图形化自建工具箱。您可以在 GitHub 官方文档 在线演示 Web 界面
为什么需要 Pigsty,它能做什么? PostgreSQL 是一个足够完美的数据库内核,但它需要更多工具与系统的配合才能成为一个足够好的数据库服务。在生产环境中,您需要管理数据库的方方面面:高可用、备份恢复、监控告警、访问控制、参数调优、扩展安装、连接池化、负载均衡……
如果这些复杂的运维工作都能自动化处理,是不是会更容易一些?这正是 Pigsty 诞生的原因。
Pigsty 为您提供:
开箱即用的 PostgreSQL 发行版
Pigsty 深度整合了 PostgreSQL 生态中的 451 扩展插件
故障自愈的高可用架构
基于 Patroni、Etcd 和 HAProxy 打造的 高可用架构
完整的时间点恢复能力
基于 pgBackRest 与可选的 MinIO 集群,提供开箱即用的 PITR 时间点恢复
灵活的服务接入与流量管理
通过 HAProxy、Pgbouncer、VIP 提供灵活的 服务接入
惊艳的可观测性
基于 Prometheus 与 Grafana 的现代可观测性技术栈,提供无与伦比的 监控最佳实践
声明式的配置管理
遵循 基础设施即代码
模块化的架构设计
采用模块化 架构
扎实的安全最佳实践
采用业界领先的安全最佳实践:自签名 CA 签发证书加密通信,AES 加密备份,scram-sha-256 加密密码,开箱即用的 ACL 模型,遵循最小权限原则的 HBA 规则集,确保数据安全。
简单易用的部署方案
所有依赖被预先打包,可在无互联网访问的环境中一键安装。本地沙箱环境可运行在 1核2G 的微型虚拟机中,提供与生产环境完全一致的功能模拟。提供基于 Vagrant 的本地沙箱与基于 Terraform 的云端部署方案。
Pigsty 不是什么 Pigsty 并不是传统的、包罗万象的 PaaS(平台即服务)系统。
Pigsty 不提供基础硬件资源 。它运行在您提供的节点之上,无论是裸金属、虚拟机还是云主机,但它本身不创建或管理这些资源(尽管提供了 Terraform 模板来简化云资源的准备)。
Pigsty 不是容器编排系统 。它直接运行在操作系统之上,不需要 Kubernetes 或 Docker 作为基础设施。当然,它可以与这些系统共存,并提供 Docker 模块来运行无状态应用。
Pigsty 不是通用的数据库管理工具 。它专注于 PostgreSQL 及其生态,虽然也支持 Redis、Etcd、MinIO 等周边组件,但核心始终是围绕 PostgreSQL 构建的。
Pigsty 不会锁定您 。它基于开源组件构建,不修改 PostgreSQL 内核,不引入专有协议。您随时可以脱离 Pigsty 继续使用管理好的 PostgreSQL 集群。
Pigsty 不限制您应该或不应该如何构建数据库服务。例如:
Pigsty 为您提供了良好的参数默认值和配置模板,但您可以覆盖任何参数。 Pigsty 提供了声明式 API,但您依然可以使用底层工具(Ansible、Patroni、pgBackRest 等)进行手动管理。 Pigsty 可以管理完整的生命周期,也可以只使用其中的监控系统来观测现有的数据库实例或 RDS。 Pigsty 提供的抽象层次不同于硬件层面,它工作在数据库服务层面,聚焦于如何让 PostgreSQL 以最佳状态交付价值,而不是重新发明轮子。
PostgreSQL 部署方式的演进 要理解 Pigsty 的价值,让我们回顾一下 PostgreSQL 部署方式的演进历程。
手工部署时代 在传统的部署方式中,DBA 需要手工安装配置 PostgreSQL,手工设置复制,手工配置监控,手工处理故障。这种方式的问题显而易见:
效率低下 :每个实例都需要重复大量手工操作,容易出错。缺乏标准化 :不同 DBA 配置的数据库可能千差万别,难以维护。可靠性差 :故障处理依赖人工介入,恢复时间长,容易出现人为失误。观测性弱 :缺乏统一的监控体系,问题发现和定位困难。托管数据库时代 为了解决这些问题,云厂商提供了托管数据库服务(RDS)。云 RDS 确实解决了部分运维问题,但也带来了新的挑战:
成本高昂 :托管服务通常收取硬件成本数倍到十几倍的"服务费"。供应商锁定 :迁移困难,受制于特定云平台。功能受限 :无法使用某些高级特性,扩展插件受限,参数调整受限。数据主权 :数据存储在云端,自主可控性降低。本地 RDS 时代 Pigsty 代表了第三种方式:在本地环境中构建媲美甚至超越云 RDS 的数据库服务。
Pigsty 结合了前两种方式的优点:
自动化程度高 :一键部署,自动配置,故障自愈,像云 RDS 一样便捷。完全自主可控 :运行在您自己的基础设施上,数据完全掌握在自己手中。成本极低 :以接近纯硬件的成本运行企业级数据库服务。功能完整 :无限制地使用 PostgreSQL 的全部能力和生态扩展。开放架构 :基于开源组件,无供应商锁定,可随时迁移。这种方式特别适合:
私有云与混合云 :需要在本地环境中运行数据库的企业。成本敏感型用户 :希望降低数据库 TCO 的组织。高安全要求场景 :需要完全自主可控的关键数据。PostgreSQL 深度用户 :需要使用高级特性和丰富扩展的场景。开发与测试 :需要在本地快速搭建与生产环境一致的数据库。接下来 现在您已经了解了 Pigsty 的基本概念,可以:
查看 系统架构 了解 集群模型 学习 高可用 探索 时间点恢复 研究 服务接入 体验 基础设施即代码 或直接开始 快速上手 3.1 - 积木式架构 Pigsty 的模块化架构介绍 —— 声明式组合,按需定制,自由部署。
Pigsty 使用 模块化架构 与 声明式接口 ,您可以像 搭积木一样自由按需组合模块
模块 Pigsty 采用模块化设计,有六个主要的默认模块:PGSQLINFRANODEETCDREDISMINIO
PGSQLINFRANODEETCDREDISMINIO你可以声明式地自由组合它们。如果你想要主机监控,在基础设施节点上安装 INFRANODEETCDPGSQLREDISMINIO
请注意,所有模块都强依赖 NODE 模块:在 Pigsty 中节点必须先安装 NODE 模块,被 Pigsty 纳管后方可部署其他模块。
当节点(默认)使用本地软件源进行安装时,NODE 模块对 INFRA 模块有弱依赖。因此安装 INFRA 模块的管理节点/基础设施节点会在 deploy.yml
单机安装 默认情况下,Pigsty 将在单个 节点 (物理机/虚拟机) 上安装。deploy.yml当前 节点上安装 INFRAETCDPGSQLMINIOpg-meta,库名为 meta)。
这个节点现在会有完整的自我监控系统、可视化工具集,以及一个自动配置有 PITR 的 Postgres 数据库(HA不可用,因为你只有一个节点)。你可以使用此节点作为开发箱、测试、运行演示以及进行数据可视化和分析。或者,还可以把这个节点当作管理节点,部署纳管更多的节点!
监控 安装的 单机元节点 可用作管理节点 和监控中心 ,以将更多节点和数据库服务器置于其监视和控制之下。
Pigsty 的监控系统可以独立使用,如果你想安装 Prometheus / Grafana 可观测性全家桶,Pigsty 为你提供了最佳实践!
它为 主机节点 和 PostgreSQL数据库 提供了丰富的仪表盘。
无论这些节点或 PostgreSQL 服务器是否由 Pigsty 管理,只需简单的配置,你就可以立即拥有生产级的监控和告警系统,并将现有的主机与PostgreSQL纳入监管。
高可用PG集群 Pigsty 帮助您在任何地方 拥有 您自己的生产级高可用 PostgreSQL RDS 服务。
要创建这样一个高可用 PostgreSQL 集群/RDS服务,你只需用简短的配置来描述它,并运行剧本来创建即可:
pg-test :
hosts :
10.10.10.11 : { pg_seq: 1, pg_role : primary }
10.10.10.12 : { pg_seq: 2, pg_role : replica }
10.10.10.13 : { pg_seq: 3, pg_role : replica }
vars : { pg_cluster : pg-test }
$ bin/pgsql-add pg-test # 初始化集群 'pg-test'
不到10分钟,您将拥有一个服务接入,监控,备份PITR,高可用配置齐全的 PostgreSQL 数据库集群。
硬件故障由 patroni、etcd 和 haproxy 提供的自愈高可用架构来兜底,在主库故障的情况下,默认会在 45 秒内执行自动故障转移(Failover)。
客户端无需修改配置重启应用:Haproxy 利用 patroni 健康检查进行流量分发,读写请求会自动分发到新的集群主库中,并避免脑裂的问题。
这一过程十分丝滑,例如在从库故障,或主动切换(switchover)的情况下,客户端只有一瞬间的当前查询闪断,
软件故障、人为错误和 数据中心级灾难由 pgbackrest 和可选的 MinIO 集群来兜底。这为您提供了本地/云端的 PITR 能力,并在数据中心失效的情况下提供了跨地理区域复制,与异地容灾功能。
3.1.1 - 节点 节点(node)是对硬件资源/操作系统的抽象,可以是物理机,裸金属、虚拟机、或者容器与 pods。
节点(node) 是对硬件资源/操作系统的抽象,可以是物理机,裸金属、虚拟机、或者容器与 pods。
只要装着 Linux 操作系统
节点上可以安装 模块
在 单机部署
普通节点 使用 Pigsty 管理节点,可在其上安装模块。node.yml
组件 端口 描述 状态 node_exporter9100节点监控指标导出器 ✅ 默认启用 haproxy9101HAProxy 负载均衡器(管理端口) ✅ 默认启用 vector9598日志收集代理 ✅ 默认启用 docker9323启用容器支持 ⚠️ 按需启用 keepalivedn/a管理节点集群 L2 VIP ⚠️ 按需启用 keepalived_exporter9650监控 Keepalived 状态 ⚠️ 按需启用
这里,node_exporter 会向监控系统暴露主机上的各类监控指标,vector 会向日志收集系统发送日志,haproxy 则提供负载均衡功能,对外暴露服务。
这三项服务默认开启。而 Docker keepalived 及 keepalived_exporter 这三项服务作为可选项,可按需启用。
ADMIN节点 一套 Pigsty 部署中有且只有一个 管理节点 ,管理节点是执行 Ansible 剧本,发起控制/部署命令的节点。
该节点拥有对所有其他节点的 ssh/sudo 访问权限。管理节点的安全至关重要,请确保它的访问受到严格控制。
在 单机安装 配置过程
例如,您使用自己的笔记本电脑,管理一台云端上部署了 Pigsty 的虚拟机,这时候,您的笔记本电脑就是管理节点。
在严肃的生产环境中,管理节点通常是 1-2 台 DBA 专用的 管控机 。在资源受限的环境中,则通常会复用 INFRA节点
INFRA节点 一套 Pigsty 部署可能有 1 个或多个 INFRA 节点,大型生产环境可能有 2-3 个。
配置清单中的 infraINFRA
组件 端口 描述 nginx80/443Web 图形界面,本地软件仓库 grafana3000可视化平台 victoriaMetrics8428时序数据库(收存监控指标) victoriaLogs9428日志收集服务器 victoriaTraces10428链路追踪收集服务器 vmalert8880告警与衍生指标计算规则 alertmanager9059告警聚合分发/屏蔽管理 blackbox_exporter9115黑盒探测,ping 节点 / vip dnsmasq53内部 DNS 域名解析 chronyd123NTP 时间服务器 ansible-执行剧本,发起管理
其中,Nginx 作为当前模块的入口,提供 Web 图形界面和本地软件仓库服务。
如果你部署多个 INFRA 节点,每个 Infra 节点上的服务是相互独立的。
但你确实可以从任意一个 Infra 节点上的 Grafana 访问所有的监控数据源。
Pigsty 使用 Apache-2.0
ETCD节点 ETCD
配置清单 etcd
组件 端口 描述 etcd2379ETCD 分布式键值存储(客户端端口) etcd2380ETCD 集群 Peer 通信端口
MINIO节点 MINIOn 备份存储仓库
配置清单中的 minio
组件 端口 描述 minio9000MinIO S3 API 服务端口 minio9001MinIO 管理控制台端口
PGSQL节点 安装了 PGSQL
PGSQL 节点可从相应 PostgreSQL 实例借用 身份 —— 由 node_id_from_pgtrue,即节点名会被设置为 PG 实例名。
PGSQL节点在 普通节点
组件 端口 描述 状态 postgres5432PostgreSQL 数据库服务器 ✅ 默认启用 pgbouncer6432Pgbouncer 连接池 ✅ 默认启用 patroni8008Patroni 高可用管理组件 ✅ 默认启用 pg_exporter9630Postgres 监控指标导出器 ✅ 默认启用 pgbouncer_exporter9631PGBouncer 监控指标导出器 ✅ 默认启用 pgbackrest_exporter9854Pgbackrest 监控指标导出器 ✅ 默认启用 vip-managern/a将 L2 VIP 绑定在集群主库节点上 ⚠️ 按需启用 {{ pg_cluster }}-primary5433通过 haproxy 对外暴露数据库服务:主连接池:读/写服务 ✅ 默认启用 {{ pg_cluster }}-replica5434通过 haproxy 对外暴露数据库服务:副本连接池:只读服务 ✅ 默认启用 {{ pg_cluster }}-default5436通过 haproxy 对外暴露数据库服务:主直连服务 ✅ 默认启用 {{ pg_cluster }}-offline5438通过 haproxy 对外暴露数据库服务:离线直连:离线读服务 ✅ 默认启用 {{ pg_cluster }}-<service>543x通过 haproxy 对外暴露数据库服务:PostgreSQL 定制服务 ⚠️按需定制
其中,vip-manager 只有当用户配置了 PG VIP 时才会启用。
在 pg_services自定义服务 haproxy 对外暴露,并使用更多的服务端口。
3.1.2 - INFRA 架构 Pigsty 中基础设施模块的架构,组件与功能详解。
运行生产级别高可用 PostgreSQL 集群,通常需要一套完善的基础设施服务(底座)来支撑,例如监控告警、日志收集、时间同步、DNS 解析,本地软件仓库等。
Pigsty 提供了 INFRA 模块 可选模块 ,但我们强烈推荐启用它。
概览 下图是 单机部署 INFRA 模块
Nginx Nginx 是 Pigsty 所有 WebUI 类服务的访问入口,默认使用 80443在线演示
带有 WebUI 的基础设施组件可以通过 Nginx 统一对外暴露服务,例如 Grafana 、VictoriaMetrics (VMUI)、AlertManager ,
以及 HAProxy 控制台,此外,本地软件仓库 等静态文件资源也通过 Nginx 对内外提供服务。
Nginx 会根据 infra_portal
infra_portal :
home : { domain : i.pigsty }
默认情况下将对外暴露 Pigsty 的管理首页:i.pigsty,上面不同的端点挂载代理了不同的组件:
Pigsty 允许对 Nginx 进行丰富的定制,将其作为本地文件服务器,或者反向代理服务器,配置自签名或者真正的 HTTPS 证书。
更多信息,请参阅:教程:Nginx:向外代理暴露Web服务 教程:Certbot:申请与更新HTTPS证书
Repo Pigsty 会在安装时,默认在 Infra 节点上创建一个 本地软件仓库 ,以加速后续软件安装。在线演示
该软件仓库默认位于 /www/pigstyNginx 对外提供服务,挂载在 /pigsty 路径上:
Pigsty 支持 离线安装 /www/pigsty/repo_complete
更多信息,请参阅:配置:INFRA - REPO
Grafana Grafana 是 Pigsty 监控系统的核心组件,用于可视化展示监控指标、日志与各种信息。在线演示
Grafana 默认监听 3000 端口,挂载于 Nginx /ui 路径点上代理访问:
Pigsty 预置了基于 VictoriaMetrics / Logs / Traces 的大量监控面板,并通过 URL 跳转实现一键下钻上卷,帮助快速定位故障。
Grafana 亦可作为低代码可视化平台使用,因此默认安装 ECharts 、victoriametrics-datasource、victorialogs-datasource 等插件,
同时将 Vector / Victoria 数据源统一注册为 vmetrics-*、vlogs-*、vtraces-*,方便扩展自定义仪表板。
更多信息请参阅:配置:INFRA - GRAFANA
VictoriaMetrics VictoriaMetrics 是 Pigsty 的时序数据库,负责拉取并存储所有监控指标。在线演示
默认监听 8428 端口,挂载于 Nginx /vmetrics 路径上,亦可通过 p.pigsty 域名直接访问:
VictoriaMetrics 完全兼容 Prometheus API,支持 PromQL 查询、远程读写协议以及 Alertmanager API。
内置的 VMUI 提供即席查询界面,可直接探索指标数据,也可作为 Grafana 的数据源使用。
更多信息请参阅:配置:INFRA - VMETRICS
VictoriaLogs VictoriaLogs 是 Pigsty 的日志平台,集中存储来自所有节点的结构化日志。在线演示
默认监听 9428 端口,挂载于 Nginx /vlogs 路径上:
所有纳管节点默认运行 Vector Agent,负责收集系统日志、PostgreSQL 日志、Patroni 日志、Pgbouncer 日志等,结构化处理后推送至 VictoriaLogs 。
内置 Web UI 支持日志检索与过滤,也可配合 Grafana 的 victorialogs-datasource 插件进行可视化分析。
更多信息请参阅:配置:INFRA - VLOGS
VictoriaTraces VictoriaTraces 用于收集链路追踪数据与慢 SQL 记录。在线演示
默认监听 10428 端口,挂载于 Nginx /vtraces 路径上:
VictoriaTraces 提供 Jaeger 兼容接口,可用于分析服务调用链路与数据库慢查询。
结合 Grafana 面板,能够快速定位性能瓶颈,追溯问题根因。
更多信息请参阅:配置:INFRA - VTRACES
VMAlert VMAlert 是告警规则计算引擎,负责评估告警规则并将触发的事件推送至 Alertmanager 。在线演示
默认监听 8880 端口,挂载于 Nginx /vmalert 路径上:
VMAlert 从 VictoriaMetrics 读取指标数据,周期性执行告警规则评估。
Pigsty 预置了 PGSQL、NODE、REDIS 等模块的告警规则,覆盖常见故障场景,开箱即用。
更多信息请参阅:配置:INFRA - VMALERT
AlertManager AlertManager 负责告警事件的聚合、去重、分组与分发。在线演示
默认监听 9059 端口,挂载于 Nginx /alertmgr 路径上,亦可通过 a.pigsty 域名直接访问:
AlertManager 支持多种通知渠道:邮件、Webhook、Slack、PagerDuty、企业微信等。
通过配置告警路由规则,可实现按严重程度、模块类型进行差异化分发,支持静默、抑制等高级功能。
更多信息请参阅:配置:INFRA - AlertManager
BlackboxExporter Blackbox Exporter 用于主动探测目标的可达性,实现黑盒监控。
默认监听 9115 端口,挂载于 Nginx /blackbox 路径上:
支持 ICMP Ping、TCP 端口、HTTP/HTTPS 端点等多种探测方式。
可用于监控 VIP 可达性、服务端口存活、外部依赖健康状态等场景,是判断故障影响范围的重要手段。
更多信息请参阅:配置:INFRA - BLACKBOX
Ansible Ansible 是 Pigsty 的核心编排工具,所有部署、配置、管理操作均通过 Ansible Playbook 完成。
Pigsty 在安装时会自动在管理节点(Infra 节点)上安装 Ansible 。
它采用声明式配置风格与幂等剧本设计:同一剧本可重复执行,系统会自动收敛至期望状态,无需担心副作用。
Ansible 的核心优势:
无 Agent :通过 SSH 远程执行,无需在目标节点安装额外软件。声明式 :描述期望状态,而非执行步骤,配置即文档。幂等性 :多次执行结果一致,支持部分失败后重试。更多信息请参阅:剧本:Pigsty Playbook
DNSMASQ DNSMASQ 在 INFRA节点
DNSMASQ 默认监听 53 端口(UDP/TCP),为环境内所有节点提供 DNS 解析服务,解析记录位于 的 /infra/hosts 目录中。
其他模块在部署时会自动将域名注册到 INFRA 节点的 DNSMASQ 服务中,您可以按需使用。
DNS 是完全可选的模块,Pigsty 本身不依赖它即可正常运行 。
客户端节点可将 INFRA 节点配置为 DNS 服务器,即可通过域名访问各服务,无需记忆 IP 地址。
更多信息请参阅:配置:INFRA - DNS 教程:DNS:配置域名解析
Chronyd Chronyd 提供 NTP 时间同步服务,确保环境内所有节点时钟一致。默认监听 123 端口(UDP),作为环境内的时间源。
时间同步对分布式系统至关重要:日志排查需要时间戳对齐,证书校验依赖时钟准确,PostgreSQL 流复制也对时钟偏移敏感。
在隔离网络环境中,INFRA 节点可作为内部 NTP 服务器,其他节点同步至此。
在 Pigsty 中,默认所有节点都会启动 chonyd 服务用于时间同步。默认使用 pool.ntp.orgNode 模块 admin_ipINFRA节点 配置:NODE - TIME
INFRA节点与普通节点 在 Pigsty 中,节点与基础设施的关系是 弱循环依赖 :node_monitor → infra → node
NODE模块 INFRA模块
因此,在 infra.ymldeploy
如果您不追求 “一次性” 部署所有节点,也可以采用 分阶段部署
节点与基础设施是如何耦合的? 普通节点会通过 admin_ipINFRA节点
例如,当你配置了全局的 admin_ip = 10.10.10.10,那么通常意味着所有节点都会使用这个 IP 上的基础设施服务。
这样的设计允许你快速,批量的切换节点的基础设施提供者 —— 以下是 可能 引用 ${admin_ip} 的配置参数列表:
例如,当节点安装软件的时候,local 仓库指向的就是 admin_ip:80/pigsty 上的 Nginx 本地软件仓库。DNS 服务器指向的也是 admin_ip:53 上的 DNSMASQ local 仓库,直接从互联网上游源安装(大部分单机配置模板);DNS 服务器也完全可以不配置与不使用,Pigsty 本身并无对 DNS 服务器的依赖。
INFRA节点与ADMIN节点 通常发起管理的 ADMIN节点 INFRA节点 单机部署 infra 分组中的第一个,其余作为备用。
不过,也有例外存在。您可能会出于各种原因,将两者分离开来:
例如在 大规模生产环境部署 admin_ip
另一种常见的情况是 本地管理云节点
all :
children :
infra : { hosts : { 10.10.10.10 : { infra_seq: 1 , ansible_host : your_ssh_alias } } } # <--- 利用 ansible_host 指向云节点(填入 ssh 别名)
etcd : { hosts : { 10.10.10.10 : { etcd_seq: 1 } }, vars : { etcd_cluster : etcd } } # ssh 连接会使用 ssh your_ssh_alias
pg-meta : { hosts : { 10.10.10.10 : { pg_seq: 1, pg_role: primary } }, vars : { pg_cluster : pg-meta } }
vars :
version : v4.2.2
admin_ip : 10.10.10.10
region : default
多个 INFRA 节点 默认情况下,Pigsty 只需要一个 INFRA 节点即可满足大部分需求。INFRA 模块挂了,也不会影响其他节点上的数据库服务。
但是,在一些对监控与告警要求极高的生产环境中,您可能希望部署多个 INFRA 节点,来提升基础设施的可用性。
一种常见的部署是使用两个 Infra 节点,提供一份冗余副本,并互相监控对方…
或者使用更多,部署分布式的 Victoria 集群实现无限水平扩展。
每个 Infra 节点都是 独立 的,Nginx 指向的都是本机上的服务。
VictoriaMetrics 也是独立抓取环境中所有服务的监控指标,
日志会默认推送到所有 VictoriaLogs 日志采集端点上。
唯一的例外是 Grafana,每一个 Grafana 中都会注册所有的 VictoriaMetrics / Logs / Traces / PostgreSQL 实例作为数据源。
因此每一个 Grafana 实例都能看到完整的监控数据。
如果您对 Grafana 进行修改,例如添加新的仪表板,或者修改数据源配置,这些变更只会影响当前节点上的 Grafana 实例。
如果您希望所有节点上的 Grafana 保持一致,可以使用一个 PostgreSQL 数据库作为共享存储,详情参考 教程:配置 Grafana 高可用
3.1.3 - PGSQL 架构 PostgreSQL 模块的组件交互与数据流。
PGSQL 模块在生产环境中以 集群 的形式组织,这些 集群 是由一组通过 主-备 关联的数据库 实例 组成的 逻辑实体 。
概览 PGSQL 模块
其中 vip-manager
如果用类比来形容,PostgreSQL 数据库内核就是 CPU,而整个 PGSQL 模块将其封装为一台完整的计算机。
Patroni 与 Etcd 组成 高可用子系统 ,pgBackRest 与 MinIO 组成 备份恢复子系统 。
HAProxy 与 Pgbouncer 、vip-manager 组成 接入子系统 。
各种 Exporter 与 Vector 构成 可观测性子系统 ;
最后还可以替换不同的 内核 CPU 扩展卡
组件交互
高可用子系统 高可用 Patroni etcd
工作原理 :Patroni 在每个节点上运行,托管本地 PostgreSQL 进程,并将集群状态(领导者、成员、配置)写入 etcd 。
当主库故障时,Patroni 通过 etcd 协调选举,选出最健康的从库提升为新主库,整个过程自动完成,RTO 通常在 45 秒内。
关键交互 :
更多信息请参阅:高可用 配置:PGSQL - PG_BOOTSTRAP
服务接入子系统 接入子系统由 HAProxy Pgbouncer vip-manager
有多种不同的接入方法,一种典型的流量路径是:客户端 → DNS/VIP → HAProxy (543x) → Pgbouncer (6432) → PostgreSQL (5432)
服务端口 :
5433 primary:读写服务,路由至主库 Pgbouncer 5434 replica:只读服务,路由至从库 Pgbouncer 5436 default:默认服务,直连主库(绕过连接池)5438 offline:离线服务,直连离线从库(ETL/分析)关键特性 :
更多信息请参阅:服务接入 配置:PGSQL - PG_ACCESS
备份恢复子系统 备份恢复子系统由 pgBackRest MinIO 作为远程仓库),负责数据备份与时间点恢复(PITR
备份类型 :
全量备份 :完整的数据库副本增量/差异备份 :仅备份变更的数据块WAL 归档 :持续归档事务日志,支持任意时间点恢复存储后端 :
local(默认):本地磁盘,备份存储在 pg_fs_backupminio:S3 兼容对象存储,支持集中化备份管理与异地容灾关键交互 :
更多信息请参阅:PITR 备份恢复 配置:PGSQL - PG_BACKUP
可观测性子系统 可观测性子系统由三个 Exporter 与 Vector
数据流向 :
指标 :Exporter → VictoriaMetrics(INFRA)→ Grafana 仪表盘日志 :Vector → VictoriaLogs(INFRA)→ Grafana 日志查询pg_exporter / pgbouncer_exporter 通过本地 Unix Socket 连接目标服务,与 HA 拓扑解耦。在 精简安装
更多信息请参阅:配置:PGSQL - PG_MONITOR
PostgreSQL PostgreSQL 5432 端口提供关系型数据库服务,采用与 节点
Pigsty 目前支持 PostgreSQL 14 - 18(生命周期内的大版本),使用 PGDG 官方仓库 PG 内核分支 451
PostgreSQL 进程默认由 高可用 Patroni
您可以直接访问 PostgreSQL,或者通过 HAProxy 与 Pgbouncer 连接池来访问。
更多信息请参阅:配置:PGSQL - PG_BOOTSTRAP
Patroni Patroni 8008 端口。
Patroni 接管 PostgreSQL etcd HAProxy
HAProxy Patroni 健康检查端点判断实例角色,将流量路由至正确的主库或从库。
vip-manager etcd
更多信息请参阅:配置:PGSQL - PG_BOOTSTRAP
Pgbouncer Pgbouncer 6432 端口,与 PostgreSQL 数据库与节点保持 1:1 部署。
Pgbouncer 以无状态方式运行在每个实例上,通过本地 Unix Socket 连接 PostgreSQL
Pigsty 默认让生产流量(读写服务 5433 / 只读服务 5434)经由 Pgbouncer ,
仅默认服务(5436)与离线服务(5438)绕过连接池直连 PostgreSQL
连接池模式由 pgbouncer_poolmodetransaction(事务级复用),可通过 pgbouncer_enabled
更多信息请参阅:配置:PGSQL - PG_ACCESS
pgBackRest pgBackRest
Pigsty 使用 pgBackRest 实现 PostgreSQL 的 PITR
pgBackRest 与 PostgreSQL pgbackrest_methodlocal),也可配置为 MinIO 等对象存储,实现集中化备份管理。
初始化完成后可通过 pgbackrest_init_backupPatroni
更多信息请参阅:备份恢复 配置:PGSQL - PG_BACKUP
HAProxy HAProxy
端口 服务名 目标 说明 9101管理接口 - HAProxy 统计与管理页面 5433primary 主库 Pgbouncer 读写服务,路由至主库连接池 5434replica 从库 Pgbouncer 只读服务,路由至从库连接池 5436default 主库 Postgres 默认服务,直连主库(绕过连接池) 5438offline 离线库 Postgres 离线服务,直连离线从库(ETL/分析)
HAProxy 通过 Patroni pg_default_servicespg_services
可通过 pg_service_providerHAProxy 对外发布服务。
更多信息请参阅:服务接入 配置:PGSQL - PG_ACCESS
vip-manager vip-manager
vip-manager 在每个 PG 节点上运行,监视 etcd Patroni pg_vip_addressvip-manager 会立即释放旧主机上的 VIP,并在新主机上重新绑定,从而将流量切换到新的主库。
该组件可选,通过 pg_vip_enabled
更多信息请参阅:教程:VIP 配置 配置:PGSQL - PG_ACCESS
pg_exporter pg_exporter PostgreSQL 监控指标,默认监听 9630 端口。
pg_exporter 运行在每个 PG 节点上,通过本地 Unix Socket 连接 PostgreSQL VictoriaMetrics 抓取。
采集配置由 pg_exporter_configpg_exporter_auto_discoverypg_exporter_cache_ttls
您可以通过参数禁用这个组件,在 精简安装
更多信息请参阅:配置:PGSQL - PG_MONITOR
pgbouncer_exporter pgbouncer_exporter 导出 Pgbouncer 连接池指标,默认监听 9631 端口。
pgbouncer_exporter 使用的同样是 pg_exporter pgbouncer_exporter 读取 Pgbouncer
若禁用 Pgbouncer 精简安装
更多信息请参阅:配置:PGSQL - PG_MONITOR
pgbackrest_exporter pgbackrest_exporter 导出备份状态指标,默认监听 9854 端口。
pgbackrest_exporter 解析 pgBackRest pgbackrest_exporter 默认设置了 2分钟的采集间隔。
最慢情况下,您可能要在一个备份完成后的 2 分钟后,才能在监控系统中看到最新的备份状态。
更多信息请参阅:配置:PGSQL - PG_MONITOR
etcd etcd Patroni
etcd 由独立的 ETCD 模块 Patroni 将集群状态、领导者信息、配置参数写入 etcd,所有节点通过 etcd 达成共识。
vip-manager 也从 etcd 读取领导者键,实现 VIP 的自动漂移。
更多信息请参阅:ETCD 模块
vector Vector NODE 模块
Vector 常驻在节点上,跟踪 PostgreSQL 、Pgbouncer 、Patroni 与 pgBackRest 的日志目录,
将结构化日志发送至 INFRA 节点上的 VictoriaLogs 进行集中存储与查询。
更多信息请参阅:NODE 模块
3.2 - 集群模型图 Pigsty 是如何将不同种类的功能抽象成为模块的,以及这些模块的逻辑模型,实体关系图。
在 Pigsty 中最大的实体概念叫做 部署(Deployment) ,一套部署中的主要实体与关系(E-R 图)如下所示:
一套部署也可以理解为一个 环境(Environment) 。例如,生产环境(Prod),用户测试环境(UTA),预发环境(Staging),测试环境(Testing),开发环境(Devbox),等等。
每个环境中,都对应着一份 Pigsty 配置清单
通常来说,一套环境中也会带有一套共用的基础设施(INFRAETCDMINIO不带基础设施的部署
在 Pigsty 中,几乎所有数据库模块都是以 “集群 "(Cluster)的方式组织起来的。每一个集群都是一个 Ansible 分组,包含有若干节点资源。
例如 PostgreSQL 高可用数据库集群,Redis,Etcd / MinIO 这些数据库都是以集群的形式存在。一套环境中可以包含多个集群。
3.2.1 - PGSQL 集群模型 介绍 Pigsty 中 PostgreSQL 集群的实体-关系模型,E-R 关系图,实体释义与命名规范。
PGSQL模块在生产环境中以集群 的形式组织,这些集群 是由一组由主-备 关联的数据库实例 组成的逻辑实体 。
每个集群都是一个自治 的业务单元,由至少一个 主库实例 组成,并通过服务向外暴露能力。
在 Pigsty 的PGSQL模块中有四种核心实体:
集群 (Cluster):自治的 PostgreSQL 业务单元,用作其他实体的顶级命名空间。服务 (Service):对外暴露能力的命名抽象,路由流量,并使用节点端口暴露服务。实例 (Instance):由在单个节点上的运行进程和数据库文件组成的单一 PostgreSQL 服务器。节点 (Node):运行 Linux + Systemd 环境的硬件资源抽象,可以是裸机、VM、容器或 Pod。辅以“数据库”“角色”两个业务实体,共同组成完整的逻辑视图。如下图所示:
具体样例 让我们来看两个具体的例子,以四节点的 Pigsty 沙箱环境 pg-test 集群。
pg-test :
hosts :
10.10.10.11 : { pg_seq: 1, pg_role : primary }
10.10.10.12 : { pg_seq: 2, pg_role : replica }
10.10.10.13 : { pg_seq: 3, pg_role : replica }
vars : { pg_cluster : pg-test }
上面的配置片段定义了一个如下所示的 高可用
集群 Cluster pg-testPostgreSQL 3 节点高可用集群 实例 Instance pg-test-11 号 PostgreSQL 实例,默认为主库 pg-test-22 号 PostgreSQL 实例,初始为从库 pg-test-33 号 PostgreSQL 实例,初始为从库 服务 Service pg-test-primary读写服务(路由到主库 pgbouncer) pg-test-replica只读服务(路由到从库 pgbouncer) pg-test-default直连读写服务(路由到主库 postgres) pg-test-offline离线读取服务(路由到专用 postgres) 节点 Nodes node-110.10.10.11 1 号节点,对应 pg-test-1 PG 实例node-210.10.10.12 2 号节点,对应 pg-test-2 PG 实例node-310.10.10.13 3 号节点,对应 pg-test-3 PG 实例
身份参数 Pigsty 使用 PG_ID
参数 类型 级别 说明 形式 pg_clusterstring集群 PG 集群名称,必选身份参数 有效的 DNS 名称,满足正则表达式 [a-zA-Z0-9-]+ pg_seqint实例 PG 实例编号,必选身份参数 自然数,可从 0 或 1 开始分配,集群内不重复 pg_roleenum实例 PG 实例角色,必选身份参数 枚举值,可为 primary,replica,offline
只要在集群层面定义了集群名称,实例层面分配了实例编号与角色,Pigsty 就能自动根据规则为每个实体生成唯一标识符。
实体 生成规则 示例 实例 {{ pg_cluster }}-{{ pg_seq }}pg-test-1,pg-test-2,pg-test-3服务 {{ pg_cluster }}-{{ pg_role }}pg-test-primary,pg-test-replica,pg-test-offline节点 显示指定覆盖,或自动从 PG 实例借用 pg-test-1,pg-test-2,pg-test-3
因为 Pigsty 采用节点与 PG 实例 1:1 的独占部署模型,因此默认情况下,主机节点的标识符会直接借用 PG 实例的标识符(node_id_from_pgnodenamenodename_overwrite
分片身份参数 当你使用多套 PostgreSQL (分片 / Sharding)集群服务同一业务时,还会使用到另外两个身份参数:pg_shardpg_group
在这种情况下,这一组 PostgreSQL 集群将拥有相同的 pg_shard 名称,以及各自的 pg_group 编号,例如下面的 Citus 集群
在这种情况下,pg_cluster 集群名通常由:{{ pg_shard }}{{ pg_group }} 组合而成,例如 pg-citus0、pg-citus1 等。
all :
children :
pg-citus0 : # citus 0号分片
hosts : { 10.10.10.10 : { pg_seq: 1, pg_role : primary } }
vars : { pg_cluster: pg-citus0 , pg_group : 0 }
pg-citus1 : # citus 1号分片
hosts : { 10.10.10.11 : { pg_seq: 1, pg_role : primary } }
vars : { pg_cluster: pg-citus1 , pg_group : 1 }
pg-citus2 : # citus 2号分片
hosts : { 10.10.10.12 : { pg_seq: 1, pg_role : primary } }
vars : { pg_cluster: pg-citus2 , pg_group : 2 }
pg-citus3 : # citus 3号分片
hosts : { 10.10.10.13 : { pg_seq: 1, pg_role : primary } }
vars : { pg_cluster: pg-citus3 , pg_group : 3 }
Pigsty 专门为水平分片集群提供专门的监控面板,便于对比各分片的性能与负载情况,但这需要您使用上述实体命名规则。
还有一些其他的身份参数,可能在特殊场景会使用到,例如,指定备份集群/级联复制上游的 pg_upstreamgp_rolepg_exporterspg_offline_queryPG_ID 参数文档
监控标签体系 Pigsty 提供了一套开箱即用的监控系统,在这个系统中使用上面的 身份参数
pg_up{cls="pg-test", ins="pg-test-1", ip="10.10.10.11", job="pgsql"}
pg_up{cls="pg-test", ins="pg-test-2", ip="10.10.10.12", job="pgsql"}
pg_up{cls="pg-test", ins="pg-test-3", ip="10.10.10.13", job="pgsql"}
例如,上面的 cls,ins,ip 三个标签,分别对应集群名、实例名与节点 IP,这三个核心实体的标识符。
它们与 job 标签,在 所有 VictoriaMetrics VictoriaLogs
采集 PostgreSQL 指标的 job 名固定为 pgsql;
用于监控远程 PG 实例的 job 名固定为 pgrds。
采集 PostgreSQL CSV 日志的 job 名固定为 postgres;
采集 pgbackrest 日志的 job 名固定为 pgbackrest,其余 PG 组件通过 job: syslog 采集日志。
此外,还有一些普通实体身份标签,会在实体相关的特定监控指标中出现,例如:
datname: 数据库名,如果一个监控指标属于某个具体的数据库,则会带上这个标签。relname: 表名,如果一个监控指标属于某个具体的表,则会带上这个标签。idxname: 索引名,如果一个监控指标属于某个具体的索引,则会带上这个标签。funcname: 函数名,如果一个监控指标属于某个具体的函数,则会带上这个标签。seqname: 序列名,如果一个监控指标属于某个具体的序列,则会带上这个标签。query: 查询指纹,如果一个监控指标属于某个具体的查询,则会带上这个标签。3.2.2 - ETCD 集群模型 介绍 Pigsty 中 ETCD 集群的实体-关系模型,E-R 关系图,实体释义与命名规范。
ETCD 模块在生产环境中以集群 的形式组织,这些集群 是由一组通过 Raft 共识协议关联的 ETCD 实例 组成的逻辑实体 。
每个集群都是一个自治 的分布式键值存储单元,由至少一个 ETCD 实例 组成,通过客户端端口向外暴露服务能力。
在 Pigsty 的 ETCD 模块中有三种核心实体:
集群 (Cluster):自治的 ETCD 服务单元,用作其他实体的顶级命名空间。实例 (Instance):单个 ETCD 服务器进程,在节点上运行,参与 Raft 共识。节点 (Node):运行 Linux + Systemd 环境的硬件资源抽象,隐含式声明。相比于 PostgreSQL 集群,ETCD 集群模型更为简单,没有服务(Service)和复杂的角色(Role)区分。
所有 ETCD 实例在功能上是对等的,通过 Raft 协议选举出 Leader,其余为 Follower。
在扩容的中间状态,还允许不参与投票的 Learner 实例成员存在。
具体样例 让我们来看一个具体的例子,以三节点的 ETCD 集群为例:
etcd :
hosts :
10.10.10.10 : { etcd_seq : 1 }
10.10.10.11 : { etcd_seq : 2 }
10.10.10.12 : { etcd_seq : 3 }
vars :
etcd_cluster : etcd
上面的配置片段定义了一个如下所示的三节点 ETCD 集群,该集群中的相关实体包括:
集群 Cluster etcdETCD 三节点高可用集群 实例 Instance etcd-11 号 ETCD 实例 etcd-22 号 ETCD 实例 etcd-33 号 ETCD 实例 节点 Nodes 10.10.10.101 号节点,对应 etcd-1 实例 10.10.10.112 号节点,对应 etcd-2 实例 10.10.10.123 号节点,对应 etcd-3 实例
身份参数 Pigsty 使用 ETCD
参数 类型 级别 说明 形式 etcd_clusterstring集群 ETCD 集群名称,必选身份参数 有效的 DNS 名称,默认为固定值 etcd etcd_seqint实例 ETCD 实例编号,必选身份参数 自然数,从 1 开始分配,集群内不重复
只要在集群层面定义了集群名称,实例层面分配了实例编号,Pigsty 就能自动根据规则为每个实体生成唯一标识符。
实体 生成规则 示例 实例 {{ etcd_cluster }}-{{ etcd_seq }}etcd-1,etcd-2,etcd-3
ETCD 模块不会为主机节点赋予额外的身份标识,节点使用其原有的主机名或 IP 地址进行标识。
端口协议 每个 ETCD 实例会监听以下两个端口:
ETCD 集群默认启用 TLS 加密通信,并使用 RBAC 认证机制。客户端需要使用正确的证书和密码才能访问 ETCD 服务。
集群规模 ETCD 作为分布式协调服务,集群规模直接影响其可用性,需要有超过半数(仲裁数)的节点存活才能维持服务。
集群规模 仲裁数 容忍故障数 适用场景 1 节点 1 0 开发、测试、演示 3 节点 2 1 中小规模生产环境 5 节点 3 2 大规模生产环境
因此,偶数节点的 ETCD 集群没有意义,超过五节点的 ETCD 集群并不常见,因此通常使用的规格就是单节点、三节点、五节点。
监控标签体系 Pigsty 提供了一套开箱即用的监控系统,在这个系统中使用上面的 身份参数
etcd_up{cls="etcd", ins="etcd-1", ip="10.10.10.10", job="etcd"}
etcd_up{cls="etcd", ins="etcd-2", ip="10.10.10.11", job="etcd"}
etcd_up{cls="etcd", ins="etcd-3", ip="10.10.10.12", job="etcd"}
例如,上面的 cls,ins,ip 三个标签,分别对应集群名、实例名与节点 IP,这三个核心实体的标识符。
它们与 job 标签,在 所有 VictoriaMetrics job 名固定为 etcd。
3.2.3 - MINIO 集群模型 介绍 Pigsty 中 MinIO 集群的实体-关系模型,E-R 关系图,实体释义与命名规范。
MinIO 模块在生产环境中以集群 的形式组织,这些集群 是由一组分布式 MinIO 实例 组成的逻辑实体 ,共同提供高可用的对象存储服务。
每个集群都是一个自治 的 S3 兼容对象存储单元,由至少一个 MinIO 实例 组成,通过 S3 API 端口向外暴露服务能力。
在 Pigsty 的 MinIO 模块中有三种核心实体:
集群 (Cluster):自治的 MinIO 服务单元,用作其他实体的顶级命名空间。实例 (Instance):单个 MinIO 服务器进程,在节点上运行,管理本地磁盘存储。节点 (Node):运行 Linux + Systemd 环境的硬件资源抽象,隐含式声明。此外,MinIO 还有 存储池
部署模式 MinIO 支持三种主要部署模式,适用于不同的场景:
模式 代号 说明 适用场景 单机单盘 SNSD 单节点,单个数据目录,或单块磁盘 开发、测试、演示 单机多盘 SNMD 单节点,使用多块磁盘,通常至少 4 块盘 资源受限的小规模部署 多机多盘 MNMD 多节点,每节点多块磁盘 生产环境推荐
单机单盘模式可以使用任意目录作为存储,适合快速体验;单机多盘和多机多盘模式需要使用真实的磁盘挂载点,否则会拒绝启动。
具体样例 让我们来看一个多机多盘模式的具体例子,以四节点的 MinIO 集群为例:
minio :
hosts :
10.10.10.10 : { minio_seq : 1 }
10.10.10.11 : { minio_seq : 2 }
10.10.10.12 : { minio_seq : 3 }
10.10.10.13 : { minio_seq : 4 }
vars :
minio_cluster : minio
minio_data : '/data{1...4}'
minio_node : '${minio_cluster}-${minio_seq}.pigsty'
上面的配置片段定义了一个四节点的 MinIO 集群,每个节点使用四块磁盘,该集群中的相关实体包括:
集群 Cluster minioMinIO 四节点高可用集群 实例 Instance minio-11 号 MinIO 实例,管理 4 块磁盘 minio-22 号 MinIO 实例,管理 4 块磁盘 minio-33 号 MinIO 实例,管理 4 块磁盘 minio-44 号 MinIO 实例,管理 4 块磁盘 节点 Nodes 10.10.10.101 号节点,对应 minio-1 实例 10.10.10.112 号节点,对应 minio-2 实例 10.10.10.123 号节点,对应 minio-3 实例 10.10.10.134 号节点,对应 minio-4 实例
身份参数 Pigsty 使用 MINIO
参数 类型 级别 说明 形式 minio_clusterstring集群 MinIO 集群名称,必选身份参数 有效的 DNS 名称,默认为 minio minio_seqint实例 MinIO 实例编号,必选身份参数 自然数,从 1 开始分配,集群内不重复
只要在集群层面定义了集群名称,实例层面分配了实例编号,Pigsty 就能自动根据规则为每个实体生成唯一标识符。
实体 生成规则 示例 实例 {{ minio_cluster }}-{{ minio_seq }}minio-1,minio-2,minio-3,minio-4
MinIO 模块不会为主机节点赋予额外的身份标识,节点使用其原有的主机名或 IP 地址进行标识。
minio_node/etc/hosts 供集群发现使用),而非主机节点的身份。
核心配置参数 除身份参数外,以下参数对 MinIO 集群配置至关重要:
这些参数共同决定了 MinIO 的核心配置 MINIO_VOLUMES:
单机单盘 :直接使用 minio_data 的值,如 /data/minio单机多盘 :使用 minio_data 展开的多个目录,如 /data{1...4}多机多盘 :组合 minio_node 与 minio_data,如 https://minio-{1...4}.pigsty:9000/data{1...4}端口与服务 每个 MinIO 实例会监听以下端口:
MinIO 默认启用 HTTPS 加密通信(由 minio_https
多节点 MinIO 集群可以通过访问 任意一个节点 来访问其服务。最佳实践是使用负载均衡器(如 HAProxy + VIP)统一接入点。
资源置备 MinIO 集群部署后,Pigsty 会自动创建以下资源(由 minio_provision
默认存储桶 (由 minio_buckets
存储桶 用途 pgsqlPostgreSQL pgBackREST 备份存储 meta元数据存储,启用版本控制 data通用数据存储
默认用户 (由 minio_users
用户 默认密码 策略 用途 pgbackrestS3User.BackuppgsqlPostgreSQL 备份专用用户 s3user_metaS3User.Metameta访问 meta 存储桶 s3user_dataS3User.Datadata访问 data 存储桶
pgbackrest 是 PostgreSQL 集群备份时使用的用户,s3user_meta 和 s3user_data 是未实际使用的保留用户。
监控标签体系 Pigsty 提供了一套开箱即用的监控系统,在这个系统中使用上面的 身份参数
minio_up{cls="minio", ins="minio-1", ip="10.10.10.10", job="minio"}
minio_up{cls="minio", ins="minio-2", ip="10.10.10.11", job="minio"}
minio_up{cls="minio", ins="minio-3", ip="10.10.10.12", job="minio"}
minio_up{cls="minio", ins="minio-4", ip="10.10.10.13", job="minio"}
例如,上面的 cls,ins,ip 三个标签,分别对应集群名、实例名与节点 IP,这三个核心实体的标识符。
它们与 job 标签,在 所有 VictoriaMetrics job 名固定为 minio。
3.2.4 - REDIS 集群模型 介绍 Pigsty 中 Redis 集群的实体-关系模型,E-R 关系图,实体释义与命名规范。
Redis 模块在生产环境中以集群 的形式组织,这些集群 是由一组 Redis 实例 组成的逻辑实体 ,部署在一个或多个节点 上。
每个集群都是一个自治 的高性能缓存/存储单元,由至少一个 Redis 实例 组成,通过端口向外暴露服务能力。
在 Pigsty 的 Redis 模块中有三种核心实体:
集群 (Cluster):自治的 Redis 服务单元,用作其他实体的顶级命名空间。实例 (Instance):单个 Redis 服务器进程,在节点上的特定端口运行。节点 (Node):运行 Linux + Systemd 环境的硬件资源抽象,可以承载多个 Redis 实例,隐含式声明。与 PostgreSQL 不同,Redis 采用 单机多实例 的部署模型:一个物理/虚拟机节点上通常会部署 多个 Redis 实例,
以充分利用多核 CPU。因此,节点与实例是 1:N 的关系。此外,生产中通常不建议设置单个内存规模大于 12GB 的 Redis 实例。
工作模式 Redis 有三种不同的工作模式,由 redis_mode
模式 代号 说明 高可用机制 主从模式 standalone经典主从复制,默认模式 需配合 Sentinel 实现 哨兵模式 sentinel为主从模式提供高可用监控与自动故障转移 本身的多节点仲裁 原生集群模式 clusterRedis 原生分布式集群,无需哨兵即可高可用 内置自动故障转移
主从模式 :默认模式,通过 replica_of 参数设置主从复制关系。需要额外的 Sentinel 集群提供高可用。哨兵模式 :不存储业务数据,专门用于监控主从模式的 Redis 集群,实现自动故障转移,本身多节点即可高可用。原生集群模式 :数据自动分片到多个主节点,每个主节点可以有多个从节点,内置高可用能力,无需哨兵支持。具体样例 让我们来看三种模式的具体例子:
主从集群 一个节点上部署一主一从的经典主从集群:
redis-ms :
hosts :
10.10.10.10 :
redis_node : 1
redis_instances :
6379 : { }
6380 : { replica_of : '10.10.10.10 6379' }
vars :
redis_cluster : redis-ms
redis_password : 'redis.ms'
redis_max_memory : 64MB
集群 Cluster redis-msRedis 主从集群 节点 Nodes redis-ms-110.10.10.10 1 号节点,承载 2 个实例实例 Instance redis-ms-1-6379主库实例,监听 6379 端口 redis-ms-1-6380从库实例,监听 6380 端口,复制自 6379
哨兵集群 一个节点上部署三个哨兵实例,用于监控主从集群。哨兵集群通过 redis_sentinel_monitor
redis-sentinel :
hosts :
10.10.10.11 :
redis_node : 1
redis_instances : { 26379 : {}, 26380 : {}, 26381 : {} }
vars :
redis_cluster : redis-sentinel
redis_password : 'redis.sentinel'
redis_mode : sentinel
redis_max_memory : 16MB
redis_sentinel_monitor :
- { name: redis-ms, host: 10.10.10.10, port: 6379, password: redis.ms, quorum : 2 }
原生集群 下面的配置片段定义了由两个节点,六个实例组成的 Redis 原生分布式集群(最小规格,3主3从):
redis-test :
hosts :
10.10.10.12 : { redis_node: 1, redis_instances : { 6379 : {}, 6380 : {}, 6381 : {} } }
10.10.10.13 : { redis_node: 2, redis_instances : { 6379 : {}, 6380 : {}, 6381 : {} } }
vars :
redis_cluster : redis-test
redis_password : 'redis.test'
redis_mode : cluster
redis_max_memory : 32MB
该配置将创建一个 3 主 3 从 的原生 Redis 集群。
集群 Cluster redis-testRedis 原生集群(3 主 3 从) 实例 Instance redis-test-1-6379节点 1 上的实例,监听 6379 端口 redis-test-1-6380节点 1 上的实例,监听 6380 端口 redis-test-1-6381节点 1 上的实例,监听 6381 端口 redis-test-2-6379节点 2 上的实例,监听 6379 端口 redis-test-2-6380节点 2 上的实例,监听 6380 端口 redis-test-2-6381节点 2 上的实例,监听 6381 端口 节点 Nodes redis-test-110.10.10.12 1 号节点,承载 3 个实例redis-test-210.10.10.13 2 号节点,承载 3 个实例
身份参数 Pigsty 使用 REDIS
参数 类型 级别 说明 形式 redis_clusterstring集群 Redis 集群名称,必选身份参数 有效的 DNS 名称,满足 [a-z][a-z0-9-]* redis_nodeint节点 Redis 节点编号,必选身份参数 自然数,从 1 开始分配,集群内不重复 redis_instancesdict节点 Redis 实例定义,必选身份参数 JSON 对象,Key 为端口号,Value 为实例配置
只要在集群层面定义了集群名称,节点层面分配了节点编号与实例定义,Pigsty 就能自动根据规则为每个实体生成唯一标识符。
实体 生成规则 示例 实例 {{ redis_cluster }}-{{ redis_node }}-{{ port }}redis-ms-1-6379,redis-ms-1-6380
Redis 模块不会为主机节点赋予额外的身份标识,节点使用其原有的主机名或 IP 地址进行标识。
redis_node
实例定义 redis_instances端口号 ,Value 为该实例的 配置项 :
redis_instances :
6379 : { } # 主库实例,无需额外配置
6380 : { replica_of : '10.10.10.10 6379' } # 从库实例,指定上游主库
6381 : { replica_of : '10.10.10.10 6379' } # 从库实例,指定上游主库
每个 Redis 实例会监听一个唯一的端口,端口在节点上唯一不重复,您可以任意选择端口号,
但请不要使用系统保留端口(小于 1024),或者与 Pigsty 使用的端口 replica_of 参数用于在主从模式下设置复制关系,格式为 '<ip> <port>',用于指定一个 Redis 从库的上游主库地址与端口。
此外,每个 Redis 节点上会运行一个 Redis Exporter,用于汇总采集当前节点上 所有本地实例 的监控指标:
Redis 模块的单机多实例部署模型带有一些一些局限性:
节点独占 :一个节点只能属于一个 Redis 集群,不能同时分配给不同的 Redis 集群。端口唯一 :同一节点上的 Redis 实例必须使用不同的端口号,避免端口冲突。密码共享 :同一节点上的多个 Redis 实例无法设置不同的密码(受 redis_exporter 限制)。手动高可用 :主从模式的 Redis 集群需要额外配置 Sentinel 才能实现自动故障转移。监控标签体系 Pigsty 提供了一套开箱即用的监控系统,在这个系统中使用上面的 身份参数
redis_up{cls="redis-ms", ins="redis-ms-1-6379", ip="10.10.10.10", job="redis"}
redis_up{cls="redis-ms", ins="redis-ms-1-6380", ip="10.10.10.10", job="redis"}
例如,上面的 cls,ins,ip 三个标签,分别对应集群名、实例名与节点 IP,这三个核心实体的标识符。
它们与 job 标签,在 所有 VictoriaMetrics job 名固定为 redis。
3.2.5 - INFRA 集群模型 介绍 Pigsty 中 INFRA 基础设施节点的实体-关系模型,组件构成与命名规范。
INFRA 模块在 Pigsty 中承担着特殊的角色:它不是传统意义上的"集群",而是由一组 基础设施节点 构成的管理中枢,为整个 Pigsty 部署提供核心服务。
每个 INFRA 节点都是一个自治 的基础设施服务单元,运行着 Nginx、Grafana、VictoriaMetrics 等核心组件,共同为纳管的数据库集群提供可观测性与管理能力。
在 Pigsty 的 INFRA 模块中有两种核心实体:
节点 (Node):运行基础设施组件的服务器,可以是裸机、VM、容器或 Pod。组件 (Component):在节点上运行的各类基础设施服务,如 Nginx、Grafana、VictoriaMetrics 等。INFRA 节点通常承担管理节点(Admin Node)的角色,是 Pigsty 的控制平面所在。
组件构成 每个 INFRA 节点上运行着以下核心组件:
这些组件共同构成了 Pigsty 的可观测性基础设施。
具体样例 让我们来看一个具体的例子,以双节点的 INFRA 部署为例:
infra :
hosts :
10.10.10.10 : { infra_seq : 1 }
10.10.10.11 : { infra_seq : 2 }
上面的配置片段定义了一个双节点的 INFRA 部署:
分组 Group infraINFRA 基础设施节点分组 节点 Nodes infra-110.10.10.10 1 号 INFRA 节点infra-210.10.10.11 2 号 INFRA 节点
在生产环境中,建议部署至少两个 INFRA 节点,以实现基础设施组件的冗余。
身份参数 Pigsty 使用 INFRA_ID
参数 类型 级别 说明 形式 infra_seqint节点 INFRA 节点序号,必选身份参数 自然数,从 1 开始分配,分组内不重复
只要在节点层面分配了节点序号,Pigsty 就能自动根据规则为每个实体生成唯一标识符。
实体 生成规则 示例 节点 infra-{{ infra_seq }}infra-1,infra-2
INFRA 模块会为节点赋予 infra-N 形式的标识,用于监控系统中区分多个基础设施节点。
但这并不改变节点本身的主机名或系统身份,节点仍然使用其原有的主机名或 IP 地址进行标识。
服务门户 INFRA 节点通过 Nginx 提供统一的 Web 服务入口。infra_portal
默认配置只定义了首页服务器:
infra_portal :
home : { domain : i.pigsty }
Pigsty 会自动为启用的组件(如 Grafana、VictoriaMetrics、AlertManager 等)配置反向代理端点。如果需要通过独立域名访问这些服务,可以显式添加配置:
infra_portal :
home : { domain : i.pigsty }
grafana : { domain: g.pigsty, endpoint : "${admin_ip}:3000" , websocket : true }
prometheus : { domain: p.pigsty, endpoint : "${admin_ip}:8428" } # VMUI
alertmanager : { domain: a.pigsty, endpoint : "${admin_ip}:9059" }
域名 服务 说明 i.pigstyHome Pigsty 首页 g.pigstyGrafana 监控可视化平台 p.pigstyVictoriaMetrics 时序数据库 Web UI a.pigstyAlertmanager 告警管理界面
建议通过域名访问 Pigsty 服务,而不是直接使用 IP + 端口的方式。
部署规模 INFRA 节点的数量取决于部署规模和高可用需求:
部署规模 INFRA 节点数 说明 开发测试 1 单节点部署,所有组件在同一节点 小规模生产 1-2 单节点或双节点,可与其他服务共用节点 中规模生产 2-3 独立的 INFRA 节点,组件冗余部署 大规模生产 3+ 多 INFRA 节点,可根据组件分离部署
单机部署 管理节点 /www/pigsty)的角色。
在更大规模的部署中,这些职责可以剥离至专用节点。
监控标签体系 Pigsty 的监控系统会采集 INFRA 组件自身的指标。与数据库模块不同,INFRA 模块的每个组件 都被视为独立的监控对象,通过 cls(类)标签区分不同组件类型。
标签 说明 示例 cls组件类型,每种组件各自构成一个"类" nginxins实例名,格式为 {组件类型}-{infra_seq} nginx-1ip运行该组件的 INFRA 节点 IP 地址 10.10.10.10jobVictoriaMetrics 采集任务名,固定为 infra infra
以双节点 INFRA 部署(infra_seq: 1 和 infra_seq: 2)为例,各组件的监控标签如下:
组件 clsins 示例端口 Nginx nginxnginx-1,nginx-29113Grafana grafanagrafana-1,grafana-23000VictoriaMetrics vmetricsvmetrics-1,vmetrics-28428VictoriaLogs vlogsvlogs-1,vlogs-29428VictoriaTraces vtracesvtraces-1,vtraces-210428VMAlert vmalertvmalert-1,vmalert-28880Alertmanager alertmanageralertmanager-1,alertmanager-29059Blackbox blackboxblackbox-1,blackbox-29115
所有 INFRA 组件的监控指标都使用统一的 job="infra" 标签,通过 cls 标签区分组件类型:
nginx_up{cls="nginx", ins="nginx-1", ip="10.10.10.10", job="infra"}
grafana_info{cls="grafana", ins="grafana-1", ip="10.10.10.10", job="infra"}
vm_app_version{cls="vmetrics", ins="vmetrics-1", ip="10.10.10.10", job="infra"}
vlogs_rows_ingested_total{cls="vlogs", ins="vlogs-1", ip="10.10.10.10", job="infra"}
alertmanager_alerts{cls="alertmanager", ins="alertmanager-1", ip="10.10.10.10", job="infra"}
3.3 - 声明式配置 —— 基础设施即代码(IaC) Pigsty 使用基础设施即代码(IaC)的理念管理所有组件,针对大规模集群提供声明式管理能力。
Pigsty 遵循 IaC 与 GitOPS 的理念:使用声明式的 配置清单 幂等剧本
用户用声明的方式通过 参数
Pigsty 诞生之初是为了解决超大规模 PostgreSQL 集群的运维管理问题,背后的想法很简单 —— 我们需要有在十分钟内在就绪的服务器上复刻整套基础设施(100+数据库集群 + PG/Redis + 可观测性)的能力。
任何 GUI + ClickOps 都无法在如此短的时间内完成如此复杂的任务,这让 CLI + IaC 成为唯一的选择 —— 它提供了精确,高效的控制能力。
配置清单 pigsty.yml
您可以使用 git 对这份部署的 “种子/基因” 进行版本控制与审计,而且,Pigsty 甚至支持将配置清单以数据库表的形式存储在 PostgreSQL CMDB
IaC 面向专业用户与企业场景而设计,但也针对个人开发者,SMB 进行了深度优化。
即使您并非专业 DBA,也无需了解这几百个调节开关与旋钮,所有参数都带有表现良好的默认值,
您完全可以在 零配置 的情况下,获得一个开箱即用的单机数据库节点;
简单地再添加两行 IP 地址,就能获得一套企业级的高可用的 PostgreSQL 集群。
声明模块 以下面的默认配置片段为例,这段配置描述了一个节点 10.10.10.10,其上安装了 INFRANODEETCDPGSQL
# 监控、告警、DNS、NTP 等基础设施集群...
infra : { hosts : { 10.10.10.10 : { infra_seq : 1 } } }
# minio 集群,兼容 s3 的对象存储
minio : { hosts : { 10.10.10.10 : { minio_seq: 1 } }, vars : { minio_cluster : minio } }
# etcd 集群,用作 PostgreSQL 高可用所需的 DCS
etcd : { hosts : { 10.10.10.10 : { etcd_seq: 1 } }, vars : { etcd_cluster : etcd } }
# PGSQL 示例集群: pg-meta
pg-meta : { hosts : { 10.10.10.10 : { pg_seq: 1, pg_role: primary }, vars : { pg_cluster : pg-meta } }
要真正安装这些模块,执行以下剧本:
./infra.yml -l 10.10.10.10 # 在节点 10.10.10.10 上初始化 infra 模块
./etcd.yml -l 10.10.10.10 # 在节点 10.10.10.10 上初始化 etcd 模块
./minio.yml -l 10.10.10.10 # 在节点 10.10.10.10 上初始化 minio 模块
./pgsql.yml -l 10.10.10.10 # 在节点 10.10.10.10 上初始化 pgsql 模块
声明集群 您可以声明 PostgreSQL 数据库集群,在多个节点上安装 PGSQL
例如,要在以下三个已被 Pigsty 纳管的节点上,部署一个使用流复制组建的三节点高可用 PostgreSQL 集群,
您可以在配置文件 pigsty.ymlall.children 中添加以下定义:
pg-test :
hosts :
10.10.10.11 : { pg_seq: 1, pg_role : primary }
10.10.10.12 : { pg_seq: 2, pg_role : replica }
10.10.10.13 : { pg_seq: 3, pg_role : offline }
vars : { pg_cluster : pg-test }
定义完后,可以使用 剧本
bin/pgsql-add pg-test # 创建 pg-test 集群
你可以使用不同的实例角色,例如 主库 从库 离线从库 延迟从库 同步备库 备份集群 Citus 集群 Redis MinIO Etcd
定制集群内容 您不仅可以使用声明式的方式定义集群,还可以定义集群中的数据库、用户、服务、HBA 规则等内容,例如,下面的配置文件对默认的 pg-meta 单节点数据库集群的内容进行了深度定制:
包括:声明了六个业务数据库与七个业务用户,添加了一个额外的 standby 服务(同步备库,提供无复制延迟的读取能力),定义了一些额外的 pg_hba 规则,一个指向集群主库的 L2 VIP 地址,与自定义的备份策略。
pg-meta :
hosts : { 10.10.10.10 : { pg_seq: 1, pg_role: primary , pg_offline_query : true } }
vars :
pg_cluster : pg-meta
pg_databases : # define business databases on this cluster, array of database definition
- name : meta # REQUIRED, `name` is the only mandatory field of a database definition
baseline : cmdb.sql # optional, database sql baseline path, (relative path among ansible search path, e.g files/)
pgbouncer : true # optional, add this database to pgbouncer database list? true by default
schemas : [ pigsty] # optional, additional schemas to be created, array of schema names
extensions: # optional, additional extensions to be installed : array of `{name[,schema]}`
- { name: postgis , schema : public }
- { name : timescaledb }
comment : pigsty meta database # optional, comment string for this database
owner : postgres # optional, database owner, postgres by default
template : template1 # optional, which template to use, template1 by default
encoding : UTF8 # optional, database encoding, UTF8 by default. (MUST same as template database)
locale : C # optional, database locale, C by default. (MUST same as template database)
lc_collate : C # optional, database collate, C by default. (MUST same as template database)
lc_ctype : C # optional, database ctype, C by default. (MUST same as template database)
tablespace : pg_default # optional, default tablespace, 'pg_default' by default.
allowconn : true # optional, allow connection, true by default. false will disable connect at all
revokeconn : false # optional, revoke public connection privilege. false by default. (leave connect with grant option to owner)
register_datasource : true # optional, register this database to grafana datasources? true by default
connlimit : -1 # optional, database connection limit, default -1 disable limit
pool_auth_user : dbuser_meta # optional, all connection to this pgbouncer database will be authenticated by this user
pool_mode : transaction # optional, pgbouncer pool mode at database level, default transaction
pool_size : 64 # optional, pgbouncer pool size at database level, default 64
pool_reserve : 32 # optional, pgbouncer pool size reserve at database level, default 32
pool_size_min : 0 # optional, pgbouncer pool size min at database level, default 0
pool_connlimit : 100 # optional, max database connections at database level, default 100
- { name: grafana ,owner: dbuser_grafana ,revokeconn: true ,comment : grafana primary database }
- { name: bytebase ,owner: dbuser_bytebase ,revokeconn: true ,comment : bytebase primary database }
- { name: kong ,owner: dbuser_kong ,revokeconn: true ,comment : kong the api gateway database }
- { name: gitea ,owner: dbuser_gitea ,revokeconn: true ,comment : gitea meta database }
- { name: wiki ,owner: dbuser_wiki ,revokeconn: true ,comment : wiki meta database }
pg_users : # define business users/roles on this cluster, array of user definition
- name : dbuser_meta # REQUIRED, `name` is the only mandatory field of a user definition
password : DBUser.Meta # optional, password, can be a scram-sha-256 hash string or plain text
login : true # optional, can log in, true by default (new biz ROLE should be false)
superuser : false # optional, is superuser? false by default
createdb : false # optional, can create database? false by default
createrole : false # optional, can create role? false by default
inherit : true # optional, can this role use inherited privileges? true by default
replication : false # optional, can this role do replication? false by default
bypassrls : false # optional, can this role bypass row level security? false by default
pgbouncer : true # optional, add this user to pgbouncer user-list? false by default (production user should be true explicitly)
connlimit : -1 # optional, user connection limit, default -1 disable limit
expire_in : 3650 # optional, now + n days when this role is expired (OVERWRITE expire_at)
expire_at : '2030-12-31' # optional, YYYY-MM-DD 'timestamp' when this role is expired (OVERWRITTEN by expire_in)
comment : pigsty admin user # optional, comment string for this user/role
roles: [dbrole_admin] # optional, belonged roles. default roles are : dbrole_{admin,readonly,readwrite,offline}
parameters : {} # optional, role level parameters with `ALTER ROLE SET`
pool_mode : transaction # optional, pgbouncer pool mode at user level, transaction by default
pool_connlimit : -1 # optional, max database connections at user level, default -1 disable limit
- {name: dbuser_view ,password: DBUser.Viewer ,pgbouncer: true ,roles: [dbrole_readonly], comment : read-only viewer for meta database}
- {name: dbuser_grafana ,password: DBUser.Grafana ,pgbouncer: true ,roles: [dbrole_admin] ,comment : admin user for grafana database }
- {name: dbuser_bytebase ,password: DBUser.Bytebase ,pgbouncer: true ,roles: [dbrole_admin] ,comment : admin user for bytebase database }
- {name: dbuser_kong ,password: DBUser.Kong ,pgbouncer: true ,roles: [dbrole_admin] ,comment : admin user for kong api gateway }
- {name: dbuser_gitea ,password: DBUser.Gitea ,pgbouncer: true ,roles: [dbrole_admin] ,comment : admin user for gitea service }
- {name: dbuser_wiki ,password: DBUser.Wiki ,pgbouncer: true ,roles: [dbrole_admin] ,comment : admin user for wiki.js service }
pg_services : # extra services in addition to pg_default_services, array of service definition
# standby service will route {ip|name}:5435 to sync replica's pgbouncer (5435->6432 standby)
- name: standby # required, service name, the actual svc name will be prefixed with `pg_cluster`, e.g : pg-meta-standby
port : 5435 # required, service exposed port (work as kubernetes service node port mode)
ip : "*" # optional, service bind ip address, `*` for all ip by default
selector : "[]" # required, service member selector, use JMESPath to filter inventory
dest : default # optional, destination port, default|postgres|pgbouncer|<port_number>, 'default' by default
check : /sync # optional, health check url path, / by default
backup : "[? pg_role == `primary`]" # backup server selector
maxconn : 3000 # optional, max allowed front-end connection
balance: roundrobin # optional, haproxy load balance algorithm (roundrobin by default, other : leastconn)
options : 'inter 3s fastinter 1s downinter 5s rise 3 fall 3 on-marked-down shutdown-sessions slowstart 30s maxconn 3000 maxqueue 128 weight 100'
pg_hba_rules :
- {user: dbuser_view , db: all ,addr: infra ,auth: pwd ,title : 'allow grafana dashboard access cmdb from infra nodes' }
pg_vip_enabled : true
pg_vip_address : 10.10.10.2 /24
pg_vip_interface : eth1
node_crontab : # make a full backup 1 am everyday
- '00 01 * * * postgres /pg/bin/pg-backup full'
声明访问控制 您还可以通过声明式的配置,深度定制 Pigsty 的访问控制能力。例如下面的配置文件对 pg-meta 集群进行了深度安全定制:
使用三节点核心集群模板:crit.yml,确保数据一致性有限,故障切换数据零丢失。
启用了 L2 VIP,并将数据库与连接池的监听地址限制在了本地环回 IP + 内网 IP + VIP 三个特定地址。
模板强制启用了 Patroni 的 SSL API,与 Pgbouncer 的 SSL,并在 HBA 规则中强制要求使用 SSL 访问数据库集群。
同时还在 pg_libs 中启用了 $libdir/passwordcheck 扩展,来强制执行密码强度安全策略。
最后,还单独声明了一个 pg-meta-delay 集群,作为 pg-meta 在一个小时前的延迟镜像从库,用于紧急数据误删恢复。
pg-meta : # 3 instance postgres cluster `pg-meta`
hosts :
10.10.10.10 : { pg_seq: 1, pg_role : primary }
10.10.10.11 : { pg_seq: 2, pg_role : replica }
10.10.10.12 : { pg_seq: 3, pg_role: replica , pg_offline_query : true }
vars :
pg_cluster : pg-meta
pg_conf : crit.yml
pg_users :
- { name: dbuser_meta , password: DBUser.Meta , pgbouncer: true , roles: [ dbrole_admin ] , comment : pigsty admin user }
- { name: dbuser_view , password: DBUser.Viewer , pgbouncer: true , roles: [ dbrole_readonly ] , comment : read-only viewer for meta database }
pg_databases :
- {name: meta ,baseline: cmdb.sql ,comment: pigsty meta database ,schemas: [pigsty] ,extensions : [ {name: postgis, schema : public}, {name: timescaledb}]}
pg_default_service_dest : postgres
pg_services :
- { name: standby ,src_ip : "*" ,port: 5435 , dest: default ,selector : "[]" , backup : "[? pg_role == `primary`]" }
pg_vip_enabled : true
pg_vip_address : 10.10.10.2 /24
pg_vip_interface : eth1
pg_listen : '${ip},${vip},${lo}'
patroni_ssl_enabled : true
pgbouncer_sslmode : require
pgbackrest_method : minio
pg_libs : 'timescaledb, $libdir/passwordcheck, pg_stat_statements, auto_explain' # add passwordcheck extension to enforce strong password
pg_default_roles : # default roles and users in postgres cluster
- { name: dbrole_readonly ,login: false ,comment : role for global read-only access }
- { name: dbrole_offline ,login: false ,comment : role for restricted read-only access }
- { name: dbrole_readwrite ,login: false ,roles: [dbrole_readonly] ,comment : role for global read-write access }
- { name: dbrole_admin ,login: false ,roles: [pg_monitor, dbrole_readwrite] ,comment : role for object creation }
- { name: postgres ,superuser: true ,expire_in: 7300 ,comment : system superuser }
- { name: replicator ,replication: true ,expire_in: 7300 ,roles: [pg_monitor, dbrole_readonly] ,comment : system replicator }
- { name: dbuser_dba ,superuser: true ,expire_in: 7300 ,roles: [dbrole_admin] ,pgbouncer: true ,pool_mode: session, pool_connlimit: 16 , comment : pgsql admin user }
- { name: dbuser_monitor ,roles: [pg_monitor] ,expire_in: 7300 ,pgbouncer: true ,parameters : {log_min_duration_statement: 1000 } ,pool_mode: session ,pool_connlimit: 8 ,comment : pgsql monitor user }
pg_default_hba_rules : # postgres host-based auth rules by default
- {user : '${dbsu}' ,db: all ,addr: local ,auth: ident ,title : 'dbsu access via local os user ident' }
- {user : '${dbsu}' ,db: replication ,addr: local ,auth: ident ,title : 'dbsu replication from local os ident' }
- {user : '${repl}' ,db: replication ,addr: localhost ,auth: ssl ,title : 'replicator replication from localhost' }
- {user : '${repl}' ,db: replication ,addr: intra ,auth: ssl ,title : 'replicator replication from intranet' }
- {user : '${repl}' ,db: postgres ,addr: intra ,auth: ssl ,title : 'replicator postgres db from intranet' }
- {user : '${monitor}' ,db: all ,addr: localhost ,auth: pwd ,title : 'monitor from localhost with password' }
- {user : '${monitor}' ,db: all ,addr: infra ,auth: ssl ,title : 'monitor from infra host with password' }
- {user : '${admin}' ,db: all ,addr: infra ,auth: ssl ,title : 'admin @ infra nodes with pwd & ssl' }
- {user : '${admin}' ,db: all ,addr: world ,auth: cert ,title : 'admin @ everywhere with ssl & cert' }
- {user: '+dbrole_readonly',db: all ,addr: localhost ,auth: ssl ,title : 'pgbouncer read/write via local socket' }
- {user: '+dbrole_readonly',db: all ,addr: intra ,auth: ssl ,title : 'read/write biz user via password' }
- {user: '+dbrole_offline' ,db: all ,addr: intra ,auth: ssl ,title : 'allow etl offline tasks from intranet' }
pgb_default_hba_rules : # pgbouncer host-based authentication rules
- {user : '${dbsu}' ,db: pgbouncer ,addr: local ,auth: peer ,title : 'dbsu local admin access with os ident' }
- {user: 'all' ,db: all ,addr: localhost ,auth: pwd ,title : 'allow all user local access with pwd' }
- {user : '${monitor}' ,db: pgbouncer ,addr: intra ,auth: ssl ,title : 'monitor access via intranet with pwd' }
- {user : '${monitor}' ,db: all ,addr: world ,auth: deny ,title : 'reject all other monitor access addr' }
- {user : '${admin}' ,db: all ,addr: intra ,auth: ssl ,title : 'admin access via intranet with pwd' }
- {user : '${admin}' ,db: all ,addr: world ,auth: deny ,title : 'reject all other admin access addr' }
- {user: 'all' ,db: all ,addr: intra ,auth: ssl ,title : 'allow all user intra access with pwd' }
# OPTIONAL delayed cluster for pg-meta
pg-meta-delay : # delayed instance for pg-meta (1 hour ago)
hosts : { 10.10.10.13 : { pg_seq: 1, pg_role: primary, pg_upstream: 10.10.10.10, pg_delay : 1h } }
vars : { pg_cluster : pg-meta-delay }
Citus 分布式集群 下面是一个四节点的 Citus 分布式集群的声明式配置:
all :
children :
pg-citus0 : # citus coordinator, pg_group = 0
hosts : { 10.10.10.10 : { pg_seq: 1, pg_role : primary } }
vars : { pg_cluster: pg-citus0 , pg_group : 0 }
pg-citus1 : # citus data node 1
hosts : { 10.10.10.11 : { pg_seq: 1, pg_role : primary } }
vars : { pg_cluster: pg-citus1 , pg_group : 1 }
pg-citus2 : # citus data node 2
hosts : { 10.10.10.12 : { pg_seq: 1, pg_role : primary } }
vars : { pg_cluster: pg-citus2 , pg_group : 2 }
pg-citus3 : # citus data node 3, with an extra replica
hosts :
10.10.10.13 : { pg_seq: 1, pg_role : primary }
10.10.10.14 : { pg_seq: 2, pg_role : replica }
vars : { pg_cluster: pg-citus3 , pg_group : 3 }
vars : # global parameters for all citus clusters
pg_mode: citus # pgsql cluster mode : citus
pg_shard: pg-citus # citus shard name : pg-citus
patroni_citus_db : meta # citus distributed database name
pg_dbsu_password : DBUser.Postgres # all dbsu password access for citus cluster
pg_users : [ { name: dbuser_meta ,password: DBUser.Meta ,pgbouncer: true ,roles : [ dbrole_admin ] } ]
pg_databases : [ { name: meta ,extensions : [ { name : citus }, { name: postgis }, { name: timescaledb } ] } ]
pg_hba_rules :
- { user: 'all' ,db: all ,addr: 127.0.0.1/32 ,auth: ssl ,title : 'all user ssl access from localhost' }
- { user: 'all' ,db: all ,addr: intra ,auth: ssl ,title : 'all user ssl access from intranet' }
Redis 集群 下面给出了 Redis 主从集群、哨兵集群、以及 Redis Cluster 的声明配置样例
redis-ms : # redis classic primary & replica
hosts : { 10.10.10.10 : { redis_node: 1 , redis_instances : { 6379 : { }, 6380 : { replica_of : '10.10.10.10 6379' } } } }
vars : { redis_cluster: redis-ms ,redis_password: 'redis.ms' ,redis_max_memory : 64MB }
redis-meta : # redis sentinel x 3
hosts : { 10.10.10.11 : { redis_node: 1 , redis_instances : { 26379 : { } ,26380 : { } ,26381 : { } } } }
vars :
redis_cluster : redis-meta
redis_password : 'redis.meta'
redis_mode : sentinel
redis_max_memory : 16MB
redis_sentinel_monitor : # primary list for redis sentinel, use cls as name, primary ip:port
- { name: redis-ms, host: 10.10.10.10, port: 6379 ,password: redis.ms, quorum : 2 }
redis-test: # redis native cluster : 3m x 3s
hosts :
10.10.10.12 : { redis_node: 1 ,redis_instances : { 6379 : { } ,6380 : { } ,6381 : { } } }
10.10.10.13 : { redis_node: 2 ,redis_instances : { 6379 : { } ,6380 : { } ,6381 : { } } }
vars : { redis_cluster: redis-test ,redis_password: 'redis.test' ,redis_mode: cluster, redis_max_memory : 32MB }
ETCD 集群 下面给出了一个三节点的 Etcd 集群声明式配置样例:
etcd : # dcs service for postgres/patroni ha consensus
hosts : # 1 node for testing, 3 or 5 for production
10.10.10.10 : { etcd_seq : 1 } # etcd_seq required
10.10.10.11 : { etcd_seq : 2 } # assign from 1 ~ n
10.10.10.12 : { etcd_seq : 3 } # odd number please
vars : # cluster level parameter override roles/etcd
etcd_cluster : etcd # mark etcd cluster name etcd
etcd_safeguard : false # safeguard against purging
etcd_clean : true # purge etcd during init process
MinIO 集群 下面给出了一个三节点的 MinIO 集群声明式配置样例:
minio :
hosts :
10.10.10.10 : { minio_seq : 1 }
10.10.10.11 : { minio_seq : 2 }
10.10.10.12 : { minio_seq : 3 }
vars :
minio_cluster : minio
minio_data : '/data{1...2}' # 每个节点使用两块磁盘
minio_node : '${minio_cluster}-${minio_seq}.pigsty' # 节点名称的模式
haproxy_services :
- name : minio # [必选] 服务名称,需要唯一
port : 9002 # [必选] 服务端口,需要唯一
options :
- option httpchk
- option http-keep-alive
- http-check send meth OPTIONS uri /minio/health/live
- http-check expect status 200
servers :
- { name: minio-1 ,ip: 10.10.10.10 , port: 9000 , options : 'check-ssl ca-file /etc/pki/ca.crt check port 9000' }
- { name: minio-2 ,ip: 10.10.10.11 , port: 9000 , options : 'check-ssl ca-file /etc/pki/ca.crt check port 9000' }
- { name: minio-3 ,ip: 10.10.10.12 , port: 9000 , options : 'check-ssl ca-file /etc/pki/ca.crt check port 9000' }
3.3.1 - 配置清单 使用声明式的配置文件描述你需要的基础设施与集群
每一套 Pigsty 部署都对应着一份 配置清单 (Inventory),描述了基础设施与数据库集群的关键属性。
配置文件 Pigsty 默认使用 Ansible YAML 配置格式 pigsty.yml
~/pigsty
^---- pigsty.yml # <---- 默认配置文件
您可以直接修改该配置文件来定制您的部署,或者使用 Pigsty 提供的 配置向导 configure
配置结构 配置清单使用标准的 Ansible YAML 配置格式 全局参数 (all.vars)和多个 组 (all.children)。
您可以在 all.children 中定义新集群,并使用全局变量描述基础设施:all.vars,它看起来像这样:
all : # 顶级对象:all
vars : {...} # 全局参数
children : # 组定义
infra : # 组定义:'infra'
hosts : {...} # 组成员:'infra'
vars : {...} # 组参数:'infra'
etcd : {...} # 组定义:'etcd'
pg-meta : {...} # 组定义:'pg-meta'
pg-test : {...} # 组定义:'pg-test'
redis-test : {...} # 组定义:'redis-test'
# ...
集群定义 每个 Ansible 组可能代表一个集群,可以是节点集群、PostgreSQL 集群、Redis 集群、Etcd 集群或 MinIO 集群等…
集群定义由两部分组成:集群成员 (hosts集群参数 (vars<cls>.hosts 中定义集群成员,并在 <cls>.vars 中使用 配置参数
all :
children : # ansible 组列表
pg-test : # ansible 组名
hosts : # ansible 组内实例(集群成员)
10.10.10.11 : { pg_seq: 1, pg_role : primary } # 主机 1
10.10.10.12 : { pg_seq: 2, pg_role : replica } # 主机 2
10.10.10.13 : { pg_seq: 3, pg_role : offline } # 主机 3
vars : # ansible 组变量(集群参数)
pg_cluster : pg-test
集群级别的 vars (集群参数)将覆盖全局参数,实例级别的 vars 将覆盖集群参数和全局参数。
拆分配置 如果您的部署规模较大,或者希望更好地组织配置文件,
可以将配置清单 拆分为多个文件
inventory/
├── hosts.yml # 主机和集群定义
├── group_vars/
│ ├── all.yml # 全局默认变量 (对应 all.vars)
│ ├── infra.yml # infra 组变量
│ ├── etcd.yml # etcd 组变量
│ └── pg-meta.yml # pg-meta 集群变量
└── host_vars/
├── 10.10.10.10.yml # 特定主机变量
└── 10.10.10.11.yml
您可以将集群成员定义放在 hosts.yml 文件中,将集群层面的 配置参数 group_vars 目录下的对应文件中。
切换配置 您可以在执行剧本的时候,通过 -i 参数,临时指定另外的配置清单文件。
./pgsql.yml -i another_config.yml
./infra.yml -i nginx_config.yml
此外,Ansible 支持多种配置方式,您可以使用本地 yaml|ini 配置文件,或者是 CMDB 与任意的动态配置脚本作为配置源。
在 Pigsty 中,我们通过 Pigsty 主目录中的 ansible.cfgpigsty.yml配置清单 ,您可按需修改。
[defaults]
inventory = pigsty.yml
此外,Pigsty 还支持使用 CMDB 元数据库
3.3.2 - 配置向导 使用 configure 脚本根据当前环境自动生成推荐的配置文件。
Pigsty 提供了一个 configure配置向导 ,它能根据当前环境,自动生成合适的 pigsty.yml 配置文件。
这是一个 可选 的脚本:如果您已经了解了如何配置 Pigsty,大可以直接编辑 pigsty.yml 配置文件,跳过向导。
快速开始 进入 pigsty 源码家目录中,执行 ./configure 即可自动运行配置向导。不带任何参数时,默认使用 meta
cd ~/pigsty
./configure # 交互式配置向导,自动检测环境并生成配置
该命令会以选定的模板为基础,检测当前节点的 IP 地址与区域,并生成适合当前环境的 pigsty.yml 配置文件。
功能说明 configurepigsty.yml 配置文件。
检测当前节点 IP 地址,如果有多个 IP,则要求用户输入一个 首要的 IP 地址 作为当前节点的身份标识 使用 IP 地址替换配置模板中的占位符 10.10.10.10admin_ip 检测当前区域,将 regiondefaultchina 针对小微实例(vCPU < 4),为 node_tunepg_conftiny 如果指定了 -vpg_version 如果指定了 -g强烈推荐 ) 当 PG 大版本 ≥ 17 时优先使用内置的 C.UTF-8C.UTF-8 检测当前环境中,用于执行部署的核心依赖 ansible 同时检测部署目标节点是否 ssh 可达,并可以使用 sudo 执行命令。(-s 使用示例 # 基本用法
./configure # 交互式配置向导
./configure -i 10.10.10.10 # 指定主 IP 地址
# 指定配置模板
./configure -c meta # 使用默认单节点模板(默认)
./configure -c rich # 使用功能丰富的单节点模板
./configure -c slim # 使用精简模板(仅 PGSQL + ETCD)
./configure -c ha/full # 使用 4 节点高可用沙箱模板
./configure -c ha/trio # 使用 3 节点高可用模板
./configure -c app/supa # 使用 Supabase 自托管模板
# 指定 PostgreSQL 版本
./configure -v 18 # 使用 PostgreSQL 18(默认)
./configure -v 16 # 使用 PostgreSQL 16
./configure -c rich -v 15 # rich 模板 + PG 15
# 区域与代理
./configure -r china # 使用中国镜像源
./configure -r europe # 使用欧洲镜像源
./configure -x # 导入当前代理环境变量
# 跳过与自动化
./configure -s # 跳过 IP 探测,保留占位符
./configure -n -i 10.10.10.10 # 非交互模式,指定 IP
./configure -c ha/full -s # 4 节点模板,跳过 IP 替换
# 安全增强
./configure -g # 生成随机密码
./configure -c meta -g -i 10.10.10.10 # 完整生产配置
# 指定输出与 SSH 端口
./configure -o prod.yml # 输出到 prod.yml
./configure -p 2222 # 使用 SSH 端口 2222
命令参数 ./configure
[ -c| --conf <template>] # 配置模板名称(meta|rich|slim|ha/full|...)
[ -i| --ip <ipaddr>] # 指定主 IP 地址
[ -v| --version <pgver>] # PostgreSQL 大版本号(13|14|15|16|17|18)
[ -r| --region <region>] # 上游软件仓库区域(default|china|europe)
[ -o| --output <file>] # 输出配置文件路径(默认:pigsty.yml)
[ -s| --skip] # 跳过 IP 地址探测与替换
[ -x| --proxy] # 从环境变量导入代理设置
[ -n| --non-interactive] # 非交互模式(不询问任何问题)
[ -p| --port <port>] # 指定 SSH 端口
[ -g| --generate] # 生成随机密码
[ -h| --help] # 显示帮助信息
参数详解 参数 说明 -c, --conf从 conf/<template>.yml 生成配置文件,支持子目录如 ha/full -i, --ip用指定 IP 替换配置模板中的占位符 10.10.10.10 -v, --version指定 PostgreSQL 大版本号(13-18),不指定时保持模板默认值 -r, --region设置软件仓库镜像区域:default(默认)、china(中国镜像)、europe(欧洲镜像) -o, --output指定输出文件路径,默认为 pigsty.yml -s, --skip跳过 IP 地址探测与替换,保留模板中的 10.10.10.10 占位符 -x, --proxy将当前环境的代理变量(HTTP_PROXY、HTTPS_PROXY、ALL_PROXY、NO_PROXY)写入配置 -n, --non-interactive非交互模式,不询问任何问题(需配合 -i 指定 IP) -p, --port指定 SSH 端口(非默认 22 端口时使用) -g, --generate为配置文件中的密码生成随机值,提高安全性(强烈推荐)
执行流程 configure 脚本按照以下顺序执行检测与配置:
┌─────────────────────────────────────────────────────────────┐
│ configure 执行流程 │
├─────────────────────────────────────────────────────────────┤
│ │
│ 1. check_region 检测网络区域(GFW 检测) │
│ ↓ │
│ 2. check_version 验证 PostgreSQL 版本号 │
│ ↓ │
│ 3. check_kernel 检测操作系统内核(Linux/Darwin) │
│ ↓ │
│ 4. check_machine 检测 CPU 架构(x86_64/aarch64) │
│ ↓ │
│ 5. check_package_manager 检测包管理器(dnf/yum/apt) │
│ ↓ │
│ 6. check_vendor_version 检测 OS 发行版与版本 │
│ ↓ │
│ 7. check_sudo 检测免密 sudo 权限 │
│ ↓ │
│ 8. check_ssh 检测免密 SSH 到本机 │
│ ↓ │
│ 9. check_proxy 处理代理环境变量 │
│ ↓ │
│ 10. check_ipaddr 探测/输入主 IP 地址 │
│ ↓ │
│ 11. check_admin 验证管理员 SSH + Sudo 权限 │
│ ↓ │
│ 12. check_conf 选择配置模板 │
│ ↓ │
│ 13. check_config 生成配置文件 │
│ ↓ │
│ 14. check_utils 检测 Ansible 等工具是否安装 │
│ ↓ │
│ ✓ 配置完成,输出 pigsty.yml │
│ │
└─────────────────────────────────────────────────────────────┘
自动化行为 区域检测 脚本会自动检测网络环境,判断是否在中国大陆(GFW 内):
# 通过访问 Google 判断网络环境
curl -I -s --connect-timeout 1 www.google.com
如果无法访问 Google,自动设置 region: china 使用国内镜像 如果可以访问,使用 region: default 默认镜像 可通过 -r 参数手动指定区域 IP 地址处理 脚本按以下优先级确定主 IP 地址:
命令行参数 :如果通过 -i 指定了 IP,直接使用单 IP 探测 :如果当前节点只有一个 IP,自动使用演示 IP 检测 :如果检测到 10.10.10.10,自动选择(用于沙箱环境)交互式输入 :多个 IP 时,提示用户选择或输入[ WARN] Multiple IP address candidates found:
( 1) 192.168.1.100 inet 192.168.1.100/24 scope global eth0
( 2) 10.10.10.10 inet 10.10.10.10/24 scope global eth1
[ IN ] INPUT primary_ip address ( of current meta node, e.g 10.10.10.10) :
= > 10.10.10.10
低端硬件优化 当检测到 CPU 核心数 ≤ 4 时,脚本会自动调整配置:
[ WARN] replace oltp template with tiny due to cpu < 4
这样可以确保在低配虚拟机上也能顺利运行。
Locale 设置 脚本会在以下情况自动启用 C.UTF-8 作为默认 Locale:
PostgreSQL 版本 ≥ 17(内置 Locale Provider 支持) 或者 当前系统支持 C.UTF-8 / C.utf8 Localepg_locale : C.UTF-8
pg_lc_collate : C.UTF-8
pg_lc_ctype : C.UTF-8
中国区特殊处理 当区域设置为 china 时,脚本会自动:
启用 docker_registry_mirrors Docker 镜像加速 启用 PIP_MIRROR_URL Python 镜像加速 密码生成 使用 -g 参数时,脚本会为以下密码生成 24 位随机字符串:
密码参数 说明 grafana_admin_passwordGrafana 管理员密码 pg_admin_passwordPostgreSQL 管理员密码 pg_monitor_passwordPostgreSQL 监控用户密码 pg_replication_passwordPostgreSQL 复制用户密码 patroni_passwordPatroni API 密码 haproxy_admin_passwordHAProxy 管理密码 minio_secret_keyMinIO Secret Key etcd_root_passwordETCD Root 密码
同时还会替换以下占位符密码:
DBUser.Meta → 随机密码DBUser.Viewer → 随机密码S3User.Backup → 随机密码S3User.Meta → 随机密码S3User.Data → 随机密码$ ./configure -g
[ INFO] generating random passwords...
grafana_admin_password : xK9mL2nP4qR7sT1vW3yZ5bD8
pg_admin_password : aB3cD5eF7gH9iJ1kL2mN4oP6
...
[ INFO] random passwords generated, check and save them
配置模板 脚本从 conf/ 目录读取配置模板,支持以下模板:
核心模板 模板 说明 meta默认模板 :单节点安装,包含 INFRA + NODE + ETCD + PGSQLrich功能丰富版:包含几乎所有扩展、MinIO、本地仓库 slim精简版:仅 PostgreSQL + ETCD,无监控基础设施 fat完整版:rich 基础上安装更多扩展 pgsql纯 PostgreSQL 模板 infra纯基础设施模板
高可用模板 (ha/) 模板 说明 ha/dual2 节点高可用集群 ha/trio3 节点高可用集群 ha/full4 节点完整沙箱环境 ha/safe安全加固版高可用配置 ha/simu42 节点大规模仿真环境
应用模板 (app/) 模板 说明 supabaseSupabase 自托管配置 app/difyDify AI 平台配置 app/odooOdoo ERP 配置 app/teableTeable 表格数据库配置 app/registryDocker Registry 配置
特殊内核模板/模式 模板 说明 ivoryIvorySQL:Oracle 兼容 PostgreSQL mssqlBabelfish:SQL Server 兼容 PostgreSQL polarPolarDB:阿里云开源分布式 PostgreSQL citusCitus:分布式 PostgreSQL orioleOrioleDB:新一代存储引擎
演示模板 (demo/) 模板 说明 demo/demo演示环境配置 demo/redisRedis 集群演示 demo/minioMinIO 集群演示
输出示例 $ ./configure
configure pigsty v4.0.0 begin
[ OK ] region = china
[ OK ] kernel = Linux
[ OK ] machine = x86_64
[ OK ] package = rpm,dnf
[ OK ] vendor = rocky ( Rocky Linux)
[ OK ] version = 9 ( 9.5)
[ OK ] sudo = vagrant ok
[ OK ] ssh = vagrant@127.0.0.1 ok
[ WARN] Multiple IP address candidates found:
( 1) 192.168.121.193 inet 192.168.121.193/24 brd 192.168.121.255 scope global dynamic noprefixroute eth0
( 2) 10.10.10.10 inet 10.10.10.10/24 brd 10.10.10.255 scope global noprefixroute eth1
[ OK ] primary_ip = 10.10.10.10 ( from demo)
[ OK ] admin = vagrant@10.10.10.10 ok
[ OK ] mode = meta ( el9)
[ OK ] locale = C.UTF-8
[ OK ] ansible = ready
[ OK ] pigsty configured
[ WARN] don' t forget to check it and change passwords!
proceed with ./deploy.yml
环境变量 脚本支持以下环境变量:
环境变量 说明 默认值 PIGSTY_HOMEPigsty 安装目录 ~/pigstyMETADB_URL元数据库连接 URL service=metaHTTP_PROXYHTTP 代理 - HTTPS_PROXYHTTPS 代理 - ALL_PROXY通用代理 - NO_PROXY代理白名单 内置默认值
注意事项 免密访问 :运行 configure 前,确保当前用户具有免密 sudo 权限和免密 SSH 到本机的能力。可以通过 bootstrap 脚本自动配置。
IP 地址选择 :请选择内网 IP 作为主 IP 地址,不要使用公网 IP 或 127.0.0.1。
密码安全 :生产环境务必 修改配置文件中的默认密码,或使用 -g 参数生成随机密码。
配置检查 :脚本执行完成后,建议检查生成的 pigsty.yml 文件,确认配置符合预期。
多次执行 :可以多次运行 configure 重新生成配置,每次会覆盖现有的 pigsty.yml。
macOS 限制 :在 macOS 上运行时,脚本会跳过部分 Linux 特有的检测,并使用占位符 IP 10.10.10.10。macOS 只能作为管理节点使用。
常见问题 如何使用自定义配置模板? 将您的配置文件放到 conf/ 目录下,然后使用 -c 参数指定:
cp my-config.yml ~/pigsty/conf/myconf.yml
./configure -c myconf
如何为多集群生成不同配置? 使用 -o 参数指定不同的输出文件:
./configure -c ha/full -o cluster-a.yml
./configure -c ha/trio -o cluster-b.yml
然后在执行剧本时指定配置文件:
./deploy.yml -i cluster-a.yml
非交互模式下如何处理多 IP? 必须使用 -i 参数明确指定 IP 地址:
./configure -n -i 10.10.10.10
如何保留模板中的占位符 IP? 使用 -s 参数跳过 IP 替换:
./configure -c ha/full -s # 保留 10.10.10.10 占位符
相关文档 配置清单 配置参数 配置模板 安装部署 元数据库 3.3.3 - 配置参数 使用配置参数对 Pigsty 进行精细化定制
在 配置清单 中,您可以使用各种参数对 Pigsty 进行精细化定制。这些参数涵盖了从基础设施设置到数据库配置的各个方面。
参数列表 Pigsty 提供了约 380+ 个配置参数,分布在 8 个默认模块中,用于精细控制系统的各个方面,完整列表见 参考-参数列表
模块 参数组 参数数 说明 PGSQL 9 123 PostgreSQL 数据库集群的核心配置 INFRA 10 82 基础设施组件:软件源、Nginx、DNS、监控、Grafana 等 NODE 11 83 主机节点调优:身份、DNS、包、调优、安全、管理员、时间、VIP等 ETCD 2 13 分布式配置存储与服务发现 REDIS 1 21 Redis 缓存与数据结构服务器 MINIO 2 21 S3 兼容对象存储服务 FERRET 1 9 MongoDB 兼容数据库 FerretDB DOCKER 1 8 Docker 容器引擎
参数形式 参数 是用于描述实体的 键值对 。键 (Key)是字符串,值 (Value)可以是五种类型之一:布尔值、字符串、数字、数组或对象。
all : # <------- 顶级对象:all
vars :
admin_ip : 10.10.10.10 # <------- 全局配置参数
children :
pg-meta : # <------- pg-meta 分组
vars :
pg_cluster : pg-meta # <------- 集群级别参数
hosts :
10.10.10.10 : # <------- 主机节点 IP
pg_seq : 1
pg_role : primary # <------- 实例级别参数
参数优先级 参数可以在不同级别设置,具有以下优先级:
级别 位置 描述 优先级 命令行 -e 命令行参数通过命令行传入 最高 (5) 主机/实例 <group>.hosts.<host>特定于单个主机的参数 较高 (4) 分组/集群 <group>.vars组/集群中主机共享的参数 中等 (3) 全局 all.vars所有主机共享的参数 较低 (2) 默认 <roles>/default/main.yml角色实现默认值 最低 (1)
以下是关于参数优先级的一些示例:
执行剧本时,使用命令行参数 -e grafana_clean=true 使用主机变量上的实例级别参数 pg_role 覆盖 pg 实例角色 使用组变量上的集群级别参数 pg_cluster 覆盖 pg 集群名称。 使用全局变量上的全局参数 node_ntp_servers 指定全局 NTP 服务器 如果没有设置 pg_versionpgsql18) 除了身份参数 外,每个参数都有适当的默认值,因此无需显式设置。
身份参数 身份参数是特殊的参数,它们会作为实体的 ID 标识符,因此 没有默认值 ,必须 显式设置 。
模块 身份参数 PGSQLpg_cluster, pg_seq, pg_role, …NODEnodename, node_clusterETCDetcd_cluster, etcd_seqMINIOminio_cluster, minio_seqREDISredis_cluster, redis_node, redis_instancesINFRAinfra_seq
例外是,etcd_clusterminio_clusteretcd 与 minio。
但您依然可以使用其他名称部署多套 etcd 或 MinIO 集群。
3.3.4 - 配置模板 使用预制的配置模板,快速生成适配当前环境的配置文件
在 Pigsty 中,部署的蓝图细节由 配置清单 pigsty.yml
然而,直接编写配置文件可能会让新用户望而生畏。为此,我们提供了一些开箱即用的配置模板,涵盖了常见的使用场景。
每一个模板都是一个预定义的 pigsty.yml 配置文件,包含了适用于特定场景的合理默认值。
您可以根据自己的需要,选择一个模板作为定制起点,然后根据需要进行修改,以满足您的具体需求。
使用模板 Pigsty 提供了 configure配置清单
使用 ./configure -c <conf> 指定配置模板,其中 <conf> 是相对于 conf 目录的路径(可省略 .yml 后缀)。
./configure # 默认使用 meta.yml 配置模板
./configure -c meta # 显式指定使用 meta.yml 单节点模板
./configure -c rich # 使用包含全部扩展与 MinIO 的富功能模板
./configure -c slim # 使用最小化的单节点模板
# 使用不同的数据库内核
./configure -c pgsql # 原生 PostgreSQL 内核,基础功能 (13~18)
./configure -c citus # Citus 分布式高可用 PostgreSQL (14~17)
./configure -c mssql # Babelfish 内核,兼容 SQL Server 协议 (17)
./configure -c polar # PolarDB PG 内核,Aurora/RAC 风格 (15)
./configure -c ivory # IvorySQL 内核,兼容 Oracle 语法 (18)
./configure -c mysql # OpenHalo 内核,兼容 MySQL (14)
./configure -c pgtde # Percona PostgreSQL Server 透明加密 (18)
./configure -c oriole # OrioleDB 内核,OLTP 增强 (17)
./configure -c supabase # Supabase 自托管配置 (15~18)
# 使用多节点高可用模板
./configure -c ha/dual # 使用 2 节点高可用模板
./configure -c ha/trio # 使用 3 节点高可用模板
./configure -c ha/full # 使用 4 节点高可用模板
如果不指定模板,Pigsty 默认使用 meta.yml 单节点配置模板。
模板列表 主要模板 以下是单节点配置模板,可用于在单台服务器上安装 Pigsty:
数据库内核模板 适用于各类数据库管理系统与内核的模板:
您可以后续添加更多节点,或使用 高可用模板 在一开始就规划好集群。
高可用模板 您可以配置 Pigsty 在多节点上运行,组成高可用(HA)集群:
应用模板 您可以使用以下模板运行 Docker 应用/软件:
演示模板 除主要模板外,Pigsty 还提供了一组面向不同场景的演示模板:
构建模板 以下配置模板用于开发和测试目的:
模板 说明 build.ymlEL 9/10、Debian 12/13、Ubuntu 22.04/24.04 开源构建配置
3.3.5 - 元数据库 使用 PostgreSQL 作为 CMDB 元数据库,存储 Ansible 配置清单。
Pigsty 允许您使用 PostgreSQL 元数据库 作为动态配置源,取代静态的 YAML 配置文件,实现更强大的配置管理能力。
概览 CMDB (Configuration Management Database,配置管理数据库)是一种将配置信息存储在数据库中进行管理的方式。
在 Pigsty 中,默认的配置源是一个静态 YAML 文件 pigsty.yml,
它作为 Ansible 的 配置清单
这种方式简单直接,但当基础设施规模扩大、需要复杂精细的管理与外部集成时,单一的静态文件难以满足需求。
特性 静态 YAML 文件 CMDB 元数据库 查询能力 手工搜索/grep SQL 任意条件查询,聚合分析 版本控制 依赖 Git 或手工备份 数据库事务,审计日志,时间旅行快照 权限控制 文件系统权限,粗粒度 PostgreSQL 数据库精细访问控制 并发编辑 需要锁文件或合并冲突 数据库事务天然支持并发 外部集成 需要解析 YAML 标准 SQL 接口,任意语言轻松对接 规模扩展 文件过大时难以维护 管理规模伸缩至物理极限 动态生成 静态文件,修改后需手动应用 即时生效,实时反映配置变更
Pigsty 在样板数据库 pg-meta.meta
工作原理 CMDB 的核心思想是用一个 动态脚本 替换静态配置文件。
Ansible 支持使用可执行脚本作为配置清单,只要脚本输出符合 JSON 格式的清单数据即可。
当您启用 CMDB 后,Pigsty 会创建一个名为 inventory.sh 的动态清单脚本:
#!/bin/bash
psql ${ METADB_URL } -AXtwc 'SELECT text FROM pigsty.inventory;'
这个脚本的作用很简单:每次 Ansible 需要读取配置清单时,它会从 PostgreSQL 数据库的 pigsty.inventory 视图中查询配置数据,并以 JSON 格式返回。
整体架构如下:
flowchart LR
conf["bin/inventory_conf"]
tocmdb["bin/inventory_cmdb"]
load["bin/inventory_load"]
ansible["🚀 Ansible"]
subgraph static["📄 静态配置模式"]
yml[("pigsty.yml")]
end
subgraph dynamic["🗄️ CMDB 动态模式"]
sh["inventory.sh"]
cmdb[("PostgreSQL CMDB")]
end
conf -->|"切换"| yml
yml -->|"加载配置"| load
load -->|"写入"| cmdb
tocmdb -->|"切换"| sh
sh --> cmdb
yml --> ansible
cmdb --> ansible 数据模型 CMDB 的数据库模式定义在 files/cmdb.sqlpigsty 模式下。
核心数据表 表名 说明 主键 pigsty.group集群/分组定义,对应 Ansible 的 group clspigsty.host主机定义,属于某个分组 (cls, ip)pigsty.global_var全局变量,对应 all.vars keypigsty.group_var分组变量,对应 all.children.<cls>.vars (cls, key)pigsty.host_var主机变量,对应主机级别的变量 (cls, ip, key)pigsty.default_var默认变量定义,存储参数的元信息 keypigsty.job作业记录表,记录执行的任务 id
表结构详解 集群表 pigsty.group
CREATE TABLE pigsty . group (
cls TEXT PRIMARY KEY , -- 集群名称,主键
ctime TIMESTAMPTZ DEFAULT now (), -- 创建时间
mtime TIMESTAMPTZ DEFAULT now () -- 修改时间
);
主机表 pigsty.host
CREATE TABLE pigsty . host (
cls TEXT NOT NULL REFERENCES pigsty . group ( cls ), -- 所属集群
ip INET NOT NULL , -- 主机 IP 地址
ctime TIMESTAMPTZ DEFAULT now (),
mtime TIMESTAMPTZ DEFAULT now (),
PRIMARY KEY ( cls , ip )
);
全局变量表 pigsty.global_var
CREATE TABLE pigsty . global_var (
key TEXT PRIMARY KEY , -- 变量名
value JSONB NULL , -- 变量值(JSON 格式)
mtime TIMESTAMPTZ DEFAULT now () -- 修改时间
);
分组变量表 pigsty.group_var
CREATE TABLE pigsty . group_var (
cls TEXT NOT NULL REFERENCES pigsty . group ( cls ),
key TEXT NOT NULL ,
value JSONB NULL ,
mtime TIMESTAMPTZ DEFAULT now (),
PRIMARY KEY ( cls , key )
);
主机变量表 pigsty.host_var
CREATE TABLE pigsty . host_var (
cls TEXT NOT NULL ,
ip INET NOT NULL ,
key TEXT NOT NULL ,
value JSONB NULL ,
mtime TIMESTAMPTZ DEFAULT now (),
PRIMARY KEY ( cls , ip , key ),
FOREIGN KEY ( cls , ip ) REFERENCES pigsty . host ( cls , ip )
);
核心视图 CMDB 提供了一系列视图,用于查询和展示配置数据:
视图名 说明 pigsty.inventory核心视图 :生成 Ansible 动态清单 JSONpigsty.raw_config原始配置的 JSON 格式展示 pigsty.global_config全局配置视图,合并默认值和全局变量 pigsty.group_config分组配置视图,包含主机列表和分组变量 pigsty.host_config主机配置视图,合并分组和主机级别变量 pigsty.pg_clusterPostgreSQL 集群视图 pigsty.pg_instancePostgreSQL 实例视图 pigsty.pg_databasePostgreSQL 数据库定义视图 pigsty.pg_usersPostgreSQL 用户定义视图 pigsty.pg_servicePostgreSQL 服务定义视图 pigsty.pg_hbaPostgreSQL HBA 规则视图 pigsty.pg_remote远程 PostgreSQL 实例视图
pigsty.inventory
SELECT text FROM pigsty . inventory ;
工具脚本 Pigsty 提供了三个便利脚本来管理 CMDB:
inventory_load 将 YAML 配置文件解析并导入到 CMDB 中:
bin/inventory_load # 加载默认的 pigsty.yml 到默认 CMDB
bin/inventory_load -p /path/to/conf.yml # 指定配置文件路径
bin/inventory_load -d "postgres://..." # 指定数据库连接 URL
bin/inventory_load -n myconfig # 指定配置名称
脚本会执行以下操作:
清空 pigsty 模式中的现有数据 解析 YAML 配置文件 将全局变量写入 global_var 表 将集群定义写入 group 表 将集群变量写入 group_var 表 将主机定义写入 host 表 将主机变量写入 host_var 表 环境变量
PIGSTY_HOME:Pigsty 安装目录,默认为 ~/pigstyMETADB_URL:数据库连接 URL,默认为 service=metainventory_cmdb 切换 Ansible 使用 CMDB 作为配置源:
脚本会执行以下操作:
创建动态清单脚本 ${PIGSTY_HOME}/inventory.sh 修改 ansible.cfg 将 inventory 设置为 inventory.sh 生成的 inventory.sh 内容如下:
#!/bin/bash
psql ${ METADB_URL } -AXtwc 'SELECT text FROM pigsty.inventory;'
inventory_conf 切换回使用静态 YAML 配置文件:
脚本会修改 ansible.cfg 将 inventory 设置回 pigsty.yml。
使用流程 首次启用 CMDB 初始化 CMDB 模式 (通常在安装 Pigsty 时已自动完成):psql -f ~/pigsty/files/cmdb.sql
加载配置到数据库 :切换到 CMDB 模式 :验证配置 :ansible all --list-hosts # 列出所有主机
ansible-inventory --list # 查看完整清单
查询配置 启用 CMDB 后,您可以使用 SQL 灵活查询配置:
-- 查看所有集群
SELECT cls FROM pigsty . group ;
-- 查看某集群的所有主机
SELECT ip FROM pigsty . host WHERE cls = 'pg-meta' ;
-- 查看全局变量
SELECT key , value FROM pigsty . global_var ;
-- 查看某集群的变量
SELECT key , value FROM pigsty . group_var WHERE cls = 'pg-meta' ;
-- 查看所有 PostgreSQL 集群
SELECT cls , name , pg_databases , pg_users FROM pigsty . pg_cluster ;
-- 查看所有 PostgreSQL 实例
SELECT cls , ins , ip , seq , role FROM pigsty . pg_instance ;
-- 查看所有数据库定义
SELECT cls , datname , owner , encoding FROM pigsty . pg_database ;
-- 查看所有用户定义
SELECT cls , name , login , superuser FROM pigsty . pg_users ;
修改配置 您可以直接通过 SQL 修改配置:
-- 添加新集群
INSERT INTO pigsty . group ( cls ) VALUES ( 'pg-new' );
-- 添加集群变量
INSERT INTO pigsty . group_var ( cls , key , value )
VALUES ( 'pg-new' , 'pg_cluster' , '"pg-new"' );
-- 添加主机
INSERT INTO pigsty . host ( cls , ip ) VALUES ( 'pg-new' , '10.10.10.20' );
-- 添加主机变量
INSERT INTO pigsty . host_var ( cls , ip , key , value )
VALUES ( 'pg-new' , '10.10.10.20' , 'pg_seq' , '1' ),
( 'pg-new' , '10.10.10.20' , 'pg_role' , '"primary"' );
-- 修改全局变量
UPDATE pigsty . global_var SET value = '"new-value"' WHERE key = 'some_param' ;
-- 删除集群(级联删除主机和变量)
DELETE FROM pigsty . group WHERE cls = 'pg-old' ;
修改后立即生效,无需重新加载或重启任何服务。
切换回静态配置 如需切换回静态配置文件模式:
高级用法 配置导出 将 CMDB 中的配置导出为 YAML 格式:
psql service = meta -AXtwc "SELECT jsonb_pretty(jsonb_build_object('all', jsonb_build_object('children', children, 'vars', vars))) FROM pigsty.raw_config;"
或者使用 ansible-inventory 命令:
ansible-inventory --list --yaml > exported_config.yml
配置审计 利用 mtime 字段追踪配置变更:
-- 查看最近修改的全局变量
SELECT key , value , mtime FROM pigsty . global_var
ORDER BY mtime DESC LIMIT 10 ;
-- 查看某时间点之后的变更
SELECT * FROM pigsty . group_var
WHERE mtime > '2024-01-01' :: timestamptz ;
与外部系统集成 CMDB 使用标准 PostgreSQL,可以轻松与其他系统集成:
Web 管理界面 :通过 REST API(如 PostgREST)暴露配置数据CI/CD 流水线 :在部署脚本中直接读写数据库监控告警 :基于配置数据生成监控规则ITSM 系统 :与企业 CMDB 系统同步注意事项 数据一致性 :修改配置后,需要重新执行相应的 Ansible 剧本才能将变更应用到实际环境
备份 :CMDB 中的配置数据非常重要,请确保定期备份
权限 :建议为 CMDB 配置适当的数据库访问权限,避免误操作
事务 :批量修改配置时,建议在事务中进行,以便出错时回滚
连接池 :inventory.sh 脚本每次执行都会建立新连接,如果 Ansible 执行频繁,建议考虑使用连接池
小结 CMDB 是 Pigsty 配置管理的高级方案,适用于需要管理大量集群、复杂查询、外部集成或精细权限控制的场景。通过将配置数据存储在 PostgreSQL 中,您可以充分利用数据库的强大能力来管理基础设施配置。
功能 说明 数据存储 PostgreSQL pigsty 模式 动态清单 inventory.sh 脚本配置加载 bin/inventory_load切换到 CMDB bin/inventory_cmdb切换到 YAML bin/inventory_conf核心视图 pigsty.inventory
3.4 - PG 高可用 Pigsty 使用 Patroni 实现了 PostgreSQL 的高可用,确保主库不可用时自动进行故障转移,由从库接管。
概览 Pigsty 的 PostgreSQL 集群带有开箱即用的高可用方案,由 Patroni Etcd HAProxy
当您的 PostgreSQL 集群含有两个或更多实例时,您无需任何配置即拥有了硬件故障自愈的数据库高可用能力 —— 只要集群中有任意实例存活,集群就可以对外提供完整的服务,而客户端只要连接至集群中的任意节点,即可获得完整的服务,而无需关心主从拓扑变化。
在默认配置下,主库故障恢复时间目标 RTO ≈ 45s,数据恢复点目标 RPO < 1MB;从库故障 RPO = 0,RTO ≈ 0 (闪断);在一致性优先模式下,可确保故障切换数据零损失:
RPO = 0。以上指标均可通过参数,根据您的实际硬件条件与可靠性要求 按需配置
Pigsty 内置了 HAProxy 负载均衡器用于自动流量切换,提供 DNS/VIP/LVS 等多种接入方式供客户端选用。故障切换与主动切换对业务侧除零星闪断外几乎无感知,应用不需要修改连接串重启。
极小的维护窗口需求带来了极大的灵活便利:您完全可以在无需应用配合的情况下滚动维护升级整个集群。硬件故障可以等到第二天再抽空善后处置的特性,让研发,运维与 DBA 都能在故障时安心睡个好觉。
许多大型组织与核心机构已经在生产环境中长时间使用 Pigsty ,最大的部署有 25K CPU 核心与 220+ PostgreSQL 超大规格实例(64c / 512g / 3TB NVMe SSD);在这一部署案例中,五年内经历了数十次硬件故障与各类事故,但依然可以保持高于 99.999% 的总体可用性战绩。
高可用(High-Availability)解决什么问题?
将数据安全C/IA中的可用性提高到一个新高度:RPO ≈ 0, RTO < 45s。 获得无缝滚动维护的能力,最小化维护窗口需求,带来极大便利。 硬件故障可以立即自愈,无需人工介入,运维DBA可以睡个好觉。 从库可以用于承载只读请求,分担主库负载,让资源得以充分利用。 高可用有什么代价?
基础设施依赖:高可用需要依赖 DCS (etcd/zk/consul) 提供共识。 起步门槛增加:一个有意义的高可用部署环境至少需要 三个节点 。 额外的资源消耗:一个新从库就要消耗一份额外资源,不算大问题。 复杂度代价显著升高:备份成本显著加大,需要使用工具压制复杂度。 高可用的局限性
因为复制实时进⾏,所有变更被⽴即应⽤⾄从库。因此基于流复制的高可用方案⽆法应对⼈为错误与软件缺陷导致的数据误删误改。(例如:DROP TABLE,或 DELETE 数据)
此类故障需要使用 延迟集群 时间点恢复
配置策略 RTO RPO 单机 + 数据永久丢失,无法恢复 数据全部丢失 单机 + 单机 + 主从 + 主从 + 主从 +
原理 在 Pigsty 中,高可用架构的实现原理如下:
PostgreSQL 使⽤标准流复制搭建物理从库,主库故障时由从库接管。 Patroni 负责管理 PostgreSQL 服务器进程,处理高可用相关事宜。 Etcd 提供分布式配置存储(DCS)能力,并用于故障后的领导者选举 Patroni 依赖 Etcd 达成集群领导者共识,并对外提供健康检查接口。 HAProxy 对外暴露集群服务,并利⽤ Patroni 健康检查接口,自动分发流量至健康节点。 vip-manager 提供一个可选的二层 VIP,从 Etcd 中获取领导者信息,并将 VIP 绑定在集群主库所在节点上。 当主库故障时,将触发新一轮领导者竞选,集群中最为健康的从库将胜出(LSN位点最高,数据损失最小者),并被提升为新的主库。 胜选从库提升后,读写流量将立即路由至新的主库。
主库故障影响是 写服务短暂不可用 :从主库故障到新主库提升期间,写入请求将被阻塞或直接失败,不可用时长通常在 15秒 ~ 30秒,通常不会超过 1 分钟。
当从库故障时,只读流量将路由至其他从库,如果所有从库都故障,只读流量才会最终由主库承载。
从库故障的影响是 部分只读查询闪断 :当前从库上正在运行查询将由于连接重置而中止,并立即由其他可用从库接管。
故障检测由 Patroni 和 Etcd 共同完成,集群领导者将持有一个租约,
如果集群领导者因为故障而没有及时续租(10s),租约将会被释放,并触发 故障切换 (Failover) 与新一轮集群选举。
即使没有出现任何故障,您依然可以主动通过 主动切换
3.4.1 - RPO 利弊权衡 针对 RPO (Recovery Point Objective)进行利弊权衡,在可用性与数据损失之间找到最佳平衡点。
RPO (Recovery Point Objective,恢复点目标)定义了在主库发生故障时,允许丢失的最大数据量 。
对于金融交易这类数据完整性至关重要的场景,通常要求 RPO = 0,即不允许任何数据丢失;
然而更为严格的 RPO 指标是有代价的,它会引入更高的写入延迟,降低系统吞吐量,并且存在从库故障导致主库不可用的风险。
因此对于常规场景,通常可以接受一定量的数据丢失(例如允许丢失不超过 1MB 的数据),以换取更高的可用性与性能。
利弊权衡 通常在异步复制场景下,从库和主库之间会存在一定的复制延迟(取决于网络和吞吐量,正常在 10KB-100KB / 100µs-10ms 的数量级),
这意味着当主库发生故障时,从库可能还没有完全同步主库的最新数据。这时候如果出现故障切换,新的主库可能会丢失一些尚未复制的数据。
潜在数据丢失量的上限由 pg_rpo1048576 (1MB),这意味着在故障转移期间最多可以容忍 1MiB 的数据丢失。
当集群主库宕机时,如果有任何一个从库的复制延迟在这个值以内,Pigsty 将自动提升该从库为新的主库。
然而当所有从库副本的复制延迟都超出这个阈值时,Pigsty 将拒绝进行 [自动故障切换 ] 以避免数据丢失。
此时需要人工介入进行决策 —— 等待主库恢复(可能永远也不会恢复),还是接受数据损失并强制提升一个从库为新的主库。
您需要根据业务的需求偏好配置这个值,在 可用性 和 一致性 之间进行 利弊权衡 。
增大这个值可以提高自动故障切换的成功率,但也会增加潜在的数据丢失量上限。
当您指定 pg_rpo同步复制 ,确保主库在确认至少一个从库持久化数据后才返回写入成功。
这种配置能确保没有复制延迟,但会带来显著的写入延迟,并降低整体的吞吐量。
flowchart LR
A([主库故障]) --> B{同步复制?}
B -->|否| C{延迟 < RPO?}
B -->|是| D{同步从库<br/>可用?}
C -->|是| E[有损自动故障切换<br/>RPO < 1MB]
C -->|否| F[拒绝自动切换<br/>等待主库恢复<br/>或人工介入决策]
D -->|是| G[无损自动故障切换<br/>RPO = 0]
D -->|否| H{严格模式?}
H -->|否| C
H -->|是| F
style A fill:#dc3545,stroke:#b02a37,color:#fff
style E fill:#F0AD4E,stroke:#146c43,color:#fff
style G fill:#198754,stroke:#146c43,color:#fff
style F fill:#BE002F,stroke:#565e64,color:#fff 保护模式 Pigsty 提供三种保护模式,以帮助用户在不同的 RPO 要求下进行利弊权衡,类似于 Oracle Data Guard
最大性能(Maximum Performance)
默认模式 ,异步复制,事务提交仅需本地 WAL 持久化,无需等待从库,从库故障对主库完全透明,不影响服务主库故障时可能丢失尚未发送/接收的 WAL(通常 < 1MB,正常网络条件通常在 10ms/100ms,10KB/100KB 量级) 针对性能优化,适用于常规业务场景,容许在故障时损失少量数据。 最大可用性(Maximum Availability)
配置有 pg_rpo = 0synchronous_mode: true 正常情况下等待至少一个从库确认,实现零数据丢失。当 所有 同步从库故障时,自动降级为异步模式继续服务 兼顾数据安全与服务可用性,是生产环境 核心业务 的推荐配置 最大保护(Maximum Protection)
使用 crit.yml 模板,启用 Patroni 严格同步模式:synchronous_mode: true / synchronous_mode_strict: true 当所有同步从库故障时,主库将拒绝写入 以防止数据丢失,事务必须在至少一个从库持久化后才返回成功。 适用于金融交易、医疗记录等对数据完整性要求极高的场景 名称 最大性能 Performance最大可用 Availability最大保护 Protection复制方式 异步复制 同步复制 严格同步复制 数据丢失 可能丢失 正常零丢失,降级少量丢失 零丢失 主库写延迟 最低 中等 中等 吞吐量 最高 降低 降低 从库故障影响 无影响 自动降级,继续服务 主库停写 RPO < 1MB = 0(正常)/ < 1MB(降级) = 0 适用场景 常规业务、性能优先 重要业务、安全优先 金融核心、安全合规第一 配置方法 默认配置 pg_rpo0pg_confcrit.yml
实现原理 三种保护模式的区别在于 Patroni 的两个核心参数:synchronous_modesynchronous_mode_strict
synchronous_modesynchronous_mode_strictsynchronous_mode_strict = false主库继续服务 (最大可用性)synchronous_mode_strict = true主库停止写入 直到同步从库恢复(最大保护)模式 synchronous_modesynchronous_mode_strict复制模式 从库故障行为 最大性能 false- 异步复制 无影响 最大可用 truefalse同步复制 自动降级为异步 最大保护 truetrue严格同步复制 主库拒绝写入
通常情况下,您只需要将 pg_rpo0,即可打开 synchronous_mode 开关,启用 最大可用性模式 。
如果您使用 pg_confcrit.ymlsynchronous_mode_strict 严格模式开关,启用 最大保护模式 。
此外,您可以启用 watchdog
当然,您可以直接按需 配置
可以指定指定 同步从库列表 您可以 配置 synchronous_commit'remote_apply',严格确保主从读写一致性。(Oracle 最大保护模式相当于 remote_write) 配置建议 最大性能模式 (异步复制)是 Pigsty 默认使用的模式,对于绝大多数业务来说已经足够使用。
容许故障时丢失少量数据(正常在 几KB - 几百KB 的数量级),换来更大的性能吞吐量与服务可用性水平,是常规业务场景的推荐配置。
在这种情况下,您可以通过 pg_rpo
最大可用性模式 (同步复制)适用于对据完整性要求高的场景,不允许数据丢失。
在这种模式下,最少需要一主一从的两节点 PostgreSQL 集群才有意义。
将 pg_rpo
最大保护模式 (严格同步复制) 适用于金融交易、医疗记录等对数据完整性要求极高的场景,我们建议至少使用一主二从的三节点集群,
因为两节点的情况下,只要从库故障,主库就会停止写入,导致业务不可用,这会降低系统的整体可靠性。而三节点的规格下,如果只有一个从库故障,主库仍然可以继续服务。
3.4.2 - RTO 利弊权衡 针对 RTO (Recovery Time Objective)进行利弊权衡,在故障恢复速度与误切风险之间找到最佳平衡点。
RTO (Recovery Time Objective,恢复时间目标)定义了在主库发生故障时,系统恢复写入能力所需的最长时间 。
对于核心交易系统这类可用性至关重要的场景,通常要求 RTO 尽可能短,例如一分钟内。
然而更短的 RTO 指标是有代价的,它会增加误切风险:网络抖动可能被误判为故障,导致不必要的故障切换。
因此对于跨机房/跨地域部署的场景,通常需要放宽 RTO 要求(例如 1-2 分钟),以降低误切风险。
利弊权衡 故障切换时的不可用时长上限由 pg_rtofast、norm、safe、wide,分别针对不同的网络条件与部署场景进行了优化,默认使用 norm 模式(约 45 秒)。
您也可以使用秒数直接指定 RTO 上限,系统会自动映射到最接近的模式。
当主库发生故障时,整个恢复流程涉及多个阶段:Patroni 检测故障、DCS 锁过期、新主选举、执行 promote、HAProxy 感知新主。
减小 RTO 意味着缩短各阶段的超时时间,这会使集群对网络抖动更加敏感,从而增加误切风险。
您需要根据实际网络条件选择合适的模式,在 恢复速度 与 误切风险 之间取得平衡。
网络质量越差,越应该选择保守的模式;网络质量越好,越可以选择激进的模式。
flowchart LR
A([主库故障]) --> B{Patroni<br/>检测到?}
B -->|PG崩溃| C[尝试本地重启]
B -->|节点宕机| D[等待 TTL 过期]
C -->|成功| E([本地恢复])
C -->|失败/超时| F[释放 Leader 锁]
D --> F
F --> G[从库竞选]
G --> H[执行 Promote]
H --> I[HAProxy 感知]
I --> J([服务恢复])
style A fill:#dc3545,stroke:#b02a37,color:#fff
style E fill:#198754,stroke:#146c43,color:#fff
style J fill:#198754,stroke:#146c43,color:#fff 四种模式 Pigsty 提供四种 RTO 模式,以帮助用户在不同的网络条件下进行利弊权衡。
名称 fast norm safe wide 适用场景 同机柜 同机房内(默认) 同省跨机房 跨地域/跨洲 网络条件 < 1ms,极稳定 1-5ms,正常 10-50ms,跨机房 100-200ms,公网 目标 RTO 30s 45s 90s 150s 误切风险 较高 中等 较低 极低 配置方法 pg_rto: fastpg_rto: normpg_rto: safepg_rto: wide
fast:同机柜/同交换机
适用于网络延迟极低(< 1ms)且非常稳定的场景,例如同机柜或同交换机部署 平均 RTO: 14s ,最坏情况: 29s ,TTL 仅 20s,检测间隔 5s 对网络质量要求最高,任何抖动都可能触发切换,误切风险较高 norm:同机房(默认)
默认模式 ,适用于同机房部署,网络延迟 1-5ms,质量正常,丢包率合理平均 RTO: 21s ,最坏情况: 43s ,TTL 为 30s,提供合理的容错窗口 平衡了恢复速度与稳定性,适合绝大多数生产环境 safe:同省跨机房
适用于同省/同区域跨机房部署,网络延迟 10-50ms,可能存在偶发抖动 平均 RTO: 43s ,最坏情况: 91s ,TTL 为 60s,更长的容错窗口 主库重启等待时间较长(60s),给予更多本地恢复机会,误切风险较低 wide:跨地域/跨洲
适用于跨地域甚至跨大洲部署,网络延迟 100-200ms,可能有公网级别的丢包率 平均 RTO: 92s ,最坏情况: 207s ,TTL 为 120s,极宽的容错窗口 牺牲恢复速度换取极低的误切率,适合异地容灾场景 RTO时序图 Patroni / PG HA 有两条关键故障路径:主动故障检测 (PG崩溃后 Patroni 检测到并尝试重启)与 被动租约过期 (节点宕机后等待 TTL 过期触发选举)。
实现原理 四种 RTO 模式的区别在于以下 10 个 Patroni 与 HAProxy HA 相关参数如何配置。
组件 参数 fast norm safe wide 说明 patronittl20 30 60 120 Leader 锁生存时间(秒) loop_wait5 5 10 20 HA 循环检查间隔(秒) retry_timeout5 10 20 30 DCS 操作重试超时(秒) primary_start_timeout15 25 45 95 主库重启等待时间(秒) safety_margin5 5 10 15 Watchdog 安全边际(秒) haproxyinter1s 2s 3s 4s 正常状态检查间隔 fastinter0.5s 1s 1.5s 2s 状态变化期检查间隔 downinter1s 2s 3s 4s DOWN 状态检查间隔 rise3 3 3 3 标记 UP 所需连续成功次数 fall3 3 3 3 标记 DOWN 所需连续失败次数
Patroni 参数 ttlloop_waitretry_timeoutprimary_start_timeoutsafety_marginHAProxy 参数 interfastinterdowninterriserise 次检查才能接收流量。fallfall 次才会被标记为 DOWN。关键约束 Patroni 核心约束 :确保主库能在 TTL 过期前完成降级,防止脑裂。
l o o p _ w a i t + 2 × r e t r y _ t i m e o u t ≤ t t l loop\_wait + 2 \times retry\_timeout \leq ttl l oo p _ w ai t + 2 × re t ry _ t im eo u t ≤ ttl 数据汇总 配置建议 fast 模式 适用于对 RTO 要求极高的场景,但需要确保网络质量足够好(延迟 < 1ms,极低丢包率)。
建议仅在同机柜或同交换机部署时使用,并在生产环境充分测试后再启用。
norm 模式 (默认 )是 Pigsty 默认使用的配置,对于绝大多数同机房部署的业务来说已经足够使用。
平均 21 秒的恢复时间在可接受范围内,同时提供了合理的容错窗口,避免网络抖动导致的误切。
safe 模式 适用于同城跨机房部署,网络延迟较高或存在偶发抖动的场景。
更长的容错窗口可以有效避免网络抖动导致的误切,是跨机房容灾的推荐配置。
wide 模式 适用于跨地域甚至跨大洲部署,网络延迟高且可能存在公网级别的丢包率。
这种场景下,稳定性比恢复速度更重要,因此使用极宽的容错窗口来确保极低的误切率。
模式 目标RTO 被动检测 RTO 主动检测 RTO 场景 fast3016 / 23 / 291 / 24 / 29同交换机,高质量网络 norm4527 / 34 / 412 / 35 / 41默认,同机房,标准网络 safe9053 / 66 / 783 / 61 / 73同城双活 / 跨机房容灾 wide150104 / 127 / 1504 / 122 / 145异地容灾 / 跨国部署 default32622 / 34 / 462 / 314 / 326Patroni 默认参数
通常只需将 pg_rtonorm 模式。
配置模式实际上是从 pg_rto_plan
pg_rto_plan : # [ttl, loop, retry, start, margin, inter, fastinter, downinter, rise, fall]
fast : [ 20 , 5 , 5 , 15 , 5 , '1s' , '0.5s' , '1s' , 3 , 3 ] # rto < 30s
norm : [ 30 , 5 , 10 , 25 , 5 , '2s' , '1s' , '2s' , 3 , 3 ] # rto < 45s
safe : [ 60 , 10 , 20 , 45 , 10 , '3s' , '1.5s' , '3s' , 3 , 3 ] # rto < 90s
wide : [ 120 , 20 , 30 , 95 , 15 , '4s' , '2s' , '4s' , 3 , 3 ] # rto < 150s
3.4.3 - 故障切换模型 详细分析三种经典故障检测/恢复路径下,最差,最优,平均 RTO 的计算逻辑与结果
Patroni 故障按故障对象分类可以分为以下 10 类,按照检测路径不同,可以进一步归纳为五类,在本节内详细展开。
# 故障场景 描述 最终走哪条路径 1 PG 进程崩溃 crash、OOM killed 主动检测 2 PG 拒绝连接 max_connections 主动检测 3 PG 假活 进程在但无响应 主动检测 (检测超时)4 Patroni 进程崩溃 kill -9、OOM 被动检测 5 Patroni 假活 进程在但卡住 Watchdog 6 节点宕机 断电、硬件故障 被动检测 7 节点假活 IO hang、CPU 饥饿 Watchdog 8 主库 ↔ DCS 网络中断 防火墙、交换机故障 网络分区 9 存储故障 磁盘坏、磁盘满、挂载失败 主动检测 或 Watchdog 10 手动切换 Switchover/Failover 手动触发
但是在 RTO 计算上,最终所有故障都会收敛到两条路径上,本节深入探讨了这两种情况下的 RTO 上下限与均值。
flowchart LR
A([主库故障]) --> B{Patroni<br/>检测到?}
B -->|PG崩溃| C[尝试本地重启]
B -->|节点宕机| D[等待 TTL 过期]
C -->|成功| E([本地恢复])
C -->|失败/超时| F[释放 Leader 锁]
D --> F
F --> G[从库竞选]
G --> H[执行 Promote]
H --> I[HAProxy 感知]
I --> J([服务恢复])
style A fill:#dc3545,stroke:#b02a37,color:#fff
style E fill:#198754,stroke:#146c43,color:#fff
style J fill:#198754,stroke:#146c43,color:#fff 3.4.3.1 - 被动故障切换 节点宕机,导致领导者租约过期触发集群领导竞选的故障路径
RTO 时序图
故障模型 项目 最好 最坏 平均 说明 租约过期 ttl - loopttlttl - loop/2最好:即将刷新时宕机 从库检测 0looploop / 2最好:恰好在检测点 抢锁提拔 021最好:直接抢锁提升 健康检查 (rise-1) × fastinter(rise-1) × fastinter + inter(rise-1) × fastinter + inter/2最好:检查前状态变化
被动故障与主动故障的核心区别 :
场景 Patroni 状态 租约处理 主要等待时间 主动故障 (PG崩溃)存活,健康 主动尝试重启 PG,超时后释放租约 primary_start_timeout被动故障 (节点宕机)随节点一起死亡 无法主动释放,只能等待 TTL 过期 ttl
在被动故障场景中,Patroni 随节点一起宕机,无法主动释放 Leader Key 。
DCS 中的租约只能等待 TTL 自然过期后触发集群选举。
时序分析 阶段 1:租约过期 Patroni 主库会在每个 loop_wait 周期刷新 Leader Key,将 TTL 重置为配置值。
时间线:
t-loop t t+ttl-loop t+ttl
| | | |
上次刷新 故障发生 最好情况 最坏情况
|←── loop ──→| | |
|←──────────── ttl ─────────────────────→|
最好情况 :故障发生在即将刷新租约之前(距上次刷新已过 loop),剩余 TTL = ttl - loop最坏情况 :故障发生在刚刷新租约之后,需等待完整 ttl平均情况 :ttl - loop/2T e x p i r e = { t t l − l o o p 最好 t t l − l o o p / 2 平均 t t l 最坏 T_{expire} = \begin{cases}
ttl - loop & \text{最好} \\
ttl - loop/2 & \text{平均} \\
ttl & \text{最坏}
\end{cases} T e x p i re = ⎩ ⎨ ⎧ ttl − l oo p ttl − l oo p /2 ttl 最好 平均 最坏 阶段 2:从库检测 从库在 loop_wait 周期醒来后检查 DCS 中的 Leader Key 状态。
时间线:
租约过期 从库醒来
| |
|←── 0~loop ─→|
最好情况 :租约过期时从库恰好醒来,等待 0最坏情况 :租约过期后从库刚进入睡眠,等待 loop平均情况 :loop/2T d e t e c t = { 0 最好 l o o p / 2 平均 l o o p 最坏 T_{detect} = \begin{cases}
0 & \text{最好} \\
loop/2 & \text{平均} \\
loop & \text{最坏}
\end{cases} T d e t ec t = ⎩ ⎨ ⎧ 0 l oo p /2 l oo p 最好 平均 最坏 阶段 3:抢锁提拔 从库发现 Leader Key 过期后,开始竞选过程,获得 Leader Key 的从库执行 pg_ctl promote,将自己提升为新主库。
通过 Rest API,并行发起查询,查询各从库的复制位置,通常 10ms,硬编码 2 秒超时。 比较 WAL 位置,确定最优候选,各从库尝试创建 Leader Key(CAS 原子操作) 执行 pg_ctl promote 提升自己为主库(很快,通常忽略不计) 选举流程:
从库A ──→ 查询复制位置 ──→ 比较 ──→ 尝试抢锁 ──→ 成功
从库B ──→ 查询复制位置 ──→ 比较 ──→ 尝试抢锁 ──→ 失败
最好情况 :单从库或直接抢到锁并提升,常数开销 0.1s最坏情况 :DCS API 调用超时:2s平均情况 :1s 常数开销T e l e c t = { 0.1 最好 1 平均 2 最坏 T_{elect} = \begin{cases}
0.1 & \text{最好} \\
1 & \text{平均} \\
2 & \text{最坏}
\end{cases} T e l ec t = ⎩ ⎨ ⎧ 0.1 1 2 最好 平均 最坏 阶段 4:健康检查 HAProxy 检测新主库上线,需要连续 rise 次健康检查成功。
检测时序:
新主提升 首次检查 第二次检查 第三次检查(UP)
| | | |
|←─ 0~inter ─→|←─ fast ─→|←─ fast ─→|
最好情况 :新主提升时恰好赶上检查,(rise-1) × fastinter最坏情况 :新主提升后刚错过检查,(rise-1) × fastinter + inter平均情况 :(rise-1) × fastinter + inter/2T h a p r o x y = { ( r i s e − 1 ) × f a s t i n t e r 最好 ( r i s e − 1 ) × f a s t i n t e r + i n t e r / 2 平均 ( r i s e − 1 ) × f a s t i n t e r + i n t e r 最坏 T_{haproxy} = \begin{cases}
(rise-1) \times fastinter & \text{最好} \\
(rise-1) \times fastinter + inter/2 & \text{平均} \\
(rise-1) \times fastinter + inter & \text{最坏}
\end{cases} T ha p ro x y = ⎩ ⎨ ⎧ ( r i se − 1 ) × f a s t in t er ( r i se − 1 ) × f a s t in t er + in t er /2 ( r i se − 1 ) × f a s t in t er + in t er 最好 平均 最坏 RTO 公式 将各阶段时间相加,得到总 RTO:
最好情况
R T O m i n = t t l − l o o p + 0.1 + ( r i s e − 1 ) × f a s t i n t e r RTO_{min} = ttl - loop + 0.1 + (rise-1) \times fastinter RT O min = ttl − l oo p + 0.1 + ( r i se − 1 ) × f a s t in t er 平均情况
R T O a v g = t t l + 1 + i n t e r / 2 + ( r i s e − 1 ) × f a s t i n t e r RTO_{avg} = ttl + 1 + inter/2 + (rise-1) \times fastinter RT O a vg = ttl + 1 + in t er /2 + ( r i se − 1 ) × f a s t in t er 最坏情况
R T O m a x = t t l + l o o p + 2 + i n t e r + ( r i s e − 1 ) × f a s t i n t e r RTO_{max} = ttl + loop + 2 + inter + (rise-1) \times fastinter RT O ma x = ttl + l oo p + 2 + in t er + ( r i se − 1 ) × f a s t in t er 模型计算 将四种 RTO 模型的参数带入上面的公式:
pg_rto_plan : # [ttl, loop, retry, start, margin, inter, fastinter, downinter, rise, fall]
fast : [ 20 , 5 , 5 , 15 , 5 , '1s' , '0.5s' , '1s' , 3 , 3 ] # rto < 30s
norm : [ 30 , 5 , 10 , 25 , 5 , '2s' , '1s' , '2s' , 3 , 3 ] # rto < 45s
safe : [ 60 , 10 , 20 , 45 , 10 , '3s' , '1.5s' , '3s' , 3 , 3 ] # rto < 90s
wide : [ 120 , 20 , 30 , 95 , 15 , '4s' , '2s' , '4s' , 3 , 3 ] # rto < 150s
四种模式计算结果 (单位:秒,格式:min / avg / max)
阶段 fast norm safe wide 租约过期 15 / 17 / 2025 / 27 / 3050 / 55 / 60100 / 110 / 120从库检测 0 / 3 / 50 / 3 / 50 / 5 / 100 / 10 / 20抢锁提拔 0 / 1 / 20 / 1 / 20 / 1 / 20 / 1 / 2健康检查 1 / 2 / 22 / 3 / 43 / 5 / 64 / 6 / 8总计 16 / 23 / 2927 / 34 / 4153 / 66 / 78104 / 127 / 150
3.4.3.2 - 主动故障检测 PostgreSQL 主库进程崩溃,Patroni 存活并尝试重启,超时后触发故障切换的路径
RTO 时序图
故障模型 项目 最好 最坏 平均 说明 故障检测 0looploop/2最好:PG 恰好在检测前崩溃 重启超时 0startstart最好:PG 瞬间自愈 从库检测 0looploop/2最好:恰好在检测点 抢锁提拔 021最好:直接抢锁提升 健康检查 (rise-1) × fastinter(rise-1) × fastinter + inter(rise-1) × fastinter + inter/2最好:检查前状态变化
主动故障与被动故障的核心区别 :
场景 Patroni 状态 租约处理 主要等待时间 主动故障 (PG 崩溃)存活,健康 主动尝试重启 PG,超时后释放租约 primary_start_timeout被动故障 (节点宕机)随节点一起死亡 无法主动释放,只能等待 TTL 过期 ttl
在主动故障场景中,Patroni 仍然存活,能够主动检测到 PG 崩溃并尝试重启 。
如果重启成功,服务自愈;如果超时仍未恢复,Patroni 会主动释放 Leader Key ,触发集群选举。
时序分析 阶段 1:故障检测 Patroni 在每个 loop_wait 周期检查 PostgreSQL 状态(通过 pg_isready 或检查进程)。
时间线:
上次检测 PG崩溃 下次检测
| | |
|←── 0~loop ─→| |
最好情况 :PG 恰好在 Patroni 检测前崩溃,立即被发现,等待 0最坏情况 :PG 刚检测完就崩溃,需等待下一个周期,等待 loop平均情况 :loop/2T d e t e c t = { 0 最好 l o o p / 2 平均 l o o p 最坏 T_{detect} = \begin{cases}
0 & \text{最好} \\
loop/2 & \text{平均} \\
loop & \text{最坏}
\end{cases} T d e t ec t = ⎩ ⎨ ⎧ 0 l oo p /2 l oo p 最好 平均 最坏 阶段 2:重启超时 Patroni 检测到 PG 崩溃后,会尝试重启 PostgreSQL。此阶段有两种可能的结果:
时间线:
检测到崩溃 尝试重启 重启成功/超时
| | |
|←──── 0 ~ start ────────→|
路径 A:自愈成功 (最好情况)
PG 成功重启,服务恢复 不触发故障切换,RTO 极短 等待时间:0(相对于 Failover 路径) 路径 B:需要 Failover (平均/最坏情况)
等待 primary_start_timeout 超时后 PG 仍未恢复 Patroni 主动释放 Leader Key 等待时间:start T r e s t a r t = { 0 最好(自愈成功) s t a r t 平均(需要 Failover) s t a r t 最坏 T_{restart} = \begin{cases}
0 & \text{最好(自愈成功)} \\
start & \text{平均(需要 Failover)} \\
start & \text{最坏}
\end{cases} T res t a r t = ⎩ ⎨ ⎧ 0 s t a r t s t a r t 最好(自愈成功) 平均(需要 Failover ) 最坏 注意 :平均情况假设需要进行故障切换。如果 PG 能够快速自愈,则整体 RTO 会大幅降低。
阶段 3:从库检测 从库在 loop_wait 周期醒来后检查 DCS 中的 Leader Key 状态。当主库 Patroni 释放 Leader Key 后,从库发现后开始竞选。
时间线:
租约释放 从库醒来
| |
|←── 0~loop ─→|
最好情况 :租约释放时从库恰好醒来,等待 0最坏情况 :租约释放后从库刚进入睡眠,等待 loop平均情况 :loop/2T s t a n d b y = { 0 最好 l o o p / 2 平均 l o o p 最坏 T_{standby} = \begin{cases}
0 & \text{最好} \\
loop/2 & \text{平均} \\
loop & \text{最坏}
\end{cases} T s t an d b y = ⎩ ⎨ ⎧ 0 l oo p /2 l oo p 最好 平均 最坏 阶段 4:抢锁提拔 从库发现 Leader Key 空缺后,开始竞选过程,获得 Leader Key 的从库执行 pg_ctl promote,将自己提升为新主库。
通过 Rest API,并行发起查询,查询各从库的复制位置,通常 10ms,硬编码 2 秒超时。 比较 WAL 位置,确定最优候选,各从库尝试创建 Leader Key(CAS 原子操作) 执行 pg_ctl promote 提升自己为主库(很快,通常忽略不计) 选举流程:
从库A ──→ 查询复制位置 ──→ 比较 ──→ 尝试抢锁 ──→ 成功
从库B ──→ 查询复制位置 ──→ 比较 ──→ 尝试抢锁 ──→ 失败
最好情况 :单从库或直接抢到锁并提升,常数开销 0.1s最坏情况 :DCS API 调用超时:2s平均情况 :1s 常数开销T e l e c t = { 0.1 最好 1 平均 2 最坏 T_{elect} = \begin{cases}
0.1 & \text{最好} \\
1 & \text{平均} \\
2 & \text{最坏}
\end{cases} T e l ec t = ⎩ ⎨ ⎧ 0.1 1 2 最好 平均 最坏 阶段 5:健康检查 HAProxy 检测新主库上线,需要连续 rise 次健康检查成功。
检测时序:
新主提升 首次检查 第二次检查 第三次检查(UP)
| | | |
|←─ 0~inter ─→|←─ fast ─→|←─ fast ─→|
最好情况 :新主提升时恰好赶上检查,(rise-1) × fastinter最坏情况 :新主提升后刚错过检查,(rise-1) × fastinter + inter平均情况 :(rise-1) × fastinter + inter/2T h a p r o x y = { ( r i s e − 1 ) × f a s t i n t e r 最好 ( r i s e − 1 ) × f a s t i n t e r + i n t e r / 2 平均 ( r i s e − 1 ) × f a s t i n t e r + i n t e r 最坏 T_{haproxy} = \begin{cases}
(rise-1) \times fastinter & \text{最好} \\
(rise-1) \times fastinter + inter/2 & \text{平均} \\
(rise-1) \times fastinter + inter & \text{最坏}
\end{cases} T ha p ro x y = ⎩ ⎨ ⎧ ( r i se − 1 ) × f a s t in t er ( r i se − 1 ) × f a s t in t er + in t er /2 ( r i se − 1 ) × f a s t in t er + in t er 最好 平均 最坏 RTO 公式 将各阶段时间相加,得到总 RTO:
最好情况 (PG 瞬间自愈)
R T O m i n = 0 + 0 + 0 + 0.1 + ( r i s e − 1 ) × f a s t i n t e r ≈ ( r i s e − 1 ) × f a s t i n t e r RTO_{min} = 0 + 0 + 0 + 0.1 + (rise-1) \times fastinter \approx (rise-1) \times fastinter RT O min = 0 + 0 + 0 + 0.1 + ( r i se − 1 ) × f a s t in t er ≈ ( r i se − 1 ) × f a s t in t er 平均情况 (需要 Failover)
R T O a v g = l o o p + s t a r t + 1 + i n t e r / 2 + ( r i s e − 1 ) × f a s t i n t e r RTO_{avg} = loop + start + 1 + inter/2 + (rise-1) \times fastinter RT O a vg = l oo p + s t a r t + 1 + in t er /2 + ( r i se − 1 ) × f a s t in t er 最坏情况
R T O m a x = l o o p × 2 + s t a r t + 2 + i n t e r + ( r i s e − 1 ) × f a s t i n t e r RTO_{max} = loop \times 2 + start + 2 + inter + (rise-1) \times fastinter RT O ma x = l oo p × 2 + s t a r t + 2 + in t er + ( r i se − 1 ) × f a s t in t er 模型计算 将四种 RTO 模型的参数带入上面的公式:
pg_rto_plan : # [ttl, loop, retry, start, margin, inter, fastinter, downinter, rise, fall]
fast : [ 20 , 5 , 5 , 15 , 5 , '1s' , '0.5s' , '1s' , 3 , 3 ] # rto < 30s
norm : [ 30 , 5 , 10 , 25 , 5 , '2s' , '1s' , '2s' , 3 , 3 ] # rto < 45s
safe : [ 60 , 10 , 20 , 45 , 10 , '3s' , '1.5s' , '3s' , 3 , 3 ] # rto < 90s
wide : [ 120 , 20 , 30 , 95 , 15 , '4s' , '2s' , '4s' , 3 , 3 ] # rto < 150s
四种模式计算结果 (单位:秒,格式:min / avg / max)
阶段 fast norm safe wide 故障检测 0 / 3 / 50 / 3 / 50 / 5 / 100 / 10 / 20重启超时 0 / 15 / 150 / 25 / 250 / 45 / 450 / 95 / 95从库检测 0 / 3 / 50 / 3 / 50 / 5 / 100 / 10 / 20抢锁提拔 0 / 1 / 20 / 1 / 20 / 1 / 20 / 1 / 2健康检查 1 / 2 / 22 / 3 / 43 / 5 / 64 / 6 / 8总计 1 / 24 / 292 / 35 / 413 / 61 / 734 / 122 / 145
与被动故障对比 阶段 主动故障(PG 崩溃) 被动故障(节点宕机) 说明 检测机制 Patroni 主动检测 TTL 被动过期 主动检测更快发现故障 核心等待 startttlstart 通常小于 ttl,但需要额外的故障检测时间 租约处理 主动释放 被动过期 主动释放更及时 自愈可能 ✅ 有 ❌ 无 主动检测可尝试本地恢复
RTO 对比 (平均情况):
模式 主动故障(PG 崩溃) 被动故障(节点宕机) 差异 fast 24s 23s +1s norm 35s 34s +1s safe 61s 66s -5s wide 122s 127s -5s
分析 :在 fast 和 norm 模式下,主动故障的 RTO 略高于被动故障,因为需要等待 primary_start_timeout(start);
但在 safe 和 wide 模式下,由于 start < ttl - loop,主动故障反而更快。
不过主动故障有自愈的可能性,最好情况下 RTO 可以极短。
3.4.4 - 服务接入 Pigsty 使用 HAProxy 提供服务接入,并提供可选的 pgBouncer 池化连接,以及可选的 L2 VIP 与 DNS 接入。
分离读写操作,正确路由流量,稳定可靠地交付 PostgreSQL 集群提供的能力。
服务 是一种抽象:它是数据库集群对外提供能力的形式,并封装了底层集群的细节。
服务对于生产环境中的 稳定接入 至关重要,在 高可用 集群自动故障时方显其价值,单机用户 通常不需要操心这个概念。
单机用户 “服务” 的概念是给生产环境用的,个人用户/单机集群可以不折腾,直接拿实例名/IP地址访问数据库。
例如,Pigsty 默认的单节点 pg-meta.meta 数据库,就可以直接用下面三个不同的用户连接上去。
psql postgres://dbuser_dba:DBUser.DBA@10.10.10.10/meta # 直接用 DBA 超级用户连上去
psql postgres://dbuser_meta:DBUser.Meta@10.10.10.10/meta # 用默认的业务管理员用户连上去
psql postgres://dbuser_view:DBUser.View@pg-meta/meta # 用默认的只读用户走实例域名连上去
服务概述 在真实世界生产环境中,我们会使用基于复制的主从数据库集群。集群中有且仅有一个实例作为领导者(主库 )可以接受写入。
而其他实例(从库 )则会从持续从集群领导者获取变更日志,与领导者保持一致。同时,从库还可以承载只读请求,在读多写少的场景下可以显著分担主库的负担,
因此对集群的写入请求与只读请求进行区分,是一种十分常见的实践。
此外对于高频短连接的生产环境,我们还会通过连接池中间件(Pgbouncer)对请求进行池化,减少连接与后端进程的创建开销。但对于ETL与变更执行等场景,我们又需要绕过连接池,直接访问数据库。
同时,高可用集群在故障时会出现故障切换(Failover),故障切换会导致集群的领导者出现变更。因此高可用的数据库方案要求写入流量可以自动适配集群的领导者变化。
这些不同的访问需求(读写分离,池化与直连,故障切换自动适配)最终抽象出 服务 (Service)的概念。
通常来说,数据库集群都必须提供这种最基础的服务:
对于生产数据库集群,至少应当提供这两种服务:
读写服务(primary) :写入数据:只能由主库所承载。只读服务(replica) :读取数据:可以由从库承载,没有从库时也可由主库承载此外,根据具体的业务场景,可能还会有其他的服务,例如:
默认直连服务(default) :允许(管理)用户,绕过连接池直接访问数据库的服务离线从库服务(offline) :不承接线上只读流量的专用从库,用于ETL与分析查询同步从库服务(standby) :没有复制延迟的只读服务,由 同步备库 /主库处理只读查询延迟从库服务(delayed) :访问同一个集群在一段时间之前的旧数据,由 延迟从库 来处理接入服务 Pigsty的服务交付边界止步于集群的HAProxy,用户可以用各种手段访问这些负载均衡器。
典型的做法是使用 DNS 或 VIP 接入,将其绑定在集群所有或任意数量的负载均衡器上。
你可以使用不同的 主机 & 端口 组合,它们以不同的方式提供 PostgreSQL 服务。
主机
类型 样例 描述 集群域名 pg-test通过集群域名访问(由 dnsmasq @ infra 节点解析) 集群 VIP 地址 10.10.10.3通过由 vip-manager 管理的 L2 VIP 地址访问,绑定到主节点 实例主机名 pg-test-1通过任何实例主机名访问(由 dnsmasq @ infra 节点解析) 实例 IP 地址 10.10.10.11访问任何实例的 IP 地址
端口
Pigsty 使用不同的 端口 来区分 pg services
端口 服务 类型 描述 5432 postgres 数据库 直接访问 postgres 服务器 6432 pgbouncer 中间件 访问 postgres 前先通过连接池中间件 5433 primary 服务 访问主 pgbouncer (或 postgres) 5434 replica 服务 访问备份 pgbouncer (或 postgres) 5436 default 服务 访问主 postgres 5438 offline 服务 访问离线 postgres
组合
# 通过集群域名访问
postgres://test@pg-test:5432/test # DNS -> L2 VIP -> 主直接连接
postgres://test@pg-test:6432/test # DNS -> L2 VIP -> 主连接池 -> 主
postgres://test@pg-test:5433/test # DNS -> L2 VIP -> HAProxy -> 主连接池 -> 主
postgres://test@pg-test:5434/test # DNS -> L2 VIP -> HAProxy -> 备份连接池 -> 备份
postgres://dbuser_dba@pg-test:5436/test # DNS -> L2 VIP -> HAProxy -> 主直接连接 (用于管理员)
postgres://dbuser_stats@pg-test:5438/test # DNS -> L2 VIP -> HAProxy -> 离线直接连接 (用于 ETL/个人查询)
# 通过集群 VIP 直接访问
postgres://test@10.10.10.3:5432/test # L2 VIP -> 主直接访问
postgres://test@10.10.10.3:6432/test # L2 VIP -> 主连接池 -> 主
postgres://test@10.10.10.3:5433/test # L2 VIP -> HAProxy -> 主连接池 -> 主
postgres://test@10.10.10.3:5434/test # L2 VIP -> HAProxy -> 备份连接池 -> 备份
postgres://dbuser_dba@10.10.10.3:5436/test # L2 VIP -> HAProxy -> 主直接连接 (用于管理员)
postgres://dbuser_stats@10.10.10.3::5438/test # L2 VIP -> HAProxy -> 离线直接连接 (用于 ETL/个人查询)
# 直接指定任何集群实例名
postgres://test@pg-test-1:5432/test # DNS -> 数据库实例直接连接 (单例访问)
postgres://test@pg-test-1:6432/test # DNS -> 连接池 -> 数据库
postgres://test@pg-test-1:5433/test # DNS -> HAProxy -> 连接池 -> 数据库读/写
postgres://test@pg-test-1:5434/test # DNS -> HAProxy -> 连接池 -> 数据库只读
postgres://dbuser_dba@pg-test-1:5436/test # DNS -> HAProxy -> 数据库直接连接
postgres://dbuser_stats@pg-test-1:5438/test # DNS -> HAProxy -> 数据库离线读/写
# 直接指定任何集群实例 IP 访问
postgres://test@10.10.10.11:5432/test # 数据库实例直接连接 (直接指定实例, 没有自动流量分配)
postgres://test@10.10.10.11:6432/test # 连接池 -> 数据库
postgres://test@10.10.10.11:5433/test # HAProxy -> 连接池 -> 数据库读/写
postgres://test@10.10.10.11:5434/test # HAProxy -> 连接池 -> 数据库只读
postgres://dbuser_dba@10.10.10.11:5436/test # HAProxy -> 数据库直接连接
postgres://dbuser_stats@10.10.10.11:5438/test # HAProxy -> 数据库离线读-写
# 智能客户端:通过URL读写分离
postgres://test@10.10.10.11:6432,10.10.10.12:6432,10.10.10.13:6432/test?target_session_attrs= primary
postgres://test@10.10.10.11:6432,10.10.10.12:6432,10.10.10.13:6432/test?target_session_attrs= prefer-standby
3.5 - 时间点恢复 Pigsty 使用 pgBackRest 实现了 PostgreSQL 时间点恢复,允许用户回滚至备份策略容许范围内的任意时间点。
当您不小心删除了数据、表、甚至整个数据库时,PITR 能力让您回到过去任意时刻,避免软件缺陷与人为失误导致的数据损失。
—— 这个曾经只有资深 DBA 才能施展的『魔法』,现在对所有用户都可以轻松做到零配置开箱即用。
概览 Pigsty 的 PostgreSQL 集群带有自动配置的时间点恢复(PITR)方案,基于 pgBackRest MinIO
高可用方案 时间点恢复 (Point in Time Recovery, PITR)能力,无需额外配置即默认启用。
Pigsty 为您提供了基础备份与 WAL 归档的默认配置,您可以使用本地目录与磁盘,亦或专用的 MinIO 集群或 S3 对象存储服务来存储备份并实现异地容灾。
当您使用本地磁盘时,默认保留恢复至过去一天内的任意时间点的能力。当您使用 MinIO 或 S3 时,默认保留恢复至过去一周内的任意时间点的能力。
只要存储空间管够,您尽可保留任意长地可恢复时间段,丰俭由人。
时间点恢复解决什么问题? 容灾能⼒增强:RPO 从 ∞ 降⾄ ⼗⼏MB, RTO 从 ∞ 降⾄ ⼏⼩时/⼏刻钟。 确保数据安全:C/I/A 中的 数据完整性 :避免误删导致的数据⼀致性问题。 确保数据安全:C/I/A 中的 数据可⽤性 :提供对“永久不可⽤”这种灾难情况的兜底 单实例配置策略 事件 RTO RPO 宕机 永久丢失 全部丢失 宕机 宕机
时间点恢复有什么代价? 降低数据安全中的 C:机密性 ,产生额外泄漏点,需要额外对备份进⾏保护。 额外的资源消耗:本地存储或⽹络流量 / 带宽开销,通常并不是⼀个问题。 复杂度代价升⾼:⽤户需要付出备份管理成本。 时间点恢复的局限性 如果只有 PITR 用于故障恢复,则 RTO 与 RPO 指标相比 高可用方案
RTO :如果只有单机 + PITR,恢复时长取决于备份大小与网络/磁盘带宽,从十几分钟到几小时,几天不等。RPO :如果只有单机 + PITR,宕机时可能丢失少量数据,一个或几个 WAL 日志段文件可能尚未归档,损失 16 MB 到⼏⼗ MB 不等的数据。除了 PITR 延迟集群
原理 时间点恢复允许您将集群恢复回滚至过去的“任意时刻”,避免软件缺陷与人为失误导致的数据损失。要做到这一点,首先需要做好两样准备工作:基础备份 WAL归档 基础备份 ,允许用户将数据库恢复至备份时的状态,而同时拥有从某个基础备份开始的 WAL归档 ,允许用户将数据库恢复至基础备份时刻之后的任意时间点。
详细原理,请参阅:基础备份与时间点恢复 PGSQL管理:备份恢复
基础备份 Pigsty 使用 pgbackrest 管理 PostgreSQL 备份。pgBackRest 将在所有集群实例上初始化空仓库,但只会在集群主库上实际使用仓库。
pgBackRest 支持三种备份模式:全量备份 ,增量备份 ,差异备份,其中前两者最为常用。
全量备份将对数据库集群取一个当前时刻的全量物理快照,增量备份会记录当前数据库集群与上一次全量备份之间的差异。
Pigsty 为备份提供了封装命令:/pg/bin/pg-backup [full|incr]。您可以通过 Crontab 或任何其他任务调度系统,按需定期制作基础备份。
WAL归档 Pigsty 默认在集群主库上启⽤了 WAL 归档,并使⽤ pgbackrest 命令行工具持续推送 WAL 段⽂件至备份仓库。
pgBackRest 会⾃动管理所需的 WAL ⽂件,并根据备份的保留策略及时清理过期的备份,与其对应的 WAL 归档⽂件。
如果您不需要 PITR 功能,可以通过 配置集群 archive_mode: off 来关闭 WAL 归档,移除 node_crontab
实现 默认情况下,Pigsty提供了两种预置 备份策略 :默认使用本地文件系统备份仓库,在这种情况下每天进行一次全量备份,确保用户任何时候都能回滚至一天内的任意时间点。备选策略使用专用的 MinIO 集群或S3存储备份,每周一全备,每天一增备,默认保留两周的备份与WAL归档。
Pigsty 使用 pgBackRest 管理备份,接收 WAL 归档,执行 PITR。备份仓库可以进行灵活配置(pgbackrest_repolocal),但也可以使用其他磁盘路径,或使用自带的可选 MinIO 服务(minio)与云上 S3 服务。
pgbackrest_enabled : true # 在 pgsql 主机上启用 pgBackRest 吗?
pgbackrest_clean : true # 初始化时删除 pg 备份数据?
pgbackrest_log_dir : /pg/log/pgbackrest # pgbackrest 日志目录,默认为 `/pg/log/pgbackrest`
pgbackrest_method : local # pgbackrest 仓库方法:local, minio, [用户定义...]
pgbackrest_repo : # pgbackrest 仓库:https://pgbackrest.org/configuration.html#section-repository
local : # 默认使用本地 posix 文件系统的 pgbackrest 仓库
path : /pg/backup # 本地备份目录,默认为 `/pg/backup`
retention_full_type : count # 按计数保留完整备份
retention_full : 2 # 使用本地文件系统仓库时,最多保留 3 个完整备份,至少保留 2 个
minio : # pgbackrest 的可选 minio 仓库
type : s3 # minio 是与 s3 兼容的,所以使用 s3
s3_endpoint : sss.pigsty # minio 端点域名,默认为 `sss.pigsty`
s3_region : us-east-1 # minio 区域,默认为 us-east-1,对 minio 无效
s3_bucket : pgsql # minio 桶名称,默认为 `pgsql`
s3_key : pgbackrest # pgbackrest 的 minio 用户访问密钥
s3_key_secret : S3User.Backup # pgbackrest 的 minio 用户秘密密钥
s3_uri_style : path # 对 minio 使用路径风格的 uri,而不是主机风格
path : /pgbackrest # minio 备份路径,默认为 `/pgbackrest`
storage_port : 9000 # minio 端口,默认为 9000
storage_ca_file : /etc/pki/ca.crt # minio ca 文件路径,默认为 `/etc/pki/ca.crt`
bundle : y # 将小文件打包成一个文件
cipher_type : aes-256-cbc # 为远程备份仓库启用 AES 加密
cipher_pass : pgBackRest # AES 加密密码,默认为 'pgBackRest'
retention_full_type : time # 在 minio 仓库上按时间保留完整备份
retention_full : 14 # 保留过去 14 天的完整备份
# 您还可以添加其他的可选备份仓库,例如 S3,用于异地容灾
Pigsty 参数 pgbackrest_repo/etc/pgbackrest/pgbackrest.conf 配置文件中的仓库定义。
例如,如果您定义了一个美西区的 S3 仓库用于存储冷备份,可以使用下面的参考配置。
s3 : # ------> /etc/pgbackrest/pgbackrest.conf
repo1-type : s3 # ----> repo1-type=s3
repo1-s3-region : us-west-1 # ----> repo1-s3-region=us-west-1
repo1-s3-endpoint : s3-us-west-1.amazonaws.com # ----> repo1-s3-endpoint=s3-us-west-1.amazonaws.com
repo1-s3-key : '<your_access_key>' # ----> repo1-s3-key=<your_access_key>
repo1-s3-key-secret : '<your_secret_key>' # ----> repo1-s3-key-secret=<your_secret_key>
repo1-s3-bucket : pgsql # ----> repo1-s3-bucket=pgsql
repo1-s3-uri-style : host # ----> repo1-s3-uri-style=host
repo1-path : /pgbackrest # ----> repo1-path=/pgbackrest
repo1-bundle : y # ----> repo1-bundle=y
repo1-cipher-type : aes-256-cbc # ----> repo1-cipher-type=aes-256-cbc
repo1-cipher-pass : pgBackRest # ----> repo1-cipher-pass=pgBackRest
repo1-retention-full-type : time # ----> repo1-retention-full-type=time
repo1-retention-full : 90 # ----> repo1-retention-full=90
恢复 您可以直接使用以下封装命令可以用于 PostgreSQL 数据库集群的 时间点恢复 。
Pigsty 默认使用增量差分并行恢复,允许您以最快速度恢复到指定时间点。
pg-pitr # 恢复到WAL存档流的结束位置(例如在整个数据中心故障的情况下使用)
pg-pitr -i # 恢复到最近备份完成的时间(不常用)
pg-pitr --time= "2022-12-30 14:44:44+08" # 恢复到指定的时间点(在删除数据库或表的情况下使用)
pg-pitr --name= "my-restore-point" # 恢复到使用 pg_create_restore_point 创建的命名恢复点
pg-pitr --lsn= "0/7C82CB8" -X # 在LSN之前立即恢复
pg-pitr --xid= "1234567" -X -P # 在指定的事务ID之前立即恢复,然后将集群直接提升为主库
pg-pitr --backup= latest # 恢复到最新的备份集
pg-pitr --backup= 20221108-105325 # 恢复到特定备份集,备份集可以使用 pgbackrest info 列出
pg-pitr # pgbackrest --stanza=pg-meta restore
pg-pitr -i # pgbackrest --stanza=pg-meta --type=immediate restore
pg-pitr -t "2022-12-30 14:44:44+08" # pgbackrest --stanza=pg-meta --type=time --target="2022-12-30 14:44:44+08" restore
pg-pitr -n "my-restore-point" # pgbackrest --stanza=pg-meta --type=name --target=my-restore-point restore
pg-pitr -b 20221108-105325F # pgbackrest --stanza=pg-meta --type=name --set=20221230-120101F restore
pg-pitr -l "0/7C82CB8" -X # pgbackrest --stanza=pg-meta --type=lsn --target="0/7C82CB8" --target-exclusive restore
pg-pitr -x 1234567 -X -P # pgbackrest --stanza=pg-meta --type=xid --target="0/7C82CB8" --target-exclusive --target-action=promote restore
在执行 PITR 时,您可以使用 Pigsty 监控系统观察集群 LSN 位点状态,判断是否成功恢复到指定的时间点,事务点,LSN位点,或其他点位。
3.5.1 - 时间点恢复的工作原理 本文解释 PITR 的工作机制,帮助您建立正确的心智模型:基础备份、WAL 归档、恢复窗口与事务边界
时间点恢复(PITR)的核心原理是:基础备份 + WAL 归档 = 任意时间点恢复能力 。
在 Pigsty 中,这一能力由 pgBackRest 实现,并通过 定时备份 + WAL 归档 自动运行。
三要素 要素 作用 Pigsty 实现 基础备份 提供一致的物理快照,决定恢复起点 pg-backup + pgbackrest + pg_crontabWAL 归档 记录备份后的所有变更,决定恢复路径 archive_mode=on + archive_command=pgbackrest ... archive-push恢复目标 指定恢复停止位置 pg_pitr 参数 / pg-pitr 脚本 / pgbackrest restore
基础备份 基础备份 是数据库在某一时刻的物理快照,是 PITR 的恢复起点。Pigsty 通过 pgBackRest 生成基础备份,并提供 pg-backup 脚本封装常用操作。
备份类型 类型 说明 恢复开销 全量备份 (Full)复制全部数据文件 恢复最快,空间占用最大 差异备份 (Differential)相对最近一次全量备份的变化 恢复需要全量 + 差异 增量备份 (Incremental)相对最近一次任意备份的变化 空间最省,恢复需要完整链路
Pigsty 的默认行为 pg-backup 默认执行增量备份 ,若不存在全量备份会自动补一次全量。备份任务通过 pg_crontabpostgres 用户的 crontab。 脚本会自动识别节点角色,只有主库实际执行 ,从库会直接退出。 备份频率越高,需要重放的 WAL 越少,恢复速度越快。
更多细节请参阅 备份机制 备份策略
WAL 归档 WAL (Write-Ahead Log)记录了数据库的每一次变更。PITR 通过持续归档 WAL,确保能够把数据库从基础备份重放到指定时刻。
Pigsty 的归档链路 Pigsty 默认开启 WAL 归档,并将归档动作交给 pgBackRest:
archive_mode = onarchive_command = pgbackrest --stanza=<cluster> archive-push %ppgBackRest 会持续接收 WAL 段文件,并依据保留策略自动清理过期归档。
恢复时,pgBackRest 负责通过 archive-get 拉取所需 WAL。
关键影响 归档延迟 会缩短恢复窗口的右边界。仓库不可用 会导致归档中断,直接影响 PITR 能力。更多细节请参阅 备份机制 备份仓库
恢复目标与事务边界 PITR 的恢复目标由 PostgreSQL 的 recovery_target_* 系列参数定义,Pigsty 通过 pg_pitr 或 pg-pitr 进行封装。
目标类型 目标类型 参数 说明 常见场景 latest 无 恢复到 WAL 归档流末尾 机房灾难后的最新恢复 time time恢复到指定时间点 误删数据 xid xid恢复到指定事务 ID 错误事务回滚 lsn lsn恢复到指定 LSN 精确回退 name name恢复到命名恢复点 预设检查点 immediate type: immediate第一一致点停止 最快恢复
包含与排除 恢复目标默认是包含 (inclusive)的。
若要回退到目标点之前 ,在 pg_pitr 中设置 exclusive: true,对应 PostgreSQL 的 recovery_target_inclusive = false。
事务边界 PITR 会保留目标点前的已提交事务 ,并回滚未提交事务。
gantt
title 事务边界与恢复目标
dateFormat X
axisFormat %s
section 事务 A
BEGIN → COMMIT (已提交) :done, a1, 0, 2
section 事务 B
BEGIN → 未提交 :active, b1, 1, 4
section 恢复
恢复目标点 :milestone, m1, 2, 0 更多操作细节请参阅 恢复操作
恢复窗口 恢复窗口 由两个边界决定:
左边界 :最早可用的基础备份右边界 :最新已归档的 WAL
窗口长短取决于备份频率、备份保留与 WAL 归档保留策略:
local 仓库默认保留 2 个全量备份 ,窗口通常为 24~48 小时 。minio 仓库默认按时间保留 14 天 备份,窗口通常为 1~2 周 。具体策略配置请参阅 备份策略 备份仓库
时间线 时间线 (Timeline)用于区分不同历史分支。以下操作会生成新时间线:
PITR 恢复 从库提升(Promote) 故障切换(Failover) gitGraph
commit id: "初始状态"
commit id: "写入数据"
commit id: "继续写入"
branch Timeline-2
checkout Timeline-2
commit id: "PITR 恢复点1"
commit id: "新写入"
branch Timeline-3
checkout Timeline-3
commit id: "PITR 恢复点2"
commit id: "继续运行"
checkout main
commit id: "原时间线继续" 当仓库存在多个时间线时,可通过 timeline 指定目标;Pigsty 默认使用 latest。
更多细节请参阅 恢复操作
3.5.2 - 时间点恢复的实现架构 Pigsty PITR 的实现架构:pgBackRest、备份仓库与执行机制
Pigsty 使用 pgBackRest
本文从架构层面说明:备份由谁执行、数据流向哪里、仓库如何组织、故障切换后如何保持连续性 。
概览 PITR 架构由三条主线构成:备份执行链路 、WAL 归档链路 、恢复执行链路 。
链路 入口 引擎 终点 备份 pg-backup + pg_crontabpgbackrest backup备份仓库 backup/ WAL 归档 PostgreSQL archive_command pgbackrest archive-push备份仓库 archive/ 恢复 pg_pitr / pg-pitr / pgsql-pitr.ymlpgbackrest restore目标数据目录
更多执行细节见 备份机制 恢复操作
组件与职责 组件 角色 描述 PostgreSQL 数据源 产生数据文件与 WAL 归档流 pgBackRest 备份引擎 执行备份、接收/拉取 WAL、执行恢复 pg-backup 备份入口 Pigsty 封装脚本,执行 pgbackrest backup pg_pitr / pg-pitr 恢复入口 Pigsty 封装参数/脚本,执行 pgbackrest restore 备份仓库 存储后端 保存 backup/ 与 archive/,支持 local / minio / s3 等仓库 pgbackrest_exporter 监控输出 导出备份状态指标,默认监听 9854 端口
数据流 flowchart TB
subgraph cluster["PostgreSQL 集群"]
direction TB
primary["Primary<br/>PostgreSQL"]
pb["pgBackRest"]
cron["pg-backup / pg_crontab"]
end
repo["备份仓库<br/>local / minio / s3"]
restore["恢复目标数据目录"]
cron --> pb
primary -->|base backup| pb
primary -->|WAL archive| pb
pb -->|backup/archive| repo
repo -->|restore/archive-get| pb
pb -->|restore| restore 要点:
备份 由 pg-backup 触发,执行 pgbackrest backup 将基础备份写入仓库。归档 由 PostgreSQL 的 archive_command 触发,持续将 WAL 段写入仓库。恢复 从仓库读取备份与 WAL,通过 pgbackrest restore 重建数据目录。部署与角色 pgBackRest 安装在 所有 PostgreSQL 节点 上,但只有 主库 实际执行备份:
pg-backup 会自动检测节点角色,从库执行时直接退出。发生 故障切换 后,新主库自动接管备份与归档,备份连续性不受影响。 这使得备份链路与高可用拓扑解耦,避免因主从切换导致备份中断。
仓库与隔离 Stanza(集群标识) pgBackRest 使用 stanza 隔离不同集群的备份,Pigsty 将其映射为 pg_cluster:
备份仓库
├── pg-meta/
│ ├── backup/
│ └── archive/
└── pg-test/
├── backup/
└── archive/
仓库类型 Pigsty 通过 pgbackrest_methodpgbackrest_repo
类型 特点 适用场景 local 本地磁盘,恢复最快 开发/测试、单机部署 minio 对象存储,集中式备份 生产环境、异地容灾 s3 云对象存储 云上部署、跨区域容灾
生产环境建议使用远程仓库(MinIO/S3),以避免主机故障导致 数据与备份同时丢失 。
详见 备份仓库
配置映射 Pigsty 会将 pgbackrest_repo 定义渲染为 /etc/pgbackrest/pgbackrest.conf。
备份日志位于 /pg/log/pgbackrest/,恢复过程生成临时配置并记录恢复日志。
更多细节请参阅 备份机制
可观测性 pgbackrest_exporter 会导出备份状态指标(最近备份时间、类型、大小等),默认启用,监听端口 9854。
您可以通过 pgbackrest_exporter_enabled
相关文档 3.5.3 - 时间点恢复的策略权衡 PITR 策略设计中的利弊权衡:仓库选择、空间规划与策略推荐
设计 PITR 策略时,最核心的权衡来自三个维度:
备份仓库位置 、恢复窗口长度 、恢复速度与空间成本 。
本文帮助您在这些维度之间做出可操作的选择。
本地 vs 远程 备份仓库的位置是 PITR 策略设计的第一步。
本地仓库 将备份存储在主库本地磁盘(pgbackrest_method = local):
优势
配置简单,开箱即用 恢复速度快(本地 I/O) 无外部依赖 劣势
无异地容灾能力,主机故障时备份可能一同丢失 受限于本地磁盘容量 备份与生产数据位于同一故障域 远程仓库 将备份存储到 MinIO / S3 等对象存储(pgbackrest_method = minio|s3):
优势
异地容灾,备份独立于数据库主机 容量几乎无限,多集群可共享 可配合加密、版本控制等安全策略 劣势
恢复速度受网络带宽影响 依赖对象存储的可用性 部署与运维成本更高 如何选择 场景 推荐仓库 理由 开发测试 local 简单够用,容灾要求低 单机生产 minio / s3 主机故障仍可恢复 集群生产 local + minio 兼顾恢复速度与异地容灾 关键业务 多远程仓库 多地容灾,最高保护
仓库配置细节请参阅 备份仓库
空间 vs 窗口 恢复窗口越长,所需存储空间越大。窗口长度由 备份保留策略 + WAL 归档保留 决定。
影响因素 因素 影响 数据库规模 决定全量备份基准空间 变更速率 影响增量备份与 WAL 归档大小 备份频率 频率越高,恢复越快,但空间增长更快 保留时间 保留越久,恢复窗口越长,空间需求越大
直观示例 假设数据库 100GB,每天变更 10GB:
每日全量备份(保留 2 份)
全量备份:100GB × 2 ≈ 200GB WAL 归档:10GB × 2 ≈ 20GB 总计:约 2~3 倍数据库空间 周全量 + 每日增量(保留 14 天)
全量备份:100GB × 2 ≈ 200GB 增量备份:约 10GB × 12 ≈ 120GB WAL 归档:10GB × 14 ≈ 140GB 总计:约 4~5 倍数据库空间 空间与窗口的关系是刚性约束,无法通过配置“同时更长窗口 + 更少空间”。
策略选择 每日全量备份 最简单可靠的策略 ,也是 Pigsty 本地仓库的默认思路:
每天一次全量备份 保留 2 份备份 恢复窗口约 24~48 小时 适用场景:
数据库规模中小(< 500GB) 备份窗口充足 对存储空间不敏感 全量 + 增量备份 空间优化策略 ,适合大库或需要更长恢复窗口:
每周一次全量备份 其他日期执行增量备份 保留 14 天 适用场景:
数据库规模较大 使用对象存储 需要 1~2 周恢复窗口 flowchart TD
A{"数据库大小<br/>< 100GB?"} -->|是| B["每日全量备份"]
A -->|否| C{"数据库大小<br/>< 500GB?"}
C -->|否| D["全量 + 增量备份"]
C -->|是| E{"备份窗口<br/>充足?"}
E -->|是| F["每日全量备份"]
E -->|否| G["全量 + 增量备份"] 推荐配置 开发测试环境 pg_crontab :
- '00 01 * * * /pg/bin/pg-backup full'
pgbackrest_method : local
恢复窗口:24~48 小时 特点:配置最简,成本最低 生产集群 pg_crontab :
- '00 01 * * 1 /pg/bin/pg-backup full'
- '00 01 * * 2,3,4,5,6,7 /pg/bin/pg-backup'
pgbackrest_method : minio
恢复窗口:7~14 天 特点:异地容灾,适合生产环境 关键业务 双仓库策略 (本地 + 远程):
pgbackrest_method : local
pgbackrest_repo :
local : { path: /pg/backup, retention_full : 2 }
minio : { type: s3, retention_full_type: time, retention_full : 14 }
更多配置细节请参阅 备份策略 备份仓库
3.5.4 - 时间点恢复的典型场景 PITR 的典型应用场景:误删数据、误删表/库、批量错误、分支恢复与机房级灾难
PITR 的价值不在于“回滚数据库”本身,而在于把不可逆的人为/软件错误变回可恢复的问题 。
它覆盖的场景从“误删一张表”到“整个机房不可用”,本质上解决的是逻辑错误与灾难恢复 。
整体认知(Overview) PITR 解决以下问题:
场景类型 典型问题 推荐策略 恢复目标 误删/误更新数据(DML) DELETE/UPDATE 无条件执行,脚本误操作分支恢复优先 time / xid误删表/库/Schema(DDL) DROP TABLE/DATABASE、错误迁移分支恢复 time / name批量错误/发布事故 Bug 批量污染数据,修复脚本失败 分支恢复 + 验证 time / xid数据审计/问题复盘 需要查看历史状态,核对差异 分支恢复(只读) time / lsn机房级灾难/全量丢失 硬件故障、勒索、机房断电 原地恢复或重建集群 latest / time
一个简单的判断原则 只要写入已经造成业务错误,就应该考虑 PITR 。需要在线验证或只恢复部分数据 → 分支恢复 。必须尽快恢复服务 → 原地恢复 (可接受停机)。flowchart TD
A["发现问题"] --> B{"能否停机?"}
B -->|能| C["原地恢复<br/>最短恢复路径"]
B -->|不能| D["分支恢复<br/>先验证后切换"]
C --> E["恢复成功后重建备份"]
D --> F["验证/导出/切流量"] 场景详情 误删/误更新数据(DML) 典型问题 :
DELETE 缺少 WHERE错误的 UPDATE 覆盖关键字段 批处理脚本逻辑错误导致脏数据扩散 处理思路 :
止损 :暂停相关应用或写入作业,防止数据继续被污染。定位时间点 :结合日志、监控、业务反馈,确定错误发生时间。选择策略 :能停机:原地恢复到错误之前 不能停机:分支恢复,导出正确数据再合并回主库 恢复目标建议 :
有明确事务:xid + exclusive: true 仅知道时间:time + exclusive: true pg_pitr : { xid : "250000" , exclusive : true }
# 或
pg_pitr : { time : "2025-01-15 14:30:00+08" , exclusive : true }
误删表 / 误删库(DDL) 典型问题 :
DROP TABLE / DROP DATABASE执行了错误迁移脚本 清理测试数据时误删生产对象 为何推荐分支恢复 :
DDL 操作不可逆,原地恢复意味着全库回滚 ,风险高。
分支恢复可将误删对象导出并导回原库,影响最小。
推荐流程 :
创建分支集群并 PITR 到误删前 校验表结构/数据正确性 pg_dump 导出目标对象导回生产库 sequenceDiagram
participant O as 原集群
participant B as 分支集群
O->>B: 创建分支集群
Note over B: PITR 到误删之前
B->>O: 导出表/库并导回
Note over B: 验证完成后销毁分支 批量错误 / 发布事故 典型问题 :
某次版本发布写入错误数据 ETL 或批处理作业造成全量污染 修复脚本执行失败或影响范围不清晰 处理原则 :
优先分支恢复 :先验证恢复点,再决定是否切流量对比原库与分支库数据差异,确认影响范围 建议流程 :
确定错误发布的时间窗口 分支恢复到“错误发生前” 校验关键业务表 决定导回部分数据,或整体切流量 这个场景通常需要结合业务复盘,因此分支恢复更安全、更可控。
数据审计 / 问题复盘 典型问题 :
需要查看某一时刻的数据状态 排查“历史正确状态”以比对差异 推荐方式 :分支恢复(只读)
优点 :
不影响生产 可多次尝试不同时间点 适合审计、核对与取证 pg_pitr : { time : "2025-01-15 10:00:00+08" } # 创建只读分支
机房级灾难 / 全量丢失 这是 PITR 的终极兜底场景 。当高可用无法应对时(主从同时不可用、机房断电、勒索攻击),PITR 是最后防线。
关键前提 :
必须使用远程仓库(MinIO/S3) 。
本地仓库在主机故障时会与数据一同丢失,无法恢复。
恢复流程 :
准备新主机或新机房资源 还原集群配置并指向远程仓库 执行 PITR 恢复(通常 latest) 验证数据后恢复服务 ./pgsql-pitr.yml -l pg-meta # 恢复到 WAL 归档末尾
原地恢复 vs 分支恢复 维度 原地恢复 分支恢复 是否停机 需要停机 无需停机 风险 高(直接影响生产) 低(可验证后操作) 复杂度 低 中(需要新集群与数据导出) 推荐场景 快速恢复服务、容灾 误操作恢复、审计、复杂场景
对于绝大多数生产场景,分支恢复是默认推荐策略 。
只有在 必须尽快恢复服务 时,才建议原地恢复。
相关文档 3.6 - 监控系统 Pigsty 的监控系统是如何架构与实现的,被监控的目标对象又是如何被自动纳入管理的。
Pigsty 监控系统由指标、日志与告警三部分组成,默认随部署开箱可用。
它既可以监控由 Pigsty 托管的数据库集群,也可以监控已有 PostgreSQL 集群与外部 RDS 服务。
监控目标 Pigsty 监控覆盖的核心对象包括:
PostgreSQL 集群与实例(SQL 性能、连接、复制、事务、检查点、WAL) 基础设施组件(Grafana、VictoriaMetrics、Alertmanager、Nginx 等) 宿主机节点(CPU、内存、磁盘、网络、内核) 关键中间件(ETCD、MINIO、REDIS、FERRET、JUICE、VIBE 等) 技术栈 纳管方式 Pigsty 支持三种监控纳管方式:
继续阅读 3.7 - 安全合规 认证、授权、加密、审计与合规基线,覆盖数据库与基础设施安全。
Pigsty 的安全目标是 CIA 三元组 :
机密性 :防止未授权访问与泄露完整性 :防止数据被篡改或静默损坏可用性 :防止故障导致业务中断Pigsty 的安全理念:
默认安全 :开箱即用的安全基线,配置少、覆盖广。纵深防御 :多层保护叠加,单点失守不致系统失守。最小权限 :角色与权限模型贯彻最小授权原则。可合规 :安全能力与流程结合即可通过合规检查。默认安全基线(解决什么问题) 安全选项 默认值 解决的问题 密码加密 pg_pwd_enc: scram-sha-256防止弱哈希与明文泄露 数据校验 pg_checksum: true检测静默数据损坏 HBA 分层 管理员外网必须 ssl 防止外网明文访问 本地 CA ca_create: true统一证书信任链 备份恢复 pgbackrest_enabled: true防止误删误改不可恢复 Nginx HTTPS nginx_sslmode: enable防止 Web 入口明文泄露 MinIO HTTPS minio_https: true防止备份链路窃听 OS 基线 SELinux permissive 为强制模式预留基础
默认配置以“可用、可扩展”为先,生产环境应根据合规要求加固。
加固路线图 Pigsty 提供安全增强模板 conf/ha/safe.yml,可快速将默认基线升级到更高安全级别:
强制 SSL 与证书认证 密码强度与过期策略 连接与断开日志 防火墙与 SELinux 加固 本章内容 章节 说明 核心问题 纵深防御 七层安全模型与基线 安全体系整体如何落地? 身份认证 HBA 规则、密码策略、证书认证 如何验证用户身份? 访问控制 角色系统、权限模型、数据库隔离 如何控制用户权限? 加密通信 TLS、本地 CA、证书管理 如何保护传输与证书? 数据安全 校验和、备份、加密与恢复 数据如何完整可恢复? 合规清单 等保三级与 SOC2 对照 如何满足合规要求?
相关话题 3.7.1 - 七层安全模型 Pigsty 的纵深防御模型:从物理到用户的多层安全基线。
安全不是一道墙,而是一座城。Pigsty 采用纵深防御 策略,在七个层次上构建多重保护,即使某一层被突破,仍有其他层提供保护。
这种分层思路解决三类核心风险:
边界被突破 :降低“单点失守导致全盘失守”的概率。内部滥用 :即使内部账号被盗,也能通过最小权限限制破坏范围。不可预期故障 :硬件、软件、人为错误都能被“多层兜底”。概览
L1 物理与介质安全 物理层失守时,唯一的对抗手段是数据本身的自我保护。
解决的问题
Pigsty 支持
数据校验和 :默认开启 pg_checksum: true,可发现坏块/内存错误导致的数据损坏。可选透明加密 :通过 pg_tde 等扩展实现数据静态加密,防止介质泄露。L2 网络安全 控制“谁能接触到服务”,降低攻击面。
解决的问题
Pigsty 支持
防火墙分区 :node_firewall_mode 可启用 zone,内网信任、公网受限。监听收敛 :pg_listen 可限制监听地址,避免全网暴露。TLS 能力 :HBA 支持 ssl/cert,保证连接加密与身份校验。L3 边界安全 “统一入口”是可审计、可控制、可封禁的基础。
解决的问题
Pigsty 支持
HAProxy 入口 :数据库流量统一入口,便于封禁/限流/切换。Nginx 网关 :基础设施服务统一 HTTPS 入口(nginx_sslmode)。集中管理口令 :HAProxy 管理口令、Grafana 管理口令统一在配置中声明。L4 主机安全 数据库安全的地基:最小权限、访问隔离、系统加固。
解决的问题
Pigsty 支持
SELinux 模式 :node_selinux_mode 可切换 enforcing 强制模式。最小权限管理员 :node_admin_sudo 支持 limit 限制 sudo 命令集。敏感文件权限 :CA 私钥目录默认 0700,私钥文件 0600。L5 应用安全 认证是所有数据库安全的“第一道闸门”。
解决的问题
Pigsty 支持
HBA 分层控制 :默认规则按来源与角色分层,管理员外网访问必须 ssl。SCRAM 密码哈希 :pg_pwd_enc: scram-sha-256 默认启用。密码强度检查 :passwordcheck/credcheck 可启用,阻止弱口令。证书认证 :auth: cert 支持客户端证书认证。L6 数据安全 保障数据在“可用、可恢复、可追责”。
解决的问题
Pigsty 支持
pgBackRest 备份 :默认启用,支持本地与 MinIO 仓库。备份加密 :MinIO 仓库支持 AES-256-CBC(cipher_type)。PITR 恢复 :结合归档可恢复到任意时间点。审计日志 :模板启用 DDL/连接/慢查询日志,可选 pgaudit。L7 用户安全 最小权限不是口号,而是默认行为。
解决的问题
Pigsty 支持
四层 RBAC :dbrole_readonly/readwrite/admin/offline。默认权限策略 :对象创建即自动授予正确权限。数据库隔离 :revokeconn: true 可隔离跨库访问。公共权限收敛 :撤销 public 模式 CREATE 权限。安全加固路径 Pigsty 提供安全增强模板:conf/ha/safe.yml。它将常见加固项集中封装:
强制 SSL、证书认证 密码强度与过期策略 连接与断开日志 防火墙与 SELinux 加固 这条路径可以作为“从默认到合规”的快速升级方案。
接下来 3.7.2 - 身份认证 HBA 规则、密码策略与证书认证,回答“谁能连进来、如何证明身份”。
身份认证解决三个核心问题:
你是谁 :身份是否唯一可识别?你怎么证明 :密码/证书是否足够安全?你从哪里来 :来源是否受控?Pigsty 使用 HBA 规则 + 密码/证书 完成身份认证,并以 SCRAM 为默认密码哈希方案。
认证链路 flowchart LR
C[客户端] --> HBA[HBA 规则]
HBA --> A1[密码 SCRAM]
HBA --> A2[证书认证]
HBA --> A3[本地 ident/peer]
A1 --> RBAC[角色与权限]
A2 --> RBAC
A3 --> RBAC HBA 决定“谁能从哪里来 ”,认证方式决定“如何证明身份 ”。
HBA 分层模型 Pigsty 默认 HBA 规则已经分层:
本地 使用 ident/peer,最安全。内网 使用 scram 密码认证。外网管理员 必须走 ssl。这解决了“同一个用户在不同来源使用不同认证强度 ”的问题。
HBA 规则的关键能力
顺序优先 :支持 order 排序,数值越小优先级越高。地址别名 :local / localhost / intra / world 等。角色条件 :primary/replica/offline 可精细化控制。密码认证 默认密码哈希算法:
pg_pwd_enc : scram-sha-256
解决的问题
兼容性
如需兼容老客户端可使用 md5,但会降低安全性。
密码强度与轮换 Pigsty 支持启用密码强度检查扩展:
pg_libs : '$libdir/passwordcheck, pg_stat_statements, auto_explain'
pg_extensions : [ passwordcheck, credcheck ]
通过 expire_in 控制账号过期时间:
pg_users :
- { name: dbuser_app, password: 'StrongPwd', expire_in : 365 }
解决的问题
证书认证 证书认证解决“密码被钓鱼/被拷贝 ”的风险。
HBA auth: cert 要求客户端证书。 证书 CN 通常对应数据库用户名。 Pigsty 内置 cert.yml 用于签发客户端证书。 PgBouncer 认证 PgBouncer 使用独立 HBA 规则与 TLS 设置:
pgbouncer_sslmode : disable # 默认关闭,可设为 require/verify-full
pgb_default_hba_rules : [ ...] # 独立规则
这解决了“连接池入口与数据库入口不同步”的问题。
默认账号与风险 用户 默认密码 风险 dbuser_dbaDBUser.DBA管理账号默认密码 dbuser_monitorDBUser.Monitor监控账号易被滥用 replicatorDBUser.Replicator复制账号被滥用可导致数据外泄
生产环境必须修改默认密码。
安全建议 对外入口全部启用 ssl/cert。 内网用户使用 scram,避免 md5。 启用 passwordcheck 强制复杂度。 定期轮换口令(expire_in)。 接下来 3.7.3 - 访问控制 Pigsty 提供开箱即用的角色与权限模型,贯彻最小权限原则。
访问控制解决两个核心问题:
你能做什么 :读/写/DDL 的权限边界你能访问哪些数据 :跨库、跨模式的隔离边界Pigsty 通过 RBAC 角色体系 + 默认权限策略 将“最小权限”落实为默认行为。
四层角色模型 flowchart TB
subgraph Admin["dbrole_admin(管理员)"]
A1["可执行 DDL / CREATE / ALTER"]
A2["继承 dbrole_readwrite"]
end
subgraph RW["dbrole_readwrite(读写)"]
RW1["可 INSERT/UPDATE/DELETE"]
RW2["继承 dbrole_readonly"]
end
subgraph RO["dbrole_readonly(只读)"]
RO1["可 SELECT 所有表"]
end
subgraph Offline["dbrole_offline(离线)"]
OFF1["仅离线实例可用"]
end
Admin --> RW --> RO 解决的问题
生产账号天然拥有过高权限 DDL 与 DML 不分离导致误操作风险 默认角色与系统用户 Pigsty 默认提供四个角色与四个系统用户(来自源码默认值):
角色/用户 属性 继承/角色 描述 dbrole_readonlyNOLOGIN- 全局只读访问 dbrole_offlineNOLOGIN- 受限只读(离线实例) dbrole_readwriteNOLOGINdbrole_readonly全局读写访问 dbrole_adminNOLOGINpg_monitor, dbrole_readwrite管理员 / 对象创建 postgresSUPERUSER- 系统超级用户 replicatorREPLICATIONpg_monitor, dbrole_readonly复制用户 dbuser_dbaSUPERUSERdbrole_admin管理员用户 dbuser_monitor- pg_monitor, dbrole_readonly监控用户
这套默认角色可以覆盖绝大多数业务场景。
默认权限策略 Pigsty 在初始化时写入默认权限(pg_default_privileges),确保新建对象自动具备合理权限。
解决的问题
新建对象未授权导致应用不可用 误授权给 PUBLIC 导致全库暴露 思路
只读角色:SELECT/EXECUTE 读写角色:INSERT/UPDATE/DELETE 管理员角色:DDL 权限 对象所有权与 DDL 规范 默认权限仅对“管理员角色创建的对象 ”自动生效。
这意味着:
必须使用 dbuser_dba/postgres 执行 DDL 或业务管理员先 SET ROLE dbrole_admin 否则新对象会脱离默认权限体系,破坏最小权限原则。
数据库隔离 数据库级别支持 revokeconn,可做到跨库隔离:
pg_databases :
- { name: appdb, owner: dbuser_app, revokeconn : true }
解决的问题
一个账号可以“穿透”访问所有数据库 多租户数据库缺乏边界 公共权限收敛 Pigsty 初始化时撤销 public 模式的 CREATE 权限:
REVOKE CREATE ON SCHEMA public FROM PUBLIC;
解决的问题
非授权用户随意创建对象 “影子表/影子函数”带来的安全风险 离线角色的作用 dbrole_offline 只能访问离线实例(pg_role=offline 或 pg_offline_query=true)。
解决的问题
ETL/分析任务影响生产性能 个人账号在主库执行高危查询 最佳实践 业务账号默认使用 dbrole_readwrite 或 dbrole_readonly。 生产 DDL 必须经由管理员角色。 多租户业务启用 revokeconn 隔离。 报表/ETL 使用 dbrole_offline。 接下来 3.7.4 - 加密通信与本地 CA Pigsty 内置自签 CA,签发 TLS 证书并加密通信流量。
加密通信解决三个问题:
窃听 :防止明文流量被监听篡改 :防止中间人修改数据冒充 :防止服务端/客户端被伪造Pigsty 通过 本地 CA + TLS 为数据库与基础设施组件提供统一的信任根。
本地 CA 的作用 Pigsty 默认会在管理节点生成自签 CA:
files/pki/ca/ca.key # CA 私钥(必须严格保护)
files/pki/ca/ca.crt # CA 根证书(可分发)
源码默认值:
ca_create: true:找不到 CA 时自动生成。ca_cn: pigsty-ca:CA 证书 CN 固定为 pigsty-ca。根证书有效期约 100 年(自签)。 由 CA 签发的服务器/客户端证书有效期 cert_validity: 7300d(20 年)。 证书覆盖范围 本地 CA 会签发多种组件证书,统一信任链:
组件 目的 典型路径 PostgreSQL / PgBouncer 连接加密 /pg/cert/Patroni API 通信 /pg/cert/etcd DCS 加密 /etc/etcd/MinIO 对象存储 HTTPS ~minio/.minio/certs/Nginx Web 入口 HTTPS /etc/nginx/conf.d/cert/
解决的问题 :不同组件自建证书会产生信任碎片,统一 CA 可以一次分发,多处复用。
信任分发 Pigsty 安装时会将 ca.crt 分发到所有节点并加入系统信任:
证书路径:/etc/pki/ca.crt EL 系列:/etc/pki/ca-trust/source/anchors/ Debian/Ubuntu:/usr/local/share/ca-certificates/ 这样可以让系统内的客户端自动信任 Pigsty 签发的证书。
使用外部 CA 如果你已有企业 CA,可以直接替换:
files/pki/ca/ca.key
files/pki/ca/ca.crt
建议设置:
解决的问题 :防止系统误生成新的自签 CA,导致证书信任链混乱。
客户端证书认证 证书认证可以替代或增强密码认证:
Pigsty 自带 cert.yml 用于签发客户端证书:
./cert.yml -e cn = dbuser_dba
./cert.yml -e cn = dbuser_monitor
默认生成在:
files/pki/misc/<cn>.key
files/pki/misc/<cn>.crt
密钥保护与轮换 CA 私钥默认 0600 权限,并在 0700 目录中保存。 一旦 CA 私钥泄露,必须重新生成 CA 并重签所有证书。 建议在重大升级或密钥泄露事件后进行证书轮换。 接下来 3.7.5 - 数据安全 数据完整性、备份与恢复、加密与审计。
数据安全关注三件事:完整性、可恢复性、保密性 。Pigsty 在默认配置中已启用关键能力,并支持按需加固。
数据完整性 解决的问题
磁盘坏块、内存错误导致的静默损坏 意外写入导致的数据污染 Pigsty 支持
数据校验和 :默认 pg_checksum: true,初始化时启用 data-checksums。副本兜底 :主库坏块可从从库恢复(与 HA 配合使用)。可恢复性(备份与 PITR) 解决的问题
Pigsty 支持
pgBackRest 默认启用 :pgbackrest_enabled: true。本地仓库 :默认保留 2 份完整备份。远程仓库 :可接入 MinIO,支持对象存储与多副本。PITR :结合 WAL 归档进行任意时间点恢复。数据保密性 解决的问题
Pigsty 支持
备份加密 :MinIO 仓库支持 AES-256-CBC(cipher_type)。透明加密(可选) :通过 pg_tde 等扩展实现数据静态加密。密钥隔离 :建议将 cipher_pass 与 CA 私钥分离管理。审计与可追溯 解决的问题
Pigsty 支持
日志收集 :模板默认启用 logging_collector。DDL 审计 :log_statement: ddl。慢查询 :log_min_duration_statement。连接日志 :log_connections(PG18+)。审计扩展 :pgaudit、pgauditlogtofile 可选。加固建议 对远程备份强制加密与专用密钥。 定期演练 PITR,验证恢复链路。 对关键业务启用 pgaudit。 结合 高可用 形成“备份 + 副本”双层兜底。 接下来 3.7.6 - 合规清单 以 SOC2 与等保三级为切入点,映射 Pigsty 安全能力与证据准备。
合规不是“开关”,而是 配置 + 流程 + 证据 的组合:
配置 :安全能力是否启用(HBA/TLS/审计/备份)流程 :是否有权限管理、变更、备份演练等制度证据 :日志、配置快照、备份报告、监控告警本页以 SOC2 与等保三级为切入点,说明 Pigsty 的安全能力与合规映射。
默认凭证清单(必须修改) 来自源码默认值:
组件 默认用户名 默认密码 PostgreSQL 管理员 dbuser_dbaDBUser.DBAPostgreSQL 监控 dbuser_monitorDBUser.MonitorPostgreSQL 复制 replicatorDBUser.ReplicatorPatroni API postgresPatroni.APIHAProxy 管理 adminpigstyGrafana 管理 adminpigstyMinIO Root minioadminS3User.MinIOetcd Root rootEtcd.Root
生产环境必须修改。
证据准备(建议) 证据类型 说明 Pigsty 支持 配置快照 HBA、角色、TLS、备份策略 pigsty.yml / inventory 配置访问控制 角色与权限 pg_default_roles / pg_default_privileges连接审计 连接、断开、DDL log_connections / log_statement备份报告 完整备份与恢复记录 pgBackRest 日志与任务 监控告警 异常事件记录 Prometheus + Grafana 证书管理 CA/证书分发记录 files/pki/ / /etc/pki/ca.crt
SOC2 视角(示例映射) SOC2 的核心是 安全、可用性、机密性 。以下为常见控制点的概念映射:
控制点(SOC2) 解决的问题 Pigsty 能力 需要流程 CC6 逻辑访问控制 未授权访问 HBA + RBAC + 默认权限 权限审批与定期审计 CC6 认证强度 弱口令/复用 SCRAM + passwordcheck 密码轮换策略 CC6 传输加密 明文传输 TLS/CA、ssl/cert 强制 TLS 政策 CC7 系统监控 异常未发现 Prometheus/Grafana 告警处理流程 CC7 审计追踪 无法追责 连接/DDL/慢查日志、pgaudit 日志留存与审查 CC9 业务连续性 数据不可恢复 pgBackRest + PITR 定期恢复演练
以上为概念映射,实际 SOC2 需要配合组织制度与审计证据。
等保三级(GB/T 22239-2019)映射 等保三级关注“身份鉴别、访问控制、审计、数据安全、通信安全、主机安全、网络边界”等。以下为核心控制点与 Pigsty 能力的对应关系:
控制点 解决的问题 Pigsty 能力 需要配置/流程 身份鉴别唯一性 账号混用 唯一用户 + SCRAM 账号管理流程 口令复杂度 弱口令 passwordcheck/credcheck启用扩展 口令定期更换 长期风险 expire_in密码轮换制度 访问控制 越权访问 RBAC + 默认权限 权限审批 最小权限 权限膨胀 四层角色模型 账号分级 通信保密性 明文泄露 TLS/CA、HBA ssl/cert 强制 TLS 安全审计 无法追责 连接/DDL/慢查日志 + pgaudit 日志留存 数据完整性 静默损坏 pg_checksum: true- 数据备份恢复 数据丢失 pgBackRest + PITR 演练与验收 主机安全 主机被攻破 SELinux/防火墙 加固策略 边界安全 暴露入口 HAProxy/Nginx 统一入口 网络分区 安全管理制度 缺乏流程 - 制度与审批
提示 :等保三级不仅是技术问题,还需要完善的制度与运维流程支撑。
合规加固配置片段 # 强制 SSL / 证书
pg_hba_rules :
- { user: '+dbrole_readonly', db: all, addr: intra, auth : ssl }
- { user: dbuser_dba, db: all, addr: world, auth : cert }
# 密码强度
pg_libs : '$libdir/passwordcheck, pg_stat_statements, auto_explain'
pg_extensions : [ passwordcheck, credcheck ]
# PgBouncer / Patroni TLS
pgbouncer_sslmode : require
patroni_ssl_enabled : true
# 操作系统安全
node_firewall_mode : zone
node_selinux_mode : enforcing
合规检查清单 部署前 部署后(必做) 定期维护 接下来 4 - 上手 在你的笔记本/云服务器上部署 Pigsty 单机版本,访问数据库以及 Web 用户界面
Pigsty 采用可伸缩的架构设计,既可用于 超大规模生产环境 单机开发演示环境
如果您打算学习了解 Pigsty,可以从 快速上手
您可以利用一台 Linux MiniPC,云厂商提供的免费/优惠虚拟机,Windows 的 WSL,或者在自己的笔记本上创建虚拟机用于 Pigsty 部署。
Pigsty 提供了开箱即用的 Vagrant Terraform
单机版本的 Pigsty 包含了所有核心功能,451 个 PG 扩展 IaC PITR 数据持久性 高可用
如果您想要在没有互联网连接的环境中安装 Pigsty,请参考 离线安装 精简安装 部署指南
快速开始 准备 SSH 权限 节点 兼容的 Linux 系统 sshsudo管理用户
curl -fsSL https://repo.pigsty.cc/get | bash # 安装 Pigsty 与依赖
cd ~/pigsty; ./configure -g # 生成配置(使用默认单机配置模板,-g 参数会生成随机密码)
./deploy.yml # 执行部署剧本,完成部署
是的,就是这么简单。您完全可以在不了解任何细节的情况下,使用 预制配置模板
接下来,您可以探索 图形用户界面 PostgreSQL 数据库服务 配置定制 执行剧本
4.1 - 快速上手 Pigsty 单机部署 快速上手 Pigsty,从一台全新的 Linux 主机开始,完成单机安装部署!
本文是 Pigsty 单节点安装指南,生产环境的多节点高可用部署请参考 部署
Pigsty 单机安装分为三步走:安装 配置 部署
摘要 准备 SSH 权限 节点 兼容的 Linux 系统 sshsudo管理用户
pigsty.cc(中国)
pigsty.io(全球) curl -fsSL https://repo.pigsty.cc/get | bash;
curl -fsSL https://repo.pigsty.io/get | bash;
该命令会执行 安装 配置 部署
cd ~/pigsty # 进入 Pigsty 目录
./configure -g # 生成配置文件(可选,如果知道如何配置可以跳过)
./deploy.yml # 执行部署剧本,根据生成的配置文件开始安装
安装完成后,您可以通过 IP / 域名 + 80/443 端口访问 Web 用户界面 5432 端口访问 PostgreSQL 服务
完整流程根据服务器规格/网络条件需 3~10 分钟,离线安装 精简安装
视频样例:在线单机安装(Debian 13, x86_64)
准备 安装 Pigsty 涉及一些 准备工作
项目 要求 项目 要求 节点 单节点 ,至少 1C2G,上不封顶磁盘 /data 作为默认主挂载点,建议使用 xfs系统 Linux x86_64 / aarch64,EL / Debian / Ubuntu网络 静态 IPv4 内网地址 SSH 通过公钥 nopass SSH 登陆纳管节点 SUDO sudo 权限,最好带有 nopass 免密选项
通常您只需要关注本机 IP 地址 —— 作为特例,单机部署时,如果没有静态 IP 地址,可使用 127.0.0.1 作为逃生窗口。
安装 您可以使用以下命令自动安装 Pigsty 源码包至 ~/pigsty 目录(推荐),部署所需依赖(Ansible)会自动安装。
pigsty.cc(中国)
pigsty.io(全球) curl -fsSL https://repo.pigsty.cc/get | bash # 安装最新稳定版本
curl -fsSL https://repo.pigsty.cc/get | bash -s v4.2.2 # 安装特定版本(示例:v4.2.2)
curl -fsSL https://repo.pigsty.io/get | bash # 安装最新稳定版本
curl -fsSL https://repo.pigsty.io/get | bash -s v4.2.2 # 安装特定版本(示例:v4.2.2)
如果您不希望执行远程脚本,可以手动 下载 git 克隆安装时,请务必检出特定版本后再使用。
git clone https://github.com/pgsty/pigsty; cd pigsty;
git checkout v4.2.2; # 使用 git 安装时,请务必检出特定版本(示例:v4.2.2)
手工下载克隆安装时,请额外执行 bootstrap自行安装
./bootstrap # 安装 ansible,用于执行后续部署
配置 在 Pigsty 中,部署的蓝图细节由 配置清单 pigsty.yml
Pigsty 提供了 configure配置向导 配置清单
./configure -g # 使用配置向导生成配置文件,并且生成随机密码
配置过程生成的配置文件默认位于:~/pigsty/pigsty.yml,您可以在安装前进行检查,按需修改与定制。
有许多 配置模板 pigsty.yml 配置文件进行定制。
./configure # 使用默认模板,安装默认的 PG 18,带有必要扩展
./configure -v 17 # 使用 PG 17 的版本,而非默认的 PG18
./configure -c rich # 创建本地软件仓库,下载所有扩展,安装主要扩展
./configure -c slim # 最小安装模板,与 ./slim.yml 剧本一起使用
./configure -c app/supa # 使用 app/supa 自托管 supabase 配置模板
./configure -c ivory # 使用 ivorysql 内核而非原生 PG
./configure -i 10.11.12.13 # 显式指定主 IP 地址
./configure -r china # 使用中国镜像而非默认仓库
./configure -c ha/full -s # 使用 4 节点沙箱配置模板,不进行 IP 替换和探测
配置 / configure 过程的样例输出 vagrant@meta:~/pigsty$ ./configure
configure pigsty v4.2.2 begin
[ OK ] region = china
[ OK ] kernel = Linux
[ OK ] machine = x86_64
[ OK ] package = deb,apt
[ OK ] vendor = ubuntu ( Ubuntu)
[ OK ] version = 22 ( 22.04)
[ OK ] sudo = vagrant ok
[ OK ] ssh = vagrant@127.0.0.1 ok
[ WARN] Multiple IP address candidates found:
( 1) 192.168.121.38 inet 192.168.121.38/24 metric 100 brd 192.168.121.255 scope global dynamic eth0
( 2) 10.10.10.10 inet 10.10.10.10/24 brd 10.10.10.255 scope global eth1
[ OK ] primary_ip = 10.10.10.10 ( from demo)
[ OK ] admin = vagrant@10.10.10.10 ok
[ OK ] mode = meta ( ubuntu22.04)
[ OK ] locale = C.UTF-8
[ OK ] ansible = ready
[ OK ] pigsty configured
[ WARN] don' t forget to check it and change passwords!
proceed with ./deploy.yml
配置脚本常用参数 :
参数 说明 -i|--ip当前主机的首要内网 IP 地址,用于替换配置文件中的 IP 地址占位符 10.10.10.10 -c|--conf用于指定使用的 配置模板 conf/ 目录,不带 .yml 后缀的配置名称 -v|--version用于指定要安装的 PostgreSQL 大版本,如 13、14、15、16、17、18 -r|--region用于指定上游软件源的区域,加速下载: (default|china|europe) -n|--non-interactive直接使用命令行参数提供首要 IP 地址,跳过交互式向导 -x|--proxy使用当前环境变量配置 proxy_env
如果您的机器网卡绑定了多个 IP 地址,那么需要使用 -i|--ip <ipaddr> 显式指定一个当前节点的首要 IP 地址,或在交互式问询中提供。
该脚本将把 IP 占位符 10.10.10.10 替换为当前节点的主 IPv4 地址。选用的地址应为静态 IP 地址,请勿使用公网 IP 地址。
修改默认密码!
我们强烈建议您在安装前,事先修改配置文件中使用的默认密码与凭据,详情参考 安全建议
部署 Pigsty 的 deploy.yml剧本 配置
./deploy.yml # 一次性在当前节点上部署所有定义的模块
部署过程的样例输出 ......
TASK [ pgsql : pgsql init done ] *************************************************
ok: [ 10.10.10.11] = > {
"msg" : "postgres://10.10.10.11/postgres | meta | dbuser_meta dbuser_view "
}
......
TASK [ pg_monitor : load grafana datasource meta] *******************************
changed: [ 10.10.10.11]
PLAY RECAP *********************************************************************
10.10.10.11 : ok = 302 changed = 232 unreachable = 0 failed = 0 skipped = 65 rescued = 0 ignored = 1
localhost : ok = 6 changed = 3 unreachable = 0 failed = 0 skipped = 1 rescued = 0 ignored = 0
当您看到输出尾部如果带有 pgsql init done,PLAY RECAP 等字样,说明安装已经完成!
上游软件仓库变更可能导致在线安装失败!
Pigsty 使用的上游软件仓库(如 Linux / PGDG 仓库)可能会因为不恰当的更新,进入崩溃状态并导致部署失败(有过多次先例)!
您可以选择等待上游仓库修复后安装,或者使用预制的 离线软件包
避免重复执行部署剧本!
警告: 在已经完成部署的环境中再次完整运行 deploy.yml
界面 Pigsty 单机安装完成后,您在当前节点上通常会安装有四个功能模块:
PGSQLINFRANODEETCD
INFRA图形化管理界面 80/443 端口访问。
PGSQLPostgreSQL 数据库服务器 5432 端口,也可通过 Pgbouncer / HAProxy 代理访问
更多 您可以以当前节点作为基础,部署和监控 更多集群 配置清单
bin/node-add pg-test # 将集群 pg-test 的 3 个节点纳入 Pigsty 管理
bin/pgsql-add pg-test # 初始化一个 3 节点的 pg-test 高可用 PG 集群
bin/redis-add redis-ms # 初始化 Redis 集群: redis-ms
大多数模块都需要先安装 NODE模块
PGSQLINFRANODEETCDMINIOREDISFERRETDOCKER
4.2 - Docker 部署 在 Docker 容器中快速拉起 Pigsty 单机环境,适合 macOS/Windows 用户体验学习
Pigsty 旨在运行于原生 Linux 系统上,但也可以在带有 systemd 的 Linux 容器环境中运行。
如果您没有原生 Linux 环境(例如 macOS 或 Windows 用户),可以使用 Docker 快速拉起一个本地单机 Pigsty 环境进行测试与体验。
快速开始 进入 Pigsty 源码包的 docker/
cd ~/pigsty/docker
make launch # 启动容器 + 生成配置 + 执行部署
部署完成后,您可以通过以下方式访问服务:
服务 地址 凭据 SSH ssh root@localhost -p 2222密码:pigsty Web 界面 http://localhost:8080 - Grafana http://localhost:8080/ui admin / grafana_admin_passwordPostgreSQL psql 'postgres://dbuser_dba:<pg_admin_password>@localhost:5432/postgres'pg_admin_password
make launch 内部会执行 ./configure -g 生成随机密码,可通过以下命令查看:
cd ~/pigsty/docker
make pass | grep -E 'grafana_admin_password|pg_admin_password'
Web 界面与 PostgreSQL 服务
Web 界面与 PostgreSQL 服务仅在完成 部署 (./deploy.yml)后才可用。
准备 使用 Docker 部署 Pigsty 需要满足以下条件:
项目 要求 项目 要求 Docker Docker 20.10+(Docker Desktop 或 CE) CPU 至少 1 核 内存 至少 2GB 磁盘 至少 20GB 可用空间
请确保默认宿主机端口(2222/8080/8443/5432)可用,否则请先修改 .env
Docker 部署适用场景
在 macOS / Windows 等非 Linux 环境下快速体验 Pigsty 学习和测试 Pigsty 的功能特性,进行开发调试 快速构建一个本地开发用的 PostgreSQL 环境 Docker 部署不适用场景
生产环境部署 :容器环境性能和稳定性不如原生 Linux高可用集群 :Docker 单机模式无法实现多节点高可用大规模部署 :建议使用原生 Linux 虚拟机或物理机镜像 Pigsty 提供开箱即用的 Docker 镜像,发布在 Docker Hub
镜像 拉取大小 解压大小 内容 pgsty/pigsty~500MB 1.3GB Debian 13 + systemd + SSH + pig + Ansible
同时支持 amd64 (x86_64)和 arm64 (Apple Silicon、AWS Graviton)架构 镜像标签与 Pigsty 版本一致:v4.2.2、latest 等 镜像内已预生成 docker 配置模板,可直接执行 ./deploy.yml 部署 镜像基于 Debian 13 (Trixie) 构建,预装了 pig
启动 Pigsty 提供了开箱即用的 Docker 支持,位于源码的 docker/
最简单的方式是使用 make launch 一键启动,它会自动完成启动容器、生成配置、执行部署三个步骤:
cd ~/pigsty/docker
make launch # 一键启动:up + config + deploy
或者分步执行,可以在每一步进行检查和调整:
cd ~/pigsty/docker
make up # 启动容器
make exec # 进入容器
./configure -c docker -g --ip 127.0.0.1 # 生成配置(可选,镜像已预配置)
./deploy.yml # 执行部署
如果您想要使用本地构建的镜像而非从 Docker Hub 拉取,可以先执行构建:
cd ~/pigsty/docker
make build # 本地构建镜像
make launch # 启动容器 + 生成配置 + 执行部署
配置 您可以通过修改 .env
PIGSTY_VERSION = <version> # 镜像版本标签(示例:v4.2.2 或 latest)
PIGSTY_SSH_PORT = 2222 # SSH 端口
PIGSTY_HTTP_PORT = 8080 # Nginx HTTP 端口
PIGSTY_HTTPS_PORT = 8443 # Nginx HTTPS 端口
PIGSTY_PG_PORT = 5432 # PostgreSQL 端口
端口映射说明 :
环境变量 默认值 容器端口 说明 PIGSTY_VERSION<version>- 镜像版本标签(如 v4.2.2 / latest) PIGSTY_SSH_PORT222222 SSH 访问端口 PIGSTY_HTTP_PORT808080 Nginx HTTP 端口 PIGSTY_HTTPS_PORT8443443 Nginx HTTPS 端口 PIGSTY_PG_PORT54325432 PostgreSQL 端口
如果默认端口已被占用,可以通过环境变量临时覆盖:
PIGSTY_HTTP_PORT = 8888 docker compose up -d
命令 Pigsty Docker 提供了丰富的 Makefile 命令,方便您管理容器和镜像。
Docker Compose 命令 推荐使用 Docker Compose 方式运行,以下是常用命令:
make up # 启动容器
make down # 停止并删除容器
make start # 启动已停止的容器
make stop # 停止容器
make restart # 重启容器
make pull # 拉取最新镜像
make config # 在容器内执行 ./configure
make deploy # 在容器内执行 ./deploy.yml
make launch # 一键启动:up + config + deploy
容器访问命令 make exec # 进入容器 bash
make ssh # 通过 SSH 进入容器
make log # 查看容器日志
make status # 查看 systemd 状态
make ps # 查看进程列表
make conf # 查看配置文件
make pass # 查看配置中的密码
镜像构建命令 make build # 本地构建镜像
make buildnc # 不使用缓存构建镜像
make push # 构建并推送多架构镜像
镜像管理命令 make save # 导出镜像到 pigsty-<version>-<arch>.tgz
make load # 从 tgz 文件导入镜像
make rmi # 删除当前版本的 pigsty 镜像
容器清理命令 make clean # 停止并删除容器
make purge # 删除容器并清空数据(会提示确认)
手动运行 如果您不想使用 Docker Compose,也可以直接使用 docker run 命令:
mkdir -p ./data
docker run -d --privileged --name pigsty \
-p 2222:22 -p 8080:80 -p 5432:5432 \
-v ./data:/data \
pgsty/pigsty:<version>
docker exec -it pigsty ./configure -c docker -g --ip 127.0.0.1
docker exec -it pigsty ./deploy.yml
或者使用 Makefile 提供的 make run 命令:
make run # 使用 docker run 启动
make exec # 进入容器
make clean # 停止并删除容器
make purge # 删除容器并清空数据
原理 Pigsty Docker 镜像基于 Debian 13 (Trixie) ,启用了 systemd 作为 init 系统。
这使得容器内的服务管理方式与原生 Linux 系统保持一致,可以使用 systemctl 管理服务。
镜像的关键特性:
systemd 支持 :容器内运行完整的 systemd,可以正常使用服务管理SSH 访问 :预配置了 SSH 服务,root 密码为 pigsty特权模式 :需要 --privileged 参数以支持 systemd数据持久化 :通过 /data 卷挂载实现数据持久化预装软件 :预装 pig CLI 和 Ansible,已完成 Pigsty 源码初始化镜像构建时会执行以下初始化步骤:
# 安装 pig CLI
RUN echo "deb [trusted=yes] https://repo.pigsty.cc/apt/infra/ generic main" \
> /etc/apt/sources.list.d/pigsty.list \
&& apt-get update && apt-get install -y pig
# 初始化 Pigsty 源码并安装 Ansible
RUN pig sty init -v ${ PIGSTY_VERSION } \
&& pig sty boot \
&& pig sty conf -c docker --ip 127.0.0.1
在容器内执行 ./configure 时,使用 -c docker 参数会应用专门针对 Docker 环境优化的 配置模板
使用 127.0.0.1 作为默认 IP 地址 针对容器环境进行了优化调整 常见问题 容器无法启动 确保 Docker 已正确安装且有足够的资源分配。在 Docker Desktop 中,建议分配至少 2GB 内存。
检查是否有端口冲突,特别是 2222、8080、8443、5432 端口。
服务访问失败 Web 界面和 PostgreSQL 服务仅在部署完成后才可用。请确保 ./deploy.yml 已成功执行完成。
可以通过 make status 检查容器内服务状态。
端口冲突 如果默认端口已被占用,可以通过修改 .env 文件或使用环境变量指定其他端口:
PIGSTY_HTTP_PORT = 8888 PIGSTY_PG_PORT = 5433 docker compose up -d
数据持久化 容器数据默认挂载到 ./data 目录。如果需要清空数据重新开始:
make purge # 删除容器并清空数据(会提示确认)
macOS 上的性能 在 macOS 上使用 Docker Desktop 时,由于虚拟化层的开销,性能会比原生 Linux 环境差。
这是正常现象,Docker 部署主要用于开发测试,生产环境请使用 原生 Linux 安装
更多 Docker Hub :https://hub.docker.com/r/pgsty/pigsty源码目录 :https://github.com/pgsty/pigsty/tree/main/docker快速上手 :原生 Linux 安装 离线安装 :离线安装 生产部署 :部署指南 4.3 - 从浏览器访问图形用户界面 探索 Pigsty 提供的 Web 图形管理界面,Grafana 大盘,以及如何通过域名和 HTTPS 访问它们。
Pigsty 单机安装 INFRA
其中的默认服务器配置提供了一个 WebUI 图形界面,用于展示监控仪表盘,并统一代理访问其他组件的 Web 界面。
访问 您可以通过在浏览器中键入部署节点 IP 地址来访问这个图形界面。在默认配置下,Nginx 将通过 80/443 标准端口对外提供服务。
监控 要访问 Pigsty 的监控系统大盘(Grafana),您可以访问服务器的 /ui 端点。
如果您的服务对互联网与办公网开放,我们建议您通过 域名 HTTPS
端点 在默认配置下,Nginx 会在 80/443 端口的默认服务器上,通过不同的路径暴露以下端点:
域名访问 如果您有自己的域名,可以将其解析到 Pigsty 服务器的 IP 地址,从而通过域名访问 Pigsty 提供的各项服务。
如果您希望启用 HTTPS,则应当修改 infra_portalhome
all :
vars :
infra_portal :
home : { domain : i.pigsty } # 将 i.pigsty 替换为你的域名
all :
vars :
infra_portal : # domain 指定域名 # certbot 参数指定证书名称
home : { domain: demo.pigsty.cc ,certbot : mycert }
您可以在部署完成后,执行 make cert 命令为该域名申请免费的 Let’s Encrypt 证书。
如果您没有定义 certbot 字段,Pigsty 会默认使用本地 CA 签发自签名的 HTTPS 证书,
在这种情况下,您必须首先信任 Pigsty 的自签名 CA 才可以在浏览器中正常访问。
您还可以将本地目录与其他上游服务挂载到 Nginx 上,更多管理预案,请参考 INFRA 管理 - Nginx
4.4 - 快速上手 PostgreSQL 快速上手 PostgreSQL,使用命令行与图形客户端连接上 PostgreSQL 并开始使用。
PostgreSQL
本指南面向有基础 Linux 基本命令行操作经验、但对 PostgreSQL 不太熟悉的开发者,带你快速上手 Pigsty 中的 PG。
我们假设您是个人用户,使用默认单机模式进行部署。关于生产环境多节点高可用集群的使用,请参考 生产服务接入
基本知识 默认 单机安装 pg-meta 的 PostgreSQL 数据库集群,只有一个主库实例。
PostgreSQL 监听在 5432 端口,集群中带有一个预置的数据库 meta 可供使用。
您可以在安装完毕后退出当前管理用户 ssh 会话,并重新登陆刷新环境变量后,
通过简单地敲一个 pp 回车,通过命令行工具 psql 访问该数据库集群:
vagrant@pg-meta-1:~$ pp
psql ( 18.2 ( Ubuntu 18.2-1.pgdg24.04+2))
Type "help" for help.
postgres = #
您也可以切换为操作系统的 postgres 用户,直接执行 psql 命令,即可连接到默认的 postgres 管理数据库上。
连接数据库 想要访问 PostgreSQL 数据库,您需要使用 命令行工具 或者 图形化客户端 工具,填入 PostgreSQL 的 连接字符串 :
postgres://username:password@host:port/dbname
一些驱动和工具也可能会要求你分别填写这些参数,通常以下五项为必选项:
参数 说明 示例值 备注 host数据库服务器地址 10.10.10.10换为你的节点 IP 地址或域名,本机可以省略 port端口号 5432PG 默认端口,可以省略 username用户名 dbuser_dbaPigsty 默认的数据库管理员 password密码 DBUser.DBAPigsty 默认的管理员密码,(请修改密码 ) dbname数据库名 meta默认模板的数据库名称
个人使用时可以直接使用 Pigsty 默认的数据库超级用户 dbuser_dba 进行连接和管理,数据库管理用户 dbuser_dba 拥有数据库的全部权限。
默认情况下,如果您在配置 Pigsty 时指定了 configure -g 参数,密码会随机生成,并保存在 ~/pigsty/pigsty.yml 文件中,可以通过以下命令查看:
cat ~/pigsty/pigsty.yml | grep pg_admin_password
默认账号密码 Pigsty 的默认 单机模板
用户名 密码 角色 用途 dbuser_dbaDBUser.DBA超级用户 数据库管理(请修改密码 ) dbuser_metaDBUser.Meta业务管理员 应用读写(请修改密码 ) dbuser_viewDBUser.Viewer只读用户 数据查阅(请修改密码 )
例如,你可以通过三个不同的连接串,使用三个不同的用户连接到 pg-meta 集群的 meta 数据库:
postgres://dbuser_dba:DBUser.DBA@10.10.10.10:5432/meta
postgres://dbuser_meta:DBUser.Meta@10.10.10.10:5432/meta
postgres://dbuser_view:DBUser.Viewer@10.10.10.10:5432/meta
请注意,这些默认密码会在 configure -g 时自动被替换为随机强密码,请注意将 IP 地址和密码替换为实际值。
使用命令行工具 psql 是 PostgreSQL 官方命令行客户端工具,功能强大,是 DBA 和开发者的首选工具。
在部署了 Pigsty 的服务器上,你可以直接使用 psql 连接本地数据库:
# 最简单的方式:使用 postgres 系统用户本地连接(无需密码)
sudo -u postgres psql
# 使用连接字符串(推荐,通用性最好)
psql 'postgres://dbuser_dba:DBUser.DBA@10.10.10.10:5432/meta'
# 使用参数形式
psql -h 10.10.10.10 -p 5432 -U dbuser_dba -d meta
# 使用环境变量避免密码出现在命令行
export PGPASSWORD = 'DBUser.DBA'
psql -h 10.10.10.10 -p 5432 -U dbuser_dba -d meta
成功连接后,你会看到类似这样的提示符:
psql ( 18.2)
Type "help" for help.
meta = #
常用 psql 命令
进入 psql 后,可以执行 SQL 语句,也可以使用以 \ 开头的元命令:
命令 说明 命令 说明 Ctrl+C中断查询 Ctrl+D退出 psql \?显示所有元命令帮助 \h显示 SQL 命令帮助 \l列出所有数据库 \c dbname切换到指定数据库 \d table查看表结构 \d+ table查看表的详细信息 \du列出所有用户/角色 \dx列出已安装的扩展 \dn列出所有的模式 \dt列出所有表
执行 SQL
在 psql 中直接输入 SQL 语句,以分号 ; 结尾:
-- 查看 PostgreSQL 版本
SELECT version ();
-- 查看当前时间
SELECT now ();
-- 创建一张测试表
CREATE TABLE test ( id SERIAL PRIMARY KEY , name TEXT , created_at TIMESTAMPTZ DEFAULT now ());
-- 插入数据
INSERT INTO test ( name ) VALUES ( 'hello' ), ( 'world' );
-- 查询数据
SELECT * FROM test ;
-- 删除测试表
DROP TABLE test ;
使用图形客户端 如果你更喜欢图形界面,以下是几款流行的 PostgreSQL 客户端:
Grafana
Pigsty INFRAGrafana 浏览器图形界面
Grafana 默认的用户名是 admin配置清单 grafana_admin_passwordpigsty)。
DataGrip
DataGrip
DBeaver
DBeaver
pgAdmin
pgAdmin
Pigsty 在 软件模板:pgAdmin
查阅监控大盘 Pigsty 提供了许多 PostgreSQL 监控面板
推荐先从 PGSQL Overview 开始浏览,面板中的许多元素都可以点击,您可以逐层深入,查阅每个集群、实例、数据库甚至是表,索引,函数等数据库内对象的详情信息。
尝试扩展插件 PostgreSQL 最强大的特性之一是其 扩展生态系统
Pigsty 提供了 PG 生态中独一无二的 451 扩展 加装 timescaledb 等更多扩展。
\ dx -- psql 元命令,列出已经安装的扩展
TABLE pg_available_extensions ; -- 查询已经安装,可以启用的扩展
CREATE EXTENSION postgis ; -- 启用 postgis 扩展
下一步 恭喜你完成了 PostgreSQL 的基础上手!下一步,你可以开始对你的数据库进行一些 配置与定制
4.5 - 通过配置清单定制 Pigsty 部署 使用声明式的配置文件,表达你需要的基础设施与集群。
除了使用 配置向导 配置清单
如果您事先就在 配置清单 deploy.yml 剧本一把梭,即可完成所有部署工作,但它隐藏了所有细节。
所以本文档会把所有模块与剧本拆解开来,介绍如何从一个简单的配置,通过增量添加的方式,形成一套复杂完备的部署。
最小配置 最简单的有效配置文件可能如下所示,唯一的内容是定义 admin_ip管理节点 )
all : { vars : { admin_ip : 10.10.10.10 } }
# 天朝自有国情在此,额外配置 region: china 以使用国内的镜像源加速下载
all : { vars : { admin_ip: 10.10.10.10, region : china } }
这个配置不会部署任何东西,但是执行 ./deploy.yml 剧本时,会在 files/pki/ca 生成一套自签名的 CA ,用于签发证书。
为了方便起见,我们还可以额外设置 regiondefault,china,europe)。
加入节点 Pigsty 的 NODE
all : # 不要忘了将 10.10.10.10 替换为您的实际 IP 地址
children : { nodes : { hosts : { 10.10.10.10 : {} } } }
vars :
admin_ip : 10.10.10.10 # 当前节点 IP 地址
region : default # 全球默认软件仓库
node_repo_modules : node,pgsql,infra # 添加 node, pgsql, infra 软件仓库
all : # 不要忘了将 10.10.10.10 替换为您的实际 IP 地址
children : { nodes : { hosts : { 10.10.10.10 : {} } } }
vars :
admin_ip : 10.10.10.10 # 当前节点 IP 地址
region : china # 使用中国镜像
node_repo_modules : node,pgsql,infra # 添加 node, pgsql, infra 软件仓库
为了让这个配置更有用,我们添加了两个 全局参数 node_repo_modulesregion
上面的两个参数能够让节点使用正确的软件仓库,安装默认指定的必须包。
在 NODE 模块中有许多可用的 定制项
接下来,执行 deploy.yml 剧本,或者更精确地执行 node.yml 剧本,将会把这里定义节点 “纳入 Pigsty 管理”,调整至默认配置描述的状态。
加入基础设施 一套功能完备的 RDS 云数据库服务需要基础设施的支持,例如,监控系统(指标/日志采集,告警,可视化),NTP,DNS 等各种基础性服务。
现在,我们通过定义一个特殊的分组 infra,来部署 INFRA
all : # 只是简单的改了个分组名 nodes -> infra,并添加新的实例变量 infra_seq
children : { infra : { hosts : { 10.10.10.10 : { infra_seq : 1 } } } }
vars :
admin_ip : 10.10.10.10
region : default
node_repo_modules : node,pgsql,infra
all : # 只是简单的改了个分组名 nodes -> infra,并添加新的实例变量 infra_seq
children : { infra : { hosts : { 10.10.10.10 : { infra_seq : 1 } } } }
vars :
admin_ip : 10.10.10.10
region : china
node_repo_modules : node,pgsql,infra
同时,我们还分配了一个 身份参数 infra_seqINFRA 模块时将不同的节点区分开来。
执行 infra.yml 剧本,将在 10.10.10.10 上安装 INFRA NODE
./infra.yml # 在 infra 分组上安装 INFRA 模块(连带安装 NODE 模块)
只要 IP 地址存在,NODE 模块会隐含定义。NODE 模块也是幂等的,即使重复执行一次,也没有什么副作用。
安装完成后,您将拥有一套完整的可观测性基础设施,以及节点监控功能,但 PostgreSQL 数据库服务尚未部署。
如果您的目的就是设置这一套监控系统(Grafana + Victoria),那么到此为止就大功告成了!infra模块化 的:您可以只部署监控基础设施,而不部署数据库服务;
或者反过来 —— 在没有基础设施的情况下,运行高可用 PostgreSQL 集群 —— 精简安装
部署数据库集群 要提供 PostgreSQL 服务,您还需要额外安装 PGSQL ETCD
all :
children :
infra : { hosts : { 10.10.10.10 : { infra_seq : 1 } } }
etcd : { hosts : { 10.10.10.10 : { etcd_seq : 1 } } } # 新增 etcd 集群
pg-meta : { hosts : { 10.10.10.10 : { pg_seq: 1, pg_role: primary } }, vars : { pg_cluster : pg-meta } } # 新增 pg 集群
vars : { admin_ip: 10.10.10.10, region: default, node_repo_modules : node,pgsql,infra }
all :
children :
infra : { hosts : { 10.10.10.10 : { infra_seq : 1 } } }
etcd : { hosts : { 10.10.10.10 : { etcd_seq : 1 } } } # 新增 etcd 集群
pg-meta : { hosts : { 10.10.10.10 : { pg_seq: 1, pg_role: primary } }, vars : { pg_cluster : pg-meta } } # 新增 pg 集群
vars : { admin_ip: 10.10.10.10, region: china, node_repo_modules : node,pgsql,infra }
我们在这里添加了两个新的分组:etcd 与 pg-meta,分别定义了一个单节点的 etcd 集群和一个单节点的 PostgreSQL 集群。
您可以使用 ./deploy.yml 重新部署所有内容,也可以使用以下命令进行增量部署:
./etcd.yml -l etcd # 在 etcd 组上安装 ETCD 模块
./pgsql.yml -l pg-meta # 在 pg-meta 组上安装 PGSQL 模块
PGSQL ETCD
至此,我们用 node.ymlinfra.ymletcd.ymlpgsql.yml剧本
定义数据库与用户 您不仅可以定制在哪些节点上安装哪些模块,还可以定制 PostgreSQL 集群的内部细节,例如 数据库 用户
all :
children :
# 隐藏其他分组与变量以简化展示
pg-meta :
hosts : { 10.10.10.10 : { pg_seq: 1, pg_role : primary } }
vars :
pg_cluster : pg-meta
pg_users : # 定义数据库用户
- { name: dbuser_meta ,password: DBUser.Meta ,pgbouncer: true ,roles: [dbrole_admin] ,comment : admin user }
pg_databases : # 定义业务数据库
- { name: meta ,baseline: cmdb.sql ,comment : pigsty meta database }
Pigsty 提供了非常丰富的定制参数,覆盖了数据库与用户的方方面面。
如果您事先定义好了上面两个参数描述所需的数据库与用户,那么它们会在 ./pgsql.yml用户 数据库
bin/pgsql-user pg-meta dbuser_meta # 确保 pg-meta 集群中有用户 dbuser_meta
bin/pgsql-db pg-meta meta # 确保 pg-meta 集群中有数据库 meta
配置 PG 版本与扩展 您可以安装 不同大版本 451 扩展插件
./pgsql-rm.yml -l pg-meta # 移除旧的 pg-meta 集群(因为它是 PG 18)
我们可以通过定制参数,让集群默认安装并启用一些常用的扩展:timescaledb、postgis 和 pgvector:
all :
children :
infra : { hosts : { 10.10.10.10 : { infra_seq : 1 } } }
etcd : { hosts : { 10.10.10.10 : { etcd_seq : 1 } } } # 新增 etcd 集群
pg-meta :
hosts : { 10.10.10.10 : { pg_seq: 1, pg_role : primary } }
vars :
pg_cluster : pg-meta
pg_version : 16 # 指定 PG 版本为 16
pg_extensions : [ timescaledb, postgis, pgvector ] # 安装这些扩展
pg_libs : 'timescaledb, pg_stat_statements, auto_explain' # 预加载这些扩展动态库
pg_databases :
- { name: meta ,baseline: cmdb.sql ,comment: pigsty meta database ,schemas: [pigsty] ,extensions : [ vector, postgis, timescaledb ] }
pg_users :
- { name: dbuser_meta ,password: DBUser.Meta ,pgbouncer: true ,roles: [dbrole_admin] ,comment : admin user }
vars :
admin_ip : 10.10.10.10
region : default
node_repo_modules : node,pgsql,infra
./pgsql.yml -l pg-meta # 安装 PG16 和扩展重新创建 pg-meta 集群
添加更多节点 我们可以向部署中添加更多节点,将其纳入 Pigsty 的管理之中,部署监控,配置仓库,安装软件 ……
一次添加整个集群,或者逐个添加节点
bin/node-add pg-test
bin/node-add 10.10.10.11
bin/node-add 10.10.10.12
bin/node-add 10.10.10.13
部署高可用PG集群 现在假设我们要在刚添加的三个新节点上,部署一套新的数据库集群 pg-test,采用三节点高可用架构,只需要:
all :
children :
infra : { hosts : { 10.10.10.10 : { infra_seq : 1 } } }
etcd : { hosts : { 10.10.10.10 : { etcd_seq: 1 } }, vars : { etcd_cluster : etcd } }
pg-meta : { hosts : { 10.10.10.10 : { pg_seq: 1, pg_role: primary } }, vars : { pg_cluster : pg-meta } }
pg-test :
hosts :
10.10.10.11 : { pg_seq: 1, pg_role : primary }
10.10.10.12 : { pg_seq: 2, pg_role : replica }
10.10.10.13 : { pg_seq: 3, pg_role : replica }
vars : { pg_cluster : pg-test }
部署 Redis 集群 Pigsty 提供了可选的 Redis 支持,可作为 PostgreSQL 前端的缓存服务。
bin/redis-add redis-ms
bin/redis-add redis-meta
bin/redis-add redis-test
Redis 高可用设置需要使用集群模式或哨兵模式,详情请参阅 Redis 配置
部署 MinIO 集群 Pigsty 提供了可选的开源对象存储,S3 替代 —— MinIO 备份存储仓库
严肃的生产环境 MinIO 部署通常需要至少 4 个节点,每个节点配备 4 块硬盘(4N/16D)。
部署 Docker 模块 如果您想要使用容器运行一些 管理 PG 的工具 使用 PostgreSQL 的软件 DOCKER
你可以使用预制的应用配置模板,一键拉起一些常见的软件工具,例如用于 PG 管理的 GUI 工具: Pgadmin
./app.yml -l infra -e app = pgadmin
甚至,您还可以用 Pigsty 自建 企业级质量的 Supabase
4.6 - 使用 Ansible 剧本完成部署 使用 Ansible 剧本部署与管理 Pigsty 集群
Pigsty 使用 Ansible
Ansible 可以使用 声明式 的方式对服务器进行配置管理,所有模块的部署都是通过一系列幂等的 Ansible 剧本
例如,在单机部署时,您会用到 deploy.yml内置剧本
了解 Ansible 基础知识有助于更好的使用 Pigsty,但这 并非必须 ,特别是在单机部署时。
部署剧本 Pigsty 提供了一个 “一条龙” 部署剧本 deploy.yml
Playbook 命令 分组 infra[nodes]etcdminio[pgsql]infra.yml./infra.yml-l infra✓ ✓ node.yml./node.yml✓ etcd.yml./etcd.yml-l etcd✓ minio.yml./minio.yml-l minio✓ pgsql.yml./pgsql.yml✓
这是最简单的部署方式,您也可以参考 定制指南
安装 Ansible 使用 Pigsty 安装脚本 bootstrapansible 及其依赖。
如果您想手动安装 Ansible,可以参考以下说明,支持的 Ansible 最低版本为 2.9
sudo apt install -y ansible python3-jmespath
sudo dnf install -y ansible python3.12-jmespath python3-cryptography # EL 8
sudo dnf install -y ansible python3-jmespath # EL 9
sudo dnf install -y ansible # EL 10
brew install ansible
pip3 install jmespath
修改默认密码!
请注意,目前 EL10 EPEL 仓库尚未提供完整的 Ansible 包,Pigsty PGSQL
Ansible 在 macOS 上也可用。您可以使用 Homebrew
执行剧本 Ansible 剧本(Playbook)是包含要执行的一系列任务定义的可执行 YAML 文件。
执行剧本需要您的环境变量 PATH 中有 ansible-playbook 可执行文件。
运行 ./node.yml 剧本本质上是执行 ansible-playbook node.yml 命令。
您可以使用一些参数来精细控制剧本的执行,其中以下 4 个参数 需要您了解,以便有效使用 Ansible:
目的 参数 描述 对象 -l|--limit <pattern>限制在特定 分组 / 主机 / 模式 上执行 任务 -t|--tags <tags>只运行具有特定标签的任务 参数 -e|--extra-vars <vars>额外的命令行参数 配置 -i|--inventory <path>使用特定的清单文件
./node.yml # 在所有主机上运行 node 剧本
./pgsql.yml -l pg-test # 在 pg-test 集群上运行 pgsql 剧本
./infra.yml -t repo_build # 运行 infra.yml 的子任务 repo_build
./pgsql-rm.yml -e pg_rm_pkg = false # 删除 pgsql,但保留软件包(不卸载软件)
./infra.yml -i conf/mynginx.yml # 使用另外一个位置的配置文件
限制主机 剧本的 执行目标 可以通过 -l|--limit <selector> 限制。
当尝试在特定主机/节点或组/集群上运行剧本时,这很方便。
以下是主机限制的一些示例:
./pgsql.yml # 在所有主机上运行(危险!)
./pgsql.yml -l pg-test # 在 pg-test 集群上运行
./pgsql.yml -l 10.10.10.10 # 在单个主机 10.10.10.10 上运行
./pgsql.yml -l pg-* # 在匹配 glob 模式 `pg-*` 的主机/组上运行
./pgsql.yml -l '10.10.10.11,&pg-test' # 在 pg-test 组的 10.10.10.11 上运行
./pgsql-rm.yml -l 'pg-test,!10.10.10.11' # 在 pg-test 上运行,除了 10.10.10.11
查看 Ansible 文档中的所有详细信息:Patterns: targeting hosts and groups
谨慎运行没有主机限制的剧本!
在大多数时候,缺少这个值可能会有危险,因为大多数剧本将在 all 主机上执行。请谨慎使用 。
限制任务 执行任务 可以通过 -t|--tags <tags> 控制。
如果指定,将只执行具有给定标签的任务,而不是整个剧本。
./infra.yml -t repo # 创建仓库
./node.yml -t node_pkg # 安装节点包
./pgsql.yml -t pg_install # 安装 PG 包和扩展
./etcd.yml -t etcd_purge # 销毁 ETCD 集群
./minio.yml -t minio_alias # 写入 MinIO CLI 配置
要运行多个任务,指定多个标签并用逗号分隔 -t tag1,tag2:
./node.yml -t node_repo,node_pkg # 添加仓库,然后安装包
./pgsql.yml -t pg_hba,pg_reload # 配置,然后重新加载 pg hba 规则
额外变量 您可以使用 CLI 参数在运行时覆盖配置参数,它具有 最高优先级
额外的命令行参数可以通过 -e|--extra-vars KEY=VALUE 传递,可以多次使用:
# 使用另一个管理员用户创建管理员
./node.yml -e ansible_user = admin -k -K -t node_admin
# 初始化一个特定的 Redis 实例:10.10.10.11:6379
./redis.yml -l 10.10.10.10 -e redis_port = 6379 -t redis
# 删除 PostgreSQL,但保留软件包和数据
./pgsql-rm.yml -e pg_rm_pkg = false -e pg_rm_data = false
对于复杂参数,可以使用 JSON 字符串,一次传递多个复杂参数。
# 添加仓库并安装包
./node.yml -t node_install -e '{"node_repo_modules":"infra","node_packages":["duckdb"]}'
指定清单 默认配置文件是 Pigsty 主目录中的 pigsty.yml。
您可以使用 -i <path> 参数指定不同的 配置清单
./pgsql.yml -i conf/rich.yml # 根据 rich 配置初始化一个下载了所有扩展的单节点
./pgsql.yml -i conf/ha/full.yml # 根据 full 配置初始化一个 4 节点集群
./pgsql.yml -i conf/app/supa.yml # 根据 supa.yml 配置初始化一个 1 节点 Supabase 部署
便捷脚本 Pigsty 提供了一系列便捷脚本来简化常见操作,这些脚本位于 bin/ 目录下:
bin/node-add <cls> # 将节点纳入 Pigsty 管理:./node.yml -l <cls>
bin/node-rm <cls> # 从 Pigsty 移除节点:./node-rm.yml -l <cls>
bin/pgsql-add <cls> # 初始化 PG 集群:./pgsql.yml -l <cls>
bin/pgsql-rm <cls> # 移除 PG 集群:./pgsql-rm.yml -l <cls>
bin/pgsql-user <cls> <username> # 添加业务用户:./pgsql-user.yml -l <cls> -e username=<user>
bin/pgsql-db <cls> <dbname> # 添加业务数据库:./pgsql-db.yml -l <cls> -e dbname=<db>
bin/redis-add <cls> # 初始化 Redis 集群:./redis.yml -l <cls>
bin/redis-rm <cls> # 移除 Redis 集群:./redis-rm.yml -l <cls>
这些脚本是对 Ansible 剧本的简单封装,让您可以更方便地执行常见操作。
剧本列表 以下是 Pigsty 中的 内置剧本
4.7 - 离线安装 在没有互联网访问的环境中,使用离线安装包安装 Pigsty
Pigsty 默认从互联网上游 安装 离线软件包
概览 离线软件包 打包了所有需要的 RPM/DEB 软件包及其依赖;它是常规 安装
在 严肃的生产环境部署 强烈推荐 您使用离线安装包进行安装。
它可以确保后续所有新节点的软件版本与现有环境保持一致,
并且可以避免上游变动导致的在线安装失败(相当常见!)
确保您能独立自主运行它至地老天荒。
使用离线软件包的优点
可以简单方便的在互联网隔离的环境中交付实施。 一次性预下载所有软件包,可以有效加速安装过程。 无需担心上游依赖项的变动导致依赖错漏/安装失败。 如果有多个节点,那么所有软件包只需要下载一次,节省带宽资源。 可以通过本地仓库确保所有节点的软件版本一致,实行统一版本管理 使用离线软件包的缺点
离线安装包针对 特定的操作系统小版本制作 ,通常不能跨版本使用 仅为制作时刻的快照,可能不包含最新的更新和操作系统安全补丁。 离线安装包通常约 1GB 左右,而在线安装则是按需下载,更节省空间。 离线软件包 我们通常为以下 Linux 发行版
如果您使用的是上述列表中给出的操作系统(精确匹配的小版本),那么建议使用离线软件包。
Pigsty 为这些系统提供了开箱即用的预制离线软件包,在 GitHub 上提供免费下载。
您可以从 GitHub 发布页面
62edcca1d1e572a247be018e1c26eda8 pigsty-pkg-v4.2.2.d12.aarch64.tgz
1d55367e2fd9106e6f18b7ee112be736 pigsty-pkg-v4.2.2.d12.x86_64.tgz
f122b1e5ba8a7ae8e3dc6e6dd53eba65 pigsty-pkg-v4.2.2.d13.aarch64.tgz
617a76bfc8df8766e78abf24339152eb pigsty-pkg-v4.2.2.d13.x86_64.tgz
908509b350403ad1a4a27a88795fee06 pigsty-pkg-v4.2.2.el10.aarch64.tgz
70cb4afd90ed7aea6ab43a264f8eb4a8 pigsty-pkg-v4.2.2.el10.x86_64.tgz
98fbd67334f5c674b12e6af81ef76923 pigsty-pkg-v4.2.2.el9.aarch64.tgz
687fa741ccd9dcf611a2aa964bcf1de8 pigsty-pkg-v4.2.2.el9.x86_64.tgz
a2a30f4b1146b3e79be91d5be57615b6 pigsty-pkg-v4.2.2.u22.aarch64.tgz
7a1f571bd8526106775c175ba728eee1 pigsty-pkg-v4.2.2.u22.x86_64.tgz
a5574071bac1955798265f71ad73c3d4 pigsty-pkg-v4.2.2.u24.aarch64.tgz
59a7632c650a3c034f1fe6cd589d7ab5 pigsty-pkg-v4.2.2.u24.x86_64.tgz
离线软件包是为特定的 Linux 操作系统小版本制作的
当操作系统小版本不匹配时,有概率能用,也有概率失败,我们建议你不要冒险尝试。
请务必注意,Pigsty 提供的 EL9/EL10 安装包基于 9.7 / 10.1 制作,Debian 安装包基于 12.13 / 13.3 制作。Ubuntu 安装包基于 22.04.5 / 24.04.4 制作。
跨操作系统小版本可能因 OpenSSL 或系统库版本变化导致安装失败。您需要在安装相同操作系统的环境中执行在线安装后制作离线安装包,或联系我们定制离线软件包。
使用离线软件包 离线安装的步骤 :
下载 Pigsty 离线软件包,将其放到 /tmp/pkg.tgz 下载 Pigsty 源码包,解压并进入目录(假设解压到家目录:cd ~/pigsty ./bootstrapansible./configure -g -c richrich照常运行 ./deploy.yml
警告
如果你在离线安装时遇到 “No package nginx available” 之类的错误,通常说明之前有过失败的安装尝试。删除 /www/pigsty 目录后重新执行部署即可。
如果您想要在自己的配置中,使用已经解包配置好的离线软件包,请修改并确保以下配置项:
repo_enabledtruenode_repo_moduleslocal在大部份模板中,此参数被显式配置为:node,infra,pgsql,即直接从这些上游软件仓库安装。 将其设置为 local,则会使用本地软件仓库安装所有软件包,速度最快,没有其他仓库的变数干扰。 如果你想同时使用本地软件仓库和上游软件仓库,可以将其设置为 local,node,infra,pgsql 第一个参数如果打开,Pigsty 会创建 本地软件仓库 ,第二个参数如果包含 local,则环境中的所有节点会使用这个本地软件仓库。
如果只包含 local,那么它会成为所有节点的唯一软件源,如果你还想要从其他上游软件仓库继续安装其他软件包,可以将其他仓库模块名称也添加进去,例如 local,node,infra,pgsql。
混合安装模式
如果您的环境有互联网访问,那么有一种混合方法可以融合离线安装与在线安装的优点。
您可以可以使用离线软件包作为基础,并在线补足不匹配的增量软件包。
例如,假设您使用的是 RockyLinux 9.6,但官方离线软件包是为 RockyLinux 9.7 制作的。
您可以使用 el9 离线软件包(虽然是针对 9.7 制作的),然后在执行正式安装前,执行 make repo-build 重新下载 9.6 对应的缺失软件包,
Pigsty 将从上游仓库重新下载所需的 增量 。
制作离线软件包 如果您选择的操作系统不在默认列表中,您可以使用内置的 cache.yml
找到一台运行完全相同操作系统版本,且可以访问互联网的节点 使用 rich在线安装 configure -c rich) cd ~/pigsty; ./cache.yml:制作并获取离线软件包到 ~/pigsty/dist/${version}/将离线软件包复制到没有互联网访问的环境中(ftp、scp、usb 等),通过 bootstrap 解包使用 我们提供 付费服务 ¥200 )。
Bootstrap Pigsty 依赖 ansible 执行剧本,这个脚本负责用各种方式来确保 ansible 正确安装。
./bootstrap # 确保 ansible 正确安装(如果有离线包,优先使用离线安装并解包使用)
通常在两种情况下,你需要运行这个脚本:
你不是通过 安装脚本 git clone 源码包的方式安装的,因此没有安装 ansible。 你准备通过离线软件包来安装 Pigsty,需要使用这个脚本来从离线软件包中安装 ansible。 bootstrap 脚本将自动检测离线软件包是否存在(-p 指定,默认为 /tmp/pkg.tgz)。
如果存在则解压使用它,然后从里面安装 ansible。
如果离线包不存在,它会尝试从互联网安装 ansible。如果还是不行,那你就要自己想办法了!
我的 yum/apt 仓库文件跑到哪里去了?
引导程序默认会 移走 现有软件源配置,以确保只有所需的仓库被启用。
您可以在 /etc/yum.repos.d/backup (EL) 或 /etc/apt/backup (Debian / Ubuntu) 中找回它们。
如果您想在 bootstrap 过程中保留现有软件源配置,请使用 -k|--keep 参数。
./bootstrap -k # 或 --keep
4.8 - 精简安装 只安装高可用 PostgreSQL 集群及其最小依赖的精简安装模式
如果您只想要高可用 PostgreSQL 数据库集群本身,而不需要监控、基础设施等功能,请考虑 精简安装 。
精简安装没有 INFRA本地仓库 ETCDPGSQLNODE
精简安装适合以下场景
只需要 PostgreSQL 数据库本身,不需要可观测性基础设施。 资源极度受限的环境,不愿意承担基础设施开销(单机约 0.2 vCPU / 500MB 开销) 已有外部监控系统,希望统一使用自己的监控管理体系。 不需要 Grafana 可视化看板组件。 精简安装的局限性
没有 基础设施模块 离线安装 概览 使用精简安装,您需要:
使用 slim.ymlconfigure -c slim) 执行 slim.yml 剧本进行部署,而不是默认的 deploy.yml curl https://repo.pigsty.cc/get | bash
./configure -g -c slim
./slim.yml
说明 精简安装只安装/配置以下组件:
组件 必要性 描述 patroni⚠️ 必需 引导高可用 PostgreSQL 集群 etcd⚠️ 必需 Patroni 的元数据库依赖(DCS) pgbouncer✔️ 可选 PostgreSQL 连接池 vip-manager✔️ 可选 L2 VIP 绑定到 PostgreSQL 集群主节点 haproxy✔️ 可选 根据 Patroni 健康检查,自动路由 服务 chronyd✔️ 可选 与 NTP 服务器的时间同步 tuned✔️ 可选 节点调优模板和内核参数管理
你可以通过进一步的配置,关闭所有可选组件,只保留必需组件 patroni 和 etcd。
因为缺少 Infra 模块的 Nginx 提供本地仓库服务,只有单机安装的时候可以进行 离线安装
配置 精简安装的配置文件示例:conf/slim.yml
---
#==============================================================#
# File : slim.yml
# Desc : Pigsty slim installation config template
# Ctime : 2020-05-22
# Mtime : 2025-12-28
# Docs : https://pigsty.io/docs/conf/slim
# License : Apache-2.0 @ https://pigsty.io/docs/about/license/
# Copyright : 2018-2026 Ruohang Feng / Vonng (rh@vonng.com)
#==============================================================#
# This is the config template for slim / minimal installation
# No monitoring & infra will be installed, just raw postgresql
#
# Usage:
# curl https://repo.pigsty.io/get | bash
# ./configure -c slim
# ./slim.yml
all :
children :
etcd : # dcs service for postgres/patroni ha consensus
hosts : # 1 node for testing, 3 or 5 for production
10.10.10.10 : { etcd_seq : 1 } # etcd_seq required
#10.10.10.11: { etcd_seq: 2 } # assign from 1 ~ n
#10.10.10.12: { etcd_seq: 3 } # odd number please
vars : # cluster level parameter override roles/etcd
etcd_cluster : etcd # mark etcd cluster name etcd
#----------------------------------------------#
# PostgreSQL Cluster
#----------------------------------------------#
pg-meta :
hosts :
10.10.10.10 : { pg_seq: 1, pg_role : primary }
#10.10.10.11: { pg_seq: 2, pg_role: replica } # you can add more!
#10.10.10.12: { pg_seq: 3, pg_role: replica, pg_offline_query: true }
vars :
pg_cluster : pg-meta
pg_users :
- { name: dbuser_meta ,password: DBUser.Meta ,pgbouncer: true ,roles: [dbrole_admin ] ,comment : pigsty admin user }
- { name: dbuser_view ,password: DBUser.Viewer ,pgbouncer: true ,roles: [dbrole_readonly] ,comment : read-only viewer }
pg_databases :
- { name: meta, baseline: cmdb.sql ,comment: pigsty meta database ,schemas: [pigsty] ,extensions : [ vector ]}
pg_hba_rules : # https://pigsty.io/docs/pgsql/config/hba
- { user: all ,db: all ,addr: intra ,auth: pwd ,title: 'everyone intranet access with password' ,order : 800 }
pg_crontab : # https://pigsty.io/docs/pgsql/admin/crontab
- '00 01 * * * /pg/bin/pg-backup full'
vars :
version : v4.2.2 # pigsty version string
admin_ip : 10.10.10.10 # admin node ip address
region: default # upstream mirror region : default,china,europe
nodename_overwrite : false # do not overwrite node hostname on single node mode
node_repo_modules : node,infra,pgsql # add these repos directly to the singleton node
node_tune: oltp # node tuning specs : oltp,olap,tiny,crit
pg_conf: oltp.yml # pgsql tuning specs : {oltp,olap,tiny,crit}.yml
pg_version : 18 # Default PostgreSQL Major Version is 18
pg_packages : [ pgsql-main, pgsql-common ] # pg kernel and common utils
#pg_extensions: [ pg18-time ,pg18-gis ,pg18-rag ,pg18-fts ,pg18-olap ,pg18-feat ,pg18-lang ,pg18-type ,pg18-util ,pg18-func ,pg18-admin ,pg18-stat ,pg18-sec ,pg18-fdw ,pg18-sim ,pg18-etl]
#----------------------------------------------#
# PASSWORD : https://pigsty.io/docs/setup/security/
#----------------------------------------------#
grafana_admin_password : pigsty
grafana_view_password : DBUser.Viewer
pg_admin_password : DBUser.DBA
pg_monitor_password : DBUser.Monitor
pg_replication_password : DBUser.Replicator
patroni_password : Patroni.API
haproxy_admin_password : pigsty
minio_secret_key : S3User.MinIO
etcd_root_password : Etcd.Root
... 部署 精简安装需要使用 slim.ymldeploy.yml
高可用集群 精简安装模式也可以部署高可用集群,在 etcd 和 pg-meta 分组中添加更多节点即可,一个三节点的部署样例:
ID NODE PGSQL INFRA ETCD 1 10.10.10.10pg-meta-1不安装基础设施模块 etcd-12 10.10.10.11pg-meta-2不安装基础设施模块 etcd-23 10.10.10.12pg-meta-3不安装基础设施模块 etcd-3
all :
children :
etcd :
hosts :
10.10.10.10 : { etcd_seq : 1 }
10.10.10.11 : { etcd_seq : 2 } # <-- 新增
10.10.10.12 : { etcd_seq : 3 } # <-- 新增
pg-meta :
hosts :
10.10.10.10 : { pg_seq: 1, pg_role : primary }
10.10.10.11 : { pg_seq: 2, pg_role : replica } # <-- 新增
10.10.10.12 : { pg_seq: 3, pg_role : replica } # <-- 新增
vars :
pg_cluster : pg-meta
pg_users :
- { name: dbuser_meta ,password: DBUser.Meta ,pgbouncer: true ,roles: [dbrole_admin ] ,comment : pigsty admin user }
- { name: dbuser_view ,password: DBUser.Viewer ,pgbouncer: true ,roles: [dbrole_readonly] ,comment : read-only viewer }
pg_databases :
- { name: meta, baseline: cmdb.sql ,comment: pigsty meta database ,schemas: [pigsty] ,extensions : [ vector ]}
node_crontab : [ '00 01 * * * postgres /pg/bin/pg-backup full' ] # make a full backup every 1am
vars :
# 省略 ……
4.9 - 安全建议 单机部署,快速上手时的三点安全加固建议
对于单机部署的 Demo/Dev 场景,只要您 修改了默认密码
如果您的部署对互联网开放,可以考虑添加 防火墙
除此之外,我们建议您保护好 Pigsty 的 关键文件
对于有着严格安全要求的企业级生产环境,请参考 部署-安全加固
密码 Pigsty 是一个开源项目,默认密码众所周知 。如果您的部署面向互联网或者办公网开放,请务必修改所有默认密码!
为了避免手动修改密码的繁琐,Pigsty 的 配置向导 提供了自动生成随机强密码的功能,使用 configure 的 -g 参数即可。
$ ./configure -g
configure pigsty v4.2.2 begin
[ OK ] region = china
[ WARN] kernel = Darwin, can be used as admin node only
[ OK ] machine = arm64
[ OK ] package = brew ( macOS)
[ WARN] primary_ip = default placeholder 10.10.10.10 ( macOS)
[ OK ] mode = meta ( unknown distro)
[ OK ] locale = C.UTF-8
[ OK ] generating random passwords...
grafana_admin_password : CdG0bDcfm3HFT9H2cvFuv9w7
pg_admin_password : 86WqSGdokjol7WAU9fUxY8IG
pg_monitor_password : 0X7PtgMmLxuCd2FveaaqBuX9
pg_replication_password : 4iAjjXgEY32hbRGVUMeFH460
patroni_password : DsD38QLTSq36xejzEbKwEqBK
haproxy_admin_password : uhdWhepXrQBrFeAhK9sCSUDo
minio_secret_key : z6zrYUN1SbdApQTmfRZlyWMT
etcd_root_password : Bmny8op1li1wKlzcaAmvPiWc
DBUser.Meta : U5v3CmeXICcMdhMNzP9JN3KY
DBUser.Viewer : 9cGQF1QMNCtV3KlDn44AEzpw
S3User.Backup : 2gjgSCFYNmDs5tOAiviCqM2X
S3User.Meta : XfqkAKY6lBtuDMJ2GZezA15T
S3User.Data : OygorcpCbV7DpDmqKe3G6UOj
[ OK ] random passwords generated, check and save them
[ OK ] ansible = ready
[ OK ] pigsty configured
[ WARN] don' t forget to check it and change passwords!
proceed with ./deploy.yml
我们建议在规划部署之前,就修改所有默认密码,确保部署完成后系统即处于安全状态。事后修改密码是一个繁琐的工作:
防火墙 在互联网或者办公网开放的部署场景中,强烈建议配置 防火墙规则 ,限制访问 IP 范围与端口。
您可以使用云厂商提供的安全组功能,或者使用 Linux 发行版自带的防火墙服务(如 firewalld、ufw、iptables 等)来实现。
方向: 协议 端口 服务 说明 入站 TCP 22 SSH 允许 ssh 登陆管理 入站 TCP 80 Nginx 允许 Nginx HTTP 访问 入站 TCP 443 Nginx 允许 Nginx HTTPS 访问 入站 TCP 5432 PostgreSQL 远程公网访问数据库,按需启用
Pigsty 默认支持配置防火墙规则,允许 22/80/443/5432 从外部网络访问,但这并非默认启用。
文件 在 Pigsty 中,您需要特别保护以下文件:
pigsty.ymlfiles/pki/ca/ca.key我们建议您严格控制这两个文件的访问权限,并定期进行备份,将它们存储在一个安全的位置。
5 - 部署 在严肃生产环境中进行多节点、高可用的 Pigsty 规划、准备与部署工作。
与 快速上手 架构规划 准备工作
本章将帮助您理解 Pigsty 的完整部署流程,并提供生产环境部署的最佳实践建议。
我们建议您在真实的生产环境部署之前,使用 Pigsty 提供的 沙箱环境 Vagrant Terraform
对于生产环境部署,您通常需要准备至少三个 节点 相关概念 参数配置 Ansible 剧本 安全性
5.1 - 生产部署 如何在 Linux 主机上安装 Pigsty?
本文是 Pigsty 生产环境多节点部署指南,部署单机版本 Demo/Dev 环境可以参考 快速上手
摘要 准备 几台 SSH 权限 节点 兼容的 Linux 系统 sshsudo管理用户
pigsty.cc(中国)
pigsty.io(全球) curl -fsSL https://repo.pigsty.cc/get | bash;
curl -fsSL https://repo.pigsty.io/get | bash;
该命令会执行 安装 配置 部署
在执行 deploy.yml配置清单 pigsty.yml
cd ~/pigsty # 进入 Pigsty 目录
./configure -g # 生成配置文件(可选,如果知道如何配置可以跳过)
./deploy.yml # 执行部署剧本,根据生成的配置文件开始安装
安装完成后,您可以通过 IP / 域名 + 80/443 端口访问 Web 用户界面 5432 端口访问 PostgreSQL 服务
完整流程根据服务器规格/网络条件需 3~10 分钟,离线安装 精简安装
视频样例:20 节点生产仿真环境(Ubuntu 24.04 x86_64)
准备 在生产环境中部署安装 Pigsty 涉及一些 准备工作
项目 要求 项目 要求 节点 至少 1C2G,上不封顶 规格 多个同质节点,2 / 3 / 4 / 或更多 磁盘 /data 作为默认主挂载点FS 推荐使用 xfs,按需使用 ext4 / zfs VIP L2 VIP,可选 (云环境不可用) 网络 静态 IPv4 地址,单节点无固定 IP 可使用 127.0.0.1 CA 可以使用自签名 CA 或指定已有证书 域名 本地 / 公网域名,可选,默认 i.pigsty 自签名域名 内核 Linux x86_64 / aarch64Linux el8, el9, el10, d12, d13, u22, u24Locale C.UTF-8 或 C防火墙 端口:80 / 443 / 22 / 5432 (可选) 用户 避免使用 root 和 postgres Sudo sudo 权限,最好带有 nopass 免密选项 SSH 通过公钥 nopass SSH 登陆纳管节点 可达性 ssh <ip|alias> sudo ls 无错误
安装 您可以使用以下命令自动安装 Pigsty 源码包 ~/pigsty 目录(推荐),部署所需依赖(Ansible)会自动安装。
pigsty.cc(中国)
pigsty.io(全球) curl -fsSL https://repo.pigsty.cc/get | bash # 安装最新稳定版本
curl -fsSL https://repo.pigsty.cc/get | bash -s v4.2.2 # 安装特定版本
curl -fsSL https://repo.pigsty.io/get | bash # 安装最新稳定版本
curl -fsSL https://repo.pigsty.io/get | bash -s v4.2.2 # 安装特定版本
如果您不希望执行远程脚本,可以手动 下载 git 克隆安装时,请务必检出特定版本后再使用。
git clone https://github.com/pgsty/pigsty; cd pigsty;
git checkout v4.2.2; # 使用 git 安装时,请务必检出特定版本
手工下载克隆安装时,请额外执行 bootstrap自行安装
./bootstrap # 安装 ansible,用于执行后续部署
配置 在 Pigsty 中,部署的蓝图细节由 配置清单 pigsty.yml
Pigsty 提供了 configure配置向导 配置清单
./configure -g # 使用配置向导生成配置文件,并且生成随机密码
配置过程生成的配置文件默认位于:~/pigsty/pigsty.yml,您可以在安装前进行检查,按需修改与定制。
有许多 配置模板 pigsty.yml 配置文件进行定制。
./configure -c ha/full -g # 使用四节点沙箱环境模板
./configure -c ha/trio -g # 使用三节点最小 HA 模板
./configure -c ha/dual -g -v 18 # 使用两节点半高可用模板,使用 PG 18
./configure -c ha/simu -s # 使用二十节点生产仿真模板,不检查 IP,不生成随机强密码
配置 / configure 过程的样例输出 vagrant@meta:~/pigsty$ ./configure
configure pigsty v4.2.2 begin
[ OK ] region = china
[ OK ] kernel = Linux
[ OK ] machine = x86_64
[ OK ] package = deb,apt
[ OK ] vendor = ubuntu ( Ubuntu)
[ OK ] version = 22 ( 22.04)
[ OK ] sudo = vagrant ok
[ OK ] ssh = vagrant@127.0.0.1 ok
[ WARN] Multiple IP address candidates found:
( 1) 192.168.121.38 inet 192.168.121.38/24 metric 100 brd 192.168.121.255 scope global dynamic eth0
( 2) 10.10.10.10 inet 10.10.10.10/24 brd 10.10.10.255 scope global eth1
[ OK ] primary_ip = 10.10.10.10 ( from demo)
[ OK ] admin = vagrant@10.10.10.10 ok
[ OK ] mode = meta ( ubuntu22.04)
[ OK ] locale = C.UTF-8
[ OK ] ansible = ready
[ OK ] pigsty configured
[ WARN] don' t forget to check it and change passwords!
proceed with ./deploy.yml
配置向导只会为您替换 当前节点 的 IP(如果您不想要替换,使用 -s 参数),所以对于一个多节点的部署,您需要自己替换其他节点的 IP 地址。
同时,你还需要按需对配置文件进行进一步的定制,例如修改默认密码、添加更多节点等。
配置脚本常用参数 :
参数 说明 -c|--conf用于指定使用的 配置模板 conf/ 目录,不带 .yml 后缀的配置名称 -v|--version用于指定要安装的 PostgreSQL 大版本,如 13、14、15、16、17、18 -r|--region用于指定上游软件源的区域,加速下载: (default|china|europe) -n|--non-interactive直接使用命令行参数提供首要 IP 地址,跳过交互式向导 -x|--proxy使用当前环境变量配置 proxy_env
如果您的机器网卡绑定了多个 IP 地址,那么需要使用 -i|--ip <ipaddr> 显式指定一个当前节点的首要 IP 地址,或在交互式问询中提供。
该脚本将把 IP 占位符 10.10.10.10 替换为当前节点的主 IPv4 地址。选用的地址应为静态 IP 地址,请勿使用公网 IP 地址。
配置过程生成的配置文件默认位于:~/pigsty/pigsty.yml,您可以在安装前进行检查与修改定制。
修改默认密码!
我们强烈建议您在安装前,事先修改配置文件中使用的默认密码与凭据,详情参考 安全加固
部署 Pigsty 的 deploy.yml剧本 配置 所有的目标节点 。
./deploy.yml # 一次性在所有节点上完成部署
部署过程的样例输出 ......
TASK [ pgsql : pgsql init done ] *************************************************
ok: [ 10.10.10.11] = > {
"msg" : "postgres://10.10.10.11/postgres | meta | dbuser_meta dbuser_view "
}
......
TASK [ pg_monitor : load grafana datasource meta] *******************************
changed: [ 10.10.10.11]
PLAY RECAP *********************************************************************
10.10.10.11 : ok = 302 changed = 232 unreachable = 0 failed = 0 skipped = 65 rescued = 0 ignored = 1
localhost : ok = 6 changed = 3 unreachable = 0 failed = 0 skipped = 1 rescued = 0 ignored = 0
当您看到输出尾部如果带有 pgsql init done,PLAY RECAP 等字样,说明安装已经完成!
上游软件仓库变更可能导致在线安装失败!
Pigsty 使用的上游软件仓库(如 Linux / PGDG 仓库)可能会因为不恰当的更新,进入崩溃状态并导致部署失败(相当常见)!
对于严肃的生产环境部署,我们强烈建议使用经过验证的 离线软件包 离线安装
避免重复执行部署剧本!
警告: 在已经完成部署的环境中再次完整运行 deploy.yml
界面 假设您使用 四节点
ID NODE PGSQL INFRA ETCD 1 10.10.10.10pg-meta-1infra-1etcd-12 10.10.10.11pg-test-1- - 3 10.10.10.12pg-test-2- - 4 10.10.10.13pg-test-3- -
INFRA图形化管理界面 80/443 端口访问。
PGSQLPostgreSQL 数据库服务器 5432 端口,也可通过 Pgbouncer / HAProxy 代理访问
对于生产环境的多节点高可用 PostgreSQL 集群来说,您需要通过 服务接入
更多 安装完成后,您可以探索 用户界面 PostgreSQL 服务
您还可以使用 Pigsty 部署和监控 更多集群 配置清单
bin/node-add pg-test # 将集群 pg-test 的 3 个节点纳入 Pigsty 管理
bin/pgsql-add pg-test # 初始化一个 3 节点的 pg-test 高可用 PG 集群
bin/redis-add redis-ms # 初始化 Redis 集群: redis-ms
大多数模块都需要先安装 NODE模块
PGSQLINFRANODEETCDMINIOREDISFERRETDOCKER
5.2 - 资源准备 生产部署的准备工作,包括硬件,节点、磁盘、网络、VIP、域名、软件、文件系统等……
Pigsty 运行在节点(物理机或虚拟机)之上,本文档介绍硬件相关的规划与准备。
节点 Pigsty 目前运行在 Linux 内核和 x86_64 / aarch64 架构的节点上。
"节点 " 指的是 SSH 可访问 systemd、sudo 和 sshd 的类似操作系统的容器。
部署 Pigsty 至少需要 1 个节点,您可以准备更多,并在 执行部署剧本 1C1G,建议至少使用 1C2G。越高越好,没有上限。系统参数将根据可用资源自动调优 。
所需节点的数量,取决于您的需求,更多详情请参考 架构规划 外部备份 单机部署 高可用配置 3 个节点才能工作,2 个节点则提供 半高可用
磁盘 Pigsty 将使用 /data/data1、/data2、/dataN。
如果你想使用其他的数据目录,可以通过以下参数进行配置:
文件系统 您可以使用任何支持的 Linux 文件系统来格式化数据磁盘,但对于生产环境部署,我们建议使用 xfs
xfs 是 linux 的标配之一,提供了最佳的性能,便利的 CoW 机制,允许你瞬间克隆大型数据库集群。使用 MinIO 时,必须使用 xfs 文件系统。
ext4 是另一个可用的选择,但缺乏 CoW 功能,但有着更为丰富的数据恢复工具生态。zfs 可以提供 RAID,快照功能,但性能折损较大且需要单独安装。
我们推荐您在这三种文件系统中按需权衡,择一使用。
如果有特殊需求,您也可以使用其他文件系统,但我们强烈不建议使用 NFS 网络文件系统来运行数据库服务。
Pigsty 的工作假设是 /data 目录属于 root:root,权限为 755。
管理员可以分配一级目录的所有权和权限。每个应用在其子目录中运行时将使用专用用户。
Pigsty 使用的目录结构说明,请参考 FHS
网络 Pigsty 默认使用在线安装模式,需要出站互联网访问。
使用 离线安装
在内网中,Pigsty 需要 静态网络 才能工作,您应该为每个节点明确分配一个 固定的 IPv4 地址。
IP 地址将用作节点的 唯一标识符 ,它应该是绑定到用于 内部 网络通信的主网络接口的主 IP 地址。
作为特例,单机部署 127.0.0.1 作为变通。
永远不要使用公网 IP 作为标识符
使用公网 IP 地址作为节点标识符可能导致安全和连接问题,请务必使用内网 IP 地址作为标识。
VIP Pigsty 支持 NODE 集群(keepalived)和 PGSQL 集群(vip-manager)的可选 L2 VIP。
要使用 L2 VIP 功能,您必须为节点集群/数据库集群明确分配指定一个 L2 VIP 地址。
在您自己的硬件上运行时这不是大问题,但在公有云环境中工作时可能成为问题。
L2 VIP 需要 L2 网络
要使用可选的节点 VIP 和 PG VIP 功能,请确保所有节点位于同一 L2 网络内。
CA Pigsty 默认为每一套部署生成一套自签名的 CA 基础设施
如果您已经有了正规的企业 CA,或者已经有了自签名的 CA,您也可以选择使用已有的 CA 来签发 Pigsty 所需的证书。
域名 Pigsty 默认使用一个本地静态域名 i.pigsty 来访问 WebUI,这是可选的,你也可以直接使用 IP 地址访问。
对于生产环境部署来说,建议您使用域名来访问服务,只有使用域名,才能启用 HTTPS 支持,加密您的数据传输。
同时,域名访问允许您在同一个端口上运行多种不同的服务,并通过不同的域名进行区分。
如果您的部署提供 互联网访问 ,那么可以使用公共 DNS 供应商(如 Cloudflare、阿里云 DNS、AWS Route53 等)来管理您的域名解析。
将您的域名指向 Pigsty 节点的 公网 IP 地址 即可。
如果您的部署针对 局域网/办公网 开放,那么可以使用内部 DNS 服务器来管理域名解析。
将您的域名指向 Pigsty 节点的 办公网 IP 地址 即可。
如果您的访问仅限于本机,或特定的几台机器,那么可以使用本地静态解析来管理域名解析。
将以下记录添加到(用于访问 Pigsty WebUI 的机器) /etc/hosts 文件(本地静态解析)中,即可从浏览器中访问。
10.10.10.10 i.pigsty # 替换为您计划使用的域名,与 Pigsty 节点的 IP 地址
Linux Pigsty 运行在 Linux 操作系统上,它支持 14 种主流 Linux 发行版:兼容操作系统列表
我们推荐使用 RockyLinux 10.1 、Debian 13.3 或 Ubuntu 24.04.4 作为默认操作系统选项。
在 MacOS 和 Windows 上,您可以用各种虚拟机软件或者 Docker systemd 镜像来安装 Pigsty。
我们 强烈建议 使用全新安装的操作系统环境,如果您的服务器已经运行了 Nginx / PostgreSQL 等服务,请考虑使用新的节点进行部署。
在所有节点上使用相同的操作系统版本
多节点部署时,请确保所有节点使用相同的 Linux 发行版,架构与版本。异构节点部署虽然可能可以工作,但不受支持且可能导致不可预见的问题。
Locale 我们建议您将 en_US 设置为操作系统的主要语言,至少确保该 Locale 可用 ,从而确保 PG 日志打印英文。
一些发行版可能默认没有提供 en_US 区域设置,例如 Debian。使用以下命令启用 en_US 区域设置:
localedef -i en_US -f UTF-8 en_US.UTF-8
localectl set-locale LANG = en_US.UTF-8
对于 PostgreSQL 来说,我们强烈建议您默认使用 PG 17+ 内置的 C.UTF-8 作为默认排序规则。
在 配置向导 C.UTF-8 作为排序规则。
Ansible Pigsty 使用 Ansible 安装 Ansible
Pigsty 默认会在 Infra 节点上安装 Ansible,所以 Infra 节点是可以作为管理节点(或备用管理节点)使用。
在 单机部署 管理节点 INFRA节点
Pigsty 您可以使用以下方式 安装
pigsty.cc(中国)
pigsty.io(全球) curl -fsSL https://repo.pigsty.cc/get | bash;
curl -fsSL https://repo.pigsty.io/get | bash;
要 安装 -s <version>
pigsty.cc(中国)
pigsty.io(全球) curl -fsSL https://repo.pigsty.cc/get | bash -s <version> # 安装特定版本(示例:v4.2.2)
curl -fsSL https://repo.pigsty.io/get | bash -s <version> # 安装特定版本(示例:v4.2.2)
要 安装 beta
pigsty.cc(中国)
pigsty.io(全球) curl -fsSL https://repo.pigsty.cc/beta | bash;
curl -fsSL https://repo.pigsty.io/beta | bash;
如果你是开发者,或者想要获取最新的开发版本,可以直接 git 克隆 Pigsty 代码仓库:
git clone https://github.com/pgsty/pigsty.git;
cd pigsty; git checkout <tag> # 使用特定版本(示例:v4.2.2)
如果您的环境没有互联网访问,也可以直接从 GitHub Release
wget https://repo.pigsty.cc/src/pigsty-v<version>.tgz
wget https://repo.pigsty.io/src/pigsty-v<version>.tgz
5.3 - 架构规划 使用多少个节点?为哪些模块配置高可用?如何根据可用的资源与业务需求进行规划?
Pigsty 采用 模块化架构 声明式配置
常见方案 这里有一些常见的组合模式供您参考,您可以根据自己的需求进行进一步的定制与调整:
使用什么样的架构规划方案,取决于您对数据库可靠性的要求,以及手头可用的资源。
通常来说,严肃的生产环境部署至少需要 3 个节点以实现 高可用配置 2 个节点,则可以使用 半高可用配置
专家咨询服务:架构规划
我们提供 架构咨询服务
利弊权衡 若要使用 Pigsty 的监控系统,则至少需要 1 个 INFRA 节点,生产部署通常使用 2 个,大规模部署 3 个。 若要启用 PG 高可用,则至少需要 1 个 ETCD 节点,生产部署通常使用 3 个,大规模环境中 5 个,须奇数个。 若要启用对象存储(MinIO),则至少需要 1 个 MINIO 节点 MNMD PG 生产集群通常至少为两节点主从配置;严肃场景通常使用 3 节点;高只读负载可以有更多从库(几十个) 此外对于 PostgreSQL 来说,您还可以按需使用 离线实例,同步实例,备份集群,延迟集群等等高级配置。 单节点配置 最简单的配置,所有内容都在单个节点上运行,默认安装四个基本模块,通常用于 Demo,Devbox,或测试环境。
如果为备份/PITR 配置了外部 S3 / MinIO 备份仓库
单节点配置有多种变体:
双节点配置 双节点配置 半高可用 能力,提供更好的数据冗余,以及有限的故障转移支持:
双节点配置的高可用自动切换机制有限制,这种"半 HA"设置只能从特定节点故障中自动恢复:
如果 node-1 故障,无自动故障转移:需要手动提升 node-2 如果 node-2 故障,自动故障转移有效:node-1 自动提升 三节点配置 三节点模板
ID NODE PGSQL INFRA ETCD 1 node-1pg-meta-1infra-1etcd-12 node-2pg-meta-2infra-2etcd-23 node-3pg-meta-3infra-3etcd-3
四节点配置 Pigsty 沙箱环境 标准四节点配置
ID NODE PGSQL INFRA ETCD 1 node-1pg-meta-1infra-1etcd-12 node-2pg-test-13 node-3pg-test-24 node-4pg-test-3
在这里我们出于演示目的,不配置 INFRA ETCD
ID NODE PGSQL INFRA ETCD MINIO 1 node-1pg-meta-1infra-1etcd-1minio-12 node-2pg-test-1infra-2etcd-23 node-3pg-test-2etcd-34 node-4pg-test-3
更多节点 如果您有着完善的虚拟化设施或充足的资源,完全可以 使用更多的节点 独占式部署 ,从而获得最佳的可靠性,可观测性与性能表现。
ID NODE INFRA ETCD MINIO PGSQL 1 10.10.10.10infra-1pg-meta-12 10.10.10.11infra-2pg-meta-23 10.10.10.21etcd-14 10.10.10.22etcd-25 10.10.10.23etcd-36 10.10.10.31minio-17 10.10.10.32minio-28 10.10.10.33minio-39 10.10.10.34minio-410 10.10.10.40pg-src-111 10.10.10.41pg-src-212 10.10.10.42pg-src-313 10.10.10.50pg-test-114 10.10.10.51pg-test-215 10.10.10.52pg-test-316 ……
5.4 - 管理机制 关于管理用户、管理节点,Sudo、SSH、可达性验证,以及防火墙的配置与准备
Pigsty 需要一个在所有被管理节点上具有免密 SSH Sudo 管理用户 。
这个用户需要能够通过 ssh 访问到所有被管理节点,并且能够在这些节点上执行 sudo 命令。
要想将节点纳入 Pigsty 中管理,
用户 通常我们会选择 dba 或 admin 这样的用户名称,并避免使用 root 与 postgres:
使用 root 进行部署是可行的,但不符合生产最佳实践。 使用 postgres (pg_dbsu 免密码 如果您可以接受为每个 ssh 和 sudo 命令输入密码,则免密码要求是可选的。
您可以在 执行剧本 -k|--ask-pass 来提示输入 SSH 密码,
以及 -K|--ask-become-pass 来提示输入 sudo 密码。
一些企业的安全策略可能不允许免密 ssh 或 sudo,在这种情况下,您可以使用上述选项。
或者考虑配置一个 sudo 密码缓存时间较长的 sudoers 规则,以减少密码提示的频率。
创建管理员用户 通常,您的服务器/虚拟机供应商会为您创建一个初始管理员用户。
如果你对这个用户不满意,Pigsty 的部署剧本可以为你创建一个 新的管理员用户
假设您在节点上有 root 权限,或有一个现有的管理员用户,您可以使用 Pigsty 本身创建管理员用户:
./node.yml -k -K -t node_admin \
-e ansible_user =[ 当前可登录的管理员名称] \
-e node_admin_username =[ 你准备创建的管理员名称]
它将利用现有的管理员创建新的管理员,创建由以下参数描述的专用 dba(uid=88)用户,并正确配置 sudo / ssh。
Sudo 所有 管理员用户 sudo 权限【最好带有免密码执行权限】。
如果您想从头开始配置具有免密 sudo 权限的管理员用户,可以编辑/创建 suoder 文件(假设用户名为 vagrant):
echo '%vagrant ALL=(ALL) NOPASSWD: ALL' | sudo tee /etc/sudoers.d/vagrant
假设您的管理员用户名选择是 dba,那么 /etc/sudoers.d/dba 内容应该是:
%dba ALL =( ALL) NOPASSWD: ALL
如果您的安全策略不允许免密码 sudo,请将 NOPASSWD: 部分删除:
Ansible 依赖 sudo 在被管理节点上以 root 权限执行命令。
在 sudo 不可用的环境中(比如 Docker 容器内)需要先安装 sudo 才能正确部署。
SSH 您的当前用户应该能够以相应的管理员用户身份免密 SSH 访问所有被管理节点。
您的当前用户可以是管理员用户本身,但不是必需的,只要您能以管理员用户身份 SSH。
SSH 配置是 Linux 101,但我们会在此处介绍基础知识,以防您不熟悉:
生成 SSH 密钥 如果您没有 SSH 密钥对,请生成一个:
ssh-keygen -t rsa -b 2048 -N '' -f ~/.ssh/id_rsa -q
如果您没有密钥对,Pigsty 会在 bootstrap
复制 SSH 密钥 您需要将生成的公钥分发到远程(和本地)服务器,并将其放入所有节点上管理员用户的 ~/.ssh/authorized_keys 文件中。
可以使用 ssh-copy-id 工具。
ssh-copy-id <ip> # 交互式密码输入
sshpass -p <password> ssh-copy-id <ip> # 非交互式(谨慎使用)
使用别名 当无法直接 SSH 访问时(由于跳板机、其他端口、凭据等),考虑在 ~/.ssh/config 中配置 SSH 别名:
Host meta
HostName 10.10.10.10
User dba # 远程上不同的用户
IdentityFile /etc/dba/id_rsa # 不是普通密钥
Port 24 # 不是众所周知的端口
并在清单中引用别名,使用 ansible_host 指定真实的 SSH 别名:
nodes :
hosts : # 如果节点 `10.10.10.10` 需要 SSH 别名 `meta`
10.10.10.10 : { ansible_host : meta } # 通过 `ssh meta` 访问
SSH 参数可以直接在 Ansible 中使用,详情请查看 Ansible Inventory Guide 。
通过这种技术,您可以使用跳板机访问私有网络中的节点,或者使用不同的端口和凭据访问节点。
或者是利用本地笔记本作为管理节点。
验证可达性 您应该能够从管理节点通过当前用户免密 ssh 访问所有被管理节点。
远程用户(管理员用户)应该有权限运行免密 sudo 命令。
要验证免密 ssh sudo 是否工作,在管理节点上对所有被管理节点运行此命令:
如果没有密码提示或错误,免密 ssh/sudo 按预期工作。
防火墙 在生产环境部署时,通常需要设置防火墙,以阻止未经授权的端口访问。
默认情况下,你可以阻断办公网/互联网对节点的入站访问,只开放下列端口:
要通过 ssh 访问节点,您必须允许 SSH 端口 22 入站访问。 要访问 WebUI 服务,您必须允许 HTTP(80)/ HTTPS(443)入站访问。 要访问 PostgreSQL 数据库服务,您必须允许 PostgreSQL 的 5432 入站访问。 如果您通过其他端口访问 PostgreSQL 服务,请相应地允许它们。
Pigsty 组件使用的端口列表,请参考:使用的端口
5432: PostgreSQL 数据库6432: Pgbouncer 连接池5433: PG 主要服务5434: PG 副本服务5436: PG 默认服务5438: PG 离线服务5.5 - 沙箱环境 用于学习、测试与演示的 Pigsty 标准四节点沙箱环境
Pigsty 提供了一个标准的四节点 沙箱环境 ,用于学习、测试与功能演示。
沙箱使用固定的 IP 地址和预定义的身份标识符,便于复现各种演示用例。
环境描述 默认的沙箱环境由 4 个节点组成,默认使用配置文件 ha/full.yml
ID IP 地址 节点名 PostgreSQL INFRA ETCD MINIO 1 10.10.10.10metapg-meta-1infra-1etcd-1minio-12 10.10.10.11node-1pg-test-13 10.10.10.12node-2pg-test-24 10.10.10.13node-3pg-test-3
沙箱的配置可以概括表示为以下配置文件:
all :
children :
infra : { hosts : { 10.10.10.10 : { infra_seq : 1 } } }
etcd : { hosts : { 10.10.10.10 : { etcd_seq: 1 } }, vars : { etcd_cluster : etcd } }
minio : { hosts : { 10.10.10.10 : { minio_seq: 1 } }, vars : { minio_cluster : minio } }
pg-meta :
hosts : { 10.10.10.10 : { pg_seq: 1, pg_role : primary } }
vars : { pg_cluster : pg-meta }
pg-test :
hosts :
10.10.10.11 : { pg_seq: 1, pg_role : primary }
10.10.10.12 : { pg_seq: 2, pg_role : replica }
10.10.10.13 : { pg_seq: 3, pg_role : replica }
vars : { pg_cluster : pg-test }
vars :
version : v4.2.2
admin_ip : 10.10.10.10
region : default
pg_version : 18
PostgreSQL 集群 沙箱带有一个位于 meta 节点上的单实例 PostgreSQL 集群 pg-meta:
10.10.10.10 meta pg-meta-1
10.10.10.2 pg-meta # 可选的 L2 VIP
沙箱中还有一个由三个实例组成的 PostgreSQL 高可用集群 pg-test,部署在另外三个节点上:
10.10.10.11 node-1 pg-test-1
10.10.10.12 node-2 pg-test-2
10.10.10.13 node-3 pg-test-3
10.10.10.3 pg-test # 可选的 L2 VIP
两个可选的 L2 VIP 分别绑定在 pg-meta 和 pg-test 集群的主实例上。
基础设施 在 meta 节点上还部署有:
ETCD 集群 :单节点 etcd 集群,为 PostgreSQL HA 提供 DCS 服务MinIO 集群 :单节点 minio 集群,提供 S3 兼容的对象存储服务10.10.10.10 etcd-1
10.10.10.10 minio-1
创建沙箱 Pigsty 提供了开箱即用的模板,您可以使用 Vagrant Terraform
4节点的沙箱
当然,您也可以自己手工准备置备这些节点。
本地沙箱(Vagrant) 本地沙箱使用 Virtualbox/libvirt 创建本地虚拟机,可以在您的 Mac / PC 上免费运行。
运行完整的 4 节点沙箱,您的机器应至少拥有 4 核 CPU 与 8GB 内存 。
cd ~/pigsty
make full # 使用默认 RockyLinux 9 镜像创建 4 节点沙箱
make full9 # 使用 RockyLinux 9 创建 4 节点沙箱
make full12 # 使用 Debian 12 创建 4 节点沙箱
make full24 # 使用 Ubuntu 24.04 创建 4 节点沙箱
更多详情请参考 Vagrant
云沙箱使用公有云 API 创建虚拟机,可以轻松创建和销毁,按需付费,非常适合快速测试。
使用 spec/aliyun-full.tf
cd ~/pigsty/terraform
cp spec/aliyun-full.tf terraform.tf
terraform init
terraform apply
更多详情请参考 Terraform
其他规格 除了标准的 4 节点沙箱,Pigsty 还提供了其他规格的环境:
最简单的 1 节点环境,用于快速上手、开发和测试:
双节点环境(dual) 2 节点环境,用于测试主从复制:
三节点环境(trio) 3 节点环境,用于测试基本高可用:
生产仿真环境(simu) 20 节点的大型仿真环境,用于模拟生产环境进行完整测试:
make simu # 创建 20 节点生产仿真环境
该环境包含:
3 个基础设施节点(meta1, meta2, meta3) 2 个 HAProxy 代理节点 4 个 MinIO 节点 5 个 ETCD 节点 6 个 PostgreSQL 节点(2 个集群,每个 3 节点) 5.6 - Vagrant 使用 Vagrant 在本地创建虚拟机环境
Vagrant
Pigsty 需要 Linux 环境运行,您可以使用 Vagrant 轻松在本地创建 Linux 虚拟机进行测试。
安装依赖 首先,确保您的系统中已经安装了 Vagrant VirtualBox libvirt
在 MacOS 上,您可以使用 Homebrew vagrant-libvirt
brew install vagrant virtualbox ansible
# 安装 VirtualBox 后需要重启系统,并在系统偏好设置中允许其内核扩展。 /bin/bash -c " $( curl -fsSL https://raw.githubusercontent.com/Homebrew/install/HEAD/install.sh) " 创建虚拟机 使用 Pigsty 提供的 make 快捷方式创建虚拟机:
cd ~/pigsty
make meta # 1 节点开发箱,用于快速上手、开发和测试
make full # 4 节点沙箱,用于高可用测试和功能演示
make simu # 20 节点仿真环境,用于生产环境模拟
# 其他不常用的规格
make dual # 2 节点环境
make trio # 3 节点环境
make deci # 10 节点环境
您可以使用变体别名指定不同的操作系统镜像:
make meta9 # 使用 RockyLinux 9.7 创建单节点
make full12 # 使用 Debian 12.13 创建 4 节点沙箱
make simu24 # 使用 Ubuntu 24.04 创建 20 节点仿真环境
可用的操作系统后缀:8(EL8)、9(EL9)、10(EL10)、12(Debian 12)、13(Debian 13)、22(Ubuntu 22.04)、24(Ubuntu 24.04)
构建环境 您还可以使用以下别名创建 Pigsty 构建环境,这些模板不会替换基础镜像:
make oss # 3 节点 OSS 构建环境
make pro # 5 节点 PRO 构建环境
make rpm # 3 节点 EL8/9/10 构建环境
make deb # 4 节点 Debian12/13 Ubuntu22/24 构建环境
make all # 7 节点全量构建环境
规格配置 Pigsty 在 vagrant/spec/
每个规格文件包含一个描述虚拟机节点的 Specs 变量。例如,full.rb 包含 4 节点沙箱的定义:
# full: pigsty full-featured 4-node sandbox for HA-testing & tutorial & practices
Specs = [
{ "name" => "meta" , "ip" => "10.10.10.10" , "cpu" => "2" , "mem" => "4096" , "image" => "bento/rockylinux-9" },
{ "name" => "node-1" , "ip" => "10.10.10.11" , "cpu" => "1" , "mem" => "2048" , "image" => "bento/rockylinux-9" },
{ "name" => "node-2" , "ip" => "10.10.10.12" , "cpu" => "1" , "mem" => "2048" , "image" => "bento/rockylinux-9" },
{ "name" => "node-3" , "ip" => "10.10.10.13" , "cpu" => "1" , "mem" => "2048" , "image" => "bento/rockylinux-9" },
]
simu 规格详情 simu.rb 提供了一个 20 节点的生产环境仿真配置:
3 x infra 节点(meta1-3):4c16g 2 x haproxy 节点(proxy1-2):1c2g 4 x minio 节点(minio1-4):1c2g 5 x etcd 节点(etcd1-5):1c2g 6 x pgsql 节点(pg-src-1-3,pg-dst-1-3):2c4g 配置脚本 使用 vagrant/configVagrantfile:
cd ~/pigsty
vagrant/config [ spec] [ image] [ scale] [ provider]
# 示例
vagrant/config meta # 使用 1 节点规格,默认 RockyLinux 9.7(EL9)镜像
vagrant/config dual el9 # 使用 2 节点规格,EL9 镜像
vagrant/config trio d12 2 # 使用 3 节点规格,Debian 12.13 镜像,双倍资源
vagrant/config full u22 4 # 使用 4 节点规格,Ubuntu 22 镜像,4 倍资源
vagrant/config simu u24 1 libvirt # 使用 20 节点规格,Ubuntu 24 镜像,libvirt 提供商
镜像别名 config 脚本支持多种镜像别名:
发行版 别名 Vagrant Box AlmaLinux 8 el8, rocky8cloud-image/almalinux-8Rocky 9 el9, rocky9, elbento/rockylinux-9AlmaLinux 10 el10, rocky10cloud-image/almalinux-10Debian 12 d12, debian12cloud-image/debian-12Debian 13 d13, debian13cloud-image/debian-13Ubuntu 22.04 u22, ubuntu22, ubuntucloud-image/ubuntu-22.04Ubuntu 24.04 u24, ubuntu24bento/ubuntu-24.04
资源缩放 您可以使用环境变量 VM_SCALE 来调整资源倍数,默认值为 1:
VM_SCALE = 2 vagrant/config meta # 将 meta 规格的 CPU/内存资源翻倍
例如,使用 VM_SCALE=4 配置 meta 规格,会将默认的 2c4g 调整为 8c16g:
Specs = [
{ "name" => "meta" , "ip" => "10.10.10.10" , "cpu" => "8" , "mem" => "16384" , "image" => "bento/rockylinux-9" },
]
simu 规格不支持缩放
simu 规格不支持资源缩放,scale 参数会被自动忽略,因为其资源配置已经针对仿真场景优化。
虚拟机管理 Pigsty 提供了一系列 Makefile 快捷方式来管理虚拟机:
make # 等于 make start
make new # 销毁现有虚拟机,创建新的虚拟机
make ssh # 将虚拟机 SSH 配置写入 ~/.ssh/(创建后必须执行)
make dns # 将虚拟机 DNS 记录写入 /etc/hosts(可选)
make start # 启动虚拟机并配置 SSH(up + ssh)
make up # 使用 vagrant up 启动虚拟机
make halt # 关闭虚拟机(别名:down, dw)
make clean # 销毁虚拟机(别名:del, destroy)
make status # 显示虚拟机状态(别名:st)
make pause # 暂停虚拟机(别名:suspend)
make resume # 恢复虚拟机
make nuke # 使用 virsh 销毁所有虚拟机和卷(仅 libvirt)
make info # 显示 libvirt 信息(虚拟机、网络、存储卷)
SSH 密钥 Pigsty Vagrant 模板默认使用您的 ~/.ssh/id_rsa[.pub] 作为虚拟机的 SSH 密钥。
在开始之前,请确保您有一个有效的 SSH 密钥对。如果没有,可以使用以下命令生成:
ssh-keygen -t rsa -b 2048 -N '' -f ~/.ssh/id_rsa -q
支持的镜像 Pigsty 目前使用以下 Vagrant Box 进行测试:
# x86_64 / amd64
el8 : cloud-image/almalinux-8 ( EL 8.10)
el9 : bento/rockylinux-9 ( RockyLinux 9.7)
el10: cloud-image/almalinux-10 ( RockyLinux 10.1)
d12 : cloud-image/debian-12 ( Debian 12.13)
d13 : cloud-image/debian-13 ( Debian 13.3)
u22 : cloud-image/ubuntu-22.04
u24 : bento/ubuntu-24.04
对于 Apple Silicon (aarch64) 架构:
# aarch64 / arm64
el8 : cloud-image/almalinux-8
el9 : bento/rockylinux-9
el10: cloud-image/almalinux-10
d12 : cloud-image/debian-12
d13 : cloud-image/debian-13
u22 : cloud-image/ubuntu-22.04
u24 : bento/ubuntu-24.04
您可以在 Vagrant Cloud
环境变量 您可以使用以下环境变量来控制 Vagrant 行为:
export VM_SPEC = 'meta' # 规格名称
export VM_IMAGE = 'bento/rockylinux-9' # 镜像名称
export VM_SCALE = '1' # 资源缩放倍数
export VM_PROVIDER = 'virtualbox' # 虚拟化提供商
export VAGRANT_EXPERIMENTAL = disks # 启用实验性磁盘功能
注意事项 VirtualBox 网络配置
使用较旧版本的 VirtualBox 作为 Vagrant 提供商时,需要额外配置才能使用 10.x.x.x CIDR 作为 Host-Only 网络:
echo "* 10.0.0.0/8" | sudo tee -a /etc/vbox/networks.conf
第一次下载镜像较慢
第一次使用 Vagrant 启动特定操作系统时,会下载相应的 Box 镜像文件(通常 1-2 GB)。下载完成后,镜像会被缓存,后续创建虚拟机时会直接复用。
libvirt 提供商
如果您使用 libvirt 作为提供商,可以使用 make info 查看虚拟机、网络和存储卷信息,使用 make nuke 强制销毁所有相关资源。
5.7 - Terraform 使用 Terraform 在公有云上创建虚拟机环境
Terraform
Pigsty 提供了阿里云、AWS、腾讯云的 Terraform 模板作为示例。
快速开始 在 macOS 上,您可以使用 Homebrew
其他平台请参考 Terraform 官方安装指南
初始化与应用 进入 Terraform 目录,选择模板,初始化提供商插件,然后应用配置:
cd ~/pigsty/terraform
cp spec/aliyun.tf terraform.tf # 选择模板
terraform init # 安装云提供商插件(首次使用时)
terraform apply # 生成执行计划并创建资源
运行 apply 命令后,按提示输入 yes 确认,Terraform 将为您创建虚拟机及相关云资源。
获取 IP 地址 创建完成后,打印管理节点的公网 IP 地址:
terraform output | grep -Eo '[0-9]{1,3}\.[0-9]{1,3}\.[0-9]{1,3}\.[0-9]{1,3}'
配置 SSH 访问 使用 ssh 脚本自动配置 SSH 别名并分发密钥:
./ssh # 写入 SSH 配置到 ~/.ssh/pigsty_config 并复制密钥
此脚本会将 Terraform 输出的 IP 地址写入 ~/.ssh/pigsty_config,并使用默认密码 PigstyDemo4 自动分发 SSH 密钥。
配置完成后,您可以直接使用主机名登录:
使用 SSH 配置文件
如果您希望使用 ~/.ssh/pigsty_config 中的配置,请确保在 ~/.ssh/config 中包含以下内容:
Include ~/.ssh/pigsty_config
销毁资源 测试完成后,可以一键销毁所有创建的云资源:
模板规格 Pigsty 在 terraform/spec/
使用模板时,将模板文件复制为 terraform.tf:
cd ~/pigsty/terraform
cp spec/aliyun-full.tf terraform.tf # 使用阿里云 4 节点沙箱模板
terraform init && terraform apply
变量配置 Pigsty 的 Terraform 模板使用变量来控制架构、操作系统发行版和资源配置:
架构与发行版 variable "architecture" {
description = "架构类型 (amd64 或 arm64)"
type = string
default = "amd64" # 注释此行以使用 arm64
#default = "arm64" # 取消注释以使用 arm64
}
variable "distro" {
description = "发行版代码 (el8,el9,el10,u22,u24,d12,d13)"
type = string
default = "el9" # 默认使用 Rocky Linux 9
}
资源配置 在 locals 块中可以配置以下资源参数:
locals {
bandwidth = 100 # 公网带宽 (Mbps)
disk_size = 40 # 系统盘大小 (GB)
spot_policy = "SpotWithPriceLimit" # 竞价策略:NoSpot, SpotWithPriceLimit, SpotAsPriceGo
spot_price_limit = 5 # 最高竞价价格 (仅在 SpotWithPriceLimit 时有效)
}
阿里云配置 凭证设置 将您的阿里云凭证添加到环境变量中,例如在 ~/.bash_profile 或 ~/.zshrc 中:
export ALICLOUD_ACCESS_KEY = "<your_access_key>"
export ALICLOUD_SECRET_KEY = "<your_secret_key>"
export ALICLOUD_REGION = "cn-shanghai"
支持的镜像 以下是阿里云中常用的 ECS 公共操作系统镜像
发行版 代码 x86_64 镜像前缀 aarch64 镜像前缀 CentOS 7.9 el7centos_7_9_x64- Rocky 8.10 el8rockylinux_8_10_x64rockylinux_8_10_arm64Rocky 9.7 el9rockylinux_9_7_x64rockylinux_9_7_arm64Rocky 10.1 el10rockylinux_10_1_x64rockylinux_10_1_arm64Debian 11.11 d11debian_11_11_x64- Debian 12.13 d12debian_12_13_x64debian_12_13_arm64Debian 13.3 d13debian_13_3_x64debian_13_3_arm64Ubuntu 20.04 u20ubuntu_20_04_x64- Ubuntu 22.04 u22ubuntu_22_04_x64_20Gubuntu_22_04_arm64_20GUbuntu 24.04 u24ubuntu_24_04_x64_20Gubuntu_24_04_arm64_20GAnolis 8.9 an8anolisos_8_9_x64- Alibaba Cloud Linux 3 al3aliyun_3_0_x64-
OSS 存储配置 aliyun-s3.tf 模板会额外创建 OSS 存储桶及相关权限,用于 PostgreSQL 的 PITR 备份:
OSS Bucket :创建名为 pigsty-oss 的私有存储桶RAM 用户 :创建专用的 pigsty-oss-user 用户访问密钥 :生成 AccessKey 并保存到 ~/pigsty.skIAM 策略 :授予对存储桶的完全访问权限AWS 配置 凭证设置 设置 AWS 配置和凭证文件:
# ~/.aws/config
[ default]
region = cn-northwest-1
# ~/.aws/credentials
[ default]
aws_access_key_id = <YOUR_AWS_ACCESS_KEY>
aws_secret_access_key = <AWS_ACCESS_SECRET>
如果需要使用 SSH 密钥,将密钥文件放置在:
~/.aws/pigsty-key
~/.aws/pigsty-key.pub
AWS 模板需要调整
AWS 模板是社区贡献的示例,可能需要根据您的具体需求进行调整。
腾讯云配置 凭证设置 将腾讯云凭证添加到环境变量中:
export TENCENTCLOUD_SECRET_ID = "<your_secret_id>"
export TENCENTCLOUD_SECRET_KEY = "<your_secret_key>"
export TENCENTCLOUD_REGION = "ap-beijing"
腾讯云模板需要调整
腾讯云模板是社区贡献的示例,可能需要根据您的具体需求进行调整。
快捷命令 Pigsty 提供了一些 Makefile 快捷命令用于 Terraform 操作:
cd ~/pigsty/terraform
make u # terraform apply -auto-approve + 配置 SSH
make d # terraform destroy -auto-approve
make apply # terraform apply(交互式确认)
make destroy # terraform destroy(交互式确认)
make out # terraform output
make ssh # 运行 ssh 脚本配置 SSH 访问
make r # 重置 terraform.tf 到版本库状态
注意事项 云资源费用
使用 Terraform 创建的云资源会产生费用。测试完成后,请及时使用 terraform destroy 销毁资源,避免不必要的开支。
建议使用按量付费的实例类型进行测试。模板默认使用竞价实例(Spot Instance)以降低成本。
默认密码
所有模板中虚拟机的默认 root 密码为 PigstyDemo4。在生产环境中,请务必修改此密码或使用 SSH 密钥认证。
安全组配置
Terraform 模板会自动创建安全组并开放必要的端口(默认开放所有 TCP 端口)。在生产环境中,请根据实际需求调整安全组规则,遵循最小权限原则。
SSH 访问
创建完成后,使用以下命令 SSH 登录到管理节点:
您也可以使用 ./ssh 或 make ssh 将 SSH 别名写入配置文件,然后使用 ssh meta 登录。
5.8 - 安全考量 Pigsty 部署中与安全有关的考量
Pigsty 的默认配置已经足以覆盖绝大多数场景对于安全的需求。
Pigsty 已经提供了开箱即用的 认证 与 访问控制 模型,对于绝大多数场景已经足够安全。
如果您希望进一步加固系统的安全性,那么以下建议供您参考:
机密性 重要文件 保护你的 pigsty.yml 配置文件或CMDB
pigsty.yml 配置文件通常包含了高度敏感的机密信息,您应当确保它的安全。严格控制管理节点的访问权限,仅限 DBA 或者 Infra 管理员访问。 严格控制 pigsty.yml 配置文件仓库的访问权限(如果您使用 git 进行管理) 保护你的 CA 私钥和其他证书,这些文件非常重要。
相关文件默认会在管理节点Pigsty源码目录的 files/pki 内生成。 你应该定期将它们备份到一个安全的地方存储。 密码 在生产环境部署时,必须更改这些密码,不要使用默认值!
如果您使用MinIO,请修改MinIO的默认用户密码,与pgbackrest中的引用
如果您使用远程备份仓库,请务必启用备份加密,并设置加解密密码
设置 [pgbackrest_repo.*.cipher_type](/docs/pgsql/param#pgbackrest_repo) 为 aes-256-cbc` 设置密码时可以使用 ${pg_cluster} 作为密码的一部分,避免所有集群使用同一个密码 为 PostgreSQL 使用安全可靠的密码加密算法
使用 pg_pwd_encscram-sha-256 替代传统的 md5 这是默认行为,如果没有特殊理由(出于对历史遗留老旧客户端的支持),请不要将其修改回 md5 使用 passwordcheck 扩展强制执行强密码 。
在 pg_libs$libdir/passwordcheck 来强制密码策略。 使用加密算法加密远程备份
为业务用户配置密码自动过期实践
不要将更改密码的语句记录到 postgres 日志或其他日志中
SET log_statement TO 'none' ;
ALTER USER "{{ user.name }}" PASSWORD '{{ user.password }}' ;
SET log_statement TO DEFAULT;
IP地址 为 postgres/pgbouncer/patroni 绑定指定的 IP 地址,而不是所有地址。
默认的 pg_listen0.0.0.0,即所有 IPv4 地址。 考虑使用 pg_listen: '${ip},${vip},${lo}' 绑定到特定IP地址(列表)以增强安全性。 不要将任何端口直接暴露到公网IP上,除了基础设施出口Nginx使用的端口(默认80/443)
出于便利考虑,Prometheus/Grafana 等组件默认监听所有IP地址,可以直接从公网IP端口访问 您可以修改它们的配置文件,只监听内网IP地址,限制其只能通过 Nginx 门户通过域名访问,你也可以当使用安全组,防火墙规则来实现这些安全限制。 出于便利考虑,Redis服务器默认监听所有IP地址,您可以修改 redis_bind_address 使用 HBA 限制 postgres 客户端访问
限制 patroni 管理访问权限:仅 infra/admin 节点可调用控制API
网络流量 使用 SSL 和域名,通过Nginx访问基础设施组件
使用 SSL 保护 Patroni REST API
使用 SSL 保护 Pgbouncer 客户端流量
完整性 为关键场景下的 PostgreSQL 数据库集群配置一致性优先模式(例如与钱相关的库)
pg_confcrit.yml 将以一些可用性为代价,换取最佳的数据一致性。使用crit节点调优模板,以获得更好的一致性。
node_tunecrit ,可以以减少脏页比率,降低数据一致性风险。启用数据校验和,以检测静默数据损坏。
记录建立/切断连接的日志
在 PG 18+ 的 oltp.yml / olap.yml 模板中,log_connections 默认开启(authorization)。 在 crit.yml 模板中,log_connections 与 log_disconnections 默认都开启,审计级别更严格。 您也可以手工 配置集群 ,按需调整这两个参数。 如果您希望彻底杜绝PG集群在故障转移时脑裂的可能性,请启用watchdog
如果你的流量走默认推荐的 HAProxy 分发,那么即使你不启用 watchdog,你也不会遇到脑裂的问题。 如果你的机器假死,Patroni 被 kill -9 杀死,那么 watchdog 可以用来兜底:超时自动关机。 最好不要在基础设施节点上启用 watchdog。 可用性 对于关键场景的PostgreSQL数据库集群,请使用足够的节点/实例数量
你至少需要三个节点(能够容忍一个节点的故障)来实现生产级的高可用性。 如果你只有两个节点,你可以容忍特定备用节点的故障。 如果你只有一个节点,请使用外部的 S3/MinIO 进行冷备份和 WAL 归档存储。 对于 PostgreSQL,在可用性和一致性之间进行权衡
不要直接通过固定的 IP 地址访问数据库;请使用 VIP、DNS、HAProxy 或它们的排列组合
使用 HAProxy 进行服务 接入 在故障切换/主备切换的情况下,Haproxy 将处理客户端的流量切换。 在重要的生产部署中使用多个基础设施节点(例如,1~3)
小规模部署或要求宽松的场景,可以使用单一基础设施节点 / 管理节点。 大型生产部署建议设置至少两个基础设施节点互为备份。 使用足够数量的 etcd 服务器实例,并使用奇数个实例(1,3,5,7)
6 - 参考信息 7 - 参考 详细的参考信息与列表:支持的操作系统,模块,参数,监控指标,数据库扩展,同类对比,术语表等。
7.1 - Linux 兼容性 Pigsty 兼容的 Linux 操作系统发行版大版本,以及芯片架构指令集
Pigsty 运行于 Linux 操作系统上,支持 amd64/x86_64arm64/aarch64EL Debian Ubuntu
Pigsty 不使用任何虚拟化容器化技术,直接运行于裸操作系统上。我们为三大主流 Linux 发行版最近两个大版本的两种架构提供支持。
概述 Pigsty 推荐使用的操作系统版本:RockyLinux 10.1、Ubuntu 24.04.4、Debian 13.3。
EL Pigsty 支持 RHEL / Rocky / Alma / Anolis / CentOS 8、9、10 版本。
推荐使用 RockyLinux 10.1 与 9.7
请注意,PGDG Yum 仓库 从 EL9 / EL10 开始,针对 EL 小版本 进行构建,目前支持的小版本为:9.6, 9.7, 10.0, 10.1。
建议离线安装包/自建离线仓库与系统 EL 小版本 (例如 RockyLinux 9.7 / 10.1)保持一致,跨小版本可能因 OpenSSL 等依赖版本跳变导致不可用。
EL8 即将不再支持
EL8 将于 2029 年进入 EOL,建议尽早规划升级。鉴于 EL10 适配已经完成,我们将在下个版本移除对 EL8 的支持。
EL 7 @ 2024-06
Red Hat Enterprise Linux 7 已经于 2024年6月停止维护,PGDG 也不再为 PostgreSQL 16/17/18 提供 EL7 二进制包支持。
如需在老旧操作系统上获得运行支持,请考虑我们的 专业订阅服务 。
Ubuntu Pigsty 支持 Ubuntu 24.04 / 22.04:
推荐使用 Ubuntu 22.04.5 / 24.04.4 LTS
Ubuntu 24.04 在系统可靠性/稳定性与软件版本的新颖性/齐全性上取得了良好的平衡,推荐使用此系统。
Ubuntu 20.04 已 EOL
Ubuntu 20.04 已于 2025年4月进入 EOL。
如需在老旧操作系统上获得扩展支持,请考虑我们的 专业订阅服务 。
Debian Pigsty 支持 Debian 12 / 13,推荐使用最新的 Debian 13.3
Debian 11 EOL @ 2024-07
Debian 11 已经于 2024-07 进入 EOL。如需在老旧操作系统上获得扩展支持,请考虑我们的 专业订阅服务 。
Vagrant 当您使用本地虚拟机部署 Pigsty 时,可以考虑使用以下 Vagrant 操作系统镜像,这也是 Pigsty 开发测试使用的镜像。
当您使用云服务器部署 Pigsty 时,可以考虑在 Terraform 中使用以下操作系统基础镜像,以 阿里云
x86_64 镜像 Rocky 8.10 rockylinux_8_10_x64_20G_alibase_20240923.vhdRocky 9.7 rockylinux_9_7_x64_20G_alibase_20260119.vhdRocky 10.1 rockylinux_10_1_x64_20G_alibase_20260119.vhdUbuntu 22.04.5 ubuntu_22_04_x64_20G_alibase_20240926.vhdUbuntu 24.04.4 ubuntu_24_04_x64_20G_alibase_20240923.vhdDebian 12.13 debian_12_13_x64_20G_alibase_20241201.vhdDebian 13.3 debian_13_3_x64_20G_alibase_20250101.vhd
aarch64 镜像 Rocky 8.10 rockylinux_8_10_arm64_20G_alibase_20251120.vhdRocky 9.7 rockylinux_9_7_arm64_20G_alibase_20260119.vhdRocky 10.1 rockylinux_10_1_arm64_20G_alibase_20260119.vhdUbuntu 22.04.5 ubuntu_22_04_arm64_20G_alibase_20251126.vhdUbuntu 24.04.4 ubuntu_24_04_arm64_20G_alibase_20251126.vhdDebian 12.13 debian_12_13_arm64_20G_alibase_20250825.vhdDebian 13.3 debian_13_3_arm64_20G_alibase_20251121.vhd
7.2 - 模块列表 本文列出了 Pigsty 中可用的功能模块,以及后续的功能模块规划。
正式模块 模块 类别 状态 文档入口 简介 PGSQL核心 GA /docs/pgsql高可用 PostgreSQL 集群,内置备份、监控、SOP 与扩展生态。 INFRA核心 GA /docs/infra本地软件仓库 + VictoriaMetrics/Logs/Traces + Grafana 等基础设施。 NODE核心 GA /docs/node节点初始化与收敛:系统调优、管理员、HAProxy、Vector、Docker 等。 ETCD核心 GA /docs/etcdPostgreSQL 高可用 DCS(服务发现、配置、选主元数据)。 MINIO扩展 GA /docs/minioS3 兼容对象存储,可作为 PostgreSQL 备份仓库。 REDIS扩展 GA /docs/redisRedis 独立/哨兵/集群模式部署与监控。 FERRET扩展 GA /docs/ferretFerretDB 模块(MONGO API 兼容),为 PG 提供 MongoDB 协议访问。 DOCKER扩展 GA /docs/dockerDocker Daemon 及容器化应用运行基础能力。 JUICE扩展 BETA /docs/juiceJuiceFS 分布式文件系统,使用 PostgreSQL 作为元数据引擎。 VIBE扩展 BETA /docs/vibe浏览器化开发环境,集成 Code-Server、JupyterLab、Node.js 与 Claude Code。
核心模块 Pigsty 提供了四个 基础
PGSQL451 INFRANODEETCD尽管这四个模块通常会同时安装,但单独使用也是可行的 —— 只有 NODE 模块通常是必选的。
扩展模块 Pigsty 提供了六个 扩展
MINIOREDISMONGODOCKERJUICEVIBE生态模块 以下模块与 PostgreSQL 生态紧密相关,属于可选生态能力,不计入上述 10 个正式模块:
7.3 - 文件结构 Pigsty 的文件系统结构是如何设计与组织的,以及各个模块使用的目录结构。
Pigsty FHS Pigsty 的主目录默认放置于 ~/pigsty,该目录下的文件结构如下所示:
#------------------------------------------------------------------------------
# pigsty
# ^-----@app # 额外的示例应用资源
# ^-----@bin # bin 脚本
# ^-----@docs # 文档(可docsify化)
# ^-----@files # ansible 文件资源
# ^-----@victoria # Victoria 规则与运维脚本(bin/rules)
# ^-----@grafana # grafana 仪表盘
# ^-----@postgres # /pg/bin/ 脚本
# ^-----@migration # pgsql 迁移任务定义
# ^-----@pki # 自签名 CA 和证书
# ^-----@roles # ansible 剧本实现
# ^-----@templates # ansible 模板文件
# ^-----@vagrant # Vagrant 沙箱虚拟机定义模板
# ^-----@terraform # Terraform 云虚拟机申请模板
# ^-----configure # 配置向导脚本
# ^-----ansible.cfg # ansible 默认配置文件
# ^-----pigsty.yml # pigsty 默认配置文件
# ^-----*.yml # ansible 剧本
#------------------------------------------------------------------------------
# /infra -> /data/infra # infra 运行时目录软链接
# /data/infra # root:infra 0771
# ^-----@metrics # VictoriaMetrics TSDB 数据
# ^-----@logs # VictoriaLogs 数据
# ^-----@traces # VictoriaTraces 数据
# ^-----@alertmgr # AlertManager 数据
# ^-----@rules # 规则定义(含 agent.yml)
# ^-----@targets # FileSD 监控目标
# ^-----@dashboards # Grafana 仪表盘定义
# ^-----@datasources # Grafana 数据源定义
# ^-----prometheus.yml # Victoria 的 Prometheus 兼容配置
#------------------------------------------------------------------------------
CA FHS Pigsty 的 自签名 CA files/pki/。
你必须妥善保管 CA 的密钥文件 :files/pki/ca/ca.key,该密钥是在 deploy.yml 或 infra.yml 的 ca 角色负责生成的。
# pigsty/files/pki # (local_user) 0755
# ^-----@ca # (local_user) 0700
# ^-----@ca.key # 0600,非常重要:保守其秘密
# ^-----@ca.crt # 0644,非常重要:在所有地方都受信任
# ^-----@csr # (local_user) 0755,签名请求 csr
# ^-----@misc # (local_user) 0755,杂项证书,已签发证书
# ^-----@etcd # (local_user) 0755,etcd 服务器证书
# ^-----@minio # (local_user) 0755,minio 服务器证书
# ^-----@nginx # (local_user) 0755,nginx SSL 证书
# ^-----@infra # (local_user) 0755,infra 客户端证书
# ^-----@pgsql # (local_user) 0755,pgsql 服务器证书
# ^-----@mongo # (local_user) 0755,mongodb/ferretdb 服务器证书
# ^-----@mysql # (local_user) 0755,mysql 服务器证书(占位符)
被 Pigsty 所管理的节点将安装以下证书文件:
/etc/pki/ca.crt # root:root 0644,所有节点都添加的根证书
/etc/pki/ca-trust/source/anchors/ca.crt # 软链接到系统受信任的锚点
所有 infra 节点都会有以下证书:
/etc/pki/infra.crt # root:infra 0644,infra 节点证书
/etc/pki/infra.key # root:infra 0640,infra 节点密钥
当您的管理节点出现故障时,files/pki 目录与 pigsty.yml 文件应当在备份的管理节点上可用。你可以用 rsync 做到这一点。
# run on meta-1, rsync to meta2
cd ~/pigsty;
rsync -avz ./ meta-2:~/pigsty
INFRA FHS infra 角色会创建 infra_data(默认 /data/infra)并建立 /infra -> /data/infra 软链接。/data/infra 的权限为 root:infra 0771,子目录默认权限为 *:infra 0750,覆盖项如下:
# /infra -> /data/infra
# /data/infra # root:infra 0771
# ^-----@pgadmin # 5050:5050 0700
# ^-----@alertmgr # prometheus:infra 0700
# ^-----@conf # root:infra 0750
# ^-----patronictl.yml # root:admin 0640
# ^-----@tmp # root:infra 0750
# ^-----@hosts # dnsmasq:dnsmasq 0755(DNS 记录)
# ^-----default # root:root 0644
# ^-----@datasources # root:infra 0750
# ^-----*.json # 0600(register 生成)
# ^-----@dashboards # grafana:infra 0750
# ^-----@metrics # victoria:infra 0750
# ^-----@logs # victoria:infra 0750
# ^-----@traces # victoria:infra 0750
# ^-----@bin # victoria:infra 0750
# ^-----check|new|reload|status # root:infra 0755
# ^-----@rules # victoria:infra 0750
# ^-----agent.yml # victoria:infra 0644
# ^-----infra.yml # victoria:infra 0644
# ^-----node.yml # victoria:infra 0644
# ^-----pgsql.yml # victoria:infra 0644
# ^-----redis.yml # victoria:infra 0644
# ^-----etcd.yml # victoria:infra 0644
# ^-----minio.yml # victoria:infra 0644
# ^-----kafka.yml # victoria:infra 0644
# ^-----mysql.yml # victoria:infra 0644
# ^-----@targets # victoria:infra 0750
# ^-----@infra # infra 组件目标(文件 0640)
# ^-----@node # 节点目标(文件 0640)
# ^-----@ping # ping 目标(文件 0640)
# ^-----@etcd # etcd 目标(文件 0640)
# ^-----@pgsql # pgsql 目标(文件 0640)
# ^-----@pgrds # pgrds 目标(文件 0640)
# ^-----@redis # redis 目标(文件 0640)
# ^-----@minio # minio 目标(文件 0640)
# ^-----@mongo # mongo 目标(文件 0640)
# ^-----@juice # juicefs 目标(文件 0640)
# ^-----@mysql # mysql 目标(文件 0640)
# ^-----@kafka # kafka 目标(文件 0640)
# ^-----@docker # docker 目标(文件 0640)
# ^-----@patroni # patroni SSL 目标(文件 0640)
# ^-----prometheus.yml # victoria:infra 0644
上述结构由以下实现生成:roles/infra/tasks/dir.yml、roles/infra/tasks/victoria.yml、roles/infra/tasks/register.yml、roles/infra/tasks/dns.yml、roles/infra/tasks/env.yml。
NODE FHS 节点的数据目录由参数 node_data/data,由 root:root 持有,权限为 0755。
每个组件的默认数据目录都位于这个数据库目录下,如下所示:
/data # root:root 0755
# ^-----@postgres # postgres:postgres 0700(默认 pg_fs_main)
# ^-----@backups # postgres:postgres 0700(默认 pg_fs_backup)
# ^-----@redis # redis:redis 0700(多实例共用)
# ^-----@minio # minio:minio 0750(单机单盘模式)
# ^-----@etcd # etcd:etcd 0700(etcd_data)
# ^-----@infra # root:infra 0771(infra 模块数据目录)
# ^-----@docker # root:root 0755(Docker 数据目录)
# ^-----@... # 其他组件的数据目录
Victoria FHS 监控配置已经从旧的 /etc/prometheus 目录布局迁移为 /infra 运行时布局。主配置模板位于 roles/infra/templates/victoria/prometheus.yml/infra/prometheus.yml。
files/victoria/bin/* 与 files/victoria/rules/* 会被同步到 /infra/bin/ 与 /infra/rules/,各模块再向 /infra/targets/* 注册 FileSD 目标。
# /infra
# ^-----prometheus.yml # Victoria 主配置(Prometheus 兼容格式)0644
# ^-----@bin # 工具脚本(check/new/reload/status)0755
# ^-----@rules # 记录与告警规则(*.yml 0644)
# ^-----agent.yml # Agent 预聚合规则
# ^-----infra.yml # infra 规则和告警
# ^-----etcd.yml # etcd 规则和告警
# ^-----node.yml # node 规则和告警
# ^-----pgsql.yml # pgsql 规则和告警
# ^-----redis.yml # redis 规则和告警
# ^-----minio.yml # minio 规则和告警
# ^-----kafka.yml # kafka 规则和告警
# ^-----mysql.yml # mysql 规则和告警
# ^-----@targets # FileSD 服务发现目标(*.yml 0640)
# ^-----@infra # infra 静态目标
# ^-----@node # node 静态目标
# ^-----@pgsql # pgsql 静态目标
# ^-----@pgrds # pgsql 远程 RDS 目标
# ^-----@redis # redis 静态目标
# ^-----@minio # minio 静态目标
# ^-----@mongo # mongo 静态目标
# ^-----@mysql # mysql 静态目标
# ^-----@etcd # etcd 静态目标
# ^-----@ping # ping 静态目标
# ^-----@kafka # kafka 静态目标
# ^-----@juice # juicefs 静态目标
# ^-----@docker # docker 静态目标
# ^-----@patroni # patroni 静态目标(启用 SSL 时)
# /etc/default/vmetrics # vmetrics 启动参数(victoria:infra 0644)
# /etc/default/vlogs # vlogs 启动参数(victoria:infra 0644)
# /etc/default/vtraces # vtraces 启动参数(victoria:infra 0644)
# /etc/default/vmalert # vmalert 启动参数(victoria:infra 0644)
# /etc/alertmanager.yml # 告警组件主配置(prometheus:infra 0644)
# /etc/default/alertmanager # 告警组件环境变量(prometheus:infra 0640)
# /etc/blackbox.yml # 黑盒探测主配置(prometheus:infra 0644)
# /etc/default/blackbox_exporter # 黑盒探测环境变量(prometheus:infra 0644)
Postgres FHS 以下参数与PostgreSQL数据库目录结构相关:
pg_dbsu_home/var/lib/pgsqlpg_bin_dir/usr/pgsql/bin/pg_data/pg/datapg_fs_main/data/postgrespg_fs_backup/data/backups(可选,也可以选择备份到主数据盘上的子目录)pg_cluster_dir{{ pg_fs_main }}/{{ pg_cluster }}-{{ pg_version }}pg_backup_dir{{ pg_fs_backup }}/{{ pg_cluster }}-{{ pg_version }}#--------------------------------------------------------------#
# 工作假设:
# {{ pg_fs_main }} 主数据目录,默认位置:`/data/postgres` [SSD]
# {{ pg_fs_backup }} 备份数据盘,默认位置:`/data/backups` [HDD]
#--------------------------------------------------------------#
# 默认配置(pg_cluster=pg-test, pg_version=18):
# pg_fs_main = /data/postgres 高速SSD
# pg_fs_backup = /data/backups 廉价HDD (可选)
#
# /pg -> /data/postgres/pg-test-18
# /pg/data -> /data/postgres/pg-test-18/data
# /pg/backup -> /data/backups/pg-test-18/backup
#--------------------------------------------------------------#
- name : create pgsql directories
tags : pg_dir
become : true
block :
- name : create pgsql directories
file : path={{ item.path }} state=directory owner={{ item.owner|default(pg_dbsu) }} group={{ item.group|default('postgres') }} mode={{ item.mode }}
with_items :
- { path : "{{ pg_fs_main }}" ,mode : "0700" }
- { path : "{{ pg_fs_backup }}" ,mode : "0700" }
- { path : "{{ pg_cluster_dir }}" ,mode : "0700" }
- { path : "{{ pg_cluster_dir }}/bin" ,mode : "0700" }
- { path : "{{ pg_cluster_dir }}/log" ,mode : "0750" }
- { path : "{{ pg_cluster_dir }}/tmp" ,mode : "0700" }
- { path : "{{ pg_cluster_dir }}/cert" ,mode : "0700" }
- { path : "{{ pg_cluster_dir }}/conf" ,mode : "0700" }
- { path : "{{ pg_cluster_dir }}/data" ,mode : "0700" }
- { path : "{{ pg_cluster_dir }}/spool" ,mode : "0700" }
- { path : "{{ pg_backup_dir }}/backup" ,mode : "0700" }
- { path : "/var/run/postgresql" ,owner: root, group: root, mode : "0755" }
- name : link pgsql directories
file : src={{ item.src }} dest={{ item.dest }} state=link
with_items :
- { src : "{{ pg_backup_dir }}/backup" ,dest : "{{ pg_cluster_dir }}/backup" }
- { src : "{{ pg_cluster_dir }}" ,dest : "/pg" }
数据文件结构
# 真实目录
{{ pg_fs_main }} /data/postgres # postgres:postgres 0700,主数据目录
{{ pg_cluster_dir }} /data/postgres/pg-test-18 # postgres:postgres 0700,集群目录
/data/postgres/pg-test-18/bin # postgres:postgres 0700(脚本文件 root:postgres 0755)
/data/postgres/pg-test-18/log # postgres:postgres 0750,日志目录
/data/postgres/pg-test-18/tmp # postgres:postgres 0700,临时文件
/data/postgres/pg-test-18/cert # postgres:postgres 0700,证书
/data/postgres/pg-test-18/conf # postgres:postgres 0700,配置索引
/data/postgres/pg-test-18/data # postgres:postgres 0700,主数据目录
/data/postgres/pg-test-18/spool # postgres:postgres 0700,pgBackRest spool
/data/postgres/pg-test-18/backup # -> /data/backups/pg-test-18/backup
{{ pg_fs_backup }} /data/backups # postgres:postgres 0700,可选备份盘目录/挂载点
{{ pg_backup_dir }} /data/backups/pg-test-18 # postgres:postgres 0700,集群备份目录
/data/backups/pg-test-18/backup # postgres:postgres 0700,实际备份位置
# 软链接
/pg -> /data/postgres/pg-test-18 # pg 根软链接
/pg/data -> /data/postgres/pg-test-18/data # pg 数据目录
/pg/backup -> /data/backups/pg-test-18/backup # pg 备份目录
二进制文件结构
在 EL 兼容发行版上(使用yum),PostgreSQL 默认安装位置为
/usr/pgsql-${ pg_version } /
Pigsty 会创建一个名为 /usr/pgsql 的软连接,指向由 pg_version
/usr/pgsql -> /usr/pgsql-18
因此,默认的 pg_bin_dir/usr/pgsql/bin/,而该路径会被添加至系统的 PATH 环境变量中,定义文件为:/etc/profile.d/pgsql.sh.
export PATH = "/usr/pgsql/bin:/pg/bin: $PATH "
export PGHOME = /usr/pgsql
export PGDATA = /pg/data
在 Ubuntu/Debian 上,PostgreSQL Deb 包的默认安装位置是:
/usr/lib/postgresql/${ pg_version } /bin
Pgbouncer FHS Pgbouncer 使用与 {{ pg_dbsu }}(默认为 postgres)相同的用户运行,配置文件位于/etc/pgbouncer。
pgbouncer.ini:连接池主配置文件(postgres:postgres 0640)database.txt:定义连接池中的数据库(postgres:postgres 0600)useropts.txt:业务用户连接参数(postgres:postgres 0600)userlist.txt:由 /pg/bin/pgb-user 维护的用户密码文件pgb_hba.conf:连接池访问控制文件(postgres:postgres 0600)/etc/pgbouncer/ # postgres:postgres 0750
/etc/pgbouncer/pgbouncer.ini # postgres:postgres 0640
/etc/pgbouncer/database.txt # postgres:postgres 0600
/etc/pgbouncer/useropts.txt # postgres:postgres 0600
/etc/pgbouncer/userlist.txt # postgres:postgres (由 pgb-user 维护)
/etc/pgbouncer/pgb_hba.conf # postgres:postgres 0600
/pg/log/pgbouncer # postgres:postgres 0750
/var/run/postgresql # {{ pg_dbsu }}:postgres 0755(tmpfiles 维护)
Redis FHS Pigsty 提供了对 Redis 部署与监控的基础支持。
Redis 二进制通常由系统包管理器安装(服务调用路径为 /bin/*,在多数发行版上由 /usr/bin/* 软链接兼容):
redis-server
redis-cli
redis-sentinel
redis-check-rdb
redis-check-aof
redis-benchmark
/usr/libexec/redis-shutdown
对于一个名为 redis-test-1-6379 的 Redis 实例,与其相关的资源如下所示:
/usr/lib/systemd/system/redis-test-1-6379.service # root:root 0644(Debian系为 /lib/systemd/system)
/etc/redis/ # redis:redis 0700
/etc/redis/redis-test-1-6379.conf # redis:redis 0700
/data/redis/ # redis:redis 0700
/data/redis/redis-test-1-6379 # redis:redis 0700
/data/redis/redis-test-1-6379/redis-test-1-6379.rdb # RDB 文件
/data/redis/redis-test-1-6379/redis-test-1-6379.aof # AOF 文件
/var/log/redis/ # redis:redis 0700
/var/log/redis/redis-test-1-6379.log # 日志
/var/run/redis/ # redis:redis 0700(开机 tmpfiles 为 0755)
/var/run/redis/redis-test-1-6379.pid # PID
对于 Ubuntu / Debian 而言,systemd 服务的默认目录不是 /usr/lib/systemd/system/ 而是 /lib/systemd/system/
7.4 - 参数列表 Pigsty v4.x 配置参数总览与模块参数导航
本文是 Pigsty v4.x 的参数导航页,不重复展开每个参数的详细解释。
参数细节请进入各模块的 param 页面查看。
按照当前文档口径,正式模块合计约 360 个参数,分布在 10 个模块中。
模块参数导航 模块 参数组 参数量 说明 PGSQL9 125 PostgreSQL 高可用集群配置 INFRA10 72 软件仓库与 Victoria 可观测基础设施 NODE11 73 节点初始化、系统调优与运维基线 ETCD2 13 ETCD 集群与移除保护参数 MINIO2 21 MinIO 部署与移除参数 REDIS2 21 Redis 部署与移除参数 FERRET1 9 FerretDB(Mongo API)参数 DOCKER1 8 Docker 引擎参数 JUICE1 2 JuiceFS 实例与缓存参数 VIBE1 16 Code/Jupyter/Node.js/Claude 配置
参数组速览 使用建议 首次部署优先阅读:NODEINFRAPGSQL 生产环境务必审查:*_safeguard、密码凭据、端口与网络暴露参数 变更前先在单集群小范围验证,再扩展到全局参数 7.5 - 剧本列表 Pigsty v4.x 预置 Ansible 剧本导航与执行要点
本文汇总 Pigsty v4.x 各模块剧本入口与执行要点,详细任务标签请进入对应模块 playbook 文档。
模块剧本导航 模块 数量 剧本 INFRA3 deploy.yml infra.yml infra-rm.ymlNODE2 node.yml node-rm.ymlETCD2 etcd.yml etcd-rm.ymlPGSQL7 pgsql.yml pgsql-rm.ymlpgsql-user.yml pgsql-db.ymlpgsql-monitor.yml pgsql-migration.yml pgsql-pitr.ymlREDIS2 redis.yml redis-rm.ymlMINIO2 minio.yml minio-rm.ymlFERRET1 mongo.ymlDOCKER1 docker.ymlJUICE1 juice.ymlVIBE1 vibe.yml
剧本总表 辅助剧本 以下剧本不归属于特定模块,提供一些辅助功能。
剧本使用注意事项 保护机制 多个模块提供了防误删保险,通过 *_safeguard 参数控制:
默认情况下,这些 safeguard 参数均未启用(未定义)。建议在生产环境中为已初始化的集群显式设置为 true。
当保护开关设置为 true 时,对应的 *-rm.yml 剧本会立即中止执行,防止误删。可以通过命令行参数强制覆盖:
./pgsql-rm.yml -l pg-test -e pg_safeguard = false
./etcd-rm.yml -l etcd -e etcd_safeguard = false
./minio-rm.yml -l minio -e minio_safeguard = false
限制执行范围 执行剧本时建议使用 -l 参数限制命令执行的对象范围:
./pgsql.yml -l pg-meta # 限制在集群 pg-meta 上执行
./node.yml -l 10.10.10.10 # 限制在特定节点上执行
./redis.yml -l redis-test # 限制在 redis-test 集群上执行
在大规模部署上批量执行时,建议先在单集群灰度验证,再分批执行到全局。
幂等性 大部分剧本都是幂等的,可以重复执行。但需要注意:
infra.yml 默认不会 清除数据,可安全重复执行。所有 clean 参数(vmetrics_clean、vlogs_clean、vtraces_clean、grafana_clean、nginx_clean)默认均为 false如需清除基础设施数据重建,需显式设置对应的 clean 参数为 true 重复执行 *-rm.yml 删除剧本需格外小心,确保在正确的目标上执行 任务标签 可以使用 -t 参数只执行特定的任务子集:
./pgsql.yml -l pg-test -t pg_service # 只刷新集群 pg-test 的服务
./node.yml -t haproxy # 只在节点上设置 haproxy
./etcd.yml -t etcd_launch # 只重启 etcd 服务
常用命令速查 INFRA 模块 ./deploy.yml # 一次性完整部署 Pigsty
./infra.yml # 初始化基础设施
./infra-rm.yml # 移除基础设施
./cache.yml # 从现有仓库创建离线安装包
./cert.yml -e cn = <name> # 签发客户端证书
NODE 模块 ./node.yml -l <cls| ip> # 添加节点
./node-rm.yml -l <cls| ip> # 移除节点
bin/node-add <cls| ip> # 添加节点 (包装脚本)
bin/node-rm <cls| ip> # 移除节点 (包装脚本)
ETCD 模块 ./etcd.yml # 初始化 etcd 集群
./etcd-rm.yml # 移除 etcd 集群
bin/etcd-add <ip> # 添加 etcd 成员 (包装脚本)
bin/etcd-rm <ip> # 移除 etcd 成员 (包装脚本)
PGSQL 模块 ./pgsql.yml -l <cls> # 初始化 PostgreSQL 集群
./pgsql-rm.yml -l <cls> # 移除 PostgreSQL 集群
./pgsql-user.yml -l <cls> -e username = <user> # 创建业务用户
./pgsql-db.yml -l <cls> -e dbname = <db> # 创建业务数据库
./pgsql-monitor.yml -e clsname = <cls> # 监控远程集群
./pgsql-migration.yml -e@files/migration/<cls>.yml # 生成迁移手册
./pgsql-pitr.yml -l <cls> -e '{"pg_pitr": {}}' # 执行 PITR 恢复
bin/pgsql-add <cls> # 初始化集群 (包装脚本)
bin/pgsql-rm <cls> # 移除集群 (包装脚本)
bin/pgsql-user <cls> <user> # 创建用户 (包装脚本)
bin/pgsql-db <cls> <db> # 创建数据库 (包装脚本)
bin/pgsql-svc <cls> # 刷新服务 (包装脚本)
bin/pgsql-hba <cls> # 重载 HBA (包装脚本)
bin/pgmon-add <cls> # 监控远程集群 (包装脚本)
REDIS 模块 ./redis.yml -l <cls> # 初始化 Redis 集群
./redis-rm.yml -l <cls> # 移除 Redis 集群
MINIO 模块 ./minio.yml -l <cls> # 初始化 MinIO 集群
./minio-rm.yml -l <cls> # 移除 MinIO 集群
FERRET 模块 ./mongo.yml -l ferret # 安装 FerretDB
DOCKER 模块 ./docker.yml -l <host> # 安装 Docker
./app.yml -e app = <name> # 部署 Docker Compose 应用
7.6 - 端口列表 Pigsty 中各个组件使用的端口一览,以及相关的配置参数与组件状态。
以下为 Pigsty 中各模块组件使用的默认端口及其对应参数,您可以按需调整,或者作为内部防火墙精细配置的参考。
公网开放端口建议 如果您使用防火墙 zonenode_firewall_public_port
最小管理面:22, 80, 443(推荐) 需要公网直连数据库:额外开放 5432 不建议直接对公网开放:etcd(2379/2380)、patroni(8008)、各类 exporter(9xxx)、minio(9000/9001)、redis(6379)、ferretdb(27017/27018)等内部组件端口。
node_firewall_mode : zone
node_firewall_public_port : [ 22 , 80 , 443 ]
# node_firewall_public_port: [22, 80, 443, 5432] # only if public DB access is required
8 - 应用 基于 Pigsty v4.2 的应用模板与数据应用说明:使用 Docker Compose 拉起无状态应用,并将状态托管到外部 PostgreSQL / MinIO。
Pigsty v4.2 的“应用”分为两类:
软件模板(Software Templates) :~/pigsty/app/<name> 下的 Docker Compose 模板,用于拉起无状态业务组件。数据应用(Applets) :基于 PostgreSQL + Grafana 的分析样例,偏教学/演示属性。v4.2 应用模型 在 v4.2 中,推荐使用以下流程部署应用:
curl -fsSL https://repo.pigsty.cc/get | bash; cd ~/pigsty
./bootstrap
./configure -c <template> # 例如 app/dify、app/odoo、app/registry、supabase
vi pigsty.yml # 修改密码、域名、IP、密钥
./deploy.yml # 部署基础设施与数据库
./docker.yml # 安装 Docker
./app.yml # 拉起应用
app.yml 会将 app/<name> 模板复制到 /opt/<name>,并按 apps.<name>.conf 覆盖 .env,最后执行 docker compose up -d。
维护中的配置模板 当前 v4.2 在源码中提供了以下应用配置模板(conf/app/*.yml 与 conf/supabase.yml):
app/difyapp/odooapp/teableapp/mattermostapp/electricapp/maybeapp/registrysupabase这些模板开箱即用,且与 ./configure -c ...、./app.yml 工作流保持一致。
轻量 Compose 应用 对于 gitea、postgrest、pgweb、wiki、kong、bytebase 等应用,也可直接使用对应目录下的 Compose 模板:
cd ~/pigsty/app/<name>
make up
如果你希望统一纳入 Pigsty IaC,可使用:
关于历史 Applet pglog、covid、db-engine、sf-survey、cloud、isd 等数据应用保留为参考示例,适合学习数据建模与可视化思路。
它们不再是 v4.2 的主线“应用交付”方式;请优先使用上面的软件模板工作流。
8.1 - Supabase 企业级自建 使用 Pigsty 自托管企业级 supabase,带有监控,高可用,PITR,IaC 以及 451 PG扩展。
Supabase 很好,拥有属于你自己的 supabase 则好上加好。
Pigsty 可以帮助您在自己的服务器上(物理机/虚拟机/云服务器),一键自建企业级 supabase
—— 更多扩展,更好性能,更深入的控制,更合算的成本。
Pigsty 是 Supabase 官网文档上列举的三种自建部署之一:Self-hosting: Third-Party Guides
本教程需要您有 Linux 基础知识,否则建议直接使用 Supabase 云服务或 “Docker Compose” 自建。
简短版本 准备 Linux 系统 标准单机安装 supabase 配置模板,依次执行:
curl -fsSL https://repo.pigsty.cc/get | bash; cd ~/pigsty
./configure -c supabase # 使用 supabase 配置(请在 pigsty.yml 中更改凭据)
vi pigsty.yml # 编辑域名、密码、密钥...
./deploy.yml # 标准单机部署 pigsty
./docker.yml # 安装 docker 模块
./app.yml # 使用 docker 启动 supabase 无状态部分(可能较慢)
安装完毕后,使用浏览器访问 8000 端口造访 Supa Studio,用户名 supabase,密码 pigsty。
检查清单 目录 Supabase是什么? Supabase 是一个 BaaS (Backend as Service),开源的 Firebase,是 AI Agent 时代最火爆的数据库 + 后端解决方案。
Supabase 对 PostgreSQL 进行了封装,并提供了身份认证,消息传递,边缘函数,对象存储,并基于 PG 数据库模式自动生成 REST API 与 GraphQL API。
Supabase 旨在为开发者提供一条龙式的后端解决方案,减少开发和维护后端基础设施的复杂性。
它能让开发者告别绝大部分后端开发的工作,只需要懂数据库设计与前端即可快速出活!
开发者只要用 Vibe Coding 糊个前端与数据库模式设计,就可以快速完成一个完整的应用。
目前,Supabase 是 PostgreSQL 开源生态 中人气最高的开源项目,在 GitHub 上已有 九万 Star。
Supabase 还为小微创业者提供了"慷慨"的免费云服务额度 —— 免费的 500 MB 空间,对于存个用户表,浏览数之类的东西绰绰有余。
为什么要自建? 既然 Supabase 云服务这么香,为什么要自建呢?
最直观的原因是我们在《云数据库是智商税吗? 》中提到过的:当你的数据/计算规模超出云计算适用光谱(Supabase:4C/8G/500MB免费存储),成本很容易出现爆炸式增长。
而且在当下,足够可靠的 本地企业级 NVMe SSD 在性价比上与 云端存储 有着三到四个数量级的优势,而自建能更好地利用这一点。
另一个重要的原因是 功能 , Supabase 云服务的功能受限 —— 很多强力PG扩展因为多租户安全挑战与许可证的原因无法以云服务的形式。
故而尽管 扩展是 PostgreSQL 的核心特色 ,在 Supabase 云服务上也依然只有 64 个扩展可用。
而通过 Pigsty 自建的 Supabase 则提供了多达 451
此外,自主可控与规避供应商锁定也是自建的重要原因 —— 尽管 Supabase 虽然旨在提供一个无供应商锁定的 Google Firebase 开源替代,但实际上自建高标准企业级的 Supabase 门槛并不低。
Supabase 内置了一系列由他们自己开发维护的 PG 扩展插件,并计划将原生的 PostgreSQL 内核替换为收购的 OrioleDB
这实际上是某种隐性的供应商锁定,阻止了用户使用除了 supabase/postgres Docker 镜像之外的方式自建,Pigsty 则提供开源,透明,通用的方案解决这个问题。
我们将所有 Supabase 自研与用到的 10 个缺失的扩展打成开箱即用的 RPM/DEB 包,确保它们在所有 主流Linux操作系统发行版 上都可用:
扩展 说明 pg_graphql提供PG内的GraphQL支持 (RUST),Rust扩展,由PIGSTY提供 pg_jsonschema提供JSON Schema校验能力,Rust扩展,由PIGSTY提供 wrappersSupabase提供的外部数据源包装器捆绑包,Rust扩展,由PIGSTY提供 index_advisor查询索引建议器,SQL扩展,由PIGSTY提供 pg_net用 SQL 进行异步非阻塞HTTP/HTTPS 请求的扩展 (supabase),C扩展,由PIGSTY提供 vault在 Vault 中存储加密凭证的扩展 (supabase),C扩展,由PIGSTY提供 pgjwtJSON Web Token API 的PG实现 (supabase),SQL扩展,由PIGSTY提供 pgsodium表数据加密存储 TDE,扩展,由PIGSTY提供 supautils用于在云环境中确保数据库集群的安全,C扩展,由PIGSTY提供 pg_plan_filter使用执行计划代价过滤阻止特定查询语句,C扩展,由PIGSTY提供
同时,我们在 Supabase 自建部署中默认 安装 绝大多数扩展,您可以参考可用扩展列表按需 启用 。
同时,Pigsty 还会负责好底层 高可用 PostgreSQL 数据库集群,高可用 MinIO 对象存储集群的自动搭建,甚至是 Docker 容器底座的部署与 Nginx 反向代
理,域名配置 与 HTTPS证书签发 。 您可以使用 Docker Compose 拉起任意数量的无状态 Supabase 容器集群,并将状态存储在外部 Pigsty 自托管数据库服务中。
在这一自建部署架构中,您获得了使用不同内核的自由(PG 15-18,OrioleDB),加装 437
单节点自建快速上手 让我们先从单节点 Supabase 部署开始,我们会在后面进一步介绍多节点高可用部署的方法。
准备 一台全新 Linux 服务器 ,使用 Pigsty 提供的 supabase标准安装 ,
然后额外运行 docker.ymlapp.yml 拉起无状态部分的 Supabase 容器即可(默认端口 8000/8433)。
curl -fsSL https://repo.pigsty.cc/get | bash; cd ~/pigsty
./configure -c supabase # 使用 supabase 配置(请在 pigsty.yml 中更改凭据)
vi pigsty.yml # 编辑域名、密码、密钥...
./deploy.yml # 安装 pigsty
./docker.yml # 安装 docker compose 组件
./app.yml # 使用 docker 启动 supabase 无状态部分
在部署 Supabase 前请根据实际情况修改自动生成的 pigsty.yml 配置文件中的参数(域名与密码)
如果只是本地开发测试,可以先跳过,我们将在后面介绍如何通过修改配置文件来进一步定制。
如果配置无误,大约十分钟后,就可以在本地网络通过 http://<your_ip_address>:8000 访问到 Supabase Studio 图形管理界面了。
默认的用户名与密码分别是: supabase 与 pigsty。
注意事项:
在中国大陆地区,Pigsty 默认使用 1Panel 与 1ms 提供的 DockerHub 镜像站点下载 Supabase 相关镜像,可能会较慢。 你也可以自行配置 代理 与 镜像站 ,cd /opt/supabase; docker compose pull 手动拉取镜像。我们亦提供包含完整离线安装方案的 Supabase 自建专家咨询服务。 如果你需要使用的对象存储功能,那么需要通过域名与 HTTPS 访问 Supabase,否则会出现报错。 对于严肃的生产部署,请 务必 修改所有默认密码! 自建关键技术决策 以下是一些自建 Supabase 会涉及到的关键技术决策,供您参考:
使用默认的单节点部署 Supabase 无法享受到 PostgreSQL / MinIO 的高可用能力。
尽管如此,单节点部署相比官方纯 Docker Compose 方案依然要有显著优势: 例如开箱即用的监控系统,自由安装扩展的能力,各个组件的扩缩容能力,以及提供兜底数据库时间点恢复能力等。
如果您只有一台服务器,或者选择在云服务器上自建,Pigsty 建议您使用外部的 S3 替代本地的 MinIO 作为对象存储,存放 PostgreSQL 的备份,并承载 Supabase Storage 服务。
这样的部署在故障时可以在单机部署条件下,提供一个兜底级别的 RTO (小时级恢复时长)/ RPO (MB级数据损失)容灾水平。
在严肃的生产部署中,Pigsty 建议使用至少3~4个节点的部署策略,确保 MinIO 与 PostgreSQL 都使用满足企业级高可用要求的多节点部署。
在这种情况下,您需要相应准备更多节点与磁盘,并相应调整 pigsty.yml 配置清单中的集群配置,以及 supabase 集群配置中的接入信息,使用高可用接入点访问服务。
Supabase 的部分功能需要发送邮件,所以要用到 SMTP 服务。除非单纯用于内网,否则对于严肃的生产部署,建议使用 SMTP 云服务。自建的邮件服务器发送的邮件容易被标记为垃圾邮件导致拒收。
如果您的服务直接向公网暴露,我们强烈建议您使用真正的域名与 HTTPS 证书,并通过 Nginx 门户 访问。
接下来,我们会依次讨论一些进阶主题。如何在单节点部署的基础上,进一步提升 Supabase 的安全性、可用性与性能。
进阶主题:安全加固 Pigsty基础组件
对于严肃的生产部署,我们强烈建议您修改 Pigsty 基础组件的密码。因为这些默认值是公开且众所周知的,不改密码上生产无异于裸奔:
以上密码为 Pigsty 组件模块的密码,强烈建议在安装部署前就设置完毕。
Supabase密钥
除了 Pigsty 组件的密码,你还需要 修改 Supabase 的密钥 ,包括
这里请您务必参照 Supabase教程:保护你的服务 里的说明:
Supabase 部分的凭据修改后,您可以重启 Docker Compose 容器以应用新的配置:
./app.yml -t app_config,app_launch # 使用剧本
cd /opt/supabase; make up # 手工执行
进阶主题:域名接入 如果你在本机或局域网内使用 Supabase,那么可以选择 IP:Port 直连 Kong 对外暴露的 HTTP 8000 端口访问 Supabase。
你可以使用一个内网静态解析的域名,但对于严肃的生产部署,我们建议您使用真域名 + HTTPS 来访问 Supabase。
在这种情况下,您的服务器应当有一个公网 IP 地址,你应当拥有一个域名,使用云/DNS/CDN 供应商提供的 DNS 解析服务,将其指向安装节点的公网 IP(可选默认下位替代:本地 /etc/hosts 静态解析)。
比较简单的做法是,直接批量替换占位域名(supa.pigsty)为你的实际域名,假设为 supa.pigsty.cc:
sed -ie 's/supa.pigsty/supa.pigsty.cc/g' ~/pigsty/pigsty.yml
如果你没有事先配置好,那么重载 Nginx 和 Supabase 的配置生效即可:
make cert # 申请 certbot 免费 HTTPS 证书
./app.yml # 重载 Supabase 配置
修改后的配置应当类似下面的片段:
all :
vars :
certbot_sign : true # 使用 certbot 签发真实证书
infra_portal :
home : i.pigsty.cc # 替换为你的域名!
supa :
domain : supa.pigsty.cc # 替换为你的域名!
endpoint : "10.10.10.10:8000"
websocket : true
certbot : supa.pigsty.cc # 证书名称,通常与域名一致即可
children :
supabase :
vars :
apps :
supabase : # supabase 应用定义
conf : # 覆盖 /opt/supabase/.env
SITE_URL : https://supa.pigsty.cc # <------- 修改为您的外部域名
API_EXTERNAL_URL : https://supa.pigsty.cc # <------- 否则 storage API 可能无法正常工作!
SUPABASE_PUBLIC_URL : https://supa.pigsty.cc # <------- 别忘了在 infra_portal 中配置!
完整的域名/HTTPS 配置可以参考 证书管理 教程,您也可以使用 Pigsty 自带的本地静态解析与自签发 HTTPS 证书作为下位替代。
进阶主题:外部对象存储 您可以使用 S3 或 S3 兼容的服务,来作为 PGSQL 备份与 Supabase 使用的对象存储。这里我们使用一个 阿里云 OSS 对象存储作为例子。
Pigsty 提供了一个 terraform/spec/aliyun-s3.tf
首先,我们修改 all.children.supa.vars.apps.[supabase].conf 中 S3 相关的配置,将其指向阿里云 OSS 存储桶:
# if using s3/minio as file storage
S3_BUCKET : data # 替换为 S3 兼容服务的连接信息
S3_ENDPOINT : https://sss.pigsty:9000 # 替换为 S3 兼容服务的连接信息
S3_ACCESS_KEY : s3user_data # 替换为 S3 兼容服务的连接信息
S3_SECRET_KEY : S3User.Data # 替换为 S3 兼容服务的连接信息
S3_FORCE_PATH_STYLE : true # 替换为 S3 兼容服务的连接信息
S3_REGION : stub # 替换为 S3 兼容服务的连接信息
S3_PROTOCOL : https # 替换为 S3 兼容服务的连接信息
同样使用以下命令重载 Supabase 配置:
./app.yml -t app_config,app_launch
您同样可以使用 S3 作为 PostgreSQL 的备份仓库,在 all.vars.pgbackrest_repo 新增一个 aliyun 备份仓库的定义:
all :
vars :
pgbackrest_method : aliyun # pgbackrest 备份方法:local,minio,[其他用户定义的仓库...],本例中将备份存储到 MinIO 上
pgbackrest_repo: # pgbackrest 备份仓库 : https://pgbackrest.org/configuration.html#section-repository
aliyun : # 定义一个新的备份仓库 aliyun
type : s3 # 阿里云 oss 是 s3-兼容的对象存储
s3_endpoint : oss-cn-beijing-internal.aliyuncs.com
s3_region : oss-cn-beijing
s3_bucket : pigsty-oss
s3_key : xxxxxxxxxxxxxx
s3_key_secret : xxxxxxxx
s3_uri_style : host
path : /pgbackrest
bundle : y # bundle small files into a single file
bundle_limit : 20MiB # Limit for file bundles, 20MiB for object storage
bundle_size : 128MiB # Target size for file bundles, 128MiB for object storage
cipher_type : aes-256-cbc # enable AES encryption for remote backup repo
cipher_pass : pgBackRest.MyPass # 设置一个加密密码,pgBackRest 备份仓库的加密密码
retention_full_type : time # retention full backup by time on minio repo
retention_full : 14 # keep full backup for the last 14 days
然后在 all.vars.pgbackrest_mehod 中指定使用 aliyun 备份仓库,重置 pgBackrest 备份:
./pgsql.yml -t pgbackrest
Pigsty 会将备份仓库切换到外部对象存储上,更多备份配置可以参考 PostgreSQL 备份 文档。
进阶主题:使用SMTP 你可以使用 SMTP 来发送邮件,修改 supabase 应用配置,添加 SMTP 信息:
all :
children :
supabase : # supa group
vars : # supa group vars
apps : # supa group app list
supabase : # the supabase app
conf : # the supabase app conf entries
SMTP_HOST : smtpdm.aliyun.com:80
SMTP_PORT : 80
SMTP_USER : no_reply@mail.your.domain.com
SMTP_PASS : your_email_user_password
SMTP_SENDER_NAME : MySupabase
SMTP_ADMIN_EMAIL : adminxxx@mail.your.domain.com
ENABLE_ANONYMOUS_USERS : false
不要忘了使用 app.yml 来重载配置
进阶主题:真·高可用 经过这些配置,您拥有了一个带公网域名,HTTPS 证书,SMTP,PITR 备份,监控,IaC,以及 400+ 扩展的企业级 Supabase (基础单机版)。
高可用的配置请参考 Pigsty 其他部份的文档,如果您懒得阅读学习,我们提供手把手扶上马的 Supabase 自建专家咨询服务 —— ¥2000 元免去折腾与下载的烦恼。
单节点的 RTO / RPO 依赖外部对象存储服务提供兜底,如果您的这个节点挂了,外部 S3 存储中保留了备份,您可以在新的节点上重新部署 Supabase,然后从备份中恢复。
这样的部署在故障时可以提供一个最低标准的 RTO (小时级恢复时长)/ RPO (MB级数据损失)兜底容灾水平 兜底。
如果想要达到 RTO < 30s ,切换零数据丢失,那么需要使用多节点进行高可用部署,这涉及到:
ETCD : DCS 需要使用三个节点或以上,才能容忍一个节点的故障。PGSQL : PGSQL 同步提交不丢数据模式,建议使用至少三个节点。INFRA :监控基础设施故障影响稍小,建议生产环境使用双副本Supabase 无状态容器本身也可以是多节点的副本,可以实现高可用。 在这种情况下,您还需要修改 PostgreSQL 与 MinIO 的接入点,使用 DNS / L2 VIP / HAProxy 等 高可用接入点
关于这些部分,您只需参考 Pigsty 中各个模块的文档进行配置部署即可。
建议您参考 conf/ha/trio.ymlconf/ha/safe.yml
8.2 - Odoo:自建开源 ERP 如何拉起开箱即用的企业级应用全家桶 Odoo,并使用 Pigsty 管理其后端 PostgreSQL 数据库。
Odoo 是一个开源企业资源规划 (ERP) 软件,提供一整套业务应用程序,包括 CRM、销售、采购、库存、生产、会计和其他管理功能。Odoo 是一个典型的 Web 应用程序,使用 PostgreSQL 作为底层数据库。
您的所有业务,都在一个平台上,简单、高效且实惠
公开演示(不一定开放):http://odoo.pigsty.io, 用户名: test@pigsty.io, 密码: pigsty
快速开始 在运行兼容操作系统的全新 Linux x86 / ARM 服务器上执行:
curl -fsSL https://repo.pigsty.io/get | bash; cd ~/pigsty
./bootstrap # 安装 ansible
./configure -c app/odoo # 使用 odoo 配置(请在 pigsty.yml 中更改凭据)
./deploy.yml # 安装 pigsty
./docker.yml # 安装 docker compose
./app.yml # 使用 docker 启动 odoo 无状态部分
Odoo 默认监听在 8069 端口,您可以通过浏览器访问 http://<ip>:8069。默认的用户名和密码都是 admin。
您可以在浏览器所在主机(/etc/hosts)添加一条解析记录 odoo.pigsty 指向您的服务器,这样您就可以通过 http://odoo.pigsty 访问 Odoo 网络界面了。
如果您想要通过 SSL/HTTPS 访问 Odoo,您需要使用真正的 SSL 证书,或者信任 Pigsty 自动生成的自签名 CA 证书。(当然,在 Chrome 浏览器中,您也可以使用敲击键入 thisisunsafe 来绕过证书验证)
配置模板 conf/app/odoo.yml
all :
children :
# Odoo 应用程序(默认用户名和密码:admin/admin)
odoo :
hosts : { 10.10.10.10 : {} }
vars :
app : odoo # 指定要安装的应用程序名称(在 apps 中)
apps : # 定义所有应用程序
odoo : # 应用程序名称,应该有对应的 ~/pigsty/app/odoo 文件夹
file : # 要创建的可选目录
- { path: /data/odoo ,state: directory, owner: 100, group : 101 }
- { path: /data/odoo/webdata ,state: directory, owner: 100, group : 101 }
- { path: /data/odoo/addons ,state: directory, owner: 100, group : 101 }
conf : # 覆盖 /opt/<app>/.env 配置文件
PG_HOST : 10.10.10.10 # postgres 主机
PG_PORT : 5432 # postgres 端口
PG_USERNAME : odoo # postgres 用户
PG_PASSWORD : DBUser.Odoo # postgres 密码
ODOO_PORT : 8069 # odoo 应用程序端口
ODOO_DATA : /data/odoo/webdata # odoo webdata
ODOO_ADDONS : /data/odoo/addons # odoo 插件
ODOO_DBNAME : odoo # odoo 数据库名称
ODOO_VERSION : 19.0 # odoo 镜像版本
# Odoo 数据库
pg-odoo :
hosts : { 10.10.10.10 : { pg_seq: 1, pg_role : primary } }
vars :
pg_cluster : pg-odoo
pg_users :
- { name: odoo ,password: DBUser.Odoo ,pgbouncer: true ,roles: [ dbrole_admin ] ,createdb: true ,comment : admin user for odoo service }
- { name: odoo_ro ,password: DBUser.Odoo ,pgbouncer: true ,roles: [ dbrole_readonly ] ,comment : read only user for odoo service }
- { name: odoo_rw ,password: DBUser.Odoo ,pgbouncer: true ,roles: [ dbrole_readwrite ] ,comment : read write user for odoo service }
pg_databases :
- { name: odoo ,owner: odoo ,revokeconn: true ,comment : odoo main database }
pg_hba_rules :
- { user: all ,db: all ,addr: 172.17.0.0/16 ,auth: pwd ,title : 'allow access from local docker network' }
- { user: dbuser_view , db: all ,addr: infra ,auth: pwd ,title : 'allow grafana dashboard access cmdb from infra nodes' }
node_crontab : [ '00 01 * * * postgres /pg/bin/pg-backup full' ] # 每天凌晨 1 点进行完整备份
infra : { hosts : { 10.10.10.10 : { infra_seq : 1 } } }
etcd : { hosts : { 10.10.10.10 : { etcd_seq: 1 } }, vars : { etcd_cluster : etcd } }
#minio: { hosts: { 10.10.10.10: { minio_seq: 1 } }, vars: { minio_cluster: minio } }
vars : # 全局变量
version : v4.2.2 # pigsty 版本字符串
admin_ip : 10.10.10.10 # 管理节点 ip 地址
region : default # 上游镜像区域:default|china|europe
node_tune : oltp # 节点调优规格:oltp,olap,tiny,crit
pg_conf : oltp.yml # pgsql 调优规格:{oltp,olap,tiny,crit}.yml
docker_enabled : true # 在应用程序组上启用 docker
#docker_registry_mirrors: ["https://docker.1panel.live","https://docker.1ms.run","https://docker.xuanyuan.me","https://registry-1.docker.io"]
proxy_env : # 下载包和拉取 docker 镜像时的全局代理环境
no_proxy : "localhost,127.0.0.1,10.0.0.0/8,192.168.0.0/16,*.pigsty,*.aliyun.com,mirrors.*,*.tsinghua.edu.cn"
#http_proxy: 127.0.0.1:12345 # 在此处添加代理环境以下载包或拉取镜像
#https_proxy: 127.0.0.1:12345 # 通常代理格式为 http://user:pass@proxy.xxx.com
#all_proxy: 127.0.0.1:12345
infra_portal : # 域名和上游服务器
home : { domain : i.pigsty }
minio : { domain: m.pigsty ,endpoint : "${admin_ip}:9001" ,scheme: https ,websocket : true }
odoo : # nginx server config for odoo
domain : odoo.pigsty # 替换为您自己的域名!
endpoint : "10.10.10.10:8069" # odoo 服务端点:IP:PORT
websocket : true # 添加 websocket 支持
certbot : odoo.pigsty # certbot 证书名称,使用 `make cert` 申请
repo_enabled : false
node_repo_modules : node,infra,pgsql
pg_version : 18
#----------------------------------#
# 凭据:务必更改这些密码!
#----------------------------------#
grafana_admin_password : pigsty
grafana_view_password : DBUser.Viewer
pg_admin_password : DBUser.DBA
pg_monitor_password : DBUser.Monitor
pg_replication_password : DBUser.Replicator
patroni_password : Patroni.API
haproxy_admin_password : pigsty
minio_secret_key : S3User.MinIO
etcd_root_password : Etcd.Root
基础 检查 .env 文件中的可配置环境变量:
# https://hub.docker.com/_/odoo#
PG_HOST = 10.10.10.10
PG_PORT = 5432
PG_USER = dbuser_odoo
PG_PASS = DBUser.Odoo
ODOO_PORT = 8069
然后使用以下命令启动 odoo:
make up # docker compose up
访问 http://ddl.pigsty 或 http://10.10.10.10:8887
Makefile make up # 在最小模式下使用 docker compose 启动 odoo
make run # 使用 docker 启动 odoo,本地数据目录和外部 PostgreSQL
make view # 打印 odoo 访问点
make log # tail -f odoo 日志
make info # 使用 jq 检查 odoo
make stop # 停止 odoo 容器
make clean # 移除 odoo 容器
make pull # 拉取最新的 odoo 镜像
make rmi # 移除 odoo 镜像
make save # 保存 odoo 镜像到 /tmp/docker/odoo.tgz
make load # 从 /tmp/docker/odoo.tgz 加载 odoo 镜像
使用外部 PostgreSQL 您可以为 Odoo 使用外部 PostgreSQL。Odoo 将在设置期间创建自己的数据库,因此您不需要这样做
pg_users : [ { name: dbuser_odoo ,password: DBUser.Odoo ,pgbouncer: true ,roles: [ dbrole_admin ] ,comment : admin user for odoo database } ]
pg_databases : [ { name: odoo ,owner: dbuser_odoo ,revokeconn: true ,comment : odoo primary database } ]
并使用以下命令创建业务用户和数据库:
bin/pgsql-user pg-meta dbuser_odoo
#bin/pgsql-db pg-meta odoo # odoo 将在设置期间创建数据库
检查连接性:
psql postgres://dbuser_odoo:DBUser.Odoo@10.10.10.10:5432/odoo
暴露 Odoo 服务 通过 nginx 门户 暴露 odoo Web 服务:
infra_portal : # 域名和上游服务器
home : { domain : h.pigsty }
grafana : { domain: g.pigsty ,endpoint : "${admin_ip}:3000" , websocket : true }
vmetrics : { domain: v.pigsty ,endpoint : "${admin_ip}:8428" }
alertmanager : { domain: a.pigsty ,endpoint : "${admin_ip}:9059" }
blackbox : { endpoint : "${admin_ip}:9115" }
vlogs : { endpoint : "${admin_ip}:9428" }
odoo : { domain: odoo.pigsty, endpoint : "127.0.0.1:8069" , websocket : true } # <------ 添加这一行
./infra.yml -t nginx # 设置 nginx 基础设施门户
Odoo 插件 社区中有很多 Odoo 模块可用,您可以通过下载并将它们放在 addons 文件夹中来安装它们。
volumes :
- ./addons:/mnt/extra-addons
您可以将 ./addons 目录挂载到容器中的 /mnt/extra-addons,然后下载并解压到 addons 文件夹,
要启用插件模块,首先进入 开发者模式
设置 -> 通用设置 -> 开发者工具 -> 激活开发者模式
然后转到 > 应用程序 -> 更新应用程序列表,然后您可以找到额外的插件并从面板安装。
常用的 免费 插件:会计套件
演示 查看公共演示:http://odoo.pigsty.io ,用户名:test@pigsty.io,密码:pigsty
如果您想通过 SSL 访问 odoo,您必须在浏览器中信任 files/pki/ca/ca.crt(或在 chrome 中使用肮脏的黑客 thisisunsafe)
8.3 - Dify:AI 工作流平台 如何使用 Pigsty 自建 AI Workflow LLMOps 平台 —— Dify,并使用外部 PostgreSQL,PGVector,Redis 作为存储?
Dify
Pigsty 提供对自托管 Dify 的支持,允许您使用单个命令部署 Dify,同时将关键状态存储在外部管理的 PostgreSQL 中。您可以在同一个 PostgreSQL 实例中使用 pgvector 作为向量数据库,进一步简化部署。
app/dify 模板最后验证的 Dify 版本:v1.8.1(2025-09-08)
快速开始 在运行 兼容操作系统
curl -fsSL https://repo.pigsty.cc/get | bash; cd ~/pigsty
./bootstrap # 安装 Pigsty 依赖
./configure -c app/dify # 使用 Dify 配置模板
vi pigsty.yml # 编辑密码、域名、密钥等
./deploy.yml # 安装 Pigsty
./docker.yml # 安装 Docker 和 Compose
./app.yml # 安装 Dify
Dify 默认监听端口 5001。您可以通过浏览器访问 http://<ip>:5001 并设置您的初始用户凭据来登录。
Dify 启动后,您可以安装各种扩展、配置系统模型并开始使用它!
为什么要自托管 自托管 Dify 有很多原因,但主要动机是数据安全。Dify 提供的 DockerCompose 模板使用基本的默认数据库镜像,缺乏企业级功能,如高可用性、灾难恢复、监控、IaC 和 PITR 能力。
Pigsty 为 Dify 优雅地解决了这些问题,基于配置文件使用单个命令部署所有组件,并使用镜像解决中国地区访问挑战。这使得 Dify 部署和交付变得非常顺畅。它一次性处理 PostgreSQL 主数据库、PGVector 向量数据库、MinIO 对象存储、Redis、Prometheus 监控、Grafana 可视化、Nginx 反向代理和免费 HTTPS 证书。
Pigsty 确保所有 Dify 状态都存储在外部管理的服务中,包括 PostgreSQL 中的元数据和文件系统中的其他数据。通过 Docker Compose 启动的 Dify 实例成为可以随时销毁和重建的无状态应用程序,大大简化了运维。
安装 让我们从单节点 Dify 部署开始。我们稍后将介绍生产高可用部署方法。
首先,使用 Pigsty 的 标准安装过程 安装 Dify 所需的 PostgreSQL 实例:
curl -fsSL https://repo.pigsty.cc/get | bash; cd ~/pigsty
./bootstrap # 准备 Pigsty 依赖
./configure -c app/dify # 使用 Dify 应用程序模板
vi pigsty.yml # 编辑配置文件,修改域名和密码
./deploy.yml # 安装 Pigsty 和各种数据库
当您使用 ./configure -c app/dify 命令时,Pigsty 会根据 conf/app/dify.ymlpigsty.yml 配置文件中修改密码、域名和其他相关参数,然后使用 ./deploy.yml 执行标准安装过程。
接下来,运行 docker.ymlapp.yml
./docker.yml # 安装 Docker 和 Docker Compose
./app.yml # 使用 Docker 部署 Dify 无状态组件
您可以在本地网络上通过 http://<your_ip_address>:5001 访问 Dify Web 管理界面。
首次登录时会提示设置默认用户名、邮箱和密码。
您也可以使用本地解析的占位符域名 dify.pigsty,或按照下面的配置使用带有 HTTPS 证书的真实域名。
配置 当您使用 ./configure -c app/dify 命令进行配置时,Pigsty 会根据 conf/app/dify.yml
all :
children :
# Dify 应用程序
dify :
hosts : { 10.10.10.10 : {} }
vars :
app : dify # 指定要安装的应用程序名称(在 apps 中)
apps : # 定义所有应用程序
dify : # 应用程序名称,应该有对应的 ~/pigsty/app/dify 文件夹
file : # 要创建的数据目录
- { path: /data/dify ,state: directory ,mode : 0755 }
conf : # 覆盖 /opt/dify/.env 配置文件
# 更改域名、镜像、代理、密钥
NGINX_SERVER_NAME : dify.pigsty
# 用于签名和加密的密钥,使用 `openssl rand -base64 42` 生成(务必更改!)
SECRET_KEY : sk-somerandomkey
# 默认使用端口 5001 暴露 DIFY nginx 服务
DIFY_PORT : 5001
# dify 文件存储位置?默认是 ./volume,我们将使用上面创建的另一个卷
DIFY_DATA : /data/dify
# 代理和镜像设置
#PIP_MIRROR_URL: https://pypi.tuna.tsinghua.edu.cn/simple
#SANDBOX_HTTP_PROXY: http://10.10.10.10:12345
#SANDBOX_HTTPS_PROXY: http://10.10.10.10:12345
# 数据库凭据
DB_USERNAME : dify
DB_PASSWORD : difyai123456
DB_HOST : 10.10.10.10
DB_PORT : 5432
DB_DATABASE : dify
VECTOR_STORE : pgvector
PGVECTOR_HOST : 10.10.10.10
PGVECTOR_PORT : 5432
PGVECTOR_USER : dify
PGVECTOR_PASSWORD : difyai123456
PGVECTOR_DATABASE : dify
PGVECTOR_MIN_CONNECTION : 2
PGVECTOR_MAX_CONNECTION : 10
pg-meta :
hosts : { 10.10.10.10 : { pg_seq: 1, pg_role : primary } }
vars :
pg_cluster : pg-meta
pg_users :
- { name: dify ,password: difyai123456 ,pgbouncer: true ,roles: [ dbrole_admin ] ,superuser: true ,comment : dify superuser }
pg_databases :
- { name: dify ,owner: dify ,revokeconn: true ,comment : dify main database }
- { name: dify_plugin ,owner: dify ,revokeconn: true ,comment : dify plugin_daemon database }
pg_hba_rules :
- { user: dify ,db: all ,addr: 172.17.0.0/16 ,auth: pwd ,title : 'allow dify access from local docker network' }
node_crontab : [ '00 01 * * * postgres /pg/bin/pg-backup full' ] # 每天凌晨 1 点进行完整备份
infra : { hosts : { 10.10.10.10 : { infra_seq : 1 } } }
etcd : { hosts : { 10.10.10.10 : { etcd_seq: 1 } }, vars : { etcd_cluster : etcd } }
#minio: { hosts: { 10.10.10.10: { minio_seq: 1 } }, vars: { minio_cluster: minio } }
vars : # 全局变量
version : v4.2.2 # pigsty 版本字符串
admin_ip : 10.10.10.10 # 管理节点 ip 地址
region : default # 上游镜像区域:default|china|europe
node_tune : oltp # 节点调优规格:oltp,olap,tiny,crit
pg_conf : oltp.yml # pgsql 调优规格:{oltp,olap,tiny,crit}.yml
docker_enabled : true # 在应用程序组上启用 docker
#docker_registry_mirrors: ["https://docker.1panel.live","https://docker.1ms.run","https://docker.xuanyuan.me","https://registry-1.docker.io"]
proxy_env : # 下载包和拉取 docker 镜像时的全局代理环境
no_proxy : "localhost,127.0.0.1,10.0.0.0/8,192.168.0.0/16,*.pigsty,*.aliyun.com,mirrors.*,*.tsinghua.edu.cn"
#http_proxy: 127.0.0.1:12345 # 在此处添加代理环境以下载包或拉取镜像
#https_proxy: 127.0.0.1:12345 # 通常代理格式为 http://user:pass@proxy.xxx.com
#all_proxy: 127.0.0.1:12345
infra_portal : # 域名和上游服务器
home : { domain : i.pigsty }
#minio : { domain: m.pigsty ,endpoint: "${admin_ip}:9001" ,scheme: https ,websocket: true }
dify : # dify 的 nginx 服务器配置
domain : dify.pigsty # 替换为您自己的域名!
endpoint : "10.10.10.10:5001" # dify 服务端点:IP:PORT
websocket : true # 添加 websocket 支持
certbot : dify.pigsty # certbot 证书名称,使用 `make cert` 申请
repo_enabled : false
node_repo_modules : node,infra,pgsql
pg_version : 18
#----------------------------------#
# 凭据:务必更改这些密码!
#----------------------------------#
grafana_admin_password : pigsty
grafana_view_password : DBUser.Viewer
pg_admin_password : DBUser.DBA
pg_monitor_password : DBUser.Monitor
pg_replication_password : DBUser.Replicator
patroni_password : Patroni.API
haproxy_admin_password : pigsty
minio_secret_key : S3User.MinIO
etcd_root_password : Etcd.Root
检查清单 以下是您需要关注的配置项检查清单:
硬件/软件:准备所需的机器资源 :Linux x86_64/arm64 服务器,主流 Linux 操作系统 的全新安装 网络/权限:SSH 免密登录访问权限,用户具有 免密 sudo 权限 确保机器在内网中有静态 IPv4 网络地址且可访问互联网 如果通过公网访问,确保您有可用的域名指向当前节点的 公网 IP 地址 确保使用 app/dify 配置模板并根据需要修改参数configure -c app/dify,并输入节点的内网主 IP 地址,或通过 -i <primary_ip> 命令行参数指定 您是否修改了所有密码相关的配置参数?【可选】 您是否修改了 PostgreSQL 集群业务用户密码和使用这些密码的应用程序配置?默认用户名 dify 和密码 difyai123456 是 Pigsty 为 Dify 生成的,请根据实际情况修改 在 Dify 的配置块中,请相应修改 DB_USERNAME、DB_PASSWORD、PGVECTOR_USER、PGVECTOR_PASSWORD 等参数 您是否修改了 Dify 的默认加密密钥?您可以使用 openssl rand -base64 42 随机生成密码字符串并填入 SECRET_KEY 参数 您是否修改了 Dify 使用的域名?将占位符域名 dify.pigsty 替换为您的实际域名,例如 dify.pigsty.cc 您可以使用 sed -ie 's/dify.pigsty/dify.pigsty.cc/g' pigsty.yml 修改 Dify 的域名 域名和 SSL 如果您想使用带有 HTTPS 证书的真实域名,需要在 pigsty.yml 配置文件中修改:
all :
children : # 集群定义
dify : # Dify 组
vars : # Dify 组变量
apps : # 应用程序配置
dify : # Dify 应用程序定义
conf : # Dify 应用程序配置
NGINX_SERVER_NAME : dify.pigsty
vars : # 全局参数
#certbot_sign: true # 使用 Certbot 申请免费 HTTPS 证书
certbot_email : your@email.com # 证书申请邮箱,用于过期通知,可选
infra_portal : # 配置 Nginx 服务器
dify : # Dify 服务器定义
domain : dify.pigsty # 请在此处替换为您自己的域名!
endpoint : "10.10.10.10:5001" # 请在此处指定 Dify 的 IP 和端口(默认自动配置)
websocket : true # Dify 需要启用 websocket
certbot : dify.pigsty # 指定 Certbot 证书名称
使用以下命令申请 Nginx 证书:
# 申请证书,也可以手动执行 /etc/nginx/sign-cert 脚本
make cert
# 上述 Makefile 快捷命令实际执行以下剧本任务:
./infra.yml -t nginx_certbot,nginx_reload -e certbot_sign = true
执行 app.yml 剧本重新部署 Dify 服务以使 NGINX_SERVER_NAME 配置生效。
文件备份 您可以使用 restic 备份 Dify 的文件存储(默认位于 /data/dify 目录),使用以下命令进行备份:
export RESTIC_REPOSITORY = /data/backups/dify # 指定 dify 备份目录
export RESTIC_PASSWORD = some-strong-password # 指定备份加密密码
mkdir -p ${ RESTIC_REPOSITORY } # 创建 dify 备份目录
restic init
创建 Restic 备份仓库后,您可以使用以下命令备份 Dify:
export RESTIC_REPOSITORY = /data/backups/dify # 指定 dify 备份目录
export RESTIC_PASSWORD = some-strong-password # 指定备份加密密码
restic backup /data/dify # 将 /dify 数据目录备份到仓库
restic snapshots # 查看备份快照列表
restic restore -t /data/dify 0b11f778 # 将快照 xxxxxx 恢复到 /data/dify
restic check # 定期检查仓库完整性
另一种更可靠的方法是使用 JuiceFS 将 MinIO 对象存储挂载到 /data/dify 目录,这样您就可以使用 MinIO/S3 存储文件状态。
如果您想将所有数据存储在 PostgreSQL 中,请考虑"使用 JuiceFS 将文件系统数据存储在 PostgreSQL 中"
例如,您可以创建另一个 dify_fs 数据库并将其用作 JuiceFS 的元数据存储:
METAURL = postgres://dify:difyai123456@:5432/dify_fs
OPTIONS =(
--storage postgres
--bucket :5432/dify_fs
--access-key dify
--secret-key difyai123456
${ METAURL }
jfs
)
juicefs format " ${ OPTIONS [@] } " # 创建 PG 文件系统
juicefs mount ${ METAURL } /data/dify -d # 后台挂载到 /data/dify 目录
juicefs bench /data/dify # 测试性能
juicefs umount /data/dify # 停止挂载
参考 Dify 自托管常见问题
8.5 - NocoDB:开源 Airtable 使用 NocoDB 将 PostgreSQL 数据库转变为智能电子表格,无代码数据库应用平台。
NocoDB
它提供了丰富的用户界面,让您无需编写代码即可创建强大的数据库应用。NocoDB 支持 PostgreSQL、MySQL、SQL Server 等多种数据库,是构建内部工具和数据管理系统的理想选择。
快速开始 在 Pigsty 软件模板目录中提供了 NocoDB 的 Docker Compose 配置文件:
检查并修改 .env 配置文件(根据需要调整数据库连接等配置)。
启动服务:
make up # 使用 Docker Compose 启动 NocoDB
访问 NocoDB:
管理命令 Pigsty 提供了便捷的 Makefile 命令来管理 NocoDB 服务:
make up # 启动 NocoDB 服务
make run # 使用 Docker 启动(连接外部 PostgreSQL)
make view # 显示 NocoDB 访问地址
make log # 查看容器日志
make info # 查看服务详细信息
make stop # 停止服务
make clean # 停止并移除容器
make pull # 拉取最新镜像
make rmi # 移除 NocoDB 镜像
make save # 保存镜像到 /tmp/nocodb.tgz
make load # 从 /tmp/nocodb.tgz 加载镜像
连接 PostgreSQL NocoDB 可以连接到 Pigsty 管理的 PostgreSQL 数据库。
在 NocoDB 界面中添加新项目时,选择「External Database」,然后输入 PostgreSQL 连接信息:
主机:10.10.10.10
端口:5432
数据库名:your_database
用户名:your_username
密码:your_password
SSL:禁用(或根据实际情况启用)
连接成功后,NocoDB 会自动读取数据库的表结构,您可以通过可视化界面进行数据管理。
功能特性 智能电子表格界面 :类似 Excel/Airtable 的用户体验多种视图 :网格、表单、看板、日历、画廊视图协作功能 :团队协作、权限管理、评论API 支持 :自动生成 REST API集成能力 :支持 Webhook、Zapier 等集成数据导入导出 :支持 CSV、Excel 等格式公式和验证 :支持复杂的数据计算和验证规则配置说明 NocoDB 的配置在 .env 文件中:
# 数据库连接(NocoDB 元数据存储)
NC_DB = pg://postgres:DBUser.Postgres@10.10.10.10:5432/nocodb
# JWT 密钥(建议修改)
NC_AUTH_JWT_SECRET = your-secret-key
# 其他配置
NC_PUBLIC_URL = http://nocodb.pigsty
NC_DISABLE_TELE = true
数据持久化 NocoDB 的元数据默认存储在外部 PostgreSQL 数据库中,应用数据也可以存储在 PostgreSQL 中。
如果使用本地存储,数据会保存在 /data/nocodb 目录中。
安全建议 修改默认密钥 :在 .env 文件中修改 NC_AUTH_JWT_SECRET使用强密码 :为管理员账户设置强密码配置 HTTPS :生产环境建议启用 HTTPS限制访问 :通过防火墙或 Nginx 限制访问权限定期备份 :定期备份 NocoDB 元数据库相关链接 8.6 - Teable:AI 无代码数据库 使用 Pigsty v4.2 自建 Teable,并接入外部 PostgreSQL 与 MinIO。
Teable
Pigsty v4.2 提供 app/teable 模板(conf/app/teable.yml),默认依赖 PostgreSQL + MinIO + Docker (不依赖 Redis)。
快速开始 curl -fsSL https://repo.pigsty.cc/get | bash; cd ~/pigsty
./bootstrap
./configure -c app/teable
vi pigsty.yml # 修改密码、域名、邮件参数
./deploy.yml # 安装基础设施、PostgreSQL、MinIO
./docker.yml
./app.yml
默认入口:
http://<IP>:8890http://tea.pigsty关键配置 模板会将以下参数写入 /opt/teable/.env:
POSTGRES_HOST/POSTGRES_PORT/POSTGRES_DB/POSTGRES_USER/POSTGRES_PASSWORDPRISMA_DATABASE_URLPUBLIC_ORIGIN(对外访问地址)PUBLIC_DATABASE_PROXYTEABLE_PORT(默认 8890)运维命令 cd /opt/teable
make up
make log
make down
参考 8.7 - Gitea:自建简易代码托管平台 使用 Pigsty 的 Compose 模板部署 Gitea,并接入外部 PostgreSQL。
Gitea 是轻量级开源 Git 托管平台。
Pigsty 的 app/gitea 模板默认就是 PostgreSQL 外部数据库模式 ,通过 .env 中 GITEA_DB_* 参数连接数据库。
快速开始 cd ~/pigsty/app/gitea
vi .env # 检查域名、端口、数据库连接
make up
默认入口:
Web:http://git.pigsty 或 http://<IP>:8889 SSH:<IP>:2222 数据库准备 bin/pgsql-user pg-meta dbuser_gitea
bin/pgsql-db pg-meta gitea
连接串示例:
postgres://dbuser_gitea:DBUser.Gitea@10.10.10.10:5432/gitea
常用命令 make up
make log
make stop
make clean
参考 8.8 - Wiki.js:维基百科站 如何使用 Wiki.js 搭建你自己的开源维基百科,并使用 Pigsty 管理的PG作为持久数据存储
公开Demo地址:http://wiki.pigsty.cc
太长;不看 cd app/wiki ; docker-compose up -d
准备数据库 # postgres://dbuser_wiki:DBUser.Wiki@10.10.10.10:5432/wiki
- { name: wiki, owner: dbuser_wiki, revokeconn: true , comment : wiki the api gateway database }
- { name: dbuser_wiki, password: DBUser.Wiki , pgbouncer: true , roles : [ dbrole_admin ] }
bin/createuser pg-meta dbuser_wiki
bin/createdb pg-meta wiki
容器配置 version : "3"
services :
wiki :
container_name : wiki
image : requarks/wiki:2
environment :
DB_TYPE : postgres
DB_HOST : 10.10.10.10
DB_PORT : 5432
DB_USER : dbuser_wiki
DB_PASS : DBUser.Wiki
DB_NAME : wiki
restart : unless-stopped
ports :
- "9002:3000"
Access Default Port for wiki: 9002 # add to nginx_upstream
- { name: wiki , domain: wiki.pigsty.cc , endpoint : "127.0.0.1:9002" }
./infra.yml -t nginx_config
ansible all -b -a 'nginx -s reload'
8.9 - Mattermost:开源团队协作 使用 Pigsty v4.2 部署 Mattermost,并将状态托管到外部 PostgreSQL。
Mattermost
Pigsty v4.2 提供 app/mattermost 配置模板(conf/app/mattermost.yml),默认将应用状态存放到外部 PostgreSQL,并将文件目录持久化到主机路径。
快速开始 curl -fsSL https://repo.pigsty.cc/get | bash; cd ~/pigsty
./bootstrap
./configure -c app/mattermost
vi pigsty.yml # 修改密码、域名
./deploy.yml
./docker.yml
./app.yml
默认访问地址:
http://<IP>:8065http://mm.pigsty首次访问需要在 Web 页面初始化管理员账号。
默认存储与连接 模板默认配置:
PostgreSQL 连接:POSTGRES_URL=postgres://dbuser_mattermost:DBUser.Mattermost@<IP>:5432/mattermost?... 持久化目录:/data/mattermost/{config,data,logs,plugins,client/plugins,bleve-indexes} 运维命令 cd /opt/mattermost
make up
make restart
make log
make stop
参考 8.10 - Maybe:个人财务管理 使用 Pigsty v4.2 自建 Maybe,并将数据存储到外部 PostgreSQL。
Maybe
Pigsty v4.2 提供 app/maybe 配置模板(conf/app/maybe.yml)。该模板会把 Maybe 作为无状态容器部署,并将业务数据落到外部 PostgreSQL。
快速开始 curl -fsSL https://repo.pigsty.cc/get | bash; cd ~/pigsty
./bootstrap
./configure -c app/maybe
vi pigsty.yml # 必改:SECRET_KEY_BASE、数据库密码、域名
./deploy.yml
./docker.yml
./app.yml
默认访问地址:
http://<IP>:5002http://maybe.pigsty关键配置 在模板的 apps.maybe.conf 中重点关注:
SECRET_KEY_BASE:必须替换为随机密钥(例如 openssl rand -hex 64)DB_HOST/DB_PORT/DB_USERNAME/DB_PASSWORD/DB_DATABASEAPP_DOMAIN 与 MAYBE_PORT运维命令 app/maybe/Makefile 默认在 /opt/maybe 工作,请在部署后执行:
cd /opt/maybe
make up
make restart
make log
make db-setup
参考 8.11 - Metabase:BI 分析工具 使用 Metabase 进行快速的商业智能分析,友好的用户界面让团队自主探索数据。
Metabase
Metabase 提供友好的用户界面和丰富的图表类型,支持连接多种数据库,是企业数据分析的理想选择。
快速开始 在 Pigsty 软件模板目录中提供了 Metabase 的 Docker Compose 配置文件:
检查并修改 .env 配置文件:
启动服务:
make up # 使用 Docker Compose 启动 Metabase
访问 Metabase:
管理命令 Pigsty 提供了便捷的 Makefile 命令来管理 Metabase 服务:
make up # 启动 Metabase 服务
make run # 使用 Docker 启动(连接外部 PostgreSQL)
make view # 显示 Metabase 访问地址
make log # 查看容器日志
make info # 查看服务详细信息
make stop # 停止服务
make clean # 停止并移除容器
make pull # 拉取最新镜像
make rmi # 移除 Metabase 镜像
make save # 保存镜像到文件
make load # 从文件加载镜像
连接 PostgreSQL Metabase 可以连接到 Pigsty 管理的 PostgreSQL 数据库。
在 Metabase 初始化或添加数据库时,选择「PostgreSQL」,然后输入连接信息:
数据库类型:PostgreSQL
名称:自定义名称(如 "生产数据库")
主机:10.10.10.10
端口:5432
数据库名:your_database
用户名:dbuser_meta
密码:DBUser.Meta
连接成功后,Metabase 会自动扫描数据库结构,您可以开始创建问题和仪表板。
功能特性 无需 SQL :通过可视化界面构建查询丰富的图表类型 :折线图、柱状图、饼图、地图等交互式仪表板 :创建美观的数据仪表板自动刷新 :定时更新数据和仪表板权限管理 :精细的用户和数据访问控制SQL 模式 :高级用户可以直接编写 SQL嵌入功能 :将图表嵌入到其他应用告警功能 :数据变化自动通知配置说明 Metabase 的配置在 .env 文件中:
# Metabase 元数据库(建议使用 PostgreSQL)
MB_DB_TYPE = postgres
MB_DB_DBNAME = metabase
MB_DB_PORT = 5432
MB_DB_USER = dbuser_metabase
MB_DB_PASS = DBUser.Metabase
MB_DB_HOST = 10.10.10.10
# 应用配置
JAVA_OPTS = -Xmx2g
建议 :为 Metabase 使用独立的 PostgreSQL 数据库存储元数据。
数据持久化 Metabase 的元数据(用户、问题、仪表板等)存储在配置的数据库中。
如果使用 H2 数据库(默认),数据会保存在 /data/metabase 目录。强烈建议在生产环境中使用 PostgreSQL 作为元数据库。
性能优化 使用 PostgreSQL :替代默认的 H2 数据库增加内存 :通过 JAVA_OPTS=-Xmx4g 增加 JVM 内存数据库索引 :为常查询的字段创建索引结果缓存 :启用 Metabase 的查询结果缓存定时更新 :合理设置仪表板的自动刷新频率安全建议 修改默认凭据 :修改元数据库的用户名和密码启用 HTTPS :生产环境配置 SSL 证书配置认证 :启用 SSO 或 LDAP 认证限制访问 :通过防火墙限制访问定期备份 :备份 Metabase 元数据库相关链接 8.12 - Kong:API 网关 使用 Pigsty Compose 模板部署 Kong(PostgreSQL 后端)。
Kong 是开源 API Gateway。
Pigsty 的 app/kong 模板使用 PostgreSQL 作为配置存储,并自动执行一次迁移任务(kong-migration)。
快速开始 cd ~/pigsty/app/kong
vi .env # 检查 KONG_PG_* 与端口配置
make
默认端口:
Proxy HTTP:8000 Proxy HTTPS:8443 Admin API:8001 数据库准备 bin/pgsql-user pg-meta dbuser_kong
bin/pgsql-db pg-meta kong
连接串示例:
postgres://dbuser_kong:DBUser.Kong@10.10.10.10:5432/kong
常用命令 make log
make stop
make clean
make pull
参考 8.13 - Registry:容器镜像缓存 使用 Pigsty v4.2 部署 Docker Registry Pull-Through Cache 与可选 Web UI。
Pigsty v4.2 提供 app/registry 配置模板(conf/app/registry.yml),用于部署:
Docker Registry 缓存服务(默认 5000) 可选管理 UI(默认 5080) 快速开始 curl -fsSL https://repo.pigsty.cc/get | bash; cd ~/pigsty
./bootstrap
./configure -c app/registry
vi pigsty.yml # 修改域名、证书与端口(如需)
./deploy.yml
./docker.yml
./app.yml
默认入口:
Registry API:http://<IP>:5000 或 http://d.pigsty Registry UI:http://<IP>:5080 或 http://dui.pigsty 镜像数据目录默认为 /data/registry。
Docker 客户端配置 如果你使用 HTTP(无 TLS),Docker 需要显式信任该仓库:
{
"registry-mirrors" : [ "http://d.pigsty" ],
"insecure-registries" : [ "d.pigsty:5000" ]
}
修改 /etc/docker/daemon.json 后重启 Docker:
运维命令 app/registry/Makefile 默认在 /opt/registry 工作:
cd /opt/registry
make up
make status
make health
make log
参考 8.15 - ByteBase:模式迁移 使用 Pigsty 提供的 Docker Compose 模板部署 Bytebase,并接入外部 PostgreSQL。
Bytebase 是数据库 Schema 变更与版本管理工具。
Pigsty 在 app/bytebase 中提供了可直接使用的 Compose 模板,默认监听 8887,并通过 BB_PGURL 连接外部 PostgreSQL。
快速开始 cd ~/pigsty/app/bytebase
vi .env # 检查 BB_PORT / BB_DOMAIN / BB_PGURL
make up
访问:
http://ddl.pigstyhttp://<IP>:8887首次启动后,请按 Bytebase 向导初始化管理员账号。
外部 PostgreSQL 默认连接串示例:
postgresql://dbuser_bytebase:DBUser.Bytebase@10.10.10.10:5432/bytebase?sslmode= prefer
可先在 Pigsty 中创建业务用户与数据库:
bin/pgsql-user pg-meta dbuser_bytebase
bin/pgsql-db pg-meta bytebase
常用命令 make up
make log
make info
make stop
make clean
参考 8.16 - PGAdmin:GUI 工具 使用Docker拉起PgAdmin4,并加载Pigsty服务器列表
pgAdmin 是最受欢迎且功能丰富的 PostgreSQL 开源管理和开发平台,PostgreSQL 是世界上最先进的开源数据库。
快速开始 Pigsty 内置(但可选)支持 pgAdmin,它使用 Docker Compose 启动 pgadmin:
./docker.yml
./app.yml -e app = pgadmin
pgadmin 的默认端口是 8885,您可以通过 IP:端口访问它:http://10.10.10.10:8885。
默认凭据在 .envadmin@pigsty.cc,密码:pigsty。
自定义 在 /opt/pgadmin/.env 中自定义 pgadmin 配置并使用 docker compose 管理它。
您还可以自定义 apps 参数并使用以下方式覆盖默认 .env 配置:
all :
children :
infra :
hosts :
10.10.10.10 : { infra_seq : 1 }
vars :
docker_enabled : true
app : pgadmin # 指定要安装的应用程序名称(pgadmin)(在 apps 中)
apps : # 定义所有应用程序
pgadmin : # pgadmin 应用程序的定义
conf : # 覆盖 /opt/pgadmin/.env
PGADMIN_DEFAULT_EMAIL : your@email.com
PGADMIN_DEFAULT_PASSWORD : yourPassword
PGADMIN_LISTEN_ADDRESS : 0.0.0.0
PGADMIN_PORT : 8885
PGADMIN_SERVER_JSON_FILE : /pgadmin4/servers.json
PGADMIN_REPLACE_SERVERS_ON_STARTUP : true
要启动应用程序,运行:
域名和证书 要通过 nginx(而不是直接访问端口 8885)访问 pgadmin,请使用以下方式配置 基础设施门户 :
all :
vars :
infra_portal :
home : { domain : h.pigsty }
grafana : { domain: g.pigsty ,endpoint : "${admin_ip}:3000" , websocket : true }
vmetrics : { domain: v.pigsty ,endpoint : "${admin_ip}:8428" }
alertmanager : { domain: a.pigsty ,endpoint : "${admin_ip}:9059" }
blackbox : { endpoint : "${admin_ip}:9115" }
vlogs : { endpoint : "${admin_ip}:9428" }
# 在此处添加 pgadmin 上游服务器定义
pgadmin : { domain: adm.pigsty ,endpoint : "127.0.0.1:8885" }
然后运行 make nginx 更新 nginx 配置,并在 /etc/hosts 或 本地 / 公共 DNS 服务器中配置 本地静态 DNS 记录 <your_ip_address> adm.pigsty。
Pigsty 将自动为 infra_portalcertbot 条目并运行 make cert,查看 SSL 证书 了解详情。
all :
vars : # 确保您的域名(adm.pigsty.cc)解析到您的公网 IP
certbot_sign : true # 使用 certbot 签发真实 HTTPS 证书(需要互联网访问!)
infra_portal :
pgadmin : { domain: adm.pigsty.cc ,endpoint : "127.0.0.1:8885" , certbot : adm.pigsty.cc }
使用方法 Pigsty 的 Pgadmin 应用模板默认使用 8885 端口,您可以通过以下地址访问:
http://adm.pigsty 或 http://10.10.10.10:8885
默认用户名与密码: admin@pigsty.cc / pigsty
make up # 使用 docker compose 启动 pgadmin
make run # 使用 docker 启动 pgadmin
make view # 打印 pgadmin 访问点
make log # tail -f pgadmin 日志
make info # 使用 jq 检查 pgadmin
make stop # 停止 pgadmin 容器
make clean # 移除 pgadmin 容器
make conf # 使用 pigsty pg 服务器列表配置 pgadmin
make dump # 从 pgadmin 容器导出 servers.json
make pull # 拉取最新的 pgadmin 镜像
make rmi # 移除 pgadmin 镜像
make save # 保存 pgadmin 镜像到 /tmp/pgadmin.tgz
make load # 从 /tmp 加载 pgadmin 镜像
Demo 公开 Demo 地址:http://adm.pigsty.cc
默认用户名与密码: admin@pigsty.cc / pigsty
8.17 - PGWeb:网页客户端 使用Docker拉起PGWEB,以便从浏览器进行小批量在线数据查询
PGWeb客户端工具 PGWeb 是一款基于浏览器的PG客户端工具,使用以下命令,在元节点上拉起PGWEB服务,默认为主机8886端口。可使用域名: http://cli.pigsty 访问,公开Demo:http://cli.pigsty.cc。
# docker stop pgweb; docker rm pgweb
docker run --init --name pgweb --restart always --detach --publish 8886:8081 sosedoff/pgweb
用户需要自行填写数据库连接串,例如默认CMDB的连接串:
postgres://dbuser_dba:DBUser.DBA@10.10.10.10:5432/meta?sslmode=disable
公开Demo地址:http://cli.pigsty.cc
使用Docker Compose拉起PGWEB容器:
cd ~/pigsty/app/pgweb ; docker-compose up -d
接下来,访问您本机的 8886 端口,即可看到 PGWEB 的UI界面: http://10.10.10.10:8886
您可以尝试使用下面的URL连接串,通过 PGWEB 连接至数据库实例并进行探索。
postgres://dbuser_meta:DBUser.Meta@10.10.10.10:5432/meta?sslmode= disable
postgres://test:test@10.10.10.11:5432/test?sslmode= disable
快捷方式 make up # pull up pgweb with docker-compose
make run # launch pgweb with docker
make view # print pgweb access point
make log # tail -f pgweb logs
make info # introspect pgweb with jq
make stop # stop pgweb container
make clean # remove pgweb container
make pull # pull latest pgweb image
make rmi # remove pgweb image
make save # save pgweb image to /tmp/pgweb.tgz
make load # load pgweb image from /tmp
8.18 - PostgREST:自动 API 使用 Pigsty Compose 模板部署 PostgREST,基于 PostgreSQL 模式自动生成 REST API。
PostgREST 可以将 PostgreSQL schema 直接暴露为 REST API。
Pigsty 提供 app/postgrest 模板,默认端口 8884。
快速开始 cd ~/pigsty/app/postgrest
vi .env # 检查 DB_URI / DB_SCHEMA / JWT
make up
默认入口:
http://<IP>:8884若配置了入口域名,可通过 http://api.pigsty 访问 关键配置 .env 常用参数:
POSTGREST_DB_URI:数据库连接串POSTGREST_DB_SCHEMA:暴露的 schema(默认 pigsty)POSTGREST_DB_ANON_ROLE:匿名角色POSTGREST_JWT_SECRET:JWT 密钥Swagger UI(可选) 可单独拉起 Swagger UI 预览 API:
docker run --rm --name swagger -p 8882:8080 \
-e API_URL = http://10.10.10.10:8884 \
swaggerapi/swagger-ui
访问 http://<IP>:8882。
常用命令 make up
make log
make stop
make clean
参考 8.19 - Electric:PostgreSQL 同步引擎 使用 Pigsty v4.2 自建 Electric,同步 PostgreSQL 数据到前端应用,支持部分复制与实时分发。
Electric
Pigsty 在 v4.2 提供了 app/electric 配置模板(conf/app/electric.yml),可一键完成数据库、容器与入口配置。
快速开始 curl -fsSL https://repo.pigsty.cc/get | bash; cd ~/pigsty
./bootstrap
./configure -c app/electric
vi pigsty.yml # 修改域名、密码、密钥
./deploy.yml
./docker.yml
./app.yml
默认访问地址:
http://<IP>:8002http://elec.pigsty(按模板默认域名)指标端口默认 8003(ELECTRIC_PROMETHEUS_PORT)。
关键配置 conf/app/electric.yml 会在 apps.electric.conf 中覆盖 /opt/electric/.env。常见参数:
DATABASE_URL:Electric 使用的 PostgreSQL 连接串(需要复制权限)ELECTRIC_PORT:Electric HTTP 服务端口(默认 8002)ELECTRIC_PROMETHEUS_PORT:指标端口(默认 8003)ELECTRIC_INSECURE:开发环境可设为 true,生产环境建议关闭并使用密钥运维命令 cd /opt/electric
make up
make logs
make down
参考 8.20 - Jupyter:笔记本 AI IDE 使用 Jupyter Lab 并访问 PostgreSQL 数据库,组合使用 SQL 与 Python 的能力进行数据分析。
Jupyter Lab 是基于 IPython Notebook 的完整数据科学研发环境,可用于数据分析与可视化。
Pigsty 提供了 Docker Compose 模板,可以一键在容器中启动 Jupyter Lab 服务,并方便地访问 PostgreSQL 数据库。
快速开始 在 Pigsty 软件模板目录中提供了 Jupyter 的 Docker Compose 配置文件:
修改默认密码,编辑 .env 文件中的 JUPYTER_TOKEN 参数(默认值为 pigsty)。
创建数据目录并启动服务:
make dir # 创建 /data/jupyter 目录并设置权限
make up # 使用 Docker Compose 启动服务
访问 Jupyter Lab:
管理命令 Pigsty 提供了便捷的 Makefile 命令来管理 Jupyter 服务:
make up # 启动 Jupyter Lab 服务
make dir # 创建 /data/jupyter 数据目录
make log # 查看容器日志
make info # 显示服务信息
make stop # 停止服务
make clean # 停止并移除容器
make pull # 拉取最新镜像
make save # 保存 Docker 镜像到文件
make load # 从文件加载 Docker 镜像
访问 PostgreSQL 数据库 在 Jupyter Lab 中访问 PostgreSQL 数据库需要先安装驱动。
在 Jupyter Lab 的 Terminal 中执行:
pip install psycopg2-binary psycopg2
然后在 Notebook 中使用 psycopg2 驱动访问 PostgreSQL:
import psycopg2
# 连接到 PostgreSQL 数据库
conn = psycopg2 . connect ( 'postgres://dbuser_meta:DBUser.Meta@10.10.10.10:5432/meta' )
# 执行查询
cursor = conn . cursor ()
cursor . execute ( "SELECT date, new_cases FROM covid.country_history WHERE country_code = 'CN';" )
data = cursor . fetchall ()
# 处理数据
for row in data :
print ( row )
你也可以使用其他 Python 数据分析库,如 Pandas、SQLAlchemy 等:
import pandas as pd
from sqlalchemy import create_engine
# 使用 SQLAlchemy 连接
engine = create_engine ( 'postgresql://dbuser_meta:DBUser.Meta@10.10.10.10:5432/meta' )
# 使用 Pandas 读取数据
df = pd . read_sql ( "SELECT * FROM covid.country_history WHERE country_code = 'CN'" , engine )
print ( df . head ())
配置说明 Jupyter 服务的配置在 .env 文件中:
JUPYTER_TOKEN = pigsty # Jupyter Lab 访问 Token(密码)
如果需要修改端口或其他配置,可以编辑 docker-compose.yml 文件:
services :
jupyter :
image : jupyter/scipy-notebook:latest
ports :
- "8888:8888"
volumes :
- /data/jupyter:/home/jovyan/work
environment :
- JUPYTER_TOKEN=${JUPYTER_TOKEN}
安装额外的 Python 包 Jupyter 容器支持使用 pip 或 conda 安装 Python 包。
在 Jupyter Lab 的 Terminal 中执行:
# 使用 pip 安装
pip install numpy pandas matplotlib seaborn scikit-learn
# 使用 conda 安装
conda install -c conda-forge geopandas
# 使用国内镜像加速(可选)
pip install -i https://pypi.tuna.tsinghua.edu.cn/simple numpy
数据持久化 Jupyter 的数据存储在 /data/jupyter 目录中,该目录会被挂载到容器的 /home/jovyan/work 路径。
所有保存在 work 目录下的 Notebook 和数据文件都会持久化保存在宿主机上,即使容器重启或删除也不会丢失。
安全建议 强烈建议修改默认的 Token(密码)!
编辑 .env 文件,修改 JUPYTER_TOKEN 的值 重启服务:make up 如果在生产环境中使用 Jupyter Lab,还应该:
使用强密码或禁用 Token 认证 配置 HTTPS 访问 限制网络访问权限 定期备份数据目录 相关链接 8.21 - 数据应用 基于 PostgreSQL 的数据可视化应用
8.22 - PGLOG:PG自带日志分析应用 Pigsty自带的,用于分析PostgreSQL CSV日志样本的一个样例Applet
PGLOG是Pigsty自带的一个样例应用,固定使用MetaDB中pglog.sample表作为数据来源。您只需要将日志灌入该表,然后访问相关Dashboard即可。
Pigsty提供了一些趁手的命令,用于拉取csv日志,并灌入样本表中。在元节点上,默认提供下列快捷命令:
catlog [ node = localhost] [ date = today] # 打印CSV日志到标准输出
pglog # 从标准输入灌入CSVLOG
pglog12 # 灌入PG12格式的CSVLOG
pglog13 # 灌入PG13格式的CSVLOG
pglog14 # 灌入PG14格式的CSVLOG (=pglog)
catlog | pglog # 分析当前节点当日的日志
catlog node-1 '2021-07-15' | pglog # 分析node-1在2021-07-15的csvlog
接下来,您可以访问以下的连接,查看样例日志分析界面。
catlog命令从特定节点拉取特定日期的CSV数据库日志,写入stdout
默认情况下,catlog会拉取当前节点当日的日志,您可以通过参数指定节点与日期。
组合使用pglog与catlog,即可快速拉取数据库CSV日志进行分析。
catlog | pglog # 分析当前节点当日的日志
catlog node-1 '2021-07-15' | pglog # 分析node-1在2021-07-15的csvlog
8.23 - NOAA ISD 全球气象站历史数据查询 以ISD数据集为例,展现如何将数据导入数据库中
如果您拥有数据库后不知道干点什么,不妨参试试这个开源项目:Vonng/isd
您可以直接复用监控系统Grafana,以交互式的方式查阅近30000个地面气象站过去120年间的亚小时级气象数据。
这是一个功能完成的数据应用,可以查询全球30000个地表气象站从1901年来的气象观测记录。
项目地址:https://github.com/Vonng/isd
在线Demo地址:https://demo.pigsty.cc/d/isd-overview
快速上手 克隆本仓库
git clone https://github.com/Vonng/isd.git; cd isd;
准备一个 PostgreSQL 实例
该 PostgreSQL 实例应当启用了 PostGIS 扩展。使用 PGURL 环境变量传递数据库连接信息:
# Pigsty 默认使用的管理员账号是 dbuser_dba,密码是 DBUser.DBA
export PGURL = postgres://dbuser_dba:DBUser.DBA@127.0.0.1:5432/meta?sslmode= disable
psql " ${ PGURL } " -c 'SELECT 1' # 检查连接是否可用
获取并导入ISD气象站元数据
这是一份每日更新的气象站元数据,包含了气象站的经纬度、海拔、名称、国家、省份等信息,使用以下命令下载并导入。
make reload-station # 相当于先下载最新的Station数据再加载:get-station + load-station
获取并导入最新的 isd.daily 数据
isd.daily 是一个每日更新的数据集,包含了全球各气象站的日观测数据摘要,使用以下命令下载并导入。
请注意,直接从 NOAA 网站下载的原始数据需要经过解析 方可入库,所以你需要下载或构建一个 ISD 数据 Parser。
make get-parser # 从 Github 下载 Parser 二进制,当然你也可以用 make build 直接用 go 构建。
make reload-daily # 下载本年度最新的 isd.daily 数据并导入数据库中
加载解析好的 CSV 数据集
ISD Daily 数据集有一些脏数据与 重复数据 ,如果你不想手工解析处理清洗,这里也提供了一份解析好的稳定CSV数据集。
该数据集包含了截止到 2023-06-24 的 isd.daily 数据,你可以直接下载并导入 PostgreSQL 中,不需要 Parser,
make get-stable # 从 Github 上获取稳定的 isd.daily 历史数据集。
make load-stable # 将下载好的稳定历史数据集加载到 PostgreSQL 数据库中。
更多数据 ISD数据集有两个部分是每日更新的,气象站元数据,以及最新年份的 isd.daily (如 2023 年的 Tarball)。
你可以使用以下命令下载并刷新这两个部分。如果数据集没有更新,那么这些命令不会重新下载同样的数据包
make reload # 实际上是:reload-station + reload-daily
你也可以使用以下命令下载并加载特定年份的 isd.daily 数据:
bin/get-daily 2022 # 获取 2022 年的每日气象观测摘要 (1900-2023)
bin/load-daily " ${ PGURL } " 2022 # 加载 2022 年的每日气象观测摘要 (1900-2023)
除了每日摘要 isd.daily, ISD 还提供了一份更详细的亚小时级原始观测记录 isd.hourly,下载与加载的方式与前者类似:
bin/get-hourly 2022 # 下载特定某一年的小时级观测记录(例如2022年,可选 1900-2023)
bin/load-hourly " ${ PGURL } " 2022 # 加载特定某一年的小时级观测记录
数据 数据集概要 ISD提供了四个数据集:亚小时级原始观测数据,每日统计摘要数据,月度统计摘要,年度统计摘要
数据集 备注 ISD Hourly 亚小时级观测记录 ISD Daily 每日统计摘要 ISD Monthly 没有用到,因为可以从 isd.daily 计算生成 ISD Yearly 没有用到,因为可以从 isd.daily 计算生成
每日摘要数据集
压缩包大小 2.8GB (截止至 2023-06-24) 表大小 24GB,索引大小 6GB,PostgreSQL 中总大小约为 30GB 如果启用了 timescaledb 压缩,总大小可以压缩到 4.5 GB。 亚小时级观测数据级
压缩包总大小 117GB 灌入数据库后表大小 1TB+ ,索引大小 600GB+,总大小 1.6TB 数据库模式 气象站元数据表
CREATE TABLE isd . station
(
station VARCHAR ( 12 ) PRIMARY KEY ,
usaf VARCHAR ( 6 ) GENERATED ALWAYS AS ( substring ( station , 1 , 6 )) STORED ,
wban VARCHAR ( 5 ) GENERATED ALWAYS AS ( substring ( station , 7 , 5 )) STORED ,
name VARCHAR ( 32 ),
country VARCHAR ( 2 ),
province VARCHAR ( 2 ),
icao VARCHAR ( 4 ),
location GEOMETRY ( POINT ),
longitude NUMERIC GENERATED ALWAYS AS ( Round ( ST_X ( location ):: NUMERIC , 6 )) STORED ,
latitude NUMERIC GENERATED ALWAYS AS ( Round ( ST_Y ( location ):: NUMERIC , 6 )) STORED ,
elevation NUMERIC ,
period daterange ,
begin_date DATE GENERATED ALWAYS AS ( lower ( period )) STORED ,
end_date DATE GENERATED ALWAYS AS ( upper ( period )) STORED
);
每日摘要表
CREATE TABLE IF NOT EXISTS isd . daily
(
station VARCHAR ( 12 ) NOT NULL , -- station number 6USAF+5WBAN
ts DATE NOT NULL , -- observation date
-- 气温 & 露点
temp_mean NUMERIC ( 3 , 1 ), -- mean temperature ℃
temp_min NUMERIC ( 3 , 1 ), -- min temperature ℃
temp_max NUMERIC ( 3 , 1 ), -- max temperature ℃
dewp_mean NUMERIC ( 3 , 1 ), -- mean dew point ℃
-- 气压
slp_mean NUMERIC ( 5 , 1 ), -- sea level pressure (hPa)
stp_mean NUMERIC ( 5 , 1 ), -- station pressure (hPa)
-- 可见距离
vis_mean NUMERIC ( 6 ), -- visible distance (m)
-- 风速
wdsp_mean NUMERIC ( 4 , 1 ), -- average wind speed (m/s)
wdsp_max NUMERIC ( 4 , 1 ), -- max wind speed (m/s)
gust NUMERIC ( 4 , 1 ), -- max wind gust (m/s)
-- 降水 / 雪深
prcp_mean NUMERIC ( 5 , 1 ), -- precipitation (mm)
prcp NUMERIC ( 5 , 1 ), -- rectified precipitation (mm)
sndp NuMERIC ( 5 , 1 ), -- snow depth (mm)
-- FRSHTT (Fog/Rain/Snow/Hail/Thunder/Tornado) 雾/雨/雪/雹/雷/龙卷
is_foggy BOOLEAN , -- (F)og
is_rainy BOOLEAN , -- (R)ain or Drizzle
is_snowy BOOLEAN , -- (S)now or pellets
is_hail BOOLEAN , -- (H)ail
is_thunder BOOLEAN , -- (T)hunder
is_tornado BOOLEAN , -- (T)ornado or Funnel Cloud
-- 统计聚合使用的记录数
temp_count SMALLINT , -- record count for temp
dewp_count SMALLINT , -- record count for dew point
slp_count SMALLINT , -- record count for sea level pressure
stp_count SMALLINT , -- record count for station pressure
wdsp_count SMALLINT , -- record count for wind speed
visib_count SMALLINT , -- record count for visible distance
-- 气温标记
temp_min_f BOOLEAN , -- aggregate min temperature
temp_max_f BOOLEAN , -- aggregate max temperature
prcp_flag CHAR , -- precipitation flag: ABCDEFGHI
PRIMARY KEY ( station , ts )
); -- PARTITION BY RANGE (ts);
亚小时级原始观测数据表
ISD Hourly CREATE TABLE IF NOT EXISTS isd . hourly
(
station VARCHAR ( 12 ) NOT NULL , -- station id
ts TIMESTAMP NOT NULL , -- timestamp
-- air
temp NUMERIC ( 3 , 1 ), -- [-93.2,+61.8]
dewp NUMERIC ( 3 , 1 ), -- [-98.2,+36.8]
slp NUMERIC ( 5 , 1 ), -- [8600,10900]
stp NUMERIC ( 5 , 1 ), -- [4500,10900]
vis NUMERIC ( 6 ), -- [0,160000]
-- wind
wd_angle NUMERIC ( 3 ), -- [1,360]
wd_speed NUMERIC ( 4 , 1 ), -- [0,90]
wd_gust NUMERIC ( 4 , 1 ), -- [0,110]
wd_code VARCHAR ( 1 ), -- code that denotes the character of the WIND-OBSERVATION.
-- cloud
cld_height NUMERIC ( 5 ), -- [0,22000]
cld_code VARCHAR ( 2 ), -- cloud code
-- water
sndp NUMERIC ( 5 , 1 ), -- mm snow
prcp NUMERIC ( 5 , 1 ), -- mm precipitation
prcp_hour NUMERIC ( 2 ), -- precipitation duration in hour
prcp_code VARCHAR ( 1 ), -- precipitation type code
-- sky
mw_code VARCHAR ( 2 ), -- manual weather observation code
aw_code VARCHAR ( 2 ), -- auto weather observation code
pw_code VARCHAR ( 1 ), -- weather code of past period of time
pw_hour NUMERIC ( 2 ), -- duration of pw_code period
-- misc
-- remark TEXT,
-- eqd TEXT,
data JSONB -- extra data
) PARTITION BY RANGE ( ts );
解析器 NOAA ISD 提供的原始数据是高度压缩的专有格式,需要通过解析器加工,才能转换为数据库表的格式。
针对 Daily 与 Hourly 两份数据集,这里提供了两个 Parser: isddisdh
NAME
isd -- Intergrated Surface Dataset Parser
SYNOPSIS
isd daily [ -i <input| stdin>] [ -o <output| stout>] [ -v]
isd hourly [ -i <input| stdin>] [ -o <output| stout>] [ -v] [ -d raw| ts-first| hour-first]
DESCRIPTION
The isd program takes noaa isd daily/hourly raw tarball data as input.
and generate parsed data in csv format as output. Works in pipe mode
cat data/daily/2023.tar.gz | bin/isd daily -v | psql ${ PGURL } -AXtwqc "COPY isd.daily FROM STDIN CSV;"
isd daily -v -i data/daily/2023.tar.gz | psql ${ PGURL } -AXtwqc "COPY isd.daily FROM STDIN CSV;"
isd hourly -v -i data/hourly/2023.tar.gz | psql ${ PGURL } -AXtwqc "COPY isd.hourly FROM STDIN CSV;"
OPTIONS
-i <input> input file, stdin by default
-o <output> output file, stdout by default
-p <profpath> pprof file path, enable if specified
-d de-duplicate rows for hourly dataset ( raw, ts-first, hour-first)
-v verbose mode
-h print help
用户界面 这里提供了几个使用 Grafana 制作的 Dashboard,可以用于探索 ISD 数据集,查询气象站与历史气象数据。
ISD Overview
全局概览,总体指标与气象站导航。
ISD Country
展示单个国家/地区内所有的气象站。
ISD Station
展示单个气象站的详细信息,元数据,天/月/年度汇总指标。
ISD Station Dashboard
ISD Detail
展示一个气象站原始亚小时级观测指标数据,需要 isd.hourly 数据集。
ISD Station Dashboard
8.24 - COVID-19 数据大盘 Pigsty 自带的,用于展示世界卫生组织官方 COVID 疫情数据的一个样例 Applet
Covid 是 Pigsty 自带的,用于展示世界卫生组织官方疫情数据大盘的一个样例 Applet。
您可以查阅每个国家与地区 COVID-19 的感染与死亡案例,以及全球的疫情趋势。
概览 GitHub 仓库地址:https://github.com/Vonng/pigsty-app/tree/master/covid
在线Demo地址:https://demo.pigsty.cc/d/covid
安装 在管理节点上进入应用目录,执行make以完成安装。
其他一些子任务:
make reload # download latest data and pour it again
make ui # install grafana dashboards
make sql # install database schemas
make download # download latest data
make load # load downloaded data into database
make reload # download latest data and pour it into database
8.25 - StackOverflow 调研 分析 StackOverflow 最近七年全球开发者调研数据中关于数据库的部分
概览 GitHub 仓库地址:https://github.com/Vonng/pigsty-app/tree/master/db
在线Demo地址:https://demo.pigsty.cc/d/sf-survey
8.27 - 云上算力价格计算器 分析阿里云 / AWS 上算力与存储的价格 (ECS/ESSD)
概览 GitHub 仓库地址:https://github.com/Vonng/pigsty-app/tree/master/cloud
在线Demo地址:https://demo.pigsty.cc/d/ecs
文章地址:《剖析算力成本:阿里云真降价了吗? 》
数据源 Aliyun ECS 价格可以在 价格计算器 - 定价详情 - 价格下载 中获取 CSV 原始数据。
模式 下载 阿里云 价格明细并导入分析
CREATE EXTENSION file_fdw ;
CREATE SERVER fs FOREIGN DATA WRAPPER file_fdw ;
DROP FOREIGN TABLE IF EXISTS aliyun_ecs CASCADE ;
CREATE FOREIGN TABLE aliyun_ecs
(
"region" text ,
"system" text ,
"network" text ,
"isIO" bool ,
"instanceId" text ,
"hourlyPrice" numeric ,
"weeklyPrice" numeric ,
"standard" numeric ,
"monthlyPrice" numeric ,
"yearlyPrice" numeric ,
"2yearPrice" numeric ,
"3yearPrice" numeric ,
"4yearPrice" numeric ,
"5yearPrice" numeric ,
"id" text ,
"instanceLabel" text ,
"familyId" text ,
"serverType" text ,
"cpu" text ,
"localStorage" text ,
"NvmeSupport" text ,
"InstanceFamilyLevel" text ,
"EniTrunkSupported" text ,
"InstancePpsRx" text ,
"GPUSpec" text ,
"CpuTurboFrequency" text ,
"InstancePpsTx" text ,
"InstanceTypeId" text ,
"GPUAmount" text ,
"InstanceTypeFamily" text ,
"SecondaryEniQueueNumber" text ,
"EniQuantity" text ,
"EniPrivateIpAddressQuantity" text ,
"DiskQuantity" text ,
"EniIpv6AddressQuantity" text ,
"InstanceCategory" text ,
"CpuArchitecture" text ,
"EriQuantity" text ,
"MemorySize" numeric ,
"EniTotalQuantity" numeric ,
"PhysicalProcessorModel" text ,
"InstanceBandwidthRx" numeric ,
"CpuCoreCount" numeric ,
"Generation" text ,
"CpuSpeedFrequency" numeric ,
"PrimaryEniQueueNumber" text ,
"LocalStorageCategory" text ,
"InstanceBandwidthTx" text ,
"TotalEniQueueQuantity" text
) SERVER fs OPTIONS ( filename '/tmp/aliyun-ecs.csv' , format 'csv' , header 'true' );
AWS EC2 同理,可以从 Vantage 下载价格清单:
DROP FOREIGN TABLE IF EXISTS aws_ec2 CASCADE ;
CREATE FOREIGN TABLE aws_ec2
(
"name" TEXT ,
"id" TEXT ,
"Memory" TEXT ,
"vCPUs" TEXT ,
"GPUs" TEXT ,
"ClockSpeed" TEXT ,
"InstanceStorage" TEXT ,
"NetworkPerformance" TEXT ,
"ondemand" TEXT ,
"reserve" TEXT ,
"spot" TEXT
) SERVER fs OPTIONS ( filename '/tmp/aws-ec2.csv' , format 'csv' , header 'true' );
DROP VIEW IF EXISTS ecs ;
CREATE VIEW ecs AS
SELECT "region" AS region ,
"id" AS id ,
"instanceLabel" AS name ,
"familyId" AS family ,
"CpuCoreCount" AS cpu ,
"MemorySize" AS mem ,
round ( "5yearPrice" / "CpuCoreCount" / 60 , 2 ) AS ycm5 , -- ¥ / (core·month)
round ( "4yearPrice" / "CpuCoreCount" / 48 , 2 ) AS ycm4 , -- ¥ / (core·month)
round ( "3yearPrice" / "CpuCoreCount" / 36 , 2 ) AS ycm3 , -- ¥ / (core·month)
round ( "2yearPrice" / "CpuCoreCount" / 24 , 2 ) AS ycm2 , -- ¥ / (core·month)
round ( "yearlyPrice" / "CpuCoreCount" / 12 , 2 ) AS ycm1 , -- ¥ / (core·month)
round ( "standard" / "CpuCoreCount" , 2 ) AS ycmm , -- ¥ / (core·month)
round ( "hourlyPrice" / "CpuCoreCount" * 720 , 2 ) AS ycmh , -- ¥ / (core·month)
"CpuSpeedFrequency" :: NUMERIC AS freq ,
"CpuTurboFrequency" :: NUMERIC AS freq_turbo ,
"Generation" AS generation
FROM aliyun_ecs
WHERE system = 'linux' ;
DROP VIEW IF EXISTS ec2 ;
CREATE VIEW ec2 AS
SELECT id ,
name ,
split_part ( id , '.' , 1 ) as family ,
split_part ( id , '.' , 2 ) as spec ,
( regexp_match ( split_part ( id , '.' , 1 ), '^[a-zA-Z]+(\d)[a-z0-9]*' ))[ 1 ] as gen ,
regexp_substr ( "vCPUs" , '^[0-9]+' ):: int as cpu ,
regexp_substr ( "Memory" , '^[0-9]+' ):: int as mem ,
CASE spot
WHEN 'unavailable' THEN NULL
ELSE round (( regexp_substr ( "spot" , '([0-9]+.[0-9]+)' ):: NUMERIC * 7 . 2 ), 2 ) END AS spot ,
CASE ondemand
WHEN 'unavailable' THEN NULL
ELSE round (( regexp_substr ( "ondemand" , '([0-9]+.[0-9]+)' ):: NUMERIC * 7 . 2 ), 2 ) END AS ondemand ,
CASE reserve
WHEN 'unavailable' THEN NULL
ELSE round (( regexp_substr ( "reserve" , '([0-9]+.[0-9]+)' ):: NUMERIC * 7 . 2 ), 2 ) END AS reserve ,
"ClockSpeed" AS freq
FROM aws_ec2 ;
9 - 模板 开箱即用的配置模板,针对具体场景的配置示例,以及配置文件的详细解释。
Pigsty 提供了多种开箱即用的配置模板,适用于不同的使用场景。
您可以在 configure-c 指定一个配置模板。如果没有指定配置模板,将会使用默认的 meta
9.1 - 单机模版 9.2 - meta Pigsty 默认使用的配置模板,单节点,覆盖核心功能,标准单机配置,在线安装,本地备份仓库。
meta 配置模板是 Pigsty 默认使用的模板,它的目标是在当前单节点上完成 Pigsty 核心功能 —— PostgreSQL 的部署。
为了实现最好的兼容性,meta 模板仅下载安装包含 最小必需 软件集合,以便在所有操作系统发行版与芯片架构上实现这一目标。
配置概览 配置名称: meta 节点数量: 单节点 配置说明:Pigsty 默认使用的单节点安装配置模板,带有较完善的关键配置参数说明,与最小可用功能集合。 适用系统:el8, el9, el10, d12, d13, u22, u24 适用架构:x86_64, aarch64 相关配置:metaslimfat 使用方式:此配置模板为 Pigsty 默认配置模板,因此在 配置 -c meta 参数:
./configure [ -i <primary_ip>]
例如,如果您想要安装 PG 16,而非默认的 PostgreSQL 18,可以在 configure 中使用 -v 参数:
./configure -v 16 # or 17,15,14,13....
配置内容 源文件地址:pigsty/conf/meta.yml
---
#==============================================================#
# File : meta.yml
# Desc : Pigsty default 1-node online install config
# Ctime : 2020-05-22
# Mtime : 2026-02-04
# Docs : https://pigsty.io/docs/conf/meta
# License : Apache-2.0 @ https://pigsty.io/docs/about/license/
# Copyright : 2018-2026 Ruohang Feng / Vonng (rh@vonng.com)
#==============================================================#
# This is the default 1-node configuration template, with:
# INFRA, NODE, PGSQL, ETCD, MINIO, DOCKER, APP (pgadmin)
# with basic pg extensions: postgis, pgvector
#
# Work with PostgreSQL 14-18 on all supported platform
# Usage:
# curl https://repo.pigsty.io/get | bash
# ./configure
# ./deploy.yml
all :
#==============================================================#
# Clusters, Nodes, and Modules
#==============================================================#
children :
#----------------------------------------------#
# PGSQL : https://pigsty.io/docs/pgsql
#----------------------------------------------#
# this is an example single-node postgres cluster with pgvector installed, with one biz database & two biz users
pg-meta :
hosts :
10.10.10.10 : { pg_seq: 1, pg_role : primary } # <---- primary instance with read-write capability
#x.xx.xx.xx: { pg_seq: 2, pg_role: replica } # <---- read only replica for read-only online traffic
#x.xx.xx.xy: { pg_seq: 3, pg_role: offline } # <---- offline instance of ETL & interactive queries
vars :
pg_cluster : pg-meta
# install, load, create pg extensions: https://pigsty.io/docs/pgsql/ext/
pg_extensions : [ postgis, pgvector ]
# define business users/roles : https://pigsty.io/docs/pgsql/config/user
pg_users :
- { name: dbuser_meta ,password: DBUser.Meta ,pgbouncer: true ,roles: [dbrole_admin ] ,comment : pigsty admin user }
- { name: dbuser_view ,password: DBUser.Viewer ,pgbouncer: true ,roles: [dbrole_readonly] ,comment : read-only viewer }
# define business databases : https://pigsty.io/docs/pgsql/config/db
pg_databases :
- name : meta
baseline : cmdb.sql
comment : "pigsty meta database"
schemas : [ pigsty]
# define extensions in database : https://pigsty.io/docs/pgsql/ext/create
extensions : [ postgis, vector ]
pg_hba_rules : # https://pigsty.io/docs/pgsql/config/hba
- { user: all ,db: all ,addr: intra ,auth: pwd ,title: 'everyone intranet access with password' ,order : 800 }
pg_crontab : # https://pigsty.io/docs/pgsql/admin/crontab
- '00 01 * * * /pg/bin/pg-backup full'
# define (OPTIONAL) L2 VIP that bind to primary
#pg_vip_enabled: true
#pg_vip_address: 10.10.10.2/24
#pg_vip_interface: eth1
#----------------------------------------------#
# INFRA : https://pigsty.io/docs/infra
#----------------------------------------------#
infra :
hosts :
10.10.10.10 : { infra_seq : 1 }
vars :
repo_enabled: false # disable in 1-node mode : https://pigsty.io/docs/infra/admin/repo
#repo_extra_packages: [ pg18-main ,pg18-time ,pg18-gis ,pg18-rag ,pg18-fts ,pg18-olap ,pg18-feat ,pg18-lang ,pg18-type ,pg18-util ,pg18-func ,pg18-admin ,pg18-stat ,pg18-sec ,pg18-fdw ,pg18-sim ,pg18-etl]
#----------------------------------------------#
# ETCD : https://pigsty.io/docs/etcd
#----------------------------------------------#
etcd :
hosts :
10.10.10.10 : { etcd_seq : 1 }
vars :
etcd_cluster : etcd
etcd_safeguard : false # prevent purging running etcd instance?
#----------------------------------------------#
# MINIO : https://pigsty.io/docs/minio
#----------------------------------------------#
#minio:
# hosts:
# 10.10.10.10: { minio_seq: 1 }
# vars:
# minio_cluster: minio
# minio_users: # list of minio user to be created
# - { access_key: pgbackrest ,secret_key: S3User.Backup ,policy: pgsql }
# - { access_key: s3user_meta ,secret_key: S3User.Meta ,policy: meta }
# - { access_key: s3user_data ,secret_key: S3User.Data ,policy: data }
#----------------------------------------------#
# DOCKER : https://pigsty.io/docs/docker
# APP : https://pigsty.io/docs/app
#----------------------------------------------#
# launch example pgadmin app with: ./app.yml (http://10.10.10.10:8885 admin@pigsty.cc / pigsty)
app :
hosts : { 10.10.10.10 : {} }
vars :
docker_enabled : true # enabled docker with ./docker.yml
#docker_registry_mirrors: ["https://docker.1panel.live","https://docker.1ms.run","https://docker.xuanyuan.me","https://registry-1.docker.io"]
app : pgadmin # specify the default app name to be installed (in the apps)
apps: # define all applications, appname : definition
pgadmin : # pgadmin app definition (app/pgadmin -> /opt/pgadmin)
conf : # override /opt/pgadmin/.env
PGADMIN_DEFAULT_EMAIL : admin@pigsty.cc
PGADMIN_DEFAULT_PASSWORD : pigsty
#==============================================================#
# Global Parameters
#==============================================================#
vars :
#----------------------------------------------#
# INFRA : https://pigsty.io/docs/infra
#----------------------------------------------#
version : v4.2.2 # pigsty version string
admin_ip : 10.10.10.10 # admin node ip address
region: default # upstream mirror region : default|china|europe
proxy_env : # global proxy env when downloading packages
no_proxy : "localhost,127.0.0.1,10.0.0.0/8,192.168.0.0/16,*.pigsty,*.aliyun.com,mirrors.*,*.myqcloud.com,*.tsinghua.edu.cn"
# http_proxy: # set your proxy here: e.g http://user:pass@proxy.xxx.com
# https_proxy: # set your proxy here: e.g http://user:pass@proxy.xxx.com
# all_proxy: # set your proxy here: e.g http://user:pass@proxy.xxx.com
infra_portal : # infra services exposed via portal
home : { domain : i.pigsty } # default domain name
pgadmin : { domain: adm.pigsty ,endpoint : "${admin_ip}:8885" }
#minio : { domain: m.pigsty ,endpoint: "${admin_ip}:9001" ,scheme: https ,websocket: true }
#----------------------------------------------#
# NODE : https://pigsty.io/docs/node/param
#----------------------------------------------#
nodename_overwrite : false # do not overwrite node hostname on single node mode
node_tune: oltp # node tuning specs : oltp,olap,tiny,crit
node_etc_hosts : [ '${admin_ip} i.pigsty sss.pigsty' ]
node_repo_modules : 'node,infra,pgsql' # add these repos directly to the singleton node
#node_repo_modules: local # use this if you want to build & user local repo
node_repo_remove : true # remove existing node repo for node managed by pigsty
#node_packages: [openssh-server] # packages to be installed current nodes with the latest version
node_firewall_public_port : [ 22 , 80 , 443 , 5432 ] # expose 5432 for demo convenience, remove in production!
#----------------------------------------------#
# PGSQL : https://pigsty.io/docs/pgsql/param
#----------------------------------------------#
pg_version : 18 # default postgres version
pg_conf: oltp.yml # pgsql tuning specs : {oltp,olap,tiny,crit}.yml
pg_safeguard : false # prevent purging running postgres instance?
pg_packages : [ pgsql-main, pgsql-common ] # pg kernel and common utils
#pg_extensions: [ pg18-time ,pg18-gis ,pg18-rag ,pg18-fts ,pg18-olap ,pg18-feat ,pg18-lang ,pg18-type ,pg18-util ,pg18-func ,pg18-admin ,pg18-stat ,pg18-sec ,pg18-fdw ,pg18-sim ,pg18-etl]
#----------------------------------------------#
# BACKUP : https://pigsty.io/docs/pgsql/backup
#----------------------------------------------#
# if you want to use minio as backup repo instead of 'local' fs, uncomment this, and configure `pgbackrest_repo`
# you can also use external object storage as backup repo
#pgbackrest_method: minio # if you want to use minio as backup repo instead of 'local' fs, uncomment this
#pgbackrest_repo: # pgbackrest repo: https://pgbackrest.org/configuration.html#section-repository
# local: # default pgbackrest repo with local posix fs
# path: /pg/backup # local backup directory, `/pg/backup` by default
# retention_full_type: count # retention full backups by count
# retention_full: 2 # keep 2, at most 3 full backup when using local fs repo
# minio: # optional minio repo for pgbackrest
# type: s3 # minio is s3-compatible, so s3 is used
# s3_endpoint: sss.pigsty # minio endpoint domain name, `sss.pigsty` by default
# s3_region: us-east-1 # minio region, us-east-1 by default, useless for minio
# s3_bucket: pgsql # minio bucket name, `pgsql` by default
# s3_key: pgbackrest # minio user access key for pgbackrest
# s3_key_secret: S3User.Backup # minio user secret key for pgbackrest
# s3_uri_style: path # use path style uri for minio rather than host style
# path: /pgbackrest # minio backup path, default is `/pgbackrest`
# storage_port: 9000 # minio port, 9000 by default
# storage_ca_file: /etc/pki/ca.crt # minio ca file path, `/etc/pki/ca.crt` by default
# block: y # Enable block incremental backup
# bundle: y # bundle small files into a single file
# bundle_limit: 20MiB # Limit for file bundles, 20MiB for object storage
# bundle_size: 128MiB # Target size for file bundles, 128MiB for object storage
# cipher_type: aes-256-cbc # enable AES encryption for remote backup repo
# cipher_pass: pgBackRest # AES encryption password, default is 'pgBackRest'
# retention_full_type: time # retention full backup by time on minio repo
# retention_full: 14 # keep full backup for last 14 days
# s3: # any s3 compatible service is fine
# type: s3
# s3_endpoint: oss-cn-beijing-internal.aliyuncs.com
# s3_region: oss-cn-beijing
# s3_bucket: <your_bucket_name>
# s3_key: <your_access_key>
# s3_key_secret: <your_secret_key>
# s3_uri_style: host
# path: /pgbackrest
# bundle: y # bundle small files into a single file
# bundle_limit: 20MiB # Limit for file bundles, 20MiB for object storage
# bundle_size: 128MiB # Target size for file bundles, 128MiB for object storage
# cipher_type: aes-256-cbc # enable AES encryption for remote backup repo
# cipher_pass: pgBackRest # AES encryption password, default is 'pgBackRest'
# retention_full_type: time # retention full backup by time on minio repo
# retention_full: 14 # keep full backup for last 14 days
#----------------------------------------------#
# PASSWORD : https://pigsty.io/docs/setup/security/
#----------------------------------------------#
grafana_admin_password : pigsty
grafana_view_password : DBUser.Viewer
pg_admin_password : DBUser.DBA
pg_monitor_password : DBUser.Monitor
pg_replication_password : DBUser.Replicator
patroni_password : Patroni.API
haproxy_admin_password : pigsty
minio_secret_key : S3User.MinIO
etcd_root_password : Etcd.Root
... 配置解读 meta 模板是 Pigsty 的 默认入门配置 ,专为快速上手设计。
适用场景 :
首次体验 Pigsty 的用户 开发测试环境的快速部署 单机运行的小型生产环境 作为更复杂部署的基础模板 关键特性 :
在线安装模式,不构建本地软件源(repo_enabled: false) 默认安装 PostgreSQL 18,带有 postgis 和 pgvector 扩展 包含完整的监控基础设施(Grafana、Prometheus、Loki 等) 预置 Docker 与 pgAdmin 应用示例 MinIO 备份存储默认禁用,可按需启用 注意事项 :
默认密码为示例密码,生产环境 务必修改 单节点模式的 etcd 无高可用保障,适合开发测试 如需构建本地软件源,请使用 rich 9.3 - rich 功能丰富的单节点配置,构建本地软件源,下载所有扩展,启用 MinIO 备份,预置完整示例
配置模板 richmeta
如果您希望构建本地软件源、使用 MinIO 存储备份、运行 Docker 应用,或需要预置业务数据库,可以使用此模板。
配置概览 配置名称: rich 节点数量: 单节点 配置说明:功能丰富的单节点配置,在 meta 基础上增加本地软件源、MinIO 备份、完整扩展、Docker 应用示例 适用系统:el8, el9, el10, d12, d13, u22, u24 适用架构:x86_64, aarch64 相关配置:metaslimfat 此模板相比 meta 的主要增强:
构建本地软件源(repo_enabled: true),下载所有 PG 扩展 启用单节点 MinIO 作为 PostgreSQL 备份存储 预置 TimescaleDB、pgvector、pg_wait_sampling 等扩展 包含详细的用户/数据库/服务定义注释示例 添加 Redis 主从实例示例 预置 pg-test 三节点高可用集群配置存根 启用方式:
./configure -c rich [ -i <primary_ip>]
配置内容 源文件地址:pigsty/conf/rich.yml
---
#==============================================================#
# File : rich.yml
# Desc : Pigsty feature-rich 1-node online install config
# Ctime : 2020-05-22
# Mtime : 2025-12-12
# Docs : https://pigsty.io/docs/conf/rich
# License : Apache-2.0 @ https://pigsty.io/docs/about/license/
# Copyright : 2018-2026 Ruohang Feng / Vonng (rh@vonng.com)
#==============================================================#
# This is the enhanced version of default meta.yml, which has:
# - almost all available postgres extensions
# - build local software repo for entire env
# - 1 node minio used as central backup repo
# - cluster stub for 3-node pg-test / ferret / redis
# - stub for nginx, certs, and website self-hosting config
# - detailed comments for database / user / service
#
# Usage:
# curl https://repo.pigsty.io/get | bash
# ./configure -c rich
# ./deploy.yml
all :
#==============================================================#
# Clusters, Nodes, and Modules
#==============================================================#
children :
#----------------------------------------------#
# PGSQL : https://pigsty.io/docs/pgsql
#----------------------------------------------#
# this is an example single-node postgres cluster with pgvector installed, with one biz database & two biz users
pg-meta :
hosts :
10.10.10.10 : { pg_seq: 1, pg_role : primary } # <---- primary instance with read-write capability
#x.xx.xx.xx: { pg_seq: 2, pg_role: replica } # <---- read only replica for read-only online traffic
#x.xx.xx.xy: { pg_seq: 3, pg_role: offline } # <---- offline instance of ETL & interactive queries
vars :
pg_cluster : pg-meta
# install, load, create pg extensions: https://pigsty.io/docs/pgsql/ext/
pg_extensions : [ postgis, timescaledb, pgvector, pg_wait_sampling ]
pg_libs : 'timescaledb, pg_stat_statements, auto_explain, pg_wait_sampling'
# define business users/roles : https://pigsty.io/docs/pgsql/config/user
pg_users :
- name : dbuser_meta # REQUIRED, `name` is the only mandatory field of a user definition
password : DBUser.Meta # optional, the password. can be a scram-sha-256 hash string or plain text
pgbouncer : true # optional, add this user to the pgbouncer user-list? false by default (production user should be true explicitly)
comment : pigsty admin user # optional, comment string for this user/role
roles: [ dbrole_admin ] # optional, belonged roles. default roles are : dbrole_{admin|readonly|readwrite|offline}
#state: create # optional, create|absent, 'create' by default, use 'absent' to drop user
#login: true # optional, can log in, true by default (new biz ROLE should be false)
#superuser: false # optional, is superuser? false by default
#createdb: false # optional, can create databases? false by default
#createrole: false # optional, can create role? false by default
#inherit: true # optional, can this role use inherited privileges? true by default
#replication: false # optional, can this role do replication? false by default
#bypassrls: false # optional, can this role bypass row level security? false by default
#connlimit: -1 # optional, user connection limit, default -1 disable limit
#expire_in: 3650 # optional, now + n days when this role is expired (OVERWRITE expire_at)
#expire_at: '2030-12-31' # optional, YYYY-MM-DD 'timestamp' when this role is expired (OVERWRITTEN by expire_in)
#parameters: {} # optional, role level parameters with `ALTER ROLE SET`
#pool_mode: transaction # optional, pgbouncer pool mode at user level, transaction by default
#pool_connlimit: -1 # optional, max database connections at user level, default -1 disable limit
# Enhanced roles syntax (PG16+): roles can be string or object with options:
# - dbrole_readwrite # simple string: GRANT role
# - { name: role, admin: true } # GRANT WITH ADMIN OPTION
# - { name: role, set: false } # PG16: REVOKE SET OPTION
# - { name: role, inherit: false } # PG16: REVOKE INHERIT OPTION
# - { name: role, state: absent } # REVOKE membership
- { name: dbuser_view ,password: DBUser.Viewer ,pgbouncer: true ,roles: [dbrole_readonly], comment : read-only viewer for meta database }
#- {name: dbuser_bytebase ,password: DBUser.Bytebase ,pgbouncer: true ,roles: [dbrole_admin] ,comment: admin user for bytebase database }
#- {name: dbuser_remove ,state: absent } # use state: absent to remove a user
# define business databases : https://pigsty.io/docs/pgsql/config/db
pg_databases : # define business databases on this cluster, array of database definition
- name : meta # REQUIRED, `name` is the only mandatory field of a database definition
#state: create # optional, create|absent|recreate, create by default
baseline: cmdb.sql # optional, database sql baseline path, (relative path among the ansible search path, e.g. : files/)
schemas : [ pigsty ] # optional, additional schemas to be created, array of schema names
extensions: # optional, additional extensions to be installed : array of `{name[,schema]}`
- vector # install pgvector for vector similarity search
- postgis # install postgis for geospatial type & index
- timescaledb # install timescaledb for time-series data
- { name: pg_wait_sampling, schema : monitor } # install pg_wait_sampling on monitor schema
comment : pigsty meta database # optional, comment string for this database
#pgbouncer: true # optional, add this database to the pgbouncer database list? true by default
#owner: postgres # optional, database owner, current user if not specified
#template: template1 # optional, which template to use, template1 by default
#strategy: FILE_COPY # optional, clone strategy: FILE_COPY or WAL_LOG (PG15+), default to PG's default
#encoding: UTF8 # optional, inherited from template / cluster if not defined (UTF8)
#locale: C # optional, inherited from template / cluster if not defined (C)
#lc_collate: C # optional, inherited from template / cluster if not defined (C)
#lc_ctype: C # optional, inherited from template / cluster if not defined (C)
#locale_provider: libc # optional, locale provider: libc, icu, builtin (PG15+)
#icu_locale: en-US # optional, icu locale for icu locale provider (PG15+)
#icu_rules: '' # optional, icu rules for icu locale provider (PG16+)
#builtin_locale: C.UTF-8 # optional, builtin locale for builtin locale provider (PG17+)
#tablespace: pg_default # optional, default tablespace, pg_default by default
#is_template: false # optional, mark database as template, allowing clone by any user with CREATEDB privilege
#allowconn: true # optional, allow connection, true by default. false will disable connect at all
#revokeconn: false # optional, revoke public connection privilege. false by default. (leave connect with grant option to owner)
#register_datasource: true # optional, register this database to grafana datasources? true by default
#connlimit: -1 # optional, database connection limit, default -1 disable limit
#pool_auth_user: dbuser_meta # optional, all connection to this pgbouncer database will be authenticated by this user
#pool_mode: transaction # optional, pgbouncer pool mode at database level, default transaction
#pool_size: 64 # optional, pgbouncer pool size at database level, default 64
#pool_reserve: 32 # optional, pgbouncer pool size reserve at database level, default 32
#pool_size_min: 0 # optional, pgbouncer pool size min at database level, default 0
#pool_connlimit: 100 # optional, max database connections at database level, default 100
#- {name: bytebase ,owner: dbuser_bytebase ,revokeconn: true ,comment: bytebase primary database }
pg_hba_rules : # https://pigsty.io/docs/pgsql/config/hba
- { user: all ,db: all ,addr: intra ,auth: pwd ,title: 'everyone intranet access with password' ,order : 800 }
pg_crontab : # https://pigsty.io/docs/pgsql/admin/crontab
- '00 01 * * * /pg/bin/pg-backup full'
# define (OPTIONAL) L2 VIP that bind to primary
#pg_vip_enabled: true
#pg_vip_address: 10.10.10.2/24
#pg_vip_interface: eth1
#----------------------------------------------#
# PGSQL HA Cluster Example: 3-node pg-test
#----------------------------------------------#
#pg-test:
# hosts:
# 10.10.10.11: { pg_seq: 1, pg_role: primary } # primary instance, leader of cluster
# 10.10.10.12: { pg_seq: 2, pg_role: replica } # replica instance, follower of leader
# 10.10.10.13: { pg_seq: 3, pg_role: replica, pg_offline_query: true } # replica with offline access
# vars:
# pg_cluster: pg-test # define pgsql cluster name
# pg_users: [{ name: test , password: test , pgbouncer: true , roles: [ dbrole_admin ] }]
# pg_databases: [{ name: test }]
# # define business service here: https://pigsty.io/docs/pgsql/service
# pg_services: # extra services in addition to pg_default_services, array of service definition
# # standby service will route {ip|name}:5435 to sync replica's pgbouncer (5435->6432 standby)
# - name: standby # required, service name, the actual svc name will be prefixed with `pg_cluster`, e.g: pg-meta-standby
# port: 5435 # required, service exposed port (work as kubernetes service node port mode)
# ip: "*" # optional, service bind ip address, `*` for all ip by default
# selector: "[]" # required, service member selector, use JMESPath to filter inventory
# dest: default # optional, destination port, default|postgres|pgbouncer|<port_number>, 'default' by default
# check: /sync # optional, health check url path, / by default
# backup: "[? pg_role == `primary`]" # backup server selector
# maxconn: 3000 # optional, max allowed front-end connection
# balance: roundrobin # optional, haproxy load balance algorithm (roundrobin by default, other: leastconn)
# options: 'inter 3s fastinter 1s downinter 5s rise 3 fall 3 on-marked-down shutdown-sessions slowstart 30s maxconn 3000 maxqueue 128 weight 100'
# pg_vip_enabled: true
# pg_vip_address: 10.10.10.3/24
# pg_vip_interface: eth1
# pg_crontab: # make a full backup on monday 1am, and an incremental backup during weekdays
# - '00 01 * * 1 /pg/bin/pg-backup full'
# - '00 01 * * 2,3,4,5,6,7 /pg/bin/pg-backup'
#----------------------------------------------#
# INFRA : https://pigsty.io/docs/infra
#----------------------------------------------#
infra :
hosts :
10.10.10.10 : { infra_seq : 1 }
vars :
repo_enabled: true # build local repo, and install everything from it : https://pigsty.io/docs/infra/admin/repo
# and download all extensions into local repo
repo_extra_packages : [ pg18-main ,pg18-time ,pg18-gis ,pg18-rag ,pg18-fts ,pg18-olap ,pg18-feat ,pg18-lang ,pg18-type ,pg18-util ,pg18-func ,pg18-admin ,pg18-stat ,pg18-sec ,pg18-fdw ,pg18-sim ,pg18-etl]
#----------------------------------------------#
# ETCD : https://pigsty.io/docs/etcd
#----------------------------------------------#
etcd :
hosts :
10.10.10.10 : { etcd_seq : 1 }
vars :
etcd_cluster : etcd
etcd_safeguard : false # prevent purging running etcd instance?
#----------------------------------------------#
# MINIO : https://pigsty.io/docs/minio
#----------------------------------------------#
minio :
hosts :
10.10.10.10 : { minio_seq : 1 }
vars :
minio_cluster : minio
minio_users : # list of minio user to be created
- { access_key: pgbackrest ,secret_key: S3User.Backup ,policy : pgsql }
- { access_key: s3user_meta ,secret_key: S3User.Meta ,policy : meta }
- { access_key: s3user_data ,secret_key: S3User.Data ,policy : data }
#----------------------------------------------#
# DOCKER : https://pigsty.io/docs/docker
# APP : https://pigsty.io/docs/app
#----------------------------------------------#
# OPTIONAL, launch example pgadmin app with: ./app.yml & ./app.yml -e app=bytebase
app :
hosts : { 10.10.10.10 : {} }
vars :
docker_enabled : true # enabled docker with ./docker.yml
#docker_registry_mirrors: ["https://docker.1panel.live","https://docker.1ms.run","https://docker.xuanyuan.me","https://registry-1.docker.io"]
app : pgadmin # specify the default app name to be installed (in the apps)
apps: # define all applications, appname : definition
# Admin GUI for PostgreSQL, launch with: ./app.yml
pgadmin : # pgadmin app definition (app/pgadmin -> /opt/pgadmin)
conf : # override /opt/pgadmin/.env
PGADMIN_DEFAULT_EMAIL : admin@pigsty.cc # default user name
PGADMIN_DEFAULT_PASSWORD : pigsty # default password
# Schema Migration GUI for PostgreSQL, launch with: ./app.yml -e app=bytebase
bytebase :
conf :
BB_DOMAIN : http://ddl.pigsty # replace it with your public domain name and postgres database url
BB_PGURL : "postgresql://dbuser_bytebase:DBUser.Bytebase@10.10.10.10:5432/bytebase?sslmode=prefer"
#----------------------------------------------#
# REDIS : https://pigsty.io/docs/redis
#----------------------------------------------#
# OPTIONAL, launch redis clusters with: ./redis.yml
redis-ms :
hosts : { 10.10.10.10 : { redis_node: 1 , redis_instances : { 6379 : { }, 6380 : { replica_of : '10.10.10.10 6379' } } } }
vars : { redis_cluster: redis-ms ,redis_password: 'redis.ms' ,redis_max_memory : 64MB }
#==============================================================#
# Global Parameters
#==============================================================#
vars :
#----------------------------------------------#
# INFRA : https://pigsty.io/docs/infra
#----------------------------------------------#
version : v4.2.2 # pigsty version string
admin_ip : 10.10.10.10 # admin node ip address
region: default # upstream mirror region : default|china|europe
proxy_env : # global proxy env when downloading packages
no_proxy : "localhost,127.0.0.1,10.0.0.0/8,192.168.0.0/16,*.pigsty,*.aliyun.com,mirrors.*,*.myqcloud.com,*.tsinghua.edu.cn"
# http_proxy: # set your proxy here: e.g http://user:pass@proxy.xxx.com
# https_proxy: # set your proxy here: e.g http://user:pass@proxy.xxx.com
# all_proxy: # set your proxy here: e.g http://user:pass@proxy.xxx.com
certbot_sign : false # enable certbot to sign https certificate for infra portal
certbot_email : your@email.com # replace your email address to receive expiration notice
infra_portal : # infra services exposed via portal
home : { domain : i.pigsty } # default domain name
pgadmin : { domain: adm.pigsty ,endpoint : "${admin_ip}:8885" }
bytebase : { domain: ddl.pigsty ,endpoint : "${admin_ip}:8887" }
minio : { domain: m.pigsty ,endpoint : "${admin_ip}:9001" ,scheme: https ,websocket : true }
#website: # static local website example stub
# domain: repo.pigsty # external domain name for static site
# certbot: repo.pigsty # use certbot to sign https certificate for this static site
# path: /www/pigsty # path to the static site directory
#supabase: # dynamic upstream service example stub
# domain: supa.pigsty # external domain name for upstream service
# certbot: supa.pigsty # use certbot to sign https certificate for this upstream server
# endpoint: "10.10.10.10:8000" # path to the static site directory
# websocket: true # add websocket support
# certbot: supa.pigsty # certbot cert name, apply with `make cert`
#----------------------------------------------#
# PASSWORD : https://pigsty.io/docs/setup/security/
#----------------------------------------------#
grafana_admin_password : pigsty
grafana_view_password : DBUser.Viewer
pg_admin_password : DBUser.DBA
pg_monitor_password : DBUser.Monitor
pg_replication_password : DBUser.Replicator
patroni_password : Patroni.API
haproxy_admin_password : pigsty
minio_secret_key : S3User.MinIO
etcd_root_password : Etcd.Root
#----------------------------------------------#
# NODE : https://pigsty.io/docs/node/param
#----------------------------------------------#
nodename_overwrite : false # do not overwrite node hostname on single node mode
node_tune: oltp # node tuning specs : oltp,olap,tiny,crit
node_etc_hosts : # add static domains to all nodes /etc/hosts
- '${admin_ip} i.pigsty sss.pigsty'
- '${admin_ip} adm.pigsty ddl.pigsty repo.pigsty supa.pigsty'
node_repo_modules : local # use pre-made local repo rather than install from upstream
node_repo_remove : true # remove existing node repo for node managed by pigsty
#node_packages: [openssh-server] # packages to be installed current nodes with latest version
#node_timezone: Asia/Hong_Kong # overwrite node timezone
#----------------------------------------------#
# PGSQL : https://pigsty.io/docs/pgsql/param
#----------------------------------------------#
pg_version : 18 # default postgres version
pg_conf: oltp.yml # pgsql tuning specs : {oltp,olap,tiny,crit}.yml
pg_safeguard : false # prevent purging running postgres instance?
pg_packages : [ pgsql-main, pgsql-common ] # pg kernel and common utils
#pg_extensions: [ pg18-time ,pg18-gis ,pg18-rag ,pg18-fts ,pg18-olap ,pg18-feat ,pg18-lang ,pg18-type ,pg18-util ,pg18-func ,pg18-admin ,pg18-stat ,pg18-sec ,pg18-fdw ,pg18-sim ,pg18-etl]
#----------------------------------------------#
# BACKUP : https://pigsty.io/docs/pgsql/backup
#----------------------------------------------#
# if you want to use minio as backup repo instead of 'local' fs, uncomment this, and configure `pgbackrest_repo`
# you can also use external object storage as backup repo
pgbackrest_method : minio # if you want to use minio as backup repo instead of 'local' fs, uncomment this
pgbackrest_repo: # pgbackrest repo : https://pgbackrest.org/configuration.html#section-repository
local : # default pgbackrest repo with local posix fs
path : /pg/backup # local backup directory, `/pg/backup` by default
retention_full_type : count # retention full backups by count
retention_full : 2 # keep 2, at most 3 full backups when using local fs repo
minio : # optional minio repo for pgbackrest
type : s3 # minio is s3-compatible, so s3 is used
s3_endpoint : sss.pigsty # minio endpoint domain name, `sss.pigsty` by default
s3_region : us-east-1 # minio region, us-east-1 by default, useless for minio
s3_bucket : pgsql # minio bucket name, `pgsql` by default
s3_key : pgbackrest # minio user access key for pgbackrest [CHANGE ACCORDING to minio_users.pgbackrest]
s3_key_secret : S3User.Backup # minio user secret key for pgbackrest [CHANGE ACCORDING to minio_users.pgbackrest]
s3_uri_style : path # use path style uri for minio rather than host style
path : /pgbackrest # minio backup path, default is `/pgbackrest`
storage_port : 9000 # minio port, 9000 by default
storage_ca_file : /etc/pki/ca.crt # minio ca file path, `/etc/pki/ca.crt` by default
block : y # Enable block incremental backup
bundle : y # bundle small files into a single file
bundle_limit : 20MiB # Limit for file bundles, 20MiB for object storage
bundle_size : 128MiB # Target size for file bundles, 128MiB for object storage
cipher_type : aes-256-cbc # enable AES encryption for remote backup repo
cipher_pass : pgBackRest # AES encryption password, default is 'pgBackRest'
retention_full_type : time # retention full backup by time on minio repo
retention_full : 14 # keep full backup for the last 14 days
s3 : # you can use cloud object storage as backup repo
type : s3 # Add your object storage credentials here!
s3_endpoint : oss-cn-beijing-internal.aliyuncs.com
s3_region : oss-cn-beijing
s3_bucket : <your_bucket_name>
s3_key : <your_access_key>
s3_key_secret : <your_secret_key>
s3_uri_style : host
path : /pgbackrest
bundle : y # bundle small files into a single file
bundle_limit : 20MiB # Limit for file bundles, 20MiB for object storage
bundle_size : 128MiB # Target size for file bundles, 128MiB for object storage
cipher_type : aes-256-cbc # enable AES encryption for remote backup repo
cipher_pass : pgBackRest # AES encryption password, default is 'pgBackRest'
retention_full_type : time # retention full backup by time on minio repo
retention_full : 14 # keep full backup for the last 14 days
...
配置解读 rich 模板是 Pigsty 的 完整功能展示配置 ,适合需要深入体验所有功能的用户。
适用场景 :
需要构建本地软件源的离线环境 需要使用 MinIO 作为 PostgreSQL 备份存储 需要预先规划多个业务数据库和用户 需要运行 Docker 应用(pgAdmin、Bytebase 等) 希望了解配置参数完整用法的学习者 与 meta 的主要区别 :
启用本地软件源构建(repo_enabled: true) 启用 MinIO 存储备份(pgbackrest_method: minio) 预装 TimescaleDB、pg_wait_sampling 等额外扩展 包含详细的参数注释,便于理解配置含义 预置高可用集群存根配置(pg-test) 注意事项 :
ARM64 架构部分扩展不可用,请按需调整 构建本地软件源需要较长时间和较大磁盘空间 默认密码为示例密码,生产环境务必修改 9.4 - slim 精简安装配置模板,不部署监控基础设施,直接从互联网安装 PostgreSQL
slim 配置模板提供 精简安装 能力,在不部署 Infra 监控基础设施的前提下,直接从互联网安装 PostgreSQL 高可用集群。
当您只需要一个可用的数据库实例,不需要监控系统时,可以考虑使用 精简安装
配置概览 配置名称: slim 节点数量: 单节点 配置说明:精简安装配置模板,不部署监控基础设施,直接安装 PostgreSQL 适用系统:el8, el9, el10, d12, d13, u22, u24 适用架构:x86_64, aarch64 相关配置:meta 启用方式:
./configure -c slim [ -i <primary_ip>]
./slim.yml # 执行精简安装
配置内容 源文件地址:pigsty/conf/slim.yml
---
#==============================================================#
# File : slim.yml
# Desc : Pigsty slim installation config template
# Ctime : 2020-05-22
# Mtime : 2025-12-28
# Docs : https://pigsty.io/docs/conf/slim
# License : Apache-2.0 @ https://pigsty.io/docs/about/license/
# Copyright : 2018-2026 Ruohang Feng / Vonng (rh@vonng.com)
#==============================================================#
# This is the config template for slim / minimal installation
# No monitoring & infra will be installed, just raw postgresql
#
# Usage:
# curl https://repo.pigsty.io/get | bash
# ./configure -c slim
# ./slim.yml
all :
children :
etcd : # dcs service for postgres/patroni ha consensus
hosts : # 1 node for testing, 3 or 5 for production
10.10.10.10 : { etcd_seq : 1 } # etcd_seq required
#10.10.10.11: { etcd_seq: 2 } # assign from 1 ~ n
#10.10.10.12: { etcd_seq: 3 } # odd number please
vars : # cluster level parameter override roles/etcd
etcd_cluster : etcd # mark etcd cluster name etcd
#----------------------------------------------#
# PostgreSQL Cluster
#----------------------------------------------#
pg-meta :
hosts :
10.10.10.10 : { pg_seq: 1, pg_role : primary }
#10.10.10.11: { pg_seq: 2, pg_role: replica } # you can add more!
#10.10.10.12: { pg_seq: 3, pg_role: replica, pg_offline_query: true }
vars :
pg_cluster : pg-meta
pg_users :
- { name: dbuser_meta ,password: DBUser.Meta ,pgbouncer: true ,roles: [dbrole_admin ] ,comment : pigsty admin user }
- { name: dbuser_view ,password: DBUser.Viewer ,pgbouncer: true ,roles: [dbrole_readonly] ,comment : read-only viewer }
pg_databases :
- { name: meta, baseline: cmdb.sql ,comment: pigsty meta database ,schemas: [pigsty] ,extensions : [ vector ]}
pg_hba_rules : # https://pigsty.io/docs/pgsql/config/hba
- { user: all ,db: all ,addr: intra ,auth: pwd ,title: 'everyone intranet access with password' ,order : 800 }
pg_crontab : # https://pigsty.io/docs/pgsql/admin/crontab
- '00 01 * * * /pg/bin/pg-backup full'
vars :
version : v4.2.2 # pigsty version string
admin_ip : 10.10.10.10 # admin node ip address
region: default # upstream mirror region : default,china,europe
nodename_overwrite : false # do not overwrite node hostname on single node mode
node_repo_modules : node,infra,pgsql # add these repos directly to the singleton node
node_tune: oltp # node tuning specs : oltp,olap,tiny,crit
pg_conf: oltp.yml # pgsql tuning specs : {oltp,olap,tiny,crit}.yml
pg_version : 18 # Default PostgreSQL Major Version is 18
pg_packages : [ pgsql-main, pgsql-common ] # pg kernel and common utils
#pg_extensions: [ pg18-time ,pg18-gis ,pg18-rag ,pg18-fts ,pg18-olap ,pg18-feat ,pg18-lang ,pg18-type ,pg18-util ,pg18-func ,pg18-admin ,pg18-stat ,pg18-sec ,pg18-fdw ,pg18-sim ,pg18-etl]
#----------------------------------------------#
# PASSWORD : https://pigsty.io/docs/setup/security/
#----------------------------------------------#
grafana_admin_password : pigsty
grafana_view_password : DBUser.Viewer
pg_admin_password : DBUser.DBA
pg_monitor_password : DBUser.Monitor
pg_replication_password : DBUser.Replicator
patroni_password : Patroni.API
haproxy_admin_password : pigsty
minio_secret_key : S3User.MinIO
etcd_root_password : Etcd.Root
... 配置解读 slim 模板是 Pigsty 的 精简安装配置 ,专为快速部署裸 PostgreSQL 集群设计。
适用场景 :
仅需要 PostgreSQL 数据库,不需要监控系统 资源有限的小型服务器或边缘设备 快速部署测试用的临时数据库 已有监控系统,只需要 PostgreSQL 高可用集群 关键特性 :
使用 slim.yml 剧本而非 deploy.yml 进行安装 从互联网直接安装软件,不构建本地软件源 保留核心 PostgreSQL 高可用能力(Patroni + etcd + HAProxy) 最小化软件包下载,加快安装速度 默认使用 PostgreSQL 18 与 meta 的区别 :
slim 使用专用的 slim.yml 剧本,跳过 Infra 模块安装安装速度更快,资源占用更少 适合"只要数据库"的场景 注意事项 :
精简安装后无法通过 Grafana 查看数据库状态 如需监控功能,请使用 metarich 可按需添加从库实现高可用 9.5 - fat 功能全测试模板,单节点安装所有扩展,构建包含 PG 13-18 全版本的本地软件源。
fat 配置模板是 Pigsty 的 功能全测试模板 (Feature-All-Test),在单节点上安装所有扩展插件,并构建包含 PostgreSQL 13-18 全部六个大版本所有扩展的本地软件源。
这是一个用于测试与开发的全功能配置,适合需要完整软件包缓存或测试全部扩展的场景。
配置概览 配置名称: fat 节点数量: 单节点 配置说明:功能全测试模板,安装所有扩展,构建包含 PG 13-18 全版本的本地软件源 适用系统:el8, el9, el10, d12, d13, u22, u24 适用架构:x86_64, aarch64 相关配置:metaslimfat 启用方式:
./configure -c fat [ -i <primary_ip>]
如需指定特定 PostgreSQL 版本:
./configure -c fat -v 16 # 使用 PostgreSQL 16
配置内容 源文件地址:pigsty/conf/fat.yml
---
#==============================================================#
# File : fat.yml
# Desc : Pigsty Feature-All-Test config template
# Ctime : 2020-05-22
# Mtime : 2025-12-28
# Docs : https://pigsty.io/docs/conf/fat
# License : Apache-2.0 @ https://pigsty.io/docs/about/license/
# Copyright : 2018-2026 Ruohang Feng / Vonng (rh@vonng.com)
#==============================================================#
# This is the 4-node sandbox for pigsty
#
# Usage:
# curl https://repo.pigsty.io/get | bash
# ./configure -c fat [-v 18|17|16|15]
# ./deploy.yml
all :
#==============================================================#
# Clusters, Nodes, and Modules
#==============================================================#
children :
#----------------------------------------------#
# PGSQL : https://pigsty.io/docs/pgsql
#----------------------------------------------#
# this is an example single-node postgres cluster with pgvector installed, with one biz database & two biz users
pg-meta :
hosts :
10.10.10.10 : { pg_seq: 1, pg_role : primary } # <---- primary instance with read-write capability
#x.xx.xx.xx: { pg_seq: 2, pg_role: replica } # <---- read only replica for read-only online traffic
#x.xx.xx.xy: { pg_seq: 3, pg_role: offline } # <---- offline instance of ETL & interactive queries
vars :
pg_cluster : pg-meta
# install, load, create pg extensions: https://pigsty.io/docs/pgsql/ext/
pg_extensions : [ pg18-main ,pg18-time ,pg18-gis ,pg18-rag ,pg18-fts ,pg18-olap ,pg18-feat ,pg18-lang ,pg18-type ,pg18-util ,pg18-func ,pg18-admin ,pg18-stat ,pg18-sec ,pg18-fdw ,pg18-sim ,pg18-etl]
pg_libs : 'timescaledb, pg_stat_statements, auto_explain, pg_wait_sampling'
# define business users/roles : https://pigsty.io/docs/pgsql/config/user
pg_users :
- name : dbuser_meta # REQUIRED, `name` is the only mandatory field of a user definition
password : DBUser.Meta # optional, the password. can be a scram-sha-256 hash string or plain text
pgbouncer : true # optional, add this user to the pgbouncer user-list? false by default (production user should be true explicitly)
comment : pigsty admin user # optional, comment string for this user/role
roles: [ dbrole_admin ] # optional, belonged roles. default roles are : dbrole_{admin|readonly|readwrite|offline}
#state: create # optional, create|absent, 'create' by default, use 'absent' to drop user
#login: true # optional, can log in, true by default (new biz ROLE should be false)
#superuser: false # optional, is superuser? false by default
#createdb: false # optional, can create databases? false by default
#createrole: false # optional, can create role? false by default
#inherit: true # optional, can this role use inherited privileges? true by default
#replication: false # optional, can this role do replication? false by default
#bypassrls: false # optional, can this role bypass row level security? false by default
#connlimit: -1 # optional, user connection limit, default -1 disable limit
#expire_in: 3650 # optional, now + n days when this role is expired (OVERWRITE expire_at)
#expire_at: '2030-12-31' # optional, YYYY-MM-DD 'timestamp' when this role is expired (OVERWRITTEN by expire_in)
#parameters: {} # optional, role level parameters with `ALTER ROLE SET`
#pool_mode: transaction # optional, pgbouncer pool mode at user level, transaction by default
#pool_connlimit: -1 # optional, max database connections at user level, default -1 disable limit
# Enhanced roles syntax (PG16+): roles can be string or object with options:
# - dbrole_readwrite # simple string: GRANT role
# - { name: role, admin: true } # GRANT WITH ADMIN OPTION
# - { name: role, set: false } # PG16: REVOKE SET OPTION
# - { name: role, inherit: false } # PG16: REVOKE INHERIT OPTION
# - { name: role, state: absent } # REVOKE membership
- { name: dbuser_view ,password: DBUser.Viewer ,pgbouncer: true ,roles: [dbrole_readonly], comment : read-only viewer for meta database }
#- {name: dbuser_bytebase ,password: DBUser.Bytebase ,pgbouncer: true ,roles: [dbrole_admin] ,comment: admin user for bytebase database }
#- {name: dbuser_remove ,state: absent } # use state: absent to remove a user
# define business databases : https://pigsty.io/docs/pgsql/config/db
pg_databases : # define business databases on this cluster, array of database definition
- name : meta # REQUIRED, `name` is the only mandatory field of a database definition
#state: create # optional, create|absent|recreate, create by default
baseline: cmdb.sql # optional, database sql baseline path, (relative path among the ansible search path, e.g. : files/)
schemas : [ pigsty ] # optional, additional schemas to be created, array of schema names
extensions: # optional, additional extensions to be installed : array of `{name[,schema]}`
- vector # install pgvector for vector similarity search
- postgis # install postgis for geospatial type & index
- timescaledb # install timescaledb for time-series data
- { name: pg_wait_sampling, schema : monitor } # install pg_wait_sampling on monitor schema
comment : pigsty meta database # optional, comment string for this database
#pgbouncer: true # optional, add this database to the pgbouncer database list? true by default
#owner: postgres # optional, database owner, current user if not specified
#template: template1 # optional, which template to use, template1 by default
#strategy: FILE_COPY # optional, clone strategy: FILE_COPY or WAL_LOG (PG15+), default to PG's default
#encoding: UTF8 # optional, inherited from template / cluster if not defined (UTF8)
#locale: C # optional, inherited from template / cluster if not defined (C)
#lc_collate: C # optional, inherited from template / cluster if not defined (C)
#lc_ctype: C # optional, inherited from template / cluster if not defined (C)
#locale_provider: libc # optional, locale provider: libc, icu, builtin (PG15+)
#icu_locale: en-US # optional, icu locale for icu locale provider (PG15+)
#icu_rules: '' # optional, icu rules for icu locale provider (PG16+)
#builtin_locale: C.UTF-8 # optional, builtin locale for builtin locale provider (PG17+)
#tablespace: pg_default # optional, default tablespace, pg_default by default
#is_template: false # optional, mark database as template, allowing clone by any user with CREATEDB privilege
#allowconn: true # optional, allow connection, true by default. false will disable connect at all
#revokeconn: false # optional, revoke public connection privilege. false by default. (leave connect with grant option to owner)
#register_datasource: true # optional, register this database to grafana datasources? true by default
#connlimit: -1 # optional, database connection limit, default -1 disable limit
#pool_auth_user: dbuser_meta # optional, all connection to this pgbouncer database will be authenticated by this user
#pool_mode: transaction # optional, pgbouncer pool mode at database level, default transaction
#pool_size: 64 # optional, pgbouncer pool size at database level, default 64
#pool_reserve: 32 # optional, pgbouncer pool size reserve at database level, default 32
#pool_size_min: 0 # optional, pgbouncer pool size min at database level, default 0
#pool_connlimit: 100 # optional, max database connections at database level, default 100
#- {name: bytebase ,owner: dbuser_bytebase ,revokeconn: true ,comment: bytebase primary database }
pg_hba_rules : # https://pigsty.io/docs/pgsql/config/hba
- { user: all ,db: all ,addr: intra ,auth: pwd ,title: 'everyone intranet access with password' ,order : 800 }
pg_crontab : # https://pigsty.io/docs/pgsql/admin/crontab
- '00 01 * * * /pg/bin/pg-backup full'
# define (OPTIONAL) L2 VIP that bind to primary
pg_vip_enabled : true
pg_vip_address : 10.10.10.2 /24
pg_vip_interface : eth1
#----------------------------------------------#
# INFRA : https://pigsty.io/docs/infra
#----------------------------------------------#
infra :
hosts :
10.10.10.10 : { infra_seq : 1 }
vars :
repo_enabled: true # build local repo : https://pigsty.io/docs/infra/admin/repo
#repo_extra_packages: [ pg18-main ,pg18-time ,pg18-gis ,pg18-rag ,pg18-fts ,pg18-olap ,pg18-feat ,pg18-lang,pg18-type ,pg18-util ,pg18-func ,pg18-admin ,pg18-stat ,pg18-sec ,pg18-fdw ,pg18-sim ,pg18-etl]
repo_packages : [
node-bootstrap, infra-package, infra-addons, node-package1, node-package2, pgsql-utility, extra-modules,
pg18-full,pg18-time,pg18-gis,pg18-rag,pg18-fts,pg18-olap,pg18-feat,pg18-lang,pg18-type,pg18-util,pg18-func,pg18-admin,pg18-stat,pg18-sec,pg18-fdw,pg18-sim,pg18-etl,
pg17-full,pg17-time,pg17-gis,pg17-rag,pg17-fts,pg17-olap,pg17-feat,pg17-lang,pg17-type,pg17-util,pg17-func,pg17-admin,pg17-stat,pg17-sec,pg17-fdw,pg17-sim,pg17-etl,
pg16-full,pg16-time,pg16-gis,pg16-rag,pg16-fts,pg16-olap,pg16-feat,pg16-lang,pg16-type,pg16-util,pg16-func,pg16-admin,pg16-stat,pg16-sec,pg16-fdw,pg16-sim,pg16-etl,
pg15-full,pg15-time,pg15-gis,pg15-rag,pg15-fts,pg15-olap,pg15-feat,pg15-lang,pg15-type,pg15-util,pg15-func,pg15-admin,pg15-stat,pg15-sec,pg15-fdw,pg15-sim,pg15-etl,
pg14-full,pg14-time,pg14-gis,pg14-rag,pg14-fts,pg14-olap,pg14-feat,pg14-lang,pg14-type,pg14-util,pg14-func,pg14-admin,pg14-stat,pg14-sec,pg14-fdw,pg14-sim,pg14-etl,
infra-extra, kafka, java-runtime, sealos, tigerbeetle, polardb, ivorysql
]
#----------------------------------------------#
# ETCD : https://pigsty.io/docs/etcd
#----------------------------------------------#
etcd :
hosts :
10.10.10.10 : { etcd_seq : 1 }
vars :
etcd_cluster : etcd
etcd_safeguard : false # prevent purging running etcd instance?
#----------------------------------------------#
# MINIO : https://pigsty.io/docs/minio
#----------------------------------------------#
minio :
hosts :
10.10.10.10 : { minio_seq : 1 }
vars :
minio_cluster : minio
minio_users : # list of minio user to be created
- { access_key: pgbackrest ,secret_key: S3User.Backup ,policy : pgsql }
- { access_key: s3user_meta ,secret_key: S3User.Meta ,policy : meta }
- { access_key: s3user_data ,secret_key: S3User.Data ,policy : data }
#----------------------------------------------#
# DOCKER : https://pigsty.io/docs/docker
# APP : https://pigsty.io/docs/app
#----------------------------------------------#
# OPTIONAL, launch example pgadmin app with: ./app.yml & ./app.yml -e app=bytebase
app :
hosts : { 10.10.10.10 : {} }
vars :
docker_enabled : true # enabled docker with ./docker.yml
#docker_registry_mirrors: ["https://docker.1panel.live","https://docker.1ms.run","https://docker.xuanyuan.me","https://registry-1.docker.io"]
app : pgadmin # specify the default app name to be installed (in the apps)
apps: # define all applications, appname : definition
# Admin GUI for PostgreSQL, launch with: ./app.yml
pgadmin : # pgadmin app definition (app/pgadmin -> /opt/pgadmin)
conf : # override /opt/pgadmin/.env
PGADMIN_DEFAULT_EMAIL : admin@pigsty.cc # default user name
PGADMIN_DEFAULT_PASSWORD : pigsty # default password
# Schema Migration GUI for PostgreSQL, launch with: ./app.yml -e app=bytebase
bytebase :
conf :
BB_DOMAIN : http://ddl.pigsty # replace it with your public domain name and postgres database url
BB_PGURL : "postgresql://dbuser_bytebase:DBUser.Bytebase@10.10.10.10:5432/bytebase?sslmode=prefer"
#==============================================================#
# Global Parameters
#==============================================================#
vars :
#----------------------------------------------#
# INFRA : https://pigsty.io/docs/infra
#----------------------------------------------#
version : v4.2.2 # pigsty version string
admin_ip : 10.10.10.10 # admin node ip address
region: default # upstream mirror region : default|china|europe
proxy_env : # global proxy env when downloading packages
no_proxy : "localhost,127.0.0.1,10.0.0.0/8,192.168.0.0/16,*.pigsty,*.aliyun.com,mirrors.*,*.myqcloud.com,*.tsinghua.edu.cn"
# http_proxy: # set your proxy here: e.g http://user:pass@proxy.xxx.com
# https_proxy: # set your proxy here: e.g http://user:pass@proxy.xxx.com
# all_proxy: # set your proxy here: e.g http://user:pass@proxy.xxx.com
certbot_sign : false # enable certbot to sign https certificate for infra portal
certbot_email : your@email.com # replace your email address to receive expiration notice
infra_portal : # domain names and upstream servers
home : { domain : i.pigsty }
pgadmin : { domain: adm.pigsty ,endpoint : "${admin_ip}:8885" }
bytebase : { domain: ddl.pigsty ,endpoint : "${admin_ip}:8887" ,websocket : true }
minio : { domain: m.pigsty ,endpoint : "${admin_ip}:9001" ,scheme: https ,websocket : true }
#website: # static local website example stub
# domain: repo.pigsty # external domain name for static site
# certbot: repo.pigsty # use certbot to sign https certificate for this static site
# path: /www/pigsty # path to the static site directory
#supabase: # dynamic upstream service example stub
# domain: supa.pigsty # external domain name for upstream service
# certbot: supa.pigsty # use certbot to sign https certificate for this upstream server
# endpoint: "10.10.10.10:8000" # path to the static site directory
# websocket: true # add websocket support
# certbot: supa.pigsty # certbot cert name, apply with `make cert`
#----------------------------------------------#
# NODE : https://pigsty.io/docs/node/param
#----------------------------------------------#
nodename_overwrite : true # overwrite node hostname on multi-node template
node_tune: oltp # node tuning specs : oltp,olap,tiny,crit
node_etc_hosts : # add static domains to all nodes /etc/hosts
- 10.10.10.10 i.pigsty sss.pigsty
- 10.10.10.10 adm.pigsty ddl.pigsty repo.pigsty supa.pigsty
node_repo_modules : local,node,infra,pgsql # use pre-made local repo rather than install from upstream
node_repo_remove : true # remove existing node repo for node managed by pigsty
#node_packages: [openssh-server] # packages to be installed current nodes with latest version
#node_timezone: Asia/Hong_Kong # overwrite node timezone
#----------------------------------------------#
# PGSQL : https://pigsty.io/docs/pgsql/param
#----------------------------------------------#
pg_version : 18 # default postgres version
pg_conf: oltp.yml # pgsql tuning specs : {oltp,olap,tiny,crit}.yml
pg_safeguard : false # prevent purging running postgres instance?
pg_packages : [ pgsql-main, pgsql-common ] # pg kernel and common utils
#pg_extensions: [ pg18-time ,pg18-gis ,pg18-rag ,pg18-fts ,pg18-olap ,pg18-feat ,pg18-lang ,pg18-type ,pg18-util ,pg18-func ,pg18-admin ,pg18-stat ,pg18-sec ,pg18-fdw ,pg18-sim ,pg18-etl]
#----------------------------------------------#
# BACKUP : https://pigsty.io/docs/pgsql/backup
#----------------------------------------------#
# if you want to use minio as backup repo instead of 'local' fs, uncomment this, and configure `pgbackrest_repo`
# you can also use external object storage as backup repo
pgbackrest_method : minio # if you want to use minio as backup repo instead of 'local' fs, uncomment this
pgbackrest_repo: # pgbackrest repo : https://pgbackrest.org/configuration.html#section-repository
local : # default pgbackrest repo with local posix fs
path : /pg/backup # local backup directory, `/pg/backup` by default
retention_full_type : count # retention full backups by count
retention_full : 2 # keep 2, at most 3 full backups when using local fs repo
minio : # optional minio repo for pgbackrest
type : s3 # minio is s3-compatible, so s3 is used
s3_endpoint : sss.pigsty # minio endpoint domain name, `sss.pigsty` by default
s3_region : us-east-1 # minio region, us-east-1 by default, useless for minio
s3_bucket : pgsql # minio bucket name, `pgsql` by default
s3_key : pgbackrest # minio user access key for pgbackrest [CHANGE ACCORDING to minio_users.pgbackrest]
s3_key_secret : S3User.Backup # minio user secret key for pgbackrest [CHANGE ACCORDING to minio_users.pgbackrest]
s3_uri_style : path # use path style uri for minio rather than host style
path : /pgbackrest # minio backup path, default is `/pgbackrest`
storage_port : 9000 # minio port, 9000 by default
storage_ca_file : /etc/pki/ca.crt # minio ca file path, `/etc/pki/ca.crt` by default
block : y # Enable block incremental backup
bundle : y # bundle small files into a single file
bundle_limit : 20MiB # Limit for file bundles, 20MiB for object storage
bundle_size : 128MiB # Target size for file bundles, 128MiB for object storage
cipher_type : aes-256-cbc # enable AES encryption for remote backup repo
cipher_pass : pgBackRest # AES encryption password, default is 'pgBackRest'
retention_full_type : time # retention full backup by time on minio repo
retention_full : 14 # keep full backup for the last 14 days
s3 : # you can use cloud object storage as backup repo
type : s3 # Add your object storage credentials here!
s3_endpoint : oss-cn-beijing-internal.aliyuncs.com
s3_region : oss-cn-beijing
s3_bucket : <your_bucket_name>
s3_key : <your_access_key>
s3_key_secret : <your_secret_key>
s3_uri_style : host
path : /pgbackrest
bundle : y # bundle small files into a single file
bundle_limit : 20MiB # Limit for file bundles, 20MiB for object storage
bundle_size : 128MiB # Target size for file bundles, 128MiB for object storage
cipher_type : aes-256-cbc # enable AES encryption for remote backup repo
cipher_pass : pgBackRest # AES encryption password, default is 'pgBackRest'
retention_full_type : time # retention full backup by time on minio repo
retention_full : 14 # keep full backup for the last 14 days
#----------------------------------------------#
# PASSWORD : https://pigsty.io/docs/setup/security/
#----------------------------------------------#
grafana_admin_password : pigsty
grafana_view_password : DBUser.Viewer
pg_admin_password : DBUser.DBA
pg_monitor_password : DBUser.Monitor
pg_replication_password : DBUser.Replicator
patroni_password : Patroni.API
haproxy_admin_password : pigsty
minio_secret_key : S3User.MinIO
etcd_root_password : Etcd.Root
...
配置解读 fat 模板是 Pigsty 的 全功能测试配置 ,专为完整性测试和离线包构建设计。
关键特性 :
全扩展安装 :安装 PostgreSQL 18 的所有分类扩展包多版本软件源 :本地软件源包含 PostgreSQL 13-18 全部六个大版本完整组件栈 :包含 MinIO 备份、Docker 应用、VIP 等功能企业级组件 :包含 Kafka、PolarDB、IvorySQL、TigerBeetle 等软件源内容 :
分类 说明 PostgreSQL 13-18 六个大版本的内核和全部扩展 扩展分类包 time, gis, rag, fts, olap, feat, lang, type, util, func, admin, stat, sec, fdw, sim, etl企业组件 Kafka、Java 运行时、Sealos、TigerBeetle 数据库内核 PolarDB、IvorySQL
与 rich 的区别 :
fat 包含 PostgreSQL 13-18 全部六个版本,rich 只包含当前默认版本fat 包含额外的企业组件(Kafka、PolarDB、IvorySQL 等)fat 需要更大的磁盘空间和更长的构建时间适用场景 :
Pigsty 开发测试与功能验证 构建完整的多版本离线软件包 需要测试全部扩展兼容性的场景 企业环境预先缓存所有软件包 注意事项 :
需要较大磁盘空间(建议 100GB+)用于存储所有软件包 构建本地软件源需要较长时间 部分扩展在 ARM64 架构不可用 默认密码为示例密码,生产环境务必修改 9.6 - infra 仅安装可观测性基础设施,不包含 PostgreSQL 与 etcd 的专用配置模板
infra 配置模板仅部署 Pigsty 的可观测性基础设施组件(VictoriaMetrics/Grafana/Loki/Nginx 等),不包含 PostgreSQL 与 etcd。
适用于需要独立监控栈的场景,例如监控外部 PostgreSQL/RDS 实例或其他数据源。
配置概览 配置名称: infra 节点数量: 单节点或多节点 配置说明:仅安装可观测性基础设施,不包含 PostgreSQL 与 etcd 适用系统:el8, el9, el10, d12, d13, u22, u24 适用架构:x86_64, aarch64 相关配置:meta 启用方式:
./configure -c infra [ -i <primary_ip>]
./infra.yml # 仅执行 infra 剧本
配置内容 源文件地址:pigsty/conf/infra.yml
---
#==============================================================#
# File : infra.yml
# Desc : Infra Only Config
# Ctime : 2025-12-16
# Mtime : 2025-12-30
# Docs : https://pigsty.io/docs/conf/infra
# License : Apache-2.0 @ https://pigsty.io/docs/about/license/
# Copyright : 2018-2026 Ruohang Feng / Vonng (rh@vonng.com)
#==============================================================#
# This is the config template for deploy victoria stack alone
# tutorial: https://pigsty.io/docs/infra
#
# Usage:
# curl https://repo.pigsty.io/get | bash
# ./configure -c infra
# ./infra.yml
all :
children :
infra :
hosts :
10.10.10.10 : { infra_seq : 1 }
#10.10.10.11: { infra_seq: 2 } # you can add more nodes if you want
#10.10.10.12: { infra_seq: 3 } # don't forget to assign unique infra_seq for each node
vars :
docker_enabled : true # enabled docker with ./docker.yml
docker_registry_mirrors : [ "https://docker.1panel.live" , "https://docker.1ms.run" , "https://docker.xuanyuan.me" , "https://registry-1.docker.io" ]
pg_exporters : # bin/pgmon-add pg-rds
20001 : { pg_cluster: pg-rds ,pg_seq: 1 ,pg_host: 10.10.10.10 ,pg_exporter_url : 'postgres://postgres:postgres@10.10.10.10:5432/postgres' }
vars : # global variables
version : v4.2.2 # pigsty version string
admin_ip : 10.10.10.10 # admin node ip address
region: default # upstream mirror region : default,china,europe
node_tune: oltp # node tuning specs : oltp,olap,tiny,crit
infra_portal : # infra services exposed via portal
home : { domain : i.pigsty } # default domain name
repo_enabled : false # online installation without repo
node_repo_modules : node,infra,pgsql # add these repos directly
#haproxy_enabled: false # enable haproxy on infra node?
#vector_enabled: false # enable vector on infra node?
# DON't FORGET TO CHANGE DEFAULT PASSWORDS!
grafana_admin_password : pigsty
haproxy_admin_password : pigsty
... 配置解读 infra 模板是 Pigsty 的 纯监控栈配置 ,专为独立部署可观测性基础设施设计。
适用场景 :
监控外部 PostgreSQL 实例(RDS、自建等) 需要独立的监控/告警平台 已有 PostgreSQL 集群,仅需添加监控 作为多集群监控的中央控制台 包含组件 :
VictoriaMetrics :时序数据库,存储监控指标VictoriaLogs :日志聚合系统VictoriaTraces :链路追踪系统Grafana :可视化仪表盘Alertmanager :告警管理Nginx :反向代理和 Web 入口不包含组件 :
PostgreSQL 数据库集群 etcd 分布式协调服务 MinIO 对象存储 监控外部实例 :
配置完成后,可通过 pgsql-monitor.yml 剧本添加外部 PostgreSQL 实例的监控:
pg_exporters :
20001 : { pg_cluster: pg-foo, pg_seq: 1, pg_host : 10.10.10.100 }
20002 : { pg_cluster: pg-bar, pg_seq: 1, pg_host : 10.10.10.101 }
注意事项 :
此模板不会安装任何数据库 如需完整功能,请使用 metarich 可根据需要添加多个 infra 节点实现高可用 9.7 - vibe VIBE AI 编程沙箱配置模板,集成 Code-Server、JupyterLab、Claude Code 与 JuiceFS 的 Web 开发环境
vibe 配置模板提供了一个开箱即用的 AI 编程沙箱 ,集成了 Code-Server(Web VS Code)、JupyterLab、Claude Code 可观测能力、JuiceFS 分布式文件系统,以及功能丰富的 PostgreSQL 数据库。
配置概览 配置名称: vibe 节点数量: 单节点 配置说明:VIBE AI 编程沙箱,Code-Server + JupyterLab + Claude Code + JuiceFS + PostgreSQL 适用系统:el8, el9, el10, d12, d13, u22, u24 适用架构:x86_64, aarch64 相关配置:meta 启用方式:
./configure -c vibe [ -i <primary_ip>]
配置内容 源文件地址:pigsty/conf/vibe.yml
---
#==============================================================#
# File : vibe.yml
# Desc : Pigsty ai vibe coding sandbox
# Ctime : 2026-01-19
# Mtime : 2026-02-28
# Docs : https://pigsty.io/docs/conf/vibe
# License : Apache-2.0 @ https://pigsty.io/docs/about/license/
# Copyright : 2018-2026 Ruohang Feng / Vonng (rh@vonng.com)
#==============================================================#
# VIBE CODING SANDBOX
# PostgreSQL with related extensions
# Code-Server, Jupyter, Claude Code
#
# Usage:
# curl https://repo.pigsty.io/get | bash
# ./configure -c vibe
# ./deploy.yml
# ./juice.yml # pgfs: juicefs on pgsql, mount on /fs
# ./vibe.yml # code-server, jupyter, and claude-code
all :
children :
infra : { hosts : { 10.10.10.10 : { infra_seq: 1 }} ,vars : { repo_enabled : false }}
etcd : { hosts : { 10.10.10.10 : { etcd_seq: 1 }} ,vars : { etcd_cluster : etcd }}
pgsql : { hosts : { 10.10.10.10 : { pg_seq: 1, pg_role: primary } } ,vars : { pg_cluster : pgsql }}
# optional modules
#minio: { hosts: { 10.10.10.10: { minio_seq: 1 }} ,vars: { minio_cluster: minio }}
#redis-ms:
# hosts: { 10.10.10.10: { redis_node: 1 , redis_instances: { 6379: { }, 6380: { replica_of: '10.10.10.10 6379' } } } }
# vars: { redis_cluster: redis-ms ,redis_password: 'redis.ms' ,redis_max_memory: 64MB }
vars :
#----------------------------------------------#
# INFRA: https://pigsty.io/docs/infra
#----------------------------------------------#
version : v4.2.2 # pigsty version string
admin_ip : 10.10.10.10 # admin node ip address
region: default # upstream mirror region : default,china,europe
infra_portal : # infra services exposed via portal
home : { domain : i.pigsty } # default domain name
dns_enabled : false # disable dns service
#blackbox_enabled: false # disable blackbox exporter
#alertmanager_enabled: false # disable alertmanager
infra_extra_services : # home page navigation entries
- { name: Code Server ,url: '/code' ,desc: 'VS Code Server' ,icon : 'code' }
- { name: Jupyter ,url: '/jupyter' ,desc: 'Jupyter Notebook' ,icon : 'jupyter' }
- { name: Claude Code ,url: '/ui/d/claude-code' ,desc: 'Claude Observability' ,icon : 'claude' }
#----------------------------------------------#
# NODE: https://pigsty.io/docs/node
#----------------------------------------------#
nodename_overwrite : false # do not overwrite node hostname on single node mode
node_tune: oltp # node tuning specs : oltp,olap,tiny,crit
node_dns_method : none # do not setup dns
node_repo_modules : node,infra,pgsql # add these repos directly to the singleton node
node_packages : [ openssh-server, juicefs, restic, rclone, uv, opencode, golang, asciinema, tmux ]
docker_enabled : true # enable docker service
node_firewall_mode: zone # default : trust intranet, expose selected public ports
node_firewall_public_port : [ 22 , 80 , 443 , 5432 ] # expose 5432 for remote access, remove in production!
#docker_registry_mirrors: ["https://docker.1panel.live","https://docker.1ms.run","https://docker.xuanyuan.me","https://registry-1.docker.io"]
#----------------------------------------------#
# PGSQL: https://pigsty.io/docs/pgsql
#----------------------------------------------#
pg_version : 18 # Default PostgreSQL Major Version is 18
pg_conf: oltp.yml # pgsql tuning specs : {oltp,olap,tiny,crit}.yml
pg_packages : [ pgsql-main, patroni, pgbackrest, pg_exporter, pgbackrest_exporter ]
pg_extensions : [ pg18-main ,pg18-time ,pg18-gis ,pg18-rag ,pg18-fts ,pg18-olap ,pg18-feat ,pg18-lang ,pg18-type ,pg18-util ,pg18-func ,pg18-admin ,pg18-stat ,pg18-sec ,pg18-fdw ,pg18-sim ,pg18-etl]
pg_users :
- { name: dbuser_meta ,password: DBUser.Meta ,pgbouncer: true ,roles: [dbrole_admin ] ,comment : pigsty admin user }
- { name: dbuser_view ,password: DBUser.Viewer ,pgbouncer: true ,roles: [dbrole_readonly] ,comment : read-only viewer }
pg_databases :
- { name: meta, baseline: cmdb.sql ,comment: pigsty meta database ,schemas: [pigsty] ,extensions : [ postgis, timescaledb, vector, age ]}
pg_libs : 'timescaledb, pg_stat_statements, auto_explain, pg_wait_sampling'
pg_hba_rules :
- { user: all ,db: all ,addr: intra ,auth: pwd ,title: 'everyone intranet access with password' ,order : 800 }
# WARNING: devbox only. Remove world access in production.
- { user: all ,db: all ,addr: world ,auth: pwd ,title: 'everyone world access with password' ,order : 900 }
pg_crontab : [ '00 01 * * * /pg/bin/pg-backup full' ] # make a full backup every 1am
patroni_mode : remove # remove patroni after deployment
pgbouncer_enabled : false # disable pgbouncer pool
pgbouncer_exporter_enabled : false # disable pgbouncer_exporter on pgsql hosts?
pgbackrest_exporter_enabled : false # disable pgbackrest_exporter
pg_default_services : [] # do not provision pg services
#pg_reload: false # do not reload patroni/service
#----------------------------------------------#
# PASSWORD : https://pigsty.io/docs/setup/security/
#----------------------------------------------#
grafana_admin_password : pigsty
grafana_view_password : DBUser.Viewer
pg_admin_password : DBUser.DBA
pg_monitor_password : DBUser.Monitor
pg_replication_password : DBUser.Replicator
patroni_password : Patroni.API
haproxy_admin_password : pigsty
#----------------------------------------------#
# OPTIONAL VIBE COMPONENTS
#----------------------------------------------#
code_enabled : true # install & enable code-server via vibe role
code_password : DBUser.Meta
jupyter_enabled : true # enable jupyter (disabled by default, enable for vibe sandbox)
jupyter_password : DBUser.Meta
juice_instances :
jfs :
path : /fs
meta : postgres://dbuser_meta:DBUser.Meta@10.10.10.10:5432/meta
data : --storage postgres --bucket 10.10.10.10:5432/meta --access-key dbuser_meta --secret-key DBUser.Meta
port : 9567
# install npm packages : ./vibe.yml -t nodejs_pkg
npm_packages :
- '@anthropic-ai/claude-code' # claude code
- '@openai/codex' # openai codex
- 'happy-coder' # remote control
#- 'openclaw@latest' # in-case you need one
# setup claude code environment: ./vibe.yml -t claude
#claude_env:
# ANTHROPIC_BASE_URL: https://open.bigmodel.cn/api/anthropic
# ANTHROPIC_API_URL: https://open.bigmodel.cn/api/anthropic
# ANTHROPIC_AUTH_TOKEN: your_api_service_token
# ANTHROPIC_DEFAULT_OPUS_MODEL: "glm-5"
# ANTHROPIC_DEFAULT_SONNET_MODEL: "glm-5"
# ANTHROPIC_DEFAULT_HAIKU_MODEL: "glm-4.7-flash"
...
配置解读 vibe 模板是一个面向 AI 时代的 Web 编程沙箱 ,让您可以在浏览器中完成开发、数据分析、AI 应用构建等任务。
核心组件 :
组件 说明 访问方式 Code-Server VS Code 的 Web 版本,功能完整的代码编辑器 http://<ip>/codeJupyterLab 交互式数据科学笔记本,支持 Python/SQL http://<ip>/jupyterClaude Code AI 编程助手运行环境与可观测性入口(可通过 claude_env 定制) 终端 / 仪表盘 JuiceFS 基于 PostgreSQL 的分布式文件系统 挂载点 /fs PostgreSQL 18 功能丰富的数据库,安装 pg18-main + 全类别扩展包组 5432 端口
模板显式安装的节点工具 (node_packages):
openssh-server, juicefs, restic, rcloneuv, opencode, golangasciinema, tmuxPostgreSQL 扩展 :
此模板通过分类包组安装 PostgreSQL 18 的完整扩展集合:
pg18-main, pg18-time, pg18-gis, pg18-rag, pg18-fts, pg18-olap,
pg18-feat, pg18-lang, pg18-type, pg18-util, pg18-func, pg18-admin,
pg18-stat, pg18-sec, pg18-fdw, pg18-sim, pg18-etl
meta 业务库默认创建扩展为 postgis、timescaledb、vector,其余扩展可按需启用。
VIBE 模块组件 VIBE 模块在 v4.2 系列中提供 AI 编程沙箱能力;vibe.yml 显式开启 Code-Server 与 Jupyter,并预留 Claude 自定义入口。
Code-Server :浏览器中的 VS Code
完整的 VS Code 功能,支持扩展安装 通过 Nginx 反向代理提供 HTTPS 访问 支持 Open VSX 和 Microsoft 扩展商店 模板显式参数:code_enabled, code_password 其余可选参数:code_port, code_data, code_gallery JupyterLab :交互式计算环境
支持 Python/SQL/Markdown 笔记本 预配置 Python venv 数据科学库 通过 Nginx 反向代理提供 HTTPS 访问 模板显式参数:jupyter_enabled, jupyter_password 其余可选参数:jupyter_port, jupyter_data, jupyter_venv Claude Code :AI 编程助手
使用模块默认行为完成 Claude 运行环境配置 可通过 claude_env 覆盖模型端点与 API 密钥 提供 claude-code 仪表盘监控使用情况 JuiceFS 文件系统 此模板使用 JuiceFS 提供分布式文件系统能力,特别之处在于:元数据和数据都存储在 PostgreSQL 中 。
架构特点 :
元数据引擎 :使用 PostgreSQL 存储文件系统元数据数据存储 :使用 PostgreSQL 大对象(Large Object)存储文件数据挂载点 :默认挂载到 /fs 目录(由 juice_instances.jfs.path 控制)监控端口 :9567 提供 Prometheus 指标使用场景 :
代码项目的持久化存储 Jupyter Notebook 的工作目录 AI 模型和数据集的存储 多实例间的文件共享(扩展到多节点时) 配置示例 :
juice_instances :
jfs :
path : /fs
meta : postgres://dbuser_meta:DBUser.Meta@10.10.10.10:5432/meta
data : --storage postgres --bucket 10.10.10.10:5432/meta --access-key dbuser_meta --secret-key DBUser.Meta
port : 9567
部署步骤 # 1. 下载 Pigsty
curl https://repo.pigsty.io/get | bash
# 2. 使用 vibe 配置模板
./configure -c vibe
# 3. 修改密码(重要!)
vi pigsty.yml
# 修改 code_password, jupyter_password 等
# 4. 部署基础设施和 PostgreSQL
./deploy.yml
# 5. 部署 JuiceFS 文件系统
./juice.yml
# 6. 部署 VIBE 模块(Code-Server、JupyterLab、Claude Code)
./vibe.yml
访问方式 部署完成后,通过浏览器访问:
# Code-Server (VS Code Web)
http://<ip>/code
# 密码:DBUser.Meta(请修改)
# JupyterLab
http://<ip>/jupyter
# 密码:DBUser.Meta(请修改)
# Claude Code 仪表盘
http://<ip>/ui/d/claude-code
# Grafana 默认用户名:admin,密码:pigsty
# PostgreSQL
psql postgres://dbuser_meta:DBUser.Meta@<ip>:5432/meta
适用场景 AI 应用开发 :构建 RAG、Agent、LLM 应用数据科学 :使用 JupyterLab 进行数据分析和可视化远程开发 :在云服务器上搭建 Web IDE 环境教学演示 :提供一致的开发环境供学员使用快速原型 :快速验证想法,无需配置本地环境Claude Code 可观测性 :监控 AI 编程助手的使用情况注意事项 必须修改密码 :code_password 和 jupyter_password 默认值仅供测试网络安全 :此模板默认开放 5432(node_firewall_public_port)且包含 addr: world HBA 规则,生产环境请收紧资源需求 :建议至少 2 核 4GB 内存,SSD 磁盘精简架构 :此模板禁用了 Patroni、PgBouncer 等高可用组件,适合单节点开发环境Claude API :使用 Claude Code 需要配置 claude_env 中的 API 密钥9.8 - docker Pigsty Docker 容器化单机模板,适用于在容器内快速启动与体验 Pigsty。
docker 配置模板用于在 Docker 容器内运行 Pigsty,提供最小可用的单节点基础设施与 PostgreSQL 能力。
配置概览 配置名称: docker 节点数量: 单节点(容器环境) 配置说明:容器内快速体验模板,使用 127.0.0.1 与精简系统能力,适配 Docker 场景。 适用系统:容器镜像内置环境(建议配合官方 Pigsty Docker 镜像) 适用架构:x86_64, aarch64 相关配置:metavibe 启用方式:
./configure -c docker -i 127.0.0.1 -g
配置内容 源文件地址:pigsty/conf/docker.yml
---
#==============================================================#
# File : docker.yml
# Desc : Pigsty docker coding environment
# Ctime : 2026-01-19
# Mtime : 2026-01-27
# Docs : https://pigsty.io/docs/conf/docker
# License : Apache-2.0 @ https://pigsty.io/docs/about/license/
# Copyright : 2018-2026 Ruohang Feng / Vonng (rh@vonng.com)
#==============================================================#
# DOCKER CONFIG, use 127.0.0.1 inside docker
# mount the /data volume when running docker container
#
# Usage:
# curl https://repo.pigsty.io/get | bash
# ./configure -c docker -i 127.0.0.1 -g
# ./deploy.yml
all :
children :
infra : { hosts : { 10.10.10.10 : { infra_seq: 1 }} ,vars : { repo_enabled : false }}
etcd : { hosts : { 10.10.10.10 : { etcd_seq: 1 }} ,vars : { etcd_cluster : etcd }}
pgsql : { hosts : { 10.10.10.10 : { pg_seq: 1, pg_role: primary }} ,vars : { pg_cluster : pgsql }}
#minio: { hosts: { 10.10.10.10: { minio_seq: 1 }} ,vars: { minio_cluster: minio }}
vars :
#----------------------------------------------#
# Infra
#----------------------------------------------#
version : v4.2.2 # pigsty version string
admin_ip : 10.10.10.10 # admin node ip address
region: china # upstream mirror region : default|china|europe
dns_enabled : false # disable dnsmasq service on single node
infra_portal :
home : { domain : i.pigsty }
proxy_env : # global proxy env when downloading packages
no_proxy : "localhost,10.10.10.10,10.0.0.0/8,192.168.0.0/16,*.pigsty,*.aliyun.com,mirrors.*,*.myqcloud.com,*.tsinghua.edu.cn"
# http_proxy: # set your proxy here: e.g http://user:pass@proxy.xxx.com
# https_proxy: # set your proxy here: e.g http://user:pass@proxy.xxx.com
# all_proxy: # set your proxy here: e.g http://user:pass@proxy.xxx.com
#----------------------------------------------#
# Node
#----------------------------------------------#
nodename : pigsty
node_id_from_pg : false
node_tune : oltp
node_write_etc_hosts : false
node_dns_method : none
node_ntp_enabled : false
node_kernel_modules : []
node_repo_remove : true
node_repo_modules : 'node,infra,pgsql'
#----------------------------------------------#
# PGSQL: https://pigsty.io/docs/pgsql
#----------------------------------------------#
pg_version : 18 # Default PostgreSQL Major Version is 18
pg_conf: oltp.yml # pgsql tuning specs : {oltp,olap,tiny,crit}.yml
pg_extensions : [ pg18-main ,pg18-time ,pg18-gis ,pg18-rag ,pg18-fts ,pg18-olap ,pg18-feat ,pg18-lang ,pg18-type ,pg18-util ,pg18-func ,pg18-admin ,pg18-stat ,pg18-sec ,pg18-fdw ,pg18-sim ,pg18-etl]
pg_users :
- { name: dbuser_meta ,password: DBUser.Meta ,pgbouncer: true ,roles: [dbrole_admin ] ,comment : pigsty admin user }
- { name: dbuser_view ,password: DBUser.Viewer ,pgbouncer: true ,roles: [dbrole_readonly] ,comment : read-only viewer }
pg_databases :
- { name: meta, baseline: cmdb.sql ,comment: pigsty meta database ,schemas: [pigsty] ,extensions : [ postgis, timescaledb, vector ]}
pg_libs : 'timescaledb, pg_stat_statements, auto_explain, pg_wait_sampling'
pg_hba_rules :
- { user: all ,db: all ,addr: intra ,auth: pwd ,title: 'everyone intranet access with password' ,order : 800 }
- { user: all ,db: all ,addr: world ,auth: pwd ,title: 'everyone world access with password' ,order : 900 }
pg_crontab : [ '00 01 * * * /pg/bin/pg-backup full' ] # make a full backup every 1am
#pg_reload: false # do not reload patroni/service
#----------------------------------------------#
# PASSWORD : https://pigsty.io/docs/setup/security/
#----------------------------------------------#
grafana_admin_password : pigsty
grafana_view_password : DBUser.Viewer
pg_admin_password : DBUser.DBA
pg_monitor_password : DBUser.Monitor
pg_replication_password : DBUser.Replicator
patroni_password : Patroni.API
haproxy_admin_password : pigsty
minio_secret_key : S3User.MinIO
etcd_root_password : Etcd.Root
#----------------------------------------------#
# OPTIONAL
#----------------------------------------------#
#code_password: DBUser.Meta
#jupyter_password: DBUser.Meta
#juice_instances: # dict of juicefs filesystems to deploy
# jfs:
# path : /fs
# meta : postgres://dbuser_meta:DBUser.Meta@10.10.10.10:5432/meta
# data : --storage postgres --bucket 10.10.10.10:5432/meta --access-key dbuser_meta --secret-key DBUser.Meta
# port : 9567
#node_packages: [ openssh-server, tmux, juicefs, restic, rclone, uv, code-server ]
#npm_packages: [ '@anthropic-ai/claude-code' , 'happy-coder' ]
#claude_env:
# ANTHROPIC_BASE_URL: https://open.bigmodel.cn/api/anthropic
# ANTHROPIC_API_URL: https://open.bigmodel.cn/api/anthropic
# ANTHROPIC_AUTH_TOKEN: your_api_service_token
# ANTHROPIC_MODEL: glm-4.7
# ANTHROPIC_SMALL_FAST_MODEL: glm-4.5-air
...
配置解读 docker 模板主要面向容器内开发与验证,默认配置特征如下:
关闭本地仓库构建(repo_enabled: false),避免容器内额外仓库构建成本。 精简节点行为:关闭 NTP、内核模块加载与 hosts 覆写(node_ntp_enabled: false、node_kernel_modules: []、node_write_etc_hosts: false)。 默认 PostgreSQL 18,预置较完整扩展集合(pg18-* 扩展包组)。 允许内网与公网密码访问(pg_hba_rules 包含 intra 与 world),便于演示与测试。 预留可选能力(注释项):Code-Server、Jupyter、JuiceFS、Claude CLI 相关参数可按需启用。 注意事项:
这是开发/演示导向模板,生产环境请收紧 pg_hba_rules 与密码策略。 容器运行时建议挂载 /data,以持久化 PostgreSQL 与组件数据。
9.9 - 内核模版 9.10 - pgsql 原生 PostgreSQL 内核,支持 PostgreSQL 13 到 18 的多版本部署
pgsql 配置模板使用原生 PostgreSQL 内核,是 Pigsty 的默认数据库内核,支持 PostgreSQL 13 到 18 版本。
配置概览 配置名称: pgsql 节点数量: 单节点 配置说明:原生 PostgreSQL 内核配置模板 适用系统:el8, el9, el10, d12, d13, u22, u24 适用架构:x86_64, aarch64 相关配置:meta 启用方式:
./configure -c pgsql [ -i <primary_ip>]
如需指定非默认 PostgreSQL 版本(如 16):
./configure -c pgsql -v 16
配置内容 源文件地址:pigsty/conf/pgsql.yml
---
#==============================================================#
# File : pgsql.yml
# Desc : 1-node PostgreSQL Config template
# Ctime : 2025-02-23
# Mtime : 2025-12-28
# Docs : https://pigsty.io/docs/conf/pgsql
# License : Apache-2.0 @ https://pigsty.io/docs/about/license/
# Copyright : 2018-2026 Ruohang Feng / Vonng (rh@vonng.com)
#==============================================================#
# This is the config template for basical PostgreSQL Kernel.
# Nothing special, just a basic setup with one node.
# tutorial: https://pigsty.io/docs/pgsql/kernel/postgres
#
# Usage:
# curl https://repo.pigsty.io/get | bash
# ./configure -c pgsql
# ./deploy.yml
all :
children :
infra : { hosts : { 10.10.10.10 : { infra_seq: 1 }} ,vars : { repo_enabled : false }}
etcd : { hosts : { 10.10.10.10 : { etcd_seq: 1 }} ,vars : { etcd_cluster : etcd }}
#minio: { hosts: { 10.10.10.10: { minio_seq: 1 }} ,vars: { minio_cluster: minio }}
#----------------------------------------------#
# PostgreSQL Cluster
#----------------------------------------------#
pg-meta :
hosts :
10.10.10.10 : { pg_seq: 1, pg_role : primary }
vars :
pg_cluster : pg-meta
pg_users :
- { name: dbuser_meta ,password: DBUser.Meta ,pgbouncer: true ,roles: [dbrole_admin ] ,comment : pigsty admin user }
- { name: dbuser_view ,password: DBUser.Viewer ,pgbouncer: true ,roles: [dbrole_readonly] ,comment : read-only viewer }
pg_databases :
- { name: meta, baseline: cmdb.sql ,comment: pigsty meta database ,schemas: [pigsty] ,extensions : [ postgis, timescaledb, vector ]}
pg_extensions : [ postgis, timescaledb, pgvector, pg_wait_sampling ]
pg_libs : 'timescaledb, pg_stat_statements, auto_explain, pg_wait_sampling'
pg_hba_rules : # https://pigsty.io/docs/pgsql/config/hba
- { user: all ,db: all ,addr: intra ,auth: pwd ,title: 'everyone intranet access with password' ,order : 800 }
pg_crontab : # https://pigsty.io/docs/pgsql/admin/crontab
- '00 01 * * * /pg/bin/pg-backup full'
vars :
#----------------------------------------------#
# INFRA : https://pigsty.io/docs/infra/param
#----------------------------------------------#
version : v4.2.2 # pigsty version string
admin_ip : 10.10.10.10 # admin node ip address
region: default # upstream mirror region : default,china,europe
infra_portal : # infra services exposed via portal
home : { domain : i.pigsty } # default domain name
#----------------------------------------------#
# NODE : https://pigsty.io/docs/node/param
#----------------------------------------------#
nodename_overwrite : false # do not overwrite node hostname on single node mode
node_repo_modules : node,infra,pgsql # add these repos directly to the singleton node
node_tune: oltp # node tuning specs : oltp,olap,tiny,crit
#----------------------------------------------#
# PGSQL : https://pigsty.io/docs/pgsql/param
#----------------------------------------------#
pg_version : 18 # Default PostgreSQL Major Version is 18
pg_conf: oltp.yml # pgsql tuning specs : {oltp,olap,tiny,crit}.yml
pg_packages : [ pgsql-main, pgsql-common ] # pg kernel and common utils
#pg_extensions: [ pg18-time ,pg18-gis ,pg18-rag ,pg18-fts ,pg18-olap ,pg18-feat ,pg18-lang ,pg18-type ,pg18-util ,pg18-func ,pg18-admin ,pg18-stat ,pg18-sec ,pg18-fdw ,pg18-sim ,pg18-etl]
#repo_extra_packages: [ pg18-main ,pg18-time ,pg18-gis ,pg18-rag ,pg18-fts ,pg18-olap ,pg18-feat ,pg18-lang ,pg18-type ,pg18-util ,pg18-func ,pg18-admin ,pg18-stat ,pg18-sec ,pg18-fdw ,pg18-sim ,pg18-etl]
#----------------------------------------------#
# PASSWORD : https://pigsty.io/docs/setup/security/
#----------------------------------------------#
grafana_admin_password : pigsty
grafana_view_password : DBUser.Viewer
pg_admin_password : DBUser.DBA
pg_monitor_password : DBUser.Monitor
pg_replication_password : DBUser.Replicator
patroni_password : Patroni.API
haproxy_admin_password : pigsty
minio_secret_key : S3User.MinIO
etcd_root_password : Etcd.Root
...
配置解读 pgsql 模板是 Pigsty 的 标准内核配置 ,使用社区原生 PostgreSQL。
版本支持 :
PostgreSQL 18(默认) PostgreSQL 17、16、15、14、13 适用场景 :
需要使用最新 PostgreSQL 特性 需要最广泛的扩展支持 标准生产环境部署 与 meta 模板功能相同,显式声明使用原生内核 与 meta 的区别 :
pgsql 模板显式声明使用原生 PostgreSQL 内核适合需要明确区分不同内核类型的场景 9.11 - mssql Babelfish(PG17)内核模板,提供 Microsoft SQL Server 协议与 T-SQL 兼容能力
mssql 配置模板使用 Babelfish(PG17) 内核替代原生 PostgreSQL,提供 Microsoft SQL Server 线缆协议(TDS)与 T-SQL 语法兼容能力。
从 Pigsty v4.2 以来,Babelfish 由 Pigsty 直接构建,不再使用 WiltonDB 仓库,可在所有 支持的 Linux 平台 上使用。
完整教程请参考:Babelfish (MSSQL) 内核使用说明
配置概览 配置名称: mssql 节点数量: 单节点 配置说明:Babelfish(PG17)配置模板,提供 SQL Server 协议兼容 适用系统:el8, el9, el10, d12, d13, u22, u24 适用架构:x86_64, aarch64 相关配置:meta 启用方式:
./configure -c mssql [ -i <primary_ip>]
配置内容 源文件地址:pigsty/conf/mssql.yml
---
#==============================================================#
# File : mssql.yml
# Desc : Babelfish (MSSQL Wire-Compatible) template
# Ctime : 2020-08-01
# Mtime : 2026-02-21
# Docs : https://pigsty.io/docs/conf/mssql
# License : Apache-2.0 @ https://pigsty.io/docs/about/license/
# Copyright : 2018-2026 Ruohang Feng / Vonng (rh@vonng.com)
#==============================================================#
# This is the config template for Babelfish Kernel made by Pigsty
# Which is a PostgreSQL 17 fork with SQL Server Compatibility
# tutorial: https://pigsty.io/docs/pgsql/kernel/babelfish
#
# Usage:
# curl https://repo.pigsty.io/get | bash
# ./configure -c mssql
# ./deploy.yml
all :
children :
infra : { hosts : { 10.10.10.10 : { infra_seq: 1 }} ,vars : { repo_enabled : false }}
etcd : { hosts : { 10.10.10.10 : { etcd_seq: 1 }} ,vars : { etcd_cluster : etcd }}
#minio: { hosts: { 10.10.10.10: { minio_seq: 1 }} ,vars: { minio_cluster: minio }}
#----------------------------------------------#
# Babelfish Database Cluster
#----------------------------------------------#
pg-meta :
hosts :
10.10.10.10 : { pg_seq: 1, pg_role : primary }
vars :
pg_cluster : pg-meta
pg_users :
- {name: dbuser_mssql ,password: DBUser.MSSQL ,superuser: true, pgbouncer: true ,roles: [dbrole_admin], comment : superuser & owner for babelfish }
pg_databases :
- name : mssql
baseline : mssql.sql
extensions : [ uuid-ossp, babelfishpg_common, babelfishpg_tsql, babelfishpg_tds, babelfishpg_money ]
owner : dbuser_mssql
parameters : { 'babelfishpg_tsql.migration_mode' : 'multi-db' }
comment : babelfish cluster, a MSSQL compatible pg cluster
pg_crontab : # https://pigsty.io/docs/pgsql/admin/crontab
- '00 01 * * * /pg/bin/pg-backup full'
# Babelfish Ad Hoc Settings
pg_mode : mssql # Microsoft SQL Server Compatible Mode
pg_version : 17
pg_packages : [ babelfish, pgsql-common, sqlcmd ]
pg_libs : 'babelfishpg_tds, pg_stat_statements, auto_explain' # add timescaledb to shared_preload_libraries
pg_hba_rules : # https://pigsty.io/docs/pgsql/config/hba
- { user: dbuser_mssql ,db: mssql ,addr: intra ,auth: md5 ,title: 'allow mssql dbsu intranet access' ,order : 525 } # <--- use md5 auth method for mssql user
- { user: all ,db: all ,addr: intra ,auth: md5 ,title: 'everyone intranet access with md5 pwd' ,order : 800 }
pg_default_services : # route primary & replica service to mssql port 1433
- { name: primary ,port: 5433 ,dest: 1433 ,check: /primary ,selector : "[]" }
- { name: replica ,port: 5434 ,dest: 1433 ,check: /read-only ,selector : "[]" , backup : "[? pg_role == `primary` || pg_role == `offline` ]" }
- { name: default ,port: 5436 ,dest: postgres ,check: /primary ,selector : "[]" }
- { name: offline ,port: 5438 ,dest: postgres ,check: /replica ,selector : "[? pg_role == `offline` || pg_offline_query ]" , backup : "[? pg_role == `replica` && !pg_offline_query]" }
vars :
#----------------------------------------------#
# INFRA : https://pigsty.io/docs/infra/param
#----------------------------------------------#
version : v4.2.2 # pigsty version string
admin_ip : 10.10.10.10 # admin node ip address
region: default # upstream mirror region : default,china,europe
infra_portal : # infra services exposed via portal
home : { domain : i.pigsty } # default domain name
#----------------------------------------------#
# NODE : https://pigsty.io/docs/node/param
#----------------------------------------------#
nodename_overwrite : false # do not overwrite node hostname on single node mode
node_repo_modules : node,infra,pgsql # extra mssql repo is required
node_tune: oltp # node tuning specs : oltp,olap,tiny,crit
#----------------------------------------------#
# PGSQL : https://pigsty.io/docs/pgsql/param
#----------------------------------------------#
pg_version : 17 # Babelfish kernel is compatible with postgres 17
pg_conf: oltp.yml # pgsql tuning specs : {oltp,olap,tiny,crit}.yml
#----------------------------------------------#
# PASSWORD : https://pigsty.io/docs/setup/security/
#----------------------------------------------#
grafana_admin_password : pigsty
grafana_view_password : DBUser.Viewer
pg_admin_password : DBUser.DBA
pg_monitor_password : DBUser.Monitor
pg_replication_password : DBUser.Replicator
patroni_password : Patroni.API
haproxy_admin_password : pigsty
minio_secret_key : S3User.MinIO
etcd_root_password : Etcd.Root
... 配置解读 mssql 模板让您可以使用 SQL Server Management Studio (SSMS) 或其他 SQL Server 客户端工具连接 PostgreSQL(Babelfish 协议层)。
关键特性 :
使用 TDS 协议(端口 1433),兼容 SQL Server 客户端 支持 T-SQL 语法,迁移成本低 保留 PostgreSQL 的 ACID 特性和扩展生态(底层为 PG17) 支持 multi-db 和 single-db 两种迁移模式 默认包组为 babelfish + pgsql-common + sqlcmd 默认创建扩展:uuid-ossp、babelfishpg_common、babelfishpg_tsql、babelfishpg_tds、babelfishpg_money、pg_hint_plan、system_stats、tds_fdw v4.2.0 起支持主流平台全覆盖(EL8/9/10、Debian 12/13、Ubuntu 22/24;x86_64 / aarch64) 连接方式 :
# 使用 sqlcmd 命令行工具
sqlcmd -S 10.10.10.10,1433 -U dbuser_mssql -P DBUser.MSSQL -d mssql
# 使用 SSMS 或 Azure Data Studio
# Server: 10.10.10.10,1433
# Authentication: SQL Server Authentication
# Login: dbuser_mssql
# Password: DBUser.MSSQL
适用场景 :
从 SQL Server 迁移到 PostgreSQL 需要同时支持 SQL Server 和 PostgreSQL 客户端的应用 希望利用 PostgreSQL 生态同时保持 T-SQL 兼容性 注意事项 :
Babelfish 内核基于 PostgreSQL 17,不支持 PG18+ 专有特性 默认迁移模式为 multi-db(babelfishpg_tsql.migration_mode),可按需改为 single-db 部分 T-SQL 语法可能存在兼容性差异,请参考 Babelfish 兼容性文档 需要使用 md5 认证方式(而非 scram-sha-256) 9.12 - polar PolarDB for PostgreSQL 内核,提供 Aurora 风格的存算分离能力
polar 配置模板使用阿里云 PolarDB for PostgreSQL 数据库内核替代原生 PostgreSQL,提供"云原生" Aurora 风格的存算分离能力。
完整教程请参考:PolarDB for PostgreSQL (POLAR) 内核使用说明
配置概览 配置名称: polar 节点数量: 单节点 配置说明:使用 PolarDB for PostgreSQL 内核 适用系统:el8, el9, el10, d12, d13, u22, u24 适用架构:x86_64 相关配置:meta 启用方式:
./configure -c polar [ -i <primary_ip>]
配置内容 源文件地址:pigsty/conf/polar.yml
---
#==============================================================#
# File : polar.yml
# Desc : Pigsty 1-node PolarDB Kernel Config Template
# Ctime : 2020-08-05
# Mtime : 2025-12-28
# Docs : https://pigsty.io/docs/conf/polar
# License : Apache-2.0 @ https://pigsty.io/docs/about/license/
# Copyright : 2018-2026 Ruohang Feng / Vonng (rh@vonng.com)
#==============================================================#
# This is the config template for PolarDB PG Kernel,
# Which is a PostgreSQL 15 fork with RAC flavor features
# tutorial: https://pigsty.io/docs/pgsql/kernel/polardb
#
# Usage:
# curl https://repo.pigsty.io/get | bash
# ./configure -c polar
# ./deploy.yml
all :
children :
infra : { hosts : { 10.10.10.10 : { infra_seq: 1 }} ,vars : { repo_enabled : false }}
etcd : { hosts : { 10.10.10.10 : { etcd_seq: 1 }} ,vars : { etcd_cluster : etcd }}
#minio: { hosts: { 10.10.10.10: { minio_seq: 1 }} ,vars: { minio_cluster: minio }}
#----------------------------------------------#
# PolarDB Database Cluster
#----------------------------------------------#
pg-meta :
hosts :
10.10.10.10 : { pg_seq: 1, pg_role : primary }
vars :
pg_cluster : pg-meta
pg_users :
- {name: dbuser_meta ,password: DBUser.Meta ,pgbouncer: true ,roles: [dbrole_admin] ,comment : pigsty admin user }
- {name: dbuser_view ,password: DBUser.Viewer ,pgbouncer: true ,roles: [dbrole_readonly] ,comment : read-only viewer for meta database }
pg_databases :
- {name: meta ,baseline: cmdb.sql ,comment: pigsty meta database ,schemas : [ pigsty]}
pg_hba_rules : # https://pigsty.io/docs/pgsql/config/hba
- { user: all ,db: all ,addr: intra ,auth: pwd ,title: 'everyone intranet access with password' ,order : 800 }
pg_crontab : # https://pigsty.io/docs/pgsql/admin/crontab
- '00 01 * * * /pg/bin/pg-backup full'
# PolarDB Ad Hoc Settings
pg_version : 15 # PolarDB PG is based on PG 15
pg_mode : polar # PolarDB PG Compatible mode
pg_packages : [ polardb, pgsql-common ] # Replace PG kernel with PolarDB kernel
pg_exporter_exclude_database : 'template0,template1,postgres,polardb_admin'
pg_default_roles : # PolarDB require replicator as superuser
- { name: dbrole_readonly ,login: false ,comment : role for global read-only access }
- { name: dbrole_offline ,login: false ,comment : role for restricted read-only access }
- { name: dbrole_readwrite ,login: false ,roles: [dbrole_readonly] ,comment : role for global read-write access }
- { name: dbrole_admin ,login: false ,roles: [pg_monitor, dbrole_readwrite] ,comment : role for object creation }
- { name: postgres ,superuser: true ,comment : system superuser }
- { name: replicator ,superuser: true ,replication: true ,roles: [pg_monitor, dbrole_readonly] ,comment : system replicator } # <- superuser is required for replication
- { name: dbuser_dba ,superuser: true ,roles: [dbrole_admin] ,pgbouncer: true ,pool_mode: session, pool_connlimit: 16 ,comment : pgsql admin user }
- { name: dbuser_monitor ,roles: [pg_monitor] ,pgbouncer: true ,parameters : {log_min_duration_statement: 1000 } ,pool_mode: session ,pool_connlimit: 8 ,comment : pgsql monitor user }
vars : # global variables
#----------------------------------------------#
# INFRA : https://pigsty.io/docs/infra/param
#----------------------------------------------#
version : v4.2.2 # pigsty version string
admin_ip : 10.10.10.10 # admin node ip address
region: default # upstream mirror region : default,china,europe
infra_portal : # infra services exposed via portal
home : { domain : i.pigsty } # default domain name
#----------------------------------------------#
# NODE : https://pigsty.io/docs/node/param
#----------------------------------------------#
nodename_overwrite : false # do not overwrite node hostname on single node mode
node_repo_modules : node,infra,pgsql # add these repos directly to the singleton node
node_tune: oltp # node tuning specs : oltp,olap,tiny,crit
#----------------------------------------------#
# PGSQL : https://pigsty.io/docs/pgsql/param
#----------------------------------------------#
pg_version : 15 # PolarDB is compatible with PG 15
pg_conf: oltp.yml # pgsql tuning specs : {oltp,olap,tiny,crit}.yml
#----------------------------------------------#
# PASSWORD : https://pigsty.io/docs/setup/security/
#----------------------------------------------#
grafana_admin_password : pigsty
grafana_view_password : DBUser.Viewer
pg_admin_password : DBUser.DBA
pg_monitor_password : DBUser.Monitor
pg_replication_password : DBUser.Replicator
patroni_password : Patroni.API
haproxy_admin_password : pigsty
minio_secret_key : S3User.MinIO
etcd_root_password : Etcd.Root
... 配置解读 polar 模板使用阿里云开源的 PolarDB for PostgreSQL 内核,提供云原生数据库能力。
关键特性 :
存算分离架构,计算节点和存储节点可独立扩展 支持一写多读,读副本秒级扩展 兼容 PostgreSQL 生态,保持 SQL 兼容性 支持共享存储场景,适合云环境部署 适用场景 :
需要存算分离架构的云原生场景 读多写少的业务负载 需要快速扩展读副本的场景 评估 PolarDB 特性的测试环境 注意事项 :
PolarDB 基于 PostgreSQL 15,不支持更高版本特性 复制用户需要超级用户权限(与原生 PostgreSQL 不同) 部分 PostgreSQL 扩展可能存在兼容性问题 不支持 ARM64 架构 9.13 - cloudberry Cloudberry 配置模板占位页(暂未提供该模板)。
当前版本暂未提供 cloudberry 配置模板。
如果你需要该模板,请先参考:
9.14 - ivory IvorySQL 内核,提供 Oracle 语法与 PL/SQL 兼容能力
ivory 配置模板使用瀚高的 IvorySQL 数据库内核替代原生 PostgreSQL,提供 Oracle 语法与 PL/SQL 兼容能力。
完整教程请参考:IvorySQL (Oracle兼容) 内核使用说明
配置概览 配置名称: ivory 节点数量: 单节点 配置说明:使用 IvorySQL Oracle 兼容内核 适用系统:el8, el9, el10, d12, d13, u22, u24 适用架构:x86_64, aarch64 相关配置:meta 启用方式:
./configure -c ivory [ -i <primary_ip>]
配置内容 源文件地址:pigsty/conf/ivory.yml
---
#==============================================================#
# File : ivory.yml
# Desc : IvorySQL 4 (Oracle Compatible) template
# Ctime : 2024-08-05
# Mtime : 2026-02-26
# Docs : https://pigsty.io/docs/conf/ivory
# License : Apache-2.0 @ https://pigsty.io/docs/about/license/
# Copyright : 2018-2026 Ruohang Feng / Vonng (rh@vonng.com)
#==============================================================#
# This is the config template for IvorySQL 5 Kernel,
# Which is a PostgreSQL 18 fork with Oracle Compatibility
# tutorial: https://pigsty.io/docs/pgsql/kernel/ivorysql
# Oracle compatible port (PGSQL Wire) is 1521
#
# Usage:
# curl https://repo.pigsty.io/get | bash
# ./configure -c ivory
# ./deploy.yml
all :
children :
infra : { hosts : { 10.10.10.10 : { infra_seq: 1 }} ,vars : { repo_enabled : false }}
etcd : { hosts : { 10.10.10.10 : { etcd_seq: 1 }} ,vars : { etcd_cluster : etcd }}
#minio: { hosts: { 10.10.10.10: { minio_seq: 1 }} ,vars: { minio_cluster: minio }}
#----------------------------------------------#
# IvorySQL Database Cluster
#----------------------------------------------#
pg-meta :
hosts :
10.10.10.10 : { pg_seq: 1, pg_role : primary }
vars :
pg_cluster : pg-meta
pg_users :
- {name: dbuser_meta ,password: DBUser.Meta ,pgbouncer: true ,roles: [dbrole_admin] ,comment : pigsty admin user }
- {name: dbuser_view ,password: DBUser.Viewer ,pgbouncer: true ,roles: [dbrole_readonly] ,comment : read-only viewer for meta database }
pg_databases :
- {name: meta ,baseline: cmdb.sql ,comment: pigsty meta database ,schemas : [ pigsty]}
pg_hba_rules : # https://pigsty.io/docs/pgsql/config/hba
- { user: all ,db: all ,addr: intra ,auth: pwd ,title: 'everyone intranet access with password' ,order : 800 }
pg_crontab : # https://pigsty.io/docs/pgsql/admin/crontab
- '00 01 * * * /pg/bin/pg-backup full'
# IvorySQL Ad Hoc Settings
pg_mode : ivory # Use IvorySQL Oracle Compatible Mode
pg_packages : [ ivorysql, pgsql-common ] # install IvorySQL instead of postgresql kernel
pg_libs : 'liboracle_parser, pg_stat_statements, auto_explain' # pre-load oracle parser
vars : # global variables
#----------------------------------------------#
# INFRA : https://pigsty.io/docs/infra/param
#----------------------------------------------#
version : v4.2.2 # pigsty version string
admin_ip : 10.10.10.10 # admin node ip address
region: default # upstream mirror region : default,china,europe
infra_portal : # infra services exposed via portal
home : { domain : i.pigsty } # default domain name
#----------------------------------------------#
# NODE : https://pigsty.io/docs/node/param
#----------------------------------------------#
nodename_overwrite : false # do not overwrite node hostname on single node mode
node_repo_modules : node,infra,pgsql # add these repos directly to the singleton node
node_tune: oltp # node tuning specs : oltp,olap,tiny,crit
#----------------------------------------------#
# PGSQL : https://pigsty.io/docs/pgsql/param
#----------------------------------------------#
pg_version : 18 # IvorySQL kernel is compatible with postgres 18
pg_conf: oltp.yml # pgsql tuning specs : {oltp,olap,tiny,crit}.yml
#----------------------------------------------#
# PASSWORD : https://pigsty.io/docs/setup/security/
#----------------------------------------------#
grafana_admin_password : pigsty
grafana_view_password : DBUser.Viewer
pg_admin_password : DBUser.DBA
pg_monitor_password : DBUser.Monitor
pg_replication_password : DBUser.Replicator
patroni_password : Patroni.API
haproxy_admin_password : pigsty
minio_secret_key : S3User.MinIO
etcd_root_password : Etcd.Root
... 配置解读 ivory 模板使用瀚高开源的 IvorySQL 内核,提供 Oracle 数据库兼容能力。
关键特性 :
支持 Oracle PL/SQL 语法 兼容 Oracle 数据类型(NUMBER、VARCHAR2 等) 支持 Oracle 风格的包(Package) 保留 PostgreSQL 的所有标准功能 适用场景 :
从 Oracle 迁移到 PostgreSQL 需要同时支持 Oracle 和 PostgreSQL 语法的应用 希望利用 PostgreSQL 生态同时保持 PL/SQL 兼容性 评估 IvorySQL 特性的测试环境 注意事项 :
IvorySQL 5 基于 PostgreSQL 18 使用 liboracle_parser 需要加载到 shared_preload_libraries pgbackrest 在 Oracle 兼容模式下可能存在校验问题,PITR 能力受限主要支持 EL8/EL9 系统,其他系统支持程度请参考官方文档 9.15 - agens AgensGraph 内核模板,提供属性图模型与 Cypher 查询能力
agens 配置模板使用 AgensGraph 数据库内核替代原生 PostgreSQL,提供属性图模型与 Cypher 查询能力。
完整教程请参考:AgensGraph 内核使用说明
配置概览 配置名称: agens 节点数量: 单节点 配置说明:AgensGraph(PG16)图数据库内核配置 适用系统:el8, el9, el10, d12, d13, u22, u24 适用架构:x86_64, aarch64 相关配置:metapgsql 启用方式:
./configure -c agens [ -i <primary_ip>]
配置内容 源文件地址:pigsty/conf/agens.yml
---
#==============================================================#
# File : agens.yml
# Desc : 1-node AgensGraph (Graph DB) template
# Ctime : 2026-02-26
# Mtime : 2026-02-26
# Docs : https://pigsty.io/docs/conf/agens
# License : Apache-2.0 @ https://pigsty.io/docs/about/license/
# Copyright : 2018-2026 Ruohang Feng / Vonng (rh@vonng.com)
#==============================================================#
# This is the config template for AgensGraph Kernel,
# Which is a PostgreSQL 16 fork with graph capabilities.
# tutorial: https://pigsty.io/docs/pgsql/kernel/agensgraph
#
# Usage:
# curl https://repo.pigsty.io/get | bash
# ./configure -c agens
# ./deploy.yml
all :
children :
infra : { hosts : { 10.10.10.10 : { infra_seq: 1 }} ,vars : { repo_enabled : false }}
etcd : { hosts : { 10.10.10.10 : { etcd_seq: 1 }} ,vars : { etcd_cluster : etcd }}
#minio: { hosts: { 10.10.10.10: { minio_seq: 1 }} ,vars: { minio_cluster: minio }}
#----------------------------------------------#
# AgensGraph Database Cluster
#----------------------------------------------#
pg-meta :
hosts :
10.10.10.10 : { pg_seq: 1, pg_role : primary }
vars :
pg_cluster : pg-meta
pg_users :
- {name: dbuser_meta ,password: DBUser.Meta ,pgbouncer: true ,roles: [dbrole_admin] ,comment : pigsty admin user }
- {name: dbuser_view ,password: DBUser.Viewer ,pgbouncer: true ,roles: [dbrole_readonly] ,comment : read-only viewer for meta database }
pg_databases :
- {name: meta ,baseline: cmdb.sql ,comment: pigsty meta database ,schemas : [ pigsty]}
pg_hba_rules : # https://pigsty.io/docs/pgsql/config/hba
- { user: all ,db: all ,addr: intra ,auth: pwd ,title: 'everyone intranet access with password' ,order : 800 }
pg_crontab : # https://pigsty.io/docs/pgsql/admin/crontab
- '00 01 * * * /pg/bin/pg-backup full'
# AgensGraph Ad Hoc Settings
pg_mode : agens # AgensGraph compatible mode
pg_packages : [ agensgraph, pgsql-common ] # install AgensGraph kernel package + common utils
vars :
#----------------------------------------------#
# INFRA : https://pigsty.io/docs/infra/param
#----------------------------------------------#
version : v4.2.2 # pigsty version string
admin_ip : 10.10.10.10 # admin node ip address
region: default # upstream mirror region : default,china,europe
infra_portal : # infra services exposed via portal
home : { domain : i.pigsty } # default domain name
#----------------------------------------------#
# NODE : https://pigsty.io/docs/node/param
#----------------------------------------------#
nodename_overwrite : false # do not overwrite node hostname on single node mode
node_repo_modules : node,infra,pgsql # add these repos directly to the singleton node
node_tune: oltp # node tuning specs : oltp,olap,tiny,crit
#----------------------------------------------#
# PGSQL : https://pigsty.io/docs/pgsql/param
#----------------------------------------------#
pg_version : 16 # AgensGraph kernel is compatible with postgres 16
pg_conf: oltp.yml # pgsql tuning specs : {oltp,olap,tiny,crit}.yml
#----------------------------------------------#
# PASSWORD : https://pigsty.io/docs/setup/security/
#----------------------------------------------#
grafana_admin_password : pigsty
grafana_view_password : DBUser.Viewer
pg_admin_password : DBUser.DBA
pg_monitor_password : DBUser.Monitor
pg_replication_password : DBUser.Replicator
patroni_password : Patroni.API
haproxy_admin_password : pigsty
minio_secret_key : S3User.MinIO
etcd_root_password : Etcd.Root
...
配置解读 agens 模板在 pg-meta 集群中启用 pg_mode: agens,并使用 agensgraph 内核包替换标准 PostgreSQL 内核。
关键特性 :
属性图模型能力(Vertex / Edge) 支持 Cypher 查询语法,可与 SQL 混合使用 兼容 PostgreSQL 生态与常规运维方式 默认基于 PostgreSQL 16 兼容内核 适用场景 :
图关系分析与路径查询 社交关系、风控关联、知识图谱等图数据场景 需要在 PostgreSQL 体系中引入图查询能力 注意事项 :
AgensGraph 当前模板固定使用 pg_version: 16 默认模板为单节点快速启用,生产场景建议按需扩展高可用拓扑 图模型与 Cypher 语义请结合 AgensGraph 官方文档进行设计 9.16 - pgedge pgEdge 内核模板,提供面向边缘场景的多主分布式 PostgreSQL 能力
pgedge 配置模板使用 pgEdge 数据库内核替代原生 PostgreSQL,提供面向边缘场景的分布式与多主复制能力。
完整教程请参考:pgEdge 内核使用说明
配置概览 配置名称: pgedge 节点数量: 单节点 配置说明:pgEdge(PG17)分布式内核配置模板 适用系统:el8, el9, el10, d12, d13, u22, u24 适用架构:x86_64, aarch64 相关配置:metapgsql 启用方式:
./configure -c pgedge [ -i <primary_ip>]
配置内容 源文件地址:pigsty/conf/pgedge.yml
---
#==============================================================#
# File : pgedge.yml
# Desc : 1-node pgEdge (Distributed PG) template
# Ctime : 2026-02-26
# Mtime : 2026-02-26
# Docs : https://pigsty.io/docs/conf/pgedge
# License : Apache-2.0 @ https://pigsty.io/docs/about/license/
# Copyright : 2018-2026 Ruohang Feng / Vonng (rh@vonng.com)
#==============================================================#
# This is the config template for pgEdge Kernel,
# Which is a PostgreSQL 17 compatible fork.
# tutorial: https://pigsty.io/docs/pgsql/kernel/pgedge
#
# Usage:
# curl https://repo.pigsty.io/get | bash
# ./configure -c pgedge
# ./deploy.yml
all :
children :
infra : { hosts : { 10.10.10.10 : { infra_seq: 1 }} ,vars : { repo_enabled : false }}
etcd : { hosts : { 10.10.10.10 : { etcd_seq: 1 }} ,vars : { etcd_cluster : etcd }}
#minio: { hosts: { 10.10.10.10: { minio_seq: 1 }} ,vars: { minio_cluster: minio }}
#----------------------------------------------#
# pgEdge Database Cluster
#----------------------------------------------#
pg-meta :
hosts :
10.10.10.10 : { pg_seq: 1, pg_role : primary }
vars :
pg_cluster : pg-meta
pg_users :
- {name: dbuser_meta ,password: DBUser.Meta ,pgbouncer: true ,roles: [dbrole_admin] ,comment : pigsty admin user }
- {name: dbuser_view ,password: DBUser.Viewer ,pgbouncer: true ,roles: [dbrole_readonly] ,comment : read-only viewer for meta database }
pg_databases :
- {name: meta ,baseline: cmdb.sql ,comment: pigsty meta database ,schemas: [pigsty] ,extensions : [ spock, snowflake, lolor]}
pg_hba_rules : # https://pigsty.io/docs/pgsql/config/hba
- { user: all ,db: all ,addr: intra ,auth: pwd ,title: 'everyone intranet access with password' ,order : 800 }
pg_crontab : # https://pigsty.io/docs/pgsql/admin/crontab
- '00 01 * * * /pg/bin/pg-backup full'
# pgEdge Ad Hoc Settings
pg_mode : pgedge # pgEdge compatible mode
pg_packages : [ pgedge, pgsql-common ] # install pgEdge kernel package + common utils
pg_extensions : [ spock, snowflake, lolor ] # ensure pgEdge extension packages are installed
pg_libs : 'spock, lolor, pg_stat_statements, auto_explain' # preload required libs for pgEdge logical replication
vars :
#----------------------------------------------#
# INFRA : https://pigsty.io/docs/infra/param
#----------------------------------------------#
version : v4.2.2 # pigsty version string
admin_ip : 10.10.10.10 # admin node ip address
region: default # upstream mirror region : default,china,europe
infra_portal : # infra services exposed via portal
home : { domain : i.pigsty } # default domain name
#----------------------------------------------#
# NODE : https://pigsty.io/docs/node/param
#----------------------------------------------#
nodename_overwrite : false # do not overwrite node hostname on single node mode
node_repo_modules : node,infra,pgsql # add these repos directly to the singleton node
node_tune: oltp # node tuning specs : oltp,olap,tiny,crit
#----------------------------------------------#
# PGSQL : https://pigsty.io/docs/pgsql/param
#----------------------------------------------#
pg_version : 17 # pgEdge kernel is compatible with postgres 17
pg_conf: oltp.yml # pgsql tuning specs : {oltp,olap,tiny,crit}.yml
#----------------------------------------------#
# PASSWORD : https://pigsty.io/docs/setup/security/
#----------------------------------------------#
grafana_admin_password : pigsty
grafana_view_password : DBUser.Viewer
pg_admin_password : DBUser.DBA
pg_monitor_password : DBUser.Monitor
pg_replication_password : DBUser.Replicator
patroni_password : Patroni.API
haproxy_admin_password : pigsty
minio_secret_key : S3User.MinIO
etcd_root_password : Etcd.Root
...
配置解读 pgedge 模板在 pg-meta 集群中启用 pg_mode: pgedge,并预装 pgEdge 核心扩展用于逻辑复制与边缘分布式场景。
关键特性 :
使用 pgedge 内核包替代标准 PostgreSQL(兼容 PG17) 默认安装 spock、snowflake、lolor 扩展 默认预加载 spock 与 lolor,便于后续多主复制配置 保留 Pigsty 的标准备份、监控与运维能力 适用场景 :
多地域边缘部署与就近写入 需要多主逻辑复制与冲突处理能力 从单节点验证逐步扩展到分布式拓扑 注意事项 :
当前模板用于单节点内核验证,生产多主需额外规划节点拓扑与复制策略 默认 pg_version: 17,建议与目标集群版本保持一致 进行跨地域复制前,请先评估网络时延与冲突处理策略 9.17 - mysql OpenHalo 内核,提供 MySQL 协议与语法兼容能力
mysql 配置模板使用 OpenHalo 数据库内核替代原生 PostgreSQL,提供 MySQL 线缆协议与 SQL 语法兼容能力。
配置概览 配置名称: mysql 节点数量: 单节点 配置说明:OpenHalo MySQL 兼容内核配置 适用系统:el8, el9, el10, d12, d13, u22, u24 适用架构:x86_64 相关配置:meta 启用方式:
./configure -c mysql [ -i <primary_ip>]
配置内容 源文件地址:pigsty/conf/mysql.yml
---
#==============================================================#
# File : mysql.yml
# Desc : 1-node OpenHaloDB (MySQL Compatible) template
# Ctime : 2025-04-03
# Mtime : 2026-02-26
# Docs : https://pigsty.io/docs/conf/mysql
# License : Apache-2.0 @ https://pigsty.io/docs/about/license/
# Copyright : 2018-2026 Ruohang Feng / Vonng (rh@vonng.com)
#==============================================================#
# This is the config template for OpenHalo PG Kernel,
# Which is a PostgreSQL 14 fork with MySQL Wire Compatibility
# tutorial: https://pigsty.io/docs/pgsql/kernel/openhalo
#
# Usage:
# curl https://repo.pigsty.io/get | bash
# ./configure -c mysql
# ./deploy.yml
all :
children :
infra : { hosts : { 10.10.10.10 : { infra_seq: 1 }} ,vars : { repo_enabled : false }}
etcd : { hosts : { 10.10.10.10 : { etcd_seq: 1 }} ,vars : { etcd_cluster : etcd }}
#minio: { hosts: { 10.10.10.10: { minio_seq: 1 }} ,vars: { minio_cluster: minio }}
#----------------------------------------------#
# OpenHalo Database Cluster
#----------------------------------------------#
# connect with mysql client: mysql -h 10.10.10.10 -u dbuser_meta -D mysql (the actual database is 'postgres', and 'mysql' is a schema)
pg-meta :
hosts :
10.10.10.10 : { pg_seq: 1, pg_role : primary }
vars :
pg_cluster : pg-meta
pg_users :
- {name: dbuser_meta ,password: DBUser.Meta ,pgbouncer: true ,roles: [dbrole_admin] ,comment : pigsty admin user }
- {name: dbuser_view ,password: DBUser.Viewer ,pgbouncer: true ,roles: [dbrole_readonly] ,comment : read-only viewer for meta database }
pg_databases :
- {name: postgres, extensions : [ aux_mysql]} # the mysql compatible database
- {name: meta ,baseline: cmdb.sql ,comment: pigsty meta database ,schemas : [ pigsty]}
pg_hba_rules : # https://pigsty.io/docs/pgsql/config/hba
- { user: all ,db: all ,addr: intra ,auth: pwd ,title: 'everyone intranet access with password' ,order : 800 }
pg_crontab : # https://pigsty.io/docs/pgsql/admin/crontab
- '00 01 * * * /pg/bin/pg-backup full'
# OpenHalo Ad Hoc Setting
pg_mode : mysql # MySQL Compatible Mode by HaloDB
pg_version : 14 # The current HaloDB is compatible with PG Major Version 14
pg_packages : [ openhalo, pgsql-common ] # install openhalodb instead of postgresql kernel
vars :
#----------------------------------------------#
# INFRA : https://pigsty.io/docs/infra/param
#----------------------------------------------#
version : v4.2.2 # pigsty version string
admin_ip : 10.10.10.10 # admin node ip address
region: default # upstream mirror region : default,china,europe
infra_portal : # infra services exposed via portal
home : { domain : i.pigsty } # default domain name
#----------------------------------------------#
# NODE : https://pigsty.io/docs/node/param
#----------------------------------------------#
nodename_overwrite : false # do not overwrite node hostname on single node mode
node_repo_modules : node,infra,pgsql # add these repos directly to the singleton node
node_tune: oltp # node tuning specs : oltp,olap,tiny,crit
#----------------------------------------------#
# PGSQL : https://pigsty.io/docs/pgsql/param
#----------------------------------------------#
pg_version : 14 # OpenHalo is compatible with PG 14
pg_conf: oltp.yml # pgsql tuning specs : {oltp,olap,tiny,crit}.yml
#----------------------------------------------#
# PASSWORD : https://pigsty.io/docs/setup/security/
#----------------------------------------------#
grafana_admin_password : pigsty
grafana_view_password : DBUser.Viewer
pg_admin_password : DBUser.DBA
pg_monitor_password : DBUser.Monitor
pg_replication_password : DBUser.Replicator
patroni_password : Patroni.API
haproxy_admin_password : pigsty
minio_secret_key : S3User.MinIO
etcd_root_password : Etcd.Root
... 配置解读 mysql 模板使用 OpenHalo 内核,让您可以使用 MySQL 客户端工具连接 PostgreSQL。
关键特性 :
使用 MySQL 协议(端口 3306),兼容 MySQL 客户端 支持 MySQL SQL 语法子集 保留 PostgreSQL 的 ACID 特性和存储引擎 同时支持 PostgreSQL 和 MySQL 两种协议连接 连接方式 :
# 使用 MySQL 客户端
mysql -h 10.10.10.10 -P 3306 -u dbuser_meta -pDBUser.Meta
# 同时保留 PostgreSQL 连接能力
psql postgres://dbuser_meta:DBUser.Meta@10.10.10.10:5432/meta
适用场景 :
从 MySQL 迁移到 PostgreSQL 需要同时支持 MySQL 和 PostgreSQL 客户端的应用 希望利用 PostgreSQL 生态同时保持 MySQL 兼容性 注意事项 :
OpenHalo 基于 PostgreSQL 14,不支持更高版本特性 部分 MySQL 语法可能存在兼容性差异 仅支持 EL8/EL9 系统 不支持 ARM64 架构 9.18 - pgtde Percona PostgreSQL 内核,提供透明数据加密 (pg_tde) 能力
pgtde 配置模板使用 Percona PostgreSQL 数据库内核,提供透明数据加密 (Transparent Data Encryption, TDE) 能力。
配置概览 配置名称: pgtde 节点数量: 单节点 配置说明:Percona PostgreSQL 透明数据加密配置 适用系统:el8, el9, el10, d12, d13, u22, u24 适用架构:x86_64 相关配置:meta 启用方式:
./configure -c pgtde [ -i <primary_ip>]
配置内容 源文件地址:pigsty/conf/pgtde.yml
---
#==============================================================#
# File : pgtde.yml
# Desc : PG TDE with Percona PostgreSQL 1-node template
# Ctime : 2025-07-04
# Mtime : 2025-12-28
# Docs : https://pigsty.io/docs/conf/pgtde
# License : Apache-2.0 @ https://pigsty.io/docs/about/license/
# Copyright : 2018-2026 Ruohang Feng / Vonng (rh@vonng.com)
#==============================================================#
# This is the config template for Percona PostgreSQL Distribution
# With pg_tde extension, which is compatible with PostgreSQL 18.1
# tutorial: https://pigsty.io/docs/pgsql/kernel/percona
#
# Usage:
# curl https://repo.pigsty.io/get | bash
# ./configure -c pgtde
# ./deploy.yml
all :
children :
infra : { hosts : { 10.10.10.10 : { infra_seq: 1 }} ,vars : { repo_enabled : false }}
etcd : { hosts : { 10.10.10.10 : { etcd_seq: 1 }} ,vars : { etcd_cluster : etcd }}
#minio: { hosts: { 10.10.10.10: { minio_seq: 1 }} ,vars: { minio_cluster: minio }}
#----------------------------------------------#
# Percona Postgres Database Cluster
#----------------------------------------------#
pg-meta :
hosts :
10.10.10.10 : { pg_seq: 1, pg_role : primary }
vars :
pg_cluster : pg-meta
pg_users :
- { name: dbuser_meta ,password: DBUser.Meta ,pgbouncer: true ,roles: [dbrole_admin ] ,comment : pigsty admin user }
- { name: dbuser_view ,password: DBUser.Viewer ,pgbouncer: true ,roles: [dbrole_readonly] ,comment : read-only viewer }
pg_databases :
- name : meta
baseline : cmdb.sql
comment : pigsty tde database
schemas : [ pigsty]
extensions : [ vector, postgis, pg_tde ,pgaudit, { name: pg_stat_monitor, schema: monitor } ]
pg_hba_rules : # https://pigsty.io/docs/pgsql/config/hba
- { user: all ,db: all ,addr: intra ,auth: pwd ,title: 'everyone intranet access with password' ,order : 800 }
pg_crontab : # https://pigsty.io/docs/pgsql/admin/crontab
- '00 01 * * * /pg/bin/pg-backup full'
# Percona PostgreSQL TDE Ad Hoc Settings
pg_packages : [ percona-main, pgsql-common ] # install percona postgres packages
pg_libs : 'pg_tde, pgaudit, pg_stat_statements, pg_stat_monitor, auto_explain'
vars :
#----------------------------------------------#
# INFRA : https://pigsty.io/docs/infra/param
#----------------------------------------------#
version : v4.2.2 # pigsty version string
admin_ip : 10.10.10.10 # admin node ip address
region: default # upstream mirror region : default,china,europe
infra_portal : # infra services exposed via portal
home : { domain : i.pigsty } # default domain name
#----------------------------------------------#
# NODE : https://pigsty.io/docs/node/param
#----------------------------------------------#
nodename_overwrite : false # do not overwrite node hostname on single node mode
node_repo_modules : node,infra,pgsql,percona
node_tune : oltp
#----------------------------------------------#
# PGSQL : https://pigsty.io/docs/pgsql/param
#----------------------------------------------#
pg_version : 18 # Default Percona TDE PG Major Version is 18
pg_conf: oltp.yml # pgsql tuning specs : {oltp,olap,tiny,crit}.yml
#----------------------------------------------#
# PASSWORD : https://pigsty.io/docs/setup/security/
#----------------------------------------------#
grafana_admin_password : pigsty
grafana_view_password : DBUser.Viewer
pg_admin_password : DBUser.DBA
pg_monitor_password : DBUser.Monitor
pg_replication_password : DBUser.Replicator
patroni_password : Patroni.API
haproxy_admin_password : pigsty
minio_secret_key : S3User.MinIO
etcd_root_password : Etcd.Root
... 配置解读 pgtde 模板使用 Percona PostgreSQL 内核,提供企业级透明数据加密能力。
关键特性 :
透明数据加密 :数据在磁盘上自动加密,对应用透明密钥管理 :支持本地密钥和外部密钥管理系统 (KMS)表级加密 :可选择性加密敏感表完整兼容 :与原生 PostgreSQL 完全兼容适用场景 :
需要满足数据安全合规要求(如 PCI-DSS、HIPAA) 存储敏感数据(如个人信息、金融数据) 需要静态数据加密的场景 对数据安全有严格要求的企业环境 使用方法 :
-- 创建加密表
CREATE TABLE sensitive_data (
id SERIAL PRIMARY KEY ,
ssn VARCHAR ( 11 )
) USING pg_tde ;
-- 或对现有表启用加密
ALTER TABLE existing_table SET ACCESS METHOD pg_tde ;
注意事项 :
Percona PostgreSQL 基于 PostgreSQL 18 加密会带来一定性能开销(通常 5-15%) 需要妥善管理加密密钥 不支持 ARM64 架构 9.19 - oriole OrioleDB 内核,提供无膨胀的 OLTP 增强存储引擎
oriole 配置模板使用 OrioleDB 存储引擎替代 PostgreSQL 默认的 Heap 存储,提供无膨胀、高性能的 OLTP 能力。
配置概览 配置名称: oriole 节点数量: 单节点 配置说明:OrioleDB 无膨胀存储引擎配置 适用系统:el8, el9, el10, d12, d13, u22, u24 适用架构:x86_64 相关配置:meta 启用方式:
./configure -c oriole [ -i <primary_ip>]
配置内容 源文件地址:pigsty/conf/oriole.yml
---
#==============================================================#
# File : oriole.yml
# Desc : 1-node OrioleDB (OLTP Enhancement) template
# Ctime : 2025-04-05
# Mtime : 2025-12-28
# Docs : https://pigsty.io/docs/conf/oriole
# License : Apache-2.0 @ https://pigsty.io/docs/about/license/
# Copyright : 2018-2026 Ruohang Feng / Vonng (rh@vonng.com)
#==============================================================#
# This is the config template for OrioleDB Kernel,
# Which is a Patched PostgreSQL 17 fork without bloat
# tutorial: https://pigsty.io/docs/pgsql/kernel/orioledb
#
# Usage:
# curl https://repo.pigsty.io/get | bash
# ./configure -c oriole
# ./deploy.yml
all :
children :
infra : { hosts : { 10.10.10.10 : { infra_seq: 1 }} ,vars : { repo_enabled : false }}
etcd : { hosts : { 10.10.10.10 : { etcd_seq: 1 }} ,vars : { etcd_cluster : etcd }}
#minio: { hosts: { 10.10.10.10: { minio_seq: 1 }} ,vars: { minio_cluster: minio }}
#----------------------------------------------#
# OrioleDB Database Cluster
#----------------------------------------------#
pg-meta :
hosts :
10.10.10.10 : { pg_seq: 1, pg_role : primary }
vars :
pg_cluster : pg-meta
pg_users :
- {name: dbuser_meta ,password: DBUser.Meta ,pgbouncer: true ,roles: [dbrole_admin] ,comment : pigsty admin user }
- {name: dbuser_view ,password: DBUser.Viewer ,pgbouncer: true ,roles: [dbrole_readonly] ,comment : read-only viewer for meta database }
pg_databases :
- {name: meta ,baseline: cmdb.sql ,comment: pigsty meta database ,schemas: [pigsty], extensions : [ orioledb]}
pg_hba_rules : # https://pigsty.io/docs/pgsql/config/hba
- { user: all ,db: all ,addr: intra ,auth: pwd ,title: 'everyone intranet access with password' ,order : 800 }
pg_crontab : # https://pigsty.io/docs/pgsql/admin/crontab
- '00 01 * * * /pg/bin/pg-backup full'
# OrioleDB Ad Hoc Settings
pg_mode : oriole # oriole compatible mode
pg_packages : [ oriole, pgsql-common ] # install OrioleDB kernel
pg_libs : 'orioledb, pg_stat_statements, auto_explain' # Load OrioleDB Extension
vars : # global variables
#----------------------------------------------#
# INFRA : https://pigsty.io/docs/infra/param
#----------------------------------------------#
version : v4.2.2 # pigsty version string
admin_ip : 10.10.10.10 # admin node ip address
region: default # upstream mirror region : default,china,europe
infra_portal : # infra services exposed via portal
home : { domain : i.pigsty } # default domain name
#----------------------------------------------#
# NODE : https://pigsty.io/docs/node/param
#----------------------------------------------#
nodename_overwrite : false # do not overwrite node hostname on single node mode
node_repo_modules : node,infra,pgsql # add these repos directly to the singleton node
node_tune: oltp # node tuning specs : oltp,olap,tiny,crit
#----------------------------------------------#
# PGSQL : https://pigsty.io/docs/pgsql/param
#----------------------------------------------#
pg_version : 17 # OrioleDB Kernel is based on PG 17
pg_conf: oltp.yml # pgsql tuning specs : {oltp,olap,tiny,crit}.yml
#----------------------------------------------#
# PASSWORD : https://pigsty.io/docs/setup/security/
#----------------------------------------------#
grafana_admin_password : pigsty
grafana_view_password : DBUser.Viewer
pg_admin_password : DBUser.DBA
pg_monitor_password : DBUser.Monitor
pg_replication_password : DBUser.Replicator
patroni_password : Patroni.API
haproxy_admin_password : pigsty
minio_secret_key : S3User.MinIO
etcd_root_password : Etcd.Root
... 配置解读 oriole 模板使用 OrioleDB 存储引擎,从根本上解决 PostgreSQL 表膨胀问题。
关键特性 :
无膨胀设计 :使用 UNDO 日志而非多版本并发控制 (MVCC)无需 VACUUM :消除 autovacuum 带来的性能抖动行级 WAL :更高效的日志记录和复制压缩存储 :内置数据压缩,减少存储空间适用场景 :
高频更新的 OLTP 工作负载 对写入延迟敏感的应用 需要稳定响应时间(消除 VACUUM 影响) 大表频繁更新导致膨胀的场景 使用方法 :
-- 创建使用 OrioleDB 存储的表
CREATE TABLE orders (
id SERIAL PRIMARY KEY ,
customer_id INT ,
amount DECIMAL ( 10 , 2 )
) USING orioledb ;
-- 对现有表无法直接转换,需要重建
注意事项 :
OrioleDB 基于 PostgreSQL 17 需要将 orioledb 添加到 shared_preload_libraries 部分 PostgreSQL 特性可能不完全支持 不支持 ARM64 架构 9.20 - mongo DocumentDB + FerretDB(Mongo Wire 协议兼容)配置模板,基于 PostgreSQL 提供 Mongo 风格服务。
mongo 配置模板用于部署 FerretDB 与 DocumentDB 兼容栈,在 PostgreSQL 之上提供 Mongo Wire 协议兼容能力。
完整教程请参考:FerretDB / Mongo 兼容层使用说明
配置概览 配置名称: mongo 节点数量: 单节点(默认) 配置说明:基于 PostgreSQL 18 + FerretDB + DocumentDB 的 Mongo 兼容模板。 适用系统:el8, el9, el10, d12, d13, u22, u24 适用架构:x86_64, aarch64 相关配置:metapgsql 启用方式:
./configure -c mongo
./deploy.yml
./mongo.yml -l ferret
配置内容 源文件地址:pigsty/conf/mongo.yml
---
#==============================================================#
# File : mongo.yml
# Desc : DocumentDB & FerretDB (MongoDB Compatible) template
# Ctime : 2025-02-23
# Mtime : 2026-01-17
# Docs : https://pigsty.io/docs/ferret
# License : Apache-2.0 @ https://pigsty.io/docs/about/license/
# Copyright : 2018-2026 Ruohang Feng / Vonng (rh@vonng.com)
#==============================================================#
# This is the config template for FerretDB & DocumentDB
# That is a Mongo Wire-Compatible Layer upon PostgreSQL
# This config template works with PostgreSQL 16, 17, 18
# tutorial: https://pigsty.io/docs/ferret
#
# Usage:
# curl https://repo.pigsty.io/get | bash
# ./configure -c mongo
# ./deploy.yml
# ./mongo.yml -l ferret
all :
children :
infra : { hosts : { 10.10.10.10 : { infra_seq: 1 }} ,vars : { repo_enabled : false }}
etcd : { hosts : { 10.10.10.10 : { etcd_seq: 1 }} ,vars : { etcd_cluster : etcd }}
#minio: { hosts: { 10.10.10.10: { minio_seq: 1 }} ,vars: { minio_cluster: minio }}
#----------------------------------#
# FerretDB Database Cluster
#----------------------------------#
# ./mongo.yml -l ferret
ferret :
hosts :
10.10.10.10 : { mongo_seq : 1 }
vars :
mongo_cluster : ferret
mongo_pgurl : 'postgres://dbuser_dba:DBUser.DBA@10.10.10.10:5432/postgres'
# mongosh 'mongodb://dbuser_dba:DBUser.DBA@10.10.10.10:27017'
#----------------------------------#
# PGSQL Database Cluster
#----------------------------------#
pg-meta :
hosts :
10.10.10.10 : { pg_seq: 1, pg_role : primary }
vars :
pg_cluster : pg-meta
pg_users :
- { name: dbuser_meta ,password: DBUser.Meta ,pgbouncer: true ,roles: [dbrole_admin ] ,comment : pigsty admin user }
- { name: dbuser_view ,password: DBUser.Viewer ,pgbouncer: true ,roles: [dbrole_readonly] ,comment : read-only viewer }
pg_databases :
- { name: postgres, extensions : [ documentdb, postgis, vector, pg_cron, rum ]} # run on the postgres database
pg_hba_rules :
- { user: dbuser_view , db: all ,addr: infra ,auth: pwd ,title : 'allow grafana dashboard access cmdb from infra nodes' }
# WARNING: demo/dev only. Avoid world access for dbsu in production.
- { user: postgres , db: all ,addr: world ,auth: pwd ,title : 'dbsu password access everywhere' }
- { user: all ,db: all ,addr: localhost ,order: 1 ,auth: trust ,title : 'documentdb localhost trust access' }
- { user: all ,db: all ,addr: local ,order: 1 ,auth: trust ,title : 'documentdb local trust access' }
- { user: all ,db: all ,addr: intra ,auth: pwd ,title: 'everyone intranet access with password' ,order : 800 }
pg_parameters : { cron.database_name : postgres }
pg_extensions : [ documentdb, postgis, pgvector, pg_cron, rum ]
pg_libs : 'pg_documentdb, pg_documentdb_core, pg_documentdb_extended_rum, pg_cron, pg_stat_statements, auto_explain'
pg_crontab : # https://pigsty.io/docs/pgsql/admin/crontab
- '00 01 * * * /pg/bin/pg-backup full'
vars : # global variables
#----------------------------------------------#
# INFRA : https://pigsty.io/docs/infra/param
#----------------------------------------------#
version : v4.2.2 # pigsty version string
admin_ip : 10.10.10.10 # admin node ip address
region: default # upstream mirror region : default,china,europe
infra_portal : # infra services exposed via portal
home : { domain : i.pigsty } # default domain name
#----------------------------------------------#
# NODE : https://pigsty.io/docs/node/param
#----------------------------------------------#
nodename_overwrite : false # do not overwrite node hostname
node_repo_modules : node,infra,pgsql # add these repos directly to the nodes (consider add 'mongo' too)
node_tune: oltp # node tuning specs : oltp,olap,tiny,crit
#----------------------------------------------#
# PGSQL : https://pigsty.io/docs/pgsql/param
#----------------------------------------------#
pg_version : 18 # default postgres version (16,17,18)
pg_conf: oltp.yml # pgsql tuning specs : {oltp,olap,tiny,crit}.yml
#----------------------------------------------#
# PASSWORD : https://pigsty.io/docs/setup/security/
#----------------------------------------------#
grafana_admin_password : pigsty
grafana_view_password : DBUser.Viewer
pg_admin_password : DBUser.DBA
pg_monitor_password : DBUser.Monitor
pg_replication_password : DBUser.Replicator
patroni_password : Patroni.API
haproxy_admin_password : pigsty
minio_secret_key : S3User.MinIO
etcd_root_password : Etcd.Root
...
配置解读 mongo 模板包含两个核心分组:
pg-meta:PostgreSQL 主库,默认安装 documentdb、postgis、pgvector、pg_cron、rum。ferret:Mongo 协议兼容服务层,使用 mongo_pgurl(默认连接 postgres 库)访问 PostgreSQL。关键特征:
默认使用 PostgreSQL 18(可改为 16/17/18)。 在 postgres 数据库直接启用 documentdb 相关能力,便于快速验证。 预加载库包含 pg_documentdb、pg_documentdb_core、pg_documentdb_extended_rum、pg_cron。 默认 HBA 规则包含本地 trust 与内网密码访问,便于开发测试。 注意事项:
模板中包含面向开发环境的宽松访问规则(如 world 访问示例),生产环境请按需收紧。 若需多节点与高可用,应在此模板基础上扩展拓扑与安全策略。 9.21 - supabase 使用 Pigsty 托管的 PostgreSQL 自建 Supabase 开源 Firebase 替代方案
supabase 配置模板提供了自建 Supabase 的参考配置,使用 Pigsty 托管的 PostgreSQL 作为底层存储。
更多细节,请参考 Supabase 自建教程
配置概览 配置名称: supabase 节点数量: 单节点 配置说明:使用 Pigsty 托管的 PostgreSQL 自建 Supabase 适用系统:el8, el9, el10, d12, d13, u22, u24 适用架构:x86_64, aarch64 相关配置:metarich 启用方式:
./configure -c supabase [ -i <primary_ip>]
配置内容 源文件地址:pigsty/conf/supabase.yml
---
#==============================================================#
# File : supabase.yml
# Desc : Pigsty configuration for self-hosting supabase
# Ctime : 2023-09-19
# Mtime : 2026-02-21
# Docs : https://pigsty.io/docs/conf/supabase
# License : Apache-2.0 @ https://pigsty.io/docs/about/license/
# Copyright : 2018-2026 Ruohang Feng / Vonng (rh@vonng.com)
#==============================================================#
# supabase is available on el8/el9/u22/u24/d12 with pg15,16,17,18
# tutorial: https://pigsty.io/docs/app/supabase
# Usage:
# curl https://repo.pigsty.io/get | bash # install pigsty
# ./configure -c supabase # use this supabase conf template
# ./deploy.yml # install pigsty & pgsql & minio
# ./docker.yml # install docker & docker compose
# ./app.yml # launch supabase with docker compose
all :
children :
#----------------------------------------------#
# INFRA : https://pigsty.io/docs/infra
#----------------------------------------------#
infra :
hosts :
10.10.10.10 : { infra_seq : 1 }
vars :
repo_enabled : false # disable local repo
#----------------------------------------------#
# ETCD : https://pigsty.io/docs/etcd
#----------------------------------------------#
etcd :
hosts :
10.10.10.10 : { etcd_seq : 1 }
vars :
etcd_cluster : etcd
etcd_safeguard : false # enable to prevent purging running etcd instance
#----------------------------------------------#
# MINIO : https://pigsty.io/docs/minio
#----------------------------------------------#
minio :
hosts :
10.10.10.10 : { minio_seq : 1 }
vars :
minio_cluster : minio
minio_users : # list of minio user to be created
- { access_key: pgbackrest ,secret_key: S3User.Backup ,policy : pgsql }
- { access_key: s3user_meta ,secret_key: S3User.Meta ,policy : meta }
- { access_key: s3user_data ,secret_key: S3User.Data ,policy : data }
#----------------------------------------------#
# PostgreSQL cluster for Supabase self-hosting
#----------------------------------------------#
pg-meta :
hosts :
10.10.10.10 : { pg_seq: 1, pg_role : primary }
vars :
pg_cluster : pg-meta
pg_users :
# supabase roles: anon, authenticated, dashboard_user
- { name: anon ,login : false }
- { name: authenticated ,login : false }
- { name: dashboard_user ,login: false ,replication: true ,createdb: true ,createrole : true }
- { name: service_role ,login: false ,bypassrls : true }
# supabase users: please use the same password
- { name: supabase_admin ,password: 'DBUser.Supa' ,pgbouncer: true ,inherit: true ,roles: [ dbrole_admin ] ,superuser: true ,replication: true ,createdb: true ,createrole: true ,bypassrls : true }
- { name: authenticator ,password: 'DBUser.Supa' ,pgbouncer: true ,inherit: false ,roles : [ dbrole_admin, authenticated ,anon ,service_role ] }
- { name: supabase_auth_admin ,password: 'DBUser.Supa' ,pgbouncer: true ,inherit: false ,roles: [ dbrole_admin ] ,createrole : true }
- { name: supabase_storage_admin ,password: 'DBUser.Supa' ,pgbouncer: true ,inherit: false ,roles: [ dbrole_admin, authenticated ,anon ,service_role ] ,createrole : true }
- { name: supabase_functions_admin ,password: 'DBUser.Supa' ,pgbouncer: true ,inherit: false ,roles: [ dbrole_admin ] ,createrole : true }
- { name: supabase_replication_admin ,password: 'DBUser.Supa' ,replication: true ,roles : [ dbrole_admin ]}
- { name: supabase_etl_admin ,password: 'DBUser.Supa' ,replication: true ,roles : [ pg_read_all_data, dbrole_readonly ]}
- { name: supabase_read_only_user ,password: 'DBUser.Supa' ,bypassrls: true ,roles : [ pg_read_all_data, dbrole_readonly ]}
pg_databases :
- name : postgres
baseline : supabase.sql
owner : supabase_admin
comment : supabase postgres database
schemas : [ extensions ,auth ,realtime ,storage ,graphql_public ,supabase_functions ,_analytics ,_realtime ]
extensions :
- { name: pgcrypto ,schema : extensions } # cryptographic functions
- { name: pg_net ,schema : extensions } # async HTTP
- { name: pgjwt ,schema : extensions } # json web token API for postgres
- { name: uuid-ossp ,schema : extensions } # generate universally unique identifiers (UUIDs)
- { name: pgsodium ,schema : extensions } # pgsodium is a modern cryptography library for Postgres.
- { name: supabase_vault ,schema : extensions } # Supabase Vault Extension
- { name: pg_graphql ,schema: extensions } # pg_graphql : GraphQL support
- { name: pg_jsonschema ,schema: extensions } # pg_jsonschema : Validate json schema
- { name: wrappers ,schema: extensions } # wrappers : FDW collections
- { name: http ,schema: extensions } # http : allows web page retrieval inside the database.
- { name: pg_cron ,schema: extensions } # pg_cron : Job scheduler for PostgreSQL
- { name: timescaledb ,schema: extensions } # timescaledb : Enables scalable inserts and complex queries for time-series data
- { name: pg_tle ,schema: extensions } # pg_tle : Trusted Language Extensions for PostgreSQL
- { name: vector ,schema: extensions } # pgvector : the vector similarity search
- { name: pgmq ,schema: extensions } # pgmq : A lightweight message queue like AWS SQS and RSMQ
- { name: supabase ,owner: supabase_admin ,comment: supabase analytics database ,schemas : [ extensions, _analytics ] }
# supabase required extensions
pg_libs : 'timescaledb, pgsodium, plpgsql, plpgsql_check, pg_cron, pg_net, pg_stat_statements, auto_explain, pg_wait_sampling, pg_tle, plan_filter'
pg_extensions : [ pg18-main ,pg18-time ,pg18-gis ,pg18-rag ,pg18-fts ,pg18-olap ,pg18-feat ,pg18-lang ,pg18-type ,pg18-util ,pg18-func ,pg18-admin ,pg18-stat ,pg18-sec ,pg18-fdw ,pg18-sim ,pg18-etl]
pg_parameters : { cron.database_name : postgres }
pg_hba_rules : # supabase hba rules, require access from docker network
- { user: all ,db: postgres ,addr: intra ,auth: pwd ,title: 'allow supabase access from intranet' ,order : 50 }
- { user: all ,db: postgres ,addr: 172.17.0.0/16 ,auth: pwd ,title: 'allow access from local docker network' ,order : 50 }
pg_crontab :
- '00 01 * * * /pg/bin/pg-backup full' # make a full backup every 1am
- '* * * * * /pg/bin/supa-kick' # kick supabase _analytics lag per minute : https://github.com/pgsty/pigsty/issues/581
#----------------------------------------------#
# Supabase
#----------------------------------------------#
# ./docker.yml
# ./app.yml
# the supabase stateless containers (default username & password: supabase/pigsty)
supabase :
hosts :
10.10.10.10 : {}
vars :
docker_enabled : true # enable docker on this group
#docker_registry_mirrors: ["https://docker.1panel.live","https://docker.1ms.run","https://docker.xuanyuan.me","https://registry-1.docker.io"]
app : supabase # specify app name (supa) to be installed (in the apps)
apps : # define all applications
supabase : # the definition of supabase app
conf : # override /opt/supabase/.env
# IMPORTANT: CHANGE JWT_SECRET AND REGENERATE CREDENTIAL ACCORDING!!!!!!!!!!!
# https://supabase.com/docs/guides/self-hosting/docker#securing-your-services
JWT_SECRET : your-super-secret-jwt-token-with-at-least-32-characters-long
ANON_KEY : eyJhbGciOiJIUzI1NiIsInR5cCI6IkpXVCJ9.eyAgCiAgICAicm9sZSI6ICJhbm9uIiwKICAgICJpc3MiOiAic3VwYWJhc2UtZGVtbyIsCiAgICAiaWF0IjogMTY0MTc2OTIwMCwKICAgICJleHAiOiAxNzk5NTM1NjAwCn0.dc_X5iR_VP_qT0zsiyj_I_OZ2T9FtRU2BBNWN8Bu4GE
SERVICE_ROLE_KEY : eyJhbGciOiJIUzI1NiIsInR5cCI6IkpXVCJ9.eyAgCiAgICAicm9sZSI6ICJzZXJ2aWNlX3JvbGUiLAogICAgImlzcyI6ICJzdXBhYmFzZS1kZW1vIiwKICAgICJpYXQiOiAxNjQxNzY5MjAwLAogICAgImV4cCI6IDE3OTk1MzU2MDAKfQ.DaYlNEoUrrEn2Ig7tqibS-PHK5vgusbcbo7X36XVt4Q
PG_META_CRYPTO_KEY : your-encryption-key-32-chars-min
DASHBOARD_USERNAME : supabase
DASHBOARD_PASSWORD : pigsty
# 32~64 random characters string for logflare
LOGFLARE_PUBLIC_ACCESS_TOKEN : 1234567890abcdef1234567890abcdef
LOGFLARE_PRIVATE_ACCESS_TOKEN : fedcba0987654321fedcba0987654321
# postgres connection string (use the correct ip and port)
POSTGRES_HOST : 10.10.10.10 # point to the local postgres node
POSTGRES_PORT : 5436 # access via the 'default' service, which always route to the primary postgres
POSTGRES_DB : postgres # the supabase underlying database
POSTGRES_PASSWORD : DBUser.Supa # password for supabase_admin and multiple supabase users
# expose supabase via domain name
SITE_URL : https://supa.pigsty # <------- Change This to your external domain name
API_EXTERNAL_URL : https://supa.pigsty # <------- Otherwise the storage api may not work!
SUPABASE_PUBLIC_URL : https://supa.pigsty # <------- DO NOT FORGET TO PUT IT IN infra_portal!
# if using s3/minio as file storage
S3_BUCKET : data
S3_ENDPOINT : https://sss.pigsty:9000
S3_ACCESS_KEY : s3user_data
S3_SECRET_KEY : S3User.Data
S3_FORCE_PATH_STYLE : true
S3_PROTOCOL : https
S3_REGION : stub
S3_PROTOCOL_ACCESS_KEY_ID : s3user_data
S3_PROTOCOL_ACCESS_KEY_SECRET : S3User.Data
MINIO_DOMAIN_IP : 10.10.10.10 # sss.pigsty domain name will resolve to this ip statically
# if using SMTP (optional)
#SMTP_ADMIN_EMAIL: admin@example.com
#SMTP_HOST: supabase-mail
#SMTP_PORT: 2500
#SMTP_USER: fake_mail_user
#SMTP_PASS: fake_mail_password
#SMTP_SENDER_NAME: fake_sender
#ENABLE_ANONYMOUS_USERS: false
#==============================================================#
# Global Parameters
#==============================================================#
vars :
#----------------------------------------------#
# INFRA : https://pigsty.io/docs/infra
#----------------------------------------------#
version : v4.2.2 # pigsty version string
admin_ip : 10.10.10.10 # admin node ip address
region: default # upstream mirror region : default|china|europe
proxy_env : # global proxy env when downloading packages
no_proxy : "localhost,127.0.0.1,10.0.0.0/8,192.168.0.0/16,*.pigsty,*.aliyun.com,mirrors.*,*.myqcloud.com,*.tsinghua.edu.cn"
# http_proxy: # set your proxy here: e.g http://user:pass@proxy.xxx.com
# https_proxy: # set your proxy here: e.g http://user:pass@proxy.xxx.com
# all_proxy: # set your proxy here: e.g http://user:pass@proxy.xxx.com
certbot_sign : false # enable certbot to sign https certificate for infra portal
certbot_email : your@email.com # replace your email address to receive expiration notice
infra_portal : # infra services exposed via portal
home : { domain : i.pigsty } # default domain name
pgadmin : { domain: adm.pigsty ,endpoint : "${admin_ip}:8885" }
bytebase : { domain: ddl.pigsty ,endpoint : "${admin_ip}:8887" }
#minio : { domain: m.pigsty ,endpoint: "${admin_ip}:9001" ,scheme: https ,websocket: true }
# Nginx / Domain / HTTPS : https://pigsty.io/docs/infra/admin/portal
supa : # nginx server config for supabase
domain : supa.pigsty # REPLACE IT WITH YOUR OWN DOMAIN!
endpoint : "10.10.10.10:8000" # supabase service endpoint: IP:PORT
websocket : true # add websocket support
certbot : supa.pigsty # certbot cert name, apply with `make cert`
#----------------------------------------------#
# NODE : https://pigsty.io/docs/node/param
#----------------------------------------------#
nodename_overwrite : false # do not overwrite node hostname on single node mode
node_tune: oltp # node tuning specs : oltp,olap,tiny,crit
node_etc_hosts : # add static domains to all nodes /etc/hosts
- 10.10.10.10 i.pigsty sss.pigsty supa.pigsty
node_repo_modules : node,pgsql,infra # use pre-made local repo rather than install from upstream
node_repo_remove : true # remove existing node repo for node managed by pigsty
#node_packages: [openssh-server] # packages to be installed current nodes with latest version
#node_timezone: Asia/Hong_Kong # overwrite node timezone
#----------------------------------------------#
# PGSQL : https://pigsty.io/docs/pgsql/param
#----------------------------------------------#
pg_version : 18 # default postgres version
pg_conf: oltp.yml # pgsql tuning specs : {oltp,olap,tiny,crit}.yml
pg_safeguard : false # prevent purging running postgres instance?
pg_default_schemas: [ monitor, extensions ] # add new schema : extensions
pg_default_extensions : # default extensions to be created
- { name: pg_stat_statements ,schema : monitor }
- { name: pgstattuple ,schema : monitor }
- { name: pg_buffercache ,schema : monitor }
- { name: pageinspect ,schema : monitor }
- { name: pg_prewarm ,schema : monitor }
- { name: pg_visibility ,schema : monitor }
- { name: pg_freespacemap ,schema : monitor }
- { name: pg_wait_sampling ,schema : monitor }
# move default extensions to `extensions` schema for supabase
- { name: postgres_fdw ,schema : extensions }
- { name: file_fdw ,schema : extensions }
- { name: btree_gist ,schema : extensions }
- { name: btree_gin ,schema : extensions }
- { name: pg_trgm ,schema : extensions }
- { name: intagg ,schema : extensions }
- { name: intarray ,schema : extensions }
- { name: pg_repack ,schema : extensions }
#----------------------------------------------#
# BACKUP : https://pigsty.io/docs/pgsql/backup
#----------------------------------------------#
minio_endpoint : https://sss.pigsty:9000 # explicit overwrite minio endpoint with haproxy port
pgbackrest_method: minio # pgbackrest repo method : local,minio,[user-defined...]
pgbackrest_repo: # pgbackrest repo : https://pgbackrest.org/configuration.html#section-repository
local : # default pgbackrest repo with local posix fs
path : /pg/backup # local backup directory, `/pg/backup` by default
retention_full_type : count # retention full backups by count
retention_full : 2 # keep 2, at most 3 full backups when using local fs repo
minio : # optional minio repo for pgbackrest
type : s3 # minio is s3-compatible, so s3 is used
s3_endpoint : sss.pigsty # minio endpoint domain name, `sss.pigsty` by default
s3_region : us-east-1 # minio region, us-east-1 by default, useless for minio
s3_bucket : pgsql # minio bucket name, `pgsql` by default
s3_key : pgbackrest # minio user access key for pgbackrest
s3_key_secret : S3User.Backup # minio user secret key for pgbackrest <------------------ HEY, DID YOU CHANGE THIS?
s3_uri_style : path # use path style uri for minio rather than host style
path : /pgbackrest # minio backup path, default is `/pgbackrest`
storage_port : 9000 # minio port, 9000 by default
storage_ca_file : /etc/pki/ca.crt # minio ca file path, `/etc/pki/ca.crt` by default
block : y # Enable block incremental backup
bundle : y # bundle small files into a single file
bundle_limit : 20MiB # Limit for file bundles, 20MiB for object storage
bundle_size : 128MiB # Target size for file bundles, 128MiB for object storage
cipher_type : aes-256-cbc # enable AES encryption for remote backup repo
cipher_pass : pgBackRest # AES encryption password, default is 'pgBackRest' <----- HEY, DID YOU CHANGE THIS?
retention_full_type : time # retention full backup by time on minio repo
retention_full : 14 # keep full backup for the last 14 days
s3 : # you can use cloud object storage as backup repo
type : s3 # Add your object storage credentials here!
s3_endpoint : oss-cn-beijing-internal.aliyuncs.com
s3_region : oss-cn-beijing
s3_bucket : <your_bucket_name>
s3_key : <your_access_key>
s3_key_secret : <your_secret_key>
s3_uri_style : host
path : /pgbackrest
bundle : y # bundle small files into a single file
bundle_limit : 20MiB # Limit for file bundles, 20MiB for object storage
bundle_size : 128MiB # Target size for file bundles, 128MiB for object storage
cipher_type : aes-256-cbc # enable AES encryption for remote backup repo
cipher_pass : pgBackRest # AES encryption password, default is 'pgBackRest'
retention_full_type : time # retention full backup by time on minio repo
retention_full : 14 # keep full backup for the last 14 days
#----------------------------------------------#
# PASSWORD : https://pigsty.io/docs/setup/security/
#----------------------------------------------#
grafana_admin_password : pigsty
grafana_view_password : DBUser.Viewer
pg_admin_password : DBUser.DBA
pg_monitor_password : DBUser.Monitor
pg_replication_password : DBUser.Replicator
patroni_password : Patroni.API
haproxy_admin_password : pigsty
minio_secret_key : S3User.MinIO
etcd_root_password : Etcd.Root
...
安装过程
配置解读 supabase 模板提供了完整的 Supabase 自建方案,让您可以在自己的基础设施上运行这个开源 Firebase 替代品。
架构组成 :
PostgreSQL :Pigsty 托管的生产级 PostgreSQL(支持高可用)Docker 容器 :Supabase 无状态服务(Auth、Storage、Realtime、Edge Functions 等)MinIO :S3 兼容的对象存储,用于文件存储和 PostgreSQL 备份Nginx :反向代理和 HTTPS 终止关键特性 :
使用 Pigsty 管理的 PostgreSQL 替代 Supabase 自带的数据库容器 支持 PostgreSQL 高可用(可扩展为三节点集群) 安装全部 Supabase 所需扩展(pg_net、pgjwt、pg_graphql、vector 等) 集成 MinIO 对象存储用于文件上传和备份 支持 HTTPS 和 Let’s Encrypt 自动证书 部署步骤 :
curl https://repo.pigsty.io/get | bash # 下载 Pigsty
./configure -c supabase # 使用 supabase 配置模板
./deploy.yml # 安装 Pigsty、PostgreSQL、MinIO
./docker.yml # 安装 Docker
./app.yml # 启动 Supabase 容器
访问方式 :
# Supabase Studio
https://supa.pigsty ( 用户名: supabase, 密码: pigsty)
# 直接连接 PostgreSQL
psql postgres://supabase_admin:DBUser.Supa@10.10.10.10:5432/postgres
适用场景 :
需要自建 BaaS (Backend as a Service) 平台 希望完全掌控数据和基础设施 需要企业级 PostgreSQL 高可用和备份 对 Supabase 云服务有合规或成本考虑 注意事项 :
必须修改 JWT_SECRET :使用至少 32 字符的随机字符串,并重新生成 ANON_KEY 和 SERVICE_ROLE_KEY需要配置正确的域名(SITE_URL、API_EXTERNAL_URL) 生产环境建议启用 HTTPS(可使用 certbot 自动签发证书) Docker 网络需要能访问 PostgreSQL(已配置 172.17.0.0/16 HBA 规则) 9.22 - ha/citus 13 节点 Citus 分布式 PostgreSQL 集群,1 协调组 + 5 工作组高可用配置,提供水平扩展与分片能力
ha/citus 配置模板部署一套完整的 Citus 分布式 PostgreSQL 集群 ,包含 1 个基础设施节点、1 组协调节点和 5 组工作节点(共 12 个 Citus 节点),提供透明的水平扩展与数据分片能力。
配置概览 配置名称: ha/citus 节点数量: 13 节点(1 基础设施 + 1 协调组 × 2 + 5 工作组 × 2) 配置说明:Citus 分布式 PostgreSQL 高可用集群 适用系统:el8, el9, el10, d12, d13, u22, u24 适用架构:x86_64 相关配置:metaha/trio 启用方式:
备注:这是一个 13 节点模板,您需要在生成配置后修改各节点的 IP 地址
配置内容 源文件地址:pigsty/conf/ha/citus.yml
---
#==============================================================#
# File : citus.yml
# Desc : 13-node Citus (6-group Distributive) Config Template
# Ctime : 2020-05-22
# Mtime : 2025-01-20
# Docs : https://pigsty.io/docs/conf/citus
# License : Apache-2.0 @ https://pigsty.io/docs/about/license/
# Copyright : 2018-2026 Ruohang Feng / Vonng (rh@vonng.com)
#==============================================================#
# This is the config template for Citus Distributive Cluster
# tutorial: https://pigsty.io/docs/pgsql/kernel/citus
# we will use the local repo for cluster bootstrapping
#
# Topology:
# - pg-citus0: coordinator (10.10.10.10) VIP: 10.10.10.19
# - pg-citus1: worker group 1 (10.10.10.21, 22) VIP: 10.10.10.29
# - pg-citus2: worker group 2 (10.10.10.31, 32) VIP: 10.10.10.39
# - pg-citus3: worker group 3 (10.10.10.41, 42) VIP: 10.10.10.49
# - pg-citus4: worker group 4 (10.10.10.51, 52) VIP: 10.10.10.59
# - pg-citus5: worker group 5 (10.10.10.61, 62) VIP: 10.10.10.69
# - pg-citus6: worker group 6 (10.10.10.71, 72) VIP: 10.10.10.79
#
# Usage:
# curl https://repo.pigsty.io/get | bash
# ./configure -c citus
# ./deploy.yml
all :
children :
infra : { hosts : { 10.10.10.10 : { infra_seq : 1 }}}
etcd : { hosts : { 10.10.10.10 : { etcd_seq: 1 }}, vars : { etcd_cluster : etcd }}
pg-meta :
hosts : { 10.10.10.10 : { pg_seq: 1, pg_role : primary } }
vars :
pg_cluster : pg-meta
pg_users :
- { name: dbuser_meta ,password: DBUser.Meta ,pgbouncer: true ,roles: [dbrole_admin ] ,comment : pigsty admin user }
pg_databases :
- name : meta
baseline : cmdb.sql
comment : "pigsty meta database"
schemas : [ pigsty]
extensions : [ postgis, vector ]
pg_crontab : [ '00 01 * * * /pg/bin/pg-backup full' ] # make a full backup every day 1am
#----------------------------------------------------------#
# pg-citus: 6 cluster groups, 12 nodes total
#----------------------------------------------------------#
pg-citus :
hosts :
# coordinator (group 0) on infra node
10.10.10.21 : { pg_group: 0, pg_cluster: pg-citus1 ,pg_vip_address: 10.10.10.29/24 ,pg_seq: 1, pg_role : primary }
10.10.10.22 : { pg_group: 0, pg_cluster: pg-citus1 ,pg_vip_address: 10.10.10.29/24 ,pg_seq: 2, pg_role : replica }
# worker group 2
10.10.10.31 : { pg_group: 1, pg_cluster: pg-citus2 ,pg_vip_address: 10.10.10.39/24 ,pg_seq: 1, pg_role : primary }
10.10.10.32 : { pg_group: 1, pg_cluster: pg-citus2 ,pg_vip_address: 10.10.10.39/24 ,pg_seq: 2, pg_role : replica }
# worker group 3
10.10.10.41 : { pg_group: 2, pg_cluster: pg-citus3 ,pg_vip_address: 10.10.10.49/24 ,pg_seq: 1, pg_role : primary }
10.10.10.42 : { pg_group: 2, pg_cluster: pg-citus3 ,pg_vip_address: 10.10.10.49/24 ,pg_seq: 2, pg_role : replica }
# worker group 4
10.10.10.51 : { pg_group: 3, pg_cluster: pg-citus4 ,pg_vip_address: 10.10.10.59/24 ,pg_seq: 1, pg_role : primary }
10.10.10.52 : { pg_group: 3, pg_cluster: pg-citus4 ,pg_vip_address: 10.10.10.59/24 ,pg_seq: 2, pg_role : replica }
# worker group 5
10.10.10.61 : { pg_group: 4, pg_cluster: pg-citus5 ,pg_vip_address: 10.10.10.69/24 ,pg_seq: 1, pg_role : primary }
10.10.10.62 : { pg_group: 4, pg_cluster: pg-citus5 ,pg_vip_address: 10.10.10.69/24 ,pg_seq: 2, pg_role : replica }
# worker group 6
10.10.10.71 : { pg_group: 5, pg_cluster: pg-citus6 ,pg_vip_address: 10.10.10.79/24 ,pg_seq: 1, pg_role : primary }
10.10.10.72 : { pg_group: 5, pg_cluster: pg-citus6 ,pg_vip_address: 10.10.10.79/24 ,pg_seq: 2, pg_role : replica }
vars :
pg_mode: citus # pgsql cluster mode : citus
pg_shard: pg-citus # citus shard name : pg-citus
pg_primary_db : citus # primary database used by citus
pg_dbsu_password : DBUser.Postgres # enable dbsu password access for citus
pg_extensions : [ citus, postgis, pgvector, topn, pg_cron, hll ]
pg_libs : 'citus, pg_cron, pg_stat_statements'
pg_users : [ { name: dbuser_citus ,password: DBUser.Citus ,pgbouncer: true ,roles : [ dbrole_admin ] }]
pg_databases : [ { name: citus ,owner: dbuser_citus ,extensions : [ citus, vector, topn, pg_cron, hll ] }]
pg_parameters :
cron.database_name : citus
citus.node_conninfo : 'sslrootcert=/pg/cert/ca.crt sslmode=verify-full'
pg_hba_rules :
- { user: 'all' ,db: all ,addr: 127.0.0.1/32 ,auth: ssl ,title : 'all user ssl access from localhost' }
- { user: 'all' ,db: all ,addr: intra ,auth: ssl ,title : 'all user ssl access from intranet' }
pg_vip_enabled : true
pg_vip_interface : eth1
pg_crontab : [ '00 01 * * * /pg/bin/pg-backup full' ] # make a full backup every day 1am
vars :
#----------------------------------------------#
# INFRA : https://pigsty.io/docs/infra/param
#----------------------------------------------#
version : v4.2.2
admin_ip : 10.10.10.10
region : default
infra_portal :
home : { domain : i.pigsty }
#----------------------------------------------#
# NODE : https://pigsty.io/docs/node/param
#----------------------------------------------#
nodename_overwrite : true
node_repo_modules : node,infra,pgsql
node_tune : oltp
#----------------------------------------------#
# PGSQL : https://pigsty.io/docs/pgsql/param
#----------------------------------------------#
pg_version : 18 # PostgreSQL 14-18
pg_conf : oltp.yml
pg_packages : [ pgsql-main, pgsql-common ]
#----------------------------------------------#
# PASSWORD : https://pigsty.io/docs/setup/security/
#----------------------------------------------#
grafana_admin_password : pigsty
grafana_view_password : DBUser.Viewer
pg_admin_password : DBUser.DBA
pg_monitor_password : DBUser.Monitor
pg_replication_password : DBUser.Replicator
patroni_password : Patroni.API
haproxy_admin_password : pigsty
minio_secret_key : S3User.MinIO
etcd_root_password : Etcd.Root
...
集群拓扑 此配置部署一套完整的 Citus 分布式集群,拓扑结构如下:
集群 节点 IP 地址 VIP 角色 pg-meta 1 10.10.10.10 - 基础设施 + CMDB pg-citus1 2 10.10.10.21, 22 10.10.10.29 协调节点(group 0) pg-citus2 2 10.10.10.31, 32 10.10.10.39 工作节点(group 1) pg-citus3 2 10.10.10.41, 42 10.10.10.49 工作节点(group 2) pg-citus4 2 10.10.10.51, 52 10.10.10.59 工作节点(group 3) pg-citus5 2 10.10.10.61, 62 10.10.10.69 工作节点(group 4) pg-citus6 2 10.10.10.71, 72 10.10.10.79 工作节点(group 5)
架构说明 :
pg-meta :基础设施节点,运行 Grafana、Prometheus、etcd 等监控组件,同时部署一个独立的 CMDB 数据库pg-citus1 :Citus 协调节点(group 0),负责接收客户端查询并路由到工作节点,1 主 1 从高可用配置pg-citus2~6 :Citus 工作节点(group 1~5),存储分片数据,每组 1 主 1 从,通过 Patroni 实现自动故障转移VIP :每个节点组配置 L2 VIP,由 vip-manager 管理,确保故障转移时客户端连接自动切换配置解读 ha/citus 模板部署生产级 Citus 分布式集群,适合需要水平扩展的大规模数据场景。
关键特性 :
水平扩展 :5 个工作组可线性扩展存储和计算能力高可用 :每个工作组 1 主 1 从,支持自动故障转移L2 VIP :每组配置虚拟 IP,故障切换对应用透明SSL 加密 :节点间通信使用 SSL 证书加密透明分片 :数据自动分布到多个工作节点预装扩展 :
pg_extensions : [ citus, postgis, pgvector, topn, pg_cron, hll ]
pg_libs : 'citus, pg_cron, pg_stat_statements'
安全配置 :
启用 pg_dbsu_password,允许超级用户密码访问(Citus 节点间通信需要) HBA 规则要求所有连接使用 SSL 认证 节点间使用证书验证:sslmode=verify-full 部署步骤 # 1. 下载 Pigsty
curl https://repo.pigsty.io/get | bash
# 2. 使用 ha/citus 配置模板
./configure -c ha/citus
# 3. 修改 IP 地址和密码
vi pigsty.yml
# 4. 部署完整集群
./deploy.yml
部署完成后,Citus 会自动注册所有工作节点。可通过以下命令验证:
-- 连接到任意协调节点
psql - h 10 . 10 . 10 . 29 - U dbuser_citus - d citus
-- 查看工作节点状态
SELECT * FROM citus_get_active_worker_nodes ();
-- 查看分片分布
SELECT * FROM citus_shards ;
使用示例 创建分布式表 :
-- 创建表
CREATE TABLE events (
tenant_id INT ,
event_id BIGSERIAL ,
event_time TIMESTAMPTZ DEFAULT now (),
payload JSONB ,
PRIMARY KEY ( tenant_id , event_id )
);
-- 按 tenant_id 分片
SELECT create_distributed_table ( 'events' , 'tenant_id' );
-- 插入数据(自动路由到对应分片)
INSERT INTO events ( tenant_id , payload )
VALUES ( 1 , '{"type": "click"}' );
-- 查询(自动并行执行)
SELECT tenant_id , count ( * )
FROM events
GROUP BY tenant_id ;
创建引用表 (小表复制到所有节点):
CREATE TABLE tenants (
tenant_id INT PRIMARY KEY ,
name TEXT
);
SELECT create_reference_table ( 'tenants' );
适用场景 多租户 SaaS :按租户 ID 分片,实现租户数据隔离和并行查询实时分析 :大规模事件数据的实时聚合分析时序数据 :结合 TimescaleDB 处理海量时序数据水平扩展 :单表数据量超过单机容量时的扩展方案注意事项 PostgreSQL 版本 :Citus 支持 PostgreSQL 14~18,此模板默认使用 PG18分布列选择 :合理选择分布列(通常是租户 ID 或时间戳)对性能至关重要跨分片限制 :外键约束必须包含分布列,部分 DDL 操作有限制网络要求 :需要配置正确的 pg_vip_interface(默认 eth1)架构限制 :Citus 扩展不支持 ARM64 架构
9.23 - 高可用模板 9.24 - ha/simu 20 节点生产环境仿真配置,用于大规模部署测试
ha/simu 配置模板是一个 20 节点的生产环境仿真配置,需要强大的宿主机方可运行。
配置概览 配置名称: ha/simu 节点数量: 20 节点,pigsty/vagrant/spec/simu.rb 配置说明:20 节点的生产环境仿真配置,需要强大的宿主机方可运行。 适用系统:el8, el9, el10, d12, d13, u22, u24 适用架构:x86_64, aarch64 启用方式:
./configure -c ha/simu [ -i <primary_ip>]
配置内容 源文件地址:pigsty/conf/ha/simu.yml
---
#==============================================================#
# File : simu.yml
# Desc : Pigsty Simubox: a 20 node prod simulation env
# Ctime : 2023-07-20
# Mtime : 2026-01-19
# Docs : https://pigsty.io/docs/conf/simu
# License : Apache-2.0 @ https://pigsty.io/docs/about/license
# Copyright : 2018-2025 Ruohang Feng / Vonng (rh@vonng.com)
#==============================================================#
all :
children :
#==========================================================#
# infra: 3 nodes
#==========================================================#
# ./infra.yml -l infra
# ./docker.yml -l infra (optional)
infra :
hosts :
10.10.10.10 : { infra_seq : 1 }
10.10.10.11 : { infra_seq: 2, repo_enabled : false }
10.10.10.12 : { infra_seq: 3, repo_enabled : false }
vars :
docker_enabled : true
node_tune : oltp # use oltp template for infra nodes
pg_conf : oltp.yml # use oltp template for infra pgsql
pg_exporters : # bin/pgmon-add pg-meta2/pg-src2/pg-dst2
20001 : {pg_cluster: pg-meta2 ,pg_seq: 1 ,pg_host: 10.10.10.10, pg_databases : [ { name : meta }]}
20002 : {pg_cluster: pg-meta2 ,pg_seq: 2 ,pg_host: 10.10.10.11, pg_databases : [ { name : meta }]}
20003 : {pg_cluster: pg-meta2 ,pg_seq: 3 ,pg_host: 10.10.10.12, pg_databases : [ { name : meta }]}
20004 : {pg_cluster: pg-src2 ,pg_seq: 1 ,pg_host: 10.10.10.31, pg_databases : [ { name : src }]}
20005 : {pg_cluster: pg-src2 ,pg_seq: 2 ,pg_host: 10.10.10.32, pg_databases : [ { name : src }]}
20006 : {pg_cluster: pg-src2 ,pg_seq: 3 ,pg_host: 10.10.10.33, pg_databases : [ { name : src }]}
20007 : {pg_cluster: pg-dst2 ,pg_seq: 1 ,pg_host: 10.10.10.41, pg_databases : [ { name : dst }]}
20008 : {pg_cluster: pg-dst2 ,pg_seq: 2 ,pg_host: 10.10.10.42, pg_databases : [ { name : dst }]}
20009 : {pg_cluster: pg-dst2 ,pg_seq: 3 ,pg_host: 10.10.10.43, pg_databases : [ { name : dst }]}
#==========================================================#
# etcd: 5 nodes dedicated etcd cluster
#==========================================================#
# ./etcd.yml -l etcd;
etcd :
hosts :
10.10.10.25 : { etcd_seq : 1 }
10.10.10.26 : { etcd_seq : 2 }
10.10.10.27 : { etcd_seq : 3 }
10.10.10.28 : { etcd_seq : 4 }
10.10.10.29 : { etcd_seq : 5 }
vars :
etcd_cluster : etcd
#==========================================================#
# minio: 4 nodes dedicated minio cluster
#==========================================================#
# ./minio.yml -l minio;
minio :
hosts :
10.10.10.21 : { minio_seq : 1 }
10.10.10.22 : { minio_seq : 2 }
10.10.10.23 : { minio_seq : 3 }
10.10.10.24 : { minio_seq : 4 }
vars :
minio_cluster : minio
minio_data : '/data{1...4}' # 4 node x 4 disk
minio_users : # list of minio user to be created
- { access_key: pgbackrest ,secret_key: S3User.Backup ,policy : pgsql }
- { access_key: s3user_meta ,secret_key: S3User.Meta ,policy : meta }
- { access_key: s3user_data ,secret_key: S3User.Data ,policy : data }
#==========================================================#
# proxy: 2 nodes used as dedicated haproxy server
#==========================================================#
# ./node.yml -l proxy
proxy :
hosts :
10.10.10.18 : { vip_role : master }
10.10.10.19 : { vip_role : backup }
vars :
vip_enabled : true
vip_address : 10.10.10.20
vip_vrid : 20
vip_interface : eth1
haproxy_services: # expose minio service : sss.pigsty:9000
- name : minio # [REQUIRED] service name, unique
port : 9000 # [REQUIRED] service port, unique
balance : leastconn # Use leastconn algorithm and minio health check
options : [ "option httpchk" , "option http-keep-alive" , "http-check send meth OPTIONS uri /minio/health/live" , "http-check expect status 200" ]
servers : # reload service with ./node.yml -t haproxy_config,haproxy_reload
- { name: minio-1 ,ip: 10.10.10.21 ,port: 9000 ,options : 'check-ssl ca-file /etc/pki/ca.crt check port 9000' }
- { name: minio-2 ,ip: 10.10.10.22 ,port: 9000 ,options : 'check-ssl ca-file /etc/pki/ca.crt check port 9000' }
- { name: minio-3 ,ip: 10.10.10.23 ,port: 9000 ,options : 'check-ssl ca-file /etc/pki/ca.crt check port 9000' }
- { name: minio-4 ,ip: 10.10.10.24 ,port: 9000 ,options : 'check-ssl ca-file /etc/pki/ca.crt check port 9000' }
#==========================================================#
# pg-meta: reuse infra node as meta cmdb
#==========================================================#
# ./pgsql.yml -l pg-meta
pg-meta :
hosts :
10.10.10.10 : { pg_seq: 1 , pg_role : primary }
10.10.10.11 : { pg_seq: 2 , pg_role : replica }
10.10.10.12 : { pg_seq: 3 , pg_role : replica }
vars :
pg_cluster : pg-meta
pg_vip_enabled : true
pg_vip_address : 10.10.10.2 /24
pg_vip_interface : eth1
pg_users :
- {name: dbuser_meta ,password: DBUser.Meta ,pgbouncer: true ,roles: [dbrole_admin] ,comment : pigsty admin user }
- {name: dbuser_view ,password: DBUser.Viewer ,pgbouncer: true ,roles: [dbrole_readonly] ,comment : read-only viewer for meta database }
- {name: dbuser_grafana ,password: DBUser.Grafana ,pgbouncer: true ,roles: [dbrole_admin] ,comment : admin user for grafana database }
- {name: dbuser_bytebase ,password: DBUser.Bytebase ,pgbouncer: true ,roles: [dbrole_admin] ,comment : admin user for bytebase database }
- {name: dbuser_kong ,password: DBUser.Kong ,pgbouncer: true ,roles: [dbrole_admin] ,comment : admin user for kong api gateway }
- {name: dbuser_gitea ,password: DBUser.Gitea ,pgbouncer: true ,roles: [dbrole_admin] ,comment : admin user for gitea service }
- {name: dbuser_wiki ,password: DBUser.Wiki ,pgbouncer: true ,roles: [dbrole_admin] ,comment : admin user for wiki.js service }
- {name: dbuser_noco ,password: DBUser.Noco ,pgbouncer: true ,roles: [dbrole_admin] ,comment : admin user for nocodb service }
pg_databases :
- { name: meta ,baseline: cmdb.sql ,comment: pigsty meta database ,schemas: [pigsty] ,extensions : [ {name : vector}]}
- { name: grafana ,owner: dbuser_grafana ,revokeconn: true ,comment : grafana primary database }
- { name: bytebase ,owner: dbuser_bytebase ,revokeconn: true ,comment : bytebase primary database }
- { name: kong ,owner: dbuser_kong ,revokeconn: true ,comment : kong the api gateway database }
- { name: gitea ,owner: dbuser_gitea ,revokeconn: true ,comment : gitea meta database }
- { name: wiki ,owner: dbuser_wiki ,revokeconn: true ,comment : wiki meta database }
- { name: noco ,owner: dbuser_noco ,revokeconn: true ,comment : nocodb database }
pg_libs : 'pg_stat_statements, auto_explain' # add timescaledb to shared_preload_libraries
#==========================================================#
# pg-src: dedicate 3 node source cluster
#==========================================================#
# ./pgsql.yml -l pg-src
pg-src :
hosts :
10.10.10.31 : { pg_seq: 1, pg_role : primary }
10.10.10.32 : { pg_seq: 2, pg_role : replica }
10.10.10.33 : { pg_seq: 3, pg_role : replica }
vars :
pg_cluster : pg-src
pg_vip_enabled : true
pg_vip_address : 10.10.10.3 /24
pg_vip_interface : eth1
pg_users : [ { name: test , password: test , pgbouncer: true , roles : [ dbrole_admin ] }]
pg_databases : [ { name : src }]
#==========================================================#
# pg-dst: dedicate 3 node destination cluster
#==========================================================#
# ./pgsql.yml -l pg-dst
pg-dst :
hosts :
10.10.10.41 : { pg_seq: 1, pg_role : primary }
10.10.10.42 : { pg_seq: 2, pg_role : replica }
10.10.10.43 : { pg_seq: 3, pg_role : replica }
vars :
pg_cluster : pg-dst
pg_vip_enabled : true
pg_vip_address : 10.10.10.4 /24
pg_vip_interface : eth1
pg_users : [ { name: test , password: test , pgbouncer: true , roles : [ dbrole_admin ] } ]
pg_databases : [ { name : dst } ]
#==========================================================#
# redis-meta: reuse the 5 etcd nodes as redis sentinel
#==========================================================#
# ./redis.yml -l redis-meta
redis-meta :
hosts :
10.10.10.25 : { redis_node: 1 , redis_instances : { 26379 : {} } }
10.10.10.26 : { redis_node: 2 , redis_instances : { 26379 : {} } }
10.10.10.27 : { redis_node: 3 , redis_instances : { 26379 : {} } }
10.10.10.28 : { redis_node: 4 , redis_instances : { 26379 : {} } }
10.10.10.29 : { redis_node: 5 , redis_instances : { 26379 : {} } }
vars :
redis_cluster : redis-meta
redis_password : 'redis.meta'
redis_mode : sentinel
redis_max_memory : 256MB
redis_sentinel_monitor : # primary list for redis sentinel, use cls as name, primary ip:port
- { name: redis-src, host: 10.10.10.31, port: 6379 ,password: redis.src, quorum : 1 }
- { name: redis-dst, host: 10.10.10.41, port: 6379 ,password: redis.dst, quorum : 1 }
#==========================================================#
# redis-src: reuse pg-src 3 nodes for redis
#==========================================================#
# ./redis.yml -l redis-src
redis-src :
hosts :
10.10.10.31 : { redis_node: 1 , redis_instances : {6379 : { } }}
10.10.10.32 : { redis_node: 2 , redis_instances : {6379 : { replica_of: '10.10.10.31 6379' }, 6380 : { replica_of : '10.10.10.32 6379' } }}
10.10.10.33 : { redis_node: 3 , redis_instances : {6379 : { replica_of: '10.10.10.31 6379' }, 6380 : { replica_of : '10.10.10.33 6379' } }}
vars :
redis_cluster : redis-src
redis_password : 'redis.src'
redis_max_memory : 64MB
#==========================================================#
# redis-dst: reuse pg-dst 3 nodes for redis
#==========================================================#
# ./redis.yml -l redis-dst
redis-dst :
hosts :
10.10.10.41 : { redis_node: 1 , redis_instances : {6379 : { } }}
10.10.10.42 : { redis_node: 2 , redis_instances : {6379 : { replica_of : '10.10.10.41 6379' } }}
10.10.10.43 : { redis_node: 3 , redis_instances : {6379 : { replica_of : '10.10.10.41 6379' } }}
vars :
redis_cluster : redis-dst
redis_password : 'redis.dst'
redis_max_memory : 64MB
#==========================================================#
# pg-tmp: reuse proxy nodes as pgsql cluster
#==========================================================#
# ./pgsql.yml -l pg-tmp
pg-tmp :
hosts :
10.10.10.18 : { pg_seq: 1 ,pg_role : primary }
10.10.10.19 : { pg_seq: 2 ,pg_role : replica }
vars :
pg_cluster : pg-tmp
pg_users : [ { name: test , password: test , pgbouncer: true , roles : [ dbrole_admin ] } ]
pg_databases : [ { name : tmp } ]
#==========================================================#
# pg-etcd: reuse etcd nodes as pgsql cluster
#==========================================================#
# ./pgsql.yml -l pg-etcd
pg-etcd :
hosts :
10.10.10.25 : { pg_seq: 1 ,pg_role : primary }
10.10.10.26 : { pg_seq: 2 ,pg_role : replica }
10.10.10.27 : { pg_seq: 3 ,pg_role : replica }
10.10.10.28 : { pg_seq: 4 ,pg_role : replica }
10.10.10.29 : { pg_seq: 5 ,pg_role : offline }
vars :
pg_cluster : pg-etcd
pg_users : [ { name: test , password: test , pgbouncer: true , roles : [ dbrole_admin ] } ]
pg_databases : [ { name : etcd } ]
#==========================================================#
# pg-minio: reuse minio nodes as pgsql cluster
#==========================================================#
# ./pgsql.yml -l pg-minio
pg-minio :
hosts :
10.10.10.21 : { pg_seq: 1 ,pg_role : primary }
10.10.10.22 : { pg_seq: 2 ,pg_role : replica }
10.10.10.23 : { pg_seq: 3 ,pg_role : replica }
10.10.10.24 : { pg_seq: 4 ,pg_role : replica }
vars :
pg_cluster : pg-minio
pg_users : [ { name: test , password: test , pgbouncer: true , roles : [ dbrole_admin ] } ]
pg_databases : [ { name : minio } ]
#==========================================================#
# ferret: reuse pg-src as mongo (ferretdb)
#==========================================================#
# ./mongo.yml -l ferret
ferret :
hosts :
10.10.10.31 : { mongo_seq : 1 }
10.10.10.32 : { mongo_seq : 2 }
10.10.10.33 : { mongo_seq : 3 }
vars :
mongo_cluster : ferret
mongo_pgurl : 'postgres://test:test@10.10.10.31:5432/src'
#============================================================#
# Global Variables
#============================================================#
vars :
#==========================================================#
# INFRA
#==========================================================#
version : v4.2.2 # pigsty version string
admin_ip : 10.10.10.10 # admin node ip address
region: default # upstream mirror region : default|china|europe
infra_portal : # infra services exposed via portal
home : { domain : i.pigsty } # default domain name
minio : { domain: m.pigsty ,endpoint : "10.10.10.21:9001" ,scheme: https ,websocket : true }
postgrest : { domain: api.pigsty ,endpoint : "127.0.0.1:8884" }
pgadmin : { domain: adm.pigsty ,endpoint : "127.0.0.1:8885" }
pgweb : { domain: cli.pigsty ,endpoint : "127.0.0.1:8886" }
bytebase : { domain: ddl.pigsty ,endpoint : "127.0.0.1:8887" }
jupyter : { domain: lab.pigsty ,endpoint : "127.0.0.1:8888" , websocket : true }
supa : { domain: supa.pigsty ,endpoint : "10.10.10.10:8000" , websocket : true }
#==========================================================#
# NODE
#==========================================================#
node_id_from_pg : true # use nodename rather than pg identity as hostname
node_tune : tiny # use small node template
node_firewall_mode: zone # default : trust intranet, expose selected public ports
node_timezone : Asia/Hong_Kong # use Asia/Hong_Kong Timezone
node_dns_servers : # DNS servers in /etc/resolv.conf
- 10.10.10.10
- 10.10.10.11
node_etc_hosts :
- 10.10.10.10 i.pigsty
- 10.10.10.20 sss.pigsty # point minio service domain to the L2 VIP of proxy cluster
node_ntp_servers : # NTP servers in /etc/chrony.conf
- pool cn.pool.ntp.org iburst
- pool 10.10.10.10 iburst
node_admin_ssh_exchange : false # exchange admin ssh key among node cluster
#==========================================================#
# PGSQL
#==========================================================#
pg_conf : tiny.yml
pgbackrest_method : minio # USE THE HA MINIO THROUGH A LOAD BALANCER
pg_dbsu_ssh_exchange : false # do not exchange dbsu ssh key among pgsql cluster
pgbackrest_repo: # pgbackrest repo : https://pgbackrest.org/configuration.html#section-repository
local : # default pgbackrest repo with local posix fs
path : /pg/backup # local backup directory, `/pg/backup` by default
retention_full_type : count # retention full backups by count
retention_full : 2 # keep 2, at most 3 full backup when using local fs repo
minio : # optional minio repo for pgbackrest
type : s3 # minio is s3-compatible, so s3 is used
s3_endpoint : sss.pigsty # minio endpoint domain name, `sss.pigsty` by default
s3_region : us-east-1 # minio region, us-east-1 by default, useless for minio
s3_bucket : pgsql # minio bucket name, `pgsql` by default
s3_key : pgbackrest # minio user access key for pgbackrest
s3_key_secret : S3User.Backup # minio user secret key for pgbackrest
s3_uri_style : path # use path style uri for minio rather than host style
path : /pgbackrest # minio backup path, default is `//pgbackrest`
storage_port : 9000 # minio port, 9000 by default
storage_ca_file : /etc/pki/ca.crt # minio ca file path, `/etc/pki/ca.crt` by default
block : y # Enable block incremental backup
bundle : y # bundle small files into a single file
bundle_limit : 20MiB # Limit for file bundles, 20MiB for object storage
bundle_size : 128MiB # Target size for file bundles, 128MiB for object storage
cipher_type : aes-256-cbc # enable AES encryption for remote backup repo
cipher_pass : pgBackRest # AES encryption password, default is 'pgBackRest'
retention_full_type : time # retention full backup by time on minio repo
retention_full : 14 # keep full backup for last 14 days
pg_crontab : # make a full backup on monday 1am, and an incremental backup during weekdays
- '00 01 * * * /pg/bin/pg-backup'
- '00 05 * * * /pg/bin/pg-vacuum'
pg_hba_rules : # https://pigsty.io/docs/pgsql/config/hba
- { user: all ,db: all ,addr: intra ,auth: pwd ,title: 'everyone intranet access with password' ,order : 800 }
#==========================================================#
# Repo
#==========================================================#
repo_packages : [
node-bootstrap, infra-package, infra-addons, node-package1, node-package2, pgsql-utility, extra-modules,
pg18-core ,pg18-time ,pg18-gis ,pg18-rag ,pg18-fts ,pg18-olap ,pg18-feat ,pg18-lang ,pg18-type ,pg18-util ,pg18-func ,pg18-admin ,pg18-stat ,pg18-sec ,pg18-fdw ,pg18-sim ,pg18-etl
]
#----------------------------------------------#
# PASSWORD : https://pigsty.io/docs/setup/security/
#----------------------------------------------#
grafana_admin_password : pigsty
grafana_view_password : DBUser.Viewer
pg_admin_password : DBUser.DBA
pg_monitor_password : DBUser.Monitor
pg_replication_password : DBUser.Replicator
patroni_password : Patroni.API
haproxy_admin_password : pigsty
minio_secret_key : S3User.MinIO
etcd_root_password : Etcd.Root
...
配置解读 ha/simu 模板是一个 大规模生产环境仿真配置 ,用于测试和验证复杂场景。
架构组成 :
2 节点高可用 INFRA(监控/告警/Nginx/DNS) 5 节点高可用 ETCD 和 MinIO(多磁盘) 2 节点 Proxy(HAProxy + Keepalived VIP) 多套 PostgreSQL 集群:pg-meta:2 节点高可用 pg-v12~v17:单节点多版本测试 pg-pitr:单节点 PITR 测试 pg-test:4 节点高可用 pg-src/pg-dst:3+2 节点复制测试 pg-citus:10 节点分布式集群 多种 Redis 模式:主从、哨兵、集群 适用场景 :
大规模部署测试与验证 高可用故障演练 性能基准测试 新功能预览与评估 注意事项 :
需要强大的宿主机(推荐 64GB+ 内存) 使用 Vagrant 虚拟机模拟 9.25 - ha/full 四节点完整功能演示环境,带有两套 PostgreSQL 集群、MinIO、Redis 等组件示例
ha/full 配置模板是 Pigsty 推荐的沙箱演示环境,使用四个节点部署两套 PostgreSQL 集群,用于测试和演示 Pigsty 各方面的能力。
Pigsty 大部分教程和示例都基于此模板的沙箱环境。
配置概览 配置名称: ha/full 节点数量: 四节点 配置说明:四节点完整功能演示环境,带有两套 PostgreSQL 集群、MinIO、Redis 等组件示例 适用系统:el8, el9, el10, d12, d13, u22, u24 适用架构:x86_64, aarch64 相关配置:ha/trioha/safedemo/demo 启用方式:
./configure -c ha/full [ -i <primary_ip>]
配置生成后,需要修改其他三个节点的 IP 地址。
配置内容 源文件地址:pigsty/conf/ha/full.yml
---
#==============================================================#
# File : full.yml
# Desc : Pigsty Local Sandbox 4-node Demo Config
# Ctime : 2020-05-22
# Mtime : 2026-01-16
# Docs : https://pigsty.io/docs/conf/full
# License : Apache-2.0 @ https://pigsty.io/docs/about/license/
# Copyright : 2018-2026 Ruohang Feng / Vonng (rh@vonng.com)
#==============================================================#
all :
#==============================================================#
# Clusters, Nodes, and Modules
#==============================================================#
children :
# infra: monitor, alert, repo, etc..
infra :
hosts :
10.10.10.10 : { infra_seq : 1 }
vars :
docker_enabled : true # enabled docker with ./docker.yml
#docker_registry_mirrors: ["https://docker.1panel.live","https://docker.1ms.run","https://docker.xuanyuan.me","https://registry-1.docker.io"]
#repo_extra_packages: [ pg18-main ,pg18-time ,pg18-gis ,pg18-rag ,pg18-fts ,pg18-olap ,pg18-feat ,pg18-lang ,pg18-type ,pg18-util ,pg18-func ,pg18-admin ,pg18-stat ,pg18-sec ,pg18-fdw ,pg18-sim ,pg18-etl]
# etcd cluster for HA postgres DCS
etcd :
hosts :
10.10.10.10 : { etcd_seq : 1 }
vars :
etcd_cluster : etcd
# minio (single node, used as backup repo)
minio :
hosts :
10.10.10.10 : { minio_seq : 1 }
vars :
minio_cluster : minio
minio_users : # list of minio user to be created
- { access_key: pgbackrest ,secret_key: S3User.Backup ,policy : pgsql }
- { access_key: s3user_meta ,secret_key: S3User.Meta ,policy : meta }
- { access_key: s3user_data ,secret_key: S3User.Data ,policy : data }
# postgres cluster: pg-meta
pg-meta :
hosts :
10.10.10.10 : { pg_seq: 1, pg_role : primary }
vars :
pg_cluster : pg-meta
pg_users :
- { name: dbuser_meta ,password: DBUser.Meta ,pgbouncer: true ,roles: [ dbrole_admin ] ,comment : pigsty admin user }
- { name: dbuser_view ,password: DBUser.Viewer ,pgbouncer: true ,roles: [ dbrole_readonly ] ,comment : read-only viewer for meta database }
pg_databases :
- { name: meta ,baseline: cmdb.sql ,comment: pigsty meta database ,schemas : [ pigsty ] }
pg_hba_rules : # https://pigsty.io/docs/pgsql/config/hba
- { user: all ,db: all ,addr: intra ,auth: pwd ,title: 'everyone intranet access with password' ,order : 800 }
pg_crontab : # https://pigsty.io/docs/pgsql/admin/crontab
- '00 01 * * * /pg/bin/pg-backup full'
pg_vip_enabled : true
pg_vip_address : 10.10.10.2 /24
pg_vip_interface : eth1
# pgsql 3 node ha cluster: pg-test
pg-test :
hosts :
10.10.10.11 : { pg_seq: 1, pg_role : primary } # primary instance, leader of cluster
10.10.10.12 : { pg_seq: 2, pg_role : replica } # replica instance, follower of leader
10.10.10.13 : { pg_seq: 3, pg_role: replica, pg_offline_query : true } # replica with offline access
vars :
pg_cluster : pg-test # define pgsql cluster name
pg_users : [ { name: test , password: test , pgbouncer: true , roles : [ dbrole_admin ] }]
pg_databases : [ { name : test }]
pg_vip_enabled : true
pg_vip_address : 10.10.10.3 /24
pg_vip_interface : eth1
pg_crontab : # make a full backup on monday 1am, and an incremental backup during weekdays
- '00 01 * * 1 /pg/bin/pg-backup full'
- '00 01 * * 2,3,4,5,6,7 /pg/bin/pg-backup'
#----------------------------------#
# redis ms, sentinel, native cluster
#----------------------------------#
redis-ms : # redis classic primary & replica
hosts : { 10.10.10.10 : { redis_node: 1 , redis_instances : { 6379 : { }, 6380 : { replica_of : '10.10.10.10 6379' } } } }
vars : { redis_cluster: redis-ms ,redis_password: 'redis.ms' ,redis_max_memory : 64MB }
redis-meta : # redis sentinel x 3
hosts : { 10.10.10.11 : { redis_node: 1 , redis_instances : { 26379 : { } ,26380 : { } ,26381 : { } } } }
vars :
redis_cluster : redis-meta
redis_password : 'redis.meta'
redis_mode : sentinel
redis_max_memory : 16MB
redis_sentinel_monitor : # primary list for redis sentinel, use cls as name, primary ip:port
- { name: redis-ms, host: 10.10.10.10, port: 6379 ,password: redis.ms, quorum : 2 }
redis-test: # redis native cluster : 3m x 3s
hosts :
10.10.10.12 : { redis_node: 1 ,redis_instances : { 6379 : { } ,6380 : { } ,6381 : { } } }
10.10.10.13 : { redis_node: 2 ,redis_instances : { 6379 : { } ,6380 : { } ,6381 : { } } }
vars : { redis_cluster: redis-test ,redis_password: 'redis.test' ,redis_mode: cluster, redis_max_memory : 32MB }
#==============================================================#
# Global Parameters
#==============================================================#
vars :
version : v4.2.2 # pigsty version string
admin_ip : 10.10.10.10 # admin node ip address
region: default # upstream mirror region : default|china|europe
node_tune: oltp # node tuning specs : oltp,olap,tiny,crit
pg_conf: oltp.yml # pgsql tuning specs : {oltp,olap,tiny,crit}.yml
proxy_env : # global proxy env when downloading packages
no_proxy : "localhost,127.0.0.1,10.0.0.0/8,192.168.0.0/16,*.pigsty,*.aliyun.com,mirrors.*,*.myqcloud.com,*.tsinghua.edu.cn"
# http_proxy: # set your proxy here: e.g http://user:pass@proxy.xxx.com
# https_proxy: # set your proxy here: e.g http://user:pass@proxy.xxx.com
# all_proxy: # set your proxy here: e.g http://user:pass@proxy.xxx.com
infra_portal : # infra services exposed via portal
home : { domain : i.pigsty } # default domain name
#minio : { domain: m.pigsty ,endpoint: "${admin_ip}:9001" ,scheme: https ,websocket: true }
#----------------------------------#
# MinIO Related Options
#----------------------------------#
node_etc_hosts : [ '${admin_ip} i.pigsty sss.pigsty' ]
pgbackrest_method : minio # if you want to use minio as backup repo instead of 'local' fs, uncomment this
pgbackrest_repo: # pgbackrest repo : https://pgbackrest.org/configuration.html#section-repository
local : # default pgbackrest repo with local posix fs
path : /pg/backup # local backup directory, `/pg/backup` by default
retention_full_type : count # retention full backups by count
retention_full : 2 # keep 2, at most 3 full backup when using local fs repo
minio : # optional minio repo for pgbackrest
type : s3 # minio is s3-compatible, so s3 is used
s3_endpoint : sss.pigsty # minio endpoint domain name, `sss.pigsty` by default
s3_region : us-east-1 # minio region, us-east-1 by default, useless for minio
s3_bucket : pgsql # minio bucket name, `pgsql` by default
s3_key : pgbackrest # minio user access key for pgbackrest
s3_key_secret : S3User.Backup # minio user secret key for pgbackrest
s3_uri_style : path # use path style uri for minio rather than host style
path : /pgbackrest # minio backup path, default is `/pgbackrest`
storage_port : 9000 # minio port, 9000 by default
storage_ca_file : /etc/pki/ca.crt # minio ca file path, `/etc/pki/ca.crt` by default
block : y # Enable block incremental backup
bundle : y # bundle small files into a single file
bundle_limit : 20MiB # Limit for file bundles, 20MiB for object storage
bundle_size : 128MiB # Target size for file bundles, 128MiB for object storage
cipher_type : aes-256-cbc # enable AES encryption for remote backup repo
cipher_pass : pgBackRest # AES encryption password, default is 'pgBackRest'
retention_full_type : time # retention full backup by time on minio repo
retention_full : 14 # keep full backup for last 14 days
#----------------------------------#
# Repo, Node, Packages
#----------------------------------#
repo_remove : true # remove existing repo on admin node during repo bootstrap
node_repo_remove : true # remove existing node repo for node managed by pigsty
repo_extra_packages : [ pg18-main ] #,pg18-core ,pg18-time ,pg18-gis ,pg18-rag ,pg18-fts ,pg18-olap ,pg18-feat ,pg18-lang ,pg18-type ,pg18-util ,pg18-func ,pg18-admin ,pg18-stat ,pg18-sec ,pg18-fdw ,pg18-sim ,pg18-etl]
pg_version : 18 # default postgres version
#pg_extensions: [pg18-time ,pg18-gis ,pg18-rag ,pg18-fts ,pg18-feat ,pg18-lang ,pg18-type ,pg18-util ,pg18-func ,pg18-admin ,pg18-stat ,pg18-sec ,pg18-fdw ,pg18-sim ,pg18-etl ,pg18-olap]
#----------------------------------------------#
# PASSWORD : https://pigsty.io/docs/setup/security/
#----------------------------------------------#
grafana_admin_password : pigsty
grafana_view_password : DBUser.Viewer
pg_admin_password : DBUser.DBA
pg_monitor_password : DBUser.Monitor
pg_replication_password : DBUser.Replicator
patroni_password : Patroni.API
haproxy_admin_password : pigsty
minio_secret_key : S3User.MinIO
etcd_root_password : Etcd.Root
...
配置解读 ha/full 模板是 Pigsty 的 完整功能演示配置 ,展示了多种组件的协同工作。
组件概览 :
组件 节点分布 说明 INFRA 节点1 监控/告警/Nginx/DNS ETCD 节点1 DCS 服务 MinIO 节点1 S3 兼容存储 pg-meta 节点1 单节点 PostgreSQL pg-test 节点2-4 三节点高可用 PostgreSQL redis-ms 节点1 Redis 主从模式 redis-meta 节点2 Redis 哨兵模式 redis-test 节点3-4 Redis 原生集群模式
适用场景 :
Pigsty 功能演示与学习 开发测试环境 评估高可用架构 Redis 不同模式对比测试 与 ha/trio 的区别 :
增加了第二套 PostgreSQL 集群(pg-test) 增加了三种模式的 Redis 集群示例 基础设施使用单节点(而非三节点) 注意事项 :
9.26 - ha/safe 安全加固的高可用配置模板,采用高标准的安全最佳实践
ha/safe 配置模板基于 ha/trio 模板修改,是一个安全加固的专用配置模板,采用高标准的安全最佳实践。
配置概览 配置名称: ha/safe 节点数量: 三节点(可选添加延迟副本) 配置说明:安全加固的高可用配置模板,采用高标准的安全最佳实践 适用系统:el8, el9, el10, d12, d13, u22, u24 适用架构:x86_64(部分安全扩展在 ARM64 不可用) 相关配置:ha/trioha/full 启用方式:
./configure -c ha/safe [ -i <primary_ip>]
安全加固措施 ha/safe 模板实现了以下安全加固:
强制 SSL 加密 :PostgreSQL 和 PgBouncer 均启用 SSL强密码策略 :使用 passwordcheck 扩展强制密码复杂度用户过期时间 :所有用户设置 20 年过期时间最小化连接范围 :限制 PostgreSQL/Patroni/PgBouncer 监听地址严格 HBA 规则 :强制 SSL 认证,管理员需证书认证审计日志 :记录连接和断开事件延迟副本 :可选的 1 小时延迟副本,用于误操作恢复关键模板 :使用 crit.yml 调优模板,零数据丢失配置内容 源文件地址:pigsty/conf/ha/safe.yml
---
#==============================================================#
# File : safe.yml
# Desc : Pigsty 3-node security enhance template
# Ctime : 2020-05-22
# Mtime : 2025-12-12
# Docs : https://pigsty.io/docs/conf/safe
# License : Apache-2.0 @ https://pigsty.io/docs/about/license/
# Copyright : 2018-2026 Ruohang Feng / Vonng (rh@vonng.com)
#==============================================================#
#===== SECURITY ENHANCEMENT CONFIG TEMPLATE WITH 3 NODES ======#
# * 3 infra nodes, 3 etcd nodes, single minio node
# * 3-instance pgsql cluster with an extra delayed instance
# * crit.yml templates, no data loss, checksum enforced
# * enforce ssl on postgres & pgbouncer, use postgres by default
# * enforce an expiration date for all users (20 years by default)
# * enforce strong password policy with passwordcheck extension
# * enforce changing default password for all users
# * log connections and disconnections
# * restrict listen ip address for postgres/patroni/pgbouncer
all :
children :
infra : # infra cluster for proxy, monitor, alert, etc
hosts : # 1 for common usage, 3 nodes for production
10.10.10.10 : { infra_seq : 1 } # identity required
10.10.10.11 : { infra_seq: 2, repo_enabled : false }
10.10.10.12 : { infra_seq: 3, repo_enabled : false }
vars : { patroni_watchdog_mode : 'off' }
minio : # minio cluster, s3 compatible object storage
hosts : { 10.10.10.10 : { minio_seq : 1 } }
vars : { minio_cluster : minio }
etcd : # dcs service for postgres/patroni ha consensus
hosts : # 1 node for testing, 3 or 5 for production
10.10.10.10 : { etcd_seq : 1 } # etcd_seq required
10.10.10.11 : { etcd_seq : 2 } # assign from 1 ~ n
10.10.10.12 : { etcd_seq : 3 } # odd number please
vars : # cluster level parameter override roles/etcd
etcd_cluster : etcd # mark etcd cluster name etcd
etcd_safeguard : false # safeguard against purging
pg-meta : # 3 instance postgres cluster `pg-meta`
hosts :
10.10.10.10 : { pg_seq: 1, pg_role : primary }
10.10.10.11 : { pg_seq: 2, pg_role : replica }
10.10.10.12 : { pg_seq: 3, pg_role: replica , pg_offline_query : true }
vars :
pg_cluster : pg-meta
pg_conf : crit.yml
pg_users :
- { name: dbuser_meta , password: Pleas3-ChangeThisPwd ,expire_in: 7300 ,pgbouncer: true ,roles: [ dbrole_admin ] ,comment : pigsty admin user }
- { name: dbuser_view , password: Make.3ure-Compl1ance ,expire_in: 7300 ,pgbouncer: true ,roles: [ dbrole_readonly ] ,comment : read-only viewer for meta database }
pg_databases :
- { name: meta ,baseline: cmdb.sql ,comment: pigsty meta database ,schemas: [ pigsty ] ,extensions : [ { name : vector } ] }
pg_services :
- { name: standby , ip : "*" ,port: 5435 , dest: default ,selector : "[]" , backup : "[? pg_role == `primary`]" }
pg_crontab : # https://pigsty.io/docs/pgsql/admin/crontab
- '00 01 * * * /pg/bin/pg-backup full'
pg_listen : '${ip},${vip},${lo}'
pg_vip_enabled : true
pg_vip_address : 10.10.10.2 /24
pg_vip_interface : eth1
# OPTIONAL delayed cluster for pg-meta
#pg-meta-delay: # delayed instance for pg-meta (1 hour ago)
# hosts: { 10.10.10.13: { pg_seq: 1, pg_role: primary, pg_upstream: 10.10.10.10, pg_delay: 1h } }
# vars: { pg_cluster: pg-meta-delay }
####################################################################
# Parameters #
####################################################################
vars : # global variables
version : v4.2.2 # pigsty version string
admin_ip : 10.10.10.10 # admin node ip address
region: default # upstream mirror region : default|china|europe
node_tune: oltp # node tuning specs : oltp,olap,tiny,crit
pg_conf: oltp.yml # pgsql tuning specs : {oltp,olap,tiny,crit}.yml
#docker_registry_mirrors: ["https://docker.1panel.live","https://docker.1ms.run","https://docker.xuanyuan.me","https://registry-1.docker.io"]
patroni_ssl_enabled : true # secure patroni RestAPI communications with SSL?
pgbouncer_sslmode: require # pgbouncer client ssl mode : disable|allow|prefer|require|verify-ca|verify-full, disable by default
pg_default_service_dest : postgres # default service destination to postgres instead of pgbouncer
pgbackrest_method: minio # pgbackrest repo method : local,minio,[user-defined...]
#----------------------------------#
# MinIO Related Options
#----------------------------------#
minio_users : # and configure `pgbackrest_repo` & `minio_users` accordingly
- { access_key: dba , secret_key: S3User.DBA.Strong.Password, policy : consoleAdmin }
- { access_key: pgbackrest , secret_key: Min10.bAckup ,policy : readwrite }
pgbackrest_repo: # pgbackrest repo : https://pgbackrest.org/configuration.html#section-repository
local : # default pgbackrest repo with local posix fs
path : /pg/backup # local backup directory, `/pg/backup` by default
retention_full_type : count # retention full backups by count
retention_full : 2 # keep 2, at most 3 full backup when using local fs repo
minio : # optional minio repo for pgbackrest
s3_key : pgbackrest # <-------- CHANGE THIS, SAME AS `minio_users` access_key
s3_key_secret : Min10.bAckup # <-------- CHANGE THIS, SAME AS `minio_users` secret_key
cipher_pass : 'pgBR.${pg_cluster}' # <-------- CHANGE THIS, you can use cluster name as part of password
type : s3 # minio is s3-compatible, so s3 is used
s3_endpoint : sss.pigsty # minio endpoint domain name, `sss.pigsty` by default
s3_region : us-east-1 # minio region, us-east-1 by default, useless for minio
s3_bucket : pgsql # minio bucket name, `pgsql` by default
s3_uri_style : path # use path style uri for minio rather than host style
path : /pgbackrest # minio backup path, default is `/pgbackrest`
storage_port : 9000 # minio port, 9000 by default
storage_ca_file : /etc/pki/ca.crt # minio ca file path, `/etc/pki/ca.crt` by default
block : y # Enable block incremental backup
bundle : y # bundle small files into a single file
bundle_limit : 20MiB # Limit for file bundles, 20MiB for object storage
bundle_size : 128MiB # Target size for file bundles, 128MiB for object storage
cipher_type : aes-256-cbc # enable AES encryption for remote backup repo
retention_full_type : time # retention full backup by time on minio repo
retention_full : 14 # keep full backup for last 14 days
#----------------------------------#
# Access Control
#----------------------------------#
# add passwordcheck extension to enforce strong password policy
pg_libs : '$libdir/passwordcheck, pg_stat_statements, auto_explain'
pg_extensions :
- passwordcheck, supautils, pgsodium, pg_vault, pg_session_jwt, anonymizer, pgsmcrypto, pgauditlogtofile, pgaudit #, pgaudit17, pgaudit16, pgaudit15, pgaudit14
- pg_auth_mon, credcheck, pgcryptokey, pg_jobmon, logerrors, login_hook, set_user, pgextwlist, pg_auditor, sslutils, noset #pg_tde #pg_snakeoil
pg_default_roles : # default roles and users in postgres cluster
- { name: dbrole_readonly ,login: false ,comment : role for global read-only access }
- { name: dbrole_offline ,login: false ,comment : role for restricted read-only access }
- { name: dbrole_readwrite ,login: false ,roles: [ dbrole_readonly ] ,comment : role for global read-write access }
- { name: dbrole_admin ,login: false ,roles: [ pg_monitor, dbrole_readwrite ] ,comment : role for object creation }
- { name: postgres ,superuser: true ,expire_in: 7300 ,comment : system superuser }
- { name: replicator ,replication: true ,expire_in: 7300 ,roles: [ pg_monitor, dbrole_readonly ] ,comment : system replicator }
- { name: dbuser_dba ,superuser: true ,expire_in: 7300 ,roles: [ dbrole_admin ] ,pgbouncer: true ,pool_mode: session, pool_connlimit: 16 , comment : pgsql admin user }
- { name: dbuser_monitor ,roles: [ pg_monitor ] ,expire_in: 7300 ,pgbouncer: true ,parameters : { log_min_duration_statement: 1000 } ,pool_mode: session ,pool_connlimit: 8 ,comment : pgsql monitor user }
pg_default_hba_rules : # postgres host-based auth rules by default, order by `order`
- { user : '${dbsu}' ,db: all ,addr: local ,auth: ident ,title: 'dbsu access via local os user ident' ,order : 100 }
- { user : '${dbsu}' ,db: replication ,addr: local ,auth: ident ,title: 'dbsu replication from local os ident' ,order : 150 }
- { user : '${repl}' ,db: replication ,addr: localhost ,auth: ssl ,title: 'replicator replication from localhost' ,order : 200 }
- { user : '${repl}' ,db: replication ,addr: intra ,auth: ssl ,title: 'replicator replication from intranet' ,order : 250 }
- { user : '${repl}' ,db: postgres ,addr: intra ,auth: ssl ,title: 'replicator postgres db from intranet' ,order : 300 }
- { user : '${monitor}' ,db: all ,addr: localhost ,auth: pwd ,title: 'monitor from localhost with password' ,order : 350 }
- { user : '${monitor}' ,db: all ,addr: infra ,auth: ssl ,title: 'monitor from infra host with password' ,order : 400 }
- { user : '${admin}' ,db: all ,addr: infra ,auth: ssl ,title: 'admin @ infra nodes with pwd & ssl' ,order : 450 }
- { user : '${admin}' ,db: all ,addr: world ,auth: cert ,title: 'admin @ everywhere with ssl & cert' ,order : 500 }
- { user: '+dbrole_readonly',db: all ,addr: localhost ,auth: ssl ,title: 'pgbouncer read/write via local socket' ,order : 550 }
- { user: '+dbrole_readonly',db: all ,addr: intra ,auth: ssl ,title: 'read/write biz user via password' ,order : 600 }
- { user: '+dbrole_offline' ,db: all ,addr: intra ,auth: ssl ,title: 'allow etl offline tasks from intranet' ,order : 650 }
pgb_default_hba_rules : # pgbouncer host-based authentication rules, order by `order`
- { user : '${dbsu}' ,db: pgbouncer ,addr: local ,auth: peer ,title: 'dbsu local admin access with os ident' ,order : 100 }
- { user: 'all' ,db: all ,addr: localhost ,auth: pwd ,title: 'allow all user local access with pwd' ,order : 150 }
- { user : '${monitor}' ,db: pgbouncer ,addr: intra ,auth: ssl ,title: 'monitor access via intranet with pwd' ,order : 200 }
- { user : '${monitor}' ,db: all ,addr: world ,auth: deny ,title: 'reject all other monitor access addr' ,order : 250 }
- { user : '${admin}' ,db: all ,addr: intra ,auth: ssl ,title: 'admin access via intranet with pwd' ,order : 300 }
- { user : '${admin}' ,db: all ,addr: world ,auth: deny ,title: 'reject all other admin access addr' ,order : 350 }
- { user: 'all' ,db: all ,addr: intra ,auth: ssl ,title: 'allow all user intra access with pwd' ,order : 400 }
#----------------------------------#
# Repo, Node, Packages
#----------------------------------#
repo_remove : true # remove existing repo on admin node during repo bootstrap
node_repo_remove : true # remove existing node repo for node managed by pigsty
#node_selinux_mode: enforcing # set selinux mode: enforcing,permissive,disabled
node_firewall_mode: zone # firewall mode : zone (default), off (disable), none (skip & self-managed)
repo_extra_packages : [ pg18-main ] #,pg18-core ,pg18-time ,pg18-gis ,pg18-rag ,pg18-fts ,pg18-olap ,pg18-feat ,pg18-lang ,pg18-type ,pg18-util ,pg18-func ,pg18-admin ,pg18-stat ,pg18-sec ,pg18-fdw ,pg18-sim ,pg18-etl]
pg_version : 18 # default postgres version
#pg_extensions: [ pg18-time ,pg18-gis ,pg18-rag ,pg18-fts ,pg18-olap ,pg18-feat ,pg18-lang ,pg18-type ,pg18-util ,pg18-func ,pg18-admin ,pg18-stat ,pg18-sec ,pg18-fdw ,pg18-sim ,pg18-etl]
#----------------------------------------------#
# PASSWORD : https://pigsty.io/docs/setup/security/
#----------------------------------------------#
#grafana_admin_username: admin
grafana_admin_password : You.Have2Use-A_VeryStrongPassword
grafana_view_password : DBUser.Viewer
#pg_admin_username: dbuser_dba
pg_admin_password : PessWorb.Should8eStrong-eNough
#pg_monitor_username: dbuser_monitor
pg_monitor_password : MekeSuerYour.PassWordI5secured
#pg_replication_username: replicator
pg_replication_password : doNotUseThis-PasswordFor.AnythingElse
#patroni_username: postgres
patroni_password : don.t-forget-to-change-thEs3-password
#haproxy_admin_username: admin
haproxy_admin_password : GneratePasswordWith-pwgen-s-16-1
minio_secret_key : S3User.MinIO
etcd_root_password : Etcd.Root
...
配置解读 ha/safe 模板是 Pigsty 的 安全加固配置 ,专为对安全性有较高要求的生产环境设计。
安全特性汇总 :
安全措施 说明 SSL 加密 PostgreSQL/PgBouncer/Patroni 全链路 SSL 强密码策略 passwordcheck 扩展强制密码复杂度用户过期 所有用户 20 年过期(expire_in: 7300) 严格 HBA 管理员远程访问需要证书认证 备份加密 MinIO 备份启用 AES-256-CBC 加密 审计日志 pgaudit 扩展记录 SQL 审计日志延迟副本 1 小时延迟副本用于误操作恢复
适用场景 :
金融、医疗、政务等高安全要求行业 需要满足合规审计要求的环境 对数据安全有极高要求的关键业务 注意事项 :
部分安全扩展在 ARM64 架构不可用,请酌情启用 所有默认密码必须修改为强密码 建议配合定期安全审计使用 9.27 - ha/trio 三节点标准高可用配置模板,允许任意一台服务器宕机。
三节点是实现真正高可用的最小规格。ha/trio 模板使用三节点标准 HA 架构,INFRA、ETCD、PGSQL 三个核心模块均采用三节点部署,允许任意一台服务器宕机。
配置概览 配置名称: ha/trio 节点数量: 三节点 配置说明:三节点标准高可用架构,允许任意一台服务器宕机 适用系统:el8, el9, el10, d12, d13, u22, u24 适用架构:x86_64, aarch64 相关配置:ha/dualha/fullha/safe 启用方式:
./configure -c ha/trio [ -i <primary_ip>]
配置生成后,需要将占位 IP 10.10.10.11 和 10.10.10.12 修改为实际的节点 IP 地址。
配置内容 源文件地址:pigsty/conf/ha/trio.yml
---
#==============================================================#
# File : trio.yml
# Desc : Pigsty 3-node security enhance template
# Ctime : 2020-05-23
# Mtime : 2026-01-20
# Docs : https://pigsty.io/docs/conf/trio
# License : Apache-2.0 @ https://pigsty.io/docs/about/license/
# Copyright : 2018-2026 Ruohang Feng / Vonng (rh@vonng.com)
#==============================================================#
# 3 infra node, 3 etcd node, 3 pgsql node, and 1 minio node
all : # top level object
#==============================================================#
# Clusters, Nodes, and Modules
#==============================================================#
children :
#----------------------------------#
# infra: monitor, alert, repo, etc..
#----------------------------------#
infra : # infra cluster for proxy, monitor, alert, etc
hosts : # 1 for common usage, 3 nodes for production
10.10.10.10 : { infra_seq : 1 } # identity required
10.10.10.11 : { infra_seq: 2, repo_enabled : false }
10.10.10.12 : { infra_seq: 3, repo_enabled : false }
vars :
patroni_watchdog_mode : 'off' # do not fencing infra
etcd : # dcs service for postgres/patroni ha consensus
hosts : # 1 node for testing, 3 or 5 for production
10.10.10.10 : { etcd_seq : 1 } # etcd_seq required
10.10.10.11 : { etcd_seq : 2 } # assign from 1 ~ n
10.10.10.12 : { etcd_seq : 3 } # odd number please
vars : # cluster level parameter override roles/etcd
etcd_cluster : etcd # mark etcd cluster name etcd
etcd_safeguard : false # safeguard against purging
minio : # minio cluster, s3 compatible object storage
hosts : { 10.10.10.10 : { minio_seq : 1 } }
vars : { minio_cluster : minio }
pg-meta : # 3 instance postgres cluster `pg-meta`
hosts : # pg-meta-3 is marked as offline readable replica
10.10.10.10 : { pg_seq: 1, pg_role : primary }
10.10.10.11 : { pg_seq: 2, pg_role : replica }
10.10.10.12 : { pg_seq: 3, pg_role: replica , pg_offline_query : true }
vars : # cluster level parameters
pg_cluster : pg-meta
pg_users : # https://pigsty.io/docs/pgsql/config/user
- { name: dbuser_meta , password: DBUser.Meta ,pgbouncer: true ,roles: [ dbrole_admin ] ,comment : pigsty admin user }
- { name: dbuser_view , password: DBUser.Viewer ,pgbouncer: true ,roles: [ dbrole_readonly ] ,comment : read-only viewer for meta database }
pg_databases :
- { name: meta ,baseline: cmdb.sql ,comment: pigsty meta database ,schemas: [ pigsty ] ,extensions : [ { name : vector } ] }
pg_hba_rules : # https://pigsty.io/docs/pgsql/config/hba
- { user: all ,db: all ,addr: intra ,auth: pwd ,title: 'everyone intranet access with password' ,order : 800 }
pg_crontab : # https://pigsty.io/docs/pgsql/admin/crontab
- '00 01 * * * /pg/bin/pg-backup full'
pg_vip_enabled : true
pg_vip_address : 10.10.10.2 /24
pg_vip_interface : eth1
#==============================================================#
# Global Parameters
#==============================================================#
vars :
#----------------------------------#
# Meta Data
#----------------------------------#
version : v4.2.2 # pigsty version string
admin_ip : 10.10.10.10 # admin node ip address
region: default # upstream mirror region : default|china|europe
node_tune: oltp # node tuning specs : oltp,olap,tiny,crit
pg_conf: oltp.yml # pgsql tuning specs : {oltp,olap,tiny,crit}.yml
#docker_registry_mirrors: ["https://docker.1panel.live","https://docker.1ms.run","https://docker.xuanyuan.me","https://registry-1.docker.io"]
proxy_env : # global proxy env when downloading packages
no_proxy : "localhost,127.0.0.1,10.0.0.0/8,192.168.0.0/16,*.pigsty,*.aliyun.com,mirrors.*,*.myqcloud.com,*.tsinghua.edu.cn"
# http_proxy: # set your proxy here: e.g http://user:pass@proxy.xxx.com
# https_proxy: # set your proxy here: e.g http://user:pass@proxy.xxx.com
# all_proxy: # set your proxy here: e.g http://user:pass@proxy.xxx.com
infra_portal : # infra services exposed via portal
home : { domain : i.pigsty } # default domain name
minio : { domain: m.pigsty ,endpoint : "${admin_ip}:9001" ,scheme: https ,websocket : true }
#----------------------------------#
# Repo, Node, Packages
#----------------------------------#
repo_remove : true # remove existing repo on admin node during repo bootstrap
node_repo_remove : true # remove existing node repo for node managed by pigsty
repo_extra_packages : [ pg18-main ] #,pg18-core ,pg18-time ,pg18-gis ,pg18-rag ,pg18-fts ,pg18-olap ,pg18-feat ,pg18-lang ,pg18-type ,pg18-util ,pg18-func ,pg18-admin ,pg18-stat ,pg18-sec ,pg18-fdw ,pg18-sim ,pg18-etl]
pg_version : 18 # default postgres version
#pg_extensions: [ pg18-time ,pg18-gis ,pg18-rag ,pg18-fts ,pg18-olap ,pg18-feat ,pg18-lang ,pg18-type ,pg18-util ,pg18-func ,pg18-admin ,pg18-stat ,pg18-sec ,pg18-fdw ,pg18-sim ,pg18-etl]
#----------------------------------#
# MinIO Related Options
#----------------------------------#
node_etc_hosts :
- '${admin_ip} i.pigsty' # static dns record that point to repo node
- '${admin_ip} sss.pigsty' # static dns record that point to minio
pgbackrest_method : minio # if you want to use minio as backup repo instead of 'local' fs, uncomment this
pgbackrest_repo: # pgbackrest repo : https://pgbackrest.org/configuration.html#section-repository
local : # default pgbackrest repo with local posix fs
path : /pg/backup # local backup directory, `/pg/backup` by default
retention_full_type : count # retention full backups by count
retention_full : 2 # keep 2, at most 3 full backup when using local fs repo
minio : # optional minio repo for pgbackrest
type : s3 # minio is s3-compatible, so s3 is used
s3_endpoint : sss.pigsty # minio endpoint domain name, `sss.pigsty` by default
s3_region : us-east-1 # minio region, us-east-1 by default, useless for minio
s3_bucket : pgsql # minio bucket name, `pgsql` by default
s3_key : pgbackrest # minio user access key for pgbackrest
s3_key_secret : S3User.Backup # minio user secret key for pgbackrest
s3_uri_style : path # use path style uri for minio rather than host style
path : /pgbackrest # minio backup path, default is `/pgbackrest`
storage_port : 9000 # minio port, 9000 by default
storage_ca_file : /etc/pki/ca.crt # minio ca file path, `/etc/pki/ca.crt` by default
block : y # Enable block incremental backup
bundle : y # bundle small files into a single file
bundle_limit : 20MiB # Limit for file bundles, 20MiB for object storage
bundle_size : 128MiB # Target size for file bundles, 128MiB for object storage
cipher_type : aes-256-cbc # enable AES encryption for remote backup repo
cipher_pass : pgBackRest # AES encryption password, default is 'pgBackRest'
retention_full_type : time # retention full backup by time on minio repo
retention_full : 14 # keep full backup for last 14 days
#----------------------------------------------#
# PASSWORD : https://pigsty.io/docs/setup/security/
#----------------------------------------------#
grafana_admin_password : pigsty
grafana_view_password : DBUser.Viewer
pg_admin_password : DBUser.DBA
pg_monitor_password : DBUser.Monitor
pg_replication_password : DBUser.Replicator
patroni_password : Patroni.API
haproxy_admin_password : pigsty
minio_secret_key : S3User.MinIO
etcd_root_password : Etcd.Root
...
配置解读 ha/trio 模板是 Pigsty 的 标准高可用配置 ,提供真正的故障自动恢复能力。
架构说明 :
三节点 INFRA:Prometheus/Grafana/Nginx 分布式部署 三节点 ETCD:DCS 多数派选举,容忍单点故障 三节点 PostgreSQL:一主两从,自动故障转移 单节点 MinIO:可按需扩展为多节点 高可用保障 :
ETCD 三节点可容忍一节点故障,保持多数派 PostgreSQL 主库故障时,Patroni 自动选举新主 L2 VIP 随主库漂移,应用无需修改连接配置 适用场景 :
生产环境最小高可用部署 需要自动故障转移的关键业务 作为更大规模部署的基础架构 扩展建议 :
需要更强数据安全性,参考 ha/safe 需要更多演示功能,参考 ha/full 生产环境建议启用 pgbackrest_method: minio 远程备份 9.28 - ha/dual 双节点配置模板,有限高可用部署,允许宕机特定一台服务器。
ha/dual 模板使用双节点部署,实现一主一备的"半高可用"架构。如果您只有两台服务器,这是一个务实的选择。
配置概览 配置名称: ha/dual 节点数量: 双节点 配置说明:两节点有限高可用部署,允许特定一台服务器宕机 适用系统:el8, el9, el10, d12, d13, u22, u24 适用架构:x86_64, aarch64 相关配置:ha/trioslim 启用方式:
./configure -c ha/dual [ -i <primary_ip>]
配置生成后,需要将占位 IP 10.10.10.11 修改为实际的备库节点 IP 地址。
配置内容 源文件地址:pigsty/conf/ha/dual.yml
---
#==============================================================#
# File : dual.yml
# Desc : Pigsty deployment example for two nodes
# Ctime : 2020-05-22
# Mtime : 2025-12-12
# Docs : https://pigsty.io/docs/conf/dual
# License : Apache-2.0 @ https://pigsty.io/docs/about/license/
# Copyright : 2018-2026 Ruohang Feng / Vonng (rh@vonng.com)
#==============================================================#
# It is recommended to use at least three nodes in production deployment.
# But sometimes, there are only two nodes available, that's dual.yml for
#
# In this setup, we have two nodes, .10 (admin_node) and .11 (pgsql_primary):
#
# If .11 is down, .10 will take over since the dcs:etcd is still alive
# If .10 is down, .11 (pgsql primary) will still be functioning as a primary if:
# - Only dcs:etcd is down
# - Only pgsql is down
# if both etcd & pgsql are down (e.g. node down), the primary will still demote itself.
all :
children :
# infra cluster for proxy, monitor, alert, etc..
infra : { hosts : { 10.10.10.10 : { infra_seq : 1 } } }
# etcd cluster for ha postgres
etcd : { hosts : { 10.10.10.10 : { etcd_seq: 1 } }, vars : { etcd_cluster : etcd } }
# minio cluster, optional backup repo for pgbackrest
#minio: { hosts: { 10.10.10.10: { minio_seq: 1 } }, vars: { minio_cluster: minio } }
# postgres cluster 'pg-meta' with single primary instance
pg-meta :
hosts :
10.10.10.10 : { pg_seq: 1, pg_role : replica }
10.10.10.11 : { pg_seq: 2, pg_role : primary } # <----- use this as primary by default
vars :
pg_cluster : pg-meta
pg_databases : [ { name: meta ,baseline: cmdb.sql ,comment: pigsty meta database ,schemas: [ pigsty ] ,extensions : [ { name : vector }] } ]
pg_users :
- { name: dbuser_meta ,password: DBUser.Meta ,pgbouncer: true ,roles: [ dbrole_admin ] ,comment : pigsty admin user }
- { name: dbuser_view ,password: DBUser.Viewer ,pgbouncer: true ,roles: [ dbrole_readonly ] ,comment : read-only viewer for meta database }
pg_hba_rules : # https://pigsty.io/docs/pgsql/config/hba
- { user: all ,db: all ,addr: intra ,auth: pwd ,title: 'everyone intranet access with password' ,order : 800 }
pg_crontab : # https://pigsty.io/docs/pgsql/admin/crontab
- '00 01 * * * /pg/bin/pg-backup full'
pg_vip_enabled : true
pg_vip_address : 10.10.10.2 /24
pg_vip_interface : eth1
vars : # global parameters
version : v4.2.2 # pigsty version string
admin_ip : 10.10.10.10 # admin node ip address
region: default # upstream mirror region : default,china,europe
node_tune: oltp # node tuning specs : oltp,olap,tiny,crit
pg_conf: oltp.yml # pgsql tuning specs : {oltp,olap,tiny,crit}.yml
#docker_registry_mirrors: ["https://docker.1panel.live","https://docker.1ms.run","https://docker.xuanyuan.me","https://registry-1.docker.io"]
infra_portal : # domain names and upstream servers
home : { domain : i.pigsty }
#minio : { domain: m.pigsty ,endpoint: "${admin_ip}:9001" ,scheme: https ,websocket: true }
#----------------------------------#
# Repo, Node, Packages
#----------------------------------#
repo_remove : true # remove existing repo on admin node during repo bootstrap
node_repo_remove : true # remove existing node repo for node managed by pigsty
repo_extra_packages : [ pg18-main ] #,pg18-core ,pg18-time ,pg18-gis ,pg18-rag ,pg18-fts ,pg18-olap ,pg18-feat ,pg18-lang ,pg18-type ,pg18-util ,pg18-func ,pg18-admin ,pg18-stat ,pg18-sec ,pg18-fdw ,pg18-sim ,pg18-etl]
pg_version : 18 # default postgres version
#pg_extensions: [ pg18-time ,pg18-gis ,pg18-rag ,pg18-fts ,pg18-olap ,pg18-feat ,pg18-lang ,pg18-type ,pg18-util ,pg18-func ,pg18-admin ,pg18-stat ,pg18-sec ,pg18-fdw ,pg18-sim ,pg18-etl]
#----------------------------------------------#
# PASSWORD : https://pigsty.io/docs/setup/security/
#----------------------------------------------#
grafana_admin_password : pigsty
grafana_view_password : DBUser.Viewer
pg_admin_password : DBUser.DBA
pg_monitor_password : DBUser.Monitor
pg_replication_password : DBUser.Replicator
patroni_password : Patroni.API
haproxy_admin_password : pigsty
minio_secret_key : S3User.MinIO
etcd_root_password : Etcd.Root
...
配置解读 ha/dual 模板是 Pigsty 的 双节点有限高可用配置 ,专为只有两台服务器的场景设计。
架构说明 :
节点A (10.10.10.10):管理节点,运行 Infra + etcd + PostgreSQL 备库节点B (10.10.10.11):数据节点,仅运行 PostgreSQL 主库故障场景分析 :
故障节点 影响 是否自动恢复 节点B 宕机 主库切换到节点A 自动 节点A etcd 宕机 主库继续运行(无 DCS) 需人工 节点A pgsql 宕机 主库继续运行 需人工 节点A 完全宕机 主库降级为单机 需人工
适用场景 :
仅有两台服务器的预算受限环境 可接受部分故障场景需要人工介入 作为三节点高可用的过渡方案 注意事项 :
真正的高可用需要至少三节点(DCS 需要多数派) 建议尽快升级到三节点架构 L2 VIP 需要网络环境支持(同一广播域)
9.29 - 应用模版 9.30 - app/odoo 使用 Pigsty 托管的 PostgreSQL 部署 Odoo 开源 ERP 系统
app/odoo 配置模板提供了自建 Odoo 开源 ERP 系统的参考配置,使用 Pigsty 托管的 PostgreSQL 作为数据库。
更多细节,请参考 Odoo 部署教程
配置概览 配置名称: app/odoo 节点数量: 单节点 配置说明:使用 Pigsty 托管的 PostgreSQL 部署 Odoo ERP 适用系统:el8, el9, el10, d12, d13, u22, u24 适用架构:x86_64, aarch64 相关配置:meta 启用方式:
./configure -c app/odoo [ -i <primary_ip>]
配置内容 源文件地址:pigsty/conf/app/odoo.yml
---
#==============================================================#
# File : odoo.yml
# Desc : pigsty config for running 1-node odoo app
# Ctime : 2025-01-11
# Mtime : 2025-12-12
# Docs : https://pigsty.io/docs/app/odoo
# License : Apache-2.0 @ https://pigsty.io/docs/about/license/
# Copyright : 2018-2026 Ruohang Feng / Vonng (rh@vonng.com)
#==============================================================#
# tutorial: https://pigsty.io/docs/app/odoo
# how to use this template:
#
# curl -fsSL https://repo.pigsty.io/get | bash; cd ~/pigsty
# ./bootstrap # prepare local repo & ansible
# ./configure -c app/odoo # Use this odoo config template
# vi pigsty.yml # IMPORTANT: CHANGE CREDENTIALS!!
# ./deploy.yml # install pigsty & pgsql & minio
# ./docker.yml # install docker & docker-compose
# ./app.yml # install odoo
all :
children :
# the odoo application (default username & password: admin/admin)
odoo :
hosts : { 10.10.10.10 : {} }
vars :
app : odoo # specify app name to be installed (in the apps)
apps : # define all applications
odoo : # app name, should have corresponding ~/pigsty/app/odoo folder
file : # optional directory to be created
- { path: /data/odoo ,state: directory, owner: 100, group : 101 }
- { path: /data/odoo/webdata ,state: directory, owner: 100, group : 101 }
- { path: /data/odoo/addons ,state: directory, owner: 100, group : 101 }
conf : # override /opt/<app>/.env config file
PG_HOST : 10.10.10.10 # postgres host
PG_PORT : 5432 # postgres port
PG_USERNAME : odoo # postgres user
PG_PASSWORD : DBUser.Odoo # postgres password
ODOO_PORT : 8069 # odoo app port
ODOO_DATA : /data/odoo/webdata # odoo webdata
ODOO_ADDONS : /data/odoo/addons # odoo plugins
ODOO_DBNAME : odoo # odoo database name
ODOO_VERSION : 19.0 # odoo image version
# the odoo database
pg-odoo :
hosts : { 10.10.10.10 : { pg_seq: 1, pg_role : primary } }
vars :
pg_cluster : pg-odoo
pg_users :
- { name: odoo ,password: DBUser.Odoo ,pgbouncer: true ,roles: [ dbrole_admin ] ,createdb: true ,comment : admin user for odoo service }
- { name: odoo_ro ,password: DBUser.Odoo ,pgbouncer: true ,roles: [ dbrole_readonly ] ,comment : read only user for odoo service }
- { name: odoo_rw ,password: DBUser.Odoo ,pgbouncer: true ,roles: [ dbrole_readwrite ] ,comment : read write user for odoo service }
pg_databases :
- { name: odoo ,owner: odoo ,revokeconn: true ,comment : odoo main database }
pg_hba_rules :
- { user: all ,db: all ,addr: 172.17.0.0/16 ,auth: pwd ,title : 'allow access from local docker network' }
- { user: dbuser_view , db: all ,addr: infra ,auth: pwd ,title : 'allow grafana dashboard access cmdb from infra nodes' }
pg_crontab : [ '00 01 * * * /pg/bin/pg-backup full' ] # make a full backup every 1am
infra : { hosts : { 10.10.10.10 : { infra_seq : 1 } } }
etcd : { hosts : { 10.10.10.10 : { etcd_seq: 1 } }, vars : { etcd_cluster : etcd } }
#minio: { hosts: { 10.10.10.10: { minio_seq: 1 } }, vars: { minio_cluster: minio } }
vars : # global variables
version : v4.2.2 # pigsty version string
admin_ip : 10.10.10.10 # admin node ip address
region: default # upstream mirror region : default|china|europe
node_tune: oltp # node tuning specs : oltp,olap,tiny,crit
pg_conf: oltp.yml # pgsql tuning specs : {oltp,olap,tiny,crit}.yml
docker_enabled : true # enable docker on app group
#docker_registry_mirrors: ["https://docker.1panel.live","https://docker.1ms.run","https://docker.xuanyuan.me","https://registry-1.docker.io"]
proxy_env : # global proxy env when downloading packages & pull docker images
no_proxy : "localhost,127.0.0.1,10.0.0.0/8,192.168.0.0/16,*.pigsty,*.aliyun.com,mirrors.*,*.tsinghua.edu.cn"
#http_proxy: 127.0.0.1:12345 # add your proxy env here for downloading packages or pull images
#https_proxy: 127.0.0.1:12345 # usually the proxy is format as http://user:pass@proxy.xxx.com
#all_proxy: 127.0.0.1:12345
infra_portal : # domain names and upstream servers
home : { domain : i.pigsty }
minio : { domain: m.pigsty ,endpoint : "${admin_ip}:9001" ,scheme: https ,websocket : true }
odoo : # nginx server config for odoo
domain : odoo.pigsty # REPLACE WITH YOUR OWN DOMAIN!
endpoint : "10.10.10.10:8069" # odoo service endpoint: IP:PORT
websocket : true # add websocket support
certbot : odoo.pigsty # certbot cert name, apply with `make cert`
repo_enabled : false
node_repo_modules : node,infra,pgsql
pg_version : 18
#----------------------------------------------#
# PASSWORD : https://pigsty.io/docs/setup/security/
#----------------------------------------------#
grafana_admin_password : pigsty
grafana_view_password : DBUser.Viewer
pg_admin_password : DBUser.DBA
pg_monitor_password : DBUser.Monitor
pg_replication_password : DBUser.Replicator
patroni_password : Patroni.API
haproxy_admin_password : pigsty
minio_secret_key : S3User.MinIO
etcd_root_password : Etcd.Root
... 配置解读 app/odoo 模板提供了 Odoo 开源 ERP 系统的一键部署方案。
Odoo 是什么 :
全球最流行的开源 ERP 系统 覆盖 CRM、销售、采购、库存、财务、HR 等企业管理模块 支持数千个社区和官方应用扩展 提供 Web 界面和移动端支持 关键特性 :
使用 Pigsty 管理的 PostgreSQL 替代 Odoo 自带的数据库 支持 Odoo 19.0 最新版本 数据持久化到独立目录 /data/odoo 支持自定义插件目录 /data/odoo/addons 访问方式 :
# Odoo Web 界面
http://odoo.pigsty:8069
# 默认管理员账号
用户名: admin
密码: admin ( 首次登录时设置)
适用场景 :
中小企业 ERP 系统 替代 SAP、Oracle ERP 等商业解决方案 需要自定义业务流程的企业应用 注意事项 :
Odoo 容器以 uid=100, gid=101 运行,数据目录需要正确的权限 首次访问时需要创建数据库和设置管理员密码 生产环境建议启用 HTTPS 可通过 /data/odoo/addons 安装自定义模块 9.31 - app/dify 使用 Pigsty 托管的 PostgreSQL 部署 Dify AI 应用开发平台
app/dify 配置模板提供了自建 Dify AI 应用开发平台的参考配置,使用 Pigsty 托管的 PostgreSQL 和 pgvector 作为向量存储。
更多细节,请参考 Dify 部署教程
配置概览 配置名称: app/dify 节点数量: 单节点 配置说明:使用 Pigsty 托管的 PostgreSQL 部署 Dify 适用系统:el8, el9, el10, d12, d13, u22, u24 适用架构:x86_64, aarch64 相关配置:meta 启用方式:
./configure -c app/dify [ -i <primary_ip>]
配置内容 源文件地址:pigsty/conf/app/dify.yml
---
#==============================================================#
# File : dify.yml
# Desc : pigsty config for running 1-node dify app
# Ctime : 2025-02-24
# Mtime : 2026-01-18
# Docs : https://pigsty.io/docs/app/dify
# License : Apache-2.0 @ https://pigsty.io/docs/about/license/
# Copyright : 2018-2026 Ruohang Feng / Vonng (rh@vonng.com)
#==============================================================#
# Last Verified Dify Version: v1.8.1 on 2025-09-08
# tutorial: https://pigsty.io/docs/app/dify
# how to use this template:
#
# curl -fsSL https://repo.pigsty.io/get | bash; cd ~/pigsty
# ./bootstrap # prepare local repo & ansible
# ./configure -c app/dify # use this dify config template
# vi pigsty.yml # IMPORTANT: CHANGE CREDENTIALS!!
# ./deploy.yml # install pigsty & pgsql & minio
# ./docker.yml # install docker & docker-compose
# ./app.yml # install dify with docker-compose
#
# To replace domain name:
# sed -ie 's/dify.pigsty/dify.pigsty.cc/g' pigsty.yml
all :
children :
# the dify application
dify :
hosts : { 10.10.10.10 : {} }
vars :
app : dify # specify app name to be installed (in the apps)
apps : # define all applications
dify : # app name, should have corresponding ~/pigsty/app/dify folder
file : # data directory to be created
- { path: /data/dify ,state: directory ,mode : 0755 }
conf : # override /opt/dify/.env config file
# change domain, mirror, proxy, secret key
NGINX_SERVER_NAME : dify.pigsty
# A secret key for signing and encryption, gen with `openssl rand -base64 42` (CHANGE PASSWORD!)
SECRET_KEY : sk-somerandomkey
# expose DIFY nginx service with port 5001 by default
DIFY_PORT : 5001
# where to store dify files? the default is ./volume, we'll use another volume created above
DIFY_DATA : /data/dify
# proxy and mirror settings
#PIP_MIRROR_URL: https://pypi.tuna.tsinghua.edu.cn/simple
#SANDBOX_HTTP_PROXY: http://10.10.10.10:12345
#SANDBOX_HTTPS_PROXY: http://10.10.10.10:12345
# database credentials
DB_USERNAME : dify
DB_PASSWORD : difyai123456
DB_HOST : 10.10.10.10
DB_PORT : 5432
DB_DATABASE : dify
VECTOR_STORE : pgvector
PGVECTOR_HOST : 10.10.10.10
PGVECTOR_PORT : 5432
PGVECTOR_USER : dify
PGVECTOR_PASSWORD : difyai123456
PGVECTOR_DATABASE : dify
PGVECTOR_MIN_CONNECTION : 2
PGVECTOR_MAX_CONNECTION : 10
pg-meta :
hosts : { 10.10.10.10 : { pg_seq: 1, pg_role : primary } }
vars :
pg_cluster : pg-meta
pg_users :
- { name: dify ,password: difyai123456 ,pgbouncer: true ,roles: [ dbrole_admin ] ,superuser: true ,comment : dify superuser }
pg_databases :
- { name: dify ,owner: dify ,comment : dify main database }
- { name: dify_plugin ,owner: dify ,comment : dify plugin daemon database }
pg_hba_rules :
- { user: dify ,db: all ,addr: 172.17.0.0/16 ,auth: pwd ,title : 'allow dify access from local docker network' }
pg_crontab : [ '00 01 * * * /pg/bin/pg-backup full' ] # make a full backup every 1am
infra : { hosts : { 10.10.10.10 : { infra_seq : 1 } } }
etcd : { hosts : { 10.10.10.10 : { etcd_seq: 1 } }, vars : { etcd_cluster : etcd } }
#minio: { hosts: { 10.10.10.10: { minio_seq: 1 } }, vars: { minio_cluster: minio } }
vars : # global variables
version : v4.2.2 # pigsty version string
admin_ip : 10.10.10.10 # admin node ip address
region: default # upstream mirror region : default|china|europe
node_tune: oltp # node tuning specs : oltp,olap,tiny,crit
pg_conf: oltp.yml # pgsql tuning specs : {oltp,olap,tiny,crit}.yml
docker_enabled : true # enable docker on app group
#docker_registry_mirrors: ["https://docker.1panel.live","https://docker.1ms.run","https://docker.xuanyuan.me","https://registry-1.docker.io"]
proxy_env : # global proxy env when downloading packages & pull docker images
no_proxy : "localhost,127.0.0.1,10.0.0.0/8,192.168.0.0/16,*.pigsty,*.aliyun.com,mirrors.*,*.tsinghua.edu.cn"
#http_proxy: 127.0.0.1:12345 # add your proxy env here for downloading packages or pull images
#https_proxy: 127.0.0.1:12345 # usually the proxy is format as http://user:pass@proxy.xxx.com
#all_proxy: 127.0.0.1:12345
infra_portal : # domain names and upstream servers
home : { domain : i.pigsty }
#minio : { domain: m.pigsty ,endpoint: "${admin_ip}:9001" ,scheme: https ,websocket: true }
dify : # nginx server config for dify
domain : dify.pigsty # REPLACE WITH YOUR OWN DOMAIN!
endpoint : "10.10.10.10:5001" # dify service endpoint: IP:PORT
websocket : true # add websocket support
certbot : dify.pigsty # certbot cert name, apply with `make cert`
repo_enabled : false
node_repo_modules : node,infra,pgsql
pg_version : 18
#----------------------------------------------#
# PASSWORD : https://pigsty.io/docs/setup/security/
#----------------------------------------------#
grafana_admin_password : pigsty
grafana_view_password : DBUser.Viewer
pg_admin_password : DBUser.DBA
pg_monitor_password : DBUser.Monitor
pg_replication_password : DBUser.Replicator
patroni_password : Patroni.API
haproxy_admin_password : pigsty
minio_secret_key : S3User.MinIO
etcd_root_password : Etcd.Root
...
配置解读 app/dify 模板提供了 Dify AI 应用开发平台的一键部署方案。
Dify 是什么 :
开源的 LLM 应用开发平台 支持 RAG、Agent、Workflow 等 AI 应用模式 提供可视化的 Prompt 编排和应用构建界面 支持多种 LLM 后端(OpenAI、Claude、本地模型等) 关键特性 :
使用 Pigsty 管理的 PostgreSQL 替代 Dify 自带的数据库 使用 pgvector 作为向量存储(替代 Weaviate/Qdrant) 支持 HTTPS 和自定义域名 数据持久化到独立目录 /data/dify 访问方式 :
# Dify Web 界面
http://dify.pigsty:5001
# 或通过 Nginx 代理
https://dify.pigsty
适用场景 :
企业内部 AI 应用开发平台 RAG 知识库问答系统 LLM 驱动的自动化工作流 AI Agent 开发与部署 注意事项 :
必须修改 SECRET_KEY,使用 openssl rand -base64 42 生成 需要配置 LLM API 密钥(如 OpenAI API Key) Docker 网络需要能访问 PostgreSQL(已配置 172.17.0.0/16 HBA 规则) 建议配置代理以加速 Python 包下载 9.32 - app/electric 使用 Pigsty 托管的 PostgreSQL 部署 Electric 实时同步服务
app/electric 配置模板提供了部署 Electric SQL 实时同步服务的参考配置,实现 PostgreSQL 到客户端的实时数据同步。
配置概览 配置名称: app/electric 节点数量: 单节点 配置说明:使用 Pigsty 托管的 PostgreSQL 部署 Electric 实时同步 适用系统:el8, el9, el10, d12, d13, u22, u24 适用架构:x86_64, aarch64 相关配置:meta 启用方式:
./configure -c app/electric [ -i <primary_ip>]
配置内容 源文件地址:pigsty/conf/app/electric.yml
---
#==============================================================#
# File : electric.yml
# Desc : pigsty config for running 1-node electric app
# Ctime : 2025-03-29
# Mtime : 2025-12-12
# Docs : https://pigsty.io/docs/app/electric
# License : Apache-2.0 @ https://pigsty.io/docs/about/license/
# Copyright : 2018-2026 Ruohang Feng / Vonng (rh@vonng.com)
#==============================================================#
# tutorial: https://pigsty.io/docs/app/electric
# quick start: https://electric-sql.com/docs/quickstart
# how to use this template:
#
# curl -fsSL https://repo.pigsty.io/get | bash; cd ~/pigsty
# ./bootstrap # prepare local repo & ansible
# ./configure -c app/electric # use this electric config template
# vi pigsty.yml # IMPORTANT: CHANGE CREDENTIALS!!
# ./deploy.yml # install pigsty & pgsql & minio
# ./docker.yml # install docker & docker-compose
# ./app.yml # install electric with docker-compose
all :
children :
# infra cluster for proxy, monitor, alert, etc..
infra :
hosts : { 10.10.10.10 : { infra_seq : 1 } }
vars :
app : electric
apps : # define all applications
electric : # app name, should have corresponding ~/pigsty/app/electric folder
conf: # override /opt/electric/.env config file : https://electric-sql.com/docs/api/config
DATABASE_URL : 'postgresql://electric:DBUser.Electric@10.10.10.10:5432/electric?sslmode=require'
ELECTRIC_PORT : 8002
ELECTRIC_PROMETHEUS_PORT : 8003
ELECTRIC_INSECURE : true
#ELECTRIC_SECRET: 1U6ItbhoQb4kGUU5wXBLbxvNf
# etcd cluster for ha postgres
etcd : { hosts : { 10.10.10.10 : { etcd_seq: 1 } }, vars : { etcd_cluster : etcd } }
# minio cluster, s3 compatible object storage
#minio: { hosts: { 10.10.10.10: { minio_seq: 1 } }, vars: { minio_cluster: minio } }
# postgres example cluster: pg-meta
pg-meta :
hosts : { 10.10.10.10 : { pg_seq: 1, pg_role : primary } }
vars :
pg_cluster : pg-meta
pg_users :
- {name: electric ,password: DBUser.Electric ,pgbouncer: true , replication: true ,roles: [dbrole_admin] ,comment : electric main user }
pg_databases : [ { name: electric , owner : electric }]
pg_hba_rules :
- { user: electric , db: replication ,addr: infra ,auth: ssl ,title : 'allow electric intranet/docker ssl access' }
#==============================================================#
# Global Parameters
#==============================================================#
vars :
#----------------------------------#
# Meta Data
#----------------------------------#
version : v4.2.2 # pigsty version string
admin_ip : 10.10.10.10 # admin node ip address
region: default # upstream mirror region : default|china|europe
node_tune: oltp # node tuning specs : oltp,olap,tiny,crit
pg_conf: oltp.yml # pgsql tuning specs : {oltp,olap,tiny,crit}.yml
docker_enabled : true # enable docker on app group
#docker_registry_mirrors: ["https://docker.1panel.live","https://docker.1ms.run","https://docker.xuanyuan.me","https://registry-1.docker.io"]
proxy_env : # global proxy env when downloading packages
no_proxy : "localhost,127.0.0.1,10.0.0.0/8,192.168.0.0/16,*.pigsty,*.aliyun.com,mirrors.*,*.myqcloud.com,*.tsinghua.edu.cn"
# http_proxy: # set your proxy here: e.g http://user:pass@proxy.xxx.com
# https_proxy: # set your proxy here: e.g http://user:pass@proxy.xxx.com
# all_proxy: # set your proxy here: e.g http://user:pass@proxy.xxx.com
infra_portal : # domain names and upstream servers
home : { domain : i.pigsty }
electric :
domain : elec.pigsty
endpoint : "${admin_ip}:8002"
websocket: true # apply free ssl cert with certbot : make cert
certbot : odoo.pigsty # <----- replace with your own domain name!
#----------------------------------#
# Safe Guard
#----------------------------------#
# you can enable these flags after bootstrap, to prevent purging running etcd / pgsql instances
etcd_safeguard : false # prevent purging running etcd instance?
pg_safeguard : false # prevent purging running postgres instance? false by default
#----------------------------------#
# Repo, Node, Packages
#----------------------------------#
repo_enabled : false
node_repo_modules : node,infra,pgsql
pg_version : 18 # default postgres version
#pg_extensions: [ pg18-time ,pg18-gis ,pg18-rag ,pg18-fts ,pg18-olap ,pg18-feat ,pg18-lang ,pg18-type ,pg18-util ,pg18-func ,pg18-admin ,pg18-stat ,pg18-sec ,pg18-fdw ,pg18-sim ,pg18-etl]
#----------------------------------------------#
# PASSWORD : https://pigsty.io/docs/setup/security/
#----------------------------------------------#
grafana_admin_password : pigsty
grafana_view_password : DBUser.Viewer
pg_admin_password : DBUser.DBA
pg_monitor_password : DBUser.Monitor
pg_replication_password : DBUser.Replicator
patroni_password : Patroni.API
haproxy_admin_password : pigsty
minio_secret_key : S3User.MinIO
etcd_root_password : Etcd.Root
...
配置解读 app/electric 模板提供了 Electric SQL 实时同步服务的一键部署方案。
Electric 是什么 :
PostgreSQL 到客户端的实时数据同步服务 支持离线优先 (Local-first) 应用架构 通过逻辑复制实时同步数据变更 提供 HTTP API 供前端应用消费 关键特性 :
使用 Pigsty 管理的 PostgreSQL 作为数据源 通过逻辑复制 (Logical Replication) 捕获数据变更 支持 SSL 加密连接 内置 Prometheus 指标端点 访问方式 :
# Electric API 端点
http://elec.pigsty:8002
# Prometheus 指标
http://elec.pigsty:8003/metrics
适用场景 :
构建离线优先 (Local-first) 应用 需要实时数据同步到客户端 移动应用和 PWA 的数据同步 协作应用的实时更新 注意事项 :
Electric 用户需要 replication 权限 需要启用 PostgreSQL 逻辑复制 生产环境建议使用 SSL 连接(已配置 sslmode=require) 9.33 - app/maybe 使用 Pigsty 托管的 PostgreSQL 部署 Maybe 个人财务管理系统
app/maybe 配置模板提供了部署 Maybe 开源个人财务管理系统的参考配置,使用 Pigsty 托管的 PostgreSQL 作为数据库。
配置概览 配置名称: app/maybe 节点数量: 单节点 配置说明:使用 Pigsty 托管的 PostgreSQL 部署 Maybe 财务管理 适用系统:el8, el9, el10, d12, d13, u22, u24 适用架构:x86_64, aarch64 相关配置:meta 启用方式:
./configure -c app/maybe [ -i <primary_ip>]
配置内容 源文件地址:pigsty/conf/app/maybe.yml
---
#==============================================================#
# File : maybe.yml
# Desc : pigsty config for running 1-node maybe app
# Ctime : 2025-09-08
# Mtime : 2025-12-12
# Docs : https://pigsty.io/docs/app/maybe
# License : Apache-2.0 @ https://pigsty.io/docs/about/license/
# Copyright : 2018-2026 Ruohang Feng / Vonng (rh@vonng.com)
#==============================================================#
# tutorial: https://pigsty.io/docs/app/maybe
# how to use this template:
#
# curl -fsSL https://repo.pigsty.io/get | bash; cd ~/pigsty
# ./bootstrap # prepare local repo & ansible
# ./configure -c app/maybe # Use this maybe config template
# vi pigsty.yml # IMPORTANT: CHANGE CREDENTIALS!!
# ./deploy.yml # install pigsty & pgsql
# ./docker.yml # install docker & docker-compose
# ./app.yml # install maybe
all :
children :
# the maybe application (personal finance management)
maybe :
hosts : { 10.10.10.10 : {} }
vars :
app : maybe # specify app name to be installed (in the apps)
apps : # define all applications
maybe : # app name, should have corresponding ~/pigsty/app/maybe folder
file : # optional directory to be created
- { path: /data/maybe ,state: directory ,mode : 0755 }
- { path: /data/maybe/storage ,state: directory ,mode : 0755 }
conf : # override /opt/<app>/.env config file
# Core Configuration
MAYBE_VERSION : latest # Maybe image version
MAYBE_PORT : 5002 # Port to expose Maybe service
MAYBE_DATA : /data/maybe # Data directory for Maybe
APP_DOMAIN : maybe.pigsty # Domain name for Maybe
# REQUIRED: Generate with: openssl rand -hex 64
SECRET_KEY_BASE : sk-somerandomkey # Secret key for maybe
# Database Configuration
DB_HOST : 10.10.10.10 # PostgreSQL host
DB_PORT : 5432 # PostgreSQL port
DB_USERNAME : maybe # PostgreSQL username
DB_PASSWORD : MaybeFinance2025 # PostgreSQL password (CHANGE THIS!)
DB_DATABASE : maybe_production # PostgreSQL database name
# Optional: API Integration
#SYNTH_API_KEY: # Get from synthfinance.com
# the maybe database
pg-maybe :
hosts : { 10.10.10.10 : { pg_seq: 1, pg_role : primary } }
vars :
pg_cluster : pg-maybe
pg_users :
- { name: maybe ,password: MaybeFinance2025 ,pgbouncer: true ,roles: [ dbrole_admin ] ,createdb: true ,comment : admin user for maybe service }
- { name: maybe_ro ,password: MaybeFinance2025 ,pgbouncer: true ,roles: [ dbrole_readonly ] ,comment : read only user for maybe service }
- { name: maybe_rw ,password: MaybeFinance2025 ,pgbouncer: true ,roles: [ dbrole_readwrite ] ,comment : read write user for maybe service }
pg_databases :
- { name: maybe_production ,owner: maybe ,revokeconn: true ,comment : maybe main database }
pg_hba_rules :
- { user: maybe ,db: all ,addr: 172.17.0.0/16 ,auth: pwd ,title : 'allow maybe access from local docker network' }
- { user: dbuser_view , db: all ,addr: infra ,auth: pwd ,title : 'allow grafana dashboard access cmdb from infra nodes' }
pg_crontab : [ '00 01 * * * /pg/bin/pg-backup full' ] # make a full backup every 1am
infra : { hosts : { 10.10.10.10 : { infra_seq : 1 } } }
etcd : { hosts : { 10.10.10.10 : { etcd_seq: 1 } }, vars : { etcd_cluster : etcd } }
#minio: { hosts: { 10.10.10.10: { minio_seq: 1 } }, vars: { minio_cluster: minio } }
vars : # global variables
version : v4.2.2 # pigsty version string
admin_ip : 10.10.10.10 # admin node ip address
region: default # upstream mirror region : default|china|europe
node_tune: oltp # node tuning specs : oltp,olap,tiny,crit
pg_conf: oltp.yml # pgsql tuning specs : {oltp,olap,tiny,crit}.yml
docker_enabled : true # enable docker on app group
#docker_registry_mirrors: ["https://docker.1panel.live","https://docker.1ms.run","https://docker.xuanyuan.me","https://registry-1.docker.io"]
proxy_env : # global proxy env when downloading packages & pull docker images
no_proxy : "localhost,127.0.0.1,10.0.0.0/8,192.168.0.0/16,*.pigsty,*.aliyun.com,mirrors.*,*.tsinghua.edu.cn"
#http_proxy: 127.0.0.1:12345 # add your proxy env here for downloading packages or pull images
#https_proxy: 127.0.0.1:12345 # usually the proxy is format as http://user:pass@proxy.xxx.com
#all_proxy: 127.0.0.1:12345
infra_portal : # infra services exposed via portal
home : { domain : i.pigsty } # default domain name
minio : { domain: m.pigsty ,endpoint : "${admin_ip}:9001" ,scheme: https ,websocket : true }
maybe : # nginx server config for maybe
domain : maybe.pigsty # REPLACE WITH YOUR OWN DOMAIN!
endpoint : "10.10.10.10:5002" # maybe service endpoint: IP:PORT
websocket : true # add websocket support
repo_enabled : false
node_repo_modules : node,infra,pgsql
#----------------------------------------------#
# PASSWORD : https://pigsty.io/docs/setup/security/
#----------------------------------------------#
grafana_admin_password : pigsty
grafana_view_password : DBUser.Viewer
pg_admin_password : DBUser.DBA
pg_monitor_password : DBUser.Monitor
pg_replication_password : DBUser.Replicator
patroni_password : Patroni.API
haproxy_admin_password : pigsty
minio_secret_key : S3User.MinIO
etcd_root_password : Etcd.Root
... 配置解读 app/maybe 模板提供了 Maybe 开源个人财务管理系统的一键部署方案。
Maybe 是什么 :
开源的个人和家庭财务管理系统 支持多账户、多币种资产追踪 提供投资组合分析和净值计算 美观现代的 Web 界面 关键特性 :
使用 Pigsty 管理的 PostgreSQL 替代 Maybe 自带的数据库 数据持久化到独立目录 /data/maybe 支持 HTTPS 和自定义域名 提供多用户权限管理 访问方式 :
# Maybe Web 界面
http://maybe.pigsty:5002
# 或通过 Nginx 代理
https://maybe.pigsty
适用场景 :
个人或家庭财务管理 投资组合追踪和分析 多账户资产汇总 替代 Mint、YNAB 等商业服务 注意事项 :
必须修改 SECRET_KEY_BASE,使用 openssl rand -hex 64 生成 首次访问时需要注册管理员账号 可选配置 Synth API 以获取股票价格数据 9.34 - app/teable 使用 Pigsty 托管的 PostgreSQL 部署 Teable 开源 Airtable 替代品
app/teable 配置模板提供了部署 Teable 开源无代码数据库的参考配置,使用 Pigsty 托管的 PostgreSQL 作为数据库。
配置概览 配置名称: app/teable 节点数量: 单节点 配置说明:使用 Pigsty 托管的 PostgreSQL 部署 Teable 适用系统:el8, el9, el10, d12, d13, u22, u24 适用架构:x86_64, aarch64 相关配置:meta 启用方式:
./configure -c app/teable [ -i <primary_ip>]
配置内容 源文件地址:pigsty/conf/app/teable.yml
---
#==============================================================#
# File : teable.yml
# Desc : pigsty config for running 1-node teable app
# Ctime : 2025-02-24
# Mtime : 2025-12-12
# Docs : https://pigsty.io/docs/app/teable
# License : Apache-2.0 @ https://pigsty.io/docs/about/license/
# Copyright : 2018-2026 Ruohang Feng / Vonng (rh@vonng.com)
#==============================================================#
# tutorial: https://pigsty.io/docs/app/teable
# how to use this template:
#
# curl -fsSL https://repo.pigsty.io/get | bash; cd ~/pigsty
# ./bootstrap # prepare local repo & ansible
# ./configure -c app/teable # use this teable config template
# vi pigsty.yml # IMPORTANT: CHANGE CREDENTIALS!!
# ./deploy.yml # install pigsty & pgsql & minio
# ./docker.yml # install docker & docker-compose
# ./app.yml # install teable with docker-compose
#
# To replace domain name:
# sed -ie 's/teable.pigsty/teable.pigsty.cc/g' pigsty.yml
all :
children :
# the teable application
teable :
hosts : { 10.10.10.10 : {} }
vars :
app : teable # specify app name to be installed (in the apps)
apps : # define all applications
teable : # app name, ~/pigsty/app/teable folder
conf : # override /opt/teable/.env config file
# https://github.com/teableio/teable/blob/develop/dockers/examples/standalone/.env
# https://help.teable.io/en/deploy/env
POSTGRES_HOST : "10.10.10.10"
POSTGRES_PORT : "5432"
POSTGRES_DB : "teable"
POSTGRES_USER : "dbuser_teable"
POSTGRES_PASSWORD : "DBUser.Teable"
PRISMA_DATABASE_URL : "postgresql://dbuser_teable:DBUser.Teable@10.10.10.10:5432/teable"
PUBLIC_ORIGIN : "http://tea.pigsty"
PUBLIC_DATABASE_PROXY : "10.10.10.10:5432"
TIMEZONE : "UTC"
# Need to support sending emails to enable the following configurations
#BACKEND_MAIL_HOST: smtp.teable.io
#BACKEND_MAIL_PORT: 465
#BACKEND_MAIL_SECURE: true
#BACKEND_MAIL_SENDER: noreply.teable.io
#BACKEND_MAIL_SENDER_NAME: Teable
#BACKEND_MAIL_AUTH_USER: username
#BACKEND_MAIL_AUTH_PASS: password
pg-meta :
hosts : { 10.10.10.10 : { pg_seq: 1, pg_role : primary } }
vars :
pg_cluster : pg-meta
pg_users :
- { name: dbuser_teable ,password: DBUser.Teable ,pgbouncer: true ,roles: [ dbrole_admin ] ,superuser: true ,comment : teable superuser }
pg_databases :
- { name: teable ,owner: dbuser_teable ,comment : teable database }
pg_hba_rules :
- { user: teable ,db: all ,addr: 172.17.0.0/16 ,auth: pwd ,title : 'allow teable access from local docker network' }
pg_crontab : [ '00 01 * * * /pg/bin/pg-backup full' ] # make a full backup every 1am
infra : { hosts : { 10.10.10.10 : { infra_seq : 1 } } }
etcd : { hosts : { 10.10.10.10 : { etcd_seq: 1 } }, vars : { etcd_cluster : etcd } }
minio : { hosts : { 10.10.10.10 : { minio_seq: 1 } }, vars : { minio_cluster : minio } }
vars : # global variables
version : v4.2.2 # pigsty version string
admin_ip : 10.10.10.10 # admin node ip address
region: default # upstream mirror region : default|china|europe
node_tune: oltp # node tuning specs : oltp,olap,tiny,crit
pg_conf: oltp.yml # pgsql tuning specs : {oltp,olap,tiny,crit}.yml
docker_enabled : true # enable docker on app group
#docker_registry_mirrors: ["https://docker.1panel.live","https://docker.1ms.run","https://docker.xuanyuan.me","https://registry-1.docker.io"]
proxy_env : # global proxy env when downloading packages & pull docker images
no_proxy : "localhost,127.0.0.1,10.0.0.0/8,192.168.0.0/16,*.pigsty,*.aliyun.com,mirrors.*,*.tsinghua.edu.cn"
#http_proxy: 127.0.0.1:12345 # add your proxy env here for downloading packages or pull images
#https_proxy: 127.0.0.1:12345 # usually the proxy is format as http://user:pass@proxy.xxx.com
#all_proxy: 127.0.0.1:12345
infra_portal : # domain names and upstream servers
home : { domain : i.pigsty }
#minio : { domain: m.pigsty ,endpoint: "${admin_ip}:9001" ,scheme: https ,websocket: true }
teable : # nginx server config for teable
domain : tea.pigsty # REPLACE IT WITH YOUR OWN DOMAIN!
endpoint : "10.10.10.10:8890" # teable service endpoint: IP:PORT
websocket : true # add websocket support
certbot : tea.pigsty # certbot cert name, apply with `make cert`
repo_enabled : false
node_repo_modules : node,infra,pgsql
node_etc_hosts : [ '${admin_ip} i.pigsty sss.pigsty' ]
pg_version : 18
#----------------------------------------------#
# PASSWORD : https://pigsty.io/docs/setup/security/
#----------------------------------------------#
grafana_admin_password : pigsty
grafana_view_password : DBUser.Viewer
pg_admin_password : DBUser.DBA
pg_monitor_password : DBUser.Monitor
pg_replication_password : DBUser.Replicator
patroni_password : Patroni.API
haproxy_admin_password : pigsty
minio_secret_key : S3User.MinIO
etcd_root_password : Etcd.Root
...
配置解读 app/teable 模板提供了 Teable 开源无代码数据库的一键部署方案。
Teable 是什么 :
开源的 Airtable 替代品 基于 PostgreSQL 的无代码数据库 支持表格、看板、日历、表单等多种视图 提供 API 和自动化工作流 关键特性 :
使用 Pigsty 管理的 PostgreSQL 作为底层存储 数据实际存储在真实的 PostgreSQL 表中 支持 SQL 直接查询数据 可与其他 PostgreSQL 工具和扩展集成 访问方式 :
# Teable Web 界面
http://tea.pigsty:8890
# 或通过 Nginx 代理
https://tea.pigsty
# 同时可以直接 SQL 访问底层数据
psql postgresql://dbuser_teable:DBUser.Teable@10.10.10.10:5432/teable
适用场景 :
需要 Airtable 类似功能但希望自建 团队协作数据管理 需要同时支持 API 和 SQL 访问 希望数据存储在真实 PostgreSQL 中 注意事项 :
Teable 用户需要 superuser 权限 需要正确配置 PUBLIC_ORIGIN 为外部访问地址 支持邮件通知(可选配置 SMTP) 9.35 - app/mattermost Mattermost 应用模板,使用 Pigsty 托管 PostgreSQL + Docker 一键部署团队协作系统。
app/mattermost 配置模板用于部署 Mattermost,默认将应用与数据库放在同一节点,使用 Pigsty 提供 PostgreSQL、Nginx 与监控能力。
配置概览 配置名称: app/mattermost 节点数量: 单节点(默认) 配置说明:Mattermost + PostgreSQL + Docker 的开箱即用模板。 适用系统:el8, el9, el10, d12, d13, u22, u24 适用架构:x86_64, aarch64 相关配置:app/odooapp/registrysupabase 启用方式:
./configure -c app/mattermost
./deploy.yml
./docker.yml
./app.yml
配置内容 源文件地址:pigsty/conf/app/mattermost.yml
---
#==============================================================#
# File : mattermost.yml
# Desc : pigsty config for running 1-node mattermost app
# Ctime : 2026-02-04
# Mtime : 2026-02-04
# Docs : https://pigsty.io/docs/app/mattermost
# License : Apache-2.0 @ https://pigsty.io/docs/about/license/
# Copyright : 2018-2026 Ruohang Feng / Vonng (rh@vonng.com)
#==============================================================#
# tutorial: https://pigsty.io/docs/app/mattermost
# how to use this template:
#
# curl -fsSL https://repo.pigsty.io/get | bash; cd ~/pigsty
# ./bootstrap # prepare local repo & ansible
# ./configure -c app/mattermost # use this mattermost config template
# vi pigsty.yml # IMPORTANT: CHANGE CREDENTIALS!!
# ./deploy.yml # install pigsty & pgsql
# ./docker.yml # install docker & docker-compose
# ./app.yml # install mattermost
#
# Design Notes:
# - Mattermost data/config/logs/plugins/bleve-indexes are persisted under /data/mattermost (host paths).
# - If you enable JuiceFS (PGFS), /data/mattermost becomes a mountpoint backed by PostgreSQL.
# This is optional and must be prepared with ./juice.yml before ./app.yml.
# - Storing file data in PostgreSQL increases DB size, WAL, and IO load; monitor bloat and backup cost.
all :
children :
# the mattermost application
mattermost :
hosts : { 10.10.10.10 : {} }
vars :
app : mattermost # specify app name to be installed (in the apps)
apps : # define all applications
mattermost : # app name, should have corresponding ~/pigsty/app/mattermost folder
file : # data directory to be created
- { path: /data/mattermost ,state: directory ,owner: 2000 ,group: 2000 ,mode : 0755 }
- { path: /data/mattermost/config ,state: directory ,owner: 2000 ,group: 2000 ,mode : 0755 }
- { path: /data/mattermost/data ,state: directory ,owner: 2000 ,group: 2000 ,mode : 0755 }
- { path: /data/mattermost/logs ,state: directory ,owner: 2000 ,group: 2000 ,mode : 0755 }
- { path: /data/mattermost/plugins ,state: directory ,owner: 2000 ,group: 2000 ,mode : 0755 }
- { path: /data/mattermost/client/plugins ,state: directory ,owner: 2000 ,group: 2000 ,mode : 0755 }
- { path: /data/mattermost/bleve-indexes ,state: directory ,owner: 2000 ,group: 2000 ,mode : 0755 }
conf : # override /opt/mattermost/.env config file
DOMAIN : mm.pigsty
APP_PORT : 8065
TZ : UTC
# postgres connection string
POSTGRES_URL : 'postgres://dbuser_mattermost:DBUser.Mattermost@10.10.10.10:5432/mattermost?sslmode=disable&connect_timeout=10'
# image version
MATTERMOST_IMAGE : mattermost-team-edition
MATTERMOST_IMAGE_TAG : latest
# data directories
MATTERMOST_CONFIG_PATH : /data/mattermost/config
MATTERMOST_DATA_PATH : /data/mattermost/data
MATTERMOST_LOGS_PATH : /data/mattermost/logs
MATTERMOST_PLUGINS_PATH : /data/mattermost/plugins
MATTERMOST_CLIENT_PLUGINS_PATH : /data/mattermost/client/plugins
MATTERMOST_BLEVE_INDEXES_PATH : /data/mattermost/bleve-indexes
MM_BLEVESETTINGS_INDEXDIR : /data/mattermost/bleve-indexes
# the mattermost database
pg-mattermost :
hosts : { 10.10.10.10 : { pg_seq: 1, pg_role : primary } }
vars :
pg_cluster : pg-mattermost
pg_users :
- { name: dbuser_mattermost ,password: DBUser.Mattermost ,pgbouncer: true ,roles: [ dbrole_admin ] ,createdb: true ,comment : admin user for mattermost }
pg_databases :
- { name: mattermost ,owner: dbuser_mattermost ,revokeconn: true ,comment : mattermost main database }
pg_hba_rules :
- { user: dbuser_mattermost ,db: all ,addr: 172.17.0.0/16 ,auth: pwd ,title : 'allow mattermost access from local docker network' }
- { user: dbuser_view , db: all ,addr: infra ,auth: pwd ,title : 'allow grafana dashboard access cmdb from infra nodes' }
pg_crontab : [ '00 01 * * * /pg/bin/pg-backup full' ] # make a full backup every 1am
infra : { hosts : { 10.10.10.10 : { infra_seq : 1 } } }
etcd : { hosts : { 10.10.10.10 : { etcd_seq: 1 } }, vars : { etcd_cluster : etcd } }
#minio: { hosts: { 10.10.10.10: { minio_seq: 1 } }, vars: { minio_cluster: minio } }
vars : # global variables
version : v4.2.2 # pigsty version string
admin_ip : 10.10.10.10 # admin node ip address
region: default # upstream mirror region : default|china|europe
node_tune: oltp # node tuning specs : oltp,olap,tiny,crit
pg_conf: oltp.yml # pgsql tuning specs : {oltp,olap,tiny,crit}.yml
docker_enabled : true # enable docker on app group
#docker_registry_mirrors: ["https://docker.1panel.live","https://docker.1ms.run","https://docker.xuanyuan.me","https://registry-1.docker.io"]
proxy_env : # global proxy env when downloading packages & pull docker images
no_proxy : "localhost,127.0.0.1,10.0.0.0/8,192.168.0.0/16,*.pigsty,*.aliyun.com,mirrors.*,*.tsinghua.edu.cn"
#http_proxy: 127.0.0.1:12345 # add your proxy env here for downloading packages or pull images
#https_proxy: 127.0.0.1:12345 # usually the proxy is format as http://user:pass@proxy.xxx.com
#all_proxy: 127.0.0.1:12345
# Optional: PGFS with JuiceFS (store Mattermost file data in PostgreSQL)
# 1) Uncomment and adjust the block below
# 2) Run: ./juice.yml -l <host>
# 3) Ensure /data/mattermost is mounted before ./app.yml
#
#juice_cache: /data/juice
#juice_instances:
# pgfs:
# path : /data/mattermost
# meta : postgres://dbuser_mattermost:DBUser.Mattermost@10.10.10.10:5432/mattermost
# data : --storage postgres --bucket 10.10.10.10:5432/mattermost --access-key dbuser_mattermost --secret-key DBUser.Mattermost
# port : 9567
# owner : 2000
# group : 2000
# mode : '0755'
infra_portal : # infra services exposed via portal
home : { domain : i.pigsty }
mattermost : # nginx server config for mattermost
domain : mm.pigsty # REPLACE WITH YOUR OWN DOMAIN!
endpoint : "${admin_ip}:8065" # mattermost service endpoint: IP:PORT
websocket : true # add websocket support
certbot : mm.pigsty # certbot cert name, apply with `make cert`
repo_enabled : false
node_repo_modules : node,infra,pgsql
pg_version : 18
#----------------------------------------------#
# PASSWORD : https://pigsty.io/docs/setup/security/
#----------------------------------------------#
grafana_admin_password : pigsty
grafana_view_password : DBUser.Viewer
pg_admin_password : DBUser.DBA
pg_monitor_password : DBUser.Monitor
pg_replication_password : DBUser.Replicator
patroni_password : Patroni.API
haproxy_admin_password : pigsty
minio_secret_key : S3User.MinIO
etcd_root_password : Etcd.Root
...
配置解读 app/mattermost 模板定义了三个关键部分:
mattermost 组:应用主机与 apps.mattermost 参数,包含 .env 覆写与数据目录声明。pg-mattermost 组:独立 PostgreSQL 集群、数据库与应用账号。infra/etcd 组:Pigsty 基础设施依赖。关键特征:
默认开启 docker_enabled: true,并通过 ./docker.yml 完成容器运行时准备。 Nginx 门户默认暴露 mm.pigsty(infra_portal.mattermost),支持 WebSocket。 预置本地 Docker 网段 HBA 规则(172.17.0.0/16)供应用访问数据库。 可选启用 JuiceFS(注释块)将 /data/mattermost 挂载到 PostgreSQL 后端存储。 注意事项:
请在部署前修改数据库口令、域名与应用密码等敏感信息。 若开放公网访问,建议配合 HTTPS、ACL 与防火墙规则。 9.36 - app/registry 使用 Pigsty 部署 Docker Registry 镜像代理和私有仓库
app/registry 配置模板提供了部署 Docker Registry 镜像代理的参考配置,可用作 Docker Hub 镜像加速或私有镜像仓库。
配置概览 配置名称: app/registry 节点数量: 单节点 配置说明:部署 Docker Registry 镜像代理和私有仓库 适用系统:el8, el9, el10, d12, d13, u22, u24 适用架构:x86_64, aarch64 相关配置:meta 启用方式:
./configure -c app/registry [ -i <primary_ip>]
配置内容 源文件地址:pigsty/conf/app/registry.yml
---
#==============================================================#
# File : registry.yml
# Desc : pigsty config for running Docker Registry Mirror
# Ctime : 2025-07-01
# Mtime : 2025-12-12
# Docs : https://pigsty.io/docs/app/registry
# License : Apache-2.0 @ https://pigsty.io/docs/about/license/
# Copyright : 2018-2026 Ruohang Feng / Vonng (rh@vonng.com)
#==============================================================#
# tutorial: https://pigsty.io/docs/app/registry
# how to use this template:
#
# curl -fsSL https://repo.pigsty.io/get | bash; cd ~/pigsty
# ./configure -c app/registry # use this registry config template
# vi pigsty.yml # IMPORTANT: CHANGE DOMAIN & CREDENTIALS!
# ./deploy.yml # install pigsty
# ./docker.yml # install docker & docker-compose
# ./app.yml # install registry with docker-compose
#
# To replace domain name:
# sed -ie 's/registry.pigsty/registry.your-domain.com/g' pigsty.yml
#==============================================================#
# Usage Instructions:
#==============================================================#
#
# 1. Deploy the registry:
# ./configure -c app/registry && ./deploy.yml && ./docker.yml && ./app.yml
#
# 2. Configure Docker clients to use the mirror:
# Edit /etc/docker/daemon.json:
# {
# "registry-mirrors": ["https://registry.your-domain.com"],
# "insecure-registries": ["registry.your-domain.com"]
# }
#
# 3. Restart Docker daemon:
# sudo systemctl restart docker
#
# 4. Test the registry:
# docker pull nginx:latest # This will now use your mirror
#
# 5. Access the web UI (optional):
# https://registry-ui.your-domain.com
#
# 6. Monitor the registry:
# curl https://registry.your-domain.com/v2/_catalog
# curl https://registry.your-domain.com/v2/nginx/tags/list
#
#==============================================================#
all :
children :
# the docker registry mirror application
registry :
hosts : { 10.10.10.10 : {} }
vars :
app : registry # specify app name to be installed
apps : # define all applications
registry :
file : # create data directory for registry
- { path: /data/registry ,state: directory ,mode : 0755 }
conf : # environment variables for registry
REGISTRY_DATA : /data/registry
REGISTRY_PORT : 5000
REGISTRY_UI_PORT : 5080
REGISTRY_STORAGE_DELETE_ENABLED : true
REGISTRY_LOG_LEVEL : info
REGISTRY_PROXY_REMOTEURL : https://registry-1.docker.io
REGISTRY_PROXY_TTL : 168h
# basic infrastructure
infra : { hosts : { 10.10.10.10 : { infra_seq : 1 } } }
etcd : { hosts : { 10.10.10.10 : { etcd_seq: 1 } }, vars : { etcd_cluster : etcd } }
vars :
#----------------------------------------------#
# INFRA : https://pigsty.io/docs/infra/param
#----------------------------------------------#
version : v4.2.2 # pigsty version string
admin_ip : 10.10.10.10 # admin node ip address
region: default # upstream mirror region : default,china,europe
infra_portal : # infra services exposed via portal
home : { domain : i.pigsty } # default domain name
# Docker Registry Mirror service configuration
registry : # nginx server config for registry
domain : d.pigsty # REPLACE IT WITH YOUR OWN DOMAIN!
endpoint : "10.10.10.10:5000" # registry service endpoint: IP:PORT
websocket : false # registry doesn't need websocket
certbot : d.pigsty # certbot cert name, apply with `make cert`
# Optional: Registry Web UI
registry-ui : # nginx server config for registry UI
domain : dui.pigsty # REPLACE IT WITH YOUR OWN DOMAIN!
endpoint : "10.10.10.10:5080" # registry UI endpoint: IP:PORT
websocket : false # UI doesn't need websocket
certbot : d.pigsty # certbot cert name for UI
#----------------------------------------------#
# NODE : https://pigsty.io/docs/node/param
#----------------------------------------------#
repo_enabled : false
node_repo_modules : node,infra,pgsql
node_tune: oltp # node tuning specs : oltp,olap,tiny,crit
#----------------------------------------------#
# PGSQL : https://pigsty.io/docs/pgsql/param
#----------------------------------------------#
pg_version : 18 # Default PostgreSQL Major Version is 18
pg_conf: oltp.yml # pgsql tuning specs : {oltp,olap,tiny,crit}.yml
pg_packages : [ pgsql-main, pgsql-common ] # pg kernel and common utils
#pg_extensions: [ pg18-time ,pg18-gis ,pg18-rag ,pg18-fts ,pg18-olap ,pg18-feat ,pg18-lang ,pg18-type ,pg18-util ,pg18-func ,pg18-admin ,pg18-stat ,pg18-sec ,pg18-fdw ,pg18-sim ,pg18-etl]
#----------------------------------------------#
# PASSWORD : https://pigsty.io/docs/setup/security/
#----------------------------------------------#
grafana_admin_password : pigsty
grafana_view_password : DBUser.Viewer
pg_admin_password : DBUser.DBA
pg_monitor_password : DBUser.Monitor
pg_replication_password : DBUser.Replicator
patroni_password : Patroni.API
haproxy_admin_password : pigsty
minio_secret_key : S3User.MinIO
etcd_root_password : Etcd.Root
...
配置解读 app/registry 模板提供了 Docker Registry 镜像代理的一键部署方案。
Registry 是什么 :
Docker 官方的镜像仓库实现 可作为 Docker Hub 的拉取代理(Pull-through Cache) 也可作为私有镜像仓库使用 支持镜像缓存和本地存储 关键特性 :
作为 Docker Hub 的代理缓存,加速镜像拉取 缓存镜像到本地存储 /data/registry 提供 Web UI 界面查看缓存的镜像 支持自定义缓存过期时间 配置 Docker 客户端 :
# 编辑 /etc/docker/daemon.json
{
"registry-mirrors" : [ "https://d.pigsty" ] ,
"insecure-registries" : [ "d.pigsty" ]
}
# 重启 Docker
sudo systemctl restart docker
访问方式 :
# Registry API
https://d.pigsty/v2/_catalog
# Web UI
http://dui.pigsty:5080
# 拉取镜像(自动使用代理)
docker pull nginx:latest
适用场景 :
加速 Docker 镜像拉取(尤其在中国大陆) 减少对外网络依赖 企业内部私有镜像仓库 离线环境镜像分发 注意事项 :
需要足够的磁盘空间存储缓存镜像 默认缓存 7 天(REGISTRY_PROXY_TTL: 168h) 可配置 HTTPS 证书(通过 certbot)
9.37 - 其他模版 9.38 - demo/el Enterprise Linux (RHEL/Rocky/Alma) 专用配置模板
demo/el 配置模板是针对 Enterprise Linux 系列发行版(RHEL、Rocky Linux、Alma Linux、Oracle Linux)优化的配置模板。
配置概览 配置名称: demo/el 节点数量: 单节点 配置说明:Enterprise Linux 专用配置模板 适用系统:el8, el9, el10 适用架构:x86_64, aarch64 相关配置:metademo/debian 启用方式:
./configure -c demo/el [ -i <primary_ip>]
配置内容 源文件地址:pigsty/conf/demo/el.yml
---
#==============================================================#
# File : el.yml
# Desc : Default parameters for EL System in Pigsty
# Ctime : 2020-05-22
# Mtime : 2026-03-04
# Docs : https://pigsty.io/docs/conf/el
# License : Apache-2.0 @ https://pigsty.io/docs/about/license/
# Copyright : 2018-2026 Ruohang Feng / Vonng (rh@vonng.com)
#==============================================================#
#==============================================================#
# Sandbox (4-node) #
#==============================================================#
# admin user : vagrant (nopass ssh & sudo already set) #
# 1. meta : 10.10.10.10 (2 Core | 4GB) pg-meta #
# 2. node-1 : 10.10.10.11 (1 Core | 1GB) pg-test-1 #
# 3. node-2 : 10.10.10.12 (1 Core | 1GB) pg-test-2 #
# 4. node-3 : 10.10.10.13 (1 Core | 1GB) pg-test-3 #
# (replace these ip if your 4-node env have different ip addr) #
# VIP 2: (l2 vip is available inside same LAN ) #
# pg-meta ---> 10.10.10.2 ---> 10.10.10.10 #
# pg-test ---> 10.10.10.3 ---> 10.10.10.1{1,2,3} #
#==============================================================#
all :
##################################################################
# CLUSTERS #
##################################################################
# meta nodes, nodes, pgsql, redis, pgsql clusters are defined as
# k:v pair inside `all.children`. Where the key is cluster name
# and value is cluster definition consist of two parts:
# `hosts`: cluster members ip and instance level variables
# `vars` : cluster level variables
##################################################################
children : # groups definition
# infra cluster for proxy, monitor, alert, etc..
infra : { hosts : { 10.10.10.10 : { infra_seq : 1 } } }
# etcd cluster for ha postgres
etcd : { hosts : { 10.10.10.10 : { etcd_seq: 1 } }, vars : { etcd_cluster : etcd } }
# minio cluster, s3 compatible object storage
minio : { hosts : { 10.10.10.10 : { minio_seq: 1 } }, vars : { minio_cluster : minio } }
#----------------------------------#
# pgsql cluster: pg-meta (CMDB) #
#----------------------------------#
pg-meta :
hosts : { 10.10.10.10 : { pg_seq: 1, pg_role: primary , pg_offline_query : true } }
vars :
pg_cluster : pg-meta
# define business databases here: https://pigsty.io/docs/pgsql/config/db
pg_databases : # define business databases on this cluster, array of database definition
- name : meta # REQUIRED, `name` is the only mandatory field of a database definition
#state: create # optional, create|absent|recreate, create by default
baseline: cmdb.sql # optional, database sql baseline path, (relative path among ansible search path, e.g : files/)
schemas : [ pigsty] # optional, additional schemas to be created, array of schema names
extensions: # optional, additional extensions to be installed : array of `{name[,schema]}`
- { name : vector } # install pgvector extension on this database by default
comment : pigsty meta database # optional, comment string for this database
#pgbouncer: true # optional, add this database to pgbouncer database list? true by default
#owner: postgres # optional, database owner, current user if not specified
#template: template1 # optional, which template to use, template1 by default
#strategy: FILE_COPY # optional, clone strategy: FILE_COPY or WAL_LOG (PG15+), default to PG's default
#encoding: UTF8 # optional, inherited from template / cluster if not defined (UTF8)
#locale: C # optional, inherited from template / cluster if not defined (C)
#lc_collate: C # optional, inherited from template / cluster if not defined (C)
#lc_ctype: C # optional, inherited from template / cluster if not defined (C)
#locale_provider: libc # optional, locale provider: libc, icu, builtin (PG15+)
#icu_locale: en-US # optional, icu locale for icu locale provider (PG15+)
#icu_rules: '' # optional, icu rules for icu locale provider (PG16+)
#builtin_locale: C.UTF-8 # optional, builtin locale for builtin locale provider (PG17+)
#tablespace: pg_default # optional, default tablespace, pg_default by default
#is_template: false # optional, mark database as template, allowing clone by any user with CREATEDB privilege
#allowconn: true # optional, allow connection, true by default. false will disable connect at all
#revokeconn: false # optional, revoke public connection privilege. false by default. (leave connect with grant option to owner)
#register_datasource: true # optional, register this database to grafana datasources? true by default
#connlimit: -1 # optional, database connection limit, default -1 disable limit
#pool_auth_user: dbuser_meta # optional, all connection to this pgbouncer database will be authenticated by this user
#pool_mode: transaction # optional, pgbouncer pool mode at database level, default transaction
#pool_size: 64 # optional, pgbouncer pool size at database level, default 64
#pool_reserve: 32 # optional, pgbouncer pool size reserve at database level, default 32
#pool_size_min: 0 # optional, pgbouncer pool size min at database level, default 0
#pool_connlimit: 100 # optional, max database connections at database level, default 100
#- { name: grafana ,owner: dbuser_grafana ,revokeconn: true ,comment: grafana primary database }
#- { name: bytebase ,owner: dbuser_bytebase ,revokeconn: true ,comment: bytebase primary database }
#- { name: kong ,owner: dbuser_kong ,revokeconn: true ,comment: kong the api gateway database }
#- { name: gitea ,owner: dbuser_gitea ,revokeconn: true ,comment: gitea meta database }
#- { name: wiki ,owner: dbuser_wiki ,revokeconn: true ,comment: wiki meta database }
# define business users here: https://pigsty.io/docs/pgsql/config/user
pg_users : # define business users/roles on this cluster, array of user definition
- name : dbuser_meta # REQUIRED, `name` is the only mandatory field of a user definition
password : DBUser.Meta # optional, password, can be a scram-sha-256 hash string or plain text
pgbouncer : true # optional, add this user to pgbouncer user-list? false by default (production user should be true explicitly)
comment : pigsty admin user # optional, comment string for this user/role
roles: [ dbrole_admin ] # optional, belonged roles. default roles are : dbrole_{admin,readonly,readwrite,offline}
#login: true # optional, can log in, true by default (new biz ROLE should be false)
#superuser: false # optional, is superuser? false by default
#createdb: false # optional, can create database? false by default
#createrole: false # optional, can create role? false by default
#inherit: true # optional, can this role use inherited privileges? true by default
#replication: false # optional, can this role do replication? false by default
#bypassrls: false # optional, can this role bypass row level security? false by default
#connlimit: -1 # optional, user connection limit, default -1 disable limit
#expire_in: 3650 # optional, now + n days when this role is expired (OVERWRITE expire_at)
#expire_at: '2030-12-31' # optional, YYYY-MM-DD 'timestamp' when this role is expired (OVERWRITTEN by expire_in)
#parameters: {} # optional, role level parameters with `ALTER ROLE SET`
#pool_mode: transaction # optional, pgbouncer pool mode at user level, transaction by default
#pool_connlimit: -1 # optional, max database connections at user level, default -1 disable limit
- {name: dbuser_view ,password: DBUser.Viewer ,pgbouncer: true ,roles: [dbrole_readonly], comment : read-only viewer for meta database}
#- {name: dbuser_grafana ,password: DBUser.Grafana ,pgbouncer: true ,roles: [dbrole_admin] ,comment: admin user for grafana database }
#- {name: dbuser_bytebase ,password: DBUser.Bytebase ,pgbouncer: true ,roles: [dbrole_admin] ,comment: admin user for bytebase database }
#- {name: dbuser_gitea ,password: DBUser.Gitea ,pgbouncer: true ,roles: [dbrole_admin] ,comment: admin user for gitea service }
#- {name: dbuser_wiki ,password: DBUser.Wiki ,pgbouncer: true ,roles: [dbrole_admin] ,comment: admin user for wiki.js service }
# define business service here: https://pigsty.io/docs/pgsql/service
pg_services : # extra services in addition to pg_default_services, array of service definition
# standby service will route {ip|name}:5435 to sync replica's pgbouncer (5435->6432 standby)
- name: standby # required, service name, the actual svc name will be prefixed with `pg_cluster`, e.g : pg-meta-standby
port : 5435 # required, service exposed port (work as kubernetes service node port mode)
ip : "*" # optional, service bind ip address, `*` for all ip by default
selector : "[]" # required, service member selector, use JMESPath to filter inventory
dest : default # optional, destination port, default|postgres|pgbouncer|<port_number>, 'default' by default
check : /sync # optional, health check url path, / by default
backup : "[? pg_role == `primary`]" # backup server selector
maxconn : 3000 # optional, max allowed front-end connection
balance: roundrobin # optional, haproxy load balance algorithm (roundrobin by default, other : leastconn)
#options: 'inter 3s fastinter 1s downinter 5s rise 3 fall 3 on-marked-down shutdown-sessions slowstart 30s maxconn 3000 maxqueue 128 weight 100'
# define pg extensions: https://pigsty.io/docs/pgsql/ext/
pg_libs : 'pg_stat_statements, auto_explain' # add timescaledb to shared_preload_libraries
#pg_extensions: [] # extensions to be installed on this cluster
# define HBA rules here: https://pigsty.io/docs/pgsql/config/hba
pg_hba_rules :
- {user: dbuser_view , db: all ,addr: infra ,auth: pwd ,title : 'allow grafana dashboard access cmdb from infra nodes' }
pg_vip_enabled : true
pg_vip_address : 10.10.10.2 /24
pg_vip_interface : eth1
pg_crontab : # make a full backup 1 am everyday
- '00 01 * * * /pg/bin/pg-backup full'
#----------------------------------#
# pgsql cluster: pg-test (3 nodes) #
#----------------------------------#
# pg-test ---> 10.10.10.3 ---> 10.10.10.1{1,2,3}
pg-test : # define the new 3-node cluster pg-test
hosts :
10.10.10.11 : { pg_seq: 1, pg_role : primary } # primary instance, leader of cluster
10.10.10.12 : { pg_seq: 2, pg_role : replica } # replica instance, follower of leader
10.10.10.13 : { pg_seq: 3, pg_role: replica, pg_offline_query : true } # replica with offline access
vars :
pg_cluster : pg-test # define pgsql cluster name
pg_users : [ { name: test , password: test , pgbouncer: true , roles : [ dbrole_admin ] }]
pg_databases : [ { name : test }] # create a database and user named 'test'
node_tune : tiny
pg_conf : tiny.yml
pg_vip_enabled : true
pg_vip_address : 10.10.10.3 /24
pg_vip_interface : eth1
pg_crontab : # make a full backup on monday 1am, and an incremental backup during weekdays
- '00 01 * * 1 /pg/bin/pg-backup full'
- '00 01 * * 2,3,4,5,6,7 /pg/bin/pg-backup'
#----------------------------------#
# redis ms, sentinel, native cluster
#----------------------------------#
redis-ms : # redis classic primary & replica
hosts : { 10.10.10.10 : { redis_node: 1 , redis_instances : { 6379 : { }, 6380 : { replica_of : '10.10.10.10 6379' } } } }
vars : { redis_cluster: redis-ms ,redis_password: 'redis.ms' ,redis_max_memory : 64MB }
redis-meta : # redis sentinel x 3
hosts : { 10.10.10.11 : { redis_node: 1 , redis_instances : { 26379 : { } ,26380 : { } ,26381 : { } } } }
vars :
redis_cluster : redis-meta
redis_password : 'redis.meta'
redis_mode : sentinel
redis_max_memory : 16MB
redis_sentinel_monitor : # primary list for redis sentinel, use cls as name, primary ip:port
- { name: redis-ms, host: 10.10.10.10, port: 6379 ,password: redis.ms, quorum : 2 }
redis-test: # redis native cluster : 3m x 3s
hosts :
10.10.10.12 : { redis_node: 1 ,redis_instances : { 6379 : { } ,6380 : { } ,6381 : { } } }
10.10.10.13 : { redis_node: 2 ,redis_instances : { 6379 : { } ,6380 : { } ,6381 : { } } }
vars : { redis_cluster: redis-test ,redis_password: 'redis.test' ,redis_mode: cluster, redis_max_memory : 32MB }
####################################################################
# VARS #
####################################################################
vars : # global variables
#================================================================#
# VARS: INFRA #
#================================================================#
#-----------------------------------------------------------------
# META
#-----------------------------------------------------------------
version : v4.2.2 # pigsty version string
admin_ip : 10.10.10.10 # admin node ip address
region: default # upstream mirror region : default,china,europe
language: en # default language : en, zh
proxy_env : # global proxy env when downloading packages
no_proxy : "localhost,127.0.0.1,10.0.0.0/8,192.168.0.0/16,*.pigsty,*.aliyun.com,mirrors.*,*.myqcloud.com,*.tsinghua.edu.cn"
# http_proxy: # set your proxy here: e.g http://user:pass@proxy.xxx.com
# https_proxy: # set your proxy here: e.g http://user:pass@proxy.xxx.com
# all_proxy: # set your proxy here: e.g http://user:pass@proxy.xxx.com
#-----------------------------------------------------------------
# CA
#-----------------------------------------------------------------
ca_create : true # create ca if not exists? or just abort
ca_cn : pigsty-ca # ca common name, fixed as pigsty-ca
cert_validity : 7300d # cert validity, 20 years by default
#-----------------------------------------------------------------
# INFRA_IDENTITY
#-----------------------------------------------------------------
#infra_seq: 1 # infra node identity, explicitly required
infra_portal : # infra services exposed via portal
home : { domain : i.pigsty } # default domain name
infra_data : /data/infra # default data path for infrastructure data
#-----------------------------------------------------------------
# REPO
#-----------------------------------------------------------------
repo_enabled : true # create a yum repo on this infra node?
repo_home : /www # repo home dir, `/www` by default
repo_name : pigsty # repo name, pigsty by default
repo_endpoint : http://${admin_ip}:80 # access point to this repo by domain or ip:port
repo_remove : true # remove existing upstream repo
repo_modules : infra,node,pgsql # which repo modules are installed in repo_upstream
repo_upstream : # where to download
- { name: pigsty-local ,description: 'Pigsty Local' ,module: local ,releases: [8,9,10] ,arch: [x86_64, aarch64] ,baseurl : { default : 'http://${admin_ip}/pigsty' }} # used by intranet nodes
- { name: pigsty-infra ,description: 'Pigsty INFRA' ,module: infra ,releases: [8,9,10] ,arch: [x86_64, aarch64] ,baseurl : { default: 'https://repo.pigsty.io/yum/infra/$basearch' ,china : 'https://repo.pigsty.cc/yum/infra/$basearch' }}
- { name: pigsty-pgsql ,description: 'Pigsty PGSQL' ,module: pgsql ,releases: [8,9,10] ,arch: [x86_64, aarch64] ,baseurl : { default: 'https://repo.pigsty.io/yum/pgsql/el$releasever.$basearch' ,china : 'https://repo.pigsty.cc/yum/pgsql/el$releasever.$basearch' }}
- { name: nginx ,description: 'Nginx Repo' ,module: infra ,releases: [8,9,10] ,arch: [x86_64, aarch64] ,baseurl : { default : 'https://nginx.org/packages/rhel/$releasever/$basearch/' }}
- { name: docker-ce ,description: 'Docker CE' ,module: infra ,releases: [8,9,10] ,arch: [x86_64, aarch64] ,baseurl : { default: 'https://download.docker.com/linux/centos/$releasever/$basearch/stable' ,china: 'https://mirrors.aliyun.com/docker-ce/linux/centos/$releasever/$basearch/stable' ,europe : 'https://mirrors.xtom.de/docker-ce/linux/centos/$releasever/$basearch/stable' }}
- { name: baseos ,description: 'EL 8+ BaseOS' ,module: node ,releases: [8,9,10] ,arch: [x86_64, aarch64] ,baseurl : { default: 'https://dl.rockylinux.org/pub/rocky/$releasever/BaseOS/$basearch/os/' ,china: 'https://mirrors.aliyun.com/rockylinux/$releasever/BaseOS/$basearch/os/' ,europe : 'https://mirrors.xtom.de/rocky/$releasever/BaseOS/$basearch/os/' }}
- { name: appstream ,description: 'EL 8+ AppStream' ,module: node ,releases: [8,9,10] ,arch: [x86_64, aarch64] ,baseurl : { default: 'https://dl.rockylinux.org/pub/rocky/$releasever/AppStream/$basearch/os/' ,china: 'https://mirrors.aliyun.com/rockylinux/$releasever/AppStream/$basearch/os/' ,europe : 'https://mirrors.xtom.de/rocky/$releasever/AppStream/$basearch/os/' }}
- { name: extras ,description: 'EL 8+ Extras' ,module: node ,releases: [8,9,10] ,arch: [x86_64, aarch64] ,baseurl : { default: 'https://dl.rockylinux.org/pub/rocky/$releasever/extras/$basearch/os/' ,china: 'https://mirrors.aliyun.com/rockylinux/$releasever/extras/$basearch/os/' ,europe : 'https://mirrors.xtom.de/rocky/$releasever/extras/$basearch/os/' }}
- { name: powertools ,description: 'EL 8 PowerTools' ,module: node ,releases: [8 ] ,arch: [x86_64, aarch64] ,baseurl : { default: 'https://dl.rockylinux.org/pub/rocky/$releasever/PowerTools/$basearch/os/' ,china: 'https://mirrors.aliyun.com/rockylinux/$releasever/PowerTools/$basearch/os/' ,europe : 'https://mirrors.xtom.de/rocky/$releasever/PowerTools/$basearch/os/' }}
- { name: crb ,description: 'EL 9 CRB' ,module: node ,releases: [ 9,10] ,arch: [x86_64, aarch64] ,baseurl : { default: 'https://dl.rockylinux.org/pub/rocky/$releasever/CRB/$basearch/os/' ,china: 'https://mirrors.aliyun.com/rockylinux/$releasever/CRB/$basearch/os/' ,europe : 'https://mirrors.xtom.de/rocky/$releasever/CRB/$basearch/os/' }}
- { name: epel ,description: 'EL 8+ EPEL' ,module: node ,releases: [8,9 ] ,arch: [x86_64, aarch64] ,baseurl : { default: 'https://mirrors.edge.kernel.org/fedora-epel/$releasever/Everything/$basearch/' ,china: 'https://mirrors.aliyun.com/epel/$releasever/Everything/$basearch/' ,europe : 'https://mirrors.xtom.de/epel/$releasever/Everything/$basearch/' }}
- { name: epel ,description: 'EL 10 EPEL' ,module: node ,releases: [ 10] ,arch: [x86_64, aarch64] ,baseurl : { default: 'https://mirrors.edge.kernel.org/fedora-epel/$releasever.0/Everything/$basearch/' ,china: 'https://mirrors.aliyun.com/epel/$releasever.0/Everything/$basearch/' ,europe : 'https://mirrors.xtom.de/epel/$releasever.0/Everything/$basearch/' }}
- { name: pgdg-common ,description: 'PostgreSQL Common' ,module: pgsql ,releases: [8,9,10] ,arch: [x86_64, aarch64] ,baseurl : { default: 'https://download.postgresql.org/pub/repos/yum/common/redhat/rhel-$releasever-$basearch' ,china: 'https://mirrors.aliyun.com/postgresql/repos/yum/common/redhat/rhel-$releasever-$basearch' ,europe : 'https://mirrors.xtom.de/postgresql/repos/yum/common/redhat/rhel-$releasever-$basearch' }}
- { name: pgdg-el8fix ,description: 'PostgreSQL EL8FIX' ,module: pgsql ,releases: [8 ] ,arch: [x86_64, aarch64] ,baseurl : { default: 'https://download.postgresql.org/pub/repos/yum/common/pgdg-centos8-sysupdates/redhat/rhel-8-$basearch/' ,china: 'https://mirrors.aliyun.com/postgresql/repos/yum/common/pgdg-centos8-sysupdates/redhat/rhel-8-$basearch/' ,europe : 'https://mirrors.xtom.de/postgresql/repos/yum/common/pgdg-centos8-sysupdates/redhat/rhel-8-$basearch/' }}
- { name: pgdg-el9fix ,description: 'PostgreSQL EL9FIX' ,module: pgsql ,releases: [ 9 ] ,arch: [x86_64, aarch64] ,baseurl : { default: 'https://download.postgresql.org/pub/repos/yum/common/pgdg-rocky9-sysupdates/redhat/rhel-9-$basearch/' ,china: 'https://mirrors.aliyun.com/postgresql/repos/yum/common/pgdg-rocky9-sysupdates/redhat/rhel-9-$basearch/' ,europe : 'https://mirrors.xtom.de/postgresql/repos/yum/common/pgdg-rocky9-sysupdates/redhat/rhel-9-$basearch/' }}
- { name: pgdg-el10fix ,description: 'PostgreSQL EL10FIX' ,module: pgsql ,releases: [ 10] ,arch: [x86_64, aarch64] ,baseurl : { default: 'https://download.postgresql.org/pub/repos/yum/common/pgdg-rocky10-sysupdates/redhat/rhel-10-$basearch/' ,china: 'https://mirrors.aliyun.com/postgresql/repos/yum/common/pgdg-rocky10-sysupdates/redhat/rhel-10-$basearch/' ,europe : 'https://mirrors.xtom.de/postgresql/repos/yum/common/pgdg-rocky10-sysupdates/redhat/rhel-10-$basearch/' }}
- { name: pgdg14 ,description: 'PostgreSQL 14' ,module: pgsql ,releases: [8,9,10] ,arch: [x86_64, aarch64] ,baseurl : { default: 'https://download.postgresql.org/pub/repos/yum/14/redhat/rhel-$releasever-$basearch' ,china: 'https://mirrors.aliyun.com/postgresql/repos/yum/14/redhat/rhel-$releasever-$basearch' ,europe : 'https://mirrors.xtom.de/postgresql/repos/yum/14/redhat/rhel-$releasever-$basearch' }}
- { name: pgdg15 ,description: 'PostgreSQL 15' ,module: pgsql ,releases: [8,9,10] ,arch: [x86_64, aarch64] ,baseurl : { default: 'https://download.postgresql.org/pub/repos/yum/15/redhat/rhel-$releasever-$basearch' ,china: 'https://mirrors.aliyun.com/postgresql/repos/yum/15/redhat/rhel-$releasever-$basearch' ,europe : 'https://mirrors.xtom.de/postgresql/repos/yum/15/redhat/rhel-$releasever-$basearch' }}
- { name: pgdg16 ,description: 'PostgreSQL 16' ,module: pgsql ,releases: [8,9,10] ,arch: [x86_64, aarch64] ,baseurl : { default: 'https://download.postgresql.org/pub/repos/yum/16/redhat/rhel-$releasever-$basearch' ,china: 'https://mirrors.aliyun.com/postgresql/repos/yum/16/redhat/rhel-$releasever-$basearch' ,europe : 'https://mirrors.xtom.de/postgresql/repos/yum/16/redhat/rhel-$releasever-$basearch' }}
- { name: pgdg17 ,description: 'PostgreSQL 17' ,module: pgsql ,releases: [8,9,10] ,arch: [x86_64, aarch64] ,baseurl : { default: 'https://download.postgresql.org/pub/repos/yum/17/redhat/rhel-$releasever-$basearch' ,china: 'https://mirrors.aliyun.com/postgresql/repos/yum/17/redhat/rhel-$releasever-$basearch' ,europe : 'https://mirrors.xtom.de/postgresql/repos/yum/17/redhat/rhel-$releasever-$basearch' }}
- { name: pgdg18 ,description: 'PostgreSQL 18' ,module: pgsql ,releases: [8,9,10] ,arch: [x86_64, aarch64] ,baseurl : { default: 'https://download.postgresql.org/pub/repos/yum/18/redhat/rhel-$releasever-$basearch' ,china: 'https://mirrors.aliyun.com/postgresql/repos/yum/18/redhat/rhel-$releasever-$basearch' ,europe : 'https://mirrors.xtom.de/postgresql/repos/yum/18/redhat/rhel-$releasever-$basearch' }}
- { name: pgdg-beta ,description: 'PostgreSQL Testing' ,module: beta ,releases: [8,9,10] ,arch: [x86_64, aarch64] ,baseurl : { default: 'https://download.postgresql.org/pub/repos/yum/testing/19/redhat/rhel-$releasever-$basearch' ,china: 'https://mirrors.aliyun.com/postgresql/repos/yum/testing/19/redhat/rhel-$releasever-$basearch' ,europe : 'https://mirrors.xtom.de/postgresql/repos/yum/testing/19/redhat/rhel-$releasever-$basearch' }}
- { name: pgdg-extras ,description: 'PostgreSQL Extra' ,module: extra ,releases: [8,9,10] ,arch: [x86_64, aarch64] ,baseurl : { default: 'https://download.postgresql.org/pub/repos/yum/extras/redhat/rhel-$releasever-$basearch' ,china: 'https://mirrors.aliyun.com/postgresql/repos/yum/extras/redhat/rhel-$releasever-$basearch' ,europe : 'https://mirrors.xtom.de/postgresql/repos/yum/extras/redhat/rhel-$releasever-$basearch' }}
- { name: pgdg14-nonfree ,description: 'PostgreSQL 14+' ,module: extra ,releases: [8,9,10] ,arch: [x86_64 ] ,baseurl : { default: 'https://download.postgresql.org/pub/repos/yum/non-free/14/redhat/rhel-$releasever-$basearch' ,china: 'https://mirrors.aliyun.com/postgresql/repos/yum/non-free/14/redhat/rhel-$releasever-$basearch' ,europe : 'https://mirrors.xtom.de/postgresql/repos/yum/non-free/14/redhat/rhel-$releasever-$basearch' }}
- { name: pgdg15-nonfree ,description: 'PostgreSQL 15+' ,module: extra ,releases: [8,9,10] ,arch: [x86_64 ] ,baseurl : { default: 'https://download.postgresql.org/pub/repos/yum/non-free/15/redhat/rhel-$releasever-$basearch' ,china: 'https://mirrors.aliyun.com/postgresql/repos/yum/non-free/15/redhat/rhel-$releasever-$basearch' ,europe : 'https://mirrors.xtom.de/postgresql/repos/yum/non-free/15/redhat/rhel-$releasever-$basearch' }}
- { name: pgdg16-nonfree ,description: 'PostgreSQL 16+' ,module: extra ,releases: [8,9,10] ,arch: [x86_64 ] ,baseurl : { default: 'https://download.postgresql.org/pub/repos/yum/non-free/16/redhat/rhel-$releasever-$basearch' ,china: 'https://mirrors.aliyun.com/postgresql/repos/yum/non-free/16/redhat/rhel-$releasever-$basearch' ,europe : 'https://mirrors.xtom.de/postgresql/repos/yum/non-free/16/redhat/rhel-$releasever-$basearch' }}
- { name: pgdg17-nonfree ,description: 'PostgreSQL 17+' ,module: extra ,releases: [8,9,10] ,arch: [x86_64 ] ,baseurl : { default: 'https://download.postgresql.org/pub/repos/yum/non-free/17/redhat/rhel-$releasever-$basearch' ,china: 'https://mirrors.aliyun.com/postgresql/repos/yum/non-free/17/redhat/rhel-$releasever-$basearch' ,europe : 'https://mirrors.xtom.de/postgresql/repos/yum/non-free/17/redhat/rhel-$releasever-$basearch' }}
- { name: pgdg18-nonfree ,description: 'PostgreSQL 18+' ,module: extra ,releases: [8,9,10] ,arch: [x86_64 ] ,baseurl : { default: 'https://download.postgresql.org/pub/repos/yum/non-free/18/redhat/rhel-$releasever-$basearch' ,china: 'https://mirrors.aliyun.com/postgresql/repos/yum/non-free/18/redhat/rhel-$releasever-$basearch' ,europe : 'https://mirrors.xtom.de/postgresql/repos/yum/non-free/18/redhat/rhel-$releasever-$basearch' }}
- { name: timescaledb ,description: 'TimescaleDB' ,module: extra ,releases: [8,9 ] ,arch: [x86_64, aarch64] ,baseurl : { default : 'https://packagecloud.io/timescale/timescaledb/el/$releasever/$basearch' }}
- { name: percona ,description: 'Percona TDE' ,module: percona ,releases: [8,9,10] ,arch: [x86_64, aarch64] ,baseurl : { default: 'https://repo.pigsty.io/yum/percona/el$releasever.$basearch' ,china: 'https://repo.pigsty.cc/yum/percona/el$releasever.$basearch' ,origin : 'http://repo.percona.com/ppg-18.1/yum/release/$releasever/RPMS/$basearch' }}
- { name: wiltondb ,description: 'WiltonDB' ,module: mssql ,releases: [8,9 ] ,arch: [x86_64, aarch64] ,baseurl : { default: 'https://repo.pigsty.io/yum/mssql/el$releasever.$basearch', china: 'https://repo.pigsty.cc/yum/mssql/el$releasever.$basearch' , origin : 'https://download.copr.fedorainfracloud.org/results/wiltondb/wiltondb/epel-$releasever-$basearch/' }}
- { name: groonga ,description: 'Groonga' ,module: groonga ,releases: [8,9,10] ,arch: [x86_64, aarch64] ,baseurl : { default : 'https://packages.groonga.org/almalinux/$releasever/$basearch/' }}
- { name: mysql ,description: 'MySQL' ,module: mysql ,releases: [8,9 ] ,arch: [x86_64, aarch64] ,baseurl : { default : 'https://repo.mysql.com/yum/mysql-8.4-community/el/$releasever/$basearch/' }}
- { name: mongo ,description: 'MongoDB' ,module: mongo ,releases: [8,9 ] ,arch: [x86_64, aarch64] ,baseurl : { default: 'https://repo.mongodb.org/yum/redhat/$releasever/mongodb-org/8.0/$basearch/' ,china : 'https://mirrors.aliyun.com/mongodb/yum/redhat/$releasever/mongodb-org/8.0/$basearch/' }}
- { name: redis ,description: 'Redis' ,module: redis ,releases: [8,9,10] ,arch: [x86_64, aarch64] ,baseurl : { default : 'https://rpmfind.net/linux/remi/enterprise/$releasever/redis72/$basearch/' }}
- { name: grafana ,description: 'Grafana' ,module: grafana ,releases: [8,9,10] ,arch: [x86_64, aarch64] ,baseurl : { default: 'https://rpm.grafana.com', china : 'https://mirrors.aliyun.com/grafana/yum/' }}
- { name: kubernetes ,description: 'Kubernetes' ,module: kube ,releases: [8,9,10] ,arch: [x86_64, aarch64] ,baseurl : { default: 'https://pkgs.k8s.io/core:/stable:/v1.33/rpm/', china : 'https://mirrors.aliyun.com/kubernetes-new/core/stable/v1.33/rpm/' }}
- { name: gitlab-ee ,description: 'Gitlab EE' ,module: gitlab ,releases: [8,9 ] ,arch: [x86_64, aarch64] ,baseurl : { default : 'https://packages.gitlab.com/gitlab/gitlab-ee/el/$releasever/$basearch' }}
- { name: gitlab-ce ,description: 'Gitlab CE' ,module: gitlab ,releases: [8,9 ] ,arch: [x86_64, aarch64] ,baseurl : { default : 'https://packages.gitlab.com/gitlab/gitlab-ce/el/$releasever/$basearch' }}
- { name: clickhouse ,description: 'ClickHouse' ,module: click ,releases: [8,9,10] ,arch: [x86_64, aarch64] ,baseurl : { default: 'https://packages.clickhouse.com/rpm/stable/', china : 'https://mirrors.aliyun.com/clickhouse/rpm/stable/' }}
repo_packages : [ node-bootstrap, infra-package, infra-addons, node-package1, node-package2, pgsql-utility, extra-modules ]
repo_extra_packages : [ pgsql-main ]
repo_url_packages : []
#-----------------------------------------------------------------
# INFRA_PACKAGE
#-----------------------------------------------------------------
infra_packages : # packages to be installed on infra nodes
- grafana,grafana-plugins,grafana-victorialogs-ds,grafana-victoriametrics-ds,victoria-metrics,victoria-logs,victoria-traces,vmutils,vlogscli,alertmanager
- node_exporter,blackbox_exporter,nginx_exporter,pg_exporter,pev2,nginx,dnsmasq,ansible,etcd,python3-requests,redis,mcli,restic,certbot,python3-certbot-nginx
#-----------------------------------------------------------------
# NGINX
#-----------------------------------------------------------------
nginx_enabled : true # enable nginx on this infra node?
nginx_clean : false # clean existing nginx config during init?
nginx_exporter_enabled : true # enable nginx_exporter on this infra node?
nginx_exporter_port : 9113 # nginx_exporter listen port, 9113 by default
nginx_sslmode : enable # nginx ssl mode? disable,enable,enforce
nginx_cert_validity : 397d # nginx self-signed cert validity, 397d by default
nginx_home : /www # nginx content dir, `/www` by default (soft link to nginx_data)
nginx_data : /data/nginx # nginx actual data dir, /data/nginx by default
nginx_users : { admin : pigsty } # nginx basic auth users : name and pass dict
nginx_port : 80 # nginx listen port, 80 by default
nginx_ssl_port : 443 # nginx ssl listen port, 443 by default
certbot_sign : false # sign nginx cert with certbot during setup?
certbot_email : your@email.com # certbot email address, used for free ssl
certbot_options : '' # certbot extra options
#-----------------------------------------------------------------
# DNS
#-----------------------------------------------------------------
dns_enabled : true # setup dnsmasq on this infra node?
dns_port : 53 # dns server listen port, 53 by default
dns_records : # dynamic dns records resolved by dnsmasq
- "${admin_ip} i.pigsty"
- "${admin_ip} m.pigsty supa.pigsty api.pigsty adm.pigsty cli.pigsty ddl.pigsty"
#-----------------------------------------------------------------
# VICTORIA
#-----------------------------------------------------------------
vmetrics_enabled : true # enable victoria-metrics on this infra node?
vmetrics_clean : false # whether clean existing victoria metrics data during init?
vmetrics_port : 8428 # victoria-metrics listen port, 8428 by default
vmetrics_scrape_interval : 10s # victoria global scrape interval, 10s by default
vmetrics_scrape_timeout : 8s # victoria global scrape timeout, 8s by default
vmetrics_options : >-
-retentionPeriod=15d
-promscrape.fileSDCheckInterval=5s
vlogs_enabled : true # enable victoria-logs on this infra node?
vlogs_clean : false # clean victoria-logs data during init?
vlogs_port : 9428 # victoria-logs listen port, 9428 by default
vlogs_options : >-
-retentionPeriod=15d
-retention.maxDiskSpaceUsageBytes=50GiB
-insert.maxLineSizeBytes=1MB
-search.maxQueryDuration=120s
vtraces_enabled : true # enable victoria-traces on this infra node?
vtraces_clean : false # clean victoria-trace data during inti?
vtraces_port : 10428 # victoria-traces listen port, 10428 by default
vtraces_options : >-
-retentionPeriod=15d
-retention.maxDiskSpaceUsageBytes=50GiB
vmalert_enabled : true # enable vmalert on this infra node?
vmalert_port : 8880 # vmalert listen port, 8880 by default
vmalert_options : '' # vmalert extra server options
#-----------------------------------------------------------------
# PROMETHEUS
#-----------------------------------------------------------------
blackbox_enabled : true # setup blackbox_exporter on this infra node?
blackbox_port : 9115 # blackbox_exporter listen port, 9115 by default
blackbox_options : '' # blackbox_exporter extra server options
alertmanager_enabled : true # setup alertmanager on this infra node?
alertmanager_port : 9059 # alertmanager listen port, 9059 by default
alertmanager_options : '' # alertmanager extra server options
exporter_metrics_path : /metrics # exporter metric path, `/metrics` by default
#-----------------------------------------------------------------
# GRAFANA
#-----------------------------------------------------------------
grafana_enabled : true # enable grafana on this infra node?
grafana_port : 3000 # default listen port for grafana
grafana_clean : false # clean grafana data during init?
grafana_admin_username : admin # grafana admin username, `admin` by default
grafana_admin_password : pigsty # grafana admin password, `pigsty` by default
grafana_auth_proxy : false # enable grafana auth proxy?
grafana_pgurl : '' # external postgres database url for grafana if given
grafana_view_password : DBUser.Viewer # password for grafana meta pg datasource
#================================================================#
# VARS: NODE #
#================================================================#
#-----------------------------------------------------------------
# NODE_IDENTITY
#-----------------------------------------------------------------
#nodename: # [INSTANCE] # node instance identity, use hostname if missing, optional
node_cluster : nodes # [CLUSTER] # node cluster identity, use 'nodes' if missing, optional
nodename_overwrite : true # overwrite node's hostname with nodename?
nodename_exchange : false # exchange nodename among play hosts?
node_id_from_pg : true # use postgres identity as node identity if applicable?
#-----------------------------------------------------------------
# NODE_DNS
#-----------------------------------------------------------------
node_write_etc_hosts : true # modify `/etc/hosts` on target node?
node_default_etc_hosts : # static dns records in `/etc/hosts`
- "${admin_ip} i.pigsty"
node_etc_hosts : [] # extra static dns records in `/etc/hosts`
node_dns_method: add # how to handle dns servers : add,none,overwrite
node_dns_servers : [ '${admin_ip}' ] # dynamic nameserver in `/etc/resolv.conf`
node_dns_options : # dns resolv options in `/etc/resolv.conf`
- options single-request-reopen timeout:1
#-----------------------------------------------------------------
# NODE_PACKAGE
#-----------------------------------------------------------------
node_repo_modules : local # upstream repo to be added on node, local by default
node_repo_remove : true # remove existing repo on node?
node_packages : [ openssh-server] # packages to be installed current nodes with latest version
node_default_packages : # default packages to be installed on all nodes
- lz4,unzip,bzip2,pv,jq,git,ncdu,make,patch,bash,lsof,wget,uuid,tuned,nvme-cli,numactl,sysstat,iotop,htop,rsync,tcpdump
- python3,python3-pip,socat,lrzsz,net-tools,ipvsadm,telnet,ca-certificates,openssl,keepalived,etcd,haproxy,chrony,pig
- zlib,yum,audit,bind-utils,readline,vim-minimal,node_exporter,grubby,openssh-server,openssh-clients,chkconfig,vector
node_uv_env : /data/venv # uv venv path, empty string to skip
node_pip_packages : '' # pip packages to install in uv venv
#-----------------------------------------------------------------
# NODE_SEC
#-----------------------------------------------------------------
node_selinux_mode: permissive # set selinux mode : enforcing,permissive,disabled
node_firewall_mode: zone # firewall mode : zone (default), off (disable), none (skip & self-managed)
node_firewall_intranet : # which intranet cidr considered as internal network
- 10.0.0.0 /8
- 192.168.0.0 /16
- 172.16.0.0 /12
node_firewall_public_port : # expose these ports to public network in (zone, strict) mode
- 22 # enable ssh access
- 80 # enable http access
- 443 # enable https access
- 5432 # enable postgres access
#-----------------------------------------------------------------
# NODE_TUNE
#-----------------------------------------------------------------
node_disable_numa : false # disable node numa, reboot required
node_disable_swap : false # disable node swap, use with caution
node_static_network : true # preserve dns resolver settings after reboot
node_disk_prefetch : false # setup disk prefetch on HDD to increase performance
node_kernel_modules : [ softdog, ip_vs, ip_vs_rr, ip_vs_wrr, ip_vs_sh ]
node_hugepage_count : 0 # number of 2MB hugepage, take precedence over ratio
node_hugepage_ratio : 0 # node mem hugepage ratio, 0 disable it by default
node_overcommit_ratio : 0 # node mem overcommit ratio, 0 disable it by default
node_tune: oltp # node tuned profile : none,oltp,olap,crit,tiny
node_sysctl_params : # sysctl parameters in k:v format in addition to tuned
fs.nr_open : 8388608
#-----------------------------------------------------------------
# NODE_ADMIN
#-----------------------------------------------------------------
node_data : /data # node main data directory, `/data` by default
node_admin_enabled : true # create a admin user on target node?
node_admin_uid : 88 # uid and gid for node admin user
node_admin_username : dba # name of node admin user, `dba` by default
node_admin_sudo : nopass # admin sudo privilege, all,nopass. nopass by default
node_admin_ssh_exchange : true # exchange admin ssh key among node cluster
node_admin_pk_current : true # add current user's ssh pk to admin authorized_keys
node_admin_pk_list : [] # ssh public keys to be added to admin user
node_aliases : {} # extra shell aliases to be added, k:v dict
#-----------------------------------------------------------------
# NODE_TIME
#-----------------------------------------------------------------
node_timezone : '' # setup node timezone, empty string to skip
node_ntp_enabled : true # enable chronyd time sync service?
node_ntp_servers : # ntp servers in `/etc/chrony.conf`
- pool pool.ntp.org iburst
node_crontab_overwrite : true # overwrite or append to `/etc/crontab`?
node_crontab : [ ] # crontab entries in `/etc/crontab`
#-----------------------------------------------------------------
# NODE_VIP
#-----------------------------------------------------------------
vip_enabled : false # enable vip on this node cluster?
# vip_address: [IDENTITY] # node vip address in ipv4 format, required if vip is enabled
# vip_vrid: [IDENTITY] # required, integer, 1-254, should be unique among same VLAN
vip_role : backup # optional, `master|backup`, backup by default, use as init role
vip_preempt : false # optional, `true/false`, false by default, enable vip preemption
vip_interface : eth0 # node vip network interface to listen, `eth0` by default
vip_dns_suffix : '' # node vip dns name suffix, empty string by default
vip_exporter_port : 9650 # keepalived exporter listen port, 9650 by default
#-----------------------------------------------------------------
# HAPROXY
#-----------------------------------------------------------------
haproxy_enabled : true # enable haproxy on this node?
haproxy_clean : false # cleanup all existing haproxy config?
haproxy_reload : true # reload haproxy after config?
haproxy_auth_enabled : true # enable authentication for haproxy admin page
haproxy_admin_username : admin # haproxy admin username, `admin` by default
haproxy_admin_password : pigsty # haproxy admin password, `pigsty` by default
haproxy_exporter_port : 9101 # haproxy admin/exporter port, 9101 by default
haproxy_client_timeout : 24h # client side connection timeout, 24h by default
haproxy_server_timeout : 24h # server side connection timeout, 24h by default
haproxy_services : [] # list of haproxy service to be exposed on node
#-----------------------------------------------------------------
# NODE_EXPORTER
#-----------------------------------------------------------------
node_exporter_enabled : true # setup node_exporter on this node?
node_exporter_port : 9100 # node exporter listen port, 9100 by default
node_exporter_options : '--no-collector.softnet --no-collector.nvme --collector.tcpstat --collector.processes'
#-----------------------------------------------------------------
# VECTOR
#-----------------------------------------------------------------
vector_enabled : true # enable vector log collector?
vector_clean : false # purge vector data dir during init?
vector_data : /data/vector # vector data dir, /data/vector by default
vector_port : 9598 # vector metrics port, 9598 by default
vector_read_from : beginning # vector read from beginning or end
vector_log_endpoint : [ infra ] # if defined, sending vector log to this endpoint.
#================================================================#
# VARS: DOCKER #
#================================================================#
docker_enabled : false # enable docker on this node?
docker_data : /data/docker # docker data directory, /data/docker by default
docker_storage_driver : overlay2 # docker storage driver, can be zfs, btrfs
docker_cgroups_driver: systemd # docker cgroup fs driver : cgroupfs,systemd
docker_registry_mirrors : [] # docker registry mirror list
docker_exporter_port : 9323 # docker metrics exporter port, 9323 by default
docker_image : [] # docker image to be pulled after bootstrap
docker_image_cache : /tmp/docker/*.tgz # docker image cache glob pattern
#================================================================#
# VARS: ETCD #
#================================================================#
#etcd_seq: 1 # etcd instance identifier, explicitly required
etcd_cluster : etcd # etcd cluster & group name, etcd by default
etcd_safeguard : false # prevent purging running etcd instance?
etcd_data : /data/etcd # etcd data directory, /data/etcd by default
etcd_port : 2379 # etcd client port, 2379 by default
etcd_peer_port : 2380 # etcd peer port, 2380 by default
etcd_init : new # etcd initial cluster state, new or existing
etcd_election_timeout : 1000 # etcd election timeout, 1000ms by default
etcd_heartbeat_interval : 100 # etcd heartbeat interval, 100ms by default
etcd_root_password : Etcd.Root # etcd root password for RBAC, change it!
#================================================================#
# VARS: MINIO #
#================================================================#
#minio_seq: 1 # minio instance identifier, REQUIRED
minio_cluster : minio # minio cluster identifier, REQUIRED
minio_user : minio # minio os user, `minio` by default
minio_https : true # use https for minio, true by default
minio_node : '${minio_cluster}-${minio_seq}.pigsty' # minio node name pattern
minio_data : '/data/minio' # minio data dir(s), use {x...y} to specify multi drivers
#minio_volumes: # minio data volumes, override defaults if specified
minio_domain : sss.pigsty # minio external domain name, `sss.pigsty` by default
minio_port : 9000 # minio service port, 9000 by default
minio_admin_port : 9001 # minio console port, 9001 by default
minio_access_key : minioadmin # root access key, `minioadmin` by default
minio_secret_key : S3User.MinIO # root secret key, `S3User.MinIO` by default
minio_extra_vars : '' # extra environment variables
minio_provision : true # run minio provisioning tasks?
minio_alias : sss # alias name for local minio deployment
#minio_endpoint: https://sss.pigsty:9000 # if not specified, overwritten by defaults
minio_buckets : # list of minio bucket to be created
- { name : pgsql }
- { name: meta ,versioning : true }
- { name : data }
minio_users : # list of minio user to be created
- { access_key: pgbackrest ,secret_key: S3User.Backup ,policy : pgsql }
- { access_key: s3user_meta ,secret_key: S3User.Meta ,policy : meta }
- { access_key: s3user_data ,secret_key: S3User.Data ,policy : data }
#================================================================#
# VARS: REDIS #
#================================================================#
#redis_cluster: <CLUSTER> # redis cluster name, required identity parameter
#redis_node: 1 <NODE> # redis node sequence number, node int id required
#redis_instances: {} <NODE> # redis instances definition on this redis node
redis_fs_main : /data/redis # redis main data directory, `/data/redis` by default
redis_exporter_enabled : true # install redis exporter on redis nodes?
redis_exporter_port : 9121 # redis exporter listen port, 9121 by default
redis_exporter_options : '' # cli args and extra options for redis exporter
redis_mode: standalone # redis mode : standalone,cluster,sentinel
redis_conf : redis.conf # redis config template path, except sentinel
redis_bind_address : '0.0.0.0' # redis bind address, empty string will use host ip
redis_max_memory : 1GB # max memory used by each redis instance
redis_mem_policy : allkeys-lru # redis memory eviction policy
redis_password : '' # redis password, empty string will disable password
redis_rdb_save : [ '1200 1' ] # redis rdb save directives, disable with empty list
redis_aof_enabled : false # enable redis append only file?
redis_rename_commands : {} # rename redis dangerous commands
redis_cluster_replicas : 1 # replica number for one master in redis cluster
redis_sentinel_monitor : [] # sentinel master list, works on sentinel cluster only
#================================================================#
# VARS: PGSQL #
#================================================================#
#-----------------------------------------------------------------
# PG_IDENTITY
#-----------------------------------------------------------------
pg_mode: pgsql #CLUSTER # pgsql cluster mode : pgsql,citus,gpsql,mssql,mysql,ivory,polar
# pg_cluster: #CLUSTER # pgsql cluster name, required identity parameter
# pg_seq: 0 #INSTANCE # pgsql instance seq number, required identity parameter
# pg_role: replica #INSTANCE # pgsql role, required, could be primary,replica,offline
# pg_instances: {} #INSTANCE # define multiple pg instances on node in `{port:ins_vars}` format
# pg_upstream: #INSTANCE # repl upstream ip addr for standby cluster or cascade replica
# pg_shard: #CLUSTER # pgsql shard name, optional identity for sharding clusters
# pg_group: 0 #CLUSTER # pgsql shard index number, optional identity for sharding clusters
# gp_role: master #CLUSTER # greenplum role of this cluster, could be master or segment
pg_offline_query : false #INSTANCE # set to true to enable offline queries on this instance
#-----------------------------------------------------------------
# PG_BUSINESS
#-----------------------------------------------------------------
# postgres business object definition, overwrite in group vars
pg_users : [] # postgres business users
pg_databases : [] # postgres business databases
pg_services : [] # postgres business services
pg_hba_rules : [] # business hba rules for postgres
pgb_hba_rules : [] # business hba rules for pgbouncer
# global credentials, overwrite in global vars
pg_dbsu_password : '' # dbsu password, empty string means no dbsu password by default
pg_replication_username : replicator
pg_replication_password : DBUser.Replicator
pg_admin_username : dbuser_dba
pg_admin_password : DBUser.DBA
pg_monitor_username : dbuser_monitor
pg_monitor_password : DBUser.Monitor
#-----------------------------------------------------------------
# PG_INSTALL
#-----------------------------------------------------------------
pg_dbsu : postgres # os dbsu name, postgres by default, better not change it
pg_dbsu_uid : 26 # os dbsu uid and gid, 26 for default postgres users and groups
pg_dbsu_sudo : limit # dbsu sudo privilege, none,limit,all,nopass. limit by default
pg_dbsu_home : /var/lib/pgsql # postgresql home directory, `/var/lib/pgsql` by default
pg_dbsu_ssh_exchange : true # exchange postgres dbsu ssh key among same pgsql cluster
pg_version : 18 # postgres major version to be installed, 18 by default
pg_bin_dir : /usr/pgsql/bin # postgres binary dir, `/usr/pgsql/bin` by default
pg_log_dir : /pg/log/postgres # postgres log dir, `/pg/log/postgres` by default
pg_packages : # pg packages to be installed, alias can be used
- pgsql-main pgsql-common
pg_extensions : [] # pg extensions to be installed, alias can be used
#-----------------------------------------------------------------
# PG_BOOTSTRAP
#-----------------------------------------------------------------
pg_data : /pg/data # postgres data directory, `/pg/data` by default
pg_fs_main : /data/postgres # postgres main data directory, `/data/postgres` by default
pg_fs_backup : /data/backups # postgres backup data directory, `/data/backups` by default
pg_storage_type : SSD # storage type for pg main data, SSD,HDD, SSD by default
pg_dummy_filesize : 64MiB # size of `/pg/dummy`, hold 64MB disk space for emergency use
pg_listen : '0.0.0.0' # postgres/pgbouncer listen addresses, comma separated list
pg_port : 5432 # postgres listen port, 5432 by default
pg_localhost : /var/run/postgresql # postgres unix socket dir for localhost connection
patroni_enabled : true # if disabled, no postgres cluster will be created during init
patroni_mode: default # patroni working mode : default,pause,remove
pg_namespace : /pg # top level key namespace in etcd, used by patroni & vip
patroni_port : 8008 # patroni listen port, 8008 by default
patroni_log_dir : /pg/log/patroni # patroni log dir, `/pg/log/patroni` by default
patroni_ssl_enabled : false # secure patroni RestAPI communications with SSL?
patroni_watchdog_mode: 'off' # patroni watchdog mode : automatic,required,off. off by default
patroni_username : postgres # patroni restapi username, `postgres` by default
patroni_password : Patroni.API # patroni restapi password, `Patroni.API` by default
pg_etcd_password : '' # etcd password for this pg cluster, '' to use pg_cluster
pg_primary_db : postgres # primary database name, used by citus,etc... ,postgres by default
pg_parameters : {} # extra parameters in postgresql.auto.conf
pg_files : [] # extra files to be copied to postgres data directory (e.g. license)
pg_conf: oltp.yml # config template : oltp,olap,crit,tiny. `oltp.yml` by default
pg_max_conn : auto # postgres max connections, `auto` will use recommended value
pg_shared_buffer_ratio : 0.25 # postgres shared buffers ratio, 0.25 by default, 0.1~0.4
pg_io_method : worker # io method for postgres, auto,fsync,worker,io_uring, worker by default
pg_rto: norm # shared rto mode for patroni & haproxy : fast,norm,safe,wide
pg_rpo : 1048576 # recovery point objective in bytes, `1MiB` at most by default
pg_libs : 'pg_stat_statements, auto_explain' # preloaded libraries, `pg_stat_statements,auto_explain` by default
pg_delay : 0 # replication apply delay for standby cluster leader
pg_checksum : true # enable data checksum for postgres cluster?
pg_encoding : UTF8 # database cluster encoding, `UTF8` by default
pg_locale : C # database cluster local, `C` by default
pg_lc_collate : C # database cluster collate, `C` by default
pg_lc_ctype : C # database character type, `C` by default
#pgsodium_key: "" # pgsodium key, 64 hex digit, default to sha256(pg_cluster)
#pgsodium_getkey_script: "" # pgsodium getkey script path, pgsodium_getkey by default
#-----------------------------------------------------------------
# PG_PROVISION
#-----------------------------------------------------------------
pg_provision : true # provision postgres cluster after bootstrap
pg_init : pg-init # provision init script for cluster template, `pg-init` by default
pg_default_roles : # default roles and users in postgres cluster
- { name: dbrole_readonly ,login: false ,comment : role for global read-only access }
- { name: dbrole_offline ,login: false ,comment : role for restricted read-only access }
- { name: dbrole_readwrite ,login: false ,roles: [dbrole_readonly] ,comment : role for global read-write access }
- { name: dbrole_admin ,login: false ,roles: [pg_monitor, dbrole_readwrite] ,comment : role for object creation }
- { name: postgres ,superuser: true ,comment : system superuser }
- { name: replicator ,replication: true ,roles: [pg_monitor, dbrole_readonly] ,comment : system replicator }
- { name: dbuser_dba ,superuser: true ,roles: [dbrole_admin] ,pgbouncer: true ,pool_mode: session, pool_connlimit: 16 ,comment : pgsql admin user }
- { name: dbuser_monitor ,roles: [pg_monitor] ,pgbouncer: true ,parameters : {log_min_duration_statement: 1000 } ,pool_mode: session ,pool_connlimit: 8 ,comment : pgsql monitor user }
pg_default_privileges : # default privileges when created by admin user
- GRANT USAGE ON SCHEMAS TO dbrole_readonly
- GRANT SELECT ON TABLES TO dbrole_readonly
- GRANT SELECT ON SEQUENCES TO dbrole_readonly
- GRANT EXECUTE ON FUNCTIONS TO dbrole_readonly
- GRANT USAGE ON SCHEMAS TO dbrole_offline
- GRANT SELECT ON TABLES TO dbrole_offline
- GRANT SELECT ON SEQUENCES TO dbrole_offline
- GRANT EXECUTE ON FUNCTIONS TO dbrole_offline
- GRANT INSERT ON TABLES TO dbrole_readwrite
- GRANT UPDATE ON TABLES TO dbrole_readwrite
- GRANT DELETE ON TABLES TO dbrole_readwrite
- GRANT USAGE ON SEQUENCES TO dbrole_readwrite
- GRANT UPDATE ON SEQUENCES TO dbrole_readwrite
- GRANT TRUNCATE ON TABLES TO dbrole_admin
- GRANT REFERENCES ON TABLES TO dbrole_admin
- GRANT TRIGGER ON TABLES TO dbrole_admin
- GRANT CREATE ON SCHEMAS TO dbrole_admin
pg_default_schemas : [ monitor ] # default schemas to be created
pg_default_extensions : # default extensions to be created
- { name: pg_stat_statements ,schema : monitor }
- { name: pgstattuple ,schema : monitor }
- { name: pg_buffercache ,schema : monitor }
- { name: pageinspect ,schema : monitor }
- { name: pg_prewarm ,schema : monitor }
- { name: pg_visibility ,schema : monitor }
- { name: pg_freespacemap ,schema : monitor }
- { name: postgres_fdw ,schema : public }
- { name: file_fdw ,schema : public }
- { name: btree_gist ,schema : public }
- { name: btree_gin ,schema : public }
- { name: pg_trgm ,schema : public }
- { name: intagg ,schema : public }
- { name: intarray ,schema : public }
- { name : pg_repack }
pg_reload : true # reload postgres after hba changes
pg_default_hba_rules : # postgres default host-based authentication rules, order by `order`
- {user : '${dbsu}' ,db: all ,addr: local ,auth: ident ,title: 'dbsu access via local os user ident' ,order : 100 }
- {user : '${dbsu}' ,db: replication ,addr: local ,auth: ident ,title: 'dbsu replication from local os ident' ,order : 150 }
- {user : '${repl}' ,db: replication ,addr: localhost ,auth: pwd ,title: 'replicator replication from localhost',order : 200 }
- {user : '${repl}' ,db: replication ,addr: intra ,auth: pwd ,title: 'replicator replication from intranet' ,order : 250 }
- {user : '${repl}' ,db: postgres ,addr: intra ,auth: pwd ,title: 'replicator postgres db from intranet' ,order : 300 }
- {user : '${monitor}' ,db: all ,addr: localhost ,auth: pwd ,title: 'monitor from localhost with password' ,order : 350 }
- {user : '${monitor}' ,db: all ,addr: infra ,auth: pwd ,title: 'monitor from infra host with password',order : 400 }
- {user : '${admin}' ,db: all ,addr: infra ,auth: ssl ,title: 'admin @ infra nodes with pwd & ssl' ,order : 450 }
- {user : '${admin}' ,db: all ,addr: world ,auth: ssl ,title: 'admin @ everywhere with ssl & pwd' ,order : 500 }
- {user: '+dbrole_readonly',db: all ,addr: localhost ,auth: pwd ,title: 'pgbouncer read/write via local socket',order : 550 }
- {user: '+dbrole_readonly',db: all ,addr: intra ,auth: pwd ,title: 'read/write biz user via password' ,order : 600 }
- {user: '+dbrole_offline' ,db: all ,addr: intra ,auth: pwd ,title: 'allow etl offline tasks from intranet',order : 650 }
pgb_default_hba_rules : # pgbouncer default host-based authentication rules, order by `order`
- {user : '${dbsu}' ,db: pgbouncer ,addr: local ,auth: peer ,title: 'dbsu local admin access with os ident',order : 100 }
- {user: 'all' ,db: all ,addr: localhost ,auth: pwd ,title: 'allow all user local access with pwd' ,order : 150 }
- {user : '${monitor}' ,db: pgbouncer ,addr: intra ,auth: pwd ,title: 'monitor access via intranet with pwd' ,order : 200 }
- {user : '${monitor}' ,db: all ,addr: world ,auth: deny ,title: 'reject all other monitor access addr' ,order : 250 }
- {user : '${admin}' ,db: all ,addr: intra ,auth: pwd ,title: 'admin access via intranet with pwd' ,order : 300 }
- {user : '${admin}' ,db: all ,addr: world ,auth: deny ,title: 'reject all other admin access addr' ,order : 350 }
- {user: 'all' ,db: all ,addr: intra ,auth: pwd ,title: 'allow all user intra access with pwd' ,order : 400 }
#-----------------------------------------------------------------
# PG_BACKUP
#-----------------------------------------------------------------
pgbackrest_enabled : true # enable pgbackrest on pgsql host?
pgbackrest_log_dir : /pg/log/pgbackrest # pgbackrest log dir, `/pg/log/pgbackrest` by default
pgbackrest_method: local # pgbackrest repo method : local,minio,[user-defined...]
pgbackrest_init_backup : true # take a full backup after pgbackrest is initialized?
pgbackrest_repo: # pgbackrest repo : https://pgbackrest.org/configuration.html#section-repository
local : # default pgbackrest repo with local posix fs
path : /pg/backup # local backup directory, `/pg/backup` by default
retention_full_type : count # retention full backups by count
retention_full : 2 # keep 2, at most 3 full backups when using local fs repo
minio : # optional minio repo for pgbackrest
type : s3 # minio is s3-compatible, so s3 is used
s3_endpoint : sss.pigsty # minio endpoint domain name, `sss.pigsty` by default
s3_region : us-east-1 # minio region, us-east-1 by default, useless for minio
s3_bucket : pgsql # minio bucket name, `pgsql` by default
s3_key : pgbackrest # minio user access key for pgbackrest
s3_key_secret : S3User.Backup # minio user secret key for pgbackrest
s3_uri_style : path # use path style uri for minio rather than host style
path : /pgbackrest # minio backup path, default is `/pgbackrest`
storage_port : 9000 # minio port, 9000 by default
storage_ca_file : /etc/pki/ca.crt # minio ca file path, `/etc/pki/ca.crt` by default
block : y # Enable block incremental backup
bundle : y # bundle small files into a single file
bundle_limit : 20MiB # Limit for file bundles, 20MiB for object storage
bundle_size : 128MiB # Target size for file bundles, 128MiB for object storage
cipher_type : aes-256-cbc # enable AES encryption for remote backup repo
cipher_pass : pgBackRest # AES encryption password, default is 'pgBackRest'
retention_full_type : time # retention full backup by time on minio repo
retention_full : 14 # keep full backup for the the last 14 days
#-----------------------------------------------------------------
# PG_ACCESS
#-----------------------------------------------------------------
pgbouncer_enabled : true # if disabled, pgbouncer will not be launched on pgsql host
pgbouncer_port : 6432 # pgbouncer listen port, 6432 by default
pgbouncer_log_dir : /pg/log/pgbouncer # pgbouncer log dir, `/pg/log/pgbouncer` by default
pgbouncer_auth_query : false # query postgres to retrieve unlisted business users?
pgbouncer_poolmode: transaction # pooling mode : transaction,session,statement, transaction by default
pgbouncer_sslmode : disable # pgbouncer client ssl mode, disable by default
pgbouncer_ignore_param : [ extra_float_digits, application_name, TimeZone, DateStyle, IntervalStyle, search_path ]
pg_weight : 100 #INSTANCE # relative load balance weight in service, 100 by default, 0-255
pg_service_provider : '' # dedicate haproxy node group name, or empty string for local nodes by default
pg_default_service_dest : pgbouncer # default service destination if svc.dest='default'
pg_default_services : # postgres default service definitions
- { name: primary ,port: 5433 ,dest: default ,check: /primary ,selector : "[]" }
- { name: replica ,port: 5434 ,dest: default ,check: /read-only ,selector : "[]" , backup : "[? pg_role == `primary` || pg_role == `offline` ]" }
- { name: default ,port: 5436 ,dest: postgres ,check: /primary ,selector : "[]" }
- { name: offline ,port: 5438 ,dest: postgres ,check: /replica ,selector : "[? pg_role == `offline` || pg_offline_query ]" , backup : "[? pg_role == `replica` && !pg_offline_query]" }
pg_vip_enabled : false # enable a l2 vip for pgsql primary? false by default
pg_vip_address : 127.0.0.1 /24 # vip address in `<ipv4>/<mask>` format, require if vip is enabled
pg_vip_interface : eth0 # vip network interface to listen, eth0 by default
pg_dns_suffix : '' # pgsql dns suffix, '' by default
pg_dns_target : auto # auto, primary, vip, none, or ad hoc ip
#-----------------------------------------------------------------
# PG_MONITOR
#-----------------------------------------------------------------
pg_exporter_enabled : true # enable pg_exporter on pgsql hosts?
pg_exporter_config : pg_exporter.yml # pg_exporter configuration file name
pg_exporter_cache_ttls : '1,10,60,300' # pg_exporter collector ttl stage in seconds, '1,10,60,300' by default
pg_exporter_port : 9630 # pg_exporter listen port, 9630 by default
pg_exporter_params : 'sslmode=disable' # extra url parameters for pg_exporter dsn
pg_exporter_url : '' # overwrite auto-generate pg dsn if specified
pg_exporter_auto_discovery : true # enable auto database discovery? enabled by default
pg_exporter_exclude_database : 'template0,template1,postgres' # csv of database that WILL NOT be monitored during auto-discovery
pg_exporter_include_database : '' # csv of database that WILL BE monitored during auto-discovery
pg_exporter_connect_timeout : 200 # pg_exporter connect timeout in ms, 200 by default
pg_exporter_options : '' # overwrite extra options for pg_exporter
pgbouncer_exporter_enabled : true # enable pgbouncer_exporter on pgsql hosts?
pgbouncer_exporter_port : 9631 # pgbouncer_exporter listen port, 9631 by default
pgbouncer_exporter_url : '' # overwrite auto-generate pgbouncer dsn if specified
pgbouncer_exporter_options : '' # overwrite extra options for pgbouncer_exporter
pgbackrest_exporter_enabled : true # enable pgbackrest_exporter on pgsql hosts?
pgbackrest_exporter_port : 9854 # pgbackrest_exporter listen port, 9854 by default
pgbackrest_exporter_options : >
--collect.interval=120
--log.level=info
#-----------------------------------------------------------------
# PG_REMOVE
#-----------------------------------------------------------------
pg_safeguard : false # stop pg_remove running if pg_safeguard is enabled, false by default
pg_rm_data : true # remove postgres data during remove? true by default
pg_rm_backup : true # remove pgbackrest backup during primary remove? true by default
pg_rm_pkg : true # uninstall postgres packages during remove? true by default
...
配置解读 demo/el 模板是针对 Enterprise Linux 系列发行版优化的配置。
支持的发行版 :
RHEL 8/9/10 Rocky Linux 8/9/10 Alma Linux 8/9/10 Oracle Linux 8/9 关键特性 :
使用 EPEL 和 PGDG 软件源 针对 YUM/DNF 包管理器优化 支持 EL 系列特定的软件包名称 适用场景 :
企业生产环境(推荐 RHEL/Rocky/Alma) 需要长期支持和稳定性保障 使用红帽生态系统的环境 9.39 - demo/debian Debian/Ubuntu 专用配置模板
demo/debian 配置模板是针对 Debian 和 Ubuntu 发行版优化的配置模板。
配置概览 配置名称: demo/debian 节点数量: 单节点 配置说明:Debian/Ubuntu 专用配置模板 适用系统:d12, d13, u22, u24 适用架构:x86_64, aarch64 相关配置:metademo/el 启用方式:
./configure -c demo/debian [ -i <primary_ip>]
配置内容 源文件地址:pigsty/conf/demo/debian.yml
---
#==============================================================#
# File : debian.yml
# Desc : Default parameters for Debian/Ubuntu in Pigsty
# Ctime : 2020-05-22
# Mtime : 2026-03-04
# Docs : https://pigsty.io/docs/conf/debian
# License : Apache-2.0 @ https://pigsty.io/docs/about/license/
# Copyright : 2018-2026 Ruohang Feng / Vonng (rh@vonng.com)
#==============================================================#
#==============================================================#
# Sandbox (4-node) #
#==============================================================#
# admin user : vagrant (nopass ssh & sudo already set) #
# 1. meta : 10.10.10.10 (2 Core | 4GB) pg-meta #
# 2. node-1 : 10.10.10.11 (1 Core | 1GB) pg-test-1 #
# 3. node-2 : 10.10.10.12 (1 Core | 1GB) pg-test-2 #
# 4. node-3 : 10.10.10.13 (1 Core | 1GB) pg-test-3 #
# (replace these ip if your 4-node env have different ip addr) #
# VIP 2: (l2 vip is available inside same LAN ) #
# pg-meta ---> 10.10.10.2 ---> 10.10.10.10 #
# pg-test ---> 10.10.10.3 ---> 10.10.10.1{1,2,3} #
#==============================================================#
all :
##################################################################
# CLUSTERS #
##################################################################
# meta nodes, nodes, pgsql, redis, pgsql clusters are defined as
# k:v pair inside `all.children`. Where the key is cluster name
# and value is cluster definition consist of two parts:
# `hosts`: cluster members ip and instance level variables
# `vars` : cluster level variables
##################################################################
children : # groups definition
# infra cluster for proxy, monitor, alert, etc..
infra : { hosts : { 10.10.10.10 : { infra_seq : 1 } } }
# etcd cluster for ha postgres
etcd : { hosts : { 10.10.10.10 : { etcd_seq: 1 } }, vars : { etcd_cluster : etcd } }
# minio cluster, s3 compatible object storage
minio : { hosts : { 10.10.10.10 : { minio_seq: 1 } }, vars : { minio_cluster : minio } }
#----------------------------------#
# pgsql cluster: pg-meta (CMDB) #
#----------------------------------#
pg-meta :
hosts : { 10.10.10.10 : { pg_seq: 1, pg_role: primary , pg_offline_query : true } }
vars :
pg_cluster : pg-meta
# define business databases here: https://pigsty.io/docs/pgsql/config/db
pg_databases : # define business databases on this cluster, array of database definition
- name : meta # REQUIRED, `name` is the only mandatory field of a database definition
#state: create # optional, create|absent|recreate, create by default
baseline: cmdb.sql # optional, database sql baseline path, (relative path among ansible search path, e.g : files/)
schemas : [ pigsty] # optional, additional schemas to be created, array of schema names
extensions: # optional, additional extensions to be installed : array of `{name[,schema]}`
- { name : vector } # install pgvector extension on this database by default
comment : pigsty meta database # optional, comment string for this database
#pgbouncer: true # optional, add this database to pgbouncer database list? true by default
#owner: postgres # optional, database owner, current user if not specified
#template: template1 # optional, which template to use, template1 by default
#strategy: FILE_COPY # optional, clone strategy: FILE_COPY or WAL_LOG (PG15+), default to PG's default
#encoding: UTF8 # optional, inherited from template / cluster if not defined (UTF8)
#locale: C # optional, inherited from template / cluster if not defined (C)
#lc_collate: C # optional, inherited from template / cluster if not defined (C)
#lc_ctype: C # optional, inherited from template / cluster if not defined (C)
#locale_provider: libc # optional, locale provider: libc, icu, builtin (PG15+)
#icu_locale: en-US # optional, icu locale for icu locale provider (PG15+)
#icu_rules: '' # optional, icu rules for icu locale provider (PG16+)
#builtin_locale: C.UTF-8 # optional, builtin locale for builtin locale provider (PG17+)
#tablespace: pg_default # optional, default tablespace, pg_default by default
#is_template: false # optional, mark database as template, allowing clone by any user with CREATEDB privilege
#allowconn: true # optional, allow connection, true by default. false will disable connect at all
#revokeconn: false # optional, revoke public connection privilege. false by default. (leave connect with grant option to owner)
#register_datasource: true # optional, register this database to grafana datasources? true by default
#connlimit: -1 # optional, database connection limit, default -1 disable limit
#pool_auth_user: dbuser_meta # optional, all connection to this pgbouncer database will be authenticated by this user
#pool_mode: transaction # optional, pgbouncer pool mode at database level, default transaction
#pool_size: 64 # optional, pgbouncer pool size at database level, default 64
#pool_reserve: 32 # optional, pgbouncer pool size reserve at database level, default 32
#pool_size_min: 0 # optional, pgbouncer pool size min at database level, default 0
#pool_connlimit: 100 # optional, max database connections at database level, default 100
#- { name: grafana ,owner: dbuser_grafana ,revokeconn: true ,comment: grafana primary database }
#- { name: bytebase ,owner: dbuser_bytebase ,revokeconn: true ,comment: bytebase primary database }
#- { name: kong ,owner: dbuser_kong ,revokeconn: true ,comment: kong the api gateway database }
#- { name: gitea ,owner: dbuser_gitea ,revokeconn: true ,comment: gitea meta database }
#- { name: wiki ,owner: dbuser_wiki ,revokeconn: true ,comment: wiki meta database }
# define business users here: https://pigsty.io/docs/pgsql/config/user
pg_users : # define business users/roles on this cluster, array of user definition
- name : dbuser_meta # REQUIRED, `name` is the only mandatory field of a user definition
password : DBUser.Meta # optional, password, can be a scram-sha-256 hash string or plain text
pgbouncer : true # optional, add this user to pgbouncer user-list? false by default (production user should be true explicitly)
comment : pigsty admin user # optional, comment string for this user/role
roles: [ dbrole_admin ] # optional, belonged roles. default roles are : dbrole_{admin,readonly,readwrite,offline}
#login: true # optional, can log in, true by default (new biz ROLE should be false)
#superuser: false # optional, is superuser? false by default
#createdb: false # optional, can create database? false by default
#createrole: false # optional, can create role? false by default
#inherit: true # optional, can this role use inherited privileges? true by default
#replication: false # optional, can this role do replication? false by default
#bypassrls: false # optional, can this role bypass row level security? false by default
#connlimit: -1 # optional, user connection limit, default -1 disable limit
#expire_in: 3650 # optional, now + n days when this role is expired (OVERWRITE expire_at)
#expire_at: '2030-12-31' # optional, YYYY-MM-DD 'timestamp' when this role is expired (OVERWRITTEN by expire_in)
#parameters: {} # optional, role level parameters with `ALTER ROLE SET`
#pool_mode: transaction # optional, pgbouncer pool mode at user level, transaction by default
#pool_connlimit: -1 # optional, max database connections at user level, default -1 disable limit
- {name: dbuser_view ,password: DBUser.Viewer ,pgbouncer: true ,roles: [dbrole_readonly], comment : read-only viewer for meta database}
#- {name: dbuser_grafana ,password: DBUser.Grafana ,pgbouncer: true ,roles: [dbrole_admin] ,comment: admin user for grafana database }
#- {name: dbuser_bytebase ,password: DBUser.Bytebase ,pgbouncer: true ,roles: [dbrole_admin] ,comment: admin user for bytebase database }
#- {name: dbuser_gitea ,password: DBUser.Gitea ,pgbouncer: true ,roles: [dbrole_admin] ,comment: admin user for gitea service }
#- {name: dbuser_wiki ,password: DBUser.Wiki ,pgbouncer: true ,roles: [dbrole_admin] ,comment: admin user for wiki.js service }
# define business service here: https://pigsty.io/docs/pgsql/service
pg_services : # extra services in addition to pg_default_services, array of service definition
# standby service will route {ip|name}:5435 to sync replica's pgbouncer (5435->6432 standby)
- name: standby # required, service name, the actual svc name will be prefixed with `pg_cluster`, e.g : pg-meta-standby
port : 5435 # required, service exposed port (work as kubernetes service node port mode)
ip : "*" # optional, service bind ip address, `*` for all ip by default
selector : "[]" # required, service member selector, use JMESPath to filter inventory
dest : default # optional, destination port, default|postgres|pgbouncer|<port_number>, 'default' by default
check : /sync # optional, health check url path, / by default
backup : "[? pg_role == `primary`]" # backup server selector
maxconn : 3000 # optional, max allowed front-end connection
balance: roundrobin # optional, haproxy load balance algorithm (roundrobin by default, other : leastconn)
#options: 'inter 3s fastinter 1s downinter 5s rise 3 fall 3 on-marked-down shutdown-sessions slowstart 30s maxconn 3000 maxqueue 128 weight 100'
# define pg extensions: https://pigsty.io/docs/pgsql/ext/
pg_libs : 'pg_stat_statements, auto_explain' # add timescaledb to shared_preload_libraries
#pg_extensions: [] # extensions to be installed on this cluster
# define HBA rules here: https://pigsty.io/docs/pgsql/config/hba
pg_hba_rules :
- {user: dbuser_view , db: all ,addr: infra ,auth: pwd ,title : 'allow grafana dashboard access cmdb from infra nodes' }
pg_vip_enabled : true
pg_vip_address : 10.10.10.2 /24
pg_vip_interface : eth1
pg_crontab : # make a full backup 1 am everyday
- '00 01 * * * /pg/bin/pg-backup full'
#----------------------------------#
# pgsql cluster: pg-test (3 nodes) #
#----------------------------------#
# pg-test ---> 10.10.10.3 ---> 10.10.10.1{1,2,3}
pg-test : # define the new 3-node cluster pg-test
hosts :
10.10.10.11 : { pg_seq: 1, pg_role : primary } # primary instance, leader of cluster
10.10.10.12 : { pg_seq: 2, pg_role : replica } # replica instance, follower of leader
10.10.10.13 : { pg_seq: 3, pg_role: replica, pg_offline_query : true } # replica with offline access
vars :
pg_cluster : pg-test # define pgsql cluster name
pg_users : [ { name: test , password: test , pgbouncer: true , roles : [ dbrole_admin ] }]
pg_databases : [ { name : test }] # create a database and user named 'test'
node_tune : tiny
pg_conf : tiny.yml
pg_vip_enabled : true
pg_vip_address : 10.10.10.3 /24
pg_vip_interface : eth1
pg_crontab : # make a full backup on monday 1am, and an incremental backup during weekdays
- '00 01 * * 1 /pg/bin/pg-backup full'
- '00 01 * * 2,3,4,5,6,7 /pg/bin/pg-backup'
#----------------------------------#
# redis ms, sentinel, native cluster
#----------------------------------#
redis-ms : # redis classic primary & replica
hosts : { 10.10.10.10 : { redis_node: 1 , redis_instances : { 6379 : { }, 6380 : { replica_of : '10.10.10.10 6379' } } } }
vars : { redis_cluster: redis-ms ,redis_password: 'redis.ms' ,redis_max_memory : 64MB }
redis-meta : # redis sentinel x 3
hosts : { 10.10.10.11 : { redis_node: 1 , redis_instances : { 26379 : { } ,26380 : { } ,26381 : { } } } }
vars :
redis_cluster : redis-meta
redis_password : 'redis.meta'
redis_mode : sentinel
redis_max_memory : 16MB
redis_sentinel_monitor : # primary list for redis sentinel, use cls as name, primary ip:port
- { name: redis-ms, host: 10.10.10.10, port: 6379 ,password: redis.ms, quorum : 2 }
redis-test: # redis native cluster : 3m x 3s
hosts :
10.10.10.12 : { redis_node: 1 ,redis_instances : { 6379 : { } ,6380 : { } ,6381 : { } } }
10.10.10.13 : { redis_node: 2 ,redis_instances : { 6379 : { } ,6380 : { } ,6381 : { } } }
vars : { redis_cluster: redis-test ,redis_password: 'redis.test' ,redis_mode: cluster, redis_max_memory : 32MB }
####################################################################
# VARS #
####################################################################
vars : # global variables
#================================================================#
# VARS: INFRA #
#================================================================#
#-----------------------------------------------------------------
# META
#-----------------------------------------------------------------
version : v4.2.2 # pigsty version string
admin_ip : 10.10.10.10 # admin node ip address
region: default # upstream mirror region : default,china,europe
language: en # default language : en, zh
proxy_env : # global proxy env when downloading packages
no_proxy : "localhost,127.0.0.1,10.0.0.0/8,192.168.0.0/16,*.pigsty,*.aliyun.com,mirrors.*,*.myqcloud.com,*.tsinghua.edu.cn"
# http_proxy: # set your proxy here: e.g http://user:pass@proxy.xxx.com
# https_proxy: # set your proxy here: e.g http://user:pass@proxy.xxx.com
# all_proxy: # set your proxy here: e.g http://user:pass@proxy.xxx.com
#-----------------------------------------------------------------
# CA
#-----------------------------------------------------------------
ca_create : true # create ca if not exists? or just abort
ca_cn : pigsty-ca # ca common name, fixed as pigsty-ca
cert_validity : 7300d # cert validity, 20 years by default
#-----------------------------------------------------------------
# INFRA_IDENTITY
#-----------------------------------------------------------------
#infra_seq: 1 # infra node identity, explicitly required
infra_portal : # infra services exposed via portal
home : { domain : i.pigsty } # default domain name
infra_data : /data/infra # default data path for infrastructure data
#-----------------------------------------------------------------
# REPO
#-----------------------------------------------------------------
repo_enabled : true # create a yum repo on this infra node?
repo_home : /www # repo home dir, `/www` by default
repo_name : pigsty # repo name, pigsty by default
repo_endpoint : http://${admin_ip}:80 # access point to this repo by domain or ip:port
repo_remove : true # remove existing upstream repo
repo_modules : infra,node,pgsql # which repo modules are installed in repo_upstream
repo_upstream : # where to download
- { name: pigsty-local ,description: 'Pigsty Local' ,module: local ,releases: [11,12,13,20,22,24] ,arch: [x86_64, aarch64] ,baseurl : { default : 'http://${admin_ip}/pigsty ./' }}
- { name: pigsty-pgsql ,description: 'Pigsty PgSQL' ,module: pgsql ,releases: [11,12,13,20,22,24] ,arch: [x86_64, aarch64] ,baseurl : { default : 'https://repo.pigsty.io/apt/pgsql/${distro_codename} ${distro_codename} main' , china : 'https://repo.pigsty.cc/apt/pgsql/${distro_codename} ${distro_codename} main' }}
- { name: pigsty-infra ,description: 'Pigsty Infra' ,module: infra ,releases: [11,12,13,20,22,24] ,arch: [x86_64, aarch64] ,baseurl : { default: 'https://repo.pigsty.io/apt/infra/ generic main' ,china : 'https://repo.pigsty.cc/apt/infra/ generic main' }}
- { name: nginx ,description: 'Nginx' ,module: infra ,releases: [11,12,13,20,22,24] ,arch: [x86_64, aarch64] ,baseurl : { default : 'http://nginx.org/packages/${distro_name} ${distro_codename} nginx' }}
- { name: docker-ce ,description: 'Docker' ,module: infra ,releases: [11,12,13,20,22,24] ,arch: [x86_64, aarch64] ,baseurl : { default : 'https://download.docker.com/linux/${distro_name} ${distro_codename} stable' ,china : 'https://mirrors.aliyun.com/docker-ce/linux/${distro_name} ${distro_codename} stable' }}
- { name: base ,description: 'Debian Basic' ,module: node ,releases: [11,12,13 ] ,arch: [x86_64, aarch64] ,baseurl : { default : 'http://deb.debian.org/debian/ ${distro_codename} main non-free-firmware' ,china : 'https://mirrors.aliyun.com/debian/ ${distro_codename} main restricted universe multiverse' }}
- { name: updates ,description: 'Debian Updates' ,module: node ,releases: [11,12,13 ] ,arch: [x86_64, aarch64] ,baseurl : { default : 'http://deb.debian.org/debian/ ${distro_codename}-updates main non-free-firmware' ,china : 'https://mirrors.aliyun.com/debian/ ${distro_codename}-updates main restricted universe multiverse' }}
- { name: security ,description: 'Debian Security' ,module: node ,releases: [11,12,13 ] ,arch: [x86_64, aarch64] ,baseurl : { default : 'http://security.debian.org/debian-security ${distro_codename}-security main non-free-firmware' ,china : 'https://mirrors.aliyun.com/debian-security/ ${distro_codename}-security main non-free-firmware' }}
- { name: base ,description: 'Ubuntu Basic' ,module: node ,releases: [ 20,22,24] ,arch: [x86_64 ] ,baseurl : { default : 'https://mirrors.edge.kernel.org/ubuntu/ ${distro_codename} main universe multiverse restricted' ,china : 'https://mirrors.aliyun.com/ubuntu/ ${distro_codename} main restricted universe multiverse' }}
- { name: updates ,description: 'Ubuntu Updates' ,module: node ,releases: [ 20,22,24] ,arch: [x86_64 ] ,baseurl : { default : 'https://mirrors.edge.kernel.org/ubuntu/ ${distro_codename}-backports main restricted universe multiverse' ,china : 'https://mirrors.aliyun.com/ubuntu/ ${distro_codename}-updates main restricted universe multiverse' }}
- { name: backports ,description: 'Ubuntu Backports' ,module: node ,releases: [ 20,22,24] ,arch: [x86_64 ] ,baseurl : { default : 'https://mirrors.edge.kernel.org/ubuntu/ ${distro_codename}-security main restricted universe multiverse' ,china : 'https://mirrors.aliyun.com/ubuntu/ ${distro_codename}-backports main restricted universe multiverse' }}
- { name: security ,description: 'Ubuntu Security' ,module: node ,releases: [ 20,22,24] ,arch: [x86_64 ] ,baseurl : { default : 'https://mirrors.edge.kernel.org/ubuntu/ ${distro_codename}-updates main restricted universe multiverse' ,china : 'https://mirrors.aliyun.com/ubuntu/ ${distro_codename}-security main restricted universe multiverse' }}
- { name: base ,description: 'Ubuntu Basic' ,module: node ,releases: [ 20,22,24] ,arch: [ aarch64] ,baseurl : { default : 'http://ports.ubuntu.com/ubuntu-ports/ ${distro_codename} main universe multiverse restricted' ,china : 'https://mirrors.aliyun.com/ubuntu-ports/ ${distro_codename} main restricted universe multiverse' }}
- { name: updates ,description: 'Ubuntu Updates' ,module: node ,releases: [ 20,22,24] ,arch: [ aarch64] ,baseurl : { default : 'http://ports.ubuntu.com/ubuntu-ports/ ${distro_codename}-backports main restricted universe multiverse' ,china : 'https://mirrors.aliyun.com/ubuntu-ports/ ${distro_codename}-updates main restricted universe multiverse' }}
- { name: backports ,description: 'Ubuntu Backports' ,module: node ,releases: [ 20,22,24] ,arch: [ aarch64] ,baseurl : { default : 'http://ports.ubuntu.com/ubuntu-ports/ ${distro_codename}-security main restricted universe multiverse' ,china : 'https://mirrors.aliyun.com/ubuntu-ports/ ${distro_codename}-backports main restricted universe multiverse' }}
- { name: security ,description: 'Ubuntu Security' ,module: node ,releases: [ 20,22,24] ,arch: [ aarch64] ,baseurl : { default : 'http://ports.ubuntu.com/ubuntu-ports/ ${distro_codename}-updates main restricted universe multiverse' ,china : 'https://mirrors.aliyun.com/ubuntu-ports/ ${distro_codename}-security main restricted universe multiverse' }}
- { name: pgdg ,description: 'PGDG' ,module: pgsql ,releases: [11,12,13, 22,24] ,arch: [x86_64, aarch64] ,baseurl : { default : 'http://apt.postgresql.org/pub/repos/apt/ ${distro_codename}-pgdg main' ,china : 'https://mirrors.aliyun.com/postgresql/repos/apt/ ${distro_codename}-pgdg main' }}
- { name: pgdg-beta ,description: 'PGDG Beta' ,module: beta ,releases: [11,12,13, 22,24] ,arch: [x86_64, aarch64] ,baseurl : { default : 'http://apt.postgresql.org/pub/repos/apt/ ${distro_codename}-pgdg-testing main 19' ,china : 'https://mirrors.aliyun.com/postgresql/repos/apt/ ${distro_codename}-pgdg-testing main 19' }}
- { name: timescaledb ,description: 'TimescaleDB' ,module: extra ,releases: [11,12,13,20,22,24] ,arch: [x86_64, aarch64] ,baseurl : { default : 'https://packagecloud.io/timescale/timescaledb/${distro_name}/ ${distro_codename} main' }}
- { name: citus ,description: 'Citus' ,module: extra ,releases: [11,12, 20,22 ] ,arch: [x86_64, aarch64] ,baseurl : { default : 'https://packagecloud.io/citusdata/community/${distro_name}/ ${distro_codename} main' } }
- { name: percona ,description: 'Percona TDE' ,module: percona ,releases: [11,12,13,20,22,24] ,arch: [x86_64, aarch64] ,baseurl : { default : 'https://repo.pigsty.io/apt/percona ${distro_codename} main' ,china : 'https://repo.pigsty.cc/apt/percona ${distro_codename} main' ,origin : 'http://repo.percona.com/ppg-18.1/apt ${distro_codename} main' }}
- { name: wiltondb ,description: 'WiltonDB' ,module: mssql ,releases: [ 20,22,24] ,arch: [x86_64, aarch64] ,baseurl : { default : 'https://repo.pigsty.io/apt/mssql/ ${distro_codename} main' ,china : 'https://repo.pigsty.cc/apt/mssql/ ${distro_codename} main' ,origin : 'https://ppa.launchpadcontent.net/wiltondb/wiltondb/ubuntu/ ${distro_codename} main' }}
- { name: groonga ,description: 'Groonga Debian' ,module: groonga ,releases: [11,12,13 ] ,arch: [x86_64, aarch64] ,baseurl : { default : 'https://packages.groonga.org/debian/ ${distro_codename} main' }}
- { name: groonga ,description: 'Groonga Ubuntu' ,module: groonga ,releases: [ 20,22,24] ,arch: [x86_64, aarch64] ,baseurl : { default : 'https://ppa.launchpadcontent.net/groonga/ppa/ubuntu/ ${distro_codename} main' }}
- { name: mysql ,description: 'MySQL' ,module: mysql ,releases: [11,12, 20,22,24] ,arch: [x86_64, aarch64] ,baseurl : { default : 'https://repo.mysql.com/apt/${distro_name} ${distro_codename} mysql-8.0 mysql-tools' , china : 'https://mirrors.tuna.tsinghua.edu.cn/mysql/apt/${distro_name} ${distro_codename} mysql-8.0 mysql-tools' }}
- { name: mongo ,description: 'MongoDB' ,module: mongo ,releases: [11,12, 20,22,24] ,arch: [x86_64, aarch64] ,baseurl : { default : 'https://repo.mongodb.org/apt/${distro_name} ${distro_codename}/mongodb-org/8.0 multiverse' , china : 'https://mirrors.aliyun.com/mongodb/apt/${distro_name} ${distro_codename}/mongodb-org/8.0 multiverse' }}
- { name: redis ,description: 'Redis' ,module: redis ,releases: [11,12, 20,22,24] ,arch: [x86_64, aarch64] ,baseurl : { default : 'https://packages.redis.io/deb ${distro_codename} main' }}
- { name: llvm ,description: 'LLVM' ,module: llvm ,releases: [11,12,13,20,22,24] ,arch: [x86_64, aarch64] ,baseurl : { default : 'http://apt.llvm.org/${distro_codename}/ llvm-toolchain-${distro_codename} main' ,china : 'https://mirrors.tuna.tsinghua.edu.cn/llvm-apt/${distro_codename}/ llvm-toolchain-${distro_codename} main' }}
- { name: haproxyd ,description: 'Haproxy Debian' ,module: haproxy ,releases: [11,12 ] ,arch: [x86_64, aarch64] ,baseurl : { default : 'http://haproxy.debian.net/ ${distro_codename}-backports-3.1 main' }}
- { name: haproxyu ,description: 'Haproxy Ubuntu' ,module: haproxy ,releases: [ 20,22,24] ,arch: [x86_64, aarch64] ,baseurl : { default : 'https://ppa.launchpadcontent.net/vbernat/haproxy-3.1/ubuntu/ ${distro_codename} main' }}
- { name: grafana ,description: 'Grafana' ,module: grafana ,releases: [11,12,13,20,22,24] ,arch: [x86_64, aarch64] ,baseurl : { default: 'https://apt.grafana.com stable main' ,china : 'https://mirrors.aliyun.com/grafana/apt/ stable main' }}
- { name: kubernetes ,description: 'Kubernetes' ,module: kube ,releases: [11,12,13,20,22,24] ,arch: [x86_64, aarch64] ,baseurl : { default: 'https://pkgs.k8s.io/core:/stable:/v1.33/deb/ /', china : 'https://mirrors.aliyun.com/kubernetes-new/core/stable/v1.33/deb/ /' }}
- { name: gitlab-ee ,description: 'Gitlab EE' ,module: gitlab ,releases: [11,12,13,20,22,24] ,arch: [x86_64, aarch64] ,baseurl : { default : 'https://packages.gitlab.com/gitlab/gitlab-ee/${distro_name}/ ${distro_codename} main' }}
- { name: gitlab-ce ,description: 'Gitlab CE' ,module: gitlab ,releases: [11,12,13,20,22,24] ,arch: [x86_64, aarch64] ,baseurl : { default : 'https://packages.gitlab.com/gitlab/gitlab-ce/${distro_name}/ ${distro_codename} main' }}
- { name: clickhouse ,description: 'ClickHouse' ,module: click ,releases: [11,12,13,20,22,24] ,arch: [x86_64, aarch64] ,baseurl : { default: 'https://packages.clickhouse.com/deb/ stable main', china : 'https://mirrors.aliyun.com/clickhouse/deb/ stable main' }}
repo_packages : [ node-bootstrap, infra-package, infra-addons, node-package1, node-package2, pgsql-utility, extra-modules ]
repo_extra_packages : [ pgsql-main ]
repo_url_packages : []
#-----------------------------------------------------------------
# INFRA_PACKAGE
#-----------------------------------------------------------------
infra_packages : # packages to be installed on infra nodes
- grafana,grafana-plugins,grafana-victorialogs-ds,grafana-victoriametrics-ds,victoria-metrics,victoria-logs,victoria-traces,vmutils,vlogscli,alertmanager
- node-exporter,blackbox-exporter,nginx-exporter,pg-exporter,pev2,nginx,dnsmasq,ansible,etcd,python3-requests,redis,mcli,restic,certbot,python3-certbot-nginx
#-----------------------------------------------------------------
# NGINX
#-----------------------------------------------------------------
nginx_enabled : true # enable nginx on this infra node?
nginx_clean : false # clean existing nginx config during init?
nginx_exporter_enabled : true # enable nginx_exporter on this infra node?
nginx_exporter_port : 9113 # nginx_exporter listen port, 9113 by default
nginx_sslmode : enable # nginx ssl mode? disable,enable,enforce
nginx_cert_validity : 397d # nginx self-signed cert validity, 397d by default
nginx_home : /www # nginx content dir, `/www` by default (soft link to nginx_data)
nginx_data : /data/nginx # nginx actual data dir, /data/nginx by default
nginx_users : { admin : pigsty } # nginx basic auth users : name and pass dict
nginx_port : 80 # nginx listen port, 80 by default
nginx_ssl_port : 443 # nginx ssl listen port, 443 by default
certbot_sign : false # sign nginx cert with certbot during setup?
certbot_email : your@email.com # certbot email address, used for free ssl
certbot_options : '' # certbot extra options
#-----------------------------------------------------------------
# DNS
#-----------------------------------------------------------------
dns_enabled : true # setup dnsmasq on this infra node?
dns_port : 53 # dns server listen port, 53 by default
dns_records : # dynamic dns records resolved by dnsmasq
- "${admin_ip} i.pigsty"
- "${admin_ip} m.pigsty supa.pigsty api.pigsty adm.pigsty cli.pigsty ddl.pigsty"
#-----------------------------------------------------------------
# VICTORIA
#-----------------------------------------------------------------
vmetrics_enabled : true # enable victoria-metrics on this infra node?
vmetrics_clean : false # whether clean existing victoria metrics data during init?
vmetrics_port : 8428 # victoria-metrics listen port, 8428 by default
vmetrics_scrape_interval : 10s # victoria global scrape interval, 10s by default
vmetrics_scrape_timeout : 8s # victoria global scrape timeout, 8s by default
vmetrics_options : >-
-retentionPeriod=15d
-promscrape.fileSDCheckInterval=5s
vlogs_enabled : true # enable victoria-logs on this infra node?
vlogs_clean : false # clean victoria-logs data during init?
vlogs_port : 9428 # victoria-logs listen port, 9428 by default
vlogs_options : >-
-retentionPeriod=15d
-retention.maxDiskSpaceUsageBytes=50GiB
-insert.maxLineSizeBytes=1MB
-search.maxQueryDuration=120s
vtraces_enabled : true # enable victoria-traces on this infra node?
vtraces_clean : false # clean victoria-trace data during inti?
vtraces_port : 10428 # victoria-traces listen port, 10428 by default
vtraces_options : >-
-retentionPeriod=15d
-retention.maxDiskSpaceUsageBytes=50GiB
vmalert_enabled : true # enable vmalert on this infra node?
vmalert_port : 8880 # vmalert listen port, 8880 by default
vmalert_options : '' # vmalert extra server options
#-----------------------------------------------------------------
# PROMETHEUS
#-----------------------------------------------------------------
blackbox_enabled : true # setup blackbox_exporter on this infra node?
blackbox_port : 9115 # blackbox_exporter listen port, 9115 by default
blackbox_options : '' # blackbox_exporter extra server options
alertmanager_enabled : true # setup alertmanager on this infra node?
alertmanager_port : 9059 # alertmanager listen port, 9059 by default
alertmanager_options : '' # alertmanager extra server options
exporter_metrics_path : /metrics # exporter metric path, `/metrics` by default
#-----------------------------------------------------------------
# GRAFANA
#-----------------------------------------------------------------
grafana_enabled : true # enable grafana on this infra node?
grafana_port : 3000 # default listen port for grafana
grafana_clean : false # clean grafana data during init?
grafana_admin_username : admin # grafana admin username, `admin` by default
grafana_admin_password : pigsty # grafana admin password, `pigsty` by default
grafana_auth_proxy : false # enable grafana auth proxy?
grafana_pgurl : '' # external postgres database url for grafana if given
grafana_view_password : DBUser.Viewer # password for grafana meta pg datasource
#================================================================#
# VARS: NODE #
#================================================================#
#-----------------------------------------------------------------
# NODE_IDENTITY
#-----------------------------------------------------------------
#nodename: # [INSTANCE] # node instance identity, use hostname if missing, optional
node_cluster : nodes # [CLUSTER] # node cluster identity, use 'nodes' if missing, optional
nodename_overwrite : true # overwrite node's hostname with nodename?
nodename_exchange : false # exchange nodename among play hosts?
node_id_from_pg : true # use postgres identity as node identity if applicable?
#-----------------------------------------------------------------
# NODE_DNS
#-----------------------------------------------------------------
node_write_etc_hosts : true # modify `/etc/hosts` on target node?
node_default_etc_hosts : # static dns records in `/etc/hosts`
- "${admin_ip} i.pigsty"
node_etc_hosts : [] # extra static dns records in `/etc/hosts`
node_dns_method: add # how to handle dns servers : add,none,overwrite
node_dns_servers : [ '${admin_ip}' ] # dynamic nameserver in `/etc/resolv.conf`
node_dns_options : # dns resolv options in `/etc/resolv.conf`
- options single-request-reopen timeout:1
#-----------------------------------------------------------------
# NODE_PACKAGE
#-----------------------------------------------------------------
node_repo_modules : local # upstream repo to be added on node, local by default
node_repo_remove : true # remove existing repo on node?
node_packages : [ openssh-server] # packages to be installed current nodes with latest version
node_default_packages : # default packages to be installed on all nodes
- lz4,unzip,bzip2,pv,jq,git,ncdu,make,patch,bash,lsof,wget,uuid,tuned,nvme-cli,numactl,sysstat,iotop,htop,rsync,tcpdump
- python3,python3-pip,socat,lrzsz,net-tools,ipvsadm,telnet,ca-certificates,openssl,keepalived,etcd,haproxy,chrony,pig
- zlib1g,acl,dnsutils,libreadline-dev,vim-tiny,node-exporter,openssh-server,openssh-client,vector
node_uv_env : /data/venv # uv venv path, empty string to skip
node_pip_packages : '' # pip packages to install in uv venv
#-----------------------------------------------------------------
# NODE_SEC
#-----------------------------------------------------------------
node_selinux_mode: permissive # set selinux mode : enforcing,permissive,disabled
node_firewall_mode: zone # firewall mode : zone (default), off (disable), none (skip & self-managed)
node_firewall_intranet : # which intranet cidr considered as internal network
- 10.0.0.0 /8
- 192.168.0.0 /16
- 172.16.0.0 /12
node_firewall_public_port : # expose these ports to public network in (zone, strict) mode
- 22 # enable ssh access
- 80 # enable http access
- 443 # enable https access
- 5432 # enable postgres access
#-----------------------------------------------------------------
# NODE_TUNE
#-----------------------------------------------------------------
node_disable_numa : false # disable node numa, reboot required
node_disable_swap : false # disable node swap, use with caution
node_static_network : true # preserve dns resolver settings after reboot
node_disk_prefetch : false # setup disk prefetch on HDD to increase performance
node_kernel_modules : [ softdog, ip_vs, ip_vs_rr, ip_vs_wrr, ip_vs_sh ]
node_hugepage_count : 0 # number of 2MB hugepage, take precedence over ratio
node_hugepage_ratio : 0 # node mem hugepage ratio, 0 disable it by default
node_overcommit_ratio : 0 # node mem overcommit ratio, 0 disable it by default
node_tune: oltp # node tuned profile : none,oltp,olap,crit,tiny
node_sysctl_params : # sysctl parameters in k:v format in addition to tuned
fs.nr_open : 8388608
#-----------------------------------------------------------------
# NODE_ADMIN
#-----------------------------------------------------------------
node_data : /data # node main data directory, `/data` by default
node_admin_enabled : true # create a admin user on target node?
node_admin_uid : 88 # uid and gid for node admin user
node_admin_username : dba # name of node admin user, `dba` by default
node_admin_sudo : nopass # admin sudo privilege, all,nopass. nopass by default
node_admin_ssh_exchange : true # exchange admin ssh key among node cluster
node_admin_pk_current : true # add current user's ssh pk to admin authorized_keys
node_admin_pk_list : [] # ssh public keys to be added to admin user
node_aliases : {} # extra shell aliases to be added, k:v dict
#-----------------------------------------------------------------
# NODE_TIME
#-----------------------------------------------------------------
node_timezone : '' # setup node timezone, empty string to skip
node_ntp_enabled : true # enable chronyd time sync service?
node_ntp_servers : # ntp servers in `/etc/chrony.conf`
- pool pool.ntp.org iburst
node_crontab_overwrite : true # overwrite or append to `/etc/crontab`?
node_crontab : [ ] # crontab entries in `/etc/crontab`
#-----------------------------------------------------------------
# NODE_VIP
#-----------------------------------------------------------------
vip_enabled : false # enable vip on this node cluster?
# vip_address: [IDENTITY] # node vip address in ipv4 format, required if vip is enabled
# vip_vrid: [IDENTITY] # required, integer, 1-254, should be unique among same VLAN
vip_role : backup # optional, `master|backup`, backup by default, use as init role
vip_preempt : false # optional, `true/false`, false by default, enable vip preemption
vip_interface : eth0 # node vip network interface to listen, `eth0` by default
vip_dns_suffix : '' # node vip dns name suffix, empty string by default
vip_exporter_port : 9650 # keepalived exporter listen port, 9650 by default
#-----------------------------------------------------------------
# HAPROXY
#-----------------------------------------------------------------
haproxy_enabled : true # enable haproxy on this node?
haproxy_clean : false # cleanup all existing haproxy config?
haproxy_reload : true # reload haproxy after config?
haproxy_auth_enabled : true # enable authentication for haproxy admin page
haproxy_admin_username : admin # haproxy admin username, `admin` by default
haproxy_admin_password : pigsty # haproxy admin password, `pigsty` by default
haproxy_exporter_port : 9101 # haproxy admin/exporter port, 9101 by default
haproxy_client_timeout : 24h # client side connection timeout, 24h by default
haproxy_server_timeout : 24h # server side connection timeout, 24h by default
haproxy_services : [] # list of haproxy service to be exposed on node
#-----------------------------------------------------------------
# NODE_EXPORTER
#-----------------------------------------------------------------
node_exporter_enabled : true # setup node_exporter on this node?
node_exporter_port : 9100 # node exporter listen port, 9100 by default
node_exporter_options : '--no-collector.softnet --no-collector.nvme --collector.tcpstat --collector.processes'
#-----------------------------------------------------------------
# VECTOR
#-----------------------------------------------------------------
vector_enabled : true # enable vector log collector?
vector_clean : false # purge vector data dir during init?
vector_data : /data/vector # vector data dir, /data/vector by default
vector_port : 9598 # vector metrics port, 9598 by default
vector_read_from : beginning # vector read from beginning or end
vector_log_endpoint : [ infra ] # if defined, sending vector log to this endpoint.
#================================================================#
# VARS: DOCKER #
#================================================================#
docker_enabled : false # enable docker on this node?
docker_data : /data/docker # docker data directory, /data/docker by default
docker_storage_driver : overlay2 # docker storage driver, can be zfs, btrfs
docker_cgroups_driver: systemd # docker cgroup fs driver : cgroupfs,systemd
docker_registry_mirrors : [] # docker registry mirror list
docker_exporter_port : 9323 # docker metrics exporter port, 9323 by default
docker_image : [] # docker image to be pulled after bootstrap
docker_image_cache : /tmp/docker/*.tgz # docker image cache glob pattern
#================================================================#
# VARS: ETCD #
#================================================================#
#etcd_seq: 1 # etcd instance identifier, explicitly required
etcd_cluster : etcd # etcd cluster & group name, etcd by default
etcd_safeguard : false # prevent purging running etcd instance?
etcd_data : /data/etcd # etcd data directory, /data/etcd by default
etcd_port : 2379 # etcd client port, 2379 by default
etcd_peer_port : 2380 # etcd peer port, 2380 by default
etcd_init : new # etcd initial cluster state, new or existing
etcd_election_timeout : 1000 # etcd election timeout, 1000ms by default
etcd_heartbeat_interval : 100 # etcd heartbeat interval, 100ms by default
etcd_root_password : Etcd.Root # etcd root password for RBAC, change it!
#================================================================#
# VARS: MINIO #
#================================================================#
#minio_seq: 1 # minio instance identifier, REQUIRED
minio_cluster : minio # minio cluster identifier, REQUIRED
minio_user : minio # minio os user, `minio` by default
minio_https : true # use https for minio, true by default
minio_node : '${minio_cluster}-${minio_seq}.pigsty' # minio node name pattern
minio_data : '/data/minio' # minio data dir(s), use {x...y} to specify multi drivers
#minio_volumes: # minio data volumes, override defaults if specified
minio_domain : sss.pigsty # minio external domain name, `sss.pigsty` by default
minio_port : 9000 # minio service port, 9000 by default
minio_admin_port : 9001 # minio console port, 9001 by default
minio_access_key : minioadmin # root access key, `minioadmin` by default
minio_secret_key : S3User.MinIO # root secret key, `S3User.MinIO` by default
minio_extra_vars : '' # extra environment variables
minio_provision : true # run minio provisioning tasks?
minio_alias : sss # alias name for local minio deployment
#minio_endpoint: https://sss.pigsty:9000 # if not specified, overwritten by defaults
minio_buckets : # list of minio bucket to be created
- { name : pgsql }
- { name: meta ,versioning : true }
- { name : data }
minio_users : # list of minio user to be created
- { access_key: pgbackrest ,secret_key: S3User.Backup ,policy : pgsql }
- { access_key: s3user_meta ,secret_key: S3User.Meta ,policy : meta }
- { access_key: s3user_data ,secret_key: S3User.Data ,policy : data }
#================================================================#
# VARS: REDIS #
#================================================================#
#redis_cluster: <CLUSTER> # redis cluster name, required identity parameter
#redis_node: 1 <NODE> # redis node sequence number, node int id required
#redis_instances: {} <NODE> # redis instances definition on this redis node
redis_fs_main : /data/redis # redis main data directory, `/data/redis` by default
redis_exporter_enabled : true # install redis exporter on redis nodes?
redis_exporter_port : 9121 # redis exporter listen port, 9121 by default
redis_exporter_options : '' # cli args and extra options for redis exporter
redis_mode: standalone # redis mode : standalone,cluster,sentinel
redis_conf : redis.conf # redis config template path, except sentinel
redis_bind_address : '0.0.0.0' # redis bind address, empty string will use host ip
redis_max_memory : 1GB # max memory used by each redis instance
redis_mem_policy : allkeys-lru # redis memory eviction policy
redis_password : '' # redis password, empty string will disable password
redis_rdb_save : [ '1200 1' ] # redis rdb save directives, disable with empty list
redis_aof_enabled : false # enable redis append only file?
redis_rename_commands : {} # rename redis dangerous commands
redis_cluster_replicas : 1 # replica number for one master in redis cluster
redis_sentinel_monitor : [] # sentinel master list, works on sentinel cluster only
#================================================================#
# VARS: PGSQL #
#================================================================#
#-----------------------------------------------------------------
# PG_IDENTITY
#-----------------------------------------------------------------
pg_mode: pgsql #CLUSTER # pgsql cluster mode : pgsql,citus,gpsql,mssql,mysql,ivory,polar
# pg_cluster: #CLUSTER # pgsql cluster name, required identity parameter
# pg_seq: 0 #INSTANCE # pgsql instance seq number, required identity parameter
# pg_role: replica #INSTANCE # pgsql role, required, could be primary,replica,offline
# pg_instances: {} #INSTANCE # define multiple pg instances on node in `{port:ins_vars}` format
# pg_upstream: #INSTANCE # repl upstream ip addr for standby cluster or cascade replica
# pg_shard: #CLUSTER # pgsql shard name, optional identity for sharding clusters
# pg_group: 0 #CLUSTER # pgsql shard index number, optional identity for sharding clusters
# gp_role: master #CLUSTER # greenplum role of this cluster, could be master or segment
pg_offline_query : false #INSTANCE # set to true to enable offline queries on this instance
#-----------------------------------------------------------------
# PG_BUSINESS
#-----------------------------------------------------------------
# postgres business object definition, overwrite in group vars
pg_users : [] # postgres business users
pg_databases : [] # postgres business databases
pg_services : [] # postgres business services
pg_hba_rules : [] # business hba rules for postgres
pgb_hba_rules : [] # business hba rules for pgbouncer
# global credentials, overwrite in global vars
pg_dbsu_password : '' # dbsu password, empty string means no dbsu password by default
pg_replication_username : replicator
pg_replication_password : DBUser.Replicator
pg_admin_username : dbuser_dba
pg_admin_password : DBUser.DBA
pg_monitor_username : dbuser_monitor
pg_monitor_password : DBUser.Monitor
#-----------------------------------------------------------------
# PG_INSTALL
#-----------------------------------------------------------------
pg_dbsu : postgres # os dbsu name, postgres by default, better not change it
pg_dbsu_uid : 543 # os dbsu uid and gid, 26 for default postgres users and groups
pg_dbsu_sudo : limit # dbsu sudo privilege, none,limit,all,nopass. limit by default
pg_dbsu_home : /var/lib/pgsql # postgresql home directory, `/var/lib/pgsql` by default
pg_dbsu_ssh_exchange : true # exchange postgres dbsu ssh key among same pgsql cluster
pg_version : 18 # postgres major version to be installed, 18 by default
pg_bin_dir : /usr/pgsql/bin # postgres binary dir, `/usr/pgsql/bin` by default
pg_log_dir : /pg/log/postgres # postgres log dir, `/pg/log/postgres` by default
pg_packages : # pg packages to be installed, alias can be used
- pgsql-main pgsql-common
pg_extensions : [] # pg extensions to be installed, alias can be used
#-----------------------------------------------------------------
# PG_BOOTSTRAP
#-----------------------------------------------------------------
pg_data : /pg/data # postgres data directory, `/pg/data` by default
pg_fs_main : /data/postgres # postgres main data directory, `/data/postgres` by default
pg_fs_backup : /data/backups # postgres backup data directory, `/data/backups` by default
pg_storage_type : SSD # storage type for pg main data, SSD,HDD, SSD by default
pg_dummy_filesize : 64MiB # size of `/pg/dummy`, hold 64MB disk space for emergency use
pg_listen : '0.0.0.0' # postgres/pgbouncer listen addresses, comma separated list
pg_port : 5432 # postgres listen port, 5432 by default
pg_localhost : /var/run/postgresql # postgres unix socket dir for localhost connection
patroni_enabled : true # if disabled, no postgres cluster will be created during init
patroni_mode: default # patroni working mode : default,pause,remove
pg_namespace : /pg # top level key namespace in etcd, used by patroni & vip
patroni_port : 8008 # patroni listen port, 8008 by default
patroni_log_dir : /pg/log/patroni # patroni log dir, `/pg/log/patroni` by default
patroni_ssl_enabled : false # secure patroni RestAPI communications with SSL?
patroni_watchdog_mode: 'off' # patroni watchdog mode : automatic,required,off. off by default
patroni_username : postgres # patroni restapi username, `postgres` by default
patroni_password : Patroni.API # patroni restapi password, `Patroni.API` by default
pg_etcd_password : '' # etcd password for this pg cluster, '' to use pg_cluster
pg_primary_db : postgres # primary database name, used by citus,etc... ,postgres by default
pg_parameters : {} # extra parameters in postgresql.auto.conf
pg_files : [] # extra files to be copied to postgres data directory (e.g. license)
pg_conf: oltp.yml # config template : oltp,olap,crit,tiny. `oltp.yml` by default
pg_max_conn : auto # postgres max connections, `auto` will use recommended value
pg_shared_buffer_ratio : 0.25 # postgres shared buffers ratio, 0.25 by default, 0.1~0.4
pg_io_method : worker # io method for postgres, auto,fsync,worker,io_uring, worker by default
pg_rto: norm # shared rto mode for patroni & haproxy : fast,norm,safe,wide
pg_rpo : 1048576 # recovery point objective in bytes, `1MiB` at most by default
pg_libs : 'pg_stat_statements, auto_explain' # preloaded libraries, `pg_stat_statements,auto_explain` by default
pg_delay : 0 # replication apply delay for standby cluster leader
pg_checksum : true # enable data checksum for postgres cluster?
pg_encoding : UTF8 # database cluster encoding, `UTF8` by default
pg_locale : C # database cluster local, `C` by default
pg_lc_collate : C # database cluster collate, `C` by default
pg_lc_ctype : C # database character type, `C` by default
#pgsodium_key: "" # pgsodium key, 64 hex digit, default to sha256(pg_cluster)
#pgsodium_getkey_script: "" # pgsodium getkey script path, pgsodium_getkey by default
#-----------------------------------------------------------------
# PG_PROVISION
#-----------------------------------------------------------------
pg_provision : true # provision postgres cluster after bootstrap
pg_init : pg-init # provision init script for cluster template, `pg-init` by default
pg_default_roles : # default roles and users in postgres cluster
- { name: dbrole_readonly ,login: false ,comment : role for global read-only access }
- { name: dbrole_offline ,login: false ,comment : role for restricted read-only access }
- { name: dbrole_readwrite ,login: false ,roles: [dbrole_readonly] ,comment : role for global read-write access }
- { name: dbrole_admin ,login: false ,roles: [pg_monitor, dbrole_readwrite] ,comment : role for object creation }
- { name: postgres ,superuser: true ,comment : system superuser }
- { name: replicator ,replication: true ,roles: [pg_monitor, dbrole_readonly] ,comment : system replicator }
- { name: dbuser_dba ,superuser: true ,roles: [dbrole_admin] ,pgbouncer: true ,pool_mode: session, pool_connlimit: 16 ,comment : pgsql admin user }
- { name: dbuser_monitor ,roles: [pg_monitor] ,pgbouncer: true ,parameters : {log_min_duration_statement: 1000 } ,pool_mode: session ,pool_connlimit: 8 ,comment : pgsql monitor user }
pg_default_privileges : # default privileges when created by admin user
- GRANT USAGE ON SCHEMAS TO dbrole_readonly
- GRANT SELECT ON TABLES TO dbrole_readonly
- GRANT SELECT ON SEQUENCES TO dbrole_readonly
- GRANT EXECUTE ON FUNCTIONS TO dbrole_readonly
- GRANT USAGE ON SCHEMAS TO dbrole_offline
- GRANT SELECT ON TABLES TO dbrole_offline
- GRANT SELECT ON SEQUENCES TO dbrole_offline
- GRANT EXECUTE ON FUNCTIONS TO dbrole_offline
- GRANT INSERT ON TABLES TO dbrole_readwrite
- GRANT UPDATE ON TABLES TO dbrole_readwrite
- GRANT DELETE ON TABLES TO dbrole_readwrite
- GRANT USAGE ON SEQUENCES TO dbrole_readwrite
- GRANT UPDATE ON SEQUENCES TO dbrole_readwrite
- GRANT TRUNCATE ON TABLES TO dbrole_admin
- GRANT REFERENCES ON TABLES TO dbrole_admin
- GRANT TRIGGER ON TABLES TO dbrole_admin
- GRANT CREATE ON SCHEMAS TO dbrole_admin
pg_default_schemas : [ monitor ] # default schemas to be created
pg_default_extensions : # default extensions to be created
- { name: pg_stat_statements ,schema : monitor }
- { name: pgstattuple ,schema : monitor }
- { name: pg_buffercache ,schema : monitor }
- { name: pageinspect ,schema : monitor }
- { name: pg_prewarm ,schema : monitor }
- { name: pg_visibility ,schema : monitor }
- { name: pg_freespacemap ,schema : monitor }
- { name: postgres_fdw ,schema : public }
- { name: file_fdw ,schema : public }
- { name: btree_gist ,schema : public }
- { name: btree_gin ,schema : public }
- { name: pg_trgm ,schema : public }
- { name: intagg ,schema : public }
- { name: intarray ,schema : public }
- { name : pg_repack }
pg_reload : true # reload postgres after hba changes
pg_default_hba_rules : # postgres default host-based authentication rules, order by `order`
- {user : '${dbsu}' ,db: all ,addr: local ,auth: ident ,title: 'dbsu access via local os user ident' ,order : 100 }
- {user : '${dbsu}' ,db: replication ,addr: local ,auth: ident ,title: 'dbsu replication from local os ident' ,order : 150 }
- {user : '${repl}' ,db: replication ,addr: localhost ,auth: pwd ,title: 'replicator replication from localhost',order : 200 }
- {user : '${repl}' ,db: replication ,addr: intra ,auth: pwd ,title: 'replicator replication from intranet' ,order : 250 }
- {user : '${repl}' ,db: postgres ,addr: intra ,auth: pwd ,title: 'replicator postgres db from intranet' ,order : 300 }
- {user : '${monitor}' ,db: all ,addr: localhost ,auth: pwd ,title: 'monitor from localhost with password' ,order : 350 }
- {user : '${monitor}' ,db: all ,addr: infra ,auth: pwd ,title: 'monitor from infra host with password',order : 400 }
- {user : '${admin}' ,db: all ,addr: infra ,auth: ssl ,title: 'admin @ infra nodes with pwd & ssl' ,order : 450 }
- {user : '${admin}' ,db: all ,addr: world ,auth: ssl ,title: 'admin @ everywhere with ssl & pwd' ,order : 500 }
- {user: '+dbrole_readonly',db: all ,addr: localhost ,auth: pwd ,title: 'pgbouncer read/write via local socket',order : 550 }
- {user: '+dbrole_readonly',db: all ,addr: intra ,auth: pwd ,title: 'read/write biz user via password' ,order : 600 }
- {user: '+dbrole_offline' ,db: all ,addr: intra ,auth: pwd ,title: 'allow etl offline tasks from intranet',order : 650 }
pgb_default_hba_rules : # pgbouncer default host-based authentication rules, order by `order`
- {user : '${dbsu}' ,db: pgbouncer ,addr: local ,auth: peer ,title: 'dbsu local admin access with os ident',order : 100 }
- {user: 'all' ,db: all ,addr: localhost ,auth: pwd ,title: 'allow all user local access with pwd' ,order : 150 }
- {user : '${monitor}' ,db: pgbouncer ,addr: intra ,auth: pwd ,title: 'monitor access via intranet with pwd' ,order : 200 }
- {user : '${monitor}' ,db: all ,addr: world ,auth: deny ,title: 'reject all other monitor access addr' ,order : 250 }
- {user : '${admin}' ,db: all ,addr: intra ,auth: pwd ,title: 'admin access via intranet with pwd' ,order : 300 }
- {user : '${admin}' ,db: all ,addr: world ,auth: deny ,title: 'reject all other admin access addr' ,order : 350 }
- {user: 'all' ,db: all ,addr: intra ,auth: pwd ,title: 'allow all user intra access with pwd' ,order : 400 }
#-----------------------------------------------------------------
# PG_BACKUP
#-----------------------------------------------------------------
pgbackrest_enabled : true # enable pgbackrest on pgsql host?
pgbackrest_log_dir : /pg/log/pgbackrest # pgbackrest log dir, `/pg/log/pgbackrest` by default
pgbackrest_method: local # pgbackrest repo method : local,minio,[user-defined...]
pgbackrest_init_backup : true # take a full backup after pgbackrest is initialized?
pgbackrest_repo: # pgbackrest repo : https://pgbackrest.org/configuration.html#section-repository
local : # default pgbackrest repo with local posix fs
path : /pg/backup # local backup directory, `/pg/backup` by default
retention_full_type : count # retention full backups by count
retention_full : 2 # keep 2, at most 3 full backups when using local fs repo
minio : # optional minio repo for pgbackrest
type : s3 # minio is s3-compatible, so s3 is used
s3_endpoint : sss.pigsty # minio endpoint domain name, `sss.pigsty` by default
s3_region : us-east-1 # minio region, us-east-1 by default, useless for minio
s3_bucket : pgsql # minio bucket name, `pgsql` by default
s3_key : pgbackrest # minio user access key for pgbackrest
s3_key_secret : S3User.Backup # minio user secret key for pgbackrest
s3_uri_style : path # use path style uri for minio rather than host style
path : /pgbackrest # minio backup path, default is `/pgbackrest`
storage_port : 9000 # minio port, 9000 by default
storage_ca_file : /etc/pki/ca.crt # minio ca file path, `/etc/pki/ca.crt` by default
block : y # Enable block incremental backup
bundle : y # bundle small files into a single file
bundle_limit : 20MiB # Limit for file bundles, 20MiB for object storage
bundle_size : 128MiB # Target size for file bundles, 128MiB for object storage
cipher_type : aes-256-cbc # enable AES encryption for remote backup repo
cipher_pass : pgBackRest # AES encryption password, default is 'pgBackRest'
retention_full_type : time # retention full backup by time on minio repo
retention_full : 14 # keep full backup for the the last 14 days
#-----------------------------------------------------------------
# PG_ACCESS
#-----------------------------------------------------------------
pgbouncer_enabled : true # if disabled, pgbouncer will not be launched on pgsql host
pgbouncer_port : 6432 # pgbouncer listen port, 6432 by default
pgbouncer_log_dir : /pg/log/pgbouncer # pgbouncer log dir, `/pg/log/pgbouncer` by default
pgbouncer_auth_query : false # query postgres to retrieve unlisted business users?
pgbouncer_poolmode: transaction # pooling mode : transaction,session,statement, transaction by default
pgbouncer_sslmode : disable # pgbouncer client ssl mode, disable by default
pgbouncer_ignore_param : [ extra_float_digits, application_name, TimeZone, DateStyle, IntervalStyle, search_path ]
pg_weight : 100 #INSTANCE # relative load balance weight in service, 100 by default, 0-255
pg_service_provider : '' # dedicate haproxy node group name, or empty string for local nodes by default
pg_default_service_dest : pgbouncer # default service destination if svc.dest='default'
pg_default_services : # postgres default service definitions
- { name: primary ,port: 5433 ,dest: default ,check: /primary ,selector : "[]" }
- { name: replica ,port: 5434 ,dest: default ,check: /read-only ,selector : "[]" , backup : "[? pg_role == `primary` || pg_role == `offline` ]" }
- { name: default ,port: 5436 ,dest: postgres ,check: /primary ,selector : "[]" }
- { name: offline ,port: 5438 ,dest: postgres ,check: /replica ,selector : "[? pg_role == `offline` || pg_offline_query ]" , backup : "[? pg_role == `replica` && !pg_offline_query]" }
pg_vip_enabled : false # enable a l2 vip for pgsql primary? false by default
pg_vip_address : 127.0.0.1 /24 # vip address in `<ipv4>/<mask>` format, require if vip is enabled
pg_vip_interface : eth0 # vip network interface to listen, eth0 by default
pg_dns_suffix : '' # pgsql dns suffix, '' by default
pg_dns_target : auto # auto, primary, vip, none, or ad hoc ip
#-----------------------------------------------------------------
# PG_MONITOR
#-----------------------------------------------------------------
pg_exporter_enabled : true # enable pg_exporter on pgsql hosts?
pg_exporter_config : pg_exporter.yml # pg_exporter configuration file name
pg_exporter_cache_ttls : '1,10,60,300' # pg_exporter collector ttl stage in seconds, '1,10,60,300' by default
pg_exporter_port : 9630 # pg_exporter listen port, 9630 by default
pg_exporter_params : 'sslmode=disable' # extra url parameters for pg_exporter dsn
pg_exporter_url : '' # overwrite auto-generate pg dsn if specified
pg_exporter_auto_discovery : true # enable auto database discovery? enabled by default
pg_exporter_exclude_database : 'template0,template1,postgres' # csv of database that WILL NOT be monitored during auto-discovery
pg_exporter_include_database : '' # csv of database that WILL BE monitored during auto-discovery
pg_exporter_connect_timeout : 200 # pg_exporter connect timeout in ms, 200 by default
pg_exporter_options : '' # overwrite extra options for pg_exporter
pgbouncer_exporter_enabled : true # enable pgbouncer_exporter on pgsql hosts?
pgbouncer_exporter_port : 9631 # pgbouncer_exporter listen port, 9631 by default
pgbouncer_exporter_url : '' # overwrite auto-generate pgbouncer dsn if specified
pgbouncer_exporter_options : '' # overwrite extra options for pgbouncer_exporter
pgbackrest_exporter_enabled : true # enable pgbackrest_exporter on pgsql hosts?
pgbackrest_exporter_port : 9854 # pgbackrest_exporter listen port, 9854 by default
pgbackrest_exporter_options : >
--collect.interval=120
--log.level=info
#-----------------------------------------------------------------
# PG_REMOVE
#-----------------------------------------------------------------
pg_safeguard : false # stop pg_remove running if pg_safeguard is enabled, false by default
pg_rm_data : true # remove postgres data during remove? true by default
pg_rm_backup : true # remove pgbackrest backup during primary remove? true by default
pg_rm_pkg : true # uninstall postgres packages during remove? true by default
...
配置解读 demo/debian 模板是针对 Debian 和 Ubuntu 发行版优化的配置。
支持的发行版 :
Debian 12 (Bookworm) Debian 13 (Trixie) Ubuntu 22.04 LTS (Jammy) Ubuntu 24.04 LTS (Noble) 关键特性 :
使用 PGDG APT 软件源 针对 APT 包管理器优化 支持 Debian/Ubuntu 特定的软件包名称 适用场景 :
云服务器(Ubuntu 广泛使用) 容器环境(Debian 常用作基础镜像) 开发测试环境 9.40 - demo/demo Pigsty 公开演示站点配置,展示如何配置 SSL 证书、暴露域名、安装全部扩展
demo/demo 配置模板是 Pigsty 公开演示站点使用的配置文件,展示了如何对外暴露网站、配置 SSL 证书、安装全部扩展插件。
如果您希望在云服务器上搭建自己的公开服务,可以参考此配置模板。
配置概览 配置名称: demo/demo 节点数量: 单节点 配置说明:Pigsty 公开演示站点配置 适用系统:el8, el9, el10, d12, d13, u22, u24 适用架构:x86_64 相关配置:metarich 启用方式:
./configure -c demo/demo [ -i <primary_ip>]
主要特性 此模板在 meta 基础上进行了以下增强:
配置 SSL 证书和自定义域名(如 pigsty.cc) 下载并安装 PostgreSQL 18 所有可用扩展 启用 Docker 并配置镜像加速 部署 MinIO 对象存储 预置多个业务数据库和用户 添加 Redis 主从实例示例 添加 FerretDB MongoDB 兼容集群 添加 Kafka 样例集群 配置内容 源文件地址:pigsty/conf/demo/demo.yml
---
#==============================================================#
# File : demo.yml
# Desc : Pigsty Public Demo Configuration
# Ctime : 2020-05-22
# Mtime : 2025-12-12
# Docs : https://pigsty.io/docs/conf/demo
# License : Apache-2.0 @ https://pigsty.io/docs/about/license/
# Copyright : 2018-2026 Ruohang Feng / Vonng (rh@vonng.com)
#==============================================================#
all :
children :
# infra cluster for proxy, monitor, alert, etc..
infra :
hosts : { 10.10.10.10 : { infra_seq : 1 } }
vars :
nodename : pigsty.cc # overwrite the default hostname
node_id_from_pg : false # do not use the pg identity as hostname
docker_enabled : true # enable docker on this node
docker_registry_mirrors : [ "https://mirror.ccs.tencentyun.com" , "https://docker.1ms.run" ]
# ./pgsql-monitor.yml -l infra # monitor 'external' PostgreSQL instance
pg_exporters : # treat local postgres as RDS for demonstration purpose
20001 : { pg_cluster: pg-foo, pg_seq: 1, pg_host : 10.10.10.10 }
#20002: { pg_cluster: pg-bar, pg_seq: 1, pg_host: 10.10.10.11 , pg_port: 5432 }
#20003: { pg_cluster: pg-bar, pg_seq: 2, pg_host: 10.10.10.12 , pg_exporter_url: 'postgres://dbuser_monitor:DBUser.Monitor@10.10.10.12:5432/postgres?sslmode=disable' }
#20004: { pg_cluster: pg-bar, pg_seq: 3, pg_host: 10.10.10.13 , pg_monitor_username: dbuser_monitor, pg_monitor_password: DBUser.Monitor }
# etcd cluster for ha postgres
etcd : { hosts : { 10.10.10.10 : { etcd_seq: 1 } }, vars : { etcd_cluster : etcd } }
# minio cluster, s3 compatible object storage
minio : { hosts : { 10.10.10.10 : { minio_seq: 1 } }, vars : { minio_cluster : minio } }
# postgres example cluster: pg-meta
pg-meta :
hosts : { 10.10.10.10 : { pg_seq: 1, pg_role : primary } }
vars :
pg_cluster : pg-meta
pg_users :
- {name: dbuser_meta ,password: DBUser.Meta ,pgbouncer: true ,roles: [dbrole_admin] ,comment : pigsty admin user }
- {name: dbuser_view ,password: DBUser.Viewer ,pgbouncer: true ,roles: [dbrole_readonly] ,comment : read-only viewer for meta database }
- {name: dbuser_grafana ,password: DBUser.Grafana ,pgbouncer: true ,roles: [dbrole_admin] ,comment : admin user for grafana database }
- {name: dbuser_bytebase ,password: DBUser.Bytebase ,pgbouncer: true ,roles: [dbrole_admin] ,comment : admin user for bytebase database }
- {name: dbuser_kong ,password: DBUser.Kong ,pgbouncer: true ,roles: [dbrole_admin] ,comment : admin user for kong api gateway }
- {name: dbuser_gitea ,password: DBUser.Gitea ,pgbouncer: true ,roles: [dbrole_admin] ,comment : admin user for gitea service }
- {name: dbuser_wiki ,password: DBUser.Wiki ,pgbouncer: true ,roles: [dbrole_admin] ,comment : admin user for wiki.js service }
- {name: dbuser_noco ,password: DBUser.Noco ,pgbouncer: true ,roles: [dbrole_admin] ,comment : admin user for nocodb service }
- {name: dbuser_odoo ,password: DBUser.Odoo ,pgbouncer: true ,roles: [dbrole_admin] ,comment: admin user for odoo service ,createdb: true } #,superuser : true }
- {name: dbuser_mattermost ,password: DBUser.MatterMost ,pgbouncer: true ,roles: [dbrole_admin] ,comment: admin user for mattermost ,createdb : true }
pg_databases :
- {name: meta ,baseline: cmdb.sql ,comment: pigsty meta database ,schemas: [pigsty] ,extensions : [ {name : vector},{name: postgis},{name: timescaledb}]}
- {name: grafana ,owner: dbuser_grafana ,revokeconn: true ,comment : grafana primary database }
- {name: bytebase ,owner: dbuser_bytebase ,revokeconn: true ,comment : bytebase primary database }
- {name: kong ,owner: dbuser_kong ,revokeconn: true ,comment : kong api gateway database }
- {name: gitea ,owner: dbuser_gitea ,revokeconn: true ,comment : gitea meta database }
- {name: wiki ,owner: dbuser_wiki ,revokeconn: true ,comment : wiki meta database }
- {name: noco ,owner: dbuser_noco ,revokeconn: true ,comment : nocodb database }
#- {name: odoo ,owner: dbuser_odoo ,revokeconn: true ,comment: odoo main database }
- {name: mattermost ,owner: dbuser_mattermost ,revokeconn: true ,comment : mattermost main database }
pg_hba_rules :
- {user: dbuser_view , db: all ,addr: infra ,auth: pwd ,title : 'allow grafana dashboard access cmdb from infra nodes' }
pg_libs : 'timescaledb,pg_stat_statements, auto_explain' # add timescaledb to shared_preload_libraries
pg_extensions : # extensions to be installed on this cluster
- timescaledb timescaledb_toolkit pg_timeseries periods temporal_tables emaj table_version pg_cron pg_task pg_later pg_background
- postgis pgrouting pointcloud pg_h3 q3c ogr_fdw geoip pg_polyline pg_geohash #mobilitydb
- pgvector vchord pgvectorscale pg_vectorize pg_similarity smlar pg_summarize pg_tiktoken pg4ml #pgml
- pg_search pgroonga pg_bigm zhparser pg_bestmatch vchord_bm25 hunspell
- citus hydra pg_analytics pg_duckdb pg_mooncake duckdb_fdw pg_parquet pg_fkpart pg_partman plproxy #pg_strom
- age hll rum pg_graphql pg_jsonschema jsquery pg_hint_plan hypopg index_advisor pg_plan_filter imgsmlr pg_ivm pg_incremental pgmq pgq pg_cardano omnigres #rdkit
- pg_tle plv8 pllua plprql pldebugger plpgsql_check plprofiler plsh pljava #plr #pgtap #faker #dbt2
- pg_prefix pg_semver pgunit pgpdf pglite_fusion md5hash asn1oid roaringbitmap pgfaceting pgsphere pg_country pg_xenophile pg_currency pg_collection pgmp numeral pg_rational pguint pg_uint128 hashtypes ip4r pg_uri pgemailaddr pg_acl timestamp9 chkpass #pg_duration #debversion #pg_rrule
- pg_gzip pg_bzip pg_zstd pg_http pg_net pg_curl pgjq pgjwt pg_smtp_client pg_html5_email_address url_encode pgsql_tweaks pg_extra_time pgpcre icu_ext pgqr pg_protobuf envvar floatfile pg_readme ddl_historization data_historization pg_schedoc pg_hashlib pg_xxhash shacrypt cryptint pg_ecdsa pgsparql
- pg_idkit pg_uuidv7 permuteseq pg_hashids sequential_uuids topn quantile lower_quantile count_distinct omnisketch ddsketch vasco pgxicor tdigest first_last_agg extra_window_functions floatvec aggs_for_vecs aggs_for_arrays pg_arraymath pg_math pg_random pg_base36 pg_base62 pg_base58 pg_financial
- pg_repack pg_squeeze pg_dirtyread pgfincore pg_cooldown pg_ddlx pg_prioritize pg_checksums pg_readonly pg_upless pg_permissions pgautofailover pg_catcheck preprepare pgcozy pg_orphaned pg_crash pg_cheat_funcs pg_fio pg_savior safeupdate pg_drop_events table_log #pgagent #pgpool
- pg_profile pg_tracing pg_show_plans pg_stat_kcache pg_stat_monitor pg_qualstats pg_store_plans pg_track_settings pg_wait_sampling system_stats pg_meta pgnodemx pg_sqlog bgw_replstatus pgmeminfo toastinfo pg_explain_ui pg_relusage pagevis powa
- passwordcheck supautils pgsodium pg_vault pg_session_jwt pg_anon pg_tde pgsmcrypto pgaudit pgauditlogtofile pg_auth_mon credcheck pgcryptokey pg_jobmon logerrors login_hook set_user pg_snakeoil pgextwlist pg_auditor sslutils pg_noset
- wrappers multicorn odbc_fdw jdbc_fdw mysql_fdw tds_fdw sqlite_fdw pgbouncer_fdw mongo_fdw redis_fdw pg_redis_pubsub kafka_fdw hdfs_fdw firebird_fdw aws_s3 log_fdw #oracle_fdw #db2_fdw
- documentdb orafce pgtt session_variable pg_statement_rollback pg_dbms_metadata pg_dbms_lock pgmemcache #pg_dbms_job
- pglogical pglogical_ticker pgl_ddl_deploy pg_failover_slots db_migrator wal2json wal2mongo decoderbufs decoder_raw mimeo pg_fact_loader pg_bulkload #repmgr
redis-ms : # redis classic primary & replica
hosts : { 10.10.10.10 : { redis_node: 1 , redis_instances : { 6379 : { }, 6380 : { replica_of: '10.10.10.10 6379' }, 6381 : { replica_of : '10.10.10.10 6379' } } } }
vars : { redis_cluster: redis-ms ,redis_password: 'redis.ms' ,redis_max_memory : 64MB }
# ./mongo.yml -l pg-mongo
pg-mongo :
hosts : { 10.10.10.10 : { mongo_seq : 1 } }
vars :
mongo_cluster : pg-mongo
mongo_pgurl : 'postgres://dbuser_meta:DBUser.Meta@10.10.10.10:5432/grafana'
# Kafka is a pilot module, see: https://pigsty.io/docs/pilot/kafka
kf-main :
hosts : { 10.10.10.10 : { kafka_seq: 1, kafka_role : controller } }
vars :
kafka_cluster : kf-main
kafka_peer_port : 9093
vars : # global variables
version : v4.2.2 # pigsty version string
admin_ip : 10.10.10.10 # admin node ip address
region: china # upstream mirror region : default|china|europe
infra_portal : # infra services exposed via portal
home : { domain : i.pigsty } # default domain name
cc : { domain: pigsty.cc ,path : "/www/pigsty.cc" ,cert: /etc/cert/pigsty.cc.crt ,key : /etc/cert/pigsty.cc.key }
minio : { domain: m.pigsty.cc ,endpoint : "${admin_ip}:9001" ,scheme: https ,websocket : true }
postgrest : { domain: api.pigsty.cc ,endpoint : "127.0.0.1:8884" }
pgadmin : { domain: adm.pigsty.cc ,endpoint : "127.0.0.1:8885" }
pgweb : { domain: cli.pigsty.cc ,endpoint : "127.0.0.1:8886" }
bytebase : { domain: ddl.pigsty.cc ,endpoint : "127.0.0.1:8887" }
jupyter : { domain: lab.pigsty.cc ,endpoint : "127.0.0.1:8888" , websocket : true }
gitea : { domain: git.pigsty.cc ,endpoint : "127.0.0.1:8889" }
wiki : { domain: wiki.pigsty.cc ,endpoint : "127.0.0.1:9002" }
noco : { domain: noco.pigsty.cc ,endpoint : "127.0.0.1:9003" }
supa : { domain: supa.pigsty.cc ,endpoint : "10.10.10.10:8000" ,websocket : true }
dify : { domain: dify.pigsty.cc ,endpoint : "10.10.10.10:8001" ,websocket : true }
odoo : { domain: odoo.pigsty.cc ,endpoint : "127.0.0.1:8069" ,websocket : true }
mm : { domain: mm.pigsty.cc ,endpoint : "10.10.10.10:8065" ,websocket : true }
# scp -r ~/pgsty/cc/cert/* pj:/etc/cert/ # copy https certs
# scp -r ~/dev/pigsty.cc/public pj:/www/pigsty.cc # copy pigsty.cc website
node_etc_hosts : [ "${admin_ip} i.pigsty sss.pigsty" ]
node_timezone : Asia/Hong_Kong
node_ntp_servers :
- pool cn.pool.ntp.org iburst
- pool ${admin_ip} iburst # assume non-admin nodes does not have internet access
pgbackrest_enabled : false # do not take backups since this is disposable demo env
# keep 3GiB metrics data at most on demo env
vmetrics_options : >-
-retentionPeriod=15d
-retention.maxDiskSpaceUsageBytes=3GiB
# install all postgresql18 extensions
pg_version : 18 # default postgres version
repo_extra_packages : [ pg18-core ,pg18-time ,pg18-gis ,pg18-rag ,pg18-fts ,pg18-olap ,pg18-feat ,pg18-lang ,pg18-type ,pg18-util ,pg18-func ,pg18-admin ,pg18-stat ,pg18-sec ,pg18-fdw ,pg18-sim ,pg18-etl]
pg_extensions : [ pg18-time ,pg18-gis ,pg18-rag ,pg18-fts ,pg18-feat ,pg18-lang ,pg18-type ,pg18-util ,pg18-func ,pg18-admin ,pg18-stat ,pg18-sec ,pg18-fdw ,pg18-sim ,pg18-etl ] #,pg18-olap]
#----------------------------------------------#
# PASSWORD : https://pigsty.io/docs/setup/security/
#----------------------------------------------#
grafana_admin_password : pigsty
grafana_view_password : DBUser.Viewer
pg_admin_password : DBUser.DBA
pg_monitor_password : DBUser.Monitor
pg_replication_password : DBUser.Replicator
patroni_password : Patroni.API
haproxy_admin_password : pigsty
minio_secret_key : S3User.MinIO
etcd_root_password : Etcd.Root
...
配置解读 demo/demo 模板是 Pigsty 的 公开演示配置 ,展示了完整的生产级部署示例。
关键特性 :
配置 HTTPS 证书和自定义域名 安装所有可用的 PostgreSQL 扩展 集成 Redis、FerretDB、Kafka 等组件 配置 Docker 镜像加速 适用场景 :
搭建公开演示站点 需要完整功能展示的场景 学习 Pigsty 高级配置 注意事项 :
需要准备 SSL 证书文件 需要配置 DNS 解析 部分扩展在 ARM64 架构不可用 9.41 - demo/minio 四节点 x 四盘位的高可用多节点多盘 MinIO 集群演示
demo/minio 配置模板演示了如何部署一套四节点 x 四盘位、总计十六盘的高可用 MinIO 集群,提供 S3 兼容的对象存储服务。
更多教程,请参考 MINIO
配置概览 配置名称: demo/minio 节点数量: 四节点 配置说明:高可用多节点多盘 MinIO 集群演示 适用系统:el8, el9, el10, d12, d13, u22, u24 适用架构:x86_64, aarch64 相关配置:meta 启用方式:
./configure -c demo/minio
备注:这是一个四节点模版,您需要在生成配置后修改其他三个节点的 IP 地址
配置内容 源文件地址:pigsty/conf/demo/minio.yml
---
#==============================================================#
# File : minio.yml
# Desc : pigsty: 4 node x 4 disk MNMD minio clusters
# Ctime : 2023-01-07
# Mtime : 2025-12-12
# Docs : https://pigsty.io/docs/minio
# License : Apache-2.0 @ https://pigsty.io/docs/about/license/
# Copyright : 2018-2026 Ruohang Feng / Vonng (rh@vonng.com)
#==============================================================#
# One pass installation with:
# ./deploy.yml
#==============================================================#
# 1. minio-1 @ 10.10.10.10:9000 - - (9002) svc <-x 10.10.10.9:9002
# 2. minio-2 @ 10.10.10.11:9000 -xx- (9002) svc <-x <----------------
# 3. minio-3 @ 10.10.10.12:9000 -xx- (9002) svc <-x sss.pigsty:9002
# 4. minio-4 @ 10.10.10.12:9000 - - (9002) svc <-x (intranet dns)
#==============================================================#
# use minio load balancer service (9002) instead of direct access (9000)
# mcli alias set sss https://sss.pigsty:9002 minioadmin S3User.MinIO
#==============================================================#
# https://min.io/docs/minio/linux/operations/install-deploy-manage/deploy-minio-multi-node-multi-drive.html
# MINIO_VOLUMES="https://minio-{1...4}.pigsty:9000/data{1...4}/minio"
all :
children :
# infra cluster for proxy, monitor, alert, etc..
infra : { hosts : { 10.10.10.10 : { infra_seq : 1 } } }
# minio cluster with 4 nodes and 4 drivers per node
minio :
hosts :
10.10.10.10 : { minio_seq: 1 , nodename : minio-1 }
10.10.10.11 : { minio_seq: 2 , nodename : minio-2 }
10.10.10.12 : { minio_seq: 3 , nodename : minio-3 }
10.10.10.13 : { minio_seq: 4 , nodename : minio-4 }
vars :
minio_cluster : minio
minio_data : '/data{1...4}'
minio_buckets : # list of minio bucket to be created
- { name : pgsql }
- { name: meta ,versioning : true }
- { name : data }
minio_users : # list of minio user to be created
- { access_key: pgbackrest ,secret_key: S3User.Backup ,policy : pgsql }
- { access_key: s3user_meta ,secret_key: S3User.Meta ,policy : meta }
- { access_key: s3user_data ,secret_key: S3User.Data ,policy : data }
# bind a node l2 vip (10.10.10.9) to minio cluster (optional)
node_cluster : minio
vip_enabled : true
vip_vrid : 128
vip_address : 10.10.10.9
vip_interface : eth1
# expose minio service with haproxy on all nodes
haproxy_services :
- name : minio # [REQUIRED] service name, unique
port : 9002 # [REQUIRED] service port, unique
balance : leastconn # [OPTIONAL] load balancer algorithm
options : # [OPTIONAL] minio health check
- option httpchk
- option http-keep-alive
- http-check send meth OPTIONS uri /minio/health/live
- http-check expect status 200
servers :
- { name: minio-1 ,ip: 10.10.10.10 ,port: 9000 ,options : 'check-ssl ca-file /etc/pki/ca.crt check port 9000' }
- { name: minio-2 ,ip: 10.10.10.11 ,port: 9000 ,options : 'check-ssl ca-file /etc/pki/ca.crt check port 9000' }
- { name: minio-3 ,ip: 10.10.10.12 ,port: 9000 ,options : 'check-ssl ca-file /etc/pki/ca.crt check port 9000' }
- { name: minio-4 ,ip: 10.10.10.13 ,port: 9000 ,options : 'check-ssl ca-file /etc/pki/ca.crt check port 9000' }
vars :
version : v4.2.2 # pigsty version string
admin_ip : 10.10.10.10 # admin node ip address
region: default # upstream mirror region : default|china|europe
infra_portal : # infra services exposed via portal
home : { domain : i.pigsty } # default domain name
# domain names to access minio web console via nginx web portal (optional)
minio : { domain: m.pigsty ,endpoint : "10.10.10.10:9001" ,scheme: https ,websocket : true }
minio10 : { domain: m10.pigsty ,endpoint : "10.10.10.10:9001" ,scheme: https ,websocket : true }
minio11 : { domain: m11.pigsty ,endpoint : "10.10.10.11:9001" ,scheme: https ,websocket : true }
minio12 : { domain: m12.pigsty ,endpoint : "10.10.10.12:9001" ,scheme: https ,websocket : true }
minio13 : { domain: m13.pigsty ,endpoint : "10.10.10.13:9001" ,scheme: https ,websocket : true }
minio_endpoint : https://sss.pigsty:9002 # explicit overwrite minio endpoint with haproxy port
node_etc_hosts : [ "10.10.10.9 sss.pigsty" ] # domain name to access minio from all nodes (required)
#----------------------------------------------#
# PASSWORD : https://pigsty.io/docs/setup/security/
#----------------------------------------------#
grafana_admin_password : pigsty
haproxy_admin_password : pigsty
minio_secret_key : S3User.MinIO
... 配置解读 demo/minio 模板是 MinIO 生产级部署的参考配置,展示了多节点多盘 (MNMD) 架构。
关键特性 :
多节点多盘架构 :4 节点 × 4 盘 = 16 盘纠删码组L2 VIP 高可用 :通过 Keepalived 绑定虚拟 IPHAProxy 负载均衡 :9002 端口统一访问入口细粒度权限 :为不同应用创建独立用户和存储桶访问方式 :
# 使用 mcli 配置 MinIO 别名(通过 HAProxy 负载均衡)
mcli alias set sss https://sss.pigsty:9002 minioadmin S3User.MinIO
# 列出存储桶
mcli ls sss/
# 使用控制台
# 访问 https://m.pigsty 或 https://m10-m13.pigsty
适用场景 :
需要 S3 兼容对象存储的环境 PostgreSQL 备份存储(pgBackRest 远程仓库) 大数据和 AI 工作负载的数据湖 需要高可用对象存储的生产环境 注意事项 :
每个节点需要准备 4 块独立磁盘挂载到 /data1 - /data4 生产环境建议至少 4 节点以实现纠删码冗余 VIP 需要正确配置网络接口(vip_interface) 9.42 - build/oss Pigsty 开源版离线软件包构建环境配置
build/oss 配置模板是 Pigsty 开源版离线软件包的构建环境配置,用于在多个操作系统上批量构建离线安装包。
此配置仅供开发者和贡献者使用。
配置概览 配置名称: build/oss 节点数量: 六节点(el9, el10, d12, d13, u22, u24) 配置说明:Pigsty 开源版离线软件包构建环境 适用系统:el9, el10, d12, d13, u22, u24 适用架构:x86_64 启用方式:
cp conf/build/oss.yml pigsty.yml
备注:这是一个固定 IP 地址的构建模板,仅供内部使用
配置内容 源文件地址:pigsty/conf/build/oss.yml
---
#==============================================================#
# File : oss.yml
# Desc : Pigsty 3-node building env (PG18)
# Ctime : 2024-10-22
# Mtime : 2025-12-12
# License : Apache-2.0 @ https://pigsty.io/docs/about/license/
# Copyright : 2018-2026 Ruohang Feng / Vonng (rh@vonng.com)
#==============================================================#
all :
vars :
version : v4.2.2
admin_ip : 10.10.10.24
region : china
proxy_env :
no_proxy : "localhost,127.0.0.1,10.0.0.0/8,192.168.0.0/16,*.pigsty,*.aliyun.com,mirrors.*,*.myqcloud.com,*.tsinghua.edu.cn,*.pigsty.cc"
# building spec
pg_version : 18
cache_pkg_dir : 'dist/${version}'
repo_modules : infra,node,pgsql
repo_packages : [ node-bootstrap, infra-package, infra-addons, node-package1, node-package2, pgsql-utility, extra-modules ]
repo_extra_packages : [ pg18-core ,pg18-time ,pg18-gis ,pg18-rag ,pg18-fts ,pg18-olap ,pg18-feat ,pg18-lang ,pg18-type ,pg18-util ,pg18-func ,pg18-admin ,pg18-stat ,pg18-sec ,pg18-fdw ,pg18-sim ,pg18-etl]
pg_extensions : [ pg18-time ,pg18-gis ,pg18-rag ,pg18-fts ,pg18-olap, pg18-feat ,pg18-lang ,pg18-type ,pg18-util ,pg18-func ,pg18-admin ,pg18-stat ,pg18-sec ,pg18-fdw ,pg18-sim ,pg18-etl]
children :
#el8: { hosts: { 10.10.10.8: { pg_cluster: el8 ,pg_seq: 1 ,pg_role: primary }}}
el9 : { hosts : { 10.10.10.9 : { pg_cluster: el9 ,pg_seq: 1 ,pg_role : primary }}}
el10 : { hosts : { 10.10.10.10 : { pg_cluster: el10 ,pg_seq: 1 ,pg_role : primary }}}
d12 : { hosts : { 10.10.10.12 : { pg_cluster: d12 ,pg_seq: 1 ,pg_role : primary }}}
d13 : { hosts : { 10.10.10.13 : { pg_cluster: d13 ,pg_seq: 1 ,pg_role : primary }}}
u22 : { hosts : { 10.10.10.22 : { pg_cluster: u22 ,pg_seq: 1 ,pg_role : primary }}}
u24 : { hosts : { 10.10.10.24 : { pg_cluster: u24 ,pg_seq: 1 ,pg_role : primary }}}
etcd : { hosts : { 10.10.10.24 : { etcd_seq: 1 }}, vars : { etcd_cluster : etcd }}
infra :
hosts :
#10.10.10.8: { infra_seq: 1, admin_ip: 10.10.10.8 ,ansible_host: el8 } #, ansible_python_interpreter: /usr/bin/python3.12 }
10.10.10.9 : { infra_seq: 2, admin_ip: 10.10.10.9 ,ansible_host : el9 }
10.10.10.10 : { infra_seq: 3, admin_ip: 10.10.10.10 ,ansible_host : el10 }
10.10.10.12 : { infra_seq: 4, admin_ip: 10.10.10.12 ,ansible_host : d12 }
10.10.10.13 : { infra_seq: 5, admin_ip: 10.10.10.13 ,ansible_host : d13 }
10.10.10.22 : { infra_seq: 6, admin_ip: 10.10.10.22 ,ansible_host : u22 }
10.10.10.24 : { infra_seq: 7, admin_ip: 10.10.10.24 ,ansible_host : u24 }
vars : { node_tune : oltp }
...
配置解读 build/oss 模板是 Pigsty 开源版离线软件包的构建配置。
构建内容 :
PostgreSQL 18 及所有分类扩展包 基础设施软件包(Prometheus、Grafana、Nginx 等) 节点软件包(监控代理、工具等) 额外模块(extra-modules) 支持的操作系统 :
EL9 (Rocky/Alma/RHEL 9) EL10 (Rocky 10 / RHEL 10) Debian 12 (Bookworm) Debian 13 (Trixie) Ubuntu 22.04 (Jammy) Ubuntu 24.04 (Noble) 构建流程 :
# 1. 准备构建环境
cp conf/build/oss.yml pigsty.yml
# 2. 在各节点上下载软件包
./infra.yml -t repo_build
# 3. 打包离线安装包
make cache
适用场景 :
Pigsty 开发者构建新版本 贡献者测试新扩展 企业用户自定义离线包 9.43 - build/pro Pigsty 专业版离线软件包构建环境配置(多版本)
build/pro 配置模板是 Pigsty 专业版离线软件包的构建环境配置,包含 PostgreSQL 13-18 全版本及额外商业组件。
此配置仅供开发者和贡献者使用。
配置概览 配置名称: build/pro 节点数量: 六节点(el9, el10, d12, d13, u22, u24) 配置说明:Pigsty 专业版离线软件包构建环境(多版本) 适用系统:el9, el10, d12, d13, u22, u24 适用架构:x86_64 启用方式:
cp conf/build/pro.yml pigsty.yml
备注:这是一个固定 IP 地址的构建模板,仅供内部使用
配置内容 源文件地址:pigsty/conf/build/pro.yml
---
#==============================================================#
# File : pro.yml
# Desc : Pigsty 6-node pro building env (PG 14-18)
# Ctime : 2024-10-22
# Mtime : 2025-12-15
# License : Apache-2.0 @ https://pigsty.io/docs/about/license/
# Copyright : 2018-2026 Ruohang Feng / Vonng (rh@vonng.com)
#==============================================================#
all :
vars :
version : v4.2.2
admin_ip : 10.10.10.24
region : china
proxy_env :
no_proxy : "localhost,127.0.0.1,10.0.0.0/8,192.168.0.0/16,*.pigsty,*.aliyun.com,mirrors.*,*.myqcloud.com,*.tsinghua.edu.cn,*.pigsty.cc"
# building spec
pg_version : 18
cache_pkg_dir : 'dist/${version}/pro'
repo_modules : infra,node,pgsql
pg_extensions : []
repo_packages : [
node-bootstrap, infra-package, infra-addons, node-package1, node-package2, pgsql-utility, extra-modules,
pg18-main,pg18-time,pg18-gis,pg18-rag,pg18-fts,pg18-olap,pg18-feat,pg18-lang,pg18-type,pg18-util,pg18-func,pg18-admin,pg18-stat,pg18-sec,pg18-fdw,pg18-sim,pg18-etl,
pg17-main,pg17-time,pg17-gis,pg17-rag,pg17-fts,pg17-olap,pg17-feat,pg17-lang,pg17-type,pg17-util,pg17-func,pg17-admin,pg17-stat,pg17-sec,pg17-fdw,pg17-sim,pg17-etl,
pg16-main,pg16-time,pg16-gis,pg16-rag,pg16-fts,pg16-olap,pg16-feat,pg16-lang,pg16-type,pg16-util,pg16-func,pg16-admin,pg16-stat,pg16-sec,pg16-fdw,pg16-sim,pg16-etl,
pg15-main,pg15-time,pg15-gis,pg15-rag,pg15-fts,pg15-olap,pg15-feat,pg15-lang,pg15-type,pg15-util,pg15-func,pg15-admin,pg15-stat,pg15-sec,pg15-fdw,pg15-sim,pg15-etl,
pg14-main,pg14-time,pg14-gis,pg14-rag,pg14-fts,pg14-olap,pg14-feat,pg14-lang,pg14-type,pg14-util,pg14-func,pg14-admin,pg14-stat,pg14-sec,pg14-fdw,pg14-sim,pg14-etl,
infra-extra, kafka, java-runtime, sealos, tigerbeetle, polardb, ivorysql
]
children :
#el8: { hosts: { 10.10.10.8: { pg_cluster: el8 ,pg_seq: 1 ,pg_role: primary }}}
el9 : { hosts : { 10.10.10.9 : { pg_cluster: el9 ,pg_seq: 1 ,pg_role : primary }}}
el10 : { hosts : { 10.10.10.10 : { pg_cluster: el10 ,pg_seq: 1 ,pg_role : primary }}}
d12 : { hosts : { 10.10.10.12 : { pg_cluster: d12 ,pg_seq: 1 ,pg_role : primary }}}
d13 : { hosts : { 10.10.10.13 : { pg_cluster: d13 ,pg_seq: 1 ,pg_role : primary }}}
u22 : { hosts : { 10.10.10.22 : { pg_cluster: u22 ,pg_seq: 1 ,pg_role : primary }}}
u24 : { hosts : { 10.10.10.24 : { pg_cluster: u24 ,pg_seq: 1 ,pg_role : primary }}}
etcd : { hosts : { 10.10.10.24 : { etcd_seq: 1 }}, vars : { etcd_cluster : etcd }}
infra :
hosts :
#10.10.10.8: { infra_seq: 9, admin_ip: 10.10.10.8 ,ansible_host: el8 } #, ansible_python_interpreter: /usr/bin/python3.12 }
10.10.10.9 : { infra_seq: 1, admin_ip: 10.10.10.9 ,ansible_host : el9 }
10.10.10.10 : { infra_seq: 2, admin_ip: 10.10.10.10 ,ansible_host : el10 }
10.10.10.12 : { infra_seq: 3, admin_ip: 10.10.10.12 ,ansible_host : d12 }
10.10.10.13 : { infra_seq: 4, admin_ip: 10.10.10.13 ,ansible_host : d13 }
10.10.10.22 : { infra_seq: 5, admin_ip: 10.10.10.22 ,ansible_host : u22 }
10.10.10.24 : { infra_seq: 6, admin_ip: 10.10.10.24 ,ansible_host : u24 }
vars : { node_tune : oltp }
...
配置解读 build/pro 模板是 Pigsty 专业版离线软件包的构建配置,比开源版包含更多内容。
与 OSS 版的区别 :
包含 PostgreSQL 13-18 全部六个大版本 包含额外商业/企业组件:Kafka、PolarDB、IvorySQL 等 包含 Java 运行时和 Sealos 等工具 输出目录为 dist/${version}/pro/ 构建内容 :
PostgreSQL 13、14、15、16、17、18 全版本 每个版本的全部分类扩展包 Kafka 消息队列 PolarDB 和 IvorySQL 内核 TigerBeetle 分布式数据库 Sealos 容器平台 适用场景 :
企业客户需要多版本支持 需要 Oracle/MySQL 兼容内核 需要 Kafka 消息队列集成 需要长期支持版本(LTS) 构建流程 :
# 1. 准备构建环境
cp conf/build/pro.yml pigsty.yml
# 2. 在各节点上下载软件包
./infra.yml -t repo_build
# 3. 打包离线安装包
make cache-pro
10 - Linux 软件仓库 用于交付 PostgreSQL 扩展的基础设施和软件包仓库
Pigsty 为主流 Linux 发行版 提供了 PostgreSQL 扩展仓库,其中包含 340+ 额外的 PostgreSQL 扩展。
Pigsty 扩展仓库旨在与 PGDG 官方仓库配合使用,共同使用时可以安装多达 450+ PostgreSQL 扩展 。
兼容性概览 系统 / 架构 代码 x86_64 aarch64 EL8 el8 18 17 16 15 14 13 18 17 16 15 14 13 EL9 el9 18 17 16 15 14 13 18 17 16 15 14 13 EL10 el10 18 17 16 15 14 13 18 17 16 15 14 13 Debian 12 d12 18 17 16 15 14 13 18 17 16 15 14 13 Debian 13 d13 18 17 16 15 14 13 18 17 16 15 14 13 Ubuntu 22.04 u22 18 17 16 15 14 13 18 17 16 15 14 13 Ubuntu 24.04 u24 18 17 16 15 14 13 18 17 16 15 14 13
快速上手 你可以使用 pig
curl https://repo.pigsty.io/pig | bash # 下载安装最新版本的 pig 命令行工具
pig repo add all -u # 添加 Linux / PGDG / Pigsty 仓库并更新缓存
curl https://repo.pigsty.cc/pig | bash # 从中国镜像站下载安装最新版本的 pig 命令行工具
pig repo add -u # 添加 Linux / PGDG / Pigsty 仓库并更新缓存
手工添加 您也可以使用经典的 apt / dnf / yum 命令,将仓库手工添加到系统中。
# 将 Pigsty 的 GPG 公钥添加到系统密钥链中,以验证软件包签名
curl -fsSL https://repo.pigsty.io/key | sudo gpg --dearmor -o /etc/apt/keyrings/pigsty.gpg
# 获取 Debian / Ubuntu 发行版的代号(jammy, focal, bullseye, bookworm),并将相应的上游仓库地址写入 /etc/apt/sources.list.d/ 中
distro_codename = $( lsb_release -cs)
sudo tee /etc/apt/sources.list.d/pigsty-io.list > /dev/null <<EOF
deb [signed-by=/etc/apt/keyrings/pigsty.gpg] https://repo.pigsty.io/apt/infra generic main
deb [signed-by=/etc/apt/keyrings/pigsty.gpg] https://repo.pigsty.io/apt/pgsql/${distro_codename} ${distro_codename} main
EOF
# 刷新 APT 仓库缓存
sudo apt update
# 将 Pigsty 的 GPG 公钥添加到系统密钥链中,以验证软件包签名
curl -fsSL https://repo.pigsty.io/key | sudo tee /etc/pki/rpm-gpg/RPM-GPG-KEY-pigsty >/dev/null
# 将 Pigsty 仓库的定义写入 /etc/yum.repos.d/ 目录中
sudo tee /etc/yum.repos.d/pigsty-io.repo > /dev/null <<-'EOF'
[pigsty-infra]
name=Pigsty Infra for $basearch
baseurl=https://repo.pigsty.io/yum/infra/$basearch
skip_if_unavailable = 1
enabled = 1
priority = 1
gpgcheck = 1
gpgkey=file:///etc/pki/rpm-gpg/RPM-GPG-KEY-pigsty
module_hotfixes=1
[pigsty-pgsql]
name=Pigsty PGSQL For el$releasever.$basearch
baseurl=https://repo.pigsty.io/yum/pgsql/el$releasever.$basearch
skip_if_unavailable = 1
enabled = 1
priority = 1
gpgcheck = 1
gpgkey=file:///etc/pki/rpm-gpg/RPM-GPG-KEY-pigsty
module_hotfixes=1
EOF
# 刷新 YUM 仓库缓存
sudo yum makecache;
所有的 RPM / DEB 软件包都使用指纹为 (B9BD8B20) 的 GPG 密钥 进行签名,以确保软件包的完整性。
仓库组成 Pigsty 仓库由两个主要部分组成:INFRA PGSQL x86_64 和 aarch64 架构下的 DEB / RPM 包。
INFRA x86_64 | aarch64)的区别。
Linux 软件包 x86_64 aarch64 EL rpm✓ ✓ Debian deb✓ ✓
PGSQL
兼容性详情 OS 系统代码 厂商 大版本 小版本 全名 PG 大版本 备注 el7.x86_64EL 7 7.9 CentOS 7 x86 15 14 13 EOL el8.x86_64EL 8 8.10 RockyLinux 8 x86 18 17 16 15 14 13 即将 EOL el8.aarch64EL 8 8.10 RockyLinux 8 ARM 18 17 16 15 14 13 即将 EOL el9.x86_64EL 9 9.7 RockyLinux 9 x86 18 17 16 15 14 13 OK el9.aarch64EL 9 9.7 RockyLinux 9 ARM 18 17 16 15 14 13 OK el10.x86_64EL 10 10.1 RockyLinux 10 x86 18 17 16 15 14 13 OK el10.aarch64EL 10 10.1 RockyLinux 10 ARM 18 17 16 15 14 13 OK d11.x86_64Debian 11 11.11 Debian 11 x86 17 16 15 14 13 EOL d11.aarch64Debian 11 11.11 Debian 11 ARM 17 16 15 14 13 EOL d12.x86_64Debian 12 12.13 Debian 12 x86 18 17 16 15 14 13 OK d12.aarch64Debian 12 12.13 Debian 12 ARM 18 17 16 15 14 13 OK d13.x86_64Debian 13 13.3 Debian 13 x86 18 17 16 15 14 13 OK d13.aarch64Debian 13 13.3 Debian 13 ARM 18 17 16 15 14 13 OK u20.x86_64Ubuntu 20 20.04.6 Ubuntu 20.04 x86 17 16 15 14 13 EOL u20.aarch64Ubuntu 20 20.04.6 Ubuntu 20.04 ARM 17 16 15 14 13 EOL u22.x86_64Ubuntu 22 22.04.5 Ubuntu 22.04 x86 18 17 16 15 14 13 OK u22.aarch64Ubuntu 22 22.04.5 Ubuntu 22.04 ARM 18 17 16 15 14 13 OK u24.x86_64Ubuntu 24 24.04.4 Ubuntu 24.04 x86 18 17 16 15 14 13 OK u24.aarch64Ubuntu 24 24.04.4 Ubuntu 24.04 ARM 18 17 16 15 14 13 OK
源代码 用于构建仓库内软件的源代码文件位于以下仓库中:
10.1 - PGDG 仓库 PostgreSQL 官方 APT/YUM 仓库
Pigsty PGSQL 仓库旨在与 PostgreSQL PGDG 官方仓库 配合使用。
Pigsty 依赖 PGDG 仓库中原生的 PostgreSQL 内核软件包,在此基础上提供了额外的 340+ 扩展插件。
PGDG Pigsty 镜像仓库最后同步于:2025-12-29 12:00:00
快速上手 您可以安装 pig
pig repo add pgdg # 添加 PGDG 仓库
pig repo add pgdg -u # 添加 PGDG 仓库,并更新本地缓存
pig repo add pgdg -u --region= default # 强制使用全球默认区域的仓库(postgresql.org)
pig repo add pgdg -u --region= china # 使用中国镜像仓库 (repo.pigsty.cc)
pig repo add pgsql -u # pgsql = pgdg + pigsty-pgsql (同时添加 Pigsty 与 PGDG 官方仓库)
pig repo add -u # all = node + pgsql (pgdg + pigsty) + infra,一次性添加所有仓库
镜像 2025年5月中旬,PGDG 关闭了 rsync/ftp 同步渠道,导致全球几乎所有 PGDG 镜像站失去同步。根据观察,目前只有 YANDEX,XTOM,PIGSTY 提供定期同步。
Pigsty 在中国区域提供了 PGDG 镜像的子集,更新频率约为一周一更新。对于 EL 7-10,Debian 11-13,Ubuntu 20.04 - 24.04 提供 x86_64 与 arm64 架构的镜像仓库。覆盖范围为所有生命周期内的 PG 大版本(PG12 - 19alpha)。
2025-11 更新通知:阿里云/清华TUNA 恢复更新
目前阿里云/清华TUNA镜像站已经恢复 PGDG 仓库的同步。
仓库配置 EL YUM/DNF 仓库 - { name: pgdg13 ,description: 'PostgreSQL 13' ,module: pgsql ,releases: [7,8,9,10] ,arch: [x86_64, aarch64] ,baseurl : { default: 'https://download.postgresql.org/pub/repos/yum/13/redhat/rhel-$releasever-$basearch' ,china: 'https://repo.pigsty.cc/yum/pgdg/13/redhat/rhel-$releasever-$basearch' ,europe : 'https://mirrors.xtom.de/postgresql/repos/yum/13/redhat/rhel-$releasever-$basearch' }}
- { name: pgdg14 ,description: 'PostgreSQL 14' ,module: pgsql ,releases: [7,8,9,10] ,arch: [x86_64, aarch64] ,baseurl : { default: 'https://download.postgresql.org/pub/repos/yum/14/redhat/rhel-$releasever-$basearch' ,china: 'https://repo.pigsty.cc/yum/pgdg/14/redhat/rhel-$releasever-$basearch' ,europe : 'https://mirrors.xtom.de/postgresql/repos/yum/14/redhat/rhel-$releasever-$basearch' }}
- { name: pgdg15 ,description: 'PostgreSQL 15' ,module: pgsql ,releases: [7,8,9,10] ,arch: [x86_64, aarch64] ,baseurl : { default: 'https://download.postgresql.org/pub/repos/yum/15/redhat/rhel-$releasever-$basearch' ,china: 'https://repo.pigsty.cc/yum/pgdg/15/redhat/rhel-$releasever-$basearch' ,europe : 'https://mirrors.xtom.de/postgresql/repos/yum/15/redhat/rhel-$releasever-$basearch' }}
- { name: pgdg16 ,description: 'PostgreSQL 16' ,module: pgsql ,releases: [ 8,9,10] ,arch: [x86_64, aarch64] ,baseurl : { default: 'https://download.postgresql.org/pub/repos/yum/16/redhat/rhel-$releasever-$basearch' ,china: 'https://repo.pigsty.cc/yum/pgdg/16/redhat/rhel-$releasever-$basearch' ,europe : 'https://mirrors.xtom.de/postgresql/repos/yum/16/redhat/rhel-$releasever-$basearch' }}
- { name: pgdg17 ,description: 'PostgreSQL 17' ,module: pgsql ,releases: [ 8,9,10] ,arch: [x86_64, aarch64] ,baseurl : { default: 'https://download.postgresql.org/pub/repos/yum/17/redhat/rhel-$releasever-$basearch' ,china: 'https://repo.pigsty.cc/yum/pgdg/17/redhat/rhel-$releasever-$basearch' ,europe : 'https://mirrors.xtom.de/postgresql/repos/yum/17/redhat/rhel-$releasever-$basearch' }}
- { name: pgdg18 ,description: 'PostgreSQL 18' ,module: pgsql ,releases: [ 8,9,10] ,arch: [x86_64, aarch64] ,baseurl : { default: 'https://download.postgresql.org/pub/repos/yum/18/redhat/rhel-$releasever-$basearch' ,china: 'https://repo.pigsty.cc/yum/pgdg/18/redhat/rhel-$releasever-$basearch' ,europe : 'https://mirrors.xtom.de/postgresql/repos/yum/18/redhat/rhel-$releasever-$basearch' }}
- { name: pgdg19-beta ,description: 'PostgreSQL 19 Beta' ,module: beta ,releases: [ 8,9,10] ,arch: [x86_64, aarch64] ,baseurl : { default: 'https://download.postgresql.org/pub/repos/yum/testing/19/redhat/rhel-$releasever-$basearch' ,china: 'https://repo.pigsty.cc/yum/pgdg/testing/19/redhat/rhel-$releasever-$basearch' ,europe : 'https://mirrors.xtom.de/postgresql/repos/yum/testing/19/redhat/rhel-$releasever-$basearch' }}
Debian / Ubuntu APT 仓库 - { name: pgdg ,description: 'PGDG' ,module: pgsql ,releases: [11,12,13, 22,24] ,arch: [x86_64, aarch64] ,baseurl : { default : 'http://apt.postgresql.org/pub/repos/apt/ ${distro_codename}-pgdg main' ,china : 'https://repo.pigsty.cc/apt/pgdg/ ${distro_codename}-pgdg main' }}
- { name: pgdg-beta ,description: 'PGDG Beta' ,module: beta ,releases: [11,12,13, 22,24] ,arch: [x86_64, aarch64] ,baseurl : { default : 'http://apt.postgresql.org/pub/repos/apt/ ${distro_codename}-pgdg-testing main 19' ,china : 'https://repo.pigsty.cc/apt/pgdg/ ${distro_codename}-pgdg-testing main 19' }}
APT GPG 密钥 PGDG APT 仓库使用以下 GPG 密钥签名: B97B0AFCAA1A47F044F244A07FCC7D46ACCC4CF8 (ACCC4CF8)
MD5 校验和为 f54c5c1aa1329dc26e33b29762faaec4,详情参考 https://www.postgresql.org/download/linux/debian/
sudo curl -fsSL https://www.postgresql.org/media/keys/ACCC4CF8.asc -o /usr/share/postgresql-common/pgdg/apt.postgresql.org.asc
. /etc/os-release
sudo sh -c "echo 'deb [signed-by=/usr/share/postgresql-common/pgdg/apt.postgresql.org.asc] https://apt.postgresql.org/pub/repos/apt $VERSION_CODENAME -pgdg main' > /etc/apt/sources.list.d/pgdg.list"
sudo curl -fsSL https://repo.pigsty.cc/apt/pgdg/ACCC4CF8.key -o /usr/share/postgresql-common/pgdg/apt.postgresql.org.asc
. /etc/os-release
sudo sh -c "echo 'deb [signed-by=/usr/share/postgresql-common/pgdg/apt.postgresql.org.asc] https://repo.pigsty.cc/apt/pgdg/ $VERSION_CODENAME -pgdg main' > /etc/apt/sources.list.d/pgdg.list"
YUM GPG 密钥 PGDG YUM 仓库使用 https://ftp.postgresql.org/pub/repos/yum/keys/ 中的一系列密钥进行签名。请自行按需选取使用。
兼容性 OS 系统代码 厂商 大版本 PG 大版本 备注 el7.x86_64 EL 7 18 17 16 15 14 13 EOL el8.x86_64 EL 8 18 17 16 15 14 13 即将 EOL el8.aarch64 EL 8 18 17 16 15 14 13 即将 EOL el9.x86_64 EL 9 18 17 16 15 14 13 OK el9.aarch64 EL 9 18 17 16 15 14 13 OK el10.x86_64 EL 10 18 17 16 15 14 13 OK el10.aarch64 EL 10 18 17 16 15 14 13 OK d11.x86_64 Debian 11 18 17 16 15 14 13 EOL d11.aarch64 Debian 11 18 17 16 15 14 13 EOL d12.x86_64 Debian 12 18 17 16 15 14 13 OK d12.aarch64 Debian 12 18 17 16 15 14 13 OK d13.x86_64 Debian 13 18 17 16 15 14 13 OK d13.aarch64 Debian 13 18 17 16 15 14 13 OK u20.x86_64 Ubuntu 20 18 17 16 15 14 13 EOL u20.aarch64 Ubuntu 20 18 17 16 15 14 13 EOL u22.x86_64 Ubuntu 22 18 17 16 15 14 13 OK u22.aarch64 Ubuntu 22 18 17 16 15 14 13 OK u24.x86_64 Ubuntu 24 18 17 16 15 14 13 OK u24.aarch64 Ubuntu 24 18 17 16 15 14 13 OK
10.2 - GPG 密钥 导入 Pigsty 仓库使用的 GPG 公钥以验证软件包签名完整性
你可以通过检查 GPG 签名来验证从 Pigsty 仓库下载的软件包的完整性,本文会介绍如何导入用于签名软件包的 GPG 密钥。
你也可以生成自己的 GPG 密钥,构建自己的仓库,并用它来签发你自己的软件包。
摘要 Pigsty 仓库中所有的 RPM / DEB 软件包都使用 GPG 密钥(指纹:B9BD8B20)进行签名,以确保软件包的完整性和来源的可信度。
完整摘要: 9592A7BC7A682E7333376E09E7935D8DB9BD8B20 Ruohang Feng (Pigsty) rh@vonng.com
pub rsa4096 2024-07-16 [SC]
9592A7BC7A682E7333376E09E7935D8DB9BD8B20
uid [ultimate] Ruohang Feng (Pigsty) <rh@vonng.com>
sub rsa4096 2024-07-16 [E]
你可以在这里找到 Pigsty 使用的 GPG 公钥:
默认地址:https://repo.pigsty.io/key 中国镜像:https://repo.pigsty.cc/key 导入 在 RHEL 兼容的 Linux 发行版上,你可以使用以下命令导入此密钥:
curl -fsSL https://repo.pigsty.io/key | sudo tee /etc/pki/rpm-gpg/RPM-GPG-KEY-pigsty >/dev/null
curl -fsSL https://repo.pigsty.cc/key | sudo tee /etc/pki/rpm-gpg/RPM-GPG-KEY-pigsty >/dev/null
在 Debian / Ubuntu 兼容的 Linux 发行版上,你可以使用以下命令导入此密钥:
curl -fsSL https://repo.pigsty.io/key | sudo gpg --dearmor -o /etc/apt/keyrings/pigsty.gpg
curl -fsSL https://repo.pigsty.cc/key | sudo gpg --dearmor -o /etc/apt/keyrings/pigsty.gpg
公钥 Pigsty 仓库使用的 GPG 公钥内容如下:
-----BEGIN PGP PUBLIC KEY BLOCK-----
mQINBGaV5PwBEACbErI+7yOrsXTT3mR83O6Fw9WyHJqozhyNPF3dA1gAtWpfWqd4
S9x6vBjVwUbIRn21jYgov0hDiaLABNQhRzifvVr0r1IjBW8lhA8zJGaO42Uz0aBW
YIkajOklsXgYMX+gSmy5WXzM31sDQVMnzptHh9dwW067hMM5pJKDslu2pLMwSb9K
QgIFcYsaR0taBkcDg4dNu1gncriD/GcdXIS0/V4R82DIYeIqj2S0lt0jDTACbUz3
C6esrTw2XerCeHKHb9c/V+KMhqvLJOOpy/aJWLrTGBoaH7xw6v0qg32OYiBxlUj9
VEzoQbDfbRkR+jlxiuYP3scUs/ziKrSh+0mshVbeuLRSNfuHLa7C4xTEnATcgD1J
MZeMaJXIcDt+DN+1aHVQjY5YNvr5wA3ykxW51uReZf7/odgqVW3+1rhW5pd8NQKQ
qoVUHOtIrC9KaiGfrczEtJTNUxcNZV9eBgcKHYDXB2hmR2pIf7WvydgXTs/qIsXg
SIzfKjisi795Dd5GrvdLYXVnu9YzylWlkJ5rjod1wnSxkI/CcCJaoPLnXZA9KV7A
cpMWWaUEXP/XBIwIU+vxDd1taBIaPIOv1KIdzvG7QqAQtf5Lphi5HfaGvBud/CVt
mvWhRPJMr1J0ER2xAgU2iZR7dN0vSF6zDqc0W09RAoC0nDS3tupDX2BrOwARAQAB
tCRSdW9oYW5nIEZlbmcgKFBpZ3N0eSkgPHJoQHZvbm5nLmNvbT6JAlEEEwEIADsW
IQSVkqe8emguczM3bgnnk12Nub2LIAUCZpXk/AIbAwULCQgHAgIiAgYVCgkICwIE
FgIDAQIeBwIXgAAKCRDnk12Nub2LIOMuEACBLVc09O4icFwc45R3KMvOMu14Egpn
UkpmBKhErjup0TIunzI0zZH6HG8LGuf6XEdH4ItCJeLg5349UE00BUHNmxk2coo2
u4Wtu28LPqmxb6sqpuRAaefedU6vqfs7YN6WWp52pVF1KdOHkIOcgAQ9z3ZHdosM
I/Y/UxO2t4pjdCAfJHOmGPrbgLcHSMpoLLxjuf3YIwS5NSfjNDd0Y8sKFUcMGLCF
5P0lv5feLLdZvh2Una34UmHKhZlXC5E3vlY9bf/LgsRzXRFQosD0RsCXbz3Tk+zF
+j/eP3WhUvJshqIDuY6eJYCzMjiA8sM5gety+htVJuD0mewp+qAhjxE0d4bIr4qO
BKQzBt9tT2ackCPdgW42VPS+IZymm1oMET0hgZfKiVpwsKO6qxeWn4RW2jJ0zkUJ
MsrrxOPFdZQAtuFcLwa5PUAHHs6XQT2vzxDpeE9lInQ14lshofU5ZKIeb9sbvb/w
P+xnDqvZ1pcotEIBvDK0S0jHbHHqtioIUdDFvdCBlBlYP1TQRNPlJ7TJDBBvhj8i
fmjQsYSV1u36aHOJVGYNHv+SyJpVd3nHCZn97ADM9qHnDm7xljyHXPzIx4FMmBGJ
UTiLH5yxa1xhWr42Iv3TykaQJVbpydmBuegFR8WbWitAvVqI3HvRG+FalLsjJruc
8YDAf7gHdj/937kCDQRmleT8ARAAmJxscC76NZzqFBiaeq2+aJxOt1HGPqKb4pbz
jLKRX9sFkeXuzhfZaNDljnr2yrnQ75rit9Aah/loEhbSHanNUDCNmvOeSEISr9yA
yfOnqlcVOtcwWQK57n6MvlCSM8Js3jdoSmCFHVtdFFwxejE5ok0dk1VFYDIg6DRk
ZBMuxGO7ZJW7TzCxhK4AL+NNYA2wX6b+IVMn6CA9kwNwCNrrnGHR1sblSxZp7lPo
+GsqzYY0LXGR2eEicgKd4lk38gaO8Q4d1mlpX95vgdhGKxR+CM26y9QU0qrO1hXP
Fw6lX9HfIUkVNrqAa1mzgneYXivnLvcj8gc7bFAdweX4MyBHsmiPm32WqjUJFAmw
kcKYaiyfDJ+1wusa/b+7RCnshWc8B9udYbXfvcpOGgphpUuvomKT8at3ToJfEWmR
BzToYYTsgAAX8diY/X53BHCE/+MhLccglEUYNZyBRkTwDLrS9QgNkhrADaTwxsv1
8PwnVKve/ZxwOU0QGf4ZOhA2YQOE5hkRDR5uY2OHsOS5vHsd9Y6kNNnO8EBy99d1
QiBJOW3AP0nr4Cj1/NhdigAujsYRKiCAuPT7dgqART58VU4bZ3PgonMlziLe7+ht
YYxV+wyP6LVqicDd0MLLvG7r/JOiWuABOUxsFFaRecehoPJjeAEQxnWJjedokXKL
HVOFaEkAEQEAAYkCNgQYAQgAIBYhBJWSp7x6aC5zMzduCeeTXY25vYsgBQJmleT8
AhsMAAoJEOeTXY25vYsgG8sP/3UdsWuiwTsf/x4BTW82K+Uk9YwZDnUNH+4dUMED
bKT1C6CbuSZ7Mnbi2rVsmGzOMs9MehIx6Ko8/iCR2OCeWi8Q+wM+iffAfWuT1GK6
7f/VIfoYBUWEa+kvDcPgEbd5Tu7ZdUO/jROVBSlXRSjzK9LpIj7GozBTJ8Vqy5x7
oqbWPPEYtGDVHime8o6f5/wfhNgL3mFnoq6srK7KhwACwfTXlNqAlGiXGa30Yj+b
Cj6IvmxoII49E67/ovMEmzDCb3RXiaL6OATy25P+HQJvWvAam7Qq5Xn+bZg65Mup
vXq3zoX0a7EKXc5vsJVNtTlXO1ATdYszKP5uNzkHrNAN52VRYaowq1vPy/MVMbSI
rL/hTFKr7ZNhmC7jmS3OuJyCYQsfEerubtBUuc/W6JDc2oTI3xOG1S2Zj8f4PxLl
H7vMG4E+p6eOrUGw6VQXjFsH9GtwhkPh/ZGMKENb2+JztJ02674Cok4s5c/lZFKz
mmRUcNjX2bm2K0GfGG5/hAog/CHCeUZvwIh4hZLkdeJ1QsIYpN8xbvY7QP6yh4VB
XrL18+2sontZ45MsGResrRibB35x7IrCrxZsVtRJZthHqshiORPatgy+AiWcAtEv
UWEnnC1xBSasNebw4fSE8AJg9JMCRw+3GAetlotOeW9q7PN6yrXD9rGuV/QquQNd
/c7w
=4rRi
-----END PGP PUBLIC KEY BLOCK-----
使用 如果你想要分发自己的仓库并使用自己的 GPG 密钥进行签名,以下是简单介绍:
安装 GPG 软件包 brew install gnupg pinentry-mac
sudo apt install gnupg2 pinentry-curses
sudo dnf install gnupg2 pinentry-curses
生成 GPG 密钥 你可以使用以下命令生成一个新的 GPG 密钥对:
导入 GPG 私钥 如果你有一个 GPG 私钥文件(例如 mykey.secret),你可以使用以下命令导入它:
gpg --import mykey.secret
列出 GPG 密钥 你可以列出已经导入的 GPG 公钥和私钥:
$ gpg --list-key
[ keyboxd]
---------
pub rsa4096 2024-07-16 [ SC]
9592A7BC7A682E7333376E09E7935D8DB9BD8B20
uid [ unknown] Ruohang Feng ( Pigsty) <rh@vonng.com>
sub rsa4096 2024-07-16 [ E]
$ gpg --list-secret-key
[ keyboxd]
---------
sec rsa4096 2024-07-16 [ SC]
9592A7BC7A682E7333376E09E7935D8DB9BD8B20
uid [ unknown] Ruohang Feng ( Pigsty) <rh@vonng.com>
ssb rsa4096 2024-07-16 [ E]
签名 RPM 包 如果你想要用 GPG 私钥签名你的 RPM 包,可以在 ~/.rpmmacros 文件中指定 GPG 密钥:
%_signature gpg
%_gpg_path ~/.gnupg
%_gpg_name B9BD8B20
%_gpg_digest_algo sha256
这里的 %_gpg_name 是你的 GPG 密钥的指纹,请将 Pigsty 密钥指纹 B9BD8B20 替换为你自己的密钥指纹。
rpm --addsign yourpackage.rpm
签名 DEB 包 如果你想要用 GPG 私钥签名你的 DEB 包,可以在 reprepro 配置文件中指定 GPG 密钥:
Origin : Pigsty
Label : Pigsty INFRA
Codename : generic
Architectures : amd64 arm64
Components : main
Description : pigsty apt repository for infra components
SignWith : 9592A7BC7A682E7333376E09E7935D8DB9BD8B20
同理,将这里的 SignWith 替换为你自己的 GPG 密钥指纹即可,reprepro 会自动使用它进行签名。
10.3 - INFRA 仓库 可观测性/PostgreSQL 工具软件仓库,Linux 发行版大版本无关的软件包
pigsty-infra
该仓库由 冯若航 (Vonng ) @ Pigsty 维护,
您可以在 https://github.com/pgsty/infra-pkg 找到所有构建源代码与命令。
为 RHEL / Debian / Ubuntu 发行版提供预构建的 RPM / DEB 包,支持 x86_64 和 aarch64 架构。
托管于 Cloudflare CDN,提供免费的全球访问。
Linux 包类型 x86_64 aarch64 EL rpm✓ ✓ Debian deb✓ ✓
Infra 仓库的更新记录可以参考 发布 - Infra 变更日志
快速上手 您可以使用 pigpigsty-infra 仓库,它会自动从 apt/yum/dnf 中选择合适的包管理器。
curl https://repo.pigsty.io/pig | bash # 下载并安装 pig CLI 工具
pig repo add infra # 将 pigsty-infra 仓库文件添加到您的系统
pig repo update # 使用 apt / dnf 更新本地仓库缓存
# 在中国大陆或 Cloudflare 不可用时使用
curl https://repo.pigsty.cc/pig | bash # 从中国 CDN 镜像安装 pig
pig repo add infra # 将 pigsty-infra 仓库文件添加到您的系统
pig repo update # 使用 apt / dnf 更新本地仓库缓存
# 您可以使用以下命令管理 infra 仓库:
pig repo add infra -u # 添加仓库文件,并更新缓存
pig repo add infra -ru # 删除所有现有仓库,添加仓库并创建缓存
pig repo set infra # = pigsty repo add infra -ru
pig repo add all # 将 infra、node、pgsql 仓库添加到您的系统
pig repo set all # 删除现有仓库,添加上述仓库并更新缓存
手动设置 您也可以不使用 pig CLI 工具直接使用此仓库,手动将其添加到您的 Linux 操作系统仓库列表中:
APT 仓库 在 Debian / Ubuntu 兼容的 Linux 发行版上,您可以手动添加 GPG 密钥 和 APT 仓库文件:
# 将 Pigsty 的 GPG 公钥添加到您的系统密钥链以验证包签名,或者直接信任
curl -fsSL https://repo.pigsty.io/key | sudo gpg --dearmor -o /etc/apt/keyrings/pigsty.gpg
# 获取 Debian 发行版代号(distro_codename=jammy, focal, bullseye, bookworm)
# 并将相应的上游仓库地址写入 APT List 文件
distro_codename = $( lsb_release -cs)
sudo tee /etc/apt/sources.list.d/pigsty-infra.list > /dev/null <<EOF
deb [signed-by=/etc/apt/keyrings/pigsty.gpg] https://repo.pigsty.io/apt/infra generic main
EOF
# 刷新 APT 仓库缓存
sudo apt update
# 在中国大陆或 Cloudflare 不可用时使用
# 将 Pigsty 的 GPG 公钥添加到您的系统密钥链以验证包签名,或者直接信任
curl -fsSL https://repo.pigsty.cc/key | sudo gpg --dearmor -o /etc/apt/keyrings/pigsty.gpg
# 获取 Debian 发行版代号(distro_codename=jammy, focal, bullseye, bookworm)
# 并将相应的上游仓库地址写入 APT List 文件
distro_codename = $( lsb_release -cs)
sudo tee /etc/apt/sources.list.d/pigsty-infra.list > /dev/null <<EOF
deb [signed-by=/etc/apt/keyrings/pigsty.gpg] https://repo.pigsty.cc/apt/infra generic main
EOF
# 刷新 APT 仓库缓存
sudo apt update
# 如果您不想信任任何 GPG 密钥,直接信任仓库
distro_codename = $( lsb_release -cs)
sudo tee /etc/apt/sources.list.d/pigsty-infra.list > /dev/null <<EOF
deb [trust=yes] https://repo.pigsty.io/apt/infra generic main
EOF
sudo apt update
YUM 仓库 在 RHEL 兼容的 Linux 发行版上,您可以手动添加 GPG 密钥 和 YUM 仓库文件:
# 将 Pigsty 的 GPG 公钥添加到您的系统密钥链以验证包签名
curl -fsSL https://repo.pigsty.io/key | sudo tee /etc/pki/rpm-gpg/RPM-GPG-KEY-pigsty >/dev/null
# 将 Pigsty 仓库定义文件添加到 /etc/yum.repos.d/ 目录
sudo tee /etc/yum.repos.d/pigsty-infra.repo > /dev/null <<-'EOF'
[pigsty-infra]
name=Pigsty Infra for $basearch
baseurl=https://repo.pigsty.io/yum/infra/$basearch
skip_if_unavailable = 1
enabled = 1
priority = 1
gpgcheck = 1
gpgkey=file:///etc/pki/rpm-gpg/RPM-GPG-KEY-pigsty
module_hotfixes=1
EOF
# 刷新 YUM/DNF 仓库缓存
sudo yum makecache;
# 在中国大陆或 Cloudflare 不可用时使用
# 将 Pigsty 的 GPG 公钥添加到您的系统密钥链以验证包签名
curl -fsSL https://repo.pigsty.cc/key | sudo tee /etc/pki/rpm-gpg/RPM-GPG-KEY-pigsty >/dev/null
# 将 Pigsty 仓库定义文件添加到 /etc/yum.repos.d/ 目录
sudo tee /etc/yum.repos.d/pigsty-infra.repo > /dev/null <<-'EOF'
[pigsty-infra]
name=Pigsty Infra for $basearch
baseurl=https://repo.pigsty.cc/yum/infra/$basearch
skip_if_unavailable = 1
enabled = 1
priority = 1
gpgcheck = 1
gpgkey=file:///etc/pki/rpm-gpg/RPM-GPG-KEY-pigsty
module_hotfixes=1
EOF
# 刷新 YUM/DNF 仓库缓存
sudo yum makecache;
# 如果您不想信任任何 GPG 密钥,直接信任仓库
sudo tee /etc/yum.repos.d/pigsty-infra.repo > /dev/null <<-'EOF'
[pigsty-infra]
name=Pigsty Infra for $basearch
baseurl=https://repo.pigsty.io/yum/infra/$basearch
skip_if_unavailable = 1
enabled = 1
priority = 1
gpgcheck = 0
module_hotfixes=1
EOF
sudo yum makecache;
10.3.1 - 软件清单 Infra 仓库中可用的软件清单
Grafana 技术栈 Victoria 技术栈 自行安装使用 victoria grafana 数据源插件时注意
Pigsty 将 victoria 数据源扩展拆分为特定架构的专用分包,因此如果您选择自行安装这些插件到您自己的 grafana 中使用时,
请在 /etc/grafana/grafana.ini 中配置以下参数,以允许使用未签名的插件。
allow_loading_unsigned_plugins = victoriametrics-logs-datasource,victoriametrics-metrics-datasource
Prometheus 技术栈 指标导出器 对象存储 数据库 PostgreSQL 相关工具、数据库管理系统和其他实用程序
工具 Pig 包管理器、PostgreSQL 工具和其他数据库相关实用程序
AI AI Agent,MCP 工具箱,编码 IDE,Python/Go/Node 工具……
10.3.2 - 发布日志 pigsty-infra 仓库变更日志和可观测性包发布说明
2026-03-21 名称 旧版本 新版本 备注 grafana12.4.0 12.4.1 pgbackrest_exporter0.22.0 0.23.0 redis_exporter1.81.0 1.82.0 victoria-logs1.47.0 1.48.0 vlagent1.47.0 1.48.0 vlogscli1.47.0 1.48.0 victoria-traces0.7.1 0.8.0 duckdb1.4.4 1.5.0 pg_timetable6.2.0 6.3.0 pgschema1.4.2 1.7.4 pgstream- 1.0.1 新增 tigerbeetle0.16.75 0.16.77 grafana-victorialogs-ds0.26.2 0.26.3 grafana-infinity-ds3.7.3 3.7.4 caddy2.11.1 2.11.2 npgsqlrest3.10.0 3.11.1 postgrest14.5 14.7 opencode1.2.17 1.2.27 pev21.20.2 1.21.0 golang1.26.0 1.26.1 vector0.53.0 0.54.0 rclone1.73.1 1.73.2 code-server4.109.5 4.112.0 code1.109.4 1.112.0 seaweedfs4.15 4.17 uv0.10.8 0.10.12 codex0.110.0 0.116.0 v2ray5.44.1 5.47.0 sabiql1.6.2 1.8.2 sql-studio- 0.1.51 新增 rainfrog- 0.3.17 新增 agentsview0.10.0 0.15.0 crush- 0.51.2 新增 tigerfs- 0.5.0 新增 victoria-metrics1.137.0 1.138.0 victoria-metrics-cluster1.137.0 1.138.0 vmutils1.137.0 1.138.0 hugo0.157.0 0.158.0 rustfs1.0.0-alpha.85 1.0.0-alpha.89 mysqld_exporter0.18.0 0.19.0 pg_exporter1.2.0 1.2.1 pig1.3.1 1.3.2 minio20260214 20260321000000 mcli20260213 20260321000000 claude2.1.68 2.1.81 ivroysql5.1 5.3
2026-03-05 名称 旧版本 新版本 备注 asciinema3.1.0 3.2.0 grafana-infinity-ds3.7.2 3.7.3 victoria-metrics1.136.0 1.137.0 victoria-metrics-cluster1.136.0 1.137.0 vmutils1.136.0 1.137.0 hugo0.155.3 0.157.0 opencode1.2.15 1.2.17 rustfs1.0.0-alpha.83 1.0.0-alpha.85 seaweedfs4.13 4.15 tigerbeetle0.16.74 0.16.75 uv0.10.4 0.10.8 codex0.105.0 0.110.0 claude2.1.59 2.1.68 xray- 26.2.6 新增 gost- 2.12.0 新增 sabiql- 1.6.2 新增 agentsview- 0.10.0 新增
2026-02-26 名称 旧版本 新版本 备注 grafana12.3.3 12.4.0 prometheus3.9.1 3.10.0 mongodb_exporter0.47.2 0.49.0 victoria-logs1.45.0 1.47.0 vlagent1.45.0 1.47.0 vlogscli1.45.0 1.47.0 tigerbeetle0.16.73 0.16.74 loki3.6.6 3.6.7 promtail3.6.6 3.6.7 logcli3.6.6 3.6.7 grafana-victorialogs-ds0.25.0 0.26.2 grafana-victoriametrics-ds0.22.0 0.23.1 grafana-infinity-ds3.7.1 3.7.2 caddy2.10.2 2.11.1 npgsqlrest3.8.0 3.10.0 opencode1.2.10 1.2.15 nodejs24.13.1 24.14.0 pev21.20.1 1.20.2 claude2.1.45 2.1.59 codex0.104.0 0.105.0 pig1.2.0 1.3.0
2026-02-22 名称 旧版本 新版本 备注 victoria-metrics1.135.0 1.136.0 victoria-metrics-cluster1.135.0 1.136.0 vmutils1.135.0 1.136.0 loki3.6.5 3.6.6 promtail3.6.5 3.6.6 logcli3.6.5 3.6.6 opencode1.2.6 1.2.10 pig1.1.2 1.2.0 stalwart- 0.15.5 新增 maddy- 0.8.2 新增
2026-02-18 名称 旧版本 新版本 备注 grafana12.3.2 12.3.3 grafana-victorialogs-ds0.24.1 0.25.0 grafana-victoriametrics-ds0.21.0 0.22.0 grafana-infinity-ds3.7.0 3.7.1 redis_exporter1.80.2 1.81.0 etcd3.6.7 3.6.8 dblab0.34.2 0.34.3 tigerbeetle0.16.72 0.16.73 seaweedfs4.09 4.13 rustfs1.0.0-alpha.82 1.0.0-alpha.83 uv0.10.0 0.10.4 kafka4.1.1 4.2.0 npgsqlrest3.7.0 3.8.0 postgrest14.4 14.5 opencode1.1.59 1.2.6 genai-toolbox0.25.0 0.27.0 claude2.1.37 2.1.45 rclone1.73.0 1.73.1 code-server4.108.2 4.109.2 code1.109.2 1.109.4
2026-02-12 名称 旧版本 新版本 备注 alertmanager0.31.0 0.31.1 tigerbeetle0.16.70 0.16.72 grafana-infinity-ds3.7.0 3.7.1 nodejs24.13.0 24.13.1 opencode1.1.53 1.1.59 golang1.25.7 1.26.0 minio20251203120000 20260214120000 pgsty fork pig1.1.0 1.1.1
2026-02-08 名称 旧版本 新版本 备注 alertmanager0.30.1 0.31.0 victoria-metrics1.134.0 1.135.0 victoria-metrics-cluster1.134.0 1.135.0 vmutils1.134.0 1.135.0 victoria-logs1.43.1 1.45.0 vlagent1.43.1 1.45.0 vlogscli1.43.1 1.45.0 grafana-victorialogs-ds0.23.5 0.24.1 grafana-victoriametrics-ds0.20.1 0.21.0 tigerbeetle0.16.68 0.16.70 loki3.1.1 3.6.5 promtail3.0.0 3.6.5 logcli3.1.1 3.6.5 redis_exporter1.80.1 1.80.2 timescaledb-tools0.18.1 0.18.2 seaweedfs4.06 4.09 rustfs1.0.0-alpha.80 1.0.0-alpha.82 uv0.9.26 0.10.0 garage2.1.0 2.2.0 headscale0.27.1 0.28.0 hugo0.154.5 0.155.2 pev21.20.0 1.20.1 postgrest14.3 14.4 npgsqlrest3.4.7 3.7.0 opencode1.1.34 1.1.53 golang1.25.6 1.25.7 nodejs24.12.0 24.13.0 claude2.1.19 2.1.37 vector0.52.0 0.53.0 code1.108.0 1.109.0 code-server4.108.0 4.108.2 rclone1.72.1 1.73.0 pg_exporter1.1.2 1.2.0 grafana12.3.1 12.3.2 pig1.0.0 1.1.0 cloudflared2026.1.1 2026.2.0
2026-01-25 名称 旧版本 新版本 备注 alertmanager0.30.0 0.30.1 victoria-metrics1.133.0 1.134.0 victoria-traces0.5.1 0.7.1 grafana-victorialogs-ds0.23.3 0.23.5 grafana-victoriametrics-ds0.20.0 0.20.1 npgsqlrest3.4.3 3.4.7 claude2.1.9 2.1.19 opencode1.1.23 1.1.34 caddy- 2.10.2 新增 hugo- 0.154.5 新增 cloudflared- 2026.1.1 新增 headscale- 0.27.1 新增 pig0.9.0 1.0.0 duckdb1.4.3 1.4.4
2026-01-16 名称 旧版本 新版本 备注 prometheus3.8.1 3.9.1 victoria-metrics1.132.0 1.133.0 tigerbeetle0.16.65 0.16.68 kafka4.0.0 4.1.1 grafana-victoriametrics-ds0.19.7 0.20.0 grafana-victorialogs-ds0.23.2 0.23.3 grafana-infinity-ds3.6.0 3.7.0 uv0.9.18 0.9.26 seaweedfs4.01 4.06 rustfsalpha.71 alpha.80 v2ray5.28.0 5.44.1 sqlcmd1.8.0 1.9.0 opencode1.0.223 1.1.23 claude2.1.1 2.1.9 golang1.25.5 1.25.6 asciinema3.0.1 3.1.0 code1.107.0 1.108.0 code-server4.107.0 4.108.0 npgsqlrest3.3.0 3.4.3 genai-toolbox0.24.0 0.25.0 pg_exporter1.1.1 1.1.2 pig0.9.0 0.9.1
2026-01-08 名称 旧版本 新版本 备注 pg_exporter1.1.01.1.1新增 pg_timeline 采集器 npgsqlrest3.3.3新增 postgrest14.3新增 opencode1.0.223新增 code-server4.107.0新增 claude2.0.762.1.1更新 genai-toolbox0.23.00.24.0移除损坏的 oracle 驱动 golang1.25.5新增 nodejs24.12.0新增
2025-12-25 名称 旧版本 新版本 备注 pig0.8.00.9.0例行更新 etcd3.6.63.6.7例行更新 uv- 0.9.18新增 PY 包管理器 ccm- 2.0.76新增 claude code asciinema- 3.0.1新增命令行录屏工具 ivorysql5.05.1grafana12.3.012.3.1vector0.51.10.52.0prometheus3.8.03.8.1alertmanager0.29.00.30.0victoria-logs1.41.01.43.1pgbackrest_exporter0.21.00.22.0grafana-victorialogs-ds0.22.40.23.2
2025-12-16 名称 旧版本 新版本 备注 victoria-metrics1.131.01.132.0victoria-logs1.40.01.41.0blackbox_exporter0.27.00.28.0duckdb1.4.21.4.3rclone1.72.01.72.1pev21.17.01.19.0pg_exporter1.0.31.1.0pig0.7.40.8.0genai-toolbox0.22.00.23.0minio2025090716130920251203120000by pgsty
2025-12-04 名称 旧版本 新版本 备注 rustfs- 1.0.0-a71新增 seaweedfs- 4.1.0新增 garage- 2.1.0新增 rclone1.71.21.72.0vector0.51.00.51.1prometheus3.7.33.8.0victoria-metrics0.130.00.131.0victoria-logs0.38.00.40.0victoria-traces- 0.5.1新增 grafana-victorialogs-ds0.22.10.22.4redis_exporter1.80.01.80.1mongodb_exporter0.47.10.47.2genai-toolbox0.21.00.22.0
2025-11-23 名称 旧版本 新版本 备注 pgschema- 1.4.2新增 pgflo- 0.0.15新增 vector0.51.00.51.1问题修复 sealos5.0.15.1.1etcd3.6.53.6.6duckdb1.4.11.4.2pg_exporter1.0.21.0.3pig0.7.10.7.2grafana12.1.012.3.0pg_timetable6.1.06.2.0genai-toolbox0.16.00.21.0timescaledb-tools0.18.00.18.1从 PGSQL 移入 INFRA 仓库 timescaledb-event-streamer0.12.00.20.0tigerbeetle0.16.600.16.65victoria-metrics1.129.11.130.0victoria-logs1.37.21.38.0grafana-victorialogs-ds0.21.40.22.1grafana-victoriametrics-ds0.19.60.19.7grafana-plugins12.0.012.3.0
2025-11-11 名称 旧版本 新版本 备注 grafana12.1.012.2.1下载地址发生变化 prometheus3.6.03.7.3pushgateway1.11.11.11.2alertmanager0.28.10.29.0nginx_exporter1.5.01.5.1node_exporter1.9.11.10.2pgbackrest_exporter0.20.00.21.0redis_exporter1.77.01.80.0duckdb1.4.01.4.1dblab0.33.00.34.2pg_timetable5.13.06.1.0vector0.50.00.51.0rclone1.71.11.71.2victoria-metrics1.126.01.129.1victoria-logs1.35.01.37.2grafana-victorialogs-ds0.21.00.21.4grafana-victoriametrics-ds0.19.40.19.6grafana-infinity-ds3.5.03.6.0genai-toolbox0.16.00.18.0pev21.16.01.17.0pig0.6.20.7.1
2025-10-18 名称 旧版本 新版本 备注 prometheus3.5.03.6.0nginx_exporter1.4.21.5.0mysqld_exporter0.17.20.18.0redis_exporter1.75.01.77.0mongodb_exporter0.47.00.47.1victoria-metrics1.121.01.126.0victoria-logs1.25.11.35.0duckdb1.3.21.4.0etcd3.6.43.6.5restic0.18.00.18.1tigerbeetle0.16.540.16.60grafana-victorialogs-ds0.19.30.21.0grafana-victoriametrics-ds0.18.30.19.4grafana-infinity-ds3.3.03.5.0genai-toolbox0.9.00.16.0grafana12.1.012.2.0vector0.49.00.50.0rclone1.70.31.71.1minio2025072315540220250907161309mcli2025072105280820250813083541
2025-08-15 名称 旧版本 新版本 备注 grafana12.0.012.1.0pg_exporter1.0.11.0.2pig0.6.00.6.1vector0.48.00.49.0redis_exporter1.74.01.75.0mongodb_exporter0.46.00.47.0victoria-metrics1.121.01.123.0victoria-logs1.25.01.28.0grafana-victoriametrics-ds0.17.00.18.3grafana-victorialogs-ds0.18.30.19.3grafana-infinity-ds3.3.03.4.1etcd3.6.13.6.4ferretdb2.3.12.5.0tigerbeetle0.16.500.16.54genai-toolbox0.9.00.12.0
2025-07-24 名称 旧版本 新版本 备注 ferretdb- 2.4.0与 documentdb 1.105 配合 etcd- 3.6.3minio- 20250723155402mcli- 20250721052808ivorysql- 4.5-0ffca11-20250709修复 libxcrypt 依赖问题
2025-07-16 名称 旧版本 新版本 备注 genai-toolbox0.8.00.9.0各种 DBMS 的 MCP 工具箱 victoria-metrics1.120.01.121.0拆分为各种包 victoria-logs1.24.01.25.0拆分为各种包 prometheus3.4.23.5.0duckdb1.3.11.3.2etcd3.6.13.6.2tigerbeetle0.16.480.16.50grafana-victoriametrics-ds0.16.00.17.0rclone1.69.31.70.3pig0.5.00.6.0pev21.15.01.16.0pg_exporter1.0.01.0.1
2025-07-04 名称 旧版本 新版本 备注 prometheus3.4.13.4.2- grafana12.0.112.0.2- vector0.47.00.48.0- rclone1.69.01.70.2- vip-manager3.0.04.0.0- blackbox_exporter0.26.00.27.0- redis_exporter1.72.11.74.0- duckdb1.3.01.3.1- etcd3.6.03.6.1- ferretdb2.2.02.3.1- dblab0.32.00.33.0- tigerbeetle0.16.410.16.48- grafana-victorialogs-ds0.16.30.18.1- grafana-victoriametrics-ds0.15.10.16.0- grafana-infinity-ds3.2.13.3.0- victoria-logs1.22.21.24.0- victoria-metrics1.117.11.120.0-
2025-06-01 名称 旧版本 新版本 备注 grafana- 12.0.1- prometheus- 3.4.1- keepalived_exporter- 1.7.0- redis_exporter- 1.73.0- victoria-metrics- 1.118.0- victoria-logs- 1.23.1- tigerbeetle- 0.16.42- grafana-victorialogs-ds- 0.17.0- grafana-infinity-ds- 3.2.2-
2025-05-22 名称 旧版本 新版本 备注 dblab- 0.32.0- prometheus- 3.4.0- duckdb- 1.3.0- etcd- 3.6.0- pg_exporter- 1.0.0- ferretdb- 2.2.0- rclone- 1.69.3- minio- 20250422221226最后一个带管理 GUI 的版本 mcli- 20250416181326- nginx_exporter- 1.4.2- keepalived_exporter- 1.6.2- pgbackrest_exporter- 0.20.0- redis_exporter- 1.27.1- victoria-metrics- 1.117.1- victoria-logs- 1.22.2- pg_timetable- 5.13.0- tigerbeetle- 0.16.41- pev2- 1.15.0- grafana- 12.0.0- grafana-victorialogs-ds- 0.16.3- grafana-victoriametrics-ds- 0.15.1- grafana-infinity-ds- 3.2.1- grafana-plugins- 12.0.0-
2025-04-23 名称 旧版本 新版本 备注 mtail- 3.0.8新 pig- 0.4.0- pg_exporter- 0.9.0- prometheus- 3.3.0- pushgateway- 1.11.1- keepalived_exporter- 1.6.0- redis_exporter- 1.70.0- victoria-metrics- 1.115.0- victoria-logs- 1.20.0- duckdb- 1.2.2- pg_timetable- 5.12.0- vector- 0.46.1- minio- 20250422221226- mcli- 20250416181326-
2025-04-05 名称 旧版本 新版本 备注 pig- 0.3.4- etcd- 3.5.21- restic- 0.18.0- ferretdb- 2.1.0- tigerbeetle- 0.16.34- pg_exporter- 0.8.1- node_exporter- 1.9.1- grafana- 11.6.0- zfs_exporter- 3.8.1- mongodb_exporter- 0.44.0- victoria-metrics- 1.114.0- minio- 20250403145628- mcli- 20250403170756-
2025-03-23 名称 旧版本 新版本 备注 etcd- 3.5.20- pgbackrest_exporter- 0.19.0重新构建 victoria-logs- 1.17.0- victoria-logs-cli- 1.17.0-
2025-03-17 名称 旧版本 新版本 备注 kafka- 4.0.0- prometheus- 3.2.1- alertmanager- 0.28.1- blackbox_exporter- 0.26.0- node_exporter- 1.9.0- mysqld_exporter- 0.17.2- kafka_exporter- 1.9.0- redis_exporter- 1.69.0- duckdb- 1.2.1- etcd- 3.5.19- ferretdb- 2.0.0- tigerbeetle- 0.16.31- vector- 0.45.0- victoria-metrics- 1.114.0- victoria-logs- 1.16.0- rclone- 1.69.1- pev2- 1.14.0- grafana-victorialogs-ds- 0.16.0- grafana-victoriametrics-ds- 0.14.0- grafana-infinity-ds- 3.0.0- timescaledb-event-streamer- 0.12.0新 restic- 0.17.3新 juicefs- 1.2.3新
2025-02-12 名称 旧版本 新版本 备注 pushgateway1.10.01.11.0- alertmanager0.27.00.28.0- nginx_exporter1.4.01.4.1- pgbackrest_exporter0.18.00.19.0- redis_exporter1.66.01.67.0- mongodb_exporter0.43.00.43.1- victoria-metrics1.107.01.111.0- victoria-logs1.3.21.9.1- duckdb1.1.31.2.0- etcd3.5.173.5.18- pg_timetable5.10.05.11.0- ferretdb1.24.02.0.0- tigerbeetle0.16.130.16.27- grafana11.4.011.5.1- vector0.43.10.44.0- minio2024121813154420250207232109- mcli2024112117215420250208191421- rclone1.68.21.69.0-
2024-11-19 名称 旧版本 新版本 备注 prometheus2.54.03.0.0- victoria-metrics1.102.11.106.1- victoria-logs0.28.01.0.0- mysqld_exporter0.15.10.16.0- redis_exporter1.62.01.66.0- mongodb_exporter0.41.20.42.0- keepalived_exporter1.3.31.4.0- duckdb1.1.21.1.3- etcd3.5.163.5.17- tigerbeetle16.80.16.13- grafana- 11.3.0- vector- 0.42.0-
10.4 - PGSQL 仓库 PostgreSQL 扩展和内核分支仓库
pigsty-pgsql 仓库包含特定于 PostgreSQL 主版本的软件包(通常也特定于特定的 Linux 发行版主版本),包括扩展和一些内核分支。
您可以参考 发布 - RPM 变更日志 发布 - DEB 变更日志
快速上手 PIG 您可以安装 pig
pig repo add pigsty # 添加 pigsty-pgsql 仓库
pig repo add pigsty -u # 添加 pigsty-pgsql 仓库,并更新本地缓存
pig repo add pigsty -u --region= default # 强制使用全球默认区域的仓库(pigsty.io)
pig repo add pigsty -u --region= china # 使用中国镜像仓库 (pigsty.cc)
pig repo add pgsql -u # pgsql = pgdg + pigsty-pgsql (同时添加 Pigsty 与 PGDG 官方仓库)
pig repo add -u # all = node + pgsql (pgdg + pigsty) + infra,一次性添加所有仓库
提示 :如果您在中国大陆区域,可以考虑使用中国 CDN 镜像(将 pigsty.io 替换为 pigsty.cc)
APT 您也可以直接在 Debian / Ubuntu 上使用 apt 启用此仓库:
# 将 Pigsty 的 GPG 公钥添加到您的系统密钥链以验证包签名
curl -fsSL https://repo.pigsty.io/key | sudo gpg --dearmor -o /etc/apt/keyrings/pigsty.gpg
# 获取 Debian 发行版代号(distro_codename=jammy, focal, bullseye, bookworm),并将相应的上游仓库地址写入 APT List 文件
distro_codename = $( lsb_release -cs)
sudo tee /etc/apt/sources.list.d/pigsty-io.list > /dev/null <<EOF
deb [signed-by=/etc/apt/keyrings/pigsty.gpg] https://repo.pigsty.io/apt/pgsql/${distro_codename} ${distro_codename} main
EOF
# 刷新 APT 仓库缓存
sudo apt update
# 在中国大陆或 Cloudflare 不可用时使用
# 将 Pigsty 的 GPG 公钥添加到您的系统密钥链以验证包签名
curl -fsSL https://repo.pigsty.cc/key | sudo gpg --dearmor -o /etc/apt/keyrings/pigsty.gpg
# 获取 Debian 发行版代号,并将相应的上游仓库地址写入 APT List 文件
distro_codename = $( lsb_release -cs)
sudo tee /etc/apt/sources.list.d/pigsty-io.list > /dev/null <<EOF
deb [signed-by=/etc/apt/keyrings/pigsty.gpg] https://repo.pigsty.cc/apt/pgsql/${distro_codename} ${distro_codename} main
EOF
# 刷新 APT 仓库缓存
sudo apt update
DNF 您也可以直接在兼容 EL 的系统上使用 dnf/yum 启用此仓库:
# 将 Pigsty 的 GPG 公钥添加到您的系统密钥链以验证包签名
curl -fsSL https://repo.pigsty.io/key | sudo tee /etc/pki/rpm-gpg/RPM-GPG-KEY-pigsty >/dev/null
# 将 Pigsty 仓库定义文件添加到 /etc/yum.repos.d/ 目录,包括两个仓库
sudo tee /etc/yum.repos.d/pigsty-pgsql.repo > /dev/null <<-'EOF'
[pigsty-pgsql]
name=Pigsty PGSQL For el$releasever.$basearch
baseurl=https://repo.pigsty.io/yum/pgsql/el$releasever.$basearch
skip_if_unavailable = 1
enabled = 1
priority = 1
gpgcheck = 1
gpgkey=file:///etc/pki/rpm-gpg/RPM-GPG-KEY-pigsty
module_hotfixes=1
EOF
# 刷新 YUM/DNF 仓库缓存
sudo yum makecache;
# 在中国大陆或 Cloudflare 不可用时使用
# 将 Pigsty 的 GPG 公钥添加到您的系统密钥链以验证包签名
curl -fsSL https://repo.pigsty.cc/key | sudo tee /etc/pki/rpm-gpg/RPM-GPG-KEY-pigsty >/dev/null
# 将 Pigsty 仓库定义文件添加到 /etc/yum.repos.d/ 目录
sudo tee /etc/yum.repos.d/pigsty-pgsql.repo > /dev/null <<-'EOF'
[pigsty-pgsql]
name=Pigsty PGSQL For el$releasever.$basearch
baseurl=https://repo.pigsty.cc/yum/pgsql/el$releasever.$basearch
skip_if_unavailable = 1
enabled = 1
priority = 1
gpgcheck = 1
gpgkey=file:///etc/pki/rpm-gpg/RPM-GPG-KEY-pigsty
module_hotfixes=1
EOF
# 刷新 YUM/DNF 仓库缓存
sudo yum makecache;
源代码 此仓库的构建脚本与源代码在 GitHub 上开源:
如果平台不受支持,您也可以自行从源代码构建软件包。
pig build
兼容性 系统 / 架构 代码 x86_64 aarch64 EL8 el8 18, 17, 16, 15, 14, 1318, 17, 16, 15, 14, 13EL9 el9 18, 17, 16, 15, 14, 1318, 17, 16, 15, 14, 13EL10 el10 18, 17, 16, 15, 14, 1318, 17, 16, 15, 14, 13Debian 12 d12 18, 17, 16, 15, 14, 1318, 17, 16, 15, 14, 13Debian 13 d13 18, 17, 16, 15, 14, 1318, 17, 16, 15, 14, 13Ubuntu 22.04 u22 18, 17, 16, 15, 14, 1318, 17, 16, 15, 14, 13Ubuntu 24.04 u24 18, 17, 16, 15, 14, 1318, 17, 16, 15, 14, 13
10.4.1 - DNF 变更日志 PostgreSQL 和扩展 RPM 包变更日志和发布说明
2026-03-21 包名 旧版本 新版本 备注 pg_search 0.21.12 0.22.2 pgsentinel 1.4.0 1.4.1 仅更新 rpm pg_track_optimizer 0.9.1 0.9.2 pgcollection 1.0.0 2.0.0 pg_ttl_index 2.0.0 3.0.0 pg_clickhouse 0.1.4 0.1.5 pdu 3.0.25.12 新增 pgdog 0.1.32 新增
2026-03-05 包名 旧版本 新版本 备注 timescaledb 2.25.1 2.25.2 vchord 1.1.0 1.1.1 新增 clang 构建依赖,修复错误 aggs_for_vecs 1.4.0 1.4.1 pg_search 0.21.9 0.21.12 pg_pinyin - 0.0.2 新增扩展 pg_eviltransform - 0.0.2 新增扩展 pg_qos - 1.0.0 新增扩展,QoS 资源治理
2026-02-27 包名 旧版本 新版本 备注 timescaledb 2.25.0 2.25.1 citus 14.0.0-3 14.0.0-4 使用最新官方版本重新构建 age 1.7.0 1.7.0 新增 PG 17 的 1.7.0 版本支持 pgmq 1.10.0 1.10.1 当前没有该扩展包 pg_search 0.21.7 0.21.9 直接下载使用 oriolepg 17.11 17.16 OriolePG 内核更新 orioledb beta12 beta14 配套 OriolePG 17.16 openhalo 14.10 1.0 更新并重命名,14.18 pgedge - 17.9 新增多主边缘分布式内核 spock - 5.0.5 新增,pgEdge 核心扩展 lolor - 1.2.2 新增,pgEdge 核心扩展 snowflake - 2.4 新增,pgEdge 核心扩展 cloudberry - 2.0.0 新增包 babelfishpg - 5.5.0 新增 BabelfishPG 包组 babelfish - 5.5.0 新增 Babelfish 兼容包 antlr4-runtime413 - 4.13 新增 Babelfish 依赖运行时
2026-02-12 名称 旧版本 新版本 备注 timescaledb 2.24.0 2.25.0 citus 14.0.0-2 14.0.0-3 官方正式 tag 发布 pg_incremental 1.2.0 1.4.1 pg_bigm 1.2-20240606 1.2-20250903 pg_net 0.20.0 0.20.2 el8/el9 libcurl 版本过低 pgmq 1.9.0 1.10.0 修复依赖关系 pg_textsearch 0.4.0 0.5.0 pljs 1.0.4 1.0.5 sslutils 1.4-1 1.4-2 el8.pg18 无法编译 table_version 1.11.0 1.11.1 supautils 3.0.2 3.1.0 pg_math 1.0 1.1.0 pgsentinel 1.3.1 1.4.0 pg_uri 1.20151224 1.20251029 pgcollection 1.1.0 1.1.1 补丁修复并发构建问题 pg_uint128 1.1.1 1.2.0 pg_roaringbitmap 0.5.5 1.1.0 交由 PGDG plprql 18.0.0 18.0.1 pglinter 1.0.1 1.1.0 pg_jsonschema 0.3.3 0.3.4 pg_anon 2.5.1 3.0.1 vchord 1.0.0 1.1.0 更新至 pgrx 0.17.0 pg_search 0.21.4 0.21.7 针对 el8 手工构建 pg_graphql 1.5.12-1 1.5.12-2 切换至官方版本 nominatim_fdw 1.1.0 新增,与 PGDG YUM 同步 pg_utl_smtp 1.0.0 新增,与 PGDG YUM 同步 pg_strict - 1.0.2 新增 Rust 扩展 pg_track_optimizer - 0.9.1 新增扩展 pgmb - 1.0.0 新增扩展
2026-01-25 名称 旧版本 新版本 备注 age 1.6.0 1.7.0 仅 PG 18 citus 14.0.0-1PIGSTY 14.0.0-2PIGSTY 官方分支正式发布 pg_clickhouse 0.1.2 0.1.3 pgmq 1.8.1 1.9.0 pg_search 0.21.2 0.21.4
2026-01-16 名称 旧版本 新版本 备注 etcd_fdw 0.0.0 新增 pg_ttl_index 0.1.0 新增 citus 13.2.0 14.0.0 +pg18,预发布 pg_search 0.20.5 0.21.2 +pg18 pg_clickhouse 0.1.0 0.1.2 pg_textsearch 0.1.0 0.4.0 pg_convert 0.0.5 0.1.0 pg_timeseries 0.1.8 0.2.0 biscuit 2.0.1 2.2.2 pgmq 1.8.0 1.8.1 documentdb 0.107 0.109 +pg18,使用微软版本 pg_bulkload 3.1.22 3.1.23 +pg18 age 1.5.0 1.6.0 pgsentinel 1.3.0 1.3.1 pljs - 1.0.4 新增 pg_partman 5.3.1 5.4.0 PGDG pgfincore - 1.3.1 +pg18 documentdb_extended_rum 0.109 新增 mobilitydb_datagen 1.3.0 新增 rum 1.3.15 +pg18,新增
2025-12-25 名称 旧版本 新版本 备注 pg_duckdb1.1.01.1.1pg_search0.20.40.20.5vchord_bm250.2.20.3.0pg_semver0.40.00.41.0pg_timeseries0.1.70.1.8
2025-12-16 名称 旧版本 新版本 备注 pg_textsearch- 0.1.0新增扩展 pg_clickhouse- 0.1.0新增扩展 pg_ai_query- 0.1.1新增扩展 timescaledb2.23.12.24.0pg_search0.20.00.20.4pg_duckdb1.1.0-11.1.0-2官方发布的版本 pg_biscuit1.02.0.1切换至新仓库 pg_convert0.0.40.0.5移除 pg13 支持 pgdd0.6.00.6.1移除 pg13 支持 pglinter1.0.01.0.1pg_session_jwt0.3.30.4.0pg_anon2.4.12.5.1pg_enigma0.4.00.5.0wrappers0.5.60.5.7pg_vectorize0.25.00.26.0synchdb- 1.3仅 EL9 可用
2025-11-20 名称 旧版本 新版本 备注 vchord0.5.31.0.0pg_later0.3.10.4.0pgvectorscale0.8.00.9.0-pg13, +pg18 pglite_fusion0.0.50.0.6pgx_ulid0.2.10.2.2pg_search0.19.50.19.7恢复由 PIGSTY 构建 citus13.2.013.2.0使用官方 tag 构建 timescaledb2.23.02.23.1pg_profile4.104.11pglinter1.0.0new pg_typeid0.3.0对齐 pg18 支持 pg_enigma0.4.0vonng patched pgrx version pg_retry1.0.0新增,pg17-18 pg_biscuit1.0新增,pg16-18 pg_weighted_statistics1.0.0新增,pg13-18 pg_stat_monitor2.2.02.3.0修复 PGDG pg18 缺失问题 documentdb0.1060.107ferretdb 分支 polardb15.1515.15.5.0-38948055
2025-11-10 为几乎所有扩展添加 PostgreSQL 18 支持
名称 旧版本 新版本 备注 omni_csv- 0.1.1新增扩展 omni_datasets- 0.1.0新增扩展 omni_shmem- 0.1.0新增扩展 pg_csv- 1.0.1新增扩展 pg_dbms_errlog- 2.2新增扩展 pg_rrule- 0.2.0新增扩展 plxslt- 0.20140221新增扩展 anon2.3.02.4.1+pg18 collection1.0.01.1.0+pg18 credcheck3.04.2+pg18 emaj4.7.04.7.1+pg18 explain_ui0.0.10.0.2+pg18 firebird_fdw1.4.01.4.1+pg18 logerrors2.1.32.1.5+pg18 multicorn3.03.2+pg18 omni0.2.90.2.14+pg18 omni_email00.1.0+pg18 omni_httpc0.1.50.1.10+pg18 omni_httpd0.4.60.4.11+pg18 omni_id0.4.20.4.3+pg18 omni_kube0.1.10.4.2+pg18 omni_ledger0.1.20.1.3+pg18 omni_sql0.5.10.5.3+pg18 omni_sqlite0.1.20.2.2+pg18 omni_types0.3.40.3.6+pg18 omni_vfs0.2.10.2.2+pg18 omni_worker0.1.00.2.1+pg18 periods1.2.21.2.3+pg18 pg_bestmatch0.0.10.0.2+pg18 pg_cardano1.0.51.1.1+pg18 pg_checksums1.11.3+pg18 pg_duckdb0.3.11.1.0+pg18 pg_failover_slots1.1.01.2.0+pg18 pg_graphql1.5.111.5.12+pg18 pg_idkit0.3.10.4.0+pg18 pg_later0.3.00.3.1+pg18 pg_mooncake0.1.20.2.0+pg18 pg_net0.9.20.20.0+pg18 pg_parquet0.4.30.5.1+pg18 pg_render0.1.20.1.3+pg18 pg_session_jwt0.3.10.3.3+pg18 pg_smtp_client0.2.00.2.1+pg18 pg_sphere1.5.11.5.2+pg18 pg_statement_rollback1.41.5+pg18 pg_store_plans1.81.9+pg18 pg_tle1.5.11.5.2+pg18 pg_tokenizer0.1.00.1.1+pg18 pg_uuidv71.6.01.7.0+pg18 pgactive2.1.62.1.7+pg18 pglogical2.4.52.4.6+pg18 pglogical_origin2.4.52.4.6+pg18 pgmq1.5.11.7.0+pg18 pgsmcrypto0.1.00.1.1+pg18 pgx_ulid0.2.00.2.1+pg18 pldbgapi1.81.9+pg18 pljava1.6.81.6.10+pg18 plprql1.0.018.0.0+pg18 roaringbitmap0.5.40.5.5+pg18 semver0.32.10.40.0+pg18 supautils2.10.03.0.2+pg18 tds_fdw2.0.42.0.5+pg18 timescaledb2.22.02.23.0+pg18 timescaledb_toolkit1.21.01.22.0+pg18 timeseries0.1.60.1.7+pg18 pg_tzf0.2.20.2.3+pg18 vchord0.5.10.5.3+pg18 vchord_bm250.2.10.2.2+pg18 vectorize0.22.20.25.0+pg18 wrappers0.5.40.5.6+pg18 gzip1.0.11.0.0+pg18 hypopg1.4.11.4.2+pg18 mobilitydb1.2.01.3.0+pg18 mongo_fdw5.5.15.5.3+pg18 orafce4.14.44.14.6+pg18 pg_hint_plan1.7.11.8.0+pg18 pg_ivm1.111.13+pg18 pg_partman5.2.45.3.1+pg18 pg_search0.18.10.19.2+pg18 pg_show_plans2.1.62.1.7+pg18 pgpcre10.20190509+pg18 pgroonga4.0.04.0.4+pg18 pgroonga_database4.0.04.0.4+pg18 plpgsql_check2.8.22.8.3+pg18 uint1.202312061.20250815+pg18 uint1281.1.01.1.1+pg18 omni_*2025052520251108+pg18 acl1.0.4+pg18 aggs_for_arrays1.3.3+pg18 aggs_for_vecs1.4.0+pg18 arraymath1.1+pg18 asn1oid1.6+pg18 aws_s30.0.1+pg18 base361.0.0+pg18 base620.0.1+pg18 bzip1.0.0+pg18 chkpass1.0+pg18 convert0.0.4+pg18 count_distinct3.0.2+pg18 country0.0.3+pg18 cryptint1.0.0+pg18 currency0.0.3+pg18 data_historization1.1.0+pg18 db_migrator1.0.0+pg18 dbt20.61.7+pg18 ddl_historization0.0.7+pg18 ddsketch1.0.1+pg18 decoder_raw1.0+pg18 decoderbufs3.2.0+pg18 emailaddr0+pg18 envvar1.0.1+pg18 faker0.5.3+pg18 financial1.0.1+pg18 fio1.0+pg18 first_last_agg0.1.4+pg18 floatfile1.3.1+pg18 floatvec1.1.1+pg18 geoip0.3.0+pg18 hashlib1.1+pg18 hashtypes0.1.5+pg18 hll2.18+pg18 hunspell_*1.0+pg18 imgsmlr1.0+pg18 index_advisor0.2.0+pg18 kafka_fdw0.0.3+pg18 login_hook1.7+pg18 oracle_fdw2.8.0+pg18 pg_auth_mon3.0+pg18 pg_background1.3+pg18 pg_bigm1.2+pg18 pg_cron1.6.7+pg18 pg_profile4.10+pg18 pg_stat_kcache2.3.0+pg18 pgdd0.6.0+pg18 pgjwt0.2.0+pg18 pgnodemx1.7+pg18 pgsodium3.1.9+pg18 pgtap1.3.3+pg18 plprofiler4.2.5+pg18 plproxy2.11.0+pg18 plr8.4.8+pg18 plv83.2.4+pg18 pointcloud1.2.5+pg18 powa5.0.1+pg18 prefix1.2.10+pg18 q3c2.0.1+pg18 redis_fdw1.0+pg18 session_variable3.4+pg18 set_user4.1.0+pg18 system_stats3.2+pg18 temporal_tables1.2.2+pg18 topn2.7.0+pg18 unit7.10+pg18 zhparser2.3+pg18 zstd1.1.2+pg18
2025-09-04 名称 旧版本 新版本 备注 timescaledb2.21.12.22.0citus13.1.013.2.0documentdb0.105.00.106.0work with ferretdb 2.5 ddlx0.290.30+ pg18 icu_ext1.9.01.10.0+ pg18 asn1oid1.51.6+ pg18 uint1281.0.01.1.0+ pg18 toastinfo1.51.6+ pg18 vchord0.4.30.5.1pgrx 0.16.0 pg_idkit0.3.00.3.1pgrx 0.15.0 pg_search0.17.30.18.0pgrx 0.15.0 pg_parquet0.4.00.4.3pgrx 0.16.0 wrappers0.5.30.5.4pgrx 0.14.3 pg_rewrite- 2.0.0+ Debian/Ubuntu (PGDG) pg_tracing- 0.1.3-2+ pg 14/18 pg_curl2.42.4.5new version epoch pg_rewrite- 2.0.0Import from PGDG pg_tracing- 1.3.0+ pg14 / pg18 pgactive2.1.52.1.6+ pg18 pgsentinel1.11.21.2 pg_tle1.5.1-11.5.1-2+ pg18 redis_fdw+ pg18 pgextwlist1.171.19+ pg18 wal2json1.6+ pg18 pgvector0.8.1+ pg18
2025-07-24 名称 旧版本 新版本 备注 orioledbbeta11 1.4beta12 1.5与 oriolepg 17.11 配合 oriolepg17.917.11与 orioledb 1.5 beta12 配合 documentdb0.104.00.105.0与 ferretdb 2.4 配合 timescaledb2.20.02.21.1supautils2.9.22.10.0.so 位置变更plv83.2.33.2.4postgresql_anonymizer3.1.12.3.0(pgrx 0.14.3) wrappers0.5.00.5.3(pgrx 0.14.3) pgrx 版本变更 pgvectorscale0.7.10.8.0(pgrx 0.12.9) pg_search0.15.80.17.0修复 el icu 依赖问题,直接下载
2025-06-24 名称 旧版本 新版本 备注 citus13.0.313.1.0timescaledb2.20.02.21.0vchord0.3.00.4.3pgactive- 2.1.5需要 pgfeutils documentdb0.103.00.104.0添加 arm 支持
2025-05-26 2025-05-22 2025-05-07 2025-03-20 名称 旧版本 新版本 备注 timescaledb- 2.19.0citus- 13.0.2documentdb- 1.102pg_analytics- 0.3.7pg_search- 0.15.8emaj- 4.6.0pgsql_tweaks- 0.11.0pgvectorscale- 0.6.0pg_session_jwt- 0.2.0wrappers- 0.4.5pg_parquet- 0.3.1vchord- 0.2.2pg_tle1.2.01.5.0supautils2.5.02.6.0sslutils1.31.4pg_profile4.74.8pg_jsonschema0.3.20.3.3pg_incremental1.1.11.2.0ddl_historization0.70.0.7pg_sqlog3.1.71.6pg_random- - pg_stat_monitor2.1.02.1.1pg_profile4.74.8
2024-10-16 名称 旧版本 新版本 备注 pg_timeseries- 0.1.6pgmq- 1.4.4pg_protobuf- 16 17pg_uuidv7- 1.6pg_readonly- latestpgddl- 0.28pg_safeupdate- latestpg_stat_monitor- 2.1pg_profile- 4.7system_stats- 3.2pg_auth_mon- 3.0login_hook- 1.6logerrors- 2.1.3pg_orphaned- latestpgnodemx- 1.7sslutils- 1.4+pg16, +pg17)
10.4.2 - APT 变更日志 PostgreSQL 和扩展 DEB 包变更日志和发布说明
2026-03-21 包名 旧版本 新版本 备注 pg_search 0.21.12 0.22.2 pg_track_optimizer 0.9.1 0.9.2 pgcollection 1.0.0 2.0.0 pg_ttl_index 2.0.0 3.0.0 pg_clickhouse 0.1.4 0.1.5 pdu 3.0.25.12 新增 pgdog 0.1.32 新增
2026-03-05 本次为 7 个扩展在 Debian 12/13 与 Ubuntu 22/24(amd64/arm64)构建了 264 个 DEB 包。
包名 旧版本 新版本 备注 aggs_for_vecs 1.4.0 1.4.1 上游版本升级,PG 14-18 timescaledb 2.25.1 2.25.2 上游版本升级,PG 15-18 vchord 1.1.0 1.1.1 上游版本升级,PG 14-18 vchord_bm25 0.3.0-1 0.3.0-2 打包修复,PG 14-18 pg_pinyin - 0.0.2 新增扩展包,PG 14-18 pg_eviltransform - 0.0.2 新增扩展包,并对齐版本号 qos - 1.0.0 新增扩展包,PG 15-18
2026-02-27 包名 旧版本 新版本 备注 timescaledb 2.25.0 2.25.1 citus 14.0.0-3 14.0.0-4 使用最新官方版本重新构建 age 1.7.0 1.7.0 新增 PG 17 的 1.7.0 版本支持 pg_background - 1.8 仅提供 DEB 包,没有 RPM pgmq 1.10.0 1.10.1 当前没有该扩展包 pg_search 0.21.6 0.21.9 直接下载使用 oriolepg 17.11 17.16 OriolePG 内核更新 orioledb beta12 beta14 配套 OriolePG 17.16 openhalo 14.10 1.0 更新并重命名,14.18 pgedge - 17.9 新增多主边缘分布式内核 spock - 5.0.5 新增,pgEdge 核心扩展 lolor - 1.2.2 新增,pgEdge 核心扩展 snowflake - 2.4 新增,pgEdge 核心扩展 babelfishpg - 5.5.0 新增 BabelfishPG 包组 babelfish - 5.5.0 新增 Babelfish 兼容包 antlr4-runtime413 - 4.13 新增 Babelfish 依赖运行时
2026-02-12 名称 旧版本 新版本 备注 timescaledb 2.24.0 2.25.0 pg_incremental 1.2.0 1.4.1 pg_bigm 1.2 1.2-20250903 pg_net 0.20.0 0.20.2 ubuntu22 libcurl 版本过低 pgmq 1.9.0 1.10.0 pg_textsearch 0.4.0 0.5.0 pljs 1.0.4 1.0.5 sslutils 1.4-1 1.4-2 supautils 3.0.2 3.1.0 pg_math 1.0 1.1.0 pgsentinel 1.3.1 1.4.0 pg_uri 1.20151224 1.20251029 pgcollection 1.1.0 1.1.1 pg_readonly 1.0.3 1.0.4 timestamp9 1.4.0-1 1.4.0-2 重新构建,修复依赖问题 plprql 18.0.0 18.0.1 pglinter 1.0.1 1.1.0 pg_jsonschema 0.3.3 0.3.4 pg_anon 2.5.1 3.0.1 pg_search 0.21.4 0.21.6 pg_graphql 1.5.12-1 1.5.12-2 切换至官方 release pg_summarize 0.0.1-2 0.0.1-3 重新构建,修复 pg18 问题 nominatim_fdw 1.1.0 新增,与 PGDG YUM 同步 pg_utl_smtp 1.0.0 新增,与 PGDG YUM 同步 pg_strict - 1.0.2 新增 Rust 扩展 pg_track_optimizer - 0.9.1 新增扩展 pgmb - 1.0.0 新增扩展
2026-01-25 名称 旧版本 新版本 备注 age 1.6.0 1.7.0 仅 PG 18 citus 14.0.0-1PIGSTY 14.0.0-2PIGSTY 官方分支正式发布 pg_clickhouse 0.1.2 0.1.3 pgmq 1.8.1 1.9.0 pg_search 0.21.2 0.21.4
2026-01-16 名称 旧版本 新版本 备注 etcd_fdw 0.0.0 新增 pg_ttl_index 0.1.0 新增 citus 13.2.0 14.0.0 +pg18,预发布 pg_search 0.20.5 0.21.2 +pg18 pg_clickhouse 0.1.0 0.1.2 pg_textsearch 0.1.0 0.4.0 pg_convert 0.0.5 0.1.0 pg_timeseries 0.1.8 0.2.0 biscuit 2.0.1 2.2.2 pgmq 1.8.0 1.8.1 documentdb 0.107 0.109 +pg18,使用微软版本 pg_bulkload 3.1.22 3.1.23 +pg18 age - 1.6.0 +pg18 PGDG pgsentinel 1.2.0 1.3.1 PGDG pljs - 1.0.4 PGDG pg_partman 5.3.0 5.4.0 PGDG pgfincore - 1.3.1 PGDG documentdb_extended_rum 0.109 新增 mobilitydb_datagen 1.3.0 新增
2025-12-25 名称 旧版本 新版本 备注 pg_duckdb1.1.01.1.1pg_search0.20.40.20.5vchord_bm250.2.20.3.0pg_semver0.40.00.41.0pg_timeseries0.1.70.1.8supautils3.0.2-13.0.2-2修复 pg18 pg_summarize0.0.1-10.0.1-2修复 pg18
2025-12-16 名称 旧版本 新版本 备注 pg_textsearch- 0.1.0新增 pg_clickhouse- 0.1.0新增 pg_ai_query- 0.1.1新增 timescaledb2.23.12.24.0pg_search0.20.00.20.4pg_duckdb1.1.0-11.1.0-2官方版本 pg_biscuit1.02.0.1新仓库 pg_convert0.0.40.0.5移除 pg13 支持 pgdd0.6.00.6.1移除 pg13 支持 pglinter1.0.01.0.1pg_session_jwt0.3.30.4.0pg_anon2.4.12.5.1pg_enigma0.4.00.5.0wrappers0.5.60.5.7pg_vectorize0.25.00.26.0修复 pg18 pg_tiktoken- - 修复 pg18 pg_tzf- - 修复 pg18 pglite_fusion- - 修复 pg18 pgsmcrypto- - 修复 pg18 pgx_ulid- - 修复 pg18 plprql- - 修复 pg18 synchdb- 1.3仅支持 Ubuntu 22/24
2025-11-20 名称 旧版本 新版本 备注 vchord0.5.31.0.0pg_later0.3.10.4.0pgvectorscale0.8.00.9.0-pg13, +pg18 pglite_fusion0.0.50.0.6pgx_ulid0.2.10.2.2pg_search0.19.50.19.7resume PIGSTY building citus13.2.013.2.0official tag timescaledb2.23.02.23.1pg_profile4.104.11pglinter1.0.0new pg_typeid0.3.0head with pg18 support pg_enigma0.4.0vonng patched pgrx version pg_retry1.0.0new, pg17-18 pg_biscuit1.0new, pg16-18 pg_weighted_statistics1.0.0new, pg13-18 documentdb0.1060.107ferretdb fork polardb15.1515.15.5.0-38948055
2025-11-10 为几乎所有扩展添加 PostgreSQL 18 支持
名称 旧版本 新版本 备注 omni_csv- 0.1.1new omni_datasets- 0.1.0new omni_shmem- 0.1.0new pg_csv- 1.0.1new pljs- 1.0.3new plxslt- 0.20140221new credcheck3.04.2+pg18 dbt20.45.00.61.7+pg18 h34.1.34.2.3+pg18 h3_postgis4.1.34.2.3+pg18 mongo_fdw1.15.5.3+pg18 multicorn3.03.2+pg18 orafce4.14.44.14.6+pg18 pg_hint_plan1.7.01.8.0+pg18 pg_search0.18.10.19.2+pg18 pg_show_plans2.1.62.1.7+pg18 pgactive2.1.62.1.7+pg18 pgpcre10.20190509+pg18 plpgsql_check2.8.22.8.3+pg18 roaringbitmap0.5.40.5.5+pg18 uint1.202312061.20250815+pg18 uint1281.1.01.1.1+pg18 anon2.3.02.4.1+pg18 collection1.0.01.1.0+pg18 emaj4.7.04.7.1+pg18 explain_ui0.0.10.0.2+pg18 firebird_fdw1.4.01.4.1+pg18 login_hook1.61.7+pg18 logerrors2.1.32.1.5+pg18 mobilitydb1.2.01.3.0+pg18 omni0.2.90.2.14+pg18 omni_httpc0.1.50.1.10+pg18 omni_httpd0.4.60.4.11+pg18 omni_kube0.1.10.4.2+pg18 omni_sql0.5.10.5.3+pg18 omni_sqlite0.1.20.2.2+pg18 omni_worker0.1.00.2.1+pg18 pg_cardano1.0.51.1.1+pg18 pg_checksums1.21.3+pg18 pg_cron1.6.51.6.7+pg18 pg_duckdb0.3.11.1.0+pg18 pg_failover_slots1.1.01.2.0+pg18 pg_graphql1.5.111.5.12+pg18 pg_idkit0.3.10.4.0+pg18 pg_mooncake0.1.20.2.0+pg18 pg_net0.9.20.20.0+pg18 pg_parquet0.4.30.5.1+pg18 pg_partman5.2.45.3.0+pg18 pg_session_jwt0.3.10.3.3+pg18 pg_sphere1.5.11.5.2+pg18 pg_stat_monitor2.2.02.3.0+pg18 pg_statement_rollback1.41.5+pg18 pg_store_plans1.81.9+pg18 pg_task1.0.02.1.12+pg18 pg_tle1.5.11.5.2+pg18 pg_uuidv71.6.01.7.0+pg18 pglogical2.4.52.4.6+pg18 pgmq1.5.11.7.0+pg18 pgroonga4.0.04.0.4+pg18 pgsql_tweaks0.11.31.0.2+pg18 pldbgapi1.81.9+pg18 plprql1.0.018.0.0+pg18 supautils2.10.03.0.2+pg18 timescaledb2.22.02.23.0+pg18 timescaledb_toolkit1.21.01.22.0+pg18 vchord0.5.10.5.3+pg18 vectorize0.22.20.25.0+pg18 wrappers0.5.40.5.6+pg18 acl1.0.4- +pg18 aggs_for_arrays1.3.3- +pg18 aggs_for_vecs1.4.0- +pg18 base361.0.0- +pg18 hashlib1.1- +pg18 hll2.18- +pg18 imgsmlr1.0- +pg18 index_advisor0.2.0- +pg18 kafka_fdw0.0.3- +pg18 pg_auth_mon3.0- +pg18 pg_background1.3- +pg18 pg_bigm1.2- +pg18 pg_profile4.10- +pg18 pg_stat_kcache2.3.0- +pg18 pgdd0.6.0- +pg18 pgjwt0.2.0- +pg18 pgmp1.0.5- +pg18 plprofiler4.2.5- +pg18 plv83.2.4- +pg18 redis_fdw1.0- +pg18 repmgr5.5.0- +pg18 system_stats3.2- +pg18 topn2.7.0- +pg18 zhparser2.3- +pg18
2025-09-06 名称 旧版本 新版本 备注 timescaledb2.21.12.22.0citus13.1.013.2.0documentdb0.105.00.106.0work with ferretdb 2.5 ddlx0.290.30+ pg18 uint1281.0.01.1.0+ pg18 vchord0.4.30.5.1pgrx 0.16.0 pg_idkit0.3.00.3.1pgrx 0.15.0 pg_search0.17.30.18.0pgrx 0.15.0 pg_parquet0.4.00.4.3pgrx 0.16.0 wrappers0.5.30.5.4pgrx 0.14.3 pg_rewrite- 2.0.0+ Debian/Ubuntu pg_tracing- 0.1.3-2+ pg 14/18 pg_curl2.42.4.5pg_ivm1.111.12+ pg18 pg_rewrite- 2.0.0new extension pg_tracing- 1.3.0+ pg14 / pg18 pgactive2.1.52.1.6+ pg18 pgsentinel1.11.21.2 pg_tle1.5.1-11.5.1-2+ pg18 redis_fdw+ pg18 emaj4.64.7table_version1.11.01.11.1
2025-07-24 名称 旧版本 新版本 备注 orioledbbeta11 1.4beta12 1.5与 oriolepg 17.11 配合 oriolepg17.917.11与 orioledb 1.5 beta12 配合 documentdb0.104.00.105.0与 ferretdb 2.4 配合 timescaledb2.20.02.21.1supautils2.9.22.10.0.so 位置变更plv83.2.33.2.4postgresql_anonymizer3.1.12.3.0 (pgrx 0.14.3)wrappers0.5.00.5.3 (pgrx 0.14.3)pgrx 版本变更 pgvectorscale0.7.10.8.0 (pgrx 0.12.9)pg_search0.15.80.17.0 (download)修复 el icu 依赖问题 pg_profile4.8.04.10.0
2025-07-04 名称 旧版本 新版本 备注 orioledb1.4 beta11重新构建 pgvectorscale0.7.10.7.1重新构建修复错误 pg_stat_monitor2.1.12.2.0pgsql_tweaks0.11.10.11.3pg_tle1.5.01.5.1pg_curl2.42.4.5
2025-06-24 名称 旧版本 新版本 备注 citus13.0.313.1.0timescaledb2.20.02.21.0vchord0.3.00.4.3pgactive- 2.1.5需要 pgfeutils documentdb0.103.00.104.0添加 arm 支持
2025-05-26 2025-05-22 2025-05-07 2025-03-20 名称 旧版本 新版本 备注 timescaledb- 2.19.0citus- 13.0.2documentdb- 1.102pg_analytics- 0.3.7pg_search- 0.15.8pg_ivm- 1.10emaj- 4.6.0pgsql_tweaks- 0.11.0pgvectorscale- 0.6.0pg_session_jwt- 0.2.0wrappers- 0.4.5pg_parquet- 0.3.1vchord- 0.2.2pg_tle1.2.01.5.0supautils2.5.02.6.0sslutils1.31.4pg_profile4.74.8pg_jsonschema0.3.20.3.3pg_incremental1.1.11.2.0ddl_historization0.70.0.7pg_sqlog3.1.71.6pg_random- - pg_stat_monitor2.1.02.1.1pg_profile4.74.8
2024-10-16 名称 旧版本 新版本 备注 pg_ivm- 1.9pg_timeseries- 0.1.6pgmq- 1.4.4pg_protobuf- 16 17pg_uuidv7- 1.6pg_readonly- latestpgddl- 0.28pg_safeupdate- latestpg_stat_monitor- 2.1pg_profile- 4.7system_stats- 3.2pg_auth_mon- 3.0login_hook- 1.6logerrors- 2.1.3pg_orphaned- latestpgnodemx- 1.7sslutils- 1.4 (+16,17)
11 - 功能模块 12 - 模块:PGSQL 如何使用 Pigsty 部署并管理世界上最先进的开源关系型数据库 —— PostgreSQL,按需定制,开箱即用!
世界上最先进的开源关系型数据库!
而 Pigsty 帮它进入全盛状态:开箱即用、可靠、可观测、可维护、可伸缩! 配置 | 管理 | 剧本 | 监控 | 参数
概览 了解关于 PostgreSQL 的重要主题与概念。
配置 描述 你想要的 PostgreSQL 集群
身份参数 :定义PostgreSQL集群的身份参数读写主库 :创建由单一主库构成的单实例“集群“只读从库 :创建一主一从的两节点基础高可用集群离线从库 :创建专用于OLAP/ETL/交互式查询的特殊只读实例同步备库 :启用同步提交,以确保没有数据丢失法定人数 :使用法定人数同步提交以获得更高的一致性级别备份集群 :克隆现有集群,并保持同步(异地灾备集群)延迟集群 :克隆现有集群,并延迟重放,用于紧急数据恢复Citus集群 :定义并创建 Citus 水平分布式数据库集群大版本切换 :使用不同的 PostgreSQL 大版本部署集群管理 管理 您所创建的 PostgreSQL 集群。
剧本 使用幂等的 剧本 ,将您的描述变为现实。
监控 在 Grafana 仪表盘 中查阅 PostgreSQL 的详情状态。
在 Pigsty 中共有 26 个与 PostgreSQL 相关的监控面板:
参数 PGSQL 模块的配置参数列表
教程 一些使用/管理 Pigsty中 PostgreSQL 数据库的教程。
克隆一套现有的 PostgreSQL 集群 创建一套现有 PostgreSQL 集群的在线备份集群。 创建一套现有 PostgreSQL 集群的延迟备份集群 监控一个已有的 postgres 实例? 使用逻辑复制从外部 PostgreSQL 迁移至 Pigsty 托管的 PostgreSQL 实例? 使用 MinIO 作为集中的 pgBackRest 备份仓库。 使用专门的 etcd 集群作为 PostgreSQL / Patroni 的 DCS ? 使用专用的 haproxy 负载均衡器集群对外暴露暴露 PostgreSQL 服务。 使用 pg-meta CMDB 替代 pigsty.yml 作为配置清单源。 使用 PostgreSQL 作为 Grafana 的后端存储数据库? 使用 PostgreSQL 作为 Prometheus 后端存储数据库?
12.1 - 配置指南 12.2 - 集群配置 根据需求场景选择合适的实例与集群类型,配置出满足需求的 PostgreSQL 数据库集群。
Pigsty 是一个“配置驱动”的 PostgreSQL 平台:所有行为都来自 ~/pigsty/conf/*.yml 清单与 PGSQL 参数
只要写好配置,你就能在几分钟内复刻出一套包含实例、用户、数据库、访问控制、扩展与调优策略的定制集群。
配置入口 准备清单 :复制 pigsty/conf/*.yml 模板或从零开始编写 Ansible Inventory,将集群分组(all.children.<cls>.hosts)与全局变量(all.vars)写入同一个文件。定义参数 :在 vars 区块中覆盖需要的 PGSQL 参数应用配置 :运行 ./configure -c <conf> 或 bin/pgsql-add <cls> 等剧本让配置落地。Pigsty 会根据参数生成 Patroni/pgbouncer/pgbackrest 等服务所需的配置文件。Pigsty 默认的 Demo 清单 conf/pgsql.yml 就是一份最小化示例:一个 pg-meta 集群、全局 pg_version: 18、少量业务用户与数据库定义。你可以在此基础上扩展更多集群。
关注点与文档索引 Pigsty 的 PostgreSQL 配置可以从以下几个维度组合,后续文档会逐一展开“如何配置”:
集群实例 pg_cluster / pg_role / pg_seq / pg_upstream 定义实例拓扑(单机、主从、备份集群、延迟集群、Citus 等)。内核版本 pg_version、pg_mode、pg_packages、pg_extensions、pg_conf 等参数挑选核心版本、风味和调优模板。用户/角色 pg_default_roles 与 pg_users 中声明系统角色、业务账号、密码策略以及连接池属性。数据库对象 pg_databases、baseline、schemas、extensions、pool_* 字段按需创建数据库并自动接入 pgbouncer/Grafana。访问控制 (HBA) pg_default_hba_rules 与 pg_hba_rules 维护主机级认证策略,保证不同角色/网络的访问边界。权限模型 (ACL) pg_default_privileges、pg_default_roles、pg_revoke_public 等参数收敛对象权限,开箱即用地提供分层角色体系。理解这些参数之后,你就可以针对任意业务需求写出“配置即基础设施”的声明式清单,Pigsty 会负责执行并确保幂等。
一个典型示例 下面的片段展示了如何在同一个配置文件中同时控制实例拓扑、内核版本、扩展、用户以及数据库:
all :
children :
pg-analytics :
hosts :
10.10.10.11 : { pg_seq: 1, pg_role : primary }
10.10.10.12 : { pg_seq: 2, pg_role: replica, pg_offline_query : true }
vars :
pg_cluster : pg-analytics
pg_conf : olap.yml
pg_extensions : [ postgis, timescaledb, pgvector ]
pg_databases :
- { name: bi, owner: dbuser_bi, schemas: [mart], extensions: [timescaledb], pool_mode : session }
pg_users :
- { name: dbuser_bi, password: DBUser.BI, roles: [dbrole_admin], pgbouncer : true }
vars :
pg_version : 18
pg_packages : [ pgsql-main pgsql-common ]
pg_hba_rules :
- { user: dbuser_bi, db: bi, addr: intra, auth: ssl, title : 'BI 只允许内网 SSL 访问' }
pg-analytics 集群包含一个主库和一个离线副本。全局指定 pg_version: 18 与一套扩展示例,并加载 olap.yml 调优。 在 pg_databases 与 pg_users 中声明业务对象,自动生成 schema/extension 与连接池条目。 附加的 pg_hba_rules 限制了访问来源与认证方式。 修改并应用这份清单即可得到一套定制化的 PostgreSQL 集群,而无需手工逐项配置。
12.2.1 - 集群实例 根据需求场景选择合适的实例与集群类型,配置出满足需求的 PostgreSQL 数据库集群。
根据需求场景选择合适的实例与集群类型,配置出满足需求的 PostgreSQL 数据库集群。
您可以定义不同类型的实例和集群,下面是 Pigsty 中常见的几种 PostgreSQL 实例/集群类型:
读写主库 我们从最简单的情况开始:由一个主库(Primary)组成的单实例集群:
pg-test :
hosts :
10.10.10.11 : { pg_seq: 1, pg_role : primary }
vars :
pg_cluster : pg-test
这段配置言简意赅,自我描述,仅由 身份参数 pg_cluster
使用以下命令创建该集群:
Demo展示,开发测试,承载临时需求,进行无关紧要的计算分析任务时,使用单一数据库实例可能并没有太大问题。但这样的单机集群没有 高可用 ,当出现硬件故障时,您需要使用 PITR 或其他恢复手段来确保集群的 RTO / RPO。为此,您可以考虑为集群添加若干个 只读从库
只读从库 要添加一台只读从库(Replica)实例,您可以在 pg-test 中添加一个新节点,并将其 pg_rolereplica。
pg-test :
hosts :
10.10.10.11 : { pg_seq: 1, pg_role : primary }
10.10.10.12 : { pg_seq: 2, pg_role : replica } # <--- 新添加的从库
vars :
pg_cluster : pg-test
如果整个集群不存在,您可以直接 创建 这个完整的集群。 如果集群主库已经初始化好了,那么您可以向现有集群 添加 一个从库:
bin/pgsql-add pg-test # 一次性初始化整个集群
bin/pgsql-add pg-test 10.10.10.12 # 添加从库到现有的集群
当集群主库出现故障时,只读实例(Replica)可以在高可用系统的帮助下接管主库的工作。除此之外,只读实例还可以用于执行只读查询:许多业务的读请求要比写请求多很多,而大部分只读查询负载都可以由从库实例承担。
离线从库 离线实例(Offline)是专门用于服务慢查询、ETL、OLAP流量和交互式查询等的专用只读从库。慢查询/长事务对在线业务的性能与稳定性有不利影响,因此最好将它们与在线业务隔离开来。
要添加离线实例,请为其分配一个新实例,并将 pg_roleoffline。
pg-test :
hosts :
10.10.10.11 : { pg_seq: 1, pg_role : primary }
10.10.10.12 : { pg_seq: 2, pg_role : replica }
10.10.10.13 : { pg_seq: 3, pg_role : offline } # <--- 新添加的离线从库
vars :
pg_cluster : pg-test
专用离线实例的工作方式与常见的从库实例类似,但它在 pg-test-replica 服务中用作备份服务器。 也就是说,只有当所有replica实例都宕机时,离线和主实例才会提供此项只读服务。
许多情况下,数据库资源有限,单独使用一台服务器作为离线实例是不经济的做法。作为折中,您可以选择一台现有的从库实例,打上 pg_offline_querypg_default_hba_rulespg_hba_rules
同步备库 当启用同步备库(Sync Standby)时,PostgreSQL 将选择一个从库作为同步备库 ,其他所有从库作为候选者 。 主数据库会等待备库实例刷新到磁盘,然后才确认提交,备库实例始终拥有最新的数据,没有复制延迟,主从切换至同步备库不会有数据丢失。
PostgreSQL 默认使用异步流复制,这可能会有小的复制延迟(10KB / 10ms 数量级)。当主库失败时,可能会有一个小的数据丢失窗口(可以使用 pg_rpo
但在某些关键场景中(例如,金融交易),数据丢失是完全不可接受的,或者,读取复制延迟是不可接受的。在这种情况下,您可以使用同步提交来解决这个问题。 要启用同步备库模式,您可以简单地使用 pg_confcrit.yml模板。
pg-test :
hosts :
10.10.10.11 : { pg_seq: 1, pg_role : primary }
10.10.10.12 : { pg_seq: 2, pg_role : replica }
10.10.10.13 : { pg_seq: 3, pg_role : replica }
vars :
pg_cluster : pg-test
pg_conf : crit.yml # <--- 使用 crit 模板
要在现有集群上启用同步备库,请 配置集群 并启用 synchronous_mode:
$ pg edit-config pg-test # 在管理员节点以管理员用户身份运行
+++
-synchronous_mode: false # <--- 旧值
+synchronous_mode: true # <--- 新值
synchronous_mode_strict: false
应用这些更改?[ y/N] : y
在这种情况下,PostgreSQL 配置项 synchronous_standby_namesapplication_name 将被写入 PostgreSQL 主库配置文件中并应用生效。
法定人数提交 法定人数提交(Quorum Commit)提供了比同步备库更强大的控制能力:特别是当您有多个从库时,您可以设定提交成功的标准,实现更高/更低的一致性级别(以及可用性之间的权衡)。
如果想要最少两个从 库来确认提交,可以通过 Patroni 配置集群 ,调整参数 synchronous_node_count
synchronous_mode : true # 确保同步提交已经启用
synchronous_node_count : 2 # 指定“至少”有多少个从库提交成功,才算提交成功
如果你想要使用更多的同步从库,修改 synchronous_node_count 的取值即可。当集群的规模发生变化时,您应当确保这里的配置仍然是有效的,以避免服务不可用。
在这种情况下,PostgreSQL 配置项 synchronous_standby_names
synchronous_standby_names = '2 ("pg-test-3","pg-test-2")'
示例:使用多个同步从库 $ pg edit-config pg-test
---
+synchronous_node_count: 2
Apply these changes? [ y/N] : y
应用配置后,出现两个同步备库。
+ Cluster: pg-test ( 7080814403632534854) +---------+----+-----------+-----------------+
| Member | Host | Role | State | TL | Lag in MB | Tags |
+-----------+-------------+--------------+---------+----+-----------+-----------------+
| pg-test-1 | 10.10.10.10 | Leader | running | 1 | | clonefrom: true |
| pg-test-2 | 10.10.10.11 | Sync Standby | running | 1 | 0 | clonefrom: true |
| pg-test-3 | 10.10.10.12 | Sync Standby | running | 1 | 0 | clonefrom: true |
+-----------+-------------+--------------+---------+----+-----------+-----------------+
另一种情景是,使用 任意n个 从库来确认提交。在这种情况下,配置的方式略有不同,例如,假设我们只需要任意一个从库确认提交:
synchronous_mode : quorum # 使用法定人数提交
postgresql :
parameters : # 修改 PostgreSQL 的配置参数 synchronous_standby_names ,使用 `ANY n ()` 语法
synchronous_standby_names : 'ANY 1 (*)' # 你可以指定具体的从库列表,或直接使用 * 通配所有从库。
示例:启用ANY法定人数提交 $ pg edit-config pg-test
+ synchronous_standby_names: 'ANY 1 (*)' # 在 ANY 模式下,需要使用此参数
- synchronous_node_count: 2 # 在 ANY 模式下, 不需要使用此参数
Apply these changes? [ y/N] : y
应用后,配置生效,所有备库在 Patroni 中变为普通的 replica。但是在 pg_stat_replication 中可以看到 sync_state 会变为 quorum。
备份集群 您可以克隆现有的集群,并创建一个备份集群(Standby Cluster),用于数据迁移、水平拆分、多区域部署,或灾难恢复。
在正常情况下,备份集群将追随上游集群并保持内容同步,您可以将备份集群提升,作为真正地独立集群。
备份集群的定义方式与正常集群的定义基本相同,除了在主库上额外定义了 pg_upstream备份集群领导者 (Standby Leader)。
例如,下面定义了一个pg-test集群,以及其备份集群pg-test2,其配置清单可能如下所示:
# pg-test 是原始集群
pg-test :
hosts :
10.10.10.11 : { pg_seq: 1, pg_role : primary }
vars : { pg_cluster : pg-test }
# pg-test2 是 pg-test 的备份集群
pg-test2 :
hosts :
10.10.10.12 : { pg_seq: 1, pg_role: primary , pg_upstream : 10.10.10.11 } # <--- pg_upstream 在这里定义
10.10.10.13 : { pg_seq: 2, pg_role : replica }
vars : { pg_cluster : pg-test2 }
而 pg-test2 集群的主节点 pg-test2-1 将是 pg-test 的下游从库,并在pg-test2集群中充当备份集群领导者(Standby Leader )。
只需确保备份集群的主节点上配置了 pg_upstream
bin/pgsql-add pg-test # 创建原始集群
bin/pgsql-add pg-test2 # 创建备份集群
示例:更改复制上游 如有必要(例如,上游发生主从切换/故障转移),您可以通过 配置集群 更改备份集群的复制上游。
要这样做,只需将standby_cluster.host更改为新的上游IP地址并应用。
$ pg edit-config pg-test2
standby_cluster:
create_replica_methods:
- basebackup
- host: 10.10.10.13 # <--- 旧的上游
+ host: 10.10.10.12 # <--- 新的上游
port: 5432
Apply these changes? [ y/N] : y
示例:提升备份集群 你可以随时将备份集群提升为独立集群,这样该集群就可以独立承载写入请求,并与原集群分叉。
为此,你必须 配置 该集群并完全擦除standby_cluster部分,然后应用。
$ pg edit-config pg-test2
-standby_cluster:
- create_replica_methods:
- - basebackup
- host: 10.10.10.11
- port: 5432
Apply these changes? [ y/N] : y
示例:级联复制 如果您在一台从库上指定了 pg_upstream级联复制 (Cascade Replication)
在配置级联复制时,您必须使用集群中某一个实例的IP地址作为参数的值,否则初始化会报错。该从库从特定的实例进行流复制,而不是主库。
这台充当 WAL 中继器的实例被称为 桥接实例 (Bridge Instance)。使用桥接实例可以分担主库发送 WAL 的负担,当您有几十台从库时,使用桥接实例级联复制是一个不错的注意。
pg-test :
hosts : # pg-test-1 ---> pg-test-2 ---> pg-test-3
10.10.10.11 : { pg_seq: 1, pg_role : primary }
10.10.10.12 : { pg_seq: 2, pg_role : replica } # <--- 桥接实例
10.10.10.13 : { pg_seq: 3, pg_role: replica, pg_upstream : 10.10.10.12 }
# ^--- 从 pg-test-2 (桥接)复制,而不是从 pg-test-1 (主节点)
vars : { pg_cluster : pg-test }
延迟集群 延迟集群(Delayed Cluster)是一种特殊类型的 备份集群 ,用于尽快恢复"意外删除"的数据。
例如,如果你希望有一个名为 pg-testdelay 的集群,其数据内容与一小时前的 pg-test 集群相同:
# pg-test 是原始集群
pg-test :
hosts :
10.10.10.11 : { pg_seq: 1, pg_role : primary }
vars : { pg_cluster : pg-test }
# pg-testdelay 是 pg-test 的延迟集群
pg-testdelay :
hosts :
10.10.10.12 : { pg_seq: 1, pg_role: primary , pg_upstream: 10.10.10.11, pg_delay : 1d }
10.10.10.13 : { pg_seq: 2, pg_role : replica }
vars : { pg_cluster : pg-testdelay }
你还可以在现有的 备份集群 上 配置 一个"复制延迟"。
$ pg edit-config pg-testdelay
standby_cluster:
create_replica_methods:
- basebackup
host: 10.10.10.11
port: 5432
+ recovery_min_apply_delay: 1h # <--- 在此处添加延迟时长,例如1小时
Apply these changes? [ y/N] : y
当某些元组和表格被意外删除时,你可以通过修改此参数的方式,将此延迟集群推进到适当的时间点,并从中读取数据,快速修复原始集群。
延迟集群需要额外的资源,但比起 PITR 要快得多,并且对系统的影响也小得多,对于非常关键的集群,可以考虑搭建延迟集群。
Citus集群 Pigsty 原生支持 Citus。可以参考 files/pigsty/citus.ymlprod.yml
要定义一个 citus 集群,您需要指定以下参数:
此外,还需要额外的 hba 规则,允许从本地和其他数据节点进行 SSL 访问。如下所示:
all :
children :
pg-citus0 : # citus 0号分片
hosts : { 10.10.10.10 : { pg_seq: 1, pg_role : primary } }
vars : { pg_cluster: pg-citus0 , pg_group : 0 }
pg-citus1 : # citus 1号分片
hosts : { 10.10.10.11 : { pg_seq: 1, pg_role : primary } }
vars : { pg_cluster: pg-citus1 , pg_group : 1 }
pg-citus2 : # citus 2号分片
hosts : { 10.10.10.12 : { pg_seq: 1, pg_role : primary } }
vars : { pg_cluster: pg-citus2 , pg_group : 2 }
pg-citus3 : # citus 3号分片
hosts :
10.10.10.13 : { pg_seq: 1, pg_role : primary }
10.10.10.14 : { pg_seq: 2, pg_role : replica }
vars : { pg_cluster: pg-citus3 , pg_group : 3 }
vars : # 所有 Citus 集群的全局参数
pg_mode : citus # pgsql 集群模式需要设置为: citus
pg_shard : pg-citus # citus 水平分片名称: pg-citus
pg_primary_db : meta # citus 数据库名称:meta
pg_dbsu_password : DBUser.Postgres # 如果使用 dbsu ,那么需要为其配置一个密码
pg_users : [ { name: dbuser_meta ,password: DBUser.Meta ,pgbouncer: true ,roles : [ dbrole_admin ] } ]
pg_databases : [ { name: meta ,extensions : [ { name : citus }, { name: postgis }, { name: timescaledb } ] } ]
pg_hba_rules :
- { user: 'all' ,db: all ,addr: 127.0.0.1/32 ,auth: ssl ,title : 'all user ssl access from localhost' }
- { user: 'all' ,db: all ,addr: intra ,auth: ssl ,title : 'all user ssl access from intranet' }
在协调者节点上,您可以创建分布式表和引用表,并从任何数据节点查询它们。从 11.2 开始,任何 Citus 数据库节点都可以扮演协调者的角色了。
SELECT create_distributed_table( 'pgbench_accounts' , 'aid' ) ; SELECT truncate_local_data_after_distributing_table( $$ public.pgbench_accounts$$ ) ;
SELECT create_reference_table( 'pgbench_branches' ) ; SELECT truncate_local_data_after_distributing_table( $$ public.pgbench_branches$$ ) ;
SELECT create_reference_table( 'pgbench_history' ) ; SELECT truncate_local_data_after_distributing_table( $$ public.pgbench_history$$ ) ;
SELECT create_reference_table( 'pgbench_tellers' ) ; SELECT truncate_local_data_after_distributing_table( $$ public.pgbench_tellers$$ ) ;
12.2.2 - 内核版本 如何选择合适的 PostgreSQL 内核与大版本。
在 Pigsty 中选择"内核"意味着确定 PostgreSQL 大版本、模式/发行版、需要安装的包以及要加载的调优模板。
Pigsty v4.2 当前支持 PostgreSQL 13 - 18,默认使用 18。下方内容展示如何通过配置文件完成这些选择。
大版本与软件包 pg_version:指定 PostgreSQL 主版本(默认 18)。Pigsty 会根据版本自动映射到正确的包名前缀。pg_packages:定义需要安装的核心包集合,支持使用 包别名 (默认 pgsql-main pgsql-common,包含内核 + patroni/pgbouncer/pgbackrest 等常用工具)。pg_extensions:额外需要安装的扩展包列表,同样支持别名;缺省为空表示只装核心依赖。all :
vars :
pg_version : 18
pg_packages : [ pgsql-main pgsql-common ]
pg_extensions : [ postgis, timescaledb, pgvector, pgml ]
效果:Ansible 在安装阶段会拉取与 pg_version=18 对应的包,将扩展预装到系统中,随后数据库初始化脚本即可直接 CREATE EXTENSION。
Pigsty 的离线仓库中不同版本的扩展支持范围不同:13 可用扩展相对较少,17/18 覆盖最广。若某扩展未预打包,可通过 repo_packages_extra 追加。
内核模式(pg_mode) pg_mode 控制要部署的内核“风味”,默认 pgsql 表示标准 PostgreSQL。Pigsty 目前支持以下模式:
模式 场景 pgsql标准 PostgreSQL,高可用 + 复制 citusCitus 分布式集群,需要额外的 pg_shard / pg_group gpsqlCloudberry / Greenplum / MatrixDB mssqlBabelfish mysqlOpenGauss/HaloDB 兼容 MySQL 协议 polar阿里 PolarDB(基于 pg polar 发行) ivoryIvorySQL(Oracle 兼容语法) orioleOrioleDB 存储引擎 oraclePostgreSQL + ora 兼容(pg_mode: oracle)
选择模式后,Pigsty 会自动加载对应的模板、依赖包与 Patroni 配置。以部署 Citus 为例:
all :
children :
pg-citus0 :
hosts : { 10.10.10.11 : { pg_seq: 1, pg_role : primary } }
vars : { pg_cluster: pg-citus0, pg_group : 0 }
pg-citus1 :
hosts : { 10.10.10.12 : { pg_seq: 1, pg_role : primary } }
vars : { pg_cluster: pg-citus1, pg_group : 1 }
vars :
pg_mode : citus
pg_shard : pg-citus
patroni_citus_db : meta
效果:所有成员会安装 Citus 相关包,Patroni 以分片模式写入 etcd,并自动在 meta 数据库内 CREATE EXTENSION citus。
扩展与预置对象 除了系统包,你还可以通过以下参数控制数据库启动后自动加载的组件:
pg_libs:写入 shared_preload_libraries 的列表。例如 pg_libs: 'timescaledb, pg_stat_statements, auto_explain'。pg_default_extensions / pg_default_schemas:控制初始化脚本对 template1 与 postgres 预创建的 schema、扩展。pg_parameters:为所有实例附加 ALTER SYSTEM SET(写入 postgresql.auto.conf)。示例:启用 TimescaleDB、pgvector 并自定义一些系统参数。
pg-analytics :
vars :
pg_cluster : pg-analytics
pg_libs : 'timescaledb, pg_stat_statements, pgml'
pg_default_extensions :
- { name : timescaledb }
- { name : pgvector }
pg_parameters :
timescaledb.max_background_workers : 8
shared_preload_libraries : "'timescaledb,pg_stat_statements,pgml'"
效果:初始化时 template1 会创建扩展、Patroni 的 postgresql.conf 注入对应参数,所有业务库继承这些设置。
调优模板 (pg_conf) pg_conf 指向 roles/pgsql/templates/*.yml 中的 Patroni 模板。Pigsty内置四套通用模板:
模板 适用场景 oltp.yml默认模板,面向 4–128 核的 TP 负载 olap.yml针对分析场景优化 crit.yml强调同步提交/最小延迟,适合金融等零丢失场景 tiny.yml轻量机 / 边缘场景 / 资源受限环境
你可以直接替换模板或自定义一个 YAML 文件放在 templates/ 下,然后在集群 vars 里指定。
pg-ledger :
hosts : { 10.10.10.21 : { pg_seq: 1, pg_role : primary } }
vars :
pg_cluster : pg-ledger
pg_conf : crit.yml
pg_parameters :
synchronous_commit : 'remote_apply'
max_wal_senders : 16
wal_keep_size : '2GB'
效果:拷贝 crit.yml 作为 Patroni 配置,叠加 pg_parameters 写入 postgresql.auto.conf,使实例立即以同步提交模式运行。
组合实例:一个完整示例 pg-rag :
hosts :
10.10.10.31 : { pg_seq: 1, pg_role : primary }
10.10.10.32 : { pg_seq: 2, pg_role : replica }
vars :
pg_cluster : pg-rag
pg_version : 18
pg_mode : pgsql
pg_conf : olap.yml
pg_packages : [ pgsql-main pgsql-common ]
pg_extensions : [ pgvector, pgml, postgis ]
pg_libs : 'pg_stat_statements, pgvector, pgml'
pg_parameters :
max_parallel_workers : 8
shared_buffers : '32GB'
第一台主库 + 一台 replica,使用 olap.yml 调优。 安装 PG18 + RAG 常用扩展,自动在系统级加载 pgvector/pgml。 Patroni/pgbouncer/pgbackrest 由 Pigsty 生成,无需手工干预。 根据业务需要替换上述参数即可完成内核层的全部定制。
12.2.3 - 别名翻译 Pigsty 提供软件包别名翻译机制,可以屏蔽底层操作系统的二进制包细节差异,让安装更简易。
PostgreSQL 在不同操作系统上的软件包命名规则存在显著差异:
EL 系统 (RHEL/Rocky/Alma/…)使用 pgvector_18,postgis36_18* 这样的格式Debian/Ubuntu 系统 使用 postgresql-18-pgvector,postgresql-18-postgis-3 这样的格式这种差异给用户带来了额外的认知负担:您需要记住不同系统的包名规则,还要处理 PostgreSQL 版本号嵌入的问题。
软件包别名 Pigsty 通过 软件包别名(Package Alias) 机制解决了这个问题:您只需使用统一的别名,Pigsty 会处理好所有细节:
# 使用别名 —— 简单、统一、跨平台
pg_extensions : [ postgis, pgvector, timescaledb ]
# 等效于 EL9 + PG18 上的实际包名
pg_extensions : [ postgis36_18*, pgvector_18*, timescaledb-tsl_18* ]
# 等效于 Ubuntu 24 + PG18 上的实际包名
pg_extensions : [ postgresql-18-postgis-3, postgresql-18-pgvector, postgresql-18-timescaledb-tsl ]
别名翻译 别名还可以将一组软件包归类为一个整体,例如 Pigsty 默认安装的软件包 —— pg_packages
pg_packages : # pg packages to be installed, alias can be used
- pgsql-main pgsql-common
Pigsty 将查询当前的操作系统别名清单(假设为 el10.x86_64
pgsql-main : "postgresql$v postgresql$v-server postgresql$v-libs postgresql$v-contrib postgresql$v-plperl postgresql$v-plpython3 postgresql$v-pltcl postgresql$v-llvmjit pg_repack_$v* wal2json_$v* pgvector_$v*"
pgsql-common : "patroni patroni-etcd pgbouncer pgbackrest pg_exporter pgbackrest_exporter vip-manager"
接下来,Pigsty 又进一步通过当前指定的 PG 大版本(假设 pg_version18 ),将 pgsql-main 翻译为:
pg18-main : "postgresql18 postgresql18-server postgresql18-libs postgresql18-contrib postgresql18-plperl postgresql18-plpython3 postgresql18-pltcl postgresql18-llvmjit pg_repack_18* wal2json_18* pgvector_18*"
通过这种方式,Pigsty 屏蔽了软件包的复杂性,让用户可以简单的指定自己想要的功能组件。
哪些变量可以使用别名? 您可以在以下四个参数中使用包别名,别名会根据翻译流程自动转换为实际的软件包名称:
别名列表 你可以在 Pigsty 项目源代码的 roles/node_id/vars/
工作原理 别名翻译流程 用户配置别名 --> 检测操作系统 --> 查找别名映射表 ---> 替换$v占位符 ---> 安装实际软件包
↓ ↓ ↓ ↓
postgis el9.x86_64 postgis36_$v * postgis36_18*
postgis u24.x86_64 postgresql-$v -postgis-3 postgresql-18-postgis-3
版本占位符 Pigsty 的别名系统使用 $v 作为 PostgreSQL 版本号的占位符。当您使用 pg_version$v 都会被替换为实际版本号。
例如,当 pg_version: 18 时:
别名定义 (EL) 展开结果 postgresql$v*postgresql18*pgvector_$v*pgvector_18*timescaledb-tsl_$v*timescaledb-tsl_18*
别名定义 (Debian/Ubuntu) 展开结果 postgresql-$vpostgresql-18postgresql-$v-pgvectorpostgresql-18-pgvectorpostgresql-$v-timescaledb-tslpostgresql-18-timescaledb-tsl
通配符匹配 在 EL 系统上,许多别名使用 * 通配符来匹配相关的子包。例如:
postgis36_18* 会匹配 postgis36_18、postgis36_18-client、postgis36_18-utils 等postgresql18* 会匹配 postgresql18、postgresql18-server、postgresql18-libs、postgresql18-contrib 等这种设计确保您无需逐一列出每个子包,一个别名即可安装完整的扩展。
12.2.4 - 用户/角色 如何通过配置来定制所需 PostgreSQL 用户与角色?
在本文中,“用户”(User) 指的是使用 SQL 命令 CREATE USER/ROLE 创建的,数据库集簇内的逻辑对象。
在 PostgreSQL 中,用户直接隶属于数据库集簇而非某个具体的数据库。因此在创建业务数据库和业务用户时,应当遵循"先用户,后数据库"的原则。
Pigsty 通过两个配置参数定义数据库集群中的角色与用户:
前者用于定义整套环境中共用的角色与用户,后者定义单个集群中特有的业务角色与用户。二者形式相同,均为用户定义对象的数组。
用户/角色按数组顺序逐一创建,因此后定义的用户可以属于先定义的角色。
默认情况下,所有带有 pgbouncer: true 标记的用户都会被添加到 Pgbouncer
定义用户 下面是 Pigsty 演示环境中默认集群 pg-meta 中的业务用户定义:
pg-meta :
hosts : { 10.10.10.10 : { pg_seq: 1, pg_role : primary } }
vars :
pg_cluster : pg-meta
pg_users :
- {name: dbuser_meta ,password: DBUser.Meta ,pgbouncer: true ,roles: [dbrole_admin] ,comment : pigsty admin user }
- {name: dbuser_view ,password: DBUser.Viewer ,pgbouncer: true ,roles: [dbrole_readonly] ,comment : read-only viewer for meta database }
- {name: dbuser_grafana ,password: DBUser.Grafana ,pgbouncer: true ,roles: [dbrole_admin] ,comment : admin user for grafana database }
- {name: dbuser_bytebase ,password: DBUser.Bytebase ,pgbouncer: true ,roles: [dbrole_admin] ,comment : admin user for bytebase database }
- {name: dbuser_kong ,password: DBUser.Kong ,pgbouncer: true ,roles: [dbrole_admin] ,comment : admin user for kong api gateway }
- {name: dbuser_gitea ,password: DBUser.Gitea ,pgbouncer: true ,roles: [dbrole_admin] ,comment : admin user for gitea service }
- {name: dbuser_wiki ,password: DBUser.Wiki ,pgbouncer: true ,roles: [dbrole_admin] ,comment : admin user for wiki.js service }
- {name: dbuser_noco ,password: DBUser.Noco ,pgbouncer: true ,roles: [dbrole_admin] ,comment : admin user for nocodb service }
- {name: dbuser_remove ,state: absent } # 使用 state : absent 删除用户
每个用户/角色定义都是一个复杂对象,可能包括以下字段,除了 name 字段外,其他字段均为可选字段:
- name : dbuser_meta # 必选,`name` 是用户定义的唯一必选字段
state : create # 可选,用户状态:create(创建,默认)、absent(删除)
password : DBUser.Meta # 可选,密码,可以是 scram-sha-256 哈希字符串或明文
login : true # 可选,默认为 true,是否可以登录
superuser : false # 可选,默认为 false,是否是超级用户
createdb : false # 可选,默认为 false,是否可以创建数据库
createrole : false # 可选,默认为 false,是否可以创建角色
inherit : true # 可选,默认为 true,是否自动继承所属角色权限
replication : false # 可选,默认为 false,是否可以发起流复制连接
bypassrls : false # 可选,默认为 false,是否可以绕过行级安全
connlimit : -1 # 可选,用户连接数限制,默认 -1 不限制
expire_in : 3650 # 可选,从创建时起 N 天后过期(优先级比 expire_at 高)
expire_at : '2030-12-31' # 可选,过期日期,使用 YYYY-MM-DD 格式(优先级没 expire_in 高)
comment : pigsty admin user # 可选,用户备注信息
roles : [ dbrole_admin] # 可选,所属角色数组
parameters : # 可选,角色级配置参数
search_path : public
pgbouncer : true # 可选,是否加入连接池用户列表,默认 false
pool_mode : transaction # 可选,用户级别的池化模式,默认 transaction
pool_connlimit : -1 # 可选,用户级别的连接池最大连接数,默认 -1 不限制
用户级连接池限额字段统一使用 pool_connlimit(对应 Pgbouncer max_user_connections)。
参数总览 所有参数中唯一 必选 的字段是 name,它应该是当前 PostgreSQL 集群中有效且唯一的用户名,其他参数都有合理的默认值,均为可选项。
参数详情 name字符串,必选参数,表示用户的名称,在一个数据库集群内必须唯一。
用户名必须是有效的 PostgreSQL 标识符,必须匹配正则表达式 ^[a-z_][a-z0-9_]{0,62}$
- name : dbuser_app # 标准命名
- name : app_readonly # 下划线分隔
- name : _internal # 下划线开头(用于内部角色)
state枚举值,用于指定要对用户执行的操作,可以是 create 或 absent,默认值为 create。
状态 说明 create默认,创建用户,如果已存在则更新属性 absent删除用户,使用 DROP ROLE
- name : dbuser_app # state 默认为 create
- name : dbuser_old
state : absent # 删除用户
以下系统用户无法通过 state: absent 删除,这是为了防止误删关键系统用户导致集群故障:
password字符串,可变参数,用于设置用户密码,不指定则用户无法使用密码登录。
密码可以是以下格式之一:
格式 示例 说明 明文密码 DBUser.Meta不推荐,会被记录到配置文件和日志 SCRAM-SHA-256 SCRAM-SHA-256$4096:xxx$yyy:zzz推荐,PostgreSQL 10+ 默认认证方式 MD5 哈希 md5...兼容旧版本,不推荐新项目使用
# 明文密码(不推荐,会被记录到配置和日志中)
- name : dbuser_app
password : MySecretPassword
# SCRAM-SHA-256 哈希(推荐)
- name : dbuser_app
password : 'SCRAM-SHA-256$4096:xxx$yyy:zzz'
设置密码时,Pigsty 会临时屏蔽当前会话的日志记录以避免密码泄露:
SET log_statement TO 'none' ;
ALTER USER "dbuser_app" PASSWORD 'xxx' ;
SET log_statement TO DEFAULT ;
如果你不希望在配置文件中记录明文密码,可以使用 SCRAM-SHA-256 哈希字符串代替明文密码。生成 SCRAM-SHA-256 哈希的方法:
# 使用 PostgreSQL 生成(需要先连接到数据库,数据库有 pgcrypto 扩展)
psql -c "SELECT encode(digest('password' || 'username', 'sha256'), 'hex')"
字符串,可变参数,用于设置用户的备注信息,如果不指定,默认值为 business user {name}。
用户备注信息通过 COMMENT ON ROLE 语句设置,支持中文和特殊字符(Pigsty 会自动转义单引号)。
- name : dbuser_app
comment : '业务应用主账号'
COMMENT ON ROLE "dbuser_app" IS '业务应用主账号' ;
login布尔值,可变参数,用于控制用户是否可以登录,默认值为 true。
设置为 false 则创建的是无法登陆的 角色 (Role)而非用户(User),通常用于权限分组。
在 PostgreSQL 中,CREATE USER 等价于 CREATE ROLE ... LOGIN。
# 创建可登录用户
- name : dbuser_app
login : true
# 创建角色(不可登录,用于权限分组)
- name : dbrole_custom
login : false
comment : 自定义权限角色
CREATE USER "dbuser_app" LOGIN ;
CREATE USER "dbrole_custom" NOLOGIN ;
superuser布尔值,可变参数,用于指定用户是否为超级用户,默认值为 false。
超级用户拥有数据库的全部权限,可以绕过所有权限检查。
- name : dbuser_admin
superuser : true # 危险:拥有全部权限
ALTER USER "dbuser_admin" SUPERUSER ;
Pigsty 已经提供了默认的超级用户 pg_admin_usernamedbuser_dba)
除非绝对必要,否则不应创建额外的超级用户。
createdb布尔值,可变参数,用于指定用户是否可以创建数据库,默认值为 false。
- name : dbuser_dev
createdb : true # 允许创建数据库
ALTER USER "dbuser_dev" CREATEDB ;
一些应用软件可能会要求自己创建数据库,例如 Gitea,Odoo 等,因此您可能需要为这些应用的管理员用户启用 CREATEDB 权限。
createrole布尔值,可变参数,用于指定用户是否可以创建其他角色,默认值为 false。
拥有 CREATEROLE 权限的用户可以创建、修改、删除其他非超级用户角色。
- name : dbuser_admin
createrole : true # 允许管理其他角色
ALTER USER "dbuser_admin" CREATEROLE ;
inherit布尔值,可变参数,用于控制用户是否自动继承所属角色的权限,默认值为 true。
设置为 false 时,用户需要通过 SET ROLE 显式切换角色才能使用所属角色的权限。
# 自动继承角色权限(默认)
- name : dbuser_app
inherit : true
roles : [ dbrole_readwrite]
# 需要显式切换角色
- name : dbuser_special
inherit : false
roles : [ dbrole_admin]
ALTER USER "dbuser_special" NOINHERIT ;
-- 用户需要执行 SET ROLE dbrole_admin 才能获得该角色权限(必要但不充分)
replication布尔值,可变参数,用于指定用户是否可以发起流复制连接,默认值为 false。
通常只有复制用户(如 replicator)需要此权限。普通业务用户不应该拥有此权限,除非这是一个逻辑解码订阅者。
- name : replicator
replication : true # 允许流复制连接
roles : [ pg_monitor, dbrole_readonly]
ALTER USER "replicator" REPLICATION ;
bypassrls布尔值,可变参数,用于指定用户是否可以绕过行级安全(RLS)策略,默认值为 false。
启用此权限后,用户可以访问所有行,即使表上定义了行级安全策略。此权限通常只授予管理员用户。
- name : dbuser_myappadmin
bypassrls : true # 绕过行级安全策略
ALTER USER "dbuser_myappadmin" BYPASSRLS ;
connlimit整数,可变参数,用于限制用户的最大并发连接数,默认值为 -1,表示不限制。
设置为正整数时,会限制该用户同时建立的最大数据库连接数。此限制不影响超级用户。
- name : dbuser_app
connlimit : 100 # 最多 100 个并发连接
- name : dbuser_batch
connlimit : 10 # 批处理用户限制连接数
ALTER USER "dbuser_app" CONNECTION LIMIT 100 ;
expire_in整数,可变参数,用于指定用户从当前日期起多少天后过期。
此参数优先级高于 expire_atexpire_in 生效。
每次执行剧本时会根据当前日期重新计算过期时间,适合用于临时用户或需要定期续期的场景。
- name : temp_user
expire_in : 30 # 30 天后过期
- name : contractor_user
expire_in : 90 # 90 天后过期
执行时会计算实际过期日期并生成对应的 SQL:
-- expire_in: 30, 假设当前日期为 2025-01-01
ALTER USER "temp_user" VALID UNTIL '2025-01-31' ;
expire_at字符串,可变参数,用于指定用户的过期日期,格式为 YYYY-MM-DD 或特殊值 infinity。
此参数优先级低于 expire_ininfinity 表示用户永不过期。
- name : contractor_user
expire_at : '2024-12-31' # 指定日期过期
- name : permanent_user
expire_at : 'infinity' # 永不过期
ALTER USER "contractor_user" VALID UNTIL '2024-12-31' ;
ALTER USER "permanent_user" VALID UNTIL 'infinity' ;
roles数组,增量参数,用于定义用户所属的角色。数组元素可以是字符串或对象。
简单格式使用字符串直接指定角色名:
- name : dbuser_app
roles :
- dbrole_readwrite
- pg_read_all_data
GRANT "dbrole_readwrite" TO "dbuser_app" ;
GRANT "pg_read_all_data" TO "dbuser_app" ;
完整格式使用对象定义,支持更精细的角色成员关系控制:
- name : dbuser_app
roles :
- dbrole_readwrite # 简单字符串:GRANT 角色
- { name: dbrole_admin, admin : true } # 带 ADMIN OPTION
- { name: pg_monitor, set: false } # PG16+ : 不允许 SET ROLE
- { name: pg_signal_backend, inherit: false } # PG16+ : 不自动继承权限
- { name: old_role, state : absent } # 撤销角色成员关系
对象格式参数说明 :
参数 类型 说明 namestring 角色名称(必选) stateenum grant(默认)或 absent/revoke:控制授予或撤销adminbool true:WITH ADMIN OPTION,false:REVOKE ADMINsetbool PG16+:true:WITH SET TRUE,false:REVOKE SET inheritbool PG16+:true:WITH INHERIT TRUE,false:REVOKE INHERIT
PostgreSQL 16+ 新特性 :
PostgreSQL 16 引入了更细粒度的角色成员关系控制:
ADMIN OPTION :允许将角色授予其他用户SET OPTION :允许使用 SET ROLE 切换到该角色INHERIT OPTION :是否自动继承该角色的权限# PostgreSQL 16+ 完整示例
- name : dbuser_app
roles :
# 普通成员关系
- dbrole_readwrite
# 可以将 dbrole_admin 授予其他用户
- { name: dbrole_admin, admin : true }
# 不能 SET ROLE 到 pg_monitor(只能通过继承使用权限)
- { name: pg_monitor, set : false }
# 不自动继承 pg_execute_server_program 的权限(需要显式 SET ROLE)
- { name: pg_execute_server_program, inherit : false }
# 撤销 old_role 的成员关系
- { name: old_role, state : absent }
set 和 inherit 选项仅在 PostgreSQL 16+ 中有效,在早期版本会被忽略并在生成的 SQL 中添加警告注释。
parameters对象,可变参数,用于设置角色级别的配置参数。参数通过 ALTER ROLE ... SET 设置,会对该用户的所有会话生效。
- name : dbuser_analyst
parameters :
work_mem : '256MB'
statement_timeout : '5min'
search_path : 'analytics,public'
log_statement : 'all'
ALTER USER "dbuser_analyst" SET "work_mem" = '256MB' ;
ALTER USER "dbuser_analyst" SET "statement_timeout" = '5min' ;
ALTER USER "dbuser_analyst" SET "search_path" = 'analytics,public' ;
ALTER USER "dbuser_analyst" SET "log_statement" = 'all' ;
使用特殊值 DEFAULT(大小写不敏感)可以将参数重置为 PostgreSQL 默认值:
- name : dbuser_app
parameters :
work_mem : DEFAULT # 重置为默认值
statement_timeout : '30s' # 设置新值
ALTER USER "dbuser_app" SET "work_mem" = DEFAULT ;
ALTER USER "dbuser_app" SET "statement_timeout" = '30s' ;
常用角色级参数:
参数 说明 示例值 work_mem查询工作内存 '64MB'statement_timeout语句超时时间 '30s'lock_timeout锁等待超时 '10s'idle_in_transaction_session_timeout空闲事务超时 '10min'search_pathSchema 搜索路径 'app,public'log_statement日志记录级别 'ddl'temp_file_limit临时文件大小限制 '10GB'
您可以从数据库的 pg_db_role_setting
pgbouncer布尔值,可变参数,用于控制是否将用户添加到 Pgbouncer 连接池用户列表,默认值为 false。
对于需要通过连接池访问数据库的生产用户,必须显式设置 pgbouncer: true。
默认为 false 是为了避免意外将内部用户暴露给连接池。
# 生产用户:需要连接池
- name : dbuser_app
password : DBUser.App
pgbouncer : true
# 内部用户:不需要连接池
- name : dbuser_internal
password : DBUser.Internal
pgbouncer : false # 默认值,可省略
设置 pgbouncer: true 的用户会被添加到 /etc/pgbouncer/userlist.txt 文件中。
pool_mode枚举值,可变参数,用于设置用户级别的池化模式,可选值为 transaction、session 或 statement,默认值为 transaction。
模式 说明 适用场景 transaction事务结束后归还连接 大多数 OLTP 应用,默认推荐 session会话结束后归还连接 需要会话状态的应用(如 SET 命令) statement每条语句后归还连接 简单无状态查询,极致复用
# DBA 用户使用 session 模式(可能需要 SET 命令等会话状态)
- name : dbuser_dba
pgbouncer : true
pool_mode : session
# 普通业务用户使用 transaction 模式
- name : dbuser_app
pgbouncer : true
pool_mode : transaction
用户级别的连接池参数通过 /etc/pgbouncer/useropts.txt 文件配置:
dbuser_dba = pool_mode=session max_user_connections=16
dbuser_monitor = pool_mode=session max_user_connections=8
pool_connlimit整数,可变参数,用于设置用户级别的连接池最大连接数,默认值为 -1,表示不限制。
- name : dbuser_app
pgbouncer : true
pool_connlimit : 50 # 此用户最多使用 50 个连接池连接
ACL 系统 Pigsty 提供了一套内置的、开箱即用的访问控制 / ACL
角色 权限说明 典型使用场景 dbrole_readwrite全局读写访问 主属业务的生产账号 dbrole_readonly全局只读访问 其他业务的只读访问 dbrole_admin拥有 DDL 权限 业务管理员,需要建表的场景 dbrole_offline受限只读访问(仅离线实例) 个人用户,ETL/分析任务
# 典型业务用户配置
pg_users :
- name : dbuser_app
password : DBUser.App
pgbouncer : true
roles : [ dbrole_readwrite] # 生产账号,读写权限
- name : dbuser_readonly
password : DBUser.Readonly
pgbouncer : true
roles : [ dbrole_readonly] # 只读账号
- name : dbuser_admin
password : DBUser.Admin
pgbouncer : true
roles : [ dbrole_admin] # 管理员,可执行 DDL
- name : dbuser_etl
password : DBUser.ETL
roles : [ dbrole_offline] # 离线分析账号
如果您希望重新设计您自己的 ACL 系统,可以考虑定制以下参数和模板:
Pgbouncer 用户 默认情况下启用 Pgbouncer 作为连接池中间件。Pigsty 默认将 pg_userspgbouncer: true 标志的所有用户添加到 Pgbouncer 用户列表中。
Pgbouncer 连接池中的用户在 /etc/pgbouncer/userlist.txt 中列出:
"postgres" ""
"dbuser_wiki" "SCRAM-SHA-256$4096:+77dyhrPeFDT/TptHs7/7Q = =$KeatuohpKIYzHPCt/tqBu85vI11o9mar/by0hHYM2W8=:X9gig4JtjoS8Y/o1vQsIX/gY1Fns8ynTXkbWOjUfbRQ="
"dbuser_view" "SCRAM-SHA-256$4096:DFoZHU/DXsHL8MJ8regdEw = =$gx9sUGgpVpdSM4o6A2R9PKAUkAsRPLhLoBDLBUYtKS0=:MujSgKe6rxcIUMv4GnyXJmV0YNbf39uFRZv724+X1FE="
"dbuser_monitor" "SCRAM-SHA-256$4096:fwU97ZMO/KR0ScHO5+UuBg = =$CrNsmGrx1DkIGrtrD1Wjexb/aygzqQdirTO1oBZROPY=:L8+dJ+fqlMQh7y4PmVR/gbAOvYWOr+KINjeMZ8LlFww="
"dbuser_meta" "SCRAM-SHA-256$4096:leB2RQPcw1OIiRnPnOMUEg = =$eyC+NIMKeoTxshJu314+BmbMFpCcspzI3UFZ1RYfNyU=:fJgXcykVPvOfro2MWNkl5q38oz21nSl1dTtM65uYR1Q="
用户级别的连接池参数使用另一个单独的文件 /etc/pgbouncer/useropts.txt 进行维护:
dbuser_dba = pool_mode=session max_user_connections=16
dbuser_monitor = pool_mode=session max_user_connections=8
当您 创建用户
Pgbouncer 使用和 PostgreSQL 相同的 dbsu 运行,默认为 postgres 操作系统用户。您可以使用 pgb 别名,使用 dbsu 访问 Pgbouncer 管理功能。
pgbouncer_auth_query
相关资源 关于用户管理操作,请参考 用户管理
关于用户的访问权限,请参考 ACL:角色权限
12.2.5 - 数据库 如何通过配置来定制所需 PostgreSQL 数据库?
在本文中,“数据库”(Database) 指的是使用 SQL 命令 CREATE DATABASE 创建的,数据库集簇内的逻辑对象。
一组 PostgreSQL 服务器可以同时服务于多个 数据库 (Database)。在 Pigsty 中,你可以在集群配置中 定义
Pigsty会对默认模板数据库template1进行修改与定制,创建默认模式,安装默认扩展,配置默认权限,新创建的数据库默认会从template1继承这些设置。
您也可以通过 template数据库克隆
默认情况下,所有业务数据库都会被 1:1 添加到 Pgbouncer 连接池 pg_exporter自动发现 机制查找所有业务数据库并进行库内对象监控。
所有数据库也会添加到所有 INFRA节点 Grafana
定义数据库 业务数据库定义在数据库集群参数 pg_databases定义顺序 依次创建,因此后面定义的数据库可以使用先前定义的数据库作为模板 。
下面是 Pigsty 演示环境中默认集群 pg-meta 中的数据库定义:
pg-meta :
hosts : { 10.10.10.10 : { pg_seq: 1, pg_role : primary } }
vars :
pg_cluster : pg-meta
pg_databases :
- { name: meta ,baseline: cmdb.sql ,comment: pigsty meta database ,schemas: [pigsty] ,extensions : [ {name: postgis, schema : public}, {name: timescaledb}]}
- { name: grafana ,owner: dbuser_grafana ,revokeconn: true ,comment : grafana primary database }
- { name: bytebase ,owner: dbuser_bytebase ,revokeconn: true ,comment : bytebase primary database }
- { name: kong ,owner: dbuser_kong ,revokeconn: true ,comment : kong the api gateway database }
- { name: gitea ,owner: dbuser_gitea ,revokeconn: true ,comment : gitea meta database }
- { name: wiki ,owner: dbuser_wiki ,revokeconn: true ,comment : wiki meta database }
- { name: noco ,owner: dbuser_noco ,revokeconn: true ,comment : nocodb database }
每个数据库定义都是一个复杂对象,可能包括以下字段,除了 name 字段外,其他字段均为可选字段:
- name : meta # 必选,`name` 是数据库定义的唯一必选字段
state : create # 可选,数据库状态:create(创建,默认)、absent(删除)、recreate(重建)
baseline : cmdb.sql # 可选,数据库 sql 的基线定义文件路径(ansible 搜索路径中的相对路径,如 files/)
pgbouncer : true # 可选,是否将此数据库添加到 pgbouncer 数据库列表?默认为 true
schemas : [ pigsty] # 可选,要创建的附加模式,由模式名称字符串组成的数组
extensions : # 可选,要安装的附加扩展: 扩展对象的数组
- { name: postgis , schema : public } # 可以指定将扩展安装到某个模式中,也可以不指定(不指定则安装到 search_path 首位模式中)
- { name : timescaledb } # 例如有的扩展会创建并使用固定的模式,就不需要指定模式。
comment : pigsty meta database # 可选,数据库的说明与备注信息
owner : postgres # 可选,数据库所有者,不指定则为当前用户
template : template1 # 可选,要使用的模板,默认为 template1,目标必须是一个模板数据库
strategy : FILE_COPY # 可选,克隆策略:FILE_COPY 或 WAL_LOG(PG15+),不指定使用 PG 默认
encoding : UTF8 # 可选,不指定则继承模板/集群配置(UTF8)
locale : C # 可选,不指定则继承模板/集群配置(C)
lc_collate : C # 可选,不指定则继承模板/集群配置(C)
lc_ctype : C # 可选,不指定则继承模板/集群配置(C)
locale_provider : libc # 可选,本地化提供者:libc、icu、builtin(PG15+)
icu_locale : en-US # 可选,ICU 本地化规则(PG15+)
icu_rules : '' # 可选,ICU 排序规则(PG16+)
builtin_locale : C.UTF-8 # 可选,内置本地化提供者规则(PG17+)
tablespace : pg_default # 可选,默认表空间,默认为 'pg_default'
is_template : false # 可选,是否标记为模板数据库,允许任何有 CREATEDB 权限的用户克隆
allowconn : true # 可选,是否允许连接,默认为 true。显式设置 false 将完全禁止连接到此数据库
revokeconn : false # 可选,撤销公共连接权限。默认为 false,设置为 true 时,属主和管理员之外用户的 CONNECT 权限会被回收
register_datasource : true # 可选,是否将此数据库注册到 grafana 数据源?默认为 true,显式设置为 false 会跳过注册
connlimit : -1 # 可选,数据库连接限制,默认为 -1 ,不限制,设置为正整数则会限制连接数。
parameters : # 可选,数据库级参数,通过 ALTER DATABASE SET 设置
work_mem : '64MB'
statement_timeout : '30s'
pool_auth_user : dbuser_meta # 可选,连接到此 pgbouncer 数据库的所有连接都将使用此用户进行验证(启用 pgbouncer_auth_query 才有用)
pool_mode : transaction # 可选,数据库级别的 pgbouncer 池化模式,默认为 transaction
pool_size : 64 # 可选,数据库级别的 pgbouncer 默认池子大小,默认为 64
pool_reserve : 32 # 可选,数据库级别的 pgbouncer 池子保留空间,默认为 32,当默认池子不够用时,最多再申请这么多条突发连接。
pool_size_min : 0 # 可选,数据库级别的 pgbouncer 池的最小大小,默认为 0
pool_connlimit : 100 # 可选,数据库级别的最大数据库连接数,默认为 100
自 Pigsty v4.1.0 起,数据库连接池参数统一使用 pool_reserve 与 pool_connlimit,旧别名 pool_size_reserve / pool_max_db_conn 已收敛。
参数总览 所有参数中唯一 必选 的字段是 name,它应该是当前 PostgreSQL 集群中有效且唯一的数据库名称,其他参数都有合理的默认值,均为可选项。
带有 “不可变 ” 标记的参数仅在数据库创建时生效,创建后无法修改,若需更改则必须删除并重建数据库。
参数详情 name字符串,必选参数,表示数据库的名称,在一个数据库集群内集群内必须唯一。
数据库名称必须是有效的 PostgreSQL 标识符,长度不超过 63 个字符,不得使用 SQL 关键字,
形式上以字母或下划线开头,后续字符可以是字母、数字或下划线,不能包含空格或特殊字符。
形式应当满足正则表达式:^[A-Za-z_][A-Za-z0-9_$]{0,62}$
- name : myapp # 简单命名
- name : my_application # 下划线分隔
- name : app_v2 # 包含版本号
state枚举值,用于指定要对数据库执行的操作,可以是 create、absent 或 recreate,默认值为 create。
状态 说明 create默认,创建或修改数据库,如果已经存在,则将可变参数调整到描述的状态 absent删除数据库,使用 DROP DATABASE WITH (FORCE) recreate先删除再创建,用于重置数据库
- name : myapp # state 默认为 create
- name : olddb
state : absent # 删除数据库
- name : testdb
state : recreate # 重建数据库
owner字符串,指定数据库的属主用户,默认不指定,不指定则为数据库 pg_dbsupostgres 用户。
要指定数据库的 owner,被指定的用户必须已存在。修改 owner 会执行:旧 Owner 在数据库上的权限不会被撤回。
数据库属主具有对数据库的完全控制权限,包括创建模式、表、扩展等对象的权限,对于多租户场景尤为有用。
ALTER DATABASE "myapp" OWNER TO "new_owner" ;
GRANT ALL PRIVILEGES ON DATABASE "myapp" TO "new_owner" ;
字符串,用于设置数据库的备注信息,如果不指定,默认值为 business database {name}。
数据库备注信息通过 COMMENT ON DATABASE 语句设置,支持中文和特殊字符(Pigsty 会自动转义单引号)。
备注信息会存储在系统目录 pg_database.datacl 中,可以通过 \l+ 命令查看。
COMMENT ON DATABASE "myapp" IS '我的应用主数据库' ;
- name : myapp
comment : 我的应用主数据库
template字符串,不可变参数 ,用于指定创建数据库时使用的模板数据库,默认值为 template1。
PostgreSQL 的 CREATE DATABASE 本质上是对模板数据库进行复制,新数据库会继承模板中的所有对象、扩展、模式、权限设置等。
Pigsty 会在集群初始化阶段对 template1 进行定制配置,因此新建数据库默认会继承这些设置。
模板 说明 template1默认模板,包含 Pigsty 预配置的扩展、模式和权限设置 template0干净模板,使用不同于集群默认的本地化提供者时,必须使用此模板 自定义数据库 可以使用已有数据库作为模板进行克隆
使用 icu 或 builtin 本地化提供者时,必须指定 template: template0,因为 template1 已有本地化设置无法覆盖。
使用其他
- name : myapp_icu
template : template0 # 使用 ICU 时必须指定 template0
locale_provider : icu
icu_locale : zh-Hans
使用 template0 时,监控所需的扩展与 Schema,以及角色的默认权限都不再自动创建,这允许你从一个完全干净的模板开始定制数据库。
strategy枚举值,不可变参数,用于指定从模板克隆数据库的策略,可选值为 FILE_COPY 或 WAL_LOG,此参数在 PostgreSQL 15 及以上版本可用。
策略 说明 适用场景 FILE_COPY直接复制数据文件,PG15+ 默认 大模板,通用场景 WAL_LOG通过 WAL 日志记录复制 小模板,不阻塞模板上的连接
WAL_LOG 策略的优势是复制过程中不会阻塞模板数据库上的连接,但对于较大的模板效率不如 FILE_COPY。
在 PostgreSQL 14 及更早版本中,此参数会被忽略。
- name : cloned_db
template : source_db
strategy : WAL_LOG # 使用 WAL 日志方式克隆
encoding字符串,不可变参数,用于指定数据库的字符编码,如果不指定则继承模板数据库的编码设置,通常为 UTF8。
如果没有特殊原因,强烈建议使用 UTF8 编码。字符编码在数据库创建后无法修改,如需更改必须重建数据库。
- name : legacy_db
template : template0 # 指定非默认编码时使用 template0
encoding : LATIN1
locale字符串,不可变参数,用于指定数据库的本地化规则,相当于同时设置 lc_collate 和 lc_ctype,如果不指定则继承模板数据库的设置,通常为 C。
本地化规则决定了字符串的排序顺序和字符分类行为。使用 C 或 POSIX 可获得最佳性能和跨平台一致性,
使用特定语言的本地化规则(如 zh_CN.UTF-8)可以获得符合该语言习惯的排序结果。
- name : chinese_db
template : template0
locale : zh_CN.UTF-8 # 中文本地化
encoding : UTF8
lc_collate字符串,不可变参数,用于指定字符串的排序规则,如果不指定则继承模板数据库的设置,通常为 C。
排序规则决定了 ORDER BY 和比较操作的结果。常用值包括:C(字节序,最快)、C.UTF-8、en_US.UTF-8、zh_CN.UTF-8。
此参数在数据库创建后无法修改。
- name : myapp
template : template0
lc_collate : en_US.UTF-8 # 英文排序规则
lc_ctype : en_US.UTF-8
lc_ctype字符串,不可变参数,用于指定字符分类规则,决定字符的大小写、数字、字母等分类,如果不指定则继承模板数据库的设置,通常为 C。
字符分类规则影响 upper()、lower()、正则表达式中的 \w 等函数的行为。此参数在数据库创建后无法修改。
locale_provider枚举值,不可变参数,用于指定本地化的实现提供者,可选值为 libc、icu 或 builtin,此参数在 PostgreSQL 15 及以上版本可用,默认值为 libc。
提供者 版本 说明 libc- 使用操作系统 C 库,传统默认方式,行为因系统而异 icuPG15+ 使用 ICU 库,跨平台一致,支持更多语言 builtinPG17+ PostgreSQL 内置实现,最高效,仅支持 C/C.UTF-8
使用 icu 或 builtin 提供者时,必须指定 template: template0,并配合相应的 icu_locale 或 builtin_locale 参数。
- name : fast_db
template : template0
locale_provider : builtin # 使用内置提供者,最高效
builtin_locale : C.UTF-8
icu_locale字符串,不可变参数,用于指定 ICU 本地化规则标识符,此参数在 PostgreSQL 15 及以上版本、且 locale_provider 为 icu 时可用。
ICU 本地化标识符遵循 BCP 47 标准,常用值包括:
值 说明 en-US美式英语 en-GB英式英语 zh-Hans简体中文 zh-Hant繁体中文 ja-JP日语 ko-KR韩语
- name : chinese_app
template : template0
locale_provider : icu
icu_locale : zh-Hans # 简体中文 ICU 排序
encoding : UTF8
icu_rules字符串,不可变参数,用于自定义 ICU 排序规则,此参数在 PostgreSQL 16 及以上版本可用。
ICU 规则允许对默认排序行为进行微调,使用 ICU 排序规则语法
- name : custom_sort_db
template : template0
locale_provider : icu
icu_locale : en-US
icu_rules : '&V << w <<< W' # 自定义 V/W 排序顺序
builtin_locale字符串,不可变参数,用于指定内置本地化提供者的规则,此参数在 PostgreSQL 17 及以上版本、且 locale_provider 为 builtin 时可用,可选值为 C 或 C.UTF-8。
builtin 提供者是 PostgreSQL 17 新增的内置本地化实现,比 libc 更快,且行为跨平台完全一致。
适合只需要 C 或 C.UTF-8 排序规则的场景。
- name : fast_db
template : template0
locale_provider : builtin
builtin_locale : C.UTF-8 # 内置 UTF-8 支持
encoding : UTF8
tablespace字符串,可变参数,用于指定数据库的默认表空间,默认值为 pg_default。
修改现有数据库的表空间会触发数据物理迁移,PostgreSQL 会将数据库中的所有对象移动到新表空间,对于大数据库可能需要较长时间,慎用。
- name : archive_db
tablespace : slow_hdd # 归档数据使用慢速存储
ALTER DATABASE "archive_db" SET TABLESPACE "slow_hdd" ;
is_template布尔值,可变参数,用于指定是否将数据库标记为模板数据库,默认值为 false。
设置为 true 后,任何拥有 CREATEDB 权限的用户都可以使用此数据库作为模板克隆新数据库。
模板数据库通常用于预装标准模式、扩展和数据,方便快速创建具有相同配置的新数据库。
- name : app_template
is_template : true # 标记为模板,允许普通用户克隆
schemas : [ core, api]
extensions : [ postgis, pg_trgm]
删除标记为 is_template: true 的数据库时,Pigsty 会先执行 ALTER DATABASE ... IS_TEMPLATE false 取消模板标记,然后再删除。
allowconn布尔值,可变参数,用于控制是否允许连接到此数据库,默认值为 true。
设置为 false 会在数据库层面完全禁止连接,任何用户(包括超级用户)都无法连接到此数据库。
此参数通常用于维护或归档用途。
- name : archive_db
allowconn : false # 禁止任何连接
ALTER DATABASE "archive_db" ALLOW_CONNECTIONS false ;
revokeconn布尔值,可变参数,用于控制是否回收 PUBLIC 角色的 CONNECT 权限,默认值为 false。
设置为 true 时,Pigsty 会执行以下权限变更:
回收 PUBLIC 的 CONNECT 权限,普通用户将无法连接 授予复制用户(replicator)和监控用户(dbuser_monitor)连接权限 授予管理员用户(dbuser_dba)和数据库属主连接权限,并附带 WITH GRANT OPTION 设置为 false 时,会恢复 PUBLIC 的 CONNECT 权限。
- name : secure_db
owner : dbuser_secure
revokeconn : true # 回收公共连接权限,只有指定用户可连接
connlimit整数,可变参数,用于限制数据库的最大并发连接数,默认值为 -1,表示不限制。
设置为正整数时,会限制同时连接到此数据库的最大会话数。此限制不影响超级用户。
- name : limited_db
connlimit : 50 # 最多允许 50 个并发连接
ALTER DATABASE "limited_db" CONNECTION LIMIT 50 ;
baseline字符串,一次性参数,用于指定数据库创建后要执行的 SQL 基线文件路径。
基线文件通常包含表结构定义、初始数据、存储过程等,用于初始化新数据库。
路径是相对于 Ansible 搜索路径的相对路径,通常放在 files/ 目录下。
基线文件仅在首次创建数据库时执行;如果数据库已存在则跳过。使用 state: recreate 重建数据库时会重新执行基线文件。
- name : myapp
baseline : myapp_schema.sql # 会查找 files/myapp_schema.sql
schemas数组,可变参数(支持增删),用于定义要在数据库中创建或删除的模式。数组元素可以是字符串或对象。
简单格式使用字符串直接指定模式名,仅支持创建操作:
schemas :
- app
- api
- core
完整格式使用对象定义,支持指定模式属主和删除操作:
schemas :
- name : app # 模式名(必选)
owner : dbuser_app # 模式属主(可选),生成 AUTHORIZATION 子句
- name : deprecated
state : absent # 删除模式(使用 CASCADE)
创建模式时使用 IF NOT EXISTS,已存在则跳过;删除模式时使用 CASCADE,会同时删除模式内的所有对象。
CREATE SCHEMA IF NOT EXISTS "app" AUTHORIZATION "dbuser_app" ;
DROP SCHEMA IF EXISTS "deprecated" CASCADE ;
extensions数组,可变参数(支持增删),用于定义要在数据库中安装或卸载的扩展。数组元素可以是字符串或对象。
简单格式使用字符串直接指定扩展名,仅支持安装操作:
extensions :
- postgis
- pg_trgm
- vector
完整格式使用对象定义,支持指定安装模式、版本和卸载操作:
extensions :
- name : vector # 扩展名(必选)
schema : public # 安装到指定模式(可选)
version : '0.5.1' # 指定版本(可选)
- name : old_extension
state : absent # 卸载扩展(使用 CASCADE)
安装扩展时使用 CASCADE,如果已存在则会报错但跳过,同时自动安装依赖扩展;卸载扩展时使用 CASCADE,会同时删除依赖此扩展的对象。
CREATE EXTENSION IF NOT EXISTS "vector" WITH SCHEMA "public" VERSION '0.5.1' CASCADE ;
DROP EXTENSION IF EXISTS "old_extension" CASCADE ;
parameters对象,可变参数,用于设置数据库级别的配置参数。参数通过 ALTER DATABASE ... SET 设置,会对连接到此数据库的所有会话生效。
- name : analytics
parameters :
work_mem : '256MB'
maintenance_work_mem : '512MB'
statement_timeout : '5min'
search_path : 'analytics,public'
使用特殊值 DEFAULT(大小写不敏感)可以将参数重置为 PostgreSQL 默认值:
parameters :
work_mem : DEFAULT # 重置为默认值
statement_timeout : '30s' # 设置新值
ALTER DATABASE "myapp" SET "work_mem" = DEFAULT ;
ALTER DATABASE "myapp" SET "statement_timeout" = '30s' ;
pgbouncer布尔值,可变参数,用于控制是否将数据库添加到 Pgbouncer 连接池列表,默认值为 true。
设置为 false 时,数据库不会出现在 Pgbouncer 的数据库列表中,客户端无法通过连接池访问此数据库。
适用于内部管理数据库或需要直连的特殊场景。
- name : internal_db
pgbouncer : false # 不通过连接池访问
pool_mode枚举值,可变参数,用于设置此数据库在 Pgbouncer 中的池化模式,可选值为 transaction、session 或 statement,默认值为 transaction。
模式 说明 适用场景 transaction事务结束后归还连接 大多数 OLTP 应用,默认推荐 session会话结束后归还连接 需要会话级状态的应用 statement每条语句后归还连接 简单无状态查询,极致复用
- name : session_app
pool_mode : session # 使用会话级池化
pool_size整数,可变参数,用于设置此数据库在 Pgbouncer 中的默认连接池大小,默认值为 64。
连接池大小决定了 Pgbouncer 为此数据库预留的后端连接数量。根据应用负载调整此值。
- name : high_load_db
pool_size : 128 # 高负载应用使用更大的池
pool_size_min整数,可变参数,用于设置此数据库在 Pgbouncer 中的最小连接池大小,默认值为 0。
设置大于 0 的值会让 Pgbouncer 预先创建指定数量的后端连接,用于连接预热,减少首次请求的延迟。
- name : latency_sensitive
pool_size_min : 10 # 预热 10 个连接
pool_reserve整数,可变参数,用于设置此数据库在 Pgbouncer 中的保留连接数,默认值为 32。
当默认池不够用时,Pgbouncer 最多可以额外申请 pool_reserve 个连接来处理突发流量。
- name : bursty_db
pool_size : 64
pool_reserve : 64 # 允许突发到 128 个连接
pool_connlimit整数,可变参数,用于设置通过 Pgbouncer 连接池访问此数据库的最大连接数,默认值为 100。
此限制是 Pgbouncer 层面的限制,与数据库本身的 connlimit 参数独立。
- name : limited_pool_db
pool_connlimit : 50 # 连接池最多 50 个连接
pool_auth_user字符串,可变参数,用于指定 Pgbouncer 认证查询使用的用户。
此参数需要配合 pgbouncer_auth_query
- name : myapp
pool_auth_user : dbuser_monitor # 使用监控用户执行认证查询
register_datasource布尔值,可变参数,用于控制是否将此数据库注册到 Grafana 作为 PostgreSQL 数据源,默认值为 true。
设置为 false 可以跳过 Grafana 数据源注册。适用于临时数据库、测试数据库,或不希望在监控系统中出现的内部数据库。
- name : temp_db
register_datasource : false # 不注册到 Grafana
模板继承 许多参数如果不显式指定,会从模板数据库继承。默认模板是 template1,其编码设置由集群初始化参数决定:
新创建的数据库默认会从 template1 数据库 Fork 出来,这个模版数据库会在 PG_PROVISION
深度定制 Pigsty 提供了丰富的定制参数与配置旋钮,如果你想定制模板数据库,请参考以下资源:
如果上面这些配置仍然无法满足您的需求,您可以使用 pg_init
本地化提供者 PostgreSQL 15+ 引入了 locale_provider
Pigsty 在 configuretemplate0 作为模板数据库。
使用 ICU 提供者(PG15+) :
- name : myapp_icu
template : template0 # ICU 必须使用 template0
locale_provider : icu
icu_locale : en-US # ICU 本地化规则
encoding : UTF8
使用内置提供者(PG17+) :
- name : myapp_builtin
template : template0
locale_provider : builtin
builtin_locale : C.UTF-8 # 内置本地化规则
encoding : UTF8
提供者对比 :libc(传统方式,依赖操作系统)、icu(PG15+,跨平台一致,功能丰富)、builtin(PG17+,最高效的 C/C.UTF-8 排序)。
连接池 Pgbouncer
Pigsty 会默认为 PostgreSQL 实例 1:1 配置启用一个连接池,
使用和 PostgreSQL 同样的 pg_dbsupostgres 操作系统用户。
连接池与数据库使用 /var/run/postgresql Unix Socket 通信。
Pigsty 默认将 pg_databasespgbouncer: false/etc/pgbouncer/database.txt 中定义。
meta = host=/var/run/postgresql mode=session
grafana = host=/var/run/postgresql mode=transaction
bytebase = host=/var/run/postgresql auth_user=dbuser_meta
kong = host=/var/run/postgresql pool_size=32 reserve_pool=64
gitea = host=/var/run/postgresql min_pool_size=10
wiki = host=/var/run/postgresql
noco = host=/var/run/postgresql
mongo = host=/var/run/postgresql
当您 创建数据库
12.2.6 - HBA 规则 Pigsty 中 PostgreSQL 与 Pgbouncer 的 HBA(Host-Based Authentication)规则配置详解。
概述 HBA(Host-Based Authentication)控制"谁可以从哪里、以什么方式连接到数据库"。
Pigsty 通过 pg_default_hba_rulespg_hba_rules
Pigsty 在集群初始化或 HBA 刷新时渲染以下配置文件:
配置文件 路径 说明 PostgreSQL HBA /pg/data/pg_hba.confPostgreSQL 服务器的 HBA 规则 Pgbouncer HBA /etc/pgbouncer/pgb_hba.conf连接池 Pgbouncer 的 HBA 规则
HBA 规则由以下参数控制:
规则支持以下特性:
按角色过滤 :规则支持 role 字段,根据实例的 pg_role 自动筛选生效按顺序排序 :规则支持 order 字段,控制规则在最终配置文件中的位置两种写法 :支持别名形式(简化语法)和原始形式(直接 HBA 文本)刷新 HBA 修改配置后,需要重新渲染配置文件并让服务重载:
bin/pgsql-hba <cls> # 刷新整个集群的 HBA 规则(推荐)
bin/pgsql-hba <cls> <ip>... # 刷新集群中指定实例的 HBA 规则
脚本内部执行以下剧本命令:
./pgsql.yml -l <cls> -t pg_hba,pg_reload,pgbouncer_hba,pgbouncer_reload -e pg_reload = true
仅刷新 PostgreSQL :./pgsql.yml -l <cls> -t pg_hba,pg_reload -e pg_reload=true
仅刷新 Pgbouncer :./pgsql.yml -l <cls> -t pgbouncer_hba,pgbouncer_reload
不要直接编辑配置文件
不要直接编辑 /pg/data/pg_hba.conf 或 /etc/pgbouncer/pgb_hba.conf,下次执行 playbook 时会被覆盖。
所有变更应在 pigsty.yml 中进行,然后执行 bin/pgsql-hba 刷新。
参数详解 pg_default_hba_rulesPostgreSQL 全局默认 HBA 规则列表,通常定义在 all.vars 中,为所有 PostgreSQL 集群提供基础访问控制。
pg_default_hba_rules :
- {user : '${dbsu}' ,db: all ,addr: local ,auth: ident ,title: 'dbsu access via local os user ident' ,order : 100 }
- {user : '${dbsu}' ,db: replication ,addr: local ,auth: ident ,title: 'dbsu replication from local os ident' ,order : 150 }
- {user : '${repl}' ,db: replication ,addr: localhost ,auth: pwd ,title: 'replicator replication from localhost',order : 200 }
- {user : '${repl}' ,db: replication ,addr: intra ,auth: pwd ,title: 'replicator replication from intranet' ,order : 250 }
- {user : '${repl}' ,db: postgres ,addr: intra ,auth: pwd ,title: 'replicator postgres db from intranet' ,order : 300 }
- {user : '${monitor}' ,db: all ,addr: localhost ,auth: pwd ,title: 'monitor from localhost with password' ,order : 350 }
- {user : '${monitor}' ,db: all ,addr: infra ,auth: pwd ,title: 'monitor from infra host with password',order : 400 }
- {user : '${admin}' ,db: all ,addr: infra ,auth: ssl ,title: 'admin @ infra nodes with pwd & ssl' ,order : 450 }
- {user : '${admin}' ,db: all ,addr: world ,auth: ssl ,title: 'admin @ everywhere with ssl & pwd' ,order : 500 }
- {user: '+dbrole_readonly',db: all ,addr: localhost ,auth: pwd ,title: 'pgbouncer read/write via local socket',order : 550 }
- {user: '+dbrole_readonly',db: all ,addr: intra ,auth: pwd ,title: 'read/write biz user via password' ,order : 600 }
- {user: '+dbrole_offline' ,db: all ,addr: intra ,auth: pwd ,title: 'allow etl offline tasks from intranet',order : 650 }
pg_hba_rulesPostgreSQL 集群/实例级 HBA 追加规则,可在集群或实例级别覆盖,与默认规则合并后按 order 排序。
类型:rule[],层级:全局/集群/实例 (G/C/I),默认值:[] pg_hba_rules :
- {user: app_user, db: app_db, addr: intra, auth: pwd, title : 'app user access' }
pgb_default_hba_rulesPgbouncer 全局默认 HBA 规则列表,通常定义在 all.vars 中。
pgb_default_hba_rules :
- {user : '${dbsu}' ,db: pgbouncer ,addr: local ,auth: peer ,title: 'dbsu local admin access with os ident',order : 100 }
- {user: 'all' ,db: all ,addr: localhost ,auth: pwd ,title: 'allow all user local access with pwd' ,order : 150 }
- {user : '${monitor}' ,db: pgbouncer ,addr: intra ,auth: pwd ,title: 'monitor access via intranet with pwd' ,order : 200 }
- {user : '${monitor}' ,db: all ,addr: world ,auth: deny ,title: 'reject all other monitor access addr' ,order : 250 }
- {user : '${admin}' ,db: all ,addr: intra ,auth: pwd ,title: 'admin access via intranet with pwd' ,order : 300 }
- {user : '${admin}' ,db: all ,addr: world ,auth: deny ,title: 'reject all other admin access addr' ,order : 350 }
- {user: 'all' ,db: all ,addr: intra ,auth: pwd ,title: 'allow all user intra access with pwd' ,order : 400 }
pgb_hba_rulesPgbouncer 集群/实例级 HBA 追加规则。
类型:rule[],层级:全局/集群/实例 (G/C/I),默认值:[] 注意 :Pgbouncer HBA 不支持 db: replication。
规则字段 每条 HBA 规则是一个 YAML 字典,支持以下字段:
字段 类型 必需 默认值 说明 userstring 否 all用户名,支持 all、变量占位符、+rolename 等 dbstring 否 all数据库名,支持 all、replication、具体库名 addrstring 是* - 地址别名或 CIDR,见 地址别名 authstring 否 pwd认证方式别名,见 认证方式 titlestring 否 - 规则说明/注释,会渲染为配置文件中的注释 rolestring 否 common实例角色过滤,见 角色过滤 orderint 否 1000排序权重,数字小的排前面,见 排序机制 ruleslist 是* - 原始 HBA 文本行列表,与 addr 二选一
addr 和 rules 必须指定其一。使用 rules 时可以直接写原始 HBA 格式。
地址别名 Pigsty 提供地址别名,简化 HBA 规则编写:
别名 展开为 说明 localUnix socket 本地 Unix 套接字连接 localhostUnix socket + 127.0.0.1/32 + ::1/128 本地回环地址 admin${admin_ip}/32管理员 IP 地址 infra所有 infra 组节点 IP 基础设施节点列表 cluster当前集群所有成员 IP 同一集群内的所有实例 intra / intranet10.0.0.0/8, 172.16.0.0/12, 192.168.0.0/16内网 CIDR 网段 world / all0.0.0.0/0 + ::/0任意地址(IPv4 + IPv6) <CIDR>直接使用 如 192.168.1.0/24、10.1.1.100/32
内网 CIDR 可通过 node_firewall_intranet 参数自定义:
node_firewall_intranet :
- 10.0.0.0 /8
- 172.16.0.0 /12
- 192.168.0.0 /16
认证方式 Pigsty 提供认证方式别名,简化配置:
别名 实际方式 连接类型 说明 pwdscram-sha-256 或 md5host根据 pg_pwd_enc 自动选择 sslscram-sha-256 或 md5hostssl强制 SSL + 密码 ssl-shascram-sha-256hostssl强制 SSL + SCRAM-SHA-256 ssl-md5md5hostssl强制 SSL + MD5 certcerthostssl客户端证书认证 trusttrusthost无条件信任(危险) deny / rejectrejecthost拒绝连接 identidenthostOS 用户映射(PostgreSQL) peerpeerlocalOS 用户映射(Pgbouncer/本地)
pg_pwd_enc 默认为 scram-sha-256,可设为 md5 以兼容老客户端。
用户变量 HBA 规则支持以下用户占位符,渲染时自动替换为实际用户名:
占位符 默认值 对应参数 ${dbsu}postgrespg_dbsu${repl}replicatorpg_replication_username${monitor}dbuser_monitorpg_monitor_username${admin}dbuser_dbapg_admin_username
角色过滤 HBA 规则的 role 字段控制规则在哪些实例上生效:
角色 说明 common默认值,所有实例都生效 primary仅主库实例生效 replica仅从库实例生效 offline仅离线实例生效(pg_role: offline 或 pg_offline_query: true) standby备库实例 delayed延迟从库实例
角色过滤基于实例的 pg_role 变量进行匹配,不匹配的规则会被注释掉(以 # 开头)。
pg_hba_rules :
# 仅在主库生效:写入用户只能连主库
- {user: writer, db: all, addr: intra, auth: pwd, role: primary, title : 'writer only on primary' }
# 仅在离线实例生效:ETL 任务专用网络
- {user: '+dbrole_offline', db: all, addr: '172.20.0.0/16', auth: ssl, role: offline, title : 'offline dedicated' }
排序机制 PostgreSQL HBA 是 首条匹配生效 ,规则顺序至关重要。Pigsty 通过 order 字段控制规则渲染顺序。
Order 区间约定
区间 用途 0 - 99用户高优先规则(在所有默认规则之前) 100 - 650默认规则区(间隔 50,便于插入) 1000+用户规则默认值(不填 order 时追加到最后)
PostgreSQL 默认规则 Order 分配
Order 规则说明 100 dbsu local ident 150 dbsu replication local 200 replicator localhost 250 replicator intra replication 300 replicator intra postgres 350 monitor localhost 400 monitor infra 450 admin infra ssl 500 admin world ssl 550 dbrole_readonly localhost 600 dbrole_readonly intra 650 dbrole_offline intra
Pgbouncer 默认规则 Order 分配
Order 规则说明 100 dbsu local peer 150 all localhost pwd 200 monitor pgbouncer intra 250 monitor world deny 300 admin intra pwd 350 admin world deny 400 all intra pwd
写法示例 别名形式 :使用 Pigsty 提供的简化语法
pg_hba_rules :
- title : allow grafana view access
role : primary
user : dbuser_view
db : meta
addr : infra
auth : ssl
渲染结果:
# allow grafana view access [primary]
hostssl meta dbuser_view 10.10.10.10/32 scram-sha-256
原始形式 :直接使用 PostgreSQL HBA 语法
pg_hba_rules :
- title : allow intranet password access
role : common
rules :
- host all all 10.0.0.0/8 scram-sha-256
- host all all 172.16.0.0/12 scram-sha-256
- host all all 192.168.0.0/16 scram-sha-256
渲染结果:
# allow intranet password access [common]
host all all 10.0.0.0/8 scram-sha-256
host all all 172.16.0.0/12 scram-sha-256
host all all 192.168.0.0/16 scram-sha-256
常见配置场景 黑名单 IP :使用 order: 0 确保最先匹配
pg_hba_rules :
- {user: all, db: all, addr: '10.1.1.100/32', auth: deny, order: 0, title : 'block bad ip' }
白名单应用服务器 :高优先级允许特定 IP
pg_hba_rules :
- {user: app_user, db: app_db, addr: '192.168.1.10/32', auth: ssl, order: 50, title : 'app server' }
管理员强制证书 :覆盖默认的 SSL 密码认证
pg_hba_rules :
- {user : '${admin}' , db: all, addr: world, auth: cert, order: 10, title : 'admin cert only' }
离线实例专用网络 :仅在 offline 实例生效
pg_hba_rules :
- {user: '+dbrole_offline', db: all, addr: '172.20.0.0/16', auth: ssl-sha, role: offline, title : 'etl network' }
按数据库限制访问 :敏感库仅允许特定网段
pg_hba_rules :
- {user: fin_user, db: finance_db, addr: '10.20.0.0/16', auth: ssl, title : 'finance only' }
- {user: hr_user, db: hr_db, addr: '10.30.0.0/16', auth: ssl, title : 'hr only' }
Pgbouncer 专用规则 :注意不支持 db: replication
pgb_hba_rules :
- {user: '+dbrole_readwrite', db: all, addr: world, auth: ssl, title : 'app via pgbouncer' }
完整集群示例 pg-prod :
hosts :
10.10.10.11 : {pg_seq: 1, pg_role : primary}
10.10.10.12 : {pg_seq: 2, pg_role : replica}
10.10.10.13 : {pg_seq: 3, pg_role : offline}
vars :
pg_cluster : pg-prod
pg_hba_rules :
# 黑名单:已知恶意 IP(最高优先级)
- {user: all, db: all, addr: '10.1.1.100/32', auth: deny, order: 0, title : 'blacklist' }
# 应用服务器白名单(高优先级)
- {user: app_user, db: app_db, addr: '192.168.1.0/24', auth: ssl, order: 50, title : 'app servers' }
# ETL 任务:仅离线实例
- {user: etl_user, db: all, addr: '172.20.0.0/16', auth: pwd, role: offline, title : 'etl tasks' }
# 集群内监控访问
- {user : '${monitor}' , db: all, addr: cluster, auth: pwd, order: 380, title : 'cluster monitor' }
pgb_hba_rules :
# 应用通过连接池
- {user: '+dbrole_readwrite', db: all, addr: '192.168.1.0/24', auth: ssl, title : 'app via pgbouncer' }
验证与排查 查看当前 HBA 规则
psql -c "TABLE pg_hba_file_rules" # 通过 SQL 查看(推荐)
cat /pg/data/pg_hba.conf # 查看 PostgreSQL HBA 文件
cat /etc/pgbouncer/pgb_hba.conf # 查看 Pgbouncer HBA 文件
grep '^#' /pg/data/pg_hba.conf | head -20 # 查看规则标题(验证 order)
测试连接认证
psql -h <host> -p 5432 -U <user> -d <db> -c "SELECT 1"
常见问题排查
错误信息 可能原因 解决方案 no pg_hba.conf entry for host...没有匹配的 HBA 规则 添加对应规则并刷新 password authentication failed密码错误或加密方式不兼容 检查密码和 pg_pwd_enc 规则不生效 未刷新或 order 被覆盖 执行 bin/pgsql-hba 并检查顺序
注意事项 顺序敏感 :PostgreSQL HBA 首条匹配生效,善用 order 字段角色匹配 :确保 role 字段与目标实例的 pg_role 一致地址格式 :CIDR 必须正确,如 10.0.0.0/8 而非 10.0.0.0/255.0.0.0Pgbouncer 限制 :不支持 db: replicationSSL 前提 :使用 ssl、cert 认证前确保 SSL 已正确配置测试优先 :修改 HBA 前建议先在测试环境验证扩缩容刷新 :使用 addr: cluster 的规则在集群成员变化后需要刷新相关文档 12.2.7 - 参数配置 如何配置集群、实例、用户和数据库级别的 PostgreSQL 参数
PostgreSQL 参数可以在多个层级进行配置,不同层级的参数设置具有不同的作用范围和优先级。
Pigsty 支持在四个层级配置 PostgreSQL 参数,从全局到局部依次为:
层级 作用范围 配置方式 存储位置 集群级 整个集群所有实例 Patroni DCS / 调优模板 etcd + postgresql.conf 实例级 单个 PostgreSQL 实例 pg_parameters / ALTER SYSTEMpostgresql.auto.conf数据库级 特定数据库的所有会话 pg_databases[].parameterspg_db_role_setting用户级 特定用户的所有会话 pg_users[].parameterspg_db_role_setting
参数优先级从低到高:集群级 < 实例级 < 数据库级 < 用户级 < 会话级 (SET 命令)。
高优先级的设置会覆盖低优先级的设置。
关于 PostgreSQL 参数的完整说明,请参阅 PostgreSQL 官方文档:服务器配置
集群级参数 集群级参数是整个 PostgreSQL 集群共享的配置,所有实例(主库和从库)都会使用相同的参数值。
在 Pigsty 中,集群级参数通过 Patroni
Pigsty 提供了四种预置的 Patroni 参数优化模板 pg_conf
调优模板文件位于 Pigsty 安装目录的 roles/pgsql/templates/ 目录下,包含了根据硬件规格自动计算的参数值。
这些模板会在集群初始化时渲染为 Patroni 配置文件 /etc/patroni/patroni.yml。更多详情请参阅 场景模板
在集群创建前,您可以通过调整这些 Patroni 配置模板来修改集群的 初始化参数 。
一旦集群初始化完成,后续的参数修改应通过 Patroni 的 配置管理
Patroni DCS 配置 Patroni 将集群配置存储在 DCS(分布式配置存储,默认为 etcd)中,确保集群所有成员使用一致的配置。
配置存储结构 :
/pigsty/ # 命名空间(patroni_namespace)
└── pg-meta/ # 集群名称(pg_cluster)
├── config # 集群配置(所有成员共享)
├── leader # 当前主库信息
├── members/ # 成员注册信息
│ ├── pg-meta-1
│ └── pg-meta-2
└── ...
配置渲染流程 :
初始化阶段 :调优模板(如 oltp.yml)通过 Jinja2 渲染为 /etc/patroni/patroni.yml启动阶段 :Patroni 读取本地配置,将 PostgreSQL 参数写入 DCS运行阶段 :Patroni 定期从 DCS 同步配置到本地 PostgreSQL本地缓存机制 :
每个 Patroni 实例会在本地缓存 DCS 配置,位于 /pg/conf/<instance>.yml:
启动时:从 DCS 加载配置,缓存到本地 运行时:定期同步 DCS 配置到本地缓存 DCS 不可用时:使用本地缓存继续运行(但无法进行主从切换) 配置文件层次 Patroni 会将 DCS 中的配置渲染到本地 PostgreSQL 配置文件,形成以下层次结构:
/pg/data/
├── postgresql.conf # 主配置文件(由 Patroni 动态管理)
├── postgresql.base.conf # 基础配置(通过 include 指令加载)
├── postgresql.auto.conf # 实例级覆盖配置(ALTER SYSTEM 写入)
├── pg_hba.conf # 客户端认证配置
└── pg_ident.conf # 用户映射配置
配置加载顺序 (优先级从低到高):
postgresql.conf:Patroni 动态生成,包含 DCS 中的集群参数postgresql.base.conf:通过 include 指令加载,包含静态基础配置postgresql.auto.conf:PostgreSQL 自动加载,用于实例级参数覆盖由于 postgresql.auto.conf 最后加载 ,其中的参数会覆盖前面文件中的同名参数。
实例级参数 实例级参数仅对单个 PostgreSQL 实例生效,用于覆盖集群级配置或设置实例特定的参数。
实例级参数会写入 postgresql.auto.conf 文件,由于该文件最后加载,可以覆盖集群级的任何参数。
这是一项非常有用的技术:您可以为特定实例设置不同于集群的参数值,例如:
为从库设置 hot_standby_feedback = on 为特定实例调整 work_mem 或 maintenance_work_mem 为延迟从库设置 recovery_min_apply_delay 使用 pg_parameters 在 Pigsty 配置中,使用 pg_parameters
pg-meta :
hosts :
10.10.10.10 :
pg_seq : 1
pg_role : primary
pg_parameters : # 实例级参数
log_statement : all # 仅此实例记录所有 SQL
vars :
pg_cluster : pg-meta
pg_parameters : # 集群默认的实例参数
log_timezone : Asia/Shanghai
log_min_duration_statement : 1000
使用 ./pgsql.yml -l <cls> -t pg_param 子任务,可以将参数配置应用生效,这些参数会被渲染到 postgresql.auto.conf 文件中。
参数覆盖层次 pg_parameters 可以在 Ansible 配置的不同层次定义,优先级从低到高:
all :
vars :
pg_parameters : # 全局默认
log_statement : none
children :
pg-meta :
vars :
pg_parameters : # 集群级覆盖
log_statement : ddl
hosts :
10.10.10.10 :
pg_parameters : # 实例级覆盖(最高优先级)
log_statement : all
使用 ALTER SYSTEM 除了通过配置文件,还可以在运行时使用 SQL 命令 ALTER SYSTEM
-- 设置参数
ALTER SYSTEM SET work_mem = '256MB' ;
ALTER SYSTEM SET log_min_duration_statement = 1000 ;
-- 重置为默认值
ALTER SYSTEM RESET work_mem ;
ALTER SYSTEM RESET ALL ; -- 重置所有 ALTER SYSTEM 设置
-- 重新加载配置使其生效
SELECT pg_reload_conf ();
ALTER SYSTEM 会将参数写入 postgresql.auto.conf 文件。
注意 :在 Pigsty 管理的集群中,postgresql.auto.conf 由 Ansible 通过 pg_parameters 管理。
手动使用 ALTER SYSTEM 修改的参数可能会在下次执行 playbook 时被覆盖。
建议通过修改 pigsty.yml 中的 pg_parameters 来管理实例级参数。
列表类型参数 PostgreSQL 中有一类特殊的参数接受逗号分隔的列表值。在 YAML 配置文件中配置这类参数时,
整个值必须用引号包裹 ,否则 YAML 解析器会将其解释为数组而导致错误:
# ✓ 正确:用引号包裹整个值
pg_parameters :
shared_preload_libraries : 'timescaledb, pg_stat_statements'
search_path : '"$user", public, app'
# ✗ 错误:不加引号会导致 YAML 解析错误
pg_parameters :
shared_preload_libraries : timescaledb, pg_stat_statements # YAML 会解析为数组!
Pigsty 会自动识别以下列表类型参数,在渲染到配置文件时不添加外层引号 :
参数 说明 示例值 shared_preload_libraries预加载共享库 'timescaledb, pg_stat_statements'search_pathSchema 搜索路径 '"$user", public, app'local_preload_libraries本地预加载库 'auto_explain'session_preload_libraries会话预加载库 'pg_hint_plan'log_destination日志输出目标 'csvlog, stderr'unix_socket_directoriesUnix Socket 目录 '/var/run/postgresql, /tmp'temp_tablespaces临时表空间 'ssd_space, hdd_space'debug_io_direct直接 I/O 模式(PG16+) 'data, wal'
渲染示例 :
# pigsty.yml 配置(YAML 中需要引号)
pg_parameters :
shared_preload_libraries : 'timescaledb, pg_stat_statements'
search_path : '"$user", public, app'
work_mem : 64MB
# 渲染后的 postgresql.auto.conf(列表参数无外层引号)
shared_preload_libraries = timescaledb, pg_stat_statements
search_path = "$user", public, app
work_mem = '64MB'
数据库级参数 数据库级参数针对特定数据库生效,连接到该数据库的所有会话都会应用这些参数设置。
通过 ALTER DATABASE ... SETpg_db_role_setting 中。
配置方式 在 pg_databasesparameters 字段定义:
pg_databases :
- name : analytics
owner : dbuser_analyst
parameters :
work_mem : 256MB # 分析库需要更多内存
maintenance_work_mem : 1GB # 大表维护操作
statement_timeout : 10min # 允许长查询
search_path : '"$user", public, mart' # 列表参数需要引号
与实例级参数相同,列表类型参数值在 YAML 中需要用引号包裹。
参数渲染规则 数据库级参数通过 ALTER DATABASE ... SET 语句设置。Pigsty 会根据参数类型自动选择正确的语法:
列表类型参数 (search_path、temp_tablespaces、local_preload_libraries、session_preload_libraries、log_destination)不加外层引号:
ALTER DATABASE "analytics" SET "search_path" = "$user" , public , mart ;
标量参数 使用引号包裹值:
ALTER DATABASE "analytics" SET "work_mem" = '256MB' ;
ALTER DATABASE "analytics" SET "statement_timeout" = '10min' ;
注意 :虽然 log_destination 在数据库级参数白名单中,但由于其 context 为 sighup,
实际上无法在数据库级别生效。此参数应在实例级(pg_parameters)配置。
查看数据库参数 -- 查看特定数据库的参数设置
SELECT datname , unnest ( setconfig ) AS setting
FROM pg_db_role_setting drs
JOIN pg_database d ON d . oid = drs . setdatabase
WHERE drs . setrole = 0 AND datname = 'analytics' ;
手动管理 -- 设置参数
ALTER DATABASE analytics SET work_mem = '256MB' ;
ALTER DATABASE analytics SET search_path = "$user" , public , myschema ;
-- 重置参数
ALTER DATABASE analytics RESET work_mem ;
ALTER DATABASE analytics RESET ALL ;
用户级参数 用户级参数针对特定数据库用户生效,该用户的所有会话都会应用这些参数设置。
通过 ALTER USER ... SETpg_db_role_setting 中。
配置方式 在 pg_userspg_default_rolesparameters 字段定义:
pg_users :
- name : dbuser_analyst
password : DBUser.Analyst
parameters :
work_mem : 256MB # 分析查询需要更多内存
statement_timeout : 5min # 允许较长的查询时间
search_path : '"$user", public, analytics' # 列表参数需要引号
log_statement : all # 记录所有 SQL
参数渲染规则 用户级参数的渲染规则与数据库级参数相同:
列表类型参数 (search_path、temp_tablespaces、local_preload_libraries、session_preload_libraries)不加外层引号:
ALTER USER "dbuser_analyst" SET "search_path" = "$user" , public , analytics ;
标量参数 使用引号包裹:
ALTER USER "dbuser_analyst" SET "work_mem" = '256MB' ;
ALTER USER "dbuser_analyst" SET "statement_timeout" = '5min' ;
特殊值 DEFAULT 使用 DEFAULT(大小写不敏感)可以将参数重置为 PostgreSQL 默认值:
parameters :
work_mem : DEFAULT # 重置为默认值
statement_timeout : 30s # 设置具体值
ALTER USER "dbuser_app" SET "work_mem" = DEFAULT ;
ALTER USER "dbuser_app" SET "statement_timeout" = '30s' ;
查看用户参数 -- 查看特定用户的参数设置
SELECT rolname , unnest ( setconfig ) AS setting
FROM pg_db_role_setting drs
JOIN pg_roles r ON r . oid = drs . setrole
WHERE rolname = 'dbuser_analyst' ;
手动管理 -- 设置参数
ALTER USER dbuser_app SET work_mem = '128MB' ;
ALTER USER dbuser_app SET search_path = "$user" , public , myschema ;
-- 重置参数
ALTER USER dbuser_app RESET work_mem ;
ALTER USER dbuser_app RESET ALL ;
参数优先级 当同一参数在多个层级设置时,PostgreSQL 按以下优先级应用(从低到高):
postgresql.conf ← 集群级参数(Patroni DCS)
↓
postgresql.auto.conf ← 实例级参数(pg_parameters / ALTER SYSTEM)
↓
数据库级 ← ALTER DATABASE SET
↓
用户级 ← ALTER USER SET
↓
会话级 ← SET 命令
关于数据库级与用户级的优先级 :
当用户连接到特定数据库时,如果同一参数在数据库级和用户级都有设置,
PostgreSQL 会使用 用户级参数 ,因为用户级优先级更高。
示例场景 :
# 数据库级:analytics 数据库 work_mem = 256MB
pg_databases :
- name : analytics
parameters :
work_mem : 256MB
# 用户级:analyst 用户 work_mem = 512MB
pg_users :
- name : analyst
parameters :
work_mem : 512MB
当 analyst 用户连接到 analytics 数据库时:work_mem = 512MB(用户级优先) 当其他用户连接到 analytics 数据库时:work_mem = 256MB(数据库级生效) 当 analyst 用户连接到其他数据库时:work_mem = 512MB(用户级生效) 12.2.8 - 访问控制 Pigsty 提供的默认角色系统与权限模型
访问控制由“角色体系 + 权限模板 + HBA”共同决定。本节聚焦于如何通过配置参数声明角色与对象权限。
Pigsty 预置了一套精简的 ACL 模型,全部通过以下参数描述:
pg_default_roles:系统角色与系统用户。pg_users:业务用户与角色。pg_default_privileges:管理员/属主新建对象时的默认权限。pg_revoke_public、pg_default_schemas、pg_default_extensions:控制 template1 的默认行为。理解这些参数后,你就可以写出完全可复现的权限配置。
默认角色体系(pg_default_roles) 默认包含 4 个业务角色 + 4 个系统用户:
名称 类型 说明 dbrole_readonlyNOLOGIN所有业务共用,拥有 SELECT/USAGE dbrole_readwriteNOLOGIN继承只读角色,并拥有 INSERT/UPDATE/DELETE dbrole_adminNOLOGIN继承 pg_monitor + 读写角色,可建对象和触发器 dbrole_offlineNOLOGIN受限只读角色,仅允许访问离线实例 postgres用户 系统超级用户,与 pg_dbsu 同名 replicator用户 用于流复制与备份,继承监控与只读权限 dbuser_dba用户 主要管理员账号,同时同步到 pgbouncer dbuser_monitor用户 监控账号,具备 pg_monitor 权限,默认记录慢 SQL
这些定义位于 pg_default_roles,理论上可以自定义,但若要替换名称,必须同步更新 HBA/ACL/脚本中的引用。
示例:为离线任务额外加一个 dbrole_etl:
pg_default_roles :
- { name: dbrole_etl, login: false, roles: [dbrole_offline], comment : 'etl read-only role' }
- { name: dbrole_admin, login: false, roles : [ pg_monitor, dbrole_readwrite, dbrole_etl] }
效果:所有继承 dbrole_admin 的用户自动拥有 dbrole_etl 权限,可访问 offline 实例并执行 ETL。
默认用户与凭据参数 系统用户的用户名/密码由以下参数控制:
参数 默认值 作用 pg_dbsupostgres数据库/系统超级用户 pg_dbsu_password空字符串 dbsu 密码(默认不启用) pg_replication_usernamereplicator复制用户名称 pg_replication_passwordDBUser.Replicator复制用户密码 pg_admin_usernamedbuser_dba管理员用户名 pg_admin_passwordDBUser.DBA管理员密码 pg_monitor_usernamedbuser_monitor监控用户 pg_monitor_passwordDBUser.Monitor监控用户密码
如果修改这些参数,请同步在 pg_default_roles 中更新对应用户的定义,以避免角色属性不一致。
业务角色与授权(pg_users) 业务用户通过 pg_users 声明(详细字段见 用户配置 ),其中 roles 字段控制授予的业务角色。
示例:创建只读/读写用户各一名:
pg_users :
- { name: app_reader, password: DBUser.Reader, roles: [dbrole_readonly], pgbouncer : true }
- { name: app_writer, password: DBUser.Writer, roles: [dbrole_readwrite], pgbouncer : true }
通过继承 dbrole_* 来控制访问权限,无需为每个库单独 GRANT。配合 pg_hba_rules
若需要更细粒度的 ACL,可在 baseline SQL 中或后续剧本里使用标准 GRANT/REVOKE。Pigsty 不会阻止你额外授予权限。
默认权限模板(pg_default_privileges) pg_default_privileges 会在 postgres、dbuser_dba、dbrole_admin(业务管理员 SET ROLE 后)上设置 DEFAULT PRIVILEGE。默认模板如下:
pg_default_privileges :
- GRANT USAGE ON SCHEMAS TO dbrole_readonly
- GRANT SELECT ON TABLES TO dbrole_readonly
- GRANT SELECT ON SEQUENCES TO dbrole_readonly
- GRANT EXECUTE ON FUNCTIONS TO dbrole_readonly
- GRANT USAGE ON SCHEMAS TO dbrole_offline
- GRANT SELECT ON TABLES TO dbrole_offline
- GRANT SELECT ON SEQUENCES TO dbrole_offline
- GRANT EXECUTE ON FUNCTIONS TO dbrole_offline
- GRANT INSERT ON TABLES TO dbrole_readwrite
- GRANT UPDATE ON TABLES TO dbrole_readwrite
- GRANT DELETE ON TABLES TO dbrole_readwrite
- GRANT USAGE ON SEQUENCES TO dbrole_readwrite
- GRANT UPDATE ON SEQUENCES TO dbrole_readwrite
- GRANT TRUNCATE ON TABLES TO dbrole_admin
- GRANT REFERENCES ON TABLES TO dbrole_admin
- GRANT TRIGGER ON TABLES TO dbrole_admin
- GRANT CREATE ON SCHEMAS TO dbrole_admin
只要对象由上述管理员创建,就会自动携带对应权限,无需人为执行 GRANT。若业务需要自定义模板,直接替换该数组即可。
额外提示:
pg_revoke_public 默认为 true,意味着自动撤销 PUBLIC 在数据库和 public schema 上的 CREATE 权限。pg_default_schemas 和 pg_default_extensions 控制在 template1/postgres 中预创建的 schema/扩展,通常用于监控对象(monitor schema、pg_stat_statements 等)。常见配置场景 为合作方提供只读账号 pg_users :
- name : partner_ro
password : Partner.Read
roles : [ dbrole_readonly]
pg_hba_rules :
- { user: partner_ro, db: analytics, addr: 203.0.113.0/24, auth : ssl }
效果:合作方账号登录后只具备默认只读权限,并且只能通过 TLS 从指定网段访问 analytics 库。
为业务管理员赋予 DDL 能力 pg_users :
- name : app_admin
password : DBUser.AppAdmin
roles : [ dbrole_admin]
业务管理员通过 SET ROLE dbrole_admin 或直接以 app_admin 登录,即可继承默认的 DDL 权限模板。
自定义默认权限 pg_default_privileges :
- GRANT INSERT,UPDATE,DELETE ON TABLES TO dbrole_admin
- GRANT SELECT,UPDATE ON SEQUENCES TO dbrole_admin
- GRANT SELECT ON TABLES TO reporting_group
替换默认模板后,所有由管理员创建的对象都会携带新的权限定义,避免逐对象授权。
与其他组件的协同 HBA 规则 :使用 pg_hba_rules 将角色与来源进行绑定(例如只让 dbrole_offline 访问离线实例)。Pgbouncer :pgbouncer: true 的用户会被写入 userlist.txt,pool_mode/pool_connlimit 可以控制连接池层面的配额。Grafana/监控 :dbuser_monitor 的权限来自 pg_default_roles,如果你新增监控用户,记得赋予 pg_monitor + monitor schema 的访问权。通过这些参数,可以让权限体系与代码一起版本化,真正做到“配置即策略”。
12.3 - 服务/接入 分离读写操作,正确路由流量,稳定可靠地交付 PostgreSQL 集群提供的能力。
分离读写操作,正确路由流量,稳定可靠地交付 PostgreSQL 集群提供的能力。
服务 是一种抽象:它是数据库集群对外提供能力的形式,并封装了底层集群的细节。
服务对于生产环境中的 稳定接入 至关重要,在 高可用 集群自动故障时方显其价值,单机用户 通常不需要操心这个概念。
单机用户 “服务” 的概念是给生产环境用的,个人用户/单机集群可以不折腾,直接拿实例名/IP地址访问数据库。
例如,Pigsty 默认的单节点 pg-meta.meta 数据库,就可以直接用下面三个不同的用户连接上去。
psql postgres://dbuser_dba:DBUser.DBA@10.10.10.10/meta # 直接用 DBA 超级用户连上去
psql postgres://dbuser_meta:DBUser.Meta@10.10.10.10/meta # 用默认的业务管理员用户连上去
psql postgres://dbuser_view:DBUser.View@pg-meta/meta # 用默认的只读用户走实例域名连上去
服务概述 在真实世界生产环境中,我们会使用基于复制的主从数据库集群。集群中有且仅有一个实例作为领导者(主库 )可以接受写入。
而其他实例(从库 )则会从持续从集群领导者获取变更日志,与领导者保持一致。同时,从库还可以承载只读请求,在读多写少的场景下可以显著分担主库的负担,
因此对集群的写入请求与只读请求进行区分,是一种十分常见的实践。
此外对于高频短连接的生产环境,我们还会通过连接池中间件(Pgbouncer)对请求进行池化,减少连接与后端进程的创建开销。但对于ETL与变更执行等场景,我们又需要绕过连接池,直接访问数据库。
同时,高可用集群在故障时会出现故障切换(Failover),故障切换会导致集群的领导者出现变更。因此高可用的数据库方案要求写入流量可以自动适配集群的领导者变化。
这些不同的访问需求(读写分离,池化与直连,故障切换自动适配)最终抽象出 服务 (Service)的概念。
通常来说,数据库集群都必须提供这种最基础的服务:
对于生产数据库集群,至少应当提供这两种服务:
读写服务(primary) :写入数据:只能由主库所承载。只读服务(replica) :读取数据:可以由从库承载,没有从库时也可由主库承载此外,根据具体的业务场景,可能还会有其他的服务,例如:
默认直连服务(default) :允许(管理)用户,绕过连接池直接访问数据库的服务离线从库服务(offline) :不承接线上只读流量的专用从库,用于ETL与分析查询同步从库服务(standby) :没有复制延迟的只读服务,由 同步备库 /主库处理只读查询延迟从库服务(delayed) :访问同一个集群在一段时间之前的旧数据,由 延迟从库 来处理默认服务 Pigsty默认为每个 PostgreSQL 数据库集群提供四种不同的服务,以下是默认服务及其定义:
以默认的 pg-meta 集群为例,它提供四种默认服务:
psql postgres://dbuser_meta:DBUser.Meta@pg-meta:5433/meta # pg-meta-primary : 通过主要的 pgbouncer(6432) 进行生产读写
psql postgres://dbuser_meta:DBUser.Meta@pg-meta:5434/meta # pg-meta-replica : 通过备份的 pgbouncer(6432) 进行生产只读
psql postgres://dbuser_dba:DBUser.DBA@pg-meta:5436/meta # pg-meta-default : 通过主要的 postgres(5432) 直接连接
psql postgres://dbuser_stats:DBUser.Stats@pg-meta:5438/meta # pg-meta-offline : 通过离线的 postgres(5432) 直接连接
从示例集群 架构图 上可以看出这四种服务的工作方式:
注意在这里pg-meta 域名指向了集群的 L2 VIP,进而指向集群主库上的 haproxy 负载均衡器,它负责将流量路由到不同的实例上,详见 服务接入
服务实现 在 Pigsty 中,服务使用 节点 上的 haproxy 来实现,通过主机节点上的不同端口进行区分。
Pigsty 所纳管的每个节点上都默认启用了 Haproxy 以对外暴露服务,而数据库节点也不例外。
集群中的节点尽管从数据库的视角来看有主从之分,但从服务的视角来看,每个节点都是相同的:
这意味着即使您访问的是从库节点,只要使用正确的服务端口,就依然可以使用到主库读写的服务。
这样的设计可以屏蔽复杂度:所以您只要可以访问 PostgreSQL 集群上的任意一个实例,就可以完整的访问到所有服务。
这样的设计类似于 Kubernetes 中的 NodePort 服务,同样在 Pigsty 中,每一个服务都包括以下两个核心要素:
通过 NodePort 暴露的访问端点(端口号,从哪访问?) 通过 Selectors 选择的目标实例(实例列表,谁来承载?) Pigsty的服务交付边界止步于集群的HAProxy,用户可以用各种手段访问这些负载均衡器,请参考 接入服务 。
所有的服务都通过配置文件进行声明,例如,PostgreSQL 默认服务就是由 pg_default_services
pg_default_services :
- { name: primary ,port: 5433 ,dest: default ,check: /primary ,selector : "[]" }
- { name: replica ,port: 5434 ,dest: default ,check: /read-only ,selector : "[]" , backup : "[? pg_role == `primary` || pg_role == `offline` ]" }
- { name: default ,port: 5436 ,dest: postgres ,check: /primary ,selector : "[]" }
- { name: offline ,port: 5438 ,dest: postgres ,check: /replica ,selector : "[? pg_role == `offline` || pg_offline_query ]" , backup : "[? pg_role == `replica` && !pg_offline_query]" }
您也可以在 pg_servicespg_default_services 与 pg_services 都是由 服务定义 对象组成的数组。
定义服务 Pigsty 允许您定义自己的服务:
对于 PostgreSQL 集群来说,通常只需要关注前两者即可。
每一条服务定义都会在所有相关 HAProxy 实例的配置目录下生成一个新的配置文件:/etc/haproxy/<svcname>.cfgstandby:当您想要对外提供没有复制延迟的只读服务时,就可以在 pg_services
- name : standby # 必选,服务名称,最终的 svc 名称会使用 `pg_cluster` 作为前缀,例如:pg-meta-standby
port : 5435 # 必选,暴露的服务端口(作为 kubernetes 服务节点端口模式)
ip : "*" # 可选,服务绑定的 IP 地址,默认情况下为所有 IP 地址
selector : "[]" # 必选,服务成员选择器,使用 JMESPath 来筛选配置清单
backup : "[? pg_role == `primary`]" # 可选,服务成员选择器(备份),也就是当默认选择器选中的实例都宕机后,服务才会由这里选中的实例成员来承载
dest : default # 可选,目标端口,default|postgres|pgbouncer|<port_number>,默认为 'default',Default的意思就是使用 pg_default_service_dest 的取值来最终决定
check : /sync # 可选,健康检查 URL 路径,默认为 /,这里使用 Patroni API:/sync ,只有同步备库和主库才会返回 200 健康状态码
maxconn : 5000 # 可选,允许的前端连接最大数,默认为5000
balance : roundrobin # 可选,haproxy 负载均衡算法(默认为 roundrobin,其他选项:leastconn)
options : 'inter 3s fastinter 1s downinter 5s rise 3 fall 3 on-marked-down shutdown-sessions slowstart 30s maxconn 3000 maxqueue 128 weight 100'
而上面的服务定义,在样例的三节点 pg-test 上将会被转换为 haproxy 配置文件 /etc/haproxy/pg-test-standby.conf:
#---------------------------------------------------------------------
# service: pg-test-standby @ 10.10.10.11:5435
#---------------------------------------------------------------------
# service instances 10.10.10.11, 10.10.10.13, 10.10.10.12
# service backups 10.10.10.11
listen pg-test-standby
bind *:5435 # <--- 绑定了所有IP地址上的 5435 端口
mode tcp # <--- 负载均衡器工作在 TCP 协议上
maxconn 5000 # <--- 最大连接数为 5000,可按需调大
balance roundrobin # <--- 负载均衡算法为 rr 轮询,还可以使用 leastconn
option httpchk # <--- 启用 HTTP 健康检查
option http-keep-alive # <--- 保持HTTP连接
http-check send meth OPTIONS uri /sync # <---- 这里使用 /sync ,Patroni 健康检查 API ,只有同步备库和主库才会返回 200 健康状态码。
http-check expect status 200 # <---- 健康检查返回代码 200 代表正常
default-server inter 3s fastinter 1s downinter 5s rise 3 fall 3 on-marked-down shutdown-sessions slowstart 30s maxconn 3000 maxqueue 128 weight 100
# servers: # pg-test 集群全部三个实例都被 selector: "[]" 给圈中了,因为没有任何的筛选条件,所以都会作为 pg-test-replica 服务的后端服务器。但是因为还有 /sync 健康检查,所以只有主库和同步备库才能真正承载请求。
server pg-test-1 10.10.10.11:6432 check port 8008 weight 100 backup # <----- 唯独主库满足条件 pg_role == `primary`, 被 backup selector 选中。
server pg-test-3 10.10.10.13:6432 check port 8008 weight 100 # 因此作为服务的兜底实例:平时不承载请求,其他从库全部宕机后,才会承载只读请求,从而最大避免了读写服务受到只读服务的影响
server pg-test-2 10.10.10.12:6432 check port 8008 weight 100 #
在这里,pg-test 集群全部三个实例都被 selector: "[]" 给圈中了,渲染进入 pg-test-replica 服务的后端服务器列表中。但是因为还有 /sync 健康检查,Patroni Rest API只有在主库和 同步备库 上才会返回代表健康的 HTTP 200 状态码,因此只有主库和同步备库才能真正承载请求。
此外,主库因为满足条件 pg_role == primary, 被 backup selector 选中,被标记为了备份服务器,只有当没有其他实例(也就是同步备库)可以满足需求时,才会顶上。
Primary服务 Primary服务可能是生产环境中最关键的服务,它在 5433 端口提供对数据库集群的读写能力,服务定义如下:
- { name: primary ,port: 5433 ,dest: default ,check: /primary ,selector : "[]" }
选择器参数 selector: "[]" 意味着所有集群成员都将被包括在Primary服务中 但只有主库能够通过健康检查(check: /primary),实际承载Primary服务的流量。 目的地参数 dest: default 意味着Primary服务的目的地受到 pg_default_service_dest dest 默认值 default 会被替换为 pg_default_service_dest 的值,默认为 pgbouncer。默认情况下 Primary 服务的目的地默认是主库上的连接池,也就是由 pgbouncer_port 如果 pg_default_service_dest 的值为 postgres,那么 primary 服务的目的地就会绕过连接池,直接使用 PostgreSQL 数据库的端口(pg_port
示例:pg-test-primary 的 haproxy 配置 listen pg-test-primary
bind *:5433 # <--- primary 服务默认使用 5433 端口
mode tcp
maxconn 5000
balance roundrobin
option httpchk
option http-keep-alive
http-check send meth OPTIONS uri /primary # <--- primary 服务默认使用 Patroni RestAPI /primary 健康检查
http-check expect status 200
default-server inter 3s fastinter 1s downinter 5s rise 3 fall 3 on-marked-down shutdown-sessions slowstart 30s maxconn 3000 maxqueue 128 weight 100
# servers
server pg-test-1 10.10.10.11:6432 check port 8008 weight 100
server pg-test-3 10.10.10.13:6432 check port 8008 weight 100
server pg-test-2 10.10.10.12:6432 check port 8008 weight 100
Patroni 的 高可用 机制确保任何时候最多只会有一个实例的 /primary 健康检查为真,因此Primary服务将始终将流量路由到主实例。
使用 Primary 服务而不是直连数据库的一个好处是,如果集群因为某种情况出现了双主(比如在没有watchdog的情况下kill -9杀死主库 Patroni),Haproxy在这种情况下仍然可以避免脑裂,因为它只会在 Patroni 存活且返回主库状态时才会分发流量。
Replica服务 Replica服务在生产环境中的重要性仅次于Primary服务,它在 5434 端口提供对数据库集群的只读能力,服务定义如下:
- { name: replica ,port: 5434 ,dest: default ,check: /read-only ,selector : "[]" , backup : "[? pg_role == `primary` || pg_role == `offline` ]" }
选择器参数 selector: "[]" 意味着所有集群成员都将被包括在Replica服务中 所有实例都能够通过健康检查(check: /read-only),承载Replica服务的流量。 备份选择器:[? pg_role == 'primary' || pg_role == 'offline' ] 将主库和 离线从库 标注为备份服务器。 只有当所有 普通从库 都宕机后,Replica服务才会由主库或离线从库来承载。 目的地参数 dest: default 意味着Replica服务的目的地也受到 pg_default_service_dest dest 默认值 default 会被替换为 pg_default_service_dest 的值,默认为 pgbouncer,这一点和 Primary服务 相同默认情况下 Replica 服务的目的地默认是从库上的连接池,也就是由 pgbouncer_port 示例:pg-test-replica 的 haproxy 配置 listen pg-test-replica
bind *:5434
mode tcp
maxconn 5000
balance roundrobin
option httpchk
option http-keep-alive
http-check send meth OPTIONS uri /read-only
http-check expect status 200
default-server inter 3s fastinter 1s downinter 5s rise 3 fall 3 on-marked-down shutdown-sessions slowstart 30s maxconn 3000 maxqueue 128 weight 100
# servers
server pg-test-1 10.10.10.11:6432 check port 8008 weight 100 backup
server pg-test-3 10.10.10.13:6432 check port 8008 weight 100
server pg-test-2 10.10.10.12:6432 check port 8008 weight 100
Replica服务非常灵活:如果有存活的专用 Replica 实例,那么它会优先使用这些实例来承载只读请求,只有当从库实例全部宕机后,才会由主库来兜底只读请求。对于常见的一主一从双节点集群就是:只要从库活着就用从库,从库挂了再用主库。
此外,除非专用只读实例全部宕机,Replica 服务也不会使用专用 Offline 实例,这样就避免了在线快查询与离线慢查询混在一起,相互影响。
Default服务 Default服务在 5436 端口上提供服务,它是Primary服务的变体。
Default服务总是绕过连接池直接连到主库上的 PostgreSQL,这对于管理连接、ETL写入、CDC数据变更捕获等都很有用。
- { name: primary ,port: 5433 ,dest: default ,check: /primary ,selector : "[]" }
如果 pg_default_service_dest 被修改为 postgres,那么可以说 Default 服务除了端口和名称内容之外,与 Primary 服务是完全等价的。在这种情况下,您可以考虑将 Default 从默认服务中剔除。
示例:pg-test-default 的 haproxy 配置 listen pg-test-default
bind *:5436 # <--- 除了监听端口/目标端口和服务名,其他配置和 primary 服务一模一样
mode tcp
maxconn 5000
balance roundrobin
option httpchk
option http-keep-alive
http-check send meth OPTIONS uri /primary
http-check expect status 200
default-server inter 3s fastinter 1s downinter 5s rise 3 fall 3 on-marked-down shutdown-sessions slowstart 30s maxconn 3000 maxqueue 128 weight 100
# servers
server pg-test-1 10.10.10.11:5432 check port 8008 weight 100
server pg-test-3 10.10.10.13:5432 check port 8008 weight 100
server pg-test-2 10.10.10.12:5432 check port 8008 weight 100
Offline服务 Default服务在 5438 端口上提供服务,它也绕开连接池直接访问 PostgreSQL 数据库,通常用于慢查询/分析查询/ETL读取/个人用户交互式查询,其服务定义如下:
- { name: offline ,port: 5438 ,dest: postgres ,check: /replica ,selector : "[? pg_role == `offline` || pg_offline_query ]" , backup : "[? pg_role == `replica` && !pg_offline_query]" }
Offline服务将流量直接路由到专用的 离线从库 上,或者带有 pg_offline_query只读实例 。
选择器参数从集群中筛选出了两种实例:pg_roleoffline 的离线从库,或是带有 pg_offline_querytrue 标记的普通 只读实例 专用离线从库和打标记的普通从库主要的区别在于:前者默认不承载 Replica服务 的请求,避免快慢请求混在一起,而后者默认会承载。 备份选择器参数从集群中筛选出了一种实例:不带 offline 标记的普通从库,这意味着如果离线实例或者带Offline标记的普通从库挂了之后,其他普通的从库可以用来承载Offline服务。 健康检查 /replica 只会针对从库返回 200, 主库会返回错误,因此 Offline服务 永远不会将流量分发到主库实例上去,哪怕集群中只剩这一台主库。 同时,主库实例既不会被选择器圈中,也不会被备份选择器圈中,因此它永远不会承载Offline服务。因此 Offline 服务总是可以避免用户访问主库,从而避免对主库的影响。 示例:pg-test-offline 的 haproxy 配置 listen pg-test-offline
bind *:5438
mode tcp
maxconn 5000
balance roundrobin
option httpchk
option http-keep-alive
http-check send meth OPTIONS uri /replica
http-check expect status 200
default-server inter 3s fastinter 1s downinter 5s rise 3 fall 3 on-marked-down shutdown-sessions slowstart 30s maxconn 3000 maxqueue 128 weight 100
# servers
server pg-test-3 10.10.10.13:5432 check port 8008 weight 100
server pg-test-2 10.10.10.12:5432 check port 8008 weight 100 backup
Offline服务提供受限的只读服务,通常用于两类查询:交互式查询(个人用户),慢查询长事务(分析/ETL)。
Offline 服务需要额外的维护照顾:当集群发生主从切换或故障自动切换时,集群的实例角色会发生变化,而 Haproxy 的配置却不会自动发生变化。对于有多个从库的集群来说,这通常并不是一个问题。
然而对于一主一从,从库跑Offline查询的精简小集群而言,主从切换意味着从库变成了主库(健康检查失效),原来的主库变成了从库(不在 Offline 后端列表中),于是没有实例可以承载 Offline 服务了,因此需要手动 重载服务 以使变更生效。
如果您的业务模型较为简单,您可以考虑剔除 Default 服务与 Offline 服务,使用 Primary 服务与 Replica 服务直连数据库。
重载服务 当集群成员发生变化,如添加/删除副本、主备切换或调整相对权重时, 你需要 重载服务 以使更改生效。
bin/pgsql-svc <cls> [ ip...] # 为 lb 集群或 lb 实例重载服务
# ./pgsql.yml -t pg_service # 重载服务的实际 ansible 任务
接入服务 Pigsty的服务交付边界止步于集群的HAProxy,用户可以用各种手段访问这些负载均衡器。
典型的做法是使用 DNS 或 VIP 接入,将其绑定在集群所有或任意数量的负载均衡器上。
你可以使用不同的 主机 & 端口 组合,它们以不同的方式提供 PostgreSQL 服务。
主机
类型 样例 描述 集群域名 pg-test通过集群域名访问(由 dnsmasq @ infra 节点解析) 集群 VIP 地址 10.10.10.3通过由 vip-manager 管理的 L2 VIP 地址访问,绑定到主节点 实例主机名 pg-test-1通过任何实例主机名访问(由 dnsmasq @ infra 节点解析) 实例 IP 地址 10.10.10.11访问任何实例的 IP 地址
端口
Pigsty 使用不同的 端口 来区分 pg services
端口 服务 类型 描述 5432 postgres 数据库 直接访问 postgres 服务器 6432 pgbouncer 中间件 访问 postgres 前先通过连接池中间件 5433 primary 服务 访问主 pgbouncer (或 postgres) 5434 replica 服务 访问备份 pgbouncer (或 postgres) 5436 default 服务 访问主 postgres 5438 offline 服务 访问离线 postgres
组合
# 通过集群域名访问
postgres://test@pg-test:5432/test # DNS -> L2 VIP -> 主直接连接
postgres://test@pg-test:6432/test # DNS -> L2 VIP -> 主连接池 -> 主
postgres://test@pg-test:5433/test # DNS -> L2 VIP -> HAProxy -> 主连接池 -> 主
postgres://test@pg-test:5434/test # DNS -> L2 VIP -> HAProxy -> 备份连接池 -> 备份
postgres://dbuser_dba@pg-test:5436/test # DNS -> L2 VIP -> HAProxy -> 主直接连接 (用于管理员)
postgres://dbuser_stats@pg-test:5438/test # DNS -> L2 VIP -> HAProxy -> 离线直接连接 (用于 ETL/个人查询)
# 通过集群 VIP 直接访问
postgres://test@10.10.10.3:5432/test # L2 VIP -> 主直接访问
postgres://test@10.10.10.3:6432/test # L2 VIP -> 主连接池 -> 主
postgres://test@10.10.10.3:5433/test # L2 VIP -> HAProxy -> 主连接池 -> 主
postgres://test@10.10.10.3:5434/test # L2 VIP -> HAProxy -> 备份连接池 -> 备份
postgres://dbuser_dba@10.10.10.3:5436/test # L2 VIP -> HAProxy -> 主直接连接 (用于管理员)
postgres://dbuser_stats@10.10.10.3::5438/test # L2 VIP -> HAProxy -> 离线直接连接 (用于 ETL/个人查询)
# 直接指定任何集群实例名
postgres://test@pg-test-1:5432/test # DNS -> 数据库实例直接连接 (单例访问)
postgres://test@pg-test-1:6432/test # DNS -> 连接池 -> 数据库
postgres://test@pg-test-1:5433/test # DNS -> HAProxy -> 连接池 -> 数据库读/写
postgres://test@pg-test-1:5434/test # DNS -> HAProxy -> 连接池 -> 数据库只读
postgres://dbuser_dba@pg-test-1:5436/test # DNS -> HAProxy -> 数据库直接连接
postgres://dbuser_stats@pg-test-1:5438/test # DNS -> HAProxy -> 数据库离线读/写
# 直接指定任何集群实例 IP 访问
postgres://test@10.10.10.11:5432/test # 数据库实例直接连接 (直接指定实例, 没有自动流量分配)
postgres://test@10.10.10.11:6432/test # 连接池 -> 数据库
postgres://test@10.10.10.11:5433/test # HAProxy -> 连接池 -> 数据库读/写
postgres://test@10.10.10.11:5434/test # HAProxy -> 连接池 -> 数据库只读
postgres://dbuser_dba@10.10.10.11:5436/test # HAProxy -> 数据库直接连接
postgres://dbuser_stats@10.10.10.11:5438/test # HAProxy -> 数据库离线读-写
# 智能客户端:自动进行读写分离
postgres://test@10.10.10.11:6432,10.10.10.12:6432,10.10.10.13:6432/test?target_session_attrs= primary
postgres://test@10.10.10.11:6432,10.10.10.12:6432,10.10.10.13:6432/test?target_session_attrs= prefer-standby
覆盖服务 你可以通过多种方式覆盖默认的服务配置,一种常见的需求是让 Primary服务 与 Replica服务 绕过Pgbouncer连接池,直接访问 PostgreSQL 数据库。
为了实现这一点,你可以将 pg_default_service_destpostgres,这样所有服务定义中 svc.dest='default' 的服务都会使用 postgres 而不是默认的 pgbouncer 作为目标。
如果您已经将 Primary服务 指向了 PostgreSQL,那么 default服务 就会比较多余,可以考虑移除。
如果您不需要区分个人交互式查询,分析/ETL慢查询,可以考虑从默认服务列表 pg_default_servicesOffline服务 。
如果您不需要只读从库来分担在线只读流量,也可以从默认服务列表中移除 Replica服务 。
委托服务 Pigsty 通过节点上的 haproxy 暴露 PostgreSQL 服务。整个集群中的所有 haproxy 实例都使用相同的 服务定义 进行配置。
但是,你可以将 pg 服务委托给特定的节点分组(例如,专门的 haproxy 负载均衡器集群),而不是 PostgreSQL 集群成员上的 haproxy。
为此,你需要使用 pg_default_servicespg_service_provider
例如,此配置将在端口 10013 的 proxy haproxy 节点组上公开 pg 集群的主服务。
pg_service_provider : proxy # 使用端口 10013 上的 `proxy` 组的负载均衡器
pg_default_services : [ { name: primary ,port: 10013 ,dest: postgres ,check: /primary ,selector : "[]" }]
用户需要确保每个委托服务的端口,在代理集群中都是唯一 的。
在 43 节点生产环境仿真 沙箱 prod.yml
12.4 - 访问控制 Pigsty 提供的默认角色系统与权限模型
Pigsty 提供了一套开箱即用的,基于 角色系统 和 权限系统 的访问控制模型。
权限控制很重要,但很多用户做不好。因此 Pigsty 提供了一套开箱即用的精简访问控制模型,为您的集群安全性提供一个兜底。
角色系统 Pigsty 默认的角色系统包含四个 默认角色 和四个 默认用户 :
角色名称 属性 所属 描述 dbrole_readonlyNOLOGIN角色:全局只读访问 dbrole_readwriteNOLOGINdbrole_readonly 角色:全局读写访问 dbrole_adminNOLOGINpg_monitor,dbrole_readwrite 角色:管理员/对象创建 dbrole_offlineNOLOGIN角色:受限的只读访问 postgresSUPERUSER系统超级用户 replicatorREPLICATIONpg_monitor,dbrole_readonly 系统复制用户 dbuser_dbaSUPERUSERdbrole_admin pgsql 管理用户 dbuser_monitorpg_monitor pgsql 监控用户
这些 角色与用户 的详细定义如下所示:
pg_default_roles : # 全局默认的角色与系统用户
- { name: dbrole_readonly ,login: false ,comment : role for global read-only access }
- { name: dbrole_offline ,login: false ,comment : role for restricted read-only access }
- { name: dbrole_readwrite ,login: false ,roles: [dbrole_readonly] ,comment : role for global read-write access }
- { name: dbrole_admin ,login: false ,roles: [pg_monitor, dbrole_readwrite] ,comment : role for object creation }
- { name: postgres ,superuser: true ,comment : system superuser }
- { name: replicator ,replication: true ,roles: [pg_monitor, dbrole_readonly] ,comment : system replicator }
- { name: dbuser_dba ,superuser: true ,roles: [dbrole_admin] ,pgbouncer: true ,pool_mode: session, pool_connlimit: 16 ,comment : pgsql admin user }
- { name: dbuser_monitor ,roles: [pg_monitor] ,pgbouncer: true ,parameters : {log_min_duration_statement: 1000 } ,pool_mode: session ,pool_connlimit: 8 ,comment : pgsql monitor user }
默认角色 Pigsty 中有四个默认角色:
业务只读 (dbrole_readonly): 用于全局只读访问的角色。如果别的业务想要此库只读访问权限,可以使用此角色。 业务读写 (dbrole_readwrite): 用于全局读写访问的角色,主属业务使用的生产账号应当具有数据库读写权限 业务管理员 (dbrole_admin): 拥有DDL权限的角色,通常用于业务管理员,或者需要在应用中建表的场景(比如各种业务软件) 离线只读访问 (dbrole_offline): 受限的只读访问角色(只能访问 offline 实例,通常是个人用户,ETL工具账号) 默认角色在 pg_default_roles
- { name: dbrole_readonly , login: false , comment : role for global read-only access } # 生产环境的只读角色
- { name: dbrole_offline , login: false , comment : role for restricted read-only access (offline instance) } # 受限的只读角色
- { name: dbrole_readwrite , login: false , roles: [dbrole_readonly], comment : role for global read-write access } # 生产环境的读写角色
- { name: dbrole_admin , login: false , roles: [pg_monitor, dbrole_readwrite] , comment : role for object creation } # 生产环境的 DDL 更改角色
默认用户 Pigsty 也有四个默认用户(系统用户):
超级用户 (postgres),集群的所有者和创建者,与操作系统 dbsu 名称相同。 复制用户 (replicator),用于主-从复制的系统用户。 监控用户 (dbuser_monitor),用于监控数据库和连接池指标的用户。 管理用户 (dbuser_dba),执行日常操作和数据库更改的管理员用户。 这4个默认用户的用户名/密码通过4对专用参数进行定义,并在很多地方引用:
在生产部署中记得更改这些密码,不要使用默认值!
pg_dbsu : postgres # 数据库超级用户名,这个用户名建议不要修改。
pg_dbsu_password : '' # 数据库超级用户密码,这个密码建议留空!禁止dbsu密码登陆。
pg_replication_username : replicator # 系统复制用户名
pg_replication_password : DBUser.Replicator # 系统复制密码,请务必修改此密码!
pg_monitor_username : dbuser_monitor # 系统监控用户名
pg_monitor_password : DBUser.Monitor # 系统监控密码,请务必修改此密码!
pg_admin_username : dbuser_dba # 系统管理用户名
pg_admin_password : DBUser.DBA # 系统管理密码,请务必修改此密码!
如果您修改默认用户的参数,在 pg_default_roles定义 即可:
- { name: postgres ,superuser: true ,comment : system superuser }
- { name: replicator ,replication: true ,roles: [pg_monitor, dbrole_readonly] ,comment : system replicator }
- { name: dbuser_dba ,superuser: true ,roles: [dbrole_admin] ,pgbouncer: true ,pool_mode: session, pool_connlimit: 16 , comment : pgsql admin user }
- { name: dbuser_monitor ,roles: [pg_monitor, dbrole_readonly] ,pgbouncer: true ,parameters : {log_min_duration_statement: 1000 } ,pool_mode: session ,pool_connlimit: 8 ,comment : pgsql monitor user }
权限系统 Pigsty 拥有一套开箱即用的权限模型,该模型与 默认角色 一起配合工作。
所有用户都可以访问所有模式。 只读用户(dbrole_readonly)可以从所有表中读取数据。(SELECT,EXECUTE) 读写用户(dbrole_readwrite)可以向所有表中写入数据并运行 DML。(INSERT,UPDATE,DELETE)。 管理员用户(dbrole_admin)可以创建对象并运行 DDL(CREATE,USAGE,TRUNCATE,REFERENCES,TRIGGER)。 离线用户(dbrole_offline)类似只读用户,但访问受到限制,只允许访问 离线实例 (pg_role = 'offline' 或 pg_offline_query = true) 由管理员用户创建的对象将具有正确的权限。 所有数据库上都配置了默认权限,包括模板数据库。 数据库连接权限由数据库 定义 管理。 默认撤销PUBLIC在数据库和public模式下的CREATE权限。 对象权限 数据库中新建对象的默认权限由参数 pg_default_privileges
- GRANT USAGE ON SCHEMAS TO dbrole_readonly
- GRANT SELECT ON TABLES TO dbrole_readonly
- GRANT SELECT ON SEQUENCES TO dbrole_readonly
- GRANT EXECUTE ON FUNCTIONS TO dbrole_readonly
- GRANT USAGE ON SCHEMAS TO dbrole_offline
- GRANT SELECT ON TABLES TO dbrole_offline
- GRANT SELECT ON SEQUENCES TO dbrole_offline
- GRANT EXECUTE ON FUNCTIONS TO dbrole_offline
- GRANT INSERT ON TABLES TO dbrole_readwrite
- GRANT UPDATE ON TABLES TO dbrole_readwrite
- GRANT DELETE ON TABLES TO dbrole_readwrite
- GRANT USAGE ON SEQUENCES TO dbrole_readwrite
- GRANT UPDATE ON SEQUENCES TO dbrole_readwrite
- GRANT TRUNCATE ON TABLES TO dbrole_admin
- GRANT REFERENCES ON TABLES TO dbrole_admin
- GRANT TRIGGER ON TABLES TO dbrole_admin
- GRANT CREATE ON SCHEMAS TO dbrole_admin
由管理员新创建 的对象,默认将会上述权限。使用 \ddp+ 可以查看这些默认权限:
类型 访问权限 函数 =X dbrole_readonly=X dbrole_offline=X dbrole_admin=X 模式 dbrole_readonly=U dbrole_offline=U dbrole_admin=UC 序列号 dbrole_readonly=r dbrole_offline=r dbrole_readwrite=wU dbrole_admin=rwU 表 dbrole_readonly=r dbrole_offline=r dbrole_readwrite=awd dbrole_admin=arwdDxt
默认权限 ALTER DEFAULT PRIVILEGES
在 Pigsty 中,默认权限针对三个角色进行定义:
{ % for priv in pg_default_privileges % }
ALTER DEFAULT PRIVILEGES FOR ROLE {{ pg_dbsu }} {{ priv }} ;
{ % endfor % }
{ % for priv in pg_default_privileges % }
ALTER DEFAULT PRIVILEGES FOR ROLE {{ pg_admin_username }} {{ priv }} ;
{ % endfor % }
-- 对于其他业务管理员而言,它们应当在执行 DDL 前执行 SET ROLE dbrole_admin,从而使用对应的默认权限配置。
{ % for priv in pg_default_privileges % }
ALTER DEFAULT PRIVILEGES FOR ROLE "dbrole_admin" {{ priv }} ;
{ % endfor % }
这些内容将会被 PG集群初始化模板 pg-init-template.sql/pg/tmp/pg-init-template.sql。
该命令会在 template1 与 postgres 数据库中执行,新创建的数据库会通过模板 template1 继承这些默认权限配置。
也就是说,为了维持正确的对象权限,您必须用管理员用户 来执行 DDL,它们可以是:
{{ pg_dbsu }}postgres{{ pg_admin_username }}dbuser_dba授予了 dbrole_admin 角色的业务管理员用户(通过 SET ROLE 切换为 dbrole_admin 身份)。 使用 postgres 作为全局对象所有者是明智的。如果您希望以业务管理员用户身份创建对象,创建之前必须使用 SET ROLE dbrole_admin 来维护正确的权限。
当然,您也可以在数据库中通过 ALTER DEFAULT PRIVILEGE FOR ROLE <some_biz_admin> XXX 来显式对业务管理员授予默认权限。
数据库权限 在 Pigsty 中,数据库(Database)层面的权限在 数据库定义 中被涵盖。
数据库有三个级别的权限:CONNECT、CREATE、TEMP,以及一个特殊的’权限’:OWNERSHIP。
- name : meta # 必选,`name` 是数据库定义中唯一的必选字段
owner : postgres # 可选,数据库所有者,默认为 postgres
allowconn : true # 可选,是否允许连接,默认为 true。显式设置 false 将完全禁止连接到此数据库
revokeconn : false # 可选,撤销公共连接权限。默认为 false,设置为 true 时,属主和管理员之外用户的 CONNECT 权限会被回收
如果 owner 参数存在,它作为数据库属主,替代默认的 {{ pg_dbsu }}postgres) 如果 revokeconn 为 false,所有用户都有数据库的 CONNECT 权限,这是默认的行为。 如果显式设置了 revokeconn 为 true:数据库的 CONNECT 权限将从 PUBLIC 中撤销:普通用户无法连接上此数据库 CONNECT 权限将被显式授予 {{ pg_replication_username }}、{{ pg_monitor_username }} 和 {{ pg_admin_username }}CONNECT 权限将 GRANT OPTION 被授予数据库属主,数据库属主用户可以自行授权其他用户连接权限。 revokeconn 选项可用于在同一个集群间隔离跨数据库访问,您可以为每个数据库创建不同的业务用户作为属主,并为它们设置 revokeconn 选项。示例:数据库隔离 pg-infra :
hosts :
10.10.10.40 : { pg_seq: 1, pg_role : primary }
10.10.10.41 : { pg_seq: 2, pg_role: replica , pg_offline_query : true }
vars :
pg_cluster : pg-infra
pg_users :
- { name: dbuser_confluence, password: mc2iohos , pgbouncer: true, roles : [ dbrole_admin ] }
- { name: dbuser_gitlab, password: sdf23g22sfdd , pgbouncer: true, roles : [ dbrole_readwrite ] }
- { name: dbuser_jira, password: sdpijfsfdsfdfs , pgbouncer: true, roles : [ dbrole_admin ] }
pg_databases :
- { name: confluence , revokeconn: true, owner: dbuser_confluence , connlimit : 100 }
- { name: gitlab , revokeconn: true, owner: dbuser_gitlab, connlimit : 100 }
- { name: jira , revokeconn: true, owner: dbuser_jira , connlimit : 100 }
CREATE权限 出于安全考虑,Pigsty 默认从 PUBLIC 撤销数据库上的 CREATE 权限,从 PostgreSQL 15 开始这也是默认行为。
数据库属主总是可以根据实际需要,来自行调整 CREATE 权限。
12.6 - 日常管理 数据库日常管理任务标准操作指南(SOP)
12.6.1 - 管理 PostgreSQL 数据库集群 创建/销毁 PostgreSQL 集群,以及对现有集群进行扩容,缩容,克隆集群。
速查手册 操作 快捷命令 说明 创建集群 bin/pgsql-add <cls>创建新的 PostgreSQL 集群 扩容集群 bin/pgsql-add <cls> <ip...>为现有集群添加从库副本 缩容集群 bin/pgsql-rm <cls> <ip...>从集群中移除指定实例 销毁集群 bin/pgsql-rm <cls>销毁整个 PostgreSQL 集群 刷新服务 bin/pgsql-svc <cls> [ip...]重载集群的负载均衡配置 刷新HBA bin/pgsql-hba <cls> [ip...]重载集群的 HBA 访问规则 克隆集群 - 通过备份集群或 PITR 克隆
其他管理任务,请参考:高可用管理 管理用户 管理数据库
创建集群 要创建一个新的 PostgreSQL 集群,请首先在 配置清单 定义集群 纳管节点
bin/node-add <cls> # 添加分组 <cls> 下的节点
./node.yml -l <cls> # 直接使用 Ansible 剧本添加分组 <cls> 下的节点
bin/pgsql-add pg-test # 例子,添加 pg-test 分组下的节点,实际执行 ./node.yml -l pg-test
在被纳管的节点上,可以使用以下命令创建集群:(针对 <cls>pgsql.yml
bin/pgsql-add <cls> # 创建 PostgreSQL 集群 <cls>
./pgsql.yml -l <cls> # 直接使用 Ansible 剧本创建 PostgreSQL 集群 <cls>
bin/pgsql-add pg-test # 例子,创建 pg-test 集群
示例:创建三节点 PG 集群 pg-test
针对已经存在的集群重新执行创建存在风险
如果您在已经存在的集群上重新执行创建操作,Pigsty 不会移除已有的数据文件,但现有服务配置会被覆盖,集群会发生 重启 !
此外,如果你在 数据库定义 baseline SQL ,它也会重新执行,如果里面包含删除/覆盖逻辑,可能会导致 数据丢失 。
扩容集群 若要将新从库添加到 现有的 PostgreSQL 集群 中,您需要将 实例定义 配置清单 all.children.<cls>.hosts 中。
pg-test :
hosts :
10.10.10.11 : { pg_seq: 1, pg_role : primary } # 已存在的成员
10.10.10.12 : { pg_seq: 2, pg_role : replica } # 已存在的成员
10.10.10.13 : { pg_seq: 3, pg_role : replica } # <--- 新成员
vars : { pg_cluster : pg-test }
扩容集群的操作与 创建集群 添加节点
bin/node-add <ip> # 添加 IP 地址为 <ip> 的节点
./node.yml -l <ip> # 直接使用 Ansible 剧本添加 <ip> 对应的节点
bin/node-add 10.10.10.13 # 例子,添加 IP 为 10.10.10.13 的节点,实际执行 ./node.yml -l 10.10.10.13
然后在新节点上运行以下命令以扩容集群(针对新节点安装 PGSQL 模块 pg_cluster
bin/pgsql-add <cls> <ip> # 添加 IP 地址为 <ip> 的节点
./pgsql.yml -l <ip> # 核心逻辑:使用 Ansible 剧本在 <ip> 节点上安装 PGSQL 模块
bin/pgsql-add pg-test 10.10.10.13 # 示例,为 pg-test 集群扩容 IP 为 10.10.10.13 的节点
扩容完成后,您应当 刷新服务
示例:为两节点集群 pg-test 扩容一个新从库 10.10.10.13
缩容集群 若要从 现有的 PostgreSQL 集群 中移除副本,您需要从 配置清单 all.children.<cls>.hosts 中移除对应的 实例定义
缩容集群首先需要卸载目标节点上的 PGSQL 模块(针对 <ip>pgsql-rm.yml
bin/pgsql-rm <cls> <ip> # 从集群 <cls> 中移除 <ip> 节点上的 PostgreSQL 实例
./pgsql-rm.yml -l <ip> # 直接使用 Ansible 剧本移除 <ip> 节点上的 PostgreSQL 实例
bin/pgsql-rm pg-test 10.10.10.13 # 例子,从 pg-test 集群移除 10.10.10.13 节点
移除 PGSQL 模块后,您可以选择将节点从 Pigsty 管理中移除:移除节点
bin/node-rm <ip> # 从 Pigsty 管理中移除 <ip> 节点
./node-rm.yml -l <ip> # 直接使用 Ansible 剧本从 Pigsty 管理中移除 <ip> 节点
bin/node-rm 10.10.10.13 # 例子,从 Pigsty 管理中移除 10.10.10.13 节点
缩容完成后,您应当从 配置清单 刷新服务
pg-test :
hosts :
10.10.10.11 : { pg_seq: 1, pg_role : primary }
10.10.10.12 : { pg_seq: 2, pg_role : replica }
10.10.10.13 : { pg_seq: 3, pg_role : replica } # <--- 执行后移除此行
vars : { pg_cluster : pg-test }
示例:从三节点集群 pg-test 中缩容一个从库 10.10.10.13
销毁集群 销毁集群需要在集群的所有节点上卸载 PGSQL 模块(针对 <cls>pgsql-rm.yml
bin/pgsql-rm <cls> # 销毁整个 PostgreSQL 集群 <cls>
./pgsql-rm.yml -l <cls> # 直接使用 Ansible 剧本销毁整个 PostgreSQL 集群 <cls>
bin/pgsql-rm pg-test # 例子,销毁 pg-test 集群
销毁 PGSQL 模块后,您可以选择将节点一并从 Pigsty 管理中移除:移除节点
bin/node-rm <cls> # 从 Pigsty 管理中移除 <cls> 分组下的所有节点
./node-rm.yml -l <cls> # 直接使用 Ansible 剧本从 Pigsty 管理中移除 <cls> 分组下的所有节点
bin/node-rm pg-test # 例子,从 Pigsty 管理中移除 pg-test 分组下的所有节点
销毁结束后,建议及时从 配置清单 集群定义
pg-test : # 清理这个集群定义分组
hosts :
10.10.10.11 : { pg_seq: 1, pg_role : primary }
10.10.10.12 : { pg_seq: 2, pg_role : replica }
10.10.10.13 : { pg_seq: 3, pg_role : replica }
vars : { pg_cluster : pg-test }
示例:销毁三节点 PG 集群 pg-test
注意:如果为这个集群配置了 pg_safeguardtrue),pgsql-rm.yml 将中止执行,以避免意外销毁集群。
您可以使用剧本命令行参数明确地覆盖它,以强制执行销毁。
此外默认情况下,集群的备份仓库将同集群一并删除。如果你希望保留备份(例如在使用集中式备份仓库时),可以设置 pg_rm_backup=false
./pgsql-rm.yml -l pg-meta -e pg_safeguard = false # 强制销毁受保护的 pg 集群 pg-meta
./pgsql-rm.yml -l pg-meta -e pg_rm_backup = false # 在销毁集群过程中保留其备份仓库
刷新服务 PostgreSQL 集群通过主机节点上的 HAProxy 服务 扩容 缩容
要在整个集群或特定实例上刷新服务配置(针对 <cls><ip>pgsql.ymlpg_service 子任务):
bin/pgsql-svc <cls> # 刷新整个集群 <cls> 的服务配置
bin/pgsql-svc <cls> <ip...> # 刷新集群 <cls> 中指定实例的服务配置
./pgsql.yml -l <cls> -t pg_service -e pg_reload = true # 刷新整个集群的服务配置
./pgsql.yml -l <ip> -t pg_service -e pg_reload = true # 刷新指定实例的服务配置
bin/pgsql-svc pg-test # 例子,刷新 pg-test 集群的服务配置
bin/pgsql-svc pg-test 10.10.10.13 # 例子,刷新 pg-test 集群中 10.10.10.13 实例的服务配置
备注:如果您使用集中式的专用负载均衡集群(pg_service_provider
示例:刷新集群 pg-test 的服务配置
示例:重载PG服务以踢除一个实例
刷新HBA 当您修改了 HBA 相关配置后,需要刷新 HBA 规则以应用更改。(pg_hba_rulespgb_hba_rules
要在整个集群或特定实例上刷新 PG 和 Pgbouncer 的 HBA 规则(针对 <cls><ip>pgsql.yml
bin/pgsql-hba <cls> # 刷新整个集群 <cls> 的 HBA 规则
bin/pgsql-hba <cls> <ip...> # 刷新集群 <cls> 中指定实例的 HBA 规则
./pgsql.yml -l <cls> -t pg_hba,pg_reload,pgbouncer_hba,pgbouncer_reload -e pg_reload = true # 刷新整个集群
./pgsql.yml -l <ip> -t pg_hba,pg_reload,pgbouncer_hba,pgbouncer_reload -e pg_reload = true # 刷新指定实例
bin/pgsql-hba pg-test # 例子,刷新 pg-test 集群的 HBA 规则
bin/pgsql-hba pg-test 10.10.10.13 # 例子,刷新 pg-test 集群中 10.10.10.13 实例的 HBA 规则
示例:刷新集群 pg-test 的 HBA 规则
配置集群 PostgreSQL 的配置参数由 Patroni 管理,初始参数由 Patroni 配置模板 配置参数 patronictl命令行工具修改。
其余参数(例如,etcd DCS 配置,日志/RestAPI 等配置)则可以通过下面的子任务进行更新。例如,当 etcd
./pgsql.yml -l pg-test -t pg_conf # 更新 Patroni 配置文件
ansible pg-test -b -a 'systemctl reload patroni' # 重载 Patroni 服务
您可以在不同层次上覆盖 Patroni 集中管理的默认,例如单独 为实例指定配置参数 为用户指定配置参数 为数据库指定配置参数
克隆集群 有两种克隆集群的方式:使用 备份集群 时间点恢复 备份仓库
方式 优点 缺点 适用场景 备份集群 配置简单,无需依赖 只能克隆最新状态 灾备,读写分离,迁移 PITR 可恢复到任意时间点 依赖集中式备份仓库 误操作恢复,数据审计
使用备份集群克隆 备份集群(Standby Cluster)通过流复制从上游集群持续同步数据,是克隆集群最简单的方式。
只需在新集群主库上指定 pg_upstream
# pg-test 是原始集群
pg-test :
hosts :
10.10.10.11 : { pg_seq: 1, pg_role : primary }
vars : { pg_cluster : pg-test }
# pg-test2 是 pg-test 的备份集群(克隆)
pg-test2 :
hosts :
10.10.10.12 : { pg_seq: 1, pg_role: primary, pg_upstream : 10.10.10.11 } # 指定上游
10.10.10.13 : { pg_seq: 2, pg_role : replica }
vars : { pg_cluster : pg-test2 }
使用以下命令创建备份集群:
bin/pgsql-add pg-test2 # 创建备份集群,自动从上游 pg-test 克隆数据
./pgsql.yml -l pg-test2 # 直接使用 Ansible 剧本创建备份集群
备份集群会持续追随上游集群,保持数据同步。您可以随时将其 提升 为独立集群:
示例:提升备份集群为独立集群 通过 配置集群 standby_cluster 配置段,即可将备份集群提升为独立集群:
$ pg edit-config pg-test2
-standby_cluster:
- create_replica_methods:
- - basebackup
- host: 10.10.10.11
- port: 5432
Apply these changes? [ y/N] : y
提升后,pg-test2 将成为可以独立承载写入请求的独立集群,与原集群 pg-test 分叉。
示例:更改复制上游 如果上游集群发生主从切换,您可以通过 配置集群
$ pg edit-config pg-test2
standby_cluster:
create_replica_methods:
- basebackup
- host: 10.10.10.11 # <--- 旧的上游
+ host: 10.10.10.14 # <--- 新的上游
port: 5432
Apply these changes? [ y/N] : y
使用 PITR 克隆 时间点恢复 备份仓库
要使用 PITR 克隆集群,在配置中添加 pg_pitr
# 从 pg-meta 集群的备份克隆一个新集群 pg-meta2
pg-meta2 :
hosts : { 10.10.10.12 : { pg_seq: 1, pg_role : primary } }
vars :
pg_cluster : pg-meta2
pg_pitr :
cluster : pg-meta # 从 pg-meta 的备份恢复
time : '2025-01-10 10:00:00+00' # 恢复到指定时间点
使用 pgsql-pitr.yml 剧本执行克隆:
./pgsql-pitr.yml -l pg-meta2 # 从 pg-meta 备份克隆 pg-meta2
# 也可以通过命令行参数指定 PITR 选项
./pgsql-pitr.yml -l pg-meta2 -e '{"pg_pitr": {"cluster": "pg-meta", "time": "2025-01-10 10:00:00+00"}}'
PITR 支持多种恢复目标类型:
目标类型 参数示例 说明 时间点 time: "2025-01-10 10:00:00+00"恢复到指定时间戳 事务ID xid: "250000"恢复到指定事务之前/之后 恢复点 name: "before_migration"恢复到命名恢复点 LSN lsn: "0/4001C80"恢复到指定 WAL 位置 最新 type: "latest"恢复到 WAL 归档末尾
PITR 恢复后处理
恢复后的集群会禁用 archive_mode,以防止意外的 WAL 写入覆盖归档。
如果恢复后的数据库状态正常,您应当启用归档并执行新的全量备份:
psql -c 'ALTER SYSTEM RESET archive_mode; SELECT pg_reload_conf();'
pg-backup full # 执行新的全量备份
更多 PITR 的详细用法,请参考 恢复操作
12.6.2 - 管理 PostgreSQL 业务用户 用户管理:创建、修改、删除用户,管理角色成员关系,连接池用户配置
快速上手 Pigsty 使用声明式管理方式,首先在 配置清单 定义用户 bin/pgsql-user <cls> <username> 创建或修改用户。
pg-meta :
hosts : { 10.10.10.10 : { pg_seq: 1, pg_role : primary } }
vars :
pg_cluster : pg-meta
pg_users : [ { name: dbuser_app, password: 'DBUser.App', pgbouncer : true }] # <--- 在这里定义用户列表!
bin/pgsql-user <cls> <username> # 在 <cls> 集群上创建/修改 <username> 用户
./pgsql-user.yml -l pg-meta -e username = dbuser_app # 直接使用剧本在 <cls> 集群上创建/修改 <username> 用户
bin/pgsql-user pg-meta dbuser_app # 在 pg-meta 集群上创建/修改 dbuser_app 用户
关于用户定义参数的完整参考,请查阅 用户配置 ACL:角色权限
请注意,用户的 name 字段在创建后无法修改。如需更改用户名,请先删除原用户,再创建新用户。
操作 快捷命令 说明 创建用户 bin/pgsql-user <cls> <user>创建新的业务用户或角色 修改用户 bin/pgsql-user <cls> <user>修改已存在用户的属性 删除用户 bin/pgsql-user <cls> <user>安全删除用户(需设置 state: absent)
创建用户 定义在 pg_users集群创建 pg_user 任务中自动创建。
要在现有的 PostgreSQL 集群上创建新的业务用户,请将 用户定义 all.children.<cls>.pg_users,然后执行:
bin/pgsql-user <cls> <username> # 创建用户 <username>
./pgsql-user.yml -l <cls> -e username = <username> # 直接使用 Ansible 剧本创建用户
bin/pgsql-user pg-meta dbuser_app # 例子,在 pg-meta 集群中创建 dbuser_app 用户
示例配置:创建名为 dbuser_app 的业务用户
#all.children.pg-meta.vars.pg_users: # 省略上级缩进
- name : dbuser_app
password : DBUser.App
pgbouncer : true
roles : [ dbrole_readwrite]
comment : application user for myapp
执行效果 :在主库上创建用户 dbuser_app,设置密码,授予 dbrole_readwrite 角色权限,
将用户添加到 Pgbouncer 连接池,在每个实例上重载 Pgbouncer 配置使其立即生效。
建议使用剧本创建用户
如果您需要手工创建用户,那么需要自行确保 Pgbouncer 连接池用户列表同步。
修改用户 修改用户与创建用户使用相同的命令,剧本是幂等的。当目标用户已存在时,Pigsty 会修改目标用户的属性使其符合配置。
bin/pgsql-user <cls> <user> # 修改用户 <user> 的属性
./pgsql-user.yml -l <cls> -e username = <user> # 幂等操作,可重复执行
bin/pgsql-user pg-meta dbuser_app # 修改 dbuser_app 用户的属性使其符合配置
不可修改的属性 :用户的 name(名称)在创建后无法修改,需要先删除再创建。
其他属性均可修改,以下是一些常见的修改示例:
修改密码 :更新配置中的 password 字段后执行剧本。密码修改时会临时禁用日志记录,避免密码泄露到日志中。
- name : dbuser_app
password : NewSecretPassword # 修改密码
修改权限属性 :通过配置相应的布尔标志来修改用户权限。
- name : dbuser_app
superuser : false # 超级用户(谨慎使用!)
createdb : true # 允许创建数据库
createrole : false # 允许创建角色
inherit : true # 自动继承角色权限
replication : false # 允许流复制连接
bypassrls : false # 绕过行级安全策略
connlimit : 50 # 限制连接数,-1 不限制
修改用户有效期 :使用 expire_in 设置相对过期时间(N 天后过期),或 expire_at 设置绝对过期日期。expire_in 优先级更高,每次执行剧本时会重新计算,适合需要定期续期的临时用户。
- name : temp_user
expire_in : 30 # 30 天后过期(相对时间)
- name : contractor_user
expire_at : '2024-12-31' # 指定日期过期(绝对时间)
- name : permanent_user
expire_at : 'infinity' # 永不过期
修改角色成员关系 :通过 roles 数组配置角色成员关系,支持简单格式和扩展格式。角色成员关系是增量操作,不会移除未声明的现有角色。使用 state: absent 可以显式撤销角色。
- name : dbuser_app
roles :
- dbrole_readwrite # 简单形式:授予角色
- { name: dbrole_admin, admin : true } # 带 ADMIN OPTION(可以将此角色授予其他用户)
- { name: pg_monitor, set: false } # PG16+ : 不允许 SET ROLE
- { name: old_role, state : absent } # 撤销角色成员关系
管理用户参数 :通过 parameters 字典配置用户级参数,会生成 ALTER USER ... SET 语句。使用特殊值 DEFAULT 可将参数重置为 PostgreSQL 默认值。
- name : dbuser_analyst
parameters :
work_mem : '256MB'
statement_timeout : '5min'
search_path : 'analytics,public'
log_statement : DEFAULT # 重置为默认值
连接池配置 :设置 pgbouncer: true 将用户添加到连接池,可选配置 pool_mode(池化模式:transaction/session/statement)和 pool_connlimit(用户最大连接数)。
- name : dbuser_app
pgbouncer : true # 添加到连接池
pool_mode : transaction # 池化模式
pool_connlimit : 50 # 用户最大连接数
删除用户 要删除用户,将其 state 设置为 absent 并执行剧本:
bin/pgsql-user <cls> <user> # 删除用户 <user>(需在配置中设置 state: absent)
./pgsql-user.yml -l <cls> -e username = <user> # 直接使用 Ansible 剧本删除用户
bin/pgsql-user pg-meta dbuser_old # 删除 dbuser_old 用户(配置中已设置 state: absent)
配置示例 :
pg_users :
- name : dbuser_old
state : absent
删除操作会 :使用 pg-drop-role 脚本安全删除用户,自动禁用用户登录并终止活跃连接,自动转移数据库/表空间所有权到 postgres,自动处理所有数据库中的对象所有权和权限,撤销所有角色成员关系,创建审计日志,从 Pgbouncer 用户列表中移除并重载配置。
保护机制 :以下系统用户无法删除,会被自动跳过:postgres(超级用户)、replicator(或 pg_replication_usernamedbuser_dba(或 pg_admin_usernamedbuser_monitor(或 pg_monitor_username
安全删除
Pigsty 使用 pg-drop-role 脚本安全删除用户,该脚本会自动处理用户拥有的数据库、表空间、Schema、表等对象,自动终止用户的活跃连接,将对象所有权转移给 postgres 用户,并在 /tmp/pg_drop_role_<user>_<timestamp>.log 创建审计日志。无需手动处理依赖对象。
手工删除用户 如果需要手动删除用户,可以直接使用 pg-drop-role 脚本:
# 检查依赖关系(只读操作)
pg-drop-role dbuser_old --check
# 预览删除操作(不实际执行)
pg-drop-role dbuser_old --dry-run -v
# 删除用户,转移对象给 postgres
pg-drop-role dbuser_old
# 强制删除(终止活跃连接)
pg-drop-role dbuser_old --force
# 删除用户,转移对象给指定用户
pg-drop-role dbuser_old dbuser_new
常见用例 下面是一些常见的用户配置示例:
创建基本业务用户
- name : dbuser_app
password : DBUser.App
pgbouncer : true
roles : [ dbrole_readwrite]
comment : application user
创建只读用户
- name : dbuser_readonly
password : DBUser.Readonly
pgbouncer : true
roles : [ dbrole_readonly]
创建管理员用户(可执行 DDL)
- name : dbuser_admin
password : DBUser.Admin
pgbouncer : true
pool_mode : session
roles : [ dbrole_admin]
parameters :
log_statement : 'all'
创建临时用户(30天后过期)
- name : temp_contractor
password : TempPassword
expire_in : 30
roles : [ dbrole_readonly]
创建角色(不可登录,用于权限分组)
- name : custom_role
login : false
comment : custom role for special permissions
创建带高级角色选项的用户(PG16+)
- name : dbuser_special
password : DBUser.Special
pgbouncer : true
roles :
- dbrole_readwrite
- { name: dbrole_admin, admin : true }
- { name: pg_monitor, set : false }
- { name: pg_execute_server_program, inherit : false }
查询用户 以下是一些常用的 SQL 查询,用于查看用户信息:
查看所有用户
SELECT rolname , rolsuper , rolinherit , rolcreaterole , rolcreatedb ,
rolcanlogin , rolreplication , rolbypassrls , rolconnlimit , rolvaliduntil
FROM pg_roles WHERE rolname NOT LIKE 'pg_%' ORDER BY rolname ;
查看用户的角色成员关系
SELECT r . rolname AS member , g . rolname AS role , m . admin_option , m . set_option , m . inherit_option
FROM pg_auth_members m
JOIN pg_roles r ON r . oid = m . member
JOIN pg_roles g ON g . oid = m . roleid
WHERE r . rolname = 'dbuser_app' ;
查看用户级参数设置
SELECT rolname , setconfig FROM pg_db_role_setting s
JOIN pg_roles r ON r . oid = s . setrole WHERE s . setdatabase = 0 ;
查看即将过期的用户
SELECT rolname , rolvaliduntil , rolvaliduntil - CURRENT_TIMESTAMP AS time_remaining
FROM pg_roles WHERE rolvaliduntil IS NOT NULL
AND rolvaliduntil < CURRENT_TIMESTAMP + INTERVAL '30 days'
ORDER BY rolvaliduntil ;
连接池管理 在用户定义中配置的 连接池参数
设置 pgbouncer: true 的用户会被添加到 /etc/pgbouncer/userlist.txt 文件中。用户级别的连接池参数(pool_mode、pool_connlimit)通过 /etc/pgbouncer/useropts.txt 文件配置。
您可以使用 postgres 操作系统用户,使用 pgb 别名访问 Pgbouncer 管理数据库。更多连接池管理操作,请参考 Pgbouncer 管理
管理默认用户密码 要修改普通用户的密码, 按照上面 修改用户 password 字段并执行剧本即可。
不过修改 默认用户 的密码会稍微复杂一些,因为它们的密码还在多个地方被其他服务引用。
要修改 pg_admin_password
# Step 1: 修改配置文件中的密码 pg_admin_password 后(重要!),通过剧本批量修改密码
./pgsql-user.yml -e username = dbuser_dba -e '{"pg_users":[{"name":"dbuser_dba","password":"NewPass123"}]}'
# Step 2: 更新所有 PG 节点的 patroni 配置文件与 .pgpass,然后重载 patroni 配置
./pgsql.yml -t pg_conf,pg_pass,patroni_reload -e pg_reload = true
# Step 3: 刷新 /infra/env/.pgpass 以及 /infra/conf/pg_service.conf 对管理员密码的引用
./infra.yml -t env_pgpass,env_pg_service
要修改 pg_monitor_password
# Step 1: 修改配置文件中的密码 pg_monitor_password 后(重要!),通过剧本批量修改密码
./pgsql-user.yml -e username = dbuser_monitor -e '{"pg_users":[{"name":"dbuser_monitor","password":"NewPass123"}]}'
# Step 2: 更新所有 PG 节点的 patroni 配置文件与 .pgpass,然后重载 patroni 配置
./pgsql.yml -t pg_conf,pg_pass,patroni_reload -e pg_reload = true
# Step 3: 刷新 pg_exporter 与 pgbouncer_exporter 配置里面使用的密码,更新 Grafana 监控面板中数据源使用的密码
./pgsql.yml -t pg_exporter,pgbouncer_exporter,add_ds
要修改 pg_replication_password
# Step 1: 修改配置文件中的密码 pg_replication_password 后(重要!),通过剧本批量修改密码
./pgsql-user.yml -e username = replicator -e '{"pg_users":[{"name":"replicator","password":"NewPass123"}]}'
# Step 2: 更新所有 PG 节点的 patorni 配置文件与 .pgpass,然后重载 patroni 配置
./pgsql.yml -t pg_conf,pg_pass,patroni_reload -e pg_reload = true
# Step 3: 更新 Infra 节点的 .pgpass
./infra.yml -t env_pgpass
此外,Patroni 本身 RestAPI 的密码 patroni_password
# Step 1: 刷新 patroni 配置文件里面配置的密码,并重载 patroni 配置应用生效
./pgsql.yml -t pg_conf,patroni_reload -e pg_reload = true
# Step 2: 刷新 /infra/conf/patronictl.yml 对 patroni 密码的引用
./infra.yml -t env_patroni
修改前三个密码前,需先用 SQL 修改对应 PostgreSQL 用户的密码:ALTER USER <username> PASSWORD '<new_password>';
12.6.3 - 管理 PostgreSQL 业务数据库 数据库管理:创建、修改、删除、重建数据库,使用模板克隆数据库
快速上手 Pigsty 使用声明式管理方式,首先在 配置清单 定义数据库 bin/pgsql-db <cls> <dbname> 创建或修改数据库。
pg-meta :
hosts : { 10.10.10.10 : { pg_seq: 1, pg_role : primary } }
vars :
pg_cluster : pg-meta
pg_databases : [ { name : some_db }] # <--- 在这里定义数据库列表!
bin/pgsql-db <cls> <dbname> # 在 <cls> 集群上创建/修改 <dbname> 数据库
./pgsql-db.yml -l pg-meta -e dbname = some_db # 直接使用剧本在 <cls> 集群上创建/修改 <dbname> 数据库
bin/pgsql-db pg-meta some_db # 在 pg-meta 集群上创建/修改 some_db 数据库
关于数据库定义参数的完整参考,请查阅 数据库配置 ACL:数据库权限
请注意,部分数据库参数仅能在 创建时 指定。修改这些参数需要先删除再创建数据库(使用 state: recreate 重建数据库)。
操作 快捷命令 说明 创建数据库 bin/pgsql-db <cls> <db>创建新的业务数据库 修改数据库 bin/pgsql-db <cls> <db>修改已存在数据库的属性 删除数据库 bin/pgsql-db <cls> <db>删除数据库(需设置 state: absent) 重建数据库 bin/pgsql-db <cls> <db>先删再建(需设置 state: recreate) 克隆数据库 bin/pgsql-db <cls> <db>使用模板克隆数据库
创建数据库 定义在 pg_databases集群创建 pg_db 任务中自动创建。
要在现有的 PostgreSQL 集群上创建新的业务数据库,请将 数据库定义 all.children.<cls>.pg_databases,然后执行:
bin/pgsql-db <cls> <dbname> # 创建数据库 <dbname>
./pgsql-db.yml -l <cls> -e dbname = <dbname> # 直接使用 Ansible 剧本创建数据库
bin/pgsql-db pg-meta myapp # 例子,在 pg-meta 集群中创建 myapp 数据库
示例配置:创建名为 myapp 的业务数据库
#all.children.pg-meta.vars.pg_databases: # 省略上级缩进
- name : myapp
owner : dbuser_myapp
schemas : [ app]
extensions :
- { name : pg_trgm }
- { name : btree_gin }
comment : my application database
执行效果 :在主库上创建数据库 myapp,设置数据库所有者为 dbuser_myapp,创建 schema app,
启用扩展 pg_trgm 和 btree_gin,数据库将默认添加到 Pgbouncer 连接池,并注册为 Grafana PG 数据源。
建议使用剧本创建数据库
如果您需要手工创建数据库,那么需要自行确保 pgbouncer 连接池 / grafana 数据源同步。
修改数据库 修改数据库与创建数据库使用相同的命令,在没有定义 baseline SQL 的情况下剧本是幂等的。
当目标数据库已存在时,Pigsty 会修改目标数据库的属性使其符合配置。然而,一些属性只能在数据库创建时设置。
bin/pgsql-db <cls> <db> # 修改数据库 <db> 的属性
./pgsql-db.yml -l <cls> -e dbname = <db> # 幂等操作,可重复执行
bin/pgsql-db pg-meta myapp # 修改 myapp 数据库的属性使其符合配置
不可修改的属性 :以下属性在数据库创建后无法修改,需要使用 state: recreate 重建数据库:
name(数据库名称)、template(模板数据库)、strategy(克隆策略)。encoding(字符编码)、locale/lc_collate/lc_ctype(本地化设置)、locale_provider/icu_locale/icu_rules/builtin_locale(本地化提供者设置)其他属性均可修改,以下是一些常见的修改示例:
修改属主 :更新配置中的 owner 字段后执行剧本,会执行 ALTER DATABASE ... OWNER TO 并授予相应权限。
- name : myapp
owner : dbuser_new_owner # 修改为新属主
修改连接限制 :通过 connlimit 限制数据库的最大连接数。
- name : myapp
connlimit : 100 # 限制最大 100 个连接
回收公共连接权限 :设置 revokeconn: true 会回收 PUBLIC 的 CONNECT 权限,仅允许属主、DBA、监控用户和复制用户连接。
- name : myapp
owner : dbuser_myapp
revokeconn : true # 回收 PUBLIC 的 CONNECT 权限
管理数据库参数 :通过 parameters 字典配置数据库级参数,会生成 ALTER DATABASE ... SET 语句。使用特殊值 DEFAULT 可将参数重置为默认值。
- name : myapp
parameters :
work_mem : '256MB'
maintenance_work_mem : '512MB'
statement_timeout : '30s'
search_path : DEFAULT # 重置为默认值
管理模式(Schema) :通过 schemas 数组配置模式,支持简单格式和指定属主的完整格式。使用 state: absent 删除模式(CASCADE)。
- name : myapp
schemas :
- app # 简单形式
- { name: core, owner : dbuser_myapp } # 指定属主
- { name: deprecated, state : absent } # 删除模式
管理扩展(Extension) :通过 extensions 数组配置扩展,支持简单格式和指定 schema/版本的完整格式。使用 state: absent 卸载扩展(CASCADE)。
- name : myapp
extensions :
- postgis # 简单形式
- { name: vector, schema : public } # 指定 schema
- { name: pg_trgm, state : absent } # 卸载扩展
CASCADE 警告
删除模式或卸载扩展使用 CASCADE 选项,会同时删除依赖该模式/扩展的所有对象。请确保理解影响范围后再执行删除操作。
连接池配置 :默认情况下所有业务数据库都会添加到 Pgbouncer 连接池。可配置 pgbouncer(是否加入连接池)、pool_mode(池化模式)、pool_size(默认池大小)、pool_reserve(保留连接数)、pool_size_min(最小池大小)、pool_connlimit(最大数据库连接)、pool_auth_user(认证查询用户)等参数。
- name : myapp
pgbouncer : true # 是否加入连接池(默认 true)
pool_mode : transaction # 池化模式:transaction/session/statement
pool_size : 64 # 默认池大小
pool_reserve : 32 # 保留池大小
pool_size_min : 0 # 最小池大小
pool_connlimit : 100 # 最大数据库连接
pool_auth_user : dbuser_meta # 认证查询使用用户(配合 pgbouncer_auth_query)
自 Pigsty v4.1.0 起,数据库连接池参数统一使用 pool_reserve 与 pool_connlimit,旧别名 pool_size_reserve / pool_max_db_conn 已收敛。
删除数据库 要删除数据库,将其 state 设置为 absent 并执行剧本:
bin/pgsql-db <cls> <db> # 删除数据库 <db>(需在配置中设置 state: absent)
./pgsql-db.yml -l <cls> -e dbname = <db> # 直接使用 Ansible 剧本删除数据库
bin/pgsql-db pg-meta olddb # 删除 olddb 数据库(配置中已设置 state: absent)
配置示例 :
pg_databases :
- name : olddb
state : absent
删除操作会 :如果数据库标记为 is_template: true,先执行 ALTER DATABASE ... IS_TEMPLATE false;使用 DROP DATABASE ... WITH (FORCE) 强制删除数据库(PG13+)并终止所有活动连接;从 Pgbouncer 连接池中移除该数据库;从 Grafana 数据源中取消注册。
保护机制 :系统数据库 postgres、template0、template1 无法删除。删除操作仅在主库上执行,流复制会自动同步到从库。
危险操作警告
删除数据库是不可逆 操作,会永久删除该数据库中的所有数据。执行前请确保:已有最新的数据库备份、已确认没有业务在使用该数据库、已通知相关干系人。
Pigsty 不对任何因删除数据库导致的数据丢失承担责任,使用需自担风险。
重建数据库 recreate 状态用于重建数据库,等效于先删除再创建:
bin/pgsql-db <cls> <db> # 重建数据库 <db>(需在配置中设置 state: recreate)
./pgsql-db.yml -l <cls> -e dbname = <db> # 直接使用 Ansible 剧本重建数据库
bin/pgsql-db pg-meta testdb # 重建 testdb 数据库(配置中已设置 state: recreate)
配置示例 :
pg_databases :
- name : testdb
state : recreate
owner : dbuser_test
baseline : test_init.sql # 重建后执行初始化
适用场景 :测试环境重置、清空开发数据库、修改不可变属性(编码、本地化等)、恢复数据库到初始状态。
与手动 DROP + CREATE 的区别 :单条命令完成,无需两次操作;自动保留 Pgbouncer 和 Grafana 配置;执行后自动加载 baseline 初始化脚本。
克隆数据库 你可以通过 PG 的 template 机制复制一个 PostgreSQL 数据库,在克隆期间,不允许有任何连接到模版数据库的活动连接。
bin/pgsql-db <cls> <db> # 克隆数据库 <db>(需在配置中指定 template)
./pgsql-db.yml -l <cls> -e dbname = <db> # 直接使用 Ansible 剧本克隆数据库
bin/pgsql-db pg-meta meta_dev # 克隆创建 meta_dev 数据库(配置中已指定 template: meta)
配置示例 :
pg_databases :
- name : meta # 源数据库
- name : meta_dev
template : meta # 以 meta 作为模板
strategy : FILE_COPY # PG15+ 克隆策略,PG18 瞬间生效
瞬间克隆(PG18+) :如果使用 PostgreSQL 18 以上版本,Pigsty 默认设置了 file_copy_methodstrategy: FILE_COPY 可以在约 200ms 内完成数据库克隆,而不需要复制数据文件。例如克隆一个 30 GB 的数据库,普通克隆用时 18 秒,瞬间克隆仅需 200 毫秒。
手动克隆 :确保清理掉所有连接到模版数据库的连接后执行:
SELECT pg_terminate_backend ( pid ) FROM pg_stat_activity WHERE datname = 'meta' ;
CREATE DATABASE meta_dev TEMPLATE meta STRATEGY FILE_COPY ;
局限性与注意事项 :瞬间克隆仅在支持的文件系统上可用(xfs,brtfs,zfs,apfs);不要使用 postgres 数据库作为模版数据库进行克隆;在高并发环境中使用瞬间克隆需要谨慎,需在克隆窗口(200ms)内清理掉所有连接到模版数据库的连接。
连接池管理 在数据库定义中配置的 连接池参数
默认情况下所有业务数据库都会添加到 Pgbouncer 连接池(pgbouncer: true)。数据库会被添加到 /etc/pgbouncer/database.txt 文件中,数据库级别的连接池参数(pool_auth_user、pool_mode、pool_size、pool_reserve、pool_size_min、pool_connlimit)通过此文件配置。
您可以使用 postgres 操作系统用户,使用 pgb 别名访问 Pgbouncer 管理数据库。更多连接池管理操作,请参考 Pgbouncer 管理
12.6.4 - 管理 Patroni 高可用 使用 Patroni 管理 PG 集群高可用,包括,修改参数,查看状态,主从切换,重启,重做从库等操作。
概览 Pigsty 使用 Patroni 管理 PostgreSQL 集群,它可以用来修改集群配置,查看集群状态,执行主从切换,重启集群,重做从库等操作。
要使用 Patroni 进行管理,您需要有以下两种身份之一:
Patroni 提供了 patronictlpg 来简化其操作。
通过 pg 别名使用 patronictl pg ()
{
local patroni_conf = "/infra/conf/patronictl.yml" ;
if [ ! -r ${ patroni_conf } ] ; then
patroni_conf = "/etc/patroni/patroni.yml" ;
if [ ! -r ${ patroni_conf } ] ; then
echo "error: patronictl config not found" ;
return 1;
fi ;
fi ;
patronictl -c ${ patroni_conf } " $@ "
}
可用命令 修改配置 使用 edit-configttl、loop_wait、synchronous_mode 等),以及 postgresql.parameters 中的 PostgreSQL 参数。
pg edit-config <cls> # 交互式编辑集群配置
pg edit-config <cls> --force # 跳过确认提示直接应用
pg edit-config <cls> -p <k>= <v> # 修改 PostgreSQL 参数(--pg 简写)
pg edit-config <cls> -s <k>= <v> # 修改 Patroni 参数(--set 简写)
以下是一些常见的配置修改示例:
# 修改 PostgreSQL 参数:慢查询阈值(会询问是否应用)
pg edit-config pg-test -p log_min_duration_statement = 1000
# 修改 PostgreSQL 参数并跳过确认
pg edit-config pg-test -p log_min_duration_statement = 1000 --force
# 修改多个 PostgreSQL 参数
pg edit-config pg-test -p work_mem = 256MB -p maintenance_work_mem = 1GB --force
# 修改 Patroni 参数:增大故障检测时间窗口(增大 RTO)
pg edit-config pg-test -s loop_wait = 15 -s ttl = 60 --force
# 修改 Patroni 参数:启用同步复制模式
pg edit-config pg-test -s synchronous_mode = true --force
# 修改 Patroni 参数:启用严格同步模式(至少一个同步从库才允许写入)
pg edit-config pg-test -s synchronous_mode_strict = true --force
# 修改需要重启的参数(修改后需执行 pg restart)
pg edit-config pg-test -p shared_buffers = 4GB --force
pg edit-config pg-test -p shared_preload_libraries = 'timescaledb, pg_stat_statements' --force
pg edit-config pg-test -p max_connections = 200 --force
部分参数修改后需要重启 PostgreSQL 才能生效,您可以使用 pg list 检查集群状态,带 * 标记的实例表示需要重启。然后使用 pg restart 命令重启集群使配置生效。
您也可以使用 curl 或编写程序直接调用 Patroni 提供的 REST API
# 查看当前配置
curl -s 10.10.10.11:8008/config | jq .
# 通过 API 修改参数(需要认证)
curl -u 'postgres:Patroni.API' \
-d '{"postgresql":{"parameters": {"log_min_duration_statement":200}}}' \
-s -X PATCH http://10.10.10.11:8008/config | jq .
查看状态 使用 list
pg list <cls> # 查看指定集群的状态
pg list # 列出所有集群(需要在管理节点上执行)
pg list <cls> -e # 显示扩展信息(--extended)
pg list <cls> -t # 显示时间戳(--timestamp)
pg list <cls> -f json # 以 JSON 格式输出(--format)
pg list <cls> -W 5 # 每 5 秒刷新一次(--watch)
输出示例:
+ Cluster: pg-test (7322261897169354773) -----+----+--------------+
| Member | Host | Role | State | TL | Lag in MB |
+-----------+-------------+---------+---------+----+--------------+
| pg-test-1 | 10.10.10.11 | Leader | running | 1 | |
| pg-test-2 | 10.10.10.12 | Replica | running | 1 | 0 |
| pg-test-3 | 10.10.10.13 | Replica | running | 1 | 0 |
+-----------+-------------+---------+---------+----+--------------+
输出列说明:Member 是实例名称,由 pg_cluster-pg_seq 组成;Host 是实例所在主机的 IP 地址;Role 表示角色,包括 Leader(主库)、Replica(从库)、Sync Standby(同步从库)、Standby Leader(级联复制的级联主库)等;State 表示运行状态,常见值包括 running(正常运行)、streaming(流复制中)、in archive recovery(归档恢复中)、starting(启动中)、stopped(已停止)等;TL 是时间线编号(Timeline),每次主从切换后会递增;Lag in MB 是复制延迟,以 MB 为单位,主库不显示此值。
如果某个实例需要重启才能应用配置更改,实例名称后会显示 * 标记:
+ Cluster: pg-test (7322261897169354773) -------+----+--------------+
| Member | Host | Role | State | TL | Lag in MB |
+-------------+-------------+---------+---------+----+--------------+
| pg-test-1 * | 10.10.10.11 | Leader | running | 1 | |
| pg-test-2 * | 10.10.10.12 | Replica | running | 1 | 0 |
+-------------+-------------+---------+---------+----+--------------+
主动切换 使用 switchover
pg switchover <cls> # 交互式切换,会提示选择目标从库
pg switchover <cls> --leader <old> # 指定当前主库名称
pg switchover <cls> --candidate <new> # 指定目标从库名称
pg switchover <cls> --scheduled <time> # 定时切换,格式如 2024-12-01T03:00
pg switchover <cls> --force # 跳过确认提示
执行切换前请确保所有从库复制状态正常(状态为 running 或 streaming),复制延迟在可接受范围内,并已通知相关业务方。
# 交互式切换(推荐,会显示当前拓扑并提示选择)
$ pg switchover pg-test
Current cluster topology
+ Cluster: pg-test ( 7322261897169354773) -----+----+--------------+
| Member | Host | Role | State | TL | Lag in MB |
+-----------+-------------+---------+---------+----+--------------+
| pg-test-1 | 10.10.10.11 | Leader | running | 1 | |
| pg-test-2 | 10.10.10.12 | Replica | running | 1 | 0 |
| pg-test-3 | 10.10.10.13 | Replica | running | 1 | 0 |
+-----------+-------------+---------+---------+----+--------------+
Primary [ pg-test-1] :
Candidate [ 'pg-test-2' , 'pg-test-3' ] [] : pg-test-2
When should the switchover take place ( e.g. 2024-01-01T12:00) [ now] :
Are you sure you want to switchover cluster pg-test, demoting current leader pg-test-1? [ y/N] : y
# 非交互式切换(指定主库和候选从库)
pg switchover pg-test --leader pg-test-1 --candidate pg-test-2 --force
# 定时切换(在凌晨 3 点执行,适合维护窗口)
pg switchover pg-test --leader pg-test-1 --candidate pg-test-2 --scheduled "2024-12-01T03:00"
切换完成后,请使用 pg list 确认新的集群拓扑。
故障切换 使用 failoverswitchover 不同,failover 用于主库已经不可用的紧急情况。它会直接提升一个从库为新主库,而不等待原主库的确认。由于从库可能尚未完全同步所有数据,使用 failover 可能会导致少量数据丢失。因此,在非紧急情况下请优先使用 switchover。
pg failover <cls> # 交互式故障切换
pg failover <cls> --leader <old> # 指定原主库(用于验证,可选)
pg failover <cls> --candidate <new> # 指定要提升的从库
pg failover <cls> --force # 跳过确认提示
故障切换示例:
# 交互式故障切换
$ pg failover pg-test
Candidate [ 'pg-test-2' , 'pg-test-3' ] [] : pg-test-2
Are you sure you want to failover cluster pg-test? [ y/N] : y
Successfully failed over to "pg-test-2"
# 非交互式故障切换(紧急情况快速执行)
pg failover pg-test --candidate pg-test-2 --force
# 指定原主库进行验证(如果原主库名称不匹配会报错)
pg failover pg-test --leader pg-test-1 --candidate pg-test-2 --force
Switchover 与 Failover 的区别 :Switchover 用于计划内维护,要求原主库在线,执行前会确保数据完全同步,不会丢失数据;Failover 用于紧急故障恢复,原主库可以离线,会直接提升从库,可能丢失未同步的数据。日常维护、升级请使用 Switchover;只有在主库彻底故障无法恢复时才使用 Failover。
重启实例 使用 restart
pg restart <cls> # 重启整个集群的所有实例
pg restart <cls> <member> # 重启指定实例
pg restart <cls> --role leader # 仅重启主库
pg restart <cls> --role replica # 仅重启所有从库
pg restart <cls> --pending # 仅重启标记为需要重启的实例
pg restart <cls> --scheduled <time> # 定时重启
pg restart <cls> --timeout <sec> # 设置重启超时时间(秒)
pg restart <cls> --force # 跳过确认提示
当您修改了需要重启才能生效的参数(如 shared_buffers、shared_preload_libraries、max_connections、max_worker_processes 等)后,需要使用此命令重启实例。
# 查看哪些实例需要重启(名称后带 * 标记)
$ pg list pg-test
+ Cluster: pg-test ( 7322261897169354773) -------+----+--------------+
| Member | Host | Role | State | TL | Lag in MB |
+-------------+-------------+---------+---------+----+--------------+
| pg-test-1 * | 10.10.10.11 | Leader | running | 1 | |
| pg-test-2 * | 10.10.10.12 | Replica | running | 1 | 0 |
+-------------+-------------+---------+---------+----+--------------+
# 重启单个从库实例
pg restart pg-test pg-test-2
# 重启整个集群(滚动重启,先从库后主库)
pg restart pg-test --force
# 仅重启需要重启的实例
pg restart pg-test --pending --force
# 仅重启所有从库
pg restart pg-test --role replica --force
# 定时重启(在维护窗口执行)
pg restart pg-test --scheduled "2024-12-01T03:00"
# 设置重启超时时间为 300 秒
pg restart pg-test --timeout 300 --force
重载配置 使用 reloadpg_reload_conf())。相比 restart,reload 更加轻量,不会中断数据库连接和正在执行的查询。
pg reload <cls> # 重载整个集群的配置
pg reload <cls> <member> # 重载指定实例的配置
pg reload <cls> --role leader # 仅重载主库
pg reload <cls> --role replica # 仅重载所有从库
pg reload <cls> --force # 跳过确认提示
大多数 PostgreSQL 参数可以通过 reload 生效,只有少数参数(位于 postmaster 上下文的参数,例如 shared_buffers、max_connections、shared_preload_libraries,archive_mode 等)需要重启 PostgreSQL 才能生效。
# 重载整个集群
pg reload pg-test
# 重载单个实例
pg reload pg-test pg-test-1
# 强制重载,跳过确认
pg reload pg-test --force
重做从库 使用 reinitpg_basebackup 进行完整的数据复制。适用于从库数据损坏无法修复、从库落后太多导致 WAL 已被清理无法追赶、或从库配置错误需要重置等场景。
pg reinit <cls> <member> # 重新初始化指定从库
pg reinit <cls> <member> --force # 跳过确认提示
pg reinit <cls> <member> --wait # 等待重建完成后再返回
⚠️ 警告 :此操作会删除目标实例的所有数据!只能对从库执行,不能对主库执行。
# 重新初始化从库(会提示确认)
$ pg reinit pg-test pg-test-2
Are you sure you want to reinitialize members pg-test-2? [ y/N] : y
Success: reinitialize for member pg-test-2
# 强制重新初始化,跳过确认
pg reinit pg-test pg-test-2 --force
# 重新初始化并等待完成
pg reinit pg-test pg-test-2 --force --wait
重建过程中,可以使用 pg list 查看进度。从库状态会显示为 creating replica:
+ Cluster: pg-test (7322261897169354773) --------------+----+------+
| Member | Host | Role | State | TL | Lag |
+-----------+-------------+---------+------------------+----+------+
| pg-test-1 | 10.10.10.11 | Leader | running | 2 | |
| pg-test-2 | 10.10.10.12 | Replica | creating replica | | ? |
+-----------+-------------+---------+------------------+----+------+
暂停自动切换 使用 pause
pg pause <cls> # 暂停自动故障转移
pg pause <cls> --wait # 暂停并等待所有成员确认
⚠️ 警告 :暂停期间如果主库故障,集群将不会自动恢复!请确保在维护完成后及时使用 resume 恢复。
# 暂停自动切换
$ pg pause pg-test
Success: cluster management is paused
# 查看集群状态(底部会显示 Maintenance mode: on)
$ pg list pg-test
+ Cluster: pg-test ( 7322261897169354773) -----+----+--------------+
| Member | Host | Role | State | TL | Lag in MB |
+-----------+-------------+---------+---------+----+--------------+
| pg-test-1 | 10.10.10.11 | Leader | running | 1 | |
| pg-test-2 | 10.10.10.12 | Replica | running | 1 | 0 |
+-----------+-------------+---------+---------+----+--------------+
Maintenance mode: on
恢复自动切换 使用 resume
pg resume <cls> # 恢复自动故障转移
pg resume <cls> --wait # 恢复并等待所有成员确认
# 恢复自动切换
$ pg resume pg-test
Success: cluster management is resumed
# 确认已恢复(Maintenance mode 提示消失)
$ pg list pg-test
查看历史 使用 history
pg history <cls> # 显示故障转移历史
pg history <cls> -f json # 以 JSON 格式输出
pg history <cls> -f yaml # 以 YAML 格式输出
$ pg history pg-test
+----+-----------+------------------------------+---------------------------+
| TL | LSN | Reason | Timestamp |
+----+-----------+------------------------------+---------------------------+
| 1 | 0/5000060 | no recovery target specified | 2024-01-15T10:30:00+08:00 |
| 2 | 0/6000000 | switchover to pg-test-2 | 2024-01-20T14:00:00+08:00 |
| 3 | 0/7000028 | failover to pg-test-1 | 2024-01-25T09:15:00+08:00 |
+----+-----------+------------------------------+---------------------------+
输出列说明:TL 是时间线编号(Timeline),每次切换后递增,用于区分不同的主库历史;LSN 是切换时的日志序列号(Log Sequence Number),标识切换发生时的 WAL 位置;Reason 是切换原因,可能是 switchover to xxx(手动切换)、failover to xxx(故障转移)或 no recovery target specified(初始化);Timestamp 是切换发生的时间戳。
显示配置 使用 show-configedit-config 命令。
pg show-config <cls> # 显示集群配置
$ pg show-config pg-test
loop_wait: 10
maximum_lag_on_failover: 1048576
postgresql:
parameters:
archive_command: pgbackrest --stanza= pg-test archive-push %p
max_connections: 100
shared_buffers: 256MB
log_min_duration_statement: 1000
use_pg_rewind: true
use_slots: true
retry_timeout: 10
ttl: 30
synchronous_mode: false
执行查询 使用 querypsql 或应用程序连接。
pg query <cls> -c "<sql>" # 在主库上执行查询
pg query <cls> -c "<sql>" -m <member> # 在指定实例上执行(--member)
pg query <cls> -c "<sql>" -r leader # 在主库上执行(--role)
pg query <cls> -c "<sql>" -r replica # 在所有从库上执行
pg query <cls> -f <file> # 从文件读取 SQL 执行
pg query <cls> -c "<sql>" -U <user> # 指定用户名(--username)
pg query <cls> -c "<sql>" -d <db> # 指定数据库(--dbname)
pg query <cls> -c "<sql>" --format json # 以 JSON 格式输出
# 查看主库当前连接数
pg query pg-test -c "SELECT count(*) FROM pg_stat_activity"
# 查看 PostgreSQL 版本
pg query pg-test -c "SELECT version()"
# 在所有从库上查看复制状态
pg query pg-test -c "SELECT pg_is_in_recovery(), pg_last_wal_replay_lsn()" -r replica
# 在指定实例上执行
pg query pg-test -c "SELECT pg_is_in_recovery()" -m pg-test-2
# 使用指定用户和数据库
pg query pg-test -c "SELECT current_user, current_database()" -U postgres -d postgres
# 以 JSON 格式输出结果
pg query pg-test -c "SELECT * FROM pg_stat_replication" --format json
查看拓扑 使用 topologylist 相比,topology 更直观地展示了主从复制关系,特别适合级联复制(Cascading Replication)场景。
pg topology <cls> # 显示复制拓扑
$ pg topology pg-test
+ Cluster: pg-test ( 7322261897169354773) -------+----+--------------+
| Member | Host | Role | State | TL | Lag in MB |
+-------------+-------------+---------+---------+----+--------------+
| pg-test-1 | 10.10.10.11 | Leader | running | 1 | |
| + pg-test-2 | 10.10.10.12 | Replica | running | 1 | 0 |
| + pg-test-3 | 10.10.10.13 | Replica | running | 1 | 0 |
+-------------+-------------+---------+---------+----+--------------+
在级联复制场景中,拓扑图会清晰展示复制链路层级,例如 pg-test-3 从 pg-test-2 复制,而 pg-test-2 从主库 pg-test-1 复制。
查看版本 使用 version
pg version # 显示 patronictl 版本
$ pg version
patronictl version 4.1.0
移除成员 使用 remove
pg remove <cls> # 从 DCS 中移除整个集群的元数据
通常情况下您不需要使用此命令。如需正确移除集群或实例,请使用 Pigsty 提供的 bin/pgsql-rmpgsql-rm.ymlremove:DCS 中存在孤立的元数据需要清理(例如节点已物理移除但元数据残留),或集群已通过其他方式销毁需要清理残留信息。
# 移除整个集群的元数据(需要多次确认)
$ pg remove pg-test
Please confirm the cluster name to remove: pg-test
You are about to remove all information in DCS for pg-test, please type: "Yes I am aware" : Yes I am aware
12.6.5 - Pgbouncer 连接池管理 使用 Pgbouncer 管理连接池,包括暂停、恢复、禁用、启用、重连、终止、重载等操作。
概览 Pigsty 使用 Pgbouncer 6432 端口,代理访问本机 5432 端口上的 PostgreSQL 实例。
这是一个 可选组件 ,如果您并没有海量链接,也不需要事务池化与查询监控指标,可以关闭连接池,直连数据库,或者保留但不使用。
用户与数据库管理 Pgbouncer 中的用户和数据库由 Pigsty 自动管理,并在 创建数据库 创建用户 数据库配置 用户配置
数据库管理 :在 pg_databasespgbouncer: false
pg_databases :
- name : mydb # 默认加入连接池
pool_auth_user : dbuser_meta # 可选,认证查询用户(配合 pgbouncer_auth_query)
pool_mode : transaction # 数据库级池化模式
pool_size : 64 # 默认池大小
pool_reserve : 32 # 保留池大小
pool_size_min : 0 # 最小池大小
pool_connlimit : 100 # 最大数据库连接数
- name : internal
pgbouncer : false # 不加入连接池
用户管理 :在 pg_userspgbouncer: true
pg_users :
- name : dbuser_app
password : DBUser.App
pgbouncer : true # 加入连接池用户列表
pool_mode : transaction # 用户级池化模式
pool_connlimit : 50 # 用户级最大连接数
自 Pigsty v4.1.0 起,数据库连接池参数统一使用 pool_reserve 与 pool_connlimit,旧别名 pool_size_reserve / pool_max_db_conn 已收敛。
服务管理 在 Pigsty 中,PostgreSQL 集群的 Primary 服务 pg_servicespg_default_service_destpostgres。
配置管理 Pgbouncer 的配置文件位于 /etc/pgbouncer/ 目录,由 Pigsty 统一生成与管理:
文件 说明 pgbouncer.ini主配置文件,连接池级别参数 database.txt数据库列表,数据库级别参数 userlist.txt用户密码列表 useropts.txt用户级别的连接池参数 pgb_hba.confHBA 访问控制规则
Pigsty 会自动管理 database.txt 和 userlist.txt,在 创建数据库 创建用户
您也可以手动编辑配置文件后执行 RELOAD 使其生效:
# 编辑配置
$ vim /etc/pgbouncer/pgbouncer.ini
# 重载生效:通过 systemctl
$ sudo systemctl reload pgbouncer
# 重载生效,本身是 pg_dbsu / postgres 用户
$ pgb -c "RELOAD;"
连接池管理 Pgbouncer 使用和 PostgreSQL 相同的 dbsu 运行,默认为 postgres 操作系统用户。Pigsty 提供了快捷命令 pgb 来简化管理操作:
alias pgb = "psql -p 6432 -d pgbouncer -U postgres"
您可以在数据库节点上使用 pgb 命令连接到 Pgbouncer 管理控制台,执行管理命令和监控查询。
$ pgb
pgbouncer = # SHOW POOLS;
pgbouncer = # SHOW CLIENTS;
pgbouncer = # SHOW SERVERS;
PAUSE 使用 PAUSE 命令暂停数据库连接。Pgbouncer 会根据池化模式等待活动事务/会话完成后断开服务端连接。新的客户端请求会被阻塞直到执行 RESUME。
PAUSE [ db ]; -- 暂停指定数据库,不指定则暂停所有数据库
典型使用场景:
在线切换后端数据库(如主从切换后更新连接目标) 执行需要断开所有连接的维护操作 配合 SUSPEND 实现 Pgbouncer 在线重启 $ pgb -c "PAUSE mydb;" # 暂停 mydb 数据库
$ pgb -c "PAUSE;" # 暂停所有数据库
暂停后,SHOW DATABASES 会显示 paused 状态:
pgbouncer =# SHOW DATABASES ;
name | host | port | database | ... | paused | disabled
----------+-----------+------+----------+-----+--------+----------
mydb | / var / run | 5432 | mydb | ... | 1 | 0
RESUME 使用 RESUME 命令恢复被 PAUSE、KILL 或 SUSPEND 暂停的数据库,允许新的连接请求并恢复正常服务。
RESUME [ db ]; -- 恢复指定数据库,不指定则恢复所有数据库
$ pgb -c "RESUME mydb;" # 恢复 mydb 数据库
$ pgb -c "RESUME;" # 恢复所有数据库
DISABLE 使用 DISABLE 命令禁用指定数据库,拒绝所有新的客户端连接请求。已存在的连接不受影响。
DISABLE db ; -- 禁用指定数据库(必须指定数据库名)
典型使用场景:
临时下线某个数据库进行维护 阻止新连接以便安全地进行数据库迁移 逐步下线即将删除的数据库 $ pgb -c "DISABLE mydb;" # 禁用 mydb,新连接被拒绝
ENABLE 使用 ENABLE 命令启用之前被 DISABLE 禁用的数据库,重新接受新的客户端连接。
ENABLE db ; -- 启用指定数据库(必须指定数据库名)
$ pgb -c "ENABLE mydb;" # 启用 mydb,允许新连接
RECONNECT 使用 RECONNECT 命令优雅地重建服务端连接。Pgbouncer 会在连接释放回池后关闭它们,并在需要时建立新连接。
RECONNECT [ db ]; -- 重建指定数据库的服务端连接,不指定则重建所有
典型使用场景:
后端数据库 IP 地址变更后刷新连接 主从切换后重新路由流量 DNS 更新后重建连接 $ pgb -c "RECONNECT mydb;" # 重建 mydb 的服务端连接
$ pgb -c "RECONNECT;" # 重建所有服务端连接
执行 RECONNECT 后,可以使用 WAIT_CLOSE 等待旧连接完全释放。
KILL 使用 KILL 命令立即断开指定数据库的所有客户端和服务端连接。与 PAUSE 不同,KILL 不等待事务完成,直接强制断开。
KILL [ db ]; -- 终止指定数据库的所有连接,不指定则终止所有(admin 除外)
$ pgb -c "KILL mydb;" # 强制断开 mydb 的所有连接
$ pgb -c "KILL;" # 强制断开所有数据库的连接(admin 除外)
执行 KILL 后,新连接会被阻塞直到执行 RESUME。
KILL_CLIENT 使用 KILL_CLIENT 命令终止指定的客户端连接。客户端 ID 可以从 SHOW CLIENTS 输出中获取。
KILL_CLIENT id ; -- 终止指定 ID 的客户端连接
# 查看客户端连接
$ pgb -c "SHOW CLIENTS;"
# 终止特定客户端(假设 ptr 列显示的 ID 为 0x1234567890)
$ pgb -c "KILL_CLIENT 0x1234567890;"
SUSPEND 使用 SUSPEND 命令挂起 Pgbouncer。Pgbouncer 会刷新所有 socket 缓冲区并停止监听数据,直到执行 RESUME。
SUSPEND 主要用于实现 Pgbouncer 的在线重启(零停机升级):
# 1. 挂起当前 Pgbouncer
$ pgb -c "SUSPEND;"
# 2. 启动新的 Pgbouncer 进程(使用 -R 选项接管 socket)
$ pgbouncer -R /etc/pgbouncer/pgbouncer.ini
# 3. 新进程接管后,旧进程自动退出
SHUTDOWN 使用 SHUTDOWN 命令关闭 Pgbouncer 进程。支持多种关闭模式:
SHUTDOWN ; -- 立即关闭
SHUTDOWN WAIT_FOR_SERVERS ; -- 等待服务端连接释放后关闭
SHUTDOWN WAIT_FOR_CLIENTS ; -- 等待客户端断开后关闭(零停机滚动重启)
模式 说明 SHUTDOWN立即关闭 Pgbouncer 进程 WAIT_FOR_SERVERS停止接受新连接,等待服务端连接释放后退出 WAIT_FOR_CLIENTS停止接受新连接,等待所有客户端断开后退出,适用于滚动重启
$ pgb -c "SHUTDOWN WAIT_FOR_CLIENTS;" # 优雅关闭,等待客户端断开
RELOAD 使用 RELOAD 命令重新加载 Pgbouncer 配置文件。可以动态更新大部分配置参数,无需重启进程。
$ pgb -c "RELOAD;" # 通过管理控制台重载
$ systemctl reload pgbouncer # 通过 systemd 重载
$ kill -SIGHUP $( cat /var/run/pgbouncer/pgbouncer.pid) # 通过信号重载
Pigsty 提供了重载 Pgbouncer 配置的剧本任务:
./pgsql.yml -l <cls> -t pgbouncer_reload # 重载集群的 Pgbouncer 配置
WAIT_CLOSE 使用 WAIT_CLOSE 命令等待服务端连接完成关闭。通常在 RECONNECT 或 RELOAD 后使用,确保旧连接已全部释放。
WAIT_CLOSE [ db ]; -- 等待指定数据库的服务端连接关闭,不指定则等待所有
# 完整的连接重建流程
$ pgb -c "RECONNECT mydb;"
$ pgb -c "WAIT_CLOSE mydb;" # 等待旧连接释放
监控命令 Pgbouncer 提供了丰富的 SHOW 命令用于监控连接池状态:
命令 说明 SHOW HELP显示可用命令帮助 SHOW DATABASES显示数据库配置和状态 SHOW POOLS显示连接池统计信息 SHOW CLIENTS显示客户端连接列表 SHOW SERVERS显示服务端连接列表 SHOW USERS显示用户配置 SHOW STATS显示统计信息(请求数、字节数等) SHOW STATS_TOTALS显示累计统计信息 SHOW STATS_AVERAGES显示平均统计信息 SHOW CONFIG显示当前配置参数 SHOW MEM显示内存使用情况 SHOW DNS_HOSTS显示 DNS 缓存的主机名 SHOW DNS_ZONES显示 DNS 缓存的区域 SHOW SOCKETS显示打开的 socket 信息 SHOW ACTIVE_SOCKETS显示活动的 socket SHOW LISTS显示内部列表计数 SHOW FDS显示文件描述符使用情况 SHOW STATE显示 Pgbouncer 运行状态 SHOW VERSION显示 Pgbouncer 版本
常用监控示例:
# 查看连接池状态
$ pgb -c "SHOW POOLS;"
# 查看客户端连接
$ pgb -c "SHOW CLIENTS;"
# 查看服务端连接
$ pgb -c "SHOW SERVERS;"
# 查看统计信息
$ pgb -c "SHOW STATS;"
# 查看数据库状态
$ pgb -c "SHOW DATABASES;"
更多监控命令的详细说明,请参考 Pgbouncer 官方文档
Unix 信号 Pgbouncer 支持通过 Unix 信号进行控制,这在无法连接管理控制台时非常有用:
信号 等效命令 说明 SIGHUPRELOAD重载配置文件 SIGTERMSHUTDOWN WAIT_FOR_CLIENTS优雅关闭,等待客户端断开 SIGINTSHUTDOWN WAIT_FOR_SERVERS优雅关闭,等待服务端释放 SIGQUITSHUTDOWN立即关闭 SIGUSR1PAUSE暂停所有数据库 SIGUSR2RESUME恢复所有数据库
# 通过信号重载配置
$ kill -SIGHUP $( cat /var/run/pgbouncer/pgbouncer.pid)
# 通过信号优雅关闭
$ kill -SIGTERM $( cat /var/run/pgbouncer/pgbouncer.pid)
# 通过信号暂停
$ kill -SIGUSR1 $( cat /var/run/pgbouncer/pgbouncer.pid)
# 通过信号恢复
$ kill -SIGUSR2 $( cat /var/run/pgbouncer/pgbouncer.pid)
流量切换 Pigsty 提供了 pgb-route 实用函数,可以将 Pgbouncer 流量快速切换至其他节点,用于零停机迁移:
# 定义(已在 /etc/profile.d/pg-alias.sh 中)
function pgb-route(){
local ip = ${ 1 - '\/var\/run\/postgresql' }
sed -ie "s/host=[^[:space:]]\+/host= ${ ip } /g" /etc/pgbouncer/pgbouncer.ini
cat /etc/pgbouncer/pgbouncer.ini
}
# 使用:将流量路由到 10.10.10.12
$ pgb-route 10.10.10.12
$ pgb -c "RECONNECT; WAIT_CLOSE;"
完整的零停机切换流程:
# 1. 修改路由目标
$ pgb-route 10.10.10.12
# 2. 重载配置
$ pgb -c "RELOAD;"
# 3. 重建连接并等待旧连接释放
$ pgb -c "RECONNECT;"
$ pgb -c "WAIT_CLOSE;"
12.6.6 - 管理 PostgreSQL 组件服务 使用 systemctl 管理 PostgreSQL 集群中的各个组件服务:启动、停止、重启、重载与状态检查。
概述 Pigsty 的 PGSQL 模块由多个组件构成,每个组件都以 systemd 服务的形式运行在节点上。( pgbackrest
了解这些组件及其管理方式,对于维护生产环境中的 PostgreSQL 集群非常重要。
组件 端口 服务名 说明 Patroni 8008patroni高可用管理器,负责 PostgreSQL 的生命周期管理 PostgreSQL 5432postgres占位服务,默认不使用,应急使用 Pgbouncer 6432pgbouncer连接池中间件,业务流量入口 PgBackRest - - pgBackRest 没有守护服务 HAProxy 543xhaproxy负载均衡器,暴露数据库服务 pg_exporter 9630pg_exporterPostgreSQL 监控指标导出器 pgbouncer_exporter 9631pgbouncer_exporterPgbouncer 监控指标导出器 vip-manager - vip-manager可选,管理 L2 VIP 地址漂移
重要提示
不要直接使用 systemctl 管理 PostgreSQL 服务 。PostgreSQL 由 Patroni 托管,应通过 patronictlpostgres 服务是 Patroni 服务失效时的应急逃生窗口。
命令速查 操作 命令 启动服务 systemctl start <service>停止服务 systemctl stop <service>重启服务 systemctl restart <service>重载配置 systemctl reload <service>查看状态 systemctl status <service>查看日志 journalctl -u <service> -f开机启动 systemctl enable <service>禁用启动 systemctl disable <service>
常用组件服务名:patroni、pgbouncer、haproxy、pg_exporter、pgbouncer_exporter、vip-manager
Patroni Patroni
启动 Patroni
systemctl start patroni # 启动 Patroni(同时启动 PostgreSQL)
启动 Patroni 后,它会自动拉起 PostgreSQL 进程。首次启动时,Patroni 会根据角色决定行为:
主库:初始化或恢复数据目录 从库:从主库克隆数据并建立复制 停止 Patroni
systemctl stop patroni # 停止 Patroni(同时停止 PostgreSQL)
停止 Patroni 时,它会优雅地关闭 PostgreSQL 进程。注意:如果这是主库,且未暂停自动切换,可能触发故障转移。
重启 Patroni
systemctl restart patroni # 重启 Patroni(同时重启 PostgreSQL)
重启会导致短暂的服务中断。对于生产环境,建议使用 pg restart 命令进行滚动重启。
重载 Patroni
systemctl reload patroni # 重载 Patroni 配置
重载会让 Patroni 重新读取配置文件,并将可热加载的参数应用到 PostgreSQL。
查看状态与日志
systemctl status patroni # 查看 Patroni 服务状态
journalctl -u patroni -f # 实时查看 Patroni 日志
journalctl -u patroni -n 100 --no-pager # 查看最近 100 行日志
配置文件位置 :/etc/patroni/patroni.yml
最佳实践 :使用 patronictl
Pgbouncer Pgbouncer
启动 Pgbouncer
systemctl start pgbouncer
停止 Pgbouncer
注意:停止 Pgbouncer 会中断所有通过连接池的业务连接。
重启 Pgbouncer
systemctl restart pgbouncer
重启会断开所有现有连接。如果只是配置变更,建议使用 reload。
重载 Pgbouncer
systemctl reload pgbouncer
重载会重新读取配置文件(用户列表、连接池参数等),不会断开现有连接。
查看状态与日志
systemctl status pgbouncer
journalctl -u pgbouncer -f
配置文件位置 :
主配置:/etc/pgbouncer/pgbouncer.ini HBA 规则:/etc/pgbouncer/pgb_hba.conf 用户列表:/etc/pgbouncer/userlist.txt 数据库列表:/etc/pgbouncer/database.txt 管理控制台
psql -p 6432 -U postgres -d pgbouncer # 连接到 Pgbouncer 管理控制台
常用管理命令:
SHOW POOLS ; -- 查看连接池状态
SHOW CLIENTS ; -- 查看客户端连接
SHOW SERVERS ; -- 查看后端服务器连接
SHOW STATS ; -- 查看统计信息
RELOAD ; -- 重载配置
PAUSE ; -- 暂停所有连接池
RESUME ; -- 恢复所有连接池
HAProxy HAProxy 服务
启动 HAProxy
停止 HAProxy
注意:停止 HAProxy 会中断所有通过负载均衡器的连接。
重启 HAProxy
systemctl restart haproxy
重载 HAProxy
HAProxy 支持优雅重载,不会断开现有连接。配置变更后推荐使用 reload。
查看状态与日志
systemctl status haproxy
journalctl -u haproxy -f
配置文件位置 :/etc/haproxy/haproxy.cfg
管理界面
HAProxy 提供 Web 管理界面,默认监听在 9101 端口:
http://<node_ip>:9101/haproxy
默认认证:用户名 admin,密码由 haproxy_admin_password
pg_exporter pg_exporter
启动 pg_exporter
systemctl start pg_exporter
停止 pg_exporter
systemctl stop pg_exporter
停止后,Prometheus 将无法采集该实例的 PostgreSQL 监控指标。
重启 pg_exporter
systemctl restart pg_exporter
查看状态与日志
systemctl status pg_exporter
journalctl -u pg_exporter -f
配置文件位置 :/etc/pg_exporter.yml
验证指标采集
curl -s localhost:9630/metrics | head -20
pgbouncer_exporter pgbouncer_exporter 是 Pgbouncer 的 Prometheus 监控指标导出器。
启动/停止/重启
systemctl start pgbouncer_exporter
systemctl stop pgbouncer_exporter
systemctl restart pgbouncer_exporter
查看状态与日志
systemctl status pgbouncer_exporter
journalctl -u pgbouncer_exporter -f
验证指标采集
curl -s localhost:9631/metrics | head -20
vip-manager vip-manager pg_vip_enabled
启动 vip-manager
systemctl start vip-manager
停止 vip-manager
systemctl stop vip-manager
停止后,VIP 地址会从当前节点释放。
重启 vip-manager
systemctl restart vip-manager
查看状态与日志
systemctl status vip-manager
journalctl -u vip-manager -f
配置文件位置 :/etc/default/vip-manager
验证 VIP 绑定
ip addr show # 查看网络接口,检查 VIP 是否绑定
pg list <cls> # 确认主库位置
启动顺序与依赖 PGSQL 模块组件的推荐启动顺序:
1. patroni # 首先启动 Patroni(会自动启动 PostgreSQL)
2. pgbouncer # 然后启动连接池
3. haproxy # 启动负载均衡器
4. pg_exporter # 启动监控导出器
5. pgbouncer_exporter
6. vip-manager # 最后启动 VIP 管理器(如果启用)
停止顺序应相反。Pigsty 剧本会自动处理这些依赖关系。
批量启动所有服务
systemctl start patroni pgbouncer haproxy pg_exporter pgbouncer_exporter
批量停止所有服务
systemctl stop pgbouncer_exporter pg_exporter haproxy pgbouncer patroni
常见故障排查 服务启动失败
systemctl status <service> # 查看服务状态
journalctl -u <service> -n 50 # 查看最近日志
journalctl -u <service> --since "5 min ago" # 查看最近 5 分钟日志
Patroni 无法启动
现象 可能原因 解决方案 无法连接 etcd etcd 集群不可用 检查 etcd 服务状态 数据目录权限错误 文件所有权不是 postgres chown -R postgres:postgres /pg/data端口被占用 PostgreSQL 残留进程 pg_ctl stop -D /pg/data 或 kill
Pgbouncer 无法启动
现象 可能原因 解决方案 配置文件语法错误 INI 格式错误 检查 /etc/pgbouncer/pgbouncer.ini 端口被占用 6432 端口已被使用 lsof -i :6432userlist.txt 权限 文件权限不正确 chmod 600 /etc/pgbouncer/userlist.txt
HAProxy 无法启动
现象 可能原因 解决方案 配置文件语法错误 haproxy.cfg 格式错误 haproxy -c -f /etc/haproxy/haproxy.cfg端口被占用 服务端口冲突 lsof -i :5433
相关文档 12.6.7 - 管理 PostgreSQL 定时任务 配置 Crontab 定期调度 PostgreSQL 备份任务,执行备份 / Vacuum Freeze / Analyze 任务,以及处理表膨胀
Pigsty 使用 crontab 来管理定时任务,用于执行例行备份,冻结老化事务,重整膨胀表索引等维护工作。
速查手册 操作 快捷命令 说明 配置定时任务 ./pgsql.yml -t pg_crontab -l <cls>应用 pg_crontab 配置 查看定时任务 crontab -l以 postgres 用户查看 物理备份 pg-backup [full|diff|incr]使用 pgBackRest 执行备份 事务冻结 pg-vacuum [database...]冻结老化事务,预防 XID 回卷 膨胀治理 pg-repack [database...]在线重整膨胀的表与索引
其他管理任务,请参考:备份管理 监控系统 高可用管理
配置定时任务 使用 pg_crontabpg_dbsupostgres)的定时任务。
下面 pg-meta 集群配置了每天凌晨1点进行全量备份的定时任务,pg-test 配置了每周一全量备份,其余日期增量备份的定时任务。
pg-meta :
hosts : { 10.10.10.10 : { pg_seq: 1, pg_role : primary } }
vars :
pg_cluster : pg-meta
pg_crontab :
- '00 01 * * * /pg/bin/pg-backup'
pg-test :
hosts :
10.10.10.11 : { pg_seq: 1, pg_role : primary }
10.10.10.12 : { pg_seq: 2, pg_role : replica }
vars :
pg_cluster : pg-test
pg_crontab :
- '00 01 * * 1 /pg/bin/pg-backup full'
- '00 01 * * 2,3,4,5,6,7 /pg/bin/pg-backup'
推荐的维护计划
pg_crontab :
- '00 01 * * * /pg/bin/pg-backup full' # 每天凌晨1点全量备份
- '00 03 * * 0 /pg/bin/pg-vacuum' # 每周日凌晨3点执行 vacuum freeze
- '00 04 * * 1 /pg/bin/pg-repack' # 每周一凌晨4点执行 repack
任务 频率 时机 说明 pg-backup每天 凌晨 全量或增量备份,视业务需求而定 pg-vacuum每周一次 周日凌晨 冻结老化事务,预防 XID 回卷 pg-repack每周/每月 业务低峰期 重整膨胀表索引,回收空间
仅在主库执行
pg-backup、pg-vacuum、pg-repack 脚本会自动检测当前节点角色,只有主库才会实际执行,从库会直接退出。
因此可以安全地在所有节点配置相同的定时任务,故障切换后新主库会自动继续执行维护任务。
应用定时任务 定时任务会在 pgsql.ymlpg_crontab 任务)自动写入对应操作系统发行版的默认位置:
EL(RHEL/Rocky/Alma):/var/spool/cron/postgres Debian/Ubuntu:/var/spool/cron/crontabs/postgres ./pgsql.yml -l pg-meta -t pg_crontab # 应用 pg_crontab 配置到指定集群
./pgsql.yml -l 10.10.10.10 -t pg_crontab # 仅针对特定主机
# 以 postgres 用户编辑定时任务
sudo -u postgres crontab -e
# 或直接编辑 crontab 文件
sudo vi /var/spool/cron/postgres # EL 系列
sudo vi /var/spool/cron/crontabs/postgres # Debian/Ubuntu
每次执行剧本都会 全量覆盖刷新 定时任务配置。
查看定时任务 使用 pg_dbsu
crontab -l
# Pigsty Managed Crontab for postgres
SHELL = /bin/bash
PATH = /usr/pgsql/bin:/pg/bin:/usr/local/bin:/usr/bin:/usr/sbin:/bin:/sbin
MAILTO = ""
00 01 * * * /pg/bin/pg-backup
如果您不熟悉 Crontab 的语法,可以参考 Crontab Guru 的解释。
pg-backup pg-backup 是 Pigsty 提供的物理备份脚本,基于 pgBackRest
基本用法
pg-backup # 执行增量备份(默认),如果没有全量备份则自动执行全量备份
pg-backup full # 执行全量备份
pg-backup diff # 执行差异备份(基于最近的全量备份)
pg-backup incr # 执行增量备份(基于最近的任意备份)
备份类型说明
类型 参数 说明 全量备份 full完整备份所有数据,恢复时只需要该备份 差异备份 diff备份自上次全量备份以来的变更,恢复时需要全量+差异 增量备份 incr备份自上次任意备份以来的变更,恢复时需要完整链路
执行条件
脚本必须在 主库 上以 postgres 用户身份运行 脚本会自动检测当前节点角色,从库执行时会直接退出(exit 1) 从 /etc/pgbackrest/pgbackrest.conf 中自动获取 stanza 名称 常用定时任务配置
pg_crontab :
- '00 01 * * * /pg/bin/pg-backup full' # 每天凌晨1点全量备份
pg_crontab :
- '00 01 * * 1 /pg/bin/pg-backup full' # 周一全量备份
- '00 01 * * 2,3,4,5,6,7 /pg/bin/pg-backup' # 其他日期增量备份
pg_crontab :
- '00 01 * * 1 /pg/bin/pg-backup full' # 周一全量备份
- '00 01 * * 2,3,4,5,6,7 /pg/bin/pg-backup diff' # 其他日期差异备份
更多备份恢复操作,请参考 备份管理
pg-vacuum pg-vacuum 是 Pigsty 提供的事务冻结脚本,用于执行 VACUUM FREEZE 操作,防止事务ID(XID)回卷导致数据库停机。
基本用法
pg-vacuum # 冻结所有数据库中的老化表
pg-vacuum mydb # 仅处理指定数据库
pg-vacuum -n mydb # 空跑模式,只显示不执行
pg-vacuum -a 80000000 mydb # 使用自定义年龄阈值(默认1亿)
pg-vacuum -r 50 mydb # 使用自定义老化比例阈值(默认40%)
-- 对整个数据库执行 VACUUM FREEZE
VACUUM FREEZE ;
-- 对特定表执行 VACUUM FREEZE
VACUUM FREEZE schema . table_name ;
命令选项
选项 说明 默认值 -h, --help显示帮助信息 - -n, --dry-run空跑模式,只显示不执行 false -a, --age年龄阈值,超过此值的表需要冻结 100000000 -r, --ratio老化比例阈值,超过则全库冻结(%) 40
工作逻辑
检查数据库的 datfrozenxid 年龄,如果低于阈值则跳过该库 计算老化页面比例(超过年龄阈值的表页面占总页面的百分比) 如果老化比例 > 40%,执行全库 VACUUM FREEZE ANALYZE 否则,仅对超过年龄阈值的表执行 VACUUM FREEZE ANALYZE 脚本会设置 vacuum_cost_limit = 10000 和 vacuum_cost_delay = 1ms 以控制 I/O 影响。
执行条件
脚本必须在 主库 上以 pg_dbsupostgres 用户身份运行 使用文件锁 /tmp/pg-vacuum.lock 防止并发执行 自动跳过 template0、template1、postgres 系统数据库 常用定时任务配置
建议将 vacuum 任务与备份/Repack 任务分开执行,避免冲突。
pg_crontab :
- '00 03 * * 0 /pg/bin/pg-vacuum' # 每周日凌晨3点执行
pg-repack pg-repack 是 Pigsty 提供的膨胀治理脚本,基于 pg_repack
基本用法
pg-repack # 重整所有数据库中的膨胀表与索引
pg-repack mydb # 仅重整指定数据库
pg-repack mydb1 mydb2 # 重整多个数据库
pg-repack -n mydb # 空跑模式,只显示不执行
pg-repack -t mydb # 仅重整表
pg-repack -i mydb # 仅重整索引
pg-repack -T 30 -j 4 mydb # 自定义锁超时(秒)和并行度
# 直接使用 pg_repack 命令重整特定表
pg_repack dbname -t schema.table
# 直接使用 pg_repack 命令重整特定索引
pg_repack dbname -i schema.index
命令选项
选项 说明 默认值 -h, --help显示帮助信息 - -n, --dry-run空跑模式,只显示不执行 false -t, --table仅重整表 false -i, --index仅重整索引 false -T, --timeout锁等待超时时间(秒) 10 -j, --jobs并行作业数 2
自动选择阈值
脚本会根据表和索引的大小与膨胀率,自动选择需要重整的对象:
表膨胀阈值
大小范围 膨胀率阈值 最大数量 < 256MB > 40% 64 256MB - 2GB > 30% 16 2GB - 8GB > 20% 4 8GB - 64GB > 15% 1
索引膨胀阈值
大小范围 膨胀率阈值 最大数量 < 128MB > 40% 64 128MB - 1GB > 35% 16 1GB - 8GB > 30% 4 8GB - 64GB > 20% 1
超过 64GB 的巨型表/索引会被跳过并给出提示,需要手动处理。
执行条件
脚本必须在 主库 上以 postgres 用户身份运行 需要安装 pg_repack 扩展(Pigsty 默认安装) 需要 monitor schema 中的 pg_table_bloat 和 pg_index_bloat 视图 使用文件锁 /tmp/pg-repack.lock 防止并发执行 自动跳过 template0、template1、postgres 系统数据库 锁等待
重整期间不会影响正常读写,但重整完毕的 切换瞬间 需要获取表上的 AccessExclusive 锁阻塞一切访问。对于高吞吐量业务,建议在业务低峰期或维护窗口进行。
常用定时任务配置
pg_crontab :
- '00 04 * * 1 /pg/bin/pg-repack' # 每周一凌晨4点执行
您可以通过 Pigsty 的 PGCAT Database - Table Bloat
更多细节请参考:关系膨胀的治理
移除定时任务 当使用 pgsql-rm.yml
./pgsql-rm.yml -l <cls> -t pg_crontab # 仅移除定时任务
./pgsql-rm.yml -l <cls> # 移除整个集群(包含定时任务)
相关文档 12.6.8 - 升级 PostgreSQL 大小版本 版本升级:小版本滚动升级、大版本迁移、扩展升级
快速上手 PostgreSQL 版本升级分为两种类型:小版本升级 和 大版本升级 ,两者的风险和复杂度差异很大。
类型 示例 停机时间 数据兼容性 风险等级 小版本升级 17.2 → 17.3 秒级(滚动重启) 完全兼容 低 大版本升级 17 → 18 分钟级 需要升级数据目录 中
# 滚动升级:先从库后主库
ansible <cls> -b -a 'yum upgrade -y postgresql17*'
pg restart --role replica --force <cls>
pg switchover <cls>
pg restart <cls> <old-primary> --force
# 推荐:逻辑复制迁移
bin/pgsql-add pg-new # 创建新版本集群
# 配置逻辑复制同步数据...
# 切换流量到新集群
ansible <cls> -b -a 'yum upgrade -y postgis36_17*'
psql -c 'ALTER EXTENSION postgis UPDATE;'
关于在线迁移的详细流程,请参考 在线迁移
小版本升级 小版本升级(如 17.2 → 17.3)是最常见的升级场景,通常用于应用安全补丁和 Bug 修复。数据目录完全兼容,通过滚动重启即可完成。
升级策略 :推荐采用 滚动升级 方式:先升级从库,再通过主从切换升级原主库,最小化服务中断。
1. 更新软件仓库 → 2. 升级从库软件包 → 3. 重启从库
4. 主从切换 → 5. 升级原主库软件包 → 6. 重启原主库
步骤一:准备软件包
确保本地软件仓库中有最新版本的 PostgreSQL 包,并刷新节点缓存:
cd ~/pigsty
./infra.yml -t repo_upstream # 添加上游仓库(需要互联网)
./infra.yml -t repo_build # 重建本地仓库
ansible <cls> -b -a 'yum clean all'
ansible <cls> -b -a 'yum makecache'
ansible <cls> -b -a 'apt clean'
ansible <cls> -b -a 'apt update'
步骤二:升级从库
在所有从库上升级软件包并验证版本:
ansible <cls> -b -a 'yum upgrade -y postgresql17*'
ansible <cls> -b -a '/usr/pgsql/bin/pg_ctl --version'
ansible <cls> -b -a 'apt install -y postgresql-17'
ansible <cls> -b -a '/usr/lib/postgresql/17/bin/pg_ctl --version'
重启所有从库以应用新版本:
pg restart --role replica --force <cls>
步骤三:切换主库
执行主从切换,将主库角色转移到已升级的从库:
pg switchover <cls>
# 或非交互式:
pg switchover --leader <old-primary> --candidate <new-primary> --scheduled= now --force <cls>
步骤四:升级原主库
原主库现在已降级为从库,升级软件包并重启:
ansible <old-primary-ip> -b -a 'yum upgrade -y postgresql17*'
ansible <old-primary-ip> -b -a 'apt install -y postgresql-17'
pg restart <cls> <old-primary-name> --force
步骤五:验证
确认所有实例版本一致:
pg list <cls>
pg query <cls> -c "SELECT version()"
小版本降级 在极少数情况下(如新版本引入 Bug),可能需要将 PostgreSQL 降级到之前的版本。
步骤一:获取旧版本包
cd ~/pigsty; ./infra.yml -t repo_upstream # 添加上游仓库
cd /www/pigsty; repotrack postgresql17-*-17.1 # 下载指定版本的包
cd ~/pigsty; ./infra.yml -t repo_create # 重建仓库元数据
ansible <cls> -b -a 'yum clean all'
ansible <cls> -b -a 'yum makecache'
步骤二:执行降级
ansible <cls> -b -a 'yum downgrade -y postgresql17*'
ansible <cls> -b -a 'apt install -y postgresql-17=17.1*'
步骤三:重启集群
大版本升级 大版本升级(如 17 → 18)涉及数据格式变更,需要使用专用工具进行数据迁移。
推荐方案
对于生产环境,推荐使用 逻辑复制迁移 方式:创建新版本集群,通过逻辑复制同步数据,然后进行蓝绿切换。这种方式停机时间最短,且可以随时回滚。详见 在线迁移
逻辑复制迁移 逻辑复制迁移是生产环境大版本升级的推荐方式,核心步骤:
1. 创建新版本目标集群 → 2. 配置逻辑复制同步数据 → 3. 验证数据一致性
4. 切换应用流量到新集群 → 5. 下线旧集群
步骤一:创建新版本集群
pg-meta-new :
hosts :
10.10.10.12 : { pg_seq: 1, pg_role : primary }
vars :
pg_cluster : pg-meta-new
pg_version : 18 # 新版本
bin/pgsql-add pg-meta-new
步骤二:配置逻辑复制
-- 源集群(旧版本)主库:创建发布
CREATE PUBLICATION upgrade_pub FOR ALL TABLES ;
-- 目标集群(新版本)主库:创建订阅
CREATE SUBSCRIPTION upgrade_sub
CONNECTION 'host=10.10.10.11 port=5432 dbname=mydb user=replicator password=xxx'
PUBLICATION upgrade_pub ;
步骤三:等待同步完成
-- 目标集群:检查订阅状态
SELECT * FROM pg_stat_subscription ;
-- 源集群:检查复制槽 LSN
SELECT slot_name , confirmed_flush_lsn FROM pg_replication_slots ;
步骤四:切换流量
确认数据同步完成后:停止应用写入源集群 → 等待最后的数据同步 → 切换应用连接到新集群 → 删除订阅,下线源集群。
-- 目标集群:删除订阅
DROP SUBSCRIPTION upgrade_sub ;
详细的迁移流程请参考 在线迁移
pg_upgrade 原地升级 pg_upgrade 是 PostgreSQL 官方提供的大版本升级工具,适用于测试环境或可接受较长停机时间的场景。
重要警告
原地升级会导致较长的停机时间,且回滚困难。生产环境请优先考虑逻辑复制迁移方式。
步骤一:安装新版本软件包
./pgsql.yml -l <cls> -t pg_pkg -e pg_version = 18
步骤二:停止 Patroni
pg pause <cls> # 暂停自动故障转移
systemctl stop patroni # 停止 Patroni(会停止 PostgreSQL)
步骤三:运行 pg_upgrade
sudo su - postgres
mkdir -p /data/postgres/pg-meta-18/data
# 预检(-c 参数只检查不执行)
/usr/pgsql-18/bin/pg_upgrade \
-b /usr/pgsql-17/bin -B /usr/pgsql-18/bin \
-d /data/postgres/pg-meta-17/data \
-D /data/postgres/pg-meta-18/data \
-v -c
# 执行升级
/usr/pgsql-18/bin/pg_upgrade \
-b /usr/pgsql-17/bin -B /usr/pgsql-18/bin \
-d /data/postgres/pg-meta-17/data \
-D /data/postgres/pg-meta-18/data \
--link -j 8 -v
步骤四:更新链接并启动
rm -rf /usr/pgsql && ln -s /usr/pgsql-18 /usr/pgsql
rm -rf /pg && ln -s /data/postgres/pg-meta-18 /pg
# 编辑 /etc/patroni/patroni.yml 更新路径
systemctl start patroni
pg resume <cls>
步骤五:后处理
/usr/pgsql-18/bin/vacuumdb --all --analyze-in-stages
./delete_old_cluster.sh # pg_upgrade 生成的清理脚本
扩展升级 升级 PostgreSQL 版本时,通常也需要升级相关扩展插件。
升级扩展软件包
ansible <cls> -b -a 'yum upgrade -y postgis36_17 timescaledb-2-postgresql-17* pgvector_17*'
ansible <cls> -b -a 'apt install -y postgresql-17-postgis-3 postgresql-17-pgvector'
升级扩展版本
软件包升级后,在数据库中执行扩展升级:
-- 查看可升级的扩展
SELECT name , installed_version , default_version FROM pg_available_extensions
WHERE installed_version IS NOT NULL AND installed_version <> default_version ;
-- 升级扩展
ALTER EXTENSION postgis UPDATE ;
ALTER EXTENSION timescaledb UPDATE ;
ALTER EXTENSION vector UPDATE ;
-- 检查扩展版本
SELECT extname , extversion FROM pg_extension ;
扩展兼容性
大版本升级前,请确认所有使用的扩展都支持目标 PostgreSQL 版本。某些扩展可能需要先卸载再重新安装,请查阅扩展文档。
注意事项 备份优先 :任何升级操作前都应进行完整备份测试验证 :先在测试环境验证升级流程扩展兼容 :确认所有扩展支持目标版本回滚预案 :准备好回滚方案,特别是大版本升级监控观察 :升级后密切监控数据库性能和错误日志文档记录 :记录升级过程中的所有操作和问题相关文档 12.6.9 - 管理 PostgreSQL 扩展插件 扩展管理:下载、安装、配置、启用、更新、卸载扩展
快速上手 Pigsty 提供 451 扩展 下载 、安装 、配置 、启用 。
pg-meta :
hosts : { 10.10.10.10 : { pg_seq: 1, pg_role : primary } }
vars :
pg_cluster : pg-meta
pg_extensions : [ postgis, timescaledb, pgvector ] # <--- 安装扩展软件包
pg_libs : 'timescaledb, pg_stat_statements, auto_explain' # <--- 配置预加载扩展
pg_databases :
- name : meta
extensions : [ postgis, timescaledb, vector ] # <--- 在数据库中启用
bin/pgsql-ext <cls> # 在 <cls> 集群上安装配置中定义的扩展
bin/pgsql-ext <cls> [ ext...] # 在 <cls> 集群上安装命令行参数给出的扩展
./pgsql.yml -l pg-meta -t pg_ext # 使用剧本安装扩展
bin/pgsql-ext pg-meta # 在 pg-meta 集群上安装定义的扩展
bin/pgsql-ext pg-meta pg_duckdb pg_mooncake # 安装指定扩展
关于扩展的完整参考,请查阅 扩展插件 扩展目录
操作 快捷命令 说明 下载扩展 ./infra.yml -t repo_build将扩展下载到本地仓库 安装扩展 bin/pgsql-ext <cls>在集群节点上安装扩展软件包 配置扩展 pg edit-config <cls> -p将扩展添加到预加载库(需重启) 启用扩展 psql -c 'CREATE EXT ...'在数据库中创建扩展对象 更新扩展 ALTER EXTENSION UPDATE更新扩展软件包与扩展对象 移除扩展 DROP EXTENSION删除扩展对象,卸载软件包
安装扩展 定义在 pg_extensions集群创建 pg_extension 任务中自动安装。
要在现有的 PostgreSQL 集群上安装扩展,请将扩展添加到 all.children.<cls>.pg_extensions,然后执行:
bin/pgsql-ext <cls> # 在 <cls> 集群上安装扩展
./pgsql.yml -l <cls> -t pg_extension # 直接使用 Ansible 剧本安装扩展
bin/pgsql-ext pg-meta # 在 pg-meta 集群上安装配置中定义的扩展
示例配置:在集群上安装 PostGIS、TimescaleDB 和 PGVector
#all.children.pg-meta.vars: # 省略上级缩进
pg_extensions : [ postgis, timescaledb, pgvector ]
执行效果 :在集群所有节点上安装扩展软件包。Pigsty 会自动将 包别名
安装前,确保软件源可用
安装扩展前请确保节点已配置正确的软件源 —— 扩展已经在本地仓库中 下载好 配置扩展仓库
手工安装 如果您不想使用 Pigsty 配置来管理 PostgreSQL 扩展,可以在命令行中直接传递要安装的扩展列表:
bin/pgsql-ext pg-meta pg_duckdb pg_mooncake # 在 pg-meta 集群上安装指定扩展
./pgsql.yml -l pg-meta -t pg_ext -e '{"pg_extensions": ["pg_duckdb", "pg_mooncake"]}'
您也可以使用 pig 包别名
pig install postgis timescaledb # 安装多个扩展
pig install pgvector -v 18 # 针对特定 PG 大版本安装
ansible pg-test -b -a 'pig install pg_duckdb' # 使用 Ansible 在集群上批量安装
您也可以 直接使用操作系统包管理器 (apt/dnf) 进行安装,但您必须知道具体操作系统/PG下的 RPM/DEB 包名:
# EL 系统(RHEL、Rocky、Alma、Oracle Linux)
sudo yum install -y pgvector_18*
# Debian / Ubuntu 系统
sudo apt install -y postgresql-18-pgvector
下载扩展 要想安装扩展,您需要确保节点上配置的 扩展仓库
Pigsty 的默认配置在安装过程中会自动下载主流扩展到本地仓库。如需额外扩展,添加到 repo_extra_packages
repo_extra_packages : [ pgvector, postgis, timescaledb ]
make repo # 快捷方式 = repo-build + node-repo
make repo-build # 快捷方式,重建 Infra 上的软件仓库(下载软件包与依赖)
make node-repo # 快捷方式,刷新节点上的软件源缓存,更新对 Infra 软件仓库的引用
./deploy.yml -t repo_build,node_repo # 一次性执行两个任务
./infra.yml -t repo_build # 重新下载软件包到本地仓库
./node.yml -t node_repo # 刷新节点软件源缓存
配置仓库 您也可以选择直接让所有节点都使用上游仓库(生产环境不推荐),跳过下载步骤,直接从互联网 上游扩展仓库
./node.yml -t node_repo -e node_repo_modules = node,pgsql # 添加 PGDG 与 Pigsty 上游仓库
配置扩展 部分扩展需要预加载到 shared_preload_libraries重启数据库 生效。
您可以用 pg_libs
pg-meta :
vars :
pg_cluster : pg-meta
pg_libs : 'timescaledb, pg_stat_statements, auto_explain' # 预加载扩展
pg_extensions : [ timescaledb, postgis, pgvector ] # 安装扩展包
对于已有集群,您可以参考 修改配置 shared_preload_libraries参数:
pg edit-config pg-meta --force -p shared_preload_libraries = 'timescaledb, pg_stat_statements, auto_explain'
pg restart pg-meta # 修改 pg-meta 集群的参数,并重启集群使配置生效
请确保扩展软件包已正确安装后再添加预加载配置,如果 shared_preload_libraries 中的扩展不存在或加载失败,PostgreSQL 将 无法启动 。
此外,请通过 Patroni 管理集群的配置变更,避免使用 ALTER SYSTEM 或者 pg_parameters
启用扩展 安装扩展软件包后,需要在数据库中执行 CREATE EXTENSION 才能使用扩展提供的功能。
集群初始化时启用
在 数据库定义 extensions 数组声明要启用的扩展:
pg_databases :
- name : meta
extensions :
- vector # 简单形式
- { name: postgis, schema : public } # 指定 Schema
手动启用
CREATE EXTENSION vector ; -- 创建扩展
CREATE EXTENSION postgis SCHEMA public ; -- 指定 Schema
CREATE EXTENSION IF NOT EXISTS vector ; -- 幂等创建
CREATE EXTENSION postgis_topology CASCADE ; -- 自动安装依赖
psql -d meta -c 'CREATE EXTENSION vector;' # 在 meta 数据库创建扩展
psql -d meta -c 'CREATE EXTENSION postgis SCHEMA public;' # 指定 Schema
# 修改数据库定义后使用剧本启用扩展
bin/pgsql-db pg-meta meta # 创建/修改数据库会自动启用定义的扩展
执行效果 :在数据库中创建扩展对象(函数、类型、操作符、索引方法等),之后即可使用扩展提供的功能。
更新扩展 扩展更新涉及两个层面:软件包更新 和 扩展对象更新 。
更新软件包
pig update pgvector # 使用 pig 更新扩展
sudo yum update pgvector_18 # EL
sudo apt upgrade postgresql-18-pgvector # Debian/Ubuntu
更新扩展对象
-- 查看可升级的扩展
SELECT name , installed_version , default_version FROM pg_available_extensions
WHERE installed_version IS NOT NULL AND installed_version <> default_version ;
-- 更新扩展到最新版本
ALTER EXTENSION vector UPDATE ;
-- 更新到指定版本
ALTER EXTENSION vector UPDATE TO '0.8.1' ;
更新注意事项
更新扩展前建议备份数据库。预加载扩展更新后可能需要重启 PostgreSQL。某些扩展版本升级可能不兼容,请查阅扩展文档。
移除扩展 移除扩展涉及两个层面:删除扩展对象 和 卸载软件包 。
删除扩展对象
DROP EXTENSION vector ; -- 删除扩展
DROP EXTENSION vector CASCADE ; -- 级联删除(删除依赖对象)
移除预加载
如果是预加载扩展,需从 shared_preload_libraries 中移除并重启:
pg edit-config pg-meta --force -p shared_preload_libraries = 'pg_stat_statements, auto_explain'
pg restart pg-meta # 重启使配置生效
卸载软件包(可选)
pig remove pgvector # 使用 pig 卸载
sudo yum remove pgvector_18* # EL 系统
sudo apt remove postgresql-18-pgvector # Debian/Ubuntu
CASCADE 警告
使用 CASCADE 删除扩展会同时删除所有依赖该扩展的对象(表、索引、视图等)。请先检查依赖关系再执行删除。
查询扩展 以下是一些常用的 SQL 查询,用于查看扩展信息:
查看已启用的扩展
SELECT extname , extversion , nspname AS schema
FROM pg_extension e JOIN pg_namespace n ON e . extnamespace = n . oid
ORDER BY extname ;
查看可用扩展
SELECT name , default_version , installed_version , comment
FROM pg_available_extensions
WHERE installed_version IS NOT NULL -- 仅显示已安装的
ORDER BY name ;
检查扩展是否可用
SELECT * FROM pg_available_extensions WHERE name = 'vector' ;
查看扩展依赖关系
SELECT e . extname , d . refobjid :: regclass AS depends_on
FROM pg_extension e
JOIN pg_depend d ON d . objid = e . oid
WHERE d . deptype = 'e' AND e . extname = 'postgis_topology' ;
查看扩展对象
SELECT classid :: regclass , objid , deptype
FROM pg_depend
WHERE refobjid = ( SELECT oid FROM pg_extension WHERE extname = 'vector' );
psql 快捷命令
\d x # 列出已启用的扩展
\d x+ vector # 显示扩展详情
添加仓库 如需直接从上游安装扩展,可手动添加软件仓库。
使用 Pigsty 剧本添加
./node.yml -t node_repo -e node_repo_modules = node,pgsql # 添加 PGDG 与 Pigsty 仓库
./node.yml -t node_repo -e node_repo_modules = node,pgsql,local # 包括本地仓库
YUM 仓库(EL 系统)
# Pigsty 仓库
curl -fsSL https://repo.pigsty.io/key | sudo tee /etc/pki/rpm-gpg/RPM-GPG-KEY-pigsty >/dev/null
curl -fsSL https://repo.pigsty.io/yum/repo | sudo tee /etc/yum.repos.d/pigsty.repo >/dev/null
# 中国大陆镜像
curl -fsSL https://repo.pigsty.cc/key | sudo tee /etc/pki/rpm-gpg/RPM-GPG-KEY-pigsty >/dev/null
curl -fsSL https://repo.pigsty.cc/yum/repo | sudo tee /etc/yum.repos.d/pigsty.repo >/dev/null
APT 仓库(Debian/Ubuntu)
curl -fsSL https://repo.pigsty.io/key | sudo gpg --dearmor -o /etc/apt/keyrings/pigsty.gpg
sudo tee /etc/apt/sources.list.d/pigsty.list > /dev/null <<EOF
deb [signed-by=/etc/apt/keyrings/pigsty.gpg] https://repo.pigsty.io/apt/infra generic main
deb [signed-by=/etc/apt/keyrings/pigsty.gpg] https://repo.pigsty.io/apt/pgsql $(lsb_release -cs) main
EOF
sudo apt update
# 中国大陆镜像:将 repo.pigsty.io 替换为 repo.pigsty.cc
常见问题 扩展名与包名的区别
名称 说明 示例 扩展名 CREATE EXTENSION 使用的名称vector包别名 Pigsty 配置中使用的标准化名称 pgvector包名 操作系统实际的包名 pgvector_18* 或 postgresql-18-pgvector
预加载扩展无法启动
如果 shared_preload_libraries 中的扩展不存在或加载失败,PostgreSQL 将无法启动。解决方法:
确保扩展软件包已正确安装 或从 shared_preload_libraries 中移除该扩展(编辑 /pg/data/postgresql.conf) 扩展依赖问题
某些扩展依赖于其他扩展,需按顺序创建或使用 CASCADE:
CREATE EXTENSION postgis ; -- 先创建基础扩展
CREATE EXTENSION postgis_topology ; -- 再创建依赖扩展
-- 或
CREATE EXTENSION postgis_topology CASCADE ; -- 自动创建依赖
扩展版本不兼容
查看当前 PostgreSQL 版本支持的扩展版本:
SELECT * FROM pg_available_extension_versions WHERE name = 'vector' ;
相关资源 12.7 - 备份恢复 时间点恢复(PITR)备份与恢复
Pigsty 使用 pgBackRest 管理 PostgreSQL 备份,这可能是生态系统中最强大的开源备份工具。
它支持增量/并行备份与恢复、加密、MinIO /S3 等众多特性。Pigsty 默认为每个 PGSQL 集群预配置了备份功能。
章节 内容 机制 备份脚本、定时任务、pgbackrest、仓库与管理 策略 备份策略、磁盘规划、恢复窗口权衡 仓库 配置备份仓库:本地、MinIO、S3 管理 常用备份管理命令 恢复 使用剧本恢复到特定时间点 示例 沙箱示例:手工执行恢复操作
免责声明
Pigsty 尽最大努力提供可靠的 PITR 解决方案,但我们不对 PITR 操作导致的数据丢失承担任何责任,使用需自担风险。如需专业支持,请考虑我们的 专业服务 。
快速上手 备份策略 :使用 Crontab 调度基础备份WAL 归档 :持续记录写入活动恢复与还原 :从备份和 WAL 归档中恢复node_crontab : [ '00 01 * * * postgres /pg/bin/pg-backup full' ]
./pgsql-pitr.yml -e '{"pg_pitr": { "time": "2025-07-13 10:00:00+00" }}'
12.7.1 - 备份策略 根据您的需求设计备份策略
下图将“恢复窗口”与“存储空间占用”合并到同一时间轴(0~108h)中,便于一起观察。
在相同假设(数据库 100GB、日写入 10GB)下,下图展示“每 7 天全量 + 每日增量、全量保留 14 天”时,30 天内恢复窗口与存储占用变化。
何时备份 第一个问题是何时 备份您的数据库——这是备份频率和恢复时间之间的权衡。
由于您需要从上一次备份开始重放 WAL 日志到恢复目标点,备份越频繁,需要重放的 WAL 日志就越少,恢复速度就越快。
每日全量备份 对于生产数据库,建议从最简单的每日全量备份策略开始。
这也是 Pigsty 的默认备份策略,通过 crontab 实现。
pg_crontab : [ '00 01 * * * /pg/bin/pg-backup full' ]
pgbackrest_method : local # 选择备份仓库方法:`local`、`minio` 或其他自定义仓库
pgbackrest_repo: # pgbackrest 仓库配置 : https://pgbackrest.org/configuration.html#section-repository
local : # 使用本地 POSIX 文件系统的默认 pgbackrest 仓库
path : /pg/backup # 本地备份目录,默认为 `/pg/backup`
retention_full_type : count # 按数量保留全量备份
retention_full : 2 # 使用本地文件系统仓库时,保留2个,最多3个全量备份
假设您的数据库大小为 100GB,每天更新写入 10GB 数据,备份耗时1小时,那么在每日全量备份,使用本地仓库的策略下,恢复窗口与备份空间随时间的变化如下图所示:
恢复窗口会在 25-49 小时之间循环,备份消耗的存储空间约为全量基础备份的 2 倍加上 2 天的 WAL 日志。
在实践中,您可能需要准备至少 3~5 倍基础数据库大小的备份磁盘才能使用默认备份策略。
全量 + 增量备份 您可以通过调整这些参数来优化备份空间使用。
如果使用 MinIO / S3 作为集中式备份仓库,您可以使用超出本地磁盘限制的存储空间。
此时可以考虑使用全量 + 增量备份配合 2 周保留策略:
pg_crontab : # 周一凌晨1点全量备份,工作日增量备份
- '00 01 * * 1 /pg/bin/pg-backup full'
- '00 01 * * 2,3,4,5,6,7 /pg/bin/pg-backup'
pgbackrest_method : minio
pgbackrest_repo: # pgbackrest 仓库配置 : https://pgbackrest.org/configuration.html#section-repository
minio : # 可选的 minio 仓库
type : s3 # minio 兼容 S3 协议
s3_endpoint : sss.pigsty # minio 端点域名,默认为 `sss.pigsty`
s3_region : us-east-1 # minio 区域,默认 us-east-1,对 minio 无实际意义
s3_bucket : pgsql # minio 桶名,默认为 `pgsql`
s3_key : pgbackrest # pgbackrest 的 minio 用户访问密钥
s3_key_secret : S3User.Backup # pgbackrest 的 minio 用户密钥
s3_uri_style : path # minio 使用路径风格 URI 而非主机风格
path : /pgbackrest # minio 备份路径,默认为 `/pgbackrest`
storage_port : 9000 # minio 端口,默认 9000
storage_ca_file : /etc/pki/ca.crt # minio CA 证书路径,默认 `/etc/pki/ca.crt`
block : y # 启用块级增量备份
bundle : y # 将小文件打包成单个文件
bundle_limit : 20MiB # 文件包大小限制,对象存储建议 20MiB
bundle_size : 128MiB # 文件包目标大小,对象存储建议 128MiB
cipher_type : aes-256-cbc # 为远程备份仓库启用 AES 加密
cipher_pass : pgBackRest # AES 加密密码,默认为 'pgBackRest'
retention_full_type : time # 按时间保留全量备份
retention_full : 14 # 保留最近 14 天的全量备份
配合内置的 minio 备份仓库使用时,可提供保证 1 周的 PITR 恢复窗口。
假设您的数据库大小为 100GB,每天写入 10GB 数据,则备份大小如下:
备份位置 默认情况下,Pigsty 提供两个默认备份仓库定义:local 和 minio 备份仓库。
local:默认选项 ,使用本地 /pg/backup 目录(软链接指向 pg_fs_backup/data/backups)minio:使用 SNSD 单节点 MinIO 集群(Pigsty 支持,但默认不启用)pgbackrest_method : local # 选择备份仓库方法:`local`、`minio` 或其他自定义仓库
pgbackrest_repo: # pgbackrest 仓库配置 : https://pgbackrest.org/configuration.html#section-repository
local : # 使用本地 POSIX 文件系统的默认 pgbackrest 仓库
path : /pg/backup # 本地备份目录,默认为 `/pg/backup`
retention_full_type : count # 按数量保留全量备份
retention_full : 2 # 使用本地文件系统仓库时,保留2个,最多3个全量备份
minio : # 可选的 minio 仓库
type : s3 # minio 兼容 S3 协议
s3_endpoint : sss.pigsty # minio 端点域名,默认为 `sss.pigsty`
s3_region : us-east-1 # minio 区域,默认 us-east-1,对 minio 无实际意义
s3_bucket : pgsql # minio 桶名,默认为 `pgsql`
s3_key : pgbackrest # pgbackrest 的 minio 用户访问密钥
s3_key_secret : S3User.Backup # pgbackrest 的 minio 用户密钥
s3_uri_style : path # minio 使用路径风格 URI 而非主机风格
path : /pgbackrest # minio 备份路径,默认为 `/pgbackrest`
storage_port : 9000 # minio 端口,默认 9000
storage_ca_file : /etc/pki/ca.crt # minio CA 证书路径,默认 `/etc/pki/ca.crt`
block : y # 启用块级增量备份
bundle : y # 将小文件打包成单个文件
bundle_limit : 20MiB # 文件包大小限制,对象存储建议 20MiB
bundle_size : 128MiB # 文件包目标大小,对象存储建议 128MiB
cipher_type : aes-256-cbc # 为远程备份仓库启用 AES 加密
cipher_pass : pgBackRest # AES 加密密码,默认为 'pgBackRest'
retention_full_type : time # 按时间保留全量备份
retention_full : 14 # 保留最近 14 天的全量备份
12.7.2 - 备份机制 备份脚本、定时任务、备份仓库与基础设施
备份可以通过内置 脚本 调用,使用节点 crontab 定时执行,
由 pgbackrest 管理,存储在备份仓库中,
仓库可以是本地磁盘文件系统或 MinIO / S3,并支持不同的 保留 策略。
脚本 您可以使用 pg_dbsupostgres)执行 pgbackrest 命令创建备份:
备份命令
backup
full
diff
incr
info pgbackrest --stanza= pg-meta --type= full backup # 为集群 pg-meta 创建全量备份 $ pgbackrest --stanza= pg-meta --type= full backup
2025-07-15 01:36:57.007 P00 INFO: backup command begin 2.54.2: --annotation= pg_cluster = pg-meta ...
2025-07-15 01:36:57.030 P00 INFO: execute non-exclusive backup start: backup begins after the requested immediate checkpoint completes
2025-07-15 01:36:57.105 P00 INFO: backup start archive = 000000010000000000000006, lsn = 0/6000028
2025-07-15 01:36:58.540 P00 INFO: new backup label = 20250715-013657F
2025-07-15 01:36:58.588 P00 INFO: full backup size = 44.5MB, file total = 1437
2025-07-15 01:36:58.589 P00 INFO: backup command end: completed successfully ( 1584ms) $ pgbackrest --stanza= pg-meta --type= diff backup
2025-07-15 01:37:24.952 P00 INFO: backup command begin 2.54.2: ...
2025-07-15 01:37:24.985 P00 INFO: last backup label = 20250715-013657F, version = 2.54.2
2025-07-15 01:37:26.337 P00 INFO: new backup label = 20250715-013657F_20250715-013724D
2025-07-15 01:37:26.381 P00 INFO: diff backup size = 424.3KB, file total = 1437
2025-07-15 01:37:26.381 P00 INFO: backup command end: completed successfully ( 1431ms) $ pgbackrest --stanza= pg-meta --type= incr backup
2025-07-15 01:37:30.305 P00 INFO: backup command begin 2.54.2: ...
2025-07-15 01:37:30.337 P00 INFO: last backup label = 20250715-013657F_20250715-013724D, version = 2.54.2
2025-07-15 01:37:31.356 P00 INFO: new backup label = 20250715-013657F_20250715-013730I
2025-07-15 01:37:31.403 P00 INFO: incr backup size = 8.3KB, file total = 1437
2025-07-15 01:37:31.403 P00 INFO: backup command end: completed successfully ( 1099ms) $ pgbackrest --stanza= pg-meta info
stanza: pg-meta
status: ok
cipher: aes-256-cbc
db ( current)
wal archive min/max ( 17) : 000000010000000000000001/00000001000000000000000A
full backup: 20250715-013657F
timestamp start/stop: 2025-07-15 01:36:57+00 / 2025-07-15 01:36:58+00
wal start/stop: 000000010000000000000006 / 000000010000000000000006
database size: 44.5MB, database backup size: 44.5MB
repo1: backup size: 8.7MB
diff backup: 20250715-013657F_20250715-013724D
timestamp start/stop: 2025-07-15 01:37:24+00 / 2025-07-15 01:37:26+00
database size: 44.5MB, database backup size: 424.3KB
repo1: backup size: 94KB
backup reference total: 1 full
incr backup: 20250715-013657F_20250715-013730I
timestamp start/stop: 2025-07-15 01:37:30+00 / 2025-07-15 01:37:31+00
database size: 44.5MB, database backup size: 8.3KB
repo1: backup size: 504B
backup reference total: 1 full, 1 diff 这里的 stanza 是数据库集群名称:pg_clusterpg-meta。
Pigsty 提供了 pb 别名和 pg-backup 包装脚本,会自动填充当前集群名称作为 stanza:
function pb() {
local stanza = $( grep -o '\[[^][]*]' /etc/pgbackrest/pgbackrest.conf | head -n1 | sed 's/.*\[\([^]]*\)].*/\1/' )
pgbackrest --stanza= $stanza $@
}
pb ... # pgbackrest --stanza=pg-meta ...
pb info # pgbackrest --stanza=pg-meta info
pb backup # pgbackrest --stanza=pg-meta backup
pg-backup full # 执行全量备份 = pgbackrest --stanza=pg-meta --type=full backup
pg-backup incr # 执行增量备份 = pgbackrest --stanza=pg-meta --type=incr backup
pg-backup diff # 执行差异备份 = pgbackrest --stanza=pg-meta --type=diff backup
定时备份 Pigsty 利用 Linux crontab 来调度备份任务。您可以用它定义备份策略。
例如,大多数单节点配置模板都有以下用于备份的 node_crontab
node_crontab : [ '00 01 * * * postgres /pg/bin/pg-backup full' ]
您可以使用 crontab 和 pg-backup 脚本设计更复杂的备份策略,例如:
node_crontab : # 周一凌晨1点全量备份,工作日增量备份
- '00 01 * * 1 postgres /pg/bin/pg-backup full'
- '00 01 * * 2,3,4,5,6,7 postgres /pg/bin/pg-backup'
要应用 crontab 变更,使用 node.yml
./node.yml -t node_crontab -l pg-meta # 将 crontab 变更应用到 pg-meta 组
pgbackrest 以下是 Pigsty 对 pgbackrest 的配置细节:
文件层次结构 bin:/usr/bin/pgbackrest,来自 PGDG 的 pgbackrest 包,在组别名 pgsql-common 中。 conf:/etc/pgbackrest,主配置文件是 /etc/pgbackrest/pgbackrest.conf logs:/pg/log/pgbackrest/*,由 pgbackrest_log_dir tmp:/pg/spool 用作 pgbackrest 的临时 spool 目录 data:/pg/backup 用于存储数据(当选择默认的 local 文件系统备份仓库时) 此外,在 PITR 恢复 过程中,Pigsty 会创建临时的 /pg/conf/pitr.conf pgbackrest 配置文件,
并将 postgres 恢复日志写入 /pg/tmp/recovery.log 文件。
监控 有一个 pgbackrest_exporter 服务运行在 pgbackrest_exporter_port9854)端口上,用于导出 pgbackrest 指标。
您可以通过 pgbackrest_exporter_optionspgbackrest_exporter_enabledfalse 来禁用它。
初始备份 当创建 postgres 集群时,Pigsty 会自动创建初始备份。
由于新集群几乎为空,这是一个很小的备份。
它会留下一个 /etc/pgbackrest/initial.done 标记文件,以避免重复创建初始备份。
如果不需要初始备份,请将 pgbackrest_init_backupfalse。
管理 启用备份 如果数据库集群创建时 pgbackrest_enabledtrue,备份将自动启用。
如果创建时该值为 false,您可以使用以下命令启用 pgbackrest 组件:
./pgsql.yml -t pg_backup # 运行 pgbackrest 子任务
删除备份 当移除主实例(pg_roleprimary)时,Pigsty 会删除 pgbackrest 备份 stanza。
./pgsql-rm.yml
./pgsql-rm.yml -e pg_rm_backup = false # 保留备份
./pgsql-rm.yml -t pg_backup # 仅删除备份
使用 pg_backup 子任务仅删除备份,使用 pg_rm_backupfalse)保留备份。
如果您的备份仓库被锁定 (例如 S3 / MinIO 有锁定选项),此操作将失败。
备份删除
删除备份可能导致永久性数据丢失,这是一个危险操作,请务必谨慎。
列出备份 此命令将列出 pgbackrest 仓库中的所有备份(所有集群共享)
手动备份 Pigsty 提供了内置脚本 /pg/bin/pg-backup,封装了 pgbackrest 备份命令。
pg-backup # 执行增量备份
pg-backup full # 执行全量备份
pg-backup incr # 执行增量备份
pg-backup diff # 执行差异备份
基础备份 Pigsty 提供了一个替代备份脚本 /pg/bin/pg-basebackup,它不依赖 pgbackrest,直接提供数据库集群的物理副本。
默认备份目录为 /pg/backup。
pg-basebackup
help
backup NAME
pg-basebackup -- make base backup from PostgreSQL instance
SYNOPSIS
pg-basebackup -sdfeukr
pg-basebackup --src postgres:/// --dst . --file backup.tar.lz4
DESCRIPTION
-s, --src, --url 备份源 URL,可选,默认为 "postgres:///" ,如需密码应在 url、ENV 或 .pgpass 中提供
-d, --dst, --dir 备份文件存放位置,默认为 "/pg/backup"
-f, --file 覆盖默认备份文件名,"backup_ ${ tag } _ ${ date } .tar.lz4"
-r, --remove 删除 n 分钟前的 .lz4 文件,默认 1200(20小时)
-t, --tag 备份文件标签,未设置时使用目标集群名或本地 IP 地址,也用于默认文件名
-k, --key 指定 --encrypt 时的加密密钥,默认密钥为 ${ tag }
-u, --upload 上传备份文件到云存储(需自行实现)
-e, --encryption 使用 OpenSSL RC4 加密,未指定密钥时使用 tag 作为密钥
-h, --help 打印此帮助信息 postgres@pg-meta-1:~$ pg-basebackup
[ 2025-07-13 06:16:05][ INFO] ================================================================
[ 2025-07-13 06:16:05][ INFO] [ INIT] pg-basebackup begin, checking parameters
[ 2025-07-13 06:16:05][ DEBUG] [ INIT] filename ( -f) : backup_pg-meta_20250713.tar.lz4
[ 2025-07-13 06:16:05][ DEBUG] [ INIT] src ( -s) : postgres:///
[ 2025-07-13 06:16:05][ DEBUG] [ INIT] dst ( -d) : /pg/backup
[ 2025-07-13 06:16:05][ INFO] [ LOCK] lock acquired success on /tmp/backup.lock, pid = 107417
[ 2025-07-13 06:16:05][ INFO] [ BKUP] backup begin, from postgres:/// to /pg/backup/backup_pg-meta_20250713.tar.lz4
pg_basebackup: initiating base backup, waiting for checkpoint to complete
pg_basebackup: checkpoint completed
pg_basebackup: write-ahead log start point: 0/7000028 on timeline 1
pg_basebackup: write-ahead log end point: 0/7000FD8
pg_basebackup: syncing data to disk ...
pg_basebackup: base backup completed
[ 2025-07-13 06:16:06][ INFO] [ BKUP] backup complete!
[ 2025-07-13 06:16:06][ INFO] [ DONE] backup procedure complete!
[ 2025-07-13 06:16:06][ INFO] ================================================================ 备份使用 lz4 压缩。您可以使用以下命令解压并提取 tarball:
mkdir -p /tmp/data # 将备份提取到此目录
cat /pg/backup/backup_pg-meta_20250713.tar.lz4 | unlz4 -d -c | tar -xC /tmp/data
逻辑备份 您也可以使用 pg_dump 命令执行逻辑备份。
逻辑备份不能用于 PITR(时间点恢复),但对于在不同主版本之间迁移数据或实现灵活的数据导出逻辑非常有用。
从仓库引导 假设您有一个现有集群 pg-meta,想要将其克隆 为 pg-meta2:
您需要创建新的 pg-meta2 集群分支,然后在其上运行 pitr。
12.7.3 - 备份仓库 PostgreSQL 备份存储仓库配置
您可以通过指定 pgbackrest_repo存储位置 。
您可以在此定义多个仓库,Pigsty 会根据 pgbackrest_method
默认仓库 默认情况下,Pigsty 提供两个默认备份仓库定义:local 和 minio 备份仓库。
local:默认选项 ,使用本地 /pg/backup 目录(软链接指向 pg_fs_backup/data/backups)minio:使用 SNSD 单节点 MinIO 集群(Pigsty 支持,但默认不启用)pgbackrest_method : local # 选择备份仓库方法:`local`、`minio` 或其他自定义仓库
pgbackrest_repo: # pgbackrest 仓库配置 : https://pgbackrest.org/configuration.html#section-repository
local : # 使用本地 POSIX 文件系统的默认 pgbackrest 仓库
path : /pg/backup # 本地备份目录,默认为 `/pg/backup`
retention_full_type : count # 按数量保留全量备份
retention_full : 2 # 使用本地文件系统仓库时,保留2个,最多3个全量备份
minio : # 可选的 minio 仓库
type : s3 # minio 兼容 S3 协议
s3_endpoint : sss.pigsty # minio 端点域名,默认为 `sss.pigsty`
s3_region : us-east-1 # minio 区域,默认 us-east-1,对 minio 无实际意义
s3_bucket : pgsql # minio 桶名,默认为 `pgsql`
s3_key : pgbackrest # pgbackrest 的 minio 用户访问密钥
s3_key_secret : S3User.Backup # pgbackrest 的 minio 用户密钥
s3_uri_style : path # minio 使用路径风格 URI 而非主机风格
path : /pgbackrest # minio 备份路径,默认为 `/pgbackrest`
storage_port : 9000 # minio 端口,默认 9000
storage_ca_file : /etc/pki/ca.crt # minio CA 证书路径,默认 `/etc/pki/ca.crt`
block : y # 启用块级增量备份
bundle : y # 将小文件打包成单个文件
bundle_limit : 20MiB # 文件包大小限制,对象存储建议 20MiB
bundle_size : 128MiB # 文件包目标大小,对象存储建议 128MiB
cipher_type : aes-256-cbc # 为远程备份仓库启用 AES 加密
cipher_pass : pgBackRest # AES 加密密码,默认为 'pgBackRest'
retention_full_type : time # 按时间保留全量备份
retention_full : 14 # 保留最近 14 天的全量备份
仓库保留策略 如果每天备份但不删除旧备份,备份仓库会不断增长并耗尽磁盘空间。
您需要定义保留策略,只保留有限数量的备份。
默认备份策略定义在 pgbackrest_repo
local:保留最近 2 个全量备份,备份期间最多允许 3 个minio:保留最近 14 天的所有全量备份空间规划 对象存储提供几乎无限的存储容量,因此无需担心磁盘空间。
您可以使用混合的全量 + 差异备份策略来优化空间使用。
对于本地磁盘备份仓库,Pigsty 建议使用保留最近 2 个全量备份的策略,
这意味着磁盘上保留两个最新的全量备份(运行新备份时可能存在第三个副本)。
这可保证至少 24 小时的恢复窗口。详情请参阅 备份策略 。
其他仓库选项 您也可以使用其他服务作为备份仓库,详情请参阅 pgbackrest 文档 :
仓库版本控制 您甚至可以指定 repo target time 来获取对象存储的快照。
您可以通过在 minio_bucketsversioning 标志来启用 MinIO 版本控制:
minio_buckets :
- { name: pgsql ,versioning : true }
- { name: meta ,versioning : true }
- { name : data }
仓库锁定 某些对象存储服务(S3、MinIO 等)支持锁定 功能,可以防止备份被删除,即使是 DBA 本人也无法删除。
您可以通过在 minio_bucketslock 标志来启用 MinIO 锁定功能:
minio_buckets :
- { name: pgsql , lock : true }
- { name: meta ,versioning : true }
- { name : data }
使用对象存储 对象存储服务提供几乎无限的存储容量,并为您的系统提供远程容灾能力。
如果您没有对象存储服务,Pigsty 内置了 MinIO 支持。
MinIO 您可以通过取消注释以下设置来启用 MinIO 备份仓库。
请注意 pgbackrest 只支持 HTTPS / 域名,因此您必须使用域名和 HTTPS 端点运行 MinIO。
all :
vars :
pgbackrest_method : minio # 使用 minio 作为默认备份仓库
children : # 定义一个单节点 minio SNSD 集群
minio : { hosts : { 10.10.10.10 : { minio_seq: 1 }} ,vars : { minio_cluster : minio }}
S3 如果您只有一个 节点,有意义的备份策略可以是使用云厂商的对象存储服务,如 AWS S3、阿里云 OSS 或 Google Cloud 等。
为此,您可以定义一个新仓库:
pgbackrest_method : s3 # 使用 'pgbackrest_repo.s3' 作为备份仓库
pgbackrest_repo: # pgbackrest 仓库配置 : https://pgbackrest.org/configuration.html#section-repository
s3 : # 阿里云 OSS(S3 兼容)对象存储服务
type : s3 # oss 兼容 S3 协议
s3_endpoint : oss-cn-beijing-internal.aliyuncs.com
s3_region : oss-cn-beijing
s3_bucket : <your_bucket_name>
s3_key : <your_access_key>
s3_key_secret : <your_secret_key>
s3_uri_style : host
path : /pgbackrest
bundle : y # 将小文件打包成单个文件
bundle_limit : 20MiB # 文件包大小限制,对象存储建议 20MiB
bundle_size : 128MiB # 文件包目标大小,对象存储建议 128MiB
cipher_type : aes-256-cbc # 为远程备份仓库启用 AES 加密
cipher_pass : pgBackRest # AES 加密密码,默认为 'pgBackRest'
retention_full_type : time # 按时间保留全量备份
retention_full : 14 # 保留最近 14 天的全量备份
local : # 使用本地 POSIX 文件系统的默认 pgbackrest 仓库
path : /pg/backup # 本地备份目录,默认为 `/pg/backup`
retention_full_type : count # 按数量保留全量备份
retention_full : 2 # 使用本地文件系统仓库时,保留2个,最多3个全量备份
管理备份 启用备份 如果数据库集群创建时 pgbackrest_enabledtrue,备份将自动启用。
如果创建时该值为 false,您可以使用以下命令启用 pgbackrest 组件:
./pgsql.yml -t pg_backup # 运行 pgbackrest 子任务
删除备份 当移除主实例(pg_roleprimary)时,Pigsty 会删除 pgbackrest 备份 stanza。
./pgsql-rm.yml
./pgsql-rm.yml -e pg_rm_backup = false # 保留备份
./pgsql-rm.yml -t pg_backup # 仅删除备份
使用 pg_backup 子任务仅删除备份,使用 pg_rm_backupfalse)保留备份。
如果您的备份仓库被锁定 (例如 S3 / MinIO 有锁定选项),此操作将失败。
备份删除
删除备份可能导致永久性数据丢失,这是一个危险操作,请务必谨慎。
列出备份 此命令将列出 pgbackrest 仓库中的所有备份(所有集群共享)
手动备份 Pigsty 提供了内置脚本 /pg/bin/pg-backup,封装了 pgbackrest 备份命令。
pg-backup # 执行增量备份
pg-backup full # 执行全量备份
pg-backup incr # 执行增量备份
pg-backup diff # 执行差异备份
基础备份 Pigsty 提供了一个替代备份脚本 /pg/bin/pg-basebackup,它不依赖 pgbackrest,直接提供数据库集群的物理副本。
默认备份目录为 /pg/backup。
pg-basebackup
help
backup NAME
pg-basebackup -- make base backup from PostgreSQL instance
SYNOPSIS
pg-basebackup -sdfeukr
pg-basebackup --src postgres:/// --dst . --file backup.tar.lz4
DESCRIPTION
-s, --src, --url 备份源 URL,可选,默认为 "postgres:///" ,如需密码应在 url、ENV 或 .pgpass 中提供
-d, --dst, --dir 备份文件存放位置,默认为 "/pg/backup"
-f, --file 覆盖默认备份文件名,"backup_ ${ tag } _ ${ date } .tar.lz4"
-r, --remove 删除 n 分钟前的 .lz4 文件,默认 1200(20小时)
-t, --tag 备份文件标签,未设置时使用目标集群名或本地 IP 地址,也用于默认文件名
-k, --key 指定 --encrypt 时的加密密钥,默认密钥为 ${ tag }
-u, --upload 上传备份文件到云存储(需自行实现)
-e, --encryption 使用 OpenSSL RC4 加密,未指定密钥时使用 tag 作为密钥
-h, --help 打印此帮助信息 postgres@pg-meta-1:~$ pg-basebackup
[ 2025-07-13 06:16:05][ INFO] ================================================================
[ 2025-07-13 06:16:05][ INFO] [ INIT] pg-basebackup begin, checking parameters
[ 2025-07-13 06:16:05][ DEBUG] [ INIT] filename ( -f) : backup_pg-meta_20250713.tar.lz4
[ 2025-07-13 06:16:05][ DEBUG] [ INIT] src ( -s) : postgres:///
[ 2025-07-13 06:16:05][ DEBUG] [ INIT] dst ( -d) : /pg/backup
[ 2025-07-13 06:16:05][ INFO] [ LOCK] lock acquired success on /tmp/backup.lock, pid = 107417
[ 2025-07-13 06:16:05][ INFO] [ BKUP] backup begin, from postgres:/// to /pg/backup/backup_pg-meta_20250713.tar.lz4
pg_basebackup: initiating base backup, waiting for checkpoint to complete
pg_basebackup: checkpoint completed
pg_basebackup: write-ahead log start point: 0/7000028 on timeline 1
pg_basebackup: write-ahead log end point: 0/7000FD8
pg_basebackup: syncing data to disk ...
pg_basebackup: base backup completed
[ 2025-07-13 06:16:06][ INFO] [ BKUP] backup complete!
[ 2025-07-13 06:16:06][ INFO] [ DONE] backup procedure complete!
[ 2025-07-13 06:16:06][ INFO] ================================================================ 备份使用 lz4 压缩。您可以使用以下命令解压并提取 tarball:
mkdir -p /tmp/data # 将备份提取到此目录
cat /pg/backup/backup_pg-meta_20250713.tar.lz4 | unlz4 -d -c | tar -xC /tmp/data
逻辑备份 您也可以使用 pg_dump 命令执行逻辑备份。
逻辑备份不能用于 PITR(时间点恢复),但对于在不同主版本之间迁移数据或实现灵活的数据导出逻辑非常有用。
从仓库引导 假设您有一个现有集群 pg-meta,想要将其克隆 为 pg-meta2:
您需要创建新的 pg-meta2 集群分支,然后在其上运行 pitr。
12.7.4 - 管理命令 管理备份仓库和备份
启用备份 如果数据库集群创建时 pgbackrest_enabledtrue,备份将自动启用。
如果创建时该值为 false,您可以使用以下命令启用 pgbackrest 组件:
./pgsql.yml -t pg_backup # 运行 pgbackrest 子任务
删除备份 当移除主实例(pg_roleprimary)时,Pigsty 会删除 pgbackrest 备份 stanza。
./pgsql-rm.yml
./pgsql-rm.yml -e pg_rm_backup = false # 保留备份
./pgsql-rm.yml -t pg_backup # 仅删除备份
使用 pg_backup 子任务仅删除备份,使用 pg_rm_backupfalse)保留备份。
如果您的备份仓库被锁定 (例如 S3 / MinIO 有锁定选项),此操作将失败。
备份删除
删除备份可能导致永久性数据丢失,这是一个危险操作,请务必谨慎。
列出备份 此命令将列出 pgbackrest 仓库中的所有备份(所有集群共享)
手动备份 Pigsty 提供了内置脚本 /pg/bin/pg-backup,封装了 pgbackrest 备份命令。
pg-backup # 执行增量备份
pg-backup full # 执行全量备份
pg-backup incr # 执行增量备份
pg-backup diff # 执行差异备份
基础备份 Pigsty 提供了一个替代备份脚本 /pg/bin/pg-basebackup,它不依赖 pgbackrest,直接提供数据库集群的物理副本。
默认备份目录为 /pg/backup。
pg-basebackup
help
backup NAME
pg-basebackup -- make base backup from PostgreSQL instance
SYNOPSIS
pg-basebackup -sdfeukr
pg-basebackup --src postgres:/// --dst . --file backup.tar.lz4
DESCRIPTION
-s, --src, --url 备份源 URL,可选,默认为 "postgres:///" ,如需密码应在 url、ENV 或 .pgpass 中提供
-d, --dst, --dir 备份文件存放位置,默认为 "/pg/backup"
-f, --file 覆盖默认备份文件名,"backup_ ${ tag } _ ${ date } .tar.lz4"
-r, --remove 删除 n 分钟前的 .lz4 文件,默认 1200(20小时)
-t, --tag 备份文件标签,未设置时使用目标集群名或本地 IP 地址,也用于默认文件名
-k, --key 指定 --encrypt 时的加密密钥,默认密钥为 ${ tag }
-u, --upload 上传备份文件到云存储(需自行实现)
-e, --encryption 使用 OpenSSL RC4 加密,未指定密钥时使用 tag 作为密钥
-h, --help 打印此帮助信息 postgres@pg-meta-1:~$ pg-basebackup
[ 2025-07-13 06:16:05][ INFO] ================================================================
[ 2025-07-13 06:16:05][ INFO] [ INIT] pg-basebackup begin, checking parameters
[ 2025-07-13 06:16:05][ DEBUG] [ INIT] filename ( -f) : backup_pg-meta_20250713.tar.lz4
[ 2025-07-13 06:16:05][ DEBUG] [ INIT] src ( -s) : postgres:///
[ 2025-07-13 06:16:05][ DEBUG] [ INIT] dst ( -d) : /pg/backup
[ 2025-07-13 06:16:05][ INFO] [ LOCK] lock acquired success on /tmp/backup.lock, pid = 107417
[ 2025-07-13 06:16:05][ INFO] [ BKUP] backup begin, from postgres:/// to /pg/backup/backup_pg-meta_20250713.tar.lz4
pg_basebackup: initiating base backup, waiting for checkpoint to complete
pg_basebackup: checkpoint completed
pg_basebackup: write-ahead log start point: 0/7000028 on timeline 1
pg_basebackup: write-ahead log end point: 0/7000FD8
pg_basebackup: syncing data to disk ...
pg_basebackup: base backup completed
[ 2025-07-13 06:16:06][ INFO] [ BKUP] backup complete!
[ 2025-07-13 06:16:06][ INFO] [ DONE] backup procedure complete!
[ 2025-07-13 06:16:06][ INFO] ================================================================ 备份使用 lz4 压缩。您可以使用以下命令解压并提取 tarball:
mkdir -p /tmp/data # 将备份提取到此目录
cat /pg/backup/backup_pg-meta_20250713.tar.lz4 | unlz4 -d -c | tar -xC /tmp/data
逻辑备份 您也可以使用 pg_dump 命令执行逻辑备份。
逻辑备份不能用于 PITR(时间点恢复),但对于在不同主版本之间迁移数据或实现灵活的数据导出逻辑非常有用。
从仓库引导 假设您有一个现有集群 pg-meta,想要将其克隆 为 pg-meta2:
您需要创建新的 pg-meta2 集群分支,然后在其上运行 pitr。
12.7.5 - 恢复操作 从备份恢复 PostgreSQL
您可以使用预配置的 pgbackrest 在 Pigsty 中执行时间点恢复(PITR)。
剧本方式 pgsql-pitr.yml 剧本自动执行 PITR手动方式 pg-pitr 脚本手动执行 PITR快速上手 如果您想将 pg-meta 集群回滚到之前的时间点,添加 pg_pitr 参数:
pg-meta :
hosts : { 10.10.10.10 : { pg_seq: 1, pg_role : primary } }
vars :
pg_cluster : pg-meta2
pg_pitr : { time : '2025-07-13 10:00:00+00' } # 从最新备份恢复
然后运行 pgsql-pitr.yml 剧本,它将把 pg-meta 集群回滚到指定时间点。
./pgsql-pitr.yml -l pg-meta
恢复后处理 恢复后的集群会禁用 archive_mode,以防止意外的 WAL 写入。
如果恢复后的数据库状态正常,您可以启用 archive_mode 并执行全量备份。
psql -c 'ALTER SYSTEM RESET archive_mode; SELECT pg_reload_conf();'
pg-backup full # 执行新的全量备份
恢复目标 您可以在 pg_pitr 中指定不同类型的恢复目标,但它们是互斥的:
timenamepg_create_restore_point 创建)xidlsn如果指定了上述任何参数,恢复 类型latest(WAL 归档流的末尾)。
特殊的 immediate 类型可用于指示 pgbackrest 通过在第一个一致点停止来最小化恢复时间。
目标类型
恢复目标类型
latest
time
lsn
xid
name
immediate pg_pitr : { } # 恢复到最新状态(WAL 归档流末尾) pg_pitr : { time : "2025-07-13 10:00:00+00" }pg_pitr : { lsn : "0/4001C80" }pg_pitr : { xid : "250000" }pg_pitr : { name : "some_restore_point" }pg_pitr : { type : "immediate" }按时间恢复 最常用的目标是时间点;您可以指定要恢复到的时间点:
./pgsql-pitr.yml -l pg-meta -e '{"pg_pitr": { "time": "2025-12-27 15:50:00+00" }}'
时间应该是有效的 PostgreSQL TIMESTAMPYYYY-MM-DD HH:MM:SS+TZ。
按名称恢复 您可以使用 pg_create_restore_point
SELECT pg_create_restore_point ( 'shit_incoming' );
然后在 PITR 中使用该命名恢复点:
./pgsql-pitr.yml -l pg-meta -e '{"pg_pitr": { "name": "shit_incoming" }}'
按 XID 恢复 如果您有一个事务意外删除了某些数据,最好的恢复方式是将数据库恢复到该事务之前的状态。
./pgsql-pitr.yml -e '{"pg_pitr": { "xid": "250000", exclusive: true }}'
您可以从监控仪表盘找到确切的事务 ID,或从 CSVLOG 中的 TXID 字段获取。
包含与排除
目标参数默认是"包含"的,这意味着恢复会包含目标点。
exclusive 标志会排除该确切目标,例如 xid 24999 将是最后一个被重放的事务。
这仅适用于 time、xid、lsn 恢复目标,详情请参阅 recovery_target_inclusive
按 LSN 恢复 PostgreSQL 使用 LSN (日志序列号)来标识 WAL 记录的位置。
您可以在很多地方找到它,比如 Pigsty 仪表盘的 PG LSN 面板。
./pgsql-pitr.yml -e '{"pg_pitr": { "lsn": "0/4001C80", timeline: "1" }}'
要恢复到 WAL 流中的确切位置,您还可以指定 timelinelatest)
恢复来源 cluster:从哪个集群恢复?默认使用当前的 pg_cluster,您可以使用同一 pgbackrest 仓库中的任何其他集群repo:覆盖备份仓库,使用与 pgbackrest_repo 相同的格式set:默认使用 latest 备份集,但您可以通过标签指定特定的 pgbackrest 备份Pigsty 将从 pgbackrest 备份仓库恢复。如果您使用集中式备份仓库(如 MinIO/S3),
可以指定另一个 “stanza”(另一个集群的备份目录)作为恢复来源。
pg-meta2 :
hosts : { 10.10.10.11 : { pg_seq: 1, pg_role : primary } }
vars :
pg_cluster : pg-meta2
pg_pitr : { cluster : pg-meta } # 从 pg-meta 集群备份恢复
上述配置将标记 PITR 过程使用 pg-meta stanza。
您也可以通过 CLI 参数传递 pg_pitr 参数:
./pgsql-pitr.yml -l pg-meta2 -e '{"pg_pitr": { "cluster": "pg-meta" }}'
从另一个集群 PITR 时也可以使用这些目标:
./pgsql-pitr.yml -l pg-meta2 -e '{"pg_pitr": { "cluster": "pg-meta", "time": "2025-07-14 08:00:00+00" }}'
分步执行 这种方式是半自动的,您将参与 PITR 过程以做出关键决策。
例如,此配置将把 pg-meta 集群本身恢复到指定时间点:
pg-meta :
hosts : { 10.10.10.10 : { pg_seq: 1, pg_role : primary } }
vars :
pg_cluster : pg-meta2
pg_pitr : { time : '2025-07-13 10:00:00+00' } # 从最新备份恢复
让我们逐步执行:
./pgsql-pitr.yml -l pg-meta -t down # 暂停 patroni 高可用
./pgsql-pitr.yml -l pg-meta -t pitr # 运行 pitr 过程
./pgsql-pitr.yml -l pg-meta -t up # 生成 pgbackrest 配置和恢复脚本
# down : # 停止高可用并关闭 patroni 和 postgres
# - pause : # 暂停 patroni 自动故障切换
# - stop : # 停止 patroni 和 postgres 服务
# - stop_patroni : # 停止 patroni 服务
# - stop_postgres : # 停止 postgres 服务
# pitr : # 执行 PITR 过程
# - config : # 生成 pgbackrest 配置和恢复脚本
# - restore : # 运行 pgbackrest 恢复命令
# - recovery : # 启动 postgres 并完成恢复
# - verify : # 验证恢复后的集群控制数据
# up: : # 启动 postgres / patroni 并恢复高可用
# - etcd : # 启动前清理 etcd 元数据
# - start : # 启动 patroni 和 postgres 服务
# - start_postgres : # 启动 postgres 服务
# - start_patroni : # 启动 patroni 服务
# - resume : # 恢复 patroni 自动故障切换
PITR 参数定义 pg_pitr 参数还有更多可用选项:
pg_pitr : # 定义 PITR 任务
cluster : "some_pg_cls_name" # 源集群名称
type : default # 恢复目标类型:time, xid, name, lsn, immediate, default
time : "2025-01-01 10:00:00+00" # 恢复目标:时间,与 xid, name, lsn 互斥
name : "some_restore_point" # 恢复目标:命名恢复点,与 time, xid, lsn 互斥
xid : "100000" # 恢复目标:事务 ID,与 time, name, lsn 互斥
lsn : "0/3000000" # 恢复目标:日志序列号,与 time, name, xid 互斥
timeline : latest # 目标时间线,可以是整数,默认为 latest
exclusive : false # 是否排除目标点,默认为 false
action : pause # 恢复后操作:pause, promote, shutdown
archive : false # 是否保留归档设置?默认为 false
db_exclude : [ template0, template1 ]
db_include : []
link_map :
pg_wal : '/data/wal'
pg_xact : '/data/pg_xact'
process : 4 # 并行恢复进程数
repo : {} # 恢复来源仓库
data : /pg/data # 数据恢复位置
port : 5432 # 恢复实例的监听端口
12.7.6 - 克隆数据库集群 如何利用 PITR 创建一个新的 PostgreSQL 集群,并恢复到指定时间点?
快速上手 利用 Standby Cluster 创建现有集群的在线副本 利用 PITR 创建现有集群的时间点快照 在 PITR 完成后进行善后,确保新集群的备份流程正常运行 您可以使用 PG PITR 机制克隆整个数据库集群。
重置一个集群的状态 您也可以考虑创建一个全新的空集群,然后利用 PITR,将其重置为 pg-meta 集群的特定状态。
利用这种技术,您可以将现有集群 pg-meta 的任意时间点(备份保留期内)状态克隆到一个新的集群中。
我们依然以 Pigsty 4 节点沙箱环境为例,使用以下命令将 pg-test 集群重置为 pg-meta 集群的最新状态:
./pgsql-pitr.yml -l pg-test -e '{"pg_pitr": { "cluster": "pg-meta" }}'
PITR 善后工作 当你使用 PITR 恢复一个集群后,这个新集群本身的 PITR 功能是被禁用的。
因为如果它也尝试去生成备份,归档 WAL,有可能会写脏数据之前集群的备份仓库。
因此,当你确认这个 PITR 恢复出来的新集群状态符合预期后,你需要执行以下善后工作。
升级备份仓库 Stanza,允许它接纳来自不同集群的新备份(仅当从别的集群恢复时)。 启用 archive_mode,允许新集群归档 WAL 日志(需要重启集群) 执行一个新的全量备份,确保新集群的数据被纳入(可选,也可以等 crontab 定时执行) pb stanza-upgrade
psql -c 'ALTER SYSTEM RESET archive_mode;'
pg-backup full
通过这些操作,你的新集群将从第一次全量备份开始时,拥有自己的备份历史。
如果你跳过这些步骤,新集群本身的备份将无法进行,WAL 归档也不会生效。
意味着你将无法对新集群执行任何备份或 PITR 操作。
不善后的后果 假设您在 pg-test 集群上执行了 PITR 恢复,使用了另外一个集群 pg-meta 的数据,但没有进行善后工作。
那么在下一次例行备份的时候,你会看到下面的错误:
postgres@pg-test-1:~$ pb backup
2025-12-27 10:20:29.336 P00 INFO: backup command begin 2.57.0: --annotation= pg_cluster = pg-test --compress-type= lz4 --delta --exec-id= 21034-171fb30b --expire-auto --log-level-console= info --log-level-file= info --log-path= /pg/log/pgbackrest --pg1-path= /pg/data --pg1-port= 5432 --repo1-block --repo1-bundle --repo1-bundle-limit= 20MiB --repo1-bundle-size= 128MiB --repo1-cipher-pass= <redacted> --repo1-cipher-type= aes-256-cbc --repo1-path= /pgbackrest --repo1-retention-full= 14 --repo1-retention-full-type= time --repo1-s3-bucket= pgsql --repo1-s3-endpoint= sss.pigsty --repo1-s3-key= <redacted> --repo1-s3-key-secret= <redacted> --repo1-s3-region= us-east-1 --repo1-s3-uri-style= path --repo1-storage-ca-file= /etc/pki/ca.crt --repo1-storage-port= 9000 --repo1-type= s3 --stanza= pg-test --start-fast
2025-12-27 10:20:29.357 P00 ERROR: [ 051] : PostgreSQL version 18, system-id 7588470953413201282 do not match stanza version 18, system-id 7588470974940466058
HINT: is this the correct stanza?
2025-12-27 10:20:29.357 P00 INFO: backup command end: aborted with exception [ 051]
postgres@pg-test-1:~$
WAL 日志归档被 pgBackrest 关闭了,因此也不会有 WAL 归档。
克隆一个新集群 例如,假设您有一个集群 pg-meta,现在你想要从 pg-meta 克隆一个 pg-meta2 的新集群。
您可以考虑使用 备份集群 pg-meta2。
pgBackrest 支持增量备份/还原,因此如果您已经通过物理复制拉取了 pg-meta 的数据,通常增量 PITR 还原会非常快。
pb stop --force
pb stanza-delete --force
pb start
pb stanza-create
./pgsql-rm.yml -t pg_backup -l pg-test -e pg_rm_backup = true
./pgsql.yml -t pg_backup -l pg-test
如果您想要将 pg-test 集群重置为 pg-meta 集群在 2025 年 12 月 26 日 15:30 的状态,可以使用以下命令:
./pgsql-pitr.yml -l pg-test -e '{"pg_pitr": { "cluster": "pg-meta", "time": "2025-12-27 17:50:00+08" ,archive: true }}'
当然,您也可以直接创建一个全新的集群,然后使用 pgsql-pitr.yml 剧本从 pg-meta 恢复数据到新集群 pg-meta2 并顶替新集群的数据目录。
使用这种技术,您不仅可以克隆 pg-meta 集群的最新状态,还可以克隆到任意时间点,例如:
12.8 - 数据迁移 如何将现有的 PostgreSQL 集群以最小的停机时间迁移至新的、由Pigsty管理的 PostgreSQL 集群?
Pigsty 内置了一个剧本 pgsql-migration.yml
通过预生成的自动化脚本,应用停机时间可以缩减到几秒内。但请注意,逻辑复制需要 PostgreSQL 10 以上的版本才能工作。
当然如果您有充足的停机时间预算,那么总是可以使用 pg_dump | psql 的方式进行停机迁移。
定义迁移任务 想要使用Pigsty提供的在线迁移剧本,您需要创建一个定义文件,来描述迁移任务的细节。
请查看任务定义文件示例作为参考: files/migration/pg-meta.yml
这个迁移任务要将 pg-meta.meta 在线迁移到 pg-test.test,前者称为 源集群(SRC) , 后者称为 宿集群(DST) 。
pg-meta-1 10.10.10.10 --> pg-test-1 10.10.10.11 (10.10.10.12,10.10.10.13)
基于逻辑复制的迁移以数据库为单位,您需要指定需要迁移的数据库名称,以及数据库源宿集群主节点的 IP 地址,以及超级用户的连接信息。
---
#-----------------------------------------------------------------
# PG_MIGRATION
#-----------------------------------------------------------------
context_dir : ~/migration # 迁移手册 & 脚本的放置目录
#-----------------------------------------------------------------
# SRC Cluster (旧集群)
#-----------------------------------------------------------------
src_cls : pg-meta # 源集群名称 <必填>
src_db : meta # 源数据库名称 <必填>
src_ip : 10.10.10.10 # 源集群主 IP <必填>
#src_pg: '' # 如果定义,使用此作为源 dbsu pgurl 代替:
# # postgres://{{ pg_admin_username }}@{{ src_ip }}/{{ src_db }}
# # 例如: 'postgres://dbuser_dba:DBUser.DBA@10.10.10.10:5432/meta'
#sub_conn: '' # 如果定义,使用此作为订阅连接字符串代替:
# # host={{ src_ip }} dbname={{ src_db }} user={{ pg_replication_username }}'
# # 例如: 'host=10.10.10.10 dbname=meta user=replicator password=DBUser.Replicator'
#-----------------------------------------------------------------
# DST Cluster (新集群)
#-----------------------------------------------------------------
dst_cls : pg-test # 宿集群名称 <必填>
dst_db : test # 宿数据库名称 <必填>
dst_ip : 10.10.10.11 # 宿集群主 IP <必填>
#dst_pg: '' # 如果定义,使用此作为目标 dbsu pgurl 代替:
# # postgres://{{ pg_admin_username }}@{{ dst_ip }}/{{ dst_db }}
# # 例如: 'postgres://dbuser_dba:DBUser.DBA@10.10.10.11:5432/test'
#-----------------------------------------------------------------
# PGSQL
#-----------------------------------------------------------------
pg_dbsu : postgres
pg_replication_username : replicator
pg_replication_password : DBUser.Replicator
pg_admin_username : dbuser_dba
pg_admin_password : DBUser.DBA
pg_monitor_username : dbuser_monitor
pg_monitor_password : DBUser.Monitor
#-----------------------------------------------------------------
...
默认情况下,源宿集群两侧的超级用户连接串会使用全局的管理员用户和各自主库的 IP 地址拼接而成,但您总是可以通过 src_pg 和 dst_pg 参数来覆盖这些默认值。
同理,您也可以通过 sub_conn 参数来覆盖订阅连接串的默认值。
生成迁移计划 此剧本不会主动完成集群的迁移工作,但它会生成迁移所需的操作手册与自动化脚本。
默认情况下,你会在 ~/migration/pg-meta.meta 下找到迁移上下文目录。
按照 README.md 的说明,依次执行这些脚本,你就可以完成数据库迁移了!
# 激活迁移上下文:启用相关环境变量
. ~/migration/pg-meta.meta/activate
# 这些脚本用于检查 src 集群状态,并帮助在 pigsty 中生成新的集群定义
./check-user # 检查 src 用户
./check-db # 检查 src 数据库
./check-hba # 检查 src hba 规则
./check-repl # 检查 src 复制身份
./check-misc # 检查 src 特殊对象
# 这些脚本用于在现有的 src 集群和由 pigsty 管理的 dst 集群之间建立逻辑复制,除序列外的数据将实时同步
./copy-schema # 将模式复制到目标
./create-pub # 在 src 上创建发布
./create-sub # 在 dst 上创建订阅
./copy-progress # 打印逻辑复制进度
./copy-diff # 通过计数表快速比较 src 和 dst 的差异
# 这些脚本将在线迁移中运行,该迁移将停止 src 集群,复制序列号(逻辑复制不复制序列号!)
./copy-seq [ n] # 同步序列号,如果给出了 n,则会应用额外的偏移
# 你必须根据你的访问方式(dns,vip,haproxy,pgbouncer等),将应用流量切换至新的集群!
#./disable-src # 将 src 集群访问限制为管理节点和新集群(你的实现)
#./re-routing # 从 SRC 到 DST 重新路由应用流量!(你的实现)
# 然后进行清理以删除订阅和发布
./drop-sub # 迁移后在 dst 上删除订阅
./drop-pub # 迁移后在 src 上删除发布
注意事项
如果担心拷贝序列号时出现主键冲突,您可以在拷贝时将所有序列号向前推进一段距离,例如 +1000 ,你可以使用 ./copy-seq 加一个参数 1000 来实现这一点。
你必须实现自己的 ./re-routing 脚本,以将你的应用流量从 src 路由到 dst。 因为我们不知道你的流量是如何路由的(例如 dns, VIP, haproxy 或 pgbouncer)。 当然,您也可以手动完成这项操作…
你可以实现一个 ./disable-src 脚本来限制应用对 src 集群的访问,这是可选的:如果你能确保所有应用流量都在 ./re-routing 中干净利落地切完,其实不用这一步。
但如果您有未知来源的各种访问无法梳理干净,那么最好使用更为彻底的方式:更改 HBA 规则并重新加载来实现(推荐),或者只是简单粗暴地关停源主库上的 postgres、pgbouncer 或 haproxy 进程。
12.9 - 任务教程 如何去完成单个任务。每个任务页面是一般通过给出若干步骤展示如何执行完成某事。
12.9.1 - 故障排查 常见故障与分析排查思路
本文档列举了 PostgreSQL 和 Pigsty 中可能出现的故障,以及定位、处理、分析问题的 SOP。
磁盘空间写满 磁盘空间写满是最常见的故障类型。
现象 当数据库所在磁盘空间耗尽时,PostgreSQL 将无法正常工作,可能出现以下现象:数据库日志反复报错"no space left on device"(磁盘空间不足),
新数据无法写入,甚至 PostgreSQL 可能触发 PANIC 强制关闭。
Pigsty 带有 NodeFsSpaceFull 告警规则,当文件系统可用空间不足 10% 时触发告警。
使用监控系统 NODE Instance 面板查阅 FS 指标面板定位问题。
诊断 您也可以登录数据库节点,使用 df -h 查看各挂载盘符使用率,确定哪个分区被写满。
对于数据库节点,重点检查以下目录及其大小,以判断是哪个类别的文件占满了空间:
数据目录 (/pg/data/base):存放表和索引的数据文件,大量写入与临时文件需要关注WAL目录 (如 pg/data/pg_wal):存放 PG WAL,WAL 堆积/复制槽保留是常见的磁盘写满原因。数据库日志目录 (如 pg/log):如果 PG 日志未及时轮转写大量报错写入,也可能占用大量空间。本地备份目录 (如 data/backups):使用 pgBackRest 等在本机保存备份时,也有可能撑满磁盘。如果问题出在 Pigsty 管理节点或监控节点,还需考虑:
监控数据 :VictoriaMetrics 的时序指标和 VictoriaLogs 日志存储都会占用磁盘,可检查保留策略。对象存储数据 :Pigsty 集成的 MinIO 对象存储可能会被用于 PG 备份保存。明确占用空间最大的目录后,可进一步使用 du -sh <目录> 深入查找特定大型文件或子目录。
处理 磁盘写满属于紧急问题,需立即采取措施释放空间并保证数据库继续运行。
当数据盘并未与系统盘区分时,写满磁盘可能导致 Shell 命令无法执行。这种情况下,可以删除 /pg/dummy 占位文件,释放少量应急空间以便 shell 命令恢复正常。
如果数据库由于 pg_wal 写满已经宕机,清理空间后需要重启数据库服务并仔细检查数据完整性。
事务号回卷 PostgreSQL 循环使用 32 位事务ID (XID),耗尽时会出现"事务号回卷"故障(XID Wraparound)。
现象 第一阶段的典型征兆是 PGSQL Persist - Age Usage 面板年龄饱和度进入警告区域。
数据库日志开始出现:WARNING: database "postgres" must be vacuumed within xxxxxxxx transactions 字样的信息。
若问题持续恶化,PostgreSQL 会进入保护模式:当剩余事务ID不到约100万时数据库切换为只读模式;达到上限约21亿(2^31)时则拒绝任何新事务并迫使服务器停机以避免数据错误。
诊断 PostgreSQL 与 Pigsty 默认启用自动垃圾回收(AutoVacuum),因此此类故障出现通常有更深层次的根因。
常见的原因包括:超长事务(SAGE),Autovacuum 配置失当,复制槽阻塞,资源不足,存储引擎/扩展BUG,磁盘坏块。
首先定位年龄最大的数据库,然后可通过 Pigsty PGCAT Database - Tables 面板来确认表的年龄分布。
同时查阅数据库错误日志,通常可以找到定位根因的线索。
处理 立即冻结老事务 :如果数据库尚未进入只读保护状态,立刻对受影响的库执行一次手动 VACUUM FREEZE。可以从老化最严重的表开始逐个冻结,而不是整库一起做,以加快效果。使用超级用户连接数据库,针对识别出的 relfrozenxid 最大的表运行 VACUUM FREEZE 表名;,优先冻结那些XID年龄最大的表元组。这样可以迅速回收大量事务ID空间。单用户模式救援 :如果数据库已经拒绝写入或宕机保护,此时需要启动数据库到单用户模式执行冻结操作。在单用户模式下运行 VACUUM FREEZE database_name; 对整个数据库进行冻结清理。完成后再以多用户模式重启数据库。这样做可以解除回卷锁定,让数据库重新可写。需要注意在单用户模式下操作要非常谨慎,并确保有足够的事务ID余量完成冻结。备用节点接管 :在某些复杂场景(例如遭遇硬件问题导致 vacuum 无法完成),可考虑提升集群中的只读备节点为主,以获取一个相对干净的环境来处理冻结。例如主库因坏块导致无法 vacuum,此时可以手动Failover提升备库为新的主库,再对其进行紧急 vacuum freeze。确保新主库已冻结老事务后,再将负载切回来。连接耗尽 PostgreSQL 有一个最大连接数配置 (max_connections),当客户端连接数超过此上限时,新的连接请求将被拒绝。典型现象是在应用端看到数据库无法连接,并报出类似
FATAL: remaining connection slots are reserved for non-replication superuser connections 或 too many clients already 的错误。
这表示普通连接数已用完,仅剩下保留给超管或复制的槽位
诊断 连接耗尽通常由客户端大量并发请求引起。您可以通过 PGCAT Instance / PGCAT Database / PGCAT Locks 直接查阅数据库当前的活跃会话。
并判断是什么样的查询填满了系统,并进行进一步的处理。特别需要关注是否存在大量 Idle in Transaction 状态的连接以及长时间运行的事务(以及慢查询)。
处理 杀查询 :对于已经耗尽导致业务受阻的情况,通常立即使用 pg_terminate_backend(pid) 进行紧急降压。
对于使用连接池的情况,则可以调整连接池大小参数,并执行 reload 重载的方式减少数据库层面的连接数量。
您也可以修改 max_connections 参数为更大的值,但本参数需要重启数据库后才能生效。
etcd 配额写满 etcd 配额写满将导致 PG 高可用控制面失效,无法进行配置变更。
诊断 Pigsty 在实现高可用时使用 etcd 作为分布式配置存储(DCS),etcd 自身有一个存储配额(默认约为2GB)。
当 etcd 存储用量达到配额上限时,etcd 将拒绝写入操作,报错 “etcdserver: mvcc: database space exceeded "。在这种情况下,Patroni 无法向 etcd 写入心跳或更新配置,从而导致集群管理功能失效。
解决 在 Pigsty v2.0.0 - v2.5.1 之间的版本默认受此问题影响。Pigsty v2.6.0 为部署的 etcd 新增了自动压实的配置项,如果您仅将其用于 PG 高可用租约,则常规用例下不会再有此问题。
有缺陷的存储引擎 目前,TimescaleDB 的试验性存储引擎 Hypercore 被证实存在缺陷,已经出现 VACUUM 无法回收出现 XID 回卷故障的案例。
请使用该功能的用户及时迁移至 PostgreSQL 原生表或者 TimescaleDB 默认引擎
详细介绍:《PG新存储引擎故障案例 》
12.9.2 - 误删处理 处理误删数据,误删表,误删数据库
误删数据 如果是小批量 DELETE 误操作,可以考虑使用 pg_surgerypg_dirtyread
-- 立即关闭此表上的 Auto Vacuum 并中止 Auto Vacuum 本表的 worker 进程
ALTER TABLE public . some_table SET ( autovacuum_enabled = off , toast . autovacuum_enabled = off );
CREATE EXTENSION pg_dirtyread ;
SELECT * FROM pg_dirtyread ( 'tablename' ) AS t ( col1 type1 , col2 type2 , ...);
如果被删除的数据已经被 VACUUM 回收,那么使用通用的误删处理流程。
误删对象 当出现 DROP/DELETE 类误操作,通常按照以下流程决定恢复方案。
确认此数据是否可以通过业务系统或其他数据系统找回,如果可以,直接从业务侧修复。 确认是否有延迟从库,如果有,推进延迟从库至误删时间点,查询出来恢复。 如果数据已经确认删除,确认备份信息,恢复范围是否覆盖误删时间点,如果覆盖,开始 PITR 确认是整集群原地 PITR 回滚 ,还是新开服务器重放,还是用从库来重放,并执行恢复策略 误删集群 如果出现整个数据库集群通过 Pigsty 管理命令被误删的情况,例如错误的执行 pgsql-rm.ymlbin/pgsql-rm 命令。
除非您指定了 pg_rm_backupfalse,否则备份会与数据库集群一起被删除。
警告 :在这种情况,您的数据将无法找回!请务必三思而后行!
建议:对于生产环境,您可以在配置清单中全局配置此参数为 false,在移除集群时保留备份。
12.9.3 - 手工恢复 在沙箱环境中按照提示脚本手动执行 PITR
您可以使用 pgsql-pitr.yml 剧本执行 PITR,但在某些情况下,您可能希望手动执行 PITR,直接使用 pgbackrest 原语实现精细的控制。
我们将使用带有 MinIO 备份仓库的 四节点沙箱
初始化沙箱 使用 vagrant terraform
curl https://repo.pigsty.io/get | bash; cd ~/pigsty/
./configure -c full
./install
现在以管理节点上的管理员用户(或 dbsu)身份操作。
检查备份 要检查备份状态,您需要切换到 postgres 用户并使用 pb 命令:
sudo su - postgres # 切换到 dbsu: postgres 用户
pb info # 打印 pgbackrest 备份信息
pb 是 pgbackrest 的别名,会自动从 pgbackrest 配置中获取 stanza 名称。
function pb() {
local stanza = $( grep -o '\[[^][]*]' /etc/pgbackrest/pgbackrest.conf | head -n1 | sed 's/.*\[\([^]]*\)].*/\1/' )
pgbackrest --stanza= $stanza $@
}
您可以看到初始备份信息,这是一个全量备份:
root@pg-meta-1:~# pb info
stanza: pg-meta
status: ok
cipher: aes-256-cbc
db (current)
wal archive min/max (17): 000000010000000000000001/000000010000000000000007
full backup: 20250713-022731F
timestamp start/stop: 2025-07-13 02:27:31+00 / 2025-07-13 02:27:33+00
wal start/stop: 000000010000000000000004 / 000000010000000000000004
database size: 44MB, database backup size: 44MB
repo1: backup size: 8.4MB
备份完成于 2025-07-13 02:27:33+00,这是您可以恢复到的最早时间。
由于 WAL 归档处于活动状态,您可以恢复到备份之后的任何时间点,直到 WAL 结束(即现在)。
生成心跳 您可以生成一些心跳来模拟工作负载。/pg-bin/pg-heartbeat 就是用于此目的的,
它每秒向 monitor.heartbeat 表写入一个心跳时间戳。
心跳生成
alias
pgbench
output make rh # 运行心跳: ssh 10.10.10.10 'sudo -iu postgres /pg/bin/pg-heartbeat' ssh 10.10.10.10 'sudo -iu postgres /pg/bin/pg-heartbeat' cls | ts | lsn | lsn_int | txid | status | now | elapse
---------+-------------------------------+------------+-----------+------+---------+-----------------+----------
pg-meta | 2025-07-13 03:01:20.318234+00 | 0/115BF5C0 | 291239360 | 4812 | leading | 03:01:20.318234 | 00:00:00 您甚至可以向集群添加更多工作负载,让我们使用 pgbench 生成一些随机写入:
pgbench 负载
alias
pgbench
output make ri # 初始化 pgbench
make rw # 运行 pgbench 读写工作负载 pgbench -is10 postgres://dbuser_meta:DBUser.Meta@10.10.10.10:5433/meta
while true; do pgbench -nv -P1 -c4 --rate= 64 -T10 postgres://dbuser_meta:DBUser.Meta@10.10.10.10:5433/meta; done while true; do pgbench -nv -P1 -c4 --rate= 64 -T10 postgres://dbuser_meta:DBUser.Meta@10.10.10.10:5433/meta; done
pgbench ( 17.5 ( Homebrew) , server 17.4 ( Ubuntu 17.4-1.pgdg24.04+2))
progress: 1.0 s, 60.9 tps, lat 7.295 ms stddev 4.219, 0 failed, lag 1.818 ms
progress: 2.0 s, 69.1 tps, lat 6.296 ms stddev 1.983, 0 failed, lag 1.397 ms
... PITR 手册 现在让我们选择一个恢复时间点,比如 2025-07-13 03:03:03+00,这是初始备份(和心跳)之后的一个时间点。
要执行手动 PITR,使用 pg-pitr 工具:
$ pg-pitr -t "2025-07-13 03:03:00+00"
它会为您生成执行恢复的指令,通常需要四个步骤:
Perform time PITR on pg-meta
[ 1. Stop PostgreSQL] ===========================================
1.1 Pause Patroni ( if there are any replicas)
$ pg pause <cls> # 暂停 patroni 自动故障切换
1.2 Shutdown Patroni
$ pt-stop # sudo systemctl stop patroni
1.3 Shutdown Postgres
$ pg-stop # pg_ctl -D /pg/data stop -m fast
[ 2. Perform PITR] ===========================================
2.1 Restore Backup
$ pgbackrest --stanza= pg-meta --type= time --target= '2025-07-13 03:03:00+00' restore
2.2 Start PG to Replay WAL
$ pg-start # pg_ctl -D /pg/data start
2.3 Validate and Promote
- If database content is ok, promote it to finish recovery, otherwise goto 2.1
$ pg-promote # pg_ctl -D /pg/data promote
[ 3. Restore Primary] ===========================================
3.1 Enable Archive Mode ( Restart Required)
$ psql -c 'ALTER SYSTEM SET archive_mode = on;'
3.1 Restart Postgres to Apply Changes
$ pg-restart # pg_ctl -D /pg/data restart
3.3 Restart Patroni
$ pt-restart # sudo systemctl restart patroni
[ 4. Restore Cluster] ===========================================
4.1 Re-Init All [ **REPLICAS**] ( if any)
- 4.1.1 option 1: restore replicas with same pgbackrest cmd ( require central backup repo)
$ pgbackrest --stanza= pg-meta --type= time --target= '2025-07-13 03:03:00+00' restore
- 4.1.2 option 2: nuke the replica data dir and restart patroni ( may take long time to restore)
$ rm -rf /pg/data/*; pt-restart
- 4.1.3 option 3: reinit with patroni, which may fail if primary lsn < replica lsn
$ pg reinit pg-meta
4.2 Resume Patroni
$ pg resume pg-meta
4.3 Full Backup ( optional)
$ pg-backup full # 建议在 PITR 后执行新的全量备份
单节点示例 让我们从简单的单节点 pg-meta 集群开始,作为一个更简单的示例。
关闭数据库
关闭服务
shutdown patroni
shutdown postgres pt-stop # sudo systemctl stop patroni,关闭 patroni(和 postgres) # 可选,因为如果 patroni 未暂停,postgres 会被 patroni 关闭
$ pg_stop # pg_ctl -D /pg/data stop -m fast,关闭 postgres
pg_ctl: PID file "/pg/data/postmaster.pid" does not exist
Is server running?
$ pg-ps # 打印 postgres 相关进程
UID PID PPID C STIME TTY STAT TIME CMD
postgres 31048 1 0 02:27 ? Ssl 0:19 /usr/sbin/pgbouncer /etc/pgbouncer/pgbouncer.ini
postgres 32026 1 0 02:28 ? Ssl 0:03 /usr/bin/pg_exporter ...
postgres 35510 35480 0 03:01 pts/2 S+ 0:00 /bin/bash /pg/bin/pg-heartbeat 确保本地 postgres 没有运行,然后执行手册中给出的恢复命令:
恢复备份 pgbackrest --stanza= pg-meta --type= time --target= '2025-07-13 03:03:00+00' restore postgres@pg-meta-1:~$ pgbackrest --stanza= pg-meta --type= time --target= '2025-07-13 03:03:00+00' restore
2025-07-13 03:17:07.443 P00 INFO: restore command begin 2.54.2: ...
2025-07-13 03:17:07.470 P00 INFO: repo1: restore backup set 20250713-022731F, recovery will start at 2025-07-13 02:27:31
2025-07-13 03:17:07.471 P00 INFO: remove invalid files/links/paths from '/pg/data'
2025-07-13 03:17:08.523 P00 INFO: write updated /pg/data/postgresql.auto.conf
2025-07-13 03:17:08.527 P00 INFO: restore size = 44MB, file total = 1436
2025-07-13 03:17:08.527 P00 INFO: restore command end: completed successfully ( 1087ms) 验证数据 我们不希望 patroni HA 接管,直到确定数据正确,所以手动启动 postgres:
验证数据
start postgres
output waiting for server to start....2025-07-13 03:19:33.133 UTC [ 39294] LOG: redirecting log output to logging collector process
2025-07-13 03:19:33.133 UTC [ 39294] HINT: Future log output will appear in directory "/pg/log/postgres" .
done
server started 现在您可以检查数据,看看是否处于您想要的时间点。
您可以通过检查业务表中的最新时间戳来验证,或者在本例中通过心跳表检查。
postgres@pg-meta-1:~$ psql -c 'table monitor.heartbeat'
id | ts | lsn | txid
---------+-------------------------------+-----------+------
pg-meta | 2025-07-13 03:02:59.214104+00 | 302005504 | 4912
时间戳正好在我们指定的时间点之前!(2025-07-13 03:03:00+00)。
如果这不是您想要的时间点,可以使用不同的时间点重复恢复。
由于恢复是以增量和并行方式执行的,速度非常快。
可以重试直到找到正确的时间点。
提升主库 恢复后的 postgres 集群处于 recovery 模式,因此在提升为主库之前会拒绝任何写操作。
这些恢复参数是由 pgBackRest 在配置文件中生成的。
postgres@pg-meta-1:~$ cat /pg/data/postgresql.auto.conf
# Do not edit this file or use ALTER SYSTEM manually!
# It is managed by Pigsty & Ansible automatically!
# Recovery settings generated by pgBackRest restore on 2025-07-13 03:17:08
archive_mode = 'off'
restore_command = 'pgbackrest --stanza=pg-meta archive-get %f "%p"'
recovery_target_time = '2025-07-13 03:03:00+00'
如果数据正确,您可以提升 它为主库,将其标记为新的领导者并准备接受写入。
pg-promote
waiting for server to promote.... done
server promoted psql -c 'SELECT pg_is_in_recovery()' # 'f' 表示已提升为主库
pg_is_in_recovery
-------------------
f
( 1 row) 新时间线和脑裂
一旦提升,数据库集群将进入新的时间线(领导者纪元)。
如果有任何写流量,将写入新的时间线。
恢复集群 最后,不仅需要恢复数据,还需要恢复集群状态,例如:
Patroni 接管 您的 postgres 是直接启动的,要恢复 HA 接管,您需要启动 patroni 服务:
Patroni 接管
launch patroni
resume patroni pt-start # sudo systemctl start patroni pg resume pg-meta # 恢复 patroni 自动故障切换(如果之前暂停过) 归档模式 archive_mode 在恢复期间被 pgbackrest 禁用。
如果您希望新领导者的写入归档到备份仓库,还需要启用 archive_mode 配置。
归档模式
check archive_mode
reset archive_mode
edit directly psql -c 'show archive_mode'
archive_mode
--------------
off psql -c 'ALTER SYSTEM RESET archive_mode;'
psql -c 'SELECT pg_reload_conf();'
psql -c 'show archive_mode' # 您也可以直接编辑 postgresql.auto.conf 并使用 pg_ctl 重载
sed -i '/archive_mode/d' /pg/data/postgresql.auto.conf
pg_ctl -D /pg/data reload 备份集 通常建议在 PITR 后执行新的全量备份,但这是可选的。
从库 如果您的 postgres 集群有从库,您也需要在每个从库上执行 PITR。
或者,更简单的方法是删除从库数据目录并重启 patroni,这将从主库重新初始化从库。
我们将在下一个多节点集群示例中介绍这种情况。
多节点示例 现在让我们以三节点 pg-test 集群作为 PITR 示例。
12.9.4 - 利用 xfs 实现实例 Fork 在同一台机器上克隆实例并执行时间点恢复
Pigsty 提供了两个实用脚本,用于在同一台机器上快速克隆实例并执行时间点恢复:
这两个脚本可以配合使用:先用 pg-fork 克隆实例,再用 pg-pitr 将克隆实例恢复到指定时间点。
pg-fork pg-fork
快速上手 使用 postgres 用户(dbsu)执行以下命令,即可创建一个新的实例:
pg-fork 1 # 从 /pg/data 克隆到 /pg/data1,端口 15432
pg-fork 2 -d /pg/data1 # 从 /pg/data1 克隆到 /pg/data2,端口 25432
pg-fork 3 -D /tmp/test -P 5555 # 克隆到自定义目录和端口
克隆完成后,可以启动并访问新实例:
pg_ctl -D /pg/data1 start # 启动克隆实例
psql -p 15432 # 连接克隆实例
命令语法 pg-fork <FORK_ID> [ options]
必填参数:
参数 说明 <FORK_ID>克隆实例编号(1-9),决定默认端口和数据目录
可选参数:
参数 说明 默认值 -d, --data <datadir>源实例数据目录 /pg/data 或 $PG_DATA-D, --dst <dst_dir>目标数据目录 /pg/data<FORK_ID>-p, --port <port>源实例端口 5432 或 $PG_PORT-P, --dst-port <port>目标实例端口 <FORK_ID>5432-s, --skip跳过备份 API,使用冷拷贝模式 - -y, --yes跳过确认提示 - -h, --help显示帮助信息 -
使用示例
pg-fork 示例
基础克隆
指定源端口
链式克隆
自定义位置
冷拷贝模式 # 从默认实例克隆到 /pg/data1,端口 15432
pg-fork 1
# 从默认实例克隆到 /pg/data2,端口 25432
pg-fork 2 # 从端口 5433 的实例克隆
pg-fork 1 -p 5433
# 使用环境变量指定源端口
PG_PORT = 5433 pg-fork 1 # 从 /pg/data1 克隆到 /pg/data2
pg-fork 2 -d /pg/data1
# 从 /pg/data2 克隆到 /pg/data3
pg-fork 3 -d /pg/data2 # 克隆到自定义目录和端口
pg-fork 1 -D /tmp/pgtest -P 5555
# 完全自定义
pg-fork 1 -d /pg/data -D /mnt/backup/pgclone -P 6543 # 源实例已停止时使用冷拷贝
pg-fork 1 -s
# 跳过确认直接执行
pg-fork 1 -s -y 工作原理 pg-fork 支持两种工作模式:
热备份模式 (默认,源实例运行中):
调用 pg_backup_start() 开始备份 使用 cp --reflink=auto 拷贝数据目录 调用 pg_backup_stop() 结束备份 修改配置文件,避免与源实例冲突 冷拷贝模式 (使用 -s 参数或源实例未运行):
直接使用 cp --reflink=auto 拷贝数据目录 修改配置文件 CoW 快速克隆
如果您使用 XFS(启用 reflink)、Btrfs 或 ZFS 文件系统,pg-fork 会利用 Copy-on-Write 特性,
数据目录拷贝在几百毫秒内完成,且几乎不占用额外存储空间。只有在数据被修改时才会分配新的存储块。
克隆后配置 pg-fork 会自动修改克隆实例的以下配置:
配置项 修改内容 port改为目标端口(避免冲突) archive_mode设为 off(避免污染 WAL 归档) log_directory设为 log(使用数据目录下的日志) primary_conninfo移除(创建独立实例) standby.signal移除(创建独立实例) pg_replslot/*清空(避免复制槽冲突)
典型工作流 # 1. 克隆实例用于测试
pg-fork 1 -y
# 2. 启动克隆实例
pg_ctl -D /pg/data1 start
# 3. 在克隆实例上测试(不影响生产)
psql -p 15432 -c "DROP TABLE important_data;" # 安全测试
# 4. 测试完成后清理
pg_ctl -D /pg/data1 stop
rm -rf /pg/data1
pg-pitr pg-pitr
快速上手 pg-pitr -d # 恢复到最新状态
pg-pitr -i # 恢复到备份完成时间
pg-pitr -t "2025-01-01 12:00:00+08" # 恢复到指定时间点
pg-pitr -n my-savepoint # 恢复到命名恢复点
pg-pitr -l "0/7C82CB8" # 恢复到指定 LSN
pg-pitr -x 12345678 -X # 恢复到事务之前
pg-pitr -b 20251225-120000F # 恢复到指定备份集
命令语法 pg-pitr [ options] [ recovery_target]
恢复目标(选择一个):
参数 说明 -d, --default恢复到 WAL 归档流末尾(最新状态) -i, --immediate恢复到数据库一致性点(最快恢复) -t, --time <timestamp>恢复到指定时间点 -n, --name <restore_point>恢复到命名恢复点 -l, --lsn <lsn>恢复到指定 LSN -x, --xid <xid>恢复到指定事务 ID -b, --backup <label>恢复到指定备份集
可选参数:
参数 说明 默认值 -D, --data <path>恢复目标数据目录 /pg/data-s, --stanza <name>pgbackrest stanza 名称 自动检测 -X, --exclusive排除目标点(恢复到目标之前) - -P, --promote恢复后自动提升(默认暂停) - -c, --check干运行模式,仅打印命令 - -y, --yes跳过确认和倒计时 - -h, --help显示帮助信息 -
恢复目标类型
恢复目标
latest
immediate
time
name
lsn
xid
backup # 恢复到 WAL 归档流末尾(最新状态)
pg-pitr -d
# 这是默认行为,会重放所有可用的 WAL # 恢复到数据库一致性点
pg-pitr -i
# 最快的恢复方式,不重放额外的 WAL
# 适用于快速验证备份是否可用 # 恢复到指定时间点
pg-pitr -t "2025-01-01 12:00:00+08"
# 使用 UTC 时间
pg-pitr -t "2025-01-01 04:00:00+00"
# 时间格式:YYYY-MM-DD HH:MM:SS[.usec][+/-TZ] # 恢复到命名恢复点
pg-pitr -n my-savepoint
# 恢复点需要事先使用 pg_create_restore_point() 创建
# SELECT pg_create_restore_point('my-savepoint'); # 恢复到指定 LSN
pg-pitr -l "0/7C82CB8"
# LSN 可以从监控面板或 pg_current_wal_lsn() 获取 # 恢复到指定事务 ID
pg-pitr -x 12345678
# 恢复到事务之前(不包含该事务)
pg-pitr -x 12345678 -X # 恢复到指定备份集
pg-pitr -b 20251225-120000F
# 查看可用备份集
pgbackrest info 使用示例 恢复到指定时间点:
# 1. 停止 PostgreSQL
pg_ctl -D /pg/data stop -m fast
# 2. 执行 PITR
pg-pitr -t "2025-12-27 10:00:00+08"
# 3. 启动并验证
pg_ctl -D /pg/data start
psql -c "SELECT * FROM important_table;"
# 4. 确认无误后提升
pg_ctl -D /pg/data promote
# 5. 启用归档并执行新备份
psql -c "ALTER SYSTEM SET archive_mode = on;"
pg_ctl -D /pg/data restart
pg-backup full
恢复到克隆实例:
# 1. 克隆实例
pg-fork 1 -y
# 2. 在克隆实例上执行 PITR
pg-pitr -D /pg/data1 -t "2025-12-27 10:00:00+08"
# 3. 启动克隆实例验证
pg_ctl -D /pg/data1 start
psql -p 15432
干运行模式:
# 仅打印命令,不执行
pg-pitr -t "2025-12-27 10:00:00+08" -c
# 输出示例:
# Command:
# pgbackrest --stanza=pg-meta --delta --force --type=time --target="2025-12-27 10:00:00+08" restore
恢复后处理 恢复完成后,实例会处于恢复暂停 状态(除非使用 -P 参数)。您需要:
启动实例 :pg_ctl -D /pg/data start验证数据 :检查数据是否符合预期提升实例 :pg_ctl -D /pg/data promote启用归档 :psql -c "ALTER SYSTEM SET archive_mode = on;"重启实例 :pg_ctl -D /pg/data restart执行备份 :pg-backup full重要提示
恢复后的实例 archive_mode 被设为 off,以防止意外的 WAL 写入污染归档仓库。
确认数据正确后,务必重新启用归档并执行全量备份。
组合使用 pg-fork 和 pg-pitr 可以组合使用,实现安全的 PITR 验证流程:
# 1. 克隆当前实例
pg-fork 1 -y
# 2. 在克隆实例上执行 PITR(不影响生产)
pg-pitr -D /pg/data1 -t "2025-12-27 10:00:00+08"
# 3. 启动克隆实例
pg_ctl -D /pg/data1 start
# 4. 验证恢复结果
psql -p 15432 -c "SELECT count(*) FROM orders WHERE created_at < '2025-12-27 10:00:00';"
# 5. 确认无误后,可以选择:
# - 方案A:在生产实例上执行相同的 PITR
# - 方案B:将克隆实例提升为新的生产实例
# 6. 清理测试实例
pg_ctl -D /pg/data1 stop
rm -rf /pg/data1
注意事项 运行要求 必须以 postgres 用户(或 postgres 组成员)执行 pg-pitr 执行前必须停止目标实例的 PostgreSQLpg-fork 热备份模式需要源实例正在运行文件系统 推荐使用 XFS(启用 reflink)或 Btrfs 文件系统 CoW 文件系统上克隆几乎瞬间完成,且不占用额外空间 非 CoW 文件系统会执行完整拷贝,耗时较长 端口规划 FORK_ID 默认端口 默认数据目录 1 15432 /pg/data1 2 25432 /pg/data2 3 35432 /pg/data3 … … … 9 95432 /pg/data9
安全建议 克隆实例仅用于测试和验证,不应长期运行 验证完成后及时清理克隆实例 生产环境 PITR 建议使用 pgsql-pitr.yml 剧本 重要操作前先使用 -c 干运行模式确认命令 原理剖析 有时候,您想要用现有的 PostgreSQL 实例在 同一台机器 上创建一个新的实例 (用于测试,PITR 恢复),可以使用 postgres 用户执行下面的命令:
psql <<EOF
CHECKPOINT;
SELECT pg_backup_start('pgfork', true);
\! rm -rf /pg/data2 && cp -r --reflink=auto /pg/data /pg/data2 && ls -alhd /pg/data2
SELECT * FROM pg_backup_stop(false);
EOF
# 修改配置,避免与现有实例冲突:端口,日志,归档等
sed -i 's/^port.*/port = 5431/' /pg/data2/postgresql.conf;
sed -i 's/^log_destination.*/log_destination = stderr/' /pg/data2/postgresql.conf;
sed -i 's/^archive_mode.*/archive_mode = off/' /pg/data2/postgresql.conf;
rm -rf /pg/data2/postmaster.pid /pg/data2/postmaster.opts
pg_ctl -D /pg/data2 start -l /pg/log/pgfork.log
pg_ctl -D /pg/data2 stop
psql -p 5431 # 访问新实例
上面的命令会创建一个新的数据目录 /pg/data2,它是现有数据目录 /pg/data 的一个完整拷贝。
如果您使用的是 XFS (启用了 reflink COW 特性),那么同磁盘拷贝目录会非常快,通常几百毫秒的常数时间内即可完成。
您在原地拉起新实例前,务必 修改 postgresql.conf 里的 port / archive_mode / log_destination 参数,避免影响现有生产实例等运行。
您可以使用一个没有被占用的端口,例如 5431,并将日志输出到 /pg/log/xxxx.log 避免写脏现有实例的日志文件。
我们建议同时修改 shared_buffers Pigsty 默认情况通常分配 25% 的系统内存给 PostgreSQL 实例,
开启新实例时,会与现有实例争夺内存资源。您可以适当调小,以减小对现有生产实例的影响。
12.9.5 - 为 PostgreSQL 集群启用 HugePage 为 PostgreSQL 集群启用大页,减少大内存实例的页表开销并提高性能
使用 node_hugepage_count 和 node_hugepage_ratio 或 /pg/bin/pg-tune-hugepage
如果你计划启用大页(HugePage),请考虑使用 node_hugepage_countnode_hugepage_ratio./node.yml -t node_tune 进行应用。
大页对于数据库来说有利有弊,利是内存是专门管理的,不用担心被挪用,降低数据库 OOM 风险。缺点是某些场景下可能对性能由负面影响。
在 PostgreSQL 启动前,您需要分配 足够多的 大页,浪费的部分可以使用 pg-tune-hugepage 脚本对其进行回收,不过此脚本仅 PostgreSQL 15+ 可用。
如果你的 PostgreSQL 已经在运行,你可以使用下面的办法启动大页(仅 PG15+ 可用):
sync; echo 3 > /proc/sys/vm/drop_caches # 刷盘,释放系统缓存(请做好数据库性能受到冲击的准备)
sudo /pg/bin/pg-tune-hugepage # 将 nr_hugepages 写入 /etc/sysctl.d/hugepage.conf
pg restart <cls> # 重启 postgres 以使用 hugepage
12.9.6 - 3坏2应急处理 高可用典型场景处理预案:三节点坏了两个节点,高可用不生效了,怎么从紧急状态中恢复?
如果经典3节点高可用部署同时出现两台(多数主体)故障,系统通常无法自动完成故障切换,需要人工介入:
首先判断另外两台服务器的情况,如果短时间内可以拉起,优先选择拉起另外两台服务。否则进入 紧急止血流程
紧急止血流程假设您的管理节点故障 ,只有单台普通数据库节点存活,在这种情况下,最快的恢复操作流程为:
调整 HAProxy 配置,将流量指向主库。 关闭 Patroni,手动提升 PostgreSQL 从库为主库。 调整HAProxy配置 如果你通过其他方式绕开 HAProxy 访问集群,那么可以跳过这一步。
如果你通过 HAProxy 方式访问数据库集群,那么你需要调整负载均衡配置,将读写流量手工指向主库。
编辑 /etc/haproxy/<pg_cluster>-primary.cfg 配置文件,其中 <pg_cluster> 为你的 PostgreSQL 集群名称,例如 pg-meta。 将健康检查配置选项注释,停止进行健康鉴擦好 将服务器列表中,其他两台故障的机器注释掉,只保留当前主库服务器。 listen pg-meta-primary
bind *:5433
mode tcp
maxconn 5000
balance roundrobin
# 注释掉以下四行健康检查配置
#option httpchk # <---- remove this
#option http-keep-alive # <---- remove this
#http-check send meth OPTIONS uri /primary # <---- remove this
#http-check expect status 200 # <---- remove this
default-server inter 3s fastinter 1s downinter 5s rise 3 fall 3 on-marked-down shutdown-sessions slowstart 30s maxconn 3000 maxqueue 128 weight 100
server pg-meta-1 10.10.10.10:6432 check port 8008 weight 100
# 注释掉其他两台故障的机器
#server pg-meta-2 10.10.10.11:6432 check port 8008 weight 100 <---- comment this
#server pg-meta-3 10.10.10.12:6432 check port 8008 weight 100 <---- comment this
配置调整完成后,先不着急执行 systemctl reload haproxy 重载生效,等待后续主库提升后一起执行。
以上配置的效果是,HAProxy 将不再进行主库健康检查(默认使用 Patroni),而是直接将写入流量指向当前主库
手工提升备库 登陆目标服务器,切换至 dbsu 用户,执行 CHECKPOINT 刷盘后,关闭 Patroni,重启 PostgreSQL 并执行 Promote。
sudo su - postgres # 切换到数据库 dbsu 用户
psql -c 'checkpoint; checkpoint;' # 两次 Checkpoint 刷脏页,避免PG后重启耗时过久
sudo systemctl stop patroni # 关闭 Patroni
pg-restart # 重新拉起 PostgreSQL
pg-promote # 将 PostgreSQL 从库提升为主库
psql -c 'SELECT pg_is_in_recovery();' # 如果结果为 f,表示已经提升为主库
如果你上面调整了 HAProxy 配置,那么现在可以执行 systemctl reload haproxy 重载 HAProxy 配置,将流量指向新的主库。
systemctl reload haproxy # 重载 HAProxy 配置,将写入流量指向当前实例
避免脑裂 紧急止血后,第二优先级问题为:避免脑裂 。用户应当防止另外两台服务器重新上线后,与当前主库形成脑裂,导致数据不一致。
简单的做法是:
将另外两台服务器直接 断电/断网 ,确保它们不会在不受控的情况下再次上线。 调整应用使用的数据库连接串,将其 HOST 直接指向唯一幸存服务器上的主库。 然后应当根据具体情况,决定下一步的操作:
A:这两台服务器是临时故障(比如断网断电),可以原地修复后继续服务 B:这两台故障服务器是永久故障(比如硬件损坏),将移除并下线。 临时故障后的复原 如果另外两台服务器是临时故障,可以修复后继续服务,那么可以按照以下步骤进行修复与重建:
每次处理一台故障服务器,优先处理 管理节点 / INFRA 管理节点 启动故障服务器,并在启动后关停 Patroni ETCD 集群在法定人数恢复后,将恢复工作,此时可以启动幸存服务器(当前主库)上的 Patroni,接管现有 PostgreSQL,并重新获取集群领导者身份。
Patroni 启动后进入维护模式。
systemctl restart patroni
pg pause <pg_cluster>
在另外两台实例上以 postgres 用户身份创建 touch /pg/data/standby.signal 标记文件将其标记为从库,然后拉起 Patroni:
systemctl restart patroni
确认 Patroni 集群身份/角色正常后,退出维护模式:
永久故障后的复原 出现永久故障后,首先需要恢复管理节点上的 ~/pigsty 目录,主要是需要 pigsty.yml 与 files/pki/ca/ca.key 两个核心文件。
如果您无法取回或没有备份这两个文件,您可以选择部署一套新的 Pigsty,并通过 备份集群 的方式将现有集群迁移至新部署中。
请定期备份 pigsty 目录(例如使用 Git 进行版本管理)。建议吸取教训,下次不要犯这样的错误。
配置修复 您可以将幸存的节点作为新的管理节点,将 ~/pigsty 目录拷贝到新的管理节点上,然后开始调整配置。
例如,将原本默认的管理节点 10.10.10.10 替换为幸存节点 10.10.10.12
all :
vars :
admin_ip : 10.10.10.12 # 使用新的管理节点地址
node_etc_hosts : [ 10.10.10.12 h.pigsty a.pigsty p.pigsty g.pigsty sss.pigsty]
infra_portal : {} # 一并修改其他引用旧管理节点 IP (10.10.10.10) 的配置
children :
infra : # 调整 Infra 集群
hosts :
# 10.10.10.10: { infra_seq: 1 } # 老的 Infra 节点
10.10.10.12 : { infra_seq : 3 } # 新增 Infra 节点
etcd : # 调整 ETCD 集群
hosts :
#10.10.10.10: { etcd_seq: 1 } # 注释掉此故障节点
#10.10.10.11: { etcd_seq: 2 } # 注释掉此故障节点
10.10.10.12 : { etcd_seq : 3 } # 保留幸存节点
vars :
etcd_cluster : etcd
pg-meta : # 调整 PGSQL 集群配置
hosts :
#10.10.10.10: { pg_seq: 1, pg_role: primary }
#10.10.10.11: { pg_seq: 2, pg_role: replica }
#10.10.10.12: { pg_seq: 3, pg_role: replica , pg_offline_query: true }
10.10.10.12 : { pg_seq: 3, pg_role: primary , pg_offline_query : true }
vars :
pg_cluster : pg-meta
ETCD修复 然后执行以下命令,将 ETCD 重置为单节点集群:
./etcd.yml -e etcd_safeguard = false -e etcd_clean = true
根据 ETCD重载配置 的说明,调整对 ETCD Endpoint 的引用。
INFRA修复 如果幸存节点上没有 INFRA 模块,请在当前节点上配置新的 INFRA 模块并安装。执行以下命令,将 INFRA 模块部署到幸存节点上:
./infra.yml -l 10.10.10.12
修复当前节点的监控
./node.yml -t node_monitor
PGSQL修复 ./pgsql.yml -t pg_conf # 重新生成 PG 配置文件
systemctl reload patroni # 在幸存节点上重载 Patroni 配置
各模块修复后,您可以参考标准扩容流程,将新的节点加入集群,恢复集群的高可用性。
12.9.7 - 使用 VIP-Manager 为 PostgreSQL 集群配置二层 VIP 您可以在 PostgreSQL 集群上绑定一个可选的 L2 VIP —— 前提条件是:集群中的所有节点都在一个二层网络中。
这个 L2 VIP 强制使用 Master - Backup 模式,Master 始终指向在数据库集群主库实例所在的节点。
这个 VIP 由 VIP-Manager 组件管理,它会从 DCS (etcd) 中直接读取由 Patroni 写入的 Leader Key,从而判断自己是否是 Master。
启用VIP 在 PostgreSQL 集群上定义 pg_vip_enabledtrue,即可在集群上启用 VIP 组件。当然您也可以在全局配置中启用此配置项。
# pgsql 3 node ha cluster: pg-test
pg-test:
hosts:
10.10.10.11: { pg_seq: 1, pg_role: primary } # primary instance, leader of cluster
10.10.10.12: { pg_seq: 2, pg_role: replica } # replica instance, follower of leader
10.10.10.13: { pg_seq: 3, pg_role: replica, pg_offline_query: true } # replica with offline access
vars:
pg_cluster: pg-test # define pgsql cluster name
pg_users: [{ name: test , password: test , pgbouncer: true , roles: [ dbrole_admin ] }]
pg_databases: [{ name: test }]
# 启用 L2 VIP
pg_vip_enabled: true
pg_vip_address: 10.10.10.3/24
pg_vip_interface: eth1
请注意,pg_vip_address
请注意,pg_vip_interfacepg_vip_interface 参数,例如:
pg-test :
hosts :
10.10.10.11 : { pg_seq: 1, pg_role: primary , pg_vip_interface : eth0 }
10.10.10.12 : { pg_seq: 2, pg_role: replica , pg_vip_interface : eth1 }
10.10.10.13 : { pg_seq: 3, pg_role: replica , pg_vip_interface : ens33 }
vars :
pg_cluster : pg-test # define pgsql cluster name
pg_users : [ { name: test , password: test , pgbouncer: true , roles : [ dbrole_admin ] }]
pg_databases : [ { name : test }]
# 启用 L2 VIP
pg_vip_enabled : true
pg_vip_address : 10.10.10.3 /24
#pg_vip_interface: eth1
使用以下命令,刷新 PG 的 vip-manager 配置并重启生效:
12.9.8 - Citus 集群部署 如何部署 Citus 高可用分布式集群?
Citus 是一个 PostgreSQL 扩展,可以将 PostgreSQL 原地转换为一个分布式数据库,并实现在多个节点上水平扩展,以处理大量数据和大量查询。
Patroni 在 v3.0 后,提供了对 Citus 原生高可用的支持,简化了 Citus 集群的搭建,Pigsty 也对此提供了原生支持。
注意:Citus 13.x 支持 PostgreSQL 18、17、16、15、14 五个大版本。Pigsty 扩展仓库提供了 Citus ARM64 软件包。
Citus集群 Pigsty 原生支持 Citus。可以参考 conf/citus.yml
这里使用 Pigsty 四节点沙箱,定义了一个 Citus 集群 pg-citus,其中包括一个两节点的协调者集群 pg-citus0,
以及两个 Worker 集群 pg-citus1,pg-citus2。
pg-citus :
hosts :
10.10.10.10 : { pg_group: 0, pg_cluster: pg-citus0 ,pg_vip_address: 10.10.10.2/24 ,pg_seq: 1, pg_role : primary }
10.10.10.11 : { pg_group: 0, pg_cluster: pg-citus0 ,pg_vip_address: 10.10.10.2/24 ,pg_seq: 2, pg_role : replica }
10.10.10.12 : { pg_group: 1, pg_cluster: pg-citus1 ,pg_vip_address: 10.10.10.3/24 ,pg_seq: 1, pg_role : primary }
10.10.10.13 : { pg_group: 2, pg_cluster: pg-citus2 ,pg_vip_address: 10.10.10.4/24 ,pg_seq: 1, pg_role : primary }
vars :
pg_mode: citus # pgsql cluster mode : citus
pg_version : 18 # citus 13.x supports PG 14-18
pg_shard: pg-citus # citus shard name : pg-citus
pg_primary_db : citus # primary database used by citus
pg_vip_enabled : true # enable vip for citus cluster
pg_vip_interface : eth1 # vip interface for all members
pg_dbsu_password : DBUser.Postgres # all dbsu password access for citus cluster
pg_extensions : [ citus, postgis, pgvector, topn, pg_cron, hll ] # install these extensions
pg_libs : 'citus, pg_cron, pg_stat_statements' # citus will be added by patroni automatically
pg_users : [ { name: dbuser_citus ,password: DBUser.Citus ,pgbouncer: true ,roles : [ dbrole_admin ] }]
pg_databases : [ { name: citus ,owner: dbuser_citus ,extensions : [ citus, vector, topn, pg_cron, hll ] }]
pg_parameters :
cron.database_name : citus
citus.node_conninfo : 'sslmode=require sslrootcert=/pg/cert/ca.crt sslmode=verify-full'
pg_hba_rules :
- { user: 'all' ,db: all ,addr: 127.0.0.1/32 ,auth: ssl ,title : 'all user ssl access from localhost' }
- { user: 'all' ,db: all ,addr: intra ,auth: ssl ,title : 'all user ssl access from intranet' }
相比标准 PostgreSQL 集群,Citus 集群的配置有一些特殊之处,首先,你需要确保 Citus 扩展被下载,安装,加载并启用,这涉及到以下四个参数
其次,你需要确保 Citus 集群的配置正确:
配置完成后,您可以像创建普通 PostgreSQL 集群一样,使用 pgsql.yml 部署 Citus 集群。
管理Citus集群 定义好 Citus 集群后,部署 Citus 集群同样使用的剧本 pgsql.yml:
./pgsql.yml -l pg-citus # 部署 Citus 集群 pg-citus
使用任意成员的 DBSU(postgres)用户,都能通过 patronictl (alias: pg) 列出 Citus 集群的状态:
$ pg list
+ Citus cluster: pg-citus ----------+---------+-----------+----+-----------+--------------------+
| Group | Member | Host | Role | State | TL | Lag in MB | Tags |
+-------+-------------+-------------+---------+-----------+----+-----------+--------------------+
| 0 | pg-citus0-1 | 10.10.10.10 | Leader | running | 1 | | clonefrom: true |
| | | | | | | | conf: tiny.yml |
| | | | | | | | spec: 20C.40G.125G |
| | | | | | | | version: '16' |
+-------+-------------+-------------+---------+-----------+----+-----------+--------------------+
| 1 | pg-citus1-1 | 10.10.10.11 | Leader | running | 1 | | clonefrom: true |
| | | | | | | | conf: tiny.yml |
| | | | | | | | spec: 10C.20G.125G |
| | | | | | | | version: '16' |
+-------+-------------+-------------+---------+-----------+----+-----------+--------------------+
| 2 | pg-citus2-1 | 10.10.10.12 | Leader | running | 1 | | clonefrom: true |
| | | | | | | | conf: tiny.yml |
| | | | | | | | spec: 10C.20G.125G |
| | | | | | | | version: '16' |
+-------+-------------+-------------+---------+-----------+----+-----------+--------------------+
| 2 | pg-citus2-2 | 10.10.10.13 | Replica | streaming | 1 | 0 | clonefrom: true |
| | | | | | | | conf: tiny.yml |
| | | | | | | | spec: 10C.20G.125G |
| | | | | | | | version: '16' |
+-------+-------------+-------------+---------+-----------+----+-----------+--------------------+
您可以将每个水平分片集群视为一个独立的 PGSQL 集群,使用 pg (patronictl) 命令管理它们。
但是务必注意,当你使用 pg 命令管理 Citus 集群时,需要额外使用 --group 参数指定集群分片号
pg list pg-citus --group 0 # 需要使用 --group 0 指定集群分片号
Citus 中有一个名为 pg_dist_node 的系统表,用于记录 Citus 集群的节点信息,Patroni 会自动维护该表。
PGURL = postgres://postgres:DBUser.Postgres@10.10.10.10/citus
psql $PGURL -c 'SELECT * FROM pg_dist_node;' # 查看节点信息
nodeid | groupid | nodename | nodeport | noderack | hasmetadata | isactive | noderole | nodecluster | metadatasynced | shouldhaveshards
--------+---------+-------------+----------+----------+-------------+----------+-----------+-------------+----------------+------------------
1 | 0 | 10.10.10.10 | 5432 | default | t | t | primary | default | t | f
4 | 1 | 10.10.10.12 | 5432 | default | t | t | primary | default | t | t
5 | 2 | 10.10.10.13 | 5432 | default | t | t | primary | default | t | t
6 | 0 | 10.10.10.11 | 5432 | default | t | t | secondary | default | t | f
此外,你还可以查看用户认证信息(仅限超级用户访问):
$ psql $PGURL -c 'SELECT * FROM pg_dist_authinfo;' # 查看节点认证信息(仅限超级用户访问)
然后,你可以使用普通业务用户(例如,具有 DDL 权限的 dbuser_citus)来访问 Citus 集群:
psql postgres://dbuser_citus:DBUser.Citus@10.10.10.10/citus -c 'SELECT * FROM pg_dist_node;'
使用Citus集群 在使用 Citus 集群时,我们强烈建议您先阅读 Citus 官方文档 ,了解其架构设计与核心概念。
其中核心是了解 Citus 中的五种表,以及其特点与应用场景:
分布式表(Distributed Table) 参考表(Reference Table) 本地表(Local Table) 本地管理表(Local Management Table) 架构表(Schema Table) 在协调者节点上,您可以创建分布式表和引用表,并从任何数据节点查询它们。从 11.2 开始,任何 Citus 数据库节点都可以扮演协调者的角色了。
我们可以使用 pgbench 来创建一些表,并将其中的主表(pgbench_accounts)分布到各个节点上,然后将其他小表作为引用表:
PGURL = postgres://dbuser_citus:DBUser.Citus@10.10.10.10/citus
pgbench -i $PGURL
psql $PGURL <<-EOF
SELECT create_distributed_table('pgbench_accounts', 'aid'); SELECT truncate_local_data_after_distributing_table('public.pgbench_accounts');
SELECT create_reference_table('pgbench_branches') ; SELECT truncate_local_data_after_distributing_table('public.pgbench_branches');
SELECT create_reference_table('pgbench_history') ; SELECT truncate_local_data_after_distributing_table('public.pgbench_history');
SELECT create_reference_table('pgbench_tellers') ; SELECT truncate_local_data_after_distributing_table('public.pgbench_tellers');
EOF
执行读写测试:
pgbench -nv -P1 -c10 -T500 postgres://dbuser_citus:DBUser.Citus@10.10.10.10/citus # 直连协调者 5432 端口
pgbench -nv -P1 -c10 -T500 postgres://dbuser_citus:DBUser.Citus@10.10.10.10:6432/citus # 通过连接池,减少客户端连接数压力,可以有效提高整体吞吐。
pgbench -nv -P1 -c10 -T500 postgres://dbuser_citus:DBUser.Citus@10.10.10.13/citus # 任意 primary 节点都可以作为 coordinator
pgbench --select-only -nv -P1 -c10 -T500 postgres://dbuser_citus:DBUser.Citus@10.10.10.11/citus # 可以发起只读查询
更严肃的生产部署 要将 Citus 用于生产环境,您通常需要为 Coordinator 和每个 Worker 集群设置流复制物理副本。
例如,在 simu.yml
pg-citus : # citus group
hosts :
10.10.10.50 : { pg_group: 0, pg_cluster: pg-citus0 ,pg_vip_address: 10.10.10.60/24 ,pg_seq: 0, pg_role : primary }
10.10.10.51 : { pg_group: 0, pg_cluster: pg-citus0 ,pg_vip_address: 10.10.10.60/24 ,pg_seq: 1, pg_role : replica }
10.10.10.52 : { pg_group: 1, pg_cluster: pg-citus1 ,pg_vip_address: 10.10.10.61/24 ,pg_seq: 0, pg_role : primary }
10.10.10.53 : { pg_group: 1, pg_cluster: pg-citus1 ,pg_vip_address: 10.10.10.61/24 ,pg_seq: 1, pg_role : replica }
10.10.10.54 : { pg_group: 2, pg_cluster: pg-citus2 ,pg_vip_address: 10.10.10.62/24 ,pg_seq: 0, pg_role : primary }
10.10.10.55 : { pg_group: 2, pg_cluster: pg-citus2 ,pg_vip_address: 10.10.10.62/24 ,pg_seq: 1, pg_role : replica }
10.10.10.56 : { pg_group: 3, pg_cluster: pg-citus3 ,pg_vip_address: 10.10.10.63/24 ,pg_seq: 0, pg_role : primary }
10.10.10.57 : { pg_group: 3, pg_cluster: pg-citus3 ,pg_vip_address: 10.10.10.63/24 ,pg_seq: 1, pg_role : replica }
10.10.10.58 : { pg_group: 4, pg_cluster: pg-citus4 ,pg_vip_address: 10.10.10.64/24 ,pg_seq: 0, pg_role : primary }
10.10.10.59 : { pg_group: 4, pg_cluster: pg-citus4 ,pg_vip_address: 10.10.10.64/24 ,pg_seq: 1, pg_role : replica }
vars :
pg_mode: citus # pgsql cluster mode : citus
pg_version : 18 # citus 13.x supports PG 14-18
pg_shard: pg-citus # citus shard name : pg-citus
pg_primary_db : citus # primary database used by citus
pg_vip_enabled : true # enable vip for citus cluster
pg_vip_interface : eth1 # vip interface for all members
pg_dbsu_password : DBUser.Postgres # enable dbsu password access for citus
pg_extensions : [ citus, postgis, pgvector, topn, pg_cron, hll ] # install these extensions
pg_libs : 'citus, pg_cron, pg_stat_statements' # citus will be added by patroni automatically
pg_users : [ { name: dbuser_citus ,password: DBUser.Citus ,pgbouncer: true ,roles : [ dbrole_admin ] }]
pg_databases : [ { name: citus ,owner: dbuser_citus ,extensions : [ citus, vector, topn, pg_cron, hll ] }]
pg_parameters :
cron.database_name : citus
citus.node_conninfo : 'sslrootcert=/pg/cert/ca.crt sslmode=verify-full'
pg_hba_rules :
- { user: 'all' ,db: all ,addr: 127.0.0.1/32 ,auth: ssl ,title : 'all user ssl access from localhost' }
- { user: 'all' ,db: all ,addr: intra ,auth: ssl ,title : 'all user ssl access from intranet' }
我们将在后续教程中覆盖一系列关于 Citus 的高级主题
读写分离 故障处理 一致性备份与恢复 高级监控与问题诊断 连接池 12.11 - 监控系统 Pigsty监控系统架构概览,以及如何监控现存的 PostgreSQL 实例?
本文介绍了 Pigsty 的监控系统架构,包括监控指标,日志,与目标管理的方式。以及如何 监控现有PG集群 与远程 RDS服务 。
监控概览 Pigsty使用现代的可观测技术栈对 PostgreSQL 进行监控:
使用 Grafana 进行指标可视化和 PostgreSQL 数据源。 使用 VictoriaMetrics 来采集 PostgreSQL / Pgbouncer / Patroni / HAProxy / Node 的指标 使用 VictoriaLogs 来记录 PostgreSQL / Pgbouncer / Patroni / pgBackRest 以及主机组件的日志 Pigsty 提供了开箱即用的 Grafana 仪表盘,展示与 PostgreSQL 有关的方方面面。 监控指标
PostgreSQL 本身的监控指标完全由 pg_exporter 配置文件所定义:pg_exporter.ymlfiles/prometheus/rules/pgsql.yml
Pigsty使用三个身份标签:cls、ins、ip,它们将附加到所有指标和日志上。此外,Pgbouncer的监控指标,主机节点 NODE,与负载均衡器的监控指标也会被 Pigsty 所使用,并尽可能地使用相同的标签以便于关联分析。
{ cls: pg-meta, ins: pg-meta-1, ip : 10.10.10.10 }
{ cls: pg-meta, ins: pg-test-1, ip : 10.10.10.11 }
{ cls: pg-meta, ins: pg-test-2, ip : 10.10.10.12 }
{ cls: pg-meta, ins: pg-test-3, ip : 10.10.10.13 }
日志
与 PostgreSQL 有关的日志由 vector 负责收集,并发送至 infra 节点上的 VictoriaLogs 日志存储/查询服务。
目标管理
Prometheus的监控目标在 /etc/prometheus/targets/pgsql/ 下的静态文件中定义,每个实例都有一个相应的文件。以 pg-meta-1 为例:
# pg-meta-1 [primary] @ 10.10.10.10
- labels : { cls: pg-meta, ins: pg-meta-1, ip : 10.10.10.10 }
targets :
- 10.10.10.10 : 9630 # <--- pg_exporter 用于PostgreSQL指标
- 10.10.10.10 : 9631 # <--- pg_exporter 用于pgbouncer指标
- 10.10.10.10 : 8008 # <--- patroni指标(未启用 API SSL 时)
当全局标志 patroni_ssl_enabled/etc/prometheus/targets/patroni/<ins>.yml。 因为此时使用的是 https 抓取端点。当您 监控RDS 实例时,监控目标会被单独放置于: /etc/prometheus/targets/pgrds/ 目录下,并以集群 为单位进行管理。
当使用 bin/pgsql-rm 或 pgsql-rm.yml 移除集群时,Prometheus监控目标将被移除。您也可以手动移除它,或使用剧本里的子任务:
bin/pgmon-rm <cls| ins> # 从所有infra节点中移除 prometheus 监控目标
远程 RDS 监控目标会被放置于 /etc/prometheus/targets/pgrds/<cls>.yml,它们是由 pgsql-monitor.ymlbin/pgmon-add 脚本所创建的。
监控模式 Pigsty 提供三种监控模式,以适应不同的监控需求。
事项\等级 L1 L2 L3 名称 基础部署 托管部署 标准部署 英文 RDS MANAGED FULL 场景 只有连接串,例如RDS DB已存在,节点可管理 实例由 Pigsty 创建 PGCAT功能 ✅ 完整可用 ✅ 完整可用 ✅ 完整可用 PGSQL功能 ✅ 限PG指标 ✅ 限PG与节点指标 ✅ 完整功能 连接池指标 ❌ 不可用 ⚠️ 选装 ✅ 预装项 负载均衡器指标 ❌ 不可用 ⚠️ 选装 ✅ 预装项 PGLOG功能 ❌ 不可用 ⚠️ 选装 ✅ 预装项 PG Exporter ⚠️ 部署于Infra节点 ✅ 部署于DB节点 ✅ 部署于DB节点 Node Exporter ❌ 不部署 ✅ 部署于DB节点 ✅ 部署于DB节点 侵入DB节点 ✅ 无侵入 ⚠️ 安装Exporter ⚠️ 完全由Pigsty管理 监控现有实例 ✅ 可支持 ✅ 可支持 ❌ 仅用于Pigsty托管实例 监控用户与视图 人工创建 人工创建 Pigsty自动创建 部署使用剧本 bin/pgmon-add <cls>部分执行 pgsql.ym/node.yml pgsql.yml所需权限 Infra 节点可达的 PGURL DB节点ssh与sudo权限 DB节点ssh与sudo权限 功能概述 PGCAT + PGRDS 大部分功能 完整功能
由Pigsty完全管理的数据库会自动纳入监控,并拥有最好的监控支持,通常不需要任何配置。对于现有的 PostgreSQL 集群或者 RDS 服务,如果如果目标DB节点可以被Pigsty所管理 (ssh可达,sudo可用),那么您可以考虑 托管部署 ,实现与 Pigsty 基本类似的监控管理体验。如果您只能通过PGURL (数据库连接串)的方式访问目标数据库,例如远程的RDS服务,则可以考虑使用 精简模式 监控目标数据库。
监控现有集群 如果目标DB节点可以被Pigsty所管理 (ssh可达且sudo可用),那么您可以使用 pgsql.ymlpg_exporter任务,
使用与标准部署相同的方式,在目标节点上部署监控组件:PG Exporter。您也可以使用该剧本的 pgbouncer,pgbouncer_exporter 任务在已有实例节点上部署连接池及其监控。此外,您也可以使用 node.ymlnode_exporter, haproxy, vector 部署主机监控,负载均衡,日志收集组件。从而获得与原生Pigsty数据库实例完全一致的使用体验。
现有集群的定义方式与 Pigsty 所管理的集群定义方式完全相同,您只是选择性执行 pgsql.yml 剧本中的部分任务,而不是执行整个剧本。
./node.yml -l <cls> -t node_repo,node_pkg # 在主机节点上添加 INFRA节点的 YUM 源并安装软件包。
./node.yml -l <cls> -t node_exporter,node_register # 配置主机监控,并加入 VictoriaMetrics
./node.yml -l <cls> -t vector # 配置主机日志采集,并发送至 victoria-logs
./pgsql.yml -l <cls> -t pg_exporter,pg_register # 配置 PostgreSQL 监控,并注册至 Victoria/Grafana
因为目标数据库集群已存在,所以您需要手工在目标数据库集群上 创建监控用户、模式与扩展 。
监控RDS 如果您只能通过PGURL (数据库连接串)的方式访问目标数据库,那么可以参照这里的说明进行配置。在这种模式下,Pigsty 在 INFRA节点
------ infra ------
| |
| prometheus | v---- pg-foo-1 ----v
| ^ | metrics | ^ |
| pg_exporter <-|------------|---- postgres |
| (port: 20001) | | 10.10.10.10:5432 |
| ^ | ^------------------^
| ^ | ^
| ^ | v---- pg-foo-2 ----v
| ^ | metrics | ^ |
| pg_exporter <-|------------|---- postgres |
| (port: 20002) | | 10.10.10.11:5433 |
------------------- ^------------------^
在这种模式下,监控系统不会有主机,连接池,负载均衡器,高可用组件的相关指标,但数据库本身,以及数据目录(Catalog)中的实时状态信息仍然可用。Pigsty提供了两个专用的监控面板,专注于 PostgreSQL 本身的监控指标: PGRDS Cluster 与 PGRDS Instance ,总览与数据库内监控则复用现有监控面板。因为Pigsty不能管理您的RDS,所以用户需要在目标数据库上提前 配置好监控对象 。
监控外部 Postgres 实例时的局限性
pgBoucner 连接池指标不可用 Patroni 高可用组件指标不可用 主机节点监控指标不可用,以及节点 HAProxy,Keepalived 指标亦不可用。 日志收集与日志衍生指标不可用 下面我们使用沙箱环境作为示例:现在我们假设 pg-meta 集群是一个有待监控的 RDS 实例 pg-foo-1,而 pg-test 集群则是一个有待监控的RDS集群 pg-bar:
在目标上创建监控模式、用户和权限。详情请参考 监控对象配置
在配置清单中声明集群。例如,假设我们想要监控“远端”的 pg-meta & pg-test 集群:
infra : # 代理、监控、警报等的infra集群..
hosts : { 10.10.10.10 : { infra_seq : 1 } }
vars : # 在组'infra'上为远程postgres RDS安装pg_exporter
pg_exporters : # 在此列出所有远程实例,为k分配一个唯一的未使用的本地端口
20001 : { pg_cluster: pg-foo, pg_seq: 1, pg_host: 10.10.10.10 , pg_databases : [ { name : meta }] } # 注册 meta 数据库为 Grafana 数据源
20002 : { pg_cluster: pg-bar, pg_seq: 1, pg_host: 10.10.10.11 , pg_port : 5432 } # 几种不同的连接串拼接方法
20003 : { pg_cluster: pg-bar, pg_seq: 2, pg_host: 10.10.10.12 , pg_exporter_url : 'postgres://dbuser_monitor:DBUser.Monitor@10.10.10.12:5432/postgres?sslmode=disable' }
20004 : { pg_cluster: pg-bar, pg_seq: 3, pg_host: 10.10.10.13 , pg_monitor_username: dbuser_monitor, pg_monitor_password : DBUser.Monitor }
其中, pg_databases 字段中所列出的数据库,将会被注册至 Grafana 中,成为一个 PostgreSQL 数据源,为 PGCAT 监控面板提供数据支持。如果您不想使用PGCAT,将注册数据库到Grafana中,只需要将 pg_databases 设置为空数组或直接留空即可。
执行添加监控命令:bin/pgmon-add <clsname>
bin/pgmon-add pg-foo # 将 pg-foo 集群纳入监控
bin/pgmon-add pg-bar # 将 pg-bar 集群纳入监控
要删除远程集群的监控目标,可以使用 bin/pgmon-rm <clsname>
bin/pgmon-rm pg-foo # 将 pg-foo 从 Pigsty 监控中移除
bin/pgmon-rm pg-bar # 将 pg-bar 从 Pigsty 监控中移除
您可以使用更多的参数来覆盖默认 pg_exporter 的选项,下面是一个使用 Pigsty 监控阿里云 RDS 与 PolarDB 的配置样例:
示例:监控阿里云 RDS for PostgreSQL 与 PolarDB 详情请参考:remote.yml
infra : # 代理、监控、警报等的infra集群..
hosts : { 10.10.10.10 : { infra_seq : 1 } }
vars :
pg_exporters : # 在此列出所有待监控的远程 RDS PG 实例
20001 : # 分配一个唯一的未使用的本地端口,供本地监控 Agent 使用,这里是一个 PolarDB 的主库
pg_cluster : pg-polar # RDS 集群名 (身份参数,手工指定分配监控系统内名称)
pg_seq : 1 # RDS 实例号 (身份参数,手工指定分配监控系统内名称)
pg_host : pc-2ze379wb1d4irc18x.polardbpg.rds.aliyuncs.com # RDS 主机地址
pg_port : 1921 # RDS 端口(从控制台连接信息获取)
pg_exporter_auto_discovery : true # 禁用新数据库自动发现功能
pg_exporter_include_database : 'test' # 仅监控这个列表中的数据库(多个数据库用逗号分隔)
pg_monitor_username : dbuser_monitor # 监控用的用户名,覆盖全局配置
pg_monitor_password : DBUser_Monitor # 监控用的密码,覆盖全局配置
pg_databases : [ { name : test }] # 希望启用PGCAT的数据库列表,只要name字段即可,register_datasource设置为false则不注册。
20002 : # 这是一个 PolarDB 从库
pg_cluster : pg-polar # RDS 集群名 (身份参数,手工指定分配监控系统内名称)
pg_seq : 2 # RDS 实例号 (身份参数,手工指定分配监控系统内名称)
pg_host : pe-2ze7tg620e317ufj4.polarpgmxs.rds.aliyuncs.com # RDS 主机地址
pg_port : 1521 # RDS 端口(从控制台连接信息获取)
pg_exporter_auto_discovery : true # 禁用新数据库自动发现功能
pg_exporter_include_database : 'test,postgres' # 仅监控这个列表中的数据库(多个数据库用逗号分隔)
pg_monitor_username : dbuser_monitor # 监控用的用户名
pg_monitor_password : DBUser_Monitor # 监控用的密码
pg_databases : [ { name : test } ] # 希望启用PGCAT的数据库列表,只要name字段即可,register_datasource设置为false则不注册。
20004 : # 这是一个基础版的单节点 RDS for PostgreSQL 实例
pg_cluster : pg-rds # RDS 集群名 (身份参数,手工指定分配监控系统内名称)
pg_seq : 1 # RDS 实例号 (身份参数,手工指定分配监控系统内名称)
pg_host : pgm-2zern3d323fe9ewk.pg.rds.aliyuncs.com # RDS 主机地址
pg_port : 5432 # RDS 端口(从控制台连接信息获取)
pg_exporter_auto_discovery : true # 禁用新数据库自动发现功能
pg_exporter_include_database : 'rds' # 仅监控这个列表中的数据库(多个数据库用逗号分隔)
pg_monitor_username : dbuser_monitor # 监控用的用户名
pg_monitor_password : DBUser_Monitor # 监控用的密码
pg_databases : [ { name : rds } ] # 希望启用PGCAT的数据库列表,只要name字段即可,register_datasource设置为false则不注册。
20005 : # 这是一个高可用版的 RDS for PostgreSQL 集群主库
pg_cluster : pg-rdsha # RDS 集群名 (身份参数,手工指定分配监控系统内名称)
pg_seq : 1 # RDS 实例号 (身份参数,手工指定分配监控系统内名称)
pg_host : pgm-2ze3d35d27bq08wu.pg.rds.aliyuncs.com # RDS 主机地址
pg_port : 5432 # RDS 端口(从控制台连接信息获取)
pg_exporter_include_database : 'rds' # 仅监控这个列表中的数据库(多个数据库用逗号分隔)
pg_databases : [ { name : rds }, {name : test} ] # 将这两个数据库纳入 PGCAT 管理,注册为 Grafana 数据源
20006 : # 这是一个高可用版的 RDS for PostgreSQL 集群只读实例(从库)
pg_cluster : pg-rdsha # RDS 集群名 (身份参数,手工指定分配监控系统内名称)
pg_seq : 2 # RDS 实例号 (身份参数,手工指定分配监控系统内名称)
pg_host : pgr-2zexqxalk7d37edt.pg.rds.aliyuncs.com # RDS 主机地址
pg_port : 5432 # RDS 端口(从控制台连接信息获取)
pg_exporter_include_database : 'rds' # 仅监控这个列表中的数据库(多个数据库用逗号分隔)
pg_databases : [ { name : rds }, {name : test} ] # 将这两个数据库纳入 PGCAT 管理,注册为 Grafana 数据源
监控对象配置 当您想要监控现有实例时,不论是 RDS,还是自建的 PostgreSQL 实例,您都需要在目标数据库上进行一些配置,以便 Pigsty 可以访问它们。
为了将外部现存PostgreSQL实例纳入监控,您需要有一个可用于访问该实例/集群的连接串。任何可达连接串(业务用户,超级用户)均可使用,但我们建议使用一个专用监控用户以避免权限泄漏。
监控用户 以Pigsty默认使用的监控用户dbuser_monitor为例,在目标数据库集群创建以下用户。
CREATE USER dbuser_monitor ; -- 创建监控用户
COMMENT ON ROLE dbuser_monitor IS 'system monitor user' ; -- 监控用户备注
GRANT pg_monitor TO dbuser_monitor ; -- 授予监控用户 pg_monitor 权限,否则一些指标将无法采集
ALTER USER dbuser_monitor PASSWORD 'DBUser.Monitor' ; -- 按需修改监控用户密码(强烈建议修改!但请与Pigsty配置一致)
ALTER USER dbuser_monitor SET log_min_duration_statement = 1000 ; -- 建议设置此参数,避免日志塞满监控慢查询
ALTER USER dbuser_monitor SET search_path = monitor , public ; -- 建议设置此参数,避免 pg_stat_statements 扩展无法生效
请注意,这里创建的监控用户与密码需要与 pg_monitor_usernamepg_monitor_password
监控认证 配置数据库 pg_hba.conf 文件,添加以下规则以允许监控用户从本地,以及管理机使用密码访问所有数据库。
# allow local role monitor with password
local all dbuser_monitor md5
host all dbuser_monitor 127.0.0.1/32 md5
host all dbuser_monitor <管理机器IP地址>/32 md5
如果您的 RDS 不支持定义 HBA,那么把安装 Pigsty 机器的内网 IP 地址开白即可。
监控模式 监控模式可选项 ,即使没有,Pigsty监控系统的主体也可以正常工作,但我们强烈建议设置此模式。
CREATE SCHEMA IF NOT EXISTS monitor ; -- 创建监控专用模式
GRANT USAGE ON SCHEMA monitor TO dbuser_monitor ; -- 允许监控用户使用
监控扩展 监控扩展是可选项,但我们强烈建议启用 pg_stat_statements 扩展该扩展提供了关于查询性能的重要数据。
注意:该扩展必须列入数据库参数 shared_preload_libraries 中方可生效,而修改该参数需要重启数据库。
CREATE EXTENSION IF NOT EXISTS "pg_stat_statements" WITH SCHEMA "monitor" ;
请注意,您应当在默认的管理数据库 postgres 中安装此扩展。有些时候,RDS不允许您在 postgres 数据库中创建监控模式,
在这种情况下,您可以将 pg_stat_statements 插件安装到默认的 public 下,只要确保监控用户的 search_path 按照上面的配置,能够找到 pg_stat_statements 视图即可。
CREATE EXTENSION IF NOT EXISTS "pg_stat_statements" ;
ALTER USER dbuser_monitor SET search_path = monitor , public ; -- 建议设置此参数,避免 pg_stat_statements 扩展无法生效
监控视图 监控视图提供了若干常用的预处理结果,并对某些需要高权限的监控指标进行权限封装(例如共享内存分配),便于查询与使用。强烈建议在所有需要监控的数据库中创建
监控模式与监控视图定义 ----------------------------------------------------------------------
-- Table bloat estimate : monitor.pg_table_bloat
----------------------------------------------------------------------
DROP VIEW IF EXISTS monitor . pg_table_bloat CASCADE ;
CREATE OR REPLACE VIEW monitor . pg_table_bloat AS
SELECT CURRENT_CATALOG AS datname , nspname , relname , tblid , bs * tblpages AS size ,
CASE WHEN tblpages - est_tblpages_ff > 0 THEN ( tblpages - est_tblpages_ff ) / tblpages :: FLOAT ELSE 0 END AS ratio
FROM (
SELECT ceil ( reltuples / ( ( bs - page_hdr ) * fillfactor / ( tpl_size * 100 ) ) ) + ceil ( toasttuples / 4 ) AS est_tblpages_ff ,
tblpages , fillfactor , bs , tblid , nspname , relname , is_na
FROM (
SELECT
( 4 + tpl_hdr_size + tpl_data_size + ( 2 * ma )
- CASE WHEN tpl_hdr_size % ma = 0 THEN ma ELSE tpl_hdr_size % ma END
- CASE WHEN ceil ( tpl_data_size ):: INT % ma = 0 THEN ma ELSE ceil ( tpl_data_size ):: INT % ma END
) AS tpl_size , ( heappages + toastpages ) AS tblpages , heappages ,
toastpages , reltuples , toasttuples , bs , page_hdr , tblid , nspname , relname , fillfactor , is_na
FROM (
SELECT
tbl . oid AS tblid , ns . nspname , tbl . relname , tbl . reltuples ,
tbl . relpages AS heappages , coalesce ( toast . relpages , 0 ) AS toastpages ,
coalesce ( toast . reltuples , 0 ) AS toasttuples ,
coalesce ( substring ( array_to_string ( tbl . reloptions , ' ' ) FROM 'fillfactor=([0-9]+)' ):: smallint , 100 ) AS fillfactor ,
current_setting ( 'block_size' ):: numeric AS bs ,
CASE WHEN version () ~ 'mingw32' OR version () ~ '64-bit|x86_64|ppc64|ia64|amd64' THEN 8 ELSE 4 END AS ma ,
24 AS page_hdr ,
23 + CASE WHEN MAX ( coalesce ( s . null_frac , 0 )) > 0 THEN ( 7 + count ( s . attname ) ) / 8 ELSE 0 :: int END
+ CASE WHEN bool_or ( att . attname = 'oid' and att . attnum < 0 ) THEN 4 ELSE 0 END AS tpl_hdr_size ,
sum ( ( 1 - coalesce ( s . null_frac , 0 )) * coalesce ( s . avg_width , 0 ) ) AS tpl_data_size ,
bool_or ( att . atttypid = 'pg_catalog.name' :: regtype )
OR sum ( CASE WHEN att . attnum > 0 THEN 1 ELSE 0 END ) <> count ( s . attname ) AS is_na
FROM pg_attribute AS att
JOIN pg_class AS tbl ON att . attrelid = tbl . oid
JOIN pg_namespace AS ns ON ns . oid = tbl . relnamespace
LEFT JOIN pg_stats AS s ON s . schemaname = ns . nspname AND s . tablename = tbl . relname AND s . inherited = false AND s . attname = att . attname
LEFT JOIN pg_class AS toast ON tbl . reltoastrelid = toast . oid
WHERE NOT att . attisdropped AND tbl . relkind = 'r' AND nspname NOT IN ( 'pg_catalog' , 'information_schema' )
GROUP BY 1 , 2 , 3 , 4 , 5 , 6 , 7 , 8 , 9 , 10
) AS s
) AS s2
) AS s3
WHERE NOT is_na ;
COMMENT ON VIEW monitor . pg_table_bloat IS 'postgres table bloat estimate' ;
GRANT SELECT ON monitor . pg_table_bloat TO pg_monitor ;
----------------------------------------------------------------------
-- Index bloat estimate : monitor.pg_index_bloat
----------------------------------------------------------------------
DROP VIEW IF EXISTS monitor . pg_index_bloat CASCADE ;
CREATE OR REPLACE VIEW monitor . pg_index_bloat AS
SELECT CURRENT_CATALOG AS datname , nspname , idxname AS relname , tblid , idxid , relpages :: BIGINT * bs AS size ,
COALESCE (( relpages - ( reltuples * ( 6 + ma - ( CASE WHEN index_tuple_hdr % ma = 0 THEN ma ELSE index_tuple_hdr % ma END )
+ nulldatawidth + ma - ( CASE WHEN nulldatawidth % ma = 0 THEN ma ELSE nulldatawidth % ma END ))
/ ( bs - pagehdr ):: FLOAT + 1 )), 0 ) / relpages :: FLOAT AS ratio
FROM (
SELECT nspname , idxname , indrelid AS tblid , indexrelid AS idxid ,
reltuples , relpages ,
current_setting ( 'block_size' ):: INTEGER AS bs ,
( CASE WHEN version () ~ 'mingw32' OR version () ~ '64-bit|x86_64|ppc64|ia64|amd64' THEN 8 ELSE 4 END ) AS ma ,
24 AS pagehdr ,
( CASE WHEN max ( COALESCE ( pg_stats . null_frac , 0 )) = 0 THEN 2 ELSE 6 END ) AS index_tuple_hdr ,
sum (( 1 . 0 - COALESCE ( pg_stats . null_frac , 0 . 0 )) *
COALESCE ( pg_stats . avg_width , 1024 )):: INTEGER AS nulldatawidth
FROM pg_attribute
JOIN (
SELECT pg_namespace . nspname ,
ic . relname AS idxname ,
ic . reltuples ,
ic . relpages ,
pg_index . indrelid ,
pg_index . indexrelid ,
tc . relname AS tablename ,
regexp_split_to_table ( pg_index . indkey :: TEXT , ' ' ) :: INTEGER AS attnum ,
pg_index . indexrelid AS index_oid
FROM pg_index
JOIN pg_class ic ON pg_index . indexrelid = ic . oid
JOIN pg_class tc ON pg_index . indrelid = tc . oid
JOIN pg_namespace ON pg_namespace . oid = ic . relnamespace
JOIN pg_am ON ic . relam = pg_am . oid
WHERE pg_am . amname = 'btree' AND ic . relpages > 0 AND nspname NOT IN ( 'pg_catalog' , 'information_schema' )
) ind_atts ON pg_attribute . attrelid = ind_atts . indexrelid AND pg_attribute . attnum = ind_atts . attnum
JOIN pg_stats ON pg_stats . schemaname = ind_atts . nspname
AND (( pg_stats . tablename = ind_atts . tablename AND pg_stats . attname = pg_get_indexdef ( pg_attribute . attrelid , pg_attribute . attnum , TRUE ))
OR ( pg_stats . tablename = ind_atts . idxname AND pg_stats . attname = pg_attribute . attname ))
WHERE pg_attribute . attnum > 0
GROUP BY 1 , 2 , 3 , 4 , 5 , 6
) est ;
COMMENT ON VIEW monitor . pg_index_bloat IS 'postgres index bloat estimate (btree-only)' ;
GRANT SELECT ON monitor . pg_index_bloat TO pg_monitor ;
----------------------------------------------------------------------
-- Relation Bloat : monitor.pg_bloat
----------------------------------------------------------------------
DROP VIEW IF EXISTS monitor . pg_bloat CASCADE ;
CREATE OR REPLACE VIEW monitor . pg_bloat AS
SELECT coalesce ( ib . datname , tb . datname ) AS datname ,
coalesce ( ib . nspname , tb . nspname ) AS nspname ,
coalesce ( ib . tblid , tb . tblid ) AS tblid ,
coalesce ( tb . nspname || '.' || tb . relname , ib . nspname || '.' || ib . tblid :: RegClass ) AS tblname ,
tb . size AS tbl_size ,
CASE WHEN tb . ratio < 0 THEN 0 ELSE round ( tb . ratio :: NUMERIC , 6 ) END AS tbl_ratio ,
( tb . size * ( CASE WHEN tb . ratio < 0 THEN 0 ELSE tb . ratio :: NUMERIC END )) :: BIGINT AS tbl_wasted ,
ib . idxid ,
ib . nspname || '.' || ib . relname AS idxname ,
ib . size AS idx_size ,
CASE WHEN ib . ratio < 0 THEN 0 ELSE round ( ib . ratio :: NUMERIC , 5 ) END AS idx_ratio ,
( ib . size * ( CASE WHEN ib . ratio < 0 THEN 0 ELSE ib . ratio :: NUMERIC END )) :: BIGINT AS idx_wasted
FROM monitor . pg_index_bloat ib
FULL OUTER JOIN monitor . pg_table_bloat tb ON ib . tblid = tb . tblid ;
COMMENT ON VIEW monitor . pg_bloat IS 'postgres relation bloat detail' ;
GRANT SELECT ON monitor . pg_bloat TO pg_monitor ;
----------------------------------------------------------------------
-- monitor.pg_index_bloat_human
----------------------------------------------------------------------
DROP VIEW IF EXISTS monitor . pg_index_bloat_human CASCADE ;
CREATE OR REPLACE VIEW monitor . pg_index_bloat_human AS
SELECT idxname AS name ,
tblname ,
idx_wasted AS wasted ,
pg_size_pretty ( idx_size ) AS idx_size ,
round ( 100 * idx_ratio :: NUMERIC , 2 ) AS idx_ratio ,
pg_size_pretty ( idx_wasted ) AS idx_wasted ,
pg_size_pretty ( tbl_size ) AS tbl_size ,
round ( 100 * tbl_ratio :: NUMERIC , 2 ) AS tbl_ratio ,
pg_size_pretty ( tbl_wasted ) AS tbl_wasted
FROM monitor . pg_bloat
WHERE idxname IS NOT NULL ;
COMMENT ON VIEW monitor . pg_index_bloat_human IS 'postgres index bloat info in human-readable format' ;
GRANT SELECT ON monitor . pg_index_bloat_human TO pg_monitor ;
----------------------------------------------------------------------
-- monitor.pg_table_bloat_human
----------------------------------------------------------------------
DROP VIEW IF EXISTS monitor . pg_table_bloat_human CASCADE ;
CREATE OR REPLACE VIEW monitor . pg_table_bloat_human AS
SELECT tblname AS name ,
idx_wasted + tbl_wasted AS wasted ,
pg_size_pretty ( idx_wasted + tbl_wasted ) AS all_wasted ,
pg_size_pretty ( tbl_wasted ) AS tbl_wasted ,
pg_size_pretty ( tbl_size ) AS tbl_size ,
tbl_ratio ,
pg_size_pretty ( idx_wasted ) AS idx_wasted ,
pg_size_pretty ( idx_size ) AS idx_size ,
round ( idx_wasted :: NUMERIC * 100 . 0 / idx_size , 2 ) AS idx_ratio
FROM ( SELECT datname ,
nspname ,
tblname ,
coalesce ( max ( tbl_wasted ), 0 ) AS tbl_wasted ,
coalesce ( max ( tbl_size ), 1 ) AS tbl_size ,
round ( 100 * coalesce ( max ( tbl_ratio ), 0 ):: NUMERIC , 2 ) AS tbl_ratio ,
coalesce ( sum ( idx_wasted ), 0 ) AS idx_wasted ,
coalesce ( sum ( idx_size ), 1 ) AS idx_size
FROM monitor . pg_bloat
WHERE tblname IS NOT NULL
GROUP BY 1 , 2 , 3
) d ;
COMMENT ON VIEW monitor . pg_table_bloat_human IS 'postgres table bloat info in human-readable format' ;
GRANT SELECT ON monitor . pg_table_bloat_human TO pg_monitor ;
----------------------------------------------------------------------
-- Activity Overview: monitor.pg_session
----------------------------------------------------------------------
DROP VIEW IF EXISTS monitor . pg_session CASCADE ;
CREATE OR REPLACE VIEW monitor . pg_session AS
SELECT coalesce ( datname , 'all' ) AS datname , numbackends , active , idle , ixact , max_duration , max_tx_duration , max_conn_duration
FROM (
SELECT datname ,
count ( * ) AS numbackends ,
count ( * ) FILTER ( WHERE state = 'active' ) AS active ,
count ( * ) FILTER ( WHERE state = 'idle' ) AS idle ,
count ( * ) FILTER ( WHERE state = 'idle in transaction'
OR state = 'idle in transaction (aborted)' ) AS ixact ,
max ( extract ( epoch from now () - state_change ))
FILTER ( WHERE state = 'active' ) AS max_duration ,
max ( extract ( epoch from now () - xact_start )) AS max_tx_duration ,
max ( extract ( epoch from now () - backend_start )) AS max_conn_duration
FROM pg_stat_activity
WHERE backend_type = 'client backend'
AND pid <> pg_backend_pid ()
GROUP BY ROLLUP ( 1 )
ORDER BY 1 NULLS FIRST
) t ;
COMMENT ON VIEW monitor . pg_session IS 'postgres activity group by session' ;
GRANT SELECT ON monitor . pg_session TO pg_monitor ;
----------------------------------------------------------------------
-- Sequential Scan: monitor.pg_seq_scan
----------------------------------------------------------------------
DROP VIEW IF EXISTS monitor . pg_seq_scan CASCADE ;
CREATE OR REPLACE VIEW monitor . pg_seq_scan AS
SELECT schemaname AS nspname ,
relname ,
seq_scan ,
seq_tup_read ,
seq_tup_read / seq_scan AS seq_tup_avg ,
idx_scan ,
n_live_tup + n_dead_tup AS tuples ,
round ( n_live_tup * 100 . 0 :: NUMERIC / ( n_live_tup + n_dead_tup ), 2 ) AS live_ratio
FROM pg_stat_user_tables
WHERE seq_scan > 0
and ( n_live_tup + n_dead_tup ) > 0
ORDER BY seq_scan DESC ;
COMMENT ON VIEW monitor . pg_seq_scan IS 'table that have seq scan' ;
GRANT SELECT ON monitor . pg_seq_scan TO pg_monitor ;
查看共享内存分配的函数(PG13以上可用) DROP FUNCTION IF EXISTS monitor . pg_shmem () CASCADE ;
CREATE OR REPLACE FUNCTION monitor . pg_shmem () RETURNS SETOF
pg_shmem_allocations AS $$ SELECT * FROM pg_shmem_allocations ; $$ LANGUAGE SQL SECURITY DEFINER ;
COMMENT ON FUNCTION monitor . pg_shmem () IS 'security wrapper for system view pg_shmem' ;
REVOKE ALL ON FUNCTION monitor . pg_shmem () FROM PUBLIC ;
GRANT EXECUTE ON FUNCTION monitor . pg_shmem () TO pg_monitor ;
12.12 - 监控面板 Pigsty 为 PostgreSQL 提供了诸多开箱即用的 Grafana 监控仪表盘
Pigsty 为 PostgreSQL 提供了诸多开箱即用的 Grafana 监控仪表盘: Demo & Gallery 。
在 Pigsty 中共有 26 个与 PostgreSQL 相关的监控面板,按照层次分为 总览,集群,实例,数据库四大类,按照数据来源又分为 PGSQL ,PGCAT ,PGLOG 三大类。
总览 概览
集群
实例
数据库
总览 PGSQL Overview :PGSQL模块的主仪表板
PGSQL Overview
PGSQL Alert :PGSQL 全局核心指标总览与告警事件一览
PGSQL Alert
PGSQL Shard :展示一个PGSQL 水平分片集群内的横向指标对比:例如 CITUS / GPSQL 集群。
PGSQL Shard
集群 PGSQL Cluster :一个PGSQL集群的主仪表板
PGSQL Cluster
PGRDS Cluster :PGSQL Cluster 的RDS版本,专注于所有 PostgreSQL 本身的指标
PGRDS Cluster
PGSQL Service :关注PGSQL集群服务、代理、路由和负载均衡。
PGSQL Service
PGSQL Activity :关注PGSQL集群的会话/负载/QPS/TPS/锁定情况
PGSQL Activity
PGSQL Replication :关注PGSQL集群复制、插槽和发布/订阅。
PGSQL Replication
PGSQL Databases :关注所有实例的数据库CRUD、慢查询和表统计信息。
PGSQL Databases
PGSQL Patroni :关注集群高可用状态,Patroni组件状态
PGSQL Patroni
PGSQL PITR :关注集群 PITR 过程的上下文,用于辅助时间点恢复
PGSQL PITR
实例 PGSQL Instance :单个PGSQL实例的主仪表板
PGSQL Instance
PGRDS Instance :PGSQL Instance 的RDS版本,专注于所有 PostgreSQL 本身的指标
PGRDS Instance
PGSQL Proxy :单个haproxy负载均衡器的详细指标
PGSQL Proxy
PGSQL Pgbouncer :单个Pgbouncer连接池实例中的指标总览
PGSQL Pgbouncer
PGSQL Persist :持久性指标:WAL、XID、检查点、存档、IO
PGSQL Persist
PGSQL Xacts :关于事务、锁、TPS/QPS相关的指标
PGSQL Xacts
PGSQL Session :单个实例中的会话和活动/空闲时间的指标
PGSQL Session
PGSQL Exporter :Postgres/Pgbouncer 监控组件自我监控指标
PGSQL Exporter
数据库 PGSQL Database :单个PGSQL数据库的主仪表板
PGSQL Database
PGSQL Tables :单个数据库内的表/索引访问指标
PGSQL Tables
PGSQL Table :单个表的详细信息(QPS/RT/索引/序列…)
PGSQL Table
PGSQL Query :单类查询的详细信息(QPS/RT)
PGSQL Query
PGCAT PGCAT Instance :直接从数据库目录获取的实例信息
PGCAT Instance
PGCAT Database :直接从数据库目录获取的数据库信息
PGCAT Database
PGCAT Schema :直接从数据库目录获取关于模式的信息(表/索引/序列…)
PGCAT Schema
PGCAT Table :直接从数据库目录获取的单个表的详细信息(统计/膨胀…)
PGCAT Table
PGCAT Query :直接从数据库目录获取的单类查询的详细信息(SQL/统计)
PGCAT Query
PGCAT Locks :直接从数据库目录获取的关于活动与锁等待的信息
PGCAT Locks
PGLOG PGLOG Overview :总览 Pigsty CMDB 中的CSV日志样本
PGLOG Overview
PGLOG Overview :Pigsty CMDB 中的CSV日志样本中某一条会话的日志详情
PGLOG Session
画廊 详情请参考 pigsty/wiki/gallery 。
PGSQL Overview
PGSQL Shard
PGSQL Cluster
PGSQL Service
PGSQL Activity
PGSQL Replication
PGSQL Databases
PGSQL Instance
PGSQL Proxy
PGSQL Pgbouncer
PGSQL Session
PGSQL Xacts
PGSQL Persist
PGSQL Database
PGSQL Tables
PGSQL Table
PGSQL Query
PGCAT Instance
PGCAT Database
PGCAT Schema
PGCAT Table
PGCAT Lock
PGCAT Query
PGLOG Overview
PGLOG Session
12.12.1 - 总览面板 PostgreSQL 模块全局总览类监控面板
PostgreSQL 模块全局总览类监控面板,包括:
12.12.1.1 - PGSQL Overview PGSQL 模块的主仪表板
PGSQL 模块的主仪表板:Demo
PGSQL Overview 是 PostgreSQL 模块的主仪表板,提供整个 PGSQL 模块的全局概览视图。
12.12.1.2 - PGSQL Alert PGSQL 的全局关键指标和警报事件
PGSQL 的全局关键指标和警报事件:Demo
PGSQL Alert 仪表板展示 PGSQL 全局核心指标总览与告警事件一览。
12.12.1.3 - PGSQL Shard 关于水平分片的 PGSQL 集群的概览
关于水平分片的 PGSQL 集群的概览:Demo
PGSQL Shard 仪表板展示一个 PGSQL 水平分片集群内的横向指标对比,例如 Citus / GPSQL 集群。
12.12.2 - 集群面板 PostgreSQL 集群级别监控面板
PostgreSQL 集群级别监控面板,包括:
12.12.2.1 - PGSQL Cluster 一个 PGSQL 集群的主仪表板
一个 PGSQL 集群的主仪表板:Demo
PGSQL Cluster 是单个 PostgreSQL 集群的主仪表板,提供集群级别的核心指标概览。
12.12.2.2 - PGRDS Cluster PGSQL Cluster 的 RDS 版本,专注于 PostgreSQL 本身的指标
PGSQL Cluster 的 RDS 版本:Demo
PGRDS Cluster 是 PGSQL Cluster 的 RDS 版本,专注于所有 PostgreSQL 本身的指标,适用于云数据库 RDS 监控场景。
12.12.2.3 - PGSQL Activity 关注 PGSQL 集群的会话/负载/QPS/TPS/锁定情况
关注 PGSQL 集群的会话/负载/QPS/TPS/锁定情况:Demo
PGSQL Activity 仪表板关注 PGSQL 集群的会话、负载、QPS、TPS 以及锁定情况。
12.12.2.4 - PGSQL Replication 关注 PGSQL 集群复制、插槽和发布/订阅
关注 PGSQL 集群复制、插槽和发布/订阅:Demo
PGSQL Replication 仪表板关注 PGSQL 集群的复制状态、复制插槽和发布/订阅信息。
12.12.2.5 - PGSQL Service 关注 PGSQL 集群服务、代理、路由和负载均衡
关注 PGSQL 集群服务、代理、路由和负载均衡:Demo
PGSQL Service 仪表板关注 PGSQL 集群的服务、代理、路由和负载均衡状态。
12.12.2.6 - PGSQL Databases 关注所有实例的数据库 CRUD、慢查询和表统计信息
关注所有实例的数据库 CRUD、慢查询和表统计信息:Demo
PGSQL Databases 仪表板关注集群中所有实例的数据库 CRUD、慢查询和表统计信息。
12.12.2.7 - PGSQL Patroni 关注集群高可用状态,Patroni 组件状态
关注集群高可用状态,Patroni 组件状态:Demo
PGSQL Patroni 仪表板关注集群的高可用状态以及 Patroni 组件的运行状态。
12.12.2.8 - PGSQL PITR 关注集群 PITR 过程的上下文,用于辅助时间点恢复
关注集群 PITR 过程的上下文:Demo
PGSQL PITR 仪表板关注集群 PITR 过程的上下文,用于辅助时间点恢复操作。
12.12.3 - 实例面板 PostgreSQL 实例级别监控面板
PostgreSQL 实例级别监控面板,包括:
12.12.3.1 - PGSQL Instance 单个 PGSQL 实例的主仪表板
单个 PGSQL 实例的主仪表板:Demo
PGSQL Instance 是单个 PostgreSQL 实例的主仪表板,提供实例级别的核心指标概览。
12.12.3.2 - PGRDS Instance PGSQL Instance 的 RDS 版本,专注于 PostgreSQL 本身的指标
PGSQL Instance 的 RDS 版本:Demo
PGRDS Instance 是 PGSQL Instance 的 RDS 版本,专注于所有 PostgreSQL 本身的指标,适用于云数据库 RDS 监控场景。
12.12.3.3 - PGCAT Instance 直接从数据库目录获取的实例信息
直接从数据库目录获取的实例信息:Demo
PGCAT Instance 仪表板展示直接从数据库系统目录获取的实例信息。
12.12.3.4 - PGSQL Persist 持久性指标:WAL、XID、检查点、存档、IO
持久性指标:WAL、XID、检查点、存档、IO:Demo
PGSQL Persist 仪表板关注持久性相关指标:WAL、XID、检查点、存档和 IO。
12.12.3.5 - PGSQL Proxy 单个 HAProxy 负载均衡器的详细指标
单个 HAProxy 负载均衡器的详细指标:Demo
PGSQL Proxy 仪表板展示单个 HAProxy 负载均衡器的详细指标。
12.12.3.6 - PGSQL Pgbouncer 单个 Pgbouncer 连接池实例中的指标总览
单个 Pgbouncer 连接池实例中的指标总览:Demo
PGSQL Pgbouncer 仪表板展示单个 Pgbouncer 连接池实例中的指标总览。
12.12.3.7 - PGSQL Session 单个实例中的会话和活动/空闲时间的指标
单个实例中的会话和活动/空闲时间的指标:Demo
PGSQL Session 仪表板展示单个实例中的会话和活动/空闲时间的指标。
12.12.3.8 - PGSQL Xacts 关于事务、锁、TPS/QPS 相关的指标
关于事务、锁、TPS/QPS 相关的指标:Demo
PGSQL Xacts 仪表板关注事务、锁、TPS/QPS 相关的指标。
12.12.3.9 - PGSQL Exporter Postgres 与 Pgbouncer 监控组件自我监控指标
Postgres 与 Pgbouncer 监控组件自我监控指标:Demo
PGSQL Exporter 仪表板展示 Postgres 与 Pgbouncer 监控组件的自我监控指标。
12.12.4 - 数据库面板 PostgreSQL 数据库级别监控面板
PostgreSQL 数据库级别监控面板,包括:
12.12.4.1 - PGSQL Database 单个 PGSQL 数据库的主仪表板
单个 PGSQL 数据库的主仪表板:Demo
PGSQL Database 是单个 PostgreSQL 数据库的主仪表板,提供数据库级别的核心指标概览。
12.12.4.2 - PGCAT Database 直接从数据库目录获取的数据库信息
直接从数据库目录获取的数据库信息:Demo
PGCAT Database 仪表板展示直接从数据库系统目录获取的数据库信息。
12.12.4.3 - PGSQL Tables 单个数据库内的表/索引访问指标
单个数据库内的表/索引访问指标:Demo
PGSQL Tables 仪表板展示单个数据库内的表和索引访问指标。
12.12.4.4 - PGSQL Table 单个表的详细信息(QPS/RT/索引/序列……)
单个表的详细信息:Demo
PGSQL Table 仪表板展示单个表的详细信息,包括 QPS、RT、索引、序列等指标。
12.12.4.5 - PGCAT Table 直接从数据库目录获取的单个表的详细信息
直接从数据库目录获取的单个表的详细信息:Demo
PGCAT Table 仪表板展示直接从数据库系统目录获取的单个表的详细信息,包括统计和膨胀信息。
12.12.4.6 - PGSQL Query 单类查询的详细信息(QPS/RT)
单类查询的详细信息:Demo
PGSQL Query 仪表板展示单类查询的详细信息,包括 QPS 和 RT 指标。
12.12.4.7 - PGCAT Query 直接从数据库目录获取的单类查询的详细信息
直接从数据库目录获取的单类查询的详细信息:Demo
PGCAT Query 仪表板展示直接从数据库系统目录获取的单类查询的详细信息,包括 SQL 和统计信息。
12.12.4.8 - PGCAT Locks 直接从数据库目录获取的关于活动与锁等待的信息
直接从数据库目录获取的关于活动与锁等待的信息:Demo
PGCAT Locks 仪表板展示直接从数据库系统目录获取的关于活动与锁等待的信息。
12.12.4.9 - PGCAT Schema 直接从数据库目录获取关于模式的信息
直接从数据库目录获取关于模式的信息:Demo
PGCAT Schema 仪表板展示直接从数据库系统目录获取的关于模式的信息,包括表、索引、序列等。
12.13 - 指标列表 Pigsty PGSQL 模块提供的完整监控指标列表与释义
PGSQL
Metric Name Type Labels Description ALERTS Unknown category, job, level, ins, severity, ip, alertname, alertstate, instance, clsN/A ALERTS_FOR_STATE Unknown category, job, level, ins, severity, ip, alertname, instance, clsN/A cls:pressure1 Unknown job, clsN/A cls:pressure15 Unknown job, clsN/A cls:pressure5 Unknown job, clsN/A go_gc_duration_seconds summary job, ins, ip, instance, quantile, clsA summary of the pause duration of garbage collection cycles. go_gc_duration_seconds_count Unknown job, ins, ip, instance, clsN/A go_gc_duration_seconds_sum Unknown job, ins, ip, instance, clsN/A go_goroutines gauge job, ins, ip, instance, clsNumber of goroutines that currently exist. go_info gauge version, job, ins, ip, instance, clsInformation about the Go environment. go_memstats_alloc_bytes gauge job, ins, ip, instance, clsNumber of bytes allocated and still in use. go_memstats_alloc_bytes_total counter job, ins, ip, instance, clsTotal number of bytes allocated, even if freed. go_memstats_buck_hash_sys_bytes gauge job, ins, ip, instance, clsNumber of bytes used by the profiling bucket hash table. go_memstats_frees_total counter job, ins, ip, instance, clsTotal number of frees. go_memstats_gc_sys_bytes gauge job, ins, ip, instance, clsNumber of bytes used for garbage collection system metadata. go_memstats_heap_alloc_bytes gauge job, ins, ip, instance, clsNumber of heap bytes allocated and still in use. go_memstats_heap_idle_bytes gauge job, ins, ip, instance, clsNumber of heap bytes waiting to be used. go_memstats_heap_inuse_bytes gauge job, ins, ip, instance, clsNumber of heap bytes that are in use. go_memstats_heap_objects gauge job, ins, ip, instance, clsNumber of allocated objects. go_memstats_heap_released_bytes gauge job, ins, ip, instance, clsNumber of heap bytes released to OS. go_memstats_heap_sys_bytes gauge job, ins, ip, instance, clsNumber of heap bytes obtained from system. go_memstats_last_gc_time_seconds gauge job, ins, ip, instance, clsNumber of seconds since 1970 of last garbage collection. go_memstats_lookups_total counter job, ins, ip, instance, clsTotal number of pointer lookups. go_memstats_mallocs_total counter job, ins, ip, instance, clsTotal number of mallocs. go_memstats_mcache_inuse_bytes gauge job, ins, ip, instance, clsNumber of bytes in use by mcache structures. go_memstats_mcache_sys_bytes gauge job, ins, ip, instance, clsNumber of bytes used for mcache structures obtained from system. go_memstats_mspan_inuse_bytes gauge job, ins, ip, instance, clsNumber of bytes in use by mspan structures. go_memstats_mspan_sys_bytes gauge job, ins, ip, instance, clsNumber of bytes used for mspan structures obtained from system. go_memstats_next_gc_bytes gauge job, ins, ip, instance, clsNumber of heap bytes when next garbage collection will take place. go_memstats_other_sys_bytes gauge job, ins, ip, instance, clsNumber of bytes used for other system allocations. go_memstats_stack_inuse_bytes gauge job, ins, ip, instance, clsNumber of bytes in use by the stack allocator. go_memstats_stack_sys_bytes gauge job, ins, ip, instance, clsNumber of bytes obtained from system for stack allocator. go_memstats_sys_bytes gauge job, ins, ip, instance, clsNumber of bytes obtained from system. go_threads gauge job, ins, ip, instance, clsNumber of OS threads created. ins:pressure1 Unknown job, ins, ip, clsN/A ins:pressure15 Unknown job, ins, ip, clsN/A ins:pressure5 Unknown job, ins, ip, clsN/A patroni_cluster_unlocked gauge job, ins, ip, instance, cls, scopeValue is 1 if the cluster is unlocked, 0 if locked. patroni_dcs_last_seen gauge job, ins, ip, instance, cls, scopeEpoch timestamp when DCS was last contacted successfully by Patroni. patroni_failsafe_mode_is_active gauge job, ins, ip, instance, cls, scopeValue is 1 if failsafe mode is active, 0 if inactive. patroni_is_paused gauge job, ins, ip, instance, cls, scopeValue is 1 if auto failover is disabled, 0 otherwise. patroni_master gauge job, ins, ip, instance, cls, scopeValue is 1 if this node is the leader, 0 otherwise. patroni_pending_restart gauge job, ins, ip, instance, cls, scopeValue is 1 if the node needs a restart, 0 otherwise. patroni_postgres_in_archive_recovery gauge job, ins, ip, instance, cls, scopeValue is 1 if Postgres is replicating from archive, 0 otherwise. patroni_postgres_running gauge job, ins, ip, instance, cls, scopeValue is 1 if Postgres is running, 0 otherwise. patroni_postgres_server_version gauge job, ins, ip, instance, cls, scopeVersion of Postgres (if running), 0 otherwise. patroni_postgres_streaming gauge job, ins, ip, instance, cls, scopeValue is 1 if Postgres is streaming, 0 otherwise. patroni_postgres_timeline counter job, ins, ip, instance, cls, scopePostgres timeline of this node (if running), 0 otherwise. patroni_postmaster_start_time gauge job, ins, ip, instance, cls, scopeEpoch seconds since Postgres started. patroni_primary gauge job, ins, ip, instance, cls, scopeValue is 1 if this node is the leader, 0 otherwise. patroni_replica gauge job, ins, ip, instance, cls, scopeValue is 1 if this node is a replica, 0 otherwise. patroni_standby_leader gauge job, ins, ip, instance, cls, scopeValue is 1 if this node is the standby_leader, 0 otherwise. patroni_sync_standby gauge job, ins, ip, instance, cls, scopeValue is 1 if this node is a sync standby replica, 0 otherwise. patroni_up Unknown job, ins, ip, instance, clsN/A patroni_version gauge job, ins, ip, instance, cls, scopePatroni semver without periods. patroni_xlog_location counter job, ins, ip, instance, cls, scopeCurrent location of the Postgres transaction log, 0 if this node is not the leader. patroni_xlog_paused gauge job, ins, ip, instance, cls, scopeValue is 1 if the Postgres xlog is paused, 0 otherwise. patroni_xlog_received_location counter job, ins, ip, instance, cls, scopeCurrent location of the received Postgres transaction log, 0 if this node is not a replica. patroni_xlog_replayed_location counter job, ins, ip, instance, cls, scopeCurrent location of the replayed Postgres transaction log, 0 if this node is not a replica. patroni_xlog_replayed_timestamp gauge job, ins, ip, instance, cls, scopeCurrent timestamp of the replayed Postgres transaction log, 0 if null. pg:cls:active_backends Unknown job, clsN/A pg:cls:active_time_rate15m Unknown job, clsN/A pg:cls:active_time_rate1m Unknown job, clsN/A pg:cls:active_time_rate5m Unknown job, clsN/A pg:cls:age Unknown job, clsN/A pg:cls:buf_alloc_rate1m Unknown job, clsN/A pg:cls:buf_clean_rate1m Unknown job, clsN/A pg:cls:buf_flush_backend_rate1m Unknown job, clsN/A pg:cls:buf_flush_checkpoint_rate1m Unknown job, clsN/A pg:cls:cpu_count Unknown job, clsN/A pg:cls:cpu_usage Unknown job, clsN/A pg:cls:cpu_usage_15m Unknown job, clsN/A pg:cls:cpu_usage_1m Unknown job, clsN/A pg:cls:cpu_usage_5m Unknown job, clsN/A pg:cls:db_size Unknown job, clsN/A pg:cls:file_size Unknown job, clsN/A pg:cls:ixact_backends Unknown job, clsN/A pg:cls:ixact_time_rate1m Unknown job, clsN/A pg:cls:lag_bytes Unknown job, clsN/A pg:cls:lag_seconds Unknown job, clsN/A pg:cls:leader Unknown job, ins, ip, instance, clsN/A pg:cls:load1 Unknown job, clsN/A pg:cls:load15 Unknown job, clsN/A pg:cls:load5 Unknown job, clsN/A pg:cls:lock_count Unknown job, clsN/A pg:cls:locks Unknown job, cls, modeN/A pg:cls:log_size Unknown job, clsN/A pg:cls:lsn_rate1m Unknown job, clsN/A pg:cls:members Unknown job, ins, ip, clsN/A pg:cls:num_backends Unknown job, clsN/A pg:cls:partition Unknown job, clsN/A pg:cls:receiver Unknown state, slot_name, job, appname, ip, cls, sender_host, sender_portN/A pg:cls:rlock_count Unknown job, clsN/A pg:cls:saturation1 Unknown job, clsN/A pg:cls:saturation15 Unknown job, clsN/A pg:cls:saturation5 Unknown job, clsN/A pg:cls:sender Unknown pid, usename, address, job, ins, appname, ip, clsN/A pg:cls:session_time_rate1m Unknown job, clsN/A pg:cls:size Unknown job, clsN/A pg:cls:slot_count Unknown job, clsN/A pg:cls:slot_retained_bytes Unknown job, clsN/A pg:cls:standby_count Unknown job, clsN/A pg:cls:sync_state Unknown job, clsN/A pg:cls:timeline Unknown job, clsN/A pg:cls:tup_deleted_rate1m Unknown job, clsN/A pg:cls:tup_fetched_rate1m Unknown job, clsN/A pg:cls:tup_inserted_rate1m Unknown job, clsN/A pg:cls:tup_modified_rate1m Unknown job, clsN/A pg:cls:tup_returned_rate1m Unknown job, clsN/A pg:cls:wal_size Unknown job, clsN/A pg:cls:xact_commit_rate15m Unknown job, clsN/A pg:cls:xact_commit_rate1m Unknown job, clsN/A pg:cls:xact_commit_rate5m Unknown job, clsN/A pg:cls:xact_rollback_rate15m Unknown job, clsN/A pg:cls:xact_rollback_rate1m Unknown job, clsN/A pg:cls:xact_rollback_rate5m Unknown job, clsN/A pg:cls:xact_total_rate15m Unknown job, clsN/A pg:cls:xact_total_rate1m Unknown job, clsN/A pg:cls:xact_total_sigma15m Unknown job, clsN/A pg:cls:xlock_count Unknown job, clsN/A pg:db:active_backends Unknown datname, job, ins, ip, instance, clsN/A pg:db:active_time_rate15m Unknown datname, job, ins, ip, instance, clsN/A pg:db:active_time_rate1m Unknown datname, job, ins, ip, instance, clsN/A pg:db:active_time_rate5m Unknown datname, job, ins, ip, instance, clsN/A pg:db:age Unknown datname, job, ins, ip, instance, clsN/A pg:db:age_deriv1h Unknown datname, job, ins, ip, instance, clsN/A pg:db:age_exhaust Unknown datname, job, ins, ip, instance, clsN/A pg:db:blk_io_time_seconds_rate1m Unknown datname, job, ins, ip, instance, clsN/A pg:db:blk_read_time_seconds_rate1m Unknown datname, job, ins, ip, instance, clsN/A pg:db:blk_write_time_seconds_rate1m Unknown datname, job, ins, ip, instance, clsN/A pg:db:blks_access_1m Unknown datname, job, ins, ip, instance, clsN/A pg:db:blks_hit_1m Unknown datname, job, ins, ip, instance, clsN/A pg:db:blks_hit_ratio1m Unknown datname, job, ins, ip, instance, clsN/A pg:db:blks_read_1m Unknown datname, job, ins, ip, instance, clsN/A pg:db:conn_limit Unknown datname, job, ins, ip, instance, clsN/A pg:db:conn_usage Unknown datname, job, ins, ip, instance, clsN/A pg:db:db_size Unknown datname, job, ins, ip, instance, clsN/A pg:db:ixact_backends Unknown datname, job, ins, ip, instance, clsN/A pg:db:ixact_time_rate1m Unknown datname, job, ins, ip, instance, clsN/A pg:db:lock_count Unknown datname, job, ins, ip, instance, clsN/A pg:db:num_backends Unknown datname, job, ins, ip, instance, clsN/A pg:db:rlock_count Unknown datname, job, ins, ip, instance, clsN/A pg:db:session_time_rate1m Unknown datname, job, ins, ip, instance, clsN/A pg:db:temp_bytes_rate1m Unknown datname, job, ins, ip, instance, clsN/A pg:db:temp_files_1m Unknown datname, job, ins, ip, instance, clsN/A pg:db:tup_deleted_rate1m Unknown datname, job, ins, ip, instance, clsN/A pg:db:tup_fetched_rate1m Unknown datname, job, ins, ip, instance, clsN/A pg:db:tup_inserted_rate1m Unknown datname, job, ins, ip, instance, clsN/A pg:db:tup_modified_rate1m Unknown datname, job, ins, ip, instance, clsN/A pg:db:tup_returned_rate1m Unknown datname, job, ins, ip, instance, clsN/A pg:db:wlock_count Unknown datname, job, ins, ip, instance, clsN/A pg:db:xact_commit_rate15m Unknown datname, job, ins, ip, instance, clsN/A pg:db:xact_commit_rate1m Unknown datname, job, ins, ip, instance, clsN/A pg:db:xact_commit_rate5m Unknown datname, job, ins, ip, instance, clsN/A pg:db:xact_rollback_rate15m Unknown datname, job, ins, ip, instance, clsN/A pg:db:xact_rollback_rate1m Unknown datname, job, ins, ip, instance, clsN/A pg:db:xact_rollback_rate5m Unknown datname, job, ins, ip, instance, clsN/A pg:db:xact_total_rate15m Unknown datname, job, ins, ip, instance, clsN/A pg:db:xact_total_rate1m Unknown datname, job, ins, ip, instance, clsN/A pg:db:xact_total_rate5m Unknown datname, job, ins, ip, instance, clsN/A pg:db:xact_total_sigma15m Unknown datname, job, ins, ip, instance, clsN/A pg:db:xlock_count Unknown datname, job, ins, ip, instance, clsN/A pg:env:active_backends Unknown jobN/A pg:env:active_time_rate15m Unknown jobN/A pg:env:active_time_rate1m Unknown jobN/A pg:env:active_time_rate5m Unknown jobN/A pg:env:age Unknown jobN/A pg:env:cpu_count Unknown jobN/A pg:env:cpu_usage Unknown jobN/A pg:env:cpu_usage_15m Unknown jobN/A pg:env:cpu_usage_1m Unknown jobN/A pg:env:cpu_usage_5m Unknown jobN/A pg:env:ixact_backends Unknown jobN/A pg:env:ixact_time_rate1m Unknown jobN/A pg:env:lag_bytes Unknown jobN/A pg:env:lag_seconds Unknown jobN/A pg:env:lsn_rate1m Unknown jobN/A pg:env:session_time_rate1m Unknown jobN/A pg:env:tup_deleted_rate1m Unknown jobN/A pg:env:tup_fetched_rate1m Unknown jobN/A pg:env:tup_inserted_rate1m Unknown jobN/A pg:env:tup_modified_rate1m Unknown jobN/A pg:env:tup_returned_rate1m Unknown jobN/A pg:env:xact_commit_rate15m Unknown jobN/A pg:env:xact_commit_rate1m Unknown jobN/A pg:env:xact_commit_rate5m Unknown jobN/A pg:env:xact_rollback_rate15m Unknown jobN/A pg:env:xact_rollback_rate1m Unknown jobN/A pg:env:xact_rollback_rate5m Unknown jobN/A pg:env:xact_total_rate15m Unknown jobN/A pg:env:xact_total_rate1m Unknown jobN/A pg:env:xact_total_sigma15m Unknown jobN/A pg:ins:active_backends Unknown job, ins, ip, instance, clsN/A pg:ins:active_time_rate15m Unknown job, ins, ip, instance, clsN/A pg:ins:active_time_rate1m Unknown job, ins, ip, instance, clsN/A pg:ins:active_time_rate5m Unknown job, ins, ip, instance, clsN/A pg:ins:age Unknown job, ins, ip, instance, clsN/A pg:ins:blks_hit_ratio1m Unknown job, ins, ip, instance, clsN/A pg:ins:buf_alloc_rate1m Unknown job, ins, ip, instance, clsN/A pg:ins:buf_clean_rate1m Unknown job, ins, ip, instance, clsN/A pg:ins:buf_flush_backend_rate1m Unknown job, ins, ip, instance, clsN/A pg:ins:buf_flush_checkpoint_rate1m Unknown job, ins, ip, instance, clsN/A pg:ins:ckpt_1h Unknown job, ins, ip, instance, clsN/A pg:ins:ckpt_req_1m Unknown job, ins, ip, instance, clsN/A pg:ins:ckpt_timed_1m Unknown job, ins, ip, instance, clsN/A pg:ins:conn_limit Unknown job, ins, ip, instance, clsN/A pg:ins:conn_usage Unknown job, ins, ip, instance, clsN/A pg:ins:cpu_count Unknown job, ins, ip, instance, clsN/A pg:ins:cpu_usage Unknown job, ins, ip, instance, clsN/A pg:ins:cpu_usage_15m Unknown job, ins, ip, instance, clsN/A pg:ins:cpu_usage_1m Unknown job, ins, ip, instance, clsN/A pg:ins:cpu_usage_5m Unknown job, ins, ip, instance, clsN/A pg:ins:db_size Unknown job, ins, ip, instance, clsN/A pg:ins:file_size Unknown job, ins, ip, instance, clsN/A pg:ins:fs_size Unknown job, ins, ip, instance, clsN/A pg:ins:is_leader Unknown job, ins, ip, instance, clsN/A pg:ins:ixact_backends Unknown job, ins, ip, instance, clsN/A pg:ins:ixact_time_rate1m Unknown job, ins, ip, instance, clsN/A pg:ins:lag_bytes Unknown job, ins, ip, instance, clsN/A pg:ins:lag_seconds Unknown job, ins, ip, instance, clsN/A pg:ins:load1 Unknown job, ins, ip, instance, clsN/A pg:ins:load15 Unknown job, ins, ip, instance, clsN/A pg:ins:load5 Unknown job, ins, ip, instance, clsN/A pg:ins:lock_count Unknown job, ins, ip, instance, clsN/A pg:ins:locks Unknown job, ins, ip, mode, instance, clsN/A pg:ins:log_size Unknown job, ins, ip, instance, clsN/A pg:ins:lsn_rate1m Unknown job, ins, ip, instance, clsN/A pg:ins:mem_size Unknown job, ins, ip, instance, clsN/A pg:ins:num_backends Unknown job, ins, ip, instance, clsN/A pg:ins:rlock_count Unknown job, ins, ip, instance, clsN/A pg:ins:saturation1 Unknown job, ins, ip, clsN/A pg:ins:saturation15 Unknown job, ins, ip, clsN/A pg:ins:saturation5 Unknown job, ins, ip, clsN/A pg:ins:session_time_rate1m Unknown job, ins, ip, instance, clsN/A pg:ins:slot_retained_bytes Unknown job, ins, ip, instance, clsN/A pg:ins:space_usage Unknown job, ins, ip, instance, clsN/A pg:ins:status Unknown job, ins, ip, instance, clsN/A pg:ins:sync_state Unknown job, ins, instance, clsN/A pg:ins:target_count Unknown job, cls, insN/A pg:ins:timeline Unknown job, ins, ip, instance, clsN/A pg:ins:tup_deleted_rate1m Unknown job, ins, ip, instance, clsN/A pg:ins:tup_fetched_rate1m Unknown job, ins, ip, instance, clsN/A pg:ins:tup_inserted_rate1m Unknown job, ins, ip, instance, clsN/A pg:ins:tup_modified_rate1m Unknown job, ins, ip, instance, clsN/A pg:ins:tup_returned_rate1m Unknown job, ins, ip, instance, clsN/A pg:ins:wal_size Unknown job, ins, ip, instance, clsN/A pg:ins:wlock_count Unknown job, ins, ip, instance, clsN/A pg:ins:xact_commit_rate15m Unknown job, ins, ip, instance, clsN/A pg:ins:xact_commit_rate1m Unknown job, ins, ip, instance, clsN/A pg:ins:xact_commit_rate5m Unknown job, ins, ip, instance, clsN/A pg:ins:xact_rollback_rate15m Unknown job, ins, ip, instance, clsN/A pg:ins:xact_rollback_rate1m Unknown job, ins, ip, instance, clsN/A pg:ins:xact_rollback_rate5m Unknown job, ins, ip, instance, clsN/A pg:ins:xact_total_rate15m Unknown job, ins, ip, instance, clsN/A pg:ins:xact_total_rate1m Unknown job, ins, ip, instance, clsN/A pg:ins:xact_total_rate5m Unknown job, ins, ip, instance, clsN/A pg:ins:xact_total_sigma15m Unknown job, ins, ip, instance, clsN/A pg:ins:xlock_count Unknown job, ins, ip, instance, clsN/A pg:query:call_rate1m Unknown datname, query, job, ins, ip, instance, clsN/A pg:query:rt_1m Unknown datname, query, job, ins, ip, instance, clsN/A pg:table:scan_rate1m Unknown datname, relname, job, ins, ip, instance, clsN/A pg_activity_count gauge datname, state, job, ins, ip, instance, clsCount of connection among (datname,state) pg_activity_max_conn_duration gauge datname, state, job, ins, ip, instance, clsMax backend session duration since state change among (datname, state) pg_activity_max_duration gauge datname, state, job, ins, ip, instance, clsMax duration since last state change among (datname, state) pg_activity_max_tx_duration gauge datname, state, job, ins, ip, instance, clsMax transaction duration since state change among (datname, state) pg_archiver_failed_count counter job, ins, ip, instance, clsNumber of failed attempts for archiving WAL files pg_archiver_finish_count counter job, ins, ip, instance, clsNumber of WAL files that have been successfully archived pg_archiver_last_failed_time counter job, ins, ip, instance, clsTime of the last failed archival operation pg_archiver_last_finish_time counter job, ins, ip, instance, clsTime of the last successful archive operation pg_archiver_reset_time gauge job, ins, ip, instance, clsTime at which archive statistics were last reset pg_backend_count gauge type, job, ins, ip, instance, clsDatabase backend process count by backend_type pg_bgwriter_buffers_alloc counter job, ins, ip, instance, clsNumber of buffers allocated pg_bgwriter_buffers_backend counter job, ins, ip, instance, clsNumber of buffers written directly by a backend pg_bgwriter_buffers_backend_fsync counter job, ins, ip, instance, clsNumber of times a backend had to execute its own fsync call pg_bgwriter_buffers_checkpoint counter job, ins, ip, instance, clsNumber of buffers written during checkpoints pg_bgwriter_buffers_clean counter job, ins, ip, instance, clsNumber of buffers written by the background writer pg_bgwriter_checkpoint_sync_time counter job, ins, ip, instance, clsTotal amount of time that has been spent in the portion of checkpoint processing where files are synchronized to disk, in seconds pg_bgwriter_checkpoint_write_time counter job, ins, ip, instance, clsTotal amount of time that has been spent in the portion of checkpoint processing where files are written to disk, in seconds pg_bgwriter_checkpoints_req counter job, ins, ip, instance, clsNumber of requested checkpoints that have been performed pg_bgwriter_checkpoints_timed counter job, ins, ip, instance, clsNumber of scheduled checkpoints that have been performed pg_bgwriter_maxwritten_clean counter job, ins, ip, instance, clsNumber of times the background writer stopped a cleaning scan because it had written too many buffers pg_bgwriter_reset_time counter job, ins, ip, instance, clsTime at which bgwriter statistics were last reset pg_boot_time gauge job, ins, ip, instance, clsunix timestamp when postmaster boot pg_checkpoint_checkpoint_lsn counter job, ins, ip, instance, clsLatest checkpoint location pg_checkpoint_elapse gauge job, ins, ip, instance, clsSeconds elapsed since latest checkpoint in seconds pg_checkpoint_full_page_writes gauge job, ins, ip, instance, clsLatest checkpoint’s full_page_writes enabled pg_checkpoint_newest_commit_ts_xid counter job, ins, ip, instance, clsLatest checkpoint’s newestCommitTsXid pg_checkpoint_next_multi_offset counter job, ins, ip, instance, clsLatest checkpoint’s NextMultiOffset pg_checkpoint_next_multixact_id counter job, ins, ip, instance, clsLatest checkpoint’s NextMultiXactId pg_checkpoint_next_oid counter job, ins, ip, instance, clsLatest checkpoint’s NextOID pg_checkpoint_next_xid counter job, ins, ip, instance, clsLatest checkpoint’s NextXID xid pg_checkpoint_next_xid_epoch counter job, ins, ip, instance, clsLatest checkpoint’s NextXID epoch pg_checkpoint_oldest_active_xid counter job, ins, ip, instance, clsLatest checkpoint’s oldestActiveXID pg_checkpoint_oldest_commit_ts_xid counter job, ins, ip, instance, clsLatest checkpoint’s oldestCommitTsXid pg_checkpoint_oldest_multi_dbid gauge job, ins, ip, instance, clsLatest checkpoint’s oldestMulti’s DB OID pg_checkpoint_oldest_multi_xid counter job, ins, ip, instance, clsLatest checkpoint’s oldestMultiXid pg_checkpoint_oldest_xid counter job, ins, ip, instance, clsLatest checkpoint’s oldestXID pg_checkpoint_oldest_xid_dbid gauge job, ins, ip, instance, clsLatest checkpoint’s oldestXID’s DB OID pg_checkpoint_prev_tli counter job, ins, ip, instance, clsLatest checkpoint’s PrevTimeLineID pg_checkpoint_redo_lsn counter job, ins, ip, instance, clsLatest checkpoint’s REDO location pg_checkpoint_time counter job, ins, ip, instance, clsTime of latest checkpoint pg_checkpoint_tli counter job, ins, ip, instance, clsLatest checkpoint’s TimeLineID pg_conf_reload_time gauge job, ins, ip, instance, clsseconds since last configuration reload pg_db_active_time counter datname, job, ins, ip, instance, clsTime spent executing SQL statements in this database, in seconds pg_db_age gauge datname, job, ins, ip, instance, clsAge of database calculated from datfrozenxid pg_db_allow_conn gauge datname, job, ins, ip, instance, clsIf false(0) then no one can connect to this database. pg_db_blk_read_time counter datname, job, ins, ip, instance, clsTime spent reading data file blocks by backends in this database, in seconds pg_db_blk_write_time counter datname, job, ins, ip, instance, clsTime spent writing data file blocks by backends in this database, in seconds pg_db_blks_access counter datname, job, ins, ip, instance, clsNumber of times disk blocks that accessed read+hit pg_db_blks_hit counter datname, job, ins, ip, instance, clsNumber of times disk blocks were found already in the buffer cache pg_db_blks_read counter datname, job, ins, ip, instance, clsNumber of disk blocks read in this database pg_db_cks_fail_time gauge datname, job, ins, ip, instance, clsTime at which the last data page checksum failure was detected in this database pg_db_cks_fails counter datname, job, ins, ip, instance, clsNumber of data page checksum failures detected in this database, -1 for not enabled pg_db_confl_confl_bufferpin counter datname, job, ins, ip, instance, clsNumber of queries in this database that have been canceled due to pinned buffers pg_db_confl_confl_deadlock counter datname, job, ins, ip, instance, clsNumber of queries in this database that have been canceled due to deadlocks pg_db_confl_confl_lock counter datname, job, ins, ip, instance, clsNumber of queries in this database that have been canceled due to lock timeouts pg_db_confl_confl_snapshot counter datname, job, ins, ip, instance, clsNumber of queries in this database that have been canceled due to old snapshots pg_db_confl_confl_tablespace counter datname, job, ins, ip, instance, clsNumber of queries in this database that have been canceled due to dropped tablespaces pg_db_conflicts counter datname, job, ins, ip, instance, clsNumber of queries canceled due to conflicts with recovery in this database pg_db_conn_limit gauge datname, job, ins, ip, instance, clsSets maximum number of concurrent connections that can be made to this database. -1 means no limit. pg_db_datid gauge datname, job, ins, ip, instance, clsOID of the database pg_db_deadlocks counter datname, job, ins, ip, instance, clsNumber of deadlocks detected in this database pg_db_frozen_xid gauge datname, job, ins, ip, instance, clsAll transaction IDs before this one have been frozened pg_db_is_template gauge datname, job, ins, ip, instance, clsIf true(1), then this database can be cloned by any user with CREATEDB privileges pg_db_ixact_time counter datname, job, ins, ip, instance, clsTime spent idling while in a transaction in this database, in seconds pg_db_numbackends gauge datname, job, ins, ip, instance, clsNumber of backends currently connected to this database pg_db_reset_time counter datname, job, ins, ip, instance, clsTime at which database statistics were last reset pg_db_session_time counter datname, job, ins, ip, instance, clsTime spent by database sessions in this database, in seconds pg_db_sessions counter datname, job, ins, ip, instance, clsTotal number of sessions established to this database pg_db_sessions_abandoned counter datname, job, ins, ip, instance, clsNumber of database sessions to this database that were terminated because connection to the client was lost pg_db_sessions_fatal counter datname, job, ins, ip, instance, clsNumber of database sessions to this database that were terminated by fatal errors pg_db_sessions_killed counter datname, job, ins, ip, instance, clsNumber of database sessions to this database that were terminated by operator intervention pg_db_temp_bytes counter datname, job, ins, ip, instance, clsTotal amount of data written to temporary files by queries in this database. pg_db_temp_files counter datname, job, ins, ip, instance, clsNumber of temporary files created by queries in this database pg_db_tup_deleted counter datname, job, ins, ip, instance, clsNumber of rows deleted by queries in this database pg_db_tup_fetched counter datname, job, ins, ip, instance, clsNumber of rows fetched by queries in this database pg_db_tup_inserted counter datname, job, ins, ip, instance, clsNumber of rows inserted by queries in this database pg_db_tup_modified counter datname, job, ins, ip, instance, clsNumber of rows modified by queries in this database pg_db_tup_returned counter datname, job, ins, ip, instance, clsNumber of rows returned by queries in this database pg_db_tup_updated counter datname, job, ins, ip, instance, clsNumber of rows updated by queries in this database pg_db_xact_commit counter datname, job, ins, ip, instance, clsNumber of transactions in this database that have been committed pg_db_xact_rollback counter datname, job, ins, ip, instance, clsNumber of transactions in this database that have been rolled back pg_db_xact_total counter datname, job, ins, ip, instance, clsNumber of transactions in this database pg_downstream_count gauge state, job, ins, ip, instance, clsCount of corresponding state pg_exporter_agent_up Unknown job, ins, ip, instance, clsN/A pg_exporter_last_scrape_time gauge job, ins, ip, instance, clsseconds exporter spending on scrapping pg_exporter_query_cache_ttl gauge datname, query, job, ins, ip, instance, clstimes to live of query cache pg_exporter_query_scrape_duration gauge datname, query, job, ins, ip, instance, clsseconds query spending on scrapping pg_exporter_query_scrape_error_count gauge datname, query, job, ins, ip, instance, clstimes the query failed pg_exporter_query_scrape_hit_count gauge datname, query, job, ins, ip, instance, clsnumbers been scrapped from this query pg_exporter_query_scrape_metric_count gauge datname, query, job, ins, ip, instance, clsnumbers of metrics been scrapped from this query pg_exporter_query_scrape_total_count gauge datname, query, job, ins, ip, instance, clstimes exporter server was scraped for metrics pg_exporter_scrape_duration gauge job, ins, ip, instance, clsseconds exporter spending on scrapping pg_exporter_scrape_error_count counter job, ins, ip, instance, clstimes exporter was scraped for metrics and failed pg_exporter_scrape_total_count counter job, ins, ip, instance, clstimes exporter was scraped for metrics pg_exporter_server_scrape_duration gauge datname, job, ins, ip, instance, clsseconds exporter server spending on scrapping pg_exporter_server_scrape_error_count Unknown datname, job, ins, ip, instance, clsN/A pg_exporter_server_scrape_total_count gauge datname, job, ins, ip, instance, clstimes exporter server was scraped for metrics pg_exporter_server_scrape_total_seconds gauge datname, job, ins, ip, instance, clsseconds exporter server spending on scrapping pg_exporter_up gauge job, ins, ip, instance, clsalways be 1 if your could retrieve metrics pg_exporter_uptime gauge job, ins, ip, instance, clsseconds since exporter primary server inited pg_flush_lsn counter job, ins, ip, instance, clsprimary only, location of current wal syncing pg_func_calls counter datname, funcname, job, ins, ip, instance, clsNumber of times this function has been called pg_func_self_time counter datname, funcname, job, ins, ip, instance, clsTotal time spent in this function itself, not including other functions called by it, in ms pg_func_total_time counter datname, funcname, job, ins, ip, instance, clsTotal time spent in this function and all other functions called by it, in ms pg_in_recovery gauge job, ins, ip, instance, clsserver is in recovery mode? 1 for yes 0 for no pg_index_idx_blks_hit counter datname, relname, job, ins, relid, ip, instance, cls, idxnameNumber of buffer hits in this index pg_index_idx_blks_read counter datname, relname, job, ins, relid, ip, instance, cls, idxnameNumber of disk blocks read from this index pg_index_idx_scan counter datname, relname, job, ins, relid, ip, instance, cls, idxnameNumber of index scans initiated on this index pg_index_idx_tup_fetch counter datname, relname, job, ins, relid, ip, instance, cls, idxnameNumber of live table rows fetched by simple index scans using this index pg_index_idx_tup_read counter datname, relname, job, ins, relid, ip, instance, cls, idxnameNumber of index entries returned by scans on this index pg_index_relpages gauge datname, relname, job, ins, relid, ip, instance, cls, idxnameSize of the on-disk representation of this index in pages pg_index_reltuples gauge datname, relname, job, ins, relid, ip, instance, cls, idxnameEstimate relation tuples pg_insert_lsn counter job, ins, ip, instance, clsprimary only, location of current wal inserting pg_io_evictions counter type, job, ins, object, ip, context, instance, clsNumber of times a block has been written out from a shared or local buffer pg_io_extend_time counter type, job, ins, object, ip, context, instance, clsTime spent in extend operations in seconds pg_io_extends counter type, job, ins, object, ip, context, instance, clsNumber of relation extend operations, each of the size specified in op_bytes. pg_io_fsync_time counter type, job, ins, object, ip, context, instance, clsTime spent in fsync operations in seconds pg_io_fsyncs counter type, job, ins, object, ip, context, instance, clsNumber of fsync calls. These are only tracked in context normal pg_io_hits counter type, job, ins, object, ip, context, instance, clsThe number of times a desired block was found in a shared buffer. pg_io_op_bytes gauge type, job, ins, object, ip, context, instance, clsThe number of bytes per unit of I/O read, written, or extended. 8192 by default pg_io_read_time counter type, job, ins, object, ip, context, instance, clsTime spent in read operations in seconds pg_io_reads counter type, job, ins, object, ip, context, instance, clsNumber of read operations, each of the size specified in op_bytes. pg_io_reset_time gauge type, job, ins, object, ip, context, instance, clsTimestamp at which these statistics were last reset pg_io_reuses counter type, job, ins, object, ip, context, instance, clsThe number of times an existing buffer in reused pg_io_write_time counter type, job, ins, object, ip, context, instance, clsTime spent in write operations in seconds pg_io_writeback_time counter type, job, ins, object, ip, context, instance, clsTime spent in writeback operations in seconds pg_io_writebacks counter type, job, ins, object, ip, context, instance, clsNumber of units of size op_bytes which the process requested the kernel write out to permanent storage. pg_io_writes counter type, job, ins, object, ip, context, instance, clsNumber of write operations, each of the size specified in op_bytes. pg_is_in_recovery gauge job, ins, ip, instance, cls1 if in recovery mode pg_is_wal_replay_paused gauge job, ins, ip, instance, cls1 if wal play paused pg_lag gauge job, ins, ip, instance, clsreplica only, replication lag in seconds pg_last_replay_time gauge job, ins, ip, instance, clstime when last transaction been replayed pg_lock_count gauge datname, job, ins, ip, mode, instance, clsNumber of locks of corresponding mode and database pg_lsn counter job, ins, ip, instance, clslog sequence number, current write location pg_meta_info gauge cls, extensions, version, job, ins, primary_conninfo, conf_path, hba_path, ip, cluster_id, instance, listen_port, wal_level, ver_num, cluster_name, data_dirconstant 1 pg_query_calls counter datname, query, job, ins, ip, instance, clsNumber of times the statement was executed pg_query_exec_time counter datname, query, job, ins, ip, instance, clsTotal time spent executing the statement, in seconds pg_query_io_time counter datname, query, job, ins, ip, instance, clsTotal time the statement spent reading and writing blocks, in seconds pg_query_rows counter datname, query, job, ins, ip, instance, clsTotal number of rows retrieved or affected by the statement pg_query_sblk_dirtied counter datname, query, job, ins, ip, instance, clsTotal number of shared blocks dirtied by the statement pg_query_sblk_hit counter datname, query, job, ins, ip, instance, clsTotal number of shared block cache hits by the statement pg_query_sblk_read counter datname, query, job, ins, ip, instance, clsTotal number of shared blocks read by the statement pg_query_sblk_written counter datname, query, job, ins, ip, instance, clsTotal number of shared blocks written by the statement pg_query_wal_bytes counter datname, query, job, ins, ip, instance, clsTotal amount of WAL bytes generated by the statement pg_receive_lsn counter job, ins, ip, instance, clsreplica only, location of wal synced to disk pg_recovery_backup_end_lsn counter job, ins, ip, instance, clsBackup end location pg_recovery_backup_start_lsn counter job, ins, ip, instance, clsBackup start location pg_recovery_min_lsn counter job, ins, ip, instance, clsMinimum recovery ending location pg_recovery_min_timeline counter job, ins, ip, instance, clsMin recovery ending loc’s timeline pg_recovery_prefetch_block_distance gauge job, ins, ip, instance, clsHow many blocks ahead the prefetcher is looking pg_recovery_prefetch_hit counter job, ins, ip, instance, clsNumber of blocks not prefetched because they were already in the buffer pool pg_recovery_prefetch_io_depth gauge job, ins, ip, instance, clsHow many prefetches have been initiated but are not yet known to have completed pg_recovery_prefetch_prefetch counter job, ins, ip, instance, clsNumber of blocks prefetched because they were not in the buffer pool pg_recovery_prefetch_reset_time counter job, ins, ip, instance, clsTime at which these recovery prefetch statistics were last reset pg_recovery_prefetch_skip_fpw gauge job, ins, ip, instance, clsNumber of blocks not prefetched because a full page image was included in the WAL pg_recovery_prefetch_skip_init counter job, ins, ip, instance, clsNumber of blocks not prefetched because they would be zero-initialized pg_recovery_prefetch_skip_new counter job, ins, ip, instance, clsNumber of blocks not prefetched because they didn’t exist yet pg_recovery_prefetch_skip_rep counter job, ins, ip, instance, clsNumber of blocks not prefetched because they were already recently prefetched pg_recovery_prefetch_wal_distance gauge job, ins, ip, instance, clsHow many bytes ahead the prefetcher is looking pg_recovery_require_record gauge job, ins, ip, instance, clsEnd-of-backup record required pg_recv_flush_lsn counter state, slot_name, job, ins, ip, instance, cls, sender_host, sender_portLast write-ahead log location already received and flushed to disk pg_recv_flush_tli counter state, slot_name, job, ins, ip, instance, cls, sender_host, sender_portTimeline number of last write-ahead log location received and flushed to disk pg_recv_init_lsn counter state, slot_name, job, ins, ip, instance, cls, sender_host, sender_portFirst write-ahead log location used when WAL receiver is started pg_recv_init_tli counter state, slot_name, job, ins, ip, instance, cls, sender_host, sender_portFirst timeline number used when WAL receiver is started pg_recv_msg_recv_time gauge state, slot_name, job, ins, ip, instance, cls, sender_host, sender_portReceipt time of last message received from origin WAL sender pg_recv_msg_send_time gauge state, slot_name, job, ins, ip, instance, cls, sender_host, sender_portSend time of last message received from origin WAL sender pg_recv_pid gauge state, slot_name, job, ins, ip, instance, cls, sender_host, sender_portProcess ID of the WAL receiver process pg_recv_reported_lsn counter state, slot_name, job, ins, ip, instance, cls, sender_host, sender_portLast write-ahead log location reported to origin WAL sender pg_recv_reported_time gauge state, slot_name, job, ins, ip, instance, cls, sender_host, sender_portTime of last write-ahead log location reported to origin WAL sender pg_recv_time gauge state, slot_name, job, ins, ip, instance, cls, sender_host, sender_portTime of current snapshot pg_recv_write_lsn counter state, slot_name, job, ins, ip, instance, cls, sender_host, sender_portLast write-ahead log location already received and written to disk, but not flushed. pg_relkind_count gauge datname, job, ins, ip, instance, cls, relkindNumber of relations of corresponding relkind pg_repl_backend_xmin counter pid, usename, address, job, ins, appname, ip, instance, clsThis standby’s xmin horizon reported by hot_standby_feedback. pg_repl_client_port gauge pid, usename, address, job, ins, appname, ip, instance, clsTCP port number that the client is using for communication with this WAL sender, or -1 if a Unix socket is used pg_repl_flush_diff gauge pid, usename, address, job, ins, appname, ip, instance, clsLast log position flushed to disk by this standby server diff with current lsn pg_repl_flush_lag gauge pid, usename, address, job, ins, appname, ip, instance, clsTime elapsed between flushing recent WAL locally and receiving notification that this standby server has written and flushed it pg_repl_flush_lsn counter pid, usename, address, job, ins, appname, ip, instance, clsLast write-ahead log location flushed to disk by this standby server pg_repl_launch_time counter pid, usename, address, job, ins, appname, ip, instance, clsTime when this process was started, i.e., when the client connected to this WAL sender pg_repl_lsn counter pid, usename, address, job, ins, appname, ip, instance, clsCurrent log position on this server pg_repl_replay_diff gauge pid, usename, address, job, ins, appname, ip, instance, clsLast log position replayed into the database on this standby server diff with current lsn pg_repl_replay_lag gauge pid, usename, address, job, ins, appname, ip, instance, clsTime elapsed between flushing recent WAL locally and receiving notification that this standby server has written, flushed and applied it pg_repl_replay_lsn counter pid, usename, address, job, ins, appname, ip, instance, clsLast write-ahead log location replayed into the database on this standby server pg_repl_reply_time gauge pid, usename, address, job, ins, appname, ip, instance, clsSend time of last reply message received from standby server pg_repl_sent_diff gauge pid, usename, address, job, ins, appname, ip, instance, clsLast log position sent to this standby server diff with current lsn pg_repl_sent_lsn counter pid, usename, address, job, ins, appname, ip, instance, clsLast write-ahead log location sent on this connection pg_repl_state gauge pid, usename, address, job, ins, appname, ip, instance, clsCurrent WAL sender encoded state 0-4 for streaming startup catchup backup stopping pg_repl_sync_priority gauge pid, usename, address, job, ins, appname, ip, instance, clsPriority of this standby server for being chosen as the synchronous standby pg_repl_sync_state gauge pid, usename, address, job, ins, appname, ip, instance, clsEncoded synchronous state of this standby server, 0-3 for async potential sync quorum pg_repl_time counter pid, usename, address, job, ins, appname, ip, instance, clsCurrent timestamp in unix epoch pg_repl_write_diff gauge pid, usename, address, job, ins, appname, ip, instance, clsLast log position written to disk by this standby server diff with current lsn pg_repl_write_lag gauge pid, usename, address, job, ins, appname, ip, instance, clsTime elapsed between flushing recent WAL locally and receiving notification that this standby server has written it pg_repl_write_lsn counter pid, usename, address, job, ins, appname, ip, instance, clsLast write-ahead log location written to disk by this standby server pg_replay_lsn counter job, ins, ip, instance, clsreplica only, location of wal applied pg_seq_blks_hit counter datname, job, ins, ip, instance, cls, seqnameNumber of buffer hits in this sequence pg_seq_blks_read counter datname, job, ins, ip, instance, cls, seqnameNumber of disk blocks read from this sequence pg_seq_last_value counter datname, job, ins, ip, instance, cls, seqnameThe last sequence value written to disk pg_setting_block_size gauge job, ins, ip, instance, clspg page block size, 8192 by default pg_setting_data_checksums gauge job, ins, ip, instance, clswhether data checksum is enabled, 1 enabled 0 disabled pg_setting_max_connections gauge job, ins, ip, instance, clsnumber of concurrent connections to the database server pg_setting_max_locks_per_transaction gauge job, ins, ip, instance, clsno more than this many distinct objects can be locked at any one time pg_setting_max_prepared_transactions gauge job, ins, ip, instance, clsmaximum number of transactions that can be in the prepared state simultaneously pg_setting_max_replication_slots gauge job, ins, ip, instance, clsmaximum number of replication slots pg_setting_max_wal_senders gauge job, ins, ip, instance, clsmaximum number of concurrent connections from standby servers pg_setting_max_worker_processes gauge job, ins, ip, instance, clsmaximum number of background processes that the system can support pg_setting_wal_log_hints gauge job, ins, ip, instance, clswhether wal_log_hints is enabled, 1 enabled 0 disabled pg_size_bytes gauge datname, job, ins, ip, instance, clsFile size in bytes pg_slot_active gauge slot_name, job, ins, ip, instance, clsTrue(1) if this slot is currently actively being used pg_slot_catalog_xmin counter slot_name, job, ins, ip, instance, clsThe oldest transaction affecting the system catalogs that this slot needs the database to retain. pg_slot_confirm_lsn counter slot_name, job, ins, ip, instance, clsThe address (LSN) up to which the logical slot’s consumer has confirmed receiving data. pg_slot_reset_time counter slot_name, job, ins, ip, instance, clsWhen statistics were last reset pg_slot_restart_lsn counter slot_name, job, ins, ip, instance, clsThe address (LSN) of oldest WAL which still might be required by the consumer of this slot pg_slot_retained_bytes gauge slot_name, job, ins, ip, instance, clsSize of bytes that retained for this slot pg_slot_safe_wal_size gauge slot_name, job, ins, ip, instance, clsbytes that can be written to WAL which will not make slot into lost pg_slot_spill_bytes counter slot_name, job, ins, ip, instance, clsBytes that spilled to disk due to logical decode mem exceeding pg_slot_spill_count counter slot_name, job, ins, ip, instance, clsXacts that spilled to disk due to logical decode mem exceeding (a xact can be spilled multiple times) pg_slot_spill_txns counter slot_name, job, ins, ip, instance, clsXacts that spilled to disk due to logical decode mem exceeding (subtrans included) pg_slot_stream_bytes counter slot_name, job, ins, ip, instance, clsBytes that streamed to decoding output plugin after mem exceed pg_slot_stream_count counter slot_name, job, ins, ip, instance, clsXacts that streamed to decoding output plugin after mem exceed (a xact can be streamed multiple times) pg_slot_stream_txns counter slot_name, job, ins, ip, instance, clsXacts that streamed to decoding output plugin after mem exceed pg_slot_temporary gauge slot_name, job, ins, ip, instance, clsTrue(1) if this is a temporary replication slot. pg_slot_total_bytes counter slot_name, job, ins, ip, instance, clsNumber of decoded bytes sent to the decoding output plugin for this slot pg_slot_total_txns counter slot_name, job, ins, ip, instance, clsNumber of decoded xacts sent to the decoding output plugin for this slot pg_slot_wal_status gauge slot_name, job, ins, ip, instance, clsWAL reserve status 0-3 means reserved,extended,unreserved,lost, -1 means other pg_slot_xmin counter slot_name, job, ins, ip, instance, clsThe oldest transaction that this slot needs the database to retain. pg_slru_blks_exists counter job, ins, ip, instance, clsNumber of blocks checked for existence for this SLRU pg_slru_blks_hit counter job, ins, ip, instance, clsNumber of times disk blocks were found already in the SLRU, so that a read was not necessary pg_slru_blks_read counter job, ins, ip, instance, clsNumber of disk blocks read for this SLRU pg_slru_blks_written counter job, ins, ip, instance, clsNumber of disk blocks written for this SLRU pg_slru_blks_zeroed counter job, ins, ip, instance, clsNumber of blocks zeroed during initializations pg_slru_flushes counter job, ins, ip, instance, clsNumber of flushes of dirty data for this SLRU pg_slru_reset_time counter job, ins, ip, instance, clsTime at which these statistics were last reset pg_slru_truncates counter job, ins, ip, instance, clsNumber of truncates for this SLRU pg_ssl_disabled gauge job, ins, ip, instance, clsNumber of client connection that does not use ssl pg_ssl_enabled gauge job, ins, ip, instance, clsNumber of client connection that use ssl pg_sync_standby_enabled gauge job, ins, ip, names, instance, clsSynchronous commit enabled, 1 if enabled, 0 if disabled pg_table_age gauge datname, relname, job, ins, ip, instance, clsAge of this table in vacuum cycles pg_table_analyze_count counter datname, relname, job, ins, ip, instance, clsNumber of times this table has been manually analyzed pg_table_autoanalyze_count counter datname, relname, job, ins, ip, instance, clsNumber of times this table has been analyzed by the autovacuum daemon pg_table_autovacuum_count counter datname, relname, job, ins, ip, instance, clsNumber of times this table has been vacuumed by the autovacuum daemon pg_table_frozenxid counter datname, relname, job, ins, ip, instance, clsAll txid before this have been frozen on this table pg_table_heap_blks_hit counter datname, relname, job, ins, ip, instance, clsNumber of buffer hits in this table pg_table_heap_blks_read counter datname, relname, job, ins, ip, instance, clsNumber of disk blocks read from this table pg_table_idx_blks_hit counter datname, relname, job, ins, ip, instance, clsNumber of buffer hits in all indexes on this table pg_table_idx_blks_read counter datname, relname, job, ins, ip, instance, clsNumber of disk blocks read from all indexes on this table pg_table_idx_scan counter datname, relname, job, ins, ip, instance, clsNumber of index scans initiated on this table pg_table_idx_tup_fetch counter datname, relname, job, ins, ip, instance, clsNumber of live rows fetched by index scans pg_table_kind gauge datname, relname, job, ins, ip, instance, clsRelation kind r/table/114 pg_table_n_dead_tup gauge datname, relname, job, ins, ip, instance, clsEstimated number of dead rows pg_table_n_ins_since_vacuum gauge datname, relname, job, ins, ip, instance, clsEstimated number of rows inserted since this table was last vacuumed pg_table_n_live_tup gauge datname, relname, job, ins, ip, instance, clsEstimated number of live rows pg_table_n_mod_since_analyze gauge datname, relname, job, ins, ip, instance, clsEstimated number of rows modified since this table was last analyzed pg_table_n_tup_del counter datname, relname, job, ins, ip, instance, clsNumber of rows deleted pg_table_n_tup_hot_upd counter datname, relname, job, ins, ip, instance, clsNumber of rows HOT updated (i.e with no separate index update required) pg_table_n_tup_ins counter datname, relname, job, ins, ip, instance, clsNumber of rows inserted pg_table_n_tup_mod counter datname, relname, job, ins, ip, instance, clsNumber of rows modified (insert + update + delete) pg_table_n_tup_newpage_upd counter datname, relname, job, ins, ip, instance, clsNumber of rows updated where the successor version goes onto a new heap page pg_table_n_tup_upd counter datname, relname, job, ins, ip, instance, clsNumber of rows updated (includes HOT updated rows) pg_table_ncols gauge datname, relname, job, ins, ip, instance, clsNumber of columns in the table pg_table_pages gauge datname, relname, job, ins, ip, instance, clsSize of the on-disk representation of this table in pages pg_table_relid gauge datname, relname, job, ins, ip, instance, clsRelation oid of this table pg_table_seq_scan counter datname, relname, job, ins, ip, instance, clsNumber of sequential scans initiated on this table pg_table_seq_tup_read counter datname, relname, job, ins, ip, instance, clsNumber of live rows fetched by sequential scans pg_table_size_bytes gauge datname, relname, job, ins, ip, instance, clsTotal bytes of this table (including toast, index, toast index) pg_table_size_indexsize gauge datname, relname, job, ins, ip, instance, clsBytes of all related indexes of this table pg_table_size_relsize gauge datname, relname, job, ins, ip, instance, clsBytes of this table itself (main, vm, fsm) pg_table_size_toastsize gauge datname, relname, job, ins, ip, instance, clsBytes of toast tables of this table pg_table_tbl_scan counter datname, relname, job, ins, ip, instance, clsNumber of scans initiated on this table pg_table_tup_read counter datname, relname, job, ins, ip, instance, clsNumber of live rows fetched by scans pg_table_tuples counter datname, relname, job, ins, ip, instance, clsAll txid before this have been frozen on this table pg_table_vacuum_count counter datname, relname, job, ins, ip, instance, clsNumber of times this table has been manually vacuumed (not counting VACUUM FULL) pg_timestamp gauge job, ins, ip, instance, clsdatabase current timestamp pg_up gauge job, ins, ip, instance, clslast scrape was able to connect to the server: 1 for yes, 0 for no pg_uptime gauge job, ins, ip, instance, clsseconds since postmaster start pg_version gauge job, ins, ip, instance, clsserver version number pg_wait_count gauge datname, job, ins, event, ip, instance, clsCount of WaitEvent on target database pg_wal_buffers_full counter job, ins, ip, instance, clsNumber of times WAL data was written to disk because WAL buffers became full pg_wal_bytes counter job, ins, ip, instance, clsTotal amount of WAL generated in bytes pg_wal_fpi counter job, ins, ip, instance, clsTotal number of WAL full page images generated pg_wal_records counter job, ins, ip, instance, clsTotal number of WAL records generated pg_wal_reset_time counter job, ins, ip, instance, clsWhen statistics were last reset pg_wal_sync counter job, ins, ip, instance, clsNumber of times WAL files were synced to disk via issue_xlog_fsync request pg_wal_sync_time counter job, ins, ip, instance, clsTotal amount of time spent syncing WAL files to disk via issue_xlog_fsync request, in seconds pg_wal_write counter job, ins, ip, instance, clsNumber of times WAL buffers were written out to disk via XLogWrite request. pg_wal_write_time counter job, ins, ip, instance, clsTotal amount of time spent writing WAL buffers to disk via XLogWrite request in seconds pg_write_lsn counter job, ins, ip, instance, clsprimary only, location of current wal writing pg_xact_xmax counter job, ins, ip, instance, clsFirst as-yet-unassigned txid. txid >= this are invisible. pg_xact_xmin counter job, ins, ip, instance, clsEarliest txid that is still active pg_xact_xnum gauge job, ins, ip, instance, clsCurrent active transaction count pgbouncer:cls:load1 Unknown job, clsN/A pgbouncer:cls:load15 Unknown job, clsN/A pgbouncer:cls:load5 Unknown job, clsN/A pgbouncer:db:conn_usage Unknown datname, job, ins, ip, instance, host, cls, real_datname, portN/A pgbouncer:db:conn_usage_reserve Unknown datname, job, ins, ip, instance, host, cls, real_datname, portN/A pgbouncer:db:pool_current_conn Unknown datname, job, ins, ip, instance, host, cls, real_datname, portN/A pgbouncer:db:pool_disabled Unknown datname, job, ins, ip, instance, host, cls, real_datname, portN/A pgbouncer:db:pool_max_conn Unknown datname, job, ins, ip, instance, host, cls, real_datname, portN/A pgbouncer:db:pool_paused Unknown datname, job, ins, ip, instance, host, cls, real_datname, portN/A pgbouncer:db:pool_reserve_size Unknown datname, job, ins, ip, instance, host, cls, real_datname, portN/A pgbouncer:db:pool_size Unknown datname, job, ins, ip, instance, host, cls, real_datname, portN/A pgbouncer:ins:free_clients Unknown job, ins, ip, instance, clsN/A pgbouncer:ins:free_servers Unknown job, ins, ip, instance, clsN/A pgbouncer:ins:load1 Unknown job, ins, ip, instance, clsN/A pgbouncer:ins:load15 Unknown job, ins, ip, instance, clsN/A pgbouncer:ins:load5 Unknown job, ins, ip, instance, clsN/A pgbouncer:ins:login_clients Unknown job, ins, ip, instance, clsN/A pgbouncer:ins:pool_databases Unknown job, ins, ip, instance, clsN/A pgbouncer:ins:pool_users Unknown job, ins, ip, instance, clsN/A pgbouncer:ins:pools Unknown job, ins, ip, instance, clsN/A pgbouncer:ins:used_clients Unknown job, ins, ip, instance, clsN/A pgbouncer_database_current_connections gauge datname, job, ins, ip, instance, host, cls, real_datname, portCurrent number of connections for this database pgbouncer_database_disabled gauge datname, job, ins, ip, instance, host, cls, real_datname, portTrue(1) if this database is currently disabled, else 0 pgbouncer_database_max_connections gauge datname, job, ins, ip, instance, host, cls, real_datname, portMaximum number of allowed connections for this database pgbouncer_database_min_pool_size gauge datname, job, ins, ip, instance, host, cls, real_datname, portMinimum number of server connections pgbouncer_database_paused gauge datname, job, ins, ip, instance, host, cls, real_datname, portTrue(1) if this database is currently paused, else 0 pgbouncer_database_pool_size gauge datname, job, ins, ip, instance, host, cls, real_datname, portMaximum number of server connections pgbouncer_database_reserve_pool gauge datname, job, ins, ip, instance, host, cls, real_datname, portMaximum number of additional connections for this database pgbouncer_exporter_agent_up Unknown job, ins, ip, instance, clsN/A pgbouncer_exporter_last_scrape_time gauge job, ins, ip, instance, clsseconds exporter spending on scrapping pgbouncer_exporter_query_cache_ttl gauge datname, query, job, ins, ip, instance, clstimes to live of query cache pgbouncer_exporter_query_scrape_duration gauge datname, query, job, ins, ip, instance, clsseconds query spending on scrapping pgbouncer_exporter_query_scrape_error_count gauge datname, query, job, ins, ip, instance, clstimes the query failed pgbouncer_exporter_query_scrape_hit_count gauge datname, query, job, ins, ip, instance, clsnumbers been scrapped from this query pgbouncer_exporter_query_scrape_metric_count gauge datname, query, job, ins, ip, instance, clsnumbers of metrics been scrapped from this query pgbouncer_exporter_query_scrape_total_count gauge datname, query, job, ins, ip, instance, clstimes exporter server was scraped for metrics pgbouncer_exporter_scrape_duration gauge job, ins, ip, instance, clsseconds exporter spending on scrapping pgbouncer_exporter_scrape_error_count counter job, ins, ip, instance, clstimes exporter was scraped for metrics and failed pgbouncer_exporter_scrape_total_count counter job, ins, ip, instance, clstimes exporter was scraped for metrics pgbouncer_exporter_server_scrape_duration gauge datname, job, ins, ip, instance, clsseconds exporter server spending on scrapping pgbouncer_exporter_server_scrape_total_count gauge datname, job, ins, ip, instance, clstimes exporter server was scraped for metrics pgbouncer_exporter_server_scrape_total_seconds gauge datname, job, ins, ip, instance, clsseconds exporter server spending on scrapping pgbouncer_exporter_up gauge job, ins, ip, instance, clsalways be 1 if your could retrieve metrics pgbouncer_exporter_uptime gauge job, ins, ip, instance, clsseconds since exporter primary server inited pgbouncer_in_recovery gauge job, ins, ip, instance, clsserver is in recovery mode? 1 for yes 0 for no pgbouncer_list_items gauge job, ins, ip, instance, list, clsNumber of corresponding pgbouncer object pgbouncer_pool_active_cancel_clients gauge datname, job, ins, ip, instance, user, cls, pool_modeClient connections that have forwarded query cancellations to the server and are waiting for the server response. pgbouncer_pool_active_cancel_servers gauge datname, job, ins, ip, instance, user, cls, pool_modeServer connections that are currently forwarding a cancel request pgbouncer_pool_active_clients gauge datname, job, ins, ip, instance, user, cls, pool_modeClient connections that are linked to server connection and can process queries pgbouncer_pool_active_servers gauge datname, job, ins, ip, instance, user, cls, pool_modeServer connections that are linked to a client pgbouncer_pool_cancel_clients gauge datname, job, ins, ip, instance, user, cls, pool_modeClient connections that have not forwarded query cancellations to the server yet. pgbouncer_pool_cancel_servers gauge datname, job, ins, ip, instance, user, cls, pool_modecancel requests have completed that were sent to cancel a query on this server pgbouncer_pool_idle_servers gauge datname, job, ins, ip, instance, user, cls, pool_modeServer connections that are unused and immediately usable for client queries pgbouncer_pool_login_servers gauge datname, job, ins, ip, instance, user, cls, pool_modeServer connections currently in the process of logging in pgbouncer_pool_maxwait gauge datname, job, ins, ip, instance, user, cls, pool_modeHow long the first(oldest) client in the queue has waited, in seconds, key metric pgbouncer_pool_maxwait_us gauge datname, job, ins, ip, instance, user, cls, pool_modeMicrosecond part of the maximum waiting time. pgbouncer_pool_tested_servers gauge datname, job, ins, ip, instance, user, cls, pool_modeServer connections that are currently running reset or check query pgbouncer_pool_used_servers gauge datname, job, ins, ip, instance, user, cls, pool_modeServer connections that have been idle for more than server_check_delay (means have to run check query) pgbouncer_pool_waiting_clients gauge datname, job, ins, ip, instance, user, cls, pool_modeClient connections that have sent queries but have not yet got a server connection pgbouncer_stat_avg_query_count gauge datname, job, ins, ip, instance, clsAverage queries per second in last stat period pgbouncer_stat_avg_query_time gauge datname, job, ins, ip, instance, clsAverage query duration, in seconds pgbouncer_stat_avg_recv gauge datname, job, ins, ip, instance, clsAverage received (from clients) bytes per second pgbouncer_stat_avg_sent gauge datname, job, ins, ip, instance, clsAverage sent (to clients) bytes per second pgbouncer_stat_avg_wait_time gauge datname, job, ins, ip, instance, clsTime spent by clients waiting for a server, in seconds (average per second). pgbouncer_stat_avg_xact_count gauge datname, job, ins, ip, instance, clsAverage transactions per second in last stat period pgbouncer_stat_avg_xact_time gauge datname, job, ins, ip, instance, clsAverage transaction duration, in seconds pgbouncer_stat_total_query_count gauge datname, job, ins, ip, instance, clsTotal number of SQL queries pooled by pgbouncer pgbouncer_stat_total_query_time counter datname, job, ins, ip, instance, clsTotal number of seconds spent when executing queries pgbouncer_stat_total_received counter datname, job, ins, ip, instance, clsTotal volume in bytes of network traffic received by pgbouncer pgbouncer_stat_total_sent counter datname, job, ins, ip, instance, clsTotal volume in bytes of network traffic sent by pgbouncer pgbouncer_stat_total_wait_time counter datname, job, ins, ip, instance, clsTime spent by clients waiting for a server, in seconds pgbouncer_stat_total_xact_count gauge datname, job, ins, ip, instance, clsTotal number of SQL transactions pooled by pgbouncer pgbouncer_stat_total_xact_time counter datname, job, ins, ip, instance, clsTotal number of seconds spent when in a transaction pgbouncer_up gauge job, ins, ip, instance, clslast scrape was able to connect to the server: 1 for yes, 0 for no pgbouncer_version gauge job, ins, ip, instance, clsserver version number process_cpu_seconds_total counter job, ins, ip, instance, clsTotal user and system CPU time spent in seconds. process_max_fds gauge job, ins, ip, instance, clsMaximum number of open file descriptors. process_open_fds gauge job, ins, ip, instance, clsNumber of open file descriptors. process_resident_memory_bytes gauge job, ins, ip, instance, clsResident memory size in bytes. process_start_time_seconds gauge job, ins, ip, instance, clsStart time of the process since unix epoch in seconds. process_virtual_memory_bytes gauge job, ins, ip, instance, clsVirtual memory size in bytes. process_virtual_memory_max_bytes gauge job, ins, ip, instance, clsMaximum amount of virtual memory available in bytes. promhttp_metric_handler_requests_in_flight gauge job, ins, ip, instance, clsCurrent number of scrapes being served. promhttp_metric_handler_requests_total counter code, job, ins, ip, instance, clsTotal number of scrapes by HTTP status code. scrape_duration_seconds Unknown job, ins, ip, instance, clsN/A scrape_samples_post_metric_relabeling Unknown job, ins, ip, instance, clsN/A scrape_samples_scraped Unknown job, ins, ip, instance, clsN/A scrape_series_added Unknown job, ins, ip, instance, clsN/A up Unknown job, ins, ip, instance, clsN/A
12.14 - 参数列表 PGSQL 模块提供的 PostgreSQL 相关配置参数详解
PGSQLNODEETCD
在单个节点上安装 PGSQL 模块将创建一个独立的 PGSQL 服务器/实例,即 主实例 。
在额外节点上安装将创建 只读副本 ,可以作为备用实例,并用于承载分担只读请求。
您还可以创建用于 ETL/OLAP/交互式查询的 离线 实例, 使用 同步备库 和 法定人数提交 来提高数据一致性,
甚至搭建 备份集群 和 延迟集群 以快速应对人为失误与软件缺陷导致的数据损失。
您可以定义多个 PGSQL 集群并进一步组建一个水平分片集群: Pigsty 支持原生的 citus 集群组 ,可以将您的标准 PGSQL 集群原地升级为一个分布式的数据库集群。
Pigsty v4.1 默认使用 PostgreSQL 18,并提供 pg_io_method、pgbackrest_exporter、pgbouncer_exporter 等相关参数。
参数概览 PG_ID
参数 类型 级别 说明 pg_modeenumCpgsql 集群模式: pgsql,citus,mssql,mysql,polar,ivory,oracle,gpsql pg_clusterstringCpgsql 集群名称, 必选身份参数 pg_seqintIpgsql 实例号, 必选身份参数 pg_roleenumIpgsql 实例角色, 必选身份参数, 可为 primary,replica,offline pg_instancesdictI在一个节点上定义多个 pg 实例,使用 {port:ins_vars} 格式 pg_upstreamipI级联从库或备份集群或的复制上游节点IP地址 pg_shardstringCpgsql 分片名,对 citus 与 gpsql 等水平分片集群为必选身份参数 pg_groupintCpgsql 分片号,正整数,对 citus 与 gpsql 等水平分片集群为必选身份参数 gp_roleenumC这个集群的 greenplum 角色,可以是 master 或 segment pg_exportersdictC在该节点上设置额外的 pg_exporters 用于监控远程 postgres 实例 pg_offline_queryboolI设置为 true 将此只读实例标记为特殊的离线从库,承载 Offline 服务,允许离线查询
PG_BUSINESS
PG_INSTALL
PG_BOOTSTRAP
参数 类型 级别 说明 pg_datapathCpostgres 数据目录,默认为 /pg/data pg_fs_mainpathCpostgres 主数据的挂载点/路径,默认为 /data/postgres pg_fs_backuppathCpg 备份数据的挂载点/路径,默认为 /data/backups pg_storage_typeenumCpg 主数据的存储类型,SSD、HDD,默认为 SSD,影响自动优化的参数。 pg_dummy_filesizesizeC/pg/dummy 的大小,默认保留 64MB 磁盘空间用于紧急抢修pg_listenip(s)C/Ipostgres/pgbouncer 的监听地址,用逗号分隔的IP列表,默认为 0.0.0.0 pg_portportCpostgres 监听端口,默认为 5432 pg_localhostpathCpostgres 的 Unix 套接字目录,用于本地连接 pg_namespacepathC在 etcd 中的顶级键命名空间,被 patroni & vip 用于高可用管理 patroni_enabledboolC如果禁用,初始化期间不会创建 postgres 集群 patroni_modeenumCpatroni 工作模式:default,pause,remove patroni_portportCpatroni 监听端口,默认为 8008 patroni_log_dirpathCpatroni 日志目录,默认为 /pg/log/patroni patroni_ssl_enabledboolG使用 SSL 保护 patroni RestAPI 通信? patroni_watchdog_modeenumCpatroni 看门狗模式:automatic,required,off,默认为 off patroni_usernameusernameCpatroni restapi 用户名,默认为 postgres patroni_passwordpasswordCpatroni restapi 密码,默认为 Patroni.API pg_primary_dbstringC指定集群中首要使用的数据库名,Citus等模式会用到,默认为 postgres pg_parametersdictC覆盖 postgresql.auto.conf 中的 PostgreSQL 参数 pg_filespath[]C拷贝至PGDATA目录中的额外文件列表 (例如许可证文件) pg_confenumC配置模板:oltp,olap,crit,tiny,默认为 oltp.yml pg_max_connintCpostgres 最大连接数,auto 将使用推荐值 pg_shared_buffer_ratiofloatCpostgres 共享缓冲区内存比率,默认为 0.25,范围 0.1~0.4 pg_rtoenumCRTO 模式:fast,norm,safe,wide,默认 norm pg_rto_plandictGRTO 预设配置,定义 Patroni HA 与 HAProxy 健康检查的超时参数 pg_rpointC恢复点目标(字节),默认为 1MiB pg_libsstringC预加载的库,默认为 pg_stat_statements,auto_explain pg_delayintervalI备份集群主库的WAL重放应用延迟,用于制备延迟从库 pg_checksumboolC为 postgres 集群启用数据校验和? pg_pwd_encenumC密码加密算法:固定为 scram-sha-256 pg_encodingenumC数据库集群编码,默认为 UTF8 pg_localeenumC数据库集群本地化设置,默认为 C pg_lc_collateenumC数据库集群排序,默认为 C pg_lc_ctypeenumC数据库字符类型,默认为 C pg_io_methodenumCPostgreSQL IO 方法:auto, sync, worker, io_uring pg_etcd_passwordpasswordC此 PostgreSQL 集群在 etcd 中使用的密码,默认使用集群名 pgsodium_keystringCpgsodium 加密主密钥,64 位十六进制数字,默认使用 sha256(pg_cluster) pgsodium_getkey_scriptpathCpgsodium 获取密钥脚本路径,默认使用模板中的 pgsodium_getkey
PG_PROVISION
PG_BACKUP
PG_ACCESS
PG_MONITOR
PG_REMOVE
PG_ID以下是一些常用的参数,用于标识 PGSQL 模块中的 实体 :集群、实例、服务等…
# pg_cluster: #CLUSTER # pgsql 集群名称,必需的标识参数
# pg_seq: 0 #INSTANCE # pgsql 实例序列号,必需的标识参数
# pg_role: replica #INSTANCE # pgsql 角色,必需的,可以是 primary,replica,offline
# pg_instances: {} #INSTANCE # 在节点上定义多个 pg 实例,使用 `{port:ins_vars}` 格式
# pg_upstream: #INSTANCE # 备用集群或级联副本的 repl 上游 ip 地址
# pg_shard: #CLUSTER # pgsql 分片名称,分片集群的可选标识
# pg_group: 0 #CLUSTER # pgsql 分片索引号,分片集群的可选标识
# gp_role: master #CLUSTER # 此集群的 greenplum 角色,可以是 master 或 segment
pg_offline_query : false #INSTANCE # 设置为 true 以在此实例上启用离线查询
您必须显式指定这些身份参数 ,它们没有默认值:
pg_clusterpg_roleprimary 角色会特别处理。如果不填写,默认为 replica 角色和特殊的 delayed 和 offline 角色。pg_seq{{ pg_cluster }}-{{ pg_seq }} 用于唯一标识 ins,即 pg_instance。{{ pg_cluster }}-{{ pg_role }} 用于标识集群内的服务,即 pg_service。pg_shardpg_grouppg_clusterpg_rolepg_seq标识参数 ,对于任何 Postgres 集群都是必选 的,并且必须显式指定。以下是一个示例:
pg-test :
hosts :
10.10.10.11 : {pg_seq: 1, pg_role : replica}
10.10.10.12 : {pg_seq: 2, pg_role : primary}
10.10.10.13 : {pg_seq: 3, pg_role : replica}
vars :
pg_cluster : pg-test
所有其他参数都可以从全局配置或默认配置继承,但标识参数必须明确指定 和手动分配 。
pg_mode参数名称: pg_mode, 类型: enum, 层次:C
PostgreSQL 集群模式,默认值为 pgsql,即标准的 PostgreSQL 集群。
可用的模式选项包括:
pgsql:标准的 PostgreSQL 集群citus:Citus 分布式数据库集群mssql:Babelfish MSSQL 线缆协议兼容内核mysql:OpenHalo/HaloDB MySQL 线协议兼容内核ivory:IvorySQL Oracle 兼容内核polar:PolarDB for PostgreSQL 内核oracle:PolarDB for Oracle 内核gpsql:Greenplum 并行数据库集群(监控)如果 pg_mode 设置为 citus 或 gpsql,则需要两个额外的必选身份参数 pg_shardpg_group
在这两种情况下,每一个 PostgreSQL 集群都是一组更大的业务单元的一部分。
pg_cluster参数名称: pg_cluster, 类型: string, 层次:C
PostgreSQL 集群名称,必选的身份标识参数,没有默认值
集群名将用作资源的命名空间。
集群命名需要遵循特定的命名模式:[a-z][a-z0-9-]*,即,只使用数字与小写字母,且不以数字开头,以符合标识上的不同约束的要求。
pg_seq参数名称: pg_seq, 类型: int, 层次:I
PostgreSQL 实例序列号,必选的身份标识参数,无默认值。
此实例的序号,在其集群 内是唯一分配的,通常使用自然数,从0或1开始分配,通常不会回收重用。
pg_role参数名称: pg_role, 类型: enum, 层次:I
PostgreSQL 实例角色,必选的身份标识参数,无默认值。取值可以是:primary, replica, offline
PGSQL 实例的角色,可以是:primary、replica、standby 或 offline。
primary: 主实例,在集群中有且仅有一个。replica: 用于承载在线只读流量的副本,高负载下可能会有轻微复制延迟(10ms~100ms, 100KB)。offline: 用于处理离线只读流量的离线副本,如统计分析/ETL/个人查询等。pg_instances参数名称: pg_instances, 类型: dict, 层次:I
使用 {port:ins_vars} 的形式在一台主机上定义多个 PostgreSQL 实例。
此参数是为在单个节点上的多实例部署保留的参数,Pigsty 尚未实现此功能,并强烈建议独占节点部署。
pg_upstream参数名称: pg_upstream, 类型: ip, 层次:I
备份集群 或级联从库的上游实例 IP 地址。
在集群的 primary 实例上设置 pg_upstream ,表示此集群是一个 备份集群 ,该实例将作为 standby leader,从上游集群接收并应用更改。
对非 primary 实例设置 pg_upstream 参数将指定一个具体实例作为物理复制的上游,如果与主实例 ip 地址不同,此实例将成为 级联副本 。确保上游 IP 地址是同一集群中的另一个实例是用户的责任。
pg_shard参数名称: pg_shard, 类型: string, 层次:C
PostgreSQL 水平分片名称,对于分片集群来说(例如 citus 集群),这是的必选标识参数。
当多个标准的 PostgreSQL 集群一起以水平分片方式为同一业务提供服务时,Pigsty 将此组集群标记为 水平分片集群 。
pg_shardpg_cluster
例如,如果我们有一个分片组 pg-citus,并且其中有4个集群,它们的标识参数将是:
cls pg_shard: pg-citus
cls pg_group = 0: pg-citus0
cls pg_group = 1: pg-citus1
cls pg_group = 2: pg-citus2
cls pg_group = 3: pg-citus3
pg_group参数名称: pg_group, 类型: int, 层次:C
PostgreSQL 水平分片集群的分片索引号,对于分片集群来说(例如 citus 集群),这是的必选标识参数。
此参数与 pg_shard 配对使用,通常可以使用非负整数作为索引号。
gp_role参数名称: gp_role, 类型: enum, 层次:C
PostgreSQL 集群的 Greenplum/Matrixdb 角色,可以是 master 或 segment。
master: 标记 postgres 集群为 greenplum 主实例(协调节点),这是默认值。segment 标记 postgres 集群为 greenplum 段集群(数据节点)。此参数仅用于 Greenplum/MatrixDB 数据库 (pg_modegpsql),对于普通的 PostgreSQL 集群没有意义。
pg_exporters参数名称: pg_exporters, 类型: dict, 层次:C
额外用于 监控 远程 PostgreSQL 实例的 Exporter 定义,默认值:{}
如果您希望监控远程 PostgreSQL 实例,请在监控系统所在节点(Infra节点)集群上的 pg_exporters 参数中定义它们,并使用 pgsql-monitor.yml
pg_exporters : # list all remote instances here, alloc a unique unused local port as k
20001 : { pg_cluster: pg-foo, pg_seq: 1, pg_host : 10.10.10.10 }
20004 : { pg_cluster: pg-foo, pg_seq: 2, pg_host : 10.10.10.11 }
20002 : { pg_cluster: pg-bar, pg_seq: 1, pg_host : 10.10.10.12 }
20003 : { pg_cluster: pg-bar, pg_seq: 1, pg_host : 10.10.10.13 }
pg_offline_query参数名称: pg_offline_query, 类型: bool, 层次:I
设置为 true 以在此实例上启用离线查询,默认为 false。
当某个 PostgreSQL 实例启用此参数时, 属于 dbrole_offline 分组的用户可以直接连接到该 PostgreSQL 实例上执行离线查询(慢查询,交互式查询,ETL/分析类查询)。
带有此标记的实例在效果上类似于为实例设置 pg_role = offline ,唯一的区别在于 offline 实例默认不会承载 replica 服务的请求,是作为专用的离线/分析从库实例而存在的。
如果您没有富余的实例可以专门用于此目的,则可以挑选一台普通的从库,在实例层次启用此参数,以便在需要时承载离线查询。
PG_BUSINESS定制集群模板:用户,数据库,服务,权限规则。
用户需重点关注 此部分参数,因为这里是业务声明自己所需数据库对象的地方。
默认 的数据库用户及其凭据,强烈建议在生产环境中修改这些用户的密码。
# postgres business object definition, overwrite in group vars
pg_users : [] # postgres business users
pg_databases : [] # postgres business databases
pg_services : [] # postgres business services
pg_hba_rules : [] # business hba rules for postgres
pgb_hba_rules : [] # business hba rules for pgbouncer
pg_crontab : [] # crontab entries for postgres dbsu
# global credentials, overwrite in global vars
pg_dbsu_password : '' # dbsu password, empty string means no dbsu password by default
pg_replication_username : replicator
pg_replication_password : DBUser.Replicator
pg_admin_username : dbuser_dba
pg_admin_password : DBUser.DBA
pg_monitor_username : dbuser_monitor
pg_monitor_password : DBUser.Monitor
pg_users参数名称: pg_users, 类型: user[], 层次:C
PostgreSQL 业务用户列表,需要在 PG 集群层面进行定义。默认值为:[] 空列表。
每一个数组元素都是一个 用户/角色
- name : dbuser_meta # 必选,`name` 是用户定义的唯一必选字段
state : create # 可选,用户状态:create(创建,默认)、absent(删除)
password : DBUser.Meta # 可选,密码,可以是 scram-sha-256 哈希字符串或明文
login : true # 可选,默认为 true,是否可以登录
superuser : false # 可选,默认为 false,是否是超级用户
createdb : false # 可选,默认为 false,是否可以创建数据库
createrole : false # 可选,默认为 false,是否可以创建角色
inherit : true # 可选,默认为 true,是否自动继承所属角色权限
replication : false # 可选,默认为 false,是否可以发起流复制连接
bypassrls : false # 可选,默认为 false,是否可以绕过行级安全
connlimit : -1 # 可选,用户连接数限制,默认 -1 不限制
expire_in : 3650 # 可选,从创建时起 N 天后过期(优先级比 expire_at 高)
expire_at : '2030-12-31' # 可选,过期日期,使用 YYYY-MM-DD 格式(优先级没 expire_in 高)
comment : pigsty admin user # 可选,用户备注信息
roles : [ dbrole_admin] # 可选,所属角色数组
parameters : # 可选,角色级配置参数
search_path : public
pgbouncer : true # 可选,是否加入连接池用户列表,默认 false
pool_mode : transaction # 可选,用户级别的池化模式,默认 transaction
pool_connlimit : -1 # 可选,用户级别的连接池最大连接数,默认 -1 不限制
用户级连接池限额字段统一使用 pool_connlimit(对应 Pgbouncer max_user_connections)。
pg_databases参数名称: pg_databases, 类型: database[], 层次:C
PostgreSQL 业务数据库列表,需要在 PG 集群层面进行定义。默认值为:[] 空列表。
每一个数组元素都是一个 业务数据库
- name : meta # 必选,`name` 是数据库定义的唯一必选字段
state : create # 可选,数据库状态:create(创建,默认)、absent(删除)、recreate(重建)
baseline : cmdb.sql # 可选,数据库 sql 的基线定义文件路径(ansible 搜索路径中的相对路径,如 files/)
pgbouncer : true # 可选,是否将此数据库添加到 pgbouncer 数据库列表?默认为 true
schemas : [ pigsty] # 可选,要创建的附加模式,由模式名称字符串组成的数组
extensions : # 可选,要安装的附加扩展:扩展对象的数组
- { name: postgis , schema : public } # 可以指定将扩展安装到某个模式中,也可以不指定(不指定则安装到 search_path 首位模式中)
- { name : timescaledb } # 例如有的扩展会创建并使用固定的模式,就不需要指定模式。
comment : pigsty meta database # 可选,数据库的说明与备注信息
owner : postgres # 可选,数据库所有者,不指定则为当前用户
template : template1 # 可选,要使用的模板,默认为 template1,目标必须是一个模板数据库
strategy : FILE_COPY # 可选,克隆策略:FILE_COPY 或 WAL_LOG(PG15+),不指定使用 PG 默认
encoding : UTF8 # 可选,不指定则继承模板/集群配置(UTF8)
locale : C # 可选,不指定则继承模板/集群配置(C)
lc_collate : C # 可选,不指定则继承模板/集群配置(C)
lc_ctype : C # 可选,不指定则继承模板/集群配置(C)
locale_provider : libc # 可选,本地化提供者:libc、icu、builtin(PG15+)
icu_locale : en-US # 可选,ICU 本地化规则(PG15+)
icu_rules : '' # 可选,ICU 排序规则(PG16+)
builtin_locale : C.UTF-8 # 可选,内置本地化提供者规则(PG17+)
tablespace : pg_default # 可选,默认表空间,默认为 'pg_default'
is_template : false # 可选,是否标记为模板数据库,允许任何有 CREATEDB 权限的用户克隆
allowconn : true # 可选,是否允许连接,默认为 true。显式设置 false 将完全禁止连接到此数据库
revokeconn : false # 可选,撤销公共连接权限。默认为 false,设置为 true 时,属主和管理员之外用户的 CONNECT 权限会被回收
register_datasource : true # 可选,是否将此数据库注册到 grafana 数据源?默认为 true,显式设置为 false 会跳过注册
connlimit : -1 # 可选,数据库连接限制,默认为 -1 ,不限制,设置为正整数则会限制连接数
parameters : # 可选,数据库级参数,通过 ALTER DATABASE SET 设置
work_mem : '64MB'
statement_timeout : '30s'
pool_auth_user : dbuser_meta # 可选,连接到此 pgbouncer 数据库的所有连接都将使用此用户进行验证(启用 pgbouncer_auth_query 才有用)
pool_mode : transaction # 可选,数据库级别的 pgbouncer 池化模式,默认为 transaction
pool_size : 64 # 可选,数据库级别的 pgbouncer 默认池子大小,默认为 64
pool_reserve : 32 # 可选,数据库级别的 pgbouncer 池子保留空间,默认为 32,当默认池子不够用时,最多再申请这么多条突发连接
pool_size_min : 0 # 可选,数据库级别的 pgbouncer 池的最小大小,默认为 0
pool_connlimit : 100 # 可选,数据库级别的最大数据库连接数,默认为 100
自 Pigsty v4.1.0 起,数据库连接池参数统一使用 pool_reserve 与 pool_connlimit,旧别名 pool_size_reserve / pool_max_db_conn 已收敛。
在每个数据库定义对象中,只有 name 是必选字段,其他的字段都是可选项。
pg_services参数名称: pg_services, 类型: service[], 层次:C
PostgreSQL 服务列表,需要在 PG 集群层面进行定义。默认值为:[] ,空列表。
用于在数据库集群层面定义额外的服务,数组中的每一个对象定义了一个 服务
- name : standby # 必选,服务名称,最终的 svc 名称会使用 `pg_cluster` 作为前缀,例如:pg-meta-standby
port : 5435 # 必选,暴露的服务端口(作为 kubernetes 服务节点端口模式)
ip : "*" # 可选,服务绑定的 IP 地址,默认情况下为所有 IP 地址
selector : "[]" # 必选,服务成员选择器,使用 JMESPath 来筛选配置清单
backup : "[? pg_role == `primary`]" # 可选,服务成员选择器(备份),也就是当默认选择器选中的实例都宕机后,服务才会由这里选中的实例成员来承载
dest : default # 可选,目标端口,default|postgres|pgbouncer|<port_number>,默认为 'default',Default的意思就是使用 pg_default_service_dest 的取值来最终决定
check : /sync # 可选,健康检查 URL 路径,默认为 /,这里使用 Patroni API:/sync ,只有同步备库和主库才会返回 200 健康状态码
maxconn : 5000 # 可选,允许的前端连接最大数,默认为5000
balance : roundrobin # 可选,haproxy 负载均衡算法(默认为 roundrobin,其他选项:leastconn)
#options: 'inter 3s fastinter 1s downinter 5s rise 3 fall 3 on-marked-down shutdown-sessions slowstart 30s maxconn 3000 maxqueue 128 weight 100'
# 注意:健康检查相关参数(inter, fastinter, downinter, rise, fall)现在由 pg_rto_plan 统一控制
# 默认 norm 模式参数:inter 2s fastinter 1s downinter 2s rise 3 fall 3
请注意,本参数用于在集群层面添加额外的服务。如果您想在全局定义所有 PostgreSQL 数据库都要提供的服务,可以使用 pg_default_services
pg_hba_rules参数名称: pg_hba_rules, 类型: hba[], 层次:C
数据库集群/实例的客户端IP黑白名单规则。默认为:[] 空列表。
对象数组,每一个对象都代表一条规则, hba 规则对象的定义形式如下:
- title : allow intranet password access
role : common
rules :
- host all all 10.0.0.0/8 md5
- host all all 172.16.0.0/12 md5
- host all all 192.168.0.0/16 md5
title: 规则的标题名称,会被渲染为 HBA 文件中的注释。rules:规则数组,每个元素是一条标准的 HBA 规则字符串。role:规则的应用范围,哪些实例角色会启用这条规则?common:对于所有实例生效primary, replica,offline: 只针对特定的角色 pg_role特例:role: 'offline' 的规则除了会应用在 pg_role : offline 的实例上,对于带有 pg_offline_query 除了上面这种原生 HBA 规则定义形式,Pigsty 还提供了另外一种更为简便的别名形式:
- addr : 'intra' # world|intra|infra|admin|local|localhost|cluster|<cidr>
auth : 'pwd' # trust|pwd|ssl|cert|deny|<official auth method>
user : 'all' # all|${dbsu}|${repl}|${admin}|${monitor}|<user>|<group>
db : 'all' # all|replication|....
rules : [] # raw hba string precedence over above all
title : allow intranet password access
pg_default_hba_rules
pgb_hba_rules参数名称: pgb_hba_rules, 类型: hba[], 层次:C
Pgbouncer 业务HBA规则,默认值为: [], 空数组。
此参数与 pg_hba_ruleshba 规则对象的数组,区别在于本参数是为 Pgbouncer 准备的。
pgb_default_hba_rules
pg_crontab参数名称: pg_crontab, 类型: string[], 层次:C
PostgreSQL 数据库超级用户(dbsu,默认 postgres)的定时任务列表,默认值为:[] 空数组。
每个数组元素是一行 crontab 条目,使用标准的用户 crontab 格式:分 时 日 月 周 命令(无需指定用户名 )。
pg_crontab :
- '00 01 * * * /pg/bin/pg-backup full' # 每天凌晨 1 点全量备份
- '00 13 * * * /pg/bin/pg-backup' # 每天下午 1 点增量备份
此参数会将定时任务写入 postgres 用户的个人 crontab 文件:
EL 系统:/var/spool/cron/postgres Debian 系统:/var/spool/cron/crontabs/postgres 注意 :此参数用于取代在 node_crontabnode_crontab 在 NODE 初始化阶段写入 /etc/crontab,此时 postgres 用户可能尚未创建,会导致 cron 报错。
移除集群时,此 crontab 文件会被一并删除。
pg_replication_username参数名称: pg_replication_username, 类型: username, 层次:G
PostgreSQL 物理复制用户名,默认使用 replicator,不建议修改此参数。
pg_replication_password参数名称: pg_replication_password, 类型: password, 层次:G
PostgreSQL 物理复制用户密码,默认值为:DBUser.Replicator。
警告:请在生产环境中修改此密码!
pg_admin_username参数名称: pg_admin_username, 类型: username, 层次:G
PostgreSQL / Pgbouncer 管理员名称,默认为:dbuser_dba。
这是全局使用的数据库管理员,具有数据库的 Superuser 权限与连接池的流量管理权限,请务必控制使用范围。
pg_admin_password参数名称: pg_admin_password, 类型: password, 层次:G
PostgreSQL / Pgbouncer 管理员密码,默认为: DBUser.DBA。
警告:请在生产环境中修改此密码!
pg_monitor_username参数名称: pg_monitor_username, 类型: username, 层次:G
PostgreSQL/Pgbouncer 监控用户名,默认为:dbuser_monitor。
这是一个用于监控的数据库/连接池用户,不建议修改此用户名。
但如果您的现有数据库使用了不同的监控用户,可以在指定监控目标时使用此参数传入使用的监控用户名。
pg_monitor_password参数名称: pg_monitor_password, 类型: password, 层次:G
PostgreSQL/Pgbouncer 监控用户使用的密码,默认为:DBUser.Monitor。
请尽可能不要在密码中使用 @:/ 这些容易与 URL 分隔符混淆的字符,减少不必要的麻烦。
警告:请在生产环境中修改此密码!
pg_dbsu_password参数名称: pg_dbsu_password, 类型: password, 层次:G/C
PostgreSQL pg_dbsu
我们不建议为 dbsu 配置密码登陆,这会增大攻击面。例外情况是:pg_modecitus,这时候需要为每个分片集群的 dbsu 配置密码,以便在分片集群内部进行连接。
PG_INSTALL本节负责安装 PostgreSQL 及其扩展。如果您希望安装不同大版本与扩展插件,修改 pg_versionpg_extensions
pg_dbsu : postgres # os 数据库超级用户名称,默认为 postgres,最好不要更改
pg_dbsu_uid : 26 # os 数据库超级用户 uid 和 gid,默认为 26,适用于默认的 postgres 用户和组
pg_dbsu_sudo : limit # 数据库超级用户 sudo 权限,可选 none,limit,all,nopass。默认为 limit
pg_dbsu_home : /var/lib/pgsql # postgresql 主目录,默认为 `/var/lib/pgsql`
pg_dbsu_ssh_exchange : true # 是否在相同的 pgsql 集群中交换 postgres 数据库超级用户的 ssh 密钥
pg_version : 18 # 要安装的 postgres 主版本,默认为 18
pg_bin_dir : /usr/pgsql/bin # postgres 二进制目录,默认为 `/usr/pgsql/bin`
pg_log_dir : /pg/log/postgres # postgres 日志目录,默认为 `/pg/log/postgres`
pg_packages : # pg packages to be installed, alias can be used
- pgsql-main pgsql-common
pg_extensions : [] # pg extensions to be installed, alias can be used
pg_dbsu参数名称: pg_dbsu, 类型: username, 层次:C
PostgreSQL 使用的操作系统 dbsu 用户名, 默认为 postgres,改这个用户名是不太明智的。
不过在特定情况下,您可能会使用到不同于 postgres 的用户名,例如在安装配置 Greenplum / MatrixDB 时,需要使用 gpadmin / mxadmin 作为相应的操作系统超级用户。
pg_dbsu_uid参数名称: pg_dbsu_uid, 类型: int, 层次:C
操作系统数据库超级用户的 uid 和 gid,26 是 PGDG RPM 默认的 postgres 用户 UID/GID。
对于 Debian/Ubuntu 系统,没有默认值,且 26 号用户经常被占用。因此Pigsty 在检测到安装环境为 Debian 系,且 uid 为 26 时,会自动使用替换的 pg_dbsu_uid = 543。
pg_dbsu_sudo参数名称: pg_dbsu_sudo, 类型: enum, 层次:C
数据库超级用户的 sudo 权限,可以是 none、limit、all 或 nopass。默认为 limit
none: 无 Sudo 权限
limit: 有限的 sudo 权限,用于执行与数据库相关的组件的 systemctl 命令(默认选项)。
all: 完全的 sudo 权限,需要密码。
nopass: 不需要密码的完全 sudo 权限(不推荐)。
默认值为 limit,只允许执行 sudo systemctl <start|stop|reload> <postgres|patroni|pgbouncer|...> 。
pg_dbsu_home参数名称: pg_dbsu_home, 类型: path, 层次:C
postgresql 主目录,默认为 /var/lib/pgsql,与官方的 pgdg RPM 保持一致。
pg_dbsu_ssh_exchange参数名称: pg_dbsu_ssh_exchange, 类型: bool, 层次:C
是否在同一 PostgreSQL 集群中交换操作系统 dbsu 的 ssh 密钥?
默认值为 true,意味着同一集群中的数据库超级用户可以互相 ssh 访问。
pg_version参数名称: pg_version, 类型: enum, 层次:C
要安装的 postgres 主版本,默认为 18。
请注意,PostgreSQL 的物理流复制不能跨主要版本,因此最好不要在实例级别上配置此项。
您可以使用 pg_packagespg_extensions
pg_bin_dir参数名称: pg_bin_dir, 类型: path, 层次:C
PostgreSQL 二进制程序目录,默认为 /usr/pgsql/bin。
默认值是在安装过程中手动创建的软链接,指向安装的特定的 Postgres 版本目录。
例如 /usr/pgsql -> /usr/pgsql-15。在 Ubuntu/Debian 上则指向 /usr/lib/postgresql/15/bin。
更多详细信息,请查看 PGSQL 文件结构 。
pg_log_dir参数名称: pg_log_dir, 类型: path, 层次:C
PostgreSQL 日志目录,默认为:/pg/log/postgres,Vector 日志代理会使用此变量收集 PostgreSQL 日志。
请注意,如果日志目录 pg_log_dirpg_data
pg_packages参数名称: pg_packages, 类型: string[], 层次:C
要安装的 PostgreSQL 软件包(RPM/DEB),这是一个包名数组,元素可以是空格或逗号分隔的包别名。
Pigsty v4 将默认值收敛为两个别名:
pg_packages :
- pgsql-main pgsql-common
pgsql-main:映射到当前平台上的 PostgreSQL 内核、客户端、PL 语言以及 pg_repack、wal2json、pgvector 等核心扩展。pgsql-common:映射到运行数据库必需的配套组件,例如 Patroni、Pgbouncer、pgBackRest、pg_exporter、vip-manager 等守护进程。别名的具体定义可以在 roles/node_id/vars/pg_package_map 查到,Pigsty 会先根据操作系统和架构解析别名,再将 $v/${pg_version} 替换为实际主版本 pg_version
如果需要额外的软件包(例如特定 FDW 或扩展),可以直接在 pg_packages 中追加别名或真实包名。但请记得保留 pgsql-main pgsql-common,否则会缺失核心组件。
pg_extensions参数名称: pg_extensions, 类型: string[], 层次:G/C
要安装的 PostgreSQL 扩展包(RPM/DEB),这是一个由扩展包名或别名组成的数组。
从 v4 开始默认值为空列表 [],Pigsty 不再强制安装大体量扩展,用户可以按需选择,避免占用额外的磁盘与依赖。
如果需要安装扩展,请像下面这样填充:
pg_extensions :
- postgis timescaledb pgvector
- pgsql-fdw # 使用别名一次性安装常用 FDW
pg_package_map 中提供了大量别名,方便在不同发行版之间屏蔽包名差异。以下是 EL9 平台可用的扩展组合供参考(按需挑选即可):
pg_extensions: # extensions to be installed on this cluster
- timescaledb periods temporal_tables emaj table_version pg_cron pg_later pg_background pg_timetable
- postgis pgrouting pointcloud pg_h3 q3c ogr_fdw geoip #pg_geohash #mobilitydb
- pgvector pgvectorscale pg_vectorize pg_similarity pg_tiktoken pgml #smlar
- pg_search pg_bigm zhparser hunspell
- hydra pg_analytics pg_lakehouse pg_duckdb duckdb_fdw pg_fkpart pg_partman plproxy #pg_strom citus
- pg_hint_plan age hll rum pg_graphql pg_jsonschema jsquery index_advisor hypopg imgsmlr pg_ivm pgmq pgq #rdkit
- pg_tle plv8 pllua plprql pldebugger plpgsql_check plprofiler plsh #pljava plr pgtap faker dbt2
- prefix semver pgunit md5hash asn1oid roaringbitmap pgfaceting pgsphere pg_country pg_currency pgmp numeral pg_rational pguint ip4r timestamp9 chkpass #pg_uri #pgemailaddr #acl #debversion #pg_rrule
- topn pg_gzip pg_http pg_net pg_html5_email_address pgsql_tweaks pg_extra_time pg_timeit count_distinct extra_window_functions first_last_agg tdigest aggs_for_arrays pg_arraymath pg_idkit pg_uuidv7 permuteseq pg_hashids
- sequential_uuids pg_math pg_random pg_base36 pg_base62 floatvec pg_financial pgjwt pg_hashlib shacrypt cryptint pg_ecdsa pgpcre icu_ext envvar url_encode #pg_zstd #aggs_for_vecs #quantile #lower_quantile #pgqr #pg_protobuf
- pg_repack pg_squeeze pg_dirtyread pgfincore pgdd ddlx pg_prioritize pg_checksums pg_readonly safeupdate pg_permissions pgautofailover pg_catcheck preprepare pgcozy pg_orphaned pg_crash pg_cheat_funcs pg_savior table_log pg_fio #pgpool pgagent
- pg_profile pg_show_plans pg_stat_kcache pg_stat_monitor pg_qualstats pg_store_plans pg_track_settings pg_wait_sampling system_stats pg_meta pgnodemx pg_sqlog bgw_replstatus pgmeminfo toastinfo pagevis powa pg_top #pg_statviz #pgexporter_ext #pg_mon
- passwordcheck supautils pgsodium pg_vault anonymizer pg_tde pgsmcrypto pgaudit pgauditlogtofile pg_auth_mon credcheck pgcryptokey pg_jobmon logerrors login_hook set_user pg_snakeoil pgextwlist pg_auditor noset #sslutils
- wrappers multicorn odbc_fdw mysql_fdw tds_fdw sqlite_fdw pgbouncer_fdw mongo_fdw redis_fdw pg_redis_pubsub kafka_fdw hdfs_fdw firebird_fdw aws_s3 log_fdw #oracle_fdw #db2_fdw #jdbc_fdw
- orafce pgtt session_variable pg_statement_rollback pg_dbms_metadata pg_dbms_lock pgmemcache #pg_dbms_job #babelfish
- pglogical pgl_ddl_deploy pg_failover_slots wal2json wal2mongo decoderbufs decoder_raw mimeo pgcopydb pgloader pg_fact_loader pg_bulkload pg_comparator pgimportdoc pgexportdoc #repmgr #slony
- gis-stack rag-stack fdw-stack fts-stack etl-stack feat-stack olap-stack supa-stack stat-stack json-stack
完整列表请参考:roles/node_id/vars
PG_BOOTSTRAP使用 Patroni 引导拉起 PostgreSQL 集群,并设置 1:1 对应的 Pgbouncer 连接池。
它还会使用 PG_PROVISION
pg_data : /pg/data # postgres data directory, `/pg/data` by default
pg_fs_main : /data/postgres # postgres main data directory, `/data/postgres` by default
pg_fs_backup : /data/backups # postgres backup data directory, `/data/backups` by default
pg_storage_type : SSD # storage type for pg main data, SSD,HDD, SSD by default
pg_dummy_filesize : 64MiB # size of `/pg/dummy`, hold 64MB disk space for emergency use
pg_listen : '0.0.0.0' # postgres/pgbouncer listen addresses, comma separated list
pg_port : 5432 # postgres listen port, 5432 by default
pg_localhost : /var/run/postgresql # postgres unix socket dir for localhost connection
patroni_enabled : true # if disabled, no postgres cluster will be created during init
patroni_mode: default # patroni working mode : default,pause,remove
pg_namespace : /pg # top level key namespace in etcd, used by patroni & vip
patroni_port : 8008 # patroni listen port, 8008 by default
patroni_log_dir : /pg/log/patroni # patroni log dir, `/pg/log/patroni` by default
patroni_ssl_enabled : false # secure patroni RestAPI communications with SSL?
patroni_watchdog_mode: off # patroni watchdog mode : automatic,required,off. off by default
patroni_username : postgres # patroni restapi username, `postgres` by default
patroni_password : Patroni.API # patroni restapi password, `Patroni.API` by default
pg_etcd_password : '' # etcd password for this pg cluster, '' to use pg_cluster
pg_primary_db : postgres # primary database name, used by citus,etc... ,postgres by default
pg_parameters : {} # extra parameters in postgresql.auto.conf
pg_files : [] # extra files to be copied to postgres data directory (e.g. license)
pg_conf: oltp.yml # config template : oltp,olap,crit,tiny. `oltp.yml` by default
pg_max_conn : auto # postgres max connections, `auto` will use recommended value
pg_shared_buffer_ratio : 0.25 # postgres shared buffers ratio, 0.25 by default, 0.1~0.4
pg_io_method : worker # io method for postgres, auto,sync,worker,io_uring, worker by default
pg_rto: norm # shared rto mode : fast,norm,safe,wide (or seconds for compatibility)
pg_rpo : 1048576 # recovery point objective in bytes, `1MiB` at most by default
pg_libs : 'pg_stat_statements, auto_explain' # preloaded libraries, `pg_stat_statements,auto_explain` by default
pg_delay : 0 # replication apply delay for standby cluster leader
pg_checksum : true # enable data checksum for postgres cluster?
pg_pwd_enc: scram-sha-256 # passwords encryption algorithm : fixed to scram-sha-256
pg_encoding : UTF8 # database cluster encoding, `UTF8` by default
pg_locale : C # database cluster local, `C` by default
pg_lc_collate : C # database cluster collate, `C` by default
pg_lc_ctype : C # database character type, `C` by default
#pgsodium_key: "" # pgsodium key, 64 hex digit, default to sha256(pg_cluster)
#pgsodium_getkey_script: "" # pgsodium getkey script path, pgsodium_getkey by default
pg_data参数名称: pg_data, 类型: path, 层次:C
Postgres 数据目录,默认为 /pg/data。
这是一个指向底层实际数据目录的符号链接,在多处被使用,请不要修改它。参阅 PGSQL文件结构 获取详细信息。
pg_fs_main参数名称: pg_fs_main, 类型: path, 层次:C
PostgreSQL 主数据盘的挂载点/文件系统路径,默认为/data/postgres。
默认值:/data/postgres,它将直接用作 PostgreSQL 主数据目录的父目录。
建议使用 NVME SSD 作为 PostgreSQL 主数据存储,Pigsty默认为SSD存储进行了优化,但是也支持HDD。
您可以更改 pg_storage_typeHDD 以针对HDD存储进行优化。
pg_fs_backup参数名称: pg_fs_backup, 类型: path, 层次:C
PostgreSQL 备份数据盘的挂载点/文件系统路径,默认为/data/backups。
如果您使用的是默认的 pgbackrest_methodlocal,建议为备份存储使用一个单独的磁盘。
备份磁盘应足够大,以容纳所有的备份,至少足以容纳3个基础备份+2天的WAL归档。 通常容量不是什么大问题,因为您可以使用便宜且大的机械硬盘作为备份盘。
建议为备份存储使用一个单独的磁盘,否则 Pigsty 将回退到主数据磁盘,并占用主数据盘的容量与IO。
pg_storage_type参数名称: pg_storage_type, 类型: enum, 层次:C
PostgreSQL 数据存储介质的类型:SSD或HDD,默认为SSD。
默认值:SSD,它会影响一些调优参数,如 random_page_cost 和 effective_io_concurrency 。
pg_dummy_filesize参数名称: pg_dummy_filesize, 类型: size, 层次:C
/pg/dummy的大小,默认值为64MiB,用于紧急使用的64MB磁盘空间。
当磁盘已满时,删除占位符文件可以为紧急使用释放一些空间,建议生产使用至少8GiB。
pg_listen参数名称: pg_listen, 类型: ip, 层次:C
PostgreSQL / Pgbouncer 的监听地址,默认为0.0.0.0(所有ipv4地址)。
您可以在此变量中使用占位符,例如:'${ip},${lo}'或'${ip},${vip},${lo}':
对于高安全性要求的生产环境,建议限制监听的IP地址。
pg_port参数名称: pg_port, 类型: port, 层次:C
PostgreSQL 服务器监听的端口,默认为 5432。
pg_localhost参数名称: pg_localhost, 类型: path, 层次:C
本地主机连接 PostgreSQL 使用的 Unix套接字目录,默认值为/var/run/postgresql。
PostgreSQL 和 Pgbouncer 本地连接的Unix套接字目录,pg_exporter
pg_namespace参数名称: pg_namespace, 类型: path, 层次:C
在 etcd 中使用的顶级命名空间,由 patroni 和 vip-manager 使用,默认值是:/pg,不建议更改。
patroni_enabled参数名称: patroni_enabled, 类型: bool, 层次:C
是否启用 Patroni ?默认值为:true。
如果禁用,则在初始化期间不会创建Postgres集群。Pigsty将跳过拉起 patroni的任务,当试图向现有的postgres实例添加一些组件时,可以使用此参数。
patroni_mode参数名称: patroni_mode, 类型: enum, 层次:C
Patroni 工作模式:default,pause,remove。默认值:default。
default:正常使用 Patroni 引导 PostgreSQL 集群pause:与default相似,但在引导后进入维护模式remove:使用Patroni初始化集群,然后删除Patroni并使用原始 PostgreSQL。patroni_port参数名称: patroni_port, 类型: port, 层次:C
patroni监听端口,默认为8008,不建议更改。
Patroni API服务器在此端口上监听健康检查和API请求。
patroni_log_dir参数名称: patroni_log_dir, 类型: path, 层次:C
patroni 日志目录,默认为 /pg/log/patroni,由 Vector 日志代理收集。
patroni_ssl_enabled参数名称: patroni_ssl_enabled, 类型: bool, 层次:G
使用SSL保护patroni RestAPI通信吗?默认值为false。
此参数是一个全局标志,只能在部署之前预先设置。因为如果为 patroni 启用了SSL,您将必须使用 HTTPS 而不是 HTTP 执行健康检查、获取指标,调用API。
patroni_watchdog_mode参数名称: patroni_watchdog_mode, 类型: string, 层次:C
patroni看门狗模式:automatic,required,off,默认值为 off。
在主库故障的情况下,Patroni 可以使用 看门狗
off:不使用看门狗。完全不进行 Fencing (默认行为)automatic:如果内核启用了softdog模块并且看门狗属于dbsu,则启用 watchdog。required:强制启用 watchdog,如果softdog不可用则拒绝启动 Patroni/PostgreSQL。默认值为off,您不应该在 Infra节点 启用看门狗,数据一致性优先于可用性的关键系统,特别是与钱有关的业务集群可以考虑打开此选项。
注意 :当使用 pg_confcrit 配置模板时,off 会被自动提升为 automatic,以确保关键业务系统的数据一致性。
请注意,如果您的所有访问流量都使用 HAproxy 健康检查 服务接入
patroni_username参数名称: patroni_username, 类型: username, 层次:C
Patroni REST API 用户名,默认为 postgres,与 patroni_password
Patroni的危险 REST API (比如重启集群)由额外的用户名/密码保护,查看 配置集群 和 Patroni RESTAPI 以获取详细信息。
patroni_password参数名称: patroni_password, 类型: password, 层次:C
Patroni REST API 密码,默认为Patroni.API。
警告:务必生产环境中修改此参数!
pg_primary_db参数名称: pg_primary_db, 类型: string, 层次:C
指定集群中的主数据库名称,用于 citus 等业务数据库,默认为 postgres。
例如,在使用 Patroni 管理高可用的 Citus 集群时,您必须选择一个 “主数据库”。
此外,在这里指定的数据库名称,将在 PGSQL 模块安装完成后,显示在打印的连接串中。
pg_parameters参数名称: pg_parameters, 类型: dict, 层次:G/C/I
可用于指定并管理 postgresql.auto.conf 中的配置参数。
当集群所有实例完成初始化后,pg_param 任务将会把本字典中的 key / value 键值对依次覆盖写入 /pg/data/postgresql.auto.conf 中。
注意:请不要手工修改该配置文件,或通过 ALTER SYSTEM 修改集群配置参数,修改会在下一次配置同步时被覆盖。
该变量的优先级大于 Patroni / DCS 中的集群配置(即优先级高于集群配置,由 Patroni edit-config 编辑的配置),因此通常可以在实例级别覆盖集群默认参数。
当您的集群成员有着不同的规格(不推荐的行为!)时,您可以通过本参数对每个实例的配置进行精细化管理。
pg-test :
hosts :
10.10.10.11 : { pg_seq: 1, pg_role: primary , pg_parameters : { shared_buffers : '5GB' } }
10.10.10.12 : { pg_seq: 2, pg_role: replica , pg_parameters : { shared_buffers : '4GB' } }
10.10.10.13 : { pg_seq: 3, pg_role: replica , pg_parameters : { shared_buffers : '3GB' } }
请注意,一些 重要的集群参数 (对主从库参数值有要求)是 Patroni 直接通过命令行参数管理的,具有最高优先级,无法通过此方式覆盖,对于这些参数,您必须使用 Patroni edit-config 进行管理与配置。
在主从上必须保持一致的 PostgreSQL 参数(不一致会导致从库无法启动!):
wal_levelmax_connectionsmax_locks_per_transactionmax_worker_processesmax_prepared_transactionstrack_commit_timestamp在主从上最好保持一致的参数(考虑到主从切换的可能性):
listen_addressesportcluster_namehot_standbywal_log_hintsmax_wal_sendersmax_replication_slotswal_keep_segmentswal_keep_size您可以设置不存在的参数(例如来自扩展的 GUC,从而配置 ALTER SYSTEM 无法修改的“尚未存在”的参数),但将现有配置修改为非法值可能会导致 PostgreSQL 无法启动,请谨慎配置!
pg_files参数名称: pg_files, 类型: path[], 层次:C
用于指定需要拷贝至PGDATA目录的文件列表,默认为空数组:[]
在本参数中指定的文件将会被拷贝至 {{ pg_data }} 目录下,这主要用于下发特殊商业版本 PostgreSQL 内核要求的 License 文件。
目前仅有 PolarDB (Oracle兼容)内核需要许可证文件,例如,您可以将 license.lic 文件放置在 files/ 目录下,并在 pg_files 中指定:
pg_files : [ license.lic ]
pg_conf参数名称: pg_conf, 类型: enum, 层次:C
配置模板:{oltp,olap,crit,tiny}.yml,默认为oltp.yml。
tiny.yml:为小节点、虚拟机、小型演示优化(1-8核,1-16GB)oltp.yml:为OLTP工作负载和延迟敏感应用优化(4C8GB+)(默认模板)olap.yml:为OLAP工作负载和吞吐量优化(4C8G+)crit.yml:为数据一致性和关键应用优化(4C8G+)默认值:oltp.yml,但是 配置 程序将在当前节点为小节点时将此值设置为 tiny.yml。
您可以拥有自己的模板,只需将其放在templates/<mode>.yml下,并将此值设置为模板名称即可使用。
pg_max_conn参数名称: pg_max_conn, 类型: int, 层次:C
PostgreSQL 服务器最大连接数。你可以选择一个介于 50 到 5000 之间的值,或使用 auto 选择推荐值。
默认值为 auto,会根据 pg_confpg_default_service_dest
tiny: 100 olap: 200 oltp: 200 (pgbouncer) / 1000 (postgres)pg_default_service_dest = pgbouncer : 200 pg_default_service_dest = postgres : 1000 crit: 200 (pgbouncer) / 1000 (postgres)pg_default_service_dest = pgbouncer : 200 pg_default_service_dest = postgres : 1000 不建议将此值设定为超过 5000,否则你还需要手动增加 haproxy 服务的连接限制。
Pgbouncer 的事务池可以缓解过多的 OLTP 连接问题,因此默认情况下不建议设置很大的连接数。
对于 OLAP 场景, pg_default_service_destpostgres 可以绕过连接池。
pg_shared_buffer_ratio参数名称: pg_shared_buffer_ratio, 类型: float, 层次:C
Postgres 共享缓冲区内存比例,默认为 0.25,正常范围在 0.1~0.4 之间。
默认值:0.25,意味着节点内存的 25% 将被用作 PostgreSQL 的分片缓冲区。如果您想为 PostgreSQL 启用大页,那么此参数值应当适当小于 node_hugepage_ratio
将此值设定为大于 0.4(40%)通常不是好主意,但在极端情况下可能有用。
注意,共享缓冲区只是 PostgreSQL 中共享内存的一部分,要计算总共享内存,使用 show shared_memory_size_in_huge_pages;。
pg_rto参数名称: pg_rto, 类型: enum, 层次:C
恢复时间目标(RTO)模式,用于控制 Patroni 与 HAProxy 的超时参数,默认为 norm。
Pigsty 提供四种预设的 RTO 模式,分别针对不同的网络条件与部署场景进行了优化:
模式 适用场景 网络条件 平均 RTO 最坏 RTO 误切风险 fast同机柜/同交换机 < 1ms,极稳定 14s 29s 较高 norm同机房(默认) 1-5ms,正常 21s 43s 中等 safe同省跨机房 10-50ms,跨机房 43s 91s 较低 wide跨地域/跨洲 100-200ms,公网 92s 207s 极低
减小 RTO 可以加快故障恢复速度,但会增加误切风险(网络抖动被误判为故障)。您需要根据实际网络条件选择合适的模式。
更多详情请参阅 RTO 利弊权衡
为了向后兼容,也支持直接指定秒数,系统会自动映射到最接近的模式:< 30 → fast,30-44 → norm,45-89 → safe,≥ 90 → wide。
pg_rto : norm # 默认模式,适合同机房部署
pg_rto : safe # 跨机房部署推荐
pg_rto : 30 # 兼容旧版写法,等效于 norm
pg_rto_plan参数名称: pg_rto_plan, 类型: dict, 层次:G
RTO 预设配置字典,定义了 Patroni 高可用与 HAProxy 健康检查的具体超时参数,默认值包含四种预设模式:
pg_rto_plan : # [ttl, loop, retry, start, margin, inter, fastinter, downinter, rise, fall]
fast : [ 20 , 5 , 5 , 15 , 5 , '1s' , '0.5s' , '1s' , 3 , 3 ] # rto < 30s
norm : [ 30 , 5 , 10 , 25 , 5 , '2s' , '1s' , '2s' , 3 , 3 ] # rto < 45s
safe : [ 60 , 10 , 20 , 45 , 10 , '3s' , '1.5s' , '3s' , 3 , 3 ] # rto < 90s
wide : [ 120 , 20 , 30 , 95 , 15 , '4s' , '2s' , '4s' , 3 , 3 ] # rto < 150s
每个模式是一个包含 10 个参数的数组,用于同时控制 Patroni 和 HAProxy 的超时行为:
索引 参数名 组件 说明 0 ttlPatroni 主库锁 TTL(秒) 1 loop_waitPatroni 主循环休眠间隔(秒) 2 retry_timeoutPatroni DCS/PostgreSQL 重试超时 3 primary_start_timeoutPatroni 主库恢复等待时间 4 safety_marginPatroni Watchdog 安全边界 5 interHAProxy 健康检查间隔 6 fastinterHAProxy 状态变化时的快速检查间隔 7 downinterHAProxy 服务器宕机时的检查间隔 8 riseHAProxy 标记为 UP 所需的连续成功检查次数 9 fallHAProxy 标记为 DOWN 所需的连续失败检查次数
此参数允许用户通过覆盖默认值来自定义 RTO 行为,或添加新的 RTO 模式。例如,如果您需要一个更激进的 RTO 配置:
pg_rto_plan :
ultra : [ 10 , 2 , 3 , 8 , 2 , '0.5s' , '0.25s' , '0.5s' , 2 , 2 ] # 极速模式,仅限低延迟环境
注意 :修改此参数需要谨慎,不恰当的超时配置可能导致集群不稳定或频繁误切换。
pg_rpo参数名称: pg_rpo, 类型: int, 层次:C
以字节为单位的恢复点目标(RPO),默认值:1048576。
默认为 1MiB,这意味着在故障转移期间最多可以容忍 1MiB 的数据丢失。
当主节点宕机并且所有副本都滞后时,你必须做出一个艰难的选择,在可用性和一致性之间进行权衡 :
提升一个从库成为新的主库,并尽快将系统恢复服务,但要付出可接受的数据丢失代价(例如,少于 1MB)。 等待主库重新上线(可能永远不会),或人工干预以避免任何数据丢失。 你可以使用 crit.yml conf 模板来确保在故障转移期间没有数据丢失,但这会牺牲一些性能。
pg_libs参数名称: pg_libs, 类型: string, 层次:C
预加载的动态共享库,默认为 pg_stat_statements,auto_explain,这是两个 PostgreSQL 自带的扩展,强烈建议启用。
对于现有集群,您可以直接 配置集群 的 shared_preload_libraries 参数并应用生效。
如果您想使用 TimescaleDB 或 Citus 扩展,您需要将 timescaledb 或 citus 添加到此列表中。timescaledb 和 citus 应当放在这个列表的最前面,例如:
citus,timescaledb,pg_stat_statements,auto_explain
其他需要动态加载的扩展也可以添加到这个列表中,例如 pg_cron, pgml 等,通常 citus 和 timescaledb 有着最高的优先级,应该添加到列表的最前面。
pg_delay参数名称: pg_delay, 类型: interval, 层次:I
延迟备库复制延迟,默认值:0。
如果此值被设置为一个正值,备用集群主库在应用 WAL 变更之前将被延迟这个时间。设置为 1h 意味着该集群中的数据将始终滞后原集群一个小时。
查看 延迟备用集群 以获取详细信息。
pg_checksum参数名称: pg_checksum, 类型: bool, 层次:C
为 PostgreSQL 集群启用数据校验和吗?默认值是 true,启用。
这个参数只能在 PGSQL 部署之前设置(但你可以稍后手动启用它)。
数据校验和可以帮助检测磁盘损坏和硬件故障,从 Pigsty v3.5 开始默认启用此功能以确保数据完整性。
pg_pwd_enc参数名称: pg_pwd_enc, 类型: enum, 层次:C
密码加密算法,Pigsty v4 以后固定为 scram-sha-256。
所有新建用户都会使用 SCRAM 凭据。md5 已被淘汰,如需兼容旧客户端,请在业务连接池或客户端驱动中升级至 SCRAM。
pg_encoding参数名称: pg_encoding, 类型: enum, 层次:C
数据库集群编码,默认为 UTF8。
不建议使用其他非 UTF8 系编码。
pg_locale参数名称: pg_locale, 类型: enum, 层次:C
数据库集群本地化规则集 (Locale),默认为 C。
此参数控制数据库的默认 Locale 设置,影响排序规则、字符分类等行为。使用 C 或 POSIX 可以获得最佳的性能和可预测的排序行为。
如果您需要特定语言的本地化支持,可以设置为相应的 Locale,例如 en_US.UTF-8 或 zh_CN.UTF-8。请注意,Locale 设置会影响索引的排序顺序,因此在集群初始化后无法更改。
pg_lc_collate参数名称: pg_lc_collate, 类型: enum, 层次:C
数据库集群本地化排序规则,默认为 C。
除非您知道自己在做什么,否则不建议修改集群级别的本地排序规则设置。
pg_lc_ctype参数名称: pg_lc_ctype, 类型: enum, 层次:C
数据库字符集 CTYPE,默认为 C。
从 Pigsty v3.5 开始,为了与 pg_lc_collate 保持一致,默认值改为 C。
pg_io_method参数名称: pg_io_method, 类型: enum, 层次:C
PostgreSQL 的 IO 方法,默认为 worker。可选值包括:
auto:根据操作系统自动选择,在 Debian 系列或 EL 10+ 上使用 io_uring,否则使用 workersync:使用传统的同步 IO 方式worker:使用后台工作进程处理 IO(默认选项)io_uring:使用 Linux 的 io_uring 异步 IO 接口此参数仅适用于 PostgreSQL 17 及以上版本,控制 PostgreSQL 数据块层的 IO 策略。
在 PostgreSQL 17 中,io_uring 可以提供更高的 IO 性能,但需要操作系统内核支持(Linux 5.1+)并安装 liburing 库。 在 PostgreSQL 18 中,默认 IO 方法已从 sync 改为 worker,使用后台工作进程处理异步 IO,无需额外依赖。 如果您使用 Debian 12/Ubuntu 22+ 或 EL 10+ 系统,并希望获得最佳 IO 性能,可以考虑设置为 io_uring。 请注意,在不支持 io_uring 的系统上设置此值可能导致 PostgreSQL 启动失败,因此 auto 或 worker 是更安全的选择。
pg_etcd_password参数名称: pg_etcd_password, 类型: password, 层次:C
此 PostgreSQL 集群在 etcd 中使用的密码,默认为空字符串 ''。
如果设置为空字符串,则会使用 pg_clusterpg_shard
此密码用于 Patroni 连接 etcd 以及 vip-manager 访问 etcd 时的认证。
pgsodium_key参数名称: pgsodium_key, 类型: string, 层次:C
用于 pgsodium 扩展的加密主密钥,由 64 位十六进制数字组成。
默认不设置此参数,如果未指定,Pigsty 会使用 sha256(pg_cluster) 的值自动生成一个确定性的密钥。
pgsodium 是一个基于 libsodium 的 PostgreSQL 扩展,提供加密函数和透明列加密功能。
如果您需要使用 pgsodium 的加密功能,建议显式指定一个安全的随机密钥,并妥善保管。
生成随机密钥的命令示例:
openssl rand -hex 32 # 生成 64 位十六进制密钥
pgsodium_getkey_script参数名称: pgsodium_getkey_script, 类型: path, 层次:C
pgsodium 获取密钥脚本的路径,默认使用 Pigsty 模板中的 pgsodium_getkey 脚本。
此脚本用于在 PostgreSQL 启动时获取 pgsodium 的主密钥。默认脚本会从环境变量或配置文件中读取密钥。
如果您有自定义的密钥管理需求(如使用 HashiCorp Vault、AWS KMS 等),可以提供自定义脚本路径。
PG_PROVISION如果说 PG_BOOTSTRAP
pg_provision : true # 在引导后提供postgres集群
pg_init : pg-init # 集群模板的初始化脚本,默认为`pg-init`
pg_default_roles : # postgres集群中的默认角色和用户
- { name: dbrole_readonly ,login: false ,comment : role for global read-only access }
- { name: dbrole_offline ,login: false ,comment : role for restricted read-only access }
- { name: dbrole_readwrite ,login: false ,roles: [dbrole_readonly] ,comment : role for global read-write access }
- { name: dbrole_admin ,login: false ,roles: [pg_monitor, dbrole_readwrite] ,comment : role for object creation }
- { name: postgres ,superuser: true ,comment : system superuser }
- { name: replicator ,replication: true ,roles: [pg_monitor, dbrole_readonly] ,comment : system replicator }
- { name: dbuser_dba ,superuser: true ,roles: [dbrole_admin] ,pgbouncer: true ,pool_mode: session, pool_connlimit: 16 ,comment : pgsql admin user }
- { name: dbuser_monitor ,roles: [pg_monitor, dbrole_readonly] ,pgbouncer: true ,parameters : {log_min_duration_statement: 1000 } ,pool_mode: session ,pool_connlimit: 8 ,comment : pgsql monitor user }
pg_default_privileges : # 管理员用户创建时的默认权限
- GRANT USAGE ON SCHEMAS TO dbrole_readonly
- GRANT SELECT ON TABLES TO dbrole_readonly
- GRANT SELECT ON SEQUENCES TO dbrole_readonly
- GRANT EXECUTE ON FUNCTIONS TO dbrole_readonly
- GRANT USAGE ON SCHEMAS TO dbrole_offline
- GRANT SELECT ON TABLES TO dbrole_offline
- GRANT SELECT ON SEQUENCES TO dbrole_offline
- GRANT EXECUTE ON FUNCTIONS TO dbrole_offline
- GRANT INSERT ON TABLES TO dbrole_readwrite
- GRANT UPDATE ON TABLES TO dbrole_readwrite
- GRANT DELETE ON TABLES TO dbrole_readwrite
- GRANT USAGE ON SEQUENCES TO dbrole_readwrite
- GRANT UPDATE ON SEQUENCES TO dbrole_readwrite
- GRANT TRUNCATE ON TABLES TO dbrole_admin
- GRANT REFERENCES ON TABLES TO dbrole_admin
- GRANT TRIGGER ON TABLES TO dbrole_admin
- GRANT CREATE ON SCHEMAS TO dbrole_admin
pg_default_schemas : [ monitor ] # 默认模式
pg_default_extensions : # 默认扩展
- { name: pg_stat_statements ,schema : monitor }
- { name: pgstattuple ,schema : monitor }
- { name: pg_buffercache ,schema : monitor }
- { name: pageinspect ,schema : monitor }
- { name: pg_prewarm ,schema : monitor }
- { name: pg_visibility ,schema : monitor }
- { name: pg_freespacemap ,schema : monitor }
- { name: postgres_fdw ,schema : public }
- { name: file_fdw ,schema : public }
- { name: btree_gist ,schema : public }
- { name: btree_gin ,schema : public }
- { name: pg_trgm ,schema : public }
- { name: intagg ,schema : public }
- { name: intarray ,schema : public }
- { name : pg_repack }
pg_reload : true # HBA变化后是否重载配置?
pg_default_hba_rules : # postgres 默认 HBA 规则集,按 order 排序
- {user : '${dbsu}' ,db: all ,addr: local ,auth: ident ,title: 'dbsu access via local os user ident' ,order : 100 }
- {user : '${dbsu}' ,db: replication ,addr: local ,auth: ident ,title: 'dbsu replication from local os ident' ,order : 150 }
- {user : '${repl}' ,db: replication ,addr: localhost ,auth: pwd ,title: 'replicator replication from localhost',order : 200 }
- {user : '${repl}' ,db: replication ,addr: intra ,auth: pwd ,title: 'replicator replication from intranet' ,order : 250 }
- {user : '${repl}' ,db: postgres ,addr: intra ,auth: pwd ,title: 'replicator postgres db from intranet' ,order : 300 }
- {user : '${monitor}' ,db: all ,addr: localhost ,auth: pwd ,title: 'monitor from localhost with password' ,order : 350 }
- {user : '${monitor}' ,db: all ,addr: infra ,auth: pwd ,title: 'monitor from infra host with password',order : 400 }
- {user : '${admin}' ,db: all ,addr: infra ,auth: ssl ,title: 'admin @ infra nodes with pwd & ssl' ,order : 450 }
- {user : '${admin}' ,db: all ,addr: world ,auth: ssl ,title: 'admin @ everywhere with ssl & pwd' ,order : 500 }
- {user: '+dbrole_readonly',db: all ,addr: localhost ,auth: pwd ,title: 'pgbouncer read/write via local socket',order : 550 }
- {user: '+dbrole_readonly',db: all ,addr: intra ,auth: pwd ,title: 'read/write biz user via password' ,order : 600 }
- {user: '+dbrole_offline' ,db: all ,addr: intra ,auth: pwd ,title: 'allow etl offline tasks from intranet',order : 650 }
pgb_default_hba_rules : # pgbouncer 默认 HBA 规则集,按 order 排序
- {user : '${dbsu}' ,db: pgbouncer ,addr: local ,auth: peer ,title: 'dbsu local admin access with os ident',order : 100 }
- {user: 'all' ,db: all ,addr: localhost ,auth: pwd ,title: 'allow all user local access with pwd' ,order : 150 }
- {user : '${monitor}' ,db: pgbouncer ,addr: intra ,auth: pwd ,title: 'monitor access via intranet with pwd' ,order : 200 }
- {user : '${monitor}' ,db: all ,addr: world ,auth: deny ,title: 'reject all other monitor access addr' ,order : 250 }
- {user : '${admin}' ,db: all ,addr: intra ,auth: pwd ,title: 'admin access via intranet with pwd' ,order : 300 }
- {user : '${admin}' ,db: all ,addr: world ,auth: deny ,title: 'reject all other admin access addr' ,order : 350 }
- {user: 'all' ,db: all ,addr: intra ,auth: pwd ,title: 'allow all user intra access with pwd' ,order : 400 }
pg_provision参数名称: pg_provision, 类型: bool, 层次:C
在集群拉起后,完整本节定义的 PostgreSQL 集群置备工作。默认值为true。
如果禁用,不会置备 PostgreSQL 集群。对于一些特殊的 “PostgreSQL” 集群,比如 Greenplum,可以关闭此选项跳过置备阶段。
pg_init参数名称: pg_init, 类型: string, 层次:G/C
用于初始化数据库模板的Shell脚本位置,默认为 pg-init,该脚本会被拷贝至/pg/bin/pg-init后执行。
该脚本位于 roles/pgsql/templates/pg-init
你可以在该脚本中添加自己的逻辑,或者提供一个新的脚本放置在 templates/ 目录下,并将 pg_init 设置为新的脚本名称。使用自定义脚本时请保留现有的初始化逻辑。
pg_default_roles参数名称: pg_default_roles, 类型: role[], 层次:G/C
Postgres 集群中的默认角色和用户。
Pigsty有一个内置的角色系统,请查看 PGSQL访问控制:角色系统 了解详情。
pg_default_roles : # postgres集群中的默认角色和用户
- { name: dbrole_readonly ,login: false ,comment : role for global read-only access }
- { name: dbrole_offline ,login: false ,comment : role for restricted read-only access }
- { name: dbrole_readwrite ,login: false ,roles: [dbrole_readonly] ,comment : role for global read-write access }
- { name: dbrole_admin ,login: false ,roles: [pg_monitor, dbrole_readwrite] ,comment : role for object creation }
- { name: postgres ,superuser: true ,comment : system superuser }
- { name: replicator ,replication: true ,roles: [pg_monitor, dbrole_readonly] ,comment : system replicator }
- { name: dbuser_dba ,superuser: true ,roles: [dbrole_admin] ,pgbouncer: true ,pool_mode: session, pool_connlimit: 16 , comment : pgsql admin user }
- { name: dbuser_monitor ,roles: [pg_monitor, dbrole_readonly] ,pgbouncer: true ,parameters : {log_min_duration_statement: 1000 } ,pool_mode: session ,pool_connlimit: 8 ,comment : pgsql monitor user }
pg_default_privileges参数名称: pg_default_privileges, 类型: string[], 层次:G/C
每个数据库中的默认权限(DEFAULT PRIVILEGE)设置:
pg_default_privileges : # 管理员用户创建时的默认权限
- GRANT USAGE ON SCHEMAS TO dbrole_readonly
- GRANT SELECT ON TABLES TO dbrole_readonly
- GRANT SELECT ON SEQUENCES TO dbrole_readonly
- GRANT EXECUTE ON FUNCTIONS TO dbrole_readonly
- GRANT USAGE ON SCHEMAS TO dbrole_offline
- GRANT SELECT ON TABLES TO dbrole_offline
- GRANT SELECT ON SEQUENCES TO dbrole_offline
- GRANT EXECUTE ON FUNCTIONS TO dbrole_offline
- GRANT INSERT ON TABLES TO dbrole_readwrite
- GRANT UPDATE ON TABLES TO dbrole_readwrite
- GRANT DELETE ON TABLES TO dbrole_readwrite
- GRANT USAGE ON SEQUENCES TO dbrole_readwrite
- GRANT UPDATE ON SEQUENCES TO dbrole_readwrite
- GRANT TRUNCATE ON TABLES TO dbrole_admin
- GRANT REFERENCES ON TABLES TO dbrole_admin
- GRANT TRIGGER ON TABLES TO dbrole_admin
- GRANT CREATE ON SCHEMAS TO dbrole_admin
Pigsty 基于默认角色系统提供了相应的默认权限设置,请查看 PGSQL访问控制:权限 了解详情。
pg_default_schemas参数名称: pg_default_schemas, 类型: string[], 层次:G/C
要创建的默认模式,默认值为:[ monitor ],这将在所有数据库上创建一个monitor模式,用于放置各种监控扩展、表、视图、函数。
pg_default_extensions参数名称: pg_default_extensions, 类型: extension[], 层次:G/C
要在所有数据库中默认创建启用的扩展列表,默认值:
pg_default_extensions : # default extensions to be created
- { name: pg_stat_statements ,schema : monitor }
- { name: pgstattuple ,schema : monitor }
- { name: pg_buffercache ,schema : monitor }
- { name: pageinspect ,schema : monitor }
- { name: pg_prewarm ,schema : monitor }
- { name: pg_visibility ,schema : monitor }
- { name: pg_freespacemap ,schema : monitor }
- { name: postgres_fdw ,schema : public }
- { name: file_fdw ,schema : public }
- { name: btree_gist ,schema : public }
- { name: btree_gin ,schema : public }
- { name: pg_trgm ,schema : public }
- { name: intagg ,schema : public }
- { name: intarray ,schema : public }
- { name : pg_repack }
唯一的三方扩展是 pg_repack,这对于数据库维护很重要,所有其他扩展都是内置的 PostgreSQL Contrib 扩展插件。
监控相关的扩展默认安装在 monitor 模式中,该模式由 pg_default_schemas
pg_reload参数名称: pg_reload, 类型: bool, 层次:A
在hba更改后重新加载 PostgreSQL,默认值为true
当您想在应用HBA更改之前进行检查时,将其设置为false以禁用自动重新加载配置。
pg_default_hba_rules参数名称: pg_default_hba_rules, 类型: hba[], 层次:G/C
PostgreSQL 基于主机的认证规则,全局默认规则定义。默认值为:
pg_default_hba_rules : # postgres default host-based authentication rules, order by `order`
- {user : '${dbsu}' ,db: all ,addr: local ,auth: ident ,title: 'dbsu access via local os user ident' ,order : 100 }
- {user : '${dbsu}' ,db: replication ,addr: local ,auth: ident ,title: 'dbsu replication from local os ident' ,order : 150 }
- {user : '${repl}' ,db: replication ,addr: localhost ,auth: pwd ,title: 'replicator replication from localhost',order : 200 }
- {user : '${repl}' ,db: replication ,addr: intra ,auth: pwd ,title: 'replicator replication from intranet' ,order : 250 }
- {user : '${repl}' ,db: postgres ,addr: intra ,auth: pwd ,title: 'replicator postgres db from intranet' ,order : 300 }
- {user : '${monitor}' ,db: all ,addr: localhost ,auth: pwd ,title: 'monitor from localhost with password' ,order : 350 }
- {user : '${monitor}' ,db: all ,addr: infra ,auth: pwd ,title: 'monitor from infra host with password',order : 400 }
- {user : '${admin}' ,db: all ,addr: infra ,auth: ssl ,title: 'admin @ infra nodes with pwd & ssl' ,order : 450 }
- {user : '${admin}' ,db: all ,addr: world ,auth: ssl ,title: 'admin @ everywhere with ssl & pwd' ,order : 500 }
- {user: '+dbrole_readonly',db: all ,addr: localhost ,auth: pwd ,title: 'pgbouncer read/write via local socket',order : 550 }
- {user: '+dbrole_readonly',db: all ,addr: intra ,auth: pwd ,title: 'read/write biz user via password' ,order : 600 }
- {user: '+dbrole_offline' ,db: all ,addr: intra ,auth: pwd ,title: 'allow etl offline tasks from intranet',order : 650 }
默认值为常见场景提供了足够的安全级别,请查看 PGSQL身份验证 了解详情。
本参数为 HBA 规则对象组成的数组,在形式上与 pg_hba_rulespg_default_hba_rulespg_hba_rules
pgb_default_hba_rules参数名称: pgb_default_hba_rules, 类型: hba[], 层次:G/C
pgbouncer default host-based authentication rules, array or hba rule object.
default value provides a fair enough security level for common scenarios, check PGSQL Authentication for details.
pgb_default_hba_rules : # pgbouncer default host-based authentication rules, order by `order`
- {user : '${dbsu}' ,db: pgbouncer ,addr: local ,auth: peer ,title: 'dbsu local admin access with os ident',order : 100 }
- {user: 'all' ,db: all ,addr: localhost ,auth: pwd ,title: 'allow all user local access with pwd' ,order : 150 }
- {user : '${monitor}' ,db: pgbouncer ,addr: intra ,auth: pwd ,title: 'monitor access via intranet with pwd' ,order : 200 }
- {user : '${monitor}' ,db: all ,addr: world ,auth: deny ,title: 'reject all other monitor access addr' ,order : 250 }
- {user : '${admin}' ,db: all ,addr: intra ,auth: pwd ,title: 'admin access via intranet with pwd' ,order : 300 }
- {user : '${admin}' ,db: all ,addr: world ,auth: deny ,title: 'reject all other admin access addr' ,order : 350 }
- {user: 'all' ,db: all ,addr: intra ,auth: pwd ,title: 'allow all user intra access with pwd' ,order : 400 }
默认的Pgbouncer HBA规则很简单:
允许从本地 使用密码登陆 允许从内网网断使用密码登陆 用户可以按照自己的需求进行定制。
本参数在形式上与 pgb_hba_rulespgb_default_hba_rulespgb_hba_rules
PG_BACKUP本节定义了用于 pgBackRest 的变量,它被用于 PGSQL 时间点恢复 PITR 。
查看 PGSQL 备份 & PITR 以获取详细信息。
pgbackrest_enabled : true # 在 pgsql 主机上启用 pgBackRest 吗?
pgbackrest_log_dir : /pg/log/pgbackrest # pgbackrest 日志目录,默认为 `/pg/log/pgbackrest`
pgbackrest_method : local # pgbackrest 仓库方法:local, minio, [用户定义...]
pgbackrest_init_backup : true # pgbackrest 初始化完成后是否立即执行全量备份?
pgbackrest_repo : # pgbackrest 仓库:https://pgbackrest.org/configuration.html#section-repository
local : # 默认使用本地 posix 文件系统的 pgbackrest 仓库
path : /pg/backup # 本地备份目录,默认为 `/pg/backup`
retention_full_type : count # 按计数保留完整备份
retention_full : 2 # 使用本地文件系统仓库时,最多保留 3 个完整备份,至少保留 2 个
minio : # pgbackrest 的可选 minio 仓库
type : s3 # minio 是与 s3 兼容的,所以使用 s3
s3_endpoint : sss.pigsty # minio 端点域名,默认为 `sss.pigsty`
s3_region : us-east-1 # minio 区域,默认为 us-east-1,对 minio 无效
s3_bucket : pgsql # minio 桶名称,默认为 `pgsql`
s3_key : pgbackrest # pgbackrest 的 minio 用户访问密钥
s3_key_secret : S3User.Backup # pgbackrest 的 minio 用户秘密密钥
s3_uri_style : path # 对 minio 使用路径风格的 uri,而不是主机风格
path : /pgbackrest # minio 备份路径,默认为 `/pgbackrest`
storage_port : 9000 # minio 端口,默认为 9000
storage_ca_file : /etc/pki/ca.crt # minio ca 文件路径,默认为 `/etc/pki/ca.crt`
block : y # 启用块级增量备份(pgBackRest 2.46+)
bundle : y # 将小文件打包成一个文件
bundle_limit : 20MiB # 对象存储文件打包阈值,默认 20MiB
bundle_size : 128MiB # 对象存储文件打包目标大小,默认 128MiB
cipher_type : aes-256-cbc # 为远程备份仓库启用 AES 加密
cipher_pass : pgBackRest # AES 加密密码,默认为 'pgBackRest'
retention_full_type : time # 在 minio 仓库上按时间保留完整备份
retention_full : 14 # 保留过去 14 天的完整备份
pgbackrest_enabled参数名称: pgbackrest_enabled, 类型: bool, 层次:C
是否在 PGSQL 节点上启用 pgBackRest?默认值为: true
在使用本地文件系统备份仓库(local)时,只有集群主库才会真正启用 pgbackrest。其他实例只会初始化一个空仓库。
pgbackrest_log_dir参数名称: pgbackrest_log_dir, 类型: path, 层次:C
pgBackRest 日志目录,默认为 /pg/log/pgbackrest,Vector 日志代理会引用此参数收集日志。
pgbackrest_method参数名称: pgbackrest_method, 类型: enum, 层次:C
pgBackRest 仓库方法:默认可选项为:local、minio 或其他用户定义的方法,默认为 local。
此参数用于确定用于 pgBackRest 的仓库,所有可用的仓库方法都在 pgbackrest_repo
Pigsty 默认使用 local 备份仓库,这将在主实例的 /pg/backup 目录上创建一个备份仓库。底层存储路径由 pg_fs_backup
pgbackrest_init_backup参数名称: pgbackrest_init_backup, 类型: bool, 层次:C
在 pgBackRest 初始化完成后是否立即执行一次全量备份?默认为 true。
此操作仅在集群主库(primary)且非级联从库(无 pg_upstream
pgbackrest_repo参数名称: pgbackrest_repo, 类型: dict, 层次:G/C
pgBackRest 仓库文档:https://pgbackrest.org/configuration.html#section-repository
默认值包括两种仓库方法:local 和 minio,定义如下:
pgbackrest_repo : # pgbackrest 仓库:https://pgbackrest.org/configuration.html#section-repository
local : # 默认使用本地 posix 文件系统的 pgbackrest 仓库
path : /pg/backup # 本地备份目录,默认为 `/pg/backup`
retention_full_type : count # 按计数保留完整备份
retention_full : 2 # 使用本地文件系统仓库时,最多保留 3 个完整备份,至少保留 2 个
minio : # pgbackrest 的可选 minio 仓库
type : s3 # minio 是与 s3 兼容的,所以使用 s3
s3_endpoint : sss.pigsty # minio 端点域名,默认为 `sss.pigsty`
s3_region : us-east-1 # minio 区域,默认为 us-east-1,对 minio 无效
s3_bucket : pgsql # minio 桶名称,默认为 `pgsql`
s3_key : pgbackrest # pgbackrest 的 minio 用户访问密钥
s3_key_secret : S3User.Backup # pgbackrest 的 minio 用户秘密密钥
s3_uri_style : path # 对 minio 使用路径风格的 uri,而不是主机风格
path : /pgbackrest # minio 备份路径,默认为 `/pgbackrest`
storage_port : 9000 # minio 端口,默认为 9000
storage_ca_file : /etc/pki/ca.crt # minio ca 文件路径,默认为 `/etc/pki/ca.crt`
block : y # 启用块级增量备份(pgBackRest 2.46+)
bundle : y # 将小文件打包成一个文件
bundle_limit : 20MiB # 对象存储文件打包阈值,默认 20MiB
bundle_size : 128MiB # 对象存储文件打包目标大小,默认 128MiB
cipher_type : aes-256-cbc # 为远程备份仓库启用 AES 加密
cipher_pass : pgBackRest # AES 加密密码,默认为 'pgBackRest'
retention_full_type : time # 在 minio 仓库上按时间保留完整备份
retention_full : 14 # 保留过去 14 天的完整备份
您可以定义新的备份仓库,例如使用 AWS S3,GCP 或其他云供应商的 S3 兼容存储服务。
块级增量备份 (Block Incremental Backup) :从 pgBackRest 2.46 版本开始支持 block: y 选项,可以实现块级增量备份。
这意味着在增量备份时,pgBackRest 只会备份发生变化的数据块,而不是整个变化的文件,从而大幅减少备份数据量和备份时间。
此功能对于大型数据库特别有用,建议在对象存储仓库上启用此选项。
PG_ACCESS本节负责数据库访问路径,包括:
在每个 PGSQL 节点上部署 Pgbouncer 连接池并设定默认行为 通过本地或专用 haproxy 节点发布服务端口 绑定可选的 L2 VIP、注册 DNS 记录 pgbouncer_enabled : true # if disabled, pgbouncer will not be launched on pgsql host
pgbouncer_port : 6432 # pgbouncer listen port, 6432 by default
pgbouncer_log_dir : /pg/log/pgbouncer # pgbouncer log dir, `/pg/log/pgbouncer` by default
pgbouncer_auth_query : false # query postgres to retrieve unlisted business users?
pgbouncer_poolmode: transaction # pooling mode : transaction,session,statement, transaction by default
pgbouncer_sslmode : disable # pgbouncer client ssl mode, disable by default
pgbouncer_ignore_param : [ extra_float_digits, application_name, TimeZone, DateStyle, IntervalStyle, search_path ]
pg_weight : 100 #INSTANCE # relative load balance weight in service, 100 by default, 0-255
pg_service_provider : '' # dedicate haproxy node group name, or empty string for local nodes by default
pg_default_service_dest : pgbouncer # default service destination if svc.dest='default'
pg_default_services : # postgres default service definitions
- { name: primary ,port: 5433 ,dest: default ,check: /primary ,selector : "[]" }
- { name: replica ,port: 5434 ,dest: default ,check: /read-only ,selector : "[]" , backup : "[? pg_role == `primary` || pg_role == `offline` ]" }
- { name: default ,port: 5436 ,dest: postgres ,check: /primary ,selector : "[]" }
- { name: offline ,port: 5438 ,dest: postgres ,check: /replica ,selector : "[? pg_role == `offline` || pg_offline_query ]" , backup : "[? pg_role == `replica` && !pg_offline_query]" }
pg_vip_enabled : false # enable a l2 vip for pgsql primary? false by default
pg_vip_address : 127.0.0.1 /24 # vip address in `<ipv4>/<mask>` format, require if vip is enabled
pg_vip_interface : eth0 # vip network interface to listen, eth0 by default
pg_dns_suffix : '' # pgsql dns suffix, '' by default
pg_dns_target : auto # auto, primary, vip, none, or ad hoc ip
pgbouncer_enabled参数名称: pgbouncer_enabled, 类型: bool, 层次:C
默认值为 true,如果禁用,将不会在 PGSQL节点
pgbouncer_port参数名称: pgbouncer_port, 类型: port, 层次:C
Pgbouncer 监听端口,默认为 6432。
pgbouncer_log_dir参数名称: pgbouncer_log_dir, 类型: path, 层次:C
Pgbouncer 日志目录,默认为 /pg/log/pgbouncer,Vector 日志代理会根据此参数收集 Pgbouncer 日志。
pgbouncer_auth_query参数名称: pgbouncer_auth_query, 类型: bool, 层次:C
是否允许 Pgbouncer 查询 PostgreSQL,以允许未显式列出的用户通过连接池访问 PostgreSQL?默认值是 false。
如果启用,pgbouncer 用户将使用 SELECT username, password FROM monitor.pgbouncer_auth($1) 对 postgres 数据库进行身份验证,否则,只有带有 pgbouncer: true 的业务用户才被允许连接到 Pgbouncer 连接池。
pgbouncer_poolmode参数名称: pgbouncer_poolmode, 类型: enum, 层次:C
Pgbouncer 连接池池化模式:transaction,session,statement,默认为 transaction。
session:会话级池化,具有最佳的功能兼容性。transaction:事务级池化,具有更好的性能(许多小连接),可能会破坏某些会话级特性,如NOTIFY/LISTEN 等…statements:语句级池化,用于简单的只读查询。如果您的应用出现功能兼容性问题,可以考虑修改此参数为 session。
pgbouncer_sslmode参数名称: pgbouncer_sslmode, 类型: enum, 层次:C
Pgbouncer 客户端 ssl 模式,默认为 disable。
注意,启用 SSL 可能会对你的 pgbouncer 产生巨大的性能影响。
disable:如果客户端请求 TLS 则忽略(默认)allow:如果客户端请求 TLS 则使用。如果没有则使用纯TCP。不验证客户端证书。prefer:与 allow 相同。require:客户端必须使用 TLS。如果没有则拒绝客户端连接。不验证客户端证书。verify-ca:客户端必须使用有效的客户端证书的TLS。verify-full:与 verify-ca 相同。pgbouncer_ignore_param参数名称: pgbouncer_ignore_param, 类型: string[], 层次:C
PgBouncer 忽略的启动参数列表,默认值为:
[ extra_float_digits, application_name, TimeZone, DateStyle, IntervalStyle, search_path ]
这些参数会被配置到 PgBouncer 配置文件中的 ignore_startup_parameters 选项。当客户端连接时设置这些参数时,PgBouncer 不会因为连接池中的连接参数不匹配而创建新的连接。
这允许不同的客户端使用相同的连接池,即使它们设置了不同的这些参数值。此参数在 Pigsty v3.5 中新增。
pg_weight参数名称: pg_weight, 类型: int, 层次:I
服务中的相对负载均衡权重,默认为100,范围0-255。
默认值: 100。您必须在实例变量中定义它,并 重载服务 以生效。
pg_service_provider参数名称: pg_service_provider, 类型: string, 层次:G/C
专用的haproxy节点组名,或默认为本地节点的空字符串。
如果指定,PostgreSQL服务将注册到专用的haproxy节点组,而不是当下的 PGSQL 集群节点。
请记住为每个服务在专用的 haproxy 节点上分配唯一 的端口!
例如,如果我们在3节点的 pg-test 集群上定义以下参数:
pg_service_provider : infra # use load balancer on group `infra`
pg_default_services : # alloc port 10001 and 10002 for pg-test primary/replica service
- { name: primary ,port: 10001 ,dest: postgres ,check: /primary ,selector : "[]" }
- { name: replica ,port: 10002 ,dest: postgres ,check: /read-only ,selector : "[]" , backup : "[? pg_role == `primary` || pg_role == `offline` ]" }
pg_default_service_dest参数名称: pg_default_service_dest, 类型: enum, 层次:G/C
当定义一个 服务 时,如果 svc.dest='default',此参数将用作默认值。
默认值: pgbouncer,意味着5433主服务和5434副本服务将默认将流量路由到 pgbouncer。
如果您不想使用pgbouncer,将其设置为postgres。流量将直接路由到 postgres。
pg_default_services参数名称: pg_default_services, 类型: service[], 层次:G/C
postgres默认服务定义
默认值是四个默认服务定义,如 PGSQL Service 所述
pg_default_services : # postgres default service definitions
- { name: primary ,port: 5433 ,dest: default ,check: /primary ,selector : "[]" }
- { name: replica ,port: 5434 ,dest: default ,check: /read-only ,selector : "[]" , backup : "[? pg_role == `primary` || pg_role == `offline` ]" }
- { name: default ,port: 5436 ,dest: postgres ,check: /primary ,selector : "[]" }
- { name: offline ,port: 5438 ,dest: postgres ,check: /replica ,selector : "[? pg_role == `offline` || pg_offline_query ]" , backup : "[? pg_role == `replica` && !pg_offline_query]" }
pg_vip_enabled参数名称: pg_vip_enabled, 类型: bool, 层次:C
为 PGSQL 集群启用 L2 VIP吗?默认值是false,表示不创建 L2 VIP。
启用 L2 VIP 后,会有一个 VIP 绑定在集群主实例节点上,由 vip-manager 管理,根据 etcd 中的数据进行判断。
L2 VIP只能在相同的L2网络中使用,这可能会对您的网络拓扑产生额外的限制。
pg_vip_address参数名称: pg_vip_address, 类型: cidr4, 层次:C
如果启用vip,则需要<ipv4>/<mask>格式的vip地址。
默认值: 127.0.0.1/24。这个值由两部分组成:ipv4和mask,用/分隔。
pg_vip_interface参数名称: pg_vip_interface, 类型: string, 层次:C/I
vip network interface to listen, eth0 by default.
L2 VIP 监听的网卡接口,默认为 eth0。
它应该是您节点的首要网卡名,即您在配置清单中使用的IP地址。
如果您的节点有多块名称不同的网卡,您可以在实例变量上进行覆盖:
pg-test :
hosts :
10.10.10.11 : {pg_seq: 1, pg_role: replica ,pg_vip_interface : eth0 }
10.10.10.12 : {pg_seq: 2, pg_role: primary ,pg_vip_interface : eth1 }
10.10.10.13 : {pg_seq: 3, pg_role: replica ,pg_vip_interface : eth2 }
vars :
pg_vip_enabled : true # 为这个集群启用L2 VIP,默认绑定到主实例
pg_vip_address: 10.10.10.3/24 # L2网络CIDR: 10.10.10.0/24, vip地址 : 10.10.10.3
# pg_vip_interface: eth1 # 如果您的节点有统一的接口,您可以在这里定义它
pg_dns_suffix参数名称: pg_dns_suffix, 类型: string, 层次:C
PostgreSQL DNS 名称后缀,默认为空字符串。
在默认情况下,PostgreQL 集群名会作为 DNS 域名注册到 Infra 节点的 dnsmasq 中对外提供解析。
您可以通过本参数指定一个域名后缀,这样会使用 {{ pg_cluster }}{{ pg_dns_suffix }} 作为集群 DNS 名称。
例如,如果您将 pg_dns_suffix 设置为 .db.vip.company.tld,那么 pg-test 的集群 DNS 名称将是 pg-test.db.vip.company.tld
pg_dns_target参数名称: pg_dns_target, 类型: enum, 层次:C
Could be: auto, primary, vip, none, or an ad hoc ip address, which will be the target IP address of cluster DNS record.
default values: auto , which will bind to pg_vip_address if pg_vip_enabled, or fallback to cluster primary instance ip address.
vip: bind to pg_vip_addressprimary: resolve to cluster primary instance ip addressauto: resolve to pg_vip_address if pg_vip_enabled, or fallback to cluster primary instance ip address.none: do not bind to any ip address<ipv4>: bind to the given IP address可以是:auto、primary、vip、none或一个特定的IP地址,它将是集群DNS记录的解析目标IP地址。
默认值: auto,如果pg_vip_enabled,将绑定到pg_vip_address,否则会回退到集群主实例的 IP 地址。
PG_MONITORPG_MONITOR 组的参数用于监控 PostgreSQL 数据库、Pgbouncer 连接池与 pgBackRest 备份系统的状态。
此参数组定义了三个 Exporter 的配置:pg_exporter 用于监控 PostgreSQL,pgbouncer_exporter 用于监控连接池,pgbackrest_exporter 用于监控备份状态。
pg_exporter_enabled : true # 在 pgsql 主机上启用 pg_exporter 吗?
pg_exporter_config : pg_exporter.yml # pg_exporter 配置文件名
pg_exporter_cache_ttls : '1,10,60,300' # pg_exporter 收集器 ttl 阶段(秒),默认为 '1,10,60,300'
pg_exporter_port : 9630 # pg_exporter 监听端口,默认为 9630
pg_exporter_params : 'sslmode=disable' # pg_exporter dsn 的额外 url 参数
pg_exporter_url : '' # 如果指定,将覆盖自动生成的 pg dsn
pg_exporter_auto_discovery : true # 启用自动数据库发现?默认启用
pg_exporter_exclude_database : 'template0,template1,postgres' # 在自动发现过程中不会被监控的数据库的 csv 列表
pg_exporter_include_database : '' # 在自动发现过程中将被监控的数据库的 csv 列表
pg_exporter_connect_timeout : 200 # pg_exporter 连接超时(毫秒),默认为 200
pg_exporter_options : '' # 覆盖 pg_exporter 的额外选项
pgbouncer_exporter_enabled : true # 在 pgsql 主机上启用 pgbouncer_exporter 吗?
pgbouncer_exporter_port : 9631 # pgbouncer_exporter 监听端口,默认为 9631
pgbouncer_exporter_url : '' # 如果指定,将覆盖自动生成的 pgbouncer dsn
pgbouncer_exporter_options : '' # 覆盖 pgbouncer_exporter 的额外选项
pgbackrest_exporter_enabled : true # 在 pgsql 主机上启用 pgbackrest_exporter 吗?
pgbackrest_exporter_port : 9854 # pgbackrest_exporter 监听端口,默认为 9854
pgbackrest_exporter_options : '' # 覆盖 pgbackrest_exporter 的额外选项
pg_exporter_enabled参数名称: pg_exporter_enabled, 类型: bool, 层次:C
是否在 PGSQL 节点上启用 pg_exporter?默认值为:true。
PG Exporter 用于监控 PostgreSQL 数据库实例,如果不想安装 pg_exporter 可以设置为 false。
pg_exporter_config参数名称: pg_exporter_config, 类型: string, 层次:C
pg_exporter 配置文件名,PG Exporter 和 PGBouncer Exporter 都会使用这个配置文件。默认值:pg_exporter.yml。
如果你想使用自定义配置文件,你可以在这里定义它。你的自定义配置文件应当放置于 files/<name>.yml。
例如,当您希望监控一个远程的 PolarDB 数据库实例时,可以使用样例配置:files/polar_exporter.yml。
pg_exporter_cache_ttls参数名称: pg_exporter_cache_ttls, 类型: string, 层次:C
pg_exporter 收集器 TTL 阶梯(秒),默认为 ‘1,10,60,300’
默认值:1,10,60,300,它将为不同的度量收集器使用不同的TTL值: 1s, 10s, 60s, 300s。
PG Exporter 内置了缓存机制,避免多个 Prometheus 重复抓取对数据库产生不当影响,所有指标收集器按 TTL 分为四类:
ttl_fast : "{{ pg_exporter_cache_ttls.split(',')[0]|int }}" # critical queries
ttl_norm : "{{ pg_exporter_cache_ttls.split(',')[1]|int }}" # common queries
ttl_slow : "{{ pg_exporter_cache_ttls.split(',')[2]|int }}" # slow queries (e.g table size)
ttl_slowest : "{{ pg_exporter_cache_ttls.split(',')[3]|int }}" # ver slow queries (e.g bloat)
例如,在默认配置下,存活类指标默认最多缓存 1s,大部分普通指标会缓存 10s(应当与监控抓取间隔 vmetrics_scrape_interval60s 的TTL,极个别大开销监控查询会有 300s 的TTL。
pg_exporter_port参数名称: pg_exporter_port, 类型: port, 层次:C
pg_exporter 监听端口号,默认值为:9630
pg_exporter_params参数名称: pg_exporter_params, 类型: string, 层次:C
pg_exporter 所使用 DSN 中额外的 URL PATH 参数。
默认值:sslmode=disable,它将禁用用于监控连接的 SSL(因为默认使用本地 unix 套接字)。
pg_exporter_url参数名称: pg_exporter_url, 类型: pgurl, 层次:C
如果指定了本参数,将会覆盖自动生成的 PostgreSQL DSN,使用指定的 DSN 连接 PostgreSQL 。默认值为空字符串。
如果没有指定此参数,PG Exporter 默认会使用以下的连接串访问 PostgreSQL :
postgres://{{ pg_monitor_username }}:{{ pg_monitor_password }}@{{ pg_host }}:{{ pg_port }}/postgres{% if pg_exporter_params != '' %}?{{ pg_exporter_params }}{% endif %}
当您想监控一个远程的 PostgreSQL 实例时,或者需要使用不同的监控用户/密码,配置选项时,可以使用这个参数。
pg_exporter_auto_discovery参数名称: pg_exporter_auto_discovery, 类型: bool, 层次:C
启用自动数据库发现吗? 默认启用:true。
PG Exporter 默认会连接到 DSN 中指定的数据库 (默认为管理数据库 postgres) 收集全局指标,如果您希望收集所有业务数据库的指标,可以开启此选项。
PG Exporter 会自动发现目标 PostgreSQL 实例中的所有数据库,并在这些数据库中收集 库级监控指标 。
pg_exporter_exclude_database参数名称: pg_exporter_exclude_database, 类型: string, 层次:C
如果启用了数据库自动发现(默认启用),在这个参数指定的列表中的数据库将不会被监控。
默认值为: template0,template1,postgres,即管理数据库 postgres 与模板数据库会被排除在自动监控的数据库之外。
作为例外,DSN 中指定的数据库不受此参数影响,例如,PG Exporter 如果连接的是 postgres 数据库,那么即使 postgres 在此列表中,也会被监控。
pg_exporter_include_database参数名称: pg_exporter_include_database, 类型: string, 层次:C
如果启用了数据库自动发现(默认启用),在这个参数指定的列表中的数据库才会被监控。默认值为空字符串,即不启用此功能。
参数的形式是由逗号分隔的数据库名称列表,例如:db1,db2,db3。
此参数相对于 [pg_exporter_exclude_database] 有更高的优先级,相当于白名单模式。如果您只希望监控特定的数据库,可以使用此参数。
pg_exporter_connect_timeout参数名称: pg_exporter_connect_timeout, 类型: int, 层次:C
pg_exporter 连接超时(毫秒),默认为 200 (单位毫秒)
当 PG Exporter 尝试连接到 PostgreSQL 数据库时,最多会等待多长时间?超过这个时间,PG Exporter 将会放弃连接并报错。
默认值 200毫秒 对于绝大多数场景(例如:同可用区监控)都是足够的,但是如果您监控的远程 PostgreSQL 位于另一个大洲,您可能需要增加此值以避免连接超时。
pg_exporter_options参数名称: pg_exporter_options, 类型: arg, 层次:C
传给 PG Exporter 的命令行参数,默认值为:"" 空字符串。
当使用空字符串时,会使用默认的命令参数:
{ % if pg_exporter_port != '' %}
PG_EXPORTER_OPTS = '--web.listen-address=:{{ pg_exporter_port }} {{ pg_exporter_options }}'
{ % else %}
PG_EXPORTER_OPTS = '--web.listen-address=:{{ pg_exporter_port }} --log.level=info'
{ % endif %}
注意,请不要在本参数中覆盖 pg_exporter_port
pgbouncer_exporter_enabled参数名称: pgbouncer_exporter_enabled, 类型: bool, 层次:C
在 PGSQL 节点上,是否启用 pgbouncer_exporter ?默认值为:true。
pgbouncer_exporter_port参数名称: pgbouncer_exporter_port, 类型: port, 层次:C
pgbouncer_exporter 监听端口号,默认值为:9631
pgbouncer_exporter_url参数名称: pgbouncer_exporter_url, 类型: pgurl, 层次:C
如果指定了本参数,将会覆盖自动生成的 pgbouncer DSN,使用指定的 DSN 连接 pgbouncer。默认值为空字符串。
如果没有指定此参数,Pgbouncer Exporter 默认会使用以下的连接串访问 Pgbouncer:
postgres://{{ pg_monitor_username }}:{{ pg_monitor_password }}@:{{ pgbouncer_port }}/pgbouncer?host={{ pg_localhost }}&sslmode=disable
当您想监控一个远程的 Pgbouncer 实例时,或者需要使用不同的监控用户/密码,配置选项时,可以使用这个参数。
pgbouncer_exporter_options参数名称: pgbouncer_exporter_options, 类型: arg, 层次:C
传给 Pgbouncer Exporter 的命令行参数,默认值为:"" 空字符串。
当使用空字符串时,会使用默认的命令参数:
{ % if pgbouncer_exporter_options != '' %}
PG_EXPORTER_OPTS = '--web.listen-address=:{{ pgbouncer_exporter_port }} {{ pgbouncer_exporter_options }}'
{ % else %}
PG_EXPORTER_OPTS = '--web.listen-address=:{{ pgbouncer_exporter_port }} --log.level=info'
{ % endif %}
注意,请不要在本参数中覆盖 pgbouncer_exporter_port
pgbackrest_exporter_enabled参数名称: pgbackrest_exporter_enabled, 类型: bool, 层次:C
是否在 PGSQL 节点上启用 pgbackrest_exporter?默认值为:true。
pgbackrest_exporter 用于监控 pgBackRest 备份系统的状态,包括备份的大小、时间、类型、持续时长等关键指标。
pgbackrest_exporter_port参数名称: pgbackrest_exporter_port, 类型: port, 层次:C
pgbackrest_exporter 监听端口号,默认值为:9854。
此端口需要在 Prometheus 服务发现配置中引用,用于抓取备份相关的监控指标。
pgbackrest_exporter_options参数名称: pgbackrest_exporter_options, 类型: arg, 层次:C
传给 pgbackrest_exporter 的命令行参数,默认值为:"" 空字符串。
当使用空字符串时,会使用默认的命令参数配置。您可以在此指定额外的参数选项来调整 exporter 的行为。
PG_REMOVEpgsql-rm.ymlpg_remove 角色来安全地移除 PostgreSQL 实例。本节参数用于控制清理行为,避免误删。
pg_rm_data : true # remove postgres data during remove? true by default
pg_rm_backup : true # remove pgbackrest backup during primary remove? true by default
pg_rm_pkg : true # uninstall postgres packages during remove? true by default
pg_safeguard : false # stop pg_remove running if pg_safeguard is enabled, false by default
pg_rm_data参数名称: pg_rm_data, 类型: bool, 层次:G/C/A
删除 PGSQL 实例时是否清理 pg_datatrue。
该开关既影响 pgsql-rm.yml,也影响其他触发 pg_remove 的场景。设为 false 可以保留数据目录,便于手动检查或重新挂载。
pg_rm_backup参数名称: pg_rm_backup, 类型: bool, 层次:G/C/A
删除主库时是否一并清理 pgBackRest 仓库与配置,默认值 true。
该参数仅对 pg_role=primary 的主实例生效:pg_remove 会先停止 pgBackRest、删除当前集群的 stanza,并在 pgbackrest_method == 'local' 时移除 pg_fs_backup
pg_rm_pkg参数名称: pg_rm_pkg, 类型: bool, 层次:G/C/A
在清理 PGSQL 实例时是否卸载 pg_packagestrue。
如果只想暂时停机并保留二进制文件,可将其设为 false,否则 pg_remove 会调用系统包管理器彻底卸载 PostgreSQL 相关组件。
pg_safeguard参数名称: pg_safeguard, 类型: bool, 层次:G/C/A
防误删保险,默认值为 false。当显式设置为 true 时,pg_remove 会立即终止并提示,必须使用 -e pg_safeguard=false 或在变量中关闭后才会继续。
建议在生产环境批量清理前先开启此开关,确认命令与目标节点无误后再解除,以避免误操作导致实例被删除。
12.15 - 预置剧本 如何使用 ansible 剧本来管理 PostgreSQL 集群
Pigsty提供了一系列剧本,用于集群上下线扩缩容,用户/数据库管理,监控、备份恢复或迁移已有实例。
保护机制 使用 PGSQL特别注意 ,剧本 pgsql.ymlpgsql-rm.yml
在执行时添加 -l 参数,限制命令执行的对象范围,并确保自己在正确的目标上执行正确的任务。 限制范围通常以一个数据库集群为宜,使用不带参数的 pgsql.yml 在生产环境中是一个高危操作,务必三思而后行。 出于防止误删的目的,Pigsty 的 PGSQL 模块提供了防误删保险,由 pg_safeguardpg_safeguard 设置为 true 时,pgsql-rm.yml
# 将会中止执行,保护数据安全
./pgsql-rm.yml -l pg-test
# 通过命令行参数强制覆盖保护开关
./pgsql-rm.yml -l pg-test -e pg_safeguard = false
除了 pg_safeguard 外,pgsql-rm.yml
参数 默认值 说明 pg_safeguardfalse防误删保险,设为 true 时剧本会中止执行 pg_rm_datatrue是否移除 PostgreSQL 数据目录 pg_rm_backuptrue是否移除 pgBackRest 备份数据(仅主库移除时生效) pg_rm_pkgtrue是否卸载 PostgreSQL 软件包
这些参数允许你根据实际需求精确控制移除行为:
# 移除集群但保留数据目录(仅停止服务)
./pgsql-rm.yml -l pg-test -e pg_rm_data = false
# 移除集群但保留备份数据
./pgsql-rm.yml -l pg-test -e pg_rm_backup = false
# 移除集群并卸载软件包
./pgsql-rm.yml -l pg-test -e pg_rm_pkg = true
pgsql.yml剧本 pgsql.yml
下面是使用此剧本初始化沙箱环境中 PostgreSQL 集群的过程:
基本用法
./pgsql.yml -l pg-meta # 初始化集群 pg-meta
./pgsql.yml -l 10.10.10.13 # 初始化/添加实例 10.10.10.13
./pgsql.yml -l pg-test -t pg_service # 刷新集群 pg-test 的服务
./pgsql.yml -l pg-test -t pg_hba,pgbouncer_hba,pgbouncer_reload -e pg_reload = true # 重载HBA规则
包装脚本
Pigsty 提供了便捷的包装脚本简化常见操作:
bin/pgsql-add pg-meta # 初始化 pgsql 集群 pg-meta
bin/pgsql-add 10.10.10.10 # 初始化 pgsql 实例 10.10.10.10
bin/pgsql-add pg-test 10.10.10.13 # 添加 10.10.10.13 到集群 pg-test(自动刷新服务)
bin/pgsql-svc pg-test # 刷新 pg-test 的 haproxy 服务(成员变更时使用)
bin/pgsql-hba pg-test # 重载 pg-test 的 pg/pgb HBA 规则
任务列表
本剧本包含以下子任务:
# pg_install : 安装 postgres 软件包与扩展
# - pg_dbsu : 设置 postgres 超级用户
# - pg_dbsu_create : 创建 dbsu 用户
# - pg_dbsu_sudo : 配置 dbsu sudo 权限
# - pg_ssh : 交换 dbsu SSH 密钥
# - pg_pkg : 安装 postgres 软件包
# - pg_pre : 安装前置任务
# - pg_ext : 安装 postgres 扩展包
# - pg_post : 安装后置任务
# - pg_link : 将 pgsql 版本 bin 链接到 /usr/pgsql
# - pg_path : 将 pgsql bin 添加到系统路径
# - pg_dir : 创建 postgres 目录并设置 FHS
# - pg_bin : 同步 /pg/bin 脚本
# - pg_alias : 配置 pgsql/psql 别名
# - pg_dummy : 创建 dummy 占位文件
#
# pg_bootstrap : 引导 postgres 集群
# - pg_config : 生成 postgres 配置
# - pg_conf : 生成 patroni 配置
# - pg_key : 生成 pgsodium 密钥
# - pg_cert : 为 postgres 签发证书
# - pg_cert_private : 检查 pg 私钥是否存在
# - pg_cert_issue : 签发 pg 服务端证书
# - pg_cert_copy : 复制密钥与证书到 pg 节点
# - pg_launch : 启动 patroni 主库与从库
# - pg_watchdog : 授予 postgres watchdog 权限
# - pg_primary : 启动 patroni/postgres 主库
# - pg_init : 使用角色/模板初始化 pg 集群
# - pg_pass : 将 .pgpass 文件写入 pg 主目录
# - pg_replica : 启动 patroni/postgres 从库
# - pg_hba : 生成 pg HBA 规则
# - patroni_reload : 重新加载 patroni 配置
# - pg_patroni : 必要时暂停或移除 patroni
#
# pg_provision : 创建 postgres 业务用户与数据库
# - pg_user : 创建 postgres 业务用户
# - pg_user_config : 渲染创建用户的 sql
# - pg_user_create : 在 postgres 上创建用户
# - pg_db : 创建 postgres 业务数据库
# - pg_db_drop : 删除数据库(state=absent/recreate时)
# - pg_db_config : 渲染创建数据库的 sql
# - pg_db_create : 在 postgres 上创建数据库
#
# pg_backup : 初始化 postgres PITR 备份
# - pgbackrest : 配置 pgbackrest 备份
# - pgbackrest_config : 生成 pgbackrest 配置
# - pgbackrest_init : 初始化 pgbackrest 仓库
# - pgbackrest_backup : 引导后进行初始备份
#
# pg_crontab : 配置 postgres dbsu 定时任务
#
# pg_access : 初始化 postgres 服务访问层
# - pgbouncer : 部署 pgbouncer 连接池
# - pgbouncer_dir : 创建 pgbouncer 目录
# - pgbouncer_config : 生成 pgbouncer 配置
# - pgbouncer_hba : 生成 pgbouncer hba 配置
# - pgbouncer_user : 生成 pgbouncer 用户列表
# - pgbouncer_launch : 启动 pgbouncer 服务
# - pgbouncer_reload : 重载 pgbouncer 配置
# - pg_vip : 使用 vip-manager 绑定 VIP 到主库
# - pg_vip_config : 生成 vip-manager 配置
# - pg_vip_launch : 启动 vip-manager 绑定 vip
# - pg_dns : 将 DNS 名称注册到基础设施 dnsmasq
# - pg_dns_ins : 注册 pg 实例名称
# - pg_dns_cls : 注册 pg 集群名称
# - pg_service : 使用 haproxy 暴露 pgsql 服务
# - pg_service_config : 为 pg 服务生成本地 haproxy 配置
# - pg_service_reload : 使用 haproxy 暴露 postgres 服务
#
# pg_monitor : 设置 pgsql 监控并注册到基础设施
# - pg_exporter : 配置并启动 pg_exporter
# - pgbouncer_exporter : 配置并启动 pgbouncer_exporter
# - pgbackrest_exporter : 配置并启动 pgbackrest_exporter
# - pg_register : 将 pgsql 注册到监控/日志/数据源
# - add_metrics : 将 pg 注册为 victoria 监控目标
# - add_logs : 将 pg 注册为 vector 日志来源
# - add_ds : 将 pg 数据库注册为 grafana 数据源
以下管理任务使用到了此剧本
注意事项
单独针对某一集群从库执行此剧本时,用户应当确保 集群主库已经完成初始化! 扩容完成后,您需要 重载服务 与 重载HBA ,包装脚本 bin/pgsql-add 会自动完成这些任务。 集群扩容时,如果 Patroni 拉起从库的时间过长,Ansible 剧本可能会因为超时而中止:
典型错误信息为:wait for postgres/patroni replica 任务执行很长时间后中止 但制作从库的进程会继续,例如制作从库需超过1天的场景,后续处理请参考 FAQ :制作从库失败。 pgsql-rm.yml剧本 pgsql-rm.yml
下面是使用此剧本移除沙箱环境中 PostgreSQL 集群的过程:
基本用法
./pgsql-rm.yml -l pg-test # 移除集群 pg-test
./pgsql-rm.yml -l 10.10.10.13 # 移除实例 10.10.10.13
命令行参数
本剧本可以使用以下命令行参数控制其行为:
./pgsql-rm.yml -l pg-test # 移除集群 pg-test
-e pg_safeguard = false # 防误删保险,默认关闭,开启时需强制覆盖
-e pg_rm_data = true # 是否一并移除 PostgreSQL 数据目录,默认移除
-e pg_rm_backup = true # 是否一并移除 pgBackRest 备份(仅主库),默认移除
-e pg_rm_pkg = true # 是否卸载 PostgreSQL 软件包,默认卸载
包装脚本
bin/pgsql-rm pg-meta # 移除 pgsql 集群 pg-meta
bin/pgsql-rm pg-test 10.10.10.13 # 从集群 pg-test 移除实例 10.10.10.13
任务列表
本剧本包含以下子任务:
# pg_safeguard : 如果 pg_safeguard 启用则中止执行
#
# pg_monitor : 从监控系统移除注册
# - pg_deregister : 从基础设施移除 pg 监控目标
# - rm_metrics : 从 prometheus 移除监控目标
# - rm_ds : 从 grafana 移除数据源
# - rm_logs : 从 vector 移除日志目标
# - pg_exporter : 移除 pg_exporter
# - pgbouncer_exporter : 移除 pgbouncer_exporter
# - pgbackrest_exporter: 移除 pgbackrest_exporter
#
# pg_access : 移除 pg 服务访问层
# - dns : 移除 pg DNS 记录
# - vip : 移除 vip-manager
# - pg_service : 从 haproxy 移除 pg 服务
# - pgbouncer : 移除 pgbouncer 连接中间件
#
# pg_crontab : 移除 postgres dbsu 定时任务
#
# postgres : 移除 postgres 实例
# - pg_replica : 移除所有从库
# - pg_primary : 移除主库
# - pg_meta : 从 etcd 移除元数据
#
# pg_backup : 移除备份仓库(使用 pg_rm_backup=false 禁用)
# pg_data : 移除 postgres 数据(使用 pg_rm_data=false 禁用)
# pg_pkg : 卸载 pg 软件包(使用 pg_rm_pkg=true 启用)
# - pg_ext : 单独卸载 postgres 扩展
以下管理任务使用到了此剧本
注意事项
请不要直接对还有从库的集群主库单独执行此剧本 ,否则抹除主库后,其余从库会自动触发高可用自动故障切换。总是先下线所有从库后,再下线主库,当一次性下线整个集群时不需要操心此问题。实例下线后请刷新集群服务 ,当您从集群中下线掉某一个从库实例时,它仍然存留于在负载均衡器的配置文件中。因为健康检查无法通过,所以下线后的实例不会对集群产生影响。但您应当在恰当的时间点 重载服务 ,确保生产环境与配置清单的一致性。pgsql-user.yml剧本 pgsql-user.yml
基本用法
./pgsql-user.yml -l pg-meta -e username = dbuser_meta
包装脚本
bin/pgsql-user pg-meta dbuser_meta # 在集群 pg-meta 上创建用户 dbuser_meta
工作流程
在配置清单中定义用户: all.children.<pg_cluster>.vars.pg_users[i] 执行剧本时指定集群和用户名: pgsql-user.yml -l <pg_cluster> -e username=<name> 剧本会:
在 /pg/tmp/pg-user-{{ user.name }}.sql 生成用户创建 SQL 在集群主库上执行用户创建/更新 SQL 若启用 pgbouncer_enabled: true,更新 /etc/pgbouncer/userlist.txt 与 useropts.txt 重载 pgbouncer 使配置生效 用户定义示例
pg_users :
- name : dbuser_meta # 必填,用户名是唯一必须的字段
password : DBUser.Meta # 可选,密码可以是 scram-sha-256 哈希或明文
login : true # 可选,是否可登录,默认 true
superuser : false # 可选,是否超级用户,默认 false
createdb : false # 可选,是否可创建数据库,默认 false
createrole : false # 可选,是否可创建角色,默认 false
inherit : true # 可选,是否继承权限,默认 true
replication : false # 可选,是否可复制,默认 false
bypassrls : false # 可选,是否绕过 RLS,默认 false
pgbouncer : true # 可选,是否添加到 pgbouncer 用户列表,默认 false
connlimit : -1 # 可选,连接数限制,-1 表示无限制
expire_in : 3650 # 可选,N 天后过期(覆盖 expire_at)
expire_at : '2030-12-31' # 可选,指定过期日期
comment : pigsty admin user # 可选,用户注释
roles : [ dbrole_admin] # 可选,所属角色
parameters : {} # 可选,角色级参数
pool_mode : transaction # 可选,pgbouncer 用户级连接池模式
pool_connlimit : -1 # 可选,用户级最大连接数(映射为 max_user_connections)
详情请参考:管理SOP:创建用户
pgsql-db.yml剧本 pgsql-db.yml
基本用法
./pgsql-db.yml -l pg-meta -e dbname = meta
包装脚本
bin/pgsql-db pg-meta meta # 在集群 pg-meta 上创建数据库 meta
工作流程
在配置清单中定义数据库: all.children.<pg_cluster>.vars.pg_databases[i] 执行剧本时指定集群和数据库名: pgsql-db.yml -l <pg_cluster> -e dbname=<name> 剧本会:
在 /pg/tmp/pg-db-{{ database.name }}.sql 生成数据库创建 SQL 在集群主库上执行数据库创建/更新 SQL 如果 db.register_datasource 为 true,将数据库注册为 grafana 数据源 更新 /etc/pgbouncer/database.txt 并重载 pgbouncer 数据库定义示例
pg_databases :
- name : meta # 必填,数据库名是唯一必须的字段
baseline : cmdb.sql # 可选,数据库初始化 SQL 文件路径
pgbouncer : true # 可选,是否添加到 pgbouncer,默认 true
schemas : [ pigsty] # 可选,额外创建的 schema
extensions : # 可选,要安装的扩展
- { name: postgis, schema : public }
- { name : timescaledb }
comment : pigsty meta database # 可选,数据库注释
owner : postgres # 可选,数据库所有者
template : template1 # 可选,模板数据库
encoding : UTF8 # 可选,字符编码
locale : C # 可选,区域设置
tablespace : pg_default # 可选,默认表空间
allowconn : true # 可选,是否允许连接
revokeconn : false # 可选,是否回收 public 连接权限
register_datasource : true # 可选,是否注册到 grafana 数据源
connlimit : -1 # 可选,连接数限制
pool_auth_user : dbuser_meta # 可选,认证查询使用的用户(配合 pgbouncer_auth_query)
pool_mode : transaction # 可选,pgbouncer 连接池模式
pool_size : 64 # 可选,pgbouncer 默认池大小
pool_reserve : 32 # 可选,pgbouncer 保留池大小
pool_size_min : 0 # 可选,pgbouncer 最小池大小
pool_connlimit : 100 # 可选,pgbouncer 最大数据库连接数
详情请参考:管理SOP:创建数据库
pgsql-monitor.yml剧本 pgsql-monitor.yml
基本用法
./pgsql-monitor.yml -e clsname = pg-foo # 监控远程集群 pg-foo
包装脚本
bin/pgmon-add pg-foo # 监控一个远程 pgsql 集群 pg-foo
bin/pgmon-add pg-foo pg-bar # 同时监控多个集群
配置方式
首先需要在 infra 组变量中定义 pg_exporters:
infra :
hosts :
10.10.10.10 :
pg_exporters : # 列出所有远程实例,分配唯一的未使用本地端口
20001 : { pg_cluster: pg-foo, pg_seq: 1, pg_host : 10.10.10.10 }
20002 : { pg_cluster: pg-foo, pg_seq: 2, pg_host : 10.10.10.11 }
架构示意
------ infra ------
| |
| prometheus | v---- pg-foo-1 ----v
| ^ | metrics | ^ |
| pg_exporter <-|------------|---- postgres |
| (port: 20001) | | 10.10.10.10:5432 |
| ^ | ^------------------^
| ^ | ^
| ^ | v---- pg-foo-2 ----v
| ^ | metrics | ^ |
| pg_exporter <-|------------|---- postgres |
| (port: 20002) | | 10.10.10.11:5433 |
------------------- ^------------------^
可配置参数
pg_exporter_config : pg_exporter.yml # pg_exporter 配置文件名
pg_exporter_cache_ttls : '1,10,60,300' # pg_exporter 采集器 TTL 阶段
pg_exporter_port : 9630 # pg_exporter 监听端口
pg_exporter_params : 'sslmode=disable' # DSN 额外 URL 参数
pg_exporter_url : '' # 直接覆盖自动生成的 DSN
pg_exporter_auto_discovery : true # 是否启用自动数据库发现
pg_exporter_exclude_database : 'template0,template1,postgres' # 排除的数据库
pg_exporter_include_database : '' # 仅包含的数据库
pg_exporter_connect_timeout : 200 # 连接超时(毫秒)
pg_monitor_username : dbuser_monitor # 监控用户名
pg_monitor_password : DBUser.Monitor # 监控密码
远程数据库配置
远程 PostgreSQL 实例需要创建监控用户:
CREATE USER dbuser_monitor ;
COMMENT ON ROLE dbuser_monitor IS 'system monitor user' ;
ALTER USER dbuser_monitor PASSWORD 'DBUser.Monitor' ;
GRANT pg_monitor TO dbuser_monitor ;
CREATE EXTENSION IF NOT EXISTS "pg_stat_statements" WITH SCHEMA "monitor" ;
限制
仅 postgres 指标可用 node、pgbouncer、patroni、haproxy 指标不可用 详情请参考:管理SOP:监控现有PG
pgsql-migration.yml剧本 pgsql-migration.yml
基本用法
./pgsql-migration.yml -e@files/migration/pg-meta.yml
工作流程
定义迁移任务配置文件(如 files/migration/pg-meta.yml) 执行剧本生成迁移手册与脚本 按照手册逐步执行脚本完成迁移 迁移任务定义示例
# files/migration/pg-meta.yml
context_dir : ~/migration # 迁移手册与脚本输出目录
src_cls : pg-meta # 源集群名称(必填)
src_db : meta # 源数据库名称(必填)
src_ip : 10.10.10.10 # 源集群主库 IP(必填)
dst_cls : pg-test # 目标集群名称(必填)
dst_db : test # 目标数据库名称(必填)
dst_ip : 10.10.10.11 # 目标集群主库 IP(必填)
# 可选参数
pg_dbsu : postgres
pg_replication_username : replicator
pg_replication_password : DBUser.Replicator
pg_admin_username : dbuser_dba
pg_admin_password : DBUser.DBA
pg_monitor_username : dbuser_monitor
pg_monitor_password : DBUser.Monitor
详情请参考:管理SOP:迁移数据库集群
pgsql-pitr.yml剧本 pgsql-pitr.yml
基本用法
# 恢复到最新状态(WAL 归档流末端)
./pgsql-pitr.yml -l pg-meta -e '{"pg_pitr": {}}'
# 恢复到指定时间点
./pgsql-pitr.yml -l pg-meta -e '{"pg_pitr": {"time": "2025-07-13 10:00:00+00"}}'
# 恢复到指定 LSN
./pgsql-pitr.yml -l pg-meta -e '{"pg_pitr": {"lsn": "0/4001C80"}}'
# 恢复到指定事务 ID
./pgsql-pitr.yml -l pg-meta -e '{"pg_pitr": {"xid": "250000"}}'
# 恢复到命名还原点
./pgsql-pitr.yml -l pg-meta -e '{"pg_pitr": {"name": "some_restore_point"}}'
# 从其他集群备份恢复
./pgsql-pitr.yml -l pg-test -e '{"pg_pitr": {"cluster": "pg-meta"}}'
PITR 任务参数
pg_pitr : # 定义 PITR 任务
cluster : "pg-meta" # 源集群名称(恢复其他集群的备份时使用)
type: latest # 恢复目标类型 : time, xid, name, lsn, immediate, latest
time : "2025-01-01 10:00:00+00" # 恢复目标:时间点
name : "some_restore_point" # 恢复目标:命名还原点
xid : "100000" # 恢复目标:事务 ID
lsn : "0/3000000" # 恢复目标:日志序列号
set : latest # 从哪个备份集恢复,默认 latest
timeline : latest # 目标时间线,可以是整数,默认 latest
exclusive : false # 是否排除目标点,默认 false
action: pause # 恢复后动作 : pause, promote, shutdown
archive : false # 是否保留归档设置,默认 false
backup : false # 恢复前是否备份现有数据到 /pg/data-backup?默认 false
db_include : [] # 仅包含这些数据库
db_exclude : [] # 排除这些数据库
link_map : {} # 表空间链接映射
process : 4 # 并行恢复进程数
repo : {} # 恢复源仓库配置
data : /pg/data # 恢复数据目录
port : 5432 # 恢复实例监听端口
任务列表
本剧本包含以下子任务:
# down : 停止 HA 并关闭 patroni 和 postgres
# - pause : 暂停 patroni 自动故障转移
# - stop : 停止 patroni 和 postgres 服务
# - stop_patroni : 停止 patroni 服务
# - stop_postgres : 停止 postgres 服务
#
# pitr : 执行 PITR 恢复过程
# - config : 生成 pgbackrest 配置和恢复脚本
# - backup : 执行可选的原始数据备份
# - restore : 运行 pgbackrest restore 命令
# - recovery : 启动 postgres 并完成恢复
# - verify : 验证恢复的集群控制数据
#
# up : 启动 postgres/patroni 并恢复 HA
# - etcd : 启动前清理 etcd 元数据
# - start : 启动 patroni 和 postgres 服务
# - start_postgres : 启动 postgres 服务
# - start_patroni : 启动 patroni 服务
# - resume : 恢复 patroni 自动故障转移
恢复目标类型说明
类型 说明 示例 latest恢复到 WAL 归档流末端(最新状态) {"pg_pitr": {}}time恢复到指定时间点 {"pg_pitr": {"time": "2025-07-13 10:00:00"}}xid恢复到指定事务 ID {"pg_pitr": {"xid": "250000"}}name恢复到命名还原点 {"pg_pitr": {"name": "before_ddl"}}lsn恢复到指定 LSN {"pg_pitr": {"lsn": "0/4001C80"}}immediate恢复到一致性状态后立即停止 {"pg_pitr": {"type": "immediate"}}
详情请参考:备份恢复教程
12.16 - 扩展插件 利用 PostgreSQL 扩展的协同超能力
Pigsty 提供 451 扩展
在 Pigsty 中使用扩展涉及四个核心步骤:下载 安装 配置/加载 启用
pg-meta :
hosts : { 10.10.10.10 : { pg_seq: 1, pg_role : primary } }
vars :
pg_cluster : pg-meta
pg_databases :
- name : meta
extensions : [ postgis, timescaledb, vector ] # 启用:在数据库中创建扩展
pg_libs : 'timescaledb, pg_stat_statements, auto_explain' # 配置:预加载扩展库
pg_extensions : [ postgis, timescaledb, pgvector ] # 安装:安装扩展软件包
12.16.1 - 快速开始 使用扩展的四步流程速览
在 Pigsty 中使用扩展需要四个步骤:下载 、安装 、配置 、启用 。
下载 :将扩展软件包下载到本地仓库(Pigsty 默认已下载主流扩展)安装 :在集群节点上安装扩展软件包配置 :部分扩展需要预加载或配置参数启用 :在数据库中执行 CREATE EXTENSION 创建扩展声明式配置 在 Pigsty 配置清单中声明扩展,集群初始化时自动完成安装与启用:
pg-meta :
hosts : { 10.10.10.10 : { pg_seq: 1, pg_role : primary } }
vars :
pg_cluster : pg-meta
pg_databases :
- name : meta
extensions : [ postgis, timescaledb, vector ] # 在数据库中启用扩展
pg_libs : 'timescaledb, pg_stat_statements, auto_explain' # 预加载扩展库
pg_extensions : [ postgis, timescaledb, pgvector ] # 安装扩展软件包
执行 ./pgsql.yml 初始化集群后,postgis、timescaledb、vector 三个扩展即在 meta 数据库中可用。
命令式操作 对于已有集群,可以使用命令行方式添加扩展:
# 1. 安装扩展软件包
./pgsql.yml -l pg-meta -t pg_extension -e '{"pg_extensions":["pgvector"]}'
# 2. 预加载扩展(如需要,修改后需重启)
pg edit-config pg-meta --force -p shared_preload_libraries = 'timescaledb, pg_stat_statements, auto_explain'
# 3. 在数据库中启用扩展
psql -d meta -c 'CREATE EXTENSION vector;'
也可以使用 pig 包管理器直接安装:
pig install pgvector # 安装扩展包
pig extension create vector # 在数据库中启用
流程速查 详细说明请参阅各子章节:下载 、安装 、配置 、启用
12.16.2 - 扩展简介 PostgreSQL 扩展的核心概念与 Pigsty 扩展生态
扩展是 PostgreSQL 的灵魂所在。Pigsty 收录了 451 个预编译、开箱即用的扩展插件,充分释放 PostgreSQL 的潜能。
扩展是什么 PostgreSQL 扩展(Extension)是一种模块化机制,允许在不修改核心代码的情况下增强数据库功能。
一个扩展通常包含三部分:
控制文件 (.control):必需,包含扩展元数据SQL 脚本 (.sql):可选,定义函数、类型、操作符等数据库对象动态库 (.so):可选,提供 C 语言实现的高性能功能扩展可以为 PostgreSQL 添加:新数据类型、索引方法、函数与操作符、外部数据访问、过程语言、性能监控、安全审计等能力。
核心扩展 Pigsty 收录的扩展中,以下是最具代表性的:
绝大多数扩展可以并存甚至组合使用,产生 1+1 远大于 2 的协同效应。
扩展类别 Pigsty 将扩展划分为 16 个类别:
类别 别名 说明 典型扩展 时序 time时序数据处理 timescaledb, pg_cron, periods 地理 gis地理空间数据 postgis, h3, pgrouting 向量 rag向量检索与 AI pgvector, vchord, pg_vectorize 搜索 fts全文检索 pgroonga, zhparser, pg_bigm 分析 olapOLAP 与分析 pg_duckdb, pg_mooncake, citus 特性 feat功能增强 age, pg_graphql, hll, rum 语言 lang过程语言 plpython3u, pljava, plv8 类型 type数据类型 hstore, ltree, ip4r 工具 util实用工具 http, pg_net, pgjwt 函数 func函数库 pg_uuidv7, topn, tdigest 管理 admin运维管理 pg_repack, pg_squeeze, pgagent 统计 stat监控统计 pg_stat_statements, pg_qualstats, auto_explain 安全 sec安全审计 pgaudit, pgsodium, pg_tde 外联 fdw外部数据访问 postgres_fdw, mysql_fdw, oracle_fdw 兼容 sim数据库兼容 orafce, babelfish 同步 etl数据同步 pglogical, wal2json, decoderbufs
使用类别别名可以批量安装整个类别的扩展,例如 pg_extensions: [ pgsql-gis, pgsql-rag ]。
预定义扩展集 Pigsty 提供了若干预定义的扩展集(Stack),方便按场景选用:
扩展集 包含扩展 gis-stackpostgis, pgrouting, pointcloud, h3, q3c, ogr_fdw rag-stackpgvector, vchord, pgvectorscale, pg_similarity, pg_tiktoken fts-stackpgroonga, pg_bigm, zhparser, hunspell olap-stackpg_duckdb, pg_mooncake, timescaledb, pg_partman, plproxy feat-stackage, hll, rum, pg_graphql, pg_jsonschema, jsquery stat-stackpg_show_plans, pg_stat_kcache, pg_qualstats, pg_wait_sampling supa-stackpg_graphql, pg_jsonschema, wrappers, pgvector, pgsodium, vault
在 pg_extensions 中直接使用这些名称即可安装整套扩展。
扩展资源 12.16.3 - 软件包 扩展包别名与类别命名规则
Pigsty 使用包别名 机制简化扩展的安装与管理。
包别名机制 管理扩展涉及多个层面的名称映射:
层面 示例 pgvector 示例 postgis 扩展名 vectorpostgis, postgis_topology, …包别名 pgvectorpostgisRPM 包名 pgvector_18postgis36_18*DEB 包名 postgresql-18-pgvectorpostgresql-18-postgis-3*
Pigsty 提供包别名 抽象层,让用户无需关心具体的 RPM/DEB 包名:
pg_extensions : [ pgvector, postgis, timescaledb ] # 使用包别名
Pigsty 会根据操作系统和 PostgreSQL 版本自动翻译为正确的包名。
注意:CREATE EXTENSION 时使用的是扩展名 (如 vector),而非包别名(pgvector)。
类别别名 所有扩展被划分为 16 个类别,可使用类别别名批量安装:
# 使用通用类别别名(自动适配当前 PG 版本)
pg_extensions : [ pgsql-gis, pgsql-rag, pgsql-fts ]
# 或使用版本特定的类别别名
pg_extensions : [ pg18-gis, pg18-rag, pg18-fts ]
除 olap 类别外,所有类别的扩展都可以同时安装。olap 类别中存在互斥:pg_duckdb 与 pg_mooncake 冲突。
类别列表 类别 说明 典型扩展 time时序类 timescaledb, pg_cron, periods gis地理类 postgis, h3, pgrouting rag向量类 pgvector, pgml, vchord fts搜索类 pg_trgm, zhparser, pgroonga olap分析类 citus, pg_duckdb, pg_analytics feat特性类 age, pg_graphql, rum lang语言类 plpython3u, pljava, plv8 type类型类 hstore, ltree, citext util工具类 http, pg_net, pgjwt func函数类 pgcrypto, uuid-ossp, pg_uuidv7 admin管理类 pg_repack, pgagent, pg_squeeze stat统计类 pg_stat_statements, pg_qualstats, auto_explain sec安全类 pgaudit, pgcrypto, pgsodium fdw外部类 postgres_fdw, mysql_fdw, oracle_fdw sim兼容类 orafce, babelfishpg_tds etl数据类 pglogical, wal2json, decoderbufs
查阅扩展目录 您可以在 Pigsty 扩展目录 网站上查阅所有可用扩展的详细信息,包括:
扩展名称、描述、版本 支持的 PostgreSQL 版本 支持的操作系统发行版 安装方式、预加载需求 许可证、来源仓库 12.16.4 - 下载扩展 从软件仓库下载扩展包到本地
在安装扩展前,需要确保扩展软件包已下载到本地仓库或可从上游获取。
默认行为 Pigsty 在安装过程中会自动下载默认 PostgreSQL 版本可用的主流扩展到本地软件仓库。
使用本地仓库的优势:
加速安装,避免重复下载 减少网络流量消耗 提高交付可靠性 确保版本一致性 下载新扩展 要下载额外的扩展,将其添加到 repo_extra_packages
all :
vars :
repo_extra_packages : [ pgvector, postgis, timescaledb, pg_duckdb ]
# 重新下载软件包到本地仓库
./infra.yml -t repo_build
# 刷新所有节点的软件源缓存
./node.yml -t node_repo
使用上游仓库 也可以直接从互联网上游仓库安装,无需预先下载:
# 在节点上添加上游软件源
./node.yml -t node_repo -e node_repo_modules = node,pgsql
这种方式适合:
但可能面临:
扩展来源 扩展软件包来自两个主要源:
仓库 说明 PGDG PostgreSQL 官方仓库,提供核心扩展 Pigsty Pigsty 补充仓库,提供额外扩展
Pigsty 仓库只收录 PGDG 仓库中不存在的扩展。一旦某扩展进入 PGDG 仓库,Pigsty 仓库会移除或与其保持一致。
仓库地址:
详细的仓库配置请参阅 扩展仓库 。
12.16.5 - 安装扩展 在集群节点上安装扩展软件包
Pigsty 使用操作系统的包管理器(yum/apt)安装扩展软件包。
相关参数 两个参数用于指定要安装的扩展:
pg_packages 通常用于指定所有集群都需要的基础组件(PostgreSQL 内核、Patroni、pgBouncer 等)和必选扩展。
pg_extensions 用于指定特定集群需要的扩展。
pg_packages : # 全局基础包
- pgsql-main pgsql-common
pg_extensions : # 集群扩展
- postgis timescaledb pgvector
集群初始化时安装 在集群配置中声明扩展,初始化时自动安装:
pg-meta :
hosts : { 10.10.10.10 : { pg_seq: 1, pg_role : primary } }
vars :
pg_cluster : pg-meta
pg_extensions : [ postgis, timescaledb, pgvector, pg_duckdb ]
执行 ./pgsql.yml 初始化集群时,扩展会自动安装。
已有集群安装扩展 对于已初始化的集群,有多种方式安装扩展:
使用 Pigsty 剧本 # 修改配置后使用剧本安装
./pgsql.yml -l pg-meta -t pg_extension
# 或直接在命令行指定扩展
./pgsql.yml -l pg-meta -t pg_extension -e '{"pg_extensions":["pg_duckdb"]}'
使用 pig 包管理器 # 使用 pig 安装扩展
pig install pg_duckdb
# 批量安装
ansible pg-meta -b -a 'pig install pg_duckdb pgvector'
直接使用包管理器 # EL 系统
sudo yum install -y pg_duckdb_18*
# Debian/Ubuntu 系统
sudo apt install -y postgresql-18-pg-duckdb
使用包别名 Pigsty 支持使用标准化的包别名,自动翻译为对应 PG 版本的包名:
pg_extensions :
- pgvector # 自动翻译为 pgvector_18* (EL) 或 postgresql-18-pgvector (Debian)
- postgis # 自动翻译为 postgis36_18* (EL) 或 postgresql-18-postgis-3* (Debian)
- pgsql-gis # 类别别名,安装整个 GIS 类别的扩展
也可以直接使用原始包名:
pg_extensions :
- pgvector_18* # EL 系统的原始包名
- postgresql-18-pgvector # Debian 系统的原始包名
包别名定义参见:
验证安装 安装后可在数据库中验证:
-- 查看已安装的扩展
SELECT * FROM pg_available_extensions WHERE name = 'vector' ;
-- 查看扩展文件是否存在
\ dx
12.16.6 - 配置扩展 预加载扩展库与配置扩展参数
部分扩展需要预加载动态库或配置参数后才能使用,本节介绍如何配置扩展。
预加载扩展 大多数扩展安装后可直接使用 CREATE EXTENSION 启用,但部分使用 PostgreSQL Hook 机制的扩展需要预加载 。
预加载通过 shared_preload_libraries 参数指定,修改后需重启数据库 生效。
需要预加载的扩展 以下是常见的需要预加载的扩展:
扩展 说明 timescaledb时序数据库扩展,必须放在最前面 citus分布式数据库扩展,必须放在最前面 pg_stat_statementsSQL 语句统计,Pigsty 默认启用 auto_explain自动记录慢查询执行计划,Pigsty 默认启用 pg_cron定时任务调度 pg_net异步 HTTP 请求 pg_tle可信语言扩展 pgaudit审计日志 pg_stat_kcache内核统计信息 pg_squeeze在线表空间回收 pgmlPostgresML 机器学习
完整列表请参阅 扩展目录 (带 LOAD 标记)。
预加载顺序 shared_preload_libraries 中扩展的加载顺序很重要:
timescaledb 和 citus 必须放在最前面 如果同时使用,citus 应在 timescaledb 之前 统计类扩展应在 pg_stat_statements 之后,以使用相同的 query_id pg_libs : 'citus, timescaledb, pg_stat_statements, auto_explain'
集群初始化时配置 在创建新集群时,使用 pg_libs
pg-meta :
hosts : { 10.10.10.10 : { pg_seq: 1, pg_role : primary } }
vars :
pg_cluster : pg-meta
pg_libs : 'timescaledb, pg_stat_statements, auto_explain'
pg_extensions : [ timescaledb, postgis, pgvector ]
pg_libs 的值将在集群初始化时写入 shared_preload_libraries。
默认值 pg_libspg_stat_statements, auto_explain,这两个 Contrib 扩展提供基本的可观测性:
pg_stat_statements:跟踪所有 SQL 语句的执行统计auto_explain:自动记录慢查询的执行计划已有集群修改配置 对于已初始化的集群,使用 patronictl 修改 shared_preload_libraries:
# 添加 timescaledb 到预加载库
pg edit-config pg-meta --force -p shared_preload_libraries = 'timescaledb, pg_stat_statements, auto_explain'
# 重启集群使配置生效
pg restart pg-meta
也可以直接修改 postgresql.conf 或使用 ALTER SYSTEM:
ALTER SYSTEM SET shared_preload_libraries = 'timescaledb, pg_stat_statements, auto_explain' ;
修改后需重启 PostgreSQL 服务生效。
扩展参数配置 许多扩展有可配置的参数,可以在以下位置设置:
集群初始化时 使用 pg_parameters
pg-meta :
vars :
pg_cluster : pg-meta
pg_libs : 'pg_cron, pg_stat_statements, auto_explain'
pg_parameters :
cron.database_name : postgres # pg_cron 使用的数据库
pg_stat_statements.track : all # 跟踪所有语句
auto_explain.log_min_duration : 1000 # 记录超过 1 秒的查询
运行时修改 使用 ALTER SYSTEM 或 patronictl:
-- 修改参数
ALTER SYSTEM SET pg_stat_statements . track = 'all' ;
-- 重新加载配置
SELECT pg_reload_conf ();
# 使用 patronictl 修改
pg edit-config pg-meta --force -p 'pg_stat_statements.track=all'
注意事项 预加载错误会阻止启动 :如果 shared_preload_libraries 中的扩展不存在或加载失败,PostgreSQL 将无法启动。确保扩展已正确安装后再添加预加载。
修改需重启 :shared_preload_libraries 的修改需要重启 PostgreSQL 服务才能生效。
部分功能可用 :某些扩展在不预加载的情况下可以部分使用,但完整功能需要预加载。
查看当前配置 :使用以下命令查看当前的预加载库:
SHOW shared_preload_libraries ;
12.16.7 - 启用扩展 在数据库中创建和启用扩展
安装扩展软件包后,需要在数据库中执行 CREATE EXTENSION 才能使用扩展功能。
查看可用扩展 安装扩展软件包后,可以查看可用的扩展:
-- 查看所有可用扩展
SELECT * FROM pg_available_extensions ;
-- 查看特定扩展
SELECT * FROM pg_available_extensions WHERE name = 'vector' ;
-- 查看已启用的扩展
SELECT * FROM pg_extension ;
创建扩展 使用 CREATE EXTENSION 在数据库中启用扩展:
-- 创建扩展
CREATE EXTENSION vector ;
-- 创建扩展到指定 Schema
CREATE EXTENSION postgis SCHEMA public ;
-- 自动安装依赖的扩展
CREATE EXTENSION postgis_topology CASCADE ;
-- 如果不存在则创建
CREATE EXTENSION IF NOT EXISTS vector ;
注意:CREATE EXTENSION 使用的是扩展名 (如 vector),而非包别名(pgvector)。
集群初始化时启用 在 pg_databases
pg-meta :
vars :
pg_cluster : pg-meta
pg_databases :
- name : meta
extensions :
- { name : vector } # 使用默认 Schema
- { name: postgis, schema : public } # 指定 Schema
- { name: pg_stat_statements, schema : monitor }
Pigsty 会在数据库创建后自动执行 CREATE EXTENSION。
需要预加载的扩展 部分扩展需要先添加到 shared_preload_libraries 并重启后才能创建:
pg-meta :
vars :
pg_cluster : pg-meta
pg_libs : 'timescaledb, pg_stat_statements, auto_explain'
pg_databases :
- name : meta
extensions :
- { name : timescaledb } # 需要预加载
如果未预加载就尝试创建,会收到错误信息。
需要预加载的常见扩展:timescaledb, citus, pg_cron, pg_net, pgaudit 等。详见 配置扩展 。
扩展依赖 某些扩展依赖于其他扩展,需要按顺序创建:
-- postgis_topology 依赖 postgis
CREATE EXTENSION postgis ;
CREATE EXTENSION postgis_topology ;
-- 或使用 CASCADE 自动安装依赖
CREATE EXTENSION postgis_topology CASCADE ;
不需要创建的扩展 少数扩展不通过 SQL 接口对外服务,无需执行 CREATE EXTENSION:
扩展 说明 wal2json逻辑解码插件,直接在复制槽中使用 decoderbufs逻辑解码插件 decoder_raw逻辑解码插件
这些扩展安装后即可使用,例如:
-- 使用 wal2json 创建逻辑复制槽
SELECT * FROM pg_create_logical_replication_slot ( 'test_slot' , 'wal2json' );
查看扩展信息 -- 查看扩展详情
\ dx + vector
-- 查看扩展包含的对象
SELECT * FROM pg_extension_config_dump ( 'vector' );
-- 查看扩展版本
SELECT extversion FROM pg_extension WHERE extname = 'vector' ;
12.16.8 - 更新扩展 升级 PostgreSQL 扩展版本
扩展更新涉及两个层面:软件包更新 (操作系统层面)和扩展对象更新 (数据库层面)。
更新软件包 使用包管理器更新扩展的软件包:
# EL 系统
sudo yum update pgvector_18*
# Debian/Ubuntu 系统
sudo apt update && sudo apt upgrade postgresql-18-pgvector
使用 Pigsty 批量更新:
# 更新指定集群的扩展包
./pgsql.yml -l pg-meta -t pg_extension -e '{"pg_extensions":["pgvector"]}'
# 使用 pig 包管理器
pig update pgvector
更新扩展对象 软件包更新后,数据库中的扩展对象可能需要同步更新。
查看可更新的扩展 -- 查看已安装扩展及其版本
SELECT name , default_version , installed_version
FROM pg_available_extensions
WHERE installed_version IS NOT NULL ;
-- 查看可升级的扩展
SELECT name , installed_version , default_version
FROM pg_available_extensions
WHERE installed_version IS NOT NULL
AND installed_version <> default_version ;
执行扩展更新 -- 更新到最新版本
ALTER EXTENSION pgvector UPDATE ;
-- 更新到指定版本
ALTER EXTENSION pgvector UPDATE TO '0.8.0' ;
查看更新路径 -- 查看扩展的可用升级路径
SELECT * FROM pg_extension_update_paths ( 'pgvector' );
注意事项 备份优先 :更新扩展前建议先备份数据库,特别是涉及数据类型变更的扩展。
检查兼容性 :某些扩展的大版本升级可能不兼容,需查阅扩展的升级文档。
预加载扩展 :如果更新的是需要预加载的扩展(如 timescaledb),更新后可能需要重启数据库。
依赖关系 :如果其他扩展依赖于被更新的扩展,需要按依赖顺序更新。
复制环境 :在主从复制环境中,应先在从库测试更新,确认无误后再更新主库。
常见问题 更新失败 如果 ALTER EXTENSION UPDATE 失败,可能是因为:
-- 查看扩展依赖
SELECT * FROM pg_depend WHERE refobjid = ( SELECT oid FROM pg_extension WHERE extname = 'pgvector' );
回滚更新 PostgreSQL 扩展通常不支持直接回滚。如需回滚:
从备份恢复 或者:卸载新版本扩展,安装旧版本软件包,重新创建扩展 12.16.9 - 移除扩展 卸载 PostgreSQL 扩展
移除扩展涉及两个层面:删除扩展对象 (数据库层面)和卸载软件包 (操作系统层面)。
删除扩展对象 使用 DROP EXTENSION 从数据库中删除扩展:
-- 删除扩展
DROP EXTENSION pgvector ;
-- 如果有依赖对象,需要级联删除
DROP EXTENSION pgvector CASCADE ;
警告 :CASCADE 会删除所有依赖于该扩展的对象(表、函数、视图等),请谨慎使用。
查看扩展依赖 删除前建议先检查依赖关系:
-- 查看依赖于某扩展的对象
SELECT
classid :: regclass ,
objid ,
deptype
FROM pg_depend
WHERE refobjid = ( SELECT oid FROM pg_extension WHERE extname = 'pgvector' );
-- 查看使用了扩展类型的表
SELECT
c . relname AS table_name ,
a . attname AS column_name ,
t . typname AS type_name
FROM pg_attribute a
JOIN pg_class c ON a . attrelid = c . oid
JOIN pg_type t ON a . atttypid = t . oid
WHERE t . typname = 'vector' ;
移除预加载 如果扩展在 shared_preload_libraries 中,删除后需要从预加载列表移除:
# 修改 shared_preload_libraries,移除扩展
pg edit-config pg-meta --force -p shared_preload_libraries = 'pg_stat_statements, auto_explain'
# 重启使配置生效
pg restart pg-meta
卸载软件包 从数据库中删除扩展后,可以选择卸载软件包:
# EL 系统
sudo yum remove pgvector_18*
# Debian/Ubuntu 系统
sudo apt remove postgresql-18-pgvector
# 使用 pig 包管理器
pig remove pgvector
通常保留软件包不会有问题,仅在需要释放磁盘空间或解决冲突时才需要卸载。
注意事项 数据丢失风险 :使用 CASCADE 会删除依赖对象,可能导致数据丢失。
应用兼容性 :删除扩展前确保应用程序不再使用该扩展的功能。
预加载顺序 :如果删除的是预加载扩展,务必同时从 shared_preload_libraries 中移除,否则数据库可能无法启动。
主从环境 :在主从复制环境中,DROP EXTENSION 会自动复制到从库。
操作顺序 完整的扩展移除流程:
# 1. 检查依赖关系
psql -d mydb -c "SELECT * FROM pg_depend WHERE refobjid = (SELECT oid FROM pg_extension WHERE extname = 'pgvector');"
# 2. 删除数据库中的扩展
psql -d mydb -c "DROP EXTENSION pgvector;"
# 3. 如果是预加载扩展,从 shared_preload_libraries 移除
pg edit-config pg-meta --force -p shared_preload_libraries = 'pg_stat_statements, auto_explain'
# 4. 重启数据库(如果修改了预加载配置)
pg restart pg-meta
# 5. 可选:卸载软件包
sudo yum remove pgvector_18*
12.16.10 - 默认扩展 Pigsty 默认安装的 PostgreSQL 扩展
Pigsty 在初始化 PostgreSQL 集群时,会默认安装和启用一些核心扩展。
默认安装的扩展 通过 pg_packages
扩展 说明 pg_repack在线处理表膨胀,重要的维护工具 wal2json逻辑解码输出 JSON 格式变更,CDC 场景常用
通过 pg_extensions
扩展 说明 postgis地理空间数据库扩展 timescaledb时序数据库扩展 pgvector向量数据类型与索引
默认启用的扩展 通过 pg_default_extensions
扩展 Schema 说明 pg_stat_statementsmonitor SQL 语句执行统计 pgstattuplemonitor 元组级统计信息 pg_buffercachemonitor 缓冲区缓存检查 pageinspectmonitor 页面级检查 pg_prewarmmonitor 关系预热 pg_visibilitymonitor 可见性映射检查 pg_freespacemapmonitor 空闲空间映射检查 postgres_fdwpublic PostgreSQL 外部数据包装器 file_fdwpublic 文件外部数据包装器 btree_gistpublic B-tree GiST 操作符类 btree_ginpublic B-tree GIN 操作符类 pg_trgmpublic 三元组匹配 intaggpublic 整数聚合器 intarraypublic 整数数组函数 pg_repack- 在线重组表
这些扩展提供基础的监控、运维和功能增强能力。
默认预加载的扩展 通过 pg_libsshared_preload_libraries 的扩展:
扩展 说明 pg_stat_statements跟踪所有 SQL 语句的执行统计 auto_explain自动记录慢查询的执行计划
这两个扩展提供基本的可观测性,强烈建议保留。
自定义默认扩展 可以通过修改配置参数来自定义默认安装和启用的扩展:
all :
vars :
# 修改默认安装的扩展包
pg_packages :
- pgsql-main pgsql-common
- pg_repack_$v* wal2json_$v*
# 修改默认安装的扩展
pg_extensions : [ postgis, timescaledb, pgvector ]
# 修改默认预加载的扩展
pg_libs : 'timescaledb, pg_stat_statements, auto_explain'
# 修改默认启用的扩展
pg_default_extensions :
- { name: pg_stat_statements, schema : monitor }
- { name : pg_repack }
# ... 添加更多
详细的扩展使用方法请参阅:
12.16.11 - 扩展仓库 Pigsty 扩展软件仓库配置
Pigsty 提供补充扩展仓库,在 PGDG 官方仓库基础上提供额外的扩展包。
YUM 仓库 适用于 EL 7/8/9/10 及其兼容系统(RHEL、Rocky、AlmaLinux、CentOS 等)。
添加仓库 # 添加 GPG 公钥
curl -fsSL https://repo.pigsty.io/key | sudo tee /etc/pki/rpm-gpg/RPM-GPG-KEY-pigsty >/dev/null
# 添加仓库配置
curl -fsSL https://repo.pigsty.io/yum/repo | sudo tee /etc/yum.repos.d/pigsty.repo >/dev/null
# 刷新缓存
sudo yum makecache
中国大陆镜像 curl -fsSL https://repo.pigsty.cc/key | sudo tee /etc/pki/rpm-gpg/RPM-GPG-KEY-pigsty >/dev/null
curl -fsSL https://repo.pigsty.cc/yum/repo | sudo tee /etc/yum.repos.d/pigsty.repo >/dev/null
仓库地址 APT 仓库 适用于 Debian 11/12/13 和 Ubuntu 22.04/24.04 及其兼容系统。
添加仓库 # 添加 GPG 公钥
curl -fsSL https://repo.pigsty.io/key | sudo gpg --dearmor -o /etc/apt/keyrings/pigsty.gpg
# 获取发行版代号并添加仓库
distro_codename = $( lsb_release -cs)
sudo tee /etc/apt/sources.list.d/pigsty.list > /dev/null <<EOF
deb [signed-by=/etc/apt/keyrings/pigsty.gpg] https://repo.pigsty.io/apt/infra generic main
deb [signed-by=/etc/apt/keyrings/pigsty.gpg] https://repo.pigsty.io/apt/pgsql ${distro_codename} main
EOF
# 刷新缓存
sudo apt update
中国大陆镜像 curl -fsSL https://repo.pigsty.cc/key | sudo gpg --dearmor -o /etc/apt/keyrings/pigsty.gpg
distro_codename = $( lsb_release -cs)
sudo tee /etc/apt/sources.list.d/pigsty.list > /dev/null <<EOF
deb [signed-by=/etc/apt/keyrings/pigsty.gpg] https://repo.pigsty.cc/apt/infra generic main
deb [signed-by=/etc/apt/keyrings/pigsty.gpg] https://repo.pigsty.cc/apt/pgsql/${distro_codename} ${distro_codename} main
EOF
仓库地址 GPG 签名 所有软件包均使用 GPG 签名:
指纹: 9592A7BC7A682E7333376E09E7935D8DB9BD8B20 短 ID: B9BD8B20 仓库策略 Pigsty 仓库遵循以下原则:
补充性 :只收录 PGDG 仓库中不存在的扩展一致性 :扩展进入 PGDG 仓库后,Pigsty 仓库会移除或保持一致兼容性 :支持 PostgreSQL 13-18 多个大版本多平台 :支持 x86_64 和 aarch64 架构相关资源 12.17 - 场景模板 使用 Pigsty 预置的四种场景化 Patroni 模版,或者基于这些模板自定义您的配置模板
Pigsty 提供四种预置的 Patroni/PostgreSQL 配置模板,针对不同的使用场景进行了参数优化:
您可以通过 pg_conf/docs/pgsql/template/oltp.yml
通常,数据库调优模板 pg_confnode_tune
使用模板 要使用特定的配置模板,只需在集群定义中设置 pg_confnode_tune
pg-test :
hosts :
10.10.10.11 : { pg_seq: 1, pg_role : primary }
10.10.10.12 : { pg_seq: 2, pg_role : replica }
vars :
pg_cluster : pg-test
pg_conf : oltp.yml # PostgreSQL 配置模板(默认值)
node_tune : oltp # 操作系统调优模板(默认值)
对于核心金融业务场景,您可以使用 /docs/pgsql/template/crit.yml
pg-finance :
hosts :
10.10.10.21 : { pg_seq: 1, pg_role : primary }
10.10.10.22 : { pg_seq: 2, pg_role : replica }
10.10.10.23 : { pg_seq: 3, pg_role : replica }
vars :
pg_cluster : pg-finance
pg_conf : crit.yml # PostgreSQL 关键业务模板
node_tune : crit # 操作系统关键业务调优
对于低配虚拟机或开发环境,可以使用 /docs/pgsql/template/tiny.yml
pg-dev :
hosts :
10.10.10.31 : { pg_seq: 1, pg_role : primary }
vars :
pg_cluster : pg-dev
pg_conf : tiny.yml # PostgreSQL 微型实例模板
node_tune : tiny # 操作系统微型实例调优
模板对比 四种模板在关键参数上有显著差异,以适应不同的业务场景。以下是主要差异对比:
连接与内存 参数 OLTP OLAP CRIT TINY max_connections 500/1000 500 500/1000 250 work_mem 范围64MB-1GB 64MB-8GB 64MB-1GB 16MB-256MB maintenance_work_mem 25% 共享缓冲区 50% 共享缓冲区 25% 共享缓冲区 25% 共享缓冲区 max_locks_per_transaction 1-2x maxconn 2-4x maxconn 1-2x maxconn 1-2x maxconn
并行查询 参数 OLTP OLAP CRIT TINY max_worker_processes cpu+8 cpu+12 cpu+8 cpu+4 max_parallel_workers 50% cpu 80% cpu 50% cpu 50% cpu max_parallel_workers_per_gather 20% cpu (max 8) 50% cpu 0(禁用) 0(禁用) parallel_setup_cost 2000 1000 2000 1000 parallel_tuple_cost 0.2 0.1 0.2 0.1
同步复制 参数 OLTP OLAP CRIT TINY synchronous_mode 取决于 pg_rpo 取决于 pg_rpo 强制开启 取决于 pg_rpo data_checksums 可选 可选 强制开启 可选
Vacuum 配置 参数 OLTP OLAP CRIT TINY vacuum_cost_delay 20ms 10ms 20ms 20ms vacuum_cost_limit 2000 10000 2000 2000 autovacuum_max_workers 3 3 3 2
超时与安全 参数 OLTP OLAP CRIT TINY idle_in_transaction_session_timeout 10min 禁用 1min 10min log_min_duration_statement 100ms 1000ms 100ms 100ms default_statistics_target 400 1000 400 200 track_activity_query_size 8KB 8KB 32KB 8KB log_connections 仅授权 仅授权 全部阶段 默认
IO 配置(PG17+) 参数 OLTP OLAP CRIT TINY io_workers 25% cpu (4-16) 50% cpu (4-32) 25% cpu (4-8) 3 temp_file_limit 1/20 磁盘 1/5 磁盘 1/20 磁盘 1/20 磁盘
选择建议 OLTP 模板
OLAP 模板
CRIT 模板
TINY 模板
自定义模板 您可以基于现有模板创建自定义配置模板。模板文件位于 Pigsty 安装目录的 roles/pgsql/templates/ 下:
roles/pgsql/templates/
├── oltp.yml # OLTP 事务处理模板(默认)
├── olap.yml # OLAP 分析处理模板
├── crit.yml # CRIT 关键业务模板
└── tiny.yml # TINY 微型实例模板
创建自定义模板的步骤:
复制一个现有模板作为基础 根据需要修改参数 将模板放置在 roles/pgsql/templates/ 目录 在集群定义中通过 pg_conf 例如,创建一个名为 myapp.yml 的自定义模板:
cp roles/pgsql/templates/oltp.yml roles/pgsql/templates/myapp.yml
# 编辑 myapp.yml 进行自定义
然后在集群中使用:
pg-myapp :
vars :
pg_conf : myapp.yml
请注意,模板文件使用 Jinja2 模板语法,参数值会根据节点的实际资源(CPU、内存、磁盘)动态计算。
参数优化策略 了解更多关于模板参数优化的技术细节,请参阅 参数优化策略
内存参数调整(共享缓冲区、工作内存、最大连接数) CPU 参数调整(并行查询工作进程配置) 存储空间参数(WAL 大小、临时文件限制) 手工调整参数的方法 相关参数 12.17.1 - 默认配置模板的参数优化策略说明 了解在 Pigsty 中,预置的四种 Patroni 场景化模板所采用的不同参数优化策略
Pigsty 默认提供了四套场景化参数模板,可以通过 pg_conf
Pigsty 会针对这四种默认场景,采取不同的参数优化策略,如下所示:
内存参数调整 Pigsty 默认会检测系统的内存大小,并以此为依据设定最大连接数量与内存相关参数。
默认情况下,Pigsty 使用 25% 的内存作为 PostgreSQL 共享缓冲区,剩余的 75% 作为操作系统缓存。
默认情况下,如果用户没有设置一个 pg_max_conn
oltp: 500 (pgbouncer) / 1000 (postgres) crit: 500 (pgbouncer) / 1000 (postgres) tiny: 300 olap: 300 其中对于 OLTP 与 CRIT 模版来说,如果服务没有指向 pgbouncer 连接池,而是直接连接 postgres 数据库,最大连接会翻倍至 1000 条。
决定最大连接数后,work_mem 会根据共享内存数量 / 最大连接数计算得到,并限定在 64MB ~ 1GB 的范围内。
{% raw %}
{% if pg_max_conn != 'auto' and pg_max_conn|int >= 20 %}{% set pg_max_connections = pg_max_conn|int %}{% else %}{% if pg_default_service_dest|default('postgres') == 'pgbouncer' %}{% set pg_max_connections = 500 %}{% else %}{% set pg_max_connections = 1000 %}{% endif %}{% endif %}
{% set pg_max_prepared_transactions = pg_max_connections if 'citus' in pg_libs else 0 %}
{% set pg_max_locks_per_transaction = (2 * pg_max_connections)|int if 'citus' in pg_libs or 'timescaledb' in pg_libs else pg_max_connections %}
{% set pg_shared_buffers = (node_mem_mb|int * pg_shared_buffer_ratio|float) | round(0, 'ceil') | int %}
{% set pg_maintenance_mem = (pg_shared_buffers|int * 0.25)|round(0, 'ceil')|int %}
{% set pg_effective_cache_size = node_mem_mb|int - pg_shared_buffers|int %}
{% set pg_workmem = ([ ([ (pg_shared_buffers / pg_max_connections)|round(0,'floor')|int , 64 ])|max|int , 1024])|min|int %}
{% endraw %}
CPU参数调整 在 PostgreSQL 中,有 4 个与并行查询相关的重要参数,Pigsty 会自动根据当前系统的 CPU 核数进行参数优化。
在所有策略中,总并行进程数量(总预算)通常设置为 CPU 核数 + 8,且保底为 16 个,从而为逻辑复制与扩展预留足够的后台 worker 数量,OLAP 和 TINY 模板根据场景略有不同。
OLTP 设置逻辑 范围限制 max_worker_processesmax(100% CPU + 8, 16)核数 + 4,保底 1, max_parallel_workersmax(ceil(50% CPU), 2)1/2 CPU 上取整,最少两个 max_parallel_maintenance_workersmax(ceil(33% CPU), 2)1/3 CPU 上取整,最少两个 max_parallel_workers_per_gathermin(max(ceil(20% CPU), 2),8)1/5 CPU 下取整,最少两个,最多 8 个
OLAP 设置逻辑 范围限制 max_worker_processesmax(100% CPU + 12, 20)核数 + 12,保底 20 max_parallel_workersmax(ceil(80% CPU, 2))4/5 CPU 上取整,最少两个 max_parallel_maintenance_workersmax(ceil(33% CPU), 2)1/3 CPU 上取整,最少两个 max_parallel_workers_per_gathermax(floor(50% CPU), 2)1/2 CPU 上取整,最少两个
CRIT 设置逻辑 范围限制 max_worker_processesmax(100% CPU + 8, 16)核数 + 8,保底 16 max_parallel_workersmax(ceil(50% CPU), 2)1/2 CPU 上取整,最少两个 max_parallel_maintenance_workersmax(ceil(33% CPU), 2)1/3 CPU 上取整,最少两个 max_parallel_workers_per_gather0, 按需启用
TINY 设置逻辑 范围限制 max_worker_processesmax(100% CPU + 4, 12)核数 + 4,保底 12 max_parallel_workersmax(ceil(50% CPU) 1)50% CPU 下取整,最少1个 max_parallel_maintenance_workersmax(ceil(33% CPU), 1)33% CPU 下取整,最少1个 max_parallel_workers_per_gather`0, 按需启用
请注意,CRIT 和 TINY 模板直接通过设置 max_parallel_workers_per_gather = 0 关闭了并行查询。
用户可以按需在需要时设置此参数以启用并行查询。
OLTP 和 CRIT 模板都额外设置了以下参数,将并行查询的 Cost x 2,以降低使用并行查询的倾向。
parallel_setup_cost : 2000 # double from 100 to increase parallel cost
parallel_tuple_cost : 0.2 # double from 0.1 to increase parallel cost
min_parallel_table_scan_size : 32MB # 4x default 8MB, prefer non-parallel scan
min_parallel_index_scan_size : 2MB # 4x default 512kB, prefer non-parallel scan
请注意 max_worker_processes 参数的调整必须在重启后才能生效。此外,当从库的本参数配置值高于主库时,从库将无法启动。
此参数必须通过 patroni 配置管理进行调整,该参数由 Patroni 管理,用于确保主从配置一致,避免在故障切换时新从库无法启动。
存储空间参数 Pigsty 默认检测 /data/postgres 主数据目录所在磁盘的总空间,并以此作为依据指定下列参数:
{% raw %}
min_wal_size : {{ ([pg_size_twentieth, 200])|min }}GB # 1/20 disk size, max 200GB
max_wal_size : {{ ([pg_size_twentieth * 4, 2000])|min }}GB # 2/10 disk size, max 2000GB
max_slot_wal_keep_size : {{ ([pg_size_twentieth * 6, 3000])|min }}GB # 3/10 disk size, max 3000GB
temp_file_limit : {{ ([pg_size_twentieth, 200])|min }}GB # 1/20 of disk size, max 200GB
{% endraw %}
temp_file_limit 默认为磁盘空间的 5%,封顶不超过 200GB。min_wal_size 默认为磁盘空间的 5%,封顶不超过 200GB。max_wal_size 默认为磁盘空间的 20%,封顶不超过 2TB。max_slot_wal_keep_size 默认为磁盘空间的 30%,封顶不超过 3TB。作为特例, OLAP 模板允许 20% 的 temp_file_limit ,封顶不超过 2TB
手工调整参数 除了使用 Pigsty 自动配置的参数外,您还可以手工调整 PostgreSQL 参数。
使用 pg edit-config <cluster> 命令可以交互式编辑集群配置:
或者使用 -p 参数直接设置参数:
pg edit-config -p log_min_duration_statement = 1000 pg-meta
pg edit-config --force -p shared_preload_libraries = 'timescaledb, pg_cron, pg_stat_statements, auto_explain' pg-meta
您也可以使用 Patroni REST API 来修改配置:
curl -u 'postgres:Patroni.API' \
-d '{"postgresql":{"parameters": {"log_min_duration_statement":200}}}' \
-s -X PATCH http://10.10.10.10:8008/config | jq .
12.17.2 - OLTP 模板 针对在线事务处理负载优化的 PostgreSQL 配置模板
oltp.yml 是 Pigsty 的默认配置模板,针对在线事务处理 (OLTP)负载进行了优化。适用于 4-128 核 CPU 的服务器,特点是高并发连接、低延迟响应、高事务吞吐量。
建议同时使用 node_tuneoltp 进行操作系统级别的配套调优。
适用场景 OLTP 模板适用于以下场景:
电商系统 :订单处理、库存管理、用户交易社交应用 :用户动态、消息推送、关注关系游戏后端 :玩家数据、排行榜、游戏状态SaaS 应用 :多租户业务系统Web 应用 :常规的 CRUD 操作密集型应用特征负载 :
大量短事务(毫秒级) 高并发连接(数百到数千) 读写比例通常在 7:3 到 9:1 对延迟敏感,要求快速响应 数据一致性要求高 使用方法 oltp.yml
pg-oltp :
hosts :
10.10.10.11 : { pg_seq: 1, pg_role : primary }
10.10.10.12 : { pg_seq: 2, pg_role : replica }
vars :
pg_cluster : pg-oltp
# pg_conf: oltp.yml # PostgreSQL 配置模板(默认值)
# node_tune: oltp # 操作系统调优模板(默认值)
或显式指定:
pg-oltp :
vars :
pg_conf : oltp.yml # PostgreSQL 配置模板
node_tune : oltp # 操作系统调优模板
参数详解 连接管理 max_connections : 500 /1000 # 取决于是否使用 pgbouncer
superuser_reserved_connections : 10
内存配置 OLTP 模板的内存分配策略:
参数 计算公式 说明 shared_buffers内存 × pg_shared_buffer_ratio 默认比例 0.25 maintenance_work_memshared_buffers × 25% 用于 VACUUM、CREATE INDEX work_mem64MB - 1GB 根据 shared_buffers/max_connections 计算 effective_cache_size总内存 - shared_buffers 可用于缓存的预估内存
work_mem 计算逻辑 :
work_mem = min(max(shared_buffers / max_connections, 64MB), 1GB)
这确保每个连接有足够的排序/哈希内存,但不会过度分配。
并行查询 OLTP 模板对并行查询做了适度限制,以避免并行查询抢占过多资源影响其他事务:
max_worker_processes : cpu + 8 (最小16)
max_parallel_workers : 50 % × cpu (最小2)
max_parallel_workers_per_gather : 20 % × cpu (2-8)
max_parallel_maintenance_workers : 33 % × cpu (最小2)
同时提高了并行查询的成本估算,让优化器倾向于串行执行:
parallel_setup_cost : 2000 # 默认值 1000 的两倍
parallel_tuple_cost : 0.2 # 默认值 0.1 的两倍
min_parallel_table_scan_size : 32MB # 默认值 8MB 的四倍,倾向于不使用并行扫描
min_parallel_index_scan_size : 2MB # 默认值 512kB 的四倍,倾向于不使用并行扫描
WAL 配置 min_wal_size : 磁盘/20 (最大200GB)
max_wal_size : 磁盘/5 (最大2000GB)
max_slot_wal_keep_size : 磁盘×3/10 (最大3000GB)
wal_buffers : 16MB
wal_writer_delay : 20ms
wal_writer_flush_after : 1MB
commit_delay : 20
commit_siblings : 10
checkpoint_timeout : 15min
checkpoint_completion_target : 0.80
这些设置平衡了数据安全性和写入性能。
Vacuum 配置 vacuum_cost_delay : 20ms # 每轮 vacuum 后休眠
vacuum_cost_limit : 2000 # 每轮 vacuum 的代价上限
autovacuum_max_workers : 3
autovacuum_naptime : 1min
autovacuum_vacuum_scale_factor : 0.08 # 8% 表变化触发 vacuum
autovacuum_analyze_scale_factor : 0.04 # 4% 表变化触发 analyze
autovacuum_freeze_max_age : 1000000000
OLTP 模板使用保守的 vacuum 设置,避免 vacuum 操作影响在线事务性能。
查询优化 random_page_cost : 1.1 # SSD 优化
effective_io_concurrency : 200 # SSD 并发 IO
default_statistics_target : 400 # 统计信息精度
这些设置让优化器能够生成更好的查询计划。
日志与监控 log_min_duration_statement : 100 # 记录超过 100ms 的慢查询
log_statement : ddl # 记录 DDL 语句
log_checkpoints : on
log_lock_waits : on
log_temp_files : 1024 # 记录超过 1MB 的临时文件
log_autovacuum_min_duration : 1s
track_io_timing : on
track_functions : all
track_activity_query_size : 8192
客户端超时 deadlock_timeout : 50ms
idle_in_transaction_session_timeout : 10min
10 分钟的空闲事务超时可以防止长时间持有锁的僵尸事务。
扩展配置 shared_preload_libraries : 'pg_stat_statements, auto_explain'
# auto_explain
auto_explain.log_min_duration : 1s
auto_explain.log_analyze : on
auto_explain.log_verbose : on
auto_explain.log_timing : on
auto_explain.log_nested_statements : true
# pg_stat_statements
pg_stat_statements.max : 10000
pg_stat_statements.track : all
pg_stat_statements.track_utility : off
pg_stat_statements.track_planning : off
与其他模板的对比 特性 OLTP OLAP CRIT max_connections 500-1000 500 500-1000 work_mem 64MB-1GB 64MB-8GB 64MB-1GB 并行查询 适度限制 激进启用 禁用 vacuum 激进度 保守 激进 保守 事务超时 10min 禁用 1min 慢查询阈值 100ms 1000ms 100ms
为什么选择 OLTP 而非 OLAP? 您的查询大多数是简单的点查和范围查询 事务响应时间要求在毫秒级 有大量并发连接 不需要执行复杂的分析查询 为什么选择 OLTP 而非 CRIT? 可以接受极小概率的数据丢失(异步复制) 不需要完整的审计日志 希望获得更好的写入性能 性能调优建议 连接池 对于高并发场景,强烈建议使用 PgBouncer 连接池:
pg-oltp :
vars :
pg_default_service_dest : pgbouncer # 默认值
pgbouncer_poolmode : transaction # 事务级池化
只读分离 使用只读从库分担读取负载:
pg-oltp :
hosts :
10.10.10.11 : { pg_seq: 1, pg_role : primary }
10.10.10.12 : { pg_seq: 2, pg_role : replica }
10.10.10.13 : { pg_seq: 3, pg_role : replica }
监控指标 关注以下监控指标:
连接数 :活跃连接数、等待连接数事务率 :TPS、提交/回滚比例响应时间 :查询延迟百分位(p50/p95/p99)锁等待 :锁等待时间、死锁次数复制延迟 :从库延迟时间和字节数参考资料 12.17.3 - OLAP 模板 针对在线分析处理负载优化的 PostgreSQL 配置模板
olap.yml 是针对在线分析处理 (OLAP)负载优化的配置模板。适用于 4-128 核 CPU 的服务器,特点是支持大查询、高并行度、宽松的超时设置和激进的 Vacuum 策略。
建议同时使用 node_tuneolap 进行操作系统级别的配套调优。
适用场景 OLAP 模板适用于以下场景:
数据仓库 :历史数据存储、多维分析BI 报表 :复杂报表查询、仪表盘数据源ETL 处理 :数据抽取、转换、加载数据分析 :Ad-hoc 查询、数据探索HTAP 混合负载 :分析型从库特征负载 :
复杂查询(秒级到分钟级) 低并发连接(数十到数百) 读密集型,写入通常是批量操作 对吞吐量敏感,可以容忍较高延迟 需要扫描大量数据 使用方法 在集群定义中指定 pg_confolap.yml:
pg-olap :
hosts :
10.10.10.11 : { pg_seq: 1, pg_role : primary }
10.10.10.12 : { pg_seq: 2, pg_role : replica }
vars :
pg_cluster : pg-olap
pg_conf : olap.yml # PostgreSQL 分析处理模板
node_tune : olap # 操作系统分析处理调优
也可以将 olap.yml
pg-mixed :
hosts :
10.10.10.11 : { pg_seq: 1, pg_role : primary }
10.10.10.12 : { pg_seq: 2, pg_role : replica }
10.10.10.13 : { pg_seq: 3, pg_role: offline, pg_conf : olap.yml } # 离线分析从库
vars :
pg_cluster : pg-mixed
pg_conf : oltp.yml # 主库和在线从库使用 OLTP 模板
node_tune : oltp # 操作系统 OLTP 调优
参数详解 连接管理 max_connections : 500
superuser_reserved_connections : 10
OLAP 场景通常不需要大量连接,500 个连接足以应对大多数分析负载。
内存配置 OLAP 模板的内存分配策略更为激进:
参数 计算公式 说明 shared_buffers内存 × pg_shared_buffer_ratio 默认比例 0.25 maintenance_work_memshared_buffers × 50% 加速索引创建和 VACUUM work_mem64MB - 8GB 更大的排序/哈希内存 effective_cache_size总内存 - shared_buffers 可用于缓存的预估内存
work_mem 计算逻辑 (与 OLTP 不同):
work_mem = min(max(shared_buffers / max_connections, 64MB), 8GB)
更大的 work_mem 允许更大的排序和哈希操作在内存中完成,避免磁盘溢出。
锁与事务 max_locks_per_transaction : 2 -4x maxconn # OLTP 是 1-2x
OLAP 查询可能涉及更多表(分区表、大量 JOIN),因此需要更多的锁槽。
并行查询 OLAP 模板激进启用并行查询:
max_worker_processes: cpu + 12 (最小20) # OLTP : cpu + 8
max_parallel_workers: 80% × cpu (最小2) # OLTP : 50 %
max_parallel_workers_per_gather: 50% × cpu # OLTP : 20 % (最大8)
max_parallel_maintenance_workers : 33 % × cpu
并行查询成本保持默认值,让优化器更倾向于选择并行计划:
# parallel_setup_cost: 1000 # 默认值,不加倍
# parallel_tuple_cost: 0.1 # 默认值,不加倍
同时启用分区智能优化:
enable_partitionwise_join : on # 分区表智能 JOIN
enable_partitionwise_aggregate : on # 分区表智能聚合
IO 配置(PG17+) io_workers: 50% × cpu (4-32) # OLTP : 25 % (4-16)
更多的 IO 工作线程支持并行扫描大表。
WAL 配置 min_wal_size : 磁盘/20 (最大200GB)
max_wal_size : 磁盘/5 (最大2000GB)
max_slot_wal_keep_size : 磁盘×3/10 (最大3000GB)
temp_file_limit: 磁盘/5 (最大2000GB) # OLTP : 磁盘/20
更大的 temp_file_limit 允许更大的中间结果溢出到磁盘。
Vacuum 配置 OLAP 模板使用更激进的 vacuum 设置:
vacuum_cost_delay: 10ms # OLTP : 20ms,更快的 vacuum
vacuum_cost_limit: 10000 # OLTP : 2000 ,每轮更多工作
autovacuum_max_workers : 3
autovacuum_naptime : 1min
autovacuum_vacuum_scale_factor : 0.08
autovacuum_analyze_scale_factor : 0.04
分析型数据库通常有大量批量写入,需要更激进的 vacuum 策略来回收空间。
查询优化 random_page_cost : 1.1
effective_io_concurrency : 200
default_statistics_target: 1000 # OLTP : 400 ,更精确的统计信息
更高的 default_statistics_target 提供更精确的查询计划,对复杂分析查询尤为重要。
日志与监控 log_min_duration_statement: 1000 # OLTP : 100ms,放宽慢查询阈值
log_statement : ddl
log_checkpoints : on
log_lock_waits : on
log_temp_files : 1024
log_autovacuum_min_duration : 1s
track_io_timing : on
track_cost_delay_timing : on # PG18+,跟踪 vacuum 代价延迟
track_functions : all
track_activity_query_size : 8192
客户端超时 deadlock_timeout : 50ms
idle_in_transaction_session_timeout: 0 # OLTP : 10min,禁用
分析查询可能需要长时间持有事务,因此禁用空闲事务超时。
与 OLTP 模板的主要差异 参数 OLAP OLTP 差异原因 max_connections 500 500-1000 分析负载连接数少 work_mem 上限 8GB 1GB 支持更大的内存排序 maintenance_work_mem 50% buffer 25% buffer 加速索引创建 max_locks_per_transaction 2-4x 1-2x 更多表参与查询 max_parallel_workers 80% cpu 50% cpu 激进并行 max_parallel_workers_per_gather 50% cpu 20% cpu 激进并行 parallel_setup_cost 1000 2000 默认值,鼓励并行 parallel_tuple_cost 0.1 0.2 默认值,鼓励并行 enable_partitionwise_join on off 分区表优化 enable_partitionwise_aggregate on off 分区表优化 vacuum_cost_delay 10ms 20ms 激进 vacuum vacuum_cost_limit 10000 2000 激进 vacuum temp_file_limit 1/5 磁盘 1/20 磁盘 允许更大临时文件 io_workers 50% cpu 25% cpu 更多并行 IO log_min_duration_statement 1000ms 100ms 放宽慢查询阈值 default_statistics_target 1000 400 更精确统计 idle_in_transaction_session_timeout 禁用 10min 允许长事务
性能调优建议 结合 TimescaleDB OLAP 模板与 TimescaleDB 配合使用效果极佳:
pg-timeseries :
vars :
pg_conf : olap.yml
pg_libs : 'timescaledb, pg_stat_statements, auto_explain'
pg_extensions :
- timescaledb
结合 pg_duckdb 对于极致的分析性能,可以结合 pg_duckdb:
pg-analytics :
vars :
pg_conf : olap.yml
pg_libs : 'pg_duckdb, pg_stat_statements, auto_explain'
列式存储 考虑使用 Citus 的列式存储或 pg_mooncake:
pg_extensions :
- citus_columnar # 或 pg_mooncake
资源隔离 对于混合负载,建议将分析查询隔离到专用从库:
pg-mixed :
hosts :
10.10.10.11 : { pg_seq: 1, pg_role : primary } # OLTP 写入
10.10.10.12 : { pg_seq: 2, pg_role : replica } # OLTP 读取
10.10.10.13 : { pg_seq: 3, pg_role : offline } # OLAP 分析
vars :
pg_cluster : pg-mixed
监控指标 关注以下监控指标:
查询时间 :长查询的执行时间分布并行度 :并行工作进程的使用率临时文件 :临时文件的大小和数量磁盘 IO :顺序扫描和索引扫描的 IO 量缓存命中率 :shared_buffers 和 OS 缓存的命中率参考资料 12.17.4 - CRIT 模板 针对核心金融业务优化的 PostgreSQL 配置模板,强调数据安全与审计合规
crit.yml 是针对核心金融业务 优化的配置模板。适用于 4-128 核 CPU 的服务器,特点是强制同步复制、数据校验和、完整审计日志、严格的安全设置。这个模板牺牲一定的性能来换取最高级别的数据安全性。
建议同时使用 node_tunecrit 进行操作系统级别的配套调优,优化脏页数量。
适用场景 CRIT 模板适用于以下场景:
金融交易 :银行转账、支付清算、证券交易核心账务 :总账系统、会计系统合规审计 :需要完整操作记录的业务关键业务 :任何不能容忍数据丢失的场景特征需求 :
零数据丢失(RPO = 0) 数据完整性校验 完整的审计日志 严格的安全策略 可以接受一定的性能损失 使用方法 在集群定义中指定 pg_confcrit.yml:
pg-finance :
hosts :
10.10.10.11 : { pg_seq: 1, pg_role : primary }
10.10.10.12 : { pg_seq: 2, pg_role : replica }
10.10.10.13 : { pg_seq: 3, pg_role : replica }
vars :
pg_cluster : pg-finance
pg_conf : crit.yml # PostgreSQL 关键业务模板
node_tune : crit # 操作系统关键业务调优
建议 :关键业务集群至少配置 3 个节点,以确保在一个节点故障时仍能保持同步复制。
核心特性 强制同步复制 CRIT 模板强制启用同步复制 ,无论 pg_rpo
synchronous_mode : true # 强制开启,不受 pg_rpo 影响
这意味着每次事务提交都必须等待至少一个从库确认写入,确保 RPO = 0 (零数据丢失)。
代价 :写入延迟会增加(通常增加 1-5ms,取决于网络延迟)。
强制数据校验和 CRIT 模板强制启用数据校验和 ,无论 pg_checksum
initdb :
- data-checksums # 强制启用,不检查 pg_checksum 参数
数据校验和可以检测到磁盘静默损坏(bit rot),这对金融数据尤为重要。
禁用并行查询 CRIT 模板禁用了并行查询的 gather 操作:
max_parallel_workers_per_gather : 0 # 禁用并行查询
同时提高了并行查询的成本估算:
parallel_setup_cost : 2000
parallel_tuple_cost : 0.2
min_parallel_table_scan_size : 32MB
min_parallel_index_scan_size : 2MB
原因 :并行查询可能导致查询延迟不稳定,对于延迟敏感的金融交易场景,稳定可预测的性能更为重要。
参数详解 连接管理 max_connections : 500 /1000 # 取决于是否使用 pgbouncer
superuser_reserved_connections : 10
与 OLTP 模板相同。
内存配置 参数 计算公式 说明 shared_buffers内存 × pg_shared_buffer_ratio 默认比例 0.25 maintenance_work_memshared_buffers × 25% 用于 VACUUM、CREATE INDEX work_mem64MB - 1GB 与 OLTP 相同 effective_cache_size总内存 - shared_buffers 可用于缓存的预估内存
WAL 配置(关键差异) wal_writer_delay: 10ms # OLTP : 20ms,更频繁刷新
wal_writer_flush_after: 0 # OLTP : 1MB,立即刷新,不缓冲
idle_replication_slot_timeout: 3d # OLTP : 7d,更严格的槽位清理
wal_writer_flush_after: 0 确保每次 WAL 写入都立即刷到磁盘,最大程度减少数据丢失风险。
复制配置(PG15-) vacuum_defer_cleanup_age : 500000 # 仅 PG15 及以下版本
这个参数保留最近 50 万个事务的变更不被 vacuum 清理,为从库提供更多的追赶缓冲。
审计日志(关键差异) CRIT 模板启用完整的连接审计:
PostgreSQL 18+ :
log_connections : 'receipt,authentication,authorization'
PostgreSQL 17 及以下 :
log_connections : 'on'
log_disconnections : 'on'
这记录了每个连接的完整生命周期,包括:
查询日志 log_min_duration_statement : 100 # 记录超过 100ms 的查询
log_statement : ddl # 记录所有 DDL
track_activity_query_size: 32768 # OLTP : 8192 ,保存完整查询
32KB 的 track_activity_query_size 确保能捕获完整的长查询文本。
统计跟踪 track_io_timing : on
track_cost_delay_timing : on # PG18+,跟踪 vacuum 代价延迟
track_functions : all
track_activity_query_size : 32768
客户端超时(关键差异) idle_in_transaction_session_timeout: 1min # OLTP : 10min,更严格
1 分钟的空闲事务超时可以快速释放持有锁的僵尸事务,避免阻塞其他交易。
扩展配置 shared_preload_libraries : '$libdir/passwordcheck, pg_stat_statements, auto_explain'
注意 :CRIT 模板默认加载 passwordcheck 扩展,强制密码复杂度检查。
与 OLTP 模板的主要差异 参数 CRIT OLTP 差异原因 synchronous_mode 强制 true 取决于 pg_rpo 零数据丢失 data-checksums 强制启用 可选 数据完整性 max_parallel_workers_per_gather 0 20% cpu 稳定延迟 wal_writer_delay 10ms 20ms 更频繁刷新 wal_writer_flush_after 0 1MB 立即刷新 idle_replication_slot_timeout 3d 7d 更严格清理 idle_in_transaction_session_timeout 1min 10min 快速释放锁 track_activity_query_size 32KB 8KB 完整查询记录 log_connections 完整记录 仅授权 审计合规 log_disconnections on off 审计合规 passwordcheck 启用 未启用 密码安全 vacuum_defer_cleanup_age 500000 0 从库追赶缓冲
性能影响 使用 CRIT 模板会带来以下性能影响:
写入延迟增加 同步复制会增加 1-5ms 的写入延迟(取决于网络):
异步复制: 提交 -> 本地刷盘 -> 返回客户端
同步复制: 提交 -> 本地刷盘 -> 等待从库确认 -> 返回客户端
写入吞吐量下降 由于需要等待从库确认,写入 TPS 可能下降 10-30%。
查询延迟更稳定 禁用并行查询后,查询延迟更加可预测,没有并行查询启动的开销波动。
资源开销略有增加 更频繁的 WAL 刷新和完整的审计日志会带来额外的 IO 开销。
高可用配置 最小推荐配置 pg-critical :
hosts :
10.10.10.11 : { pg_seq: 1, pg_role : primary }
10.10.10.12 : { pg_seq: 2, pg_role : replica }
10.10.10.13 : { pg_seq: 3, pg_role : replica }
vars :
pg_cluster : pg-critical
pg_conf : crit.yml # PostgreSQL 关键业务模板
node_tune : crit # 操作系统关键业务调优
3 节点配置确保在一个节点故障时仍能保持同步复制。
跨机房部署 对于金融级别的容灾要求:
pg-critical :
hosts :
10.10.10.11 : { pg_seq: 1, pg_role: primary, pg_weight : 100 } # 机房 A
10.10.10.12 : { pg_seq: 2, pg_role: replica, pg_weight : 100 } # 机房 A
10.20.10.13 : { pg_seq: 3, pg_role: replica, pg_weight : 0 } # 机房 B(备用)
vars :
pg_cluster : pg-critical
pg_conf : crit.yml # PostgreSQL 关键业务模板
node_tune : crit # 操作系统关键业务调优
法定人数提交 对于更高的一致性要求,可以配置多个同步从库:
$ pg edit-config pg-critical
synchronous_mode: true
synchronous_node_count: 2 # 需要 2 个从库确认
安全加固建议 密码策略 CRIT 模板已启用 passwordcheck,建议进一步配置:
-- 设置密码最小长度
ALTER SYSTEM SET password_encryption = 'scram-sha-256' ;
审计扩展 考虑启用 pgaudit 扩展进行更详细的审计:
pg_libs : 'pg_stat_statements, auto_explain, pgaudit'
pg_parameters :
pgaudit.log : 'ddl, role, write'
网络隔离 确保数据库网络与业务网络隔离,使用 HBA 规则 限制访问。
监控指标 对于关键业务集群,重点关注:
复制延迟 :同步复制延迟应接近 0事务提交时间 :p99 延迟锁等待 :长时间锁等待可能影响业务检查点 :检查点持续时间和频率WAL 生成速率 :预测磁盘空间需求参考资料 12.17.5 - TINY 模板 针对微型实例和资源受限环境优化的 PostgreSQL 配置模板
tiny.yml 是针对微型实例 和资源受限环境优化的配置模板。适用于 1-3 核 CPU 的服务器,特点是最小化资源占用、保守的内存分配、禁用并行查询。
建议同时使用 node_tunetiny 进行操作系统级别的配套调优。
适用场景 TINY 模板适用于以下场景:
开发测试 :本地开发环境、CI/CD 测试低配虚拟机 :1-2 核 CPU、1-4GB 内存的云主机边缘计算 :树莓派、嵌入式设备Demo 演示 :快速体验 Pigsty 功能个人项目 :资源有限的个人博客、小型应用资源限制 :
1-3 核 CPU 1-8 GB 内存 有限的磁盘空间 可能与其他服务共享资源 使用方法 在集群定义中指定 pg_conftiny.yml:
pg-dev :
hosts :
10.10.10.11 : { pg_seq: 1, pg_role : primary }
vars :
pg_cluster : pg-dev
pg_conf : tiny.yml # PostgreSQL 微型实例模板
node_tune : tiny # 操作系统微型实例调优
单节点开发环境:
pg-local :
hosts :
127.0.0.1 : { pg_seq: 1, pg_role : primary }
vars :
pg_cluster : pg-local
pg_conf : tiny.yml # PostgreSQL 微型实例模板
node_tune : tiny # 操作系统微型实例调优
参数详解 连接管理 max_connections: 250 # OLTP : 500-1000 ,减少连接开销
superuser_reserved_connections : 10
微型实例不需要处理大量并发连接,250 个连接足以应对开发测试场景。
内存配置 TINY 模板使用保守的内存分配策略:
参数 计算公式 说明 shared_buffers内存 × pg_shared_buffer_ratio 默认比例 0.25 maintenance_work_memshared_buffers × 25% 用于 VACUUM、CREATE INDEX work_mem16MB - 256MB 更小的排序/哈希内存 effective_cache_size总内存 - shared_buffers 可用于缓存的预估内存
work_mem 计算逻辑 (与 OLTP 不同):
work_mem = min(max(shared_buffers / max_connections, 16MB), 256MB)
更小的 work_mem 上限(256MB vs OLTP 的 1GB)避免内存溢出。
并行查询(完全禁用) TINY 模板完全禁用了并行查询:
max_worker_processes: cpu + 4 (最小12) # OLTP : cpu + 8
max_parallel_workers: 50% × cpu (最小1) # OLTP : 50 % (最小2)
max_parallel_workers_per_gather : 0 # 禁用并行查询
max_parallel_maintenance_workers : 33 % × cpu (最小1)
max_parallel_workers_per_gather: 0 确保查询不会启动并行工作进程,避免在低核心环境下争抢资源。
IO 配置(PG17+) io_workers: 3 # 固定值,OLTP : 25 % cpu (4-16)
固定的低 IO 工作线程数量,适合资源受限环境。
Vacuum 配置 vacuum_cost_delay : 20ms
vacuum_cost_limit : 2000
autovacuum_max_workers: 2 # OLTP : 3 ,减少一个工作进程
autovacuum_naptime : 1min
# autovacuum_vacuum_scale_factor 使用默认值
# autovacuum_analyze_scale_factor 使用默认值
减少 autovacuum 工作进程数量,降低后台资源占用。
查询优化 random_page_cost : 1.1
effective_io_concurrency : 200
default_statistics_target: 200 # OLTP : 400 ,降低统计精度以节省空间
较低的 default_statistics_target 减少 pg_statistic 表的大小。
日志配置 log_min_duration_statement : 100 # 与 OLTP 相同
log_statement : ddl
log_checkpoints : on
log_lock_waits : on
log_temp_files : 1024
# log_connections 使用默认设置(不额外记录)
TINY 模板不启用额外的连接日志,以减少日志量。
客户端超时 deadlock_timeout : 50ms
idle_in_transaction_session_timeout : 10min # 与 OLTP 相同
扩展配置 shared_preload_libraries : 'pg_stat_statements, auto_explain'
pg_stat_statements.max: 2500 # OLTP : 10000 ,减少内存占用
pg_stat_statements.track : all
pg_stat_statements.track_utility : off
pg_stat_statements.track_planning : off
pg_stat_statements.max 从 10000 降到 2500,减少约 75% 的内存占用。
与 OLTP 模板的主要差异 参数 TINY OLTP 差异原因 max_connections 250 500-1000 减少连接开销 work_mem 上限 256MB 1GB 避免内存溢出 max_worker_processes cpu+4 cpu+8 减少后台进程 max_parallel_workers_per_gather 0 20% cpu 禁用并行查询 autovacuum_max_workers 2 3 减少后台负载 default_statistics_target 200 400 节省空间 pg_stat_statements.max 2500 10000 减少内存占用 io_workers 3 25% cpu 固定低值
资源估算 以下是 TINY 模板在不同配置下的资源使用估算:
1 核 1GB 内存 shared_buffers : ~256MB
work_mem : ~16MB
maintenance_work_mem : ~64MB
max_connections : 250
max_worker_processes : ~12
PostgreSQL 进程内存占用 :约 400-600MB
2 核 4GB 内存 shared_buffers : ~1GB
work_mem : ~32MB
maintenance_work_mem : ~256MB
max_connections : 250
max_worker_processes : ~12
PostgreSQL 进程内存占用 :约 1.5-2GB
4 核 8GB 内存 此配置建议使用 OLTP 模板而非 TINY 模板:
pg-small :
vars :
pg_conf : oltp.yml # 4核8GB可以使用OLTP模板
性能调优建议 进一步减少资源 如果资源极度受限,可以考虑:
pg_parameters :
max_connections : 100 # 进一步减少
shared_buffers : 128MB # 进一步减少
maintenance_work_mem : 32MB
work_mem : 8MB
禁用不需要的扩展 pg_libs : 'pg_stat_statements' # 只保留必要扩展
关闭不需要的功能 pg_parameters :
track_io_timing : off # 禁用 IO 时间跟踪
track_functions : none # 禁用函数跟踪
使用外部连接池 即使在微型实例上,使用 PgBouncer 也能显著提高并发能力:
pg-tiny :
vars :
pg_conf : tiny.yml
pg_default_service_dest : pgbouncer
pgbouncer_poolmode : transaction
云平台推荐规格 AWS t3.micro :1 vCPU, 1GB RAM - 适合 TINYt3.small :2 vCPU, 2GB RAM - 适合 TINYt3.medium :2 vCPU, 4GB RAM - 可考虑 OLTP阿里云 ecs.t6-c1m1.small :1 vCPU, 1GB RAM - 适合 TINYecs.t6-c1m2.small :1 vCPU, 2GB RAM - 适合 TINYecs.t6-c1m4.small :1 vCPU, 4GB RAM - 适合 TINY腾讯云 SA2.SMALL1 :1 vCPU, 1GB RAM - 适合 TINYSA2.SMALL2 :1 vCPU, 2GB RAM - 适合 TINYSA2.SMALL4 :1 vCPU, 4GB RAM - 适合 TINY边缘设备部署 树莓派 4 pg-pi :
hosts :
192.168.1.100 : { pg_seq: 1, pg_role : primary }
vars :
pg_cluster : pg-pi
pg_conf : tiny.yml # PostgreSQL 微型实例模板
node_tune : tiny # 操作系统微型实例调优
pg_storage_type : SSD # 建议使用 SSD 存储
Docker 容器 pg-docker :
hosts :
172.17.0.2 : { pg_seq: 1, pg_role : primary }
vars :
pg_cluster : pg-docker
pg_conf : tiny.yml # PostgreSQL 微型实例模板
node_tune : tiny # 操作系统微型实例调优
升级到 OLTP 当您的应用增长,需要更多资源时,可以轻松升级到 OLTP 模板
升级虚拟机规格(4核 8GB 以上) 修改集群配置: pg-growing :
vars :
pg_conf : oltp.yml # 从 tiny.yml 改为 oltp.yml
node_tune : oltp # 从 tiny 改为 oltp
重新配置集群 或重新部署参考资料 12.18 - 内核分支 如何在 Pigsty 中使用其他 PostgreSQL 内核分支?例如 Citus,Babelfish,IvorySQL,PolarDB 等
在 Pigsty 中,您可以使用不同 “风味 ” 的 PostgreSQL 分支替换 “原生PG内核”,实现特殊的功能与效果。
Pigsty 支持多种 PostgreSQL 内核和兼容分支,让您能够在同一套运维体系中获得兼容性、多主复制、图查询、MPP 数仓、透明加密等不同能力。
需要注意的是,不同内核在 Pigsty 中的交付深度并不完全一致:
像 PostgreSQL、Citus、Babelfish、IvorySQL、PolarDB、AgensGraph、pgEdge 已经有较明确的模板与配置方式;
像 Cloudberry / Greenplum 则更多通过 gpsql 模式统一纳管,MPP 初始化与扩缩容仍建议使用上游工具链。
版本 各个 PG 分支内核的版本号字符串(以 el9 为例),其中 citus, ferret, supabase 与原生 PostgreSQL 一致。
以下版本字符串来自当前 Pigsty 仓库对应的软件包。需要特别注意:Cloudberry 2.0.0 目前仅 RPM 构建,pgEdge 当前默认交付 PG17 系列。
内核 描述 PostgreSQL PostgreSQL 18.2 on x86_64-pc-linux-gnu, compiled by gcc (GCC) 11.5.0 20240719 (Red Hat 11.5.0-5), 64-bitBabelfish Babelfish 17.7 on x86_64-pc-linux-gnu, compiled by gcc (GCC) 11.5.0 20240719 (Red Hat 11.5.0-11), 64-bitIvorySQL PostgreSQL 18.1 (IvorySQL 5.1) on x86_64-pc-linux-gnu, compiled by gcc (GCC) 9.5.0, 64-bitOpenHalo openHalo 1.0.14.18 (260226) on x86_64-pc-linux-gnu, compiled by gcc (GCC) 11.5.0 20240719 (Red Hat 11.5.0-11), 64-bitPercona PostgreSQL 18.1 - Percona Server for PostgreSQL 18.1.1 on x86_64-pc-linux-gnu, compiled by gcc (GCC) 11.5.0 20240719 (Red Hat 11.5.0-11.0.1), 64-bitOrioleDB PostgreSQL 17.6 (OrioleDB 1.6-beta14) on aarch64-unknown-linux-gnu, compiled by gcc (GCC) 11.5.0 20240719 (Red Hat 11.5.0-11), 64-bitPolarDB PostgreSQL 15.16 (PolarDB 15.16.5.0 build 710ce891) on x86_64-linux-gnuAgensGraph PostgreSQL 16.9 (AgensGraph 2.16) on x86_64-pc-linux-gnu, compiled by gcc (GCC) 11.5.0 20240719 (Red Hat 11.5.0-11), 64-bitpgEdge PostgreSQL 17.9 (pgEdge 5.0.5) on x86_64-pc-linux-gnu, compiled by gcc (GCC) 11.5.0 20240719 (Red Hat 11.5.0-11), 64-bitCloudberry PostgreSQL 14.4 (Apache Cloudberry 2.0.0-incubating build 1) on aarch64-unknown-linux-gnu, compiled by gcc (GCC) 11.5.0 20240719 (Red Hat 11.5.0-11), 64-bit
12.18.1 - PostgreSQL 带有 451 扩展的原版 PostgreSQL 内核
PostgreSQL 是世界上最先进和最受欢迎的开源数据库。
Pigsty 支持 PostgreSQL 14 ~ 18,并提供 464 个 PG 扩展。
快速开始 使用 pgsql安装
./configure -c pgsql # 使用 postgres 内核
./deploy.yml # 使用 pigsty 设置一切
大多数 配置模板 默认使用 PostgreSQL 内核,例如:
meta默认 ,带有核心扩展(vector、postgis、timescale)的 postgresrichslimfullpgsql配置 原版 PostgreSQL 内核不需要特殊调整:
pg-meta :
hosts :
10.10.10.10 : { pg_seq: 1, pg_role : primary }
vars :
pg_cluster : pg-meta
pg_users :
- { name: dbuser_meta ,password: DBUser.Meta ,pgbouncer: true ,roles: [dbrole_admin ] ,comment : pigsty admin user }
- { name: dbuser_view ,password: DBUser.Viewer ,pgbouncer: true ,roles: [dbrole_readonly] ,comment : read-only viewer }
pg_databases :
- { name: meta, baseline: cmdb.sql ,comment: pigsty meta database ,schemas: [pigsty] ,extensions : [ vector ]}
pg_hba_rules :
- { user: dbuser_view , db: all ,addr: infra ,auth: pwd ,title : 'allow grafana dashboard access cmdb from infra nodes' }
node_crontab : [ '00 01 * * * postgres /pg/bin/pg-backup full' ] # 每天凌晨 1 点进行全量备份
pg_packages : [ pgsql-main, pgsql-common ] # pg 内核和通用工具
#pg_extensions: [ pg18-time ,pg18-gis ,pg18-rag ,pg18-fts ,pg18-olap ,pg18-feat ,pg18-lang ,pg18-type ,pg18-util ,pg18-func ,pg18-admin ,pg18-stat ,pg18-sec ,pg18-fdw ,pg18-sim ,pg18-etl]
版本选择 要使用不同的 PostgreSQL 主版本,您可以使用 -v 参数进行配置:
./configure -c pgsql # 默认就是 postgresql 18,无需显式指定
./configure -c pgsql -v 18 # 显式指定 postgresql 18
./configure -c pgsql -v 17 # 使用 postgresql 17
./configure -c pgsql -v 16 # 使用 postgresql 16
./configure -c pgsql -v 15 # 使用 postgresql 15
./configure -c pgsql -v 14 # 使用 postgresql 14
./configure -c pgsql -v 13 # 使用 postgresql 13
如果 PostgreSQL 集群已经安装,您需要在安装新版本之前卸载它:
./pgsql-rm.yml # -l pg-meta
扩展生态 Pigsty 为 PostgreSQL 提供了丰富的扩展生态,包括:
时序类 :timescaledb, pg_cron, periods地理类 :postgis, h3, pgrouting向量类 :pgvector, pgml, vchord搜索类 :pg_trgm, zhparser, pgroonga分析类 :citus, pg_duckdb, pg_analytics特性类 :age, pg_graphql, rum语言类 :plpython3u, pljava, plv8类型类 :hstore, ltree, citext工具类 :http, pg_net, pgjwt函数类 :pgcrypto, uuid-ossp, pg_uuidv7管理类 :pg_repack, pgagent, pg_squeeze统计类 :pg_stat_statements, pg_qualstats, auto_explain安全类 :pgaudit, pgcrypto, pgsodium外部类 :postgres_fdw, mysql_fdw, oracle_fdw兼容类 :orafce, babelfishpg_tds数据类 :pglogical, wal2json, decoderbufs详情请参考 扩展目录 。
12.18.2 - Supabase 如何使用Pigsty自建Supabase,一键拉起开源Firebase替代,后端全栈全家桶。
Supabase —— Build in a weekend, Scale to millions
Supabase 是一个开源的 Firebase 替代,对 PostgreSQL 进行了封装,并提供了认证,开箱即用的 API,边缘函数,实时订阅,对象存储,向量嵌入能力。
这是一个低代码的一站式后端平台,能让你几乎告别大部分后端开发的工作,只需要懂数据库设计与前端即可快速出活!
Supabase 的口号是:“花个周末写写,随便扩容至百万 ”。诚然,在小微规模(4c8g)内的 Supabase 极有性价比 ,堪称赛博菩萨。
—— 但当你真的增长到百万用户时 —— 确实应该认真考虑托管自建 Supabase 了 —— 无论是出于功能,性能,还是成本上的考虑。
Pigsty 为您提供完整的 Supabase 一键自建方案。自建的 Supabase 可以享受完整的 PostgreSQL 监控,IaC,PITR 与高可用,
而且相比 Supabase 云服务,提供了多达 451
完整自建教程,请参考:《Supabase自建手册
快速上手 Pigsty 默认提供的 supa.yml
首先,使用 Pigsty 标准安装流程 安装 Supabase 所需的 MinIO 与 PostgreSQL 实例:
curl -fsSL https://repo.pigsty.io/get | bash
./bootstrap # 环境检查,安装依赖
./configure -c supa # 重要:请在配置文件中修改密码等关键信息!
./deploy.yml # 安装 Pigsty,拉起 PGSQL 与 MINIO!
请在部署 Supabase 前,根据您的实际情况,修改 pigsty.yml 配置文件中 关于 Supabase 的参数 (主要是密码!)
然后,运行 supabase.yml
./docker.yml # 安装 Docker 模块
./app.yml # 拉起 Supabase 无状态部分!
中国区域用户注意,请您配置合适的 Docker 镜像站点或代理服务器绕过 GFW 以拉取 DockerHub 镜像。
对于 专业订阅 ,我们提供在没有互联网访问的情况下,离线安装 Pigsty 与 Supabase 的能力。
Pigsty 默认通过管理节点/INFRA节点上的 Nginx 对外暴露 Web 服务,您可以在本地添加 supa.pigsty 的 DNS 解析指向该节点,
然后通过浏览器访问 https://supa.pigsty 即可进入 Supabase Studio 管理界面。
默认用户名与密码:supabase / pigsty
配置细节 ./configure -c supa 会生成 ~/pigsty/pigsty.yml。在执行 ./deploy.yml 之前,请至少检查并修改其中的密码、密钥、域名等敏感配置。
更完整的配置说明请参阅:《Supabase自建手册 》。
12.18.3 - Citus 使用 Pigsty 部署原生高可用的 Citus 水平分片集群,将 PostgreSQL 无缝伸缩到多套分片并加速 OLTP/OLAP 查询。
Pigsty 原生支持 Citus。这是一个基于原生 PostgreSQL 内核的分布式水平扩展插件。
安装 Citus 是一个 PostgreSQL 扩展插件 ,可以按照标准插件安装的流程,在原生 PostgreSQL 集群上加装启用。
./pgsql.yml -t pg_extension -e '{"pg_extensions":["citus"]}'
配置 要定义一个 citus 集群,您需要指定以下参数:
此外,还需要额外的 hba 规则,允许从本地和其他数据节点进行 SSL 访问。
您可以将每个 Citus 集群分别定义为独立的分组,像标准的 PostgreSQL 集群一样,如 conf/dbms/citus.yml
all :
children :
pg-citus0 : # citus 0号分片
hosts : { 10.10.10.10 : { pg_seq: 1, pg_role : primary } }
vars : { pg_cluster: pg-citus0 , pg_group : 0 }
pg-citus1 : # citus 1号分片
hosts : { 10.10.10.11 : { pg_seq: 1, pg_role : primary } }
vars : { pg_cluster: pg-citus1 , pg_group : 1 }
pg-citus2 : # citus 2号分片
hosts : { 10.10.10.12 : { pg_seq: 1, pg_role : primary } }
vars : { pg_cluster: pg-citus2 , pg_group : 2 }
pg-citus3 : # citus 3号分片
hosts :
10.10.10.13 : { pg_seq: 1, pg_role : primary }
10.10.10.14 : { pg_seq: 2, pg_role : replica }
vars : { pg_cluster: pg-citus3 , pg_group : 3 }
vars : # 所有 Citus 集群的全局参数
pg_mode : citus # pgsql 集群模式需要设置为: citus
pg_shard : pg-citus # citus 水平分片名称: pg-citus
pg_primary_db : meta # citus 数据库名称:meta
pg_dbsu_password : DBUser.Postgres # 如果使用 dbsu ,那么需要为其配置一个密码
pg_users : [ { name: dbuser_meta ,password: DBUser.Meta ,pgbouncer: true ,roles : [ dbrole_admin ] } ]
pg_databases : [ { name: meta ,extensions : [ { name : citus }, { name: postgis }, { name: timescaledb } ] } ]
pg_hba_rules :
- { user: 'all' ,db: all ,addr: 127.0.0.1/32 ,auth: ssl ,title : 'all user ssl access from localhost' }
- { user: 'all' ,db: all ,addr: intra ,auth: ssl ,title : 'all user ssl access from intranet' }
您也可以在一个分组内指定所有 Citus 集群成员的身份参数,如 prod.yml
#==========================================================#
# pg-citus: 10 node citus cluster (5 x primary-replica pair)
#==========================================================#
pg-citus : # citus group
hosts :
10.10.10.50 : { pg_group: 0, pg_cluster: pg-citus0 ,pg_vip_address: 10.10.10.60/24 ,pg_seq: 0, pg_role : primary }
10.10.10.51 : { pg_group: 0, pg_cluster: pg-citus0 ,pg_vip_address: 10.10.10.60/24 ,pg_seq: 1, pg_role : replica }
10.10.10.52 : { pg_group: 1, pg_cluster: pg-citus1 ,pg_vip_address: 10.10.10.61/24 ,pg_seq: 0, pg_role : primary }
10.10.10.53 : { pg_group: 1, pg_cluster: pg-citus1 ,pg_vip_address: 10.10.10.61/24 ,pg_seq: 1, pg_role : replica }
10.10.10.54 : { pg_group: 2, pg_cluster: pg-citus2 ,pg_vip_address: 10.10.10.62/24 ,pg_seq: 0, pg_role : primary }
10.10.10.55 : { pg_group: 2, pg_cluster: pg-citus2 ,pg_vip_address: 10.10.10.62/24 ,pg_seq: 1, pg_role : replica }
10.10.10.56 : { pg_group: 3, pg_cluster: pg-citus3 ,pg_vip_address: 10.10.10.63/24 ,pg_seq: 0, pg_role : primary }
10.10.10.57 : { pg_group: 3, pg_cluster: pg-citus3 ,pg_vip_address: 10.10.10.63/24 ,pg_seq: 1, pg_role : replica }
10.10.10.58 : { pg_group: 4, pg_cluster: pg-citus4 ,pg_vip_address: 10.10.10.64/24 ,pg_seq: 0, pg_role : primary }
10.10.10.59 : { pg_group: 4, pg_cluster: pg-citus4 ,pg_vip_address: 10.10.10.64/24 ,pg_seq: 1, pg_role : replica }
vars :
pg_mode: citus # pgsql cluster mode : citus
pg_shard: pg-citus # citus shard name : pg-citus
pg_primary_db : test # primary database used by citus
pg_dbsu_password : DBUser.Postgres # all dbsu password access for citus cluster
pg_vip_enabled : true
pg_vip_interface : eth1
pg_extensions : [ 'citus postgis timescaledb pgvector' ]
pg_libs : 'citus, timescaledb, pg_stat_statements, auto_explain' # citus will be added by patroni automatically
pg_users : [ { name: test ,password: test ,pgbouncer: true ,roles : [ dbrole_admin ] } ]
pg_databases : [ { name: test ,owner: test ,extensions : [ { name : citus }, { name: postgis } ] } ]
pg_hba_rules :
- { user: 'all' ,db: all ,addr: 10.10.10.0/24 ,auth: trust ,title : 'trust citus cluster members' }
- { user: 'all' ,db: all ,addr: 127.0.0.1/32 ,auth: ssl ,title : 'all user ssl access from localhost' }
- { user: 'all' ,db: all ,addr: intra ,auth: ssl ,title : 'all user ssl access from intranet' }
使用 您可以像访问普通集群一样,访问任意节点:
pgbench -i postgres://test:test@pg-citus0/test
pgbench -nv -P1 -T1000 -c 2 postgres://test:test@pg-citus0/test
默认情况下,您对某一个 Shard 进行的变更,都只发生在这套集群上,而不会同步到其他 Shard。
如果你希望将写入分布到所有 Shard,可以使用 Citus 提供的 API 函数,将表标记为:
水平分片表 (自动分区,需要指定分区键)引用表 (全量复制:不需要指定分区键):从 Citus 11.2 开始,任何 Citus 数据库节点都可以扮演协调者的角色,即,任意一个主节点都可以写入:
psql -h pg-citus0 -d test -c "SELECT create_distributed_table('pgbench_accounts', 'aid'); SELECT truncate_local_data_after_distributing_table('public.pgbench_accounts');"
psql -h pg-citus0 -d test -c "SELECT create_reference_table('pgbench_branches') ; SELECT truncate_local_data_after_distributing_table('public.pgbench_branches');"
psql -h pg-citus0 -d test -c "SELECT create_reference_table('pgbench_history') ; SELECT truncate_local_data_after_distributing_table('public.pgbench_history');"
psql -h pg-citus0 -d test -c "SELECT create_reference_table('pgbench_tellers') ; SELECT truncate_local_data_after_distributing_table('public.pgbench_tellers');"
将表分布出去后,你可以在其他节点上也访问到:
psql -h pg-citus1 -d test -c '\dt+'
例如,全表扫描可以发现执行计划已经变为分布式计划
vagrant@meta-1:~$ psql -h pg-citus3 -d test -c 'explain select * from pgbench_accounts'
QUERY PLAN
---------------------------------------------------------------------------------------------------------
Custom Scan ( Citus Adaptive) ( cost = 0.00..0.00 rows = 100000 width = 352)
Task Count: 32
Tasks Shown: One of 32
-> Task
Node: host = 10.10.10.52 port = 5432 dbname = test
-> Seq Scan on pgbench_accounts_102008 pgbench_accounts ( cost = 0.00..81.66 rows = 3066 width = 97)
( 6 rows)
你可以从几个不同的主节点发起写入:
pgbench -nv -P1 -T1000 -c 2 postgres://test:test@pg-citus1/test
pgbench -nv -P1 -T1000 -c 2 postgres://test:test@pg-citus2/test
pgbench -nv -P1 -T1000 -c 2 postgres://test:test@pg-citus3/test
pgbench -nv -P1 -T1000 -c 2 postgres://test:test@pg-citus4/test
当某个节点出现故障时,Patroni 提供的原生高可用支持会将备用节点提升并自动顶上。
test = # select * from pg_dist_node;
nodeid | groupid | nodename | nodeport | noderack | hasmetadata | isactive | noderole | nodecluster | metadatasynced | shouldhaveshards
--------+---------+-------------+----------+----------+-------------+----------+----------+-------------+----------------+------------------
1 | 0 | 10.10.10.51 | 5432 | default | t | t | primary | default | t | f
2 | 2 | 10.10.10.54 | 5432 | default | t | t | primary | default | t | t
5 | 1 | 10.10.10.52 | 5432 | default | t | t | primary | default | t | t
3 | 4 | 10.10.10.58 | 5432 | default | t | t | primary | default | t | t
4 | 3 | 10.10.10.56 | 5432 | default | t | t | primary | default | t | t
12.18.4 - Babelfish 在 Pigsty 中使用 Babelfish(PG17)提供 SQL Server 协议/T-SQL 兼容能力
Babelfish 是一个提供 MS SQL Server 线缆协议兼容性的内核分支 + 扩展,由 AWS 开源。
概览 Pigsty 允许您使用 mssql 模式部署 Babelfish 内核,在 PostgreSQL 上提供:
SQL Server 线缆协议兼容(TDS 协议,1433 端口) T-SQL 语法兼容 与 Pigsty 现有能力(高可用、备份、监控、IaC)统一集成 在 v4.2.0 中,Babelfish 默认基于 PostgreSQL 17 ,并已经纳入 Pigsty 标准交付链路。支持所有 Linux 平台
快速开始 使用 Pigsty 内置模板:
./configure -c mssql
./deploy.yml
部署完成后可直接使用 SQL Server 客户端连接:
sqlcmd -S <ip>,1433 -U dbuser_mssql -P DBUser.MSSQL -d mssql
关键配置 mssql 模板中的核心参数如下:
pg_mode : mssql
pg_version : 17
pg_packages : [ babelfish, pgsql-common, sqlcmd ]
pg_libs : 'babelfishpg_tds, pg_stat_statements, auto_explain'
pg_databases :
- name : mssql
baseline : mssql.sql
extensions :
- { name : uuid-ossp }
- { name : babelfishpg_common }
- { name : babelfishpg_tsql }
- { name : babelfishpg_tds }
- { name : babelfishpg_money }
- { name : pg_hint_plan }
- { name : system_stats }
- { name : tds_fdw }
parameters : { 'babelfishpg_tsql.migration_mode' : 'multi-db' }
pg_hba_rules :
- { user: dbuser_mssql, db: mssql, addr: intra, auth: md5, order : 525 }
pg_default_services :
- { name: primary, port: 5433, dest : 1433 }
- { name: replica, port: 5434, dest : 1433 }
连接与端口 Babelfish 集群会同时提供两类访问:
PostgreSQL 协议:5432 SQL Server 协议(TDS):1433 通过 Pigsty 服务抽象,还可使用:
5433 固定路由到主库 14335434 路由到可读节点 1433# 主库写入
sqlcmd -S <任意节点IP>,5433 -U dbuser_mssql -P DBUser.MSSQL
# 读库查询
sqlcmd -S <任意节点IP>,5434 -U dbuser_mssql -P DBUser.MSSQL
注意事项 Babelfish 认证规则需使用 md5,而不是默认 scram-sha-256。 默认迁移模式为 multi-db,如需 single-db 可修改 babelfishpg_tsql.migration_mode。 并非所有原生 PostgreSQL 扩展都可直接在 Babelfish 内核使用;请以包可用性与兼容性测试为准。 生产环境请收紧 HBA 与网络暴露策略,不要沿用演示级开放配置。 相关文档 12.18.5 - IvorySQL 使用瀚高开源的 IvorySQL 内核,基于 PostgreSQL 集群实现 Oracle 语法/PLSQL 兼容性。
IvorySQL 是一个开源的,旨在基于 PG 提供 “Oracle兼容性” 的 PostgreSQL 内核分支。
概览 IvorySQL 内核支持在 Pigsty 开源版本中提供,您的服务器需要互联网访问,直接从 IvorySQL 的官方仓库下载相关软件包。
请注意,直接将 IvorySQL 加入 Pigsty 默认软件仓库中会影响原生 PostgreSQL 内核的安装。Pigsty 专业版提供包括 IvorySQL 内核在内的离线安装解决方案。
当前 IvorySQL 的最新版本为 5.0 ,对应的 PostgreSQL 版本为 18 。请注意,IvorySQL 当前仅在 EL8/EL9 上可用。
最后一个支持 EL7 的 IvorySQL 版本为 3.3,对应 PostgreSQL 16.3;最后一个基于 PostgreSQL 17 的版本为 IvorySQL 4.4
安装 如果您的环境有互联网访问,您可以使用以下方式,直接将 IvorySQL 仓库加入到节点上,然后执行 PGSQL 剧本进行安装
./node.yml -t node_repo -e '{"node_repo_modules":"local,node,pgsql,ivory"}'
配置 以下参数需要针对 IvorySQL 数据库集群进行配置:
#----------------------------------#
# Ivory SQL Configuration
#----------------------------------#
node_repo_modules : local,node,pgsql,ivory # add ivorysql upstream repo
pg_mode : ivory # IvorySQL Oracle Compatible Mode
pg_packages : [ 'ivorysql patroni pgbouncer pgbackrest pg_exporter pgbadger vip-manager' ]
pg_libs : 'liboracle_parser, pg_stat_statements, auto_explain'
pg_extensions : [ ] # do not install any vanilla postgresql extensions
使用 Oracle 兼容性模式时,需要动态加载 liboracle_parser 扩展插件。
客户端访问 IvorySQL 等效于 PostgreSQL 16,任何兼容 PostgreSQL 线缆协议的客户端工具都可以访问 IvorySQL 集群。
扩展列表 绝大多数 PGSQL 模块的 扩展插件
目前 IvorySQL 内核自带了以下 101 个扩展插件。
name version comment hstore_plperl 1.0 transform between hstore and plperl plisql 1.0 PL/iSQL procedural language hstore_plperlu 1.0 transform between hstore and plperlu adminpack 2.1 administrative functions for PostgreSQL insert_username 1.0 functions for tracking who changed a table dblink 1.2 connect to other PostgreSQL databases from within a database dict_int 1.0 text search dictionary template for integers amcheck 1.3 functions for verifying relation integrity intagg 1.1 integer aggregator and enumerator (obsolete) autoinc 1.0 functions for autoincrementing fields bloom 1.0 bloom access method - signature file based index dict_xsyn 1.0 text search dictionary template for extended synonym processing btree_gin 1.3 support for indexing common datatypes in GIN earthdistance 1.1 calculate great-circle distances on the surface of the Earth file_fdw 1.0 foreign-data wrapper for flat file access fuzzystrmatch 1.2 determine similarities and distance between strings btree_gist 1.7 support for indexing common datatypes in GiST intarray 1.5 functions, operators, and index support for 1-D arrays of integers citext 1.6 data type for case-insensitive character strings isn 1.2 data types for international product numbering standards ivorysql_ora 1.0 Oracle Compatible extenison on Postgres Database jsonb_plperl 1.0 transform between jsonb and plperl cube 1.5 data type for multidimensional cubes dummy_index_am 1.0 dummy_index_am - index access method template dummy_seclabel 1.0 Test code for SECURITY LABEL feature hstore 1.8 data type for storing sets of (key, value) pairs jsonb_plperlu 1.0 transform between jsonb and plperlu lo 1.1 Large Object maintenance ltree 1.2 data type for hierarchical tree-like structures moddatetime 1.0 functions for tracking last modification time old_snapshot 1.0 utilities in support of old_snapshot_threshold ora_btree_gin 1.0 support for indexing oracle datatypes in GIN pg_trgm 1.6 text similarity measurement and index searching based on trigrams ora_btree_gist 1.0 support for oracle indexing common datatypes in GiST pg_visibility 1.2 examine the visibility map (VM) and page-level visibility info pg_walinspect 1.1 functions to inspect contents of PostgreSQL Write-Ahead Log pgcrypto 1.3 cryptographic functions pgstattuple 1.5 show tuple-level statistics pageinspect 1.12 inspect the contents of database pages at a low level pgrowlocks 1.2 show row-level locking information pg_buffercache 1.4 examine the shared buffer cache pg_stat_statements 1.10 track planning and execution statistics of all SQL statements executed pg_freespacemap 1.2 examine the free space map (FSM) plsample 1.0 PL/Sample pg_prewarm 1.2 prewarm relation data pg_surgery 1.0 extension to perform surgery on a damaged relation seg 1.4 data type for representing line segments or floating-point intervals postgres_fdw 1.1 foreign-data wrapper for remote PostgreSQL servers refint 1.0 functions for implementing referential integrity (obsolete) test_ext_req_schema1 1.0 Required extension to be referenced spgist_name_ops 1.0 Test opclass for SP-GiST test_ext_req_schema2 1.0 Test schema referencing of required extensions test_shm_mq 1.0 Test code for shared memory message queues sslinfo 1.2 information about SSL certificates test_slru 1.0 Test code for SLRU tablefunc 1.0 functions that manipulate whole tables, including crosstab bool_plperl 1.0 transform between bool and plperl tcn 1.0 Triggered change notifications test_ext_req_schema3 1.0 Test schema referencing of 2 required extensions test_bloomfilter 1.0 Test code for Bloom filter library test_copy_callbacks 1.0 Test code for COPY callbacks test_ginpostinglist 1.0 Test code for ginpostinglist.c test_custom_rmgrs 1.0 Test code for custom WAL resource managers test_integerset 1.0 Test code for integerset test_ddl_deparse 1.0 Test code for DDL deparse feature tsm_system_rows 1.0 TABLESAMPLE method which accepts number of rows as a limit test_ext1 1.0 Test extension 1 tsm_system_time 1.0 TABLESAMPLE method which accepts time in milliseconds as a limit test_ext2 1.0 Test extension 2 unaccent 1.1 text search dictionary that removes accents test_ext3 1.0 Test extension 3 test_ext4 1.0 Test extension 4 uuid-ossp 1.1 generate universally unique identifiers (UUIDs) test_ext5 1.0 Test extension 5 worker_spi 1.0 Sample background worker test_ext6 1.0 test_ext6 test_lfind 1.0 Test code for optimized linear search functions xml2 1.1 XPath querying and XSLT test_ext7 1.0 Test extension 7 plpgsql 1.0 PL/pgSQL procedural language test_ext8 1.0 Test extension 8 test_parser 1.0 example of a custom parser for full-text search test_pg_dump 1.0 Test pg_dump with an extension test_ext_cine 1.0 Test extension using CREATE IF NOT EXISTS test_predtest 1.0 Test code for optimizer/util/predtest.c test_ext_cor 1.0 Test extension using CREATE OR REPLACE test_rbtree 1.0 Test code for red-black tree library test_ext_cyclic1 1.0 Test extension cyclic 1 test_ext_cyclic2 1.0 Test extension cyclic 2 test_ext_extschema 1.0 test @extschema@ test_regex 1.0 Test code for backend/regex/ test_ext_evttrig 1.0 Test extension - event trigger bool_plperlu 1.0 transform between bool and plperlu plperl 1.0 PL/Perl procedural language plperlu 1.0 PL/PerlU untrusted procedural language hstore_plpython3u 1.0 transform between hstore and plpython3u jsonb_plpython3u 1.0 transform between jsonb and plpython3u ltree_plpython3u 1.0 transform between ltree and plpython3u plpython3u 1.0 PL/Python3U untrusted procedural language pltcl 1.0 PL/Tcl procedural language pltclu 1.0 PL/TclU untrusted procedural language
请注意,Pigsty 不对使用 IvorySQL 内核承担任何质保责任,使用此内核遇到的任何问题与需求请联系原厂解决。
12.18.6 - PolarDB PG 使用阿里云开源的 PolarDB for PostgreSQL 内核提供国产信创资质支持,与类似 Oracle RAC 的使用体验。
概览 Pigsty 允许使用 PolarDB 创建带有 “国产化信创资质” 的 PostgreSQL 集群!
PolarDB for PostgreSQL 基本等效于 PostgreSQL 15,任何兼容 PostgreSQL 线缆协议的客户端工具都可以访问 PolarDB 集群。
Pigsty 的 PGSQL 仓库中提供了 PolarDB PG 开源版安装包,但不会在 Pigsty 安装时下载到本地软件仓库。
安装 使用 Pigsty 内置模板:
./configure -c polar
./deploy.yml
配置 以下参数需要针对 PolarDB 数据库集群进行特殊配置:
#----------------------------------#
# PGSQL & PolarDB
#----------------------------------#
pg_version : 15
pg_packages : [ 'polardb patroni pgbouncer pgbackrest pg_exporter pgbadger vip-manager' ]
pg_extensions : [ ] # do not install any vanilla postgresql extensions
pg_mode : polar # PolarDB Compatible Mode
pg_default_roles : # default roles and users in postgres cluster
- { name: dbrole_readonly ,login: false ,comment : role for global read-only access }
- { name: dbrole_offline ,login: false ,comment : role for restricted read-only access }
- { name: dbrole_readwrite ,login: false ,roles: [dbrole_readonly] ,comment : role for global read-write access }
- { name: dbrole_admin ,login: false ,roles: [pg_monitor, dbrole_readwrite] ,comment : role for object creation }
- { name: postgres ,superuser: true ,comment : system superuser }
- { name: replicator ,superuser: true ,replication: true ,roles: [pg_monitor, dbrole_readonly] ,comment : system replicator } # <- superuser is required for replication
- { name: dbuser_dba ,superuser: true ,roles: [dbrole_admin] ,pgbouncer: true ,pool_mode: session, pool_connlimit: 16 ,comment : pgsql admin user }
- { name: dbuser_monitor ,roles: [pg_monitor] ,pgbouncer: true ,parameters : {log_min_duration_statement: 1000 } ,pool_mode: session ,pool_connlimit: 8 ,comment : pgsql monitor user }
这里特别注意,PolarDB PG 要求 replicator 复制用户为 Superuser,与原生 PG 不同。
扩展列表 绝大多数 PGSQL 模块的 扩展插件
目前 PolarDB 内核自带了以下 61 个扩展插件,除去 Contrib 扩展外,提供的额外扩展包括:
polar_csn 1.0 : polar_csnpolar_monitor 1.2 : examine the polardb informationpolar_monitor_preload 1.1 : examine the polardb informationpolar_parameter_check 1.0 : kernel extension for parameter validationpolar_px 1.0 : Parallel Execution extensionpolar_stat_env 1.0 : env stat functions for PolarDBpolar_stat_sql 1.3 : Kernel statistics gathering, and sql plan nodes information gatheringpolar_tde_utils 1.0 : Internal extension for TDEpolar_vfs 1.0 : polar_vfspolar_worker 1.0 : polar_workertimetravel 1.0 : functions for implementing time travelvector 0.5.1 : vector data type and ivfflat and hnsw access methodssmlar 1.0 : compute similary of any one-dimensional arraysPolarDB 可用的完整插件列表:
name version comment hstore_plpython2u 1.0 transform between hstore and plpython2u dict_int 1.0 text search dictionary template for integers adminpack 2.0 administrative functions for PostgreSQL hstore_plpython3u 1.0 transform between hstore and plpython3u amcheck 1.1 functions for verifying relation integrity hstore_plpythonu 1.0 transform between hstore and plpythonu autoinc 1.0 functions for autoincrementing fields insert_username 1.0 functions for tracking who changed a table bloom 1.0 bloom access method - signature file based index file_fdw 1.0 foreign-data wrapper for flat file access dblink 1.2 connect to other PostgreSQL databases from within a database btree_gin 1.3 support for indexing common datatypes in GIN fuzzystrmatch 1.1 determine similarities and distance between strings lo 1.1 Large Object maintenance intagg 1.1 integer aggregator and enumerator (obsolete) btree_gist 1.5 support for indexing common datatypes in GiST hstore 1.5 data type for storing sets of (key, value) pairs intarray 1.2 functions, operators, and index support for 1-D arrays of integers citext 1.5 data type for case-insensitive character strings cube 1.4 data type for multidimensional cubes hstore_plperl 1.0 transform between hstore and plperl isn 1.2 data types for international product numbering standards jsonb_plperl 1.0 transform between jsonb and plperl dict_xsyn 1.0 text search dictionary template for extended synonym processing hstore_plperlu 1.0 transform between hstore and plperlu earthdistance 1.1 calculate great-circle distances on the surface of the Earth pg_prewarm 1.2 prewarm relation data jsonb_plperlu 1.0 transform between jsonb and plperlu pg_stat_statements 1.6 track execution statistics of all SQL statements executed jsonb_plpython2u 1.0 transform between jsonb and plpython2u jsonb_plpython3u 1.0 transform between jsonb and plpython3u jsonb_plpythonu 1.0 transform between jsonb and plpythonu pg_trgm 1.4 text similarity measurement and index searching based on trigrams pgstattuple 1.5 show tuple-level statistics ltree 1.1 data type for hierarchical tree-like structures ltree_plpython2u 1.0 transform between ltree and plpython2u pg_visibility 1.2 examine the visibility map (VM) and page-level visibility info ltree_plpython3u 1.0 transform between ltree and plpython3u ltree_plpythonu 1.0 transform between ltree and plpythonu seg 1.3 data type for representing line segments or floating-point intervals moddatetime 1.0 functions for tracking last modification time pgcrypto 1.3 cryptographic functions pgrowlocks 1.2 show row-level locking information pageinspect 1.7 inspect the contents of database pages at a low level pg_buffercache 1.3 examine the shared buffer cache pg_freespacemap 1.2 examine the free space map (FSM) tcn 1.0 Triggered change notifications plperl 1.0 PL/Perl procedural language uuid-ossp 1.1 generate universally unique identifiers (UUIDs) plperlu 1.0 PL/PerlU untrusted procedural language refint 1.0 functions for implementing referential integrity (obsolete) xml2 1.1 XPath querying and XSLT plpgsql 1.0 PL/pgSQL procedural language plpython3u 1.0 PL/Python3U untrusted procedural language pltcl 1.0 PL/Tcl procedural language pltclu 1.0 PL/TclU untrusted procedural language polar_csn 1.0 polar_csn sslinfo 1.2 information about SSL certificates polar_monitor 1.2 examine the polardb information polar_monitor_preload 1.1 examine the polardb information polar_parameter_check 1.0 kernel extension for parameter validation polar_px 1.0 Parallel Execution extension tablefunc 1.0 functions that manipulate whole tables, including crosstab polar_stat_env 1.0 env stat functions for PolarDB smlar 1.0 compute similary of any one-dimensional arrays timetravel 1.0 functions for implementing time travel tsm_system_rows 1.0 TABLESAMPLE method which accepts number of rows as a limit polar_stat_sql 1.3 Kernel statistics gathering, and sql plan nodes information gathering tsm_system_time 1.0 TABLESAMPLE method which accepts time in milliseconds as a limit polar_tde_utils 1.0 Internal extension for TDE polar_vfs 1.0 polar_vfs polar_worker 1.0 polar_worker unaccent 1.1 text search dictionary that removes accents postgres_fdw 1.0 foreign-data wrapper for remote PostgreSQL servers
Pigsty 专业版提供 PolarDB 离线安装支持,扩展插件编译支持,以及针对 PolarDB 集群进行专门适配的监控与管控支持。 Pigsty 与阿里云内核团队有合作,可以提供有偿内核兜底支持服务。 12.18.7 - PolarDB Oracle 使用阿里云商业版本的 PolarDB for Oracle 内核(闭源,PG14,仅在特殊企业版定制中可用)
Pigsty 允许使用 PolarDB 创建带有 “国产化信创资质” 的 PolarDB for Oracle 集群!
根据 【安全可靠测评结果公告(2023年第1号) 】,附表三、集中式数据库。PolarDB v2.0 属于自主可控,安全可靠的国产信创数据库。
PolarDB for Oracle 是基于 PolarDB for PostgreSQL 进行二次开发的 Oracle 兼容版本,两者共用同一套内核,通过 --compatibility-mode 参数进行区分。
我们与阿里云内核团队合作,提供基于 PolarDB v2.0 内核与 Pigsty 的完整数据库解决方案,请联系销售咨询,或在阿里云市场自行采购。
PolarDB for Oracle 内核目前仅在 EL7 (CentOS 7) 系统中可用。
扩展 目前 PolarDB 2.0 (Oracle兼容) 内核自带了以下 188 个扩展插件:
name default_version comment cube 1.5 data type for multidimensional cubes ip4r 2.4 NULL adminpack 2.1 administrative functions for PostgreSQL dict_xsyn 1.0 text search dictionary template for extended synonym processing amcheck 1.4 functions for verifying relation integrity autoinc 1.0 functions for autoincrementing fields hstore 1.8 data type for storing sets of (key, value) pairs bloom 1.0 bloom access method - signature file based index earthdistance 1.1 calculate great-circle distances on the surface of the Earth hstore_plperl 1.0 transform between hstore and plperl bool_plperl 1.0 transform between bool and plperl file_fdw 1.0 foreign-data wrapper for flat file access bool_plperlu 1.0 transform between bool and plperlu fuzzystrmatch 1.1 determine similarities and distance between strings hstore_plperlu 1.0 transform between hstore and plperlu btree_gin 1.3 support for indexing common datatypes in GIN hstore_plpython2u 1.0 transform between hstore and plpython2u btree_gist 1.6 support for indexing common datatypes in GiST hll 2.17 type for storing hyperloglog data hstore_plpython3u 1.0 transform between hstore and plpython3u citext 1.6 data type for case-insensitive character strings hstore_plpythonu 1.0 transform between hstore and plpythonu hypopg 1.3.1 Hypothetical indexes for PostgreSQL insert_username 1.0 functions for tracking who changed a table dblink 1.2 connect to other PostgreSQL databases from within a database decoderbufs 0.1.0 Logical decoding plugin that delivers WAL stream changes using a Protocol Buffer format intagg 1.1 integer aggregator and enumerator (obsolete) dict_int 1.0 text search dictionary template for integers intarray 1.5 functions, operators, and index support for 1-D arrays of integers isn 1.2 data types for international product numbering standards jsonb_plperl 1.0 transform between jsonb and plperl jsonb_plperlu 1.0 transform between jsonb and plperlu jsonb_plpython2u 1.0 transform between jsonb and plpython2u jsonb_plpython3u 1.0 transform between jsonb and plpython3u jsonb_plpythonu 1.0 transform between jsonb and plpythonu lo 1.1 Large Object maintenance log_fdw 1.0 foreign-data wrapper for csvlog ltree 1.2 data type for hierarchical tree-like structures ltree_plpython2u 1.0 transform between ltree and plpython2u ltree_plpython3u 1.0 transform between ltree and plpython3u ltree_plpythonu 1.0 transform between ltree and plpythonu moddatetime 1.0 functions for tracking last modification time old_snapshot 1.0 utilities in support of old_snapshot_threshold oracle_fdw 1.2 foreign data wrapper for Oracle access oss_fdw 1.1 foreign-data wrapper for OSS access pageinspect 2.1 inspect the contents of database pages at a low level pase 0.0.1 ant ai similarity search pg_bigm 1.2 text similarity measurement and index searching based on bigrams pg_freespacemap 1.2 examine the free space map (FSM) pg_hint_plan 1.4 controls execution plan with hinting phrases in comment of special form pg_buffercache 1.5 examine the shared buffer cache pg_prewarm 1.2 prewarm relation data pg_repack 1.4.8-1 Reorganize tables in PostgreSQL databases with minimal locks pg_sphere 1.0 spherical objects with useful functions, operators and index support pg_cron 1.5 Job scheduler for PostgreSQL pg_jieba 1.1.0 a parser for full-text search of Chinese pg_stat_kcache 2.2.1 Kernel statistics gathering pg_stat_statements 1.9 track planning and execution statistics of all SQL statements executed pg_surgery 1.0 extension to perform surgery on a damaged relation pg_trgm 1.6 text similarity measurement and index searching based on trigrams pg_visibility 1.2 examine the visibility map (VM) and page-level visibility info pg_wait_sampling 1.1 sampling based statistics of wait events pgaudit 1.6.2 provides auditing functionality pgcrypto 1.3 cryptographic functions pgrowlocks 1.2 show row-level locking information pgstattuple 1.5 show tuple-level statistics pgtap 1.2.0 Unit testing for PostgreSQL pldbgapi 1.1 server-side support for debugging PL/pgSQL functions plperl 1.0 PL/Perl procedural language plperlu 1.0 PL/PerlU untrusted procedural language plpgsql 1.0 PL/pgSQL procedural language plpython2u 1.0 PL/Python2U untrusted procedural language plpythonu 1.0 PL/PythonU untrusted procedural language plsql 1.0 Oracle compatible PL/SQL procedural language pltcl 1.0 PL/Tcl procedural language pltclu 1.0 PL/TclU untrusted procedural language polar_bfile 1.0 The BFILE data type enables access to binary file LOBs that are stored in file systems outside Database polar_bpe 1.0 polar_bpe polar_builtin_cast 1.1 Internal extension for builtin casts polar_builtin_funcs 2.0 implement polar builtin functions polar_builtin_type 1.5 polar_builtin_type for PolarDB polar_builtin_view 1.5 polar_builtin_view polar_catalog 1.2 polardb pg extend catalog polar_channel 1.0 polar_channel polar_constraint 1.0 polar_constraint polar_csn 1.0 polar_csn polar_dba_views 1.0 polar_dba_views polar_dbms_alert 1.2 implement polar_dbms_alert - supports asynchronous notification of database events. polar_dbms_application_info 1.0 implement polar_dbms_application_info - record names of executing modules or transactions in the database. polar_dbms_pipe 1.1 implements polar_dbms_pipe - package lets two or more sessions in the same instance communicate. polar_dbms_aq 1.2 implement dbms_aq - provides an interface to Advanced Queuing. polar_dbms_lob 1.3 implement dbms_lob - provides subprograms to operate on BLOBs, CLOBs, and NCLOBs. polar_dbms_output 1.2 implement polar_dbms_output - enables you to send messages from stored procedures. polar_dbms_lock 1.0 implement polar_dbms_lock - provides an interface to Oracle Lock Management services. polar_dbms_aqadm 1.3 polar_dbms_aqadm - procedures to manage Advanced Queuing configuration and administration information. polar_dbms_assert 1.0 implement polar_dbms_assert - provide an interface to validate properties of the input value. polar_dbms_metadata 1.0 implement polar_dbms_metadata - provides a way for you to retrieve metadata from the database dictionary. polar_dbms_random 1.0 implement polar_dbms_random - a built-in random number generator, not intended for cryptography polar_dbms_crypto 1.1 implement dbms_crypto - provides an interface to encrypt and decrypt stored data. polar_dbms_redact 1.0 implement polar_dbms_redact - provides an interface to mask data from queries by an application. polar_dbms_debug 1.1 server-side support for debugging PL/SQL functions polar_dbms_job 1.0 polar_dbms_job polar_dbms_mview 1.1 implement polar_dbms_mview - enables to refresh materialized views. polar_dbms_job_preload 1.0 polar_dbms_job_preload polar_dbms_obfuscation_toolkit 1.1 implement polar_dbms_obfuscation_toolkit - enables an application to get data md5. polar_dbms_rls 1.1 implement polar_dbms_rls - a fine-grained access control administrative built-in package polar_multi_toast_utils 1.0 polar_multi_toast_utils polar_dbms_session 1.2 implement polar_dbms_session - support to set preferences and security levels. polar_odciconst 1.0 implement ODCIConst - Provide some built-in constants in Oracle. polar_dbms_sql 1.2 implement polar_dbms_sql - provides an interface to execute dynamic SQL. polar_osfs_toolkit 1.0 osfs library tools and functions extension polar_dbms_stats 14.0 stabilize plans by fixing statistics polar_monitor 1.5 monitor functions for PolarDB polar_osfs_utils 1.0 osfs library utils extension polar_dbms_utility 1.3 implement polar_dbms_utility - provides various utility subprograms. polar_parameter_check 1.0 kernel extension for parameter validation polar_dbms_xmldom 1.0 implement dbms_xmldom and dbms_xmlparser - support standard DOM interface and xml parser object polar_parameter_manager 1.1 Extension to select parameters for manger. polar_faults 1.0.0 simulate some database faults for end user or testing system. polar_monitor_preload 1.1 examine the polardb information polar_proxy_utils 1.0 Extension to provide operations about proxy. polar_feature_utils 1.2 PolarDB feature utilization polar_global_awr 1.0 PolarDB Global AWR Report polar_publication 1.0 support polardb pg logical replication polar_global_cache 1.0 polar_global_cache polar_px 1.0 Parallel Execution extension polar_serverless 1.0 polar serverless extension polar_resource_manager 1.0 a background process that forcibly frees user session process memory polar_sys_context 1.1 implement polar_sys_context - returns the value of parameter associated with the context namespace at the current instant. polar_gpc 1.3 polar_gpc polar_tde_utils 1.0 Internal extension for TDE polar_gtt 1.1 polar_gtt polar_utl_encode 1.2 implement polar_utl_encode - provides functions that encode RAW data into a standard encoded format polar_htap 1.1 extension for PolarDB HTAP polar_htap_db 1.0 extension for PolarDB HTAP database level operation polar_io_stat 1.0 polar io stat in multi dimension polar_utl_file 1.0 implement utl_file - support PL/SQL programs can read and write operating system text files polar_ivm 1.0 polar_ivm polar_sql_mapping 1.2 Record error sqls and mapping them to correct one polar_stat_sql 1.0 Kernel statistics gathering, and sql plan nodes information gathering tds_fdw 2.0.2 Foreign data wrapper for querying a TDS database (Sybase or Microsoft SQL Server) xml2 1.1 XPath querying and XSLT polar_upgrade_catalogs 1.1 Upgrade catalogs for old version instance polar_utl_i18n 1.1 polar_utl_i18n polar_utl_raw 1.0 implement utl_raw - provides SQL functions for manipulating RAW datatypes. timescaledb 2.9.2 Enables scalable inserts and complex queries for time-series data polar_vfs 1.0 polar virtual file system for different storage polar_worker 1.0 polar_worker postgres_fdw 1.1 foreign-data wrapper for remote PostgreSQL servers refint 1.0 functions for implementing referential integrity (obsolete) roaringbitmap 0.5 support for Roaring Bitmaps tsm_system_time 1.0 TABLESAMPLE method which accepts time in milliseconds as a limit vector 0.5.0 vector data type and ivfflat and hnsw access methods rum 1.3 RUM index access method unaccent 1.1 text search dictionary that removes accents seg 1.4 data type for representing line segments or floating-point intervals sequential_uuids 1.0.2 generator of sequential UUIDs uuid-ossp 1.1 generate universally unique identifiers (UUIDs) smlar 1.0 compute similary of any one-dimensional arrays varbitx 1.1 varbit functions pack sslinfo 1.2 information about SSL certificates tablefunc 1.0 functions that manipulate whole tables, including crosstab tcn 1.0 Triggered change notifications zhparser 1.0 a parser for full-text search of Chinese address_standardizer 3.3.2 Ganos PostGIS address standardizer address_standardizer_data_us 3.3.2 Ganos PostGIS address standardizer data us ganos_fdw 6.0 Ganos Spatial FDW extension for POLARDB ganos_geometry 6.0 Ganos geometry lite extension for POLARDB ganos_geometry_pyramid 6.0 Ganos Geometry Pyramid extension for POLARDB ganos_geometry_sfcgal 6.0 Ganos geometry lite sfcgal extension for POLARDB ganos_geomgrid 6.0 Ganos geometry grid extension for POLARDB ganos_importer 6.0 Ganos Spatial importer extension for POLARDB ganos_networking 6.0 Ganos networking ganos_pointcloud 6.0 Ganos pointcloud extension For POLARDB ganos_pointcloud_geometry 6.0 Ganos_pointcloud LIDAR data and ganos_geometry data for POLARDB ganos_raster 6.0 Ganos raster extension for POLARDB ganos_scene 6.0 Ganos scene extension for POLARDB ganos_sfmesh 6.0 Ganos surface mesh extension for POLARDB ganos_spatialref 6.0 Ganos spatial reference extension for POLARDB ganos_trajectory 6.0 Ganos trajectory extension for POLARDB ganos_vomesh 6.0 Ganos volumn mesh extension for POLARDB postgis_tiger_geocoder 3.3.2 Ganos PostGIS tiger geocoder postgis_topology 3.3.2 Ganos PostGIS topology
12.18.8 - Percona 支持 TDE 透明加密的 Percona Postgres 发行版
Percona Postgres 是一个带有 pg_tde
它与 PostgreSQL 18.1 兼容,在所有 Pigsty 支持的平台上都可用。
快速开始 使用 Pigsty 标准安装流程 pgtde
curl -fsSL https://repo.pigsty.io/get | bash; cd ~/pigsty;
./configure -c pgtde # 使用 percona postgres 内核
./deploy.yml # 使用 pigsty 设置一切
配置 需要调整以下参数来部署 Percona 集群:
pg-meta :
hosts :
10.10.10.10 : { pg_seq: 1, pg_role : primary }
vars :
pg_cluster : pg-meta
pg_users :
- { name: dbuser_meta ,password: DBUser.Meta ,pgbouncer: true ,roles: [dbrole_admin ] ,comment : pigsty admin user }
- { name: dbuser_view ,password: DBUser.Viewer ,pgbouncer: true ,roles: [dbrole_readonly] ,comment : read-only viewer }
pg_databases :
- name : meta
baseline : cmdb.sql
comment : pigsty tde database
schemas : [ pigsty]
extensions : [ vector, postgis, pg_tde ,pgaudit, { name: pg_stat_monitor, schema: monitor } ]
pg_hba_rules :
- { user: dbuser_view , db: all ,addr: infra ,auth: pwd ,title : 'allow grafana dashboard access cmdb from infra nodes' }
node_crontab : [ '00 01 * * * postgres /pg/bin/pg-backup full' ] # 每天凌晨 1 点进行全量备份
# Percona PostgreSQL TDE 临时设置
pg_packages : [ percona-main, pgsql-common ] # 安装 percona postgres 包
pg_libs : 'pg_tde, pgaudit, pg_stat_statements, pg_stat_monitor, auto_explain'
扩展 Percona 提供了 80 个可用的扩展,包括 pg_tde, pgvector, postgis, pgaudit, set_user, pg_stat_monitor 等实用三方扩展。
扩展名 版本 说明 pg_tde 2.1 Percona 透明数据加密访问方法 vector 0.8.1 向量数据类型及 ivfflat 和 hnsw 访问方法 postgis 3.5.4 PostGIS 几何和地理空间类型及函数 pgaudit 18.0 提供审计功能 pg_stat_monitor 2.3 PostgreSQL 查询性能监控工具 set_user 4.2.0 类似 SET ROLE 但带有额外日志记录 pg_repack 1.5.3 以最小锁定重组 PostgreSQL 数据库中的表 hstore 1.8 用于存储(键,值)对集合的数据类型 ltree 1.3 用于层次树状结构的数据类型 pg_trgm 1.6 基于三元组的文本相似度测量和索引搜索
完整的 80 个扩展列表请参考 Percona Postgres 官方文档 。
关键特性 透明数据加密 :使用 pg_tde 扩展提供静态数据加密PostgreSQL 18 兼容 :基于最新 PostgreSQL 18 版本企业级扩展 :包含 pgaudit、pg_stat_monitor 等企业级功能完整生态 :支持 pgvector、PostGIS 等流行扩展注意 :目前处于稳定阶段 - 在生产使用前请彻底评估。
12.18.9 - PostgresML 如何使用 Pigsty 部署 PostgresML,在数据库内进行机器学习、模型训练、推理、Embedding 与 RAG。
PostgresML 是一个 PostgreSQL 扩展,支持最新的大语言模型(LLM)、向量操作、经典机器学习以及传统的 Postgres 应用负载。
PostgresML (pgml) 是一个用 Rust 编写的 PostgreSQL 扩展。您可以运行独立的 Docker 镜像,但本文档不是 docker-compose 模板介绍,仅供参考。
PostgresML 官方支持 Ubuntu 22.04,但我们也为 EL 8/9 维护了 RPM 版本,如果您不需要 CUDA 和 NVIDIA 相关功能的话。
您需要在数据库节点上能够访问互联网,以便从 PyPI 下载 Python 依赖,并从 HuggingFace 下载模型。
配置 PostgresML 是一个用 Rust 编写的扩展,官方支持 Ubuntu。Pigsty 在 EL8 和 EL9 上维护了 PostgresML 的 RPM 版本。
创建新集群
PostgresML 2.7.9 可用于 PostgreSQL 15,支持 Ubuntu 22.04(官方)、Debian 12 和 EL 8/9(Pigsty 维护)。要启用 pgml,首先需要安装扩展:
pg-meta :
hosts : { 10.10.10.10 : { pg_seq: 1, pg_role : primary } }
vars :
pg_cluster : pg-meta
pg_users :
- {name: dbuser_meta ,password: DBUser.Meta ,pgbouncer: true ,roles: [dbrole_admin] ,comment : pigsty admin user }
- {name: dbuser_view ,password: DBUser.Viewer ,pgbouncer: true ,roles: [dbrole_readonly] ,comment : read-only viewer for meta database }
pg_databases :
- { name: meta ,baseline: cmdb.sql ,comment: pigsty meta database ,schemas: [pigsty] ,extensions : [ {name: postgis, schema : public}, {name: timescaledb}]}
pg_hba_rules :
- {user: dbuser_view , db: all ,addr: infra ,auth: pwd ,title : 'allow grafana dashboard access cmdb from infra nodes' }
pg_libs : 'pgml, pg_stat_statements, auto_explain'
pg_extensions : [ 'pgml_15 pgvector_15 wal2json_15 repack_15' ] # ubuntu
#pg_extensions: [ 'postgresql-pgml-15 postgresql-15-pgvector postgresql-15-wal2json postgresql-15-repack' ] # ubuntu
在 EL 8/9 中,扩展名为 pgml_15,对应的 Ubuntu/Debian 名称为 postgresql-pgml-15。同时需要将 pgml 添加到 pg_libs 中。
在现有集群上启用
要在现有集群上启用 pgml,可以使用 Ansible 的 package 模块安装:
ansible pg-meta -m package -b -a 'name=pgml_15'
# ansible el8,el9 -m package -b -a 'name=pgml_15' # EL 8/9
# ansible u22 -m package -b -a 'name=postgresql-pgml-15' # Ubuntu 22.04 jammy
Python 依赖 您还需要在集群节点上安装 PostgresML 的 Python 依赖。官方教程:安装指南
安装 Python 和 PIP
确保已安装 python3、pip 和 venv:
# Ubuntu 22.04 (python3.10),需要使用 apt 安装 pip 和 venv
sudo apt install -y python3 python3-pip python3-venv
对于 EL 8 / EL9 及兼容发行版,可以使用 python3.11:
# EL 8/9,可以升级默认的 pip 和 virtualenv
sudo yum install -y python3.11 python3.11-pip # 安装最新的 python3.11
python3.11 -m pip install --upgrade pip virtualenv # 在 EL8 / EL9 上使用 python3.11
使用 PyPI 镜像 对于中国大陆用户,建议使用清华大学 PyPI 镜像 。
pip config set global.index-url https://pypi.tuna.tsinghua.edu.cn/simple # 设置全局镜像(推荐)
pip install -i https://pypi.tuna.tsinghua.edu.cn/simple some-package # 单次安装时使用
安装依赖包
创建 Python 虚拟环境,并使用 pip 从 requirements.txtrequirements-xformers.txt
如果您使用的是 EL 8/9,需要将以下命令中的 python3 替换为 python3.11。
su - postgres; # 使用数据库超级用户创建虚拟环境
mkdir -p /data/pgml; cd /data/pgml; # 创建虚拟环境目录
python3 -m venv /data/pgml # 创建虚拟环境目录(Ubuntu 22.04)
source /data/pgml/bin/activate # 激活虚拟环境
# 写入 Python 依赖并使用 pip 安装
cat > /data/pgml/requirments.txt <<EOF
accelerate==0.22.0
auto-gptq==0.4.2
bitsandbytes==0.41.1
catboost==1.2
ctransformers==0.2.27
datasets==2.14.5
deepspeed==0.10.3
huggingface-hub==0.17.1
InstructorEmbedding==1.0.1
lightgbm==4.1.0
orjson==3.9.7
pandas==2.1.0
rich==13.5.2
rouge==1.0.1
sacrebleu==2.3.1
sacremoses==0.0.53
scikit-learn==1.3.0
sentencepiece==0.1.99
sentence-transformers==2.2.2
tokenizers==0.13.3
torch==2.0.1
torchaudio==2.0.2
torchvision==0.15.2
tqdm==4.66.1
transformers==4.33.1
xgboost==2.0.0
langchain==0.0.287
einops==0.6.1
pynvml==11.5.0
EOF
# 在虚拟环境中使用 pip 安装依赖
python3 -m pip install -r /data/pgml/requirments.txt
python3 -m pip install xformers == 0.0.21 --no-dependencies
# 此外,有 3 个 Python 包需要使用 sudo 全局安装!
sudo python3 -m pip install xgboost lightgbm scikit-learn
启用 PostgresML 在所有集群节点上安装 pgml 扩展和 Python 依赖后,就可以在 PostgreSQL 集群上启用 pgml 了。
使用 patronictl 命令 配置集群 ,将 pgml 添加到 shared_preload_libraries,并在 pgml.venv 中指定您的虚拟环境目录:
shared_preload_libraries : pgml, timescaledb, pg_stat_statements, auto_explain
pgml.venv : '/data/pgml'
然后重启数据库集群,并使用 SQL 命令创建扩展:
CREATE EXTENSION vector ; -- 建议同时安装 pgvector!
CREATE EXTENSION pgml ; -- 在当前数据库中创建 PostgresML
SELECT pgml . version (); -- 打印 PostgresML 版本信息
如果一切正常,您应该会看到类似以下输出:
# create extension pgml;
INFO: Python version: 3.11.2 ( main, Oct 5 2023, 16:06:03) [ GCC 8.5.0 20210514 ( Red Hat 8.5.0-18)]
INFO: Scikit-learn 1.3.0, XGBoost 2.0.0, LightGBM 4.1.0, NumPy 1.26.1
CREATE EXTENSION
# SELECT pgml.version(); -- 打印 PostgresML 版本信息
version
---------
2.7.8
大功告成!更多详情请参阅 PostgresML 官方文档:https://postgresml.org/docs/guides/use-cases/
12.18.10 - openHalo MySQL 兼容的 Postgres 14 分支
OpenHalo 是一个开源的 PostgreSQL 内核,提供 MySQL 线协议兼容性。
openHalo 基于 PostgreSQL 14.18 内核版本,提供与 MySQL 5.7.32-log / 8.0 版本的线协议兼容性。
Pigsty 在所有支持的 Linux 平台上为 OpenHalo 提供部署支持。
快速开始 使用 Pigsty 的 标准安装流程 mysql
curl -fsSL https://repo.pigsty.io/get | bash; cd ~/pigsty;
./configure -c mysql # 使用 MySQL(openHalo)配置模板
./deploy.yml # 安装,生产部署请先在 pigsty.yml 中修改密码
对于生产部署,请确保在运行安装剧本之前修改 pigsty.yml 配置文件中的密码参数。
配置 pg-meta :
hosts :
10.10.10.10 : { pg_seq: 1, pg_role : primary }
vars :
pg_cluster : pg-meta
pg_users :
- {name: dbuser_meta ,password: DBUser.Meta ,pgbouncer: true ,roles: [dbrole_admin] ,comment : pigsty admin user }
- {name: dbuser_view ,password: DBUser.Viewer ,pgbouncer: true ,roles: [dbrole_readonly] ,comment : read-only viewer for meta database }
pg_databases :
- {name: postgres, extensions : [ aux_mysql ]} # mysql 兼容数据库
- {name: meta ,baseline: cmdb.sql ,comment: pigsty meta database ,schemas : [ pigsty]}
pg_hba_rules :
- {user: dbuser_view , db: all ,addr: infra ,auth: pwd ,title : 'allow grafana dashboard access cmdb from infra nodes' }
node_crontab : [ '00 01 * * * postgres /pg/bin/pg-backup full' ] # 每天凌晨 1 点进行全量备份
# OpenHalo 临时设置
pg_mode : mysql # HaloDB 的 MySQL 兼容模式
pg_version : 14 # 当前 HaloDB 兼容 PG 主版本 14
pg_packages : [ openhalodb, pgsql-common ] # 安装 openhalodb 而不是 postgresql 内核
OpenHalo 提供了一个独有的扩展 aux_mysql,它包含了 MySQL 兼容性所需的函数和类型。请确保在 pg_databases 配置中为 postgres 数据库启用此扩展,以获得完整的 MySQL 兼容功能。
使用 访问 MySQL 时,实际连接使用的是 postgres 数据库。请注意,MySQL 中的"数据库"概念实际上对应于 PostgreSQL 中的"Schema"。
因此,use mysql 实际上使用的是 postgres 数据库内的 mysql Schema。
用于 MySQL 的用户名和密码与 PostgreSQL 中的相同。您可以使用标准的 PostgreSQL 方法管理用户和权限。
客户端访问 OpenHalo 提供 MySQL 线协议兼容性,默认监听端口 3306,允许 MySQL 客户端和驱动程序直接连接。
Pigsty 的 conf/mysqlmysql 客户端工具。
您可以使用以下命令访问 MySQL:
mysql -h 127.0.0.1 -u dbuser_dba
目前,OpenHalo 官方确保 Navicat 可以正常访问此 MySQL 端口,但 Intellij IDEA 的 DataGrip 访问会导致错误。
配置 Pigsty 默认配置了 database_compat_mode 值为 mysql,启用 MySQL 兼容性模式。您可以进一步调整以下参数来调整 MySQL 兼容性设置:
mysql.listener_on = true # (enable MySQL listener; change requires restart)
mysql.port = 3306 # (second_port is for MySQL mode; change requires restart)
mysql.halo_mysql_version = '5.7.32-log' # (change requires restart)
mysql.ci_collation = true # (change requires restart)
mysql.explicit_defaults_for_timestamp = false # (change requires restart)
mysql.auto_rollback_tx_on_error = false # (change requires restart)
修改说明 Pigsty 安装的 OpenHalo 内核基于 HaloTech-Co-Ltd/openHalo 内核进行了少量修改:
将默认数据库名称从 halo0root 改回 postgres 从默认版本号中删除 1.0. 前缀,恢复为 14.18(否则 Patroni 会报错) 修改默认配置文件以启用 MySQL 兼容性并默认监听端口 3306 请注意,Pigsty 不为使用 OpenHalo 内核提供任何保证。使用此内核时遇到的任何问题或需求应与原始供应商联系。
警告 :目前该内核处于 beta1 阶段 - 在生产使用前请自行评估风险。
12.18.11 - Greenplum 使用 Pigsty 部署/监控 Greenplum 集群,构建大规模并行处理(MPP)的 PostgreSQL 数据仓库集群!
Pigsty 支持部署 Greenplum 集群,及其衍生发行版 YMatrixDB,并提供了将现有 Greenplum 部署纳入 Pigsty 监控的能力。
概览 Greenplum / YMatrix 集群部署能力仅在专业版本/企业版本中提供,目前不对外开源。
安装 Pigsty 提供了 Greenplum 6 (@el7) 与 Greenplum 7 (@el8) 的安装包,开源版本用户可以自行安装配置。
# EL 7 Only (Greenplum6)
./node.yml -t node_install -e '{"node_repo_modules":"pgsql","node_packages":["open-source-greenplum-db-6"]}'
# EL 8 Only (Greenplum7)
./node.yml -t node_install -e '{"node_repo_modules":"pgsql","node_packages":["open-source-greenplum-db-7"]}'
配置 要定义 Greenplum 集群,需要用到 pg_mode = gpsql,并使用额外的身份参数 pg_shard 与 gp_role。
#================================================================#
# GPSQL Clusters #
#================================================================#
#----------------------------------#
# cluster: mx-mdw (gp master)
#----------------------------------#
mx-mdw :
hosts :
10.10.10.10 : { pg_seq: 1, pg_role: primary , nodename : mx-mdw-1 }
vars :
gp_role : master # this cluster is used as greenplum master
pg_shard : mx # pgsql sharding name & gpsql deployment name
pg_cluster : mx-mdw # this master cluster name is mx-mdw
pg_databases :
- { name: matrixmgr , extensions : [ { name : matrixdbts } ] }
- { name : meta }
pg_users :
- { name: meta , password: DBUser.Meta , pgbouncer : true }
- { name: dbuser_monitor , password: DBUser.Monitor , roles: [ dbrole_readonly ], superuser : true }
pgbouncer_enabled : true # enable pgbouncer for greenplum master
pgbouncer_exporter_enabled : false # enable pgbouncer_exporter for greenplum master
pg_exporter_params : 'host=127.0.0.1&sslmode=disable' # use 127.0.0.1 as local monitor host
#----------------------------------#
# cluster: mx-sdw (gp master)
#----------------------------------#
mx-sdw :
hosts :
10.10.10.11 :
nodename : mx-sdw-1 # greenplum segment node
pg_instances : # greenplum segment instances
6000 : { pg_cluster: mx-seg1, pg_seq: 1, pg_role: primary , pg_exporter_port : 9633 }
6001 : { pg_cluster: mx-seg2, pg_seq: 2, pg_role: replica , pg_exporter_port : 9634 }
10.10.10.12 :
nodename : mx-sdw-2
pg_instances :
6000 : { pg_cluster: mx-seg2, pg_seq: 1, pg_role: primary , pg_exporter_port : 9633 }
6001 : { pg_cluster: mx-seg3, pg_seq: 2, pg_role: replica , pg_exporter_port : 9634 }
10.10.10.13 :
nodename : mx-sdw-3
pg_instances :
6000 : { pg_cluster: mx-seg3, pg_seq: 1, pg_role: primary , pg_exporter_port : 9633 }
6001 : { pg_cluster: mx-seg1, pg_seq: 2, pg_role: replica , pg_exporter_port : 9634 }
vars :
gp_role : segment # these are nodes for gp segments
pg_shard : mx # pgsql sharding name & gpsql deployment name
pg_cluster : mx-sdw # these segment clusters name is mx-sdw
pg_preflight_skip : true # skip preflight check (since pg_seq & pg_role & pg_cluster not exists)
pg_exporter_config : pg_exporter_basic.yml # use basic config to avoid segment server crash
pg_exporter_params : 'options=-c%20gp_role%3Dutility&sslmode=disable' # use gp_role = utility to connect to segments
此外,PG Exporter 需要额外的连接参数,才能连接到 Greenplum Segment 实例上采集监控指标。
12.18.12 - OrioleDB PostgreSQL 的下一代 OLTP 引擎
OrioleDB 是一个 PostgreSQL 存储引擎扩展,声称能够提供 4 倍 OLTP 性能,没有 xid 环绕和表膨胀问题,并具有"云原生"(数据存储在 S3)能力。
OrioleDB 的最新版本基于 补丁版 PostgreSQL 17.6 和一个额外的 扩展
您可以使用 Pigsty 将 OrioleDB 作为 RDS 运行,它与 PG 17 兼容,在所有支持的 Linux 平台上都可用。最新版本为 beta14,基于 PG 17_16 补丁。
快速开始 按照 Pigsty 标准安装 oriole
curl -fsSL https://repo.pigsty.io/get | bash; cd ~/pigsty;
./configure -c oriole # 使用 OrioleDB 配置模板
./deploy.yml # 使用 OrioleDB 安装 Pigsty
对于生产部署,请确保在运行 install 剧本之前修改 pigsty.yml 配置中的密码参数。
配置 pg-meta :
hosts :
10.10.10.10 : { pg_seq: 1, pg_role : primary }
vars :
pg_cluster : pg-meta
pg_users :
- {name: dbuser_meta ,password: DBUser.Meta ,pgbouncer: true ,roles: [dbrole_admin] ,comment : pigsty admin user }
- {name: dbuser_view ,password: DBUser.Viewer ,pgbouncer: true ,roles: [dbrole_readonly] ,comment : read-only viewer for meta database }
pg_databases :
- {name: meta ,baseline: cmdb.sql ,comment: pigsty meta database ,schemas: [pigsty], extensions : [ orioledb]}
pg_hba_rules :
- {user: dbuser_view , db: all ,addr: infra ,auth: pwd ,title : 'allow grafana dashboard access cmdb from infra nodes' }
node_crontab : [ '00 01 * * * postgres /pg/bin/pg-backup full' ] # 每天凌晨 1 点进行全量备份
# OrioleDB 临时设置
pg_mode : oriole # oriole 兼容模式
pg_packages : [ orioledb, pgsql-common ] # 安装 OrioleDB 内核
pg_libs : 'orioledb, pg_stat_statements, auto_explain' # 加载 OrioleDB 扩展
使用 要使用 OrioleDB,您需要安装 orioledb_17 和 oriolepg_17 包(目前仅提供 RPM 版本)。
使用 pgbench 初始化类似 TPC-B 的表,包含 100 个仓库:
pgbench -is 100 meta
pgbench -nv -P1 -c10 -S -T1000 meta
pgbench -nv -P1 -c50 -S -T1000 meta
pgbench -nv -P1 -c10 -T1000 meta
pgbench -nv -P1 -c50 -T1000 meta
接下来,您可以使用 orioledb 存储引擎重建这些表并观察性能差异:
-- 创建 OrioleDB 表
CREATE TABLE pgbench_accounts_o ( LIKE pgbench_accounts INCLUDING ALL ) USING orioledb ;
CREATE TABLE pgbench_branches_o ( LIKE pgbench_branches INCLUDING ALL ) USING orioledb ;
CREATE TABLE pgbench_history_o ( LIKE pgbench_history INCLUDING ALL ) USING orioledb ;
CREATE TABLE pgbench_tellers_o ( LIKE pgbench_tellers INCLUDING ALL ) USING orioledb ;
-- 从常规表复制数据到 OrioleDB 表
INSERT INTO pgbench_accounts_o SELECT * FROM pgbench_accounts ;
INSERT INTO pgbench_branches_o SELECT * FROM pgbench_branches ;
INSERT INTO pgbench_history_o SELECT * FROM pgbench_history ;
INSERT INTO pgbench_tellers_o SELECT * FROM pgbench_tellers ;
-- 删除原始表并重命名 OrioleDB 表
DROP TABLE pgbench_accounts , pgbench_branches , pgbench_history , pgbench_tellers ;
ALTER TABLE pgbench_accounts_o RENAME TO pgbench_accounts ;
ALTER TABLE pgbench_branches_o RENAME TO pgbench_branches ;
ALTER TABLE pgbench_history_o RENAME TO pgbench_history ;
ALTER TABLE pgbench_tellers_o RENAME TO pgbench_tellers ;
关键特性 无 XID 回绕 :消除事务 ID 回绕维护无表膨胀 :高级存储管理防止表膨胀云存储 :对 S3 兼容对象存储的原生支持OLTP 优化 :专为事务工作负载设计改进性能 :更好的空间利用率和查询性能注意 :目前处于 Beta 阶段 - 在生产使用前请彻底评估。
12.18.13 - Cloudberry 在 Pigsty 中使用 Cloudberry 开源 MPP 数仓内核,通过 gpsql 模式统一纳管节点、监控与配置。
Cloudberry 是一个源自 Greenplum 社区的开源 MPP 数据仓库内核,适合大规模并行分析场景。
概览 在 Pigsty 中,Cloudberry 沿用 gpsql 模式接入,与 Greenplum / MatrixDB 共享一套身份模型、监控逻辑与目录约定。
内核包名:cloudberry 模式标识:pg_mode: gpsql 角色标识:gp_role: master | segment 当前仓库版本:Cloudberry 2.0.0 当前版本字符串:PostgreSQL 14.4 (Apache Cloudberry 2.0.0-incubating build 1) 默认二进制目录:/usr/local/cloudberry 需要特别说明的是,Pigsty 当前对 Cloudberry 的支持重点在于:软件包交付、节点管理、监控纳管、访问控制与配置编排。
对于 MPP 集群初始化、扩容、重平衡和上游专有运维动作,仍建议使用 Cloudberry 官方工具链完成。
根据当前发布说明,Cloudberry 目前在 Pigsty 仓库中为 仅 RPM 构建 的内核。
安装 当前版本暂未提供独立的 cloudberry 一键模板。更常见的使用方式是:
将目标节点纳入 Pigsty 管理。 安装 cloudberry 内核包。 通过 gpsql 模式描述 coordinator / segment 拓扑。 使用 Pigsty 统一接入监控、账号、访问控制与备份体系。 如果只是为节点安装内核包,可直接执行:
./node.yml -t node_repo -e '{"node_repo_modules":"local,node,pgsql"}'
./node.yml -t node_install -e '{"node_packages":["cloudberry"]}'
如果是已有 Cloudberry 集群纳管,建议先保留原有初始化方式,再逐步补齐 Pigsty inventory 与监控配置。
配置 Cloudberry 使用 gpsql 模式,而不是单独的 cloudberry 模式。与原生 PostgreSQL 相比,至少需要额外关注 pg_shard 与 gp_role 两个身份参数;如需显式标注分片组,也可以补充 pg_group。
下面是一个最小可读的拓扑示例:
all :
children :
cb-mdw :
hosts :
10.10.10.10 : { pg_seq: 1, pg_role : primary }
vars :
pg_cluster : cb-mdw
pg_mode : gpsql
pg_shard : cb
gp_role : master
pg_packages : [ cloudberry, pgsql-common ]
cb-sdw :
hosts :
10.10.10.11 :
nodename : cb-sdw-1
pg_instances :
6000 : { pg_cluster: cb-seg1, pg_seq: 1, pg_role: primary, pg_exporter_port : 9633 }
10.10.10.12 :
nodename : cb-sdw-2
pg_instances :
6000 : { pg_cluster: cb-seg2, pg_seq: 1, pg_role: primary, pg_exporter_port : 9633 }
vars :
pg_cluster : cb-sdw
pg_mode : gpsql
pg_shard : cb
gp_role : segment
pg_preflight_skip : true
pg_packages : [ cloudberry, pgsql-common ]
pg_exporter_config : pg_exporter_basic.yml
pg_exporter_params : 'options=-c%20gp_role%3Dutility&sslmode=disable'
其中有两点最容易忽略:
gp_role: master 用于 coordinator / master 节点,业务访问通常落在这里。gp_role: segment 节点采集监控时,通常需要让 pg_exporter 以 utility 模式连接。客户端访问 对业务侧来说,Cloudberry 仍然暴露 PostgreSQL 线缆协议,绝大多数兼容 PostgreSQL 的客户端、驱动与 BI 工具都可以接入。
但需要注意:
应用与分析查询应连接到 master / coordinator,而不是直接访问 segment 节点。 segment 节点更适合承载数据与计算分片,以及被 Pigsty 纳入监控采集。 如果需要统一接入地址,可以继续使用 Pigsty 的 HAProxy / PgBouncer / DNS 服务抽象。 扩展与生态 Cloudberry 虽然源自 PostgreSQL 生态,但它不是“原生 PostgreSQL + 若干扩展”那么简单。
对于 Pigsty 主仓库中现成的扩展包,需要分两类看待:
纯 SQL 或与内核 ABI 耦合较弱的对象,通常更容易适配。 依赖 PGXS / 内核 C ABI 的扩展,往往需要针对 Cloudberry 的版本和编译链重新验证甚至重编译。 如果你的业务依赖 postgis、向量、FDW、审计或自定义 C 扩展,请先在目标 Cloudberry 版本上单独做兼容性验证,不要直接照搬原生 PostgreSQL 的扩展清单。
注意事项 Cloudberry 当前没有单独的 Pigsty 配置模板,使用时应以 gpsql 模式手工描述拓扑。 当前仓库交付重点是包、配置与监控,并不替代 Cloudberry 官方的 MPP 初始化与扩缩容工具。 由于这是 MPP 分布式内核,Patroni / PgBouncer / PgBackRest 的原生 PostgreSQL 经验并不能无条件套用到所有节点角色。 如果你只需要 PostgreSQL 水平扩展而不是完整 MPP 数仓,通常应优先考虑 Citus 。 相关文档 12.18.14 - Neon 使用 Neon 开源的 Serverless 版本 PostgreSQL 内核,自建灵活伸缩,Scale To Zero,灵活分叉的PG服务。
Neon
Neon 官网:https://neon.tech/
Neon 编译后的二进制产物过于庞大,目前不对开源版用户提供,目前处于试点阶段,有需求请联系 Pigsty 销售。
12.18.15 - AgensGraph 在 Pigsty 中使用 AgensGraph(PG16)图数据库内核,在 PostgreSQL 体系内获得属性图与 Cypher/SQL 混合查询能力。
AgensGraph 是基于 PostgreSQL 的属性图数据库内核,支持 openCypher 查询,并允许 Cypher 与 SQL 混合使用。
概览 Pigsty 通过 pg_mode: agens 接入 AgensGraph,并保留标准 PostgreSQL 集群的大部分运维体验。
内核包:agensgraph 模式标识:pg_mode: agens 当前模板版本:AgensGraph 2.16 当前版本字符串:PostgreSQL 16.9 (AgensGraph 2.16) 当前内置模板:agens 适用场景:关系数据之上叠加图关系分析、路径查询、知识图谱、风控关联 对客户端来说,AgensGraph 仍然暴露 PostgreSQL 线缆协议,常规 PG 客户端、驱动与连接池都可以直接接入。
和原生 PostgreSQL 的主要区别不在“如何连接”,而在“库内多了图模型对象、Cypher 语法与 agtype 数据类型”。
安装 使用 Pigsty 内置模板:
./configure -c agens
./deploy.yml
agens 模板会自动启用 pg_mode: agens 并安装 agensgraph 内核包。部署完成后可直接核对内核版本:
psql -d meta -c "SELECT version();"
配置 AgensGraph 在 Pigsty 中的关键配置如下:
all :
vars :
node_repo_modules : node,infra,pgsql
pg_version : 16
children :
pg-meta :
vars :
pg_mode : agens
pg_packages : [ agensgraph, pgsql-common ]
AgensGraph 不需要像 pgEdge / Babelfish 那样额外预加载一组专有库,因此大多数 Pigsty 的标准 HA、备份、监控、访问控制与 IaC 用法都保持不变。
如果你的负载以图遍历和复杂路径查询为主,通常应重点关注 work_mem、shared_buffers 与代价参数,而不是简单沿用默认 OLTP 习惯。
使用 连接到数据库后,通常先创建图并设置 graph_path:
CREATE GRAPH g ;
SET graph_path = g ;
创建标签、顶点和边:
CREATE VLABEL person ;
CREATE ELABEL knows ;
CREATE (: person { name : 'Jack' } );
CREATE (: person { name : 'Emily' } ) - [: knows ] -> (: person { name : 'Tom' } );
执行图查询与更新:
MATCH (: person { name : 'Emily' } ) - [: knows ] -> ( v : person )
RETURN v . name ;
MATCH ( v : person { name : 'Jack' } )
SET v . age = '24' ;
如需在 SQL 中混合调用 Cypher,可使用 cypher():
SELECT *
FROM cypher ( 'g' , $$ MATCH ( v : person ) RETURN v . name $$ ) AS ( name agtype );
在实际项目里,更常见的做法是把“关系表 + 图标签 + Cypher 查询”混合使用:
普通事务、权限与备份仍沿用 PostgreSQL 的工作流,而图分析逻辑放在 AgensGraph 提供的图对象与 cypher() 接口中完成。
注意事项 AgensGraph 当前固定在 PG16 兼容系,规划扩展生态时不要按 PG17 / PG18 的可用性来假定。 agens 默认模板为单节点快速启用,生产环境建议按需扩展为高可用拓扑。并非所有 PostgreSQL 三方扩展都保证可直接用于 AgensGraph 内核,建议先做兼容性验证。 图对象与关系对象可以共存于同一数据库中,但生产上通常更建议规划清晰的数据库或命名约定,避免图模型与普通业务对象互相污染。 请结合业务图模型规模调优内存与代价参数,避免直接沿用默认值。 使用 AgensGraph 内核遇到兼容或语义问题时,建议优先对照官方手册与上游 Issue 排查。 相关文档 12.18.16 - pgEdge 在 Pigsty 中使用 pgEdge(PG17)内核,借助 Spock 多主逻辑复制构建面向边缘场景的分布式 PostgreSQL。
pgEdge Spock
概览 Pigsty 通过 pg_mode: pgedge 接入 pgEdge,并用标准 PG 集群编排流程交付其核心组件:
pgedge:PG17 兼容内核spock:多主(active-active)逻辑复制snowflake:分布式唯一序列lolor:大对象逻辑复制兼容层当前 Pigsty 仓库中,pgEdge 对应版本为 17.9,并同时提供 spock 5.0.5、snowflake 2.4 与 lolor 1.2.2。
对客户端来说,pgEdge 仍然是 PostgreSQL 线缆协议,psql、JDBC/ODBC、DBeaver 等工具都可以直接接入。
Pigsty 提供的是“先验证单节点内核,再扩展到多节点复制拓扑”的交付路径:
模板会开箱即用地完成内核、扩展、监控、备份与访问控制,但真正的多主拓扑编排仍需要你根据业务一致性和冲突策略来设计。
安装 使用 Pigsty 内置模板:
./configure -c pgedge
./deploy.yml
模板默认在 meta 数据库预装 spock、snowflake、lolor。部署完成后可用以下命令核对版本和扩展:
psql -d meta -c "SELECT version();"
psql -d meta -c "SELECT extname, extversion FROM pg_extension WHERE extname IN ('spock','snowflake','lolor') ORDER BY 1;"
模板与完整参数见:pgedge 配置模板
配置 pgedge 模板的关键参数如下(与 conf/pgedge.yml 一致):
pg_mode : pgedge
pg_version : 17
pg_packages : [ pgedge, pgsql-common ]
pg_extensions : [ spock, snowflake, lolor ]
pg_libs : 'spock, lolor, pg_stat_statements, auto_explain'
pg_databases :
- { name: meta ,baseline: cmdb.sql ,comment: pigsty meta database ,schemas: [pigsty] ,extensions : [ spock, snowflake, lolor] }
如果计划扩展为多节点多主,建议额外显式配置逻辑复制容量和 snowflake.node:
pg_parameters :
wal_level : logical
max_replication_slots : 16
max_wal_senders : 16
'snowflake.node' : 1
其中 snowflake.node 必须在每个写节点上保持唯一,否则分布式 ID 会冲突。
使用 在 Pigsty 中,常见使用路径是“先单节点验证内核,再扩展为多节点 Spock 复制拓扑”。
如果你在业务数据库中也需要这些能力,请先创建扩展:
CREATE EXTENSION IF NOT EXISTS spock ;
CREATE EXTENSION IF NOT EXISTS snowflake ;
CREATE EXTENSION IF NOT EXISTS lolor ;
随后再使用 Spock SQL API 或 pgEdge CLI 建立节点、复制集和订阅关系。
对于已有使用 serial / identity 的业务表,建议在多主写入前先完成 snowflake 序列规划,否则跨节点写入很容易出现主键冲突。
注意事项 pgEdge 的复制是“按数据库”组织的,不是一次性把整个实例自动变成全库多主。 参与复制的表应具备 PRIMARY KEY 或合适的 REPLICA IDENTITY。 UNLOGGED 与 TEMPORARY 表不会进入 Spock 逻辑复制。Spock 的配置与运维通常需要超级用户权限,生产环境应明确权限边界。 如果业务依赖 large object 复制,应显式使用 lolor,不要假定原生 large object 会自动正确同步。 跨地域多主不是“开关一开即可用”的功能,网络时延、冲突解决策略与写入模型都要先评估。 相关文档 12.19 - 常见问题 PostgreSQL 常见问题答疑
我当前执行安装的用户为何不能使用 pg 管理别名? 从 Pigsty v4.0 开始,使用 pg 管理别名管理全局的 Patroni / PostgreSQL 集群的权限被收紧到了管理节点上的管理员分组(admin)。
node.ymldba)默认具有此权限,而其他用户如果想要获得这个权限,需要你显式地将该用户加入到 admin 组中。
sudo usermod -aG admin <username>
PGSQL初始化失败:Fail to wait for postgres/patroni primary 这种错误信息存在多种可能,需要你 检查 Ansible,Systemd / Patroni / PostgreSQL 日志,找出真正的原因。
可能性1:集群配置错误,找出错误的配置项修改并应用。 可能性2:在部署中存在同名集群,或者之前的同名集群主节点被不正确地移除 可能性3:在DCS中有同名集群残留的垃圾元数据:没有正确完成下线,你可以使用 etcdctl del --prefix /pg/<cls> 来手工删除残留数据(请小心) 可能性4:你的 PostgreSQL 或节点相关 RPM 包没有被成功安装 可能性5:你的 Watchdog 内核模块没有正确启用加载 可能性6:你在初始化数据库时指定的语言 Locale 不存在(例如,使用了 en_US.UTF8,但没有安装英文语言包或 Locale 支持) 如果你遇到了其他的原因,欢迎提交 Issue 或向社区求助。 PGSQL初始化失败:Fail to wait for postgres/patroni replica 存在几种可能的原因:
立即失败 :通常是由于配置错误、网络问题、损坏的DCS元数据等原因。你必须检查 /pg/log 找出实际原因。
过了一会儿失败 :这可能是由于源实例数据损坏。查看 PGSQL FAQ:如何在数据损坏时创建副本?
过了很长时间再超时 :如果 wait for postgres replica 任务耗时 30 分钟或更长时间并由于超时而失败,这对于大型集群(例如,1TB+,可能需要几小时创建一个副本)是很常见的。
在这种情况下,底层创建副本的过程仍在进行。你可以使用 pg list <cls> 检查集群状态并等待副本赶上主节点。然后使用以下命令继续以下任务,完成完整的从库初始化:
./pgsql.yml -t pg_hba,pg_reload,pg_backup,pgbouncer,pg_vip,pg_dns,pg_service,pg_exporter,pg_register -l <problematic_replica>
PGSQL初始化失败:ABORT due to pg_safeguard enabled 这意味着正准备清理的 PostgreSQL 实例打开了防误删保险, 禁用 pg_safeguard 以移除 Postgres 实例。
如果防误删保险 pg_safeguardbin/pgsql-rm 和 pgsql-rm.yml 剧本移除正在运行的 PGSQL 实例了。
要禁用 pg_safeguard,你可以在配置清单中将 pg_safeguard 设置为 false,或者在执行剧本时使用命令参数 -e pg_safeguard=false。
./pgsql-rm.yml -e pg_safeguard = false -l <cls_to_remove> # 强制覆盖 pg_safeguard
如何确保故障转移中数据不丢失? 使用 crit.yml 参数模板,设置 pg_rpo 为 0,或 配置集群 为同步提交模式。
考虑使用 同步备库 法定多数提交
更多细节,可以参考 安全考量 - 可用性 的相关介绍。
磁盘写满了如何抢救? 如果磁盘写满了,连 Shell 命令都无法执行,rm -rf /pg/dummy 可以释放一些救命空间。
默认情况下,pg_dummy_filesize64MB。在生产环境中,建议将其增加到 8GB 或更大。
它将被放置在 PGSQL 主数据磁盘上的 /pg/dummy 路径下。你可以删除该文件以释放一些紧急空间:
至少可以让你在该节点上运行一些 shell 脚本来进一步回收其他空间(例如日志/WAL,过时数据,WAL归档与备份)。
当集群数据已经损坏时如何创建副本? Pigsty 在所有实例的 patroni 配置中设置了 clonefrom: true 标签,标记该实例可用于创建副本。
如果某个实例有损坏的数据文件,导致创建新副本的时候出错中断,那么你可以设置 clonefrom: false 来避免从损坏的实例中拉取数据。具体操作如下
$ vi /pg/bin/patroni.yml
tags:
nofailover: false
clonefrom: true # ----------> change to false
noloadbalance: false
nosync: false
version: '15'
spec: '4C.8G.50G'
conf: 'oltp.yml'
$ systemctl reload patroni # 重新加载 Patroni 配置
PostgreSQL 监控的性能损耗如何? 一个常规 PostgreSQL 实例抓取耗时大约 200ms。抓取间隔默认为 10 秒,对于一个生产多核数据库实例来说几乎微不足道。
请注意,Pigsty 默认开启了库内对象监控,所以如果您的数据库内有数以十万计的表/索引对象,抓取可能耗时会增加到几秒。
您可以修改 Prometheus 的抓取频率,请确保一点:抓取周期应当显著高于一次抓取的时长。
如何监控一个现存的 PostgreSQL 实例? 在 PGSQL Monitor 中提供了详细的监控配置说明。
如何手工从监控中移除 PostgreSQL 监控目标? ./pgsql-rm.yml -t rm_metrics -l <cls> # 将集群 'cls' 的所有实例从 victoria 中移除
bin/pgmon-rm <ins> # 用于从 Victoria 中移除单个实例 'ins' 的监控对象,特别适合移除添加的外部实例
12.20.1 - 用户/角色 用户/角色指的是使用 SQL 命令 CREATE USER/ROLE 创建的,数据库集簇内的逻辑对象。
在这里的上下文中,用户指的是使用 SQL 命令 CREATE USER/ROLE 创建的,数据库集簇内的逻辑对象。
在PostgreSQL中,用户直接隶属于数据库集簇而非某个具体的数据库。因此在创建业务数据库和业务用户时,应当遵循"先用户,后数据库"的原则。
定义用户 Pigsty通过两个配置参数定义数据库集群中的角色与用户:
前者用于定义了整套环境中共用的角色与用户,后者定义单个集群中特有的业务角色与用户。二者形式相同,均为用户定义对象的数组。
你可以定义多个用户/角色,它们会按照先全局,后集群,最后按数组内排序的顺序依次创建,所以后面的用户可以属于前面定义的角色。
下面是 Pigsty 演示环境中默认集群 pg-meta 中的业务用户定义:
pg-meta :
hosts : { 10.10.10.10 : { pg_seq: 1, pg_role : primary } }
vars :
pg_cluster : pg-meta
pg_users :
- {name: dbuser_meta ,password: DBUser.Meta ,pgbouncer: true ,roles: [dbrole_admin] ,comment : pigsty admin user }
- {name: dbuser_view ,password: DBUser.Viewer ,pgbouncer: true ,roles: [dbrole_readonly] ,comment : read-only viewer for meta database }
- {name: dbuser_grafana ,password: DBUser.Grafana ,pgbouncer: true ,roles: [dbrole_admin] ,comment : admin user for grafana database }
- {name: dbuser_bytebase ,password: DBUser.Bytebase ,pgbouncer: true ,roles: [dbrole_admin] ,comment : admin user for bytebase database }
- {name: dbuser_kong ,password: DBUser.Kong ,pgbouncer: true ,roles: [dbrole_admin] ,comment : admin user for kong api gateway }
- {name: dbuser_gitea ,password: DBUser.Gitea ,pgbouncer: true ,roles: [dbrole_admin] ,comment : admin user for gitea service }
- {name: dbuser_wiki ,password: DBUser.Wiki ,pgbouncer: true ,roles: [dbrole_admin] ,comment : admin user for wiki.js service }
- {name: dbuser_noco ,password: DBUser.Noco ,pgbouncer: true ,roles: [dbrole_admin] ,comment : admin user for nocodb service }
每个用户/角色定义都是一个 object,可能包括以下字段,以 dbuser_meta 用户为例:
- name : dbuser_meta # 必需,`name` 是用户定义的唯一必选字段
password : DBUser.Meta # 可选,密码,可以是 scram-sha-256 哈希字符串或明文
login : true # 可选,默认情况下可以登录
superuser : false # 可选,默认为 false,是超级用户吗?
createdb : false # 可选,默认为 false,可以创建数据库吗?
createrole : false # 可选,默认为 false,可以创建角色吗?
inherit : true # 可选,默认情况下,此角色可以使用继承的权限吗?
replication : false # 可选,默认为 false,此角色可以进行复制吗?
bypassrls : false # 可选,默认为 false,此角色可以绕过行级安全吗?
pgbouncer : true # 可选,默认为 false,将此用户添加到 pgbouncer 用户列表吗?(使用连接池的生产用户应该显式定义为 true)
connlimit : -1 # 可选,用户连接限制,默认 -1 禁用限制
expire_in : 3650 # 可选,此角色过期时间:从创建时 + n天计算(优先级比 expire_at 更高)
expire_at : '2030-12-31' # 可选,此角色过期的时间点,使用 YYYY-MM-DD 格式的字符串指定一个特定日期(优先级没 expire_in 高)
comment : pigsty admin user # 可选,此用户/角色的说明与备注字符串
roles : [ dbrole_admin] # 可选,默认角色为:dbrole_{admin,readonly,readwrite,offline}
parameters : {} # 可选,使用 `ALTER ROLE SET` 针对这个角色,配置角色级的数据库参数
pool_mode : transaction # 可选,默认为 transaction 的 pgbouncer 池模式,用户级别
pool_connlimit : -1 # 可选,用户级别的最大数据库连接数,默认 -1 禁用限制
search_path : public # 可选,根据 postgresql 文档的键值配置参数(例如:使用 pigsty 作为默认 search_path)
唯一必需的字段是 name,它应该是 PostgreSQL 集群中的一个有效且唯一的用户名。 角色不需要 password,但对于可登录的业务用户,通常是需要指定一个密码的。 password 可以是明文或 scram-sha-256 / md5 哈希字符串,请最好不要使用明文密码。用户/角色按数组顺序逐一创建,因此,请确保角色/分组的定义在成员之前。 login、superuser、createdb、createrole、inherit、replication、bypassrls 是布尔标志。pgbouncer 默认是禁用的:要将业务用户添加到 pgbouncer 用户列表,您应当显式将其设置为 true。ACL系统
Pigsty 具有一套内置的,开箱即用的访问控制 / ACL 系统,您只需将以下四个默认角色分配给业务用户即可轻松使用:
dbrole_readwrite:全局读写访问的角色(主属业务使用的生产账号应当具有数据库读写权限)dbrole_readonly:全局只读访问的角色(如果别的业务想要只读访问,可以使用此角色)dbrole_admin:拥有DDL权限的角色 (业务管理员,需要在应用中建表的场景)dbrole_offline:受限的只读访问角色(只能访问 offline 实例,通常是个人用户)如果您希望重新设计您自己的 ACL 系统,可以考虑定制以下参数和模板:
创建用户 在 pg_default_rolespg_users定义 的用户和角色,将在集群初始化的 PROVISION 阶段中自动逐一创建。
如果您希望在现有的集群上 创建用户 ,可以使用 bin/pgsql-user 工具。
将新用户/角色定义添加到 all.children.<cls>.pg_users,并使用以下方法创建该数据库:
bin/pgsql-user <cls> <username> # pgsql-user.yml -l <cls> -e username=<username>
不同于数据库,创建用户的剧本总是幂等的。当目标用户已经存在时,Pigsty会修改目标用户的属性使其符合配置。所以在现有集群上重复运行它通常不会有问题。
请使用剧本创建用户
我们不建议您手工创建新的业务用户,特别当您想要创建的用户使用默认的 pgbouncer 连接池时:除非您愿意手工负责维护 Pgbouncer 中的用户列表并与 PostgreSQL 保持一致。
使用 bin/pgsql-userpgsql-user.ymlPgbouncer用户 列表中。
修改用户 修改 PostgreSQL 用户的属性的方式与 创建用户
首先,调整您的用户定义,修改需要调整的属性,然后执行以下命令应用:
bin/pgsql-user <cls> <username> # pgsql-user.yml -l <cls> -e username=<username>
请注意,修改用户不会删除用户,而是通过 ALTER USER 命令修改用户属性;也不会回收用户的权限与分组,并使用 GRANT 命令授予新的角色。
Pgbouncer用户 默认情况下启用 Pgbouncer,并作为连接池中间件,其用户默认被管理。
Pigsty 默认将 pg_userspgbouncer: true 标志的所有用户添加到 pgbouncer 用户列表中。
Pgbouncer 连接池中的用户在 /etc/pgbouncer/userlist.txt 中列出:
"postgres" ""
"dbuser_wiki" "SCRAM-SHA-256$4096:+77dyhrPeFDT/TptHs7/7Q = =$KeatuohpKIYzHPCt/tqBu85vI11o9mar/by0hHYM2W8=:X9gig4JtjoS8Y/o1vQsIX/gY1Fns8ynTXkbWOjUfbRQ="
"dbuser_view" "SCRAM-SHA-256$4096:DFoZHU/DXsHL8MJ8regdEw = =$gx9sUGgpVpdSM4o6A2R9PKAUkAsRPLhLoBDLBUYtKS0=:MujSgKe6rxcIUMv4GnyXJmV0YNbf39uFRZv724+X1FE="
"dbuser_monitor" "SCRAM-SHA-256$4096:fwU97ZMO/KR0ScHO5+UuBg = =$CrNsmGrx1DkIGrtrD1Wjexb/aygzqQdirTO1oBZROPY=:L8+dJ+fqlMQh7y4PmVR/gbAOvYWOr+KINjeMZ8LlFww="
"dbuser_meta" "SCRAM-SHA-256$4096:leB2RQPcw1OIiRnPnOMUEg = =$eyC+NIMKeoTxshJu314+BmbMFpCcspzI3UFZ1RYfNyU=:fJgXcykVPvOfro2MWNkl5q38oz21nSl1dTtM65uYR1Q="
"dbuser_kong" "SCRAM-SHA-256$4096:bK8sLXIieMwFDz67/0dqXQ = =$P/tCRgyKx9MC9LH3ErnKsnlOqgNd/nn2RyvThyiK6e4=:CDM8QZNHBdPf97ztusgnE7olaKDNHBN0WeAbP/nzu5A="
"dbuser_grafana" "SCRAM-SHA-256$4096:HjLdGaGmeIAGdWyn2gDt/Q = =$jgoyOB8ugoce+Wqjr0EwFf8NaIEMtiTuQTg1iEJs9BM=:ed4HUFqLyB4YpRr+y25FBT7KnlFDnan6JPVT9imxzA4="
"dbuser_gitea" "SCRAM-SHA-256$4096:l1DBGCc4dtircZ8O8Fbzkw = =$tpmGwgLuWPDog8IEKdsaDGtiPAxD16z09slvu+rHE74=:pYuFOSDuWSofpD9OZhG7oWvyAR0PQjJBffgHZLpLHds="
"dbuser_dba" "SCRAM-SHA-256$4096:zH8niABU7xmtblVUo2QFew = =$Zj7/pq+ICZx7fDcXikiN7GLqkKFA+X5NsvAX6CMshF0=:pqevR2WpizjRecPIQjMZOm+Ap+x0kgPL2Iv5zHZs0+g="
"dbuser_bytebase" "SCRAM-SHA-256$4096:OMoTM9Zf8QcCCMD0svK5gg = =$kMchqbf4iLK1U67pVOfGrERa/fY818AwqfBPhsTShNQ=:6HqWteN+AadrUnrgC0byr5A72noqnPugItQjOLFw0Wk="
而用户级别的连接池参数则是使用另一个单独的文件: /etc/pgbouncer/useropts.txt 进行维护,比如:
dbuser_dba = pool_mode=session max_user_connections=16
dbuser_monitor = pool_mode=session max_user_connections=8
当您 创建数据库 时,Pgbouncer 的数据库列表定义文件将会被刷新,并通过在线重载配置的方式生效,不会影响现有的连接。
Pgbouncer 使用和 PostgreSQL 同样的 dbsu 运行,默认为 postgres 操作系统用户,您可以使用 pgb 别名,使用 dbsu 访问 pgbouncer 管理功能。
Pigsty 还提供了一个实用函数 pgb-route ,可以将 pgbouncer 数据库流量快速切换至集群中的其他节点,用于零停机迁移:
连接池用户配置文件 userlist.txt 与 useropts.txt 会在您 创建用户 时自动刷新,并通过在线重载配置的方式生效,正常不会影响现有的连接。
请注意,pgbouncer_auth_query
12.20.2 - 数据库 数据库指的是使用 SQL 命令 CREATE DATABASE 创建的,数据库集簇内的逻辑对象。
在这里的上下文中,数据库指的是使用 SQL 命令 CREATE DATABASE 创建的,数据库集簇内的逻辑对象。
一组 PostgreSQL 服务器可以同时服务于多个 数据库 (Database)。在 Pigsty 中,你可以在集群配置中 定义 好所需的数据库。
Pigsty会对默认模板数据库template1进行修改与定制,创建默认模式,安装默认扩展,配置默认权限,新创建的数据库默认会从template1继承这些设置。
默认情况下,所有业务数据库都会被1:1添加到 Pgbouncer 连接池中;pg_exporter 默认会通过 自动发现 机制查找所有业务数据库并进行库内对象监控。
定义数据库 业务数据库定义在数据库集群参数 pg_databases定义顺序 依次创建,因此后面定义的数据库可以使用先前定义的数据库作为模板 。
下面是 Pigsty 演示环境中默认集群 pg-meta 中的数据库定义:
pg-meta :
hosts : { 10.10.10.10 : { pg_seq: 1, pg_role : primary } }
vars :
pg_cluster : pg-meta
pg_databases :
- { name: meta ,baseline: cmdb.sql ,comment: pigsty meta database ,schemas: [pigsty] ,extensions : [ {name: postgis, schema : public}, {name: timescaledb}]}
- { name: grafana ,owner: dbuser_grafana ,revokeconn: true ,comment : grafana primary database }
- { name: bytebase ,owner: dbuser_bytebase ,revokeconn: true ,comment : bytebase primary database }
- { name: kong ,owner: dbuser_kong ,revokeconn: true ,comment : kong the api gateway database }
- { name: gitea ,owner: dbuser_gitea ,revokeconn: true ,comment : gitea meta database }
- { name: wiki ,owner: dbuser_wiki ,revokeconn: true ,comment : wiki meta database }
- { name: noco ,owner: dbuser_noco ,revokeconn: true ,comment : nocodb database }
每个数据库定义都是一个 object,可能包括以下字段,以 meta 数据库为例:
- name : meta # 必选,`name` 是数据库定义的唯一必选字段
baseline : cmdb.sql # 可选,数据库 sql 的基线定义文件路径(ansible 搜索路径中的相对路径,如 files/)
pgbouncer : true # 可选,是否将此数据库添加到 pgbouncer 数据库列表?默认为 true
schemas : [ pigsty] # 可选,要创建的附加模式,由模式名称字符串组成的数组
extensions : # 可选,要安装的附加扩展: 扩展对象的数组
- { name: postgis , schema : public } # 可以指定将扩展安装到某个模式中,也可以不指定(不指定则安装到 search_path 首位模式中)
- { name : timescaledb } # 例如有的扩展会创建并使用固定的模式,就不需要指定模式。
comment : pigsty meta database # 可选,数据库的说明与备注信息
owner : postgres # 可选,数据库所有者,默认为 postgres
template : template1 # 可选,要使用的模板,默认为 template1,目标必须是一个模板数据库
encoding : UTF8 # 可选,数据库编码,默认为 UTF8(必须与模板数据库相同)
locale : C # 可选,数据库地区设置,默认为 C(必须与模板数据库相同)
lc_collate : C # 可选,数据库 collate 排序规则,默认为 C(必须与模板数据库相同),没有理由不建议更改。
lc_ctype : C # 可选,数据库 ctype 字符集,默认为 C(必须与模板数据库相同)
tablespace : pg_default # 可选,默认表空间,默认为 'pg_default'
allowconn : true # 可选,是否允许连接,默认为 true。显式设置 false 将完全禁止连接到此数据库
revokeconn : false # 可选,撤销公共连接权限。默认为 false,设置为 true 时,属主和管理员之外用户的 CONNECT 权限会被回收
register_datasource : true # 可选,是否将此数据库注册到 grafana 数据源?默认为 true,显式设置为 false 会跳过注册
connlimit : -1 # 可选,数据库连接限制,默认为 -1 ,不限制,设置为正整数则会限制连接数。
pool_auth_user : dbuser_meta # 可选,连接到此 pgbouncer 数据库的所有连接都将使用此用户进行验证(启用 pgbouncer_auth_query 才有用)
pool_mode : transaction # 可选,数据库级别的 pgbouncer 池化模式,默认为 transaction
pool_size : 64 # 可选,数据库级别的 pgbouncer 默认池子大小,默认为 64
pool_reserve : 32 # 可选,数据库级别的 pgbouncer 池子保留空间,默认为 32,当默认池子不够用时,最多再申请这么多条突发连接。
pool_size_min : 0 # 可选,数据库级别的 pgbouncer 池的最小大小,默认为 0
pool_connlimit : 100 # 可选,数据库级别的最大数据库连接数,默认为 100
唯一必选的字段是 name,它应该是当前 PostgreSQL 集群中有效且唯一的数据库名称,其他参数都有合理的默认值。
name:数据库名称,必选项 。baseline:SQL文件路径(Ansible搜索路径,通常位于files),用于初始化数据库内容。owner:数据库属主,默认为postgrestemplate:数据库创建时使用的模板,默认为template1encoding:数据库默认字符编码,默认为UTF8,默认与实例保持一致。建议不要配置与修改。locale:数据库默认的本地化规则,默认为C,建议不要配置,与实例保持一致。lc_collate:数据库默认的本地化字符串排序规则,默认与实例设置相同,建议不要修改,必须与模板数据库一致。强烈建议不要配置,或配置为C。lc_ctype:数据库默认的LOCALE,默认与实例设置相同,建议不要修改或设置,必须与模板数据库一致。建议配置为C或en_US.UTF8。allowconn:是否允许连接至数据库,默认为true,不建议修改。revokeconn:是否回收连接至数据库的权限?默认为false。如果为true,则数据库上的PUBLIC CONNECT权限会被回收。只有默认用户(dbsu|monitor|admin|replicator|owner)可以连接。此外,admin|owner 会拥有GRANT OPTION,可以赋予其他用户连接权限。tablespace:数据库关联的表空间,默认为pg_default。connlimit:数据库连接数限制,默认为-1,即没有限制。extensions:对象数组 ,每一个对象定义了一个数据库中的扩展 ,以及其安装的模式 。parameters:KV对象,每一个KV定义了一个需要针对数据库通过ALTER DATABASE修改的参数。pgbouncer:布尔选项,是否将该数据库加入到Pgbouncer中。所有数据库都会加入至Pgbouncer列表,除非显式指定pgbouncer: false。comment:数据库备注信息。pool_auth_user:启用 pgbouncer_auth_querypg_shadow 表权限的用户。pool_mode:数据库级别的 pgbouncer 池化模式,默认为 transaction,即事物池化。如果留空,会使用 pgbouncer_poolmodepool_size:数据库级别的 pgbouncer 默认池子大小,默认为 64pool_reserve:数据库级别的 pgbouncer 池子保留空间,默认为 32,当默认池子不够用时,最多再申请这么多条突发连接。pool_size_min: 数据库级别的 pgbouncer 池的最小大小,默认为 0pool_connlimit: 数据库级别的 pgbouncer 连接池最大数据库连接数,默认为 100新创建的数据库默认会从 template1 数据库 Fork 出来,这个模版数据库会在 PG_PROVISION
关于数据库的访问权限,请参考 ACL:数据库权限 一节。
创建数据库 在 pg_databases定义 的数据库将在集群初始化时自动创建。
如果您希望在现有集群上 创建数据库 ,可以使用 bin/pgsql-db 包装脚本。
将新的数据库定义添加到 all.children.<cls>.pg_databases 中,并使用以下命令创建该数据库:
bin/pgsql-db <cls> <dbname> # pgsql-db.yml -l <cls> -e dbname=<dbname>
下面是新建数据库时的一些注意事项:
创建数据库的剧本默认为幂等剧本,不过当您当使用 baseline 脚本时就不一定了:这种情况下,通常不建议在现有数据库上重复执行此操作,除非您确定所提供的 baseline SQL也是幂等的。
我们不建议您手工创建新的数据库,特别当您使用默认的 pgbouncer 连接池时:除非您愿意手工负责维护 Pgbouncer 中的数据库列表并与 PostgreSQL 保持一致。
使用 pgsql-db 工具或 pgsql-db.yml 剧本创建新数据库时,会将此数据库一并添加到 Pgbouncer 数据库 列表中。
如果您的数据库定义有一个非常规 owner(默认为 dbsu postgres),那么请确保在创建该数据库前,属主用户已经存在。
最佳实践永远是在创建数据库之前 创建 用户 。
Pgbouncer数据库 Pigsty 会默认为 PostgreSQL 实例 1:1 配置启用一个 Pgbouncer 连接池,使用 /var/run/postgresql Unix Socket 通信。
连接池可以优化短连接性能,降低并发征用,以避免过高的连接数冲垮数据库,并在数据库迁移时提供额外的灵活处理空间。
Pigsty 默认将 pg_databases定义 中显式设置 pgbouncer: false 来禁用特定数据库的 pgbouncer 连接池支持。
Pgbouncer数据库列表在 /etc/pgbouncer/database.txt 中定义,数据库定义中关于连接池的参数会体现在这里:
meta = host=/var/run/postgresql mode=session
grafana = host=/var/run/postgresql mode=transaction
bytebase = host=/var/run/postgresql auth_user=dbuser_meta
kong = host=/var/run/postgresql pool_size=32 reserve_pool=64
gitea = host=/var/run/postgresql min_pool_size=10
wiki = host=/var/run/postgresql
noco = host=/var/run/postgresql
mongo = host=/var/run/postgresql
当您 创建数据库 时,Pgbouncer 的数据库列表定义文件将会被刷新,并通过在线重载配置的方式生效,正常不会影响现有的连接。
Pgbouncer 使用和 PostgreSQL 同样的 dbsu 运行,默认为 postgres 操作系统用户,您可以使用 pgb 别名,使用 dbsu 访问 pgbouncer 管理功能。
Pigsty 还提供了一个实用函数 pgb-route ,可以将 pgbouncer 数据库流量快速切换至集群中的其他节点,用于零停机迁移:
# route pgbouncer traffic to another cluster member
function pgb-route(){
local ip = ${ 1 - '\/var\/run\/postgresql' }
sed -ie "s/host=[^[:space:]]\+/host= ${ ip } /g" /etc/pgbouncer/pgbouncer.ini
cat /etc/pgbouncer/pgbouncer.ini
}
12.20.3 - 服务/接入 分离读写操作,正确路由流量,稳定可靠地交付 PostgreSQL 集群提供的能力。
分离读写操作,正确路由流量,稳定可靠地交付 PostgreSQL 集群提供的能力。
服务 是一种抽象:它是数据库集群对外提供能力的形式,并封装了底层集群的细节。
服务对于生产环境中的 稳定接入 至关重要,在 高可用 集群自动故障时方显其价值,单机用户 通常不需要操心这个概念。
单机用户 “服务” 的概念是给生产环境用的,个人用户/单机集群可以不折腾,直接拿实例名/IP地址访问数据库。
例如,Pigsty 默认的单节点 pg-meta.meta 数据库,就可以直接用下面三个不同的用户连接上去。
psql postgres://dbuser_dba:DBUser.DBA@10.10.10.10/meta # 直接用 DBA 超级用户连上去
psql postgres://dbuser_meta:DBUser.Meta@10.10.10.10/meta # 用默认的业务管理员用户连上去
psql postgres://dbuser_view:DBUser.View@pg-meta/meta # 用默认的只读用户走实例域名连上去
服务概述 在真实世界生产环境中,我们会使用基于复制的主从数据库集群。集群中有且仅有一个实例作为领导者(主库 )可以接受写入。
而其他实例(从库 )则会从持续从集群领导者获取变更日志,与领导者保持一致。同时,从库还可以承载只读请求,在读多写少的场景下可以显著分担主库的负担,
因此对集群的写入请求与只读请求进行区分,是一种十分常见的实践。
此外对于高频短连接的生产环境,我们还会通过连接池中间件(Pgbouncer)对请求进行池化,减少连接与后端进程的创建开销。但对于ETL与变更执行等场景,我们又需要绕过连接池,直接访问数据库。
同时,高可用集群在故障时会出现故障切换(Failover),故障切换会导致集群的领导者出现变更。因此高可用的数据库方案要求写入流量可以自动适配集群的领导者变化。
这些不同的访问需求(读写分离,池化与直连,故障切换自动适配)最终抽象出 服务 (Service)的概念。
通常来说,数据库集群都必须提供这种最基础的服务:
对于生产数据库集群,至少应当提供这两种服务:
读写服务(primary) :写入数据:只能由主库所承载。只读服务(replica) :读取数据:可以由从库承载,没有从库时也可由主库承载此外,根据具体的业务场景,可能还会有其他的服务,例如:
默认直连服务(default) :允许(管理)用户,绕过连接池直接访问数据库的服务离线从库服务(offline) :不承接线上只读流量的专用从库,用于ETL与分析查询同步从库服务(standby) :没有复制延迟的只读服务,由 同步备库 /主库处理只读查询延迟从库服务(delayed) :访问同一个集群在一段时间之前的旧数据,由 延迟从库 来处理默认服务 Pigsty默认为每个 PostgreSQL 数据库集群提供四种不同的服务,以下是默认服务及其定义:
以默认的 pg-meta 集群为例,它提供四种默认服务:
psql postgres://dbuser_meta:DBUser.Meta@pg-meta:5433/meta # pg-meta-primary : 通过主要的 pgbouncer(6432) 进行生产读写
psql postgres://dbuser_meta:DBUser.Meta@pg-meta:5434/meta # pg-meta-replica : 通过备份的 pgbouncer(6432) 进行生产只读
psql postgres://dbuser_dba:DBUser.DBA@pg-meta:5436/meta # pg-meta-default : 通过主要的 postgres(5432) 直接连接
psql postgres://dbuser_stats:DBUser.Stats@pg-meta:5438/meta # pg-meta-offline : 通过离线的 postgres(5432) 直接连接
从示例集群 架构图 上可以看出这四种服务的工作方式:
注意在这里pg-meta 域名指向了集群的 L2 VIP,进而指向集群主库上的 haproxy 负载均衡器,它负责将流量路由到不同的实例上,详见 服务接入
服务实现 在 Pigsty 中,服务使用 节点 上的 haproxy 来实现,通过主机节点上的不同端口进行区分。
Pigsty 所纳管的每个节点上都默认启用了 Haproxy 以对外暴露服务,而数据库节点也不例外。
集群中的节点尽管从数据库的视角来看有主从之分,但从服务的视角来看,每个节点都是相同的:
这意味着即使您访问的是从库节点,只要使用正确的服务端口,就依然可以使用到主库读写的服务。
这样的设计可以屏蔽复杂度:所以您只要可以访问 PostgreSQL 集群上的任意一个实例,就可以完整的访问到所有服务。
这样的设计类似于 Kubernetes 中的 NodePort 服务,同样在 Pigsty 中,每一个服务都包括以下两个核心要素:
通过 NodePort 暴露的访问端点(端口号,从哪访问?) 通过 Selectors 选择的目标实例(实例列表,谁来承载?) Pigsty的服务交付边界止步于集群的HAProxy,用户可以用各种手段访问这些负载均衡器,请参考 接入服务 。
所有的服务都通过配置文件进行声明,例如,PostgreSQL 默认服务就是由 pg_default_services
pg_default_services :
- { name: primary ,port: 5433 ,dest: default ,check: /primary ,selector : "[]" }
- { name: replica ,port: 5434 ,dest: default ,check: /read-only ,selector : "[]" , backup : "[? pg_role == `primary` || pg_role == `offline` ]" }
- { name: default ,port: 5436 ,dest: postgres ,check: /primary ,selector : "[]" }
- { name: offline ,port: 5438 ,dest: postgres ,check: /replica ,selector : "[? pg_role == `offline` || pg_offline_query ]" , backup : "[? pg_role == `replica` && !pg_offline_query]" }
您也可以在 pg_servicespg_default_services 与 pg_services 都是由 服务定义 对象组成的数组。
定义服务 Pigsty 允许您定义自己的服务:
对于 PostgreSQL 集群来说,通常只需要关注前两者即可。
每一条服务定义都会在所有相关 HAProxy 实例的配置目录下生成一个新的配置文件:/etc/haproxy/<svcname>.cfgstandby:当您想要对外提供没有复制延迟的只读服务时,就可以在 pg_services
- name : standby # 必选,服务名称,最终的 svc 名称会使用 `pg_cluster` 作为前缀,例如:pg-meta-standby
port : 5435 # 必选,暴露的服务端口(作为 kubernetes 服务节点端口模式)
ip : "*" # 可选,服务绑定的 IP 地址,默认情况下为所有 IP 地址
selector : "[]" # 必选,服务成员选择器,使用 JMESPath 来筛选配置清单
backup : "[? pg_role == `primary`]" # 可选,服务成员选择器(备份),也就是当默认选择器选中的实例都宕机后,服务才会由这里选中的实例成员来承载
dest : default # 可选,目标端口,default|postgres|pgbouncer|<port_number>,默认为 'default',Default的意思就是使用 pg_default_service_dest 的取值来最终决定
check : /sync # 可选,健康检查 URL 路径,默认为 /,这里使用 Patroni API:/sync ,只有同步备库和主库才会返回 200 健康状态码
maxconn : 5000 # 可选,允许的前端连接最大数,默认为5000
balance : roundrobin # 可选,haproxy 负载均衡算法(默认为 roundrobin,其他选项:leastconn)
options : 'inter 3s fastinter 1s downinter 5s rise 3 fall 3 on-marked-down shutdown-sessions slowstart 30s maxconn 3000 maxqueue 128 weight 100'
而上面的服务定义,在样例的三节点 pg-test 上将会被转换为 haproxy 配置文件 /etc/haproxy/pg-test-standby.conf:
#---------------------------------------------------------------------
# service: pg-test-standby @ 10.10.10.11:5435
#---------------------------------------------------------------------
# service instances 10.10.10.11, 10.10.10.13, 10.10.10.12
# service backups 10.10.10.11
listen pg-test-standby
bind *:5435 # <--- 绑定了所有IP地址上的 5435 端口
mode tcp # <--- 负载均衡器工作在 TCP 协议上
maxconn 5000 # <--- 最大连接数为 5000,可按需调大
balance roundrobin # <--- 负载均衡算法为 rr 轮询,还可以使用 leastconn
option httpchk # <--- 启用 HTTP 健康检查
option http-keep-alive # <--- 保持HTTP连接
http-check send meth OPTIONS uri /sync # <---- 这里使用 /sync ,Patroni 健康检查 API ,只有同步备库和主库才会返回 200 健康状态码。
http-check expect status 200 # <---- 健康检查返回代码 200 代表正常
default-server inter 3s fastinter 1s downinter 5s rise 3 fall 3 on-marked-down shutdown-sessions slowstart 30s maxconn 3000 maxqueue 128 weight 100
# servers: # pg-test 集群全部三个实例都被 selector: "[]" 给圈中了,因为没有任何的筛选条件,所以都会作为 pg-test-replica 服务的后端服务器。但是因为还有 /sync 健康检查,所以只有主库和同步备库才能真正承载请求。
server pg-test-1 10.10.10.11:6432 check port 8008 weight 100 backup # <----- 唯独主库满足条件 pg_role == `primary`, 被 backup selector 选中。
server pg-test-3 10.10.10.13:6432 check port 8008 weight 100 # 因此作为服务的兜底实例:平时不承载请求,其他从库全部宕机后,才会承载只读请求,从而最大避免了读写服务受到只读服务的影响
server pg-test-2 10.10.10.12:6432 check port 8008 weight 100 #
在这里,pg-test 集群全部三个实例都被 selector: "[]" 给圈中了,渲染进入 pg-test-replica 服务的后端服务器列表中。但是因为还有 /sync 健康检查,Patroni Rest API只有在主库和 同步备库 上才会返回代表健康的 HTTP 200 状态码,因此只有主库和同步备库才能真正承载请求。
此外,主库因为满足条件 pg_role == primary, 被 backup selector 选中,被标记为了备份服务器,只有当没有其他实例(也就是同步备库)可以满足需求时,才会顶上。
Primary服务 Primary服务可能是生产环境中最关键的服务,它在 5433 端口提供对数据库集群的读写能力,服务定义如下:
- { name: primary ,port: 5433 ,dest: default ,check: /primary ,selector : "[]" }
选择器参数 selector: "[]" 意味着所有集群成员都将被包括在Primary服务中 但只有主库能够通过健康检查(check: /primary),实际承载Primary服务的流量。 目的地参数 dest: default 意味着Primary服务的目的地受到 pg_default_service_dest dest 默认值 default 会被替换为 pg_default_service_dest 的值,默认为 pgbouncer。默认情况下 Primary 服务的目的地默认是主库上的连接池,也就是由 pgbouncer_port 如果 pg_default_service_dest 的值为 postgres,那么 primary 服务的目的地就会绕过连接池,直接使用 PostgreSQL 数据库的端口(pg_port
示例:pg-test-primary 的 haproxy 配置 listen pg-test-primary
bind *:5433 # <--- primary 服务默认使用 5433 端口
mode tcp
maxconn 5000
balance roundrobin
option httpchk
option http-keep-alive
http-check send meth OPTIONS uri /primary # <--- primary 服务默认使用 Patroni RestAPI /primary 健康检查
http-check expect status 200
default-server inter 3s fastinter 1s downinter 5s rise 3 fall 3 on-marked-down shutdown-sessions slowstart 30s maxconn 3000 maxqueue 128 weight 100
# servers
server pg-test-1 10.10.10.11:6432 check port 8008 weight 100
server pg-test-3 10.10.10.13:6432 check port 8008 weight 100
server pg-test-2 10.10.10.12:6432 check port 8008 weight 100
Patroni 的 高可用 机制确保任何时候最多只会有一个实例的 /primary 健康检查为真,因此Primary服务将始终将流量路由到主实例。
使用 Primary 服务而不是直连数据库的一个好处是,如果集群因为某种情况出现了双主(比如在没有watchdog的情况下kill -9杀死主库 Patroni),Haproxy在这种情况下仍然可以避免脑裂,因为它只会在 Patroni 存活且返回主库状态时才会分发流量。
Replica服务 Replica服务在生产环境中的重要性仅次于Primary服务,它在 5434 端口提供对数据库集群的只读能力,服务定义如下:
- { name: replica ,port: 5434 ,dest: default ,check: /read-only ,selector : "[]" , backup : "[? pg_role == `primary` || pg_role == `offline` ]" }
选择器参数 selector: "[]" 意味着所有集群成员都将被包括在Replica服务中 所有实例都能够通过健康检查(check: /read-only),承载Replica服务的流量。 备份选择器:[? pg_role == 'primary' || pg_role == 'offline' ] 将主库和 离线从库 标注为备份服务器。 只有当所有 普通从库 都宕机后,Replica服务才会由主库或离线从库来承载。 目的地参数 dest: default 意味着Replica服务的目的地也受到 pg_default_service_dest dest 默认值 default 会被替换为 pg_default_service_dest 的值,默认为 pgbouncer,这一点和 Primary服务 相同默认情况下 Replica 服务的目的地默认是从库上的连接池,也就是由 pgbouncer_port 示例:pg-test-replica 的 haproxy 配置 listen pg-test-replica
bind *:5434
mode tcp
maxconn 5000
balance roundrobin
option httpchk
option http-keep-alive
http-check send meth OPTIONS uri /read-only
http-check expect status 200
default-server inter 3s fastinter 1s downinter 5s rise 3 fall 3 on-marked-down shutdown-sessions slowstart 30s maxconn 3000 maxqueue 128 weight 100
# servers
server pg-test-1 10.10.10.11:6432 check port 8008 weight 100 backup
server pg-test-3 10.10.10.13:6432 check port 8008 weight 100
server pg-test-2 10.10.10.12:6432 check port 8008 weight 100
Replica服务非常灵活:如果有存活的专用 Replica 实例,那么它会优先使用这些实例来承载只读请求,只有当从库实例全部宕机后,才会由主库来兜底只读请求。对于常见的一主一从双节点集群就是:只要从库活着就用从库,从库挂了再用主库。
此外,除非专用只读实例全部宕机,Replica 服务也不会使用专用 Offline 实例,这样就避免了在线快查询与离线慢查询混在一起,相互影响。
Default服务 Default服务在 5436 端口上提供服务,它是Primary服务的变体。
Default服务总是绕过连接池直接连到主库上的 PostgreSQL,这对于管理连接、ETL写入、CDC数据变更捕获等都很有用。
- { name: primary ,port: 5433 ,dest: default ,check: /primary ,selector : "[]" }
如果 pg_default_service_dest 被修改为 postgres,那么可以说 Default 服务除了端口和名称内容之外,与 Primary 服务是完全等价的。在这种情况下,您可以考虑将 Default 从默认服务中剔除。
示例:pg-test-default 的 haproxy 配置 listen pg-test-default
bind *:5436 # <--- 除了监听端口/目标端口和服务名,其他配置和 primary 服务一模一样
mode tcp
maxconn 5000
balance roundrobin
option httpchk
option http-keep-alive
http-check send meth OPTIONS uri /primary
http-check expect status 200
default-server inter 3s fastinter 1s downinter 5s rise 3 fall 3 on-marked-down shutdown-sessions slowstart 30s maxconn 3000 maxqueue 128 weight 100
# servers
server pg-test-1 10.10.10.11:5432 check port 8008 weight 100
server pg-test-3 10.10.10.13:5432 check port 8008 weight 100
server pg-test-2 10.10.10.12:5432 check port 8008 weight 100
Offline服务 Default服务在 5438 端口上提供服务,它也绕开连接池直接访问 PostgreSQL 数据库,通常用于慢查询/分析查询/ETL读取/个人用户交互式查询,其服务定义如下:
- { name: offline ,port: 5438 ,dest: postgres ,check: /replica ,selector : "[? pg_role == `offline` || pg_offline_query ]" , backup : "[? pg_role == `replica` && !pg_offline_query]" }
Offline服务将流量直接路由到专用的 离线从库 上,或者带有 pg_offline_query只读实例 。
选择器参数从集群中筛选出了两种实例:pg_roleoffline 的离线从库,或是带有 pg_offline_querytrue 标记的普通 只读实例 专用离线从库和打标记的普通从库主要的区别在于:前者默认不承载 Replica服务 的请求,避免快慢请求混在一起,而后者默认会承载。 备份选择器参数从集群中筛选出了一种实例:不带 offline 标记的普通从库,这意味着如果离线实例或者带Offline标记的普通从库挂了之后,其他普通的从库可以用来承载Offline服务。 健康检查 /replica 只会针对从库返回 200, 主库会返回错误,因此 Offline服务 永远不会将流量分发到主库实例上去,哪怕集群中只剩这一台主库。 同时,主库实例既不会被选择器圈中,也不会被备份选择器圈中,因此它永远不会承载Offline服务。因此 Offline 服务总是可以避免用户访问主库,从而避免对主库的影响。 示例:pg-test-offline 的 haproxy 配置 listen pg-test-offline
bind *:5438
mode tcp
maxconn 5000
balance roundrobin
option httpchk
option http-keep-alive
http-check send meth OPTIONS uri /replica
http-check expect status 200
default-server inter 3s fastinter 1s downinter 5s rise 3 fall 3 on-marked-down shutdown-sessions slowstart 30s maxconn 3000 maxqueue 128 weight 100
# servers
server pg-test-3 10.10.10.13:5432 check port 8008 weight 100
server pg-test-2 10.10.10.12:5432 check port 8008 weight 100 backup
Offline服务提供受限的只读服务,通常用于两类查询:交互式查询(个人用户),慢查询长事务(分析/ETL)。
Offline 服务需要额外的维护照顾:当集群发生主从切换或故障自动切换时,集群的实例角色会发生变化,而 Haproxy 的配置却不会自动发生变化。对于有多个从库的集群来说,这通常并不是一个问题。
然而对于一主一从,从库跑Offline查询的精简小集群而言,主从切换意味着从库变成了主库(健康检查失效),原来的主库变成了从库(不在 Offline 后端列表中),于是没有实例可以承载 Offline 服务了,因此需要手动 重载服务 以使变更生效。
如果您的业务模型较为简单,您可以考虑剔除 Default 服务与 Offline 服务,使用 Primary 服务与 Replica 服务直连数据库。
重载服务 当集群成员发生变化,如添加/删除副本、主备切换或调整相对权重时, 你需要 重载服务 以使更改生效。
bin/pgsql-svc <cls> [ ip...] # 为 lb 集群或 lb 实例重载服务
# ./pgsql.yml -t pg_service # 重载服务的实际 ansible 任务
接入服务 Pigsty的服务交付边界止步于集群的HAProxy,用户可以用各种手段访问这些负载均衡器。
典型的做法是使用 DNS 或 VIP 接入,将其绑定在集群所有或任意数量的负载均衡器上。
你可以使用不同的 主机 & 端口 组合,它们以不同的方式提供 PostgreSQL 服务。
主机
类型 样例 描述 集群域名 pg-test通过集群域名访问(由 dnsmasq @ infra 节点解析) 集群 VIP 地址 10.10.10.3通过由 vip-manager 管理的 L2 VIP 地址访问,绑定到主节点 实例主机名 pg-test-1通过任何实例主机名访问(由 dnsmasq @ infra 节点解析) 实例 IP 地址 10.10.10.11访问任何实例的 IP 地址
端口
Pigsty 使用不同的 端口 来区分 pg services
端口 服务 类型 描述 5432 postgres 数据库 直接访问 postgres 服务器 6432 pgbouncer 中间件 访问 postgres 前先通过连接池中间件 5433 primary 服务 访问主 pgbouncer (或 postgres) 5434 replica 服务 访问备份 pgbouncer (或 postgres) 5436 default 服务 访问主 postgres 5438 offline 服务 访问离线 postgres
组合
# 通过集群域名访问
postgres://test@pg-test:5432/test # DNS -> L2 VIP -> 主直接连接
postgres://test@pg-test:6432/test # DNS -> L2 VIP -> 主连接池 -> 主
postgres://test@pg-test:5433/test # DNS -> L2 VIP -> HAProxy -> 主连接池 -> 主
postgres://test@pg-test:5434/test # DNS -> L2 VIP -> HAProxy -> 备份连接池 -> 备份
postgres://dbuser_dba@pg-test:5436/test # DNS -> L2 VIP -> HAProxy -> 主直接连接 (用于管理员)
postgres://dbuser_stats@pg-test:5438/test # DNS -> L2 VIP -> HAProxy -> 离线直接连接 (用于 ETL/个人查询)
# 通过集群 VIP 直接访问
postgres://test@10.10.10.3:5432/test # L2 VIP -> 主直接访问
postgres://test@10.10.10.3:6432/test # L2 VIP -> 主连接池 -> 主
postgres://test@10.10.10.3:5433/test # L2 VIP -> HAProxy -> 主连接池 -> 主
postgres://test@10.10.10.3:5434/test # L2 VIP -> HAProxy -> 备份连接池 -> 备份
postgres://dbuser_dba@10.10.10.3:5436/test # L2 VIP -> HAProxy -> 主直接连接 (用于管理员)
postgres://dbuser_stats@10.10.10.3::5438/test # L2 VIP -> HAProxy -> 离线直接连接 (用于 ETL/个人查询)
# 直接指定任何集群实例名
postgres://test@pg-test-1:5432/test # DNS -> 数据库实例直接连接 (单例访问)
postgres://test@pg-test-1:6432/test # DNS -> 连接池 -> 数据库
postgres://test@pg-test-1:5433/test # DNS -> HAProxy -> 连接池 -> 数据库读/写
postgres://test@pg-test-1:5434/test # DNS -> HAProxy -> 连接池 -> 数据库只读
postgres://dbuser_dba@pg-test-1:5436/test # DNS -> HAProxy -> 数据库直接连接
postgres://dbuser_stats@pg-test-1:5438/test # DNS -> HAProxy -> 数据库离线读/写
# 直接指定任何集群实例 IP 访问
postgres://test@10.10.10.11:5432/test # 数据库实例直接连接 (直接指定实例, 没有自动流量分配)
postgres://test@10.10.10.11:6432/test # 连接池 -> 数据库
postgres://test@10.10.10.11:5433/test # HAProxy -> 连接池 -> 数据库读/写
postgres://test@10.10.10.11:5434/test # HAProxy -> 连接池 -> 数据库只读
postgres://dbuser_dba@10.10.10.11:5436/test # HAProxy -> 数据库直接连接
postgres://dbuser_stats@10.10.10.11:5438/test # HAProxy -> 数据库离线读-写
# 智能客户端:自动进行读写分离
postgres://test@10.10.10.11:6432,10.10.10.12:6432,10.10.10.13:6432/test?target_session_attrs= primary
postgres://test@10.10.10.11:6432,10.10.10.12:6432,10.10.10.13:6432/test?target_session_attrs= prefer-standby
覆盖服务 你可以通过多种方式覆盖默认的服务配置,一种常见的需求是让 Primary服务 与 Replica服务 绕过Pgbouncer连接池,直接访问 PostgreSQL 数据库。
为了实现这一点,你可以将 pg_default_service_destpostgres,这样所有服务定义中 svc.dest='default' 的服务都会使用 postgres 而不是默认的 pgbouncer 作为目标。
如果您已经将 Primary服务 指向了 PostgreSQL,那么 default服务 就会比较多余,可以考虑移除。
如果您不需要区分个人交互式查询,分析/ETL慢查询,可以考虑从默认服务列表 pg_default_servicesOffline服务 。
如果您不需要只读从库来分担在线只读流量,也可以从默认服务列表中移除 Replica服务 。
委托服务 Pigsty 通过节点上的 haproxy 暴露 PostgreSQL 服务。整个集群中的所有 haproxy 实例都使用相同的 服务定义 进行配置。
但是,你可以将 pg 服务委托给特定的节点分组(例如,专门的 haproxy 负载均衡器集群),而不是 PostgreSQL 集群成员上的 haproxy。
为此,你需要使用 pg_default_servicespg_service_provider
例如,此配置将在端口 10013 的 proxy haproxy 节点组上公开 pg 集群的主服务。
pg_service_provider : proxy # 使用端口 10013 上的 `proxy` 组的负载均衡器
pg_default_services : [ { name: primary ,port: 10013 ,dest: postgres ,check: /primary ,selector : "[]" }]
用户需要确保每个委托服务的端口,在代理集群中都是唯一 的。
在 43 节点生产环境仿真 沙箱 prod.yml
12.20.4 - 认证 / HBA Pigsty 中基于主机的身份认证 HBA(Host-Based Authentication)详解。
Pigsty 中基于主机的身份认证 HBA(Host-Based Authentication)详解。
认证是 访问控制 与 权限系统 的基石,PostgreSQL 拥有多种 认证 方法。
这里主要介绍 HBA:Host Based Authentication,HBA规则定义了哪些用户能够通过哪些方式从哪些地方访问哪些数据库。
客户端认证 要连接到PostgreSQL数据库,用户必须先经过认证(默认使用密码)。
您可以在连接字符串中提供密码(不安全)或使用PGPASSWORD环境变量或.pgpass文件传递密码。参考 psqlPostgreSQL连接字符串 以获取更多详细信息。
psql 'host=<host> port=<port> dbname=<dbname> user=<username> password=<password>'
psql postgres://<username>:<password>@<host>:<port>/<dbname>
PGPASSWORD = <password>; psql -U <username> -h <host> -p <port> -d <dbname>
例如,连接 Pigsty 默认的 meta 数据库,可以使用以下连接串:
psql 'host=10.10.10.10 port=5432 dbname=meta user=dbuser_dba password=DBUser.DBA'
psql postgres://dbuser_dba:DBUser.DBA@10.10.10.10:5432/meta
PGPASSWORD = DBUser.DBA; psql -U dbuser_dba -h 10.10.10.10 -p 5432 -d meta
默认配置下,Pigsty会启用服务端 SSL 加密,但不验证客户端 SSL 证书。要使用客户端SSL证书连接,你可以使用PGSSLCERT和PGSSLKEY环境变量或sslkey和sslcert参数提供客户端参数。
psql 'postgres://dbuser_dba:DBUser.DBA@10.10.10.10:5432/meta?sslkey=/path/to/dbuser_dba.key&sslcert=/path/to/dbuser_dba.crt'
客户端证书(CN = 用户名)可以使用本地CA与 cert.yml
定义HBA 在Pigsty中,有四个与HBA规则有关的参数:
这些都是 HBA 规则对象的数组,每个HBA规则都是以下两种形式之一的对象:
1. 原始形式 原始形式的 HBA 与 PostgreSQL pg_hba.conf 的格式几乎完全相同:
- title : allow intranet password access
role : common
rules :
- host all all 10.0.0.0/8 md5
- host all all 172.16.0.0/12 md5
- host all all 192.168.0.0/16 md5
在这种形式中,rules 字段是字符串数组,每一行都是条原始形式的 HBA规则 。title 字段会被渲染为一条注释,解释下面规则的作用。
role 字段用于说明该规则适用于哪些实例角色,当实例的 pg_rolerole相同时,HBA规则将被添加到这台实例的 HBA 中。
role: common的HBA规则将被添加到所有实例上。role: primary 的 HBA 规则只会添加到主库实例上。role: replica 的 HBA 规则只会添加到从库实例上。role: offline的HBA规则将被添加到离线实例上( pg_roleoffline或 pg_offline_querytrue)2. 别名形式 别名形式允许您用更简单清晰便捷的方式维护 HBA 规则:它用addr、auth、user和db 字段替换了 rules。 title、role 和 order 字段则仍然生效。
- addr : 'intra' # world|intra|infra|admin|local|localhost|cluster|<cidr>
auth : 'pwd' # trust|pwd|ssl|cert|deny|<official auth method>
user : 'all' # all|${dbsu}|${repl}|${admin}|${monitor}|<user>|<group>
db : 'all' # all|replication|....
rules : [] # raw hba string precedence over above all
title : allow intranet password access
order : 100 # 排序权重,数字小的排前面(可选,默认追加到最后)
addr: where 哪些IP地址段受本条规则影响?world: 所有的IP地址intra: 所有的内网IP地址段: '10.0.0.0/8', '172.16.0.0/12', '192.168.0.0/16'infra: Infra节点的IP地址admin: admin_ip 管理节点的IP地址local: 本地 Unix Socketlocalhost: 本地 Unix Socket 以及TCP 127.0.0.1/32 环回地址cluster: 同一个 PostgresQL 集群所有成员的IP地址<cidr>: 一个特定的 CIDR 地址块或IP地址auth: how 本条规则指定的认证方式?deny: 拒绝访问trust: 直接信任,不需要认证pwd: 密码认证,根据 pg_pwd_encmd5 或 scram-sha-256 认证sha/scram-sha-256:强制使用 scram-sha-256 密码认证方式。md5: md5 密码认证方式,但也可以兼容 scram-sha-256 认证,不建议使用。ssl: 在密码认证 pwd 的基础上,强制要求启用SSLssl-md5: 在密码认证 md5 的基础上,强制要求启用SSLssl-sha: 在密码认证 sha 的基础上,强制要求启用SSLos/ident: 使用操作系统用户的身份进行 ident 认证peer: 使用 peer 认证方式,类似于 os identcert: 使用基于客户端SSL证书的认证方式,证书CN为用户名user: who :哪些用户受本条规则影响?db: which :哪些数据库受本条规则影响?all: 所有数据库replication: 允许建立复制连接(不指定特定数据库)某个特定的数据库 3. 定义位置 通常,全局的HBA定义在 all.vars 中,如果您想要修改全局默认的HBA规则,可以从 full.ymlall.vars 中进行修改。
而集群特定的 HBA 规则定义在数据库的集群级配置中:
下面是一些集群HBA规则的定义例子:
pg-meta :
hosts : { 10.10.10.10 : { pg_seq: 1, pg_role : primary } }
vars :
pg_cluster : pg-meta
pg_hba_rules :
- { user: dbuser_view ,db: all ,addr: infra ,auth: pwd ,title : '允许 dbuser_view 从基础设施节点密码访问所有库' }
- { user: all ,db: all ,addr: 100.0.0.0/8 ,auth: pwd ,title : '允许所有用户从K8S网段密码访问所有库' }
- { user : '${admin}' ,db: world ,addr: 0.0.0.0/0 ,auth: cert ,title : '允许管理员用户从任何地方用客户端证书登陆' }
重载HBA HBA 是一个静态的规则配置文件,修改后需要重载才能生效。默认的 HBA 规则集合因为不涉及 Role 与集群成员,所以通常不需要重载。
如果您设计的 HBA 使用了特定的实例角色限制,或者集群成员限制,那么当集群实例成员发生变化(新增/下线/主从切换),一部分HBA规则的生效条件/涉及范围发生变化,通常也需要 重载HBA 以反映最新变化。
要重新加载 postgres/pgbouncer 的 hba 规则:
bin/pgsql-hba <cls> # 重新加载集群 `<cls>` 的 hba 规则
bin/pgsql-hba <cls> ip1 ip2... # 重新加载特定实例的 hba 规则
底层实际执行的 Ansible 剧本命令为:
./pgsql.yml -l <cls> -e pg_reload = true -t pg_hba,pg_reload
./pgsql.yml -l <cls> -e pg_reload = true -t pgbouncer_hba,pgbouncer_reload
默认HBA Pigsty 有一套默认的 HBA 规则,对于绝大多数场景来说,它已经足够安全了。这些规则使用别名形式,因此基本可以自我解释。
pg_default_hba_rules : # postgres 全局默认的HBA规则,按 order 排序
- {user : '${dbsu}' ,db: all ,addr: local ,auth: ident ,title: 'dbsu access via local os user ident' ,order : 100 }
- {user : '${dbsu}' ,db: replication ,addr: local ,auth: ident ,title: 'dbsu replication from local os ident' ,order : 150 }
- {user : '${repl}' ,db: replication ,addr: localhost ,auth: pwd ,title: 'replicator replication from localhost',order : 200 }
- {user : '${repl}' ,db: replication ,addr: intra ,auth: pwd ,title: 'replicator replication from intranet' ,order : 250 }
- {user : '${repl}' ,db: postgres ,addr: intra ,auth: pwd ,title: 'replicator postgres db from intranet' ,order : 300 }
- {user : '${monitor}' ,db: all ,addr: localhost ,auth: pwd ,title: 'monitor from localhost with password' ,order : 350 }
- {user : '${monitor}' ,db: all ,addr: infra ,auth: pwd ,title: 'monitor from infra host with password',order : 400 }
- {user : '${admin}' ,db: all ,addr: infra ,auth: ssl ,title: 'admin @ infra nodes with pwd & ssl' ,order : 450 }
- {user : '${admin}' ,db: all ,addr: world ,auth: ssl ,title: 'admin @ everywhere with ssl & pwd' ,order : 500 }
- {user: '+dbrole_readonly',db: all ,addr: localhost ,auth: pwd ,title: 'pgbouncer read/write via local socket',order : 550 }
- {user: '+dbrole_readonly',db: all ,addr: intra ,auth: pwd ,title: 'read/write biz user via password' ,order : 600 }
- {user: '+dbrole_offline' ,db: all ,addr: intra ,auth: pwd ,title: 'allow etl offline tasks from intranet',order : 650 }
pgb_default_hba_rules : # pgbouncer 全局默认的HBA规则,按 order 排序
- {user : '${dbsu}' ,db: pgbouncer ,addr: local ,auth: peer ,title: 'dbsu local admin access with os ident',order : 100 }
- {user: 'all' ,db: all ,addr: localhost ,auth: pwd ,title: 'allow all user local access with pwd' ,order : 150 }
- {user : '${monitor}' ,db: pgbouncer ,addr: intra ,auth: pwd ,title: 'monitor access via intranet with pwd' ,order : 200 }
- {user : '${monitor}' ,db: all ,addr: world ,auth: deny ,title: 'reject all other monitor access addr' ,order : 250 }
- {user : '${admin}' ,db: all ,addr: intra ,auth: pwd ,title: 'admin access via intranet with pwd' ,order : 300 }
- {user : '${admin}' ,db: all ,addr: world ,auth: deny ,title: 'reject all other admin access addr' ,order : 350 }
- {user: 'all' ,db: all ,addr: intra ,auth: pwd ,title: 'allow all user intra access with pwd' ,order : 400 }
注意 :order 字段控制规则渲染顺序。0-99 用于高优先规则(如黑名单),100-650 为默认规则区间,1000+ 用于追加规则。详见 HBA 配置 。
示例:渲染 pg_hba.conf #==============================================================#
# File : pg_hba.conf
# Desc : Postgres HBA Rules for pg-meta-1 [primary]
# Time : 2023-01-11 15:19
# Host : pg-meta-1 @ 10.10.10.10:5432
# Path : /pg/data/pg_hba.conf
# Note : ANSIBLE MANAGED, DO NOT CHANGE!
# Author : Ruohang Feng (rh@vonng.com)
# License : Apache-2.0
#==============================================================#
# addr alias
# local : /var/run/postgresql
# admin : 10.10.10.10
# infra : 10.10.10.10
# intra : 10.0.0.0/8, 172.16.0.0/12, 192.168.0.0/16
# user alias
# dbsu : postgres
# repl : replicator
# monitor : dbuser_monitor
# admin : dbuser_dba
# dbsu access via local os user ident [default]
local all postgres ident
# dbsu replication from local os ident [default]
local replication postgres ident
# replicator replication from localhost [default]
local replication replicator scram-sha-256
host replication replicator 127.0.0.1/32 scram-sha-256
# replicator replication from intranet [default]
host replication replicator 10.0.0.0/8 scram-sha-256
host replication replicator 172.16.0.0/12 scram-sha-256
host replication replicator 192.168.0.0/16 scram-sha-256
# replicator postgres db from intranet [default]
host postgres replicator 10.0.0.0/8 scram-sha-256
host postgres replicator 172.16.0.0/12 scram-sha-256
host postgres replicator 192.168.0.0/16 scram-sha-256
# monitor from localhost with password [default]
local all dbuser_monitor scram-sha-256
host all dbuser_monitor 127.0.0.1/32 scram-sha-256
# monitor from infra host with password [default]
host all dbuser_monitor 10.10.10.10/32 scram-sha-256
# admin @ infra nodes with pwd & ssl [default]
hostssl all dbuser_dba 10.10.10.10/32 scram-sha-256
# admin @ everywhere with ssl & pwd [default]
hostssl all dbuser_dba 0.0.0.0/0 scram-sha-256
# pgbouncer read/write via local socket [default]
local all +dbrole_readonly scram-sha-256
host all +dbrole_readonly 127.0.0.1/32 scram-sha-256
# read/write biz user via password [default]
host all +dbrole_readonly 10.0.0.0/8 scram-sha-256
host all +dbrole_readonly 172.16.0.0/12 scram-sha-256
host all +dbrole_readonly 192.168.0.0/16 scram-sha-256
# allow etl offline tasks from intranet [default]
host all +dbrole_offline 10.0.0.0/8 scram-sha-256
host all +dbrole_offline 172.16.0.0/12 scram-sha-256
host all +dbrole_offline 192.168.0.0/16 scram-sha-256
# allow application database intranet access [common] [DISABLED]
#host kong dbuser_kong 10.0.0.0/8 md5
#host bytebase dbuser_bytebase 10.0.0.0/8 md5
#host grafana dbuser_grafana 10.0.0.0/8 md5
示例: 渲染 pgb_hba.conf #==============================================================#
# File : pgb_hba.conf
# Desc : Pgbouncer HBA Rules for pg-meta-1 [primary]
# Time : 2023-01-11 15:28
# Host : pg-meta-1 @ 10.10.10.10:5432
# Path : /etc/pgbouncer/pgb_hba.conf
# Note : ANSIBLE MANAGED, DO NOT CHANGE!
# Author : Ruohang Feng (rh@vonng.com)
# License : Apache-2.0
#==============================================================#
# PGBOUNCER HBA RULES FOR pg-meta-1 @ 10.10.10.10:6432
# ansible managed: 2023-01-11 14:30:58
# addr alias
# local : /var/run/postgresql
# admin : 10.10.10.10
# infra : 10.10.10.10
# intra : 10.0.0.0/8, 172.16.0.0/12, 192.168.0.0/16
# user alias
# dbsu : postgres
# repl : replicator
# monitor : dbuser_monitor
# admin : dbuser_dba
# dbsu local admin access with os ident [default]
local pgbouncer postgres peer
# allow all user local access with pwd [default]
local all all scram-sha-256
host all all 127.0.0.1/32 scram-sha-256
# monitor access via intranet with pwd [default]
host pgbouncer dbuser_monitor 10.0.0.0/8 scram-sha-256
host pgbouncer dbuser_monitor 172.16.0.0/12 scram-sha-256
host pgbouncer dbuser_monitor 192.168.0.0/16 scram-sha-256
# reject all other monitor access addr [default]
host all dbuser_monitor 0.0.0.0/0 reject
# admin access via intranet with pwd [default]
host all dbuser_dba 10.0.0.0/8 scram-sha-256
host all dbuser_dba 172.16.0.0/12 scram-sha-256
host all dbuser_dba 192.168.0.0/16 scram-sha-256
# reject all other admin access addr [default]
host all dbuser_dba 0.0.0.0/0 reject
# allow all user intra access with pwd [default]
host all all 10.0.0.0/8 scram-sha-256
host all all 172.16.0.0/12 scram-sha-256
host all all 192.168.0.0/16 scram-sha-256
安全加固 对于那些需要更高安全性的场合,我们提供了一个安全加固的配置模板 security.yml ,使用了以下的默认 HBA 规则集:
pg_default_hba_rules : # postgres host-based auth rules by default, order by `order`
- {user : '${dbsu}' ,db: all ,addr: local ,auth: ident ,title: 'dbsu access via local os user ident' ,order : 100 }
- {user : '${dbsu}' ,db: replication ,addr: local ,auth: ident ,title: 'dbsu replication from local os ident' ,order : 150 }
- {user : '${repl}' ,db: replication ,addr: localhost ,auth: ssl ,title: 'replicator replication from localhost',order : 200 }
- {user : '${repl}' ,db: replication ,addr: intra ,auth: ssl ,title: 'replicator replication from intranet' ,order : 250 }
- {user : '${repl}' ,db: postgres ,addr: intra ,auth: ssl ,title: 'replicator postgres db from intranet' ,order : 300 }
- {user : '${monitor}' ,db: all ,addr: localhost ,auth: pwd ,title: 'monitor from localhost with password' ,order : 350 }
- {user : '${monitor}' ,db: all ,addr: infra ,auth: ssl ,title: 'monitor from infra host with password',order : 400 }
- {user : '${admin}' ,db: all ,addr: infra ,auth: ssl ,title: 'admin @ infra nodes with pwd & ssl' ,order : 450 }
- {user : '${admin}' ,db: all ,addr: world ,auth: cert ,title: 'admin @ everywhere with ssl & cert' ,order : 500 }
- {user: '+dbrole_readonly',db: all ,addr: localhost ,auth: ssl ,title: 'pgbouncer read/write via local socket',order : 550 }
- {user: '+dbrole_readonly',db: all ,addr: intra ,auth: ssl ,title: 'read/write biz user via password' ,order : 600 }
- {user: '+dbrole_offline' ,db: all ,addr: intra ,auth: ssl ,title: 'allow etl offline tasks from intranet',order : 650 }
pgb_default_hba_rules : # pgbouncer host-based authentication rules, order by `order`
- {user : '${dbsu}' ,db: pgbouncer ,addr: local ,auth: peer ,title: 'dbsu local admin access with os ident',order : 100 }
- {user: 'all' ,db: all ,addr: localhost ,auth: pwd ,title: 'allow all user local access with pwd' ,order : 150 }
- {user : '${monitor}' ,db: pgbouncer ,addr: intra ,auth: ssl ,title: 'monitor access via intranet with pwd' ,order : 200 }
- {user : '${monitor}' ,db: all ,addr: world ,auth: deny ,title: 'reject all other monitor access addr' ,order : 250 }
- {user : '${admin}' ,db: all ,addr: intra ,auth: ssl ,title: 'admin access via intranet with pwd' ,order : 300 }
- {user : '${admin}' ,db: all ,addr: world ,auth: deny ,title: 'reject all other admin access addr' ,order : 350 }
- {user: 'all' ,db: all ,addr: intra ,auth: ssl ,title: 'allow all user intra access with pwd' ,order : 400 }
更多信息,请参考 安全加固 一节。
12.20.5 - 访问控制 Pigsty 提供的默认角色系统与权限模型
Pigsty 提供了一套开箱即用的,基于 角色系统 和 权限系统 的访问控制模型。
权限控制很重要,但很多用户做不好。因此 Pigsty 提供了一套开箱即用的精简访问控制模型,为您的集群安全性提供一个兜底。
角色系统 Pigsty 默认的角色系统包含四个 默认角色 和四个 默认用户 :
角色名称 属性 所属 描述 dbrole_readonlyNOLOGIN角色:全局只读访问 dbrole_readwriteNOLOGINdbrole_readonly 角色:全局读写访问 dbrole_adminNOLOGINpg_monitor,dbrole_readwrite 角色:管理员/对象创建 dbrole_offlineNOLOGIN角色:受限的只读访问 postgresSUPERUSER系统超级用户 replicatorREPLICATIONpg_monitor,dbrole_readonly 系统复制用户 dbuser_dbaSUPERUSERdbrole_admin pgsql 管理用户 dbuser_monitorpg_monitor pgsql 监控用户
这些 角色与用户 的详细定义如下所示:
pg_default_roles : # 全局默认的角色与系统用户
- { name: dbrole_readonly ,login: false ,comment : role for global read-only access }
- { name: dbrole_offline ,login: false ,comment : role for restricted read-only access }
- { name: dbrole_readwrite ,login: false ,roles: [dbrole_readonly] ,comment : role for global read-write access }
- { name: dbrole_admin ,login: false ,roles: [pg_monitor, dbrole_readwrite] ,comment : role for object creation }
- { name: postgres ,superuser: true ,comment : system superuser }
- { name: replicator ,replication: true ,roles: [pg_monitor, dbrole_readonly] ,comment : system replicator }
- { name: dbuser_dba ,superuser: true ,roles: [dbrole_admin] ,pgbouncer: true ,pool_mode: session, pool_connlimit: 16 ,comment : pgsql admin user }
- { name: dbuser_monitor ,roles: [pg_monitor] ,pgbouncer: true ,parameters : {log_min_duration_statement: 1000 } ,pool_mode: session ,pool_connlimit: 8 ,comment : pgsql monitor user }
默认角色 Pigsty 中有四个默认角色:
业务只读 (dbrole_readonly): 用于全局只读访问的角色。如果别的业务想要此库只读访问权限,可以使用此角色。 业务读写 (dbrole_readwrite): 用于全局读写访问的角色,主属业务使用的生产账号应当具有数据库读写权限 业务管理员 (dbrole_admin): 拥有DDL权限的角色,通常用于业务管理员,或者需要在应用中建表的场景(比如各种业务软件) 离线只读访问 (dbrole_offline): 受限的只读访问角色(只能访问 offline 实例,通常是个人用户,ETL工具账号) 默认角色在 pg_default_roles
- { name: dbrole_readonly , login: false , comment : role for global read-only access } # 生产环境的只读角色
- { name: dbrole_offline , login: false , comment : role for restricted read-only access (offline instance) } # 受限的只读角色
- { name: dbrole_readwrite , login: false , roles: [dbrole_readonly], comment : role for global read-write access } # 生产环境的读写角色
- { name: dbrole_admin , login: false , roles: [pg_monitor, dbrole_readwrite] , comment : role for object creation } # 生产环境的 DDL 更改角色
默认用户 Pigsty 也有四个默认用户(系统用户):
超级用户 (postgres),集群的所有者和创建者,与操作系统 dbsu 名称相同。 复制用户 (replicator),用于主-从复制的系统用户。 监控用户 (dbuser_monitor),用于监控数据库和连接池指标的用户。 管理用户 (dbuser_dba),执行日常操作和数据库更改的管理员用户。 这4个默认用户的用户名/密码通过4对专用参数进行定义,并在很多地方引用:
在生产部署中记得更改这些密码,不要使用默认值!
pg_dbsu : postgres # 数据库超级用户名,这个用户名建议不要修改。
pg_dbsu_password : '' # 数据库超级用户密码,这个密码建议留空!禁止dbsu密码登陆。
pg_replication_username : replicator # 系统复制用户名
pg_replication_password : DBUser.Replicator # 系统复制密码,请务必修改此密码!
pg_monitor_username : dbuser_monitor # 系统监控用户名
pg_monitor_password : DBUser.Monitor # 系统监控密码,请务必修改此密码!
pg_admin_username : dbuser_dba # 系统管理用户名
pg_admin_password : DBUser.DBA # 系统管理密码,请务必修改此密码!
如果您修改默认用户的参数,在 pg_default_roles定义 即可:
- { name: postgres ,superuser: true ,comment : system superuser }
- { name: replicator ,replication: true ,roles: [pg_monitor, dbrole_readonly] ,comment : system replicator }
- { name: dbuser_dba ,superuser: true ,roles: [dbrole_admin] ,pgbouncer: true ,pool_mode: session, pool_connlimit: 16 , comment : pgsql admin user }
- { name: dbuser_monitor ,roles: [pg_monitor, dbrole_readonly] ,pgbouncer: true ,parameters : {log_min_duration_statement: 1000 } ,pool_mode: session ,pool_connlimit: 8 ,comment : pgsql monitor user }
权限系统 Pigsty 拥有一套开箱即用的权限模型,该模型与 默认角色 一起配合工作。
所有用户都可以访问所有模式。 只读用户(dbrole_readonly)可以从所有表中读取数据。(SELECT,EXECUTE) 读写用户(dbrole_readwrite)可以向所有表中写入数据并运行 DML。(INSERT,UPDATE,DELETE)。 管理员用户(dbrole_admin)可以创建对象并运行 DDL(CREATE,USAGE,TRUNCATE,REFERENCES,TRIGGER)。 离线用户(dbrole_offline)类似只读用户,但访问受到限制,只允许访问 离线实例 (pg_role = 'offline' 或 pg_offline_query = true) 由管理员用户创建的对象将具有正确的权限。 所有数据库上都配置了默认权限,包括模板数据库。 数据库连接权限由数据库 定义 管理。 默认撤销PUBLIC在数据库和public模式下的CREATE权限。 对象权限 数据库中新建对象的默认权限由参数 pg_default_privileges
- GRANT USAGE ON SCHEMAS TO dbrole_readonly
- GRANT SELECT ON TABLES TO dbrole_readonly
- GRANT SELECT ON SEQUENCES TO dbrole_readonly
- GRANT EXECUTE ON FUNCTIONS TO dbrole_readonly
- GRANT USAGE ON SCHEMAS TO dbrole_offline
- GRANT SELECT ON TABLES TO dbrole_offline
- GRANT SELECT ON SEQUENCES TO dbrole_offline
- GRANT EXECUTE ON FUNCTIONS TO dbrole_offline
- GRANT INSERT ON TABLES TO dbrole_readwrite
- GRANT UPDATE ON TABLES TO dbrole_readwrite
- GRANT DELETE ON TABLES TO dbrole_readwrite
- GRANT USAGE ON SEQUENCES TO dbrole_readwrite
- GRANT UPDATE ON SEQUENCES TO dbrole_readwrite
- GRANT TRUNCATE ON TABLES TO dbrole_admin
- GRANT REFERENCES ON TABLES TO dbrole_admin
- GRANT TRIGGER ON TABLES TO dbrole_admin
- GRANT CREATE ON SCHEMAS TO dbrole_admin
由管理员新创建 的对象,默认将会上述权限。使用 \ddp+ 可以查看这些默认权限:
类型 访问权限 函数 =X dbrole_readonly=X dbrole_offline=X dbrole_admin=X 模式 dbrole_readonly=U dbrole_offline=U dbrole_admin=UC 序列号 dbrole_readonly=r dbrole_offline=r dbrole_readwrite=wU dbrole_admin=rwU 表 dbrole_readonly=r dbrole_offline=r dbrole_readwrite=awd dbrole_admin=arwdDxt
默认权限 ALTER DEFAULT PRIVILEGES
在 Pigsty 中,默认权限针对三个角色进行定义:
{ % for priv in pg_default_privileges % }
ALTER DEFAULT PRIVILEGES FOR ROLE {{ pg_dbsu }} {{ priv }} ;
{ % endfor % }
{ % for priv in pg_default_privileges % }
ALTER DEFAULT PRIVILEGES FOR ROLE {{ pg_admin_username }} {{ priv }} ;
{ % endfor % }
-- 对于其他业务管理员而言,它们应当在执行 DDL 前执行 SET ROLE dbrole_admin,从而使用对应的默认权限配置。
{ % for priv in pg_default_privileges % }
ALTER DEFAULT PRIVILEGES FOR ROLE "dbrole_admin" {{ priv }} ;
{ % endfor % }
这些内容将会被 PG集群初始化模板 pg-init-template.sql/pg/tmp/pg-init-template.sql。
该命令会在 template1 与 postgres 数据库中执行,新创建的数据库会通过模板 template1 继承这些默认权限配置。
也就是说,为了维持正确的对象权限,您必须用管理员用户 来执行 DDL,它们可以是:
{{ pg_dbsu }}postgres{{ pg_admin_username }}dbuser_dba授予了 dbrole_admin 角色的业务管理员用户(通过 SET ROLE 切换为 dbrole_admin 身份)。 使用 postgres 作为全局对象所有者是明智的。如果您希望以业务管理员用户身份创建对象,创建之前必须使用 SET ROLE dbrole_admin 来维护正确的权限。
当然,您也可以在数据库中通过 ALTER DEFAULT PRIVILEGE FOR ROLE <some_biz_admin> XXX 来显式对业务管理员授予默认权限。
数据库权限 在 Pigsty 中,数据库(Database)层面的权限在 数据库定义 中被涵盖。
数据库有三个级别的权限:CONNECT、CREATE、TEMP,以及一个特殊的’权限’:OWNERSHIP。
- name : meta # 必选,`name` 是数据库定义中唯一的必选字段
owner : postgres # 可选,数据库所有者,默认为 postgres
allowconn : true # 可选,是否允许连接,默认为 true。显式设置 false 将完全禁止连接到此数据库
revokeconn : false # 可选,撤销公共连接权限。默认为 false,设置为 true 时,属主和管理员之外用户的 CONNECT 权限会被回收
如果 owner 参数存在,它作为数据库属主,替代默认的 {{ pg_dbsu }}postgres) 如果 revokeconn 为 false,所有用户都有数据库的 CONNECT 权限,这是默认的行为。 如果显式设置了 revokeconn 为 true:数据库的 CONNECT 权限将从 PUBLIC 中撤销:普通用户无法连接上此数据库 CONNECT 权限将被显式授予 {{ pg_replication_username }}、{{ pg_monitor_username }} 和 {{ pg_admin_username }}CONNECT 权限将 GRANT OPTION 被授予数据库属主,数据库属主用户可以自行授权其他用户连接权限。 revokeconn 选项可用于在同一个集群间隔离跨数据库访问,您可以为每个数据库创建不同的业务用户作为属主,并为它们设置 revokeconn 选项。示例:数据库隔离 pg-infra :
hosts :
10.10.10.40 : { pg_seq: 1, pg_role : primary }
10.10.10.41 : { pg_seq: 2, pg_role: replica , pg_offline_query : true }
vars :
pg_cluster : pg-infra
pg_users :
- { name: dbuser_confluence, password: mc2iohos , pgbouncer: true, roles : [ dbrole_admin ] }
- { name: dbuser_gitlab, password: sdf23g22sfdd , pgbouncer: true, roles : [ dbrole_readwrite ] }
- { name: dbuser_jira, password: sdpijfsfdsfdfs , pgbouncer: true, roles : [ dbrole_admin ] }
pg_databases :
- { name: confluence , revokeconn: true, owner: dbuser_confluence , connlimit : 100 }
- { name: gitlab , revokeconn: true, owner: dbuser_gitlab, connlimit : 100 }
- { name: jira , revokeconn: true, owner: dbuser_jira , connlimit : 100 }
CREATE权限 出于安全考虑,Pigsty 默认从 PUBLIC 撤销数据库上的 CREATE 权限,从 PostgreSQL 15 开始这也是默认行为。
数据库属主总是可以根据实际需要,来自行调整 CREATE 权限。
13 - 模块:INFRA 可独立使用且可选的基础设施,为 PostgreSQL 提供 NTP,DNS,可观测性等基础服务。
配置 | 管理 | 剧本 | 监控 | 参数
概览 每一套 Pigsty 部署都会提供一套基础架构组件,为纳管的节点与数据库集群提供服务,组件包括:
在 Pigsty 中,PGSQL 模块会使用到 INFRA节点
数据库集群/主机节点的域名,依赖 INFRA 节点的 DNSMASQ 解析 。 在数据库节点软件上安装 ,需要用到 INFRA 节点上的 Nginx 托管的本地 yum/apt 软件源。 数据库集群/节点的监控指标 ,会被 INFRA 节点上的 VictoriaMetrics 拉取并存储,可通过 VMUI / PromQL 访问。 数据库与节点运行日志由 Vector 收集,统一推送到 INFRA 上的 VictoriaLogs,支持在 Grafana 中检索。 VMAlert 根据 VictoriaMetrics 中的指标评估 告警规则,并将事件转发到 Alertmanager。 用户会从 Infra/Admin 节点上使用 Ansible 或其他工具发起对数据库节点的管理 :执行集群创建,扩缩容,实例/集群回收 创建业务用户、业务数据库、修改服务、HBA修改; 执行日志采集、垃圾清理,备份,巡检等 数据库节点默认会从 INFRA/ADMIN 节点上的 NTP 服务器同步时间 如果没有专用集群,高可用组件 Patroni 会使用 INFRA 节点上的 etcd 作为高可用DCS。 如果没有专用集群,备份组件 pgbackrest 会使用 INFRA 节点上的 minio 作为可选的集中备份仓库。 Nginx Nginx是Pigsty所有WebUI类服务的访问入口,默认使用管理节点80端口。
有许多带有 WebUI 的基础设施组件通过 Nginx 对外暴露服务,例如 Grafana、VictoriaMetrics(VMUI)、AlertManager,以及 HAProxy 流量管理页等,此外 yum/apt 仓库等静态文件资源也通过 Nginx 对外提供服务。
Nginx会根据 infra_portal域名 进行区分,将访问请求转发至对应的上游组件处理。如果您使用了其他的域名,或者公网域名,可以在这里进行相应修改:
infra_portal : # domain names and upstream servers
home : { domain : i.pigsty }
grafana : { domain: g.pigsty ,endpoint : "${admin_ip}:3000" , websocket : true }
vmetrics : { domain: p.pigsty ,endpoint : "${admin_ip}:8428" } # VMUI
alertmanager : { domain: a.pigsty ,endpoint : "${admin_ip}:9059" }
blackbox : { endpoint : "${admin_ip}:9115" }
vmalert : { endpoint : "${admin_ip}:8880" }
#logs : { domain: logs.pigsty ,endpoint: "${admin_ip}:9428" }
#minio : { domain: m.pigsty ,endpoint: "${admin_ip}:9001" ,scheme: https ,websocket: true }
Pigsty强烈建议使用域名访问Pigsty UI系统,而不是直接通过IP+端口的方式访问,基于以下几个理由:
使用域名便于启用 HTTPS 流量加密,可以将访问收拢至Nginx,审计一切请求,并方便地集成认证机制。 一些组件默认只监听 127.0.0.1 ,因此只能通过Nginx代理访问。 域名更容易记忆,并提供了额外的配置灵活性。 如果您没有可用的互联网域名或本地DNS解析,您可以在 /etc/hosts (MacOS/Linux)或C:\Windows\System32\drivers\etc\hosts (Windows)中添加本地静态解析记录。
Nginx相关配置参数位于:配置:INFRA - NGINX
本地软件仓库 Pigsty会在安装时首先建立一个本地软件源,以加速后续软件安装。
该软件源由Nginx提供服务,默认位于为 /www/pigsty,可以访问 http://i.pigsty/pigsty 使用。
Pigsty的离线软件包即是将已经建立好的软件源目录(yum/apt)整个打成压缩包,当Pigsty尝试构建本地源时,如果发现本地源目录 /www/pigsty 已经存在,
且带有 /www/pigsty/repo_complete 标记文件,则会认为本地源已经构建完成,从而跳过从原始上游下载软件的步骤,消除了对互联网访问的依赖。
Repo定义文件位于 /www/pigsty.repo,默认可以通过 http://${admin_ip}/pigsty.repo 获取
curl -L http://i.pigsty/pigsty.repo -o /etc/yum.repos.d/pigsty.repo
您也可以在没有Nginx的情况下直接使用文件本地源:
[pigsty-local]
name = Pigsty local $releasever - $basearch
baseurl = file:///www/pigsty/
enabled = 1
gpgcheck = 0
本地软件仓库相关配置参数位于:配置:INFRA - REPO
Victoria 可观测性套件 Pigsty v4.1 使用 VictoriaMetrics 家族提供统一的监控、日志与链路追踪能力:
VictoriaMetrics 默认监听 8428 端口,可通过 http://p.pigsty 或 https://i.pigsty/vmetrics/ 访问 VMUI,兼容 Prometheus API。VMAlert 负责评估 /infra/rules/*.yml 中的告警规则,监听 8880 端口,并将告警事件发送到 Alertmanager。VictoriaLogs 监听 9428 端口,支持 https://i.pigsty/vlogs/ 查询界面。所有节点默认运行 Vector,将系统日志、PostgreSQL 日志等结构化后推送至 VictoriaLogs。VictoriaTraces 监听 10428 端口,用于慢 SQL / Trace 采集,Grafana 以 Jaeger 数据源方式访问。Alertmanager 监听 9059 端口,可通过 http://a.pigsty 或 https://i.pigsty/alertmgr/ 管理告警通知。完成 SMTP、Webhook 等配置后即可推送消息。Blackbox Exporter 默认监听 9115 端口,用于 Ping/TCP/HTTP 探测,可通过 https://i.pigsty/blackbox/ 访问。更多信息请参阅:配置:INFRA - VICTORIA 与 配置:INFRA - PROMETHEUS 。
Grafana Grafana 是 Pigsty 的 WebUI 核心,默认监听 3000 端口,可以直接通过 IP:3000 或域名 http://g.pigsty 访问。
Pigsty 预置了针对 VictoriaMetrics / Logs / Traces 的数据源(vmetrics-*、vlogs-*、vtraces-*),以及大量 Dashboard,可通过 URL 进行联动跳转,快速定位问题。
Grafana 也可作为通用低代码可视化平台使用,因此 Pigsty 默认安装了 ECharts、victoriametrics-datasource 等插件,方便构建监控大屏或巡检报表。
Grafana 相关配置参数位于:配置:INFRA - GRAFANA 。
Ansible Pigsty默认会在元节点上安装Ansible,Ansible是一个流行的运维工具,采用声明式的配置风格与幂等的剧本设计,可以极大降低系统维护的复杂度。
DNSMASQ DNSMASQ 提供环境内的DNS解析 服务,其他模块的域名将会注册到 INFRA节点上的 DNSMASQ 服务中。
DNS记录默认放置于所有INFRA节点的 /etc/hosts.d/ 目录中。
DNSMASQ相关配置参数位于:配置:INFRA - DNS
Chronyd NTP服务用于同步环境内所有节点的时间(可选)
NTP相关配置参数位于:配置:NODES - NTP
PostgreSQL Pigsty 的元数据库(CMDB)通常使用 PostgreSQL,默认监听 5432 端口,用于存储 Pigsty 元数据并支撑部分内置应用。
更多信息请参阅:PGSQL 模块与 配置:INFRA - META 。
配置 要在节点上安装 INFRA 模块,首先需要在配置清单中的 infra 分组中将其加入,并分配实例号 infra_seq
# 配置单个 INFRA 节点
infra : { hosts : { 10.10.10.10 : { infra_seq : 1 } }}
# 配置两个 INFRA 节点
infra :
hosts :
10.10.10.10 : { infra_seq : 1 }
10.10.10.11 : { infra_seq : 2 }
然后,使用 infra.yml
管理 下面是与 INFRA 模块相关的一些管理任务:
安装卸载Infra模块 ./infra.yml # 在 infra 分组上安装 INFRA 模块
./infra-rm.yml # 从 infra 分组上卸载 INFRA 模块
管理本地软件仓库 您可以使用以下剧本子任务,管理 Infra节点 上的本地yun源:
./infra.yml -t repo #从互联网或离线包中创建本地软件源
./infra.yml -t repo_dir # 创建本地软件源
./infra.yml -t repo_check # 检查本地软件源是否已经存在?
./infra.yml -t repo_prepare # 如果存在,直接使用已有的本地软件源
./infra.yml -t repo_build # 如果不存在,从上游构建本地软件源
./infra.yml -t repo_upstream # 处理 /etc/yum.repos.d 中的上游仓库文件
./infra.yml -t repo_remove # 如果 repo_remove == true,则删除现有的仓库文件
./infra.yml -t repo_add # 将上游仓库文件添加到 /etc/yum.repos.d (或 /etc/apt/sources.list.d)
./infra.yml -t repo_url_pkg # 从由 repo_url_packages 定义的互联网下载包
./infra.yml -t repo_cache # 使用 yum makecache / apt update 创建上游软件源元数据缓存
./infra.yml -t repo_boot_pkg # 安装如 createrepo_c、yum-utils 等的引导包...(或 dpkg-)
./infra.yml -t repo_pkg # 从上游仓库下载包 & 依赖项
./infra.yml -t repo_create # 使用 createrepo_c & modifyrepo_c 创建本地软件源
./infra.yml -t repo_use # 将新建的仓库添加到 /etc/yum.repos.d | /etc/apt/sources.list.d 用起来
./infra.yml -t repo_nginx # 如果没有 nginx 在服务,启动一个 nginx 作为 Web Server
其中最常用的命令为:
./infra.yml -t repo_upstream # 向 INFRA 节点添加 repo_upstream 中定义的上游软件源
./infra.yml -t repo_pkg # 从上游仓库下载包及其依赖项。
./infra.yml -t repo_create # 使用 createrepo_c & modifyrepo_c 创建/更新本地 yum 仓库
管理基础设施组件 您可以使用以下剧本子任务,管理 Infra节点 上的各个基础设施组件
./infra.yml -t infra # 配置基础设施
./infra.yml -t infra_env # 配置管理节点上的环境变量:env_patroni, env_pg, env_pgadmin, env_var
./infra.yml -t infra_pkg # 安装 INFRA 所需的软件包:infra_packages
./infra.yml -t infra_user # 设置 infra 操作系统用户组
./infra.yml -t infra_cert # 为 infra 组件颁发证书
./infra.yml -t dns # 配置 DNSMasq:dns_config, dns_record, dns_launch
./infra.yml -t nginx # 配置 Nginx:nginx_config, nginx_cert, nginx_static, nginx_launch, nginx_certbot, nginx_reload, nginx_exporter
./infra.yml -t victoria # 配置 VictoriaMetrics/Logs/Traces:vmetrics|vlogs|vtraces|vmalert
./infra.yml -t alertmanager # 配置 AlertManager:alertmanager_config, alertmanager_launch
./infra.yml -t blackbox # 配置 Blackbox Exporter:blackbox_config, blackbox_launch
./infra.yml -t grafana # 配置 Grafana:grafana_clean, grafana_config, grafana_launch, grafana_provision
./infra.yml -t infra_register # 将 infra 组件注册到 VictoriaMetrics / Grafana
其他常用的任务包括:
./infra.yml -t nginx_index # 重新渲染 Nginx 首页内容
./infra.yml -t nginx_config,nginx_reload # 重新渲染 Nginx 网站门户配置,对外暴露新的上游服务。
./infra.yml -t vmetrics_config,vmetrics_launch # 重新生成 VictoriaMetrics 主配置文件,并重启服务
./infra.yml -t vlogs_config,vlogs_launch # 重新渲染 VictoriaLogs 配置
./infra.yml -t vmetrics_clean # 清理 VictoriaMetrics 存储数据目录
./infra.yml -t grafana_provision # 重新加载 Grafana 仪表盘与数据源定义
剧本 Pigsty 提供了三个与 INFRA 模块相关的剧本:
infra.ymlINFRA模块剧本 infra.ymlInfra节点
执行该剧本将完成以下任务
配置元节点的目录与环境变量 下载并建立一个本地软件源,加速后续安装。(若使用离线软件包,则跳过下载阶段) 将当前元节点作为一个普通节点纳入 Pigsty 管理 部署基础设施 组件,包括 VictoriaMetrics/Logs/Traces、VMAlert、Grafana、Alertmanager、Blackbox Exporter 等 该剧本默认在 INFRA节点
Pigsty默认将使用当前执行此剧本的节点 作为Pigsty的 Infra节点 ADMIN节点 Pigsty在 配置过程 中默认会将当前节点标记为Infra/Admin节点,并使用当前节点首要IP地址 替换配置模板中的占位IP地址10.10.10.10。 该节点除了可以发起管理,部署有基础设施,与一个部署普通托管节点并无区别。 单机安装时,ETCD 也会安装在此节点上,提供 DCS 服务 本剧本的一些注意事项
本剧本为幂等剧本,重复执行默认不会清理历史数据与 Grafana 数据。 如需保留历史监控数据,请先将 vmetrics_clean、vlogs_clean、vtraces_clean 设置为 false。 如果将 vmetrics_clean、vlogs_clean、vtraces_clean、grafana_clean 设为 true,对应组件数据会在执行时被清理。 当离线软件源 /www/pigsty/repo_complete 存在时,本剧本会跳过从互联网下载软件的任务。完整执行该剧本耗时约5-8分钟,视机器配置而异。 不使用离线软件包而直接从互联网原始上游下载软件时,可能耗时10-20分钟,根据您的网络条件而异。
infra-rm.ymlINFRA模块剧本 infra-rm.ymlINFRA节点
常用子任务包括:
./infra-rm.yml # 移除 INFRA 模块
./infra-rm.yml -t service # 停止 INFRA 上的基础设施服务
./infra-rm.yml -t data # 移除 INFRA 上的存留数据
./infra-rm.yml -t package # 卸载 INFRA 上安装的软件包
deploy.ymlINFRA模块剧本 deploy.yml所有节点 上一次性完整安装 Pigsty
该剧本在 剧本:一次性安装 中有更详细的介绍。
监控 Pigsty Home : Pigsty 监控系统主页
Pigsty Home Dashboard
INFRA Overview : Pigsty 基础设施自监控概览
INFRA Overview Dashboard
Nginx Instance : Nginx 监控指标与日志
Nginx Overview Dashboard
Grafana Instance : Grafana 监控指标与日志
Grafana Overview Dashboard
VictoriaMetrics Instance : VictoriaMetrics 抓取、查询与存储指标
VMAlert Instance : 告警规则评估与队列状态
Alertmanager Instance : 告警聚合、通知管道与 Silences
VictoriaLogs Instance : 日志写入速率、查询负载与索引命中
VictoriaTraces Instance : Trace/KV 存储与 Jaeger 接口
Logs Instance : 基于 Vector + VictoriaLogs 的节点日志检索
Logs Instance Dashboard
CMDB Overview : CMDB 可视化
CMDB Overview Dashboard
ETCD Overview : etcd 监控指标与日志
ETCD Overview Dashboard
参数 INFRA
参数速览 为保持与 Pigsty 版本一致,请参阅 《参数列表》 获取最新的默认值、类型与层级说明。
13.1 - 集群配置 如何配置 Infra 节点?定制 Nginx 服务器的配置与本地软件仓库的内容?配置 DNS,NTP 与监控组件的方法。
配置说明 INFRA 主要用于提供监控 基础设施,对于 PostgreSQL 数据库是可选项 。
除非手工配置了对 INFRA 节点上 DNS/NTP 服务的依赖,否则 INFRA 模块故障通常不影响 PostgreSQL 数据库集群运行。
单个 INFRA 节点足以应对绝大部分场景。生产环境建议使用 2~3 个 INFRA 节点实现高可用。
通常出于提高资源利用率的考虑,PostgreSQL 高可用依赖的 ETCD 模块可以与 INFRA 模块共用节点。
使用 3 个以上的 INFRA 节点意义不大,但可以使用更多 ETCD 节点(如 5 个)提高 DCS 服务可用性。
配置样例 在配置清单中的 infra 分组加入节点 IP,并分配 Infra 实例号 infra_seq。
默认单个 INFRA 节点配置:
all :
children :
infra : { hosts : { 10.10.10.10 : { infra_seq : 1 } }}
默认情况下,10.10.10.10 占位符在配置过程中被替换为当前节点首要 IP 地址。
使用 infra.yml 剧本在节点上初始化 INFRA 模块。
更多节点 两个 INFRA 节点配置:
all :
children :
infra :
hosts :
10.10.10.10 : { infra_seq : 1 }
10.10.10.11 : { infra_seq : 2 }
三个 INFRA 节点配置(含参数):
all :
children :
infra :
hosts :
10.10.10.10 : { infra_seq : 1 }
10.10.10.11 : { infra_seq: 2, repo_enabled : false }
10.10.10.12 : { infra_seq: 3, repo_enabled : false }
vars :
grafana_clean : false
vmetrics_clean : false
vlogs_clean : false
vtraces_clean : false
Infra 高可用 Infra 模块中的大部分组件都属于"无状态/相同状态",对于这类组件,高可用只需要操心"负载均衡"问题。
高可用可通过 Keepalived L2 VIP 或 HAProxy 四层负载均衡实现。二层互通网络推荐使用 Keepalived L2 VIP。
配置示例:
infra :
hosts :
10.10.10.10 : { infra_seq : 1 }
10.10.10.11 : { infra_seq : 2 }
10.10.10.12 : { infra_seq : 3 }
vars :
vip_enabled : true
vip_vrid : 128
vip_address : 10.10.10.8
vip_interface : eth1
infra_portal :
home : { domain : i.pigsty }
grafana : { domain: g.pigsty ,endpoint : "10.10.10.8:3000" , websocket : true }
vmetrics : { domain: p.pigsty ,endpoint : "10.10.10.8:8428" }
alertmanager : { domain: a.pigsty ,endpoint : "10.10.10.8:9059" }
blackbox : { endpoint : "10.10.10.8:9115" }
vmalert : { endpoint : "10.10.10.8:8880" }
需要设置 VIP 相关参数并在 infra_portal 中修改各 Infra 服务端点。
Nginx配置 请参阅 Nginx 参数配置 与 Nginx 管理 。
本地仓库配置 请参阅 Repo 参数配置 。
DNS配置 请参阅 DNS 参数配置 与 教程:DNS 。
NTP配置 请参阅 NTP 参数配置 。
13.2 - 参数列表 INFRA 模块提供了 10 组共 70+ 个配置参数
INFRA 模块负责配置 Pigsty 的基础设施组件:本地软件源、Nginx、DNSMasq、VictoriaMetrics、VictoriaLogs、Grafana、Alertmanager、Blackbox Exporter 等监控告警基础设施。
Pigsty v4.x 使用 VictoriaMetrics 替代 Prometheus,使用 VictoriaLogs 替代 Loki,实现了更优秀的可观测性方案。
参数概览 META
CA
INFRA_ID
REPO
INFRA_PACKAGE
NGINX
DNS
VICTORIA
PROMETHEUS
GRAFANA
这一小节指定了一套 Pigsty 部署的元数据:包括版本号,管理员节点 IP 地址,软件源镜像上游 区域
version : v4.2.2 # pigsty 版本号
admin_ip : 10.10.10.10 # 管理节点IP地址
region : default # 上游镜像区域:default,china,europe
language: en # 默认语言 : en 或 zh
proxy_env : # 全局HTTPS代理,用于下载、安装软件包。
no_proxy : "localhost,127.0.0.1,10.0.0.0/8,192.168.0.0/16,*.pigsty,*.aliyun.com,mirrors.*,*.myqcloud.com,*.tsinghua.edu.cn"
# http_proxy: # set your proxy here: e.g http://user:pass@proxy.xxx.com
# https_proxy: # set your proxy here: e.g http://user:pass@proxy.xxx.com
# all_proxy: # set your proxy here: e.g http://user:pass@proxy.xxx.com
version参数名称: version, 类型: string, 层次:G
Pigsty 版本号字符串,默认值为当前版本:v4.2.2。
Pigsty 内部会使用版本号进行功能控制与内容渲染,请勿随意修改此参数。
Pigsty 使用语义化版本号,版本号字符串通常以字符 v 开头,例如 v4.2.2。
admin_ip参数名称: admin_ip, 类型: ip, 层次:G
管理节点的 IP 地址,默认为占位符 IP 地址:10.10.10.10
由该参数指定的节点将被视为管理节点,通常指向安装 Pigsty 时的第一个节点,即中控节点。
默认值 10.10.10.10 是一个占位符,会在 configure 过程中被替换为实际的管理节点 IP 地址。
许多参数都会引用此参数,例如:
在这些参数中,字符串 ${admin_ip} 会被替换为 admin_ip 的真实取值。使用这种机制,您可以为不同的节点指定不同的中控管理节点。
region参数名称: region, 类型: enum, 层次:G
上游镜像的区域,默认可选值为:default、 china、 europe,默认为: default
如果一个不同于 default 的区域被设置,且在 repo_upstreambaseurl 代替 default 中的 baseurl。
例如,如果您的区域被设置为 china,那么 Pigsty 会尝试使用中国地区的上游软件镜像站点以加速下载,如果某个上游软件仓库没有对应的中国地区镜像,那么会使用默认的上游镜像站点替代。
同时,在 repo_url_packagesrepo.pigsty.io 到 repo.pigsty.cc 的替换,以使用国内的镜像源。
language参数名称: language, 类型: enum, 层次:G
默认语言设置,可选值为 en(英文) 或 zh(中文),默认为 en。
此参数会影响 Pigsty 生成的部分配置与内容的语言偏好,例如 Grafana 面板的初始语言设置等。
如果您是中国用户,建议将此参数设置为 zh,以获得更好的中文支持体验。
proxy_env参数名称: proxy_env, 类型: dict, 层次:G
下载包时使用的全局代理环境变量,默认值指定了 no_proxy,即不使用代理的地址列表:
proxy_env :
no_proxy : "localhost,127.0.0.1,10.0.0.0/8,192.168.0.0/16,*.pigsty,*.aliyun.com,mirrors.aliyuncs.com,mirrors.tuna.tsinghua.edu.cn,mirrors.zju.edu.cn"
#http_proxy: 'http://username:password@proxy.address.com'
#https_proxy: 'http://username:password@proxy.address.com'
#all_proxy: 'http://username:password@proxy.address.com'
当您在中国大陆地区从互联网上游安装时,特定的软件包可能会被墙,您可以使用代理来解决这个问题。
请注意,如果使用了 Docker 模块,那么这里的代理服务器配置也会写入 Docker Daemon 配置文件中。
请注意,如果在 ./configure 过程中指定了 -x 参数,那么当前环境中的代理配置信息将会被自动填入到生成的 pigsty.yaml 文件中。
CAPigsty 使用自签名 CA 证书,用于支持高级安全特性,例如 HTTPS 访问、PostgreSQL SSL 连接等。
ca_create : true # 如果 CA 不存在,是否创建?默认为 true
ca_cn : pigsty-ca # CA CN名称,固定为 pigsty-ca
cert_validity : 7300d # 证书有效期,默认为 20 年
ca_create参数名称: ca_create, 类型: bool, 层次:G
如果 CA 不存在,是否创建?默认值为 true。
当设置为 true 时,如果 files/pki/ca 目录中不存在 CA 公私钥对,Pigsty 将会自动创建一个新的 CA。
如果您已经有了一对 CA 公私钥对,可以将其复制到 files/pki/ca 目录下:
files/pki/ca/ca.crt:CA 公钥证书files/pki/ca/ca.key:CA 私钥文件Pigsty 将会使用现有的 CA 公私钥对,而不是新建一个。如果 CA 不存在且此参数设置为 false,则会报错终止。
请务必保留并备份好部署过程中新生成的 CA 私钥文件,这对于后续签发新证书至关重要。
注意:Pigsty v3.x 使用的是 ca_method 参数(取值为 create/recreate/copy),v4.x 简化为布尔类型的 ca_create。
ca_cn参数名称: ca_cn, 类型: string, 层次:G
CA CN(Common Name)名称,固定为 pigsty-ca,不建议修改。
你可以使用以下命令来查看节点上的 Pigsty CA 证书详情:
openssl x509 -text -in /etc/pki/ca.crt
cert_validity参数名称: cert_validity, 类型: interval, 层次:G
签发证书的有效期,默认为 20 年,对绝大多数场景都足够了。默认值为: 7300d
此参数影响由 Pigsty CA 签发的所有证书的有效期,包括:
PostgreSQL 服务器证书 Patroni API 证书 etcd 服务器/客户端证书 其他内部服务证书 注意:Nginx 使用的 HTTPS 证书有效期由 nginx_cert_validity
INFRA_ID基础设施身份标识与门户定义。
#infra_seq: 1 # 基础设施节点序号,必选身份参数
infra_portal : # 通过 Nginx 门户暴露的基础设施服务
home : { domain : i.pigsty } # 默认首页服务器定义
infra_data : /data/infra # 基础设施默认数据目录
infra_seq参数名称: infra_seq, 类型: int, 层次:I
基础设施节点序号,必选身份参数,必须在基础设施节点上显式指定,所以不提供默认值。
此参数用于在多个基础设施节点的部署中唯一标识每个节点,通常使用从 1 开始的正整数。
示例配置:
infra :
hosts :
10.10.10.10 : { infra_seq : 1 }
10.10.10.11 : { infra_seq : 2 }
infra_portal参数名称: infra_portal, 类型: dict, 层次:G
通过 Nginx 门户暴露的基础设施服务列表。v4.x 的默认值非常简洁:
infra_portal :
home : { domain : i.pigsty } # 默认首页服务器定义
Pigsty 会根据实际启用的组件自动配置相应的反向代理,用户通常只需要定义首页域名即可。
每条记录由一个 Key 与一个 Value 字典组成,name 作为键,代表组件名称,value 是一个可以配置以下参数的对象:
name: 必填 ,指定 Nginx 服务器的名称默认记录:home 是固定名称,请不要修改。 作为 Nginx 配置文件名称的一部分,对应配置文件:/etc/nginx/conf.d/<name>.conf 没有 domain 字段的 Nginx 服务器不会生成配置文件,但会被用作引用。 domain: 可选 ,当服务需要通过 Nginx 对外暴露时为必填 字段,指定使用的域名在 Pigsty 自签名 Nginx HTTPS 证书中,域名将被添加到 Nginx SSL 证书的 SAN 字段 Pigsty 网页交叉引用将使用这里的默认域名 endpoint: 通常作为 path 的替代,指定上游服务器地址。设置 endpoint 表示这是一个反向代理服务器配置中可以使用 ${admin_ip} 作为占位符,在部署时会被动态替换为 admin_ip 默认反向代理服务器使用 endpoint.conf 作为配置模板 反向代理服务器还可以配置 websocket 和 scheme 参数 path: 通常作为 endpoint 的替代,指定本地文件服务器路径。设置 path 表示这是一个本地 Web 服务器本地 Web 服务器使用 path.conf 作为配置模板 本地 Web 服务器还可以配置 index 参数,是否启用文件索引页 certbot: Certbot 证书名称,如果配置,将使用 Certbot 申请证书如果多个服务器指定相同的 certbot,Pigsty 会合并证书申请,最终证书名称为此 certbot 的值 cert: 证书文件路径,如果配置,将覆盖默认证书路径key: 证书密钥文件路径,如果配置,将覆盖默认证书密钥路径websocket: 是否启用 WebSocket 支持只有反向代理服务器可以配置此参数,如果启用将允许上游使用 WebSocket 连接 scheme: 上游服务器使用的协议,如果配置,将覆盖默认协议默认为 http,如果配置为 https 将强制使用 HTTPS 连接到上游服务器 index: 是否启用文件索引页只有本地 Web 服务器可以配置此参数,如果启用将启用 autoindex 配置自动生成目录索引页 log: Nginx 日志文件路径如果指定,访问日志将写入此文件,否则根据服务器类型使用默认日志文件 反向代理服务器使用 /var/log/nginx/<name>.log 作为默认日志文件路径 本地 Web 服务器使用默认 Access 日志 conf: Nginx 配置文件路径config: Nginx 配置代码块直接注入到 Nginx Server 配置块中的配置文本 enforce_https: 将 HTTP 重定向到 HTTPS可以通过 nginx_sslmode: enforce 指定全局配置 此配置不影响默认的 home 服务器,它将始终同时监听 80 和 443 端口以确保兼容性 infra_data参数名称: infra_data, 类型: path, 层次:G
基础设施数据目录,默认值为 /data/infra。
此目录用于存放基础设施组件的数据文件,包括:
VictoriaMetrics 时序数据库数据 VictoriaLogs 日志数据 VictoriaTraces 追踪数据 其他基础设施组件的持久化数据 建议将此目录放置在独立的数据盘上,以便于管理和扩展。
REPO本节配置是关于本地软件仓库的。 Pigsty 默认会在基础设施节点上启用一个本地软件仓库(APT / YUM)。
在初始化过程中,Pigsty 会从互联网上游仓库(由 repo_upstreamrepo_packages{{ nginx_home }}{{ repo_name }}/www/pigsty),所有软件及其依赖的总大小约为 1GB 左右。
创建本地软件仓库时,如果仓库已存在(判断方式:仓库目录中有一个名为 repo_complete 的标记文件)Pigsty 将认为仓库已经创建完成,跳过软件下载阶段,直接使用构建好的仓库。
如果某些软件包的下载速度太慢,您可以通过使用 proxy_env离线软件包 ,离线软件包本质上就是在同样操作系统上构建好的本地软件源。
repo_enabled : true # 在此 Infra 节点上创建本地软件仓库?
repo_home : /www # 软件仓库主目录,默认为 /www
repo_name : pigsty # 软件仓库名称,默认为 pigsty
repo_endpoint : http://${admin_ip}:80 # 仓库访问端点
repo_remove : true # 移除现有上游仓库定义
repo_modules : infra,node,pgsql # 启用的上游仓库模块
#repo_upstream: [] # 上游仓库定义(从操作系统变量继承)
#repo_packages: [] # 要下载的软件包(从操作系统变量继承)
#repo_extra_packages: [] # 额外要下载的软件包
repo_url_packages : [] # 通过 URL 下载的额外软件包
repo_enabled参数名称: repo_enabled, 类型: bool, 层次:G/I
是否在当前的基础设施节点上启用本地软件源?默认为: true,即所有 Infra 节点都会设置一个本地软件仓库。
如果您有多个基础设施节点,可以只保留 1~2 个节点作为软件仓库,其他节点可以通过设置此参数为 false 来避免重复软件下载构建。
repo_home参数名称: repo_home, 类型: path, 层次:G
本地软件仓库的家目录,默认为 Nginx 的根目录,也就是: /www。
这个目录实际上是指向 nginx_datanginx_home
repo_name参数名称: repo_name, 类型: string, 层次:G
本地仓库名称,默认为 pigsty,更改此仓库的名称是不明智的行为。
最终的仓库路径为 {{ repo_home }}/{{ repo_name }},默认为 /www/pigsty。
repo_endpoint参数名称: repo_endpoint, 类型: url, 层次:G
其他节点访问此仓库时使用的端点,默认值为:http://${admin_ip}:80。
Pigsty 默认会在基础设施节点 80/443 端口启动 Nginx,对外提供本地软件源(静态文件)服务。
如果您修改了 nginx_portnginx_ssl_port
如果您使用了域名,可以在 node_default_etc_hostsnode_etc_hostsdns_records
repo_remove参数名称: repo_remove, 类型: bool, 层次:G/A
在构建本地软件源时,是否移除现有的上游仓库定义?默认值: true。
当启用此参数时,/etc/yum.repos.d 中所有已有仓库文件会被移动备份至 /etc/yum.repos.d/backup,在 Debian 系上是移除 /etc/apt/sources.list 和 /etc/apt/sources.list.d,将文件备份至 /etc/apt/backup 中。
因为操作系统已有的源内容不可控,使用 Pigsty 验证过的上游软件源可以提高从互联网下载软件包的成功率与速度。
但在一些特定情况下(例如您的操作系统是某种 EL/Deb 兼容版,许多软件包使用了自己的私有源),您可能需要保留现有的上游仓库定义,此时可以将此参数设置为 false。
repo_modules参数名称: repo_modules, 类型: string, 层次:G/A
哪些上游仓库模块会被添加到本地软件源中,默认值: infra,node,pgsql
当 Pigsty 尝试添加上游仓库时,会根据此参数的值来过滤 repo_upstreammodule 字段与此参数值匹配的条目才会被添加到本地软件源中。
模块以逗号分隔,可用的模块列表请参考 repo_upstream 中的定义,常见模块包括:
local: 本地 Pigsty 仓库infra: 基础设施软件包(Nginx、Docker 等)node: 操作系统基础软件包pgsql: PostgreSQL 相关软件包extra: 额外的 PostgreSQL 扩展docker: Docker 相关redis: Redis 相关mongo: MongoDB 相关mysql: MySQL 相关等等… repo_upstream参数名称: repo_upstream, 类型: upstream[], 层次:G
构建本地软件源时,从哪里下载上游软件包?本参数没有默认值,如果用户不在配置文件中显式指定,则会从根据当前节点的操作系统族,从定义于 roles/node_id/varsrepo_upstream_default 变量中加载获取。
Pigsty 为不同的操作系统版本(EL8/9/10, Debian 11/12/13, Ubuntu 22/24)预置了完整的上游仓库定义,包括:
操作系统基础仓库(BaseOS、AppStream、EPEL 等) PostgreSQL 官方 PGDG 仓库 Pigsty 扩展仓库 各种第三方软件仓库(Docker、Nginx、Grafana 等) 每个上游仓库定义包含以下字段:
- name : pigsty-pgsql # 仓库名称
description : 'Pigsty PGSQL' # 仓库描述
module : pgsql # 所属模块
releases : [ 8 , 9 , 10 ] # 支持的操作系统版本
arch : [ x86_64, aarch64] # 支持的 CPU 架构
baseurl : # 仓库 URL,按区域配置
default : 'https://repo.pigsty.io/yum/pgsql/el$releasever.$basearch'
china : 'https://repo.pigsty.cc/yum/pgsql/el$releasever.$basearch'
用户通常不需要修改此参数,除非有特殊的仓库需求。详细的仓库定义请参考 roles/node_id/vars/
repo_packages参数名称: repo_packages, 类型: string[], 层次:G
字符串数组类型,每一行都是 由空格分隔 的软件包列表字符串,指定将要使用 repotrack 或 apt download 下载到本地的软件包(及其依赖)。
本参数没有默认值,即默认值为未定义状态。如果该参数没有被显式定义,那么 Pigsty 会从 roles/node_id/varsrepo_packages_default 变量中加载获取默认值,默认值为:
[ node-bootstrap, infra-package, infra-addons, node-package1, node-package2, pgsql-utility, extra-modules ]
该参数中的每个元素,都会在上述文件中定义的 package_map 中,根据特定的操作系统发行版大版本进行翻译。例如在 EL 系统上会翻译为:
node-bootstrap : "ansible python3 python3-pip python3-virtualenv python3-requests python3-jmespath python3-cryptography dnf-utils modulemd-tools createrepo_c sshpass"
infra-package : "nginx dnsmasq etcd haproxy vip-manager node_exporter keepalived_exporter pg_exporter pgbackrest_exporter redis_exporter redis minio mcli pig"
infra-addons : "grafana grafana-plugins grafana-victoriametrics-ds grafana-victorialogs-ds victoria-metrics victoria-logs victoria-traces vlogscli vmutils vector alertmanager"
作为一个使用约定,repo_packages 中通常包括了那些与 PostgreSQL 大版本号无关的软件包(例如 Infra,Node 和 PGDG Common 等部分),而 PostgreSQL 大版本相关的软件包(内核,扩展),通常在 repo_extra_packages 中指定,方便用户切换 PG 大版本。
参数名称: repo_extra_packages, 类型: string[], 层次:G/C/I
用于在不修改 repo_packages
如果该参数没有被显式定义,那么 Pigsty 会从 roles/node_id/varsrepo_extra_packages_default 变量中加载获取默认值,默认值为:
该参数中的元素会进行包名翻译,其中 $v 会被替换为 pg_version18)。
这里的 pgsql-main 在 EL 系统上会翻译为:
postgresql$v postgresql$v-server postgresql$v-libs postgresql$v-contrib postgresql$v-plperl postgresql$v-plpython3 postgresql$v-pltcl postgresql$v-llvmjit pg_repack_$v* wal2json_$v* pgvector_$v*
通常用户可以在这里指定 PostgreSQL 大版本相关的软件包,而不影响 repo_packages 中定义的其他 PG 大版本无关的软件包。
repo_url_packages参数名称: repo_url_packages, 类型: object[] | string[], 层次:G
直接使用 URL 从互联网上下载的软件包,默认为空数组: []
您可以直接在本参数中使用 URL 字符串作为数组元素,也可以使用对象结构,显式指定 URL 与文件名称。
请注意,本参数会受到 regionrepo.pigsty.io 替换为 repo.pigsty.cc。
INFRA_PACKAGE这些软件包只会在 INFRA 节点上安装。
infra_packages参数名称: infra_packages, 类型: string[], 层次:G
字符串数组类型,每一行都是 由空格分隔 的软件包列表字符串,指定将要在 Infra 节点上安装的软件包列表。
本参数没有默认值,即默认值为未定义状态。如果用户不在配置文件中显式指定本参数,则 Pigsty 会从根据当前节点的操作系统族,从定义于 roles/node_id/varsinfra_packages_default 变量中加载获取默认值。
v4.x 默认值(EL系操作系统):
infra_packages_default :
- grafana,grafana-plugins,grafana-victorialogs-ds,grafana-victoriametrics-ds,victoria-metrics,victoria-logs,victoria-traces,vmutils,vlogscli,alertmanager
- node_exporter,blackbox_exporter,nginx_exporter,pg_exporter,pev2,nginx,dnsmasq,ansible,etcd,python3-requests,redis,mcli,restic,certbot,python3-certbot-nginx
默认值(Debian/Ubuntu):
infra_packages_default :
- grafana,grafana-plugins,grafana-victorialogs-ds,grafana-victoriametrics-ds,victoria-metrics,victoria-logs,victoria-traces,vmutils,vlogscli,alertmanager
- node-exporter,blackbox-exporter,nginx-exporter,pg-exporter,pev2,nginx,dnsmasq,ansible,etcd,python3-requests,redis,mcli,restic,certbot,python3-certbot-nginx
注意:v4.x 使用 VictoriaMetrics 套件替代了 Prometheus 和 Loki,因此软件包列表与 v3.x 有显著差异。
NGINXPigsty 会通过 Nginx 代理所有的 Web 服务访问:Home Page、Grafana、VictoriaMetrics 等等。
以及其他可选的工具,如 PGWeb、Jupyter Lab、Pgadmin、Bytebase 等等,还有一些静态资源和报告,如 pev、schemaspy 和 pgbadger。
最重要的是,Nginx 还作为本地软件仓库(Yum/Apt)的 Web 服务器,用于存储和分发 Pigsty 的软件包。
nginx_enabled : true # 在此 Infra 节点上启用 Nginx?
nginx_clean : false # 初始化时清理现有 Nginx 配置?
nginx_exporter_enabled : true # 启用 nginx_exporter?
nginx_exporter_port : 9113 # nginx_exporter 监听端口
nginx_sslmode : enable # SSL 模式:disable,enable,enforce
nginx_cert_validity : 397d # 自签名证书有效期
nginx_home : /www # Nginx 内容目录(软链接)
nginx_data : /data/nginx # Nginx 实际数据目录
nginx_users : {} # 基础认证用户字典
nginx_port : 80 # HTTP 端口
nginx_ssl_port : 443 # HTTPS 端口
certbot_sign : false # 使用 certbot 签署证书?
certbot_email : your@email.com # certbot 邮箱
certbot_options : '' # certbot 额外选项
nginx_enabled参数名称: nginx_enabled, 类型: bool, 层次:G/I
是否在当前的 Infra 节点上启用 Nginx?默认值为: true。
Nginx 是 Pigsty 基础设施的核心组件,负责:
提供本地软件仓库服务 反向代理 Grafana、VictoriaMetrics 等 Web 服务 托管静态文件和报告 nginx_clean参数名称: nginx_clean, 类型: bool, 层次:G/A
初始化时是否清理现有的 Nginx 配置?默认值为: false。
当设置为 true 时,在 Nginx 初始化过程中会删除 /etc/nginx/conf.d/ 下的所有现有配置文件,确保一个干净的起点。
如果您是首次部署或希望完全重建 Nginx 配置,可以将此参数设置为 true。
nginx_exporter_enabled参数名称: nginx_exporter_enabled, 类型: bool, 层次:G/I
在此基础设施节点上启用 nginx_exporter ?默认值为: true。
如果禁用此选项,还会一并禁用 /nginx 健康检查 stub,当您安装使用的 Nginx 版本不支持此功能时可以考虑关闭此开关。
nginx_exporter_port参数名称: nginx_exporter_port, 类型: port, 层次:G
nginx_exporter 监听端口,默认值为 9113。
nginx_exporter 用于收集 Nginx 的运行指标,供 VictoriaMetrics 抓取监控。
nginx_sslmode参数名称: nginx_sslmode, 类型: enum, 层次:G
Nginx 的 SSL 工作模式?有三种选择:disable , enable , enforce, 默认值为 enable,即启用 SSL,但不强制使用。
nginx_cert_validity参数名称: nginx_cert_validity, 类型: duration, 层次:G
Nginx 自签名证书的有效期,默认值为 397d(约13个月)。
现代浏览器要求网站证书的有效期最多为 397 天,因此这是默认值。不建议设置更长的有效期,否则浏览器可能会拒绝信任该证书。
nginx_home参数名称: nginx_home, 类型: path, 层次:G
Nginx 服务器静态文件目录,默认为: /www
这是一个软链接,实际指向 nginx_data
最好不要随意修改此参数,修改时需要与 repo_home
nginx_data参数名称: nginx_data, 类型: path, 层次:G
Nginx 实际数据目录,默认为 /data/nginx。
这是 Nginx 静态文件的实际存储位置,nginx_home
建议将此目录放置在数据盘上,以便于管理大量的软件包文件。
nginx_users参数名称: nginx_users, 类型: dict, 层次:G
Nginx 基础认证(Basic Auth)用户字典,默认为空字典 {}。
格式为 { username: password } 的键值对,例如:
nginx_users :
admin : pigsty
viewer : readonly
这些用户可用于保护某些需要认证的 Nginx 端点。
nginx_port参数名称: nginx_port, 类型: port, 层次:G
Nginx 默认监听的端口(提供 HTTP 服务),默认为 80 端口,最好不要修改这个参数。
当您的服务器 80 端口被占用时,可以考虑修改此参数,但需要同时修改 repo_endpoint
nginx_ssl_port参数名称: nginx_ssl_port, 类型: port, 层次:G
Nginx SSL 默认监听的端口,默认为 443,最好不要修改这个参数。
certbot_sign参数名称: certbot_sign, 类型: bool, 层次:G/A
是否在安装过程中使用 certbot 签署 Nginx 证书?默认值为 false。
当设置为 true 时,Pigsty 会在执行 infra.yml 和 deploy.yml 剧本(nginx 角色)期间使用 certbot 自动从 Let’s Encrypt 申请免费 SSL 证书。
在 infra_portalcertbot 参数,Pigsty 将使用 certbot 为 domain 域名申请证书,证书名称将是 certbot 参数的值。如果多个服务器/域名指定了相同的 certbot 参数,Pigsty 会合并并为这些域名申请一个证书,使用 certbot 参数的值作为证书名称。
启用此选项需要:
当前节点可以通过公共域名访问,并且 DNS 解析已正确指向当前节点的公网 IP 当前节点可以访问 Let’s Encrypt API 接口 此选项默认禁用,您可以在安装后手动执行 make cert 命令来手动执行,它实际上调用渲染好的 /etc/nginx/sign-cert 脚本,使用 certbot 更新或申请证书。
certbot_email参数名称: certbot_email, 类型: string, 层次:G/A
用于接收证书过期提醒邮件的电子邮件地址,默认值为 your@email.com。
当 certbot_sign 设置为 true 时,建议提供此参数。Let’s Encrypt 会在证书即将过期时向此邮箱发送提醒邮件。
certbot_options参数名称: certbot_options, 类型: string, 层次:G/A
传递给 certbot 的额外配置参数,默认值为空字符串。
您可以通过此参数向 certbot 传递额外的命令行选项,例如 --dry-run,则 certbot 不会实际申请证书,而是进行预览和测试。
DNSPigsty 默认会在 Infra 节点上启用 DNSMASQ 服务,用于解析一些辅助域名,例如 i.pigsty、m.pigsty、supa.pigsty、api.pigsty 等。
解析记录会记录在 Infra 节点的 /etc/hosts.d/default 文件中。 要使用这个 DNS 服务器,您必须将 nameserver <ip> 添加到 /etc/resolv.conf 中,node_dns_servers
dns_enabled : true # 在此 Infra 节点上设置 dnsmasq?
dns_port : 53 # DNS 服务器监听端口
dns_records : # 动态 DNS 记录
- "${admin_ip} i.pigsty"
- "${admin_ip} m.pigsty supa.pigsty api.pigsty adm.pigsty cli.pigsty ddl.pigsty"
dns_enabled参数名称: dns_enabled, 类型: bool, 层次:G/I
是否在这个 Infra 节点上启用 DNSMASQ 服务?默认值为: true。
如果你不想使用默认的 DNS 服务器(比如你已经有了外部的 DNS 服务器,或者您的供应商不允许您使用 DNS 服务器)可以将此值设置为 false 来禁用它。
并使用 node_default_etc_hostsnode_etc_hosts
dns_port参数名称: dns_port, 类型: port, 层次:G
DNSMASQ 的默认监听端口,默认是 53,不建议修改 DNS 服务默认端口。
dns_records参数名称: dns_records, 类型: string[], 层次:G
由 dnsmasq 负责解析的动态 DNS 记录,一般用于将一些辅助域名解析到管理节点。这些记录会被写入到基础设施节点的 /etc/hosts.d/default 文件中。
v4.x 默认值:
dns_records :
- "${admin_ip} i.pigsty"
- "${admin_ip} m.pigsty supa.pigsty api.pigsty adm.pigsty cli.pigsty ddl.pigsty"
这里使用 ${admin_ip} 占位符,在部署时会被替换为实际的 admin_ip
常见的域名用途:
i.pigsty:Pigsty 首页m.pigsty:常用于 MinIO 控制台(可选)p.pigsty:常用于 VictoriaMetrics Web UI(当在 infra_portal 中显式配置时)api.pigsty:API 服务adm.pigsty:管理服务其他根据实际部署需求自定义 VICTORIAPigsty v4.x 使用 VictoriaMetrics 套件替代 Prometheus 和 Loki,提供更优秀的可观测性解决方案:
VictoriaMetrics :替代 Prometheus,作为时序数据库存储监控指标VictoriaLogs :替代 Loki,作为日志聚合存储VictoriaTraces :分布式追踪存储VMAlert :替代 Prometheus Alerting,进行告警规则评估vmetrics_enabled : true # 启用 VictoriaMetrics?
vmetrics_clean : false # 初始化时清理数据?
vmetrics_port : 8428 # 监听端口
vmetrics_scrape_interval : 10s # 全局抓取间隔
vmetrics_scrape_timeout : 8s # 全局抓取超时
vmetrics_options : >-
-retentionPeriod=15d
-promscrape.fileSDCheckInterval=5s
vlogs_enabled : true # 启用 VictoriaLogs?
vlogs_clean : false # 初始化时清理数据?
vlogs_port : 9428 # 监听端口
vlogs_options : >-
-retentionPeriod=15d
-retention.maxDiskSpaceUsageBytes=50GiB
-insert.maxLineSizeBytes=1MB
-search.maxQueryDuration=120s
vtraces_enabled : true # 启用 VictoriaTraces?
vtraces_clean : false # 初始化时清理数据?
vtraces_port : 10428 # 监听端口
vtraces_options : >-
-retentionPeriod=15d
-retention.maxDiskSpaceUsageBytes=50GiB
vmalert_enabled : true # 启用 VMAlert?
vmalert_port : 8880 # 监听端口
vmalert_options : '' # 额外命令行参数
vmetrics_enabled参数名称: vmetrics_enabled, 类型: bool, 层次:G/I
是否在当前 Infra 节点上启用 VictoriaMetrics?默认值为 true。
VictoriaMetrics 是 Pigsty v4.x 的核心监控组件,替代 Prometheus 作为时序数据库,负责:
从各个 Exporter 抓取监控指标 存储时序数据 提供 PromQL 兼容的查询接口 支持 Grafana 数据源 vmetrics_clean参数名称: vmetrics_clean, 类型: bool, 层次:G/A
初始化 VictoriaMetrics 时是否清理现有数据?默认值为 false。
当设置为 true 时,在初始化过程中会删除已有的时序数据。谨慎使用此选项,除非您确定要重建监控数据。
vmetrics_port参数名称: vmetrics_port, 类型: port, 层次:G
VictoriaMetrics 监听端口,默认值为 8428。
此端口用于:
HTTP API 访问 Web UI 访问 Prometheus 兼容的远程写入/读取 Grafana 数据源连接 vmetrics_scrape_interval参数名称: vmetrics_scrape_interval, 类型: interval, 层次:G
VictoriaMetrics 全局指标抓取周期,默认值为 10s。
在生产环境,10秒 - 30秒是一个较为合适的抓取周期。如果您需要更精细的监控数据粒度,可以调整此参数,但会增加存储和 CPU 开销。
vmetrics_scrape_timeout参数名称: vmetrics_scrape_timeout, 类型: interval, 层次:G
VictoriaMetrics 全局抓取超时,默认为 8s。
设置抓取超时可以有效避免监控系统查询导致的雪崩,设置原则是本参数必须小于并接近 vmetrics_scrape_interval
vmetrics_options参数名称: vmetrics_options, 类型: arg, 层次:G
VictoriaMetrics 的额外命令行参数,默认值:
vmetrics_options : >-
-retentionPeriod=15d
-promscrape.fileSDCheckInterval=5s
常用参数说明:
-retentionPeriod=15d:数据保留期限,默认 15 天-promscrape.fileSDCheckInterval=5s:文件服务发现刷新间隔您可以根据需要添加其他 VictoriaMetrics 支持的参数。
vlogs_enabled参数名称: vlogs_enabled, 类型: bool, 层次:G/I
是否在当前 Infra 节点上启用 VictoriaLogs?默认值为 true。
VictoriaLogs 替代 Loki 作为日志聚合存储,负责:
接收来自 Vector 的日志数据 存储和索引日志 提供日志查询接口 支持 Grafana VictoriaLogs 数据源 vlogs_clean参数名称: vlogs_clean, 类型: bool, 层次:G/A
初始化 VictoriaLogs 时是否清理现有数据?默认值为 false。
vlogs_port参数名称: vlogs_port, 类型: port, 层次:G
VictoriaLogs 监听端口,默认值为 9428。
vlogs_options参数名称: vlogs_options, 类型: arg, 层次:G
VictoriaLogs 的额外命令行参数,默认值:
vlogs_options : >-
-retentionPeriod=15d
-retention.maxDiskSpaceUsageBytes=50GiB
-insert.maxLineSizeBytes=1MB
-search.maxQueryDuration=120s
常用参数说明:
-retentionPeriod=15d:日志保留期限,默认 15 天-retention.maxDiskSpaceUsageBytes=50GiB:最大磁盘使用量-insert.maxLineSizeBytes=1MB:单行日志最大大小-search.maxQueryDuration=120s:查询最大执行时间vtraces_enabled参数名称: vtraces_enabled, 类型: bool, 层次:G/I
是否在当前 Infra 节点上启用 VictoriaTraces?默认值为 true。
VictoriaTraces 用于分布式追踪数据的存储和查询,支持 Jaeger、Zipkin 等追踪协议。
vtraces_clean参数名称: vtraces_clean, 类型: bool, 层次:G/A
初始化 VictoriaTraces 时是否清理现有数据?默认值为 false。
vtraces_port参数名称: vtraces_port, 类型: port, 层次:G
VictoriaTraces 监听端口,默认值为 10428。
vtraces_options参数名称: vtraces_options, 类型: arg, 层次:G
VictoriaTraces 的额外命令行参数,默认值:
vtraces_options : >-
-retentionPeriod=15d
-retention.maxDiskSpaceUsageBytes=50GiB
vmalert_enabled参数名称: vmalert_enabled, 类型: bool, 层次:G/I
是否在当前 Infra 节点上启用 VMAlert?默认值为 true。
VMAlert 负责告警规则评估,替代 Prometheus Alerting 功能,与 Alertmanager 配合使用。
vmalert_port参数名称: vmalert_port, 类型: port, 层次:G
VMAlert 监听端口,默认值为 8880。
vmalert_options参数名称: vmalert_options, 类型: arg, 层次:G
VMAlert 的额外命令行参数,默认值为空字符串。
PROMETHEUS此部分现在主要包含 Blackbox Exporter 和 Alertmanager 的配置。
注意:Pigsty v4.x 使用 VictoriaMetrics 替代 Prometheus,原有的 prometheus_* 和 pushgateway_* 参数已移至 VICTORIA
blackbox_enabled : true # 启用 blackbox_exporter?
blackbox_port : 9115 # blackbox_exporter 监听端口
blackbox_options : '' # 额外命令行参数
alertmanager_enabled : true # 启用 alertmanager?
alertmanager_port : 9059 # alertmanager 监听端口
alertmanager_options : '' # 额外命令行参数
exporter_metrics_path : /metrics # exporter 指标路径
blackbox_enabled参数名称: blackbox_enabled, 类型: bool, 层次:G/I
是否在当前 Infra 节点上启用 BlackboxExporter?默认值为 true。
BlackboxExporter 会向节点 IP 地址、VIP 地址、PostgreSQL VIP 地址发送 ICMP 报文测试网络连通性,还可以进行 HTTP、TCP、DNS 等探测。
blackbox_port参数名称: blackbox_port, 类型: port, 层次:G
Blackbox Exporter 监听端口,默认值为 9115。
blackbox_options参数名称: blackbox_options, 类型: arg, 层次:G
BlackboxExporter 的额外命令行参数,默认值:空字符串。
alertmanager_enabled参数名称: alertmanager_enabled, 类型: bool, 层次:G/I
是否在当前 Infra 节点上启用 AlertManager?默认值为 true。
AlertManager 负责接收来自 VMAlert 的告警通知,并进行告警分组、抑制、静默、路由等处理。
alertmanager_port参数名称: alertmanager_port, 类型: port, 层次:G
AlertManager 监听端口,默认值为 9059。
如果您修改了此端口,请确保相应更新 infra_portalendpoint 配置(如果有定义的话)。
alertmanager_options参数名称: alertmanager_options, 类型: arg, 层次:G
AlertManager 的额外命令行参数,默认值:空字符串。
exporter_metrics_path参数名称: exporter_metrics_path, 类型: path, 层次:G
监控 exporter 暴露指标的 HTTP 端点路径,默认为: /metrics,不建议修改此参数。
此参数定义了所有 Exporter 暴露监控指标的标准路径。
GRAFANAPigsty 使用 Grafana 作为监控系统前端。它也可以作为数据分析与可视化平台,或者用于低代码数据应用开发,制作数据应用原型等目的。
grafana_enabled : true # 启用 Grafana?
grafana_port : 3000 # Grafana 监听端口
grafana_clean : false # 初始化时清理数据?
grafana_admin_username : admin # 管理员用户名
grafana_admin_password : pigsty # 管理员密码
grafana_auth_proxy : false # 启用身份代理?
grafana_pgurl : '' # 外部 PostgreSQL URL
grafana_view_password : DBUser.Viewer # PG 数据源密码
grafana_enabled参数名称: grafana_enabled, 类型: bool, 层次:G/I
是否在 Infra 节点上启用 Grafana?默认值为: true,即所有基础设施节点默认都会安装启用 Grafana。
grafana_port参数名称: grafana_port, 类型: port, 层次:G
Grafana 监听端口,默认值为 3000。
如果您需要直接访问 Grafana(不通过 Nginx 反向代理),可以使用此端口。
grafana_clean参数名称: grafana_clean, 类型: bool, 层次:G/A
是否在初始化 Grafana 时一并清理其数据文件?默认为:false。
如果设置为 true,初始化 Grafana 时会移除 /var/lib/grafana/grafana.db,确保 Grafana 是一个全新安装。
如果您希望保留现有的 Grafana 配置(如仪表盘、用户、数据源等),请将此参数保留为 false。
grafana_admin_username参数名称: grafana_admin_username, 类型: username, 层次:G
Grafana 管理员用户名,默认为 admin。
grafana_admin_password参数名称: grafana_admin_password, 类型: password, 层次:G
Grafana 管理员密码,默认为 pigsty。
重要提示:请务必在生产部署中修改此密码参数!
grafana_auth_proxy参数名称: grafana_auth_proxy, 类型: bool, 层次:G
是否启用 Grafana 身份代理?默认为 false。
当启用时,Grafana 会信任反向代理(Nginx)传递的用户身份信息,实现单点登录(SSO)功能。
这通常用于与外部身份认证系统集成的场景。
grafana_pgurl参数名称: grafana_pgurl, 类型: url, 层次:G
外部 PostgreSQL 数据库 URL,用于 Grafana 持久化存储。默认为空字符串。
如果指定,Grafana 将使用此 PostgreSQL 数据库替代默认的 SQLite 数据库存储其配置数据。
格式示例:postgres://grafana:password@pg-meta:5432/grafana?sslmode=disable
这对于需要 Grafana 高可用部署或数据持久化的场景非常有用。
grafana_view_password参数名称: grafana_view_password, 类型: password, 层次:G
Grafana 元数据库 PG 数据源使用的只读用户密码,默认为 DBUser.Viewer。
此密码用于 Grafana 连接 PostgreSQL CMDB 数据源,以只读方式查询元数据。
13.3 - 预置剧本 如何使用预置的 ansible 剧本来管理 INFRA 集群,常用管理命令速查。
Pigsty 提供了三个与 INFRA 模块相关的剧本:
deploy.yml在所有节点上一次性完整部署所有组件,解决 INFRA/NODE 循环依赖问题。
该剧本会交叉执行 infra.yml 与 node.yml 的子任务,按以下顺序完成所有组件的部署:
id :生成节点与 PostgreSQL 身份标识ca :在本地创建自签名 CA 证书repo :在 infra 节点上创建本地软件仓库node-init :初始化节点、HAProxy 与 Dockerinfra :初始化 Nginx、DNS、VictoriaMetrics、Grafana 等node-monitor :初始化 node-exporter、vectoretcd :初始化 etcd(PostgreSQL 高可用必需)minio :初始化 MinIO(可选)pgsql :初始化 PostgreSQL 集群pgsql-monitor :初始化 PostgreSQL 监控该剧本等效于依次执行以下四个剧本:
./infra.yml -l infra # 在 infra 分组上部署基础设施
./node.yml # 在所有节点上初始化节点
./etcd.yml # 初始化 etcd 集群
./pgsql.yml # 初始化 PostgreSQL 集群
infra.yml在配置文件的 infra 分组所定义的 Infra节点 上初始化基础设施模块。
执行该剧本将完成以下任务:
配置 Infra节点 的目录与环境变量 下载并创建本地软件仓库,加速后续安装 将当前 Infra节点 作为普通节点纳入 Pigsty 管理 部署基础设施组件(VictoriaMetrics/Logs/Traces、VMAlert、Grafana、Alertmanager、Blackbox Exporter 等) 剧本注意事项 :
本剧本为幂等剧本,重复执行默认不会清理历史数据与 Grafana 数据 如需保留历史监控数据,请先将 vmetrics_clean、vlogs_clean、vtraces_clean 设置为 false 如果设置 grafana_clean 为 true,Grafana 数据库会被清理,原有仪表盘与配置会丢失 当本地软件仓库 /www/pigsty/repo_complete 存在时,本剧本会跳过从互联网下载软件的任务 完整执行该剧本耗时约1~3分钟,视机器配置与网络条件而异 可用任务列表 # ca: create self-signed CA on localhost files/pki
# - ca_dir : create CA directory
# - ca_private : generate ca private key: files/pki/ca/ca.key
# - ca_cert : signing ca cert: files/pki/ca/ca.crt
#
# id: generate node identity
#
# repo: bootstrap a local yum repo from internet or offline packages
# - repo_dir : create repo directory
# - repo_check : check repo exists
# - repo_prepare : use existing repo if exists
# - repo_build : build repo from upstream if not exists
# - repo_upstream : handle upstream repo files in /etc/yum.repos.d
# - repo_remove : remove existing repo file if repo_remove == true
# - repo_add : add upstream repo files to /etc/yum.repos.d
# - repo_url_pkg : download packages from internet defined by repo_url_packages
# - repo_cache : make upstream yum cache with yum makecache
# - repo_boot_pkg : install bootstrap pkg such as createrepo_c,yum-utils,...
# - repo_pkg : download packages & dependencies from upstream repo
# - repo_create : create a local yum repo with createrepo_c & modifyrepo_c
# - repo_use : add newly built repo into /etc/yum.repos.d
# - repo_nginx : launch a nginx for repo if no nginx is serving
#
# node/haproxy/docker/monitor: setup infra node as a common node
# - node_name, node_hosts, node_resolv, node_firewall, node_ca, node_repo, node_pkg
# - node_feature, node_kernel, node_tune, node_sysctl, node_profile, node_ulimit
# - node_data, node_admin, node_timezone, node_ntp, node_crontab, node_vip
# - haproxy_install, haproxy_config, haproxy_launch, haproxy_reload
# - docker_install, docker_admin, docker_config, docker_launch, docker_image
# - haproxy_register, node_exporter, node_register, vector
#
# infra: setup infra components
# - infra_env : env_patroni, env_pg, env_pgadmin, env_var
# - infra_pkg : install infra packages
# - infra_user : setup infra os user group
# - infra_cert : issue cert for infra components
# - dns : dns_config, dns_record, dns_launch
# - nginx : nginx_config, nginx_cert, nginx_static, nginx_launch, nginx_certbot, nginx_reload, nginx_exporter
# - victoria : vmetrics_config, vmetrics_launch, vlogs_config, vlogs_launch, vtraces_config, vtraces_launch, vmalert_config, vmalert_launch
# - alertmanager : alertmanager_config, alertmanager_launch
# - blackbox : blackbox_config, blackbox_launch
# - grafana : grafana_clean, grafana_config, grafana_launch, grafana_provision
# - infra_register : register infra components to victoria
infra-rm.yml从配置文件 infra 分组定义的 Infra节点 上移除 Pigsty 基础设施。
常用子任务包括:
./infra-rm.yml # 移除 INFRA 模块
./infra-rm.yml -t service # 停止 INFRA 上的基础设施服务
./infra-rm.yml -t data # 移除 INFRA 上的存留数据
./infra-rm.yml -t package # 卸载 INFRA 上安装的软件包
13.4 - 监控告警 如何在 Pigsty 中对基础设施进行自监控?
本文介绍 Pigsty 中 INFRA 模块的监控面板与告警规则。
监控面板 Pigsty 针对 Infra 模块提供了以下监控面板:
告警规则 Pigsty 针对 INFRA 模块提供了以下两条告警规则:
告警规则 描述 InfraDown基础设施组件出现宕机 AgentDown监控 Agent 代理出现宕机
可在 files/victoria/rules/infra.yml
告警规则配置 ################################################################
# Infrastructure Alert Rules #
################################################################
- name : infra-alert
rules :
#==============================================================#
# Infra Aliveness #
#==============================================================#
# infra components (victoria,grafana) down for 1m triggers a P1 alert
- alert : InfraDown
expr : infra_up < 1
for : 1m
labels : { level: 0, severity: CRIT, category : infra }
annotations :
summary : "CRIT InfraDown {{ $labels.type }}@{{ $labels.instance }}"
description : |
infra_up[type={{ $labels.type }}, instance={{ $labels.instance }}] = {{ $value | printf "%.2f" }} < 1
#==============================================================#
# Agent Aliveness #
#==============================================================#
# agent aliveness are determined directly by exporter aliveness
# including: node_exporter, pg_exporter, pgbouncer_exporter, haproxy_exporter
- alert : AgentDown
expr : agent_up < 1
for : 1m
labels : { level: 0, severity: CRIT, category : infra }
annotations :
summary : 'CRIT AgentDown {{ $labels.ins }}@{{ $labels.instance }}'
description : |
agent_up[ins={{ $labels.ins }}, instance={{ $labels.instance }}] = {{ $value | printf "%.2f" }} < 1
13.5 - 指标列表 Pigsty INFRA 模块提供的完整监控指标列表与释义
注意 :Pigsty v4.0 已将 Prometheus/Loki 替换为 VictoriaMetrics/Logs/Traces。以下指标清单仍基于 v3.x 生成,仅供排查旧版本问题参考。若需获取最新指标,请在 https://p.pigsty (VMUI) 或 Grafana 中直接查询,后续版本会重新生成与 Victoria 套件一致的指标速查表。
INFRA 指标 INFRA
Metric Name Type Labels Description alertmanager_alerts gauge ins, instance, ip, job, cls, stateHow many alerts by state. alertmanager_alerts_invalid_total counter version, ins, instance, ip, job, clsThe total number of received alerts that were invalid. alertmanager_alerts_received_total counter version, ins, instance, ip, status, job, clsThe total number of received alerts. alertmanager_build_info gauge revision, version, ins, instance, ip, tags, goarch, goversion, job, cls, branch, goosA metric with a constant ‘1’ value labeled by version, revision, branch, goversion from which alertmanager was built, and the goos and goarch for the build. alertmanager_cluster_alive_messages_total counter ins, instance, ip, peer, job, clsTotal number of received alive messages. alertmanager_cluster_enabled gauge ins, instance, ip, job, clsIndicates whether the clustering is enabled or not. alertmanager_cluster_failed_peers gauge ins, instance, ip, job, clsNumber indicating the current number of failed peers in the cluster. alertmanager_cluster_health_score gauge ins, instance, ip, job, clsHealth score of the cluster. Lower values are better and zero means ’totally healthy’. alertmanager_cluster_members gauge ins, instance, ip, job, clsNumber indicating current number of members in cluster. alertmanager_cluster_messages_pruned_total counter ins, instance, ip, job, clsTotal number of cluster messages pruned. alertmanager_cluster_messages_queued gauge ins, instance, ip, job, clsNumber of cluster messages which are queued. alertmanager_cluster_messages_received_size_total counter ins, instance, ip, msg_type, job, clsTotal size of cluster messages received. alertmanager_cluster_messages_received_total counter ins, instance, ip, msg_type, job, clsTotal number of cluster messages received. alertmanager_cluster_messages_sent_size_total counter ins, instance, ip, msg_type, job, clsTotal size of cluster messages sent. alertmanager_cluster_messages_sent_total counter ins, instance, ip, msg_type, job, clsTotal number of cluster messages sent. alertmanager_cluster_peer_info gauge ins, instance, ip, peer, job, clsA metric with a constant ‘1’ value labeled by peer name. alertmanager_cluster_peers_joined_total counter ins, instance, ip, job, clsA counter of the number of peers that have joined. alertmanager_cluster_peers_left_total counter ins, instance, ip, job, clsA counter of the number of peers that have left. alertmanager_cluster_peers_update_total counter ins, instance, ip, job, clsA counter of the number of peers that have updated metadata. alertmanager_cluster_reconnections_failed_total counter ins, instance, ip, job, clsA counter of the number of failed cluster peer reconnection attempts. alertmanager_cluster_reconnections_total counter ins, instance, ip, job, clsA counter of the number of cluster peer reconnections. alertmanager_cluster_refresh_join_failed_total counter ins, instance, ip, job, clsA counter of the number of failed cluster peer joined attempts via refresh. alertmanager_cluster_refresh_join_total counter ins, instance, ip, job, clsA counter of the number of cluster peer joined via refresh. alertmanager_config_hash gauge ins, instance, ip, job, clsHash of the currently loaded alertmanager configuration. alertmanager_config_last_reload_success_timestamp_seconds gauge ins, instance, ip, job, clsTimestamp of the last successful configuration reload. alertmanager_config_last_reload_successful gauge ins, instance, ip, job, clsWhether the last configuration reload attempt was successful. alertmanager_dispatcher_aggregation_groups gauge ins, instance, ip, job, clsNumber of active aggregation groups alertmanager_dispatcher_alert_processing_duration_seconds_count Unknown ins, instance, ip, job, clsN/A alertmanager_dispatcher_alert_processing_duration_seconds_sum Unknown ins, instance, ip, job, clsN/A alertmanager_http_concurrency_limit_exceeded_total counter ins, instance, method, ip, job, clsTotal number of times an HTTP request failed because the concurrency limit was reached. alertmanager_http_request_duration_seconds_bucket Unknown ins, instance, method, ip, le, job, cls, handlerN/A alertmanager_http_request_duration_seconds_count Unknown ins, instance, method, ip, job, cls, handlerN/A alertmanager_http_request_duration_seconds_sum Unknown ins, instance, method, ip, job, cls, handlerN/A alertmanager_http_requests_in_flight gauge ins, instance, method, ip, job, clsCurrent number of HTTP requests being processed. alertmanager_http_response_size_bytes_bucket Unknown ins, instance, method, ip, le, job, cls, handlerN/A alertmanager_http_response_size_bytes_count Unknown ins, instance, method, ip, job, cls, handlerN/A alertmanager_http_response_size_bytes_sum Unknown ins, instance, method, ip, job, cls, handlerN/A alertmanager_integrations gauge ins, instance, ip, job, clsNumber of configured integrations. alertmanager_marked_alerts gauge ins, instance, ip, job, cls, stateHow many alerts by state are currently marked in the Alertmanager regardless of their expiry. alertmanager_nflog_gc_duration_seconds_count Unknown ins, instance, ip, job, clsN/A alertmanager_nflog_gc_duration_seconds_sum Unknown ins, instance, ip, job, clsN/A alertmanager_nflog_gossip_messages_propagated_total counter ins, instance, ip, job, clsNumber of received gossip messages that have been further gossiped. alertmanager_nflog_maintenance_errors_total counter ins, instance, ip, job, clsHow many maintenances were executed for the notification log that failed. alertmanager_nflog_maintenance_total counter ins, instance, ip, job, clsHow many maintenances were executed for the notification log. alertmanager_nflog_queries_total counter ins, instance, ip, job, clsNumber of notification log queries were received. alertmanager_nflog_query_duration_seconds_bucket Unknown ins, instance, ip, le, job, clsN/A alertmanager_nflog_query_duration_seconds_count Unknown ins, instance, ip, job, clsN/A alertmanager_nflog_query_duration_seconds_sum Unknown ins, instance, ip, job, clsN/A alertmanager_nflog_query_errors_total counter ins, instance, ip, job, clsNumber notification log received queries that failed. alertmanager_nflog_snapshot_duration_seconds_count Unknown ins, instance, ip, job, clsN/A alertmanager_nflog_snapshot_duration_seconds_sum Unknown ins, instance, ip, job, clsN/A alertmanager_nflog_snapshot_size_bytes gauge ins, instance, ip, job, clsSize of the last notification log snapshot in bytes. alertmanager_notification_latency_seconds_bucket Unknown integration, ins, instance, ip, le, job, clsN/A alertmanager_notification_latency_seconds_count Unknown integration, ins, instance, ip, job, clsN/A alertmanager_notification_latency_seconds_sum Unknown integration, ins, instance, ip, job, clsN/A alertmanager_notification_requests_failed_total counter integration, ins, instance, ip, job, clsThe total number of failed notification requests. alertmanager_notification_requests_total counter integration, ins, instance, ip, job, clsThe total number of attempted notification requests. alertmanager_notifications_failed_total counter integration, ins, instance, ip, reason, job, clsThe total number of failed notifications. alertmanager_notifications_total counter integration, ins, instance, ip, job, clsThe total number of attempted notifications. alertmanager_oversize_gossip_message_duration_seconds_bucket Unknown ins, instance, ip, le, key, job, clsN/A alertmanager_oversize_gossip_message_duration_seconds_count Unknown ins, instance, ip, key, job, clsN/A alertmanager_oversize_gossip_message_duration_seconds_sum Unknown ins, instance, ip, key, job, clsN/A alertmanager_oversized_gossip_message_dropped_total counter ins, instance, ip, key, job, clsNumber of oversized gossip messages that were dropped due to a full message queue. alertmanager_oversized_gossip_message_failure_total counter ins, instance, ip, key, job, clsNumber of oversized gossip message sends that failed. alertmanager_oversized_gossip_message_sent_total counter ins, instance, ip, key, job, clsNumber of oversized gossip message sent. alertmanager_peer_position gauge ins, instance, ip, job, clsPosition the Alertmanager instance believes it’s in. The position determines a peer’s behavior in the cluster. alertmanager_receivers gauge ins, instance, ip, job, clsNumber of configured receivers. alertmanager_silences gauge ins, instance, ip, job, cls, stateHow many silences by state. alertmanager_silences_gc_duration_seconds_count Unknown ins, instance, ip, job, clsN/A alertmanager_silences_gc_duration_seconds_sum Unknown ins, instance, ip, job, clsN/A alertmanager_silences_gossip_messages_propagated_total counter ins, instance, ip, job, clsNumber of received gossip messages that have been further gossiped. alertmanager_silences_maintenance_errors_total counter ins, instance, ip, job, clsHow many maintenances were executed for silences that failed. alertmanager_silences_maintenance_total counter ins, instance, ip, job, clsHow many maintenances were executed for silences. alertmanager_silences_queries_total counter ins, instance, ip, job, clsHow many silence queries were received. alertmanager_silences_query_duration_seconds_bucket Unknown ins, instance, ip, le, job, clsN/A alertmanager_silences_query_duration_seconds_count Unknown ins, instance, ip, job, clsN/A alertmanager_silences_query_duration_seconds_sum Unknown ins, instance, ip, job, clsN/A alertmanager_silences_query_errors_total counter ins, instance, ip, job, clsHow many silence received queries did not succeed. alertmanager_silences_snapshot_duration_seconds_count Unknown ins, instance, ip, job, clsN/A alertmanager_silences_snapshot_duration_seconds_sum Unknown ins, instance, ip, job, clsN/A alertmanager_silences_snapshot_size_bytes gauge ins, instance, ip, job, clsSize of the last silence snapshot in bytes. blackbox_exporter_build_info gauge revision, version, ins, instance, ip, tags, goarch, goversion, job, cls, branch, goosA metric with a constant ‘1’ value labeled by version, revision, branch, goversion from which blackbox_exporter was built, and the goos and goarch for the build. blackbox_exporter_config_last_reload_success_timestamp_seconds gauge ins, instance, ip, job, clsTimestamp of the last successful configuration reload. blackbox_exporter_config_last_reload_successful gauge ins, instance, ip, job, clsBlackbox exporter config loaded successfully. blackbox_module_unknown_total counter ins, instance, ip, job, clsCount of unknown modules requested by probes cortex_distributor_ingester_clients gauge ins, instance, ip, job, clsThe current number of ingester clients. cortex_dns_failures_total Unknown ins, instance, ip, job, clsN/A cortex_dns_lookups_total Unknown ins, instance, ip, job, clsN/A cortex_frontend_query_range_duration_seconds_bucket Unknown ins, instance, method, ip, le, job, cls, status_codeN/A cortex_frontend_query_range_duration_seconds_count Unknown ins, instance, method, ip, job, cls, status_codeN/A cortex_frontend_query_range_duration_seconds_sum Unknown ins, instance, method, ip, job, cls, status_codeN/A cortex_ingester_flush_queue_length gauge ins, instance, ip, job, clsThe total number of series pending in the flush queue. cortex_kv_request_duration_seconds_bucket Unknown ins, instance, role, ip, le, kv_name, type, operation, job, cls, status_codeN/A cortex_kv_request_duration_seconds_count Unknown ins, instance, role, ip, kv_name, type, operation, job, cls, status_codeN/A cortex_kv_request_duration_seconds_sum Unknown ins, instance, role, ip, kv_name, type, operation, job, cls, status_codeN/A cortex_member_consul_heartbeats_total Unknown ins, instance, ip, job, clsN/A cortex_prometheus_notifications_alertmanagers_discovered gauge ins, instance, ip, user, job, clsThe number of alertmanagers discovered and active. cortex_prometheus_notifications_dropped_total Unknown ins, instance, ip, user, job, clsN/A cortex_prometheus_notifications_queue_capacity gauge ins, instance, ip, user, job, clsThe capacity of the alert notifications queue. cortex_prometheus_notifications_queue_length gauge ins, instance, ip, user, job, clsThe number of alert notifications in the queue. cortex_prometheus_rule_evaluation_duration_seconds summary ins, instance, ip, user, job, cls, quantileThe duration for a rule to execute. cortex_prometheus_rule_evaluation_duration_seconds_count Unknown ins, instance, ip, user, job, clsN/A cortex_prometheus_rule_evaluation_duration_seconds_sum Unknown ins, instance, ip, user, job, clsN/A cortex_prometheus_rule_group_duration_seconds summary ins, instance, ip, user, job, cls, quantileThe duration of rule group evaluations. cortex_prometheus_rule_group_duration_seconds_count Unknown ins, instance, ip, user, job, clsN/A cortex_prometheus_rule_group_duration_seconds_sum Unknown ins, instance, ip, user, job, clsN/A cortex_query_frontend_connected_schedulers gauge ins, instance, ip, job, clsNumber of schedulers this frontend is connected to. cortex_query_frontend_queries_in_progress gauge ins, instance, ip, job, clsNumber of queries in progress handled by this frontend. cortex_query_frontend_retries_bucket Unknown ins, instance, ip, le, job, clsN/A cortex_query_frontend_retries_count Unknown ins, instance, ip, job, clsN/A cortex_query_frontend_retries_sum Unknown ins, instance, ip, job, clsN/A cortex_query_scheduler_connected_frontend_clients gauge ins, instance, ip, job, clsNumber of query-frontend worker clients currently connected to the query-scheduler. cortex_query_scheduler_connected_querier_clients gauge ins, instance, ip, job, clsNumber of querier worker clients currently connected to the query-scheduler. cortex_query_scheduler_inflight_requests summary ins, instance, ip, job, cls, quantileNumber of inflight requests (either queued or processing) sampled at a regular interval. Quantile buckets keep track of inflight requests over the last 60s. cortex_query_scheduler_inflight_requests_count Unknown ins, instance, ip, job, clsN/A cortex_query_scheduler_inflight_requests_sum Unknown ins, instance, ip, job, clsN/A cortex_query_scheduler_queue_duration_seconds_bucket Unknown ins, instance, ip, le, job, clsN/A cortex_query_scheduler_queue_duration_seconds_count Unknown ins, instance, ip, job, clsN/A cortex_query_scheduler_queue_duration_seconds_sum Unknown ins, instance, ip, job, clsN/A cortex_query_scheduler_queue_length Unknown ins, instance, ip, user, job, clsN/A cortex_query_scheduler_running gauge ins, instance, ip, job, clsValue will be 1 if the scheduler is in the ReplicationSet and actively receiving/processing requests cortex_ring_member_heartbeats_total Unknown ins, instance, ip, job, clsN/A cortex_ring_member_tokens_owned gauge ins, instance, ip, job, clsThe number of tokens owned in the ring. cortex_ring_member_tokens_to_own gauge ins, instance, ip, job, clsThe number of tokens to own in the ring. cortex_ring_members gauge ins, instance, ip, job, cls, stateNumber of members in the ring cortex_ring_oldest_member_timestamp gauge ins, instance, ip, job, cls, stateTimestamp of the oldest member in the ring. cortex_ring_tokens_total gauge ins, instance, ip, job, clsNumber of tokens in the ring cortex_ruler_clients gauge ins, instance, ip, job, clsThe current number of ruler clients in the pool. cortex_ruler_config_last_reload_successful gauge ins, instance, ip, user, job, clsBoolean set to 1 whenever the last configuration reload attempt was successful. cortex_ruler_config_last_reload_successful_seconds gauge ins, instance, ip, user, job, clsTimestamp of the last successful configuration reload. cortex_ruler_config_updates_total Unknown ins, instance, ip, user, job, clsN/A cortex_ruler_managers_total gauge ins, instance, ip, job, clsTotal number of managers registered and running in the ruler cortex_ruler_ring_check_errors_total Unknown ins, instance, ip, job, clsN/A cortex_ruler_sync_rules_total Unknown ins, instance, ip, reason, job, clsN/A deprecated_flags_inuse_total Unknown ins, instance, ip, job, clsN/A go_cgo_go_to_c_calls_calls_total Unknown ins, instance, ip, job, clsN/A go_cpu_classes_gc_mark_assist_cpu_seconds_total Unknown ins, instance, ip, job, clsN/A go_cpu_classes_gc_mark_dedicated_cpu_seconds_total Unknown ins, instance, ip, job, clsN/A go_cpu_classes_gc_mark_idle_cpu_seconds_total Unknown ins, instance, ip, job, clsN/A go_cpu_classes_gc_pause_cpu_seconds_total Unknown ins, instance, ip, job, clsN/A go_cpu_classes_gc_total_cpu_seconds_total Unknown ins, instance, ip, job, clsN/A go_cpu_classes_idle_cpu_seconds_total Unknown ins, instance, ip, job, clsN/A go_cpu_classes_scavenge_assist_cpu_seconds_total Unknown ins, instance, ip, job, clsN/A go_cpu_classes_scavenge_background_cpu_seconds_total Unknown ins, instance, ip, job, clsN/A go_cpu_classes_scavenge_total_cpu_seconds_total Unknown ins, instance, ip, job, clsN/A go_cpu_classes_total_cpu_seconds_total Unknown ins, instance, ip, job, clsN/A go_cpu_classes_user_cpu_seconds_total Unknown ins, instance, ip, job, clsN/A go_gc_cycles_automatic_gc_cycles_total Unknown ins, instance, ip, job, clsN/A go_gc_cycles_forced_gc_cycles_total Unknown ins, instance, ip, job, clsN/A go_gc_cycles_total_gc_cycles_total Unknown ins, instance, ip, job, clsN/A go_gc_duration_seconds summary ins, instance, ip, job, cls, quantileA summary of the pause duration of garbage collection cycles. go_gc_duration_seconds_count Unknown ins, instance, ip, job, clsN/A go_gc_duration_seconds_sum Unknown ins, instance, ip, job, clsN/A go_gc_gogc_percent gauge ins, instance, ip, job, clsHeap size target percentage configured by the user, otherwise 100. This value is set by the GOGC environment variable, and the runtime/debug.SetGCPercent function. go_gc_gomemlimit_bytes gauge ins, instance, ip, job, clsGo runtime memory limit configured by the user, otherwise math.MaxInt64. This value is set by the GOMEMLIMIT environment variable, and the runtime/debug.SetMemoryLimit function. go_gc_heap_allocs_by_size_bytes_bucket Unknown ins, instance, ip, le, job, clsN/A go_gc_heap_allocs_by_size_bytes_count Unknown ins, instance, ip, job, clsN/A go_gc_heap_allocs_by_size_bytes_sum Unknown ins, instance, ip, job, clsN/A go_gc_heap_allocs_bytes_total Unknown ins, instance, ip, job, clsN/A go_gc_heap_allocs_objects_total Unknown ins, instance, ip, job, clsN/A go_gc_heap_frees_by_size_bytes_bucket Unknown ins, instance, ip, le, job, clsN/A go_gc_heap_frees_by_size_bytes_count Unknown ins, instance, ip, job, clsN/A go_gc_heap_frees_by_size_bytes_sum Unknown ins, instance, ip, job, clsN/A go_gc_heap_frees_bytes_total Unknown ins, instance, ip, job, clsN/A go_gc_heap_frees_objects_total Unknown ins, instance, ip, job, clsN/A go_gc_heap_goal_bytes gauge ins, instance, ip, job, clsHeap size target for the end of the GC cycle. go_gc_heap_live_bytes gauge ins, instance, ip, job, clsHeap memory occupied by live objects that were marked by the previous GC. go_gc_heap_objects_objects gauge ins, instance, ip, job, clsNumber of objects, live or unswept, occupying heap memory. go_gc_heap_tiny_allocs_objects_total Unknown ins, instance, ip, job, clsN/A go_gc_limiter_last_enabled_gc_cycle gauge ins, instance, ip, job, clsGC cycle the last time the GC CPU limiter was enabled. This metric is useful for diagnosing the root cause of an out-of-memory error, because the limiter trades memory for CPU time when the GC’s CPU time gets too high. This is most likely to occur with use of SetMemoryLimit. The first GC cycle is cycle 1, so a value of 0 indicates that it was never enabled. go_gc_pauses_seconds_bucket Unknown ins, instance, ip, le, job, clsN/A go_gc_pauses_seconds_count Unknown ins, instance, ip, job, clsN/A go_gc_pauses_seconds_sum Unknown ins, instance, ip, job, clsN/A go_gc_scan_globals_bytes gauge ins, instance, ip, job, clsThe total amount of global variable space that is scannable. go_gc_scan_heap_bytes gauge ins, instance, ip, job, clsThe total amount of heap space that is scannable. go_gc_scan_stack_bytes gauge ins, instance, ip, job, clsThe number of bytes of stack that were scanned last GC cycle. go_gc_scan_total_bytes gauge ins, instance, ip, job, clsThe total amount space that is scannable. Sum of all metrics in /gc/scan. go_gc_stack_starting_size_bytes gauge ins, instance, ip, job, clsThe stack size of new goroutines. go_godebug_non_default_behavior_execerrdot_events_total Unknown ins, instance, ip, job, clsN/A go_godebug_non_default_behavior_gocachehash_events_total Unknown ins, instance, ip, job, clsN/A go_godebug_non_default_behavior_gocachetest_events_total Unknown ins, instance, ip, job, clsN/A go_godebug_non_default_behavior_gocacheverify_events_total Unknown ins, instance, ip, job, clsN/A go_godebug_non_default_behavior_http2client_events_total Unknown ins, instance, ip, job, clsN/A go_godebug_non_default_behavior_http2server_events_total Unknown ins, instance, ip, job, clsN/A go_godebug_non_default_behavior_installgoroot_events_total Unknown ins, instance, ip, job, clsN/A go_godebug_non_default_behavior_jstmpllitinterp_events_total Unknown ins, instance, ip, job, clsN/A go_godebug_non_default_behavior_multipartmaxheaders_events_total Unknown ins, instance, ip, job, clsN/A go_godebug_non_default_behavior_multipartmaxparts_events_total Unknown ins, instance, ip, job, clsN/A go_godebug_non_default_behavior_multipathtcp_events_total Unknown ins, instance, ip, job, clsN/A go_godebug_non_default_behavior_panicnil_events_total Unknown ins, instance, ip, job, clsN/A go_godebug_non_default_behavior_randautoseed_events_total Unknown ins, instance, ip, job, clsN/A go_godebug_non_default_behavior_tarinsecurepath_events_total Unknown ins, instance, ip, job, clsN/A go_godebug_non_default_behavior_tlsmaxrsasize_events_total Unknown ins, instance, ip, job, clsN/A go_godebug_non_default_behavior_x509sha1_events_total Unknown ins, instance, ip, job, clsN/A go_godebug_non_default_behavior_x509usefallbackroots_events_total Unknown ins, instance, ip, job, clsN/A go_godebug_non_default_behavior_zipinsecurepath_events_total Unknown ins, instance, ip, job, clsN/A go_goroutines gauge ins, instance, ip, job, clsNumber of goroutines that currently exist. go_info gauge version, ins, instance, ip, job, clsInformation about the Go environment. go_memory_classes_heap_free_bytes gauge ins, instance, ip, job, clsMemory that is completely free and eligible to be returned to the underlying system, but has not been. This metric is the runtime’s estimate of free address space that is backed by physical memory. go_memory_classes_heap_objects_bytes gauge ins, instance, ip, job, clsMemory occupied by live objects and dead objects that have not yet been marked free by the garbage collector. go_memory_classes_heap_released_bytes gauge ins, instance, ip, job, clsMemory that is completely free and has been returned to the underlying system. This metric is the runtime’s estimate of free address space that is still mapped into the process, but is not backed by physical memory. go_memory_classes_heap_stacks_bytes gauge ins, instance, ip, job, clsMemory allocated from the heap that is reserved for stack space, whether or not it is currently in-use. Currently, this represents all stack memory for goroutines. It also includes all OS thread stacks in non-cgo programs. Note that stacks may be allocated differently in the future, and this may change. go_memory_classes_heap_unused_bytes gauge ins, instance, ip, job, clsMemory that is reserved for heap objects but is not currently used to hold heap objects. go_memory_classes_metadata_mcache_free_bytes gauge ins, instance, ip, job, clsMemory that is reserved for runtime mcache structures, but not in-use. go_memory_classes_metadata_mcache_inuse_bytes gauge ins, instance, ip, job, clsMemory that is occupied by runtime mcache structures that are currently being used. go_memory_classes_metadata_mspan_free_bytes gauge ins, instance, ip, job, clsMemory that is reserved for runtime mspan structures, but not in-use. go_memory_classes_metadata_mspan_inuse_bytes gauge ins, instance, ip, job, clsMemory that is occupied by runtime mspan structures that are currently being used. go_memory_classes_metadata_other_bytes gauge ins, instance, ip, job, clsMemory that is reserved for or used to hold runtime metadata. go_memory_classes_os_stacks_bytes gauge ins, instance, ip, job, clsStack memory allocated by the underlying operating system. In non-cgo programs this metric is currently zero. This may change in the future.In cgo programs this metric includes OS thread stacks allocated directly from the OS. Currently, this only accounts for one stack in c-shared and c-archive build modes, and other sources of stacks from the OS are not measured. This too may change in the future. go_memory_classes_other_bytes gauge ins, instance, ip, job, clsMemory used by execution trace buffers, structures for debugging the runtime, finalizer and profiler specials, and more. go_memory_classes_profiling_buckets_bytes gauge ins, instance, ip, job, clsMemory that is used by the stack trace hash map used for profiling. go_memory_classes_total_bytes gauge ins, instance, ip, job, clsAll memory mapped by the Go runtime into the current process as read-write. Note that this does not include memory mapped by code called via cgo or via the syscall package. Sum of all metrics in /memory/classes. go_memstats_alloc_bytes counter ins, instance, ip, job, clsTotal number of bytes allocated, even if freed. go_memstats_alloc_bytes_total counter ins, instance, ip, job, clsTotal number of bytes allocated, even if freed. go_memstats_buck_hash_sys_bytes gauge ins, instance, ip, job, clsNumber of bytes used by the profiling bucket hash table. go_memstats_frees_total counter ins, instance, ip, job, clsTotal number of frees. go_memstats_gc_sys_bytes gauge ins, instance, ip, job, clsNumber of bytes used for garbage collection system metadata. go_memstats_heap_alloc_bytes gauge ins, instance, ip, job, clsNumber of heap bytes allocated and still in use. go_memstats_heap_idle_bytes gauge ins, instance, ip, job, clsNumber of heap bytes waiting to be used. go_memstats_heap_inuse_bytes gauge ins, instance, ip, job, clsNumber of heap bytes that are in use. go_memstats_heap_objects gauge ins, instance, ip, job, clsNumber of allocated objects. go_memstats_heap_released_bytes gauge ins, instance, ip, job, clsNumber of heap bytes released to OS. go_memstats_heap_sys_bytes gauge ins, instance, ip, job, clsNumber of heap bytes obtained from system. go_memstats_last_gc_time_seconds gauge ins, instance, ip, job, clsNumber of seconds since 1970 of last garbage collection. go_memstats_lookups_total counter ins, instance, ip, job, clsTotal number of pointer lookups. go_memstats_mallocs_total counter ins, instance, ip, job, clsTotal number of mallocs. go_memstats_mcache_inuse_bytes gauge ins, instance, ip, job, clsNumber of bytes in use by mcache structures. go_memstats_mcache_sys_bytes gauge ins, instance, ip, job, clsNumber of bytes used for mcache structures obtained from system. go_memstats_mspan_inuse_bytes gauge ins, instance, ip, job, clsNumber of bytes in use by mspan structures. go_memstats_mspan_sys_bytes gauge ins, instance, ip, job, clsNumber of bytes used for mspan structures obtained from system. go_memstats_next_gc_bytes gauge ins, instance, ip, job, clsNumber of heap bytes when next garbage collection will take place. go_memstats_other_sys_bytes gauge ins, instance, ip, job, clsNumber of bytes used for other system allocations. go_memstats_stack_inuse_bytes gauge ins, instance, ip, job, clsNumber of bytes in use by the stack allocator. go_memstats_stack_sys_bytes gauge ins, instance, ip, job, clsNumber of bytes obtained from system for stack allocator. go_memstats_sys_bytes gauge ins, instance, ip, job, clsNumber of bytes obtained from system. go_sched_gomaxprocs_threads gauge ins, instance, ip, job, clsThe current runtime.GOMAXPROCS setting, or the number of operating system threads that can execute user-level Go code simultaneously. go_sched_goroutines_goroutines gauge ins, instance, ip, job, clsCount of live goroutines. go_sched_latencies_seconds_bucket Unknown ins, instance, ip, le, job, clsN/A go_sched_latencies_seconds_count Unknown ins, instance, ip, job, clsN/A go_sched_latencies_seconds_sum Unknown ins, instance, ip, job, clsN/A go_sql_stats_connections_blocked_seconds unknown ins, instance, db_name, ip, job, clsThe total time blocked waiting for a new connection. go_sql_stats_connections_closed_max_idle unknown ins, instance, db_name, ip, job, clsThe total number of connections closed due to SetMaxIdleConns. go_sql_stats_connections_closed_max_idle_time unknown ins, instance, db_name, ip, job, clsThe total number of connections closed due to SetConnMaxIdleTime. go_sql_stats_connections_closed_max_lifetime unknown ins, instance, db_name, ip, job, clsThe total number of connections closed due to SetConnMaxLifetime. go_sql_stats_connections_idle gauge ins, instance, db_name, ip, job, clsThe number of idle connections. go_sql_stats_connections_in_use gauge ins, instance, db_name, ip, job, clsThe number of connections currently in use. go_sql_stats_connections_max_open gauge ins, instance, db_name, ip, job, clsMaximum number of open connections to the database. go_sql_stats_connections_open gauge ins, instance, db_name, ip, job, clsThe number of established connections both in use and idle. go_sql_stats_connections_waited_for unknown ins, instance, db_name, ip, job, clsThe total number of connections waited for. go_sync_mutex_wait_total_seconds_total Unknown ins, instance, ip, job, clsN/A go_threads gauge ins, instance, ip, job, clsNumber of OS threads created. grafana_access_evaluation_count unknown ins, instance, ip, job, clsnumber of evaluation calls grafana_access_evaluation_duration_bucket Unknown ins, instance, ip, le, job, clsN/A grafana_access_evaluation_duration_count Unknown ins, instance, ip, job, clsN/A grafana_access_evaluation_duration_sum Unknown ins, instance, ip, job, clsN/A grafana_access_permissions_duration_bucket Unknown ins, instance, ip, le, job, clsN/A grafana_access_permissions_duration_count Unknown ins, instance, ip, job, clsN/A grafana_access_permissions_duration_sum Unknown ins, instance, ip, job, clsN/A grafana_aggregator_discovery_aggregation_count_total Unknown ins, instance, ip, job, clsN/A grafana_alerting_active_alerts gauge ins, instance, ip, job, clsamount of active alerts grafana_alerting_active_configurations gauge ins, instance, ip, job, clsThe number of active Alertmanager configurations. grafana_alerting_alertmanager_config_match gauge ins, instance, ip, job, clsThe total number of match grafana_alerting_alertmanager_config_match_re gauge ins, instance, ip, job, clsThe total number of matchRE grafana_alerting_alertmanager_config_matchers gauge ins, instance, ip, job, clsThe total number of matchers grafana_alerting_alertmanager_config_object_matchers gauge ins, instance, ip, job, clsThe total number of object_matchers grafana_alerting_discovered_configurations gauge ins, instance, ip, job, clsThe number of organizations we’ve discovered that require an Alertmanager configuration. grafana_alerting_dispatcher_aggregation_groups gauge ins, instance, ip, job, clsNumber of active aggregation groups grafana_alerting_dispatcher_alert_processing_duration_seconds_count Unknown ins, instance, ip, job, clsN/A grafana_alerting_dispatcher_alert_processing_duration_seconds_sum Unknown ins, instance, ip, job, clsN/A grafana_alerting_execution_time_milliseconds summary ins, instance, ip, job, cls, quantilesummary of alert execution duration grafana_alerting_execution_time_milliseconds_count Unknown ins, instance, ip, job, clsN/A grafana_alerting_execution_time_milliseconds_sum Unknown ins, instance, ip, job, clsN/A grafana_alerting_nflog_gc_duration_seconds_count Unknown ins, instance, ip, job, clsN/A grafana_alerting_nflog_gc_duration_seconds_sum Unknown ins, instance, ip, job, clsN/A grafana_alerting_nflog_gossip_messages_propagated_total Unknown ins, instance, ip, job, clsN/A grafana_alerting_nflog_queries_total Unknown ins, instance, ip, job, clsN/A grafana_alerting_nflog_query_duration_seconds_bucket Unknown ins, instance, ip, le, job, clsN/A grafana_alerting_nflog_query_duration_seconds_count Unknown ins, instance, ip, job, clsN/A grafana_alerting_nflog_query_duration_seconds_sum Unknown ins, instance, ip, job, clsN/A grafana_alerting_nflog_query_errors_total Unknown ins, instance, ip, job, clsN/A grafana_alerting_nflog_snapshot_duration_seconds_count Unknown ins, instance, ip, job, clsN/A grafana_alerting_nflog_snapshot_duration_seconds_sum Unknown ins, instance, ip, job, clsN/A grafana_alerting_nflog_snapshot_size_bytes gauge ins, instance, ip, job, clsSize of the last notification log snapshot in bytes. grafana_alerting_notification_latency_seconds_bucket Unknown ins, instance, ip, le, job, clsN/A grafana_alerting_notification_latency_seconds_count Unknown ins, instance, ip, job, clsN/A grafana_alerting_notification_latency_seconds_sum Unknown ins, instance, ip, job, clsN/A grafana_alerting_schedule_alert_rules gauge ins, instance, ip, job, clsThe number of alert rules that could be considered for evaluation at the next tick. grafana_alerting_schedule_alert_rules_hash gauge ins, instance, ip, job, clsA hash of the alert rules that could be considered for evaluation at the next tick. grafana_alerting_schedule_periodic_duration_seconds_bucket Unknown ins, instance, ip, le, job, clsN/A grafana_alerting_schedule_periodic_duration_seconds_count Unknown ins, instance, ip, job, clsN/A grafana_alerting_schedule_periodic_duration_seconds_sum Unknown ins, instance, ip, job, clsN/A grafana_alerting_schedule_query_alert_rules_duration_seconds_bucket Unknown ins, instance, ip, le, job, clsN/A grafana_alerting_schedule_query_alert_rules_duration_seconds_count Unknown ins, instance, ip, job, clsN/A grafana_alerting_schedule_query_alert_rules_duration_seconds_sum Unknown ins, instance, ip, job, clsN/A grafana_alerting_scheduler_behind_seconds gauge ins, instance, ip, job, clsThe total number of seconds the scheduler is behind. grafana_alerting_silences_gc_duration_seconds_count Unknown ins, instance, ip, job, clsN/A grafana_alerting_silences_gc_duration_seconds_sum Unknown ins, instance, ip, job, clsN/A grafana_alerting_silences_gossip_messages_propagated_total Unknown ins, instance, ip, job, clsN/A grafana_alerting_silences_queries_total Unknown ins, instance, ip, job, clsN/A grafana_alerting_silences_query_duration_seconds_bucket Unknown ins, instance, ip, le, job, clsN/A grafana_alerting_silences_query_duration_seconds_count Unknown ins, instance, ip, job, clsN/A grafana_alerting_silences_query_duration_seconds_sum Unknown ins, instance, ip, job, clsN/A grafana_alerting_silences_query_errors_total Unknown ins, instance, ip, job, clsN/A grafana_alerting_silences_snapshot_duration_seconds_count Unknown ins, instance, ip, job, clsN/A grafana_alerting_silences_snapshot_duration_seconds_sum Unknown ins, instance, ip, job, clsN/A grafana_alerting_silences_snapshot_size_bytes gauge ins, instance, ip, job, clsSize of the last silence snapshot in bytes. grafana_alerting_state_calculation_duration_seconds_bucket Unknown ins, instance, ip, le, job, clsN/A grafana_alerting_state_calculation_duration_seconds_count Unknown ins, instance, ip, job, clsN/A grafana_alerting_state_calculation_duration_seconds_sum Unknown ins, instance, ip, job, clsN/A grafana_alerting_state_history_writes_bytes_total Unknown ins, instance, ip, job, clsN/A grafana_alerting_ticker_interval_seconds gauge ins, instance, ip, job, clsInterval at which the ticker is meant to tick. grafana_alerting_ticker_last_consumed_tick_timestamp_seconds gauge ins, instance, ip, job, clsTimestamp of the last consumed tick in seconds. grafana_alerting_ticker_next_tick_timestamp_seconds gauge ins, instance, ip, job, clsTimestamp of the next tick in seconds before it is consumed. grafana_api_admin_user_created_total Unknown ins, instance, ip, job, clsN/A grafana_api_dashboard_get_milliseconds summary ins, instance, ip, job, cls, quantilesummary for dashboard get duration grafana_api_dashboard_get_milliseconds_count Unknown ins, instance, ip, job, clsN/A grafana_api_dashboard_get_milliseconds_sum Unknown ins, instance, ip, job, clsN/A grafana_api_dashboard_save_milliseconds summary ins, instance, ip, job, cls, quantilesummary for dashboard save duration grafana_api_dashboard_save_milliseconds_count Unknown ins, instance, ip, job, clsN/A grafana_api_dashboard_save_milliseconds_sum Unknown ins, instance, ip, job, clsN/A grafana_api_dashboard_search_milliseconds summary ins, instance, ip, job, cls, quantilesummary for dashboard search duration grafana_api_dashboard_search_milliseconds_count Unknown ins, instance, ip, job, clsN/A grafana_api_dashboard_search_milliseconds_sum Unknown ins, instance, ip, job, clsN/A grafana_api_dashboard_snapshot_create_total Unknown ins, instance, ip, job, clsN/A grafana_api_dashboard_snapshot_external_total Unknown ins, instance, ip, job, clsN/A grafana_api_dashboard_snapshot_get_total Unknown ins, instance, ip, job, clsN/A grafana_api_dataproxy_request_all_milliseconds summary ins, instance, ip, job, cls, quantilesummary for dataproxy request duration grafana_api_dataproxy_request_all_milliseconds_count Unknown ins, instance, ip, job, clsN/A grafana_api_dataproxy_request_all_milliseconds_sum Unknown ins, instance, ip, job, clsN/A grafana_api_login_oauth_total Unknown ins, instance, ip, job, clsN/A grafana_api_login_post_total Unknown ins, instance, ip, job, clsN/A grafana_api_login_saml_total Unknown ins, instance, ip, job, clsN/A grafana_api_models_dashboard_insert_total Unknown ins, instance, ip, job, clsN/A grafana_api_org_create_total Unknown ins, instance, ip, job, clsN/A grafana_api_response_status_total Unknown ins, instance, ip, job, cls, codeN/A grafana_api_user_signup_completed_total Unknown ins, instance, ip, job, clsN/A grafana_api_user_signup_invite_total Unknown ins, instance, ip, job, clsN/A grafana_api_user_signup_started_total Unknown ins, instance, ip, job, clsN/A grafana_apiserver_audit_event_total Unknown ins, instance, ip, job, clsN/A grafana_apiserver_audit_requests_rejected_total Unknown ins, instance, ip, job, clsN/A grafana_apiserver_client_certificate_expiration_seconds_bucket Unknown ins, instance, ip, le, job, clsN/A grafana_apiserver_client_certificate_expiration_seconds_count Unknown ins, instance, ip, job, clsN/A grafana_apiserver_client_certificate_expiration_seconds_sum Unknown ins, instance, ip, job, clsN/A grafana_apiserver_envelope_encryption_dek_cache_fill_percent gauge ins, instance, ip, job, cls[ALPHA] Percent of the cache slots currently occupied by cached DEKs. grafana_apiserver_flowcontrol_seat_fair_frac gauge ins, instance, ip, job, cls[ALPHA] Fair fraction of server’s concurrency to allocate to each priority level that can use it grafana_apiserver_storage_data_key_generation_duration_seconds_bucket Unknown ins, instance, ip, le, job, clsN/A grafana_apiserver_storage_data_key_generation_duration_seconds_count Unknown ins, instance, ip, job, clsN/A grafana_apiserver_storage_data_key_generation_duration_seconds_sum Unknown ins, instance, ip, job, clsN/A grafana_apiserver_storage_data_key_generation_failures_total Unknown ins, instance, ip, job, clsN/A grafana_apiserver_storage_envelope_transformation_cache_misses_total Unknown ins, instance, ip, job, clsN/A grafana_apiserver_tls_handshake_errors_total Unknown ins, instance, ip, job, clsN/A grafana_apiserver_webhooks_x509_insecure_sha1_total Unknown ins, instance, ip, job, clsN/A grafana_apiserver_webhooks_x509_missing_san_total Unknown ins, instance, ip, job, clsN/A grafana_authn_authn_failed_authentication_total Unknown ins, instance, ip, job, clsN/A grafana_authn_authn_successful_authentication_total Unknown ins, instance, ip, client, job, clsN/A grafana_authn_authn_successful_login_total Unknown ins, instance, ip, client, job, clsN/A grafana_aws_cloudwatch_get_metric_data_total Unknown ins, instance, ip, job, clsN/A grafana_aws_cloudwatch_get_metric_statistics_total Unknown ins, instance, ip, job, clsN/A grafana_aws_cloudwatch_list_metrics_total Unknown ins, instance, ip, job, clsN/A grafana_build_info gauge revision, version, ins, instance, edition, ip, goversion, job, cls, branchA metric with a constant ‘1’ value labeled by version, revision, branch, and goversion from which Grafana was built grafana_build_timestamp gauge revision, version, ins, instance, edition, ip, goversion, job, cls, branchA metric exposing when the binary was built in epoch grafana_cardinality_enforcement_unexpected_categorizations_total Unknown ins, instance, ip, job, clsN/A grafana_database_conn_idle gauge ins, instance, ip, job, clsThe number of idle connections grafana_database_conn_in_use gauge ins, instance, ip, job, clsThe number of connections currently in use grafana_database_conn_max_idle_closed_seconds unknown ins, instance, ip, job, clsThe total number of connections closed due to SetConnMaxIdleTime grafana_database_conn_max_idle_closed_total Unknown ins, instance, ip, job, clsN/A grafana_database_conn_max_lifetime_closed_total Unknown ins, instance, ip, job, clsN/A grafana_database_conn_max_open gauge ins, instance, ip, job, clsMaximum number of open connections to the database grafana_database_conn_open gauge ins, instance, ip, job, clsThe number of established connections both in use and idle grafana_database_conn_wait_count_total Unknown ins, instance, ip, job, clsN/A grafana_database_conn_wait_duration_seconds unknown ins, instance, ip, job, clsThe total time blocked waiting for a new connection grafana_datasource_request_duration_seconds_bucket Unknown datasource, ins, instance, method, ip, le, datasource_type, job, cls, codeN/A grafana_datasource_request_duration_seconds_count Unknown datasource, ins, instance, method, ip, datasource_type, job, cls, codeN/A grafana_datasource_request_duration_seconds_sum Unknown datasource, ins, instance, method, ip, datasource_type, job, cls, codeN/A grafana_datasource_request_in_flight gauge datasource, ins, instance, ip, datasource_type, job, clsA gauge of outgoing data source requests currently being sent by Grafana grafana_datasource_request_total Unknown datasource, ins, instance, method, ip, datasource_type, job, cls, codeN/A grafana_datasource_response_size_bytes_bucket Unknown datasource, ins, instance, ip, le, datasource_type, job, clsN/A grafana_datasource_response_size_bytes_count Unknown datasource, ins, instance, ip, datasource_type, job, clsN/A grafana_datasource_response_size_bytes_sum Unknown datasource, ins, instance, ip, datasource_type, job, clsN/A grafana_db_datasource_query_by_id_total Unknown ins, instance, ip, job, clsN/A grafana_disabled_metrics_total Unknown ins, instance, ip, job, clsN/A grafana_emails_sent_failed unknown ins, instance, ip, job, clsNumber of emails Grafana failed to send grafana_emails_sent_total Unknown ins, instance, ip, job, clsN/A grafana_encryption_cache_reads_total Unknown ins, instance, method, ip, hit, job, clsN/A grafana_encryption_ops_total Unknown ins, instance, ip, success, operation, job, clsN/A grafana_environment_info gauge version, ins, instance, ip, job, cls, commitA metric with a constant ‘1’ value labeled by environment information about the running instance. grafana_feature_toggles_info gauge ins, instance, ip, job, clsinfo metric that exposes what feature toggles are enabled or not grafana_frontend_boot_css_time_seconds_bucket Unknown ins, instance, ip, le, job, clsN/A grafana_frontend_boot_css_time_seconds_count Unknown ins, instance, ip, job, clsN/A grafana_frontend_boot_css_time_seconds_sum Unknown ins, instance, ip, job, clsN/A grafana_frontend_boot_first_contentful_paint_time_seconds_bucket Unknown ins, instance, ip, le, job, clsN/A grafana_frontend_boot_first_contentful_paint_time_seconds_count Unknown ins, instance, ip, job, clsN/A grafana_frontend_boot_first_contentful_paint_time_seconds_sum Unknown ins, instance, ip, job, clsN/A grafana_frontend_boot_first_paint_time_seconds_bucket Unknown ins, instance, ip, le, job, clsN/A grafana_frontend_boot_first_paint_time_seconds_count Unknown ins, instance, ip, job, clsN/A grafana_frontend_boot_first_paint_time_seconds_sum Unknown ins, instance, ip, job, clsN/A grafana_frontend_boot_js_done_time_seconds_bucket Unknown ins, instance, ip, le, job, clsN/A grafana_frontend_boot_js_done_time_seconds_count Unknown ins, instance, ip, job, clsN/A grafana_frontend_boot_js_done_time_seconds_sum Unknown ins, instance, ip, job, clsN/A grafana_frontend_boot_load_time_seconds_bucket Unknown ins, instance, ip, le, job, clsN/A grafana_frontend_boot_load_time_seconds_count Unknown ins, instance, ip, job, clsN/A grafana_frontend_boot_load_time_seconds_sum Unknown ins, instance, ip, job, clsN/A grafana_frontend_plugins_preload_ms_bucket Unknown ins, instance, ip, le, job, clsN/A grafana_frontend_plugins_preload_ms_count Unknown ins, instance, ip, job, clsN/A grafana_frontend_plugins_preload_ms_sum Unknown ins, instance, ip, job, clsN/A grafana_hidden_metrics_total Unknown ins, instance, ip, job, clsN/A grafana_http_request_duration_seconds_bucket Unknown ins, instance, method, ip, le, job, cls, status_code, handlerN/A grafana_http_request_duration_seconds_count Unknown ins, instance, method, ip, job, cls, status_code, handlerN/A grafana_http_request_duration_seconds_sum Unknown ins, instance, method, ip, job, cls, status_code, handlerN/A grafana_http_request_in_flight gauge ins, instance, ip, job, clsA gauge of requests currently being served by Grafana. grafana_idforwarding_idforwarding_failed_token_signing_total Unknown ins, instance, ip, job, clsN/A grafana_idforwarding_idforwarding_token_signing_duration_seconds_bucket Unknown ins, instance, ip, le, job, clsN/A grafana_idforwarding_idforwarding_token_signing_duration_seconds_count Unknown ins, instance, ip, job, clsN/A grafana_idforwarding_idforwarding_token_signing_duration_seconds_sum Unknown ins, instance, ip, job, clsN/A grafana_idforwarding_idforwarding_token_signing_from_cache_total Unknown ins, instance, ip, job, clsN/A grafana_idforwarding_idforwarding_token_signing_total Unknown ins, instance, ip, job, clsN/A grafana_instance_start_total Unknown ins, instance, ip, job, clsN/A grafana_ldap_users_sync_execution_time summary ins, instance, ip, job, cls, quantilesummary for LDAP users sync execution duration grafana_ldap_users_sync_execution_time_count Unknown ins, instance, ip, job, clsN/A grafana_ldap_users_sync_execution_time_sum Unknown ins, instance, ip, job, clsN/A grafana_live_client_command_duration_seconds summary ins, instance, method, ip, job, cls, quantileClient command duration summary. grafana_live_client_command_duration_seconds_count Unknown ins, instance, method, ip, job, clsN/A grafana_live_client_command_duration_seconds_sum Unknown ins, instance, method, ip, job, clsN/A grafana_live_client_num_reply_errors unknown ins, instance, method, ip, job, cls, codeNumber of errors in replies sent to clients. grafana_live_client_num_server_disconnects unknown ins, instance, ip, job, cls, codeNumber of server initiated disconnects. grafana_live_client_recover unknown ins, instance, ip, recovered, job, clsCount of recover operations. grafana_live_node_action_count unknown action, ins, instance, ip, job, clsNumber of node actions called. grafana_live_node_build gauge version, ins, instance, ip, job, clsNode build info. grafana_live_node_messages_received_count unknown ins, instance, ip, type, job, clsNumber of messages received. grafana_live_node_messages_sent_count unknown ins, instance, ip, type, job, clsNumber of messages sent. grafana_live_node_num_channels gauge ins, instance, ip, job, clsNumber of channels with one or more subscribers. grafana_live_node_num_clients gauge ins, instance, ip, job, clsNumber of clients connected. grafana_live_node_num_nodes gauge ins, instance, ip, job, clsNumber of nodes in cluster. grafana_live_node_num_subscriptions gauge ins, instance, ip, job, clsNumber of subscriptions. grafana_live_node_num_users gauge ins, instance, ip, job, clsNumber of unique users connected. grafana_live_transport_connect_count unknown ins, instance, ip, transport, job, clsNumber of connections to specific transport. grafana_live_transport_messages_sent unknown ins, instance, ip, transport, job, clsNumber of messages sent over specific transport. grafana_loki_plugin_parse_response_duration_seconds_bucket Unknown endpoint, ins, instance, ip, le, status, job, clsN/A grafana_loki_plugin_parse_response_duration_seconds_count Unknown endpoint, ins, instance, ip, status, job, clsN/A grafana_loki_plugin_parse_response_duration_seconds_sum Unknown endpoint, ins, instance, ip, status, job, clsN/A grafana_page_response_status_total Unknown ins, instance, ip, job, cls, codeN/A grafana_plugin_build_info gauge version, signature_status, ins, instance, plugin_type, ip, plugin_id, job, clsA metric with a constant ‘1’ value labeled by pluginId, pluginType and version from which Grafana plugin was built grafana_plugin_request_duration_milliseconds_bucket Unknown endpoint, ins, instance, target, ip, le, plugin_id, job, clsN/A grafana_plugin_request_duration_milliseconds_count Unknown endpoint, ins, instance, target, ip, plugin_id, job, clsN/A grafana_plugin_request_duration_milliseconds_sum Unknown endpoint, ins, instance, target, ip, plugin_id, job, clsN/A grafana_plugin_request_duration_seconds_bucket Unknown endpoint, ins, instance, target, ip, le, status, plugin_id, source, job, clsN/A grafana_plugin_request_duration_seconds_count Unknown endpoint, ins, instance, target, ip, status, plugin_id, source, job, clsN/A grafana_plugin_request_duration_seconds_sum Unknown endpoint, ins, instance, target, ip, status, plugin_id, source, job, clsN/A grafana_plugin_request_size_bytes_bucket Unknown endpoint, ins, instance, target, ip, le, plugin_id, source, job, clsN/A grafana_plugin_request_size_bytes_count Unknown endpoint, ins, instance, target, ip, plugin_id, source, job, clsN/A grafana_plugin_request_size_bytes_sum Unknown endpoint, ins, instance, target, ip, plugin_id, source, job, clsN/A grafana_plugin_request_total Unknown endpoint, ins, instance, target, ip, status, plugin_id, job, clsN/A grafana_process_cpu_seconds_total Unknown ins, instance, ip, job, clsN/A grafana_process_max_fds gauge ins, instance, ip, job, clsMaximum number of open file descriptors. grafana_process_open_fds gauge ins, instance, ip, job, clsNumber of open file descriptors. grafana_process_resident_memory_bytes gauge ins, instance, ip, job, clsResident memory size in bytes. grafana_process_start_time_seconds gauge ins, instance, ip, job, clsStart time of the process since unix epoch in seconds. grafana_process_virtual_memory_bytes gauge ins, instance, ip, job, clsVirtual memory size in bytes. grafana_process_virtual_memory_max_bytes gauge ins, instance, ip, job, clsMaximum amount of virtual memory available in bytes. grafana_prometheus_plugin_backend_request_count unknown endpoint, ins, instance, ip, status, errorSource, job, clsThe total amount of prometheus backend plugin requests grafana_proxy_response_status_total Unknown ins, instance, ip, job, cls, codeN/A grafana_public_dashboard_request_count unknown ins, instance, ip, job, clscounter for public dashboards requests grafana_registered_metrics_total Unknown ins, instance, ip, stability_level, deprecated_version, job, clsN/A grafana_rendering_queue_size gauge ins, instance, ip, job, clssize of rendering queue grafana_search_dashboard_search_failures_duration_seconds_bucket Unknown ins, instance, ip, le, job, clsN/A grafana_search_dashboard_search_failures_duration_seconds_count Unknown ins, instance, ip, job, clsN/A grafana_search_dashboard_search_failures_duration_seconds_sum Unknown ins, instance, ip, job, clsN/A grafana_search_dashboard_search_successes_duration_seconds_bucket Unknown ins, instance, ip, le, job, clsN/A grafana_search_dashboard_search_successes_duration_seconds_count Unknown ins, instance, ip, job, clsN/A grafana_search_dashboard_search_successes_duration_seconds_sum Unknown ins, instance, ip, job, clsN/A grafana_stat_active_users gauge ins, instance, ip, job, clsnumber of active users grafana_stat_total_orgs gauge ins, instance, ip, job, clstotal amount of orgs grafana_stat_total_playlists gauge ins, instance, ip, job, clstotal amount of playlists grafana_stat_total_service_account_tokens gauge ins, instance, ip, job, clstotal amount of service account tokens grafana_stat_total_service_accounts gauge ins, instance, ip, job, clstotal amount of service accounts grafana_stat_total_service_accounts_role_none gauge ins, instance, ip, job, clstotal amount of service accounts with no role grafana_stat_total_teams gauge ins, instance, ip, job, clstotal amount of teams grafana_stat_total_users gauge ins, instance, ip, job, clstotal amount of users grafana_stat_totals_active_admins gauge ins, instance, ip, job, clstotal amount of active admins grafana_stat_totals_active_editors gauge ins, instance, ip, job, clstotal amount of active editors grafana_stat_totals_active_viewers gauge ins, instance, ip, job, clstotal amount of active viewers grafana_stat_totals_admins gauge ins, instance, ip, job, clstotal amount of admins grafana_stat_totals_alert_rules gauge ins, instance, ip, job, clstotal amount of alert rules in the database grafana_stat_totals_annotations gauge ins, instance, ip, job, clstotal amount of annotations in the database grafana_stat_totals_correlations gauge ins, instance, ip, job, clstotal amount of correlations grafana_stat_totals_dashboard gauge ins, instance, ip, job, clstotal amount of dashboards grafana_stat_totals_dashboard_versions gauge ins, instance, ip, job, clstotal amount of dashboard versions in the database grafana_stat_totals_data_keys gauge ins, instance, ip, job, cls, activetotal amount of data keys in the database grafana_stat_totals_datasource gauge ins, instance, ip, plugin_id, job, clstotal number of defined datasources, labeled by pluginId grafana_stat_totals_editors gauge ins, instance, ip, job, clstotal amount of editors grafana_stat_totals_folder gauge ins, instance, ip, job, clstotal amount of folders grafana_stat_totals_library_panels gauge ins, instance, ip, job, clstotal amount of library panels in the database grafana_stat_totals_library_variables gauge ins, instance, ip, job, clstotal amount of library variables in the database grafana_stat_totals_public_dashboard gauge ins, instance, ip, job, clstotal amount of public dashboards grafana_stat_totals_rule_groups gauge ins, instance, ip, job, clstotal amount of alert rule groups in the database grafana_stat_totals_viewers gauge ins, instance, ip, job, clstotal amount of viewers infra_up Unknown ins, instance, ip, job, clsN/A jaeger_tracer_baggage_restrictions_updates_total Unknown result, ins, instance, ip, job, clsN/A jaeger_tracer_baggage_truncations_total Unknown ins, instance, ip, job, clsN/A jaeger_tracer_baggage_updates_total Unknown result, ins, instance, ip, job, clsN/A jaeger_tracer_finished_spans_total Unknown ins, instance, ip, sampled, job, clsN/A jaeger_tracer_reporter_queue_length gauge ins, instance, ip, job, clsCurrent number of spans in the reporter queue jaeger_tracer_reporter_spans_total Unknown result, ins, instance, ip, job, clsN/A jaeger_tracer_sampler_queries_total Unknown result, ins, instance, ip, job, clsN/A jaeger_tracer_sampler_updates_total Unknown result, ins, instance, ip, job, clsN/A jaeger_tracer_span_context_decoding_errors_total Unknown ins, instance, ip, job, clsN/A jaeger_tracer_started_spans_total Unknown ins, instance, ip, sampled, job, clsN/A jaeger_tracer_throttled_debug_spans_total Unknown ins, instance, ip, job, clsN/A jaeger_tracer_throttler_updates_total Unknown result, ins, instance, ip, job, clsN/A jaeger_tracer_traces_total Unknown ins, instance, ip, sampled, job, cls, stateN/A kv_request_duration_seconds_bucket Unknown ins, instance, role, ip, le, kv_name, type, operation, job, cls, status_codeN/A kv_request_duration_seconds_count Unknown ins, instance, role, ip, kv_name, type, operation, job, cls, status_codeN/A kv_request_duration_seconds_sum Unknown ins, instance, role, ip, kv_name, type, operation, job, cls, status_codeN/A legacy_grafana_alerting_ticker_interval_seconds gauge ins, instance, ip, job, clsInterval at which the ticker is meant to tick. legacy_grafana_alerting_ticker_last_consumed_tick_timestamp_seconds gauge ins, instance, ip, job, clsTimestamp of the last consumed tick in seconds. legacy_grafana_alerting_ticker_next_tick_timestamp_seconds gauge ins, instance, ip, job, clsTimestamp of the next tick in seconds before it is consumed. logql_query_duration_seconds_bucket Unknown ins, instance, query_type, ip, le, job, clsN/A logql_query_duration_seconds_count Unknown ins, instance, query_type, ip, job, clsN/A logql_query_duration_seconds_sum Unknown ins, instance, query_type, ip, job, clsN/A loki_azure_blob_egress_bytes_total Unknown ins, instance, ip, job, clsN/A loki_boltdb_shipper_apply_retention_last_successful_run_timestamp_seconds gauge ins, instance, ip, job, clsUnix timestamp of the last successful retention run loki_boltdb_shipper_compact_tables_operation_duration_seconds gauge ins, instance, ip, job, clsTime (in seconds) spent in compacting all the tables loki_boltdb_shipper_compact_tables_operation_last_successful_run_timestamp_seconds gauge ins, instance, ip, job, clsUnix timestamp of the last successful compaction run loki_boltdb_shipper_compact_tables_operation_total Unknown ins, instance, ip, status, job, clsN/A loki_boltdb_shipper_compactor_running gauge ins, instance, ip, job, clsValue will be 1 if compactor is currently running on this instance loki_boltdb_shipper_open_existing_file_failures_total Unknown ins, instance, ip, component, job, clsN/A loki_boltdb_shipper_query_time_table_download_duration_seconds unknown ins, instance, ip, component, job, cls, tableTime (in seconds) spent in downloading of files per table at query time loki_boltdb_shipper_request_duration_seconds_bucket Unknown ins, instance, ip, le, component, operation, job, cls, status_codeN/A loki_boltdb_shipper_request_duration_seconds_count Unknown ins, instance, ip, component, operation, job, cls, status_codeN/A loki_boltdb_shipper_request_duration_seconds_sum Unknown ins, instance, ip, component, operation, job, cls, status_codeN/A loki_boltdb_shipper_tables_download_operation_duration_seconds gauge ins, instance, ip, component, job, clsTime (in seconds) spent in downloading updated files for all the tables loki_boltdb_shipper_tables_sync_operation_total Unknown ins, instance, ip, status, component, job, clsN/A loki_boltdb_shipper_tables_upload_operation_total Unknown ins, instance, ip, status, component, job, clsN/A loki_build_info gauge revision, version, ins, instance, ip, tags, goarch, goversion, job, cls, branch, goosA metric with a constant ‘1’ value labeled by version, revision, branch, goversion from which loki was built, and the goos and goarch for the build. loki_bytes_per_line_bucket Unknown ins, instance, ip, le, job, clsN/A loki_bytes_per_line_count Unknown ins, instance, ip, job, clsN/A loki_bytes_per_line_sum Unknown ins, instance, ip, job, clsN/A loki_cache_corrupt_chunks_total Unknown ins, instance, ip, job, clsN/A loki_cache_fetched_keys unknown ins, instance, ip, job, clsTotal count of keys requested from cache. loki_cache_hits unknown ins, instance, ip, job, clsTotal count of keys found in cache. loki_cache_request_duration_seconds_bucket Unknown ins, instance, method, ip, le, job, cls, status_codeN/A loki_cache_request_duration_seconds_count Unknown ins, instance, method, ip, job, cls, status_codeN/A loki_cache_request_duration_seconds_sum Unknown ins, instance, method, ip, job, cls, status_codeN/A loki_cache_value_size_bytes_bucket Unknown ins, instance, method, ip, le, job, clsN/A loki_cache_value_size_bytes_count Unknown ins, instance, method, ip, job, clsN/A loki_cache_value_size_bytes_sum Unknown ins, instance, method, ip, job, clsN/A loki_chunk_fetcher_cache_dequeued_total Unknown ins, instance, ip, job, clsN/A loki_chunk_fetcher_cache_enqueued_total Unknown ins, instance, ip, job, clsN/A loki_chunk_fetcher_cache_skipped_buffer_full_total Unknown ins, instance, ip, job, clsN/A loki_chunk_fetcher_fetched_size_bytes_bucket Unknown ins, instance, ip, le, source, job, clsN/A loki_chunk_fetcher_fetched_size_bytes_count Unknown ins, instance, ip, source, job, clsN/A loki_chunk_fetcher_fetched_size_bytes_sum Unknown ins, instance, ip, source, job, clsN/A loki_chunk_store_chunks_per_query_bucket Unknown ins, instance, ip, le, job, clsN/A loki_chunk_store_chunks_per_query_count Unknown ins, instance, ip, job, clsN/A loki_chunk_store_chunks_per_query_sum Unknown ins, instance, ip, job, clsN/A loki_chunk_store_deduped_bytes_total Unknown ins, instance, ip, job, clsN/A loki_chunk_store_deduped_chunks_total Unknown ins, instance, ip, job, clsN/A loki_chunk_store_fetched_chunk_bytes_total Unknown ins, instance, ip, user, job, clsN/A loki_chunk_store_fetched_chunks_total Unknown ins, instance, ip, user, job, clsN/A loki_chunk_store_index_entries_per_chunk_bucket Unknown ins, instance, ip, le, job, clsN/A loki_chunk_store_index_entries_per_chunk_count Unknown ins, instance, ip, job, clsN/A loki_chunk_store_index_entries_per_chunk_sum Unknown ins, instance, ip, job, clsN/A loki_chunk_store_index_lookups_per_query_bucket Unknown ins, instance, ip, le, job, clsN/A loki_chunk_store_index_lookups_per_query_count Unknown ins, instance, ip, job, clsN/A loki_chunk_store_index_lookups_per_query_sum Unknown ins, instance, ip, job, clsN/A loki_chunk_store_series_post_intersection_per_query_bucket Unknown ins, instance, ip, le, job, clsN/A loki_chunk_store_series_post_intersection_per_query_count Unknown ins, instance, ip, job, clsN/A loki_chunk_store_series_post_intersection_per_query_sum Unknown ins, instance, ip, job, clsN/A loki_chunk_store_series_pre_intersection_per_query_bucket Unknown ins, instance, ip, le, job, clsN/A loki_chunk_store_series_pre_intersection_per_query_count Unknown ins, instance, ip, job, clsN/A loki_chunk_store_series_pre_intersection_per_query_sum Unknown ins, instance, ip, job, clsN/A loki_chunk_store_stored_chunk_bytes_total Unknown ins, instance, ip, user, job, clsN/A loki_chunk_store_stored_chunks_total Unknown ins, instance, ip, user, job, clsN/A loki_consul_request_duration_seconds_bucket Unknown ins, instance, ip, le, kv_name, operation, job, cls, status_codeN/A loki_consul_request_duration_seconds_count Unknown ins, instance, ip, kv_name, operation, job, cls, status_codeN/A loki_consul_request_duration_seconds_sum Unknown ins, instance, ip, kv_name, operation, job, cls, status_codeN/A loki_delete_request_lookups_failed_total Unknown ins, instance, ip, job, clsN/A loki_delete_request_lookups_total Unknown ins, instance, ip, job, clsN/A loki_discarded_bytes_total Unknown ins, instance, ip, reason, job, cls, tenantN/A loki_discarded_samples_total Unknown ins, instance, ip, reason, job, cls, tenantN/A loki_distributor_bytes_received_total Unknown ins, instance, retention_hours, ip, job, cls, tenantN/A loki_distributor_ingester_appends_total Unknown ins, instance, ip, ingester, job, clsN/A loki_distributor_lines_received_total Unknown ins, instance, ip, job, cls, tenantN/A loki_distributor_replication_factor gauge ins, instance, ip, job, clsThe configured replication factor. loki_distributor_structured_metadata_bytes_received_total Unknown ins, instance, retention_hours, ip, job, cls, tenantN/A loki_experimental_features_in_use_total Unknown ins, instance, ip, job, clsN/A loki_index_chunk_refs_total Unknown ins, instance, ip, status, job, clsN/A loki_index_request_duration_seconds_bucket Unknown ins, instance, ip, le, component, operation, job, cls, status_codeN/A loki_index_request_duration_seconds_count Unknown ins, instance, ip, component, operation, job, cls, status_codeN/A loki_index_request_duration_seconds_sum Unknown ins, instance, ip, component, operation, job, cls, status_codeN/A loki_inflight_requests gauge ins, instance, method, ip, route, job, clsCurrent number of inflight requests. loki_ingester_autoforget_unhealthy_ingesters_total Unknown ins, instance, ip, job, clsN/A loki_ingester_blocks_per_chunk_bucket Unknown ins, instance, ip, le, job, clsN/A loki_ingester_blocks_per_chunk_count Unknown ins, instance, ip, job, clsN/A loki_ingester_blocks_per_chunk_sum Unknown ins, instance, ip, job, clsN/A loki_ingester_checkpoint_creations_failed_total Unknown ins, instance, ip, job, clsN/A loki_ingester_checkpoint_creations_total Unknown ins, instance, ip, job, clsN/A loki_ingester_checkpoint_deletions_failed_total Unknown ins, instance, ip, job, clsN/A loki_ingester_checkpoint_deletions_total Unknown ins, instance, ip, job, clsN/A loki_ingester_checkpoint_duration_seconds summary ins, instance, ip, job, cls, quantileTime taken to create a checkpoint. loki_ingester_checkpoint_duration_seconds_count Unknown ins, instance, ip, job, clsN/A loki_ingester_checkpoint_duration_seconds_sum Unknown ins, instance, ip, job, clsN/A loki_ingester_checkpoint_logged_bytes_total Unknown ins, instance, ip, job, clsN/A loki_ingester_chunk_age_seconds_bucket Unknown ins, instance, ip, le, job, clsN/A loki_ingester_chunk_age_seconds_count Unknown ins, instance, ip, job, clsN/A loki_ingester_chunk_age_seconds_sum Unknown ins, instance, ip, job, clsN/A loki_ingester_chunk_bounds_hours_bucket Unknown ins, instance, ip, le, job, clsN/A loki_ingester_chunk_bounds_hours_count Unknown ins, instance, ip, job, clsN/A loki_ingester_chunk_bounds_hours_sum Unknown ins, instance, ip, job, clsN/A loki_ingester_chunk_compression_ratio_bucket Unknown ins, instance, ip, le, job, clsN/A loki_ingester_chunk_compression_ratio_count Unknown ins, instance, ip, job, clsN/A loki_ingester_chunk_compression_ratio_sum Unknown ins, instance, ip, job, clsN/A loki_ingester_chunk_encode_time_seconds_bucket Unknown ins, instance, ip, le, job, clsN/A loki_ingester_chunk_encode_time_seconds_count Unknown ins, instance, ip, job, clsN/A loki_ingester_chunk_encode_time_seconds_sum Unknown ins, instance, ip, job, clsN/A loki_ingester_chunk_entries_bucket Unknown ins, instance, ip, le, job, clsN/A loki_ingester_chunk_entries_count Unknown ins, instance, ip, job, clsN/A loki_ingester_chunk_entries_sum Unknown ins, instance, ip, job, clsN/A loki_ingester_chunk_size_bytes_bucket Unknown ins, instance, ip, le, job, clsN/A loki_ingester_chunk_size_bytes_count Unknown ins, instance, ip, job, clsN/A loki_ingester_chunk_size_bytes_sum Unknown ins, instance, ip, job, clsN/A loki_ingester_chunk_stored_bytes_total Unknown ins, instance, ip, job, cls, tenantN/A loki_ingester_chunk_utilization_bucket Unknown ins, instance, ip, le, job, clsN/A loki_ingester_chunk_utilization_count Unknown ins, instance, ip, job, clsN/A loki_ingester_chunk_utilization_sum Unknown ins, instance, ip, job, clsN/A loki_ingester_chunks_created_total Unknown ins, instance, ip, job, clsN/A loki_ingester_chunks_flushed_total Unknown ins, instance, ip, reason, job, clsN/A loki_ingester_chunks_stored_total Unknown ins, instance, ip, job, cls, tenantN/A loki_ingester_client_request_duration_seconds_bucket Unknown ins, instance, ip, le, operation, job, cls, status_codeN/A loki_ingester_client_request_duration_seconds_count Unknown ins, instance, ip, operation, job, cls, status_codeN/A loki_ingester_client_request_duration_seconds_sum Unknown ins, instance, ip, operation, job, cls, status_codeN/A loki_ingester_limiter_enabled gauge ins, instance, ip, job, clsWhether the ingester’s limiter is enabled loki_ingester_memory_chunks gauge ins, instance, ip, job, clsThe total number of chunks in memory. loki_ingester_memory_streams gauge ins, instance, ip, job, cls, tenantThe total number of streams in memory per tenant. loki_ingester_memory_streams_labels_bytes gauge ins, instance, ip, job, clsTotal bytes of labels of the streams in memory. loki_ingester_received_chunks unknown ins, instance, ip, job, clsThe total number of chunks received by this ingester whilst joining. loki_ingester_samples_per_chunk_bucket Unknown ins, instance, ip, le, job, clsN/A loki_ingester_samples_per_chunk_count Unknown ins, instance, ip, job, clsN/A loki_ingester_samples_per_chunk_sum Unknown ins, instance, ip, job, clsN/A loki_ingester_sent_chunks unknown ins, instance, ip, job, clsThe total number of chunks sent by this ingester whilst leaving. loki_ingester_shutdown_marker gauge ins, instance, ip, job, cls1 if prepare shutdown has been called, 0 otherwise loki_ingester_streams_created_total Unknown ins, instance, ip, job, cls, tenantN/A loki_ingester_streams_removed_total Unknown ins, instance, ip, job, cls, tenantN/A loki_ingester_wal_bytes_in_use gauge ins, instance, ip, job, clsTotal number of bytes in use by the WAL recovery process. loki_ingester_wal_disk_full_failures_total Unknown ins, instance, ip, job, clsN/A loki_ingester_wal_duplicate_entries_total Unknown ins, instance, ip, job, clsN/A loki_ingester_wal_logged_bytes_total Unknown ins, instance, ip, job, clsN/A loki_ingester_wal_records_logged_total Unknown ins, instance, ip, job, clsN/A loki_ingester_wal_recovered_bytes_total Unknown ins, instance, ip, job, clsN/A loki_ingester_wal_recovered_chunks_total Unknown ins, instance, ip, job, clsN/A loki_ingester_wal_recovered_entries_total Unknown ins, instance, ip, job, clsN/A loki_ingester_wal_recovered_streams_total Unknown ins, instance, ip, job, clsN/A loki_ingester_wal_replay_active gauge ins, instance, ip, job, clsWhether the WAL is replaying loki_ingester_wal_replay_duration_seconds gauge ins, instance, ip, job, clsTime taken to replay the checkpoint and the WAL. loki_ingester_wal_replay_flushing gauge ins, instance, ip, job, clsWhether the wal replay is in a flushing phase due to backpressure loki_internal_log_messages_total Unknown ins, instance, ip, level, job, clsN/A loki_kv_request_duration_seconds_bucket Unknown ins, instance, role, ip, le, kv_name, type, operation, job, cls, status_codeN/A loki_kv_request_duration_seconds_count Unknown ins, instance, role, ip, kv_name, type, operation, job, cls, status_codeN/A loki_kv_request_duration_seconds_sum Unknown ins, instance, role, ip, kv_name, type, operation, job, cls, status_codeN/A loki_log_flushes_bucket Unknown ins, instance, ip, le, job, clsN/A loki_log_flushes_count Unknown ins, instance, ip, job, clsN/A loki_log_flushes_sum Unknown ins, instance, ip, job, clsN/A loki_log_messages_total Unknown ins, instance, ip, level, job, clsN/A loki_logql_querystats_bytes_processed_per_seconds_bucket Unknown ins, instance, range, ip, le, sharded, type, job, cls, status_code, latency_typeN/A loki_logql_querystats_bytes_processed_per_seconds_count Unknown ins, instance, range, ip, sharded, type, job, cls, status_code, latency_typeN/A loki_logql_querystats_bytes_processed_per_seconds_sum Unknown ins, instance, range, ip, sharded, type, job, cls, status_code, latency_typeN/A loki_logql_querystats_chunk_download_latency_seconds_bucket Unknown ins, instance, range, ip, le, type, job, cls, status_codeN/A loki_logql_querystats_chunk_download_latency_seconds_count Unknown ins, instance, range, ip, type, job, cls, status_codeN/A loki_logql_querystats_chunk_download_latency_seconds_sum Unknown ins, instance, range, ip, type, job, cls, status_codeN/A loki_logql_querystats_downloaded_chunk_total Unknown ins, instance, range, ip, type, job, cls, status_codeN/A loki_logql_querystats_duplicates_total Unknown ins, instance, ip, job, clsN/A loki_logql_querystats_ingester_sent_lines_total Unknown ins, instance, ip, job, clsN/A loki_logql_querystats_latency_seconds_bucket Unknown ins, instance, range, ip, le, type, job, cls, status_codeN/A loki_logql_querystats_latency_seconds_count Unknown ins, instance, range, ip, type, job, cls, status_codeN/A loki_logql_querystats_latency_seconds_sum Unknown ins, instance, range, ip, type, job, cls, status_codeN/A loki_panic_total Unknown ins, instance, ip, job, clsN/A loki_querier_index_cache_corruptions_total Unknown ins, instance, ip, job, clsN/A loki_querier_index_cache_encode_errors_total Unknown ins, instance, ip, job, clsN/A loki_querier_index_cache_gets_total Unknown ins, instance, ip, job, clsN/A loki_querier_index_cache_hits_total Unknown ins, instance, ip, job, clsN/A loki_querier_index_cache_puts_total Unknown ins, instance, ip, job, clsN/A loki_querier_query_frontend_clients gauge ins, instance, ip, job, clsThe current number of clients connected to query-frontend. loki_querier_query_frontend_request_duration_seconds_bucket Unknown ins, instance, ip, le, operation, job, cls, status_codeN/A loki_querier_query_frontend_request_duration_seconds_count Unknown ins, instance, ip, operation, job, cls, status_codeN/A loki_querier_query_frontend_request_duration_seconds_sum Unknown ins, instance, ip, operation, job, cls, status_codeN/A loki_querier_tail_active gauge ins, instance, ip, job, clsNumber of active tailers loki_querier_tail_active_streams gauge ins, instance, ip, job, clsNumber of active streams being tailed loki_querier_tail_bytes_total Unknown ins, instance, ip, job, clsN/A loki_querier_worker_concurrency gauge ins, instance, ip, job, clsNumber of concurrent querier workers loki_querier_worker_inflight_queries gauge ins, instance, ip, job, clsNumber of queries being processed by the querier workers loki_query_frontend_log_result_cache_hit_total Unknown ins, instance, ip, job, clsN/A loki_query_frontend_log_result_cache_miss_total Unknown ins, instance, ip, job, clsN/A loki_query_frontend_partitions_bucket Unknown ins, instance, ip, le, job, clsN/A loki_query_frontend_partitions_count Unknown ins, instance, ip, job, clsN/A loki_query_frontend_partitions_sum Unknown ins, instance, ip, job, clsN/A loki_query_frontend_shard_factor_bucket Unknown ins, instance, ip, le, mapper, job, clsN/A loki_query_frontend_shard_factor_count Unknown ins, instance, ip, mapper, job, clsN/A loki_query_frontend_shard_factor_sum Unknown ins, instance, ip, mapper, job, clsN/A loki_query_scheduler_enqueue_count Unknown ins, instance, ip, level, user, job, clsN/A loki_rate_store_expired_streams_total Unknown ins, instance, ip, job, clsN/A loki_rate_store_max_stream_rate_bytes gauge ins, instance, ip, job, clsThe maximum stream rate for any stream reported by ingesters during a sync operation. Sharded Streams are combined. loki_rate_store_max_stream_shards gauge ins, instance, ip, job, clsThe number of shards for a single stream reported by ingesters during a sync operation. loki_rate_store_max_unique_stream_rate_bytes gauge ins, instance, ip, job, clsThe maximum stream rate for any stream reported by ingesters during a sync operation. Sharded Streams are considered separate. loki_rate_store_stream_rate_bytes_bucket Unknown ins, instance, ip, le, job, clsN/A loki_rate_store_stream_rate_bytes_count Unknown ins, instance, ip, job, clsN/A loki_rate_store_stream_rate_bytes_sum Unknown ins, instance, ip, job, clsN/A loki_rate_store_stream_shards_bucket Unknown ins, instance, ip, le, job, clsN/A loki_rate_store_stream_shards_count Unknown ins, instance, ip, job, clsN/A loki_rate_store_stream_shards_sum Unknown ins, instance, ip, job, clsN/A loki_rate_store_streams gauge ins, instance, ip, job, clsThe number of unique streams reported by all ingesters. Sharded streams are combined loki_request_duration_seconds_bucket Unknown ins, instance, method, ip, le, ws, route, job, cls, status_codeN/A loki_request_duration_seconds_count Unknown ins, instance, method, ip, ws, route, job, cls, status_codeN/A loki_request_duration_seconds_sum Unknown ins, instance, method, ip, ws, route, job, cls, status_codeN/A loki_request_message_bytes_bucket Unknown ins, instance, method, ip, le, route, job, clsN/A loki_request_message_bytes_count Unknown ins, instance, method, ip, route, job, clsN/A loki_request_message_bytes_sum Unknown ins, instance, method, ip, route, job, clsN/A loki_response_message_bytes_bucket Unknown ins, instance, method, ip, le, route, job, clsN/A loki_response_message_bytes_count Unknown ins, instance, method, ip, route, job, clsN/A loki_response_message_bytes_sum Unknown ins, instance, method, ip, route, job, clsN/A loki_results_cache_version_comparisons_total Unknown ins, instance, ip, job, clsN/A loki_store_chunks_downloaded_total Unknown ins, instance, ip, status, job, clsN/A loki_store_chunks_per_batch_bucket Unknown ins, instance, ip, le, status, job, clsN/A loki_store_chunks_per_batch_count Unknown ins, instance, ip, status, job, clsN/A loki_store_chunks_per_batch_sum Unknown ins, instance, ip, status, job, clsN/A loki_store_series_total Unknown ins, instance, ip, status, job, clsN/A loki_stream_sharding_count unknown ins, instance, ip, job, clsTotal number of times the distributor has sharded streams loki_tcp_connections gauge ins, instance, ip, protocol, job, clsCurrent number of accepted TCP connections. loki_tcp_connections_limit gauge ins, instance, ip, protocol, job, clsThe max number of TCP connections that can be accepted (0 means no limit). net_conntrack_dialer_conn_attempted_total counter ins, instance, ip, dialer_name, job, clsTotal number of connections attempted by the given dialer a given name. net_conntrack_dialer_conn_closed_total counter ins, instance, ip, dialer_name, job, clsTotal number of connections closed which originated from the dialer of a given name. net_conntrack_dialer_conn_established_total counter ins, instance, ip, dialer_name, job, clsTotal number of connections successfully established by the given dialer a given name. net_conntrack_dialer_conn_failed_total counter ins, instance, ip, dialer_name, reason, job, clsTotal number of connections failed to dial by the dialer a given name. net_conntrack_listener_conn_accepted_total counter ins, instance, ip, listener_name, job, clsTotal number of connections opened to the listener of a given name. net_conntrack_listener_conn_closed_total counter ins, instance, ip, listener_name, job, clsTotal number of connections closed that were made to the listener of a given name. nginx_connections_accepted counter ins, instance, ip, job, clsAccepted client connections nginx_connections_active gauge ins, instance, ip, job, clsActive client connections nginx_connections_handled counter ins, instance, ip, job, clsHandled client connections nginx_connections_reading gauge ins, instance, ip, job, clsConnections where NGINX is reading the request header nginx_connections_waiting gauge ins, instance, ip, job, clsIdle client connections nginx_connections_writing gauge ins, instance, ip, job, clsConnections where NGINX is writing the response back to the client nginx_exporter_build_info gauge revision, version, ins, instance, ip, tags, goarch, goversion, job, cls, branch, goosA metric with a constant ‘1’ value labeled by version, revision, branch, goversion from which nginx_exporter was built, and the goos and goarch for the build. nginx_http_requests_total counter ins, instance, ip, job, clsTotal http requests nginx_up gauge ins, instance, ip, job, clsStatus of the last metric scrape plugins_active_instances gauge ins, instance, ip, job, clsThe number of active plugin instances plugins_datasource_instances_total Unknown ins, instance, ip, job, clsN/A process_cpu_seconds_total counter ins, instance, ip, job, clsTotal user and system CPU time spent in seconds. process_max_fds gauge ins, instance, ip, job, clsMaximum number of open file descriptors. process_open_fds gauge ins, instance, ip, job, clsNumber of open file descriptors. process_resident_memory_bytes gauge ins, instance, ip, job, clsResident memory size in bytes. process_start_time_seconds gauge ins, instance, ip, job, clsStart time of the process since unix epoch in seconds. process_virtual_memory_bytes gauge ins, instance, ip, job, clsVirtual memory size in bytes. process_virtual_memory_max_bytes gauge ins, instance, ip, job, clsMaximum amount of virtual memory available in bytes. prometheus_api_remote_read_queries gauge ins, instance, ip, job, clsThe current number of remote read queries being executed or waiting. prometheus_build_info gauge revision, version, ins, instance, ip, tags, goarch, goversion, job, cls, branch, goosA metric with a constant ‘1’ value labeled by version, revision, branch, goversion from which prometheus was built, and the goos and goarch for the build. prometheus_config_last_reload_success_timestamp_seconds gauge ins, instance, ip, job, clsTimestamp of the last successful configuration reload. prometheus_config_last_reload_successful gauge ins, instance, ip, job, clsWhether the last configuration reload attempt was successful. prometheus_engine_queries gauge ins, instance, ip, job, clsThe current number of queries being executed or waiting. prometheus_engine_queries_concurrent_max gauge ins, instance, ip, job, clsThe max number of concurrent queries. prometheus_engine_query_duration_seconds summary ins, instance, ip, job, cls, quantile, sliceQuery timings prometheus_engine_query_duration_seconds_count Unknown ins, instance, ip, job, cls, sliceN/A prometheus_engine_query_duration_seconds_sum Unknown ins, instance, ip, job, cls, sliceN/A prometheus_engine_query_log_enabled gauge ins, instance, ip, job, clsState of the query log. prometheus_engine_query_log_failures_total counter ins, instance, ip, job, clsThe number of query log failures. prometheus_engine_query_samples_total counter ins, instance, ip, job, clsThe total number of samples loaded by all queries. prometheus_http_request_duration_seconds_bucket Unknown ins, instance, ip, le, job, cls, handlerN/A prometheus_http_request_duration_seconds_count Unknown ins, instance, ip, job, cls, handlerN/A prometheus_http_request_duration_seconds_sum Unknown ins, instance, ip, job, cls, handlerN/A prometheus_http_requests_total counter ins, instance, ip, job, cls, code, handlerCounter of HTTP requests. prometheus_http_response_size_bytes_bucket Unknown ins, instance, ip, le, job, cls, handlerN/A prometheus_http_response_size_bytes_count Unknown ins, instance, ip, job, cls, handlerN/A prometheus_http_response_size_bytes_sum Unknown ins, instance, ip, job, cls, handlerN/A prometheus_notifications_alertmanagers_discovered gauge ins, instance, ip, job, clsThe number of alertmanagers discovered and active. prometheus_notifications_dropped_total counter ins, instance, ip, job, clsTotal number of alerts dropped due to errors when sending to Alertmanager. prometheus_notifications_errors_total counter ins, instance, ip, alertmanager, job, clsTotal number of errors sending alert notifications. prometheus_notifications_latency_seconds summary ins, instance, ip, alertmanager, job, cls, quantileLatency quantiles for sending alert notifications. prometheus_notifications_latency_seconds_count Unknown ins, instance, ip, alertmanager, job, clsN/A prometheus_notifications_latency_seconds_sum Unknown ins, instance, ip, alertmanager, job, clsN/A prometheus_notifications_queue_capacity gauge ins, instance, ip, job, clsThe capacity of the alert notifications queue. prometheus_notifications_queue_length gauge ins, instance, ip, job, clsThe number of alert notifications in the queue. prometheus_notifications_sent_total counter ins, instance, ip, alertmanager, job, clsTotal number of alerts sent. prometheus_ready gauge ins, instance, ip, job, clsWhether Prometheus startup was fully completed and the server is ready for normal operation. prometheus_remote_storage_exemplars_in_total counter ins, instance, ip, job, clsExemplars in to remote storage, compare to exemplars out for queue managers. prometheus_remote_storage_highest_timestamp_in_seconds gauge ins, instance, ip, job, clsHighest timestamp that has come into the remote storage via the Appender interface, in seconds since epoch. prometheus_remote_storage_histograms_in_total counter ins, instance, ip, job, clsHistogramSamples in to remote storage, compare to histograms out for queue managers. prometheus_remote_storage_samples_in_total counter ins, instance, ip, job, clsSamples in to remote storage, compare to samples out for queue managers. prometheus_remote_storage_string_interner_zero_reference_releases_total counter ins, instance, ip, job, clsThe number of times release has been called for strings that are not interned. prometheus_rule_evaluation_duration_seconds summary ins, instance, ip, job, cls, quantileThe duration for a rule to execute. prometheus_rule_evaluation_duration_seconds_count Unknown ins, instance, ip, job, clsN/A prometheus_rule_evaluation_duration_seconds_sum Unknown ins, instance, ip, job, clsN/A prometheus_rule_evaluation_failures_total counter ins, instance, ip, job, cls, rule_groupThe total number of rule evaluation failures. prometheus_rule_evaluations_total counter ins, instance, ip, job, cls, rule_groupThe total number of rule evaluations. prometheus_rule_group_duration_seconds summary ins, instance, ip, job, cls, quantileThe duration of rule group evaluations. prometheus_rule_group_duration_seconds_count Unknown ins, instance, ip, job, clsN/A prometheus_rule_group_duration_seconds_sum Unknown ins, instance, ip, job, clsN/A prometheus_rule_group_interval_seconds gauge ins, instance, ip, job, cls, rule_groupThe interval of a rule group. prometheus_rule_group_iterations_missed_total counter ins, instance, ip, job, cls, rule_groupThe total number of rule group evaluations missed due to slow rule group evaluation. prometheus_rule_group_iterations_total counter ins, instance, ip, job, cls, rule_groupThe total number of scheduled rule group evaluations, whether executed or missed. prometheus_rule_group_last_duration_seconds gauge ins, instance, ip, job, cls, rule_groupThe duration of the last rule group evaluation. prometheus_rule_group_last_evaluation_samples gauge ins, instance, ip, job, cls, rule_groupThe number of samples returned during the last rule group evaluation. prometheus_rule_group_last_evaluation_timestamp_seconds gauge ins, instance, ip, job, cls, rule_groupThe timestamp of the last rule group evaluation in seconds. prometheus_rule_group_rules gauge ins, instance, ip, job, cls, rule_groupThe number of rules. prometheus_sd_azure_cache_hit_total counter ins, instance, ip, job, clsNumber of cache hit during refresh. prometheus_sd_azure_failures_total counter ins, instance, ip, job, clsNumber of Azure service discovery refresh failures. prometheus_sd_consul_rpc_duration_seconds summary endpoint, ins, instance, ip, job, cls, call, quantileThe duration of a Consul RPC call in seconds. prometheus_sd_consul_rpc_duration_seconds_count Unknown endpoint, ins, instance, ip, job, cls, callN/A prometheus_sd_consul_rpc_duration_seconds_sum Unknown endpoint, ins, instance, ip, job, cls, callN/A prometheus_sd_consul_rpc_failures_total counter ins, instance, ip, job, clsThe number of Consul RPC call failures. prometheus_sd_discovered_targets gauge ins, instance, ip, config, job, clsCurrent number of discovered targets. prometheus_sd_dns_lookup_failures_total counter ins, instance, ip, job, clsThe number of DNS-SD lookup failures. prometheus_sd_dns_lookups_total counter ins, instance, ip, job, clsThe number of DNS-SD lookups. prometheus_sd_failed_configs gauge ins, instance, ip, job, clsCurrent number of service discovery configurations that failed to load. prometheus_sd_file_mtime_seconds gauge ins, instance, ip, filename, job, clsTimestamp (mtime) of files read by FileSD. Timestamp is set at read time. prometheus_sd_file_read_errors_total counter ins, instance, ip, job, clsThe number of File-SD read errors. prometheus_sd_file_scan_duration_seconds summary ins, instance, ip, job, cls, quantileThe duration of the File-SD scan in seconds. prometheus_sd_file_scan_duration_seconds_count Unknown ins, instance, ip, job, clsN/A prometheus_sd_file_scan_duration_seconds_sum Unknown ins, instance, ip, job, clsN/A prometheus_sd_file_watcher_errors_total counter ins, instance, ip, job, clsThe number of File-SD errors caused by filesystem watch failures. prometheus_sd_http_failures_total counter ins, instance, ip, job, clsNumber of HTTP service discovery refresh failures. prometheus_sd_kubernetes_events_total counter event, ins, instance, role, ip, job, clsThe number of Kubernetes events handled. prometheus_sd_kuma_fetch_duration_seconds summary ins, instance, ip, job, cls, quantileThe duration of a Kuma MADS fetch call. prometheus_sd_kuma_fetch_duration_seconds_count Unknown ins, instance, ip, job, clsN/A prometheus_sd_kuma_fetch_duration_seconds_sum Unknown ins, instance, ip, job, clsN/A prometheus_sd_kuma_fetch_failures_total counter ins, instance, ip, job, clsThe number of Kuma MADS fetch call failures. prometheus_sd_kuma_fetch_skipped_updates_total counter ins, instance, ip, job, clsThe number of Kuma MADS fetch calls that result in no updates to the targets. prometheus_sd_linode_failures_total counter ins, instance, ip, job, clsNumber of Linode service discovery refresh failures. prometheus_sd_nomad_failures_total counter ins, instance, ip, job, clsNumber of nomad service discovery refresh failures. prometheus_sd_received_updates_total counter ins, instance, ip, job, clsTotal number of update events received from the SD providers. prometheus_sd_updates_total counter ins, instance, ip, job, clsTotal number of update events sent to the SD consumers. prometheus_target_interval_length_seconds summary ins, instance, interval, ip, job, cls, quantileActual intervals between scrapes. prometheus_target_interval_length_seconds_count Unknown ins, instance, interval, ip, job, clsN/A prometheus_target_interval_length_seconds_sum Unknown ins, instance, interval, ip, job, clsN/A prometheus_target_metadata_cache_bytes gauge ins, instance, ip, scrape_job, job, clsThe number of bytes that are currently used for storing metric metadata in the cache prometheus_target_metadata_cache_entries gauge ins, instance, ip, scrape_job, job, clsTotal number of metric metadata entries in the cache prometheus_target_scrape_pool_exceeded_label_limits_total counter ins, instance, ip, job, clsTotal number of times scrape pools hit the label limits, during sync or config reload. prometheus_target_scrape_pool_exceeded_target_limit_total counter ins, instance, ip, job, clsTotal number of times scrape pools hit the target limit, during sync or config reload. prometheus_target_scrape_pool_reloads_failed_total counter ins, instance, ip, job, clsTotal number of failed scrape pool reloads. prometheus_target_scrape_pool_reloads_total counter ins, instance, ip, job, clsTotal number of scrape pool reloads. prometheus_target_scrape_pool_sync_total counter ins, instance, ip, scrape_job, job, clsTotal number of syncs that were executed on a scrape pool. prometheus_target_scrape_pool_target_limit gauge ins, instance, ip, scrape_job, job, clsMaximum number of targets allowed in this scrape pool. prometheus_target_scrape_pool_targets gauge ins, instance, ip, scrape_job, job, clsCurrent number of targets in this scrape pool. prometheus_target_scrape_pools_failed_total counter ins, instance, ip, job, clsTotal number of scrape pool creations that failed. prometheus_target_scrape_pools_total counter ins, instance, ip, job, clsTotal number of scrape pool creation attempts. prometheus_target_scrapes_cache_flush_forced_total counter ins, instance, ip, job, clsHow many times a scrape cache was flushed due to getting big while scrapes are failing. prometheus_target_scrapes_exceeded_body_size_limit_total counter ins, instance, ip, job, clsTotal number of scrapes that hit the body size limit prometheus_target_scrapes_exceeded_native_histogram_bucket_limit_total counter ins, instance, ip, job, clsTotal number of scrapes that hit the native histogram bucket limit and were rejected. prometheus_target_scrapes_exceeded_sample_limit_total counter ins, instance, ip, job, clsTotal number of scrapes that hit the sample limit and were rejected. prometheus_target_scrapes_exemplar_out_of_order_total counter ins, instance, ip, job, clsTotal number of exemplar rejected due to not being out of the expected order. prometheus_target_scrapes_sample_duplicate_timestamp_total counter ins, instance, ip, job, clsTotal number of samples rejected due to duplicate timestamps but different values. prometheus_target_scrapes_sample_out_of_bounds_total counter ins, instance, ip, job, clsTotal number of samples rejected due to timestamp falling outside of the time bounds. prometheus_target_scrapes_sample_out_of_order_total counter ins, instance, ip, job, clsTotal number of samples rejected due to not being out of the expected order. prometheus_target_sync_failed_total counter ins, instance, ip, scrape_job, job, clsTotal number of target sync failures. prometheus_target_sync_length_seconds summary ins, instance, ip, scrape_job, job, cls, quantileActual interval to sync the scrape pool. prometheus_target_sync_length_seconds_count Unknown ins, instance, ip, scrape_job, job, clsN/A prometheus_target_sync_length_seconds_sum Unknown ins, instance, ip, scrape_job, job, clsN/A prometheus_template_text_expansion_failures_total counter ins, instance, ip, job, clsThe total number of template text expansion failures. prometheus_template_text_expansions_total counter ins, instance, ip, job, clsThe total number of template text expansions. prometheus_treecache_watcher_goroutines gauge ins, instance, ip, job, clsThe current number of watcher goroutines. prometheus_treecache_zookeeper_failures_total counter ins, instance, ip, job, clsThe total number of ZooKeeper failures. prometheus_tsdb_blocks_loaded gauge ins, instance, ip, job, clsNumber of currently loaded data blocks prometheus_tsdb_checkpoint_creations_failed_total counter ins, instance, ip, job, clsTotal number of checkpoint creations that failed. prometheus_tsdb_checkpoint_creations_total counter ins, instance, ip, job, clsTotal number of checkpoint creations attempted. prometheus_tsdb_checkpoint_deletions_failed_total counter ins, instance, ip, job, clsTotal number of checkpoint deletions that failed. prometheus_tsdb_checkpoint_deletions_total counter ins, instance, ip, job, clsTotal number of checkpoint deletions attempted. prometheus_tsdb_clean_start gauge ins, instance, ip, job, cls-1: lockfile is disabled. 0: a lockfile from a previous execution was replaced. 1: lockfile creation was clean prometheus_tsdb_compaction_chunk_range_seconds_bucket Unknown ins, instance, ip, le, job, clsN/A prometheus_tsdb_compaction_chunk_range_seconds_count Unknown ins, instance, ip, job, clsN/A prometheus_tsdb_compaction_chunk_range_seconds_sum Unknown ins, instance, ip, job, clsN/A prometheus_tsdb_compaction_chunk_samples_bucket Unknown ins, instance, ip, le, job, clsN/A prometheus_tsdb_compaction_chunk_samples_count Unknown ins, instance, ip, job, clsN/A prometheus_tsdb_compaction_chunk_samples_sum Unknown ins, instance, ip, job, clsN/A prometheus_tsdb_compaction_chunk_size_bytes_bucket Unknown ins, instance, ip, le, job, clsN/A prometheus_tsdb_compaction_chunk_size_bytes_count Unknown ins, instance, ip, job, clsN/A prometheus_tsdb_compaction_chunk_size_bytes_sum Unknown ins, instance, ip, job, clsN/A prometheus_tsdb_compaction_duration_seconds_bucket Unknown ins, instance, ip, le, job, clsN/A prometheus_tsdb_compaction_duration_seconds_count Unknown ins, instance, ip, job, clsN/A prometheus_tsdb_compaction_duration_seconds_sum Unknown ins, instance, ip, job, clsN/A prometheus_tsdb_compaction_populating_block gauge ins, instance, ip, job, clsSet to 1 when a block is currently being written to the disk. prometheus_tsdb_compactions_failed_total counter ins, instance, ip, job, clsTotal number of compactions that failed for the partition. prometheus_tsdb_compactions_skipped_total counter ins, instance, ip, job, clsTotal number of skipped compactions due to disabled auto compaction. prometheus_tsdb_compactions_total counter ins, instance, ip, job, clsTotal number of compactions that were executed for the partition. prometheus_tsdb_compactions_triggered_total counter ins, instance, ip, job, clsTotal number of triggered compactions for the partition. prometheus_tsdb_data_replay_duration_seconds gauge ins, instance, ip, job, clsTime taken to replay the data on disk. prometheus_tsdb_exemplar_exemplars_appended_total counter ins, instance, ip, job, clsTotal number of appended exemplars. prometheus_tsdb_exemplar_exemplars_in_storage gauge ins, instance, ip, job, clsNumber of exemplars currently in circular storage. prometheus_tsdb_exemplar_last_exemplars_timestamp_seconds gauge ins, instance, ip, job, clsThe timestamp of the oldest exemplar stored in circular storage. Useful to check for what timerange the current exemplar buffer limit allows. This usually means the last timestampfor all exemplars for a typical setup. This is not true though if one of the series timestamp is in future compared to rest series. prometheus_tsdb_exemplar_max_exemplars gauge ins, instance, ip, job, clsTotal number of exemplars the exemplar storage can store, resizeable. prometheus_tsdb_exemplar_out_of_order_exemplars_total counter ins, instance, ip, job, clsTotal number of out of order exemplar ingestion failed attempts. prometheus_tsdb_exemplar_series_with_exemplars_in_storage gauge ins, instance, ip, job, clsNumber of series with exemplars currently in circular storage. prometheus_tsdb_head_active_appenders gauge ins, instance, ip, job, clsNumber of currently active appender transactions prometheus_tsdb_head_chunks gauge ins, instance, ip, job, clsTotal number of chunks in the head block. prometheus_tsdb_head_chunks_created_total counter ins, instance, ip, job, clsTotal number of chunks created in the head prometheus_tsdb_head_chunks_removed_total counter ins, instance, ip, job, clsTotal number of chunks removed in the head prometheus_tsdb_head_chunks_storage_size_bytes gauge ins, instance, ip, job, clsSize of the chunks_head directory. prometheus_tsdb_head_gc_duration_seconds_count Unknown ins, instance, ip, job, clsN/A prometheus_tsdb_head_gc_duration_seconds_sum Unknown ins, instance, ip, job, clsN/A prometheus_tsdb_head_max_time gauge ins, instance, ip, job, clsMaximum timestamp of the head block. The unit is decided by the library consumer. prometheus_tsdb_head_max_time_seconds gauge ins, instance, ip, job, clsMaximum timestamp of the head block. prometheus_tsdb_head_min_time gauge ins, instance, ip, job, clsMinimum time bound of the head block. The unit is decided by the library consumer. prometheus_tsdb_head_min_time_seconds gauge ins, instance, ip, job, clsMinimum time bound of the head block. prometheus_tsdb_head_out_of_order_samples_appended_total counter ins, instance, ip, job, clsTotal number of appended out of order samples. prometheus_tsdb_head_samples_appended_total counter ins, instance, ip, type, job, clsTotal number of appended samples. prometheus_tsdb_head_series gauge ins, instance, ip, job, clsTotal number of series in the head block. prometheus_tsdb_head_series_created_total counter ins, instance, ip, job, clsTotal number of series created in the head prometheus_tsdb_head_series_not_found_total counter ins, instance, ip, job, clsTotal number of requests for series that were not found. prometheus_tsdb_head_series_removed_total counter ins, instance, ip, job, clsTotal number of series removed in the head prometheus_tsdb_head_truncations_failed_total counter ins, instance, ip, job, clsTotal number of head truncations that failed. prometheus_tsdb_head_truncations_total counter ins, instance, ip, job, clsTotal number of head truncations attempted. prometheus_tsdb_isolation_high_watermark gauge ins, instance, ip, job, clsThe highest TSDB append ID that has been given out. prometheus_tsdb_isolation_low_watermark gauge ins, instance, ip, job, clsThe lowest TSDB append ID that is still referenced. prometheus_tsdb_lowest_timestamp gauge ins, instance, ip, job, clsLowest timestamp value stored in the database. The unit is decided by the library consumer. prometheus_tsdb_lowest_timestamp_seconds gauge ins, instance, ip, job, clsLowest timestamp value stored in the database. prometheus_tsdb_mmap_chunk_corruptions_total counter ins, instance, ip, job, clsTotal number of memory-mapped chunk corruptions. prometheus_tsdb_mmap_chunks_total counter ins, instance, ip, job, clsTotal number of chunks that were memory-mapped. prometheus_tsdb_out_of_bound_samples_total counter ins, instance, ip, type, job, clsTotal number of out of bound samples ingestion failed attempts with out of order support disabled. prometheus_tsdb_out_of_order_samples_total counter ins, instance, ip, type, job, clsTotal number of out of order samples ingestion failed attempts due to out of order being disabled. prometheus_tsdb_reloads_failures_total counter ins, instance, ip, job, clsNumber of times the database failed to reloadBlocks block data from disk. prometheus_tsdb_reloads_total counter ins, instance, ip, job, clsNumber of times the database reloaded block data from disk. prometheus_tsdb_retention_limit_bytes gauge ins, instance, ip, job, clsMax number of bytes to be retained in the tsdb blocks, configured 0 means disabled prometheus_tsdb_retention_limit_seconds gauge ins, instance, ip, job, clsHow long to retain samples in storage. prometheus_tsdb_size_retentions_total counter ins, instance, ip, job, clsThe number of times that blocks were deleted because the maximum number of bytes was exceeded. prometheus_tsdb_snapshot_replay_error_total counter ins, instance, ip, job, clsTotal number snapshot replays that failed. prometheus_tsdb_storage_blocks_bytes gauge ins, instance, ip, job, clsThe number of bytes that are currently used for local storage by all blocks. prometheus_tsdb_symbol_table_size_bytes gauge ins, instance, ip, job, clsSize of symbol table in memory for loaded blocks prometheus_tsdb_time_retentions_total counter ins, instance, ip, job, clsThe number of times that blocks were deleted because the maximum time limit was exceeded. prometheus_tsdb_tombstone_cleanup_seconds_bucket Unknown ins, instance, ip, le, job, clsN/A prometheus_tsdb_tombstone_cleanup_seconds_count Unknown ins, instance, ip, job, clsN/A prometheus_tsdb_tombstone_cleanup_seconds_sum Unknown ins, instance, ip, job, clsN/A prometheus_tsdb_too_old_samples_total counter ins, instance, ip, type, job, clsTotal number of out of order samples ingestion failed attempts with out of support enabled, but sample outside of time window. prometheus_tsdb_vertical_compactions_total counter ins, instance, ip, job, clsTotal number of compactions done on overlapping blocks. prometheus_tsdb_wal_completed_pages_total counter ins, instance, ip, job, clsTotal number of completed pages. prometheus_tsdb_wal_corruptions_total counter ins, instance, ip, job, clsTotal number of WAL corruptions. prometheus_tsdb_wal_fsync_duration_seconds summary ins, instance, ip, job, cls, quantileDuration of write log fsync. prometheus_tsdb_wal_fsync_duration_seconds_count Unknown ins, instance, ip, job, clsN/A prometheus_tsdb_wal_fsync_duration_seconds_sum Unknown ins, instance, ip, job, clsN/A prometheus_tsdb_wal_page_flushes_total counter ins, instance, ip, job, clsTotal number of page flushes. prometheus_tsdb_wal_segment_current gauge ins, instance, ip, job, clsWrite log segment index that TSDB is currently writing to. prometheus_tsdb_wal_storage_size_bytes gauge ins, instance, ip, job, clsSize of the write log directory. prometheus_tsdb_wal_truncate_duration_seconds_count Unknown ins, instance, ip, job, clsN/A prometheus_tsdb_wal_truncate_duration_seconds_sum Unknown ins, instance, ip, job, clsN/A prometheus_tsdb_wal_truncations_failed_total counter ins, instance, ip, job, clsTotal number of write log truncations that failed. prometheus_tsdb_wal_truncations_total counter ins, instance, ip, job, clsTotal number of write log truncations attempted. prometheus_tsdb_wal_writes_failed_total counter ins, instance, ip, job, clsTotal number of write log writes that failed. prometheus_web_federation_errors_total counter ins, instance, ip, job, clsTotal number of errors that occurred while sending federation responses. prometheus_web_federation_warnings_total counter ins, instance, ip, job, clsTotal number of warnings that occurred while sending federation responses. promhttp_metric_handler_requests_in_flight gauge ins, instance, ip, job, clsCurrent number of scrapes being served. promhttp_metric_handler_requests_total counter ins, instance, ip, job, cls, codeTotal number of scrapes by HTTP status code. pushgateway_build_info gauge revision, version, ins, instance, ip, tags, goarch, goversion, job, cls, branch, goosA metric with a constant ‘1’ value labeled by version, revision, branch, goversion from which pushgateway was built, and the goos and goarch for the build. pushgateway_http_requests_total counter ins, instance, method, ip, job, cls, code, handlerTotal HTTP requests processed by the Pushgateway, excluding scrapes. querier_cache_added_new_total Unknown ins, instance, ip, job, cache, clsN/A querier_cache_added_total Unknown ins, instance, ip, job, cache, clsN/A querier_cache_entries gauge ins, instance, ip, job, cache, clsThe total number of entries querier_cache_evicted_total Unknown ins, instance, ip, job, reason, cache, clsN/A querier_cache_gets_total Unknown ins, instance, ip, job, cache, clsN/A querier_cache_memory_bytes gauge ins, instance, ip, job, cache, clsThe current cache size in bytes querier_cache_misses_total Unknown ins, instance, ip, job, cache, clsN/A querier_cache_stale_gets_total Unknown ins, instance, ip, job, cache, clsN/A ring_member_heartbeats_total Unknown ins, instance, ip, job, clsN/A ring_member_tokens_owned gauge ins, instance, ip, job, clsThe number of tokens owned in the ring. ring_member_tokens_to_own gauge ins, instance, ip, job, clsThe number of tokens to own in the ring. scrape_duration_seconds Unknown ins, instance, ip, job, clsN/A scrape_samples_post_metric_relabeling Unknown ins, instance, ip, job, clsN/A scrape_samples_scraped Unknown ins, instance, ip, job, clsN/A scrape_series_added Unknown ins, instance, ip, job, clsN/A up Unknown ins, instance, ip, job, clsN/A
PING 指标 PINGblackbox_epxorter 提供。
Metric Name Type Labels Description agent_up Unknown ins, ip, job, instance, clsN/A probe_dns_lookup_time_seconds gauge ins, ip, job, instance, clsReturns the time taken for probe dns lookup in seconds probe_duration_seconds gauge ins, ip, job, instance, clsReturns how long the probe took to complete in seconds probe_icmp_duration_seconds gauge ins, ip, job, phase, instance, clsDuration of icmp request by phase probe_icmp_reply_hop_limit gauge ins, ip, job, instance, clsReplied packet hop limit (TTL for ipv4) probe_ip_addr_hash gauge ins, ip, job, instance, clsSpecifies the hash of IP address. It’s useful to detect if the IP address changes. probe_ip_protocol gauge ins, ip, job, instance, clsSpecifies whether probe ip protocol is IP4 or IP6 probe_success gauge ins, ip, job, instance, clsDisplays whether or not the probe was a success scrape_duration_seconds Unknown ins, ip, job, instance, clsN/A scrape_samples_post_metric_relabeling Unknown ins, ip, job, instance, clsN/A scrape_samples_scraped Unknown ins, ip, job, instance, clsN/A scrape_series_added Unknown ins, ip, job, instance, clsN/A up Unknown ins, ip, job, instance, clsN/A
PUSH 指标 PushGateway 提供 44 类监控指标。
Metric Name Type Labels Description agent_up Unknown job, cls, instance, ins, ipN/A go_gc_duration_seconds summary job, cls, instance, ins, quantile, ipA summary of the pause duration of garbage collection cycles. go_gc_duration_seconds_count Unknown job, cls, instance, ins, ipN/A go_gc_duration_seconds_sum Unknown job, cls, instance, ins, ipN/A go_goroutines gauge job, cls, instance, ins, ipNumber of goroutines that currently exist. go_info gauge job, cls, instance, ins, ip, versionInformation about the Go environment. go_memstats_alloc_bytes counter job, cls, instance, ins, ipTotal number of bytes allocated, even if freed. go_memstats_alloc_bytes_total counter job, cls, instance, ins, ipTotal number of bytes allocated, even if freed. go_memstats_buck_hash_sys_bytes gauge job, cls, instance, ins, ipNumber of bytes used by the profiling bucket hash table. go_memstats_frees_total counter job, cls, instance, ins, ipTotal number of frees. go_memstats_gc_sys_bytes gauge job, cls, instance, ins, ipNumber of bytes used for garbage collection system metadata. go_memstats_heap_alloc_bytes gauge job, cls, instance, ins, ipNumber of heap bytes allocated and still in use. go_memstats_heap_idle_bytes gauge job, cls, instance, ins, ipNumber of heap bytes waiting to be used. go_memstats_heap_inuse_bytes gauge job, cls, instance, ins, ipNumber of heap bytes that are in use. go_memstats_heap_objects gauge job, cls, instance, ins, ipNumber of allocated objects. go_memstats_heap_released_bytes gauge job, cls, instance, ins, ipNumber of heap bytes released to OS. go_memstats_heap_sys_bytes gauge job, cls, instance, ins, ipNumber of heap bytes obtained from system. go_memstats_last_gc_time_seconds gauge job, cls, instance, ins, ipNumber of seconds since 1970 of last garbage collection. go_memstats_lookups_total counter job, cls, instance, ins, ipTotal number of pointer lookups. go_memstats_mallocs_total counter job, cls, instance, ins, ipTotal number of mallocs. go_memstats_mcache_inuse_bytes gauge job, cls, instance, ins, ipNumber of bytes in use by mcache structures. go_memstats_mcache_sys_bytes gauge job, cls, instance, ins, ipNumber of bytes used for mcache structures obtained from system. go_memstats_mspan_inuse_bytes gauge job, cls, instance, ins, ipNumber of bytes in use by mspan structures. go_memstats_mspan_sys_bytes gauge job, cls, instance, ins, ipNumber of bytes used for mspan structures obtained from system. go_memstats_next_gc_bytes gauge job, cls, instance, ins, ipNumber of heap bytes when next garbage collection will take place. go_memstats_other_sys_bytes gauge job, cls, instance, ins, ipNumber of bytes used for other system allocations. go_memstats_stack_inuse_bytes gauge job, cls, instance, ins, ipNumber of bytes in use by the stack allocator. go_memstats_stack_sys_bytes gauge job, cls, instance, ins, ipNumber of bytes obtained from system for stack allocator. go_memstats_sys_bytes gauge job, cls, instance, ins, ipNumber of bytes obtained from system. go_threads gauge job, cls, instance, ins, ipNumber of OS threads created. process_cpu_seconds_total counter job, cls, instance, ins, ipTotal user and system CPU time spent in seconds. process_max_fds gauge job, cls, instance, ins, ipMaximum number of open file descriptors. process_open_fds gauge job, cls, instance, ins, ipNumber of open file descriptors. process_resident_memory_bytes gauge job, cls, instance, ins, ipResident memory size in bytes. process_start_time_seconds gauge job, cls, instance, ins, ipStart time of the process since unix epoch in seconds. process_virtual_memory_bytes gauge job, cls, instance, ins, ipVirtual memory size in bytes. process_virtual_memory_max_bytes gauge job, cls, instance, ins, ipMaximum amount of virtual memory available in bytes. pushgateway_build_info gauge job, goversion, cls, branch, instance, tags, revision, goarch, ins, ip, version, goosA metric with a constant ‘1’ value labeled by version, revision, branch, goversion from which pushgateway was built, and the goos and goarch for the build. pushgateway_http_requests_total counter job, cls, method, code, handler, instance, ins, ipTotal HTTP requests processed by the Pushgateway, excluding scrapes. scrape_duration_seconds Unknown job, cls, instance, ins, ipN/A scrape_samples_post_metric_relabeling Unknown job, cls, instance, ins, ipN/A scrape_samples_scraped Unknown job, cls, instance, ins, ipN/A scrape_series_added Unknown job, cls, instance, ins, ipN/A up Unknown job, cls, instance, ins, ipN/A
13.6 - 常见问题 Pigsty INFRA 基础设施模块常见问题答疑
INFRA 模块中包含了哪些组件? Ansible :用于自动化配置、部署和日常运维。Nginx :对外暴露 Grafana、VictoriaMetrics(VMUI)、Alertmanager 等 WebUI,并托管本地 YUM/APT 仓库。自签名 CA :为 Nginx、Patroni、pgBackRest 等组件签发 SSL/TLS 证书。VictoriaMetrics 套件 :替代 Prometheus/Loki,包含 VictoriaMetrics(TSDB)、VMAlert(告警评估)、VictoriaLogs(集中日志)、VictoriaTraces(链路追踪)。Vector :节点侧日志采集器,负责将系统/数据库日志推送至 VictoriaLogs。AlertManager :聚合并分发告警通知。Grafana :监控/可视化平台,预置大量仪表板和数据源。Chronyd :提供 NTP 时间同步。DNSMasq :提供 DNS 注册与解析。ETCD :作为 PostgreSQL 高可用 DCS(亦可在专用集群部署)。PostgreSQL :在管理节点上充当 CMDB(可选)。Docker :在节点上运行无状态工具或应用(可选)。如何重新向 VictoriaMetrics 注册监控目标? VictoriaMetrics 通过 /infra/targets/<job>/*.yml 目录进行静态服务发现。如果目标文件被误删,可使用如下命令重新注册:
./infra.yml -t infra_register # 重新渲染 infra 自监控目标
./node.yml -t node_register # 重新渲染节点 / HAProxy / Vector 目标
./etcd.yml -t etcd_register # 重新渲染 etcd 目标
./minio.yml -t minio_register # 重新渲染 MinIO 目标
./pgsql.yml -t pg_register # 重新渲染 PGSQL/Patroni 目标
./redis.yml -t redis_register # 重新渲染 Redis 目标
其他模块(如 pg_monitor.yml、mongo.yml、mysql.yml)也提供了对应的 *_register 标签,可按需执行。
如何重新向 Grafana 注册 PostgreSQL 数据源? 在 pg_databases
如果你不小心删除了在 Grafana 中注册的 postgres 数据源,你可以使用以下命令再次注册它们:
# 将所有(在 pg_databases 中定义的) pgsql 数据库注册为 grafana 数据源
./pgsql.yml -t add_ds
如何重新向 Nginx 注册节点的 Haproxy 管控界面? 如果你不小心删除了 /etc/nginx/conf.d/haproxy 中的已注册 haproxy 代理设置,你可以使用以下命令再次恢复它们:
./node.yml -t register_nginx # 在 infra 节点上向 nginx 注册所有 haproxy 管理页面的代理设置
如何恢复 DNSMASQ 中的域名注册记录? PGSQL 集群/实例域名默认注册到 infra 节点的 /etc/hosts.d/<name>。你可以使用以下命令再次恢复它们:
./pgsql.yml -t pg_dns # 在 infra 节点上向 dnsmasq 注册 pg 的 DNS 名称
如何使用Nginx对外暴露新的上游服务? 尽管您可以直接通过 IP:Port 的方式访问服务,但我们依然建议收敛访问入口,使用域名并统一从 Nginx 代理访问各类带有 Web 界面的服务。
这样有利于统一收口访问,减少暴露的端口,便于进行访问控制与审计。
如果你希望通过 Nginx 门户公开新的 WebUI 服务,你可以将服务定义添加到 infra_portal
infra_portal :
home : { domain : home.pigsty.cc }
grafana : { domain: demo.pigsty.cc ,endpoint : "${admin_ip}:3000" ,websocket : true }
vmetrics : { domain: p.pigsty.cc ,endpoint : "${admin_ip}:8428" }
alertmanager : { domain: a.pigsty.cc ,endpoint : "${admin_ip}:9059" }
blackbox : { endpoint : "${admin_ip}:9115" }
vmalert : { endpoint : "${admin_ip}:8880" }
# 新增的 Web 门户
minio : { domain: m.pigsty.cc ,endpoint : "${admin_ip}:9001" ,scheme: https ,websocket : true }
postgrest : { domain: api.pigsty.cc ,endpoint : "127.0.0.1:8884" }
pgadmin : { domain: adm.pigsty.cc ,endpoint : "127.0.0.1:8885" }
pgweb : { domain: cli.pigsty.cc ,endpoint : "127.0.0.1:8886" }
bytebase : { domain: ddl.pigsty.cc ,endpoint : "127.0.0.1:8887" }
gitea : { domain: git.pigsty.cc ,endpoint : "127.0.0.1:8889" }
wiki : { domain: wiki.pigsty.cc ,endpoint : "127.0.0.1:9002" }
noco : { domain: noco.pigsty.cc ,endpoint : "127.0.0.1:9003" }
supa : { domain: supa.pigsty.cc ,endpoint : "127.0.0.1:8000" , websocket : true }
完成 Nginx 上游服务定义后,使用以下配置与命令,向 Nginx 注册新的服务。
./infra.yml -t nginx_config # 重新生成 Nginx 配置文件
./infra.yml -t nginx_launch # 更新并应用 Nginx 配置。
# 您也可以使用 Ansible 手工重载 Nginx 配置
ansible infra -b -a 'nginx -s reload' # 重载Nginx配置
如果你希望通过 HTTPS 访问,你必须删除 files/pki/csr/pigsty.csr 和 files/pki/nginx/pigsty.{key,crt} 以强制重新生成 Nginx SSL/TLS 证书以包括新上游的域名。
如果您希望使用权威机构签发的 SSL 证书,而不是 Pigsty 自签名 CA 颁发的证书,可以将其放置于 /etc/nginx/conf.d/cert/ 目录中并修改相应配置:/etc/nginx/conf.d/<name>.conf。
如何手动向节点添加上游仓库的Repo文件? Pigsty 有一个内置的包装脚本 bin/repo-add,它将调用 ansible 剧本 node.yml 来将 repo 文件添加到相应的节点。
bin/repo-add <selector> [ modules]
bin/repo-add 10.10.10.10 # 为节点 10.10.10.10 添加 node 源
bin/repo-add infra node,infra # 为 infra 分组添加 node 和 infra 源
bin/repo-add infra node,local # 为 infra 分组添加节点仓库和本地pigsty源
bin/repo-add pg-test node,pgsql # 为 pg-test 分组添加 node 和 pgsql 源
13.7 - 管理预案 基础设施组件与 Infra 集群管理 SOP:创建,销毁,扩容,缩容,证书,仓库……
本章节介绍 Pigsty 部署的日常管理和运维操作。
13.7.1 - Nginx 管理 Nginx 管理,Web 门户配置,Web Server,暴露上游服务
Pigsty 在 INFRA 节点上安装 Nginx 作为所有 Web 服务的入口,默认监听在 80/443 标准端口上。
在 Pigsty 中,你可以通过修改配置清单,让 nginx 对外提供多种服务:
对外暴露 Grafana、VictoriaMetrics(VMUI)、Alertmanager、VictoriaLogs 等监控组件的 Web 界面 提供静态文件服务(如软件仓库、文档站,网站等) 代理自定义的应用服务(如内部应用、数据库管理界面,Docker 应用的界面等) 自动签发自签名的 HTTPS 证书,或者使用 certbot 申请免费的 Let’s Encrypt 证书 通过不同的子域名,使用单一端口对外暴露服务 基础配置 您可以通过 infra_portal
infra_portal :
home : { domain : i.pigsty }
infra_portal 是一个字典,每个键定义一个服务,值为服务的配置选项。
只有定义了 domain 的服务才会生成对应的 Nginx 配置文件。
home代理服务 :通过 endpoint 指定上游服务地址,进行反向代理静态服务 :通过 path 指定本地目录,提供静态文件服务服务器参数 基本参数 参数 说明 domain可选的代理域名 endpoint上游服务地址(IP:PORT 或 socket) path静态内容的本地目录 scheme协议类型(http/https),默认 http domains额外的域名列表(别名)
SSL/TLS 选项 参数 说明 certbot启用 Let’s Encrypt 证书管理,值为证书名称 cert自定义证书文件路径 key自定义私钥文件路径 enforce_https强制跳转 HTTPS(301 重定向)
高级设置 参数 说明 config自定义 Nginx 配置片段 index启用目录列表(用于静态服务) log自定义日志文件名称 websocket启用 WebSocket 支持 auth启用 Basic Auth 认证 realmBasic Auth 认证提示语
配置示例 反向代理服务 grafana : { domain: g.pigsty, endpoint : "${admin_ip}:3000" , websocket : true }
pgadmin : { domain: adm.pigsty, endpoint : "127.0.0.1:8885" }
静态文件与目录列表 repo : { domain: repo.pigsty.cc, path : "/www/repo" , index : true }
自定义 SSL 证书 secure_app :
domain : secure.pigsty.cc
endpoint : "${admin_ip}:8443"
cert : "/etc/ssl/certs/custom.crt"
key : "/etc/ssl/private/custom.key"
使用 Let’s Encrypt 证书 grafana :
domain : demo.pigsty.cc
endpoint : "${admin_ip}:3000"
websocket : true
certbot : pigsty.demo # 证书名称,多个域名可共用同一证书
强制 HTTPS 跳转 web.io :
domain : en.pigsty.cc
path : "/www/web.io"
certbot : pigsty.doc
enforce_https : true
自定义配置片段 web.cc :
domain : pigsty.cc
path : "/www/web.cc"
domains : [ zh.pigsty.cc ]
certbot : pigsty.doc
config : |
# rewrite /zh/ to /
location /zh/ {
rewrite ^/zh/(.*)$ /$1 permanent;
}
管理命令 ./infra.yml -t nginx # 完整重新配置 Nginx
./infra.yml -t nginx_config # 重新生成配置文件
./infra.yml -t nginx_launch # 重启 Nginx 服务
./infra.yml -t nginx_cert # 重新生成 SSL 证书
./infra.yml -t nginx_certbot # 使用 certbot 签发证书
./infra.yml -t nginx_reload # 重新加载 Nginx 配置
域名解析 有三种方式将域名解析到 Pigsty 服务器:
公网域名 :通过 DNS 服务商配置内网 DNS 服务器 :配置内部 DNS 解析本地 hosts 文件 :修改 /etc/hosts本地开发时,在 /etc/hosts 中添加:
<your_public_ip_address> i.pigsty g.pigsty p.pigsty a.pigsty
Pigsty 内置了 dnsmasq 服务,可以通过 dns_records
HTTPS 配置 通过 nginx_sslmode
模式 说明 disable仅监听 HTTP(nginx_port) enable同时监听 HTTPS(nginx_ssl_port),默认签发自签名证书 enforce强制跳转到 HTTPS,所有 80 端口请求都会 301 重定向
对于自签名证书,有以下几种访问方式:
在浏览器中信任自签名 CA(下载地址 http://<ip>/ca.crt) 使用浏览器安全绕过(Chrome 中输入 “thisisunsafe”) 为生产环境配置正规 CA 签发的证书或使用 Let’s Encrypt Certbot 证书 Pigsty 支持使用 Certbot 申请免费的 Let’s Encrypt 证书。
启用 Certbot 在 infra_portal 中为服务添加 certbot 参数,指定证书名称 配置 certbot_email 设置 certbot_signtrue 在部署时自动签发 certbot_sign : true
certbot_email : your@email.com
手动签发证书 ./infra.yml -t nginx_certbot # 签发 Let's Encrypt 证书
或直接运行服务器上的脚本:
/etc/nginx/sign-cert # 签发证书
/etc/nginx/link-cert # 链接证书到 Nginx 配置目录
更多信息,请参阅 Certbot:申请与更新 HTTPS 证书
默认首页 Pigsty 的默认首页 home 服务器提供以下内置路由:
路径 说明 /首页导航 /zh中文首页 /ui/Grafana 监控面板 /vmetrics/VictoriaMetrics VMUI /vlogs/VictoriaLogs 日志查询 /vtraces/VictoriaTraces 链路追踪 /vmalert/VMAlert 告警规则 /alertmgr/AlertManager 告警管理 /blackbox/Blackbox Exporter /pevPostgreSQL Explain 可视化工具 /haproxy/<cluster>/HAProxy 管理界面(如有)
这些路由允许通过单一入口访问所有监控组件,无需配置多个域名。
最佳实践 使用域名而非 IP:PORT 访问服务 正确配置 DNS 解析或 hosts 文件 为实时应用启用 WebSocket(如 Grafana、Jupyter) 生产环境启用 HTTPS 使用有意义的子域名组织服务 监控 Let’s Encrypt 证书过期时间 利用 config 参数添加自定义 Nginx 配置 完整示例 以下是 Pigsty 公开演示站点 demo.pigsty.cc 使用的 Nginx 配置:
infra_portal :
home : { domain : i.pigsty }
cc : { domain: pigsty.cc ,path : "/www/pigsty.cc" ,cert: /etc/cert/pigsty.cc.crt ,key : /etc/cert/pigsty.cc.key }
minio : { domain: m.pigsty.cc ,endpoint : "${admin_ip}:9001" ,scheme: https ,websocket : true }
postgrest : { domain: api.pigsty.cc ,endpoint : "127.0.0.1:8884" }
pgadmin : { domain: adm.pigsty.cc ,endpoint : "127.0.0.1:8885" }
pgweb : { domain: cli.pigsty.cc ,endpoint : "127.0.0.1:8886" }
bytebase : { domain: ddl.pigsty.cc ,endpoint : "127.0.0.1:8887" }
jupyter : { domain: lab.pigsty.cc ,endpoint : "127.0.0.1:8888" ,websocket : true }
gitea : { domain: git.pigsty.cc ,endpoint : "127.0.0.1:8889" }
wiki : { domain: wiki.pigsty.cc ,endpoint : "127.0.0.1:9002" }
noco : { domain: noco.pigsty.cc ,endpoint : "127.0.0.1:9003" }
supa : { domain: supa.pigsty.cc ,endpoint : "10.10.10.10:8000" ,websocket : true }
dify : { domain: dify.pigsty.cc ,endpoint : "10.10.10.10:8001" ,websocket : true }
odoo : { domain: odoo.pigsty.cc ,endpoint : "127.0.0.1:8069" ,websocket : true }
mm : { domain: mm.pigsty.cc ,endpoint : "10.10.10.10:8065" ,websocket : true }
13.7.2 - 软件仓库 管理本地 APT/YUM 软件仓库
Pigsty 支持创建和管理本地 APT/YUM 软件仓库,用于在离线环境中部署或加速软件包安装。
快速开始 向本地仓库添加软件包:
将软件包添加到 repo_packages 将软件包添加到 repo_extra_packages 执行构建命令: ./infra.yml -t repo_build # 从上游构建本地仓库
./node.yml -t node_repo # 刷新节点仓库缓存
软件包别名 Pigsty 预定义了常用的软件包组合,方便批量安装:
EL 系统(RHEL/CentOS/Rocky) 别名 说明 node-bootstrapAnsible、Python3 工具、SSH 相关 infra-packageNginx、etcd、HAProxy、监控导出器、MinIO 等 pgsql-utilityPatroni、pgBouncer、pgBackRest、PG 工具 pgsql完整 PostgreSQL(服务端、客户端、扩展) pgsql-mini最小化 PostgreSQL 安装
Debian/Ubuntu 系统 别名 说明 node-bootstrapAnsible、开发工具 infra-package基础设施组件(使用 Debian 命名规范) pgsql-clientPostgreSQL 客户端 pgsql-serverPostgreSQL 服务端及相关包
剧本任务 主要任务 任务 说明 repo从互联网或离线包创建本地仓库 repo_build如不存在则从上游构建 repo_upstream添加上游仓库文件 repo_pkg下载软件包及依赖 repo_create创建/更新 YUM 或 APT 仓库 repo_nginx启动 Nginx 文件服务器
完整任务列表 ./infra.yml -t repo_dir # 创建本地软件仓库目录
./infra.yml -t repo_check # 检查本地仓库是否存在
./infra.yml -t repo_prepare # 直接使用已有仓库
./infra.yml -t repo_build # 从上游构建仓库
./infra.yml -t repo_upstream # 添加上游仓库
./infra.yml -t repo_remove # 删除现有仓库文件
./infra.yml -t repo_add # 添加仓库到系统目录
./infra.yml -t repo_url_pkg # 从互联网下载包
./infra.yml -t repo_cache # 创建元数据缓存
./infra.yml -t repo_boot_pkg # 安装引导包
./infra.yml -t repo_pkg # 下载包及依赖
./infra.yml -t repo_create # 创建本地仓库
./infra.yml -t repo_use # 添加新建仓库到系统
./infra.yml -t repo_nginx # 启动 Nginx 文件服务器
常用操作 添加新软件包 # 1. 配置上游仓库
./infra.yml -t repo_upstream
# 2. 下载软件包及依赖
./infra.yml -t repo_pkg
# 3. 构建本地仓库元数据
./infra.yml -t repo_create
刷新节点仓库 ./node.yml -t node_repo # 刷新所有节点的仓库缓存
完整重建仓库 ./infra.yml -t repo # 从互联网或离线包创建仓库
13.7.3 - 域名管理 配置本地或公网域名访问 Pigsty 服务
使用域名代替 IP 地址访问 Pigsty 的各项 Web 服务。
快速开始 将以下静态解析记录添加到 /etc/hosts:
10.10.10.10 i.pigsty g.pigsty p.pigsty a.pigsty
将 IP 地址替换为实际 Pigsty 节点的 IP。
为什么使用域名 比 IP 地址更易于记忆 灵活指向不同 IP 通过 Nginx 统一管理服务 支持 HTTPS 加密 防止某些地区的 ISP 劫持 允许通过代理访问内部绑定的服务 DNS 机制 DNS 协议 :将域名解析为 IP 地址。多个域名可以指向同一个 IP。
HTTP 协议 :使用 Host 头将请求路由到同一端口(80/443)上的不同站点。
默认域名 Pigsty 预定义了以下默认域名:
域名 服务 端口 用途 i.pigstyNginx 80/443 默认首页、本地仓库与统一入口 g.pigstyGrafana 3000 监控与可视化 p.pigstyVictoriaMetrics 8428 VMUI/PromQL 入口 a.pigstyAlertManager 9059 告警路由 m.pigstyMinIO 9001 对象存储控制台
解析方式 本地静态解析 在客户端机器的 /etc/hosts 中添加条目:
# Linux/macOS
sudo vim /etc/hosts
# Windows
notepad C:\W indows\S ystem32\d rivers\e tc\h osts
添加内容:
10.10.10.10 i.pigsty g.pigsty p.pigsty a.pigsty m.pigsty
内网动态解析 Pigsty 内置了 dnsmasq 服务作为内网 DNS 服务器。配置被管理的节点使用 INFRA 节点作为 DNS 服务器:
node_dns_servers : [ '${admin_ip}' ] # 使用 INFRA 节点作为 DNS 服务器
node_dns_method : add # 将其添加到现有 DNS 服务器列表
通过 dns_records
dns_records :
- "${admin_ip} i.pigsty"
- "${admin_ip} m.pigsty supa.pigsty api.pigsty adm.pigsty cli.pigsty ddl.pigsty"
公网域名 购买域名并添加 DNS A 记录指向公网 IP:
在域名服务商处购买域名(如 example.com) 配置 A 记录指向服务器公网 IP 在 infra_portal 内置 DNS 服务 Pigsty 在 INFRA 节点上运行 dnsmasq 作为 DNS 服务器。
相关参数 默认的 DNS 记录:
dns_records :
- "${admin_ip} i.pigsty"
- "${admin_ip} m.pigsty supa.pigsty api.pigsty adm.pigsty cli.pigsty ddl.pigsty"
动态 DNS 注册 Pigsty 会自动为 PostgreSQL 集群和实例注册 DNS 记录:
实例级 DNS :<pg_instance> 指向实例 IP(如 pg-meta-1)集群级 DNS :<pg_cluster> 指向主库 IP 或 VIP(如 pg-meta)集群级 DNS 目标由 pg_dns_target
值 说明 auto自动选择:有 VIP 用 VIP,否则用主库 IP primary始终指向主库 IP vip始终指向 VIP(需启用 VIP) none不注册集群 DNS <ip>指定固定 IP 地址
通过 pg_dns_suffix
节点 DNS 配置 Pigsty 管理被纳管节点的 DNS 配置。
静态 hosts 记录 通过 node_etc_hosts/etc/hosts 记录:
node_etc_hosts :
- "${admin_ip} i.pigsty"
- "${admin_ip} sss.pigsty" # 可选:MinIO S3 接入域名
- "10.10.10.20 db.example.com"
DNS 服务器配置 node_dns_method 可选值:
值 说明 add添加到现有 DNS 服务器列表前面 overwrite完全覆盖 DNS 服务器配置 none不修改 DNS 配置
默认的 DNS 选项:
node_dns_options :
- options single-request-reopen timeout:1
HTTPS 证书 Pigsty 默认使用自签名证书。可选方案包括:
忽略警告,使用 HTTP 信任自签名 CA 证书(下载地址 http://<ip>/ca.crt) 使用真实 CA 或通过 Certbot 获取免费公网域名证书 详见 CA 与证书 文档。
扩展域名 Pigsty 扩展预留了以下域名用于各种应用服务:
域名 用途 adm.pigstyPgAdmin 管理界面 ddl.pigstyBytebase DDL 管理 cli.pigstyPgWeb 命令行界面 api.pigstyPostgREST API 服务 lab.pigstyJupyter 实验环境 git.pigstyGitea Git 服务 wiki.pigstyWiki.js 文档 noco.pigstyNocoDB supa.pigstySupabase dify.pigstyDify AI odoo.pigstyOdoo ERP mm.pigstyMattermost
使用这些域名需要在 infra_portal
管理命令 ./infra.yml -t dns # 完整配置 DNS 服务
./infra.yml -t dns_config # 重新生成 dnsmasq 配置
./infra.yml -t dns_record # 更新默认 DNS 记录
./infra.yml -t dns_launch # 重启 dnsmasq 服务
./node.yml -t node_hosts # 配置节点 /etc/hosts
./node.yml -t node_resolv # 配置节点 DNS 解析器
./pgsql.yml -t pg_dns # 注册 PostgreSQL DNS 记录
./pgsql.yml -t pg_dns_ins # 仅注册实例级 DNS
./pgsql.yml -t pg_dns_cls # 仅注册集群级 DNS
13.7.4 - 模块管理 Infra 模块本身的管理 SOP:定义,创建,销毁,扩容,缩容
本文介绍 INFRA 模块的日常管理操作,包括安装、卸载、扩容、以及各组件的管理维护。
安装 Infra 模块 使用 infra.ymlinfra 分组上安装 INFRA 模块:
./infra.yml # 在 infra 分组上安装 INFRA 模块
卸载 Infra 模块 使用 infra-rm.ymlinfra 分组上卸载 INFRA 模块:
./infra-rm.yml # 从 infra 分组上卸载 INFRA 模块
扩容 Infra 模块 在配置清单中为新节点分配 infra_seqinfra 分组:
all :
children :
infra :
hosts :
10.10.10.10 : { infra_seq : 1 } # 原有节点
10.10.10.11 : { infra_seq : 2 } # 新节点
使用限制选项 -l 仅在新节点上执行剧本:
./infra.yml -l 10.10.10.11 # 在新节点上安装 INFRA 模块
管理本地软件仓库 本地软件仓库相关的管理任务:
./infra.yml -t repo # 从互联网或离线包创建仓库
./infra.yml -t repo_upstream # 添加上游仓库
./infra.yml -t repo_pkg # 下载包及依赖
./infra.yml -t repo_create # 创建本地 yum/apt 仓库
完整子任务列表:
./infra.yml -t repo_dir # 创建本地软件仓库
./infra.yml -t repo_check # 检查本地软件仓库是否存在
./infra.yml -t repo_prepare # 直接使用已有仓库
./infra.yml -t repo_build # 从上游构建仓库
./infra.yml -t repo_upstream # 添加上游仓库
./infra.yml -t repo_remove # 删除现有仓库文件
./infra.yml -t repo_add # 添加仓库到系统目录
./infra.yml -t repo_url_pkg # 从互联网下载包
./infra.yml -t repo_cache # 创建元数据缓存
./infra.yml -t repo_boot_pkg # 安装引导包
./infra.yml -t repo_pkg # 下载包及依赖
./infra.yml -t repo_create # 创建本地仓库
./infra.yml -t repo_use # 添加新建仓库到系统
./infra.yml -t repo_nginx # 启动 nginx 文件服务器
管理 Nginx Nginx 相关的管理任务:
./infra.yml -t nginx # 重置 Nginx 组件
./infra.yml -t nginx_index # 重新渲染首页
./infra.yml -t nginx_config,nginx_reload # 重新渲染配置并重载
申请 HTTPS 证书:
./infra.yml -t nginx_certbot,nginx_reload -e certbot_sign = true
管理基础设施组件 基础设施各组件的管理命令:
./infra.yml -t infra # 配置基础设施
./infra.yml -t infra_env # 配置环境变量
./infra.yml -t infra_pkg # 安装软件包
./infra.yml -t infra_user # 设置操作系统用户
./infra.yml -t infra_cert # 颁发证书
./infra.yml -t dns # 配置 DNSMasq
./infra.yml -t nginx # 配置 Nginx
./infra.yml -t victoria # 配置 VictoriaMetrics/Logs/Traces
./infra.yml -t alertmanager # 配置 AlertManager
./infra.yml -t blackbox # 配置 Blackbox Exporter
./infra.yml -t grafana # 配置 Grafana
./infra.yml -t infra_register # 注册到 VictoriaMetrics/Grafana
常用维护命令:
./infra.yml -t nginx_index # 重新渲染首页
./infra.yml -t nginx_config,nginx_reload # 重新配置并重载
./infra.yml -t vmetrics_config,vmetrics_launch # 重新生成 VictoriaMetrics 配置并重启
./infra.yml -t vlogs_config,vlogs_launch # 更新 VictoriaLogs 配置
./infra.yml -t grafana_provision # 重新加载 Grafana 仪表盘与数据源定义
管理 Grafana 密码 Grafana 有两个密码参数:grafana_admin_passwordpigsty)和 grafana_view_passwordDBUser.Viewer):
参数 渲染到的配置文件 grafana_admin_password/etc/grafana/grafana.ini,/infra/env/pigstygrafana_view_password/etc/grafana/provisioning/datasources/pigsty.yml
这两个密码一旦初始化之后,就只能通过 grafana 界面进行修改。
Pigsty 会在初始化 Grafana 监控面板,注册 Grafana 数据源的时候,使用 grafana_admin_password
./infra.yml -t env_var # 重新渲染环境变量
grafana_view_passworddbuser_view 的密码。
如果你修改了这个密码,请在 Grafana 数据源管理界面中同步修改密码。
13.7.5 - CA 与证书 使用自签名 CA 或真实 HTTPS 证书
Pigsty 默认使用自签名证书颁发机构 (CA) 进行内部 SSL/TLS 加密。本文档包含:
自签名 CA Pigsty 在基础设施初始化 (infra.yml) 时自动创建自签名 CA。该 CA 用于签发以下证书:
PostgreSQL 服务器/客户端 SSL Patroni REST API etcd 集群通信 MinIO 集群通信 Nginx HTTPS(备用) 基础设施服务 PKI 目录结构 files/pki/
├── ca/
│ ├── ca.key # CA 私钥(务必保管好!)
│ └── ca.crt # CA 证书
├── csr/ # 证书签名请求
├── misc/ # 杂项证书(cert.yml 输出)
├── etcd/ # ETCD 证书
├── pgsql/ # PostgreSQL 证书
├── minio/ # MinIO 证书
├── infra/ # 基础设施证书
├── nginx/ # Nginx 证书
└── mongo/ # FerretDB 证书
CA 变量 变量 默认值 说明 ca_createtrue如果不存在则创建 CA,否则中止 ca_cnpigsty-caCA 证书通用名称 cert_validity7300d签发证书的默认有效期
证书有效期 证书类型 有效期 控制参数 CA 证书 100 年 硬编码(36500 天) 服务器/客户端 20 年 cert_validity(7300d)Nginx HTTPS ~1 年 nginx_cert_validity(397d)
注意 :浏览器厂商限制超过 398 天的证书信任。Nginx 使用较短有效期以保证浏览器兼容性。
使用外部 CA 如需使用企业自有 CA 而非自动生成的 CA:
在配置中设置 ca_create: false
在运行 playbook 之前放置 CA 文件:
mkdir -p files/pki/ca
cp /path/to/your/ca.key files/pki/ca/ca.key
cp /path/to/your/ca.crt files/pki/ca/ca.crt
chmod 600 files/pki/ca/ca.key
chmod 644 files/pki/ca/ca.crt
运行 ./infra.yml
备份 CA 文件 CA 私钥至关重要,请安全备份:
# 带时间戳备份
tar -czvf pigsty-ca-$( date +%Y%m%d) .tar.gz files/pki/ca/
警告 :如果丢失 CA 私钥,由其签发的所有证书都将无法验证。您需要重新生成所有内容。
签发证书 使用 cert.yml 签发由 Pigsty CA 签名的额外证书。
基本用法 # 为数据库用户签发证书(客户端证书)
./cert.yml -e cn = dbuser_dba
# 为监控用户签发证书
./cert.yml -e cn = dbuser_monitor
默认情况下,证书生成在 files/pki/misc/<cn>.{key,crt}。
参数说明 参数 默认值 说明 cnpigsty通用名称(必填) san[DNS:localhost, IP:127.0.0.1]主题备用名称 orgpigsty组织名称 unitpigsty组织单位名称 expire7300d证书有效期(20 年) keyfiles/pki/misc/<cn>.key私钥输出路径 crtfiles/pki/misc/<cn>.crt证书输出路径
高级示例 # 签发带自定义 SAN(DNS 和 IP)的证书
./cert.yml -e cn = myservice \
-e '{"san":["DNS:myservice.local","DNS:myservice","IP:10.10.10.10"]}'
# 签发自定义有效期(10 年)的证书
./cert.yml -e cn = shortlived -e expire = 3650d
# 签发到自定义路径
./cert.yml -e cn = custom \
-e key = /tmp/custom.key \
-e crt = /tmp/custom.crt
# 签发带自定义组织的证书
./cert.yml -e cn = external \
-e org = "My Company" \
-e unit = "IT Department"
使用场景 PostgreSQL 客户端证书
用于 SSL 客户端认证(pg_hba.conf 中的 cert 认证方式):
# 为 DBA 用户签发证书
./cert.yml -e cn = dbuser_dba
# 复制到客户端机器
scp files/pki/misc/dbuser_dba.{ key,crt} user@client:~/.postgresql/
scp files/pki/ca/ca.crt user@client:~/.postgresql/root.crt
# 使用客户端证书连接
psql "host=pg-test port=5432 dbname=postgres user=dbuser_dba sslmode=verify-full sslcert=~/.postgresql/dbuser_dba.crt sslkey=~/.postgresql/dbuser_dba.key sslrootcert=~/.postgresql/root.crt"
服务间 TLS
用于需要双向 TLS 的内部服务:
./cert.yml -e cn = myapp -e '{"san":["DNS:myapp.service.local","IP:10.10.10.50"]}'
信任 CA 证书 在客户端机器上信任自签名 CA:
Linux (Debian/Ubuntu) sudo cp files/pki/ca/ca.crt /usr/local/share/ca-certificates/pigsty-ca.crt
sudo update-ca-certificates
Linux (RHEL/Rocky/Alma) sudo cp files/pki/ca/ca.crt /etc/pki/ca-trust/source/anchors/pigsty-ca.crt
sudo update-ca-trust
macOS sudo security add-trusted-cert -d -r trustRoot \
-k /Library/Keychains/System.keychain files/pki/ca/ca.crt
Windows Import-Certificate -FilePath files \ pki \ ca \ ca . crt -CertStoreLocation Cert : \ LocalMachine \ Root
从 Nginx 下载 CA 证书也可通过 Nginx 在 http://<infra_ip>/ca.crt 获取:
curl -o ca.crt http://10.10.10.10/ca.crt
Let’s Encrypt 对于公网服务,您可以通过 Certbot 使用 Let’s Encrypt 的真实证书。
前置条件 拥有公网域名 DNS 记录指向服务器的公网 IP Nginx 已正确配置 80 和 443 端口可访问 第一步:域名配置 在 infra_portal 中配置服务域名:
infra_portal :
home : { domain : pigsty.cc }
grafana : { domain: g.pigsty.cc, endpoint : "${admin_ip}:3000" , websocket : true }
vmetrics : { domain: p.pigsty.cc, endpoint : "${admin_ip}:8428" }
alertmanager : { domain: a.pigsty.cc, endpoint : "${admin_ip}:9059" }
第二步:DNS 配置 通过 A 记录将所有域名指向服务器的公网 IP:
nslookup g.pigsty.cc
dig +short g.pigsty.cc
第三步:申请证书 交互式方式:
certbot --nginx -d pigsty.cc -d g.pigsty.cc -d p.pigsty.cc -d a.pigsty.cc
非交互式方式:
certbot --nginx --agree-tos --email admin@pigsty.cc -n \
-d pigsty.cc -d g.pigsty.cc -d p.pigsty.cc -d a.pigsty.cc
第四步:Nginx 配置 在 portal 条目中添加 certbot: <证书名称> 参数(例如 certbot: pigsty-prod),然后重新生成配置:
./infra.yml -t nginx_config,nginx_launch
第五步:自动续期 测试续期(预演模式):
设置 cron 定时任务(每月 1 日凌晨 2 点):
0 2 1 * * certbot renew --quiet
或启用 systemd 定时器:
systemctl enable certbot.timer
管理命令 Certbot 命令 命令 说明 certbot certificates列出所有证书 certbot renew --cert-name domain.com续期指定证书 certbot delete --cert-name domain.com删除证书 certbot revoke --cert-path /path/to/cert.pem吊销证书
OpenSSL 命令 # 查看证书详情
openssl x509 -in files/pki/ca/ca.crt -text -noout
# 查看证书过期时间
openssl x509 -in files/pki/pgsql/pg-meta-1.crt -enddate -noout
# 验证证书是否由 CA 签发
openssl verify -CAfile files/pki/ca/ca.crt files/pki/pgsql/pg-meta-1.crt
# 检查证书链
openssl s_client -connect 10.10.10.10:5432 -starttls postgres </dev/null
故障排查 问题 解决方案 证书过期 重新运行 playbook 重新生成,或使用 cert.yml CA 不被信任 在客户端安装 CA 证书(参见信任 CA 章节) 域名无法访问 验证 DNS 传播是否完成 端口 80 被阻止 确保 Let’s Encrypt 验证时端口 80 开放 请求频率限制 避免短时间内多次申请 Let’s Encrypt 证书 权限被拒绝 检查文件权限(密钥:0600,证书:0644)
最佳实践 备份 CA 密钥 :将 files/pki/ca/ca.key 安全地离线存储使用适当的有效期 :nginx 用短期(浏览器兼容),内部服务用长期轮换证书 :定期重新运行 playbook 刷新证书监控过期 :设置证书过期告警公网用 Let’s Encrypt :内部用自签名,公网服务用真实证书记录配置 :跟踪哪些服务使用哪些证书13.7.6 - Grafana 高可用部署:使用 PostgreSQL 后端数据库 使用 PostgreSQL 而不是 SQLite 作为 Grafana 后端使用的远程存储数据库,获取更好的性能与可用性。
您可以使用 PostgreSQL 作为 Grafana 后端使用的数据库。
这是了解Pigsty部署系统使用方式的好机会,完成此教程,您会了解:
太长不看 vi pigsty.yml # 取消注释DB/User定义:dbuser_grafana grafana
bin/pgsql-user pg-meta dbuser_grafana
bin/pgsql-db pg-meta grafana
psql postgres://dbuser_grafana:DBUser.Grafana@meta:5436/grafana -c \
'CREATE TABLE t(); DROP TABLE t;' # 检查连接串可用性
vi /etc/grafana/grafana.ini # 修改 [database] type url
systemctl restart grafana-server
创建数据库集群 我们可以在pg-meta上定义一个新的数据库grafana,也可以在新的机器节点上创建一个专用于Grafana的数据库集群:pg-grafana
定义集群 如果需要创建新的专用数据库集群pg-grafana,部署在10.10.10.11,10.10.10.12两台机器上,可以使用以下配置文件:
pg-grafana :
hosts :
10.10.10.11 : {pg_seq: 1, pg_role : primary}
10.10.10.12 : {pg_seq: 2, pg_role : replica}
vars :
pg_cluster : pg-grafana
pg_databases :
- name : grafana
owner : dbuser_grafana
revokeconn : true
comment : grafana primary database
pg_users :
- name : dbuser_grafana
password : DBUser.Grafana
pgbouncer : true
roles : [ dbrole_admin]
comment : admin user for grafana database
创建集群 使用以下命令完成数据库集群pg-grafana的创建:pgsql.yml
./pgsql.yml -l pg-grafana # 初始化pg-grafana集群
该命令是 Ansible Playbook pgsql.yml
定义在 pg_userspg_databases访问 数据库(任一即可):
postgres://dbuser_grafana:DBUser.Grafana@10.10.10.11:5432/grafana # 主库直连
postgres://dbuser_grafana:DBUser.Grafana@10.10.10.11:5436/grafana # 直连default服务
postgres://dbuser_grafana:DBUser.Grafana@10.10.10.11:5433/grafana # 连接串读写服务
postgres://dbuser_grafana:DBUser.Grafana@10.10.10.12:5432/grafana # 主库直连
postgres://dbuser_grafana:DBUser.Grafana@10.10.10.12:5436/grafana # 直连default服务
postgres://dbuser_grafana:DBUser.Grafana@10.10.10.12:5433/grafana # 连接串读写服务
因为默认情况下Pigsty安装在单个元节点 上,接下来的步骤我们会在已有的pg-meta数据库集群上创建Grafana所需的用户与数据库,而并非使用这里创建的pg-grafana集群。
创建Grafana业务用户 通常业务对象管理的惯例是:先创建用户,再创建数据库。
因为如果为数据库配置了owner,数据库对相应的用户存在依赖。
定义用户 要在pg-meta集群上创建用户dbuser_grafana,首先将以下用户定义添加至pg-meta的 集群定义 中:
添加位置:all.children.pg-meta.vars.pg_users
- name : dbuser_grafana
password : DBUser.Grafana
comment : admin user for grafana database
pgbouncer : true
roles : [ dbrole_admin ]
如果您在这里定义了不同的密码,请在后续步骤中将相应参数替换为新密码
创建用户 使用以下命令完成dbuser_grafana用户的创建(任一均可)。
bin/pgsql-user pg-meta dbuser_grafana # 在pg-meta集群上创建`dbuser_grafana`用户
实际上调用了 Ansible Playbook pgsql-user.yml
./pgsql-user.yml -l pg-meta -e pg_user = dbuser_grafana # Ansible
dbrole_admin 角色具有在数据库中执行DDL变更的权限,这正是Grafana所需要的。
创建Grafana业务数据库 定义数据库 创建业务数据库的方式与业务用户一致,首先在pg-meta的集群定义中添加新数据库grafana的 定义 。
添加位置:all.children.pg-meta.vars.pg_databases
- { name: grafana, owner: dbuser_grafana, revokeconn : true }
创建数据库 使用以下命令完成grafana数据库的创建(任一均可)。
bin/pgsql-db pg-meta grafana # 在`pg-meta`集群上创建`grafana`数据库
实际上调用了 Ansible Playbook pgsql-db.yml
./pgsql-db.yml -l pg-meta -e pg_database = grafana # 实际执行的Ansible剧本
使用Grafana业务数据库 检查连接串可达性 您可以使用不同的 服务 或 接入 方式访问数据库,例如:
postgres://dbuser_grafana:DBUser.Grafana@meta:5432/grafana # 直连
postgres://dbuser_grafana:DBUser.Grafana@meta:5436/grafana # default服务
postgres://dbuser_grafana:DBUser.Grafana@meta:5433/grafana # primary服务
这里,我们将使用通过负载均衡器直接访问主库的 Default服务 访问数据库。
首先检查连接串是否可达,以及是否有权限执行DDL命令。
psql postgres://dbuser_grafana:DBUser.Grafana@meta:5436/grafana -c \
'CREATE TABLE t(); DROP TABLE t;'
直接修改Grafana配置 为了让Grafana使用 Postgres 数据源,您需要编辑 /etc/grafana/grafana.ini,并修改配置项:
[database]
;type = sqlite3
;host = 127.0.0.1:3306
;name = grafana
;user = root
# If the password contains # or ; you have to wrap it with triple quotes. Ex """#password;"""
;password =
;url =
将默认的配置项修改为:
[database]
type = postgres
url = postgres://dbuser_grafana:DBUser.Grafana@meta/grafana
随后重启Grafana即可:
systemctl restart grafana-server
从监控系统中看到新增的 grafana监控面板 与 Postgres数据源
管理Grafana监控面板 您可以使用管理用户前往 Pigsty 目录下的 files/grafana 目录,执行 grafana.py init 重新加载 Pigsty 监控面板。
cd ~/pigsty/files/grafana
./grafana.py init # 使用当前目录下的Dashboards初始化Grafana监控面板
执行结果:
vagrant@meta:~/pigsty/files/grafana
$ ./grafana.py init
Grafana API: admin:pigsty @ http://10.10.10.10:3000
init dashboard : home.json
init folder pgcat
init dashboard: pgcat / pgcat-table.json
init dashboard: pgcat / pgcat-bloat.json
init dashboard: pgcat / pgcat-query.json
init folder pgsql
init dashboard: pgsql / pgsql-replication.json
init dashboard: pgsql / pgsql-table.json
init dashboard: pgsql / pgsql-activity.json
init dashboard: pgsql / pgsql-cluster.json
init dashboard: pgsql / pgsql-node.json
init dashboard: pgsql / pgsql-database.json
init dashboard: pgsql / pgsql-xacts.json
init dashboard: pgsql / pgsql-overview.json
init dashboard: pgsql / pgsql-session.json
init dashboard: pgsql / pgsql-tables.json
init dashboard: pgsql / pgsql-instance.json
init dashboard: pgsql / pgsql-queries.json
init dashboard: pgsql / pgsql-alert.json
init dashboard: pgsql / pgsql-service.json
init dashboard: pgsql / pgsql-persist.json
init dashboard: pgsql / pgsql-proxy.json
init dashboard: pgsql / pgsql-query.json
init folder pglog
init dashboard: pglog / pglog-instance.json
init dashboard: pglog / pglog-analysis.json
init dashboard: pglog / pglog-session.json
该脚本会通过 Grafana API 导入仪表盘。你可以使用环境变量显式指定 Grafana 访问参数:
export GRAFANA_ENDPOINT = http://10.10.10.10:3000
export GRAFANA_USERNAME = admin
export GRAFANA_PASSWORD = pigsty
题外话,使用grafana.py clean会清空目标监控面板,使用grafana.py load会加载当前目录下所有监控面板,当Pigsty的监控面板发生变更,可以使用这两个命令升级所有的监控面板。
管理Postgres数据源 当使用 pgsql.ymlpgsql-db.ymlpgcat的绝大部分功能有赖于此。
要注册 Postgres 数据库数据源,可以使用 pgsql.ymladd_ds 任务(或使用更全面的 pg_register):
./pgsql.yml -t add_ds # 重新注册当前环境中所有 PostgreSQL 数据源
./pgsql.yml -t add_ds -l pg-test # 仅重新注册 pg-test 集群的数据源
一步到位更新Grafana 您可以直接通过修改 Pigsty 配置文件,更改 Grafana 使用的后端数据源,一步到位的完成切换 Grafana 后端数据库的工作。编辑 pigsty.yml 中 grafana_pgurl
grafana_pgurl : postgres://dbuser_grafana:DBUser.Grafana@meta:5436/grafana
然后重新执行 infra.ymlgrafana 任务,即可完成 Grafana 升级
14 - 模块:NODE 配置目标服务器,纳管主机节点,并将其调整至描述的状态。也包括节点上的 VIP,HAProxy 以及监控组件。
配置目标服务器,纳管主机节点,并将其调整至描述的状态。也包括节点上的 VIP,HAProxy 以及监控组件。
14.1 - 集群配置 根据需求场景选择合适的 Node 部署类型,并对外提供可靠的接入。
Pigsty 使用 IP地址 作为 节点 的唯一身份标识,该IP地址应当是数据库实例监听并对外提供服务的内网IP地址 。
node-test :
hosts :
10.10.10.11 : { nodename : node-test-1 }
10.10.10.12 : { nodename : node-test-2 }
10.10.10.13 : { nodename : node-test-3 }
vars :
node_cluster : node-test
该IP地址必须是数据库实例监听并对外提供服务的IP地址,但不宜使用公网IP地址。尽管如此,用户并不一定非要通过该IP地址连接至该数据库。例如,通过SSH隧道或跳板机中转的方式间接操作管理目标节点也是可行的。但在标识数据库节点时,首要IPv4地址依然是节点的核心标识符。这一点非常重要,用户应当在配置时保证这一点 。
IP地址即配置清单中主机的 inventory_hostname,体现为 <cluster>.hosts 对象中的 key。除此之外,每个节点还有两个额外的身份参数:
nodenamenode_clusternodes 作为默认值。在 Pigsty 的监控系统中,这两者将会被用作节点的 集群标识 (cls)与 实例标识 (ins)。
对于 PGSQL节点 node_id_from_pgpg_clusterpg_seqins 与 cls 标签上,从而让数据库与节点的监控指标拥有相同的标签,便于交叉分析。
#nodename: # [实例] # 节点实例标识,如缺失则使用现有主机名,可选,无默认值
node_cluster : nodes # [集群] # 节点集群标识,如缺失则使用默认值'nodes',可选
nodename_overwrite : true # 用 nodename 覆盖节点的主机名吗?
nodename_exchange : false # 在剧本主机之间交换 nodename 吗?
node_id_from_pg : true # 如果可行,是否借用 postgres 身份作为节点身份?
您还可以为主机集群配置丰富的功能参数,例如,使用节点集群上的 HAProxy 对外提供负载均衡,暴露服务,或者为集群绑定一个 L2 VIP。
14.2 - 参数列表 NODE 模块提供了 11 组共 85 个配置参数
NODE 模块负责将主机节点调整到期待的目标状态,并将其纳入 Pigsty 的监控系统中。
参数概览 NODE_ID
NODE_DNS
NODE_PACKAGE
NODE_TUNE
NODE_SEC
NODE_ADMIN
NODE_TIME
NODE_VIP
HAPROXY
NODE_EXPORTER
VECTOR
NODE_ID每个节点都有身份参数 ,通过在<cluster>.hosts与<cluster>.vars中的相关参数进行配置。
Pigsty使用IP地址 作为数据库节点 的唯一标识,该IP地址必须是数据库实例监听并对外提供服务的IP地址 ,但不宜使用公网IP地址。
尽管如此,用户并不一定非要通过该IP地址连接至该数据库。例如,通过SSH隧道或跳板机中转的方式间接操作管理目标节点也是可行的。
但在标识数据库节点时,首要IPv4地址依然是节点的核心标识符。这一点非常重要,用户应当在配置时保证这一点 。
IP地址即配置清单中主机的inventory_hostname ,体现为<cluster>.hosts对象中的key。
node-test :
hosts :
10.10.10.11 : { nodename : node-test-1 }
10.10.10.12 : { nodename : node-test-2 }
10.10.10.13 : { nodename : node-test-3 }
vars :
node_cluster : node-test
除此之外,在Pigsty监控系统中,节点还有两个重要的身份参数:nodenamenode_cluster实例标识 (ins) 与 集群标识 (cls)。
node_load1{cls="pg-meta", ins="pg-meta-1", ip="10.10.10.10", job="nodes"}
node_load1{cls="pg-test", ins="pg-test-1", ip="10.10.10.11", job="nodes"}
node_load1{cls="pg-test", ins="pg-test-2", ip="10.10.10.12", job="nodes"}
node_load1{cls="pg-test", ins="pg-test-3", ip="10.10.10.13", job="nodes"}
在执行默认的PostgreSQL部署时,因为Pigsty默认采用节点独占1:1部署,因此可以通过 node_id_from_pgpg_clusterins与cls标签上。
#nodename: # [实例] # 节点实例标识,如缺失则使用现有主机名,可选,无默认值
node_cluster : nodes # [集群] # 节点集群标识,如缺失则使用默认值'nodes',可选
nodename_overwrite : true # 用 nodename 覆盖节点的主机名吗?
nodename_exchange : false # 在剧本主机之间交换 nodename 吗?
node_id_from_pg : true # 如果可行,是否借用 postgres 身份作为节点身份?
nodename参数名称: nodename, 类型: string, 层次:I
主机节点的身份参数,如果没有显式设置,则会使用现有的主机 Hostname 作为节点名。本参数虽然是身份参数,但因为有合理默认值,所以是可选项。
如果启用了 node_id_from_pgnodename 没有被显式指定,
那么 nodename${pg_cluster}-${pg_seq} 作为实例身份参数,如果集群没有定义 PGSQL 模块,那么会回归到默认值,也就是主机节点的 HOSTNAME。
node_cluster参数名称: node_cluster, 类型: string, 层次:C
该选项可为节点显式指定一个集群名称,通常在节点集群层次定义才有意义。使用默认空值将直接使用固定值nodes作为节点集群标识。
如果启用了 node_id_from_pgnode_cluster 没有被显式指定,那么 node_cluster${pg_cluster} 作为集群身份参数,如果集群没有定义 PGSQL 模块,那么会回归到默认值 nodes。
nodename_overwrite参数名称: nodename_overwrite, 类型: bool, 层次:C
是否使用 nodenametrue,在这种情况下,如果你设置了一个非空的 nodename
当 nodename 配置为空时,如果 node_id_from_pgtrue (默认为真),那么 Pigsty 会尝试借用1:1定义在节点上的 PostgreSQL 实例的身份参数作为主机的节点名。
也就是 {{ pg_cluster }}-{{ pg_seq }},如果该节点没有安装 PGSQL 模块,则会回归到默认什么都不做的状态。
因此,如果您将 nodenamenode_id_from_pg
nodename_exchange参数名称: nodename_exchange, 类型: bool, 层次:C
是否在剧本节点间交换主机名?默认值为:false
启用此参数时,同一批组执行 node.yml/etc/hosts中。
node_id_from_pg参数名称: node_id_from_pg, 类型: bool, 层次:C
从节点上 1:1 部署的 PostgreSQL 实例/集群上借用身份参数? 默认值为 true。
Pigsty 中的 PostgreSQL 实例与节点默认使用 1:1 部署,因此,您可以从数据库实例上“借用” 身份参数。
此参数默认启用,这意味着一套 PostgreSQL 集群如果没有特殊配置,主机节点集群和实例的身份参数默认值是与数据库身份参数保持一致的。对于问题分析,监控数据处理都提供了额外便利。
NODE_DNSPigsty会为节点配置静态DNS解析记录与动态DNS服务器。
如果您的节点供应商已经为您配置了DNS服务器,您可以将 node_dns_methodnone 跳过DNS设置。
node_write_etc_hosts : true # modify `/etc/hosts` on target node?
node_default_etc_hosts : # static dns records in `/etc/hosts`
- "${admin_ip} i.pigsty"
node_etc_hosts : [] # extra static dns records in `/etc/hosts`
node_dns_method: add # how to handle dns servers : add,none,overwrite
node_dns_servers : [ '${admin_ip}' ] # dynamic nameserver in `/etc/resolv.conf`
node_dns_options : # dns resolv options in `/etc/resolv.conf`
- options single-request-reopen timeout:1
node_write_etc_hosts 参数名称: node_write_etc_hosts, 类型: bool, 层次:G|C|I
是否修改目标节点上的 /etc/hosts?例如,在容器环境中通常不允许修改此配置文件。
node_default_etc_hosts参数名称: node_default_etc_hosts, 类型: string[], 层次:G
默认写入所有节点 /etc/hosts 的静态DNS记录,默认值为:
node_default_etc_hosts<ip> <name>,您可以指定多个用空格分隔的域名。
这个参数是用于配置全局静态DNS解析记录的,如果您希望为单个集群与实例配置特定的静态DNS解析,则可以使用 node_etc_hosts
node_etc_hosts参数名称: node_etc_hosts, 类型: string[], 层次:C
写入节点 /etc/hosts 的额外的静态DNS记录,默认值为:[] 空数组。
本参数与 node_default_etc_hosts
node_dns_method参数名称: node_dns_method, 类型: enum, 层次:C
如何配置DNS服务器?有三种选项:add、none、overwrite,默认值为 add。
add:将 node_dns_servers追加 至/etc/resolv.conf,并保留已有DNS服务器。(默认)overwrite:使用将 node_dns_servers/etc/resolv.confnone:跳过DNS服务器配置,如果您的环境中已经配置有DNS服务器,则可以直接跳过DNS配置。node_dns_servers参数名称: node_dns_servers, 类型: string[], 层次:C
配置 /etc/resolv.conf 中的动态DNS服务器列表:默认值为: ["${admin_ip}"],即将管理节点作为首要DNS服务器。
node_dns_options参数名称: node_dns_options, 类型: string[], 层次:C
/etc/resolv.conf 中的DNS解析选项,默认值为:
- "options single-request-reopen timeout:1"
如果 node_dns_methodadd或overwrite,则本配置项中的记录会被首先写入/etc/resolv.conf 中。具体格式请参考Linux文档关于/etc/resolv.conf的说明
NODE_PACKAGEPigsty会为纳入管理的节点配置Yum源,并安装软件包,以及配置 uv Python 虚拟环境。
node_repo_modules : local # upstream repo to be added on node, local by default.
node_repo_remove : true # remove existing repo on node?
node_packages : [ openssh-server] # packages to be installed current nodes with latest version
#node_default_packages: # default packages to be installed on all nodes
node_uv_env : /data/venv # uv venv path, /data/venv by default, empty to skip
node_pip_packages : '' # pip packages to be installed in uv venv
node_repo_modules参数名称: node_repo_modules, 类型: string, 层次:C/A
需要在节点上添加的软件源模块列表,形式同 repo_moduleslocal,即使用 repo_upstreamlocal 所指定的本地软件源。
当 Pigsty 纳管节点时,会根据此参数的值来过滤 repo_upstreammodule 字段与此参数值匹配的条目才会被添加到节点的软件源中。
node_repo_remove参数名称: node_repo_remove, 类型: bool, 层次:C/A
是否移除节点已有的软件仓库定义?默认值为:true。
如果启用,则Pigsty会 移除 节点上/etc/yum.repos.d中原有的配置文件,并备份至/etc/yum.repos.d/backup。
在 Debian/Ubuntu 系统上,则是 /etc/apt/sources.list(.d) 备份至 /etc/apt/backup。
node_packages参数名称: node_packages, 类型: string[], 层次:C
在当前节点上要安装并升级的软件包列表,默认值为:[openssh-server] ,即在安装时会将 sshd 升级到最新版本(避免安全漏洞)。
每一个数组元素都是字符串:由逗号分隔的软件包名称。形式上与 node_packages_default
在本参数中指定的软件包,会 升级到可用的最新版本 ,如果您需要保持现有节点软件版本不变(存在即可),请使用 node_default_packages
node_default_packages参数名称: node_default_packages, 类型: string[], 层次:G
默认在所有节点上安装的软件包,默认值为一组按操作系统族区分的软件包列表(字符串数组,每个元素为逗号分隔的包名):
字符串数组类型,每一行都是 由逗号分隔 的软件包列表字符串,指定默认在所有节点上安装的软件包列表。
在此变量中指定的软件包,只要求 存在 ,而不要求 最新 。如果您需要安装最新版本的软件包,请使用 node_packages
本参数没有默认值,即默认值为未定义状态。如果用户不在配置文件中显式指定本参数,则 Pigsty 会从根据当前节点的操作系统族,从定义于 roles/node_id/varsnode_packages_default 变量中加载获取默认值。
默认值(EL系操作系统):
- lz4,unzip,bzip2,pv,jq,git,ncdu,make,patch,bash,lsof,wget,tuned,nvme-cli,numactl,sysstat,iotop,htop,rsync,tcpdump
- python3,socat,net-tools,ipvsadm,telnet,ca-certificates,openssl,keepalived,etcd,haproxy,chrony,cronie,pig,uv
- zlib,yum,audit,bind-utils,readline,vim-minimal,node_exporter,grubby,openssh-server,openssh-clients,chkconfig,vector
默认值(Debian/Ubuntu):
- lz4,unzip,bzip2,pv,jq,git,ncdu,make,patch,bash,lsof,wget,tuned,nvme-cli,numactl,sysstat,iotop,htop,rsync,tcpdump
- python3,socat,net-tools,ipvsadm,telnet,ca-certificates,openssl,keepalived,etcd,haproxy,chrony,cron,pig,uv
- zlib1g,acl,dnsutils,libreadline-dev,vim-tiny,node-exporter,openssh-server,openssh-client,vector
本参数形式上与 node_packages
node_uv_env参数名称: node_uv_env, 类型: path, 层次:C
uv 虚拟环境路径,默认值为:/data/venv。设置为空字符串 '' 则跳过 uv 虚拟环境的配置。
当此参数非空时,Pigsty 会在节点上使用 uv venv 命令创建 Python 虚拟环境,并根据 node_pip_packages
在中国区域(region: china)时,会自动配置 /etc/uv/uv.toml 使用阿里云 PyPI 镜像加速下载。
node_pip_packages参数名称: node_pip_packages, 类型: string, 层次:C
在 uv 虚拟环境中安装的 pip 包列表,默认值为:空字符串 ''。
使用空格分隔多个包名,例如:'ansible pgcli requests pandas'。
仅当 node_uv_env
NODE_TUNE主机节点特性、内核模块与参数调优模板。
node_disable_numa : false # disable node numa, reboot required
node_disable_swap : false # disable node swap, use with caution
node_static_network : true # preserve dns resolver settings after reboot
node_disk_prefetch : false # setup disk prefetch on HDD to increase performance
node_kernel_modules : [ softdog, ip_vs, ip_vs_rr, ip_vs_wrr, ip_vs_sh ]
node_hugepage_count : 0 # number of 2MB hugepage, take precedence over ratio
node_hugepage_ratio : 0 # node mem hugepage ratio, 0 disable it by default
node_overcommit_ratio : 0 # node mem overcommit ratio, 0 disable it by default
node_tune: oltp # node tuned profile : none,oltp,olap,crit,tiny
node_sysctl_params : # sysctl parameters in k:v format in addition to tuned
fs.nr_open : 8388608
node_disable_numa参数名称: node_disable_numa, 类型: bool, 层次:C
是否关闭NUMA?默认不关闭NUMA:false。
注意,关闭NUMA需要重启机器后方可生效!如果您不清楚如何绑核,在生产环境使用数据库时建议关闭 NUMA。
node_disable_swap参数名称: node_disable_swap, 类型: bool, 层次:C
是否关闭 SWAP ? 默认不关闭SWAP:false。
通常情况下不建议关闭 SWAP,例外情况是如果您有足够的内存用于独占式 PostgreSQL 部署,则可以关闭 SWAP 提高性能。
例外:当您的节点用于部署 Kubernetes 模块时,应当禁用SWAP。
node_static_network参数名称: node_static_network, 类型: bool, 层次:C
是否使用静态DNS服务器, 类型:bool,层级:C,默认值为:true,默认启用。
启用静态网络,意味着您的DNS Resolv配置不会因为机器重启与网卡变动被覆盖,建议启用,或由网络工程师负责配置。
node_disk_prefetch参数名称: node_disk_prefetch, 类型: bool, 层次:C
是否启用磁盘预读?默认不启用:false。
针对HDD部署的实例可以优化性能,使用机械硬盘时建议启用。
node_kernel_modules参数名称: node_kernel_modules, 类型: string[], 层次:C
启用哪些内核模块?默认启用以下内核模块:
node_kernel_modules : [ softdog, ip_vs, ip_vs_rr, ip_vs_wrr, ip_vs_sh ]
形式上是由内核模块名称组成的数组,声明了需要在节点上安装的内核模块。
node_hugepage_count参数名称: node_hugepage_count, 类型: int, 层次:C
在节点上分配 2MB 大页的数量,默认为 0,另一个相关的参数是 node_hugepage_ratio
如果这两个参数 node_hugepage_count 和 node_hugepage_ratio 都为 0(默认),则大页将完全被禁用,本参数的优先级相比 node_hugepage_ratio
如果设定了一个非零值,它将被写入 /etc/sysctl.d/hugepage.conf 中应用生效;负值将不起作用,高于 90% 节点内存的数字将被限制为节点内存的 90%
如果不为零,它应该略大于 pg_shared_buffer_ratio
node_hugepage_ratio参数名称: node_hugepage_ratio, 类型: float, 层次:C
节点内存大页占内存的比例,默认为 0,有效范围:0 ~ 0.40
此内存比例将以大页的形式分配,并为PostgreSQL预留。 node_hugepage_count
默认值:0,这将设置 vm.nr_hugepages=0 并完全不使用大页。
本参数应该等于或略大于 pg_shared_buffer_ratio
例如,如果您为Postgres共享缓冲区默认分配了25%的内存,您可以将此值设置为 0.27 ~ 0.30,并在初始化后使用 /pg/bin/pg-tune-hugepage 精准回收浪费的大页。
node_overcommit_ratio参数名称: node_overcommit_ratio, 类型: int, 层次:C
节点内存超额分配比率,默认为:0。这是一个从 0 到 100+ 的整数。
默认值:0,这将设置 vm.overcommit_memory=0,否则将使用 vm.overcommit_memory=2, 并使用此值作为 vm.overcommit_ratio。
建议在 pgsql 独占节点上设置 vm.overcommit_ratio,避免内存过度提交。
node_tune参数名称: node_tune, 类型: enum, 层次:C
针对机器进行调优的预制方案,基于tuned 提供服务。有四种预制模式:
tiny:微型虚拟机oltp:常规OLTP模板,优化延迟(默认值)olap:常规OLAP模板,优化吞吐量crit:核心金融业务模板,优化脏页数量通常,数据库的调优模板 pg_conf
node_sysctl_params参数名称: node_sysctl_params, 类型: dict, 层次:C
使用 K:V 形式的 sysctl 内核参数(通过 Ansible sysctl 模块写入并立即生效),作为 tuned profile 的补充。
默认值为:
node_sysctl_params :
fs.nr_open : 8388608
默认设置 fs.nr_open=8388608 用于确保内核每进程 FD 上限不小于 Pigsty systemd unit 中的 LimitNOFILE=8388608,避免在部分发行版 / systemd 组合上服务启动时 setrlimit 失败。
这是一个 KV 结构的字典参数,Key 是内核 sysctl 参数名,Value 是参数值。你也可以考虑直接在 roles/node/templates 中的 tuned 模板中直接定义额外的 sysctl 参数。
NODE_SEC节点安全相关参数,包括 SELinux 与防火墙配置。
node_selinux_mode: permissive # selinux mode : disabled, permissive, enforcing
node_firewall_mode: zone # firewall mode : zone (default, enabled), off (disable), none (skip & self-managed)
node_firewall_intranet : # which intranet cidr considered as internal network
- 10.0.0.0 /8
- 192.168.0.0 /16
- 172.16.0.0 /12
node_firewall_public_port : # expose these ports to public network in zone mode
- 22 # enable ssh access
- 80 # enable http access
- 443 # enable https access
node_selinux_mode参数名称: node_selinux_mode, 类型: enum, 层次:C
SELinux 运行模式,默认值为:permissive(宽容模式)。
可选值:
disabled:完全禁用 SELinux(等同于旧版本的 node_disable_selinux: true)permissive:宽容模式,记录违规但不阻止(推荐,默认值)enforcing:强制模式,严格执行 SELinux 策略如果您没有专业的操作系统/安全专家,建议使用 permissive 或 disabled 模式。
请注意,SELinux 默认只在 EL 系列系统上启用,如果你想要在 Debian/Ubuntu 系统上启用 SELinux,请自行安装并启用 SELinux 配置。
另外,SELinux 模式的更改可能需要重启系统才能完全生效。
node_firewall_mode参数名称: node_firewall_mode, 类型: enum, 层次:C
防火墙运行模式,默认值为:zone(启用防火墙并按分区规则管理)。
自 v4.1 起,默认值从 none 调整为 zone,即默认启用防火墙。
可选值:
zone:启用防火墙并配置规则:内网信任,公网只开放指定端口(默认值)。off:关闭并禁用防火墙(等同于旧版本的 node_disable_firewall: true)。none:不修改防火墙状态与规则,由用户完全自管。在 EL 系统上使用 firewalld 服务,在 Debian/Ubuntu 系统上使用 ufw 服务。为保证跨发行版行为一致,Pigsty 默认采用 zone 模式:自动启用系统防火墙,内网全通,公网仅开放 node_firewall_public_port
如果您需要完全自行维护防火墙规则(例如仅依赖云安全组,或已有企业级防火墙策略),可以设置为 none 跳过 Pigsty 的防火墙管理;若要显式关闭系统防火墙,请使用 off。
需要公网暴露的生产环境建议使用 zone 模式,配合 node_firewall_intranetnode_firewall_public_portzone 模式会在防火墙未运行时自动启用防火墙。
node_firewall_intranet参数名称: node_firewall_intranet, 类型: cidr[], 层次:C
内网 CIDR 地址列表(自 v4.0 版本引入),默认值为:
node_firewall_intranet :
- 10.0.0.0 /8
- 172.16.0.0 /12
- 192.168.0.0 /16
此参数定义了被视为"内部网络"的 IP 地址范围。来自这些网络的流量将被允许访问所有服务端口,而无需单独配置开放规则。
这些 CIDR 范围内的主机将被视为可信内网主机,享有更宽松的防火墙规则。同时,在 PG/PGB HBA 规则中,这里定义的内网范围也会被视作 “内网” 对待。
由于默认防火墙模式为 zone,该列表在默认配置下即生效。
node_firewall_public_port参数名称: node_firewall_public_port, 类型: port[], 层次:C
公网开放端口列表,默认值为:[22, 80, 443]。
此参数定义了对公网(非内网 CIDR)开放的端口列表。默认开放的端口包括:
22:SSH 服务端口80:HTTP 服务端口443:HTTPS 服务端口您可以根据实际需求调整此列表。例如,如果您需要对外暴露 PostgreSQL,可以显式添加 5432:
node_firewall_public_port : [ 22 , 80 , 443 , 5432 ]
Pigsty 中 PostgreSQL 默认安全策略仅允许管理员通过公网访问数据库端口。
如果您想要让其他用户也能通过公网访问数据库,请确保在 PG/PGB HBA 规则中正确配置相应的访问权限。
如果你想要将其他服务端口对公网开放,也可以将它们添加到此列表中。
建议始终保持最小暴露原则,只开放真正需要的服务端口。
请注意,只有当 node_firewall_modezone 时,此参数才会生效;若设置为 none 或 off 则不会应用此端口策略。
NODE_ADMIN这一节关于主机节点上的管理员,谁能登陆,怎么登陆。
node_data : /data # node main data directory, `/data` by default
node_admin_enabled : true # create a admin user on target node?
node_admin_uid : 88 # uid and gid for node admin user
node_admin_username : dba # name of node admin user, `dba` by default
node_admin_sudo: nopass # admin user's sudo privilege : nopass, all, limit
node_admin_ssh_exchange : true # exchange admin ssh key among node cluster
node_admin_pk_current : true # add current user's ssh pk to admin authorized_keys
node_admin_pk_list : [] # ssh public keys to be added to admin user
node_aliases : {} # shell aliases to write into `/etc/profile.d/node.alias.sh`
node_data参数名称: node_data, 类型: path, 层次:C
节点的主数据目录,默认为 /data。
如果该目录不存在,则该目录会被创建。该目录由 root:root 拥有,权限为 0755。
node_admin_enabled参数名称: node_admin_enabled, 类型: bool, 层次:C
是否在本节点上创建一个专用管理员用户?默认值为:true。
Pigsty默认会在每个节点上创建一个管理员用户(拥有免密sudo与ssh权限),默认的管理员名为dba (uid=88)的管理用户,可以从元节点上通过SSH免密访问环境中的其他节点并执行免密sudo。
node_admin_uid参数名称: node_admin_uid, 类型: int, 层次:C
管理员用户UID,默认值为:88。
请尽可能确保 UID 在所有节点上都相同,可以避免一些无谓的权限问题。
如果默认 UID 88 已经被占用,您可以选择一个其他 UID ,手工分配时请注意UID命名空间冲突。
node_admin_username参数名称: node_admin_username, 类型: username, 层次:C
管理员用户名,默认为 dba 。
node_admin_sudo参数名称: node_admin_sudo, 类型: enum, 层次:C
管理员用户的 sudo 权限级别,默认值为:nopass(免密 sudo)。
可选值:
nopass:授予免密 sudo 权限(默认,允许执行所有命令但无需密码)all:授予完整 sudo 权限(需要密码)limit:授予有限的 sudo 权限(仅允许执行特定命令)Pigsty 默认使用 nopass 模式,管理员用户可以无需密码执行任意 sudo 命令,这对于自动化运维非常方便。
在安全要求较高的生产环境中,您可能需要将此参数调整为 limit 或 all,以限制管理员的权限范围。
node_admin_ssh_exchange参数名称: node_admin_ssh_exchange, 类型: bool, 层次:C
在节点集群间交换节点管理员SSH密钥, 类型:bool,层级:C,默认值为:true
启用时,Pigsty会在执行剧本时,在成员间交换SSH公钥,允许管理员 node_admin_username
node_admin_pk_current参数名称: node_admin_pk_current, 类型: bool, 层次:C
是否将当前节点 & 用户的公钥加入管理员账户,默认值是: true
启用时,将会把当前节点上执行此剧本的管理用户的SSH公钥(~/.ssh/id_rsa.pub)拷贝至目标节点管理员用户的 authorized_keys 中。
生产环境部署时,请务必注意此参数,此参数会将当前执行命令用户的默认公钥安装至所有机器的管理用户上。
node_admin_pk_list参数名称: node_admin_pk_list, 类型: string[], 层次:C
可登陆管理员的公钥列表,默认值为:[] 空数组。
数组的每一个元素为字符串,内容为写入到管理员用户~/.ssh/authorized_keys中的公钥,持有对应私钥的用户可以以管理员身份登录。
生产环境部署时,请务必注意此参数,仅将信任的密钥加入此列表中。
node_aliases参数名称: node_aliases, 类型: dict, 层次:C
用于写入主机 /etc/profile.d/node.alias.sh 的 shell 别名,默认值为:{} 空字典。
此参数允许您为主机的 shell 环境配置方便使用的 alias,此处定义的 K:V 字典将以 alias k=v 的形式写入到目标节点的 profile.d 文件中生效。
例如,以下命令声明了一个名为 dp 的别名,用于快速执行 docker compose pull 命令:
node_alias :
dp : 'docker compose pull'
NODE_TIME关于主机时间/时区/NTP/定时任务的相关配置。
时间同步对于数据库服务来说非常重要,请确保系统 chronyd 授时服务正常运行。
node_timezone : '' # 设置节点时区,空字符串表示跳过
node_ntp_enabled : true # 启用chronyd时间同步服务?
node_ntp_servers : # `/etc/chrony.conf`中的ntp服务器
- pool pool.ntp.org iburst
node_crontab_overwrite : true # 覆盖还是追加到`/etc/crontab`?
node_crontab : [ ] # `/etc/crontab`中的crontab条目
node_timezone参数名称: node_timezone, 类型: string, 层次:C
设置节点时区,空字符串表示跳过。默认值是空字符串,默认不会修改默认的时区(即使用通常的默认值UTC)
在中国地区使用时,建议设置为 Asia/Hong_Kong / Asia/ShangHai。
node_ntp_enabled参数名称: node_ntp_enabled, 类型: bool, 层次:C
启用chronyd时间同步服务?默认值为:true
此时 Pigsty 将使用 node_ntp_servers/etc/chrony.conf。
如果您的节点已经配置好了 NTP 服务器,那么可以将此参数设置为 false 跳过时间同步配置。
node_ntp_servers参数名称: node_ntp_servers, 类型: string[], 层次:C
在 /etc/chrony.conf 中使用的 NTP 服务器列表。默认值为:["pool pool.ntp.org iburst"]
本参数是一个数组,每一个数组元素是一个字符串,代表一行 NTP 服务器配置。仅当 node_ntp_enabled
Pigsty 默认使用全球 NTP 服务器 pool.ntp.org,您可以根据自己的网络环境修改此参数,例如 cn.pool.ntp.org iburst,或内网的时钟服务。
您也可以在配置中使用 ${admin_ip} 占位符,使用管理节点上的时间服务器。
node_ntp_servers : [ 'pool ${admin_ip} iburst' ]
node_crontab_overwrite参数名称: node_crontab_overwrite, 类型: bool, 层次:C
处理 node_crontabtrue,即覆盖。
如果您希望在节点上追加定时任务,可以将此参数设置为 false,Pigsty 将会在节点的 crontab 上 追加 ,而非 覆盖所有 定时任务。
node_crontab参数名称: node_crontab, 类型: string[], 层次:C
定义在节点 /etc/crontab 中的定时任务:默认值为:[] 空数组。
每一个数组元素都是一个字符串,代表一行定时任务。使用标准的系统 crontab 格式:分 时 日 月 周 用户 命令。
node_crontab :
- '00 03 * * * root /usr/bin/some-system-task'
注意 :对于 PostgreSQL 备份等 postgres 用户的定时任务,请使用 pg_crontabnode_crontab。因为 node_crontab 在 NODE 初始化阶段写入 /etc/crontab,此时 postgres 用户可能尚未创建,
会导致 cron 报错 bad username 并忽略整个 crontab 文件。
当 node_crontab_overwritetrue(默认)时,移除节点时会恢复默认的 /etc/crontab。
NODE_VIP您可以为节点集群绑定一个可选的 L2 VIP,默认不启用此特性。L2 VIP 只对一组节点集群有意义,该 VIP 会根据配置的优先级在集群中的节点之间进行切换,确保节点服务的高可用。
请注意,L2 VIP 只能 在同一 L2 网段中使用,这可能会对您的网络拓扑产生额外的限制,如果不想受此限制,您可以考虑使用 DNS LB 或者 Haproxy 实现类似的功能。
当启用此功能时,您需要为这个 L2 VIP 显式分配可用的 vip_addressvip_vrid
请注意,NODE VIP 与 PG VIP 不同,PG VIP 是为 PostgreSQL 实例服务的 VIP,由 vip-manager 组件管理并绑定在 PG 集群主库上。
而 NODE VIP 由 Keepalived 组件管理,绑定在节点集群上。可以是主备模式,也可以是负载均衡模式,两者可以并存。
vip_enabled : false # enable vip on this node cluster?
# vip_address: [IDENTITY] # node vip address in ipv4 format, required if vip is enabled
# vip_vrid: [IDENTITY] # required, integer, 1-254, should be unique among same VLAN
vip_role : backup # optional, `master/backup`, backup by default, use as init role
vip_preempt : false # optional, `true/false`, false by default, enable vip preemption
vip_interface : eth0 # node vip network interface to listen, `eth0` by default
vip_dns_suffix : '' # node vip dns name suffix, empty string by default
vip_auth_pass : '' # vrrp auth password, empty to use `<cls>-<vrid>` as default
vip_exporter_port : 9650 # keepalived exporter listen port, 9650 by default
vip_enabled参数名称: vip_enabled, 类型: bool, 层次:C
是否在当前这个节点集群中配置一个由 Keepalived 管理的 L2 VIP ? 默认值为: false。
vip_address参数名称: vip_address, 类型: ip, 层次:C
节点 VIP 地址,IPv4 格式(不带 CIDR 网段后缀),当节点启用 vip_enabled
本参数没有默认值,这意味着您必须显式地为节点集群分配一个唯一的 VIP 地址。
vip_vrid参数名称: vip_vrid, 类型: int, 层次:C
VRID 是一个范围从 1 到 254 的正整数,用于标识一个网络中的 VIP,当节点启用 vip_enabled
本参数没有默认值,这意味着您必须显式地为节点集群分配一个网段内唯一的 ID。
vip_role参数名称: vip_role, 类型: enum, 层次:I
节点 VIP 角色,可选值为: master 或 backup,默认值为 backup
该参数的值会被设置为 keepalived 的初始状态。
vip_preempt参数名称: vip_preempt, 类型: bool, 层次:C/I
是否启用 VIP 抢占?可选参数,默认值为 false,即不抢占 VIP。
所谓抢占,是指一个 backup 角色的节点,当其优先级高于当前存活且正常工作的 master 角色的节点时,是否取抢占其 VIP?
vip_interface参数名称: vip_interface, 类型: string, 层次:C/I
节点 VIP 监听使用的网卡,默认为 eth0。
您应当使用与节点主IP地址(即:你填入清单中IP地址)所使用网卡相同的名称。
如果你的节点有着不同的网卡名称,你可以在实例/节点层次对其进行覆盖。
vip_dns_suffix参数名称: vip_dns_suffix, 类型: string, 层次:C/I
节点集群 L2 VIP 使用的DNS名称,默认是空字符串,即直接使用集群名本身作为DNS名。
vip_auth_pass参数名称: vip_auth_pass, 类型: password, 层次:C
VRRP 认证密码,用于 keepalived VRRP 协议认证。默认为空字符串。
当为空时,Pigsty 会自动使用 <cluster_name>-<vrid> 模式生成密码。
在有安全要求的生产环境中,建议设置一个显式的强密码。
vip_exporter_port参数名称: vip_exporter_port, 类型: port, 层次:C/I
keepalived exporter 监听端口号,默认为:9650。
HAPROXYHAProxy 默认在所有节点上安装启用,并以类似于 Kubernetes NodePort 的方式对外暴露服务。
PGSQL服务 使用到了 Haproxy。
haproxy_enabled : true # 在此节点上启用haproxy?
haproxy_clean : false # 清理所有现有的haproxy配置?
haproxy_reload : true # 配置后重新加载haproxy?
haproxy_auth_enabled : true # 为haproxy管理页面启用身份验证
haproxy_admin_username : admin # haproxy管理用户名,默认为`admin`
haproxy_admin_password : pigsty # haproxy管理密码,默认为`pigsty`
haproxy_exporter_port : 9101 # haproxy管理/导出端口,默认为9101
haproxy_client_timeout : 24h # 客户端连接超时,默认为24小时
haproxy_server_timeout : 24h # 服务器端连接超时,默认为24小时
haproxy_services : [] # 需要在节点上暴露的haproxy服务列表
haproxy_enabled参数名称: haproxy_enabled, 类型: bool, 层次:C
在此节点上启用haproxy?默认值为: true。
haproxy_clean参数名称: haproxy_clean, 类型: bool, 层次:G/C/A
清理所有现有的haproxy配置?默认值为 false。
haproxy_reload参数名称: haproxy_reload, 类型: bool, 层次:A
配置后重新加载 haproxy?默认值为 true,配置更改后会重新加载haproxy。
如果您希望在应用配置前进行手工检查,您可以使用命令参数关闭此选项,并进行检查后再应用。
haproxy_auth_enabled参数名称: haproxy_auth_enabled, 类型: bool, 层次:G
为haproxy管理页面启用身份验证,默认值为 true,它将要求管理页面进行http基本身份验证。
建议不要禁用认证,因为您的流量控制页面将对外暴露,这是比较危险的。
haproxy_admin_username参数名称: haproxy_admin_username, 类型: username, 层次:G
haproxy 管理员用户名,默认为:admin。
haproxy_admin_password参数名称: haproxy_admin_password, 类型: password, 层次:G
haproxy管理密码,默认为 pigsty
在生产环境中请务必修改此密码!
haproxy_exporter_port参数名称: haproxy_exporter_port, 类型: port, 层次:C
haproxy 流量管理/指标对外暴露的端口,默认为:9101
haproxy_client_timeout参数名称: haproxy_client_timeout, 类型: interval, 层次:C
客户端连接超时,默认为 24h。
设置一个超时可以避免难以清理的超长的连接,但如果您真的需要一个长连接,您可以将其设置为更长的时间。
haproxy_server_timeout参数名称: haproxy_server_timeout, 类型: interval, 层次:C
服务端连接超时,默认为 24h。
设置一个超时可以避免难以清理的超长的连接,但如果您真的需要一个长连接,您可以将其设置为更长的时间。
haproxy_services参数名称: haproxy_services, 类型: service[], 层次:C
需要在此节点上通过 Haproxy 对外暴露的服务列表,默认值为: [] 空数组。
每一个数组元素都是一个服务定义,下面是一个服务定义的例子:
haproxy_services : # list of haproxy service
# expose pg-test read only replicas
- name : pg-test-ro # [REQUIRED] service name, unique
port : 5440 # [REQUIRED] service port, unique
ip : "*" # [OPTIONAL] service listen addr, "*" by default
protocol : tcp # [OPTIONAL] service protocol, 'tcp' by default
balance : leastconn # [OPTIONAL] load balance algorithm, roundrobin by default (or leastconn)
maxconn : 20000 # [OPTIONAL] max allowed front-end connection, 20000 by default
default : 'inter 3s fastinter 1s downinter 5s rise 3 fall 3 on-marked-down shutdown-sessions slowstart 30s maxconn 3000 maxqueue 128 weight 100'
options :
- option httpchk
- option http-keep-alive
- http-check send meth OPTIONS uri /read-only
- http-check expect status 200
servers :
- { name: pg-test-1 ,ip: 10.10.10.11 , port: 5432 , options: check port 8008 , backup : true }
- { name: pg-test-2 ,ip: 10.10.10.12 , port: 5432 , options : check port 8008 }
- { name: pg-test-3 ,ip: 10.10.10.13 , port: 5432 , options : check port 8008 }
每个服务定义会被渲染为 /etc/haproxy/<service.name>.cfg 配置文件,并在 Haproxy 重载后生效。
NODE_EXPORTERnode_exporter_enabled : true # setup node_exporter on this node?
node_exporter_port : 9100 # node exporter listen port, 9100 by default
node_exporter_options : '--no-collector.softnet --no-collector.nvme --collector.tcpstat --collector.processes'
node_exporter_enabled参数名称: node_exporter_enabled, 类型: bool, 层次:C
在当前节点上启用节点指标收集器?默认启用:true
node_exporter_port参数名称: node_exporter_port, 类型: port, 层次:C
对外暴露节点指标使用的端口,默认为 9100。
node_exporter_options参数名称: node_exporter_options, 类型: arg, 层次:C
节点指标采集器的命令行参数,默认值为:
--no-collector.softnet --no-collector.nvme --collector.tcpstat --collector.processes
该选项会启用/禁用一些指标收集器,请根据您的需要进行调整。
VECTORVector 是 Pigsty v4.0 使用的日志收集组件,会收集各个模块产生的日志并发送至基础设施节点上的 VictoriaLogs 服务。
INFRA: 基础设施组件的日志只会在 Infra 节点上收集。
nginx-access: /var/log/nginx/access.lognginx-error: /var/log/nginx/error.loggrafana: /var/log/grafana/grafana.logNODES:主机相关日志,所有节点上都会启用收集。
通过 journald 统一采集系统服务日志(job=syslog),不依赖固定的 /var/log/* 文件路径。 PGSQL:PostgreSQL 相关的日志,只有节点配置了 PGSQL 模块才会启用收集。
postgres: /pg/log/postgres/*patroni: /pg/log/patroni.logpgbouncer: /pg/log/pgbouncer/pgbouncer.logpgbackrest: /pg/log/pgbackrest/*.logREDIS:Redis 相关日志,只有节点配置了 REDIS 模块才会启用收集。
redis: /var/log/redis/*.log日志目录会根据这些参数的配置自动调整:pg_log_dirpatroni_log_dirpgbouncer_log_dirpgbackrest_log_dir
vector_enabled : true # 启用 vector 日志收集器吗?
vector_clean : false # 初始化时清除 vector 数据目录吗?
vector_data : /data/vector # vector 数据目录,默认为 /data/vector
vector_port : 9598 # vector 指标端口,默认为 9598
vector_read_from : beginning # vector 从头还是从尾开始读取日志
vector_log_endpoint : [ infra ] # 日志发送目标端点,默认发送至 infra 组
vector_enabled参数名称: vector_enabled, 类型: bool, 层次:C
是否启用 Vector 日志收集服务?默认值为: true
Vector 是 Pigsty v4.0 使用的日志收集代理,替代了之前版本使用的 Promtail,用于收集节点和服务的日志并发送至 VictoriaLogs。
vector_clean参数名称: vector_clean, 类型: bool, 层次:G/A
是否在安装 Vector 时清除已有数据目录?默认值为: false。
默认不会清理,当您选择清理时,Pigsty 会在部署 Vector 时移除现有数据目录 vector_data
vector_data参数名称: vector_data, 类型: path, 层次:C
Vector 数据目录路径,默认值为:/data/vector。
Vector 会将日志读取的偏移量和缓冲数据存储在此目录中。
vector_port参数名称: vector_port, 类型: port, 层次:C
Vector 指标监听端口号,默认为:9598
此端口用于暴露 Vector 自身的监控指标,可被 VictoriaMetrics 抓取。
vector_read_from参数名称: vector_read_from, 类型: enum, 层次:C
Vector 日志读取起始位置,默认值为:beginning。
可选值为 beginning(从头开始)或 end(从尾开始)。beginning 会读取现有日志文件的全部内容,end 只读取新产生的日志。
vector_log_endpoint参数名称: vector_log_endpoint, 类型: string[], 层次:C
日志发送目标端点列表,默认值为:[ infra ]。
指定将日志发送至哪个节点组的 VictoriaLogs 服务。默认发送至 infra 组的节点。
14.3 - 预置剧本 如何使用预置的 ansible 剧本来管理 Node 集群,常用管理命令速查。
Pigsty 提供两个与 NODE 模块相关的剧本:
另提供两个包装命令工具:bin/node-add 与 bin/node-rm,用于快速调用剧本。
node.yml向 Pigsty 添加节点的 node.yml
node-id :生成节点身份标识
node_name :设置主机名
node_hosts :配置 /etc/hosts 记录
node_resolv :配置 DNS 解析器 /etc/resolv.conf
node_firewall :设置防火墙 & selinux
node_ca :添加并信任CA证书
node_repo :添加上游软件仓库
node_pkg :安装 rpm/deb 软件包
node_uv :配置 uv Python 虚拟环境
node_feature :配置 numa、grub、静态网络等特性
node_kernel :配置操作系统内核模块
node_tune :配置 tuned 调优模板
node_sysctl :设置额外的 sysctl 参数
node_profile :写入 /etc/profile.d/node.sh
node_ulimit :配置资源限制
node_data :配置数据目录
node_admin :配置管理员用户和ssh密钥
node_timezone :配置时区
node_ntp :配置 NTP 服务器/客户端
node_crontab :添加/覆盖 crontab 定时任务
node_vip :为节点集群设置可选的 L2 VIP
haproxy :在节点上设置 haproxy 以暴露服务
monitor :配置节点监控:node_exporter & vector
node-rm.yml从 Pigsty 中移除节点的剧本 node-rm.yml
node_deregister : 移除节点注册信息(VictoriaMetrics / Vector / DNS)
- rm_metrics : 移除已注册的 VictoriaMetrics 监控目标
- rm_logs : 移除已注册的 Vector 日志采集配置
- rm_dns : 移除已注册的 Node VIP DNS 解析记录
haproxy_deregister: 移除用于 haproxy 管理界面的 nginx 代理记录
- rm_proxy : 移除 nginx upstream/location 记录
vip : 移除节点的 keepalived 与 L2 VIP(如果启用 VIP)
haproxy : 移除 haproxy 负载均衡器
node_exporter : 移除节点监控:Node Exporter
vip_exporter : 移除 keepalived_exporter (如果启用 VIP)
vector : 移除日志收集代理 vector
node_crontab : 恢复默认 /etc/crontab(当 node_crontab_overwrite=true 时)
profile : 移除 /etc/profile.d/node.sh 环境配置文件
常用命令速查 # 基础节点管理
./node.yml -l <cls| ip| group> # 向 Pigsty 中添加节点
./node-rm.yml -l <cls| ip| group> # 从 Pigsty 中移除节点
# 节点管理快捷命令
bin/node-add node-test # 初始化节点集群 'node-test'
bin/node-add 10.10.10.10 # 初始化节点 '10.10.10.10'
bin/node-rm node-test # 移除节点集群 'node-test'
bin/node-rm 10.10.10.10 # 移除节点 '10.10.10.10'
# 节点主体初始化
./node.yml -t node # 完成节点主体初始化(haproxy,监控除外)
./node.yml -t haproxy # 在节点上设置 haproxy
./node.yml -t monitor # 配置节点监控:node_exporter & vector
# VIP 管理
./node.yml -t node_vip # 为节点集群设置可选的 L2 VIP
./node.yml -t vip_config,vip_reload # 刷新节点 L2 VIP 配置
# HAProxy 管理
./node.yml -t haproxy_config,haproxy_reload # 刷新节点上的服务定义
# 注册管理
./node.yml -t node_register # 重新将节点注册到 VictoriaMetrics 中
./node.yml -t register_nginx # 重新将节点 haproxy 管控界面注册到 Nginx 中
# 具体任务
./node.yml -t node-id # 生成节点身份标识
./node.yml -t node_name # 设置主机名
./node.yml -t node_hosts # 配置节点 /etc/hosts 记录
./node.yml -t node_resolv # 配置节点 DNS 解析器 /etc/resolv.conf
./node.yml -t node_firewall # 配置防火墙 & selinux
./node.yml -t node_ca # 配置节点的CA证书
./node.yml -t node_repo # 配置节点上游软件仓库
./node.yml -t node_pkg # 在节点上安装 yum 软件包
./node.yml -t node_uv # 配置 uv Python 虚拟环境
./node.yml -t node_feature # 配置 numa、grub、静态网络等特性
./node.yml -t node_kernel # 配置操作系统内核模块
./node.yml -t node_tune # 配置 tuned 调优模板
./node.yml -t node_sysctl # 设置额外的 sysctl 参数
./node.yml -t node_profile # 配置节点环境变量:/etc/profile.d/node.sh
./node.yml -t node_ulimit # 配置节点资源限制
./node.yml -t node_data # 配置节点首要数据目录
./node.yml -t node_admin # 配置管理员用户和ssh密钥
./node.yml -t node_timezone # 配置节点时区
./node.yml -t node_ntp # 配置节点 NTP 服务器/客户端
./node.yml -t node_crontab # 添加/覆盖 crontab 定时任务
14.4 - 管理预案 Node 集群管理 SOP:创建,销毁,扩容,缩容,节点故障与磁盘故障的处理。
下面是 Node 模块中常用的管理操作:
更多问题请参考 FAQ:NODE
添加节点 要将节点添加到 Pigsty,您需要对该节点具有无密码的 ssh/sudo 访问权限。
您也可以选择一次性添加一个集群,或使用通配符匹配配置清单中要加入 Pigsty 的节点。
# ./node.yml -l <cls|ip|group> # 向 Pigsty 中添加节点的实际剧本
# bin/node-add <selector|ip...> # 向 Pigsty 中添加节点
bin/node-add node-test # 初始化节点集群 'node-test'
bin/node-add 10.10.10.10 # 初始化节点 '10.10.10.10'
示例:将 PG 集群 pg-test 的三个节点纳入 Pigsty 管理
移除节点 要从 Pigsty 中移除一个节点,您可以使用以下命令:
# ./node-rm.yml -l <cls|ip|group> # 从 pigsty 中移除节点的实际剧本
# bin/node-rm <cls|ip|selector> ... # 从 pigsty 中移除节点
bin/node-rm node-test # 移除节点集群 'node-test'
bin/node-rm 10.10.10.10 # 移除节点 '10.10.10.10'
您也可以选择一次性移除一个集群,或使用通配符匹配配置清单中要从 Pigsty 移除的节点。
创建管理员 如果当前用户没有对节点的无密码 ssh/sudo 访问权限,您可以使用另一个管理员用户来初始化该节点:
node.yml -t node_admin -k -K -e ansible_user = <另一个管理员> # 为另一个管理员输入 ssh/sudo 密码以完成此任务
绑定VIP 您可以在节点集群上绑定一个可选的 L2 VIP,使用 vip_enabled
proxy :
hosts :
10.10.10.29 : { nodename : proxy-1 } # 您可以显式指定初始的 VIP 角色:MASTER / BACKUP
10.10.10.30 : { nodename: proxy-2 } # , vip_role : master }
vars :
node_cluster : proxy
vip_enabled : true
vip_vrid : 128
vip_address : 10.10.10.99
vip_interface : eth1
./node.yml -l proxy -t node_vip # 首次启用 VIP
./node.yml -l proxy -t vip_refresh # 刷新 vip 配置(例如指定 master)
添加节点监控 如果您想要在现有节点上添加或重新配置监控,可以使用以下命令:
./node.yml -t node_exporter,node_register # 配置监控并注册
./node.yml -t vector # 配置日志收集
其他常见任务 # Play
./node.yml -t node # 完成节点主体初始化(haproxy,监控除外)
./node.yml -t haproxy # 在节点上设置 haproxy
./node.yml -t monitor # 配置节点监控:node_exporter & vector
./node.yml -t node_vip # 为没启用过 VIP 的集群安装、配置、启用 L2 VIP
./node.yml -t vip_config,vip_reload # 刷新节点 L2 VIP 配置
./node.yml -t haproxy_config,haproxy_reload # 刷新节点上的服务定义
./node.yml -t node_register # 重新将节点注册到 VictoriaMetrics 中
./node.yml -t register_nginx # 重新将节点 haproxy 管控界面注册到 Nginx 中
# Task
./node.yml -t node-id # 生成节点身份标识
./node.yml -t node_name # 设置主机名
./node.yml -t node_hosts # 配置节点 /etc/hosts 记录
./node.yml -t node_resolv # 配置节点 DNS 解析器 /etc/resolv.conf
./node.yml -t node_firewall # 配置防火墙 & selinux
./node.yml -t node_ca # 配置节点的CA证书
./node.yml -t node_repo # 配置节点上游软件仓库
./node.yml -t node_pkg # 在节点上安装 yum 软件包
./node.yml -t node_feature # 配置 numa、grub、静态网络等特性
./node.yml -t node_kernel # 配置操作系统内核模块
./node.yml -t node_tune # 配置 tuned 调优模板
./node.yml -t node_sysctl # 设置额外的 sysctl 参数
./node.yml -t node_profile # 配置节点环境变量:/etc/profile.d/node.sh
./node.yml -t node_ulimit # 配置节点资源限制
./node.yml -t node_data # 配置节点首要数据目录
./node.yml -t node_admin # 配置管理员用户和ssh密钥
./node.yml -t node_timezone # 配置节点时区
./node.yml -t node_ntp # 配置节点 NTP 服务器/客户端
./node.yml -t node_crontab # 添加/覆盖 crontab 定时任务
./node.yml -t node_vip # 为节点集群设置可选的 L2 VIP
管理 HAProxy 密码 haproxy_admin_passwordpigsty)用于 HAProxy 管理界面认证,渲染到 /etc/haproxy/haproxy.cfg 中。
修改密码后,使用以下命令刷新配置(热重载,不中断连接):
./node.yml -l <目标节点> -t haproxy_config,haproxy_reload
防火墙管理 Pigsty 使用 node_firewall_modefirewalld ,在 Debian/Ubuntu 系统上使用 ufw 。
自 v4.1 起,默认情况下这个参数是 zone:Pigsty 会在各发行版上统一启用系统防火墙,并应用“内网信任、公网最小暴露”的规则。
在 zone 模式下,内网流量不受防火墙限制,但非内网网段只能访问特定端口。
如果你希望完全自行维护防火墙,请将该参数设置为 none(Pigsty 不再管理防火墙状态与规则)。
如果您在云服务器上部署并对互联网开放,这一点尤为重要。
我们建议你只开放必要的端口,例如:22 (SSH), 80/443 (HTTP/HTTPS),这三个是必要的端口,谨慎对外开放 5432 数据库端口。
应用防火墙规则 默认就是 zone。如果之前设置过 none/off,可以改回 zone 以重新启用并应用分区规则:
node_firewall_mode : zone # 启用防火墙并配置区域规则
node_firewall_intranet : # 信任这些网段(完全放行)
- 10.0.0.0 /8
- 192.168.0.0 /16
- 172.16.0.0 /12
node_firewall_public_port : # 对公网开放这些端口
- 22 # SSH
- 80 # HTTP
- 443 # HTTPS
然后执行:./node.yml -l <目标> -t node_firewall
开放更多端口 要开放更多端口,将其添加到 node_firewall_public_port 并重新执行:
node_firewall_public_port : [ 22 , 80 , 443 , 5432 , 6379 ] # 添加 PostgreSQL 和 Redis 端口
./node.yml -l <目标> -t node_firewall
配置内网网段 node_firewall_intranet 中的网段会被添加到 trusted 区域 ,拥有完全访问权限:
node_firewall_intranet :
- 10.0.0.0 /8 # A 类私网
- 192.168.0.0 /16 # C 类私网
- 172.16.0.0 /12 # B 类私网
- 100.64.0.0 /10 # 运营商级 NAT(如需要)
删除规则(手动) 重要提示 :Pigsty 的防火墙管理是只增不删 的。从配置中移除条目并重新执行
不会 删除已存在的规则。您需要手动删除规则。
EL (firewalld)
Debian (ufw) # 从 public 区域删除指定端口
sudo firewall-cmd --zone= public --remove-port= 5432/tcp
sudo firewall-cmd --runtime-to-permanent
# 从 trusted 区域删除指定网段
sudo firewall-cmd --zone= trusted --remove-source= 10.0.0.0/8
sudo firewall-cmd --runtime-to-permanent
# 查看当前规则
sudo firewall-cmd --zone= public --list-ports
sudo firewall-cmd --zone= trusted --list-sources
# 重置为初始状态(删除所有自定义规则)
sudo firewall-cmd --complete-reload
# 删除指定端口规则
sudo ufw delete allow 5432/tcp
# 删除指定网段规则
sudo ufw delete allow from 10.0.0.0/8
# 查看当前规则(带编号)
sudo ufw status numbered
# 按编号删除规则
sudo ufw delete <规则编号>
# 重置为初始状态(删除所有规则,保持 ufw 启用状态)
sudo ufw reset
关闭防火墙 要完全关闭防火墙,将 node_firewall_mode 设置为 off:
node_firewall_mode : off # 完全禁用防火墙
./node.yml -l <目标> -t node_firewall
或者手动关闭:
EL (firewalld)
Debian (ufw) sudo systemctl disable --now firewalld
14.5 - 监控告警 如何在 Pigsty 中监控 Node?如何使用 Node 本身的管控面板?有哪些告警规则值得关注?
Pigsty 中的 NODE 模块提供了 8 个监控面板和完善的告警规则。
监控面板 NODE 模块提供 8 个监控仪表板:
NODE Overview 展示当前环境所有主机节点的总体情况概览。
NODE Cluster 显示特定主机集群的详细监控数据。
Node Instance 呈现单个主机节点的详细监控信息。
NODE Alert 集中展示环境中所有主机的告警信息。
NODE VIP 监控 L2 虚拟 IP 的详细状态。
Node Haproxy 追踪 HAProxy 负载均衡器的运行情况。
Node Disk 聚焦单盘 I/O 延迟、吞吐与队列深度等存储指标。
Node Vector 查看 Vector 采集与转发状态,以及日志管道健康度。
告警规则 Pigsty 针对 NODE 实现了以下告警规则:
可用性告警 规则 级别 说明 NodeDownCRIT 节点离线 HaproxyDownCRIT HAProxy 服务离线 VectorDownWARN 日志收集代理离线(Vector) DockerDownWARN 容器引擎离线 KeepalivedDownWARN Keepalived 守护进程离线
CPU 告警 规则 级别 说明 NodeCpuHighWARN CPU 使用率超过 70%
调度告警 规则 级别 说明 NodeLoadHighWARN 标准化负载超过 100%
内存告警 规则 级别 说明 NodeOutOfMemWARN 可用内存少于 10% NodeMemSwappedWARN Swap 使用率超过 1%
文件系统告警 规则 级别 说明 NodeFsSpaceFullWARN 磁盘使用率超过 90% NodeFsFilesFullWARN Inode 使用率超过 90% NodeFdFullWARN 文件描述符使用率超过 90%
磁盘告警 规则 级别 说明 NodeDiskSlowINFO 读写延迟超过 32ms
网络协议告警 规则 级别 说明 NodeTcpErrHighWARN TCP 错误率超过 1/分钟 NodeTcpRetransHighINFO TCP 重传率超过 1%
时间同步告警 规则 级别 说明 NodeTimeDriftWARN 系统时间未同步
14.6 - 指标列表 Pigsty NODE 模块提供的完整监控指标列表与释义
NODE
Metric Name Type Labels Description ALERTS Unknown alertname, ip, level, severity, ins, job, alertstate, category, instance, clsN/A ALERTS_FOR_STATE Unknown alertname, ip, level, severity, ins, job, category, instance, clsN/A deprecated_flags_inuse_total Unknown instance, ins, job, ip, clsN/A go_gc_duration_seconds summary quantile, instance, ins, job, ip, clsA summary of the pause duration of garbage collection cycles. go_gc_duration_seconds_count Unknown instance, ins, job, ip, clsN/A go_gc_duration_seconds_sum Unknown instance, ins, job, ip, clsN/A go_goroutines gauge instance, ins, job, ip, clsNumber of goroutines that currently exist. go_info gauge version, instance, ins, job, ip, clsInformation about the Go environment. go_memstats_alloc_bytes gauge instance, ins, job, ip, clsNumber of bytes allocated and still in use. go_memstats_alloc_bytes_total counter instance, ins, job, ip, clsTotal number of bytes allocated, even if freed. go_memstats_buck_hash_sys_bytes gauge instance, ins, job, ip, clsNumber of bytes used by the profiling bucket hash table. go_memstats_frees_total counter instance, ins, job, ip, clsTotal number of frees. go_memstats_gc_sys_bytes gauge instance, ins, job, ip, clsNumber of bytes used for garbage collection system metadata. go_memstats_heap_alloc_bytes gauge instance, ins, job, ip, clsNumber of heap bytes allocated and still in use. go_memstats_heap_idle_bytes gauge instance, ins, job, ip, clsNumber of heap bytes waiting to be used. go_memstats_heap_inuse_bytes gauge instance, ins, job, ip, clsNumber of heap bytes that are in use. go_memstats_heap_objects gauge instance, ins, job, ip, clsNumber of allocated objects. go_memstats_heap_released_bytes gauge instance, ins, job, ip, clsNumber of heap bytes released to OS. go_memstats_heap_sys_bytes gauge instance, ins, job, ip, clsNumber of heap bytes obtained from system. go_memstats_last_gc_time_seconds gauge instance, ins, job, ip, clsNumber of seconds since 1970 of last garbage collection. go_memstats_lookups_total counter instance, ins, job, ip, clsTotal number of pointer lookups. go_memstats_mallocs_total counter instance, ins, job, ip, clsTotal number of mallocs. go_memstats_mcache_inuse_bytes gauge instance, ins, job, ip, clsNumber of bytes in use by mcache structures. go_memstats_mcache_sys_bytes gauge instance, ins, job, ip, clsNumber of bytes used for mcache structures obtained from system. go_memstats_mspan_inuse_bytes gauge instance, ins, job, ip, clsNumber of bytes in use by mspan structures. go_memstats_mspan_sys_bytes gauge instance, ins, job, ip, clsNumber of bytes used for mspan structures obtained from system. go_memstats_next_gc_bytes gauge instance, ins, job, ip, clsNumber of heap bytes when next garbage collection will take place. go_memstats_other_sys_bytes gauge instance, ins, job, ip, clsNumber of bytes used for other system allocations. go_memstats_stack_inuse_bytes gauge instance, ins, job, ip, clsNumber of bytes in use by the stack allocator. go_memstats_stack_sys_bytes gauge instance, ins, job, ip, clsNumber of bytes obtained from system for stack allocator. go_memstats_sys_bytes gauge instance, ins, job, ip, clsNumber of bytes obtained from system. go_threads gauge instance, ins, job, ip, clsNumber of OS threads created. haproxy:cls:usage Unknown job, clsN/A haproxy:ins:uptime Unknown instance, ins, job, ip, clsN/A haproxy:ins:usage Unknown instance, ins, job, ip, clsN/A haproxy_backend_active_servers gauge proxy, instance, ins, job, ip, clsTotal number of active UP servers with a non-zero weight haproxy_backend_agg_check_status gauge state, proxy, instance, ins, job, ip, clsBackend’s aggregated gauge of servers’ state check status haproxy_backend_agg_server_check_status gauge state, proxy, instance, ins, job, ip, cls[DEPRECATED] Backend’s aggregated gauge of servers’ status haproxy_backend_agg_server_status gauge state, proxy, instance, ins, job, ip, clsBackend’s aggregated gauge of servers’ status haproxy_backend_backup_servers gauge proxy, instance, ins, job, ip, clsTotal number of backup UP servers with a non-zero weight haproxy_backend_bytes_in_total counter proxy, instance, ins, job, ip, clsTotal number of request bytes since process started haproxy_backend_bytes_out_total counter proxy, instance, ins, job, ip, clsTotal number of response bytes since process started haproxy_backend_check_last_change_seconds gauge proxy, instance, ins, job, ip, clsHow long ago the last server state changed, in seconds haproxy_backend_check_up_down_total counter proxy, instance, ins, job, ip, clsTotal number of failed checks causing UP to DOWN server transitions, per server/backend, since the worker process started haproxy_backend_client_aborts_total counter proxy, instance, ins, job, ip, clsTotal number of requests or connections aborted by the client since the worker process started haproxy_backend_connect_time_average_seconds gauge proxy, instance, ins, job, ip, clsAvg. connect time for last 1024 successful connections. haproxy_backend_connection_attempts_total counter proxy, instance, ins, job, ip, clsTotal number of outgoing connection attempts on this backend/server since the worker process started haproxy_backend_connection_errors_total counter proxy, instance, ins, job, ip, clsTotal number of failed connections to server since the worker process started haproxy_backend_connection_reuses_total counter proxy, instance, ins, job, ip, clsTotal number of reused connection on this backend/server since the worker process started haproxy_backend_current_queue gauge proxy, instance, ins, job, ip, clsNumber of current queued connections haproxy_backend_current_sessions gauge proxy, instance, ins, job, ip, clsNumber of current sessions on the frontend, backend or server haproxy_backend_downtime_seconds_total counter proxy, instance, ins, job, ip, clsTotal time spent in DOWN state, for server or backend haproxy_backend_failed_header_rewriting_total counter proxy, instance, ins, job, ip, clsTotal number of failed HTTP header rewrites since the worker process started haproxy_backend_http_cache_hits_total counter proxy, instance, ins, job, ip, clsTotal number of HTTP requests not found in the cache on this frontend/backend since the worker process started haproxy_backend_http_cache_lookups_total counter proxy, instance, ins, job, ip, clsTotal number of HTTP requests looked up in the cache on this frontend/backend since the worker process started haproxy_backend_http_comp_bytes_bypassed_total counter proxy, instance, ins, job, ip, clsTotal number of bytes that bypassed HTTP compression for this object since the worker process started (CPU/memory/bandwidth limitation) haproxy_backend_http_comp_bytes_in_total counter proxy, instance, ins, job, ip, clsTotal number of bytes submitted to the HTTP compressor for this object since the worker process started haproxy_backend_http_comp_bytes_out_total counter proxy, instance, ins, job, ip, clsTotal number of bytes emitted by the HTTP compressor for this object since the worker process started haproxy_backend_http_comp_responses_total counter proxy, instance, ins, job, ip, clsTotal number of HTTP responses that were compressed for this object since the worker process started haproxy_backend_http_requests_total counter proxy, instance, ins, job, ip, clsTotal number of HTTP requests processed by this object since the worker process started haproxy_backend_http_responses_total counter ip, proxy, ins, code, job, instance, clsTotal number of HTTP responses with status 100-199 returned by this object since the worker process started haproxy_backend_internal_errors_total counter proxy, instance, ins, job, ip, clsTotal number of internal errors since process started haproxy_backend_last_session_seconds gauge proxy, instance, ins, job, ip, clsHow long ago some traffic was seen on this object on this worker process, in seconds haproxy_backend_limit_sessions gauge proxy, instance, ins, job, ip, clsFrontend/listener/server’s maxconn, backend’s fullconn haproxy_backend_loadbalanced_total counter proxy, instance, ins, job, ip, clsTotal number of requests routed by load balancing since the worker process started (ignores queue pop and stickiness) haproxy_backend_max_connect_time_seconds gauge proxy, instance, ins, job, ip, clsMaximum observed time spent waiting for a connection to complete haproxy_backend_max_queue gauge proxy, instance, ins, job, ip, clsHighest value of queued connections encountered since process started haproxy_backend_max_queue_time_seconds gauge proxy, instance, ins, job, ip, clsMaximum observed time spent in the queue haproxy_backend_max_response_time_seconds gauge proxy, instance, ins, job, ip, clsMaximum observed time spent waiting for a server response haproxy_backend_max_session_rate gauge proxy, instance, ins, job, ip, clsHighest value of sessions per second observed since the worker process started haproxy_backend_max_sessions gauge proxy, instance, ins, job, ip, clsHighest value of current sessions encountered since process started haproxy_backend_max_total_time_seconds gauge proxy, instance, ins, job, ip, clsMaximum observed total request+response time (request+queue+connect+response+processing) haproxy_backend_queue_time_average_seconds gauge proxy, instance, ins, job, ip, clsAvg. queue time for last 1024 successful connections. haproxy_backend_redispatch_warnings_total counter proxy, instance, ins, job, ip, clsTotal number of server redispatches due to connection failures since the worker process started haproxy_backend_requests_denied_total counter proxy, instance, ins, job, ip, clsTotal number of denied requests since process started haproxy_backend_response_errors_total counter proxy, instance, ins, job, ip, clsTotal number of invalid responses since the worker process started haproxy_backend_response_time_average_seconds gauge proxy, instance, ins, job, ip, clsAvg. response time for last 1024 successful connections. haproxy_backend_responses_denied_total counter proxy, instance, ins, job, ip, clsTotal number of denied responses since process started haproxy_backend_retry_warnings_total counter proxy, instance, ins, job, ip, clsTotal number of server connection retries since the worker process started haproxy_backend_server_aborts_total counter proxy, instance, ins, job, ip, clsTotal number of requests or connections aborted by the server since the worker process started haproxy_backend_sessions_total counter proxy, instance, ins, job, ip, clsTotal number of sessions since process started haproxy_backend_status gauge state, proxy, instance, ins, job, ip, clsCurrent status of the service, per state label value. haproxy_backend_total_time_average_seconds gauge proxy, instance, ins, job, ip, clsAvg. total time for last 1024 successful connections. haproxy_backend_uweight gauge proxy, instance, ins, job, ip, clsServer’s user weight, or sum of active servers’ user weights for a backend haproxy_backend_weight gauge proxy, instance, ins, job, ip, clsServer’s effective weight, or sum of active servers’ effective weights for a backend haproxy_frontend_bytes_in_total counter proxy, instance, ins, job, ip, clsTotal number of request bytes since process started haproxy_frontend_bytes_out_total counter proxy, instance, ins, job, ip, clsTotal number of response bytes since process started haproxy_frontend_connections_rate_max gauge proxy, instance, ins, job, ip, clsHighest value of connections per second observed since the worker process started haproxy_frontend_connections_total counter proxy, instance, ins, job, ip, clsTotal number of new connections accepted on this frontend since the worker process started haproxy_frontend_current_sessions gauge proxy, instance, ins, job, ip, clsNumber of current sessions on the frontend, backend or server haproxy_frontend_denied_connections_total counter proxy, instance, ins, job, ip, clsTotal number of incoming connections blocked on a listener/frontend by a tcp-request connection rule since the worker process started haproxy_frontend_denied_sessions_total counter proxy, instance, ins, job, ip, clsTotal number of incoming sessions blocked on a listener/frontend by a tcp-request connection rule since the worker process started haproxy_frontend_failed_header_rewriting_total counter proxy, instance, ins, job, ip, clsTotal number of failed HTTP header rewrites since the worker process started haproxy_frontend_http_cache_hits_total counter proxy, instance, ins, job, ip, clsTotal number of HTTP requests not found in the cache on this frontend/backend since the worker process started haproxy_frontend_http_cache_lookups_total counter proxy, instance, ins, job, ip, clsTotal number of HTTP requests looked up in the cache on this frontend/backend since the worker process started haproxy_frontend_http_comp_bytes_bypassed_total counter proxy, instance, ins, job, ip, clsTotal number of bytes that bypassed HTTP compression for this object since the worker process started (CPU/memory/bandwidth limitation) haproxy_frontend_http_comp_bytes_in_total counter proxy, instance, ins, job, ip, clsTotal number of bytes submitted to the HTTP compressor for this object since the worker process started haproxy_frontend_http_comp_bytes_out_total counter proxy, instance, ins, job, ip, clsTotal number of bytes emitted by the HTTP compressor for this object since the worker process started haproxy_frontend_http_comp_responses_total counter proxy, instance, ins, job, ip, clsTotal number of HTTP responses that were compressed for this object since the worker process started haproxy_frontend_http_requests_rate_max gauge proxy, instance, ins, job, ip, clsHighest value of http requests observed since the worker process started haproxy_frontend_http_requests_total counter proxy, instance, ins, job, ip, clsTotal number of HTTP requests processed by this object since the worker process started haproxy_frontend_http_responses_total counter ip, proxy, ins, code, job, instance, clsTotal number of HTTP responses with status 100-199 returned by this object since the worker process started haproxy_frontend_intercepted_requests_total counter proxy, instance, ins, job, ip, clsTotal number of HTTP requests intercepted on the frontend (redirects/stats/services) since the worker process started haproxy_frontend_internal_errors_total counter proxy, instance, ins, job, ip, clsTotal number of internal errors since process started haproxy_frontend_limit_session_rate gauge proxy, instance, ins, job, ip, clsLimit on the number of sessions accepted in a second (frontend only, ‘rate-limit sessions’ setting) haproxy_frontend_limit_sessions gauge proxy, instance, ins, job, ip, clsFrontend/listener/server’s maxconn, backend’s fullconn haproxy_frontend_max_session_rate gauge proxy, instance, ins, job, ip, clsHighest value of sessions per second observed since the worker process started haproxy_frontend_max_sessions gauge proxy, instance, ins, job, ip, clsHighest value of current sessions encountered since process started haproxy_frontend_request_errors_total counter proxy, instance, ins, job, ip, clsTotal number of invalid requests since process started haproxy_frontend_requests_denied_total counter proxy, instance, ins, job, ip, clsTotal number of denied requests since process started haproxy_frontend_responses_denied_total counter proxy, instance, ins, job, ip, clsTotal number of denied responses since process started haproxy_frontend_sessions_total counter proxy, instance, ins, job, ip, clsTotal number of sessions since process started haproxy_frontend_status gauge state, proxy, instance, ins, job, ip, clsCurrent status of the service, per state label value. haproxy_process_active_peers gauge instance, ins, job, ip, clsCurrent number of verified active peers connections on the current worker process haproxy_process_build_info gauge version, instance, ins, job, ip, clsBuild info haproxy_process_busy_polling_enabled gauge instance, ins, job, ip, cls1 if busy-polling is currently in use on the worker process, otherwise zero (config.busy-polling) haproxy_process_bytes_out_rate gauge instance, ins, job, ip, clsNumber of bytes emitted by current worker process over the last second haproxy_process_bytes_out_total counter instance, ins, job, ip, clsTotal number of bytes emitted by current worker process since started haproxy_process_connected_peers gauge instance, ins, job, ip, clsCurrent number of peers having passed the connection step on the current worker process haproxy_process_connections_total counter instance, ins, job, ip, clsTotal number of connections on this worker process since started haproxy_process_current_backend_ssl_key_rate gauge instance, ins, job, ip, clsNumber of SSL keys created on backends in this worker process over the last second haproxy_process_current_connection_rate gauge instance, ins, job, ip, clsNumber of front connections created on this worker process over the last second haproxy_process_current_connections gauge instance, ins, job, ip, clsCurrent number of connections on this worker process haproxy_process_current_frontend_ssl_key_rate gauge instance, ins, job, ip, clsNumber of SSL keys created on frontends in this worker process over the last second haproxy_process_current_run_queue gauge instance, ins, job, ip, clsTotal number of active tasks+tasklets in the current worker process haproxy_process_current_session_rate gauge instance, ins, job, ip, clsNumber of sessions created on this worker process over the last second haproxy_process_current_ssl_connections gauge instance, ins, job, ip, clsCurrent number of SSL endpoints on this worker process (front+back) haproxy_process_current_ssl_rate gauge instance, ins, job, ip, clsNumber of SSL connections created on this worker process over the last second haproxy_process_current_tasks gauge instance, ins, job, ip, clsTotal number of tasks in the current worker process (active + sleeping) haproxy_process_current_zlib_memory gauge instance, ins, job, ip, clsAmount of memory currently used by HTTP compression on the current worker process (in bytes) haproxy_process_dropped_logs_total counter instance, ins, job, ip, clsTotal number of dropped logs for current worker process since started haproxy_process_failed_resolutions counter instance, ins, job, ip, clsTotal number of failed DNS resolutions in current worker process since started haproxy_process_frontend_ssl_reuse gauge instance, ins, job, ip, clsPercent of frontend SSL connections which did not require a new key haproxy_process_hard_max_connections gauge instance, ins, job, ip, clsHard limit on the number of per-process connections (imposed by Memmax_MB or Ulimit-n) haproxy_process_http_comp_bytes_in_total counter instance, ins, job, ip, clsNumber of bytes submitted to the HTTP compressor in this worker process over the last second haproxy_process_http_comp_bytes_out_total counter instance, ins, job, ip, clsNumber of bytes emitted by the HTTP compressor in this worker process over the last second haproxy_process_idle_time_percent gauge instance, ins, job, ip, clsPercentage of last second spent waiting in the current worker thread haproxy_process_jobs gauge instance, ins, job, ip, clsCurrent number of active jobs on the current worker process (frontend connections, master connections, listeners) haproxy_process_limit_connection_rate gauge instance, ins, job, ip, clsHard limit for ConnRate (global.maxconnrate) haproxy_process_limit_http_comp gauge instance, ins, job, ip, clsLimit of CompressBpsOut beyond which HTTP compression is automatically disabled haproxy_process_limit_session_rate gauge instance, ins, job, ip, clsHard limit for SessRate (global.maxsessrate) haproxy_process_limit_ssl_rate gauge instance, ins, job, ip, clsHard limit for SslRate (global.maxsslrate) haproxy_process_listeners gauge instance, ins, job, ip, clsCurrent number of active listeners on the current worker process haproxy_process_max_backend_ssl_key_rate gauge instance, ins, job, ip, clsHighest SslBackendKeyRate reached on this worker process since started (in SSL keys per second) haproxy_process_max_connection_rate gauge instance, ins, job, ip, clsHighest ConnRate reached on this worker process since started (in connections per second) haproxy_process_max_connections gauge instance, ins, job, ip, clsHard limit on the number of per-process connections (configured or imposed by Ulimit-n) haproxy_process_max_fds gauge instance, ins, job, ip, clsHard limit on the number of per-process file descriptors haproxy_process_max_frontend_ssl_key_rate gauge instance, ins, job, ip, clsHighest SslFrontendKeyRate reached on this worker process since started (in SSL keys per second) haproxy_process_max_memory_bytes gauge instance, ins, job, ip, clsWorker process’s hard limit on memory usage in byes (-m on command line) haproxy_process_max_pipes gauge instance, ins, job, ip, clsHard limit on the number of pipes for splicing, 0=unlimited haproxy_process_max_session_rate gauge instance, ins, job, ip, clsHighest SessRate reached on this worker process since started (in sessions per second) haproxy_process_max_sockets gauge instance, ins, job, ip, clsHard limit on the number of per-process sockets haproxy_process_max_ssl_connections gauge instance, ins, job, ip, clsHard limit on the number of per-process SSL endpoints (front+back), 0=unlimited haproxy_process_max_ssl_rate gauge instance, ins, job, ip, clsHighest SslRate reached on this worker process since started (in connections per second) haproxy_process_max_zlib_memory gauge instance, ins, job, ip, clsLimit on the amount of memory used by HTTP compression above which it is automatically disabled (in bytes, see global.maxzlibmem) haproxy_process_nbproc gauge instance, ins, job, ip, clsNumber of started worker processes (historical, always 1) haproxy_process_nbthread gauge instance, ins, job, ip, clsNumber of started threads (global.nbthread) haproxy_process_pipes_free_total counter instance, ins, job, ip, clsCurrent number of allocated and available pipes in this worker process haproxy_process_pipes_used_total counter instance, ins, job, ip, clsCurrent number of pipes in use in this worker process haproxy_process_pool_allocated_bytes gauge instance, ins, job, ip, clsAmount of memory allocated in pools (in bytes) haproxy_process_pool_failures_total counter instance, ins, job, ip, clsNumber of failed pool allocations since this worker was started haproxy_process_pool_used_bytes gauge instance, ins, job, ip, clsAmount of pool memory currently used (in bytes) haproxy_process_recv_logs_total counter instance, ins, job, ip, clsTotal number of log messages received by log-forwarding listeners on this worker process since started haproxy_process_relative_process_id gauge instance, ins, job, ip, clsRelative worker process number (1) haproxy_process_requests_total counter instance, ins, job, ip, clsTotal number of requests on this worker process since started haproxy_process_spliced_bytes_out_total counter instance, ins, job, ip, clsTotal number of bytes emitted by current worker process through a kernel pipe since started haproxy_process_ssl_cache_lookups_total counter instance, ins, job, ip, clsTotal number of SSL session ID lookups in the SSL session cache on this worker since started haproxy_process_ssl_cache_misses_total counter instance, ins, job, ip, clsTotal number of SSL session ID lookups that didn’t find a session in the SSL session cache on this worker since started haproxy_process_ssl_connections_total counter instance, ins, job, ip, clsTotal number of SSL endpoints on this worker process since started (front+back) haproxy_process_start_time_seconds gauge instance, ins, job, ip, clsStart time in seconds haproxy_process_stopping gauge instance, ins, job, ip, cls1 if the worker process is currently stopping, otherwise zero haproxy_process_unstoppable_jobs gauge instance, ins, job, ip, clsCurrent number of unstoppable jobs on the current worker process (master connections) haproxy_process_uptime_seconds gauge instance, ins, job, ip, clsHow long ago this worker process was started (seconds) haproxy_server_bytes_in_total counter proxy, instance, ins, job, server, ip, clsTotal number of request bytes since process started haproxy_server_bytes_out_total counter proxy, instance, ins, job, server, ip, clsTotal number of response bytes since process started haproxy_server_check_code gauge proxy, instance, ins, job, server, ip, clslayer5-7 code, if available of the last health check. haproxy_server_check_duration_seconds gauge proxy, instance, ins, job, server, ip, clsTotal duration of the latest server health check, in seconds. haproxy_server_check_failures_total counter proxy, instance, ins, job, server, ip, clsTotal number of failed individual health checks per server/backend, since the worker process started haproxy_server_check_last_change_seconds gauge proxy, instance, ins, job, server, ip, clsHow long ago the last server state changed, in seconds haproxy_server_check_status gauge state, proxy, instance, ins, job, server, ip, clsStatus of last health check, per state label value. haproxy_server_check_up_down_total counter proxy, instance, ins, job, server, ip, clsTotal number of failed checks causing UP to DOWN server transitions, per server/backend, since the worker process started haproxy_server_client_aborts_total counter proxy, instance, ins, job, server, ip, clsTotal number of requests or connections aborted by the client since the worker process started haproxy_server_connect_time_average_seconds gauge proxy, instance, ins, job, server, ip, clsAvg. connect time for last 1024 successful connections. haproxy_server_connection_attempts_total counter proxy, instance, ins, job, server, ip, clsTotal number of outgoing connection attempts on this backend/server since the worker process started haproxy_server_connection_errors_total counter proxy, instance, ins, job, server, ip, clsTotal number of failed connections to server since the worker process started haproxy_server_connection_reuses_total counter proxy, instance, ins, job, server, ip, clsTotal number of reused connection on this backend/server since the worker process started haproxy_server_current_queue gauge proxy, instance, ins, job, server, ip, clsNumber of current queued connections haproxy_server_current_sessions gauge proxy, instance, ins, job, server, ip, clsNumber of current sessions on the frontend, backend or server haproxy_server_current_throttle gauge proxy, instance, ins, job, server, ip, clsThrottling ratio applied to a server’s maxconn and weight during the slowstart period (0 to 100%) haproxy_server_downtime_seconds_total counter proxy, instance, ins, job, server, ip, clsTotal time spent in DOWN state, for server or backend haproxy_server_failed_header_rewriting_total counter proxy, instance, ins, job, server, ip, clsTotal number of failed HTTP header rewrites since the worker process started haproxy_server_idle_connections_current gauge proxy, instance, ins, job, server, ip, clsCurrent number of idle connections available for reuse on this server haproxy_server_idle_connections_limit gauge proxy, instance, ins, job, server, ip, clsLimit on the number of available idle connections on this server (server ‘pool_max_conn’ directive) haproxy_server_internal_errors_total counter proxy, instance, ins, job, server, ip, clsTotal number of internal errors since process started haproxy_server_last_session_seconds gauge proxy, instance, ins, job, server, ip, clsHow long ago some traffic was seen on this object on this worker process, in seconds haproxy_server_limit_sessions gauge proxy, instance, ins, job, server, ip, clsFrontend/listener/server’s maxconn, backend’s fullconn haproxy_server_loadbalanced_total counter proxy, instance, ins, job, server, ip, clsTotal number of requests routed by load balancing since the worker process started (ignores queue pop and stickiness) haproxy_server_max_connect_time_seconds gauge proxy, instance, ins, job, server, ip, clsMaximum observed time spent waiting for a connection to complete haproxy_server_max_queue gauge proxy, instance, ins, job, server, ip, clsHighest value of queued connections encountered since process started haproxy_server_max_queue_time_seconds gauge proxy, instance, ins, job, server, ip, clsMaximum observed time spent in the queue haproxy_server_max_response_time_seconds gauge proxy, instance, ins, job, server, ip, clsMaximum observed time spent waiting for a server response haproxy_server_max_session_rate gauge proxy, instance, ins, job, server, ip, clsHighest value of sessions per second observed since the worker process started haproxy_server_max_sessions gauge proxy, instance, ins, job, server, ip, clsHighest value of current sessions encountered since process started haproxy_server_max_total_time_seconds gauge proxy, instance, ins, job, server, ip, clsMaximum observed total request+response time (request+queue+connect+response+processing) haproxy_server_need_connections_current gauge proxy, instance, ins, job, server, ip, clsEstimated needed number of connections haproxy_server_queue_limit gauge proxy, instance, ins, job, server, ip, clsLimit on the number of connections in queue, for servers only (maxqueue argument) haproxy_server_queue_time_average_seconds gauge proxy, instance, ins, job, server, ip, clsAvg. queue time for last 1024 successful connections. haproxy_server_redispatch_warnings_total counter proxy, instance, ins, job, server, ip, clsTotal number of server redispatches due to connection failures since the worker process started haproxy_server_response_errors_total counter proxy, instance, ins, job, server, ip, clsTotal number of invalid responses since the worker process started haproxy_server_response_time_average_seconds gauge proxy, instance, ins, job, server, ip, clsAvg. response time for last 1024 successful connections. haproxy_server_responses_denied_total counter proxy, instance, ins, job, server, ip, clsTotal number of denied responses since process started haproxy_server_retry_warnings_total counter proxy, instance, ins, job, server, ip, clsTotal number of server connection retries since the worker process started haproxy_server_safe_idle_connections_current gauge proxy, instance, ins, job, server, ip, clsCurrent number of safe idle connections haproxy_server_server_aborts_total counter proxy, instance, ins, job, server, ip, clsTotal number of requests or connections aborted by the server since the worker process started haproxy_server_sessions_total counter proxy, instance, ins, job, server, ip, clsTotal number of sessions since process started haproxy_server_status gauge state, proxy, instance, ins, job, server, ip, clsCurrent status of the service, per state label value. haproxy_server_total_time_average_seconds gauge proxy, instance, ins, job, server, ip, clsAvg. total time for last 1024 successful connections. haproxy_server_unsafe_idle_connections_current gauge proxy, instance, ins, job, server, ip, clsCurrent number of unsafe idle connections haproxy_server_used_connections_current gauge proxy, instance, ins, job, server, ip, clsCurrent number of connections in use haproxy_server_uweight gauge proxy, instance, ins, job, server, ip, clsServer’s user weight, or sum of active servers’ user weights for a backend haproxy_server_weight gauge proxy, instance, ins, job, server, ip, clsServer’s effective weight, or sum of active servers’ effective weights for a backend haproxy_up Unknown instance, ins, job, ip, clsN/A inflight_requests gauge instance, ins, job, route, ip, cls, methodCurrent number of inflight requests. jaeger_tracer_baggage_restrictions_updates_total Unknown instance, ins, job, result, ip, clsN/A jaeger_tracer_baggage_truncations_total Unknown instance, ins, job, ip, clsN/A jaeger_tracer_baggage_updates_total Unknown instance, ins, job, result, ip, clsN/A jaeger_tracer_finished_spans_total Unknown instance, ins, job, sampled, ip, clsN/A jaeger_tracer_reporter_queue_length gauge instance, ins, job, ip, clsCurrent number of spans in the reporter queue jaeger_tracer_reporter_spans_total Unknown instance, ins, job, result, ip, clsN/A jaeger_tracer_sampler_queries_total Unknown instance, ins, job, result, ip, clsN/A jaeger_tracer_sampler_updates_total Unknown instance, ins, job, result, ip, clsN/A jaeger_tracer_span_context_decoding_errors_total Unknown instance, ins, job, ip, clsN/A jaeger_tracer_started_spans_total Unknown instance, ins, job, sampled, ip, clsN/A jaeger_tracer_throttled_debug_spans_total Unknown instance, ins, job, ip, clsN/A jaeger_tracer_throttler_updates_total Unknown instance, ins, job, result, ip, clsN/A jaeger_tracer_traces_total Unknown state, instance, ins, job, sampled, ip, clsN/A loki_experimental_features_in_use_total Unknown instance, ins, job, ip, clsN/A loki_internal_log_messages_total Unknown level, instance, ins, job, ip, clsN/A loki_log_flushes_bucket Unknown instance, ins, job, le, ip, clsN/A loki_log_flushes_count Unknown instance, ins, job, ip, clsN/A loki_log_flushes_sum Unknown instance, ins, job, ip, clsN/A loki_log_messages_total Unknown level, instance, ins, job, ip, clsN/A loki_logql_querystats_duplicates_total Unknown instance, ins, job, ip, clsN/A loki_logql_querystats_ingester_sent_lines_total Unknown instance, ins, job, ip, clsN/A loki_querier_index_cache_corruptions_total Unknown instance, ins, job, ip, clsN/A loki_querier_index_cache_encode_errors_total Unknown instance, ins, job, ip, clsN/A loki_querier_index_cache_gets_total Unknown instance, ins, job, ip, clsN/A loki_querier_index_cache_hits_total Unknown instance, ins, job, ip, clsN/A loki_querier_index_cache_puts_total Unknown instance, ins, job, ip, clsN/A net_conntrack_dialer_conn_attempted_total counter ip, ins, job, instance, cls, dialer_nameTotal number of connections attempted by the given dialer a given name. net_conntrack_dialer_conn_closed_total counter ip, ins, job, instance, cls, dialer_nameTotal number of connections closed which originated from the dialer of a given name. net_conntrack_dialer_conn_established_total counter ip, ins, job, instance, cls, dialer_nameTotal number of connections successfully established by the given dialer a given name. net_conntrack_dialer_conn_failed_total counter ip, ins, job, reason, instance, cls, dialer_nameTotal number of connections failed to dial by the dialer a given name. node:cls:avail_bytes Unknown job, clsN/A node:cls:cpu_count Unknown job, clsN/A node:cls:cpu_usage Unknown job, clsN/A node:cls:cpu_usage_15m Unknown job, clsN/A node:cls:cpu_usage_1m Unknown job, clsN/A node:cls:cpu_usage_5m Unknown job, clsN/A node:cls:disk_io_bytes_rate1m Unknown job, clsN/A node:cls:disk_iops_1m Unknown job, clsN/A node:cls:disk_mreads_rate1m Unknown job, clsN/A node:cls:disk_mreads_ratio1m Unknown job, clsN/A node:cls:disk_mwrites_rate1m Unknown job, clsN/A node:cls:disk_mwrites_ratio1m Unknown job, clsN/A node:cls:disk_read_bytes_rate1m Unknown job, clsN/A node:cls:disk_reads_rate1m Unknown job, clsN/A node:cls:disk_write_bytes_rate1m Unknown job, clsN/A node:cls:disk_writes_rate1m Unknown job, clsN/A node:cls:free_bytes Unknown job, clsN/A node:cls:mem_usage Unknown job, clsN/A node:cls:network_io_bytes_rate1m Unknown job, clsN/A node:cls:network_rx_bytes_rate1m Unknown job, clsN/A node:cls:network_rx_pps1m Unknown job, clsN/A node:cls:network_tx_bytes_rate1m Unknown job, clsN/A node:cls:network_tx_pps1m Unknown job, clsN/A node:cls:size_bytes Unknown job, clsN/A node:cls:space_usage Unknown job, clsN/A node:cls:space_usage_max Unknown job, clsN/A node:cls:stdload1 Unknown job, clsN/A node:cls:stdload15 Unknown job, clsN/A node:cls:stdload5 Unknown job, clsN/A node:cls:time_drift_max Unknown job, clsN/A node:cpu:idle_time_irate1m Unknown ip, ins, job, cpu, instance, clsN/A node:cpu:sched_timeslices_rate1m Unknown ip, ins, job, cpu, instance, clsN/A node:cpu:sched_wait_rate1m Unknown ip, ins, job, cpu, instance, clsN/A node:cpu:time_irate1m Unknown ip, mode, ins, job, cpu, instance, clsN/A node:cpu:total_time_irate1m Unknown ip, ins, job, cpu, instance, clsN/A node:cpu:usage Unknown ip, ins, job, cpu, instance, clsN/A node:cpu:usage_avg15m Unknown ip, ins, job, cpu, instance, clsN/A node:cpu:usage_avg1m Unknown ip, ins, job, cpu, instance, clsN/A node:cpu:usage_avg5m Unknown ip, ins, job, cpu, instance, clsN/A node:dev:disk_avg_queue_size Unknown ip, device, ins, job, instance, clsN/A node:dev:disk_io_batch_1m Unknown ip, device, ins, job, instance, clsN/A node:dev:disk_io_bytes_rate1m Unknown ip, device, ins, job, instance, clsN/A node:dev:disk_io_rt_1m Unknown ip, device, ins, job, instance, clsN/A node:dev:disk_io_time_rate1m Unknown ip, device, ins, job, instance, clsN/A node:dev:disk_iops_1m Unknown ip, device, ins, job, instance, clsN/A node:dev:disk_mreads_rate1m Unknown ip, device, ins, job, instance, clsN/A node:dev:disk_mreads_ratio1m Unknown ip, device, ins, job, instance, clsN/A node:dev:disk_mwrites_rate1m Unknown ip, device, ins, job, instance, clsN/A node:dev:disk_mwrites_ratio1m Unknown ip, device, ins, job, instance, clsN/A node:dev:disk_read_batch_1m Unknown ip, device, ins, job, instance, clsN/A node:dev:disk_read_bytes_rate1m Unknown ip, device, ins, job, instance, clsN/A node:dev:disk_read_rt_1m Unknown ip, device, ins, job, instance, clsN/A node:dev:disk_read_time_rate1m Unknown ip, device, ins, job, instance, clsN/A node:dev:disk_reads_rate1m Unknown ip, device, ins, job, instance, clsN/A node:dev:disk_util_1m Unknown ip, device, ins, job, instance, clsN/A node:dev:disk_write_batch_1m Unknown ip, device, ins, job, instance, clsN/A node:dev:disk_write_bytes_rate1m Unknown ip, device, ins, job, instance, clsN/A node:dev:disk_write_rt_1m Unknown ip, device, ins, job, instance, clsN/A node:dev:disk_write_time_rate1m Unknown ip, device, ins, job, instance, clsN/A node:dev:disk_writes_rate1m Unknown ip, device, ins, job, instance, clsN/A node:dev:network_io_bytes_rate1m Unknown ip, device, ins, job, instance, clsN/A node:dev:network_rx_bytes_rate1m Unknown ip, device, ins, job, instance, clsN/A node:dev:network_rx_pps1m Unknown ip, device, ins, job, instance, clsN/A node:dev:network_tx_bytes_rate1m Unknown ip, device, ins, job, instance, clsN/A node:dev:network_tx_pps1m Unknown ip, device, ins, job, instance, clsN/A node:env:avail_bytes Unknown jobN/A node:env:cpu_count Unknown jobN/A node:env:cpu_usage Unknown jobN/A node:env:cpu_usage_15m Unknown jobN/A node:env:cpu_usage_1m Unknown jobN/A node:env:cpu_usage_5m Unknown jobN/A node:env:device_space_usage_max Unknown device, mountpoint, job, fstypeN/A node:env:free_bytes Unknown jobN/A node:env:mem_avail Unknown jobN/A node:env:mem_total Unknown jobN/A node:env:mem_usage Unknown jobN/A node:env:size_bytes Unknown jobN/A node:env:space_usage Unknown jobN/A node:env:stdload1 Unknown jobN/A node:env:stdload15 Unknown jobN/A node:env:stdload5 Unknown jobN/A node:fs:avail_bytes Unknown ip, device, mountpoint, ins, cls, job, instance, fstypeN/A node:fs:free_bytes Unknown ip, device, mountpoint, ins, cls, job, instance, fstypeN/A node:fs:inode_free Unknown ip, device, mountpoint, ins, cls, job, instance, fstypeN/A node:fs:inode_total Unknown ip, device, mountpoint, ins, cls, job, instance, fstypeN/A node:fs:inode_usage Unknown ip, device, mountpoint, ins, cls, job, instance, fstypeN/A node:fs:inode_used Unknown ip, device, mountpoint, ins, cls, job, instance, fstypeN/A node:fs:size_bytes Unknown ip, device, mountpoint, ins, cls, job, instance, fstypeN/A node:fs:space_deriv1h Unknown ip, device, mountpoint, ins, cls, job, instance, fstypeN/A node:fs:space_exhaust Unknown ip, device, mountpoint, ins, cls, job, instance, fstypeN/A node:fs:space_predict_1d Unknown ip, device, mountpoint, ins, cls, job, instance, fstypeN/A node:fs:space_usage Unknown ip, device, mountpoint, ins, cls, job, instance, fstypeN/A node:ins Unknown id, ip, ins, job, nodename, instance, clsN/A node:ins:avail_bytes Unknown instance, ins, job, ip, clsN/A node:ins:cpu_count Unknown instance, ins, job, ip, clsN/A node:ins:cpu_usage Unknown instance, ins, job, ip, clsN/A node:ins:cpu_usage_15m Unknown instance, ins, job, ip, clsN/A node:ins:cpu_usage_1m Unknown instance, ins, job, ip, clsN/A node:ins:cpu_usage_5m Unknown instance, ins, job, ip, clsN/A node:ins:ctx_switch_rate1m Unknown instance, ins, job, ip, clsN/A node:ins:disk_io_bytes_rate1m Unknown instance, ins, job, ip, clsN/A node:ins:disk_iops_1m Unknown instance, ins, job, ip, clsN/A node:ins:disk_mreads_rate1m Unknown instance, ins, job, ip, clsN/A node:ins:disk_mreads_ratio1m Unknown instance, ins, job, ip, clsN/A node:ins:disk_mwrites_rate1m Unknown instance, ins, job, ip, clsN/A node:ins:disk_mwrites_ratio1m Unknown instance, ins, job, ip, clsN/A node:ins:disk_read_bytes_rate1m Unknown instance, ins, job, ip, clsN/A node:ins:disk_reads_rate1m Unknown instance, ins, job, ip, clsN/A node:ins:disk_write_bytes_rate1m Unknown instance, ins, job, ip, clsN/A node:ins:disk_writes_rate1m Unknown instance, ins, job, ip, clsN/A node:ins:fd_alloc_rate1m Unknown instance, ins, job, ip, clsN/A node:ins:fd_usage Unknown instance, ins, job, ip, clsN/A node:ins:forks_rate1m Unknown instance, ins, job, ip, clsN/A node:ins:free_bytes Unknown instance, ins, job, ip, clsN/A node:ins:inode_usage Unknown instance, ins, job, ip, clsN/A node:ins:interrupt_rate1m Unknown instance, ins, job, ip, clsN/A node:ins:mem_avail Unknown instance, ins, job, ip, clsN/A node:ins:mem_commit_ratio Unknown instance, ins, job, ip, clsN/A node:ins:mem_kernel Unknown instance, ins, job, ip, clsN/A node:ins:mem_rss Unknown instance, ins, job, ip, clsN/A node:ins:mem_usage Unknown instance, ins, job, ip, clsN/A node:ins:network_io_bytes_rate1m Unknown instance, ins, job, ip, clsN/A node:ins:network_rx_bytes_rate1m Unknown instance, ins, job, ip, clsN/A node:ins:network_rx_pps1m Unknown instance, ins, job, ip, clsN/A node:ins:network_tx_bytes_rate1m Unknown instance, ins, job, ip, clsN/A node:ins:network_tx_pps1m Unknown instance, ins, job, ip, clsN/A node:ins:pagefault_rate1m Unknown instance, ins, job, ip, clsN/A node:ins:pagein_rate1m Unknown instance, ins, job, ip, clsN/A node:ins:pageout_rate1m Unknown instance, ins, job, ip, clsN/A node:ins:pgmajfault_rate1m Unknown instance, ins, job, ip, clsN/A node:ins:sched_wait_rate1m Unknown instance, ins, job, ip, clsN/A node:ins:size_bytes Unknown instance, ins, job, ip, clsN/A node:ins:space_usage_max Unknown instance, ins, job, ip, clsN/A node:ins:stdload1 Unknown instance, ins, job, ip, clsN/A node:ins:stdload15 Unknown instance, ins, job, ip, clsN/A node:ins:stdload5 Unknown instance, ins, job, ip, clsN/A node:ins:swap_usage Unknown instance, ins, job, ip, clsN/A node:ins:swapin_rate1m Unknown instance, ins, job, ip, clsN/A node:ins:swapout_rate1m Unknown instance, ins, job, ip, clsN/A node:ins:tcp_active_opens_rate1m Unknown instance, ins, job, ip, clsN/A node:ins:tcp_dropped_rate1m Unknown instance, ins, job, ip, clsN/A node:ins:tcp_error Unknown instance, ins, job, ip, clsN/A node:ins:tcp_error_rate1m Unknown instance, ins, job, ip, clsN/A node:ins:tcp_insegs_rate1m Unknown instance, ins, job, ip, clsN/A node:ins:tcp_outsegs_rate1m Unknown instance, ins, job, ip, clsN/A node:ins:tcp_overflow_rate1m Unknown instance, ins, job, ip, clsN/A node:ins:tcp_passive_opens_rate1m Unknown instance, ins, job, ip, clsN/A node:ins:tcp_retrans_ratio1m Unknown instance, ins, job, ip, clsN/A node:ins:tcp_retranssegs_rate1m Unknown instance, ins, job, ip, clsN/A node:ins:tcp_segs_rate1m Unknown instance, ins, job, ip, clsN/A node:ins:time_drift Unknown instance, ins, job, ip, clsN/A node:ins:udp_in_rate1m Unknown instance, ins, job, ip, clsN/A node:ins:udp_out_rate1m Unknown instance, ins, job, ip, clsN/A node:ins:uptime Unknown instance, ins, job, ip, clsN/A node_arp_entries gauge ip, device, ins, job, instance, clsARP entries by device node_boot_time_seconds gauge instance, ins, job, ip, clsNode boot time, in unixtime. node_context_switches_total counter instance, ins, job, ip, clsTotal number of context switches. node_cooling_device_cur_state gauge instance, ins, job, type, ip, clsCurrent throttle state of the cooling device node_cooling_device_max_state gauge instance, ins, job, type, ip, clsMaximum throttle state of the cooling device node_cpu_guest_seconds_total counter ip, mode, ins, job, cpu, instance, clsSeconds the CPUs spent in guests (VMs) for each mode. node_cpu_seconds_total counter ip, mode, ins, job, cpu, instance, clsSeconds the CPUs spent in each mode. node_disk_discard_time_seconds_total counter ip, device, ins, job, instance, clsThis is the total number of seconds spent by all discards. node_disk_discarded_sectors_total counter ip, device, ins, job, instance, clsThe total number of sectors discarded successfully. node_disk_discards_completed_total counter ip, device, ins, job, instance, clsThe total number of discards completed successfully. node_disk_discards_merged_total counter ip, device, ins, job, instance, clsThe total number of discards merged. node_disk_filesystem_info gauge ip, usage, version, device, uuid, ins, type, job, instance, clsInfo about disk filesystem. node_disk_info gauge minor, ip, major, revision, device, model, serial, path, ins, job, instance, clsInfo of /sys/block/<block_device>. node_disk_io_now gauge ip, device, ins, job, instance, clsThe number of I/Os currently in progress. node_disk_io_time_seconds_total counter ip, device, ins, job, instance, clsTotal seconds spent doing I/Os. node_disk_io_time_weighted_seconds_total counter ip, device, ins, job, instance, clsThe weighted # of seconds spent doing I/Os. node_disk_read_bytes_total counter ip, device, ins, job, instance, clsThe total number of bytes read successfully. node_disk_read_time_seconds_total counter ip, device, ins, job, instance, clsThe total number of seconds spent by all reads. node_disk_reads_completed_total counter ip, device, ins, job, instance, clsThe total number of reads completed successfully. node_disk_reads_merged_total counter ip, device, ins, job, instance, clsThe total number of reads merged. node_disk_write_time_seconds_total counter ip, device, ins, job, instance, clsThis is the total number of seconds spent by all writes. node_disk_writes_completed_total counter ip, device, ins, job, instance, clsThe total number of writes completed successfully. node_disk_writes_merged_total counter ip, device, ins, job, instance, clsThe number of writes merged. node_disk_written_bytes_total counter ip, device, ins, job, instance, clsThe total number of bytes written successfully. node_dmi_info gauge bios_vendor, ip, product_family, product_version, product_uuid, system_vendor, bios_version, ins, bios_date, cls, job, product_name, instance, chassis_version, chassis_vendor, product_serialA metric with a constant ‘1’ value labeled by bios_date, bios_release, bios_vendor, bios_version, board_asset_tag, board_name, board_serial, board_vendor, board_version, chassis_asset_tag, chassis_serial, chassis_vendor, chassis_version, product_family, product_name, product_serial, product_sku, product_uuid, product_version, system_vendor if provided by DMI. node_entropy_available_bits gauge instance, ins, job, ip, clsBits of available entropy. node_entropy_pool_size_bits gauge instance, ins, job, ip, clsBits of entropy pool. node_exporter_build_info gauge ip, version, revision, goversion, branch, ins, goarch, job, tags, instance, cls, goosA metric with a constant ‘1’ value labeled by version, revision, branch, goversion from which node_exporter was built, and the goos and goarch for the build. node_filefd_allocated gauge instance, ins, job, ip, clsFile descriptor statistics: allocated. node_filefd_maximum gauge instance, ins, job, ip, clsFile descriptor statistics: maximum. node_filesystem_avail_bytes gauge ip, device, mountpoint, ins, cls, job, instance, fstypeFilesystem space available to non-root users in bytes. node_filesystem_device_error gauge ip, device, mountpoint, ins, cls, job, instance, fstypeWhether an error occurred while getting statistics for the given device. node_filesystem_files gauge ip, device, mountpoint, ins, cls, job, instance, fstypeFilesystem total file nodes. node_filesystem_files_free gauge ip, device, mountpoint, ins, cls, job, instance, fstypeFilesystem total free file nodes. node_filesystem_free_bytes gauge ip, device, mountpoint, ins, cls, job, instance, fstypeFilesystem free space in bytes. node_filesystem_readonly gauge ip, device, mountpoint, ins, cls, job, instance, fstypeFilesystem read-only status. node_filesystem_size_bytes gauge ip, device, mountpoint, ins, cls, job, instance, fstypeFilesystem size in bytes. node_forks_total counter instance, ins, job, ip, clsTotal number of forks. node_hwmon_chip_names gauge chip_name, ip, ins, chip, job, instance, clsAnnotation metric for human-readable chip names node_hwmon_energy_joule_total counter sensor, ip, ins, chip, job, instance, clsHardware monitor for joules used so far (input) node_hwmon_sensor_label gauge sensor, ip, ins, chip, job, label, instance, clsLabel for given chip and sensor node_intr_total counter instance, ins, job, ip, clsTotal number of interrupts serviced. node_ipvs_connections_total counter instance, ins, job, ip, clsThe total number of connections made. node_ipvs_incoming_bytes_total counter instance, ins, job, ip, clsThe total amount of incoming data. node_ipvs_incoming_packets_total counter instance, ins, job, ip, clsThe total number of incoming packets. node_ipvs_outgoing_bytes_total counter instance, ins, job, ip, clsThe total amount of outgoing data. node_ipvs_outgoing_packets_total counter instance, ins, job, ip, clsThe total number of outgoing packets. node_load1 gauge instance, ins, job, ip, cls1m load average. node_load15 gauge instance, ins, job, ip, cls15m load average. node_load5 gauge instance, ins, job, ip, cls5m load average. node_memory_Active_anon_bytes gauge instance, ins, job, ip, clsMemory information field Active_anon_bytes. node_memory_Active_bytes gauge instance, ins, job, ip, clsMemory information field Active_bytes. node_memory_Active_file_bytes gauge instance, ins, job, ip, clsMemory information field Active_file_bytes. node_memory_AnonHugePages_bytes gauge instance, ins, job, ip, clsMemory information field AnonHugePages_bytes. node_memory_AnonPages_bytes gauge instance, ins, job, ip, clsMemory information field AnonPages_bytes. node_memory_Bounce_bytes gauge instance, ins, job, ip, clsMemory information field Bounce_bytes. node_memory_Buffers_bytes gauge instance, ins, job, ip, clsMemory information field Buffers_bytes. node_memory_Cached_bytes gauge instance, ins, job, ip, clsMemory information field Cached_bytes. node_memory_CommitLimit_bytes gauge instance, ins, job, ip, clsMemory information field CommitLimit_bytes. node_memory_Committed_AS_bytes gauge instance, ins, job, ip, clsMemory information field Committed_AS_bytes. node_memory_DirectMap1G_bytes gauge instance, ins, job, ip, clsMemory information field DirectMap1G_bytes. node_memory_DirectMap2M_bytes gauge instance, ins, job, ip, clsMemory information field DirectMap2M_bytes. node_memory_DirectMap4k_bytes gauge instance, ins, job, ip, clsMemory information field DirectMap4k_bytes. node_memory_Dirty_bytes gauge instance, ins, job, ip, clsMemory information field Dirty_bytes. node_memory_FileHugePages_bytes gauge instance, ins, job, ip, clsMemory information field FileHugePages_bytes. node_memory_FilePmdMapped_bytes gauge instance, ins, job, ip, clsMemory information field FilePmdMapped_bytes. node_memory_HardwareCorrupted_bytes gauge instance, ins, job, ip, clsMemory information field HardwareCorrupted_bytes. node_memory_HugePages_Free gauge instance, ins, job, ip, clsMemory information field HugePages_Free. node_memory_HugePages_Rsvd gauge instance, ins, job, ip, clsMemory information field HugePages_Rsvd. node_memory_HugePages_Surp gauge instance, ins, job, ip, clsMemory information field HugePages_Surp. node_memory_HugePages_Total gauge instance, ins, job, ip, clsMemory information field HugePages_Total. node_memory_Hugepagesize_bytes gauge instance, ins, job, ip, clsMemory information field Hugepagesize_bytes. node_memory_Hugetlb_bytes gauge instance, ins, job, ip, clsMemory information field Hugetlb_bytes. node_memory_Inactive_anon_bytes gauge instance, ins, job, ip, clsMemory information field Inactive_anon_bytes. node_memory_Inactive_bytes gauge instance, ins, job, ip, clsMemory information field Inactive_bytes. node_memory_Inactive_file_bytes gauge instance, ins, job, ip, clsMemory information field Inactive_file_bytes. node_memory_KReclaimable_bytes gauge instance, ins, job, ip, clsMemory information field KReclaimable_bytes. node_memory_KernelStack_bytes gauge instance, ins, job, ip, clsMemory information field KernelStack_bytes. node_memory_Mapped_bytes gauge instance, ins, job, ip, clsMemory information field Mapped_bytes. node_memory_MemAvailable_bytes gauge instance, ins, job, ip, clsMemory information field MemAvailable_bytes. node_memory_MemFree_bytes gauge instance, ins, job, ip, clsMemory information field MemFree_bytes. node_memory_MemTotal_bytes gauge instance, ins, job, ip, clsMemory information field MemTotal_bytes. node_memory_Mlocked_bytes gauge instance, ins, job, ip, clsMemory information field Mlocked_bytes. node_memory_NFS_Unstable_bytes gauge instance, ins, job, ip, clsMemory information field NFS_Unstable_bytes. node_memory_PageTables_bytes gauge instance, ins, job, ip, clsMemory information field PageTables_bytes. node_memory_Percpu_bytes gauge instance, ins, job, ip, clsMemory information field Percpu_bytes. node_memory_SReclaimable_bytes gauge instance, ins, job, ip, clsMemory information field SReclaimable_bytes. node_memory_SUnreclaim_bytes gauge instance, ins, job, ip, clsMemory information field SUnreclaim_bytes. node_memory_ShmemHugePages_bytes gauge instance, ins, job, ip, clsMemory information field ShmemHugePages_bytes. node_memory_ShmemPmdMapped_bytes gauge instance, ins, job, ip, clsMemory information field ShmemPmdMapped_bytes. node_memory_Shmem_bytes gauge instance, ins, job, ip, clsMemory information field Shmem_bytes. node_memory_Slab_bytes gauge instance, ins, job, ip, clsMemory information field Slab_bytes. node_memory_SwapCached_bytes gauge instance, ins, job, ip, clsMemory information field SwapCached_bytes. node_memory_SwapFree_bytes gauge instance, ins, job, ip, clsMemory information field SwapFree_bytes. node_memory_SwapTotal_bytes gauge instance, ins, job, ip, clsMemory information field SwapTotal_bytes. node_memory_Unevictable_bytes gauge instance, ins, job, ip, clsMemory information field Unevictable_bytes. node_memory_VmallocChunk_bytes gauge instance, ins, job, ip, clsMemory information field VmallocChunk_bytes. node_memory_VmallocTotal_bytes gauge instance, ins, job, ip, clsMemory information field VmallocTotal_bytes. node_memory_VmallocUsed_bytes gauge instance, ins, job, ip, clsMemory information field VmallocUsed_bytes. node_memory_WritebackTmp_bytes gauge instance, ins, job, ip, clsMemory information field WritebackTmp_bytes. node_memory_Writeback_bytes gauge instance, ins, job, ip, clsMemory information field Writeback_bytes. node_netstat_Icmp6_InErrors unknown instance, ins, job, ip, clsStatistic Icmp6InErrors. node_netstat_Icmp6_InMsgs unknown instance, ins, job, ip, clsStatistic Icmp6InMsgs. node_netstat_Icmp6_OutMsgs unknown instance, ins, job, ip, clsStatistic Icmp6OutMsgs. node_netstat_Icmp_InErrors unknown instance, ins, job, ip, clsStatistic IcmpInErrors. node_netstat_Icmp_InMsgs unknown instance, ins, job, ip, clsStatistic IcmpInMsgs. node_netstat_Icmp_OutMsgs unknown instance, ins, job, ip, clsStatistic IcmpOutMsgs. node_netstat_Ip6_InOctets unknown instance, ins, job, ip, clsStatistic Ip6InOctets. node_netstat_Ip6_OutOctets unknown instance, ins, job, ip, clsStatistic Ip6OutOctets. node_netstat_IpExt_InOctets unknown instance, ins, job, ip, clsStatistic IpExtInOctets. node_netstat_IpExt_OutOctets unknown instance, ins, job, ip, clsStatistic IpExtOutOctets. node_netstat_Ip_Forwarding unknown instance, ins, job, ip, clsStatistic IpForwarding. node_netstat_TcpExt_ListenDrops unknown instance, ins, job, ip, clsStatistic TcpExtListenDrops. node_netstat_TcpExt_ListenOverflows unknown instance, ins, job, ip, clsStatistic TcpExtListenOverflows. node_netstat_TcpExt_SyncookiesFailed unknown instance, ins, job, ip, clsStatistic TcpExtSyncookiesFailed. node_netstat_TcpExt_SyncookiesRecv unknown instance, ins, job, ip, clsStatistic TcpExtSyncookiesRecv. node_netstat_TcpExt_SyncookiesSent unknown instance, ins, job, ip, clsStatistic TcpExtSyncookiesSent. node_netstat_TcpExt_TCPSynRetrans unknown instance, ins, job, ip, clsStatistic TcpExtTCPSynRetrans. node_netstat_TcpExt_TCPTimeouts unknown instance, ins, job, ip, clsStatistic TcpExtTCPTimeouts. node_netstat_Tcp_ActiveOpens unknown instance, ins, job, ip, clsStatistic TcpActiveOpens. node_netstat_Tcp_CurrEstab unknown instance, ins, job, ip, clsStatistic TcpCurrEstab. node_netstat_Tcp_InErrs unknown instance, ins, job, ip, clsStatistic TcpInErrs. node_netstat_Tcp_InSegs unknown instance, ins, job, ip, clsStatistic TcpInSegs. node_netstat_Tcp_OutRsts unknown instance, ins, job, ip, clsStatistic TcpOutRsts. node_netstat_Tcp_OutSegs unknown instance, ins, job, ip, clsStatistic TcpOutSegs. node_netstat_Tcp_PassiveOpens unknown instance, ins, job, ip, clsStatistic TcpPassiveOpens. node_netstat_Tcp_RetransSegs unknown instance, ins, job, ip, clsStatistic TcpRetransSegs. node_netstat_Udp6_InDatagrams unknown instance, ins, job, ip, clsStatistic Udp6InDatagrams. node_netstat_Udp6_InErrors unknown instance, ins, job, ip, clsStatistic Udp6InErrors. node_netstat_Udp6_NoPorts unknown instance, ins, job, ip, clsStatistic Udp6NoPorts. node_netstat_Udp6_OutDatagrams unknown instance, ins, job, ip, clsStatistic Udp6OutDatagrams. node_netstat_Udp6_RcvbufErrors unknown instance, ins, job, ip, clsStatistic Udp6RcvbufErrors. node_netstat_Udp6_SndbufErrors unknown instance, ins, job, ip, clsStatistic Udp6SndbufErrors. node_netstat_UdpLite6_InErrors unknown instance, ins, job, ip, clsStatistic UdpLite6InErrors. node_netstat_UdpLite_InErrors unknown instance, ins, job, ip, clsStatistic UdpLiteInErrors. node_netstat_Udp_InDatagrams unknown instance, ins, job, ip, clsStatistic UdpInDatagrams. node_netstat_Udp_InErrors unknown instance, ins, job, ip, clsStatistic UdpInErrors. node_netstat_Udp_NoPorts unknown instance, ins, job, ip, clsStatistic UdpNoPorts. node_netstat_Udp_OutDatagrams unknown instance, ins, job, ip, clsStatistic UdpOutDatagrams. node_netstat_Udp_RcvbufErrors unknown instance, ins, job, ip, clsStatistic UdpRcvbufErrors. node_netstat_Udp_SndbufErrors unknown instance, ins, job, ip, clsStatistic UdpSndbufErrors. node_network_address_assign_type gauge ip, device, ins, job, instance, clsNetwork device property: address_assign_type node_network_carrier gauge ip, device, ins, job, instance, clsNetwork device property: carrier node_network_carrier_changes_total counter ip, device, ins, job, instance, clsNetwork device property: carrier_changes_total node_network_carrier_down_changes_total counter ip, device, ins, job, instance, clsNetwork device property: carrier_down_changes_total node_network_carrier_up_changes_total counter ip, device, ins, job, instance, clsNetwork device property: carrier_up_changes_total node_network_device_id gauge ip, device, ins, job, instance, clsNetwork device property: device_id node_network_dormant gauge ip, device, ins, job, instance, clsNetwork device property: dormant node_network_flags gauge ip, device, ins, job, instance, clsNetwork device property: flags node_network_iface_id gauge ip, device, ins, job, instance, clsNetwork device property: iface_id node_network_iface_link gauge ip, device, ins, job, instance, clsNetwork device property: iface_link node_network_iface_link_mode gauge ip, device, ins, job, instance, clsNetwork device property: iface_link_mode node_network_info gauge broadcast, ip, device, operstate, ins, job, adminstate, duplex, address, instance, clsNon-numeric data from /sys/class/net/, value is always 1. node_network_mtu_bytes gauge ip, device, ins, job, instance, clsNetwork device property: mtu_bytes node_network_name_assign_type gauge ip, device, ins, job, instance, clsNetwork device property: name_assign_type node_network_net_dev_group gauge ip, device, ins, job, instance, clsNetwork device property: net_dev_group node_network_protocol_type gauge ip, device, ins, job, instance, clsNetwork device property: protocol_type node_network_receive_bytes_total counter ip, device, ins, job, instance, clsNetwork device statistic receive_bytes. node_network_receive_compressed_total counter ip, device, ins, job, instance, clsNetwork device statistic receive_compressed. node_network_receive_drop_total counter ip, device, ins, job, instance, clsNetwork device statistic receive_drop. node_network_receive_errs_total counter ip, device, ins, job, instance, clsNetwork device statistic receive_errs. node_network_receive_fifo_total counter ip, device, ins, job, instance, clsNetwork device statistic receive_fifo. node_network_receive_frame_total counter ip, device, ins, job, instance, clsNetwork device statistic receive_frame. node_network_receive_multicast_total counter ip, device, ins, job, instance, clsNetwork device statistic receive_multicast. node_network_receive_nohandler_total counter ip, device, ins, job, instance, clsNetwork device statistic receive_nohandler. node_network_receive_packets_total counter ip, device, ins, job, instance, clsNetwork device statistic receive_packets. node_network_speed_bytes gauge ip, device, ins, job, instance, clsNetwork device property: speed_bytes node_network_transmit_bytes_total counter ip, device, ins, job, instance, clsNetwork device statistic transmit_bytes. node_network_transmit_carrier_total counter ip, device, ins, job, instance, clsNetwork device statistic transmit_carrier. node_network_transmit_colls_total counter ip, device, ins, job, instance, clsNetwork device statistic transmit_colls. node_network_transmit_compressed_total counter ip, device, ins, job, instance, clsNetwork device statistic transmit_compressed. node_network_transmit_drop_total counter ip, device, ins, job, instance, clsNetwork device statistic transmit_drop. node_network_transmit_errs_total counter ip, device, ins, job, instance, clsNetwork device statistic transmit_errs. node_network_transmit_fifo_total counter ip, device, ins, job, instance, clsNetwork device statistic transmit_fifo. node_network_transmit_packets_total counter ip, device, ins, job, instance, clsNetwork device statistic transmit_packets. node_network_transmit_queue_length gauge ip, device, ins, job, instance, clsNetwork device property: transmit_queue_length node_network_up gauge ip, device, ins, job, instance, clsValue is 1 if operstate is ‘up’, 0 otherwise. node_nf_conntrack_entries gauge instance, ins, job, ip, clsNumber of currently allocated flow entries for connection tracking. node_nf_conntrack_entries_limit gauge instance, ins, job, ip, clsMaximum size of connection tracking table. node_nf_conntrack_stat_drop gauge instance, ins, job, ip, clsNumber of packets dropped due to conntrack failure. node_nf_conntrack_stat_early_drop gauge instance, ins, job, ip, clsNumber of dropped conntrack entries to make room for new ones, if maximum table size was reached. node_nf_conntrack_stat_found gauge instance, ins, job, ip, clsNumber of searched entries which were successful. node_nf_conntrack_stat_ignore gauge instance, ins, job, ip, clsNumber of packets seen which are already connected to a conntrack entry. node_nf_conntrack_stat_insert gauge instance, ins, job, ip, clsNumber of entries inserted into the list. node_nf_conntrack_stat_insert_failed gauge instance, ins, job, ip, clsNumber of entries for which list insertion was attempted but failed. node_nf_conntrack_stat_invalid gauge instance, ins, job, ip, clsNumber of packets seen which can not be tracked. node_nf_conntrack_stat_search_restart gauge instance, ins, job, ip, clsNumber of conntrack table lookups which had to be restarted due to hashtable resizes. node_os_info gauge id, ip, version, version_id, ins, instance, job, pretty_name, id_like, clsA metric with a constant ‘1’ value labeled by build_id, id, id_like, image_id, image_version, name, pretty_name, variant, variant_id, version, version_codename, version_id. node_os_version gauge id, ip, ins, instance, job, id_like, clsMetric containing the major.minor part of the OS version. node_processes_max_processes gauge instance, ins, job, ip, clsNumber of max PIDs limit node_processes_max_threads gauge instance, ins, job, ip, clsLimit of threads in the system node_processes_pids gauge instance, ins, job, ip, clsNumber of PIDs node_processes_state gauge state, instance, ins, job, ip, clsNumber of processes in each state. node_processes_threads gauge instance, ins, job, ip, clsAllocated threads in system node_processes_threads_state gauge instance, ins, job, thread_state, ip, clsNumber of threads in each state. node_procs_blocked gauge instance, ins, job, ip, clsNumber of processes blocked waiting for I/O to complete. node_procs_running gauge instance, ins, job, ip, clsNumber of processes in runnable state. node_schedstat_running_seconds_total counter ip, ins, job, cpu, instance, clsNumber of seconds CPU spent running a process. node_schedstat_timeslices_total counter ip, ins, job, cpu, instance, clsNumber of timeslices executed by CPU. node_schedstat_waiting_seconds_total counter ip, ins, job, cpu, instance, clsNumber of seconds spent by processing waiting for this CPU. node_scrape_collector_duration_seconds gauge ip, collector, ins, job, instance, clsnode_exporter: Duration of a collector scrape. node_scrape_collector_success gauge ip, collector, ins, job, instance, clsnode_exporter: Whether a collector succeeded. node_selinux_enabled gauge instance, ins, job, ip, clsSELinux is enabled, 1 is true, 0 is false node_sockstat_FRAG6_inuse gauge instance, ins, job, ip, clsNumber of FRAG6 sockets in state inuse. node_sockstat_FRAG6_memory gauge instance, ins, job, ip, clsNumber of FRAG6 sockets in state memory. node_sockstat_FRAG_inuse gauge instance, ins, job, ip, clsNumber of FRAG sockets in state inuse. node_sockstat_FRAG_memory gauge instance, ins, job, ip, clsNumber of FRAG sockets in state memory. node_sockstat_RAW6_inuse gauge instance, ins, job, ip, clsNumber of RAW6 sockets in state inuse. node_sockstat_RAW_inuse gauge instance, ins, job, ip, clsNumber of RAW sockets in state inuse. node_sockstat_TCP6_inuse gauge instance, ins, job, ip, clsNumber of TCP6 sockets in state inuse. node_sockstat_TCP_alloc gauge instance, ins, job, ip, clsNumber of TCP sockets in state alloc. node_sockstat_TCP_inuse gauge instance, ins, job, ip, clsNumber of TCP sockets in state inuse. node_sockstat_TCP_mem gauge instance, ins, job, ip, clsNumber of TCP sockets in state mem. node_sockstat_TCP_mem_bytes gauge instance, ins, job, ip, clsNumber of TCP sockets in state mem_bytes. node_sockstat_TCP_orphan gauge instance, ins, job, ip, clsNumber of TCP sockets in state orphan. node_sockstat_TCP_tw gauge instance, ins, job, ip, clsNumber of TCP sockets in state tw. node_sockstat_UDP6_inuse gauge instance, ins, job, ip, clsNumber of UDP6 sockets in state inuse. node_sockstat_UDPLITE6_inuse gauge instance, ins, job, ip, clsNumber of UDPLITE6 sockets in state inuse. node_sockstat_UDPLITE_inuse gauge instance, ins, job, ip, clsNumber of UDPLITE sockets in state inuse. node_sockstat_UDP_inuse gauge instance, ins, job, ip, clsNumber of UDP sockets in state inuse. node_sockstat_UDP_mem gauge instance, ins, job, ip, clsNumber of UDP sockets in state mem. node_sockstat_UDP_mem_bytes gauge instance, ins, job, ip, clsNumber of UDP sockets in state mem_bytes. node_sockstat_sockets_used gauge instance, ins, job, ip, clsNumber of IPv4 sockets in use. node_tcp_connection_states gauge state, instance, ins, job, ip, clsNumber of connection states. node_textfile_scrape_error gauge instance, ins, job, ip, cls1 if there was an error opening or reading a file, 0 otherwise node_time_clocksource_available_info gauge ip, device, ins, clocksource, job, instance, clsAvailable clocksources read from ‘/sys/devices/system/clocksource’. node_time_clocksource_current_info gauge ip, device, ins, clocksource, job, instance, clsCurrent clocksource read from ‘/sys/devices/system/clocksource’. node_time_seconds gauge instance, ins, job, ip, clsSystem time in seconds since epoch (1970). node_time_zone_offset_seconds gauge instance, ins, job, time_zone, ip, clsSystem time zone offset in seconds. node_timex_estimated_error_seconds gauge instance, ins, job, ip, clsEstimated error in seconds. node_timex_frequency_adjustment_ratio gauge instance, ins, job, ip, clsLocal clock frequency adjustment. node_timex_loop_time_constant gauge instance, ins, job, ip, clsPhase-locked loop time constant. node_timex_maxerror_seconds gauge instance, ins, job, ip, clsMaximum error in seconds. node_timex_offset_seconds gauge instance, ins, job, ip, clsTime offset in between local system and reference clock. node_timex_pps_calibration_total counter instance, ins, job, ip, clsPulse per second count of calibration intervals. node_timex_pps_error_total counter instance, ins, job, ip, clsPulse per second count of calibration errors. node_timex_pps_frequency_hertz gauge instance, ins, job, ip, clsPulse per second frequency. node_timex_pps_jitter_seconds gauge instance, ins, job, ip, clsPulse per second jitter. node_timex_pps_jitter_total counter instance, ins, job, ip, clsPulse per second count of jitter limit exceeded events. node_timex_pps_shift_seconds gauge instance, ins, job, ip, clsPulse per second interval duration. node_timex_pps_stability_exceeded_total counter instance, ins, job, ip, clsPulse per second count of stability limit exceeded events. node_timex_pps_stability_hertz gauge instance, ins, job, ip, clsPulse per second stability, average of recent frequency changes. node_timex_status gauge instance, ins, job, ip, clsValue of the status array bits. node_timex_sync_status gauge instance, ins, job, ip, clsIs clock synchronized to a reliable server (1 = yes, 0 = no). node_timex_tai_offset_seconds gauge instance, ins, job, ip, clsInternational Atomic Time (TAI) offset. node_timex_tick_seconds gauge instance, ins, job, ip, clsSeconds between clock ticks. node_udp_queues gauge ip, queue, ins, job, exported_ip, instance, clsNumber of allocated memory in the kernel for UDP datagrams in bytes. node_uname_info gauge ip, sysname, version, domainname, release, ins, job, nodename, instance, cls, machineLabeled system information as provided by the uname system call. node_up Unknown instance, ins, job, ip, clsN/A node_vmstat_oom_kill unknown instance, ins, job, ip, cls/proc/vmstat information field oom_kill. node_vmstat_pgfault unknown instance, ins, job, ip, cls/proc/vmstat information field pgfault. node_vmstat_pgmajfault unknown instance, ins, job, ip, cls/proc/vmstat information field pgmajfault. node_vmstat_pgpgin unknown instance, ins, job, ip, cls/proc/vmstat information field pgpgin. node_vmstat_pgpgout unknown instance, ins, job, ip, cls/proc/vmstat information field pgpgout. node_vmstat_pswpin unknown instance, ins, job, ip, cls/proc/vmstat information field pswpin. node_vmstat_pswpout unknown instance, ins, job, ip, cls/proc/vmstat information field pswpout. process_cpu_seconds_total counter instance, ins, job, ip, clsTotal user and system CPU time spent in seconds. process_max_fds gauge instance, ins, job, ip, clsMaximum number of open file descriptors. process_open_fds gauge instance, ins, job, ip, clsNumber of open file descriptors. process_resident_memory_bytes gauge instance, ins, job, ip, clsResident memory size in bytes. process_start_time_seconds gauge instance, ins, job, ip, clsStart time of the process since unix epoch in seconds. process_virtual_memory_bytes gauge instance, ins, job, ip, clsVirtual memory size in bytes. process_virtual_memory_max_bytes gauge instance, ins, job, ip, clsMaximum amount of virtual memory available in bytes. prometheus_remote_storage_exemplars_in_total counter instance, ins, job, ip, clsExemplars in to remote storage, compare to exemplars out for queue managers. prometheus_remote_storage_histograms_in_total counter instance, ins, job, ip, clsHistogramSamples in to remote storage, compare to histograms out for queue managers. prometheus_remote_storage_samples_in_total counter instance, ins, job, ip, clsSamples in to remote storage, compare to samples out for queue managers. prometheus_remote_storage_string_interner_zero_reference_releases_total counter instance, ins, job, ip, clsThe number of times release has been called for strings that are not interned. prometheus_sd_azure_failures_total counter instance, ins, job, ip, clsNumber of Azure service discovery refresh failures. prometheus_sd_consul_rpc_duration_seconds summary ip, call, quantile, ins, job, instance, cls, endpointThe duration of a Consul RPC call in seconds. prometheus_sd_consul_rpc_duration_seconds_count Unknown ip, call, ins, job, instance, cls, endpointN/A prometheus_sd_consul_rpc_duration_seconds_sum Unknown ip, call, ins, job, instance, cls, endpointN/A prometheus_sd_consul_rpc_failures_total counter instance, ins, job, ip, clsThe number of Consul RPC call failures. prometheus_sd_consulagent_rpc_duration_seconds summary ip, call, quantile, ins, job, instance, cls, endpointThe duration of a Consul Agent RPC call in seconds. prometheus_sd_consulagent_rpc_duration_seconds_count Unknown ip, call, ins, job, instance, cls, endpointN/A prometheus_sd_consulagent_rpc_duration_seconds_sum Unknown ip, call, ins, job, instance, cls, endpointN/A prometheus_sd_consulagent_rpc_failures_total Unknown instance, ins, job, ip, clsN/A prometheus_sd_dns_lookup_failures_total counter instance, ins, job, ip, clsThe number of DNS-SD lookup failures. prometheus_sd_dns_lookups_total counter instance, ins, job, ip, clsThe number of DNS-SD lookups. prometheus_sd_file_read_errors_total counter instance, ins, job, ip, clsThe number of File-SD read errors. prometheus_sd_file_scan_duration_seconds summary quantile, instance, ins, job, ip, clsThe duration of the File-SD scan in seconds. prometheus_sd_file_scan_duration_seconds_count Unknown instance, ins, job, ip, clsN/A prometheus_sd_file_scan_duration_seconds_sum Unknown instance, ins, job, ip, clsN/A prometheus_sd_file_watcher_errors_total counter instance, ins, job, ip, clsThe number of File-SD errors caused by filesystem watch failures. prometheus_sd_kubernetes_events_total counter ip, event, ins, job, role, instance, clsThe number of Kubernetes events handled. prometheus_target_scrape_pool_exceeded_label_limits_total counter instance, ins, job, ip, clsTotal number of times scrape pools hit the label limits, during sync or config reload. prometheus_target_scrape_pool_exceeded_target_limit_total counter instance, ins, job, ip, clsTotal number of times scrape pools hit the target limit, during sync or config reload. prometheus_target_scrape_pool_reloads_failed_total counter instance, ins, job, ip, clsTotal number of failed scrape pool reloads. prometheus_target_scrape_pool_reloads_total counter instance, ins, job, ip, clsTotal number of scrape pool reloads. prometheus_target_scrape_pools_failed_total counter instance, ins, job, ip, clsTotal number of scrape pool creations that failed. prometheus_target_scrape_pools_total counter instance, ins, job, ip, clsTotal number of scrape pool creation attempts. prometheus_target_scrapes_cache_flush_forced_total counter instance, ins, job, ip, clsHow many times a scrape cache was flushed due to getting big while scrapes are failing. prometheus_target_scrapes_exceeded_body_size_limit_total counter instance, ins, job, ip, clsTotal number of scrapes that hit the body size limit prometheus_target_scrapes_exceeded_sample_limit_total counter instance, ins, job, ip, clsTotal number of scrapes that hit the sample limit and were rejected. prometheus_target_scrapes_exemplar_out_of_order_total counter instance, ins, job, ip, clsTotal number of exemplar rejected due to not being out of the expected order. prometheus_target_scrapes_sample_duplicate_timestamp_total counter instance, ins, job, ip, clsTotal number of samples rejected due to duplicate timestamps but different values. prometheus_target_scrapes_sample_out_of_bounds_total counter instance, ins, job, ip, clsTotal number of samples rejected due to timestamp falling outside of the time bounds. prometheus_target_scrapes_sample_out_of_order_total counter instance, ins, job, ip, clsTotal number of samples rejected due to not being out of the expected order. prometheus_template_text_expansion_failures_total counter instance, ins, job, ip, clsThe total number of template text expansion failures. prometheus_template_text_expansions_total counter instance, ins, job, ip, clsThe total number of template text expansions. prometheus_treecache_watcher_goroutines gauge instance, ins, job, ip, clsThe current number of watcher goroutines. prometheus_treecache_zookeeper_failures_total counter instance, ins, job, ip, clsThe total number of ZooKeeper failures. promhttp_metric_handler_errors_total counter ip, cause, ins, job, instance, clsTotal number of internal errors encountered by the promhttp metric handler. promhttp_metric_handler_requests_in_flight gauge instance, ins, job, ip, clsCurrent number of scrapes being served. promhttp_metric_handler_requests_total counter ip, ins, code, job, instance, clsTotal number of scrapes by HTTP status code. request_duration_seconds_bucket Unknown instance, ins, job, status_code, route, ws, le, ip, cls, methodN/A request_duration_seconds_count Unknown instance, ins, job, status_code, route, ws, ip, cls, methodN/A request_duration_seconds_sum Unknown instance, ins, job, status_code, route, ws, ip, cls, methodN/A request_message_bytes_bucket Unknown instance, ins, job, route, le, ip, cls, methodN/A request_message_bytes_count Unknown instance, ins, job, route, ip, cls, methodN/A request_message_bytes_sum Unknown instance, ins, job, route, ip, cls, methodN/A response_message_bytes_bucket Unknown instance, ins, job, route, le, ip, cls, methodN/A response_message_bytes_count Unknown instance, ins, job, route, ip, cls, methodN/A response_message_bytes_sum Unknown instance, ins, job, route, ip, cls, methodN/A scrape_duration_seconds Unknown instance, ins, job, ip, clsN/A scrape_samples_post_metric_relabeling Unknown instance, ins, job, ip, clsN/A scrape_samples_scraped Unknown instance, ins, job, ip, clsN/A scrape_series_added Unknown instance, ins, job, ip, clsN/A tcp_connections gauge instance, ins, job, protocol, ip, clsCurrent number of accepted TCP connections. tcp_connections_limit gauge instance, ins, job, protocol, ip, clsThe max number of TCP connections that can be accepted (0 means no limit). up Unknown instance, ins, job, ip, clsN/A
14.7 - 常见问题 Pigsty NODE 主机节点模块常见问题答疑
如何配置主机节点上的NTP服务? NTP对于生产环境各项服务非常重要,如果没有配置 NTP,您可以使用公共 NTP 服务,或管理节点上的 Chronyd 作为标准时间。
如果您的节点已经配置了 NTP,可以通过设置 node_ntp_enabled 为 false 来保留现有配置,不进行任何变更。
否则,如果您有互联网访问权限,可以使用公共 NTP 服务,例如 pool.ntp.org。
如果您没有互联网访问权限,可以使用以下方式,确保所有环境内的节点与管理节点时间是同步的,或者使用其他内网环境的 NTP 授时服务。
node_ntp_servers: # /etc/chrony.conf 中的 ntp 服务器列表
- pool cn.pool.ntp.org iburst
- pool ${ admin_ip } iburst # 假设其他节点都没有互联网访问,那么至少与 Admin 节点保持时间同步。
如何在节点上强制同步时间? 为了使用 chronyc 来同步时间。您首先需要配置 NTP 服务。
ansible all -b -a 'chronyc -a makestep' # 同步时间
您可以用任何组或主机 IP 地址替换 all,以限制执行范围。
远程节点无法通过SSH访问怎么办? 如果目标机器隐藏在SSH跳板机后面, 或者进行了一些无法直接使用ssh ip访问的自定义操作, 可以使用诸如 ansible_port
或 ansible_host 这一类 Ansible连接参数 来指定各种 SSH 连接信息,如下所示:
pg-test:
vars: { pg_cluster: pg-test }
hosts:
10.10.10.11: { pg_seq: 1, pg_role: primary, ansible_host: node-1 }
10.10.10.12: { pg_seq: 2, pg_role: replica, ansible_port: 22223, ansible_user: admin }
10.10.10.13: { pg_seq: 3, pg_role: offline, ansible_port: 22224 }
远程节点SSH与SUDO需要密码怎么办? 执行部署和更改时 ,使用的管理员用户必须 对所有节点拥有ssh和sudo权限。无需密码免密登录。
您可以在执行剧本时通过 -k|-K 参数传入 ssh 和 sudo 密码,甚至可以通过 -e ansible_user=<another_user> 使用另一个用户来运行剧本。
但是,Pigsty强烈建议为管理员用户配置SSH无密码登录 以及无密码的sudo。
如何使用现有管理员创建专用管理员用户? 使用以下命令,使用该节点上现有的管理员用户,创建由 node_admin_username
./node.yml -k -K -e ansible_user = <another_admin> -t node_admin
如何使用节点上的HAProxy对外暴露服务? 您可以在配置中中使用 haproxy_servicesnode.yml -t haproxy_config,haproxy_reload 来更新配置。
以下是使用它暴露MinIO服务的示例:暴露MinIO服务
为什么我的 /etc/yum.repos.d/* 全没了? Pigsty会在infra节点上构建的本地软件仓库源中包含所有依赖项。而所有普通节点会根据 node_repo_moduleslocal 来引用并使用 Infra 节点上的本地软件源。
这一设计从而避免了互联网访问,增强了安装过程的稳定性与可靠性。所有原有的源定义文件会被移动到 /etc/yum.repos.d/backup 目录中,您只要按需复制回来即可。
如果您想在普通节点安装过程中保留原有的源定义文件,将 node_repo_removefalse即可。
如果您想在 Infra 节点构建本地源的过程中保留原有的源定义文件,将 repo_removefalse即可。
为什么我的命令行提示符变样了?怎么恢复? Pigsty 使用的 Shell 命令行提示符是由环境变量 PS1 指定,定义在 /etc/profile.d/node.sh 文件中。
如果您不喜欢,想要修改或恢复原样,可以将这个文件移除,重新登陆即可。
为什么我的主机名变了? 在两种情况下,Pigsty 会修改您的节点主机名:
如果您不希望修改主机名,可以在全局/集群/实例层面修改 nodename_overwritefalse (默认值为 true)。
详情请参考 NODE_ID
腾讯云的 OpenCloudOS 有什么兼容性问题? OpenCloudOS 上的 softdog 内核模块不可用,需要从 node_kernel_modules 中移除。在配置文件全局变量中添加以下配置项以覆盖:
node_kernel_modules : [ ip_vs, ip_vs_rr, ip_vs_wrr, ip_vs_sh ]
Debian 系统有哪些常见问题? 在 Debian/Ubuntu 系统上使用 Pigsty 时,可能遇到以下问题:
本地语言环境缺失
如果系统提示 locale 相关错误,可以使用以下命令修复:
localedef -i en_US -f UTF-8 en_US.UTF-8
缺少 rsync 工具
Pigsty 依赖 rsync 进行文件同步,如果系统未安装,可以使用以下命令安装:
15 - 模块:ETCD Pigsty 可部署 etcd 模块,作为 DCS 为 PostgreSQL 高可用提供可靠的分布式配置存储支持。
ETCD 是一个分布式的、可靠的键-值存储,用于存放系统中最为关键的配置数据。
Pigsty 使用 etcd DCS
ETCDNODEPGSQLETCDNODEPGSQLETCDpatroni 和 vip-manager 会依赖 etcd 实现高可用与 L2 VIP 主库绑定。
flowchart LR
subgraph PGSQL [PGSQL]
patroni[Patroni]
vip[VIP Manager]
end
subgraph ETCD [ETCD]
etcd[DCS 服务]
end
subgraph NODE [NODE]
node[软件仓库]
end
PGSQL -->|依赖| ETCD -->|依赖| NODE
style PGSQL fill:#3E668F,stroke:#2d4a66,color:#fff
style ETCD fill:#5B9CD5,stroke:#4178a8,color:#fff
style NODE fill:#FCDB72,stroke:#d4b85e,color:#333
style patroni fill:#2d4a66,stroke:#1e3347,color:#fff
style vip fill:#2d4a66,stroke:#1e3347,color:#fff
style etcd fill:#4178a8,stroke:#2d5a7a,color:#fff
style node fill:#d4b85e,stroke:#b89a4a,color:#333 在一套 Pigsty 部署中,只需要一套 etcd 集群。同一套 etcd 集群可以为多套 PostgreSQL 集群提供 DCS 服务支持。
Pigsty 中的 etcd 默认启用 RBAC,不同 PostgreSQL 集群使用独立的用户名与密码访问 etcd,从而实现多租户管理隔离。
管理员使用 etcd root 用户,拥有对所有 PostgreSQL 集群的管理权限。
15.1 - 集群配置 根据需求场景选择合适的 Etcd 集群规模,并对外提供可靠的接入。
在部署 Etcd 之前,你需要在 配置清单 中定义一个 Etcd 集群,通常来说,你可以选择:
单节点 :没有高可用性,适用于开发、测试、演示,或者依赖外部 S3 备份进行 PITR 的无高可用单机部署三节点 :具有基本的高可用性,可以容忍一个节点的故障,适用于中小规模的生产环境五节点 :具有更好的高可用性,可以容忍两个节点的故障,适用于大规模生产环境偶数节点的 Etcd 集群没有意义,超过五节点的 Etcd 集群并不常见,因此通常使用的规格就是单节点、三节点、五节点。
集群规模 仲裁数 容忍故障数 适用场景 1 节点 1 0 开发、测试、演示 3 节点 2 1 中小规模生产环境 5 节点 3 2 大规模生产环境 7 节点 4 3 特殊高可用需求
单节点 在 Pigsty 中,定义一个单例 Etcd 实例非常简单,只需要一行配置即可:
etcd : { hosts : { 10.10.10.10 : { etcd_seq: 1 } }, vars : { etcd_cluster : etcd } }
在 Pigsty 提供的所有单机配置模板中,都有这样一项,其中的占位 IP 地址:10.10.10.10 默认会被替换为当前管理节点的 IP。
除了 IP 地址外,这里唯一必要的参数是 etcd_seqetcd_cluster
三节点 三节点的 Etcd 集群最为常见,它可以容忍一个节点的故障,适用于中小规模的生产环境。
例如,Pigsty 的三节点模板:triosafe
etcd :
hosts :
10.10.10.10 : { etcd_seq : 1 } # etcd_seq (etcd实例号)是必须指定的身份参数
10.10.10.11 : { etcd_seq : 2 } # 实例号是正整数,一般从 0 或 1 开始依次分配
10.10.10.12 : { etcd_seq : 3 } # 实例号应当终生不可变,一旦分配就不再回收使用。
vars : # 集群层面的参数
etcd_cluster : etcd # 默认情况下,etcd 集群名就叫 etcd, 除非您想要部署多套 etcd 集群,否则不要改这个名字
etcd_safeguard : false # 是否打开 etcd 的防误删安全保险? 在生产环境初始化完成后,可以考虑打开这个选项,避免误删。
五节点 五节点的 Etcd 集群可以容忍两个节点的故障,适用于大规模生产环境。
例如,Pigsty 的生产仿真模板:prod
etcd :
hosts :
10.10.10.21 : { etcd_seq : 1 }
10.10.10.22 : { etcd_seq : 2 }
10.10.10.23 : { etcd_seq : 3 }
10.10.10.24 : { etcd_seq : 4 }
10.10.10.25 : { etcd_seq : 5 }
vars : { etcd_cluster : etcd }
使用 etcd 的服务 目前 Pigsty 中使用 etcd 的服务有:
服务 用途 配置文件 Patroni PostgreSQL 高可用,存储集群状态和配置 /etc/patroni/patroni.ymlVIP-Manager 在 PostgreSQL 集群上绑定 L2 VIP /etc/default/vip-manager.yml
当 etcd 集群的成员信息发生永久性变更时,您应当 重载相关服务的配置 ,以确保服务能够正确访问 Etcd 集群。
更新 Patroni 的 etcd 端点引用 :
./pgsql.yml -t pg_conf # 重新生成 patroni 配置
ansible all -f 1 -b -a 'systemctl reload patroni' # 重新加载 patroni 配置
更新 VIP-Manager 的 etcd 端点引用 (仅当使用 PGSQL L2 VIP 时需要):
./pgsql.yml -t pg_vip_config # 重新生成 vip-manager 配置
ansible all -f 1 -b -a 'systemctl restart vip-manager' # 重启 vip-manager
RBAC 认证配置 Pigsty v4.0 默认启用 etcd 的 RBAC 认证机制。相关配置参数:
生产环境建议 :
all :
vars :
etcd_root_password : 'YourSecureEtcdPassword' # 修改默认密码
etcd :
hosts :
10.10.10.10 : { etcd_seq : 1 }
10.10.10.11 : { etcd_seq : 2 }
10.10.10.12 : { etcd_seq : 3 }
vars :
etcd_cluster : etcd
etcd_safeguard : true # 生产环境开启防误删保护
文件系统布局 etcd 模块在目标主机上创建以下目录和文件:
路径 用途 权限 /etc/etcd/配置目录 0750, etcd:etcd /etc/etcd/etcd.conf主配置文件 0644, etcd:etcd /etc/etcd/etcd.passroot 密码文件 0640, root:etcd /etc/etcd/ca.crtCA 证书 0644, etcd:etcd /etc/etcd/server.crt服务器证书 0644, etcd:etcd /etc/etcd/server.key服务器私钥 0600, etcd:etcd /var/lib/etcd/备用数据目录 0770, etcd:etcd /data/etcd/主数据目录(可配置) 0700, etcd:etcd /etc/profile.d/etcdctl.sh客户端环境变量 0755, root:root /usr/lib/systemd/system/etcd.service 或 /lib/systemd/system/etcd.serviceSystemd 服务 0644, root:root
15.2 - 参数列表 ETCD 模块提供了 13 个配置参数,用于精细控制集群的行为表现。
ETCD 模块的参数列表,共有 13 个参数,分为两个部分:
架构变化:Pigsty v3.6+
自 Pigsty v3.6 起,etcd.yml 剧本不再包含移除功能,移除相关参数已迁移至独立的 etcd_remove 角色。v4.0 起默认启用 RBAC 认证,新增 etcd_root_password 参数。
参数概览 ETCD
ETCD_REMOVE
ETCD本节包含 etcdetcd.yml
相关参数定义于 roles/etcd/defaults/main.yml
#etcd_seq: 1 # etcd 实例标识符,需要显式指定(必填)
etcd_cluster : etcd # etcd 集群和组名称,默认为 etcd
etcd_learner : false # etcd 实例是否以 learner 模式运行?默认为 false
etcd_data : /data/etcd # etcd 数据目录,默认为 /data/etcd
etcd_port : 2379 # etcd 客户端端口,默认为 2379
etcd_peer_port : 2380 # etcd 对等端口,默认为 2380
etcd_init : new # etcd 初始集群状态,new 或 existing
etcd_election_timeout : 1000 # etcd 选举超时,默认为 1000ms
etcd_heartbeat_interval : 100 # etcd 心跳间隔,默认为 100ms
etcd_root_password : Etcd.Root # etcd root 用户密码,用于 RBAC 认证(请修改!)
etcd_seq参数名称: etcd_seq, 类型: int, 层次:I
etcd 实例标号, 这是必选参数,必须为每一个 etcd 实例指定一个唯一的标号。
以下是一个3节点etcd集群的示例,分配了 1 ~ 3 三个标号。
etcd : # dcs service for postgres/patroni ha consensus
hosts : # 1 node for testing, 3 or 5 for production
10.10.10.10 : { etcd_seq : 1 } # etcd_seq required
10.10.10.11 : { etcd_seq : 2 } # assign from 1 ~ n
10.10.10.12 : { etcd_seq : 3 } # use odd numbers
vars : # cluster level parameter override roles/etcd
etcd_cluster : etcd # mark etcd cluster name etcd
etcd_safeguard : false # safeguard against purging
etcd_cluster参数名称: etcd_cluster, 类型: string, 层次:C
etcd 集群 & 分组名称,默认值为硬编码值 etcd。
当您想要部署另外的 etcd 集群备用时,可以修改此参数并使用其他集群名。
etcd_learner参数名称: etcd_learner, 类型: bool, 层次:I/A
是否以 learner 模式初始化 etcd 实例?默认值为 false。
当设置为 true 时,etcd 实例将以 learner(学习者)模式初始化,这意味着该实例不能在 etcd 集群中参与投票选举。
使用场景 :
集群扩容 :向现有集群添加新成员时,使用 learner 模式可以避免在数据同步完成前影响集群的仲裁安全迁移 :在滚动升级或迁移场景中,先以 learner 模式加入,确认数据同步完成后再提升操作流程 :
设置 etcd_learner: true,以 learner 模式初始化新成员 等待数据同步完成(通过 etcdctl endpoint status 检查) 使用 etcdctl member promote <member_id> 将其提升为正式成员 注意
Learner 实例不计入集群仲裁成员数。例如,3 节点集群中有 1 个 learner,实际投票成员数为 2,不能容忍任何节点故障。
etcd_data参数名称: etcd_data, 类型: path, 层次:C
etcd 数据目录,默认为/data/etcd 。
etcd_port参数名称: etcd_port, 类型: port, 层次:C
etcd 客户端端口号,默认为2379。
etcd_peer_port参数名称: etcd_peer_port, 类型: port, 层次:C
etcd peer 端口,默认为 2380 。
etcd_init参数名称: etcd_init, 类型: enum, 层次:C
etcd 初始集群状态,可以是 new 或 existing,默认值:new。
可选值说明 :
值 说明 使用场景 new创建新的 etcd 集群 首次部署、集群重建 existing加入现有 etcd 集群 集群扩容、添加新成员
重要说明 :
扩容时必须使用 existing
向现有 etcd 集群添加新成员时,必须 设置 etcd_init=existing。否则新实例会尝试创建独立的新集群,导致脑裂或初始化失败。
使用示例 :
# 创建新集群(默认行为)
./etcd.yml
# 向现有集群添加新成员
./etcd.yml -l <new_ip> -e etcd_init = existing
# 或使用便捷脚本(自动设置 etcd_init=existing)
bin/etcd-add <new_ip>
etcd_election_timeout参数名称: etcd_election_timeout, 类型: int, 层次:C
etcd 选举超时,默认为 1000 (毫秒),也就是 1 秒。
etcd_heartbeat_interval参数名称: etcd_heartbeat_interval, 类型: int, 层次:C
etcd心跳间隔,默认为 100 (毫秒)。
etcd_root_password参数名称: etcd_root_password, 类型: password, 层次:G
etcd root 用户密码,用于 RBAC 认证,默认值为 Etcd.Root。
Pigsty v4.0 默认启用 etcd 的 RBAC(基于角色的访问控制)认证机制。在集群初始化时,etcd_auth 任务会自动创建 root 用户并启用认证。
密码存储位置 :
密码存储在 /etc/etcd/etcd.pass 文件中 文件权限为 0640(root 所有,etcd 组可读) etcdctl 环境变量脚本 /etc/profile.d/etcdctl.sh 会自动读取此文件 与其他组件的配合 :
Patroni 通过 pg_etcd_password 如果 pg_etcd_password 为空,Patroni 会使用集群名称作为密码(不推荐) VIP-Manager 也需要使用相同的认证信息连接 etcd 安全建议 :
生产环境安全
在生产环境中,强烈建议修改默认密码 Etcd.Root。可以在全局配置或集群配置中设置:
etcd_root_password : 'YourSecurePassword'
使用 configure -g 参数可以自动生成并替换 etcd_root_password
ETCD_REMOVE本节包含 etcd_removeetcd-rm.yml
相关参数定义于 roles/etcd_remove/defaults/main.yml
etcd_safeguard : false # 防误删保险,阻止移除正在运行的 etcd 实例?
etcd_rm_data : true # 移除时是否删除 etcd 数据和配置文件?
etcd_rm_pkg : false # 移除时是否卸载 etcd 软件包?
etcd_safeguard参数名称: etcd_safeguard, 类型: bool, 层次:G/C/A
防误删保险参数,防止清除正在运行的 etcd 实例?默认值为 false。
如果启用安全保险,etcd-rm.yml-e etcd_safeguard=false 才能覆盖。
使用建议 :
环境 建议值 说明 开发/测试 false方便快速重建和测试 生产环境 true防止误操作导致服务中断
紧急情况下,可以使用命令行参数覆盖配置:
./etcd-rm.yml -e etcd_safeguard = false
etcd_rm_data参数名称: etcd_rm_data, 类型: bool, 层次:G/C/A
移除时是否删除 etcd 数据和配置文件?默认值为 true。
启用此选项后,etcd-rm.yml
/etc/etcd/ - 配置目录(包括证书和密码文件)/var/lib/etcd/ - 备用数据目录{{ etcd_data }} - 主数据目录(默认 /data/etcd){{ systemd_dir }}/etcd.service - Systemd 服务单元文件/etc/profile.d/etcdctl.sh - 客户端环境变量脚本/etc/vector/etcd.yaml - Vector 日志采集配置使用场景 :
场景 建议值 说明 彻底移除 true(默认)完全清理,释放磁盘空间 仅停止服务 false保留数据,便于故障排查或恢复
# 仅停止服务,保留数据
./etcd-rm.yml -e etcd_rm_data = false
etcd_rm_pkg参数名称: etcd_rm_pkg, 类型: bool, 层次:G/C/A
移除时是否卸载 etcd 软件包?默认值为 false。
启用此选项后,etcd-rm.yml
使用场景 :
场景 建议值 说明 常规移除 false(默认)保留软件包,便于快速重建 彻底清理 true完全卸载,节省磁盘空间
# 移除时同时卸载软件包
./etcd-rm.yml -e etcd_rm_pkg = true
提示
通常不需要卸载 etcd 软件包。保留软件包可以加快后续的重新部署速度,因为不需要重新下载和安装。
15.3 - 管理预案 etcd 集群管理 SOP:创建,销毁,扩缩容,更新配置,RBAC 配置的详细说明。
以下是一些常见的 etcd 管理任务 SOP(预案):
创建集群 :如何初始化 etcd 集群?销毁集群 :如何销毁 etcd 集群?环境变量 :如何配置 etcd 客户端,以访问 etcd 服务器集群?RBAC 认证 :如何使用 etcd 的 RBAC 认证?重载配置 :如何更新客户端使用的 etcd 服务器成员列表?添加成员 :如何向现有 etcd 集群添加新成员?移除成员 :如何从 etcd 集群移除老成员?便捷脚本 :使用 bin/etcd-add 和 bin/etcd-rm 简化操作更多问题请参考 FAQ:ETCD 。
创建集群 要创建一个集群,首先需要在 配置清单 etcd 集群:
etcd :
hosts :
10.10.10.10 : { etcd_seq : 1 }
10.10.10.11 : { etcd_seq : 2 }
10.10.10.12 : { etcd_seq : 3 }
vars : { etcd_cluster : etcd }
执行 etcd.yml
架构变化:Pigsty v3.6+
自 Pigsty v3.6 起,etcd.yml 剧本专注于集群安装和成员添加,不再包含移除功能。所有移除操作请使用独立的 etcd-rm.yml 剧本。
对于已初始化的生产环境 etcd 集群,可以打开防误删保护 etcd_safeguard
销毁集群 要销毁一个 etcd 集群,请使用独立的 etcd-rm.yml
./etcd-rm.yml # 移除整个 etcd 集群
./etcd-rm.yml -e etcd_safeguard = false # 强制覆盖防误删保险
或使用便捷脚本:
bin/etcd-rm # 移除整个 etcd 集群
移除剧本会尊重 etcd_safeguardtrue,剧本将中止执行以防止误删。
注意
在移除 etcd 集群之前,请确保没有 PostgreSQL 集群正在使用该 etcd 作为 DCS 服务。否则会导致 PostgreSQL 高可用功能失效。
环境变量 Pigsty 默认使用 etcd v3 API(v3.6+ 已移除 v2 API 支持)。Pigsty 会在 etcd 节点上自动配置环境变量脚本 /etc/profile.d/etcdctl.sh,登录后会自动加载。
以下是 etcd 客户端配置环境变量的示例:
alias e = "etcdctl"
alias em = "etcdctl member"
export ETCDCTL_ENDPOINTS = https://10.10.10.10:2379
export ETCDCTL_CACERT = /etc/etcd/ca.crt
export ETCDCTL_CERT = /etc/etcd/server.crt
export ETCDCTL_KEY = /etc/etcd/server.key
Pigsty v4.0 默认启用 RBAC 认证,因此还需要配置用户认证:
export ETCDCTL_USER = "root: $( cat /etc/etcd/etcd.pass) "
配置好客户端环境变量后,你可以使用以下命令进行 etcd CRUD 操作:
e put a 10 ; e get a; e del a # 基本 KV 操作
e member list # 列出集群成员
e endpoint health # 检查端点健康状态
e endpoint status # 查看端点状态
RBAC 认证 Pigsty v4.0 默认启用 etcd 的 RBAC(基于角色的访问控制)认证机制。在集群初始化时,etcd_auth 任务会自动创建 root 用户并启用认证。
root 用户密码 由 etcd_root_passwordEtcd.Root。密码存储在 /etc/etcd/etcd.pass 文件中,权限为 0640(root 所有,etcd 组可读)。
在生产环境中,强烈建议修改默认密码 :
etcd :
hosts :
10.10.10.10 : { etcd_seq : 1 }
10.10.10.11 : { etcd_seq : 2 }
10.10.10.12 : { etcd_seq : 3 }
vars :
etcd_cluster : etcd
etcd_root_password : 'YourSecurePassword' # 修改默认密码
客户端认证方式 :
# 方式一:使用环境变量(推荐,已自动配置在 /etc/profile.d/etcdctl.sh)
export ETCDCTL_USER = "root: $( cat /etc/etcd/etcd.pass) "
# 方式二:在命令行中指定
etcdctl --user root:YourSecurePassword member list
重载配置 如果 etcd 集群的成员发生变化(添加或移除成员),我们需要刷新对 etcd 服务端点的引用。目前 Pigsty 中有以下几处 etcd 引用需要更新:
配置位置 配置文件 更新方式 etcd 成员配置 /etc/etcd/etcd.conf./etcd.yml -t etcd_confetcdctl 环境变量 /etc/profile.d/etcdctl.sh./etcd.yml -t etcd_configPatroni DCS 配置 /etc/patroni/patroni.yml./pgsql.yml -t pg_confVIP-Manager 配置 /etc/default/vip-manager.yml./pgsql.yml -t pg_vip_config
刷新 etcd 成员配置文件 :
./etcd.yml -t etcd_conf # 刷新 /etc/etcd/etcd.conf
ansible etcd -f 1 -b -a 'systemctl restart etcd' # 可选:逐一重启 etcd 实例
刷新 etcdctl 客户端环境变量 :
./etcd.yml -t etcd_config # 刷新 /etc/profile.d/etcdctl.sh
更新 Patroni DCS 端点配置 :
./pgsql.yml -t pg_conf # 重新生成 patroni 配置
ansible all -f 1 -b -a 'systemctl reload patroni' # 重新加载 patroni 配置
更新 VIP-Manager 端点配置 (仅当使用 PGSQL L2 VIP 时需要):
./pgsql.yml -t pg_vip_config # 重新生成 vip-manager 配置
ansible all -f 1 -b -a 'systemctl restart vip-manager' # 重启 vip-manager
提示
使用 bin/etcd-add 和 bin/etcd-rm 便捷脚本时,脚本会在操作完成后提示您需要执行的配置刷新命令。
添加成员 ETCD 参考: 添加成员
推荐方式:使用便捷脚本 使用 bin/etcd-add 脚本是向现有 etcd 集群添加新成员的推荐方式 :
# 首先在配置清单中添加新成员定义,然后执行:
bin/etcd-add <ip> # 添加单个新成员
bin/etcd-add <ip1> <ip2> ... # 添加多个新成员
脚本会自动完成以下操作:
验证 IP 地址有效性 执行 etcd.yml 剧本(自动设置 etcd_init=existing) 提供安全警告和倒计时 操作完成后提示配置刷新命令 手动方式:分步操作 向现有的 etcd 集群添加新成员需要以下步骤:
更新配置清单 :将新实例添加到 etcd 组通知集群 :执行 etcdctl member add 命令(可选,剧本会自动执行)初始化新成员 :使用 etcd_init=existing 参数运行剧本提升成员 :将学习者提升为正式成员(可选,使用 etcd_learner=true 时需要)重载配置 :更新所有客户端的 etcd 端点引用# 配置清单更新后,初始化新成员
./etcd.yml -l <new_ins_ip> -e etcd_init = existing
# 如果使用 learner 模式,需要手动提升
etcdctl member promote <new_ins_server_id>
重要
添加新成员时必须使用 etcd_init=existing 参数,否则新实例会尝试创建新集群而非加入现有集群。
详细步骤:向etcd集群添加成员 下面是具体操作的详细细节,让我们从一个单实例 etcd 集群开始:
etcd :
hosts :
10.10.10.10 : { etcd_seq : 1 } # <--- 集群中原本存在的唯一实例
10.10.10.11 : { etcd_seq : 2 } # <--- 将此新成员定义添加到清单中
vars : { etcd_cluster : etcd }
使用便捷脚本添加新成员(推荐):
$ bin/etcd-add 10.10.10.11
或者手动操作。首先使用 etcdctl member add 向现有 etcd 集群宣告新的学习者实例 etcd-2 即将到来:
$ etcdctl member add etcd-2 --learner= true --peer-urls= https://10.10.10.11:2380
Member 33631ba6ced84cf8 added to cluster 6646fbcf5debc68f
ETCD_NAME = "etcd-2"
ETCD_INITIAL_CLUSTER = "etcd-2=https://10.10.10.11:2380,etcd-1=https://10.10.10.10:2380"
ETCD_INITIAL_ADVERTISE_PEER_URLS = "https://10.10.10.11:2380"
ETCD_INITIAL_CLUSTER_STATE = "existing"
使用 etcdctl member list(或 em list)检查成员列表,我们可以看到一个 unstarted 新成员:
33631ba6ced84cf8, unstarted, , https://10.10.10.11:2380, , true # 这里有一个未启动的新成员
429ee12c7fbab5c1, started, etcd-1, https://10.10.10.10:2380, https://10.10.10.10:2379, false
接下来使用 etcd.yml 剧本初始化新的 etcd 实例 etcd-2,完成后,我们可以看到新成员已经启动:
$ ./etcd.yml -l 10.10.10.11 -e etcd_init = existing # 一定要添加 existing 参数
...
33631ba6ced84cf8, started, etcd-2, https://10.10.10.11:2380, https://10.10.10.11:2379, true
429ee12c7fbab5c1, started, etcd-1, https://10.10.10.10:2380, https://10.10.10.10:2379, false
新成员初始化完成并稳定运行后,可以将新成员从学习者提升为追随者:
$ etcdctl member promote 33631ba6ced84cf8 # 将学习者提升为追随者
Member 33631ba6ced84cf8 promoted in cluster 6646fbcf5debc68f
$ em list # 再次检查,新成员已提升为正式成员
33631ba6ced84cf8, started, etcd-2, https://10.10.10.11:2380, https://10.10.10.11:2379, false
429ee12c7fbab5c1, started, etcd-1, https://10.10.10.10:2380, https://10.10.10.10:2379, false
新成员添加完成,请不要忘记 重载配置 ,让所有客户端也知道新成员的存在。
重复以上步骤,可以添加更多成员。记住,生产环境中至少要使用 3 个成员。
移除成员 推荐方式:使用便捷脚本 使用 bin/etcd-rm 脚本是从 etcd 集群移除成员的推荐方式 :
bin/etcd-rm <ip> # 移除指定成员
bin/etcd-rm <ip1> <ip2> ... # 移除多个成员
bin/etcd-rm # 移除整个 etcd 集群
脚本会自动完成以下操作:
从集群中优雅地移除成员 停止并禁用 etcd 服务 清理数据和配置文件 从监控系统中注销 手动方式:分步操作 要从 etcd 集群中删除一个成员实例,通常需要以下步骤:
从配置清单中移除 :注释或删除该实例,并 重载配置 从集群中踢除 :使用 etcdctl member remove 命令清理实例 :使用 etcd-rm.yml 剧本清理实例# 使用专用移除剧本(推荐)
./etcd-rm.yml -l <ip>
# 或者手动操作
etcdctl member remove <server_id> # 从集群中踢除
./etcd-rm.yml -l <ip> # 清理实例
详细步骤:从etcd集群移除成员 让我们以一个 3 节点的 etcd 集群为例,从中移除 3 号实例。
方法一:使用便捷脚本(推荐)
$ bin/etcd-rm 10.10.10.12
脚本会自动完成所有操作,包括从集群中移除成员、停止服务、清理数据。
方法二:手动操作
首先,为了刷新配置,您需要 注释 待删除的成员,然后 重载配置 ,让所有客户端都不要再使用此实例。
etcd :
hosts :
10.10.10.10 : { etcd_seq : 1 }
10.10.10.11 : { etcd_seq : 2 }
# 10.10.10.12: { etcd_seq: 3 } # <---- 注释掉这个成员
vars : { etcd_cluster : etcd }
然后,使用移除剧本:
$ ./etcd-rm.yml -l 10.10.10.12
剧本会自动执行以下操作:
获取成员列表并找到对应的成员 ID 执行 etcdctl member remove 从集群中踢除 停止 etcd 服务 清理数据和配置文件 如果需要手动操作,可以这样做:
$ etcdctl member list
429ee12c7fbab5c1, started, etcd-1, https://10.10.10.10:2380, https://10.10.10.10:2379, false
33631ba6ced84cf8, started, etcd-2, https://10.10.10.11:2380, https://10.10.10.11:2379, false
93fcf23b220473fb, started, etcd-3, https://10.10.10.12:2380, https://10.10.10.12:2379, false # <--- 移除这个
$ etcdctl member remove 93fcf23b220473fb # 从集群中踢除
Member 93fcf23b220473fb removed from cluster 6646fbcf5debc68f
执行完毕后,您可以将其从配置清单中永久删除,移除成员至此完成。
重复以上步骤,可以移除更多成员,与 添加成员 配合使用,可以对 etcd 集群进行滚动升级搬迁。
便捷脚本 Pigsty v3.6+ 提供了便捷脚本简化 etcd 集群的扩容和缩容操作:
bin/etcd-add向现有 etcd 集群添加新成员:
bin/etcd-add <ip> # 添加单个新成员
bin/etcd-add <ip1> <ip2> ... # 添加多个新成员
脚本功能:
验证 IP 地址格式 自动设置 etcd_init=existing 参数 执行 etcd.yml 剧本完成成员添加 操作完成后提示配置刷新命令 bin/etcd-rm从 etcd 集群移除成员或整个集群:
bin/etcd-rm <ip> # 移除指定成员
bin/etcd-rm <ip1> <ip2> ... # 移除多个成员
bin/etcd-rm # 移除整个 etcd 集群
脚本功能:
提供安全警告和确认倒计时 自动执行 etcd-rm.yml 剧本 优雅地从集群中移除成员 清理数据和配置文件 管理 Etcd 密码 etcd_root_password
要修改此密码,你需要访问到 etcd 端点,例如在 INFRA节点 ETCD节点 管理用户
e user passwd root # 修改 etcd root 用户密码
然后你应该刷新所有对 etcd root 密码的引用,包括 INFRA 节点上的 Patroni 客户端配置与 etcdctl 客户端环境变量:
./infra.yml -t env_patroni # 刷新 /infra/conf/patronictl.yml 对 etcd root 密码的引用
./etcd.yml -t etcd_conf # 刷新 /etc/etcd/etcd.pass 与 /etc/profile.d/etcdctl.sh
15.4 - 预置剧本 如何使用预置的 ansible 剧本来管理 Etcd 集群,常用管理命令速查。
Etcd 模块提供了两个核心剧本:etcd.ymletcd-rm.yml
架构变化:Pigsty v3.6+
自 Pigsty v3.6 起,etcd.yml 剧本专注于集群安装和成员添加,所有移除操作已迁移至独立的 etcd-rm.yml 剧本和 etcd_remove 角色。
etcd.yml剧本原始文件:etcd.yml
执行本剧本,将会在硬编码的固定分组 etcd 上安装配置 Etcd 集群,并启动 etcd 服务。
在 etcd.yml
etcd_assert :验证 etcd 身份参数(etcd_seq 必须定义且为非负整数)etcd_install :安装 etcd 软件包etcd_dir :创建 etcd 数据和配置目录etcd_config :生成 etcd 配置etcd_conf :生成 etcd 主配置文件 /etc/etcd/etcd.confetcd_cert :生成 etcd TLS 证书(CA、服务器证书、私钥)etcd_member :将新成员添加到现有集群(仅当 etcd_init=existing 时执行)etcd_launch :启动 etcd 服务etcd_auth :启用 RBAC 认证(创建 root 用户并启用认证)etcd_register :将 etcd 注册到 VictoriaMetrics/Prometheus 监控etcd-rm.yml剧本原始文件:etcd-rm.yml
用于移除 Etcd 集群或单个成员的专用剧本。在 etcd-rm.yml
etcd_safeguard :检查防误删保险,如果启用则中止执行etcd_pause :暂停 3 秒,允许用户使用 Ctrl-C 中止执行etcd_deregister :从 VictoriaMetrics 监控目标中移除 etcd 注册etcd_leave :在清理前尝试优雅地离开 etcd 集群etcd_svc :使用 systemd 停止并禁用 etcd 服务etcd_data :移除 etcd 数据(可通过 etcd_rm_data=false 禁用)etcd_pkg :卸载 etcd 软件包(需通过 etcd_rm_pkg=true 显式启用)移除剧本使用 etcd_remove
执行演示
命令速查 Etcd 安装与配置:
./etcd.yml # 初始化 etcd 集群
./etcd.yml -t etcd_launch # 重启整个 etcd 集群
./etcd.yml -t etcd_conf # 使用最新状态刷新 /etc/etcd/etcd.conf
./etcd.yml -t etcd_cert # 重新生成 etcd TLS 证书
./etcd.yml -l 10.10.10.12 -e etcd_init = existing # 扩容节点:添加新成员到现有集群
Etcd 移除与清理:
./etcd-rm.yml # 移除整个 etcd 集群
./etcd-rm.yml -l 10.10.10.12 # 移除单个 etcd 成员
./etcd-rm.yml -e etcd_safeguard = false # 覆盖防误删保险强制移除
./etcd-rm.yml -e etcd_rm_data = false # 仅停止服务,保留数据
./etcd-rm.yml -e etcd_rm_pkg = true # 同时卸载 etcd 软件包
便捷脚本:
bin/etcd-add <ip> # 向现有集群添加新成员(推荐)
bin/etcd-rm <ip> # 从集群中移除指定成员(推荐)
bin/etcd-rm # 移除整个 etcd 集群
保护机制 出于防止误删的目的,Pigsty 的 ETCD 模块提供了防误删保险,由 etcd_safeguardfalse,即默认不打开防误删保护。
对于生产环境已经初始化好的 etcd 集群,建议打开防误删保护,避免误删现有的 etcd 实例:
etcd :
hosts :
10.10.10.10 : { etcd_seq : 1 }
10.10.10.11 : { etcd_seq : 2 }
10.10.10.12 : { etcd_seq : 3 }
vars :
etcd_cluster : etcd
etcd_safeguard : true # 打开防误删保护
当 etcd_safeguard 设置为 true 时,etcd-rm.yml 剧本会检测到存活的 etcd 实例并主动中止,避免误删。您可以使用命令行参数来覆盖这一行为:
./etcd-rm.yml -e etcd_safeguard = false # 强制覆盖防误删保险
除非您清楚地知道自己在做什么,我们并不建议用户随意清理 Etcd 集群。
15.5 - 监控告警 etcd 监控面板,指标,以及告警规则。
监控面板 ETCD 模块提供了一个监控面板:Etcd Overview。
ETCD Overview Dashboard ETCD Overview :ETCD 集群概览
这个监控面板提供了 ETCD 状态的关键信息:最值得关注的是 ETCD Aliveness,它显示了 ETCD 集群整体的服务状态。
红色的条带标识着实例不可用的时间段,而底下蓝灰色的条带标识着整个集群处于不可用的时间段。
告警规则 Pigsty 针对 Etcd 提供了以下五条预置告警规则,定义于 files/victoria/rules/etcd.yml
EtcdServerDown:Etcd 节点宕机,严重警报EtcdNoLeader:Etcd 集群没有领导者,严重警报EtcdQuotaFull:Etcd 配额使用超过 90%,警告EtcdNetworkPeerRTSlow:Etcd 网络时延缓慢,提醒EtcdWalFsyncSlow:Etcd 磁盘刷盘缓慢,提醒#==============================================================#
# Aliveness #
#==============================================================#
# etcd server instance down
- alert : EtcdServerDown
expr : etcd_up < 1
for : 1m
labels : { level: 0, severity: CRIT, category : etcd }
annotations :
summary : "CRIT EtcdServerDown {{ $labels.ins }}@{{ $labels.instance }}"
description : |
etcd_up[ins={{ $labels.ins }}, instance={{ $labels.instance }}] = {{ $value }} < 1
/ui/d/etcd-overview
#==============================================================#
# Error #
#==============================================================#
# Etcd no Leader triggers a P0 alert immediately
# if dcs_failsafe mode is not enabled, this may lead to global outage
- alert : EtcdNoLeader
expr : min(etcd_server_has_leader) by (cls) < 1
for : 15s
labels : { level: 0, severity: CRIT, category : etcd }
annotations :
summary : "CRIT EtcdNoLeader: {{ $labels.cls }} {{ $value }}"
description : |
etcd_server_has_leader[cls={{ $labels.cls }}] = {{ $value }} < 1
/ui/d/etcd-overview?from=now-5m&to=now&var-cls={{$labels.cls}}
#==============================================================#
# Saturation #
#==============================================================#
- alert : EtcdQuotaFull
expr : etcd:cls:quota_usage > 0.90
for : 1m
labels : { level: 1, severity: WARN, category : etcd }
annotations :
summary : "WARN EtcdQuotaFull: {{ $labels.cls }}"
description : |
etcd:cls:quota_usage[cls={{ $labels.cls }}] = {{ $value | printf "%.3f" }} > 90%
#==============================================================#
# Latency #
#==============================================================#
# etcd network peer rt p95 > 200ms for 1m
- alert : EtcdNetworkPeerRTSlow
expr : etcd:ins:network_peer_rt_p95_5m > 0.200
for : 1m
labels : { level: 2, severity: INFO, category : etcd }
annotations :
summary : "INFO EtcdNetworkPeerRTSlow: {{ $labels.cls }} {{ $labels.ins }}"
description : |
etcd:ins:network_peer_rt_p95_5m[cls={{ $labels.cls }}, ins={{ $labels.ins }}] = {{ $value }} > 200ms
/ui/d/etcd-instance?from=now-10m&to=now&var-cls={{ $labels.cls }}
# Etcd wal fsync rt p95 > 50ms
- alert : EtcdWalFsyncSlow
expr : etcd:ins:wal_fsync_rt_p95_5m > 0.050
for : 1m
labels : { level: 2, severity: INFO, category : etcd }
annotations :
summary : "INFO EtcdWalFsyncSlow: {{ $labels.cls }} {{ $labels.ins }}"
description : |
etcd:ins:wal_fsync_rt_p95_5m[cls={{ $labels.cls }}, ins={{ $labels.ins }}] = {{ $value }} > 50ms
/ui/d/etcd-instance?from=now-10m&to=now&var-cls={{ $labels.cls }}
15.6 - 指标列表 Pigsty ETCD 模块提供的完整监控指标列表与释义
ETCD
Metric Name Type Labels Description etcd:ins:backend_commit_rt_p95_5m Unknown cls, ins, instance, job, ipN/A etcd:ins:wal_fsync_rt_p95_5m Unknown cls, ins, instance, job, ipN/A etcd:ins:network_peer_rt_p95_5m Unknown cls, To, ins, instance, job, ipN/A etcd_cluster_version gauge cls, cluster_version, ins, instance, job, ipWhich version is running. 1 for ‘cluster_version’ label with current cluster version etcd_debugging_auth_revision gauge cls, ins, instance, job, ipThe current revision of auth store. etcd_debugging_disk_backend_commit_rebalance_duration_seconds_bucket Unknown cls, ins, instance, job, le, ipN/A etcd_debugging_disk_backend_commit_rebalance_duration_seconds_count Unknown cls, ins, instance, job, ipN/A etcd_debugging_disk_backend_commit_rebalance_duration_seconds_sum Unknown cls, ins, instance, job, ipN/A etcd_debugging_disk_backend_commit_spill_duration_seconds_bucket Unknown cls, ins, instance, job, le, ipN/A etcd_debugging_disk_backend_commit_spill_duration_seconds_count Unknown cls, ins, instance, job, ipN/A etcd_debugging_disk_backend_commit_spill_duration_seconds_sum Unknown cls, ins, instance, job, ipN/A etcd_debugging_disk_backend_commit_write_duration_seconds_bucket Unknown cls, ins, instance, job, le, ipN/A etcd_debugging_disk_backend_commit_write_duration_seconds_count Unknown cls, ins, instance, job, ipN/A etcd_debugging_disk_backend_commit_write_duration_seconds_sum Unknown cls, ins, instance, job, ipN/A etcd_debugging_lease_granted_total counter cls, ins, instance, job, ipThe total number of granted leases. etcd_debugging_lease_renewed_total counter cls, ins, instance, job, ipThe number of renewed leases seen by the leader. etcd_debugging_lease_revoked_total counter cls, ins, instance, job, ipThe total number of revoked leases. etcd_debugging_lease_ttl_total_bucket Unknown cls, ins, instance, job, le, ipN/A etcd_debugging_lease_ttl_total_count Unknown cls, ins, instance, job, ipN/A etcd_debugging_lease_ttl_total_sum Unknown cls, ins, instance, job, ipN/A etcd_debugging_mvcc_compact_revision gauge cls, ins, instance, job, ipThe revision of the last compaction in store. etcd_debugging_mvcc_current_revision gauge cls, ins, instance, job, ipThe current revision of store. etcd_debugging_mvcc_db_compaction_keys_total counter cls, ins, instance, job, ipTotal number of db keys compacted. etcd_debugging_mvcc_db_compaction_last gauge cls, ins, instance, job, ipThe unix time of the last db compaction. Resets to 0 on start. etcd_debugging_mvcc_db_compaction_pause_duration_milliseconds_bucket Unknown cls, ins, instance, job, le, ipN/A etcd_debugging_mvcc_db_compaction_pause_duration_milliseconds_count Unknown cls, ins, instance, job, ipN/A etcd_debugging_mvcc_db_compaction_pause_duration_milliseconds_sum Unknown cls, ins, instance, job, ipN/A etcd_debugging_mvcc_db_compaction_total_duration_milliseconds_bucket Unknown cls, ins, instance, job, le, ipN/A etcd_debugging_mvcc_db_compaction_total_duration_milliseconds_count Unknown cls, ins, instance, job, ipN/A etcd_debugging_mvcc_db_compaction_total_duration_milliseconds_sum Unknown cls, ins, instance, job, ipN/A etcd_debugging_mvcc_events_total counter cls, ins, instance, job, ipTotal number of events sent by this member. etcd_debugging_mvcc_index_compaction_pause_duration_milliseconds_bucket Unknown cls, ins, instance, job, le, ipN/A etcd_debugging_mvcc_index_compaction_pause_duration_milliseconds_count Unknown cls, ins, instance, job, ipN/A etcd_debugging_mvcc_index_compaction_pause_duration_milliseconds_sum Unknown cls, ins, instance, job, ipN/A etcd_debugging_mvcc_keys_total gauge cls, ins, instance, job, ipTotal number of keys. etcd_debugging_mvcc_pending_events_total gauge cls, ins, instance, job, ipTotal number of pending events to be sent. etcd_debugging_mvcc_range_total counter cls, ins, instance, job, ipTotal number of ranges seen by this member. etcd_debugging_mvcc_slow_watcher_total gauge cls, ins, instance, job, ipTotal number of unsynced slow watchers. etcd_debugging_mvcc_total_put_size_in_bytes gauge cls, ins, instance, job, ipThe total size of put kv pairs seen by this member. etcd_debugging_mvcc_watch_stream_total gauge cls, ins, instance, job, ipTotal number of watch streams. etcd_debugging_mvcc_watcher_total gauge cls, ins, instance, job, ipTotal number of watchers. etcd_debugging_server_lease_expired_total counter cls, ins, instance, job, ipThe total number of expired leases. etcd_debugging_snap_save_marshalling_duration_seconds_bucket Unknown cls, ins, instance, job, le, ipN/A etcd_debugging_snap_save_marshalling_duration_seconds_count Unknown cls, ins, instance, job, ipN/A etcd_debugging_snap_save_marshalling_duration_seconds_sum Unknown cls, ins, instance, job, ipN/A etcd_debugging_snap_save_total_duration_seconds_bucket Unknown cls, ins, instance, job, le, ipN/A etcd_debugging_snap_save_total_duration_seconds_count Unknown cls, ins, instance, job, ipN/A etcd_debugging_snap_save_total_duration_seconds_sum Unknown cls, ins, instance, job, ipN/A etcd_debugging_store_expires_total counter cls, ins, instance, job, ipTotal number of expired keys. etcd_debugging_store_reads_total counter cls, action, ins, instance, job, ipTotal number of reads action by (get/getRecursive), local to this member. etcd_debugging_store_watch_requests_total counter cls, ins, instance, job, ipTotal number of incoming watch requests (new or reestablished). etcd_debugging_store_watchers gauge cls, ins, instance, job, ipCount of currently active watchers. etcd_debugging_store_writes_total counter cls, action, ins, instance, job, ipTotal number of writes (e.g. set/compareAndDelete) seen by this member. etcd_disk_backend_commit_duration_seconds_bucket Unknown cls, ins, instance, job, le, ipN/A etcd_disk_backend_commit_duration_seconds_count Unknown cls, ins, instance, job, ipN/A etcd_disk_backend_commit_duration_seconds_sum Unknown cls, ins, instance, job, ipN/A etcd_disk_backend_defrag_duration_seconds_bucket Unknown cls, ins, instance, job, le, ipN/A etcd_disk_backend_defrag_duration_seconds_count Unknown cls, ins, instance, job, ipN/A etcd_disk_backend_defrag_duration_seconds_sum Unknown cls, ins, instance, job, ipN/A etcd_disk_backend_snapshot_duration_seconds_bucket Unknown cls, ins, instance, job, le, ipN/A etcd_disk_backend_snapshot_duration_seconds_count Unknown cls, ins, instance, job, ipN/A etcd_disk_backend_snapshot_duration_seconds_sum Unknown cls, ins, instance, job, ipN/A etcd_disk_defrag_inflight gauge cls, ins, instance, job, ipWhether or not defrag is active on the member. 1 means active, 0 means not. etcd_disk_wal_fsync_duration_seconds_bucket Unknown cls, ins, instance, job, le, ipN/A etcd_disk_wal_fsync_duration_seconds_count Unknown cls, ins, instance, job, ipN/A etcd_disk_wal_fsync_duration_seconds_sum Unknown cls, ins, instance, job, ipN/A etcd_disk_wal_write_bytes_total gauge cls, ins, instance, job, ipTotal number of bytes written in WAL. etcd_grpc_proxy_cache_hits_total gauge cls, ins, instance, job, ipTotal number of cache hits etcd_grpc_proxy_cache_keys_total gauge cls, ins, instance, job, ipTotal number of keys/ranges cached etcd_grpc_proxy_cache_misses_total gauge cls, ins, instance, job, ipTotal number of cache misses etcd_grpc_proxy_events_coalescing_total counter cls, ins, instance, job, ipTotal number of events coalescing etcd_grpc_proxy_watchers_coalescing_total gauge cls, ins, instance, job, ipTotal number of current watchers coalescing etcd_mvcc_db_open_read_transactions gauge cls, ins, instance, job, ipThe number of currently open read transactions etcd_mvcc_db_total_size_in_bytes gauge cls, ins, instance, job, ipTotal size of the underlying database physically allocated in bytes. etcd_mvcc_db_total_size_in_use_in_bytes gauge cls, ins, instance, job, ipTotal size of the underlying database logically in use in bytes. etcd_mvcc_delete_total counter cls, ins, instance, job, ipTotal number of deletes seen by this member. etcd_mvcc_hash_duration_seconds_bucket Unknown cls, ins, instance, job, le, ipN/A etcd_mvcc_hash_duration_seconds_count Unknown cls, ins, instance, job, ipN/A etcd_mvcc_hash_duration_seconds_sum Unknown cls, ins, instance, job, ipN/A etcd_mvcc_hash_rev_duration_seconds_bucket Unknown cls, ins, instance, job, le, ipN/A etcd_mvcc_hash_rev_duration_seconds_count Unknown cls, ins, instance, job, ipN/A etcd_mvcc_hash_rev_duration_seconds_sum Unknown cls, ins, instance, job, ipN/A etcd_mvcc_put_total counter cls, ins, instance, job, ipTotal number of puts seen by this member. etcd_mvcc_range_total counter cls, ins, instance, job, ipTotal number of ranges seen by this member. etcd_mvcc_txn_total counter cls, ins, instance, job, ipTotal number of txns seen by this member. etcd_network_active_peers gauge cls, ins, Local, instance, job, ip, RemoteThe current number of active peer connections. etcd_network_client_grpc_received_bytes_total counter cls, ins, instance, job, ipThe total number of bytes received from grpc clients. etcd_network_client_grpc_sent_bytes_total counter cls, ins, instance, job, ipThe total number of bytes sent to grpc clients. etcd_network_peer_received_bytes_total counter cls, ins, instance, job, ip, FromThe total number of bytes received from peers. etcd_network_peer_round_trip_time_seconds_bucket Unknown cls, To, ins, instance, job, le, ipN/A etcd_network_peer_round_trip_time_seconds_count Unknown cls, To, ins, instance, job, ipN/A etcd_network_peer_round_trip_time_seconds_sum Unknown cls, To, ins, instance, job, ipN/A etcd_network_peer_sent_bytes_total counter cls, To, ins, instance, job, ipThe total number of bytes sent to peers. etcd_server_apply_duration_seconds_bucket Unknown cls, version, ins, instance, job, le, success, ip, opN/A etcd_server_apply_duration_seconds_count Unknown cls, version, ins, instance, job, success, ip, opN/A etcd_server_apply_duration_seconds_sum Unknown cls, version, ins, instance, job, success, ip, opN/A etcd_server_client_requests_total counter client_api_version, cls, ins, instance, type, job, ipThe total number of client requests per client version. etcd_server_go_version gauge cls, ins, instance, job, server_go_version, ipWhich Go version server is running with. 1 for ‘server_go_version’ label with current version. etcd_server_has_leader gauge cls, ins, instance, job, ipWhether or not a leader exists. 1 is existence, 0 is not. etcd_server_health_failures counter cls, ins, instance, job, ipThe total number of failed health checks etcd_server_health_success counter cls, ins, instance, job, ipThe total number of successful health checks etcd_server_heartbeat_send_failures_total counter cls, ins, instance, job, ipThe total number of leader heartbeat send failures (likely overloaded from slow disk). etcd_server_id gauge cls, ins, instance, job, server_id, ipServer or member ID in hexadecimal format. 1 for ‘server_id’ label with current ID. etcd_server_is_leader gauge cls, ins, instance, job, ipWhether or not this member is a leader. 1 if is, 0 otherwise. etcd_server_is_learner gauge cls, ins, instance, job, ipWhether or not this member is a learner. 1 if is, 0 otherwise. etcd_server_leader_changes_seen_total counter cls, ins, instance, job, ipThe number of leader changes seen. etcd_server_learner_promote_successes counter cls, ins, instance, job, ipThe total number of successful learner promotions while this member is leader. etcd_server_proposals_applied_total gauge cls, ins, instance, job, ipThe total number of consensus proposals applied. etcd_server_proposals_committed_total gauge cls, ins, instance, job, ipThe total number of consensus proposals committed. etcd_server_proposals_failed_total counter cls, ins, instance, job, ipThe total number of failed proposals seen. etcd_server_proposals_pending gauge cls, ins, instance, job, ipThe current number of pending proposals to commit. etcd_server_quota_backend_bytes gauge cls, ins, instance, job, ipCurrent backend storage quota size in bytes. etcd_server_read_indexes_failed_total counter cls, ins, instance, job, ipThe total number of failed read indexes seen. etcd_server_slow_apply_total counter cls, ins, instance, job, ipThe total number of slow apply requests (likely overloaded from slow disk). etcd_server_slow_read_indexes_total counter cls, ins, instance, job, ipThe total number of pending read indexes not in sync with leader’s or timed out read index requests. etcd_server_snapshot_apply_in_progress_total gauge cls, ins, instance, job, ip1 if the server is applying the incoming snapshot. 0 if none. etcd_server_version gauge cls, server_version, ins, instance, job, ipWhich version is running. 1 for ‘server_version’ label with current version. etcd_snap_db_fsync_duration_seconds_bucket Unknown cls, ins, instance, job, le, ipN/A etcd_snap_db_fsync_duration_seconds_count Unknown cls, ins, instance, job, ipN/A etcd_snap_db_fsync_duration_seconds_sum Unknown cls, ins, instance, job, ipN/A etcd_snap_db_save_total_duration_seconds_bucket Unknown cls, ins, instance, job, le, ipN/A etcd_snap_db_save_total_duration_seconds_count Unknown cls, ins, instance, job, ipN/A etcd_snap_db_save_total_duration_seconds_sum Unknown cls, ins, instance, job, ipN/A etcd_snap_fsync_duration_seconds_bucket Unknown cls, ins, instance, job, le, ipN/A etcd_snap_fsync_duration_seconds_count Unknown cls, ins, instance, job, ipN/A etcd_snap_fsync_duration_seconds_sum Unknown cls, ins, instance, job, ipN/A etcd_up Unknown cls, ins, instance, job, ipN/A go_gc_duration_seconds summary cls, ins, instance, quantile, job, ipA summary of the pause duration of garbage collection cycles. go_gc_duration_seconds_count Unknown cls, ins, instance, job, ipN/A go_gc_duration_seconds_sum Unknown cls, ins, instance, job, ipN/A go_goroutines gauge cls, ins, instance, job, ipNumber of goroutines that currently exist. go_info gauge cls, version, ins, instance, job, ipInformation about the Go environment. go_memstats_alloc_bytes gauge cls, ins, instance, job, ipNumber of bytes allocated and still in use. go_memstats_alloc_bytes_total counter cls, ins, instance, job, ipTotal number of bytes allocated, even if freed. go_memstats_buck_hash_sys_bytes gauge cls, ins, instance, job, ipNumber of bytes used by the profiling bucket hash table. go_memstats_frees_total counter cls, ins, instance, job, ipTotal number of frees. go_memstats_gc_cpu_fraction gauge cls, ins, instance, job, ipThe fraction of this program’s available CPU time used by the GC since the program started. go_memstats_gc_sys_bytes gauge cls, ins, instance, job, ipNumber of bytes used for garbage collection system metadata. go_memstats_heap_alloc_bytes gauge cls, ins, instance, job, ipNumber of heap bytes allocated and still in use. go_memstats_heap_idle_bytes gauge cls, ins, instance, job, ipNumber of heap bytes waiting to be used. go_memstats_heap_inuse_bytes gauge cls, ins, instance, job, ipNumber of heap bytes that are in use. go_memstats_heap_objects gauge cls, ins, instance, job, ipNumber of allocated objects. go_memstats_heap_released_bytes gauge cls, ins, instance, job, ipNumber of heap bytes released to OS. go_memstats_heap_sys_bytes gauge cls, ins, instance, job, ipNumber of heap bytes obtained from system. go_memstats_last_gc_time_seconds gauge cls, ins, instance, job, ipNumber of seconds since 1970 of last garbage collection. go_memstats_lookups_total counter cls, ins, instance, job, ipTotal number of pointer lookups. go_memstats_mallocs_total counter cls, ins, instance, job, ipTotal number of mallocs. go_memstats_mcache_inuse_bytes gauge cls, ins, instance, job, ipNumber of bytes in use by mcache structures. go_memstats_mcache_sys_bytes gauge cls, ins, instance, job, ipNumber of bytes used for mcache structures obtained from system. go_memstats_mspan_inuse_bytes gauge cls, ins, instance, job, ipNumber of bytes in use by mspan structures. go_memstats_mspan_sys_bytes gauge cls, ins, instance, job, ipNumber of bytes used for mspan structures obtained from system. go_memstats_next_gc_bytes gauge cls, ins, instance, job, ipNumber of heap bytes when next garbage collection will take place. go_memstats_other_sys_bytes gauge cls, ins, instance, job, ipNumber of bytes used for other system allocations. go_memstats_stack_inuse_bytes gauge cls, ins, instance, job, ipNumber of bytes in use by the stack allocator. go_memstats_stack_sys_bytes gauge cls, ins, instance, job, ipNumber of bytes obtained from system for stack allocator. go_memstats_sys_bytes gauge cls, ins, instance, job, ipNumber of bytes obtained from system. go_threads gauge cls, ins, instance, job, ipNumber of OS threads created. grpc_server_handled_total counter cls, ins, instance, grpc_code, job, grpc_method, grpc_type, ip, grpc_serviceTotal number of RPCs completed on the server, regardless of success or failure. grpc_server_msg_received_total counter cls, ins, instance, job, grpc_type, grpc_method, ip, grpc_serviceTotal number of RPC stream messages received on the server. grpc_server_msg_sent_total counter cls, ins, instance, job, grpc_type, grpc_method, ip, grpc_serviceTotal number of gRPC stream messages sent by the server. grpc_server_started_total counter cls, ins, instance, job, grpc_type, grpc_method, ip, grpc_serviceTotal number of RPCs started on the server. os_fd_limit gauge cls, ins, instance, job, ipThe file descriptor limit. os_fd_used gauge cls, ins, instance, job, ipThe number of used file descriptors. process_cpu_seconds_total counter cls, ins, instance, job, ipTotal user and system CPU time spent in seconds. process_max_fds gauge cls, ins, instance, job, ipMaximum number of open file descriptors. process_open_fds gauge cls, ins, instance, job, ipNumber of open file descriptors. process_resident_memory_bytes gauge cls, ins, instance, job, ipResident memory size in bytes. process_start_time_seconds gauge cls, ins, instance, job, ipStart time of the process since unix epoch in seconds. process_virtual_memory_bytes gauge cls, ins, instance, job, ipVirtual memory size in bytes. process_virtual_memory_max_bytes gauge cls, ins, instance, job, ipMaximum amount of virtual memory available in bytes. promhttp_metric_handler_requests_in_flight gauge cls, ins, instance, job, ipCurrent number of scrapes being served. promhttp_metric_handler_requests_total counter cls, ins, instance, job, ip, codeTotal number of scrapes by HTTP status code. scrape_duration_seconds Unknown cls, ins, instance, job, ipN/A scrape_samples_post_metric_relabeling Unknown cls, ins, instance, job, ipN/A scrape_samples_scraped Unknown cls, ins, instance, job, ipN/A scrape_series_added Unknown cls, ins, instance, job, ipN/A up Unknown cls, ins, instance, job, ipN/A
15.7 - 常见问题 Pigsty etcd 模块常见问题答疑
etcd集群起什么作用? etcd 是一个分布式的、可靠的键-值存储,用于存放系统中最为关键的数据,Pigsty 使用 etcd 作为 Patroni 的 DCS(分布式配置存储)服务,用于存储 PostgreSQL 集群的高可用状态信息。
Patroni 将通过 etcd,实现集群故障检测、自动故障转移、主从切换,集群配置管理等功能。
etcd 对于 PostgreSQL 集群的高可用至关重要,而 etcd 本身的可用性与容灾,是通过使用多个分布式的节点来保证的。
etcd集群使用多大规模合适? 如果超过集群成员数一半(包括正好一半)的 etcd 实例不可用,那么 etcd 集群将进入不可用状态,拒绝对外提供服务。
例如:使用 3 节点的 etcd 集群允许最多一个节点宕机,而其他两个节点仍然可以正常工作;而使用 5 节点的 etcd 集群则可以容忍 2 节点失效。
请注意,etcd 集群中的 学习者 (Learner)实例不计入成员数,因此在 3 节点 etcd 集群中,如果有一个学习者实例,那么实际上成员数量为 2,不能容忍任一节点失效。
在生产环境中,我们建议使用奇数个 etcd 实例,对于生产环境,建议使用 3 节点或 5 节点的 etcd 集群部署以确保足够的可靠性。
etcd集群不可用会有什么影响? 如果 etcd 集群不可用,那么会影响 PostgreSQL 的管控平面,但不会影响数据平面 —— 现有的 PostgreSQL 集群将继续运行,但通过 Patroni 进行的管理操作将无法执行。
etcd 故障期间,PostgreSQL 高可用将无法实现自动故障转移,您也无法使用 patronictl 对 PostgreSQL 集群发起管理操作,例如修改配置,执行手动故障转移等。
通过 Ansible 发起的管理命令不受 etcd 故障影响:例如创建数据库,创建用户,刷新 HBA 与 Service 配置等,etcd 故障期间,您依然可以直接操作 PostgreSQL 集群来实现这些功能。
请注意,以上描述的行为仅适用于较新版本的 Patroni (>=3.0,对应 Pigsty >= 2.0)。如果您使用的是较老版本的 Patroni (<3.0,对应 Pigsty 版本为 1.x),则 etcd / consul 故障会引发极为严重的全局性影响:
所有 PostgreSQL 集群将发生降级:主库将降级为从库,拒绝写请求,etcd 故障将放大为全局性 PostgreSQL 故障。在 Patroni 3.0 引入 DCS Failsafe 功能后,这种情况得到了显著改善。
etcd集群中存储着什么数据? 在 Pigsty 中,etcd 仅用于 PostgreSQL 高可用,并不会用于存储任何其他配置或状态数据。
而 PG 高可用组件 Patroni 会自动生成并管理 etcd 中的数据,当这些数据在 etcd 中丢失时,Patroni 会自动重建。
因此默认情况下,Pigsty 中的 etcd 可以视作 “无状态服务”,可以进行销毁与重建,这为维护工作带来了极大的便利。
如果您将 etcd 用于其他目的,例如作为 Kubernetes 的元数据存储,或自行存储其他数据,那么您需要自行备份 etcd 数据,并在 etcd 集群恢复后进行数据恢复。
如何从etcd故障中恢复? 因为 Pigsty 中的 etcd 只用于 PostgreSQL 高可用,本质上是可销毁、可重建的 “无状态服务”,因此在出现故障时,您可以通过 “重启” / “重置” 来进行快速止血。
要 重启 etcd 集群,您可以使用以下 Ansible 命令:
./etcd.yml -t etcd_launch
要 重置/重建 etcd 集群,建议先清理再重建:
./etcd-rm.yml # 清理 etcd 集群(默认删除数据)
./etcd.yml # 按清单重新部署 etcd 集群
如果您自行使用 etcd 存储了其他数据,那么通常需要备份 etcd 数据,并在 etcd 集群恢复后进行数据恢复。
维护etcd有什么注意事项? 简单的版本是:不要写爆 etcd 就好 。
Pigsty v2.6+ 默认启用了 etcd 自动压实(Auto Compact)和 16GB 的后端存储配额,通常无需担心写满 etcd 的问题。
etcd 的 数据模型 使得每一次写入都会产生一个新的版本。
因此如果您的 etcd 集群频繁写入,即使只有极个别的 Key,etcd 数据库的大小也可能会不断增长。
当达到容量上限时,etcd 将会拒绝写入请求,这可能导致依赖 etcd 的 PostgreSQL 高可用机制无法正常工作。
Pigsty 默认的 etcd 配置已包含以下优化:
auto-compaction-mode : periodic # 周期性自动压缩
auto-compaction-retention : "24h" # 保留 24 小时历史
quota-backend-bytes : 17179869184 # 16 GiB 配额
更多维护细节请阅读 etcd 官方文档维护指南 。
提示
对于 Pigsty v2.6 之前的版本,请参照下面的说明手动启用 etcd 自动垃圾回收。
如何启动etcd自动垃圾回收? 如果您使用的早先版本的 Pigsty (v2.0 - v2.5),我们强烈建议您通过以下步骤,在生产环境中启用 etcd 的自动压实功能,从而避免 etcd 容量配额写满导致的 etcd 不可用故障。
在 Pigsty 源码目录中,编辑 etcd 配置文件模板:roles/etcd/templates/etcd.conf
auto-compaction-mode : periodic
auto-compaction-retention : "24h"
quota-backend-bytes : 17179869184
然后将所有相关 PostgreSQL 集群设置为 维护模式 ./etcd.yml 覆盖部署 etcd 集群即可。
该配置会将 etcd 默认的容量配额从 2 GiB 提高到 16 GiB,并确保只保留最近一天的写入历史版本,从而避免了 etcd 数据库大小的无限增长。
etcd中的PostgreSQL高可用数据存储在哪里? 默认情况下,Patroni 使用 pg_namespace/pg)作为所有元数据键的前缀,随后是 PostgreSQL 集群名称。
例如,名为 pg-meta 的 PG 集群,其元数据键将存储在 /pg/pg-meta 下。
etcdctl get /pg/pg-meta --prefix
其中的数据样本如下所示:
/pg/pg-meta/config
{ "ttl" :30,"loop_wait" :10,"retry_timeout" :10,"primary_start_timeout" :10,"maximum_lag_on_failover" :1048576,"maximum_lag_on_syncnode" :-1,"primary_stop_timeout" :30,"synchronous_mode" :false,"synchronous_mode_strict" :false,"failsafe_mode" :true,"pg_version" :16,"pg_cluster" :"pg-meta" ,"pg_shard" :"pg-meta" ,"pg_group" :0,"postgresql" :{ "use_slots" :true,"use_pg_rewind" :true,"remove_data_directory_on_rewind_failure" :true,"parameters" :{ "max_connections" :100,"superuser_reserved_connections" :10,"max_locks_per_transaction" :200,"max_prepared_transactions" :0,"track_commit_timestamp" :"on" ,"wal_level" :"logical" ,"wal_log_hints" :"on" ,"max_worker_processes" :16,"max_wal_senders" :50,"max_replication_slots" :50,"password_encryption" :"scram-sha-256" ,"ssl" :"on" ,"ssl_cert_file" :"/pg/cert/server.crt" ,"ssl_key_file" :"/pg/cert/server.key" ,"ssl_ca_file" :"/pg/cert/ca.crt" ,"shared_buffers" :"7969MB" ,"maintenance_work_mem" :"1993MB" ,"work_mem" :"79MB" ,"max_parallel_workers" :8,"max_parallel_maintenance_workers" :2,"max_parallel_workers_per_gather" :0,"hash_mem_multiplier" :8.0,"huge_pages" :"try" ,"temp_file_limit" :"7GB" ,"vacuum_cost_delay" :"20ms" ,"vacuum_cost_limit" :2000,"bgwriter_delay" :"10ms" ,"bgwriter_lru_maxpages" :800,"bgwriter_lru_multiplier" :5.0,"min_wal_size" :"7GB" ,"max_wal_size" :"28GB" ,"max_slot_wal_keep_size" :"42GB" ,"wal_buffers" :"16MB" ,"wal_writer_delay" :"20ms" ,"wal_writer_flush_after" :"1MB" ,"commit_delay" :20,"commit_siblings" :10,"checkpoint_timeout" :"15min" ,"checkpoint_completion_target" :0.8,"archive_mode" :"on" ,"archive_timeout" :300,"archive_command" :"pgbackrest --stanza=pg-meta archive-push %p" ,"max_standby_archive_delay" :"10min" ,"max_standby_streaming_delay" :"3min" ,"wal_receiver_status_interval" :"1s" ,"hot_standby_feedback" :"on" ,"wal_receiver_timeout" :"60s" ,"max_logical_replication_workers" :8,"max_sync_workers_per_subscription" :6,"random_page_cost" :1.1,"effective_io_concurrency" :1000,"effective_cache_size" :"23907MB" ,"default_statistics_target" :200,"log_destination" :"csvlog" ,"logging_collector" :"on" ,"log_directory" :"/pg/log/postgres" ,"log_filename" :"postgresql-%Y-%m-%d.log" ,"log_checkpoints" :"on" ,"log_lock_waits" :"on" ,"log_replication_commands" :"on" ,"log_statement" :"ddl" ,"log_min_duration_statement" :100,"track_io_timing" :"on" ,"track_functions" :"all" ,"track_activity_query_size" :8192,"log_autovacuum_min_duration" :"1s" ,"autovacuum_max_workers" :2,"autovacuum_naptime" :"1min" ,"autovacuum_vacuum_cost_delay" :-1,"autovacuum_vacuum_cost_limit" :-1,"autovacuum_freeze_max_age" :1000000000,"deadlock_timeout" :"50ms" ,"idle_in_transaction_session_timeout" :"10min" ,"shared_preload_libraries" :"timescaledb, pg_stat_statements, auto_explain" ,"auto_explain.log_min_duration" :"1s" ,"auto_explain.log_analyze" :"on" ,"auto_explain.log_verbose" :"on" ,"auto_explain.log_timing" :"on" ,"auto_explain.log_nested_statements" :true,"pg_stat_statements.max" :5000,"pg_stat_statements.track" :"all" ,"pg_stat_statements.track_utility" :"off" ,"pg_stat_statements.track_planning" :"off" ,"timescaledb.telemetry_level" :"off" ,"timescaledb.max_background_workers" :8,"citus.node_conninfo" :"sslm
ode=prefer" }}}
/pg/pg-meta/failsafe
{ "pg-meta-2" :"http://10.10.10.11:8008/patroni" ,"pg-meta-1" :"http://10.10.10.10:8008/patroni" }
/pg/pg-meta/initialize
7418384210787662172
/pg/pg-meta/leader
pg-meta-1
/pg/pg-meta/members/pg-meta-1
{ "conn_url" :"postgres://10.10.10.10:5432/postgres" ,"api_url" :"http://10.10.10.10:8008/patroni" ,"state" :"running" ,"role" :"primary" ,"version" :"4.0.1" ,"tags" :{ "clonefrom" :true,"version" :"16" ,"spec" :"8C.32G.125G" ,"conf" :"tiny.yml" } ,"xlog_location" :184549376,"timeline" :1}
/pg/pg-meta/members/pg-meta-2
{ "conn_url" :"postgres://10.10.10.11:5432/postgres" ,"api_url" :"http://10.10.10.11:8008/patroni" ,"state" :"running" ,"role" :"replica" ,"version" :"4.0.1" ,"tags" :{ "clonefrom" :true,"version" :"16" ,"spec" :"8C.32G.125G" ,"conf" :"tiny.yml" } ,"xlog_location" :184549376,"replication_state" :"streaming" ,"timeline" :1}
/pg/pg-meta/status
{ "optime" :184549376,"slots" :{ "pg_meta_2" :184549376,"pg_meta_1" :184549376} ,"retain_slots" :[ "pg_meta_1" ,"pg_meta_2" ]}
如何使用一个外部的已经存在的 etcd 集群? 配置清单中硬编码了所使用 etcd 的分组名为 etcd,这个分组里的成员将被用作 PGSQL 的 DCS 服务器。您可以使用 etcd.yml 对它们进行初始化,或直接假设它是一个已存在的外部 etcd 集群。
要使用现有的外部 etcd 集群,只要像往常一样定义它们即可,您可以跳过 etcd.yml 剧本的执行,因为集群已经存在,不需要部署。
但用户必须确保 现有 etcd 集群证书是由 Pigsty 使用的相同 CA 签名颁发的 。否则客户端无法使用 Pigsty 自签名 CA 颁发的证书来访问外部的 etcd 集群。
如何向现有etcd集群添加新的成员? 详细过程,请参考 向 etcd 集群添加成员
推荐方式:使用便捷脚本
# 首先在配置清单中添加新成员定义,然后执行:
bin/etcd-add <ip> # 添加单个新成员
bin/etcd-add <ip1> # 添加多个新成员
手动方式:
etcdctl member add <etcd-?> --learner= true --peer-urls= https://<new_ins_ip>:2380 # 宣告新成员加入
./etcd.yml -l <new_ins_ip> -e etcd_init = existing # 初始化新成员
etcdctl member promote <new_ins_server_id> # 提升为正式成员
请注意,我们建议一次只添加一个新成员。
如何从现有etcd集群中移除成员? 详细过程,请参考 从 etcd 集群中移除成员
推荐方式:使用便捷脚本
bin/etcd-rm <ip> # 移除指定成员
bin/etcd-rm # 移除整个 etcd 集群
手动方式:
./etcd-rm.yml -l <ins_ip> # 使用专用移除剧本
etcdctl member remove <etcd_server_id> # 从集群中踢出成员
./etcd-rm.yml -l <ins_ip> # 清理实例
如何配置 etcd RBAC 认证? Pigsty v4.0 默认启用 etcd 的 RBAC 认证。root 用户密码由 etcd_root_passwordEtcd.Root。
在生产环境中,强烈建议修改默认密码 :
all :
vars :
etcd_root_password : 'YourSecurePassword'
客户端认证 :
# 在 etcd 节点上,环境变量已自动配置
source /etc/profile.d/etcdctl.sh
etcdctl member list
# 手动配置认证
export ETCDCTL_USER = "root:YourSecurePassword"
export ETCDCTL_CACERT = /etc/etcd/ca.crt
export ETCDCTL_CERT = /etc/etcd/server.crt
export ETCDCTL_KEY = /etc/etcd/server.key
更多详情请参考 RBAC 认证 。
16 - 模块:MINIO Pigsty 内置了 MinIO 支持,一个本地 S3 对象存储开源替代,可用于 PGSQL 模块冷备份存储。
MinIO 是一个兼容 AWS S3 的多云对象存储软件。
MinIO 可以用来存储文档、图片、视频和备份。Pigsty 原生支持部署各种 MinIO 集群,具备原生多节点多磁盘高可用支持,易于扩展、安全且开箱即用,
并且有过 10PB+ 级别的大规模生产环境部署用例。
MinIO 是 Pigsty 中的一个 可选模块 备份 MINIO 模块应在任何 PGSQLNODE
快速开始 以下是一个最简单的 MinIO 单机单盘部署示例:
# 在配置清单中定义 MinIO 集群
minio : { hosts : { 10.10.10.10 : { minio_seq: 1 } }, vars : { minio_cluster : minio } }
./minio.yml -l minio # 在 minio 分组上部署 MinIO 模块
部署完成后,您可以通过以下方式访问 MinIO:
S3 API :https://sss.pigsty:9000(使用域名需要配置 DNS 解析)Web 控制台 :https://<minio-ip>:9001(默认用户名/密码:minioadmin / S3User.MinIO)命令行 :mcli ls sss/(管理节点上已预配置别名)部署模式 MinIO 支持三种主要部署模式:
模式 说明 适用场景 单机单盘 单节点,单个数据目录 开发、测试、演示 单机多盘 单节点,多块磁盘 资源受限的小规模部署 多机多盘 多节点,每节点多块磁盘 生产环境推荐
此外,您还可以使用 多池部署 来扩容现有集群,或部署 多套集群 。
核心特性 S3 兼容 :完全兼容 AWS S3 API,可与各种 S3 客户端和工具无缝集成高可用 :原生支持多节点多磁盘部署,容忍节点和磁盘故障安全 :默认启用 HTTPS 加密传输,支持服务端加密监控 :开箱即用的 Grafana 监控面板和 Prometheus 告警规则易用 :预配置的 mcli 客户端别名,一键部署和管理16.1 - 使用方法 快速上手,如何上手使用 MinIO ?如何可靠地接入 MinIO?如何使用 mc / rclone 客户端工具?
当您 配置 并执行 剧本 部署 MinIO 集群后,可以参考这里的说明开始使用与接入 MinIO 集群。
部署集群 在 Pigsty 中部署一个开箱即用的 单机单盘 MinIO 实例非常简单:首先在 配置清单 中定义一套 MinIO 集群:
minio : { hosts : { 10.10.10.10 : { minio_seq: 1 } }, vars : { minio_cluster : minio } }
然后,针对定义的分组(这里为 minio )执行 Pigsty 提供的 minio.yml
请注意在 deploy.ymlminio.yml 剧本。
如果您计划部署一个生产等级的大规模多节点 MinIO 集群,我们强烈建议您通读 Pigsty MinIO 配置文档 与 MinIO 官方文档 后再进行。
接入集群 请注意:生产环境建议通过域名与 HTTPS 访问 MinIO(默认配置也是 HTTPS)。
如果您显式设置 minio_httpsfalse,也可以使用 HTTP 访问。
无论哪种方式,都请确保 MinIO 服务域名(默认为 sss.pigsty)正确指向 MinIO 服务器节点。
您可以在 node_etc_hosts/etc/hosts 文件 您可以在内网的 DNS 服务器上添加一条记录,如果已经有了现成的 DNS 服务 如果您启用了 Infra 节点上的 DNS 服务器,可以在 dns_records 对于生产环境访问 MinIO,通常我们建议使用第一种方式:静态 DNS 解析记录,避免 MinIO 对于 DNS 的额外依赖。
您应当将 MinIO 服务域名指向 MinIO 服务器节点的 IP 地址与服务端口,或者负载均衡器的 IP 地址与服务端口。
Pigsty 默认使用的 MinIO 服务域名是 sss.pigsty,在单机部署时默认指向本机,在 9000 端口提供服务。
在一些例子中,MinIO 集群上还部署了 HAProxy 实例对外暴露服务,在这种情况下,9002 是模板中使用的服务端口。
添加别名 要使用 mcli 客户端访问 minio 服务器集群,首先要配置服务器的别名(alias):
mcli alias ls # 列出 minio 别名(默认使用sss)
mcli alias set sss https://sss.pigsty:9000 minioadmin S3User.MinIO # root 用户
mcli alias set sss https://sss.pigsty:9002 minioadmin S3User.MinIO # root 用户,使用负载均衡器 9002 端口
mcli alias set pgbackrest https://sss.pigsty:9000 pgbackrest S3User.Backup # 使用备份用户
在管理节点的管理用户上,已经默认配置了名为 sss 的 MinIO 别名,可以直接使用。
MinIO 客户端工具 mcli 的完整功能参考,请查阅文档: MinIO 客户端 。
注意:请使用您实际配置的密码
上述示例中的密码 S3User.MinIO 是 Pigsty 的默认值。如果您在部署时修改了 minio_secret_key
用户管理 使用 mcli 可以管理 MinIO 中的业务用户,例如这里我们可以使用命令行创建两个业务用户:
mcli admin user list sss # 列出 sss 上的所有用户
set +o history # 在历史记录中隐藏密码并创建 minio 用户
mcli admin user add sss dba S3User.DBA
mcli admin user add sss pgbackrest S3User.Backup
set -o history
存储桶管理 您可以对MinIO中的存储桶进行增删改查 :
mcli ls sss/ # 列出别名 'sss' 的所有桶
mcli mb --ignore-existing sss/hello # 创建名为 'hello' 的桶
mcli rb --force sss/hello # 强制删除 'hello' 桶
对象管理 您也可以对存储桶内的对象进行增删改查 ,详情请参考官方文档:对象管理
mcli cp /www/pigsty/* sss/infra/ # 将本地软件源的内容上传到 MinIO 的 infra 桶中
mcli cp sss/infra/plugins.tgz /tmp/ # 从 minio 下载文件到本地
mcli ls sss/infra # 列出 infra 桶中的所有文件
mcli rm sss/infra/plugins.tgz # 删除 infra 桶中的特定文件
mcli cat sss/infra/repo_complete # 查看 infra 桶中的文件内容
使用rclone Pigsty 仓库中提供了 rclone , 一个方便的多云对象存储客户端,您可以使用它来访问 MinIO 服务。
yum install rclone; # EL 系列系统
apt install rclone; # Debian/Ubuntu 系统
mkdir -p ~/.config/rclone/;
tee ~/.config/rclone/rclone.conf > /dev/null <<EOF
[sss]
type = s3
access_key_id = minioadmin
secret_access_key = S3User.MinIO
endpoint = https://sss.pigsty:9000
EOF
rclone ls sss:/
注意:HTTPS 与证书信任
如果 MinIO 使用 HTTPS(默认配置),您需要确保客户端信任 Pigsty 的 CA 证书(/etc/pki/ca.crt),或者在 rclone 配置中添加 no_check_certificate = true 来跳过证书验证(不建议在生产环境使用)。
配置备份仓库 在 Pigsty 中,MinIO 默认的用例是作为 pgBackRest 的备份存储仓库。
当您修改 pgbackrest_methodminio 时,PGSQL 模块会自动将备份存储仓库切换到 MinIO 上。
pgbackrest_method: local # pgbackrest repo method : local,minio,[user-defined...]
pgbackrest_repo: # pgbackrest repo : https://pgbackrest.org/configuration.html#section-repository
local : # default pgbackrest repo with local posix fs
path : /pg/backup # local backup directory, `/pg/backup` by default
retention_full_type : count # retention full backups by count
retention_full : 2 # keep 2, at most 3 full backup when using local fs repo
minio : # optional minio repo for pgbackrest
type : s3 # minio is s3-compatible, so s3 is used
s3_endpoint : sss.pigsty # minio endpoint domain name, `sss.pigsty` by default
s3_region : us-east-1 # minio region, us-east-1 by default, useless for minio
s3_bucket : pgsql # minio bucket name, `pgsql` by default
s3_key : pgbackrest # minio user access key for pgbackrest
s3_key_secret : S3User.Backup # minio user secret key for pgbackrest
s3_uri_style : path # use path style uri for minio rather than host style
path : /pgbackrest # minio backup path, default is `/pgbackrest`
storage_port : 9000 # minio port, 9000 by default
storage_ca_file : /etc/pki/ca.crt # minio ca file path, `/etc/pki/ca.crt` by default
bundle : y # bundle small files into a single file
cipher_type : aes-256-cbc # enable AES encryption for remote backup repo
cipher_pass : pgBackRest # AES encryption password, default is 'pgBackRest'
retention_full_type : time # retention full backup by time on minio repo
retention_full : 14 # keep full backup for last 14 days
请注意,如果您使用了多节点部署的 MinIO 集群,并通过负载均衡器对外提供服务,您需要相应地修改这里的 s3_endpoint 与 storage_port 参数。
16.2 - 集群配置 根据需求场景选择合适的 MinIO 部署类型,并对外提供可靠的接入。
在部署 MinIO 之前,你需要在 配置清单 中定义一个 MinIO 集群,MinIO 有三种经典部署模式:
单机单盘:SNSD :单机单盘模式,可以使用任意目录作为数据盘,仅作为开发、测试、演示使用。单机多盘:SNMD :折中模式,在单台服务器上使用多块磁盘 (>=2),仅当资源极为有限时使用。多机多盘:MNMD :多机多盘模式,标准生产环境部署,具有最好的可靠性,但需要多台服务器。通常我们建议使用 SNSD 与 MNMD 这两种模式,前者用于开发测试,后者用于生产部署,SNMD 仅在资源有限(只有一台服务器)的情况下使用。
此外,还可以使用 多池部署 来实现现有 MinIO 集群的扩容,或者直接部署 多套集群 。
使用多节点 MinIO 集群时,访问任意节点都可以获取服务,因此最佳实践是在 MinIO 集群前使用负载均衡与 高可用服务接入机制 。
核心参数 MinIO 部署中,MINIO_VOLUMESMINIO_VOLUMES 与其他配置参数的值,但您也可以直接指定它们。
单机单盘: MINIO_VOLUMES 指向本机上的一个普通目录,默认由 minio_data/data/minio。 单机多盘: MINIO_VOLUMES 指向本机上的序列挂载点,同样是由 minio_data/data{1...4}。 多机多盘: MINIO_VOLUMES 指向多台服务器上的序列挂载点,由以下两部分自动组合生成:首先要使用 minio_data/data{1...4}, 还需要使用 minio_node${minio_cluster}-${minio_seq}.pigsty 多池部署: 您需要显式指定 minio_volumes 单机单盘 SNSD 模式,部署参考教程:MinIO 单机单盘部署
在 Pigsty 中,定义一个单例 MinIO 实例非常简单:
# 1 节点 1 驱动器(默认)
minio : { hosts : { 10.10.10.10 : { minio_seq: 1 } }, vars : { minio_cluster : minio } }
单机模式下,唯一必要的参数是 minio_seqminio_cluster
单节点单磁盘模式仅用于开发目的,因此您可以使用一个普通的目录作为数据目录,该目录由参数 minio_data/data/minio。
在您使用 MinIO 时,强烈建议您通过静态解析的域名记录访问 MinIO,例如,假设 minio_domainsss.pigsty,
那么您可以在所有节点上添加一个静态解析,便于其他节点访问此服务。
node_etc_hosts : [ "10.10.10.10 sss.pigsty" ] # domain name to access minio from all nodes (required)
SNSD 仅适用于开发测试
单节点单盘模式应当仅用于开发、测试、演示目的,因为它无法容忍任何硬件故障,也无法带来多磁盘的性能改善。生产环境请使用 多机多盘 模式。
单机多盘 SNMD 模式,部署参考教程:MinIO 单机多盘部署
要在单节点上使用多块磁盘,所需的操作与 单机单盘 基本一致,但用户需要以 {{ prefix }}{x...y} 的特定格式指定 minio_data
minio :
hosts : { 10.10.10.10 : { minio_seq : 1 } }
vars :
minio_cluster : minio # minio 集群名称,默认为 minio
minio_data : '/data{1...4}' # minio 数据目录,使用 {x...y} 记号来指定多块磁盘
请使用真实磁盘挂载点
请注意,SNMD 模式不支持使用普通目录作为数据目录。如果您使用 SNMD 模式拉起 MinIO,但数据目录不是有效的磁盘挂载点,MinIO 将拒绝启动。请确保使用 XFS 格式化的真实磁盘。
例如 Vagrant MinIO 沙箱 定义了一个带有4块磁盘的单节点 MinIO 集群:/data1、/data2、/data3 和 /data4。启动 MinIO 之前,你需要正确地挂载它们(请务必使用 xfs 格式化磁盘):
mkfs.xfs /dev/vdb; mkdir /data1; mount -t xfs /dev/vdb /data1; # 挂载第1块盘……
mkfs.xfs /dev/vdc; mkdir /data2; mount -t xfs /dev/vdc /data2; # 挂载第2块盘……
mkfs.xfs /dev/vdd; mkdir /data3; mount -t xfs /dev/vdd /data3; # 挂载第3块盘……
mkfs.xfs /dev/vde; mkdir /data4; mount -t xfs /dev/vde /data4; # 挂载第4块盘……
挂载磁盘属于服务器置备的部分,超出 Pigsty 的处理范畴。挂载的磁盘应该同时写入 /etc/fstab 以便在服务器重启后可以自动挂载。
/dev/vdb /data1 xfs defaults,noatime,nodiratime 0 0
/dev/vdc /data2 xfs defaults,noatime,nodiratime 0 0
/dev/vdd /data3 xfs defaults,noatime,nodiratime 0 0
/dev/vde /data4 xfs defaults,noatime,nodiratime 0 0
SNMD 模式可以利用单机上的多块磁盘,提供更高的性能和容量,并且容忍部分磁盘故障。
但单节点模式无法容忍整个节点的故障,而且您无法在运行时添加新的节点,因此如果没有特殊原因,我们不建议在生产环境中使用 SNMD 模式。
多机多盘 MNMD 模式,部署参考教程:MinIO 多机多盘部署
除了需要 单机多盘 模式中的 minio_dataminio_node
例如,以下配置定义了一个 MinIO 集群,其中有四个节点,每个节点有四块磁盘:
minio :
hosts :
10.10.10.10 : { minio_seq : 1 } # 实际节点名: minio-1.pigsty
10.10.10.11 : { minio_seq : 2 } # 实际节点名: minio-2.pigsty
10.10.10.12 : { minio_seq : 3 } # 实际节点名: minio-3.pigsty
10.10.10.13 : { minio_seq : 4 } # 实际节点名: minio-4.pigsty
vars :
minio_cluster : minio
minio_data : '/data{1...4}' # 每个节点使用四块磁盘
minio_node : '${minio_cluster}-${minio_seq}.pigsty' # minio 节点名称规则
minio_node${minio_cluster}-${minio_seq}.pigsty,其中 ${minio_cluster} 是集群名称,${minio_seq} 是节点序号。
MinIO 实例的名称非常重要,会自动写入到 MinIO 节点的 /etc/hosts 中进行静态解析。MinIO 依靠这些名称来识别并访问集群中的其他节点。
在这种情况下,MINIO_VOLUMES 将被设置为 https://minio-{1...4}.pigsty:9000/data{1...4} ,以标识四个节点上的四块盘。
您可以直接在 MinIO 集群中指定 minio_volumes
多池部署 MinIO 的架构允许通过添加新的存储池来扩容。在 Pigsty 中,您可以通过显式指定 minio_volumes
例如,假设您已经创建了 多机多盘 样例中定义的 MinIO 集群,现在您想要添加一个新的存储池,同样由四个节点构成。
那么,你需要直接覆盖指定 minio_volumes
minio :
hosts :
10.10.10.10 : { minio_seq : 1 }
10.10.10.11 : { minio_seq : 2 }
10.10.10.12 : { minio_seq : 3 }
10.10.10.13 : { minio_seq : 4 }
10.10.10.14 : { minio_seq : 5 }
10.10.10.15 : { minio_seq : 6 }
10.10.10.16 : { minio_seq : 7 }
10.10.10.17 : { minio_seq : 8 }
vars :
minio_cluster : minio
minio_data : "/data{1...4}"
minio_node : '${minio_cluster}-${minio_seq}.pigsty' # minio 节点名称规则
minio_volumes : 'https://minio-{1...4}.pigsty:9000/data{1...4} https://minio-{5...8}.pigsty:9000/data{1...4}'
在这里,空格分割的两个参数分别代表两个存储池,每个存储池有四个节点,每个节点有四块磁盘。更多关于存储池的信息请参考 管理预案:MinIO集群扩容
多套集群 您可以将新的 MinIO 节点部署为一个全新的 MinIO 集群,使用不同的集群名称定义一个新的分组即可,以下配置声明了两个独立的 MinIO 集群:
minio1 :
hosts :
10.10.10.10 : { minio_seq : 1 }
10.10.10.11 : { minio_seq : 2 }
10.10.10.12 : { minio_seq : 3 }
10.10.10.13 : { minio_seq : 4 }
vars :
minio_cluster : minio1
minio_data : "/data{1...4}"
minio2 :
hosts :
10.10.10.14 : { minio_seq : 5 }
10.10.10.15 : { minio_seq : 6 }
10.10.10.16 : { minio_seq : 7 }
10.10.10.17 : { minio_seq : 8 }
vars :
minio_cluster : minio2
minio_data : "/data{1...4}"
minio_alias : sss2
minio_domain : sss2.pigsty
minio_endpoint : https://sss2.pigsty:9000
请注意,Pigsty 默认一套部署中只有一个 MinIO 集群,如果您需要部署多个 MinIO 集群,那么一些带有默认值的参数需要显式设置,无法省略,否则会出现命名冲突,如上所示。
服务接入 MinIO 默认使用 9000 端口提供服务。多节点 MinIO 集群可以通过访问 任意一个节点 来访问其服务。
服务接入属于 NODE 模块的功能范畴,这里仅做基本介绍。
多节点 MinIO 集群的高可用接入可以使用 L2 VIP 或 HAProxy 实现。例如,您可以选择使用 keepalived 在 MinIO 集群上绑定一个 L2 VIP ,
或者使用由 NODEhaproxy
# minio cluster with 4 nodes and 4 drivers per node
minio :
hosts :
10.10.10.10 : { minio_seq: 1 , nodename : minio-1 }
10.10.10.11 : { minio_seq: 2 , nodename : minio-2 }
10.10.10.12 : { minio_seq: 3 , nodename : minio-3 }
10.10.10.13 : { minio_seq: 4 , nodename : minio-4 }
vars :
minio_cluster : minio
minio_data : '/data{1...4}'
minio_buckets : [ { name : pgsql }, { name: infra }, { name: redis } ]
minio_users :
- { access_key: dba , secret_key: S3User.DBA, policy : consoleAdmin }
- { access_key: pgbackrest , secret_key: S3User.SomeNewPassWord , policy : readwrite }
# bind a node l2 vip (10.10.10.9) to minio cluster (optional)
node_cluster : minio
vip_enabled : true
vip_vrid : 128
vip_address : 10.10.10.9
vip_interface : eth1
# expose minio service with haproxy on all nodes
haproxy_services :
- name : minio # [REQUIRED] service name, unique
port : 9002 # [REQUIRED] service port, unique
balance : leastconn # [OPTIONAL] load balancer algorithm
options : # [OPTIONAL] minio health check
- option httpchk
- option http-keep-alive
- http-check send meth OPTIONS uri /minio/health/live
- http-check expect status 200
servers :
- { name: minio-1 ,ip: 10.10.10.10 ,port: 9000 ,options : 'check-ssl ca-file /etc/pki/ca.crt check port 9000' }
- { name: minio-2 ,ip: 10.10.10.11 ,port: 9000 ,options : 'check-ssl ca-file /etc/pki/ca.crt check port 9000' }
- { name: minio-3 ,ip: 10.10.10.12 ,port: 9000 ,options : 'check-ssl ca-file /etc/pki/ca.crt check port 9000' }
- { name: minio-4 ,ip: 10.10.10.13 ,port: 9000 ,options : 'check-ssl ca-file /etc/pki/ca.crt check port 9000' }
例如,上面的配置块为 MinIO 集群的所有节点上启用了 HAProxy ,在 9002 端口上暴露 MinIO 服务,同时为集群绑定了一个二层 VIP。
当使用时,用户应当将 sss.pigsty 域名解析指向 VIP 地址 10.10.10.9,并使用 9002 端口访问 MinIO 服务。这样当任意一个节点发生故障时,VIP 会自动切换到另一个节点,保证服务的高可用性。
在这种情况下,您通常还需要在全局修改域名解析的目的地,以及 minio_endpoint
minio_endpoint : https://sss.pigsty:9002 # 覆盖默认值: https://sss.pigsty:9000
node_etc_hosts : [ "10.10.10.9 sss.pigsty" ] # 其他节点将使用 sss.pigsty 域名来访问 MinIO
专用负载均衡 Pigsty 允许用户使用专用的负载均衡服务器组,而不是集群本身来运行 VIP 与 HAProxy。例如 prod
proxy :
hosts :
10.10.10.18 : { nodename: proxy1 ,node_cluster: proxy ,vip_interface: eth1 ,vip_role : master }
10.10.10.19 : { nodename: proxy2 ,node_cluster: proxy ,vip_interface: eth1 ,vip_role : backup }
vars :
vip_enabled : true
vip_address : 10.10.10.20
vip_vrid : 20
haproxy_services: # expose minio service : sss.pigsty:9002
- name : minio # [REQUIRED] service name, unique
port : 9002 # [REQUIRED] service port, unique
balance : leastconn # Use leastconn algorithm and minio health check
options : [ "option httpchk" , "option http-keep-alive" , "http-check send meth OPTIONS uri /minio/health/live" , "http-check expect status 200" ]
servers : # reload service with ./node.yml -t haproxy_config,haproxy_reload
- { name: minio-1 ,ip: 10.10.10.21 ,port: 9000 ,options : 'check-ssl ca-file /etc/pki/ca.crt check port 9000' }
- { name: minio-2 ,ip: 10.10.10.22 ,port: 9000 ,options : 'check-ssl ca-file /etc/pki/ca.crt check port 9000' }
- { name: minio-3 ,ip: 10.10.10.23 ,port: 9000 ,options : 'check-ssl ca-file /etc/pki/ca.crt check port 9000' }
- { name: minio-4 ,ip: 10.10.10.24 ,port: 9000 ,options : 'check-ssl ca-file /etc/pki/ca.crt check port 9000' }
- { name: minio-5 ,ip: 10.10.10.25 ,port: 9000 ,options : 'check-ssl ca-file /etc/pki/ca.crt check port 9000' }
在这种情况下,您通常还需要在全局修改 MinIO 域名的解析,将 sss.pigsty 指向负载均衡器的地址,并修改 minio_endpoint
minio_endpoint: https://sss.pigsty:9002 # overwrite the defaults : https://sss.pigsty:9000
node_etc_hosts : [ "10.10.10.20 sss.pigsty" ] # domain name to access minio from all nodes (required)
访问服务 如果您想要访问上面通过 HAProxy 暴露的 MinIO,以 PGSQL 备份配置为例,可以修改 pgbackrest_repo
# 这是新添加的 HA MinIO Repo 定义,使用此配置代替之前的单机 MinIO 配置
minio_ha :
type : s3
s3_endpoint : minio-1.pigsty # s3_endpoint 可以是任何一个负载均衡器:10.10.10.1{0,1,2},或指向任意 3 个节点的域名
s3_region : us-east-1 # 你可以使用外部域名:sss.pigsty,该域名指向任一成员(`minio_domain`)
s3_bucket : pgsql # 你可使用实例名和节点名:minio-1.pigsty minio-1.pigsty minio-1.pigsty minio-1 minio-2 minio-3
s3_key : pgbackrest # 最好为 MinIO 的 pgbackrest 用户使用专门的密码
s3_key_secret : S3User.SomeNewPassWord
s3_uri_style : path
path : /pgbackrest
storage_port : 9002 # 使用负载均衡器的端口 9002 代替默认的 9000(直接访问)
storage_ca_file : /etc/pki/ca.crt
bundle : y
cipher_type : aes-256-cbc # 在您的生产环境中最好使用新的加密密码,这里可以使用集群名作为密码的一部分。
cipher_pass : pgBackRest.With.Some.Extra.PassWord.And.Salt.${pg_cluster}
retention_full_type : time
retention_full : 14
暴露管控 MinIO 默认通过 9001 端口(由 minio_admin_port
将后台管理界面暴露给外部可能存在安全隐患。如果你希望这样做,请将 MinIO 添加到 infra_portal
# ./infra.yml -t nginx
infra_portal :
home : { domain : h.pigsty }
grafana : { domain: g.pigsty ,endpoint : "${admin_ip}:3000" , websocket : true }
vmetrics : { domain: v.pigsty ,endpoint : "${admin_ip}:8428" }
alertmanager : { domain: a.pigsty ,endpoint : "${admin_ip}:9059" }
blackbox : { endpoint : "${admin_ip}:9115" }
vlogs : { endpoint : "${admin_ip}:9428" }
# MinIO 管理页面需要 HTTPS / Websocket 才能工作
minio : { domain: m.pigsty ,endpoint : "10.10.10.10:9001" ,scheme: https ,websocket : true }
minio10 : { domain: m10.pigsty ,endpoint : "10.10.10.10:9001" ,scheme: https ,websocket : true }
minio11 : { domain: m11.pigsty ,endpoint : "10.10.10.11:9001" ,scheme: https ,websocket : true }
minio12 : { domain: m12.pigsty ,endpoint : "10.10.10.12:9001" ,scheme: https ,websocket : true }
minio13 : { domain: m13.pigsty ,endpoint : "10.10.10.13:9001" ,scheme: https ,websocket : true }
请注意,MinIO 管控页面需要使用 HTTPS,请 不要 在生产环境中暴露未加密的 MinIO 管控页面。
这意味着,您通常需要在您的 DNS 服务器,或者本机 /etc/hosts 中添加 m.pigsty 的解析记录,以便访问 MinIO 管控页面。
与此同时,如果您使用的是 Pigsty 自签名的 CA 而不是一个正规的公共 CA ,通常您还需要手工信任该 CA 或证书,才能跳过浏览器中的 “不安全” 提示信息。
16.3 - 参数列表 MinIO 模块提供了 21 个相关配置参数,用于定制所需的 MinIO 集群。
MinIO 模块的参数列表,共有 21 个参数,分为两个部分:
架构变化:Pigsty v3.6+
自 Pigsty v3.6 起,minio.yml 剧本不再包含移除功能,移除相关参数已迁移至独立的 minio_remove 角色和 minio-rm.yml 剧本。
参数概览 MINIO
MINIO_REMOVE
其中,minio_volumes 与 minio_endpoint 为自动生成的参数,但您可以显式覆盖指定这两个参数。
默认参数 MINIO:18 个参数,定义于 roles/minio/defaults/main.yml
#-----------------------------------------------------------------
# MINIO
#-----------------------------------------------------------------
#minio_seq: 1 # minio 实例标识符,必填
minio_cluster : minio # minio 集群名称,默认为 minio
minio_user : minio # minio 操作系统用户,默认为 `minio`
minio_https : true # 是否为 MinIO 启用 HTTPS?默认为 true
minio_node : '${minio_cluster}-${minio_seq}.pigsty' # minio 节点名模式
minio_data : '/data/minio' # minio 数据目录,使用 `{x...y}` 指定多个磁盘
#minio_volumes: # minio 核心参数,如果未指定,则使用拼接生成的默认值
minio_domain : sss.pigsty # minio 外部域名,默认为 `sss.pigsty`
minio_port : 9000 # minio 服务端口,默认为 9000
minio_admin_port : 9001 # minio 控制台端口,默认为 9001
minio_access_key : minioadmin # 根访问密钥,默认为 `minioadmin`
minio_secret_key : S3User.MinIO # 根密钥,默认为 `S3User.MinIO`
minio_extra_vars : '' # minio 服务器的额外环境变量
minio_provision : true # 是否执行 minio 资源置备任务?
minio_alias : sss # minio 部署的客户端别名
#minio_endpoint: https://sss.pigsty:9000 # minio 别名对应的接入点,如果未指定,则使用拼接生成的默认值
minio_buckets : # 待创建的 minio 存储桶列表
- { name : pgsql }
- { name: meta ,versioning : true }
- { name : data }
minio_users : # 待创建的 minio 用户列表
- { access_key: pgbackrest ,secret_key: S3User.Backup ,policy : pgsql }
- { access_key: s3user_meta ,secret_key: S3User.Meta ,policy : meta }
- { access_key: s3user_data ,secret_key: S3User.Data ,policy : data }
MINIO_REMOVE:3 个参数,定义于 roles/minio_remove/defaults/main.yml
#-----------------------------------------------------------------
# MINIO_REMOVE
#-----------------------------------------------------------------
minio_safeguard : false # 防止意外删除?默认为 false
minio_rm_data : true # 移除时是否删除 minio 数据?默认为 true
minio_rm_pkg : false # 移除时是否卸载 minio 软件包?默认为 false
MINIO本节包含 miniominio.yml
minio_seq参数名称: minio_seq, 类型: int, 层次:I
MinIO 实例标识符,必需的身份参数。没有默认值,您必须手动分配这些序列号。
通常的最佳实践是,从 1 开始分配,依次加 1,并永远不使用已经分配的序列号。
序列号与集群名称 minio_clusterminio-1)。
在多节点部署中,序列号还会用于生成节点名称,写入 /etc/hosts 文件中进行静态解析。
minio_cluster参数名称: minio_cluster, 类型: string, 层次:C
MinIO 集群名称,默认为 minio。当部署多个 MinIO 集群时,可以使用此参数进行区分。
集群名称与序列号 minio_seqminio,序列号为 1 时,实例名称为 minio-1。
请注意,Pigsty 默认一套部署中只有一个 MinIO 集群。如果您需要部署多个 MinIO 集群,
需要显式设置 minio_aliasminio_domainminio_endpoint
minio_user参数名称: minio_user, 类型: username, 层次:C
MinIO 操作系统用户名,默认为 minio。
MinIO 服务将以此用户身份运行,该用户的家目录(默认为 /home/minio)中将存储 MinIO 使用的 SSL 证书(位于 ~/.minio/certs/ 目录下)。
minio_https参数名称: minio_https, 类型: bool, 层次:G/C
是否为 MinIO 服务启用 HTTPS?默认为 true,即使用 HTTPS。
请注意,pgBackREST 需要 MinIO 启用 HTTPS 才能正常工作。但如果您不使用 MinIO 进行 PostgreSQL 备份,且不需要使用 HTTPS,可以将此参数设置为 false。
启用 HTTPS 后,Pigsty 会自动为 MinIO 服务器签发 SSL 证书,证书包含 minio_domain
minio_node参数名称: minio_node, 类型: string, 层次:C
MinIO 节点名称模式,用于 多节点 部署。
默认值为:${minio_cluster}-${minio_seq}.pigsty,即以实例名 + .pigsty 后缀作为默认的节点名。
在这里指定的域名模式将用于生成节点名,节点名将写入所有 MinIO 节点的 /etc/hosts 文件中。
minio_data参数名称: minio_data, 类型: path, 层次:C
MinIO 数据目录(们),默认值:/data/minio,这是 单节点 部署的常见目录。
对于 多机多盘 与 单机多盘 {x...y} 的记法来指定多个磁盘。
minio_volumes参数名称: minio_volumes, 类型: string, 层次:C
MinIO 核心参数,默认不指定留空,留空情况下,该参数会自动使用以下规则拼接生成:
minio_volumes : "{% if minio_cluster_size|int > 1 %}{% if minio_https|bool %}https{% else %}http{% endif %}://{{ minio_node|replace('${minio_cluster}', minio_cluster)|replace('${minio_seq}',minio_seq_range) }}:{{ minio_port|default(9000) }}{% endif %}{{ minio_data }}"
在单机部署(无论是单盘还是多盘)模式下,minio_volumes 直接使用 minio_data 在多机部署模式下,minio_volumes 会使用 minio_node, minio_port, minio_data 参数的值生成多节点的地址,用于多机部署。 在多池部署模式下,通常需要您直接指定并覆盖 minio_volumes 的值,以指定多个节点池的地址。 指定本参数时,您需要确保使用的参数与 minio_node, minio_port, minio_data 三者匹配。
minio_domain参数名称: minio_domain, 类型: string, 层次:G
MinIO 服务域名,默认为 sss.pigsty。
客户端可以通过此域名访问 MinIO S3 服务。此名称将注册到本地 DNSMASQ,并包含在 SSL 证书的 SAN(Subject Alternative Name)字段中。
建议在 node_etc_hosts
minio_port参数名称: minio_port, 类型: port, 层次:C
MinIO 服务端口,默认为 9000。
这是 MinIO S3 API 的监听端口,客户端通过此端口访问对象存储服务。在多节点部署中,此端口也用于节点间通信。
minio_admin_port参数名称: minio_admin_port, 类型: port, 层次:C
MinIO 控制台端口,默认为 9001。
这是 MinIO 内置 Web 管理控制台的监听端口。您可以通过 https://<minio-ip>:9001 访问 MinIO 的图形化管理界面。
如果希望通过 Nginx 对外暴露 MinIO 控制台,可以将其添加到 infra_portal
minio_access_key参数名称: minio_access_key, 类型: username, 层次:C
根访问用户名(access key),默认为 minioadmin。
这是 MinIO 的超级管理员用户名,拥有对所有存储桶和对象的完全访问权限。建议在生产环境中修改此默认值。
minio_secret_key参数名称: minio_secret_key, 类型: password, 层次:C
根访问密钥(secret key),默认为 S3User.MinIO。
这是 MinIO 超级管理员的密码,与 minio_access_key
安全警告:请务必修改默认密码!
使用默认密码是高危行为!请务必在您的生产环境部署中修改此密码。
提示:执行 ./configure 或 ./configure -g 时,会自动修改配置文件模板中的这些默认密码。
参数名称: minio_extra_vars, 类型: string, 层次:C
MinIO 服务器的额外环境变量。查看 MinIO Server 文档以获取完整列表。
默认值为空字符串,您可以使用多行字符串来传递多个环境变量。例如:
minio_extra_vars : |
MINIO_BROWSER_REDIRECT_URL=https://minio.example.com
MINIO_SERVER_URL=https://s3.example.com
minio_provision参数名称: minio_provision, 类型: bool, 层次:G/C
是否执行 MinIO 资源置备任务?默认为 true。
当启用时,Pigsty 将自动创建 minio_bucketsminio_usersfalse。
minio_alias参数名称: minio_alias, 类型: string, 层次:G
本地 MinIO 集群的 MinIO 客户端别名,默认值:sss。
此别名将被写入管理节点上管理员用户的 MinIO 客户端配置文件中(~/.mcli/config.json),
使您可以直接使用 mcli <alias> 命令访问 MinIO 集群,例如 mcli ls sss/。
如果部署多个 MinIO 集群,需要为每个集群指定不同的别名以避免冲突。
minio_endpoint参数名称:minio_endpoint, 类型: string, 层次:C
部署的客户端别名对应的端点,如果指定,这里的 minio_endpoint (例如: https://sss.pigsty:9002)将会替代默认值,作为写入管理节点 MinIO Alias 的目标端点。
mcli alias set {{ minio_alias }} { % if minio_endpoint is defined and minio_endpoint != '' %}{{ minio_endpoint }}{ % else %}{ % if minio_https| bool %} https{ % else %} http{ % endif %} ://{{ minio_domain }} :{{ minio_port }}{ % endif %} {{ minio_access_key }} {{ minio_secret_key }}
以上 MinIO Alias 会在管理节点上以默认管理用户执行。
minio_buckets参数名称: minio_buckets, 类型: bucket[], 层次:C
默认创建的 MinIO 存储桶列表:
minio_buckets :
- { name : pgsql }
- { name: meta ,versioning : true }
- { name : data }
默认创建三个存储桶,各有不同的用途和策略:
pgsql 存储桶:默认用于 PostgreSQL 的 pgBackREST 备份存储。meta 存储桶:开放式存储桶,启用了版本控制(versioning),适合存储需要版本管理的重要元数据。data 存储桶:开放式存储桶,用于其他用途,例如 Supabase 模板可能使用此存储桶存储业务数据。每个存储桶都会创建一个同名的访问策略,例如 pgsql 策略拥有对 pgsql 存储桶的所有权限,以此类推。
您还可以在存储桶定义中添加 lock 标志,启用对象锁定功能,防止存储桶中的对象被意外删除。
minio_users参数名称: minio_users, 类型: user[], 层次:C
要创建的 MinIO 用户列表,默认值:
minio_users :
- { access_key: pgbackrest ,secret_key: S3User.Backup ,policy : pgsql }
- { access_key: s3user_meta ,secret_key: S3User.Meta ,policy : meta }
- { access_key: s3user_data ,secret_key: S3User.Data ,policy : data }
默认配置会创建三个用户,分别对应三个默认存储桶:
pgbackrest:用于 PostgreSQL pgBackREST 备份,拥有 pgsql 存储桶的访问权限。s3user_meta:用于访问 meta 存储桶。s3user_data:用于访问 data 存储桶。使用默认密码是高危行为!请务必在您的部署中调整这些凭证!
提示:./configure -g 会默认修改配置文件模板中的这些密码,如果这些默认密码出现在模版文件中。
MINIO_REMOVE本节包含 minio_removeminio-rm.yml
minio_safeguard参数名称: minio_safeguard, 类型: bool, 层次:G/C/A
防止意外删除的保险开关,默认值为 false。
如果启用此参数,minio-rm.yml
建议在生产环境中启用此保险开关,防止误操作导致数据丢失:
minio_safeguard : true # 启用后,minio-rm.yml 将拒绝执行
minio_rm_data参数名称: minio_rm_data, 类型: bool, 层次:G/C/A
移除时是否删除 MinIO 数据?默认值为 true。
当启用时,minio-rm.yml
minio_rm_pkg参数名称: minio_rm_pkg, 类型: bool, 层次:G/C/A
移除时是否卸载 MinIO 软件包?默认值为 false。
当启用时,minio-rm.yml
16.4 - 预置剧本 如何使用预置的 ansible 剧本来管理 MinIO 集群,常用管理命令速查。
MinIO 模块提供了两个内置剧本用于集群管理:
minio.yml剧本 minio.yml
minio-id : 生成/校验 minio 身份参数minio_install : 安装 miniominio_os_user : 创建操作系统用户 miniominio_pkg : 安装 minio/mcli 软件包minio_dir : 创建 minio 目录minio_config : 生成 minio 配置minio_conf : minio 主配置文件minio_cert : minio SSL 证书签发minio_dns : minio DNS 记录插入minio_launch : minio 服务启动minio_register : minio 纳入监控minio_provision : 创建 minio 别名/存储桶/业务用户minio_alias : 创建 minio 客户端别名(管理节点上)minio_bucket : 创建 minio 存储桶minio_user : 创建 minio 业务用户在执行剧本前,请先在 配置清单 中,完成 MinIO 集群的 配置 。
执行条件
剧本会自动跳过未定义 minio_seq
架构变更:Pigsty v3.6+
从 Pigsty v3.6 开始,minio.yml 剧本专注于集群安装。所有移除操作已迁移至专用的 minio-rm.yml 剧本,使用 minio_remove 角色执行。
minio-rm.yml剧本 minio-rm.yml
minio-id : 生成 minio 身份参数用于移除操作(启用 any_errors_fatal,身份验证失败时立即停止)minio_safeguard : 安全检查,防止意外删除(默认:false)minio_pause : 暂停 3 秒,允许用户中止操作(Ctrl+C 可取消)minio_deregister : 从 Victoria/Prometheus 监控中移除目标,清理 DNS 记录minio_svc : 停止并禁用 minio systemd 服务minio_data : 移除 minio 数据目录(可通过 minio_rm_data=false 禁用)minio_pkg : 卸载 minio 软件包(可通过 minio_rm_pkg=true 启用)执行条件与安全机制
剧本会自动跳过未定义 minio_seq 身份验证阶段启用了 any_errors_fatal,一旦检测到无效的 MinIO 身份,剧本会立即停止 移除前会暂停 3 秒,给用户提供中止操作的机会 移除剧本使用 minio_remove 角色,支持以下 可配置参数 :
命令速查 MINIO 剧本常用命令:
./minio.yml -l <cls> # 在 <cls> 分组上安装 MINIO 模块
./minio.yml -l minio -t minio_install # 在节点上安装 MinIO 服务,准备数据目录,但不配置启动
./minio.yml -l minio -t minio_config # 重新配置 MinIO 集群
./minio.yml -l minio -t minio_launch # 重启 MinIO 集群
./minio.yml -l minio -t minio_provision # 重新执行资源置备(创建存储桶和用户)
./minio-rm.yml -l minio # 移除 MinIO 集群(使用专用移除剧本)
./minio-rm.yml -l minio -e minio_rm_data = false # 移除集群但保留数据
./minio-rm.yml -l minio -e minio_rm_pkg = true # 移除集群并卸载软件包
保护机制 出于防止误删的目的,Pigsty 的 MINIO 模块提供了防误删保险,由参数 minio_safeguard
默认情况下,minio_safeguard 为 false,允许执行移除操作。如果您希望保护 MinIO 集群不被意外删除,可以在配置清单中启用此保险:
minio_safeguard : true # 启用后,minio-rm.yml 将拒绝执行
如果您确实需要移除受保护的集群,可以在执行时使用命令行参数覆盖:
./minio-rm.yml -l minio -e minio_safeguard = false
执行演示
16.5 - 管理预案 MinIO 集群管理 SOP:创建,销毁,扩容,缩容,节点故障与磁盘故障的处理。
创建集群 要创建一个集群,在配置清单中定义好后,执行 minio.yml
minio : { hosts : { 10.10.10.10 : { minio_seq: 1 } }, vars : { minio_cluster : minio } }
例如,上面的配置定义了一个 SNSD 单机单盘 MinIO 集群,使用以下命令即可创建该 MinIO 集群:
./minio.yml -l minio # 在 minio 分组上安装 MinIO 模块
销毁集群 要销毁一个集群,执行专用的 minio-rm.yml
./minio-rm.yml -l minio # 移除 MinIO 集群
./minio-rm.yml -l minio -e minio_rm_data = false # 移除集群但保留数据
./minio-rm.yml -l minio -e minio_rm_pkg = true # 移除集群并卸载软件包
架构变更:Pigsty v3.6+
从 Pigsty v3.6 开始,集群移除操作已从 minio.yml 剧本迁移至专用的 minio-rm.yml 剧本。旧的 minio_clean 任务已被弃用。
移除剧本会自动完成以下操作:
从 Victoria/Prometheus 监控系统中注销 MinIO 目标 从 INFRA 节点的 DNS 服务中移除记录 停止并禁用 MinIO systemd 服务 删除 MinIO 数据目录和配置文件(可选) 卸载 MinIO 软件包(可选) 集群扩容 MinIO 无法在节点/磁盘级别上扩容,但可以在存储池(多个节点)层次上进行扩容。
现在假设您有 这样一个 四节点的 MinIO 集群,希望扩容一倍,新增一个四节点的存储池。
minio :
hosts :
10.10.10.10 : { minio_seq: 1 , nodename : minio-1 }
10.10.10.11 : { minio_seq: 2 , nodename : minio-2 }
10.10.10.12 : { minio_seq: 3 , nodename : minio-3 }
10.10.10.13 : { minio_seq: 4 , nodename : minio-4 }
vars :
minio_cluster : minio
minio_data : '/data{1...4}'
minio_buckets : [ { name : pgsql }, { name: infra }, { name: redis } ]
minio_users :
- { access_key: dba , secret_key: S3User.DBA, policy : consoleAdmin }
- { access_key: pgbackrest , secret_key: S3User.SomeNewPassWord , policy : readwrite }
# bind a node l2 vip (10.10.10.9) to minio cluster (optional)
node_cluster : minio
vip_enabled : true
vip_vrid : 128
vip_address : 10.10.10.9
vip_interface : eth1
# expose minio service with haproxy on all nodes
haproxy_services :
- name : minio # [REQUIRED] service name, unique
port : 9002 # [REQUIRED] service port, unique
balance : leastconn # [OPTIONAL] load balancer algorithm
options : # [OPTIONAL] minio health check
- option httpchk
- option http-keep-alive
- http-check send meth OPTIONS uri /minio/health/live
- http-check expect status 200
servers :
- { name: minio-1 ,ip: 10.10.10.10 ,port: 9000 ,options : 'check-ssl ca-file /etc/pki/ca.crt check port 9000' }
- { name: minio-2 ,ip: 10.10.10.11 ,port: 9000 ,options : 'check-ssl ca-file /etc/pki/ca.crt check port 9000' }
- { name: minio-3 ,ip: 10.10.10.12 ,port: 9000 ,options : 'check-ssl ca-file /etc/pki/ca.crt check port 9000' }
- { name: minio-4 ,ip: 10.10.10.13 ,port: 9000 ,options : 'check-ssl ca-file /etc/pki/ca.crt check port 9000' }
首先,修改 MinIO 集群定义,新增四台节点,按顺序分配序列号 5 到 8。
这里的关键一步是修改 minio_volumes存储池 。
minio :
hosts :
10.10.10.10 : { minio_seq: 1 , nodename : minio-1 }
10.10.10.11 : { minio_seq: 2 , nodename : minio-2 }
10.10.10.12 : { minio_seq: 3 , nodename : minio-3 }
10.10.10.13 : { minio_seq: 4 , nodename : minio-4 }
# 新增的四个节点
10.10.10.14 : { minio_seq: 5 , nodename : minio-5 }
10.10.10.15 : { minio_seq: 6 , nodename : minio-6 }
10.10.10.16 : { minio_seq: 7 , nodename : minio-7 }
10.10.10.17 : { minio_seq: 8 , nodename : minio-8 }
vars :
minio_cluster : minio
minio_data : '/data{1...4}'
minio_volumes : 'https://minio-{1...4}.pigsty:9000/data{1...4} https://minio-{5...8}.pigsty:9000/data{1...4}' # 新增的集群配置
# …… 省略其他配置
第二步,将这些节点交由 Pigsty 纳管:
./node.yml -l 10.10.10.14,10.10.10.15,10.10.10.16,10.10.10.17
第三步,在新节点上,使用 Ansible 剧本 安装并准备 MinIO 软件:
./minio.yml -l 10.10.10.14,10.10.10.15,10.10.10.16,10.10.10.17 -t minio_install
第四步,在 整个集群 上,使用 Ansible 剧本 重新配置 MinIO 集群:
./minio.yml -l minio -t minio_config
这一步会更新现有四个节点的 MINIO_VOLUMES 配置
第五步,一次性重启整个 MinIO 集群(请注意,不要滚动重启!):
./minio.yml -l minio -t minio_launch -f 10 # 8并发数,确保同时重启
第六步(可选):如果您使用了负载均衡,那么请确保负载均衡器的配置也已经更新。例如,将新的四个节点加入到负载均衡器的配置中:
# expose minio service with haproxy on all nodes
haproxy_services :
- name : minio # [REQUIRED] service name, unique
port : 9002 # [REQUIRED] service port, unique
balance : leastconn # [OPTIONAL] load balancer algorithm
options : # [OPTIONAL] minio health check
- option httpchk
- option http-keep-alive
- http-check send meth OPTIONS uri /minio/health/live
- http-check expect status 200
servers :
- { name: minio-1 ,ip: 10.10.10.10 ,port: 9000 ,options : 'check-ssl ca-file /etc/pki/ca.crt check port 9000' }
- { name: minio-2 ,ip: 10.10.10.11 ,port: 9000 ,options : 'check-ssl ca-file /etc/pki/ca.crt check port 9000' }
- { name: minio-3 ,ip: 10.10.10.12 ,port: 9000 ,options : 'check-ssl ca-file /etc/pki/ca.crt check port 9000' }
- { name: minio-4 ,ip: 10.10.10.13 ,port: 9000 ,options : 'check-ssl ca-file /etc/pki/ca.crt check port 9000' }
- { name: minio-5 ,ip: 10.10.10.14 ,port: 9000 ,options : 'check-ssl ca-file /etc/pki/ca.crt check port 9000' }
- { name: minio-6 ,ip: 10.10.10.15 ,port: 9000 ,options : 'check-ssl ca-file /etc/pki/ca.crt check port 9000' }
- { name: minio-7 ,ip: 10.10.10.16 ,port: 9000 ,options : 'check-ssl ca-file /etc/pki/ca.crt check port 9000' }
- { name: minio-8 ,ip: 10.10.10.17 ,port: 9000 ,options : 'check-ssl ca-file /etc/pki/ca.crt check port 9000' }
然后,执行 node.yml 剧本的 haproxy 子任务,更新负载均衡器配置:
./node.yml -l minio -t haproxy_config,haproxy_reload # 更新负载均衡器配置并在线加载
如果您使用 L2 VIP 来确保可靠的负载均衡器接入,那么还需要将新的节点(如果有)加入到现有 NODE VIP 分组中:
./node.yml -l minio -t node_vip # 刷新集群 L2 VIP 配置
集群缩容 MinIO 无法在节点/磁盘级别上缩容,但可以在存储池(多个节点)层次上进行退役 —— 新增一个新存储池,将旧存储池排干迁移到新存储池,然后将旧存储池退役。
集群升级 首先,将新版本的 MinIO 软件包下载至 INFRA 节点的本地软件仓库,然后重建软件仓库索引:
从 Pigsty v4.1 开始,建议优先使用 Pigsty Infra 软件源中的 minio / mcli 包(由 Pigsty 维护构建),
同步到本地仓库后重建索引:
./infra.yml -t repo_create
其次,使用 Ansible 批量升级 MinIO 软件包版本:
ansible minio -m package -b -a 'name=minio state=latest' # 升级 MinIO 服务器软件版本
ansible minio -m package -b -a 'name=mcli state=latest' # 升级 MinIO 客户端软件版本
最后,使用 mcli 命令行工具通知 MinIO 集群重启:
mcli admin service restart sss
替换故障节点 # 1. 从集群中下线故障节点
bin/node-rm <your_old_node_ip>
# 2. 替换故障节点,使用原来的节点名称(如果IP变化,您需要修改 MinIO 集群定义)
bin/node-add <your_new_node_ip>
# 3. 在新节点上安装配置 MinIO
./minio.yml -l <your_new_node_ip>
# 4. 指示 MinIO 执行恢复动作
mcli admin heal
替换故障磁盘 # 1. 从集群中删除故障磁盘
umount /dev/<your_disk_device>
# 2. 替换故障磁盘,使用xfs格盘
mkfs.xfs /dev/sdb -L DRIVE1
# 3. 不要忘记设置开机自动挂载
vi /etc/fstab
# LABEL=DRIVE1 /mnt/drive1 xfs defaults,noatime 0 2
# 4. 重新挂载
mount -a
# 5. 指示 MinIO 执行恢复动作
mcli admin heal
管理 MinIO 密码 minio_secret_keyS3User.MinIO)是 MinIO root 用户密码,渲染到 /etc/default/minio 中。
修改密码后,使用以下命令刷新配置并重启服务(需同时重启整个集群):
./minio.yml -l minio -t minio_config,minio_launch,minio_alias -f 30 # 重新渲染配置文件,写入 Alias
如果要修改 MinIO 普通用户的密码,例如 pgbackrest 用户的密码,请在可以访问 MinIO 的节点上(比如管理节点的管理用户):
set +o history
mcli admin user passwd sss pgbackrest <YOUR_NEW_PASSWORD>
set -o history
然后,你还需要修改引用该用户密码的所有配置,例如,当你的 pgBackRest 使用 MinIO 作为备份仓库时(pgbackrest_methodminio),需要更新 pgBackRest 的 MinIO 访问密钥密码:
./pgsql.yml -t pgbackrest_config
16.6 - 监控告警 如何在 Pigsty 中监控 MinIO?如何使用 MinIO 本身的管控面板?有哪些告警规则值得关注?
内置控制台 MinIO 内置了一个相当不错的管控界面,默认您可以通过任意 MinIO 实例的管控端口 (minio_admin_port9001),使用 HTTPS 访问此界面。
在大多数提供 MinIO 服务的配置模板中,MinIO 都会以 m.pigsty 的自定义服务对外暴露。在配置域名解析后,您可以通过 https://m.pigsty 访问 MinIO 管控界面。
使用 minio_access_keyminio_secret_keyminioadmin / S3User.MinIO)。
注意:HTTPS 与证书信任
MinIO 控制台需要 HTTPS 访问。如果您使用 Pigsty 自签名 CA,需要在浏览器中信任该 CA 证书,或者手动接受安全警告。
Pigsty监控 Pigsty 提供了两个与 MINIO
MinIO 监控指标通过 MinIO 原生的 Prometheus 端点(/minio/v2/metrics/cluster)采集,默认由 Victoria Metrics 抓取并存储。
Pigsty告警 Pigsty 针对 MinIO 提供了以下三条告警规则,分别是:
MinIO 宕机 MinIO 节点离线 MinIO 磁盘离线 #==============================================================#
# Aliveness #
#==============================================================#
# MinIO server instance down
- alert : MinioServerDown
expr : minio_up < 1
for : 1m
labels : { level: 0, severity: CRIT, category : minio }
annotations :
summary : "CRIT MinioServerDown {{ $labels.ins }}@{{ $labels.instance }}"
description : |
minio_up[ins={{ $labels.ins }}, instance={{ $labels.instance }}] = {{ $value }} < 1
/ui/d/minio-overview
#==============================================================#
# Error #
#==============================================================#
# MinIO node offline triggers a p1 alert
- alert : MinioNodeOffline
expr : avg_over_time(minio_cluster_nodes_offline_total{job="minio"}[5m]) > 0
for : 3m
labels : { level: 1, severity: WARN, category : minio }
annotations :
summary : "WARN MinioNodeOffline: {{ $labels.cls }} {{ $value }}"
description : |
minio_cluster_nodes_offline_total[cls={{ $labels.cls }}] = {{ $value }} > 0
/ui/d/minio-overview?from=now-5m&to=now&var-cls={{$labels.cls}}
# MinIO disk offline triggers a p1 alert
- alert : MinioDiskOffline
expr : avg_over_time(minio_cluster_disk_offline_total{job="minio"}[5m]) > 0
for : 3m
labels : { level: 1, severity: WARN, category : minio }
annotations :
summary : "WARN MinioDiskOffline: {{ $labels.cls }} {{ $value }}"
description : |
minio_cluster_disk_offline_total[cls={{ $labels.cls }}] = {{ $value }} > 0
/ui/d/minio-overview?from=now-5m&to=now&var-cls={{$labels.cls}}
16.7 - 指标列表 Pigsty MINIO 模块提供的完整监控指标列表与释义
MINIO
Metric Name Type Labels Description minio_audit_failed_messages counter ip, job, target_id, cls, instance, server, insTotal number of messages that failed to send since start minio_audit_target_queue_length gauge ip, job, target_id, cls, instance, server, insNumber of unsent messages in queue for target minio_audit_total_messages counter ip, job, target_id, cls, instance, server, insTotal number of messages sent since start minio_cluster_bucket_total gauge ip, job, cls, instance, server, insTotal number of buckets in the cluster minio_cluster_capacity_raw_free_bytes gauge ip, job, cls, instance, server, insTotal free capacity online in the cluster minio_cluster_capacity_raw_total_bytes gauge ip, job, cls, instance, server, insTotal capacity online in the cluster minio_cluster_capacity_usable_free_bytes gauge ip, job, cls, instance, server, insTotal free usable capacity online in the cluster minio_cluster_capacity_usable_total_bytes gauge ip, job, cls, instance, server, insTotal usable capacity online in the cluster minio_cluster_drive_offline_total gauge ip, job, cls, instance, server, insTotal drives offline in this cluster minio_cluster_drive_online_total gauge ip, job, cls, instance, server, insTotal drives online in this cluster minio_cluster_drive_total gauge ip, job, cls, instance, server, insTotal drives in this cluster minio_cluster_health_erasure_set_healing_drives gauge pool, ip, job, cls, set, instance, server, insGet the count of healing drives of this erasure set minio_cluster_health_erasure_set_online_drives gauge pool, ip, job, cls, set, instance, server, insGet the count of the online drives in this erasure set minio_cluster_health_erasure_set_read_quorum gauge pool, ip, job, cls, set, instance, server, insGet the read quorum for this erasure set minio_cluster_health_erasure_set_status gauge pool, ip, job, cls, set, instance, server, insGet current health status for this erasure set minio_cluster_health_erasure_set_write_quorum gauge pool, ip, job, cls, set, instance, server, insGet the write quorum for this erasure set minio_cluster_health_status gauge ip, job, cls, instance, server, insGet current cluster health status minio_cluster_nodes_offline_total gauge ip, job, cls, instance, server, insTotal number of MinIO nodes offline minio_cluster_nodes_online_total gauge ip, job, cls, instance, server, insTotal number of MinIO nodes online minio_cluster_objects_size_distribution gauge ip, range, job, cls, instance, server, insDistribution of object sizes across a cluster minio_cluster_objects_version_distribution gauge ip, range, job, cls, instance, server, insDistribution of object versions across a cluster minio_cluster_usage_deletemarker_total gauge ip, job, cls, instance, server, insTotal number of delete markers in a cluster minio_cluster_usage_object_total gauge ip, job, cls, instance, server, insTotal number of objects in a cluster minio_cluster_usage_total_bytes gauge ip, job, cls, instance, server, insTotal cluster usage in bytes minio_cluster_usage_version_total gauge ip, job, cls, instance, server, insTotal number of versions (includes delete marker) in a cluster minio_cluster_webhook_failed_messages counter ip, job, cls, instance, server, insNumber of messages that failed to send minio_cluster_webhook_online gauge ip, job, cls, instance, server, insIs the webhook online? minio_cluster_webhook_queue_length counter ip, job, cls, instance, server, insWebhook queue length minio_cluster_webhook_total_messages counter ip, job, cls, instance, server, insTotal number of messages sent to this target minio_cluster_write_quorum gauge ip, job, cls, instance, server, insMaximum write quorum across all pools and sets minio_node_file_descriptor_limit_total gauge ip, job, cls, instance, server, insLimit on total number of open file descriptors for the MinIO Server process minio_node_file_descriptor_open_total gauge ip, job, cls, instance, server, insTotal number of open file descriptors by the MinIO Server process minio_node_go_routine_total gauge ip, job, cls, instance, server, insTotal number of go routines running minio_node_ilm_expiry_pending_tasks gauge ip, job, cls, instance, server, insNumber of pending ILM expiry tasks in the queue minio_node_ilm_transition_active_tasks gauge ip, job, cls, instance, server, insNumber of active ILM transition tasks minio_node_ilm_transition_missed_immediate_tasks gauge ip, job, cls, instance, server, insNumber of missed immediate ILM transition tasks minio_node_ilm_transition_pending_tasks gauge ip, job, cls, instance, server, insNumber of pending ILM transition tasks in the queue minio_node_ilm_versions_scanned counter ip, job, cls, instance, server, insTotal number of object versions checked for ilm actions since server start minio_node_io_rchar_bytes counter ip, job, cls, instance, server, insTotal bytes read by the process from the underlying storage system including cache, /proc/[pid]/io rchar minio_node_io_read_bytes counter ip, job, cls, instance, server, insTotal bytes read by the process from the underlying storage system, /proc/[pid]/io read_bytes minio_node_io_wchar_bytes counter ip, job, cls, instance, server, insTotal bytes written by the process to the underlying storage system including page cache, /proc/[pid]/io wchar minio_node_io_write_bytes counter ip, job, cls, instance, server, insTotal bytes written by the process to the underlying storage system, /proc/[pid]/io write_bytes minio_node_process_cpu_total_seconds counter ip, job, cls, instance, server, insTotal user and system CPU time spent in seconds minio_node_process_resident_memory_bytes gauge ip, job, cls, instance, server, insResident memory size in bytes minio_node_process_starttime_seconds gauge ip, job, cls, instance, server, insStart time for MinIO process per node, time in seconds since Unix epoc minio_node_process_uptime_seconds gauge ip, job, cls, instance, server, insUptime for MinIO process per node in seconds minio_node_scanner_bucket_scans_finished counter ip, job, cls, instance, server, insTotal number of bucket scans finished since server start minio_node_scanner_bucket_scans_started counter ip, job, cls, instance, server, insTotal number of bucket scans started since server start minio_node_scanner_directories_scanned counter ip, job, cls, instance, server, insTotal number of directories scanned since server start minio_node_scanner_objects_scanned counter ip, job, cls, instance, server, insTotal number of unique objects scanned since server start minio_node_scanner_versions_scanned counter ip, job, cls, instance, server, insTotal number of object versions scanned since server start minio_node_syscall_read_total counter ip, job, cls, instance, server, insTotal read SysCalls to the kernel. /proc/[pid]/io syscr minio_node_syscall_write_total counter ip, job, cls, instance, server, insTotal write SysCalls to the kernel. /proc/[pid]/io syscw minio_notify_current_send_in_progress gauge ip, job, cls, instance, server, insNumber of concurrent async Send calls active to all targets (deprecated, please use ‘minio_notify_target_current_send_in_progress’ instead) minio_notify_events_errors_total counter ip, job, cls, instance, server, insEvents that were failed to be sent to the targets (deprecated, please use ‘minio_notify_target_failed_events’ instead) minio_notify_events_sent_total counter ip, job, cls, instance, server, insTotal number of events sent to the targets (deprecated, please use ‘minio_notify_target_total_events’ instead) minio_notify_events_skipped_total counter ip, job, cls, instance, server, insEvents that were skipped to be sent to the targets due to the in-memory queue being full minio_s3_requests_4xx_errors_total counter ip, job, cls, instance, server, ins, apiTotal number of S3 requests with (4xx) errors minio_s3_requests_errors_total counter ip, job, cls, instance, server, ins, apiTotal number of S3 requests with (4xx and 5xx) errors minio_s3_requests_incoming_total gauge ip, job, cls, instance, server, insTotal number of incoming S3 requests minio_s3_requests_inflight_total gauge ip, job, cls, instance, server, ins, apiTotal number of S3 requests currently in flight minio_s3_requests_rejected_auth_total counter ip, job, cls, instance, server, insTotal number of S3 requests rejected for auth failure minio_s3_requests_rejected_header_total counter ip, job, cls, instance, server, insTotal number of S3 requests rejected for invalid header minio_s3_requests_rejected_invalid_total counter ip, job, cls, instance, server, insTotal number of invalid S3 requests minio_s3_requests_rejected_timestamp_total counter ip, job, cls, instance, server, insTotal number of S3 requests rejected for invalid timestamp minio_s3_requests_total counter ip, job, cls, instance, server, ins, apiTotal number of S3 requests minio_s3_requests_ttfb_seconds_distribution gauge ip, job, cls, le, instance, server, ins, apiDistribution of time to first byte across API calls minio_s3_requests_waiting_total gauge ip, job, cls, instance, server, insTotal number of S3 requests in the waiting queue minio_s3_traffic_received_bytes counter ip, job, cls, instance, server, insTotal number of s3 bytes received minio_s3_traffic_sent_bytes counter ip, job, cls, instance, server, insTotal number of s3 bytes sent minio_software_commit_info gauge ip, job, cls, instance, commit, server, insGit commit hash for the MinIO release minio_software_version_info gauge ip, job, cls, instance, version, server, insMinIO Release tag for the server minio_up Unknown ip, job, cls, instance, insN/A minio_usage_last_activity_nano_seconds gauge ip, job, cls, instance, server, insTime elapsed (in nano seconds) since last scan activity. scrape_duration_seconds Unknown ip, job, cls, instance, insN/A scrape_samples_post_metric_relabeling Unknown ip, job, cls, instance, insN/A scrape_samples_scraped Unknown ip, job, cls, instance, insN/A scrape_series_added Unknown ip, job, cls, instance, insN/A up Unknown ip, job, cls, instance, insN/A
16.8 - 常见问题 Pigsty MINIO 对象存储模块常见问题答疑
Pigsty 使用的 MinIO 是什么版本? MinIO 于 2025-12-03 宣布进入 维护模式 ,不再发布新的功能版本,只会发布安全补丁与维护版本,并且在 2025-10-15 停止发布二进制 RPM/DEB。
所以 Pigsty fork 了自己的 MinIO ,并使用 minio/pkger
这一版本修复了 MinIO CVE-2025-62506
为什么 MinIO 强制要求 HTTPS? 当 pgbackrest 使用对象存储作为备份仓库时,强制要求使用 HTTPS,以确保数据传输的安全性。
如果您的 MinIO 并非用于 pgbackrest 备份,您仍然可以选择使用 HTTP 协议。
可以通过修改参数 minio_https
从容器中访问 MinIO 提示证书无效? 除非您使用真正的企业 CA 颁发的证书,否则 MinIO 默认使用自签名证书,这会导致容器内的客户端工具(如 mc / rclone / awscli 等)无法验证 MinIO 服务器的身份,从而提示证书无效。
例如,对于 Node.js 应用程序,可以 MinIO 服务器的 CA 证书挂载到容器内,并通过环境变量 NODE_EXTRA_CA_CERTS 指定 CA 证书路径:
environment :
NODE_EXTRA_CA_CERTS : /etc/pki/ca.crt
volumes :
- /etc/pki/ca.crt:/etc/pki/ca.crt:ro
当然,如果您的 MinIO 没有用作 pgbackrest 备份仓库的话,您也可以选择关闭 MinIO 的 HTTPS 支持,改用 HTTP 协议访问。
启动多节点/多盘 MinIO 集群失败怎么办? 在 单机多盘 多机多盘 单机单盘
如何向已有的 MinIO 集群中添加新的成员? 在部署之前,您最好规划 MinIO 集群容量,因为新增成员需要全局重启。
您可以通过向现有集群中添加新的服务器节点,打造一个新的存储池的方式,实现 MinIO 扩容。
请注意,MinIO 一旦部署,你无法修改现有集群的节点数量与磁盘数量!只能通过添加新的存储池来扩容。
详细步骤请参考 Pigsty 文档:集群扩容 扩展 MinIO 部署
如何移除 MinIO 集群? 从 Pigsty v3.6 开始,移除 MinIO 集群需要使用专用的 minio-rm.yml 剧本:
./minio-rm.yml -l minio # 移除 MinIO 集群
./minio-rm.yml -l minio -e minio_rm_data = false # 移除集群但保留数据
如果您启用了 minio_safeguard
./minio-rm.yml -l minio -e minio_safeguard = false
mcli 命令与 mc 命令有什么区别? mcli 是 MinIO 官方客户端 mc 的重命名版本。在 Pigsty 中,我们使用 mcli 而不是 mc,以避免与 Midnight Commander(一个常见的文件管理器,也使用 mc 命令)产生冲突。
两者功能完全相同,只是命令名称不同。您可以在 MinIO 客户端文档 中找到完整的命令参考。
如何监控 MinIO 集群状态? Pigsty 为 MinIO 提供了开箱即用的监控能力:
详情请参阅 监控告警 文档
17 - 模块:REDIS Pigsty 内置了 Redis 支持,开源高性能缓存,可作为 PostgreSQL 的辅助与补充,支持主从、集群、哨兵三种模式。
Redis 是广为流行的开源“高性能”内存数据结构服务器,PostgreSQL 的好搭子。
Pigsty 中的 Redis 是一套生产就绪的完整解决方案,支持主从复制、哨兵高可用与原生集群模式,集成了监控与日志功能,并提供自动化的安装、配置与运维管理剧本。
17.1 - 集群配置 根据需求场景选择合适的 Redis 模式,并通过配置清单表达您的需求
概念 Redis的实体概念模型与 PostgreSQL 几乎相同,同样包括 集群(Cluster) 与 实例(Instance) 的概念。注意这里的Cluster指的不是Redis原生集群方案中的集群。
REDIS模块与PGSQL模块核心的区别在于,Redis通常采用 单机多实例 部署,而不是 PostgreSQL 的 1:1 部署:一个物理/虚拟机节点上通常会部署 多个 Redis实例,以充分利用多核CPU。因此 配置 和 管理 Redis实例的方式与PGSQL稍有不同。
在Pigsty管理的Redis中,节点完全隶属于集群,即目前尚不允许在一个节点上部署两个不同集群的Redis实例,但这并不影响您在一个节点上部署多个独立 Redis 主从实例。当然这样也会有一些局限性,例如在这种情况下您就无法为同一个节点上的不同实例指定不同的密码了。
身份参数 Redis 身份参数
工作模式 Redis有三种不同的工作模式,由 redis_mode
standalone:默认的独立主从模式cluster:Redis原生分布式集群模式sentinel:哨兵模式,可以为主从模式的 Redis 提供高可用能力下面给出了三种Redis集群的定义样例:
一个1节点,一主一从的 Redis Standalone 集群:redis-ms 一个1节点,3实例的Redis Sentinel集群:redis-sentinel 一个2节点,6实例的 Redis Cluster集群: redis-cluster redis-ms : # redis 经典主从集群
hosts : { 10.10.10.10 : { redis_node: 1 , redis_instances : { 6379 : { }, 6380 : { replica_of : '10.10.10.10 6379' } } } }
vars : { redis_cluster: redis-ms ,redis_password: 'redis.ms' ,redis_max_memory : 64MB }
redis-meta : # redis 哨兵 x 3
hosts : { 10.10.10.11 : { redis_node: 1 , redis_instances : { 26379 : { } ,26380 : { } ,26381 : { } } } }
vars :
redis_cluster : redis-meta
redis_password : 'redis.meta'
redis_mode : sentinel
redis_max_memory : 16MB
redis_sentinel_monitor : # primary list for redis sentinel, use cls as name, primary ip:port
- { name: redis-ms, host: 10.10.10.10, port: 6379 ,password: redis.ms, quorum : 2 }
redis-test : # redis 原生集群: 3主 x 3从
hosts :
10.10.10.12 : { redis_node: 1 ,redis_instances : { 6379 : { } ,6380 : { } ,6381 : { } } }
10.10.10.13 : { redis_node: 2 ,redis_instances : { 6379 : { } ,6380 : { } ,6381 : { } } }
vars : { redis_cluster: redis-test ,redis_password: 'redis.test' ,redis_mode: cluster, redis_max_memory : 32MB }
局限性 一个节点只能属于一个 Redis 集群,这意味着您不能将一个节点同时分配给两个不同的Redis集群。 在每个 Redis 节点上,您需要为 Redis实例 分配唯一的端口号,避免端口冲突。 通常同一个 Reids 集群会使用同一个密码,但一个 Redis节点上的多个 Redis 实例无法设置不同的密码(因为 redis_exporter 只允许使用一个密码) Redis Cluster自带高可用,而Redis主从的高可用需要在 Sentinel 中额外进行手工配置:因为我们不知道您是否会部署 Sentinel。 好在配置 Redis 主从实例的高可用非常简单,可以通过Sentinel进行配置,详情请参考 管理-设置Redis主从高可用 典型配置示例 以下是一些常见场景的 Redis 配置示例:
缓存集群(纯内存) 适用于对数据持久性要求不高的纯缓存场景:
redis-cache :
hosts :
10.10.10.10 : { redis_node: 1 , redis_instances : { 6379 : { }, 6380 : { } } }
10.10.10.11 : { redis_node: 2 , redis_instances : { 6379 : { }, 6380 : { } } }
vars :
redis_cluster : redis-cache
redis_password : 'cache.password'
redis_max_memory : 2GB
redis_mem_policy : allkeys-lru # 内存满时淘汰最近最少使用的Key
redis_rdb_save : [] # 禁用 RDB 持久化
redis_aof_enabled : false # 禁用 AOF 持久化
Session 存储集群 适用于 Web 应用 Session 存储,需要一定的持久性:
redis-session :
hosts :
10.10.10.10 : { redis_node: 1 , redis_instances : { 6379 : { }, 6380 : { replica_of : '10.10.10.10 6379' } } }
vars :
redis_cluster : redis-session
redis_password : 'session.password'
redis_max_memory : 1GB
redis_mem_policy : volatile-lru # 只淘汰设置了过期时间的Key
redis_rdb_save : [ '300 1' ] # 5分钟至少1个变更时保存
redis_aof_enabled : false
消息队列集群 适用于简单的消息队列场景,需要较高的数据可靠性:
redis-queue :
hosts :
10.10.10.10 : { redis_node: 1 , redis_instances : { 6379 : { }, 6380 : { replica_of : '10.10.10.10 6379' } } }
vars :
redis_cluster : redis-queue
redis_password : 'queue.password'
redis_max_memory : 4GB
redis_mem_policy : noeviction # 内存满时拒绝写入,不淘汰数据
redis_rdb_save : [ '60 1' ] # 1分钟至少1个变更时保存
redis_aof_enabled : true # 启用 AOF 获得更好的持久性
高可用主从集群 带有 Sentinel 自动故障转移的主从集群:
# 主从集群
redis-ha :
hosts :
10.10.10.10 : { redis_node: 1 , redis_instances : { 6379 : { } } } # 主库
10.10.10.11 : { redis_node: 2 , redis_instances : { 6379 : { replica_of : '10.10.10.10 6379' } } } # 从库1
10.10.10.12 : { redis_node: 3 , redis_instances : { 6379 : { replica_of : '10.10.10.10 6379' } } } # 从库2
vars :
redis_cluster : redis-ha
redis_password : 'ha.password'
redis_max_memory : 8GB
# 哨兵集群(管理上述主从集群)
redis-sentinel :
hosts :
10.10.10.10 : { redis_node: 1 , redis_instances : { 26379 : { } } }
10.10.10.11 : { redis_node: 2 , redis_instances : { 26379 : { } } }
10.10.10.12 : { redis_node: 3 , redis_instances : { 26379 : { } } }
vars :
redis_cluster : redis-sentinel
redis_password : 'sentinel.password'
redis_mode : sentinel
redis_max_memory : 64MB
redis_sentinel_monitor :
- { name: redis-ha, host: 10.10.10.10, port: 6379, password: 'ha.password', quorum : 2 }
大容量原生集群 适用于大数据量、高吞吐场景的原生分布式集群:
redis-cluster :
hosts :
10.10.10.10 : { redis_node: 1 , redis_instances : { 6379 : { }, 6380 : { }, 6381 : { } } }
10.10.10.11 : { redis_node: 2 , redis_instances : { 6379 : { }, 6380 : { }, 6381 : { } } }
10.10.10.12 : { redis_node: 3 , redis_instances : { 6379 : { }, 6380 : { }, 6381 : { } } }
10.10.10.13 : { redis_node: 4 , redis_instances : { 6379 : { }, 6380 : { }, 6381 : { } } }
vars :
redis_cluster : redis-cluster
redis_password : 'cluster.password'
redis_mode : cluster
redis_cluster_replicas : 1 # 每个主分片1个从库
redis_max_memory : 16GB # 每个实例最大内存
redis_rdb_save : [ '900 1' ]
redis_aof_enabled : false
# 这将创建一个 6主6从 的原生集群
# 总容量约 96GB (6 * 16GB)
安全加固配置 生产环境推荐的安全配置:
redis-secure :
hosts :
10.10.10.10 : { redis_node: 1 , redis_instances : { 6379 : { } } }
vars :
redis_cluster : redis-secure
redis_password : 'StrongP@ssw0rd!' # 使用强密码
redis_bind_address : '' # 绑定到内网IP而非 0.0.0.0
redis_max_memory : 4GB
redis_rename_commands : # 重命名危险命令
FLUSHDB : 'DANGEROUS_FLUSHDB'
FLUSHALL : 'DANGEROUS_FLUSHALL'
DEBUG : '' # 禁用命令
CONFIG : 'ADMIN_CONFIG'
17.2 - 参数列表 REDIS 模块提供了 18 个部署参数 + 3 个移除参数
REDIS 模块的参数列表,共有 21 个参数,分为两个部分:
架构变化:Pigsty v3.6+
自 Pigsty v3.6 起,redis.yml 剧本不再包含移除功能,移除相关参数已迁移至独立的 redis_remove 角色和 redis-rm.yml 剧本。
参数概览 REDIS
REDIS_REMOVE
默认参数 REDIS:18 个参数,定义于 roles/redis/defaults/main.yml
#-----------------------------------------------------------------
# REDIS
#-----------------------------------------------------------------
#redis_cluster: <集群> # Redis数据库集群名称,必选身份参数
#redis_node: 1 <节点> # Redis节点编号,正整数,集群内唯一,必选身份参数
#redis_instances: {} <节点> # Redis节点上的实例定义
redis_fs_main : /data/redis # Redis主数据目录,默认为 `/data/redis`
redis_exporter_enabled : true # Redis Exporter 是否启用?
redis_exporter_port : 9121 # Redis Exporter监听端口
redis_exporter_options : '' # Redis Exporter命令参数
redis_mode : standalone # Redis集群模式:sentinel,cluster,standalone
redis_conf : redis.conf # Redis配置文件模板,sentinel 除外
redis_bind_address : '0.0.0.0' # Redis监听地址,默认 `0.0.0.0`,留空则会绑定主机IP
redis_max_memory : 1GB # Redis可用的最大内存
redis_mem_policy : allkeys-lru # Redis内存逐出策略
redis_password : '' # Redis密码,默认留空则禁用密码
redis_rdb_save : [ '1200 1' ] # Redis RDB 保存指令,字符串列表,空数组则禁用RDB
redis_aof_enabled : false # Redis AOF 是否启用?
redis_rename_commands : {} # Redis危险命令重命名列表
redis_cluster_replicas : 1 # Redis原生集群中每个主库配几个从库?
redis_sentinel_monitor : [] # Redis哨兵监控的主库列表,仅用于哨兵集群
REDIS_REMOVE:3 个参数,定义于 roles/redis_remove/defaults/main.yml
#-----------------------------------------------------------------
# REDIS_REMOVE
#-----------------------------------------------------------------
redis_safeguard : false # 禁止移除正在运行的Redis实例
redis_rm_data : true # 移除Redis实例时是否一并移除数据目录?
redis_rm_pkg : false # 移除Redis实例时是否卸载Redis软件包?
REDIS本节包含 redisredis.yml
redis_cluster参数名称: redis_cluster, 类型: string, 层次:C
身份参数,必选参数,必须显式在集群层面配置,将用作集群内资源的命名空间。
需要遵循特定命名规则:[a-z][a-z0-9-]*,以兼容不同约束对身份标识的要求,建议使用redis-作为集群名前缀。
redis_node参数名称: redis_node, 类型: int, 层次:I
Redis节点序列号,身份参数,必选参数,必须显式在节点(Host)层面配置。
自然数,在集群中应当是唯一的,用于区别与标识集群内的不同节点,从0或1开始分配。
redis_instances参数名称: redis_instances, 类型: dict, 层次:I
当前 Redis 节点上的 Redis 实例定义,必选参数,必须显式在节点(Host)层面配置。
内容为JSON KV对象格式。Key为数值类型端口号,Value为该实例特定的JSON配置项。
redis-test: # redis native cluster : 3m x 3s
hosts :
10.10.10.12 : { redis_node: 1 ,redis_instances : { 6379 : { } ,6380 : { } ,6381 : { } } }
10.10.10.13 : { redis_node: 2 ,redis_instances : { 6379 : { } ,6380 : { } ,6381 : { } } }
vars : { redis_cluster: redis-test ,redis_password: 'redis.test' ,redis_mode: cluster, redis_max_memory : 32MB }
每一个Redis实例在对应节点上监听一个唯一端口,实例配置项中replica_of 用于设置一个实例的上游主库地址,构建主从复制关系。
redis_instances :
6379 : {}
6380 : { replica_of : '10.10.10.13 6379' }
6381 : { replica_of : '10.10.10.13 6379' }
redis_fs_main参数名称: redis_fs_main, 类型: path, 层次:C
Redis使用的主数据目录,默认为/data/redis。
部署阶段不允许使用旧值 /data(redis 角色的 identity assert 会直接报错);移除阶段为兼容旧配置,redis-rm.yml 在 redis_fs_main=/data 时会按 /data/redis 执行删除。
数据目录的属主为操作系统用户 redis,内部结构详情请参考 FHS:Redis
redis_exporter_enabled参数名称: redis_exporter_enabled, 类型: bool, 层次:C
是否启用Redis监控组件 Redis Exporter?
默认启用,在每个Redis节点上部署一个,默认监听 redis_exporter_port9121 端口。所有本节点上 Redis 实例的监控指标都由它负责抓取。
将此参数设为 false 时,roles/redis/tasks/exporter.yml 仍会渲染配置文件,但会跳过 redis_exporter systemd 服务的启动步骤(redis_exporter_launch 任务带有 when: redis_exporter_enabled|bool 判断),可用于在节点上保留手工配置的 exporter。
redis_exporter_port参数名称: redis_exporter_port, 类型: port, 层次:C
Redis Exporter监听端口,默认值为:9121
redis_exporter_options参数名称: redis_exporter_options, 类型: string, 层次:C/I
传给 Redis Exporter 的额外命令行参数,会被渲染到 /etc/default/redis_exporter 中(参见 roles/redis/tasks/exporter.yml),默认为空字符串。REDIS_EXPORTER_OPTS 最终会附加到 systemd 服务的 ExecStart=/bin/redis_exporter $REDIS_EXPORTER_OPTS,可用于配置额外的抓取目标或过滤行为。
redis_mode参数名称: redis_mode, 类型: enum, 层次:C
Redis集群的工作模式,有三种选项:standalone, cluster, sentinel,默认值为 standalone
standalone:默认,独立的Redis主从模式cluster: Redis原生集群模式sentinel:Redis高可用组件:哨兵当使用standalone模式时,Pigsty会根据 replica_of 参数设置Redis主从复制关系。
当使用cluster模式时,Pigsty会根据 redis_cluster_replicas
当 redis_mode=sentinel 时,redis.yml 会执行 redis-ha 阶段(redis.yml 第 80130 行)将 redis_sentinel_monitorredis_mode=cluster 时还会执行 redis-join 阶段(redis.yml 第 134180 行)调用 redis-cli --cluster create --cluster-yes ... --cluster-replicas {{ redis_cluster_replicas }}。这两个阶段均在普通 ./redis.yml -l <cluster> 中自动触发,也可以通过 -t redis-ha 或 -t redis-join 单独运行。
redis_conf参数名称: redis_conf, 类型: string, 层次:C
Redis 配置模板路径,Sentinel除外。
默认值:redis.conf,这是一个模板文件,位于 roles/redis/templates/redis.conf
如果你想使用自己的 Redis 配置模板,你可以将它放在 templates/ 目录中,并设置此参数为模板文件名。
注意: Redis Sentinel 使用的是另一个不同的模板文件,即 roles/redis/templates/redis-sentinel.conf
redis_bind_address参数名称: redis_bind_address, 类型: ip, 层次:C
Redis服务器绑定的IP地址,空字符串将使用配置清单中定义的主机名。
默认值:0.0.0.0,这将绑定到此主机上的所有可用 IPv4 地址。
在生产环境中出于安全性考虑,建议仅绑定内网 IP,即将此值设置为空字符串 ''
当该值为空字符串时,模板 roles/redis/templates/redis.confinventory_hostname 渲染 bind <ip>,从而绑定到清单中声明的管理地址。
redis_max_memory参数名称: redis_max_memory, 类型: size, 层次:C/I
每个 Redis 实例使用的最大内存配置,默认值:1GB。
redis_mem_policy参数名称: redis_mem_policy, 类型: enum, 层次:C
Redis 内存回收策略,默认值:allkeys-lru,
noeviction:内存达限时不保存新值:当使用主从复制时仅适用于主库allkeys-lru:保持最近使用的键;删除最近最少使用的键(LRU)allkeys-lfu:保持频繁使用的键;删除最少频繁使用的键(LFU)volatile-lru:删除带有真实过期字段的最近最少使用的键volatile-lfu:删除带有真实过期字段的最少频繁使用的键allkeys-random:随机删除键以为新添加的数据腾出空间volatile-random:随机删除带有过期字段的键volatile-ttl:删除带有真实过期字段和最短剩余生存时间(TTL)值的键。详情请参阅 Redis内存回收策略 。
redis_password参数名称: redis_password, 类型: password, 层次:C/N
Redis 密码,空字符串将禁用密码,这是默认行为。
注意,由于 redis_exporter 的实现限制,您每个节点只能设置一个 redis_password。这通常不是问题,因为 pigsty 不允许在同一节点上部署两个不同的 Redis 集群。
Pigsty 会自动将此密码写入 /etc/default/redis_exporter(REDIS_PASSWORD=...)并在 redis-ha 阶段用于 redis-cli -a <password>,因此无需重复配置 exporter 或 Sentinel 的认证口令。
请在生产环境中使用强密码
redis_rdb_save参数名称: redis_rdb_save, 类型: string[], 层次:C
Redis RDB 保存指令,使用空列表则禁用 RDB。
默认值是 ["1200 1"]:如果最近20分钟至少有1个键更改,则将数据集转储到磁盘。
详情请参考 Redis持久化 。
redis_aof_enabled参数名称: redis_aof_enabled, 类型: bool, 层次:C
启用 Redis AOF 吗?默认值是 false,即不使用 AOF。
redis_rename_commands参数名称: redis_rename_commands, 类型: dict, 层次:C
重命名 Redis 危险命令,这是一个 k:v 字典:old: new,old是待重命名的命令名称,new是重命名后的名字。
默认值:{},你可以通过设置此值来隐藏像 FLUSHDB 和 FLUSHALL 这样的危险命令,下面是一个例子:
{
"keys": "op_keys" ,
"flushdb": "op_flushdb" ,
"flushall": "op_flushall" ,
"config": "op_config"
}
redis_cluster_replicas参数名称: redis_cluster_replicas, 类型: int, 层次:C
在 Redis 原生集群中,应当为一个 Master/Primary 实例配置多少个从库?默认值为: 1,即每个主库配一个从库。
redis_sentinel_monitor参数名称: redis_sentinel_monitor, 类型: master[], 层次:C
Redis哨兵监控的主库列表,只在哨兵集群上使用。每个待纳管的主库定义方式如下所示:
redis_sentinel_monitor : # primary list for redis sentinel, use cls as name, primary ip:port
- { name: redis-src, host: 10.10.10.45, port: 6379 ,password: redis.src, quorum : 1 }
- { name: redis-dst, host: 10.10.10.48, port: 6379 ,password: redis.dst, quorum : 1 }
其中,name,host 是必选参数,port,password,quorum 是可选参数,quorum 用于设置判定主库失效所需的法定人数数,通常大于哨兵实例数的一半(默认为1)。
从 Pigsty 4.0 开始还可以为某个条目添加 remove: true,此时 redis-ha 阶段只会执行 SENTINEL REMOVE <name>,用于清理不再需要的目标。
REDIS_REMOVE本节包含 redis_removeredis-rm.yml
redis_safeguard参数名称: redis_safeguard, 类型: bool, 层次:G/C/A
Redis 的防误删安全保险开关:打开后 redis-rm.yml 剧本无法移除正在运行的 Redis 实例。
默认值为 false,如果设置为 true,那么 redis-rm.yml 剧本会拒绝执行,防止误删正在运行的 Redis 实例。
可以通过命令行参数 -e redis_safeguard=false 强制覆盖此保护。
redis_rm_data参数名称: redis_rm_data, 类型: bool, 层次:G/C/A
移除 Redis 实例时,是否一并移除 Redis 数据目录?默认为 true。
数据目录(默认 /data/redis/,即 redis_fs_main)包含了 Redis 的 RDB 与 AOF 文件,如果不移除它们,那么新部署的 Redis 实例将会从这些备份文件中加载数据。
设置为 false 可以保留数据目录用于后续恢复。
redis_rm_pkg参数名称: redis_rm_pkg, 类型: bool, 层次:G/C/A
移除 Redis 实例时,是否一并卸载 Redis 与 redis_exporter 软件包?默认为 false。
通常情况下不需要卸载软件包,仅当需要彻底清理节点时才需要启用此选项。
17.3 - 预置剧本 如何使用预置的 ansible 剧本来管理 Redis 集群,常用管理命令速查。
REDIS模块提供了两个剧本,用于部署/移除 Redis 集群/节点/实例:
redis.yml用于部署 Redis 的 redis.yml
redis_node : 初始化redis节点
- redis_install : 安装redis & redis_exporter
- redis_user : 创建操作系统用户 redis
- redis_dir : 配置 redis的FHS目录结构
redis_exporter : 配置 redis_exporter 监控
- redis_exporter_config : 生成redis_exporter配置
- redis_exporter_launch : 启动redis_exporter
redis_instance : 初始化并重启redis集群/节点/实例
- redis_config : 生成redis实例配置
- redis_launch : 启动redis实例
redis_register : 将redis注册到基础设施中
redis_ha : 配置redis哨兵(仅sentinel模式)
redis_join : 组建redis原生集群(仅cluster模式)
操作级别 redis.yml 支持三种操作级别,通过 -l 限制目标范围,通过 -e redis_port=<port> 指定单个实例:
操作级别 限制参数 说明 集群 -l <cluster>部署整个 Redis 集群的所有节点和实例 节点 -l <ip>部署指定节点上的所有 Redis 实例 实例 -l <ip> -e redis_port=<port>仅部署指定节点上的单个实例
集群级别操作 部署整个 Redis 集群,包括所有节点上的所有实例:
./redis.yml -l redis-ms # 部署名为 redis-ms 的整个集群
./redis.yml -l redis-test # 部署名为 redis-test 的整个集群
./redis.yml -l redis-sentinel # 部署哨兵集群
集群级别操作会:
在所有节点上安装 Redis 软件包 在所有节点上创建 redis 用户和目录结构 启动所有节点上的 redis_exporter 部署并启动所有定义的 Redis 实例 将所有实例注册到监控系统 如果是 sentinel 模式,配置哨兵监控目标 如果是 cluster 模式,组建原生集群 节点级别操作 仅部署指定节点上的所有 Redis 实例:
./redis.yml -l 10.10.10.10 # 部署该节点上的所有实例
./redis.yml -l 10.10.10.11 # 部署另一个节点
节点级别操作适用于:
向现有集群扩容新节点 重新部署某个节点上的所有实例 节点故障恢复后重新初始化 注意 :节点级别命令仍会进入 redis-ha / redis-join 的模式判断:在 sentinel 模式下会刷新哨兵纳管目标,在 cluster 模式下可能再次触发 --cluster create(该步骤 ignore_errors: true,但并非幂等)。扩容原生集群时仍建议手工执行 redis-cli --cluster add-node 与 reshard。
实例级别操作 通过 -e redis_port=<port> 参数指定单个实例进行操作:
# 仅部署 10.10.10.10 上的 6379 端口实例
./redis.yml -l 10.10.10.10 -e redis_port = 6379
# 仅部署 10.10.10.11 上的 6380 端口实例
./redis.yml -l 10.10.10.11 -e redis_port = 6380
实例级别操作适用于:
向现有节点添加新实例 重新部署单个故障实例 更新单个实例的配置 当指定 redis_port 时:
仅渲染该端口对应的配置文件 仅启动/重启该端口对应的 systemd 服务 会重写该节点的监控注册文件(内容来自 redis_instances 全量定义) 不会 启停 redis_exporter 或重载 Vector 日志配置不会 影响同节点上的其他 Redis 实例进程常用标签 可以通过 -t <tag> 参数选择性执行部分任务:
# 仅安装软件包,不启动服务
./redis.yml -l redis-ms -t redis_node
# 仅更新配置并重启实例
./redis.yml -l redis-ms -t redis_config,redis_launch
# 仅更新监控注册
./redis.yml -l redis-ms -t redis_register
# 仅配置哨兵监控目标(sentinel模式)
./redis.yml -l redis-sentinel -t redis-ha
# 仅组建原生集群(cluster模式,首次部署后自动执行)
./redis.yml -l redis-cluster -t redis-join
幂等性说明 redis.yml 的大部分任务可安全重复执行,但 redis-join 例外:
redis_node / redis_exporter / redis_instance / redis_register 重复执行会覆盖配置并重启实例redis-ha 重复执行会按 redis_sentinel_monitor 重新下发 SENTINEL REMOVE/MONITORredis-join 使用 redis-cli --cluster create,不是幂等操作;重复执行在已建集群上通常会报错(剧本当前为 ignore_errors: true)提示 :如果只想更新配置而不想重启所有实例,可以使用 -t redis_config 仅渲染配置,然后手动重启需要的实例。
redis-rm.yml用于移除 Redis 的 redis-rm.yml
redis_safeguard : 安全检查,当 redis_safeguard = true 时拒绝执行
redis_deregister : 从监控系统移除注册信息
- rm_metrics : 删除 /infra/targets/redis/*.yml
- rm_logs : 撤销 /etc/vector/redis.yaml
redis_exporter : 停止并禁用 redis_exporter
redis : 停止并禁用 redis 实例
redis_data : 删除数据目录(当 redis_rm_data = true)
redis_pkg : 卸载软件包(当 redis_rm_pkg = true)
操作级别 redis-rm.yml 同样支持三种操作级别:
操作级别 限制参数 说明 集群 -l <cluster>移除整个 Redis 集群的所有节点和实例 节点 -l <ip>移除指定节点上的所有 Redis 实例 实例 -l <ip> -e redis_port=<port>仅移除指定节点上的单个实例
集群级别移除 移除整个 Redis 集群:
./redis-rm.yml -l redis-ms # 移除整个 redis-ms 集群
./redis-rm.yml -l redis-test # 移除整个 redis-test 集群
集群级别移除会:
从监控系统注销所有节点的所有实例 停止所有节点上的 redis_exporter 停止并禁用所有 Redis 实例 删除所有数据目录(如果 redis_rm_data=true) 卸载软件包(如果 redis_rm_pkg=true) 节点级别移除 仅移除指定节点上的所有 Redis 实例:
./redis-rm.yml -l 10.10.10.10 # 移除该节点上的所有实例
./redis-rm.yml -l 10.10.10.11 # 移除另一个节点
节点级别移除适用于:
集群缩容 ,下线整个节点 节点退役前的清理 节点迁移前的准备 节点级别移除会:
从监控系统注销该节点的所有实例 停止该节点上的 redis_exporter 停止该节点上的所有 Redis 实例 删除该节点上的所有数据目录 删除该节点上的 Vector 日志配置 实例级别移除 通过 -e redis_port=<port> 参数指定移除单个实例:
# 仅移除 10.10.10.10 上的 6379 端口实例
./redis-rm.yml -l 10.10.10.10 -e redis_port = 6379
# 仅移除 10.10.10.11 上的 6380 端口实例
./redis-rm.yml -l 10.10.10.11 -e redis_port = 6380
实例级别移除适用于:
移除节点上的单个从库 移除不再需要的实例 主从切换后移除原主库 当指定 redis_port 时的行为差异:
组件 节点级别(无 redis_port) 实例级别(有 redis_port) 监控注册 删除整个节点的注册文件 仅从注册文件中移除该实例 redis_exporter 停止并禁用 不操作 (其他实例还需要)Redis 实例 停止所有实例 仅停止指定端口的实例 数据目录 删除 redis_fs_main(默认 /data/redis/)整个目录 仅删除 redis_fs_main/<cluster>-<node>-<port>/(redis_fs_main=/data 时按 /data/redis 兼容处理) Vector 配置 删除 /etc/vector/redis.yaml 不操作 (其他实例还需要)软件包 可选卸载 不操作
控制参数 redis-rm.yml 提供以下控制参数:
参数 默认值 说明 redis_safeguardfalse安全保险,设为 true 时拒绝执行移除操作 redis_rm_datatrue是否删除数据目录(RDB/AOF 文件) redis_rm_pkgfalse是否卸载 Redis 软件包
使用示例:
# 移除集群但保留数据目录
./redis-rm.yml -l redis-ms -e redis_rm_data = false
# 移除集群并卸载软件包
./redis-rm.yml -l redis-ms -e redis_rm_pkg = true
# 绕过安全保险强制移除
./redis-rm.yml -l redis-ms -e redis_safeguard = false
安全保险机制 当集群配置了 redis_safeguard: true 时,redis-rm.yml 会拒绝执行:
redis-production :
vars :
redis_safeguard : true # 生产环境开启保护
$ ./redis-rm.yml -l redis-production
TASK [ ABORT due to redis_safeguard enabled] ***
fatal: [ 10.10.10.10] : FAILED! = > { "msg" : "Abort due to redis_safeguard..." }
需要显式覆盖才能执行:
./redis-rm.yml -l redis-production -e redis_safeguard = false
快速参考 部署操作速查 # 部署整个集群
./redis.yml -l <cluster>
# 扩容:部署新节点(cluster 模式下随后手工 add-node)
./redis.yml -l <new-node-ip>
# 扩容:在现有节点上添加新实例(先在配置中添加定义)
./redis.yml -l <ip> -e redis_port = <new-port>
# 更新配置并重启
./redis.yml -l <cluster> -t redis_config,redis_launch
# 仅更新单个实例配置
./redis.yml -l <ip> -e redis_port = <port> -t redis_config,redis_launch
移除操作速查 # 移除整个集群
./redis-rm.yml -l <cluster>
# 缩容:移除整个节点
./redis-rm.yml -l <ip>
# 缩容:移除单个实例
./redis-rm.yml -l <ip> -e redis_port = <port>
# 移除但保留数据
./redis-rm.yml -l <cluster> -e redis_rm_data = false
# 彻底清理(包括软件包)
./redis-rm.yml -l <cluster> -e redis_rm_pkg = true
包装脚本 Pigsty 提供了便捷的包装脚本:
# 部署
bin/redis-add <cluster> # 部署集群
bin/redis-add <ip> # 部署节点
bin/redis-add <ip> <port> # 部署实例
# 移除
bin/redis-rm <cluster> # 移除集群
bin/redis-rm <ip> # 移除节点
bin/redis-rm <ip> <port> # 移除实例
示例演示 使用 Redis 剧本初始化 Redis 集群:
17.4 - 管理预案 Redis 集群管理 SOP,创建、销毁、扩容、缩容与高可用的详细说明
以下是一些常见的 Redis 管理任务 SOP(预案):
基础运维
高可用管理
扩缩容与迁移
故障排查
更多问题请参考 FAQ:REDIS 。
初始化Redis 您可以使用 redis.yml
# 初始化集群内所有 Redis 实例
./redis.yml -l <cluster> # 初始化 redis 集群
# 初始化特定节点上的所有 Redis 实例
./redis.yml -l 10.10.10.10 # 初始化 redis 节点
# 初始化特定 Redis 实例: 10.10.10.11:6379
./redis.yml -l 10.10.10.11 -e redis_port = 6379 -t redis
你也可以使用包装脚本命令行脚本来初始化:
bin/redis-add redis-ms # 初始化 redis 集群 'redis-ms'
bin/redis-add 10.10.10.10 # 初始化 redis 节点 '10.10.10.10'
bin/redis-add 10.10.10.10 6379 # 初始化 redis 实例 '10.10.10.10:6379'
下线Redis 您可以使用 redis-rm.yml
# 下线 Redis 集群 `redis-test`
./redis-rm.yml -l redis-test
# 下线 Redis 集群 `redis-test` 并卸载 Redis 软件包
./redis-rm.yml -l redis-test -e redis_rm_pkg = true
# 下线 Redis 节点 10.10.10.13 上的所有实例
./redis-rm.yml -l 10.10.10.13
# 下线特定 Redis 实例 10.10.10.13:6379
./redis-rm.yml -l 10.10.10.13 -e redis_port = 6379
你也可以使用包装脚本来下线 Redis 集群/节点/实例:
bin/redis-rm redis-ms # 下线 redis 集群 'redis-ms'
bin/redis-rm 10.10.10.10 # 下线 redis 节点 '10.10.10.10'
bin/redis-rm 10.10.10.10 6379 # 下线 redis 实例 '10.10.10.10:6379'
重新配置Redis 您可以部分执行 redis.yml
./redis.yml -l <cluster> -t redis_config,redis_launch
请注意,redis 无法在线重载配置,您只能使用 launch 任务进行重启来让配置生效。
使用Redis客户端 使用 redis-cli 访问 Reids 实例:
$ redis-cli -h 10.10.10.10 -p 6379 # <--- 使用 Host 与 Port 访问对应 Redis 实例
10.10.10.10:6379> auth redis.ms # <--- 使用密码验证
OK
10.10.10.10:6379> set a 10 # <--- 设置一个Key
OK
10.10.10.10:6379> get a # <--- 获取 Key 的值
"10"
Redis提供了redis-benchmark工具,可以用于Redis的性能评估,或生成一些负载用于测试。
redis-benchmark -h 10.10.10.13 -p 6379
手工设置Redis从库 https://redis.io/commands/replicaof/
# 将一个 Redis 实例提升为主库
> REPLICAOF NO ONE
"OK"
# 将一个 Redis 实例设置为另一个实例的从库
> REPLICAOF 127.0.0.1 6379
"OK"
设置Redis主从高可用 Redis独立主从集群可以通过 Redis 哨兵集群配置自动高可用,详细用户请参考 Sentinel官方文档
以四节点 沙箱 redis-meta,可以用来管理很多套独立 Redis 主从集群。
以一主一从的Redis普通主从集群 redis-ms 为例,您需要在每个 Sentinel 实例上,使用 SENTINEL MONITOR 添加目标,并使用 SENTINEL SET 提供密码,高可用就配置完毕了。
# 对于每一个 sentinel,将 redis 主服务器纳入哨兵管理:(26379,26380,26381)
$ redis-cli -h 10.10.10.11 -p 26379 -a redis.meta
10.10.10.11:26379> SENTINEL MONITOR redis-ms 10.10.10.10 6379 1
10.10.10.11:26379> SENTINEL SET redis-ms auth-pass redis.ms # 如果启用了授权,需要配置密码
如果您想移除某个由 Sentinel 管理的 Redis 主从集群,使用 SENTINEL REMOVE <name> 移除即可。
您可以使用定义在 Sentinel 集群上的 redis_sentinel_monitor
redis_sentinel_monitor : # 需要被监控的主库列表,端口、密码、法定人数(应为1/2以上的哨兵数量)为可选参数
- { name: redis-src, host: 10.10.10.45, port: 6379 ,password: redis.src, quorum : 1 }
- { name: redis-dst, host: 10.10.10.48, port: 6379 ,password: redis.dst, quorum : 1 }
redis.yml 中的 redis-ha 阶段会根据该列表在每个哨兵实例上渲染 /tmp/<cluster>.monitor 并依次执行 SENTINEL REMOVE 与 SENTINEL MONITOR 命令,
从而保证哨兵纳管状态与清单保持一致。如果只想移除某个目标而不再重新添加,可以在监控对象上设置 remove: true,剧本会在 SENTINEL REMOVE 后跳过重新注册。
使用以下命令刷新 Redis 哨兵集群上的纳管主库列表:
./redis.yml -l redis-meta -t redis-ha # 如果您的 Sentinel 集群名称不是 redis-meta,请在这里替换。
初始化 Redis 原生集群 当 redis_modecluster 时,redis.yml 会额外执行 redis-join 阶段 :
在 /tmp/<cluster>-join.sh 中使用 redis-cli --cluster create --cluster-yes ... --cluster-replicas {{ redis_cluster_replicas }} 把所有实例拼成原生集群。
该步骤在首次部署时自动运行,后续重新执行 ./redis.yml -l <cluster> -t redis-join 将再次生成并运行相同命令;
由于 --cluster create 并非幂等操作, 只有在你确认需要重建整个原生集群时才应单独触发这一阶段。
扩容Redis节点 扩容独立主从集群 向现有的 Redis 主从集群添加新节点/实例时,首先在配置清单中添加新的定义:
redis-ms :
hosts :
10.10.10.10 : { redis_node: 1 , redis_instances : { 6379 : { }, 6380 : { replica_of : '10.10.10.10 6379' } } }
10.10.10.11 : { redis_node: 2 , redis_instances : { 6379 : { replica_of : '10.10.10.10 6379' } } } # 新增节点
vars : { redis_cluster: redis-ms ,redis_password: 'redis.ms' ,redis_max_memory : 64MB }
然后仅针对新节点执行部署:
./redis.yml -l 10.10.10.11 # 仅部署新增的节点
扩容原生集群 向 Redis 原生集群添加新节点需要额外的步骤:
# 1. 在配置清单中添加新节点
# 2. 部署新节点
./redis.yml -l 10.10.10.14
# 3. 将新节点添加到集群中(手动执行)
redis-cli --cluster add-node 10.10.10.14:6379 10.10.10.12:6379
# 4. 重新分配槽位(如需要)
redis-cli --cluster reshard 10.10.10.12:6379
扩容哨兵集群 向 Sentinel 集群添加新实例后,需要同时完成实例部署与纳管目标刷新:
# 1. 在配置清单中添加新的哨兵实例,部署实例
./redis.yml -l <sentinel-cluster> -t redis_instance
# 2. 重新下发 redis_sentinel_monitor 到所有哨兵
./redis.yml -l <sentinel-cluster> -t redis-ha
缩容Redis节点 缩容独立主从集群 # 1. 如果要移除的是从库,直接移除即可
./redis-rm.yml -l 10.10.10.11 -e redis_port = 6379
# 2. 如果要移除的是主库,先进行主从切换
redis-cli -h 10.10.10.10 -p 6380 REPLICAOF NO ONE # 提升从库
redis-cli -h 10.10.10.10 -p 6379 REPLICAOF 10.10.10.10 6380 # 降级原主库
# 3. 然后移除原主库
./redis-rm.yml -l 10.10.10.10 -e redis_port = 6379
# 4. 更新配置清单,移除相关定义
缩容原生集群 # 1. 先迁移数据槽位
redis-cli --cluster reshard 10.10.10.12:6379 \
--cluster-from <node-id> --cluster-to <target-node-id> --cluster-slots <count>
# 2. 从集群中移除节点
redis-cli --cluster del-node 10.10.10.12:6379 <node-id>
# 3. 下线实例
./redis-rm.yml -l 10.10.10.14
# 4. 更新配置清单
数据备份与恢复 手动备份 # 触发 RDB 快照
redis-cli -h 10.10.10.10 -p 6379 -a <password> BGSAVE
# 查看快照状态
redis-cli -h 10.10.10.10 -p 6379 -a <password> LASTSAVE
# 复制 RDB 文件(默认位置)
cp /data/redis/redis-ms-1-6379/dump.rdb /backup/redis-ms-$( date +%Y%m%d) .rdb
数据恢复 # 1. 停止 Redis 实例
sudo systemctl stop redis-ms-1-6379
# 2. 替换 RDB 文件
cp /backup/redis-ms-20241231.rdb /data/redis/redis-ms-1-6379/dump.rdb
chown redis:redis /data/redis/redis-ms-1-6379/dump.rdb
# 3. 启动 Redis 实例
sudo systemctl start redis-ms-1-6379
使用 AOF 持久化 如果需要更高的数据安全性,可以启用 AOF:
redis-ms :
vars :
redis_aof_enabled : true
redis_rdb_save : [ '900 1' , '300 10' , '60 10000' ] # 同时保留 RDB
重新部署以应用 AOF 配置:
./redis.yml -l redis-ms -t redis_config,redis_launch
常见问题诊断 连接问题排查 # 检查 Redis 服务状态
systemctl status redis-ms-1-6379
# 检查端口监听
ss -tlnp | grep 6379
# 检查防火墙
sudo iptables -L -n | grep 6379
# 测试连接
redis-cli -h 10.10.10.10 -p 6379 PING
内存问题排查 # 查看内存使用情况
redis-cli -h 10.10.10.10 -p 6379 INFO memory
# 查看大 Key
redis-cli -h 10.10.10.10 -p 6379 --bigkeys
# 查看内存分析报告
redis-cli -h 10.10.10.10 -p 6379 MEMORY DOCTOR
性能问题排查 # 查看慢查询日志
redis-cli -h 10.10.10.10 -p 6379 SLOWLOG GET 10
# 实时监控命令
redis-cli -h 10.10.10.10 -p 6379 MONITOR
# 查看客户端连接
redis-cli -h 10.10.10.10 -p 6379 CLIENT LIST
复制问题排查 # 查看复制状态
redis-cli -h 10.10.10.10 -p 6379 INFO replication
# 检查复制延迟
redis-cli -h 10.10.10.10 -p 6380 INFO replication | grep lag
性能调优 内存优化 redis-cache :
vars :
redis_max_memory : 4GB # 根据可用内存设置
redis_mem_policy : allkeys-lru # 缓存场景推荐 LRU
redis_conf : redis.conf
持久化优化 # 纯缓存场景:禁用持久化
redis-cache :
vars :
redis_rdb_save : [] # 禁用 RDB
redis_aof_enabled : false # 禁用 AOF
# 数据安全场景:同时启用 RDB 和 AOF
redis-data :
vars :
redis_rdb_save : [ '900 1' , '300 10' , '60 10000' ]
redis_aof_enabled : true
连接池配置建议 客户端应用连接 Redis 时,建议:
使用连接池,避免频繁创建连接 设置合理的超时时间(推荐 1-3 秒) 启用 TCP keepalive 对于高并发场景,考虑使用 Pipeline 批量操作 监控关键指标 通过 Grafana 仪表盘关注以下指标:
内存使用率 :redis:ins:mem_usage > 80% 时需要关注CPU 使用率 :redis:ins:cpu_usage > 70% 时需要关注QPS :关注突增和异常波动响应时间 :redis:ins:rt > 1ms 时需要排查连接数 :关注连接数增长趋势复制延迟 :主从复制场景下需要关注17.5 - 监控告警 如何监控 redis?有哪些告警规则值得关注?
监控面板 REDIS 模块提供了 3 个监控面板
Redis Overview:redis 集群概览 Redis Cluster:redis 集群详情 Redis Instance:redis 实例详情 监控 Pigsty 提供了三个与 REDIS
Redis Overview Redis Overview :关于所有Redis集群/实例的详细信息
Redis Cluster Redis Cluster :关于单个Redis集群的详细信息
Redis Cluster Dashboard
Redis Instance Redis Instance : 关于单个Redis实例的详细信息
Redis Instance Dashboard
告警规则 Pigsty 针对 redis 提供了以下六条预置告警规则,定义于 files/victoria/rules/redis.yml
RedisDown:redis 实例不可用RedisRejectConn:redis 实例拒绝连接RedisRTHigh:redis 实例响应时间过高RedisCPUHigh:redis 实例 CPU 使用率过高RedisMemHigh:redis 实例内存使用率过高RedisQPSHigh:redis 实例 QPS 过高#==============================================================#
# Error #
#==============================================================#
# redis down triggers a P0 alert
- alert : RedisDown
expr : redis_up < 1
for : 1m
labels : { level: 0, severity: CRIT, category : redis }
annotations :
summary : "CRIT RedisDown: {{ $labels.ins }} {{ $labels.instance }} {{ $value }}"
description : |
redis_up[ins={{ $labels.ins }}, instance={{ $labels.instance }}] = {{ $value }} == 0
/ui/d/redis-instance?from=now-5m&to=now&var-ins={{$labels.ins}}
# redis reject connection in last 5m
- alert : RedisRejectConn
expr : redis:ins:conn_reject > 0
labels : { level: 0, severity: CRIT, category : redis }
annotations :
summary : "CRIT RedisRejectConn: {{ $labels.ins }} {{ $labels.instance }} {{ $value }}"
description : |
redis:ins:conn_reject[cls={{ $labels.cls }}, ins={{ $labels.ins }}][5m] = {{ $value }} > 0
/ui/d/redis-instance?from=now-10m&to=now&viewPanel=88&fullscreen&var-ins={{ $labels.ins }}
#==============================================================#
# Latency #
#==============================================================#
# redis avg query response time > 160 µs
- alert : RedisRTHigh
expr : redis:ins:rt > 0.00016
for : 1m
labels : { level: 1, severity: WARN, category : redis }
annotations :
summary : "WARN RedisRTHigh: {{ $labels.cls }} {{ $labels.ins }}"
description : |
pg:ins:query_rt[cls={{ $labels.cls }}, ins={{ $labels.ins }}] = {{ $value }} > 160µs
/ui/d/redis-instance?from=now-10m&to=now&viewPanel=97&fullscreen&var-ins={{ $labels.ins }}
#==============================================================#
# Saturation #
#==============================================================#
# redis cpu usage more than 70% for 1m
- alert : RedisCPUHigh
expr : redis:ins:cpu_usage > 0.70
for : 1m
labels : { level: 1, severity: WARN, category : redis }
annotations :
summary : "WARN RedisCPUHigh: {{ $labels.cls }} {{ $labels.ins }}"
description : |
redis:ins:cpu_all[cls={{ $labels.cls }}, ins={{ $labels.ins }}] = {{ $value }} > 60%
/ui/d/redis-instance?from=now-10m&to=now&viewPanel=43&fullscreen&var-ins={{ $labels.ins }}
# redis mem usage more than 70% for 1m
- alert : RedisMemHigh
expr : redis:ins:mem_usage > 0.70
for : 1m
labels : { level: 1, severity: WARN, category : redis }
annotations :
summary : "WARN RedisMemHigh: {{ $labels.cls }} {{ $labels.ins }}"
description : |
redis:ins:mem_usage[cls={{ $labels.cls }}, ins={{ $labels.ins }}] = {{ $value }} > 80%
/ui/d/redis-instance?from=now-10m&to=now&viewPanel=7&fullscreen&var-ins={{ $labels.ins }}
#==============================================================#
# Traffic #
#==============================================================#
# redis qps more than 32000 for 5m
- alert : RedisQPSHigh
expr : redis:ins:qps > 32000
for : 5m
labels : { level: 2, severity: INFO, category : redis }
annotations :
summary : "INFO RedisQPSHigh: {{ $labels.cls }} {{ $labels.ins }}"
description : |
redis:ins:qps[cls={{ $labels.cls }}, ins={{ $labels.ins }}] = {{ $value }} > 16000
/ui/d/redis-instance?from=now-10m&to=now&viewPanel=96&fullscreen&var-ins={{ $labels.ins }}
17.6 - 指标列表 Pigsty REDIS 模块提供的完整监控指标列表与释义
REDIS
Metric Name Type Labels Description ALERTS Unknown cls, ip, level, severity, instance, category, ins, alertname, job, alertstateN/A ALERTS_FOR_STATE Unknown cls, ip, level, severity, instance, category, ins, alertname, jobN/A redis:cls:aof_rewrite_time Unknown cls, jobN/A redis:cls:blocked_clients Unknown cls, jobN/A redis:cls:clients Unknown cls, jobN/A redis:cls:cmd_qps Unknown cls, cmd, jobN/A redis:cls:cmd_rt Unknown cls, cmd, jobN/A redis:cls:cmd_time Unknown cls, cmd, jobN/A redis:cls:conn_rate Unknown cls, jobN/A redis:cls:conn_reject Unknown cls, jobN/A redis:cls:cpu_sys Unknown cls, jobN/A redis:cls:cpu_sys_child Unknown cls, jobN/A redis:cls:cpu_usage Unknown cls, jobN/A redis:cls:cpu_usage_child Unknown cls, jobN/A redis:cls:cpu_user Unknown cls, jobN/A redis:cls:cpu_user_child Unknown cls, jobN/A redis:cls:fork_time Unknown cls, jobN/A redis:cls:key_evict Unknown cls, jobN/A redis:cls:key_expire Unknown cls, jobN/A redis:cls:key_hit Unknown cls, jobN/A redis:cls:key_hit_rate Unknown cls, jobN/A redis:cls:key_miss Unknown cls, jobN/A redis:cls:mem_max Unknown cls, jobN/A redis:cls:mem_usage Unknown cls, jobN/A redis:cls:mem_usage_max Unknown cls, jobN/A redis:cls:mem_used Unknown cls, jobN/A redis:cls:net_traffic Unknown cls, jobN/A redis:cls:qps Unknown cls, jobN/A redis:cls:qps_mu Unknown cls, jobN/A redis:cls:qps_realtime Unknown cls, jobN/A redis:cls:qps_sigma Unknown cls, jobN/A redis:cls:rt Unknown cls, jobN/A redis:cls:rt_mu Unknown cls, jobN/A redis:cls:rt_sigma Unknown cls, jobN/A redis:cls:rx Unknown cls, jobN/A redis:cls:size Unknown cls, jobN/A redis:cls:tx Unknown cls, jobN/A redis:env:blocked_clients Unknown jobN/A redis:env:clients Unknown jobN/A redis:env:cmd_qps Unknown cmd, jobN/A redis:env:cmd_rt Unknown cmd, jobN/A redis:env:cmd_time Unknown cmd, jobN/A redis:env:conn_rate Unknown jobN/A redis:env:conn_reject Unknown jobN/A redis:env:cpu_usage Unknown jobN/A redis:env:cpu_usage_child Unknown jobN/A redis:env:key_evict Unknown jobN/A redis:env:key_expire Unknown jobN/A redis:env:key_hit Unknown jobN/A redis:env:key_hit_rate Unknown jobN/A redis:env:key_miss Unknown jobN/A redis:env:mem_usage Unknown jobN/A redis:env:net_traffic Unknown jobN/A redis:env:qps Unknown jobN/A redis:env:qps_mu Unknown jobN/A redis:env:qps_realtime Unknown jobN/A redis:env:qps_sigma Unknown jobN/A redis:env:rt Unknown jobN/A redis:env:rt_mu Unknown jobN/A redis:env:rt_sigma Unknown jobN/A redis:env:rx Unknown jobN/A redis:env:tx Unknown jobN/A redis:ins Unknown cls, id, instance, ins, jobN/A redis:ins:blocked_clients Unknown cls, ip, instance, ins, jobN/A redis:ins:clients Unknown cls, ip, instance, ins, jobN/A redis:ins:cmd_qps Unknown cls, cmd, ip, instance, ins, jobN/A redis:ins:cmd_rt Unknown cls, cmd, ip, instance, ins, jobN/A redis:ins:cmd_time Unknown cls, cmd, ip, instance, ins, jobN/A redis:ins:conn_rate Unknown cls, ip, instance, ins, jobN/A redis:ins:conn_reject Unknown cls, ip, instance, ins, jobN/A redis:ins:cpu_sys Unknown cls, ip, instance, ins, jobN/A redis:ins:cpu_sys_child Unknown cls, ip, instance, ins, jobN/A redis:ins:cpu_usage Unknown cls, ip, instance, ins, jobN/A redis:ins:cpu_usage_child Unknown cls, ip, instance, ins, jobN/A redis:ins:cpu_user Unknown cls, ip, instance, ins, jobN/A redis:ins:cpu_user_child Unknown cls, ip, instance, ins, jobN/A redis:ins:key_evict Unknown cls, ip, instance, ins, jobN/A redis:ins:key_expire Unknown cls, ip, instance, ins, jobN/A redis:ins:key_hit Unknown cls, ip, instance, ins, jobN/A redis:ins:key_hit_rate Unknown cls, ip, instance, ins, jobN/A redis:ins:key_miss Unknown cls, ip, instance, ins, jobN/A redis:ins:lsn_rate Unknown cls, ip, instance, ins, jobN/A redis:ins:mem_usage Unknown cls, ip, instance, ins, jobN/A redis:ins:net_traffic Unknown cls, ip, instance, ins, jobN/A redis:ins:qps Unknown cls, ip, instance, ins, jobN/A redis:ins:qps_mu Unknown cls, ip, instance, ins, jobN/A redis:ins:qps_realtime Unknown cls, ip, instance, ins, jobN/A redis:ins:qps_sigma Unknown cls, ip, instance, ins, jobN/A redis:ins:rt Unknown cls, ip, instance, ins, jobN/A redis:ins:rt_mu Unknown cls, ip, instance, ins, jobN/A redis:ins:rt_sigma Unknown cls, ip, instance, ins, jobN/A redis:ins:rx Unknown cls, ip, instance, ins, jobN/A redis:ins:tx Unknown cls, ip, instance, ins, jobN/A redis:node:ip Unknown cls, ip, instance, ins, jobN/A redis:node:mem_alloc Unknown cls, ip, jobN/A redis:node:mem_total Unknown cls, ip, jobN/A redis:node:mem_used Unknown cls, ip, jobN/A redis:node:qps Unknown cls, ip, jobN/A redis_active_defrag_running gauge cls, ip, instance, ins, jobactive_defrag_running metric redis_allocator_active_bytes gauge cls, ip, instance, ins, joballocator_active_bytes metric redis_allocator_allocated_bytes gauge cls, ip, instance, ins, joballocator_allocated_bytes metric redis_allocator_frag_bytes gauge cls, ip, instance, ins, joballocator_frag_bytes metric redis_allocator_frag_ratio gauge cls, ip, instance, ins, joballocator_frag_ratio metric redis_allocator_resident_bytes gauge cls, ip, instance, ins, joballocator_resident_bytes metric redis_allocator_rss_bytes gauge cls, ip, instance, ins, joballocator_rss_bytes metric redis_allocator_rss_ratio gauge cls, ip, instance, ins, joballocator_rss_ratio metric redis_aof_current_rewrite_duration_sec gauge cls, ip, instance, ins, jobaof_current_rewrite_duration_sec metric redis_aof_enabled gauge cls, ip, instance, ins, jobaof_enabled metric redis_aof_last_bgrewrite_status gauge cls, ip, instance, ins, jobaof_last_bgrewrite_status metric redis_aof_last_cow_size_bytes gauge cls, ip, instance, ins, jobaof_last_cow_size_bytes metric redis_aof_last_rewrite_duration_sec gauge cls, ip, instance, ins, jobaof_last_rewrite_duration_sec metric redis_aof_last_write_status gauge cls, ip, instance, ins, jobaof_last_write_status metric redis_aof_rewrite_in_progress gauge cls, ip, instance, ins, jobaof_rewrite_in_progress metric redis_aof_rewrite_scheduled gauge cls, ip, instance, ins, jobaof_rewrite_scheduled metric redis_blocked_clients gauge cls, ip, instance, ins, jobblocked_clients metric redis_client_recent_max_input_buffer_bytes gauge cls, ip, instance, ins, jobclient_recent_max_input_buffer_bytes metric redis_client_recent_max_output_buffer_bytes gauge cls, ip, instance, ins, jobclient_recent_max_output_buffer_bytes metric redis_clients_in_timeout_table gauge cls, ip, instance, ins, jobclients_in_timeout_table metric redis_cluster_connections gauge cls, ip, instance, ins, jobcluster_connections metric redis_cluster_current_epoch gauge cls, ip, instance, ins, jobcluster_current_epoch metric redis_cluster_enabled gauge cls, ip, instance, ins, jobcluster_enabled metric redis_cluster_known_nodes gauge cls, ip, instance, ins, jobcluster_known_nodes metric redis_cluster_messages_received_total gauge cls, ip, instance, ins, jobcluster_messages_received_total metric redis_cluster_messages_sent_total gauge cls, ip, instance, ins, jobcluster_messages_sent_total metric redis_cluster_my_epoch gauge cls, ip, instance, ins, jobcluster_my_epoch metric redis_cluster_size gauge cls, ip, instance, ins, jobcluster_size metric redis_cluster_slots_assigned gauge cls, ip, instance, ins, jobcluster_slots_assigned metric redis_cluster_slots_fail gauge cls, ip, instance, ins, jobcluster_slots_fail metric redis_cluster_slots_ok gauge cls, ip, instance, ins, jobcluster_slots_ok metric redis_cluster_slots_pfail gauge cls, ip, instance, ins, jobcluster_slots_pfail metric redis_cluster_state gauge cls, ip, instance, ins, jobcluster_state metric redis_cluster_stats_messages_meet_received gauge cls, ip, instance, ins, jobcluster_stats_messages_meet_received metric redis_cluster_stats_messages_meet_sent gauge cls, ip, instance, ins, jobcluster_stats_messages_meet_sent metric redis_cluster_stats_messages_ping_received gauge cls, ip, instance, ins, jobcluster_stats_messages_ping_received metric redis_cluster_stats_messages_ping_sent gauge cls, ip, instance, ins, jobcluster_stats_messages_ping_sent metric redis_cluster_stats_messages_pong_received gauge cls, ip, instance, ins, jobcluster_stats_messages_pong_received metric redis_cluster_stats_messages_pong_sent gauge cls, ip, instance, ins, jobcluster_stats_messages_pong_sent metric redis_commands_duration_seconds_total counter cls, cmd, ip, instance, ins, jobTotal amount of time in seconds spent per command redis_commands_failed_calls_total counter cls, cmd, ip, instance, ins, jobTotal number of errors prior command execution per command redis_commands_latencies_usec_bucket Unknown cls, cmd, ip, le, instance, ins, jobN/A redis_commands_latencies_usec_count Unknown cls, cmd, ip, instance, ins, jobN/A redis_commands_latencies_usec_sum Unknown cls, cmd, ip, instance, ins, jobN/A redis_commands_processed_total counter cls, ip, instance, ins, jobcommands_processed_total metric redis_commands_rejected_calls_total counter cls, cmd, ip, instance, ins, jobTotal number of errors within command execution per command redis_commands_total counter cls, cmd, ip, instance, ins, jobTotal number of calls per command redis_config_io_threads gauge cls, ip, instance, ins, jobconfig_io_threads metric redis_config_maxclients gauge cls, ip, instance, ins, jobconfig_maxclients metric redis_config_maxmemory gauge cls, ip, instance, ins, jobconfig_maxmemory metric redis_connected_clients gauge cls, ip, instance, ins, jobconnected_clients metric redis_connected_slave_lag_seconds gauge cls, ip, slave_ip, instance, slave_state, ins, slave_port, jobLag of connected slave redis_connected_slave_offset_bytes gauge cls, ip, slave_ip, instance, slave_state, ins, slave_port, jobOffset of connected slave redis_connected_slaves gauge cls, ip, instance, ins, jobconnected_slaves metric redis_connections_received_total counter cls, ip, instance, ins, jobconnections_received_total metric redis_cpu_sys_children_seconds_total counter cls, ip, instance, ins, jobcpu_sys_children_seconds_total metric redis_cpu_sys_main_thread_seconds_total counter cls, ip, instance, ins, jobcpu_sys_main_thread_seconds_total metric redis_cpu_sys_seconds_total counter cls, ip, instance, ins, jobcpu_sys_seconds_total metric redis_cpu_user_children_seconds_total counter cls, ip, instance, ins, jobcpu_user_children_seconds_total metric redis_cpu_user_main_thread_seconds_total counter cls, ip, instance, ins, jobcpu_user_main_thread_seconds_total metric redis_cpu_user_seconds_total counter cls, ip, instance, ins, jobcpu_user_seconds_total metric redis_db_keys gauge cls, ip, instance, ins, db, jobTotal number of keys by DB redis_db_keys_expiring gauge cls, ip, instance, ins, db, jobTotal number of expiring keys by DB redis_defrag_hits gauge cls, ip, instance, ins, jobdefrag_hits metric redis_defrag_key_hits gauge cls, ip, instance, ins, jobdefrag_key_hits metric redis_defrag_key_misses gauge cls, ip, instance, ins, jobdefrag_key_misses metric redis_defrag_misses gauge cls, ip, instance, ins, jobdefrag_misses metric redis_dump_payload_sanitizations counter cls, ip, instance, ins, jobdump_payload_sanitizations metric redis_errors_total counter cls, ip, err, instance, ins, jobTotal number of errors per error type redis_evicted_keys_total counter cls, ip, instance, ins, jobevicted_keys_total metric redis_expired_keys_total counter cls, ip, instance, ins, jobexpired_keys_total metric redis_expired_stale_percentage gauge cls, ip, instance, ins, jobexpired_stale_percentage metric redis_expired_time_cap_reached_total gauge cls, ip, instance, ins, jobexpired_time_cap_reached_total metric redis_exporter_build_info gauge cls, golang_version, ip, commit_sha, instance, version, ins, job, build_dateredis exporter build_info redis_exporter_last_scrape_connect_time_seconds gauge cls, ip, instance, ins, jobexporter_last_scrape_connect_time_seconds metric redis_exporter_last_scrape_duration_seconds gauge cls, ip, instance, ins, jobexporter_last_scrape_duration_seconds metric redis_exporter_last_scrape_error gauge cls, ip, instance, ins, jobThe last scrape error status. redis_exporter_scrape_duration_seconds_count Unknown cls, ip, instance, ins, jobN/A redis_exporter_scrape_duration_seconds_sum Unknown cls, ip, instance, ins, jobN/A redis_exporter_scrapes_total counter cls, ip, instance, ins, jobCurrent total redis scrapes. redis_instance_info gauge cls, ip, os, role, instance, run_id, redis_version, tcp_port, process_id, ins, redis_mode, maxmemory_policy, redis_build_id, jobInformation about the Redis instance redis_io_threaded_reads_processed counter cls, ip, instance, ins, jobio_threaded_reads_processed metric redis_io_threaded_writes_processed counter cls, ip, instance, ins, jobio_threaded_writes_processed metric redis_io_threads_active gauge cls, ip, instance, ins, jobio_threads_active metric redis_keyspace_hits_total counter cls, ip, instance, ins, jobkeyspace_hits_total metric redis_keyspace_misses_total counter cls, ip, instance, ins, jobkeyspace_misses_total metric redis_last_key_groups_scrape_duration_milliseconds gauge cls, ip, instance, ins, jobDuration of the last key group metrics scrape in milliseconds redis_last_slow_execution_duration_seconds gauge cls, ip, instance, ins, jobThe amount of time needed for last slow execution, in seconds redis_latency_percentiles_usec summary cls, cmd, ip, instance, quantile, ins, jobA summary of latency percentile distribution per command redis_latency_percentiles_usec_count Unknown cls, cmd, ip, instance, ins, jobN/A redis_latency_percentiles_usec_sum Unknown cls, cmd, ip, instance, ins, jobN/A redis_latest_fork_seconds gauge cls, ip, instance, ins, joblatest_fork_seconds metric redis_lazyfree_pending_objects gauge cls, ip, instance, ins, joblazyfree_pending_objects metric redis_loading_dump_file gauge cls, ip, instance, ins, jobloading_dump_file metric redis_master_last_io_seconds_ago gauge cls, ip, master_host, instance, ins, job, master_portMaster last io seconds ago redis_master_link_up gauge cls, ip, master_host, instance, ins, job, master_portMaster link status on Redis slave redis_master_repl_offset gauge cls, ip, instance, ins, jobmaster_repl_offset metric redis_master_sync_in_progress gauge cls, ip, master_host, instance, ins, job, master_portMaster sync in progress redis_mem_clients_normal gauge cls, ip, instance, ins, jobmem_clients_normal metric redis_mem_clients_slaves gauge cls, ip, instance, ins, jobmem_clients_slaves metric redis_mem_fragmentation_bytes gauge cls, ip, instance, ins, jobmem_fragmentation_bytes metric redis_mem_fragmentation_ratio gauge cls, ip, instance, ins, jobmem_fragmentation_ratio metric redis_mem_not_counted_for_eviction_bytes gauge cls, ip, instance, ins, jobmem_not_counted_for_eviction_bytes metric redis_memory_max_bytes gauge cls, ip, instance, ins, jobmemory_max_bytes metric redis_memory_used_bytes gauge cls, ip, instance, ins, jobmemory_used_bytes metric redis_memory_used_dataset_bytes gauge cls, ip, instance, ins, jobmemory_used_dataset_bytes metric redis_memory_used_lua_bytes gauge cls, ip, instance, ins, jobmemory_used_lua_bytes metric redis_memory_used_overhead_bytes gauge cls, ip, instance, ins, jobmemory_used_overhead_bytes metric redis_memory_used_peak_bytes gauge cls, ip, instance, ins, jobmemory_used_peak_bytes metric redis_memory_used_rss_bytes gauge cls, ip, instance, ins, jobmemory_used_rss_bytes metric redis_memory_used_scripts_bytes gauge cls, ip, instance, ins, jobmemory_used_scripts_bytes metric redis_memory_used_startup_bytes gauge cls, ip, instance, ins, jobmemory_used_startup_bytes metric redis_migrate_cached_sockets_total gauge cls, ip, instance, ins, jobmigrate_cached_sockets_total metric redis_module_fork_in_progress gauge cls, ip, instance, ins, jobmodule_fork_in_progress metric redis_module_fork_last_cow_size gauge cls, ip, instance, ins, jobmodule_fork_last_cow_size metric redis_net_input_bytes_total counter cls, ip, instance, ins, jobnet_input_bytes_total metric redis_net_output_bytes_total counter cls, ip, instance, ins, jobnet_output_bytes_total metric redis_number_of_cached_scripts gauge cls, ip, instance, ins, jobnumber_of_cached_scripts metric redis_process_id gauge cls, ip, instance, ins, jobprocess_id metric redis_pubsub_channels gauge cls, ip, instance, ins, jobpubsub_channels metric redis_pubsub_patterns gauge cls, ip, instance, ins, jobpubsub_patterns metric redis_pubsubshard_channels gauge cls, ip, instance, ins, jobpubsubshard_channels metric redis_rdb_bgsave_in_progress gauge cls, ip, instance, ins, jobrdb_bgsave_in_progress metric redis_rdb_changes_since_last_save gauge cls, ip, instance, ins, jobrdb_changes_since_last_save metric redis_rdb_current_bgsave_duration_sec gauge cls, ip, instance, ins, jobrdb_current_bgsave_duration_sec metric redis_rdb_last_bgsave_duration_sec gauge cls, ip, instance, ins, jobrdb_last_bgsave_duration_sec metric redis_rdb_last_bgsave_status gauge cls, ip, instance, ins, jobrdb_last_bgsave_status metric redis_rdb_last_cow_size_bytes gauge cls, ip, instance, ins, jobrdb_last_cow_size_bytes metric redis_rdb_last_save_timestamp_seconds gauge cls, ip, instance, ins, jobrdb_last_save_timestamp_seconds metric redis_rejected_connections_total counter cls, ip, instance, ins, jobrejected_connections_total metric redis_repl_backlog_first_byte_offset gauge cls, ip, instance, ins, jobrepl_backlog_first_byte_offset metric redis_repl_backlog_history_bytes gauge cls, ip, instance, ins, jobrepl_backlog_history_bytes metric redis_repl_backlog_is_active gauge cls, ip, instance, ins, jobrepl_backlog_is_active metric redis_replica_partial_resync_accepted gauge cls, ip, instance, ins, jobreplica_partial_resync_accepted metric redis_replica_partial_resync_denied gauge cls, ip, instance, ins, jobreplica_partial_resync_denied metric redis_replica_resyncs_full gauge cls, ip, instance, ins, jobreplica_resyncs_full metric redis_replication_backlog_bytes gauge cls, ip, instance, ins, jobreplication_backlog_bytes metric redis_second_repl_offset gauge cls, ip, instance, ins, jobsecond_repl_offset metric redis_sentinel_master_ckquorum_status gauge cls, ip, message, instance, ins, master_name, jobMaster ckquorum status redis_sentinel_master_ok_sentinels gauge cls, ip, instance, ins, master_address, master_name, jobThe number of okay sentinels monitoring this master redis_sentinel_master_ok_slaves gauge cls, ip, instance, ins, master_address, master_name, jobThe number of okay slaves of the master redis_sentinel_master_sentinels gauge cls, ip, instance, ins, master_address, master_name, jobThe number of sentinels monitoring this master redis_sentinel_master_setting_ckquorum gauge cls, ip, instance, ins, master_address, master_name, jobShow the current ckquorum config for each master redis_sentinel_master_setting_down_after_milliseconds gauge cls, ip, instance, ins, master_address, master_name, jobShow the current down-after-milliseconds config for each master redis_sentinel_master_setting_failover_timeout gauge cls, ip, instance, ins, master_address, master_name, jobShow the current failover-timeout config for each master redis_sentinel_master_setting_parallel_syncs gauge cls, ip, instance, ins, master_address, master_name, jobShow the current parallel-syncs config for each master redis_sentinel_master_slaves gauge cls, ip, instance, ins, master_address, master_name, jobThe number of slaves of the master redis_sentinel_master_status gauge cls, ip, master_status, instance, ins, master_address, master_name, jobMaster status on Sentinel redis_sentinel_masters gauge cls, ip, instance, ins, jobThe number of masters this sentinel is watching redis_sentinel_running_scripts gauge cls, ip, instance, ins, jobNumber of scripts in execution right now redis_sentinel_scripts_queue_length gauge cls, ip, instance, ins, jobQueue of user scripts to execute redis_sentinel_simulate_failure_flags gauge cls, ip, instance, ins, jobFailures simulations redis_sentinel_tilt gauge cls, ip, instance, ins, jobSentinel is in TILT mode redis_slave_expires_tracked_keys gauge cls, ip, instance, ins, jobslave_expires_tracked_keys metric redis_slave_info gauge cls, ip, master_host, instance, read_only, ins, job, master_portInformation about the Redis slave redis_slave_priority gauge cls, ip, instance, ins, jobslave_priority metric redis_slave_repl_offset gauge cls, ip, master_host, instance, ins, job, master_portSlave replication offset redis_slowlog_last_id gauge cls, ip, instance, ins, jobLast id of slowlog redis_slowlog_length gauge cls, ip, instance, ins, jobTotal slowlog redis_start_time_seconds gauge cls, ip, instance, ins, jobStart time of the Redis instance since unix epoch in seconds. redis_target_scrape_request_errors_total counter cls, ip, instance, ins, jobErrors in requests to the exporter redis_total_error_replies counter cls, ip, instance, ins, jobtotal_error_replies metric redis_total_reads_processed counter cls, ip, instance, ins, jobtotal_reads_processed metric redis_total_system_memory_bytes gauge cls, ip, instance, ins, jobtotal_system_memory_bytes metric redis_total_writes_processed counter cls, ip, instance, ins, jobtotal_writes_processed metric redis_tracking_clients gauge cls, ip, instance, ins, jobtracking_clients metric redis_tracking_total_items gauge cls, ip, instance, ins, jobtracking_total_items metric redis_tracking_total_keys gauge cls, ip, instance, ins, jobtracking_total_keys metric redis_tracking_total_prefixes gauge cls, ip, instance, ins, jobtracking_total_prefixes metric redis_unexpected_error_replies counter cls, ip, instance, ins, jobunexpected_error_replies metric redis_up gauge cls, ip, instance, ins, jobInformation about the Redis instance redis_uptime_in_seconds gauge cls, ip, instance, ins, jobuptime_in_seconds metric scrape_duration_seconds Unknown cls, ip, instance, ins, jobN/A scrape_samples_post_metric_relabeling Unknown cls, ip, instance, ins, jobN/A scrape_samples_scraped Unknown cls, ip, instance, ins, jobN/A scrape_series_added Unknown cls, ip, instance, ins, jobN/A up Unknown cls, ip, instance, ins, jobN/A
17.7 - 常见问题 Pigsty REDIS 模块常见问题答疑
Redis移除失败:ABORT due to redis_safeguard enabled 这意味着正准备移除的 Redis 实例打开了防误删保险:当 redis_safeguardtrue 时,redis-rm.yml 剧本会拒绝执行,防止误删正在运行的 Redis 实例。
您可以通过命令行参数 -e redis_safeguard=false 来覆盖此保护,强制移除 Redis 实例。这就是 redis_safeguard 的设计目的。
如何在某个节点上添加一个新的Redis实例? 使用 bin/redis-add <ip> <port> 在节点上部署一个新的redis实例。
如何从节点上移除一个特定实例? 使用 bin/redis-rm <ip> <port> 从节点上移除一个单独的redis实例。
是否有计划升级到 Valkey 或最新版本? 当前 Pigsty v4.1 仍以 Redis 7.2 BSD 分支作为默认实现,尚未切换到 Redis 新许可证版本或 Valkey 作为默认组件。
不同操作系统渠道里的 Redis 小版本可能不同(例如 APT 渠道可见 7.2.7),请以您实际使用仓库中的包版本为准。
18 - 模块:FERRET 使用 FerretDB 为 PostgreSQL 添加 MongoDB 兼容的协议支持
FERRET 是 Pigsty 中的一个 可选 模块,用于部署 FerretDB DocumentDB
Pigsty 是 FerretDB 社区的合作伙伴,我们提供 FerretDB DocumentDB mongo.yml
18.1 - 使用方法 安装客户端工具,连接并使用 FerretDB
本文档介绍如何安装 MongoDB 客户端工具并连接到 FerretDB。
安装客户端工具 您可以使用 MongoDB 的命令行工具 MongoSH 来访问 FerretDB。
使用 pig 命令添加 MongoDB 仓库,然后使用 yum 或 apt 安装 mongosh:
pig repo add mongo -u # 添加 MongoDB 官方仓库
yum install mongodb-mongosh # RHEL/CentOS/Rocky/Alma
apt install mongodb-mongosh # Debian/Ubuntu
安装完成后,您可以使用 mongosh 命令连接到 FerretDB。
连接到 FerretDB 您可以使用任何语言的 MongoDB 驱动程序通过 MongoDB 连接字符串访问 FerretDB。以下是使用 mongosh CLI 工具的示例:
$ mongosh 'mongodb://postgres:DBUser.Postgres@10.10.10.10:27017'
Current Mongosh Log ID: 696b5bb93441875f86284d0b
Connecting to: mongodb://<credentials>@10.10.10.10:27017/?directConnection= true& appName = mongosh+2.6.0
Using MongoDB: 7.0.77
Using Mongosh: 2.6.0
test>
使用连接字符串 FerretDB 的身份验证完全基于 PostgreSQL。Pigsty 默认使用 scram-sha-256,在 FerretDB 2.x 中对应 SCRAM-SHA-256 认证。通常客户端会自动协商,你可以直接使用 PostgreSQL 用户名与密码。
mongosh 'mongodb://postgres:DBUser.Postgres@10.10.10.10:27017'
# 若客户端认证协商失败,可显式指定:
mongosh 'mongodb://postgres:DBUser.Postgres@10.10.10.10:27017/?authMechanism=SCRAM-SHA-256'
连接字符串格式:
mongodb://<username>:<password>@<host>:<port>/<database>[ ?authMechanism= SCRAM-SHA-256]
使用不同的用户 您可以使用任何已在 PostgreSQL 中创建的用户连接到 FerretDB:
# 使用超级管理员用户
mongosh 'mongodb://dbuser_dba:DBUser.DBA@10.10.10.10:27017'
# 使用普通管理员用户
mongosh 'mongodb://dbuser_meta:DBUser.Meta@10.10.10.10:27017'
# 使用普通只读用户
mongosh 'mongodb://dbuser_view:DBUser.Viewer@10.10.10.10:27017'
基本操作 连接到 FerretDB 后,您可以像使用 MongoDB 一样进行操作。以下是一些基本操作示例:
数据库操作 // 显示所有数据库
show dbs
// 显示所有集合
show collections
// 切换/创建数据库
use mydb
// 删除当前数据库
db . dropDatabase ();
集合操作 db . createCollection ( 'users' ); // 创建集合
db . users . drop (); // 删除集合
文档操作 // 插入单个文档
db . users . insertOne ({
name : 'Alice' , age : 30 , email : 'alice@example.com'
});
// 插入多个文档
db . users . insertMany ([
{ name : 'Bob' , age : 25 },
{ name : 'Charlie' , age : 35 }
]);
// 查询文档
db . users . find ();
db . users . find ({ age : { $gt : 25 } });
db . users . findOne ({ name : 'Alice' });
// 更新文档
db . users . updateOne (
{ name : 'Alice' },
{ $set : { age : 31 } }
);
// 删除文档
db . users . deleteOne ({ name : 'Bob' });
db . users . deleteMany ({ age : { $lt : 30 } });
索引操作 // 创建索引
db . users . createIndex ({ age : - 1 });
// 查看索引
db . users . getIndexes ();
// 删除索引
db . users . dropIndex ( 'name_1' );
与 MongoDB 的差异 FerretDB 实现了 MongoDB 的线协议,但底层使用 PostgreSQL 存储数据。这意味着:
MongoDB 命令会被翻译为 SQL 语句执行 大多数基本操作与 MongoDB 兼容 某些高级功能可能有差异或不支持 您可以查阅以下资源了解详细信息:
程序语言驱动 除了 mongosh 命令行工具,您还可以使用各种编程语言的 MongoDB 驱动程序连接到 FerretDB:
Python from pymongo import MongoClient
client = MongoClient ( 'mongodb://dbuser_dba:DBUser.DBA@10.10.10.10:27017' )
db = client . test
collection = db . users
collection . insert_one ({ 'name' : 'Alice' , 'age' : 30 })
Node.js const { MongoClient } = require ( 'mongodb' );
const uri = 'mongodb://dbuser_meta:DBUser.Meta@10.10.10.10:27017' ;
const client = new MongoClient ( uri );
async function run () {
await client . connect ();
const db = client . db ( 'test' );
const collection = db . collection ( 'users' );
await collection . insertOne ({ name : 'Alice' , age : 30 });
}
Go import (
"go.mongodb.org/mongo-driver/mongo"
"go.mongodb.org/mongo-driver/mongo/options"
)
uri := "mongodb://dbuser_meta:DBUser.Meta@10.10.10.10:27017"
client , err := mongo . Connect ( context . TODO (), options . Client (). ApplyURI ( uri ))
18.2 - 集群配置 配置 FerretDB 模块,定义集群拓扑
在部署 FerretDB 集群之前,您需要使用相关 参数 在配置清单中定义它。
FerretDB 集群 以下示例使用默认单节点 pg-meta 集群的 postgres 数据库作为 FerretDB 的底层存储:
all :
children :
#----------------------------------#
# ferretdb for mongodb on postgresql
#----------------------------------#
# ./mongo.yml -l ferret
ferret :
hosts :
10.10.10.10 : { mongo_seq : 1 }
vars :
mongo_cluster : ferret
mongo_pgurl : 'postgres://dbuser_dba:DBUser.DBA@10.10.10.10:5432/postgres'
这里,mongo_clustermongo_seqmongo_pgurl
请注意,mongo_pgurl 参数需要一个 PostgreSQL 超级用户 。此示例使用默认的 dbuser_dba,生产环境中也可以改用专用超级用户。
请注意,FerretDB 的 身份验证 完全基于 PostgreSQL。您可以使用 FerretDB 或 PostgreSQL 创建其他常规用户。
PostgreSQL 集群 FerretDB 2.0+ 需要一个扩展:DocumentDB ,它依赖于几个其他扩展。以下是为 FerretDB 创建 PostgreSQL 集群的模板:
all :
children :
#----------------------------------#
# pgsql (singleton on current node)
#----------------------------------#
# postgres cluster: pg-meta
pg-meta :
hosts :
10.10.10.10 : { pg_seq: 1, pg_role : primary }
vars :
pg_cluster : pg-meta
pg_users :
- { name: dbuser_meta ,password: DBUser.Meta ,pgbouncer: true ,roles: [dbrole_admin ] ,comment : pigsty admin user }
- { name: dbuser_view ,password: DBUser.Viewer ,pgbouncer: true ,roles: [dbrole_readonly] ,comment : read-only viewer }
pg_databases :
- { name: postgres, extensions : [ documentdb, postgis, vector, pg_cron, rum ]}
pg_hba_rules :
- { user: dbuser_view , db: all ,addr: infra ,auth: pwd ,title : 'allow grafana dashboard access cmdb from infra nodes' }
# WARNING: demo/dev only. Avoid world access for dbsu in production.
- { user: postgres , db: all ,addr: world ,auth: pwd ,title : 'dbsu password access everywhere' }
- { user: all , db: all ,addr: localhost ,order: 1 ,auth: trust ,title : 'documentdb localhost trust access' }
- { user: all , db: all ,addr: local ,order: 1 ,auth: trust ,title : 'documentdb local trust access' }
- { user: all , db: all ,addr: intra ,auth: pwd ,title: 'everyone intranet access with password' ,order : 800 }
pg_parameters :
cron.database_name : postgres
pg_extensions :
- documentdb, postgis, pgvector, pg_cron, rum
pg_libs : 'pg_documentdb, pg_documentdb_core, pg_documentdb_extended_rum, pg_cron, pg_stat_statements, auto_explain'
关键配置要点:
用户配置 :mongo_pgurl 对应用户必须具备超级用户权限(示例使用 dbuser_dba)数据库配置 :数据库需要安装 documentdb 扩展及其依赖HBA 规则 :建议包含 localhost/local 的 trust 规则以满足 documentdb 本地访问需求,同时为业务网段配置密码认证共享库 :需要在 pg_libs 中预加载 pg_documentdb、pg_documentdb_core、pg_documentdb_extended_rum高可用性 您可以使用 服务 连接到高可用的 PostgreSQL 集群,并部署多个 FerretDB 实例副本,并为 FerretDB 层绑定 L2 VIP 以实现高可用性。
ferret :
hosts :
10.10.10.45 : { mongo_seq : 1 }
10.10.10.46 : { mongo_seq : 2 }
10.10.10.47 : { mongo_seq : 3 }
vars :
mongo_cluster : ferret
mongo_pgurl : 'postgres://dbuser_dba:DBUser.DBA@10.10.10.3:5436/postgres'
vip_enabled : true
vip_vrid : 128
vip_address : 10.10.10.99
vip_interface : eth1
在这个高可用配置中:
多实例部署 :在三个节点上部署 FerretDB 实例,所有实例连接到同一个 PostgreSQL 后端VIP 配置 :使用 Keepalived 绑定虚拟 IP 10.10.10.99,实现 FerretDB 层的故障转移服务地址 :使用 PostgreSQL 的服务地址(端口 5436 通常是主库服务),确保连接到正确的主库这样配置后,客户端可以通过 VIP 地址连接到 FerretDB,即使某个 FerretDB 实例故障,VIP 也会自动漂移到其他可用实例。
18.3 - 参数列表 使用 9 个参数自定义 FerretDB 组件
参数概览 FERRET
默认值 默认参数定义在 roles/ferret/defaults/main.yml
# mongo_cluster: #CLUSTER # mongo 集群名称,必选身份参数
# mongo_seq: 0 #INSTANCE # mongo 实例序列号,必选身份参数
# mongo_pgurl: 'postgres:///' # mongo/ferretdb 底层 postgresql url,必选
mongo_ssl_enabled : false # mongo/ferretdb ssl 启用,默认为 false
mongo_listen : '' # mongo/ferretdb 监听地址,'' 表示所有地址
mongo_port : 27017 # mongo/ferretdb 监听端口,默认为 27017
mongo_ssl_port : 27018 # mongo/ferretdb tls 监听端口,默认为 27018
mongo_exporter_port : 9216 # mongo/ferretdb exporter 端口,默认为 9216
mongo_extra_vars : '' # mongo/ferretdb 的额外环境变量
mongo_cluster参数名称:mongo_cluster,类型:string,级别:C
mongo 集群名称,必选身份参数。
没有默认值,您必须为生产环境显式定义它。
集群名称需要符合正则表达式 [a-z][a-z0-9-]*,建议使用描述性名称。
mongo_seq参数名称:mongo_seq,类型:int,级别:I
mongo 实例序列号,集群内需要唯一的整数标识。
您必须为每个 mongo 实例显式定义序列号,整数从 0 或 1 开始。
mongo_pgurl参数名称:mongo_pgurl,类型:pgurl,级别:C/I
FerretDB 连接的底层 PostgreSQL URL,必选参数。
没有默认值,您必须显式定义它。这是 FerretDB 将用作其后端存储的 PostgreSQL 数据库连接串。
格式:postgres://username:password@host:port/database
请注意:
用户需要是 PostgreSQL 超级用户 目标数据库需要安装 documentdb 扩展 建议使用专用的 mongod 用户 mongo_ssl_enabled参数名称:mongo_ssl_enabled,类型:bool,级别:C
是否为 FerretDB 启用 SSL/TLS 加密。
默认值为 false。设置为 true 以启用 mongo 连接的 SSL/TLS 加密。
启用后,FerretDB 将会:
mongo_listen参数名称:mongo_listen,类型:ip,级别:C
mongo 绑定的监听地址。
默认值为空字符串 '',这意味着监听所有可用地址(0.0.0.0)。您可以指定特定的 IP 地址进行绑定。
mongo_port参数名称:mongo_port,类型:port,级别:C
mongo 客户端连接的服务端口。
默认值为 27017,这是标准的 MongoDB 端口。如果您需要避免端口冲突或有安全考虑,可以更改此端口。
mongo_ssl_port参数名称:mongo_ssl_port,类型:port,级别:C
mongo 加密连接的 TLS 监听端口。
默认值为 27018。当通过 mongo_ssl_enabled
mongo_exporter_port参数名称:mongo_exporter_port,类型:port,级别:C
mongo 指标收集的 Exporter 端口。
默认值为 9216。此端口由 FerretDB 内置的指标导出器使用,向 Prometheus 暴露监控指标。
参数名称:mongo_extra_vars,类型:string,级别:C
FerretDB 服务器的额外环境变量。
默认值为空字符串 ''。您可以指定将传递给 FerretDB 进程的额外环境变量,格式为 KEY=VALUE,多个变量用空格分隔。
例如:
mongo_extra_vars : 'FERRETDB_LOG_LEVEL=debug FERRETDB_TELEMETRY=disable'
18.4 - 管理预案 创建、移除、扩展、收缩、升级 FerretDB 集群
本文档介绍 FerretDB 集群的日常管理操作。
创建 FerretDB 集群 在 配置清单 中 定义 FerretDB 集群后,您可以使用以下命令安装它:
./mongo.yml -l ferret # 在 ferret 分组上安装 FerretDB
由于 FerretDB 使用 PostgreSQL 作为其底层存储,多次运行此剧本通常是安全的(幂等性)。
FerretDB 服务配置了失败自动重启(Restart=on-failure),为这个无状态代理层提供了基本的容错能力。
移除 FerretDB 集群 要移除 FerretDB 集群,请使用 mongo_purge 参数运行 mongo.ymlmongo_purge 子任务:
./mongo.yml -l ferret -e mongo_purge = true -t mongo_purge
重要 :请务必使用 -l <cluster> 参数限制执行范围,避免误删其他集群。
此命令将会:
停止 FerretDB 服务 移除 systemd 服务文件 清理配置文件和证书 从 Prometheus 监控中注销 连接到 FerretDB 您可以使用 MongoDB 连接串,用任何语言的 MongoDB 驱动访问 FerretDB。以下是使用 mongosh
mongosh 'mongodb://dbuser_meta:DBUser.Meta@10.10.10.10:27017'
mongosh 'mongodb://test:test@10.10.10.11:27017/test'
Pigsty 管理的 PostgreSQL 集群默认使用 scram-sha-256。FerretDB 2.x 对应使用 SCRAM-SHA-256 认证,绝大多数客户端会自动协商;如果遇到协商失败,可在连接串中显式追加 authMechanism=SCRAM-SHA-256。参阅 FerretDB:认证 获取详细信息。
您也可以使用其他 PostgreSQL 用户来访问 FerretDB,只要在连接串中指定即可:
mongosh 'mongodb://dbuser_dba:DBUser.DBA@10.10.10.10:27017'
mongosh 'mongodb://dbuser_dba:DBUser.DBA@10.10.10.10:27017/?authMechanism=SCRAM-SHA-256'
快速上手 连接到 FerretDB 后,您可以像使用 MongoDB 一样进行操作:
$ mongosh 'mongodb://dbuser_meta:DBUser.Meta@10.10.10.10:27017'
MongoDB 的命令会被翻译为 SQL 命令,在底层的 PostgreSQL 中执行:
use test // CREATE SCHEMA test;
db . dropDatabase () // DROP SCHEMA test;
db . createCollection ( 'posts' ) // CREATE TABLE posts(_data JSONB,...)
db . posts . insert ({ // INSERT INTO posts VALUES(...);
title : 'Post One' ,
body : 'Body of post one' ,
category : 'News' ,
tags : [ 'news' , 'events' ],
user : { name : 'John Doe' , status : 'author' },
date : Date ()
})
db . posts . find (). limit ( 2 ). pretty () // SELECT * FROM posts LIMIT 2;
db . posts . createIndex ({ title : 1 }) // CREATE INDEX ON posts(_data->>'title');
如果您不熟悉 MongoDB,这里有一个快速上手教程,同样适用于 FerretDB:Perform CRUD Operations with MongoDB Shell
压力测试 如果您希望生成一些样例负载,可以使用 mongosh 执行以下简易测试脚本:
cat > benchmark.js <<'EOF'
const coll = "testColl";
const numDocs = 10000;
for (let i = 0; i < numDocs; i++) { // insert
db.getCollection(coll).insert({ num: i, name: "MongoDB Benchmark Test" });
}
for (let i = 0; i < numDocs; i++) { // select
db.getCollection(coll).find({ num: i });
}
for (let i = 0; i < numDocs; i++) { // update
db.getCollection(coll).update({ num: i }, { $set: { name: "Updated" } });
}
for (let i = 0; i < numDocs; i++) { // delete
db.getCollection(coll).deleteOne({ num: i });
}
EOF
mongosh 'mongodb://dbuser_meta:DBUser.Meta@10.10.10.10:27017' benchmark.js
您可以查阅 FerretDB 支持的 MongoDB 命令 ,同时还有一些 已知的区别 。对于基本的使用来说,这些差异通常不是什么大问题。
18.5 - 管理剧本 可在 FERRET 模块中使用的 Ansible 剧本
Pigsty 提供了一个内置剧本 mongo.yml
重要说明 :此剧本仅在定义了 mongo_seqmongo_seq 的主机,剧本会安全跳过所有任务,因此可以安全地在混合主机组上运行。
mongo.yml剧本地址:mongo.yml
功能说明:在定义了 mongo_seq 的目标主机上安装 MongoDB/FerretDB。
此剧本包含以下子任务:
子任务 说明 mongo_check检查 mongo 身份参数 mongo_dbsu创建操作系统用户 mongod mongo_install安装 ferretdb RPM/DEB 包 mongo_purge清理现有 FerretDB(默认不执行) mongo_config配置 FerretDB 服务 mongo_cert签发 FerretDB SSL 证书 mongo_launch启动 FerretDB 服务 mongo_register将 FerretDB 注册到 Prometheus
任务详解 mongo_check检查必选的身份参数是否已定义:
mongo_cluster:集群名称mongo_seq:实例序号mongo_pgurl:PostgreSQL 连接串如果任一参数缺失,剧本将报错退出。
mongo_dbsu创建 FerretDB 运行所需的操作系统用户和组:
创建 mongod 用户组 创建 mongod 用户,家目录为 /var/lib/mongod mongo_install安装 FerretDB 软件包:
在 RPM 系发行版上安装 ferretdb2 包 在 DEB 系发行版上安装对应的 deb 包 mongo_purge清理现有的 FerretDB 集群。此任务默认不执行,需要显式指定:
./mongo.yml -l <cluster> -e mongo_purge = true -t mongo_purge
重要 :请务必使用 -l <cluster> 参数限制执行范围。
清理操作包括:
停止并禁用 ferretdb 服务 移除 systemd 服务文件 移除配置文件和 SSL 证书 从 Prometheus 监控目标中注销 mongo_config配置 FerretDB 服务:
渲染环境变量配置文件 /etc/default/ferretdb 创建 systemd 服务文件 mongo_cert当 mongo_ssl_enabledtrue 时,此任务会:
生成 FerretDB 的 SSL 私钥 创建证书签名请求(CSR) 使用 CA 签发 SSL 证书 将证书文件部署到 /var/lib/mongod/ mongo_launch启动 FerretDB 服务:
重新加载 systemd 配置 启动并启用 ferretdb 服务 等待服务在指定端口上可用(默认 27017) FerretDB 服务配置了 Restart=on-failure,因此当进程意外崩溃时会自动重启。这为这个无状态代理服务提供了基本的容错能力。
mongo_register将 FerretDB 实例注册到 Prometheus 监控系统:
在所有 infra 节点上创建监控目标文件 目标文件路径:/infra/targets/mongo/<cluster>-<seq>.yml 包含实例的 IP、标签和指标端口信息 使用示例 # 在 ferret 分组上部署 FerretDB
./mongo.yml -l ferret
# 仅执行配置任务
./mongo.yml -l ferret -t mongo_config
# 重新签发 SSL 证书
./mongo.yml -l ferret -t mongo_cert
# 重启 FerretDB 服务
./mongo.yml -l ferret -t mongo_launch
# 清理 FerretDB 集群
./mongo.yml -l ferret -e mongo_purge = true -t mongo_purge
18.6 - 监控告警 FerretDB 模块的监控仪表板与告警规则
FERRET
Mongo Overview Mongo Overview :Mongo/FerretDB 集群概览
这个监控面板提供了关于 FerretDB 的基本监控指标,包括:
实例状态 :FerretDB 实例的运行状态客户端连接 :客户端连接数量和请求统计资源使用 :CPU、内存、Goroutine 数量等PostgreSQL 连接池 :后端 PostgreSQL 连接池状态
由于 FerretDB 底层使用 PostgreSQL 作为存储引擎,更多的监控指标请参考 PostgreSQL 监控 。
监控指标 FerretDB 通过内置的 Exporter 在 mongo_exporter_port
关键指标类别包括:
指标前缀 说明 ferretdb_*FerretDB 核心指标 ferretdb_client_*客户端连接和请求统计 ferretdb_postgresql_*PostgreSQL 后端状态 go_*Go 运行时指标 process_*进程级别指标
完整的指标列表请参阅 指标列表 。
告警规则 Pigsty v4.1 默认规则集中未内置专门的 FerretDB 告警规则(files/victoria/rules/*.yml)。您可以基于 ferretdb_up 指标按需添加自定义告警,例如:
- alert : FerretDBDown
expr : ferretdb_up == 0
for : 1m
labels :
severity : critical
annotations :
summary : "FerretDB instance {{ $labels.ins }} is down"
description : "FerretDB instance {{ $labels.ins }} on {{ $labels.ip }} has been down for more than 1 minute."
由于 FerretDB 是无状态的代理层,主要的监控和告警应集中在底层 PostgreSQL 集群。
18.7 - 指标列表 FerretDB 模块提供的完整监控指标列表与释义
MONGO
Metric Name Type Labels Description ferretdb_client_accepts_total Unknown error, cls, ip, ins, instance, jobN/A ferretdb_client_duration_seconds_bucket Unknown error, le, cls, ip, ins, instance, jobN/A ferretdb_client_duration_seconds_count Unknown error, cls, ip, ins, instance, jobN/A ferretdb_client_duration_seconds_sum Unknown error, cls, ip, ins, instance, jobN/A ferretdb_client_requests_total Unknown cls, ip, ins, opcode, instance, command, jobN/A ferretdb_client_responses_total Unknown result, argument, cls, ip, ins, opcode, instance, command, jobN/A ferretdb_postgresql_metadata_databases gauge cls, ip, ins, instance, jobThe current number of database in the registry. ferretdb_postgresql_pool_size gauge cls, ip, ins, instance, jobThe current number of pools. ferretdb_up gauge cls, version, commit, ip, ins, dirty, telemetry, package, update_available, uuid, instance, job, branch, debugFerretDB instance state. go_gc_duration_seconds summary cls, ip, ins, instance, quantile, jobA summary of the pause duration of garbage collection cycles. go_gc_duration_seconds_count Unknown cls, ip, ins, instance, jobN/A go_gc_duration_seconds_sum Unknown cls, ip, ins, instance, jobN/A go_goroutines gauge cls, ip, ins, instance, jobNumber of goroutines that currently exist. go_info gauge cls, version, ip, ins, instance, jobInformation about the Go environment. go_memstats_alloc_bytes gauge cls, ip, ins, instance, jobNumber of bytes allocated and still in use. go_memstats_alloc_bytes_total counter cls, ip, ins, instance, jobTotal number of bytes allocated, even if freed. go_memstats_buck_hash_sys_bytes gauge cls, ip, ins, instance, jobNumber of bytes used by the profiling bucket hash table. go_memstats_frees_total counter cls, ip, ins, instance, jobTotal number of frees. go_memstats_gc_sys_bytes gauge cls, ip, ins, instance, jobNumber of bytes used for garbage collection system metadata. go_memstats_heap_alloc_bytes gauge cls, ip, ins, instance, jobNumber of heap bytes allocated and still in use. go_memstats_heap_idle_bytes gauge cls, ip, ins, instance, jobNumber of heap bytes waiting to be used. go_memstats_heap_inuse_bytes gauge cls, ip, ins, instance, jobNumber of heap bytes that are in use. go_memstats_heap_objects gauge cls, ip, ins, instance, jobNumber of allocated objects. go_memstats_heap_released_bytes gauge cls, ip, ins, instance, jobNumber of heap bytes released to OS. go_memstats_heap_sys_bytes gauge cls, ip, ins, instance, jobNumber of heap bytes obtained from system. go_memstats_last_gc_time_seconds gauge cls, ip, ins, instance, jobNumber of seconds since 1970 of last garbage collection. go_memstats_lookups_total counter cls, ip, ins, instance, jobTotal number of pointer lookups. go_memstats_mallocs_total counter cls, ip, ins, instance, jobTotal number of mallocs. go_memstats_mcache_inuse_bytes gauge cls, ip, ins, instance, jobNumber of bytes in use by mcache structures. go_memstats_mcache_sys_bytes gauge cls, ip, ins, instance, jobNumber of bytes used for mcache structures obtained from system. go_memstats_mspan_inuse_bytes gauge cls, ip, ins, instance, jobNumber of bytes in use by mspan structures. go_memstats_mspan_sys_bytes gauge cls, ip, ins, instance, jobNumber of bytes used for mspan structures obtained from system. go_memstats_next_gc_bytes gauge cls, ip, ins, instance, jobNumber of heap bytes when next garbage collection will take place. go_memstats_other_sys_bytes gauge cls, ip, ins, instance, jobNumber of bytes used for other system allocations. go_memstats_stack_inuse_bytes gauge cls, ip, ins, instance, jobNumber of bytes in use by the stack allocator. go_memstats_stack_sys_bytes gauge cls, ip, ins, instance, jobNumber of bytes obtained from system for stack allocator. go_memstats_sys_bytes gauge cls, ip, ins, instance, jobNumber of bytes obtained from system. go_threads gauge cls, ip, ins, instance, jobNumber of OS threads created. mongo_up Unknown cls, ip, ins, instance, jobN/A process_cpu_seconds_total counter cls, ip, ins, instance, jobTotal user and system CPU time spent in seconds. process_max_fds gauge cls, ip, ins, instance, jobMaximum number of open file descriptors. process_open_fds gauge cls, ip, ins, instance, jobNumber of open file descriptors. process_resident_memory_bytes gauge cls, ip, ins, instance, jobResident memory size in bytes. process_start_time_seconds gauge cls, ip, ins, instance, jobStart time of the process since unix epoch in seconds. process_virtual_memory_bytes gauge cls, ip, ins, instance, jobVirtual memory size in bytes. process_virtual_memory_max_bytes gauge cls, ip, ins, instance, jobMaximum amount of virtual memory available in bytes. promhttp_metric_handler_errors_total counter job, cls, ip, ins, instance, causeTotal number of internal errors encountered by the promhttp metric handler. promhttp_metric_handler_requests_in_flight gauge cls, ip, ins, instance, jobCurrent number of scrapes being served. promhttp_metric_handler_requests_total counter job, cls, ip, ins, instance, codeTotal number of scrapes by HTTP status code. scrape_duration_seconds Unknown cls, ip, ins, instance, jobN/A scrape_samples_post_metric_relabeling Unknown cls, ip, ins, instance, jobN/A scrape_samples_scraped Unknown cls, ip, ins, instance, jobN/A scrape_series_added Unknown cls, ip, ins, instance, jobN/A up Unknown cls, ip, ins, instance, jobN/A
18.8 - 常见问题 FerretDB 与 DocumentDB 模块常见问题答疑
为什么要使用 FerretDB? MongoDB 曾经 是一项令人惊叹的技术,让开发者能够抛开关系型数据库的"模式束缚",快速构建应用程序。
然而随着时间推移,MongoDB 放弃了它的开源本质,将许可证更改为 SSPL,这使得许多开源项目和早期商业项目无法使用它。
大多数 MongoDB 用户其实并不需要 MongoDB 提供的高级功能,但他们确实需要一个易于使用的开源文档数据库解决方案。为了填补这个空白,FerretDB 应运而生。
PostgreSQL 的 JSON 功能支持已经足够完善了:二进制存储 JSONB,GIN 任意字段索引,各种 JSON 处理函数,JSON PATH 和 JSON Schema,它早已是一个功能完备,性能强大的文档数据库。
但是提供替代的功能,与 直接仿真 还是不一样的。FerretDB 可以为使用 MongoDB 驱动的应用程序提供一个丝滑迁移到 PostgreSQL 的过渡方案。
Pigsty 对 FerretDB 的支持历史? Pigsty 从 1.x 开始就提供了基于 Docker 的 FerretDB 模板,在 v2.3 中提供了原生部署支持。
它作为一个选装项,对丰富 PostgreSQL 生态大有裨益。Pigsty 社区已经与 FerretDB 社区成为了合作伙伴,后续将进行深度的合作与适配支持。
FERRET 是 Pigsty 中的一个 可选 模块。自 v2.0 以来,它需要 documentdbmongo.yml
安装 MongoSH 您可以使用 MongoSH 作为客户端工具访问 FerretDB 集群。
推荐使用 pig 命令添加 MongoDB 仓库并安装:
pig repo add mongo -u # 添加 MongoDB 官方仓库
yum install mongodb-mongosh # RHEL/CentOS/Rocky/Alma
apt install mongodb-mongosh # Debian/Ubuntu
您也可以手动添加 MongoDB 仓库:
# RHEL/CentOS 系
cat > /etc/yum.repos.d/mongo.repo <<EOF
[mongodb-org-7.0]
name=MongoDB Repository
baseurl=https://repo.mongodb.org/yum/redhat/\$releasever/mongodb-org/7.0/\$basearch/
gpgcheck=1
enabled=1
gpgkey=https://www.mongodb.org/static/pgp/server-7.0.asc
EOF
yum install -y mongodb-mongosh
认证方式 FerretDB 的身份验证完全基于底层 PostgreSQL。Pigsty 管理的 PostgreSQL 集群默认使用 scram-sha-256,FerretDB 2.x 对应使用 SCRAM-SHA-256。通常客户端会自动协商,如遇认证协商失败可显式指定机制:
mongosh 'mongodb://user:password@host:27017'
mongosh 'mongodb://user:password@host:27017/?authMechanism=SCRAM-SHA-256'
与 MongoDB 的兼容性 FerretDB 实现了 MongoDB 的线协议,但底层使用 PostgreSQL 存储。这意味着:
大多数基本的 CRUD 操作与 MongoDB 兼容 某些高级功能可能不支持或有差异 聚合管道支持有限 详细的兼容性信息请参阅:
为什么需要超级用户 FerretDB 2.0+ 使用 documentdb 扩展,该扩展需要超级用户权限来创建和管理内部结构。因此,在 mongo_pgurl
建议创建一个专用的 mongod 超级用户供 FerretDB 使用,而不是使用默认的 postgres 用户。
如何实现高可用 FerretDB 本身是无状态的,所有数据都存储在底层的 PostgreSQL 中。要实现高可用:
PostgreSQL 层 :使用 Pigsty 的 PGSQL 模块部署高可用 PostgreSQL 集群FerretDB 层 :部署多个 FerretDB 实例,使用 VIP 或负载均衡器详细配置请参阅 高可用配置 。
性能如何 FerretDB 的性能取决于底层的 PostgreSQL 集群。由于需要将 MongoDB 命令翻译为 SQL,会有一定的性能开销。对于大多数 OLTP 场景,性能是可接受的。
如果您需要更高的性能,可以:
使用更快的存储(NVMe SSD) 增加 PostgreSQL 的资源配置 优化 PostgreSQL 参数 使用连接池减少连接开销 19 - 模块:DOCKER Docker Daemon 服务,允许用户一键拉起容器化的无状态软件工具模板,加装各种功能。
Docker 是最流行的容器化平台,提供了标准化的软件交付能力。
Pigsty 本身并不依赖 Docker 部署任何组件,相反,它提供了部署安装 Docker 的能力 ,这是一个 可选模块 。
Pigsty 提供一系列 Docker 软件/工具/应用模板 ,供您按需选用。
这允许用户快速拉起各种容器化的无状态软件工具模板,加装各种功能。
您可以使用外部由 Pigsty 托管的高可用数据库集群,将无状态的应用放入容器之中。
在执行 configure 时,Pigsty 会根据 region(如中国大陆网络环境)自动选择合适的软件源与镜像加速配置,以提升拉取镜像的速度与可用性。
您可以轻松配置 Registry 与 Proxy,以便灵活访问不同的镜像源。
19.1 - 使用方法 Docker 模块快速上手,安装,卸载,下载,仓库,镜像,代理,拉取,关于 Docker 你需要知道的内容。
Pigsty 内置了 Docker
上手 Docker 是一个 可选模块 。在 Pigsty 中,Docker 是否安装由节点上的 docker_enabled
在 v4.1 中,docker-ce 上游仓库归属于 infra 模块。若你需要在离线仓库中显式加入 Docker 包,可通过 repo_extra_packages 指定 docker 包别名(映射为 docker-ce 与 docker-compose-plugin)。
repo_modules : infra,node,pgsql # <--- 保持 infra 模块(Docker 上游在 infra 中)
repo_extra_packages :
- pgsql-main
- docker # <--- 下载 Docker(docker-ce + docker-compose-plugin)
Docker 下载完之后,您需要在待安装 Docker 的节点上配置 docker_enabledtrue 标记,并按需配置 其他参数
infra :
hosts :
10.10.10.10 : { infra_seq: 1 ,nodename : infra-1 }
10.10.10.11 : { infra_seq: 2 ,nodename : infra-2 }
vars :
docker_enabled : true # 在这个分组上安装 Docker !
最后,您可以使用 docker.yml
./docker.yml -l infra # 在 infra 分组上安装 Docker
安装 如果您只是临时性的希望在某些节点上,直接从互联网安装 Docker,那么可以考虑使用以下命令:
./node.yml -e '{"node_repo_modules":"node,infra","node_packages":["docker-ce","docker-compose-plugin"]}' -t node_repo,node_pkg -l <select_group_ip>
这条命令会在目标节点上,首先启用 node,infra 两个模块对应的上游软件源,然后安装 docker-ce 与 docker-compose-plugin 两个软件包(EL/Debian 同名)。
如果您希望的是在 Pigsty 初始化的时候就自动下载好 Docker 相关软件包,请参考下面的说明。
卸载 因为过于简单,Pigsty 不提供 Docker 模块的卸载剧本,你可以直接使用 Ansible 指令移除 Docker
ansible <selector> -m package -b -a 'name=docker-ce,docker-compose-plugin state=absent' # 卸载 docker
下载 想要在 Pigsty 安装过程中下载 Docker,在 配置清单 repo_modulesinfra(Docker 上游所在模块),
然后在 repo_packagesrepo_extra_packages
repo_modules : infra,node,pgsql # <--- Docker 上游仓库归属 infra 模块
repo_packages :
- node-bootstrap, infra-package, infra-addons, node-package1, node-package2, pgsql-common, docker
repo_extra_packages :
- pgsql-main
- docker # <--- 也可以在这里指定
这里指定的 docker(实际对应 docker-ce 与 docker-compose-plugin 两个软件包)会在默认的 deploy.yml
如果您已经完成了 Pigsty 安装,本地软件源已经初始化完毕,您可以在修改配置之后执行 ./infra.yml -t repo_build 重新下载并构建离线软件源。
安装 Docker 需要用到 Docker 的 YUM/APT 仓库 。该仓库在 v4.1 的默认 repo_upstream 中归属于 infra 模块,通常已经可用。
仓库 下载 Docker 需要用到互联网上游软件仓库,已定义在默认的 repo_upstream 中,模块名为 infra
- { name: docker-ce ,description: 'Docker CE' ,module: infra ,releases: [8,9,10] ,arch: [x86_64, aarch64] ,baseurl : { default: 'https://download.docker.com/linux/centos/$releasever/$basearch/stable' ,china: 'https://mirrors.aliyun.com/docker-ce/linux/centos/$releasever/$basearch/stable' ,europe : 'https://mirrors.xtom.de/docker-ce/linux/centos/$releasever/$basearch/stable' }}
- { name: docker-ce ,description: 'Docker' ,module: infra ,releases: [11,12,13,20,22,24] ,arch: [x86_64, aarch64] ,baseurl : { default : 'https://download.docker.com/linux/${distro_name} ${distro_codename} stable' ,china : 'https://mirrors.aliyun.com/docker-ce/linux/${distro_name} ${distro_codename} stable' }}
您可以在 repo_modulesnode_repo_modulesinfra 模块名引用这个仓库。
请注意,Docker 的官方软件仓库在中国大陆默认处于 封锁 状态,您需要使用中国地区的镜像站点才能正常完成下载。
如果您处在中国大陆地区遇到 Docker 本身下载失败的问题,请检查您的配置清单中,region 是否被设置为了 default,默认情况下自动配置的 region: china 可以解决这个问题。
代理 如果您的网络环境需要使用代理服务器才能访问互联网,您可以在 Pigsty 的配置清单中配置 proxy_envproxy 相关配置中。
proxy_env:
no_proxy: "localhost,127.0.0.1,10.0.0.0/8,192.168.0.0/16,*.pigsty,*.aliyun.com,mirrors.aliyuncs.com,mirrors.tuna.tsinghua.edu.cn,mirrors.zju.edu.cn"
#http_proxy: 'http://username:password@proxy.address.com'
#https_proxy: 'http://username:password@proxy.address.com'
#all_proxy: 'http://username:password@proxy.address.com'
在执行 configure-x 参数,当前环境中的代理服务器配置会自动生成到 Pigsty 配置文件到 proxy_env 中。
除了使用代理服务器之外,您还可以通过配置 Docker镜像站点
镜像站 您可以通过参数 docker_registry_mirrors
普通墙外用户,除了官方默认的 DockerHub 站点外,还可以考虑使用 quay.io 镜像站点。如果您的内网环境已经有了成熟的镜像基础设施,您可以使用内网的 Docker 镜像站点,避免受到外网镜像站点的影响,提高下载速度。
使用公有云厂商服务的用户可以考虑使用内网免费的 Docker 镜像。例如,如果您使用阿里云,可以使用阿里云提供的内网 Docker 镜像站点(需要登陆):
[ "https://registry.cn-hangzhou.aliyuncs.com" ] # 阿里云镜像站点,需要显式登陆
如果你使用腾讯云,可以使用腾讯云提供的内网 Docker 镜像站点(需要内网):
[ "https://ccr.ccs.tencentyun.com" ] # 腾讯云镜像站点,内网专用
此外,您还可以使用 CF-Workers-docker.io 快速拉起您自己的 Docker 镜像代理。
也可以考虑使用免费的 Docker代理镜像 (风险自负!)
拉取镜像 参数 docker_imagedocker_image_cache
使用这一功能,可以让 Docker 装好之后就带有指定的镜像(前提是可以成功拉取,此任务失败会自动忽略跳过)
例如,您可以在配置清单中指定需要拉取的镜像:
infra :
hosts :
10.10.10.10 : { infra_seq : 1 }
vars :
docker_enabled : true # 在这个分组上安装 Docker !
docker_image :
- redis:latest # 拉取最新版本的 Redis 镜像
另一种预先加载镜像的方式是使用本地 save 的 tgz 压缩包:如果您预先使用 docker save xxx | gzip -c > /tmp/docker/xxx.tgz 将 Docker 镜像导出保存在本地。
那么这些导出的镜像文件可以通过参数 docker_image_cache/tmp/docker/*.tgz。
这意味着你可以事先把镜像放在 /tmp/docker 目录中,然后执行 docker.yml
例如,在 supabase自建教程 中就使用了这种技术,在拉起 Supabase,安装 Docker 之前,把本地 /tmp/supabase 目录的 *.tgz 镜像压缩包都拷贝到了目标节点的 /tmp/docker 目录下。
- name : copy local docker images
copy : src="{{ item }}" dest="/tmp/docker/"
with_fileglob : "{{ supa_images }}"
vars : # you can override this with -e cli args
supa_images : /tmp/supabase/*.tgz
应用 Pigsty 提供了一系列开箱即用的,基于 Docker Compose 的 软件模板
19.2 - 参数列表 DOCKER 模块提供了 8 个配置参数
DOCKER 模块提供了 8 个配置参数。
参数概览 DOCKER
您可以使用 docker.yml
Docker 的默认参数定义于 roles/docker/defaults/main.yml
docker_enabled : false # 在当前节点启用 Docker?
docker_data : /data/docker # Docker 数据目录,默认为 /data/docker
docker_storage_driver : overlay2 # Docker 存储驱动,可选 zfs, btrfs 等
docker_cgroups_driver : systemd # Docker CGroup 驱动:cgroupfs 或 systemd
docker_registry_mirrors : [] # Docker 镜像仓库加速列表
docker_exporter_port : 9323 # Docker 监控指标导出端口,默认 9323
docker_image : [] # Docker 启动后待拉取的镜像列表
docker_image_cache : /tmp/docker/*.tgz # Docker 镜像缓存 tarball 匹配模式
docker_enabled参数名称: docker_enabled, 类型: bool, 层次:G/C/I
是否在当前节点启用Docker?默认为: false,即不启用。
docker_data参数名称: docker_data, 类型: path, 层次:G/C/I
Docker 数据目录,默认为 /data/docker。
此目录用于存储 Docker 的镜像、容器、卷等数据。如果您有独立的数据磁盘,建议将此目录指向该磁盘的挂载点。
docker_storage_driver参数名称: docker_storage_driver, 类型: enum, 层次:G/C/I
Docker 存储驱动,默认为 overlay2。
请参考官方文档:https://docs.docker.com/engine/storage/drivers/select-storage-driver/
可选的存储驱动包括:
overlay2:推荐的默认驱动,适用于大多数场景fuse-overlayfs:用于无 root 权限的容器场景btrfs:使用 Btrfs 文件系统时zfs:使用 ZFS 文件系统时vfs:用于测试目的,不推荐生产使用docker_cgroups_driver参数名称: docker_cgroups_driver, 类型: enum, 层次:G/C/I
Docker使用的 CGroup FS 驱动,可以是 cgroupfs 或 systemd,默认值为: systemd
docker_registry_mirrors参数名称: docker_registry_mirrors, 类型: string[], 层次:G/C/I
Docker 镜像仓库加速地址列表,默认值为:[] 空数组。
您可以使用 Docker 镜像站点加速镜像拉取,下面是一些中国大陆可用的镜像站点示例:
[ "https://docker.m.daocloud.io" ] # DaoCloud 镜像站点
[ "https://docker.1ms.run" ] # 毫秒镜像站点
[ "https://mirror.ccs.tencentyun.com" ] # 腾讯云内网镜像站点
[ "https://registry.cn-hangzhou.aliyuncs.com" ] # 阿里云镜像站点,需要登录
您也可以考虑使用 Cloudflare Worker 搭建 Docker Proxy 来加速访问。
如果拉取速度仍然太慢,您也可以考虑使用其他 Registry:docker login quay.io
docker_exporter_port参数名称: docker_exporter_port, 类型: port, 层次:G
Docker 监控指标导出端口,默认为 9323。
Docker 守护进程会在此端口暴露 Prometheus 格式的监控指标,供监控基础设施采集。
docker_image参数名称: docker_image, 类型: string[], 层次:G/C/I
Docker 待拉取的镜像列表,默认为空列表 []。
在这里指定的 Docker 镜像名称会在安装阶段自动拉取。
docker_image_cache参数名称: docker_image_cache, 类型: path, 层次:G/C/I
本地 Docker 镜像离线缓存包 glob 匹配模式,默认为 /tmp/docker/*.tgz。
您可以使用 docker save | gzip 的方式将镜像打包,并通过此参数在 Docker 安装阶段自动导入。
匹配该模式的 .tgz 后缀 tarball 文件将使用以下方式逐个导入 Docker 中:
cat *.tgz | gzip -d -c - | docker load
19.3 - 预置剧本 如何使用预置的 ansible 剧本来管理 Docker,常用管理命令速查。
Docker 模块提供了一个默认的剧本 docker.yml
docker.yml剧本原始文件:docker.yml
执行本剧本,将会在带有 docker_enabled: true 标记的目标节点上安装 docker-ce 与 docker-compose-plugin,启用 dockerd 服务
以下是 docker.yml 剧本中可用的任务子集:
docker_install : 在节点上安装 Docker,Docker Compose 软件包docker_admin : 将指定的用户加入 Docker 管理员用户组中docker_dir : 创建 Docker 相关目录docker_config : 生成 Docker 守护进程服务配置文件docker_launch : 启动 Docker 守护进程服务docker_register : 将 Docker 守护进程注册为监控目标(别名标签:register / add_metrics)docker_image : 尝试从 /tmp/docker/*.tgz 加载预置镜像压缩包(如果存在)Docker 模块没有提供专门的卸载剧本,如果您需要卸载 Docker,可以手工停止 docker 后卸载:
systemctl stop docker # 停止 Docker 守护进程服务
yum remove docker-ce docker-compose-plugin # 在 EL 系统上卸载 Docker
apt remove docker-ce docker-compose-plugin # 在 Debian 系统上卸载 Docker
19.4 - 指标列表 Pigsty Docker 模块提供的完整监控指标列表与释义
DOCKER
Metric Name Type Labels Description builder_builds_failed_total counter ip, cls, reason, ins, job, instanceNumber of failed image builds builder_builds_triggered_total counter ip, cls, ins, job, instanceNumber of triggered image builds docker_up Unknown ip, cls, ins, job, instanceN/A engine_daemon_container_actions_seconds_bucket Unknown ip, cls, ins, job, instance, le, actionN/A engine_daemon_container_actions_seconds_count Unknown ip, cls, ins, job, instance, actionN/A engine_daemon_container_actions_seconds_sum Unknown ip, cls, ins, job, instance, actionN/A engine_daemon_container_states_containers gauge ip, cls, ins, job, instance, stateThe count of containers in various states engine_daemon_engine_cpus_cpus gauge ip, cls, ins, job, instanceThe number of cpus that the host system of the engine has engine_daemon_engine_info gauge ip, cls, architecture, ins, job, instance, os_version, kernel, version, graphdriver, os, daemon_id, commit, os_typeThe information related to the engine and the OS it is running on engine_daemon_engine_memory_bytes gauge ip, cls, ins, job, instanceThe number of bytes of memory that the host system of the engine has engine_daemon_events_subscribers_total gauge ip, cls, ins, job, instanceThe number of current subscribers to events engine_daemon_events_total counter ip, cls, ins, job, instanceThe number of events logged engine_daemon_health_checks_failed_total counter ip, cls, ins, job, instanceThe total number of failed health checks engine_daemon_health_check_start_duration_seconds_bucket Unknown ip, cls, ins, job, instance, leN/A engine_daemon_health_check_start_duration_seconds_count Unknown ip, cls, ins, job, instanceN/A engine_daemon_health_check_start_duration_seconds_sum Unknown ip, cls, ins, job, instanceN/A engine_daemon_health_checks_total counter ip, cls, ins, job, instanceThe total number of health checks engine_daemon_host_info_functions_seconds_bucket Unknown ip, cls, ins, job, instance, le, functionN/A engine_daemon_host_info_functions_seconds_count Unknown ip, cls, ins, job, instance, functionN/A engine_daemon_host_info_functions_seconds_sum Unknown ip, cls, ins, job, instance, functionN/A engine_daemon_image_actions_seconds_bucket Unknown ip, cls, ins, job, instance, le, actionN/A engine_daemon_image_actions_seconds_count Unknown ip, cls, ins, job, instance, actionN/A engine_daemon_image_actions_seconds_sum Unknown ip, cls, ins, job, instance, actionN/A engine_daemon_network_actions_seconds_bucket Unknown ip, cls, ins, job, instance, le, actionN/A engine_daemon_network_actions_seconds_count Unknown ip, cls, ins, job, instance, actionN/A engine_daemon_network_actions_seconds_sum Unknown ip, cls, ins, job, instance, actionN/A etcd_debugging_snap_save_marshalling_duration_seconds_bucket Unknown ip, cls, ins, job, instance, leN/A etcd_debugging_snap_save_marshalling_duration_seconds_count Unknown ip, cls, ins, job, instanceN/A etcd_debugging_snap_save_marshalling_duration_seconds_sum Unknown ip, cls, ins, job, instanceN/A etcd_debugging_snap_save_total_duration_seconds_bucket Unknown ip, cls, ins, job, instance, leN/A etcd_debugging_snap_save_total_duration_seconds_count Unknown ip, cls, ins, job, instanceN/A etcd_debugging_snap_save_total_duration_seconds_sum Unknown ip, cls, ins, job, instanceN/A etcd_disk_wal_fsync_duration_seconds_bucket Unknown ip, cls, ins, job, instance, leN/A etcd_disk_wal_fsync_duration_seconds_count Unknown ip, cls, ins, job, instanceN/A etcd_disk_wal_fsync_duration_seconds_sum Unknown ip, cls, ins, job, instanceN/A etcd_disk_wal_write_bytes_total gauge ip, cls, ins, job, instanceTotal number of bytes written in WAL. etcd_snap_db_fsync_duration_seconds_bucket Unknown ip, cls, ins, job, instance, leN/A etcd_snap_db_fsync_duration_seconds_count Unknown ip, cls, ins, job, instanceN/A etcd_snap_db_fsync_duration_seconds_sum Unknown ip, cls, ins, job, instanceN/A etcd_snap_db_save_total_duration_seconds_bucket Unknown ip, cls, ins, job, instance, leN/A etcd_snap_db_save_total_duration_seconds_count Unknown ip, cls, ins, job, instanceN/A etcd_snap_db_save_total_duration_seconds_sum Unknown ip, cls, ins, job, instanceN/A etcd_snap_fsync_duration_seconds_bucket Unknown ip, cls, ins, job, instance, leN/A etcd_snap_fsync_duration_seconds_count Unknown ip, cls, ins, job, instanceN/A etcd_snap_fsync_duration_seconds_sum Unknown ip, cls, ins, job, instanceN/A go_gc_duration_seconds summary ip, cls, ins, job, instance, quantileA summary of the pause duration of garbage collection cycles. go_gc_duration_seconds_count Unknown ip, cls, ins, job, instanceN/A go_gc_duration_seconds_sum Unknown ip, cls, ins, job, instanceN/A go_goroutines gauge ip, cls, ins, job, instanceNumber of goroutines that currently exist. go_info gauge ip, cls, ins, job, version, instanceInformation about the Go environment. go_memstats_alloc_bytes counter ip, cls, ins, job, instanceTotal number of bytes allocated, even if freed. go_memstats_alloc_bytes_total counter ip, cls, ins, job, instanceTotal number of bytes allocated, even if freed. go_memstats_buck_hash_sys_bytes gauge ip, cls, ins, job, instanceNumber of bytes used by the profiling bucket hash table. go_memstats_frees_total counter ip, cls, ins, job, instanceTotal number of frees. go_memstats_gc_sys_bytes gauge ip, cls, ins, job, instanceNumber of bytes used for garbage collection system metadata. go_memstats_heap_alloc_bytes gauge ip, cls, ins, job, instanceNumber of heap bytes allocated and still in use. go_memstats_heap_idle_bytes gauge ip, cls, ins, job, instanceNumber of heap bytes waiting to be used. go_memstats_heap_inuse_bytes gauge ip, cls, ins, job, instanceNumber of heap bytes that are in use. go_memstats_heap_objects gauge ip, cls, ins, job, instanceNumber of allocated objects. go_memstats_heap_released_bytes gauge ip, cls, ins, job, instanceNumber of heap bytes released to OS. go_memstats_heap_sys_bytes gauge ip, cls, ins, job, instanceNumber of heap bytes obtained from system. go_memstats_last_gc_time_seconds gauge ip, cls, ins, job, instanceNumber of seconds since 1970 of last garbage collection. go_memstats_lookups_total counter ip, cls, ins, job, instanceTotal number of pointer lookups. go_memstats_mallocs_total counter ip, cls, ins, job, instanceTotal number of mallocs. go_memstats_mcache_inuse_bytes gauge ip, cls, ins, job, instanceNumber of bytes in use by mcache structures. go_memstats_mcache_sys_bytes gauge ip, cls, ins, job, instanceNumber of bytes used for mcache structures obtained from system. go_memstats_mspan_inuse_bytes gauge ip, cls, ins, job, instanceNumber of bytes in use by mspan structures. go_memstats_mspan_sys_bytes gauge ip, cls, ins, job, instanceNumber of bytes used for mspan structures obtained from system. go_memstats_next_gc_bytes gauge ip, cls, ins, job, instanceNumber of heap bytes when next garbage collection will take place. go_memstats_other_sys_bytes gauge ip, cls, ins, job, instanceNumber of bytes used for other system allocations. go_memstats_stack_inuse_bytes gauge ip, cls, ins, job, instanceNumber of bytes in use by the stack allocator. go_memstats_stack_sys_bytes gauge ip, cls, ins, job, instanceNumber of bytes obtained from system for stack allocator. go_memstats_sys_bytes gauge ip, cls, ins, job, instanceNumber of bytes obtained from system. go_threads gauge ip, cls, ins, job, instanceNumber of OS threads created. logger_log_entries_size_greater_than_buffer_total counter ip, cls, ins, job, instanceNumber of log entries which are larger than the log buffer logger_log_read_operations_failed_total counter ip, cls, ins, job, instanceNumber of log reads from container stdio that failed logger_log_write_operations_failed_total counter ip, cls, ins, job, instanceNumber of log write operations that failed process_cpu_seconds_total counter ip, cls, ins, job, instanceTotal user and system CPU time spent in seconds. process_max_fds gauge ip, cls, ins, job, instanceMaximum number of open file descriptors. process_open_fds gauge ip, cls, ins, job, instanceNumber of open file descriptors. process_resident_memory_bytes gauge ip, cls, ins, job, instanceResident memory size in bytes. process_start_time_seconds gauge ip, cls, ins, job, instanceStart time of the process since unix epoch in seconds. process_virtual_memory_bytes gauge ip, cls, ins, job, instanceVirtual memory size in bytes. process_virtual_memory_max_bytes gauge ip, cls, ins, job, instanceMaximum amount of virtual memory available in bytes. promhttp_metric_handler_requests_in_flight gauge ip, cls, ins, job, instanceCurrent number of scrapes being served. promhttp_metric_handler_requests_total counter ip, cls, ins, job, instance, codeTotal number of scrapes by HTTP status code. scrape_duration_seconds Unknown ip, cls, ins, job, instanceN/A scrape_samples_post_metric_relabeling Unknown ip, cls, ins, job, instanceN/A scrape_samples_scraped Unknown ip, cls, ins, job, instanceN/A scrape_series_added Unknown ip, cls, ins, job, instanceN/A swarm_dispatcher_scheduling_delay_seconds_bucket Unknown ip, cls, ins, job, instance, leN/A swarm_dispatcher_scheduling_delay_seconds_count Unknown ip, cls, ins, job, instanceN/A swarm_dispatcher_scheduling_delay_seconds_sum Unknown ip, cls, ins, job, instanceN/A swarm_manager_configs_total gauge ip, cls, ins, job, instanceThe number of configs in the cluster object store swarm_manager_leader gauge ip, cls, ins, job, instanceIndicates if this manager node is a leader swarm_manager_networks_total gauge ip, cls, ins, job, instanceThe number of networks in the cluster object store swarm_manager_nodes gauge ip, cls, ins, job, instance, stateThe number of nodes swarm_manager_secrets_total gauge ip, cls, ins, job, instanceThe number of secrets in the cluster object store swarm_manager_services_total gauge ip, cls, ins, job, instanceThe number of services in the cluster object store swarm_manager_tasks_total gauge ip, cls, ins, job, instance, stateThe number of tasks in the cluster object store swarm_node_manager gauge ip, cls, ins, job, instanceWhether this node is a manager or not swarm_raft_snapshot_latency_seconds_bucket Unknown ip, cls, ins, job, instance, leN/A swarm_raft_snapshot_latency_seconds_count Unknown ip, cls, ins, job, instanceN/A swarm_raft_snapshot_latency_seconds_sum Unknown ip, cls, ins, job, instanceN/A swarm_raft_transaction_latency_seconds_bucket Unknown ip, cls, ins, job, instance, leN/A swarm_raft_transaction_latency_seconds_count Unknown ip, cls, ins, job, instanceN/A swarm_raft_transaction_latency_seconds_sum Unknown ip, cls, ins, job, instanceN/A swarm_store_batch_latency_seconds_bucket Unknown ip, cls, ins, job, instance, leN/A swarm_store_batch_latency_seconds_count Unknown ip, cls, ins, job, instanceN/A swarm_store_batch_latency_seconds_sum Unknown ip, cls, ins, job, instanceN/A swarm_store_lookup_latency_seconds_bucket Unknown ip, cls, ins, job, instance, leN/A swarm_store_lookup_latency_seconds_count Unknown ip, cls, ins, job, instanceN/A swarm_store_lookup_latency_seconds_sum Unknown ip, cls, ins, job, instanceN/A swarm_store_memory_store_lock_duration_seconds_bucket Unknown ip, cls, ins, job, instance, leN/A swarm_store_memory_store_lock_duration_seconds_count Unknown ip, cls, ins, job, instanceN/A swarm_store_memory_store_lock_duration_seconds_sum Unknown ip, cls, ins, job, instanceN/A swarm_store_read_tx_latency_seconds_bucket Unknown ip, cls, ins, job, instance, leN/A swarm_store_read_tx_latency_seconds_count Unknown ip, cls, ins, job, instanceN/A swarm_store_read_tx_latency_seconds_sum Unknown ip, cls, ins, job, instanceN/A swarm_store_write_tx_latency_seconds_bucket Unknown ip, cls, ins, job, instance, leN/A swarm_store_write_tx_latency_seconds_count Unknown ip, cls, ins, job, instanceN/A swarm_store_write_tx_latency_seconds_sum Unknown ip, cls, ins, job, instanceN/A up Unknown ip, cls, ins, job, instanceN/A
19.5 - 常见问题 Pigsty Docker 模块常见问题答疑
谁能执行Docker命令? 默认情况下,Pigsty 会将当前远程节点执行剧本的管理用户(即目标节点上 ssh 远程登陆的用户),以及参数 node_admin_usernamedocker)中的所有用户,可以使用 docker CLI 命令对 Docker 发起管理。
如果你想让其他用户也可以执行 Docker 命令,可以将该操作系统用户加入到 docker 组中:
usermod -aG docker <username>
使用代理服务器 在 Docker 安装过程中,如果 proxy_env/etc/docker/daemon.json 配置文件中。
Docker 在从上游 Registry 拉取镜像时,会使用此代理服务器。
小提示,在执行 configure 过程中使用 -x 参数会将当前环境中的代理服务器配置写入到 proxy_env 中。
使用镜像站点 如果您在中国大陆网络环境下访问 DockerHub 较慢,可以优先考虑:
docker login quay.io # 输入用户名密码,完成登陆
将Docker纳入监控 在 Docker 模块安装过程中,针对节点单独执行监控目标注册子任务 docker_register(或别名标签 add_metrics)即可:
./docker.yml -l <your-node-selector> -t docker_register
使用软件模板 Pigsty 提供了一系列使用 Docker Compose 拉起的软件 工具模板
但需要首先安装 Docker 模块。
20 - 模块:JUICE 使用 JuiceFS 分布式文件系统,以 PostgreSQL 作为元数据引擎,提供可共享的 POSIX 存储。
JuiceFS 是一款高性能、POSIX 兼容的分布式文件系统,可以将对象存储/数据库挂载为本地文件系统。
JUICE 模块依赖 NODEPGSQLMINIOINFRA
flowchart LR
subgraph Client["应用/用户"]
app["POSIX 访问"]
end
subgraph JUICE["JUICE"]
jfs["JuiceFS Mount"]
end
subgraph PGSQL["PGSQL"]
meta["Metadata DB"]
end
subgraph Object["对象存储(可选)"]
s3["S3 / MinIO"]
end
subgraph INFRA["INFRA(可选)"]
vm["VictoriaMetrics"]
end
app --> jfs
jfs --> meta
jfs -.-> s3
jfs -->|/metrics| vm
style JUICE fill:#5B9CD5,stroke:#4178a8,color:#fff
style PGSQL fill:#3E668F,stroke:#2d4a66,color:#fff
style Object fill:#FCDB72,stroke:#d4b85e,color:#333
style INFRA fill:#999,stroke:#666,color:#fff 模块特点 PostgreSQL 元数据 :元数据存储于 PostgreSQL,便于管理与备份多实例 :单节点可挂载多个独立文件系统实例多种数据后端 :支持 PostgreSQL、MinIO、S3 等监控集成 每实例暴露 Prometheus / Victoria 指标端口配置简洁 :以 juice_instances快速开始 最小配置示例(单实例):
juice_instances :
jfs :
path : /fs
meta : postgres://dbuser_meta:DBUser.Meta@10.10.10.10:5432/meta
data : --storage postgres --bucket 10.10.10.10:5432/meta --access-key dbuser_meta --secret-key DBUser.Meta
port : 9567
部署:
20.1 - 集群配置 JUICE 模块配置说明:实例定义、存储后端与挂载参数。
概念与实现 JuiceFS 由 元数据引擎 与 数据存储 两部分组成。
在 Pigsty v4.1 中,meta 会原样透传给 juicefs 作为元数据引擎 URL,生产场景通常使用 PostgreSQL。
数据存储通过 data 参数传入 juicefs format 选项决定。
JUICE 模块执行逻辑与关键命令:
# 格式化(仅首次创建有效)
juicefs format --no-update <data> "<meta>" "<name>"
# 挂载
juicefs mount <mount> --cache-dir <juice_cache> --metrics 0.0.0.0:<port> <meta> <path>
说明:
--no-update 确保已存在的文件系统不会被覆盖。data 仅用于 首次格式化 ,文件系统已存在时不会生效。mount 仅用于挂载阶段,可按需传入缓存与并发参数。模块参数 JUICE 模块仅有两个参数:
juice_cache:所有实例共享的本地缓存目录,默认 /data/juicejuice_instances:在实例级别 定义的实例字典,Key 为文件系统名称;空字典表示不管理实例实例配置 juice_instances 的每个条目代表一个 JuiceFS 实例:
字段 必选 默认值 说明 path是 - 挂载点路径,如 /fs meta是 - 元数据引擎 URL(建议 PostgreSQL) data否 ''juicefs format 选项(存储后端)unit否 juicefs-<name>systemd 服务名 mount否 ''juicefs mount 额外参数port否 9567指标端口(同节点需唯一) owner否 root挂载点属主 group否 root挂载点属组 mode否 0755挂载点权限 state否 createcreate / absent
重要
建议在 首次格式化 时显式设置 data,以明确存储后端。 同一节点多个实例必须配置不同的 port。 配置示例:
juice_instances :
jfs :
path : /fs
meta : postgres://dbuser_meta:DBUser.Meta@10.10.10.10:5432/meta
data : --storage postgres --bucket 10.10.10.10:5432/meta --access-key dbuser_meta --secret-key DBUser.Meta
port : 9567
存储后端 data 字段直接拼接到 juicefs format,可配置任意支持的后端。
以下为常见示例:
PostgreSQL 大对象 juice_instances :
jfs :
path : /fs
meta : postgres://dbuser_meta:DBUser.Meta@10.10.10.10:5432/meta
data : --storage postgres --bucket 10.10.10.10:5432/meta --access-key dbuser_meta --secret-key DBUser.Meta
MinIO 对象存储 juice_instances :
jfs :
path : /fs
meta : postgres://dbuser_meta:DBUser.Meta@10.10.10.10:5432/meta
data : --storage minio --bucket http://10.10.10.10:9000/juice --access-key minioadmin --secret-key minioadmin
S3 兼容存储 juice_instances :
jfs :
path : /fs
meta : postgres://dbuser_meta:DBUser.Meta@10.10.10.10:5432/meta
data : --storage s3 --bucket https://s3.amazonaws.com/my-bucket --access-key AKIAXXXXXXXX --secret-key XXXXXXXXXX
典型配置 多实例(同节点) juice_instances :
pgfs :
path : /pgfs
meta : postgres://dbuser_meta:DBUser.Meta@10.10.10.10:5432/meta
data : --storage postgres --bucket 10.10.10.10:5432/meta --access-key dbuser_meta --secret-key DBUser.Meta
port : 9567
shared :
path : /shared
meta : postgres://dbuser_meta:DBUser.Meta@10.10.10.10:5432/shared
data : --storage minio --bucket http://10.10.10.10:9000/shared
port : 9568
owner : postgres
group : postgres
多节点共享挂载 多个节点挂载同一个 JuiceFS:
app :
hosts :
10.10.10.11 : { juice_instances : { shared : { path: /shared, meta : "postgres://..." , port : 9567 } } }
10.10.10.12 : { juice_instances : { shared : { path: /shared, meta : "postgres://..." , port : 9567 } } }
第一次格式化由任一节点执行即可,其余节点会通过 --no-update 自动跳过。
注意事项 port 会暴露在 0.0.0.0,请结合防火墙或安全组控制访问。data 变更不会更新已存在的文件系统,如需切换后端请手动处理。20.2 - 参数列表 JUICE 模块参数说明(共 2 项)。
JUICE 模块参数共 2 项:
参数概览 级别说明 :C 为集群级别,I 为实例级别。
默认参数 参数定义于 roles/juice/defaults/main.yml
#-----------------------------------------------------------------
# JUICE
#-----------------------------------------------------------------
juice_cache : /data/juice
juice_instances : {}
juice_cache参数名称:juice_cache,类型:path,级别:C
所有 JuiceFS 实例共享的本地缓存目录,默认 /data/juice。
JuiceFS 会在此目录下按文件系统 UUID 进行隔离。
juice_instances参数名称:juice_instances,类型:dict,级别:I
JuiceFS 实例定义字典,通常在实例级别定义。
默认值为空字典(表示不部署实例);Key 为文件系统名称,Value 为实例配置对象。
juice_instances :
jfs :
path : /fs
meta : postgres://u:p@h:5432/db
data : --storage postgres --bucket ...
port : 9567
实例字段说明:
字段 必选 默认值 说明 path是 - 挂载点路径 meta是 - 元数据引擎 URL(建议 PostgreSQL) data否 ''juicefs format 选项(仅首次创建生效)unit否 juicefs-<name>systemd 服务名 mount否 ''juicefs mount 额外参数port否 9567指标端口(同节点需唯一) owner否 root挂载点属主 group否 root挂载点属组 mode否 0755挂载点权限 state否 createcreate / absent
注意
data 仅用于 juicefs format,文件系统创建后不会再更新。同一节点多实例必须使用不同的 port。 20.3 - 预置剧本 JUICE 模块剧本使用说明。
JUICE 模块提供 juice.yml 剧本,用于部署与移除 JuiceFS 实例。
juice.ymljuice.yml
juice_id : 校验配置、检查端口冲突
juice_install : 安装 juicefs 软件包
juice_cache : 创建共享缓存目录
juice_clean : 移除实例(state= absent)
juice_instance : 创建实例(state= create)
- juice_init : 格式化文件系统(--no-update)
- juice_dir : 创建挂载点目录
- juice_config: 渲染环境文件与 systemd 服务单元
- juice_launch: 启动服务并等待指标端口就绪
juice_register : 注册到 VictoriaMetrics 目标文件
运行粒度 粒度 限制参数 说明 节点 -l <host>部署该节点所有实例 实例 -l <host> -e fsname=<name>只处理指定实例
示例:
./juice.yml -l 10.10.10.10 # 部署该节点所有实例
./juice.yml -l 10.10.10.10 -e fsname = jfs # 仅部署 jfs 实例
常用标签 标签 说明 juice_id校验 juice_instances 与端口冲突 juice_install安装 juicefs 软件包 juice_cache创建共享缓存目录 juice_clean移除实例(state=absent) juice_instance创建实例(伞形标签) juice_init格式化文件系统 juice_dir创建挂载点目录 juice_config渲染配置文件 juice_launch启动服务 juice_register写入 VictoriaMetrics 目标文件
配置更新 仅更新配置文件(不重启服务):
./juice.yml -l <host> -t juice_config
更新配置并确保服务在线(不强制重启):
./juice.yml -l <host> -t juice_config,juice_launch
如需让新的挂载参数立即生效,请手动重启对应实例服务:
systemctl restart juicefs-<name>
移除实例 移除流程:
将实例 state 置为 absent 执行 juice_clean juice_instances :
jfs :
path : /fs
meta : postgres://...
state : absent
./juice.yml -l <host> -t juice_clean
./juice.yml -l <host> -e fsname = jfs -t juice_clean
移除动作包括:停止服务、懒卸载、删除 systemd 单元与环境文件、重载 systemd。
不会删除 PostgreSQL 元数据或对象存储数据。
监控注册 juice_register 会在 infra 节点 写入目标文件:
/infra/targets/juice/<hostname>.yml
如需手动重新注册:
./juice.yml -l <host> -t juice_register
20.4 - 管理预案 JUICE 模块运维与故障排查手册。
常见运维场景如下:
更多问题参见 FAQ 。
初始化实例 ./juice.yml -l <host>
./juice.yml -l <host> -e fsname = <name>
初始化流程:
安装 juicefs 软件包 创建共享缓存目录(默认 /data/juice) 执行 juicefs format --no-update(仅首次创建有效) 创建挂载点目录并设置权限 渲染 systemd 单元与环境文件 启动服务并等待指标端口就绪 注册到 VictoriaMetrics(若存在 infra 节点) 重新配置 修改配置后,建议执行以下命令(更新配置并确保服务在线):
./juice.yml -l <host> -t juice_config,juice_launch
仅渲染配置文件而不触碰服务状态:
./juice.yml -l <host> -t juice_config
说明:
juice_config,juice_launch 会确保服务处于 started,但不会强制重启已运行实例data 仅在首次 format 时生效变更 mount 参数后,请手动重启对应服务(systemctl restart juicefs-<name>) 移除实例 将实例 state 设为 absent 执行 juice_clean juice_instances :
jfs :
path : /fs
meta : postgres://...
state : absent
./juice.yml -l <host> -t juice_clean
./juice.yml -l <host> -e fsname = jfs -t juice_clean
移除动作:
停止 systemd 服务 umount -l 懒卸载删除 unit 与环境文件 重载 systemd 不会删除 PostgreSQL 元数据与对象存储数据。
添加新实例 在配置中新增实例,确保端口唯一:
juice_instances :
newfs :
path : /newfs
meta : postgres://...
data : --storage minio --bucket http://minio:9000/newfs
port : 9568
部署:
./juice.yml -l <host> -e fsname = newfs
多节点共享挂载 多个节点配置相同的 meta 与实例名:
app :
hosts :
10.10.10.11 : { juice_instances : { shared : { path: /shared, meta : "postgres://..." , port : 9567 } } }
10.10.10.12 : { juice_instances : { shared : { path: /shared, meta : "postgres://..." , port : 9567 } } }
首次格式化由任一节点完成,其余节点会通过 --no-update 自动跳过。
PITR 恢复 当 数据也存储在 PostgreSQL (--storage postgres)时,可通过 PG 的 PITR 恢复文件系统:
# 停止所有节点上的服务
systemctl stop juicefs-jfs
# 使用 pgBackRest 恢复元数据库
pb restore --stanza= meta --type= time --target= "2024-01-15 10:30:00"
# 启动 PostgreSQL
systemctl start postgresql
# 启动 JuiceFS 服务
systemctl start juicefs-jfs
如果数据存储在 MinIO/S3,仅元数据可回滚,数据对象不会自动回退。
故障排查 挂载失败 systemctl status juicefs-jfs
journalctl -u juicefs-jfs -f
mountpoint /fs
元数据连接问题 psql "postgres://dbuser_meta:DBUser.Meta@10.10.10.10:5432/meta" -c "SELECT 1"
指标端口检查 ss -tlnp | grep 9567
curl http://localhost:9567/metrics
性能调优 通过 mount 传入 juicefs mount 选项:
juice_instances :
jfs :
path : /fs
meta : postgres://...
mount : --cache-size 102400 --prefetch 3 --max-uploads 50
常用关注指标:
juicefs_blockcache_hits/juicefs_blockcache_miss:缓存命中率juicefs_object_request_durations_histogram_seconds:对象存储延迟juicefs_transaction_durations_histogram_seconds:元数据事务延迟20.5 - 监控告警 JUICE 模块监控与指标说明。
JuiceFS 实例通过 juicefs mount --metrics 暴露 Prometheus 指标。
在 JUICE 模块中,指标监听地址为 0.0.0.0:<port>,默认端口 9567。
监控架构 JuiceFS Mount (metrics: 0.0.0.0:<port>)
↓
VictoriaMetrics (scrape)
↓
Grafana Dashboard
若已部署 INFRAjuice_register 会自动写入抓取目标:
/infra/targets/juice/<hostname>.yml
目标文件示例 - labels : { ip: 10.10.10.10, ins : "node-jfs" , cls : "jfs" }
targets : [ 10.10.10.10 : 9567 ]
如需手动注册:
./juice.yml -l <host> -t juice_register
关键指标 对象存储 指标 类型 说明 juicefs_object_request_durations_histogram_secondshistogram 对象存储请求延迟 juicefs_object_request_errorscounter 对象存储错误数
缓存 指标 类型 说明 juicefs_blockcache_hitscounter 缓存命中次数 juicefs_blockcache_misscounter 缓存未命中次数
元数据事务 指标 类型 说明 juicefs_transaction_durations_histogram_secondshistogram 元数据事务延迟(直方图) juicefs_transaction_durations_histogram_seconds_countcounter 元数据事务请求计数
常用 PromQL 缓存命中率:
rate ( juicefs_blockcache_hits [ 5m ] ) /
( rate ( juicefs_blockcache_hits [ 5m ] ) + rate ( juicefs_blockcache_miss [ 5m ] ))
对象存储 P99 延迟:
histogram_quantile ( 0.99 , rate ( juicefs_object_request_durations_histogram_seconds_bucket [ 5m ] ))
20.6 - 常见问题 JUICE 模块常见问题解答。
端口冲突怎么办? 同一节点上的多个实例必须使用不同的 port。示例:
juice_instances :
fs1 :
path : /fs1
meta : postgres://...
port : 9567
fs2 :
path : /fs2
meta : postgres://...
port : 9568
为什么 data 变更不生效? data 仅用于 juicefs format --no-update,文件系统创建后不会再更新。
如需切换后端,请手动迁移与重新格式化。
如何添加新实例? 在配置中新增实例定义 执行: ./juice.yml -l <host> -e fsname = <name>
如何移除实例? 将实例 state 设为 absent 执行: ./juice.yml -l <host> -t juice_clean
移除不会删除 PostgreSQL 元数据或对象存储数据。
文件数据存储在哪里? 取决于 data 参数:
--storage postgres:数据存于 PostgreSQL pg_largeobject--storage minio/s3:数据存于对象存储 bucket元数据存储在 meta 指定的元数据引擎中(Pigsty 生产场景通常使用 PostgreSQL)。
多节点挂载注意事项? 多节点使用相同的 meta 与实例名 首次格式化仅需执行一次,其余节点会自动跳过 确保 port 在每个节点上不冲突 监控目标没有生成? juice_register 仅在存在 infra 组时写入 /infra/targets/juice/。
可手动执行:
./juice.yml -l <host> -t juice_register
如何修改挂载参数? 在实例中调整 mount 后,先刷新配置,再手动重启服务:
./juice.yml -l <host> -t juice_config,juice_launch
systemctl restart juicefs-<name>
21 - 模块:VIBE 使用 Pigsty 部署 AI 编程沙箱:Code-Server、JupyterLab、Node.js 与 Claude Code。
VIBE 模块提供一套 浏览器化开发环境 ,包含 Code-Server、JupyterLab、Node.js 与 Claude Code 的协同配置,
并可与 JUICEPGSQL
VIBE 依赖 NODEINFRA
NODE 负责基础软件与 Python uv 环境INFRA 提供 Nginx 反向代理、Grafana 等可视化入口组件一览 组件 说明 本地端口 访问路径 Code-Server VS Code 浏览器版 8443 /code/JupyterLab 交互式 Notebook 8888 /jupyter/Node.js 运行时与 npm - CLI Claude Code CLI + 可观测性配置 - CLI / Grafana
说明:
Code-Server 仅监听 127.0.0.1:8443,通过 Nginx 暴露 JupyterLab 监听 0.0.0.0:8888,默认基路径为 /jupyter/ 模块默认 jupyter_enabled: false,而 conf/vibe.yml 模板会显式开启 Jupyter 快速开始 ./configure -c vibe
./deploy.yml # 部署 NODE + INFRA + PGSQL
./juice.yml # 可选,部署共享存储
./vibe.yml # 部署 VIBE
默认访问入口(通过 infra_portal.home):
Code-Server:https://<domain>/code/ JupyterLab:https://<domain>/jupyter/ Claude Dashboard:https://<domain>/ui/d/claude-code 模块特点 统一工作区 :vibe_data 作为 Code-Server 与 Jupyter 的根目录可选共享存储 :配合 JUICE 实现多节点共享可观测性 :Claude Code OpenTelemetry 默认对接 VictoriaMetrics/VictoriaLogs可组件化 :Code/Jupyter/Node.js/Claude 可按需启用文档目录 21.1 - 功能配置 VIBE 模块配置说明(Code-Server、JupyterLab、Node.js 与 Claude Code)。
VIBE 模块支持按需启用组件,并通过统一的工作目录和 Nginx 入口对外提供服务。
配置概览 组件 启用参数 默认状态 说明 Code-Server code_enabled启用 浏览器 VS Code JupyterLab jupyter_enabled禁用 Notebook/终端/编辑器 Node.js nodejs_enabled启用 Node.js 运行时与 npm Claude Code claude_enabled启用 CLI 配置与可观测性
说明:模块默认 jupyter_enabled: false,但 conf/vibe.yml 预置模板会显式设置为 true。
配置通常位于集群 vars,也可以在实例级别覆盖:
all :
children :
infra :
hosts :
10.10.10.10 :
vibe_data : /fs
code_enabled : true
jupyter_enabled : true
claude_enabled : true
工作目录 vibe_data 作为 VIBE 的统一工作区:
Code-Server 默认打开目录 JupyterLab root_dir Claude Code 的工作目录 CLAUDE.md / AGENTS.md 上下文文件vibe_dir 任务会创建目录并写入上下文文件,文件属主为 node_user。
Code-Server 配置 code_enabled : true
code_port : 8443
code_data : /data/code
code_password : Vibe.Coding
code_gallery : openvsx
说明:
服务监听 127.0.0.1:<code_port>(默认 8443),通过 Nginx /code/ 访问 配置文件:code_data/code-server/config.yaml(默认 /data/code/code-server/config.yaml) 环境文件:/etc/default/code,用于配置扩展市场 扩展市场:
code_gallery: microsoft 使用微软官方市场region=china 时默认切换 Open VSX 清华镜像JupyterLab 配置 jupyter_enabled : true
jupyter_port : 8888
jupyter_data : /data/jupyter
jupyter_password : Vibe.Coding
jupyter_venv : /data/venv
说明:
服务监听 0.0.0.0:<jupyter_port>(默认 8888),基路径为 /jupyter/ 配置文件:jupyter_data/jupyter_config.py(默认 /data/jupyter/jupyter_config.py) 登录 Token:c.IdentityProvider.token 不会自动创建 venv ,建议通过 NODE 模块的 node_uv_env 预先创建创建 venv 示例:
Node.js 配置 nodejs_enabled : true
nodejs_registry : ''
npm_packages :
- '@anthropic-ai/claude-code'
- happy-coder
说明:
nodejs_registry 为空时,region=china 会自动使用 https://registry.npmmirror.comnpm_packages 通过 npm install -g 安装,全局可用默认会安装 @anthropic-ai/claude-code,因此通常无需手工安装 Claude CLI Claude Code 配置 claude 子任务仅进行配置写入 (claude_config)。
Claude CLI 在默认情况下由 nodejs 子任务通过 npm_packages 安装(包含 @anthropic-ai/claude-code)。
claude_enabled : true
claude_env :
ANTHROPIC_API_KEY : sk-ant-xxx
如果你禁用了 nodejs_enabled 或清空了 npm_packages,则需要手工安装 Claude CLI。
生成的文件:
~/.claude.json~/.claude/settings.jsonclaude_env 会与默认 OpenTelemetry 环境变量合并,默认上报到 VictoriaMetrics / VictoriaLogs。
Nginx 入口 VIBE 通过 infra_portalhome 域名自动包含 /code/ 与 /jupyter/ 子路径。
如需独立域名:
infra_portal :
code : { domain: code.pigsty, endpoint : "127.0.0.1:8443" , websocket : true }
jupyter : { domain: jupyter.pigsty, endpoint : "127.0.0.1:8888" , websocket : true }
21.2 - 参数列表 VIBE 模块参数详解(共 16 项)。
VIBE 模块共有 16 个参数,分为:
通用参数 Code-Server 参数 JupyterLab 参数 Node.js 参数 Claude Code 参数 参数概览 默认参数 定义于 roles/vibe/defaults/main.yml
vibe_data : /fs
code_enabled : true
code_port : 8443
code_data : /data/code
code_password : Vibe.Coding
code_gallery : 'openvsx'
jupyter_enabled : false
jupyter_port : 8888
jupyter_data : /data/jupyter
jupyter_password : Vibe.Coding
jupyter_venv : /data/venv
nodejs_enabled : true
nodejs_registry : ''
npm_packages : [ '@anthropic-ai/claude-code' , 'happy-coder' ]
claude_enabled : true
claude_env : {}
通用参数 vibe_data工作目录,Code-Server 与 JupyterLab 的默认根目录,CLAUDE.md 与 AGENTS.md 也会写入此处。
Code-Server code_enabled是否启用 Code-Server。
code_port监听端口,绑定 127.0.0.1,由 Nginx /code/ 转发。
code_data用户数据目录,配置文件位于 code_data/code-server/config.yaml(默认 /data/code/code-server/config.yaml)。
code_password登录密码,生产环境必须修改。
code_gallery扩展市场:openvsx / microsoft。
当 region=china 且选择 openvsx 时会自动使用清华镜像。
JupyterLab jupyter_enabled是否启用 JupyterLab。
模块默认值为 false,conf/vibe.yml 中会显式改为 true 以启用完整沙箱。
jupyter_port监听端口,默认 0.0.0.0:8888。
jupyter_data数据目录,配置文件位于 jupyter_data/jupyter_config.py(默认 /data/jupyter/jupyter_config.py)。
jupyter_password访问 Token,写入 c.IdentityProvider.token。
jupyter_venvJupyterLab 使用的 Python venv 路径,需要预先创建(通常由 NODE 模块完成)。
Node.js nodejs_enabled是否启用 Node.js。
nodejs_registrynpm 镜像地址,region=china 且为空时自动使用 https://registry.npmmirror.com。
npm_packages全局安装的 npm 包列表,对应标签 nodejs_pkg。
默认包含 @anthropic-ai/claude-code 与 happy-coder。
Claude Code claude_enabled启用 Claude Code 配置任务(claude_config)。
Claude CLI 默认由 nodejs_pkg 根据 npm_packages 安装。
claude_env额外环境变量,合并至默认 OpenTelemetry 配置。
默认环境变量包括:
CLAUDE_CODE_ENABLE_TELEMETRY=1CLAUDE_CODE_EXPERIMENTAL_AGENT_TEAMS=1OTEL_METRICS_EXPORTER=otlpOTEL_LOGS_EXPORTER=otlpOTEL_EXPORTER_OTLP_METRICS_ENDPOINT=http://127.0.0.1:8428/opentelemetry/v1/metricsOTEL_EXPORTER_OTLP_LOGS_ENDPOINT=http://127.0.0.1:9428/insert/opentelemetry/v1/logs21.3 - 预置剧本 VIBE 模块的 Ansible 剧本使用说明。
VIBE 模块提供 vibe.yml 剧本,用于部署 Code-Server、JupyterLab、Node.js 与 Claude Code 配置。
vibe.yml 只包含 node_id 与 vibe 角色,不包含 node/infra。
建议先执行 deploy.ymlnode.ymlinfra.yml
vibe.ymlvibe.yml
- name : VIBE
hosts : all
become : true
gather_facts : no
roles :
- { role: node_id, tags : id }
- { role: vibe, tags : vibe }
任务结构 vibe
├── vibe_dir # 创建工作目录与上下文文件
├── code # Code-Server
│ ├── code_install
│ ├── code_dir
│ ├── code_config
│ └── code_launch
├── jupyter # JupyterLab
│ ├── jupyter_install
│ ├── jupyter_dir
│ ├── jupyter_config
│ └── jupyter_launch
├── nodejs # Node.js Runtime
│ ├── nodejs_install
│ ├── nodejs_config
│ └── nodejs_pkg
└── claude # Claude Code 配置
└── claude_config
说明:
jupyter_install 使用 uv pip,不会创建 venvclaude_config 仅写入 ~/.claude 配置Claude CLI 默认由 nodejs_pkg 按 npm_packages 安装(默认包含 @anthropic-ai/claude-code) 常用命令 完整部署:
组件级部署:
./vibe.yml -l <host> -t code
./vibe.yml -l <host> -t jupyter
./vibe.yml -l <host> -t nodejs
./vibe.yml -l <host> -t claude
配置更新:
./vibe.yml -l <host> -t code_config,code_launch
./vibe.yml -l <host> -t jupyter_config,jupyter_launch
./vibe.yml -l <host> -t claude_config
禁用组件:
./vibe.yml -l <host> -e code_enabled = false
./vibe.yml -l <host> -e jupyter_enabled = false
./vibe.yml -l <host> -e nodejs_enabled = false
./vibe.yml -l <host> -e claude_enabled = false
部署顺序 ./deploy.yml # NODE + INFRA + PGSQL
./juice.yml # 可选共享存储
./vibe.yml # VIBE
幂等性 vibe.yml 支持重复执行,配置变更后可直接重跑。
21.4 - 管理预案 VIBE 模块运维操作与常见管理任务。
服务管理 systemctl status code-server
systemctl restart code-server
systemctl status jupyter
systemctl restart jupyter
查看日志:
journalctl -u code-server -f
journalctl -u jupyter -f
工作目录与上下文 vibe_dir 会在 vibe_data 下创建:
CLAUDE.mdAGENTS.md(指向 CLAUDE.md 的符号链接)默认位置(可由 vibe_data 调整):
/fs/CLAUDE.md
/fs/AGENTS.md
密码与认证 Code-Server 修改配置:
vi /data/code/code-server/config.yaml
systemctl restart code-server
或通过 Ansible:
./vibe.yml -l <host> -e code_password = 'NewPassword' -t code_config,code_launch
JupyterLab 配置文件位置:/data/jupyter/jupyter_config.py
字段:c.IdentityProvider.token。
vi /data/jupyter/jupyter_config.py
systemctl restart jupyter
Code-Server 扩展 code-server --install-extension ms-python.python
code-server --list-extensions
code-server --uninstall-extension ms-python.python
切换扩展市场:
重新部署:
./vibe.yml -l <host> -t code_config,code_launch
JupyterLab 环境管理 VIBE 不会自动创建 venv,请确保 jupyter_venv 存在:
安装/更新 JupyterLab:
uv pip install --python /data/venv/bin/python jupyterlab ipykernel
systemctl restart jupyter
安装扩展(以 venv 为准):
source /data/venv/bin/activate
pip install jupyterlab-git
systemctl restart jupyter
Claude Code claude_config 子任务仅写入配置文件。
Claude CLI 默认由 nodejs_pkg 根据 npm_packages 全局安装(默认包含 @anthropic-ai/claude-code)。
which claude
claude --version
配置文件:
~/.claude.json~/.claude/settings.json更新配置:
./vibe.yml -l <host> -t claude_config
重装/补装 Claude CLI:
./vibe.yml -l <host> -t nodejs_pkg
# 或手工安装
npm install -g @anthropic-ai/claude-code
如果需要配置到其他用户,请使用对应的远程登录用户执行或手动拷贝配置文件。
文件位置速查 组件 关键文件 Code-Server /data/code/code-server/config.yamlCode-Server /etc/default/codeCode-Server /etc/systemd/system/code-server.serviceJupyterLab /data/jupyter/jupyter_config.pyJupyterLab /etc/default/jupyterJupyterLab /etc/systemd/system/jupyter.serviceClaude Code ~/.claude.json / ~/.claude/settings.json
故障排查 端口检查:
ss -tlnp | grep 8443
ss -tlnp | grep 8888
Nginx 入口:
nginx -t
systemctl status nginx
21.5 - 监控告警 VIBE 模块监控说明,重点为 Claude Code 可观测性。
VIBE 的监控主要集中在 Claude Code 的 OpenTelemetry 数据。
Code-Server 与 JupyterLab 本身不暴露 Prometheus 指标,可通过 systemd 与日志进行健康检查。
Claude Code 可观测性 VIBE 在 ~/.claude/settings.json 中写入默认 OpenTelemetry 环境变量:
{
"env" : {
"CLAUDE_CODE_ENABLE_TELEMETRY" : 1 ,
"CLAUDE_CODE_EXPERIMENTAL_AGENT_TEAMS" : 1 ,
"OTEL_LOG_USER_PROMPTS" : 1 ,
"OTEL_METRICS_EXPORTER" : "otlp" ,
"OTEL_LOGS_EXPORTER" : "otlp" ,
"OTEL_EXPORTER_OTLP_PROTOCOL" : "http/protobuf" ,
"OTEL_EXPORTER_OTLP_METRICS_ENDPOINT" : "http://127.0.0.1:8428/opentelemetry/v1/metrics" ,
"OTEL_EXPORTER_OTLP_LOGS_ENDPOINT" : "http://127.0.0.1:9428/insert/opentelemetry/v1/logs" ,
"OTEL_RESOURCE_ATTRIBUTES" : "ip=<host>,job=claude"
}
}
claude_env 会与上述默认配置合并,可用于配置 API Key 或替换模型端点。
Grafana Dashboard Grafana 默认包含 claude-code Dashboard:
Portal 入口:https://<domain>/ui/d/claude-code 直接访问:http://<ip>:3000/d/claude-code 运行状态检查 systemctl status code-server
systemctl status jupyter
journalctl -u code-server -f
journalctl -u jupyter -f
端口检查:
ss -tlnp | grep 8443
ss -tlnp | grep 8888
Claude 日志查询 通过 VictoriaLogs:
curl -G 'http://127.0.0.1:9428/select/logsql/query' \
--data-urlencode 'query=job:claude'
21.6 - 常见问题 VIBE 模块常见问题解答。
部署问题 code-server 软件包找不到 确认已部署 NODE
yum repolist # EL
apt update # Debian/Ubuntu
./infra.yml -t repo
JupyterLab 安装失败 jupyter_venv 必须存在:
uv venv /data/venv
./vibe.yml -l <host> -t jupyter
访问问题 无法访问 /code/ 或 /jupyter/ 检查服务状态 检查端口监听 检查 Nginx 配置 systemctl status code-server
systemctl status jupyter
ss -tlnp | grep 8443
ss -tlnp | grep 8888
nginx -t
WebSocket 连接失败 确保 Nginx 配置启用 WebSocket(默认已配置)。
若使用自定义 infra_portal,需配置 websocket: true。
密码与 Token 修改 Code-Server 密码 ./vibe.yml -l <host> -e code_password = 'NewPass' -t code_config,code_launch
修改 JupyterLab Token ./vibe.yml -l <host> -e jupyter_password = 'NewToken' -t jupyter_config,jupyter_launch
Claude Code CLI 找不到命令 先检查 nodejs_pkg 是否完成(默认会安装 @anthropic-ai/claude-code):
which claude
npm list -g --depth= 0 | grep '@anthropic-ai/claude-code'
./vibe.yml -l <host> -t nodejs_pkg
如果你禁用了 nodejs_enabled 或覆盖了 npm_packages,可手工安装:
npm install -g @anthropic-ai/claude-code
API Key 未配置 export ANTHROPIC_API_KEY = sk-ant-xxx
# 或配置到 claude_env
监控数据不显示 检查本地 VictoriaMetrics/VictoriaLogs:
curl http://127.0.0.1:8428/api/v1/status/buildinfo
curl http://127.0.0.1:9428/select/logsql/stats_query
确保 ~/.claude/settings.json 中 OTEL 端点正确。
扩展与插件 Code-Server 扩展安装失败 检查网络 尝试切换 code_gallery 或手动安装 VSIX code-server --install-extension /path/to/extension.vsix
JupyterLab 扩展安装失败 source /data/venv/bin/activate
pip install jupyterlab-git
systemctl restart jupyter
22.1 - 模块:Code 使用 Pigsty 部署 Code-Server,在浏览器中运行 VS Code,打造云端开发环境。
文档已迁移
Code-Server 现已整合到 VIBE 模块
Code-Server 是在浏览器中运行的 VS Code,让您可以在任何设备上访问完整的开发环境。
Pigsty 的 VIBE 模块提供了 Code-Server 的自动化部署方案,通过 Nginx 反向代理提供 HTTPS 访问。
概述 Code-Server 作为 VIBE 模块的一部分,部署为 systemd 服务,通过 Nginx 反向代理暴露到 Web。
用户浏览器
↓ HTTPS
Nginx (https://i.pigsty/code/)
↓ proxy_pass
Code-Server (127.0.0.1:8443)
└─ User: {{ node_user }}
└─ WorkDir: {{ vibe_data }}
└─ DataDir: {{ code_data }}
快速开始 启用 Code-Server 在节点上设置 code_enabled: true(默认已启用),然后执行:
./vibe.yml -l <host> -t code
或部署完整的 VIBE 模块(Code-Server + JupyterLab + Claude Code):
访问 Code-Server 部署完成后,通过以下地址访问:
子路径方式 :https://i.pigsty/code/子域名方式 :https://code.pigsty(需在 infra_portal 中配置)默认登录密码:Code.Server
参数配置 参数 默认值 说明 code_enabledtrue是否在该节点启用 Code-Server code_port8443Code-Server 监听端口(仅 localhost) vibe_data/fs工作目录(VS Code 打开的文件夹) code_data/data/code用户数据目录(扩展、设置等) code_passwordCode.Server登录密码 code_galleryopenvsx扩展市场:openvsx 或 microsoft
扩展市场 Code-Server 默认使用 Open VSX 扩展市场。如需使用微软官方市场:
中国大陆用户可使用清华镜像加速(自动配置)。
剧本与任务 Code-Server 通过 vibe.yml 剧本的 code 标签部署,包含以下任务:
标签 说明 codeCode-Server 完整部署 code_install安装 code-server 软件包 code_dir创建工作目录和数据目录 code_config渲染配置文件和 systemd 服务单元 code_launch启动 code-server 服务
常用命令:
# 部署 Code-Server
./vibe.yml -l <host> -t code
# 仅更新配置
./vibe.yml -l <host> -t code_config
# 重启服务
./vibe.yml -l <host> -t code_launch
目录结构 {{ vibe_data }} # 工作目录(如 /fs)
└── your-projects/ # 项目文件
{{ code_data }} # 数据目录(如 /data/code)
├── code-server/
│ ├── config.yaml # Code-Server 配置
│ ├── extensions/ # 已安装扩展
│ └── User/
│ └── settings.json # 用户设置
└── ...
/etc/systemd/system/code-server.service # systemd 服务单元
/etc/default/code # 环境变量
配置示例 基础配置 all :
children :
infra :
hosts :
10.10.10.10 :
code_enabled : true
code_password : 'MySecurePassword'
AI 辅助编程沙箱 配合 JuiceFS 共享文件系统,打造云端开发环境(使用 vibe 配置模板):
all :
children :
infra :
hosts :
10.10.10.10 :
code_enabled : true
code_password : 'Code.Server'
vibe_data : /fs # 使用 JuiceFS 挂载点作为工作目录
jupyter_enabled : true
jupyter_password : 'Jupyter.Lab'
claude_enabled : true
juice_instances :
jfs :
path : /fs
meta : postgres://dbuser_meta:DBUser.Meta@10.10.10.10:5432/meta
data : --storage postgres --bucket ...
常见问题 如何修改密码? 修改配置中的 code_password,然后重新执行剧本:
./vibe.yml -l <host> -t code_config,code_launch
如何安装扩展? 在 Code-Server 界面中直接搜索安装,或通过命令行:
code-server --install-extension ms-python.python
扩展市场访问慢? 使用 code_gallery: microsoft 切换到微软官方市场,或确保网络可访问 Open VSX。
如何使用 GitHub Copilot? GitHub Copilot 目前不支持 Code-Server,可以考虑使用其他 AI 辅助编程工具。
支持平台 操作系统 :EL 8/9/10、Ubuntu 20/22/24、Debian 11/12/13架构 :x86_64、ARM64Ansible :2.9+22.2 - 模块:MySQL 使用 Pigsty 拉起过气的 MySQL 集群,用于测试,迁移,性能评估等目的。
MySQL 曾经是“世界上最流行的开源关系型数据库”。 安装 | 配置 | 管理 | 剧本 | 监控 | 参数
概览 MySQL 模块本身目前仅在 Pigsty 专业版中提供 Beta 试用预览,注意,请不要将这里的 MySQL 用于生产环境。
安装 您可以直接使用以下命令,在 Pigsty 管理的节点上,直接从官方软件源安装 MySQL 8.0 (EL系统)
# el 7,8,9
./node.yml -t node_install -e '{"node_repo_modules":"node,mysql","node_packages":["mysql-community-server,mysql-community-client"]}'
# debian / ubuntu
./node.yml -t node_install -e '{"node_repo_modules":"node,mysql","node_packages":["mysql-server"]}'
您也可以将 MySQL 软件包加入本地软件源后,使用 MySQL 剧本 mysql.yml 进行生产环境部署。
配置 以下配置片段定义了一个单节点的 MySQL 实例,以及其中的 Database 与 User。
my-test :
hosts : { 10.10.10.10 : { mysql_seq: 1, mysql_role : primary } }
vars :
mysql_cluster : my-test
mysql_databases :
- { name : meta }
mysql_users :
- { name: dbuser_meta ,host: '%' ,password: 'dbuesr_meta' ,priv : { "*.*": "SELECT, UPDATE, DELETE, INSERT" } }
- { name: dbuser_dba ,host: '%' ,password: 'DBUser.DBA' ,priv : { "*.*": "ALL PRIVILEGES" } }
- { name: dbuser_monitor ,host: '%' ,password: 'DBUser.Monitor' ,priv : { "*.*": "SELECT, PROCESS, REPLICATION CLIENT" } ,connlimit : 3 }
管理 以下是基本的 MySQL 集群基本管理操作:
使用 mysql.yml 创建 MySQL 集群:
剧本 Pigsty 提供了一个与 MYSQL 模块相关的剧本,用于部署 MySQL 集群
mysql.yml用于部署 MySQL 模式集群的 mysql.yml
mysql-id : generate mysql instance identity
mysql_clean : remove existing mysql instance ( DANGEROUS)
mysql_dbsu : create os user mysql
mysql_install : install mysql rpm/deb packages
mysql_dir : create mysql data & conf dir
mysql_config : generate mysql config file
mysql_boot : bootstrap mysql cluster
mysql_launch : launch mysql service
mysql_pass : write mysql password
mysql_db : create mysql biz database
mysql_user : create mysql biz user
mysql_exporter : launch mysql exporter
mysql_register : register mysql service to prometheus
监控 Pigsty 提供了两个与 MYSQL
MYSQL Overview 展示了 MySQL 集群的整体监控指标。
MYSQL Instance 展示了单个 MySQL 实例的监控指标详情
参数 MySQL 的可用配置项:
#-----------------------------------------------------------------
# MYSQL_IDENTITY
#-----------------------------------------------------------------
# mysql_cluster: #CLUSTER # mysql cluster name, required identity parameter
# mysql_role: replica #INSTANCE # mysql role, required, could be primary,replica
# mysql_seq: 0 #INSTANCE # mysql instance seq number, required identity parameter
#-----------------------------------------------------------------
# MYSQL_BUSINESS
#-----------------------------------------------------------------
# mysql business object definition, overwrite in group vars
mysql_users : [] # mysql business users
mysql_databases : [] # mysql business databases
mysql_services : [] # mysql business services
# global credentials, overwrite in global vars
mysql_root_username : root
mysql_root_password : DBUser.Root
mysql_replication_username : replicator
mysql_replication_password : DBUser.Replicator
mysql_admin_username : dbuser_dba
mysql_admin_password : DBUser.DBA
mysql_monitor_username : dbuser_monitor
mysql_monitor_password : DBUser.Monitor
#-----------------------------------------------------------------
# MYSQL_INSTALL
#-----------------------------------------------------------------
# - install - #
mysql_dbsu : mysql # os dbsu name, mysql by default, better not change it
mysql_dbsu_uid : 27 # os dbsu uid and gid, 306 for default mysql users and groups
mysql_dbsu_home : /var/lib/mysql # mysql home directory, `/var/lib/mysql` by default
mysql_dbsu_ssh_exchange : true # exchange mysql dbsu ssh key among same mysql cluster
mysql_packages : # mysql packages to be installed, `mysql-community*` by default
- mysql-community*
- mysqld_exporter
# - bootstrap - #
mysql_data : /data/mysql # mysql data directory, `/data/mysql` by default
mysql_listen : '0.0.0.0' # mysql listen addresses, comma separated IP list
mysql_port : 3306 # mysql listen port, 3306 by default
mysql_sock : /var/lib/mysql/mysql.sock # mysql socket dir, `/var/lib/mysql/mysql.sock` by default
mysql_pid : /var/run/mysqld/mysqld.pid # mysql pid file, `/var/run/mysqld/mysqld.pid` by default
mysql_conf : /etc/my.cnf # mysql config file, `/etc/my.cnf` by default
mysql_log_dir : /var/log # mysql log dir, `/var/log/mysql` by default
mysql_exporter_port : 9104 # mysqld_exporter listen port, 9104 by default
mysql_parameters : {} # extra parameters for mysqld
mysql_default_parameters : # default parameters for mysqld
22.3 - 模块:Kafka 使用 Pigsty 拉起 Kafka Kraft 集群,一个开源的分布式流处理平台。
Kafka 是一个开源的分布式流处理平台:安装 | 配置 | 管理 | 剧本 | 监控 | 参数 | 资源
概览 Kafka 模块本身目前仅在 Pigsty 专业版中提供 Beta 试用预览。
安装 如果您使用开源版 Pigsty,可以使用以下命令,在指定节点上安装 Kafka 及其 Java 依赖。
Pigsty 在官方 Infra 仓库中提供了 Kafka 3.8.0 的 RPM 与 DEB 安装包,如果需要使用,可以直接下载安装。
./node.yml -t node_install -e '{"node_repo_modules":"infra","node_packages":["kafka"]}'
Kafka 依赖 Java 运行环境,因此在安装 Kafka 时,需要安装可用的 JDK (默认使用 OpenJDK 17,但其他 JDK 与版本,例如 8,11 都可以使用)
# EL7 (没有 JDK 17 支持)
./node.yml -t node_install -e '{"node_repo_modules":"node","node_packages":["java-11-openjdk-headless"]}'
# EL8 / EL9 (使用 OpenJDK 17 )
./node.yml -t node_install -e '{"node_repo_modules":"node","node_packages":["java-17-openjdk-headless"]}'
# Debian / Ubuntu (使用 OpenJDK 17)
./node.yml -t node_install -e '{"node_repo_modules":"node","node_packages":["openjdk-17-jdk"]}'
配置 单节点 Kafka 配置样例,请注意,在 Pigsty 单机部署模式下,管理节点上的 9093 端口默认已经被 AlertManager 占用。
建议在管理节点上安装 Kafka 时,Peer Poort 使用其他端口,例如(9095)。
kf-main :
hosts :
10.10.10.10 : { kafka_seq: 1, kafka_role : controller }
vars :
kafka_cluster : kf-main
kafka_data : /data/kafka
kafka_peer_port : 9095 # 9093 is already hold by alertmanager
三节点 Kraft 模式 Kafka 集群配置样例:
kf-test :
hosts :
10.10.10.11 : { kafka_seq: 1, kafka_role : controller }
10.10.10.12 : { kafka_seq: 2, kafka_role : controller }
10.10.10.13 : { kafka_seq: 3, kafka_role : controller }
vars :
kafka_cluster : kf-test
管理 以下是基本的 Kafka 集群基本管理操作:
使用 kafka.yml 创建 Kafka 集群:
./kafka.yml -l kf-main
./kafka.yml -l kf-test
创建一个名为 test 的 Topic:
kafka-topics.sh --create --topic test --partitions 1 --replication-factor 1 --bootstrap-server localhost:9092
这里 --replication-factor 1 表示每个数据只会复制一次,--partitions 1 表示只创建一个分区。
使用以下命令,查看 Kafka 中的 Topic 列表:
kafka-topics.sh --bootstrap-server localhost:9092 --list
使用 Kafka 自带的消息生产者,向 test Topic 发送消息:
kafka-console-producer.sh --topic test --bootstrap-server localhost:9092
>haha
>xixi
>hoho
>hello
>world
> ^D
使用 Kafka 自带的消费者,从 test Topic 中读取消息:
kafka-console-consumer.sh --topic test --from-beginning --bootstrap-server localhost:9092
剧本 Pigsty 提供了两个与 KAFKA 模块相关的剧本,分别用于纳管与移除节点。
此外, Pigsty 还提供了两个包装命令工具:node-add 与 node-rm,用于快速调用剧本。
kafka.yml用于部署 Kafka KRaft 模式集群的 kafka.yml
kafka-id : generate kafka instance identity
kafka_clean : remove existing kafka instance ( DANGEROUS)
kafka_user : create os user kafka
kafka_pkg : install kafka rpm/deb packages
kafka_link : create symlink to /usr/kafka
kafka_path : add kafka bin path to /etc/profile.d
kafka_svc : install kafka systemd service
kafka_dir : create kafka data & conf dir
kafka_config : generate kafka config file
kafka_boot : bootstrap kafka cluster
kafka_launch : launch kafka service
kafka_exporter : launch kafka exporter
kafka_register : register kafka service to prometheus
监控 Pigsty 提供了两个与 KAFKA
KAFKA Overview 展示了 Kafka 集群的整体监控指标。
KAFKA Instance 展示了单个 Kafka 实例的监控指标详情
参数 Kafka 的可用配置项:
#kafka_cluster: #CLUSTER # kafka cluster name, required identity parameter
#kafka_role: controller #INSTANCE # kafka role, controller, broker, or controller-only
#kafka_seq: 0 #INSTANCE # kafka instance seq number, required identity parameter
kafka_clean : false # cleanup kafka during init? false by default
kafka_data : /data/kafka # kafka data directory, `/data/kafka` by default
kafka_version : 3.8.0 # kafka version string
scala_version : 2.13 # kafka binary scala version
kafka_port : 9092 # kafka broker listen port
kafka_peer_port : 9093 # kafka broker peer listen port, 9093 by default (conflict with alertmanager)
kafka_exporter_port : 9308 # kafka exporter listen port, 9308 by default
kafka_parameters : # kafka parameters to be added to server.properties
num.network.threads : 3
num.io.threads : 8
socket.send.buffer.bytes : 102400
socket.receive.buffer.bytes : 102400
socket.request.max.bytes : 104857600
num.partitions : 1
num.recovery.threads.per.data.dir : 1
offsets.topic.replication.factor : 1
transaction.state.log.replication.factor : 1
transaction.state.log.min.isr : 1
log.retention.hours : 168
log.segment.bytes : 1073741824
log.retention.check.interval.ms : 300000
#log.retention.bytes: 1073741824
#log.flush.interval.ms: 1000
#log.flush.interval.messages: 10000
资源 Pigsty 为 PostgreSQL 提供了一些 Kafka 相关的扩展插件:
kafka_fdwwal2jsonwal2mongodecoder_rawtest_decoding22.4 - 模块:DuckDB 使用 Pigsty 安装 DuckDB,一个高性能,嵌入式的分析数据库组件。
DuckDB 是一个高性能,嵌入式的分析数据库。
DuckDB 是嵌入式数据库,不需要部署与服务化,只需要在节点上安装 DuckDB 软件包即可使用。
安装 Pigsty Infra 仓库
./node.yml -t node_install -e '{"node_repo_modules":"infra","node_packages":["duckdb"]}'
使用 pig 安装:
pig repo add infra -u # 添加 Infra 仓库
pig install duckdb # 安装 DuckDB 包
相关资源 Pigsty 为 PostgreSQL 提供了一些 DuckDB 相关的扩展插件:
22.5 - 模块:TigerBeetle 使用 Pigsty 部署 TigerBeetle,金融会计事务专用数据库。
TigerBeetle 是一个金融会计事务专用数据库,提供了极致性能与可靠性。
概览 TigerBeetle 模块目前仅在 Pigsty 专业版中提供 Beta 试用预览。
安装 Pigsty Infra 仓库中提供了 TigerBeetle 的 RPM / DEB 软件包,使用以下命令即可完成安装:
./node.yml -t node_install -e '{"node_repo_modules":"infra","node_packages":["tigerbeetle"]}'
即可安装,然后请参考官方文档进行配置:https://github.com/tigerbeetle/tigerbeetle
TigerBeetle需要Linux内核5.5以上版本!
请注意,TigerBeetle 仅支持 Linux 内核 5.5 或更高版本,因此默认在 EL7 (3.10) / EL8 (4.18) 系统上无法使用。
请使用 EL9 (5.14), Ubuntu 22.04 (5.15),或 Debian 12 (6.1) 与 Debian 11 (5.10),或其他支持的系统来安装 Tiger Beetle
22.6 - 模块:Kubernetes 使用 Pigsty 安装 Kubernetes,生产级无状态容器调度编排私有云平台
Kubernetes 是生产级无状态容器调度编排私有云平台。
Pigsty 提供了原生的 ETCDKUBE
Kubernetes 模块目前仅在 Pigsty Pro 专业版本中提供 Beta 预览,在开源版本中不可用。
但您可以直接在 Pigsty 中指定节点仓库,安装 Kubernetes 软件包,并使用 Pigsty 调整环境配置,置备节点供 K8S 部署使用,解决交付的最后一公里问题。
SealOS SealOS 是一个 Kubernetes 发行版,可以用于将整个 Kubernetes 集群打包制作为一个镜像在其他地方使用
Pigsty 在 Infra 仓库中提供了 SealOS 5.0 的 RPM 与 DEB 安装包,可以直接下载安装,并使用 SealOS 管理集群。
./node.yml -t node_install -e '{"node_repo_modules":"infra","node_packages":["sealos"]}'
Kubernetes 如果您更喜欢使用经典的 Kubeadm 来部署 Kubernetes,请参考下面的 KUBE 模块参考。
./node.yml -t node_install -e '{"node_repo_modules":"kube","node_packages":["kubeadm,kubelet,kubectl"]}'
Kubernetes 支持多种容器运行时,要使用 Containerd 容器运行时,请确保节点上已经安装了 Containerd 软件包。
./node.yml -t node_install -e '{"node_repo_modules":"node,docker","node_packages":["containerd.io"]}'
若要使用 Docker 作为容器运行时,您需要安装 Docker ,并使用 cri-dockerd 项目桥接(EL9 / D11 / U20 尚不可用):
./node.yml -t node_install -e '{"node_repo_modules":"node,infra,docker","node_packages":["docker-ce,docker-compose-plugin,cri-dockerd"]}'
剧本 kube.yml 剧本
监控 Kubernetes 集群监控通常由集群内的可观测组件(如 kube-prometheus-stack)负责。
Pigsty 侧建议重点监控 Kubernetes 依赖的基础能力:
参数 Kubernetes 模块支持以下配置参数
#kube_cluster: #IDENTITY# # define kubernetes cluster name
kube_role : node # default kubernetes role (master|node)
kube_version : 1.31.0 # kubernetes version
kube_registry : registry.aliyuncs.com/google_containers # kubernetes version aliyun k8s miiror repository
kube_pod_cidr : "10.11.0.0/16" # kubernetes pod network cidr
kube_service_cidr : "10.12.0.0/16" # kubernetes service network cidr
kube_dashboard_admin_user : dashboard-admin-sa # kubernetes dashboard admin user name
22.7 - 模块:Consul 使用 Pigsty 安装部署 Consul —— Etcd 的替代品。
Consul 是一个分布式 DCS + KV + DNS + 服务注册/发现的组件。
在旧版本 (1.x) 的 Pigsty 里,默认使用 Consul 作为高可用的 DCS,现在该支持已经移除,但会在后续重新作为独立模块提供。
配置 要部署 Consul,您需要将所有节点的 IP 地址和主机名添加到 consul 分组中。
您至少需要指定一个节点的 consul_role 为 server,其他节点的 consul_role 默认为 node。
consul:
hosts:
10.10.10.10: { nodename: meta , consul_role: server }
10.10.10.11: { nodename: node-1 }
10.10.10.12: { nodename: node-2 }
10.10.10.13: { nodename: node-3 }
我们建议在严肃生产部署中使用奇数个 Consul Server,三个为宜。
参数 #-----------------------------------------------------------------
# CONSUL
#-----------------------------------------------------------------
consul_role : node # consul role, node or server, node by default
consul_dc : pigsty # consul data center name, `pigsty` by default
consul_data : /data/consul # consul data dir, `/data/consul`
consul_clean : true # consul purge flag, if true, clean consul during init
consul_ui : false # enable consul ui, the default value for consul server is true
23 - 其他组件 24 - pig 文档 PostgreSQL 扩展生态包管理器
—— Postgres Install Genius,PostgreSQL 生态中缺失的扩展包管理器
PIG 包管理器是一个专门用于安装、管理、构建 PostgreSQL 及其扩展的命令行工具,使用 Go 开发,开箱即用,简单易用,小巧玲珑(4MB)。
PIG 包管理器并非重新发明的土鳖轮子,而是 依托 (PiggyBack)现有 Linux 发行版包管理器 (apt/dnf)的一个高级抽象层。
它屏蔽了不同操作系统,不同芯片架构,以及不同 PG 大版本的管理差异,让您用简单的几行命令,就可以完成 PG 内核与 464 个扩展的安装与管理。
PIG 的命令设计同样适合自动化脚本:提供统一的参数风格、清晰的错误提示,以及如 --dry-run 等安全开关。
请注意:对于扩展安装来说,pig 并非必须组件 ,您依然可以使用 apt / dnf 等包管理器直接访问 Pigsty PGSQL
简介 上手 安装 快速上手 使用以下命令即可在您的系统上 安装
默认安装 (Cloudflare CDN):
curl -fsSL https://repo.pigsty.io/pig | bash
中国镜像 :
curl -fsSL https://repo.pigsty.cc/pig | bash
安装完成后,几行命令即可 快速开始 pg_duckdb
$ pig repo set # 一次性设置好 Linux, Pigsty + PGDG 仓库(覆盖式!)
$ pig install pg18 # 安装 PostgreSQL 18 内核(原生 PGDG 包)
$ pig install pg_duckdb -v 18 # 安装 pg_duckdb 扩展(针对当前 pg 18)
$ pig install -y postgis timescaledb # 针对当前活跃PG版本,安装多个扩展
$ pig install -y vector # 您可以使用扩展名称(vector)或者扩展包名称(pgvector)来安装扩展!
命令参考 你可以执行 pig help <command> 获取子命令的详细帮助。
扩展管理 :
Pigsty 管理 :
关于 pig 命令行工具由 Vonng (冯若航 rh@vonng.com )开发,并以 Apache 2.0 许可证开源。
您还可以参考 PIGSTY
24.1 - 上手 快速上手 pig,PostgreSQL 包管理器
下面是一个简单的上手教程,带您体验 PIG 包管理器的核心能力。
简短版本 curl -fsSL https://repo.pigsty.io/pig | bash # 从 Cloudflare 安装 PIG
pig repo set # 一次性设置好 Linux, Pigsty + PGDG 仓库(覆盖式!)
pig install -v 18 -y pg18 pg_duckdb vector # 安装 PG 18 内核,pg_duckdb, pgvector 扩展……
安装 您可以使用以下命令 一键安装 pig:
中国大陆 :
curl -fsSL https://repo.pigsty.cc/pig | bash
全球网站 (Cloudflare CDN):
curl -fsSL https://repo.pigsty.io/pig | bash
PIG 二进制包大约 4 MB,在 Linux 上会自动使用 rpm 或 dpkg 安装最新可用版本:
$ curl -fsSL https://repo.pigsty.cc/pig | bash
[ INFO] kernel = Linux
[ INFO] machine = x86_64
[ INFO] package = deb
[ INFO] pkg_url = https://repo.pigsty.cc/pkg/pig/v1.0.0/pig_1.0.0-1_amd64.deb
[ INFO] download = /tmp/pig_1.0.0-1_amd64.deb
[ INFO] downloading pig v1.0.0
curl -fSL https://repo.pigsty.cc/pkg/pig/v1.0.0/pig_1.0.0-1_amd64.deb -o /tmp/pig_1.0.0-1_amd64.deb
######################################################################## 100.0%
[ INFO] md5sum = a543882aa905713a0c50088d4e848951b6957a37a1594d7e9f3fe46453d5ce66
[ INFO] installing: dpkg -i /tmp/pig_1.0.0-1_amd64.deb
( Reading database ... 166001 files and directories currently installed.)
Preparing to unpack /tmp/pig_1.0.0-1_amd64.deb ...
Unpacking pig ( 1.0.0-1) ...
Setting up pig ( 1.0.0-1) ...
[ INFO] pig v1.0.0 installed successfully
check https://pigsty.io/ext/ for details
检查环境 PIG 是一个由 Go 编写的二进制程序,默认安装路径为 /usr/bin/pig,pig version 会打印版本信息:
$ pig version
pig version 1.0.0 linux/amd64
build: HEAD dc8f343 2026-01-26T15:52:04Z
使用 pig status 命令,会打印当前环境的状态,操作系统代码,PG的安装情况,仓库的可访问性与延迟。
$ pig status
# [Configuration] ================================
Pig Version : 1.0.0
Pig Config : /home/vagrant/.pig/config.yml
Log Level : info
Log Path : stderr
# [OS Environment] ===============================
OS Distro Code : u24
OS OSArch : arm64
OS Package Type : deb
OS Vendor ID : ubuntu
OS Version : 24
OS Version Full : 24.04
OS Version Code : noble
# [PG Environment] ===============================
Installed:
- PostgreSQL 18.1 ( Ubuntu 18.1-1.pgdg24.04+2) 398 Extensions
Active:
PG Version : PostgreSQL 18.1 ( Ubuntu 18.1-1.pgdg24.04+2)
Config Path : /usr/bin/pg_config
Binary Path : /usr/lib/postgresql/18/bin
Library Path : /usr/lib/postgresql/18/lib
Extension Path : /usr/share/postgresql/18/extension
# [Pigsty Environment] ===========================
Inventory Path : Not Found
Pigsty Home : Not Found
# [Network Conditions] ===========================
pigsty.cc ping ok: 802 ms
pigsty.io ping ok: 1410 ms
Internet Access : true
Pigsty Repo : pigsty.io
Inferred Region : china
Latest Pigsty Ver : v4.2.2
自动化建议 对于生产环境恢复任务,建议先使用 --dry-run 预览 PITR 执行计划,再决定是否实际执行:
pig pitr -d --dry-run # 仅预览恢复步骤,不执行
pig pitr -d -y # 跳过确认(自动化场景)
列出扩展 使用 pig ext list 命令,可以打印内置的 PG 扩展数据目录。
$ pig ext list
Name Status Version Cate Flags License Repo PGVer Package Description
---- ------ ------- ---- ------ ------- ------ ----- ------------ ---------------------
timescaledb installed 2.24.0 TIME -dsl-- Timescale PIGSTY 15-18 postgresql-18-timescaledb-tsl Enables scalable inserts and complex queries for time-series dat
timescaledb_toolkit installed 1.22.0 TIME -ds-t- Timescale PIGSTY 15-18 postgresql-18-timescaledb-toolkit Library of analytical hyperfunctions, time-series pipelining, an
timeseries installed 0.2.0 TIME -d---- PostgreSQL PIGSTY 14-18 postgresql-18-pg-timeseries Convenience API for time series stack
periods installed 1.2.3 TIME -ds--- PostgreSQL PGDG 14-18 postgresql-18-periods Provide Standard SQL functionality for PERIODs and SYSTEM VERSIO
temporal_tables installed 1.2.2 TIME -ds--r BSD 2-Clause PIGSTY 14-18 postgresql-18-temporal-tables temporal tables
.........
pg_fact_loader not avail 2.0.1 ETL -ds--x MIT PGDG 13-17 postgresql-18-pg-fact-loader build fact tables with Postgres
pg_bulkload installed 3.1.23 ETL bds--- BSD 3-Clause PIGSTY 14-18 postgresql-18-pg-bulkload pg_bulkload is a high speed data loading utility for PostgreSQL
test_decoding available - ETL --s--x PostgreSQL CONTRIB 14-18 postgresql-18 SQL-based test/example module for WAL logical decoding
pgoutput available - ETL --s--- PostgreSQL CONTRIB 14-18 postgresql-18 Logical Replication output plugin
( 464 Rows) ( Status: installed, available, not avail | Flags: b = HasBin, d = HasDDL, s = HasLib, l = NeedLoad, t = Trusted, r = Relocatable, x = Unknown)
所有的扩展元数据都在一份名为 extension.csvpig ext reload~/.pig/extension.csv 中,您可以查阅与更改;在线最新版目录可在 pigsty.io/ext/data/extension.csv
添加仓库 要想安装扩展,首先需要添加上游仓库。pig repo
您可以使用简单粗暴直接的版本 pig repo set
pig repo set # 一次性配置好所有仓库,包括 Linux 系统仓库,PGDG,PIGSTY (PGSQL+INFRA) 仓库
警告 :pig repo set 会备份并清理现有的仓库配置,然后添加所需的仓库,实现 Overwrite 语义,请务必注意!
或者选择使用温和的 pig repo add
pig repo add pgdg pigsty # 添加 PGDG 官方仓库 和 PIGSTY 补充仓库
pig repo add pgsql # 【可选】您也可以选择将 PGDG 和 PIGSTY 合在一起,当成一个 "pgsql" 模块整体添加
pig repo update # 更新缓存:apt update / yum makecache
PIG 会检测您的网络环境,并选择使用 Cloudflare 全球 CDN,或者中国境内云 CDN,但您可以通过 --region 参数强制指定区域。
pig repo set --region= china # 使用中国区域镜像仓库加速下载
pig repo add pgdg --region= default --update # 强制指定使用 PGDG 上游仓库
PIG 本身不支持离线安装,您可以自行下载 RPM/DEB 包,拷贝到网络隔离的生产服务器安装。
相关项目 PIGSTY 提供本地软件仓库,支持可以使用 pig 从本地软件仓库安装已经下载好的扩展。
安装 PG 添加仓库后,您可以使用 pig ext add
pig ext add -v 18 -y pgsql timescaledb postgis vector pg_duckdb pg_mooncake # 安装 PG 18 内核与扩展,自动确认
# 该命令会自动执行翻译,将软件包翻译为
INFO[ 20:34:44] translate alias 'pgsql' to package: postgresql$v postgresql$v -server postgresql$v -libs postgresql$v -contrib postgresql$v -plperl postgresql$v -plpython3 postgresql$v -pltcl
INFO[ 20:34:44] translate extension 'timescaledb' to package: timescaledb-tsl_18
INFO[ 20:34:44] translate extension 'postgis' to package: postgis36_18
INFO[ 20:34:44] translate extension 'vector' to package: pgvector_18
INFO[ 20:34:44] translate extension 'pg_duckdb' to package: pg_duckdb_18
INFO[ 20:34:44] translate extension 'pg_mooncake' to package: pg_mooncake_18
INFO[ 20:34:44] installing packages: dnf install -y postgresql18 postgresql18-server postgresql18-libs postgresql18-contrib postgresql18-plperl postgresql18-plpython3 postgresql18-pltcl timescaledb-tsl_18 postgis36_18 pgvector_18 pg_duckdb_18 pg_mooncake_18
这里使用了 “别名翻译” 机制,将清爽的 PG 内核/扩展 逻辑包名翻译为实际的 RPM/DEB 列表。如果您不需要别名翻译机制,可以直接使用 apt/dnf 安装,
或者使用变体 pig install 的 -n|--no-translation 参数:
pig install vector # 带有翻译机制,安装当前 PG 18 对应的 pgvector_18 或 postgresql-18-pgvector
pig install vector -n # 关闭翻译机制,安装名为 vector 的日志收集组件(来自 pigsty-infra 仓库)
别名翻译 PostgreSQL 内核与扩展对应着一系列的 RPM/DEB 包,记住这些包是一件麻烦事,所以 pig 提供了许多常用的别名,帮助您简化安装过程:
例如在 EL 系统上, 下面的别名将会被翻译为右侧的对应 RPM 包列表:
pgsql : "postgresql$v postgresql$v-server postgresql$v-libs postgresql$v-contrib postgresql$v-plperl postgresql$v-plpython3 postgresql$v-pltcl"
pg18 : "postgresql18 postgresql18-server postgresql18-libs postgresql18-contrib postgresql18-plperl postgresql18-plpython3 postgresql18-pltcl"
pg18-client : "postgresql18"
pg18-server : "postgresql18-server postgresql18-libs postgresql18-contrib"
pg18-devel : "postgresql18-devel"
pg18-basic : "pg_repack_18 wal2json_18 pgvector_18"
pg17-mini : "postgresql17 postgresql17-server postgresql17-libs postgresql17-contrib"
pg16-full : "postgresql16 postgresql16-server postgresql16-libs postgresql16-contrib postgresql16-plperl postgresql16-plpython3 postgresql16-pltcl postgresql16-llvmjit postgresql16-test postgresql16-devel"
pg15-main : "postgresql15 postgresql15-server postgresql15-libs postgresql15-contrib postgresql15-plperl postgresql15-plpython3 postgresql15-pltcl pg_repack_15 wal2json_15 pgvector_15"
pg14-core : "postgresql14 postgresql14-server postgresql14-libs postgresql14-contrib postgresql14-plperl postgresql14-plpython3 postgresql14-pltcl"
注意这里的 $v 占位符会被替换为 PG 大版本号,因此当您使用 pgsql 别名时,$v 会被实际替代为 18,17 这样的大版本号。
因此,当您安装 pg18-server 别名时,EL 上实际安装的是 postgresql18-server, postgresql18-libs, postgresql18-contrib,在 Debian / Ubuntu 上安装的是 postgresql-18 ,pig 会处理好所有细节。
常用 PostgreSQL 别名 EL 使用的别名翻译列表
"pgsql" : "postgresql $v postgresql $v -server postgresql $v -libs postgresql $v -contrib postgresql $v -plperl postgresql $v -plpython3 postgresql $v -pltcl" ,
"pgsql-mini" : "postgresql $v postgresql $v -server postgresql $v -libs postgresql $v -contrib" ,
"pgsql-core" : "postgresql $v postgresql $v -server postgresql $v -libs postgresql $v -contrib postgresql $v -plperl postgresql $v -plpython3 postgresql $v -pltcl" ,
"pgsql-full" : "postgresql $v postgresql $v -server postgresql $v -libs postgresql $v -contrib postgresql $v -plperl postgresql $v -plpython3 postgresql $v -pltcl postgresql $v -llvmjit postgresql $v -test postgresql $v -devel" ,
"pgsql-main" : "postgresql $v postgresql $v -server postgresql $v -libs postgresql $v -contrib postgresql $v -plperl postgresql $v -plpython3 postgresql $v -pltcl pg_repack_ $v wal2json_ $v pgvector_ $v " ,
"pgsql-client" : "postgresql $v " ,
"pgsql-server" : "postgresql $v -server postgresql $v -libs postgresql $v -contrib" ,
"pgsql-devel" : "postgresql $v -devel" ,
"pgsql-basic" : "pg_repack_ $v wal2json_ $v pgvector_ $v " ,
Debian / Ubuntu 系统使用的别名翻译
"pgsql" : "postgresql- $v postgresql-client- $v postgresql-plpython3- $v postgresql-plperl- $v postgresql-pltcl- $v " ,
"pgsql-mini" : "postgresql- $v postgresql-client- $v " ,
"pgsql-core" : "postgresql- $v postgresql-client- $v postgresql-plpython3- $v postgresql-plperl- $v postgresql-pltcl- $v " ,
"pgsql-full" : "postgresql- $v postgresql-client- $v postgresql-plpython3- $v postgresql-plperl- $v postgresql-pltcl- $v postgresql-server-dev- $v " ,
"pgsql-main" : "postgresql- $v postgresql-client- $v postgresql-plpython3- $v postgresql-plperl- $v postgresql-pltcl- $v postgresql- $v -repack postgresql- $v -wal2json postgresql- $v -pgvector" ,
"pgsql-client" : "postgresql-client- $v " ,
"pgsql-server" : "postgresql- $v " ,
"pgsql-devel" : "postgresql-server-dev- $v " ,
"pgsql-basic" : "postgresql- $v -repack postgresql- $v -wal2json postgresql- $v -pgvector" ,
上面这些别名可以直接使用,并通过参数实例化大版本号,也可以使用另一种带有大版本号的别名变体:即将 pgsql 替换为 pg18, pg17, pgxx 等具体大版本号。
当前活跃支持的 PostgreSQL 主版本范围为 14-18 ,例如对于 PostgreSQL 18,可以直接使用下面这些别名:
pgsqlpg18pg17pg16pg15pg14pgsqlpg18pg17pg16pg15pg14pgsql-minipg18-minipg17-minipg16-minipg15-minipg14-minipgsql-corepg18-corepg17-corepg16-corepg15-corepg14-corepgsql-fullpg18-fullpg17-fullpg16-fullpg15-fullpg14-fullpgsql-mainpg18-mainpg17-mainpg16-mainpg15-mainpg14-mainpgsql-clientpg18-clientpg17-clientpg16-clientpg15-clientpg14-clientpgsql-serverpg18-serverpg17-serverpg16-serverpg15-serverpg14-serverpgsql-develpg18-develpg17-develpg16-develpg15-develpg14-develpgsql-basicpg18-basicpg17-basicpg16-basicpg15-basicpg14-basic
安装扩展 pig 会检测当前系统环境中的 PostgreSQL 安装情况。如果检测到环境中(以 PATH 中的 pg_config 为准)有活跃的 PG 安装,那么 pig 会自动安装对应 PG 大版本所需的扩展,无需您显式指定 PG 大版本。
pig install pg_smtp_client # 更简单
pig install pg_smtp_client -v 18 # 显示指定大版本,更稳定可靠
pig install pg_smtp_client -p /usr/lib/postgresql/16/bin/pg_config # 另一种指定 PG 版本的方式
dnf install pg_smtp_client_18 # 最直接……,但并非所有扩展都这么简单……
提示:如需将特定大版本的 PostgreSQL 内核二进制加入 PATH,可用 pig ext link 命令:
pig ext link pg18 # 创建 /usr/pgsql 软链接,并写入 /etc/profile.d/pgsql.sh
. /etc/profile.d/pgsql.sh # 立即生效,更新 PATH 环境变量
如果你想要安装特定版本的软件,可以使用 name=ver 的语法:
pig ext add -v 18 pgvector = 0.7.2 # install pgvector 0.7.2 for PG 18
pig ext add pg16 = 16.5 # install PostgreSQL 16 with a specific minor version
警告 :请注意,目前只有 PGDG YUM 仓库提供扩展历史版本,PIGSTY 仓库与 PGDG APT 仓库都只提供扩展的 最新版本 。
显示扩展 pig ext status
$ pig ext status
Installed:
- PostgreSQL 18.1 ( Ubuntu 18.1-1.pgdg24.04+2) 398 Extensions
Active:
PG Version : PostgreSQL 18.1 ( Ubuntu 18.1-1.pgdg24.04+2)
Config Path : /usr/bin/pg_config
Binary Path : /usr/lib/postgresql/18/bin
Library Path : /usr/lib/postgresql/18/lib
Extension Path : /usr/share/postgresql/18/extension
Extension Stat : 329 Installed ( PIGSTY 234, PGDG 95) + 69 CONTRIB = 398 Total
Name Version Cate Flags License Repo Package Description
---- ------- ---- ------ ------- ------ ------------ ---------------------
timescaledb 2.24.0 TIME -dsl-- Timescale PIGSTY postgresql-18-timescaledb-tsl Enables scalable inserts and complex queries for time-series dat
timescaledb_toolkit 1.22.0 TIME -ds-t- Timescale PIGSTY postgresql-18-timescaledb-toolkit Library of analytical hyperfunctions, time-series pipelining, an
timeseries 0.2.0 TIME -d---- PostgreSQL PIGSTY postgresql-18-pg-timeseries Convenience API for time series stack
periods 1.2.3 TIME -ds--- PostgreSQL PGDG postgresql-18-periods Provide Standard SQL functionality for PERIODs and SYSTEM VERSIO
temporal_tables 1.2.2 TIME -ds--r BSD 2-Clause PIGSTY postgresql-18-temporal-tables temporal tables
postgis 3.6.1 GIS -ds--- GPL-2.0 PGDG postgresql-18-postgis-3 PostGIS geometry and geography spatial types and functions
postgis_topology 3.6.1 GIS -ds--- GPL-2.0 PGDG postgresql-18-postgis-3 PostGIS topology spatial types and functions
postgis_raster 3.6.1 GIS -ds--- GPL-2.0 PGDG postgresql-18-postgis-3 PostGIS raster types and functions
vector 0.8.1 RAG -ds--r PostgreSQL PGDG postgresql-18-pgvector vector data type and ivfflat and hnsw access methods
pg_duckdb 1.1.0 OLAP -dsl-- MIT PIGSTY postgresql-18-pg-duckdb DuckDB Embedded in Postgres
如果您的当前系统路径中找不到 PostgreSQL(以 PATH 中的 pg_config 为准),建议显式通过 -v|-p 指定 PG 大版本号或 pg_config 路径,以避免版本探测歧义。
扫描扩展 pig ext scan
$ pig ext scan
Installed:
- PostgreSQL 18.1 ( Ubuntu 18.1-1.pgdg24.04+2) 398 Extensions
Active:
PG Version : PostgreSQL 18.1 ( Ubuntu 18.1-1.pgdg24.04+2)
Config Path : /usr/bin/pg_config
Binary Path : /usr/lib/postgresql/18/bin
Library Path : /usr/lib/postgresql/18/lib
Extension Path : /usr/share/postgresql/18/extension
Name Version SharedLibs Description Meta
---- ------- ---------- --------------------- ------
timescaledb 2.25.1 Enables scalable inserts and complex queries... module_pathname = $libdir /timescaledb-2.24.0 relocatable = false trusted = true lib = ...
timescaledb_toolkit 1.22.0 Library of analytical hyperfunctions... relocatable = false superuser = false module_pathname = $libdir /timescaledb_toolkit lib = ...
periods 1.2 Provide Standard SQL functionality for PERIODs module_pathname = $libdir /periods relocatable = false requires = btree_gist lib = periods.so
pg_cron 1.6 Job scheduler for PostgreSQL relocatable = false schema = pg_catalog module_pathname = $libdir /pg_cron lib = pg_cron.so
postgis 3.6.1 PostGIS geometry and geography spatial types... module_pathname = $libdir /postgis-3 relocatable = false lib = postgis-3.so
vector 0.8.1 vector data type and ivfflat and hnsw access... relocatable = true lib = vector.so
pg_duckdb 1.1.0 DuckDB Embedded in Postgres module_pathname = $libdir /pg_duckdb relocatable = false schema = public lib = ...
...
容器实战 您可以创建一台全新的虚拟机,或者使用下面的 Docker 容器进行功能测试,创建一个 d13 目录,创建 Dockerfile:
FROM debian:13
USER root
WORKDIR /root /
CMD [ "/bin/bash" ]
RUN apt update && apt install -y ca-certificates curl && curl https://repo.pigsty.io/pig | bash
docker build -t d13:latest .
docker run -it d13:latest /bin/bash
pig repo set --region= china # 添加中国区域的仓库
pig install -y pg18 # 安装 PGDG 18 内核包
pig install -y postgis timescaledb pgvector pg_duckdb
24.2 - 简介 为什么我们还需要一个新的包管理器?尤其是针对 Postgres 扩展?
你是否曾因安装或升级 PostgreSQL 扩展而头疼?翻查过时的文档、晦涩难懂的配置脚本,或是在 GitHub 上苦寻分支与补丁?
Postgres 丰富的扩展生态同时意味着复杂的部署流程 —— 在多发行版、多架构环境下尤为棘手。而 PIG 可以为您解决这些烦恼。
这正是 Pig 诞生的初衷。Pig 由 Go 语言开发,致力于一站式管理 Postgres 及其 464 个扩展。
无论是 TimescaleDB、Citus、PGVector,还是 30+ Rust 扩展,亦或 自建 Supabase 所需的全部组件 —— Pig 统一的 CLI 让一切触手可及。
它彻底告别源码编译与杂乱仓库,直接提供版本对齐的 RPM/DEB 包,完美兼容 Debian、Ubuntu、RedHat 等主流发行版,支持 x86 与 Arm 架构,无需猜测,无需折腾。
Pig 并非重复造轮子,而是充分利用系统原生包管理器(APT、YUM、DNF),严格遵循 PGDG 官方 打包规范,确保无缝集成。
你无需在"标准做法"与"快捷方式"之间权衡;Pig 尊重现有仓库,遵循操作系统最佳实践,与现有仓库和软件包和谐共存。
如果你的 Linux 系统和 PostgreSQL 大版本不在 支持的列表 中,你还可以使用 pig build
想让你的 Postgres 如虎添翼、远离繁琐?欢迎访问 PIG 官方文档 获取文档、指南,并查阅庞大的 扩展列表 ,
让你的本地 Postgres 数据库一键进化为全能的多模态数据中台。
如果说 Postgres 的未来是无可匹敌的可扩展性 ,那么 Pig 就是帮你解锁它的神灯。毕竟,从没有人抱怨 “扩展太多”。
自动化友好 PIG 的命令体系可直接用于自动化脚本:参数风格统一、输出稳定,并在高风险操作中提供 --dry-run 或确认步骤,减少误操作风险。
《ANNOUNCE pig: The Postgres Extension Wizard 》
Linux 兼容性 PIG 与 Pigsty 扩展仓库支持以下 Linux 发行版和 PostgreSQL 版本组合:
OS 代码 厂商 大版本 小版本 全名 PG 版本 备注 el7.x86_64EL 7 7.9 CentOS 7 x86 13-15 EOL el8.x86_64EL 8 8.10 RockyLinux 8 x86 14-18 即将EOL el8.aarch64EL 8 8.10 RockyLinux 8 ARM 14-18 即将EOL el9.x86_64EL 9 9.7 RockyLinux 9 x86 14-18 ✅ el9.aarch64EL 9 9.7 RockyLinux 9 ARM 14-18 ✅ el10.x86_64EL 10 10.1 RockyLinux 10 x86 14-18 ✅ el10.aarch64EL 10 10.1 RockyLinux 10 ARM 14-18 ✅ d11.x86_64Debian 11 11.11 Debian 11 x86 14-18 EOL d11.aarch64Debian 11 11.11 Debian 11 ARM 14-18 EOL d12.x86_64Debian 12 12.13 Debian 12 x86 14-18 ✅ d12.aarch64Debian 12 12.13 Debian 12 ARM 14-18 ✅ d13.x86_64Debian 13 13.3 Debian 13 x86 14-18 ✅ d13.aarch64Debian 13 13.3 Debian 13 ARM 14-18 ✅ u20.x86_64Ubuntu 20 20.04.6 Ubuntu 20.04 x86 14-18 EOL u20.aarch64Ubuntu 20 20.04.6 Ubuntu 20.04 ARM 14-18 EOL u22.x86_64Ubuntu 22 22.04.5 Ubuntu 22.04 x86 14-18 ✅ u22.aarch64Ubuntu 22 22.04.5 Ubuntu 22.04 ARM 14-18 ✅ u24.x86_64Ubuntu 24 24.04.4 Ubuntu 24.04 x86 14-18 ✅ u24.aarch64Ubuntu 24 24.04.4 Ubuntu 24.04 ARM 14-18 ✅
说明:
EL 指 RHEL 兼容发行版,包括 RHEL、CentOS、RockyLinux、AlmaLinux、OracleLinux 等EOL 表示该操作系统已经或即将停止支持,建议升级到更新版本✅ 表示完整支持,推荐使用PG 版本 14-18 表示支持 PostgreSQL 14、15、16、17、18 五个大版本 24.3 - 安装 如何下载与安装 pig 包管理器
脚本安装 安装 pig 最简单的方式是运行以下安装脚本:
默认安装 (Cloudflare CDN):
curl -fsSL https://repo.pigsty.io/pig | bash
中国镜像 :
curl -fsSL https://repo.pigsty.cc/pig | bash
该脚本会从 Pigsty 软件仓库 下载最新版 pig 的 RPM / DEB 包,并通过 rpm 或 dpkg 进行安装。
指定版本 您可以指定特定版本进行安装,将版本号作为参数传入即可:
默认安装 (Cloudflare CDN):
curl -fsSL https://repo.pigsty.io/pig | bash -s 1.0.0
中国镜像 :
curl -fsSL https://repo.pigsty.cc/pig | bash -s 1.0.0
发布页下载 你也可以直接从 Pigsty 仓库下载 pig 安装包(RPM/DEB/ 压缩包):GitHub v1.0.0 稳定版发布页
latest
└── v1.0.0
├── pig_1.0.0-1_amd64.deb
├── pig_1.0.0-1_arm64.deb
├── pig-1.0.0-1.aarch64.rpm
├── pig-1.0.0-1.x86_64.rpm
├── pig-v1.0.0.linux-amd64.tar.gz
├── pig-v1.0.0.linux-arm64.tar.gz
├── pig-v1.0.0.darwin-amd64.tar.gz
└── pig-v1.0.0.darwin-arm64.tar.gz
将其解压后,将二进制文件放入您的 PATH 系统路径中即可。
仓库安装 pig 软件位于 pigsty-infra
YUM 对于 RHEL,RockyLinux,CentOS,Alma Linux,OracleLinux 等 EL 系发行版:
sudo tee /etc/yum.repos.d/pigsty-infra.repo > /dev/null <<-'EOF'
[pigsty-infra]
name=Pigsty Infra for $basearch
baseurl=https://repo.pigsty.io/yum/infra/$basearch
enabled = 1
gpgcheck = 0
module_hotfixes=1
EOF
sudo yum makecache;
sudo yum install -y pig
APT 对于 Debian,Ubuntu 等 DEB 系发行版:
sudo tee /etc/apt/sources.list.d/pigsty-infra.list > /dev/null <<EOF
deb [trusted=yes] https://repo.pigsty.io/apt/infra generic main
EOF
sudo apt update;
sudo apt install -y pig
更新 若要将现有 pig 版本升级至最新可用版本,可以使用以下命令:
pig update # 将 pig 自身升级到最新版
若要将现有 pig 的扩展数据升级至最新可用版本,可以使用以下命令:
pig ext reload # 将 pig 扩展数据更新至最新版本
卸载 apt remove -y pig # Debian / Ubuntu 等 Debian 系统
yum remove -y pig # RHEL / CentOS / RockyLinux 等 EL 系发行版
rm -rf /usr/bin/pig # 若直接使用二进制安装,删除二进制文件即可
构建 你也可以自行构建 pig。pig 使用 Go 语言开发,构建非常容易,源码托管在 github.com/pgsty/pig
git clone https://github.com/pgsty/pig.git; cd pig
go get -u; go build
所有 RPM / DEB 包都通过 GitHub CI/CD 流程使用 goreleaser 自动化构建。
24.5 - 命令参考 24.6 - pig pig CLI 命令参考概览
pig CLI 提供了全面的工具集,用于管理 PostgreSQL 安装、扩展、软件仓库以及从源码构建扩展。使用 pig help <command> 查看命令文档。
概览 pig - PostgreSQL 的 Linux 包管理器
Usage:
pig [ command]
Examples:
pig repo add -ru # 覆盖现有仓库并更新缓存
pig install pg18 # 安装 PostgreSQL 18 PGDG 软件包
pig install pg_duckdb # 安装指定的 PostgreSQL 扩展
pig install pgactive -v 18 # 为特定 PG 版本安装扩展
访问 https://pigsty.io/ext/ 获取详情
PostgreSQL Extension Manager
build 构建 Postgres 扩展
ext 管理 PostgreSQL 扩展 ( pgext)
repo 管理 Linux 软件仓库 ( apt/dnf)
Pigsty Management Commands
do 运行管理任务
patroni 使用 patronictl 管理 Patroni 集群
pg_exporter 管理 pg_exporter 与监控指标
pgbackrest 管理 pgBackRest 备份与恢复
pitr 编排式时间点恢复
postgres 管理本地 PostgreSQL 服务器与数据库
sty 管理 Pigsty 安装
Additional Commands:
completion 生成指定 shell 的自动补全脚本
help 获取任何命令的帮助信息
install 使用原生包管理器安装软件包
status 显示环境状态
update 升级 pig 自身
version 显示 pig 版本信息
Flags:
--debug 启用调试模式
-h, --help 获取帮助信息
-H, --home string Pigsty 主目录路径
-i, --inventory string 配置清单路径
-t, --toggle 帮助信息中的占位参数
--log-level string 日志级别: debug, info, warn, error, fatal, panic ( 默认 "info" )
--log-path string 日志文件路径,默认为终端输出
使用 "pig [command] --help" 获取命令的详细信息。
pig repo 管理 PostgreSQL 软件包的 APT/YUM 仓库,详情请参考 pig repo
pig repo list # 列出可用仓库
pig repo info pgdg # 显示仓库详情
pig repo status # 检查当前仓库状态
pig repo add pgdg pigsty -u # 添加仓库
pig repo rm old-repo # 移除仓库
pig repo update # 更新软件包缓存
pig repo create /www/pigsty # 创建本地仓库
pig repo cache # 创建离线包
pig repo boot # 从离线包引导
pig ext 管理 PostgreSQL 扩展和内核包,详情请参考 pig ext
pig ext list duck # 搜索扩展
pig ext info pg_duckdb # 扩展详情
pig ext status # 显示已安装的扩展
pig ext add pg_duckdb -y # 安装扩展
pig ext rm old_extension # 移除扩展
pig ext update # 更新扩展
pig ext scan # 扫描已安装的扩展
pig ext import pg_duckdb # 下载以供离线使用
pig ext link 17 # 链接 PG 版本到 PATH
pig ext reload # 刷新扩展目录
pig build 从源码构建 PostgreSQL 扩展,详情请参考 pig build
# 环境设置
pig build spec # 初始化构建规格
pig build repo # 设置仓库
pig build tool # 安装构建工具
pig build rust -y # 强制重装 Rust(默认不重装)
pig build pgrx # 安装 PGRX 框架
# 构建扩展
pig build pkg citus # 完整构建流程 = get + dep + ext
pig build get citus # 下载源码
pig build dep citus # 安装依赖
pig build ext citus # 构建包
pig sty 安装 Pigsty 发行版,详情请参考 pig sty
pig sty init # 安装 Pigsty 到 ~/pigsty
pig sty boot # 安装 Ansible 依赖
pig sty conf # 生成配置
pig sty deploy # 运行部署 playbook
pig pg 管理本地 PostgreSQL 服务器,详情请参考 pig pg
pig pg init # 初始化数据目录
pig pg start # 启动 PostgreSQL
pig pg stop # 停止 PostgreSQL
pig pg status # 查看状态
pig pg psql mydb # 连接数据库
pig pg ps # 查看当前连接
pig pg vacuum mydb # 清理数据库
pig pg tune -p olap # 生成调优参数
pig pg log tail # 实时查看日志
pig pt 管理 Patroni HA 集群,详情请参考 pig pt
pig pt list # 列出集群成员
pig pt config # 显示集群配置
pig pt config ttl = 60 # 修改集群配置
pig pt status # 查看服务状态
pig pt log -f # 实时查看日志
pig pb 管理 pgBackRest 备份与恢复,详情请参考 pig pb
pig pb info # 显示备份信息
pig pb ls # 列出所有备份
pig pb backup # 创建备份
pig pb backup full # 全量备份
pig pb restore -d # 恢复到最新
pig pb restore -t "2025-01-01" # 恢复到指定时间
pig pb log tail # 实时查看日志
pig pitr 执行编排式时间点恢复(PITR),详情请参考 pig pitr
pig pitr -d # 恢复到最新数据
pig pitr -t "2025-01-01 12:00" # 恢复到指定时间
pig pitr -I # 恢复到备份一致性点
pig pitr -d --dry-run # 显示执行计划(不实际执行)
pig pitr -d -y # 跳过确认(自动化)
24.7 - pig repo 使用 pig repo 子命令管理软件仓库
pig repo 命令是一个综合性的软件包仓库管理工具。它提供了添加、移除、创建和管理软件仓库的功能,支持 RPM 系统(RHEL/CentOS/Rocky/Alma)和 Debian 系统(Debian/Ubuntu)。
pig repo - Manage Linux APT/YUM Repo
pig repo list # available repo list (info)
pig repo info [ repo| module...] # show repo info (info)
pig repo status # show current repo status (info)
pig repo add [ repo| module...] # add repo and modules (root)
pig repo rm [ repo| module...] # remove repo & modules (root)
pig repo update # update repo pkg cache (root)
pig repo create # create repo on current system (root)
pig repo boot # boot repo from offline package (root)
pig repo cache # cache repo as offline package (root)
Examples:
pig repo add -ru # add all repo and update cache (brute but effective)
pig repo add pigsty -u # gentle version, only add pigsty repo and update cache
pig repo add node pgdg pigsty # essential repo to install postgres packages
pig repo add all # all = node + pgdg + pigsty
pig repo add all extra # extra module has non-free and some 3rd repo for certain extensions
pig repo update # update repo cache
pig repo create # update local repo /www/pigsty meta
pig repo boot # extract /tmp/pkg.tgz to /www/pigsty
pig repo cache # cache /www/pigsty into /tmp/pkg.tgz
命令 描述 备注 repo list打印可用仓库与模块列表 repo info获取仓库详细信息 repo status显示当前仓库状态 repo add添加新仓库 需要 sudo 或 root 权限 repo set清空、覆盖并更新仓库 需要 sudo 或 root 权限 repo rm移除仓库 需要 sudo 或 root 权限 repo update更新仓库缓存 需要 sudo 或 root 权限 repo create创建本地 YUM/APT 仓库 需要 sudo 或 root 权限 repo cache从本地仓库创建离线包 需要 sudo 或 root 权限 repo boot从离线包引导仓库 需要 sudo 或 root 权限 repo reload刷新仓库目录
快速入门 # 方法 1:清理干净现有仓库,添加所有必要仓库并更新缓存(推荐)
pig repo add all --remove --update # 移除旧仓库,添加所有必要仓库,更新缓存
# 方法 1 变体:一步到位
pig repo set # = pig repo add all --remove --update
# 方法 2:温和方式 - 仅添加所需仓库,保留你目前的仓库配置
pig repo add pgsql # 添加 PGDG 和 Pigsty 仓库并更新缓存
pig repo add pigsty --region= china # 添加 Pigsty 仓库,指定使用中国区域
pig repo add pgdg --region= europe # 添加 PGDG 仓库,指定使用欧洲区域
pig repo add infra --region= default # 添加 INFRA 仓库 ,指定使用默认区域
# 如果上面没有-u|--update 选项一步到位,请额外执行此命令
pig repo update # 更新系统包缓存
模块 在 pig 中,APT/YUM 仓库被组织为 模块 —— 服务于特定目的的一组仓库。
模块 说明 仓库列表 all安装 PG 所需的全部核心模块 node + infra + pgsqlpgsqlPGDG + Pigsty PG 扩展 pigsty-pgsql + pgdgpigstyPigsty Infra + PGSQL 仓库 pigsty-infra, pigsty-pgsql pgdgPGDG 官方仓库 pgdg-common, pgdg13-18 nodeLinux 系统仓库 base, updates, extras, epel, baseos, appstream… infra基础设施组件仓库 pigsty-infra, nginx, docker-ce dockerDocker 仓库 docker-ce betaPostgreSQL 19 Beta 版本 pgdg19-beta, pgdg-beta extraPGDG Non-Free 与三方扩展 pgdg-extras, timescaledb, citus groongaPGroonga 仓库 groonga mssqlWiltondb 仓库(已弃用) babelfish perconaPercona PG + PG_TDE percona llvmLLVM 工具链仓库 llvm kubeKubernetes 仓库 kubernetes grafanaGrafana 仓库 grafana haproxyHAProxy 仓库 haproxyd, haproxyu redisRedis 仓库 redis mongoMongoDB 仓库 mongo mysqlMySQL 仓库 mysql clickClickHouse 仓库 clickhouse gitlabGitLab 仓库 gitlab-ce, gitlab-ee
除此之外,pig 还自带了一些其他数据库的 APT/DNF 仓库:redis, kubernetes, grafana, clickhouse, gitlab, haproxy, mongodb, mysql,在此不再展开。
通常来说,为了安装 PostgreSQL node (Linux 系统仓库) 和 pgsql(PGDG + Pigsty)是必选项,infra 仓库是可选项(包含了一些工具,IvorySQL Kernel 等)。
您可以使用特殊的 all 模块,一次性添加所有需要的仓库到系统中,对绝大多数用户来说,这是合适的起点。
pig repo add all # 添加 node,pgsql,infra 三个仓库到系统中
pig repo add # 不添加任何参数时,默认使用 all 模块
pig repo set # 使用 set 替代 add 时,将清理备份现有仓库定义并覆盖式更新
仓库定义 Pigsty 中可用仓库的完整定义位于 cli/repo/assets/repo.yml
您可以创建 ~/.pig/repo.yml 文件,显式修改并覆盖 pig 的仓库定义。在编辑仓库定义文件时,您可以在 baseurl 处添加额外的区域镜像,例如指定中国,欧洲地区的镜像仓库 URL。当 pig 使用 --region 参数指定特定的区域时,pig 会优先查找对应区域的仓库 URL,如果不存在,则会 Fallback 到 default 的仓库 URL。
repo list pig repo list 将列出当前系统可用的所有仓库模块。
pig repo list # 列出当前系统可用仓库
pig repo list all # 列出所有仓库(不过滤)
repo info 显示特定仓库或模块的详细信息,包括 URL、元数据和区域镜像,以及 .repo / .list 仓库文件内容。
pig repo info pgdg # 显示 pgdg 模块的信息
pig repo info pigsty pgdg # 显示多个模块的信息
pig repo info all # 显示所有模块的信息
repo status 显示系统上的当前仓库配置。
repo add 添加仓库配置文件到系统。需要 root/sudo 权限。
pig repo add pgdg # 添加 PGDG 仓库
pig repo add pgdg pigsty # 添加多个仓库
pig repo add all # 添加所有必要仓库 (pgdg + pigsty + node)
pig repo add pigsty -u # 添加并更新缓存
pig repo add all -r # 添加前移除现有仓库
pig repo add all -ru # 移除、添加并更新(完全重置)
pig repo add pgdg --region= china # 使用中国镜像
选项:
-r|--remove:添加新仓库前移除现有仓库-u|--update:添加仓库后运行包缓存更新--region <region>:使用区域镜像仓库(default / china / europe)平台 模块位置 EL /etc/yum.repos.d/<module>.repoDebian /etc/apt/sources.list.d/<module>.list
repo set 等同于 repo add --remove --update。清空现有仓库并设置新仓库,然后更新缓存。
pig repo set # 替换为默认仓库
pig repo set pgdg pigsty # 替换为特定仓库并更新
pig repo set all --region= china # 使用中国镜像
repo rm 移除仓库配置文件并备份它们。
pig repo rm # 移除所有仓库
pig repo rm pgdg # 移除特定仓库
pig repo rm pgdg pigsty -u # 移除并更新缓存
平台 备份位置 EL /etc/yum.repos.d/backup/Debian /etc/apt/sources.list.d/backup/
repo update 更新包管理器缓存以反映仓库更改。
平台 等效命令 EL dnf makecacheDebian apt update
repo create 为离线安装创建本地包仓库。
pig repo create # 在默认位置创建 (/www/pigsty)
pig repo create /srv/repo # 在自定义位置创建
平台 依赖软件 EL createrepo_cDebian dpkg-dev
repo cache 创建仓库内容的压缩 tarball 用于离线分发。
pig repo cache # 默认:/www 到 /tmp/pkg.tgz
pig repo cache -d /srv # 自定义源目录
选项:
-d, --dir:源目录(默认:/www/)-p, --path:输出路径(默认:/tmp/pkg.tgz)repo boot 从离线包解压并设置本地仓库。
pig repo boot # 默认:/tmp/pkg.tgz 到 /www
pig repo boot -p /mnt/pkg.tgz # 自定义包路径
pig repo boot -d /srv # 自定义目标目录
选项:
-p, --path:包路径(默认:/tmp/pkg.tgz)-d, --dir:目标目录(默认:/www/)repo reload 从 GitHub 刷新仓库元数据到最新版本。
更新后的文件会放置于 ~/.pig/repo.yml 中。
24.8 - pig ext 使用 pig ext 子命令管理 PostgreSQL 扩展
pig ext 命令是一个用于管理 PostgreSQL 扩展的全能工具。它允许用户搜索、安装、移除、更新和管理 PostgreSQL 扩展,甚至支持内核包的管理。
pig ext - Manage PostgreSQL Extensions
pig repo add -ru # add all repo and update cache (brute but effective)
pig ext add pg18 # install optional postgresql 18 package
pig ext list duck # search extension in catalog
pig ext scan -v 18 # scan installed extension for pg 18
pig ext add pg_duckdb # install certain postgresql extension
Examples:
pig ext list [ query] # list & search extension
pig ext info [ ext...] # get information of a specific extension
pig ext status [ -v] # show installed extension and pg status
pig ext add [ ext...] # install extension for current pg version
pig ext rm [ ext...] # remove extension for current pg version
pig ext update [ ext...] # update extension to the latest version
pig ext import [ ext...] # download extension to local repo
pig ext link [ ext...] # link postgres installation to path
pig ext reload # reload the latest extension catalog data
命令 描述 备注 ext list搜索扩展 ext info显示扩展详细信息 ext avail显示扩展可用性矩阵 ext status显示已安装的扩展 ext scan扫描已安装的扩展 ext add安装扩展 需要 sudo 或 root 权限 ext rm移除扩展 需要 sudo 或 root 权限 ext update更新扩展 需要 sudo 或 root 权限 ext import下载扩展以供离线使用 需要 sudo 或 root 权限 ext link链接 PG 版本到 PATH 需要 sudo 或 root 权限 ext reload刷新扩展目录
快速入门 在安装 PostgreSQL 扩展前,你需要先添加 pig repo add
pig repo add pgdg pigsty -u # 温和方式添加 pgdg 和 pigsty 仓库
pig repo set # 粗暴方式移除并添加所有所需仓库
然后你可以搜索并安装 PostgreSQL 扩展:
pig ext install pg_duckdb
pig ext install pg_partman
pig ext install pg_cron
pig ext install pg_repack
pig ext install pg_stat_statements
pig ext install pg_stat_kcache
可用扩展及其名称请查阅 扩展列表
使用说明:
未指定 PostgreSQL 版本时,工具会尝试从 PATH 中的 pg_config 自动检测当前活动的 PostgreSQL 安装。 PostgreSQL 可通过主版本号(-v)或 pg_config 路径(-p)指定。若指定 -v,pig 会使用该版本 PGDG 内核包的默认路径。EL 发行版为 /usr/pgsql-$v/bin/pg_config, DEB 发行版为 /usr/lib/postgresql/$v/bin/pg_config 等。 若指定 -p,则直接用该路径定位 PostgreSQL。 扩展管理器会根据操作系统自动适配不同的包格式:RHEL/CentOS/Rocky Linux/AlmaLinux 使用 RPM 包 Debian/Ubuntu 使用 DEB 包 某些扩展可能有依赖项,安装时会自动解决。 谨慎使用 -y 参数,它会自动确认所有提示。 Pigsty 假定你已安装官方 PGDG 内核包,如未安装,可用如下命令:
pig ext install pg18 # 安装 PostgreSQL 18 内核(除 devel 包)
ext list 列出(或搜索)扩展目录中的可用扩展。
pig ext list # 列出所有扩展
pig ext list duck # 搜索包含 "duck" 的扩展
pig ext list -v 18 # 按 PG 版本筛选
pig ext ls olap # 列出 olap 类别扩展
pig ext ls gis -v 16 # 列出 PG 16 的 GIS 类扩展
pig ext ls rag # 列出 RAG 类别扩展
分类筛选通过查询参数直接指定分类名实现,支持的分类包括:time, gis, rag, fts, olap, feat, lang, type, func, util, admin, stat, sec, fdw, sim, etl。
选项:
-v|--version:按 PG 版本筛选--pkg:显示包名而非扩展名,仅列出主导扩展Status 列说明:
installed:扩展已安装(绿色)available:扩展可用但未安装(黄色)not avail:扩展在当前系统不可用(红色)默认扩展目录定义在 cli/ext/assets/extension.csv
可用 pig ext reload 命令更新到最新扩展目录,数据将下载到 ~/.pig/extension.csv;在线最新版目录同步发布于 pigsty.io/ext/data/extension.csv
ext info 显示指定扩展的详细信息。
pig ext info postgis # 显示 PostGIS 详细信息
pig ext info timescaledb # 显示 TimescaleDB 信息
pig ext info vector postgis # 显示多个扩展信息
ext avail 显示扩展的可用性矩阵,展示扩展在不同操作系统、架构和 PostgreSQL 版本上的可用情况。
pig ext avail # 显示当前系统上所有包的可用性
pig ext avail timescaledb # 显示 timescaledb 的可用性矩阵
pig ext avail postgis pg_duckdb # 显示多个扩展的可用性
pig ext av pgvector # 显示 pgvector 的可用性
pig ext matrix citus # avail 命令的别名
可用性矩阵会显示扩展在各个操作系统(EL8/9/10, Debian 12/13, Ubuntu 22/24)、架构(x86_64/aarch64)和 PostgreSQL 版本(14-18)上的可用情况。
ext status 显示当前 PostgreSQL 实例已安装扩展的状态。
pig ext status # 显示已安装扩展
pig ext status -c # 包含 contrib 扩展
pig ext status -v 16 # 显示 PG 16 已安装扩展
选项:
-c|--contrib: 结果中包含 contrib 扩展ext scan 扫描当前 PostgreSQL 实例已安装的扩展。
pig ext scan [ -v version]
该命令会扫描 postgres 扩展目录,查找所有实际已安装的扩展。
ext add 安装一个或多个 PostgreSQL 扩展。也可以使用别名 pig install。
pig ext add pg_duckdb # 安装 pg_duckdb
pig ext add pg_duckdb -v 18 # 为 PG 18 安装
pig ext add pg_duckdb -y # 自动确认安装
pig ext add vector postgis # 安装多个扩展
# 使用别名
pig install pg_duckdb
pig install pg_duckdb -v 18 -y
# 安装 PostgreSQL 内核
pig ext install pgsql # 安装最新版 postgresql 内核
pig ext a pg18 # 安装 postgresql 18 内核包
pig ext ins pg16 # 安装 postgresql 16 内核包
pig ext install pg15-core # 安装 postgresql 15 核心包
pig ext install pg14-main -y # 安装 pg 14 + 常用扩展(vector, repack, wal2json)
选项:
-v|--version:指定 PG 大版本-y|--yes:自动确认安装ext rm 移除一个或多个 PostgreSQL 扩展。
pig ext rm pg_duckdb # 移除 pg_duckdb
pig ext rm pg_duckdb -v 18 # 移除 PG 18 版本
pig ext rm pgvector -y # 自动确认移除
ext update 将已安装扩展更新到最新版。
pig ext update # 更新所有已安装扩展
pig ext update pg_duckdb # 更新特定扩展
pig ext update postgis timescaledb # 更新多个扩展
pig ext update -y # 自动确认更新
ext import 下载扩展包到本地仓库,便于离线安装。
pig ext import postgis # 导入 PostGIS 包
pig ext import timescaledb pg_cron # 导入多个扩展包
pig ext import pg16 # 导入 PostgreSQL 16 包
pig ext import pgsql-common # 导入常用工具包
pig ext import -d /www/pigsty postgis # 指定路径导入
选项:
-d|--repo: 指定仓库目录(默认:/www/pigsty)ext link 将指定 PG 版本链接到系统 PATH。
pig ext link 18 # 链接 PG 18 到 PATH
pig ext link 16 # 链接 PG 16 到 /usr/pgsql
pig ext link /usr/pgsql-16 # 从指定路径链接到 /usr/pgsql
pig ext link null # 取消当前 PostgreSQL 链接
该命令会创建 /usr/pgsql 软链接,并写入 /etc/profile.d/pgsql.sh。
ext reload 从 GitHub 刷新扩展元数据。
更新后的文件会放置于 ~/.pig/extension.csv 中。
24.9 - pig build 使用 pig build 子命令从源码构建扩展
pig build 命令是一个强大的工具,简化了从源码构建 PostgreSQL 扩展的整个工作流程。它提供了完整的构建基础设施设置、依赖管理,以及标准和自定义 PostgreSQL 扩展在不同操作系统上的编译环境。
pig build - Build Postgres Extension
Environment Setup:
pig build spec # init build spec and directory (~ext)
pig build repo # init build repo (=repo set, with remove+update)
pig build tool [ mini| full| ...] # init build toolset
pig build rust [ -y] # install Rust toolchain
pig build pgrx [ -v <ver>] # install & init pgrx (0.16.1)
pig build proxy [ id@host:port ] # init build proxy (optional)
Package Building:
pig build pkg [ ext| pkg...] # complete pipeline: get + dep + ext
pig build get [ ext| pkg...] # download extension source tarball
pig build dep [ ext| pkg...] # install extension build dependencies
pig build ext [ ext| pkg...] # build extension package
Quick Start:
pig build spec # setup build spec and directory
pig build pkg citus # build citus extension
命令 描述 备注 build spec初始化构建规范仓库 build repo初始化所需仓库 需要 sudo 或 root 权限 build tool初始化构建工具 需要 sudo 或 root 权限 build rust安装 Rust 工具链 需要 sudo 或 root 权限 build pgrx安装并初始化 pgrx 需要 sudo 或 root 权限 build proxy初始化构建代理 build get下载源代码 tarball build dep安装扩展构建依赖 需要 sudo 或 root 权限 build ext构建扩展包 需要 sudo 或 root 权限 build pkg完整构建流程:get、dep、ext 需要 sudo 或 root 权限
快速入门 设置构建环境并构建扩展的最快方式:
# 步骤 1:初始化构建规范
pig build spec
# 步骤 2:构建扩展(完整流程)
pig build pkg citus
# 构建的包将位于:
# - EL: ~/rpmbuild/RPMS/
# - Debian: ~/
更精细的控制方式:
# 设置环境
pig build spec # 初始化构建规范
pig build repo # 设置仓库
pig build tool # 安装构建工具
# 构建过程
pig build get citus # 下载源码
pig build dep citus # 安装依赖
pig build ext citus # 构建包
# 或一次完成所有三个步骤
pig build pkg citus # get + dep + ext
构建基础设施 目录结构 ~/ext/ # 默认构建规范目录
├── Makefile # 主构建 makefile
├── <extension>/ # 每个扩展的目录
│ ├── Makefile # 扩展特定的 makefile
│ ├── <extension>.spec # RPM 规范文件(EL)
│ └── debian/ # Debian 打包文件
│ ├── control
│ ├── rules
│ └── ...
构建输出位置:
EL 系统 :~/rpmbuild/RPMS/<arch>/Debian 系统 :~/(deb 文件)build spec 设置构建规范仓库和目录结构。
pig build spec # 在默认位置初始化 ~/ext
功能:
克隆或更新扩展构建规范仓库 创建必要的目录结构 设置 makefile 和构建脚本 准备平台特定的打包文件 仓库位置: 默认 ~/ext/,包含 100+ 扩展的构建规范。
build repo 初始化构建扩展所需的包仓库。
pig build repo # 等同于:pig repo set(内部执行 remove+update)
功能: 移除现有仓库、添加所有必需仓库(pgdg、pigsty、node)、更新包缓存。
安装必要的开发工具和编译器。
pig build tool # 安装默认工具集
pig build tool mini # 最小工具集
pig build tool full # 完整工具集
pig build tool rust # 添加 Rust 开发工具
工具包:
最小(mini): GCC/Clang 编译器、Make 和构建必需品、PostgreSQL 开发头文件、基本库默认: 所有最小工具、额外编译器(g++、clang++)、开发库、打包工具(rpmbuild、dpkg-dev)完整(full): 所有默认工具、语言特定工具(Python、Perl、Ruby 开发)、高级调试工具、性能分析工具build rust 安装 Rust 编程语言工具链,基于 Rust 的扩展所需。
pig build rust # 带确认安装
pig build rust -y # 强制重新安装 Rust 工具链
安装内容: Rust 编译器(rustc)、Cargo 包管理器、Rust 标准库、开发工具。
build pgrx 安装并初始化 PGRX(Rust 的 PostgreSQL 扩展框架)。
pig build pgrx # 安装最新稳定版 (0.16.1)
pig build pgrx -v 0.15.0 # 安装特定版本
前提条件: 必须先安装 Rust 工具链、PostgreSQL 开发头文件。
build proxy 为受限互联网访问的构建环境设置代理配置。
pig build proxy # 交互式设置
pig build proxy user@host:8080 # 直接配置
pig build proxy http://proxy.company.com:3128
build get 下载扩展源代码 tarball。
pig build get citus # 单个扩展
pig build get citus pgvector # 多个扩展
pig build get all # 所有可用扩展
pig build get std # 标准扩展
pig build get pdu pgdog # 使用内置源码 alias
一些源码包并不直接对应扩展名,pig build get 内置了少量特殊 alias 以便直接下载源码。v1.3.2 新增了 pdu 与 pgdog 两个 alias。
pig build get pdu # 下载 pdu-3.0.25.12.tar.gz
pig build get pgdog # 下载 pgdog-0.1.32.tar.gz
pig build get pgedge # 同时下载 PostgreSQL 与 spock 源码
当前常见的特殊源码 alias 包括:babelfishpg / babelfish、agensgraph / agens、pgedge、pdu、pgdog。
build dep 安装构建扩展所需的依赖。
pig build dep citus # 单个扩展
pig build dep citus pgvector # 多个扩展
pig build dep citus --pg 17,16 # 为特定 PG 版本
build ext 编译扩展并创建安装包。
pig build ext citus # 构建单个扩展
pig build ext citus pgvector # 构建多个
pig build ext citus --pg 17 # 为特定 PG 版本
pig build ext citus -s # 包含调试符号(仅 RPM)
build pkg 执行完整的构建流程:下载、依赖和构建。
pig build pkg citus # 构建单个扩展
pig build pkg citus pgvector # 构建多个
pig build pkg citus --pg 17,16 # 为多个 PG 版本
pig build pkg citus -s # 包含调试符号
常见工作流 工作流 1:构建标准扩展 # 1. 设置构建环境(一次性)
pig build spec
pig build repo
pig build tool
# 2. 构建扩展
pig build pkg pg_partman
# 3. 安装构建的包
sudo rpm -ivh ~/rpmbuild/RPMS/x86_64/pg_partman*.rpm # EL
sudo dpkg -i ~/pg_partman*.deb # Debian
工作流 2:构建 Rust 扩展 # 1. 设置 Rust 环境
pig build spec
pig build tool
pig build rust # 如需强制重装可追加 -y
pig build pgrx
# 2. 构建 Rust 扩展
pig build pkg pgmq
# 3. 安装
sudo pig ext add pgmq
工作流 3:构建多个版本 # 为多个 PostgreSQL 版本构建扩展
pig build pkg citus --pg 15,16,17
# 结果为每个版本生成包:
# citus_15-*.rpm
# citus_16-*.rpm
# citus_17-*.rpm
故障排除 找不到构建工具 # 安装构建工具
pig build tool
# 对于特定编译器
sudo dnf groupinstall "Development Tools" # EL
sudo apt install build-essential # Debian
缺少依赖 # 安装扩展依赖
pig build dep <extension>
# 检查错误消息以了解特定包
# 如需要,手动安装
sudo dnf install <package> # EL
sudo apt install <package> # Debian
找不到 PostgreSQL 头文件 # 安装 PostgreSQL 开发包
sudo pig ext install pg18-devel
# 或指定 pg_config 路径
export PG_CONFIG = /usr/pgsql-18/bin/pg_config
Rust/PGRX 问题 # 重新安装 Rust
curl --proto '=https' --tlsv1.2 -sSf https://sh.rustup.rs | sh
# 更新 PGRX
cargo install cargo-pgrx --force
# 重新初始化 PGRX
cargo pgrx init
扩展构建矩阵 常见构建的扩展 扩展 类型 构建时间 复杂度 特殊要求 pg_repack C 快速 简单 无 pg_partman SQL/PLPGSQL 快速 简单 无 citus C 中等 中等 无 timescaledb C 慢 复杂 CMake postgis C 非常慢 复杂 GDAL、GEOS、Proj pg_duckdb C++ 中等 中等 C++17 编译器 pgroonga C 中等 中等 Groonga 库 pgvector C 快速 简单 无 plpython3 C 中等 中等 Python 开发 pgrx 扩展 Rust 慢 复杂 Rust、PGRX
24.10 - pig sty 使用 pig sty 子命令管理 Pigsty 安装
pig 也可作为 Pigsty 的命令行工具使用 —— 这是一款开箱即用的免费 PostgreSQL RDS 解决方案。
它为你的 PostgreSQL 集群带来高可用(HA)、PITR、监控、基础设施即代码(IaC)以及丰富的扩展支持。
pig sty - Init ( Download) , Bootstrap, Configure, and Deploy Pigsty
pig sty init [ -pfvd] # install pigsty (~/pigsty by default)
pig sty boot [ -rpk] # install ansible and prepare offline pkg
pig sty conf [ -cvrsoxnpg] # configure pigsty and generate config
pig sty deploy # use pigsty to deploy everything (CAUTION!)
pig sty get # download pigsty source tarball
pig sty list # list available pigsty versions
Examples:
pig sty init # extract and init ~/pigsty
pig sty boot # install ansible & other deps
pig sty conf # generate pigsty.yml config file
pig sty deploy # run the deploy.yml playbook
命令 描述 备注 sty init安装 Pigsty sty boot安装 Ansible 依赖 需要 sudo 或 root 权限 sty conf生成配置 sty deploy运行部署 playbook sty list列出可用 Pigsty 版本 sty get下载 Pigsty 源码压缩包
快速入门 你可以使用 pig sty 子命令在当前节点引导部署 Pigsty。
pig sty init # 安装 Pigsty 到 ~/pigsty
pig sty boot # 安装 Ansible 依赖
pig sty conf # 生成配置
pig sty deploy # 运行部署 playbook
详细入门指南请参阅:https://pigsty.io/docs/setup/install/
sty init 下载并安装 Pigsty 发行版到 ~/pigsty 目录。
pig sty init # 使用最新版本安装到 ~/pigsty
pig sty init -f # 安装并覆盖已有 pigsty 目录
pig sty init -p /tmp/pigsty # 安装到指定目录 /tmp/pigsty
pig sty init -v 3.4 # 获取并安装指定版本 v3.4.1
pig sty init 3 # 获取并安装指定主版本 v3 最新
选项:
-p|--path:目标安装目录(默认 “~/pigsty”)-f|--force:强制覆盖已存在的 pigsty 目录-v|--version:pigsty 版本号-d|--dir:下载目录(默认 “/tmp”)sty boot 安装 Ansible 及其依赖。
pig sty boot # 安装 Ansible
pig sty boot -r china # 使用中国区域镜像
pig sty boot -k # 保留已有仓库
pig sty boot -p /path/to/pkg # 指定离线包路径
选项:
-r|--region:区域(default, china, europe…)-p|--path:离线包路径-k|--keep:保留已有仓库详见:https://pigsty.io/zh/docs/setup/offline/#bootstrap
sty conf 使用 ./configure 配置 Pigsty,生成配置文件。
pig sty conf # 使用默认 meta.yml 配置
pig sty conf -g # 生成随机密码(推荐!)
pig sty conf -c rich # 使用 conf/rich.yml 模板(包含更多扩展)
pig sty conf -c ha/full # 使用 conf/ha/full.yml 4 节点高可用模板
pig sty conf -c slim # 使用 conf/slim.yml 模板(最小化安装)
pig sty conf -c supabase # 使用 conf/supabase.yml 模板(自托管)
pig sty conf -v 18 -c rich # 使用 conf/rich.yml 模板,PostgreSQL 18
pig sty conf -r china -s # 使用中国区镜像源,跳过 IP 探测
pig sty conf -x # 从环境变量写入代理配置到配置文件
pig sty conf -c full -g -o ha.yml # 完整 HA 模板,随机密码输出到 ha.yml
选项:
-c|--conf:配置模板名称(meta/rich/slim/full/supabase/…)--ip:主节点 IP 地址-v|--version:PostgreSQL 主版本(18/17/16/15/14/13)-r|--region:上游仓库区域(default/china/europe)-o|--output:输出配置文件路径(默认:pigsty.yml)-s|--skip:跳过 IP 探测-p|--port:SSH 端口-x|--proxy:从环境变量写入代理配置-n|--non-interactive:非交互模式-g|--generate:生成随机默认密码(推荐!)详见:https://pigsty.io/docs/setup/install/#configure
sty deploy 使用 deploy.yml 剧本部署 Pigsty。
pig sty deploy # 执行 deploy.yml(如果找不到则使用 install.yml)
pig sty install # 与 deploy 相同(向后兼容)
pig sty d # 短别名
pig sty de # 短别名
pig sty ins # 短别名
此命令从您的 Pigsty 安装目录执行 deploy.yml 剧本。为保持向后兼容性,如果 deploy.yml 不存在但 install.yml 存在,将使用 install.yml 代替。
警告 :此操作会修改您的系统。请谨慎使用!
sty list 列出可用的 Pigsty 版本。
sty get 下载 Pigsty 源码压缩包。
pig sty get # 下载最新版本
pig sty get v3.4.0 # 下载指定版本
24.11 - pig postgres 使用 pig postgres 子命令管理本地 PostgreSQL 服务器
pig pg 命令(别名 pig postgres)用于管理本地 PostgreSQL 服务器和数据库。它封装了 pg_ctl、psql、vacuumdb 等原生工具,提供简化的服务器管理体验。
pig pg - Manage local PostgreSQL server and databases.
Server Control ( via pg_ctl) :
pig pg init [ -v ver] [ -D datadir] initialize data directory
pig pg start [ -D datadir] start PostgreSQL server
pig pg stop [ -D datadir] [ -m fast] stop PostgreSQL server
pig pg restart [ -D datadir] [ -m fast] restart PostgreSQL server
pig pg reload [ -D datadir] reload configuration
pig pg status [ -D datadir] show server status
pig pg promote [ -D datadir] promote standby to primary
pig pg role [ -D datadir] [ -V] detect instance role ( primary/replica)
Service Management ( via systemctl) :
pig pg svc start start postgres systemd service
pig pg svc stop stop postgres systemd service
pig pg svc restart restart postgres systemd service
pig pg svc reload reload postgres systemd service
pig pg svc status show postgres service status
Connection & Query:
pig pg psql [ db] [ -c cmd] connect to database via psql
pig pg ps [ -a] [ -u user] show current connections
pig pg kill [ -x] [ -u user] terminate connections ( dry-run by default)
Database Maintenance:
pig pg vacuum [ db] [ -a] [ -t table] vacuum tables
pig pg analyze [ db] [ -a] [ -t table] analyze tables
pig pg freeze [ db] [ -a] [ -t table] vacuum freeze tables
pig pg repack [ db] [ -a] [ -t table] repack tables ( online rebuild)
Tuning:
pig pg tune [ -p profile] generate optimized parameters
Utilities:
pig pg log <list| tail| cat| less> view PostgreSQL logs
命令概览 服务控制 (pg_ctl 封装):
命令 别名 描述 备注 pg initinitdb, i初始化数据目录 封装 initdb pg startboot, up启动 PostgreSQL 封装 pg_ctl start pg stophalt, down停止 PostgreSQL 封装 pg_ctl stop pg restartreboot重启 PostgreSQL 封装 pg_ctl restart pg reloadhup重载配置 封装 pg_ctl reload pg statusst, stat查看服务状态 显示进程与相关服务状态 pg promotepro提升备库为主库 封装 pg_ctl promote pg roler检测实例角色 输出 primary/replica
连接与查询 :
命令 别名 描述 备注 pg psqlsql, connect连接到数据库 封装 psql pg psactivity, act显示当前连接 查询 pg_stat_activity pg killk终止连接 默认 dry-run 模式
数据库维护 :
命令 别名 描述 备注 pg vacuumvac, vc清理表 封装 vacuumdb pg analyzeana, az分析表 封装 vacuumdb –analyze-only pg freezefrz冻结清理表 封装 vacuumdb –freeze pg repackrp在线重整表 需要 pg_repack 扩展
参数调优 :
命令 别名 描述 备注 pg tunetuning生成 PostgreSQL 调优参数 自动探测硬件,支持结构化输出
日志工具 :
命令 别名 描述 备注 pg logl日志管理 父命令 pg log listls列出日志文件 pg log tailt, f实时查看日志 tail -f pg log catc输出日志内容 pg log lessvi, v用 less 查看
v1.0.0 已知问题:pig pg log grep 存在参数冲突导致不可用。可使用 pig pg log cat | grep PATTERN 作为替代。
服务子命令 (pg svc):
命令 别名 描述 pg svc startboot, up启动 postgres 服务 pg svc stophalt, dn, down停止 postgres 服务 pg svc restartreboot, rt重启 postgres 服务 pg svc reloadrl, hup重载 postgres 服务 pg svc statusst, stat显示服务状态
快速入门 # 服务控制
pig pg init # 初始化数据目录
pig pg start # 启动 PostgreSQL
pig pg status # 查看状态
pig pg stop # 停止 PostgreSQL
pig pg restart # 重启 PostgreSQL
pig pg reload # 重载配置
# 连接与查询
pig pg psql # 连接到 postgres 数据库
pig pg psql mydb # 连接到指定数据库
pig pg ps # 查看当前连接
pig pg kill -x # 终止连接(需要 -x 确认执行)
# 数据库维护
pig pg vacuum mydb # 清理指定数据库
pig pg analyze mydb # 分析指定数据库
pig pg repack mydb # 在线重整数据库
# 参数调优
pig pg tune # 自动探测硬件并生成调优参数
pig pg tune -p olap # 使用 OLAP 负载画像
pig pg tune -c 8 -m 32768 -d 500 # 手工覆盖 CPU / 内存 / 磁盘
# 日志查看
pig pg log tail # 实时查看最新日志
pig pg log list --log-dir /var/log/pg # 使用自定义日志目录
pig pg log cat | grep ERROR # 在 shell 中过滤日志
全局参数 以下参数适用于所有 pig pg 子命令:
参数 简写 默认值 说明 --version-v自动检测 PostgreSQL 主版本号 --data-D/pg/data数据目录路径 --dbsu-Upostgres数据库超级用户(或 $PIG_DBSU 环境变量)
版本检测逻辑:
如果指定了 -v,使用指定版本 否则从数据目录的 PG_VERSION 文件读取版本 如果都无法获取,使用 PATH 中的默认 PostgreSQL 服务控制命令 pg init 初始化 PostgreSQL 数据目录。封装 initdb 命令。
pig pg init # 使用默认设置初始化
pig pg init -v 18 # 指定 PostgreSQL 18
pig pg init -D /data/pg18 # 指定数据目录
pig pg init -k # 启用数据校验和
pig pg init -f # 强制初始化(删除已有数据)
pig pg init -- --waldir= /wal # 传递额外参数给 initdb
选项:
参数 简写 默认值 说明 --encoding-EUTF8 数据库编码 --localeC 区域设置 --data-checksum-kfalse 启用数据校验和 --force-ffalse 强制初始化,删除已有数据(危险!)
安全机制: 即使使用 --force,如果 PostgreSQL 正在运行,命令也会拒绝执行,以防止数据丢失。
pg start 启动 PostgreSQL 服务器。
pig pg start # 使用默认设置启动
pig pg up # 别名
pig pg boot # 别名
pig pg start -D /data/pg18 # 指定数据目录
pig pg start -l /pg/log/pg.log # 重定向输出到日志文件
pig pg start -o "-p 5433" # 传递参数给 postgres
pig pg start -y # 强制启动(跳过运行检查)
选项:
参数 简写 说明 --log-l重定向 stdout/stderr 到日志文件 --timeout-t等待超时(秒) --no-wait-W不等待启动完成 --options-o传递给 postgres 的选项 --yes-y强制启动(即使已运行)
pg stop 停止 PostgreSQL 服务器。
pig pg stop # 快速停止(默认)
pig pg down # 别名
pig pg halt # 别名
pig pg stop -m smart # 等待客户端断开
pig pg stop -m immediate # 立即关闭
选项:
参数 简写 默认值 说明 --mode-mfast 关闭模式:smart/fast/immediate --timeout-t60 等待超时(秒) --no-wait-Wfalse 不等待关闭完成
关闭模式说明:
模式 说明 smart等待所有客户端断开后关闭 fast回滚活动事务,断开客户端,正常关闭 immediate立即终止所有进程,下次启动需要恢复
pg restart 重启 PostgreSQL 服务器。
pig pg restart # 快速重启
pig pg reboot # 别名
pig pg restart -m immediate # 立即重启
pig pg restart -o "-p 5433" # 使用新选项重启
选项: 与 pg stop 相同,另外支持 --options(-o)传递给 postgres。
pg reload 重载 PostgreSQL 配置。向服务器发送 SIGHUP 信号。
pig pg reload # 重载配置
pig pg hup # 别名
pig pg reload -D /data/pg18 # 指定数据目录
pg status 显示 PostgreSQL 服务器状态。此命令不仅显示 pg_ctl status 的结果,还会显示 postgres 相关进程和 Pigsty 相关服务的状态。
pig pg status # 查看服务状态
pig pg st # 别名
pig pg status -D /data/pg18 # 指定数据目录
输出内容:
pg_ctl status 输出(进程是否运行、PID 等)PostgreSQL 进程列表(ps -u postgres) 相关服务状态:postgres:PostgreSQL systemd 服务patroni:Patroni HA 管理服务pgbouncer:连接池服务pgbackrest:备份服务vip-manager:VIP 管理服务haproxy:负载均衡服务 将备库提升为主库。
pig pg promote # 提升备库
pig pg pro # 别名
pig pg promote -D /data/pg18 # 指定数据目录
选项:
参数 简写 说明 --timeout-t等待超时(秒) --no-wait-W不等待提升完成
pg role 检测 PostgreSQL 实例的角色(主库或备库)。
pig pg role # 输出:primary、replica 或 unknown
pig pg role -V # 详细输出,显示检测过程
pig pg role -D /data/pg18 # 指定数据目录
选项:
参数 简写 说明 --verbose-V显示详细检测过程
输出说明:
primary:当前实例为主库replica:当前实例为备库unknown:无法确定实例角色检测策略(按优先级):
进程检测 :检查 walreceiver、recovery 等进程SQL 查询 :执行 pg_is_in_recovery() 查询(需要 PostgreSQL 运行)数据目录检查 :检查 standby.signal、recovery.signal、recovery.conf 文件连接与查询命令 pg psql 通过 psql 连接到 PostgreSQL 数据库。
pig pg psql # 连接到 postgres 数据库
pig pg sql # 别名
pig pg connect # 别名
pig pg psql mydb # 连接到指定数据库
pig pg psql mydb -c "SELECT 1" # 执行单条命令
pig pg psql -f script.sql # 执行 SQL 脚本文件
选项:
参数 简写 说明 --command-c执行单条 SQL 命令 --file-f执行 SQL 脚本文件
pg ps 显示 PostgreSQL 当前连接。查询 pg_stat_activity 视图。
pig pg ps # 显示客户端连接
pig pg activity # 别名
pig pg act # 别名
pig pg ps -a # 显示所有连接(包括系统进程)
pig pg ps -u admin # 按用户筛选
pig pg ps -d mydb # 按数据库筛选
选项:
参数 简写 说明 --all-a显示所有连接(包括系统进程) --user-u按用户筛选 --database-d按数据库筛选
pg kill 终止 PostgreSQL 连接。默认为 dry-run 模式 ,需要 -x 参数才会实际执行。
pig pg kill # 显示将被终止的连接(dry-run)
pig pg kill -x # 实际终止连接
pig pg kill --pid 12345 -x # 终止指定 PID
pig pg kill -u admin -x # 终止指定用户的连接
pig pg kill -d mydb -x # 终止指定数据库的连接
pig pg kill -s idle -x # 终止空闲连接
pig pg kill --cancel -x # 取消查询而非终止连接
pig pg kill -w 5 -x # 每 5 秒重复执行
选项:
参数 简写 说明 --execute-x实际执行(默认为 dry-run) --pid终止指定 PID --user-u按用户筛选 --database-d按数据库筛选 --state-s按状态筛选(idle/active/idle in transaction) --query-q按查询模式筛选 --all-a包括复制连接 --cancel-c取消查询而非终止连接 --watch-w每 N 秒重复执行
安全说明: --state 和 --query 参数会进行标识符验证,只接受简单的字母数字模式,以防止 SQL 注入。
数据库维护命令 pg vacuum 清理数据库表。封装 vacuumdb 命令。
pig pg vacuum # 清理当前数据库
pig pg vac # 别名
pig pg vacuum mydb # 清理指定数据库
pig pg vacuum -a # 清理所有数据库
pig pg vacuum mydb -t mytable # 清理指定表
pig pg vacuum mydb -n myschema # 清理指定 schema 中的表
pig pg vacuum mydb --full # VACUUM FULL(需要排他锁)
选项:
参数 简写 说明 --all-a处理所有数据库 --schema-n指定 schema --table-t指定表名 --verbose-V详细输出 --full-FVACUUM FULL(需要排他锁)
安全说明: --schema 和 --table 参数会进行标识符验证,只接受有效的 PostgreSQL 标识符格式。
pg analyze 分析数据库表以更新统计信息。
pig pg analyze # 分析当前数据库
pig pg ana # 别名
pig pg analyze mydb # 分析指定数据库
pig pg analyze -a # 分析所有数据库
pig pg analyze mydb -t mytable # 分析指定表
选项: 与 pg vacuum 相同(不含 --full)。
pg freeze 对数据库表执行冻结清理(vacuum freeze),防止事务 ID 回卷。
pig pg freeze # 冻结清理当前数据库
pig pg freeze mydb # 冻结清理指定数据库
pig pg freeze -a # 冻结清理所有数据库
pig pg freeze mydb -t mytable # 冻结清理指定表
选项: 与 pg vacuum 相同(不含 --full)。
pg repack 在线重整数据库表。需要安装 pg_repack 扩展。
pig pg repack mydb # 重整数据库中所有表
pig pg rp mydb # 别名
pig pg repack -a # 重整所有数据库
pig pg repack mydb -t mytable # 重整指定表
pig pg repack mydb -n myschema # 重整指定 schema 中的表
pig pg repack mydb -j 4 # 使用 4 个并行任务
pig pg repack mydb --dry-run # 显示将被重整的表
选项:
参数 简写 说明 --all-a处理所有数据库 --schema-n指定 schema --table-t指定表名 --verbose-V详细输出 --jobs-j并行任务数(默认 1) --dry-run-N显示将被重整的表
参数调优命令 pg tune 根据当前 PostgreSQL 主版本、主机硬件资源和工作负载画像,生成一组推荐的 PostgreSQL 参数。默认自动探测 CPU、内存与数据盘容量,并以文本形式输出配置项。
pig pg tune # 自动探测硬件,使用 oltp 画像
pig pg tuning # 别名
pig pg tune -p olap # 使用 OLAP 画像
pig pg tune -p tiny # 小规格实例
pig pg tune -c 8 -m 32768 -d 500 # 覆盖自动探测结果
pig pg tune -C 500 # 覆盖 max_connections
pig pg tune -R 0.30 # 调整 shared_buffers 比例
pig pg tune -o json # 结构化输出 JSON
pig pg tune -o yaml # 结构化输出 YAML
选项:
参数 简写 默认值 说明 --profile-poltp 调优画像:oltp / olap / tiny / crit --cpu-c0 CPU 核数,0 表示自动探测 --mem-m0 内存大小(MB),0 表示自动探测 --disk-d0 数据盘容量(GB),0 表示自动探测 --max-conn-C0 覆盖 max_connections,0 表示使用画像默认值 --shmem-ratio-R0.25 shared_buffers 占内存比例,取值范围 0.1 ~ 0.4
画像说明:
画像 适用场景 特点 oltp通用在线事务处理 平衡连接数、缓存与并行度 olap分析型负载 更激进地使用并行与工作内存 tiny小规格实例 控制内存占用与并行度 crit延迟敏感场景 限制并行 gather,偏向稳态响应
说明:
生成结果会随当前 PostgreSQL 主版本自动裁剪,例如 io_workers 仅会在 PG 18+ 输出。 文本输出可直接重定向到配置片段,结构化输出适合自动化脚本消费。 该命令当前生成建议参数,不会直接修改数据库配置文件。 日志命令 日志命令用于查看 PostgreSQL 日志文件。默认日志目录为 /pg/log/postgres,可通过 --log-dir 参数指定其他目录。
日志命令全局参数:
参数 说明 --log-dir日志目录路径(默认:/pg/log/postgres)
权限处理: 如果当前用户没有权限读取日志目录,命令会自动使用 sudo 重试。
pg log list 列出日志目录中的日志文件。
pig pg log list # 列出默认目录中的日志
pig pg log ls # 别名
pig pg log list --log-dir /var/log/postgres # 列出指定目录中的日志
pg log tail 实时查看日志文件(类似 tail -f)。默认查看最新的 CSV 日志文件。
pig pg log tail # 查看最新日志
pig pg log t # 别名
pig pg log f # 别名
pig pg log tail postgresql.csv # 查看指定日志文件
pig pg log tail -n 100 # 显示最后 100 行后开始跟踪
pig pg log tail --log-dir /var/log/postgres # 使用自定义目录
选项:
参数 简写 默认值 说明 --lines-n50 显示的行数
pg log cat 输出日志文件内容。
pig pg log cat # 输出最新日志
pig pg log c # 别名
pig pg log cat -n 100 # 输出最后 100 行
pig pg log cat postgresql.csv # 输出指定日志文件
选项:
参数 简写 默认值 说明 --lines-n100 显示的行数
pg log less 用 less 打开日志文件。默认定位到文件末尾(+G)。
pig pg log less # 用 less 打开最新日志
pig pg log vi # 别名
pig pg log v # 别名
pig pg log less postgresql.csv # 打开指定日志文件
pg svc 子命令 pg svc 提供通过 systemctl 管理 PostgreSQL 服务的功能:
pig pg svc start # 启动 postgres 服务
pig pg svc stop # 停止 postgres 服务
pig pg svc restart # 重启 postgres 服务
pig pg svc reload # 重载 postgres 服务
pig pg svc status # 显示服务状态
别名对照:
命令 别名 pg svc startboot, uppg svc stophalt, dn, downpg svc restartreboot, rtpg svc reloadrl, huppg svc statusst, stat
设计说明 与原生工具的关系:
pig pg 并非对 PostgreSQL 原生工具的简单封装,而是针对常用操作的上层抽象:
服务控制命令(init/start/stop/restart/reload/promote)调用 pg_ctl status 命令除了 pg_ctl status 外,还显示进程和相关服务状态连接管理命令(psql/ps/kill)调用 psql 维护命令(vacuum/analyze)调用 vacuumdb repack 命令调用 pg_repack 日志命令调用 tail、less、grep 等系统工具 pg svc 命令调用 systemctl如需使用原生工具的完整功能,可直接调用相应命令。
权限处理:
如果当前用户已是 DBSU:直接执行命令 如果当前用户是 root:使用 su - postgres -c "..." 执行 其他用户:使用 sudo -inu postgres -- ... 执行 安全性考虑:
--state、--query、--schema、--table 等参数都经过标识符验证,防止 SQL 注入pg kill 默认为 dry-run 模式,避免误操作日志命令在权限不足时自动使用 sudo 平台支持:
此命令专为 Linux 系统设计,部分功能依赖 systemctl。
24.12 - pig patroni 使用 pig patroni 子命令管理 Patroni 服务与集群
title: “pig patroni”
description: “使用 pig patroni 子命令管理 Patroni 服务与集群”
weight: 170
icon: fas fa-infinity
module: [PIG]
categories: [参考] pig patroni 命令(别名 pig pt)用于管理 Patroni 服务和 PostgreSQL HA 集群。它封装了常用的 patronictl 和 systemctl 操作,提供简化的集群管理体验。
pig pt - Manage Patroni cluster using patronictl commands.
Cluster Operations ( via patronictl) :
pig pt list list cluster members
pig pt restart [ member] restart PostgreSQL ( rolling restart)
pig pt reload reload PostgreSQL config
pig pt reinit <member> reinitialize a member
pig pt pause pause automatic failover
pig pt resume resume automatic failover
pig pt switchover perform planned switchover
pig pt failover perform manual failover
pig pt config <action> manage cluster config
Service Management ( via systemctl) :
pig pt status show comprehensive patroni status
pig pt start start patroni service ( shortcut)
pig pt stop stop patroni service ( shortcut)
pig pt svc start start patroni service
pig pt svc stop stop patroni service
pig pt svc restart restart patroni service
pig pt svc status show patroni service status
Logs:
pig pt log [ -f] [ -n 100] view patroni logs
命令概览 集群操作 (patronictl 封装):
命令 别名 描述 实现方式 pt listls, l列出集群成员 patronictl list -e -tpt restartreboot, rt重启 PostgreSQL 实例 patronictl restartpt reloadrl, hup重载 PostgreSQL 配置 patronictl reloadpt reinitri重新初始化成员 patronictl reinitpt switchoversw计划内主从切换 patronictl switchoverpt failoverfo手动故障切换 patronictl failoverpt pausep暂停自动故障切换 patronictl pausept resumer恢复自动故障切换 patronictl resumept configcfg, c查看或修改集群配置 patronictl show-config / edit-config
服务管理 (systemctl 封装):
命令 别名 描述 实现方式 pt startboot, up启动 Patroni 服务 systemctl start patronipt stophalt, dn, down停止 Patroni 服务 systemctl stop patronipt statusst, stat显示服务状态 systemctl status patronipt logl, lg查看 Patroni 日志 journalctl -u patroni
服务子命令 (pt svc):
命令 别名 描述 pt svc startboot, up启动 Patroni 服务 pt svc stophalt, dn, down停止 Patroni 服务 pt svc restartreboot, rt重启 Patroni 服务 pt svc reloadrl, hup重载 Patroni 服务 pt svc statusst, stat显示服务状态
快速入门 # 查看集群成员状态
pig pt list # 列出默认集群成员
pig pt list pg-meta # 列出指定集群成员
pig pt list -W # 持续监视模式
pig pt list -w 5 # 每 5 秒刷新一次
# 查看和修改集群配置
pig pt config # 显示当前集群配置
pig pt config ttl = 60 # 修改单个配置项(直接生效)
pig pt config ttl = 60 loop_wait = 15 # 修改多个配置项
# 集群运维操作
pig pt restart # 重启所有成员的 PostgreSQL
pig pt restart pg-test-1 # 重启指定成员
pig pt switchover # 计划内主从切换
pig pt pause # 暂停自动故障切换
pig pt resume # 恢复自动故障切换
# 管理 Patroni 服务
pig pt status # 查看服务状态
pig pt start # 启动服务
pig pt stop # 停止服务
pig pt log -f # 实时查看日志
全局参数 以下参数适用于所有 pig pt 子命令:
参数 简写 说明 --dbsu-U数据库超级用户(默认:$PIG_DBSU 或 postgres)
集群操作命令 pt list 列出 Patroni 集群成员状态。该命令封装了 patronictl list,并默认添加 -e(扩展输出)和 -t(显示时间戳)参数。
pig pt list # 列出默认集群成员
pig pt list pg-meta # 列出指定集群
pig pt list -W # 持续监视模式
pig pt list -w 5 # 每 5 秒刷新一次
pig pt list pg-test -W -w 3 # 监视 pg-test 集群,3 秒刷新
选项:
参数 简写 说明 --watch-W启用持续监视模式 --interval-w监视刷新间隔(秒)
pt restart 通过 Patroni 重启 PostgreSQL 实例。这会触发 PostgreSQL 的滚动重启,而非重启 Patroni 守护进程本身。
pig pt restart # 重启所有成员(交互式)
pig pt restart pg-test-1 # 重启指定成员
pig pt restart -f # 跳过确认直接重启
pig pt restart --role= replica # 仅重启从库
pig pt restart --pending # 重启待重启的成员
选项:
参数 简写 说明 --force-f跳过确认 --role按角色筛选(leader/replica/any) --pending仅重启待重启的成员
pt reload 通过 Patroni 重载 PostgreSQL 配置。这会触发所有成员执行配置重载。
pt reinit 重新初始化集群成员。这会从主库重新同步数据。
pig pt reinit pg-test-1 # 重新初始化指定成员
pig pt reinit pg-test-1 -f # 跳过确认
pig pt reinit pg-test-1 --wait # 等待完成
选项:
参数 简写 说明 --force-f跳过确认 --wait-w等待重新初始化完成
警告: 此操作会删除目标成员的所有数据并重新同步。
pt switchover 执行计划内的主从切换。
pig pt switchover # 交互式切换
pig pt switchover -f # 跳过确认
pig pt switchover --leader pg-1 # 指定当前主库
pig pt switchover --candidate pg-2 # 指定新主库
选项:
参数 简写 说明 --force-f跳过确认 --leader指定当前主库 --candidate指定候选新主库
pt failover 执行手动故障切换。用于主库不可用时强制切换。
pig pt failover # 交互式故障切换
pig pt failover -f # 跳过确认
pig pt failover --candidate pg-2 # 指定新主库
选项:
参数 简写 说明 --force-f跳过确认 --candidate指定候选新主库
pt pause 暂停 Patroni 的自动故障切换。
pig pt pause # 暂停自动故障切换
pig pt pause --wait # 等待确认
选项:
使用场景: 在执行维护操作(如大版本升级、存储迁移)时暂停自动故障切换,防止误触发。
pt resume 恢复 Patroni 的自动故障切换。
pig pt resume # 恢复自动故障切换
pig pt resume --wait # 等待确认
选项:
pt config 显示或修改集群配置。不带参数时显示当前配置,带 key=value 参数时修改配置。
pig pt config # 显示当前集群配置
pig pt config show # 显示配置(显式)
pig pt config edit # 交互式编辑配置
pig pt config set ttl = 60 # 设置 TTL 为 60 秒
pig pt config set ttl = 60 loop_wait = 15 # 同时修改多个配置项
pig pt config pg max_connections = 200 # 修改 PostgreSQL 参数
子命令:
子命令 说明 show(默认)显示当前配置 edit交互式编辑配置 set key=value直接设置配置项 pg key=value设置 PostgreSQL 参数
常用配置项:
配置项 说明 默认值 ttlLeader 锁的生存时间(秒) 30 loop_wait主循环休眠时间(秒) 10 retry_timeoutDCS 和 PostgreSQL 操作超时(秒) 10 maximum_lag_on_failover故障切换时允许的最大延迟(字节) 1048576
注意: 此命令修改的是存储在 DCS(如 etcd)中的集群动态配置,而非本地配置文件 /etc/patroni/patroni.yml。
服务管理命令 pt start 启动 Patroni 服务。
pig pt start # 启动 Patroni 服务
pig pt up # 别名
pig pt boot # 别名
等效于执行 sudo systemctl start patroni。
pt stop 停止 Patroni 服务。
pig pt stop # 停止 Patroni 服务
pig pt down # 别名
pig pt halt # 别名
等效于执行 sudo systemctl stop patroni。
注意: 停止 Patroni 服务会导致该节点上的 PostgreSQL 实例也被停止(取决于 Patroni 配置)。
pt status 显示 Patroni 服务的综合状态,包括:
systemd 服务状态 Patroni 进程信息 集群成员状态 pt log 查看 Patroni 服务日志。
pig pt log # 显示最近 50 行日志
pig pt log -f # 实时跟踪日志输出
pig pt log -n 100 # 显示最近 100 行日志
pig pt log -f -n 200 # 显示最近 200 行并持续跟踪
选项:
参数 简写 默认值 说明 --follow-ffalse 实时跟踪日志输出 --lines-n50 显示的日志行数
等效于执行 journalctl -u patroni [-f] [-n N]。
pt svc 子命令 pt svc 提供与顶层服务命令相同的功能,用于明确操作的是 Patroni 守护进程:
pig pt svc start # 启动 Patroni 服务
pig pt svc stop # 停止 Patroni 服务
pig pt svc restart # 重启 Patroni 服务
pig pt svc reload # 重载 Patroni 服务
pig pt svc status # 显示服务状态
别名对照:
命令 别名 pt svc startboot, uppt svc stophalt, dn, downpt svc restartreboot, rtpt svc reloadrl, huppt svc statusst, stat
设计说明 与 patronictl 的关系:
pig pt 封装了 patronictl 的常用操作:
集群查询:list、config show 集群管理:restart、reload、reinit、switchover、failover、pause、resume 配置修改:config set、config edit 服务管理命令(start/stop/restart/reload/status)调用 systemctl log 命令调用 journalctl默认配置路径:
配置项 默认值 Patroni 配置文件 /etc/patroni/patroni.yml服务名称 patroni
权限处理:
如果当前用户已是 DBSU:直接执行命令 如果当前用户是 root:使用 su - postgres -c "..." 执行 其他用户:使用 sudo -inu postgres -- ... 执行 平台支持:
此命令专为 Linux 系统设计,依赖 systemctl 和 journalctl。
24.13 - pig pgbackrest 使用 pig pgbackrest 子命令管理 pgBackRest 备份与时间点恢复
pig pgbackrest 命令(别名 pig pb)用于管理 pgBackRest 备份和时间点恢复(PITR)。它封装了常用的 pgbackrest 操作,提供简化的备份管理体验。所有命令均以数据库超级用户身份(默认 postgres)执行。
pig pb - Manage pgBackRest backup and point-in-time recovery.
Information:
pig pb info show backup info
pig pb ls list backups
pig pb ls repo list configured repositories
pig pb ls stanza list all stanzas
Backup & Restore:
pig pb backup create backup ( auto: full/incr)
pig pb backup full create full backup
pig pb restore restore from backup ( PITR)
pig pb restore -t "..." restore to specific time
pig pb expire cleanup expired backups
Stanza Management:
pig pb create create stanza ( first-time setup)
pig pb upgrade upgrade stanza ( after PG upgrade)
pig pb delete delete stanza ( DANGEROUS!)
Control:
pig pb check verify backup integrity
pig pb start enable pgBackRest operations
pig pb stop disable pgBackRest operations
pig pb log view pgBackRest logs
Examples:
pig pb info # show all backup info
pig pb backup # auto: full if none, else incr
pig pb backup full # full backup
pig pb restore -d # restore to latest (end of WAL)
pig pb restore -t "2025-01-01 12:00:00+08" # restore to time
pig pb create # initialize stanza
pig pb expire # cleanup per retention policy
命令概览 信息查询 :
命令 描述 实现方式 pb info显示备份仓库信息 pgbackrest infopb ls列出备份集 pgbackrest infopb ls repo列出配置的仓库 解析 pgbackrest.conf pb ls stanza列出所有 stanza 解析 pgbackrest.conf
备份与恢复 :
命令 描述 实现方式 pb backup创建备份 pgbackrest backuppb restore从备份恢复(PITR) pgbackrest restorepb expire清理过期备份 pgbackrest expire
Stanza 管理 :
命令 描述 实现方式 pb create创建 stanza(首次设置) pgbackrest stanza-createpb upgrade升级 stanza(PG 大版本升级后) pgbackrest stanza-upgradepb delete删除 stanza(危险操作!) pgbackrest stanza-delete
控制命令 :
命令 别名 描述 实现方式 pb check验证备份仓库完整性 pgbackrest checkpb start启用 pgBackRest 操作 pgbackrest startpb stop禁用 pgBackRest 操作 pgbackrest stoppb logl, lg查看日志 tail/cat 日志文件
快速入门 # 查看备份信息
pig pb info # 显示所有备份信息
pig pb info --raw -o json # 原始 JSON 输出
pig pb ls # 列出所有备份
pig pb ls repo # 列出配置的仓库
pig pb ls stanza # 列出所有 stanza
# 创建备份(必须在主库执行)
pig pb backup # 自动模式:无备份则全量,否则增量
pig pb backup full # 全量备份
pig pb backup diff # 差异备份
pig pb backup incr # 增量备份
# 恢复(PITR,至少指定一个恢复目标)
pig pb restore -d # 恢复到最新(WAL 流末尾)
pig pb restore -I # 恢复到备份一致性点
pig pb restore -t "2025-01-01 12:00:00+08" # 恢复到指定时间
pig pb restore -n savepoint # 恢复到命名还原点
# Stanza 管理
pig pb create # 初始化 stanza
pig pb upgrade # PG 大版本升级后升级 stanza
pig pb check # 验证仓库完整性
# 清理
pig pb expire # 按保留策略清理
pig pb expire --dry-run # 干运行模式
全局参数 以下参数适用于所有 pig pb 子命令:
参数 简写 说明 --stanza-spgBackRest stanza 名称(自动检测) --config-c配置文件路径 --repo-r仓库编号(多仓库场景) --dbsu-U数据库超级用户(默认:$PIG_DBSU 或 postgres)
Stanza 自动检测:
如果未指定 -s 参数,pig 会从配置文件中自动检测 stanza 名称:
读取配置文件(默认 /etc/pgbackrest/pgbackrest.conf) 查找非 [global*] 开头的 section 使用找到的第一个 stanza 如果配置文件中有多个 stanza,会发出警告并使用第一个。此时应显式指定 --stanza 参数。
多仓库支持:
pgBackRest 支持配置多个仓库(repo1、repo2 等)。使用 -r 参数指定操作的目标仓库:
pig pb backup -r 1 # 备份到 repo1
pig pb backup -r 2 # 备份到 repo2
pig pb info -r 2 # 查看 repo2 的备份信息
信息查询命令 pb info 显示备份仓库详细信息,包括所有备份集和 WAL 归档状态。
pig pb info # 显示所有备份信息
pig pb info --raw -o json # 原始 JSON 输出
pig pb info --set 20250101-120000F # 显示特定备份集详情
选项:
参数 简写 说明 --raw-R原始输出模式(透传 pgBackRest 输出) --output-o输出格式:text、json(仅 --raw 模式) --set显示特定备份集详情
pb ls 列出备份仓库中的资源。
pig pb ls # 列出所有备份(默认)
pig pb ls backup # 列出所有备份(显式)
pig pb ls repo # 列出配置的仓库
pig pb ls stanza # 列出所有 stanza
pig pb ls cluster # stanza 的别名
类型说明:
类型 描述 数据来源 backup 列出所有备份集(默认) pgbackrest info repo 列出配置的仓库 解析 pgbackrest.conf stanza 列出所有 stanza 解析 pgbackrest.conf
备份命令 pb backup 创建物理备份。备份只能在主库实例上执行。
pig pb backup # 自动模式
pig pb backup full # 全量备份
pig pb backup diff # 差异备份
pig pb backup incr # 增量备份
pig pb backup --force # 跳过主库角色检查
选项:
备份类型:
类型 说明 (空) 自动模式:无备份则全量,否则增量 full 全量备份:备份所有数据 diff 差异备份:自上次全量备份以来的变更 incr 增量备份:自上次任意备份以来的变更
主库检查:
执行备份前,命令会自动检查当前实例是否为主库。如果是备库,命令会报错退出。使用 --force 可跳过此检查。
pb expire 按保留策略清理过期的备份和 WAL 归档。
pig pb expire # 按策略清理
pig pb expire --set 20250101-* # 删除特定备份集
pig pb expire --dry-run # 干运行模式(仅显示)
选项:
参数 说明 --set删除特定备份集 --dry-run干运行模式:仅显示将删除的内容
保留策略配置:
保留策略在 pgbackrest.conf 中配置:
[global]
repo1-retention-full = 2 # 保留的全量备份数
repo1-retention-diff = 4 # 保留的差异备份数
repo1-retention-archive = 2 # WAL 归档保留策略
恢复命令 pb restore 从备份恢复,支持时间点恢复(PITR)。
必须显式指定一个恢复目标(-d/-I/-t/-n/-l/-x);不带参数仅显示帮助信息。
# 恢复目标(互斥选项)
pig pb restore -d # 恢复到最新(显式)
pig pb restore -I # 恢复到备份一致性点
pig pb restore -t "2025-01-01 12:00:00+08" # 恢复到指定时间
pig pb restore -t "2025-01-01" # 恢复到日期(当天 00:00:00)
pig pb restore -t "12:00:00" # 恢复到时间(今天)
pig pb restore -n my-savepoint # 恢复到命名还原点
pig pb restore -l "0/7C82CB8" # 恢复到 LSN
pig pb restore -x 12345 # 恢复到事务 ID
# 备份集选择(可与恢复目标组合)
pig pb restore -b 20251225-120000F # 从特定备份集恢复
# 其他选项
pig pb restore -t "..." -X # 排他模式(在目标前停止)
pig pb restore -t "..." -P # 恢复后自动提升
pig pb restore -y # 跳过确认倒计时
恢复目标选项:
参数 简写 说明 --default-d恢复到 WAL 流末尾(最新数据) --immediate-I恢复到备份一致性点 --time-t恢复到指定时间戳 --name-n恢复到命名还原点 --lsn-l恢复到指定 LSN --xid-x恢复到指定事务 ID
备份集和其他选项:
参数 简写 说明 --set-b从特定备份集恢复(可与目标组合) --data-D目标数据目录 --exclusive-X排他模式:在目标前停止 --promote-P恢复后自动提升为主库 --yes-y跳过确认和倒计时
时间格式:
支持多种时间格式输入,自动补全时区(支持非整小时时区如 +05:30):
格式 示例 说明 完整格式 2025-01-01 12:00:00+08包含时区的完整时间戳 仅日期 2025-01-01自动补全为当天 00:00:00(当前时区) 仅时间 12:00:00自动补全为今天(当前时区)
恢复流程:
验证参数和环境 检查 PostgreSQL 已停止 显示恢复计划,等待确认(5 秒倒计时) 执行 pgbackrest restore 提供恢复后的操作指引 重要提示: 恢复前必须先停止 PostgreSQL:
pig pg stop # 停止 PostgreSQL
pig pb restore -t "..." # 执行恢复
pig pg start # 启动 PostgreSQL
Stanza 管理命令 pb create 初始化新的 stanza。必须在首次备份前执行。
pig pb create # 创建 stanza
pig pb create --no-online # PostgreSQL 未运行时创建
pig pb create --force # 强制创建
选项:
参数 简写 说明 --no-onlinePostgreSQL 未运行时创建 --force-f强制创建
pb upgrade PostgreSQL 大版本升级后更新 stanza。
pig pb upgrade # 升级 stanza
pig pb upgrade --no-online # PostgreSQL 未运行时升级
选项:
参数 说明 --no-onlinePostgreSQL 未运行时升级
使用场景:
当 PostgreSQL 进行大版本升级(如 16 → 17)后,需要执行此命令更新 stanza 元数据。
pb delete 删除 stanza 及其所有备份。
pig pb delete --force # 删除 stanza(需要 --force)
pig pb delete --force --yes # 跳过倒计时确认
选项:
参数 简写 说明 --force-f确认删除(必需) --yes-y跳过倒计时确认
警告: 这是一个破坏性且不可逆 的操作!所有备份将被永久删除。
命令包含多重安全机制:
必须提供 --force 参数 5 秒倒计时确认(可按 Ctrl+C 取消) 使用 --yes 可跳过倒计时 控制命令 pb check 验证备份仓库的完整性和配置。
此命令检查:
WAL 归档配置是否正确 仓库是否可访问 stanza 配置是否有效 pb start 启用 pgBackRest 操作。
在执行 pb stop 后使用此命令恢复正常操作。
pb stop 禁用 pgBackRest 操作(用于维护)。
pig pb stop # 禁用操作
pig pb stop --force # 终止正在运行的操作
选项:
使用场景:
在进行系统维护时,使用此命令阻止新的备份操作启动。
日志命令 pb log 查看 pgBackRest 日志文件。日志目录为 /pg/log/pgbackrest/。
pig pb log # 列出日志文件
pig pb log list # 列出日志文件
pig pb log tail # 实时查看最新日志
pig pb log tail -n 100 # 显示最后 100 行并跟踪
pig pb log cat # 显示最新日志内容
pig pb log cat -n 50 # 显示最后 50 行
pig pb log cat pg-meta-backup.log # 显示指定日志文件
子命令:
子命令 别名 说明 list ls 列出日志文件 tail follow, f 实时跟踪最新日志 cat show 显示日志内容
选项:
参数 简写 默认值 说明 --lines-n50 显示的行数
权限处理:
如果当前用户没有权限读取日志目录,命令会自动使用 sudo 重试。
设计说明 命令执行方式:
所有 pig pb 命令都以数据库超级用户(DBSU)身份执行。这是因为 pgBackRest 需要访问 PostgreSQL 数据文件和 WAL 归档。
执行逻辑:
如果当前用户已是 DBSU:直接执行命令 如果当前用户是 root:使用 su - postgres -c "..." 执行 其他用户:使用 sudo -inu postgres -- ... 执行 与 pgbackrest 的关系:
pig pb 并非 pgbackrest 的完整封装,而是针对常用操作的上层抽象:
自动检测 stanza 名称,无需每次指定 备份前自动检查主库角色 恢复时显示计划并要求确认 提供人性化的时间格式输入 恢复后提供操作指引 如需使用 pgbackrest 的完整功能,请直接使用 pgbackrest 命令。
默认配置路径:
配置项 默认值 配置文件 /etc/pgbackrest/pgbackrest.conf日志目录 /pg/log/pgbackrest数据目录 配置文件中的 pg1-path,或 $PGDATA 环境变量,或 /pg/data
安全考虑:
pb delete 需要 --force 确认,并有 5 秒倒计时pb restore 显示恢复计划,有 5 秒倒计时确认pb backup 默认检查主库角色,防止在备库执行日志命令的文件名参数会过滤路径,防止路径遍历攻击 平台支持:
此命令专为 Linux 系统设计,依赖 Pigsty 的默认目录结构。
24.14 - pig pitr 使用 pig pitr 命令执行编排式时间点恢复(PITR)
pig pitr 命令用于执行编排式时间点恢复 (Orchestrated Point-In-Time Recovery)。与 pig pb restore 不同,此命令会自动协调 Patroni、PostgreSQL 和 pgBackRest,完成完整的 PITR 工作流。
pig pitr - Perform PITR with automatic Patroni/PostgreSQL lifecycle management.
This command orchestrates a complete PITR workflow:
1. Stop Patroni service ( if running)
2. Ensure PostgreSQL is stopped ( with retry and fallback)
3. Execute pgbackrest restore
4. Start PostgreSQL
5. Provide post-restore guidance
Recovery Targets ( at least one required) :
--default, -d Recover to end of WAL stream ( latest)
--immediate, -I Recover to backup consistency point
--time, -t Recover to specific timestamp
--name, -n Recover to named restore point
--lsn, -l Recover to specific LSN
--xid, -x Recover to specific transaction ID
Time Format:
- Full: "2025-01-01 12:00:00+08"
- Date only: "2025-01-01" ( defaults to 00:00:00)
- Time only: "12:00:00" ( defaults to today)
Examples:
pig pitr -d # Recover to latest (most common)
pig pitr -t "2025-01-01 12:00" # Recover to specific time
pig pitr -I # Recover to backup consistency point
pig pitr -d --dry-run # Show execution plan without running
pig pitr -d -y # Skip confirmation (for automation)
pig pitr -d --skip-patroni # Skip Patroni management
pig pitr -d --no-restart # Don't auto-start PostgreSQL after restore
命令概览 pig pitr 是一个高度自动化的恢复命令,它会:
自动停止 Patroni 服务(如果正在运行) 确保 PostgreSQL 已停止(带重试和降级策略) 执行 pgBackRest 恢复 启动 PostgreSQL 提供恢复后的操作指引 与 pig pb restore 的区别:
特性 pig pitrpig pb restore停止 Patroni 自动 手动 停止 PostgreSQL 自动(带重试) 需要预先停止 启动 PostgreSQL 自动 手动 恢复后指引 提供详细指引 无 适用场景 生产环境完整恢复 底层操作或脚本集成
快速入门 # 最常用:恢复到最新数据
pig pitr -d
# 恢复到指定时间点
pig pitr -t "2025-01-01 12:00:00+08"
# 恢复到备份一致性点(最快)
pig pitr -I
# 查看执行计划(不实际执行)
pig pitr -d --dry-run
# 跳过确认(用于自动化)
pig pitr -d -y
# 从特定备份集恢复
pig pitr -d -b 20251225-120000F
# 独立 PostgreSQL(非 Patroni 管理)
pig pitr -d --skip-patroni
# 恢复后不自动启动 PostgreSQL
pig pitr -d --no-restart
参数说明 恢复目标(必选其一) 参数 简写 说明 --default-d恢复到 WAL 流末尾(最新数据) --immediate-I恢复到备份一致性点 --time-t恢复到指定时间戳 --name-n恢复到命名还原点 --lsn-l恢复到指定 LSN --xid-x恢复到指定事务 ID
备份选择 流程控制 参数 简写 说明 --skip-patroni-S跳过 Patroni 停止操作 --no-restart-N恢复后不自动启动 PostgreSQL --dry-run仅显示执行计划,不实际执行 --yes-y跳过确认倒计时
恢复选项 参数 简写 说明 --exclusive-X排他模式:在目标前停止 --promote-P恢复后自动提升为主库
配置参数 参数 简写 说明 --stanza-spgBackRest stanza 名称(自动检测) --config-cpgBackRest 配置文件路径 --repo-r仓库编号(多仓库场景) --dbsu-U数据库超级用户(默认:postgres) --data-D目标数据目录
时间格式 --time 参数支持多种时间格式,自动补全时区:
格式 示例 说明 完整格式 2025-01-01 12:00:00+08包含时区的完整时间戳 仅日期 2025-01-01自动补全为当天 00:00:00(当前时区) 仅时间 12:00:00自动补全为今天(当前时区)
执行流程 第一阶段:预检查 验证恢复目标参数(必须且只能指定一个) 检查数据目录是否存在且已初始化 检测 Patroni 服务状态 检测 PostgreSQL 运行状态 第二阶段:停止 Patroni 如果 Patroni 服务正在运行且未指定 --skip-patroni:
执行 systemctl stop patroni 等待 PostgreSQL 随 Patroni 自动停止 第三阶段:确保 PostgreSQL 停止 采用渐进式策略确保 PostgreSQL 完全停止:
等待自动停止 :Patroni 停止后等待 30 秒优雅停止 :使用 pg_ctl stop -m fast(最多重试 3 次,指数退避)立即停止 :使用 pg_ctl stop -m immediate强制终止 :使用 kill -9(最后手段)第四阶段:执行恢复 调用 pgBackRest 执行实际的数据恢复:
pgbackrest restore --target-action= promote ...
第五阶段:启动 PostgreSQL 除非指定 --no-restart,否则自动启动 PostgreSQL:
第六阶段:恢复后指引 显示详细的后续操作指引,包括:
如何验证恢复的数据 如何提升为主库 如何恢复 Patroni 集群管理 如何重新创建 pgBackRest stanza 使用示例 场景一:误删数据恢复 # 1. 查看可用的备份
pig pb info
# 2. 恢复到误删前的时间点
pig pitr -t "2025-01-15 09:30:00+08"
# 3. 验证数据
pig pg psql
SELECT * FROM important_table;
# 4. 确认无误后提升为主库
pig pg promote
场景二:恢复到最新状态 # 服务器故障后恢复到最新数据
pig pitr -d
场景三:快速恢复到备份点 # 恢复到备份一致性点(不需要回放 WAL)
pig pitr -I
场景四:自动化脚本 # 跳过所有确认,适合自动化
pig pitr -d -y
场景五:独立 PostgreSQL 实例 # 非 Patroni 管理的实例
pig pitr -d --skip-patroni
场景六:仅恢复不启动 # 恢复后手动检查,再决定是否启动
pig pitr -d --no-restart
# 检查恢复的数据目录
ls -la /pg/data/
# 手动启动
pig pg start
执行计划示例 执行 pig pitr -d --dry-run 会显示类似以下的执行计划:
══════════════════════════════════════════════════════════════════
PITR Execution Plan
══════════════════════════════════════════════════════════════════
Current State:
Data Directory: /pg/data
Database User: postgres
Patroni Service: active
PostgreSQL: running (PID: 12345)
Recovery Target:
Latest (end of WAL stream)
Execution Steps:
[1] Stop Patroni service
[2] Ensure PostgreSQL is stopped
[3] Execute pgBackRest restore
[4] Start PostgreSQL
[5] Print post-restore guidance
══════════════════════════════════════════════════════════════════
[Dry-run mode] No changes made.
恢复后操作 成功恢复后,命令会显示详细的后续操作指引:
══════════════════════════════════════════════════════════════════
PITR Complete
══════════════════════════════════════════════════════════════════
[1] Verify recovered data:
pig pg psql
[2] If satisfied, promote to primary:
pig pg promote
[3] To resume Patroni cluster management:
WARNING: Ensure data is correct before starting Patroni!
systemctl start patroni
Or if you want this node to be the leader:
1. Promote PostgreSQL first: pig pg promote
2. Then start Patroni: systemctl start patroni
[4] Re-create pgBackRest stanza if needed:
pig pb create
══════════════════════════════════════════════════════════════════
安全机制 确认倒计时 除非使用 --yes 参数,命令执行前会显示 5 秒倒计时:
WARNING: This will overwrite the current database!
Press Ctrl+C to cancel, or wait for countdown...
Starting PITR in 5 seconds...
渐进式停止策略 为确保数据安全,停止 PostgreSQL 采用渐进式策略:
先尝试优雅停止(保证数据一致性) 失败后尝试立即停止 最后才使用 kill -9(仅在极端情况) 恢复验证 恢复后自动验证 PostgreSQL 是否成功启动,如果失败会提示检查日志。
设计说明 与其他命令的关系:
pig pitr 内部调用 pig pt stop、pig pg stop、pig pg start 和 pig pb restore提供比单独命令更高级别的自动化协调 适合生产环境的完整 PITR 工作流 错误处理:
每个阶段都有详细的错误信息 失败时提示相关日志位置 支持中断后手动继续 权限执行:
如果当前用户已是 DBSU:直接执行命令 如果当前用户是 root:使用 su - postgres -c "..." 执行 其他用户:使用 sudo -inu postgres -- ... 执行 平台支持:
此命令专为 Linux 系统设计,依赖 Pigsty 的默认目录结构。
25 - Piglet Runtime:AI 运行时沙箱 Pigsty 轻量运行时,AI Vibe Coding 沙箱,一键在云端拉起你的写意编程环境
—— Pigsty Lightweight Runtime,动嘴出活的 AI 编码沙箱
PIGLET 是基于 Pigsty 的轻量运行时环境,专为 AI Web Coding 打造的云端编码沙箱。
它将 PostgreSQL 数据库、JuiceFS 分布式存储、VS Code、JupyterLab 等工具整合为一体,
让你从 “出嘴编码” 到 “部署上线” 实现零阻力。
核心特性 特性 说明 🤖 AI 编码 预装 Claude Code 、OpenCode、VS Code、Jupyter 全家桶,Python/Go/Node.js 开发环境开箱即用 🐘 数据全能 PostgreSQL 18 + 460+ 💾 共享存储 JuiceFS ⏱️ 时光机器 数据库 PITR + 文件系统快照联动,搞砸了?一键回到任意时间点,文件系统与数据库保持一致与同步! 🔀 瞬间克隆 CoW 百毫秒级 Fork 巨型数据库 🌐 一键上线 内置 Nginx 搞定域名、证书、代理,静态网页,动态网站,从出嘴到上线交付一步到位,省略中间步骤! 📊 全栈监控 VictoriaMetrics + Grafana 全景大盘,特供 Claude Code 可观测性,一切细节尽在掌控!🇨🇳 国内畅通 全球 CDN + 国内镜像双通道,免翻墙,一行配置 CC + GLM-4.7 国产模型,无需魔法,合法合规!
快速上手 准备 SSH 权限 节点 兼容的 Linux 系统 sshsudo管理用户
curl -fsSL https://repo.pigsty.cc/get | bash; cd ~/pigsty
./configure -c vibe -g # 使用 vibe 模式,生成随机密码!
./deploy.yml # 部署基础设施和 PostgreSQL
./juice.yml # 部署 JuiceFS 文件系统
./vibe.yml # 部署 Claude, Code-Server, JupyterLab
安装完成后,直接访问 IP 地址: http://<ip> 即可访问沙箱环境首页,假设您的 IP 地址是 10.10.10.10
提示,如果你在公网云服务器上部署,最好看一眼 安全建议 configure -g 即可),防火墙打开
开始 AI Coding 接下来,你就可以动嘴开始 AI Coding 了,默认情况下 /fs 是存放在 PostgreSQL 里的共享目录,也是 VSCode,Jupyter 的默认家目录。
家目录里放置了 CLAUDE.md/AGENTS.md 环境说明,建议在这个目录里面 Vibe Coding。
你可以直接 ssh 登陆服务器然后 cd /fs,使用 x 启动 claude,使用 xx 以 YOLO 模式启动 Claude。
你也可以直接利用 VS Code 与 Jupyter 的 Claude 插件或者终端启动 claude。
这里的 Claude 已经将日志与监控指标默认接入到 Grafana 大盘,你可以通过 Grafana 监控 Claude 的运行状态。
使用其他模型 如果你想使用其他模型,比如不用翻墙的 GLM 4.7,那么可以在上面安装的过程中,修改 pigsty.yml 配置文件,找到最下面的 claude_env 部分,
按需添加环境变量,例如:
claude_env :
ANTHROPIC_BASE_URL : https://open.bigmodel.cn/api/anthropic
ANTHROPIC_API_URL : https://open.bigmodel.cn/api/anthropic
ANTHROPIC_AUTH_TOKEN : your_api_service_token
ANTHROPIC_DEFAULT_OPUS_MODEL : "glm-5"
ANTHROPIC_DEFAULT_SONNET_MODEL : "glm-5"
ANTHROPIC_DEFAULT_HAIKU_MODEL : "glm-4.7-flash"
然后重新执行 ./vibe.yml 即可。
Claude Code 接入监控 如果你想把其他环境的 Claude Code 指标接入监控系统,请配置环境变量,将 OTEL 事件打入到 VictoriaMetrics / VictoriaLogs 的 OTEL 端点即可。
Claude Code 自己应该可以自己 Vibe 自己处理好这件事。
# Claude Code OTEL 配置
export CLAUDE_CODE_ENABLE_TELEMETRY = 1 # 启用监控
export OTEL_METRICS_EXPORTER = otlp
export OTEL_LOGS_EXPORTER = otlp
export OTEL_EXPORTER_OTLP_PROTOCOL = http/protobuf
export OTEL_LOG_USER_PROMPTS = 1 # 如果要隐藏 Prompt,设置为 0
export OTEL_RESOURCE_ATTRIBUTES = "job=claude" # 添加你自己的标签
export OTEL_EXPORTER_OTLP_METRICS_ENDPOINT = http://10.10.10.10:8428/opentelemetry/v1/metrics # 指标端点,打入 VictoriaMetrics
export OTEL_EXPORTER_OTLP_LOGS_ENDPOINT = http://10.10.10.10:9428/insert/opentelemetry/v1/logs # 日志端点,打入 VictoriaLogs
export OTEL_EXPORTER_OTLP_METRICS_TEMPORALITY_PREFERENCE = cumulative
26 - Patroni 4.1 中文文档 Patroni PostgreSQL 高可用模板,v4.1 中文文档
原始页面: https://patroni.readthedocs.io/en/latest/index.html
Patroni 是一个基于 Python 的 PostgreSQL 高可用(HA)解决方案模板。为了最大程度地兼容各种环境,Patroni 支持多种分布式配置存储后端,包括 ZooKeeper 、etcd 、Consul 和 Kubernetes 。希望在数据中心或任何其他环境中快速部署 PostgreSQL 高可用的数据库工程师、DBA、DevOps 工程师和 SRE 们,都能从中受益。
我们将 Patroni 称为"模板",是因为它远非一套放之四海而皆准的即插即用复制系统,使用时需要结合实际情况量力而行。实现 PostgreSQL 高可用的方案有很多,详情可参阅 PostgreSQL 文档
目前支持的 PostgreSQL 版本:9.3 至 18。
Citus 用户注意 :从 3.0 版本起,Patroni 已与 PostgreSQL 扩展 Citus 深度集成。如需了解如何将 Patroni 高可用与 Citus 分布式集群结合使用,请参阅文档中的 Citus 支持页面
Kubernetes 用户注意 :Patroni 可原生运行在 Kubernetes 之上。请参阅文档中的 Kubernetes
26.1 - 简介 Patroni 简介、快速上手以及高可用核心概念。
原始页面: https://patroni.readthedocs.io/en/latest/README.html
Governor 项目,并在此基础上引入了大量新特性。
更多背景资料,请参阅:
开发状态 Patroni 正处于活跃开发阶段,欢迎社区贡献。详情请参阅下方的 贡献指南
新版本发布信息记录在 这里
技术要求与安装 有关在各平台上安装和升级 Patroni 的指引,请参阅 安装文档
规划 PostgreSQL 节点数量 Patroni/PostgreSQL 节点与 DCS 节点是解耦的(除非 Patroni 自行实现 RAFT),因此对最小节点数没有硬性要求。运行一个由一主一从构成的集群完全没有问题,后续可随时添加更多从库节点。
双节点集群 (一主一备)是常见部署方式,可提供自动故障转移和高可用能力。请注意,在故障转移期间,直至故障节点重新加入集群前,集群将暂时失去冗余。
DCS 要求 :您的 DCS(etcd、ZooKeeper、Consul)必须以 3 或 5 个节点 运行,以保证正确的共识能力和容错性。单个 DCS 集群可通过不同的命名空间/scope 组合,同时存储数百乃至数千个 Patroni 集群的信息。
运行与配置 以下内容假设您已从 https://github.com/patroni/patroni 克隆了 Patroni 仓库,尤其需要用到示例配置文件 postgres0.ymlpostgres1.yml./patroni.pypatroni
在不同终端窗口中依次执行以下命令即可启动:
> etcd --data-dir=data/etcd --enable-v2=true
> ./patroni.py postgres0.yml
> ./patroni.py postgres1.yml
随后您将看到一个高可用集群启动起来。可以修改 YAML 文件中的不同配置,观察集群行为的变化;也可以主动终止某些组件,观察系统的响应表现。
通过添加更多 postgres*.yml
Patroni 提供了一份 HAProxy 配置,可为应用程序提供连接集群主库的单一端点。配置方式如下:
> haproxy -f haproxy.cfg
> psql --host 127.0.0.1 --port 5000 postgres
YAML 配置 有关 etcd、Consul 和 ZooKeeper 的完整配置说明,请参阅 YAML 配置文档 postgres0.yml 。
环境变量配置 有关通过环境变量覆盖配置的完整说明,请参阅 环境变量文档
复制模式选择 Patroni 使用 PostgreSQL 的流复制,默认为异步复制。异步复制模式下可配置 maximum_lag_on_failover复制模式文档
应用程序不应使用超级用户 从应用程序连接数据库时,请始终使用非超级用户账号。Patroni 本身需要访问数据库才能正常运行。若应用程序使用超级用户连接,可能耗尽整个连接池,包括通过 superuser_reserved_connections
测试您的高可用方案 测试高可用方案是一项耗时的工作,涉及诸多变量,跨平台应用尤为如此。这项工作需要经验丰富的系统管理员或专业顾问来执行,文档中难以全面覆盖。
以下是您应当重点测试的基础设施要素:
网络(系统前端网络以及网卡本身,无论是物理网卡还是虚拟网卡) 磁盘 IO 文件描述符限制(Linux 中的 nofile) 内存——即便关闭了 oomkiller,内存不足同样可能引发问题 CPU 虚拟化资源争用(Hypervisor 超售) 任何 cgroup 限制(通常与上述问题相关) 对任意 postgres 进程执行 kill -9 有一件事切勿尝试:对 postmaster 进程执行 kill -9kill -9
26.2 - 安装 在各支持平台上安装和升级 Patroni 的详细说明。
原始页面: https://patroni.readthedocs.io/en/latest/installation.html
Mac OS 前置依赖 在 Mac 上安装依赖,执行以下命令:
brew install postgresql etcd haproxy libyaml python
Psycopg 从 psycopg2-2.8 开始,psycopg2 的二进制版本不再默认安装。从源码编译安装需要 C 编译器以及 postgres 和 python 的开发包。由于 Python 生态中无法将依赖声明为 psycopg2 OR psycopg2-binary
可选方案如下:
使用发行版自带的包管理器: sudo apt-get install python3-psycopg2 # 在 Debian/Ubuntu 上安装 psycopg2 模块
sudo yum install python3-psycopg2 # 在 RedHat/Fedora/CentOS 上安装 psycopg2
在通过 pip 安装 Patroni 时,在 依赖列表 psycopgpsycopg2psycopg2-binary
通过 pip 安装 Patroni 可以通过 pip 安装:
pip install patroni[ dependencies]
其中 dependencies
etcdetcd3python-etcdconsulpy-consulzookeeperkazooexhibitorkazookuberneteskubernetes raftpysyncobjawsboto3jsonloggerpython-json-logger日志记录 systemdsystemd-pythonall以上所有选项(psycopg 系列除外) psycopg3psycopg\[binary\]\>=3.0.0psycopg2psycopg2\>=2.5.4psycopg2-binarypsycopg2-binary例如,以下命令将同时安装 Patroni、psycopg3、Etcd DCS 依赖以及 AWS 回调支持:
pip install patroni[ psycopg3,etcd3,aws]
请注意,用于创建从库或自定义引导脚本的外部工具(如 WAL-E)需要独立于 Patroni 单独安装。
在 Linux 上通过包管理器安装 PostgreSQL 社区为以下操作系统提供了 Patroni 软件包:
RHEL、RockyLinux、AlmaLinux; Debian 和 Ubuntu; SUSE Enterprise Linux。 您也可以在这里找到 Patroni 直接依赖项(如官方 OS 仓库中未收录的 Python 模块)的软件包。
更多信息请参阅 PGDG 仓库
如果您使用的是 RedHat Enterprise Linux 衍生发行版,可能还需要 EPEL 中的软件包,请参阅 EPEL 仓库
为您的 OS 添加 PGDG 仓库后,即可安装 Patroni。
说明
Patroni 软件包并非由 Patroni 开发团队维护,而是由 PostgreSQL 社区负责维护。如需支持,请优先在 Postgres Slack 上寻求帮助。
在 Debian 衍生发行版上安装 安装 PGDG 仓库(参见 上文
在 RedHat 衍生发行版上安装 安装 PGDG 仓库(参见 上文
dnf install patroni patroni-etcd
若您的 RedHat 衍生发行版未提供 etcd 软件包,可从 PGDG 安装。在承载 DCS 的节点上执行:
dnf install 'dnf-command(config-manager)'
dnf config-manager --enable pgdg-rhel9-extras
dnf install etcd
如需适配 RHEL 8,将仓库名中的版本号替换为 8pgdg-rhel8-extraspgdg-rhelN-extras
在 SUSE Enterprise Linux 上安装 部分依赖可能需要启用 SUSE PackageHub 仓库,请参阅 SUSE PackageHub
在已安装 PGDG 仓库(参见 上文
zypper install patroni patroni-etcd
启用 SUSE PackageHub 仓库后,还可安装 etcd:
SUSEConnect -p PackageHub/15.5/x86_64
zypper install etcd
升级 升级 Patroni 非常简单:更新软件包后,在集群每个节点上重启 Patroni 守护进程即可。
但请注意,重启 Patroni 守护进程会导致 PostgreSQL 数据库重启。在某些情况下,这可能触发主库的故障转移。因此,建议在重启 Patroni 守护进程之前,先将集群置于维护模式。
在任意一个 Patroni 节点上执行以下命令,将集群切换至维护模式:
然后在集群的每个节点上执行对应 OS 所需的软件包升级操作:
apt-get update && apt-get install patroni patroni-etcd
在每个节点上重启 Patroni 守护进程:
systemctl restart patroni
最后,恢复 Patroni 对 PostgreSQL 的监控,退出维护模式:
至此,集群已使用新版 Patroni 恢复完整运行。
26.3 - Patroni 配置 Patroni 配置模型、优先级规则与验证工具。
原始页面: https://patroni.readthedocs.io/en/latest/patroni_configuration.html
全局 动态配置 patronictl edit-configREST API PostgreSQL 参数 ),则会在成员数据 JSON 中设置一个特殊标志 pending_restart"restart_pending": true
本地 YAML 配置文件 patroni.ymlPOST /reloadpatronictl reload
环境变量配置 docker
重要规则 由 Patroni 控制的 PostgreSQL 参数 某些 PostgreSQL 参数必须在主库和从库上保持相同的值 。对于这些参数,在本地 Patroni 配置文件或通过环境变量设置的值不会生效 。要修改或设置这些参数的值,必须通过 DCS 修改共享配置。以下是这类参数的列表,包含默认值和最小值:
max_connectionsmax_locks_per_transactionmax_worker_processesmax_prepared_transactionswal_leveltrack_commit_timestamp对于下列参数,PostgreSQL 不要求主库和所有从库的值相同。但考虑到从库随时可能成为主库,将它们设置为不同值实际上没有意义;因此,Patroni 限制只能通过 动态配置 来设置这些参数的值 。
max_wal_sendersmax_replication_slotswal_keep_segmentswal_keep_sizewal_log_hints这些参数会经过校验,以确保其合理性或满足最小值要求。
还有一些其他由 Patroni 控制的 Postgres 参数:
listen_addressespostgresql.listenPATRONI_POSTGRESQL_LISTENportpostgresql.listenPATRONI_POSTGRESQL_LISTENcluster_namescopePATRONI_SCOPEhot_standby: on为安全起见,上述列表中的参数会被写入 postgresql.confpostgreswal_keep_segmentswal_keep_sizeALTER SYSTEM 。
还有一些参数如 postgresql.listenpostgresql.data_dir只能在本地设置 ,即在 Patroni YAML 配置文件 环境变量配置
应用本地或动态配置选项时,会执行以下操作:
节点首先检查是否存在 postgresql.base.confcustom_conf 如果设置了 custom_confpostgresql.base.confpostgresql.conf 如果未设置 custom_confpostgresql.base.conf 如果既无 custom_confpostgresql.base.confpostgresql.confpostgresql.base.conf 动态选项(除上述例外)会被写入 postgresql.confpostgresql.confpostgresql.base.confcustom_conf 对于 Patroni 管理集群所必需的某些参数,会通过命令行进行覆盖。 如果某个需要重启的选项被更改(需查看 pg_settingspending_restart 参数按以下顺序应用(运行时参数优先级最高):
从 postgresql.base.confcustom_conf 从 postgresql.conf 从 postgresql.auto.conf 使用 -o --name=value 这种设计允许为所有节点统一配置(2),通过 ALTER SYSTEMpostgresql.conf
影响共享内存的 PostgreSQL 参数 PostgreSQL 有一些参数决定了其使用的共享内存大小:
max_connectionsmax_prepared_transactionsmax_locks_per_transactionmax_wal_sendersmax_worker_processes更改这些参数需要重启 PostgreSQL 才能生效,且从库上的共享内存结构不能小于主库上的对应结构。
如前所述,Patroni 限制只能通过 动态配置
通过 patronictl edit-config/config 通过 patronictl restart/restart 注意: 请记住,应通过 patronictl restart/restartsystemctl restart patroni
由于这些设置管理共享内存,重启节点时需要格外注意:
若要增大 上述任一设置的值:
先重启所有从库 之后再重启主库 若要减小 上述任一设置的值:
先重启主库 之后再重启所有从库 注意: 如果在减小 上述任一设置值后尝试一次性重启所有节点,Patroni 将忽略该变更并用原始设置值重启从库,从而需要之后再次重启从库。Patroni 这样处理是为了防止从库进入无限崩溃循环,因为如果尝试将上述任一参数设置为低于从库的 pg_controldataFATALpg_controldata
更多信息请参阅 PostgreSQL 管理员概述 。
Patroni 配置参数 以下 Patroni 配置选项只能通过动态配置方式修改 :
ttlloop_waitretry_timeoutsmaximum_lag_on_failovermax_timelines_historycheck_timelinepostgresql.use_slots修改这些选项后,Patroni 会读取存储在 DCS 中的配置相关部分,并更新其运行时值。
Patroni 节点会在每次配置变更时,将 DCS 选项的状态以文件形式写入 Postgres 数据目录中名为 patroni.dynamic.json
配置生成与验证 Patroni 提供了用于生成和验证 Patroni 本地配置文件 patroni
生成示例本地 Patroni 配置; 为本地运行的 PostgreSQL 实例生成 Patroni 配置文件(例如作为 Patroni 集成 验证给定的 Patroni 配置文件。
示例 Patroni 配置 patroni --generate-sample-config [configfile]
说明 以 yaml环境变量配置 #FIXME
部分默认值根据本地环境确定:
postgresql.listengethostname5432postgresql.connect_addressgethostname5432postgresql.authentication.rewindrestapi.listengethostname8008restapi.connect_addressgethostname8008参数 configfilestdout
为运行中实例生成 Patroni 配置 patroni --generate-config [--dsn DSN] [configfile]
说明 为本地运行的 PostgreSQL 实例以 yaml环境变量 建立 PostgreSQL 连接。如果未提供密码,则通过提示符输入。
源 Postgres 实例中定义的所有非内部 GUC,无论是通过配置文件、postmaster 命令行还是环境变量设置,都将作为以下 Patroni 配置参数的来源:
scopecluster_namepostgresql.listenlisten_addressesportpostgresql.datadirdata_directorypostgresql.parametersarchive_commandrestore_commandarchive_cleanup_commandrecovery_end_commandssl_passphrase_commandhba_fileident_fileconfig_filebootstrap.dcs如果 scopepostgresql.listenpostgresql.datadir环境变量配置
其他值定义规则:
namePATRONI_NAMEpostgresql.bin_dirpostgresql.connect_addressgethostnameportpostgresql.authentication.superuserpostgresql.pg_hbahba_filepostgresql.pg_identident_filerestapi.listengethostname8008restapi.connect_addressgethostname8008通过 环境变量配置
参数 configfilestdout
dsn
验证 Patroni 配置 patroni --validate-config [configfile] [--ignore-listen-port | -i]
说明 验证给定的 Patroni 配置,并打印失败检查项的相关信息。
参数 configfilePATRONI_CONFIG_VARIABLEPatroni 环境变量
--ignore-listen-port | -iconfigfilelisten
--print | -p
26.3.1 - 动态配置 存储在 DCS 中并应用于整个集群的动态配置参数。
原始页面: https://patroni.readthedocs.io/en/latest/dynamic_configuration.html
如需修改动态配置,可使用 patronictl edit-configREST API
loop_waitttlretry_timeout警告
修改 loop_waitretry_timeoutttl
loop_wait + 2 * retry_timeout <= ttl
maximum_lag_on_failovermaximum_lag_on_syncnodemax_timelines_historyprimary_start_timeoutloop_wait + primary_start_timeout + loop_waitprimary_start_timeoutloop_waitprimary_stop_timeoutsynchronous_modeprimary_stop_timeoutsynchronous_modeoffonquorumsynchronous_standby_names复制模式文档 synchronous_mode_strict复制模式文档 synchronous_node_countsynchronous_modesynchronous_standby_names1failsafe_modeDCS 故障安全模式 falsepostgresqluse_pg_rewindfalseinitdb--data-checksumswal_log_hintsonpg_rewinduse_slotstruerecovery_confrecovery.confrecovery.confparameters{max_connections: 100, wal_level: "replica", max_wal_senders: 10, wal_log_hints: "on"}pg_hbapg_hba.confhba_file- host all all 0.0.0.0/0 md5- host replication replicator 127.0.0.1/32 md5pg_identpg_ident.confident_file- mapname1 systemname1 pguser1- mapname1 systemname2 pguser2standby_clusterhostportprimary_slot_nameslot_name_from_member_namecreate_replica_methodspostgresql_settingsrestore_commandpostgresql_settingsarchive_cleanup_commandrecovery_min_apply_delaymember_slots_ttl30min0slotsloop_waitloop_waitlibpqpostgresql.authenticationconfirmed_flush_lsnpostgresql.use_slotstruehot_standby_feedbackmy_slot_name将独立实例转换为 Patroni 集群 typephysicallogicaldatabaseplugincluster_typedatabaseplugincluster_typeprimarystandbyignore_slotsnametypephysicallogicaldatabaseplugindatabaselogicalpluginlogical注意:slotsignore_slots
slots :
permanent_logical_slot_name :
type : logical
database : my_db
plugin : test_decoding
permanent_physical_slot_name :
type : physical
...
ignore_slots :
- name : ignored_logical_slot_name
type : logical
database : my_db
plugin : test_decoding
- name : ignored_physical_slot_name
type : physical
...
注意:当运行 PostgreSQL v11 或更新版本时,Patroni 在所有可能成为领导者的节点上维护物理复制槽,以便从库在其他节点可能需要时保留 WAL 段。若节点缺席且其在 DCS 中的成员键过期,对应的复制槽将在 member_slots_ttl30min
slots :
node_name1 :
type : physical
node_name2 :
type : physical
node_name3 :
type : physical
...
警告
永久复制槽仅从 primarystandby_leaderpg_wal
警告
在备库上设置 nostream
26.3.2 - YAML 配置参数 Patroni YAML 配置选项与各配置节的完整参考。
原始页面: https://patroni.readthedocs.io/en/latest/yaml_configuration.html
全局/通用 namenamespace/servicescope
日志 typeplainjsonjsonjsonloggerplainlevelINFOPython logging 文档 )。traceback_levelERRORlog.level=DEBUGDEBUGformatplainLogRecord 属性 。若日志类型为 json%()%(asctime)s %(levelname)s: %(message)s 。dateformatformatTime() 文档 )。static_fieldsjsonmax_queue_size1000dirfile_numfile_sizemode0644file_numfile_sizeloggerspatroni.postmaster: WARNING urllib3: DEBUG deduplicate_heartbeat_logstruefalse警告
HA 循环的执行时间是诊断因资源耗尽等问题导致故障转移的重要信息。当 deduplicate_heartbeat_logstrue
以下是将 Patroni 配置为 JSON 格式日志的配置示例:
log :
type : json
format :
- message
- module
- asctime : '@timestamp'
- levelname : level
static_fields :
app : patroni
引导配置 bootstrapdcs/<namespace>/<scope>/config ,作为集群的全局动态配置。可将 动态配置参数 bootstrap.dcs
method
详见 自定义引导方法文档 initdbinitdbmethodinitdb
initdb
- data-checksums- encoding: UTF8- locale: UTF8post_bootstrappost_init
Citus 启用 Patroni 与 Citus 的集成。配置后,Patroni 将负责在协调节点上注册 Citus 工作节点。关于 Citus 支持的更多信息,参见 此处
group012databasecitus
Consul 大多数参数为可选,但必须指定 hosturl
hosturlportschemehttphttpshttptokenverifycacertcertkeycertdcconsistencydefaultconsistentstaleConsul API 参考 )。checksregister_servicefalseservice_tagsprimaryreplicastandby-leaderservice_check_interval5sservice_check_tls_server_nameConsul agent check API 参考 。token
service_prefix "${scope}" {
policy = "write"
}
key_prefix "${namespace}/${scope}" {
policy = "write"
}
session_prefix "" {
policy = "write"
}
Etcd 大多数参数为可选,但必须指定 hosthostsurlproxysrv
hosthostsuse_proxieshostsurlproxyurlsrv_etcd-client-ssl_etcd-client_etcd-ssl_etcd_etcd-server-ssl_etcd-server_etcd-server-ssl_etcd-serversrv_suffixsrvsrv_suffix: foosrv: example.org_etcd-client-ssl-foo._tcp.example.comprotocolurlproxyusernamepasswordcacertcertkeycertEtcdv3 若要让 Patroni 通过协议版本 3 与 Etcd 集群通信,在 Patroni 配置文件中使用 etcd3etcd
警告
使用协议版本 2 创建的键在版本 3 中不可见,反之亦然,因此不能仅通过更新 Patroni 配置文件来从 etcdetcd3
ZooKeeper hostsuse_sslfalsefalsecacertcertkeykey_passwordverifytrueset_aclsx509digestCREATEREADWRITEDELETEADMINALLset_acls: {CN=principal1: [CREATE, READ], digest:principal2:+pjROuBuuwNNSujKyH8dGcEnFPQ=: [ALL]}auth_dataschemecredential说明
需要安装 kazoo>=2.6.0
Exhibitor hostspoll_intervalport
Kubernetes bypass_api_servicekubernetesKUBERNETES_SERVICE_HOSTbypass_api_servicetruenamespacedefaultlabels{label1: value1, label2: value2}scope_labelcluster-namebootstrap_labels{label1: value1, label2: value2}initializing new clusterrunning custom bootstrap scriptstarting after custom bootstrapcreating replicarole_labelprimaryreplicaroleleader_label_valueprimaryprimaryfollower_label_valuereplicareplicastandby_leader_label_valuestandby_leaderprimarytmp_role_labelprimaryreplicause_endpointspod_ipuse_endpointsports{Kind: Service, spec: {ports: [{name: postgresql, port: 5432, targetPort: 5432}]}}kubernetes.ports: [{"name": "postgresql", "port": 5432}]kubernetes.use_endpointscacertretriable_http_codes500503504retry-after
Raft(已弃用) self_addrip:portself_addr
bind_addrip:portself_addr
partner_addrs
\['ip1:port', 'ip2:port', 'etc...'\]。
data_dir
passwordcryptography
关于 Raft 实现的简短 FAQ:
问:如何列出所有参与共识的节点?
答:syncobj_admin -conn host:port -status
问:某个参与共识的节点已下线,且我无法为其他节点复用相同 IP,如何将其从共识中移除?
答:syncobj_admin -conn host:port -remove host2:port2host2:port2
问:从哪里获取 syncobj_admin
答:它随 pysyncobj
问:是否可以在不加入共识的情况下运行 Patroni 节点?
答:可以,只需在 Patroni 配置中注释掉或删除 raft.self_addr
问:是否可以只在两个节点上运行 Patroni 和 PostgreSQL?
答:可以,在第三个节点上运行 patroni_raft_controller
PostgreSQL postgresqlauthentication
superuserusernamepasswordsslmodesslmode 连接参数,允许客户端指定与服务器的 TLS 协商模式,默认模式为 prefersslkeysslkey 连接参数,指定与客户端证书配套的私钥位置。sslpasswordsslpassword 连接参数,指定 sslkeysslcertsslcert 连接参数,指定客户端证书的位置。sslrootcertsslrootcert 连接参数,指定包含一个或多个受信任 CA 证书的文件位置,客户端将用其验证服务器证书。sslcrlsslcrl 连接参数,指定证书吊销列表文件的位置,客户端将拒绝连接证书出现在该列表中的服务器。sslcrldirsslcrldir 连接参数,指定包含证书吊销列表文件的目录位置,客户端将拒绝连接证书出现在该列表中的服务器。sslnegotiationsslnegotiation 连接参数,控制在使用 SSL 时与服务器协商 SSL 加密的方式。gssencmodegssencmode 连接参数,决定是否以及以何种优先级与服务器建立安全的 GSS TCP/IP 连接。channel_bindingchannel_binding 连接参数,控制客户端对通道绑定的使用。replicationusernamepasswordsslmodesslmode 连接参数,默认模式为 prefersslkeysslkey 连接参数,指定与客户端证书配套的私钥位置。sslpasswordsslpassword 连接参数,指定 sslkeysslcertsslcert 连接参数,指定客户端证书的位置。sslrootcertsslrootcert 连接参数,指定包含一个或多个受信任 CA 证书的文件位置。sslcrlsslcrl 连接参数,指定证书吊销列表文件的位置。sslcrldirsslcrldir 连接参数,指定包含证书吊销列表文件的目录位置。sslnegotiationsslnegotiation 连接参数,控制在使用 SSL 时协商 SSL 加密的方式。gssencmodegssencmode 连接参数,决定是否以及以何种优先级建立安全的 GSS TCP/IP 连接。channel_bindingchannel_binding 连接参数,控制客户端对通道绑定的使用。rewindusernamepg_rewind权限 。passwordpg_rewindsslmodesslmode 连接参数,默认模式为 prefersslkeysslkey 连接参数,指定与客户端证书配套的私钥位置。sslpasswordsslpassword 连接参数,指定 sslkeysslcertsslcert 连接参数,指定客户端证书的位置。sslrootcertsslrootcert 连接参数,指定包含一个或多个受信任 CA 证书的文件位置。sslcrlsslcrl 连接参数,指定证书吊销列表文件的位置。sslcrldirsslcrldir 连接参数,指定包含证书吊销列表文件的目录位置。sslnegotiationsslnegotiation 连接参数,控制在使用 SSL 时协商 SSL 加密的方式。gssencmodegssencmode 连接参数,决定是否以及以何种优先级建立安全的 GSS TCP/IP 连接。channel_bindingchannel_binding 连接参数,控制客户端对通道绑定的使用。callbacks
on_reloadon_restarton_role_changeon_starton_stopconnect_address
proxy_addressproxy_url
create_replica_methodsbasebackup自定义从库创建方法文档
data_dir已有目录
config_dir
bin_dir
bin_name
pg_ctlpg_ctlinitdbinitdbpgcontroldatapg_controldatapg_basebackuppg_basebackuppostgrespostgrespg_isreadypg_isreadypg_rewindpg_rewindlistenlisten: 127.0.0.1,127.0.0.2:5432
use_unix_socketfalseunix_socket_directoriespostgresql.parametersunix_socket_directorieshost
use_unix_socket_replfalseuse_unix_socket
pgpass.pgpass 密码文件的路径。Patroni 在执行 pg_basebackup、post_init 脚本及其他某些情况下会创建此文件,该路径必须对 Patroni 可写。
recovery_conf
custom_confpostgresql.confpostgresql.base.confpostgresql.conf动态配置
parameters{ssl: "on", ssl_cert_file: "cert_file"}
pg_hbapg_hba.confhba_file动态配置 pg_hba.conf
- host all all 0.0.0.0/0 md5- host replication replicator 127.0.0.1/32 md5pg_identpg_ident.confident_file动态配置 pg_ident.conf
- mapname1 systemname1 pguser1- mapname1 systemname2 pguser2pg_ctl_timeoutstartstoprestart
use_pg_rewinddata page checksumsinitdb--data-checksumswal_log_hintson
rewindpg_rewindtarget-pgdatasource-pgdatasource-serverwrite-recovery-confdry-runrestore-target-walconfig-fileno-ensure-shutdownversionhelp
postgresql :
rewind :
- debug
- progress
- sync-method : fsync
remove_data_directory_on_rewind_failurefalse
remove_data_directory_on_diverged_timelinespg_rewindfalse
replica_methodcreate_replica_methodsbasebackupcommandparameter=value
pre_promote
before_stop
REST API restapiconnect_addressREST API connect_addresslistenOPTIONSGETauthenticationusernamepasswordcertfilekeyfilekeyfile_passwordcafileciphersverify_clientnoneoptionalrequirednonerequiredoptionalrequiredoptionalPUTPOSTPATCHDELETEallowlistallowlistallowlist_include_membersallowlist_include_memberstrueapi_urlhttp_extra_headershttps_extra_headershttp_extra_headersrequest_queue_sizeserver_tokensServerMinimalPatroni/4.0.0ProductOnlyPatroniOriginalBaseHTTP/0.6 Python/3.12.3以下是 http_extra_headershttps_extra_headers
restapi :
listen : <listen>
connect_address : <connect_address>
authentication :
username : <username>
password : <password>
http_extra_headers :
'X-Frame-Options' : 'SAMEORIGIN'
'X-XSS-Protection' : '1; mode=block'
'X-Content-Type-Options' : 'nosniff'
cafile : <ca file>
certfile : <cert>
keyfile : <key>
https_extra_headers :
'Strict-Transport-Security' : 'max-age=31536000; includeSubDomains'
restapi.connect_address若启用了客户端证书验证(restapi.verify_clientrequired必须 在 ctl.certfilectl.keyfilectl.keyfile_password
CTL ctlauthenticationusernamepatronictlpasswordpatronictlinsecurecacertpatronictlcertfilekeyfilekeyfile_passwordWatchdog modeoffautomaticrequiredoffautomaticrequireddevice/dev/watchdogsafety_margin
clonefromtruefalsetruepg_basebackupclonefromtruefalsenoloadbalancetruefalsetrueGET /replicafalsereplicatefromnosynctruefalsetruesync_prioritysynchronous_modeonsync_prioritysynchronous_standby_namesnosync: truepg_stat_replicationsync_prioritynofailovertruefalsefalse可以 参与主库竞选。failover_priorityfailover_prioritynofailover: truefailover_priority基于法定人数的同步复制 nostreamtruefalsetruerestore_commandpg_walpg_xlog警告
nofailoverfailover_prioritynofailover: truefailover_priority: 0nofailover: false
除这些预定义标签外,还可以添加自定义标签:
key1truekey2falsekey31.4key4"RandomString"标签在 REST API patronictl list
26.3.3 - 环境变量 用于覆盖 Patroni 配置文件参数的环境变量。
原始页面: https://patroni.readthedocs.io/en/latest/ENVIRONMENT.html
全局/通用 PATRONI_CONFIGURATIONPATRONI_CONFIGURATIONPATRONI_NAMEPATRONI_NAMESPACEPATRONI_SCOPE日志 PATRONI_LOG_TYPEplainjsonjsonjsonloggerplainPATRONI_LOG_LEVELINFOPython logging 文档 )。PATRONI_LOG_TRACEBACK_LEVELERRORPATRONI_LOG_LEVEL=DEBUGDEBUGPATRONI_LOG_FORMATplainLogRecord 属性文档 。若日志类型为 json%()%(asctime)s %(levelname)s: %(message)s 。PATRONI_LOG_DATEFORMATformatTime() 文档 )。PATRONI_LOG_STATIC_FIELDSjsonPATRONI_LOG_STATIC_FIELDS="{app: patroni}"PATRONI_LOG_MAX_QUEUE_SIZE1000PATRONI_LOG_DIRPATRONI_LOG_FILE_NUMPATRONI_LOG_FILE_SIZEPATRONI_LOG_MODE0644PATRONI_LOG_FILE_NUMPATRONI_LOG_FILE_SIZEPATRONI_LOG_LOGGERSPATRONI_LOG_LOGGERS="{patroni.postmaster: WARNING, urllib3: DEBUG}"PATRONI_LOG_DEDUPLICATE_HEARTBEAT_LOGStruefalse警告
HA 循环的执行时间是诊断资源耗尽等问题所致故障转移的重要信息。将 PATRONI_LOG_DEDUPLICATE_HEARTBEAT_LOGStrue
Citus 启用 Patroni 与 Citus 的集成。配置后,Patroni 将负责在协调器上注册 Citus 工作节点。更多关于 Citus 支持的信息请参阅 此处
PATRONI_CITUS_GROUP012PATRONI_CITUS_DATABASEcitusConsul PATRONI_CONSUL_HOSTPATRONI_CONSUL_URLPATRONI_CONSUL_PORTPATRONI_CONSUL_SCHEMEhttphttpshttpPATRONI_CONSUL_TOKENPATRONI_CONSUL_VERIFYPATRONI_CONSUL_CACERTPATRONI_CONSUL_CERTPATRONI_CONSUL_KEYPATRONI_CONSUL_DCPATRONI_CONSUL_CONSISTENCYdefaultconsistentstaleConsul API 参考 )。PATRONI_CONSUL_CHECKSPATRONI_CONSUL_REGISTER_SERVICEfalsePATRONI_CONSUL_SERVICE_TAGSprimaryreplicastandby-leaderPATRONI_CONSUL_SERVICE_CHECK_INTERVALPATRONI_CONSUL_SERVICE_CHECK_TLS_SERVER_NAMEConsul agent check API 参考 。Etcd PATRONI_ETCD_PROXYPATRONI_ETCD_URLPATRONI_ETCD_URLPATRONI_ETCD_HOSTSPATRONI_ETCD_USE_PROXIEShostshostsPATRONI_ETCD_PROTOCOLurlproxyPATRONI_ETCD_HOSTPATRONI_ETCD_SRV_etcd-client-ssl_etcd-client_etcd-ssl_etcd_etcd-server-ssl_etcd-server_etcd-server-ssl_etcd-serverPATRONI_ETCD_SRV_SUFFIXPATRONI_ETCD_SRVPATRONI_ETCD_SRV_SUFFIX=fooPATRONI_ETCD_SRV=example.org_etcd-client-ssl-foo._tcp.example.comPATRONI_ETCD_USERNAMEPATRONI_ETCD_PASSWORDPATRONI_ETCD_CACERTPATRONI_ETCD_CERTPATRONI_ETCD_KEYEtcdv3 Etcdv3 的环境变量名与 Etcd 类似,只需将变量名中的 ETCDETCD3PATRONI_ETCD3_HOSTPATRONI_ETCD3_CACERT
警告
使用协议版本 2 创建的键在协议版本 3 中不可见,反之亦然,因此无法仅通过更新 Patroni 配置来从 Etcd 切换到 Etcdv3。此外,Patroni 使用 Etcd 的 gRPC 网关(代理)与 V3 API 通信,这意味着不支持 TLS 通用名称认证。
ZooKeeper PATRONI_ZOOKEEPER_HOSTS'host1:port1','host2:port2','etc...'PATRONI_ZOOKEEPER_USE_SSLfalsefalsePATRONI_ZOOKEEPER_CACERTPATRONI_ZOOKEEPER_CERTPATRONI_ZOOKEEPER_KEYPATRONI_ZOOKEEPER_KEY_PASSWORDPATRONI_ZOOKEEPER_VERIFYtruePATRONI_ZOOKEEPER_SET_ACLSx509digestCREATEREADWRITEDELETEADMINALLset_acls: {CN=principal1: [CREATE, READ], digest:principal2:+pjROuBuuwNNSujKyH8dGcEnFPQ=: [ALL]}PATRONI_ZOOKEEPER_AUTH_DATAschemecredential说明
需要安装 kazoo>=2.6.0
Exhibitor PATRONI_EXHIBITOR_HOSTSPATRONI_EXHIBITOR_PORT
Kubernetes PATRONI_KUBERNETES_BYPASS_API_SERVICEkubernetesKUBERNETES_SERVICE_HOSTtruePATRONI_KUBERNETES_NAMESPACEdefaultPATRONI_KUBERNETES_LABELS{label1: value1, label2: value2}PATRONI_KUBERNETES_SCOPE_LABELcluster-namePATRONI_KUBERNETES_BOOTSTRAP_LABELS{label1: value1, label2: value2}initializing new clusterrunning custom bootstrap scriptstarting after custom bootstrapcreating replicaPATRONI_KUBERNETES_ROLE_LABELprimaryreplicarolePATRONI_KUBERNETES_LEADER_LABEL_VALUEprimaryprimaryPATRONI_KUBERNETES_FOLLOWER_LABEL_VALUEreplicareplicaPATRONI_KUBERNETES_STANDBY_LEADER_LABEL_VALUEstandby_leaderprimaryPATRONI_KUBERNETES_TMP_ROLE_LABELprimaryreplicaPATRONI_KUBERNETES_USE_ENDPOINTSPATRONI_KUBERNETES_POD_IPPATRONI_KUBERNETES_USE_ENDPOINTSPATRONI_KUBERNETES_PORTS{Kind: Service, spec: {ports: [{name: postgresql, port: 5432, targetPort: 5432}]}}PATRONI_KUBERNETES_PORTS='[{"name": "postgresql", "port": 5432}]'PATRONI_KUBERNETES_USE_ENDPOINTSPATRONI_KUBERNETES_CACERTPATRONI_RETRIABLE_HTTP_CODES500503504retry-afterRaft(已弃用) PATRONI_RAFT_SELF_ADDRip:portPATRONI_RAFT_BIND_ADDRip:portself_addrPATRONI_RAFT_PARTNER_ADDRS"'ip1:port1','ip2:port2'"PATRONI_RAFT_DATA_DIRPATRONI_RAFT_PASSWORDcryptographyPostgreSQL PATRONI_POSTGRESQL_LISTENlisten: 127.0.0.1,127.0.0.2:5432PATRONI_POSTGRESQL_CONNECT_ADDRESSPATRONI_POSTGRESQL_PROXY_ADDRESSproxy_urlPATRONI_POSTGRESQL_DATA_DIRPATRONI_POSTGRESQL_CONFIG_DIRPATRONI_POSTGRESQL_BIN_DIRPATRONI_POSTGRESQL_BIN_PG_CTLpg_ctlPATRONI_POSTGRESQL_BIN_INITDBinitdbPATRONI_POSTGRESQL_BIN_PG_CONTROLDATApg_controldataPATRONI_POSTGRESQL_BIN_PG_BASEBACKUPpg_basebackupPATRONI_POSTGRESQL_BIN_POSTGRESpostgresPATRONI_POSTGRESQL_BIN_IS_READYpg_isreadyPATRONI_POSTGRESQL_BIN_PG_REWINDpg_rewindPATRONI_POSTGRESQL_PGPASS.pgpass 密码文件的路径。Patroni 在执行 pg_basebackup 及某些其他情况下会创建此文件,该位置必须对 Patroni 可写。PATRONI_REPLICATION_USERNAMEPATRONI_REPLICATION_PASSWORDPATRONI_REPLICATION_SSLMODEsslmode 连接参数,用于指定客户端与服务器的 TLS 协商模式。各模式详见 PostgreSQL 文档 ,默认模式为 preferPATRONI_REPLICATION_SSLKEYsslkey 连接参数,指定与客户端证书配套使用的私钥文件位置。PATRONI_REPLICATION_SSLPASSWORDsslpassword 连接参数,指定 PATRONI_REPLICATION_SSLKEYPATRONI_REPLICATION_SSLCERTsslcert 连接参数,指定客户端证书的文件位置。PATRONI_REPLICATION_SSLROOTCERTsslrootcert 连接参数,指定包含一个或多个 CA 证书的文件位置,客户端用于验证服务器证书。PATRONI_REPLICATION_SSLCRLsslcrl 连接参数,指定包含证书吊销列表的文件位置。客户端将拒绝连接到证书出现在此列表中的任何服务器。PATRONI_REPLICATION_SSLCRLDIRsslcrldir 连接参数,指定包含证书吊销列表文件的目录位置。客户端将拒绝连接到证书出现在此列表中的任何服务器。PATRONI_REPLICATION_SSLNEGOTIATIONsslnegotiation 连接参数,控制使用 SSL 时如何与服务器协商 SSL 加密。PATRONI_REPLICATION_GSSENCMODEgssencmode 连接参数,决定是否以及以何种优先级与服务器协商安全的 GSS TCP/IP 连接。PATRONI_REPLICATION_CHANNEL_BINDINGchannel_binding 连接参数,控制客户端对通道绑定的使用。PATRONI_SUPERUSER_USERNAMEPATRONI_SUPERUSER_PASSWORDPATRONI_SUPERUSER_SSLMODEsslmode 连接参数,用于指定客户端与服务器的 TLS 协商模式。各模式详见 PostgreSQL 文档 ,默认模式为 preferPATRONI_SUPERUSER_SSLKEYsslkey 连接参数,指定与客户端证书配套使用的私钥文件位置。PATRONI_SUPERUSER_SSLPASSWORDsslpassword 连接参数,指定 PATRONI_SUPERUSER_SSLKEYPATRONI_SUPERUSER_SSLCERTsslcert 连接参数,指定客户端证书的文件位置。PATRONI_SUPERUSER_SSLROOTCERTsslrootcert 连接参数,指定包含一个或多个 CA 证书的文件位置,客户端用于验证服务器证书。PATRONI_SUPERUSER_SSLCRLsslcrl 连接参数,指定包含证书吊销列表的文件位置。客户端将拒绝连接到证书出现在此列表中的任何服务器。PATRONI_SUPERUSER_SSLCRLDIRsslcrldir 连接参数,指定包含证书吊销列表文件的目录位置。客户端将拒绝连接到证书出现在此列表中的任何服务器。PATRONI_SUPERUSER_SSLNEGOTIATIONsslnegotiation 连接参数,控制使用 SSL 时如何与服务器协商 SSL 加密。PATRONI_SUPERUSER_GSSENCMODEgssencmode 连接参数,决定是否以及以何种优先级与服务器协商安全的 GSS TCP/IP 连接。PATRONI_SUPERUSER_CHANNEL_BINDINGchannel_binding 连接参数,控制客户端对通道绑定的使用。PATRONI_REWIND_USERNAMEpg_rewind权限 。PATRONI_REWIND_PASSWORDpg_rewindPATRONI_REWIND_SSLMODEsslmode 连接参数,用于指定客户端与服务器的 TLS 协商模式。各模式详见 PostgreSQL 文档 ,默认模式为 preferPATRONI_REWIND_SSLKEYsslkey 连接参数,指定与客户端证书配套使用的私钥文件位置。PATRONI_REWIND_SSLPASSWORDsslpassword 连接参数,指定 PATRONI_REWIND_SSLKEYPATRONI_REWIND_SSLCERTsslcert 连接参数,指定客户端证书的文件位置。PATRONI_REWIND_SSLROOTCERTsslrootcert 连接参数,指定包含一个或多个 CA 证书的文件位置,客户端用于验证服务器证书。PATRONI_REWIND_SSLCRLsslcrl 连接参数,指定包含证书吊销列表的文件位置。客户端将拒绝连接到证书出现在此列表中的任何服务器。PATRONI_REWIND_SSLCRLDIRsslcrldir 连接参数,指定包含证书吊销列表文件的目录位置。客户端将拒绝连接到证书出现在此列表中的任何服务器。PATRONI_REWIND_SSLNEGOTIATIONsslnegotiation 连接参数,控制使用 SSL 时如何与服务器协商 SSL 加密。PATRONI_REWIND_GSSENCMODEgssencmode 连接参数,决定是否以及以何种优先级与服务器协商安全的 GSS TCP/IP 连接。PATRONI_REWIND_CHANNEL_BINDINGchannel_binding 连接参数,控制客户端对通道绑定的使用。REST API PATRONI_RESTAPI_CONNECT_ADDRESSPATRONI_RESTAPI_LISTENPATRONI_RESTAPI_USERNAMEPATRONI_RESTAPI_PASSWORDPATRONI_RESTAPI_CERTFILEPATRONI_RESTAPI_KEYFILEPATRONI_RESTAPI_KEYFILE_PASSWORDPATRONI_RESTAPI_CAFILEPATRONI_RESTAPI_CIPHERSPATRONI_RESTAPI_VERIFY_CLIENTnoneoptionalrequirednonerequiredoptionalPUTPOSTPATCHDELETEPATRONI_RESTAPI_ALLOWLISTallowlistallowlist_include_membersPATRONI_RESTAPI_ALLOWLIST_INCLUDE_MEMBERStrueapi_urlPATRONI_RESTAPI_HTTP_EXTRA_HEADERSPATRONI_RESTAPI_HTTPS_EXTRA_HEADERShttp_extra_headersPATRONI_RESTAPI_REQUEST_QUEUE_SIZEPATRONI_RESTAPI_SERVER_TOKENSServerOriginalBaseHTTP/0.6 Python/3.12.3MinimalPatroni/4.0.0ProductOnlyPatroniPATRONI_RESTAPI_CONNECT_ADDRESS若启用了客户端证书验证(PATRONI_RESTAPI_VERIFY_CLIENTrequired必须 在 PATRONI_CTL_CERTFILEPATRONI_CTL_KEYFILEPATRONI_CTL_KEYFILE_PASSWORD有效的客户端证书 ,否则 Patroni 将无法正常工作。 CTL PATRONICTL_CONFIG_FILEPATRONI_CTL_USERNAMEpatronictlPATRONI_CTL_PASSWORDpatronictlPATRONI_CTL_INSECUREPATRONI_CTL_CACERTpatronictlPATRONI_CTL_CERTFILEPATRONI_CTL_KEYFILEPATRONI_CTL_KEYFILE_PASSWORD26.4 - Patroni REST API Patroni REST API 端点与操作行为参考。
原始页面: https://patroni.readthedocs.io/en/latest/rest_api.html
patronictl 工具执行故障转移、主从切换、重新初始化、重启和重载等操作,还可供 HAProxy 或其他负载均衡器执行 HTTP 健康检查,以及用于监控目的。以下是 Patroni REST API 端点的完整列表。
健康检查端点 对于所有健康检查 GETHEADOPTIONSGET
以下请求仅在 Patroni 节点作为持有领导者锁的主库运行时返回 HTTP 状态码 200
GET /GET /primaryGET /read-writeGET /standby-leader备用集群 中的领导者运行时,返回 HTTP 状态码 200
GET /leader200primarystandby_leader
GET /replicarunningreplicanoloadbalance200
GET /replica?replication_state=<required state>replicareplication_state=streaming
GET /replica?lag=<max-lag>replica200cluster.last_leader_operationmax-lag
GET /replica?lag=1048576GET /replica?lag=1024kBGET /replica?lag=10MBGET /replica?lag=1GBGET /replica?tag_key1=value1&tag_key2=value2tagskey1key2
以下请求检查的是 leader 或 standby-leader 状态,Patroni 不会应用任何用户自定义标签,这些标签将被忽略:
GET /?tag_key1=value1&tag_key2=value2GET /leader?tag_key1=value1&tag_key2=value2GET /primary?tag_key1=value1&tag_key2=value2GET /read-write?tag_key1=value1&tag_key2=value2GET /standby_leader?tag_key1=value1&tag_key2=value2GET /standby-leader?tag_key1=value1&tag_key2=value2GET /read-only
GET /synchronousGET /sync200
GET /read-only-sync
GET /quorumsynchronous_standby_names200
GET /read-only-quorum
GET /asynchronousGET /async200
GET /asynchronous?lag=<max-lag>GET /async?lag=<max-lag>asynchronousasync200cluster.last_leader_operationmax-lag
GET /async?lag=1048576GET /async?lag=1024kBGET /async?lag=10MBGET /async?lag=1GBGET /health200
GET /liveness200ttl2*ttl503livenessProbe
GET /readiness?lag=<max-lag>&mode=apply|write200lagmaximum_lag_on_failovermode
作为 Kubernetes readinessProbereadinessProbe
livenessttl30s
readinessProbe :
httpGet :
scheme : HTTP
path : /readiness
port : 8008
initialDelaySeconds : 3
periodSeconds : 10
timeoutSeconds : 5
successThreshold : 1
failureThreshold : 3
livenessProbe :
httpGet :
scheme : HTTP
path : /liveness
port : 8008
initialDelaySeconds : 3
periodSeconds : 10
timeoutSeconds : 5
successThreshold : 1
failureThreshold : 3
监控端点 GET /patroni
示例: 健康运行中的集群
$ curl -s http://localhost:8008/patroni | jq .
{
"state" : "running" ,
"postmaster_start_time" : "2024-08-28 19:39:26.352526+00:00" ,
"role" : "primary" ,
"server_version" : 160004,
"xlog" : {
"location" : 67395656
} ,
"timeline" : 1,
"replication" : [
{
"usename" : "replicator" ,
"application_name" : "patroni2" ,
"client_addr" : "10.89.0.6" ,
"state" : "streaming" ,
"sync_state" : "async" ,
"sync_priority" : 0
} ,
{
"usename" : "replicator" ,
"application_name" : "patroni3" ,
"client_addr" : "10.89.0.2" ,
"state" : "streaming" ,
"sync_state" : "async" ,
"sync_priority" : 0
}
] ,
"dcs_last_seen" : 1692356718,
"tags" : {
"clonefrom" : true
} ,
"database_system_identifier" : "7268616322854375442" ,
"patroni" : {
"version" : "4.0.0" ,
"scope" : "demo" ,
"name" : "patroni1"
}
}
示例: 无主锁的集群
$ curl -s http://localhost:8008/patroni | jq .
{
"state" : "running" ,
"postmaster_start_time" : "2024-08-28 19:39:26.352526+00:00" ,
"role" : "replica" ,
"server_version" : 160004,
"xlog" : {
"received_location" : 67419744,
"replayed_location" : 67419744,
"replayed_timestamp" : null,
"paused" : false
} ,
"timeline" : 1,
"replication" : [
{
"usename" : "replicator" ,
"application_name" : "patroni2" ,
"client_addr" : "10.89.0.6" ,
"state" : "streaming" ,
"sync_state" : "async" ,
"sync_priority" : 0
} ,
{
"usename" : "replicator" ,
"application_name" : "patroni3" ,
"client_addr" : "10.89.0.2" ,
"state" : "streaming" ,
"sync_state" : "async" ,
"sync_priority" : 0
}
] ,
"cluster_unlocked" : true,
"dcs_last_seen" : 1692356928,
"tags" : {
"clonefrom" : true
} ,
"database_system_identifier" : "7268616322854375442" ,
"patroni" : {
"version" : "4.0.0" ,
"scope" : "demo" ,
"name" : "patroni1"
}
}
示例: 启用了 DCS 故障安全模式 的无主锁集群
$ curl -s http://localhost:8008/patroni | jq .
{
"state" : "running" ,
"postmaster_start_time" : "2024-08-28 19:39:26.352526+00:00" ,
"role" : "replica" ,
"server_version" : 160004,
"xlog" : {
"location" : 67420024
} ,
"timeline" : 1,
"replication" : [
{
"usename" : "replicator" ,
"application_name" : "patroni2" ,
"client_addr" : "10.89.0.6" ,
"state" : "streaming" ,
"sync_state" : "async" ,
"sync_priority" : 0
} ,
{
"usename" : "replicator" ,
"application_name" : "patroni3" ,
"client_addr" : "10.89.0.2" ,
"state" : "streaming" ,
"sync_state" : "async" ,
"sync_priority" : 0
}
] ,
"cluster_unlocked" : true,
"failsafe_mode_is_active" : true,
"dcs_last_seen" : 1692356928,
"tags" : {
"clonefrom" : true
} ,
"database_system_identifier" : "7268616322854375442" ,
"patroni" : {
"version" : "4.0.0" ,
"scope" : "demo" ,
"name" : "patroni1"
}
}
示例: 启用了 暂停模式 的集群
$ curl -s http://localhost:8008/patroni | jq .
{
"state" : "running" ,
"postmaster_start_time" : "2024-08-28 19:39:26.352526+00:00" ,
"role" : "replica" ,
"server_version" : 160004,
"xlog" : {
"location" : 67420024
} ,
"timeline" : 1,
"replication" : [
{
"usename" : "replicator" ,
"application_name" : "patroni2" ,
"client_addr" : "10.89.0.6" ,
"state" : "streaming" ,
"sync_state" : "async" ,
"sync_priority" : 0
} ,
{
"usename" : "replicator" ,
"application_name" : "patroni3" ,
"client_addr" : "10.89.0.2" ,
"state" : "streaming" ,
"sync_state" : "async" ,
"sync_priority" : 0
}
] ,
"pause" : true,
"dcs_last_seen" : 1724874295,
"tags" : {
"clonefrom" : true
} ,
"database_system_identifier" : "7268616322854375442" ,
"patroni" : {
"version" : "4.0.0" ,
"scope" : "demo" ,
"name" : "patroni1"
}
}
GET /metrics
$ curl http://localhost:8008/metrics
# HELP patroni_version Patroni semver without periods. \
# TYPE patroni_version gauge
patroni_version{ scope = "batman" ,name= "patroni1" } 040000
# HELP patroni_postgres_running Value is 1 if Postgres is running, 0 otherwise.
# TYPE patroni_postgres_running gauge
patroni_postgres_running{ scope = "batman" ,name= "patroni1" } 1
# HELP patroni_postmaster_start_time Epoch seconds since Postgres started.
# TYPE patroni_postmaster_start_time gauge
patroni_postmaster_start_time{ scope = "batman" ,name= "patroni1" } 1724873966.352526
# HELP patroni_primary Value is 1 if this node is the leader, 0 otherwise.
# TYPE patroni_primary gauge
patroni_primary{ scope = "batman" ,name= "patroni1" } 1
# HELP patroni_xlog_location Current location of the Postgres transaction log, 0 if this node is not the leader.
# TYPE patroni_xlog_location counter
patroni_xlog_location{ scope = "batman" ,name= "patroni1" } 22320573386952
# HELP patroni_standby_leader Value is 1 if this node is the standby_leader, 0 otherwise.
# TYPE patroni_standby_leader gauge
patroni_standby_leader{ scope = "batman" ,name= "patroni1" } 0
# HELP patroni_replica Value is 1 if this node is a replica, 0 otherwise.
# TYPE patroni_replica gauge
patroni_replica{ scope = "batman" ,name= "patroni1" } 0
# HELP patroni_sync_standby Value is 1 if this node is a sync standby replica, 0 otherwise.
# TYPE patroni_sync_standby gauge
patroni_sync_standby{ scope = "batman" ,name= "patroni1" } 0
# HELP patroni_quorum_standby Value is 1 if this node is a quorum standby replica, 0 otherwise.
# TYPE patroni_quorum_standby gauge
patroni_quorum_standby{ scope = "batman" ,name= "patroni1" } 0
# HELP patroni_xlog_received_location Current location of the received Postgres transaction log, 0 if this node is not a replica.
# TYPE patroni_xlog_received_location counter
patroni_xlog_received_location{ scope = "batman" ,name= "patroni1" } 0
# HELP patroni_xlog_replayed_location Current location of the replayed Postgres transaction log, 0 if this node is not a replica.
# TYPE patroni_xlog_replayed_location counter
patroni_xlog_replayed_location{ scope = "batman" ,name= "patroni1" } 0
# HELP patroni_xlog_replayed_timestamp Current timestamp of the replayed Postgres transaction log, 0 if null.
# TYPE patroni_xlog_replayed_timestamp gauge
patroni_xlog_replayed_timestamp{ scope = "batman" ,name= "patroni1" } 0
# HELP patroni_xlog_paused Value is 1 if the Postgres xlog is paused, 0 otherwise.
# TYPE patroni_xlog_paused gauge
patroni_xlog_paused{ scope = "batman" ,name= "patroni1" } 0
# HELP patroni_postgres_streaming Value is 1 if Postgres is streaming, 0 otherwise.
# TYPE patroni_postgres_streaming gauge
patroni_postgres_streaming{ scope = "batman" ,name= "patroni1" } 1
# HELP patroni_postgres_in_archive_recovery Value is 1 if Postgres is replicating from archive, 0 otherwise.
# TYPE patroni_postgres_in_archive_recovery gauge
patroni_postgres_in_archive_recovery{ scope = "batman" ,name= "patroni1" } 0
# HELP patroni_postgres_server_version Version of Postgres (if running), 0 otherwise.
# TYPE patroni_postgres_server_version gauge
patroni_postgres_server_version{ scope = "batman" ,name= "patroni1" } 160004
# HELP patroni_cluster_unlocked Value is 1 if the cluster is unlocked, 0 if locked.
# TYPE patroni_cluster_unlocked gauge
patroni_cluster_unlocked{ scope = "batman" ,name= "patroni1" } 0
# HELP patroni_postgres_timeline Postgres timeline of this node (if running), 0 otherwise.
# TYPE patroni_postgres_timeline counter
patroni_failsafe_mode_is_active{ scope = "batman" ,name= "patroni1" } 0
# HELP patroni_postgres_timeline Postgres timeline of this node (if running), 0 otherwise.
# TYPE patroni_postgres_timeline counter
patroni_postgres_timeline{ scope = "batman" ,name= "patroni1" } 24
# HELP patroni_dcs_last_seen Epoch timestamp when DCS was last contacted successfully by Patroni.
# TYPE patroni_dcs_last_seen gauge
patroni_dcs_last_seen{ scope = "batman" ,name= "patroni1" } 1724874235
# HELP patroni_pending_restart Value is 1 if the node needs a restart, 0 otherwise.
# TYPE patroni_pending_restart gauge
patroni_pending_restart{ scope = "batman" ,name= "patroni1" } 1
# HELP patroni_is_paused Value is 1 if auto failover is disabled, 0 otherwise.
# TYPE patroni_is_paused gauge
patroni_is_paused{ scope = "batman" ,name= "patroni1" } 1
# HELP patroni_postgres_state Numeric representation of Postgres state.
# Values: 0=initdb, 1=initdb_failed, 2=custom_bootstrap, 3=custom_bootstrap_failed, 4=creating_replica, 5=running, 6=starting, 7=bootstrap_starting, 8=start_failed, 9=restarting, 10=restart_failed, 11=stopping, 12=stopped, 13=stop_failed, 14=crashed
# TYPE patroni_postgres_state gauge
patroni_postgres_state{ scope = "batman" ,name= "patroni1" } 5
PostgreSQL 状态值 patroni_postgres_statePostgresqlState.get_metrics_description()
值 状态名称 描述 0 initdb 正在初始化新集群 1 initdb_failed 新集群初始化失败 2 custom_bootstrap 正在运行自定义引导脚本 3 custom_bootstrap_failed 自定义引导脚本失败 4 creating_replica 正在从主库创建从库 5 running PostgreSQL 正常运行 6 starting PostgreSQL 正在启动 7 bootstrap_starting 自定义引导后正在启动 8 start_failed PostgreSQL 启动失败 9 restarting PostgreSQL 正在重启 10 restart_failed PostgreSQL 重启失败 11 stopping PostgreSQL 正在停止 12 stopped PostgreSQL 已停止 13 stop_failed PostgreSQL 停止失败 14 crashed PostgreSQL 已崩溃
说明
上述数值固定不变,以保持与现有监控系统的向后兼容性。未来如需新增状态,将分配新的数值,已有数值不会改变。
集群状态端点 GET /cluster$ curl -s http://localhost:8008/cluster | jq .
{
"members" : [
{
"name" : "patroni1" ,
"role" : "leader" ,
"state" : "running" ,
"api_url" : "http://10.89.0.4:8008/patroni" ,
"host" : "10.89.0.4" ,
"port" : 5432,
"timeline" : 5,
"tags" : {
"clonefrom" : true
}
} ,
{
"name" : "patroni2" ,
"role" : "replica" ,
"state" : "streaming" ,
"api_url" : "http://10.89.0.6:8008/patroni" ,
"host" : "10.89.0.6" ,
"port" : 5433,
"timeline" : 5,
"tags" : {
"clonefrom" : true
} ,
"receive_lag" : 0,
"receive_lsn" : "0/4000060" ,
"replay_lag" : 0,
"replay_lsn" : "0/4000060" ,
"lag" : 0,
"lsn" : "0/4000060"
}
] ,
"scope" : "demo" ,
"scheduled_switchover" : {
"at" : "2023-09-24T10:36:00+02:00" ,
"from" : "patroni1" ,
"to" : "patroni3"
}
}
GET /historypg_wal$ curl -s http://localhost:8008/history | jq .
[
[
1,
25623960,
"no recovery target specified" ,
"2019-09-23T16:57:57+02:00"
] ,
[
2,
25624344,
"no recovery target specified" ,
"2019-09-24T09:22:33+02:00"
] ,
[
3,
25624752,
"no recovery target specified" ,
"2019-09-24T09:26:15+02:00"
] ,
[
4,
50331856,
"no recovery target specified" ,
"2019-09-24T09:35:52+02:00"
]
]
配置端点 GET /config
$ curl -s http://localhost:8008/config | jq .
{
"ttl" : 30,
"loop_wait" : 10,
"retry_timeout" : 10,
"maximum_lag_on_failover" : 1048576,
"postgresql" : {
"use_slots" : true,
"use_pg_rewind" : true,
"parameters" : {
"hot_standby" : "on" ,
"wal_level" : "hot_standby" ,
"max_wal_senders" : 5,
"max_replication_slots" : 5,
"max_connections" : "100"
}
}
}
PATCH /config
$ curl -s -XPATCH -d \
'{"loop_wait":5,"ttl":20,"postgresql":{"parameters":{"max_connections":"101"}}}' \
http://localhost:8008/config | jq .
{
"ttl" : 20,
"loop_wait" : 5,
"maximum_lag_on_failover" : 1048576,
"retry_timeout" : 10,
"postgresql" : {
"use_slots" : true,
"use_pg_rewind" : true,
"parameters" : {
"hot_standby" : "on" ,
"wal_level" : "hot_standby" ,
"max_wal_senders" : 5,
"max_replication_slots" : 5,
"max_connections" : "101"
}
}
}
上述调用对现有配置进行部分更新(patch),并返回更新后的配置。
验证节点是否已处理该配置:日志应每 5 秒打印一次(loop_wait=5)。由于 max_connectionspending_restart
$ curl -s http://localhost:8008/patroni | jq .
{
"database_system_identifier" : "6287881213849985952" ,
"postmaster_start_time" : "2024-08-28 19:39:26.352526+00:00" ,
"xlog" : {
"location" : 2197818976
} ,
"timeline" : 1,
"dcs_last_seen" : 1724874545,
"database_system_identifier" : "7408277255830290455" ,
"pending_restart" : true,
"pending_restart_reason" : {
"max_connections" : {
"old_value" : "100" ,
"new_value" : "101"
}
} ,
"patroni" : {
"version" : "4.0.0" ,
"scope" : "batman" ,
"name" : "patroni1"
} ,
"state" : "running" ,
"role" : "primary" ,
"server_version" : 160004
}
删除参数:
若要删除(重置)某个配置项,将其 patch 为 null
$ curl -s -XPATCH -d \
'{"postgresql":{"parameters":{"max_connections":null}}}' \
http://localhost:8008/config | jq .
{
"ttl" : 20,
"loop_wait" : 5,
"retry_timeout" : 10,
"maximum_lag_on_failover" : 1048576,
"postgresql" : {
"use_slots" : true,
"use_pg_rewind" : true,
"parameters" : {
"hot_standby" : "on" ,
"unix_socket_directories" : "." ,
"wal_level" : "hot_standby" ,
"max_wal_senders" : 5,
"max_replication_slots" : 5
}
}
}
上述调用从动态配置中删除了 postgresql.parameters.max_connections
PUT /config
$ curl -s -XPUT -d \
'{"maximum_lag_on_failover":1048576,"retry_timeout":10,"postgresql":{"use_slots":true,"use_pg_rewind":true,"parameters":{"hot_standby":"on","wal_level":"hot_standby","unix_socket_directories":".","max_wal_senders":5}},"loop_wait":3,"ttl":20}' \
http://localhost:8008/config | jq .
{
"ttl" : 20,
"maximum_lag_on_failover" : 1048576,
"retry_timeout" : 10,
"postgresql" : {
"use_slots" : true,
"parameters" : {
"hot_standby" : "on" ,
"unix_socket_directories" : "." ,
"wal_level" : "hot_standby" ,
"max_wal_senders" : 5
} ,
"use_pg_rewind" : true
} ,
"loop_wait" : 3
}
主从切换与故障转移端点
主从切换(Switchover) /switchover
调用 /switchover/failover
POSTleadercandidatescheduled_at
根据执行情况,请求可能返回不同的 HTTP 状态码。主从切换或故障转移成功完成时返回 200202400412503
DELETE /switchover
示例: 切换到任意健康备库
$ curl -s http://localhost:8008/switchover -XPOST -d '{"leader":"postgresql1"}'
Successfully switched over to "postgresql2"
示例: 切换到指定节点
$ curl -s http://localhost:8008/switchover -XPOST -d \
'{"leader":"postgresql1","candidate":"postgresql2"}'
Successfully switched over to "postgresql2"
示例: 在指定时间将领导者切换到集群中任意健康备库。
$ curl -s http://localhost:8008/switchover -XPOST -d \
'{"leader":"postgresql0","scheduled_at":"2019-09-24T12:00+00"}'
Switchover scheduled
故障转移(Failover) /failover
POSTcandidateleader
示例:
$ curl -s http://localhost:8008/failover -XPOST -d '{"candidate":"postgresql1"}'
Successfully failed over to "postgresql1"
警告
使用此端点时请 格外谨慎 ,在某些情况下可能造成数据丢失。大多数情况下,使用 主从切换端点 即可满足需求。
POST /switchoverPOST /failoverpatronictl_switchover 和 patronictl_failover 使用。
DELETE /switchoverpatronictl flush cluster-name switchover 使用。
故障转移 主从切换 需要指定 leader 否 是 需要指定 candidate 是 否 可在暂停模式下执行 是 是(仅限指定候选节点的情况) 可调度执行 否 是(非暂停模式下)
健康备库 集群成员需满足以下所有条件,才能在主从切换期间参与主库竞选,或被选为故障转移/主从切换的候选节点:
可通过 Patroni API 访问; 未将 nofailovertrue watchdog 功能完整可用(若配置要求); 在健康集群的主从切换或自动故障转移场景中,复制延迟不超过 maximum_lag_on_failover配置参数 所设的上限; 在健康集群的主从切换或自动故障转移场景中,若 check_timeline配置参数 设为 true 在 同步模式 下:主从切换场景(无论是否指定候选节点):必须列于 /sync 故障转移场景(无论集群是否健康):跳过此检查。 警告
在无领导者的集群中执行手动故障转移时,候选节点即便存在以下情况也将被允许提升:同步模式下该节点不在 /sync
重启端点 POST /restartPOSTrestart_pendingtruerolepostgres_versiontimeoutprimary_start_timeoutscheduleDELETE /restartPOST /restartDELETE /restartpatronictl_restart 和 patronictl flush cluster-name restart
重载端点 POST /reloadSIGHUPshared_buffersPOST /restartpatronictl_restart 显式重启 PostgreSQL。
重载端点由 patronictl_reload 使用。
重新初始化端点 POST /reinitializepg_basebackup从库创建方法 。
若 Patroni 正处于循环尝试恢复失败 PostgreSQL 的过程中,此调用可能失败。解决方法是在请求体中指定 {"force":true}
也可在请求体中指定 {"from-leader":true}
重新初始化端点由 patronictl_reinit 使用。
26.5 - patronictl 命令行 patronictl 的配置说明、语法参考与子命令完整参考。
原始页面: https://patroni.readthedocs.io/en/latest/patronictl.html
patronictl 命令行工具,用于与 Patroni 的 REST API 和 DCS 交互,旨在简化集群操作,适合人工操作或脚本调用。
配置 patronictl 使用以下 3 个配置节:
ctlctl 配置参数 ;restapictlpatronictl 主要使用 restapi.authenticationctl.authenticationrestapi.cafilectl.cacertREST API 配置参数 ;DCS(如 etcd 这些配置可通过环境变量或配置文件提供。具体设置方式请参阅 环境变量配置参数 或 YAML 配置参数 中的相应章节。
若使用环境变量,方式直接——patronictl 读取环境变量并使用其值即可。
若使用配置文件,可通过多种方式告知 patronictl 应加载哪个文件。默认情况下,patronictl 会尝试加载名为 patronictl.yaml
Mac OS X:~/Library/Application Support/patroni Mac OS X(POSIX):~/.patroni Unix:~/.config/patroni Unix(POSIX):~/.patroni Windows(漫游):C:\Users\<user>\AppData\Roaming\patroni Windows(非漫游):C:\Users\<user>\AppData\Local\patroni 可通过以下方式覆盖默认配置文件路径:
设置环境变量 PATRONICTL_CONFIG_FILE 使用 patronictl 的 -c--config-file
用法 patronictl 提供了若干便捷操作,本节将逐一介绍。
各子命令介绍之前,先了解 patronictl 自身的命令行参数:
-c--config-filepatronictl 指定配置文件路径,用法如前所述。
-d--dcs-url--dcs
可用于覆盖 patronictl 配置中的 DCS 和 namespace
值的格式为 DCS://HOST:PORT/NAMESPACEetcd3://localhost:2379/serviceservice
-k--insecure
以下是 patronictl 命令的使用语法:
patronictl [ { -c | --config-file } CONFIG_FILE ]
[ { -d | --dcs-url | --dcs } DCS_URL ]
[ { -k | --insecure } ]
SUBCOMMAND
说明
语法约定:
方括号 [ ] 花括号 { } 带有 [, ... ] 大写字母表示需要赋值的占位符。 以下各小节描述子命令时均使用相同语法,子命令语法说明可视为上述语法中 SUBCOMMAND
以下各小节介绍 patronictl 的每个子命令,示例均使用 Patroni GitHub 仓库中的配置文件(postgres0.ymlpostgres1.ymlpostgres2.yml
patronictl dsn
语法 dsn
[ CLUSTER_NAME ]
[ { { -r | --role } { leader | primary | standby-leader | replica | standby | any } | { -m | --member } MEMBER_NAME } ]
[ --group CITUS_GROUP ]
描述 patronictl dsn
若多个成员符合条件,将优先返回主库的连接字符串。
参数 CLUSTER_NAME
若未指定,patronictl 将尝试从 scope
-r--role
角色可以是以下之一:
leaderprimarystandby-leaderreplicastandbyreplicaany-m--member
MEMBER_NAME
--group
CITUS_GROUP
示例 获取主库的 DSN:
$ patronictl -c postgres0.yml dsn batman -r primary
host = 127.0.0.1 port = 5432
获取名为 postgresql1
$ patronictl -c postgres0.yml dsn batman --member postgresql1
host = 127.0.0.1 port = 5433
patronictl edit-config
语法 edit-config
[ CLUSTER_NAME ]
[ --group CITUS_GROUP ]
[ { -q | --quiet } ]
[ { -s | --set } CONFIG="VALUE" [, ... ] ]
[ { -p | --pg } PG_CONFIG="PG_VALUE" [, ... ] ]
[ { --apply | --replace } CONFIG_FILE ]
[ --force ]
描述 patronictl edit-config
说明
通过 TTY 调用时,该命令会通过分页器显示动态配置的差异,默认使用 lessmorePAGER
参数 CLUSTER_NAME
若未指定,patronictl 将尝试从 scope
--group
若未指定,patronictl 将尝试从 citus.group
CITUS_GROUP
-q--quiet
-s--set
CONFIG.
VALUECONFIGnull
-p--pg
本质上是 -s--setCONFIGpostgresql.parameters.
PG_CONFIG
PG_VALUEPG_CONFIGnull
--apply
效果等同于对文件中每项配置分别指定 -s--set
CONFIG_FILE-
--replace
CONFIG_FILE-
--force
示例 修改 max_connections
patronictl -c postgres0.yml edit-config batman --pg max_connections="150" --force
---
+++
@@ -1,6 +1,8 @@
loop_wait: 10
maximum_lag_on_failover: 1048576
postgresql:
+ parameters:
+ max_connections: 150
pg_hba:
- host replication replicator 127.0.0.1/32 md5
- host all all 0.0.0.0/0 md5
Configuration changed
修改 loop_waitttl
patronictl -c postgres0.yml edit-config batman --set loop_wait="15" --set ttl="45" --force
---
+++
@@ -1,4 +1,4 @@
-loop_wait: 10
+loop_wait: 15
maximum_lag_on_failover: 1048576
postgresql:
pg_hba:
@@ -6,4 +6,4 @@
- host all all 0.0.0.0/0 md5
use_pg_rewind: true
retry_timeout: 10
-ttl: 30
+ttl: 45
Configuration changed
从动态配置中删除 maximum_lag_on_failover
patronictl -c postgres0.yml edit-config batman --set maximum_lag_on_failover="null" --force
---
+++
@@ -1,5 +1,4 @@
loop_wait: 10
-maximum_lag_on_failover: 1048576
postgresql:
pg_hba:
- host replication replicator 127.0.0.1/32 md5
Configuration changed
patronictl failover 语法 failover
[ CLUSTER_NAME ]
[ --group CITUS_GROUP ]
--candidate CANDIDATE_NAME
[ --force ]
描述 patronictl failover
此命令适用于集群不健康的场景,例如:
也可用于在同步模式下将故障转移到异步节点。
说明
健康集群中也可运行 patronictl failoverpatronictl switchover
警告
故障转移可能导致数据丢失,具体取决于被提升的从库与主库的同步程度。
参数 CLUSTER_NAME
若未指定,patronictl 将尝试从 scope
--group
CITUS_GROUP
--candidate
CANDIDATE_NAME
--force
示例 故障转移到节点 postgresql2
$ patronictl -c postgres0.yml failover batman --candidate postgresql2 --force
Current cluster topology
+ Cluster: batman ( 7277694203142172922) -+-----------+----+-------------+-----+------------+-----+
| Member | Host | Role | State | TL | Receive LSN | Lag | Replay LSN | Lag |
+-------------+----------------+---------+-----------+----+-------------+-----+------------+-----+
| postgresql0 | 127.0.0.1:5432 | Leader | running | 3 | | | | |
| postgresql1 | 127.0.0.1:5433 | Replica | streaming | 3 | 0/40004E8 | 0 | 0/40004E8 | 0 |
| postgresql2 | 127.0.0.1:5434 | Replica | streaming | 3 | 0/40004E8 | 0 | 0/40004E8 | 0 |
+-------------+----------------+---------+-----------+----+-------------+-----+------------+-----+
2023-09-12 11:52:27.50978 Successfully failed over to "postgresql2"
+ Cluster: batman ( 7277694203142172922) -+---------+----+-------------+---------+------------+---------+
| Member | Host | Role | State | TL | Receive LSN | Lag | Replay LSN | Lag |
+-------------+----------------+---------+---------+----+-------------+---------+------------+---------+
| postgresql0 | 127.0.0.1:5432 | Replica | stopped | | unknown | unknown | unknown | unknown |
| postgresql1 | 127.0.0.1:5433 | Replica | running | 3 | 0/4000188 | 0 | 0/4000188 | 0 |
| postgresql2 | 127.0.0.1:5434 | Leader | running | 3 | | | | |
+-------------+----------------+---------+---------+----+-------------+---------+------------+---------+
patronictl flush
语法 flush
CLUSTER_NAME
[ MEMBER_NAME [, ... ] ]
{ restart | switchover }
[ --group CITUS_GROUP ]
[ { -r | --role } { leader | primary | standby-leader | replica | standby | any } ]
[ --force ]
描述 patronictl flush
参数 CLUSTER_NAME
MEMBER_NAME
restart
switchover
--group
CITUS_GROUP
-r--role
角色可以是以下之一:
leaderprimarystandby-leaderreplicastandbyreplicaany--force
示例 取消已调度的主从切换事件:
$ patronictl -c postgres0.yml flush batman switchover --force
Success: scheduled switchover deleted
取消所有备库的已调度重启:
$ patronictl -c postgres0.yml flush batman restart -r replica --force
+ Cluster: batman ( 7277694203142172922) -+-----------+----+-------------+-----+------------+-----+---------------------------+
| Member | Host | Role | State | TL | Receive LSN | Lag | Replay LSN | Lag | Scheduled restart |
+-------------+----------------+---------+-----------+----+-------------+-----+------------+-----+---------------------------+
| postgresql0 | 127.0.0.1:5432 | Leader | running | 5 | | | | | 2025-03-23T18:00:00-03:00 |
| postgresql1 | 127.0.0.1:5433 | Replica | streaming | 5 | 0/4000400 | 0 | 0/4000400 | 0 | 2025-03-23T18:00:00-03:00 |
| postgresql2 | 127.0.0.1:5434 | Replica | streaming | 5 | 0/4000400 | 0 | 0/4000400 | 0 | 2025-03-23T18:00:00-03:00 |
+-------------+----------------+---------+-----------+----+-------------+-----+------------+-----+---------------------------+
Success: flush scheduled restart for member postgresql1
Success: flush scheduled restart for member postgresql2
取消节点 postgresql0postgresql1
$ patronictl -c postgres0.yml flush batman postgresql0 postgresql1 restart --force
+ Cluster: batman ( 7277694203142172922) -+-----------+----+-------------+-----+------------+-----+---------------------------+
| Member | Host | Role | State | TL | Receive LSN | Lag | Replay LSN | Lag | Scheduled restart |
+-------------+----------------+---------+-----------+----+-------------+-----+------------+-----+---------------------------+
| postgresql0 | 127.0.0.1:5432 | Leader | running | 5 | | | | | 2025-03-23T18:00:00-03:00 |
| postgresql1 | 127.0.0.1:5433 | Replica | streaming | 5 | 0/4000400 | 0 | 0/4000400 | 0 | 2025-03-23T18:00:00-03:00 |
| postgresql2 | 127.0.0.1:5434 | Replica | streaming | 5 | 0/4000400 | 0 | 0/4000400 | 0 | 2025-03-23T18:00:00-03:00 |
+-------------+----------------+---------+-----------+----+-------------+-----+------------+-----+---------------------------+
Success: flush scheduled restart for member postgresql0
Success: flush scheduled restart for member postgresql1
patronictl history
语法 history
[ CLUSTER_NAME ]
[ --group CITUS_GROUP ]
[ { -f | --format } { pretty | tsv | json | yaml } ]
描述 patronictl history
输出包含以下信息:
TL
LSN
Reason.history
Timestamp
New Leader
参数 CLUSTER_NAME
若未指定,patronictl 将尝试从 scope
--group
CITUS_GROUP
若未指定,patronictl 将尝试从 citus.group
-f--format
格式可以是以下之一:
prettytsv\tjsonyaml默认为 pretty
示例 显示事件历史记录:
$ patronictl -c postgres0.yml history batman
+----+----------+------------------------------+----------------------------------+-------------+
| TL | LSN | Reason | Timestamp | New Leader |
+----+----------+------------------------------+----------------------------------+-------------+
| 1 | 24392648 | no recovery target specified | 2023-09-11T22:11:27.125527+00:00 | postgresql0 |
| 2 | 50331864 | no recovery target specified | 2023-09-12T11:34:03.148097+00:00 | postgresql0 |
| 3 | 83886704 | no recovery target specified | 2023-09-12T11:52:26.948134+00:00 | postgresql2 |
| 4 | 83887280 | no recovery target specified | 2023-09-12T11:53:09.620136+00:00 | postgresql0 |
+----+----------+------------------------------+----------------------------------+-------------+
以 YAML 格式显示事件历史记录:
$ patronictl -c postgres0.yml history batman -f yaml
- LSN: 24392648
New Leader: postgresql0
Reason: no recovery target specified
TL: 1
Timestamp: '2023-09-11T22:11:27.125527+00:00'
- LSN: 50331864
New Leader: postgresql0
Reason: no recovery target specified
TL: 2
Timestamp: '2023-09-12T11:34:03.148097+00:00'
- LSN: 83886704
New Leader: postgresql2
Reason: no recovery target specified
TL: 3
Timestamp: '2023-09-12T11:52:26.948134+00:00'
- LSN: 83887280
New Leader: postgresql0
Reason: no recovery target specified
TL: 4
Timestamp: '2023-09-12T11:53:09.620136+00:00'
patronictl list
语法 list
[ CLUSTER_NAME [, ... ] ]
[ --group CITUS_GROUP ]
[ { -e | --extended } ]
[ { -t | --timestamp } ]
[ { -f | --format } { pretty | tsv | json | yaml } ]
[ { -W | { -w | --watch } TIME } ]
描述 patronictl list
输出包含以下信息:
Cluster
Member
Host
Role
可以是以下之一:
LeaderStandby LeaderSync StandbyReplicaState
常见状态值:
runningstreamingin archive recoverystoppedcrashedTL
Receive LSNpg_catalog.pg_last_(xlog|wal)_receive_(location|lsn)()
Receive LagReceive LSN
Replay LSNpg_catalog.pg_last_(xlog|wal)_replay_(location|lsn)()
Replay LagReplay LSN
此外,以下信息也可能出现在输出中:
System identifier
说明
显示在表格标题中,仅在输出格式为 pretty
Group
Pending restart*
说明
显示为成员属性。在以下情况下显示:
以 prettytsv 节点有待应用的配置变更需要重启。 Scheduled restart
说明
显示为成员属性。在以下情况下显示:
以 prettytsv 节点有已调度的重启。 Tags
说明
显示为成员属性。在以下情况下显示:
以 prettytsv 节点有自定义标签,或有使用非默认值的内置标签。 Scheduled switchover
说明
显示在表格底部,仅在有已调度的主从切换且输出格式为 pretty
Maintenance mode
说明
显示在表格底部,仅在集群已暂停且输出格式为 pretty
参数 CLUSTER_NAME
若未指定,patronictl 将尝试从 scope
--group
CITUS_GROUP
-e--extendedPending restartScheduled restartTags
-t--timestamp
-f--format
prettytsv\tjsonyaml默认为 pretty
-W
-w--watch
示例 以美观表格格式显示集群信息:
$ patronictl -c postgres0.yml list batman
+ Cluster: batman ( 7277694203142172922) -+-----------+----+-------------+-----+------------+-----+
| Member | Host | Role | State | TL | Receive LSN | Lag | Replay LSN | Lag |
+-------------+----------------+---------+-----------+----+-------------+-----+------------+-----+
| postgresql0 | 127.0.0.1:5432 | Leader | running | 5 | | | | |
| postgresql1 | 127.0.0.1:5433 | Replica | streaming | 5 | 0/40004E8 | 0 | 0/40004E8 | 0 |
| postgresql2 | 127.0.0.1:5434 | Replica | streaming | 5 | 0/40004E8 | 0 | 0/40004E8 | 0 |
+-------------+----------------+---------+-----------+----+-------------+-----+------------+-----+
以美观表格格式显示集群信息(含扩展列):
$ patronictl -c postgres0.yml list batman -e
+ Cluster: batman ( 7277694203142172922) -+-----------+----+-------------+-----+------------+-----+-----------------+------------------------+-------------------+------+
| Member | Host | Role | State | TL | Receive LSN | Lag | Replay LSN | Lag | Pending restart | Pending restart reason | Scheduled restart | Tags |
+-------------+----------------+---------+-----------+----+-------------+-----+------------+-----+-----------------+------------------------+-------------------+------+
| postgresql0 | 127.0.0.1:5432 | Leader | running | 5 | | | | | | | | |
| postgresql1 | 127.0.0.1:5433 | Replica | streaming | 5 | 0/40004E8 | 0 | 0/40004E8 | 0 | | | | |
| postgresql2 | 127.0.0.1:5434 | Replica | streaming | 5 | 0/40004E8 | 0 | 0/40004E8 | 0 | | | | |
+-------------+----------------+---------+-----------+----+-------------+-----+------------+-----+-----------------+------------------------+-------------------+------+
以 YAML 格式显示集群信息,并附带执行时间戳:
$ patronictl -c postgres0.yml list batman -f yaml -t
2023-09-12 13:30:48
- Cluster: batman
Host: 127.0.0.1:5432
Member: postgresql0
Role: Leader
State: running
TL: 5
- Cluster: batman
Host: 127.0.0.1:5433
Receive LSN: 0/40004E8
Receive Lag: 0
Replay LSN: 0/40004E8
Replay Lag: 0
Member: postgresql1
Role: Replica
State: streaming
TL: 5
- Cluster: batman
Host: 127.0.0.1:5434
Receive LSN: 0/40004E8
Receive Lag: 0
Replay LSN: 0/40004E8
Replay Lag: 0
Member: postgresql2
Role: Replica
State: streaming
TL: 5
patronictl pause
语法 pause
[ CLUSTER_NAME ]
[ --group CITUS_GROUP ]
[ --wait ]
描述 patronictl pause
参数 CLUSTER_NAME
若未指定,patronictl 将尝试从 scope
--group
CITUS_GROUP
若未指定,patronictl 将尝试从 citus.group
--wait
示例 将集群置于维护模式,并等待所有节点都完成暂停:
$ patronictl -c postgres0.yml pause batman --wait
'pause' request sent, waiting until it is recognized by all nodes
Success: cluster management is paused
patronictl query
语法 query
[ CLUSTER_NAME ]
[ --group CITUS_GROUP ]
[ { { -r | --role } { leader | primary | standby-leader | replica | standby | any } | { -m | --member } MEMBER_NAME } ]
[ { -d | --dbname } DBNAME ]
[ { -U | --username } USERNAME ]
[ --password ]
[ --format { pretty | tsv | json | yaml } ]
[ { { -f | --file } FILE_NAME | { -c | --command } SQL_COMMAND } ]
[ --delimiter ]
[ { -W | { -w | --watch } TIME } ]
描述 patronictl query
参数 CLUSTER_NAME
若未指定,patronictl 将尝试从 scope
--group
CITUS_GROUP
-r--role
角色可以是以下之一:
leaderprimarystandby-leaderreplicastandbyreplicaany-m--member
MEMBER_NAME
-d--dbnameUSERNAME
-U--usernamepatronictl query
--password~/.pgpassPGPASSWORDlibpq
--format
prettytsv\tjsonyaml默认为 tsv
-f--file
-c--command
--delimitertsv\t
-W
-w--watch
示例 以 postgres
$ patronictl -c postgres0.yml query batman -U postgres --password -c "SELECT now()"
Password:
now
2023-09-12 18:10:53.228084+00:00
以 postgreslibpq
$ PGPASSWORD = patroni patronictl -c postgres0.yml query batman -U postgres -c "SELECT now()"
now
2023-09-12 18:11:37.639500+00:00
执行 SQL 命令并以 pretty
$ patronictl -c postgres0.yml query batman -c "SELECT now()" --format pretty -W
+----------------------------------+
| now |
+----------------------------------+
| 2023-09-12 18:12:16.716235+00:00 |
+----------------------------------+
+----------------------------------+
| now |
+----------------------------------+
| 2023-09-12 18:12:18.732645+00:00 |
+----------------------------------+
+----------------------------------+
| now |
+----------------------------------+
| 2023-09-12 18:12:20.750573+00:00 |
+----------------------------------+
在数据库 test
$ patronictl -c postgres0.yml query batman -d test -c "SELECT now() AS column_1, 'test' AS column_2" --format yaml
- column_1: 2023-09-12 18:14:22.052060+00:00
column_2: test
在成员 postgresql2
$ patronictl -c postgres0.yml query batman -m postgresql2 -c "SHOW port"
port
5434
在任意备库上执行 SQL 命令:
$ patronictl -c postgres0.yml query batman -r replica -c "SHOW port"
port
5433
patronictl reinit
语法 reinit
CLUSTER_NAME
[ MEMBER_NAME [, ... ] ]
[ --group CITUS_GROUP ]
[ --wait ]
[ --force ]
[ --from-leader ]
描述 patronictl reinit
参数 CLUSTER_NAME
MEMBER_NAME
--group
CITUS_GROUP
--wait
--force
--from-leader
示例 重新初始化集群所有从库成员(不等待完成):
$ patronictl -c postgres0.yml reinit batman postgresql1 postgresql2 --force
+ Cluster: batman ( 7277694203142172922) -+-----------+----+-------------+-----+------------+-----+
| Member | Host | Role | State | TL | Receive LSN | Lag | Replay LSN | Lag |
+-------------+----------------+---------+-----------+----+-------------+-----+------------+-----+
| postgresql0 | 127.0.0.1:5432 | Leader | running | 5 | | | | |
| postgresql1 | 127.0.0.1:5433 | Replica | streaming | 5 | 0/40004E8 | 0 | 0/40004E8 | 0 |
| postgresql2 | 127.0.0.1:5434 | Replica | streaming | 5 | 0/40004E8 | 0 | 0/40004E8 | 0 |
+-------------+----------------+---------+-----------+----+-------------+-----+------------+-----+
Success: reinitialize for member postgresql1
Success: reinitialize for member postgresql2
重新初始化 postgresql2
$ patronictl -c postgres0.yml reinit batman postgresql2 --wait --force
+ Cluster: batman ( 7277694203142172922) -+-----------+----+-------------+-----+------------+-----+
| Member | Host | Role | State | TL | Receive LSN | Lag | Replay LSN | Lag |
+-------------+----------------+---------+-----------+----+-------------+-----+------------+-----+
| postgresql0 | 127.0.0.1:5432 | Leader | running | 5 | | | | |
| postgresql1 | 127.0.0.1:5433 | Replica | streaming | 5 | 0/40004E8 | 0 | 0/40004E8 | 0 |
| postgresql2 | 127.0.0.1:5434 | Replica | streaming | 5 | 0/40004E8 | 0 | 0/40004E8 | 0 |
+-------------+----------------+---------+-----------+----+-------------+-----+------------+-----+
Success: reinitialize for member postgresql2
Waiting for reinitialize to complete on: postgresql2
Reinitialize is completed on: postgresql2
重新初始化 postgresql2
$ patronictl -c postgres0.yml reinit batman postgresql2 --from-leader
+ Cluster: batman ( 7277694203142172922) -+-----------+----+-------------+-----+------------+-----+
| Member | Host | Role | State | TL | Receive LSN | Lag | Replay LSN | Lag |
+-------------+----------------+---------+-----------+----+-------------+-----+------------+-----+
| postgresql0 | 127.0.0.1:5432 | Leader | running | 5 | | | | |
| postgresql1 | 127.0.0.1:5433 | Replica | streaming | 5 | 0/40004E8 | 0 | 0/40004E8 | 0 |
| postgresql2 | 127.0.0.1:5434 | Replica | streaming | 5 | 0/40004E8 | 0 | 0/40004E8 | 0 |
+-------------+----------------+---------+-----------+----+-------------+-----+------------+-----+
Success: reinitialize for member postgresql2
patronictl reload
语法 reload
CLUSTER_NAME
[ MEMBER_NAME [, ... ] ]
[ --group CITUS_GROUP ]
[ { -r | --role } { leader | primary | standby-leader | replica | standby | any } ]
[ --force ]
描述 patronictl reload
同时也会对被管理的 PostgreSQL 实例触发 pg_ctl reload
参数 CLUSTER_NAME
MEMBER_NAME
--group
CITUS_GROUP
-r--role
leaderprimarystandby-leaderreplicastandbyreplicaany--force
示例 重载集群所有成员的本地配置:
$ patronictl -c postgres0.yml reload batman --force
+ Cluster: batman ( 7277694203142172922) -+-----------+----+-------------+-----+------------+-----+
| Member | Host | Role | State | TL | Receive LSN | Lag | Replay LSN | Lag |
+-------------+----------------+---------+-----------+----+-------------+-----+------------+-----+
| postgresql0 | 127.0.0.1:5432 | Leader | running | 5 | | | | |
| postgresql1 | 127.0.0.1:5433 | Replica | streaming | 5 | 0/40004E8 | 0 | 0/40004E8 | 0 |
| postgresql2 | 127.0.0.1:5434 | Replica | streaming | 5 | 0/40004E8 | 0 | 0/40004E8 | 0 |
+-------------+----------------+---------+-----------+----+-------------+-----+------------+-----+
Reload request received for member postgresql0 and will be processed within 10 seconds
Reload request received for member postgresql1 and will be processed within 10 seconds
Reload request received for member postgresql2 and will be processed within 10 seconds
patronictl remove
语法 remove
CLUSTER_NAME
[ --group CITUS_GROUP ]
[ { -f | --format } { pretty | tsv | json | yaml } ]
描述 patronictl remove
警告
此操作将永久清除 DCS 中该 Patroni 集群的所有数据。
参数 CLUSTER_NAME
--group
CITUS_GROUP
-f--formatprettytsvjsonyaml
示例 从 DCS 中删除 Patroni 集群 batman
$ patronictl -c postgres0.yml remove batman
+ Cluster: batman ( 7277694203142172922) -+-----------+----+-------------+-----+------------+-----+
| Member | Host | Role | State | TL | Receive LSN | Lag | Replay LSN | Lag |
+-------------+----------------+---------+-----------+----+-------------+-----+------------+-----+
| postgresql0 | 127.0.0.1:5432 | Leader | running | 5 | | | | |
| postgresql1 | 127.0.0.1:5433 | Replica | streaming | 5 | 0/40004E8 | 0 | 0/40004E8 | 0 |
| postgresql2 | 127.0.0.1:5434 | Replica | streaming | 5 | 0/40004E8 | 0 | 0/40004E8 | 0 |
+-------------+----------------+---------+-----------+----+-------------+-----+------------+-----+
Please confirm the cluster name to remove: batman
You are about to remove all information in DCS for batman, please type: "Yes I am aware" : Yes I am aware
This cluster currently is healthy. Please specify the leader name to continue : postgresql0
patronictl restart
语法 restart
CLUSTER_NAME
[ MEMBER_NAME [, ...] ]
[ --group CITUS_GROUP ]
[ { -r | --role } { leader | primary | standby-leader | replica | standby | any } ]
[ --any ]
[ --pg-version PG_VERSION ]
[ --pending ]
[ --timeout TIMEOUT ]
[ --scheduled TIMESTAMP ]
[ --force ]
描述 patronictl restart
参数 CLUSTER_NAME
--group
-r--role
leaderprimarystandby-leaderreplicastandbyreplicaany--any
--pg-version
--pendingPending restart
--timeout
--schedulednow
--force
示例 立即重启集群所有成员:
$ patronictl -c postgres0.yml restart batman --force
+ Cluster: batman ( 7277694203142172922) -+-----------+----+-------------+-----+------------+-----+
| Member | Host | Role | State | TL | Receive LSN | Lag | Replay LSN | Lag |
+-------------+----------------+---------+-----------+----+-------------+-----+------------+-----+
| postgresql0 | 127.0.0.1:5432 | Leader | running | 6 | | | | |
| postgresql1 | 127.0.0.1:5433 | Replica | streaming | 6 | 0/40004E8 | 0 | 0/40004E8 | 0 |
| postgresql2 | 127.0.0.1:5434 | Replica | streaming | 6 | 0/40004E8 | 0 | 0/40004E8 | 0 |
+-------------+----------------+---------+-----------+----+-------------+-----+------------+-----+
Success: restart on member postgresql0
Success: restart on member postgresql1
Success: restart on member postgresql2
立即重启集群中的一个随机成员:
$ patronictl -c postgres0.yml restart batman --any --force
+ Cluster: batman ( 7277694203142172922) -+-----------+----+-------------+-----+------------+-----+
| Member | Host | Role | State | TL | Receive LSN | Lag | Replay LSN | Lag |
+-------------+----------------+---------+-----------+----+-------------+-----+------------+-----+
| postgresql0 | 127.0.0.1:5432 | Leader | running | 6 | | | | |
| postgresql1 | 127.0.0.1:5433 | Replica | streaming | 6 | 0/40004E8 | 0 | 0/40004E8 | 0 |
| postgresql2 | 127.0.0.1:5434 | Replica | streaming | 6 | 0/40004E8 | 0 | 0/40004E8 | 0 |
+-------------+----------------+---------+-----------+----+-------------+-----+------------+-----+
Success: restart on member postgresql1
调度在 2023-09-13T18:00-03:00
$ patronictl -c postgres0.yml restart batman --scheduled 2023-09-13T18:00-03:00 --force
+ Cluster: batman ( 7277694203142172922) -+-----------+----+-------------+-----+------------+-----+
| Member | Host | Role | State | TL | Receive LSN | Lag | Replay LSN | Lag |
+-------------+----------------+---------+-----------+----+-------------+-----+------------+-----+
| postgresql0 | 127.0.0.1:5432 | Leader | running | 6 | | | | |
| postgresql1 | 127.0.0.1:5433 | Replica | streaming | 6 | 0/40004E8 | 0 | 0/40004E8 | 0 |
| postgresql2 | 127.0.0.1:5434 | Replica | streaming | 6 | 0/40004E8 | 0 | 0/40004E8 | 0 |
+-------------+----------------+---------+-----------+----+-------------+-----+------------+-----+
Success: restart scheduled on member postgresql0
Success: restart scheduled on member postgresql1
Success: restart scheduled on member postgresql2
patronictl resume
语法 resume
[ CLUSTER_NAME ]
[ --group CITUS_GROUP ]
[ --wait ]
描述 patronictl resume
参数 CLUSTER_NAME
若未指定,patronictl 将尝试从 scope
--group
CITUS_GROUP
若未指定,patronictl 将尝试从 citus.group
--wait
示例 将集群从维护模式中恢复:
$ patronictl -c postgres0.yml resume batman --wait
'resume' request sent, waiting until it is recognized by all nodes
Success: cluster management is resumed
patronictl show-config
语法 show-config
[ CLUSTER_NAME ]
[ --group CITUS_GROUP ]
描述 patronictl show-config
参数 CLUSTER_NAME
若未指定,patronictl 将尝试从 scope
--group
CITUS_GROUP
若未指定,patronictl 将尝试从 citus.group
示例 显示集群 batman
$ patronictl -c postgres0.yml show-config batman
loop_wait: 10
postgresql:
parameters:
max_connections: 250
pg_hba:
- host replication replicator 127.0.0.1/32 md5
- host all all 0.0.0.0/0 md5
use_pg_rewind: true
retry_timeout: 10
ttl: 30
patronictl switchover
语法 switchover
[ CLUSTER_NAME ]
[ --group CITUS_GROUP ]
[ { --leader | --primary } LEADER_NAME ]
--candidate CANDIDATE_NAME
[ --force ]
描述 patronictl switchover
说明
若集群不健康,可考虑使用 patronictl failover
参数 CLUSTER_NAME
若未指定,patronictl 将尝试从 scope
--group
CITUS_GROUP
--leader--primary
--candidate
--schedulednow
--force
示例 切换到节点 postgresql2
$ patronictl -c postgres0.yml switchover batman --leader postgresql0 --candidate postgresql2 --force
Current cluster topology
+ Cluster: batman ( 7277694203142172922) -+-----------+----+-------------+-----+------------+-----+
| Member | Host | Role | State | TL | Receive LSN | Lag | Replay LSN | Lag |
+-------------+----------------+---------+-----------+----+-------------+-----+------------+-----+
| postgresql0 | 127.0.0.1:5432 | Leader | running | 6 | | | | |
| postgresql1 | 127.0.0.1:5433 | Replica | streaming | 6 | 0/40004E8 | 0 | 0/40004E8 | 0 |
| postgresql2 | 127.0.0.1:5434 | Replica | streaming | 6 | 0/40004E8 | 0 | 0/40004E8 | 0 |
+-------------+----------------+---------+-----------+----+-------------+-----+------------+-----+
2023-09-13 14:15:23.07497 Successfully switched over to "postgresql2"
+ Cluster: batman ( 7277694203142172922) -+---------+----+-------------+---------+------------+---------+
| Member | Host | Role | State | TL | Receive LSN | Lag | Replay LSN | Lag |
+-------------+----------------+---------+---------+----+-------------+---------+------------+---------+
| postgresql0 | 127.0.0.1:5432 | Replica | stopped | | unknown | unknown | unknown | unknown |
| postgresql1 | 127.0.0.1:5433 | Replica | running | 6 | 0/4000188 | 0 | 0/4000188 | 0 |
| postgresql2 | 127.0.0.1:5434 | Leader | running | 6 | | | | |
+-------------+----------------+---------+---------+----+-------------+---------+------------+---------+
调度 postgresql0postgresql22023-09-13T18:00:00-03:00
$ patronictl -c postgres0.yml switchover batman --leader postgresql0 --candidate postgresql2 --scheduled 2023-09-13T18:00-03:00 --force
Current cluster topology
+ Cluster: batman ( 7277694203142172922) -+-----------+----+-------------+-----+------------+-----+
| Member | Host | Role | State | TL | Receive LSN | Lag | Replay LSN | Lag |
+-------------+----------------+---------+-----------+----+-------------+-----+------------+-----+
| postgresql0 | 127.0.0.1:5432 | Leader | running | 8 | | | | |
| postgresql1 | 127.0.0.1:5433 | Replica | streaming | 8 | 0/40004E8 | 0 | 0/40004E8 | 0 |
| postgresql2 | 127.0.0.1:5434 | Replica | streaming | 8 | 0/40004E8 | 0 | 0/40004E8 | 0 |
+-------------+----------------+---------+-----------+----+-------------+-----+------------+-----+
2023-09-13 14:18:11.20661 Switchover scheduled
+ Cluster: batman ( 7277694203142172922) -+-----------+----+-------------+-----+------------+-----+
| Member | Host | Role | State | TL | Receive LSN | Lag | Replay LSN | Lag |
+-------------+----------------+---------+-----------+----+-------------+-----+------------+-----+
| postgresql0 | 127.0.0.1:5432 | Leader | running | 8 | | | | |
| postgresql1 | 127.0.0.1:5433 | Replica | streaming | 8 | 0/40004E8 | 0 | 0/40004E8 | 0 |
| postgresql2 | 127.0.0.1:5434 | Replica | streaming | 8 | 0/40004E8 | 0 | 0/40004E8 | 0 |
+-------------+----------------+---------+-----------+----+-------------+-----+------------+-----+
Switchover scheduled at: 2023-09-13T18:00:00-03:00
from: postgresql0
to: postgresql2
patronictl topology
语法 topology
[ CLUSTER_NAME [, ... ] ]
[ --group CITUS_GROUP ]
[ { -W | { -w | --watch } TIME } ]
描述 patronictl topology
输出字段含义与 patronictl listtopology
Member
System identifier
Pending restart*
Scheduled restart
Tags
Scheduled switchover
Maintenance mode
参数 CLUSTER_NAME
若未指定,patronictl 将尝试从 scope
--group
CITUS_GROUP
-W
-w--watch
示例 显示集群 batmanpostgresql1postgresql2postgresql0
$ patronictl -c postgres0.yml topology batman
+ Cluster: batman ( 7277694203142172922) ---+-----------+----+-------------+-----+------------+-----+
| Member | Host | Role | State | TL | Receive LSN | Lag | Replay LSN | Lag |
+---------------+----------------+---------+-----------+----+-------------+-----+------------+-----+
| postgresql0 | 127.0.0.1:5432 | Leader | running | 8 | | | | |
| + postgresql1 | 127.0.0.1:5433 | Replica | streaming | 8 | 0/40004E8 | 0 | 0/40004E8 | 0 |
| + postgresql2 | 127.0.0.1:5434 | Replica | streaming | 8 | 0/40004E8 | 0 | 0/40004E8 | 0 |
+---------------+----------------+---------+-----------+----+-------------+-----+------------+-----+
patronictl version
语法 version
[ CLUSTER_NAME [, ... ] ]
[ MEMBER_NAME [, ... ] ]
[ --group CITUS_GROUP ]
描述 patronictl versionpatronictl 自身的版本,也可同时显示 Patroni 集群及其成员的版本信息。
参数 CLUSTER_NAME
MEMBER_NAME
--group
CITUS_GROUP
示例 获取 patronictl 自身的版本:
$ patronictl -c postgres0.yml version
patronictl version 4.0.0
获取 patronictl 版本及集群 batman
$ patronictl -c postgres0.yml version batman
patronictl version 4.0.0
postgresql0: Patroni 4.0.0 PostgreSQL 16.4
postgresql1: Patroni 4.0.0 PostgreSQL 16.4
postgresql2: Patroni 4.0.0 PostgreSQL 16.4
获取 patronictl 版本及集群 batmanpostgresql1postgresql2
$ patronictl -c postgres0.yml version batman postgresql1 postgresql2
patronictl version 4.0.0
postgresql1: Patroni 4.0.0 PostgreSQL 16.4
postgresql2: Patroni 4.0.0 PostgreSQL 16.4
26.6 - 从库镜像与引导 从库镜像、引导及自定义从库创建工作流。
原始页面: https://patroni.readthedocs.io/en/latest/replica_bootstrap.html
initialize
引导(Bootstrap) PostgreSQL 提供了 initdbbootstrap
bootstrap :
method : <custom_bootstrap_method_name>
<custom_bootstrap_method_name> :
command : <path_to_custom_bootstrap_script> [param1 [, ...]]
keep_existing_recovery_conf : False
no_params : False
recovery_conf :
recovery_target_action : promote
recovery_target_timeline : latest
restore_command : <method_specific_restore_command>
每种引导方法至少需要定义 namecommandinitdbmethodcommandpatroni
--scope
--datadir
将 no_paramsTrue
如果引导脚本返回 0
如果在自定义引导方法的同一配置节中定义了 recovery_confrecovery.confrecovery_target_*promoterecovery_target_action
如果 keep_existing_recovery_confTruerecovery.confrecovery.signalstandby.signal
此外,自定义引导方法配置中定义的其他任意键值对,都会以 --name=valuecommand
bootstrap :
method : <custom_bootstrap_method_name>
<custom_bootstrap_method_name> :
command : <path_to_custom_bootstrap_script>
arg1 : value1
arg2 : value2
以上配置会让 command--arg1=value1 --arg2=value2
说明
引导方法之间不会链式调用,主方法失败时也不会回退到默认方法。
举个例子,你可以用如下配置从 Barman 备份引导一个全新的 Patroni 集群:
bootstrap :
method : barman
barman :
keep_existing_recovery_conf : true
command : patroni_barman --api-url https://barman-host:7480 recover
barman-server : my_server
ssh-command : ssh postgres@patroni-host
说明
patroni_barman recoverpg-backup-apibarman recoverpatroni_barman recover --help
构建从库 Patroni 默认使用久经考验的 pg_basebackupWAL-EpgBackRestBarmanpostgresql
postgresql :
create_replica_methods :
- <method name>
<method name> :
command : <command name>
keep_data : True
no_params : True
no_leader : 1
示例:wal_e
postgresql :
create_replica_methods :
- wal_e
- basebackup
wal_e :
command : patroni_wale_restore
no_leader : 1
envdir : {{WALE_ENV_DIR}}
use_iam : 1
basebackup :
max-rate : '100M'
示例:pgbackrest
postgresql :
create_replica_methods :
- pgbackrest
- basebackup
pgbackrest :
command : /usr/bin/pgbackrest --stanza=<scope> --delta restore
keep_data : True
no_params : True
basebackup :
max-rate : '100M'
示例:Barman
postgresql :
create_replica_methods :
- barman
- basebackup
barman :
command : patroni_barman --api-url https://barman-host:7480 recover
barman-server : my_server
ssh-command : ssh postgres@patroni-host
basebackup :
max-rate : '100M'
说明
patroni_barman recoverpg-backup-apibarman recoverpatroni_barman recover --help
create_replica_methods0--name=value
--scope
--datadir
--rolereplica
--connstring
特殊参数 no_leader
特殊参数 keep_data
特殊参数 no_params
basebackupcreate_replica_methodscreate_replica_methodspg_basebackupclonefrompg_basebackupbasebackup--basebackup--waldir
basebackup--verbose
postgresql :
basebackup :
max-rate : '100M'
checkpoint : 'fast'
以及
postgresql :
basebackup :
- verbose
- max-rate : '100M'
- waldir : /pg-wal-mount/external-waldir
如果所有从库创建方法均失败,Patroni 将在下一个事件循环周期中重新按顺序尝试所有方法。
26.7 - 复制模式 Patroni 管理的异步与同步复制模式。
原始页面: https://patroni.readthedocs.io/en/latest/replication_modes.html
Postgres 文档 。默认情况下,Patroni 将 PostgreSQL 配置为异步复制。选择哪种复制方案取决于你的业务需求。建议同时研究异步和同步复制,以及其他高可用方案,以确定最适合自己的解决方案。
异步模式的持久性 在异步模式下,集群允许丢失部分已提交的事务以保证可用性。当主库故障或因任何其他原因变得不可用时,Patroni 会自动将一个足够健康的备库提升为主库。尚未复制到该备库的事务将残留在主库的"分叉时间线"中,实际上无法恢复
可能丢失的事务量通过 maximum_lag_on_failovermaximum_lag_on_failoverttlloop_wait
默认情况下,执行领导者选举时,Patroni 不考虑从库的当前时间线,这在某些情况下可能并不合适。将 check_timelinetrue
PostgreSQL 同步复制 你可以将 Postgres 的 同步复制 与 Patroni 配合使用。同步复制通过确认写入已写到从库后再向客户端返回成功,来保证集群的一致性。代价是写入延迟增加、写入吞吐量降低——吞吐量完全取决于网络性能。
在托管数据中心环境(如 AWS、Rackspace 或任何你无法控制的网络)中,同步复制会显著增加写入性能的波动性。如果从库无法从主库访问,主库实际上将变为只读。
要启用简单的同步复制测试,请在 YAML 配置文件的 parameters
synchronous_commit : "on"
synchronous_standby_names : "*"
使用 PostgreSQL 同步复制时,建议至少使用三个 Postgres 数据节点,以确保一台主机故障时写入仍然可用。
在所有情况下,使用 PostgreSQL 同步复制并不能保证零事务丢失。当主库和当前充当同步从库的备库同时故障时,可能会提升一个不包含所有事务的第三个节点。
同步模式 对于不允许丢失已提交事务的使用场景,你可以开启 Patroni 的 synchronous_mode
开启 synchronous_mode
synchronous_modettlloop_wait
当绝对有必要保证每次写入都持久存储在至少两个节点上时,请在开启 synchronous_modesynchronous_mode_strictsynchronous_commit
将 nosynctruenostreamtrue
同步模式可以通过 patronictl edit-config动态配置
注意:由于 PostgreSQL 中同步复制的实现方式,即使使用 synchronous_mode_strict
同步复制因子 参数 synchronous_node_count1synchronous_modeoffsynchronous_node_countsynchronous_standby_names
同步节点的最大延迟 默认情况下,Patroni 会坚持使用根据 pg_stat_replicationsynchronoussynchronous_standby_namesmaximum_lag_on_syncnode
Patroni 在存在多个备库时使用最大从库 LSN,否则使用主库当前的 WAL LSN。默认值为 -10
同步模式的实现原理 在同步模式下,Patroni 在 DCS 的 /sync
节点能够接受写事务时,必须被标记为最新的领导者。Patroni 崩溃或 PostgreSQL 未正常关闭可能导致违反此不变式。 只要节点在 DCS 的 /sync 既不是领导者也不是当前同步备库的节点,不允许自动提升自身。 Patroni 将根据 synchronous_node_countsynchronous_standby_names
在每次 HA 循环迭代中,Patroni 都会重新评估同步备库的选择。如果当前同步备库列表处于连接状态,且没有请求解除其同步状态,则继续保留。否则,将选择可用于同步且复制进度最靠前的集群成员。
示例: DCS 中的 /config synchronous_mode : on
synchronous_node_count : 2
...
DCS 中的 /sync {
"leader" : "node0" ,
"sync_standby" : "node1,node2"
}
postgresql.conf synchronous_standby_names = 'FIRST 2 (node1,node2)'
在上述示例中,只有 node1node2node0
法定人数提交模式 从 PostgreSQL v10 起,Patroni 支持基于法定人数的同步复制。
在此模式下,Patroni 在 DCS 中维护同步状态,包含最新已知的主库、达成法定人数所需的节点数以及当前有资格投票的节点。在稳定状态下,参与法定人数投票的节点为主库和所有同步备库。该状态的更新遵循严格的顺序约束(涉及节点提升和 synchronous_standby_names
在每次 HA 循环迭代中,Patroni 根据节点可用性和请求的集群配置,重新评估同步备库的选择和法定人数。在 PostgreSQL 9.6 以上版本中,所有符合条件的节点一旦复制追上主库,就会被添加为同步备库。
法定人数提交有助于降低最坏情况的延迟,即使在正常运行期间也是如此——某个备库的高复制延迟可以由其他备库来补偿。
基于法定人数的同步模式可以通过 patronictl edit-configsynchronous_modequorum动态配置
其他参数如 synchronous_node_countmaximum_lag_on_syncnodesynchronous_mode_strictsynchronous_mode=on
示例: DCS 中的 /config synchronous_mode : quorum
synchronous_node_count : 2
...
DCS 中的 /sync {
"leader" : "node0" ,
"sync_standby" : "node1,node2,node3" ,
"quorum" : 1
}
postgresql.conf synchronous_standby_names = 'ANY 2 (node1,node2,node3)'
在上述示例中,如果主库(node0node1node2node3node1node2node3至少 一个节点(/syncquorum=1node1node1
26.8 - 备用集群 备用集群的搭建、行为及从远程主库复制的说明。
原始页面: https://patroni.readthedocs.io/en/latest/standby_cluster.html
备用领导者 (standby leader):行为与普通集群领导者基本相同,区别在于它从远程节点进行复制。级联从库 :从备用领导者进行复制。备用领导者在 DCS 中持有并更新领导者锁。若领导者锁过期,级联从库将通过选举从备用节点中选出新的领导者。
备用集群与其所复制的主集群之间没有其他关联。特别是,若双方使用同一个 DCS,则不能共享相同的 DCS 作用域(scope)。双方除复制信息外互不了解。此外,备用集群不会出现在主集群的 patronictl listpatronictl topology
为了提高灵活性,可以在 standby_clustercreate_replica_methodspostgresqlcreate_replica_methodscreate_replica_methodspostgresql
要配置备用集群,需要在 Patroni 配置中指定 standby_cluster
bootstrap :
dcs :
standby_cluster :
host : 1.2.3.4
port : 5432
primary_slot_name : patroni
create_replica_methods :
- basebackup
请注意,这些选项仅在集群引导期间生效一次,之后只能通过 DCS 修改。
Patroni 会在远程主库的 PGDATA 目录中查找 postgresql.confpostgresql.conf.backuppostgresql.conf
若在备用集群上使用复制槽,还必须在主集群上手动创建对应的复制槽——备用集群不会自动完成此操作。可以在主集群上使用 Patroni 的永久复制槽功能,维护一个与 primary_slot_nameprimary_slot_name
如果远端站点没有提供连接到主库的单一端点,可以在 standby_cluster.hoststandby_cluster.host
在备用领导者节点的 primary_conninfotarget_session_attrs=read-write 在判断是否需要执行 pg_rewindpg_rewindtarget_session_attrs=read-write 注意:要使 pg_rewinddata page checksumsinitdb--data-checksumswal_log_hintsonpg_rewind 备用集群也可以配置为从另一个备用集群或主集群的备库成员进行复制:只需在 standby_cluster.hostpg_rewind
26.9 - Watchdog 支持 Patroni 集群的 watchdog 集成与隔离(fencing)注意事项。
原始页面: https://patroni.readthedocs.io/en/latest/watchdog.html
同时存在多个以主库身份运行的 PostgreSQL 实例,可能因时间线分叉而导致事务丢失,这种情况也称为脑裂(split-brain)问题。为了避免脑裂,Patroni 需要确保在 DCS 中的领导者键过期后,PostgreSQL 不再接受任何事务提交。正常情况下,Patroni 会在领导者锁更新失败时尝试停止 PostgreSQL 来实现这一目标。然而,以下各种原因可能导致该机制失效:
Patroni 因程序缺陷、内存溢出或系统管理员误操作而崩溃。 PostgreSQL 关闭速度过慢。 系统高负载、虚拟机被 hypervisor 暂停或其他基础设施故障导致 Patroni 无法及时运行。 为了在上述情况下保证行为的正确性,Patroni 支持 watchdog 设备。watchdog 设备是一种软件或硬件机制,当其在指定时间内未收到保活心跳时,会强制重置整个系统,为 Patroni 常规脑裂防护机制失效时提供额外的故障安全保障。
Patroni 会在将 PostgreSQL 提升为主库之前尝试激活 watchdog。若 watchdog 激活失败且 watchdog 模式设置为 required
默认情况下,Patroni 会将 watchdog 设置为在 TTL 到期前 5 秒触发。在默认配置 loop_wait=10ttl=30ttlsafety_marginloop_waitttlsafety_marginloop_waitretry_timeout
安全余量(safety_marginsafety_margin-1ttl // 2ttlloop_waitretry_timeout
目前 watchdog 仅支持 Linux watchdog 设备接口。
在 Linux 上设置软件 watchdog Patroni 的默认配置会在 Linux 上尝试使用 /dev/watchdog
在启动 Patroni 之前,以 root 身份执行以下命令来启用软件 watchdog:
modprobe softdog
# 将 postgres 替换为实际运行 patroni 的用户
chown postgres /dev/watchdog
测试时,可在 modprobe 命令行中添加 soft_noboot=1dmesg
watchdog 成功启用后,Patroni 会将相关信息写入日志。
26.10 - 集群的暂停/恢复模式 Patroni 集群管理中的暂停与恢复模式行为说明。
原始页面: https://patroni.readthedocs.io/en/latest/pause.html
目标 在某些特殊情况下,Patroni 需要临时退出对集群的管理,同时仍在 DCS 中保留集群状态。典型使用场景包括对集群执行一些不常见的操作,例如大版本升级或数据损坏恢复。在此类操作期间,节点往往会因 Patroni 未知的原因频繁启停,某些节点甚至可能被临时提升为主库,从而打破"同一时间只能有一个主库"的假设。为此,Patroni 需要具备从运行中的集群"脱离"的能力,实现类似 Pacemaker 维护模式的效果。
实现机制 当 Patroni 处于暂停模式时,它不会更改 PostgreSQL 的状态,以下情况除外:
每个节点在 DCS 中的成员键会更新为集群的当前信息,Patroni 因此会对运行中的成员节点执行只读查询。 对于持有领导者锁的 PostgreSQL 主库,Patroni 会持续更新该锁。若持有领导者锁的节点不再是主库(即被手动降级),Patroni 将释放该锁,而不是将该节点重新提升为主库。 允许执行手动非计划重启、手动非计划故障转移/主从切换以及重新初始化操作;不允许执行任何计划任务。手动主从切换仅在指定了目标节点时才被允许。 若 Patroni 检测到存在"并行"主库,会发出警告,但不会对没有领导者锁的主库执行降级操作。 若集群中不存在领导者锁,正在运行的主库将获取该锁;若存在多个主库,则第一个获取锁的主库胜出。若完全没有主库,Patroni 不会尝试提升任何从库。此规则有一个例外:若领导者锁不存在的原因是旧主库因手动提升而自行降级,则只有提升请求中指定的候选节点才能获取领导者锁。新的领导者锁授予后(即从库被手动提升后),Patroni 会确保原先从旧主库拉取流复制的从库切换到新主库。 当 PostgreSQL 停止后,Patroni 不会尝试重新启动它;当 Patroni 停止后,也不会尝试停止其所管理的 PostgreSQL 实例。 Patroni 不会尝试删除既不代表其他集群成员、也未在永久复制槽配置中列出的复制槽。 使用指南 patronictl pauseresume
也可以向 {namespace}/{cluster}/config{"pause": true/false/null}PATCH
26.11 - DCS 故障安全模式 DCS 故障安全模式的行为机制、启用条件与操作注意事项。
原始页面: https://patroni.readthedocs.io/en/latest/dcs_failsafe_mode.html
问题背景 Patroni 高度依赖分布式配置存储(DCS)来完成领导者选举和检测网络分区。具体而言,节点只有在能够成功更新 DCS 中的领导者锁时,才被允许以主库身份运行 PostgreSQL。一旦领导者锁更新失败,PostgreSQL 将立即被降级并以只读模式启动。触发该"问题"的概率因所使用的 DCS 而异——例如,当 Etcd 专用于 Patroni 时,发生概率接近于零;而当使用以 Etcd 为后端的 Kubernetes API 时,则可能更为频繁。
现有实现的设计原因 领导者锁更新失败通常由以下两种原因导致:
网络分区 DCS 宕机 单个节点通常无法区分这两种情况,因此 Patroni 默认假设最坏情况——网络分区。在网络分区的情形下,Patroni 集群的其他节点可能成功获取领导者锁并将 PostgreSQL 提升为主库。为避免脑裂,旧主库将在领导者锁过期之前主动降级。
DCS 故障安全模式 我们引入了一个新的特殊选项:failsafe_mode/config动态配置
底层实现细节 在 DCS 中引入一个新的永久键 /failsafe /failsafe由当前领导者节点负责维护 /failsafe 只有出现在 /failsafe 若集群仅有单个节点,/failsafe 当 DCS 发生"中断"时,现有主库通过 POST /failsafe/failsafe 若任何一个成员无响应,主库将被降级。 从库将收到的 POST /failsafettl 常见问题 为什么当前主库必须能访问所有其他成员?不能依赖法定人数吗?
这是一个很好的问题!问题在于,DCS 和 Patroni 对法定人数的"视图"可能存在差异。DCS 节点必须均匀分布在各可用区,但 Patroni 节点没有这样的规则,更重要的是,目前也没有引入和强制执行此规则的机制。如果多数 Patroni 节点(包括主库)落在网络分区的失败侧,而少数节点在成功侧,那么主库就必须被降级。只有检查所有其他成员,才能发现这种情况。
如果在 DCS 宕机期间某个节点/Pod 被终止,会发生什么?
当 DCS 不可访问时,“所有其他集群成员是否均可访问?“的检查将在每次心跳循环(每 loop_wait
如果在 DCS 宕机期间 Patroni 集群的所有成员全部丢失,会发生什么?
Patroni 可以配置为在集群无领导者时从备份中创建新的从库。但如果新成员不在 /failsafe
如果主库失去了对 DCS 的访问权限,而从库没有,会发生什么?
主库将执行故障安全代码,联系所有已知从库。从库将把这一信息视为主库仍然存活的信号,即使 DCS 中的领导者锁已经过期,它们也不会发起领导者竞选。
如何启用故障安全模式?
在启用 failsafe_modePATCH /configREST API patronictl edit-config -s failsafe_mode=true
26.12 - 在 Kubernetes 中使用 Patroni 结合 Kubernetes 对象、标签和服务发现使用 Patroni。
原始页面: https://patroni.readthedocs.io/en/latest/kubernetes.html
kubernetes.use_endpointsPATRONI_KUBERNETES_USE_ENDPOINTS
使用 Endpoints 尽管这是推荐模式,但出于兼容性考虑,默认情况下该模式是关闭的。启用后,Patroni 会将集群配置和领导者键存储在其创建的 Endpointsmetadata: annotationsConfigMaps
使用 ConfigMaps 在此模式下,Patroni 将创建 ConfigMaps 而非 Endpoints,并将键值存储在 ConfigMaps 的元数据中。领导者切换至少需要两次更新操作:一次更新领导者 ConfigMap,另一次更新对应的 Endpoint。
若要将流量引导至 PostgreSQL 主库,您需要将 Kubernetes PostgreSQL Service 配置为使用带有 role_label
请注意,在某些场景下(例如在 OpenShift 上运行时)只能使用 ConfigMaps 模式。
配置 Patroni 的 Kubernetes 配置项 环境变量
自定义角色标签 默认情况下,Patroni 会根据节点角色在其所在 Pod 上设置对应标签,例如 role=primarykubernetes.role_labelkubernetes.leader_label_valuekubernetes.follower_label_valuekubernetes.standby_leader_label_value
如需从默认角色标签迁移到自定义标签,可按照以下步骤操作以减少停机时间:
使用 kubernetes.tmp_role_labeltmp_role labels :
cluster-name : foo
role : primary
tmp_role : primary
待所有 Pod 更新完成后,将 Service 的选择器修改为使用临时标签: selector :
cluster-name : foo
tmp_role : primary
添加自定义角色标签(例如,设置 kubernetes.leader_label_value=primary labels :
cluster-name : foo
role : primary
tmp_role : primary
待所有 Pod 再次更新完成后,将 Service 的选择器修改为使用新的角色值: selector :
cluster-name : foo
role : primary
最后,从配置中删除临时标签并更新所有 Pod: labels :
cluster-name : foo
role : primary
示例 Patroni 仓库的 kubernetes 目录中包含 Docker 镜像示例以及用于测试 Patroni Kubernetes 部署的 Kubernetes 清单文件。请注意,在当前状态下,由于权限问题,无法使用 PersistentVolumes。 支持 Persistent Volumes 的完整功能 Docker 镜像可在 Spilo 项目 中找到。 此外,还有一个 Helm Chart 可用于在 Kubernetes 上部署配置了 Patroni 的 Spilo 镜像。 若要大规模运行基于 Patroni 和 Spilo 的数据库集群,请参阅 postgres-operator 项目,它实现了用于管理 Spilo 集群的 Operator 模式。 26.13 - Citus 支持 Patroni 与 Citus 协调节点及工作节点组的集成详情。
原始页面: https://patroni.readthedocs.io/en/latest/citus.html
多节点 Citus 集群变得极为简单。
TL;DR 只需遵循以下几条简单规则:
所有节点上必须安装 Citus 数据库扩展。最低支持的 Citus 版本为 10.0,但为了充分利用工作节点透明主从切换和重启的特性,建议使用至少 Citus 11.2。 集群名称(scope 超级用户凭据在协调节点和所有工作节点上必须相同,且 pg_hba.conf 工作节点到协调节点的 REST API 在 patroni.yaml citus :
group : X # 0 表示协调节点,工作节点使用 1、2、3 等
database : citus # 所有节点上必须相同
之后只需启动 Patroni,它会处理其余的一切:
Patroni 会将 bootstrap.dcs.synchronous_mode法定人数模式 citusshared_preload_libraries如果全局 动态配置 max_prepared_transactions2*max_connections citus.local_hostnamelocalhostlocalhostcitus.databaseCREATE EXTENSION citus当前超级用户 凭据 pg_dist_authinfo 协调节点主库将自动发现工作节点主库,并使用 citus_add_node()pg_dist_node Patroni 还会在协调节点或工作节点集群发生故障转移/主从切换时,自动维护 pg_dist_node patronictl 协调节点和工作节点集群是物理上独立的 PostgreSQL/Patroni 集群,仅通过 Citus 数据库扩展在逻辑上组合在一起。因此,在大多数情况下无法将它们作为单一实体进行管理。
当 patroni.yamlcituspatronictl
listtopologyGroup所有 patronictl--grouppatroni.yamlpatronictl pausecitusgrouppatronictl switchoverpatronictl remove 以下是 Citus 集群的 patronictl list
postgres@coord1:~$ patronictl list demo
+ Citus cluster: demo ----------+----------------+---------+----+-------------+-----+------------+-----+
| Group | Member | Host | Role | State | TL | Receive LSN | Lag | Replay LSN | Lag |
+-------+---------+-------------+----------------+---------+----+-------------+-----+------------+-----+
| 0 | coord1 | 172.27.0.10 | Replica | running | 1 | 0/41C0368 | 0 | 0/41C0368 | 0 |
| 0 | coord2 | 172.27.0.6 | Quorum Standby | running | 1 | 0/41C0368 | 0 | 0/41C0368 | 0 |
| 0 | coord3 | 172.27.0.4 | Leader | running | 1 | | | | |
| 1 | work1-1 | 172.27.0.8 | Quorum Standby | running | 1 | 0/31D3198 | 0 | 0/31D3198 | 0 |
| 1 | work1-2 | 172.27.0.2 | Leader | running | 1 | | | | |
| 2 | work2-1 | 172.27.0.5 | Quorum Standby | running | 1 | 0/31CDFC0 | 0 | 0/31CDFC0 | 0 |
| 2 | work2-2 | 172.27.0.7 | Leader | running | 1 | | | | |
+-------+---------+-------------+----------------+---------+----+-------------+-----+------------+-----+
添加 --group
postgres@coord1:~$ patronictl list demo --group 0
+ Citus cluster: demo (group: 0, 7179854923829112860) -+-------------+-----+------------+-----+
| Member | Host | Role | State | TL | Receive LSN | Lag | Replay LSN | Lag |
+--------+-------------+----------------+---------+----+-------------+-----+------------+-----+
| coord1 | 172.27.0.10 | Replica | running | 1 | 0/41C0368 | 0 | 0/41C0368 | 0 |
| coord2 | 172.27.0.6 | Quorum Standby | running | 1 | 0/41C0368 | 0 | 0/41C0368 | 0 |
| coord3 | 172.27.0.4 | Leader | running | 1 | | | | |
+--------+-------------+----------------+---------+----+-------------+-----+------------+-----+
postgres@coord1:~$ patronictl list demo --group 1
+ Citus cluster: demo (group: 1, 7179854923881963547) -+-------------+-----+------------+-----+
| Member | Host | Role | State | TL | Receive LSN | Lag | Replay LSN | Lag |
+---------+------------+----------------+---------+----+-------------+-----+------------+-----+
| work1-1 | 172.27.0.8 | Quorum Standby | running | 1 | 0/31D3198 | 0 | 0/31D3198 | 0 |
| work1-2 | 172.27.0.2 | Leader | running | 1 | | | | |
+---------+------------+----------------+---------+----+-------------+-----+------------+-----+
Citus 工作节点主从切换 当对 Citus 工作节点编排主从切换时,Citus 提供了使切换对应用程序接近透明的能力。由于应用程序连接到协调节点,再由协调节点连接工作节点,因此 Citus 能够在协调节点上 暂停
以下是在工作节点集群上执行 patronictl switchover
postgres@coord1:~$ patronictl switchover demo
+ Citus cluster: demo ----------+----------------+---------+----+-------------+-----+------------+-----+
| Group | Member | Host | Role | State | TL | Receive LSN | Lag | Replay LSN | Lag |
+-------+---------+-------------+----------------+---------+----+-------------+-----+------------+-----+
| 0 | coord1 | 172.27.0.10 | Replica | running | 1 | 0/41C0368 | 0 | 0/41C0368 | 0 |
| 0 | coord2 | 172.27.0.6 | Quorum Standby | running | 1 | 0/41C0368 | 0 | 0/41C0368 | 0 |
| 0 | coord3 | 172.27.0.4 | Leader | running | 1 | | | | |
| 1 | work1-1 | 172.27.0.8 | Leader | running | 1 | | | | |
| 1 | work1-2 | 172.27.0.2 | Quorum Standby | running | 1 | 0/31D3198 | 0 | 0/31D3198 | 0 |
| 2 | work2-1 | 172.27.0.5 | Quorum Standby | running | 1 | 0/31CDFC0 | 0 | 0/31CDFC0 | 0 |
| 2 | work2-2 | 172.27.0.7 | Leader | running | 1 | | | | |
+-------+---------+-------------+----------------+---------+----+-------------+-----+------------+-----+
Citus group: 2
Primary [work2-2]:
Candidate ['work2-1'] []:
When should the switchover take place (e.g. 2024-08-26T08:02 ) [now]:
Current cluster topology
+ Citus cluster: demo (group: 2, 7179854924063375386) -+-------------+-----+------------+-----+
| Member | Host | Role | State | TL | Receive LSN | Lag | Replay LSN | Lag |
+---------+------------+----------------+---------+----+-------------+-----+------------+-----+
| work2-1 | 172.27.0.5 | Quorum Standby | running | 1 | 0/31CDFC0 | 0 | 0/31CDFC0 | 0 |
| work2-2 | 172.27.0.7 | Leader | running | 1 | | | | |
+---------+------------+----------------+---------+----+-------------+-----+------------+-----+
Are you sure you want to switchover cluster demo, demoting current primary work2-2? [y/N]: y
2024-08-26 07:02:40.33003 Successfully switched over to "work2-1"
+ Citus cluster: demo (group: 2, 7179854924063375386) --------+---------+------------+---------+
| Member | Host | Role | State | TL | Receive LSN | Lag | Replay LSN | Lag |
+---------+------------+---------+---------+----+-------------+---------+------------+---------+
| work2-1 | 172.27.0.5 | Leader | running | 1 | | | | |
| work2-2 | 172.27.0.7 | Replica | stopped | | unknown | unknown | unknown | unknown |
+---------+------------+---------+---------+----+-------------+---------+------------+---------+
postgres@coord1:~$ patronictl list demo
+ Citus cluster: demo ----------+----------------+---------+----+-------------+-----+------------+-----+
| Group | Member | Host | Role | State | TL | Receive LSN | Lag | Replay LSN | Lag |
+-------+---------+-------------+----------------+---------+----+-------------+-----+------------+-----+
| 0 | coord1 | 172.27.0.10 | Replica | running | 1 | 0/41C0368 | 0 | 0/41C0368 | 0 |
| 0 | coord2 | 172.27.0.6 | Quorum Standby | running | 1 | 0/41C0368 | 0 | 0/41C0368 | 0 |
| 0 | coord3 | 172.27.0.4 | Leader | running | 1 | | | | |
| 1 | work1-1 | 172.27.0.8 | Leader | running | 1 | | | | |
| 1 | work1-2 | 172.27.0.2 | Quorum Standby | running | 1 | 0/31D3198 | 0 | 0/31D3198 | 0 |
| 2 | work2-1 | 172.27.0.5 | Leader | running | 2 | | | | |
| 2 | work2-2 | 172.27.0.7 | Quorum Standby | running | 2 | 0/31CDFC0 | 0 | 0/31CDFC0 | 0 |
+-------+---------+-------------+----------------+---------+----+-------------+-----+------------+-----+
以下是协调节点侧的日志:
# 工作节点主库通知协调节点,它即将执行 "pg_ctl stop"。
2024-08-26 07:02:38,636 DEBUG: query(BEGIN, ())
2024-08-26 07:02:38,636 DEBUG: query(SELECT pg_catalog.citus_update_node(%s, %s, %s, true, %s), (3, '172.19.0.7-demoted', 5432, 10000))
# 从此刻起,协调节点上发往工作节点组 2 的所有应用流量被暂停。
# 旧的工作节点主库被指定为从库。
2024-08-26 07:02:40,084 DEBUG: query(SELECT pg_catalog.citus_update_node(%s, %s, %s, true, %s), (7, '172.19.0.7', 5432, 10000))
# 未来的工作节点主库通知协调节点,它已在 DCS 中获取了 leader 锁,即将运行 "pg_ctl promote"。
2024-08-26 07:02:40,085 DEBUG: query(SELECT pg_catalog.citus_update_node(%s, %s, %s, true, %s), (3, '172.19.0.5', 5432, 10000))
# 新的工作节点主库刚完成提升,通知协调节点它已准备好接受读写流量。
2024-08-26 07:02:41,485 DEBUG: query(COMMIT, ())
# 从此刻起,协调节点上发往工作节点组 2 的应用流量被解除阻塞。
从节点(Secondary nodes) 从 Patroni v4.0.0 起,没有 noloadbalance标签 pg_dist_nodecitus.use_secondary_nodes GUC。
查看 DCS 结构 Citus 集群(协调节点和工作节点)在 DCS 中以逻辑分组的 Patroni 集群群组方式存储:
/service/batman/ # scope=batman
/service/batman/0/ # citus.group=0,协调节点
/service/batman/0/initialize
/service/batman/0/leader
/service/batman/0/members/
/service/batman/0/members/m1
/service/batman/0/members/m2
/service/batman/1/ # citus.group=1,工作节点
/service/batman/1/initialize
/service/batman/1/leader
/service/batman/1/members/
/service/batman/1/members/m3
/service/batman/1/members/m4
...
选择这种方式是因为,对于大多数 DCS,可以通过单次递归读取请求获取整个 Citus 集群的数据。只有 Citus 协调节点需要读取整棵树,因为它们需要发现工作节点。工作节点只读取自身组的子树,某些情况下也可能读取协调节点组的子树。
Kubernetes 上的 Citus 由于 Kubernetes 不支持层级结构,我们必须在 Patroni 创建的所有 K8s 对象中包含 citus group:
batman-0-leader # 协调节点的 leader ConfigMap
batman-0-config # 存储 initialize、config 和 history "键"的 ConfigMap
...
batman-1-leader # 工作节点组 1 的 leader ConfigMap
batman-1-config
...
命名规则为:${scope}-${citus.group}-${type}
Patroni 使用 标签选择器 来发现所有 Kubernetes 对象,因此带有 Patroni&Citus 的所有 Pod 以及 Endpoints/ConfigMaps 必须具有相同的标签,且必须通过 Kubernetes Kubernetes 配置
以下是使用 Pod 环境变量配置 Patroni 的两个示例:
协调节点集群 apiVersion : v1
kind : Pod
metadata :
labels :
application : patroni
citus-group : "0"
citus-type : coordinator
cluster-name : citusdemo
name : citusdemo-0-0
namespace : default
spec :
containers :
- env :
- name : PATRONI_SCOPE
value : citusdemo
- name : PATRONI_NAME
valueFrom :
fieldRef :
apiVersion : v1
fieldPath : metadata.name
- name : PATRONI_KUBERNETES_POD_IP
valueFrom :
fieldRef :
apiVersion : v1
fieldPath : status.podIP
- name : PATRONI_KUBERNETES_NAMESPACE
valueFrom :
fieldRef :
apiVersion : v1
fieldPath : metadata.namespace
- name : PATRONI_KUBERNETES_LABELS
value : '{application: patroni}'
- name : PATRONI_CITUS_DATABASE
value : citus
- name : PATRONI_CITUS_GROUP
value : "0"
第 2 组工作节点集群 apiVersion : v1
kind : Pod
metadata :
labels :
application : patroni
citus-group : "2"
citus-type : worker
cluster-name : citusdemo
name : citusdemo-2-0
namespace : default
spec :
containers :
- env :
- name : PATRONI_SCOPE
value : citusdemo
- name : PATRONI_NAME
valueFrom :
fieldRef :
apiVersion : v1
fieldPath : metadata.name
- name : PATRONI_KUBERNETES_POD_IP
valueFrom :
fieldRef :
apiVersion : v1
fieldPath : status.podIP
- name : PATRONI_KUBERNETES_NAMESPACE
valueFrom :
fieldRef :
apiVersion : v1
fieldPath : metadata.namespace
- name : PATRONI_KUBERNETES_LABELS
value : '{application: patroni}'
- name : PATRONI_CITUS_DATABASE
value : citus
- name : PATRONI_CITUS_GROUP
value : "2"
你可能注意到,两个示例都设置了 citus-groupPATRONI_CITUS_GROUPcitus-groupcitus-group: ${env.PATRONI_CITUS_GROUP}
apiVersion : v1
kind : ConfigMap
metadata :
name : citusdemo-0-leader # 由 ${env.PATRONI_SCOPE}-${env.PATRONI_CITUS_GROUP}-leader 生成
labels :
application : patroni # 从 ${env.PATRONI_KUBERNETES_LABELS} 中设置
cluster-name : citusdemo # 从 ${env.PATRONI_SCOPE} 自动设置
citus-group : '0' # 从 ${env.PATRONI_CITUS_GROUP} 自动设置
你可以在 Patroni 仓库的 kubernetes 目录中找到支持 Citus 的 Patroni Kubernetes 部署完整示例。
其中两个重要文件:
Dockerfile.citus citus_k8s.yaml Citus 升级与 PostgreSQL 大版本升级 首先,请阅读 Citus 文档 中关于升级 Citus 版本的内容。流程中有一处小变化:在执行升级时,必须使用 patronictl restartsystemctl restart
包含 Citus 的 PostgreSQL 大版本升级相对复杂。你需要结合 Citus 文档中关于大版本升级的技术,以及 Patroni 文档中关于 PostgreSQL major upgrade<major_upgrade>
26.14 - 将独立实例转换为 Patroni 集群 将现有 PostgreSQL 数据迁移并转换为 Patroni 集群的操作步骤。
原始页面: https://patroni.readthedocs.io/en/latest/existing_data.html
如需从零开始部署 Patroni 集群(不使用已有 PostgreSQL 实例),请参阅 运行与配置
操作步骤 以下是将现有 PostgreSQL 集群转换为 Patroni 托管集群的步骤概览。本步骤假设现有集群的所有节点当前均在运行,并且您不打算 在迁移过程中修改 PostgreSQL 配置。具体步骤如下:
按照 Patroni 配置中 认证
-- Patroni 超级用户
-- 请将 PATRONI_SUPERUSER_USERNAME 和 PATRONI_SUPERUSER_PASSWORD 替换为实际值
CREATE USER PATRONI_SUPERUSER_USERNAME WITH SUPERUSER ENCRYPTED PASSWORD 'PATRONI_SUPERUSER_PASSWORD' ;
-- Patroni 复制用户
-- 请将 PATRONI_REPLICATION_USERNAME 和 PATRONI_REPLICATION_PASSWORD 替换为实际值
CREATE USER PATRONI_REPLICATION_USERNAME WITH REPLICATION ENCRYPTED PASSWORD 'PATRONI_REPLICATION_PASSWORD' ;
-- Patroni rewind 用户(若您打算在 Patroni 配置中启用 use_pg_rewind)
-- 请将 PATRONI_REWIND_USERNAME 和 PATRONI_REWIND_PASSWORD 替换为实际值
CREATE USER PATRONI_REWIND_USERNAME WITH ENCRYPTED PASSWORD 'PATRONI_REWIND_PASSWORD' ;
GRANT EXECUTE ON function pg_catalog . pg_ls_dir ( text , boolean , boolean ) TO PATRONI_REWIND_USERNAME ;
GRANT EXECUTE ON function pg_catalog . pg_stat_file ( text , boolean ) TO PATRONI_REWIND_USERNAME ;
GRANT EXECUTE ON function pg_catalog . pg_read_binary_file ( text ) TO PATRONI_REWIND_USERNAME ;
GRANT EXECUTE ON function pg_catalog . pg_read_binary_file ( text , bigint , bigint , boolean ) TO PATRONI_REWIND_USERNAME ;
在所有 PostgreSQL 节点上依次执行以下操作。请逐节点完成所有步骤后再处理下一个节点,先从主库开始,然后依次处理各从库节点:
如果 PostgreSQL 通过 systemd 管理,请先禁用 PostgreSQL 的 systemd 服务单元——因为 PostgreSQL 的启停将改由 Patroni 负责管理。 为 Patroni 创建 YAML 配置文件。可使用 Patroni 配置生成与校验工具 注意(仅适用于主库): 如果现有集群成员之间使用复制槽进行复制,建议启用 use_slotsslotsuse_slots动态配置项 通过 patroni 将 PostgreSQL 的"启动控制权"移交给 Patroni。为此,需要通过 patronictl restart cluster-name member-name
立即重启从库节点。 在维护窗口内计划性地重启主库。 如果您在第 2.2 步中配置了永久槽,应在 Patroni 创建的复制槽的 restart_lsnrestart_lsnpatronictl edit-config cluster-nameslotsrestart_lsn
-- 假设 original_slot_for_member_x 是原集群中用于向成员 X 复制变更的槽名称,
-- slot_for_member_x 是 Patroni 为同一目的创建的槽名称。
-- 需要确认 slot_for_member_x 的 restart_lsn >= original_slot_for_member_x 的 restart_lsn
SELECT slot_name ,
restart_lsn
FROM pg_replication_slots
WHERE slot_name IN (
'original_slot_for_member_x' ,
'slot_for_member_x'
)
PostgreSQL 大版本升级 目前,进行大版本升级的唯一可行方式是:
停止 Patroni。 升级 PostgreSQL 二进制文件,并在主库上执行 pg_upgrade 。 更新 patroni.yml 从 DCS 中删除 initializepatronictl remove cluster-namepg_upgradeinitdb 如果您在上一步中清除了集群状态,建议将旧数据目录中的 patroni.dynamic.json 在主库上启动 Patroni。 在从库节点上升级 PostgreSQL 二进制文件,更新 patroni.ymldata_dir 在从库节点上启动 Patroni,等待复制完成。 PostgreSQL 不支持在从库节点上运行 pg_upgradehttps://www.postgresql.org/docs/current/pgupgrade.html 中描述的 rsync 方式,以替代清空从库节点 data_dir
常见问题 Patroni 启动时报错,提示无法绑定到 PostgreSQL 端口。
请核查 postgresql.conflisten_addressesportpatroni.ymlpostgresql.listenpg_hba.conf
请求 Patroni 重启节点后,PostgreSQL 报错:could not open configuration file "/etc/postgresql/10/main/pg_hba.conf": No such file or directory
这个问题可能由多种原因引起,具体取决于您管理 PostgreSQL 配置的方式。如果您指定了 postgresql.config_dirbootstrap pg_hba.confPGDATA
26.15 - 与其他工具的集成 Patroni 与外部备份及编排工具的集成方法。
原始页面: https://patroni.readthedocs.io/en/latest/tools_integration.html
Barman Patroni 提供了一个名为 patroni_barmanpg-backup-api
该应用程序目前包含两个子命令:recoverconfig-switch
patroni_barman recover recoverreplica_imaging_and_bootstrap
patroni_barman config-switch config-switchon_role_changepatroni_barman config-switchon_role_change
说明
该子命令依赖于 barman config-switch
以下示例展示了如何配置 Patroni,使其在节点被提升为主库时应用一个配置模型:
postgresql :
callbacks :
on_role_change : >
patroni_barman
--api-url YOUR_API_URL
config-switch
--barman-server YOUR_BARMAN_SERVER_NAME
--barman-model YOUR_BARMAN_MODEL_NAME
--switch-when promoted
说明
patroni_barman config-switchpg-backup-apibarman config-switchpatroni_barman config-switch --help
26.16 - 安全注意事项 DCS、REST API 及凭据处理的安全注意事项。
原始页面: https://patroni.readthedocs.io/en/latest/security.html
保护 DCS Patroni 和 patronictl
尽管 DCS 本身不包含任何敏感信息,但它允许修改部分 Patroni/PostgreSQL 配置,因此首要保护对象就是 DCS 本身。
具体的保护方式取决于所使用的 DCS 类型。各类 DCS 的认证和加密参数(令牌/基本认证/客户端证书)详见 配置说明
通用建议是为所有 DCS 通信启用 TLS。
保护 REST API 保护 REST API 是一项更为复杂的任务。
Patroni REST API 的使用方包括:Patroni 自身(领导者竞选期间)、patronictl
从安全角度来看,REST API 端点分为两类:安全端点(GETPUTPOSTPATCHDELETE
非安全端点可通过设置 restapi.authentication.usernamerestapi.authentication.password
当 REST API 启用 TLS 且已建立 PKI 基础设施时,可对 API 服务端和客户端实现所有端点的双向认证。
restapiverify_clientrequiredoptionalnone
ctlpatronictl insecure: true配置说明
保护 PostgreSQL 数据库本身免受未授权访问超出了本文档的范围,相关内容请参阅 https://www.postgresql.org/docs/current/client-authentication.html 。
26.17 - 多数据中心高可用 基于 Patroni 复制的多数据中心高可用架构模式。
原始页面: https://patroni.readthedocs.io/en/latest/ha_multi_dc.html
复制模式
无论哪种模式,都需要明确以下概念:
PostgreSQL 仅在持有领导者键且能够更新领导者键时,才能以主库或备用领导者身份运行。 etcd、ZooKeeper 或 Consul 节点的数量应为奇数:3 个或 5 个! 同步复制 要构建能够自动容忍单区域故障的多数据中心集群,至少需要 3 个数据中心。
架构图如下:
需要跨不同数据中心部署一个 etcd、ZooKeeper 或 Consul 集群,至少包含 3 个节点,每个可用区各一个。
PostgreSQL 方面,至少需要在不同数据中心部署 2 个节点,然后在全局 动态配置 synchronous_mode: true
这将启用同步复制,主库会从其他节点中选择一个作为同步备库。
异步复制 如果只有两个数据中心,更好的方案是部署两个独立的 etcd 集群,并在第二个数据中心运行 Patroni 备用集群 手动 提升备用集群。
架构图如下:
自动提升是不可能的,因为 DC2 永远无法确定 DC1 的真实状态。
此场景下不应使用 pg_ctl promote动态配置 standby_cluster
若需恢复到"初始"状态,只有以下两种方式:
重新添加 standby_clusterpg_rewindpg_rewinddata page checksumsinitdb--data-checksumswal_log_hintsonpg_rewind 从头重建备用集群。 在提升备用集群之前,必须人工确认源集群已停止(STONITH)。DC1 恢复后,该集群需要被转换为备用集群。
在执行此操作之前,可以手动检查数据库,提取从 DC1 与 DC2 之间网络中断到手动停止 DC1 集群这段时间内发生的所有变更,并在必要时手动将这些变更应用到 DC2 的集群中。
26.18 - 常见问题 关于 Patroni 运维与故障排查的常见问题解答。
原始页面: https://patroni.readthedocs.io/en/latest/faq.html
希望这些内容能帮你解答大多数疑问。如果仍有疑问或遇到意外问题,请参阅 chattingreporting_bugs
与其他高可用方案的比较 为什么 Patroni 需要独立的 DCS 节点集群,而 repmgr 等其他方案不需要?
实现高可用方案有多种不同方式,各有优缺点。
repmgr
而 Patroni 则依赖存储在 DCS 中的状态,DCS 是 Patroni 决策的唯一可信来源。
虽然独立的 DCS 集群会使架构变得复杂,但这种方式也降低了 Postgres 集群发生脑裂(split-brain)的可能性。
Patroni 与其他高可用方案在 Postgres 管理方面有何不同?
Patroni 不仅管理 Postgres 集群的高可用,还全面管理 Postgres 本身。
如果 Postgres 节点尚不存在,Patroni 会负责引导主库和备库节点,并管理各节点的 Postgres 配置。如果 Postgres 节点已存在,Patroni 将接管集群的管理。
除此之外,Patroni 还具备自愈能力。若主库故障,Patroni 不仅会故障转移到从库,还会尝试将原主库以从库身份重新加入新主库。同样,若从库故障,Patroni 也会尝试重新加入该从库。
这就是我们将 Patroni 称为"高可用方案模板"的原因——它不仅仅管理物理复制,而是对 Postgres 进行整体管理。
DCS 可以使用同一个 etcd 集群存储两个或多个 Patroni 集群的数据吗?
可以!
Patroni 集群的信息以 namespacescope
只要不同 Patroni 集群之间的 namespace 和 scope 不冲突,就可以使用同一个 DCS 集群存储多个 Patroni 集群的信息。
如果为指向同一 DCS 集群的不同 Patroni 集群使用相同的 namespace 和 scope 组合,会发生什么?
第二个尝试使用相同 namespacescope
在处理共享同一 DCS 集群的不同 Patroni 集群时,请确保使用不同的 namespacescope
DCS 集群丢失了会怎样?
DCS 主要用于存储 Patroni 集群的状态和动态配置。
最直接的后果是,所有依赖该 DCS 的 Patroni 集群将进入只读模式——除非启用了 dcs_failsafe_mode
DCS 集群丢失后该怎么做?
丢失 DCS 集群后有三种可能的处置方式:
DCS 集群完全恢复:Patroni 侧无需任何操作。DCS 集群恢复后,Patroni 也应能自动恢复; DCS 集群在原地重建,端点保持不变:Patroni 侧无需任何变更; 新建一个端点不同的 DCS 集群:需要在每个 Patroni 节点的配置中更新 DCS 端点。 如果遇到第 2.3.patroni.dynamic.json
DCS 集群丧失多数节点会怎样?
DCS 将变得无响应,这会导致 Patroni 将当前的读写 Postgres 节点降级。
请记住:Patroni 依赖 DCS 的状态来对集群采取行动。
你可以使用 dcs_failsafe_mode
patronictl 必须在 Patroni 主机上运行 patronictl
不需要。
在 Patroni 主机上运行 patronictlpatroni
但 patronictl
为什么 patronictl list
patronictl list
如果某个成员的信息从 DCS 中消失,很可能是该节点上的 Patroni 代理已停止运行,或者无法与 DCS 通信。
由于该成员无法更新其信息,信息最终会从 DCS 中过期,该成员也就不再出现在 patronictl list
为什么 patronictl list
patronictl list
默认情况下,该信息由 Patroni 大约每 loop_waitloop_wait
但请注意,这并不是一成不变的规则。Patroni 执行的某些操作会立即更新 DCS 信息。
配置 动态配置与本地配置有什么区别?
动态配置(或全局配置)是存储在 DCS 中的配置,适用于 Patroni 集群的所有成员,是存储配置的首选位置。
特定于某个节点的配置,或希望覆盖全局配置的配置,应仅在目标 Patroni 成员上设置为本地配置。本地配置可以通过配置文件或环境变量来指定。
更多详情请参阅 Patroni 配置
Patroni 的配置类型有哪些?优先级如何?
配置类型包括:
动态配置:适用于所有成员; 本地配置:适用于本地成员,覆盖动态配置; 环境配置:适用于本地成员,覆盖动态配置和本地配置。 注意: 某些 Postgres GUC 只能全局设置,即通过动态配置。此外,还有一些 GUC 的值由 Patroni 强制硬编码。
更多详情请参阅 Patroni 配置
有没有工具可以帮我创建 Patroni 配置文件?
有的。
你可以使用 patroni --generate-sample-configpatroni --generate-config
详情请参阅 generate_sample_configgenerate_config
我修改了 bootstrap.dcs 下的参数,但 Patroni 没有将更改应用到集群成员。哪里出了问题?
bootstrap.dcs
引导阶段完成后,只能通过 DCS 来修改动态配置。
请参阅下一个问题了解更多详情。
如何修改动态配置?
需要在 DCS 中修改配置,可以通过以下方式实现:
如何修改本地配置?
需要修改对应 Patroni 成员的配置文件,并向 Patroni 代理发送 SIGHUP
注意: 在以下情况下,通过 patronictl reload
REST API 证书过期:可以使用 patronictl-k 凭据错误:例如在配置文件中修改了 restapictlpatronictl 如何修改环境配置?
环境配置只在 Patroni 启动时读取。
因此,修改环境配置后需要重启相应的 Patroni 代理。
注意不要导致集群发生故障转移!你可能需要先查看 patronictl pause
修改需要重载的 Postgres GUC 时会发生什么?
当你按照上述方法修改动态配置或本地配置时,Patroni 会自动帮你重载 Postgres 配置。
修改需要重启的 Postgres GUC 时会发生什么?
Patroni 会在受影响的成员上标记 pending restart
由你决定何时以何种方式重启成员。可以通过以下方式实现:
注意: 某些 Postgres GUC 在重启 Postgres 节点的顺序上需要特别处理。详情请参阅 shared_memory_gucs
Patroni 配置中 etcd 和 etcd3 有什么区别?
etcdetcd3
请注意,API 版本 2 存储的信息不能由 API 版本 3 管理,反之亦然。
我们建议配置 etcd3etcd
API 版本 2 从 Etcd v3.4 起默认禁用; API 版本 2 将在 Etcd v3.6 中被完全移除。 我在 Patroni 配置中启用了 use_slots,但当集群某个成员下线一段时间后,其在上游节点上使用的复制槽被删除了。如何避免这个问题?
有两种方案:
调整 member_slots_ttl30min4.0.0 为成员配置永久物理复制槽。 自 Patroni 3.2.0
Patroni 会在所有节点上创建永久物理复制槽,确保不删除这些槽,并根据成员已消费的 LSN 在所有节点上推进槽的 LSN。
之后,如果你决定移除相应成员,需要由你负责 调整永久槽配置,否则 Patroni 将永久保留这些槽。
注意: 在 Patroni 3.2.0
注意: 即使使用 Patroni 3.2.0
loop_wait、retry_timeout 和 ttl 有什么区别?
Patroni 会定期执行我们所称的 HA 循环。在每次 HA 循环中,它会对集群执行一系列检查以判断其健康状态,并根据状态采取相应行动,例如故障转移到备库。
loop_wait
retry_timeoutretry_timeout
ttlleaderttlleader race
注意: 修改这些配置时,请记住 Patroni 在 动态配置
Postgres 管理 可以直接在 Postgres 配置文件中修改 Postgres GUC 吗?
可以,但不建议这样做。
Postgres 配置由 Patroni 管理,直接编辑配置文件的尝试可能会因 Patroni 最终覆盖它们而徒劳无功。
有几种方式可以绕过 Patroni 的管理:
通过 $PGDATA/postgresql.base.conf 定义一个 postgresql.custom_confpostgresql.base.conf 使用 ALTER SYSTEMALTER DATABASEALTER USER 更多信息请参阅 important_configuration_rules
无论如何,我们建议通过 Patroni 统一管理所有 Postgres 配置。这样可以集中管理,并在需要调试 Patroni 时更加方便。
可以直接重启 Postgres 节点吗?
不,你不应该 直接管理 Postgres!
任何绕过 Patroni 直接重启 Postgres 服务器的尝试都可能导致集群发生故障转移。
如果需要管理 Postgres 服务器,请通过 Patroni 提供的方式进行操作。
Patroni 能接管对已有 Postgres 集群的管理吗?
可以!
详细操作说明请参阅 将独立实例转换为 Patroni 集群
Patroni 如何管理 Postgres?
Patroni 通过运行 Postgres 二进制文件(如 pg_ctlpostgres
因此,你必须 禁用所有其他可能管理 Postgres 集群的来源,例如 systemd 单元 postgresql.servicepostgresql.service
概念与要求 Patroni 包含哪些应用?
Patroni 主要包含以下几个应用:
Patroni 中的"备用集群"(standby cluster)是什么?
备用集群是指没有任何主库 Postgres 节点运行的集群,即集群中没有可读写的成员。
这类集群的作用是从另一个集群复制数据,通常用于跨数据中心的数据复制场景。
集群中会有一个领导者节点,该节点作为备库负责从远程 Postgres 节点复制变更。集群中其他备库则通过级联复制从该领导者成员同步数据。
注意: 备用集群对其复制来源的集群一无所知——它甚至可以使用 restore_command
更多详情请参阅 备用集群
Patroni 中的"领导者"(leader)是什么?
Patroni 中的 leader
在普通 Patroni 集群中,leader
在备用 Patroni 集群中,leaderstandby leader
Patroni 对集群中 Postgres 节点数量有最低要求吗?
没有,Patroni 可以在任意数量的 Postgres 节点上运行。
请记住:Patroni 与 DCS 是解耦的。
Patroni 中的暂停(pause )是什么意思?
暂停(pause)是 Patroni 提供的一项操作,允许用户要求 Patroni 在 Postgres 管理方面退后一步。
这在需要对集群进行维护时非常有用,可以避免 Patroni 在你停止主库时做出故障转移等高可用决策。
更多信息请参阅 暂停/恢复集群
自动故障转移 Patroni 的自动故障转移机制是如何工作的?
Patroni 的自动故障转移基于我们所称的 leader race
Patroni 将集群状态存储在 DCS 中,其中包含一个 leaderleader
该 leaderleader
leaderleader raceleader
所有认为自己是接管 leaderleaderstandby leader
可以临时禁用 Patroni 集群的自动故障转移吗?
可以!
可以通过暂时暂停集群来实现。这在执行维护操作时非常有用。
当需要恢复集群的自动故障转移时,只需取消暂停即可。
更多信息请参阅 暂停/恢复集群
引导与从库创建 Patroni 如何创建主库 Postgres 节点?从库 Postgres 节点又是如何创建的?
默认情况下,Patroni 使用 initdbpg_basebackupleader
你可以通过编写自定义引导方法和自定义从库创建方法来改变这一行为。
自定义方法在需要恢复由 pgBackRest 或 Barman 等备份工具创建的备份时尤为有用。
详细信息请参阅 自定义引导方法 自定义从库创建
监控 如何监控我的 Patroni 集群?
Patroni 在其 REST API
/metrics/patroni/metrics你可以使用这些端点来实现监控检查。
26.19 - 版本历史 Patroni 各版本发布说明与变更历史。
原始页面:https://patroni.readthedocs.io/en/latest/releases.html
Version 4.1.0 发布于 2025-09-23
新特性
添加对 systemd “notify” 单元类型的支持(Ronan Dunklau)
如果没有 notify 单元类型,在使用 systemd 时,有可能在 Patroni 启动后立即向其发送 SIGHUP 信号,从而在其设置信号处理程序之前将其终止。
在 API 和 ctl 中提供接收和重放 LSN/延迟信息(Polina Bungina)
Patroni REST API 的 /clusterpatronictl list
确保干净地降级为备用集群(Polina Bungina)
确保在动态配置中引入 standby_cluster
实现 patronictl demote-clusterpromote-cluster
用于集群降级和提升的新命令,可同时处理动态配置编辑和结果状态检查。
实现 sync_priority
此参数控制当 synchronous_modeon
实现 --validate-config--print
在本地配置(包括环境配置覆盖)成功验证后将其打印输出。
实现 kubernetes.bootstrap_labels
此功能允许您定义标签,这些标签将在成员 Pod 处于 initializing new clusterrunning custom bootstrap scriptstarting after custom bootstrapcreating replica
添加抑制重复心跳日志的配置选项(Michael Morris)
如果设置为 true
为永久复制槽添加可选的 cluster_type
这允许您设置特定的永久复制槽是应该始终创建,还是仅在主集群或备用集群上创建。
使 HTTP Server 头可配置(David Grierson)
引入 restapi.server_tokens
为副本成员实现复制就绪 API 检查(Ants Aasma)
之前的实现在 PostgreSQL 启动后就认为副本已就绪。此更改后,只有当 PostgreSQL 正在进行复制且落后主节点不太远时,副本 Pod 才被视为就绪。
改进
降低 watchdog 配置失败的日志级别(Ants Aasma)
将 Could not activate Linux watchdog devicerequired
利用 pg_stat_wal_receiverwritten_lsnlatest_end_lsn
written_lsnpg_last_wal_receive_lsn()latest_end_lsnloop_wait
避免与使用 failover=true
此更改是使逻辑故障转移槽功能完全正常运行所必需的。
在 /metrics
PostgreSQL 实例状态信息现在可通过 /metrics
Version 4.0.7 发布于 2025-09-22
新特性
错误修复
修复 Windows 上 localhost 解析为 IPv6 的潜在问题(András Váczi)
在 PostgreSQL 中配置 listen_addresses0.0.0.0127.0.0.1localhost::1127.0.0.1localhost
仅当 DCS 中存在 /config
此前,当 DCS 中缺少 /config
修复 Etcd 不可用时故障安全模式未被触发的问题(Alexander Kukushkin)
Patroni 并非总能正确处理 etcd3
修复信号处理程序重入死锁(Waynerv)
在 Docker 容器中以 PID=1SIGCHLD
当(永久)物理槽未保留 WAL 时重新创建(Israel Barth Rubio)
在 Patroni 作用域之外创建的、未保留 WAL 的永久物理复制槽会导致 replication slot cannot be advanced
正确处理 etcd3
当 etcd3
处理 HTTPConnectionpyopenssl
Patroni 未正确使用 python-etcdpyopenssl
文档改进
Version 4.0.6 发布于 2025-06-06
错误修复
修复从具有更高优先级的主节点故障转移的错误(Alexander Kukushkin)
确保 Patroni 在具有更高优先级的旧主节点报告与当前节点相同的 LSN
修复在 PGDATApostgresql.conf
在 PGDATApostgresql.conf
修复 synchronous_mode=quorum
当指定了候选节点时,不检查 quorum 要求。
通过比较集群 term 来忽略过期的 Etcd 节点(Alexander Kukushkin)
记录 Etcd 集群最后已知的 “raft_term”,并在执行客户端请求时将其与 Etcd 节点报告的 “raft_term” 进行比较。
在 SIGHUP
此前,Patroni 仅在检测到全局或本地配置发生更改时才替换 PostgreSQL 配置文件。
正确处理 etcd3Unavailable
Patroni 过去会在同一个 etcd3
改进 etcd3
确保 Patroni 每个 HA 循环至少刷新一次 etcd3
尝试获取主节点锁时在 409 状态码下重新检查注解(Alexander Kukushkin)
实现与 Patroni 4.0.3 版本中对主节点对象读取所做的相同行为。
在推进槽时考虑 replay_lsn
不要尝试在副本上将槽推进到超过 replay_lsnconfirmed_flush_lsnLSNreplay_lsn
确保在提升后执行 CHECKPOINT
由于 CHECKPOINTresult
避免并发运行"离线"降级(Alexander Kukushkin)
在缓慢关闭的情况下,可能会出现下一个心跳循环再次触发 DCS 错误处理方法的情况,导致 AsyncExecutor is busy, demoting from the main thread
在初始化失败时重命名数据目录前规范化 data_dir
防止 data_dir
检查 synchronous_standby_names
此前,实现非 quorum 同步复制的状态机机制未检查 synchronous_standby_namespg_stat_replicationsynchronous_standby_namessynchronous_standby_names
Version 4.0.5 发布于 2025-02-20
稳定性改进
兼容 python-json-logger>=3.1
消除旧 API 用法产生的警告。
兼容 Python 3.13(Alexander Kukushkin)
在 Python 3.13 上运行测试。
兼容 pyinstaller>=4.4
当 pyinstallertociter_modules
修复 PostgreSQL 9.5 支持的问题(Alexander Kukushkin)
正确处理 pg_rewind 考虑 synchronous_standby_names 兼容 urlparse
urlparse[]libpqPQconninfoParse()libpqpsycopg2
错误修复
仅显示待重启的成员以进行重启确认(András Váczi)
此前,执行 patronictl restart <clustername> --pending
在 Patroni 停止时取消长时间运行的任务,并在副本引导失败时删除数据目录(Alexander Kukushkin)
此前,Patroni 可能在进行副本引导时停止,而 pg_basebackupwal-gpgBackRestbarman
正确处理 patronictl edit-config
将 cluster_name
避免过早删除物理槽(Alexander Kukushkin)
在故障转移后推迟删除包含 xmin
处理 controldata()
Patroni 未正确处理调用 pg_controldata
修复故障转移时旧主节点的槽未被保留的错误(Alexander Kukushkin)
避免错误地依赖 DCS 中存在的成员信息,因为在故障转移时旧主节点的 /member
修复 quorum 状态机中的几个错误(Alexander Kukushkin)
在评估是否有健康节点可用于主节点选举时,降级前需要考虑 quorum 要求。否则,旧主节点可能最终在异步节点包围下处于恢复状态。 QuorumStateResolver改进
Version 4.0.4 发布于 2024-11-22
稳定性改进
添加对 py-consul
python-consulpy-consul
添加对 prettytable>=3.12.0
处理弃用警告。
兼容 ydiff==1.4.2
修复最新版本的兼容性问题,在 requirements.txt
错误修复
在主节点恢复失败后运行 on_role_change
额外为崩溃后启动失败的主节点运行 on_role_change
修复 patronictl list -W
缓存 DCS 实例对象以避免线程泄漏。
确保只有受支持的参数写入连接字符串(Alexander Kukushkin)
Patroni 过去会将新版本中引入的参数传递到连接字符串中,导致连接错误。
Version 4.0.3 发布于 2024-10-18
错误修复
创建用户时禁用 pgaudit
当启用 pgauditsuperuserreplicationrewind
修复混合部署的问题:主节点运行 Patroni v4 之前版本而副本运行 v4+ 版本(Alexander Kukushkin)
如果主节点运行的 Patroni 版本低于 4.0.0,则使用从 /membersxlog_location/status
不要忽略没有 Patroni 验证器但有效的 PostgreSQL GUC(Polina Bungina)
即使 GUC 没有 Patroni 验证器,仍然通过 postgres --describe-config
改进
在 K8s 中读取 leader 对象时,遇到 409 状态码时重新检查注解(Alexander Kukushkin)
避免在 PATCH
添加对 sslnegotiation
sslnegotiation
Version 4.0.2 发布于 2024-09-17
错误修复
处理发现配置验证文件时的异常(Alexander Kukushkin)
跳过 Patroni 没有足够权限执行列表操作的目录。
确保不活跃的热物理复制槽不持有 xmin
自 3.2.0 版本以来,Patroni 在副本上为所有成员创建物理复制槽,并使用 pg_replication_slot_advance()hot_standby_feedbackxminxminxmin
修复启动阶段未处理的 DCSError
在尝试检查节点名称唯一性之前,确保 DCS 连接可用。
查询 pg_settingsCMDLINE_OPTIONS
确保当 Patroni 加入正在运行的备用节点时,所有作为命令行参数传递给 postmaster 的 GUC 都被恢复。这是 Patroni 3.2.2 中修复的错误的后续处理。
修复 synchronous_standby_names
根据 PostgreSQL 文档,ANYFIRST
修复 keepalive 连接值超出范围的问题(hadizamani021)
确保基于 ttlkeepalive
Version 4.0.1 发布于 2024-08-30
错误修复
Version 4.0.0 发布于 2024-08-29
警告
此版本完成了将 “master” 术语替换为 “primary” 的工作。这意味着有一些破坏性变更,请仔细阅读发行说明。升级到 Patroni 4+ 仅在运行 Patroni 3.1.0 或更新版本时才能可靠工作。从更旧的版本直接升级到 4+ 是可能的,但如果在其余节点运行其他 Patroni 版本时主节点发生故障,可能会导致意外行为。 破坏性变更
在消除非包容性 “master” 术语的过程中引入了以下破坏性变更:在 Kubernetes 上,Patroni 默认将 roleprimarykubernetes.leader_label_valuekubernetes.standby_leader_label_valuemaster此处 Patroni 角色在 DCS 中写入为 primarymaster Patroni REST API 返回的角色已从 masterprimary Patroni REST API 不再接受 /switchover/failover/restartrole=master /metricspatroni_masterpatronictl--master--leader--primary自定义副本创建方法声明式配置中的 no_masterno_leader patroni_wale_restore--no_masterpatroni_barman--role=master所有回调脚本现在传递 role=primaryrole=master patronictl failover--leader自 Patroni 3.2.0 起已弃用的用户创建功能(bootstrap.users 新特性
基于 quorum 的故障转移(Ants Aasma、Alexander Kukushkin)
此功能实现了基于 quorum 的同步复制(从 PostgreSQL v10 开始可用),有助于降低最坏情况下的延迟,即使在正常运行期间也是如此,因为复制到某个备用节点的较高延迟可以由其他备用节点补偿。Patroni 实现了额外的安全保障,通过根据接收到的最新事务选择故障转移候选节点来防止任何用户可见的数据丢失。
在 pg_dist_node
Patroni 现在在 pg_dist_noderole==replicastate==runningnoloadbalance标签 的节点列表。
可配置的成员复制槽保留时间(Alexander Kukushkin)
实现了 member_slots_ttl
使 Patroni 创建的日志文件权限可配置(Alexander Kukushkin)
允许为 Patroni 创建的日志文件设置特定权限。如果未指定,权限将根据当前 umask
兼容 PostgreSQL 17 beta3(Alexander Kukushkin)
GUC 验证规则已扩展。Patroni 在关闭期间处理所有新的辅助后端进程,并在 primary_conninfodbname
为 Patroni 配置验证实现 --ignore-listen-port
使在运行 patroni --validate-config
改进
使 wal_log_hints
允许在 use_pg_rewindoffwal_log_hints
在 DEBUGpg_basebackup
便于调试失败的初始化。
错误修复
在故障安全模式下推进级联节点的永久槽(Alexander Kukushkin)
确保在激活故障安全模式时,级联副本的槽在主节点上被正确推进。通过在 POST /failsafexlog_location
不要让当前节点被选为同步节点(Alexander Kukushkin)
可能存在某些进程从当前主节点进行流复制,其 application_name
对 POST /failsafe 忽略 restapi.allowlist_include_members
改进 GUC 验证(Polina Bungina)
由于通过运行 postgres --describe-config
当检测到 Unix 套接字时,在 .pgpasslocalhost
如果指定的 host/.pgpasshost
修复日志问题(Waynerv)
在故障安全处理日志中定义了正确的请求 URL,并修复了 postmaster 检查日志中时间戳的顺序。
Version 3.3.2 发布于 2024-07-11
错误修复
修复原生 Postgres 同步复制模式(Israel Barth Rubio)
自从 Patroni 引入 synchronous_modesynchronous_modesynchronous_standby_names
处理备用节点上逻辑槽的失效(Polina Bungina)
自 PG16 起,备用节点上的逻辑复制槽可能因为水位原因而失效:从现在起,Patroni 会强制复制(即重新创建)失效的槽。
修复逻辑槽推进和复制之间的竞态条件(Alexander Kukushkin)
由于此错误,可能出现失效的逻辑复制槽在 PostgreSQL 重启时被多次复制的情况。
Version 3.3.1 发布于 2024-06-17
稳定性改进
错误修复
修复 replicatefrom
作为此修复的一部分,还改进了 is_physical_slot()
修复备用集群中错误的角色报告(Alexander Kukushkin)
synchronous_standby_namespatronictl listGET /cluster
修复 allow_in_place_tablespaces
allow_in_place_tablespaces
Version 3.3.0 发布于 2024-04-04
警告
所有较旧的 Patroni 版本与 ydiff>=1.3
有以下可用选项来"修复"此问题:
将 Patroni 升级到最新版本 在安装 Patroni 后安装 ydiff<1.3 安装 cdiff 新特性
添加向 Zookeeper 客户端传递 auth_data
允许指定用于连接的认证凭据。
添加用于 Barman
提供一个 patroni_barmanBarmanon_role_change此处
支持 JSON
除了 plainjsonpython-json-logger>=2.0.2
显示 pending_restart_reason
提供关于导致 pending_restartpatronictl list/patronipending_restart_reason
实现 nostream
如果 nostreamtruerestore_command
改进
实现 log
此前验证器未检查所提供的日志配置的正确性。
改进 PostgreSQL 参数变更的日志记录(Polina Bungina)
将旧值转换为人类可读的格式,并记录 pg_controldata
错误修复
正确过滤不允许的 pg_basebackup
由于错误,当以 - setting: valuebasebackup
修复 etcd3
如果在执行请求之前未进行认证,则始终在 etcd3
改进验证器文件发现逻辑(Waynerv)
尽可能使用 importlibzip
仅当 standby_clustertarget_session_attrs
target_session_attrs=read-writestandby_cluster.hostprimary_conninfo
添加 ydiff
Patroni 依赖 ydiff
Version 3.2.2 发布于 2024-01-17
错误修复
当 DCS 被清除时,不允许副本恢复初始化键(Alexander Kukushkin)
这发生在 Patroni 原本应该接管独立 PG 集群的方法中。
从 Consul 获取刚更新的 sync 键时使用一致性读取(Alexander Kukushkin)
Consul 不提供任何接口来立即获取刚更新的键的 ModifyIndex
如果需要重启的参数被重置为原始值,则重新加载 Postgres 配置(Polina Bungina)
此前 Patroni 只重置了 pending_restart
修复在同步模式下故障转移到异步候选节点时确认提示消息的逻辑反转错误(Polina Bungina)
此问题仅存在于 patronictl
在 patronictl
如果集群健康,故障转移到现有主节点是无操作的。
以幂等方式创建 Citus 数据库和扩展(Alexander Kukushkin、Zhao Junwang)
如果需要向 Citus 数据库添加更多依赖项,这将允许在 post_bootstrap
不要过滤掉矛盾的 nofailover
在节点上设置的配置 {nofailover: false, failover_priority: 0}nofailover
修复 PyInstaller 冻结问题(Sophia Ruan)
freeze_support()argparse
修复 patronictlCitus 配置的配置生成器中的错误(Israel Barth Rubio)
该错误阻止了通过环境变量设置的 patronictlCitus 配置参数被写入生成的配置中。
在加入运行中的备用节点时恢复恢复 GUC 和一些 Patroni 管理的参数(Alexander Kukushkin)
Patroni 在 Postgres v12 及以上版本中无法重启,报告内部结构中缺少 port
围绕 pending_restart
在使用 recovery_target_action = promoteALTER SYSTEMhot_standbywal_log_hintspending_restart
Version 3.2.1 发布于 2023-11-30
错误修复
限制 patronictl--format
此前它接受任意字符串,当值未被识别时不产生任何输出。
在关闭时释放主节点键之前,验证副本节点已接收到检查点 LSN(Alexander Kukushkin)
此前在某些情况下,我们使用的是 SWITCH 记录的 LSN,该记录后面跟着 CHECKPOINT(如果启用了归档模式)。因此,旧主节点有时不得不执行 pg_rewind
执行节点名称唯一性检查时进行真正的 HTTP 请求(Alexander Kukushkin)
在容器中运行 Patroni 时,流量可能通过 docker-proxy
修复 Etcd v2 下的 Citus 支持(Alexander Kukushkin)
Patroni 在使用 Etcd v2 部署新的 Citus 集群时会失败。
修复 Postgres v16+ 下的 pg_rewind
pg_waldumppg_rewind
修复自定义引导的错误(Alexander Kukushkin)
Patroni 错误地应用了 --command
修复 REST API 健康检查端点的问题(Sophia Ruan)
Postgres 重启后,由于连接未正确关闭,有可能返回 Postgres 的 unknown
缓存 postgres --describe-config
这些结果用于确定哪些 GUC 可用于验证 PostgreSQL 配置,我们不期望在 Patroni 运行期间此列表会发生变化。
Version 3.2.0 发布于 2023-10-25
废弃通知
bootstrap.usersbootstrap.post_bootstrap破坏性变更
新特性
故障转移优先级(Mark Pekala)
借助 tags.failover_priority
实现了 patroni --generate-config [--dsn DSN]patroni --generate-sample-config
允许为正在运行的PostgreSQL集群生成配置文件,或为新的Patroni集群生成示例配置文件。
为Patroni REST API使用专用的Postgres连接(Alexander Kukushkin)
这有助于在系统压力较大时避免阻塞主心跳循环。
在部分端点中丰富节点的 name
对于监控端点,namescopename
确保严格区分故障转移/切换(Polina Bungina)
在日志消息中更加精确,并允许在健康的同步集群中故障转移到异步节点。
使永久物理复制槽的行为类似于永久逻辑槽(Alexander Kukushkin)
在所有允许成为领导者的节点上创建永久物理复制槽,并使用 pg_replication_slot_advance()restart_lsn
在 patronictl 中添加通过 --dcs
当 patronictl 在没有配置文件的情况下使用时,这会很方便。
在自定义引导配置中添加对额外参数的支持(Israel Barth Rubio)
之前只能向 command
改进
错误修复
在备用集群中忽略 synchronous_mode 设置(Polina Bungina)
Postgres不支持级联同步复制,不忽略 synchronous_mode 会导致备用集群中的切换失败。
处理 on_reload
不这样做会导致僵尸进程,只有在下一次 on_reload
处理使用Etcd v3时的 AuthOldRevision
当Etcd配置为使用JWT且Etcd中的用户数据库被更新时,会引发此错误。
Version 3.1.2 发布于 2023-09-26
错误修复
修复了 wal_keep_size
wal_keep_sizeintbootstrap.dcs/config
检测并解决 /syncsynchronous_standby_names
通常,Patroni以非常特定的顺序更新 /syncsynchronous_standby_namessynchronous_standby_names
加入运行中的Postgres时读取GUC的值(Alexander Kukushkin)
在 暂停 模式中重启时,Patroni会丢弃 postgresql.confsynchronous_standby_names
消除检查节点唯一性时的烦人警告(Alexander Kukushkin)
如果Patroni快速重启,urllib3WARNING
Version 3.1.1 发布于 2023-09-20
错误修复
在提升时重置故障安全状态(ChenChangAo)
如果切换/故障转移发生在故障安全模式激活后不久,新提升的主节点会在故障安全变为非活动状态后降级自己。
消除 patronictl 中无用的警告(Alexander Kukushkin)
如果 patronictl 使用与Patroni相同的patroni.yaml文件并可以访问 PGDATA
针对边界情况显式启用同步模式(Alexander Kukushkin)
如果没有副本从主节点进行流复制,同步模式实际上从未被激活。
修复了 0
在大多数情况下,这不会导致任何问题,只是产生警告。
不为备用集群返回逻辑槽(Alexander Kukushkin)
Patroni无法在备用集群中创建逻辑复制槽,因此如果在全局配置中定义了逻辑槽,应忽略它们。
避免在 patronictl --help
click
修复了 kubernetes.standby_leader_label_value
此功能实际上从未工作过。
将集群系统标识符恢复到 patronictl list
此问题是在实现Citus支持时引入的,当时我们需要隐藏标识符,因为协调器和所有工作节点的标识符不同。
在Kubernetes实现中覆盖 write_leader_optime
该方法应在没有健康副本可用于成为新主节点时,将关闭LSN写入领导者的Endpoint/ConfigMap。
在暂停模式下不启动已停止的postgres(Alexander Kukushkin)
由于竞争条件,Patroni错误地认为备用节点应该重启,因为某些恢复参数(primary_conninfo
修复了 patronictl query
当只提供 -m-r-m
正确处理用于启动postgres命令行中的整数参数(Polina Bungina)
如果值以字符串形式提供而未转换为整数,会导致Citus集群中基于 max_connectionsmax_prepared_transactions
在决定 pg_rewindpg_stat_wal_receiver
pg_stat_wal_receiverreceived_tliIDENTIFY_SYSTEM
Version 3.1.0 发布于 2023-08-03
破坏性变更
警告
如果你启用了客户端证书验证(restapi.verify_clientrequired必须 在 ctl.certfilectl.keyfilectl.keyfile_password有效的客户端证书 。如果未提供,Patroni将无法正常工作。
新特性
改进
patroni --validate-config
改进了不同DCS、bootstrap.dcsctlrestapiwatchdog 部分的参数验证。
如果Postgres在Patroni运行期间于恢复过程中崩溃,则不以恢复模式启动Postgres(Alexander Kukushkin)
这可以减少恢复时间,并有助于防止不必要的时间线递增。
避免不必要地更新 /status
当没有永久逻辑槽时,即使主节点上的LSN没有向前移动,Patroni也会在每次心跳循环中更新 /status
不允许过期的主节点赢得领导者竞选(Alexander Kukushkin)
如果Patroni由于资源不足而挂起了很长时间,它会在获取领导者锁之前额外检查是否有其他节点已经提升了Postgres。
实现了某些PostgreSQL参数验证的可见性(Alexander Kukushkin,Feike Steenbergen)
如果 max_connectionsmax_wal_sendersmax_prepared_transactionsmax_locks_per_transactionmax_replication_slotsmax_worker_processes
为 PGDATA
Patroni创建的所有文件之前只有所有者读/写权限。此行为会破坏在不同用户下运行并依赖组读权限的备份工具。现在Patroni会遵循 PGDATAPGDATA
错误修复
通过shell运行 archive_command
Patroni可能会在单用户模式下进行崩溃恢复之前或 pg_rewind&&
修复了"切换时"关闭检查(Polina Bungina)
可能出现指定的候选节点仍在流复制且未收到关闭检查的情况,但由于其他一些节点是健康的,领导者键被移除了。
修复了"是否为主节点"检查(Alexander Kukushkin)
在领导者竞选期间,副本无法识别旧领导者上的Postgres仍在作为主节点运行。
修复了 patronictl list
在 tsvjsonyaml
修复了暂停后的 pg_rewind
在某些条件下,从维护模式退出后,Patroni无法使用 pg_rewind
修复了Etcd v3实现中的错误(Alexander Kukushkin)
如果使用 create_revisionmod_revision
修复了暂停模式下备用集群中副本的行为(Alexander Kukushkin)
当领导者键过期时,备用集群中的副本不会跟随远程节点,而是保持 primary_conninfo
Version 3.0.4 发布于 2023-07-13
新特性
改进
改进了Etcd v3的错误消息(Alexander Kukushkin)
当Etcd v3集群不可访问时,Patroni之前报告无法访问 /v2
如果可能,在 patronictl 中使用仲裁读取(Alexander Kukushkin)
Etcd或Consul集群可能降级为只读状态,但从 patronictl 的视角来看一切正常。现在它将报错失败。
防止配置中的重复名称导致脑裂(Mark Pekala)
启动Patroni时将检查DCS中是否已注册同名节点,并尝试查询其REST API。如果REST API可访问,Patroni将报错退出。这有助于防止人为错误。
如果Postgres在Patroni运行期间崩溃,则不以恢复模式启动Postgres(Alexander Kukushkin)
这可以减少恢复时间,并有助于防止不必要的时间线递增。
错误修复
REST API SSL证书在收到SIGHUP后未重新加载(Israel Barth Rubio)
此回退在3.0.3中引入。
修复了 max_connections
Patroni不接受带引号的数值。此回退在3.0.3中引入。
修复了 synchronous_mode 的问题(Alexander Kukushkin)
使用 synchronous_commit=offtxid_current()synchronous_mode_strict
Version 3.0.3 发布于 2023-06-22
新特性
兼容PostgreSQL 16 beta1(Alexander Kukushkin)
扩展了GUC验证器规则。
使PostgreSQL GUC验证器可扩展(Israel Barth Rubio)
验证器规则从位于 patroni/postgresql/available_parameters/
添加了 restapi.request_queue_size
设置Patroni REST API所用TCP套接字的请求队列大小。一旦队列已满,后续请求将收到"连接被拒绝"错误。默认值为5。
初始化新集群时直接调用 initdb
之前是通过 pg_ctlinitdb
添加了停止前钩子(Le Duane)
该钩子可通过 postgresql.before_stoppg_ctl stop
添加了对自定义Postgres二进制文件名的支持(Israel Barth Rubio,Polina Bungina)
当使用自定义Postgres发行版时,Postgres二进制文件可能使用与社区Postgres发行版不同的名称编译。自定义二进制文件名可通过 postgresql.bin_name.*PATRONI_POSTGRESQL_BIN_*
改进
错误修复
修复了Citus支持中的问题(Alexander Kukushkin)
如果在切换期间从已提升的工作节点到协调器的REST API调用失败,它会导致给定的Citus组在无限期内被阻塞。
允许在 patronictl 的 --dcs-urletcd3
如果用户尝试通过 patronictl 的 --dcs-urletcd3
Version 3.0.2 发布于 2023-03-24
警告
3.0.2版本放弃了对Python 3.6以下版本的支持。
新特性
在 /metrics
之前只报告 primarystandby_leaderreplica
在 patronictl 中用户友好地处理 PAGER
使分页器可通过 PAGERlessmore
使K8s可重试的HTTP状态码可配置(Alexander Kukushkin)
在某些托管平台上,可能会收到 401 Unauthorized
改进
仅在 recovery_target_actionpromotehot_standbyoff
这对于使 recovery_target_action=pause
不允许 on_reload
on_starton_stopon_role_changeon_reload
在aws回调示例脚本中切换到 IMDSFetcher
IMDSv2IMDSFetcher
错误修复
修复了在Kubernetes上运行的Citus集群的 patronictl switchover
对于 default
如果主版本未知,则不写入 PGDATA
如果启动后 PGDATArecovery.conf
修复了协调器故障转移后的Citus元数据错误(Alexander Kukushkin)
citus_set_coordinator_host()citus_update_node()
当所有etcd节点"失败"时,使用配置文件中列出的etcd主机作为后备(Alexander Kukushkin)
etcd集群可能随时间改变拓扑,Patroni会尝试跟踪它。如果在某个时刻所有节点都不可达,Patroni将在尝试重新连接时使用配置中的节点与最后已知拓扑的组合。
Version 3.0.1 发布于 2023-02-16
错误修复
Version 3.0.0 发布于 2023-01-30
此版本添加了与 Citus 的集成,使得在临时DCS中断期间无需降级主节点即可存活。
警告
3.0.0版本是支持Python 2.7的最后一个版本。即将发布的版本将放弃对Python 3.7以下版本的支持。
RAFT支持已废弃。我们将尽力维护它,但不保证也不对可能出现的问题负责。
此版本是逐步淘汰"master"、改用"primary"的第一步。只有运行了至少3.0.0版本,升级到下一个主版本才能可靠地工作。
新特性
DCS故障安全模式(Alexander Kukushkin,Polina Bungina)
如果启用此功能,它将允许Patroni集群在临时DCS中断期间存活。你可以在 文档 中找到更多详情。
Citus支持(Alexander Kukushkin,Polina Bungina,Jelte Fennema)
Patroni使 Citus 集群的高可用部署和管理变得简单。请查看 此处 获取更多信息。
改进
在删除未知但活跃的复制槽时抑制重复错误(Michael Banck)
Patroni仍会写入这些日志,但仅在DEBUG级别。
每个HA循环只运行一个监控查询(Alexander Kukushkin)
在启用同步复制的情况下之前不是这样。
仅保留最新的失败数据目录(William Albertus Dembo)
如果引导失败,Patroni过去会将$PGDATA文件夹重命名并添加时间戳后缀。从现在起,后缀将为 .failed
改进了同步复制连接的检查(Alexander Kukushkin)
当新主机被添加到 synchronous_standby_namespg_stat_replication.sync_state = 'sync'
移除的功能
Version 2.1.7 发布于 2023-01-04
错误修复
Version 2.1.6 发布于 2022-12-30
改进
修复了SSL套接字关闭时的烦人异常(Alexander Kukushkin)
HAProxy在获得HTTP状态码后立即关闭连接,没有给Patroni留出正确关闭SSL连接的时间。
调整arm64的示例Dockerfile(Polina Bungina)
移除显式的 amd64x86_64libnss_files.so.*
安全改进
为非复制连接强制设置 search_path=pg_catalog
由于Patroni严重依赖超级用户连接,我们希望保护它免受使用 publicpg_catalogsearch_path=pg_catalog
防止密码被记录在 pg_stat_statements
通过在创建用户时设置 pg_stat_statements.track_utility=off
错误修复
将 proxy_address
因为它实际上是一个非必需选项。
改进insecure选项的行为(Alexander Kukushkin)
当使用客户端证书进行REST API请求时,Ctl的 insecure
引导新集群时从 bootstrap.dcs
Patroni过去在引导新集群时使用默认值初始化watchdog配置,而不是使用用于引导DCS的配置。
修复了WIN32中查找可执行文件时处理文件扩展名的方式(Martín Marqués)
仅在文件名没有扩展名时才添加 .exe
修复了Consul TTL设置(Alexander Kukushkin)
在HTTPClient上设置值时我们使用了 ttl/2.0
移除的功能
Version 2.1.5 发布于 2022-11-28
此版本增强了与PostgreSQL 15的兼容性,并宣布Etcd v3支持已达到生产就绪状态。Patroni on Raft仍处于Beta阶段。
新特性
改进 patroni --validate-config
如果配置无效则以代码1退出,并将错误打印到stderr。
在暂停模式下不删除复制槽(Alexander Kukushkin)
Patroni会在成员加入/离开集群时自动创建/移除物理复制槽。在暂停模式下将不再移除槽。
支持监控端点的 HEAD
如果用 HEADGET
支持在Windows上运行behave测试(Alexander Kukushkin)
通过引入新的REST API端点 POST /sigtermSIGTERM
引入 postgresql.proxy_address
它将作为 proxy_url
稳定性改进
从线程中调用 pg_replication_slot_advance()
在具有许多逻辑复制槽的繁忙集群上,pg_replication_slot_advance()
在旧主节点上调用 pg_rewind
如果主节点崩溃并停机了相当长时间,归档和新主节点中可能缺少一些WAL文件。pg_rewindready
在尝试创建Kubernetes Service时忽略 403
Patroni之前会因为尝试创建可能已存在的服务而频繁输出失败日志。
改进存活探针(Alexander Kukushkin)
如果心跳循环在主节点上运行时间超过 ttl2*ttlwatchdog 的替代方案使用。
确保切换时只有同步节点尝试获取锁(Alexander Kukushkin,Polina Bungina)
之前在不指定目标的情况下执行手动切换时,有很小的概率异步但数据最新的成员可能成为领导者。
避免在引导运行时进行克隆(Ants Aasma)
不允许在集群引导运行时触发不需要领导者的创建副本方法。
与kazoo-2.9.0的兼容性(Alexander Kukushkin)
根据Python版本,如果在已关闭的套接字上调用 select()SequentialThreadingHandler.select()TypeErrorIOError
在套接字关闭前显式关闭SSL连接(Alexander Kukushkin)
不这样做会导致OpenSSL 3.0出现 unexpected eof while reading
与 prettytable>=2.2.0
由于内部API更改,集群名称标题显示在了不正确的行上。
错误修复
处理Etcd lease_grant的过期令牌(monsterxx03)
在出错时获取新令牌并重试请求。
修复了 GET /read-only-sync
它在上一个版本中引入,实际上从未工作过。
处理数据目录存储消失的情况(Alexander Kukushkin)
Patroni会定期检查PGDATA是否存在且非空,但在存储出现问题时,os.listdir()OSError
在等待用户后端关闭时应用 master_stop_timeout
看起来像用户后端的东西实际上可能是无法停止的后台工作进程(例如Citus Maintenance Daemon)。
为 postgresql.listen*:<port>
patroni --validate-config
Raft中的超时修复(Alexander Kukushkin)
当Patroni或patronictl启动时,它们会尝试从已知成员获取Raft集群拓扑。这些调用之前没有设置适当的超时。
在令牌更改时强制更新consul服务(John A. Lotoski)
不这样做会导致"rpc error making call: rpc error making call: ACL not found"错误。
Version 2.1.4 发布于 2022-06-01
新特性
改进 pg_rewind
在将 postgresql.confpg_rewind --restore-target-walrestore_command
允许在Consul服务检查中设置 TLSServerName
当检查通过IP进行且Consul的 node_name
在watchdog中添加 ppc64le
同时修复了某些非x86平台上的watchdog支持。
将aws.py回调从 botoboto3
boto
定期刷新K8s上的服务账户令牌(Haitao Li)
自Kubernetes v1.21起,服务账户令牌会在1小时后过期。
添加 /read-only-sync
类似于 /read-only
稳定性改进
当逻辑解码配置与主库不匹配时,不再将逻辑复制槽复制到副本(Alexander Kukushkin)
如果槽的 plugindatabase
对PostgreSQL v12+的恢复配置参数进行特殊处理(Alexander Kukushkin)
作为副本启动时,Patroni应该能够在领导者地址发生变化时更新 postgresql.confpg_settings
改进 postgresql.listen
由于 listen
仅在PostgreSQL v10及更早版本上执行分歧检查时使用 replication
如果启用了 rewindsuperuserrewind
错误修复
修复 dateutil.parser
测试之前没有失败,只是因为其他模块也导入了该模块。
确保 optime
在某些情况下,Patroni会尝试将其作为数值传递。
改进 pg_rewind
如果主库在 pg_rewind$PGDATA
当PostgreSQL未就绪时,不要从领导者 ConfigMapEndpointslots
如果未传递 slots
处理K8s API watcher的并发问题(Alexander Kukushkin)
在某些(未知的)条件下,watcher可能会变得过时;因此,attempt_to_acquire_leader()
Version 2.1.3 发布于 2022-02-18
新特性
为 patronictl 添加加密TLS密钥支持(Alexander Kukushkin)
可通过 ctl.keyfile_passwordPATRONI_CTL_KEYFILE_PASSWORD
向/metrics端点添加更多指标(Alexandre Pereira)
具体包括 patroni_pending_restartpatroni_is_paused
支持在备用集群配置中指定多个主机(Michael Banck)
如果备用集群从Patroni集群进行复制,利用自PostgreSQL v10起 libpqprimary_conninfopg_rewindtarget_session_attrs=read-writepgpassCHECKPOINTpg_control
稳定性改进
兼容旧版 psycopg2
例如,从Ubuntu 18.04软件包安装的 psycopg2UndefinedFile
当所有Etcd节点无响应时重启 etcd3
如果watcher仍然存活,即使所有Etcd节点都出现故障,get_cluster()
暂停状态下不要移除备用集群的领导者锁(Alexander Kukushkin)
此前,锁仅由作为主库运行的节点维护,而非备用领导者。
错误修复
修复备用领导者引导中的错误(Alexander Kukushkin)
如果Postgres在60秒后未开始接受连接,Patroni会认为引导失败。此错误在2.1.2版本中引入。
修复故障转移到级联备库时的错误(Alexander Kukushkin)
在确定应在级联备库上创建哪些槽时,我们忘记考虑领导者可能不存在的情况。
修复Postgres配置验证器中的小问题(Alexander Kukushkin)
PostgreSQL v14中引入的整数参数验证失败,因为validator.py中的最小值和最大值被加了引号。
检查领导者状态时使用复制凭据(Alexander Kukushkin)
可能存在设置了 remove_data_directory_on_diverged_timelinesrewind_credentials
修复REST API证书替换时的"端口被占用"错误(Ants Aasma)
切换证书时,与并发API请求之间存在竞态条件。如果在替换期间有一个活跃的请求,替换将因端口被占用错误而失败,导致Patroni陷入没有活跃API服务器的状态。
修复密码包含 %
引导方法执行 DOcursor.execute()
修复"AttributeError: no attribute ’leader’“异常(Hrvoje Milković)
当启用同步模式且DCS内容被清除时可能发生此错误。
修复分歧时间线检查中的错误(Alexander Kukushkin)
Patroni错误地判断时间线已经分歧。对于pg_rewind来说这不会造成问题,但如果不允许pg_rewind且设置了 remove_data_directory_on_diverged_timelines
Version 2.1.2 发布于 2021-12-03
新特性
兼容 psycopg>=3.0
默认优先使用 psycopg2psycopg2psycopg>=3.0
向REST API添加 dcs_last_seen
此字段记录集群成员最后一次成功与DCS通信的时间(Unix时间戳)。这对于识别和/或分析网络分区非常有用。
当 pg_controldata
为解决 archive_commandpg_controldatashut down
添加 sslcrldir
该新连接参数在PostgreSQL v14中引入。
允许为Zookeeper中的ZNode设置ACL(Alwyn Davis)
引入新配置选项 zookeeper.set_acls
稳定性改进
将下一次恢复尝试延迟到下一个HA循环(Alexander Kukushkin)
如果Postgres因磁盘空间不足(例如)而崩溃并因此无法启动,Patroni会过于频繁地尝试恢复,导致日志泛滥。
在降级之前添加日志,因为降级可能需要一些时间(Michael Banck)
降级完成可能需要一些时间,仅从日志中可能不太明显正在发生什么。
改进"I am"状态消息(Michael Banck)
no action. I am a secondary ({0})no action. I am ({0}), a secondary
将 wal_keep_segmentswal_keep_size
可以在全局 动态配置 中将 wal_keep_segmentswal_keep_segments: "100"100100100100100100100100100100100100100100100100MB
启用同步复制时仅允许切换到同步节点(Alexander Kukushkin)
此外,领导者选举也仅在已知的同步节点之间进行。
当Postgres响应缓慢时使用缓存的角色作为回退(Alexander Kukushkin)
在某些极端情况下,Postgres可能非常慢,以至于正常的监控查询无法在几秒钟内完成。statement_timeoutrole
避免不必要的成员ZNode更新(Alexander Kukushkin)
如果成员数据中没有值发生变化,则不应进行更新。
优化提升后的检查点(Alexander Kukushkin)
如果最新时间线已存储在 pg_controlCHECKPOINTinitdbCHECKPOINT
选择同步节点时优先选择没有 nofailover
此前,同步节点仅基于复制延迟进行选择,因此带有 nofailover
从etcd机器缓存中移除重复主机(Michael Banck)
etcd集群中的已公布客户端URL可能配置错误。在Patroni中移除重复项是一个简单的改进。
错误修复
在槽管理时跳过临时复制槽(Alexander Kukushkin)
从v10开始,pg_basebackuppg_stat_replication_slots
确保 pg_replication_slot_advance()
Patroni在此情况下使用默认的 statement_timeoutpg_walpg_catalog
/status
降级PostgreSQL后,旧领导者会更新DCS中的最后LSN。从 2.1.0/status/optime/leader
处理降级时的DCS异常(Alexander Kukushkin)
在由于更新领导者锁失败而降级主库时,可能发生DCS完全宕机的情况,导致 get_cluster()
use_unix_socket_repl
具体来说,当未设置 postgresql.unix_socket_directorieslibpq
修复Patroni REST API中的若干问题(Alexander Kukushkin)
clusters_unlockedGET /metricsconnect_address
等待新提升的节点完成恢复后再决定是否进行rewind(Alexander Kukushkin)
实际提升发生和新时间线创建之前可能需要一些时间。如果不等待,副本可能会错误地判断不需要rewind。
处理决定是否进行rewind时历史文件中缺失时间线的情况(Alexander Kukushkin)
如果主库上的历史文件中缺少当前副本的时间线,副本会错误地认为不需要rewind。
Version 2.1.1 发布于 2021-08-19
新特性
支持ETCD SRV名称后缀(David Pavlicek)
Etcd允许在同一域下区分多个Etcd集群,Patroni现在也支持此功能。
丰富历史记录,包含新领导者信息(huiyalin525)
为 patronictl history
使集群内Kubernetes配置的CA证书包可配置(Aron Parsons)
默认情况下,Patroni使用 /var/run/secrets/kubernetes.io/serviceaccount/ca.crtkubernetes.cacert
支持动态注册/注销Consul服务和更改标签(Tommy Li)
此前需要重启Patroni。
错误修复
避免不必要的REST API重新加载(Alexander Kukushkin)
前一版本添加了在磁盘上证书变更时重新加载REST API证书的功能。不幸的是,重新加载在启动后会无条件地发生。
设置 etcd.use_proxies
启动时Patroni通过查询成员列表来检查Etcd集群的健康状况。此外,它还尝试解析主机名,但在通过代理使用Etcd时这是不必要的,并会导致不必要的警告。
跳过 pg_stat_replication
pg_stat_replicationstate = 'streaming'replay_lsnflush_lsnwrite_lsn
Version 2.1.0 发布于 2021-07-06
此版本添加了与PostgreSQL v14的兼容性,使逻辑复制槽在故障转移/切换中得以保留,实现了REST API的允许列表支持,并将日志减少到每次心跳一行。
新特性
兼容PostgreSQL v14(Alexander Kukushkin)
如果Patroni本身不处于"暂停"模式,则取消暂停WAL回放。WAL回放可能因为主库上某些参数(例如 max_connections
逻辑槽故障转移(Alexander Kukushkin)
使逻辑复制槽在PostgreSQL v11+上的故障转移/切换中得以保留。复制槽在重启时从主库复制到副本,然后使用 pg_replication_slot_advance() 函数将其向前推进。因此,槽在故障转移之前就已存在,不会丢失任何事件,但有可能某些事件会被重复投递。
为Patroni REST API实现允许列表(Alexander Kukushkin)
配置后,只有匹配规则的IP才被允许调用不安全的端点。此外,还可以自动将集群成员的IP添加到列表中。
添加通过Unix套接字进行复制连接的支持(Mohamad El-Rifai)
此前,Patroni始终使用TCP进行复制连接,这可能导致SSL验证问题。使用Unix套接字可以使复制用户免于SSL验证。
基于用户定义标签的健康检查(Arman Jafari Tehrani)
除 预定义标签 外,还可以指定任意数量的自定义标签,这些标签在 patronictl list
添加Prometheus /metrics
该端点暴露与 /patroni
减少Patroni日志的冗余度(Alexander Kukushkin)
当一切正常时,每次HA循环运行只写入一行日志。
破坏性变更
旧的 permanent logical replication slots
在提升后创建逻辑槽的策略无法保证不丢失逻辑事件,因此已被禁用。
/leader
提升备用集群需要更新负载均衡器健康检查,这不太方便且容易遗忘。为解决此问题,我们更改了 /leader备用集群 。
Raft支持改进
可靠的Raft流量加密支持(Alexander Kukushkin)
由于 PySyncObj
处理Raft实现中的DNS问题(Alexander Kukushkin)
如果 self_addrpartner_addrsPySyncObj
稳定性改进
兼容 psycopg2-2.9+
在 psycopg2autocommit = Truewith connection
修复Zookeeper下过多的HA循环运行(Alexander Kukushkin)
成员ZNode的更新会引发连锁反应,导致HA循环连续运行多次。
当磁盘上的REST API证书发生变更时进行重新加载(Michael Todorovic)
如果REST API证书文件被就地更新,Patroni不会执行重新加载。
使用Kerberos认证时不创建pgpass目录(Kostiantyn Nemchenko)
Kerberos和密码认证是互斥的。
修复自定义引导中的小问题(Alexander Kukushkin)
仅在执行PITR时以 hot_standby=off
错误修复
兼容 kazoo-2.7+
由于Patroni自行处理重试,它依赖于 kazoo
当已知通过代理连接时,显式请求Etcd v3集群的版本(Alexander Kukushkin)
Patroni通过gRPC-gateway与Etcd v3集群交互,根据集群版本需要使用不同的端点(/v3/v3beta/v3alpha
Version 2.0.2 发布于 2021-02-22
新特性
能够忽略外部管理的复制槽(James Coleman)
Patroni会尝试移除任何它不认识的复制槽,但确实存在复制槽应由外部管理的情况。现在可以配置不应被移除的槽。
为REST API添加密码套件限制支持(Gunnar “Nick” Bluth)
可通过 restapi.ciphersPATRONI_RESTAPI_CIPHERS
为REST API添加加密TLS密钥支持(Jonathan S. Katz)
可通过 restapi.keyfile_passwordPATRONI_RESTAPI_KEYFILE_PASSWORD
REST API认证凭据的常量时间比较(Alex Brasetvik)
使用 hmac.compare_digest()==
基于复制延迟选择同步节点(Krishna Sarabu)
如果同步节点上的复制延迟开始超过配置的阈值,它可能被降级为异步节点和/或被其他节点替换。行为通过 maximum_lag_on_syncnode
稳定性改进
执行自定义引导时以 hot_standby = off
在自定义引导期间,Patroni恢复基础备份、启动Postgres并等待恢复完成。备库上的某些PostgreSQL参数不能小于主库上的值,如果新值(从WAL恢复)高于配置值,Postgres会panic并停止。为避免此行为,我们将在没有 hot_standby
当所需的watchdog不健康时警告用户(Nicolas Thauvin)
当watchdog设备在必需模式下不可写或缺失时,成员无法被提升。添加了警告以向用户展示在哪里查找此配置错误。
改进单用户模式恢复的详细输出(Alexander Kukushkin)
如果Patroni注意到PostgreSQL未正常关闭,在某些情况下会通过以单用户模式启动Postgres来执行崩溃恢复。恢复可能失败(例如由于磁盘空间不足),但错误被吞没了。
添加与 python-consul2
老旧的 python-consul
运行 patronictl 时不使用 bypass_api_service
当K8s Pod在非 defaultkubernetes 端点。在这种情况下,Patroni会显示警告并忽略 bypass_api_servicepatronictl 来说,这个警告有些烦人。
如果 raft.data_dir
改善用户友好性和可用性。
错误修复
在暂停状态下丢失领导者锁时不中断重启或提升(Alexander Kukushkin)
在暂停状态下,允许在没有锁的情况下以主库身份运行Postgres。
修复REST API中 shutdown_request()
为改善SSL连接处理并延迟握手直到线程启动,Patroni重写了 HTTPServershutdown_request()
修复使用Zookeeper时睡眠时间的问题(Alexander Kukushkin)
Patroni有可能在HA代码运行之间睡眠长达两倍的时间。
修复引导失败后移动数据目录时无效的 os.symlink()
如果引导失败,Patroni会重命名数据目录、pg_wal和所有表空间。之后更新符号链接以保持文件系统一致。符号链接创建失败是因为 srcdst
修复post_bootstrap()方法中的错误(Alexander Kukushkin)
如果未配置超级用户密码,Patroni无法调用 post_init
修复备用集群中pg_rewind的问题(Alexander Kukushkin)
如果超级用户名称与Postgres不同,备用集群中的 pg_rewind
仅在Etcd v3认证明确失败时才退出(Alexander Kukushkin)
启动时Patroni执行Etcd集群拓扑发现并在必要时进行认证。可能其中一台etcd服务器不可访问,Patroni尝试在此服务器上进行认证并失败,而不是重试下一个节点。
处理psutil cmdline()返回空列表的情况(Alexander Kukushkin)
僵尸进程仍然是postmaster的子进程,但它们没有cmdline()。
将 PATRONI_KUBERNETES_USE_ENDPOINTS
不这样做会导致无法通过环境变量禁用 kubernetes.use_endpoints
改进并发端点更新错误的处理(Alexander Kukushkin)
Patroni将显式查询当前端点对象,验证当前Pod仍持有领导者锁,然后重复更新。
Version 2.0.1 发布于 2020-10-01
新特性
在 patronictl edit-configlessmore
在Windows上将使用 more.comrequirements.txtcdiffydiffpatronictl 仍然为兼容性同时支持两者。
添加 raftbind_addrpassword
raft.bind_addrraft.passwordcryptography
添加 sslpassword
该连接参数在PostgreSQL 13中引入。
稳定性改进
更改暂停模式下的行为(Alexander Kukushkin)
如果 PGDATAbootstrap Patroni在暂停模式下不会因sysid不匹配而退出,仅记录警告。 如果Postgres未在恢复模式下运行(接受写入)但sysid与初始化键不匹配,节点将不会在暂停模式下尝试获取领导者键。 执行崩溃恢复时应用 master_start_timeout
如果Postgres在领导者节点上崩溃,Patroni通过以单用户模式启动Postgres来执行崩溃恢复。在崩溃恢复期间,领导者锁会持续更新。如果崩溃恢复未在 master_start_timeout
从 urllib3secure
添加它的唯一原因是Python 2.7的 ipaddress
错误修复
修复 Kubernetes.update_leader()
一个未处理的异常阻止了在更新领导者对象失败时降级主库。
修复使用RAFT时 patronictl 挂起的问题(Alexander Kukushkin)
使用Patroni配置运行 patronictl 时,self_addrpartner_addrs
修复 get_guc_value()
Patroni无法在PostgreSQL 12上获取 restore_commandpg_rewind
Version 2.0.0 发布于 2020-09-02
此版本增强了与 PostgreSQL 13 的兼容性,添加了对多个同步备用节点的支持,对 pg_rewindpre_promote
PostgreSQL 13 支持
提升为 standby_leaderon_reload
提升为 standby_leaderprimary_conninfoon_role_changeon_reloadon_role_change
添加对 gssencmodechannel_binding
PostgreSQL 12 引入了 gssencmodechannel_bindingpostgresql.authentication
处理 wal_keep_segmentswal_keep_size
在配置错误的情况下(在 13 上使用 wal_keep_segmentswal_keep_size
在 13 上尽可能使用带有 --restore-target-walpg_rewind
在 PostgreSQL 13 上,Patroni 检查是否配置了 restore_commandpg_rewind
新特性
\[BETA\]实现纯 RAFT 模式下的 Patroni 支持(Alexander Kukushkin)
这使得可以在没有第三方依赖(如 Etcd、Consul 或 Zookeeper)的情况下运行 Patroni。为实现高可用,您需要运行三个 Patroni 节点,或者两个 Patroni 节点加一个运行 patroni_raft_controller文档
\[BETA\]通过 gRPC-gateway 实现对 Etcd v3 协议的支持(Alexander Kukushkin)
Etcd 3.0 在四年多前发布,Etcd 3.4 默认禁用了 v2。v2 也有可能从 Etcd 中被完全移除,因此我们在 Patroni 中实现了对 Etcd v3 的支持。要开始使用它,您必须在 Patroni 配置文件中显式创建 etcd3
支持多个同步备用节点(Krishna Sarabu)
允许运行具有多个同步副本的集群。同步副本的最大数量由新参数 synchronous_node_countsynchronous_modeoff
添加调用 pre_promote
与回调不同,pre_promote
添加对配置目录的支持(Floris van Nee)
目录中的 YAML 文件按字母顺序加载和应用。
PostgreSQL 参数的高级验证(Alexander Kukushkin)
如果特定参数不受当前 PostgreSQL 版本支持或其值不正确,Patroni 将完全移除该参数或尝试修复该值。
强制检查点完成后唤醒主线程(Alexander Kukushkin)
副本通过 DCS 中主节点的成员键等待检查点指示。该键通常仅每个 HA 循环更新一次。不唤醒主线程的话,副本将不得不多等待最多 loop_wait
在 9.6+ 上使用 pg_stat_wal_receiver
该视图包含 primary_conninfoprimary_slot_namerecovery.conf
改进 Patroni 配置文件中 IPv6 地址的处理(Mateusz Kowalski)
IPv6 地址应该用方括号括起来,但 Patroni 之前期望的是纯格式。现在两种格式都受支持。
添加 Consul service_tags
它们对于动态服务发现很有用,例如供负载均衡器使用。
为 Zookeeper 实现 SSL 支持(Kostiantyn Nemchenko)
需要 kazoo>=2.6.0
为自定义引导方法实现 no_params
允许直接调用 wal-gpgBackRest
初始化失败后移动 WAL 和表空间(Feike Steenbergen)
执行 reinitPGDATAmove_data_directory()
改进 pg_rewind 支持
改进时间线分歧检查(Alexander Kukushkin)
当副本上的重放位置未超过切换点,或者旧主节点上检查点记录的结尾与切换点相同时,我们不需要执行 rewind。为了获取检查点记录的结尾,我们使用 pg_waldump
如果 pg_rewind
pg_rewindpg_walpg_rewindpg_rewindrestore_commandrestore_command
检测备用集群中的新时间线,并在必要时触发 rewind/重新初始化(Alexander Kukushkin)
standby_clusterstandby_leaderpg_wal
缩短和美化历史日志输出(Alexander Kukushkin)
当 Patroni 尝试确定是否需要 pg_rewind
K8s 改进
去除 kubernetes Python 模块依赖(Alexander Kukushkin)
官方 Python kubernetes 客户端包含大量自动生成的代码,因此非常臃肿。Patroni 只使用 K8s API 端点的一小部分,实现对它们的支持并不困难。
使绕过 kubernetes 服务成为可能(Alexander Kukushkin)
在 K8s 上运行时,Patroni 通常通过 kubernetes 服务与 K8s API 通信,其地址通过 KUBERNETES_SERVICE_HOSTkubernetes 服务由 kube-proxyiptables
同步 Patroni 集群所有 Pod 的 HA 循环(Alexander Kukushkin)
不这样做会将故障检测时间从 ttlttl + loop_wait
在 K8s 上填充子集地址中的 referencesnodename
一些负载均衡器依赖此信息。
修复 update_leader()
在 Patroni 外部发生的 leader configmap 或 endpoint 的并发更新可能导致 update_leader()
显式禁止修补不存在的配置(Alexander Kukushkin)
对于 kubernetes 以外的 DCS,PATCH 调用会因为 cluster.configNone
修复 暂停 中的错误(Alexander Kukushkin)
当主节点键不存在时,副本会删除 primary_conninfo
REST API 改进
将 TLS 握手延迟到工作线程启动后(Alexander Kukushkin、Ben Harris)
如果 TLS 握手在 API 线程中完成且客户端未发送任何数据,API 线程将被阻塞(存在 DoS 风险)。
在 REST API 中独立于客户端证书检查 basic-auth
此前只验证客户端证书。独立执行两项检查是完全有效的用例。
在 OPTIONSCRLF
HAProxy 对单个 CRLF
GET /cluster
该端点使用的是 Patroni 内部集群视图。对于 Patroni 本身不会造成任何问题,但当暴露给外部时,我们需要显示最新的信息,特别是复制延迟。
修复备用集群的健康检查(Alexander Kukushkin)
对主节点的 GET /standby-leaderstandby_leaderGET /master
实现 DELETE /switchover
此 REST API 调用删除已计划的切换。
创建 /readiness/liveness
当 K8s 服务使用标签选择器时,它们可用于从子集地址中排除"不健康"的 Pod。
增强 GET /replicaGET /async
检查现在支持可选的关键字 ?lag=<max-lag>loop_wait
添加对 REST API 响应中用户自定义 HTTP 头的支持(Yogesh Sharma)
如果请求来自浏览器,此功能可能很有用。
patronictl 改进
在 patronictl pause
在 K8s 上暂停没有 leader 的集群时,patronictl
处理成员 conn_url
在 K8s 上,Pod 可能因为 Patroni 尚未运行而没有必要的注解。这会导致 patronictl
添加打印 ASCII 集群拓扑的能力(Maxim Fedotov、Alexander Kukushkin)
对于查看具有级联复制的集群概览非常有用。
实现 patronictl flush switchover
在此之前,patronictl flush
错误修复
使用现有 PGDATA 引导集群时的属性错误(Krishna Sarabu)
在尝试创建/更新 /historyClusterConfig
改进 Consul 中的异常处理(Alexander Kukushkin)
touch_member()
对 post_initsynchronous_commit=local
Patroni 在创建用户(replicationrewindpost_initsynchronous_mode
增加 Consul 连接池管理器中的 maxsize
使用默认的 size=1
Patroni 错误地报告 Postgres 正在运行(Alexander Kukushkin)
例如当 Postgres 因磁盘空间不足错误而崩溃时,状态未被更新。
在 pgpass*
例如当未指定 standby_cluster.portpgpass
跳过为名称包含特殊字符的主节点创建物理复制槽(Krishna Sarabu)
当名称包含特殊字符(如 ‘-’,例如 “abc-us-1”)时,Patroni 似乎在为主节点创建休眠槽(当定义了 slots
避免在自定义引导中删除不存在的 pg_hba.conf
如果自定义引导后 pg_hba.confpgdata
Version 1.6.5 发布于 2020-08-23
新特性
主节点停止超时(Krishna Sarabu)
Patroni 在停止 Postgres 时允许等待的秒数。仅在启用 synchronous_modesynchronous_modemaster_stop_timeoutSIGKILLmaster_stop_timeout
不为主节点名称创建永久物理槽(Alexander Kukushkin)
一个常见问题是当副本宕机时主节点回收 WAL 段。现在我们为静态集群提供了一个好的解决方案,即节点数量固定且名称永不改变的集群。您只需在 slots
配置验证器的初步版本(Igor Yanchenko)
使用 patroni --validate-config patroni.yaml
可配置时间线历史最大长度的可能性(Krishna Sarabu)
Patroni 将故障转移/切换的历史记录写入 DCS 中的 /historymax_timelines_history
Kazoo 2.7.0 兼容性(Danyal Prout)
Kazoo 中一些非公开方法更改了签名,但 Patroni 依赖于它们。
patronictl 改进
显示成员标签(Kostiantyn Nemchenko、Alexander Kukushkin)
标签是为每个节点单独配置的,此前没有简便方法来查看它们的概览。
改进成员输出(Alexander Kukushkin)
冗余的集群名称不再在每行显示,仅在表头中显示。
$ patronictl list
+ Cluster: batman ( 6813309862653668387) +---------+----+-----------+---------------------+
| Member | Host | Role | State | TL | Lag in MB | Tags |
+-------------+----------------+--------+---------+----+-----------+---------------------+
| postgresql0 | 127.0.0.1:5432 | Leader | running | 3 | | clonefrom: true |
| | | | | | | noloadbalance: true |
| | | | | | | nosync: true |
+-------------+----------------+--------+---------+----+-----------+---------------------+
| postgresql1 | 127.0.0.1:5433 | | running | 3 | 0.0 | |
+-------------+----------------+--------+---------+----+-----------+---------------------+
显式指定配置文件但未找到时报错(Kaarel Moppel)
此前 patronictlDEBUG
解决未初始化的 K8s Pod 导致 patronictl 崩溃的问题(Alexander Kukushkin)
Patroni 依赖 K8s 上的某些 Pod 注解。当某个 Patroni Pod 正在停止或启动时,尚未有有效的注解,patronictl
稳定性改进
如果对 K8s API 服务器的 LIST 调用失败,应用 1 秒退避(Alexander Kukushkin)
这主要是为了避免日志泛滥,同时也有助于防止主线程的饥饿。
如果 K8s API 返回 retry-after
如果 K8s API 服务器被请求淹没,它可能会要求重试。
从 postmaster 中清除 KUBERNETES_
KUBERNETES_
重新初始化时清理表空间(Krishna Sarabu)
在 reinit 期间,Patroni 仅删除 PGDATA自定义引导 脚本。
提升后显式执行 CHECKPOINT
这有助于缩短新主节点可用于 pg_rewind
智能刷新 Etcd 成员(Alexander Kukushkin)
如果 Patroni 未能在 Etcd 集群的所有成员上执行请求,Patroni 将在下次重试之前重新检查 ASRV
跳过 pg_controldata
当尝试使用与 PGDATA 版本不匹配的二进制文件时,值会缺失。Patroni 仍会尝试启动 Postgres,Postgres 会抱怨主版本不匹配并以错误中止。
错误修复
在需要时为 Consul 禁用 SSL 验证(Julien Riou)
从 urllib3cert_reqsssl.CERT_NONE
避免在 HA 循环的每个周期都打开复制连接(Alexander Kukushkin)
回归问题在 1.6.4 中引入。
在失败的主节点上调用 on_role_change
在某些情况下,这可能导致虚拟 IP 仍然挂载在旧主节点上。回归问题在 1.4.5 中引入。
如果 pg_rewind 成功后 postgres 已启动,则重置 rewind 状态(Alexander Kukushkin)
由于此错误,Patroni 在暂停模式下会启动手动关闭的 postgres。
检查 recovery.confrecovery_min_apply_delayms
如果在 PostgreSQL 12 之前的版本上配置了 recovery_min_apply_delay
PyInstaller 兼容性(Alexander Kukushkin)
PyInstaller 将 Python 应用程序冻结(打包)为独立可执行文件。当我们将 multiprocessingforkspawn
Version 1.6.4 发布于 2020-01-27
新特性
为 patronictl reinit--wait
使用 --waitreinit
进一步改进 Windows 支持(Igor Yanchenko、Alexander Kukushkin)
所有用于集成测试的 shell 脚本均已用 Python 重写 在非 POSIX 系统上将使用 pg_ctl kill 不再尝试使用 Unix 域套接字 稳定性改进
确保 unix_socket_directoriesstats_temp_directory
在 Patroni 和 Postgres 启动时,确保 unix_socket_directoriesstats_temp_directory
确保 postgresql.pgpass
如果没有写入权限,Patroni 将抛出异常并退出。
默认禁用 Consul serfHealth
即使在轻微的网络问题情况下,失败的 serfHealthttl
为到 K8s API 的连接配置 TCP keepalive(Alexander Kukushkin)
如果在 TTL 秒后从套接字未收到任何数据,可以认为它已死。
避免在创建用户时记录密码(Alexander Kukushkin)
如果密码被拒绝或日志配置为 verbose 或完全未配置,密码可能会被写入 postgres 日志。为避免这种情况,Patroni 在尝试创建/更新用户之前会将 log_statementlog_min_duration_statementlog_min_error_statement
错误修复
在级联副本上使用 standby_clusterrestore_command
standby_leader
更新备用集群报告的时间线(Alexander Kukushkin)
在时间线切换的情况下,备用集群正确地从主节点复制,但 patronictl
允许在 custom_conf 中定义某些恢复参数(Alexander Kukushkin)
在副本上验证恢复参数时,如果 archive_cleanup_commandpromote_trigger_filerecovery_end_commandrecovery_min_apply_delayrestore_commandpostgresql.auto.confpostgresql.conf
改进对名称中包含句号的 PostgreSQL 参数的处理(Alexander Kukushkin)
此类参数可以由扩展定义,其中单位不一定是字符串。更改值可能需要重启(例如 pg_stat_statements.max
改进关闭期间的异常处理(Alexander Kukushkin)
在关闭期间,Patroni 会尝试更新其在 DCS 中的状态。如果 DCS 不可访问,可能会引发异常。缺少异常处理会阻止日志线程停止。
Version 1.6.3 发布于 2019-12-05
错误修复
运行 pg_rewind
此错误在 #1301 中引入。
将 postgresql.authenticationpg_basebackup
它们依赖于类 URL 的连接字符串,因此参数从未被应用。
Version 1.6.2 发布于 2019-12-05
新特性
实现 patroni --version
打印当前 Patroni 版本并退出。
为所有 HTTP 请求设置 user-agent
Patroni 通过 HTTP 协议与 Consul、Etcd 和 Kubernetes API 通信。拥有特别定制的 user-agentPatroni/1.6.2 Python/3.6.8 Linux
使异常追踪的日志级别可配置(Igor Yanchenko)
如果设置 log.traceback_level=DEBUGlog.level=DEBUG
稳定性改进
搜索配置文件所需的模块时,避免导入所有 DCS 模块(Alexander Kukushkin)
如果我们只需要例如 Zookeeper,则无需导入 Etcd、Consul 和 Kubernetes 的模块。这有助于减少内存使用并解决 Failed to import smth
从显式依赖中移除 Python requests
它不用于任何关键功能,但在新版本的 urllib3
改进将 etcd.hosts
此前当以 host1:port1, host2:port2
易用性改进
在 patronictl
如果用户提供了错误的集群名称,我们将引发异常而不是要求从空列表中选择成员。
如果 REST API 无法绑定,使错误消息更有帮助(Igor Yanchenko)
对于没有经验的用户来说,可能很难从 Python 堆栈跟踪中弄清楚出了什么问题。
错误修复
修复 wal_buffers
基本单位在 PostgreSQL 11 中从 8 kB 块更改为字节。
仅在 PostgreSQL 10+ 上在 primary_conninfopassfile
在较旧版本上,除非安装了最新版本的 libpqpassfile
Version 1.6.1 发布于 2019-11-15
新特性
新增 PATRONICTL_CONFIG_FILE
它允许通过环境变量配置 patronictl 的 --config-file
实现 patronictl history
显示故障转移/切换的历史记录。
执行 pg_rewindPGOPTIONS-c statement_timeout=0
这可以防止服务器上 statement_timeout
允许 PostgreSQL 配置使用更小的值(Soulou)
Patroni 之前不允许某些 PostgreSQL 配置参数设置为低于某些硬编码值。现在允许的最小值更小了,默认值保持不变。
允许基于证书的认证(Jonathan S. Katz)
此功能为超级用户、复制、rewind 账户启用了基于证书的认证,并允许用户指定希望使用的 sslmode
在 primary_conninfopassfile
这避免了在 postgresql.conf 上设置 600
无论配置是否变更都执行 pg_ctl reload
有些配置文件可能不受 Patroni 管控。当有人通过 REST API 或向 Patroni 进程发送 SIGHUP 进行 reload 时,通常期望 Postgres 也会被 reload。之前当 Patroni 配置的 postgresql
比较所有恢复参数,而不仅仅是 primary_conninfo
之前 check_recovery_conf()primary_conninfo
支持不重启即可应用某些恢复参数(Alexander Kukushkin)
从 PostgreSQL 12 开始,以下恢复参数可以不重启即可更改:archive_cleanup_commandpromote_trigger_filerecovery_end_commandrecovery_min_apply_delay
支持在线更改 use_slots
之前需要重启 Patroni 并手动删除 slots。
启动 Postgres 时只移除 PATRONI_
这将解决运行各种外部数据包装器时遇到的许多问题。
稳定性改进
与 K8s API 交互时使用 LIST + WATCH(Alexander Kukushkin)
它可以高效地接收对象变更(pods、endpoints/configmaps),减轻 K8s 主节点的压力。
改进 bootstrap 时 PGDATA 非空的处理流程(Alexander Kukushkin)
根据 initdblost+found.dotfilesPGDATApg_controldata
避免在每次 HA 循环中调用开销较大的 os.listdir()
当系统处于 IO 压力下时,os.listdir()global/pg_control
日志基础设施的一些改进(Alexander Kukushkin)
之前由于日志线程是 daemon
在 python 3.4+ 上使用 spawn
Python 中线程和多进程混合使用存在已知 问题 。从默认的 forkspawnINFO: restarting after failure in progress
REST API 改进
支持在 REST API 中检查客户端证书(Alexander Kukushkin)
如果 verify_clientrequiredoptional
当 Postgres 未运行时,GET /replica
Postgres 在开始接受客户端连接之前可能需要花费大量时间进行恢复。
实现 /history/cluster
/historyhistory/cluster
Etcd 支持改进
在 Etcd RAFT 内部错误时重试(Alexander Kukushkin)
当 Etcd 节点正在关闭时,它会发送 response code=300, data='etcdserver: server stopped'
不要过早放弃 Etcd 请求重试(Alexander Kukushkin)
当出现网络问题时,Patroni 之前会很快耗尽 Etcd 节点列表并放弃,而没有用完整个 retry_timeout
错误修复
在向 pg_rewindsynchronous_commit
如果 bootstrap 时使用了 synchronous_mode_strict: trueGRANT EXECUTE
修复 python 3.7 上的内存泄漏(Alexander Kukushkin)
Patroni 使用 ThreadingMixIn
修复异步操作中的竞争条件(Alexander Kukushkin)
patronictl reinit --force
修复 postmaster_start_time()
如果该方法从 REST API 线程执行,则需要创建一个单独的游标对象。
修复名称包含大写字母的同步备库无法被提升的问题(Alexander Kukushkin)
我们将名称转换为小写,因为 Postgres 在将 application_namesynchronous_standby_names
在启动新回调之前,连同回调进程一起终止所有子进程(Alexander Kukushkin)
不这样做会使在 bash 中实现回调变得困难,最终可能导致两个回调同时运行的情况。
修复"start failed"问题(Alexander Kukushkin)
在某些条件下,尽管 Postgres 正在运行,其状态可能被设置为"start failed"。
Version 1.6.0 发布于 2019-08-05
此版本增加了对 PostgreSQL 12 的兼容性,使得在 PostgreSQL 11 及更新版本上无需超级用户即可运行 pg_rewind,并启用了 IPv6 支持。
新特性
将 Psycopg2 从依赖项中移除,必须独立安装(Alexander Kukushkin)
从 2.8.0 开始,psycopg2psycopg2psycopg2-binary文档 。
兼容 PostgreSQL 12(Alexander Kukushkin)
从 PostgreSQL 12 开始不再有 recovery.confGUC 。为了防止 ALTER SYSTEM SET primary_conninfopostgresql.auto.confrestore_commandpostgresql.recovery_conf.restore_commandpostgresql.conf
支持在 PostgreSQL 11 及更新版本上无需超级用户使用 pg_rewind
如果要使用此功能,请在 Patroni 配置文件的 postgresql.authentication.rewindusernamepasswordGRANT EXECUTE文档 。
对副本上实际和期望的 primary_conninfo
这有助于在将已有的主备集群转换为 Patroni 管理时避免副本重启。
IPv6 支持(Alexander Kukushkin)
有两个主要问题。Patroni REST API 服务之前只监听 0.0.0.0api_urlconn_url
Kerberos 支持(Ajith Vilas,Alexander Kukushkin)
使得可以在 Postgres 节点之间使用 Kerberos 认证,而无需在 Patroni 配置文件中定义密码。
管理 pg_ident.conf
此功能的工作方式与 pg_hba.confpostgresql.pg_identpg_ident.confpostgresql.parameters.ident_filepg_ident
REST API 改进
新增 /health
仅在 PostgreSQL 正在运行时返回 HTTP 状态码。
新增 /read-only/read-write
/read-only/read-write/primary/leader/master
使用 SSLContext
ssl.wrap_socket()
日志改进
两阶段日志记录(Alexander Kukushkin)
所有日志消息首先写入内存队列,然后由单独的线程异步刷新到 stderr 或文件中。最大队列大小有限制(可配置)。如果达到限制,Patroni 将开始丢失日志,但这仍然比阻塞 HA 循环要好。
为 GET/OPTIONS API 调用及其延迟启用调试日志(Jan Tomsa)
这有助于调试 HAProxy、Consul 或其他用于判断哪个节点是主节点/副本的工具所执行的健康检查。
记录 Retry 中捕获的异常(Daniel Kucera)
当达到尝试次数或超时时记录最终异常。这有望帮助调试与 DCS 通信失败时的一些问题。
patronictl 改进
增强计划切换和重启的对话交互(Rafia Sabih)
之前的对话没有考虑到计划操作,因此具有误导性。
检查配置文件是否存在(Wilfried Roset)
当给定的文件名不存在时,明确提示配置文件信息,而不是静默忽略(这可能导致误解)。
为 EDITOR
当 EDITORpatronictl edit-configPatroniCtlExceptioneditorvi
Consul 支持改进
错误修复
修复切换/故障转移中的边界情况(Sharoon Thomas)
如果 REST API 不可访问且我们使用 DCS 作为回退时,变量 scheduled_at
自定义 bootstrap 期间在 pg_hba.conf
之前只对 unix_socket 开放,这导致了大量错误:FATAL: no pg_hba.conf entry for replication connection from host "127.0.0.1", user "replicator"
即使前任 leader 领先也将同步节点视为健康(Alexander Kukushkin)
如果主节点失去对 DCS 的访问,它会以只读模式重启 Postgres,但其他节点可能仍然可以通过 REST API 访问旧主节点。这种情况导致同步备库无法提升,因为旧主节点报告的 WAL 位置领先于同步备库。
备用集群错误修复(Alexander Kukushkin)
使得在 standby_leader 不可访问时可以在备用集群中引导副本,以及其他一些小修复。
Version 1.5.6 发布于 2019-08-03
新特性
支持通过一组代理与 etcd 集群通信(Alexander Kukushkin)
可能存在 etcd 集群无法直接访问但可以通过一组代理访问的情况。在这种情况下,Patroni 不会执行 etcd 拓扑发现,而只是在代理主机之间轮询。此行为由 etcd.use_proxies
更改节点角色变化时的回调行为(Alexander Kukushkin)
如果角色从 masterstandby_leaderreplicareplicastandby_leaderon_restarton_role_change
更改 Postgres 的启动方式(Alexander Kukushkin)
使用 multiprocessing.Processmultiprocessing.Pipe
错误修复
修复 REST API 为 standby leader 返回的角色(Alexander Kukushkin)
之前错误地返回 replicastandby_leader
如果回调无法被终止则等待其结束(Julien Tachoires)
Patroni 没有足够的权限终止在 sudo
减少 dcs.get_cluster 方法的锁持有时间(Alexander Kukushkin)
由于锁被持有,DCS 的慢速会影响 REST API 的健康检查,导致误报。
改进当 pg_walpg_xlog
在这种情况下,Patroni 将显式删除目标目录中的文件。
移除不必要的 os.path.relpath 使用(Ants Aasma)
它依赖于能够解析工作目录,如果 Patroni 在一个后来从文件系统中取消链接的目录中启动,这将失败。
与 Etcd 通信时不强制 ssl 版本(Alexander Kukushkin)
由于某些未知原因,debian 和 ubuntu 上的 python3-etcd 不是基于最新版本的包,因此它强制使用 Etcd v3 不支持的 TLSv1。我们在 Patroni 端解决了这个问题。
Version 1.5.5 发布于 2019-02-15
此版本引入了前主节点自动重新初始化的功能,改进了 patronictl list 的输出,并修复了若干错误。
新特性
新增 PATRONI_ETCD_PROTOCOLPATRONI_ETCD_USERNAMEPATRONI_ETCD_PASSWORD
之前只能在配置文件中或作为 PATRONI_ETCD_URL
支持自动重新初始化前主节点(Alexander Kukushkin)
如果 pg_rewind 被禁用或无法使用,前主节点可能因时间线分叉而无法作为新副本启动。在这种情况下,唯一的修复方法是清除数据目录并重新初始化。此行为可以通过设置 postgresql.remove_data_directory_on_diverged_timelines
在 patronictl list 中显示时间线信息(Alexander Kukushkin)
这有助于检测过时的副本。此外,如果端口值不是默认值或有多个成员运行在同一主机上,Host
创建与 $SCOPE-config 端点关联的 headless service(Alexander Kukushkin)
“config” 端点保存集群范围的 Patroni 和 Postgres 配置、历史文件,以及最重要的 initialize
错误修复
调整 leader watch 阻塞查询的读取超时(Alexander Kukushkin)
根据 Consul 文档,实际响应超时会增加少量随机的额外等待时间,以分散并发请求的唤醒时间。它在最大持续时间上增加最多 wait / 16wait / 15
通过复制协议连接 postgres 时始终使用 replication=1(Alexander Kukushkin)
从 Postgres 10 开始,pg_hba.conf 中 database=replication 的行不接受 replication=database 参数的连接。
不要为仅使用 WAL 的备用集群将 primary_conninfo 写入 recovery.conf(Alexander Kukushkin)
尽管在 standby_cluster 配置中既没有定义 hostportprimary_conninforecovery.conf
Version 1.5.4 发布于 2019-01-15
此版本实现了灵活的日志记录功能并修复了若干错误。
新特性
日志基础设施改进(Alexander Kukushkin,Lucas Capistrant,Alexander Anikin)
日志配置不仅可以通过环境变量,还可以从 Patroni 配置文件中进行配置。这使得可以通过更新配置并执行 reload 或向 Patroni 进程发送 SIGHUP 来在运行时更改日志配置。默认情况下 Patroni 将日志写入 stderr,但现在可以直接将日志写入文件并在达到一定大小时轮转。此外还增加了对自定义日期格式的支持以及对每个 Python 模块日志级别进行微调的功能。
支持在 leader 选举时考虑当前时间线(Alexander Kukushkin)
可能会出现节点认为自己是最健康的,但实际上不在最新已知时间线上的情况。在某些情况下我们希望避免提升此类节点,这可以通过将 check_timelinetrue
放宽超级用户凭证要求
Libpq 允许在不显式指定用户名或密码的情况下打开连接。根据情况,它依赖于 pgpass 文件或 pg_hba.conf 中的 trust 认证方法。由于 pg_rewind 也使用 libpq,它将以相同的方式工作。
实现通过环境变量配置 Consul Service 注册和检查间隔的功能(Alexander Kukushkin)
Consul 中的服务注册在 1.5.0 中添加,但到目前为止只能通过 patroni.yaml 来启用。
稳定性改进
在自定义 bootstrap 期间将 archive_mode 设置为 off(Alexander Kukushkin)
我们希望在集群完全运行之前避免归档 WAL 和历史文件。如果自定义 bootstrap 涉及 pg_upgrade,这确实很有帮助。
启动时加载全局配置时应用五秒退避(Alexander Kukushkin)
这有助于避免在 Patroni 刚启动时频繁请求 DCS。
减少关闭时产生的错误消息数量(Alexander Kukushkin)
这些消息是无害的,但相当烦人,有时还很吓人。
在创建 recovery.conf 时显式设置 rw 权限(Lucas Capistrant)
我们不希望除 patroni/postgres 用户之外的任何人读取此文件,因为它包含复制用户和密码。
将 HTTPServer 异常重定向到 logger(Julien Riou)
默认情况下,此类异常会记录到标准输出,干扰常规日志。
错误修复
移除 pg_ctl 进程中的 stderr 到 stdout 管道重定向(Cody Coons)
从主 Patroni 进程继承 stderr 允许所有 Postgres 日志与所有 Patroni 日志一起查看。这在容器环境中非常有用,因为 Patroni 和 Postgres 日志可以使用标准工具(docker logs、kubectl 等)来查看。此外,此更改修复了当 Postgres 向 stderr 写入一些警告时 Patroni 无法捕获 postmaster pid 的错误。
以 Go 时间格式设置 Consul service check 注销超时(Pavel Kirillov)
没有明确指定时间单位时注册会失败。
放宽 standby_cluster 集群配置检查(Dmitry Dolgov,Alexander Kukushkin)
之前只接受字符串作为有效值,因此无法将端口指定为整数,也无法将 create_replica_methods 指定为列表。
Version 1.5.3 发布于 2018-12-03
兼容性和错误修复版本。
改进在 python3 下与 zookeeper 运行时的稳定性(Alexander Kukushkin)
更改 loop_wait
修复与 postgres 9.3 的兼容性问题(Alexander Kukushkin)
打开复制连接时应指定 replication=1,因为 9.3 不理解 replication=‘database’。
确保每次 HA 循环至少刷新一次 Consul 会话,并改进 consul 会话异常处理(Alexander Kukushkin)
重启本地 consul agent 会使与该节点相关的所有会话失效。未及时调用会话刷新以及未正确处理会话错误会导致主节点被降级。
Version 1.5.2 发布于 2018-11-26
兼容性和错误修复版本。
兼容 kazoo-2.6.0(Alexander Kukushkin)
为了确保请求以适当的超时执行,Patroni 重新定义了 python-kazoo 模块中的 create_connection 方法。kazoo 的最新版本稍微改变了 create_connection 方法的调用方式。
修复 Consul 集群失去 leader 时 Patroni 崩溃的问题(Alexander Kukushkin)
崩溃是由于 touch_member 方法的不正确实现导致的,它应该返回布尔值而不是抛出任何异常。
Version 1.5.1 发布于 2018-11-01
此版本实现了对永久复制槽的支持,增加了对 pgBackRest 的支持,并修复了若干错误。
新特性
永久复制槽(Alexander Kukushkin)
永久复制槽在故障转移/切换时被保留,即新主节点上的 Patroni 在完成提升后会立即创建配置的复制槽。可以借助 patronictl edit-configbootstrap.dcs 中完成。
新增 pgbackrest 支持(Yogesh Sharma)
pgBackrest 可以在现有的 $PGDATA 文件夹中恢复,这使得恢复速度更快,因为自上次备份以来未更改的文件会被跳过。为了支持此功能,引入了新参数 keep_data副本创建方法 部分。
错误修复
Version 1.5.0 发布于 2018-09-20
此版本使 Patroni HA 集群能够以备用模式运行,引入了对 Windows 运行的实验性支持,并提供了在 Consul 中注册 PostgreSQL 服务的新配置参数。
新特性
备用集群(Dmitry Dolgov)
一个或多个 Patroni 节点可以组成一个备用集群,与主集群并行运行(即在另一个数据中心),由从主集群中的 master 复制的备用节点组成。备用集群中的所有 PostgreSQL 节点都是副本;其中一个副本选举自己直接从远程 master 复制,而其他副本则以级联方式从它复制。此功能的更详细描述和一些配置示例可以在 这里 找到。
在 Consul 中注册服务(Pavel Kirillov,Alexander Kukushkin)
如果在 consul 配置 中启用了 register_servicescopemasterreplicastandby-leader
实验性 Windows 支持(Pavel Golub)
从现在起可以在 Windows 上运行 Patroni,尽管 Windows 支持是全新的,还没有像 Linux 版本那样经过大量实际测试。欢迎您的反馈!
patronictl 改进
为 patronictl 添加 -k/–insecure 标志并支持 restapi 证书(Wilfried Roset)
过去如果 REST API 由自签名证书保护,patronictl 将无法验证它们。没有办法禁用该验证。现在可以配置 patronictl 完全跳过证书验证,或在配置的 ctl: 部分提供 CA 和客户端证书。
从 patronictl switchover/failover 输出中排除带有 nofailover 标签的成员(Alexander Anikin)
之前,通过 patronictl 执行交互式切换或故障转移时,这些成员被错误地建议为候选者。
稳定性改进
避免解析 pg_controldata 的非键值对输出行(Alexander Anikin)
在某些情况下 pg_controldata 会输出没有冒号字符的行。这会在解析 pg_controldata 输出的 Patroni 代码中触发错误,隐藏了实际问题;通常这些行是 pg_controldata 在常规输出之前以警告形式发出的,即当二进制主版本与 PostgreSQL 数据目录的版本不匹配时。
在 leader 选举期间将成员名称添加到错误消息中(Jan Mussler)
在 leader 选举期间,Patroni 连接到集群的所有已知成员并请求其状态。该状态写入 Patroni 日志并包含成员名称。之前,如果成员不可访问,错误消息不会显示其名称,只包含 URL。
在创建复制槽时立即保留 WAL 位置(Alexander Kukushkin)
从 9.6 开始,pg_create_physical_replication_slotimmediately_reservefalse
修复严格同步复制中的错误(Alexander Kukushkin)
当以 synchronous_mode_strict: true\*synchronous_standby_namespotentialasync
Version 1.4.6 发布于 2018-08-14
错误修复和稳定性改进
此版本修复了 Patroni API /master 端点在非 master 节点上返回 200 的关键问题。这是一个报告问题,不是实际的脑裂,但在某些情况下客户端可能被定向到只读节点。
在降级时重置 is_leader 状态(Alexander Kukushkin,Oleksii Kliukin)
确保被降级的集群成员停止在 /master API 调用上以 200 状态码响应。
在 API 输出中添加新的 “cluster_unlocked” 字段(Dmitry Dolgov)
该字段指示集群是否有正在运行的 master。当无法查询除某个副本之外的任何其他节点时,它可以被使用。
Version 1.4.5 发布于 2018-08-03
新特性
改进应用新 postgres 配置时的日志记录(Don Seiler)
Patroni 会记录已更改的参数名称和值。
Python 3.7 兼容性(Christoph Berg)
async 是 python3.7 中的保留关键字。
成员关闭时在 DCS 中将状态设置为 “stopped”(Tony Sorrentino)
这会在 “patronictl list” 命令中将成员状态显示为 “stopped”。
改进当过时的 postmaster.pid 匹配到运行中的进程时记录的消息(Ants Aasma)
之前的消息非常令人困惑。
实现 patronictl reload 功能(Don Seiler)
之前只能通过调用 REST API 或向 Patroni 进程发送 SIGHUP 信号来重新加载配置。
作为副本启动时从 controldata 获取并应用某些参数(Alexander Kukushkin)
在全局配置中设置的 max_connectionspg_controldatapending_restart
如果设置了 LD_LIBRARY_PATH 则在启动 postgres 时使用它(Chris Fraser)
启动 Postgres 时,Patroni 之前会传递已设置的 PATH、LC_ALL 和 LANG 环境变量。现在对 LD_LIBRARY_PATH 也做了相同处理。如果有人将 PostgreSQL 安装到非标准位置,这应该会有所帮助。
将 create_replica_method 重命名为 create_replica_methods(Dmitry Dolgov)
为了明确它实际上是一个数组。旧名称仍然支持以保持向后兼容。
错误修复和稳定性改进
修复暂停状态下因 pg_rewind 导致副本启动的条件(Oleksii Kliukin)
避免启动之前已经执行过 pg_rewind 的副本。
仅在 update_lock 成功时才对 master 健康检查响应 200(Alexander Kukushkin)
防止在 DCS 分区时,Patroni 在前(已降级的)master 上将自己报告为 master。
修复与新 consul 模块的兼容性(Alexander Kukushkin)
从 v1.1.0 开始,python-consul 更改了内部 API,开始使用 listdict
捕获关闭期间 Patroni REST API 线程的异常(Alexander Kukushkin)
那些未捕获的异常会导致 PostgreSQL 在关闭时继续运行。
仅当 Postgres 作为 master 运行时才执行崩溃恢复(Alexander Kukushkin)
要求 pg_controldata
改进配置错误处理(Henning Jacobs,Alexander Kukushkin)
可以通过更新 Patroni 配置文件并向 Patroni 进程发送 SIGHUP 来在运行时更改许多参数(包括 restapi.listen
Version 1.4.4 发布于 2018-05-22
稳定性改进
修复 poll_failover_result 中的竞争条件(Alexander Kukushkin)
它没有直接影响故障转移或切换,但在某些罕见情况下,当前任 leader 释放锁时会过早地报告成功,产生 ‘Failed over to “None”’ 而不是 ‘Failed over to “desired-node”’ 的消息。
将 Postgres 参数名称视为不区分大小写(Alexander Kukushkin)
大多数 Postgres 参数使用 snake_case 命名,但有三个例外:DateStyle、IntervalStyle 和 TimeZone。Postgres 接受以不同大小写编写的这些参数(例如 timezone = ‘some/tzn’);但是,Patroni 无法在 pg_settings 中找到这些参数名称的不区分大小写匹配,因此忽略了这些参数。
如果附加到运行中的 postgres 但集群未初始化则中止启动(Alexander Kukushkin)
Patroni 可以附加到已经运行的 Postgres 实例。在处理副本之前,必须先在主节点上启动 Patroni。
修复 patronictl scaffold 的行为(Alexander Kukushkin)
向 touch_member 传递 dict 对象而不是 json 编码的字符串,DCS 实现会负责编码。
暂停状态下更新 leader 键失败时不降级 master(Alexander Kukushkin)
在维护期间,DCS 可能开始拒绝写请求但继续响应读请求。在这种情况下,Patroni 之前会在 DCS 中更新 leader 锁失败后将 Postgres 主节点置为只读模式。
当 Patroni 注意到新的 postmaster 进程时同步复制槽(Alexander Kukushkin)
如果 Postgres 已重启,Patroni 必须确保复制槽列表符合其预期。
退出暂停后验证 sysid 并同步复制槽(Alexander Kukushkin)
在 maintenanceDatabase system identifier
修复在存在 postmaster 锁文件的数据目录上无法启动未运行的 Postgres 的问题(Alexander Kukushkin)
检测 postmaster 锁文件中 PID 的重用。如果在 docker 容器中运行 Patroni 和 Postgres,更容易遇到此问题。
改进 DCS 被意外清除时的保护(Alexander Kukushkin)
Patroni 有大量逻辑来防止在这种情况下发生故障转移;它还可以恢复所有键;但是,在此更改之前,意外删除 /config 键会在 1 个 HA 循环周期内关闭暂停模式。
遇到无效系统 ID 时不退出(Oleksii Kliukin)
当集群系统 ID 为空或未通过验证检查时不退出。在这种情况下,集群很可能需要重新初始化;在结果消息中提及这一点。避免终止 Patroni,否则无法进行重新初始化。
兼容 Kubernetes 1.10+
Bootstrap 改进
使删除 recovery.conf 变为可选(Brad Nicholson)
如果定义了 bootstrap.<custom_bootstrap_method_name>.keep_existing_recovery_conf 并设置为 Truerecovery.confrecovery.conf
允许为内置 basebackup 方法提供选项(Oleksii Kliukin)
现在可以通过在配置中定义 basebackupbasebackup--key=value--key副本创建方法 部分。
Version 1.4.3 发布于 2018-03-05
日志改进
允许从环境变量配置日志级别(Andy Newton,Keyvan Hedayati)
PATRONI_LOGLEVELPATRONI_REQUESTS_LOGLEVELPython logging 文档 <https://docs.python.org/3.6/library/logging.html#levels> 。
稳定性改进和错误修复
当 watch 超时时不重新发现 etcd 集群拓扑(Alexander Kukushkin)
如果 etcd 配置中只有一个主机且正好这个主机不可访问,Patroni 之前会开始发现集群拓扑但永远不会成功。相反,它应该只是切换到下一个可用节点。
自定义 bootstrap 后将 bootstrap.pg_hba 的内容写入 pg_hba.conf(Alexander Kukushkin)
现在其行为与使用 initdb
单用户模式会等待用户输入而永不结束(Alexander Kukushkin)
回归问题引入于 https://github.com/patroni/patroni/pull/576 。
Version 1.4.2 发布于 2018-01-30
patronictl 改进
将 scheduled failover 重命名为 scheduled switchover(Alexander Kukushkin)
故障转移和切换功能在 1.4 版本中已分离,但 patronictl listScheduled failoverScheduled switchover
显示待重启信息(Alexander Kukushkin)
为了应用某些配置更改,有时需要重启 postgres。Patroni 之前已经在 REST API 和写入 DCS 的节点状态中给出了提示,但没有简便的方式来显示它。
使 show-config 与配置文件中的 cluster_name 一起工作(Alexander Kukushkin)
其工作方式类似于 patronictl edit-config
稳定性改进
避免在 bootstrap 期间调用 pg_controldata(Alexander Kukushkin)
在 initdb 或自定义 bootstrap 期间,存在一个 pgdata 不为空但 pg_controldata 尚未写入的时间窗口。在这种情况下,pg_controldata 调用会因错误消息而失败。
处理 psutil 抛出的异常(Alexander Kukushkin)
每次调用 cmdline()NoSuchProcess
Kubernetes 支持改进
不要吞掉 k8s API 的错误(Alexander Kukushkin)
对 Kubernetes API 的调用可能因多种原因而失败。在某些情况下应重试此类调用,在其他情况下我们应记录错误消息和异常堆栈跟踪。此更改将有助于调试 Kubernetes 权限问题。
更新 Kubernetes 示例 Dockerfile 以从 master 分支安装 Patroni(Maciej Szulik)
之前使用的是 feature/k8s
添加适当的 RBAC 以在 k8s 上运行 patroni(Maciej Szulik)
添加分配给集群 pod 的 Service account、仅包含必要权限的 role,以及连接 Service account 和 Role 的 rolebinding。
Version 1.4.1 发布于 2018-01-17
patronictl修复
不在建议的故障转移目标成员列表中显示当前领导者(Alexander Kukushkin)
当集群中存在领导者时,patronictl failover仍然可以工作,应将其从可以故障转移到的成员列表中排除。
使patronictl switchover与旧版Patroni API兼容(Alexander Kukushkin)
如果POST /switchover REST API调用以状态码501失败,它将再次请求,但调用/failover端点。
Version 1.4 发布于 2018-01-10
此版本添加了使用Kubernetes作为DCS的支持,允许Patroni作为云原生代理在Kubernetes中运行,无需额外部署Etcd、Zookeeper或Consul。
升级须知
通过pip安装Patroni将不再自动引入依赖项(如Etcd、Zookeeper、Consul或Kubernetes的库,或AWS支持)。要启用它们,需要在pip install命令中显式列出,例如 pip install patroni[etcd,kubernetes]
Kubernetes支持
实现了基于Kubernetes的DCS。使用Endpoints的元数据来存储配置和领导者键。Pod定义中的元数据字段用于存储成员相关数据。除了使用Endpoints,Patroni还支持ConfigMaps。你可以在 文档的Kubernetes章节 中找到关于此功能的更多信息。
稳定性改进
将postmaster进程分离为独立对象(Ants Aasma)
该对象通过pid和启动时间标识正在运行的postmaster进程,简化了对postmaster在后台被重启或postgres目录从文件系统中消失的情况的检测(和解决)。
最小化Patroni在每次HA循环迭代中发出的SELECT数量(Alexander Kukushkin)
在HA循环的每次迭代中,Patroni需要知道恢复状态和绝对WAL位置。从现在起,Patroni将只运行单个SELECT来获取此信息,而不是在副本上运行两个、在主节点上运行三个。
仅在持有锁时才在关闭时移除领导者键(Ants Aasma)
无条件移除会产生不必要和误导性的异常。
patronictl改进
为patronictl添加version命令(Ants Aasma)
它将显示已安装的Patroni版本和正在运行的Patroni实例的版本(如果指定了集群名称)。
使某些patronictl命令的cluster_name参数可选(Alexander Kukushkin,Ants Aasma)
如果patronictl使用定义了 scope
显示有关计划切换和维护模式的信息(Alexander Kukushkin)
在此之前,只能从Patroni日志或直接从DCS获取此信息。
改进 patronictl reinit
有时 patronictl reinitpatronictl 没有提供任何命令来取消此类长时间运行的操作,唯一(危险的)解决方法是手动删除数据目录。新的 reinit
在 patronictl pausepatronictl resume--wait
它将使 patronictl 等待直到集群中所有节点确认请求的操作。此行为通过在DCS和REST API中为每个节点公开 暂停 标志来实现。
将 patronictl failoverpatronictl switchover
之前的 failover
更改 patronictl failover
即使没有领导者它也能工作,但在这种情况下你必须显式指定一个应成为新领导者的节点。
公开时间线和历史信息
在DCS和API中公开当前时间线(Alexander Kukushkin)
为集群的每个成员存储当前时间线的信息。此信息可通过API访问并存储在DCS中。
在DCS的/history键中存储提升历史(Alexander Kukushkin)
此外,在DCS的/history键中存储包含相应提升时间戳的时间线历史,并在每次提升时更新它。
添加获取同步和异步副本的端点
添加新的/sync和/async端点(Alexander Kukushkin,Oleksii Kliukin) 这些端点(也可通过/synchronous和/asynchronous访问)分别仅对同步和异步副本返回200(不包括标记为 noloadbalance
允许Etcd配置多个主机
Version 1.3.6 发布于 2017-11-10
稳定性改进
在检查postgres是否正在运行时验证进程启动时间(Ants Aasma)
在未清理postmaster.pid的崩溃后,可能存在具有相同pid的新进程,导致is_running()误报,从而引发各种异常行为。
当丢失数据目录时,在引导前关闭postgresql(ainlolcat)
当主节点上的数据目录被强制删除时,postgres进程可能仍然存活一段时间,阻止在该前主节点位置创建的副本启动或复制。此修复使Patroni缓存postmaster的pid及其启动时间,并在相应数据目录被删除后终止仍在运行的旧postmaster。
如果postgres主进程死亡,则在单用户模式下执行崩溃恢复(Alexander Kukushkin)
如果postgres没有干净关闭,立即作为备用节点启动是不安全的,也无法运行 pg_rewindpg_rewind
Consul改进
使得为Consul提供数据中心配置成为可能(Vilius Okockis,Alexander Kukushkin)
在此之前,Patroni始终与其运行所在主机的数据中心通信。
始终在X-Consul-Token HTTP头中发送令牌(Alexander Kukushkin)
如果在Patroni配置中定义了 consul.token会话API 的查询参数,但它仍然可以使用’X-Consul-Token’头。
如果提供的值小于最小可能值,则调整会话TTL(Stas Fomin,Alexander Kukushkin)
Patroni配置中提供的TTL可能小于Consul支持的最小值。在这种情况下,Consul代理无法创建新会话。没有会话,Patroni就无法在Consul KV存储中创建成员和领导者键,导致集群不健康。
其他改进
Version 1.3.5 发布于 2017-10-12
错误修复
稳定性改进
Consul改进
错误修复
Version 1.3.4 发布于 2017-09-08
各种Consul改进
将consul令牌作为头部传递(Andrew Colin Kissa)
头部现在是向consul API 传递令牌的首选方式。
Consul的高级配置(Alexander Kukushkin)
可以指定 schemetoken详细信息 。
与python-consul-0.7.1及以上版本的兼容性(Alexander Kukushkin)
新的python-consul模块更改了某些方法的签名。
“Could not take out TTL lock"消息从未被记录(Alexander Kukushkin)
不是关键错误,但缺乏适当的日志记录会使出现问题时的调查变得复杂。
使用quote_ident引用synchronous_standby_names
围绕暂停状态的各种修复,主要与watchdog相关 (Alexander Kukushkin)
如果watchdog未激活,则不发送keepalive 避免在暂停模式下激活watchdog 在暂停模式下设置正确的postgres状态 如果postgres已停止,则不要尝试从API运行查询 Version 1.3.3 发布于 2017-08-04
错误修复
即使开启了synchronous_mode_strict,同步复制也会在提升后不久被禁用(Alexander Kukushkin) 如果从备份恢复后缺少 pg_ident.conf 在 pg_hba.conf Version 1.3.2 发布于 2017-07-31
错误修复
patronictl edit-config无法与ZooKeeper配合工作(Alexander Kukushkin) Version 1.3.1 发布于 2017-07-28
错误修复
由于 _MemberStatus Version 1.3 发布于 2017-07-27
Version 1.3增加了自定义引导功能,显著改进了对pg_rewind的支持,增强了同步模式支持,为patronictl添加了配置编辑功能,并在Linux上实现了watchdog支持。此外,这是第一个能正确支持PostgreSQL 10的版本。
升级须知
目前没有已知的新版本兼容性问题。Version 1.2的配置应无需任何更改即可使用。升级方式为安装新软件包后重启Patroni(会导致PostgreSQL重启),或者先将Patroni置于 暂停模式
自定义引导
更智能的pg_rewind支持
通过查看与当前主节点的时间线差异来决定是否运行pg_rewind(Alexander Kukushkin)
此前,Patroni有一组固定条件来触发pg_rewind,即在启动前主节点时、在对集群中每个其他节点进行切换到指定节点的操作时,或当存在带有nofailover标签的副本时。所有这些情况的共同点是某些副本可能领先于新主节点。在某些情况下pg_rewind没有执行任何操作,在另一些情况下它在需要时却未运行。Patroni不再依赖这个有限的规则列表,而是比较主节点和副本的WAL位置(使用流复制协议),以可靠地决定副本是否需要rewind。
同步复制严格模式
通过添加严格模式增强同步复制支持(James Sewell,Alexander Kukushkin)
通常,当启用 synchronous_modesynchronous_mode_strict 选项改变了这一行为,设置后Patroni在缺少副本时不会禁用同步复制,实际上会阻止所有客户端向主节点写入数据。除了同步模式保证自动故障转移不丢失任何数据外,严格模式还确保每次写入要么持久存储在两个节点上,要么在集群只有一个节点时完全不发生。
使用patronictl编辑配置
Linux watchdog支持
为Linux实现watchdog支持(Ants Aasma)
支持Linux软件watchdog,以在Patroni未运行或无响应时(例如由于高负载)重启节点。Linux软件watchdog会重启无响应的节点。可以从Patroni配置的watchdog部分配置要使用的watchdog设备(默认为 /dev/watchdog)和模式(on、automatic、off)。更多信息请参阅 watchdog文档
添加PostgreSQL 10支持
Patroni兼容迄今为止发布的所有PostgreSQL 10 beta版本,我们预期在PostgreSQL 10正式发布时也将兼容。 PostgreSQL相关的小改进
通过Patroni配置文件或DCS中的动态配置定义pg_hba.conf(Alexander Kukushkin)
允许在配置的 postgresql 部分的 pg_hba 子部分中定义 pg_hba.conf 的内容。这简化了在多个节点上管理 pg_hba.conf 的工作,因为只需在DCS中定义一次,而无需登录每个节点手动更改并重载配置。
定义后,此部分的内容将完全替换当前的 pg_hba.conf。如果设置了 hba_file PostgreSQL参数,Patroni将忽略此配置。
支持通过UNIX套接字连接到本地PostgreSQL集群(Alexander Kukushkin)
在Patroni配置的 postgresql 部分添加 use_unix_socket 选项。设置为true且PostgreSQL的 unix_socket_directories 选项不为空时,Patroni将使用其第一个值连接到本地PostgreSQL集群。如果未定义 unix_socket_directories,Patroni将假定其默认值,并在PostgreSQL连接字符串中完全省略 host 参数。
支持在重载时更改超级用户和复制凭据(Alexander Kukushkin)
支持将配置文件存储在PostgreSQL数据目录之外(@jouir)
添加新的 postgresql 配置指令 config_dir。默认为数据目录,必须可被Patroni写入。
错误修复和稳定性改进
处理EtcdEventIndexCleared和EtcdWatcherCleared异常(Alexander Kukushkin)
通过避免无用的重试,在watch操作被Etcd终止时更快恢复。
消除Etcd故障时的错误自旋并减少日志垃圾(Ants Aasma)
避免在第二次及后续Etcd连接失败时立即重试和在日志中输出堆栈跟踪。
在fork PostgreSQL进程时导出locale变量(Oleksii Kliukin)
避免在使用NLS构建的PostgreSQL的非英语locale下出现 postmaster became multithreaded during startup 致命错误。
删除复制槽时的额外检查(Alexander Kukushkin)
在某些情况下,WAL发送者会阻止Patroni删除复制槽。
将复制槽名称截断为63(NAMEDATALEN - 1)个字符以符合PostgreSQL命名规则(Nick Scott)
修复导致Patroni向PostgreSQL集群打开额外连接的竞态条件(Alexander Kukushkin)
当节点以空数据目录重启时释放领导者键(Alex Kerney)
在没有领导者的情况下运行引导时将异步执行器设置为忙碌状态(Alexander Kukushkin)
未能执行此操作可能导致错误,声明节点属于不同的集群,因为Patroni在通过不需要集群中存在领导者的引导方法引导时继续执行正常业务。
改进WAL-E副本创建方法(Joar Wandborg,Alexander Kukushkin)
在解析WAL-E基础备份时使用csv.DictReader,接受以空格分隔日期和时间的ISO日期格式。 支持从副本获取当前WAL位置以估算需要恢复的WAL量。此前,代码使用的系统信息函数仅在主节点上可用。 Version 1.2 发布于 2016-12-13
此版本在同步复制处理方面引入了重大改进,使启动过程和故障转移更加可靠,添加了PostgreSQL 9.6支持并修复了大量错误。此外,包括这些发布说明在内的文档已迁移至 </docs/patroni>。
同步复制
可靠性改进
当PostgreSQL不是100%健康时,不尝试更新存储在 leader optime 键中的领导者位置。当领导者键更新失败时立即降级。(Alexander Kukushkin)
将不健康的节点从克隆新副本的目标列表中排除。(Alexander Kukushkin)
为Consul实现类似于Etcd的重试和超时策略。(Alexander Kukushkin)
使 --dcs 和 --config-file 适用于 patronictl 中的所有选项。(Alexander Kukushkin)
将所有postgres参数写入postgresql.conf。(Alexander Kukushkin)
这允许仅使用 pg_ctl 启动由Patroni配置的PostgreSQL。
避免在配置中没有用户时出现异常。(Kirill Pushkin)
允许暂停不健康的集群。在此修复之前,如果尝试执行暂停操作的节点不健康,patronictl 会中止操作。(Alexander Kukushkin)
改进领导者监视功能。(Alexander Kukushkin)
此前,副本始终监视领导者键(休眠直到超时或领导者键变更)。此更改后,它们仅在副本的PostgreSQL处于 running 状态时监视,而不在PostgreSQL停止/启动或重启时监视。
避免在作为PID 1处理SIGCHILD时遇到竞态条件。(Alexander Kukushkin)
此前,在Docker容器内运行时可能出现竞态条件,因为Patroni内部的同一进程既生成新进程又处理来自它们的SIGCHILD信号。此更改对Patroni使用fork/exec,将原始PID 1进程保留为处理子进程信号的专用进程。
修复WAL-E恢复。(Oleksii Kliukin)
此前,WAL-E恢复使用 no_master 标志来完全避免与主节点协商,使Patroni总是选择从WAL恢复而非 pg_basebackup。此更改将其恢复为 no_master 的原始含义,即当主节点未运行时可以选择Patroni WAL-E恢复作为复制方法。后者通过检查传递给方法的连接字符串来判断。此外,使重试机制更加健壮并处理了其他细节问题。
实现异步DNS解析器缓存。(Alexander Kukushkin)
避免在DNS暂时不可用时(例如,由于节点接收的流量过大)出现故障。
实现启动状态和主节点启动超时。(Ants Aasma,Alexander Kukushkin)
此前,pg_ctl 等待超时后便认为PostgreSQL正在运行。这导致PostgreSQL在列表中显示为运行状态但实际并非如此,并引发竞态条件,结果要么是故障转移,要么是崩溃恢复,要么是被故障转移中断的崩溃恢复和错过的rewind。此更改添加了 master_start_timeout 参数,并为主HA循环引入了新状态:starting。当 master_start_timeout 为0时,只要有故障转移候选者,主节点崩溃后将立即进行故障转移。否则,Patroni将在尝试在主节点上启动PostgreSQL后等待超时时长;超时后如果可能则进行故障转移。即使在超时到期之前,主节点崩溃期间也会响应手动故障转移请求。
为 restart API端点和 patronictl 引入 timeout 参数。设置后,如果重启时间超过超时值,PostgreSQL将被视为不健康,其他节点将有资格获取领导者锁。
修复暂停模式下的 pg_rewind 行为。(Ants Aasma)
避免在暂停模式下Patroni认为需要rewind但无法执行rewind时(即 pg_rewind 不存在)进行不必要的重启。如果 pg_rewind 相关的Patroni配置部分中缺少 superuser 认证信息,则回退到 libpq 的默认 superuser(默认操作系统用户)值。
序列化回调执行。当新的同类型回调即将运行时,终止之前的回调。修复运行回调时产生僵尸进程的问题。(Alexander Kukushkin)
当领导者键已在DCS中设置但更新此领导者键失败时,避免提升前主节点。(Alexander Kukushkin)
这避免了当前主节点与Etcd中少数节点一起被分区时继续保持其角色的问题,以及允许"不一致读取"的其他DCS中的类似问题。
杂项
在引导时添加 post_init 配置选项。(Alejandro Martínez)
Patroni将在对新集群运行 initdb 并启动PostgreSQL后,立即调用此选项的脚本参数。该脚本接收包含 superuser 的连接URL,并将 PGPASSFILE 设置为指向包含密码的 .pgpass 文件。如果脚本失败,Patroni初始化也将失败。这对于在新集群中添加新用户或创建扩展非常有用。
实现PostgreSQL 9.6支持。(Alexander Kukushkin)
使用 wal_level = replica 作为 hot_standby 的同义词,避免在两者之间切换时出现pending_restart标志。(Alexander Kukushkin)
文档改进
添加Patroni主 循环工作流程图 。(Alejandro Martínez,Alexander Kukushkin)
改进README,添加Helm chart和发布说明链接。(Lauri Apple)
将Patroni文档迁移至 Read the Docs
使文档可在不同设备(包括智能手机)上轻松查看和搜索。
将软件包迁移至语义版本控制。(Oleksii Kliukin)
Patroni将遵循major.minor.patch版本方案,以避免对小但关键的错误修复发布新的minor版本。我们将仅发布minor版本的发布说明,其中包含所有补丁。
Version 1.1 发布于 2016-09-07
此版本通过引入暂停模式改进了Patroni集群的管理,通过计划性和条件性重启改善了维护体验,使Patroni与Etcd或Zookeeper的交互更加健壮,并大幅增强了patronictl。
升级须知
从1.0以下版本升级时,请阅读1.0发布说明中关于凭据和配置格式变更的内容。
暂停模式
引入暂停模式,暂时使Patroni脱离对PostgreSQL实例的管理(Murat Kabilov,Alexander Kukushkin,Oleksii Kliukin)。
此前,必须向Patroni发送SIGKILL信号才能在不终止PostgreSQL的情况下停止它。新的暂停模式在集群范围内使Patroni脱离PostgreSQL管理,而不终止Patroni。这类似于Pacemaker中的维护模式。Patroni仍负责更新DCS中的成员和领导者键,但在此过程中不会启动、停止或重启PostgreSQL服务器。有一些例外情况,例如手动故障转移、重新初始化和重启仍然允许。详细说明请参阅 此功能的详细描述
此外,patronictl支持新的 pause resume 命令来切换暂停模式。
计划性和条件性重启
为restart API命令添加条件(Oleksii Kliukin)
此更改通过添加一些可验证的条件来增强Patroni重启功能。这些条件包括当PostgreSQL角色为主节点或副本时重启、检查PostgreSQL版本号,或仅在需要重启以应用配置更改时才重启。
添加计划性重启(Oleksii Kliukin)
现在可以安排在未来执行重启。每个节点仅支持一个计划性重启。如果不再需要,可以取消计划性重启。支持计划性和条件性重启的组合,例如可以安排在夜间进行PostgreSQL小版本升级,仅重启运行过时小版本的实例,而无需在管理脚本中添加PostgreSQL特定的逻辑。
为patronictl添加条件性和计划性重启支持(Murat Kabilov)。
patronictl restart支持多个新选项。还有patronictl flush命令用于清理计划的操作。
健壮的DCS交互
根据loop_wait设置Kazoo超时(Alexander Kukushkin)
最初,ping_timeout和connect_timeout值是从协商的会话超时计算得出的。未考虑Patroni的loop_wait。因此,单次重试可能花费超过会话超时的时间,迫使Patroni释放锁并降级。
此更改将ping和connect超时设置为loop_wait值的一半,加快连接问题的检测速度,并留出足够时间在丢失锁之前重试连接。
仅在原始请求成功后更新Etcd拓扑(Alexander Kukushkin)
将更新客户端已知的Etcd拓扑推迟到原始请求完成之后。在检索集群拓扑时,根据Etcd集群中已知的节点数量实现重试超时。这使我们的客户端优先获取请求结果,而非拥有最新的节点列表。
这两项更改使Patroni在面对网络问题时与DCS的连接更加健壮。
patronictl、监控和配置
通过API返回流复制副本的信息(Feike Steenbergen) 此前,没有可靠的方法查询Patroni关于无法流式传输变更的PostgreSQL实例(例如由于连接问题)。此更改通过/patroni端点公开pg_stat_replication的内容。
添加patronictl scaffold命令(Oleksii Kliukin)
添加在Etcd中创建集群结构的命令。使用用户指定的sysid和领导者创建集群,领导者键和成员键都设置为持久化。此命令对于创建所谓的无主配置非常有用,其中仅由副本组成的Patroni集群从不感知Patroni的外部主节点进行复制。随后,可以删除领导者键,提升其中一个Patroni节点,用基于Patroni的HA集群替换原始主节点。
添加配置选项 bin_dir 以定位PostgreSQL二进制文件(Ants Aasma)
当Linux发行版支持同时安装多个PostgreSQL版本时,能够显式指定PostgreSQL二进制文件的位置非常有用。
允许使用 custom_conf 覆盖配置文件路径(Alejandro Martínez)
允许自定义配置文件路径,该路径不受Patroni管理, 详情
错误修复和代码改进
使Patroni兼容PostgreSQL 10及更高版本中的新版本号格式(Feike Steenbergen)
确保Patroni在基于PostgreSQL版本执行条件性重启时能理解两位数版本号。
使用pkgutil查找DCS模块(Alexander Kukushkin)
使用专用的Python模块而非手动遍历目录来查找DCS模块。
启动Patroni时始终调用on_start回调(Alexander Kukushkin)
此前,当连接到已经以正确角色运行的节点时,Patroni不会调用任何回调。由于回调通常用于路由客户端连接,这可能导致无法在连接路由方案中注册正在运行的节点。此修复使Patroni即使在连接到已运行的节点时也会调用on_start回调。
不删除活跃的复制槽(Murat Kabilov,Oleksii Kliukin)
避免在主节点上删除活跃的物理复制槽。PostgreSQL本身也无法删除此类槽。此更改使得可以在主节点上运行非Patroni管理的副本/消费者。
在PostgreSQL实例启动期间关闭Patroni连接(Alexander Kukushkin)
强制Patroni在PostgreSQL节点启动时关闭所有先前的连接。避免在postmaster被SIGKILL终止后复用先前连接的陷阱。
从成员名称构造槽名称时替换无效字符(Ants Aasma)
确保不符合槽命名规则的备用名称不会导致槽创建和备用启动失败。将槽名称中的短横线替换为下划线,将槽名称中不允许的所有其他字符替换为其unicode码点。
Version 1.0 发布于 2016-07-05
此版本引入了全局动态配置,允许对整个HA集群的PostgreSQL和Patroni配置参数进行动态更改。同时还修复了大量错误。
升级须知
从v0.90或更低版本升级时,请始终先升级所有副本,再升级主节点。由于我们不再在DCS中存储复制凭据,旧版本的副本将无法连接到新版本的主节点。
动态配置
实现全局动态配置(Alexander Kukushkin)
引入新的REST API端点/config,用于提供应在整个HA集群(主节点和所有副本)中全局设置的PostgreSQL和Patroni配置参数。这些参数设置在DCS中,在很多情况下可以在不中断PostgreSQL或Patroni的情况下应用。当某些值需要重启PostgreSQL时,Patroni会设置一个通过API可见的特殊标志"pending restart”。在这种情况下,需要通过API手动发起重启。
向Patroni发送SIGHUP或POST到/reload将使其重新读取配置文件。
关于哪些参数可以更改以及不同配置源的处理顺序,请参阅 Patroni配置
自v0.90以来配置文件格式已更改 。Patroni仍兼容旧的配置文件,但要利用引导参数需要进行更改。建议用户参考 动态配置文档页面
更灵活的配置 *
使PostgreSQL配置和Patroni连接的数据库名可配置(Misja Hoebe)
引入 database 和 config_base_name 配置参数。除其他功能外,它使得可以在PipelineDB和其他PostgreSQL分支上运行Patroni。
实现通过环境变量配置部分Patroni配置参数的功能(Alexander Kukushkin)
这些参数包括scope、节点名称和namespace,以及密钥信息,使得在动态环境(即Kubernetes)中运行Patroni更加容易。更多详情请参阅 支持的环境变量
更新内置的Patroni Docker容器以利用基于环境变量的配置(Feike Steenbergen)。
为Patroni Docker镜像添加Zookeeper支持(Alexander Kukushkin)
拆分Zookeeper和Exhibitor配置选项(Alexander Kukushkin)
使patronictl复用Patroni的代码来读取配置(Alexander Kukushkin)
这使patronictl能够利用基于环境变量的配置。
在primary_conninfo中将应用名称设置为节点名称(Alexander Kukushkin)
这简化了给定节点同步复制的识别和配置。
稳定性、安全性和可用性改进
在备份恢复进行中时重置sysid并且不调用pg_controldata(Alexander Kukushkin)
此更改减少了在从备份进行漫长初始化期间Patroni API健康检查产生的噪音。
修复一系列pg_rewind边界情况(Alexander Kukushkin)
避免在源集群不是主节点时运行pg_rewind。
此外,避免在rewind不成功时删除数据目录,除非新参数 remove_data_directory_on_rewind_failure 设置为true。默认为false。
从DCS中的复制连接字符串中移除密码(Alexander Kukushkin)
此前,Patroni始终使用DCS中PostgreSQL URL的复制凭据。现已更改为从Patroni配置中获取凭据。密钥信息(复制用户名和密码)不再在DCS中暴露。
修复降级调用相关的异步机制(Alexander Kukushkin)
降级现在完全异步运行,不会阻塞DCS交互。
在配置了授权的情况下,使patronictl始终发送授权头(Alexander Kukushkin)
这允许patronictl在Patroni配置为需要授权时发出"受保护的"请求,如重启或重新初始化。
正确处理SystemExit异常(Alexander Kukushkin)
避免Patroni在收到SIGTERM时无法正确停止的问题。
用于confd的haproxy模板示例(Alexander Kukushkin)
使用confd从DCS中的Patroni状态生成并动态更改haproxy配置。
改进和重组文档使其对新用户更友好(Lauri Apple)
API必须在pg_ctl stop期间报告role=master(Alexander Kukushkin)
使回调调用更加可靠,特别是在集群停止的情况下。此外,引入 pg_ctl_timeout 选项来设置通过 pg_ctl 进行启动、停止和重启调用的超时时间。
修复etcd中的重试逻辑(Alexander Kukushkin)
使重试更可预测和健壮。
使Zookeeper代码对短暂网络故障更具弹性(Alexander Kukushkin)
减少连接超时以使Zookeeper连接尝试更频繁。
Version 0.90 发布于 2016-04-27
此版本添加了对Consul的支持,包含新的 noloadbalance 标签,更改了 clonefrom 标签的行为,改进了 pg_rewind 处理并改进了 patronictl 控制程序。
Consul支持
新标签和改进的标签
实现 noloadbalance 标签(Alexander Kukushkin)
此标签使Patroni始终向负载均衡器返回该副本不可用。
更改 clonefrom 标签的实现(Alexander Kukushkin)
此前,必须向 clonefrom 提供节点名称,强制带标签的副本从指定节点克隆。新实现将 clonefrom 改为布尔标签:如果设置为true,该副本将成为其他副本从其克隆的候选者。当存在多个候选者时,副本会随机选择一个。
稳定性和安全性改进
大量可靠性改进(Alexander Kukushkin)
移除一些虚假的错误消息,提高故障转移的稳定性,解决从DCS读取数据、关闭、降级和前领导者重新连接的一些边界情况。
改进系统脚本以避免在停止时终止Patroni子进程(Jan Keirse,Alexander Kukushkin)
此前,在停止Patroni时,systemd 也会向PostgreSQL发送信号。由于Patroni本身也尝试停止PostgreSQL,导致发送两个不同的关闭请求(smart关闭后跟fast关闭)。这导致副本过早断开连接,前主节点在降级后无法重新加入。由Jan修复,Alexander进行了前期研究。
消除前主节点在作为副本重新加入前无法调用pg_rewind的一些情况(Oleksii Kliukin)
此前,我们仅在前主节点崩溃时才调用 pg_rewind 。现更改为只要系统中存在pg_rewind就始终对前主节点运行pg_rewind。这修复了主节点在副本获取最新变更之前被关闭的情况(即在"smart"关闭期间)。
对单元测试和验收测试进行大量改进,特别是启用了对Zookeeper和Consul的支持(Alexander Kukushkin)。
加速Travis CI并实现对Zookeeper(Exhibitor)和Consul运行测试的支持(Alexander Kukushkin)
单元测试和验收测试在每次提交或拉取请求时自动对Etcd、Zookeeper和Consul运行。
从Patroni调用PostgreSQL命令前清除环境变量(Feike Steenbergen)
这防止了通过连接到Patroni管理的PostgreSQL集群来读取系统环境变量的可能性。
配置和控制变更
统一patronictl和Patroni配置(Feike Steenbergen)
patronictl可以使用与Patroni本身相同的配置文件。
使Patroni能够从环境变量读取配置(Oleksii Kliukin)
这简化了自动生成Patroni配置或从不同来源合并单一配置的工作。
在API返回的信息中包含数据库系统标识符(Feike Steenbergen)
为所有可用的DCS实现 delete_cluster (Alexander Kukushkin)
在patronictl中启用对Etcd以外的DCS的支持。
Version 0.80 发布于 2016-03-14
此版本添加了对级联复制 的支持,并通过提供计划性故障转移 简化了Patroni管理。可以将旧版本的Patroni(特别是0.78)与此版本组合使用以迁移到新版本。请注意,计划性故障转移和级联复制相关功能仅适用于Patroni 0.80及以上版本。
级联复制
为Patroni节点添加 replicatefrom 和 clonefrom 标签支持(Oleksii Kliukin)。 replicatefrom 标签允许副本使用任意节点作为源,不必是主节点。clonefrom 对初始备份做同样的事情。它们共同使Patroni完全支持级联复制。
添加运行复制方法来初始化副本的支持,即使没有运行中的复制连接也可以(Oleksii Kliukin)。 这对于从S3或FTP上存储的快照创建副本非常有用。不需要运行中复制连接的复制方法应在yaml配置中提供 no_master: true 。如果存在复制连接,这些脚本仍会按顺序调用。
patronictl、API和DCS改进
实现计划性故障转移(Feike Steenbergen)。
故障转移可以安排在未来的特定时间发生,使用patronictl或API调用均可。
为patronictl添加 dbuser 和 password 参数支持(Feike Steenbergen)。
在健康检查输出中添加PostgreSQL版本信息(Feike Steenbergen)。
改进patronictl中的Zookeeper支持(Oleksandr Shulgin)
迁移到python-etcd 0.43(Alexander Kukushkin)
配置
添加Patroni的系统配置脚本示例(Jan Keirse)。 修复Patroni忽略配置文件中指定的超级用户名进行数据库连接的问题(Alexander Kukushkin)。 修复CTRL-C的处理,为Patroni启动的postmaster创建单独的会话ID和进程组(Alexander Kukushkin)。 测试
添加使用 behave 的验收测试,以检查运行Patroni的真实场景(Alexander Kukushkin,Oleksii Kliukin)。
测试可以使用 behave 命令手动启动。它们也会在拉取请求和提交后自动运行。
一些旧版本的发布说明可以在 项目的GitHub页面
26.20 - 贡献指南 贡献工作流程、支持渠道与开发指南。
原始页面: https://patroni.readthedocs.io/en/latest/contributing_guidelines.html
在线交流 如有疑问、需要互动式故障排查帮助,或希望与其他 Patroni 用户交流,欢迎加入 PostgreSQL Slack 的 #patroni 频道。
报告缺陷 提交缺陷报告前,请务必在最新版 Patroni 上复现该问题 !同时请检查 Issues Tracker 中是否已存在相同问题。
运行测试 运行 behave 测试的前置条件:
需要安装包含 contrib 模块的 PostgreSQL 软件包。 PostgreSQL 二进制文件必须在 PATHPATH=/usr/lib/postgresql/11/bin:\$PATH python -m behave 如需测试外部 DCS(如 Etcd、Consul、Zookeeper),需要提前安装相应软件包,并确保对应服务在本地默认端口上以无加密/无认证方式接受连接。对于 Etcd 或 Consul,若相应二进制文件在 PATH 安装依赖:
# 可以使用 Virtualenv 或指定 pip3。
pip install -r requirements.txt
pip install -r requirements.dev.txt
安装完所有依赖后,可以运行各类测试套件:
# 可以使用 Virtualenv 或指定 python3。
# 运行 flake8 检查语法和格式:
python setup.py flake8
# 运行 tests/ 目录中的 pytest 套件:
python setup.py test
# 也可以以更细粒度运行测试,便于调试;
# -s 选项会在测试执行期间显示打印输出。
# pytest 测试通常遵循 FILEPATH::CLASSNAME::TESTNAME 的格式。
pytest -s tests/test_api.py
pytest -s tests/test_api.py::TestRestApiHandler
pytest -s tests/test_api.py::TestRestApiHandler::test_do_GET
# 运行 features/ 目录中的 behave(https://behave.readthedocs.io/en/latest/)测试套件;
# 可根据需要修改 DCS(raft 没有外部依赖,最易于上手):
DCS = raft python -m behave
使用 tox 进行测试 运行 tox 测试只需安装一个额外依赖(Python 本身除外):
如需运行 behave
tox.ini
lintflake8testpytestdeppipdeptreetypepyrightblackblackdocker-buildbehavedocker-cmddocker-behave-etcdpy*behavedocssphinx运行 tox 运行默认环境列表(dep、lint、test 和 docs),直接执行:
可以使用 testtest
可以使用 behavebehave
类似地,docs 使用 docs
其他所有环境可通过对应的环境名称运行:
tox -e lint
tox -e py39-test-lin
也可以使用 factors
这等价于运行以下所有环境:
$ tox -l -f py310
py310-test-lin
py310-test-mac
py310-test-win
py310-type-lin
py310-type-mac
py310-type-win
py310-behave-etcd-lin
py310-behave-etcd-win
py310-behave-etcd-mac
可以使用 tox(>= v4)列出所有已配置的环境组合:
当 tox 在有活跃终端的情况下运行时,testdocsopenxdg-openOPEN_CMDOPEN_CMD:
Behave 测试 使用 -m behave
若要指定 PostgreSQL 版本,请同时指定所需的镜像构建环境和 behave 环境名称。例如,若要测试 PostgreSQL 14,请使用:
tox -e pg14-docker-build,pg14-docker-behave-etcd-lin
如果只想测试特定功能,可以向 behave 传递位置参数。以下命令将针对所有 PostgreSQL 版本运行 watchdog behave 功能测试场景:
tox -m behave -- features/watchdog.feature
当然,您也可以将上述两种方式结合使用。
提交 Pull Request Fork 仓库,在本地开发并测试您的代码变更。 在用户文档中同步反映相关变更。 提交 Pull Request,并清晰描述本次变更的目标。如涉及已有 Issue,请关联该 Issue。 我们将尽快为您的 Pull Request 提供反馈。
祝 Patroni 开发愉快 ;-)
27 - pgBouncer 1.25 中文文档 PgBouncer —— PostgreSQL 轻量级连接池,v1.25 中文文档
原始页面: https://www.pgbouncer.org/
pgbouncer 是 PostgreSQL 的连接池。任何目标应用都可以像连接 PostgreSQL 服务器一样连接到 pgbouncer ,pgbouncer 将负责创建到实际服务器的连接,或者复用已有的连接。
pgbouncer 的目标是降低向 PostgreSQL 建立新连接所带来的性能损耗。
为了在连接池化时不破坏事务语义,pgbouncer 在轮换连接时支持多种池化类型:
会话池化 :最温和的方式。当客户端连接时,将为其分配一个服务端连接,并在客户端保持连接期间始终持有。当客户端断开时,服务端连接将放回连接池。这是默认方式。事务池化 :仅在事务期间为客户端分配服务端连接。当 PgBouncer 检测到事务结束时,服务端连接将放回连接池。语句池化 :最激进的方式。查询完成后,服务端连接立即放回连接池。此模式禁止多语句事务。27.1 - 特性 PgBouncer 特性——池化模式与 SQL 兼容性
原始页面: https://www.pgbouncer.org/features.html
各池化模式的 SQL 特性兼容表 下表列出了 PostgreSQL 的各项特性及其与 PgBouncer 池化模式的兼容性。请注意,事务池化在设计上 就会打破客户端对服务端的预期,只有在应用程序配合、不使用不可用特性的情况下方可使用。
特性 会话池化 事务池化 Startup parameters 是 是 SET/RESET 是 不支持 LISTEN 是 不支持 NOTIFY 是 是 WITHOUT HOLD CURSOR 是 是 WITH HOLD CURSOR 是 不支持 Protocol-level prepared plans 是 是 PREPARE / DEALLOCATE 是 不支持 ON COMMIT DROP temp tables 是 是 PRESERVE/DELETE ROWS temp tables 是 不支持 Cached plan reset 是 是 LOAD statement 是 不支持 Session-level advisory locks 是 不支持
27.2 - 配置:pgbouncer.ini PgBouncer 配置文件(pgbouncer.ini)完整参考
原始页面: https://www.pgbouncer.org/config.html
描述 配置文件采用 “ini” 格式。节名称位于 [ 和 ] 之间。以 ; 或 # 开头的行被视为注释并忽略。当 ; 和 # 出现在行中间时,不会被识别为特殊字符。
通用设置 logfile 指定日志文件。若要以守护进程方式运行(-d),需要设置此项或 syslog。
日志文件保持打开状态,因此在日志轮转后,应执行 kill -HUP 或在控制台执行 RELOAD;。在 Windows 上,必须停止并重启服务。
注意:设置 logfile 本身并不会关闭向 stderr 的日志输出,如需关闭请使用命令行选项 -q 或 -d。
默认值:未设置
pidfile 指定 PID 文件。若未设置 pidfile,则不允许以守护进程方式运行(-d)。
默认值:未设置
listen_addr 指定监听 TCP 连接的地址列表(逗号分隔)。也可使用 * 表示"监听所有地址"。若未设置,则只接受 Unix 套接字连接。
地址可以用数字形式(IPv4/IPv6)或主机名指定。
默认值:未设置
listen_port 监听的端口号。同时适用于 TCP 和 Unix 套接字。
默认值:6432
unix_socket_dir 指定 Unix 套接字的位置。同时适用于监听套接字和服务端连接。若设为空字符串,则禁用 Unix 套接字。以 @ 开头的值表示创建抽象命名空间中的 Unix 套接字(目前仅支持 Linux 和 Windows)。
若要使在线重启(-R)正常工作,需要配置 Unix 套接字,且必须位于文件系统命名空间中。
默认值:/tmp(Windows 上为空)
unix_socket_mode Unix 套接字的文件系统权限模式。对抽象命名空间中的套接字无效,Windows 上不支持。
默认值:0777
unix_socket_group Unix 套接字使用的组名。对抽象命名空间中的套接字无效,Windows 上不支持。
默认值:未设置
user 若设置此项,则在启动后切换到指定的 Unix 用户。仅当 PgBouncer 以 root 启动或已以指定用户运行时有效,Windows 上不支持。
默认值:未设置
pool_mode 指定服务端连接何时可被其他客户端复用。
sessiontransactionstatementmax_client_conn 允许的最大客户端连接数。
增大此设置时,操作系统的文件描述符限制可能也需要相应提高。注意,实际可能使用的文件描述符数量多于 max_client_conn。如果每个用户以自己的用户名连接到服务器,理论最大值为:
max_client_conn + (max pool_size * total databases * total users)
如果连接字符串中指定了数据库用户(所有用户以同一用户名连接),理论最大值为:
max_client_conn + (max pool_size * total databases)
理论最大值通常不会被达到,除非有人刻意构造特殊负载。尽管如此,这意味着你应该将文件描述符数量设置到一个足够大的安全值。
在你喜欢的 shell 手册页中搜索 ulimit。注意:ulimit 在 Windows 环境中不适用。
默认值:100
default_pool_size 每个用户/数据库对允许的服务端连接数。可在每个数据库的配置中覆盖。
默认值:20
min_pool_size 若连接池中的连接数低于此值,则向连接池添加更多服务端连接。在长时间完全空闲后恢复正常负载时,可改善响应行为。该值实际上被限制在连接池大小以内。
仅在以下至少一个条件满足时才强制执行:
[database] 节中该连接池的条目设置了 user 键(即强制用户)该连接池中至少有一个客户端连接 默认值:0(禁用)
reserve_pool_size 允许向连接池添加的额外连接数(参见 reserve_pool_timeout)。0 表示禁用。
默认值:0(禁用)
reserve_pool_timeout 如果客户端在此时间内未被服务,则使用备用连接池中的额外连接。0 表示禁用。[秒]
默认值:5.0
max_db_connections 每个数据库允许的最大服务端连接数(不区分用户)。这里指的是客户端所连接的 PgBouncer 数据库,而非出站连接对应的 PostgreSQL 数据库。
也可在 [databases] 节中按数据库设置。
注意:达到限制后,关闭某个连接池的客户端连接并不会立即允许另一个连接池建立新的服务端连接,因为第一个连接池的服务端连接仍然是打开的。一旦该服务端连接因空闲超时而关闭,等待中的连接池将立即打开新的服务端连接。
默认值:0(不限制)
max_db_client_connections 每个数据库允许的最大客户端连接数(不区分用户)。这里指的是客户端所连接的 PgBouncer 数据库,而非出站连接对应的 PostgreSQL 数据库。
此值应大于或等于 max_db_connections。两者之差可以理解为:在等待活跃连接完成的过程中,某个数据库可以排队的连接数。
也可在 [databases] 节中按数据库设置。
默认值:0(不限制)
max_user_connections 每个用户允许的最大服务端连接数(不区分数据库)。这里指的是与连接池关联的 PgBouncer 用户,即为服务端连接指定的用户,或在未指定的情况下,客户端所使用的登录用户。
也可在 [users] 节中按用户设置。
注意:达到限制后,关闭某个连接池的客户端连接并不会立即允许另一个连接池建立新的服务端连接,因为第一个连接池的服务端连接仍然是打开的。一旦该服务端连接因空闲超时而关闭,等待中的连接池将立即打开新的服务端连接。
默认值:0(不限制)
max_user_client_connections 每个用户允许的最大客户端连接数(不区分数据库)。此值应高于 max_user_connections。max_user_connections 与 max_user_client_connections 之差,可以理解为该用户的最大排队长度。
也可在 [users] 节中按用户设置。
默认值:0(不限制)
server_round_robin 默认情况下,PgBouncer 以 LIFO(后进先出)方式复用服务端连接,从而使少数连接承担大部分负载。当只有一台服务器为某个数据库提供服务时,这种方式性能最佳。但如果数据库地址背后有轮询系统(TCP、DNS 或主机列表),则 PgBouncer 也采用轮询方式使用连接会更好,从而实现均匀的负载分布。
默认值:0
默认情况下,PgBouncer 为每个客户端跟踪 client_encoding、datestyle、timezone、standard_conforming_strings 和 application_name 参数。若需跟踪其他参数,可在此处指定,使 PgBouncer 知道应将它们维护在客户端变量缓存中,并在客户端变为活跃状态时将其恢复到服务端。
若需指定多个值,请使用逗号分隔的列表(例如 default_transaction_read_only, IntervalStyle)。
注意:大多数参数无法通过此方式跟踪。只有 Postgres 向客户端报告的参数才能被跟踪。Postgres 有一份 官方报告给客户端的参数列表 。不过,Postgres 扩展可以修改此列表——它们可以添加自己上报的参数,也可以开始上报 Postgres 原本未上报的已有参数。值得注意的是,Citus 12.0+ 会导致 Postgres 额外上报 search_path。
Postgres 协议支持通过两种方式指定参数设置:直接作为启动包中的参数,或在 options 启动包track_extra_parameters 支持。但 options 本身不能被包含在 track_extra_parameters 中,只有 options 中包含的参数才可以。
默认值:IntervalStyle
ignore_startup_parameters 默认情况下,PgBouncer 在启动包中只允许它可以跟踪的参数:client_encoding、datestyle、timezone 和 standard_conforming_strings。所有其他参数都会触发错误。若要允许其他参数,可在此处指定,PgBouncer 便知道这些参数由管理员处理,可以忽略它们。
若需指定多个值,请使用逗号分隔的列表(例如 options,extra_float_digits)。
Postgres 协议支持通过两种方式指定参数设置:直接作为启动包中的参数,或在 options 启动包ignore_startup_parameters 支持。甚至可以将 options 本身包含在 track_extra_parameters 中,这样 options 中包含的所有未知参数都会被忽略。
默认值:空
peer_id 用于在一组相互对等的 PgBouncer 进程中标识当前 PgBouncer 进程的对等 ID。在一组对等的 PgBouncer 进程中,peer_id 值必须唯一。设为 0 时,PgBouncer 对等功能被禁用。详见 [peers] 节的文档。peer_id 的最大值为 16383。
默认值:0
disable_pqexec 禁用简单查询协议(PQexec)。与扩展查询协议不同,简单查询协议允许在一个数据包中发送多条查询,这可能导致某些类型的 SQL 注入攻击。禁用它可以提高安全性。显然,这意味着只有完全使用扩展查询协议的客户端才能正常工作。
默认值:0
application_name_add_host 在连接建立时,将客户端主机地址和端口追加到 application_name 设置中。这有助于识别问题查询的来源等。此逻辑仅在连接建立时生效。若之后通过 SET 修改了 application_name,PgBouncer 不会再次更改它。
默认值:0
conffile 显示当前配置文件的位置。修改此项将使 PgBouncer 在下次 RELOAD / SIGHUP 时使用另一个配置文件。
默认值:命令行指定的文件
service_name 用于 Win32 服务注册。
默认值:pgbouncer
job_name service_name 的别名。
stats_period 设置各 SHOW 命令中显示的平均值的更新频率,以及聚合统计信息写入日志的频率(另见 log_stats)。[秒]
默认值:60
max_prepared_statements 当此值设为非零时,PgBouncer 会在事务池化和语句池化模式下,跟踪客户端发送的协议级命名预处理语句相关命令。PgBouncer 会确保客户端发出的任何预处理语句在后端服务端连接上都可用,即使该语句最初是在另一个服务端连接上准备的。
PgBouncer 内部会检查客户端作为预处理语句发送的所有查询,并以 PGBOUNCER_{unique_id} 格式为每个唯一查询字符串分配一个内部名称。如果同一查询字符串被多次准备(可能来自不同客户端),这些查询会共享同一个内部名称。PgBouncer 仅使用内部名称(而非客户端提供的名称)在实际的 PostgreSQL 服务器上准备语句。PgBouncer 会记录客户端为每个预处理语句指定的名称,并在将命令转发到服务器之前,将使用预处理语句的每条命令中的客户端名称替换为内部名称(例如,将 my_prepared_statement 替换为 PGBOUNCER_123)。更重要的是,如果客户端想要执行的预处理语句尚未在服务器上准备好(例如,因为当前分配给客户端的服务器与客户端准备该语句时的服务器不同),PgBouncer 会在执行前透明地进行准备。
注意:对预处理语句命令的跟踪和改写不适用于 SQL 级别的预处理语句命令,因此 PREPARE、EXECUTE 和 DEALLOCATE 会直接转发给 Postgres。例外情况是 DEALLOCATE ALL 和 DISCARD ALL 命令,它们可以按预期工作,并会清除 PgBouncer 为发送这些命令的客户端跟踪的预处理语句。
此设置的实际值控制在单个服务端连接上的 LRU 缓存中保持活跃的预处理语句数量。设为 0 时,事务池化和语句池化的预处理语句支持被禁用。为获得最佳性能,应确保此设置大于应用程序中常用预处理语句的数量。请注意,该值越高,PgBouncer 每个连接在 PostgreSQL 服务器上的内存占用就越大,因为服务器会保持更多已准备好的查询。这也会增加 PgBouncer 自身的内存占用,因为它需要跟踪查询字符串。
不过,PgBouncer 内存使用的影响并不太大:
每个唯一查询在全局查询缓存中只存储一次。 每个客户端连接都保留一个用于改写数据包的缓冲区,大小最多为 pkt_buf 的 4 倍。但这个上限通常不会被达到,只有在预处理语句中的查询大小介于 pkt_buf 的 2 到 4 倍之间时才会出现。 以如下示例场景为例:
有 1000 个活跃客户端 客户端准备了 200 个唯一查询 查询的平均大小为 5kB pkt_buf 参数设置为默认值 4096(4kB)那么,PgBouncer 处理这些预处理语句所需的最大内存量为:
200 x 5kB + 1000 x 4 x 4kB = ~17MB of memory.
跟踪预处理语句不仅有内存开销,还会增加 CPU 使用率,因为 PgBouncer 需要检查和改写查询。多个 PgBouncer 实例可以监听同一端口,以使用多个核心进行处理,详情参见 so_reuseport 选项的文档 。
当然,预处理语句也有性能优势。就像直接连接 PostgreSQL 一样,通过预先准备一个多次执行的查询,可以减少总体的解析和规划开销。PgBouncer 跟踪预处理语句的方式对性能尤其有益,特别是当多个客户端准备相同查询时。因为客户端连接会自动在服务端连接上复用预处理语句,即使该语句是由其他客户端准备的。例如,如果 pool_size 为 20,且有 100 个客户端都准备了完全相同的查询,那么该查询在 PostgreSQL 服务器上只会被准备(即解析)20 次。
复用预处理语句有一个缺点。如果预处理语句的返回类型或参数类型在多次执行之间发生变化,PostgreSQL 当前会抛出如下错误:
ERROR: cached plan must not change result type
避免此类错误的方法是:不要让多个客户端使用完全相同的查询字符串的预处理语句,但期望不同的参数或返回类型。最常见的触发场景是在 DDL 迁移期间,对现有表添加新列或更改列类型。在这种情况下,可以在完成迁移后在 PgBouncer 管理控制台上运行 RECONNECT,强制重新准备查询以消除该错误。
默认值:200
scram_iterations 使用 SCRAM-SHA-256 加密密码时执行的计算迭代次数。迭代次数越多,对已存储密码的暴力破解攻击的防护越强,但也会使认证速度变慢。
默认值:4096
认证设置 PgBouncer 处理自己的客户端认证,并维护自己的用户数据库。这些设置用于控制此行为。
auth_type 用户认证方式。
certmd5auth_file 可以同时包含 MD5 加密和明文密码。若配置了 md5 但某用户拥有 SCRAM 密钥,则自动使用 SCRAM 认证。scram-sha-256auth_file 必须包含 SCRAM 密钥或明文密码。plaintrustauth_file 中。anytrust 方式,但忽略所提供的用户名。要求所有数据库都配置为以特定用户登录。此外,控制台数据库允许任何用户以管理员身份登录。hbaauth_hba_file 加载。这允许为不同的访问路径使用不同的认证方式,例如:通过 Unix 套接字的连接使用 peer 认证方式,通过 TCP 的连接必须使用 TLS。ldaphttps://www.postgresql.org/docs/current/auth-ldap.html )。LDAP 连接选项通过 auth_ldap_options 设置配置,也可在 auth_hba_file 中配置。pamauth_file。此方法与使用 auth_user 选项的数据库不兼容。报告给 PAM 的服务名称为 “pgbouncer”。pam 在 HBA 配置文件中不受支持。auth_hba_file 当 auth_type 为 hba 时使用的 HBA 配置文件。详见下方 HBA 文件格式 节。
默认值:未设置
auth_ident_file 当 auth_type 为 hba 且需要定义用户映射时使用的身份映射文件。详见下方 Ident 映射文件格式 节。
默认值:未设置
auth_file 用于加载用户名和密码的文件名。详见下方 认证文件格式 节。
大多数认证类型(见上文)要求设置 auth_file 或 auth_user,否则将没有用户定义。
默认值:未设置
auth_user 若设置了 auth_user,则任何未在 auth_file 中指定的用户,都将通过 auth_query 查询从数据库的 pg_authid 中获取密码,使用的是 auth_user。auth_user 的密码从 auth_file 中获取。(如果 auth_user 不需要密码,则不需要在 auth_file 中定义。)
直接访问 pg_authid 需要管理员权限。建议使用调用 SECURITY DEFINER 函数的非超级用户替代。
默认值:未设置
auth_query 用于从数据库加载用户密码的查询。
直接访问 pg_authid 需要管理员权限。建议使用调用 SECURITY DEFINER 函数的非超级用户替代。
注意:该查询在目标数据库内部运行。因此,若使用函数,需要将其安装到每个数据库中。
默认值:SELECT rolname, CASE WHEN rolvaliduntil < now() THEN NULL ELSE rolpassword END FROM pg_authid WHERE rolname=$1 AND rolcanlogin
auth_dbname [database] 节中用于认证目的的数据库名称。此选项可以是全局设置,也可以在连接字符串中指定该参数来覆盖全局设置。
auth_ldap_options 当 auth_type 为 ldap 时使用的 LDAP 连接选项。(若通过 auth_hba_file 配置认证,则不使用此项。)示例:
auth_ldap_options = ldapurl="ldap://127.0.0.1:12345/dc=example,dc=net?uid?sub"
日志设置 syslog 开启/关闭 syslog。在 Windows 上,使用事件日志替代。
默认值:0
syslog_ident 发送日志到 syslog 时使用的名称。
默认值:pgbouncer(程序名)
syslog_facility 发送日志到 syslog 时使用的设施(facility)。可选值:auth、authpriv、daemon、user、local0-7。
默认值:daemon
log_connections 记录成功的登录。
默认值:1
log_disconnections 记录断开连接及其原因。
默认值:1
log_pooler_errors 记录连接池向客户端发送的错误消息。
默认值:1
log_stats 每隔 stats_period 将聚合统计信息写入日志。如果使用外部监控工具通过 SHOW 命令获取相同数据,可以禁用此项。
默认值:1
verbose 增加日志详细程度。与命令行上的 -v 开关效果相同。例如,命令行上使用 -v -v 等同于 verbose=2。3 是目前支持的最高详细级别。
默认值:0
控制台访问控制 admin_users 允许连接并在控制台执行所有命令的数据库用户(逗号分隔列表)。当 auth_type 为 any 时忽略此项,此时任何用户名都被允许作为管理员登录。
默认值:空
stats_users 允许连接并在控制台执行只读查询的数据库用户(逗号分隔列表)。即除 SHOW FDS 外的所有 SHOW 命令。
默认值:空
连接健康检查与超时 server_reset_query 在将服务端连接释放给其他客户端之前,向服务器发送的查询。此时没有进行中的事务,因此该值不应包含 ABORT 或 ROLLBACK。
该查询用于清除对数据库会话所做的任何更改,以便下一个客户端获得处于明确已知状态的连接。默认值为 DISCARD ALL,它会清除所有内容,但这使下一个客户端没有任何预缓存的状态。可以设置得更轻量,例如仅使用 DEALLOCATE ALL 来清除预处理语句,前提是应用程序在保留部分状态时不会出错。
使用事务池化时,不使用 server_reset_query,因为在该模式下,客户端不得使用任何基于会话的功能,因为每个事务最终会在不同的连接上执行,从而获得不同的会话状态。
默认值:DISCARD ALL
server_reset_query_always 是否在所有池化模式下都运行 server_reset_query。当此设置关闭时(默认),server_reset_query 只会在会话池化模式的连接池中运行。事务池化模式的连接不应需要重置查询。
此设置用于变通处理一种异常配置:应用程序通过事务池化的 PgBouncer 使用了会话级功能。它将不确定性故障转变为确定性故障:客户端在每次事务后都会丢失会话状态。
默认值:0
server_check_delay 释放的连接在无需运行 server_check_query 的情况下,可供立即重用的时间长度。若为 0,则每次都运行检查。
默认值:30.0
server_check_query 用于检查服务端连接是否存活的简单无操作查询。
若为空字符串,则禁用健康检查。
若为 <empty>,则发送空查询作为健康检查。
默认值:<empty>
server_fast_close 在会话池化模式下,如果服务端处于"close_needed"状态(由 RECONNECT、更改连接设置的 RELOAD 或 DNS 变更触发),则立即断开该服务端连接,或在当前事务结束后断开,而不是等到会话结束。在语句或事务池化模式下,此设置无效,因为那已经是默认行为。
如果因此设置导致服务端连接在客户端会话结束前被关闭,则客户端连接也会被关闭。这确保客户端注意到会话已被中断。
此设置使连接配置变更在使用会话池化和长时间会话时能更快生效。缺点是客户端会话可能因配置变更而被中断,因此客户端应用程序需要具备重连并重建会话状态的逻辑。但请注意,不会有任何事务丢失,因为正在运行的事务不会被中断,只有空闲会话才会被中断。
默认值:0
server_lifetime 连接池将关闭已建立连接时间超过此值的未使用服务端连接(即当前未与任何客户端连接关联的连接)。设为 0 表示连接只使用一次,然后关闭。[秒]
也可在 [databases] 节中按数据库设置。
默认值:3600.0
server_idle_timeout 如果服务端连接空闲超过此秒数,则关闭该连接。若为 0,则禁用此超时。[秒]
默认值:600.0
server_connect_timeout 如果连接和登录在此时间内未完成,则关闭该连接。[秒]
默认值:15.0
server_login_retry 如果因连接失败或认证失败导致无法登录到服务器,连接池在重试连接前等待的时间。在等待期间,尝试连接到故障服务器的新客户端将立即收到错误,而不会再次尝试连接。[秒]
此行为的目的是:当服务器不可用时,避免客户端不必要地排队等待服务端连接。但这也意味着,如果服务器出现短暂故障(例如在重启期间或配置有误时),连接池至少需要等待这么长时间才会再次考虑连接它。对于计划内的重启等事件,通常应使用 PAUSE 命令来管理,以避免此问题。
默认值:15.0
client_login_timeout 客户端连接后,若在此时间内未能完成登录,则断开该连接。主要用于避免僵尸连接阻塞 SUSPEND 进而影响在线重启。[秒]
默认值:60.0
autodb_idle_timeout 通过 * 自动创建的数据库连接池,若在此秒数内未被使用,则释放。其负面影响是对应的统计数据也会被清除。[秒]
默认值:3600.0
dns_max_ttl DNS 查询结果可被缓存的时长。实际的 DNS TTL 值会被忽略。[秒]
默认值:15.0
dns_nxdomain_ttl DNS 错误和 NXDOMAIN 查询结果可被缓存的时长。[秒]
默认值:15.0
dns_zone_check_period 检查区域序列号是否已变更的周期。
PgBouncer 可以从主机名(第一个点之后的所有内容)中收集 DNS 区域,并定期检查区域序列号是否变更。如果检测到变更,则重新查找该区域下的所有主机名。若任何主机的 IP 发生变化,则使相关连接失效。
仅适用于 c-ares 后端(configure 选项 --with-cares)。
默认值:0.0(禁用)
resolv_conf 自定义 resolv.conf 文件的位置。这允许独立于全局操作系统配置来指定自定义 DNS 服务器及其他名称解析选项。
需要 evdns(>= 2.0.3)或 c-ares(>= 1.15.0)后端。
文件的解析由 DNS 后端库完成,而非 PgBouncer,因此请参阅相应库的文档以了解允许的语法和指令。
默认值:空(使用操作系统默认值)
query_wait_notify 客户端在 PgBouncer 发送排队通知消息前等待的时间。[秒]
设为 0 时禁用此通知消息。
默认值:5
TLS 设置 如果任何证书或密钥文件的内容发生了变更,但配置中的文件名未变,新的文件内容将在 RELOAD 之后用于新的连接。但现有连接不会被关闭。如果出于安全原因需要让所有连接尽快使用新文件,建议在 RELOAD 之后运行 RECONNECT。
更改任何 TLS 设置都会出于安全原因自动触发 RECONNECT。
client_tls_sslmode 用于客户端连接的 TLS 模式。默认情况下禁用 TLS 连接。启用后,还必须配置 client_tls_key_file 和 client_tls_cert_file,以设置 PgBouncer 用于接受客户端连接的密钥和证书。PgBouncer 支持的最常见证书文件格式是 PEM。
disableallowpreferallow 相同。requireverify-caverify-fullverify-ca 相同。client_tls_key_file PgBouncer 用于接受客户端连接的私钥。
默认值:未设置
client_tls_cert_file 与私钥对应的证书,客户端可以对其进行验证。
默认值:未设置
client_tls_ca_file 用于验证客户端证书的根证书文件。
默认值:未设置
client_tls_protocols 允许使用的 TLS 协议版本。可选值:tlsv1.0、tlsv1.1、tlsv1.2、tlsv1.3。快捷方式:all(tlsv1.0,tlsv1.1,tlsv1.2,tlsv1.3)、secure(tlsv1.2,tlsv1.3)。
默认值:secure
client_tls_ciphers 允许使用的 TLS 加密套件,采用 OpenSSL 语法。快捷方式:
default/secure/fast/normal(均使用系统级 OpenSSL 默认值)all(启用所有加密套件,不推荐)此设置仅影响使用 TLS 1.2 及以下版本的连接。目前没有用于控制 TLS 1.3 连接所使用加密套件的设置。
默认值:default
client_tls13_ciphers 允许使用的 TLS v1.3 加密套件。若为空,则使用 client_tls_ciphers 的值。可选值:
TLS_AES_256_GCM_SHA384TLS_CHACHA20_POLY1305_SHA256TLS_AES_128_GCM_SHA256TLS_AES_128_CCM_8_SHA256TLS_AES_128_CCM_SHA256此设置仅影响使用 TLS 1.3 及以上版本的连接。对于 1.2 及以下版本,请参见 client_tls_ciphers。
默认值:<empty>
client_tls_ecdhcurve 用于 ECDH 密钥交换的椭圆曲线名称。
可选值:none(禁用 DH)、auto(256 位 ECDH)、曲线名称
默认值:auto
client_tls_dheparams DHE 密钥交换类型。
可选值:none(禁用 DH)、auto(2048 位 DH)、legacy(1024 位 DH)
默认值:auto
server_tls_sslmode 用于连接 PostgreSQL 服务器的 TLS 模式。默认模式为 prefer。
disableallowpreferrequireverify-caserver_tls_ca_file 有效。不检查服务器主机名与证书是否匹配。verify-fullserver_tls_ca_file 有效。服务器主机名必须与证书信息匹配。server_tls_ca_file 用于验证 PostgreSQL 服务器证书的根证书文件。
默认值:未设置
server_tls_key_file PgBouncer 用于向 PostgreSQL 服务器进行认证的私钥。
默认值:未设置
server_tls_cert_file 与私钥对应的证书,PostgreSQL 服务器可以对其进行验证。
默认值:未设置
server_tls_protocols 允许使用的 TLS 协议版本。可选值:tlsv1.0、tlsv1.1、tlsv1.2、tlsv1.3。快捷方式:all(tlsv1.0,tlsv1.1,tlsv1.2,tlsv1.3)、secure(tlsv1.2,tlsv1.3)、legacy(all)。
默认值:secure
server_tls_ciphers 允许使用的 TLS 加密套件,采用 OpenSSL 语法。快捷方式:
default/secure/fast/normal(均使用系统级 OpenSSL 默认值)all(启用所有加密套件,不推荐)此设置仅影响使用 TLS 1.2 及以下版本的连接。目前没有用于控制 TLS 1.3 连接所使用加密套件的设置。
默认值:default
server_tls13_ciphers 允许使用的 TLS v1.3 加密套件。若为空,则使用 server_tls_ciphers 的值。可选值:
TLS_AES_256_GCM_SHA384TLS_CHACHA20_POLY1305_SHA256TLS_AES_128_GCM_SHA256TLS_AES_128_CCM_8_SHA256TLS_AES_128_CCM_SHA256此设置仅影响使用 TLS 1.3 及以上版本的连接。对于 1.2 及以下版本,请参见 client_tls_ciphers。
默认值:<empty>
危险超时 设置以下超时可能导致意外错误。
query_timeout 运行时间超过此值的查询将被取消。此设置应与略小于此值的服务端 statement_timeout 配合使用,以便仅针对网络问题生效。[秒]
默认值:0.0(禁用)
query_wait_timeout 查询等待执行的最长时间。若在此时间内未将查询分配给服务器,则断开客户端连接。0 表示禁用;禁用后,客户端将无限期排队。[秒]
此设置用于防止无响应的服务器占用连接。在服务器宕机或因任何原因拒绝连接时也有帮助。
默认值:120.0
cancel_wait_timeout 取消请求等待执行的最长时间。若在此时间内未将取消请求分配给服务器,则断开客户端连接。0 表示禁用;禁用后,取消请求将无限期排队。[秒]
此设置用于防止在服务器宕机导致取消请求无法转发时客户端被卡住。
默认值:10.0
client_idle_timeout 空闲时间超过此秒数的客户端连接将被关闭。此值应大于客户端侧的连接生命周期设置,且仅用于处理网络问题。[秒]
默认值:0.0(禁用)
idle_transaction_timeout 客户端处于"事务中空闲"状态超过此时间后,将被断开连接。[秒]
默认值:0.0(禁用)
transaction_timeout 客户端处于"事务进行中"状态超过此时间后,将被断开连接。[秒]
默认值:0.0(禁用)
suspend_timeout 在 SUSPEND 或重启(-R)期间,等待缓冲区刷新的时长。若刷新未能成功完成,则断开该连接。[秒]
默认值:10
底层网络设置 pkt_buf 数据包的内部缓冲区大小,影响发送的 TCP 数据包大小和总体内存使用量。实际的 libpq 数据包可能大于此值,因此无需将其设置得很大。
默认值:4096
max_packet_size PgBouncer 允许通过的 PostgreSQL 数据包的最大大小。一个数据包对应一条查询或一行结果集,完整的结果集可以更大。
默认值:2147483647
listen_backlog listen(2) 的 backlog 参数,决定在队列中保留多少个未应答的新连接尝试。队列满时,后续新连接将被丢弃。
默认值:128
sbuf_loopcnt 在继续处理之前,对单个连接上的数据进行多少轮处理。若没有此限制,一个拥有大型结果集的连接可能会长时间阻塞 PgBouncer。每轮处理一个 pkt_buf 大小的数据量。0 表示不限制。
默认值:5
so_reuseport 指定是否在 TCP 监听套接字上设置 SO_REUSEPORT 套接字选项。在某些操作系统上,这允许在同一主机上运行多个 PgBouncer 实例,监听相同端口,并由内核自动分配连接。此选项是让 PgBouncer 使用更多 CPU 核心的一种方式。(PgBouncer 是单线程的,每个实例使用一个 CPU 核心。)
具体行为取决于操作系统内核。截至本文撰写时,此设置在(足够新版本的)Linux、DragonFlyBSD 和 FreeBSD 上具有预期效果(在 FreeBSD 上,应用的是 SO_REUSEPORT_LB 套接字选项)。某些其他操作系统支持该套接字选项,但不会达到预期效果:允许多个进程绑定到同一端口,但只有其中一个会收到连接。详情请参阅操作系统的 setsockopt() 文档。
在完全不支持该套接字选项的系统上,启用此设置将导致错误。
同一主机上的每个 PgBouncer 实例至少需要为 unix_socket_dir 和 pidfile 配置不同的值,如果使用 logfile 也是如此。另外请注意,如果使用了此选项,就无法再通过 TCP/IP 连接到特定的 PgBouncer 实例,这可能对监控和指标收集有影响。
为确保查询取消功能正常工作,应在不同的 PgBouncer 进程之间配置 PgBouncer 对等(peering)。详情请参阅 peer_id 配置选项和 peers 配置节的文档。本文档示例节中也提供了一个使用对等和 so_reuseport 的示例。
默认值:0
tcp_defer_accept 设置 TCP_DEFER_ACCEPT 套接字选项;详见 man 7 tcp。(这是一个布尔选项:1 表示启用。启用时实际设置的值当前硬编码为 45 秒。)
目前仅在 Linux 上支持。
默认值:Linux 上为 1,其他系统为 0
tcp_socket_buffer 默认值:未设置
tcp_keepalive 使用操作系统默认值开启基本的 keepalive。
在 Linux 上,系统默认值为 tcp_keepidle=7200、tcp_keepintvl=75、tcp_keepcnt=9。其他操作系统上的默认值可能相近。
默认值:1
tcp_keepcnt 默认值:未设置
tcp_keepidle 默认值:未设置
tcp_keepintvl 默认值:未设置
tcp_user_timeout 设置 TCP_USER_TIMEOUT 套接字选项。该选项指定已传输数据在 TCP 连接被强制关闭之前,可以保持未确认状态的最长时间(毫秒)。若设为 0,则使用操作系统默认值。
目前仅在 Linux 上支持。
默认值:0
[databases] 节 [databases] 节定义了 PgBouncer 客户端可以连接的数据库名称,并指定这些连接将被路由到何处。该节包含如下形式的 key=value 行:
dbname = connection string
其中键将作为数据库名称,值将作为连接字符串,由以下描述的连接参数键值对组成(类似于 libpq,但实际上并不使用 libpq,且可用功能集有所不同)。示例:
foodb = host=host1.example.com port=5432
bardb = host=localhost dbname=bazdb
数据库名称可包含字符 _0-9A-Za-z 而无需引号。包含其他字符的名称需要使用标准 SQL 标识符引号(双引号)括起来,双引号字符本身用 "" 表示。
数据库名称 pgbouncer 为管理控制台保留,不能在此处用作键。
* 充当后备数据库:若请求的数据库名称不完全匹配任何条目,则将其值作为所请求数据库的连接字符串使用。例如,若存在(且没有其他覆盖条目):
那么,指定数据库 bar 连接到 PgBouncer 时,其行为实际上等同于存在如下条目:
bar = host=foo dbname=bar
(利用了 dbname 默认为客户端侧数据库名的特性;见下文。)
此类自动创建的数据库条目,若空闲时间超过 autodb_idle_timeout 参数指定的时间,则会被清除。
dbname 目标数据库名称。
默认值:与客户端侧数据库名相同
host 连接的目标主机名或 IP 地址。主机名在连接时解析,结果按 dns_max_ttl 参数进行缓存。当主机名的解析结果发生变化时,现有服务端连接在被释放时(根据池化模式)自动关闭,新的服务端连接立即使用新的解析结果。若 DNS 返回多个结果,则以轮询方式使用。
若值以 / 开头,则使用文件系统命名空间中的 Unix 套接字。若以 @ 开头,则使用抽象命名空间中的 Unix 套接字。
可以指定逗号分隔的主机名或地址列表,连接将以轮询方式建立。(若主机列表中的主机名通过 DNS 解析到多个地址,则轮询系统独立运行。这是一个实现细节,可能会发生变化。)注意,列表中所有主机在任何时候都必须可用:没有跳过不可达主机或仅选择可用主机的机制。(这与 libpq 中主机列表的含义不同。)另外请注意,这只影响新连接的目标选择方式。关于客户端如何被分配到已建立的服务端连接,另见 server_round_robin 设置。
示例:
host=localhost
host=127.0.0.1
host=2001:0db8:85a3:0000:0000:8a2e:0370:7334
host=/var/run/postgresql
host=192.168.0.1,192.168.0.2,192.168.0.3
默认值:未设置,表示使用 Unix 套接字
port 默认值:5432
user 若设置了 user=,则所有到目标数据库的连接都将以指定用户进行,意味着该数据库只有一个连接池。
否则,PgBouncer 将以客户端用户名登录到目标数据库,意味着每个用户有一个连接池。
password 若此处未指定密码,则使用 auth_file 中对应上述指定用户的密码。目前不支持动态密码发现方式(如 auth_query)。
auth_user 若指定,则覆盖全局 auth_user 设置。
auth_query 若指定,则覆盖全局 auth_query 设置。整个 SQL 语句需要用单引号括起来。
auth_dbname 若指定,则覆盖全局 auth_dbname 设置。
pool_size 设置此数据库的连接池最大大小。若未设置,则使用 default_pool_size。
min_pool_size 设置此数据库的连接池最小大小。若未设置,则使用全局 min_pool_size。
仅在以下至少一个条件满足时才强制执行:
[database] 节中此条目设置了 user 键(即强制用户)该连接池中至少有一个客户端连接 reserve_pool_size 为此数据库设置额外连接数。若未设置,则使用全局 reserve_pool_size。出于向后兼容原因,reserve_pool 是此选项的别名。
connect_query 连接建立后、允许任何客户端使用该连接前执行的查询。若查询引发错误,则记录日志但忽略该错误。
pool_mode 为此数据库设置特定的池化模式。若未设置,则使用默认的 pool_mode。
load_balance_hosts 当 host 中指定了逗号分隔的列表时,load_balance_hosts 控制新连接选择哪个条目。
注意:此设置目前仅控制在连接字符串中提供多个主机时的负载均衡行为,不控制单个主机的 DNS 记录指向多个 IP 地址的情况。这是一个待实现的功能,因此在未来版本中此设置可能开始同时控制这两种负载均衡方式。
round-robindisable建议将 server_login_retry 设置得低于默认值,以确保在有多个可用主机时能快速重试。
默认值:round-robin
max_db_connections 配置该数据库的服务端连接上限(即该数据库内所有连接池的服务端连接总数不超过此值)。
max_db_client_connections 配置该数据库的客户端连接上限。应与 max_client_conn 配合使用,以限制 PgBouncer 允许接受的连接数。
server_lifetime 按数据库配置 server_lifetime。若未设置,则回退到实例级别配置的 server_lifetime。
client_encoding 向服务器请求特定的 client_encoding。
datestyle 向服务器请求特定的 datestyle。
timezone 向服务器请求特定的 timezone。
[users] 节 本节包含如下形式的 key=value 行:
其中键将作为用户名,值将作为该用户特定配置设置的键值对列表。示例:
user1 = pool_mode=session
此处仅支持少数几项设置。
注意:当配置了 auth_file 时,若某用户在本节中有定义但未列于 auth_file 中,且已设置 auth_user,则 PgBouncer 将尝试使用 auth_query 为该用户查找密码。若未设置 auth_user,PgBouncer 将假装该用户存在,但不会向客户端返回"无此用户"消息,也不会接受任何提供的密码。
pool_size 设置此用户所有连接的连接池最大大小。若未设置,则使用数据库级别或 default_pool_size。
reserve_pool_size 设置允许为此用户连接池添加的额外连接数。若未设置,则使用数据库级别配置或全局 reserve_pool_size。
pool_mode 设置此用户所有连接使用的池化模式。若未设置,则使用数据库级别或默认的 pool_mode。
max_user_connections 配置该用户的服务端连接上限(即该用户的所有连接池的服务端连接总数不超过此值)。
query_timeout 设置用户查询的最长运行秒数。若设置,此超时将覆盖上述服务器级别的 query_timeout。
idle_transaction_timeout 设置用户保持事务空闲打开的最长秒数。若设置,此超时将覆盖上述服务器级别的 idle_transaction_timeout。
transaction_timeout 设置用户保持事务打开的最长秒数。若设置,此超时将覆盖上述服务器级别的 transaction_timeout。
client_idle_timeout 设置客户端在 PgBouncer 实例上保持空闲连接的最长秒数。若设置,此超时将覆盖上述服务器级别的 client_idle_timeout。
请注意,这是一个潜在危险的超时。
max_user_client_connections 配置该用户的客户端连接上限。这是 max_client_conn 设置在用户级别的等效项。
[peers] 节 [peers] 节定义了 PgBouncer 可以将取消请求转发到的对等节点,以及这些取消请求将被路由到的位置。
可以通过在所有 PgBouncer 进程的配置中定义 peer_id 值和 [peers] 节,将多个 PgBouncer 进程组成一组对等节点。这些 PgBouncer 进程可以将取消请求转发到其来源进程。当多个 PgBouncer 进程(可能在不同服务器上)位于同一 TCP 负载均衡器后端时,这对于使取消功能正常工作是必要的。取消请求通过与被取消查询不同的 TCP 连接发送,因此 TCP 负载均衡器可能会将取消请求连接发送到与预期不同的进程。通过配置对等关系,这些取消请求最终会到达正确的进程。这份 会议演讲录像 提供了更深入的解释。
本节包含如下形式的 key=value 行:
peer_id = connection string
其中键将作为 peer_id,值将作为连接字符串,由以下描述的连接参数键值对组成(类似于 libpq,但实际上并不使用 libpq,且可用功能集有所不同)。示例:
1 = host=host1.example.com
2 = host=/tmp/pgbouncer-2 port=5555
注意 1:要使对等功能正常工作,组内每个 PgBouncer 进程的 peer_id 在对等组中必须唯一。且 [peers] 节应包含所有这些对等 ID 的条目。文档示例节中有一个示例。允许 (但非必须)[peers] 节包含当前配置所属 PgBouncer 的 peer_id,此类条目会被忽略,但允许这样做是为了便于配置管理——使得同一个 [peers] 节可以用于多个配置文件。
注意 2:只要所有对等节点都在 v1.21.0 版本边界的同一侧,即支持跨版本对等。v1.21.0 对取消令牌的编码方式做了一些破坏性变更,与早期版本不兼容。
host 连接的目标主机名或 IP 地址。主机名在连接时解析,结果按 dns_max_ttl 参数进行缓存。若 DNS 返回多个结果,则以轮询方式使用。但一般不建议使用解析到多个 IP 的主机名,因为这样取消请求可能仍会被转发到错误的节点,需要再次转发(最多只允许转发三次)。
若值以 / 开头,则使用文件系统命名空间中的 Unix 套接字。若以 @ 开头,则使用抽象命名空间中的 Unix 套接字。
示例:
host=localhost
host=127.0.0.1
host=2001:0db8:85a3:0000:0000:8a2e:0370:7334
host=/var/run/pgbouncer-1
port 默认值:6432
pool_size 设置同时发往该对等节点的最大在途取消请求数。取消请求以突发形式到达是很常见的,例如当后端 Postgres 服务器响应缓慢或宕机时。因此,pool_size 不应设置得太低而无法处理这些突发请求。
若未设置,则使用 default_pool_size。
Include 指令 PgBouncer 配置文件可以包含 include 指令,用于指定要读取和处理的另一个配置文件。这允许将配置文件拆分为物理上独立的部分。include 指令的格式如下:
若文件名不是绝对路径,则相对于当前工作目录进行解析。
认证文件格式 本节描述 auth_file 设置所指定文件的格式。该文件是如下格式的文本文件:
"username1" "password" ...
"username2" "md5abcdef012342345" ...
"username2" "SCRAM-SHA-256$<iterations>:<salt>$<storedkey>:<serverkey>"
至少需要 2 个字段,并用双引号括起。第一个字段是用户名,第二个字段是明文密码、MD5 哈希密码或 SCRAM 密钥。PgBouncer 忽略该行的其余内容。字段值中的双引号可以用两个双引号来转义。
PostgreSQL MD5 哈希密码格式:
"md5" + md5(password + username)
因此,用户名为 admin、密码为 1234 的用户,其 MD5 哈希密码为 md545f2603610af569b6155c45067268c6b。
PostgreSQL SCRAM 密钥格式:
SCRAM-SHA-256$<iterations>:<salt>$<storedkey>:<serverkey>
详情请参见 PostgreSQL 文档和 RFC 5803。
认证文件中存储的密码或密钥有两个用途:一是在配置了基于密码的认证方式时,用于验证传入客户端连接的密码;二是在后端服务器需要基于密码认证时,用作到后端服务器出站连接的密码(除非在数据库的连接字符串中直接指定了密码)。
限制 若密码以明文存储,则可用于后端服务器使用的任何基于密码的认证方式:明文、MD5 或 SCRAM(详见 https://www.postgresql.org/docs/current/auth-password.html )。
MD5 哈希密码可用于后端服务器使用 MD5 认证(或特定用户具有 MD5 哈希密码)的情况。
SCRAM 密钥只有在以下条件同时满足时才能用于登录服务器:客户端认证也使用 SCRAM;PgBouncer 数据库定义中未指定用户名;且 PgBouncer 与 PostgreSQL 服务器中的 SCRAM 密钥完全相同(相同的盐值和迭代次数,而不仅仅是相同的密码)。这是由 SCRAM 固有的安全属性决定的:存储的 SCRAM 密钥本身不能用于推导登录凭据。
认证文件可以手动编写,但也可以从其他用户和密码列表生成。参见 ./etc/mkauth.py 了解从 pg_authid 系统表生成认证文件的示例脚本。也可以使用 auth_query 代替 auth_file,以避免维护单独的认证文件。
关于托管服务器的说明 若后端服务器配置为使用 SCRAM 密码认证,且 PgBouncer 不知道用户的明文密码或对应的 SCRAM 密钥,则 PgBouncer 无法成功认证。
某些云服务提供商(如 AWS RDS)禁止访问 PostgreSQL 敏感系统表以获取密码。即使是权限最高的用户(如 rds_superuser 的成员),执行 select * from pg_authid 也会返回 ERROR: permission denied for table pg_authid。这是已知行为(博客 )。
因此,在托管服务器中一旦存储了 SCRAM 密钥,便无法再获取,这使得配置 PgBouncer 使用相同 SCRAM 密钥变得困难。不过,仍然可以通过以下技巧在双方配置并使用 SCRAM 密钥:
使用能够打印出密钥的工具为任意密码生成 SCRAM 密钥。例如,psql --echo-hidden 及 \password 命令会在将 SCRAM 密钥发送到服务器之前将其打印到控制台。
$ psql --echo-hidden <connection_string>
postgres = # \password <role_name>
Enter new password for user "<role_name>" :
Enter it again:
********* QUERY **********
ALTER USER <role_name> PASSWORD 'SCRAM-SHA-256$<iterations>:<salt>$<storedkey>:<serverkey>'
**************************
记下 QUERY 中的 SCRAM 密钥,并将其设置到 PgBouncer 的 userlist.txt 中。
若使用了 psql --echo-hidden 以外的工具,则还需要在服务器端设置 SCRAM 密钥(可以使用 ALTER ROLE <role_name> PASSWORD '<scram_secret>' 来设置)。
HBA 文件格式 HBA 文件的位置由 auth_hba_file 设置指定。仅当 auth_type 设置为 hba 时才使用。
该文件遵循 PostgreSQL pg_hba.conf 文件的格式(见 https://www.postgresql.org/docs/current/auth-pg-hba-conf.html )。
支持的记录类型:local、host、hostssl、hostnossl。 数据库字段:支持 all、replication、sameuser、@file、多个名称。不支持:samerole、samegroup。 用户名字段:支持 all、@file、多个名称。不支持:+groupname。 地址字段:支持 all、IPv4、IPv6。不支持:samehost、samenet、DNS 名称、域前缀。 认证方式字段:仅支持 PgBouncer auth_type 支持的方式,以及 peer 和 reject,但不支持 any 和 pam(它们只在全局范围内有效)。 当 auth_type 为 cert 或 peer 时,支持用户名映射(map=)参数。 Ident 映射文件格式 Ident 映射文件的位置由 auth_ident_file 设置指定。仅当 auth_type 设置为 hba 时才加载。
该文件格式是 PostgreSQL ident 映射文件的简化变体(见 https://www.postgresql.org/docs/current/auth-username-maps.html )。
支持的行格式仅为 map-name system-username database-username。 不支持 include 文件/目录。 系统用户名字段:不支持正则表达式。 数据库用户名字段:支持 all 或单个 Postgres 用户名。不支持:+groupname、正则表达式。 示例 小型配置示例:
[databases]
template1 = host=localhost dbname=template1 auth_user=someuser
[pgbouncer]
pool_mode = session
listen_port = 6432
listen_addr = localhost
auth_type = md5
auth_file = users.txt
logfile = pgbouncer.log
pidfile = pgbouncer.pid
admin_users = someuser
stats_users = stat_collector
数据库配置示例:
[databases]
; foodb 通过 Unix 套接字连接
foodb =
; 将 bardb 重定向到 localhost 上的 bazdb
bardb = host=localhost dbname=bazdb
; 到目标数据库的访问将以单一用户进行
forcedb = host=localhost port=300 user=baz password=foo client_encoding=UNICODE datestyle=ISO
auth_query 安全函数示例:
CREATE OR REPLACE FUNCTION pgbouncer . user_lookup ( in i_username text , out uname text , out phash text )
RETURNS record AS $$
BEGIN
SELECT rolname , CASE WHEN rolvaliduntil < now () THEN NULL ELSE rolpassword END
FROM pg_authid
WHERE rolname = i_username AND rolcanlogin
INTO uname , phash ;
RETURN ;
END ;
$$ LANGUAGE plpgsql
SECURITY DEFINER
-- 设置安全的 search_path:受信任的模式,然后是 'pg_temp'。
SET search_path = pg_catalog , pg_temp ;
REVOKE ALL ON FUNCTION pgbouncer . user_lookup ( text ) FROM public , pgbouncer ;
GRANT EXECUTE ON FUNCTION pgbouncer . user_lookup ( text ) TO pgbouncer ;
使用 so_reuseport 配置 2 个对等 PgBouncer 进程以创建多核 PgBouncer 部署的配置示例。第一个进程的配置:
[databases]
postgres = host=localhost dbname=postgres
[peers]
1 = host=/tmp/pgbouncer1
2 = host=/tmp/pgbouncer2
[pgbouncer]
listen_addr = 127.0.0.1
auth_file = auth_file.conf
so_reuseport = 1
unix_socket_dir = /tmp/pgbouncer1
peer_id = 1
第二个进程的配置:
[databases]
postgres = host=localhost dbname=postgres
[peers]
1 = host=/tmp/pgbouncer1
2 = host=/tmp/pgbouncer2
[pgbouncer]
listen_addr = 127.0.0.1
auth_file = auth_file.conf
so_reuseport = 1
; 只有 unix_socket_dir 和 peer_id 不同
unix_socket_dir = /tmp/pgbouncer2
peer_id = 2
另请参阅 pgbouncer(1) - 通用用法及控制台命令的 man 手册页
27.3 - pgbouncer 命令用法 PgBouncer 命令行用法与管理控制台
原始页面: https://www.pgbouncer.org/usage.html
语法 pgbouncer [-d][-R][-v][-u user] <pgbouncer.ini>
pgbouncer -V|-h
在 Windows 系统上,选项如下:
pgbouncer.exe [-v][-u user] <pgbouncer.ini>
pgbouncer.exe -V|-h
用于设置 Windows 服务的附加选项:
pgbouncer.exe --regservice <pgbouncer.ini>
pgbouncer.exe --unregservice <pgbouncer.ini>
描述 pgbouncer 是一个 PostgreSQL 连接池。任何目标应用程序都可以像连接 PostgreSQL 服务器一样连接到 pgbouncer ,pgbouncer 会创建一个到实际服务器的连接,或者复用已有连接。
pgbouncer 的目标是降低向 PostgreSQL 打开新连接所带来的性能损耗。
为了在连接池化时不破坏事务语义,pgbouncer 在轮换连接时支持以下几种池化模式:
会话池化 最保守的方式。当客户端连接时,将为其分配一个服务端连接,并在客户端保持连接期间一直持有。当客户端断开时,该服务端连接将被归还到连接池中。这是默认模式。
事务池化 仅在事务期间将服务端连接分配给客户端。当 PgBouncer 检测到事务结束后,该服务端连接将被归还到连接池中。
语句池化 最激进的方式。查询完成后,服务端连接将立即归还到连接池中。此模式下不允许多语句事务,因为这会导致错误。
pgbouncer 的管理接口由一些新的 SHOW 命令组成,这些命令在连接到特殊的"虚拟"数据库 pgbouncer 时可用。
快速入门 基本的安装和使用步骤如下。
创建 pgbouncer.ini 文件。详见 pgbouncer(5) 。简单示例:
[databases]
template1 = host=localhost port=5432 dbname=template1
[pgbouncer]
listen_port = 6432
listen_addr = localhost
auth_type = md5
auth_file = userlist.txt
logfile = pgbouncer.log
pidfile = pgbouncer.pid
admin_users = someuser
创建 userlist.txt 文件,其中包含允许登录的用户:
"someuser" "same_password_as_in_server"
启动 pgbouncer :
$ pgbouncer -d pgbouncer.ini
让应用程序(或 psql 客户端)连接到 pgbouncer 而不是直接连接到 PostgreSQL 服务器:
$ psql -p 6432 -U someuser template1
通过连接到特殊管理数据库 pgbouncer 来管理 pgbouncer ,并执行 SHOW HELP; 开始操作:
$ psql -p 6432 -U someuser pgbouncer
pgbouncer=# SHOW HELP;
NOTICE: Console usage
DETAIL:
SHOW [HELP|CONFIG|DATABASES|FDS|POOLS|CLIENTS|SERVERS|SOCKETS|LISTS|VERSION|...]
SET key = arg
RELOAD
PAUSE
SUSPEND
RESUME
SHUTDOWN
[...]
如果对 pgbouncer.ini 文件进行了修改,可以通过以下命令重新加载:
pgbouncer=# RELOAD;
命令行选项 -d,--daemon在后台运行。不加此选项时,进程将在前台运行。在守护进程模式下,需要同时设置 pidfile 以及 logfile 或 syslog。进入后台后,不会向 stderr 写入任何日志信息。
注意:在 Windows 上不可用;pgbouncer 需要以服务形式运行。
-R,--reboot已弃用:请使用多个 pgbouncer 进程通过 so_reuseport 监听同一端口的滚动重启方式来替代此选项。 执行在线重启。即连接到正在运行的进程,从中加载已打开的套接字,然后使用这些套接字。如果没有活动进程,则正常启动。
注意:仅在 OS 支持 Unix 套接字且配置中未禁用 unix_socket_dir 时有效。在 Windows 上不可用。TLS 连接不兼容此选项,将被断开。-u USERNAME ,--user=USERNAME 启动时切换到指定用户。 -v,--verbose增加详细程度。可多次使用。 -q,--quiet静默模式:不向 stderr 输出日志。这不影响日志详细程度,仅禁止使用 stderr。适用于 init.d 脚本。 -V,--version显示版本信息。 -h,--help显示简短帮助信息。 --regserviceWin32:将 PgBouncer 注册为 Windows 服务。使用配置参数 service_name 的值作为注册名称。 --unregserviceWin32:注销 Windows 服务。 管理控制台 通过普通方式连接到数据库 pgbouncer 即可访问控制台:
$ psql -p 6432 pgbouncer
只有在配置参数 admin_users 或 stats_users 中列出的用户才能登录控制台。(当 auth_type=any 时,任何用户均可作为 stats_user 登录。)
此外,用户名为 pgbouncer 的用户可以无密码登录,前提是通过 Unix 套接字连接,且客户端的 Unix 用户 UID 与运行进程相同。
管理控制台目前仅支持简单查询协议。部分驱动程序对所有命令使用扩展查询协议,这些驱动程序无法用于此目的。
Show 命令 SHOW 命令用于输出信息,每个命令说明如下。
SHOW STATS 显示统计信息。在此命令及相关命令中,总计数据自进程启动起累计,平均值每隔 stats_period 更新一次。
database 统计信息按数据库呈现。 total_xact_count pgbouncer 处理的 SQL 事务总数。total_query_count pgbouncer 处理的 SQL 命令总数。total_server_assignment_count 服务端连接被分配给客户端的总次数。 total_received pgbouncer 接收的网络流量总字节数。total_sent pgbouncer 发送的网络流量总字节数。total_xact_time pgbouncer 连接到 PostgreSQL 并处于事务中(包括事务空闲或执行查询)所花费的总微秒数。total_query_time pgbouncer 主动连接到 PostgreSQL 并执行查询所花费的总微秒数。total_wait_time 客户端等待服务端连接所花费的总时间(微秒)。在客户端连接被分配到后端连接时更新。 total_client_parse_count 客户端创建的预处理语句总数。仅适用于命名预处理语句跟踪模式,参见 max_prepared_statements。 total_server_parse_count pgbouncer 在服务端创建的预处理语句总数。仅适用于命名预处理语句跟踪模式,参见 max_prepared_statements。total_bind_count 客户端准备执行并由 pgbouncer 转发给 PostgreSQL 的预处理语句总数。仅适用于命名预处理语句跟踪模式,参见 max_prepared_statements。 avg_xact_count 最近统计周期内每秒平均事务数。 avg_query_count 最近统计周期内每秒平均查询数。 avg_server_assignment_count 最近统计周期内每秒平均服务端连接分配次数。 avg_recv 每秒平均接收(来自客户端)字节数。 avg_sent 每秒平均发送(到客户端)字节数。 avg_xact_time 平均事务持续时间(微秒)。 avg_query_time 平均查询持续时间(微秒)。 avg_wait_time 客户端等待服务端的时间(微秒),为当前 stats_period 内被分配到后端的客户端等待时间的平均值。 avg_client_parse_count 客户端创建预处理语句的平均数量。仅适用于命名预处理语句跟踪模式,参见 max_prepared_statements。 avg_server_parse_count pgbouncer 在服务端创建预处理语句的平均数量。仅适用于命名预处理语句跟踪模式,参见 max_prepared_statements。avg_bind_count 客户端准备执行并由 pgbouncer 转发给 PostgreSQL 的预处理语句平均数量。仅适用于命名预处理语句跟踪模式,参见 max_prepared_statements。 SHOW STATS_TOTALS SHOW STATS 的子集,仅显示总计值(total_ 前缀字段)。
SHOW STATS_AVERAGES SHOW STATS 的子集,仅显示平均值(avg_ 前缀字段)。
SHOW TOTALS 类似 SHOW STATS ,但跨所有数据库汇总。
SHOW SERVERS type S,表示服务端。 user pgbouncer 用于连接服务端的用户名。database 数据库名称。 replication 服务端连接是否使用复制。可为 none 、logical 或 physical 。 state PgBouncer 服务端连接的状态,为以下之一:active 、idle 、used 、tested 、new 、active_cancel 、being_canceled 。 addr PostgreSQL 服务器的 IP 地址。 port PostgreSQL 服务器的端口。 local_addr 本机上连接的起始地址。 local_port 本机上连接的起始端口。 connect_time 连接建立的时间。 request_time 最近一次请求发出的时间。 wait 服务端连接不使用此字段。 wait_us 服务端连接不使用此字段。 close_needed 若为 1,表示该连接将尽快关闭,原因是配置文件重新加载或 DNS 更新改变了连接信息,或发出了 RECONNECT 命令。 ptr 此连接内部对象的地址。 link 与该服务端配对的客户端连接地址。 remote_pid 后端服务器进程的 PID。若连接通过 Unix 套接字建立且 OS 支持获取进程 ID 信息,则为 OS PID;否则从服务器发送的取消包中提取,对于 PostgreSQL 服务器应为 PID,对于另一个 PgBouncer 则为随机数。 tls TLS 连接信息字符串,未使用 TLS 时为空。 application_name 链接客户端连接上设置的 application_name 字符串,未设置或无链接连接时为空。 prepared_statements 服务端上已准备的预处理语句数量,受 max_prepared_statements 设置限制。 id 服务端的唯一 ID。 SHOW CLIENTS type C,表示客户端。 user 客户端连接使用的用户名。 database 数据库名称。 replication 客户端连接是否使用复制。可为 none 、logical 或 physical 。 state 客户端连接的状态,为以下之一:active (已链接到服务端连接的客户端)、idle (无等待查询的空闲客户端)、waiting 、active_cancel_req 或 waiting_cancel_req 。 addr 客户端的 IP 地址。 port 客户端的源端口。 local_addr 本机上连接的终止地址。 local_port 本机上连接的终止端口。 connect_time 连接时间的时间戳。 request_time 最近一次客户端请求的时间戳。 wait 当前等待时间(秒)。 wait_us 当前等待时间的微秒部分。 close_needed 客户端不使用此字段。 ptr 此连接内部对象的地址。 link 与该客户端配对的服务端连接地址。 remote_pid 进程 ID,当客户端通过 Unix 套接字连接且 OS 支持获取时可用。 tls TLS 连接信息字符串,未使用 TLS 时为空。 application_name 客户端为此连接设置的 application_name 字符串,未设置时为空。 prepared_statements 客户端已准备的预处理语句数量。 id 客户端的唯一 ID。 SHOW POOLS 每对(database,user)组合会创建一个连接池条目。
database 数据库名称。 user 用户名。 cl_active 已链接到服务端连接或空闲无等待查询的客户端连接数。 cl_waiting 已发送查询但尚未获得服务端连接的客户端连接数。 cl_active_cancel_req 已将查询取消请求转发给服务端并等待服务端响应的客户端连接数。 cl_waiting_cancel_req 尚未将查询取消请求转发给服务端的客户端连接数。 sv_active 已链接到客户端的服务端连接数。 sv_active_cancel 当前正在转发取消请求的服务端连接数。 sv_being_canceled 正常情况下可变为空闲,但正在等待所有发送到该服务端以取消查询的飞行中取消请求完成后才能变为空闲的服务端连接数。 sv_idle 未使用且可立即用于客户端查询的服务端连接数。 sv_used 空闲时间超过 server_check_delay 的服务端连接数,需要先运行 server_check_query 才能再次使用。 sv_tested 当前正在运行 server_reset_query 或 server_check_query 的服务端连接数。 sv_login 当前正在登录过程中的服务端连接数。 maxwait 队列中第一个(最早的)客户端已等待的时间(秒)。若此值持续增加,说明当前服务端连接池处理请求的速度不够快,原因可能是服务器过载或 pool_size 设置过小。 maxwait_us 最大等待时间的微秒部分。 pool_mode 当前使用的池化模式。 load_balance_hosts 若连接池的 host 包含逗号分隔列表,则显示所使用的 load_balance_hosts。 SHOW PEER_POOLS 每个已配置的 peer 会创建一个 peer_pool 条目。
database 已配置 peer 条目的 ID。 cl_active_cancel_req 已将查询取消请求转发给服务端并等待服务端响应的客户端连接数。 cl_waiting_cancel_req 尚未将查询取消请求转发给服务端的客户端连接数。 sv_active_cancel 当前正在转发取消请求的服务端连接数。 sv_login 当前正在登录过程中的服务端连接数。 SHOW LISTS 以列(而非行)形式显示以下内部信息:
databases 数据库数量。 users 用户数量。 pools 连接池数量。 free_clients 空闲客户端数量。这些客户端已断开连接,但 PgBouncer 保留了为其分配的内存,以便后续客户端复用,避免重复分配。 used_clients 已使用的客户端数量。 login_clients 处于 login 状态的客户端数量。 free_servers 空闲服务端数量。这些服务端已断开连接,但 PgBouncer 保留了为其分配的内存,以便后续服务端复用,避免重复分配。 used_servers 已使用的服务端数量。 dns_names DNS 缓存中的域名数量。 dns_zones DNS 缓存中的 DNS 区域数量。 dns_queries 飞行中的 DNS 查询数量。 dns_pending 未使用。 SHOW USERS name 用户名。 pool_size 用户的覆盖 pool_size,未设置则为 NULL。 reserve_pool_size 用户的覆盖 reserve_pool_size,未设置则为 NULL。 pool_mode 用户的覆盖 pool_mode,未设置则为 NULL。 max_user_connections 用户的 max_user_connections 设置。若未为该用户单独设置,则显示默认值。 current_connections 该用户当前向所有服务器打开的服务端连接数。 max_user_client_connections 用户的 max_user_client_connections 设置。若未为该用户单独设置,则显示默认值。 current_client_connections 该用户当前向 PgBouncer 打开的客户端连接数。 SHOW DATABASES name 已配置数据库条目的名称。 host PgBouncer 连接到的主机。 port PgBouncer 连接到的端口。 database PgBouncer 实际连接到的数据库名称。 force_user 当用户包含在连接字符串中时,无论客户端用户是谁,PgBouncer 与 PostgreSQL 之间的连接都强制使用指定用户。 pool_size 最大服务端连接数。 min_pool_size 最小服务端连接数。 reserve_pool_size 此数据库的最大附加连接数。 server_lifetime 此数据库服务端连接的最大生命周期。 pool_mode 数据库的覆盖 pool_mode,为 NULL 时使用默认值。 load_balance_hosts 若 host 包含逗号分隔列表,则显示数据库的 load_balance_hosts。 max_connections 此数据库允许的最大服务端连接数,由 max_db_connections 全局或按数据库设置。 current_connections 此数据库当前的服务端连接数。 max_client_connections 此 PgBouncer 实例允许的最大客户端连接数,由 max_db_client_connections 按数据库设置。 current_client_connections 此数据库当前的客户端连接数。 paused 若此数据库当前已暂停则为 1,否则为 0。 disabled 若此数据库当前已禁用则为 1,否则为 0。 SHOW PEERS peer_id 已配置 peer 条目的 ID。 host PgBouncer 连接到的主机。 port PgBouncer 连接到的端口。 pool_size 可向此 peer 建立的最大服务端连接数。 SHOW FDS 内部命令——显示当前使用中的文件描述符列表及其关联的内部状态。
当连接用户名为"pgbouncer"、通过 Unix 套接字连接且 UID 与运行进程相同时,实际的 FD 将通过连接传递。此机制用于在线重启。
注意:在 Windows 上不可用。
此命令还会阻塞内部事件循环,因此在 PgBouncer 使用期间不应调用。
fd 文件描述符的数值。 task 为 pooler 、client 或 server 之一。 user 使用该 FD 的连接的用户名。 database 使用该 FD 的连接的数据库名。 addr 使用该 FD 的连接的 IP 地址,若使用 Unix 套接字则为 unix 。 port 使用该 FD 的连接所用的端口。 cancel 此连接的取消密钥。 link 对应服务端/客户端的 FD。空闲时为 NULL。 SHOW SOCKETS, SHOW ACTIVE_SOCKETS 显示套接字或仅显示活跃套接字的底层信息。包含 SHOW CLIENTS 和 SHOW SERVERS 所显示的信息,以及其他更底层的信息。
SHOW CONFIG 显示当前配置设置,每行一条,包含以下列:
key 配置变量名称。 value 配置值。 default 配置默认值。 changeable yes 或 no ,表示该变量是否可在运行时更改。若为 no ,则只能在启动时更改。使用 SET 在运行时更改变量。SHOW MEM 显示各种内部内存分配当前大小的底层信息。所呈现的信息可能随版本变化。
SHOW DNS_HOSTS 显示 DNS 缓存中的主机名。
hostname 主机名。 ttl 距下次查询还剩多少秒。 addrs 逗号分隔的地址列表。 SHOW DNS_ZONES 显示缓存中的 DNS 区域。
zonename 区域名称。 serial 当前序列号。 count 属于此区域的主机名数量。 SHOW VERSION 显示 PgBouncer 版本字符串。
SHOW STATE 显示 PgBouncer 状态设置。当前状态为 active、paused 和 suspended。
进程控制命令 PAUSE [db] PgBouncer 尝试断开与所有服务器的连接。断开每个服务端连接时,需根据服务端连接池的池化模式等待该连接被释放(事务池化模式下需等待事务完成,语句模式下需等待语句完成,会话池化模式下需等待客户端断开)。该命令在所有服务端连接断开之前不会返回。适用于数据库重启时使用。
若指定了数据库名称,则仅暂停该数据库。
连接到已暂停数据库的新客户端连接将等待,直到调用 RESUME 。
DISABLE db 拒绝指定数据库上的所有新客户端连接。
ENABLE db 在之前的 DISABLE 命令之后,允许新客户端连接。
RECONNECT [db] 关闭指定数据库或所有数据库中每个已打开的服务端连接,在其被释放后(根据池化模式),即使其生命周期尚未结束。新服务端连接可立即建立,并根据连接池大小设置按需连接。
此命令适用于服务端连接配置发生变化时,例如逐步切换到新服务器。当 pgbouncer.ini 中的连接字符串已更改并重新加载(见 RELOAD )或 DNS 解析发生变化时,无需 执行此命令,因为等效操作会自动运行。仅当 PgBouncer 下游有某些组件负责路由连接时,才需要此命令。
运行此命令后,可能有一段时间部分服务端连接指向旧目标,部分指向新目标。这通常仅在将只读流量在只读副本之间切换,或在多主复制环境节点之间切换时才合理。若需要同时切换所有连接,建议使用 PAUSE 。若需要不等待地立即关闭服务端连接(例如紧急故障转移而非渐进式切换),还可考虑 KILL 。
KILL [db] 立即断开指定数据库或所有数据库(不包括管理数据库)上的所有客户端和服务端连接。
连接到已被 kill 的数据库的新客户端连接将等待,直到调用 RESUME 。
KILL_CLIENT id 立即终止指定的客户端连接及该客户端的所有服务端连接。要终止的客户端由 SHOW CLIENTS 命令中找到的 id 值标识。
示例命令类似于 KILL_CLIENT 1234。
SUSPEND 所有套接字缓冲区将被刷新,PgBouncer 停止监听其上的数据。该命令在所有缓冲区清空之前不会返回。适用于 PgBouncer 在线重启时使用。
连接到已挂起数据库的新客户端连接将等待,直到调用 RESUME 。
RESUME [db] 从之前的 KILL 、PAUSE 或 SUSPEND 命令中恢复工作。
SHUTDOWN PgBouncer 进程将退出。
SHUTDOWN WAIT_FOR_SERVERS 停止接受新连接,并在所有服务端连接释放后关闭。这基本上等同于依次执行 PAUSE 和 SHUTDOWN ,区别在于此命令在等待 PAUSE 期间也停止接受新连接,并主动断开正在等待服务端连接的客户端。请注意,关闭期间 UNIX 套接字将保持打开,但只接受到 PgBouncer 管理控制台的连接。
SHUTDOWN WAIT_FOR_CLIENTS 停止接受新连接,并在所有现有客户端断开后关闭进程。请注意,关闭期间 UNIX 套接字将保持打开,但只接受到 pgbouncer 管理控制台的连接。此命令可用于使用以下步骤对两个 PgBouncer 进程进行零停机时间的滚动重启:
让两个或更多 PgBouncer 进程使用 so_reuseport 在同一端口上运行(建议 配置对等 ,但非必须)。为了在重启时实现零停机时间,我们将逐个重启这些进程,让其他进程在某一进程重启期间继续接受连接。 选择一个进程先重启,称之为 A。 对进程 A 执行 SHUTDOWN WAIT_FOR_CLIENTS(或发送 SIGTERM)。 让所有客户端重新连接。可能需要等待一段时间,直到客户端侧连接池因其 server_idle_timeout(或类似配置)触发重连。如果没有客户端侧连接池,可能需要重启客户端。一旦所有客户端重新连接,进程 A 将自动退出,因为已没有客户端连接到它。 重新启动进程 A。 对其余每个进程逐个重复步骤 3、4 和 5,直到所有进程都重启完成。 RELOAD PgBouncer 进程将重新加载其配置文件并更新可更改的设置。包括主配置文件以及由 auth_file 和 auth_hba_file 设置指定的文件。
PgBouncer 会检测配置文件重新加载是否更改了数据库定义的连接参数。到旧目标的现有服务端连接将在下次释放时关闭(根据池化模式),新服务端连接将立即使用更新后的连接参数。
WAIT_CLOSE [db] 等待指定数据库或所有数据库的所有服务端连接清除"close_needed"状态(见 SHOW SERVERS )。可在 RECONNECT 或 RELOAD 之后调用,等待相应配置更改完全生效,例如在切换脚本中使用。
其他命令 SET key = arg 更改配置设置(另见 SHOW CONFIG )。例如:
SET log_connections = 1;
SET server_check_query = 'select 2';
(注意,此命令在 PgBouncer 管理控制台上运行,用于设置 PgBouncer 的配置项。在其他数据库上运行的 SET 命令将像普通 SQL 命令一样传递给 PostgreSQL 后端。)
信号 SIGHUP 重新加载配置。与在控制台执行 RELOAD 命令效果相同。 SIGTERM 超安全关闭。等待所有现有客户端断开连接,但不接受新连接。与在控制台执行 SHUTDOWN WAIT_FOR_CLIENTS 效果相同。若在已有关闭进程中再次收到此信号,则触发"立即关闭"而非"超安全关闭"。在 PgBouncer 1.23.0 之前的版本中,此信号会导致"立即关闭"。 SIGINT 安全关闭。与在控制台执行 SHUTDOWN WAIT_FOR_SERVERS 效果相同。若在已有关闭进程中再次收到此信号,则触发"立即关闭"而非"安全关闭"。 SIGQUIT 立即关闭。与在控制台执行 SHUTDOWN 效果相同。 SIGUSR1 与在控制台执行 PAUSE 效果相同。 SIGUSR2 与在控制台执行 RESUME 效果相同。 Libevent 设置 来自 Libevent 文档:
It is possible to disable support for epoll, kqueue, devpoll, poll
or select by setting the environment variable EVENT_NOEPOLL,
EVENT_NOKQUEUE, EVENT_NODEVPOLL, EVENT_NOPOLL or EVENT_NOSELECT,
respectively.
By setting the environment variable EVENT_SHOW_METHOD, libevent
displays the kernel notification method that it uses.
另请参阅 pgbouncer(5) - 配置设置描述手册页
https://www.pgbouncer.org/
27.4 - PgBouncer 编译与安装 PgBouncer 编译与安装说明
原始页面: https://www.pgbouncer.org/install.html
编译 PgBouncer 的编译依赖以下组件:
安装依赖后,执行以下命令:
$ ./configure --prefix=/usr/local
$ make
$ make install
如果从 Git 构建或在 Windows 上构建,请参阅下方的单独构建说明。
DNS 查询支持 PgBouncer 在每次连接时执行主机名查询,而非仅在配置加载时查询一次。这需要异步 DNS 实现。下表列出了支持的后端及其探测顺序:
后端 并行 EDNS0 (1) /etc/hosts SOA 查询 (2) 备注 c-ares 是 是 是 是 <=1.10 版本中 IPv6+CNAME 存在缺陷 evdns, libevent 2.x 是 否 是 否 不检查 /etc/hosts 更新 getaddrinfo_a, glibc 2.9+ 是 是 (3) 是 否 非 glibc 环境不可用 getaddrinfo, libc 否 是 (3) 是 否 需要 pthreads
若需要一个主机名对应 8 个以上 IP 地址,则需要 EDNS0 支持。 SOA 查询用于在区域序列号变更时重新检查主机名。 要启用 EDNS0,请在 /etc/resolv.conf 中添加 options edns0。 c-ares 是功能最完整的实现,推荐在大多数场景和二进制打包中使用(前提是有足够新的版本可用)。Libevent 内置的 evdns 在列出的限制条件下也适用于许多场景。其他后端目前基本属于遗留选项,不再接受太多测试。
默认情况下,若系统中存在 c-ares,则会优先使用它。可通过 configure --with-cares 强制使用,或通过 --without-cares 禁用。若不使用 c-ares(未找到或被禁用),则使用 Libevent。指定 --disable-evdns 可禁用 Libevent 的 evdns,并回退到基于 libc 的实现。
PAM 认证 要启用 PAM 认证,./configure 提供了 --with-pam 标志(默认值为 no)。编译时启用 PAM 支持后,将新增一个全局认证类型 pam,可通过 PAM 对用户进行鉴权。
LDAP 认证 要启用 LDAP 认证,./configure 提供了 --with-ldap 标志(默认值为 no)。编译时启用 LDAP 支持后,将新增一个全局认证类型 ldap,可通过 LDAP 对用户进行鉴权。
systemd 集成 要启用 systemd 集成,请使用 configure 选项 --with-systemd。这将允许使用 Type=notify(若使用 systemd 253 或更高版本,则可使用 Type=notify-reload)以及 socket 激活。示例请参见 etc/pgbouncer.service 和 etc/pgbouncer.socket。
从 Git 构建 从 Git 构建 PgBouncer 需要在运行 configure 之前先生成头文件和配置文件:
$ git clone https://github.com/pgbouncer/pgbouncer.git
$ cd pgbouncer
$ ./autogen.sh
$ ./configure
$ make
$ make install
默认情况下,所有文件将安装在 /usr/local 下。可向 configure 提供一个或多个命令行选项。运行 ./configure --help 可列出所有可用选项及用于自定义配置的环境变量。
额外需要的软件包:autoconf、automake、libtool、pandoc
测试 如需了解如何运行测试,请参阅 测试目录中的 README.md 文件
在 Windows 上构建 Windows 上唯一受支持的构建环境是 MinGW。不支持 Cygwin 和 Visual $ANYTHING。
在 MinGW 上构建,按照常规方式执行:
$ ./configure
$ make
如果从 Unix 交叉编译:
$ ./configure --host=i586-mingw32msvc
LDAP 构建选项目前不支持 Windows。
在 Windows 上运行 从命令行运行的方式与通常相同,但 -d(守护进程化)、-R(重启)和 -u(切换用户)选项无法使用。
要将 PgBouncer 作为 Windows 服务运行,需要配置 service_name 参数以设置服务名称。然后执行:
$ pgbouncer -regservice config.ini
要卸载服务:
$ pgbouncer -unregservice config.ini
要使用 Windows 事件日志,请在配置文件中设置 syslog = 1。但在此之前,需要先注册 pgbevent.dll:
$ regsvr32 pgbevent.dll
要取消注册,执行:
$ regsvr32 /u pgbevent.dll
27.5 - 源码发布版下载 PgBouncer 源码发布版与二进制软件包
原始页面: https://www.pgbouncer.org/downloads/
PgBouncer 1.25 PgBouncer 1.24 PgBouncer 1.23 PgBouncer 1.22 PgBouncer 1.21 PgBouncer 1.20 PgBouncer 1.19 PgBouncer 1.18 PgBouncer 1.17 PgBouncer 1.16 PgBouncer 1.15 PgBouncer 1.14 PgBouncer 1.13 PgBouncer 1.12 PgBouncer 1.11 PgBouncer 1.10 PgBouncer 1.9 PgBouncer 1.8 PgBouncer 1.7 PgBouncer 1.6 PgBouncer 1.5 PgBouncer 1.4 PgBouncer 1.3 PgBouncer 1.2 PgBouncer 1.1 PgBouncer 1.0 二进制软件包 许多操作系统发行版提供了 PgBouncer 的原生软件包/移植版本,建议首先检查您的系统中是否已有可用的版本。
以下专用构建可能提供比发行版仓库更新的版本:
27.6 - 版本变更日志 PgBouncer 版本历史与发布说明
来源: https://www.pgbouncer.org/changelog.html
PgBouncer 1.25.x 2025-12-03 - PgBouncer 1.25.1 - “Fixing a bunch of bugs before Christmas(圣诞节前修复一堆 Bug)”
安全
修复
修复重连服务器后临时 SCRAM 认证的错误( #1432 ,引入自 1.25.0) 为不支持 SIMD 的特殊架构补充缺失的类型定义( #1414 ,引入自 1.25.0) 移除客户端在发送任何数据之前关闭连接时产生的噪音警告日志( #1420 ,引入自 1.25.0) 防止潜在的 NULL 指针解引用( #1423 ,引入自 1.25.0) 修复潜在的内存泄漏( #1422 ,引入自 1.25.0) 修复 SCRAM 对服务端消息的解析( #1431 ,引入自 1.25.0) 2025-11-09 - PgBouncer 1.25.0 - “The one with LDAP support(支持 LDAP 的版本)”
功能新增 LDAP 认证支持!可通过 HBA 文件或使用 auth_ldap_options 进行配置。( #731 ) 新增客户端侧直连 TLS 支持。这使客户端能够使用 PostgreSQL 17 引入的更快速的 TLS 连接建立方式。PgBouncer 暂不支持通过此更快方式连接 PostgreSQL 服务器。( #1359 ) 在 SHOW CLIENTS 中新增空闲状态字段。( #1191 ) 新增 transaction_timeout 设置,支持全局配置及用户级别配置。( #1242 ) 若客户端排队等待超过 5 秒仍未获得连接,则向客户端发送 NOTICE 消息。此时长可通过 query_wait_notify 修改或禁用。( #1264 ) 新增 scram_iterations 设置,允许运维人员在安全性与认证速度之间做出权衡。( #1339 ) 新增 client_tls13_ciphers 与 server_tls13_ciphers,用于选择启用哪些 TLSv1.3 加密套件。( #1352 ) 变更大幅提升临时 SCRAM 认证的性能。( #1338 ) 允许 KILL 命令不指定数据库,此时表示终止所有数据库。( #1317 ) 健康检查查询默认改为发送空查询,而非 SELECT 1。( #1233 ) 将完整的 PAM 队列记录为警告日志,便于排查由此引起的慢查询原因。( #1297 ) RELOAD 命令现在会报告重载过程中发生的任何错误。( #1231 )在关闭过程中开放对 PgBouncer UNIX 套接字的管理连接访问。这使运维人员更容易排查 PgBouncer 进程无法关闭的原因,并可手动执行 KILL_CLIENT 终止卡住的连接。( #1305 ) 修改 mkauth.py,不再添加已废弃的第三个字段。( #1365 ) 改进 disconnect_client 和 disconnect_server 函数中的 FATAL 消息。( #1382 ) 停止使用已废弃的 OpenSSL 函数 EVP_PKEY_get0_EC_KEY,该函数可能在某些 FIPS 实现中引发问题。( #1384 ) 修复修复涉及长密码(1024 个字符或以上)的崩溃问题。( #1215 ) 修复使用 server_tls_sslmode=verify-full 时多主机连接的问题。( #1303 ) 修复转发取消请求时偶发的 FATAL 错误。( #1383 ) 修复 SHOW CONFIG 中参数的排序问题。( #1403 ) 加固启动包的解析逻辑。( #1407 ) PgBouncer 1.24.x 2025-04-16 - PgBouncer 1.24.1 - “CVE-2025-2291 VALID UNTIL yesterday(CVE-2025-2291 昨天已到期)”
安全
修复 CVE-2025-2291:此前 PgBouncer 在通过 auth_query 查询密码哈希时,未考虑用户密码的 VALID UNTIL 有效期。因此,若将 PgBouncer 用作 PostgreSQL 前端的透明代理,可能允许已过期的密码通过验证。为解决此问题,文档中默认 auth_query 及自定义 auth_query 函数的示例均已更新,以正确处理 VALID UNTIL。如果您使用的是自定义 auth_query,请相应更新。如果您使用的是默认 auth_query,可以升级到 PgBouncer 1.24.1,或在旧版本中手动修改配置以使用新的默认 auth_query。 修复
通过回退 HBA 文件中 pam 认证支持来修复 PAM 问题。( #1291 )(Bug 引入自 1.24.0) 修复用户连接计数递减时的 Bug。该修复已包含在 GitHub 上的 1.24.0 标签中,但发布压缩包未包含此修复。( #1238 )(Bug 引入自 1.24.0) 将 test_load_balance_hosts.py 添加到发布压缩包中。( #1282 ) 修复测试相关问题,以便 Debian 打包人员可以正常运行测试。( #1266 ,#1250 ) 文档
更新 auth_query 示例,设置安全的 search_path。( #1245 ) 2025-01-10 - PgBouncer 1.24.0 - “New year, new bouncer(新年,新连接池)”
功能
新增对 systemd Type=notify-reload 的支持,需要 systemd 253 或更高版本。( #1148 ) 在管理控制台新增 KILL_CLIENT 命令,允许强制终止客户端连接。( #1147 ) 新增 max_user_client_connections 设置,支持全局配置及用户级别配置。( #1137 ) 新增 max_db_client_connections 设置,支持全局配置及数据库级别配置。( #1138 ) 在 SHOW USERS 和 SHOW DATABASES 输出中新增 current_client_connections 计数器。( #1137 ,#1138 ) 新增 load_balance_hosts 参数,支持禁止 在多个主机之间进行负载均衡。( #736 ) 在 SHOW STATS 中暴露预备语句使用计数器。( #1192 ) 新增 client_idle_timeout 设置。( #1189 ) 新增用户级别的 query_timeout 和 reserve_pool_size。( #1180 ,#1228 ) 在 HBA 文件中启用 pam 认证支持。( #326 ) 变更
TLS 配置未发生变更时,RELOAD 不再回收连接。此前只要执行 RELOAD,所有 TLS 连接都会被回收,可能导致短暂但严重的性能下降。现在仅在 TLS 设置实际发生变更时才会触发回收。( #1157 ) 默认启用预备语句支持,max_prepared_statements 默认值现为 200。此默认值变更仅影响实际使用预备语句的客户端。如果您使用预备语句,建议阅读 文档 中关于预备语句支持限制的说明。( #1144 ) 套接字、客户端和服务器现在可通过唯一 ID 在管理输出中进行标识。此前使用指针标识,但指针在断开连接后常被新客户端复用。( #1172 ) 对空 pidfile 提供更清晰的错误提示。( #1195 ) server_login_retry 失败时,将原始错误返回给客户端。( #1152 )auth_query 出错时,在日志中记录原始服务器错误。( #1187 )将 default_pool_size 设置为 0 表示不限制大小。( #1227 ) 将数据库级别的 reserve_pool 设置重命名为 reserve_pool_size,原名称仍作为别名保留。( #1232 ) 修复
更好地处理各种低概率错误情况,例如 OOM 错误,此类情况此前可能导致崩溃或内存泄漏。( #1108 ,#1101 ,#1099 ,#1169 ,#1202 ) 修正示例配置文件中 server_tls_sslmode 的默认值。( #1133 ) 移除文档中对 server_tls_protocols 无效别名的描述。( #1155 ) 修复同时使用 auth_query 和复制连接时的 Bug,该 Bug 会导致此类场景下的连接失败。( #1166 ) PgBouncer 配置服务器参数期间忽略客户端取消请求。( #298 ) PgBouncer 1.23.x 2024-08-02 - PgBouncer 1.23.1 - “Everything is put back in order(一切恢复有序)”
修复修复 PgBouncer 重载配置后可能发生的段错误。( #1105 )(Bug 引入自 1.23.0) 修复所有已知的 put_in_order 崩溃问题。( #1120 )(新崩溃引入自 1.23.0) 将发布压缩包中缺失的测试所需文件补充完整。( #1124 )(文件缺失引入自 1.23.0) 2024-07-03 - PgBouncer 1.23.0 - “Into the new beginnings(迈向新的起点)”
功能
新增滚动重启支持。SIGTERM 不再触发 PgBouncer 进程的立即关闭,现在改为执行"超安全关闭":等待所有客户端断开连接后再关闭。新的 SIGTERM 行为允许在负载均衡器后对多个 PgBouncer 进程进行滚动重启,或在使用 so_reuseport 监听同一端口的场景下滚动重启。这是一个次要的破坏性变更 :如果您在 Dockerfile 或 Systemd 服务文件中依赖 SIGTERM 的旧行为,现在应改用 SIGQUIT。( #902 ) 新增对 cert 和 peer 认证方式的用户名映射支持。此功能提供了灵活性,使发起连接的用户无需与数据库用户相同。PgBouncer 对用户名映射的支持与 PostgreSQL 非常相似,但存在文档中列出的若干例外。( #996 ) 新增通过 PgBouncer 进行复制连接的支持。( #876 ) 变更
改进 SHOW USERS 输出中的连接列表展示。( #1040 ) 允许按用户配置 pool_size。( #1049 ) 允许按数据库配置 server_lifetime。( #1057 ) 在 SHOW USERS 输出中支持列举动态创建的用户。( #1052 ) 在 HBA 配置中支持 all 地址类型。( #1078 ) 支持使用 systemd 时自动重启。( #1080 ) 将 c-ares 最低版本要求提升至 1.9.0。( #1076 ) 修复
修复处理大型及不完整启动包时的问题。( #1058 ) 在 options 启动参数中新增对 --config=value 格式的支持。( #1064 ) 修复 avg_wait_time 指标计算错误。( #727 ) 新增与客户端协商 PostgreSQL 协议版本的支持。( #1007 ) 为 auth_query 添加未完成请求的处理。( #1034 ) 多项文档与 CI 改进。 PgBouncer 1.22.x 2024-03-04 - PgBouncer 1.22.1 - “It’s summer in Bangalore(班加罗尔的夏天)”
修复修复部分客户端使用 COPY FROM STDIN 查询时引发的问题。此类查询可能导致内存泄漏、性能回退以及预备语句行为异常。 (#1025 )
(漏洞引入自 1.21.0) 在发布压缩包中补充缺失的测试用例 (#1026 )
(测试文件缺失问题引入自 1.19.0 和 1.21.0) 2024-01-31 - PgBouncer 1.22.0 - “DEALLOCATE ALL(取消分配所有语句)”
功能
在 max_prepared_statements 设置为非零值时,新增对 DEALLOCATE ALL 和 DISCARD ALL 的支持(普通的 DEALLOCATE 仍不受支持)。 (#972 ) 支持按数据库单独配置 auth_query。 (#979 ) 变更
改进推荐的 systemd 单元文件中的设置。 (#983 ) 使快速失败逻辑能够处理所有无法再向数据库建立有效连接的场景。 (#998 ) 多处文档改进。 修复
修复在 PG14 及更高版本中,PgBouncer 每次事务都会发送 SET DateStyle='ISO' 的问题。 (#879 ) 修复对空 application_name 的处理问题。 (#999 ) 修复在 Windows 上使用 OpenSSL 3.2.0 时的编译问题。 (#1009 ) PgBouncer 1.21.x 2023-10-16 - PgBouncer 1.21.0 - “The one with prepared statements(预备语句版本)”
功能
新增对协议层命名预备语句的支持!这可能是 PgBouncer 呼声最高的功能之一。将预备语句与 PgBouncer 配合使用,可以大幅降低系统的 CPU 负载(PgBouncer 侧和 PostgreSQL 侧均如此)。在合成基准测试中,该功能能够将查询吞吐量提升 15% 至 250%,具体幅度取决于工作负载。要使用此新功能,需要将新参数 max_prepared_statements 设置为非零值(具体数值取决于您的工作负载,100 通常是一个合理的起点)。有关该功能的工作原理、限制及调优方法,请参阅 max_prepared_statements 文档#845 ) 变更
改进 OpenSSL 安全设置,之前使用的默认值已严重过时。此版本起默认值与运行 PgBouncer 的系统 OpenSSL 默认值保持一致。 (#948 及 libusual/#41 ) PgBouncer 现在在可能的情况下使用 OpenSSL 计算 MD5 哈希,这是以符合 FIPS 标准的方式使用 PgBouncer 的必要条件。 (#949 ) 即使没有客户端连接到 PgBouncer,也为拥有强制用户的连接池维持 min_pool_size。 (#947 ) PgBouncer 在取消令牌中编码 peer_id 的方式已更改,这意味着不同版本的 PgBouncer 之间若未同时处于 v1.21.0 版本边界的同一侧,则无法正常互联。 (#945 ) 修复
修复带有错误信息 “FATAL in function client_proto(): bad client state: 6/7” 的崩溃问题。 (#928 )(漏洞引入自 1.18.0) 修复带有错误信息 “FATAL in function server_proto(): server in bad state: 11” 的崩溃问题。 (#927 )(漏洞引入自 1.18.0) 降低取消请求的日志记录级别。 (#903 ) 修复对等节点的 slog 日志前缀问题。 (#922 ) 修复文档中的拼写错误。 (#932 ) 修复静态分析器指出的错误。 (#943 ) 不再因登录阶段的临时 FATAL 错误而终止所有等待中的客户端连接。 (#946 ) 当 auth_dbname 中的数据库未显式配置时,使用自动数据库。 (#921 ) 清理
PgBouncer 1.20.x 2023-08-09 - PgBouncer 1.20.1 - “Optional options(可选的选项)”
修复修复将 options 加入 ignore_startup_parameters 后,不再忽略 options 启动参数中未知参数的回退问题。 (#908 )(回退引入自 1.20.0) 修复文档中令人困惑的拼写错误。 (#917 ) 2023-07-20 - PgBouncer 1.20.0 - “A funny name goes here(此处应有一个有趣的名字)”
废弃声明
在线重启选项现已被视为废弃。该功能近年来几乎未得到维护,存在多个已知问题,且新增功能通常不支持它。目前推荐的在线重启方式是使用 so_reuseport 和 peers 功能,这样可以让多个 PgBouncer 进程监听同一端口,通过逐一重启各进程,始终保证有一个 PgBouncer 进程在目标端口上监听。 (#894 ) 功能
引入 track_extra_parameters 参数,允许在事务池化模式下追踪更多参数。此前 PgBouncer 仅追踪 application_name、DateStyle、TimeZone 和 standard_conforming_strings。此版本起,PgBouncer 默认还追踪 IntervalStyle。通过修改 track_extra_parameters,可以追踪更多设置,但仅限于 PostgreSQL 会向客户端回报的参数 。如果使用 Citus 12.0 及以上版本,Citus 会确保 PostgreSQL 也将 search_path 回报给客户端,因此可以将 search_path 添加到 track_extra_parameters 设置中。 (#867 ) 在认证阶段转发 SQLSTATE,这允许检测数据库不存在的情况,该功能由 Npgsql(.NET 的 PostgreSQL 数据提供程序)使用。 (#814 ) 将 server_tls_sslmode 的默认值更改为 prefer。 (#866 ) 新增对 options 启动参数的支持,允许使用 psql 和 libpq 所支持的 PGOPTIONS 环境变量 ,通过该变量可以在启动时设置任意 PostgreSQL 参数。此功能仅适用于 PgBouncer 通过 track_extra_parameters 追踪的 PostgreSQL 参数。 (#878 ) 修复
修复将 pgbouncer 管理数据库用作 auth_dbname 时的崩溃问题。该用法仍不受支持,但现在会给出明确的错误提示而非直接崩溃。 (#817 ) 修复 SHOW MEM 中 peer_cache 的名称显示错误(之前错误地显示为 db_cache)。 (#864 ) 修复日志中源地址与目标地址混淆的问题(PgBouncer 原本应记录目标 IP,却记录了源 IP)。 (#880 ) 仅在 log_connections 设置为 1 时,才记录通过 UNIX 套接字进行的管理连接日志。 (#883 ) PgBouncer 1.19.x 2023-05-31 - PgBouncer 1.19.1 - “Sunny Spring(晴朗的春天)”
本次为小版本发布,修复了若干近期引入的缺陷:
修复修复:FATAL in function disconnect_client(): bad client state: 0 (#846 )
(漏洞引入自 1.18.0) 修复:FATAL in function server_proto(): server in bad state: 14 (#849 )
(漏洞引入自 1.18.0) 在发布压缩包中补充运行 Python 测试所需的文件。 (#852 )
(新测试引入自 1.19.0) 2023-05-04 - PgBouncer 1.19.0 - “The old-fashioned, human-generated kind(老派的、人工生成的那种)”
功能
新增 auth_dbname 选项,用于指定运行 auth_query 所使用的数据库。 (#764 ) 新增 SHOW STATE 命令,显示 PgBouncer 当前处于活跃、暂停还是挂起状态。 (#528 ) 新增对 PgBouncer 进程间互联(peering)的支持。此功能允许在多个不同的 PgBouncer 进程位于同一负载均衡器后端时,查询取消请求仍能正常工作。 (#666 ) 新增专用的 cancel_wait_timeout 设置,用于指定转发取消请求的超时时长,默认为 10 秒。 (#833 ) 新增测试框架。 (#792 ) 修复
修复 TLS 握手失败时可能发生的内存泄漏问题。 (#796 ) 在 Windows 上,为不支持的命令行选项提供更准确的错误提示信息。 (#620 ) 修复在服务器处于 BEING_CANCELED 状态时调用 disconnect_server 的问题。 (#815 )(引入自 1.18.0) 修复接收到 SIGTERM 信号时以非零状态码退出的问题。 (#834 ) 在 unix_socket_dir 中无法创建套接字时,于启动阶段立即报错退出。 (#830 ) 在 listen_addr 中所有地址均无法监听时,于启动阶段立即报错退出。 (#838 ) 当 sbuf_connect 失败时,输出包含更多信息的警告日志,这在 UNIX 套接字创建失败时尤为有用。 (#837 ) 清理
PgBouncer 1.18.x 2022-12-12 - PgBouncer 1.18.0 - “No real mystery(并无真正的谜团)”
功能
在 SHOW CLIENTS/SERVERS/SOCKETS 输出中新增 application_name 字段。
(#449 ) 在 SHOW CLIENTS/SERVERS/POOLS 输出中新增取消请求相关信息。
(#782 ) 修复
当目标套接字已关闭时,sbuf_send_pending 操作立即失败。
(#652 ) 修复若干可能导致崩溃的问题。
(#700 ,
#730 ) 修复逗号分隔主机列表功能中的整数溢出缺陷,该缺陷会导致连接被错误路由到 UNIX 套接字。
(#747 ) 不再为维持 min_pool_size 而驱逐现有连接。
(#648 ) 修复与 PostgreSQL 15 一起使用时 SHOW HELP 的问题。
(#769 ) 修复查询取消处理中的竞争条件。此前,针对某个客户端的查询取消请求有可能取消另一个客户端的查询——当 PgBouncer 收到取消请求时,被取消的查询已自行完成,就会发生这种情况。
(#717 ) 清理
PgBouncer 1.17.x 2022-03-23 - PgBouncer 1.17.0 - “A line has been drawn”(界限已划定)
功能
数据库定义现在可以指定以逗号分隔的主机列表,连接时将以轮询方式依次访问各主机。 连接到不存在的数据库时,错误信息(“no such database”)现在会在身份验证完成后才返回。这可以防止未经验证的客户端探测数据库是否存在。(与 1.15.0 版本中将用户不存在的错误推迟到验证后报告的变更类似。) 登录前不再向客户端发送服务器断开连接的错误信息。此前这可能会将配置细节等非公开信息泄露给尚未登录的客户端。 再次提高最大密码长度上限。显然上一次的调整仍不足够。 移除 auth_file 的自动重载功能。auth_file 现在仅在配置文件重载时才会重新读取,不再在文件变更后自动加载。 Windows 构建版本现已包含版本信息资源文件。 CI 生成的 Windows 构建版本现采用静态链接,可直接使用,无需额外依赖。 修复
修复了 OpenSSL 3 的支持问题。之前的版本会导致崩溃。 连接时不再应用快速失败(fast-fail)机制。这是上述"在验证前不报告服务器错误"变更的一部分。同时也修复了 SCRAM 透传认证场景中的特殊问题——在该场景下,需要允许客户端侧的认证交换,以便通过重新认证来修复服务端连接。快速失败机制仍会在认证完成后立即生效,因此在大多数情况下,实际可观察到的行为保持不变。 将示例 pgbouncer.ini 中的 auth_type 改为 md5,以与内置默认值保持一致。由于部分用户直接将此文件作为默认配置文件使用,请检查这一配置变更是否适合您的环境。 修复在启用断言的构建版本中退出时发生的崩溃问题。 改进 tcp_defer_accept 的文档说明和行为。文档中关于默认值的描述此前存在错误和误导性,在某些情况下 “show config” 显示的值也不正确。此外,若该选项已设置但不受支持,现在将报错而非忽略,与其他平台相关 socket 选项的处理方式保持一致。 修复 Windows 上使用 c-ares 的构建问题。Windows 上现在要求 c-ares >= 1.18.0。 清理
清理了 Autoconf >= 2.70 产生的大部分弃用警告,仍支持旧版本的 Autoconf。 Cirrus CI 的使用已扩展到更多平台。 已移除对 Travis CI 的支持。 更新了默认根 CA 文件的搜索路径,以覆盖更多平台,例如 Fedora/RHEL/CentOS。 所有 Python 脚本现在默认使用 python3,不再维护 Python 2 兼容性。 测试套件脚本改用 command -v 替代已弃用的 which。 多条错误信息已重新措辞,以更清晰地说明其对应的命令或配置项。 测试套件脚本不再依赖 GNU sed。 make check 现在可在 Windows 上运行(但 SSL 测试套件暂不支持)。文档中说明了管理控制台仅支持简单查询协议,并针对此问题提供了更清晰的错误提示。 PgBouncer 1.16.x 2021-11-11 - PgBouncer 1.16.1 - “Test of depth against quiet efficiency”(以深度检验静默效率)
这是一个包含安全修复的小版本发布。
使 PgBouncer 作为服务器时,拒绝在 SSL 或 GSS 加密握手后接收多余数据。
具有 TCP 连接数据注入能力的中间人攻击者,可能在本应受加密保护的数据库会话开始时塞入明文数据。这可能被用于向服务器发送伪造的 SQL 命令,但仅在 PgBouncer 不要求任何身份验证数据时才有效。(不过,依赖 SSL 证书认证的 PgBouncer 部署恰恰可能不要求验证。)(CVE-2021-3935)
2021-08-09 - PgBouncer 1.16.0 - “Fended off a jaguar”(击退了一头美洲虎)
功能
支持 TLS 设置的热重载。重载配置文件时,变更的 TLS 设置会自动生效。 新增对抽象 UNIX 域套接字的支持。在 UNIX 域套接字路径前加 @ 前缀即可使用抽象命名空间中的套接字。这与 PostgreSQL 14 中的对应功能保持一致。 密码和用户名的最大长度分别提升至 996 和 128 个字符。多种云服务有此需求。 最小连接池大小现在可以按数据库单独配置,与常规连接池大小和保留连接池大小的配置方式相同。 SHOW POOLS 中新增显示待处理查询取消请求的数量。修复
配置解析在多处增强了错误处理的严格程度。此前可能仅记录错误并继续运行的情况,现在将导致启动失败。这才是应有的正确行为,但部分代码之前并未做到。某些用户可能会发现其配置一直存在问题,并将无法继续使用。 修复了查询取消的处理逻辑。在某些情况下,取消请求会莫名地卡住很长时间,此问题现已解决。事实上,取消请求现在可以超出连接池大小两倍,因此不应再出现卡住的情况。( #542 、 #543 ) 修复了通过 HBA 混用 md5 和 scram 认证的问题。 修复了 Windows 上使用 c-ares 的构建问题。 修复了令人头疼的"FIXME: query end, but query_start == 0"日志信息。我们现在已知其成因,您不应再看到这条信息。( #565 ) 修复 default_pool_size、min_pool_size 和 res_pool_size 的热重载问题。此前重载这些配置项不会生效。 清理
现已改用 Cirrus CI ,不再使用 Travis CI。 照例新增了许多测试用例。 “unclean server"日志信息已进一步明确。现在会显示"client disconnect while server was not ready"或"client disconnect before everything was sent to the server”。前者可能发生在客户端断开时服务器仍有事务块未关闭的情况下,此前曾令部分用户感到困惑。 不再允许将"pgbouncer"用作数据库名称。该名称为管理控制台保留,将其用作普通数据库名称从未真正正常工作过,现已明确禁止。 在关闭连接前发送给客户端的错误信息现在标记为 FATAL 而非 ERROR。部分客户端此前会因此产生困惑。( #564 ) 修复了 GCC 11 的编译警告。( #623 ) PgBouncer 1.15.x 2020-11-19 - PgBouncer 1.15.0 - “Ich hab noch einen Koffer in Berlin”(我在柏林还有一只行李箱)
功能
改进认证失败的错误报告。发送给客户端的认证失败消息现在只说明认证失败,不再提供进一步细节,详细信息可在 PgBouncer 日志中查看。此外,若请求的用户不存在,认证流程仍会完整执行,并返回相同的通用失败消息。这些改动可防止客户端探测 PgBouncer 实例中存在的用户名及其他认证相关信息,与 PostgreSQL 的行为保持一致。 客户端立即断开连接时不再记录日志。这可以避免监控系统仅建立 TCP/IP 连接但未发送任何数据就断开时产生大量日志噪音。 使用 systemd journal 时改用其进行日志输出。当检测到标准错误输出指向 systemd journal 时,使用 systemd 原生函数输出日志,避免重复打印时间戳和进程 ID,使日志更加整洁。同时,这也为日志添加了严重级别等元数据,使 journal 转发至 syslog 时消息能携带有用的元数据。 测试套件的部分内容现在可以在 Windows 上运行。 SHOW CONFIG 现在同时显示各配置项的默认值。修复
修复 FreeBSD 上的 so_reuseport 选项。PgBouncer 1.12.0 中的原始实现在 FreeBSD 上实际无法工作。( #504 ) 修复在旧版 systemd 系统上的编译问题。该问题在 1.14.0 中引入。( #505 ) 修复了用于构建 Windows 二进制 zip 包的 Makefile 目标。 长格式命令行选项现在也可以在 Windows 上正常使用。 修复全局 auth_user 配置项的行为。旧的行为取决于配置文件中的顺序,容易造成混乱且不稳定,现已不再如此。( #391 、 #393 ) 清理
提高测试的稳定性和可移植性。 现代化 Autoconf 相关代码。 禁用来自 OpenSSL 3.0.0 的弃用编译警告。 PgBouncer 1.14.x 2020-06-11 - PgBouncer 1.14.0 - “La ritrovata magia”(重拾的魔法)
功能
新增 SCRAM 认证透传支持。允许在 PgBouncer 中使用加密的 SCRAM 密钥(来自 userlist.txt 或 auth_query)登录后端服务器。 新增对 systemd socket 激活的支持。在对 /var/run/postgresql 访问受限的系统上,这对于让 systemd 管理 UNIX 域套接字的创建尤为有用。 新增 Windows 上对 UNIX 域套接字的支持。 清理
新增一个更精简的备用示例配置文件 pgbouncer-minimal.ini,供测试或部署使用。 PgBouncer 1.13.x 2020-04-27 - PgBouncer 1.13.0 - “My favourite game”(我最喜欢的游戏)
功能
新增配置项 tcp_user_timeout,用于设置对应的 socket 选项。 client_tls_protocols 和 server_tls_protocols 现在默认值为 secure,即仅启用 TLS 1.2 和 TLS 1.3。旧版本仍受支持,只是默认不启用。新增对 systemd 服务通知的支持。目前支持使用 Type=notify 服务单元,未来版本计划提供更深入的集成。 修复
清理
移除了 debian 目录下的 Debian 打包文件,建议使用来自 https://apt.postgresql.org/ 的软件包。 对测试套件进行了大量修复和改进。 测试默认不再尝试使用 sudo,现在可以通过设置环境变量 USE_SUDO 来显式启用。 libevent API 的使用已更新为版本 2 风格的接口,不再使用版本 1 中已弃用的接口。 PgBouncer 1.12.x 2019-10-17 - PgBouncer 1.12.0 - “It’s about learning and getting better”(关于学习与持续进步)
本版本包含多项小幅功能增强与缺陷修复。
功能
新增启用 SO_REUSEPORT 套接字选项的配置项。在部分操作系统上,该选项允许在同一主机上运行多个 PgBouncer 实例,监听相同端口,并由内核自动分发连接。 新增使用独立于操作系统的 resolv.conf 文件的配置项。这允许设置自定义 DNS 服务器以及其他 DNS 选项。 将 SHOW VERSION 的输出从 NOTICE 消息改为普通结果行返回。这样更易于处理,并与其他 SHOW 命令保持一致。 修复
将统计列的类型从 bigint 改为 numeric 发送。这避免了在值超出 bigint 范围时某些客户端库报错的问题。( #360 ,#401 ) 修复 PAM 用户密码丢失的问题。( #285 ) 接受启用了 SCRAM channel binding 的客户端。此前,支持 channel binding 的客户端(即 PostgreSQL 11+)在某些情况下连接 PgBouncer 时会失败。(PgBouncer 本身不支持 channel binding,此修复仅为兼容提供该功能的客户端。) 修复与较新版本 musl-libc(Alpine Linux 所用)的编译兼容性问题。 清理
新增 make check 目标,允许通过单个命令运行所有测试。 移除对 PostgreSQL wiki 的引用,相关信息现已全部收录于 PgBouncer 文档或官网中。 移除对 Libevent 1.x 版本的支持,现在要求使用 Libevent 2.x。Libevent 现通过 pkg-config 进行检测。 修复 macOS 和 Windows 上的编译器警告,这两个平台的构建现在应无警告。 修复 LLVM scan-build 报告的若干警告。 PgBouncer 1.11.x 2019-08-27 - PgBouncer 1.11.0 - “Instinct for Greatness”(卓越的本能)
功能新增对客户端和服务端 SCRAM 认证的支持,添加了新的认证类型 scram-sha-256。 当存储密码为 md5 格式时,auth_type=password 的处理行为与 PostgreSQL 服务器保持一致。( #129 ) 新增 log_stats 选项,用于禁止将统计信息打印到日志。( #287 ) 在日志时间戳中添加时区信息。 在日志前缀中以方括号包裹 PID。 修复修复在针对较新版本 OpenSSL(使用 -Werror)运行时的 OpenSSL 配置检测问题。 修复使用 auth_user 时等待时间的计算错误,该问题会导致程序崩溃或报告错误的等待时间。( #393 ) 处理 PostgreSQL 12 新增的 GSSENCRequest 数据包。当前该处理不执行任何操作,但可避免出现关于"bad packet header"的令人困惑的错误信息。 清理对测试套件进行了大量改进,并新增了若干测试用例。 修复 Windows 上的多个编译器警告。 扩展了 [users] 节的文档说明,并在示例配置文件中补充了相关内容。( #330 ) PgBouncer 1.10.x 2019-07-01 - PgBouncer 1.10.0 - “Afraid of the World”(对世界的畏惧)
功能新增启用和禁用 TLS 1.3 的支持。(TLS 1.3 在之前已可依赖 OpenSSL 库的版本获得支持,但现在配置 TLS 协议版本的相关设置项也正式支持 TLS 1.3。) 修复修复 TLS 1.3 支持问题,该问题在 OpenSSL 1.1.1 和 1.1.1a 版本中存在(更早或更新版本不受影响)。 修复 SHOW FDS 命令中偶发的崩溃问题。( #311 ) 修复大量取消请求到达时可能导致长时间宕机的问题。( #329 ) 避免 PostgreSQL 执行 reload 后出现"unexpected response from login query"错误。( #220 ) 修复 idle_transaction_timeout 的计算错误,该缺陷会在特定情况下导致过早超时。( #125 ) 清理使各类日志和错误信息更加精确。 修复 Coverity 发现的若干问题(均对实际运行无显著影响)。 改进所有测试脚本并补充文档说明。 在文档中新增若干 SHOW 命令的说明。 将文档格式从 rst 转换为 Markdown。 源码树中的 Python 脚本现已全部兼容 Python 3。 PgBouncer 1.9.x 2018-08-13 - PgBouncer 1.9.0 - “Chaos Survival”(混乱中求生)
功能新增 RECONNECT 命令。 新增 WAIT_CLOSE 命令。 快速关闭——在会话池模式下,若服务器连接处于"close_needed"(重连)状态,立即断开该连接。 在 SHOW SERVERS 输出中新增 close_needed 列。 修复避免 parse_filename 中的双重释放(double-free)问题。 避免 parse_line 中的空指针解引用问题。 清理将 mkauth.py 移植到 Python 3。 改进信号(signals)相关文档。 改进快速入门文档。 补充 SET 命令的文档说明。 更正所需软件列表。 修复 -Wimplicit-fallthrough 编译警告。 补充多个 SHOW 字段的缺失文档说明。 补充 reload 和 DNS 变更时的重连行为说明。 说明 KILL 命令之后需执行 RESUME。 补充 server_lifetime 文档说明。 修正消息和文档中的错别字及大小写问题。 修复测试中 psql 的调用方式。 其他若干测试环境改进。 PgBouncer 1.8.x 2017-12-20 - PgBouncer 1.8.1 - “Ground-and-pound Mentality”(摔打磨练的心态)
修复将头文件 include/pam.h 加入发布压缩包。该文件缺失导致 1.8 版本的压缩包完全无法构建。 2017-12-19 - PgBouncer 1.8 - “Confident at the Helm”(掌舵自如的自信)
功能支持 PAM 认证(通过 --with-pam 启用)。 在 SHOW DATABASES 输出中新增 paused 和 disabled 字段。 在 SHOW POOLS 输出中新增 maxwait_us 字段。 在 SHOW 命令输出中新增 wait 和 wait_us 字段。 新增 SHOW STATS_TOTALS 和 SHOW STATS_AVERAGES 命令。 在 SHOW STATS 中分别追踪查询数和事务数,原有字段 total_requests、avg_req 和 avg_query 已被新字段替代。 在 SHOW STATS 中新增 wait_time 字段。 修复更新 libusual 以支持 OpenSSL 1.1。 不再尝试在 UNIX 套接字上使用 TLS。 解析 pg_hba.conf 时,遇到错误行后继续解析,而非拒绝整个文件。( #118 ) 其他若干 HBA 解析修复。 修复取消查询时的竞争条件(race condition)。( #141 ) 清理auth_user 设置现在也允许在全局范围内配置,而不仅限于单个数据库。( #142 )将控制台客户端和服务端编码设置为 UTF8。 PgBouncer 1.7.x 2016-02-26 - PgBouncer 1.7.2 - “Finally Airborne”(终于腾空而起)
修复修复删除过期 pidfile 时的崩溃问题,该问题由 1.7.1 版本引入。 禁用内存清理功能——该功能会破坏接管(takeover)流程,对生产负载也无益。该问题由 1.7.1 版本引入。 接管完成后,等待 pidfile 消失再启动。缓慢的内存清理关闭暴露了已存在的竞争条件。( #113 ) 清理移除 DBGVER 处理,使构建结果可重现。( #112 ) Antimake:对 $(wildcard) 的文件列表进行排序,较新版本的 gmake 已不再自动排序。( #111 ) 在日志中显示 libssl 版本信息。 deb:开启完整的构建安全加固选项。 2016-02-18 - PgBouncer 1.7.1 - “Forward To Five Friends Or Else”(转发给五位好友,否则后果自负)
警告:自 1.7 版本起,当数据库处于事务池模式时,server_reset_query 将不再被执行。这一变化在 1.7 版本的发布说明中未被充分强调。如果你的应用依赖此行为,请使用 server_reset_query_always 恢复旧有行为。
本版本的主要工作是追查一个与 TLS 相关的内存泄漏问题,最终证明该泄漏并不存在。问题实际上出在 Debian/wheezy 中构建的 libssl 版本上——每个连接有约 600k 的固定开销(不存在泄漏),而预期应为 20–30k。使用 TLS 时需留意此问题。
修复TLS:将 sslmode 中的"disabled"重命名为"disable",与 PostgreSQL 的命名保持一致。 TLS:client_tls_sslmode=verify-ca/-full 现在会拒绝未提供客户端证书的连接。( #104 ) TLS:client_tls_sslmode=allow/require 在客户端提供证书时会对其进行验证。此前由于证书验证未配置,带有客户端证书的连接会失败。( #105 ) 修复释放数据库时的内存泄漏。 修复 tls_handshake() 中潜在的内存泄漏。 修复 tls_handshake() 中的 EOF 处理问题。 修复 asn1_time_parse 兼容实现中 memset 大小过小的问题。 修复非 TLS 构建(--without-openssl)的编译问题。( #101 ) 修复 Windows 构建中的若干问题。( #100 ) 清理TLS:使用 SSL_MODE_RELEASE_BUFFERS 降低非活跃连接的内存占用。 在退出时释放已分配的内存,便于使用内存泄漏检测工具。 改进 server_reset_query 的文档说明。( #110 ) 在示例配置文件中新增 TLS 相关选项。 2015-12-18 - PgBouncer 1.7 - “Colors Vary After Resurrection”(复活之后,色彩各异)
功能支持 TLS 连接,以 OpenSSL/LibreSSL 作为后端实现。 支持通过 TLS 客户端证书进行身份认证。 支持 UNIX 套接字上的"peer"认证。 支持基于主机的访问控制文件(类似 Postgres 的 pg_hba.conf ),允许为网络连接配置 TLS,为本地连接配置"peer"认证。 清理将 query_wait_timeout 的默认值设置为 120 秒。原默认值(0)会导致无限排队,实际上没有意义。即当客户端有待执行的查询但尚未分配到服务器连接时,客户端连接将被断开。 默认禁用 server_reset_query_always。现在重置查询仅在会话模式的连接池中执行。 将 pkt_buf 增大至 4096 字节,可改善 TLS 下的性能。此行为可能与负载特性有关,但自 v1.2 起数据包缓冲区已从连接中分离并从池中按需惰性使用,因此该修改是安全的。 支持流水线(pipelining)——统计预期的 ReadyForQuery 数据包数量,避免过早释放服务器连接。修复了 #52 。 改进 sbuf_loopcnt 逻辑——即使套接字无事件,也保证套接字会被重新处理。这对 TLS 是必要的,因为 TLS 有其自身的缓冲机制。 适配系统测试以兼容现代 BSD 和 MacOS。(Eric Radman) 移除 crypt 认证方式,该方式已过时,PostgreSQL 8.4 起不再支持。 修复不带参数的 --with-cares 配置选项——此前不带参数时该选项无法正常工作。 PgBouncer 1.6.x 2015-09-03 - PgBouncer 1.6.1 - “Studio Audience Approves(观众席报以掌声)”
功能
修复
【安全】移除对 auth_user 的错误赋值(#69)。
当 auth_user 已配置,且客户端请求一个不存在的用户名时,
客户端将以 auth_user 身份登录。这是不合理的。
CVE-2015-6817
在 handle_auth_response 中跳过 NoticeResponse。否则,服务端较高的日志级别会导致登录失败。
console:当 auth_type=any 时,填充 auth_user。否则日志记录可能崩溃(#67)。
多项可移植性修复(OpenBSD、Solaris、OSX)。
2015-08-01 - PgBouncer 1.6 - “Zombies of the future(未来的僵尸)”
功能
从 postgres 数据库加载用户密码哈希。
新增参数:
auth_user
用于连接同一数据库并获取用户信息的用户名。
也可按数据库单独设置。
auth_query
以 auth_user 身份执行的 SQL 查询。
默认值:“SELECT usename, passwd FROM pg_shadow WHERE usename=$1”
(Cody Cutrer)
连接池模式现在支持按数据库和按用户分别配置。
(Cody Cutrer)
支持按数据库和按用户设置连接数上限:max_db_connections 和 max_user_connections。
(Cody Cutrer / Pavel Stehule)
新增 DISABLE/ENABLE 命令,用于阻止新连接接入。
(William Grant)
新增 DNS 后端:c-ares。这是唯一支持所有关键特性的 DNS 后端:支持自动刷新的 /etc/hosts、SOA 查询、大响应(通过 TCP/EDNS+UDP)以及 IPv6。它现在是首选后端,未来可能成为唯一 后端,因为维护一套功能残缺的库没有意义。
注意:c-ares 版本 <= 1.10 存在一个 bug,当启用 IPv6 时会导致 CNAME 支持失效(上游已修复)。作为临时规避措施,c-ares <= 1.10 将仅使用 IPv4。因此,PgBouncer 将在 c-ares >1.10(尚未发布)发布一段时间后,才会放弃其他后端……
在 SHOW CLIENTS/SERVERS 中显示 remote_pid。适用于通过 UNIX socket 连接的客户端,以及通过 TCP 和 UNIX socket 连接的服务端。对于 TCP 服务端,pid 来自取消密钥。
新增独立的配置参数(dns_nxdomain_ttl),用于控制 DNS 否定缓存时间。
(Cody Cutrer)
将客户端主机 IP 地址和端口追加到 application_name 中。
该功能由配置参数 application_name_add_host 控制,默认为 ‘off’。
(Andrew Dunstan)
配置文件新增 %include FILENAME 指令,允许将配置拆分到多个文件中。
(Andrew Dunstan)
清理
日志:用 [] 包裹 IPv6 地址 日志:连接服务端时,显示本地 IP 和端口 win32:长参数采用 GNU 风格:–foo 允许主机名中包含数字,始终尝试用 inet_pton 解析 修正 FAQ 中的 deallocate_all() 修正示例配置文件中的错误关键字
(Magnus Hagander) 允许在认证文件中使用注释(以 ‘;’ 开头)。
(Guillaume Aubert) 修正日志消息和注释中的拼写错误。
(Dmitriy Olshevskiy) 修复
修复维护期间启动新连接的问题
(Cody Cutrer) 启动时不重复加载认证文件
(Cody Cutrer) 修复自动数据库(autodb)的失效逻辑 IPv6:在监听套接字上设置 IPV6_V6ONLY。 win32:不在监听套接字上设置 SO_REUSEADDR。 修复 IPv6 地址的 memcpy 问题 修复取消等待中的客户端连接的问题。
(Mathieu Fenniak) 小 bug 修复:必须检查 calloc 的返回值
(Heikki Linnakangas) 在 PID 文件末尾添加换行符
(Peter Eisentraut) 执行 PAUSE 后,不允许建立新的服务端连接。
(Petr Jelinek) 修复登录时因包头延迟导致的 ‘bad packet’ 错误。
(Michal Trojnara, Marko Kreen) 修复 Coverity 检测到的错误。
(Euler Taveira) 当服务端连接数低于 min_pool 时,禁用 server_idle_timeout(#60)
(Marko Kreen) PgBouncer 1.5.x 2015-04-09 - PgBouncer 1.5.5 - “Play Dead To Win(装死求胜)”
修复修复远程崩溃问题——无效的数据包顺序导致对 NULL 指针进行查找。
该漏洞不可被利用,仅会造成拒绝服务(DoS)。 2012-11-28 - PgBouncer 1.5.4 - “No Leaks, Potty-Training Successful(无内存泄漏,如厕训练成功)”
修复DNS:修复 getaddrinfo_a() 后端中的内存泄漏。 DNS:修复 udns 后端中的内存泄漏。 DNS:修复统计数据计算错误。 DNS:改进 getaddrinfo_a() 的错误消息处理。 修复 win32 编译问题。 修复 configure 中的编译器依赖性支持检测。 若干文档修复。 2012-09-12 - PgBouncer 1.5.3 - “Quantum Toaster(量子烤面包机)”
严重修复
次要功能
max_packet_size——用于调整允许通过的最大数据包大小的配置参数。默认值保持不变:(2G-1),但现在可以调小。当数据包头无法解析时,在日志和错误消息中以十六进制显示该包头。 修复
AntiMake:其使用了 $(relpath) 和 $(abspath) 来操作路径名,但当源码树路径包含符号链接时,会导致构建失败。相关代码现已改为仅在纯字符串上操作。 console:现在可以使用 SET 命令来设置空字符串值。 config.txt:说明所有超时参数均可设置为浮点数。这是 1.4 中引入的隐藏特性。 2012-05-29 - PgBouncer 1.5.2 - “Don’t Chew, Just Swallow(别嚼,直接吞)”
修复由于失误,reserve_pool_timeout 被以微秒而非秒为单位读取,导致在连接池满时立即激活备用池。现已修正为以秒为单位,与设计意图一致。
(由 Keyur Govande 发现) 2012-04-17 - PgBouncer 1.5.1 - “Abort, Retry, Ignore?(中止,重试,忽略?)”
功能新增用于调整 UNIX socket 权限的参数:unix_socket_mode=0777、unix_socket_group=''。 修复允许服务端变量设置为空字符串——这是使 “application_name” 正常工作所必需的,因为它是唯一没有服务端默认值的参数。 若连接字符串发生变化,要求刷新服务端参数。
此前 PgBouncer 会继续使用旧参数,这在 Postgres 升级后会出现问题。 若 autodb 的连接字符串发生变化,断开旧连接。 cf_setint:使用 strtol() 而非 atoi() 来解析整型配置参数,支持十六进制、八进制,并具备更好的错误检测能力。 使用 sigqueue() 检测 union sigval 的存在——修复在 HPUX 上的编译问题。 从 Makefile 中移除 ‘git’ 命令,以避免在纯 tarball 构建时出现随机错误。 为 stats_period 参数补充文档,该参数用于调整统计信息的输出周期。 要求 Asciidoc 版本 >= 8.4,文档与更早版本已不再兼容。 停止对 close() 返回的 EINTR 进行重试。 2012-01-05 - PgBouncer 1.5 - “Bouncing Satisfied Clients Since 2007(自 2007 年起,服务满意的客户端)”
若一个 DNS 名称背后有超过 8 个 IP,现在需要使用 EDNS0 协议进行查询。只有 getaddrinfo_a()/getaddrinfo() 和 UDNS 后端支持它,libevent 1.x/2.x 不支持。要为 libc 启用此功能,请在 /etc/resolv.conf 中添加 ‘options edns0’。
构建现在需要 GNU Make 3.81+。
功能检测 DNS 回复变化,并使 IP 不再出现在最新回复中的连接失效。
(Petr Jelinek) 基于 DNS 区域 serial 的主机名失效机制。当设置了 dns_zone_check_period 选项后,所有 DNS 区域都会被查询 SOA 记录,一旦 serial 发生变化,所有主机名都将重新查询。这是实现确定性连接失效的必要机制,因为当没有查询发生时,基于查询的失效方式毫无意义。仅在新 UDNS 后端下可用。 新增 SHOW DNS_HOSTS、SHOW DNS_ZONES 命令,用于检查 DNS 缓存。 新增参数:min_pool_size——避免在无负载时断开所有连接。
(Filip Rembialkowski) idle_in_transaction_timeout——若事务空闲时间过长则终止。默认不设置。新增 libudns DNS 查询后端,比 evdns 功能更丰富。使用 –with-udns 启用。暂不支持 IPv6。 KILL 命令,立即断开某一数据库的所有连接。
(Michael Tharp) 迁移至 Antimake 构建系统,使 Makefile 更整洁。构建现需 GNU Make 3.81+。 修复DNS 现在支持 IPv6 主机名。 当 NOTIFY 来自服务端时,不改变连接状态。 若干文档修复。
(Dan McGee) Console:支持使用 "" 进行标识符引用。原先没有接受数据库名称的命令,因此无需引用。 Console:允许单词正则表达式以数字开头。使用严格解析器在此处会使事情过于复杂。 不要使已暂停的自动数据库过期。
(Michael Tharp) 在执行 PAUSE 时按需创建自动数据库。
(Michael Tharp) 修复 RESUME 命令打印的错误日志消息。
(Peter Eisentraut) 当数据库连接字符串中有 user= 但无 password= 时,将从 userlist 中获取密码。 在接管(takeover)代码中正确解析 ‘*’。 autogen.sh:兼容更旧版本的 autoconf/automake。 修复 win32 上因 mingw/msvc 运行时提供了错误的 basename() 而导致的服务崩溃。现在始终使用兼容版本的 basename()。 PgBouncer 1.4.x 2011-06-16 - PgBouncer 1.4.2 - “Strike-First Algorithm(先发制人算法)”
受影响的操作系统:*BSD、Solaris、Win32。
可移植性修复将 CFLAGS 传递给链接器。在使用基于 pthread 的 getaddrinfo_a() 回退实现时,这是必要的。 lib/find_modules.sh:用 index()+substr() 替换 split(),使其兼容更旧版本的 AWK。 <usual/endian.h>:忽略系统定义的 htoX/Xtoh 宏。系统可能只定义了部分宏。 <usual/signal.h>:将兼容的 sigval 与兼容的 sigevent 分离 <usual/socket.h>:引入 <sys/uio.h> 以获取 iovec <usual/time.h>:在 win32 上改进函数自动检测 <usual/base_win32.h>:移除重复的 sigval/sigevent 声明 2011-04-01 - PgBouncer 1.4.1 - “It Was All An Act(一切不过是表演)”
功能
支持监听/连接 IPv6 地址。
(Hannu Krosing) listen_addr 支持多个监听地址。对每个地址调用 getaddrinfo(),因此也可以使用域名。console:向客户端发送 PgBouncer 版本作为 ‘server_version’。 重要修复
在 glibc < 2.9 上禁用 getaddrinfo_a(),因为旧版本会崩溃。
受影响的主要操作系统:RHEL/CentOS 5.x(glibc 2.5)、Ubuntu 8.04(glibc 2.7)。
Debian/lenny(glibc 2.7)的 getaddrinfo_a() 不会崩溃,但目前没有好的检测方法。
请在此类系统上使用 libevent 2.x,getaddrinfo_a() 的回退实现不适用于生产系统。另请阅读 README 中新增的"DNS 查询支持"章节,了解 DNS 后端的选取方式。
(Hubert Depesz Lubaczewski, Dominique Hermsdorff, David Sommerseth)
若使用 libevent 2.x,默认启用 –enable-evdns。
默认开启 tcp_keepalive,与 Postgres 的行为保持一致。
(Hubert Depesz Lubaczewski)
将默认的 server_reset_query 设置为 DISCARD ALL,以默认与 Postgres 兼容。
win32:修复 NULL UNIX socket 地址导致的崩溃。
(Hiroshi Saito)
修复 autodb 清理逻辑:旧的清理代码混淆了数据库和连接池——一旦发现一个空连接池,就将该数据库标记为"空闲",这可能导致有活跃用户的数据库被错误终止。
由 Hubert Depesz Lubaczewski 报告。
修复
通过使用单个并行线程执行查询,使兼容版本的 getaddrinfo_a() 变为非阻塞。 若使用兼容版 getaddrinfo_a(),启用 pthread 编译。 release_server 在生命周期断开时漏掉了对 ->last_lifetime_disconnect 的设置。
(Emmanuel Courreges) win32:修复 DOS 换行符的认证文件处理——load_file() 在加载时未考虑文件大小缩减的情况。
(Rich Schaaf) <usual/endian.h>:为编解码函数添加 autoconf 检测,避免在 BSD 上产生冲突。
(James Pye) 当配置文件不存在时不崩溃。
(Lou Picciano) 在噪声级别日志(-v -v)下,DNS 查询失败时不崩溃。
(Hubert Depesz Lubaczewski, Dominique Hermsdorff) 在 find_modules.sh 中使用反引号替代 $(cmd),提升可移植性。
(Lou Picciano) 在 find_modules.sh 中使用 ‘awk’ 替代 ‘sed’,提升可移植性。
(Giorgio Valoti) 启动时记录当前使用的异步 DNS 后端信息。 修复 –disable-evdns 被识别为 ‘yes’ 而非 ’no’ 的问题。 在文档中说明 -R 需要配置 unix_socket_dir。 在 faq.txt 中讨论 server_reset_query。 恢复 slab 分配器中丢失的 memset libusual 中的若干小型可移植性修复。 2011-01-11 - PgBouncer 1.4 - “Gore Code(鲜血淋漓的代码)”
功能
异步 DNS 查询——不再在重载时解析主机名,而是在连接时按需解析,并支持可配置的缓存。
(参见 dns_max_ttl 参数。)
默认使用 getaddrinfo_a()(glibc)作为后端;若不存在,则通过阻塞式(!)getaddrinfo() 模拟 getaddrinfo_a()。
若在 configure 时指定 –enable-evdns 参数,则使用 libevent 的 evdns 作为后端。默认不使用,因为 libevent 1.3/1.4 包含有 bug 的实现,只有 libevent 2.0 中的 evdns 看起来是可用的。
新配置变量:syslog_ident,用于调整 syslog 名称。
正式支持 application_name 启动参数。
命令行长选项支持(Guillaume Lelarge)
Solaris 可移植性修复(Hubert Depesz Lubaczewski)
新配置变量:disable_pqexec。高度偏执的环境可以使用此选项禁用简单查询协议(Simple Query Protocol),要求应用仅使用扩展查询协议(Extended Query Protocol)。
Postgres 兼容性:若启动数据包中的数据库名称为空,则使用用户名作为数据库名。
修复
DateStyle 和 TimeZone 服务端参数需要使用精确的大小写。 Console:向客户端发送 datetime、timezone 和 stdstr 服务端参数。 内部清理
使用 libusual 库处理底层工具函数。 移除服务端参数的固定长度限制。 PgBouncer 1.3.x 2010-09-09 - PgBouncer 1.3.4 - “Bouncer is always right(保镖永远是对的)”
修复在连接时应用快速失败(fast-fail)逻辑,使客户端在服务端出现故障时连接时即可收到错误。 不在重载时将自动生成的数据库标记为待检查状态,否则它们将因不在配置中而被删除。 默认忽略 application_name 参数,避免所有 Postgres 9.0 用户都需要自行将其添加到 ignore_startup_parameters= 中。 修正 pg_auth 中的引用处理,其中不使用 ‘'。 改善 console 的错误报告,向用户显示传入的查询。 支持 tv_sec 不是 time_t 类型的操作系统(如 OpenBSD)。 避免在 gcc 4.5 上产生过多警告。 2010-05-10 - PgBouncer 1.3.3 - “NSFW(不宜工作场所浏览)”
改进使 listen(2) 的参数可配置:listen_backlog。这在允许配置系统最大值的操作系统上非常有用。 改进断开连接的日志消息,显示导致登录失败的用户名或数据库名。 修复调整快速失败(fast-fail)重启逻辑的位置。旧的逻辑令人恼火,当数据库或用户永久损坏时,即使没有客户端想要登录,也会不断重试。 使日志函数保留旧的 errno,否则在日志级别较高且存在日志问题时,pgbouncer 可能产生异常行为。 增大各种启动相关缓冲区的大小,以处理 EDB 更冗长的启动过程。 检测 V2 协议启动请求,并给出明确的断开原因。 2010-03-15 - PgBouncer 1.3.2 - “Boomerang Bullet(回旋镖子弹)”
修复
新配置变量 query_wait_timeout。若客户端在此秒数内未获得服务端连接,将被终止。
若连接池中没有可用的服务端连接且上次连接尝试失败,则不让客户端连接进入等待队列,而是立即返回错误。
此修复与上一修复结合,可在数据库宕机时避免不必要的停滞。
在 sbuf.c 中追踪 libevent 状态,以避免重复调用 event_del()。尽管通常是安全的,但似乎并非 100% 可靠。现在我们应能始终明确是否已调用过它。
在 SUSPEND 期间禁用维护操作。否则,在超时较短的情况下,旧的 bouncer 可能在将连接移交后关闭其中几个。
对等待欢迎数据包(即第一个服务端连接)的客户端应用 client_login_timeout。否则,除非设置了 query_timeout,它们可能会无限期等待。
win32:在 -regservice 中新增 -U/-P 开关,允许用户选择运行服务所用的账户。旧的在 Local Service 和 Local System 之间自动选择的逻辑不够可靠。
console:移除文本列末尾的 \0。由于 C 客户端对此无感,该问题不易察觉。
文档改进。(Greg Sabino Mullane)
澄清若干登录相关的日志消息。
将连接池发出的错误(通常在断开时)的日志级别从 INFO 提升至 WARNING,因为它们表示存在问题。
将 query_timeout 的日志消息更改为 “query timeout”。
2009-07-06 - PgBouncer 1.3.1 - “Now fully conforming to NSA monitoring requirements(现已完全符合 NSA 监控要求)”
修复修复 sbuf_loopcnt 相关问题,该问题可能导致连接挂起。若查询或结果长度接近 (pktlen*sbuf_loopcnt)(默认 10k)的整数倍,连接可能会停留在等待更多数据的状态,而这些数据永远不会到来。 使数据库重新配置立即生效。此前在 SIGHUP 后旧连接可能被复用。 修复 SHOW DATABASES 因列添加而损坏的问题。 当 “auth_type=any” 时,console 访问因 pgbouncer 丢弃了用户名而被禁用。修复:若 “auth_type=any”,允许任何用户以管理员身份访问 console。 修复错误的 CUSTOM_ALIGN 宏。幸运的是,若操作系统已定义了 ALIGN 宏,该宏则不会被使用,因此该 bug 似乎从未在实际中触发。 win32:始终调用 WSAStartup(),而不仅在守护进程模式下调用,因为配置解析也需要解析主机名。 win32:在服务命令行中为配置文件名加上引号,以支持路径中包含空格。可执行文件路径似乎因某种 win32 机制而无需此处理。 将 STATS 添加到 SHOW HELP 文本中。 doc/usage.txt:console 结果中的时间单位是微秒,不是毫秒。 2009-02-18 - PgBouncer 1.3 - “New Ki-Smash Finishing Move(全新气功波终结技)”
功能
IANA 已将 6432 端口分配为 PgBouncer 的官方端口。因此,默认端口号已更改为 6432。现有的个人用户无需更改,但若您打包分发 PgBouncer,请将包的默认端口改为此官方端口。
动态数据库创建(David Galoyan)
现在可以定义名称为 “*” 的数据库。若已定义,其连接字符串将用于所有未定义的数据库。主要适用于测试/开发环境。
Windows 支持(Hiroshi Saito)
PgBouncer 现可运行于 Windows 2000+。命令行用法保持不变,但不能以守护进程运行,也不能进行在线重启。要作为服务运行,请在配置中定义 service_name 参数,然后执行:
> pgbouncer.exe config.ini -regservice
> net start SERVICE_NAME
停止并注销服务:
> net stop SERVICE_NAME
> pgbouncer.exe config.ini -unregservice
要使用 Windows 事件日志,需要先注册事件 DLL:
> regsrv32 pgbevent.dll
之后即可在配置中设置 “syslog = 1”。
次要功能
配置文件中的数据库名称现在可以使用标准 SQL 标识符引用方式加引号,以支持名称中包含非标准字符。
新可调参数:reserve_pool_size 和 reserve_pool_timeout。当连接池中有客户端等待时间超过 reserve_pool_timeout 秒时,reserve_pool_size 指定可向连接池添加的额外连接数。也可通过连接变量 reserve_pool 按连接池单独设置。
新可调参数 sbuf_loopcnt,用于限制在单个套接字上花费的时间。
在某些情况下——如 SMP 服务器、本地 Postgres 和快速网络——pgbouncer 可以在两端都不阻塞的情况下多次执行 recv()->send() 循环。但这意味着其他连接将长时间停滞。为使处理更加公平,限制对单个套接字执行 recv()->send() 的次数。若计数达到限制,则继续处理其他套接字,该套接字的处理将在下一个事件循环中恢复。
感谢 Alexander Schocke 的报告和测试。
crypt() 认证现为可选,因为它已从 Postgres 中移除。若操作系统不提供它,pgbouncer 也能正常工作。
在日志时间戳中添加毫秒。
用更精简的实现替换旧的 MD5 实现。
更新 ISC 许可证,加入 FSF 的澄清说明。
修复
若 event_del() 报告失败,则继续执行清理操作。
此前 pgbouncer 会重试,以防失败是由 ENOMEM 引起的。但这导致了包含无限重复的日志洪泛,看来 libevent 不喜欢这种做法。
为何 event_del() 第一次就报告失败,至今仍是个谜。
–enable-debug 现在仅控制是否从二进制文件中剥离调试信息,不再影响 -fomit-frame-pointer,因为那样做是危险的。
修复 include 顺序,否则系统头文件可能在内部头文件之前被引入。这对新的 md5.h 头文件来说是个问题。
在 .tgz 中包含 COPYRIGHT 文件……
PgBouncer 1.2.x 2008-08-08 - PgBouncer 1.2.3 - “Carefully Selected Bytes(精心挑选的字节)”
修复禁用在 BSD 上无法正常工作的 SO_ACCEPTFILTER 代码。 在 tgz 中包含示例 etc/userlist.txt。 在递归调用中使用 ‘$(MAKE)’ 而非 ‘make’(Jorgen Austvik) 定义 _GNU_SOURCE,否则 glibc 形同虚设。 允许 libevent 1.1 通过链接测试,以便稍后报告"需要 1.3b+"。 检测并移除过期的 pidfile。 感谢 Devrim GUNDUZ 和 Bjoern Metzdorf 的问题报告和测试。
2008-08-06 - PgBouncer 1.2.2 - “Barf-bag Included(随附呕吐袋)”
修复移除 ‘drop_on_error’,这是个糟糕的设计。它最初是作为 Postgres 中破损的计划缓存行为的变通方案而添加的,但在某些查询总是返回错误的常见场景下,可能会造成损坏。 2008-08-04 - PgBouncer 1.2.1 - “Waterproof(防水)”
功能新参数 drop_on_error——若服务端抛出错误,该连接在客户端使用完毕后将被丢弃而非复用。这是为了刷新计划缓存,即便在 8.3 中自动刷新也无法正常工作。默认值为 1。 修复SHOW SOCKETS/CLIENTS/SERVERS:若套接字无缓冲区时不崩溃。 修复当 suspend_timeout 触发时 SUSPEND 进入无限循环的问题。 小型清理使用 <sys/uio.h> 获取 ‘struct iovec’。 在 RESUME/SIGUSR2 时取消关闭操作(由 SIGINT 触发),否则下次 PAUSE 时还会触发。 若 console 操作被取消,输出正确的日志消息。 2008-07-29 - PgBouncer 1.2 - “Ordinary Magic Flute(普通魔法长笛)”
PgBouncer 1.2 现在要求 libevent 版本 1.3b 或更高。更旧的 libevent 版本在新的重启代码下会崩溃。
功能
命令行选项(-u)和配置参数(user=),支持在启动时切换用户。同时,pgbouncer 现在拒绝以 root 身份运行。
(Jacob Coby)
更具描述性的使用说明文本(-h)。(Jacob Coby)
新的数据库选项:connect_query,允许在新连接投入使用前执行一条查询。
(Teodor Sigaev)
新配置变量 ignore_startup_parameters,允许忽略启动数据包中的额外参数。默认情况下只允许 ‘database’ 和 ‘user’,其他所有参数均会触发错误。这是为了兼容 JDBC 强制在启动数据包中设置 ’extra_float_digits=2’ 的行为。
syslog 日志记录:新增参数 syslog=0/1 和 syslog_facility=daemon/user/local0。
更平滑的在线重启(-R)
将 FD 加载移至 fork 之前,使其日志输出到控制台,且可用 ^C 取消。
fork 之后保持 SHUTDOWN 状态,使 ^C 操作更安全。
尝试通过 connect() 连接 UNIX socket,以检查是否有进程在监听。现在即使之前没有运行中的进程,也可以使用 -R。若之前有进程运行,但未使用 -R,则启动失败。
新控制台命令:
次要功能
suspend_timeout——断开停滞连接和长时间登录的连接。为重启提供额外安全保障。
当远端数据库在登录时抛出错误,将通知客户端。
从配置中删除数据库并重载配置后,该数据库的所有连接将被终止并移除。
在 console 的 SHOW/SET 命令中伪造部分参数,使其更接近 Postgres。这是为了让 psycopg 能够连接到 console。
(client_encoding/default_transaction_isolation/datestyle/timezone)
将 server_lifetime=0 的行为改为:在首次使用后立即断开服务端连接。此前 “0” 使 PgBouncer 忽略服务端连接的存活时间。由于该行为未在文档中说明,应该没有用户依赖此行为。
内部改进:
修复
每个事件循环只处理一个 accept(),当连接请求量较大时可能导致连接积压。现在始终将监听套接字完全排空,应可解决此问题。 处理来自 connect() 的 EINTR。 使 configure.ac 兼容 autoconf 2.59。 Solaris 兼容性修复(Magne Maehre) PgBouncer 1.1.x 2007-12-10 - PgBouncer 1.1.2 - “The Hammer(铁锤)”
功能因 server_lifetime 导致的断开连接现在按(server_lifetime / pool_size)秒的间隔分散执行,以避免 pgbouncer 造成重连风暴。 修复在线升级 1.0 -> 1.1 时的问题:1.0 不追踪服务端参数,因此它们保持为 NULL,而 1.1 未预期此情况并发生崩溃。 若服务端参数未知,但客户端参数已设置,则发出 SET 命令,而非报错。 移除意外遗留在代码中的 INFO 级别临时调试语句,它们污染了日志。 修复 debian/changelog 清理重新排列 SBuf 结构体字段,使缓冲区对齐更优。 2007-10-26 - PgBouncer 1.1.1 - “Breakdancing Bee(霹雳舞蜜蜂)”
修复服务端参数缓存可能保持未初始化状态,导致不必要的 SET 操作。这在不允许修改 standard_conforming_strings 的 8.1 版本上引发了问题。
(感谢 Dimitri Fontaine 的报告和测试。) 若干文档修复。 在 .tgz 中包含 doc/fixman.py。 2007-10-09 - PgBouncer 1.1 - “Mad-Hat Toolbox(疯帽子工具箱)”
功能
追踪以下服务端参数:
client_encoding datestyle, timezone, standard_conforming_strings
数据库连接字符串增强:
host= 接受主机名 host= 接受自定义 UNIX socket 路径 接受带引号的值:password=’ asd’‘foo’ 新配置变量:server_reset_query,在连接释放后立即发送。
新配置变量:server_round_robin,用于在 LIFO 和轮询(RR)之间切换。
向空闲连接发送取消包不再断开该连接。
在 SUSPEND / PAUSE 时,psql 的 ^C 取消操作现在可以正常工作。
启动时打印 FD 限制。
暂停时尽快对齐到数据包边界。
将 ’timezone’ 添加到数据库参数中。
使用长期持有的日志文件描述符,在 SIGHUP / RELOAD 时重新打开。
在 SHOW SERVERS/CLIENTS/SOCKETS 中显示本地连接端点信息。
代码清理
更多调试日志消息包含套接字信息。 移除魔法数字,清理错误消息。(David Fetter) 为当前包信息引入包装结构体,大幅降低代码复杂度。 修复
改进无效包头的检测。 auth_file 的修改时间检测存在 bug,导致 pgbouncer 过于频繁地重新加载它。 PgBouncer 1.0.x 2007-06-18 - PgBouncer 1.0.8 - “Undead Shovel Jutsu(不死铲子术)”
修复修复取消包(cancel packet)处理中的崩溃问题。(psql 中的 ^C) 功能PAUSE ; RESUME ; 现在可以正常使用。 清理 console 命令解析。 禁用开销较大的列表内断言检查。 2007-04-19 - PgBouncer 1.0.7 - “With Vitamin A-Z(含维生素 A-Z)”
修复在发送过程中多个错误/通知数据包与 send() 阻塞交叠时触发了断言。通过彻底移除刷新逻辑来修复此问题。由于 pgbouncer 不主动缓冲任何内容,刷新逻辑实际上不必要。这是使用 MSG_MORE 将缓冲推送到内核时代遗留下来的。 另外,避免在发送解除阻塞时调用 recv() 逻辑。 admin_users 和 stats_users 的列表搜索代码对部分匹配处理有误,已修复。 将 UNIX socket 对端 UID 获取标准化为使用 getpeereid()。 2007-04-12 - PgBouncer 1.0.6 - “Daily Dose(每日剂量)”
修复“在接管期间禁用维护"的修复可能导致维护被彻底禁用,已修复。 FreeBSD 编译修复:在 FreeBSD 上,<sys/ucred.h> 需要先引入 <sys/param.h>。
感谢 Robert Gogolok 的报告。 2007-04-11 - PgBouncer 1.0.5 - “Enough for today(今天到此为止)”
修复修复在线重启(online-restart)的若干 bug:为空闲服务端设置 ->ready 标志。 移除 use_client_socket() 中的过时代码。 在接管期间禁用维护操作。 2007-04-11 - PgBouncer 1.0.4 - “Last ’last’ bug(最后一个’最后’的 bug)”
修复来自空闲服务端的 Notice 将服务端连接标记为脏状态,而 release_server() 未预期此情况。通过直接丢弃此类通知来修复。 2007-04-11 - PgBouncer 1.0.3 - “Fearless Fork(无畏的 Fork)”
修复
登录路径中部分错误处理缺失,导致该处的连接断开可能触发断言。 清理 sbuf.c 中的断言,以便更早发现问题。 在 Assert() 触发时生成 core dump。 新增内容
新配置变量:log_connections、log_disconnections、log_pooler_errors,用于控制日志噪声的开关。 配置变量:client_login_timeout,用于终止登录阶段停滞的连接,避免其阻塞 SUSPEND 进而影响在线重启。 2007-03-28 - PgBouncer 1.0.2 - “Supersonic Spoon(超音速汤匙)”
修复libevent 可能在同一事件循环内报告一个已删除的事件。通过在一个事件循环内避免套接字复用来解决。 从 disconnect_client() 调用 release_server() 时,未检查数据包是否实际已发送。 2007-03-15 - PgBouncer 1.0.1 - “Alien technology(外星科技)”
修复
混用缓存时间与非缓存时间,加上无符号的 usec_t typedef,导致了虚假的 query_timeout 错误。 修复套接字从发送等待中唤醒后偶发停滞的罕见情况。 更公平的服务端连接排队机制。此前,新查询可能比旧查询更早获得服务端连接。 延迟服务端释放,直至所有数据确保已发送完毕。 功能
SHOW SOCKETS 命令,提供连接状态的详细信息。 在日志中加入 PgSocket 指针,便于追踪单个连接。 在 console 中,允许用 SELECT 替代 SHOW。 若干代码清理。 2007-03-13 - PgBouncer 1.0 - “Tuunitud bemm(调校过的宝马)”
27.8 - 常见问题解答 PgBouncer 常见问题解答
原始页面: https://www.pgbouncer.org/faq.html
如何连接到 PgBouncer? PgBouncer 扮演 PostgreSQL 服务器的角色,只需将客户端指向 PgBouncer 端口即可。
如何在多个服务器之间实现查询负载均衡? PgBouncer 没有内置的多主机配置功能,但可以通过外部工具实现:
DNS 轮询。在一个 DNS 名称后面配置多个 IP。PgBouncer 不会在每次新建连接时查询 DNS,而是缓存所有 IP 并在内部进行轮询。注意:若一个名称后有 8 个以上的 IP,则 DNS 后端必须支持 EDNS0 协议。详情参见 README。
使用 TCP 连接负载均衡器。 LVS HAProxy server_lifetime 的值并开启 server_round_robin:默认情况下,空闲连接按 LIFO 算法复用,在需要负载均衡时效果可能不佳。
如何实现故障转移? PgBouncer 没有内置的故障转移主机配置或检测功能,可借助外部工具实现:
DNS 重新配置:当 DNS 名称对应的 IP 地址发生变化时,PgBouncer 将重新连接到新服务器。可通过两个配置参数进行调整:dns_max_ttl 控制单个主机名的生存时间,dns_zone_check_period 控制查询区域 SOA 变更的频率。若区域 SOA 记录发生变化,PgBouncer 将重新查询该区域下的所有主机名。
向配置文件写入新主机并让 PgBouncer 重新加载:发送 SIGHUP 信号或在控制台执行 RELOAD 命令。PgBouncer 会检测到主机配置变更并重新连接到新服务器。
使用 RECONNECT 命令。适用于上述两种方案都不适用的情况,例如使用前述的 HAProxy 在 PgBouncer 下游路由连接时。RECONNECT 会重新打开所有服务端连接,请在其他组件更改连接路由信息后执行该命令。
如何在会话池化模式下使用预处理语句? 在会话池化模式下,重置查询必须清理旧的预处理语句。可通过设置 server_reset_query = DISCARD ALL; 或至少 DEALLOCATE ALL; 来实现。
如何在事务池化模式下使用预处理语句? 自 1.21.0 版本起,PgBouncer 可在事务池化模式下追踪预处理语句,并确保它们在关联的服务端连接上即时准备好。要启用此功能,需将 max_prepared_statements 设置为非零值。详情请参阅 max_prepared_statements
如果使用 PHP/PDO,根据其版本可能与 PgBouncer 的预处理语句支持不兼容(#991 )。PHP/PDO 仅在使用 PHP 8.4+ 且 libpq 17 时才兼容。因此,对于使用旧版本的环境,建议升级或在客户端禁用预处理语句。
在 JDBC 中禁用预处理语句 对于 JDBC,正确的做法是在连接字符串中添加 prepareThreshold=0 参数。
在 PHP/PDO 中禁用预处理语句 要禁用服务端预处理语句,必须将 PDO 属性 PDO::ATTR_EMULATE_PREPARES 设置为 true。可在连接时设置:
$db = new PDO("dsn", "user", "pass", array(PDO::ATTR_EMULATE_PREPARES => true));
或在连接后设置:
$db->setAttribute(PDO::ATTR_EMULATE_PREPARES, true);
如何在不断开连接的情况下升级 PgBouncer? 可以按照 SHUTDOWN WAIT_FOR_CLIENTS
如何查看哪个客户端对应哪个服务端连接? 在控制台使用 SHOW CLIENTS 和 SHOW SERVERS 命令。
使用 ptr 和 link 将本地客户端连接映射到服务端连接。
使用客户端连接的 addr 和 port 识别来自客户端的 TCP 连接。
使用 local_addr 和 local_port 识别到服务端的 TCP 连接。
PgBouncer 应安装在 Web 服务器还是数据库服务器上? 视情况而定。
当使用短连接时,将 PgBouncer 安装在 Web 服务器上较为合适,可以最大程度降低连接建立的延迟(TCP 连接在可用前需要几次数据包往返)。当有大量不同主机(如多台 Web 服务器)连接到数据库时,将 PgBouncer 安装在数据库服务器上更为合适,可统一优化这些连接。
也可以在 Web 服务器和数据库服务器上同时安装 PgBouncer。但这样做的缺点是每经过一个 PgBouncer 节点,每条查询都会增加一定的延迟。
最终,需要根据性能需求测试哪种模式效果更好。还应考虑在 Web 服务器或数据库服务器发生故障时,PgBouncer 的安装位置将如何影响应用程序的故障转移。
28 - pgBackRest 2.58 中文文档 可靠的 PostgreSQL 备份与恢复工具 —— pgBackRest 文档与参考手册。
原始页面: https://pgbackrest.org/
简介 pgBackRest 是一款可靠的 PostgreSQL 备份与恢复解决方案,可无缝扩展以应对超大规模数据库和高并发工作负载。
pgBackRest v2.58.0发布历史
如果您喜欢 pgBackRest,欢迎在 GitHub 赞助
功能特性 并行备份与恢复 压缩通常是备份操作的性能瓶颈,pgBackRest 通过并行处理以及 lz4、zstd 等高效压缩算法解决了这一问题。
本地或远程操作 pgBackRest 采用自定义协议,仅需极少配置即可通过 TLS/SSH 在本地或远程执行备份、恢复和归档操作。协议层还提供了查询 PostgreSQL 的接口,因此无需直接远程访问 PostgreSQL,从而增强了安全性。
多仓库支持 多仓库支持让用户可以灵活组合,例如:用一个保留周期较短的本地仓库快速恢复,同时用一个保留周期较长的远程仓库实现冗余备份和企业级访问。
全量、差异与增量备份(文件级或块级) pgBackRest 支持全量备份(full backup)、差异备份(differential backup)和增量备份(incremental backup)。pgBackRest 不受 rsync 时间精度问题的影响,因此无需对每个文件都做校验和计算,差异备份和增量备份同样安全可靠。块级备份通过仅复制文件中发生变化的部分来节省存储空间。
备份轮换与归档过期 可为全量备份和差异备份分别设置保留策略,覆盖任意时间范围。WAL 归档可以针对所有备份维护,也可以只针对最近的备份维护;后一种情况下,旧备份保持一致性所必需的 WAL 会继续保留在归档中。
备份完整性 pgBackRest 为备份中的每个文件计算校验和,并在恢复或验证时重新校验。备份完成文件复制后,会等待所有维持备份一致性所需的 WAL 段到达仓库。
仓库中的备份可以与标准 PostgreSQL 集群相同的格式存储(含表空间)。若禁用压缩并启用硬链接,可对仓库中的备份创建快照,并直接在快照上启动 PostgreSQL 集群。这对于以传统方式恢复耗时较长的 TB 级数据库尤为有利。
所有操作均使用文件和目录级 fsync 以确保持久性。
页面校验和 若启用了页面校验和,pgBackRest 在备份时会对每个复制的文件进行校验和验证。全量备份时验证所有页面的校验和,差异备份和增量备份时仅验证已变更文件的校验和。
校验和验证失败不会中止备份进程,而是将包含具体失败页面详情的警告信息输出到控制台和日志文件。
此功能可在包含有效数据副本的备份过期之前,提前发现页面级损坏。
备份续传 中断的备份可从中断位置续传。已复制的文件会与清单文件(manifest)中的校验和进行比对以确保完整性。由于该操作可完全在仓库主机上执行,因此减轻了数据库主机的负载,并因校验和计算比重新压缩和重传数据更快而节省了时间。
流式压缩与校验和 无论仓库位于本地还是远程,压缩和校验和计算均在文件复制到仓库的过程中以流式方式同步进行。
若仓库位于仓库主机上,压缩在数据库主机上执行,文件以压缩格式传输并直接存储到仓库主机。若禁用压缩,则采用较低级别的压缩,在最大程度降低 CPU 开销的同时有效利用可用带宽。
Delta 恢复 清单文件(manifest)包含备份中每个文件的校验和,恢复时可利用这些校验和大幅加速处理过程。执行 delta restore 时,先删除备份中不存在的文件,再对剩余文件计算校验和;与备份匹配的文件原地保留,其余文件按常规方式恢复。并行处理可显著缩短恢复时间。
并行异步 WAL 推送与获取 pgBackRest 提供了专用命令,用于将 WAL 推送到归档以及从归档获取 WAL。两个命令均支持并行处理以加速操作,并以异步方式运行,尽可能快速地响应 PostgreSQL 的请求。
WAL 推送会自动检测被重复推送的 WAL 段:内容相同则去重,内容不同则报错。异步 WAL 推送可将传输任务卸载到后台进程,该进程并行压缩 WAL 段以实现最大吞吐量。对于写入量极大的数据库,这是一项关键功能。
异步 WAL 获取会在本地维护一个已解压、可供回放的 WAL 段队列,从而减少向 PostgreSQL 提供 WAL 所需的延迟,最大化回放速度。高延迟连接和存储(如 S3)受益最为明显。
推送和获取命令均通过比对 PostgreSQL 版本和系统标识符来确保数据库与仓库匹配,从而几乎消除了 WAL 归档位置配置错误的风险。
表空间与链接支持 pgBackRest 完全支持表空间,恢复时可将表空间重新映射到任意位置。也可通过单条命令将所有表空间映射到同一位置,在开发环境恢复时非常实用。
pgBackRest 支持 PostgreSQL 集群中任意文件或目录的文件链接和目录链接。恢复时,可将所有链接还原到原始位置、重新映射部分或全部链接,也可将部分或全部链接以普通文件或目录的形式恢复到集群目录中。
兼容 S3、Azure 和 GCS 对象存储 pgBackRest 仓库可存储在兼容 S3、Azure 和 GCS 的对象存储中,从而实现近乎无限的存储容量和保留期限。
加密 pgBackRest 支持对仓库加密,无论备份存储在何处,均能保障数据安全。
兼容十个 PostgreSQL 版本 pgBackRest 支持十个 PostgreSQL 版本,包括五个仍在官方支持期内的版本和最近五个已终止支持(EOL)的版本,为用户升级到受支持版本留出了充足时间。
快速入门 pgBackRest 致力于提供简便的配置和操作体验:
v1 版本的文档可在 此处
贡献 我们随时欢迎对 pgBackRest 的贡献!请参阅 贡献指南
支持 pgBackRest 基于 MIT 此处
制定完善的容灾方案(包含合理的复制和备份策略)可能是一项复杂而艰巨的任务。在架构设计阶段和持续运营中,您可能需要专业支持以确保企业业务平稳运行。目前有多家 PostgreSQL 支持公司可提供此类服务。
致谢 Crunchy Data 和 Resonate 慷慨地支持了 pgBackRest 的开发。
Armchair 图标由 Alexander Skowalsky 设计。
28.1 - 用户指南(Debian/Ubuntu) 面向 Debian 和 Ubuntu 系统的 pgBackRest 安装配置与使用指南,按步骤逐一讲解。
原始页面: https://pgbackrest.org/user-guide.html
简介 本用户指南适合从头到尾顺序阅读——每章内容均依赖前一章的配置基础。例如, 恢复 快速开始
本指南的示例基于 Debian/Ubuntu 和 PostgreSQL 16,但移植到其他 Unix 发行版和 PostgreSQL 版本并不困难。与操作系统相关的命令仅限于创建、启动、停止和删除 PostgreSQL 集群的部分;pgBackRest 命令在各 Unix 系统上完全相同,只是可执行文件路径可能有所不同。pgBackRest 致力于在各 PostgreSQL 版本间保持一致的行为,但不同版本在路径、文件名和配置项等细节上存在细微差异,这些差异可能在本指南的某些示例中有所体现。
PostgreSQL 配置信息和文档,请参阅 PostgreSQL 手册
本用户指南在文档方式上颇具特色:每条命令在从 XML 源构建文档时都会在虚拟机上实际执行。因此,你可以充分相信这些命令按照呈现的顺序能够正确运行。命令执行后如有相关输出,将显示在命令下方;若未附输出,则说明该输出与叙述无关或有所干扰。
所有命令均以具有 root 和 postgres 用户 sudo 权限的非特权用户身份运行。也可以直接以对应用户身份运行,无需任何修改,此时去掉 sudo 即可。
核心概念 以下概念的定义与 pgBackRest、PostgreSQL 及本用户指南密切相关。
备份 备份是数据库集群的一致性副本,可用于从硬件故障中恢复、执行时间点恢复(PITR)或启动新的备库。
全量备份(full backup) :将数据库集群的全部内容复制到备份中。第一次备份始终是全量备份。全量备份可直接恢复,其一致性不依赖于任何外部文件。
差异备份(differential backup) :仅复制自上次全量备份以来发生变化的文件。恢复时,pgBackRest 将差异备份中的所有文件与上一次全量备份中未变化的文件合并。差异备份占用的磁盘空间少于全量备份,但恢复时差异备份和对应的全量备份必须同时有效。
增量备份(incremental backup) :仅复制自上次备份(可以是增量备份、差异备份或全量备份)以来发生变化的文件,因此通常比全量备份或差异备份小得多。与差异备份类似,增量备份的恢复依赖于其他备份的有效性。具体而言,恢复增量备份需要:该增量备份之前同一差异备份周期内的所有增量备份、上一次差异备份,以及上一次全量备份,全部有效。若不存在差异备份,则需要追溯至上一次全量备份的全部增量备份及全量备份本身。
恢复 恢复是将备份复制到目标系统并将其作为活跃数据库集群启动的过程。恢复需要备份文件以及一个或多个 WAL 段。
预写日志(WAL) WAL 是 PostgreSQL 用于确保已提交事务不丢失的机制。事务按顺序写入 WAL,写入刷盘后该事务即视为已提交。此后,后台进程再将变更写入主数据库集群文件(即堆文件)。发生崩溃时,PostgreSQL 会重放 WAL 以恢复数据库一致性。
WAL 在概念上是无限的,但实际中会被切分为每个 16MB 的独立文件,称为 WAL 段。WAL 段遵循 0000000100000A1E000000FE 这样的命名约定,其中前 8 个十六进制数字表示时间线,后 16 位是逻辑序列号(LSN)。
加密 加密是将数据转换为不可识别格式的过程,只有提供正确的密码(口令)才能还原。
pgBackRest 根据用户提供的密码对仓库进行加密,防止未经授权的访问。
升级 pgBackRest 从 v1 升级到 v2 从 v1 升级到 v2 相当简单。仓库格式没有变化,v1 中所有未弃用的选项均可继续使用,大多数情况下只需安装新版本即可。
但有几点需要注意:
已弃用的 thread-max 选项不再有效,请改用 process-max。 已弃用的 archive-max-mb 选项不再有效,已被语义不同的 archive-push-queue-max 选项取代。 backup-user 选项的默认值已从 backrest 改为 pgbackrest。自 v2.02 起,pgBackRest 配置文件的默认位置从 /etc/pgbackrest.conf 变更为 /etc/pgbackrest/pgbackrest.conf。若 /etc/pgbackrest/pgbackrest.conf 不存在,则尝试加载 /etc/pgbackrest.conf(如果存在)。 许多选项已改名以提高一致性,但 v1 的旧名称仍被接受。总体而言,db-* 选项已重命名为 pg-*,backup-*/retention-* 选项在适当情况下已重命名为 repo-*。
使用 v2 引入的新名称时,PostgreSQL 和仓库选项必须带索引,例如 pg1-host、pg1-path、repo1-path、repo1-type 等。
从 v2.x 升级到 v2.y 从 v2.x 升级到 v2.y 非常简单。仓库格式没有变化,大多数情况下只需安装新版本的二进制文件即可。如果未使用旧版本不支持的新功能,也可以回滚降级。
重要提示:
本地与远程的 pgBackRest 版本必须完全一致,因此应同步升级。版本不一致时,WAL 归档和备份将无法正常工作,并报告如下错误:[ProtocolError] expected value '2.x' for greeting key 'version' but got '2.y'。
编译构建 推荐通过软件包安装 pgBackRest,而非从源码构建。有关软件包的更多信息,请参阅 安装
如需从源码构建,建议在专用构建主机上进行,而非生产环境——构建所需的许多工具不应出现在生产系统上。pgBackRest 由单个可执行文件构成,构建完成后可方便地复制到目标主机。
build ⇒ 将 pgBackRest 版本 2.58.0 下载到 /build 路径
mkdir -p /build
wget -q -O - \
https://github.com/pgbackrest/pgbackrest/archive/release/2.58.0.tar.gz | \
tar zx -C /build
build ⇒ 安装构建依赖
sudo apt-get install python3-distutils meson gcc libpq-dev libssl-dev libxml2-dev \
pkg-config liblz4-dev libzstd-dev libbz2-dev libz-dev libyaml-dev libssh2-1-dev
build ⇒ 配置并编译 pgBackRest
meson setup /build/pgbackrest /build/pgbackrest-release-2.58.0
ninja -C /build/pgbackrest
安装 创建一台名为 pg-primary 的新主机,用于承载演示集群并运行 pgBackRest 示例。
推荐通过软件包安装 pgBackRest。使用软件包时,本节后续步骤通常不必手动执行,但个别软件包可能遗漏某个目录的创建或权限设置有误,此时需要手动创建目录或修正权限。
Debian/Ubuntu 的 pgBackRest 软件包可在 apt.postgresql.org 获取。
如果当前发行版没有提供软件包,可以 从源码构建
pg-primary ⇒ 安装依赖项
sudo apt-get install postgresql-client libxml2 libssh2-1
pg-primary ⇒ 从构建主机复制 pgBackRest 二进制文件
sudo scp build:/build/pgbackrest/src/pgbackrest /usr/bin
sudo chmod 755 /usr/bin/pgbackrest
pgBackRest 运行需要日志目录、配置目录和配置文件。
pg-primary ⇒ 创建 pgBackRest 配置文件和目录
sudo mkdir -p -m 770 /var/log/pgbackrest
sudo chown postgres:postgres /var/log/pgbackrest
sudo mkdir -p /etc/pgbackrest
sudo mkdir -p /etc/pgbackrest/conf.d
sudo touch /etc/pgbackrest/pgbackrest.conf
sudo chmod 640 /etc/pgbackrest/pgbackrest.conf
sudo chown postgres:postgres /etc/pgbackrest/pgbackrest.conf
pgBackRest 此时应已正确安装,建议进行验证。若有依赖项缺失,命令行运行 pgBackRest 时会报错。
pg-primary ⇒ 确认安装成功
sudo -u postgres pgbackrest
pgBackRest 2.58.0 - General help
Usage:
pgbackrest [ options] [ command]
Commands:
annotate add or modify backup annotation
archive-get get a WAL segment from the archive
archive-push push a WAL segment to the archive
backup backup a database cluster
check check the configuration
expire expire backups that exceed retention
help get help
info retrieve information about backups
repo-get get a file from a repository
repo-ls list files in a repository
restore restore a database cluster
server pgBackRest server
server-ping ping pgBackRest server
stanza-create create the required stanza data
stanza-delete delete a stanza
stanza-upgrade upgrade a stanza
start allow pgBackRest processes to run
stop stop pgBackRest processes from running
verify verify contents of a repository
version get version
Use 'pgbackrest help [command]' for more information.
快速开始 本章介绍 pgBackRest 和 PostgreSQL 的基本配置,并演示 backup、restore 和 info 命令的基本用法。
创建演示集群 创建演示集群是可选步骤,但强烈推荐,尤其是对新用户而言——用户指南中的示例命令均引用该演示集群,且假设其运行在默认端口(5432)上。由于还有一些配置工作需要完成,集群将在后续章节中启动。
pg-primary ⇒ 创建演示集群
sudo -u postgres /usr/lib/postgresql/16/bin/initdb \
-D /var/lib/postgresql/16/demo -k -A peer
sudo pg_createcluster 16 demo
Configuring already existing cluster (configuration: /etc/postgresql/16/demo, data: /var/lib/postgresql/16/demo, owner: 102:103)
Ver Cluster Port Status Owner Data directory Log file
16 demo 5432 down postgres /var/lib/postgresql/16/demo /var/log/postgresql/postgresql-16-demo.log
配置集群 Stanza stanza 是 pgBackRest 中标识一个 PostgreSQL 集群备份配置的逻辑名称,定义了数据库集群的位置、备份方式和归档选项等配置。大多数数据库服务器只有一个 PostgreSQL 集群,因此只有一个 stanza;备份服务器则为每个需要备份的集群各配置一个 stanza。
为 stanza 命名时,容易直接使用主集群名,但更好的做法是用能描述集群所承载业务的名称。由于 stanza 名称同时用于主库和所有副本,选择能反映集群实际用途的名称(如 app 或 dw)比使用本地集群名(如 main 或 prod)更为合适。
demo 准确描述了该集群的用途,因此也是一个合适的 stanza 名称。
pgBackRest 需要知道 PostgreSQL 集群数据目录的位置。该路径通常可从 PostgreSQL 直接获取,但在恢复场景中 PostgreSQL 进程不可用。备份过程中,pgBackRest 会将配置的路径与 PostgreSQL 实际运行的路径进行比对,两者必须完全一致,否则备份会报错。请确保 pg-path 与 PostgreSQL 报告的 data_directory 完全匹配。
Debian/Ubuntu 默认将集群存储在 /var/lib/postgresql/[version]/[cluster],数据目录路径易于确定。
/etc/pgbackrest/pgbackrest.conf 文件必须对数据库所有者(通常为 postgres)授予读取权限。
pg-primary:/etc/pgbackrest/pgbackrest.conf ⇒ 配置 PostgreSQL 集群数据目录
[demo]
pg1-path = /var/lib/postgresql/16/demo
pgBackRest 配置文件采用类 Windows INI 的格式。节(section)以方括号内的文本标识,键/值对包含在各节中。以 # 开头的行为注释,会被忽略。不支持引号,键和值会自动去除首尾空白。若同一节出现多次,内容将被合并。
pgBackRest 配置文件支持多种加载方式:
config 和 config-include-path 均使用默认值:若存在则加载默认配置文件,若存在则追加默认配置包含路径中的 *.conf 文件。指定了 config 选项:仅加载指定的配置文件,且该文件必须存在。 指定了 config-include-path:加载该路径中的所有 *.conf 文件(路径必须存在),同时加载默认配置文件(若存在)。若只想加载指定路径中的文件,可额外传入 --no-config 选项。 同时指定了 config 和 config-include-path:使用用户指定的值,加载配置文件并追加包含路径中的 *.conf 文件,这些文件必须存在。 指定了 config-path:此设置将覆盖配置文件默认位置的基路径和/或 config-include-path 的默认基路径,除非已显式设置 config 或 config-include-path。 所有配置文件会被拼接为一个整体,每个文件须各自有效。这意味着每个文件中需要为相应的键/值对声明所属节。节的顺序不影响最终结果,但存在基于节的优先级。优先级从高到低为:
[stanza :command ] [stanza ] [global:command ] [global] 注意:
--config、--config-include-path 和 --config-path 仅为命令行选项。
pgBackRest 也支持通过环境变量进行配置(见下方示例);环境变量适用于 backuprestorearchive-push
pg-primary ⇒ 使用环境变量配置 log-path
sudo -u postgres bash -c ' \
export PGBACKREST_LOG_PATH=/path/set/by/env && \
pgbackrest --log-level-console=error help backup log-path'
pgBackRest 2.58.0 - 'backup' command - 'log-path' option help
Path where log files are stored.
The log path provides a location for pgBackRest to store log files. Note that
if log-level-file= off then no log path is required.
current: /path/set/by/env
default: /var/log/pgbackrest
创建仓库 仓库是 pgBackRest 存储备份和归档 WAL 段的位置。
提前准确估算所需空间并不容易。最好的做法是先执行几次备份,记录各类备份(full/incr/diff)的大小,并测量每天产生的 WAL 量,从而得出大致的空间需求——随着数据库的增长,这一需求也会随时间变化。
本演示中,仓库与 PostgreSQL 服务器存放在同一台主机上。这是最简单的配置,适合已用传统备份软件备份数据库主机的场景。
pg-primary ⇒ 创建 pgBackRest 仓库
sudo mkdir -p /var/lib/pgbackrest
sudo chmod 750 /var/lib/pgbackrest
sudo chown postgres:postgres /var/lib/pgbackrest
必须配置仓库路径,pgBackRest 才能找到它。
pg-primary:/etc/pgbackrest/pgbackrest.conf ⇒ 配置 pgBackRest 仓库路径
[demo]
pg1-path = /var/lib/postgresql/16/demo
[global]
repo1-path = /var/lib/pgbackrest
pgBackRest 也支持配置多个仓库,详见 多仓库
配置归档 备份正在运行的 PostgreSQL 集群需要启用 WAL 归档。其中 %p 是 PostgreSQL 传递待归档 WAL 段路径的方式。请注意,即使没有对集群进行显式写入,备份过程中也至少会生成一个 WAL 段。
pg-primary:/etc/postgresql/16/demo/postgresql.conf ⇒ 配置归档设置
archive_command = 'pgbackrest --stanza=demo archive-push %p'
archive_mode = on
完成上述配置修改后,必须重启 PostgreSQL 集群方可执行备份。
pg-primary ⇒ 重启演示集群
sudo pg_ctlcluster 16 demo restart
如果归档单个 WAL 段预计耗时超过 60 秒(默认超时),应适当增大 pgBackRest 的 archive-timeout 选项。注意,该选项与 PostgreSQL 的 archive_timeout 不同,后者用于强制切换 WAL 段,适合长时间处于非活跃状态的数据库。关于 PostgreSQL archive_timeout 的详细说明,请参阅 PostgreSQL 预写日志
archive-push 命令支持单独配置选项。例如,可以为其设置较低的压缩级别以加速归档,而不影响备份使用的压缩配置。
pg-primary:/etc/pgbackrest/pgbackrest.conf ⇒ 配置 archive-push 使用较低的压缩级别
[demo]
pg1-path = /var/lib/postgresql/16/demo
[global]
repo1-path = /var/lib/pgbackrest
[global:archive-push]
compress-level = 3
这种配置方式适用于任何命令,也可以针对特定 stanza,例如 demo:archive-push。
配置保留策略 pgBackRest 根据保留策略选项对备份执行到期清理操作。
pg-primary:/etc/pgbackrest/pgbackrest.conf ⇒ 配置保留 2 个全量备份
[demo]
pg1-path = /var/lib/postgresql/16/demo
[global]
repo1-path = /var/lib/pgbackrest
repo1-retention-full = 2
[global:archive-push]
compress-level = 3
有关保留策略的更多信息,请参阅 保留策略
配置仓库加密 本节将为仓库配置加密类型和密钥以演示加密功能。无论仓库类型(如 S3 或其他对象存储)本身是否支持加密,pgBackRest 的加密始终在客户端执行。
建议为密钥使用足够长的随机口令,可通过以下命令生成:openssl rand -base64 48。
pg-primary:/etc/pgbackrest/pgbackrest.conf ⇒ 配置 pgBackRest 仓库加密
[demo]
pg1-path = /var/lib/postgresql/16/demo
[global]
repo1-cipher-pass = zWaf6XtpjIVZC5444yXB+cgFDFl7MxGlgkZSaoPvTGirhPygu4jOKOXf9LO4vjfO
repo1-cipher-type = aes-256-cbc
repo1-path = /var/lib/pgbackrest
repo1-retention-full = 2
[global:archive-push]
compress-level = 3
仓库配置完成、stanza 创建并检查通过后,仓库加密设置将无法再更改。
创建 Stanza 需要运行 stanza-create 命令来初始化 stanza。建议在 stanza-create 之后运行 check 命令,验证归档和备份配置是否正确。
pg-primary ⇒ 创建 stanza 并检查配置
sudo -u postgres pgbackrest --stanza= demo --log-level-console= info stanza-create
P00 INFO: stanza-create command begin 2.58.0: --exec-id=1060-8b7025bb --log-level-console=info --no-log-timestamp --pg1-path=/var/lib/postgresql/16/demo --repo1-cipher-pass= --repo1-cipher-type=aes-256-cbc --repo1-path=/var/lib/pgbackrest --stanza=demo
P00 INFO: stanza-create for stanza 'demo' on repo1
P00 INFO: stanza-create command end: completed successfully
检查配置 check 命令用于验证 pgBackRest 和 archive_command 是否为指定 stanza 的归档和备份正确配置。它会检查运行该命令的主机上所有已配置的仓库和数据库,可发现配置错误——尤其是因所需 WAL 段未能到达归档而导致备份不完整的问题。该命令可在 PostgreSQL 主机或仓库主机上运行,也可在备库主机上运行,但由于备库无法执行 pg_switch_xlog()/pg_switch_wal(),在备库上仅能测试仓库配置。
注意:执行该命令时,pgBackRest 会调用 pg_create_restore_point('pgBackRest Archive Check') 和 pg_switch_xlog()/pg_switch_wal() 来强制 PostgreSQL 归档一个 WAL 段。
pg-primary ⇒ 检查配置
sudo -u postgres pgbackrest --stanza= demo --log-level-console= info check
P00 INFO: check command begin 2.58.0: --exec-id=1069-d864650d --log-level-console=info --no-log-timestamp --pg1-path=/var/lib/postgresql/16/demo --repo1-cipher-pass= --repo1-cipher-type=aes-256-cbc --repo1-path=/var/lib/pgbackrest --stanza=demo
P00 INFO: check repo1 configuration (primary)
P00 INFO: check repo1 archive for WAL (primary)
P00 INFO: WAL segment 000000010000000000000001 successfully archived to '/var/lib/pgbackrest/archive/demo/16-1/0000000100000000/000000010000000000000001-b2bbfb2253a998ecb763348c553b8d2c8a31ca0b.gz' on repo1
P00 INFO: check command end: completed successfully
性能调优 pgBackRest 提供了许多性能选项,为保持仓库的向后兼容性,这些选项默认未启用。但对于新建仓库,推荐开启以下选项。这些选项也可用于现有仓库,但请注意,开启后旧版本 pgBackRest 将无法读取该仓库,具体的兼容性边界取决于各功能的引入版本,详见下方列表。
compress-type — 控制 backup 和 archive-push 命令使用的压缩算法。默认为 gz(Gzip),推荐改用 zst(Zstandard),速度更快且压缩率与 gz 相当。zst 自 v2.27 起支持。详情请参阅 压缩类型 repo-bundle — 备份时将小文件合并打包,节省空间并提升 backup 和 restore 速度,在 S3 等对象存储上效果尤为明显。repo-bundle 选项在 v2.39 中引入。详情请参阅 文件打包 repo-block — 执行 diff/incr 备份时,仅存储文件中发生变化的数据块,而非整个文件,从而节省空间并提升备份速度。repo-block 选项在 v2.46 中引入,建议至少使用 v2.52.1 。详情请参阅 块级增量备份 还有一些性能选项因需要额外配置或默认值已足够安全(但未必最优)而默认未启用,这些选项在所有 v2 版本中均可用:
process-max — 控制命令使用的进程数,默认为 1,几乎在任何场景下都不是最优值。各命令对 process-max 的使用方式不同,请参阅对应命令的文档。archive-async — 批量将 WAL 文件归档到仓库,大幅提升归档速度,默认未启用(需要创建缓冲区路径)。详情请参阅 异步归档 backup-standby — 在备库而非主库上执行备份,降低主库负载,默认未启用(需要额外配置且依赖备库的存在)。详情请参阅 从备库备份 执行备份 默认情况下,pgBackRest 会等待下一个定期检查点完成后再开始备份。根据 PostgreSQL 的 checkpoint_timeout 和 checkpoint_segments 设置,检查点可能需要较长时间,从而延迟备份启动。通常建议设置 start-fast=y,使备份立即开始——这会强制触发一次检查点,但由于备份通常每天只运行一次,额外的检查点对性能影响可以忽略不计。对于极其繁忙的集群,可以根据需要在命令行临时传入 --start-fast。
pg-primary:/etc/pgbackrest/pgbackrest.conf ⇒ 配置备份快速启动
[demo]
pg1-path = /var/lib/postgresql/16/demo
[global]
repo1-cipher-pass = zWaf6XtpjIVZC5444yXB+cgFDFl7MxGlgkZSaoPvTGirhPygu4jOKOXf9LO4vjfO
repo1-cipher-type = aes-256-cbc
repo1-path = /var/lib/pgbackrest
repo1-retention-full = 2
start-fast = y
[global:archive-push]
compress-level = 3
使用 backup 命令对 PostgreSQL 集群执行备份。
pg-primary ⇒ 备份演示集群
sudo -u postgres pgbackrest --stanza= demo \
--log-level-console= info backup
P00 INFO: backup command begin 2.58.0: --exec-id=1097-1bd2b5f6 --log-level-console=info --no-log-timestamp --pg1-path=/var/lib/postgresql/16/demo --repo1-cipher-pass= --repo1-cipher-type=aes-256-cbc --repo1-path=/var/lib/pgbackrest --repo1-retention-full=2 --stanza=demo --start-fast
P00 WARN: no prior backup exists, incr backup has been changed to full
P00 INFO: execute backup start: backup begins after the requested immediate checkpoint completes
P00 INFO: backup start archive = 000000010000000000000002, lsn = 0/2000028
[filtered 3 lines of output]
P00 INFO: check archive for segment(s) 000000010000000000000002:000000010000000000000003
P00 INFO: new backup label = 20260119-092813F
P00 INFO: full backup size = 22MB, file total = 963
P00 INFO: backup command end: completed successfully
P00 INFO: expire command begin 2.58.0: --exec-id=1097-1bd2b5f6 --log-level-console=info --no-log-timestamp --repo1-cipher-pass= --repo1-cipher-type=aes-256-cbc --repo1-path=/var/lib/pgbackrest --repo1-retention-full=2 --stanza=demo
默认情况下,pgBackRest 会尝试执行增量备份。由于增量备份必须基于全量备份,而此时不存在全量备份,pgBackRest 自动改为执行全量备份。
可通过 type 选项指定备份类型为全量备份或差异备份。
pg-primary ⇒ 对演示集群执行差异备份
sudo -u postgres pgbackrest --stanza= demo --type= diff \
--log-level-console= info backup
[filtered 7 lines of output]
P00 INFO: check archive for segment(s) 000000010000000000000004:000000010000000000000005
P00 INFO: new backup label = 20260119-092813F_20260119-092815D
P00 INFO: diff backup size = 8.3KB, file total = 963
P00 INFO: backup command end: completed successfully
P00 INFO: expire command begin 2.58.0: --exec-id=1124-89578f42 --log-level-console=info --no-log-timestamp --repo1-cipher-pass= --repo1-cipher-type=aes-256-cbc --repo1-path=/var/lib/pgbackrest --repo1-retention-full=2 --stanza=demo
这次未出现警告,因为全量备份已存在。增量备份可以基于全量备份或 差异备份,而差异备份只能基于全量备份。可通过 --type=full 选项执行全量备份。
在线备份期间,pgBackRest 会等待备份一致性所需的 WAL 段完成归档。等待超时由 archive-timeout 选项控制,默认为 60 秒。若已知归档单个 WAL 段需要更长时间,应适当增大该选项的值。
制定备份计划 可以使用 cron 等工具调度备份任务。
下面的示例配置了两个 cron 任务:每周日早上 6:30 执行全量备份,周一至周六早上 6:30 执行差异备份。若该 crontab 在周中首次安装,pgBackRest 会在差异任务首次执行时自动改为执行全量备份,次日再执行差异备份。
#m h dom mon dow command
30 06 * * 0 pgbackrest --type= full --stanza= demo backup
30 06 * * 1-6 pgbackrest --type= diff --stanza= demo backup
确定备份计划后,务必配置保留策略,以便定期清理过期备份,详见 保留策略
备份信息 使用 info 命令获取备份信息。
pg-primary ⇒ 获取演示集群的信息
sudo -u postgres pgbackrest info
stanza: demo
status: ok
cipher: aes-256-cbc
db (current)
wal archive min/max (16): 000000010000000000000001/000000010000000000000005
full backup: 20260119-092813F
timestamp start/stop: 2026-01-19 09:28:13+00 / 2026-01-19 09:28:15+00
wal start/stop: 000000010000000000000002 / 000000010000000000000003
database size: 22MB, database backup size: 22MB
repo1: backup set size: 2.9MB, backup size: 2.9MB
diff backup: 20260119-092813F_20260119-092815D
timestamp start/stop: 2026-01-19 09:28:15+00 / 2026-01-19 09:28:16+00
wal start/stop: 000000010000000000000004 / 000000010000000000000005
database size: 22MB, database backup size: 8.3KB
repo1: backup set size: 2.9MB, backup size: 448B
backup reference total: 1 full
info 命令可操作单个 stanza 或所有 stanza。默认为文本格式,以人类可读的摘要展示所请求 stanza 的备份信息,此格式可能随版本变化。
如需机器可读的输出,请使用 --output=json。JSON 输出比文本格式包含更多信息,在无 bug 的情况下格式保持稳定。
如需加快执行速度,可指定 --detail-level=progress,将输出限制为仅进度信息,但注意这会跳过除 stanza 可用性以外的所有检查。
输出中每个 stanza 对应一个独立区块,可通过 --stanza 选项限制仅显示指定 stanza。status 字段简要描述 stanza 的健康状态:ok 表示正常;若有多个仓库,mixed 表示 stanza 在一个或多个仓库上存在问题,此时会按仓库逐一列出详细状态;对于不属于已知错误码的仓库错误,将使用 other 错误码并附上完整错误信息。wal archive min/max 显示归档中当前存储的最小和最大 WAL,有多个仓库时跨所有仓库汇总报告(可通过 --repo 选项限制到特定仓库)。注意,由于归档保留策略或其他原因,WAL 序列中可能存在间隙。
若当前主机上有备份/过期或恢复操作正在运行,status 信息旁会出现 backup/expire running 和/或 restore running 提示。
备份按从旧到新的顺序排列。最旧的备份始终 是全量备份(标签末尾带 F),最新的备份可以是全量备份、差异备份(末尾带 D)或增量备份(末尾带 I)。
timestamp start/stop 定义了备份的运行时间范围,timestamp stop 可用于确定时间点恢复所选用的备份。详见 时间点恢复
wal start/stop 定义了恢复时使数据库达到一致状态所需的 WAL 范围,backup 命令会确保该范围内的 WAL 在备份完成前已归档。
database size 是数据库的完整未压缩大小,database backup size 是本次实际备份的数据量(全量备份时两者相同)。
repo 标识此备份所在的仓库。backup set size 包含恢复该备份所需的本备份及所有引用备份的全部文件,backup size 则仅包含本次备份的文件(全量备份时两者相同)。若启用了压缩,仓库大小反映的是压缩后的文件大小。
backup reference total 汇总了恢复此备份所依赖的其他备份。使用 --set 选项可显示完整的引用列表。
恢复备份 备份可以防范多种灾难场景,最常见的是硬件故障和数据损坏。模拟数据损坏最简单的方法是删除一个关键的 PostgreSQL 集群文件。
pg-primary ⇒ 停止演示集群并删除 pg_control 文件
sudo pg_ctlcluster 16 demo stop
sudo -u postgres rm /var/lib/postgresql/16/demo/global/pg_control
缺少该关键文件时,启动集群将报错。
pg-primary ⇒ 尝试启动已损坏的演示集群
sudo pg_ctlcluster 16 demo start
Error: /usr/lib/postgresql/16/bin/pg_ctl /usr/lib/postgresql/16/bin/pg_ctl start -D /var/lib/postgresql/16/demo -l /var/log/postgresql/postgresql-16-demo.log -s -o -c config_file="/etc/postgresql/16/demo/postgresql.conf" exited with status 1:
postgres: could not find the database system
Expected to find it in the directory "/var/lib/postgresql/16/demo",
but could not open file "/var/lib/postgresql/16/demo/global/pg_control": No such file or directory
Examine the log output.
使用 restore 命令恢复 PostgreSQL 集群备份。执行前集群必须处于停止状态(本例中已停止),并且需要清空 PostgreSQL 数据目录中的所有文件。
pg-primary ⇒ 从演示集群中删除旧文件
sudo -u postgres find /var/lib/postgresql/16/demo -mindepth 1 -delete
pg-primary ⇒ 恢复演示集群并启动 PostgreSQL
sudo -u postgres pgbackrest --stanza= demo restore
sudo pg_ctlcluster 16 demo start
这次集群成功启动,因为恢复操作已补全缺失的 pg_control 文件。
有关 restore 命令的更多信息,请参阅 恢复
监控 监控是任何生产系统不可或缺的组成部分。市面上有许多可用的监控工具,稍加处理即可将 pgBackRest 纳入其中。
pgBackRest 支持以 JSON 格式输出仓库信息,包含每个 stanza 的完整备份列表和 WAL 归档信息。
在 PostgreSQL 中 PostgreSQL 的 COPY 命令可将 pgBackRest 信息加载到表中。以下示例将该逻辑封装为一个函数,供实时查询使用。
pg-primary ⇒ 为 PostgreSQL 加载 pgBackRest info 函数
sudo -u postgres cat \
/var/lib/postgresql/pgbackrest/doc/example/pgsql-pgbackrest-info.sql
-- 在 PostgreSQL 内部监控 pgBackRest 的示例
--
-- 使用 copy 命令将 pgBackRest info 命令的输出导出为 jsonb 类型,
-- 以便 PostgreSQL 直接查询。
-- 创建 monitor schema
create schema monitor ;
-- 以 JSON 格式获取 pgBackRest info
create function monitor . pgbackrest_info ()
returns jsonb AS $$
declare
data jsonb ;
begin
-- 创建临时表以存储 JSON 数据
create temp table temp_pgbackrest_data ( data text );
-- 直接从 pgBackRest info 命令将数据写入临时表
copy temp_pgbackrest_data ( data )
from program
'pgbackrest --output=json info' ( format text );
select replace ( temp_pgbackrest_data . data , E '\n' , '\n' ):: jsonb
into data
from temp_pgbackrest_data ;
drop table temp_pgbackrest_data ;
return data ;
end $$ language plpgsql ;
sudo -u postgres psql -f \
/var/lib/postgresql/pgbackrest/doc/example/pgsql-pgbackrest-info.sql
现在可以使用 monitor.pgbackrest_info() 函数查询指定 stanza 的上次成功备份时间和已归档的 WAL。
pg-primary ⇒ 查询上次成功备份时间和归档的 WAL
sudo -u postgres cat \
/var/lib/postgresql/pgbackrest/doc/example/pgsql-pgbackrest-query.sql
-- 获取每个 stanza 的最近一次成功备份时间
--
-- 依赖 monitor.pgbackrest_info 函数。
with stanza as
(
select data -> 'name' as name ,
data -> 'backup' -> (
jsonb_array_length ( data -> 'backup' ) - 1 ) as last_backup ,
data -> 'archive' -> (
jsonb_array_length ( data -> 'archive' ) - 1 ) as current_archive
from jsonb_array_elements ( monitor . pgbackrest_info ()) as data
)
select name ,
to_timestamp (
( last_backup -> 'timestamp' ->> 'stop' ):: numeric ) as last_successful_backup ,
current_archive ->> 'max' as last_archived_wal
from stanza ;
sudo -u postgres psql -f \
/var/lib/postgresql/pgbackrest/doc/example/pgsql-pgbackrest-query.sql
name | last_successful_backup | last_archived_wal
--------+------------------------+--------------------------
"demo" | 2026-01-19 09:28:16+00 | 000000010000000000000005
(1 row)
使用 jq jq 是一款命令行工具,可方便地从 JSON 中提取数据。
pg-primary ⇒ 安装 jq 工具
现在可以使用 jq 查询指定 stanza 的上次成功备份时间。
pg-primary ⇒ 查询上次成功备份时间
sudo -u postgres pgbackrest --output= json --stanza= demo info | \
jq '.[0] | .backup[-1] | .timestamp.stop'
1768814896
或查询最后归档的 WAL。
pg-primary ⇒ 查询最后归档的 WAL
sudo -u postgres pgbackrest --output= json --stanza= demo info | \
jq '.[0] | .archive[-1] | .max'
"000000010000000000000005"
注意:
此语法需要 jq v1.5 及以上版本。
注意:
jq 可能会对系统标识符等大整数进行四舍五入,请仔细测试你的查询。
备份 配置了多个仓库时,pgBackRest 默认备份到最高优先级的仓库(如 repo1),可通过 --repo 选项指定目标仓库。
pgBackRest 没有内置调度器,建议通过 cron 或其他调度机制运行备份任务。
详情与示例请参阅 执行备份
文件打包 将仓库中的文件打包在一起可以节省备份时间和仓库空间,在对象存储(如 S3)或大块大小的文件系统上尤为明显。对象存储的每个文件创建开销较高,非常小的文件与较大文件的存储成本相差无几。
文件打包功能通过 repo-bundle 选项启用。
pg-primary:/etc/pgbackrest/pgbackrest.conf ⇒ 配置 repo1-bundle
[demo]
pg1-path = /var/lib/postgresql/16/demo
[global]
repo1-bundle = y
repo1-cipher-pass = zWaf6XtpjIVZC5444yXB+cgFDFl7MxGlgkZSaoPvTGirhPygu4jOKOXf9LO4vjfO
repo1-cipher-type = aes-256-cbc
repo1-path = /var/lib/pgbackrest
repo1-retention-full = 2
start-fast = y
[global:archive-push]
compress-level = 3
不使用文件打包时,全量备份路径下通常有 1000 多个文件;启用打包后文件总数大幅减少。另一个好处是,零长度文件不再单独存储(仅记录在清单文件(manifest)中),而普通备份中每个零长度文件都会占用独立存储条目。
pg-primary ⇒ 执行全量备份
sudo -u postgres pgbackrest --stanza= demo --type= full backup
pg-primary ⇒ 检查文件总数
sudo -u postgres find /var/lib/pgbackrest/backup/demo/latest/ -type f | wc -l
5
repo-bundle-size 和 repo-bundle-limit 选项可用于调优,大多数情况下默认值即为最优。
文件打包虽然通常更高效,但也有一些不足:手动从仓库检索文件变得更加困难;对于去重存储,由于每次全量备份中文件在包内的排列方式不同,去重效果可能不理想;此外,文件包不支持断点续传,因此不应将 repo-bundle-limit 设置过高。
块级增量备份 块级增量备份仅存储文件中自上次备份以来发生变化的数据块,而非整个文件,从而节省存储空间。
块级增量备份通过 repo-block 选项启用,对所有备份类型均启用时效果最佳,且必须同时启用文件打包功能。
pg-primary:/etc/pgbackrest/pgbackrest.conf ⇒ 配置 repo1-block
[demo]
pg1-path = /var/lib/postgresql/16/demo
[global]
repo1-block = y
repo1-bundle = y
repo1-cipher-pass = zWaf6XtpjIVZC5444yXB+cgFDFl7MxGlgkZSaoPvTGirhPygu4jOKOXf9LO4vjfO
repo1-cipher-type = aes-256-cbc
repo1-path = /var/lib/pgbackrest
repo1-retention-full = 2
start-fast = y
[global:archive-push]
compress-level = 3
备份注解 用户可以为备份附加键/值形式的注解信息,该选项可多次使用以添加多个注解。
pg-primary ⇒ 执行带注解的全量备份
sudo -u postgres pgbackrest --stanza= demo --annotation= source = "demo backup" \
--annotation= key = value --type= full backup
通过 --set 指定备份时,info 命令的文本输出会显示注解;JSON 格式输出中始终包含注解信息。
pg-primary ⇒ 获取演示集群的信息
sudo -u postgres pgbackrest --stanza= demo --set= 20260119-092829F info
stanza: demo
status: ok
cipher: aes-256-cbc
db (current)
wal archive min/max (16): 000000020000000000000007/000000020000000000000009
full backup: 20260119-092829F
timestamp start/stop: 2026-01-19 09:28:29+00 / 2026-01-19 09:28:30+00
wal start/stop: 000000020000000000000008 / 000000020000000000000009
lsn start/stop: 0/8000028 / 0/9000050
database size: 22MB, database backup size: 22MB
repo1: backup size: 2.9MB
database list: postgres (5)
annotation(s)
key: value
source: demo backup
备份时通过 backup 命令添加的注解,可在事后使用 annotate 命令进行添加、修改或删除。
pg-primary ⇒ 修改备份注解
sudo -u postgres pgbackrest --stanza= demo --set= 20260119-092829F \
--annotation= key = --annotation= new_key = new_value annotate
sudo -u postgres pgbackrest --stanza= demo --set= 20260119-092829F info
stanza: demo
status: ok
cipher: aes-256-cbc
db (current)
wal archive min/max (16): 000000020000000000000007/000000020000000000000009
full backup: 20260119-092829F
timestamp start/stop: 2026-01-19 09:28:29+00 / 2026-01-19 09:28:30+00
wal start/stop: 000000020000000000000008 / 000000020000000000000009
lsn start/stop: 0/8000028 / 0/9000050
database size: 22MB, database backup size: 22MB
repo1: backup size: 2.9MB
database list: postgres (5)
annotation(s)
new_key: new_value
source: demo backup
保留策略 一般来说,保留尽可能多的备份可以扩大 时间点恢复
pgBackRest 根据保留策略类型(数量或时间段)对全量备份进行轮转。按数量时,过期逻辑只关注应保留多少个,而不关心备份的创建时间。差异备份按数量管理,但当依赖的全量备份过期时,差异备份也随之过期。增量备份不会被保留策略单独过期——始终随其关联的全量备份或差异备份一起过期。详情与示例请参见 全量备份保留策略 差异备份保留策略
归档的 WAL 默认随未过期的备份一起保留;如有特殊需求,可通过各仓库的 retention-archive 选项调整(不推荐)。详情与示例请参见 归档保留策略
expire 命令在每次备份成功后自动运行,也可手动触发。手动运行时,过期操作按各已配置仓库的保留策略执行;若指定了 --repo 选项,则仅对该仓库执行。还可通过 --set 选项将过期操作限定在特定备份集上——若未同时指定 --repo,则会搜索所有仓库并对匹配的备份集执行过期。注意,每次运行 expire 命令都会检查并执行归档保留计划。
全量备份保留策略 repo1-retention-full-type 决定 repo1-retention-full 的解释方式:可以是保留的全量备份数量,也可以是保留全量备份的天数。过期操作只在新备份完成后触发——若 repo1-retention-full-type=count 且 repo1-retention-full=2,则需要存储第三个全量备份时才会过期最旧的一个;若 repo1-retention-full-type=time 且 repo1-retention-full=20,则至少要有一个全量备份已经超过 20 天才会触发过期。
pg-primary:/etc/pgbackrest/pgbackrest.conf ⇒ 配置 repo1-retention-full
[demo]
pg1-path = /var/lib/postgresql/16/demo
[global]
repo1-block = y
repo1-bundle = y
repo1-cipher-pass = zWaf6XtpjIVZC5444yXB+cgFDFl7MxGlgkZSaoPvTGirhPygu4jOKOXf9LO4vjfO
repo1-cipher-type = aes-256-cbc
repo1-path = /var/lib/pgbackrest
repo1-retention-full = 2
start-fast = y
[global:archive-push]
compress-level = 3
目前已配置 repo1-retention-full=2,但当前只有一个全量备份,因此下次执行全量备份时不会触发任何过期操作。
pg-primary ⇒ 执行全量备份
sudo -u postgres pgbackrest --stanza= demo --type= full \
--log-level-console= detail backup
[filtered 975 lines of output]
P00 INFO: repo1: remove expired backup 20260119-092827F
P00 DETAIL: repo1: 16-1 archive retention on backup 20260119-092829F, start = 000000020000000000000008
P00 INFO: repo1: 16-1 remove archive, start = 000000020000000000000007, stop = 000000020000000000000007
P00 INFO: expire command end: completed successfully
归档确实 被过期了,因为这些 WAL 段是在最旧备份之前生成的,对恢复没有意义——只有备份开始之后生成的 WAL 段才能用于该备份的恢复。
pg-primary ⇒ 执行全量备份
sudo -u postgres pgbackrest --stanza= demo --type= full \
--log-level-console= info backup
[filtered 11 lines of output]
P00 INFO: repo1: expire full backup 20260119-092829F
P00 INFO: repo1: remove expired backup 20260119-092829F
P00 INFO: repo1: 16-1 remove archive, start = 000000020000000000000008, stop = 000000020000000000000009
P00 INFO: expire command end: completed successfully
全量备份 20260119-092813F 已被过期,归档保留策略现在以 20260119-092831F 为基准——该备份是当前最旧的全量备份。
差异备份保留策略 将 repo1-retention-diff 设置为需要保留的差异备份数量。由于差异备份只依赖于前一次全量备份,可以维护一个最近数天的"滚动"差异备份集合,既能快速恢复到近期某个时间点,又能降低整体空间占用。
pg-primary:/etc/pgbackrest/pgbackrest.conf ⇒ 配置 repo1-retention-diff
[demo]
pg1-path = /var/lib/postgresql/16/demo
[global]
repo1-block = y
repo1-bundle = y
repo1-cipher-pass = zWaf6XtpjIVZC5444yXB+cgFDFl7MxGlgkZSaoPvTGirhPygu4jOKOXf9LO4vjfO
repo1-cipher-type = aes-256-cbc
repo1-path = /var/lib/pgbackrest
repo1-retention-diff = 1
repo1-retention-full = 2
start-fast = y
[global:archive-push]
compress-level = 3
已配置 repo1-retention-diff=1,因此需要执行第二次差异备份时才会过期第一个。下面再添加一个增量备份,以演示增量备份的过期逻辑——本例中,增量备份的过期依赖于所属差异备份的过期。
pg-primary ⇒ 执行差异备份和增量备份
sudo -u postgres pgbackrest --stanza= demo --type= diff backup
sudo -u postgres pgbackrest --stanza= demo --type= incr backup
现在执行一次差异备份,将过期之前的差异备份和增量备份,只保留最新的一个差异备份。
pg-primary ⇒ 执行差异备份
sudo -u postgres pgbackrest --stanza= demo --type= diff \
--log-level-console= info backup
[filtered 10 lines of output]
P00 INFO: backup command end: completed successfully
P00 INFO: expire command begin 2.58.0: --exec-id=1601-86e69e59 --log-level-console=info --no-log-timestamp --repo1-cipher-pass= --repo1-cipher-type=aes-256-cbc --repo1-path=/var/lib/pgbackrest --repo1-retention-diff=1 --repo1-retention-full=2 --stanza=demo
P00 INFO: repo1: expire diff backup set 20260119-092833F_20260119-092835D, 20260119-092833F_20260119-092836I
P00 INFO: repo1: remove expired backup 20260119-092833F_20260119-092836I
P00 INFO: repo1: remove expired backup 20260119-092833F_20260119-092835D
P00 INFO: expire command end: completed successfully
归档保留策略 pgBackRest 在过期备份时会自动删除对应的归档 WAL 段(默认根据 repo1-retention-full 过期全量备份对应的 WAL),但有时可能需要更激进地清理归档以节省磁盘空间。注意,在差异归档保留策略中,全量备份被视为差异备份处理。
过期归档时,维持备份一致性所必需的 WAL 段永远不会被删除。但由于 PITR 只能在连续的 WAL 流上进行,在正常备份过期流程之外激进地清理归档时需格外谨慎。若要在不实际执行过期操作的情况下预览将被清理的内容,可在 expire 命令中传入 --dry-run 选项。
pg-primary:/etc/pgbackrest/pgbackrest.conf ⇒ 配置 repo1-retention-diff
[demo]
pg1-path = /var/lib/postgresql/16/demo
[global]
repo1-block = y
repo1-bundle = y
repo1-cipher-pass = zWaf6XtpjIVZC5444yXB+cgFDFl7MxGlgkZSaoPvTGirhPygu4jOKOXf9LO4vjfO
repo1-cipher-type = aes-256-cbc
repo1-path = /var/lib/pgbackrest
repo1-retention-diff = 2
repo1-retention-full = 2
start-fast = y
[global:archive-push]
compress-level = 3
pg-primary ⇒ 执行差异备份
sudo -u postgres pgbackrest --stanza= demo --type= diff \
--log-level-console= info backup
[filtered 6 lines of output]
P00 INFO: backup stop archive = 000000020000000000000017, lsn = 0/17000050
P00 INFO: check archive for segment(s) 000000020000000000000016:000000020000000000000017
P00 INFO: new backup label = 20260119-092833F_20260119-092839D
P00 INFO: diff backup size = 8.3KB, file total = 963
P00 INFO: backup command end: completed successfully
[filtered 2 lines of output]
pg-primary ⇒ 过期归档
sudo -u postgres pgbackrest --stanza= demo --log-level-console= detail \
--repo1-retention-archive-type= diff --repo1-retention-archive= 1 expire
P00 INFO: expire command begin 2.58.0: --exec-id=1685-5edd5b29 --log-level-console=detail --no-log-timestamp --repo1-cipher-pass= --repo1-cipher-type=aes-256-cbc --repo1-path=/var/lib/pgbackrest --repo1-retention-archive=1 --repo1-retention-archive-type=diff --repo1-retention-diff=2 --repo1-retention-full=2 --stanza=demo
P00 DETAIL: repo1: 16-1 archive retention on backup 20260119-092831F, start = 00000002000000000000000A, stop = 00000002000000000000000B
P00 DETAIL: repo1: 16-1 archive retention on backup 20260119-092833F, start = 00000002000000000000000C, stop = 00000002000000000000000D
P00 DETAIL: repo1: 16-1 archive retention on backup 20260119-092833F_20260119-092837D, start = 000000020000000000000012, stop = 000000020000000000000013
P00 DETAIL: repo1: 16-1 archive retention on backup 20260119-092833F_20260119-092839D, start = 000000020000000000000016
P00 INFO: repo1: 16-1 remove archive, start = 00000002000000000000000E, stop = 000000020000000000000011
P00 INFO: repo1: 16-1 remove archive, start = 000000020000000000000014, stop = 000000020000000000000015
P00 INFO: expire command end: completed successfully
差异备份 20260119-092833F_20260119-092837D 保留了部分 WAL 段,即使这些 WAL 段无法用于更早备份的 PITR 向前回放,也必须保留以确保旧备份的一致性。20260119-092833F_20260119-092837D 之后、20260119-092833F_20260119-092839D 之前生成的 WAL 段已被删除。最新备份 20260119-092833F_20260119-092839D 之后生成的 WAL 段仍然保留,可用于 PITR。
由于差异归档保留策略中全量备份被视为差异备份,若以相同设置执行一次全量备份,则只保留该全量备份对应的归档用于 PITR。
恢复 restore 命令默认从第一个存在备份的仓库中自动选取最新备份(参见 快速开始 - 恢复备份 pgbackrest.conf 决定(如 repo1 先于 repo2 被检查)。若要从特定仓库选取备份,可传入 --repo 选项(如 --repo=1);若需选取非最新的备份,可传入 --set 选项。
当 PITR 类型为 --type=time 或 --type=lsn 时,必须通过 --target 选项指定目标时间或 lsn。若未通过 --set 指定备份,pgBackRest 会按顺序检查各已配置仓库,寻找包含所请求时间或 lsn 的备份。若未找到匹配备份,--type=time 会使用第一个有备份的仓库中的最新备份,而 --type=lsn 则不会选取任何备份。对于其他 PITR 类型(如 xid),若目标在最新备份之前,则必须提供 --set 选项。详情与示例请参见 时间点恢复
按照 PostgreSQL 的建议,复制槽不包含在备份中。详情请参阅 PostgreSQL 文档的 备份数据目录
以下各节介绍 restore 命令的更多功能。
文件所有权 以非 root 用户运行 restore(典型场景)时,所有恢复的文件都将归执行 pgBackRest 的用户/组所有。若现有文件不属于该用户/组,且无法更新所有权,则会报错——此时需要由特权用户先修正文件所有权,再重试恢复。
以 root 用户运行 restore 时,pgBackRest 会尝试按照备份清单文件(manifest)中记录的所有权来恢复文件归属。清单中只存储用户/组的名称 ,因此恢复主机上必须存在同名的用户/组。若本地找不到对应名称,则使用 PostgreSQL 数据目录的用户/组;若数据目录的用户/组也无法映射到名称,则最终回退为 root。
Delta 选项 快速开始 恢复备份 restore 前先清空数据库集群目录。delta 选项允许 pgBackRest 自动判断哪些文件可以保留、哪些需要从备份中恢复——同时删除 不在备份清单中的文件,从而清除差异变更。该功能通过计算集群目录中每个文件的 SHA-1 哈希来实现,若哈希与备份中存储的不匹配,则恢复该文件。与 process-max 选项结合使用时效率极高。恢复期间 PostgreSQL 服务器已关闭,因此可以使用比备份时更多的并行进程。
pg-primary ⇒ 停止 demo 集群,执行 delta 恢复
sudo pg_ctlcluster 16 demo stop
sudo -u postgres pgbackrest --stanza= demo --delta \
--log-level-console= detail restore
[filtered 2 lines of output]
P00 DETAIL: check '/var/lib/postgresql/16/demo' exists
P00 DETAIL: remove 'global/pg_control' so cluster will not start if restore does not complete
P00 INFO: remove invalid files/links/paths from '/var/lib/postgresql/16/demo'
P00 DETAIL: remove invalid file '/var/lib/postgresql/16/demo/backup_label.old'
P00 DETAIL: remove invalid file '/var/lib/postgresql/16/demo/base/1/pg_internal.init'
[filtered 769 lines of output]
P01 DETAIL: restore file /var/lib/postgresql/16/demo/base/1/113 - exists and matches backup (bundle 20260119-092833F/1/2736168, 8KB, 88.04%) checksum 9bbd4f25b106d88a2c938f5c0d57c390e7ca9d63
P01 DETAIL: restore file /var/lib/postgresql/16/demo/base/1/112 - exists and matches backup (bundle 20260119-092833F/1/2736256, 8KB, 88.08%) checksum 482d3ba07134400f1f78d634db79caf025cbd7a5
P01 DETAIL: restore file /var/lib/postgresql/16/demo/PG_VERSION - exists and matches backup (bundle 20260119-092833F/1/2736344, 3B, 88.08%) checksum 3596ea087bfdaf52380eae441077572ed289d657
P01 DETAIL: restore file /var/lib/postgresql/16/demo/base/5/2608_fsm - exists and matches backup (bundle 20260119-092833F/1/2736368, 24KB, 88.18%) checksum cd30d4d0be58b99bf5929fb2c3afc2550f710741
P01 DETAIL: restore file /var/lib/postgresql/16/demo/postgresql.auto.conf - exists and matches backup (bundle 20260119-092833F/1/2736608, 229B, 88.18%) checksum abe90322c61a48f660b6b471e0bc12fc9aa21780
[filtered 232 lines of output]
pg-primary ⇒ 重启 PostgreSQL
sudo pg_ctlcluster 16 demo start
选择性数据库恢复 某些情况下,可能只需要从集群备份中恢复特定数据库——出于性能考虑,或是将选定数据库迁移到磁盘空间不足以恢复整个集群的机器上。
为演示此功能,先创建两个数据库:test1 和 test2。
pg-primary ⇒ 创建两个测试数据库
sudo -u postgres psql -c "create database test1;"
sudo -u postgres psql -c "create database test2;"
向每个测试数据库填充表和数据,以便演示选择性恢复的效果。
pg-primary ⇒ 在每个数据库中创建测试表
sudo -u postgres psql -c "create table test1_table (id int); \
insert into test1_table (id) values (1);" test1
sudo -u postgres psql -c "create table test2_table (id int); \
insert into test2_table (id) values (2);" test2
执行一次新备份,让 pgBackRest 感知到新建的数据库。
pg-primary ⇒ 执行备份
sudo -u postgres pgbackrest --stanza= demo --type= incr backup
使用选择性恢复的主要原因之一是节省空间。先记录 test1 数据库当前的磁盘占用,以便与选择性恢复后进行对比。
pg-primary ⇒ 查看 test1 数据库占用的空间
sudo -u postgres du -sh /var/lib/postgresql/16/demo/base/32768
7.4M /var/lib/postgresql/16/demo/base/32768
若不清楚要恢复的数据库名称,可使用 info 命令的 --set 选项查看该备份集包含的数据库列表。
pg-primary ⇒ 查看备份的数据库列表
sudo -u postgres pgbackrest --stanza= demo \
--set= 20260119-092833F_20260119-092846I info
[filtered 12 lines of output]
repo1: backup size: 2MB
backup reference list: 20260119-092833F, 20260119-092833F_20260119-092839D
database list: postgres (5), test1 (32768), test2 (32769)
停止集群,仅恢复 test2 数据库。内置数据库(template0、template1 和 postgres)始终会被恢复。
警告:
除非指定 --type=immediate,否则恢复可能会报错。原因是在达到一致性点之后,PostgreSQL 会将清零页标记为错误,即使是完整页写入也不例外。对于 PostgreSQL 13 及以上版本,可通过 ignore_invalid_pages 参数忽略无效页面。此时恢复完成后务必检查日志,确认所选数据库中没有无效页面的报告。
pg-primary ⇒ 从最新备份恢复,仅包含 test2 数据库
sudo pg_ctlcluster 16 demo stop
sudo -u postgres pgbackrest --stanza= demo --delta \
--db-include= test2 --type= immediate --target-action= promote restore
sudo pg_ctlcluster 16 demo start
恢复完成后,test2 数据库将包含之前创建的所有表和数据,可正常访问。
pg-primary ⇒ 验证 test2 数据库已成功恢复
sudo -u postgres psql -c "select * from test2_table;" test2
id
----
2
(1 row)
test1 数据库虽然恢复成功,但无法访问。这是因为该数据库以稀疏清零文件的形式恢复——PostgreSQL 可以在清零文件上成功应用 WAL,但整个数据库并不有效,关键文件中不含任何实际数据。这是有意为之的设计,目的是防止在数据库可能包含 WAL 回放期间写入的部分数据时被意外访问。
pg-primary ⇒ 尝试连接 test1 数据库将产生错误
sudo -u postgres psql -c "select * from test1_table;" test1
psql: error: connection to server on socket "/var/run/postgresql/.s.PGSQL.5432" failed: FATAL: relation mapping file "base/32768/pg_filenode.map" contains invalid data
由于 test1 以稀疏清零文件恢复,其占用空间仅相当于恢复期间写入的 WAL 量。备份期间生成并在恢复期间应用的 WAL 可能相当可观,但通常只是数据库总大小的一小部分——对于大型数据库而言尤为明显,这正是选择性恢复最有价值的场景。
可以看到,选择性恢复后 test1 的磁盘占用远小于完整恢复时的大小。
pg-primary ⇒ 查看恢复后 test1 数据库占用的空间
sudo -u postgres du -sh /var/lib/postgresql/16/demo/base/32768
8.0K /var/lib/postgresql/16/demo/base/32768
此时对无效的 test1 数据库唯一可执行的操作是 drop database。pgBackRest 不会自动删除该数据库,因为这一操作必须在恢复完成、集群可访问之后才能进行。
pg-primary ⇒ 删除 test1 数据库
sudo -u postgres psql -c "drop database test1;"
删除无效的 test1 后,只剩下 test2 和内置数据库。
pg-primary ⇒ 列出剩余数据库
sudo -u postgres psql -c "select oid, datname from pg_database order by oid;"
oid | datname
-------+-----------
1 | template1
4 | template0
5 | postgres
32769 | test2
(4 rows)
时间点恢复 快速开始 恢复备份
PITR 允许将 WAL 回放至指定的 lsn、时间戳、事务 ID 或恢复点。在常见恢复场景中,基于时间的恢复最为实用。典型场景是恢复意外删除的表或数据——下面以恢复被删除的表为例进行演示,被删除的数据可以用完全相同的方式恢复。
pg-primary ⇒ 创建一张存有重要数据的表
sudo -u postgres psql -c "begin; \
create table important_table (message text); \
insert into important_table values ('Important Data'); \
commit; \
select * from important_table;"
[filtered 4 lines of output]
message
----------------
Important Data
(1 row)
记录时间时应以 PostgreSQL 返回的时间为准,且必须包含时区偏移量。这样可以避免时区转换导致意外的恢复结果。
pg-primary ⇒ 从 PostgreSQL 获取当前时间
sudo -u postgres psql -Atc "select current_timestamp"
2026-01-19 09:28:56.893848+00
记录时间后,删除该表。实际场景中,找到表被删除的确切时间远比此示例困难——可能无法精确定位,但通过一些排查工作通常能接近实际时间。
pg-primary ⇒ 删除重要表
sudo -u postgres psql -c "begin; \
drop table important_table; \
commit; \
select * from important_table;"
COMMITERROR: relation "important_table" does not exist
LINE 1: ...le important_table; commit; select * from important_...
^
若选择了错误的备份进行恢复,则无法恢复到所需的时间目标。为演示这一点,在 important_table 不存在的情况下执行一次新的增量备份。
pg-primary ⇒ 执行增量备份
sudo -u postgres pgbackrest --stanza= demo --type= incr backup
sudo -u postgres pgbackrest info
[filtered 38 lines of output]
backup reference total: 1 full, 1 diff
incr backup: 20260119-092833F_20260119-092858I
timestamp start/stop: 2026-01-19 09:28:58+00 / 2026-01-19 09:28:59+00
wal start/stop: 00000004000000000000001A / 00000004000000000000001A
[filtered 2 lines of output]
由于 PostgreSQL 只能向前回放 WAL,无法向后回放,因此无法从这个备份中恢复已删除的表。
pg-primary ⇒ 尝试从错误的备份中恢复
sudo pg_ctlcluster 16 demo stop
sudo -u postgres pgbackrest --stanza= demo --delta \
--set= 20260119-092833F_20260119-092858I --target-timeline= current \
--type= time "--target=2026-01-19 09:28:56.893848+00" --target-action= promote restore
sudo pg_ctlcluster 16 demo start
[filtered 13 lines of output]
LOG: database system is ready to accept read-only connections
LOG: redo done at 0/1A000100 system usage: CPU: user: 0.00 s, system: 0.00 s, elapsed: 0.02 s
FATAL: recovery ended before configured recovery target was reached
LOG: startup process (PID 2087) exited with exit code 1
LOG: terminating any other active server processes
[filtered 3 lines of output]
一种可靠的方法是让 pgBackRest 自动选择能够恢复到目标时间的备份,即在指定时间之前完成的备份。
注意:
当恢复类型为 xid 或 name 时,pgBackRest 无法自动选择备份,必须手动指定。
pg-primary ⇒ 将 demo 集群恢复至 2026-01-19 09:28:56.893848+00
sudo -u postgres pgbackrest --stanza= demo --delta \
--type= time "--target=2026-01-19 09:28:56.893848+00" \
--target-action= promote restore
sudo -u postgres cat /var/lib/postgresql/16/demo/postgresql.auto.conf
[filtered 9 lines of output]
# Recovery settings generated by pgBackRest restore on 2026-01-19 09:29:01
restore_command = 'pgbackrest --stanza=demo archive-get %f "%p"'
recovery_target_time = '2026-01-19 09:28:56.893848+00'
recovery_target_action = 'promote'
pgBackRest 已将恢复配置写入 postgresql.auto.conf,PostgreSQL 可以直接启动恢复。其中 %f 是 PostgreSQL 传递所需 WAL 段名称的方式,%p 是该段的目标路径。恢复完成后,被删除的表将重新存在,可以正常查询。
pg-primary ⇒ 启动 PostgreSQL 并验证重要表是否存在
sudo pg_ctlcluster 16 demo start
sudo -u postgres psql -c "select * from important_table"
message
----------------
Important Data
(1 row)
PostgreSQL 日志中也包含有价值的信息,记录了恢复停止的时间和事务,以及最后一个被应用事务的时间。
pg-primary ⇒ 查看 PostgreSQL 日志输出
sudo -u postgres cat /var/log/postgresql/postgresql-16-demo.log
[filtered 4 lines of output]
LOG: database system was interrupted; last known up at 2026-01-19 09:28:46 UTC
LOG: restored log file "00000004.history" from archive
LOG: starting point-in-time recovery to 2026-01-19 09:28:56.893848+00
LOG: starting backup recovery with redo LSN 0/19000028, checkpoint LSN 0/19000060, on timeline ID 3
LOG: restored log file "00000004.history" from archive
[filtered 5 lines of output]
LOG: database system is ready to accept read-only connections
LOG: restored log file "00000004000000000000001A" from archive
LOG: recovery stopping before commit of transaction 740, time 2026-01-19 09:28:58.178129+00
LOG: redo done at 0/19026050 system usage: CPU: user: 0.00 s, system: 0.01 s, elapsed: 0.08 s
LOG: last completed transaction was at log time 2026-01-19 09:28:55.619384+00
LOG: restored log file "000000040000000000000019" from archive
LOG: selected new timeline ID: 5
[filtered 5 lines of output]
删除 Stanza stanza-delete 命令用于删除仓库中与某个 stanza 关联的所有数据。
警告:
请谨慎使用此命令——它将永久删除 pgBackRest 仓库中指定 stanza 的所有备份和归档。
删除 stanza 的步骤如下:
关闭与该 stanza 关联的 PostgreSQL 集群(或使用 --force 强制跳过此检查)。 在将要执行 stanza-delete 的主机上先运行 stop 命令。 运行 stanza-delete 命令。 命令成功完成后,用户需自行从所有 pgBackRest 配置文件和/或环境变量中删除该 stanza 的相关配置。
每次只能从一个仓库中删除 stanza。若要从多个仓库中删除,需指定 --repo 选项,对每个仓库分别执行 stanza-delete。
pg-primary ⇒ 停止待删除的 PostgreSQL 集群
sudo pg_ctlcluster 16 demo stop
pg-primary ⇒ 停止该 stanza 的 pgBackRest
sudo -u postgres pgbackrest --stanza= demo --log-level-console= info stop
P00 INFO: stop command begin 2.58.0: --exec-id=2218-8ca4f1b4 --log-level-console=info --no-log-timestamp --stanza=demo
P00 INFO: stop command end: completed successfully
pg-primary ⇒ 从一个仓库中删除 stanza
sudo -u postgres pgbackrest --stanza= demo --repo= 1 \
--log-level-console= info stanza-delete
P00 INFO: stanza-delete command begin 2.58.0: --exec-id=2226-48f6922d --log-level-console=info --no-log-timestamp --pg1-path=/var/lib/postgresql/16/demo --repo=1 --repo1-cipher-pass= --repo1-cipher-type=aes-256-cbc --repo1-path=/var/lib/pgbackrest --stanza=demo
P00 INFO: stanza-delete command end: completed successfully
多仓库 如 S3 兼容对象存储支持
某些命令(如 stanza-createstanza-upgradestanza-delete--repo 选项指定仓库。
注意,当仅配置了 repo1 时,--repo 选项不是必需的——这是为了保持向后兼容。但若单个仓库被配置为 repo2 等非默认索引,则必须指定 --repo,以防后续新增仓库时命令行为发生变化。
archive-push 命令始终将 WAL 推送到所有已配置仓库的归档。当某个仓库不可达时,WAL 仍会被推送到其他可达的仓库。但要使此功能有效运作,必须启用 archive-async=y;否则,其他仓库相比不可达的仓库也只能多归档一个 WAL 段。此外,若 WAL 无法推送到任何仓库,PostgreSQL 不会将其从 pg_wal 目录中删除,可能导致该卷空间耗尽。
备份需要为每个仓库单独调度,这在很多情况下是合理的,因为不同仓库可能采用不同的备份类型和保留策略。同样,恢复时也必须指定仓库。通常建议优先选择延迟低/成本低的仓库进行恢复,即使这意味着恢复时间较长——具体哪个仓库效率最高,只有通过实际恢复测试才能确定。
Azure 兼容对象存储支持 pgBackRest 支持将仓库存放在 Azure 兼容的对象存储中。存储仓库的容器必须提前创建——pgBackRest 不会自动创建。仓库可以放置在容器根目录(/),但通常建议放在子路径下,以便对象存储日志或其他数据也能存储在同一容器中而不产生冲突。
警告:
请勿启用"分层命名空间",否则执行 expire 时会报错。
pg-primary:/etc/pgbackrest/pgbackrest.conf ⇒ 配置 Azure
[demo]
pg1-path = /var/lib/postgresql/16/demo
[global]
repo1-block = y
repo1-bundle = y
repo1-cipher-pass = zWaf6XtpjIVZC5444yXB+cgFDFl7MxGlgkZSaoPvTGirhPygu4jOKOXf9LO4vjfO
repo1-cipher-type = aes-256-cbc
repo1-path = /var/lib/pgbackrest
repo1-retention-diff = 2
repo1-retention-full = 2
repo2-azure-account = pgbackrest
repo2-azure-container = demo-container
repo2-azure-key = YXpLZXk=
repo2-path = /demo-repo
repo2-retention-full = 4
repo2-type = azure
start-fast = y
[global:archive-push]
compress-level = 3
将 repo2-azure-key-type 设置为 sas、将 repo2-azure-key 设置为共享访问签名令牌,即可使用共享访问签名(SAS)认证。
命令的运行方式与仓库存储在本地磁盘上完全相同。
pg-primary ⇒ 创建 stanza
sudo -u postgres pgbackrest --stanza= demo --log-level-console= info stanza-create
P00 INFO: stanza-create command begin 2.58.0: --exec-id=2308-b4d7b69d --log-level-console=info --no-log-timestamp --pg1-path=/var/lib/postgresql/16/demo --repo2-azure-account= --repo2-azure-container=demo-container --repo2-azure-key= --repo1-cipher-pass= --repo1-cipher-type=aes-256-cbc --repo1-path=/var/lib/pgbackrest --repo2-path=/demo-repo --repo2-type=azure --stanza=demo
P00 INFO: stanza-create for stanza 'demo' on repo1
P00 INFO: stanza-create for stanza 'demo' on repo2
P00 INFO: stanza-create command end: completed successfully
由于在 Azure 中创建文件相对较慢,启用 文件打包 backup/restore 的性能。
pg-primary ⇒ 备份 demo 集群
sudo -u postgres pgbackrest --stanza= demo --repo= 2 \
--log-level-console= info backup
P00 INFO: backup command begin 2.58.0: --exec-id=2317-4e42a3a2 --log-level-console=info --no-log-timestamp --pg1-path=/var/lib/postgresql/16/demo --repo=2 --repo2-azure-account= --repo2-azure-container=demo-container --repo2-azure-key= --repo1-block --repo1-bundle --repo1-cipher-pass= --repo1-cipher-type=aes-256-cbc --repo1-path=/var/lib/pgbackrest --repo2-path=/demo-repo --repo1-retention-diff=2 --repo1-retention-full=2 --repo2-retention-full=4 --repo2-type=azure --stanza=demo --start-fast
P00 WARN: no prior backup exists, incr backup has been changed to full
P00 INFO: execute backup start: backup begins after the requested immediate checkpoint completes
P00 INFO: backup start archive = 00000005000000000000001B, lsn = 0/1B000028
[filtered 3 lines of output]
P00 INFO: check archive for segment(s) 00000005000000000000001B:00000005000000000000001B
P00 INFO: new backup label = 20260119-092914F
P00 INFO: full backup size = 29.2MB, file total = 1265
P00 INFO: backup command end: completed successfully
P00 INFO: expire command begin 2.58.0: --exec-id=2317-4e42a3a2 --log-level-console=info --no-log-timestamp --repo=2 --repo2-azure-account= --repo2-azure-container=demo-container --repo2-azure-key= --repo1-cipher-pass= --repo1-cipher-type=aes-256-cbc --repo1-path=/var/lib/pgbackrest --repo2-path=/demo-repo --repo1-retention-diff=2 --repo1-retention-full=2 --repo2-retention-full=4 --repo2-type=azure --stanza=demo
S3 兼容对象存储支持 pgBackRest 支持将仓库存放在 S3 兼容的对象存储中。存储仓库的存储桶必须提前创建——pgBackRest 不会自动创建。仓库可以放置在存储桶根目录(/),但通常建议放在子路径下,以便对象存储日志或其他数据也能存储在同一存储桶中而不产生冲突。
pg-primary:/etc/pgbackrest/pgbackrest.conf ⇒ 配置 S3
[demo]
pg1-path = /var/lib/postgresql/16/demo
[global]
repo1-block = y
repo1-bundle = y
repo1-cipher-pass = zWaf6XtpjIVZC5444yXB+cgFDFl7MxGlgkZSaoPvTGirhPygu4jOKOXf9LO4vjfO
repo1-cipher-type = aes-256-cbc
repo1-path = /var/lib/pgbackrest
repo1-retention-diff = 2
repo1-retention-full = 2
repo2-azure-account = pgbackrest
repo2-azure-container = demo-container
repo2-azure-key = YXpLZXk=
repo2-path = /demo-repo
repo2-retention-full = 4
repo2-type = azure
repo3-path = /demo-repo
repo3-retention-full = 4
repo3-s3-bucket = demo-bucket
repo3-s3-endpoint = s3.us-east-1.amazonaws.com
repo3-s3-key = accessKey1
repo3-s3-key-secret = verySecretKey1
repo3-s3-region = us-east-1
repo3-type = s3
start-fast = y
[global:archive-push]
compress-level = 3
注意:
region 和 endpoint 需配置为存储桶所在的位置,此处给出的值适用于 us-east-1 区域。
建议创建专用角色来运行 pgBackRest,并尽可能收紧存储桶权限。若该角色与 AWS 实例关联,设置 repo3-s3-key-type=auto 后 pgBackRest 将自动获取临时凭证,无需在 /etc/pgbackrest/pgbackrest.conf 中显式配置密钥。
以下 Amazon S3 策略示例将存储桶和仓库路径的读写权限限制在最小范围。
{
"Version": "2012-10-17",
"Statement": [
{
"Effect": "Allow",
"Action": [
"s3:ListBucket"
],
"Resource": [
"arn:aws:s3:::demo-bucket"
],
"Condition": {
"StringEquals": {
"s3:prefix": [
"",
"demo-repo"
],
"s3:delimiter": [
"/"
]
}
}
},
{
"Effect": "Allow",
"Action": [
"s3:ListBucket"
],
"Resource": [
"arn:aws:s3:::demo-bucket"
],
"Condition": {
"StringLike": {
"s3:prefix": [
"demo-repo/*"
]
}
}
},
{
"Effect": "Allow",
"Action": [
"s3:PutObject",
"s3:PutObjectTagging",
"s3:GetObject",
"s3:GetObjectVersion",
"s3:DeleteObject"
],
"Resource": [
"arn:aws:s3:::demo-bucket/demo-repo/*"
]
}
]
}
命令的运行方式与仓库存储在本地磁盘上完全相同。
pg-primary ⇒ 创建 stanza
sudo -u postgres pgbackrest --stanza= demo --log-level-console= info stanza-create
[filtered 4 lines of output]
P00 INFO: stanza 'demo' already exists on repo2 and is valid
P00 INFO: stanza-create for stanza 'demo' on repo3
P00 INFO: stanza-create command end: completed successfully
由于在 S3 中创建文件相对较慢,启用 文件打包 backup/restore 的性能。
pg-primary ⇒ 备份 demo 集群
sudo -u postgres pgbackrest --stanza= demo --repo= 3 \
--log-level-console= info backup
P00 INFO: backup command begin 2.58.0: --exec-id=2369-53f55626 --log-level-console=info --no-log-timestamp --pg1-path=/var/lib/postgresql/16/demo --repo=3 --repo2-azure-account= --repo2-azure-container=demo-container --repo2-azure-key= --repo1-block --repo1-bundle --repo1-cipher-pass= --repo1-cipher-type=aes-256-cbc --repo1-path=/var/lib/pgbackrest --repo2-path=/demo-repo --repo3-path=/demo-repo --repo1-retention-diff=2 --repo1-retention-full=2 --repo2-retention-full=4 --repo3-retention-full=4 --repo3-s3-bucket=demo-bucket --repo3-s3-endpoint=s3.us-east-1.amazonaws.com --repo3-s3-key= --repo3-s3-key-secret= --repo3-s3-region=us-east-1 --repo2-type=azure --repo3-type=s3 --stanza=demo --start-fast
P00 WARN: no prior backup exists, incr backup has been changed to full
P00 INFO: execute backup start: backup begins after the requested immediate checkpoint completes
P00 INFO: backup start archive = 00000005000000000000001C, lsn = 0/1C000028
[filtered 3 lines of output]
P00 INFO: check archive for segment(s) 00000005000000000000001C:00000005000000000000001D
P00 INFO: new backup label = 20260119-092920F
P00 INFO: full backup size = 29.2MB, file total = 1265
P00 INFO: backup command end: completed successfully
P00 INFO: expire command begin 2.58.0: --exec-id=2369-53f55626 --log-level-console=info --no-log-timestamp --repo=3 --repo2-azure-account= --repo2-azure-container=demo-container --repo2-azure-key= --repo1-cipher-pass= --repo1-cipher-type=aes-256-cbc --repo1-path=/var/lib/pgbackrest --repo2-path=/demo-repo --repo3-path=/demo-repo --repo1-retention-diff=2 --repo1-retention-full=2 --repo2-retention-full=4 --repo3-retention-full=4 --repo3-s3-bucket=demo-bucket --repo3-s3-endpoint=s3.us-east-1.amazonaws.com --repo3-s3-key= --repo3-s3-key-secret= --repo3-s3-region=us-east-1 --repo2-type=azure --repo3-type=s3 --stanza=demo
SFTP 支持 pgBackRest 支持将仓库存储在 SFTP 主机上。SFTP 文件传输相对较慢,建议增大 process-max 以并行化文件传输,从而提升命令性能。
pg-primary:/etc/pgbackrest/pgbackrest.conf ⇒ 配置 SFTP
[demo]
pg1-path = /var/lib/postgresql/16/demo
[global]
process-max = 4
repo1-block = y
repo1-bundle = y
repo1-cipher-pass = zWaf6XtpjIVZC5444yXB+cgFDFl7MxGlgkZSaoPvTGirhPygu4jOKOXf9LO4vjfO
repo1-cipher-type = aes-256-cbc
repo1-path = /var/lib/pgbackrest
repo1-retention-diff = 2
repo1-retention-full = 2
repo2-azure-account = pgbackrest
repo2-azure-container = demo-container
repo2-azure-key = YXpLZXk=
repo2-path = /demo-repo
repo2-retention-full = 4
repo2-type = azure
repo3-path = /demo-repo
repo3-retention-full = 4
repo3-s3-bucket = demo-bucket
repo3-s3-endpoint = s3.us-east-1.amazonaws.com
repo3-s3-key = accessKey1
repo3-s3-key-secret = verySecretKey1
repo3-s3-region = us-east-1
repo3-type = s3
repo4-bundle = y
repo4-path = /demo-repo
repo4-sftp-host = sftp-server
repo4-sftp-host-key-hash-type = sha1
repo4-sftp-host-user = pgbackrest
repo4-sftp-private-key-file = /var/lib/postgresql/.ssh/id_rsa_sftp
repo4-sftp-public-key-file = /var/lib/postgresql/.ssh/id_rsa_sftp.pub
repo4-type = sftp
start-fast = y
[global:archive-push]
compress-level = 3
使用 SFTP 时,若 libssh2 基于 OpenSSH 编译,则 repo4-sftp-public-key-file 为可选项。
pg-primary ⇒ 为 SFTP 备份生成 SSH 密钥对
sudo -u postgres mkdir -m 750 -p /var/lib/postgresql/.ssh
sudo -u postgres ssh-keygen -f /var/lib/postgresql/.ssh/id_rsa_sftp \
-t rsa -b 4096 -N "" -m PEM
sftp-server ⇒ 将 pg-primary 的 SFTP 备份公钥复制到 sftp-server
sudo -u pgbackrest mkdir -m 750 -p /home/pgbackrest/.ssh
( sudo ssh root@pg-primary cat /var/lib/postgresql/.ssh/id_rsa_sftp.pub) | \
sudo -u pgbackrest tee -a /home/pgbackrest/.ssh/authorized_keys
命令的运行方式与仓库存储在本地磁盘上时完全相同。
pg-primary ⇒ 将 sftp-server 的指纹添加到 known_hosts 文件(repo4-sftp-host-key-check-type 默认为 “strict”)
ssh-keyscan -H sftp-server >> /var/lib/postgresql/.ssh/known_hosts 2>/dev/null
pg-primary ⇒ 创建 stanza
sudo -u postgres pgbackrest --stanza= demo --log-level-console= info stanza-create
[filtered 6 lines of output]
P00 INFO: stanza 'demo' already exists on repo3 and is valid
P00 INFO: stanza-create for stanza 'demo' on repo4
P00 INFO: stanza-create command end: completed successfully
pg-primary ⇒ 备份 demo 集群
sudo -u postgres pgbackrest --stanza= demo --repo= 4 \
--log-level-console= info backup
P00 INFO: backup command begin 2.58.0: --exec-id=2456-cb9d7447 --log-level-console=info --no-log-timestamp --pg1-path=/var/lib/postgresql/16/demo --process-max=4 --repo=4 --repo2-azure-account= --repo2-azure-container=demo-container --repo2-azure-key= --repo1-block --repo1-bundle --repo4-bundle --repo1-cipher-pass= --repo1-cipher-type=aes-256-cbc --repo1-path=/var/lib/pgbackrest --repo2-path=/demo-repo --repo3-path=/demo-repo --repo4-path=/demo-repo --repo1-retention-diff=2 --repo1-retention-full=2 --repo2-retention-full=4 --repo3-retention-full=4 --repo3-s3-bucket=demo-bucket --repo3-s3-endpoint=s3.us-east-1.amazonaws.com --repo3-s3-key= --repo3-s3-key-secret= --repo3-s3-region=us-east-1 --repo4-sftp-host=sftp-server --repo4-sftp-host-key-hash-type=sha1 --repo4-sftp-host-user=pgbackrest --repo4-sftp-private-key-file=/var/lib/postgresql/.ssh/id_rsa_sftp --repo4-sftp-public-key-file=/var/lib/postgresql/.ssh/id_rsa_sftp.pub --repo2-type=azure --repo3-type=s3 --repo4-type=sftp --stanza=demo --start-fast
P00 WARN: option 'repo4-retention-full' is not set for 'repo4-retention-full-type=count', the repository may run out of space
HINT: to retain full backups indefinitely (without warning), set option 'repo4-retention-full' to the maximum.
P00 WARN: no prior backup exists, incr backup has been changed to full
P00 INFO: execute backup start: backup begins after the requested immediate checkpoint completes
P00 INFO: backup start archive = 00000005000000000000001E, lsn = 0/1E000028
[filtered 3 lines of output]
P00 INFO: check archive for segment(s) 00000005000000000000001E:00000005000000000000001F
P00 INFO: new backup label = 20260119-092928F
P00 INFO: full backup size = 29.2MB, file total = 1265
P00 INFO: backup command end: completed successfully
P00 INFO: expire command begin 2.58.0: --exec-id=2456-cb9d7447 --log-level-console=info --no-log-timestamp --repo=4 --repo2-azure-account= --repo2-azure-container=demo-container --repo2-azure-key= --repo1-cipher-pass= --repo1-cipher-type=aes-256-cbc --repo1-path=/var/lib/pgbackrest --repo2-path=/demo-repo --repo3-path=/demo-repo --repo4-path=/demo-repo --repo1-retention-diff=2 --repo1-retention-full=2 --repo2-retention-full=4 --repo3-retention-full=4 --repo3-s3-bucket=demo-bucket --repo3-s3-endpoint=s3.us-east-1.amazonaws.com --repo3-s3-key= --repo3-s3-key-secret= --repo3-s3-region=us-east-1 --repo4-sftp-host=sftp-server --repo4-sftp-host-key-hash-type=sha1 --repo4-sftp-host-user=pgbackrest --repo4-sftp-private-key-file=/var/lib/postgresql/.ssh/id_rsa_sftp --repo4-sftp-public-key-file=/var/lib/postgresql/.ssh/id_rsa_sftp.pub --repo2-type=azure --repo3-type=s3 --repo4-type=sftp --stanza=demo
P00 INFO: expire command end: completed successfully
GCS 兼容对象存储支持 pgBackRest 支持将仓库存储在 GCS 兼容的对象存储中。存储仓库的存储桶必须提前创建——pgBackRest 不会自动创建。仓库可以存放在存储桶根目录(/),但通常建议放在子路径下,以便对象存储日志或其他数据也能存储在同一存储桶中而不产生冲突。
pg-primary:/etc/pgbackrest/pgbackrest.conf ⇒ 配置 GCS
[demo]
pg1-path = /var/lib/postgresql/16/demo
[global]
process-max = 4
repo1-block = y
repo1-bundle = y
repo1-cipher-pass = zWaf6XtpjIVZC5444yXB+cgFDFl7MxGlgkZSaoPvTGirhPygu4jOKOXf9LO4vjfO
repo1-cipher-type = aes-256-cbc
repo1-path = /var/lib/pgbackrest
repo1-retention-diff = 2
repo1-retention-full = 2
repo2-azure-account = pgbackrest
repo2-azure-container = demo-container
repo2-azure-key = YXpLZXk=
repo2-path = /demo-repo
repo2-retention-full = 4
repo2-type = azure
repo3-path = /demo-repo
repo3-retention-full = 4
repo3-s3-bucket = demo-bucket
repo3-s3-endpoint = s3.us-east-1.amazonaws.com
repo3-s3-key = accessKey1
repo3-s3-key-secret = verySecretKey1
repo3-s3-region = us-east-1
repo3-type = s3
repo4-bundle = y
repo4-path = /demo-repo
repo4-sftp-host = sftp-server
repo4-sftp-host-key-hash-type = sha1
repo4-sftp-host-user = pgbackrest
repo4-sftp-private-key-file = /var/lib/postgresql/.ssh/id_rsa_sftp
repo4-sftp-public-key-file = /var/lib/postgresql/.ssh/id_rsa_sftp.pub
repo4-type = sftp
repo5-gcs-bucket = demo-bucket
repo5-gcs-key = /etc/pgbackrest/gcs-key.json
repo5-path = /demo-repo
repo5-type = gcs
start-fast = y
[global:archive-push]
compress-level = 3
在 GCE 中运行时,设置 repo5-gcs-key-type=auto 可使用实例服务账号自动完成身份验证,无需手动配置密钥文件。
命令的运行方式与仓库存储在本地磁盘上时完全相同。
GCS 中文件创建速度相对较慢,启用 文件打包 backup/restore 的性能。
仓库目标时间 目标时间定义了命令读取版本化存储上仓库时所使用的时间点,允许以历史某一时刻的状态读取仓库,以便恢复因用户误操作或恶意软件而被删除或损坏的数据。
版本化存储受 S3、GCS 和 Azure 支持,但通常默认未启用。除了启用版本控制之外,还可以考虑为 S3 启用对象锁定(object locking),为 GCS 或 Azure 启用软删除(soft delete)。
指定 --repo-target-time 选项时,必须同时提供 --repo 选项。由于并非所有仓库类型都支持版本控制,针对单个仓库进行恢复是合理的做法。
注意,时间戳的比较采用 <= 关系,且所提供时间戳中的毫秒部分会被截断。
为演示此功能,先删除 S3 仓库中 demo stanza 的数据。
pg-primary ⇒ 删除 S3 仓库中的 stanza
sudo pg_ctlcluster 16 demo stop
sudo -u postgres pgbackrest --stanza= demo stop
sudo -u postgres pgbackrest --stanza= demo --repo= 3 stanza-delete
stanza 删除后,info 命令会显示仓库处于错误状态。
pg-primary ⇒ info 命令报错
sudo -u postgres pgbackrest --stanza= demo --repo= 3 info
stanza: demo
status: error (missing stanza data)
cipher: none
由于存储是版本化的,可以查看 stanza 被删除之前某个时间点的仓库状态。确定合适的目标时间可能并不容易,但在本例中,可以通过检查 backup.info 被删除的时间来确定。
s3-server ⇒ 使用 mc 列出存储桶中 backup.info 的版本信息
mc ls --versions s3/demo-bucket/demo-repo/backup/demo/backup.info
[2026-01-19 09:29:33 UTC] 0B STANDARD e60f13be-eb40-4101-a5f4-a733ec515b72 v3 DEL backup.info
[2026-01-19 09:29:25 UTC] 1.0KiB STANDARD 6c12779b-6620-4c0d-b185-9d4a73fa76e3 v2 PUT backup.info
[2026-01-19 09:29:20 UTC] 372B STANDARD cd7d190f-8734-4fd7-a188-cfab6ed47edc v1 PUT backup.info
[2026-01-19 09:29:33 UTC] 0B STANDARD 90efc3d6-9b35-424a-bc43-63ec11104bba v3 DEL backup.info.copy
[2026-01-19 09:29:25 UTC] 1.0KiB STANDARD a1929d2f-d190-4b23-b528-234df9f367cc v2 PUT backup.info.copy
现在可以使用目标时间运行 info 命令,查看仓库被删除之前的状态。
pg-primary ⇒ 带目标时间的 info 命令
sudo -u postgres pgbackrest --stanza= demo --repo= 3 \
--repo-target-time= "2026-01-19 09:29:25+00" info
[filtered 5 lines of output]
wal archive min/max (16): 00000005000000000000001C/00000005000000000000001D
full backup: 20260119-092920F
timestamp start/stop: 2026-01-19 09:29:20+00 / 2026-01-19 09:29:25+00
wal start/stop: 00000005000000000000001C / 00000005000000000000001D
repo3: backup set size: 3.9MB, backup size: 3.9MB
若 info 命令显示了所需的备份,即可使用相同的目标时间进行恢复。
pg-primary ⇒ 带目标时间的 restore 命令
sudo -u postgres pgbackrest --stanza= demo --repo= 3 --delta \
--repo-target-time= "2026-01-19 09:29:25+00" --log-level-console= info restore
P00 INFO: restore command begin 2.58.0: --delta --exec-id=2539-eda692fe --log-level-console=info --no-log-timestamp --pg1-path=/var/lib/postgresql/16/demo --process-max=4 --repo=3 --repo2-azure-account= --repo2-azure-container=demo-container --repo2-azure-key= --repo1-cipher-pass= --repo1-cipher-type=aes-256-cbc --repo5-gcs-bucket=demo-bucket --repo5-gcs-key= --repo1-path=/var/lib/pgbackrest --repo2-path=/demo-repo --repo3-path=/demo-repo --repo4-path=/demo-repo --repo5-path=/demo-repo --repo3-s3-bucket=demo-bucket --repo3-s3-endpoint=s3.us-east-1.amazonaws.com --repo3-s3-key= --repo3-s3-key-secret= --repo3-s3-region=us-east-1 --repo4-sftp-host=sftp-server --repo4-sftp-host-key-hash-type=sha1 --repo4-sftp-host-user=pgbackrest --repo4-sftp-private-key-file=/var/lib/postgresql/.ssh/id_rsa_sftp --repo4-sftp-public-key-file=/var/lib/postgresql/.ssh/id_rsa_sftp.pub --repo-target-time="2026-01-19 09:29:25+00" --repo2-type=azure --repo3-type=s3 --repo4-type=sftp --repo5-type=gcs --stanza=demo
P00 INFO: repo3: restore backup set 20260119-092920F, recovery will start at 2026-01-19 09:29:20
P00 INFO: remove invalid files/links/paths from '/var/lib/postgresql/16/demo'
P00 INFO: write updated /var/lib/postgresql/16/demo/postgresql.auto.conf
[filtered 2 lines of output]
sudo pg_ctlcluster 16 demo start
专用仓库主机 快速开始
在 PostgreSQL 主机上,pg1-path 必须设置为本地 PostgreSQL 集群的路径,且不应配置 pg1-host。在仓库主机的配置中,pgBackRest 配置文件必须通过 pg-host 选项连接主库和备库(如有)。仓库主机是唯一需要感知多个 PostgreSQL 主机的配置节点。顺序无关紧要,pg1-path/pg1-host、pg2-path/pg2-host 可以分别对应主库或备库。
安装 创建一台名为 repository 的新主机,用于存储集群备份。
注意:
仓库主机上安装的 pgBackRest 版本必须与 PostgreSQL 主机上安装的版本完全一致。
创建 pgbackrest 用户来管理 pgBackRest 仓库。仓库可以由任何用户管理,但建议不要使用 postgres(若存在),以避免混淆。
repository ⇒ 创建 pgbackrest 用户
sudo adduser --disabled-password --gecos "" pgbackrest
推荐通过软件包安装 pgBackRest,而非从源码编译。使用软件包时,本节后续步骤通常不必手动执行,但个别软件包可能遗漏某个目录的创建或权限设置有误,此时需要手动创建目录或修正权限。
Debian/Ubuntu 的 pgBackRest 软件包可在 apt.postgresql.org 获取。
如果当前发行版没有提供软件包,可以 从源码构建
repository ⇒ 安装依赖
sudo apt-get install postgresql-client libxml2 libssh2-1
repository ⇒ 从构建主机复制 pgBackRest 二进制文件
sudo scp build:/build/pgbackrest/src/pgbackrest /usr/bin
sudo chmod 755 /usr/bin/pgbackrest
pgBackRest 运行需要日志目录、配置目录以及配置文件。
repository ⇒ 创建 pgBackRest 配置文件和目录
sudo mkdir -p -m 770 /var/log/pgbackrest
sudo chown pgbackrest:pgbackrest /var/log/pgbackrest
sudo mkdir -p /etc/pgbackrest
sudo mkdir -p /etc/pgbackrest/conf.d
sudo touch /etc/pgbackrest/pgbackrest.conf
sudo chmod 640 /etc/pgbackrest/pgbackrest.conf
sudo chown pgbackrest:pgbackrest /etc/pgbackrest/pgbackrest.conf
repository ⇒ 创建 pgBackRest 仓库
sudo mkdir -p /var/lib/pgbackrest
sudo chmod 750 /var/lib/pgbackrest
sudo chown pgbackrest:pgbackrest /var/lib/pgbackrest
配置免密 SSH pgBackRest 支持使用免密 SSH 实现主机间通信。也可以使用 TLS,请参见 配置 TLS
repository ⇒ 创建仓库主机密钥对
sudo -u pgbackrest mkdir -m 750 /home/pgbackrest/.ssh
sudo -u pgbackrest ssh-keygen -f /home/pgbackrest/.ssh/id_rsa \
-t rsa -b 4096 -N ""
pg-primary ⇒ 创建 pg-primary 主机密钥对
sudo -u postgres mkdir -m 750 -p /var/lib/postgresql/.ssh
sudo -u postgres ssh-keygen -f /var/lib/postgresql/.ssh/id_rsa \
-t rsa -b 4096 -N ""
在 repository 和 pg-primary 之间互换公钥。
repository ⇒ 将 pg-primary 公钥复制到 repository
( echo -n 'no-agent-forwarding,no-X11-forwarding,no-port-forwarding,' && \
echo -n 'command="/usr/bin/pgbackrest ${SSH_ORIGINAL_COMMAND#* }" ' && \
sudo ssh root@pg-primary cat /var/lib/postgresql/.ssh/id_rsa.pub) | \
sudo -u pgbackrest tee -a /home/pgbackrest/.ssh/authorized_keys
pg-primary ⇒ 将 repository 公钥复制到 pg-primary
( echo -n 'no-agent-forwarding,no-X11-forwarding,no-port-forwarding,' && \
echo -n 'command="/usr/bin/pgbackrest ${SSH_ORIGINAL_COMMAND#* }" ' && \
sudo ssh root@repository cat /home/pgbackrest/.ssh/id_rsa.pub) | \
sudo -u postgres tee -a /var/lib/postgresql/.ssh/authorized_keys
验证 repository 到 pg-primary 以及反向的 SSH 连接是否正常。
repository ⇒ 测试从 repository 到 pg-primary 的连接
sudo -u pgbackrest ssh postgres@pg-primary
pg-primary ⇒ 测试从 pg-primary 到 repository 的连接
sudo -u postgres ssh pgbackrest@repository
注意:
SSH 已配置为仅允许通过免密 SSH 运行 pgBackRest,这可以在服务账号被劫持时增强安全性。
配置 仓库主机必须配置 pg-primary 的主机/用户及数据库路径。主库配置为 pg1,以便后续添加备库。
repository:/etc/pgbackrest/pgbackrest.conf ⇒ 配置 pg1-host/pg1-host-user 和 pg1-path
[demo]
pg1-host = pg-primary
pg1-path = /var/lib/postgresql/16/demo
[global]
repo1-path = /var/lib/pgbackrest
repo1-retention-full = 2
start-fast = y
数据库主机必须配置仓库主机/用户。repo1-host-user 选项的默认值为 pgbackrest。若 postgres 用户需要在仓库主机上执行恢复操作,最好不要同时允许其执行备份。不过,若 postgres 用户与 pgbackrest 用户属于同一用户组,则可以直接读取仓库。
pg-primary:/etc/pgbackrest/pgbackrest.conf ⇒ 配置 repo1-host/repo1-host-user
[demo]
pg1-path = /var/lib/postgresql/16/demo
[global]
log-level-file = detail
repo1-host = repository
PostgreSQL 的配置可以参见 配置归档
命令的运行方式与单主机配置相同,但 backup 和 expire 等命令需要在仓库主机上运行,而非数据库主机。
创建并检查 Stanza 在新仓库中创建 stanza。
repository ⇒ 创建 stanza
sudo -u pgbackrest pgbackrest --stanza= demo stanza-create
在数据库主机和仓库主机上分别验证配置是否正确。关于 check 命令的更多信息,请参见 检查配置
pg-primary ⇒ 检查配置
sudo -u postgres pgbackrest --stanza= demo check
repository ⇒ 检查配置
sudo -u pgbackrest pgbackrest --stanza= demo check
执行备份 在仓库主机上使用 backup 命令对 PostgreSQL 集群执行备份。
repository ⇒ 备份 demo 集群
sudo -u pgbackrest pgbackrest --stanza= demo backup
P00 WARN: no prior backup exists, incr backup has been changed to full
由于仓库主机上的仓库是新建的,因此出现增量备份自动转为全量备份的警告。
恢复备份 在数据库主机上使用 restore 命令恢复 PostgreSQL 集群。
pg-primary ⇒ 停止 demo 集群、执行恢复并重启 PostgreSQL
sudo pg_ctlcluster 16 demo stop
sudo -u postgres pgbackrest --stanza= demo --delta restore
sudo pg_ctlcluster 16 demo start
并行备份与恢复 pgBackRest 提供并行处理功能,可以提升压缩和传输性能。通过 --process-max 选项设置并行进程数。
对于 backup 命令,通常建议不超过可用 CPU 数量的 25%。只要定期执行备份,速度并不需要太快,且备份过程应尽量不影响数据库性能。
对于 restore 命令,可以也应该使用全部可用 CPU,因为恢复期间 PostgreSQL 集群处于关闭状态,主机上通常没有其他关键任务在运行。若主机上有多个集群,设置恢复并行度时需相应考虑。
repository ⇒ 使用单进程执行备份
sudo -u pgbackrest pgbackrest --stanza= demo --type= full backup
repository:/etc/pgbackrest/pgbackrest.conf ⇒ 配置 pgBackRest 使用多个 backup 进程
[demo]
pg1-host = pg-primary
pg1-path = /var/lib/postgresql/16/demo
[global]
process-max = 3
repo1-path = /var/lib/pgbackrest
repo1-retention-full = 2
start-fast = y
repository ⇒ 使用多进程执行备份
sudo -u pgbackrest pgbackrest --stanza= demo --type= full backup
repository ⇒ 获取 demo 集群的备份信息
sudo -u pgbackrest pgbackrest info
stanza: demo
status: ok
cipher: none
db (current)
wal archive min/max (16): 000000070000000000000023/000000070000000000000025
full backup: 20260119-093003F
timestamp start/stop: 2026-01-19 09:30:03+00 / 2026-01-19 09:30:06+00
wal start/stop: 000000070000000000000023 / 000000070000000000000023
database size: 29.2MB, database backup size: 29.2MB
repo1: backup set size: 3.9MB, backup size: 3.9MB
full backup: 20260119-093007F
timestamp start/stop: 2026-01-19 09:30:07+00 / 2026-01-19 09:30:11+00
wal start/stop: 000000070000000000000024 / 000000070000000000000025
database size: 29.2MB, database backup size: 29.2MB
repo1: backup set size: 3.9MB, backup size: 3.9MB
与单进程备份相比,多进程备份应有明显的性能提升。对于非常小的备份,差异可能不明显,但随着数据库规模增大,节省的时间也会相应增加。
启动与停止 若备库被提升用于测试,或测试集群从生产备份中恢复,应阻止这些集群向 pgBackRest 仓库写入数据,这可以通过 stop 命令实现。
会向仓库写入数据且会被 stop 阻止的命令有:archive-push、backup、expire、stanza-create 和 stanza-upgrade。注意,stanza-delete 是例外(详情参见 删除 Stanza
pg-primary ⇒ 停止 pgBackRest 写入命令
sudo -u postgres pgbackrest stop
此后新的 pgBackRest 写入命令将不再被执行。
repository ⇒ 尝试执行备份
sudo -u pgbackrest pgbackrest --stanza= demo backup
P00 WARN: unable to check pg1: [StopError] raised from remote-0 ssh protocol on 'pg-primary': stop file exists for all stanzas
P00 ERROR: [056]: unable to find primary cluster - cannot proceed
HINT: are all available clusters in recovery?
指定 --force 选项可以终止当前正在运行的 pgBackRest 写入命令,包括异步 archive-get(如果 PostgreSQL 需要,它会再次启动)。若 pgBackRest 已处于停止状态,再次执行 stop 将产生警告。
pg-primary ⇒ 再次停止 pgBackRest 服务
sudo -u postgres pgbackrest stop
P00 WARN: stop file already exists for all stanzas
使用 start 命令重新允许 pgBackRest 写入命令运行。停止之前正在进行的写入命令不会自动重启,但现在可以重新运行。
pg-primary ⇒ 启动 pgBackRest 写入命令
sudo -u postgres pgbackrest start
也可以仅停止特定 stanza 的 pgBackRest 写入命令。
pg-primary ⇒ 停止 demo stanza 的 pgBackRest 写入命令
sudo -u postgres pgbackrest --stanza= demo stop
指定 stanza 的新写入命令将不再被执行。
repository ⇒ 尝试执行备份
sudo -u pgbackrest pgbackrest --stanza= demo backup
P00 WARN: unable to check pg1: [StopError] raised from remote-0 ssh protocol on 'pg-primary': stop file exists for stanza demo
P00 ERROR: [056]: unable to find primary cluster - cannot proceed
HINT: are all available clusters in recovery?
针对单个 stanza 重新启动写入命令时,也必须指定该 stanza。
pg-primary ⇒ 启动 demo stanza 的 pgBackRest 写入命令
sudo -u postgres pgbackrest --stanza= demo start
复制 复制允许从单个主库创建多个 PostgreSQL 集群副本(即备库)。备库可用于分担读取负载,并在主库主机发生故障时提供冗余。
安装 创建一台名为 pg-standby 的新主机来运行备库。
推荐通过软件包安装 pgBackRest,而非从源码编译。使用软件包时,本节后续步骤通常不必手动执行,但个别软件包可能遗漏目录创建或权限设置有误,此时需要手动处理。
Debian/Ubuntu 的 pgBackRest 软件包可在 apt.postgresql.org 获取。
如果当前发行版没有提供软件包,可以 从源码构建
pg-standby ⇒ 安装依赖
sudo apt-get install postgresql-client libxml2 libssh2-1
pg-standby ⇒ 从构建主机复制 pgBackRest 二进制文件
sudo scp build:/build/pgbackrest/src/pgbackrest /usr/bin
sudo chmod 755 /usr/bin/pgbackrest
pgBackRest 需要日志目录、配置目录以及配置文件。
pg-standby ⇒ 创建 pgBackRest 配置文件和目录
sudo mkdir -p -m 770 /var/log/pgbackrest
sudo chown postgres:postgres /var/log/pgbackrest
sudo mkdir -p /etc/pgbackrest
sudo mkdir -p /etc/pgbackrest/conf.d
sudo touch /etc/pgbackrest/pgbackrest.conf
sudo chmod 640 /etc/pgbackrest/pgbackrest.conf
sudo chown postgres:postgres /etc/pgbackrest/pgbackrest.conf
配置免密 SSH pgBackRest 支持使用免密 SSH 实现主机间通信。也可以使用 TLS,请参见 配置 TLS
pg-standby ⇒ 创建 pg-standby 主机密钥对
sudo -u postgres mkdir -m 750 -p /var/lib/postgresql/.ssh
sudo -u postgres ssh-keygen -f /var/lib/postgresql/.ssh/id_rsa \
-t rsa -b 4096 -N ""
在 repository 和 pg-standby 之间互换公钥。
repository ⇒ 将 pg-standby 公钥复制到 repository
( echo -n 'no-agent-forwarding,no-X11-forwarding,no-port-forwarding,' && \
echo -n 'command="/usr/bin/pgbackrest ${SSH_ORIGINAL_COMMAND#* }" ' && \
sudo ssh root@pg-standby cat /var/lib/postgresql/.ssh/id_rsa.pub) | \
sudo -u pgbackrest tee -a /home/pgbackrest/.ssh/authorized_keys
pg-standby ⇒ 将 repository 公钥复制到 pg-standby
( echo -n 'no-agent-forwarding,no-X11-forwarding,no-port-forwarding,' && \
echo -n 'command="/usr/bin/pgbackrest ${SSH_ORIGINAL_COMMAND#* }" ' && \
sudo ssh root@repository cat /home/pgbackrest/.ssh/id_rsa.pub) | \
sudo -u postgres tee -a /var/lib/postgresql/.ssh/authorized_keys
验证 repository 到 pg-standby 以及反向的 SSH 连接是否正常。
repository ⇒ 测试从 repository 到 pg-standby 的连接
sudo -u pgbackrest ssh postgres@pg-standby
pg-standby ⇒ 测试从 pg-standby 到 repository 的连接
sudo -u postgres ssh pgbackrest@repository
热备库 热备库通过 WAL 归档进行复制,并允许只读查询。
pgBackRest 的配置与 pg-primary 非常相似,区别在于使用 standby 恢复类型,使集群在到达 WAL 流末尾时保持在恢复模式而不退出。
pg-standby:/etc/pgbackrest/pgbackrest.conf ⇒ 在备库上配置 pgBackRest
[demo]
pg1-path = /var/lib/postgresql/16/demo
[global]
log-level-file = detail
repo1-host = repository
必须先创建 demo 集群(即使恢复时会被覆盖),以便生成 PostgreSQL 配置文件。
pg-standby ⇒ 创建 demo 集群
sudo pg_createcluster 16 demo
现在可以使用 restore 命令创建备库。
重要提示:
若集群要在不成为新主库的情况下被提升(例如用于报表或测试),请使用 --archive-mode=off 或在 postgresql.conf 中设置 archive_mode=off 来禁用归档。若不禁用归档,仓库中可能会被大量 WAL 污染,使后续恢复更加困难。
pg-standby ⇒ 恢复 demo 备库集群
sudo -u postgres pgbackrest --stanza= demo --delta --type= standby restore
sudo -u postgres cat /var/lib/postgresql/16/demo/postgresql.auto.conf
# Do not edit this file manually!
# It will be overwritten by the ALTER SYSTEM command.
# Recovery settings generated by pgBackRest restore on 2026-01-19 09:28:18
restore_command = 'pgbackrest --stanza=demo archive-get %f "%p"'
# Recovery settings generated by pgBackRest restore on 2026-01-19 09:28:41
restore_command = 'pgbackrest --stanza=demo archive-get %f "%p"'
# Recovery settings generated by pgBackRest restore on 2026-01-19 09:29:01
restore_command = 'pgbackrest --stanza=demo archive-get %f "%p"'
# Removed by pgBackRest restore on 2026-01-19 09:29:35 # recovery_target_time = '2026-01-19 09:28:56.893848+00'
# Removed by pgBackRest restore on 2026-01-19 09:29:35 # recovery_target_action = 'promote'
# Recovery settings generated by pgBackRest restore on 2026-01-19 09:29:35
restore_command = 'pgbackrest --repo=3 --repo-target-time="2026-01-19 09:29:25+00" --stanza=demo archive-get %f "%p"'
# Recovery settings generated by pgBackRest restore on 2026-01-19 09:29:57
restore_command = 'pgbackrest --stanza=demo archive-get %f "%p"'
# Recovery settings generated by pgBackRest restore on 2026-01-19 09:30:25
restore_command = 'pgbackrest --stanza=demo archive-get %f "%p"'
启动 PostgreSQL 之前,必须启用 hot_standby 设置以允许 pg-standby 接受只读连接,否则连接请求将被拒绝。其余配置是为备库被提升为主库做准备。
pg-standby:/etc/postgresql/16/demo/postgresql.conf ⇒ 配置 PostgreSQL
archive_command = 'pgbackrest --stanza=demo archive-push %p'
archive_mode = on
hot_standby = on
pg-standby ⇒ 启动 PostgreSQL
sudo pg_ctlcluster 16 demo start
PostgreSQL 日志提供了恢复过程的重要信息,请注意确认集群已进入备库模式并准备好接受只读连接。
pg-standby ⇒ 检查 PostgreSQL 日志中表示成功的日志消息
sudo -u postgres cat /var/log/postgresql/postgresql-16-demo.log
[filtered 3 lines of output]
LOG: listening on Unix socket "/var/run/postgresql/.s.PGSQL.5432"
LOG: database system was interrupted; last known up at 2026-01-19 09:30:07 UTC
LOG: entering standby mode
LOG: starting backup recovery with redo LSN 0/24000028, checkpoint LSN 0/24000060, on timeline ID 7
LOG: restored log file "00000007.history" from archive
[filtered 6 lines of output]
验证复制是否正确配置的简单方法是在 pg-primary 上创建一张表。
pg-primary ⇒ 在主库上创建新表
sudo -u postgres psql -c " \
begin; \
create table replicated_table (message text); \
insert into replicated_table values ('Important Data'); \
commit; \
select * from replicated_table" ;
[filtered 4 lines of output]
message
----------------
Important Data
(1 row)
然后在 pg-standby 上查询同一张表,验证数据是否已同步。
pg-standby ⇒ 在备库上查询新表
sudo -u postgres psql -c "select * from replicated_table;"
ERROR: relation "replicated_table" does not exist
LINE 1: select * from replicated_table;
^
为什么没有数据?因为 PostgreSQL 从归档中拉取 WAL 段来执行复制,包含这些更改的 WAL 段尚未从 pg-primary 推送到归档,所以备库还看不到这些更改。
可以手动调用 pg_switch_wal() 解决这一问题——该函数会将当前 WAL 段推送到归档(并创建新的 WAL 段来存放后续更改)。
pg-primary ⇒ 调用 pg_switch_wal()
sudo -u postgres psql -c "select *, current_timestamp from pg_switch_wal()" ;
pg_switch_wal | current_timestamp
---------------+-------------------------------
0/2601A870 | 2026-01-19 09:30:32.338412+00
(1 row)
稍等片刻后,表将出现在 pg-standby 上(可能需要等待 WAL 段完成归档和应用)。
pg-standby ⇒ 新表现在已出现在备库上(可能需要重试几次)
sudo -u postgres psql -c " \
select *, current_timestamp from replicated_table"
message | current_timestamp
----------------+------------------------------
Important Data | 2026-01-19 09:30:33.80566+00
(1 row)
验证备库配置对仓库的访问是否正常。
pg-standby ⇒ 检查配置
sudo -u postgres pgbackrest --stanza= demo --log-level-console= info check
P00 INFO: check command begin 2.58.0: --exec-id=1159-e47628bc --log-level-console=info --log-level-file=detail --no-log-timestamp --pg1-path=/var/lib/postgresql/16/demo --repo1-host=repository --stanza=demo
P00 INFO: check repo1 (standby)
P00 INFO: switch wal not performed because this is a standby
P00 INFO: check command end: completed successfully
流复制 流复制不仅依赖 WAL 归档,而是直接连接到主库,在主库发生更改时立即应用,从而大幅降低主备延迟。
流复制需要一个具有复制权限的用户。
pg-primary ⇒ 创建复制用户
sudo -u postgres psql -c " \
create user replicator password 'jw8s0F4' replication" ;
需要更新 pg_hba.conf 文件以允许备库以复制用户身份连接。请将下面的 IP 地址替换为实际的 pg-standby IP 地址。修改 pg_hba.conf 后需重新加载配置。
pg-primary ⇒ 为复制用户创建 pg_hba.conf 条目
sudo -u postgres sh -c 'echo \
"host replication replicator 172.17.0.8/32 md5" \
>> /etc/postgresql/16/demo/pg_hba.conf'
sudo pg_ctlcluster 16 demo reload
备库需要知道如何连接到主库,因此在 pgBackRest 配置中设置 primary_conninfo。
pg-standby:/etc/pgbackrest/pgbackrest.conf ⇒ 设置 primary_conninfo
[demo]
pg1-path = /var/lib/postgresql/16/demo
recovery-option = primary_conninfo=host=172.17.0.6 port=5432 user=replicator
[global]
log-level-file = detail
repo1-host = repository
密码可以直接写入 primary_conninfo,但使用 .pgpass 文件更灵活、更安全。
pg-standby ⇒ 在 .pgpass 文件中配置复制密码
sudo -u postgres sh -c 'echo \
"172.17.0.6:*:replication:replicator:jw8s0F4" \
>> /var/lib/postgresql/.pgpass'
sudo -u postgres chmod 600 /var/lib/postgresql/.pgpass
现在可以使用 restore 命令创建备库。
pg-standby ⇒ 停止 PostgreSQL,恢复 demo 备库集群
sudo pg_ctlcluster 16 demo stop
sudo -u postgres pgbackrest --stanza= demo --delta --type= standby restore
sudo -u postgres cat /var/lib/postgresql/16/demo/postgresql.auto.conf
# Do not edit this file manually!
# It will be overwritten by the ALTER SYSTEM command.
# Recovery settings generated by pgBackRest restore on 2026-01-19 09:28:18
restore_command = 'pgbackrest --stanza=demo archive-get %f "%p"'
# Recovery settings generated by pgBackRest restore on 2026-01-19 09:28:41
restore_command = 'pgbackrest --stanza=demo archive-get %f "%p"'
# Recovery settings generated by pgBackRest restore on 2026-01-19 09:29:01
restore_command = 'pgbackrest --stanza=demo archive-get %f "%p"'
# Removed by pgBackRest restore on 2026-01-19 09:29:35 # recovery_target_time = '2026-01-19 09:28:56.893848+00'
# Removed by pgBackRest restore on 2026-01-19 09:29:35 # recovery_target_action = 'promote'
# Recovery settings generated by pgBackRest restore on 2026-01-19 09:29:35
restore_command = 'pgbackrest --repo=3 --repo-target-time="2026-01-19 09:29:25+00" --stanza=demo archive-get %f "%p"'
# Recovery settings generated by pgBackRest restore on 2026-01-19 09:29:57
restore_command = 'pgbackrest --stanza=demo archive-get %f "%p"'
# Recovery settings generated by pgBackRest restore on 2026-01-19 09:30:36
primary_conninfo = 'host=172.17.0.6 port=5432 user=replicator'
restore_command = 'pgbackrest --stanza=demo archive-get %f "%p"'
注意:
primary_conninfo 设置已写入 postgresql.auto.conf,因为它在 pgbackrest.conf 中通过 recovery-option 方式配置。若希望保留现有的 postgresql.auto.conf 文件,可在 restore 时使用 --type=preserve 选项。
pg-standby ⇒ 启动 PostgreSQL
sudo pg_ctlcluster 16 demo start
PostgreSQL 日志将确认流复制已成功启动。
pg-standby ⇒ 检查 PostgreSQL 日志中表示成功的日志消息
sudo -u postgres cat /var/log/postgresql/postgresql-16-demo.log
[filtered 13 lines of output]
LOG: consistent recovery state reached at 0/25000050
LOG: database system is ready to accept read-only connections
LOG: started streaming WAL from primary at 0/27000000 on timeline 7
现在在 pg-primary 上创建表后,无需调用 pg_switch_wal(),数据将很快出现在 pg-standby 上。
pg-primary ⇒ 在主库上创建新表
sudo -u postgres psql -c " \
begin; \
create table stream_table (message text); \
insert into stream_table values ('Important Data'); \
commit; \
select *, current_timestamp from stream_table" ;
[filtered 4 lines of output]
message | current_timestamp
----------------+-------------------------------
Important Data | 2026-01-19 09:30:43.211099+00
(1 row)
pg-standby ⇒ 在备库上查询表
sudo -u postgres psql -c " \
select *, current_timestamp from stream_table"
message | current_timestamp
----------------+-------------------------------
Important Data | 2026-01-19 09:30:43.388694+00
(1 row)
多 Stanza 配置 pgBackRest 支持多个 stanza,最常见的用法是多个 stanza 共享同一台仓库主机。
安装 创建一台名为 pg-alt 的新主机,用于运行新的主库。
推荐优先从软件包安装 pgBackRest,而非从源码构建。使用软件包安装时,本节中的其余步骤通常可以跳过,但某些软件包可能会遗漏目录创建或权限设置,届时需要手动补全。
Debian/Ubuntu 平台的 pgBackRest 软件包可在 apt.postgresql.org 获取。
如果当前发行版没有提供适用的软件包,可以参考 编译构建
pg-alt ⇒ 安装依赖
sudo apt-get install postgresql-client libxml2 libssh2-1
pg-alt ⇒ 从编译主机复制 pgBackRest 二进制文件
sudo scp build:/build/pgbackrest/src/pgbackrest /usr/bin
sudo chmod 755 /usr/bin/pgbackrest
pgBackRest 需要创建日志目录、配置目录和配置文件。
pg-alt ⇒ 创建 pgBackRest 配置文件和目录
sudo mkdir -p -m 770 /var/log/pgbackrest
sudo chown postgres:postgres /var/log/pgbackrest
sudo mkdir -p /etc/pgbackrest
sudo mkdir -p /etc/pgbackrest/conf.d
sudo touch /etc/pgbackrest/pgbackrest.conf
sudo chmod 640 /etc/pgbackrest/pgbackrest.conf
sudo chown postgres:postgres /etc/pgbackrest/pgbackrest.conf
配置免密 SSH pgBackRest 支持使用免密 SSH 实现主机间通信,也可以改用 TLS,详见 配置 TLS
pg-alt ⇒ 创建 pg-alt 主机密钥对
sudo -u postgres mkdir -m 750 -p /var/lib/postgresql/.ssh
sudo -u postgres ssh-keygen -f /var/lib/postgresql/.ssh/id_rsa \
-t rsa -b 4096 -N ""
交换仓库主机与 pg-alt 之间的 SSH 公钥。
repository ⇒ 将 pg-alt 公钥复制到仓库主机
( echo -n 'no-agent-forwarding,no-X11-forwarding,no-port-forwarding,' && \
echo -n 'command="/usr/bin/pgbackrest ${SSH_ORIGINAL_COMMAND#* }" ' && \
sudo ssh root@pg-alt cat /var/lib/postgresql/.ssh/id_rsa.pub) | \
sudo -u pgbackrest tee -a /home/pgbackrest/.ssh/authorized_keys
pg-alt ⇒ 将仓库主机公钥复制到 pg-alt
( echo -n 'no-agent-forwarding,no-X11-forwarding,no-port-forwarding,' && \
echo -n 'command="/usr/bin/pgbackrest ${SSH_ORIGINAL_COMMAND#* }" ' && \
sudo ssh root@repository cat /home/pgbackrest/.ssh/id_rsa.pub) | \
sudo -u postgres tee -a /var/lib/postgresql/.ssh/authorized_keys
验证仓库主机到 pg-alt 及 pg-alt 到仓库主机的双向 SSH 连接。
repository ⇒ 测试从仓库主机到 pg-alt 的连接
sudo -u pgbackrest ssh postgres@pg-alt
pg-alt ⇒ 测试从 pg-alt 到仓库主机的连接
sudo -u postgres ssh pgbackrest@repository
配置 pg-alt 上的 pgBackRest 配置与 pg-primary 基本相同,区别在于使用 demo-alt stanza,从而将备份和归档存储在独立的位置。
pg-alt:/etc/pgbackrest/pgbackrest.conf ⇒ 在新主库上配置 pgBackRest
[demo-alt]
pg1-path = /var/lib/postgresql/16/demo
[global]
log-level-file = detail
repo1-host = repository
repository:/etc/pgbackrest/pgbackrest.conf ⇒ 配置 pg1-host/pg1-host-user 和 pg1-path
[demo]
pg1-host = pg-primary
pg1-path = /var/lib/postgresql/16/demo
[demo-alt]
pg1-host = pg-alt
pg1-path = /var/lib/postgresql/16/demo
[global]
process-max = 3
repo1-path = /var/lib/pgbackrest
repo1-retention-full = 2
start-fast = y
初始化演示集群 pg-alt ⇒ 创建演示集群
sudo -u postgres /usr/lib/postgresql/16/bin/initdb \
-D /var/lib/postgresql/16/demo -k -A peer
sudo pg_createcluster 16 demo
Configuring already existing cluster (configuration: /etc/postgresql/16/demo, data: /var/lib/postgresql/16/demo, owner: 102:103)
Ver Cluster Port Status Owner Data directory Log file
16 demo 5432 down postgres /var/lib/postgresql/16/demo /var/log/postgresql/postgresql-16-demo.log
pg-alt:/etc/postgresql/16/demo/postgresql.conf ⇒ 配置 PostgreSQL 设置
archive_command = 'pgbackrest --stanza=demo-alt archive-push %p'
archive_mode = on
pg-alt ⇒ 启动演示集群
sudo pg_ctlcluster 16 demo restart
创建 Stanza 并检查配置 必须运行 stanza-create 命令初始化 stanza。建议随后运行 check 命令,确认归档与备份配置均正确无误。
pg-alt ⇒ 创建 stanza 并检查配置
sudo -u postgres pgbackrest --stanza= demo-alt --log-level-console= info stanza-create
P00 INFO: stanza-create command begin 2.58.0: --exec-id=1027-863103d1 --log-level-console=info --log-level-file=detail --no-log-timestamp --pg1-path=/var/lib/postgresql/16/demo --repo1-host=repository --stanza=demo-alt
P00 INFO: stanza-create for stanza 'demo-alt' on repo1
P00 INFO: stanza-create command end: completed successfully
sudo -u postgres pgbackrest --log-level-console= info check
P00 INFO: check command begin 2.58.0: --exec-id=1037-dcb84d90 --log-level-console=info --log-level-file=detail --no-log-timestamp --repo1-host=repository
P00 INFO: check stanza 'demo-alt'
P00 INFO: check repo1 configuration (primary)
P00 INFO: check repo1 archive for WAL (primary)
P00 INFO: WAL segment 000000010000000000000001 successfully archived to '/var/lib/pgbackrest/archive/demo-alt/16-1/0000000100000000/000000010000000000000001-d581f9c024aa57fd11caaf7b1d0142d6eb7e6c98.gz' on repo1
P00 INFO: check command end: completed successfully
在仓库主机上运行 check 命令时,会同时检查所有 stanza。
repository ⇒ 检查所有 stanza 的配置
sudo -u pgbackrest pgbackrest --log-level-console= info check
P00 INFO: check command begin 2.58.0: --exec-id=1919-952717d9 --log-level-console=info --no-log-timestamp --repo1-path=/var/lib/pgbackrest
P00 INFO: check stanza 'demo'
P00 INFO: check repo1 configuration (primary)
P00 INFO: check repo1 archive for WAL (primary)
P00 INFO: WAL segment 000000070000000000000027 successfully archived to '/var/lib/pgbackrest/archive/demo/16-1/0000000700000000/000000070000000000000027-943c372700ab056ed6f01bd2fe5cc4b05f22be52.gz' on repo1
P00 INFO: check stanza 'demo-alt'
P00 INFO: check repo1 configuration (primary)
P00 INFO: check repo1 archive for WAL (primary)
P00 INFO: WAL segment 000000010000000000000002 successfully archived to '/var/lib/pgbackrest/archive/demo-alt/16-1/0000000100000000/000000010000000000000002-74201c5f0512a2313d44b325bc97b774ada813e2.gz' on repo1
P00 INFO: check command end: completed successfully
异步归档 通过 archive-async 选项可启用异步归档,该选项对 archive-push 和 archive-get 命令均生效。
异步归档需要配置缓冲区路径(spool path)。两个命令都会在此路径下存储临时数据,但工作方式各有不同,具体用法将在各小节中分别说明。
pg-primary ⇒ 创建缓冲区目录
sudo mkdir -p -m 750 /var/spool/pgbackrest
sudo chown postgres:postgres /var/spool/pgbackrest
pg-standby ⇒ 创建缓冲区目录
sudo mkdir -p -m 750 /var/spool/pgbackrest
sudo chown postgres:postgres /var/spool/pgbackrest
配置缓冲区路径并启用异步归档后,pgBackRest 会通过减少远程存储的连接次数自动获得一定的性能提升。进一步配置 process-max 可通过并行化操作大幅提升性能,但不宜设置过高,以免影响正常的数据库运行。
pg-primary:/etc/pgbackrest/pgbackrest.conf ⇒ 配置缓冲区路径和异步归档
[demo]
pg1-path = /var/lib/postgresql/16/demo
[global]
archive-async = y
log-level-file = detail
repo1-host = repository
spool-path = /var/spool/pgbackrest
[global:archive-get]
process-max = 2
[global:archive-push]
process-max = 2
pg-standby:/etc/pgbackrest/pgbackrest.conf ⇒ 配置缓冲区路径和异步归档
[demo]
pg1-path = /var/lib/postgresql/16/demo
recovery-option = primary_conninfo=host=172.17.0.6 port=5432 user=replicator
[global]
archive-async = y
log-level-file = detail
repo1-host = repository
spool-path = /var/spool/pgbackrest
[global:archive-get]
process-max = 2
[global:archive-push]
process-max = 2
注意:
process-max 通过命令专属配置节(command sections)来设置,使其不会被备份和恢复操作所继承,同时也允许为 archive-push 和 archive-get 分别指定不同的值。
为便于演示,这里通过中断流复制,强制 PostgreSQL 使用 restore_command 从归档获取 WAL。
pg-primary ⇒ 通过更改复制密码来中断流复制
sudo -u postgres psql -c "alter user replicator password 'bogus'"
pg-standby ⇒ 重启备库以中断连接
sudo pg_ctlcluster 16 demo restart
归档推送(Archive Push) 异步 archive-push 命令将 WAL 归档工作转交给独立进程(或多进程)处理,以提升吞吐量。其工作原理是"向前预读"——扫描除 PostgreSQL 当前通过 archive_command 请求的文件外,还有哪些 WAL 段已就绪可归档。WAL 段直接从 pg_xlog/pg_wal 目录传输到归档存储,只有确认 WAL 段已安全入库后,archive_command 才返回成功。
缓冲区路径用于记录当前 WAL 归档的状态。写入其中的状态文件通常为零字节,整体占用空间极少(最多几 MB),IO 开销也很小。目录中的所有信息均可重建,因此将集群迁移到新硬件时无需保留缓冲区目录。
重要提示:
早期实现中,WAL 段会先复制到缓冲区目录再进行压缩和传输;新实现则直接从 pg_xlog 目录读取 WAL。如果曾在 v1.12 或更早版本中使用异步归档,请在升级前仔细阅读 v1.13 的发版说明。
可通过 [stanza]-archive-push-async.log 文件监控异步进程的活动。快速连续推送多个 WAL 段是验证并行归档的好方法。
pg-primary ⇒ 测试并行异步归档
sudo -u postgres psql -c " \
select pg_create_restore_point('test async push'); select pg_switch_wal(); \
select pg_create_restore_point('test async push'); select pg_switch_wal(); \
select pg_create_restore_point('test async push'); select pg_switch_wal(); \
select pg_create_restore_point('test async push'); select pg_switch_wal(); \
select pg_create_restore_point('test async push'); select pg_switch_wal();"
sudo -u postgres pgbackrest --stanza= demo --log-level-console= info check
P00 INFO: check command begin 2.58.0: --exec-id=3183-d3ffb6cd --log-level-console=info --log-level-file=detail --no-log-timestamp --pg1-path=/var/lib/postgresql/16/demo --repo1-host=repository --stanza=demo
P00 INFO: check repo1 configuration (primary)
P00 INFO: check repo1 archive for WAL (primary)
P00 INFO: WAL segment 00000007000000000000002D successfully archived to '/var/lib/pgbackrest/archive/demo/16-1/0000000700000000/00000007000000000000002D-b22834a2d3306ded7a39c8982af40c38d01d1595.gz' on repo1
P00 INFO: check command end: completed successfully
此时日志文件中将包含并行异步归档的详细记录。
pg-primary ⇒ 查看日志中的结果
sudo -u postgres cat /var/log/pgbackrest/demo-archive-push-async.log
-------------------PROCESS START-------------------
P00 INFO: archive-push:async command begin 2.58.0: [/var/lib/postgresql/16/demo/pg_wal] --archive-async --exec-id=3169-08eec32e --log-level-console=off --log-level-file=detail --log-level-stderr=off --no-log-timestamp --pg1-path=/var/lib/postgresql/16/demo --process-max=2 --repo1-host=repository --spool-path=/var/spool/pgbackrest --stanza=demo
P00 INFO: push 1 WAL file(s) to archive: 000000070000000000000028
P01 DETAIL: pushed WAL file '000000070000000000000028' to the archive
P00 INFO: archive-push:async command end: completed successfully
-------------------PROCESS START-------------------
P00 INFO: archive-push:async command begin 2.58.0: [/var/lib/postgresql/16/demo/pg_wal] --archive-async --exec-id=3187-9a196906 --log-level-console=off --log-level-file=detail --log-level-stderr=off --no-log-timestamp --pg1-path=/var/lib/postgresql/16/demo --process-max=2 --repo1-host=repository --spool-path=/var/spool/pgbackrest --stanza=demo
P00 INFO: push 5 WAL file(s) to archive: 000000070000000000000029...00000007000000000000002D
P02 DETAIL: pushed WAL file '00000007000000000000002A' to the archive
P01 DETAIL: pushed WAL file '000000070000000000000029' to the archive
P01 DETAIL: pushed WAL file '00000007000000000000002C' to the archive
P02 DETAIL: pushed WAL file '00000007000000000000002B' to the archive
P01 DETAIL: pushed WAL file '00000007000000000000002D' to the archive
P00 INFO: archive-push:async command end: completed successfully
归档获取(Archive Get) 异步 archive-get 命令通过维护本地 WAL 队列来提升吞吐量。若队列中找不到所需的 WAL 段,则会从仓库获取该段及足够多的后续 WAL 来填满队列。队列的最大容量由 archive-get-queue-max 定义,当队列剩余容量不足一半时,会自动补充获取。
在 WAL 生成量较大、或与仓库存储(如 S3 等对象存储)连接延迟较高的环境中,异步模式的收益最为显著。高延迟场景下,适当调大 process-max 通常有助于进一步提升性能。
可通过 [stanza]-archive-get-async.log 文件监控异步进程的活动。
pg-standby ⇒ 查看日志中的结果
sudo -u postgres cat /var/log/pgbackrest/demo-archive-get-async.log
-------------------PROCESS START-------------------
P00 INFO: archive-get:async command begin 2.58.0: [000000070000000000000024, 000000070000000000000025, 000000070000000000000026, 000000070000000000000027, 000000070000000000000028, 000000070000000000000029, 00000007000000000000002A, 00000007000000000000002B] --archive-async --exec-id=1380-8760a6e0 --log-level-console=off --log-level-file=detail --log-level-stderr=off --no-log-timestamp --pg1-path=/var/lib/postgresql/16/demo --process-max=2 --repo1-host=repository --spool-path=/var/spool/pgbackrest --stanza=demo
P00 INFO: get 8 WAL file(s) from archive: 000000070000000000000024...00000007000000000000002B
P01 DETAIL: found 000000070000000000000024 in the repo1: 16-1 archive
P02 DETAIL: found 000000070000000000000025 in the repo1: 16-1 archive
P01 DETAIL: found 000000070000000000000026 in the repo1: 16-1 archive
P02 DETAIL: found 000000070000000000000027 in the repo1: 16-1 archive
P00 DETAIL: unable to find 000000070000000000000028 in the archive
P00 INFO: archive-get:async command end: completed successfully
[filtered 14 lines of output]
P00 INFO: archive-get:async command begin 2.58.0: [000000070000000000000028, 000000070000000000000029, 00000007000000000000002A, 00000007000000000000002B, 00000007000000000000002C, 00000007000000000000002D, 00000007000000000000002E, 00000007000000000000002F] --archive-async --exec-id=1431-a78c4f0a --log-level-console=off --log-level-file=detail --log-level-stderr=off --no-log-timestamp --pg1-path=/var/lib/postgresql/16/demo --process-max=2 --repo1-host=repository --spool-path=/var/spool/pgbackrest --stanza=demo
P00 INFO: get 8 WAL file(s) from archive: 000000070000000000000028...00000007000000000000002F
P02 DETAIL: found 000000070000000000000029 in the repo1: 16-1 archive
P01 DETAIL: found 000000070000000000000028 in the repo1: 16-1 archive
P02 DETAIL: found 00000007000000000000002A in the repo1: 16-1 archive
P01 DETAIL: found 00000007000000000000002B in the repo1: 16-1 archive
P02 DETAIL: found 00000007000000000000002C in the repo1: 16-1 archive
P01 DETAIL: found 00000007000000000000002D in the repo1: 16-1 archive
P00 DETAIL: unable to find 00000007000000000000002E in the archive
P00 INFO: archive-get:async command end: completed successfully
[filtered 11 lines of output]
pg-primary ⇒ 通过更改复制密码恢复流复制
sudo -u postgres psql -c "alter user replicator password 'jw8s0F4'"
从备库备份 pgBackRest 支持从备库而非主库执行备份。从备库备份需要配置 pg-standby 主机并启用 backup-standby 选项。若配置了多个备库,则使用第一个处于运行状态的备库进行备份。
repository:/etc/pgbackrest/pgbackrest.conf ⇒ 配置 pg2-host/pg2-host-user 和 pg2-path
[demo]
pg1-host = pg-primary
pg1-path = /var/lib/postgresql/16/demo
pg2-host = pg-standby
pg2-path = /var/lib/postgresql/16/demo
[demo-alt]
pg1-host = pg-alt
pg1-path = /var/lib/postgresql/16/demo
[global]
backup-standby = y
process-max = 3
repo1-path = /var/lib/pgbackrest
repo1-retention-full = 2
start-fast = y
执行备份时,主库和备库均须在线,但绝大多数文件将从备库复制,以减轻主库的 I/O 压力。数据库主机可按任意顺序配置,pgBackRest 会自动识别主库和备库的角色。
repository ⇒ 从 pg2 备份演示集群
sudo -u pgbackrest pgbackrest --stanza= demo --log-level-console= detail backup
[filtered 2 lines of output]
P00 INFO: execute backup start: backup begins after the requested immediate checkpoint completes
P00 INFO: backup start archive = 00000007000000000000002F, lsn = 0/2F000028
P00 INFO: wait for replay on the standby to reach 0/2F000028
P00 INFO: replay on the standby reached 0/2F000028
P00 INFO: check archive for prior segment 00000007000000000000002E
P01 DETAIL: backup file pg-primary:/var/lib/postgresql/16/demo/global/pg_control (8KB, 0.53%) checksum c9b694b7e3af23be6834c24b23bb1a43d8fb22f4
P01 DETAIL: match file from prior backup pg-primary:/var/lib/postgresql/16/demo/pg_logical/replorigin_checkpoint (8B, 0.53%) checksum 347fc8f2df71bd4436e38bd1516ccd7ea0d46532
P02 DETAIL: backup file pg-standby:/var/lib/postgresql/16/demo/base/5/1249 (464KB, 31.38%) checksum c32e73e05783bcad1a0107e7b5462117b2906d5e
[filtered 1278 lines of output]
从该增量备份的输出可以看出,绝大多数文件从 pg-standby 主机复制,只有极少数文件来自 pg-primary。
pgBackRest 从备库创建的备份与在主库上创建的备份完全等效。其实现方式为:在 pg-primary 上执行备份的启动和停止操作,从 pg-standby 复制已复制的文件,再从 pg-primary 补充少量剩余文件。因此,主库的日志和统计信息也会完整纳入备份。
升级 PostgreSQL 将 PostgreSQL 升级到新的主版本后,必须立即将所有 pgBackRest 配置中的 pg-path 更新为新的数据目录路径,并运行 stanza-upgrade 命令。若主机上配置了多个仓库,则每个仓库上的 stanza 都会一并升级。若数据库处于离线状态,请加上 --no-online 选项。
以下步骤并非 PostgreSQL 升级的完整指南,而是概要介绍了升级主库和备库的一般流程,重点展示重新配置 pgBackRest 所需的操作。建议在升级前先执行一次全量备份。
pg-primary ⇒ 停止旧集群
sudo pg_ctlcluster 16 demo stop
由于备库将从升级后的新集群恢复,因此备库上的旧集群也需要一并停止。
pg-standby ⇒ 停止旧集群
sudo pg_ctlcluster 16 demo stop
初始化新版本的集群并执行升级。
pg-primary ⇒ 创建新集群并执行升级
sudo -u postgres /usr/lib/postgresql/17/bin/initdb \
-D /var/lib/postgresql/17/demo -k -A peer
sudo pg_createcluster 17 demo
sudo -u postgres sh -c 'cd /var/lib/postgresql && \
/usr/lib/postgresql/17/bin/pg_upgrade \
--old-bindir=/usr/lib/postgresql/16/bin \
--new-bindir=/usr/lib/postgresql/17/bin \
--old-datadir=/var/lib/postgresql/16/demo \
--new-datadir=/var/lib/postgresql/17/demo \
--old-options=" -c config_file=/etc/postgresql/16/demo/postgresql.conf" \
--new-options=" -c config_file=/etc/postgresql/17/demo/postgresql.conf"'
[filtered 41 lines of output]
Checking for extension updates ok
Upgrade Complete
----------------
Optimizer statistics are not transferred by pg_upgrade.
[filtered 3 lines of output]
配置新集群的参数。
pg-primary:/etc/postgresql/17/demo/postgresql.conf ⇒ 配置 PostgreSQL
archive_command = 'pgbackrest --stanza=demo archive-push %p'
archive_mode = on
更新所有主机上的 pgBackRest 配置,将 pg-path 指向新集群的数据目录。
pg-primary:/etc/pgbackrest/pgbackrest.conf ⇒ 升级 pg1-path
[demo]
pg1-path = /var/lib/postgresql/17/demo
[global]
archive-async = y
log-level-file = detail
repo1-host = repository
spool-path = /var/spool/pgbackrest
[global:archive-get]
process-max = 2
[global:archive-push]
process-max = 2
pg-standby:/etc/pgbackrest/pgbackrest.conf ⇒ 升级 pg-path
[demo]
pg1-path = /var/lib/postgresql/17/demo
recovery-option = primary_conninfo=host=172.17.0.6 port=5432 user=replicator
[global]
archive-async = y
log-level-file = detail
repo1-host = repository
spool-path = /var/spool/pgbackrest
[global:archive-get]
process-max = 2
[global:archive-push]
process-max = 2
repository:/etc/pgbackrest/pgbackrest.conf ⇒ 升级 pg1-path 和 pg2-path,禁用从备库备份
[demo]
pg1-host = pg-primary
pg1-path = /var/lib/postgresql/17/demo
pg2-host = pg-standby
pg2-path = /var/lib/postgresql/17/demo
[demo-alt]
pg1-host = pg-alt
pg1-path = /var/lib/postgresql/16/demo
[global]
backup-standby = n
process-max = 3
repo1-path = /var/lib/pgbackrest
repo1-retention-full = 2
start-fast = y
pg-primary ⇒ 复制 hba 配置文件
sudo cp /etc/postgresql/16/demo/pg_hba.conf \
/etc/postgresql/17/demo/pg_hba.conf
启动新集群前,必须先运行 stanza-upgrade 命令完成 stanza 升级。
pg-primary ⇒ 升级 stanza
sudo -u postgres pgbackrest --stanza= demo --no-online \
--log-level-console= info stanza-upgrade
P00 INFO: stanza-upgrade command begin 2.58.0: --exec-id=3590-c2882bfe --log-level-console=info --log-level-file=detail --no-log-timestamp --no-online --pg1-path=/var/lib/postgresql/17/demo --repo1-host=repository --stanza=demo
P00 INFO: stanza-upgrade for stanza 'demo' on repo1
P00 INFO: stanza-upgrade command end: completed successfully
启动新集群并验证配置。
pg-primary ⇒ 启动新集群
sudo pg_ctlcluster 17 demo start
使用 check 命令验证配置。
pg-primary ⇒ 检查配置
sudo pg_lsclusters
sudo -u postgres pgbackrest --stanza= demo check
确认无误后,删除旧版本集群。
pg-primary ⇒ 删除旧集群
sudo pg_dropcluster 16 demo
在备库上安装新版本的 PostgreSQL 并创建集群。
pg-standby ⇒ 删除旧集群并创建新集群
sudo pg_dropcluster 16 demo
sudo pg_createcluster 17 demo
在仓库主机上运行 check 命令。由于备库集群尚未启动,出现备库不可用的警告属于预期行为。执行此命令是为了确认仓库主机已感知到备库的存在,且主库端配置正确。
repository ⇒ 检查配置
sudo -u pgbackrest pgbackrest --stanza= demo check
P00 WARN: unable to check pg2: [DbConnectError] raised from remote-0 ssh protocol on 'pg-standby': unable to connect to 'dbname='postgres' port=5432': connection to server on socket "/var/run/postgresql/.s.PGSQL.5432" failed: No such file or directory
Is the server running locally and accepting connections on that socket?
对新集群执行全量备份,再从备份中恢复备库。若指定 incr 或 diff 类型,pgBackRest 会自动将其升级为 full。
repository ⇒ 运行全量备份
sudo -u pgbackrest pgbackrest --stanza= demo --type= full backup
pg-standby ⇒ 恢复演示备库集群
sudo -u postgres pgbackrest --stanza= demo --delta --type= standby restore
pg-standby:/etc/postgresql/17/demo/postgresql.conf ⇒ 配置 PostgreSQL
pg-standby ⇒ 启动 PostgreSQL 并检查 pgBackRest 配置
sudo pg_ctlcluster 17 demo start
sudo -u postgres pgbackrest --stanza= demo check
备库恢复并正常运行后,即可重新启用从备库备份功能。
repository:/etc/pgbackrest/pgbackrest.conf ⇒ 重新启用从备库备份
[demo]
pg1-host = pg-primary
pg1-path = /var/lib/postgresql/17/demo
pg2-host = pg-standby
pg2-path = /var/lib/postgresql/17/demo
[demo-alt]
pg1-host = pg-alt
pg1-path = /var/lib/postgresql/16/demo
[global]
backup-standby = y
process-max = 3
repo1-path = /var/lib/pgbackrest
repo1-retention-full = 2
start-fast = y
28.2 - 用户指南(RHEL/Rocky/CentOS) 面向 RHEL、Rocky Linux 和 AlmaLinux 系统的 pgBackRest 安装配置与使用指南,按步骤逐一讲解。
原始页面: https://pgbackrest.org/user-guide-rhel.html
简介 本用户指南设计为从头到尾顺序阅读——每个章节都依赖前一章节的内容。例如, 恢复 快速开始
本指南的示例基于 RHEL 和 PostgreSQL 13,但迁移到其他 Unix 发行版或 PostgreSQL 版本并不困难。与操作系统相关的命令仅限于创建、启动、停止和删除 PostgreSQL 集群的部分;pgBackRest 命令在所有 Unix 系统上均相同,只是可执行文件路径可能有所不同。pgBackRest 致力于在各 PostgreSQL 版本间保持一致的行为,但不同版本间存在细微差异,这些差异可能体现在本指南的部分示例中,例如 PostgreSQL 路径、文件名和配置项。
有关 PostgreSQL 的配置信息,请参阅 PostgreSQL 手册
本指南在文档方面采用了一种较为新颖的方式:每条命令在从 XML 源构建文档时都会在虚拟机上实际执行,因此可以确信这些命令按照所呈现的顺序正确运行。相关命令的输出会显示在命令下方;若未包含输出,则是因为其与说明无关或会干扰行文。
所有命令均预期以具有 root 和 postgres 用户 sudo 权限的非特权用户身份运行。也可以直接以对应用户身份运行,去掉 sudo 即可。
核心概念 以下概念与 pgBackRest、PostgreSQL 以及本用户指南密切相关。
备份 备份是数据库集群的一致性副本,可用于从硬件故障中恢复、执行时间点恢复(PITR),或启动新的备库。
全量备份(full backup) :pgBackRest 将数据库集群的全部内容复制到备份中。数据库集群的第一次备份始终是全量备份。pgBackRest 始终能够直接恢复全量备份。全量备份的一致性不依赖于备份外部的任何文件。
差异备份(differential backup) :pgBackRest 仅复制自上次全量备份以来发生变化的数据库集群文件。pgBackRest 通过复制所选差异备份中的所有文件以及上一次全量备份中相应的未变化文件来恢复差异备份。差异备份的优点是比全量备份占用更少的磁盘空间,但差异备份和全量备份必须都有效才能恢复差异备份。
增量备份(incremental backup) :pgBackRest 仅复制自上次备份(可以是另一次增量备份、差异备份或全量备份)以来发生变化的文件,因此通常比全量备份或差异备份小得多。与差异备份一样,增量备份依赖于其他备份的有效性才能恢复。恢复增量备份需要:所有在上一次差异备份之前的增量备份、上一次差异备份以及上一次全量备份都有效。若不存在差异备份,则需要追溯到上一次全量备份的所有增量备份以及全量备份本身都有效。
恢复 恢复是将备份复制到某个系统并作为活跃数据库集群启动的过程,需要备份文件和一个或多个 WAL 段才能正确完成。
预写日志(WAL) WAL 是 PostgreSQL 确保已提交更改不会丢失的机制。事务按顺序写入 WAL,待这些写入刷盘后,事务即视为已提交。随后,后台进程将变更写入主数据库集群文件(即堆)。发生崩溃时,PostgreSQL 会重放 WAL 以恢复数据库一致性。
WAL 在概念上是连续无限的,但在实践中被切分为每个 16MB 的独立文件,称为 WAL 段。WAL 段遵循 0000000100000A1E000000FE 这样的命名约定,其中前 8 个十六进制数字表示时间线,后 16 位是逻辑序列号(LSN)。
加密 加密是将数据转换为无法识别格式的过程,只有提供正确的密码(口令)才能还原。
pgBackRest 使用用户提供的密码对仓库进行加密,防止未经授权的访问。
升级 pgBackRest 从 v1 升级到 v2 从 v1 升级到 v2 相当简单。仓库格式没有改变,v1 中所有未弃用的选项均被接受,因此大多数安装只需安装新版本即可。
但有几点注意事项:
已弃用的 thread-max 选项不再有效,请改用 process-max。 已弃用的 archive-max-mb 选项不再有效,该选项已被语义不同的 archive-push-queue-max 选项取代。 backup-user 选项的默认值已从 backrest 改为 pgbackrest。在 v2.02 中,pgBackRest 配置文件的默认位置从 /etc/pgbackrest.conf 更改为 /etc/pgbackrest/pgbackrest.conf。如果 /etc/pgbackrest/pgbackrest.conf 不存在,则会加载 /etc/pgbackrest.conf 文件(如果存在)。 许多选项名称已更改以提高一致性,但 v1 中的旧名称仍然被接受。一般来说,db-* 选项已重命名为 pg-*,backup-*/retention-* 选项在适当的情况下已重命名为 repo-*。
使用 v2 中引入的新名称时,PostgreSQL 和仓库选项必须使用索引,例如 pg1-host、pg1-path、repo1-path、repo1-type 等。
从 v2.x 升级到 v2.y 从 v2.x 升级到 v2.y 非常简单。仓库格式没有改变,大多数安装只需替换新版本的二进制文件即可。若没有用到旧版本不支持的新功能,也可以降级。
重要提示:
本地和远程 pgBackRest 版本必须完全匹配,因此应一起升级。若版本不匹配,WAL 归档和备份将无法正常工作,直到版本一致为止,此时会报告以下错误:[ProtocolError] expected value '2.x' for greeting key 'version' but got '2.y'。
编译构建 推荐通过包安装 pgBackRest,而非从源码构建,详见 安装
如需从源码构建,建议使用专用构建主机而非在生产环境中操作,因为构建所需的许多工具不应安装在生产服务器上。pgBackRest 只有单个可执行文件,构建完成后可直接复制到目标主机。
build ⇒ 将 pgBackRest 版本 2.58.0 下载到 /build 路径
mkdir -p /build
wget -q -O - \
https://github.com/pgbackrest/pgbackrest/archive/release/2.58.0.tar.gz | \
tar zx -C /build
build ⇒ 安装构建依赖
sudo yum install meson gcc postgresql13-devel openssl-devel \
libxml2-devel lz4-devel libzstd-devel bzip2-devel libyaml-devel libssh2-devel
build ⇒ 配置并编译 pgBackRest
meson setup /build/pgbackrest /build/pgbackrest-release-2.58.0
ninja -C /build/pgbackrest
安装 创建一台名为 pg-primary 的新主机,用于承载演示集群并运行 pgBackRest 示例。
推荐通过包安装 pgBackRest,而非从源码构建。通过包安装时,本节后续步骤通常不需要手动执行,但某些包可能会跳过创建目录或权限设置有误。遇到这种情况时,手动创建目录或更新权限即可。
RHEL 平台的 pgBackRest 包可在 yum.postgresql.org 获取。
如果所用发行版/版本没有提供包,可以 从源码构建
pg-primary ⇒ 安装依赖项
sudo yum install postgresql-libs libssh2
pg-primary ⇒ 从构建主机复制 pgBackRest 二进制文件
sudo scp build:/build/pgbackrest/src/pgbackrest /usr/bin
sudo chmod 755 /usr/bin/pgbackrest
pgBackRest 需要日志目录、配置目录和配置文件。
pg-primary ⇒ 创建 pgBackRest 配置文件和目录
sudo mkdir -p -m 770 /var/log/pgbackrest
sudo chown postgres:postgres /var/log/pgbackrest
sudo mkdir -p /etc/pgbackrest
sudo mkdir -p /etc/pgbackrest/conf.d
sudo touch /etc/pgbackrest/pgbackrest.conf
sudo chmod 640 /etc/pgbackrest/pgbackrest.conf
sudo chown postgres:postgres /etc/pgbackrest/pgbackrest.conf
pgBackRest 现在应已正确安装,建议验证一下。若有依赖项缺失,命令行运行 pgBackRest 时会出现相应错误。
pg-primary ⇒ 确认安装成功
sudo -u postgres pgbackrest
pgBackRest 2.58.0 - General help
Usage:
pgbackrest [ options] [ command]
Commands:
annotate add or modify backup annotation
archive-get get a WAL segment from the archive
archive-push push a WAL segment to the archive
backup backup a database cluster
check check the configuration
expire expire backups that exceed retention
help get help
info retrieve information about backups
repo-get get a file from a repository
repo-ls list files in a repository
restore restore a database cluster
server pgBackRest server
server-ping ping pgBackRest server
stanza-create create the required stanza data
stanza-delete delete a stanza
stanza-upgrade upgrade a stanza
start allow pgBackRest processes to run
stop stop pgBackRest processes from running
verify verify contents of a repository
version get version
Use 'pgbackrest help [command]' for more information.
快速开始 本章介绍 pgBackRest 和 PostgreSQL 的基本配置,并演示 backup、restore 和 info 命令的用法。
创建演示集群 创建演示集群是可选的,但强烈推荐——尤其对新用户而言,因为本指南的所有示例命令都引用该演示集群,且假设它运行在默认端口(5432)上。由于还有一些配置工作要完成,集群将在后续章节中才会启动。
pg-primary ⇒ 创建演示集群
sudo -u postgres /usr/pgsql-13/bin/initdb \
-D /var/lib/pgsql/13/data -k -A peer
RHEL 默认在日志文件名中包含星期几,这会使用户指南的示例变得复杂,因此将 log_filename 设置为固定值。
pg-primary:/var/lib/pgsql/13/data/postgresql.conf ⇒ 设置 log_filename
log_filename = 'postgresql.log'
配置集群 Stanza stanza 是 pgBackRest 中用于标识一个 PostgreSQL 集群备份配置的逻辑名称,定义了集群的位置、备份方式、归档选项等。大多数数据库服务器只有一个 PostgreSQL 集群,因此只有一个 stanza;备份服务器则为每个需要备份的数据库集群各配置一个 stanza。
命名 stanza 时,以主集群名称命名是常见做法,但更好的方式是描述集群所承载的业务数据。由于 stanza 名称会同时用于主库和所有副本,选择描述集群功能的名称(如 app 或 dw)比使用本地集群名称(如 main 或 prod)更为合适。
demo 准确描述了该集群的用途,因此也是一个恰当的 stanza 名称。
pgBackRest 需要知道 PostgreSQL 集群数据目录的位置。该路径可以直接从 PostgreSQL 获取,但在恢复场景中 PostgreSQL 进程不可用。备份过程中,pgBackRest 会将配置中的路径与 PostgreSQL 实际运行的路径进行比较,两者必须完全一致,否则备份会报错。请确保 pg-path 与 PostgreSQL 报告的 data_directory 完全匹配。
RHEL 默认将集群数据存储在 /var/lib/pgsql/[version]/data,因此数据目录路径很容易确定。
创建 /etc/pgbackrest/pgbackrest.conf 时,必须赋予数据库所有者(通常是 postgres)读取权限。
pg-primary:/etc/pgbackrest/pgbackrest.conf ⇒ 配置 PostgreSQL 集群数据目录
[demo]
pg1-path = /var/lib/pgsql/13/data
pgBackRest 配置文件采用类 Windows INI 的格式。节(section)以方括号中的文本表示,键/值对包含在各节中。以 # 开头的行被视为注释而忽略。不支持引号,键和值会自动去除首尾空白。同一节若出现多次,将被合并处理。
pgBackRest 配置文件有多种加载方式:
config 和 config-include-path 均为默认值:若默认配置文件存在则加载,若默认配置包含路径存在则追加其中的 *.conf 文件。指定了 config 选项:仅加载指定的配置文件,该文件必须存在。 指定了 config-include-path:加载该路径下的 *.conf 文件,路径必须存在;同时若默认配置文件存在也会加载。如只希望加载指定路径中的文件,可同时传递 --no-config 选项。 同时指定了 config 和 config-include-path:使用用户指定的值,加载配置文件并追加指定包含路径中的 *.conf 文件,这些文件均预期存在。 指定了 config-path:此设置会覆盖配置文件默认基路径和/或默认 config-include-path 的基路径,除非显式设置了 config 和/或 config-include-path 选项。 所有配置文件会被拼接,相当于一个大文件,每个文件必须各自有效。这意味着需要在每个文件中为所需的键/值对指定对应的节。顺序不影响结果,但节有基于类型的优先级。优先级从高到低为:
[stanza :command ] [stanza ] [global:command ] [global] 注意:
--config、--config-include-path 和 --config-path 仅是命令行选项。
pgBackRest 也可以通过环境变量进行配置(如下示例所示),适用于 backuprestorearchive-push
pg-primary ⇒ 使用环境变量配置 log-path
sudo -u postgres bash -c ' \
export PGBACKREST_LOG_PATH=/path/set/by/env && \
pgbackrest --log-level-console=error help backup log-path'
pgBackRest 2.58.0 - 'backup' command - 'log-path' option help
Path where log files are stored.
The log path provides a location for pgBackRest to store log files. Note that
if log-level-file= off then no log path is required.
current: /path/set/by/env
default: /var/log/pgbackrest
创建仓库 仓库是 pgBackRest 存储备份和归档 WAL 段的位置。
提前精确估算所需空间并不容易。较好的做法是先执行几次备份,记录不同类型备份(full/incr/diff)的大小,并统计每日产生的 WAL 量,由此对空间需求形成大致判断——尽管随着数据库的演变,需求会随时间变化。
本演示将仓库存储在与 PostgreSQL 服务器相同的主机上,这是最简单的配置,适用于通过传统备份软件对数据库主机进行整机备份的场景。
pg-primary ⇒ 创建 pgBackRest 仓库
sudo mkdir -p /var/lib/pgbackrest
sudo chmod 750 /var/lib/pgbackrest
sudo chown postgres:postgres /var/lib/pgbackrest
需要配置仓库路径,以便 pgBackRest 知道仓库的位置。
pg-primary:/etc/pgbackrest/pgbackrest.conf ⇒ 配置 pgBackRest 仓库路径
[demo]
pg1-path = /var/lib/pgsql/13/data
[global]
repo1-path = /var/lib/pgbackrest
也可以配置多个仓库,详见 多仓库
配置归档 备份正在运行的 PostgreSQL 集群需要启用 WAL 归档。%p 是 PostgreSQL 传递待归档 WAL 段路径的占位符。注意,即使没有对集群进行显式写入,备份过程中也会生成至少 一个 WAL 段。
pg-primary:/var/lib/pgsql/13/data/postgresql.conf ⇒ 配置归档设置
archive_command = 'pgbackrest --stanza=demo archive-push %p'
archive_mode = on
log_filename = 'postgresql.log'
完成以上更改后,必须重启 PostgreSQL 集群使配置生效。
pg-primary ⇒ 重启演示集群
sudo systemctl restart postgresql-13.service
若归档单个 WAL 段预计超过 60 秒(默认值)才能到达仓库,应适当增大 pgBackRest 的 archive-timeout 选项。注意,此选项与 PostgreSQL 的 archive_timeout 不同——后者用于强制切换 WAL 段,适用于长时间没有写入的数据库。有关 PostgreSQL archive_timeout 的更多信息,请参阅 PostgreSQL 预写日志
archive-push 命令可以单独配置选项。例如,可以为归档设置较低的压缩级别以提升速度,而不影响备份的压缩设置。
pg-primary:/etc/pgbackrest/pgbackrest.conf ⇒ 配置 archive-push 使用较低的压缩级别
[demo]
pg1-path = /var/lib/pgsql/13/data
[global]
repo1-path = /var/lib/pgbackrest
[global:archive-push]
compress-level = 3
这种配置方式适用于任何命令,也可以针对特定 stanza 进一步细化,例如 demo:archive-push。
配置保留策略 pgBackRest 根据保留策略选项对备份执行过期(轮转)操作。
pg-primary:/etc/pgbackrest/pgbackrest.conf ⇒ 配置保留 2 个全量备份
[demo]
pg1-path = /var/lib/pgsql/13/data
[global]
repo1-path = /var/lib/pgbackrest
repo1-retention-full = 2
[global:archive-push]
compress-level = 3
有关保留策略的更多信息,请参阅 保留策略
配置仓库加密 本节为仓库配置加密类型和密钥,演示加密功能。无论仓库类型(如 S3 或其他对象存储)是否自带加密,pgBackRest 的加密始终在客户端执行。
密钥应使用长随机口令,推荐通过 openssl rand -base64 48 生成。
pg-primary:/etc/pgbackrest/pgbackrest.conf ⇒ 配置 pgBackRest 仓库加密
[demo]
pg1-path = /var/lib/pgsql/13/data
[global]
repo1-cipher-pass = zWaf6XtpjIVZC5444yXB+cgFDFl7MxGlgkZSaoPvTGirhPygu4jOKOXf9LO4vjfO
repo1-cipher-type = aes-256-cbc
repo1-path = /var/lib/pgbackrest
repo1-retention-full = 2
[global:archive-push]
compress-level = 3
仓库完成配置、stanza 创建并检查完毕后,加密设置不可更改。
创建 Stanza 需要运行 stanza-create 命令来初始化 stanza。建议在 stanza-create 之后运行 check 命令,验证归档和备份配置是否正确。
pg-primary ⇒ 创建 stanza 并检查配置
sudo -u postgres pgbackrest --stanza= demo --log-level-console= info stanza-create
P00 INFO: stanza-create command begin 2.58.0: --exec-id=1001-c0a11b26 --log-level-console=info --no-log-timestamp --pg1-path=/var/lib/pgsql/13/data --repo1-cipher-pass= --repo1-cipher-type=aes-256-cbc --repo1-path=/var/lib/pgbackrest --stanza=demo
P00 INFO: stanza-create for stanza 'demo' on repo1
P00 INFO: stanza-create command end: completed successfully
检查配置 check 命令验证 pgBackRest 和 archive_command 是否为指定 stanza 正确配置了归档和备份。它会检查运行该命令的主机上配置的所有仓库和数据库,并能发现配置错误——尤其是因所需 WAL 段未能到达归档而导致备份不完整的问题。该命令可在 PostgreSQL 主机或仓库主机上运行。也可以在备库主机上运行,但由于备库无法执行 pg_switch_xlog()/pg_switch_wal(),此时只会测试仓库配置。
注意:check 命令会调用 pg_create_restore_point('pgBackRest Archive Check') 和 pg_switch_xlog()/pg_switch_wal(),以强制 PostgreSQL 归档一个 WAL 段。
pg-primary ⇒ 检查配置
sudo -u postgres pgbackrest --stanza= demo --log-level-console= info check
P00 INFO: check command begin 2.58.0: --exec-id=1029-7fad2b46 --log-level-console=info --no-log-timestamp --pg1-path=/var/lib/pgsql/13/data --repo1-cipher-pass= --repo1-cipher-type=aes-256-cbc --repo1-path=/var/lib/pgbackrest --stanza=demo
P00 INFO: check repo1 configuration (primary)
P00 INFO: check repo1 archive for WAL (primary)
P00 INFO: WAL segment 000000010000000000000001 successfully archived to '/var/lib/pgbackrest/archive/demo/13-1/0000000100000000/000000010000000000000001-7f6faa2bdee862515d964b0dac87805c5f762965.gz' on repo1
P00 INFO: check command end: completed successfully
性能调优 pgBackRest 有许多性能选项,为保持仓库的向后兼容性,这些选项默认未启用。创建新仓库时,建议启用以下选项。这些选项也可用于现有仓库,但需注意较旧版本的 pgBackRest 将无法读取该仓库——具体兼容性取决于各功能的引入版本,详见下列说明。
compress-type — 决定 backup 和 archive-push 命令使用的压缩算法。默认为 gz(Gzip),但推荐使用 zst(Zstandard),后者速度更快,压缩率与 gz 相近。zst 自 v2.27 起受 compress-type 支持。详见 压缩类型 repo-bundle — 备份时将小文件合并打包,节省空间并提升 backup 和 restore 的速度,在 S3 等对象存储上效果尤为明显。该选项在 v2.39 中引入。详见 文件打包 repo-block — 执行 diff/incr 备份时,仅存储文件中发生变化的部分,而非整个文件,从而节省空间并提升备份速度。该选项在 v2.46 中引入,但建议至少使用 v2.52.1 。详见 块级增量备份 还有一些性能选项默认未启用,原因是需要额外配置,或默认值虽安全但并非最优。这些选项在所有 v2 版本中均可用。
process-max — 控制命令使用的进程数,默认值为 1,几乎在任何场景下都不是合适的值。各命令对 process-max 的使用方式不同,详见各命令的文档。archive-async — 批量将 WAL 文件归档到仓库,大幅提升归档吞吐量。默认未启用,因为需要额外创建缓冲区目录。详见 异步归档 backup-standby — 在备库而非主库上执行备份,以减轻主库负载。默认未启用,因为需要额外配置,并且要求存在一个或多个备库。详见 从备库备份 执行备份 默认情况下,pgBackRest 会等待下一个定期检查点完成后才开始备份。根据 PostgreSQL 的 checkpoint_timeout 和 checkpoint_segments 设置,等待时间可能较长。通常建议设置 start-fast=y,让备份立即启动——这会强制执行一次检查点,但由于备份一般每天只运行一次,额外的检查点对性能几乎没有影响。对于负载极高的集群,建议按需在命令行传递 --start-fast。
pg-primary:/etc/pgbackrest/pgbackrest.conf ⇒ 配置备份快速启动
[demo]
pg1-path = /var/lib/pgsql/13/data
[global]
repo1-cipher-pass = zWaf6XtpjIVZC5444yXB+cgFDFl7MxGlgkZSaoPvTGirhPygu4jOKOXf9LO4vjfO
repo1-cipher-type = aes-256-cbc
repo1-path = /var/lib/pgbackrest
repo1-retention-full = 2
start-fast = y
[global:archive-push]
compress-level = 3
运行 pgBackRest 的 backup 命令即可对 PostgreSQL 集群执行备份。
pg-primary ⇒ 备份演示集群
sudo -u postgres pgbackrest --stanza= demo \
--log-level-console= info backup
P00 INFO: backup command begin 2.58.0: --exec-id=1102-82fc2007 --log-level-console=info --no-log-timestamp --pg1-path=/var/lib/pgsql/13/data --repo1-cipher-pass= --repo1-cipher-type=aes-256-cbc --repo1-path=/var/lib/pgbackrest --repo1-retention-full=2 --stanza=demo --start-fast
P00 WARN: no prior backup exists, incr backup has been changed to full
P00 INFO: execute backup start: backup begins after the requested immediate checkpoint completes
P00 INFO: backup start archive = 000000010000000000000002, lsn = 0/2000028
[filtered 3 lines of output]
P00 INFO: check archive for segment(s) 000000010000000000000002:000000010000000000000003
P00 INFO: new backup label = 20260119-092100F
P00 INFO: full backup size = 23.2MB, file total = 936
P00 INFO: backup command end: completed successfully
P00 INFO: expire command begin 2.58.0: --exec-id=1102-82fc2007 --log-level-console=info --no-log-timestamp --repo1-cipher-pass= --repo1-cipher-type=aes-256-cbc --repo1-path=/var/lib/pgbackrest --repo1-retention-full=2 --stanza=demo
默认情况下,pgBackRest 尝试执行增量备份。增量备份必须基于全量备份,由于尚无全量备份,pgBackRest 自动改为执行全量备份。
type 选项用于指定备份类型(全量或差异)。
pg-primary ⇒ 对演示集群执行差异备份
sudo -u postgres pgbackrest --stanza= demo --type= diff \
--log-level-console= info backup
[filtered 7 lines of output]
P00 INFO: check archive for segment(s) 000000010000000000000004:000000010000000000000005
P00 INFO: new backup label = 20260119-092100F_20260119-092102D
P00 INFO: diff backup size = 9.1KB, file total = 936
P00 INFO: backup command end: completed successfully
P00 INFO: expire command begin 2.58.0: --exec-id=1163-a7659621 --log-level-console=info --no-log-timestamp --repo1-cipher-pass= --repo1-cipher-type=aes-256-cbc --repo1-path=/var/lib/pgbackrest --repo1-retention-full=2 --stanza=demo
这次没有出现警告,因为全量备份已经存在。增量备份可以基于全量备份或 差异备份,而差异备份只能基于全量备份。若要执行全量备份,加上 --type=full 选项即可。
在线备份期间,pgBackRest 会等待备份一致性所需的 WAL 段完成归档。等待时间由 archive-timeout 选项控制,默认为 60 秒。若已知单个 WAL 段的归档需要更长时间,应适当增大此值。
制定备份计划 可以使用 cron 等工具调度备份。
以下示例配置了两个 cron 任务:每周日早上 6:30 运行全量备份,周一至周六早上 6:30 运行差异备份。若此 crontab 在周中首次安装,pgBackRest 会在差异任务首次执行时自动改为运行全量备份,第二天再运行差异备份。
#m h dom mon dow command
30 06 * * 0 pgbackrest --type= full --stanza= demo backup
30 06 * * 1-6 pgbackrest --type= diff --stanza= demo backup
确定备份计划后,务必配置保留策略以定期清理旧备份,详见 保留策略
备份信息 使用 info 命令获取备份信息。
pg-primary ⇒ 获取演示集群的信息
sudo -u postgres pgbackrest info
stanza: demo
status: ok
cipher: aes-256-cbc
db (current)
wal archive min/max (13): 000000010000000000000001/000000010000000000000005
full backup: 20260119-092100F
timestamp start/stop: 2026-01-19 09:21:00+00 / 2026-01-19 09:21:02+00
wal start/stop: 000000010000000000000002 / 000000010000000000000003
database size: 23.2MB, database backup size: 23.2MB
repo1: backup set size: 2.9MB, backup size: 2.9MB
diff backup: 20260119-092100F_20260119-092102D
timestamp start/stop: 2026-01-19 09:21:02+00 / 2026-01-19 09:21:03+00
wal start/stop: 000000010000000000000004 / 000000010000000000000005
database size: 23.2MB, database backup size: 9.1KB
repo1: backup set size: 2.9MB, backup size: 880B
backup reference total: 1 full
info 命令可查询单个 stanza 或所有 stanza。默认输出为文本格式,以人类可读的方式显示备份摘要,该格式可能随版本发布而变化。
如需机器可读输出,请使用 --output=json。JSON 输出包含比文本格式更多的信息,且在未发现 bug 的情况下保持稳定。
若要加快执行速度,可指定 --detail-level=progress 将输出限制为仅进度信息,但这会跳过除 stanza 可用性之外的所有检查。
输出中每个 stanza 对应一个独立的节,可使用 --stanza 选项将输出限制为单个 stanza。status 字段简要说明 stanza 的健康状况:ok 表示运行正常;存在多个仓库时,mixed 表示 stanza 在一个或多个仓库上存在异常,此时会按仓库逐一列出状态;若仓库出现未知错误码的错误,将使用 other 并附上完整错误详情。wal archive min/max 显示归档中当前存储的最小和最大 WAL,若有多个仓库则跨所有仓库汇总报告(除非指定了 --repo)。注意,由于归档保留策略或其他原因,WAL 序列中可能存在间隙。
若有上述命令正在主机上运行,status 信息旁会出现 backup/expire running 和/或 restore running 提示。
备份按从旧到新的顺序显示。最旧的备份始终 是全量备份(标签末尾为 F),最新的备份则可能是全量备份、差异备份(末尾为 D)或增量备份(末尾为 I)。
timestamp start/stop 定义了备份的执行时间段。timestamp stop 可用于判断时间点恢复时应选择哪个备份。有关时间点恢复的更多信息,请参阅 时间点恢复
wal start/stop 定义了恢复时使数据库达到一致性所需的 WAL 范围,backup 命令在完成前会确保此范围内的 WAL 已全部归档。
database size 是数据库的完整未压缩大小,database backup size 是实际需要备份的数据量(全量备份时两者相同)。
repo 标识备份所在的仓库。backup set size 包含该备份及恢复所需的所有引用备份中的文件总量,backup size 仅包含该备份自身的文件(全量备份时两者相同)。若启用了压缩,仓库大小反映压缩后的大小。
backup reference total 汇总了恢复该备份所需的其他备份。使用 --set 选项可显示完整的引用列表。
恢复备份 备份可以防范多种灾难场景,最常见的是硬件故障和数据损坏。模拟数据损坏最简单的方法是删除某个关键的 PostgreSQL 集群文件。
pg-primary ⇒ 停止演示集群并删除 pg_control 文件
sudo systemctl stop postgresql-13.service
sudo -u postgres rm /var/lib/pgsql/13/data/global/pg_control
缺少这个关键文件时,集群将无法启动。
pg-primary ⇒ 尝试启动已损坏的演示集群
sudo systemctl start postgresql-13.service
sudo systemctl status postgresql-13.service
postgresql-13.service - PostgreSQL 13 database server
Loaded: loaded (/usr/lib/systemd/system/postgresql-13.service, disabled)
Active: failed (failed)
恢复 PostgreSQL 集群的备份,使用 pgBackRest 的 restore 命令即可。集群必须处于停止状态(本例已停止),且需先清空 PostgreSQL 数据目录中的所有文件。
pg-primary ⇒ 从演示集群中删除旧文件
sudo -u postgres find /var/lib/pgsql/13/data -mindepth 1 -delete
pg-primary ⇒ 恢复演示集群并启动 PostgreSQL
sudo -u postgres pgbackrest --stanza= demo restore
sudo systemctl start postgresql-13.service
这次集群成功启动,因为恢复操作已补回了缺失的 pg_control 文件。
有关 restore 命令的更多信息,请参阅 恢复
监控 监控是任何生产系统的重要组成部分。市面上有众多监控工具,稍加处理即可将 pgBackRest 集成进去。
pgBackRest 可以 JSON 格式输出仓库信息,包含每个 stanza 的所有备份列表和 WAL 归档信息。
在 PostgreSQL 中 PostgreSQL 的 COPY 命令可将 pgBackRest 信息加载到表中。以下示例将该逻辑封装成函数,便于执行实时查询。
pg-primary ⇒ 为 PostgreSQL 加载 pgBackRest info 函数
sudo -u postgres cat \
/var/lib/pgsql/pgbackrest/doc/example/pgsql-pgbackrest-info.sql
-- An example of monitoring pgBackRest from within PostgreSQL
--
-- Use copy to export data from the pgBackRest info command into the jsonb
-- type so it can be queried directly by PostgreSQL.
-- Create monitor schema
create schema monitor ;
-- Get pgBackRest info in JSON format
create function monitor . pgbackrest_info ()
returns jsonb AS $$
declare
data jsonb ;
begin
-- Create a temp table to hold the JSON data
create temp table temp_pgbackrest_data ( data text );
-- Copy data into the table directly from the pgBackRest info command
copy temp_pgbackrest_data ( data )
from program
'pgbackrest --output=json info' ( format text );
select replace ( temp_pgbackrest_data . data , E '\n' , '\n' ):: jsonb
into data
from temp_pgbackrest_data ;
drop table temp_pgbackrest_data ;
return data ;
end $$ language plpgsql ;
sudo -u postgres psql -f \
/var/lib/pgsql/pgbackrest/doc/example/pgsql-pgbackrest-info.sql
现在可以使用 monitor.pgbackrest_info() 函数查询某个 stanza 的上次成功备份时间和最新归档 WAL。
pg-primary ⇒ 查询上次成功备份时间和归档的 WAL
sudo -u postgres cat \
/var/lib/pgsql/pgbackrest/doc/example/pgsql-pgbackrest-query.sql
-- Get last successful backup for each stanza
--
-- Requires the monitor.pgbackrest_info function.
with stanza as
(
select data -> 'name' as name ,
data -> 'backup' -> (
jsonb_array_length ( data -> 'backup' ) - 1 ) as last_backup ,
data -> 'archive' -> (
jsonb_array_length ( data -> 'archive' ) - 1 ) as current_archive
from jsonb_array_elements ( monitor . pgbackrest_info ()) as data
)
select name ,
to_timestamp (
( last_backup -> 'timestamp' ->> 'stop' ):: numeric ) as last_successful_backup ,
current_archive ->> 'max' as last_archived_wal
from stanza ;
sudo -u postgres psql -f \
/var/lib/pgsql/pgbackrest/doc/example/pgsql-pgbackrest-query.sql
name | last_successful_backup | last_archived_wal
--------+------------------------+--------------------------
"demo" | 2026-01-19 09:21:03+00 | 000000010000000000000005
(1 row)
使用 jq jq 是一款命令行工具,可方便地从 JSON 中提取数据。
pg-primary ⇒ 安装 jq 工具
现在可以使用 jq 查询指定 stanza 的上次成功备份时间。
pg-primary ⇒ 查询上次成功备份时间
sudo -u postgres pgbackrest --output= json --stanza= demo info | \
jq '.[0] | .backup[-1] | .timestamp.stop'
1768814896
或查询最后归档的 WAL。
pg-primary ⇒ 查询最后归档的 WAL
sudo -u postgres pgbackrest --output= json --stanza= demo info | \
jq '.[0] | .archive[-1] | .max'
"000000010000000000000005"
注意:
此语法需要 jq v1.5 及以上版本。
注意:
jq 可能会对系统标识符等大整数进行四舍五入,请仔细测试你的查询。
备份 配置了多个仓库时,pgBackRest 默认备份到优先级最高的仓库(如 repo1),除非指定了 --repo 选项。
pgBackRest 没有内置调度器,建议通过 cron 或其他调度机制运行备份。
详情和示例请参阅 执行备份
文件打包 将仓库中的文件打包在一起可以节省备份时间和仓库空间,在对象存储(如 S3)或块大小较大的文件系统上效果尤为明显。对象存储上每个文件的创建开销较高,极小文件的存储成本可能与大文件相当。
文件打包功能通过 repo-bundle 选项启用。
pg-primary:/etc/pgbackrest/pgbackrest.conf ⇒ 配置 repo1-bundle
[demo]
pg1-path = /var/lib/pgsql/13/data
[global]
repo1-bundle = y
repo1-cipher-pass = zWaf6XtpjIVZC5444yXB+cgFDFl7MxGlgkZSaoPvTGirhPygu4jOKOXf9LO4vjfO
repo1-cipher-type = aes-256-cbc
repo1-path = /var/lib/pgbackrest
repo1-retention-full = 2
start-fast = y
[global:archive-push]
compress-level = 3
不使用文件打包时,全量备份路径中会有 1000 多个文件;启用打包后文件总数大幅减少。另一个好处是,零长度文件不再单独存储(仅记录在清单(manifest)中),而普通备份中每个零长度文件都会独立占用一个文件。
pg-primary ⇒ 执行全量备份
sudo -u postgres pgbackrest --stanza= demo --type= full backup
pg-primary ⇒ 检查文件总数
sudo -u postgres find /var/lib/pgbackrest/backup/demo/latest/ -type f | wc -l
5
repo-bundle-size 和 repo-bundle-limit 选项可用于调优,但大多数情况下默认值已是最优。
文件打包虽然通常更高效,但也有一些缺点:从仓库手动检索文件变得更困难;对去重存储可能并不理想,因为每次全量备份的文件在包中排列方式都不同;文件包不支持断点续传,因此不宜将 repo-bundle-limit 设置过高。
块级增量备份 块级增量备份只存储文件中自上次备份以来发生变化的部分,而非整个文件,从而节省存储空间。
通过 repo-block 选项启用块级增量备份,对所有备份类型都启用时效果最佳,且必须同时启用文件打包功能。
pg-primary:/etc/pgbackrest/pgbackrest.conf ⇒ 配置 repo1-block
[demo]
pg1-path = /var/lib/pgsql/13/data
[global]
repo1-block = y
repo1-bundle = y
repo1-cipher-pass = zWaf6XtpjIVZC5444yXB+cgFDFl7MxGlgkZSaoPvTGirhPygu4jOKOXf9LO4vjfO
repo1-cipher-type = aes-256-cbc
repo1-path = /var/lib/pgbackrest
repo1-retention-full = 2
start-fast = y
[global:archive-push]
compress-level = 3
备份注解 用户可以为备份附加键/值对形式的注解,此选项可多次使用以添加多条注解。
pg-primary ⇒ 执行带注解的全量备份
sudo -u postgres pgbackrest --stanza= demo --annotation= source = "demo backup" \
--annotation= key = value --type= full backup
通过 --set 指定备份时,info 命令的文本输出会显示注解;JSON 输出中则始终包含注解。
pg-primary ⇒ 获取演示集群的信息
sudo -u postgres pgbackrest --stanza= demo --set= 20260119-092115F info
stanza: demo
status: ok
cipher: aes-256-cbc
db (current)
wal archive min/max (13): 000000020000000000000007/000000020000000000000009
full backup: 20260119-092115F
timestamp start/stop: 2026-01-19 09:21:15+00 / 2026-01-19 09:21:16+00
wal start/stop: 000000020000000000000008 / 000000020000000000000009
lsn start/stop: 0/8000028 / 0/9000050
database size: 23.2MB, database backup size: 23.2MB
repo1: backup size: 2.9MB
database list: postgres (13383)
annotation(s)
key: value
source: demo backup
备份时附加的注解,之后可使用 annotate 命令添加、修改或删除。
pg-primary ⇒ 修改备份注解
sudo -u postgres pgbackrest --stanza= demo --set= 20260119-092115F \
--annotation= key = --annotation= new_key = new_value annotate
sudo -u postgres pgbackrest --stanza= demo --set= 20260119-092115F info
stanza: demo
status: ok
cipher: aes-256-cbc
db (current)
wal archive min/max (13): 000000020000000000000007/000000020000000000000009
full backup: 20260119-092115F
timestamp start/stop: 2026-01-19 09:21:15+00 / 2026-01-19 09:21:16+00
wal start/stop: 000000020000000000000008 / 000000020000000000000009
lsn start/stop: 0/8000028 / 0/9000050
database size: 23.2MB, database backup size: 23.2MB
repo1: backup size: 2.9MB
database list: postgres (13383)
annotation(s)
new_key: new_value
source: demo backup
保留策略 通常,保留尽可能多的备份有助于提供更大的 时间点恢复
pgBackRest 根据保留策略类型(数量或时间段)对全量备份进行轮转。指定数量时,过期逻辑只关注需保留多少个备份,与创建时间无关。差异备份也按数量管理,当其依赖的全量备份过期时,差异备份随之过期。增量备份不会被保留策略单独过期,始终随关联的全量备份或差异备份一起过期。详情与示例请参见 全量备份保留策略 差异备份保留策略
归档 WAL 默认与未过期备份一起保留;如有特殊需求,可通过各仓库的 retention-archive 选项调整此策略(不推荐)。详情与示例请参见 归档保留策略
expire 命令会在每次备份成功后自动运行,也可手动执行。手动运行时,会按各已配置仓库的保留策略执行过期操作。若指定了 --repo 选项,则仅对该仓库执行。还可以通过 --set 选项将过期操作限定到特定备份集;若未同时指定 --repo,则会搜索所有仓库并对符合条件的备份集执行过期。每次运行 expire 命令时都会检查并执行归档保留计划。
全量备份保留策略 repo1-retention-full-type 决定 repo1-retention-full 的解释方式:可以是保留的全量备份数量,也可以是保留天数。过期操作仅在新备份完成后触发。例如,若 repo1-retention-full-type=count 且 repo1-retention-full=2,则需要存储了三个全量备份之后才会过期最旧的那个;若 repo1-retention-full-type=time 且 repo1-retention-full=20,则只有当至少一个全量备份的存储时间超过 20 天时,才会触发过期操作。
pg-primary:/etc/pgbackrest/pgbackrest.conf ⇒ 配置 repo1-retention-full
[demo]
pg1-path = /var/lib/pgsql/13/data
[global]
repo1-block = y
repo1-bundle = y
repo1-cipher-pass = zWaf6XtpjIVZC5444yXB+cgFDFl7MxGlgkZSaoPvTGirhPygu4jOKOXf9LO4vjfO
repo1-cipher-type = aes-256-cbc
repo1-path = /var/lib/pgbackrest
repo1-retention-full = 2
start-fast = y
[global:archive-push]
compress-level = 3
目前已配置 repo1-retention-full=2,但当前只有一个全量备份,因此下次执行全量备份时不会过期任何旧备份。
pg-primary ⇒ 执行全量备份
sudo -u postgres pgbackrest --stanza= demo --type= full \
--log-level-console= detail backup
[filtered 948 lines of output]
P00 INFO: repo1: remove expired backup 20260119-092113F
P00 DETAIL: repo1: 13-1 archive retention on backup 20260119-092115F, start = 000000020000000000000008
P00 INFO: repo1: 13-1 remove archive, start = 000000020000000000000007, stop = 000000020000000000000007
P00 INFO: expire command end: completed successfully
归档确实 被过期了,因为这些 WAL 段生成于最旧备份之前,对恢复没有意义——只有备份之后生成的 WAL 段才能用于恢复该备份。
pg-primary ⇒ 执行全量备份
sudo -u postgres pgbackrest --stanza= demo --type= full \
--log-level-console= info backup
[filtered 11 lines of output]
P00 INFO: repo1: expire full backup 20260119-092115F
P00 INFO: repo1: remove expired backup 20260119-092115F
P00 INFO: repo1: 13-1 remove archive, start = 000000020000000000000008, stop = 000000020000000000000009
P00 INFO: expire command end: completed successfully
全量备份 20260119-092100F 已被过期,归档保留策略现在以 20260119-092118F(当前最旧的全量备份)为基准。
差异备份保留策略 repo1-retention-diff 设置为需要保留的差异备份数量。差异备份只依赖于之前的全量备份,因此可以维护最近一天或更长时间内的"滚动"差异备份集合,既支持快速恢复到近期时间点,又能控制整体空间占用。
pg-primary:/etc/pgbackrest/pgbackrest.conf ⇒ 配置 repo1-retention-diff
[demo]
pg1-path = /var/lib/pgsql/13/data
[global]
repo1-block = y
repo1-bundle = y
repo1-cipher-pass = zWaf6XtpjIVZC5444yXB+cgFDFl7MxGlgkZSaoPvTGirhPygu4jOKOXf9LO4vjfO
repo1-cipher-type = aes-256-cbc
repo1-path = /var/lib/pgbackrest
repo1-retention-diff = 1
repo1-retention-full = 2
start-fast = y
[global:archive-push]
compress-level = 3
已配置 repo1-retention-diff=1,因此需要执行两次差异备份才会过期其中一个。这里额外创建一个增量备份,用于演示增量备份的过期逻辑——本例中,增量备份随差异备份一起被过期。
pg-primary ⇒ 执行差异备份和增量备份
sudo -u postgres pgbackrest --stanza= demo --type= diff backup
sudo -u postgres pgbackrest --stanza= demo --type= incr backup
再执行一次差异备份,之前的差异备份和增量备份将被过期,只保留最新的差异备份。
pg-primary ⇒ 执行差异备份
sudo -u postgres pgbackrest --stanza= demo --type= diff \
--log-level-console= info backup
[filtered 10 lines of output]
P00 INFO: backup command end: completed successfully
P00 INFO: expire command begin 2.58.0: --exec-id=2196-f736765b --log-level-console=info --no-log-timestamp --repo1-cipher-pass= --repo1-cipher-type=aes-256-cbc --repo1-path=/var/lib/pgbackrest --repo1-retention-diff=1 --repo1-retention-full=2 --stanza=demo
P00 INFO: repo1: expire diff backup set 20260119-092120F_20260119-092122D, 20260119-092120F_20260119-092123I
P00 INFO: repo1: remove expired backup 20260119-092120F_20260119-092123I
P00 INFO: repo1: remove expired backup 20260119-092120F_20260119-092122D
P00 INFO: expire command end: completed successfully
归档保留策略 pgBackRest 在过期备份时会自动删除对应的归档 WAL(默认按 repo1-retention-full 过期全量备份的 WAL),但有时可能需要更激进地过期归档以节省磁盘空间。需要注意,在差异归档保留策略中,全量备份被视为差异备份处理。
过期归档时,pgBackRest 永远不会删除维持备份一致性所必需的 WAL 段。但由于时间点恢复(PITR)只能在连续的 WAL 流上进行,在正常备份过期流程之外激进地过期归档时需格外谨慎。若要在不实际执行过期的情况下预览哪些内容将被删除,可在执行 expire 命令时添加 dry-run 选项。
pg-primary:/etc/pgbackrest/pgbackrest.conf ⇒ 配置 repo1-retention-diff
[demo]
pg1-path = /var/lib/pgsql/13/data
[global]
repo1-block = y
repo1-bundle = y
repo1-cipher-pass = zWaf6XtpjIVZC5444yXB+cgFDFl7MxGlgkZSaoPvTGirhPygu4jOKOXf9LO4vjfO
repo1-cipher-type = aes-256-cbc
repo1-path = /var/lib/pgbackrest
repo1-retention-diff = 2
repo1-retention-full = 2
start-fast = y
[global:archive-push]
compress-level = 3
pg-primary ⇒ 执行差异备份
sudo -u postgres pgbackrest --stanza= demo --type= diff \
--log-level-console= info backup
[filtered 6 lines of output]
P00 INFO: backup stop archive = 000000020000000000000017, lsn = 0/17000050
P00 INFO: check archive for segment(s) 000000020000000000000016:000000020000000000000017
P00 INFO: new backup label = 20260119-092120F_20260119-092126D
P00 INFO: diff backup size = 11.6KB, file total = 936
P00 INFO: backup command end: completed successfully
[filtered 2 lines of output]
pg-primary ⇒ 过期归档
sudo -u postgres pgbackrest --stanza= demo --log-level-console= detail \
--repo1-retention-archive-type= diff --repo1-retention-archive= 1 expire
P00 INFO: expire command begin 2.58.0: --exec-id=2392-b81327e6 --log-level-console=detail --no-log-timestamp --repo1-cipher-pass= --repo1-cipher-type=aes-256-cbc --repo1-path=/var/lib/pgbackrest --repo1-retention-archive=1 --repo1-retention-archive-type=diff --repo1-retention-diff=2 --repo1-retention-full=2 --stanza=demo
P00 DETAIL: repo1: 13-1 archive retention on backup 20260119-092118F, start = 00000002000000000000000A, stop = 00000002000000000000000B
P00 DETAIL: repo1: 13-1 archive retention on backup 20260119-092120F, start = 00000002000000000000000C, stop = 00000002000000000000000D
P00 DETAIL: repo1: 13-1 archive retention on backup 20260119-092120F_20260119-092124D, start = 000000020000000000000012, stop = 000000020000000000000013
P00 DETAIL: repo1: 13-1 archive retention on backup 20260119-092120F_20260119-092126D, start = 000000020000000000000016
P00 INFO: repo1: 13-1 remove archive, start = 00000002000000000000000E, stop = 000000020000000000000011
P00 INFO: repo1: 13-1 remove archive, start = 000000020000000000000014, stop = 000000020000000000000015
P00 INFO: expire command end: completed successfully
差异备份 20260119-092120F_20260119-092124D 中保留了一些 WAL 段——尽管这些段无法用于更早备份的 PITR 向前回放,但必须保留以确保旧备份的一致性。20260119-092120F_20260119-092124D 之后、20260119-092120F_20260119-092126D 之前生成的 WAL 段已被删除。20260119-092120F_20260119-092126D 之后生成的 WAL 段仍然保留,可用于 PITR。
在差异归档保留策略中,全量备份被视为差异备份,因此若以相同设置执行全量备份,则只会保留该全量备份之后的归档用于 PITR。
恢复 restore 命令默认从第一个存在备份的仓库中自动选取最新备份(参见 快速开始 - 恢复备份 pgbackrest.conf 决定(如 repo1 先于 repo2)。若要从特定仓库恢复,可传入 --repo 选项(如 --repo=1);若要恢复非最新的备份,可传入 --set 选项。
指定 PITR 类型为 --type=time 或 --type=lsn 时,必须通过 --target 选项指定目标时间或 LSN。若未通过 --set 指定备份,pgBackRest 会按顺序检查各仓库,寻找包含所请求时间或 LSN 的备份。若未找到匹配备份:--type=time 时会使用第一个含备份仓库中的最新备份;--type=lsn 时则不选取任何备份。对于其他 PITR 类型(如 xid),若目标早于最新备份,则必须提供 --set 选项。详情与示例请参见 时间点恢复
根据 PostgreSQL 的建议,复制槽不包含在备份中,更多信息请参阅 PostgreSQL 文档中的 备份数据目录
以下各节介绍 restore 命令的更多功能。
文件所有权 若 restore 以非 root 用户运行(典型场景),所有恢复的文件都将归执行 pgBackRest 的用户/组所有。若现有文件不属于该用户/组且无法更新所有权,则会报错。此时需由特权用户先更新文件所有权,再重新尝试恢复。
若 restore 以 root 用户运行,pgBackRest 会尝试按照备份时清单(manifest)中记录的所有权信息重建文件归属。清单中只存储用户/组的名称 ,恢复主机上必须存在相同的名称才能正常映射。若找不到对应的用户/组名称,则使用 PostgreSQL 数据目录的用户/组;若仍无法映射,则最终回退到 root。
Delta 选项 快速开始 恢复备份 restore 前先清空数据库集群目录。delta 选项让 pgBackRest 自动判断集群目录中哪些文件可以保留、哪些需要从备份恢复——同时还会删除 不在备份清单中的文件,从而清除无关变更。该功能通过计算集群目录中每个文件的 SHA-1 加密哈希来实现,若哈希值与备份中存储的不匹配,则恢复该文件。配合 process-max 使用时效率极高。由于恢复期间 PostgreSQL 已关闭,可以使用比备份时更多的进程数。
pg-primary ⇒ 停止 demo 集群,执行 delta 恢复
sudo systemctl stop postgresql-13.service
sudo -u postgres pgbackrest --stanza= demo --delta \
--log-level-console= detail restore
[filtered 2 lines of output]
P00 DETAIL: check '/var/lib/pgsql/13/data' exists
P00 DETAIL: remove 'global/pg_control' so cluster will not start if restore does not complete
P00 INFO: remove invalid files/links/paths from '/var/lib/pgsql/13/data'
P00 DETAIL: remove invalid file '/var/lib/pgsql/13/data/backup_label.old'
P00 DETAIL: remove invalid file '/var/lib/pgsql/13/data/base/13383/pg_internal.init'
[filtered 981 lines of output]
pg-primary ⇒ 重启 PostgreSQL
sudo systemctl start postgresql-13.service
选择性数据库恢复 某些场景下,可能需要从集群备份中有选择地恢复特定数据库——原因可能是性能考量,也可能是目标机器空间不足以恢复整个集群,只需迁移部分数据库。
为演示此功能,创建两个数据库:test1 和 test2。
pg-primary ⇒ 创建两个测试数据库
sudo -u postgres psql -c "create database test1;"
sudo -u postgres psql -c "create database test2;"
在每个测试数据库中创建表并填充数据,用于演示选择性恢复。
pg-primary ⇒ 在每个数据库中创建测试表
sudo -u postgres psql -c "create table test1_table (id int); \
insert into test1_table (id) values (1);" test1
sudo -u postgres psql -c "create table test2_table (id int); \
insert into test2_table (id) values (2);" test2
执行一次新备份,让 pgBackRest 感知到新建的数据库。
pg-primary ⇒ 执行备份
sudo -u postgres pgbackrest --stanza= demo --type= incr backup
选择性恢复的主要用途之一是节省空间。先记录 test1 当前占用的空间,以便与选择性恢复后进行对比。
pg-primary ⇒ 查看 test1 数据库占用的空间
sudo -u postgres du -sh /var/lib/pgsql/13/data/base/32768
7.8M /var/lib/pgsql/13/data/base/32768
若不清楚需要恢复的数据库名称,可使用 info 命令配合 --set 选项,查看该备份集中包含的数据库列表。
pg-primary ⇒ 查看备份的数据库列表
sudo -u postgres pgbackrest --stanza= demo \
--set= 20260119-092120F_20260119-092135I info
[filtered 12 lines of output]
repo1: backup size: 1.9MB
backup reference list: 20260119-092120F, 20260119-092120F_20260119-092126D
database list: postgres (13383), test1 (32768), test2 (32769)
停止集群,仅恢复 test2 数据库。内置数据库(template0、template1、postgres)始终会被恢复。
警告:
除非指定 --type=immediate,否则恢复可能会报错。原因是:达到一致性点之后,PostgreSQL 会将清零页标记为错误,即使是完整页写入也不例外。对于 PostgreSQL 13 及以上版本,可使用 ignore_invalid_pages 参数忽略无效页面。采用此方案时,恢复完成后务必检查日志,确认所选数据库中没有无效页面的报告。
pg-primary ⇒ 从最新备份恢复,仅包含 test2 数据库
sudo systemctl stop postgresql-13.service
sudo -u postgres pgbackrest --stanza= demo --delta \
--db-include= test2 --type= immediate --target-action= promote restore
sudo systemctl start postgresql-13.service
恢复完成后,test2 数据库中将包含之前创建的表和数据。
pg-primary ⇒ 验证 test2 数据库已成功恢复
sudo -u postgres psql -c "select * from test2_table;" test2
id
----
2
(1 row)
test1 数据库虽然恢复成功,但无法访问。这是因为整个数据库以稀疏清零文件的形式恢复,关键文件中不含任何实际数据。PostgreSQL 可以在清零文件上应用 WAL,但数据库本身并不有效。这是有意为之——目的是防止该数据库在可能包含 WAL 回放期间写入的部分数据时被意外访问。
pg-primary ⇒ 尝试连接 test1 数据库将产生错误
sudo -u postgres psql -c "select * from test1_table;" test1
psql: error: connection to server on socket "/run/postgresql/.s.PGSQL.5432" failed: FATAL: relation mapping file "base/32768/pg_filenode.map" contains invalid data
由于 test1 数据库以稀疏清零文件恢复,其占用空间仅相当于恢复期间写入的 WAL 量。备份期间生成、恢复期间应用的 WAL 量虽可能不少,但通常只是数据库总大小的一小部分——大型数据库中尤为如此,这正是此功能最有价值的场景。
因此,选择性恢复后 test1 数据库占用的磁盘空间远少于完整恢复时的用量。
pg-primary ⇒ 查看恢复后 test1 数据库占用的空间
sudo -u postgres du -sh /var/lib/pgsql/13/data/base/32768
8.0K /var/lib/pgsql/13/data/base/32768
此时对无效的 test1 数据库唯一可执行的操作是 drop database。pgBackRest 不会自动删除它,删除操作必须在恢复完成且集群可访问后手动执行。
pg-primary ⇒ 删除 test1 数据库
sudo -u postgres psql -c "drop database test1;"
删除无效的 test1 数据库后,只剩下 test2 和内置系统数据库。
pg-primary ⇒ 列出剩余数据库
sudo -u postgres psql -c "select oid, datname from pg_database order by oid;"
oid | datname
-------+-----------
1 | template1
13382 | template0
13383 | postgres
32769 | test2
(4 rows)
时间点恢复 快速开始 恢复备份
PITR 允许将 WAL 从备份回放至指定的 LSN、时间、事务 ID 或恢复点。常见恢复场景中,基于时间的恢复最为实用。典型场景是恢复意外删除的表或数据——以下以恢复误删表为例,误删数据的恢复方式完全相同。
pg-primary ⇒ 创建一张存有重要数据的表
sudo -u postgres psql -c "begin; \
create table important_table (message text); \
insert into important_table values ('Important Data'); \
commit; \
select * from important_table;"
message
----------------
Important Data
(1 row)
记录时间时务必以 PostgreSQL 的时间为准,并包含时区偏移量,以免时区转换错误导致恢复结果与预期不符。
pg-primary ⇒ 从 PostgreSQL 获取当前时间
sudo -u postgres psql -Atc "select current_timestamp"
2026-01-19 09:21:46.275227+00
记录时间后删除该表。实际操作中,找到表被删除的确切时间远比示例困难,可能无法获得精确时间,但通过一些取证工作通常能大致确定。
pg-primary ⇒ 删除重要表
sudo -u postgres psql -c "begin; \
drop table important_table; \
commit; \
select * from important_table;"
ERROR: relation "important_table" does not exist
LINE 1: ...le important_table; commit; select * from important_...
^
若选择了错误的备份,恢复到所需时间目标将会失败。为演示这一点,在 important_table 不存在的情况下执行一次增量备份。
pg-primary ⇒ 执行增量备份
sudo -u postgres pgbackrest --stanza= demo --type= incr backup
sudo -u postgres pgbackrest info
[filtered 38 lines of output]
backup reference total: 1 full, 1 diff
incr backup: 20260119-092120F_20260119-092147I
timestamp start/stop: 2026-01-19 09:21:47+00 / 2026-01-19 09:21:48+00
wal start/stop: 00000004000000000000001A / 00000004000000000000001A
[filtered 2 lines of output]
由于 PostgreSQL 只能向前回放 WAL,无法向后回放,因此无法从该备份中恢复丢失的表。
pg-primary ⇒ 尝试从错误的备份中恢复
sudo systemctl stop postgresql-13.service
sudo -u postgres pgbackrest --stanza= demo --delta \
--set= 20260119-092120F_20260119-092147I --target-timeline= current \
--type= time "--target=2026-01-19 09:21:46.275227+00" --target-action= promote restore
sudo systemctl start postgresql-13.service
sudo -u postgres cat /var/lib/pgsql/13/data/log/postgresql.log
[filtered 11 lines of output]
LOG: database system is ready to accept read only connections
LOG: redo done at 0/1A000100
FATAL: recovery ended before configured recovery target was reached
LOG: startup process (PID 3390) exited with exit code 1
LOG: terminating any other active server processes
更可靠的方法是让 pgBackRest 自动选择能够恢复到时间目标的备份,即在指定时间之前完成的那个备份。
注意:
当恢复类型为 xid 或 name 时,pgBackRest 无法自动选择备份,必须手动指定 --set。
pg-primary ⇒ 将 demo 集群恢复至 2026-01-19 09:21:46.275227+00
sudo -u postgres pgbackrest --stanza= demo --delta \
--type= time "--target=2026-01-19 09:21:46.275227+00" \
--target-action= promote restore
sudo -u postgres cat /var/lib/pgsql/13/data/postgresql.auto.conf
[filtered 9 lines of output]
# Recovery settings generated by pgBackRest restore on 2026-01-19 09:21:53
restore_command = 'pgbackrest --stanza=demo archive-get %f "%p"'
recovery_target_time = '2026-01-19 09:21:46.275227+00'
recovery_target_action = 'promote'
pgBackRest 已将恢复设置写入 postgresql.auto.conf,PostgreSQL 可以直接启动。其中 %f 是 PostgreSQL 指定所需 WAL 段名称的占位符,%p 是该段的目标路径。PostgreSQL 完成恢复后,该表将重新存在,可正常查询。
pg-primary ⇒ 启动 PostgreSQL 并验证重要表是否存在
sudo systemctl start postgresql-13.service
sudo -u postgres psql -c "select * from important_table"
message
----------------
Important Data
(1 row)
PostgreSQL 日志中也包含有价值的信息,记录了恢复停止的时间和事务,以及最后应用的事务时间。
pg-primary ⇒ 查看 PostgreSQL 日志输出
sudo -u postgres cat /var/lib/pgsql/13/data/log/postgresql.log
[filtered 5 lines of output]
LOG: database system was interrupted; last known up at 2026-01-19 09:21:35 UTC
LOG: restored log file "00000004.history" from archive
LOG: starting point-in-time recovery to 2026-01-19 09:21:46.275227+00
LOG: restored log file "00000004.history" from archive
LOG: restored log file "000000040000000000000019" from archive
[filtered 2 lines of output]
LOG: consistent recovery state reached at 0/19000100
LOG: database system is ready to accept read only connections
LOG: recovery stopping before commit of transaction 495, time 2026-01-19 09:21:47.553454+00
LOG: redo done at 0/1901E348
LOG: last completed transaction was at log time 2026-01-19 09:21:44.998203+00
LOG: selected new timeline ID: 5
LOG: archive recovery complete
LOG: database system is ready to accept connections
删除 Stanza stanza-delete 命令用于删除仓库中与某个 stanza 关联的全部数据。
警告:
请谨慎使用此命令——它将永久删除 pgBackRest 仓库中指定 stanza 的所有备份和归档,且无法恢复。
删除 stanza 的步骤如下:
关闭与该 stanza 关联的 PostgreSQL 集群(或使用 --force 强制覆盖)。 在将要运行 stanza-delete 命令的主机上执行 stop 命令。 运行 stanza-delete 命令。 命令成功完成后,需手动从所有 pgBackRest 配置文件和/或环境变量中删除该 stanza 的配置。
每次只能从一个仓库中删除 stanza。若要从多个仓库中删除,需指定 --repo 选项,并对每个仓库分别执行一次 stanza-delete。
pg-primary ⇒ 停止待删除的 PostgreSQL 集群
sudo systemctl stop postgresql-13.service
pg-primary ⇒ 停止该 stanza 的 pgBackRest
sudo -u postgres pgbackrest --stanza= demo --log-level-console= info stop
P00 INFO: stop command begin 2.58.0: --exec-id=3691-ad85dcc9 --log-level-console=info --no-log-timestamp --stanza=demo
P00 INFO: stop command end: completed successfully
pg-primary ⇒ 从一个仓库中删除 stanza
sudo -u postgres pgbackrest --stanza= demo --repo= 1 \
--log-level-console= info stanza-delete
P00 INFO: stanza-delete command begin 2.58.0: --exec-id=3718-4fafd9b4 --log-level-console=info --no-log-timestamp --pg1-path=/var/lib/pgsql/13/data --repo=1 --repo1-cipher-pass= --repo1-cipher-type=aes-256-cbc --repo1-path=/var/lib/pgbackrest --stanza=demo
P00 INFO: stanza-delete command end: completed successfully
多仓库 如 S3 兼容对象存储支持
某些命令(如 stanza-createstanza-upgradestanza-delete--repo 选项指定仓库。
注意:仅配置了 repo1 时,--repo 选项不是必需的,这是为了保持向后兼容。但若单个仓库配置为 repo2,则必须指定 --repo,以防止后续添加新仓库时改变命令行为。
archive-push 命令始终将 WAL 推送到所有已配置仓库的归档。某个仓库不可达时,WAL 仍会被推送到其他仓库。但要使此功能有效,必须启用 archive-async=y;否则其他仓库只能比不可达的仓库多存一个 WAL 段。另需注意,若 WAL 无法推送到任何仓库,PostgreSQL 将不会从 pg_wal 目录中删除它,可能导致磁盘空间耗尽。
各仓库的备份需要单独调度,这在多数情况下是合理的,因为不同仓库的备份类型和保留策略可能不同。恢复时同样必须指定仓库,通常建议优先选择延迟较低或成本较低的仓库,哪怕恢复时间更长。只有通过实际恢复测试才能确定哪个仓库效率最高。
Azure 兼容对象存储支持 pgBackRest 支持将仓库存放在 Azure 兼容的对象存储中。容器必须提前创建,pgBackRest 不会自动创建。仓库可以放在容器根目录(/),但通常建议放在子路径下,以便对象存储日志或其他数据也能存放在同一容器中而不产生冲突。
警告:
请勿启用"分层命名空间",否则执行 expire 时会报错。
pg-primary:/etc/pgbackrest/pgbackrest.conf ⇒ 配置 Azure
[demo]
pg1-path = /var/lib/pgsql/13/data
[global]
repo1-block = y
repo1-bundle = y
repo1-cipher-pass = zWaf6XtpjIVZC5444yXB+cgFDFl7MxGlgkZSaoPvTGirhPygu4jOKOXf9LO4vjfO
repo1-cipher-type = aes-256-cbc
repo1-path = /var/lib/pgbackrest
repo1-retention-diff = 2
repo1-retention-full = 2
repo2-azure-account = pgbackrest
repo2-azure-container = demo-container
repo2-azure-key = YXpLZXk=
repo2-path = /demo-repo
repo2-retention-full = 4
repo2-type = azure
start-fast = y
[global:archive-push]
compress-level = 3
若要使用共享访问签名(SAS),将 repo2-azure-key-type 设置为 sas,并将 repo2-azure-key 设置为对应的共享访问签名令牌即可。
命令的运行方式与本地磁盘仓库完全相同。
pg-primary ⇒ 创建 stanza
sudo -u postgres pgbackrest --stanza= demo --log-level-console= info stanza-create
P00 INFO: stanza-create command begin 2.58.0: --exec-id=3889-dc76115c --log-level-console=info --no-log-timestamp --pg1-path=/var/lib/pgsql/13/data --repo2-azure-account= --repo2-azure-container=demo-container --repo2-azure-key= --repo1-cipher-pass= --repo1-cipher-type=aes-256-cbc --repo1-path=/var/lib/pgbackrest --repo2-path=/demo-repo --repo2-type=azure --stanza=demo
P00 INFO: stanza-create for stanza 'demo' on repo1
P00 INFO: stanza-create for stanza 'demo' on repo2
P00 INFO: stanza-create command end: completed successfully
由于在 Azure 中创建文件相对较慢,建议启用 文件打包 backup/restore 的性能。
pg-primary ⇒ 备份 demo 集群
sudo -u postgres pgbackrest --stanza= demo --repo= 2 \
--log-level-console= info backup
P00 INFO: backup command begin 2.58.0: --exec-id=3917-455d2c05 --log-level-console=info --no-log-timestamp --pg1-path=/var/lib/pgsql/13/data --repo=2 --repo2-azure-account= --repo2-azure-container=demo-container --repo2-azure-key= --repo1-block --repo1-bundle --repo1-cipher-pass= --repo1-cipher-type=aes-256-cbc --repo1-path=/var/lib/pgbackrest --repo2-path=/demo-repo --repo1-retention-diff=2 --repo1-retention-full=2 --repo2-retention-full=4 --repo2-type=azure --stanza=demo --start-fast
P00 WARN: no prior backup exists, incr backup has been changed to full
P00 INFO: execute backup start: backup begins after the requested immediate checkpoint completes
P00 INFO: backup start archive = 00000005000000000000001B, lsn = 0/1B000028
[filtered 3 lines of output]
P00 INFO: check archive for segment(s) 00000005000000000000001B:00000005000000000000001B
P00 INFO: new backup label = 20260119-092208F
P00 INFO: full backup size = 30.8MB, file total = 1229
P00 INFO: backup command end: completed successfully
P00 INFO: expire command begin 2.58.0: --exec-id=3917-455d2c05 --log-level-console=info --no-log-timestamp --repo=2 --repo2-azure-account= --repo2-azure-container=demo-container --repo2-azure-key= --repo1-cipher-pass= --repo1-cipher-type=aes-256-cbc --repo1-path=/var/lib/pgbackrest --repo2-path=/demo-repo --repo1-retention-diff=2 --repo1-retention-full=2 --repo2-retention-full=4 --repo2-type=azure --stanza=demo
S3 兼容对象存储支持 pgBackRest 支持将仓库存放在 S3 兼容的对象存储中。存储桶必须提前创建,pgBackRest 不会自动创建。仓库可以放在存储桶根目录(/),但通常建议放在子路径下,以便对象存储日志或其他数据也能存放在同一存储桶中而不产生冲突。
pg-primary:/etc/pgbackrest/pgbackrest.conf ⇒ 配置 S3
[demo]
pg1-path = /var/lib/pgsql/13/data
[global]
repo1-block = y
repo1-bundle = y
repo1-cipher-pass = zWaf6XtpjIVZC5444yXB+cgFDFl7MxGlgkZSaoPvTGirhPygu4jOKOXf9LO4vjfO
repo1-cipher-type = aes-256-cbc
repo1-path = /var/lib/pgbackrest
repo1-retention-diff = 2
repo1-retention-full = 2
repo2-azure-account = pgbackrest
repo2-azure-container = demo-container
repo2-azure-key = YXpLZXk=
repo2-path = /demo-repo
repo2-retention-full = 4
repo2-type = azure
repo3-path = /demo-repo
repo3-retention-full = 4
repo3-s3-bucket = demo-bucket
repo3-s3-endpoint = s3.us-east-1.amazonaws.com
repo3-s3-key = accessKey1
repo3-s3-key-secret = verySecretKey1
repo3-s3-region = us-east-1
repo3-type = s3
start-fast = y
[global:archive-push]
compress-level = 3
注意:
需要将 region 和 endpoint 配置为存储桶所在的区域。此处给出的值适用于 us-east-1 区域。
建议创建专用角色来运行 pgBackRest,并尽可能严格地限制存储桶权限。若该角色与 AWS 实例关联,设置 repo3-s3-key-type=auto 后 pgBackRest 将自动获取临时凭证,无需在 /etc/pgbackrest/pgbackrest.conf 中显式配置密钥。
以下 Amazon S3 策略示例将存储桶和仓库路径的读写权限限制在最小必要范围内。
{
"Version": "2012-10-17",
"Statement": [
{
"Effect": "Allow",
"Action": [
"s3:ListBucket"
],
"Resource": [
"arn:aws:s3:::demo-bucket"
],
"Condition": {
"StringEquals": {
"s3:prefix": [
"",
"demo-repo"
],
"s3:delimiter": [
"/"
]
}
}
},
{
"Effect": "Allow",
"Action": [
"s3:ListBucket"
],
"Resource": [
"arn:aws:s3:::demo-bucket"
],
"Condition": {
"StringLike": {
"s3:prefix": [
"demo-repo/*"
]
}
}
},
{
"Effect": "Allow",
"Action": [
"s3:PutObject",
"s3:PutObjectTagging",
"s3:GetObject",
"s3:GetObjectVersion",
"s3:DeleteObject"
],
"Resource": [
"arn:aws:s3:::demo-bucket/demo-repo/*"
]
}
]
}
命令的运行方式与本地磁盘仓库完全相同。
pg-primary ⇒ 创建 stanza
sudo -u postgres pgbackrest --stanza= demo --log-level-console= info stanza-create
[filtered 4 lines of output]
P00 INFO: stanza 'demo' already exists on repo2 and is valid
P00 INFO: stanza-create for stanza 'demo' on repo3
P00 INFO: stanza-create command end: completed successfully
由于在 S3 中创建文件相对较慢,建议启用 文件打包 backup/restore 的性能。
pg-primary ⇒ 备份 demo 集群
sudo -u postgres pgbackrest --stanza= demo --repo= 3 \
--log-level-console= info backup
P00 INFO: backup command begin 2.58.0: --exec-id=4045-563092b9 --log-level-console=info --no-log-timestamp --pg1-path=/var/lib/pgsql/13/data --repo=3 --repo2-azure-account= --repo2-azure-container=demo-container --repo2-azure-key= --repo1-block --repo1-bundle --repo1-cipher-pass= --repo1-cipher-type=aes-256-cbc --repo1-path=/var/lib/pgbackrest --repo2-path=/demo-repo --repo3-path=/demo-repo --repo1-retention-diff=2 --repo1-retention-full=2 --repo2-retention-full=4 --repo3-retention-full=4 --repo3-s3-bucket=demo-bucket --repo3-s3-endpoint=s3.us-east-1.amazonaws.com --repo3-s3-key= --repo3-s3-key-secret= --repo3-s3-region=us-east-1 --repo2-type=azure --repo3-type=s3 --stanza=demo --start-fast
P00 WARN: no prior backup exists, incr backup has been changed to full
P00 INFO: execute backup start: backup begins after the requested immediate checkpoint completes
P00 INFO: backup start archive = 00000005000000000000001C, lsn = 0/1C000028
[filtered 3 lines of output]
P00 INFO: check archive for segment(s) 00000005000000000000001C:00000005000000000000001D
P00 INFO: new backup label = 20260119-092215F
P00 INFO: full backup size = 30.8MB, file total = 1229
P00 INFO: backup command end: completed successfully
P00 INFO: expire command begin 2.58.0: --exec-id=4045-563092b9 --log-level-console=info --no-log-timestamp --repo=3 --repo2-azure-account= --repo2-azure-container=demo-container --repo2-azure-key= --repo1-cipher-pass= --repo1-cipher-type=aes-256-cbc --repo1-path=/var/lib/pgbackrest --repo2-path=/demo-repo --repo3-path=/demo-repo --repo1-retention-diff=2 --repo1-retention-full=2 --repo2-retention-full=4 --repo3-retention-full=4 --repo3-s3-bucket=demo-bucket --repo3-s3-endpoint=s3.us-east-1.amazonaws.com --repo3-s3-key= --repo3-s3-key-secret= --repo3-s3-region=us-east-1 --repo2-type=azure --repo3-type=s3 --stanza=demo
SFTP 支持 pgBackRest 支持将仓库存储在 SFTP 主机上。SFTP 文件传输相对较慢,因此建议通过增大 process-max 来并行化文件传输,以提升命令性能。
pg-primary:/etc/pgbackrest/pgbackrest.conf ⇒ 配置 SFTP
[demo]
pg1-path = /var/lib/pgsql/13/data
[global]
process-max = 4
repo1-block = y
repo1-bundle = y
repo1-cipher-pass = zWaf6XtpjIVZC5444yXB+cgFDFl7MxGlgkZSaoPvTGirhPygu4jOKOXf9LO4vjfO
repo1-cipher-type = aes-256-cbc
repo1-path = /var/lib/pgbackrest
repo1-retention-diff = 2
repo1-retention-full = 2
repo2-azure-account = pgbackrest
repo2-azure-container = demo-container
repo2-azure-key = YXpLZXk=
repo2-path = /demo-repo
repo2-retention-full = 4
repo2-type = azure
repo3-path = /demo-repo
repo3-retention-full = 4
repo3-s3-bucket = demo-bucket
repo3-s3-endpoint = s3.us-east-1.amazonaws.com
repo3-s3-key = accessKey1
repo3-s3-key-secret = verySecretKey1
repo3-s3-region = us-east-1
repo3-type = s3
repo4-bundle = y
repo4-path = /demo-repo
repo4-sftp-host = sftp-server
repo4-sftp-host-key-hash-type = sha1
repo4-sftp-host-user = pgbackrest
repo4-sftp-private-key-file = /var/lib/pgsql/.ssh/id_rsa_sftp
repo4-sftp-public-key-file = /var/lib/pgsql/.ssh/id_rsa_sftp.pub
repo4-type = sftp
start-fast = y
[global:archive-push]
compress-level = 3
使用 SFTP 时,若 libssh2 基于 OpenSSH 编译,则 repo4-sftp-public-key-file 为可选项。
pg-primary ⇒ 为 SFTP 备份生成 SSH 密钥对
sudo -u postgres mkdir -m 750 -p /var/lib/pgsql/.ssh
sudo -u postgres ssh-keygen -f /var/lib/pgsql/.ssh/id_rsa_sftp \
-t rsa -b 4096 -N "" -m PEM
sftp-server ⇒ 将 pg-primary 的 SFTP 备份公钥复制到 sftp-server
sudo -u pgbackrest mkdir -m 750 -p /home/pgbackrest/.ssh
( sudo ssh root@pg-primary cat /var/lib/pgsql/.ssh/id_rsa_sftp.pub) | \
sudo -u pgbackrest tee -a /home/pgbackrest/.ssh/authorized_keys
命令的运行方式与本地磁盘仓库完全相同。
pg-primary ⇒ 将 sftp-server 的指纹添加到 known_hosts(repo4-sftp-host-key-check-type 默认为 strict)
ssh-keyscan -H sftp-server >> /var/lib/pgsql/.ssh/known_hosts 2>/dev/null
pg-primary ⇒ 创建 stanza
sudo -u postgres pgbackrest --stanza= demo --log-level-console= info stanza-create
[filtered 6 lines of output]
P00 INFO: stanza 'demo' already exists on repo3 and is valid
P00 INFO: stanza-create for stanza 'demo' on repo4
P00 INFO: stanza-create command end: completed successfully
pg-primary ⇒ 备份 demo 集群
sudo -u postgres pgbackrest --stanza= demo --repo= 4 \
--log-level-console= info backup
P00 INFO: backup command begin 2.58.0: --exec-id=4286-e118cc78 --log-level-console=info --no-log-timestamp --pg1-path=/var/lib/pgsql/13/data --process-max=4 --repo=4 --repo2-azure-account= --repo2-azure-container=demo-container --repo2-azure-key= --repo1-block --repo1-bundle --repo4-bundle --repo1-cipher-pass= --repo1-cipher-type=aes-256-cbc --repo1-path=/var/lib/pgbackrest --repo2-path=/demo-repo --repo3-path=/demo-repo --repo4-path=/demo-repo --repo1-retention-diff=2 --repo1-retention-full=2 --repo2-retention-full=4 --repo3-retention-full=4 --repo3-s3-bucket=demo-bucket --repo3-s3-endpoint=s3.us-east-1.amazonaws.com --repo3-s3-key= --repo3-s3-key-secret= --repo3-s3-region=us-east-1 --repo4-sftp-host=sftp-server --repo4-sftp-host-key-hash-type=sha1 --repo4-sftp-host-user=pgbackrest --repo4-sftp-private-key-file=/var/lib/pgsql/.ssh/id_rsa_sftp --repo4-sftp-public-key-file=/var/lib/pgsql/.ssh/id_rsa_sftp.pub --repo2-type=azure --repo3-type=s3 --repo4-type=sftp --stanza=demo --start-fast
P00 WARN: option 'repo4-retention-full' is not set for 'repo4-retention-full-type=count', the repository may run out of space
HINT: to retain full backups indefinitely (without warning), set option 'repo4-retention-full' to the maximum.
P00 WARN: no prior backup exists, incr backup has been changed to full
P00 INFO: execute backup start: backup begins after the requested immediate checkpoint completes
P00 INFO: backup start archive = 00000005000000000000001E, lsn = 0/1E000028
[filtered 3 lines of output]
P00 INFO: check archive for segment(s) 00000005000000000000001E:00000005000000000000001F
P00 INFO: new backup label = 20260119-092223F
P00 INFO: full backup size = 30.8MB, file total = 1229
P00 INFO: backup command end: completed successfully
P00 INFO: expire command begin 2.58.0: --exec-id=4286-e118cc78 --log-level-console=info --no-log-timestamp --repo=4 --repo2-azure-account= --repo2-azure-container=demo-container --repo2-azure-key= --repo1-cipher-pass= --repo1-cipher-type=aes-256-cbc --repo1-path=/var/lib/pgbackrest --repo2-path=/demo-repo --repo3-path=/demo-repo --repo4-path=/demo-repo --repo1-retention-diff=2 --repo1-retention-full=2 --repo2-retention-full=4 --repo3-retention-full=4 --repo3-s3-bucket=demo-bucket --repo3-s3-endpoint=s3.us-east-1.amazonaws.com --repo3-s3-key= --repo3-s3-key-secret= --repo3-s3-region=us-east-1 --repo4-sftp-host=sftp-server --repo4-sftp-host-key-hash-type=sha1 --repo4-sftp-host-user=pgbackrest --repo4-sftp-private-key-file=/var/lib/pgsql/.ssh/id_rsa_sftp --repo4-sftp-public-key-file=/var/lib/pgsql/.ssh/id_rsa_sftp.pub --repo2-type=azure --repo3-type=s3 --repo4-type=sftp --stanza=demo
P00 INFO: expire command end: completed successfully
GCS 兼容对象存储支持 pgBackRest 支持将仓库存储在 GCS 兼容的对象存储中。存储桶必须提前创建,pgBackRest 不会自动创建。仓库可以放在存储桶根目录(/),但通常建议放在子路径下,以便对象存储日志或其他数据也能存放在同一存储桶中而不产生冲突。
pg-primary:/etc/pgbackrest/pgbackrest.conf ⇒ 配置 GCS
[demo]
pg1-path = /var/lib/pgsql/13/data
[global]
process-max = 4
repo1-block = y
repo1-bundle = y
repo1-cipher-pass = zWaf6XtpjIVZC5444yXB+cgFDFl7MxGlgkZSaoPvTGirhPygu4jOKOXf9LO4vjfO
repo1-cipher-type = aes-256-cbc
repo1-path = /var/lib/pgbackrest
repo1-retention-diff = 2
repo1-retention-full = 2
repo2-azure-account = pgbackrest
repo2-azure-container = demo-container
repo2-azure-key = YXpLZXk=
repo2-path = /demo-repo
repo2-retention-full = 4
repo2-type = azure
repo3-path = /demo-repo
repo3-retention-full = 4
repo3-s3-bucket = demo-bucket
repo3-s3-endpoint = s3.us-east-1.amazonaws.com
repo3-s3-key = accessKey1
repo3-s3-key-secret = verySecretKey1
repo3-s3-region = us-east-1
repo3-type = s3
repo4-bundle = y
repo4-path = /demo-repo
repo4-sftp-host = sftp-server
repo4-sftp-host-key-hash-type = sha1
repo4-sftp-host-user = pgbackrest
repo4-sftp-private-key-file = /var/lib/pgsql/.ssh/id_rsa_sftp
repo4-sftp-public-key-file = /var/lib/pgsql/.ssh/id_rsa_sftp.pub
repo4-type = sftp
repo5-gcs-bucket = demo-bucket
repo5-gcs-key = /etc/pgbackrest/gcs-key.json
repo5-path = /demo-repo
repo5-type = gcs
start-fast = y
[global:archive-push]
compress-level = 3
在 GCE 中运行时,设置 repo5-gcs-key-type=auto 可利用实例服务账号自动完成身份验证。
命令的运行方式与本地磁盘仓库完全相同。
GCS 中的文件创建速度相对较慢,建议启用 文件打包 backup/restore 的性能。
仓库目标时间 目标时间(repo target time)定义了命令读取版本化存储上仓库时所用的历史时间点。通过指定目标时间,命令可以查看仓库在某个历史时刻的状态,从而恢复因用户误操作或恶意软件导致被删除或损坏的数据。
版本化存储受 S3、GCS 和 Azure 支持,但通常默认未启用。除了启用版本控制之外,还可以考虑为 S3 启用对象锁定(object locking),为 GCS 或 Azure 启用软删除(soft delete)。
指定 repo-target-time 时,必须同时提供 --repo 选项。由于并非所有仓库类型都支持版本控制,针对单个仓库进行恢复是合理的做法。
注意:时间戳比较使用 <= 逻辑(即小于等于所提供的时间戳),且所提供时间戳的毫秒部分会被截断。
为演示此功能,将删除 S3 仓库中 demo stanza 的数据。
pg-primary ⇒ 删除 S3 仓库中的 stanza
sudo systemctl stop postgresql-13.service
sudo -u postgres pgbackrest --stanza= demo stop
sudo -u postgres pgbackrest --stanza= demo --repo= 3 stanza-delete
stanza 删除后,info 命令将显示仓库处于错误状态。
pg-primary ⇒ info 命令报错
sudo -u postgres pgbackrest --stanza= demo --repo= 3 info
stanza: demo
status: error (missing stanza data)
cipher: none
由于存储是版本化的,仍可查看 stanza 被删除之前某个时间点的仓库状态。确定合适的目标时间可能有些棘手,本例中可通过查找 backup.info 被删除的时间来确定。
s3-server ⇒ 使用 mc 列出存储桶中 backup.info 的版本信息
mc ls --versions s3/demo-bucket/demo-repo/backup/demo/backup.info
[2026-01-19 09:22:30 UTC] 0B STANDARD 7933eae9-2226-4dc3-aa14-02cc52e0fb4f v3 DEL backup.info
[2026-01-19 09:22:20 UTC] 1.0KiB STANDARD 78f325bc-a340-4c8b-b423-8409b3a1cc91 v2 PUT backup.info
[2026-01-19 09:22:15 UTC] 372B STANDARD 6e6603b7-b30b-4aab-a3ef-42f95184034a v1 PUT backup.info
[2026-01-19 09:22:30 UTC] 0B STANDARD fa5ded47-c1e2-4672-b5d9-2874e4841d91 v3 DEL backup.info.copy
[2026-01-19 09:22:20 UTC] 1.0KiB STANDARD 69453b85-7d97-4e61-81d0-d8a3ad6cfea6 v2 PUT backup.info.copy
现在可以使用目标时间运行 info 命令,查看 stanza 被删除之前的仓库状态。
pg-primary ⇒ 带目标时间的 info 命令
sudo -u postgres pgbackrest --stanza= demo --repo= 3 \
--repo-target-time= "2026-01-19 09:22:20+00" info
[filtered 5 lines of output]
wal archive min/max (13): 00000005000000000000001C/00000005000000000000001D
full backup: 20260119-092215F
timestamp start/stop: 2026-01-19 09:22:15+00 / 2026-01-19 09:22:20+00
wal start/stop: 00000005000000000000001C / 00000005000000000000001D
repo3: backup set size: 3.8MB, backup size: 3.8MB
若 info 命令显示了所需的备份,便可使用相同的目标时间进行恢复。
pg-primary ⇒ 带目标时间的 restore 命令
sudo -u postgres pgbackrest --stanza= demo --repo= 3 --delta \
--repo-target-time= "2026-01-19 09:22:20+00" --log-level-console= info restore
P00 INFO: restore command begin 2.58.0: --delta --exec-id=4527-3f625708 --log-level-console=info --no-log-timestamp --pg1-path=/var/lib/pgsql/13/data --process-max=4 --repo=3 --repo2-azure-account= --repo2-azure-container=demo-container --repo2-azure-key= --repo1-cipher-pass= --repo1-cipher-type=aes-256-cbc --repo5-gcs-bucket=demo-bucket --repo5-gcs-key= --repo1-path=/var/lib/pgbackrest --repo2-path=/demo-repo --repo3-path=/demo-repo --repo4-path=/demo-repo --repo5-path=/demo-repo --repo3-s3-bucket=demo-bucket --repo3-s3-endpoint=s3.us-east-1.amazonaws.com --repo3-s3-key= --repo3-s3-key-secret= --repo3-s3-region=us-east-1 --repo4-sftp-host=sftp-server --repo4-sftp-host-key-hash-type=sha1 --repo4-sftp-host-user=pgbackrest --repo4-sftp-private-key-file=/var/lib/pgsql/.ssh/id_rsa_sftp --repo4-sftp-public-key-file=/var/lib/pgsql/.ssh/id_rsa_sftp.pub --repo-target-time="2026-01-19 09:22:20+00" --repo2-type=azure --repo3-type=s3 --repo4-type=sftp --repo5-type=gcs --stanza=demo
P00 INFO: repo3: restore backup set 20260119-092215F, recovery will start at 2026-01-19 09:22:15
P00 INFO: remove invalid files/links/paths from '/var/lib/pgsql/13/data'
P00 INFO: write updated /var/lib/pgsql/13/data/postgresql.auto.conf
[filtered 2 lines of output]
sudo systemctl start postgresql-13.service
专用仓库主机 快速开始
在 PostgreSQL 主机上,pg1-path 必须是本地集群的数据目录路径,且不应配置 pg1-host。在仓库主机上配置 pgBackRest 时,必须通过 pg-host 选项指定主库和备库(如有)的连接信息。仓库主机是唯一需要感知多个 PostgreSQL 主机的节点。配置顺序无关紧要,pg1-path/pg1-host、pg2-path/pg2-host 可以分别对应主库或备库。
安装 创建一台名为 repository 的新主机,用于存储集群备份。
注意:
仓库主机上安装的 pgBackRest 版本必须与 PostgreSQL 主机上安装的版本完全一致。
创建专用的 pgbackrest 用户来管理仓库。仓库可以由任何用户管理,但建议不要使用 postgres(若存在),以避免混淆。
repository ⇒ 创建 pgbackrest 用户
sudo groupadd pgbackrest
sudo adduser -gpgbackrest -n pgbackrest
推荐通过软件包安装 pgBackRest,而非从源码编译。通过软件包安装时,本节后续步骤通常不需要手动执行,但某些软件包可能会跳过创建目录或权限设置有误。遇到这种情况,手动创建目录或更新权限即可。
RHEL 平台的 pgBackRest 软件包可在 yum.postgresql.org 获取。
如果所用发行版/版本没有提供软件包,可以 编译构建
repository ⇒ 安装依赖
sudo yum install postgresql-libs libssh2
repository ⇒ 从构建主机复制 pgBackRest 二进制文件
sudo scp build:/build/pgbackrest/src/pgbackrest /usr/bin
sudo chmod 755 /usr/bin/pgbackrest
pgBackRest 需要日志目录、配置目录以及配置文件。
repository ⇒ 创建 pgBackRest 配置文件和目录
sudo mkdir -p -m 770 /var/log/pgbackrest
sudo chown pgbackrest:pgbackrest /var/log/pgbackrest
sudo mkdir -p /etc/pgbackrest
sudo mkdir -p /etc/pgbackrest/conf.d
sudo touch /etc/pgbackrest/pgbackrest.conf
sudo chmod 640 /etc/pgbackrest/pgbackrest.conf
sudo chown pgbackrest:pgbackrest /etc/pgbackrest/pgbackrest.conf
repository ⇒ 创建 pgBackRest 仓库
sudo mkdir -p /var/lib/pgbackrest
sudo chmod 750 /var/lib/pgbackrest
sudo chown pgbackrest:pgbackrest /var/lib/pgbackrest
配置 pgBackRest 可以使用 TLS 客户端证书实现主机间通信,也可以使用 SSH,请参见 配置免密 SSH
pgBackRest 期望客户端/服务器证书的生成方式与 PostgreSQL 相同。有关证书生成的详细说明,请参见 PostgreSQL 文档中的 使用 TLS 的安全 TCP/IP 连接
仓库主机必须配置 pg-primary 的主机/用户和数据库路径。主库将配置为 pg1,以便后续可以添加备库。
repository:/etc/pgbackrest/pgbackrest.conf ⇒ 配置 pg1-host/pg1-host-user 和 pg1-path
[demo]
pg1-host = pg-primary
pg1-host-ca-file = /etc/pgbackrest/cert/ca.crt
pg1-host-cert-file = /etc/pgbackrest/cert/client.crt
pg1-host-key-file = /etc/pgbackrest/cert/client.key
pg1-host-type = tls
pg1-path = /var/lib/pgsql/13/data
[global]
repo1-path = /var/lib/pgbackrest
repo1-retention-full = 2
start-fast = y
tls-server-address = *
tls-server-auth = pgbackrest-client=*
tls-server-ca-file = /etc/pgbackrest/cert/ca.crt
tls-server-cert-file = /etc/pgbackrest/cert/server.crt
tls-server-key-file = /etc/pgbackrest/cert/server.key
数据库主机需要配置仓库主机/用户信息。repo1-host-user 选项的默认值为 pgbackrest。若 postgres 用户需要在仓库主机上执行恢复,最好不要同时允许其执行备份。不过,若 postgres 用户与 pgbackrest 用户属于同一用户组,则可以直接读取仓库。
pg-primary:/etc/pgbackrest/pgbackrest.conf ⇒ 配置 repo1-host/repo1-host-user
[demo]
pg1-path = /var/lib/pgsql/13/data
[global]
log-level-file = detail
repo1-host = repository
repo1-host-ca-file = /etc/pgbackrest/cert/ca.crt
repo1-host-cert-file = /etc/pgbackrest/cert/client.crt
repo1-host-key-file = /etc/pgbackrest/cert/client.key
repo1-host-type = tls
tls-server-address = *
tls-server-auth = pgbackrest-client=demo
tls-server-ca-file = /etc/pgbackrest/cert/ca.crt
tls-server-cert-file = /etc/pgbackrest/cert/server.crt
tls-server-key-file = /etc/pgbackrest/cert/server.key
PostgreSQL 的归档配置请参见 配置归档
命令的运行方式与单主机配置相同,但 backup 和 expire 等命令需要在仓库主机上运行,而非数据库主机上。
配置 TLS 服务器 pgBackRest TLS 服务器必须在每台主机上进行配置并启动。
repository ⇒ 配置 pgBackRest 服务器
sudo cat /etc/systemd/system/pgbackrest.service
[Unit]
Description = pgBackRest Server
After = network.target
StartLimitIntervalSec = 0
[Service]
Type = simple
Restart = always
RestartSec = 1
User = pgbackrest
ExecStart = /usr/bin/pgbackrest server
ExecStartPost = /bin/sleep 3
ExecStartPost = /bin/bash -c "[ ! -z $MAINPID ]"
ExecReload = /bin/kill -HUP $MAINPID
[Install]
WantedBy = multi-user.target
sudo systemctl enable pgbackrest
sudo systemctl start pgbackrest
pg-primary ⇒ 配置 pgBackRest 服务器
sudo cat /etc/systemd/system/pgbackrest.service
[Unit]
Description = pgBackRest Server
After = network.target
StartLimitIntervalSec = 0
[Service]
Type = simple
Restart = always
RestartSec = 1
User = postgres
ExecStart = /usr/bin/pgbackrest server
ExecStartPost = /bin/sleep 3
ExecStartPost = /bin/bash -c "[ ! -z $MAINPID ]"
ExecReload = /bin/kill -HUP $MAINPID
[Install]
WantedBy = multi-user.target
sudo systemctl enable pgbackrest
sudo systemctl start pgbackrest
创建并检查 Stanza 在新仓库中创建 stanza。
repository ⇒ 创建 stanza
sudo -u pgbackrest pgbackrest --stanza= demo stanza-create
在数据库主机和仓库主机上分别验证配置是否正确。关于 check 命令的更多信息,请参见 检查配置
pg-primary ⇒ 检查配置
sudo -u postgres pgbackrest --stanza= demo check
repository ⇒ 检查配置
sudo -u pgbackrest pgbackrest --stanza= demo check
执行备份 在仓库主机上运行 pgBackRest 的 backup 命令,对 PostgreSQL 集群执行备份。
repository ⇒ 备份 demo 集群
sudo -u pgbackrest pgbackrest --stanza= demo backup
P00 WARN: no prior backup exists, incr backup has been changed to full
由于仓库主机上为新仓库,因此出现增量备份自动变更为全量备份的警告。
恢复备份 在数据库主机上运行 restore 命令,对 PostgreSQL 集群执行恢复。
pg-primary ⇒ 停止 demo 集群、执行恢复并重启 PostgreSQL
sudo systemctl stop postgresql-13.service
sudo -u postgres pgbackrest --stanza= demo --delta restore
sudo systemctl start postgresql-13.service
并行备份与恢复 pgBackRest 提供并行处理功能,可提升压缩和传输的性能。通过 --process-max 选项设置并发进程数。
对于 backup 命令,通常建议不超过可用 CPU 数量的 25%。备份只要定期执行即可,速度不需要很快,且备份过程应尽量不影响数据库性能。
restore 命令可以也应该使用所有可用的 CPU——恢复期间 PostgreSQL 已关闭,主机上通常没有其他重要工作在运行。若主机上有多个集群,设置恢复并行度时需相应考虑。
repository ⇒ 使用单进程执行备份
sudo -u pgbackrest pgbackrest --stanza= demo --type= full backup
repository:/etc/pgbackrest/pgbackrest.conf ⇒ 配置 pgBackRest 使用多个 backup 进程
[demo]
pg1-host = pg-primary
pg1-host-ca-file = /etc/pgbackrest/cert/ca.crt
pg1-host-cert-file = /etc/pgbackrest/cert/client.crt
pg1-host-key-file = /etc/pgbackrest/cert/client.key
pg1-host-type = tls
pg1-path = /var/lib/pgsql/13/data
[global]
process-max = 3
repo1-path = /var/lib/pgbackrest
repo1-retention-full = 2
start-fast = y
tls-server-address = *
tls-server-auth = pgbackrest-client=*
tls-server-ca-file = /etc/pgbackrest/cert/ca.crt
tls-server-cert-file = /etc/pgbackrest/cert/server.crt
tls-server-key-file = /etc/pgbackrest/cert/server.key
repository ⇒ 使用多进程执行备份
sudo -u pgbackrest pgbackrest --stanza= demo --type= full backup
repository ⇒ 获取 demo 集群的备份信息
sudo -u pgbackrest pgbackrest info
stanza: demo
status: ok
cipher: none
db (current)
wal archive min/max (13): 000000070000000000000023/000000070000000000000025
full backup: 20260119-092306F
timestamp start/stop: 2026-01-19 09:23:06+00 / 2026-01-19 09:23:08+00
wal start/stop: 000000070000000000000023 / 000000070000000000000023
database size: 30.8MB, database backup size: 30.8MB
repo1: backup set size: 3.8MB, backup size: 3.8MB
full backup: 20260119-092309F
timestamp start/stop: 2026-01-19 09:23:09+00 / 2026-01-19 09:23:11+00
wal start/stop: 000000070000000000000024 / 000000070000000000000025
database size: 30.8MB, database backup size: 30.8MB
repo1: backup set size: 3.8MB, backup size: 3.8MB
与单进程备份相比,多进程应能提升最后一次备份的速度。对于极小的备份,差距可能不明显,但随着数据库规模增大,节省的时间也会相应增加。
启动与停止 若备库被提升用于测试,或测试集群从生产备份恢复,最好阻止这些集群向 pgBackRest 仓库写入数据,stop 命令可以实现这一点。
会写入数据且受 stop 约束的命令包括:archive-push、backup、expire、stanza-create 和 stanza-upgrade。stanza-delete 是例外,详见 删除 Stanza
pg-primary ⇒ 停止 pgBackRest 写入命令
sudo -u postgres pgbackrest stop
新的 pgBackRest 写入命令将不再运行。
repository ⇒ 尝试执行备份
sudo -u pgbackrest pgbackrest --stanza= demo backup
P00 WARN: unable to check pg1: [StopError] raised from remote-0 tls protocol on 'pg-primary': stop file exists for all stanzas
P00 ERROR: [056]: unable to find primary cluster - cannot proceed
HINT: are all available clusters in recovery?
指定 --force 选项可以终止当前正在运行的 pgBackRest 写入命令,包括异步 archive-get(但若 PostgreSQL 需要,它会再次启动)。若 pgBackRest 已处于停止状态,再次执行 stop 会产生警告。
pg-primary ⇒ 再次停止 pgBackRest 服务
sudo -u postgres pgbackrest stop
P00 WARN: stop file already exists for all stanzas
使用 start 命令恢复 pgBackRest 写入命令。停止前正在进行的写入命令不会自动重新启动,但之后允许重新运行。
pg-primary ⇒ 启动 pgBackRest 写入命令
sudo -u postgres pgbackrest start
也可以仅停止某个特定 stanza 的 pgBackRest 写入命令。
pg-primary ⇒ 停止 demo stanza 的 pgBackRest 写入命令
sudo -u postgres pgbackrest --stanza= demo stop
指定 stanza 的新 pgBackRest 写入命令将不再运行。
repository ⇒ 尝试执行备份
sudo -u pgbackrest pgbackrest --stanza= demo backup
P00 WARN: unable to check pg1: [StopError] raised from remote-0 tls protocol on 'pg-primary': stop file exists for stanza demo
P00 ERROR: [056]: unable to find primary cluster - cannot proceed
HINT: are all available clusters in recovery?
针对单个 stanza 启动时,同样必须指定该 stanza。
pg-primary ⇒ 启动 demo stanza 的 pgBackRest 写入命令
sudo -u postgres pgbackrest --stanza= demo start
复制 复制允许从单个主库派生出多个 PostgreSQL 集群副本(备库),用于分担读取负载,并在主库故障时提供冗余。
安装 创建一台名为 pg-standby 的新主机来运行备库。
推荐通过软件包安装 pgBackRest,而非从源码编译。通过软件包安装时,本节后续步骤通常不需要手动执行,但某些软件包可能会跳过创建目录或权限设置有误。遇到这种情况,手动创建目录或更新权限即可。
RHEL 平台的 pgBackRest 软件包可在 yum.postgresql.org 获取。
如果所用发行版/版本没有提供软件包,可以 编译构建
pg-standby ⇒ 安装依赖
sudo yum install postgresql-libs libssh2
pg-standby ⇒ 从构建主机复制 pgBackRest 二进制文件
sudo scp build:/build/pgbackrest/src/pgbackrest /usr/bin
sudo chmod 755 /usr/bin/pgbackrest
pgBackRest 需要日志目录、配置目录以及配置文件。
pg-standby ⇒ 创建 pgBackRest 配置文件和目录
sudo mkdir -p -m 770 /var/log/pgbackrest
sudo chown postgres:postgres /var/log/pgbackrest
sudo mkdir -p /etc/pgbackrest
sudo mkdir -p /etc/pgbackrest/conf.d
sudo touch /etc/pgbackrest/pgbackrest.conf
sudo chmod 640 /etc/pgbackrest/pgbackrest.conf
sudo chown postgres:postgres /etc/pgbackrest/pgbackrest.conf
热备库 热备库通过 WAL 归档进行复制,并允许只读查询。
备库上的 pgBackRest 配置与 pg-primary 非常相似,区别在于使用 standby 恢复类型,使集群在到达 WAL 流末尾时保持在恢复模式而不切换为主库。
pg-standby:/etc/pgbackrest/pgbackrest.conf ⇒ 在备库上配置 pgBackRest
[demo]
pg1-path = /var/lib/pgsql/13/data
[global]
log-level-file = detail
repo1-host = repository
repo1-host-ca-file = /etc/pgbackrest/cert/ca.crt
repo1-host-cert-file = /etc/pgbackrest/cert/client.crt
repo1-host-key-file = /etc/pgbackrest/cert/client.key
repo1-host-type = tls
tls-server-address = *
tls-server-auth = pgbackrest-client=demo
tls-server-ca-file = /etc/pgbackrest/cert/ca.crt
tls-server-cert-file = /etc/pgbackrest/cert/server.crt
tls-server-key-file = /etc/pgbackrest/cert/server.key
pg-standby ⇒ 配置 pgBackRest 服务器
sudo cat /etc/systemd/system/pgbackrest.service
[Unit]
Description = pgBackRest Server
After = network.target
StartLimitIntervalSec = 0
[Service]
Type = simple
Restart = always
RestartSec = 1
User = postgres
ExecStart = /usr/bin/pgbackrest server
ExecStartPost = /bin/sleep 3
ExecStartPost = /bin/bash -c "[ ! -z $MAINPID ]"
ExecReload = /bin/kill -HUP $MAINPID
[Install]
WantedBy = multi-user.target
sudo systemctl enable pgbackrest
sudo systemctl start pgbackrest
创建 PostgreSQL 将要恢复到的路径。
pg-standby ⇒ 创建 PostgreSQL 路径
sudo -u postgres mkdir -p -m 700 /var/lib/pgsql/13/data
现在可以使用 restore 命令创建备库。
重要提示:
如果集群被提升后不会成为新主库(例如用于报表或测试),请使用 --archive-mode=off 或在 postgresql.conf 中设置 archive_mode=off 来禁用归档。若不禁用归档,仓库中可能积累大量无用 WAL,使后续恢复更加困难。
pg-standby ⇒ 恢复 demo 备库集群
sudo -u postgres pgbackrest --stanza= demo --type= standby restore
sudo -u postgres cat /var/lib/pgsql/13/data/postgresql.auto.conf
# Do not edit this file manually!
# It will be overwritten by the ALTER SYSTEM command.
# Recovery settings generated by pgBackRest restore on 2026-01-19 09:21:08
restore_command = 'pgbackrest --stanza=demo archive-get %f "%p"'
# Recovery settings generated by pgBackRest restore on 2026-01-19 09:21:29
restore_command = 'pgbackrest --stanza=demo archive-get %f "%p"'
# Recovery settings generated by pgBackRest restore on 2026-01-19 09:21:53
restore_command = 'pgbackrest --stanza=demo archive-get %f "%p"'
# Removed by pgBackRest restore on 2026-01-19 09:22:32 # recovery_target_time = '2026-01-19 09:21:46.275227+00'
# Removed by pgBackRest restore on 2026-01-19 09:22:32 # recovery_target_action = 'promote'
# Recovery settings generated by pgBackRest restore on 2026-01-19 09:22:32
restore_command = 'pgbackrest --repo=3 --repo-target-time="2026-01-19 09:22:20+00" --stanza=demo archive-get %f "%p"'
# Recovery settings generated by pgBackRest restore on 2026-01-19 09:23:01
restore_command = 'pgbackrest --stanza=demo archive-get %f "%p"'
# Recovery settings generated by pgBackRest restore on 2026-01-19 09:23:27
restore_command = 'pgbackrest --stanza=demo archive-get %f "%p"'
启动 PostgreSQL 之前,必须启用 hot_standby 设置,以允许在 pg-standby 上建立只读连接,否则连接请求将被拒绝。其余配置是为备库日后晋升为主库做准备。
pg-standby:/var/lib/pgsql/13/data/postgresql.conf ⇒ 配置 PostgreSQL
archive_command = 'pgbackrest --stanza=demo archive-push %p'
archive_mode = on
hot_standby = on
log_filename = 'postgresql.log'
pg-standby ⇒ 启动 PostgreSQL
sudo systemctl start postgresql-13.service
PostgreSQL 日志提供了关于恢复的重要信息。特别注意集群已进入备库模式并准备好接受只读连接。
pg-standby ⇒ 检查 PostgreSQL 日志中表示成功的日志消息
sudo -u postgres cat /var/lib/pgsql/13/data/log/postgresql.log
[filtered 4 lines of output]
LOG: listening on Unix socket "/tmp/.s.PGSQL.5432"
LOG: database system was interrupted; last known up at 2026-01-19 09:23:09 UTC
LOG: entering standby mode
LOG: restored log file "00000007.history" from archive
LOG: restored log file "000000070000000000000024" from archive
LOG: redo starts at 0/24000028
LOG: restored log file "000000070000000000000025" from archive
LOG: consistent recovery state reached at 0/25000050
LOG: database system is ready to accept read only connections
验证复制是否配置正确,最简单的方法是在 pg-primary 上创建一张表。
pg-primary ⇒ 在主库上创建新表
sudo -u postgres psql -c " \
begin; \
create table replicated_table (message text); \
insert into replicated_table values ('Important Data'); \
commit; \
select * from replicated_table" ;
message
----------------
Important Data
(1 row)
然后在 pg-standby 上查询同一张表。
pg-standby ⇒ 在备库上查询新表
sudo -u postgres psql -c "select * from replicated_table;"
ERROR: relation "replicated_table" does not exist
LINE 1: select * from replicated_table;
^
这是为什么?由于 PostgreSQL 通过从归档拉取 WAL 段来执行复制,包含这些变更的 WAL 段还未从 pg-primary 推送过来,备库自然看不到这些变更。
手动调用 pg_switch_wal() 可以解决这个问题,该函数会将当前 WAL 段推送到归档(并创建新 WAL 段以存放后续变更)。
pg-primary ⇒ 调用 pg_switch_wal()
sudo -u postgres psql -c "select *, current_timestamp from pg_switch_wal()" ;
pg_switch_wal | current_timestamp
---------------+-------------------------------
0/26017738 | 2026-01-19 09:23:33.308165+00
(1 row)
稍等片刻,该表就会出现在 pg-standby 上。
pg-standby ⇒ 新表现在已出现在备库上(可能需要重试几次)
sudo -u postgres psql -c " \
select *, current_timestamp from replicated_table"
message | current_timestamp
----------------+-------------------------------
Important Data | 2026-01-19 09:23:34.570736+00
(1 row)
检查备库配置对仓库的访问权限。
pg-standby ⇒ 检查配置
sudo -u postgres pgbackrest --stanza= demo --log-level-console= info check
P00 INFO: check command begin 2.58.0: --exec-id=1105-680ac4e9 --log-level-console=info --log-level-file=detail --no-log-timestamp --pg1-path=/var/lib/pgsql/13/data --repo1-host=repository --repo1-host-ca-file=/etc/pgbackrest/cert/ca.crt --repo1-host-cert-file=/etc/pgbackrest/cert/client.crt --repo1-host-key-file=/etc/pgbackrest/cert/client.key --repo1-host-type=tls --stanza=demo
P00 INFO: check repo1 (standby)
P00 INFO: switch wal not performed because this is a standby
P00 INFO: check command end: completed successfully
流复制 流复制不依赖 WAL 归档,而是直接连接到主库,变更发生后即刻应用,主备延迟因此大幅降低。
流复制需要一个具有复制权限的数据库用户。
pg-primary ⇒ 创建复制用户
sudo -u postgres psql -c " \
create user replicator password 'jw8s0F4' replication" ;
需要更新 pg_hba.conf 文件,允许备库以复制用户身份连接。请将下面的 IP 地址替换为 pg-standby 的实际地址,修改后需重新加载配置。
pg-primary ⇒ 为复制用户创建 pg_hba.conf 条目
sudo -u postgres sh -c 'echo \
"host replication replicator 172.17.0.8/32 md5" \
>> /var/lib/pgsql/13/data/pg_hba.conf'
sudo systemctl reload postgresql-13.service
备库需要知道如何连接主库,因此在 pgBackRest 中配置 primary_conninfo 设置。
pg-standby:/etc/pgbackrest/pgbackrest.conf ⇒ 设置 primary_conninfo
[demo]
pg1-path = /var/lib/pgsql/13/data
recovery-option = primary_conninfo=host=172.17.0.6 port=5432 user=replicator
[global]
log-level-file = detail
repo1-host = repository
repo1-host-ca-file = /etc/pgbackrest/cert/ca.crt
repo1-host-cert-file = /etc/pgbackrest/cert/client.crt
repo1-host-key-file = /etc/pgbackrest/cert/client.key
repo1-host-type = tls
tls-server-address = *
tls-server-auth = pgbackrest-client=demo
tls-server-ca-file = /etc/pgbackrest/cert/ca.crt
tls-server-cert-file = /etc/pgbackrest/cert/server.crt
tls-server-key-file = /etc/pgbackrest/cert/server.key
密码可以写在 primary_conninfo 中,但使用 .pgpass 文件更灵活、更安全。
pg-standby ⇒ 在 .pgpass 文件中配置复制密码
sudo -u postgres sh -c 'echo \
"172.17.0.6:*:replication:replicator:jw8s0F4" \
>> /var/lib/pgsql/.pgpass'
sudo -u postgres chmod 600 /var/lib/pgsql/.pgpass
现在可以使用 restore 命令创建备库。
pg-standby ⇒ 停止 PostgreSQL 并恢复 demo 备库集群
sudo systemctl stop postgresql-13.service
sudo -u postgres pgbackrest --stanza= demo --delta --type= standby restore
sudo -u postgres cat /var/lib/pgsql/13/data/postgresql.auto.conf
# Do not edit this file manually!
# It will be overwritten by the ALTER SYSTEM command.
# Recovery settings generated by pgBackRest restore on 2026-01-19 09:21:08
restore_command = 'pgbackrest --stanza=demo archive-get %f "%p"'
# Recovery settings generated by pgBackRest restore on 2026-01-19 09:21:29
restore_command = 'pgbackrest --stanza=demo archive-get %f "%p"'
# Recovery settings generated by pgBackRest restore on 2026-01-19 09:21:53
restore_command = 'pgbackrest --stanza=demo archive-get %f "%p"'
# Removed by pgBackRest restore on 2026-01-19 09:22:32 # recovery_target_time = '2026-01-19 09:21:46.275227+00'
# Removed by pgBackRest restore on 2026-01-19 09:22:32 # recovery_target_action = 'promote'
# Recovery settings generated by pgBackRest restore on 2026-01-19 09:22:32
restore_command = 'pgbackrest --repo=3 --repo-target-time="2026-01-19 09:22:20+00" --stanza=demo archive-get %f "%p"'
# Recovery settings generated by pgBackRest restore on 2026-01-19 09:23:01
restore_command = 'pgbackrest --stanza=demo archive-get %f "%p"'
# Recovery settings generated by pgBackRest restore on 2026-01-19 09:23:39
primary_conninfo = 'host=172.17.0.6 port=5432 user=replicator'
restore_command = 'pgbackrest --stanza=demo archive-get %f "%p"'
注意:
primary_conninfo 之所以写入了 postgresql.auto.conf,是因为它在 pgbackrest.conf 中被配置为 recovery-option。若希望保留现有的 postgresql.auto.conf,可在 restore 时使用 --type=preserve 选项。
RHEL 默认将 postgresql.conf 存放在数据目录中,因此每次恢复都会覆盖其中的更改,hot_standby 设置也需要重新启用。解决办法是:将 postgresql.conf 存放到其他位置,或在 pg-primary 上启用 hot_standby(主库上该设置会被忽略)。
pg-standby:/var/lib/pgsql/13/data/postgresql.conf ⇒ 启用 hot_standby
archive_command = 'pgbackrest --stanza=demo archive-push %p'
archive_mode = on
hot_standby = on
log_filename = 'postgresql.log'
pg-standby ⇒ 启动 PostgreSQL
sudo systemctl start postgresql-13.service
PostgreSQL 日志将确认流复制已启动。
pg-standby ⇒ 检查 PostgreSQL 日志中表示成功的日志消息
sudo -u postgres cat /var/lib/pgsql/13/data/log/postgresql.log
[filtered 12 lines of output]
LOG: database system is ready to accept read only connections
LOG: restored log file "000000070000000000000026" from archive
LOG: started streaming WAL from primary at 0/27000000 on timeline 7
现在在 pg-primary 上创建表后,无需调用 pg_switch_wal(),它会很快出现在 pg-standby 上。
pg-primary ⇒ 在主库上创建新表
sudo -u postgres psql -c " \
begin; \
create table stream_table (message text); \
insert into stream_table values ('Important Data'); \
commit; \
select *, current_timestamp from stream_table" ;
message | current_timestamp
----------------+-------------------------------
Important Data | 2026-01-19 09:23:44.896378+00
(1 row)
pg-standby ⇒ 在备库上查询表
sudo -u postgres psql -c " \
select *, current_timestamp from stream_table"
message | current_timestamp
----------------+------------------------------
Important Data | 2026-01-19 09:23:45.09247+00
(1 row)
多 Stanza 配置 pgBackRest 支持多个 stanza,最常见的用法是多个 stanza 共用同一台仓库主机。
安装 创建一台名为 pg-alt 的新主机,用于运行新的主库。
推荐通过软件包安装 pgBackRest,而非从源码编译。软件包安装时,本节后续步骤通常无需手动执行,但个别软件包可能漏建某些目录或权限设置有误,此时需手动创建目录或修正权限。
RHEL 平台的 pgBackRest 软件包可在 yum.postgresql.org 获取。
若您的发行版没有提供现成软件包,可参考 编译构建
pg-alt ⇒ 安装依赖
sudo yum install postgresql-libs libssh2
pg-alt ⇒ 从构建主机复制 pgBackRest 二进制文件
sudo scp build:/build/pgbackrest/src/pgbackrest /usr/bin
sudo chmod 755 /usr/bin/pgbackrest
pgBackRest 需要日志目录、配置目录以及配置文件。
pg-alt ⇒ 创建 pgBackRest 配置文件和目录
sudo mkdir -p -m 770 /var/log/pgbackrest
sudo chown postgres:postgres /var/log/pgbackrest
sudo mkdir -p /etc/pgbackrest
sudo mkdir -p /etc/pgbackrest/conf.d
sudo touch /etc/pgbackrest/pgbackrest.conf
sudo chmod 640 /etc/pgbackrest/pgbackrest.conf
sudo chown postgres:postgres /etc/pgbackrest/pgbackrest.conf
配置 pg-alt 的 pgBackRest 配置与 pg-primary 基本相同,区别在于使用 demo-alt stanza,备份和归档因此存储在独立的位置。
pg-alt:/etc/pgbackrest/pgbackrest.conf ⇒ 在新主库上配置 pgBackRest
[demo-alt]
pg1-path = /var/lib/pgsql/13/data
[global]
log-level-file = detail
repo1-host = repository
repo1-host-ca-file = /etc/pgbackrest/cert/ca.crt
repo1-host-cert-file = /etc/pgbackrest/cert/client.crt
repo1-host-key-file = /etc/pgbackrest/cert/client.key
repo1-host-type = tls
tls-server-address = *
tls-server-auth = pgbackrest-client=demo-alt
tls-server-ca-file = /etc/pgbackrest/cert/ca.crt
tls-server-cert-file = /etc/pgbackrest/cert/server.crt
tls-server-key-file = /etc/pgbackrest/cert/server.key
repository:/etc/pgbackrest/pgbackrest.conf ⇒ 配置 pg1-host/pg1-host-user 和 pg1-path
[demo]
pg1-host = pg-primary
pg1-host-ca-file = /etc/pgbackrest/cert/ca.crt
pg1-host-cert-file = /etc/pgbackrest/cert/client.crt
pg1-host-key-file = /etc/pgbackrest/cert/client.key
pg1-host-type = tls
pg1-path = /var/lib/pgsql/13/data
[demo-alt]
pg1-host = pg-alt
pg1-host-ca-file = /etc/pgbackrest/cert/ca.crt
pg1-host-cert-file = /etc/pgbackrest/cert/client.crt
pg1-host-key-file = /etc/pgbackrest/cert/client.key
pg1-host-type = tls
pg1-path = /var/lib/pgsql/13/data
[global]
process-max = 3
repo1-path = /var/lib/pgbackrest
repo1-retention-full = 2
start-fast = y
tls-server-address = *
tls-server-auth = pgbackrest-client=*
tls-server-ca-file = /etc/pgbackrest/cert/ca.crt
tls-server-cert-file = /etc/pgbackrest/cert/server.crt
tls-server-key-file = /etc/pgbackrest/cert/server.key
pg-alt ⇒ 配置 pgBackRest 服务器
sudo cat /etc/systemd/system/pgbackrest.service
[Unit]
Description = pgBackRest Server
After = network.target
StartLimitIntervalSec = 0
[Service]
Type = simple
Restart = always
RestartSec = 1
User = postgres
ExecStart = /usr/bin/pgbackrest server
ExecStartPost = /bin/sleep 3
ExecStartPost = /bin/bash -c "[ ! -z $MAINPID ]"
ExecReload = /bin/kill -HUP $MAINPID
[Install]
WantedBy = multi-user.target
sudo systemctl enable pgbackrest
sudo systemctl start pgbackrest
初始化演示集群 pg-alt ⇒ 创建演示集群
sudo -u postgres /usr/pgsql-13/bin/initdb \
-D /var/lib/pgsql/13/data -k -A peer
pg-alt:/var/lib/pgsql/13/data/postgresql.conf ⇒ 配置 PostgreSQL 设置
archive_command = 'pgbackrest --stanza=demo-alt archive-push %p'
archive_mode = on
log_filename = 'postgresql.log'
pg-alt ⇒ 启动演示集群
sudo systemctl restart postgresql-13.service
创建 Stanza 并检查配置 需运行 stanza-create 命令初始化 stanza,之后建议运行 check 命令,确认归档和备份配置正确。
pg-alt ⇒ 创建 stanza 并检查配置
sudo -u postgres pgbackrest --stanza= demo-alt --log-level-console= info stanza-create
P00 INFO: stanza-create command begin 2.58.0: --exec-id=808-80d5cc1a --log-level-console=info --log-level-file=detail --no-log-timestamp --pg1-path=/var/lib/pgsql/13/data --repo1-host=repository --repo1-host-ca-file=/etc/pgbackrest/cert/ca.crt --repo1-host-cert-file=/etc/pgbackrest/cert/client.crt --repo1-host-key-file=/etc/pgbackrest/cert/client.key --repo1-host-type=tls --stanza=demo-alt
P00 INFO: stanza-create for stanza 'demo-alt' on repo1
P00 INFO: stanza-create command end: completed successfully
sudo -u postgres pgbackrest --log-level-console= info check
P00 INFO: check command begin 2.58.0: --exec-id=836-0d0cd439 --log-level-console=info --log-level-file=detail --no-log-timestamp --repo1-host=repository --repo1-host-ca-file=/etc/pgbackrest/cert/ca.crt --repo1-host-cert-file=/etc/pgbackrest/cert/client.crt --repo1-host-key-file=/etc/pgbackrest/cert/client.key --repo1-host-type=tls
P00 INFO: check stanza 'demo-alt'
P00 INFO: check repo1 configuration (primary)
P00 INFO: check repo1 archive for WAL (primary)
P00 INFO: WAL segment 000000010000000000000001 successfully archived to '/var/lib/pgbackrest/archive/demo-alt/13-1/0000000100000000/000000010000000000000001-6682d48b9456c97a63b86fb052e926912686d78a.gz' on repo1
P00 INFO: check command end: completed successfully
在仓库主机上运行 check 命令时,会检查所有 stanza。
repository ⇒ 检查所有 stanza 的配置
sudo -u pgbackrest pgbackrest --log-level-console= info check
P00 INFO: check command begin 2.58.0: --exec-id=1188-a5806db7 --log-level-console=info --no-log-timestamp --repo1-path=/var/lib/pgbackrest
P00 INFO: check stanza 'demo'
P00 INFO: check repo1 configuration (primary)
P00 INFO: check repo1 archive for WAL (primary)
P00 INFO: WAL segment 000000070000000000000027 successfully archived to '/var/lib/pgbackrest/archive/demo/13-1/0000000700000000/000000070000000000000027-ab9de60f70c5f849d29e55b1104aae9c6dfee0dc.gz' on repo1
P00 INFO: check stanza 'demo-alt'
P00 INFO: check repo1 configuration (primary)
P00 INFO: check repo1 archive for WAL (primary)
P00 INFO: WAL segment 000000010000000000000002 successfully archived to '/var/lib/pgbackrest/archive/demo-alt/13-1/0000000100000000/000000010000000000000002-1cfb636b14b524bd3cf014e32ec3211fcf7ea48e.gz' on repo1
P00 INFO: check command end: completed successfully
异步归档 通过 archive-async 选项可启用异步归档,该选项同时适用于 archive-push 和 archive-get 命令。
异步归档需要配置缓冲区路径(spool path)。两个命令都会在此存储临时数据,但工作方式各有不同,具体用法将在各节中详细说明。
pg-primary ⇒ 创建缓冲区目录
sudo mkdir -p -m 750 /var/spool/pgbackrest
sudo chown postgres:postgres /var/spool/pgbackrest
pg-standby ⇒ 创建缓冲区目录
sudo mkdir -p -m 750 /var/spool/pgbackrest
sudo chown postgres:postgres /var/spool/pgbackrest
需配置缓冲区路径并启用异步归档。异步归档通过减少远程存储的连接次数自动带来一定的性能提升,配置 process-max 还可通过并行化操作大幅提升吞吐量。注意不要将 process-max 设置过高,以免影响正常数据库操作。
pg-primary:/etc/pgbackrest/pgbackrest.conf ⇒ 配置缓冲区路径和异步归档
[demo]
pg1-path = /var/lib/pgsql/13/data
[global]
archive-async = y
log-level-file = detail
repo1-host = repository
repo1-host-ca-file = /etc/pgbackrest/cert/ca.crt
repo1-host-cert-file = /etc/pgbackrest/cert/client.crt
repo1-host-key-file = /etc/pgbackrest/cert/client.key
repo1-host-type = tls
spool-path = /var/spool/pgbackrest
tls-server-address = *
tls-server-auth = pgbackrest-client=demo
tls-server-ca-file = /etc/pgbackrest/cert/ca.crt
tls-server-cert-file = /etc/pgbackrest/cert/server.crt
tls-server-key-file = /etc/pgbackrest/cert/server.key
[global:archive-get]
process-max = 2
[global:archive-push]
process-max = 2
pg-standby:/etc/pgbackrest/pgbackrest.conf ⇒ 配置缓冲区路径和异步归档
[demo]
pg1-path = /var/lib/pgsql/13/data
recovery-option = primary_conninfo=host=172.17.0.6 port=5432 user=replicator
[global]
archive-async = y
log-level-file = detail
repo1-host = repository
repo1-host-ca-file = /etc/pgbackrest/cert/ca.crt
repo1-host-cert-file = /etc/pgbackrest/cert/client.crt
repo1-host-key-file = /etc/pgbackrest/cert/client.key
repo1-host-type = tls
spool-path = /var/spool/pgbackrest
tls-server-address = *
tls-server-auth = pgbackrest-client=demo
tls-server-ca-file = /etc/pgbackrest/cert/ca.crt
tls-server-cert-file = /etc/pgbackrest/cert/server.crt
tls-server-key-file = /etc/pgbackrest/cert/server.key
[global:archive-get]
process-max = 2
[global:archive-push]
process-max = 2
注意:
process-max 通过命令专属配置节(command sections)设置,这样备份和恢复操作就不会受其影响,同时也允许为 archive-push 和 archive-get 分别设置不同的值。
为演示效果,下面通过中断流复制,强制 PostgreSQL 使用 restore_command 获取 WAL。
pg-primary ⇒ 通过更改复制密码来中断流复制
sudo -u postgres psql -c "alter user replicator password 'bogus'"
pg-standby ⇒ 重启备库以中断连接
sudo systemctl restart postgresql-13.service
归档推送(Archive Push) 异步 archive-push 命令将 WAL 归档工作交给独立进程(或多个进程)处理,以提升吞吐量。其工作原理是"向前预读"——在 PostgreSQL 当前通过 archive_command 请求的 WAL 段之外,预先查找并归档其他已就绪的 WAL 段。WAL 段直接从 pg_xlog/pg_wal 目录传输到归档存储,只有 WAL 段安全入库后,archive_command 才返回成功。
缓冲区路径保存当前 WAL 归档的状态。写入其中的状态文件通常长度为零,占用空间极少(最多几 MB),IO 开销也很小。目录中的所有信息均可重建,因此将集群迁移到新硬件时无需保留缓冲区目录。
重要提示:
早期实现中,WAL 段在压缩和传输之前会先复制到缓冲区目录;新实现直接从 pg_xlog 目录复制 WAL。如果曾在 v1.12 或更早版本中使用过异步归档,请在升级前仔细阅读 v1.13 的发版说明。
可通过 [stanza]-archive-push-async.log 文件监控异步进程的活动。一个简单的测试方法是连续快速推送多个 WAL 段。
pg-primary ⇒ 测试并行异步归档
sudo -u postgres psql -c " \
select pg_create_restore_point('test async push'); select pg_switch_wal(); \
select pg_create_restore_point('test async push'); select pg_switch_wal(); \
select pg_create_restore_point('test async push'); select pg_switch_wal(); \
select pg_create_restore_point('test async push'); select pg_switch_wal(); \
select pg_create_restore_point('test async push'); select pg_switch_wal();"
sudo -u postgres pgbackrest --stanza= demo --log-level-console= info check
P00 INFO: check command begin 2.58.0: --exec-id=5533-a10d780a --log-level-console=info --log-level-file=detail --no-log-timestamp --pg1-path=/var/lib/pgsql/13/data --repo1-host=repository --repo1-host-ca-file=/etc/pgbackrest/cert/ca.crt --repo1-host-cert-file=/etc/pgbackrest/cert/client.crt --repo1-host-key-file=/etc/pgbackrest/cert/client.key --repo1-host-type=tls --stanza=demo
P00 INFO: check repo1 configuration (primary)
P00 INFO: check repo1 archive for WAL (primary)
P00 INFO: WAL segment 00000007000000000000002D successfully archived to '/var/lib/pgbackrest/archive/demo/13-1/0000000700000000/00000007000000000000002D-68fdc910d7c6f88b37ea66c55abbb15619fc23e4.gz' on repo1
P00 INFO: check command end: completed successfully
现在日志文件中将包含并行异步活动的记录。
pg-primary ⇒ 查看日志中的结果
sudo -u postgres cat /var/log/pgbackrest/demo-archive-push-async.log
-------------------PROCESS START-------------------
P00 INFO: archive-push:async command begin 2.58.0: [/var/lib/pgsql/13/data/pg_wal] --archive-async --exec-id=5499-311a72c4 --log-level-console=off --log-level-file=detail --log-level-stderr=off --no-log-timestamp --pg1-path=/var/lib/pgsql/13/data --process-max=2 --repo1-host=repository --repo1-host-ca-file=/etc/pgbackrest/cert/ca.crt --repo1-host-cert-file=/etc/pgbackrest/cert/client.crt --repo1-host-key-file=/etc/pgbackrest/cert/client.key --repo1-host-type=tls --spool-path=/var/spool/pgbackrest --stanza=demo
P00 INFO: push 1 WAL file(s) to archive: 000000070000000000000028
P01 DETAIL: pushed WAL file '000000070000000000000028' to the archive
P00 DETAIL: statistics: {"socket.client":{"total":1},"socket.session":{"total":1},"tls.client":{"total":1},"tls.session":{"total":1}}
P00 INFO: archive-push:async command end: completed successfully
-------------------PROCESS START-------------------
P00 INFO: archive-push:async command begin 2.58.0: [/var/lib/pgsql/13/data/pg_wal] --archive-async --exec-id=5522-2bee2531 --log-level-console=off --log-level-file=detail --log-level-stderr=off --no-log-timestamp --pg1-path=/var/lib/pgsql/13/data --process-max=2 --repo1-host=repository --repo1-host-ca-file=/etc/pgbackrest/cert/ca.crt --repo1-host-cert-file=/etc/pgbackrest/cert/client.crt --repo1-host-key-file=/etc/pgbackrest/cert/client.key --repo1-host-type=tls --spool-path=/var/spool/pgbackrest --stanza=demo
P00 INFO: push 4 WAL file(s) to archive: 000000070000000000000029...00000007000000000000002C
P01 DETAIL: pushed WAL file '000000070000000000000029' to the archive
P02 DETAIL: pushed WAL file '00000007000000000000002A' to the archive
P01 DETAIL: pushed WAL file '00000007000000000000002B' to the archive
P02 DETAIL: pushed WAL file '00000007000000000000002C' to the archive
P00 DETAIL: statistics: {"socket.client":{"total":1},"socket.session":{"total":1},"tls.client":{"total":1},"tls.session":{"total":1}}
P00 INFO: archive-push:async command end: completed successfully
-------------------PROCESS START-------------------
P00 INFO: archive-push:async command begin 2.58.0: [/var/lib/pgsql/13/data/pg_wal] --archive-async --exec-id=5540-4b5e5f9b --log-level-console=off --log-level-file=detail --log-level-stderr=off --no-log-timestamp --pg1-path=/var/lib/pgsql/13/data --process-max=2 --repo1-host=repository --repo1-host-ca-file=/etc/pgbackrest/cert/ca.crt --repo1-host-cert-file=/etc/pgbackrest/cert/client.crt --repo1-host-key-file=/etc/pgbackrest/cert/client.key --repo1-host-type=tls --spool-path=/var/spool/pgbackrest --stanza=demo
P00 INFO: push 1 WAL file(s) to archive: 00000007000000000000002D
P01 DETAIL: pushed WAL file '00000007000000000000002D' to the archive
P00 DETAIL: statistics: {"socket.client":{"total":1},"socket.session":{"total":1},"tls.client":{"total":1},"tls.session":{"total":1}}
P00 INFO: archive-push:async command end: completed successfully
归档获取(Archive Get) 异步 archive-get 命令通过维护本地 WAL 队列来提升吞吐量。若队列中找不到某个 WAL 段,会从仓库获取该段及足够多的连续 WAL 段填满队列,队列最大容量由 archive-get-queue-max 定义。当队列容量低于一半时,会自动获取更多 WAL 进行填充。
在 WAL 生成量较大、或与仓库存储(如 S3 等对象存储)连接延迟较高的环境中,异步操作最为有益。延迟较高时,适当增大 process-max 也有帮助。
可通过 [stanza]-archive-get-async.log 文件监控异步进程的活动。
pg-standby ⇒ 查看日志中的结果
sudo -u postgres cat /var/log/pgbackrest/demo-archive-get-async.log
-------------------PROCESS START-------------------
P00 INFO: archive-get:async command begin 2.58.0: [000000070000000000000024, 000000070000000000000025, 000000070000000000000026, 000000070000000000000027, 000000070000000000000028, 000000070000000000000029, 00000007000000000000002A, 00000007000000000000002B] --archive-async --exec-id=1655-39b5c501 --log-level-console=off --log-level-file=detail --log-level-stderr=off --no-log-timestamp --pg1-path=/var/lib/pgsql/13/data --process-max=2 --repo1-host=repository --repo1-host-ca-file=/etc/pgbackrest/cert/ca.crt --repo1-host-cert-file=/etc/pgbackrest/cert/client.crt --repo1-host-key-file=/etc/pgbackrest/cert/client.key --repo1-host-type=tls --spool-path=/var/spool/pgbackrest --stanza=demo
P00 INFO: get 8 WAL file(s) from archive: 000000070000000000000024...00000007000000000000002B
P02 DETAIL: found 000000070000000000000025 in the repo1: 13-1 archive
P01 DETAIL: found 000000070000000000000024 in the repo1: 13-1 archive
P02 DETAIL: found 000000070000000000000026 in the repo1: 13-1 archive
P01 DETAIL: found 000000070000000000000027 in the repo1: 13-1 archive
P00 DETAIL: unable to find 000000070000000000000028 in the archive
P00 DETAIL: statistics: {"socket.client":{"total":1},"socket.session":{"total":1},"tls.client":{"total":1},"tls.session":{"total":1}}
[filtered 24 lines of output]
P00 INFO: archive-get:async command begin 2.58.0: [000000070000000000000028, 000000070000000000000029, 00000007000000000000002A, 00000007000000000000002B, 00000007000000000000002C, 00000007000000000000002D, 00000007000000000000002E, 00000007000000000000002F] --archive-async --exec-id=1705-617957e3 --log-level-console=off --log-level-file=detail --log-level-stderr=off --no-log-timestamp --pg1-path=/var/lib/pgsql/13/data --process-max=2 --repo1-host=repository --repo1-host-ca-file=/etc/pgbackrest/cert/ca.crt --repo1-host-cert-file=/etc/pgbackrest/cert/client.crt --repo1-host-key-file=/etc/pgbackrest/cert/client.key --repo1-host-type=tls --spool-path=/var/spool/pgbackrest --stanza=demo
P00 INFO: get 8 WAL file(s) from archive: 000000070000000000000028...00000007000000000000002F
P02 DETAIL: found 000000070000000000000029 in the repo1: 13-1 archive
P01 DETAIL: found 000000070000000000000028 in the repo1: 13-1 archive
P02 DETAIL: found 00000007000000000000002A in the repo1: 13-1 archive
P01 DETAIL: found 00000007000000000000002B in the repo1: 13-1 archive
P02 DETAIL: found 00000007000000000000002C in the repo1: 13-1 archive
P01 DETAIL: found 00000007000000000000002D in the repo1: 13-1 archive
P00 DETAIL: unable to find 00000007000000000000002E in the archive
P00 DETAIL: statistics: {"socket.client":{"total":1},"socket.session":{"total":1},"tls.client":{"total":1},"tls.session":{"total":1}}
[filtered 7 lines of output]
pg-primary ⇒ 通过更改复制密码恢复流复制
sudo -u postgres psql -c "alter user replicator password 'jw8s0F4'"
从备库备份 pgBackRest 支持在备库而非主库上执行备份。从备库备份需要配置 pg-standby 主机并启用 backup-standby 选项。若配置了多个备库,将使用第一个处于运行状态的备库。
repository:/etc/pgbackrest/pgbackrest.conf ⇒ 配置 pg2-host/pg2-host-user 和 pg2-path
[demo]
pg1-host = pg-primary
pg1-host-ca-file = /etc/pgbackrest/cert/ca.crt
pg1-host-cert-file = /etc/pgbackrest/cert/client.crt
pg1-host-key-file = /etc/pgbackrest/cert/client.key
pg1-host-type = tls
pg1-path = /var/lib/pgsql/13/data
pg2-host = pg-standby
pg2-host-ca-file = /etc/pgbackrest/cert/ca.crt
pg2-host-cert-file = /etc/pgbackrest/cert/client.crt
pg2-host-key-file = /etc/pgbackrest/cert/client.key
pg2-host-type = tls
pg2-path = /var/lib/pgsql/13/data
[demo-alt]
pg1-host = pg-alt
pg1-host-ca-file = /etc/pgbackrest/cert/ca.crt
pg1-host-cert-file = /etc/pgbackrest/cert/client.crt
pg1-host-key-file = /etc/pgbackrest/cert/client.key
pg1-host-type = tls
pg1-path = /var/lib/pgsql/13/data
[global]
backup-standby = y
process-max = 3
repo1-path = /var/lib/pgbackrest
repo1-retention-full = 2
start-fast = y
tls-server-address = *
tls-server-auth = pgbackrest-client=*
tls-server-ca-file = /etc/pgbackrest/cert/ca.crt
tls-server-cert-file = /etc/pgbackrest/cert/server.crt
tls-server-key-file = /etc/pgbackrest/cert/server.key
备份时主库和备库都必须在线,但绝大多数文件从备库复制,从而减轻主库的负载。数据库主机可以按任意顺序配置,pgBackRest 会自动识别主备角色。
repository ⇒ 从 pg2 备份演示集群
sudo -u pgbackrest pgbackrest --stanza= demo --log-level-console= detail backup
[filtered 2 lines of output]
P00 INFO: execute backup start: backup begins after the requested immediate checkpoint completes
P00 INFO: backup start archive = 00000007000000000000002F, lsn = 0/2F000028
P00 INFO: wait for replay on the standby to reach 0/2F000028
P00 INFO: replay on the standby reached 0/2F000028
P00 INFO: check archive for prior segment 00000007000000000000002E
P01 DETAIL: backup file pg-primary:/var/lib/pgsql/13/data/log/postgresql.log (11KB, 0.48%) checksum c9e618ab29ad21e5a3e14a5c02cead1a9506adc5
P01 DETAIL: backup file pg-primary:/var/lib/pgsql/13/data/global/pg_control (8KB, 0.83%) checksum 8f43c919dede7e23f0a104a7ad769cf5ff365daa
P01 DETAIL: backup file pg-primary:/var/lib/pgsql/13/data/pg_hba.conf (4.5KB, 1.02%) checksum 65e54ae24bda87b2542351cb16a7fecc7e5aceeb
P01 DETAIL: match file from prior backup pg-primary:/var/lib/pgsql/13/data/current_logfiles (26B, 1.02%) checksum 78a9f5c10960f0d91fcd313937469824861795a2
P01 DETAIL: match file from prior backup pg-primary:/var/lib/pgsql/13/data/pg_logical/replorigin_checkpoint (8B, 1.02%) checksum 347fc8f2df71bd4436e38bd1516ccd7ea0d46532
[filtered 1243 lines of output]
从此增量备份可以看出,大部分文件从 pg-standby 复制,只有少数文件来自 pg-primary。
pgBackRest 从备库创建的备份与在主库上执行的备份完全等价。其实现方式是:在 pg-primary 上启动/停止备份,从 pg-standby 复制已完成复制的文件,再从 pg-primary 补充少量剩余文件。因此主库的日志和统计信息也会包含在备份中。
升级 PostgreSQL 将 PostgreSQL 升级到新主版本后,必须立即将所有 pgBackRest 配置中的 pg-path 更新为新路径,并运行 stanza-upgrade 命令。若主机上配置了多个仓库,每个仓库上的 stanza 都会被升级。若数据库处于离线状态,请使用 --no-online 选项。
以下说明并非 PostgreSQL 升级的完整指南,而是概述升级主库和备库的一般流程,重点演示重新配置 pgBackRest 所需的步骤。建议升级前先执行一次备份。
pg-primary ⇒ 停止旧集群
sudo systemctl stop postgresql-13.service
备库将从新升级的集群恢复,因此也需要停止旧集群。
pg-standby ⇒ 停止旧集群
sudo systemctl stop postgresql-13.service
初始化新集群并执行升级。
pg-primary ⇒ 创建新集群并执行升级
sudo -u postgres /usr/pgsql-14/bin/initdb \
-D /var/lib/pgsql/14/data -k -A peer
sudo -u postgres sh -c 'cd /var/lib/pgsql && \
/usr/pgsql-14/bin/pg_upgrade \
--old-bindir=/usr/pgsql-13/bin \
--new-bindir=/usr/pgsql-14/bin \
--old-datadir=/var/lib/pgsql/13/data \
--new-datadir=/var/lib/pgsql/14/data \
--old-options=" -c config_file=/var/lib/pgsql/13/data/postgresql.conf" \
--new-options=" -c config_file=/var/lib/pgsql/14/data/postgresql.conf"'
[filtered 69 lines of output]
Checking for extension updates ok
Upgrade Complete
----------------
Optimizer statistics are not transferred by pg_upgrade.
[filtered 4 lines of output]
配置新集群的相关参数。
pg-primary:/var/lib/pgsql/14/data/postgresql.conf ⇒ 配置 PostgreSQL
archive_command = 'pgbackrest --stanza=demo archive-push %p'
archive_mode = on
log_filename = 'postgresql.log'
更新所有主机上的 pgBackRest 配置,使其指向新集群。
pg-primary:/etc/pgbackrest/pgbackrest.conf ⇒ 升级 pg1-path
[demo]
pg1-path = /var/lib/pgsql/14/data
[global]
archive-async = y
log-level-file = detail
repo1-host = repository
repo1-host-ca-file = /etc/pgbackrest/cert/ca.crt
repo1-host-cert-file = /etc/pgbackrest/cert/client.crt
repo1-host-key-file = /etc/pgbackrest/cert/client.key
repo1-host-type = tls
spool-path = /var/spool/pgbackrest
tls-server-address = *
tls-server-auth = pgbackrest-client=demo
tls-server-ca-file = /etc/pgbackrest/cert/ca.crt
tls-server-cert-file = /etc/pgbackrest/cert/server.crt
tls-server-key-file = /etc/pgbackrest/cert/server.key
[global:archive-get]
process-max = 2
[global:archive-push]
process-max = 2
pg-standby:/etc/pgbackrest/pgbackrest.conf ⇒ 升级 pg-path
[demo]
pg1-path = /var/lib/pgsql/14/data
recovery-option = primary_conninfo=host=172.17.0.6 port=5432 user=replicator
[global]
archive-async = y
log-level-file = detail
repo1-host = repository
repo1-host-ca-file = /etc/pgbackrest/cert/ca.crt
repo1-host-cert-file = /etc/pgbackrest/cert/client.crt
repo1-host-key-file = /etc/pgbackrest/cert/client.key
repo1-host-type = tls
spool-path = /var/spool/pgbackrest
tls-server-address = *
tls-server-auth = pgbackrest-client=demo
tls-server-ca-file = /etc/pgbackrest/cert/ca.crt
tls-server-cert-file = /etc/pgbackrest/cert/server.crt
tls-server-key-file = /etc/pgbackrest/cert/server.key
[global:archive-get]
process-max = 2
[global:archive-push]
process-max = 2
repository:/etc/pgbackrest/pgbackrest.conf ⇒ 升级 pg1-path 和 pg2-path,禁用从备库备份
[demo]
pg1-host = pg-primary
pg1-host-ca-file = /etc/pgbackrest/cert/ca.crt
pg1-host-cert-file = /etc/pgbackrest/cert/client.crt
pg1-host-key-file = /etc/pgbackrest/cert/client.key
pg1-host-type = tls
pg1-path = /var/lib/pgsql/14/data
pg2-host = pg-standby
pg2-host-ca-file = /etc/pgbackrest/cert/ca.crt
pg2-host-cert-file = /etc/pgbackrest/cert/client.crt
pg2-host-key-file = /etc/pgbackrest/cert/client.key
pg2-host-type = tls
pg2-path = /var/lib/pgsql/14/data
[demo-alt]
pg1-host = pg-alt
pg1-host-ca-file = /etc/pgbackrest/cert/ca.crt
pg1-host-cert-file = /etc/pgbackrest/cert/client.crt
pg1-host-key-file = /etc/pgbackrest/cert/client.key
pg1-host-type = tls
pg1-path = /var/lib/pgsql/13/data
[global]
backup-standby = n
process-max = 3
repo1-path = /var/lib/pgbackrest
repo1-retention-full = 2
start-fast = y
tls-server-address = *
tls-server-auth = pgbackrest-client=*
tls-server-ca-file = /etc/pgbackrest/cert/ca.crt
tls-server-cert-file = /etc/pgbackrest/cert/server.crt
tls-server-key-file = /etc/pgbackrest/cert/server.key
pg-primary ⇒ 复制 hba 配置文件
sudo cp /var/lib/pgsql/13/data/pg_hba.conf \
/var/lib/pgsql/14/data/pg_hba.conf
启动新集群前,必须先运行 stanza-upgrade 命令。
pg-primary ⇒ 升级 stanza
sudo -u postgres pgbackrest --stanza= demo --no-online \
--log-level-console= info stanza-upgrade
P00 INFO: stanza-upgrade command begin 2.58.0: --exec-id=6060-3d1ec838 --log-level-console=info --log-level-file=detail --no-log-timestamp --no-online --pg1-path=/var/lib/pgsql/14/data --repo1-host=repository --repo1-host-ca-file=/etc/pgbackrest/cert/ca.crt --repo1-host-cert-file=/etc/pgbackrest/cert/client.crt --repo1-host-key-file=/etc/pgbackrest/cert/client.key --repo1-host-type=tls --stanza=demo
P00 INFO: stanza-upgrade for stanza 'demo' on repo1
P00 INFO: stanza-upgrade command end: completed successfully
启动新集群并验证安装成功。
pg-primary ⇒ 启动新集群
sudo systemctl start postgresql-14.service
用 check 命令测试配置。
pg-primary ⇒ 检查配置
sudo systemctl status postgresql-14.service
sudo -u postgres pgbackrest --stanza= demo check
清理旧集群。
pg-primary ⇒ 删除旧集群
sudo rm -rf /var/lib/pgsql/13/data
在备库上安装新版 PostgreSQL 并准备集群目录。
pg-standby ⇒ 删除旧集群并创建新集群
sudo rm -rf /var/lib/pgsql/13/data
sudo -u postgres mkdir -p -m 700 /usr/pgsql-14/bin
在仓库主机上运行 check 命令。由于备库集群已停止,出现备库不可用的警告是正常现象。此命令说明仓库服务器已感知到备库的存在,且已为主库服务器正确配置。
repository ⇒ 检查配置
sudo -u pgbackrest pgbackrest --stanza= demo check
P00 WARN: unable to check pg2: [DbConnectError] raised from remote-0 tls protocol on 'pg-standby': unable to connect to 'dbname='postgres' port=5432': could not connect to server: No such file or directory
Is the server running locally and accepting
connections on Unix domain socket "/run/postgresql/.s.PGSQL.5432"?
对新集群执行全量备份,然后从备份恢复备库。若请求 incr 或 diff 类型,备份类型将自动升级为 full。
repository ⇒ 运行全量备份
sudo -u pgbackrest pgbackrest --stanza= demo --type= full backup
pg-standby ⇒ 恢复演示备库集群
sudo -u postgres pgbackrest --stanza= demo --type= standby restore
pg-standby:/var/lib/pgsql/14/data/postgresql.conf ⇒ 配置 PostgreSQL
pg-standby ⇒ 启动 PostgreSQL 并检查 pgBackRest 配置
sudo systemctl start postgresql-14.service
sudo -u postgres pgbackrest --stanza= demo check
备库恢复完成后,即可重新启用从备库备份。
repository:/etc/pgbackrest/pgbackrest.conf ⇒ 重新启用从备库备份
[demo]
pg1-host = pg-primary
pg1-host-ca-file = /etc/pgbackrest/cert/ca.crt
pg1-host-cert-file = /etc/pgbackrest/cert/client.crt
pg1-host-key-file = /etc/pgbackrest/cert/client.key
pg1-host-type = tls
pg1-path = /var/lib/pgsql/14/data
pg2-host = pg-standby
pg2-host-ca-file = /etc/pgbackrest/cert/ca.crt
pg2-host-cert-file = /etc/pgbackrest/cert/client.crt
pg2-host-key-file = /etc/pgbackrest/cert/client.key
pg2-host-type = tls
pg2-path = /var/lib/pgsql/14/data
[demo-alt]
pg1-host = pg-alt
pg1-host-ca-file = /etc/pgbackrest/cert/ca.crt
pg1-host-cert-file = /etc/pgbackrest/cert/client.crt
pg1-host-key-file = /etc/pgbackrest/cert/client.key
pg1-host-type = tls
pg1-path = /var/lib/pgsql/13/data
[global]
backup-standby = y
process-max = 3
repo1-path = /var/lib/pgbackrest
repo1-retention-full = 2
start-fast = y
tls-server-address = *
tls-server-auth = pgbackrest-client=*
tls-server-ca-file = /etc/pgbackrest/cert/ca.crt
tls-server-cert-file = /etc/pgbackrest/cert/server.crt
tls-server-key-file = /etc/pgbackrest/cert/server.key
28.3 - 命令参考 pgBackRest 命令参考手册,包含备份、恢复、归档及管理操作的全部选项。
原始页面: https://pgbackrest.org/command.html
简介 pgBackRest 通过命令来执行各项功能。本文档对每个命令的选项进行了详尽列举——即每个适用于某命令的选项都会随该命令一并列出,即便该选项同样适用于其他命令。所有可在 pgbackrest.conf 中配置的选项均包含在内。
在 pgbackrest.conf 中配置的非布尔型选项,可在命令行上使用 reset- 前缀将其重置为默认值。这一功能在直接于仓库主机上执行恢复时很有用。通常情况下,pgBackRest 检测到数据库主机是远程主机后会报错,因为恢复操作无法远程执行。在命令行添加 --reset-pg1-host 后,pgBackRest 将忽略远程数据库主机并在本地执行恢复。此时可能还需要传入新的 --pg1-path,将恢复操作强制指向特定路径,而非使用数据库主机上的原有路径。
在命令行上,可使用 no- 前缀将布尔型选项设置为 false。
任何选项均可通过环境变量设置,方法是加上 PGBACKREST_ 前缀,将选项名称全部大写,并将 - 替换为 _,例如 pg1-path 对应 PGBACKREST_PG1_PATH,stanza 对应 PGBACKREST_STANZA。布尔型选项的表示方式与配置文件中相同,例如 PGBACKREST_COMPRESS="n",且不支持 reset-* 变体。可在命令行或配置文件中多次指定的选项,可通过冒号分隔多个值来设置,例如 PGBACKREST_DB_INCLUDE="db1:db2"。
命令行选项优先于环境变量选项,环境变量选项优先于配置文件选项。
关于选项类型的说明,请参阅 配置简介
命令列表 28.3.1 - 注解命令(annotate) pgBackRest annotate 命令的选项与行为参考。
原始页面: pgBackRest Command Docs: annotate
backup 命令执行时附加的注解,可在事后通过 annotate 命令进行添加、修改或删除。
命令选项 备份注解选项(--annotation) 为备份添加用户自定义键值对注解。
可为备份附加具有描述性的键值对。此选项可多次使用,以添加多条注解。
使用 --set 指定备份后,注解将显示在 info 命令的文本输出中,并始终出现在 JSON 输出中。
example : --annotation=source="Sunday backup for website database"
备份集选项(--set) 要添加注解的目标备份集。
指定需要添加注解的备份集名称。
example : --set=20150131-153358F_20150131-153401I
通用选项 缓冲区大小选项(--buffer-size) I/O 操作的缓冲区大小。
复制、压缩、加密等操作均使用此缓冲区。实际使用的缓冲区数量取决于各选项配置,每个操作可能还会额外占用内存,例如 gz 压缩可能额外使用 256KiB 内存。
允许的值为:16KiB、32KiB、64KiB、128KiB、256KiB、512KiB、1MiB、2MiB、4MiB、8MiB 和 16MiB。
default : 1MiB
example : --buffer-size=2MiB
SSH 客户端命令选项(--cmd-ssh) SSH 客户端命令。
若需使用特定的 SSH 客户端,或 ssh 命令不在 $PATH 中,可通过此选项指定。
default : ssh
example : --cmd-ssh=/usr/bin/ssh
网络压缩级别选项(--compress-level-network) 网络压缩级别。
当 compress-type=none 且命令不在仓库所在主机上运行时,此选项设置网络压缩级别,以减少网络流量。若 compress-type 不等于 none,则忽略 compress-level-network,改用 compress-level,从而避免文件被压缩两次。
default : 1
allowed : [ -5 , 12 ]
example : --compress-level-network=1
配置文件选项(--config) pgBackRest 配置文件。
使用此选项可指定非默认路径的配置文件。
default : CFGOPTDEF_CONFIG_PATH "/" PROJECT_CONFIG_FILE
example : --config=/conf/pgbackrest/pgbackrest.conf
配置包含路径选项(--config-include-path) 附加 pgBackRest 配置文件的路径。
该路径下所有扩展名为 .conf 的文件将与 pgBackRest 主配置文件合并,共同构成完整配置。
default : CFGOPTDEF_CONFIG_PATH "/" PROJECT_CONFIG_INCLUDE_PATH
example : --config-include-path=/conf/pgbackrest/conf.d
配置基础路径选项(--config-path) pgBackRest 配置文件的基础路径。
此设置可覆盖 --config 和 --config-include-path 的默认基础路径,但仅在这两个选项未在命令行中明确指定时生效。
例如,若只传入 --config-path=/conf/pgbackrest,则 --config 的默认值将变为 /conf/pgbackrest/pgbackrest.conf,--config-include-path 的默认值将变为 /conf/pgbackrest/conf.d。
default : CFGOPTDEF_CONFIG_PATH
example : --config-path=/conf/pgbackrest
I/O 超时选项(--io-timeout) I/O 超时时间。
连接及读写操作的超时时间,单位为秒。
注意:整个读写操作无需在此时间内全部完成,但必须 持续有进展,哪怕只传输了一个字节。
default : 1m
allowed : [ 100ms, 1h]
example : --io-timeout=120
锁文件路径选项(--lock-path) 锁文件的存储路径。
pgBackRest 在此路径下创建锁文件,防止相互冲突的操作并发执行。
default : /tmp/pgbackrest
example : --lock-path=/backup/db/lock
中性 umask 选项(--neutral-umask) 使用中性 umask。
将 umask 设置为 0000,使仓库中创建的文件具有合理的权限。默认目录权限为 0750,文件权限为 0640;锁文件和日志目录的权限分别为 0770 和 0660。
若要使用执行用户自身的 umask,可在配置文件中设置 neutral-umask=n,或在命令行传入 --no-neutral-umask。
default : y
example : --no -neutral-umask
进程优先级选项(--priority) 设置进程优先级。
定义内核调度器赋予该进程的优先级(即 niceness 值)。正值降低优先级,负值提高优先级。普通进程通常无权提高自身优先级。
allowed : [ -20 , 19 ]
example : --priority=19
协议超时选项(--protocol-timeout) 协议超时时间。
本地或远程进程在协议层等待接收新消息的超时时间,单位为秒。此设置可防止进程无限期等待消息。
注意: protocol-timeout 的值必须大于 db-timeout。
default : 31m
allowed : [ 100ms, 7d]
example : --protocol-timeout=630
保活选项(--sck-keep-alive) 启用保活。
在 socket 连接上启用保活消息。
default : y
example : --no -sck-keep-alive
Stanza 选项(--stanza) 定义 stanza。
stanza 是 pgBackRest 中用于标识一个 PostgreSQL 集群备份配置的逻辑名称,包含集群的位置、备份方式、归档选项等信息。大多数数据库主机只有一个 PostgreSQL 集群,因此只需配置一个 stanza;备份服务器则需为每个待备份的集群各配置一个 stanza。
命名 stanza 时,用主库名称固然直观,但用描述数据库实际用途的名称(如 app 或 dw)更为合适,因为该名称对主库和所有副本均适用,而非仅用于本地集群(如 main 或 prod)。
TCP 保活计数选项(--tcp-keep-alive-count) 保活计数。
连接被判定为断开之前,允许丢失的 TCP 保活消息数量。
此选项仅在支持 TCP_KEEPCNT socket 选项的系统上可用。
allowed : [ 1 , 32 ]
example : --tcp-keep-alive-count=3
TCP 保活空闲时间选项(--tcp-keep-alive-idle) 保活空闲时间。
无网络活动持续多少秒后,操作系统开始发送 TCP 保活消息。
此选项仅在支持 TCP_KEEPIDLE socket 选项的系统上可用。
allowed : [ 1 , 3600 ]
example : --tcp-keep-alive-idle=60
TCP 保活间隔选项(--tcp-keep-alive-interval) 保活间隔时间。
未被确认的 TCP 保活消息在多少秒后重新发送。
此选项仅在支持 TCP_KEEPINTVL socket 选项的系统上可用。
allowed : [ 1 , 900 ]
example : --tcp-keep-alive-interval=30
TLSv1.2 加密套件选项(--tls-cipher-12) 允许使用的 TLSv1.2 加密套件。
pgBackRest 客户端与服务端之间的所有 TLS 连接均经过加密,连接对象存储(如 S3)时默认也会加密。
注意: 任何传输连接的最低安全级别为 TLSv1.2。
如有需要,可调整允许使用的加密套件。示例中的配置在没有特殊安全要求的情况下是合理的选择。若未设置(默认),则使用底层 OpenSSL 库的默认值。
example : --tls-cipher-12=HIGH:MEDIUM:+3DES:!aNULL
TLSv1.3 加密套件选项(--tls-cipher-13) 允许使用的 TLSv1.3 加密套件。
pgBackRest 客户端与服务端之间的所有 TLS 连接均经过加密,连接对象存储(如 S3)时默认也会加密。
注意: 任何传输连接的最低安全级别为 TLSv1.2。
如有需要,可调整允许使用的加密套件。若未设置(默认),则使用底层 OpenSSL 库的默认值。
example : --tls-cipher-13=TLS_AES_256_GCM_SHA384:TLS_CHACHA20_POLY1305_SHA256
日志选项 控制台日志级别选项(--log-level-console) 控制台日志级别。
支持以下日志级别:
off - 不记录任何日志(不推荐)error - 仅记录错误warn - 记录警告和错误info - 记录信息、警告和错误detail - 记录详情、信息、警告和错误debug - 记录调试、详情、信息、警告和错误trace - 记录追踪(非常详细的调试信息)、调试、信息、警告和错误default : warn
example : --log-level-console=error
文件日志级别选项(--log-level-file) 文件日志级别。
支持以下日志级别:
off - 不记录任何日志(不推荐)error - 仅记录错误warn - 记录警告和错误info - 记录信息、警告和错误detail - 记录详情、信息、警告和错误debug - 记录调试、详情、信息、警告和错误trace - 记录追踪(非常详细的调试信息)、调试、信息、警告和错误default : info
example : --log-level-file=debug
标准错误日志级别选项(--log-level-stderr) stderr 日志级别。
指定哪些日志级别输出到 stderr 而非 stdout(由 log-level-console 指定)。时间戳和进程信息不会输出到 stderr。
支持以下日志级别:
off - 不记录任何日志(不推荐)error - 仅记录错误warn - 记录警告和错误info - 记录信息、警告和错误detail - 记录详情、信息、警告和错误debug - 记录调试、详情、信息、警告和错误trace - 记录追踪(非常详细的调试信息)、调试、信息、警告和错误default : off
example : --log-level-stderr=error
日志路径选项(--log-path) 日志文件的存储路径。
pgBackRest 将日志文件存储在此路径下。注意,若 log-level-file=off,则无需配置日志路径。
default : /var/log/pgbackrest
example : --log-path=/backup/db/log
子进程日志选项(--log-subprocess) 在子进程中启用日志记录。
为此进程创建的所有子进程启用文件日志,日志级别由 log-level-file 指定。
default : n
example : --log-subprocess
日志时间戳选项(--log-timestamp) 在日志中启用时间戳。
在控制台和文件日志中启用时间戳。某些特殊场景(如生成文档时)会禁用此选项。
default : y
example : --no -log-timestamp
仓库选项 指定仓库选项(--repo) 设置仓库。
指定命令操作的目标仓库。
例如,可使用此选项从指定仓库执行恢复,而不是由 pgBackRest 自动选择。
allowed : [ 1 , 256 ]
example : --repo=1
Azure 仓库容器选项(--repo-azure-container) Azure 仓库容器。
用于存储仓库的 Azure 容器。
设置 repo-path=/ 可将 pgBackRest 仓库存储在容器根目录下,但通常建议指定一个前缀(如 /repo),以便日志及其他 Azure 生成的内容也能存储在同一容器中。
example : --repo1-azure-container=pg-backup
Azure 仓库密钥类型选项(--repo-azure-key-type) Azure 仓库密钥类型。
支持以下授权类型:
shared - 共享密钥sas - 共享访问签名auto - 使用 Azure 托管身份自动授权default : shared
example : --repo1-azure-key-type=sas
Azure 仓库 URI 风格选项(--repo-azure-uri-style) Azure URI 风格。
支持以下 URI 风格:
host - 连接到 account.endpoint 主机。path - 连接到 endpoint 主机,并在 URI 中添加账户前缀。default : host
example : --repo1-azure-uri-style=path
仓库加密类型选项(--repo-cipher-type) 仓库加密所使用的加密算法。
支持以下加密类型:
none - 仓库不加密aes-256-cbc - 256 位密钥长度的高级加密标准注意,即使仓库类型(如 S3)本身支持加密,pgBackRest 也始终在客户端执行加密。
default : none
example : --repo1-cipher-type=aes-256-cbc
GCS 仓库存储桶选项(--repo-gcs-bucket) GCS 仓库存储桶。
用于存储仓库的 GCS 存储桶。
设置 repo-path=/ 可将 pgBackRest 仓库存储在存储桶根目录下,但通常建议指定一个前缀(如 /repo),以便日志及其他 GCS 生成的内容也能存储在同一存储桶中。
example : --repo1-gcs-bucket=/pg-backup
GCS 仓库端点选项(--repo-gcs-endpoint) GCS 仓库端点。
连接存储服务所使用的端点,可更新为本地 GCS 服务器或备用端点。
default : storage.googleapis.com
example : --repo1-gcs-endpoint=localhost
GCS 仓库密钥类型选项(--repo-gcs-key-type) GCS 仓库密钥类型。
支持以下授权类型:
auto - 使用实例服务账户进行授权。service - 使用本地存储的服务账户密钥。token - 用于本地测试(如 fakegcs)。当 repo-gcs-key-type=service 时,认证令牌续期时将重新加载凭证。
default : service
example : --repo1-gcs-key-type=auto
GCS 仓库项目 ID 选项(--repo-gcs-user-project) GCS 项目 ID。
用于确定请求计费归属的 GCS 项目 ID。
example : --repo1-gcs-user-project=my-project
仓库主机选项(--repo-host) 远程操作时的仓库主机。
若备份和归档写入本地挂载的文件系统,则无需此设置。
example : --repo1-host=repo1.domain.com
已弃用名称:backup-host
仓库主机证书颁发机构文件选项(--repo-host-ca-file) 仓库主机证书颁发机构文件。
连接仓库主机时使用非系统默认的 CA 文件。
example : --repo1-host-ca-file=/etc/pki/tls/certs/ca-bundle.crt
仓库主机证书颁发机构路径选项(--repo-host-ca-path) 仓库主机证书颁发机构路径。
连接仓库主机时使用非系统默认的 CA 路径。
example : --repo1-host-ca-path=/etc/pki/tls/certs
仓库主机证书文件选项(--repo-host-cert-file) 仓库主机证书文件。
发送给仓库主机以证明客户端身份。
example : --repo1-host-cert-file=/path/to/client.crt
仓库主机命令选项(--repo-host-cmd) 仓库主机上的 pgBackRest 命令。
仅当本地主机与仓库主机上的 pgBackRest 命令路径不同时才需要配置。若未定义,仓库主机命令将与本地命令保持一致。
default : [ path of executed pgbackrest binary]
example : --repo1-host-cmd=/usr/lib/backrest/bin/pgbackrest
已弃用名称:backup-cmd
仓库主机配置文件选项(--repo-host-config) pgBackRest 仓库主机配置文件。
设置仓库主机上配置文件的位置。仅当仓库主机上的配置文件路径与本地不同时才需要配置。
default : CFGOPTDEF_CONFIG_PATH "/" PROJECT_CONFIG_FILE
example : --repo1-host-config=/conf/pgbackrest/pgbackrest.conf
已弃用名称:backup-config
仓库主机配置包含路径选项(--repo-host-config-include-path) pgBackRest 仓库主机配置包含路径。
设置仓库主机上配置包含路径的位置。仅当仓库主机上的配置包含路径与本地不同时才需要配置。
default : CFGOPTDEF_CONFIG_PATH "/" PROJECT_CONFIG_INCLUDE_PATH
example : --repo1-host-config-include-path=/conf/pgbackrest/conf.d
仓库主机配置路径选项(--repo-host-config-path) pgBackRest 仓库主机配置路径。
设置仓库主机上配置路径的位置。仅当仓库主机上的配置路径与本地不同时才需要配置。
default : CFGOPTDEF_CONFIG_PATH
example : --repo1-host-config-path=/conf/pgbackrest
仓库主机密钥文件选项(--repo-host-key-file) 仓库主机密钥文件。
用于证明客户端证书由所有者发送。
example : --repo1-host-key-file=/path/to/client.key
仓库主机端口选项(--repo-host-port) 设置了 repo-host 时的仓库主机端口。
使用此选项为仓库主机协议指定非默认端口。
注意: 当 repo-host-type=ssh 时,repo-host-port 没有默认值,端口取决于 cmd-ssh 所指定命令的配置。
default (depending on repo-host-type) :
tls - 8432
allowed : [ 0 , 65535 ]
example : --repo1-host-port=25
已弃用名称:backup-ssh-port
仓库主机协议类型选项(--repo-host-type) 仓库主机协议类型。
支持以下协议类型:
ssh - 安全外壳协议(Secure Shell)。tls - pgBackRest TLS 服务器。default : ssh
example : --repo1-host-type=tls
仓库主机用户选项(--repo-host-user) 设置了 repo-host 时的仓库主机用户。
定义在仓库主机上执行操作所使用的用户。建议使用专用用户(如 pgbackrest),而非 postgres 用户。若 PostgreSQL 运行在仓库主机上,可将 postgres 用户加入 pgbackrest 组,使其具有仓库的读取权限,同时防止意外损坏仓库内容。
default : pgbackrest
example : --repo1-host-user=repo-user
已弃用名称:backup-user
仓库路径选项(--repo-path) 备份和归档的存储路径。
仓库是 pgBackRest 存储备份和归档 WAL 段的位置。
预估所需空间可能较为困难。建议先执行几次备份,记录不同备份类型(全量/增量/差异)的大小,并测量每日产生的 WAL 量,从而大致估算所需空间;当然,随着数据库规模增长,实际需求也会随之变化。
default : /var/lib/pgbackrest
example : --repo1-path=/backup/db/backrest
S3 仓库存储桶选项(--repo-s3-bucket) S3 仓库存储桶。
用于存储仓库的 S3 存储桶。
设置 repo-path=/ 可将 pgBackRest 仓库存储在存储桶根目录下,但通常建议指定一个前缀(如 /repo),以便日志及其他 AWS 生成的内容也能存储在同一存储桶中。
example : --repo1-s3-bucket=pg-backup
S3 仓库端点选项(--repo-s3-endpoint) S3 仓库端点。
AWS 端点应与所选区域匹配。
对于自定义或测试配置,repo-storage-ca-file、repo-storage-ca-path、repo-storage-host、repo-storage-port 和 repo-storage-verify-tls 等选项可能会有所帮助。
example : --repo1-s3-endpoint=s3.amazonaws.com
S3 仓库密钥类型选项(--repo-s3-key-type) S3 仓库密钥类型。
支持以下类型:
shared - 共享密钥auto - 自动获取临时凭证web-id - 自动获取 Web 身份凭证default : shared
example : --repo1-s3-key-type=auto
S3 仓库 KMS 密钥 ID 选项(--repo-s3-kms-key-id) S3 仓库 KMS 密钥。
使用指定的 AWS 密钥管理服务密钥启用 S3 服务端加密。
example : --repo1-s3-kms-key-id=bceb4f13-6939-4be3-910d-df54dee817b7
S3 仓库区域选项(--repo-s3-region) S3 仓库区域。
创建存储桶所在的 AWS 区域。
example : --repo1-s3-region=us-east-1
S3 仓库请求方付费选项(--repo-s3-requester-pays) S3 仓库请求方付费。
启用 S3 请求方付费功能。
default : n
example : --no -repo1-s3-requester-pays
S3 仓库角色选项(--repo-s3-role) S3 仓库角色。
当 repo-s3-key-type=auto 时,用于获取临时凭证的 AWS 角色名称(非完整 ARN)。
example : --repo1-s3-role=authrole
S3 仓库 URI 风格选项(--repo-s3-uri-style) S3 URI 风格。
支持以下 URI 风格:
host - 连接到 bucket.endpoint 主机。path - 连接到 endpoint 主机,并在 URI 中添加存储桶前缀。default : host
example : --repo1-s3-uri-style=path
SFTP 仓库主机选项(--repo-sftp-host) SFTP 仓库主机。
包含仓库的 SFTP 主机。
example : --repo1-sftp-host=sftprepo.domain
SFTP 仓库主机指纹选项(--repo-sftp-host-fingerprint) SFTP 仓库主机指纹。
SFTP 仓库主机指纹的生成方式应与 repo-sftp-host-key-hash-type 匹配。可通过以下命令生成指纹:awk '{print $2}' ssh_host_xxx_key.pub | base64 -d | (md5sum or sha1sum) -b。SSH 主机密钥通常位于 /etc/ssh 目录中。
example : --repo1-sftp-host-fingerprint=f84e172dfead7aeeeae6c1fdfb5aa8cf
SFTP 主机密钥检查类型选项(--repo-sftp-host-key-check-type) SFTP 主机密钥检查类型。
支持以下 SFTP 主机密钥检查类型:
strict - pgBackRest 不会自动将主机密钥添加到 ~/.ssh/known_hosts 文件,且拒绝连接到主机密钥已更改或在已知主机文件中找不到的主机。此选项要求用户手动添加所有新主机。accept-new - pgBackRest 会自动将新主机密钥添加到用户的已知主机文件,但不允许连接到主机密钥已更改的主机。fingerprint - pgBackRest 会将主机密钥与 repo-sftp-host-fingerprint 选项指定的指纹进行比对。none - 不执行主机密钥检查。default : strict
example : --repo1-sftp-host-key-check-type=accept-new
SFTP 仓库主机密钥哈希类型选项(--repo-sftp-host-key-hash-type) SFTP 仓库主机密钥哈希类型。
声明在 SSH 启动时用于计算远程系统主机密钥摘要的哈希算法。较新版本的 libssh2 除 md5 和 sha1 外,还支持 sha256。
example : --repo1-sftp-host-key-hash-type=sha256
SFTP 仓库主机端口选项(--repo-sftp-host-port) SFTP 仓库主机端口。
SFTP 仓库主机端口。
default : 22
allowed : [ 1 , 65535 ]
example : --repo1-sftp-host-port=22
SFTP 仓库主机用户选项(--repo-sftp-host-user) SFTP 仓库主机用户。
用于存储仓库的主机上的用户。
example : --repo1-sftp-host-user=pg-backup
SFTP 已知主机文件选项(--repo-sftp-known-host) SFTP 已知主机文件。
认证时用于搜索 SFTP 主机匹配项的已知主机文件。若未指定,pgBackRest 默认搜索 ~/.ssh/known_hosts、~/.ssh/known_hosts2、/etc/ssh/ssh_known_hosts 和 /etc/ssh/ssh_known_hosts2。若配置了一个或多个文件路径,pgBackRest 将只在这些文件中搜索匹配项。文件路径必须为完整路径或以波浪号开头的路径。可多次传入 repo-sftp-known-host 以指定多个已知主机文件。使用已知主机文件检查时,不得同时指定 repo-sftp-host-fingerprint。另请参阅 repo-sftp-host-check-type 选项。
example : --repo1-sftp-known-host=/home/postgres/.ssh/known_hosts
SFTP 仓库私钥文件选项(--repo-sftp-private-key-file) SFTP 私钥文件。
用于认证的 SFTP 私钥文件。
example : --repo1-sftp-private-key-file=~/.ssh/id_ed25519
SFTP 仓库公钥文件选项(--repo-sftp-public-key-file) SFTP 公钥文件。
用于认证的 SFTP 公钥文件。若编译时链接了 OpenSSL,此项为可选;若链接了其他库,则为必填项。
example : --repo1-sftp-public-key-file=~/.ssh/id_ed25519.pub
仓库存储 CA 文件选项(--repo-storage-ca-file) 仓库存储 CA 文件。
连接存储(如 S3、Azure)时使用非系统默认的 CA 文件。
example : --repo1-storage-ca-file=/etc/pki/tls/certs/ca-bundle.crt
已弃用名称:repo-azure-ca-file、repo-s3-ca-file
仓库存储 TLS CA 路径选项(--repo-storage-ca-path) 仓库存储 CA 路径。
连接存储(如 S3、Azure)时使用非系统默认的 CA 路径。
example : --repo1-storage-ca-path=/etc/pki/tls/certs
已弃用名称:repo-azure-ca-path、repo-s3-ca-path
仓库存储主机选项(--repo-storage-host) 仓库存储主机。
连接到存储(如 S3、Azure)端点以外的其他主机,通常用于测试场景。
example : --repo1-storage-host=127.0.0.1
已弃用名称:repo-azure-host、repo-s3-host
仓库存储端口选项(--repo-storage-port) 仓库存储端口。
连接到存储(如 S3、Azure)端点(或指定主机)时使用的端口。
default : 443
allowed : [ 1 , 65535 ]
example : --repo1-storage-port=9000
已弃用名称:repo-azure-port、repo-s3-port
仓库存储标签选项(--repo-storage-tag) 仓库存储标签。
当仓库为对象存储(如 S3)时,指定要添加到对象上的标签。可重复使用此选项以添加多个标签。
pgBackRest 目前不支持修改这些标签,因此请在运行 stanza-create 之前正确设置,以确保整个仓库的标签一致。
example : --repo1-storage-tag=key1=value1
仓库存储上传分块大小选项(--repo-storage-upload-chunk-size) 仓库存储上传分块大小。
当文件过大无法全部加载到内存时,S3 等对象存储支持分块上传。即便文件可以全部加载到内存,限制上传时的内存用量也更为高效。
较大的分块大小通常能带来更好的性能,因为它减少了上传请求次数,允许更多文件在单次请求中完成上传而无需分块。其缺点是内存占用更高,且由于分块缓冲区按进程分配,较大的 process-max 值会导致整体内存消耗增加。
注意,有效的分块大小因存储类型和平台而异。例如,AWS S3 的最小分块大小为 5MiB。分块大小的术语也因存储类型而异:AWS S3 称之为"part size",GCS 称之为"chunk size",Azure 称之为"block size"。
如果文件大于 1GiB(PostgreSQL 默认创建的最大文件大小),分块大小将逐步增大至允许的最大值,以完成文件上传。
default (depending on repo-type) :
azure - 4MiB
gcs - 4MiB
s3 - 5MiB
allow range (depending on repo-type) :
azure - [4MiB, 1GiB]
gcs - [4MiB, 1GiB]
s3 - [5MiB, 1GiB]
example : --repo1-storage-upload-chunk-size=16MiB
仓库存储证书验证选项(--repo-storage-verify-tls) 仓库存储证书验证。
启用或禁用存储(如 S3、Azure)服务端 TLS 证书的验证。仅在测试或使用自签名证书等特定场景下才应禁用验证。
default : y
example : --no -repo1-storage-verify-tls
已弃用名称:repo-azure-verify-tls、repo-s3-verify-ssl、repo-s3-verify-tls
仓库类型选项(--repo-type) 仓库使用的存储类型。
支持以下仓库类型:
azure - Azure Blob 存储服务cifs - 类似 posix,但禁用链接和目录 fsyncgcs - Google Cloud 存储posix - 符合 POSIX 规范的文件系统s3 - AWS 简单存储服务sftp - 安全文件传输协议当使用 NFS 挂载作为 posix 仓库时,适用于 pgBackRest 的规则与 PostgreSQL 文档中的描述相同,参见 创建数据库集群 - 文件系统
default : posix
example : --repo1-type=cifs
28.3.2 - 归档获取命令(archive-get) pgBackRest archive-get 命令的选项与行为参考。
原始页面: pgBackRest Command Docs: archive-get
PostgreSQL 通过此命令执行备份恢复、PITR,或将其作为流复制的替代方式来维持副本同步。WAL 段是 PostgreSQL 执行恢复或维护副本的必要条件。
配置多个仓库时,pgBackRest 按优先级顺序(如 repo1、repo2 等)依次从各仓库获取 WAL。速度更快或成本更低的存储应配置更高的优先级。若通过 --repo 选项指定了某个仓库,则仅从该仓库中查找。
archive-get 命令由 pgBackRest 在恢复过程中自动配置并生成,供 PostgreSQL 使用。相关示例请参见 时间点恢复
命令选项 异步归档选项(--archive-async) 异步推送/获取 WAL 段。
启用 archive-push 和 archive-get 命令的异步操作模式。
异步模式效率更高,可复用连接并充分利用并行处理。更多信息请参见 spool-path、archive-get-queue-max 和 archive-push-queue-max 选项。
default : n
example : --archive-async
归档获取最大队列大小选项(--archive-get-queue-max) archive-get 队列的最大容量。
指定启用 archive-async 时 archive-get 队列的最大容量。队列存储在 spool-path 中,用于加速向 PostgreSQL 提供 WAL。
default : 128MiB
allowed : [ 0B, 4PiB]
example : --archive-get-queue-max=1GiB
重试缺失 WAL 段选项(--archive-missing-retry) 重试缺失的 WAL 段。
在异步模式下,对之前被 archive-get 命令标记为缺失的 WAL 段进行重试。此选项可防止使用缓冲区路径中来自先前恢复的通知,避免在尚未达到一致性状态时导致恢复失败。
禁用此选项后,PostgreSQL 可以更可靠地识别归档中 WAL 的结束位置,从而切换到从主库进行流复制。若启用重试,持续的 WAL 归档流会使 PostgreSQL 继续从归档获取 WAL,而不切换到流复制。
禁用此选项时,务必确保 stanza 的缓冲区路径为空。若恢复时已配置缓冲区路径,restore 命令会自动清空;否则需要手动清空。
default : y
example : --no -archive-missing-retry
归档超时选项(--archive-timeout) 归档超时时间。
设置等待每个 WAL 段到达 pgBackRest 归档仓库的最长时间(秒)。此超时适用于 check 和 backup 命令在等待备份一致性所需的 WAL 段完成归档时。
default : 1m
allowed : [ 100ms, 1d]
example : --archive-timeout=30
通用选项 缓冲区大小选项(--buffer-size) I/O 操作的缓冲区大小。
用于复制、压缩、加密等操作的缓冲区大小。实际占用的缓冲区数量取决于具体选项,每个操作可能额外消耗内存,例如 gz 压缩可能额外占用 256KiB 内存。
允许的值为:16KiB、32KiB、64KiB、128KiB、256KiB、512KiB、1MiB、2MiB、4MiB、8MiB 和 16MiB。
default : 1MiB
example : --buffer-size=2MiB
pgBackRest 命令选项(--cmd) pgBackRest 命令路径。
pgBackRest 在某些场景下需要生成命令字符串,例如 restore 命令生成 restore_command 配置时。若未提供 cmd 选项,则使用当前运行的 pgBackRest 进程路径。
注意:
对 pgBackRest 命令进行包装可能导致不可预期的行为,不建议使用。
default : [ path of executed pgbackrest binary]
example : --cmd=/var/lib/pgsql/bin/pgbackrest_wrapper.sh
SSH 客户端命令选项(--cmd-ssh) SSH 客户端命令。
当需要使用特定的 SSH 客户端,或 ssh 命令不在 $PATH 中时,使用此选项指定。
default : ssh
example : --cmd-ssh=/usr/bin/ssh
网络压缩级别选项(--compress-level-network) 网络压缩级别。
当 compress-type=none 且命令不在仓库所在主机上运行时,通过此选项设置网络传输的压缩级别,以减少网络流量。若 compress-type 不等于 none,则忽略 compress-level-network,改用 compress-level,避免对文件进行二次压缩。
default : 1
allowed : [ -5 , 12 ]
example : --compress-level-network=1
配置文件选项(--config) pgBackRest 配置文件路径。
使用此选项指定非默认路径的配置文件。
default : CFGOPTDEF_CONFIG_PATH "/" PROJECT_CONFIG_FILE
example : --config=/conf/pgbackrest/pgbackrest.conf
配置包含路径选项(--config-include-path) 附加 pgBackRest 配置文件的目录路径。
该路径下扩展名为 .conf 的配置文件将与主配置文件合并,形成一份完整的配置。
default : CFGOPTDEF_CONFIG_PATH "/" PROJECT_CONFIG_INCLUDE_PATH
example : --config-include-path=/conf/pgbackrest/conf.d
配置基础路径选项(--config-path) pgBackRest 配置文件的基础路径。
用于覆盖 --config 和 --config-include-path 选项的默认基础路径,除非这两个选项已在命令行中显式指定。
例如,仅传入 --config-path=/conf/pgbackrest 时,--config 的默认值将变为 /conf/pgbackrest/pgbackrest.conf,--config-include-path 的默认值将变为 /conf/pgbackrest/conf.d。
default : CFGOPTDEF_CONFIG_PATH
example : --config-path=/conf/pgbackrest
I/O 超时选项(--io-timeout) I/O 超时时间。
用于连接及读/写操作的超时时间(秒)。
注意:整个读/写操作不必在此超时内全部完成,但必须 持续有进展,哪怕每次只传输一个字节。
default : 1m
allowed : [ 100ms, 1h]
example : --io-timeout=120
锁文件路径选项(--lock-path) 锁文件的存储路径。
pgBackRest 在此路径下创建锁文件,以防止冲突操作并发运行。
default : /tmp/pgbackrest
example : --lock-path=/backup/db/lock
中性 umask 选项(--neutral-umask) 使用中性 umask。
将 umask 设置为 0000,使仓库中的文件和目录以合理的权限创建。默认目录权限为 0750,默认文件权限为 0640,锁文件和日志目录的权限分别为 0770 和 0660。
如需使用执行用户自身的 umask,请在配置文件中设置 neutral-umask=n,或在命令行使用 --no-neutral-umask。
default : y
example : --no -neutral-umask
进程优先级选项(--priority) 设置进程优先级。
定义内核调度器赋予该进程的优先级(即 niceness 值)。正值降低优先级,负值提升优先级。普通进程在大多数情况下没有权限提升自身优先级。
allowed : [ -20 , 19 ]
example : --priority=19
最大进程数选项(--process-max) 用于压缩/传输的最大进程数。
每个进程负责压缩和传输,可加快命令执行速度。但不应将 process-max 设置过高,以免影响数据库性能。
default : 1
allowed : [ 1 , 999 ]
example : --process-max=4
协议超时选项(--protocol-timeout) 协议超时时间。
设置本地或远端进程在协议层等待新消息的最长时间(秒),防止进程无限期阻塞等待。
注意: protocol-timeout 选项的值必须大于 db-timeout 选项的值。
default : 31m
allowed : [ 100ms, 7d]
example : --protocol-timeout=630
保活选项(--sck-keep-alive) 启用 keep-alive。
在 socket 连接上启用 keep-alive 消息。
default : y
example : --no -sck-keep-alive
缓冲区路径选项(--spool-path) 临时数据的存储路径。
该路径用于存储异步 archive-push 和 archive-get 命令的数据。
异步 archive-push 命令在成功将 WAL 存入归档后,向缓冲区路径写入确认文件(失败时写入错误信息),以便前台进程快速通知 PostgreSQL。确认文件非常小——成功时为零字节,失败时仅几百字节。
异步 archive-get 命令会将 WAL 预取至缓冲区路径,以便在 PostgreSQL 请求时快速响应。缓冲区路径与 pg_xlog/pg_wal 位于同一文件系统时,文件移动效率最高。但不建议将缓冲区路径设置在 pg_xlog/pg_wal 目录内部 ,否则可能导致 pg_rewind 等 PostgreSQL 工具出现问题。
缓冲区路径中存储的数据并非严格意义上的临时数据,重启后应当保留。不过,即使数据丢失也不成问题——pgBackRest 会重新检查每个 WAL 段以确认 archive-push 的归档安全性,并为 archive-get 重建队列。
缓冲区路径应位于本地 Posix 兼容文件系统上,而非 NFS 或 CIFS 等远程文件系统。
default : /var/spool/pgbackrest
example : --spool-path=/backup/db/spool
Stanza 选项(--stanza) 定义 stanza。
stanza 是 pgBackRest 中用于标识一个 PostgreSQL 集群备份配置的逻辑名称,定义了集群的位置、备份方式、归档选项等。大多数数据库服务器只有一个 PostgreSQL 集群,因此只有一个 stanza;备份服务器则为每个需要备份的集群各配置一个 stanza。
命名 stanza 时,以主集群名称命名虽然直观,但更好的做法是描述集群所承载的业务内容。由于 stanza 名称同时用于主库和所有副本,选用描述集群实际功能的名称(如 app 或 dw)比使用本地集群名称(如 main 或 prod)更为合适。
TCP 保活计数选项(--tcp-keep-alive-count) Keep-Alive 探测包数量。
指定连接被判定为断开之前,允许丢失的 TCP keep-alive 消息数量。
此选项仅在支持 TCP_KEEPCNT socket 选项的系统上可用。
allowed : [ 1 , 32 ]
example : --tcp-keep-alive-count=3
TCP 保活空闲时间选项(--tcp-keep-alive-idle) Keep-Alive 空闲时间。
指定在无网络活动多少秒后,操作系统应发送 TCP keep-alive 消息。
此选项仅在支持 TCP_KEEPIDLE socket 选项的系统上可用。
allowed : [ 1 , 3600 ]
example : --tcp-keep-alive-idle=60
TCP 保活间隔选项(--tcp-keep-alive-interval) Keep-Alive 重传间隔。
指定未收到确认的 TCP keep-alive 消息在多少秒后进行重传。
此选项仅在支持 TCP_KEEPINTVL socket 选项的系统上可用。
allowed : [ 1 , 900 ]
example : --tcp-keep-alive-interval=30
TLSv1.2 加密套件选项(--tls-cipher-12) 允许使用的 TLSv1.2 加密套件。
pgBackRest 客户端与服务端之间的所有 TLS 连接均已加密,默认情况下与对象存储(如 S3)的连接也使用加密。
注意: 任何传输连接的最低安全级别为 TLSv1.2。
如有需要,可调整允许使用的加密套件。示例中的配置是合理选择,除非有特定安全要求。若未设置(默认),则使用底层 OpenSSL 库的默认值。
example : --tls-cipher-12=HIGH:MEDIUM:+3DES:!aNULL
TLSv1.3 加密套件选项(--tls-cipher-13) 允许使用的 TLSv1.3 加密套件。
pgBackRest 客户端与服务端之间的所有 TLS 连接均已加密,默认情况下与对象存储(如 S3)的连接也使用加密。
注意: 任何传输连接的最低安全级别为 TLSv1.2。
如有需要,可调整允许使用的加密套件。若未设置(默认),则使用底层 OpenSSL 库的默认值。
example : --tls-cipher-13=TLS_AES_256_GCM_SHA384:TLS_CHACHA20_POLY1305_SHA256
日志选项 控制台日志级别选项(--log-level-console) 控制台日志输出级别。
支持以下日志级别:
off - 不输出任何日志(不推荐)error - 仅输出错误warn - 输出警告和错误info - 输出信息、警告和错误detail - 输出详情、信息、警告和错误debug - 输出调试、详情、信息、警告和错误trace - 输出追踪(极详细的调试信息)、调试、信息、警告和错误default : warn
example : --log-level-console=error
文件日志级别选项(--log-level-file) 文件日志输出级别。
支持以下日志级别:
off - 不输出任何日志(不推荐)error - 仅输出错误warn - 输出警告和错误info - 输出信息、警告和错误detail - 输出详情、信息、警告和错误debug - 输出调试、详情、信息、警告和错误trace - 输出追踪(极详细的调试信息)、调试、信息、警告和错误default : info
example : --log-level-file=debug
标准错误日志级别选项(--log-level-stderr) stderr 日志输出级别。
指定哪些日志级别输出到 stderr(而非 stdout,后者由 log-level-console 控制)。时间戳和进程信息不会输出到 stderr。
支持以下日志级别:
off - 不输出任何日志(不推荐)error - 仅输出错误warn - 输出警告和错误info - 输出信息、警告和错误detail - 输出详情、信息、警告和错误debug - 输出调试、详情、信息、警告和错误trace - 输出追踪(极详细的调试信息)、调试、信息、警告和错误default : off
example : --log-level-stderr=error
日志路径选项(--log-path) 日志文件的存储路径。
pgBackRest 将日志文件存储在此路径下。注意:若设置了 log-level-file=off,则无需配置日志路径。
default : /var/log/pgbackrest
example : --log-path=/backup/db/log
子进程日志选项(--log-subprocess) 启用子进程日志记录。
为当前进程创建的子进程启用文件日志,使用 log-level-file 指定的日志级别。
default : n
example : --log-subprocess
日志时间戳选项(--log-timestamp) 启用日志时间戳。
在控制台和文件日志中启用时间戳。此选项在生成文档等特殊场景下会被禁用。
default : y
example : --no -log-timestamp
维护者选项 强制指定 PostgreSQL 版本选项(--pg-version-force) 强制指定 PostgreSQL 版本。
使用指定的 PostgreSQL 版本,而非通过读取 pg_control 或 WAL 头部自动检测到的版本。此选项主要用于 PostgreSQL 分支版本或开发版本——这些版本中的相关值可能与正式发行版不同。PostgreSQL 通过 server_version_num 报告的版本必须与强制指定的版本一致。
警告:
使用此选项需谨慎。pg_control 和 WAL 头部仍会按指定版本的预期格式(即 PostgreSQL 官方开源版本的格式)进行读取。若分支或开发版本修改了 pgBackRest 所依赖字段的格式,将导致不可预期的行为。通常只有当分支在标准 PostgreSQL 成员之后 添加自定义结构体成员时,此选项才能正常工作。
example : --pg-version-force=15
仓库选项 指定仓库选项(--repo) 指定操作的目标仓库。
指定命令所操作的仓库。例如,可使用此选项从特定仓库执行恢复,而不是由 pgBackRest 自动选择。
allowed : [ 1 , 256 ]
example : --repo=1
Azure 仓库容器选项(--repo-azure-container) Azure 仓库容器名称。
用于存储仓库的 Azure 容器。
通过设置 repo-path=/ 可将 pgBackRest 仓库存储在容器根目录,但通常建议指定前缀(如 /repo),以便日志及其他 Azure 生成的内容也能存储在同一容器中。
example : --repo1-azure-container=pg-backup
Azure 仓库密钥类型选项(--repo-azure-key-type) Azure 仓库密钥类型。
支持以下授权类型:
shared - 共享密钥sas - 共享访问签名auto - 使用 Azure 托管标识自动授权default : shared
example : --repo1-azure-key-type=sas
Azure 仓库 URI 风格选项(--repo-azure-uri-style) Azure URI 风格。
支持以下 URI 风格:
host - 连接到 account.endpoint 主机。path - 连接到 endpoint 主机并在 URI 前添加账户名。default : host
example : --repo1-azure-uri-style=path
仓库加密类型选项(--repo-cipher-type) 仓库加密所用的密码算法。
支持以下加密类型:
none - 仓库不加密aes-256-cbc - 256 位密钥长度的高级加密标准注意:即使仓库类型(如 S3)本身支持加密,pgBackRest 的加密也始终在客户端执行。
default : none
example : --repo1-cipher-type=aes-256-cbc
GCS 仓库存储桶选项(--repo-gcs-bucket) GCS 仓库存储桶名称。
用于存储仓库的 GCS 存储桶。
通过设置 repo-path=/ 可将 pgBackRest 仓库存储在存储桶根目录,但通常建议指定前缀(如 /repo),以便日志及其他 GCS 生成的内容也能存储在同一存储桶中。
example : --repo1-gcs-bucket=/pg-backup
GCS 仓库端点选项(--repo-gcs-endpoint) GCS 仓库端点地址。
用于连接存储服务的端点,可更新为本地 GCS 服务器或备用端点。
default : storage.googleapis.com
example : --repo1-gcs-endpoint=localhost
GCS 仓库密钥类型选项(--repo-gcs-key-type) GCS 仓库密钥类型。
支持以下授权类型:
auto - 使用实例服务账号授权。service - 使用本地存储的服务账号密钥。token - 用于本地测试,例如 fakegcs。设置 repo-gcs-key-type=service 时,认证令牌续期时会重新加载凭证。
default : service
example : --repo1-gcs-key-type=auto
GCS 仓库项目 ID 选项(--repo-gcs-user-project) GCS 项目 ID。
用于确定请求计费归属的 GCS 项目 ID。
example : --repo1-gcs-user-project=my-project
仓库主机选项(--repo-host) 远程操作时的仓库主机地址。
若备份和归档目标为本地挂载的文件系统,则无需配置此选项。
example : --repo1-host=repo1.domain.com
已弃用名称:backup-host
仓库主机证书颁发机构文件选项(--repo-host-ca-file) 仓库主机证书颁发机构文件。
连接仓库主机时使用非系统默认的 CA 文件。
example : --repo1-host-ca-file=/etc/pki/tls/certs/ca-bundle.crt
仓库主机证书颁发机构路径选项(--repo-host-ca-path) 仓库主机证书颁发机构路径。
连接仓库主机时使用非系统默认的 CA 路径。
example : --repo1-host-ca-path=/etc/pki/tls/certs
仓库主机证书文件选项(--repo-host-cert-file) 仓库主机证书文件。
向仓库主机发送,用于证明客户端身份。
example : --repo1-host-cert-file=/path/to/client.crt
仓库主机命令选项(--repo-host-cmd) 仓库主机上的 pgBackRest 命令路径。
仅当本地主机与仓库主机上的 pgBackRest 命令路径不同时才需要配置。若未定义,仓库主机命令将与本地命令保持一致。
default : [ path of executed pgbackrest binary]
example : --repo1-host-cmd=/usr/lib/backrest/bin/pgbackrest
已弃用名称:backup-cmd
仓库主机配置文件选项(--repo-host-config) pgBackRest 仓库主机配置文件路径。
设置仓库主机上的配置文件位置。仅当仓库主机上的配置文件路径与本地不同时才需要配置。
default : CFGOPTDEF_CONFIG_PATH "/" PROJECT_CONFIG_FILE
example : --repo1-host-config=/conf/pgbackrest/pgbackrest.conf
已弃用名称:backup-config
仓库主机配置包含路径选项(--repo-host-config-include-path) pgBackRest 仓库主机配置包含路径。
设置仓库主机上配置包含路径的位置。仅当仓库主机上的配置包含路径与本地不同时才需要配置。
default : CFGOPTDEF_CONFIG_PATH "/" PROJECT_CONFIG_INCLUDE_PATH
example : --repo1-host-config-include-path=/conf/pgbackrest/conf.d
仓库主机配置路径选项(--repo-host-config-path) pgBackRest 仓库主机配置路径。
设置仓库主机上配置路径的位置。仅当仓库主机上的配置路径与本地不同时才需要配置。
default : CFGOPTDEF_CONFIG_PATH
example : --repo1-host-config-path=/conf/pgbackrest
仓库主机密钥文件选项(--repo-host-key-file) 仓库主机密钥文件。
用于证明客户端证书由所有者发送。
example : --repo1-host-key-file=/path/to/client.key
仓库主机端口选项(--repo-host-port) 设置了 repo-host 时使用的仓库主机端口。
使用此选项为仓库主机协议指定非默认端口。
注意: 当 repo-host-type=ssh 时,repo-host-port 没有默认值,端口由 cmd-ssh 指定的命令配置决定。
default (depending on repo-host-type) :
tls - 8432
allowed : [ 0 , 65535 ]
example : --repo1-host-port=25
已弃用名称:backup-ssh-port
仓库主机协议类型选项(--repo-host-type) 仓库主机协议类型。
支持以下协议类型:
ssh - 安全外壳协议(SSH)。tls - pgBackRest TLS 服务器。default : ssh
example : --repo1-host-type=tls
仓库主机用户选项(--repo-host-user) 设置了 repo-host 时使用的仓库主机用户。
定义在仓库主机上执行操作的用户。建议使用非 postgres 的专用用户(如 pgbackrest)。若 PostgreSQL 运行在仓库主机上,可将 postgres 用户加入 pgbackrest 组,使其具有仓库读取权限,同时避免意外损坏仓库内容。
default : pgbackrest
example : --repo1-host-user=repo-user
已弃用名称:backup-user
仓库路径选项(--repo-path) 备份和归档的存储路径。
pgBackRest 在此仓库中存储备份并归档 WAL 段。
预估所需空间并不容易。建议先执行几次备份,记录不同类型备份(全量/增量/差异)的大小,并统计每天产生的 WAL 量,从而大致估算所需空间。随着数据库规模增长,需求也会随之变化。
default : /var/lib/pgbackrest
example : --repo1-path=/backup/db/backrest
S3 仓库存储桶选项(--repo-s3-bucket) S3 仓库存储桶名称。
用于存储仓库的 S3 存储桶。
通过设置 repo-path=/ 可将 pgBackRest 仓库存储在存储桶根目录,但通常建议指定前缀(如 /repo),以便日志及其他 AWS 生成的内容也能存储在同一存储桶中。
example : --repo1-s3-bucket=pg-backup
S3 仓库端点选项(--repo-s3-endpoint) S3 仓库端点地址。
AWS 端点应与所选区域匹配。
对于自定义或测试配置,repo-storage-ca-file、repo-storage-ca-path、repo-storage-host、repo-storage-port 和 repo-storage-verify-tls 选项可能有所帮助。
example : --repo1-s3-endpoint=s3.amazonaws.com
S3 仓库密钥类型选项(--repo-s3-key-type) S3 仓库密钥类型。
支持以下类型:
shared - 共享密钥auto - 自动获取临时凭证web-id - 自动获取 Web 身份凭证default : shared
example : --repo1-s3-key-type=auto
S3 仓库 KMS 密钥 ID 选项(--repo-s3-kms-key-id) S3 仓库 KMS 密钥。
使用指定的 AWS 密钥管理服务密钥启用 S3 服务端加密。
example : --repo1-s3-kms-key-id=bceb4f13-6939-4be3-910d-df54dee817b7
S3 仓库区域选项(--repo-s3-region) S3 仓库区域。
创建存储桶所在的 AWS 区域。
example : --repo1-s3-region=us-east-1
S3 仓库请求方付费选项(--repo-s3-requester-pays) S3 仓库请求方付费。
启用 S3 请求方付费功能。
default : n
example : --no -repo1-s3-requester-pays
S3 仓库角色选项(--repo-s3-role) S3 仓库角色。
当 repo-s3-key-type=auto 时,用于获取临时凭证的 AWS 角色名称(非完整 ARN)。
example : --repo1-s3-role=authrole
S3 仓库 URI 风格选项(--repo-s3-uri-style) S3 URI 风格。
支持以下 URI 风格:
host - 连接到 bucket.endpoint 主机。path - 连接到 endpoint 主机并在 URI 前添加存储桶名。default : host
example : --repo1-s3-uri-style=path
SFTP 仓库主机选项(--repo-sftp-host) SFTP 仓库主机地址。
包含仓库的 SFTP 主机。
example : --repo1-sftp-host=sftprepo.domain
SFTP 仓库主机指纹选项(--repo-sftp-host-fingerprint) SFTP 仓库主机指纹。
SFTP 仓库主机指纹的生成方式应与 repo-sftp-host-key-hash-type 匹配。可通过以下命令生成指纹:
awk '{print $2}' ssh_host_xxx_key.pub | base64 -d | (md5sum or sha1sum) -b
SSH 主机密钥通常位于 /etc/ssh 目录下。
example : --repo1-sftp-host-fingerprint=f84e172dfead7aeeeae6c1fdfb5aa8cf
SFTP 主机密钥检查类型选项(--repo-sftp-host-key-check-type) SFTP 主机密钥检查类型。
支持以下检查类型:
strict - pgBackRest 不会自动将主机密钥添加到 ~/.ssh/known_hosts 文件,且拒绝连接主机密钥已更改或未在已知主机文件中找到的主机。此选项要求用户手动添加所有新主机。accept-new - pgBackRest 会自动将新主机密钥添加到用户的已知主机文件,但不允许连接主机密钥已更改的主机。fingerprint - pgBackRest 将根据 repo-sftp-host-fingerprint 选项指定的指纹检查主机密钥。none - 不执行主机密钥检查。default : strict
example : --repo1-sftp-host-key-check-type=accept-new
SFTP 仓库主机密钥哈希类型选项(--repo-sftp-host-key-hash-type) SFTP 仓库主机密钥哈希类型。
声明在 SSH 启动时计算远端系统主机密钥摘要所使用的哈希类型。较新版本的 libssh2 除支持 md5 和 sha1 外,还支持 sha256。
example : --repo1-sftp-host-key-hash-type=sha256
SFTP 仓库主机端口选项(--repo-sftp-host-port) SFTP 仓库主机端口。
SFTP 仓库主机的连接端口。
default : 22
allowed : [ 1 , 65535 ]
example : --repo1-sftp-host-port=22
SFTP 仓库主机用户选项(--repo-sftp-host-user) SFTP 仓库主机用户。
用于存储仓库的主机上的用户。
example : --repo1-sftp-host-user=pg-backup
SFTP 已知主机文件选项(--repo-sftp-known-host) SFTP 已知主机文件。
身份验证时用于查找 SFTP 主机匹配项的已知主机文件。若未指定,pgBackRest 默认搜索 ~/.ssh/known_hosts、~/.ssh/known_hosts2、/etc/ssh/ssh_known_hosts 和 /etc/ssh/ssh_known_hosts2。若配置了一个或多个文件路径,pgBackRest 将仅在这些路径中查找匹配项。文件路径必须为完整路径或以波浪号开头的路径。可多次传入 repo-sftp-known-host 以指定多个已知主机文件。使用已知主机文件检查时,不得同时指定 repo-sftp-host-fingerprint。另请参见 repo-sftp-host-check-type 选项。
example : --repo1-sftp-known-host=/home/postgres/.ssh/known_hosts
SFTP 仓库私钥文件选项(--repo-sftp-private-key-file) SFTP 私钥文件。
用于身份验证的 SFTP 私钥文件。
example : --repo1-sftp-private-key-file=~/.ssh/id_ed25519
SFTP 仓库公钥文件选项(--repo-sftp-public-key-file) SFTP 公钥文件。
用于身份验证的 SFTP 公钥文件。若编译时使用 OpenSSL 则为可选,若使用其他库则为必填。
example : --repo1-sftp-public-key-file=~/.ssh/id_ed25519.pub
仓库存储 CA 文件选项(--repo-storage-ca-file) 仓库存储 CA 文件。
连接存储(如 S3、Azure)时使用非系统默认的 CA 文件。
example : --repo1-storage-ca-file=/etc/pki/tls/certs/ca-bundle.crt
已弃用名称:repo-azure-ca-file, repo-s3-ca-file
仓库存储 TLS CA 路径选项(--repo-storage-ca-path) 仓库存储 CA 路径。
连接存储(如 S3、Azure)时使用非系统默认的 CA 路径。
example : --repo1-storage-ca-path=/etc/pki/tls/certs
已弃用名称:repo-azure-ca-path, repo-s3-ca-path
仓库存储主机选项(--repo-storage-host) 仓库存储主机。
连接到存储(如 S3、Azure)端点以外的主机,通常用于测试。
example : --repo1-storage-host=127.0.0.1
已弃用名称:repo-azure-host, repo-s3-host
仓库存储端口选项(--repo-storage-port) 仓库存储端口。
连接存储(如 S3、Azure)端点(或指定主机)时使用的端口。
default : 443
allowed : [ 1 , 65535 ]
example : --repo1-storage-port=9000
已弃用名称:repo-azure-port, repo-s3-port
仓库存储标签选项(--repo-storage-tag) 仓库存储标签。
当仓库为对象存储(如 S3)时,为对象添加指定标签。此选项可重复使用以添加多个标签。
pgBackRest 不提供修改标签的功能,因此请在运行 stanza-create 之前确保标签设置正确,以保证整个仓库标签的一致性。
example : --repo1-storage-tag=key1=value1
仓库存储上传分块大小选项(--repo-storage-upload-chunk-size) 仓库存储上传分块大小。
当文件过大无法全部存入内存时,S3 等对象存储支持分块上传。即使文件能够存入内存,限制上传内存用量也更为高效。
较大的分块大小通常可提升性能,因为它能减少上传请求次数,让更多文件在单次请求中完成上传,而非分块传输。缺点是内存占用更高——由于分块缓冲区需按进程分配,process-max 值越大,总体内存消耗越多。
注意,有效的分块大小因存储类型和平台而异。例如,AWS S3 的最小分块大小为 5MiB。各存储类型对分块大小的术语也不同:AWS S3 称为"part size",GCS 称为"chunk size",Azure 称为"block size"。
若文件大于 1GiB(PostgreSQL 默认创建文件的最大大小),则分块大小将递增至允许的最大值,以完成文件上传。
default (depending on repo-type) :
azure - 4MiB
gcs - 4MiB
s3 - 5MiB
allow range (depending on repo-type) :
azure - [4MiB, 1GiB]
gcs - [4MiB, 1GiB]
s3 - [5MiB, 1GiB]
example : --repo1-storage-upload-chunk-size=16MiB
仓库存储证书验证选项(--repo-storage-verify-tls) 仓库存储证书验证。
启用或禁用对存储(如 S3、Azure)服务器 TLS 证书的验证。仅在测试或使用自签名证书的场景下才应禁用验证。
default : y
example : --no -repo1-storage-verify-tls
已弃用名称:repo-azure-verify-tls, repo-s3-verify-ssl, repo-s3-verify-tls
仓库目标时间选项(--repo-target-time) 仓库目标时间。
目标时间定义了命令读取版本化存储上仓库时所参照的时间点。通过此选项,命令可以读取某一历史时间点的仓库状态,从而恢复因用户误操作或恶意软件导致删除或损坏的数据。
S3、GCS 和 Azure 均支持版本化存储,但通常默认未启用。除了启用版本化,还可以考虑为 S3 启用对象锁定,为 GCS 或 Azure 启用软删除功能。
指定 repo-target-time 时,还必须同时提供 repo 选项。通常并非所有仓库类型都支持版本化功能,因此建议针对单个仓库进行恢复。
注意:与存储时间戳的比较采用小于等于(<=)的方式,且时间戳中的毫秒部分在比较时会被截断。
example : --repo-target-time=2024-08-08 12:12:12+00
仓库类型选项(--repo-type) 仓库所使用的存储类型。
支持以下仓库类型:
azure - Azure Blob 存储服务cifs - 类似 posix,但禁用链接和目录 fsyncgcs - Google Cloud Storageposix - 符合 Posix 标准的文件系统s3 - AWS Simple Storage Servicesftp - 安全文件传输协议将 NFS 挂载用作 posix 仓库时,适用于 pgBackRest 的规则与 PostgreSQL 文档中描述的规则相同,请参见 Creating a Database Cluster - File Systems
default : posix
example : --repo1-type=cifs
Stanza 选项 PostgreSQL 路径选项(--pg-path) PostgreSQL 数据目录。
应与 PostgreSQL 报告的 data_directory 一致。尽管此值可从多处读取,但建议明确配置,以防在恢复或离线备份场景中相关资源不可用。
pg-path 选项在每次在线备份时都会与 PostgreSQL 报告的值进行校验,因此应始终保持最新。
example : --pg1-path=/data/db
已弃用名称:db-path
28.3.3 - 归档推送命令(archive-push) pgBackRest archive-push 命令的选项与行为参考。
原始页面: pgBackRest Command Docs: archive-push
接收来自 PostgreSQL 的 WAL 段,并将其归档到各个仓库中(仓库路径由带索引的 repo-path 选项定义,详见 仓库选项 archive-async 的值先暂存在本地。配置了多个仓库时,archive-push 会尽量向所有仓库推送。
archive-push 由 PostgreSQL 负责配置和调用。相关示例请参见 配置归档
命令选项 异步归档选项(--archive-async) 异步推送/获取 WAL 段。
为 archive-push 和 archive-get 命令启用异步操作模式。
异步模式效率更高,因为它能复用连接并充分利用并行处理能力。详情请参见 spool-path、archive-get-queue-max 和 archive-push-queue-max 选项。
default : n
example : --archive-async
归档检查选项(--archive-check) 在备份完成前检查 WAL 段是否已存入归档。
检查使备份达到一致性所需的全部 WAL 段是否已存在于 WAL 归档中。除非采用了其他归档方式,否则建议保留默认值。
若启用了 archive-copy,则必须同时启用此选项。
default : y
example : --no -archive-check
归档模式检查选项(--archive-mode-check) 检查 PostgreSQL 的 archive_mode 设置。
此选项默认启用,用于禁止 PostgreSQL 使用 archive_mode=always。
从备库推送的 WAL 段,其内容在逻辑上可能与从主库推送的相同,但校验和不同。为避免冲突,建议禁止从多个来源归档。
注意:
若禁用此选项,必须确保只有一个归档进程通过 archive-push 命令向仓库写入数据。
default : y
example : --no -archive-mode-check
归档推送最大队列大小选项(--archive-push-queue-max) PostgreSQL 归档队列的最大容量。
达到上限后,将发生以下情况:
pgBackRest 会告知 PostgreSQL WAL 已成功归档,然后将其丢弃 。 PostgreSQL 日志中会输出一条警告。 一旦发生此情况,归档日志流将中断,此后无法进行 PITR。需重新执行一次备份才能恢复完整的恢复能力。
在异步模式下,整个队列将被清空,以防止在再次触及队列上限之前仅有零星 WAL 通过。
此功能旨在防止日志卷空间耗尽——一旦日志卷写满,PostgreSQL 将完全停止运行。与其让 PostgreSQL 宕机,不如主动丢弃备份。
allowed : [ 0B, 4PiB]
example : --archive-push-queue-max=1TiB
已弃用名称:archive-queue-max
归档超时选项(--archive-timeout) 归档超时时间。
等待每个 WAL 段到达 pgBackRest 归档仓库的最长时间(秒)。此超时适用于 check 和 backup 命令等待备份一致性所需 WAL 段完成归档的场景。
default : 1m
allowed : [ 100ms, 1d]
example : --archive-timeout=30
通用选项 缓冲区大小选项(--buffer-size) I/O 操作的缓冲区大小。
用于复制、压缩、加密等操作的缓冲区大小。实际使用的缓冲区数量取决于具体选项,每种操作可能额外占用内存,例如 gz 压缩可能额外占用 256KiB。
允许的值:16KiB、32KiB、64KiB、128KiB、256KiB、512KiB、1MiB、2MiB、4MiB、8MiB、16MiB。
default : 1MiB
example : --buffer-size=2MiB
pgBackRest 命令选项(--cmd) pgBackRest 命令路径。
pgBackRest 有时需要生成命令字符串,例如 restore 命令生成 restore_command 配置时。若未提供 cmd 选项,则使用当前运行的 pgBackRest 进程路径。
注意:
对 pgBackRest 命令进行包装可能导致不可预期的行为,不建议使用。
default : [ path of executed pgbackrest binary]
example : --cmd=/var/lib/pgsql/bin/pgbackrest_wrapper.sh
SSH 客户端命令选项(--cmd-ssh) SSH 客户端命令。
如需使用特定的 SSH 客户端,或 ssh 命令不在 $PATH 中,可通过此选项指定。
default : ssh
example : --cmd-ssh=/usr/bin/ssh
压缩选项(--compress) 启用文件压缩。
备份文件与命令行压缩工具兼容。
此选项已弃用,请改用 compress-type 选项。
default : y
example : --no -compress
压缩级别选项(--compress-level) 文件压缩级别。
当 compress-type 不等于 none,或使用已弃用的 compress=y 时,此选项指定文件压缩级别。
default (depending on compress-type) :
bz2 - 9
gz - 6
lz4 - 1
zst - 3
allow range (depending on compress-type) :
bz2 - [1, 9]
gz - [-1, 9]
lz4 - [-5, 12]
zst - [-7, 22]
example : --compress-level=9
网络压缩级别选项(--compress-level-network) 网络传输压缩级别。
当 compress-type=none 且命令不在仓库所在主机上运行时,通过此选项设置网络传输的压缩级别以减少网络流量。若 compress-type 不等于 none,则忽略 compress-level-network,改用 compress-level,从而避免对文件进行二次压缩。
default : 1
allowed : [ -5 , 12 ]
example : --compress-level-network=1
压缩类型选项(--compress-type) 文件压缩类型。
支持以下压缩类型:
none - 不压缩bz2 - bzip2 压缩格式gz - gzip 压缩格式lz4 - lz4 压缩格式(并非所有平台均支持)zst - Zstandard 压缩格式(并非所有平台均支持)default : gz
example : --compress-type=none
配置文件选项(--config) pgBackRest 配置文件路径。
指定非默认路径的配置文件时使用此选项。
default : CFGOPTDEF_CONFIG_PATH "/" PROJECT_CONFIG_FILE
example : --config=/conf/pgbackrest/pgbackrest.conf
配置包含路径选项(--config-include-path) 附加 pgBackRest 配置文件的目录路径。
该路径下扩展名为 .conf 的配置文件将与主配置文件合并,共同构成完整配置。
default : CFGOPTDEF_CONFIG_PATH "/" PROJECT_CONFIG_INCLUDE_PATH
example : --config-include-path=/conf/pgbackrest/conf.d
配置基础路径选项(--config-path) pgBackRest 配置文件的基础路径。
用于覆盖 --config 和 --config-include-path 选项的默认基础路径,前提是这两个选项未在命令行中显式指定。
例如,仅传入 --config-path=/conf/pgbackrest 时,--config 的默认值将变为 /conf/pgbackrest/pgbackrest.conf,--config-include-path 的默认值将变为 /conf/pgbackrest/conf.d。
default : CFGOPTDEF_CONFIG_PATH
example : --config-path=/conf/pgbackrest
I/O 超时选项(--io-timeout) I/O 超时时间。
连接及读/写操作的超时时间(秒)。
注意:整个读/写操作无需在此超时内全部完成,但必须 有进展,哪怕只传输了一个字节。
default : 1m
allowed : [ 100ms, 1h]
example : --io-timeout=120
锁文件路径选项(--lock-path) 锁文件的存储路径。
pgBackRest 在此路径下创建锁文件,以防止冲突操作并发运行。
default : /tmp/pgbackrest
example : --lock-path=/backup/db/lock
中性 umask 选项(--neutral-umask) 使用中性 umask。
将 umask 设置为 0000,使仓库中的文件和目录以合理的权限创建。默认目录权限为 0750,默认文件权限为 0640。锁文件和日志目录的权限分别为 0770 和 0660。
如需使用执行用户自身的 umask,请在配置文件中设置 neutral-umask=n,或在命令行传入 --no-neutral-umask。
default : y
example : --no -neutral-umask
进程优先级选项(--priority) 设置进程优先级。
定义内核调度器赋予该进程的优先级(即 niceness 值)。正值降低优先级,负值提升优先级。普通进程通常没有权限自行提升优先级。
allowed : [ -20 , 19 ]
example : --priority=19
最大进程数选项(--process-max) 用于压缩/传输的最大进程数。
每个进程负责压缩和传输,可加快命令执行速度。但 process-max 不宜设置过高,否则可能影响数据库性能。
default : 1
allowed : [ 1 , 999 ]
example : --process-max=4
协议超时选项(--protocol-timeout) 协议超时时间。
本地或远端进程在协议层等待新消息的最长时间(秒),防止进程无限期阻塞。
注意: protocol-timeout 选项的值必须大于 db-timeout 选项的值。
default : 31m
allowed : [ 100ms, 7d]
example : --protocol-timeout=630
保活选项(--sck-keep-alive) 启用 keep-alive。
在 socket 连接上启用 keep-alive 消息。
default : y
example : --no -sck-keep-alive
缓冲区路径选项(--spool-path) 临时数据的存储路径。
用于存储异步 archive-push 和 archive-get 命令数据的路径。
异步 archive-push 命令在成功将 WAL 存入归档后,会在缓冲区路径写入确认文件(失败时写入错误信息),供前台进程快速通知 PostgreSQL。确认文件非常小——成功时为零字节,失败时仅几百字节。
异步 archive-get 命令会将 WAL 缓冲至此路径,以便在 PostgreSQL 请求时快速提供。若缓冲区路径与 pg_xlog/pg_wal 位于同一文件系统,文件移动效率最高。但不建议将缓冲区路径设置在 pg_xlog/pg_wal 目录内部 ,否则可能导致 pg_rewind 等 PostgreSQL 工具出现问题。
缓冲区路径中的数据并非严格意义上的临时数据,重启后应当保留。不过,即使数据丢失也不成问题——pgBackRest 会重新检查每个 WAL 段以确认 archive-push 的归档安全性,并为 archive-get 重建队列。
缓冲区路径应位于本地 Posix 兼容文件系统上,而非 NFS 或 CIFS 等远程文件系统。
default : /var/spool/pgbackrest
example : --spool-path=/backup/db/spool
Stanza 选项(--stanza) 定义 stanza。
stanza 是 pgBackRest 中用于标识一个 PostgreSQL 集群备份配置的逻辑名称,定义了集群的位置、备份方式、归档选项等。大多数数据库服务器只有一个 PostgreSQL 集群,因此只有一个 stanza;备份服务器则为每个需要备份的数据库集群各配置一个 stanza。
命名 stanza 时,以主集群名称命名虽然直观,但更好的做法是描述集群中所承载的数据库内容。由于 stanza 名称同时适用于主库和所有副本,选用描述集群实际功能的名称(如 app 或 dw)比使用本地集群名称(如 main 或 prod)更为合适。
TCP 保活计数选项(--tcp-keep-alive-count) Keep-Alive 探测包数量。
连接被判定为断开之前,允许丢失的 TCP keep-alive 消息数量。
此选项仅在支持 TCP_KEEPCNT socket 选项的系统上可用。
allowed : [ 1 , 32 ]
example : --tcp-keep-alive-count=3
TCP 保活空闲时间选项(--tcp-keep-alive-idle) Keep-Alive 空闲时间。
无网络活动超过指定秒数后,操作系统发送 TCP keep-alive 消息的等待时长。
此选项仅在支持 TCP_KEEPIDLE socket 选项的系统上可用。
allowed : [ 1 , 3600 ]
example : --tcp-keep-alive-idle=60
TCP 保活间隔选项(--tcp-keep-alive-interval) Keep-Alive 重传间隔。
未收到确认的 TCP keep-alive 消息经过指定秒数后进行重传。
此选项仅在支持 TCP_KEEPINTVL socket 选项的系统上可用。
allowed : [ 1 , 900 ]
example : --tcp-keep-alive-interval=30
TLSv1.2 加密套件选项(--tls-cipher-12) 允许使用的 TLSv1.2 加密套件。
pgBackRest 客户端与服务端之间的所有 TLS 连接均已加密。默认情况下,与对象存储(如 S3)的连接同样使用加密。
注意: 任何传输连接的最低安全级别为 TLSv1.2。
如有需要,可调整允许使用的加密套件。示例中的配置是合理的选择,除非有特定安全要求。若未设置(默认),则使用底层 OpenSSL 库的默认值。
example : --tls-cipher-12=HIGH:MEDIUM:+3DES:!aNULL
TLSv1.3 加密套件选项(--tls-cipher-13) 允许使用的 TLSv1.3 加密套件。
pgBackRest 客户端与服务端之间的所有 TLS 连接均已加密。默认情况下,与对象存储(如 S3)的连接同样使用加密。
注意: 任何传输连接的最低安全级别为 TLSv1.2。
如有需要,可调整允许使用的加密套件。若未设置(默认),则使用底层 OpenSSL 库的默认值。
example : --tls-cipher-13=TLS_AES_256_GCM_SHA384:TLS_CHACHA20_POLY1305_SHA256
日志选项 控制台日志级别选项(--log-level-console) 控制台日志输出级别。
支持以下日志级别:
off - 不输出任何日志(不推荐)error - 仅输出错误warn - 输出警告和错误info - 输出信息、警告和错误detail - 输出详情、信息、警告和错误debug - 输出调试、详情、信息、警告和错误trace - 输出追踪(极详细的调试信息)、调试、信息、警告和错误default : warn
example : --log-level-console=error
文件日志级别选项(--log-level-file) 文件日志输出级别。
支持以下日志级别:
off - 不输出任何日志(不推荐)error - 仅输出错误warn - 输出警告和错误info - 输出信息、警告和错误detail - 输出详情、信息、警告和错误debug - 输出调试、详情、信息、警告和错误trace - 输出追踪(极详细的调试信息)、调试、信息、警告和错误default : info
example : --log-level-file=debug
标准错误日志级别选项(--log-level-stderr) stderr 日志输出级别。
指定哪些日志级别输出到 stderr(而非 stdout,后者由 log-level-console 控制)。时间戳和进程信息不会输出到 stderr。
支持以下日志级别:
off - 不输出任何日志(不推荐)error - 仅输出错误warn - 输出警告和错误info - 输出信息、警告和错误detail - 输出详情、信息、警告和错误debug - 输出调试、详情、信息、警告和错误trace - 输出追踪(极详细的调试信息)、调试、信息、警告和错误default : off
example : --log-level-stderr=error
日志路径选项(--log-path) 日志文件的存储路径。
pgBackRest 将日志文件存储在此路径下。注意:若设置了 log-level-file=off,则无需配置日志路径。
default : /var/log/pgbackrest
example : --log-path=/backup/db/log
子进程日志选项(--log-subprocess) 启用子进程日志记录。
为当前进程派生的子进程启用文件日志,日志级别由 log-level-file 指定。
default : n
example : --log-subprocess
日志时间戳选项(--log-timestamp) 启用日志时间戳。
在控制台和文件日志中添加时间戳。此选项在生成文档等特殊场景下会被禁用。
default : y
example : --no -log-timestamp
维护者选项 检查 WAL 头部中的 PostgreSQL 版本/ID。
此选项默认启用,通过对照 PostgreSQL 版本和系统标识符检查 WAL 头部,确保 WAL 被复制到正确的 stanza。这是在核验 pg_control 与 stanza 匹配性、以及验证 WAL 是否来自 pg_control 所在 PostgreSQL 数据目录的基础上进行的额外校验。
因此,禁用此检查相对安全,但仅应在必要时使用,例如 WAL 已加密的场景。
default : y
example : --no -archive-header-check
强制指定 PostgreSQL 版本选项(--pg-version-force) 强制指定 PostgreSQL 版本。
使用指定的 PostgreSQL 版本,而非通过读取 pg_control 或 WAL 头部自动检测到的版本。此选项主要用于 PostgreSQL 的分支版本或开发版本——这些版本中相关值可能与正式发行版不同。PostgreSQL 通过 server_version_num 报告的版本必须与强制指定的版本一致。
警告:
使用此选项时需谨慎。pg_control 和 WAL 头部仍会按指定版本的预期格式(即 PostgreSQL 官方开源版本的格式)进行解析。若分支或开发版本修改了 pgBackRest 所依赖字段的格式,将导致不可预期的行为。通常只有当分支在标准 PostgreSQL 成员之后 添加自定义结构体成员时,此选项才能正常工作。
example : --pg-version-force=15
仓库选项 Azure 仓库容器选项(--repo-azure-container) Azure 仓库容器名称。
用于存储仓库的 Azure 容器。
通过设置 repo-path=/ 可将 pgBackRest 仓库存储在容器根目录,但通常建议指定前缀(如 /repo),以便日志及其他 Azure 生成的内容也能存入同一容器。
example : --repo1-azure-container=pg-backup
Azure 仓库密钥类型选项(--repo-azure-key-type) Azure 仓库密钥类型。
支持以下授权类型:
shared - 共享密钥sas - 共享访问签名auto - 使用 Azure 托管标识自动授权default : shared
example : --repo1-azure-key-type=sas
Azure 仓库 URI 风格选项(--repo-azure-uri-style) Azure URI 风格。
支持以下 URI 风格:
host - 连接到 account.endpoint 主机。path - 连接到 endpoint 主机并在 URI 前添加账户名。default : host
example : --repo1-azure-uri-style=path
仓库加密类型选项(--repo-cipher-type) 仓库加密所用的密码算法。
支持以下加密类型:
none - 仓库不加密aes-256-cbc - 256 位密钥长度的高级加密标准注意:即使仓库类型(如 S3)本身支持加密,pgBackRest 的加密始终在客户端执行。
default : none
example : --repo1-cipher-type=aes-256-cbc
GCS 仓库存储桶选项(--repo-gcs-bucket) GCS 仓库存储桶名称。
用于存储仓库的 GCS 存储桶。
通过设置 repo-path=/ 可将 pgBackRest 仓库存储在存储桶根目录,但通常建议指定前缀(如 /repo),以便日志及其他 GCS 生成的内容也能存入同一存储桶。
example : --repo1-gcs-bucket=/pg-backup
GCS 仓库端点选项(--repo-gcs-endpoint) GCS 仓库端点地址。
用于连接存储服务的端点,可更新为本地 GCS 服务器或备用端点。
default : storage.googleapis.com
example : --repo1-gcs-endpoint=localhost
GCS 仓库密钥类型选项(--repo-gcs-key-type) GCS 仓库密钥类型。
支持以下授权类型:
auto - 使用实例服务账号授权。service - 使用本地存储的服务账号密钥。token - 用于本地测试,例如 fakegcs。设置 repo-gcs-key-type=service 时,认证令牌续期时会重新加载凭证。
default : service
example : --repo1-gcs-key-type=auto
GCS 仓库项目 ID 选项(--repo-gcs-user-project) GCS 项目 ID。
用于确定请求计费归属的 GCS 项目 ID。
example : --repo1-gcs-user-project=my-project
仓库主机选项(--repo-host) 远程操作时的仓库主机地址。
若备份和归档目标为本地挂载的文件系统,则无需配置此选项。
example : --repo1-host=repo1.domain.com
已弃用名称:backup-host
仓库主机证书颁发机构文件选项(--repo-host-ca-file) 仓库主机证书颁发机构文件。
连接仓库主机时使用非系统默认的 CA 文件。
example : --repo1-host-ca-file=/etc/pki/tls/certs/ca-bundle.crt
仓库主机证书颁发机构路径选项(--repo-host-ca-path) 仓库主机证书颁发机构路径。
连接仓库主机时使用非系统默认的 CA 路径。
example : --repo1-host-ca-path=/etc/pki/tls/certs
仓库主机证书文件选项(--repo-host-cert-file) 仓库主机证书文件。
发送给仓库主机,用于证明客户端身份。
example : --repo1-host-cert-file=/path/to/client.crt
仓库主机命令选项(--repo-host-cmd) 仓库主机上的 pgBackRest 命令路径。
仅当本地主机与仓库主机上的 pgBackRest 命令路径不同时才需配置。若未定义,仓库主机命令将与本地命令保持一致。
default : [ path of executed pgbackrest binary]
example : --repo1-host-cmd=/usr/lib/backrest/bin/pgbackrest
已弃用名称:backup-cmd
仓库主机配置文件选项(--repo-host-config) pgBackRest 仓库主机配置文件路径。
设置仓库主机上的配置文件位置。仅当仓库主机上的配置文件路径与本地不同时才需配置。
default : CFGOPTDEF_CONFIG_PATH "/" PROJECT_CONFIG_FILE
example : --repo1-host-config=/conf/pgbackrest/pgbackrest.conf
已弃用名称:backup-config
仓库主机配置包含路径选项(--repo-host-config-include-path) pgBackRest 仓库主机配置包含路径。
设置仓库主机上配置包含路径的位置。仅当仓库主机上的配置包含路径与本地不同时才需配置。
default : CFGOPTDEF_CONFIG_PATH "/" PROJECT_CONFIG_INCLUDE_PATH
example : --repo1-host-config-include-path=/conf/pgbackrest/conf.d
仓库主机配置路径选项(--repo-host-config-path) pgBackRest 仓库主机配置路径。
设置仓库主机上配置路径的位置。仅当仓库主机上的配置路径与本地不同时才需配置。
default : CFGOPTDEF_CONFIG_PATH
example : --repo1-host-config-path=/conf/pgbackrest
仓库主机密钥文件选项(--repo-host-key-file) 仓库主机密钥文件。
用于证明客户端证书由所有者发送。
example : --repo1-host-key-file=/path/to/client.key
仓库主机端口选项(--repo-host-port) 设置了 repo-host 时使用的仓库主机端口。
为仓库主机协议指定非默认端口。
注意: 当 repo-host-type=ssh 时,repo-host-port 没有默认值,端口由 cmd-ssh 指定的命令配置决定。
default (depending on repo-host-type) :
tls - 8432
allowed : [ 0 , 65535 ]
example : --repo1-host-port=25
已弃用名称:backup-ssh-port
仓库主机协议类型选项(--repo-host-type) 仓库主机协议类型。
支持以下协议类型:
ssh - 安全外壳协议(SSH)。tls - pgBackRest TLS 服务器。default : ssh
example : --repo1-host-type=tls
仓库主机用户选项(--repo-host-user) 设置了 repo-host 时使用的仓库主机用户。
定义在仓库主机上执行操作的用户。建议使用非 postgres 的专用用户(如 pgbackrest)。若 PostgreSQL 运行在仓库主机上,可将 postgres 用户加入 pgbackrest 组,使其具有仓库读取权限,同时避免意外损坏仓库内容。
default : pgbackrest
example : --repo1-host-user=repo-user
已弃用名称:backup-user
仓库路径选项(--repo-path) 备份和归档的存储路径。
pgBackRest 在此仓库中存储备份并归档 WAL 段。
预估所需空间并不容易。建议先执行几次备份,记录不同类型(全量/增量/差异)的备份大小及每天产生的 WAL 量,从而大致估算所需空间。当然,随着数据库规模增长,需求也会相应变化。
default : /var/lib/pgbackrest
example : --repo1-path=/backup/db/backrest
S3 仓库存储桶选项(--repo-s3-bucket) S3 仓库存储桶名称。
用于存储仓库的 S3 存储桶。
通过设置 repo-path=/ 可将 pgBackRest 仓库存储在存储桶根目录,但通常建议指定前缀(如 /repo),以便日志及其他 AWS 生成的内容也能存入同一存储桶。
example : --repo1-s3-bucket=pg-backup
S3 仓库端点选项(--repo-s3-endpoint) S3 仓库端点地址。
AWS 端点应与所选区域匹配。
对于自定义或测试配置,可参考 repo-storage-ca-file、repo-storage-ca-path、repo-storage-host、repo-storage-port 和 repo-storage-verify-tls 选项。
example : --repo1-s3-endpoint=s3.amazonaws.com
S3 仓库密钥类型选项(--repo-s3-key-type) S3 仓库密钥类型。
支持以下类型:
shared - 共享密钥auto - 自动获取临时凭证web-id - 自动获取 Web 身份凭证default : shared
example : --repo1-s3-key-type=auto
S3 仓库 KMS 密钥 ID 选项(--repo-s3-kms-key-id) S3 仓库 KMS 密钥。
使用指定的 AWS 密钥管理服务密钥启用 S3 服务端加密。
example : --repo1-s3-kms-key-id=bceb4f13-6939-4be3-910d-df54dee817b7
S3 仓库区域选项(--repo-s3-region) S3 仓库区域。
存储桶所在的 AWS 区域。
example : --repo1-s3-region=us-east-1
S3 仓库请求方付费选项(--repo-s3-requester-pays) S3 仓库请求方付费。
启用 S3 请求方付费功能。
default : n
example : --no -repo1-s3-requester-pays
S3 仓库角色选项(--repo-s3-role) S3 仓库角色。
当 repo-s3-key-type=auto 时,用于获取临时凭证的 AWS 角色名称(非完整 ARN)。
example : --repo1-s3-role=authrole
S3 仓库 URI 风格选项(--repo-s3-uri-style) S3 URI 风格。
支持以下 URI 风格:
host - 连接到 bucket.endpoint 主机。path - 连接到 endpoint 主机并在 URI 前添加存储桶名。default : host
example : --repo1-s3-uri-style=path
SFTP 仓库主机选项(--repo-sftp-host) SFTP 仓库主机地址。
包含仓库的 SFTP 主机。
example : --repo1-sftp-host=sftprepo.domain
SFTP 仓库主机指纹选项(--repo-sftp-host-fingerprint) SFTP 仓库主机指纹。
指纹的生成方式应与 repo-sftp-host-key-hash-type 匹配。可通过以下命令生成:awk '{print $2}' ssh_host_xxx_key.pub | base64 -d | (md5sum or sha1sum) -b。SSH 主机密钥通常位于 /etc/ssh 目录下。
example : --repo1-sftp-host-fingerprint=f84e172dfead7aeeeae6c1fdfb5aa8cf
SFTP 主机密钥检查类型选项(--repo-sftp-host-key-check-type) SFTP 主机密钥检查类型。
支持以下 SFTP 主机密钥检查类型:
strict - pgBackRest 不会自动将主机密钥添加到 ~/.ssh/known_hosts 文件,且拒绝连接主机密钥已更改或不在已知主机文件中的主机。此选项要求用户手动添加所有新主机。accept-new - pgBackRest 会自动将新主机密钥添加到用户的已知主机文件,但不允许连接主机密钥已更改的主机。fingerprint - pgBackRest 将根据 repo-sftp-host-fingerprint 选项指定的指纹验证主机密钥。none - 不执行主机密钥检查。default : strict
example : --repo1-sftp-host-key-check-type=accept-new
SFTP 仓库主机密钥哈希类型选项(--repo-sftp-host-key-hash-type) SFTP 仓库主机密钥哈希类型。
声明 SSH 启动时计算远端系统主机密钥摘要所使用的哈希类型。较新版本的 libssh2 除 md5 和 sha1 外,还支持 sha256。
example : --repo1-sftp-host-key-hash-type=sha256
SFTP 仓库主机端口选项(--repo-sftp-host-port) SFTP 仓库主机端口。
SFTP 仓库主机的连接端口。
default : 22
allowed : [ 1 , 65535 ]
example : --repo1-sftp-host-port=22
SFTP 仓库主机用户选项(--repo-sftp-host-user) SFTP 仓库主机用户。
用于存储仓库的主机上的用户。
example : --repo1-sftp-host-user=pg-backup
SFTP 已知主机文件选项(--repo-sftp-known-host) SFTP 已知主机文件。
身份验证时用于查找 SFTP 主机匹配项的已知主机文件。若未指定,pgBackRest 默认搜索 ~/.ssh/known_hosts、~/.ssh/known_hosts2、/etc/ssh/ssh_known_hosts 和 /etc/ssh/ssh_known_hosts2。若配置了一个或多个文件路径,pgBackRest 将在这些路径中查找匹配项。文件路径必须为完整路径或以波浪号开头的路径。可多次传入 repo-sftp-known-host 以指定多个已知主机文件。使用已知主机文件检查时,不得同时指定 repo-sftp-host-fingerprint。另请参见 repo-sftp-host-check-type 选项。
example : --repo1-sftp-known-host=/home/postgres/.ssh/known_hosts
SFTP 仓库私钥文件选项(--repo-sftp-private-key-file) SFTP 私钥文件。
用于身份验证的 SFTP 私钥文件。
example : --repo1-sftp-private-key-file=~/.ssh/id_ed25519
SFTP 仓库公钥文件选项(--repo-sftp-public-key-file) SFTP 公钥文件。
用于身份验证的 SFTP 公钥文件。若编译时使用 OpenSSL 则为可选,若使用其他库则为必填。
example : --repo1-sftp-public-key-file=~/.ssh/id_ed25519.pub
仓库存储 CA 文件选项(--repo-storage-ca-file) 仓库存储 CA 文件。
连接存储(如 S3、Azure)时使用非系统默认的 CA 文件。
example : --repo1-storage-ca-file=/etc/pki/tls/certs/ca-bundle.crt
已弃用名称:repo-azure-ca-file, repo-s3-ca-file
仓库存储 TLS CA 路径选项(--repo-storage-ca-path) 仓库存储 CA 路径。
连接存储(如 S3、Azure)时使用非系统默认的 CA 路径。
example : --repo1-storage-ca-path=/etc/pki/tls/certs
已弃用名称:repo-azure-ca-path, repo-s3-ca-path
仓库存储主机选项(--repo-storage-host) 仓库存储主机。
连接到存储(如 S3、Azure)端点以外的主机,通常用于测试。
example : --repo1-storage-host=127.0.0.1
已弃用名称:repo-azure-host, repo-s3-host
仓库存储端口选项(--repo-storage-port) 仓库存储端口。
连接存储(如 S3、Azure)端点(或指定主机)时使用的端口。
default : 443
allowed : [ 1 , 65535 ]
example : --repo1-storage-port=9000
已弃用名称:repo-azure-port, repo-s3-port
仓库存储标签选项(--repo-storage-tag) 仓库存储标签。
当仓库为对象存储(如 S3)时,为对象添加指定标签。此选项可重复使用以添加多个标签。
pgBackRest 不提供修改标签的功能,因此请在运行 stanza-create 之前确保标签设置正确,以保证整个仓库标签的一致性。
example : --repo1-storage-tag=key1=value1
仓库存储上传分块大小选项(--repo-storage-upload-chunk-size) 仓库存储上传分块大小。
当文件过大无法全部存入内存时,S3 等对象存储支持分块上传。即使文件能够存入内存,限制上传内存用量也更为高效。
较大的分块通常可提升性能,因为它能减少上传请求次数,让更多文件在单次请求中完成上传,而非分块传输。但缺点是内存占用更高——由于分块缓冲区需按进程分配,process-max 值越大,总体内存消耗越多。
注意,有效的分块大小因存储类型和平台而异。例如,AWS S3 的最小分块大小为 5MiB。各存储类型对分块大小的术语也不同:AWS S3 称为"part size",GCS 称为"chunk size",Azure 称为"block size"。
若文件大于 1GiB(PostgreSQL 默认创建文件的最大大小),分块大小将递增至允许的最大值以完成上传。
default (depending on repo-type) :
azure - 4MiB
gcs - 4MiB
s3 - 5MiB
allow range (depending on repo-type) :
azure - [4MiB, 1GiB]
gcs - [4MiB, 1GiB]
s3 - [5MiB, 1GiB]
example : --repo1-storage-upload-chunk-size=16MiB
仓库存储证书验证选项(--repo-storage-verify-tls) 仓库存储证书验证。
启用或禁用对存储(如 S3、Azure)服务器 TLS 证书的验证。仅在测试或使用自签名证书的场景下才应禁用。
default : y
example : --no -repo1-storage-verify-tls
已弃用名称:repo-azure-verify-tls, repo-s3-verify-ssl, repo-s3-verify-tls
仓库类型选项(--repo-type) 仓库所使用的存储类型。
支持以下仓库类型:
azure - Azure Blob 存储服务cifs - 类似 posix,但禁用链接和目录 fsyncgcs - Google Cloud Storageposix - 符合 Posix 标准的文件系统s3 - AWS Simple Storage Servicesftp - 安全文件传输协议将 NFS 挂载用作 posix 仓库时,适用的规则与 PostgreSQL 文档中描述的规则相同,详见 Creating a Database Cluster - File Systems
default : posix
example : --repo1-type=cifs
Stanza 选项 PostgreSQL 路径选项(--pg-path) PostgreSQL 数据目录。
应与 PostgreSQL 报告的 data_directory 一致。尽管此值可从多处读取,但建议明确配置,以防在恢复或离线备份场景中相关资源不可用。
pg-path 选项在每次在线备份时都会与 PostgreSQL 报告的值进行核验,因此应始终保持最新。
example : --pg1-path=/data/db
已弃用名称:db-path
28.3.4 - 备份命令(backup) pgBackRest backup 命令的选项与行为参考。
Source: pgBackRest Command Docs: backup
配置多个仓库时,pgBackRest 默认备份到优先级最高的仓库(如 repo1),除非通过 --repo 选项明确指定目标仓库。
pgBackRest 本身不内置调度器,建议通过 cron 或其他调度机制触发备份。
详情与示例请参见 执行备份
命令选项 备份注解选项(--annotation) 为备份附加用户自定义的键值对注解。
可为备份附加任意键值对信息,此选项可多次使用以添加多个注解。
通过 --set 指定备份时,info 命令的文本输出会显示注解;JSON 输出则始终包含注解信息。
example : --annotation=source="Sunday backup for website database"
归档检查选项(--archive-check) 备份完成前检查 WAL 段是否已写入归档。
此选项验证备份一致性所需的全部 WAL 段都已存在于 WAL 归档中。除非使用了其他归档方法,否则建议保留默认值。
若启用了 archive-copy,则必须同时启用此选项。
default : y
example : --no -archive-check
归档复制选项(--archive-copy) 将一致性所需的 WAL 段直接复制到备份中。
这是一个相对保守的选项,通过将一致性所需的 WAL 段直接存入备份,防范 WAL 归档损坏。WAL 段仍会写入归档,因此此选项会额外占用存储空间。
使用此选项时,建议 archive-push 和 backup 命令采用相同的压缩类型(如 lz4)。否则,WAL 段需要按备份所用的压缩类型重新压缩,这取决于备份期间产生的 WAL 量,代价可能较高。
恢复时,WAL 段位于 pg_xlog/pg_wal 目录中,PostgreSQL 会优先使用这些文件,而不调用 restore_command。
若启用 archive-copy,则必须同时启用 archive-check 选项。
default : n
example : --archive-copy
归档模式检查选项(--archive-mode-check) 检查 PostgreSQL 的 archive_mode 设置。
此选项默认启用,会禁止使用 PostgreSQL 的 archive_mode=always 配置。
从备库推送的 WAL 段与从主库推送的 WAL 段在逻辑上可能相同,但校验和不同。建议禁用多源归档以避免冲突。
注意:
禁用此选项时,务必确保只有一个归档进程通过 archive-push 命令向仓库写入数据。
default : y
example : --no -archive-mode-check
归档超时选项(--archive-timeout) 归档超时时间。
设置等待每个 WAL 段到达 pgBackRest 归档仓库的最长时间(秒)。check 和 backup 命令等待备份一致性所需的 WAL 段完成归档时,此超时时间生效。
default : 1m
allowed : [ 100ms, 1d]
example : --archive-timeout=30
从备库备份选项(--backup-standby) 从备库集群执行备份。
从备库备份可降低主库负载。使用此选项时,主库和备库主机都必须已完成配置。
支持以下模式:
y — 必须从备库执行备份。prefer — 优先从备库备份,备库不可用时转为从主库备份。n — 仅从主库备份。default : n
example : --backup-standby=y
页面校验和选项(--checksum-page) 验证数据页面校验和。
指示 pgBackRest 在备份集群时验证所有数据页面的校验和。当集群启用了数据页面校验和时,此选项自动开启。
校验和验证失败不会中止备份,而是在日志中(默认也在控制台)输出警告,并将无效页面列表记录到备份的清单文件(manifest)中。
example : --no -checksum-page
路径/文件排除选项(--exclude) 从备份中排除指定的路径或文件。
所有排除规则均相对于 $PGDATA。若排除规则以 / 结尾,则仅排除该目录下的文件,例如 --exclude=junk/ 会排除 $PGDATA/junk 目录中的所有文件,但目录本身会保留。若不以 / 结尾,则精确匹配该文件名或追加 / 后匹配,例如 --exclude=junk 会排除 $PGDATA/junk 目录及其所有文件。
请谨慎使用此功能——极易误排除关键文件,导致备份不一致。务必测试恢复!
所有被排除的文件都会以 info 级别写入日志,并注明排除规则。请仔细审查被排除的文件列表,确认没有意外排除重要内容。
注意: delta 恢复不遵循排除规则。备份时被排除的文件/目录,在 delta 恢复时会被删除 。
不应使用此选项排除 PostgreSQL 日志。可通过 PostgreSQL 的 log_directory 参数将日志目录移到 PGDATA 之外,这样还能在恢复后保留日志。
可在命令行或配置文件中指定多个排除规则。
自动过期选项(--expire-auto) 备份成功完成后自动执行 expire 命令。
此选项默认启用。禁用时需谨慎,因为这会导致所有备份和归档无限期保留,可能耗尽仓库空间。禁用后需定期手动运行 expire 命令以避免空间不足。
default : y
example : --expire-auto
强制选项(--force) 强制执行离线备份。
与 --no-start-stop 配合使用时,即使 pgBackRest 判断 PostgreSQL 正在运行,也会强制执行备份。此选项风险极高,极可能产生损坏的备份,请极度谨慎使用。
某些特殊场景下,此类条件下的备份可能仍有价值。例如,服务器崩溃后数据库集群卷只能以只读方式挂载时,即使存在 postmaster.pid 文件,也值得做一次备份。此时更好的做法是回退到上一个备份并重放 WAL,但如果某个未完成归档的 WAL 段中包含非常重要的事务,强制备份也是一种选择。
default : n
example : --force
清单保存阈值选项(--manifest-save-threshold) 备份过程中清单文件(manifest)的保存阈值。
定义备份期间保存清单文件的频率。保存清单文件非常重要,因为它存储了校验和并使续传功能高效工作。实际使用的阈值取备份大小的 1% 与 manifest-save-threshold 中的较大值。
default : 1GiB
allowed : [ 1B, 1TiB]
example : --manifest-save-threshold=8GiB
在线选项(--online) 执行在线备份。
指定 --no-online 会阻止 pgBackRest 在数据库集群上执行备份启动/停止函数。要使此选项生效,PostgreSQL 必须已关闭,否则 pgBackRest 会报错。
此选项的用途是支持离线备份。pg_xlog/pg_wal 目录会原样复制,且 archive-check 会为该次备份自动禁用。
default : y
example : --no -online
续传选项(--resume) 允许续传失败的备份。
定义是否启用续传功能。续传功能可大幅减少同类型备份在上次失败后重新运行所需的时间。在不需要此功能的环境中,可以考虑禁用以降低复杂性。
default : y
example : --no -resume
快速启动选项(--start-fast) 强制执行检查点以快速启动备份。
通过向备份启动函数的 fast 参数传入 y 来强制执行检查点,使备份立即开始。否则备份将等到下一个常规检查点后才开始。
default : n
example : --start-fast
类型选项(--type) 备份类型。
支持以下备份类型:
full — 全量备份(full backup),复制所有数据库集群文件,不依赖之前的任何备份。incr — 增量备份(incremental backup),基于最近一次成功的备份。diff — 差异备份(differential backup),类似增量备份,但始终基于最近一次全量备份。default : incr
example : --type=full
通用选项 缓冲区大小选项(--buffer-size) I/O 操作的缓冲区大小。
用于复制、压缩、加密等操作的缓冲区大小。实际使用的缓冲区数量取决于具体选项,每个操作可能会占用额外内存,例如 gz 压缩可能额外使用 256KiB 内存。
允许值为 16KiB、32KiB、64KiB、128KiB、256KiB、512KiB、1MiB、2MiB、4MiB、8MiB 和 16MiB。
default : 1MiB
example : --buffer-size=2MiB
pgBackRest 命令选项(--cmd) pgBackRest 命令路径。
pgBackRest 有时需要生成命令字符串,例如 restore 命令生成 restore_command 配置时。若未提供 cmd 选项,则使用当前运行 pgBackRest 进程的命令路径。
注意:
包装 pgBackRest 命令可能导致不可预期的行为,不建议这样做。
default : [ path of executed pgbackrest binary]
example : --cmd=/var/lib/pgsql/bin/pgbackrest_wrapper.sh
SSH 客户端命令选项(--cmd-ssh) SSH 客户端命令。
当需要使用特定 SSH 客户端,或 ssh 命令不在 $PATH 中时,可通过此选项指定。
default : ssh
example : --cmd-ssh=/usr/bin/ssh
压缩选项(--compress) 启用文件压缩。
备份文件与命令行压缩工具兼容。
此选项现已弃用,请改用 compress-type 选项。
default : y
example : --no -compress
压缩级别选项(--compress-level) 文件压缩级别。
当 compress-type 不等于 none 或使用已弃用的 compress=y 时,指定文件压缩级别。
default (depending on compress-type) :
bz2 - 9
gz - 6
lz4 - 1
zst - 3
allow range (depending on compress-type) :
bz2 - [1, 9]
gz - [-1, 9]
lz4 - [-5, 12]
zst - [-7, 22]
example : --compress-level=9
网络压缩级别选项(--compress-level-network) 网络压缩级别。
当 compress-type=none 且命令不在仓库所在主机上运行时,指定网络压缩级别,用于减少网络流量。当 compress-type 不等于 none 时,此选项会被忽略,转而使用 compress-level,以避免文件被压缩两次。
default : 1
allowed : [ -5 , 12 ]
example : --compress-level-network=1
压缩类型选项(--compress-type) 文件压缩类型。
支持以下压缩类型:
none — 不压缩bz2 — bzip2 压缩格式gz — gzip 压缩格式lz4 — lz4 压缩格式(并非所有平台都支持)zst — Zstandard 压缩格式(并非所有平台都支持)default : gz
example : --compress-type=none
配置文件选项(--config) pgBackRest 配置文件。
使用此选项指定非默认位置的配置文件。
default : CFGOPTDEF_CONFIG_PATH "/" PROJECT_CONFIG_FILE
example : --config=/conf/pgbackrest/pgbackrest.conf
配置包含路径选项(--config-include-path) 附加 pgBackRest 配置文件的路径。
指定路径下扩展名为 .conf 的配置文件将与主配置文件拼接,合并为一个完整的配置文件。
default : CFGOPTDEF_CONFIG_PATH "/" PROJECT_CONFIG_INCLUDE_PATH
example : --config-include-path=/conf/pgbackrest/conf.d
配置基础路径选项(--config-path) pgBackRest 配置文件的基础路径。
用于覆盖 --config 和 --config-include-path 选项的默认基础路径,前提是这两个选项未在命令行中显式指定。
例如,仅传入 --config-path=/conf/pgbackrest 时,--config 的默认值将变为 /conf/pgbackrest/pgbackrest.conf,--config-include-path 的默认值将变为 /conf/pgbackrest/conf.d。
default : CFGOPTDEF_CONFIG_PATH
example : --config-path=/conf/pgbackrest
数据库超时选项(--db-timeout) 数据库查询超时时间。
设置对数据库执行查询的超时时间(秒)。这包括备份的启动/停止函数,这些函数各自可能耗时较长。因此,除非可以确定这些函数会很快返回(例如设置了 start-fast=y 且备份期间集群不会产生大量 WAL 段),否则应将此超时时间设置得较大。
注意: db-timeout 的值必须小于 protocol-timeout 的值。
default : 30m
allowed : [ 100ms, 7d]
example : --db-timeout=600
Delta 选项(--delta) 使用校验和进行恢复或备份。
恢复时,默认情况下 PostgreSQL 数据目录和表空间目录应已存在但为空。此选项启用基于校验和的 delta 恢复。
备份时,此选项使用校验和而非时间戳来判断哪些文件需要复制。
default : n
example : --delta
I/O 超时选项(--io-timeout) I/O 超时时间。
连接及读写操作的超时时间(秒)。
注意,整个读写操作不必在此超时时间内完成,但必须有一定 进展,哪怕只是传输了一个字节。
default : 1m
allowed : [ 100ms, 1h]
example : --io-timeout=120
锁文件路径选项(--lock-path) 锁文件的存储路径。
pgBackRest 使用锁文件防止并发执行相互冲突的操作。
default : /tmp/pgbackrest
example : --lock-path=/backup/db/lock
中性 umask 选项(--neutral-umask) 使用中性 umask。
将 umask 设置为 0000,使仓库中创建的文件和目录具有合理的权限。默认目录模式为 0750,文件模式为 0640;锁文件和日志目录的目录模式为 0770,文件模式为 0660。
如需改用执行用户的 umask,可在配置文件中设置 neutral-umask=n,或在命令行使用 --no-neutral-umask。
default : y
example : --no -neutral-umask
进程优先级选项(--priority) 设置进程优先级。
定义内核调度器分配给该进程的优先级(即 niceness 值)。正值降低优先级,负值提升优先级。大多数情况下,进程没有权限提升自身优先级。
allowed : [ -20 , 19 ]
example : --priority=19
最大进程数选项(--process-max) 压缩/传输使用的最大进程数。
每个进程负责压缩和传输,进程数越多命令运行越快,但不要将 process-max 设置得过高,以免影响数据库性能。
default : 1
allowed : [ 1 , 999 ]
example : --process-max=4
协议超时选项(--protocol-timeout) 协议超时时间。
设置本地或远程进程在协议层等待新消息的最长时间(秒),以防止进程无限期地等待。
注意: protocol-timeout 的值必须大于 db-timeout 的值。
default : 31m
allowed : [ 100ms, 7d]
example : --protocol-timeout=630
保活选项(--sck-keep-alive) 启用保活机制。
在 socket 连接上启用保活消息。
default : y
example : --no -sck-keep-alive
Stanza 选项(--stanza) 定义 stanza(stanza 是 pgBackRest 中用于标识一个 PostgreSQL 集群备份配置的逻辑名称)。
一个 stanza 包含某个 PostgreSQL 数据库集群的完整配置,定义了集群的位置、备份方式、归档选项等。大多数数据库主机只有一个 PostgreSQL 集群,因此只有一个 stanza;而备份服务器通常为每个需要备份的数据库集群单独配置一个 stanza。
命名 stanza 时,常见做法是以主集群名称命名,但更好的方式是以集群中承载的业务来命名。由于 stanza 名称同时适用于主库和所有副本,选择能反映集群实际功能的名称(如 app 或 dw)比使用本地集群名称(如 main 或 prod)更为合适。
TCP 保活计数选项(--tcp-keep-alive-count) 保活计数。
指定连接被判定为断开之前,允许丢失的 TCP 保活消息数量。
此选项仅在系统支持 TCP_KEEPCNT socket 选项时可用。
allowed : [ 1 , 32 ]
example : --tcp-keep-alive-count=3
TCP 保活空闲时间选项(--tcp-keep-alive-idle) 保活空闲时间。
指定操作系统在多少秒无网络活动后,应发送 TCP 保活消息。
此选项仅在系统支持 TCP_KEEPIDLE socket 选项时可用。
allowed : [ 1 , 3600 ]
example : --tcp-keep-alive-idle=60
TCP 保活间隔选项(--tcp-keep-alive-interval) 保活重传间隔时间。
指定未收到确认的 TCP 保活消息多少秒后进行重传。
此选项仅在系统支持 TCP_KEEPINTVL socket 选项时可用。
allowed : [ 1 , 900 ]
example : --tcp-keep-alive-interval=30
TLSv1.2 加密套件选项(--tls-cipher-12) 允许的 TLSv1.2 加密套件。
pgBackRest 客户端与服务器之间的所有 TLS 连接均已加密。默认情况下,到对象存储(如 S3)的连接也经过加密。
注意: 任何传输连接的最低安全级别为 TLSv1.2。
如有需要,可调整可接受的加密套件。示例值是合理的选择,除非有特定安全需求。若未设置(默认),则使用底层 OpenSSL 库的默认值。
example : --tls-cipher-12=HIGH:MEDIUM:+3DES:!aNULL
TLSv1.3 加密套件选项(--tls-cipher-13) 允许的 TLSv1.3 加密套件。
pgBackRest 客户端与服务器之间的所有 TLS 连接均已加密。默认情况下,到对象存储(如 S3)的连接也经过加密。
注意: 任何传输连接的最低安全级别为 TLSv1.2。
如有需要,可调整可接受的加密套件。若未设置(默认),则使用底层 OpenSSL 库的默认值。
example : --tls-cipher-13=TLS_AES_256_GCM_SHA384:TLS_CHACHA20_POLY1305_SHA256
日志选项 控制台日志级别选项(--log-level-console) 控制台日志级别。
支持以下日志级别:
off — 不记录任何日志(不推荐)error — 仅记录错误warn — 记录警告和错误info — 记录信息、警告和错误detail — 记录详细信息、信息、警告和错误debug — 记录调试信息、详细信息、信息、警告和错误trace — 记录跟踪信息(极详细的调试输出)、调试信息、信息、警告和错误default : warn
example : --log-level-console=error
文件日志级别选项(--log-level-file) 文件日志级别。
支持以下日志级别:
off — 不记录任何日志(不推荐)error — 仅记录错误warn — 记录警告和错误info — 记录信息、警告和错误detail — 记录详细信息、信息、警告和错误debug — 记录调试信息、详细信息、信息、警告和错误trace — 记录跟踪信息(极详细的调试输出)、调试信息、信息、警告和错误default : info
example : --log-level-file=debug
标准错误日志级别选项(--log-level-stderr) stderr 日志级别。
指定哪些日志级别的内容输出到 stderr 而非 stdout(stdout 由 log-level-console 控制)。输出到 stderr 的内容不含时间戳和进程信息。
支持以下日志级别:
off — 不记录任何日志(不推荐)error — 仅记录错误warn — 记录警告和错误info — 记录信息、警告和错误detail — 记录详细信息、信息、警告和错误debug — 记录调试信息、详细信息、信息、警告和错误trace — 记录跟踪信息(极详细的调试输出)、调试信息、信息、警告和错误default : off
example : --log-level-stderr=error
日志路径选项(--log-path) 日志文件的存储路径。
pgBackRest 将日志文件存储在此路径下。注意,若 log-level-file=off,则无需配置日志路径。
default : /var/log/pgbackrest
example : --log-path=/backup/db/log
子进程日志选项(--log-subprocess) 在子进程中启用日志记录。
对该进程创建的所有子进程启用文件日志,日志级别使用 log-level-file 指定的级别。
default : n
example : --log-subprocess
日志时间戳选项(--log-timestamp) 在日志中启用时间戳。
在控制台和文件日志中启用时间戳。此选项在某些特殊场景(如生成文档)中会被禁用。
default : y
example : --no -log-timestamp
维护者选项 检查 PostgreSQL 页面头。
此选项默认启用,会添加页面头检查。
除非必要(例如页面已加密),否则不建议禁用此选项。
default : y
example : --no -page-header-check
强制指定 PostgreSQL 版本选项(--pg-version-force) 强制指定 PostgreSQL 版本。
使用指定的 PostgreSQL 版本,而非通过读取 pg_control 或 WAL 头自动检测的版本。此选项主要适用于 PostgreSQL 的分支版本或开发版本,因为这些版本的版本号可能与发行版本不同。PostgreSQL 通过 server_version_num 报告的版本号必须与强制指定的版本号一致。
警告:
使用此选项时请谨慎,因为 pg_control 和 WAL 头仍会按指定版本的预期格式读取,即官方开源 PostgreSQL 版本的格式。如果分支版本或开发版本修改了 pgBackRest 所依赖字段的格式,将导致不可预期的行为。通常,只有当分支版本将所有自定义结构成员添加在标准 PostgreSQL 成员之后 时,此选项才能按预期工作。
example : --pg-version-force=15
仓库选项 指定仓库选项(--repo) 指定操作仓库。
指定命令操作的目标仓库。
例如,可用此选项从特定仓库执行恢复,而不是由 pgBackRest 自动选择。
allowed : [ 1 , 256 ]
example : --repo=1
Azure 仓库容器选项(--repo-azure-container) Azure 仓库容器。
用于存储仓库的 Azure 容器。
通过设置 repo-path=/ 可将 pgBackRest 仓库存储在容器根目录,但通常建议指定一个前缀路径(如 /repo),以便日志和其他 Azure 生成的内容也能存放在该容器中。
example : --repo1-azure-container=pg-backup
Azure 仓库密钥类型选项(--repo-azure-key-type) Azure 仓库密钥类型。
支持以下授权类型:
shared — 共享密钥sas — 共享访问签名auto — 使用 Azure 托管标识自动授权default : shared
example : --repo1-azure-key-type=sas
Azure 仓库 URI 风格选项(--repo-azure-uri-style) Azure URI 风格。
支持以下 URI 风格:
host — 连接到 account.endpoint 主机。path — 连接到 endpoint 主机并在 URI 前添加账户名。default : host
example : --repo1-azure-uri-style=path
块级增量备份选项(--repo-block) 启用块级增量备份(block incremental backup)。
块级备份将文件拆分为可独立备份的块,实现更细粒度的备份。这不仅节省仓库空间,还能提升 delta 恢复性能,因为可以直接获取单个块,而无需从仓库读取整个文件。
注意: 必须先启用 repo-bundle 选项,才能启用 repo-block。
文件的块大小根据文件大小和使用时间确定。通常,越旧/越大的文件使用越大的块。若文件足够旧,则不会使用块级增量备份。
块级备份在对所有备份类型(包括全量备份)启用时最为高效。这会使全量备份稍大,但后续的差异备份和增量备份可以利用全量备份生成的块映射来节省空间。
default : n
example : --repo1-block
仓库包(bundle)选项(--repo-bundle) 在仓库中将文件打包(bundle)存储。
将小文件合并打包存储,以减少写入仓库的文件总数。写入文件数量更少通常效率更高,尤其是在 S3 等对象存储上。此外,零长度文件不会存储(清单文件除外),可节省时间和空间。
default : n
example : --repo1-bundle
仓库包大小限制选项(--repo-bundle-limit) 文件包的大小限制。
指定纳入包中的文件大小上限,超过此大小的文件将单独存储。
打包的文件在备份续传时无法复用,因此此选项控制了可续传的文件范围——值越大,可续传的文件越少。
default : 2MiB
allowed : [ 8KiB, 1PiB]
example : --repo1-bundle-limit=10MiB
仓库包目标大小选项(--repo-bundle-size) 文件包的目标大小。
定义单个包中文件的总大小目标。大多数包会小于此值,但部分包可能略超此值,因此不要将此选项设置为文件系统允许的最大值。
通常不建议将此值设置得过高,因为重试时需要重做整个包。
default : 20MiB
allowed : [ 1MiB, 1PiB]
example : --repo1-bundle-size=10MiB
仓库加密类型选项(--repo-cipher-type) 用于加密仓库的加密算法。
支持以下加密类型:
none — 仓库不加密aes-256-cbc — 使用 256 位密钥的高级加密标准注意,即使仓库类型(如 S3)本身支持加密,加密也始终在客户端执行。
default : none
example : --repo1-cipher-type=aes-256-cbc
GCS 仓库存储桶选项(--repo-gcs-bucket) GCS 仓库存储桶。
用于存储仓库的 GCS 存储桶。
通过设置 repo-path=/ 可将 pgBackRest 仓库存储在存储桶根目录,但通常建议指定一个前缀路径(如 /repo),以便日志和其他 GCS 生成的内容也能存放在该存储桶中。
example : --repo1-gcs-bucket=/pg-backup
GCS 仓库端点选项(--repo-gcs-endpoint) GCS 仓库端点。
用于连接存储服务的端点,可修改为使用本地 GCS 服务器或备用端点。
default : storage.googleapis.com
example : --repo1-gcs-endpoint=localhost
GCS 仓库密钥类型选项(--repo-gcs-key-type) GCS 仓库密钥类型。
支持以下授权类型:
auto — 使用实例服务账号自动授权。service — 使用本地存储的服务账号密钥文件。token — 用于本地测试,例如 fakegcs。当 repo-gcs-key-type=service 时,认证令牌续期时会重新加载凭证。
default : service
example : --repo1-gcs-key-type=auto
GCS 仓库项目 ID 选项(--repo-gcs-user-project) GCS 项目 ID。
用于确定请求计费的 GCS 项目 ID。
example : --repo1-gcs-user-project=my-project
仓库硬链接选项(--repo-hardlink) 在仓库中对备份文件创建硬链接。
为差异备份和增量备份中的文件创建指向其对应全量备份的硬链接,使每个备份在文件系统层面看起来都像一个完整的全量备份。但请注意,修改硬链接文件会影响同一备份集中的所有备份。
default : n
example : --repo1-hardlink
已弃用名称:hardlink
仓库主机选项(--repo-host) 远程操作时的仓库主机。
若备份和归档使用本地挂载的文件系统,则无需配置此选项。
example : --repo1-host=repo1.domain.com
已弃用名称:backup-host
仓库主机证书颁发机构文件选项(--repo-host-ca-file) 仓库主机的证书颁发机构文件。
连接仓库主机时使用非系统默认的 CA 文件。
example : --repo1-host-ca-file=/etc/pki/tls/certs/ca-bundle.crt
仓库主机证书颁发机构路径选项(--repo-host-ca-path) 仓库主机的证书颁发机构路径。
连接仓库主机时使用非系统默认的 CA 路径。
example : --repo1-host-ca-path=/etc/pki/tls/certs
仓库主机证书文件选项(--repo-host-cert-file) 仓库主机的证书文件。
发送给仓库主机以证明客户端身份。
example : --repo1-host-cert-file=/path/to/client.crt
仓库主机命令选项(--repo-host-cmd) 仓库主机上的 pgBackRest 命令路径。
仅当本地主机与仓库主机上的 pgBackRest 命令路径不同时才需要配置。若未定义,仓库主机命令将与本地命令相同。
default : [ path of executed pgbackrest binary]
example : --repo1-host-cmd=/usr/lib/backrest/bin/pgbackrest
已弃用名称:backup-cmd
仓库主机配置文件选项(--repo-host-config) pgBackRest 仓库主机配置文件。
设置仓库主机上配置文件的位置。仅当仓库主机的配置文件位置与本地配置文件位置不同时才需要配置。
default : CFGOPTDEF_CONFIG_PATH "/" PROJECT_CONFIG_FILE
example : --repo1-host-config=/conf/pgbackrest/pgbackrest.conf
已弃用名称:backup-config
仓库主机配置包含路径选项(--repo-host-config-include-path) pgBackRest 仓库主机配置包含路径。
设置仓库主机上配置包含路径的位置。仅当仓库主机的配置包含路径与本地配置包含路径不同时才需要配置。
default : CFGOPTDEF_CONFIG_PATH "/" PROJECT_CONFIG_INCLUDE_PATH
example : --repo1-host-config-include-path=/conf/pgbackrest/conf.d
仓库主机配置路径选项(--repo-host-config-path) pgBackRest 仓库主机配置路径。
设置仓库主机上配置路径的位置。仅当仓库主机的配置路径与本地配置路径不同时才需要配置。
default : CFGOPTDEF_CONFIG_PATH
example : --repo1-host-config-path=/conf/pgbackrest
仓库主机密钥文件选项(--repo-host-key-file) 仓库主机的密钥文件。
证明客户端证书由其所有者发送。
example : --repo1-host-key-file=/path/to/client.key
仓库主机端口选项(--repo-host-port) 设置 repo-host 时使用的仓库主机端口。
使用此选项为仓库主机协议指定非默认端口。
注意: 当 repo-host-type=ssh 时,repo-host-port 没有默认值,实际使用的端口由 cmd-ssh 指定的命令配置决定。
default (depending on repo-host-type) :
tls - 8432
allowed : [ 0 , 65535 ]
example : --repo1-host-port=25
已弃用名称:backup-ssh-port
仓库主机协议类型选项(--repo-host-type) 仓库主机协议类型。
支持以下协议类型:
ssh — 安全外壳协议(Secure Shell)。tls — pgBackRest TLS 服务器。default : ssh
example : --repo1-host-type=tls
仓库主机用户选项(--repo-host-user) 设置 repo-host 时使用的仓库主机用户。
定义在仓库主机上执行操作所使用的用户。建议不使用 postgres 用户,而改用专用用户(如 pgbackrest)。若 PostgreSQL 也运行在仓库主机上,可将 postgres 用户加入 pgbackrest 组,使其拥有仓库的读权限,同时避免意外损坏仓库内容。
default : pgbackrest
example : --repo1-host-user=repo-user
已弃用名称:backup-user
仓库路径选项(--repo-path) 备份和归档的存储路径。
仓库是 pgBackRest 存储备份和归档 WAL 段的位置。
预先估算所需空间可能比较困难。建议先执行若干次备份,记录不同类型备份(全量/增量/差异)的大小,并测量每天产生的 WAL 量,以此对所需空间有一个大致判断。随着数据库的演进,需求也会随时间变化。
default : /var/lib/pgbackrest
example : --repo1-path=/backup/db/backrest
归档保留选项(--repo-retention-archive) 连续 WAL 保留的备份数量。
注意: 无论此选项如何配置,确保备份一致性所需的 WAL 段始终会保留到备份过期为止。
若未设置此值且 repo-retention-full-type 为 count(默认值),则归档过期默认值为 repo-retention-full(或 repo-retention-diff)对应 repo-retention-archive-type(设置为 full 或 diff)的值,确保 WAL 仅在对应备份过期后才会过期。若 repo-retention-full-type 为 time,则此值默认为移除早于满足 repo-retention-full 设置后保留的最旧全量备份的归档。
若 repo-retention-archive-type 设置为 incr,则必须设置此选项。在磁盘空间极为紧张时,可结合 repo-retention-archive-type 使用此选项激进地清理 WAL 段。但这样做会导致无法从已清理 WAL 的备份执行 PITR,因此不推荐 。
allowed : [ 1 , 9999999 ]
example : --repo1-retention-archive=2
已弃用名称:retention-archive
归档保留类型选项(--repo-retention-archive-type) WAL 保留的备份类型。
若设置为 full,pgBackRest 将按 repo-retention-archive 定义的全量备份数量保留归档日志。若设置为 diff(差异备份),则按 repo-retention-archive 定义的全量备份和差异备份数量保留归档日志,如果最后一次备份是全量备份,它将被视为差异备份计入 repo-retention-archive。若设置为 incr(增量备份),则按 repo-retention-archive 定义的全量、差异和增量备份数量保留归档日志。建议不要修改此选项的默认值,即仅在过期全量备份的同时过期对应的 WAL。
default : full
example : --repo1-retention-archive-type=diff
已弃用名称:retention-archive-type
差异备份保留选项(--repo-retention-diff) 保留的差异备份数量。
差异备份过期时,与之关联的所有增量备份也会一同过期。若未定义,所有差异备份将保留到其所依赖的全量备份过期为止。
注意,计算过期时,全量备份会被纳入差异备份数量的统计,这在大多数情况下会略微减少需要保留的差异备份数量。
allowed : [ 1 , 9999999 ]
example : --repo1-retention-diff=3
已弃用名称:retention-diff
全量备份保留选项(--repo-retention-full) 全量备份的保留数量/时间。
全量备份过期时,与之关联的所有差异备份和增量备份也会一同过期。若未定义此选项,将会发出警告。如果希望无限期保留,可将此选项设置为最大值。
allowed : [ 1 , 9999999 ]
example : --repo1-retention-full=2
已弃用名称:retention-full
全量备份保留类型选项(--repo-retention-full-type) 全量备份的保留类型。
决定 repo-retention-full 表示时间周期(天数)还是保留的全量备份数量。
若设置为 time,则超过 repo-retention-full 天的全量备份将被删除,前提是至少存在一个不早于 repo-retention-full 天的备份。例如,若 repo-retention-full 为 30(天),且有 2 个全量备份,分别为 25 天前和 35 天前创建,则两个备份均不会过期——因为删除 35 天前的备份将只剩 25 天前的备份,不满足"至少保留一个 30 天以内的备份"的策略要求。早于保留的最旧全量备份的归档 WAL 将自动过期,除非显式设置了 repo-retention-archive-type 和 repo-retention-archive。
若设置为 count,则超过 repo-retention-full 数量的全量备份将过期。例如,若 repo-retention-full 为 4 且第五个全量备份完成,则最旧的全量备份将过期以保持数量为 4。
注意,备份必须成功完成后才会被纳入保留策略的考量。例如,若 repo-retention-full-type 为 count 且 repo-retention-full 为 2,则必须有 3 个完整的全量备份,最旧的才会过期。
default : count
example : --repo1-retention-full-type=time
备份历史保留选项(--repo-retention-history) 备份历史清单文件的保留天数。
备份完成时,清单文件(manifest)的副本会存储在 backup.history 路径下。默认情况下这些文件永不过期,因为它们对数据挖掘(如统计备份和 WAL 增长趋势)很有价值。
通过设置 repo-retention-history,可以定义保留备份历史清单文件的天数。未过期的备份始终保留在备份历史中。设置 repo-retention-history=0 可仅为未过期的备份保留备份历史。
全量备份历史清单文件过期时,与之关联的所有差异备份和增量备份历史清单文件也会一同过期。
allowed : [ 0 , 9999999 ]
example : --repo1-retention-history=365
S3 仓库存储桶选项(--repo-s3-bucket) S3 仓库存储桶。
用于存储仓库的 S3 存储桶。
通过设置 repo-path=/ 可将 pgBackRest 仓库存储在存储桶根目录,但通常建议指定一个前缀路径(如 /repo),以便日志和其他 AWS 生成的内容也能存放在该存储桶中。
example : --repo1-s3-bucket=pg-backup
S3 仓库端点选项(--repo-s3-endpoint) S3 仓库端点。
AWS 端点应与所选区域匹配。
对于自定义或测试配置,可使用 repo-storage-ca-file、repo-storage-ca-path、repo-storage-host、repo-storage-port 和 repo-storage-verify-tls 等选项。
example : --repo1-s3-endpoint=s3.amazonaws.com
S3 仓库密钥类型选项(--repo-s3-key-type) S3 仓库密钥类型。
支持以下类型:
shared — 共享密钥auto — 自动获取临时凭证web-id — 自动获取 Web 身份凭证default : shared
example : --repo1-s3-key-type=auto
S3 仓库 KMS 密钥 ID 选项(--repo-s3-kms-key-id) S3 仓库 KMS 密钥。
使用指定的 AWS 密钥管理服务密钥启用 S3 服务端加密。
example : --repo1-s3-kms-key-id=bceb4f13-6939-4be3-910d-df54dee817b7
S3 仓库区域选项(--repo-s3-region) S3 仓库区域。
创建存储桶所在的 AWS 区域。
example : --repo1-s3-region=us-east-1
S3 仓库请求方付费选项(--repo-s3-requester-pays) S3 仓库请求方付费。
启用 S3 请求方付费功能。
default : n
example : --no -repo1-s3-requester-pays
S3 仓库角色选项(--repo-s3-role) S3 仓库角色。
当 repo-s3-key-type=auto 时,用于获取临时凭证的 AWS 角色名称(非完整 ARN)。
example : --repo1-s3-role=authrole
S3 仓库 URI 风格选项(--repo-s3-uri-style) S3 URI 风格。
支持以下 URI 风格:
host — 连接到 bucket.endpoint 主机。path — 连接到 endpoint 主机并在 URI 前添加存储桶名称。default : host
example : --repo1-s3-uri-style=path
SFTP 仓库主机选项(--repo-sftp-host) SFTP 仓库主机。
存放仓库的 SFTP 主机。
example : --repo1-sftp-host=sftprepo.domain
SFTP 仓库主机指纹选项(--repo-sftp-host-fingerprint) SFTP 仓库主机指纹。
SFTP 仓库主机指纹的生成方式应与 repo-sftp-host-key-hash-type 匹配。通过以下命令生成指纹:awk '{print $2}' ssh_host_xxx_key.pub | base64 -d | (md5sum or sha1sum) -b。SSH 主机密钥通常位于 /etc/ssh 目录下。
example : --repo1-sftp-host-fingerprint=f84e172dfead7aeeeae6c1fdfb5aa8cf
SFTP 主机密钥检查类型选项(--repo-sftp-host-key-check-type) SFTP 主机密钥检查类型。
支持以下 SFTP 主机密钥检查类型:
strict — pgBackRest 不会自动将主机密钥添加到 ~/.ssh/known_hosts 文件,并拒绝连接到主机密钥已更改或未在已知主机文件中找到的主机。此选项要求用户手动添加所有新主机。accept-new — pgBackRest 会自动将新主机密钥添加到用户的已知主机文件,但不允许连接到主机密钥已更改的主机。fingerprint — pgBackRest 将根据 repo-sftp-host-fingerprint 选项指定的指纹验证主机密钥。none — 不执行主机密钥检查。default : strict
example : --repo1-sftp-host-key-check-type=accept-new
SFTP 仓库主机密钥哈希类型选项(--repo-sftp-host-key-hash-type) SFTP 仓库主机密钥哈希类型。
声明在 SSH 启动时用于计算远程系统主机密钥摘要的哈希类型。较新版本的 libssh2 除 md5 和 sha1 外,还支持 sha256。
example : --repo1-sftp-host-key-hash-type=sha256
SFTP 仓库主机端口选项(--repo-sftp-host-port) SFTP 仓库主机端口。
SFTP 仓库主机的端口号。
default : 22
allowed : [ 1 , 65535 ]
example : --repo1-sftp-host-port=22
SFTP 仓库主机用户选项(--repo-sftp-host-user) SFTP 仓库主机用户。
存储仓库的主机上的用户名。
example : --repo1-sftp-host-user=pg-backup
SFTP 已知主机文件选项(--repo-sftp-known-host) SFTP 已知主机文件。
身份验证时用于查找 SFTP 主机匹配的已知主机文件。若未指定,pgBackRest 默认依次搜索 ~/.ssh/known_hosts、~/.ssh/known_hosts2、/etc/ssh/ssh_known_hosts 和 /etc/ssh/ssh_known_hosts2。若配置了一个或多个文件路径,pgBackRest 将在这些文件中搜索匹配项。文件路径必须为完整路径或以波浪号(~)开头的路径。可多次传入 repo-sftp-known-host 选项以指定多个已知主机文件。使用已知主机文件检查时,不能指定 repo-sftp-host-fingerprint。另请参见 repo-sftp-host-check-type 选项。
example : --repo1-sftp-known-host=/home/postgres/.ssh/known_hosts
SFTP 仓库私钥文件选项(--repo-sftp-private-key-file) SFTP 私钥文件。
用于身份验证的 SFTP 私钥文件。
example : --repo1-sftp-private-key-file=~/.ssh/id_ed25519
SFTP 仓库公钥文件选项(--repo-sftp-public-key-file) SFTP 公钥文件。
用于身份验证的 SFTP 公钥文件。若使用 OpenSSL 编译则为可选,若使用其他库编译则为必需。
example : --repo1-sftp-public-key-file=~/.ssh/id_ed25519.pub
仓库存储 CA 文件选项(--repo-storage-ca-file) 仓库存储 CA 文件。
为存储(如 S3、Azure)证书使用非系统默认的 CA 文件。
example : --repo1-storage-ca-file=/etc/pki/tls/certs/ca-bundle.crt
已弃用名称:repo-azure-ca-file、repo-s3-ca-file
仓库存储 TLS CA 路径选项(--repo-storage-ca-path) 仓库存储 CA 路径。
为存储(如 S3、Azure)证书使用非系统默认的 CA 路径。
example : --repo1-storage-ca-path=/etc/pki/tls/certs
已弃用名称:repo-azure-ca-path、repo-s3-ca-path
仓库存储主机选项(--repo-storage-host) 仓库存储主机。
连接到存储(如 S3、Azure)端点以外的主机,通常用于测试。
example : --repo1-storage-host=127.0.0.1
已弃用名称:repo-azure-host、repo-s3-host
仓库存储端口选项(--repo-storage-port) 仓库存储端口。
连接存储(如 S3、Azure)端点(或指定主机)时使用的端口。
default : 443
allowed : [ 1 , 65535 ]
example : --repo1-storage-port=9000
已弃用名称:repo-azure-port、repo-s3-port
仓库存储标签选项(--repo-storage-tag) 仓库存储标签。
当仓库为对象存储(如 S3)时,指定要添加到对象上的标签。此选项可重复使用以添加多个标签。
pgBackRest 不提供修改这些标签的功能,因此请在运行 stanza-create 之前正确设置,以确保整个仓库的标签一致。
example : --repo1-storage-tag=key1=value1
仓库存储上传分块大小选项(--repo-storage-upload-chunk-size) 仓库存储上传分块大小。
当文件过大无法完整存入内存时,S3 等对象存储支持分块上传。即使文件可以存入内存,限制上传所用的内存量也更为高效。
分块大小越大,通常性能越好,因为可以减少上传请求数量,允许在单次请求中上传更多数据。缺点是内存占用更高;process-max 值较大时,每个进程都需要分配分块缓冲区,整体内存消耗更多。
请注意,有效的分块大小因存储类型和平台而异。例如,AWS S3 的最小分块大小为 5MiB。不同存储类型对分块大小的术语也不同:AWS S3 称之为"part size"(分片大小),GCS 称之为"chunk size"(分块大小),Azure 称之为"block size"(块大小)。
若文件大于 1GiB(PostgreSQL 默认最大创建文件大小),则分块大小会逐步增大至允许的最大值,以完成文件上传。
default (depending on repo-type) :
azure - 4MiB
gcs - 4MiB
s3 - 5MiB
allow range (depending on repo-type) :
azure - [4MiB, 1GiB]
gcs - [4MiB, 1GiB]
s3 - [5MiB, 1GiB]
example : --repo1-storage-upload-chunk-size=16MiB
仓库存储证书验证选项(--repo-storage-verify-tls) 仓库存储证书验证。
提供启用/禁用存储(如 S3、Azure)服务器 TLS 证书验证的能力。仅在测试或使用自签名证书等特殊场景下才应禁用验证。
default : y
example : --no -repo1-storage-verify-tls
已弃用名称:repo-azure-verify-tls、repo-s3-verify-ssl、repo-s3-verify-tls
仓库符号链接选项(--repo-symlink) 在仓库中创建符号链接。
启用 latest 和表空间符号链接的创建。这些符号链接在使用快照对仓库进行原地恢复时最为有用,但这是较少见的使用场景。
尽管此功能对大多数用户可能没有实际用处,但为了兼容性默认保持启用。对于不支持符号链接的 POSIX 类存储,禁用符号链接可能是有益的。
default : y
example : --no -repo1-symlink
仓库类型选项(--repo-type) 仓库所使用的存储类型。
支持以下仓库类型:
azure — Azure Blob 存储服务cifs — 类似 posix,但禁用链接和目录 fsyncgcs — Google Cloud 存储posix — 符合 POSIX 标准的文件系统s3 — AWS 简单存储服务sftp — 安全文件传输协议当 NFS 挂载作为 posix 类型仓库使用时,适用 PostgreSQL 文档中描述的相同规则: 创建数据库集群 - 文件系统
default : posix
example : --repo1-type=cifs
Stanza 选项 PostgreSQL 数据库选项(--pg-database) PostgreSQL 数据库名。
连接 PostgreSQL 时使用的数据库名称。默认值通常即可,但某些安装可能不包含此数据库。
注意,出于历史兼容原因,PGDATABASE 环境变量的设置会被忽略。
default : postgres
example : --pg1-database=backupdb
PostgreSQL 主机选项(--pg-host) 远程操作时的 PostgreSQL 主机。
用于 PostgreSQL 主机与仓库主机不在同一台机器上的备份场景。
example : --pg1-host=db.domain.com
已弃用名称:db-host
PostgreSQL 主机证书颁发机构文件选项(--pg-host-ca-file) PostgreSQL 主机的证书颁发机构文件。
连接 PostgreSQL 主机时使用非系统默认的 CA 文件。
example : --pg1-host-ca-file=/etc/pki/tls/certs/ca-bundle.crt
PostgreSQL 主机证书颁发机构路径选项(--pg-host-ca-path) PostgreSQL 主机的证书颁发机构路径。
连接 PostgreSQL 主机时使用非系统默认的 CA 路径。
example : --pg1-host-ca-path=/etc/pki/tls/certs
PostgreSQL 主机证书文件选项(--pg-host-cert-file) PostgreSQL 主机的证书文件。
发送给 PostgreSQL 主机以证明客户端身份。
example : --pg1-host-cert-file=/path/to/client.crt
PostgreSQL 主机命令选项(--pg-host-cmd) PostgreSQL 主机上的 pgBackRest 命令路径。
仅当本地主机与 PostgreSQL 主机上的 pgBackRest 命令路径不同时才需要配置。若未定义,PostgreSQL 主机命令将与本地命令相同。
default : [ path of executed pgbackrest binary]
example : --pg1-host-cmd=/usr/lib/backrest/bin/pgbackrest
已弃用名称:db-cmd
PostgreSQL 主机配置文件选项(--pg-host-config) pgBackRest 数据库主机配置文件。
设置 PostgreSQL 主机上配置文件的位置。仅当 PostgreSQL 主机的配置文件位置与本地配置文件位置不同时才需要配置。
default : CFGOPTDEF_CONFIG_PATH "/" PROJECT_CONFIG_FILE
example : --pg1-host-config=/conf/pgbackrest/pgbackrest.conf
已弃用名称:db-config
PostgreSQL 主机配置包含路径选项(--pg-host-config-include-path) pgBackRest 数据库主机配置包含路径。
设置 PostgreSQL 主机上配置包含路径的位置。仅当 PostgreSQL 主机的配置包含路径与本地配置包含路径不同时才需要配置。
default : CFGOPTDEF_CONFIG_PATH "/" PROJECT_CONFIG_INCLUDE_PATH
example : --pg1-host-config-include-path=/conf/pgbackrest/conf.d
PostgreSQL 主机配置路径选项(--pg-host-config-path) pgBackRest 数据库主机配置路径。
设置 PostgreSQL 主机上配置路径的位置。仅当 PostgreSQL 主机的配置路径与本地配置路径不同时才需要配置。
default : CFGOPTDEF_CONFIG_PATH
example : --pg1-host-config-path=/conf/pgbackrest
PostgreSQL 主机密钥文件选项(--pg-host-key-file) PostgreSQL 主机的密钥文件。
证明客户端证书由其所有者发送。
example : --pg1-host-key-file=/path/to/client.key
PostgreSQL 主机端口选项(--pg-host-port) 设置 pg-host 时使用的 PostgreSQL 主机端口。
使用此选项为 PostgreSQL 主机协议指定非默认端口。
注意: 当 pg-host-type=ssh 时,pg-host-port 没有默认值,实际使用的端口由 cmd-ssh 指定的命令配置决定。
default (depending on pg-host-type) :
tls - 8432
allowed : [ 0 , 65535 ]
example : --pg1-host-port=25
已弃用名称:db-ssh-port
PostgreSQL 主机协议类型选项(--pg-host-type) PostgreSQL 主机协议类型。
支持以下协议类型:
ssh — 安全外壳协议(Secure Shell)。tls — pgBackRest TLS 服务器。default : ssh
example : --pg1-host-type=tls
PostgreSQL 主机用户选项(--pg-host-user) 设置 pg-host 时使用的 PostgreSQL 主机登录用户。
该用户同时拥有远程 pgBackRest 进程,并负责发起与 PostgreSQL 的连接。为使其正常工作,此用户应为 PostgreSQL 数据库集群的所有者,通常为默认值 postgres。
default : postgres
example : --pg1-host-user=db_owner
已弃用名称:db-user
PostgreSQL 路径选项(--pg-path) PostgreSQL 数据目录。
应与 PostgreSQL 报告的 data_directory 一致。尽管可以从多处读取此值,但建议在配置文件中显式设置,以防在恢复或离线备份场景中这些来源不可用。
每次在线备份时,pg-path 选项都会与 PostgreSQL 报告的值进行核对,因此应始终保持最新。
example : --pg1-path=/data/db
已弃用名称:db-path
PostgreSQL 端口选项(--pg-port) PostgreSQL 端口。
PostgreSQL 运行的端口。大多数 PostgreSQL 集群使用默认端口,通常无需指定此选项。
default : 5432
allowed : [ 0 , 65535 ]
example : --pg1-port=6543
已弃用名称:db-port
PostgreSQL Socket 路径选项(--pg-socket-path) PostgreSQL Unix socket 路径。
启动 PostgreSQL 时指定的 Unix socket 目录。pgBackRest 会自动查找操作系统的标准位置,通常无需配置此选项,除非通过 postgresql.conf 中的 unix_socket_directories 参数显式修改了 socket 目录。
example : --pg1-socket-path=/var/run/postgresql
已弃用名称:db-socket-path
PostgreSQL 数据库用户选项(--pg-user) PostgreSQL 数据库用户。
连接 PostgreSQL 时使用的数据库用户名。若未指定,pgBackRest 将使用本地操作系统用户或 PGUSER 环境变量。
example : --pg1-user=backupuser
28.3.5 - 检查命令(check) pgBackRest check 命令的选项与行为参考。
原始页面: pgBackRest Command Docs: check
check 命令用于验证 pgBackRest 及 archive_command 的配置是否正确,确保指定 stanza(stanza 是 pgBackRest 中用于标识 PostgreSQL 集群备份配置的逻辑名称)的归档与备份能够正常运作。该命令会对当前主机上为该 stanza 配置的所有仓库和数据库逐一检查,可检测出配置错误——尤其是归档配置问题,此类问题会导致所需的 WAL 段无法进入归档,从而造成备份不完整。此命令可在 PostgreSQL 主机或仓库主机上运行;也可在备库主机上运行,但由于备库无法执行 pg_switch_xlog()/pg_switch_wal(),命令仅会测试仓库配置。
请注意,该命令会调用 pg_create_restore_point('pgBackRest Archive Check') 和 pg_switch_xlog()/pg_switch_wal() 来强制 PostgreSQL 归档一个 WAL 段。
命令选项 归档检查选项(--archive-check) 在备份完成前检查 WAL 段是否已进入归档。
此选项会验证使备份达到一致状态所需的全部 WAL 段是否均已存在于归档中。建议保持默认值,除非你通过其他方式管理归档。
若启用了 archive-copy,则必须同时启用此选项。
default : y
example : --no -archive-check
归档模式检查选项(--archive-mode-check) 检查 PostgreSQL 的 archive_mode 设置。
此选项默认启用,作用是禁止 PostgreSQL 使用 archive_mode=always。
从备库推送的 WAL 段与从主库推送的 WAL 段在逻辑上可能相同,但校验和不同。禁止多源归档可以避免潜在冲突。
注意:
若禁用此选项,必须确保只有一个归档进程通过 archive-push 命令向仓库写入数据。
default : y
example : --no -archive-mode-check
归档超时选项(--archive-timeout) 归档超时时间。
设置等待每个 WAL 段进入 pgBackRest 归档仓库的最长时间(秒)。此超时适用于 check 和 backup 命令等待备份一致性所需 WAL 段完成归档的场景。
default : 1m
allowed : [ 100ms, 1d]
example : --archive-timeout=30
从备库备份选项(--backup-standby) 从备库集群进行备份。
从备库备份可降低主库的负载。此选项要求同时配置主库和备库主机。
支持以下模式:
y - 必须使用备库进行备份。prefer - 优先从备库备份,备库不可用时自动切换到主库。n - 仅从主库备份。default : n
example : --backup-standby=y
通用选项 缓冲区大小选项(--buffer-size) I/O 操作的缓冲区大小。
用于复制、压缩、加密等操作的缓冲区大小。实际使用的缓冲区数量取决于具体选项,每个操作可能会额外占用内存,例如 gz 压缩可能额外使用 256KiB 内存。
允许的值为 16KiB、32KiB、64KiB、128KiB、256KiB、512KiB、1MiB、2MiB、4MiB、8MiB 和 16MiB。
default : 1MiB
example : --buffer-size=2MiB
SSH 客户端命令选项(--cmd-ssh) SSH 客户端命令。
当需要使用特定 SSH 客户端,或 ssh 命令不在 $PATH 中时,使用此选项指定。
default : ssh
example : --cmd-ssh=/usr/bin/ssh
网络压缩级别选项(--compress-level-network) 网络压缩级别。
当 compress-type=none 且命令不在仓库所在主机上运行时,此选项设置网络传输的压缩级别。压缩可减少网络流量。当 compress-type 不为 none 时,compress-level-network 将被忽略,转而使用 compress-level,以避免对文件进行二次压缩。
default : 1
allowed : [ -5 , 12 ]
example : --compress-level-network=1
配置文件选项(--config) pgBackRest 配置文件。
使用此选项指定非默认路径的配置文件。
default : CFGOPTDEF_CONFIG_PATH "/" PROJECT_CONFIG_FILE
example : --config=/conf/pgbackrest/pgbackrest.conf
配置包含路径选项(--config-include-path) 附加 pgBackRest 配置文件的路径。
指定路径下扩展名为 .conf 的配置文件将与主配置文件合并,构成完整的配置。
default : CFGOPTDEF_CONFIG_PATH "/" PROJECT_CONFIG_INCLUDE_PATH
example : --config-include-path=/conf/pgbackrest/conf.d
配置基础路径选项(--config-path) pgBackRest 配置文件的基础路径。
此设置用于覆盖 --config 和 --config-include-path 的默认基础路径,前提是这两个选项未在命令行中显式指定。
例如,仅传入 --config-path=/conf/pgbackrest 时,--config 的默认值将变为 /conf/pgbackrest/pgbackrest.conf,--config-include-path 的默认值将变为 /conf/pgbackrest/conf.d。
default : CFGOPTDEF_CONFIG_PATH
example : --config-path=/conf/pgbackrest
数据库超时选项(--db-timeout) 数据库查询超时时间。
设置对数据库执行查询的超时时间(秒)。涉及备份启动/停止函数的查询各自可能耗时较长,因此除非你确定这些函数会快速返回(例如已设置 start-fast=y,且数据库集群在备份期间不会产生大量 WAL 段),否则应将此超时设为较大值。
注意: db-timeout 选项的值必须小于 protocol-timeout 选项的值。
default : 30m
allowed : [ 100ms, 7d]
example : --db-timeout=600
I/O 超时选项(--io-timeout) I/O 超时时间。
用于连接和读写操作的超时时间(秒)。
请注意,整个读写操作无需在此时间内完成,但必须 持续有所进展,哪怕每次只传输一个字节。
default : 1m
allowed : [ 100ms, 1h]
example : --io-timeout=120
中性 umask 选项(--neutral-umask) 使用中性 umask。
将 umask 设为 0000,使仓库中的文件和目录以合理的权限模式创建。默认目录权限为 0750,文件权限为 0640。锁文件和日志目录的权限分别为 0770(目录)和 0660(文件)。
若要改用当前运行用户的 umask,请在配置文件中指定 neutral-umask=n,或在命令行中使用 --no-neutral-umask。
default : y
example : --no -neutral-umask
进程优先级选项(--priority) 设置进程优先级。
定义内核调度器赋予该进程的优先级(即 nice 值)。正值降低优先级,负值提高优先级。大多数情况下,进程没有权限提高自身优先级。
allowed : [ -20 , 19 ]
example : --priority=19
协议超时选项(--protocol-timeout) 协议超时时间。
设置本地或远程进程在协议层等待新消息的超时时间(秒),防止进程无限期阻塞。
注意: protocol-timeout 选项的值必须大于 db-timeout 选项的值。
default : 31m
allowed : [ 100ms, 7d]
example : --protocol-timeout=630
保活选项(--sck-keep-alive) 启用保活机制。
在 socket 连接上启用保活消息。
default : y
example : --no -sck-keep-alive
Stanza 选项(--stanza) 定义 stanza。
stanza 是 PostgreSQL 数据库集群的配置,定义了集群的位置、备份方式、归档选项等。大多数数据库服务器只有一个 PostgreSQL 集群,因此只有一个 stanza;而备份服务器则需要为每个待备份的数据库集群分别配置一个 stanza。
命名 stanza 时,很容易直接使用主集群的名称,但更好的做法是根据集群承载的数据库功能来命名。由于 stanza 名称同时用于主库和所有副本,建议选择能描述集群实际用途的名称(如 app 或 dw),而非本地集群名称(如 main 或 prod)。
TCP 保活计数选项(--tcp-keep-alive-count) 保活数据包计数。
指定连接被判定为断开前,可丢失的 TCP 保活消息数量。
此选项仅在支持 TCP_KEEPCNT socket 选项的系统上可用。
allowed : [ 1 , 32 ]
example : --tcp-keep-alive-count=3
TCP 保活空闲时间选项(--tcp-keep-alive-idle) 保活空闲时间。
指定无网络活动持续多少秒后,操作系统开始发送 TCP 保活消息。
此选项仅在支持 TCP_KEEPIDLE socket 选项的系统上可用。
allowed : [ 1 , 3600 ]
example : --tcp-keep-alive-idle=60
TCP 保活间隔选项(--tcp-keep-alive-interval) 保活消息重传间隔。
指定未收到确认的 TCP 保活消息在多少秒后重新发送。
此选项仅在支持 TCP_KEEPINTVL socket 选项的系统上可用。
allowed : [ 1 , 900 ]
example : --tcp-keep-alive-interval=30
TLSv1.2 加密套件选项(--tls-cipher-12) 允许的 TLSv1.2 加密套件。
pgBackRest 客户端与服务端之间的所有 TLS 连接均已加密。默认情况下,与对象存储(如 S3)的连接也会加密。
注意: 任何传输连接的最低安全级别为 TLSv1.2。
如有需要,可调整可接受的加密套件列表。示例为合理选择,除非有特定安全需求。若未设置(默认),则使用底层 OpenSSL 库的默认配置。
example : --tls-cipher-12=HIGH:MEDIUM:+3DES:!aNULL
TLSv1.3 加密套件选项(--tls-cipher-13) 允许的 TLSv1.3 加密套件。
pgBackRest 客户端与服务端之间的所有 TLS 连接均已加密。默认情况下,与对象存储(如 S3)的连接也会加密。
注意: 任何传输连接的最低安全级别为 TLSv1.2。
如有需要,可调整可接受的加密套件列表。若未设置(默认),则使用底层 OpenSSL 库的默认配置。
example : --tls-cipher-13=TLS_AES_256_GCM_SHA384:TLS_CHACHA20_POLY1305_SHA256
日志选项 控制台日志级别选项(--log-level-console) 控制台日志级别。
支持以下日志级别:
off - 不记录任何日志(不推荐)error - 仅记录错误warn - 记录警告和错误info - 记录信息、警告和错误detail - 记录详情、信息、警告和错误debug - 记录调试、详情、信息、警告和错误trace - 记录跟踪(非常详细的调试信息)、调试、信息、警告和错误default : warn
example : --log-level-console=error
文件日志级别选项(--log-level-file) 文件日志级别。
支持以下日志级别:
off - 不记录任何日志(不推荐)error - 仅记录错误warn - 记录警告和错误info - 记录信息、警告和错误detail - 记录详情、信息、警告和错误debug - 记录调试、详情、信息、警告和错误trace - 记录跟踪(非常详细的调试信息)、调试、信息、警告和错误default : info
example : --log-level-file=debug
标准错误日志级别选项(--log-level-stderr) stderr 日志级别。
指定哪些日志级别输出到 stderr 而非 stdout(由 log-level-console 控制)。输出到 stderr 的内容不包含时间戳和进程信息。
支持以下日志级别:
off - 不记录任何日志(不推荐)error - 仅记录错误warn - 记录警告和错误info - 记录信息、警告和错误detail - 记录详情、信息、警告和错误debug - 记录调试、详情、信息、警告和错误trace - 记录跟踪(非常详细的调试信息)、调试、信息、警告和错误default : off
example : --log-level-stderr=error
日志路径选项(--log-path) 日志文件存储路径。
指定 pgBackRest 日志文件的存储位置。若 log-level-file=off,则无需配置此路径。
default : /var/log/pgbackrest
example : --log-path=/backup/db/log
子进程日志选项(--log-subprocess) 启用子进程日志记录。
为当前进程创建的子进程启用文件日志记录,日志级别由 log-level-file 指定。
default : n
example : --log-subprocess
日志时间戳选项(--log-timestamp) 启用日志时间戳。
在控制台和文件日志中附加时间戳。生成文档等特殊场景下此选项会被禁用。
default : y
example : --no -log-timestamp
维护者选项 强制指定 PostgreSQL 版本选项(--pg-version-force) 强制指定 PostgreSQL 版本。
使用此选项指定的 PostgreSQL 版本,而不依赖从 pg_control 或 WAL 头部自动检测的版本。此选项主要用于 PostgreSQL 分支版本或开发版本——在这些版本中,自动检测值可能与正式发行版本不同。PostgreSQL 通过 server_version_num 报告的版本必须与强制指定的版本一致。
警告:
使用此选项须格外谨慎。pg_control 和 WAL 头部仍会按指定版本的预期格式读取,即官方开源 PostgreSQL 的格式。若分支版本或开发版本修改了 pgBackRest 所依赖的字段格式,将导致不可预期的行为。通常只有在分支版本于标准 PostgreSQL 结构成员之后 追加自定义成员时,此选项才能正常工作。
example : --pg-version-force=15
仓库选项 Azure 仓库容器选项(--repo-azure-container) Azure 仓库容器。
用于存储仓库的 Azure 容器。
通过设置 repo-path=/ 可将 pgBackRest 仓库存储在容器根目录,但通常建议指定前缀(如 /repo),以便日志和其他 Azure 生成的内容也能存储在同一容器中。
example : --repo1-azure-container=pg-backup
Azure 仓库密钥类型选项(--repo-azure-key-type) Azure 仓库密钥类型。
支持以下授权类型:
shared - 共享密钥sas - 共享访问签名auto - 使用 Azure 托管标识自动授权default : shared
example : --repo1-azure-key-type=sas
Azure 仓库 URI 风格选项(--repo-azure-uri-style) Azure URI 风格。
支持以下 URI 风格:
host - 连接到 account.endpoint 主机。path - 连接到 endpoint 主机,并在 URI 中添加账户前缀。default : host
example : --repo1-azure-uri-style=path
仓库加密类型选项(--repo-cipher-type) 用于加密仓库的加密算法。
支持以下加密类型:
none - 仓库不加密aes-256-cbc - 256 位密钥长度的高级加密标准请注意,即使仓库类型(如 S3)本身支持加密,pgBackRest 的加密也始终在客户端执行。
default : none
example : --repo1-cipher-type=aes-256-cbc
GCS 仓库存储桶选项(--repo-gcs-bucket) GCS 仓库存储桶。
用于存储仓库的 GCS 存储桶。
通过设置 repo-path=/ 可将 pgBackRest 仓库存储在存储桶根目录,但通常建议指定前缀(如 /repo),以便日志和其他 GCS 生成的内容也能存储在同一存储桶中。
example : --repo1-gcs-bucket=/pg-backup
GCS 仓库端点选项(--repo-gcs-endpoint) GCS 仓库端点。
用于连接存储服务的端点。可更新为本地 GCS 服务器或备用端点。
default : storage.googleapis.com
example : --repo1-gcs-endpoint=localhost
GCS 仓库密钥类型选项(--repo-gcs-key-type) GCS 仓库密钥类型。
支持以下授权类型:
auto - 使用实例服务账号授权。service - 使用本地存储的服务账号密钥。token - 用于本地测试,如 fakegcs。当 repo-gcs-key-type=service 时,认证令牌续期时会重新加载凭据。
default : service
example : --repo1-gcs-key-type=auto
GCS 仓库项目 ID 选项(--repo-gcs-user-project) GCS 项目 ID。
用于确定请求计费的 GCS 项目 ID。
example : --repo1-gcs-user-project=my-project
仓库主机选项(--repo-host) 远程操作时的仓库主机。
若备份和归档使用本地挂载的文件系统,则无需此设置。
example : --repo1-host=repo1.domain.com
已弃用名称:backup-host
仓库主机证书颁发机构文件选项(--repo-host-ca-file) 仓库主机证书颁发机构文件。
连接仓库主机时,使用非系统默认的 CA 文件。
example : --repo1-host-ca-file=/etc/pki/tls/certs/ca-bundle.crt
仓库主机证书颁发机构路径选项(--repo-host-ca-path) 仓库主机证书颁发机构路径。
连接仓库主机时,使用非系统默认的 CA 路径。
example : --repo1-host-ca-path=/etc/pki/tls/certs
仓库主机证书文件选项(--repo-host-cert-file) 仓库主机证书文件。
发送给仓库主机以证明客户端身份。
example : --repo1-host-cert-file=/path/to/client.crt
仓库主机命令选项(--repo-host-cmd) 仓库主机上的 pgBackRest 命令。
仅当 pgBackRest 在本地主机与仓库主机上的路径不同时才需要此选项。若未定义,仓库主机命令将与本地命令相同。
default : [ path of executed pgbackrest binary]
example : --repo1-host-cmd=/usr/lib/backrest/bin/pgbackrest
已弃用名称:backup-cmd
仓库主机配置文件选项(--repo-host-config) pgBackRest 仓库主机配置文件。
设置仓库主机上配置文件的位置。仅当仓库主机上的配置文件路径与本地不同时才需要此选项。
default : CFGOPTDEF_CONFIG_PATH "/" PROJECT_CONFIG_FILE
example : --repo1-host-config=/conf/pgbackrest/pgbackrest.conf
已弃用名称:backup-config
仓库主机配置包含路径选项(--repo-host-config-include-path) pgBackRest 仓库主机配置包含路径。
设置仓库主机上配置包含路径的位置。仅当仓库主机上的配置包含路径与本地不同时才需要此选项。
default : CFGOPTDEF_CONFIG_PATH "/" PROJECT_CONFIG_INCLUDE_PATH
example : --repo1-host-config-include-path=/conf/pgbackrest/conf.d
仓库主机配置路径选项(--repo-host-config-path) pgBackRest 仓库主机配置路径。
设置仓库主机上配置路径的位置。仅当仓库主机上的配置路径与本地不同时才需要此选项。
default : CFGOPTDEF_CONFIG_PATH
example : --repo1-host-config-path=/conf/pgbackrest
仓库主机密钥文件选项(--repo-host-key-file) 仓库主机密钥文件。
证明客户端证书由其所有者发送。
example : --repo1-host-key-file=/path/to/client.key
仓库主机端口选项(--repo-host-port) repo-host 已设置时的仓库主机端口。
使用此选项为仓库主机协议指定非默认端口。
注意: 当 repo-host-type=ssh 时,repo-host-port 无默认值,端口由 cmd-ssh 指定的命令配置决定。
default (depending on repo-host-type) :
tls - 8432
allowed : [ 0 , 65535 ]
example : --repo1-host-port=25
已弃用名称:backup-ssh-port
仓库主机协议类型选项(--repo-host-type) 仓库主机协议类型。
支持以下协议类型:
ssh - 安全外壳协议(Secure Shell)。tls - pgBackRest TLS 服务器。default : ssh
example : --repo1-host-type=tls
仓库主机用户选项(--repo-host-user) repo-host 已设置时的仓库主机用户。
定义在仓库主机上执行操作所用的用户。建议不要使用 postgres 用户,而是使用专用用户(如 pgbackrest)。若 PostgreSQL 运行在仓库主机上,可将 postgres 用户加入 pgbackrest 组,使其对仓库拥有读取权限,但无法意外损坏仓库内容。
default : pgbackrest
example : --repo1-host-user=repo-user
已弃用名称:backup-user
仓库路径选项(--repo-path) 备份和归档的存储路径。
仓库是 pgBackRest 存储备份和归档 WAL 段的地方。
预先估算所需空间可能比较困难。建议先执行若干次备份,记录不同备份类型(全量/增量/差异)的大小,并衡量每天产生的 WAL 量,从而得出大致的空间需求。随着数据库持续增长,需求也会相应变化。
default : /var/lib/pgbackrest
example : --repo1-path=/backup/db/backrest
S3 仓库存储桶选项(--repo-s3-bucket) S3 仓库存储桶。
用于存储仓库的 S3 存储桶。
通过设置 repo-path=/ 可将 pgBackRest 仓库存储在存储桶根目录,但通常建议指定前缀(如 /repo),以便日志和其他 AWS 生成的内容也能存储在同一存储桶中。
example : --repo1-s3-bucket=pg-backup
S3 仓库端点选项(--repo-s3-endpoint) S3 仓库端点。
AWS 端点应与所选区域匹配。
对于自定义或测试配置,repo-storage-ca-file、repo-storage-ca-path、repo-storage-host、repo-storage-port 和 repo-storage-verify-tls 选项可能有用。
example : --repo1-s3-endpoint=s3.amazonaws.com
S3 仓库密钥类型选项(--repo-s3-key-type) S3 仓库密钥类型。
支持以下类型:
shared - 共享密钥auto - 自动获取临时凭据web-id - 自动获取 Web 身份凭据default : shared
example : --repo1-s3-key-type=auto
S3 仓库 KMS 密钥 ID 选项(--repo-s3-kms-key-id) S3 仓库 KMS 密钥。
使用指定的 AWS 密钥管理服务密钥启用 S3 服务端加密。
example : --repo1-s3-kms-key-id=bceb4f13-6939-4be3-910d-df54dee817b7
S3 仓库区域选项(--repo-s3-region) S3 仓库区域。
创建存储桶所在的 AWS 区域。
example : --repo1-s3-region=us-east-1
S3 仓库请求方付费选项(--repo-s3-requester-pays) S3 仓库请求方付费。
启用 S3 请求方付费功能。
default : n
example : --no -repo1-s3-requester-pays
S3 仓库角色选项(--repo-s3-role) S3 仓库角色。
当 repo-s3-key-type=auto 时,用于获取临时凭据的 AWS 角色名称(非完整 ARN)。
example : --repo1-s3-role=authrole
S3 仓库 URI 风格选项(--repo-s3-uri-style) S3 URI 风格。
支持以下 URI 风格:
host - 连接到 bucket.endpoint 主机。path - 连接到 endpoint 主机,并在 URI 中添加存储桶前缀。default : host
example : --repo1-s3-uri-style=path
SFTP 仓库主机选项(--repo-sftp-host) SFTP 仓库主机。
存储仓库的 SFTP 主机。
example : --repo1-sftp-host=sftprepo.domain
SFTP 仓库主机指纹选项(--repo-sftp-host-fingerprint) SFTP 仓库主机指纹。
主机指纹的生成方式应与 repo-sftp-host-key-hash-type 一致,通过 awk '{print $2}' ssh_host_xxx_key.pub | base64 -d | (md5sum or sha1sum) -b 命令生成。SSH 主机密钥通常位于 /etc/ssh 目录下。
example : --repo1-sftp-host-fingerprint=f84e172dfead7aeeeae6c1fdfb5aa8cf
SFTP 主机密钥检查类型选项(--repo-sftp-host-key-check-type) SFTP 主机密钥检查类型。
支持以下 SFTP 主机密钥检查类型:
strict - pgBackRest 不会自动将主机密钥添加到 ~/.ssh/known_hosts 文件,并拒绝连接到主机密钥已更改或不在已知主机文件中的主机。此模式强制用户手动添加所有新主机。accept-new - pgBackRest 会自动将新主机密钥添加到用户的已知主机文件,但不允许连接到主机密钥已更改的主机。fingerprint - pgBackRest 将主机密钥与 repo-sftp-host-fingerprint 选项指定的指纹进行比对。none - 不执行主机密钥检查。default : strict
example : --repo1-sftp-host-key-check-type=accept-new
SFTP 仓库主机密钥哈希类型选项(--repo-sftp-host-key-hash-type) SFTP 仓库主机密钥哈希类型。
声明在 SSH 启动时用于计算远程系统主机密钥摘要的哈希类型。较新版本的 libssh2 除 md5 和 sha1 外,还支持 sha256。
example : --repo1-sftp-host-key-hash-type=sha256
SFTP 仓库主机端口选项(--repo-sftp-host-port) SFTP 仓库主机端口。
SFTP 仓库主机的端口号。
default : 22
allowed : [ 1 , 65535 ]
example : --repo1-sftp-host-port=22
SFTP 仓库主机用户选项(--repo-sftp-host-user) SFTP 仓库主机用户。
用于存储仓库的主机上的用户。
example : --repo1-sftp-host-user=pg-backup
SFTP 已知主机文件选项(--repo-sftp-known-host) SFTP 已知主机文件。
认证过程中用于搜索 SFTP 主机匹配的已知主机文件。若未指定,pgBackRest 默认搜索 ~/.ssh/known_hosts、~/.ssh/known_hosts2、/etc/ssh/ssh_known_hosts 和 /etc/ssh/ssh_known_hosts2。若配置了一个或多个文件路径,pgBackRest 将只在这些文件中搜索匹配项。文件路径必须为完整路径或以波浪号开头的路径。此选项可多次传入以指定多个已知主机文件。使用已知主机文件检查时,不得同时指定 repo-sftp-host-fingerprint。另请参阅 repo-sftp-host-check-type 选项。
example : --repo1-sftp-known-host=/home/postgres/.ssh/known_hosts
SFTP 仓库私钥文件选项(--repo-sftp-private-key-file) SFTP 私钥文件。
用于认证的 SFTP 私钥文件。
example : --repo1-sftp-private-key-file=~/.ssh/id_ed25519
SFTP 仓库公钥文件选项(--repo-sftp-public-key-file) SFTP 公钥文件。
用于认证的 SFTP 公钥文件。使用 OpenSSL 编译时为可选;使用其他库编译时为必需。
example : --repo1-sftp-public-key-file=~/.ssh/id_ed25519.pub
仓库存储 CA 文件选项(--repo-storage-ca-file) 仓库存储 CA 文件。
连接存储(如 S3、Azure)时,使用非系统默认的 CA 文件。
example : --repo1-storage-ca-file=/etc/pki/tls/certs/ca-bundle.crt
已弃用名称:repo-azure-ca-file、repo-s3-ca-file
仓库存储 TLS CA 路径选项(--repo-storage-ca-path) 仓库存储 CA 路径。
连接存储(如 S3、Azure)时,使用非系统默认的 CA 路径。
example : --repo1-storage-ca-path=/etc/pki/tls/certs
已弃用名称:repo-azure-ca-path、repo-s3-ca-path
仓库存储主机选项(--repo-storage-host) 仓库存储主机。
连接到存储(如 S3、Azure)端点以外的主机,通常用于测试。
example : --repo1-storage-host=127.0.0.1
已弃用名称:repo-azure-host、repo-s3-host
仓库存储端口选项(--repo-storage-port) 仓库存储端口。
连接存储(如 S3、Azure)端点(或指定主机)时使用的端口。
default : 443
allowed : [ 1 , 65535 ]
example : --repo1-storage-port=9000
已弃用名称:repo-azure-port、repo-s3-port
仓库存储标签选项(--repo-storage-tag) 仓库存储标签。
指定在仓库为对象存储(如 S3)时添加到对象上的标签。可多次使用此选项以添加多个标签。
pgBackRest 不提供修改这些标签的功能,因此请在运行 stanza-create 之前确保标签设置正确,以保证整个仓库标签的一致性。
example : --repo1-storage-tag=key1=value1
仓库存储上传分块大小选项(--repo-storage-upload-chunk-size) 仓库存储上传分块大小。
S3 等对象存储支持在文件过大无法全部载入内存时分块上传。即使文件能全部载入内存,限制上传所用内存量也更为高效。
较大的块大小通常能提升性能,因为它可以减少上传请求数量,使更多文件在单次请求中完成上传而无需分块处理。其代价是内存占用更高,且由于块缓冲区需按进程分配,process-max 值越大,整体内存消耗越多。
请注意,有效的块大小因存储类型和平台而异。例如,AWS S3 的最小块大小为 5MiB。各存储类型对块大小的叫法不同,查找最小/最大值时请参考:AWS S3 用"part size",GCS 用"chunk size",Azure 用"block size"。
若文件大小超过 1GiB(PostgreSQL 默认创建文件的上限),块大小将逐步增大至允许的最大值,以完成文件上传。
default (depending on repo-type) :
azure - 4MiB
gcs - 4MiB
s3 - 5MiB
allow range (depending on repo-type) :
azure - [4MiB, 1GiB]
gcs - [4MiB, 1GiB]
s3 - [5MiB, 1GiB]
example : --repo1-storage-upload-chunk-size=16MiB
仓库存储证书验证选项(--repo-storage-verify-tls) 仓库存储证书验证。
启用或禁用对存储(如 S3、Azure)服务端 TLS 证书的验证。禁用验证仅应用于测试或使用自签名证书的场景。
default : y
example : --no -repo1-storage-verify-tls
已弃用名称:repo-azure-verify-tls、repo-s3-verify-ssl、repo-s3-verify-tls
仓库类型选项(--repo-type) 仓库使用的存储类型。
支持以下仓库类型:
azure - Azure Blob 存储服务cifs - 类似 posix,但禁用链接和目录 fsyncgcs - Google Cloud 存储posix - 符合 POSIX 标准的文件系统s3 - AWS 简单存储服务sftp - 安全文件传输协议将 NFS 挂载用作 posix 仓库时,适用于 pgBackRest 的规则与 PostgreSQL 文档中描述的相同,详见 创建数据库集群 - 文件系统 。
default : posix
example : --repo1-type=cifs
Stanza 选项 PostgreSQL 数据库选项(--pg-database) PostgreSQL 数据库。
连接 PostgreSQL 时使用的数据库名称。默认值通常是最佳选择,但某些安装可能不包含此数据库。
请注意,出于历史原因,PGDATABASE 环境变量的设置将被忽略。
default : postgres
example : --pg1-database=backupdb
PostgreSQL 主机选项(--pg-host) 远程操作时的 PostgreSQL 主机。
用于 PostgreSQL 主机与仓库主机分离的备份场景。
example : --pg1-host=db.domain.com
已弃用名称:db-host
PostgreSQL 主机证书颁发机构文件选项(--pg-host-ca-file) PostgreSQL 主机证书颁发机构文件。
连接 PostgreSQL 主机时,使用非系统默认的 CA 文件。
example : --pg1-host-ca-file=/etc/pki/tls/certs/ca-bundle.crt
PostgreSQL 主机证书颁发机构路径选项(--pg-host-ca-path) PostgreSQL 主机证书颁发机构路径。
连接 PostgreSQL 主机时,使用非系统默认的 CA 路径。
example : --pg1-host-ca-path=/etc/pki/tls/certs
PostgreSQL 主机证书文件选项(--pg-host-cert-file) PostgreSQL 主机证书文件。
发送给 PostgreSQL 主机以证明客户端身份。
example : --pg1-host-cert-file=/path/to/client.crt
PostgreSQL 主机命令选项(--pg-host-cmd) PostgreSQL 主机上的 pgBackRest 命令。
仅当 pgBackRest 在本地主机与 PostgreSQL 主机上的路径不同时才需要此选项。若未定义,PostgreSQL 主机命令将与本地命令相同。
default : [ path of executed pgbackrest binary]
example : --pg1-host-cmd=/usr/lib/backrest/bin/pgbackrest
已弃用名称:db-cmd
PostgreSQL 主机配置文件选项(--pg-host-config) pgBackRest 数据库主机配置文件。
设置 PostgreSQL 主机上配置文件的位置。仅当 PostgreSQL 主机上的配置文件路径与本地不同时才需要此选项。
default : CFGOPTDEF_CONFIG_PATH "/" PROJECT_CONFIG_FILE
example : --pg1-host-config=/conf/pgbackrest/pgbackrest.conf
已弃用名称:db-config
PostgreSQL 主机配置包含路径选项(--pg-host-config-include-path) pgBackRest 数据库主机配置包含路径。
设置 PostgreSQL 主机上配置包含路径的位置。仅当 PostgreSQL 主机上的配置包含路径与本地不同时才需要此选项。
default : CFGOPTDEF_CONFIG_PATH "/" PROJECT_CONFIG_INCLUDE_PATH
example : --pg1-host-config-include-path=/conf/pgbackrest/conf.d
PostgreSQL 主机配置路径选项(--pg-host-config-path) pgBackRest 数据库主机配置路径。
设置 PostgreSQL 主机上配置路径的位置。仅当 PostgreSQL 主机上的配置路径与本地不同时才需要此选项。
default : CFGOPTDEF_CONFIG_PATH
example : --pg1-host-config-path=/conf/pgbackrest
PostgreSQL 主机密钥文件选项(--pg-host-key-file) PostgreSQL 主机密钥文件。
证明客户端证书由其所有者发送。
example : --pg1-host-key-file=/path/to/client.key
PostgreSQL 主机端口选项(--pg-host-port) pg-host 已设置时的 PostgreSQL 主机端口。
使用此选项为 PostgreSQL 主机协议指定非默认端口。
注意: 当 pg-host-type=ssh 时,pg-host-port 无默认值,端口由 cmd-ssh 指定的命令配置决定。
default (depending on pg-host-type) :
tls - 8432
allowed : [ 0 , 65535 ]
example : --pg1-host-port=25
已弃用名称:db-ssh-port
PostgreSQL 主机协议类型选项(--pg-host-type) PostgreSQL 主机协议类型。
支持以下协议类型:
ssh - 安全外壳协议(Secure Shell)。tls - pgBackRest TLS 服务器。default : ssh
example : --pg1-host-type=tls
PostgreSQL 主机用户选项(--pg-host-user) pg-host 已设置时的 PostgreSQL 主机登录用户。
此用户还将作为远程 pgBackRest 进程的所有者,并负责发起到 PostgreSQL 的连接。为使其正常工作,该用户应为 PostgreSQL 数据库集群的所有者,通常即默认值 postgres。
default : postgres
example : --pg1-host-user=db_owner
已弃用名称:db-user
PostgreSQL 路径选项(--pg-path) PostgreSQL 数据目录。
此路径应与 PostgreSQL 报告的 data_directory 一致。尽管该值可从多处读取,但在恢复或离线备份场景下这些资源可能不可用,因此建议显式设置。
每次在线备份时,pg-path 选项都会与 PostgreSQL 报告的值进行核对,因此应始终保持最新。
example : --pg1-path=/data/db
已弃用名称:db-path
PostgreSQL 端口选项(--pg-port) PostgreSQL 端口。
PostgreSQL 运行的端口号。大多数 PostgreSQL 集群使用默认端口,通常无需指定此选项。
default : 5432
allowed : [ 0 , 65535 ]
example : --pg1-port=6543
已弃用名称:db-port
PostgreSQL Socket 路径选项(--pg-socket-path) PostgreSQL Unix socket 路径。
启动 PostgreSQL 时指定的 Unix socket 目录。pgBackRest 会自动查找当前操作系统的标准位置,通常无需指定此选项,除非在 postgresql.conf 中通过 unix_socket_directories 显式修改了 socket 目录。
example : --pg1-socket-path=/var/run/postgresql
已弃用名称:db-socket-path
PostgreSQL 数据库用户选项(--pg-user) PostgreSQL 数据库用户。
连接 PostgreSQL 时使用的数据库用户名。若未指定,pgBackRest 将使用本地操作系统用户或 PGUSER。
example : --pg1-user=backupuser
28.3.6 - 过期命令(expire) pgBackRest expire 命令的选项与行为参考。
原始页面: pgBackRest Command Docs: expire
pgBackRest 基于保留策略对全量备份进行轮换,策略可按数量或时间段定义。按数量保留时,过期操作只关注需要保留的备份数量,不考虑备份的创建时间。差异备份按数量进行保留,但当其依赖的全量备份过期时,差异备份也会随之过期。增量备份没有独立的保留策略——它们始终随关联的全量备份或差异备份一同过期。详情及示例请参见 全量备份保留策略 差异备份保留策略
默认情况下,未过期备份对应的已归档 WAL 会被保留。如有需要(不推荐),可通过归档保留选项按仓库单独调整此策略。详情及示例请参见 归档保留策略
expire 命令在每次备份成功后自动运行,也可由用户手动执行。手动执行时,将按每个已配置仓库的保留策略处理过期备份。若指定了 --repo 选项,则仅对指定仓库执行过期操作。还可通过 --set 选项将过期操作限定到特定备份集;若未指定 --repo,则会搜索所有仓库,对所有匹配该备份集条件的仓库执行过期。需要注意的是,每次运行 expire 命令时都会检查并执行归档保留策略。
命令选项 最旧备份选项(--oldest) 过期最旧的可删除备份集。
过期可以删除的最旧全量备份集(即至少保留一个比它更新的全量备份)。这等价于将保留数量临时减一,但由系统自动计算。与该过期全量备份集关联的所有备份(差异备份和增量备份)也会一同过期。
使用此选项时,归档保留策略也会相应调整,以便在同一次运行中删除已过期备份的 WAL。
若配置了基于时间的全量保留策略(--repo-retention-full-type=time),则本次执行中 --oldest 将改用基于数量的过期方式。
警告:
此选项不能与 --set 同时使用。
default : n
example : --oldest
备份集选项(--set) 指定要过期的备份集。
无论保留规则如何,指定的备份集(即所提供的备份标签及其所有依赖备份)都将被过期,但仓库中至少必须保留一个全量备份。
警告:
请极其谨慎地使用此选项——它将从 pgBackRest 仓库中永久删除指定备份集中的所有备份,以及使该备份保持一致所不需要的所有归档文件。此操作可能导致相关备份无法执行 PITR。若已配置 --repo-retention-full 和/或 --repo-retention-archive,建议在执行临时过期操作时将这些选项设为最大值,以防意外删除归档文件。
example : --set=20150131-153358F_20150131-153401I
通用选项 缓冲区大小选项(--buffer-size) I/O 操作的缓冲区大小。
用于复制、压缩、加密等操作的缓冲区大小。实际使用的缓冲区数量取决于具体选项,每个操作可能会额外占用内存,例如 gz 压缩可能额外使用 256KiB 内存。
允许的值为 16KiB、32KiB、64KiB、128KiB、256KiB、512KiB、1MiB、2MiB、4MiB、8MiB 和 16MiB。
default : 1MiB
example : --buffer-size=2MiB
SSH 客户端命令选项(--cmd-ssh) SSH 客户端命令。
当需要使用特定 SSH 客户端,或 ssh 命令不在 $PATH 中时,使用此选项指定。
default : ssh
example : --cmd-ssh=/usr/bin/ssh
网络压缩级别选项(--compress-level-network) 网络压缩级别。
当 compress-type=none 且命令不在仓库所在主机上运行时,此选项设置网络传输的压缩级别。压缩可减少网络流量。当 compress-type 不为 none 时,compress-level-network 将被忽略,转而使用 compress-level,以避免对文件进行二次压缩。
default : 1
allowed : [ -5 , 12 ]
example : --compress-level-network=1
配置文件选项(--config) pgBackRest 配置文件。
使用此选项指定非默认路径的配置文件。
default : CFGOPTDEF_CONFIG_PATH "/" PROJECT_CONFIG_FILE
example : --config=/conf/pgbackrest/pgbackrest.conf
配置包含路径选项(--config-include-path) 附加 pgBackRest 配置文件的路径。
指定路径下扩展名为 .conf 的配置文件将与主配置文件合并,构成完整的配置。
default : CFGOPTDEF_CONFIG_PATH "/" PROJECT_CONFIG_INCLUDE_PATH
example : --config-include-path=/conf/pgbackrest/conf.d
配置基础路径选项(--config-path) pgBackRest 配置文件的基础路径。
此设置用于覆盖 --config 和 --config-include-path 的默认基础路径,前提是这两个选项未在命令行中显式指定。
例如,仅传入 --config-path=/conf/pgbackrest 时,--config 的默认值将变为 /conf/pgbackrest/pgbackrest.conf,--config-include-path 的默认值将变为 /conf/pgbackrest/conf.d。
default : CFGOPTDEF_CONFIG_PATH
example : --config-path=/conf/pgbackrest
试运行选项(--dry-run) 以试运行模式执行命令。
--dry-run 仅可在命令行使用,适用于需要预判命令将进行哪些修改而不实际执行的场景。
default : n
example : --dry-run
I/O 超时选项(--io-timeout) I/O 超时时间。
用于连接和读写操作的超时时间(秒)。
请注意,整个读写操作无需在此时间内完成,但必须 持续有所进展,哪怕每次只传输一个字节。
default : 1m
allowed : [ 100ms, 1h]
example : --io-timeout=120
锁文件路径选项(--lock-path) 锁文件存储路径。
指定 pgBackRest 创建锁文件的位置,用于防止相互冲突的操作并发运行。
default : /tmp/pgbackrest
example : --lock-path=/backup/db/lock
中性 umask 选项(--neutral-umask) 使用中性 umask。
将 umask 设为 0000,使仓库中的文件和目录以合理的权限模式创建。默认目录权限为 0750,文件权限为 0640。锁文件和日志目录的权限分别为 0770(目录)和 0660(文件)。
若要改用当前运行用户的 umask,请在配置文件中指定 neutral-umask=n,或在命令行中使用 --no-neutral-umask。
default : y
example : --no -neutral-umask
进程优先级选项(--priority) 设置进程优先级。
定义内核调度器赋予该进程的优先级(即 nice 值)。正值降低优先级,负值提高优先级。大多数情况下,进程没有权限提高自身优先级。
allowed : [ -20 , 19 ]
example : --priority=19
协议超时选项(--protocol-timeout) 协议超时时间。
设置本地或远程进程在协议层等待新消息的超时时间(秒),防止进程无限期阻塞。
注意: protocol-timeout 选项的值必须大于 db-timeout 选项的值。
default : 31m
allowed : [ 100ms, 7d]
example : --protocol-timeout=630
保活选项(--sck-keep-alive) 启用保活机制。
在 socket 连接上启用保活消息。
default : y
example : --no -sck-keep-alive
Stanza 选项(--stanza) 定义 stanza。
stanza 是 PostgreSQL 数据库集群的配置,定义了集群的位置、备份方式、归档选项等。大多数数据库服务器只有一个 PostgreSQL 集群,因此只有一个 stanza;而备份服务器则需要为每个待备份的数据库集群分别配置一个 stanza。
命名 stanza 时,很容易直接使用主集群的名称,但更好的做法是根据集群承载的数据库功能来命名。由于 stanza 名称同时用于主库和所有副本,建议选择能描述集群实际用途的名称(如 app 或 dw),而非本地集群名称(如 main 或 prod)。
TCP 保活计数选项(--tcp-keep-alive-count) 保活数据包计数。
指定连接被判定为断开前,可丢失的 TCP 保活消息数量。
此选项仅在支持 TCP_KEEPCNT socket 选项的系统上可用。
allowed : [ 1 , 32 ]
example : --tcp-keep-alive-count=3
TCP 保活空闲时间选项(--tcp-keep-alive-idle) 保活空闲时间。
指定无网络活动持续多少秒后,操作系统开始发送 TCP 保活消息。
此选项仅在支持 TCP_KEEPIDLE socket 选项的系统上可用。
allowed : [ 1 , 3600 ]
example : --tcp-keep-alive-idle=60
TCP 保活间隔选项(--tcp-keep-alive-interval) 保活消息重传间隔。
指定未收到确认的 TCP 保活消息在多少秒后重新发送。
此选项仅在支持 TCP_KEEPINTVL socket 选项的系统上可用。
allowed : [ 1 , 900 ]
example : --tcp-keep-alive-interval=30
TLSv1.2 加密套件选项(--tls-cipher-12) 允许的 TLSv1.2 加密套件。
pgBackRest 客户端与服务端之间的所有 TLS 连接均已加密。默认情况下,与对象存储(如 S3)的连接也会加密。
注意: 任何传输连接的最低安全级别为 TLSv1.2。
如有需要,可调整可接受的加密套件列表。示例为合理选择,除非有特定安全需求。若未设置(默认),则使用底层 OpenSSL 库的默认配置。
example : --tls-cipher-12=HIGH:MEDIUM:+3DES:!aNULL
TLSv1.3 加密套件选项(--tls-cipher-13) 允许的 TLSv1.3 加密套件。
pgBackRest 客户端与服务端之间的所有 TLS 连接均已加密。默认情况下,与对象存储(如 S3)的连接也会加密。
注意: 任何传输连接的最低安全级别为 TLSv1.2。
如有需要,可调整可接受的加密套件列表。若未设置(默认),则使用底层 OpenSSL 库的默认配置。
example : --tls-cipher-13=TLS_AES_256_GCM_SHA384:TLS_CHACHA20_POLY1305_SHA256
日志选项 控制台日志级别选项(--log-level-console) 控制台日志级别。
支持以下日志级别:
off - 不记录任何日志(不推荐)error - 仅记录错误warn - 记录警告和错误info - 记录信息、警告和错误detail - 记录详情、信息、警告和错误debug - 记录调试、详情、信息、警告和错误trace - 记录跟踪(非常详细的调试信息)、调试、信息、警告和错误default : warn
example : --log-level-console=error
文件日志级别选项(--log-level-file) 文件日志级别。
支持以下日志级别:
off - 不记录任何日志(不推荐)error - 仅记录错误warn - 记录警告和错误info - 记录信息、警告和错误detail - 记录详情、信息、警告和错误debug - 记录调试、详情、信息、警告和错误trace - 记录跟踪(非常详细的调试信息)、调试、信息、警告和错误default : info
example : --log-level-file=debug
标准错误日志级别选项(--log-level-stderr) stderr 日志级别。
指定哪些日志级别输出到 stderr 而非 stdout(由 log-level-console 控制)。输出到 stderr 的内容不包含时间戳和进程信息。
支持以下日志级别:
off - 不记录任何日志(不推荐)error - 仅记录错误warn - 记录警告和错误info - 记录信息、警告和错误detail - 记录详情、信息、警告和错误debug - 记录调试、详情、信息、警告和错误trace - 记录跟踪(非常详细的调试信息)、调试、信息、警告和错误default : off
example : --log-level-stderr=error
日志路径选项(--log-path) 日志文件存储路径。
指定 pgBackRest 日志文件的存储位置。若 log-level-file=off,则无需配置此路径。
default : /var/log/pgbackrest
example : --log-path=/backup/db/log
子进程日志选项(--log-subprocess) 启用子进程日志记录。
为当前进程创建的子进程启用文件日志记录,日志级别由 log-level-file 指定。
default : n
example : --log-subprocess
日志时间戳选项(--log-timestamp) 启用日志时间戳。
在控制台和文件日志中附加时间戳。生成文档等特殊场景下此选项会被禁用。
default : y
example : --no -log-timestamp
仓库选项 指定仓库选项(--repo) 指定操作仓库。
指定命令操作的目标仓库。
例如,可使用此选项从特定仓库执行恢复,而不是让 pgBackRest 自动选择。
allowed : [ 1 , 256 ]
example : --repo=1
Azure 仓库容器选项(--repo-azure-container) Azure 仓库容器。
用于存储仓库的 Azure 容器。
通过设置 repo-path=/ 可将 pgBackRest 仓库存储在容器根目录,但通常建议指定前缀(如 /repo),以便日志和其他 Azure 生成的内容也能存储在同一容器中。
example : --repo1-azure-container=pg-backup
Azure 仓库密钥类型选项(--repo-azure-key-type) Azure 仓库密钥类型。
支持以下授权类型:
shared - 共享密钥sas - 共享访问签名auto - 使用 Azure 托管标识自动授权default : shared
example : --repo1-azure-key-type=sas
Azure 仓库 URI 风格选项(--repo-azure-uri-style) Azure URI 风格。
支持以下 URI 风格:
host - 连接到 account.endpoint 主机。path - 连接到 endpoint 主机,并在 URI 中添加账户前缀。default : host
example : --repo1-azure-uri-style=path
仓库加密类型选项(--repo-cipher-type) 用于加密仓库的加密算法。
支持以下加密类型:
none - 仓库不加密aes-256-cbc - 256 位密钥长度的高级加密标准请注意,即使仓库类型(如 S3)本身支持加密,pgBackRest 的加密也始终在客户端执行。
default : none
example : --repo1-cipher-type=aes-256-cbc
GCS 仓库存储桶选项(--repo-gcs-bucket) GCS 仓库存储桶。
用于存储仓库的 GCS 存储桶。
通过设置 repo-path=/ 可将 pgBackRest 仓库存储在存储桶根目录,但通常建议指定前缀(如 /repo),以便日志和其他 GCS 生成的内容也能存储在同一存储桶中。
example : --repo1-gcs-bucket=/pg-backup
GCS 仓库端点选项(--repo-gcs-endpoint) GCS 仓库端点。
用于连接存储服务的端点。可更新为本地 GCS 服务器或备用端点。
default : storage.googleapis.com
example : --repo1-gcs-endpoint=localhost
GCS 仓库密钥类型选项(--repo-gcs-key-type) GCS 仓库密钥类型。
支持以下授权类型:
auto - 使用实例服务账号授权。service - 使用本地存储的服务账号密钥。token - 用于本地测试,如 fakegcs。当 repo-gcs-key-type=service 时,认证令牌续期时会重新加载凭据。
default : service
example : --repo1-gcs-key-type=auto
GCS 仓库项目 ID 选项(--repo-gcs-user-project) GCS 项目 ID。
用于确定请求计费的 GCS 项目 ID。
example : --repo1-gcs-user-project=my-project
仓库主机选项(--repo-host) 远程操作时的仓库主机。
若备份和归档使用本地挂载的文件系统,则无需此设置。
example : --repo1-host=repo1.domain.com
已弃用名称:backup-host
仓库主机证书颁发机构文件选项(--repo-host-ca-file) 仓库主机证书颁发机构文件。
连接仓库主机时,使用非系统默认的 CA 文件。
example : --repo1-host-ca-file=/etc/pki/tls/certs/ca-bundle.crt
仓库主机证书颁发机构路径选项(--repo-host-ca-path) 仓库主机证书颁发机构路径。
连接仓库主机时,使用非系统默认的 CA 路径。
example : --repo1-host-ca-path=/etc/pki/tls/certs
仓库主机证书文件选项(--repo-host-cert-file) 仓库主机证书文件。
发送给仓库主机以证明客户端身份。
example : --repo1-host-cert-file=/path/to/client.crt
仓库主机命令选项(--repo-host-cmd) 仓库主机上的 pgBackRest 命令。
仅当 pgBackRest 在本地主机与仓库主机上的路径不同时才需要此选项。若未定义,仓库主机命令将与本地命令相同。
default : [ path of executed pgbackrest binary]
example : --repo1-host-cmd=/usr/lib/backrest/bin/pgbackrest
已弃用名称:backup-cmd
仓库主机配置文件选项(--repo-host-config) pgBackRest 仓库主机配置文件。
设置仓库主机上配置文件的位置。仅当仓库主机上的配置文件路径与本地不同时才需要此选项。
default : CFGOPTDEF_CONFIG_PATH "/" PROJECT_CONFIG_FILE
example : --repo1-host-config=/conf/pgbackrest/pgbackrest.conf
已弃用名称:backup-config
仓库主机配置包含路径选项(--repo-host-config-include-path) pgBackRest 仓库主机配置包含路径。
设置仓库主机上配置包含路径的位置。仅当仓库主机上的配置包含路径与本地不同时才需要此选项。
default : CFGOPTDEF_CONFIG_PATH "/" PROJECT_CONFIG_INCLUDE_PATH
example : --repo1-host-config-include-path=/conf/pgbackrest/conf.d
仓库主机配置路径选项(--repo-host-config-path) pgBackRest 仓库主机配置路径。
设置仓库主机上配置路径的位置。仅当仓库主机上的配置路径与本地不同时才需要此选项。
default : CFGOPTDEF_CONFIG_PATH
example : --repo1-host-config-path=/conf/pgbackrest
仓库主机密钥文件选项(--repo-host-key-file) 仓库主机密钥文件。
证明客户端证书由其所有者发送。
example : --repo1-host-key-file=/path/to/client.key
仓库主机端口选项(--repo-host-port) repo-host 已设置时的仓库主机端口。
使用此选项为仓库主机协议指定非默认端口。
注意: 当 repo-host-type=ssh 时,repo-host-port 无默认值,端口由 cmd-ssh 指定的命令配置决定。
default (depending on repo-host-type) :
tls - 8432
allowed : [ 0 , 65535 ]
example : --repo1-host-port=25
已弃用名称:backup-ssh-port
仓库主机协议类型选项(--repo-host-type) 仓库主机协议类型。
支持以下协议类型:
ssh - 安全外壳协议(Secure Shell)。tls - pgBackRest TLS 服务器。default : ssh
example : --repo1-host-type=tls
仓库主机用户选项(--repo-host-user) repo-host 已设置时的仓库主机用户。
定义在仓库主机上执行操作所用的用户。建议不要使用 postgres 用户,而是使用专用用户(如 pgbackrest)。若 PostgreSQL 运行在仓库主机上,可将 postgres 用户加入 pgbackrest 组,使其对仓库拥有读取权限,但无法意外损坏仓库内容。
default : pgbackrest
example : --repo1-host-user=repo-user
已弃用名称:backup-user
仓库路径选项(--repo-path) 备份和归档的存储路径。
仓库是 pgBackRest 存储备份和归档 WAL 段的地方。
预先估算所需空间可能比较困难。建议先执行若干次备份,记录不同备份类型(全量/增量/差异)的大小,并衡量每天产生的 WAL 量,从而得出大致的空间需求。随着数据库持续增长,需求也会相应变化。
default : /var/lib/pgbackrest
example : --repo1-path=/backup/db/backrest
归档保留选项(--repo-retention-archive) 连续 WAL 保留的备份数量。
注意: 使备份保持一致所需的 WAL 段将始终保留,直到该备份过期,与此选项的配置无关。
若未设置此值且 repo-retention-full-type 为 count(默认值),则归档过期策略默认与 repo-retention-archive-type 对应的 repo-retention-full(或 repo-retention-diff)值一致——前提是 repo-retention-archive-type 设为 full(或 diff)。这确保了 WAL 仅在对应备份过期时才同步过期。若 repo-retention-full-type 为 time,则此值默认删除比满足 repo-retention-full 设置后所保留的最旧全量备份更早的归档。
若 repo-retention-archive-type 设为 incr,则必须设置此选项。在磁盘空间紧张时,此选项与 repo-retention-archive-type 配合可更激进地过期 WAL 段,但代价是相关备份将无法执行 PITR,因此不推荐 。
allowed : [ 1 , 9999999 ]
example : --repo1-retention-archive=2
已弃用名称:retention-archive
归档保留类型选项(--repo-retention-archive-type) WAL 保留的备份类型。
设为 full 时,pgBackRest 将为 repo-retention-archive 指定数量的全量备份保留归档日志。 设为 diff(差异)时,pgBackRest 将为 repo-retention-archive 指定数量的全量和差异备份保留归档日志;若最后一次备份是全量备份,它也会被计入差异备份数量。 设为 incr(增量)时,pgBackRest 将为 repo-retention-archive 指定数量的全量、差异和增量备份保留归档日志。 建议保持默认值,即仅在全量备份过期时才过期 WAL。
default : full
example : --repo1-retention-archive-type=diff
已弃用名称:retention-archive-type
差异备份保留选项(--repo-retention-diff) 保留的差异备份数量。
差异备份过期时,与之关联的所有增量备份也会一同过期。若未定义,所有差异备份将保留,直到其依赖的全量备份过期。
请注意,在过期计算中,全量备份也会被计入差异备份数量,这在大多数情况下会略微减少实际保留的差异备份数量。
allowed : [ 1 , 9999999 ]
example : --repo1-retention-diff=3
已弃用名称:retention-diff
全量备份保留选项(--repo-retention-full) 全量备份的保留数量/时间。
全量备份过期时,与之关联的所有差异和增量备份也会一同过期。若未定义此选项,将发出警告。若希望无限期保留,请将此选项设为最大值。
allowed : [ 1 , 9999999 ]
example : --repo1-retention-full=2
已弃用名称:retention-full
全量备份保留类型选项(--repo-retention-full-type) 全量备份的保留类型。
决定 repo-retention-full 表示的是天数(时间段)还是全量备份数量。
设为 time 时,创建时间早于 repo-retention-full 天的全量备份将被删除,但前提是仓库中至少有一个不早于该天数的备份。例如,若 repo-retention-full 为 30,且存在两个全量备份(一个 25 天前,一个 35 天前),则不会过期任何备份——因为删除 35 天前的备份后只剩 25 天前的备份,而 25 天未满足"至少有一个 30 天以内备份"的条件,因此不允许过期更旧的备份。比最旧保留全量备份更早的归档 WAL 将自动过期,除非显式设置了 repo-retention-archive-type 和 repo-retention-archive。 设为 count 时,超出 repo-retention-full 数量的全量备份将被过期。例如,若 repo-retention-full 为 4,完成第五个全量备份后,最旧的全量备份将被过期以保持数量为 4。 请注意,只有成功完成的备份才会纳入保留计算。例如,若 repo-retention-full-type 为 count 且 repo-retention-full 为 2,则必须存在 3 个完整的全量备份,最旧的才会被过期。
default : count
example : --repo1-retention-full-type=time
备份历史保留选项(--repo-retention-history) 备份历史清单文件的保留天数。
备份完成时,清单文件(manifest)的副本会存储在 backup.history 路径下。默认情况下这些文件永不过期,因为它们对分析历史数据很有价值,例如用于统计备份和 WAL 随时间的增长趋势。
设置 repo-retention-history 可指定保留备份历史清单的天数。未过期的备份始终保留在备份历史中。指定 repo-retention-history=0 可仅为未过期备份保留备份历史。
当全量备份的历史清单过期时,与该全量备份关联的所有差异和增量备份历史清单也会一同过期。
allowed : [ 0 , 9999999 ]
example : --repo1-retention-history=365
S3 仓库存储桶选项(--repo-s3-bucket) S3 仓库存储桶。
用于存储仓库的 S3 存储桶。
通过设置 repo-path=/ 可将 pgBackRest 仓库存储在存储桶根目录,但通常建议指定前缀(如 /repo),以便日志和其他 AWS 生成的内容也能存储在同一存储桶中。
example : --repo1-s3-bucket=pg-backup
S3 仓库端点选项(--repo-s3-endpoint) S3 仓库端点。
AWS 端点应与所选区域匹配。
对于自定义或测试配置,repo-storage-ca-file、repo-storage-ca-path、repo-storage-host、repo-storage-port 和 repo-storage-verify-tls 选项可能有用。
example : --repo1-s3-endpoint=s3.amazonaws.com
S3 仓库密钥类型选项(--repo-s3-key-type) S3 仓库密钥类型。
支持以下类型:
shared - 共享密钥auto - 自动获取临时凭据web-id - 自动获取 Web 身份凭据default : shared
example : --repo1-s3-key-type=auto
S3 仓库 KMS 密钥 ID 选项(--repo-s3-kms-key-id) S3 仓库 KMS 密钥。
使用指定的 AWS 密钥管理服务密钥启用 S3 服务端加密。
example : --repo1-s3-kms-key-id=bceb4f13-6939-4be3-910d-df54dee817b7
S3 仓库区域选项(--repo-s3-region) S3 仓库区域。
创建存储桶所在的 AWS 区域。
example : --repo1-s3-region=us-east-1
S3 仓库请求方付费选项(--repo-s3-requester-pays) S3 仓库请求方付费。
启用 S3 请求方付费功能。
default : n
example : --no -repo1-s3-requester-pays
S3 仓库角色选项(--repo-s3-role) S3 仓库角色。
当 repo-s3-key-type=auto 时,用于获取临时凭据的 AWS 角色名称(非完整 ARN)。
example : --repo1-s3-role=authrole
S3 仓库 URI 风格选项(--repo-s3-uri-style) S3 URI 风格。
支持以下 URI 风格:
host - 连接到 bucket.endpoint 主机。path - 连接到 endpoint 主机,并在 URI 中添加存储桶前缀。default : host
example : --repo1-s3-uri-style=path
SFTP 仓库主机选项(--repo-sftp-host) SFTP 仓库主机。
存储仓库的 SFTP 主机。
example : --repo1-sftp-host=sftprepo.domain
SFTP 仓库主机指纹选项(--repo-sftp-host-fingerprint) SFTP 仓库主机指纹。
主机指纹的生成方式应与 repo-sftp-host-key-hash-type 一致,通过 awk '{print $2}' ssh_host_xxx_key.pub | base64 -d | (md5sum or sha1sum) -b 命令生成。SSH 主机密钥通常位于 /etc/ssh 目录下。
example : --repo1-sftp-host-fingerprint=f84e172dfead7aeeeae6c1fdfb5aa8cf
SFTP 主机密钥检查类型选项(--repo-sftp-host-key-check-type) SFTP 主机密钥检查类型。
支持以下 SFTP 主机密钥检查类型:
strict - pgBackRest 不会自动将主机密钥添加到 ~/.ssh/known_hosts 文件,并拒绝连接到主机密钥已更改或不在已知主机文件中的主机。此模式强制用户手动添加所有新主机。accept-new - pgBackRest 会自动将新主机密钥添加到用户的已知主机文件,但不允许连接到主机密钥已更改的主机。fingerprint - pgBackRest 将主机密钥与 repo-sftp-host-fingerprint 选项指定的指纹进行比对。none - 不执行主机密钥检查。default : strict
example : --repo1-sftp-host-key-check-type=accept-new
SFTP 仓库主机密钥哈希类型选项(--repo-sftp-host-key-hash-type) SFTP 仓库主机密钥哈希类型。
声明在 SSH 启动时用于计算远程系统主机密钥摘要的哈希类型。较新版本的 libssh2 除 md5 和 sha1 外,还支持 sha256。
example : --repo1-sftp-host-key-hash-type=sha256
SFTP 仓库主机端口选项(--repo-sftp-host-port) SFTP 仓库主机端口。
SFTP 仓库主机的端口号。
default : 22
allowed : [ 1 , 65535 ]
example : --repo1-sftp-host-port=22
SFTP 仓库主机用户选项(--repo-sftp-host-user) SFTP 仓库主机用户。
用于存储仓库的主机上的用户。
example : --repo1-sftp-host-user=pg-backup
SFTP 已知主机文件选项(--repo-sftp-known-host) SFTP 已知主机文件。
认证过程中用于搜索 SFTP 主机匹配的已知主机文件。若未指定,pgBackRest 默认搜索 ~/.ssh/known_hosts、~/.ssh/known_hosts2、/etc/ssh/ssh_known_hosts 和 /etc/ssh/ssh_known_hosts2。若配置了一个或多个文件路径,pgBackRest 将只在这些文件中搜索匹配项。文件路径必须为完整路径或以波浪号开头的路径。此选项可多次传入以指定多个已知主机文件。使用已知主机文件检查时,不得同时指定 repo-sftp-host-fingerprint。另请参阅 repo-sftp-host-check-type 选项。
example : --repo1-sftp-known-host=/home/postgres/.ssh/known_hosts
SFTP 仓库私钥文件选项(--repo-sftp-private-key-file) SFTP 私钥文件。
用于认证的 SFTP 私钥文件。
example : --repo1-sftp-private-key-file=~/.ssh/id_ed25519
SFTP 仓库公钥文件选项(--repo-sftp-public-key-file) SFTP 公钥文件。
用于认证的 SFTP 公钥文件。使用 OpenSSL 编译时为可选;使用其他库编译时为必需。
example : --repo1-sftp-public-key-file=~/.ssh/id_ed25519.pub
仓库存储 CA 文件选项(--repo-storage-ca-file) 仓库存储 CA 文件。
连接存储(如 S3、Azure)时,使用非系统默认的 CA 文件。
example : --repo1-storage-ca-file=/etc/pki/tls/certs/ca-bundle.crt
已弃用名称:repo-azure-ca-file、repo-s3-ca-file
仓库存储 TLS CA 路径选项(--repo-storage-ca-path) 仓库存储 CA 路径。
连接存储(如 S3、Azure)时,使用非系统默认的 CA 路径。
example : --repo1-storage-ca-path=/etc/pki/tls/certs
已弃用名称:repo-azure-ca-path、repo-s3-ca-path
仓库存储主机选项(--repo-storage-host) 仓库存储主机。
连接到存储(如 S3、Azure)端点以外的主机,通常用于测试。
example : --repo1-storage-host=127.0.0.1
已弃用名称:repo-azure-host、repo-s3-host
仓库存储端口选项(--repo-storage-port) 仓库存储端口。
连接存储(如 S3、Azure)端点(或指定主机)时使用的端口。
default : 443
allowed : [ 1 , 65535 ]
example : --repo1-storage-port=9000
已弃用名称:repo-azure-port、repo-s3-port
仓库存储标签选项(--repo-storage-tag) 仓库存储标签。
指定在仓库为对象存储(如 S3)时添加到对象上的标签。可多次使用此选项以添加多个标签。
pgBackRest 不提供修改这些标签的功能,因此请在运行 stanza-create 之前确保标签设置正确,以保证整个仓库标签的一致性。
example : --repo1-storage-tag=key1=value1
仓库存储上传分块大小选项(--repo-storage-upload-chunk-size) 仓库存储上传分块大小。
S3 等对象存储支持在文件过大无法全部载入内存时分块上传。即使文件能全部载入内存,限制上传所用内存量也更为高效。
较大的块大小通常能提升性能,因为它可以减少上传请求数量,使更多文件在单次请求中完成上传而无需分块处理。其代价是内存占用更高,且由于块缓冲区需按进程分配,process-max 值越大,整体内存消耗越多。
请注意,有效的块大小因存储类型和平台而异。例如,AWS S3 的最小块大小为 5MiB。各存储类型对块大小的叫法不同,查找最小/最大值时请参考:AWS S3 用"part size",GCS 用"chunk size",Azure 用"block size"。
若文件大小超过 1GiB(PostgreSQL 默认创建文件的上限),块大小将逐步增大至允许的最大值,以完成文件上传。
default (depending on repo-type) :
azure - 4MiB
gcs - 4MiB
s3 - 5MiB
allow range (depending on repo-type) :
azure - [4MiB, 1GiB]
gcs - [4MiB, 1GiB]
s3 - [5MiB, 1GiB]
example : --repo1-storage-upload-chunk-size=16MiB
仓库存储证书验证选项(--repo-storage-verify-tls) 仓库存储证书验证。
启用或禁用对存储(如 S3、Azure)服务端 TLS 证书的验证。禁用验证仅应用于测试或使用自签名证书的场景。
default : y
example : --no -repo1-storage-verify-tls
已弃用名称:repo-azure-verify-tls、repo-s3-verify-ssl、repo-s3-verify-tls
仓库符号链接选项(--repo-symlink) 在仓库中创建符号链接。
启用 latest 符号链接和表空间符号链接的创建。这些符号链接在使用快照进行仓库内原地恢复时最为有用,而这是一个不常见的使用场景。
虽然此功能对绝大多数用户可能没有实际价值,但出于历史原因默认保持开启。对于不支持符号链接的类 POSIX 存储,禁用此选项可能更为合适。
default : y
example : --no -repo1-symlink
仓库类型选项(--repo-type) 仓库使用的存储类型。
支持以下仓库类型:
azure - Azure Blob 存储服务cifs - 类似 posix,但禁用链接和目录 fsyncgcs - Google Cloud 存储posix - 符合 POSIX 标准的文件系统s3 - AWS 简单存储服务sftp - 安全文件传输协议将 NFS 挂载用作 posix 仓库时,适用于 pgBackRest 的规则与 PostgreSQL 文档中描述的相同,详见 创建数据库集群 - 文件系统 。
default : posix
example : --repo1-type=cifs
28.3.7 - 帮助命令(help) pgBackRest help 命令的选项与行为参考。
原始页面: pgBackRest Command Docs: help
help 命令提供三个层级的帮助信息:未指定命令时显示通用帮助;指定命令(例如 pgbackrest help backup)时显示该命令的完整说明及有效选项列表;在命令之外还指定了某个选项(例如 pgbackrest help backup type)时显示该选项在此命令下的完整说明。
命令选项 显示帮助选项(--help) 显示帮助信息。
即使未指定 help 命令也会显示帮助信息,且优先于 --version 选项。
default : n
example : --help
显示版本选项(--version) 显示版本信息。
即使未指定 version 或 help 命令也会显示版本信息。
default : n
example : --version
28.3.8 - Info 命令(info) pgBackRest info 命令选项与行为参考。
原始页面: pgBackRest Command Docs: info
info 命令可查询单个 stanza(stanza 是 pgBackRest 中用于标识一个 PostgreSQL 集群备份配置的逻辑名称)或所有 stanza 的信息。默认输出为文本格式,以人类可读的摘要展示所请求 stanza 的备份信息。该格式可能随版本更新而变化。
如需机器可读输出,请使用 --output=json。JSON 输出包含的信息远多于文本格式,且除非发现缺陷,其格式保持稳定。
若只需快速查看进度信息,可指定 --detail-level=progress。注意此模式会跳过 stanza 可用性检查以外的所有检查。
每个 stanza 占独立的输出区块,可使用 --stanza 选项将输出限定到单个 stanza。stanza 的 status 字段简要反映其健康状态:ok 表示 pgBackRest 运行正常。若配置了多个仓库,mixed 状态表示该 stanza 在一个或多个仓库上存在异常,此时会按仓库分别显示详细状态。若某仓库发生了未知错误代码的错误,将使用 other 作为错误码,并附上完整的错误详情。wal archive min/max 显示当前归档中最小和最大 WAL 段;配置多个仓库时,除非指定了 --repo 选项,否则将跨所有仓库汇总报告。注意,由于归档保留策略或其他原因,归档中可能存在间隙。
若主机上正在运行 backup/expire 或 restore 命令,status 信息旁边将分别显示 backup/expire running 和/或 restore running。
备份按从旧到新的顺序列出。最旧的备份始终 是全量备份(标签末尾以 F 标识),最新的备份可以是全量备份、差异备份(末尾以 D 标识)或增量备份(末尾以 I 标识)。
timestamp start/stop 定义了备份运行的时间段。timestamp stop 可用于确定时间点恢复(PITR)所需的目标备份。更多关于时间点恢复的信息,请参见 时间点恢复
wal start/stop 定义了恢复时将数据库恢复到一致状态所需的 WAL 范围。backup 命令完成前会确保该 WAL 范围已存在于归档中。
database size 是数据库未压缩的完整大小,database backup size 是本次备份实际需要备份的数据量(全量备份时两者相同)。
repo 表示该备份所在的仓库。backup set size 包含该备份及仓库中恢复数据库所需引用的所有备份文件,backup size 仅包含本次备份中的文件(全量备份时两者相同)。若 pgBackRest 启用了压缩,仓库大小反映压缩后的文件大小。
backup reference total 汇总了恢复该备份时所需引用的其他备份数量。使用 --set 选项可显示完整的引用列表。
命令选项 详细级别选项(--detail-level) 输出详细级别。
支持以下级别:
progress - 仅输出当前备份/expire 的进度信息。此级别不能与 --set 选项同时使用。full - 输出完整信息。default : full
example : --detail-level=progress
输出格式选项(--output) 输出格式。
支持以下输出类型:
text - 备份信息的人类可读摘要。json - JSON 格式的完整机器可读备份信息。default : text
example : --output=json
备份集选项(--set) 要查看详情的备份集。
详情包括:恢复该备份所需引用的其他备份完整列表、备份集中的数据库列表(含 OID,不含模板数据库)、表空间(含 OID)及其默认恢复目标路径,以及指定 --link-all 时符号链接的恢复目标路径。
example : --set=20150131-153358F_20150131-153401I
类型选项(--type) 按备份类型过滤。
使用以下备份类型之一过滤输出:
full - 仅输出全量备份。diff - 仅输出差异备份。incr - 仅输出增量备份。通用选项 缓冲区大小选项(--buffer-size) I/O 操作的缓冲区大小。
用于复制、压缩、加密等操作的缓冲区大小。实际使用的缓冲区数量取决于具体选项,每个操作可能还会使用额外内存,例如 gz 压缩可能额外使用 256KiB 内存。
允许的值为 16KiB、32KiB、64KiB、128KiB、256KiB、512KiB、1MiB、2MiB、4MiB、8MiB 和 16MiB。
default : 1MiB
example : --buffer-size=2MiB
SSH 客户端命令选项(--cmd-ssh) SSH 客户端命令。
如需使用其他 SSH 客户端,或 ssh 命令不在 $PATH 中,可通过此选项指定具体路径。
default : ssh
example : --cmd-ssh=/usr/bin/ssh
网络压缩级别选项(--compress-level-network) 网络压缩级别。
当 compress-type=none 且命令不在仓库所在主机上运行时,设置网络传输的压缩级别。压缩用于减少网络流量。当 compress-type 不等于 none 时,将忽略 compress-level-network,转而使用 compress-level,以避免文件被压缩两次。
default : 1
allowed : [ -5 , 12 ]
example : --compress-level-network=1
配置文件选项(--config) pgBackRest 配置文件。
使用此选项指定非默认的配置文件路径。
default : CFGOPTDEF_CONFIG_PATH "/" PROJECT_CONFIG_FILE
example : --config=/conf/pgbackrest/pgbackrest.conf
配置包含路径选项(--config-include-path) 额外 pgBackRest 配置文件的路径。
该路径下扩展名为 .conf 的配置文件将与 pgBackRest 主配置文件合并,形成完整的配置。
default : CFGOPTDEF_CONFIG_PATH "/" PROJECT_CONFIG_INCLUDE_PATH
example : --config-include-path=/conf/pgbackrest/conf.d
配置基础路径选项(--config-path) pgBackRest 配置文件的基础路径。
用于覆盖 --config 和 --config-include-path 选项的默认基础路径,除非这两个选项已在命令行中显式设置。
例如,仅传入 --config-path=/conf/pgbackrest 时,--config 的默认值将变为 /conf/pgbackrest/pgbackrest.conf,--config-include-path 的默认值将变为 /conf/pgbackrest/conf.d。
default : CFGOPTDEF_CONFIG_PATH
example : --config-path=/conf/pgbackrest
I/O 超时选项(--io-timeout) I/O 超时时间。
连接及读/写操作的超时时间(秒)。
注意,整个读/写操作无需在此超时时间内完成,但必须 有所进展,哪怕只传输了一个字节。
default : 1m
allowed : [ 100ms, 1h]
example : --io-timeout=120
锁文件路径选项(--lock-path) 锁文件的存储路径。
pgBackRest 使用此路径下的锁文件防止冲突操作并发执行。
default : /tmp/pgbackrest
example : --lock-path=/backup/db/lock
进程优先级选项(--priority) 设置进程优先级。
定义内核调度器为进程分配的优先级(即 niceness 值)。正值降低优先级,负值提高优先级。大多数情况下,进程没有权限提高自身优先级。
allowed : [ -20 , 19 ]
example : --priority=19
协议超时选项(--protocol-timeout) 协议超时时间。
本地或远程进程在协议层等待新消息的超时时间(秒),防止进程无限期等待。
注意: protocol-timeout 选项的值必须大于 db-timeout 选项的值。
default : 31m
allowed : [ 100ms, 7d]
example : --protocol-timeout=630
保活选项(--sck-keep-alive) 启用保活(keep-alive)。
在套接字连接上启用保活消息。
default : y
example : --no -sck-keep-alive
Stanza 选项(--stanza) 定义 stanza。
stanza 是 PostgreSQL 数据库集群的配置单元,定义了集群的位置、备份方式、归档选项等。大多数数据库主机只有一个 PostgreSQL 集群,因此只有一个 stanza;备份服务器则为每个需要备份的数据库集群各配置一个 stanza。
命名 stanza 时,虽然容易以主集群名称命名,但更好的做法是以集群所承载数据库的功能来命名。由于 stanza 名称同时适用于主库和所有副本,选择能描述集群实际用途的名称(如 app 或 dw)比使用本地集群名称(如 main 或 prod)更为合适。
TCP 保活计数选项(--tcp-keep-alive-count) 保活(keep-alive)计数。
在判定连接已断开之前,允许丢失的 TCP 保活消息数量。
此选项仅在支持 TCP_KEEPCNT 套接字选项的系统上可用。
allowed : [ 1 , 32 ]
example : --tcp-keep-alive-count=3
TCP 保活空闲时间选项(--tcp-keep-alive-idle) 保活(keep-alive)空闲时间。
无网络活动持续多少秒后,操作系统开始发送 TCP 保活消息。
此选项仅在支持 TCP_KEEPIDLE 套接字选项的系统上可用。
allowed : [ 1 , 3600 ]
example : --tcp-keep-alive-idle=60
TCP 保活间隔选项(--tcp-keep-alive-interval) 保活(keep-alive)间隔时间。
未收到确认的 TCP 保活消息在多少秒后重新发送。
此选项仅在支持 TCP_KEEPINTVL 套接字选项的系统上可用。
allowed : [ 1 , 900 ]
example : --tcp-keep-alive-interval=30
TLSv1.2 加密套件选项(--tls-cipher-12) 允许使用的 TLSv1.2 加密套件。
pgBackRest 客户端与服务器之间的所有 TLS 连接均已加密。默认情况下,到对象存储(如 S3)的连接也经过加密。
注意: 所有传输连接的最低安全级别为 TLSv1.2。
如有需要,可调整允许使用的加密套件。示例中的配置是合理的选择,除非有特殊安全要求。若未设置(默认),则使用底层 OpenSSL 库的默认值。
example : --tls-cipher-12=HIGH:MEDIUM:+3DES:!aNULL
TLSv1.3 加密套件选项(--tls-cipher-13) 允许使用的 TLSv1.3 加密套件。
pgBackRest 客户端与服务器之间的所有 TLS 连接均已加密。默认情况下,到对象存储(如 S3)的连接也经过加密。
注意: 所有传输连接的最低安全级别为 TLSv1.2。
如有需要,可调整允许使用的加密套件。若未设置(默认),则使用底层 OpenSSL 库的默认值。
example : --tls-cipher-13=TLS_AES_256_GCM_SHA384:TLS_CHACHA20_POLY1305_SHA256
日志选项 控制台日志级别选项(--log-level-console) 控制台日志级别。
支持以下日志级别:
off - 不记录任何日志(不推荐)error - 仅记录错误warn - 记录警告和错误info - 记录信息、警告和错误detail - 记录详情、信息、警告和错误debug - 记录调试、详情、信息、警告和错误trace - 记录跟踪信息(非常详细的调试)、调试、信息、警告和错误default : warn
example : --log-level-console=error
文件日志级别选项(--log-level-file) 文件日志级别。
支持以下日志级别:
off - 不记录任何日志(不推荐)error - 仅记录错误warn - 记录警告和错误info - 记录信息、警告和错误detail - 记录详情、信息、警告和错误debug - 记录调试、详情、信息、警告和错误trace - 记录跟踪信息(非常详细的调试)、调试、信息、警告和错误default : info
example : --log-level-file=debug
标准错误日志级别选项(--log-level-stderr) stderr 日志级别。
指定哪些日志级别输出到 stderr 而非 stdout(由 log-level-console 控制)。输出到 stderr 的日志不含时间戳和进程信息。
支持以下日志级别:
off - 不记录任何日志(不推荐)error - 仅记录错误warn - 记录警告和错误info - 记录信息、警告和错误detail - 记录详情、信息、警告和错误debug - 记录调试、详情、信息、警告和错误trace - 记录跟踪信息(非常详细的调试)、调试、信息、警告和错误default : off
example : --log-level-stderr=error
日志路径选项(--log-path) 日志文件的存储路径。
pgBackRest 将日志文件存储在此路径下。注意,若 log-level-file=off,则无需设置日志路径。
default : /var/log/pgbackrest
example : --log-path=/backup/db/log
子进程日志选项(--log-subprocess) 启用子进程日志记录。
为该进程创建的所有子进程启用文件日志记录,日志级别由 log-level-file 指定。
default : n
example : --log-subprocess
日志时间戳选项(--log-timestamp) 在日志中启用时间戳。
在控制台和文件日志中启用时间戳。在生成文档等特殊情况下,此选项会被禁用。
default : y
example : --no -log-timestamp
仓库选项 指定仓库选项(--repo) 设置仓库。
指定命令操作的目标仓库。
例如,可使用此选项从特定仓库执行恢复,而不是让 pgBackRest 自动选择。
allowed : [ 1 , 256 ]
example : --repo=1
Azure 仓库容器选项(--repo-azure-container) Azure 仓库容器。
用于存储仓库的 Azure 容器。
pgBackRest 仓库可通过设置 repo-path=/ 存储在容器根目录下,但通常建议指定一个前缀路径(如 /repo),以便日志和其他 Azure 生成的内容也能存储在同一容器中。
example : --repo1-azure-container=pg-backup
Azure 仓库密钥类型选项(--repo-azure-key-type) Azure 仓库密钥类型。
支持以下授权类型:
shared - 共享密钥sas - 共享访问签名auto - 使用 Azure 托管身份自动授权default : shared
example : --repo1-azure-key-type=sas
Azure 仓库 URI 风格选项(--repo-azure-uri-style) Azure URI 风格。
支持以下 URI 风格:
host - 连接到 account.endpoint 主机。path - 连接到 endpoint 主机,并在 URI 前添加账户前缀。default : host
example : --repo1-azure-uri-style=path
仓库加密类型选项(--repo-cipher-type) 用于加密仓库的加密算法。
支持以下加密类型:
none - 仓库不加密aes-256-cbc - 256 位密钥长度的高级加密标准注意,即使仓库类型(如 S3)支持服务端加密,pgBackRest 也始终在客户端执行加密。
default : none
example : --repo1-cipher-type=aes-256-cbc
GCS 仓库存储桶选项(--repo-gcs-bucket) GCS 仓库存储桶。
用于存储仓库的 GCS 存储桶。
pgBackRest 仓库可通过设置 repo-path=/ 存储在存储桶根目录下,但通常建议指定一个前缀路径(如 /repo),以便日志和其他 GCS 生成的内容也能存储在同一存储桶中。
example : --repo1-gcs-bucket=/pg-backup
GCS 仓库端点选项(--repo-gcs-endpoint) GCS 仓库端点。
用于连接存储服务的端点。可更新为使用本地 GCS 服务器或其他端点。
default : storage.googleapis.com
example : --repo1-gcs-endpoint=localhost
GCS 仓库密钥类型选项(--repo-gcs-key-type) GCS 仓库密钥类型。
支持以下授权类型:
auto - 使用实例服务账号授权。service - 使用本地存储的服务账号密钥。token - 用于本地测试,例如 fakegcs。当 repo-gcs-key-type=service 时,认证令牌续期时将重新加载凭证。
default : service
example : --repo1-gcs-key-type=auto
GCS 仓库项目 ID 选项(--repo-gcs-user-project) GCS 项目 ID。
用于确定请求计费的 GCS 项目 ID。
example : --repo1-gcs-user-project=my-project
仓库主机选项(--repo-host) 远程操作时的仓库主机。
当备份和归档到本地挂载的文件系统时,无需设置此选项。
example : --repo1-host=repo1.domain.com
已弃用名称:backup-host
仓库主机证书颁发机构文件选项(--repo-host-ca-file) 仓库主机证书颁发机构文件。
连接仓库主机时使用非系统默认的 CA 文件。
example : --repo1-host-ca-file=/etc/pki/tls/certs/ca-bundle.crt
仓库主机证书颁发机构路径选项(--repo-host-ca-path) 仓库主机证书颁发机构路径。
连接仓库主机时使用非系统默认的 CA 路径。
example : --repo1-host-ca-path=/etc/pki/tls/certs
仓库主机证书文件选项(--repo-host-cert-file) 仓库主机证书文件。
发送给仓库主机以证明客户端身份。
example : --repo1-host-cert-file=/path/to/client.crt
仓库主机命令选项(--repo-host-cmd) 仓库主机上的 pgBackRest 命令路径。
仅当仓库主机上的 pgBackRest 命令路径与本地不同时才需要设置。若未定义,仓库主机命令将与本地命令保持一致。
default : [ path of executed pgbackrest binary]
example : --repo1-host-cmd=/usr/lib/backrest/bin/pgbackrest
已弃用名称:backup-cmd
仓库主机配置文件选项(--repo-host-config) pgBackRest 仓库主机配置文件。
设置仓库主机上配置文件的位置。仅当仓库主机上的配置文件路径与本地不同时才需要设置。
default : CFGOPTDEF_CONFIG_PATH "/" PROJECT_CONFIG_FILE
example : --repo1-host-config=/conf/pgbackrest/pgbackrest.conf
已弃用名称:backup-config
仓库主机配置包含路径选项(--repo-host-config-include-path) pgBackRest 仓库主机配置包含路径。
设置仓库主机上配置包含路径的位置。仅当仓库主机上的配置包含路径与本地不同时才需要设置。
default : CFGOPTDEF_CONFIG_PATH "/" PROJECT_CONFIG_INCLUDE_PATH
example : --repo1-host-config-include-path=/conf/pgbackrest/conf.d
仓库主机配置路径选项(--repo-host-config-path) pgBackRest 仓库主机配置路径。
设置仓库主机上配置路径的位置。仅当仓库主机上的配置路径与本地不同时才需要设置。
default : CFGOPTDEF_CONFIG_PATH
example : --repo1-host-config-path=/conf/pgbackrest
仓库主机密钥文件选项(--repo-host-key-file) 仓库主机密钥文件。
用于证明客户端证书由其所有者发送。
example : --repo1-host-key-file=/path/to/client.key
仓库主机端口选项(--repo-host-port) 设置了 repo-host 时仓库主机使用的端口。
使用此选项为仓库主机协议指定非默认端口。
注意: 当 repo-host-type=ssh 时,repo-host-port 没有默认值,端口由 cmd-ssh 指定的命令配置决定。
default (depending on repo-host-type) :
tls - 8432
allowed : [ 0 , 65535 ]
example : --repo1-host-port=25
已弃用名称:backup-ssh-port
仓库主机协议类型选项(--repo-host-type) 仓库主机协议类型。
支持以下协议类型:
ssh - Secure Shell。tls - pgBackRest TLS 服务器。default : ssh
example : --repo1-host-type=tls
仓库主机用户选项(--repo-host-user) 设置了 repo-host 时仓库主机使用的用户。
定义在仓库主机上执行操作的用户。建议使用非 postgres 用户,例如 pgbackrest。如果 PostgreSQL 运行在仓库主机上,可将 postgres 用户加入 pgbackrest 组,使其对仓库拥有只读权限,避免意外损坏仓库内容。
default : pgbackrest
example : --repo1-host-user=repo-user
已弃用名称:backup-user
仓库路径选项(--repo-path) 备份和归档的存储路径。
仓库是 pgBackRest 存储备份和归档 WAL 段的地方。
事先估算所需空间可能比较困难。最佳做法是先执行几次备份,记录不同备份类型(全量/增量/差异)的大小,并测量每天生成的 WAL 量,以此作为空间规划的参考。随着数据库的演进,需求也会随时间变化。
default : /var/lib/pgbackrest
example : --repo1-path=/backup/db/backrest
S3 仓库存储桶选项(--repo-s3-bucket) S3 仓库存储桶。
用于存储仓库的 S3 存储桶。
pgBackRest 仓库可通过设置 repo-path=/ 存储在存储桶根目录下,但通常建议指定一个前缀路径(如 /repo),以便日志和其他 AWS 生成的内容也能存储在同一存储桶中。
example : --repo1-s3-bucket=pg-backup
S3 仓库端点选项(--repo-s3-endpoint) S3 仓库端点。
AWS 端点应与所选区域匹配。
对于自定义/测试配置,repo-storage-ca-file、repo-storage-ca-path、repo-storage-host、repo-storage-port 和 repo-storage-verify-tls 选项可能会有用。
example : --repo1-s3-endpoint=s3.amazonaws.com
S3 仓库密钥类型选项(--repo-s3-key-type) S3 仓库密钥类型。
支持以下类型:
shared - 共享密钥auto - 自动获取临时凭证web-id - 自动获取 Web 身份凭证default : shared
example : --repo1-s3-key-type=auto
S3 仓库 KMS 密钥 ID 选项(--repo-s3-kms-key-id) S3 仓库 KMS 密钥。
使用指定的 AWS 密钥管理服务密钥启用 S3 服务端加密。
example : --repo1-s3-kms-key-id=bceb4f13-6939-4be3-910d-df54dee817b7
S3 仓库区域选项(--repo-s3-region) S3 仓库区域。
创建存储桶时所在的 AWS 区域。
example : --repo1-s3-region=us-east-1
S3 仓库请求方付费选项(--repo-s3-requester-pays) S3 仓库请求方付费。
启用 S3 请求方付费模式。
default : n
example : --no -repo1-s3-requester-pays
S3 仓库角色选项(--repo-s3-role) S3 仓库角色。
当 repo-s3-key-type=auto 时,用于获取临时凭证的 AWS 角色名称(非完整 ARN)。
example : --repo1-s3-role=authrole
S3 仓库 URI 风格选项(--repo-s3-uri-style) S3 URI 风格。
支持以下 URI 风格:
host - 连接到 bucket.endpoint 主机。path - 连接到 endpoint 主机,并在 URI 前添加存储桶前缀。default : host
example : --repo1-s3-uri-style=path
SFTP 仓库主机选项(--repo-sftp-host) SFTP 仓库主机。
包含仓库的 SFTP 主机。
example : --repo1-sftp-host=sftprepo.domain
SFTP 仓库主机指纹选项(--repo-sftp-host-fingerprint) SFTP 仓库主机指纹。
指纹的生成方式应与 repo-sftp-host-key-hash-type 一致。可通过以下命令生成:awk '{print $2}' ssh_host_xxx_key.pub | base64 -d | (md5sum or sha1sum) -b。SSH 主机密钥通常位于 /etc/ssh 目录下。
example : --repo1-sftp-host-fingerprint=f84e172dfead7aeeeae6c1fdfb5aa8cf
SFTP 主机密钥检查类型选项(--repo-sftp-host-key-check-type) SFTP 主机密钥检查类型。
支持以下检查类型:
strict - pgBackRest 不会自动将主机密钥添加到 ~/.ssh/known_hosts,并拒绝连接到主机密钥已更改或未在已知主机文件中找到的主机。此选项要求用户手动添加所有新主机。accept-new - pgBackRest 会自动将新主机密钥添加到用户的已知主机文件中,但不允许连接到主机密钥已更改的主机。fingerprint - pgBackRest 将根据 repo-sftp-host-fingerprint 选项指定的指纹验证主机密钥。none - 不执行主机密钥检查。default : strict
example : --repo1-sftp-host-key-check-type=accept-new
SFTP 仓库主机密钥哈希类型选项(--repo-sftp-host-key-hash-type) SFTP 仓库主机密钥哈希类型。
声明 SSH 启动时用于计算远程系统主机密钥摘要的哈希类型。较新版本的 libssh2 除支持 md5 和 sha1 外,还支持 sha256。
example : --repo1-sftp-host-key-hash-type=sha256
SFTP 仓库主机端口选项(--repo-sftp-host-port) SFTP 仓库主机端口。
SFTP 仓库主机端口。
default : 22
allowed : [ 1 , 65535 ]
example : --repo1-sftp-host-port=22
SFTP 仓库主机用户选项(--repo-sftp-host-user) SFTP 仓库主机用户。
用于存储仓库的主机上的用户。
example : --repo1-sftp-host-user=pg-backup
SFTP 已知主机文件选项(--repo-sftp-known-host) SFTP 已知主机文件。
认证期间用于搜索 SFTP 主机匹配项的已知主机文件。若未指定,pgBackRest 默认搜索 ~/.ssh/known_hosts、~/.ssh/known_hosts2、/etc/ssh/ssh_known_hosts 和 /etc/ssh/ssh_known_hosts2。若配置了一个或多个文件路径,pgBackRest 将在这些路径中搜索匹配项。文件路径必须是完整路径或以波浪号(~)开头的路径。该选项可多次传入以指定多个已知主机文件。使用已知主机文件检查时,不得同时指定 repo-sftp-host-fingerprint。另请参见 repo-sftp-host-check-type 选项。
example : --repo1-sftp-known-host=/home/postgres/.ssh/known_hosts
SFTP 仓库私钥文件选项(--repo-sftp-private-key-file) SFTP 私钥文件。
用于认证的 SFTP 私钥文件。
example : --repo1-sftp-private-key-file=~/.ssh/id_ed25519
SFTP 仓库公钥文件选项(--repo-sftp-public-key-file) SFTP 公钥文件。
用于认证的 SFTP 公钥文件。编译时使用 OpenSSL 则为可选,使用其他库则为必填。
example : --repo1-sftp-public-key-file=~/.ssh/id_ed25519.pub
仓库存储 CA 文件选项(--repo-storage-ca-file) 仓库存储 CA 文件。
连接存储(如 S3、Azure)时使用非系统默认的 CA 文件。
example : --repo1-storage-ca-file=/etc/pki/tls/certs/ca-bundle.crt
已弃用名称:repo-azure-ca-file、repo-s3-ca-file
仓库存储 TLS CA 路径选项(--repo-storage-ca-path) 仓库存储 CA 路径。
连接存储(如 S3、Azure)时使用非系统默认的 CA 路径。
example : --repo1-storage-ca-path=/etc/pki/tls/certs
已弃用名称:repo-azure-ca-path、repo-s3-ca-path
仓库存储主机选项(--repo-storage-host) 仓库存储主机。
连接到存储(如 S3、Azure)端点以外的主机。通常用于测试。
example : --repo1-storage-host=127.0.0.1
已弃用名称:repo-azure-host、repo-s3-host
仓库存储端口选项(--repo-storage-port) 仓库存储端口。
连接存储(如 S3、Azure)端点(或指定的主机)时使用的端口。
default : 443
allowed : [ 1 , 65535 ]
example : --repo1-storage-port=9000
已弃用名称:repo-azure-port、repo-s3-port
仓库存储标签选项(--repo-storage-tag) 仓库存储标签。
当仓库为对象存储(如 S3)时,指定添加到对象上的标签。可重复使用此选项以添加多个标签。
pgBackRest 不提供修改这些标签的功能,因此请在运行 stanza-create 之前正确设置,以确保整个仓库的标签一致。
example : --repo1-storage-tag=key1=value1
仓库存储上传分块大小选项(--repo-storage-upload-chunk-size) 仓库存储上传分块大小。
当文件过大而无法完整存入内存时,S3 等对象存储支持分块上传。即使文件能够存入内存,限制上传所用内存量也更为高效。
较大的分块大小通常能提升性能,因为可以减少上传请求次数,并允许在单次请求中上传更多数据而无需分块。缺点是内存占用更高,且由于分块缓冲区必须按进程分配,较大的 process-max 值会导致整体内存消耗增加。
注意,有效的分块大小因存储类型和平台而异。例如,AWS S3 的最小分块大小为 5MiB。各存储类型对分块大小的术语不同:AWS S3 使用 “part size”,GCS 使用 “chunk size”,Azure 使用 “block size”。
若文件大于 1GiB(PostgreSQL 默认创建的最大文件大小),分块大小将逐步增大至允许的最大值,以完成文件上传。
default (depending on repo-type) :
azure - 4MiB
gcs - 4MiB
s3 - 5MiB
allow range (depending on repo-type) :
azure - [4MiB, 1GiB]
gcs - [4MiB, 1GiB]
s3 - [5MiB, 1GiB]
example : --repo1-storage-upload-chunk-size=16MiB
仓库存储证书验证选项(--repo-storage-verify-tls) 仓库存储证书验证。
启用或禁用对存储(如 S3、Azure)服务器 TLS 证书的验证。仅在测试场景或使用自签名证书时才应禁用验证。
default : y
example : --no -repo1-storage-verify-tls
已弃用名称:repo-azure-verify-tls、repo-s3-verify-ssl、repo-s3-verify-tls
仓库目标时间选项(--repo-target-time) 仓库的目标时间。
目标时间定义了命令读取版本化存储上的仓库所使用的时间点。通过此选项,命令可以读取某一历史时刻的仓库状态,从而恢复因用户误操作或恶意软件导致被删除或损坏的数据。
S3、GCS 和 Azure 均支持版本化存储,但通常默认不启用。除了启用版本控制外,还可考虑为 S3 启用对象锁定,为 GCS 或 Azure 启用软删除。
使用 repo-target-time 选项时,还必须同时指定 repo 选项。并非所有仓库类型都支持版本控制,通常针对单个仓库进行恢复更为合理。
注意,与存储时间戳的比较为 <=(小于等于)所提供的时间戳,且提供的时间戳中的毫秒部分将被截断。
example : --repo-target-time=2024-08-08 12:12:12+00
仓库类型选项(--repo-type) 仓库使用的存储类型。
支持以下仓库类型:
azure - Azure Blob 存储服务cifs - 类似 posix,但禁用链接和目录 fsyncgcs - Google Cloud 存储posix - 符合 POSIX 标准的文件系统s3 - AWS 简单存储服务sftp - 安全文件传输协议将 NFS 挂载用作 posix 仓库时,pgBackRest 遵循的规则与 PostgreSQL 文档中描述的相同,详见 Creating a Database Cluster - File Systems 。
default : posix
example : --repo1-type=cifs
28.3.9 - 仓库获取命令(repo-get) pgBackRest repo-get 命令选项与行为参考。
原始页面: pgBackRest Command Docs: repo-get
repo-get 命令类似于 Unix 的 cat 命令,但支持所有仓库类型。使用此命令需要提供完整的文件名,主要用于管理、排查和测试目的,不是常规 pgBackRest 使用流程中的必需命令。
若仓库已加密,repo-get 将自动解密文件。文件不会自动解压,但可将输出通过管道传递给相应的解压命令,例如 gzip -d。
若配置了多个仓库,命令默认使用优先级最高的仓库(如 repo1),除非通过 --repo 选项指定了具体仓库。
命令选项 忽略缺失文件选项(--ignore-missing) 忽略缺失的源文件。
若源文件不存在,则以退出码 1 退出,而不抛出错误。
default : n
example : --ignore-missing
通用选项 缓冲区大小选项(--buffer-size) I/O 操作的缓冲区大小。
用于复制、压缩、加密等操作的缓冲区大小。实际使用的缓冲区数量取决于具体选项,每个操作可能还会使用额外内存,例如 gz 压缩可能额外使用 256KiB 内存。
允许的值为 16KiB、32KiB、64KiB、128KiB、256KiB、512KiB、1MiB、2MiB、4MiB、8MiB 和 16MiB。
default : 1MiB
example : --buffer-size=2MiB
SSH 客户端命令选项(--cmd-ssh) SSH 客户端命令。
如需使用其他 SSH 客户端,或 ssh 命令不在 $PATH 中,可通过此选项指定具体路径。
default : ssh
example : --cmd-ssh=/usr/bin/ssh
网络压缩级别选项(--compress-level-network) 网络压缩级别。
当 compress-type=none 且命令不在仓库所在主机上运行时,设置网络传输的压缩级别。压缩用于减少网络流量。当 compress-type 不等于 none 时,将忽略 compress-level-network,转而使用 compress-level,以避免文件被压缩两次。
default : 1
allowed : [ -5 , 12 ]
example : --compress-level-network=1
配置文件选项(--config) pgBackRest 配置文件。
使用此选项指定非默认的配置文件路径。
default : CFGOPTDEF_CONFIG_PATH "/" PROJECT_CONFIG_FILE
example : --config=/conf/pgbackrest/pgbackrest.conf
配置包含路径选项(--config-include-path) 额外 pgBackRest 配置文件的路径。
该路径下扩展名为 .conf 的配置文件将与 pgBackRest 主配置文件合并,形成完整的配置。
default : CFGOPTDEF_CONFIG_PATH "/" PROJECT_CONFIG_INCLUDE_PATH
example : --config-include-path=/conf/pgbackrest/conf.d
配置基础路径选项(--config-path) pgBackRest 配置文件的基础路径。
用于覆盖 --config 和 --config-include-path 选项的默认基础路径,除非这两个选项已在命令行中显式设置。
例如,仅传入 --config-path=/conf/pgbackrest 时,--config 的默认值将变为 /conf/pgbackrest/pgbackrest.conf,--config-include-path 的默认值将变为 /conf/pgbackrest/conf.d。
default : CFGOPTDEF_CONFIG_PATH
example : --config-path=/conf/pgbackrest
I/O 超时选项(--io-timeout) I/O 超时时间。
连接及读/写操作的超时时间(秒)。
注意,整个读/写操作无需在此超时时间内完成,但必须 有所进展,哪怕只传输了一个字节。
default : 1m
allowed : [ 100ms, 1h]
example : --io-timeout=120
中性 umask 选项(--neutral-umask) 使用中性 umask。
将 umask 设置为 0000,以合理的默认权限创建仓库中的文件。默认目录权限为 0750,默认文件权限为 0640;锁文件和日志目录的权限分别为 0770(目录)和 0660(文件)。
若要使用执行用户的 umask,请在配置文件中指定 neutral-umask=n,或在命令行中使用 --no-neutral-umask。
default : y
example : --no -neutral-umask
进程优先级选项(--priority) 设置进程优先级。
定义内核调度器为进程分配的优先级(即 niceness 值)。正值降低优先级,负值提高优先级。大多数情况下,进程没有权限提高自身优先级。
allowed : [ -20 , 19 ]
example : --priority=19
协议超时选项(--protocol-timeout) 协议超时时间。
本地或远程进程在协议层等待新消息的超时时间(秒),防止进程无限期等待。
注意: protocol-timeout 选项的值必须大于 db-timeout 选项的值。
default : 31m
allowed : [ 100ms, 7d]
example : --protocol-timeout=630
原始数据选项(--raw) 不对数据进行转换。
执行当前命令时跳过所有数据转换操作(如加密、解压等)。
default : n
example : --raw
保活选项(--sck-keep-alive) 启用保活(keep-alive)。
在套接字连接上启用保活消息。
default : y
example : --no -sck-keep-alive
Stanza 选项(--stanza) 定义 stanza。
stanza 是 PostgreSQL 数据库集群的配置单元,定义了集群的位置、备份方式、归档选项等。大多数数据库主机只有一个 PostgreSQL 集群,因此只有一个 stanza;备份服务器则为每个需要备份的数据库集群各配置一个 stanza。
命名 stanza 时,虽然容易以主集群名称命名,但更好的做法是以集群所承载数据库的功能来命名。由于 stanza 名称同时适用于主库和所有副本,选择能描述集群实际用途的名称(如 app 或 dw)比使用本地集群名称(如 main 或 prod)更为合适。
TCP 保活计数选项(--tcp-keep-alive-count) 保活(keep-alive)计数。
在判定连接已断开之前,允许丢失的 TCP 保活消息数量。
此选项仅在支持 TCP_KEEPCNT 套接字选项的系统上可用。
allowed : [ 1 , 32 ]
example : --tcp-keep-alive-count=3
TCP 保活空闲时间选项(--tcp-keep-alive-idle) 保活(keep-alive)空闲时间。
无网络活动持续多少秒后,操作系统开始发送 TCP 保活消息。
此选项仅在支持 TCP_KEEPIDLE 套接字选项的系统上可用。
allowed : [ 1 , 3600 ]
example : --tcp-keep-alive-idle=60
TCP 保活间隔选项(--tcp-keep-alive-interval) 保活(keep-alive)间隔时间。
未收到确认的 TCP 保活消息在多少秒后重新发送。
此选项仅在支持 TCP_KEEPINTVL 套接字选项的系统上可用。
allowed : [ 1 , 900 ]
example : --tcp-keep-alive-interval=30
TLSv1.2 加密套件选项(--tls-cipher-12) 允许使用的 TLSv1.2 加密套件。
pgBackRest 客户端与服务器之间的所有 TLS 连接均已加密。默认情况下,到对象存储(如 S3)的连接也经过加密。
注意: 所有传输连接的最低安全级别为 TLSv1.2。
如有需要,可调整允许使用的加密套件。示例中的配置是合理的选择,除非有特殊安全要求。若未设置(默认),则使用底层 OpenSSL 库的默认值。
example : --tls-cipher-12=HIGH:MEDIUM:+3DES:!aNULL
TLSv1.3 加密套件选项(--tls-cipher-13) 允许使用的 TLSv1.3 加密套件。
pgBackRest 客户端与服务器之间的所有 TLS 连接均已加密。默认情况下,到对象存储(如 S3)的连接也经过加密。
注意: 所有传输连接的最低安全级别为 TLSv1.2。
如有需要,可调整允许使用的加密套件。若未设置(默认),则使用底层 OpenSSL 库的默认值。
example : --tls-cipher-13=TLS_AES_256_GCM_SHA384:TLS_CHACHA20_POLY1305_SHA256
日志选项 控制台日志级别选项(--log-level-console) 控制台日志级别。
支持以下日志级别:
off - 不记录任何日志(不推荐)error - 仅记录错误warn - 记录警告和错误info - 记录信息、警告和错误detail - 记录详情、信息、警告和错误debug - 记录调试、详情、信息、警告和错误trace - 记录跟踪信息(非常详细的调试)、调试、信息、警告和错误default : warn
example : --log-level-console=error
文件日志级别选项(--log-level-file) 文件日志级别。
支持以下日志级别:
off - 不记录任何日志(不推荐)error - 仅记录错误warn - 记录警告和错误info - 记录信息、警告和错误detail - 记录详情、信息、警告和错误debug - 记录调试、详情、信息、警告和错误trace - 记录跟踪信息(非常详细的调试)、调试、信息、警告和错误default : info
example : --log-level-file=debug
标准错误日志级别选项(--log-level-stderr) stderr 日志级别。
指定哪些日志级别输出到 stderr 而非 stdout(由 log-level-console 控制)。输出到 stderr 的日志不含时间戳和进程信息。
支持以下日志级别:
off - 不记录任何日志(不推荐)error - 仅记录错误warn - 记录警告和错误info - 记录信息、警告和错误detail - 记录详情、信息、警告和错误debug - 记录调试、详情、信息、警告和错误trace - 记录跟踪信息(非常详细的调试)、调试、信息、警告和错误default : off
example : --log-level-stderr=error
日志路径选项(--log-path) 日志文件的存储路径。
pgBackRest 将日志文件存储在此路径下。注意,若 log-level-file=off,则无需设置日志路径。
default : /var/log/pgbackrest
example : --log-path=/backup/db/log
子进程日志选项(--log-subprocess) 启用子进程日志记录。
为该进程创建的所有子进程启用文件日志记录,日志级别由 log-level-file 指定。
default : n
example : --log-subprocess
日志时间戳选项(--log-timestamp) 在日志中启用时间戳。
在控制台和文件日志中启用时间戳。在生成文档等特殊情况下,此选项会被禁用。
default : y
example : --no -log-timestamp
仓库选项 指定仓库选项(--repo) 设置仓库。
指定命令操作的目标仓库。
例如,可使用此选项从特定仓库执行恢复,而不是让 pgBackRest 自动选择。
allowed : [ 1 , 256 ]
example : --repo=1
Azure 仓库容器选项(--repo-azure-container) Azure 仓库容器。
用于存储仓库的 Azure 容器。
pgBackRest 仓库可通过设置 repo-path=/ 存储在容器根目录下,但通常建议指定一个前缀路径(如 /repo),以便日志和其他 Azure 生成的内容也能存储在同一容器中。
example : --repo1-azure-container=pg-backup
Azure 仓库密钥类型选项(--repo-azure-key-type) Azure 仓库密钥类型。
支持以下授权类型:
shared - 共享密钥sas - 共享访问签名auto - 使用 Azure 托管身份自动授权default : shared
example : --repo1-azure-key-type=sas
Azure 仓库 URI 风格选项(--repo-azure-uri-style) Azure URI 风格。
支持以下 URI 风格:
host - 连接到 account.endpoint 主机。path - 连接到 endpoint 主机,并在 URI 前添加账户前缀。default : host
example : --repo1-azure-uri-style=path
仓库加密类型选项(--repo-cipher-type) 用于加密仓库的加密算法。
支持以下加密类型:
none - 仓库不加密aes-256-cbc - 256 位密钥长度的高级加密标准注意,即使仓库类型(如 S3)支持服务端加密,pgBackRest 也始终在客户端执行加密。
default : none
example : --repo1-cipher-type=aes-256-cbc
GCS 仓库存储桶选项(--repo-gcs-bucket) GCS 仓库存储桶。
用于存储仓库的 GCS 存储桶。
pgBackRest 仓库可通过设置 repo-path=/ 存储在存储桶根目录下,但通常建议指定一个前缀路径(如 /repo),以便日志和其他 GCS 生成的内容也能存储在同一存储桶中。
example : --repo1-gcs-bucket=/pg-backup
GCS 仓库端点选项(--repo-gcs-endpoint) GCS 仓库端点。
用于连接存储服务的端点。可更新为使用本地 GCS 服务器或其他端点。
default : storage.googleapis.com
example : --repo1-gcs-endpoint=localhost
GCS 仓库密钥类型选项(--repo-gcs-key-type) GCS 仓库密钥类型。
支持以下授权类型:
auto - 使用实例服务账号授权。service - 使用本地存储的服务账号密钥。token - 用于本地测试,例如 fakegcs。当 repo-gcs-key-type=service 时,认证令牌续期时将重新加载凭证。
default : service
example : --repo1-gcs-key-type=auto
GCS 仓库项目 ID 选项(--repo-gcs-user-project) GCS 项目 ID。
用于确定请求计费的 GCS 项目 ID。
example : --repo1-gcs-user-project=my-project
仓库主机选项(--repo-host) 远程操作时的仓库主机。
当备份和归档到本地挂载的文件系统时,无需设置此选项。
example : --repo1-host=repo1.domain.com
已弃用名称:backup-host
仓库主机证书颁发机构文件选项(--repo-host-ca-file) 仓库主机证书颁发机构文件。
连接仓库主机时使用非系统默认的 CA 文件。
example : --repo1-host-ca-file=/etc/pki/tls/certs/ca-bundle.crt
仓库主机证书颁发机构路径选项(--repo-host-ca-path) 仓库主机证书颁发机构路径。
连接仓库主机时使用非系统默认的 CA 路径。
example : --repo1-host-ca-path=/etc/pki/tls/certs
仓库主机证书文件选项(--repo-host-cert-file) 仓库主机证书文件。
发送给仓库主机以证明客户端身份。
example : --repo1-host-cert-file=/path/to/client.crt
仓库主机命令选项(--repo-host-cmd) 仓库主机上的 pgBackRest 命令路径。
仅当仓库主机上的 pgBackRest 命令路径与本地不同时才需要设置。若未定义,仓库主机命令将与本地命令保持一致。
default : [ path of executed pgbackrest binary]
example : --repo1-host-cmd=/usr/lib/backrest/bin/pgbackrest
已弃用名称:backup-cmd
仓库主机配置文件选项(--repo-host-config) pgBackRest 仓库主机配置文件。
设置仓库主机上配置文件的位置。仅当仓库主机上的配置文件路径与本地不同时才需要设置。
default : CFGOPTDEF_CONFIG_PATH "/" PROJECT_CONFIG_FILE
example : --repo1-host-config=/conf/pgbackrest/pgbackrest.conf
已弃用名称:backup-config
仓库主机配置包含路径选项(--repo-host-config-include-path) pgBackRest 仓库主机配置包含路径。
设置仓库主机上配置包含路径的位置。仅当仓库主机上的配置包含路径与本地不同时才需要设置。
default : CFGOPTDEF_CONFIG_PATH "/" PROJECT_CONFIG_INCLUDE_PATH
example : --repo1-host-config-include-path=/conf/pgbackrest/conf.d
仓库主机配置路径选项(--repo-host-config-path) pgBackRest 仓库主机配置路径。
设置仓库主机上配置路径的位置。仅当仓库主机上的配置路径与本地不同时才需要设置。
default : CFGOPTDEF_CONFIG_PATH
example : --repo1-host-config-path=/conf/pgbackrest
仓库主机密钥文件选项(--repo-host-key-file) 仓库主机密钥文件。
用于证明客户端证书由其所有者发送。
example : --repo1-host-key-file=/path/to/client.key
仓库主机端口选项(--repo-host-port) 设置了 repo-host 时仓库主机使用的端口。
使用此选项为仓库主机协议指定非默认端口。
注意: 当 repo-host-type=ssh 时,repo-host-port 没有默认值,端口由 cmd-ssh 指定的命令配置决定。
default (depending on repo-host-type) :
tls - 8432
allowed : [ 0 , 65535 ]
example : --repo1-host-port=25
已弃用名称:backup-ssh-port
仓库主机协议类型选项(--repo-host-type) 仓库主机协议类型。
支持以下协议类型:
ssh - Secure Shell。tls - pgBackRest TLS 服务器。default : ssh
example : --repo1-host-type=tls
仓库主机用户选项(--repo-host-user) 设置了 repo-host 时仓库主机使用的用户。
定义在仓库主机上执行操作的用户。建议使用非 postgres 用户,例如 pgbackrest。如果 PostgreSQL 运行在仓库主机上,可将 postgres 用户加入 pgbackrest 组,使其对仓库拥有只读权限,避免意外损坏仓库内容。
default : pgbackrest
example : --repo1-host-user=repo-user
已弃用名称:backup-user
仓库路径选项(--repo-path) 备份和归档的存储路径。
仓库是 pgBackRest 存储备份和归档 WAL 段的地方。
事先估算所需空间可能比较困难。最佳做法是先执行几次备份,记录不同备份类型(全量/增量/差异)的大小,并测量每天生成的 WAL 量,以此作为空间规划的参考。随着数据库的演进,需求也会随时间变化。
default : /var/lib/pgbackrest
example : --repo1-path=/backup/db/backrest
S3 仓库存储桶选项(--repo-s3-bucket) S3 仓库存储桶。
用于存储仓库的 S3 存储桶。
pgBackRest 仓库可通过设置 repo-path=/ 存储在存储桶根目录下,但通常建议指定一个前缀路径(如 /repo),以便日志和其他 AWS 生成的内容也能存储在同一存储桶中。
example : --repo1-s3-bucket=pg-backup
S3 仓库端点选项(--repo-s3-endpoint) S3 仓库端点。
AWS 端点应与所选区域匹配。
对于自定义/测试配置,repo-storage-ca-file、repo-storage-ca-path、repo-storage-host、repo-storage-port 和 repo-storage-verify-tls 选项可能会有用。
example : --repo1-s3-endpoint=s3.amazonaws.com
S3 仓库密钥类型选项(--repo-s3-key-type) S3 仓库密钥类型。
支持以下类型:
shared - 共享密钥auto - 自动获取临时凭证web-id - 自动获取 Web 身份凭证default : shared
example : --repo1-s3-key-type=auto
S3 仓库 KMS 密钥 ID 选项(--repo-s3-kms-key-id) S3 仓库 KMS 密钥。
使用指定的 AWS 密钥管理服务密钥启用 S3 服务端加密。
example : --repo1-s3-kms-key-id=bceb4f13-6939-4be3-910d-df54dee817b7
S3 仓库区域选项(--repo-s3-region) S3 仓库区域。
创建存储桶时所在的 AWS 区域。
example : --repo1-s3-region=us-east-1
S3 仓库请求方付费选项(--repo-s3-requester-pays) S3 仓库请求方付费。
启用 S3 请求方付费模式。
default : n
example : --no -repo1-s3-requester-pays
S3 仓库角色选项(--repo-s3-role) S3 仓库角色。
当 repo-s3-key-type=auto 时,用于获取临时凭证的 AWS 角色名称(非完整 ARN)。
example : --repo1-s3-role=authrole
S3 仓库 URI 风格选项(--repo-s3-uri-style) S3 URI 风格。
支持以下 URI 风格:
host - 连接到 bucket.endpoint 主机。path - 连接到 endpoint 主机,并在 URI 前添加存储桶前缀。default : host
example : --repo1-s3-uri-style=path
SFTP 仓库主机选项(--repo-sftp-host) SFTP 仓库主机。
包含仓库的 SFTP 主机。
example : --repo1-sftp-host=sftprepo.domain
SFTP 仓库主机指纹选项(--repo-sftp-host-fingerprint) SFTP 仓库主机指纹。
指纹的生成方式应与 repo-sftp-host-key-hash-type 一致。可通过以下命令生成:awk '{print $2}' ssh_host_xxx_key.pub | base64 -d | (md5sum or sha1sum) -b。SSH 主机密钥通常位于 /etc/ssh 目录下。
example : --repo1-sftp-host-fingerprint=f84e172dfead7aeeeae6c1fdfb5aa8cf
SFTP 主机密钥检查类型选项(--repo-sftp-host-key-check-type) SFTP 主机密钥检查类型。
支持以下检查类型:
strict - pgBackRest 不会自动将主机密钥添加到 ~/.ssh/known_hosts,并拒绝连接到主机密钥已更改或未在已知主机文件中找到的主机。此选项要求用户手动添加所有新主机。accept-new - pgBackRest 会自动将新主机密钥添加到用户的已知主机文件中,但不允许连接到主机密钥已更改的主机。fingerprint - pgBackRest 将根据 repo-sftp-host-fingerprint 选项指定的指纹验证主机密钥。none - 不执行主机密钥检查。default : strict
example : --repo1-sftp-host-key-check-type=accept-new
SFTP 仓库主机密钥哈希类型选项(--repo-sftp-host-key-hash-type) SFTP 仓库主机密钥哈希类型。
声明 SSH 启动时用于计算远程系统主机密钥摘要的哈希类型。较新版本的 libssh2 除支持 md5 和 sha1 外,还支持 sha256。
example : --repo1-sftp-host-key-hash-type=sha256
SFTP 仓库主机端口选项(--repo-sftp-host-port) SFTP 仓库主机端口。
SFTP 仓库主机端口。
default : 22
allowed : [ 1 , 65535 ]
example : --repo1-sftp-host-port=22
SFTP 仓库主机用户选项(--repo-sftp-host-user) SFTP 仓库主机用户。
用于存储仓库的主机上的用户。
example : --repo1-sftp-host-user=pg-backup
SFTP 已知主机文件选项(--repo-sftp-known-host) SFTP 已知主机文件。
认证期间用于搜索 SFTP 主机匹配项的已知主机文件。若未指定,pgBackRest 默认搜索 ~/.ssh/known_hosts、~/.ssh/known_hosts2、/etc/ssh/ssh_known_hosts 和 /etc/ssh/ssh_known_hosts2。若配置了一个或多个文件路径,pgBackRest 将在这些路径中搜索匹配项。文件路径必须是完整路径或以波浪号(~)开头的路径。该选项可多次传入以指定多个已知主机文件。使用已知主机文件检查时,不得同时指定 repo-sftp-host-fingerprint。另请参见 repo-sftp-host-check-type 选项。
example : --repo1-sftp-known-host=/home/postgres/.ssh/known_hosts
SFTP 仓库私钥文件选项(--repo-sftp-private-key-file) SFTP 私钥文件。
用于认证的 SFTP 私钥文件。
example : --repo1-sftp-private-key-file=~/.ssh/id_ed25519
SFTP 仓库公钥文件选项(--repo-sftp-public-key-file) SFTP 公钥文件。
用于认证的 SFTP 公钥文件。编译时使用 OpenSSL 则为可选,使用其他库则为必填。
example : --repo1-sftp-public-key-file=~/.ssh/id_ed25519.pub
仓库存储 CA 文件选项(--repo-storage-ca-file) 仓库存储 CA 文件。
连接存储(如 S3、Azure)时使用非系统默认的 CA 文件。
example : --repo1-storage-ca-file=/etc/pki/tls/certs/ca-bundle.crt
已弃用名称:repo-azure-ca-file、repo-s3-ca-file
仓库存储 TLS CA 路径选项(--repo-storage-ca-path) 仓库存储 CA 路径。
连接存储(如 S3、Azure)时使用非系统默认的 CA 路径。
example : --repo1-storage-ca-path=/etc/pki/tls/certs
已弃用名称:repo-azure-ca-path、repo-s3-ca-path
仓库存储主机选项(--repo-storage-host) 仓库存储主机。
连接到存储(如 S3、Azure)端点以外的主机。通常用于测试。
example : --repo1-storage-host=127.0.0.1
已弃用名称:repo-azure-host、repo-s3-host
仓库存储端口选项(--repo-storage-port) 仓库存储端口。
连接存储(如 S3、Azure)端点(或指定的主机)时使用的端口。
default : 443
allowed : [ 1 , 65535 ]
example : --repo1-storage-port=9000
已弃用名称:repo-azure-port、repo-s3-port
仓库存储标签选项(--repo-storage-tag) 仓库存储标签。
当仓库为对象存储(如 S3)时,指定添加到对象上的标签。可重复使用此选项以添加多个标签。
pgBackRest 不提供修改这些标签的功能,因此请在运行 stanza-create 之前正确设置,以确保整个仓库的标签一致。
example : --repo1-storage-tag=key1=value1
仓库存储上传分块大小选项(--repo-storage-upload-chunk-size) 仓库存储上传分块大小。
当文件过大而无法完整存入内存时,S3 等对象存储支持分块上传。即使文件能够存入内存,限制上传所用内存量也更为高效。
较大的分块大小通常能提升性能,因为可以减少上传请求次数,并允许在单次请求中上传更多数据而无需分块。缺点是内存占用更高,且由于分块缓冲区必须按进程分配,较大的 process-max 值会导致整体内存消耗增加。
注意,有效的分块大小因存储类型和平台而异。例如,AWS S3 的最小分块大小为 5MiB。各存储类型对分块大小的术语不同:AWS S3 使用 “part size”,GCS 使用 “chunk size”,Azure 使用 “block size”。
若文件大于 1GiB(PostgreSQL 默认创建的最大文件大小),分块大小将逐步增大至允许的最大值,以完成文件上传。
default (depending on repo-type) :
azure - 4MiB
gcs - 4MiB
s3 - 5MiB
allow range (depending on repo-type) :
azure - [4MiB, 1GiB]
gcs - [4MiB, 1GiB]
s3 - [5MiB, 1GiB]
example : --repo1-storage-upload-chunk-size=16MiB
仓库存储证书验证选项(--repo-storage-verify-tls) 仓库存储证书验证。
启用或禁用对存储(如 S3、Azure)服务器 TLS 证书的验证。仅在测试场景或使用自签名证书时才应禁用验证。
default : y
example : --no -repo1-storage-verify-tls
已弃用名称:repo-azure-verify-tls、repo-s3-verify-ssl、repo-s3-verify-tls
仓库目标时间选项(--repo-target-time) 仓库的目标时间。
目标时间定义了命令读取版本化存储上的仓库所使用的时间点。通过此选项,命令可以读取某一历史时刻的仓库状态,从而恢复因用户误操作或恶意软件导致被删除或损坏的数据。
S3、GCS 和 Azure 均支持版本化存储,但通常默认不启用。除了启用版本控制外,还可考虑为 S3 启用对象锁定,为 GCS 或 Azure 启用软删除。
使用 repo-target-time 选项时,还必须同时指定 repo 选项。并非所有仓库类型都支持版本控制,通常针对单个仓库进行恢复更为合理。
注意,与存储时间戳的比较为 <=(小于等于)所提供的时间戳,且提供的时间戳中的毫秒部分将被截断。
example : --repo-target-time=2024-08-08 12:12:12+00
仓库类型选项(--repo-type) 仓库使用的存储类型。
支持以下仓库类型:
azure - Azure Blob 存储服务cifs - 类似 posix,但禁用链接和目录 fsyncgcs - Google Cloud 存储posix - 符合 POSIX 标准的文件系统s3 - AWS 简单存储服务sftp - 安全文件传输协议将 NFS 挂载用作 posix 仓库时,pgBackRest 遵循的规则与 PostgreSQL 文档中描述的相同,详见 Creating a Database Cluster - File Systems 。
default : posix
example : --repo1-type=cifs
28.3.10 - 仓库列表命令(repo-ls) pgBackRest repo-ls 命令的选项与行为参考。
原始页面: pgBackRest Command Docs: repo-ls
repo-ls 类似于 Unix 的 ls 命令,但支持所有 pgBackRest 仓库类型。该命令接受一个路径参数,可以是绝对路径,也可以是相对于 --repo-path 所定义的仓库根路径的相对路径。此命令主要用于管理、排查和测试场景,并非常规部署的必要命令。
默认以文本格式输出,每行一个文件名。指定 --output=json 可切换为 JSON 格式。
若配置了多个仓库,默认操作优先级最高的仓库(如 repo1),如需指定特定仓库,请使用 --repo 选项。
命令选项 过滤输出选项(--filter) 使用正则表达式过滤输出。
过滤器在输出文件名或路径名之前生效。
example : --filter="(F|D|I)$"
输出格式选项(--output) 输出格式。
支持以下输出类型:
text — 简单列表,每行一个文件、链接或路径名。json — 以 JSON 格式输出文件、链接或路径的详细信息。JSON 格式包含以下字段:
name — 文件、链接或路径名(递归时包含部分路径)。type — file(文件)、path(路径)或 link(链接)。size — 字节大小(仅限文件)。time — 最后修改时间(仅限文件)。destination — 链接目标(仅限链接)。default : text
example : --output=json
递归子路径选项(--recurse) 在输出中包含所有子路径。
输出将递归包含所有子路径及其下的文件。
default : n
example : --recurse
排序输出选项(--sort) 按升序、降序或不排序输出。
支持以下排序类型:
asc — 升序。desc — 降序。none — 不排序。default : asc
example : --sort=desc
通用选项 缓冲区大小选项(--buffer-size) I/O 操作的缓冲区大小。
该缓冲区用于复制、压缩、加密等操作。实际使用的缓冲区数量取决于具体选项,每种操作可能额外占用内存,例如 gz 压缩最多可额外使用 256KiB 内存。
允许的值为 16KiB、32KiB、64KiB、128KiB、256KiB、512KiB、1MiB、2MiB、4MiB、8MiB 和 16MiB。
default : 1MiB
example : --buffer-size=2MiB
SSH 客户端命令选项(--cmd-ssh) SSH 客户端命令。
如需使用特定的 SSH 客户端,或 ssh 命令不在 $PATH 中,可通过此选项指定。
default : ssh
example : --cmd-ssh=/usr/bin/ssh
网络压缩级别选项(--compress-level-network) 网络压缩级别。
当 compress-type=none 且命令不在仓库所在主机上执行时,此选项设置网络传输的压缩级别,以减少网络流量。若 compress-type 不等于 none,则忽略此设置,改用 compress-level,避免对文件进行二次压缩。
default : 1
allowed : [ -5 , 12 ]
example : --compress-level-network=1
配置文件选项(--config) pgBackRest 配置文件。
通过此选项可指定非默认路径的配置文件。
default : CFGOPTDEF_CONFIG_PATH "/" PROJECT_CONFIG_FILE
example : --config=/conf/pgbackrest/pgbackrest.conf
配置包含路径选项(--config-include-path) 附加配置文件的目录路径。
该目录下扩展名为 .conf 的文件将与 pgBackRest 主配置文件合并,共同构成最终的配置。
default : CFGOPTDEF_CONFIG_PATH "/" PROJECT_CONFIG_INCLUDE_PATH
example : --config-include-path=/conf/pgbackrest/conf.d
配置基础路径选项(--config-path) pgBackRest 配置文件的基础路径。
此设置覆盖 --config 和 --config-include-path 的默认基础路径,前提是这两个选项未在命令行中显式指定。
例如,仅传入 --config-path=/conf/pgbackrest 时,--config 的默认值将变为 /conf/pgbackrest/pgbackrest.conf,--config-include-path 的默认值将变为 /conf/pgbackrest/conf.d。
default : CFGOPTDEF_CONFIG_PATH
example : --config-path=/conf/pgbackrest
I/O 超时选项(--io-timeout) I/O 超时。
连接、读写操作的超时时间(秒)。
注意,整个读写操作不必在此超时内完成,但必须持续有进展,哪怕每次只传输一个字节。
default : 1m
allowed : [ 100ms, 1h]
example : --io-timeout=120
中性 umask 选项(--neutral-umask) 使用中性 umask。
将 umask 设为 0000,确保仓库中的文件以合理的权限创建。默认目录模式为 0750,文件模式为 0640;锁目录和日志目录的目录模式为 0770,文件模式为 0660。
如需沿用执行用户自身的 umask,请在配置文件中设置 neutral-umask=n,或在命令行中使用 --no-neutral-umask。
default : y
example : --no -neutral-umask
进程优先级选项(--priority) 设置进程优先级。
指定内核调度器为该进程分配的 niceness 值。正值降低优先级,负值提高优先级。大多数情况下,进程没有权限自行提升优先级。
allowed : [ -20 , 19 ]
example : --priority=19
协议超时选项(--protocol-timeout) 协议超时。
设置本地或远程进程在协议层等待新消息的超时时间(秒),防止进程无限期挂起。
注意: protocol-timeout 的值必须大于 db-timeout。
default : 31m
allowed : [ 100ms, 7d]
example : --protocol-timeout=630
保活选项(--sck-keep-alive) 启用 keep-alive。
在套接字连接上启用 keep-alive 消息。
default : y
example : --no -sck-keep-alive
Stanza 选项(--stanza) 定义 stanza。
stanza 是 pgBackRest 中用于标识一个 PostgreSQL 集群备份配置的逻辑名称,定义了集群的位置、备份方式、归档选项等。大多数数据库主机只有一个 PostgreSQL 集群,因此只有一个 stanza;备份服务器则会为每个需要备份的集群各配置一个 stanza。
stanza 名称很容易直接使用主库集群名,但更好的做法是用名称描述集群中所包含的数据库内容。由于该名称同时用于主库和所有副本,选择能体现集群实际用途的名称(如 app 或 dw)比使用本地集群名称(如 main 或 prod)更为合适。
TCP 保活计数选项(--tcp-keep-alive-count) Keep-alive 计数。
指定在判定连接断开之前,允许丢失的 TCP keep-alive 消息数量。
此选项仅在系统支持 TCP_KEEPCNT 套接字选项时有效。
allowed : [ 1 , 32 ]
example : --tcp-keep-alive-count=3
TCP 保活空闲时间选项(--tcp-keep-alive-idle) Keep-alive 空闲时间。
指定在无网络活动达到多少秒后,操作系统开始发送 TCP keep-alive 消息。
此选项仅在系统支持 TCP_KEEPIDLE 套接字选项时有效。
allowed : [ 1 , 3600 ]
example : --tcp-keep-alive-idle=60
TCP 保活间隔选项(--tcp-keep-alive-interval) Keep-alive 间隔时间。
指定未收到确认的 TCP keep-alive 消息重新发送前的等待秒数。
此选项仅在系统支持 TCP_KEEPINTVL 套接字选项时有效。
allowed : [ 1 , 900 ]
example : --tcp-keep-alive-interval=30
TLSv1.2 加密套件选项(--tls-cipher-12) 允许的 TLSv1.2 加密套件。
pgBackRest 客户端与服务端之间的所有 TLS 连接均已加密,默认情况下与对象存储(如 S3)的连接也会加密。
注意: 所有传输连接的最低安全级别为 TLSv1.2。
如有需要,可调整允许的加密套件。示例中的配置是合理的选择,除非有特定安全要求。若未设置(默认),则使用底层 OpenSSL 库的默认值。
example : --tls-cipher-12=HIGH:MEDIUM:+3DES:!aNULL
TLSv1.3 加密套件选项(--tls-cipher-13) 允许的 TLSv1.3 加密套件。
pgBackRest 客户端与服务端之间的所有 TLS 连接均已加密,默认情况下与对象存储(如 S3)的连接也会加密。
注意: 所有传输连接的最低安全级别为 TLSv1.2。
如有需要,可调整允许的加密套件。若未设置(默认),则使用底层 OpenSSL 库的默认值。
example : --tls-cipher-13=TLS_AES_256_GCM_SHA384:TLS_CHACHA20_POLY1305_SHA256
日志选项 控制台日志级别选项(--log-level-console) 控制台日志级别。
支持以下日志级别:
off — 不记录任何日志(不推荐)error — 仅记录错误warn — 记录警告和错误info — 记录信息、警告和错误detail — 记录详情、信息、警告和错误debug — 记录调试、详情、信息、警告和错误trace — 记录跟踪(极详细的调试信息)、调试、信息、警告和错误default : warn
example : --log-level-console=error
文件日志级别选项(--log-level-file) 文件日志级别。
支持以下日志级别:
off — 不记录任何日志(不推荐)error — 仅记录错误warn — 记录警告和错误info — 记录信息、警告和错误detail — 记录详情、信息、警告和错误debug — 记录调试、详情、信息、警告和错误trace — 记录跟踪(极详细的调试信息)、调试、信息、警告和错误default : info
example : --log-level-file=debug
标准错误日志级别选项(--log-level-stderr) stderr 日志级别。
指定哪些级别的日志输出到 stderr 而非 stdout(由 log-level-console 控制)。时间戳和进程信息不会输出到 stderr。
支持以下日志级别:
off — 不记录任何日志(不推荐)error — 仅记录错误warn — 记录警告和错误info — 记录信息、警告和错误detail — 记录详情、信息、警告和错误debug — 记录调试、详情、信息、警告和错误trace — 记录跟踪(极详细的调试信息)、调试、信息、警告和错误default : off
example : --log-level-stderr=error
日志路径选项(--log-path) 日志文件存储路径。
pgBackRest 将日志文件保存到此路径。注意,若 log-level-file=off,则无需配置此项。
default : /var/log/pgbackrest
example : --log-path=/backup/db/log
子进程日志选项(--log-subprocess) 启用子进程日志记录。
为该进程创建的所有子进程启用文件日志记录,使用 log-level-file 指定的日志级别。
default : n
example : --log-subprocess
日志时间戳选项(--log-timestamp) 在日志中启用时间戳。
在控制台和文件日志中输出时间戳。某些特殊场景(如生成文档)下会禁用此选项。
default : y
example : --no -log-timestamp
仓库选项 指定仓库选项(--repo) 指定仓库。
指定命令操作的目标仓库。
例如,可通过此选项指定从特定仓库执行恢复,而非由 pgBackRest 自动选择。
allowed : [ 1 , 256 ]
example : --repo=1
Azure 仓库容器选项(--repo-azure-container) Azure 仓库容器。
用于存储仓库的 Azure 容器。
pgBackRest 仓库可通过设置 repo-path=/ 存储在容器根目录,但通常建议指定一个前缀(如 /repo),这样日志及其他 Azure 生成的内容也可存放在同一容器中。
example : --repo1-azure-container=pg-backup
Azure 仓库密钥类型选项(--repo-azure-key-type) Azure 仓库密钥类型。
支持以下授权类型:
shared — 共享密钥sas — 共享访问签名auto — 使用 Azure 托管标识自动授权default : shared
example : --repo1-azure-key-type=sas
Azure 仓库 URI 风格选项(--repo-azure-uri-style) Azure URI 风格。
支持以下 URI 风格:
host — 连接到 account.endpoint 主机。path — 连接到 endpoint 主机,并在 URI 中添加账户前缀。default : host
example : --repo1-azure-uri-style=path
仓库加密类型选项(--repo-cipher-type) 仓库加密算法。
支持以下加密类型:
none — 不加密aes-256-cbc — 256 位密钥的 AES 加密标准注意,即使仓库存储类型(如 S3)本身支持加密,pgBackRest 的加密始终在客户端执行。
default : none
example : --repo1-cipher-type=aes-256-cbc
GCS 仓库存储桶选项(--repo-gcs-bucket) GCS 仓库存储桶。
用于存储仓库的 GCS 存储桶。
pgBackRest 仓库可通过设置 repo-path=/ 存储在存储桶根目录,但通常建议指定一个前缀(如 /repo),这样日志及其他 GCS 生成的内容也可存放在同一存储桶中。
example : --repo1-gcs-bucket=/pg-backup
GCS 仓库端点选项(--repo-gcs-endpoint) GCS 仓库端点。
用于连接存储服务的端点地址,可替换为本地 GCS 服务器或其他备用端点。
default : storage.googleapis.com
example : --repo1-gcs-endpoint=localhost
GCS 仓库密钥类型选项(--repo-gcs-key-type) GCS 仓库密钥类型。
支持以下授权类型:
auto — 使用实例服务账号授权。service — 使用本地存储的服务账号密钥。token — 用于本地测试,如 fakegcs。当 repo-gcs-key-type=service 时,认证令牌续期时会重新加载身份凭据。
default : service
example : --repo1-gcs-key-type=auto
GCS 仓库项目 ID 选项(--repo-gcs-user-project) GCS 项目 ID。
用于确定请求计费归属的 GCS 项目 ID。
example : --repo1-gcs-user-project=my-project
仓库主机选项(--repo-host) 远程操作时的仓库主机。
若备份和归档存储在本地挂载的文件系统中,则无需此设置。
example : --repo1-host=repo1.domain.com
已弃用名称:backup-host
仓库主机证书颁发机构文件选项(--repo-host-ca-file) 仓库主机证书颁发机构文件。
连接仓库主机时,使用指定的 CA 文件替代系统默认值。
example : --repo1-host-ca-file=/etc/pki/tls/certs/ca-bundle.crt
仓库主机证书颁发机构路径选项(--repo-host-ca-path) 仓库主机证书颁发机构路径。
连接仓库主机时,使用指定的 CA 路径替代系统默认值。
example : --repo1-host-ca-path=/etc/pki/tls/certs
仓库主机证书文件选项(--repo-host-cert-file) 仓库主机证书文件。
向仓库主机发送此证书以证明客户端身份。
example : --repo1-host-cert-file=/path/to/client.crt
仓库主机命令选项(--repo-host-cmd) 仓库主机上的 pgBackRest 命令。
仅当仓库主机上的 pgBackRest 命令路径与本地不同时才需要配置。若未定义,将沿用本地命令路径。
default : [ path of executed pgbackrest binary]
example : --repo1-host-cmd=/usr/lib/backrest/bin/pgbackrest
已弃用名称:backup-cmd
仓库主机配置文件选项(--repo-host-config) pgBackRest 仓库主机配置文件。
设置仓库主机上配置文件的路径。仅当仓库主机的配置文件路径与本地不同时才需要配置。
default : CFGOPTDEF_CONFIG_PATH "/" PROJECT_CONFIG_FILE
example : --repo1-host-config=/conf/pgbackrest/pgbackrest.conf
已弃用名称:backup-config
仓库主机配置包含路径选项(--repo-host-config-include-path) pgBackRest 仓库主机配置包含路径。
设置仓库主机上配置包含路径的位置。仅当仓库主机的配置包含路径与本地不同时才需要配置。
default : CFGOPTDEF_CONFIG_PATH "/" PROJECT_CONFIG_INCLUDE_PATH
example : --repo1-host-config-include-path=/conf/pgbackrest/conf.d
仓库主机配置路径选项(--repo-host-config-path) pgBackRest 仓库主机配置路径。
设置仓库主机上配置路径的位置。仅当仓库主机的配置路径与本地不同时才需要配置。
default : CFGOPTDEF_CONFIG_PATH
example : --repo1-host-config-path=/conf/pgbackrest
仓库主机密钥文件选项(--repo-host-key-file) 仓库主机密钥文件。
用于证明客户端证书由其所有者发送。
example : --repo1-host-key-file=/path/to/client.key
仓库主机端口选项(--repo-host-port) repo-host 已设置时的仓库主机端口。
通过此选项为仓库主机协议指定非默认端口。
注意: 当 repo-host-type=ssh 时,repo-host-port 没有默认值,端口由 cmd-ssh 所指定命令的配置决定。
default (depending on repo-host-type) :
tls - 8432
allowed : [ 0 , 65535 ]
example : --repo1-host-port=25
已弃用名称:backup-ssh-port
仓库主机协议类型选项(--repo-host-type) 仓库主机协议类型。
支持以下协议类型:
ssh — 安全外壳协议。tls — pgBackRest TLS 服务器。default : ssh
example : --repo1-host-type=tls
仓库主机用户选项(--repo-host-user) repo-host 已设置时的仓库主机用户。
定义在仓库主机上执行操作所使用的用户。建议使用专用用户(如 pgbackrest)而非 postgres。若 PostgreSQL 运行在仓库主机上,可将 postgres 用户加入 pgbackrest 组,使其对仓库拥有读取权限,同时避免意外损坏仓库内容。
default : pgbackrest
example : --repo1-host-user=repo-user
已弃用名称:backup-user
仓库路径选项(--repo-path) 备份和归档的存储路径。
仓库是 pgBackRest 存储备份和归档 WAL 段的位置。
预先估算所需空间可能比较困难。建议先执行几次备份,分别记录全量、增量、差异备份的大小,并统计每天的 WAL 生成量,从而大致估算所需空间。随着数据库的演进,空间需求也会持续变化。
default : /var/lib/pgbackrest
example : --repo1-path=/backup/db/backrest
S3 仓库存储桶选项(--repo-s3-bucket) S3 仓库存储桶。
用于存储仓库的 S3 存储桶。
pgBackRest 仓库可通过设置 repo-path=/ 存储在存储桶根目录,但通常建议指定一个前缀(如 /repo),这样日志及其他 AWS 生成的内容也可存放在同一存储桶中。
example : --repo1-s3-bucket=pg-backup
S3 仓库端点选项(--repo-s3-endpoint) S3 仓库端点。
AWS 端点应与存储桶所在区域匹配。
自定义或测试配置时,repo-storage-ca-file、repo-storage-ca-path、repo-storage-host、repo-storage-port 和 repo-storage-verify-tls 等选项可能有所帮助。
example : --repo1-s3-endpoint=s3.amazonaws.com
S3 仓库密钥类型选项(--repo-s3-key-type) S3 仓库密钥类型。
支持以下类型:
shared — 共享密钥auto — 自动获取临时凭据web-id — 自动获取 Web 身份凭据default : shared
example : --repo1-s3-key-type=auto
S3 仓库 KMS 密钥 ID 选项(--repo-s3-kms-key-id) S3 仓库 KMS 密钥。
使用指定的 AWS KMS 密钥启用 S3 服务端加密。
example : --repo1-s3-kms-key-id=bceb4f13-6939-4be3-910d-df54dee817b7
S3 仓库区域选项(--repo-s3-region) S3 仓库区域。
存储桶所在的 AWS 区域。
example : --repo1-s3-region=us-east-1
S3 仓库请求方付费选项(--repo-s3-requester-pays) S3 仓库请求方付费。
启用 S3 请求方付费功能。
default : n
example : --no -repo1-s3-requester-pays
S3 仓库角色选项(--repo-s3-role) S3 仓库角色。
当 repo-s3-key-type=auto 时,用于获取临时凭据的 AWS 角色名称(非完整 ARN)。
example : --repo1-s3-role=authrole
S3 仓库 URI 风格选项(--repo-s3-uri-style) S3 URI 风格。
支持以下 URI 风格:
host — 连接到 bucket.endpoint 主机。path — 连接到 endpoint 主机,并在 URI 中添加存储桶前缀。default : host
example : --repo1-s3-uri-style=path
SFTP 仓库主机选项(--repo-sftp-host) SFTP 仓库主机。
存放仓库的 SFTP 主机地址。
example : --repo1-sftp-host=sftprepo.domain
SFTP 仓库主机指纹选项(--repo-sftp-host-fingerprint) SFTP 仓库主机指纹。
指纹的生成方式须与 repo-sftp-host-key-hash-type 保持一致。可通过以下命令生成:awk '{print $2}' ssh_host_xxx_key.pub | base64 -d | (md5sum or sha1sum) -b。SSH 主机密钥通常位于 /etc/ssh 目录下。
example : --repo1-sftp-host-fingerprint=f84e172dfead7aeeeae6c1fdfb5aa8cf
SFTP 主机密钥检查类型选项(--repo-sftp-host-key-check-type) SFTP 主机密钥检查类型。
支持以下检查类型:
strict — pgBackRest 不会自动将主机密钥添加到 ~/.ssh/known_hosts,并拒绝连接密钥已变更或不在已知主机文件中的主机。此选项要求手动添加所有新主机。accept-new — pgBackRest 自动将新主机密钥添加到已知主机文件,但不允许连接密钥已变更的主机。fingerprint — 根据 repo-sftp-host-fingerprint 指定的指纹验证主机密钥。none — 不执行主机密钥检查。default : strict
example : --repo1-sftp-host-key-check-type=accept-new
SFTP 仓库主机密钥哈希类型选项(--repo-sftp-host-key-hash-type) SFTP 仓库主机密钥哈希类型。
声明 SSH 握手时计算远程主机密钥摘要所用的哈希算法。较新版本的 libssh2 在 md5 和 sha1 之外还支持 sha256。
example : --repo1-sftp-host-key-hash-type=sha256
SFTP 仓库主机端口选项(--repo-sftp-host-port) SFTP 仓库主机端口。
default : 22
allowed : [ 1 , 65535 ]
example : --repo1-sftp-host-port=22
SFTP 仓库主机用户选项(--repo-sftp-host-user) SFTP 仓库主机用户。
存储仓库的主机上对应的用户名。
example : --repo1-sftp-host-user=pg-backup
SFTP 已知主机文件选项(--repo-sftp-known-host) SFTP 已知主机文件。
认证时用于匹配 SFTP 主机的已知主机文件。若未指定,pgBackRest 默认搜索 ~/.ssh/known_hosts、~/.ssh/known_hosts2、/etc/ssh/ssh_known_hosts 和 /etc/ssh/ssh_known_hosts2。若指定了一个或多个文件路径,pgBackRest 将仅在这些文件中查找匹配项。路径必须为完整路径或以波浪号(~)开头的路径。此选项可多次传入以指定多个文件。使用已知主机文件检查时,不得同时指定 repo-sftp-host-fingerprint。另请参阅 repo-sftp-host-check-type 选项。
example : --repo1-sftp-known-host=/home/postgres/.ssh/known_hosts
SFTP 仓库私钥文件选项(--repo-sftp-private-key-file) SFTP 私钥文件。
用于认证的 SFTP 私钥文件路径。
example : --repo1-sftp-private-key-file=~/.ssh/id_ed25519
SFTP 仓库公钥文件选项(--repo-sftp-public-key-file) SFTP 公钥文件。
用于认证的 SFTP 公钥文件路径。若编译时链接的是 OpenSSL,则此项可选;若链接的是其他库,则为必填。
example : --repo1-sftp-public-key-file=~/.ssh/id_ed25519.pub
仓库存储 CA 文件选项(--repo-storage-ca-file) 仓库存储 CA 文件。
连接对象存储(如 S3、Azure)时,使用指定的 CA 文件替代系统默认值。
example : --repo1-storage-ca-file=/etc/pki/tls/certs/ca-bundle.crt
已弃用名称:repo-azure-ca-file、repo-s3-ca-file
仓库存储 TLS CA 路径选项(--repo-storage-ca-path) 仓库存储 CA 路径。
连接对象存储(如 S3、Azure)时,使用指定的 CA 路径替代系统默认值。
example : --repo1-storage-ca-path=/etc/pki/tls/certs
已弃用名称:repo-azure-ca-path、repo-s3-ca-path
仓库存储主机选项(--repo-storage-host) 仓库存储主机。
连接到非标准存储端点(如 S3、Azure)的主机地址,通常用于测试。
example : --repo1-storage-host=127.0.0.1
已弃用名称:repo-azure-host、repo-s3-host
仓库存储端口选项(--repo-storage-port) 仓库存储端口。
连接对象存储端点(或指定主机)时使用的端口。
default : 443
allowed : [ 1 , 65535 ]
example : --repo1-storage-port=9000
已弃用名称:repo-azure-port、repo-s3-port
仓库存储标签选项(--repo-storage-tag) 仓库存储标签。
当仓库使用对象存储(如 S3)时,为对象添加的标签。此选项可多次指定以添加多个标签。
pgBackRest 不提供修改已有标签的功能,因此请在执行 stanza-create 之前确认标签设置正确,以保证整个仓库的标签一致性。
example : --repo1-storage-tag=key1=value1
仓库存储上传分块大小选项(--repo-storage-upload-chunk-size) 仓库存储上传分块大小。
S3 等对象存储在文件过大无法整体载入内存时,支持分块上传。即使文件能放入内存,限制单次上传的内存用量也更为高效。
较大的块大小通常有助于提升性能,因为它能减少上传请求次数,在单个请求中传输更多数据。但代价是内存占用更高,且块缓冲区按进程分配,process-max 越大,总内存消耗越多。
不同存储类型和平台对块大小的有效范围要求不同。例如,AWS S3 的最小块大小为 5MiB。各存储类型对此的术语也有差异:AWS S3 称为 “part size”,GCS 称为 “chunk size”,Azure 称为 “block size”。
若文件超过 1GiB(PostgreSQL 默认的单文件上限),块大小将自动逐步增大直至允许的最大值,以确保文件能够上传完成。
default (depending on repo-type) :
azure - 4MiB
gcs - 4MiB
s3 - 5MiB
allow range (depending on repo-type) :
azure - [4MiB, 1GiB]
gcs - [4MiB, 1GiB]
s3 - [5MiB, 1GiB]
example : --repo1-storage-upload-chunk-size=16MiB
仓库存储证书验证选项(--repo-storage-verify-tls) 仓库存储证书验证。
控制是否验证对象存储(如 S3、Azure)服务器的 TLS 证书。仅在测试或使用自签名证书等特殊场景下才应禁用验证。
default : y
example : --no -repo1-storage-verify-tls
已弃用名称:repo-azure-verify-tls、repo-s3-verify-ssl、repo-s3-verify-tls
仓库目标时间选项(--repo-target-time) 仓库目标时间。
指定读取版本化存储上仓库时所参照的时间点,从而访问某一历史时刻的仓库状态,用于恢复因误操作或恶意软件导致删除或损坏的数据。
S3、GCS 和 Azure 均支持版本化存储,但通常默认未启用。除启用版本控制外,还可以考虑为 S3 启用对象锁定,为 GCS 或 Azure 启用软删除。
使用 repo-target-time 时,必须同时指定 repo 选项。并非所有仓库类型都支持版本控制,通常针对单个仓库进行恢复最为合理。
注意,时间戳比较使用 <= 关系,且提供的时间戳中的毫秒部分会被截断。
example : --repo-target-time=2024-08-08 12:12:12+00
仓库类型选项(--repo-type) 仓库使用的存储类型。
支持以下仓库类型:
azure — Azure Blob 存储服务cifs — 类似 posix,但禁用链接和目录 fsyncgcs — Google Cloud 存储posix — 符合 POSIX 规范的文件系统s3 — AWS 简单存储服务sftp — 安全文件传输协议将 NFS 挂载用作 posix 类型仓库时,适用于 pgBackRest 的规则与 PostgreSQL 文档中的描述相同,详见 Creating a Database Cluster - File Systems 。
default : posix
example : --repo1-type=cifs
28.3.11 - 恢复命令(restore) pgBackRest restore 命令的选项与行为参考。
Source: pgBackRest Command Docs: restore
restore 命令默认从第一个存有备份的仓库中自动选取最新备份(参见 快速开始 - 恢复备份 pgbackrest.conf 决定(例如先检查 repo1,再检查 repo2)。若要从特定仓库恢复,可使用 --repo 选项(例如 --repo=1)。若需恢复非最新的备份,可传入 --set 选项。
使用 --type=time 或 --type=lsn 进行 PITR(时间点恢复)时,必须通过 --target 选项指定目标时间或目标 LSN。若未通过 --set 选项指定备份集,系统将依次检查各仓库,查找包含所请求时间或 LSN 的备份。若未找到匹配备份,--type=time 将使用第一个存有备份的仓库中的最新备份,而 --type=lsn 则不会选择任何备份。对于其他类型的 PITR(如 xid),若目标早于最新备份,则必须通过 --set 选项明确指定备份集。详情及示例请参见 时间点恢复
按照 PostgreSQL 的建议,复制槽不包含在恢复中。更多信息请参阅 PostgreSQL 文档中的 Backing Up The Data Directory
命令选项 归档模式选项(--archive-mode) 恢复后集群的归档模式设置。
此选项用于在恢复后的集群上保留或禁用归档功能。当集群必须被提升(promote)以执行某些操作,但并非打算成为新主库时,此选项非常有用——在这种情况下,将 WAL 从该集群推送到仓库并不合适。
支持以下模式:
off - 通过设置 archive_mode=off 禁用归档。preserve - 保留当前的 archive_mode 设置。注意: 此选项不适用于 PostgreSQL < 12。
default : preserve
example : --archive-mode=off
排除数据库选项(--db-exclude) 恢复时排除指定的数据库。
被排除的数据库将以稀疏清零文件的形式恢复,以节省空间,但仍允许 PostgreSQL 完成恢复过程。恢复完成后,这些数据库将无法访问,但可以用 drop database 命令将其删除。可多次传入 --db-exclude 选项以排除多个数据库。
与 --db-include 选项组合使用时,--db-exclude 仅适用于标准系统数据库(template0、template1 和 postgres)。
example : --db-exclude=db_main
包含数据库选项(--db-include) 仅恢复指定的数据库。
此功能允许只恢复选定的数据库。未明确包含的数据库将以稀疏清零文件的形式恢复,以节省空间,但仍允许 PostgreSQL 完成恢复过程。恢复完成后,未包含的数据库将无法访问,但可以用 drop database 命令将其删除。
注意: 内置数据库(template0、template1 和 postgres)始终会被恢复,除非被明确排除。
可多次传入 --db-include 选项以包含多个数据库。
更多信息及注意事项请参见 选择性数据库恢复
example : --db-include=db_main
强制选项(--force) 强制执行恢复。
单独使用时,此选项将强制完全覆盖 PostgreSQL 数据目录及表空间路径。与 --delta 组合使用时,将基于时间戳/大小执行差量比对,而非使用校验和。
default : n
example : --force
恢复全部链接选项(--link-all) 恢复所有符号链接。
默认情况下,链接的目录和文件将作为普通目录和文件恢复到 $PGDATA 中。这是因为在与原始备份环境不同的系统上,将符号链接恢复到其原始目标可能并不安全。启用此选项后,所有符号链接将按原始备份系统的方式完整恢复。
default : n
example : --link-all
链接映射选项(--link-map) 修改符号链接的目标路径。
恢复时允许修改符号链接所指向的文件或路径。当恢复目标系统的存储布局与原始备份系统不同时,此选项非常有用。
example : --link-map=pg_xlog=/data/xlog
恢复选项(--recovery-option) 在 postgresql.auto.conf 或 recovery.conf 中设置选项。
各选项的详细说明请参阅 PostgreSQL 的 服务器配置
对于 PostgreSQL >= 12,选项将写入 postgresql.auto.conf;对于旧版本,选项将写入 recovery.conf。
注意: restore_command 选项由 pgBackRest 自动生成,但可通过此选项覆盖。请谨慎手动指定 restore_command,因为 pgBackRest 本身就是为处理该事项而设计的。目标恢复选项(recovery_target_name、recovery_target_time 等)由 pgBackRest 自动生成,不应通过此选项手动设置。
由于 pgBackRest 写入 postgresql.auto.conf 或 recovery.conf 文件后不会自动启动 PostgreSQL,在手动重启之前始终可以编辑或检查这些文件。
example : --recovery-option=primary_conninfo=db.mydomain.com
备份集选项(--set) 要恢复的备份集。
指定要恢复的备份集。latest 表示恢复最新备份,否则请提供具体的备份名称。
default : latest
example : --set=20150131-153358F_20150131-153401I
表空间映射选项(--tablespace-map) 将表空间恢复到指定目录。
恢复时将表空间移动到新位置。当备库或已升级系统上的表空间路径与原始系统不同时,此选项非常有用。
表空间位置不存储在 pg_tablespace 中,因此可以随意移动。但不建议将表空间移动到 data_directory,这可能会引发问题。关于移动表空间的更多信息,可参考 http://www.databasesoup.com/2013/11/moving-tablespaces.html 。
example : --tablespace-map=ts_01=/db/ts_01
映射全部表空间选项(--tablespace-map-all) 将所有表空间恢复到指定目录。
默认情况下,表空间将恢复到其原始位置。可通过 --tablespace-map 选项为每个表空间单独修改,但有时将所有表空间一次性重新映射到同一个新目录更为方便,在存储布局与原始备份系统不同的开发或测试环境中尤为如此。
指定的路径将作为父路径,备份中所有表空间的子目录都将在其下创建。
注意:
备份启动后创建的表空间不会被映射。如有表空间映射需求,请在创建表空间后重新进行一次备份。
example : --tablespace-map-all=/data/tablespace
目标选项(--target) 恢复目标。
当 --type 为 lsn、name、xid 或 time 时,用于定义恢复目标。若目标早于最新备份且 --type 不是 time 或 lsn,则需使用 --set 选项指定备份集。
example : --target=2015-01-30 14:15:11 EST
目标动作选项(--target-action) 到达恢复目标时的动作。
当 hot_standby=on(PostgreSQL 10 起的默认值)时,此选项统一控制集群在到达目标或归档中没有更多 WAL 时的行为。
当 PostgreSQL >= 12 且 hot_standby=off 时,pause 的行为等同于 shutdown。当 PostgreSQL < 12 且 hot_standby=off 时,pause 的行为等同于 promote。
支持以下动作:
pause - 到达恢复目标时暂停。promote - 到达恢复目标时提升并切换时间线。shutdown - 到达恢复目标时关闭服务器(PostgreSQL >= 9.5)。default : pause
example : --target-action=promote
目标排他选项(--target-exclusive) 在到达恢复目标之前停止。
定义是否以排他方式恢复到目标(默认为包含目标),仅在 --type 为 lsn、time 或 xid 时有效。例如,当 --type=xid 且 --target=1007 时,指定 --target-exclusive 将排除事务 1007 的内容。更多信息请参阅 PostgreSQL 文档中的 recovery_target_inclusive 选项。
default : n
example : --no -target-exclusive
目标时间线选项(--target-timeline) 沿指定时间线进行恢复。
更多信息请参阅 PostgreSQL 文档中的 recovery_target_timeline。
example : --target-timeline=3
类型选项(--type) 恢复类型。
支持以下恢复类型:
default - 恢复到归档流的末尾。immediate - 仅恢复到数据库达到一致性状态为止。lsn - 恢复到 --target 中指定的 LSN(日志序列号),仅支持 PostgreSQL >= 10。name - 恢复到 --target 中指定的恢复点名称。xid - 恢复到 --target 中指定的事务 ID。time - 恢复到 --target 中指定的时间。preserve - 保留现有的 postgresql.auto.conf 或 recovery.conf 文件。standby - 向 postgresql.auto.conf 或 recovery.conf 文件中添加 standby_mode=on,使集群以备库模式启动。none - 不写入 postgresql.auto.conf 或 recovery.conf 文件,PostgreSQL 将尝试使用 pg_xlog/pg_wal 中已有的 WAL 段达到一致性。请预先提供所需的 WAL 段,或通过 archive-copy 设置将其包含在备份中。警告:
应避免使用 type=none,因为恢复结束时时间线不会递增。这可能导致 PostgreSQL 尝试归档重复的 WAL 段(会被拒绝),进而耗尽磁盘空间并引发 PostgreSQL panic。此外,pg_rewind 等工具可能无法正常工作,甚至可能造成数据损坏。
请注意,离线备份的默认恢复 type 为 none,因为当 wal_level=minimal 时无法进行时间点恢复。若明确设置了 type,则以该设置为准,因为只要 wal_level > minimal,即可从离线备份执行时间点恢复。
default : default
example : --type=xid
通用选项 缓冲区大小选项(--buffer-size) I/O 操作的缓冲区大小。
用于复制、压缩、加密等操作的缓冲区大小。实际使用的缓冲区数量取决于选项配置,每个操作可能占用额外内存,例如 gz 压缩可能额外使用 256KiB 内存。
允许值为 16KiB、32KiB、64KiB、128KiB、256KiB、512KiB、1MiB、2MiB、4MiB、8MiB 和 16MiB。
default : 1MiB
example : --buffer-size=2MiB
pgBackRest 命令选项(--cmd) pgBackRest 命令。
pgBackRest 在某些情况下需要生成命令字符串,例如 restore 命令生成 restore_command 设置时。此时将使用运行当前 pgBackRest 进程的命令,除非通过 --cmd 选项另行指定。
注意:
对 pgBackRest 命令进行封装可能导致不可预期的行为,不建议这样做。
default : [ path of executed pgbackrest binary]
example : --cmd=/var/lib/pgsql/bin/pgbackrest_wrapper.sh
SSH 客户端命令选项(--cmd-ssh) SSH 客户端命令。
当需要使用其他 SSH 客户端,或 ssh 命令不在 $PATH 中时,使用此选项指定特定的 SSH 客户端命令。
default : ssh
example : --cmd-ssh=/usr/bin/ssh
网络压缩级别选项(--compress-level-network) 网络压缩级别。
当 compress-type=none 且命令不在仓库所在主机上运行时,设置网络传输的压缩级别。压缩用于减少网络流量。当 compress-type 不等于 none 时,compress-level-network 设置将被忽略,改用 compress-level,以避免文件被压缩两次。
default : 1
allowed : [ -5 , 12 ]
example : --compress-level-network=1
配置文件选项(--config) pgBackRest 配置文件。
使用此选项指定与默认路径不同的配置文件。
default : CFGOPTDEF_CONFIG_PATH "/" PROJECT_CONFIG_FILE
example : --config=/conf/pgbackrest/pgbackrest.conf
配置包含路径选项(--config-include-path) 附加 pgBackRest 配置文件的路径。
该路径下扩展名为 .conf 的配置文件将与 pgBackRest 主配置文件合并,形成完整的配置。
default : CFGOPTDEF_CONFIG_PATH "/" PROJECT_CONFIG_INCLUDE_PATH
example : --config-include-path=/conf/pgbackrest/conf.d
配置基础路径选项(--config-path) pgBackRest 配置文件的基础路径。
此设置用于覆盖 --config 和 --config-include-path 选项的默认基础路径,前提是这两个选项未在命令行中被显式指定。
例如,仅传入 --config-path=/conf/pgbackrest 时,--config 的默认值将变为 /conf/pgbackrest/pgbackrest.conf,--config-include-path 的默认值将变为 /conf/pgbackrest/conf.d。
default : CFGOPTDEF_CONFIG_PATH
example : --config-path=/conf/pgbackrest
Delta 选项(--delta) 使用校验和进行恢复或备份。
恢复时,默认要求 PostgreSQL 数据目录和表空间目录已存在且为空。启用此选项后,将使用校验和执行差量恢复。
备份时,启用此选项将使用校验和而非时间戳来判断是否需要复制文件。
default : n
example : --delta
I/O 超时选项(--io-timeout) I/O 超时时间。
连接及读/写操作的超时时间(秒)。
请注意,整个读/写操作不必在此超时时间内完成,但必须有一定 进展,哪怕只传输了一个字节。
default : 1m
allowed : [ 100ms, 1h]
example : --io-timeout=120
锁文件路径选项(--lock-path) 锁文件存储路径。
pgBackRest 将锁文件存储在此路径下,以防止并发运行相互冲突的操作。
default : /tmp/pgbackrest
example : --lock-path=/backup/db/lock
中性 umask 选项(--neutral-umask) 使用中性 umask。
将 umask 设置为 0000,以合理的方式创建仓库中的文件权限。默认目录模式为 0750,默认文件模式为 0640。锁文件和日志目录的目录及文件模式分别为 0770 和 0660。
若要使用当前执行用户的 umask,请在配置文件中设置 neutral-umask=n,或在命令行中使用 --no-neutral-umask。
default : y
example : --no -neutral-umask
进程优先级选项(--priority) 设置进程优先级。
定义内核调度器分配给该进程的优先级(即 niceness 值)。正值降低优先级,负值提高优先级。在大多数情况下,进程没有权限提高自身优先级。
allowed : [ -20 , 19 ]
example : --priority=19
最大进程数选项(--process-max) 压缩/传输使用的最大进程数。
每个进程将执行压缩和传输以加快命令运行速度,但不要将 process-max 设置过高,以免影响数据库性能。
default : 1
allowed : [ 1 , 999 ]
example : --process-max=4
协议超时选项(--protocol-timeout) 协议超时时间。
本地或远程进程在协议层等待接收新消息的超时时间(秒)。此设置可防止进程无限期等待消息。
注意: --protocol-timeout 选项的值必须大于 --db-timeout 选项的值。
default : 31m
allowed : [ 100ms, 7d]
example : --protocol-timeout=630
保活选项(--sck-keep-alive) 启用保活(keep-alive)。
在套接字连接上启用保活消息。
default : y
example : --no -sck-keep-alive
Stanza 选项(--stanza) 定义 stanza。
stanza(stanza 是 pgBackRest 中用于标识一个 PostgreSQL 集群备份配置的逻辑名称)是对一个 PostgreSQL 数据库集群的配置,定义了集群所在位置、备份方式、归档选项等。大多数数据库服务器只有一个 PostgreSQL 集群,因此只有一个 stanza;备份服务器则为每个需要备份的集群各配置一个 stanza。
stanza 命名时容易直接使用主集群名称,但更好的做法是使用描述该集群中数据库用途的名称。由于 stanza 名称同时用于主库和所有副本,选择一个描述集群实际功能的名称(如 app 或 dw)比使用本地集群名称(如 main 或 prod)更为合适。
TCP 保活计数选项(--tcp-keep-alive-count) 保活计数。
指定在连接被判定为失效之前,可以丢失的 TCP 保活消息数量。
此选项在支持 TCP_KEEPCNT 套接字选项的系统上可用。
allowed : [ 1 , 32 ]
example : --tcp-keep-alive-count=3
TCP 保活空闲时间选项(--tcp-keep-alive-idle) 保活空闲时间。
指定在无网络活动持续多少秒后,操作系统应发送 TCP 保活消息。
此选项在支持 TCP_KEEPIDLE 套接字选项的系统上可用。
allowed : [ 1 , 3600 ]
example : --tcp-keep-alive-idle=60
TCP 保活间隔选项(--tcp-keep-alive-interval) 保活间隔时间。
指定未收到确认的 TCP 保活消息在多少秒后应重新发送。
此选项在支持 TCP_KEEPINTVL 套接字选项的系统上可用。
allowed : [ 1 , 900 ]
example : --tcp-keep-alive-interval=30
TLSv1.2 加密套件选项(--tls-cipher-12) 允许的 TLSv1.2 加密套件。
pgBackRest 客户端与服务器之间的所有 TLS 连接均已加密。默认情况下,与对象存储(如 S3)的连接也会加密。
注意: 任何传输连接的最低安全级别为 TLSv1.2。
如有需要,可调整接受的加密套件。示例中的配置是合理的选择,除非有特定安全要求。若未设置(默认),则使用底层 OpenSSL 库的默认值。
example : --tls-cipher-12=HIGH:MEDIUM:+3DES:!aNULL
TLSv1.3 加密套件选项(--tls-cipher-13) 允许的 TLSv1.3 加密套件。
pgBackRest 客户端与服务器之间的所有 TLS 连接均已加密。默认情况下,与对象存储(如 S3)的连接也会加密。
注意: 任何传输连接的最低安全级别为 TLSv1.2。
如有需要,可调整接受的加密套件。若未设置(默认),则使用底层 OpenSSL 库的默认值。
example : --tls-cipher-13=TLS_AES_256_GCM_SHA384:TLS_CHACHA20_POLY1305_SHA256
日志选项 控制台日志级别选项(--log-level-console) 控制台日志级别。
支持以下日志级别:
off - 不记录任何日志(不推荐)error - 仅记录错误warn - 记录警告和错误info - 记录信息、警告和错误detail - 记录详情、信息、警告和错误debug - 记录调试信息、详情、信息、警告和错误trace - 记录跟踪信息(非常详细的调试信息)、调试信息、信息、警告和错误default : warn
example : --log-level-console=error
文件日志级别选项(--log-level-file) 文件日志级别。
支持以下日志级别:
off - 不记录任何日志(不推荐)error - 仅记录错误warn - 记录警告和错误info - 记录信息、警告和错误detail - 记录详情、信息、警告和错误debug - 记录调试信息、详情、信息、警告和错误trace - 记录跟踪信息(非常详细的调试信息)、调试信息、信息、警告和错误default : info
example : --log-level-file=debug
标准错误日志级别选项(--log-level-stderr) 标准错误输出日志级别。
指定哪些日志级别输出到 stderr 而非 stdout(由 --log-level-console 指定)。时间戳和进程信息不会输出到 stderr。
支持以下日志级别:
off - 不记录任何日志(不推荐)error - 仅记录错误warn - 记录警告和错误info - 记录信息、警告和错误detail - 记录详情、信息、警告和错误debug - 记录调试信息、详情、信息、警告和错误trace - 记录跟踪信息(非常详细的调试信息)、调试信息、信息、警告和错误default : off
example : --log-level-stderr=error
日志路径选项(--log-path) 日志文件存储路径。
pgBackRest 将日志文件存储在此路径下。请注意,若 log-level-file=off,则无需配置日志路径。
default : /var/log/pgbackrest
example : --log-path=/backup/db/log
子进程日志选项(--log-subprocess) 启用子进程日志记录。
为当前进程创建的所有子进程启用文件日志记录,日志级别使用 --log-level-file 指定的值。
default : n
example : --log-subprocess
日志时间戳选项(--log-timestamp) 启用日志时间戳。
在控制台和文件日志中启用时间戳。此选项在生成文档等特殊场景下会被禁用。
default : y
example : --no -log-timestamp
维护者选项 强制指定 PostgreSQL 版本选项(--pg-version-force) 强制指定 PostgreSQL 版本。
使用指定的 PostgreSQL 版本,而非通过读取 pg_control 或 WAL 头部自动检测到的版本。此选项主要用于 PostgreSQL 分支版本或开发版本,因为这些版本中上述值可能与正式发布版本不同。PostgreSQL 通过 server_version_num 报告的版本必须与强制指定的版本一致。
警告:
使用此选项时需谨慎,因为 pg_control 和 WAL 头部仍将按指定版本的预期格式读取,即来自官方开源 PostgreSQL 版本的格式。若分支版本或开发版本更改了 pgBackRest 所依赖字段的格式,将导致不可预期的行为。一般而言,只有当分支在标准 PostgreSQL 成员之后 添加所有自定义结构成员时,此选项才能按预期工作。
example : --pg-version-force=15
仓库选项 指定仓库选项(--repo) 设置仓库。
指定命令操作的目标仓库。
例如,可使用此选项从特定仓库执行恢复,而非让 pgBackRest 自动选择。
allowed : [ 1 , 256 ]
example : --repo=1
Azure 仓库容器选项(--repo-azure-container) Azure 仓库容器。
用于存储仓库的 Azure 容器。
通过设置 repo-path=/ 可将 pgBackRest 仓库存储在容器根目录,但通常建议指定一个前缀(如 /repo),以便日志和其他 Azure 生成的内容也可以存储在同一容器中。
example : --repo1-azure-container=pg-backup
Azure 仓库密钥类型选项(--repo-azure-key-type) Azure 仓库密钥类型。
支持以下授权类型:
shared - 共享密钥sas - 共享访问签名auto - 使用 Azure 托管标识自动授权default : shared
example : --repo1-azure-key-type=sas
Azure 仓库 URI 风格选项(--repo-azure-uri-style) Azure URI 风格。
支持以下 URI 风格:
host - 连接到 account.endpoint 主机。path - 连接到 endpoint 主机并在 URI 中添加账户前缀。default : host
example : --repo1-azure-uri-style=path
仓库加密类型选项(--repo-cipher-type) 用于加密仓库的加密算法。
支持以下加密类型:
none - 仓库不加密aes-256-cbc - 256 位密钥长度的高级加密标准请注意,即使仓库类型(如 S3)本身支持加密,加密也始终在客户端执行。
default : none
example : --repo1-cipher-type=aes-256-cbc
GCS 仓库存储桶选项(--repo-gcs-bucket) GCS 仓库存储桶。
用于存储仓库的 GCS 存储桶。
通过设置 repo-path=/ 可将 pgBackRest 仓库存储在存储桶根目录,但通常建议指定一个前缀(如 /repo),以便日志和其他 GCS 生成的内容也可以存储在同一存储桶中。
example : --repo1-gcs-bucket=/pg-backup
GCS 仓库端点选项(--repo-gcs-endpoint) GCS 仓库端点。
用于连接存储服务的端点。可更新为使用本地 GCS 服务器或备用端点。
default : storage.googleapis.com
example : --repo1-gcs-endpoint=localhost
GCS 仓库密钥类型选项(--repo-gcs-key-type) GCS 仓库密钥类型。
支持以下授权类型:
auto - 使用实例服务账号自动授权。service - 使用本地存储的密钥文件中的服务账号。token - 用于本地测试,如 fakegcs。当 repo-gcs-key-type=service 时,凭据将在身份验证令牌续期时重新加载。
default : service
example : --repo1-gcs-key-type=auto
GCS 仓库项目 ID 选项(--repo-gcs-user-project) GCS 项目 ID。
用于确定请求计费归属的 GCS 项目 ID。
example : --repo1-gcs-user-project=my-project
仓库主机选项(--repo-host) 远程操作时的仓库主机。
备份和归档到本地挂载的文件系统时,无需此设置。
example : --repo1-host=repo1.domain.com
已弃用名称:backup-host
仓库主机证书颁发机构文件选项(--repo-host-ca-file) 仓库主机证书颁发机构文件。
连接仓库主机时使用非系统默认的 CA 文件。
example : --repo1-host-ca-file=/etc/pki/tls/certs/ca-bundle.crt
仓库主机证书颁发机构路径选项(--repo-host-ca-path) 仓库主机证书颁发机构路径。
连接仓库主机时使用非系统默认的 CA 路径。
example : --repo1-host-ca-path=/etc/pki/tls/certs
仓库主机证书文件选项(--repo-host-cert-file) 仓库主机证书文件。
发送给仓库主机以证明客户端身份。
example : --repo1-host-cert-file=/path/to/client.crt
仓库主机命令选项(--repo-host-cmd) 仓库主机 pgBackRest 命令。
仅当本地主机与仓库主机上的 pgBackRest 命令路径不同时才需要设置。若未定义,仓库主机命令将与本地命令相同。
default : [ path of executed pgbackrest binary]
example : --repo1-host-cmd=/usr/lib/backrest/bin/pgbackrest
已弃用名称:backup-cmd
仓库主机配置文件选项(--repo-host-config) pgBackRest 仓库主机配置文件。
设置仓库主机上配置文件的位置。仅当仓库主机上的配置文件与本地配置文件位于不同路径时才需要此设置。
default : CFGOPTDEF_CONFIG_PATH "/" PROJECT_CONFIG_FILE
example : --repo1-host-config=/conf/pgbackrest/pgbackrest.conf
已弃用名称:backup-config
仓库主机配置包含路径选项(--repo-host-config-include-path) pgBackRest 仓库主机配置包含路径。
设置仓库主机上配置包含路径的位置。仅当仓库主机上的配置包含路径与本地配置包含路径不同时才需要此设置。
default : CFGOPTDEF_CONFIG_PATH "/" PROJECT_CONFIG_INCLUDE_PATH
example : --repo1-host-config-include-path=/conf/pgbackrest/conf.d
仓库主机配置路径选项(--repo-host-config-path) pgBackRest 仓库主机配置路径。
设置仓库主机上配置路径的位置。仅当仓库主机上的配置路径与本地配置路径不同时才需要此设置。
default : CFGOPTDEF_CONFIG_PATH
example : --repo1-host-config-path=/conf/pgbackrest
仓库主机密钥文件选项(--repo-host-key-file) 仓库主机密钥文件。
与客户端证书配合使用,证明证书由所有者发送。
example : --repo1-host-key-file=/path/to/client.key
仓库主机端口选项(--repo-host-port) 设置了 --repo-host 时的仓库主机端口。
使用此选项为仓库主机协议指定非默认端口。
注意: 当 repo-host-type=ssh 时,--repo-host-port 没有默认值,端口将使用 --cmd-ssh 指定命令所配置的端口。
default (depending on repo-host-type) :
tls - 8432
allowed : [ 0 , 65535 ]
example : --repo1-host-port=25
已弃用名称:backup-ssh-port
仓库主机协议类型选项(--repo-host-type) 仓库主机协议类型。
支持以下协议类型:
ssh - 安全外壳协议。tls - pgBackRest TLS 服务器。default : ssh
example : --repo1-host-type=tls
仓库主机用户选项(--repo-host-user) 设置了 --repo-host 时的仓库主机用户。
定义在仓库主机上执行操作所使用的用户。建议不要使用 postgres 用户,而改用 pgbackrest 等专用用户。若 PostgreSQL 运行在仓库主机上,可将 postgres 用户加入 pgbackrest 组,使其对仓库具有读权限,同时避免意外损坏仓库内容。
default : pgbackrest
example : --repo1-host-user=repo-user
已弃用名称:backup-user
仓库路径选项(--repo-path) 备份和归档的存储路径。
仓库是 pgBackRest 存储备份和归档 WAL 段的位置。
提前估算所需空间可能比较困难。建议先进行几次备份,记录不同类型备份(全量/增量/差异)的大小,并测量每天产生的 WAL 量。这将给出大致的空间需求,但实际需求会随数据库的演变而变化。
default : /var/lib/pgbackrest
example : --repo1-path=/backup/db/backrest
S3 仓库存储桶选项(--repo-s3-bucket) S3 仓库存储桶。
用于存储仓库的 S3 存储桶。
通过设置 repo-path=/ 可将 pgBackRest 仓库存储在存储桶根目录,但通常建议指定一个前缀(如 /repo),以便日志和其他 AWS 生成的内容也可以存储在同一存储桶中。
example : --repo1-s3-bucket=pg-backup
S3 仓库端点选项(--repo-s3-endpoint) S3 仓库端点。
AWS 端点应与所选区域匹配。
对于自定义或测试配置,可使用 --repo-storage-ca-file、--repo-storage-ca-path、--repo-storage-host、--repo-storage-port 和 --repo-storage-verify-tls 选项。
example : --repo1-s3-endpoint=s3.amazonaws.com
S3 仓库密钥类型选项(--repo-s3-key-type) S3 仓库密钥类型。
支持以下类型:
shared - 共享密钥auto - 自动获取临时凭据web-id - 自动获取 Web 身份凭据default : shared
example : --repo1-s3-key-type=auto
S3 仓库 KMS 密钥 ID 选项(--repo-s3-kms-key-id) S3 仓库 KMS 密钥。
使用指定的 AWS 密钥管理服务密钥启用 S3 服务器端加密。
example : --repo1-s3-kms-key-id=bceb4f13-6939-4be3-910d-df54dee817b7
S3 仓库区域选项(--repo-s3-region) S3 仓库区域。
创建存储桶时所在的 AWS 区域。
example : --repo1-s3-region=us-east-1
S3 仓库请求方付费选项(--repo-s3-requester-pays) S3 仓库请求方付费。
启用 S3 请求方付费功能。
default : n
example : --no -repo1-s3-requester-pays
S3 仓库角色选项(--repo-s3-role) S3 仓库角色。
当 repo-s3-key-type=auto 时,用于获取临时凭据的 AWS 角色名称(非完整 ARN)。
example : --repo1-s3-role=authrole
S3 仓库 URI 风格选项(--repo-s3-uri-style) S3 URI 风格。
支持以下 URI 风格:
host - 连接到 bucket.endpoint 主机。path - 连接到 endpoint 主机并在 URI 中添加存储桶前缀。default : host
example : --repo1-s3-uri-style=path
SFTP 仓库主机选项(--repo-sftp-host) SFTP 仓库主机。
包含仓库的 SFTP 主机。
example : --repo1-sftp-host=sftprepo.domain
SFTP 仓库主机指纹选项(--repo-sftp-host-fingerprint) SFTP 仓库主机指纹。
SFTP 仓库主机指纹的生成方式应与 --repo-sftp-host-key-hash-type 匹配。通过以下命令生成指纹:awk '{print $2}' ssh_host_xxx_key.pub | base64 -d | (md5sum or sha1sum) -b。SSH 主机密钥通常位于 /etc/ssh 目录中。
example : --repo1-sftp-host-fingerprint=f84e172dfead7aeeeae6c1fdfb5aa8cf
SFTP 主机密钥检查类型选项(--repo-sftp-host-key-check-type) SFTP 主机密钥检查类型。
支持以下 SFTP 主机密钥检查类型:
strict - pgBackRest 不会自动将主机密钥添加到 ~/.ssh/known_hosts 文件,且拒绝连接主机密钥已更改或不在已知主机文件中的主机。此选项强制用户手动添加所有新主机。accept-new - pgBackRest 将自动将新主机密钥添加到用户的已知主机文件,但不允许连接主机密钥已更改的主机。fingerprint - pgBackRest 将根据 --repo-sftp-host-fingerprint 选项指定的指纹来验证主机密钥。none - 不执行主机密钥检查。default : strict
example : --repo1-sftp-host-key-check-type=accept-new
SFTP 仓库主机密钥哈希类型选项(--repo-sftp-host-key-hash-type) SFTP 仓库主机密钥哈希类型。
声明在 SSH 启动时用于计算远程系统主机密钥摘要的哈希类型。较新版本的 libssh2 除支持 md5 和 sha1 外,还支持 sha256。
example : --repo1-sftp-host-key-hash-type=sha256
SFTP 仓库主机端口选项(--repo-sftp-host-port) SFTP 仓库主机端口。
default : 22
allowed : [ 1 , 65535 ]
example : --repo1-sftp-host-port=22
SFTP 仓库主机用户选项(--repo-sftp-host-user) SFTP 仓库主机用户。
用于存储仓库的主机上的用户名。
example : --repo1-sftp-host-user=pg-backup
SFTP 已知主机文件选项(--repo-sftp-known-host) SFTP 已知主机文件。
身份验证期间用于搜索 SFTP 主机匹配项的已知主机文件。若未指定,pgBackRest 将默认搜索 ~/.ssh/known_hosts、~/.ssh/known_hosts2、/etc/ssh/ssh_known_hosts 和 /etc/ssh/ssh_known_hosts2。若配置了一个或多个文件路径,pgBackRest 将在这些路径中搜索匹配项。文件路径必须是完整路径或以波浪号开头的路径。可多次传入 --repo-sftp-known-host 选项以指定多个已知主机文件。使用已知主机文件检查时,不得同时指定 --repo-sftp-host-fingerprint。另请参阅 --repo-sftp-host-check-type 选项。
example : --repo1-sftp-known-host=/home/postgres/.ssh/known_hosts
SFTP 仓库私钥文件选项(--repo-sftp-private-key-file) SFTP 私钥文件。
用于身份验证的 SFTP 私钥文件。
example : --repo1-sftp-private-key-file=~/.ssh/id_ed25519
SFTP 仓库公钥文件选项(--repo-sftp-public-key-file) SFTP 公钥文件。
用于身份验证的 SFTP 公钥文件。针对 OpenSSL 编译时为可选,针对其他库编译时为必填。
example : --repo1-sftp-public-key-file=~/.ssh/id_ed25519.pub
仓库存储 CA 文件选项(--repo-storage-ca-file) 仓库存储 CA 文件。
为存储(如 S3、Azure)证书使用非系统默认的 CA 文件。
example : --repo1-storage-ca-file=/etc/pki/tls/certs/ca-bundle.crt
已弃用名称:repo-azure-ca-file, repo-s3-ca-file
仓库存储 TLS CA 路径选项(--repo-storage-ca-path) 仓库存储 CA 路径。
为存储(如 S3、Azure)证书使用非系统默认的 CA 路径。
example : --repo1-storage-ca-path=/etc/pki/tls/certs
已弃用名称:repo-azure-ca-path, repo-s3-ca-path
仓库存储主机选项(--repo-storage-host) 仓库存储主机。
连接到存储(如 S3、Azure)端点以外的主机,通常用于测试目的。
example : --repo1-storage-host=127.0.0.1
已弃用名称:repo-azure-host, repo-s3-host
仓库存储端口选项(--repo-storage-port) 仓库存储端口。
连接到存储(如 S3、Azure)端点(或指定主机)时使用的端口。
default : 443
allowed : [ 1 , 65535 ]
example : --repo1-storage-port=9000
已弃用名称:repo-azure-port, repo-s3-port
仓库存储标签选项(--repo-storage-tag) 仓库存储标签。
当仓库为对象存储(如 S3)时,指定添加到对象上的标签。可重复使用此选项添加多个标签。
pgBackRest 不提供修改这些标签的功能,因此请在运行 stanza-create 之前确保标签已正确设置,以保证整个仓库的标签统一。
example : --repo1-storage-tag=key1=value1
仓库存储上传分块大小选项(--repo-storage-upload-chunk-size) 仓库存储上传分块大小。
对象存储(如 S3)允许在文件过大无法存入内存时分块上传。即使文件可以存入内存,限制单次上传占用的内存量也更为高效。
较大的块大小通常可以带来更好的性能,因为它减少了上传请求数量,允许在单个请求中上传更多数据而非分块处理。其缺点是内存占用更高——由于块缓冲区必须按进程分配,--process-max 值越大,整体内存消耗越多。
请注意,有效的块大小因存储类型和平台而异。例如,AWS S3 的最小块大小为 5MiB。各存储类型对块大小的术语也不同,因此搜索最小/最大值时,AWS S3 请使用"part size",GCS 请使用"chunk size",Azure 请使用"block size"。
如果文件大于 1GiB(PostgreSQL 默认创建的最大文件大小),块大小将逐步增加到允许的最大值,以完成文件上传。
default (depending on repo-type) :
azure - 4MiB
gcs - 4MiB
s3 - 5MiB
allow range (depending on repo-type) :
azure - [4MiB, 1GiB]
gcs - [4MiB, 1GiB]
s3 - [5MiB, 1GiB]
example : --repo1-storage-upload-chunk-size=16MiB
仓库存储证书验证选项(--repo-storage-verify-tls) 仓库存储证书验证。
启用或禁用存储(如 S3、Azure)服务器的 TLS 证书验证。仅在测试场景或使用自签名证书时才应禁用验证。
default : y
example : --no -repo1-storage-verify-tls
已弃用名称:repo-azure-verify-tls, repo-s3-verify-ssl, repo-s3-verify-tls
仓库目标时间选项(--repo-target-time) 仓库目标时间。
定义命令读取版本化存储上的仓库所使用的时间点。这允许命令读取某个历史时间点的仓库状态,以便恢复因用户误操作或恶意软件而被删除或损坏的数据。
S3、GCS 和 Azure 均支持版本化存储,但通常默认不启用。除启用版本控制外,还可以考虑为 S3 启用对象锁定,为 GCS 或 Azure 启用软删除。
指定 --repo-target-time 时,还必须提供 --repo 选项。并非所有仓库类型都支持版本控制,通常针对单个仓库进行恢复更为合理。
请注意,与存储时间戳的比较使用 <= 关系,且提供的时间戳中的毫秒部分将被截断。
example : --repo-target-time=2024-08-08 12:12:12+00
仓库类型选项(--repo-type) 仓库使用的存储类型。
支持以下仓库类型:
azure - Azure Blob 存储服务cifs - 类似 posix,但禁用链接和目录 fsyncgcs - Google Cloud Storageposix - 符合 POSIX 标准的文件系统s3 - AWS 简单存储服务sftp - 安全文件传输协议使用 NFS 挂载作为 posix 仓库时,适用规则与 PostgreSQL 文档中描述的相同:创建数据库集群 - 文件系统
default : posix
example : --repo1-type=cifs
Stanza 选项 PostgreSQL 路径选项(--pg-path) PostgreSQL 数据目录。
此路径应与 PostgreSQL 报告的 data_directory 一致。尽管可以从多处读取此值,但在恢复或离线备份场景中这些来源可能不可用,因此建议在配置文件中明确设置。
--pg-path 选项在每次在线备份时都会与 PostgreSQL 报告的值进行验证,因此应始终保持最新。
example : --pg1-path=/data/db
已弃用名称:db-path
28.3.12 - 服务器命令(server) pgBackRest server 命令的选项与行为参考。
原始页面: pgBackRest Command Docs: server
pgBackRest 服务器允许在不使用 SSH 协议的情况下访问远程主机。
命令选项 TLS 服务器地址选项(--tls-server-address) TLS 服务器地址。
服务器监听客户端请求的 IP 地址。
default : localhost
example : --tls-server-address=*
TLS 服务器授权客户端选项(--tls-server-auth) TLS 服务器授权客户端。
服务器通过验证客户端证书,并将其证书 CN(Common Name,通用名称)与 tls-server-auth 选项所配置的列表进行比对,来完成对客户端的授权。
可通过向 tls-server-auth 选项传入逗号分隔的列表,授权某个客户端 CN 访问多个 stanza(stanza 是 pgBackRest 中用于标识一个 PostgreSQL 集群备份配置的逻辑名称);也可通过指定 tls-server-auth=client-cn=* 授权其访问所有 stanza。客户端 CN 不支持通配符。
example : --tls-server-auth=client-cn=stanza1,stanza2
TLS 服务器证书颁发机构选项(--tls-server-ca-file) TLS 服务器证书颁发机构。
用于验证客户端证书是否由受信任的证书颁发机构签发。
example : --tls-server-ca-file=/path/to/server.ca
TLS 服务器证书选项(--tls-server-cert-file) TLS 服务器证书文件。
发送给客户端以证明服务器身份的证书。
example : --tls-server-cert-file=/path/to/server.crt
TLS 服务器密钥选项(--tls-server-key-file) TLS 服务器密钥文件。
用于证明服务器证书归属的私钥。
example : --tls-server-key-file=/path/to/server.key
TLS 服务器端口选项(--tls-server-port) TLS 服务器端口。
服务器监听客户端请求的端口。
default : 8432
allowed : [ 1 , 65535 ]
example : --tls-server-port=8000
通用选项 缓冲区大小选项(--buffer-size) I/O 操作的缓冲区大小。
用于复制、压缩、加密等操作的缓冲区大小。实际使用的缓冲区数量取决于各选项配置,每个操作可能还会额外占用内存,例如 gz 压缩可能额外使用 256KiB 内存。
允许的值为:16KiB、32KiB、64KiB、128KiB、256KiB、512KiB、1MiB、2MiB、4MiB、8MiB 和 16MiB。
default : 1MiB
example : --buffer-size=2MiB
配置文件选项(--config) pgBackRest 配置文件。
指定与默认值不同的配置文件路径。
default : CFGOPTDEF_CONFIG_PATH "/" PROJECT_CONFIG_FILE
example : --config=/conf/pgbackrest/pgbackrest.conf
配置包含路径选项(--config-include-path) 附加 pgBackRest 配置文件的路径。
该路径下扩展名为 .conf 的配置文件将与 pgBackRest 主配置文件合并,最终形成一个完整的配置文件。
default : CFGOPTDEF_CONFIG_PATH "/" PROJECT_CONFIG_INCLUDE_PATH
example : --config-include-path=/conf/pgbackrest/conf.d
配置基础路径选项(--config-path) pgBackRest 配置文件的基础路径。
此选项覆盖 --config 和 --config-include-path 的默认基础路径,但仅在这两个选项未在命令行中明确指定时生效。
例如,仅传入 --config-path=/conf/pgbackrest 时,--config 的默认值将变为 /conf/pgbackrest/pgbackrest.conf,--config-include-path 的默认值将变为 /conf/pgbackrest/conf.d。
default : CFGOPTDEF_CONFIG_PATH
example : --config-path=/conf/pgbackrest
I/O 超时选项(--io-timeout) I/O 超时时间。
连接及读写操作的超时时间,单位为秒。
注意:整个读写操作不必在此超时时间内完成,但必须 有所进展,哪怕只传输了一个字节。
default : 1m
allowed : [ 100ms, 1h]
example : --io-timeout=120
进程优先级选项(--priority) 设置进程优先级。
定义内核调度器赋予该进程的优先级(即 niceness 值)。正值降低优先级,负值提高优先级。普通进程在大多数情况下无权提高自身优先级。
allowed : [ -20 , 19 ]
example : --priority=19
协议超时选项(--protocol-timeout) 协议超时时间。
本地或远程进程在协议层等待新消息的超时时间,单位为秒。此设置可防止进程无限期阻塞等待消息。
注意: protocol-timeout 选项的值必须大于 db-timeout 选项的值。
default : 31m
allowed : [ 100ms, 7d]
example : --protocol-timeout=630
保活选项(--sck-keep-alive) 启用保活。
在 socket 连接上启用保活消息。
default : y
example : --no -sck-keep-alive
TCP 保活计数选项(--tcp-keep-alive-count) 保活计数。
连接被判定为断开之前,允许丢失的 TCP 保活消息数量。
此选项仅在支持 TCP_KEEPCNT socket 选项的系统上可用。
allowed : [ 1 , 32 ]
example : --tcp-keep-alive-count=3
TCP 保活空闲时间选项(--tcp-keep-alive-idle) 保活空闲时间。
无网络活动持续多少秒后,操作系统开始发送 TCP 保活消息。
此选项仅在支持 TCP_KEEPIDLE socket 选项的系统上可用。
allowed : [ 1 , 3600 ]
example : --tcp-keep-alive-idle=60
TCP 保活间隔选项(--tcp-keep-alive-interval) 保活间隔时间。
未被确认的 TCP 保活消息重新发送前的等待秒数。
此选项仅在支持 TCP_KEEPINTVL socket 选项的系统上可用。
allowed : [ 1 , 900 ]
example : --tcp-keep-alive-interval=30
TLSv1.2 加密套件选项(--tls-cipher-12) 允许使用的 TLSv1.2 加密套件。
pgBackRest 客户端与服务器之间的所有 TLS 连接均经过加密,连接到对象存储(如 S3)时默认也会加密。
注意: 任何传输连接的最低安全级别为 TLSv1.2。
如有需要,可调整允许使用的加密套件。示例中的配置是合理的选择,除非有特殊安全要求。若未设置(默认),则使用底层 OpenSSL 库的默认值。
example : --tls-cipher-12=HIGH:MEDIUM:+3DES:!aNULL
TLSv1.3 加密套件选项(--tls-cipher-13) 允许使用的 TLSv1.3 加密套件。
pgBackRest 客户端与服务器之间的所有 TLS 连接均经过加密,连接到对象存储(如 S3)时默认也会加密。
注意: 任何传输连接的最低安全级别为 TLSv1.2。
如有需要,可调整允许使用的加密套件。若未设置(默认),则使用底层 OpenSSL 库的默认值。
example : --tls-cipher-13=TLS_AES_256_GCM_SHA384:TLS_CHACHA20_POLY1305_SHA256
日志选项 控制台日志级别选项(--log-level-console) 控制台日志级别。
支持以下日志级别:
off - 不记录任何日志(不推荐)error - 仅记录错误warn - 记录警告和错误info - 记录信息、警告和错误detail - 记录详情、信息、警告和错误debug - 记录调试、详情、信息、警告和错误trace - 记录追踪(非常详细的调试信息)、调试、信息、警告和错误default : warn
example : --log-level-console=error
文件日志级别选项(--log-level-file) 文件日志级别。
支持以下日志级别:
off - 不记录任何日志(不推荐)error - 仅记录错误warn - 记录警告和错误info - 记录信息、警告和错误detail - 记录详情、信息、警告和错误debug - 记录调试、详情、信息、警告和错误trace - 记录追踪(非常详细的调试信息)、调试、信息、警告和错误default : info
example : --log-level-file=debug
标准错误日志级别选项(--log-level-stderr) stderr 日志级别。
指定哪些日志级别输出到 stderr 而非 stdout(由 log-level-console 控制)。时间戳和进程信息不会输出到 stderr。
支持以下日志级别:
off - 不记录任何日志(不推荐)error - 仅记录错误warn - 记录警告和错误info - 记录信息、警告和错误detail - 记录详情、信息、警告和错误debug - 记录调试、详情、信息、警告和错误trace - 记录追踪(非常详细的调试信息)、调试、信息、警告和错误default : off
example : --log-level-stderr=error
日志路径选项(--log-path) 日志文件的存储路径。
pgBackRest 将日志文件写入此路径。若 log-level-file=off,则无需配置日志路径。
default : /var/log/pgbackrest
example : --log-path=/backup/db/log
日志时间戳选项(--log-timestamp) 在日志中启用时间戳。
在控制台和文件日志中启用时间戳。在某些特殊情况下(如生成文档时),此选项会被禁用。
default : y
example : --no -log-timestamp
28.3.13 - 服务器心跳命令(server-ping) pgBackRest server-ping 命令选项与行为参考。
原始页面: pgBackRest Command Docs: server-ping
向 pgBackRest TLS 服务器发送 ping,确认其正在接受连接。此命令仅作为存活性检查,不进行身份验证。
若命令行中未指定主机,则使用 tls-server-host 选项的值。
命令选项 TLS 服务器地址选项(--tls-server-address) TLS 服务器地址。
服务器监听客户端请求的 IP 地址。
default : localhost
example : --tls-server-address=*
TLS 服务器端口选项(--tls-server-port) TLS 服务器端口。
服务器监听客户端请求的端口号。
default : 8432
allowed : [ 1 , 65535 ]
example : --tls-server-port=8000
通用选项 缓冲区大小选项(--buffer-size) I/O 操作的缓冲区大小。
用于复制、压缩、加密等操作的缓冲区大小。实际使用的缓冲区数量取决于具体选项,每个操作可能会额外消耗内存,例如 gz 压缩可能额外占用 256KiB 内存。
允许的值为:16KiB、32KiB、64KiB、128KiB、256KiB、512KiB、1MiB、2MiB、4MiB、8MiB 和 16MiB。
default : 1MiB
example : --buffer-size=2MiB
配置文件选项(--config) pgBackRest 配置文件。
使用此选项可以指定非默认的配置文件。
default : CFGOPTDEF_CONFIG_PATH "/" PROJECT_CONFIG_FILE
example : --config=/conf/pgbackrest/pgbackrest.conf
配置包含路径选项(--config-include-path) 附加 pgBackRest 配置文件的路径。
该路径下扩展名为 .conf 的配置文件将与主配置文件合并,形成统一的配置文件。
default : CFGOPTDEF_CONFIG_PATH "/" PROJECT_CONFIG_INCLUDE_PATH
example : --config-include-path=/conf/pgbackrest/conf.d
配置基础路径选项(--config-path) pgBackRest 配置文件的基础路径。
此设置用于覆盖 --config 和 --config-include-path 选项的默认基础路径,但若这两个选项已在命令行中显式指定,则此设置不生效。
例如,仅传入 --config-path=/conf/pgbackrest 时,--config 的默认值将变为 /conf/pgbackrest/pgbackrest.conf,--config-include-path 的默认值将变为 /conf/pgbackrest/conf.d。
default : CFGOPTDEF_CONFIG_PATH
example : --config-path=/conf/pgbackrest
I/O 超时选项(--io-timeout) I/O 超时时间。
连接及读写操作的超时时间(单位:秒)。
注意,整个读写操作无需在超时时间内全部完成,但必须有一定 进展,哪怕只传输了一个字节。
default : 1m
allowed : [ 100ms, 1h]
example : --io-timeout=120
进程优先级选项(--priority) 设置进程优先级。
定义内核调度器为进程分配的优先级(即 niceness 值)。正值降低优先级,负值提高优先级。大多数情况下,进程没有权限提高自身优先级。
allowed : [ -20 , 19 ]
example : --priority=19
保活选项(--sck-keep-alive) 启用 keep-alive。
在 socket 连接上启用 keep-alive 消息。
default : y
example : --no -sck-keep-alive
TCP 保活计数选项(--tcp-keep-alive-count) keep-alive 探测次数。
指定在判定连接已断开之前,允许丢失的 TCP keep-alive 消息数量。
此选项仅在支持 TCP_KEEPCNT socket 选项的系统上可用。
allowed : [ 1 , 32 ]
example : --tcp-keep-alive-count=3
TCP 保活空闲时间选项(--tcp-keep-alive-idle) keep-alive 空闲时间。
指定在多长时间无网络活动后(单位:秒),操作系统开始发送 TCP keep-alive 消息。
此选项仅在支持 TCP_KEEPIDLE socket 选项的系统上可用。
allowed : [ 1 , 3600 ]
example : --tcp-keep-alive-idle=60
TCP 保活间隔选项(--tcp-keep-alive-interval) keep-alive 重传间隔时间。
指定未收到确认的 TCP keep-alive 消息在多长时间后重传(单位:秒)。
此选项仅在支持 TCP_KEEPINTVL socket 选项的系统上可用。
allowed : [ 1 , 900 ]
example : --tcp-keep-alive-interval=30
TLSv1.2 加密套件选项(--tls-cipher-12) 允许使用的 TLSv1.2 加密套件。
pgBackRest 客户端与服务器之间的所有 TLS 连接均经过加密。默认情况下,与对象存储(如 S3)的连接也会加密。
注意: 任何传输连接的最低安全级别为 TLSv1.2。
如有需要,可调整允许的加密套件。除非有特定的安全要求,否则示例值是一个合理的选择。若未设置(默认),则使用底层 OpenSSL 库的默认值。
example : --tls-cipher-12=HIGH:MEDIUM:+3DES:!aNULL
TLSv1.3 加密套件选项(--tls-cipher-13) 允许使用的 TLSv1.3 加密套件。
pgBackRest 客户端与服务器之间的所有 TLS 连接均经过加密。默认情况下,与对象存储(如 S3)的连接也会加密。
注意: 任何传输连接的最低安全级别为 TLSv1.2。
如有需要,可调整允许的加密套件。若未设置(默认),则使用底层 OpenSSL 库的默认值。
example : --tls-cipher-13=TLS_AES_256_GCM_SHA384:TLS_CHACHA20_POLY1305_SHA256
日志选项 控制台日志级别选项(--log-level-console) 控制台日志的输出级别。
支持以下日志级别:
off - 不输出任何日志(不推荐)error - 仅记录错误warn - 记录警告和错误info - 记录信息、警告和错误detail - 记录详情、信息、警告和错误debug - 记录调试、详情、信息、警告和错误trace - 记录跟踪(非常详细的调试信息)、调试、信息、警告和错误default : warn
example : --log-level-console=error
文件日志级别选项(--log-level-file) 文件日志的输出级别。
支持以下日志级别:
off - 不输出任何日志(不推荐)error - 仅记录错误warn - 记录警告和错误info - 记录信息、警告和错误detail - 记录详情、信息、警告和错误debug - 记录调试、详情、信息、警告和错误trace - 记录跟踪(非常详细的调试信息)、调试、信息、警告和错误default : info
example : --log-level-file=debug
标准错误日志级别选项(--log-level-stderr) stderr 的日志输出级别。
指定哪些日志级别将输出到 stderr 而非 stdout(后者由 log-level-console 控制)。时间戳和进程信息不会输出到 stderr。
支持以下日志级别:
off - 不输出任何日志(不推荐)error - 仅记录错误warn - 记录警告和错误info - 记录信息、警告和错误detail - 记录详情、信息、警告和错误debug - 记录调试、详情、信息、警告和错误trace - 记录跟踪(非常详细的调试信息)、调试、信息、警告和错误default : off
example : --log-level-stderr=error
日志路径选项(--log-path) 日志文件的存储路径。
pgBackRest 将日志文件写入此路径。注意,若 log-level-file=off,则无需配置日志路径。
default : /var/log/pgbackrest
example : --log-path=/backup/db/log
日志时间戳选项(--log-timestamp) 在日志中启用时间戳。
在控制台和文件日志中启用时间戳输出。某些特殊场景(如生成文档时)会禁用此选项。
default : y
example : --no -log-timestamp
28.3.14 - Stanza 创建命令(stanza-create) pgBackRest stanza-create 命令的选项与行为参考。
原始页面: pgBackRest Command Docs: stanza-create
stanza-create 命令须在 pgbackrest.conf 中完成 stanza 配置后再执行(stanza 是 pgBackRest 中用于标识一个 PostgreSQL 集群备份配置的逻辑名称)。若配置了多个仓库,stanza-create 会在每个仓库上分别建立 stanza。已创建的 stanza 会被跳过,因此即便新增了仓库,也可以随时安全地重复执行 stanza-create。
更多信息和示例,请参见 创建 Stanza
命令选项 在线选项(--online) 在在线集群上创建 stanza。
指定 --no-online 可阻止 pgBackRest 在创建 stanza 时连接 PostgreSQL。
default : y
example : --no -online
通用选项 缓冲区大小选项(--buffer-size) I/O 操作的缓冲区大小。
该缓冲区用于复制、压缩、加密等操作。实际使用的缓冲区数量取决于所启用的选项,每个操作还可能额外占用内存,例如 gz 压缩可能额外使用约 256KiB 内存。
允许值为:16KiB、32KiB、64KiB、128KiB、256KiB、512KiB、1MiB、2MiB、4MiB、8MiB 和 16MiB。
default : 1MiB
example : --buffer-size=2MiB
SSH 客户端命令选项(--cmd-ssh) SSH 客户端命令。
需要使用特定 SSH 客户端,或 ssh 命令不在 $PATH 中时,可通过此选项指定。
default : ssh
example : --cmd-ssh=/usr/bin/ssh
网络压缩级别选项(--compress-level-network) 网络压缩级别。
当 compress-type=none 且命令不在仓库所在主机上运行时,通过此选项设置网络传输的压缩级别,以降低网络流量。若 compress-type 不等于 none,则忽略 compress-level-network,转而使用 compress-level,避免对文件进行二次压缩。
default : 1
allowed : [ -5 , 12 ]
example : --compress-level-network=1
配置文件选项(--config) pgBackRest 配置文件。
指定与默认值不同的配置文件路径。
default : CFGOPTDEF_CONFIG_PATH "/" PROJECT_CONFIG_FILE
example : --config=/conf/pgbackrest/pgbackrest.conf
配置包含路径选项(--config-include-path) 附加 pgBackRest 配置文件的路径。
该路径下以 .conf 为扩展名的配置文件将与主配置文件合并,形成完整配置。
default : CFGOPTDEF_CONFIG_PATH "/" PROJECT_CONFIG_INCLUDE_PATH
example : --config-include-path=/conf/pgbackrest/conf.d
配置基础路径选项(--config-path) pgBackRest 配置文件的基础路径。
用于覆盖 --config 和 --config-include-path 的默认基础路径;若这两个选项已在命令行中显式指定,则此设置不生效。
例如,仅传入 --config-path=/conf/pgbackrest 时,--config 的默认值将变为 /conf/pgbackrest/pgbackrest.conf,--config-include-path 的默认值将变为 /conf/pgbackrest/conf.d。
default : CFGOPTDEF_CONFIG_PATH
example : --config-path=/conf/pgbackrest
数据库超时选项(--db-timeout) 数据库查询超时时间。
设置对数据库执行查询的超时时长(单位:秒)。这包括备份启动和停止函数——两者各自可能需要较长时间。因此,除非明确知道这些函数会很快返回(例如已设置 start-fast=y,且备份期间数据库集群不会产生大量 WAL 段),否则应将此超时值设置得较高。
注意: db-timeout 的值必须小于 protocol-timeout。
default : 30m
allowed : [ 100ms, 7d]
example : --db-timeout=600
I/O 超时选项(--io-timeout) I/O 超时时间。
连接及读/写操作的超时时长(单位:秒)。
注意,整个读/写操作无需在此超时时间内全部完成,但必须持续有进展,哪怕每次仅传输一个字节。
default : 1m
allowed : [ 100ms, 1h]
example : --io-timeout=120
锁文件路径选项(--lock-path) 锁文件的存储路径。
pgBackRest 将锁文件存放于此路径,用于防止相互冲突的操作并发执行。
default : /tmp/pgbackrest
example : --lock-path=/backup/db/lock
中性 umask 选项(--neutral-umask) 使用中性 umask。
将 umask 设置为 0000,使仓库中的文件和目录拥有合理的权限。默认目录权限为 0750,默认文件权限为 0640;锁文件目录和日志目录的目录权限为 0770,文件权限为 0660。
若要改用执行用户自身的 umask,可在配置文件中指定 neutral-umask=n,或在命令行中使用 --no-neutral-umask。
default : y
example : --no -neutral-umask
进程优先级选项(--priority) 设置进程优先级。
定义内核调度器为该进程分配的优先级(即 niceness 值)。正值降低优先级,负值提升优先级。普通进程通常没有权限提升自身优先级。
allowed : [ -20 , 19 ]
example : --priority=19
协议超时选项(--protocol-timeout) 协议超时时间。
设置本地或远程进程在协议层等待新消息的超时时长(单位:秒),防止进程无限期等待。
注意: protocol-timeout 的值必须大于 db-timeout。
default : 31m
allowed : [ 100ms, 7d]
example : --protocol-timeout=630
保活选项(--sck-keep-alive) 启用 keep-alive。
在套接字连接上启用 keep-alive 消息。
default : y
example : --no -sck-keep-alive
Stanza 选项(--stanza) 定义 stanza。
stanza 是对一个 PostgreSQL 数据库集群的备份配置,定义了集群的位置、备份方式及归档选项等内容。大多数数据库服务器只有一个 PostgreSQL 集群,因此只需配置一个 stanza;备份服务器则需要为每个待备份的数据库集群各配置一个 stanza。
命名 stanza 时,用主集群名称命名看似直观,但更好的做法是用名称描述集群中存储的数据库。由于 stanza 名称同时用于主库和所有副本,选用描述集群实际用途的名称(如 app 或 dw)比使用本地集群名称(如 main 或 prod)更为合适。
TCP 保活计数选项(--tcp-keep-alive-count) TCP 保活计数。
指定在连接被判定为断开之前,允许丢失的 TCP 保活消息数量。
此选项仅在系统支持 TCP_KEEPCNT 套接字选项时可用。
allowed : [ 1 , 32 ]
example : --tcp-keep-alive-count=3
TCP 保活空闲时间选项(--tcp-keep-alive-idle) TCP 保活空闲时间。
指定网络空闲多少秒后,操作系统应开始发送 TCP 保活消息。
此选项仅在系统支持 TCP_KEEPIDLE 套接字选项时可用。
allowed : [ 1 , 3600 ]
example : --tcp-keep-alive-idle=60
TCP 保活间隔选项(--tcp-keep-alive-interval) TCP 保活间隔时间。
指定在未收到确认的情况下,TCP 保活消息的重传间隔(单位:秒)。
此选项仅在系统支持 TCP_KEEPINTVL 套接字选项时可用。
allowed : [ 1 , 900 ]
example : --tcp-keep-alive-interval=30
TLSv1.2 加密套件选项(--tls-cipher-12) 允许使用的 TLSv1.2 加密套件。
pgBackRest 客户端与服务器之间的所有 TLS 连接均经过加密,与对象存储(如 S3)的连接默认也会加密。
注意: 任何传输连接的最低安全级别为 TLSv1.2。
如有需要,可调整允许使用的加密套件。示例值是合理的选择,除非有特殊安全需求。未设置时(默认行为),使用底层 OpenSSL 库的默认值。
example : --tls-cipher-12=HIGH:MEDIUM:+3DES:!aNULL
TLSv1.3 加密套件选项(--tls-cipher-13) 允许使用的 TLSv1.3 加密套件。
pgBackRest 客户端与服务器之间的所有 TLS 连接均经过加密,与对象存储(如 S3)的连接默认也会加密。
注意: 任何传输连接的最低安全级别为 TLSv1.2。
如有需要,可调整允许使用的加密套件。未设置时(默认行为),使用底层 OpenSSL 库的默认值。
example : --tls-cipher-13=TLS_AES_256_GCM_SHA384:TLS_CHACHA20_POLY1305_SHA256
日志选项 控制台日志级别选项(--log-level-console) 控制台日志的输出级别。
支持以下日志级别:
off - 不输出任何日志(不推荐)error - 仅记录错误warn - 记录警告和错误info - 记录信息、警告和错误detail - 记录详细信息、信息、警告和错误debug - 记录调试、详细信息、信息、警告和错误trace - 记录跟踪(非常详细的调试信息)、调试、信息、警告和错误default : warn
example : --log-level-console=error
文件日志级别选项(--log-level-file) 文件日志的输出级别。
支持以下日志级别:
off - 不输出任何日志(不推荐)error - 仅记录错误warn - 记录警告和错误info - 记录信息、警告和错误detail - 记录详细信息、信息、警告和错误debug - 记录调试、详细信息、信息、警告和错误trace - 记录跟踪(非常详细的调试信息)、调试、信息、警告和错误default : info
example : --log-level-file=debug
标准错误日志级别选项(--log-level-stderr) stderr 的日志输出级别。
指定哪些日志级别输出到 stderr 而非 stdout(由 log-level-console 控制)。时间戳和进程信息不会输出到 stderr。
支持以下日志级别:
off - 不输出任何日志(不推荐)error - 仅记录错误warn - 记录警告和错误info - 记录信息、警告和错误detail - 记录详细信息、信息、警告和错误debug - 记录调试、详细信息、信息、警告和错误trace - 记录跟踪(非常详细的调试信息)、调试、信息、警告和错误default : off
example : --log-level-stderr=error
日志路径选项(--log-path) 日志文件的存储路径。
pgBackRest 将日志文件存放于此路径。注意,若 log-level-file=off,则无需配置此选项。
default : /var/log/pgbackrest
example : --log-path=/backup/db/log
子进程日志选项(--log-subprocess) 启用子进程日志记录。
为当前进程创建的子进程启用文件日志,使用 log-level-file 指定的日志级别。
default : n
example : --log-subprocess
日志时间戳选项(--log-timestamp) 启用日志时间戳。
在控制台和文件日志中启用时间戳。该选项在生成文档等特殊场景下会被禁用。
default : y
example : --no -log-timestamp
维护者选项 强制指定 PostgreSQL 版本选项(--pg-version-force) 强制指定 PostgreSQL 版本。
使用指定的 PostgreSQL 版本,而非通过读取 pg_control 或 WAL 头部自动检测到的版本。此选项主要用于 PostgreSQL 分支版本或开发版本——这些版本中的相关值可能与发行版本不同。PostgreSQL 通过 server_version_num 报告的版本必须与强制指定的版本一致。
警告:
使用此选项须谨慎,因为 pg_control 和 WAL 头部仍将按照所指定版本对应的官方 PostgreSQL 格式读取。若分支版本或开发版本修改了 pgBackRest 所依赖字段的格式,将导致不可预期的行为。通常,只有当分支在标准 PostgreSQL 结构成员之后 追加自定义成员时,此选项才能正常工作。
example : --pg-version-force=15
仓库选项 Azure 仓库容器选项(--repo-azure-container) Azure 仓库容器。
用于存储仓库的 Azure 容器。
设置 repo-path=/ 可将 pgBackRest 仓库存储在容器根目录下,但通常建议指定一个前缀路径(如 /repo),以便日志等 Azure 生成的内容也能存储在同一容器中。
example : --repo1-azure-container=pg-backup
Azure 仓库密钥类型选项(--repo-azure-key-type) Azure 仓库密钥类型。
支持以下授权类型:
shared - 共享密钥sas - 共享访问签名auto - 使用 Azure 托管标识自动授权default : shared
example : --repo1-azure-key-type=sas
Azure 仓库 URI 风格选项(--repo-azure-uri-style) Azure URI 风格。
支持以下 URI 风格:
host - 连接到 account.endpoint 主机。path - 连接到 endpoint 主机,并在 URI 中前置账户名。default : host
example : --repo1-azure-uri-style=path
仓库加密类型选项(--repo-cipher-type) 仓库加密算法。
支持以下加密类型:
none - 仓库不加密aes-256-cbc - 256 位密钥的高级加密标准注意,即使仓库类型(如 S3)本身支持加密,pgBackRest 的加密操作始终在客户端执行。
default : none
example : --repo1-cipher-type=aes-256-cbc
GCS 仓库存储桶选项(--repo-gcs-bucket) GCS 仓库存储桶。
用于存储仓库的 GCS 存储桶。
设置 repo-path=/ 可将 pgBackRest 仓库存储在存储桶根目录下,但通常建议指定一个前缀路径(如 /repo),以便日志等 GCS 生成的内容也能存储在同一存储桶中。
example : --repo1-gcs-bucket=/pg-backup
GCS 仓库端点选项(--repo-gcs-endpoint) GCS 仓库端点。
连接存储服务的端点,可修改为本地 GCS 服务器地址或其他备用端点。
default : storage.googleapis.com
example : --repo1-gcs-endpoint=localhost
GCS 仓库密钥类型选项(--repo-gcs-key-type) GCS 仓库密钥类型。
支持以下授权类型:
auto - 使用实例服务账号自动授权。service - 使用本地存储的服务账号密钥文件。token - 用于本地测试,例如 fakegcs。当 repo-gcs-key-type=service 时,认证令牌续期时将重新加载凭据。
default : service
example : --repo1-gcs-key-type=auto
GCS 仓库项目 ID 选项(--repo-gcs-user-project) GCS 项目 ID。
用于确定请求计费归属的 GCS 项目 ID。
example : --repo1-gcs-user-project=my-project
仓库主机选项(--repo-host) 远程操作时使用的仓库主机。
若备份和归档存储在本地挂载的文件系统上,则无需配置此选项。
example : --repo1-host=repo1.domain.com
已弃用名称:backup-host
仓库主机证书颁发机构文件选项(--repo-host-ca-file) 仓库主机证书颁发机构文件。
连接仓库主机时,使用非系统默认的 CA 文件。
example : --repo1-host-ca-file=/etc/pki/tls/certs/ca-bundle.crt
仓库主机证书颁发机构路径选项(--repo-host-ca-path) 仓库主机证书颁发机构路径。
连接仓库主机时,使用非系统默认的 CA 路径。
example : --repo1-host-ca-path=/etc/pki/tls/certs
仓库主机证书文件选项(--repo-host-cert-file) 仓库主机证书文件。
发送给仓库主机,用于验证客户端身份。
example : --repo1-host-cert-file=/path/to/client.crt
仓库主机命令选项(--repo-host-cmd) 仓库主机上的 pgBackRest 命令路径。
仅当本地主机与仓库主机上的 pgBackRest 命令路径不同时才需要配置。若未定义,仓库主机命令与本地命令相同。
default : [ path of executed pgbackrest binary]
example : --repo1-host-cmd=/usr/lib/backrest/bin/pgbackrest
已弃用名称:backup-cmd
仓库主机配置文件选项(--repo-host-config) pgBackRest 仓库主机配置文件。
设置仓库主机上配置文件的位置。仅当仓库主机上的配置文件路径与本地不同时才需要配置。
default : CFGOPTDEF_CONFIG_PATH "/" PROJECT_CONFIG_FILE
example : --repo1-host-config=/conf/pgbackrest/pgbackrest.conf
已弃用名称:backup-config
仓库主机配置包含路径选项(--repo-host-config-include-path) pgBackRest 仓库主机配置包含路径。
设置仓库主机上配置包含路径的位置。仅当仓库主机上的配置包含路径与本地不同时才需要配置。
default : CFGOPTDEF_CONFIG_PATH "/" PROJECT_CONFIG_INCLUDE_PATH
example : --repo1-host-config-include-path=/conf/pgbackrest/conf.d
仓库主机配置路径选项(--repo-host-config-path) pgBackRest 仓库主机配置路径。
设置仓库主机上配置路径的位置。仅当仓库主机上的配置路径与本地不同时才需要配置。
default : CFGOPTDEF_CONFIG_PATH
example : --repo1-host-config-path=/conf/pgbackrest
仓库主机密钥文件选项(--repo-host-key-file) 仓库主机密钥文件。
用于证明客户端证书由其所有者发送。
example : --repo1-host-key-file=/path/to/client.key
仓库主机端口选项(--repo-host-port) 仓库主机端口。
设置 repo-host 时,通过此选项为仓库主机协议指定非默认端口。
注意: 当 repo-host-type=ssh 时,repo-host-port 没有默认值,端口以 cmd-ssh 所指定命令的配置为准。
default (depending on repo-host-type) :
tls - 8432
allowed : [ 0 , 65535 ]
example : --repo1-host-port=25
已弃用名称:backup-ssh-port
仓库主机协议类型选项(--repo-host-type) 仓库主机协议类型。
支持以下协议类型:
ssh - 安全外壳协议(SSH)。tls - pgBackRest TLS 服务器。default : ssh
example : --repo1-host-type=tls
仓库主机用户选项(--repo-host-user) 仓库主机用户。
设置 repo-host 时,定义在仓库主机上执行操作所使用的用户。建议使用专用用户(如 pgbackrest)而非 postgres。若 PostgreSQL 也运行在仓库主机上,可将 postgres 用户加入 pgbackrest 组,使其对仓库具有读取权限,同时避免意外损坏仓库内容。
default : pgbackrest
example : --repo1-host-user=repo-user
已弃用名称:backup-user
仓库路径选项(--repo-path) 备份和归档的存储路径。
仓库是 pgBackRest 存放备份文件和归档 WAL 段的位置。
提前估算所需空间可能较为困难。建议先执行几次备份,记录不同备份类型(全量/增量/差异)的大小,并测量每日产生的 WAL 量,以此大致了解所需空间。随着数据库的增长,需求也会随时间变化。
default : /var/lib/pgbackrest
example : --repo1-path=/backup/db/backrest
S3 仓库存储桶选项(--repo-s3-bucket) S3 仓库存储桶。
用于存储仓库的 S3 存储桶。
设置 repo-path=/ 可将 pgBackRest 仓库存储在存储桶根目录下,但通常建议指定一个前缀路径(如 /repo),以便日志等 AWS 生成的内容也能存储在同一存储桶中。
example : --repo1-s3-bucket=pg-backup
S3 仓库端点选项(--repo-s3-endpoint) S3 仓库端点。
AWS 端点应与所选区域对应。
对于自定义或测试配置,repo-storage-ca-file、repo-storage-ca-path、repo-storage-host、repo-storage-port 和 repo-storage-verify-tls 选项可能会有所帮助。
example : --repo1-s3-endpoint=s3.amazonaws.com
S3 仓库密钥类型选项(--repo-s3-key-type) S3 仓库密钥类型。
支持以下类型:
shared - 共享密钥auto - 自动获取临时凭据web-id - 自动获取 Web 身份凭据default : shared
example : --repo1-s3-key-type=auto
S3 仓库 KMS 密钥 ID 选项(--repo-s3-kms-key-id) S3 仓库 KMS 密钥。
使用指定的 AWS 密钥管理服务密钥启用 S3 服务端加密。
example : --repo1-s3-kms-key-id=bceb4f13-6939-4be3-910d-df54dee817b7
S3 仓库区域选项(--repo-s3-region) S3 仓库区域。
创建存储桶时所在的 AWS 区域。
example : --repo1-s3-region=us-east-1
S3 仓库请求方付费选项(--repo-s3-requester-pays) S3 仓库请求方付费。
启用 S3 请求方付费功能。
default : n
example : --no -repo1-s3-requester-pays
S3 仓库角色选项(--repo-s3-role) S3 仓库角色。
当 repo-s3-key-type=auto 时,用于获取临时凭据的 AWS 角色名称(非完整 ARN)。
example : --repo1-s3-role=authrole
S3 仓库 URI 风格选项(--repo-s3-uri-style) S3 URI 风格。
支持以下 URI 风格:
host - 连接到 bucket.endpoint 主机。path - 连接到 endpoint 主机,并在 URI 中前置存储桶名。default : host
example : --repo1-s3-uri-style=path
SFTP 仓库主机选项(--repo-sftp-host) SFTP 仓库主机。
存储仓库的 SFTP 主机。
example : --repo1-sftp-host=sftprepo.domain
SFTP 仓库主机指纹选项(--repo-sftp-host-fingerprint) SFTP 仓库主机指纹。
主机指纹的生成方式应与 repo-sftp-host-key-hash-type 一致。可通过以下命令生成:awk '{print $2}' ssh_host_xxx_key.pub | base64 -d | (md5sum or sha1sum) -b。SSH 主机密钥文件通常位于 /etc/ssh 目录下。
example : --repo1-sftp-host-fingerprint=f84e172dfead7aeeeae6c1fdfb5aa8cf
SFTP 主机密钥检查类型选项(--repo-sftp-host-key-check-type) SFTP 主机密钥检查类型。
支持以下检查类型:
strict - pgBackRest 不会自动将主机密钥添加到 ~/.ssh/known_hosts,并拒绝连接主机密钥已变更或在已知主机文件中不存在的主机。此选项要求用户手动添加所有新主机。accept-new - pgBackRest 将自动将新主机密钥添加到已知主机文件,但不允许连接主机密钥已变更的主机。fingerprint - pgBackRest 将对照 repo-sftp-host-fingerprint 选项指定的指纹验证主机密钥。none - 不执行主机密钥检查。default : strict
example : --repo1-sftp-host-key-check-type=accept-new
SFTP 仓库主机密钥哈希类型选项(--repo-sftp-host-key-hash-type) SFTP 仓库主机密钥哈希类型。
声明 SSH 启动时用于计算远程系统主机密钥摘要的哈希类型。较新版本的 libssh2 除支持 md5 和 sha1 外,还支持 sha256。
example : --repo1-sftp-host-key-hash-type=sha256
SFTP 仓库主机端口选项(--repo-sftp-host-port) SFTP 仓库主机端口。
default : 22
allowed : [ 1 , 65535 ]
example : --repo1-sftp-host-port=22
SFTP 仓库主机用户选项(--repo-sftp-host-user) SFTP 仓库主机用户。
存储仓库的主机上所使用的用户。
example : --repo1-sftp-host-user=pg-backup
SFTP 已知主机文件选项(--repo-sftp-known-host) SFTP 已知主机文件。
用于在认证过程中查找 SFTP 主机匹配条目的已知主机文件。若未指定,pgBackRest 默认搜索 ~/.ssh/known_hosts、~/.ssh/known_hosts2、/etc/ssh/ssh_known_hosts 和 /etc/ssh/ssh_known_hosts2。若配置了一个或多个文件路径,pgBackRest 将在这些路径中查找匹配项;文件路径必须是绝对路径或以波浪号开头的路径。此选项可多次传入,以指定多个已知主机文件。使用已知主机文件检查时,不得同时指定 repo-sftp-host-fingerprint。另请参见 repo-sftp-host-check-type 选项。
example : --repo1-sftp-known-host=/home/postgres/.ssh/known_hosts
SFTP 仓库私钥文件选项(--repo-sftp-private-key-file) SFTP 私钥文件。
用于认证的 SFTP 私钥文件。
example : --repo1-sftp-private-key-file=~/.ssh/id_ed25519
SFTP 仓库公钥文件选项(--repo-sftp-public-key-file) SFTP 公钥文件。
用于认证的 SFTP 公钥文件。编译时链接了 OpenSSL 时为可选项;链接了其他库时为必填项。
example : --repo1-sftp-public-key-file=~/.ssh/id_ed25519.pub
仓库存储 CA 文件选项(--repo-storage-ca-file) 仓库存储 CA 文件。
连接存储服务(如 S3、Azure)时,使用非系统默认的 CA 文件验证证书。
example : --repo1-storage-ca-file=/etc/pki/tls/certs/ca-bundle.crt
已弃用名称:repo-azure-ca-file、repo-s3-ca-file
仓库存储 TLS CA 路径选项(--repo-storage-ca-path) 仓库存储 CA 路径。
连接存储服务(如 S3、Azure)时,使用非系统默认的 CA 路径验证证书。
example : --repo1-storage-ca-path=/etc/pki/tls/certs
已弃用名称:repo-azure-ca-path、repo-s3-ca-path
仓库存储主机选项(--repo-storage-host) 仓库存储主机。
连接到存储服务(如 S3、Azure)端点以外的主机,通常用于测试场景。
example : --repo1-storage-host=127.0.0.1
已弃用名称:repo-azure-host、repo-s3-host
仓库存储端口选项(--repo-storage-port) 仓库存储端口。
连接存储服务(如 S3、Azure)端点或指定主机时使用的端口。
default : 443
allowed : [ 1 , 65535 ]
example : --repo1-storage-port=9000
已弃用名称:repo-azure-port、repo-s3-port
仓库存储标签选项(--repo-storage-tag) 仓库存储标签。
指定当仓库为对象存储(如 S3)时,附加到对象上的标签。可重复使用此选项以添加多个标签。
pgBackRest 没有提供修改这些标签的机制,因此请在运行 stanza-create 之前确认标签设置正确,以保证整个仓库的标签一致。
example : --repo1-storage-tag=key1=value1
仓库存储上传分块大小选项(--repo-storage-upload-chunk-size) 仓库存储上传分块大小。
当文件过大无法全部载入内存时,对象存储(如 S3)支持以分块方式上传。即使文件可以全部载入内存,限制上传所用内存也更为高效。
较大的分块大小通常能提升性能,因为它可减少上传请求次数,并允许在单次请求中传输更多数据。代价是内存占用更高——分块缓冲区按进程分配,process-max 值越大,总体内存消耗也越多。
注意,有效的分块大小因存储类型和平台而异。例如,AWS S3 的最小分块大小为 5MiB。各存储类型对分块大小的术语不同:AWS S3 称之为"part size",GCS 称之为"chunk size",Azure 称之为"block size"。
若文件大于 1GiB(PostgreSQL 默认创建的最大文件大小),分块大小将逐步增加至允许的最大值,以完成文件上传。
default (depending on repo-type) :
azure - 4MiB
gcs - 4MiB
s3 - 5MiB
allow range (depending on repo-type) :
azure - [4MiB, 1GiB]
gcs - [4MiB, 1GiB]
s3 - [5MiB, 1GiB]
example : --repo1-storage-upload-chunk-size=16MiB
仓库存储证书验证选项(--repo-storage-verify-tls) 仓库存储证书验证。
启用或禁用对存储服务(如 S3、Azure)服务器 TLS 证书的验证。禁用验证仅应用于测试环境或使用自签名证书的场景。
default : y
example : --no -repo1-storage-verify-tls
已弃用名称:repo-azure-verify-tls、repo-s3-verify-ssl、repo-s3-verify-tls
仓库类型选项(--repo-type) 仓库使用的存储类型。
支持以下仓库类型:
azure - Azure Blob Storage 服务cifs - 类似 posix,但禁用链接和目录 fsyncgcs - Google Cloud Storageposix - 符合 POSIX 规范的文件系统s3 - AWS Simple Storage Servicesftp - 安全文件传输协议以 NFS 挂载作为 posix 类型仓库时,适用于 pgBackRest 的规则与 PostgreSQL 文档中描述的规则相同,详见 Creating a Database Cluster - File Systems 。
default : posix
example : --repo1-type=cifs
Stanza 选项 PostgreSQL 数据库选项(--pg-database) PostgreSQL 数据库名称。
连接 PostgreSQL 时使用的数据库名称。默认值通常可正常使用,但某些安装环境中可能不包含此数据库。
注意,出于历史原因,PGDATABASE 环境变量的设置将被忽略。
default : postgres
example : --pg1-database=backupdb
PostgreSQL 主机选项(--pg-host) 远程操作时使用的 PostgreSQL 主机。
用于 PostgreSQL 主机与仓库主机分离的备份场景。
example : --pg1-host=db.domain.com
已弃用名称:db-host
PostgreSQL 主机证书颁发机构文件选项(--pg-host-ca-file) PostgreSQL 主机证书颁发机构文件。
连接 PostgreSQL 主机时,使用非系统默认的 CA 文件。
example : --pg1-host-ca-file=/etc/pki/tls/certs/ca-bundle.crt
PostgreSQL 主机证书颁发机构路径选项(--pg-host-ca-path) PostgreSQL 主机证书颁发机构路径。
连接 PostgreSQL 主机时,使用非系统默认的 CA 路径。
example : --pg1-host-ca-path=/etc/pki/tls/certs
PostgreSQL 主机证书文件选项(--pg-host-cert-file) PostgreSQL 主机证书文件。
发送给 PostgreSQL 主机,用于验证客户端身份。
example : --pg1-host-cert-file=/path/to/client.crt
PostgreSQL 主机命令选项(--pg-host-cmd) PostgreSQL 主机上的 pgBackRest 命令路径。
仅当本地主机与 PostgreSQL 主机上的 pgBackRest 命令路径不同时才需要配置。若未定义,PostgreSQL 主机命令与本地命令相同。
default : [ path of executed pgbackrest binary]
example : --pg1-host-cmd=/usr/lib/backrest/bin/pgbackrest
已弃用名称:db-cmd
PostgreSQL 主机配置文件选项(--pg-host-config) pgBackRest 数据库主机配置文件。
设置 PostgreSQL 主机上配置文件的位置。仅当 PostgreSQL 主机上的配置文件路径与本地不同时才需要配置。
default : CFGOPTDEF_CONFIG_PATH "/" PROJECT_CONFIG_FILE
example : --pg1-host-config=/conf/pgbackrest/pgbackrest.conf
已弃用名称:db-config
PostgreSQL 主机配置包含路径选项(--pg-host-config-include-path) pgBackRest 数据库主机配置包含路径。
设置 PostgreSQL 主机上配置包含路径的位置。仅当 PostgreSQL 主机上的配置包含路径与本地不同时才需要配置。
default : CFGOPTDEF_CONFIG_PATH "/" PROJECT_CONFIG_INCLUDE_PATH
example : --pg1-host-config-include-path=/conf/pgbackrest/conf.d
PostgreSQL 主机配置路径选项(--pg-host-config-path) pgBackRest 数据库主机配置路径。
设置 PostgreSQL 主机上配置路径的位置。仅当 PostgreSQL 主机上的配置路径与本地不同时才需要配置。
default : CFGOPTDEF_CONFIG_PATH
example : --pg1-host-config-path=/conf/pgbackrest
PostgreSQL 主机密钥文件选项(--pg-host-key-file) PostgreSQL 主机密钥文件。
用于证明客户端证书由其所有者发送。
example : --pg1-host-key-file=/path/to/client.key
PostgreSQL 主机端口选项(--pg-host-port) PostgreSQL 主机端口。
设置 pg-host 时,通过此选项为 PostgreSQL 主机协议指定非默认端口。
注意: 当 pg-host-type=ssh 时,pg-host-port 没有默认值,端口以 cmd-ssh 所指定命令的配置为准。
default (depending on pg-host-type) :
tls - 8432
allowed : [ 0 , 65535 ]
example : --pg1-host-port=25
已弃用名称:db-ssh-port
PostgreSQL 主机协议类型选项(--pg-host-type) PostgreSQL 主机协议类型。
支持以下协议类型:
ssh - 安全外壳协议(SSH)。tls - pgBackRest TLS 服务器。default : ssh
example : --pg1-host-type=tls
PostgreSQL 主机用户选项(--pg-host-user) PostgreSQL 主机登录用户。
设置 pg-host 时,该用户同时拥有远程 pgBackRest 进程,并负责发起与 PostgreSQL 的连接。为确保其正常工作,该用户通常应为 PostgreSQL 数据库集群的所有者,默认为 postgres。
default : postgres
example : --pg1-host-user=db_owner
已弃用名称:db-user
PostgreSQL 路径选项(--pg-path) PostgreSQL 数据目录。
此路径应与 PostgreSQL 报告的 data_directory 一致。尽管该值可从多处获取,但为了在恢复或离线备份场景下这些资源不可用时仍能正常工作,建议明确配置此项。
pg-path 在每次在线备份时都会与 PostgreSQL 报告的值进行核对,应始终保持最新。
example : --pg1-path=/data/db
已弃用名称:db-path
PostgreSQL 端口选项(--pg-port) PostgreSQL 端口。
PostgreSQL 运行的端口。大多数 PostgreSQL 集群使用默认端口,通常无需指定此选项。
default : 5432
allowed : [ 0 , 65535 ]
example : --pg1-port=6543
已弃用名称:db-port
PostgreSQL Socket 路径选项(--pg-socket-path) PostgreSQL Unix 套接字路径。
PostgreSQL 启动时指定的 Unix 套接字目录。pgBackRest 会自动查找操作系统标准位置,通常无需配置此选项,除非通过 postgresql.conf 中的 unix_socket_directories 显式修改了套接字目录。
example : --pg1-socket-path=/var/run/postgresql
已弃用名称:db-socket-path
PostgreSQL 数据库用户选项(--pg-user) PostgreSQL 数据库用户。
连接 PostgreSQL 时使用的数据库用户名。若未指定,pgBackRest 将使用本地操作系统用户或 PGUSER 环境变量。
example : --pg1-user=backupuser
28.3.15 - Stanza 删除命令(stanza-delete) pgBackRest stanza-delete 命令的选项与行为参考。
原始页面: pgBackRest Command Docs: stanza-delete
stanza-delete 命令用于删除仓库中与指定 stanza 关联的所有数据。stanza 是 pgBackRest 中用于标识一个 PostgreSQL 集群备份配置的逻辑名称。
警告:
此命令会永久删除指定 stanza 在 pgBackRest 仓库中的所有备份和归档数据,请谨慎使用。
删除 stanza 的步骤如下:
停止与该 stanza 关联的 PostgreSQL 集群(或使用 --force 选项强制删除)。 在执行 stanza-delete 命令的主机上先运行 stop 命令。 运行 stanza-delete 命令。 命令执行成功后,需自行从所有 pgBackRest 配置文件和/或环境变量中移除该 stanza 的相关配置。
每次只能从一个仓库中删除 stanza。若需从多个仓库中删除,请使用 --repo 选项逐一指定每个仓库,分别执行 stanza-delete 命令。
命令选项 强制删除选项(--force) 强制删除 stanza。
若该 stanza 对应的 PostgreSQL 实例仍在运行,可使用此选项强制从仓库中删除该 stanza。
default : n
example : --no -force
通用选项 缓冲区大小选项(--buffer-size) I/O 操作的缓冲区大小。
此选项设置用于复制、压缩、加密及其他操作的缓冲区大小。实际使用的缓冲区数量取决于具体操作,部分操作可能额外占用内存,例如 gz 压缩可能额外占用 256KiB。
允许的值为 16KiB、32KiB、64KiB、128KiB、256KiB、512KiB、1MiB、2MiB、4MiB、8MiB 和 16MiB。
default : 1MiB
example : --buffer-size=2MiB
SSH 客户端命令选项(--cmd-ssh) SSH 客户端命令。
如需使用特定 SSH 客户端,或 ssh 命令不在 $PATH 中,可通过此选项指定。
default : ssh
example : --cmd-ssh=/usr/bin/ssh
网络压缩级别选项(--compress-level-network) 网络压缩级别。
当 compress-type=none 且命令不在仓库所在主机上运行时,此选项控制网络传输的压缩级别,用于减少网络流量。若 compress-type 不为 none,则忽略 compress-level-network,转而使用 compress-level,确保文件只被压缩一次。
default : 1
allowed : [ -5 , 12 ]
example : --compress-level-network=1
配置文件选项(--config) pgBackRest 配置文件。
指定与默认路径不同的配置文件路径。
default : CFGOPTDEF_CONFIG_PATH "/" PROJECT_CONFIG_FILE
example : --config=/conf/pgbackrest/pgbackrest.conf
配置包含路径选项(--config-include-path) 附加 pgBackRest 配置文件的路径。
该路径下扩展名为 .conf 的配置文件将与 pgBackRest 主配置文件合并,最终形成完整配置。
default : CFGOPTDEF_CONFIG_PATH "/" PROJECT_CONFIG_INCLUDE_PATH
example : --config-include-path=/conf/pgbackrest/conf.d
配置基础路径选项(--config-path) pgBackRest 配置文件的基础路径。
此设置用于覆盖 --config 和 --config-include-path 的默认基础路径,前提是这两个选项未在命令行中明确指定。
例如,仅传入 --config-path=/conf/pgbackrest 时,--config 的默认值将变为 /conf/pgbackrest/pgbackrest.conf,--config-include-path 的默认值将变为 /conf/pgbackrest/conf.d。
default : CFGOPTDEF_CONFIG_PATH
example : --config-path=/conf/pgbackrest
数据库超时选项(--db-timeout) 数据库查询超时时间。
设置针对数据库查询的超时时间(秒),包括备份启动/停止函数。由于这些函数可能耗时较长,建议将此值设置得宽裕一些——除非确认已设置 start-fast=y,且数据库集群在备份期间不会产生大量 WAL 段。
注意: db-timeout 的值必须小于 protocol-timeout 的值。
default : 30m
allowed : [ 100ms, 7d]
example : --db-timeout=600
I/O 超时选项(--io-timeout) I/O 超时时间。
用于连接及读/写操作的超时时间(秒)。
注意,整个读/写操作无需在此超时时间内完成,但必须有一定 进展,哪怕只传输了一个字节。
default : 1m
allowed : [ 100ms, 1h]
example : --io-timeout=120
锁文件路径选项(--lock-path) 锁文件的存储路径。
pgBackRest 将锁文件写入此路径,以防止并发执行相互冲突的操作。
default : /tmp/pgbackrest
example : --lock-path=/backup/db/lock
中性 umask 选项(--neutral-umask) 使用中性 umask。
将 umask 设置为 0000,使仓库中创建的文件权限更合理。默认目录权限为 0750,文件权限为 0640;锁文件和日志目录的目录权限为 0770,文件权限为 0660。
若要沿用执行用户自身的 umask,请在配置文件中指定 neutral-umask=n,或在命令行使用 --no-neutral-umask。
default : y
example : --no -neutral-umask
进程优先级选项(--priority) 设置进程优先级。
定义内核调度器赋予该进程的 nice 值。正值降低优先级,负值提高优先级。大多数情况下,进程没有权限提升自身优先级。
allowed : [ -20 , 19 ]
example : --priority=19
协议超时选项(--protocol-timeout) 协议超时时间。
设置本地或远程进程在协议层等待新消息的超时时间(秒),防止进程无限期挂起。
注意: protocol-timeout 的值必须大于 db-timeout 的值。
default : 31m
allowed : [ 100ms, 7d]
example : --protocol-timeout=630
保活选项(--sck-keep-alive) 启用 keep-alive。
在套接字连接上启用 keep-alive 消息。
default : y
example : --no -sck-keep-alive
Stanza 选项(--stanza) 定义 stanza。
stanza 是对一个 PostgreSQL 数据库集群的备份配置,定义了集群位置、备份方式、归档选项等。大多数数据库主机只有一个 PostgreSQL 集群,因此只有一个 stanza;备份主机则会为每个需要备份的数据库集群各配置一个 stanza。
命名建议:相比使用本地集群名称(如 main 或 prod),更好的做法是根据集群中实际存放的数据来命名 stanza(如 app 或 dw),因为 stanza 名称同时用于主库和所有副本。
TCP 保活计数选项(--tcp-keep-alive-count) Keep-alive 计数。
指定在判定连接已断开之前,允许丢失的 TCP keep-alive 消息数量。
此选项仅在系统支持 TCP_KEEPCNT 套接字选项时可用。
allowed : [ 1 , 32 ]
example : --tcp-keep-alive-count=3
TCP 保活空闲时间选项(--tcp-keep-alive-idle) Keep-alive 空闲时间。
指定在没有网络活动多少秒后,操作系统应发送 TCP keep-alive 消息。
此选项仅在系统支持 TCP_KEEPIDLE 套接字选项时可用。
allowed : [ 1 , 3600 ]
example : --tcp-keep-alive-idle=60
TCP 保活间隔选项(--tcp-keep-alive-interval) Keep-alive 间隔时间。
指定未收到确认的 TCP keep-alive 消息在多少秒后重新发送。
此选项仅在系统支持 TCP_KEEPINTVL 套接字选项时可用。
allowed : [ 1 , 900 ]
example : --tcp-keep-alive-interval=30
TLSv1.2 加密套件选项(--tls-cipher-12) 允许使用的 TLSv1.2 加密套件。
pgBackRest 客户端与服务器之间的所有 TLS 连接均经过加密,默认情况下与对象存储(如 S3)的连接也会加密。
注意: 任何传输连接的最低安全级别为 TLSv1.2。
如有需要,可调整允许使用的加密套件。示例值是一个合理的选择,除非有特定安全要求。若未设置(默认),则使用底层 OpenSSL 库的默认值。
example : --tls-cipher-12=HIGH:MEDIUM:+3DES:!aNULL
TLSv1.3 加密套件选项(--tls-cipher-13) 允许使用的 TLSv1.3 加密套件。
pgBackRest 客户端与服务器之间的所有 TLS 连接均经过加密,默认情况下与对象存储(如 S3)的连接也会加密。
注意: 任何传输连接的最低安全级别为 TLSv1.2。
如有需要,可调整允许使用的加密套件。若未设置(默认),则使用底层 OpenSSL 库的默认值。
example : --tls-cipher-13=TLS_AES_256_GCM_SHA384:TLS_CHACHA20_POLY1305_SHA256
日志选项 控制台日志级别选项(--log-level-console) 控制台日志级别。
支持以下日志级别:
off - 不记录任何日志(不推荐)error - 仅记录错误warn - 记录警告和错误info - 记录信息、警告和错误detail - 记录详情、信息、警告和错误debug - 记录调试信息、详情、信息、警告和错误trace - 记录追踪信息(非常详细的调试)、调试信息、信息、警告和错误default : warn
example : --log-level-console=error
文件日志级别选项(--log-level-file) 文件日志级别。
支持以下日志级别:
off - 不记录任何日志(不推荐)error - 仅记录错误warn - 记录警告和错误info - 记录信息、警告和错误detail - 记录详情、信息、警告和错误debug - 记录调试信息、详情、信息、警告和错误trace - 记录追踪信息(非常详细的调试)、调试信息、信息、警告和错误default : info
example : --log-level-file=debug
标准错误日志级别选项(--log-level-stderr) stderr 日志级别。
指定哪些日志级别输出到 stderr 而非 stdout(由 log-level-console 控制)。输出到 stderr 的日志不含时间戳和进程信息。
支持以下日志级别:
off - 不记录任何日志(不推荐)error - 仅记录错误warn - 记录警告和错误info - 记录信息、警告和错误detail - 记录详情、信息、警告和错误debug - 记录调试信息、详情、信息、警告和错误trace - 记录追踪信息(非常详细的调试)、调试信息、信息、警告和错误default : off
example : --log-level-stderr=error
日志路径选项(--log-path) 日志文件的存储路径。
pgBackRest 将日志文件写入此路径。注意,若 log-level-file=off,则无需配置此选项。
default : /var/log/pgbackrest
example : --log-path=/backup/db/log
子进程日志选项(--log-subprocess) 启用子进程日志记录。
为当前进程创建的所有子进程启用文件日志,日志级别由 log-level-file 控制。
default : n
example : --log-subprocess
日志时间戳选项(--log-timestamp) 启用日志时间戳。
在控制台和文件日志中启用时间戳。此选项在特殊情况下(如生成文档时)会被禁用。
default : y
example : --no -log-timestamp
维护者选项 强制指定 PostgreSQL 版本选项(--pg-version-force) 强制指定 PostgreSQL 版本。
使用此选项指定的版本,替代从 pg_control 或 WAL 头部自动检测的版本。此选项主要用于 PostgreSQL 分支版本或开发版本——这些版本中的相关值可能与发布版本不同。PostgreSQL 通过 server_version_num 上报的版本号必须与强制指定的版本一致。
警告:
使用此选项需谨慎。pg_control 和 WAL 头部仍会按照指定版本的预期格式(即官方开源 PostgreSQL 的格式)读取。若分支版本或开发版本更改了 pgBackRest 所依赖字段的格式,将导致不可预期的行为。通常,只有当分支将所有自定义结构成员添加在标准 PostgreSQL 成员之后 时,此选项才能按预期工作。
example : --pg-version-force=15
仓库选项 指定仓库选项(--repo) 设置仓库。
指定命令操作的目标仓库。例如,可使用此选项从特定仓库执行恢复,而非由 pgBackRest 自动选择。
allowed : [ 1 , 256 ]
example : --repo=1
Azure 仓库容器选项(--repo-azure-container) Azure 仓库容器。
用于存储仓库的 Azure 容器。
通过设置 repo-path=/ 可将 pgBackRest 仓库存储在容器根目录,但通常建议指定一个前缀路径(如 /repo),以便日志和其他 Azure 生成的内容也可存储在同一容器中。
example : --repo1-azure-container=pg-backup
Azure 仓库密钥类型选项(--repo-azure-key-type) Azure 仓库密钥类型。
支持以下授权类型:
shared - 共享密钥sas - 共享访问签名auto - 使用 Azure 托管身份自动授权default : shared
example : --repo1-azure-key-type=sas
Azure 仓库 URI 风格选项(--repo-azure-uri-style) Azure URI 风格。
支持以下 URI 风格:
host - 连接到 account.endpoint 主机。path - 连接到 endpoint 主机并在 URI 前添加账户名。default : host
example : --repo1-azure-uri-style=path
仓库加密类型选项(--repo-cipher-type) 仓库加密算法。
支持以下加密类型:
none - 仓库不加密aes-256-cbc - 256 位密钥长度的高级加密标准注意,即使仓库类型(如 S3)本身支持加密,pgBackRest 的加密也始终在客户端执行。
default : none
example : --repo1-cipher-type=aes-256-cbc
GCS 仓库存储桶选项(--repo-gcs-bucket) GCS 仓库存储桶。
用于存储仓库的 GCS 存储桶。
通过设置 repo-path=/ 可将 pgBackRest 仓库存储在存储桶根目录,但通常建议指定一个前缀路径(如 /repo),以便日志和其他 GCS 生成的内容也可存储在同一存储桶中。
example : --repo1-gcs-bucket=/pg-backup
GCS 仓库端点选项(--repo-gcs-endpoint) GCS 仓库端点。
用于连接存储服务的端点,可更改为本地 GCS 服务器或其他备用端点。
default : storage.googleapis.com
example : --repo1-gcs-endpoint=localhost
GCS 仓库密钥类型选项(--repo-gcs-key-type) GCS 仓库密钥类型。
支持以下授权类型:
auto - 使用实例服务账号自动授权。service - 使用本地存储的密钥文件中的服务账号。token - 用于本地测试,例如使用 fakegcs。当 repo-gcs-key-type=service 时,凭据将在认证令牌续期时重新加载。
default : service
example : --repo1-gcs-key-type=auto
GCS 仓库项目 ID 选项(--repo-gcs-user-project) GCS 项目 ID。
用于确定请求计费归属的 GCS 项目 ID。
example : --repo1-gcs-user-project=my-project
仓库主机选项(--repo-host) 远程操作时的仓库主机。
备份和归档到本地挂载的文件系统时,无需此设置。
example : --repo1-host=repo1.domain.com
已弃用名称:backup-host
仓库主机证书颁发机构文件选项(--repo-host-ca-file) 仓库主机证书颁发机构文件。
连接仓库主机时,使用非系统默认的 CA 文件。
example : --repo1-host-ca-file=/etc/pki/tls/certs/ca-bundle.crt
仓库主机证书颁发机构路径选项(--repo-host-ca-path) 仓库主机证书颁发机构路径。
连接仓库主机时,使用非系统默认的 CA 路径。
example : --repo1-host-ca-path=/etc/pki/tls/certs
仓库主机证书文件选项(--repo-host-cert-file) 仓库主机证书文件。
发送给仓库主机以证明客户端身份。
example : --repo1-host-cert-file=/path/to/client.crt
仓库主机命令选项(--repo-host-cmd) 仓库主机上的 pgBackRest 命令路径。
仅当本地主机与仓库主机上的 pgBackRest 路径不同时才需要配置。若未定义,则与本地命令路径保持一致。
default : [ path of executed pgbackrest binary]
example : --repo1-host-cmd=/usr/lib/backrest/bin/pgbackrest
已弃用名称:backup-cmd
仓库主机配置文件选项(--repo-host-config) pgBackRest 仓库主机配置文件。
设置仓库主机上配置文件的位置。仅当仓库主机上的配置文件路径与本地不同时才需要配置。
default : CFGOPTDEF_CONFIG_PATH "/" PROJECT_CONFIG_FILE
example : --repo1-host-config=/conf/pgbackrest/pgbackrest.conf
已弃用名称:backup-config
仓库主机配置包含路径选项(--repo-host-config-include-path) pgBackRest 仓库主机配置包含路径。
设置仓库主机上配置包含路径的位置。仅当仓库主机上的配置包含路径与本地不同时才需要配置。
default : CFGOPTDEF_CONFIG_PATH "/" PROJECT_CONFIG_INCLUDE_PATH
example : --repo1-host-config-include-path=/conf/pgbackrest/conf.d
仓库主机配置路径选项(--repo-host-config-path) pgBackRest 仓库主机配置路径。
设置仓库主机上配置路径的位置。仅当仓库主机上的配置路径与本地不同时才需要配置。
default : CFGOPTDEF_CONFIG_PATH
example : --repo1-host-config-path=/conf/pgbackrest
仓库主机密钥文件选项(--repo-host-key-file) 仓库主机密钥文件。
用于证明客户端证书由所有者发送。
example : --repo1-host-key-file=/path/to/client.key
仓库主机端口选项(--repo-host-port) 设置了 repo-host 时仓库主机的端口。
使用此选项为仓库主机协议指定非默认端口。
注意: 当 repo-host-type=ssh 时,repo-host-port 没有默认值,端口由 cmd-ssh 指定命令中的配置决定。
default (depending on repo-host-type) :
tls - 8432
allowed : [ 0 , 65535 ]
example : --repo1-host-port=25
已弃用名称:backup-ssh-port
仓库主机协议类型选项(--repo-host-type) 仓库主机协议类型。
支持以下协议类型:
ssh - 安全外壳协议(SSH)。tls - pgBackRest TLS 服务器。default : ssh
example : --repo1-host-type=tls
仓库主机用户选项(--repo-host-user) 设置了 repo-host 时仓库主机的用户。
定义用于仓库主机操作的用户。建议使用非 postgres 的专用用户(如 pgbackrest)。若 PostgreSQL 运行在仓库主机上,可将 postgres 用户加入 pgbackrest 组,使其对仓库具有读取权限,同时避免意外损坏仓库内容。
default : pgbackrest
example : --repo1-host-user=repo-user
已弃用名称:backup-user
仓库路径选项(--repo-path) 备份和归档的存储路径。
仓库是 pgBackRest 存储备份并归档 WAL 段的位置。
预估所需空间并不容易。建议先执行几次备份,记录不同类型备份(全量/增量/差异)的大小,并测量每天产生的 WAL 量,从而得出大致估算。随着数据库的增长,空间需求也会随时间变化。
default : /var/lib/pgbackrest
example : --repo1-path=/backup/db/backrest
S3 仓库存储桶选项(--repo-s3-bucket) S3 仓库存储桶。
用于存储仓库的 S3 存储桶。
通过设置 repo-path=/ 可将 pgBackRest 仓库存储在存储桶根目录,但通常建议指定一个前缀路径(如 /repo),以便日志和其他 AWS 生成的内容也可存储在同一存储桶中。
example : --repo1-s3-bucket=pg-backup
S3 仓库端点选项(--repo-s3-endpoint) S3 仓库端点。
AWS 端点应与所选区域匹配。
对于自定义或测试配置,repo-storage-ca-file、repo-storage-ca-path、repo-storage-host、repo-storage-port 和 repo-storage-verify-tls 等选项可能会有所帮助。
example : --repo1-s3-endpoint=s3.amazonaws.com
S3 仓库密钥类型选项(--repo-s3-key-type) S3 仓库密钥类型。
支持以下类型:
shared - 共享密钥auto - 自动获取临时凭证web-id - 自动获取 Web 身份凭证default : shared
example : --repo1-s3-key-type=auto
S3 仓库 KMS 密钥 ID 选项(--repo-s3-kms-key-id) S3 仓库 KMS 密钥。
使用指定的 AWS 密钥管理服务密钥启用 S3 服务端加密。
example : --repo1-s3-kms-key-id=bceb4f13-6939-4be3-910d-df54dee817b7
S3 仓库区域选项(--repo-s3-region) S3 仓库区域。
创建存储桶时所在的 AWS 区域。
example : --repo1-s3-region=us-east-1
S3 仓库请求方付费选项(--repo-s3-requester-pays) S3 仓库请求方付费。
启用 S3 请求方付费模式。
default : n
example : --no -repo1-s3-requester-pays
S3 仓库角色选项(--repo-s3-role) S3 仓库角色。
当 repo-s3-key-type=auto 时,用于获取临时凭证的 AWS 角色名称(非完整 ARN)。
example : --repo1-s3-role=authrole
S3 仓库 URI 风格选项(--repo-s3-uri-style) S3 URI 风格。
支持以下 URI 风格:
host - 连接到 bucket.endpoint 主机。path - 连接到 endpoint 主机并在 URI 前添加存储桶名。default : host
example : --repo1-s3-uri-style=path
SFTP 仓库主机选项(--repo-sftp-host) SFTP 仓库主机。
存储仓库的 SFTP 主机。
example : --repo1-sftp-host=sftprepo.domain
SFTP 仓库主机指纹选项(--repo-sftp-host-fingerprint) SFTP 仓库主机指纹。
SFTP 仓库主机指纹的生成方式应与 repo-sftp-host-key-hash-type 匹配。可通过以下命令生成指纹:awk '{print $2}' ssh_host_xxx_key.pub | base64 -d | (md5sum or sha1sum) -b。SSH 主机密钥通常位于 /etc/ssh 目录下。
example : --repo1-sftp-host-fingerprint=f84e172dfead7aeeeae6c1fdfb5aa8cf
SFTP 主机密钥检查类型选项(--repo-sftp-host-key-check-type) SFTP 主机密钥检查类型。
支持以下 SFTP 主机密钥检查类型:
strict - pgBackRest 不会自动将主机密钥添加到 ~/.ssh/known_hosts,并拒绝连接主机密钥已更改或不在已知主机文件中的主机。此选项要求手动添加所有新主机。accept-new - pgBackRest 会自动将新主机密钥添加到已知主机文件,但不允许连接主机密钥已更改的主机。fingerprint - pgBackRest 将根据 repo-sftp-host-fingerprint 选项指定的指纹验证主机密钥。none - 不执行主机密钥检查。default : strict
example : --repo1-sftp-host-key-check-type=accept-new
SFTP 仓库主机密钥哈希类型选项(--repo-sftp-host-key-hash-type) SFTP 仓库主机密钥哈希类型。
声明在 SSH 启动时用于计算远程系统主机密钥摘要的哈希算法。较新版本的 libssh2 在支持 md5 和 sha1 的基础上,还支持 sha256。
example : --repo1-sftp-host-key-hash-type=sha256
SFTP 仓库主机端口选项(--repo-sftp-host-port) SFTP 仓库主机端口。
default : 22
allowed : [ 1 , 65535 ]
example : --repo1-sftp-host-port=22
SFTP 仓库主机用户选项(--repo-sftp-host-user) SFTP 仓库主机用户。
存储仓库的主机上使用的用户名。
example : --repo1-sftp-host-user=pg-backup
SFTP 已知主机文件选项(--repo-sftp-known-host) SFTP 已知主机文件。
认证过程中用于匹配 SFTP 主机的已知主机文件。若未指定,pgBackRest 默认搜索 ~/.ssh/known_hosts、~/.ssh/known_hosts2、/etc/ssh/ssh_known_hosts 和 /etc/ssh/ssh_known_hosts2。若配置了一个或多个文件路径,pgBackRest 将仅在这些文件中搜索匹配项。文件路径必须为绝对路径或以波浪号开头。此选项可多次传入以指定多个文件。若要使用已知主机文件检查,不得同时指定 repo-sftp-host-fingerprint。另请参见 repo-sftp-host-check-type 选项。
example : --repo1-sftp-known-host=/home/postgres/.ssh/known_hosts
SFTP 仓库私钥文件选项(--repo-sftp-private-key-file) SFTP 私钥文件。
用于认证的 SFTP 私钥文件。
example : --repo1-sftp-private-key-file=~/.ssh/id_ed25519
SFTP 仓库公钥文件选项(--repo-sftp-public-key-file) SFTP 公钥文件。
用于认证的 SFTP 公钥文件。若基于 OpenSSL 编译,此项可选;若基于其他库编译,则为必填项。
example : --repo1-sftp-public-key-file=~/.ssh/id_ed25519.pub
仓库存储 CA 文件选项(--repo-storage-ca-file) 仓库存储 CA 文件。
为存储(如 S3、Azure)证书使用非系统默认的 CA 文件。
example : --repo1-storage-ca-file=/etc/pki/tls/certs/ca-bundle.crt
已弃用名称:repo-azure-ca-file、repo-s3-ca-file
仓库存储 TLS CA 路径选项(--repo-storage-ca-path) 仓库存储 CA 路径。
为存储(如 S3、Azure)证书使用非系统默认的 CA 路径。
example : --repo1-storage-ca-path=/etc/pki/tls/certs
已弃用名称:repo-azure-ca-path、repo-s3-ca-path
仓库存储主机选项(--repo-storage-host) 仓库存储主机。
连接到存储(如 S3、Azure)端点以外的主机,通常用于测试场景。
example : --repo1-storage-host=127.0.0.1
已弃用名称:repo-azure-host、repo-s3-host
仓库存储端口选项(--repo-storage-port) 仓库存储端口。
连接存储(如 S3、Azure)端点(或指定主机)时使用的端口。
default : 443
allowed : [ 1 , 65535 ]
example : --repo1-storage-port=9000
已弃用名称:repo-azure-port、repo-s3-port
仓库存储标签选项(--repo-storage-tag) 仓库存储标签。
当仓库为对象存储(如 S3)时,指定添加到对象上的标签。可多次传入此选项以添加多个标签。
pgBackRest 不提供修改这些标签的功能,因此请在运行 stanza-create 之前确认标签设置正确,确保整个仓库的标签统一。
example : --repo1-storage-tag=key1=value1
仓库存储上传分块大小选项(--repo-storage-upload-chunk-size) 仓库存储上传分块大小。
当文件过大无法全部载入内存时,对象存储(如 S3)允许分块上传。即使文件可以载入内存,限制上传所用内存量也更高效。
较大的分块大小通常有助于提升性能:减少上传请求数,并允许更多文件在单次请求中完成上传而无需分块。缺点是内存占用更高——由于分块缓冲区必须按进程分配,较大的 process-max 值将导致整体内存消耗更多。
注意,不同存储类型和平台对有效分块大小有所不同。例如,AWS S3 的最小分块大小为 5MiB。各存储类型对分块大小的术语不同,查询最小/最大值时请注意:AWS S3 使用"part size",GCS 使用"chunk size",Azure 使用"block size"。
若文件大于 1GiB(PostgreSQL 默认创建的最大文件大小),分块大小将逐步增大至允许的最大值,以完成文件上传。
default (depending on repo-type) :
azure - 4MiB
gcs - 4MiB
s3 - 5MiB
allow range (depending on repo-type) :
azure - [4MiB, 1GiB]
gcs - [4MiB, 1GiB]
s3 - [5MiB, 1GiB]
example : --repo1-storage-upload-chunk-size=16MiB
仓库存储证书验证选项(--repo-storage-verify-tls) 仓库存储证书验证。
启用或禁用对存储(如 S3、Azure)服务器 TLS 证书的验证。仅在测试或使用自签名证书时才应禁用此功能。
default : y
example : --no -repo1-storage-verify-tls
已弃用名称:repo-azure-verify-tls、repo-s3-verify-ssl、repo-s3-verify-tls
仓库类型选项(--repo-type) 仓库使用的存储类型。
支持以下仓库类型:
azure - Azure Blob 存储服务cifs - 类似 posix,但禁用链接和目录 fsyncgcs - Google Cloud 存储posix - POSIX 兼容文件系统s3 - AWS 简单存储服务sftp - 安全文件传输协议使用 NFS 挂载作为 posix 仓库时,适用于 pgBackRest 的规则与 PostgreSQL 文档中的描述相同,参见 Creating a Database Cluster - File Systems
default : posix
example : --repo1-type=cifs
Stanza 选项 PostgreSQL 数据库选项(--pg-database) PostgreSQL 数据库。
连接 PostgreSQL 时使用的数据库名称。默认值通常最为合适,但某些安装环境中可能不存在此数据库。
注意,由于历史原因,PGDATABASE 环境变量的设置将被忽略。
default : postgres
example : --pg1-database=backupdb
PostgreSQL 主机选项(--pg-host) 远程操作时的 PostgreSQL 主机。
用于 PostgreSQL 主机与仓库主机分离时的备份场景。
example : --pg1-host=db.domain.com
已弃用名称:db-host
PostgreSQL 主机证书颁发机构文件选项(--pg-host-ca-file) PostgreSQL 主机证书颁发机构文件。
连接 PostgreSQL 主机时,使用非系统默认的 CA 文件。
example : --pg1-host-ca-file=/etc/pki/tls/certs/ca-bundle.crt
PostgreSQL 主机证书颁发机构路径选项(--pg-host-ca-path) PostgreSQL 主机证书颁发机构路径。
连接 PostgreSQL 主机时,使用非系统默认的 CA 路径。
example : --pg1-host-ca-path=/etc/pki/tls/certs
PostgreSQL 主机证书文件选项(--pg-host-cert-file) PostgreSQL 主机证书文件。
发送给 PostgreSQL 主机以证明客户端身份。
example : --pg1-host-cert-file=/path/to/client.crt
PostgreSQL 主机命令选项(--pg-host-cmd) PostgreSQL 主机上的 pgBackRest 命令路径。
仅当本地主机与 PostgreSQL 主机上的 pgBackRest 路径不同时才需要配置。若未定义,则与本地命令路径保持一致。
default : [ path of executed pgbackrest binary]
example : --pg1-host-cmd=/usr/lib/backrest/bin/pgbackrest
已弃用名称:db-cmd
PostgreSQL 主机配置文件选项(--pg-host-config) pgBackRest 数据库主机配置文件。
设置 PostgreSQL 主机上配置文件的位置。仅当 PostgreSQL 主机上的配置文件路径与本地不同时才需要配置。
default : CFGOPTDEF_CONFIG_PATH "/" PROJECT_CONFIG_FILE
example : --pg1-host-config=/conf/pgbackrest/pgbackrest.conf
已弃用名称:db-config
PostgreSQL 主机配置包含路径选项(--pg-host-config-include-path) pgBackRest 数据库主机配置包含路径。
设置 PostgreSQL 主机上配置包含路径的位置。仅当 PostgreSQL 主机上的配置包含路径与本地不同时才需要配置。
default : CFGOPTDEF_CONFIG_PATH "/" PROJECT_CONFIG_INCLUDE_PATH
example : --pg1-host-config-include-path=/conf/pgbackrest/conf.d
PostgreSQL 主机配置路径选项(--pg-host-config-path) pgBackRest 数据库主机配置路径。
设置 PostgreSQL 主机上配置路径的位置。仅当 PostgreSQL 主机上的配置路径与本地不同时才需要配置。
default : CFGOPTDEF_CONFIG_PATH
example : --pg1-host-config-path=/conf/pgbackrest
PostgreSQL 主机密钥文件选项(--pg-host-key-file) PostgreSQL 主机密钥文件。
用于证明客户端证书由所有者发送。
example : --pg1-host-key-file=/path/to/client.key
PostgreSQL 主机端口选项(--pg-host-port) 设置了 pg-host 时 PostgreSQL 主机的端口。
使用此选项为 PostgreSQL 主机协议指定非默认端口。
注意: 当 pg-host-type=ssh 时,pg-host-port 没有默认值,端口由 cmd-ssh 指定命令中的配置决定。
default (depending on pg-host-type) :
tls - 8432
allowed : [ 0 , 65535 ]
example : --pg1-host-port=25
已弃用名称:db-ssh-port
PostgreSQL 主机协议类型选项(--pg-host-type) PostgreSQL 主机协议类型。
支持以下协议类型:
ssh - 安全外壳协议(SSH)。tls - pgBackRest TLS 服务器。default : ssh
example : --pg1-host-type=tls
PostgreSQL 主机用户选项(--pg-host-user) 设置了 pg-host 时 PostgreSQL 主机的登录用户。
此用户同时作为远程 pgBackRest 进程的所有者,并负责发起与 PostgreSQL 的连接。为使其正常工作,该用户通常应为 PostgreSQL 数据库集群的所有者,默认为 postgres。
default : postgres
example : --pg1-host-user=db_owner
已弃用名称:db-user
PostgreSQL 路径选项(--pg-path) PostgreSQL 数据目录。
此路径应与 PostgreSQL 上报的 data_directory 一致。虽然可以从多处读取此值,但建议在配置文件中明确设置,以确保在恢复或离线备份等这些资源不可用的场景下仍能正常使用。
pg-path 在每次在线备份时都会与 PostgreSQL 上报的值进行校验,因此应始终保持最新。
example : --pg1-path=/data/db
已弃用名称:db-path
PostgreSQL 端口选项(--pg-port) PostgreSQL 端口。
PostgreSQL 监听的端口。大多数集群使用默认端口,通常无需指定此选项。
default : 5432
allowed : [ 0 , 65535 ]
example : --pg1-port=6543
已弃用名称:db-port
PostgreSQL Socket 路径选项(--pg-socket-path) PostgreSQL Unix Socket 路径。
PostgreSQL 启动时指定的 Unix Socket 目录。pgBackRest 会自动在操作系统的标准位置查找,通常无需指定此选项——除非在 postgresql.conf 中通过 unix_socket_directories 修改了 Socket 目录。
example : --pg1-socket-path=/var/run/postgresql
已弃用名称:db-socket-path
PostgreSQL 数据库用户选项(--pg-user) PostgreSQL 数据库用户。
连接 PostgreSQL 时使用的数据库用户名。若未指定,pgBackRest 将使用当前操作系统用户或 PGUSER 环境变量中的用户。
example : --pg1-user=backupuser
28.3.16 - Stanza 升级命令(stanza-upgrade) pgBackRest stanza-upgrade 命令的选项与行为参考。
原始页面: pgBackRest Command Docs: stanza-upgrade
将 PostgreSQL 升级到新的主版本后,必须立即将所有 pgBackRest 配置中的 pg-path 更新为新的数据库位置,然后运行 stanza-upgrade 命令。若主机上配置了多个仓库,每个仓库都会执行 stanza 升级。若数据库处于离线状态,请使用 --no-online 选项。
命令选项 在线选项(--online) 在线更新集群。
指定 --no-online 可阻止 pgBackRest 在升级 stanza 时连接 PostgreSQL。
default : y
example : --no -online
通用选项 缓冲区大小选项(--buffer-size) I/O 操作的缓冲区大小。
缓冲区大小用于复制、压缩、加密及其他操作。实际使用的缓冲区数量取决于各项选项,且每个操作可能会占用额外的内存,例如 gz 压缩最多可额外消耗 256KiB 内存。
允许的值为 16KiB、32KiB、64KiB、128KiB、256KiB、512KiB、1MiB、2MiB、4MiB、8MiB 和 16MiB。
default : 1MiB
example : --buffer-size=2MiB
SSH 客户端命令选项(--cmd-ssh) SSH 客户端命令。
若需要使用特定的 SSH 客户端,或 ssh 命令不在 $PATH 中,可通过此选项指定。
default : ssh
example : --cmd-ssh=/usr/bin/ssh
网络压缩级别选项(--compress-level-network) 网络压缩级别。
当 compress-type=none 且命令不在仓库所在主机上运行时,设置网络传输的压缩级别。压缩用于降低网络流量。若 compress-type 不等于 none,则忽略 compress-level-network 设置,改用 compress-level,从而避免对文件进行二次压缩。
default : 1
allowed : [ -5 , 12 ]
example : --compress-level-network=1
配置文件选项(--config) pgBackRest 配置文件。
通过此选项可指定与默认值不同的配置文件路径。
default : CFGOPTDEF_CONFIG_PATH "/" PROJECT_CONFIG_FILE
example : --config=/conf/pgbackrest/pgbackrest.conf
配置包含路径选项(--config-include-path) pgBackRest 附加配置文件路径。
指定路径下扩展名为 .conf 的配置文件将与 pgBackRest 主配置文件合并,形成一个统一的配置文件。
default : CFGOPTDEF_CONFIG_PATH "/" PROJECT_CONFIG_INCLUDE_PATH
example : --config-include-path=/conf/pgbackrest/conf.d
配置基础路径选项(--config-path) pgBackRest 配置文件的基础路径。
此设置用于覆盖 --config 和 --config-include-path 选项的默认基础路径,除非这两个选项已在命令行中显式指定。
例如,仅传入 --config-path=/conf/pgbackrest 时,--config 的默认值将被设为 /conf/pgbackrest/pgbackrest.conf,--config-include-path 的默认值将被设为 /conf/pgbackrest/conf.d。
default : CFGOPTDEF_CONFIG_PATH
example : --config-path=/conf/pgbackrest
数据库超时选项(--db-timeout) 数据库查询超时时间。
设置对数据库执行查询操作的超时时间(单位:秒)。这包括备份启动/停止函数,这些函数各自可能耗时较长。因此,除非确认这些函数能快速返回(例如已设置 start-fast=y,且数据库集群在备份期间不会产生大量 WAL 段),否则应将超时时间设置得足够长。
注意: db-timeout 的值必须小于 protocol-timeout。
default : 30m
allowed : [ 100ms, 7d]
example : --db-timeout=600
I/O 超时选项(--io-timeout) I/O 超时时间。
连接及读写操作的超时时间(单位:秒)。
注意,整个读写操作无需在此时间内完成,但必须持续有所进展,哪怕仅传输了一个字节。
default : 1m
allowed : [ 100ms, 1h]
example : --io-timeout=120
锁文件路径选项(--lock-path) 锁文件的存储路径。
pgBackRest 将锁文件存储在此路径下,以防止冲突操作并发运行。
default : /tmp/pgbackrest
example : --lock-path=/backup/db/lock
中性 umask 选项(--neutral-umask) 使用中性 umask。
将 umask 设置为 0000,使仓库中的文件以合理的权限创建。目录默认权限为 0750,文件默认权限为 0640。锁文件目录和日志目录的目录权限与文件权限分别为 0770 和 0660。
若要改用执行用户自身的 umask,请在配置文件中指定 neutral-umask=n,或在命令行中使用 --no-neutral-umask。
default : y
example : --no -neutral-umask
进程优先级选项(--priority) 进程优先级。
定义内核调度器赋予该进程的优先级(即 niceness 值)。正值降低优先级,负值提高优先级。大多数情况下,进程没有权限提高自身优先级。
allowed : [ -20 , 19 ]
example : --priority=19
协议超时选项(--protocol-timeout) 协议超时时间。
设置本地或远程进程在协议层等待接收新消息的超时时间(单位:秒)。此设置可防止进程无限期等待。
注意: protocol-timeout 的值必须大于 db-timeout。
default : 31m
allowed : [ 100ms, 7d]
example : --protocol-timeout=630
保活选项(--sck-keep-alive) 启用保活机制。
在套接字连接上启用保活消息。
default : y
example : --no -sck-keep-alive
Stanza 选项(--stanza) 定义 stanza。
stanza 是 PostgreSQL 数据库集群的配置单元,定义了集群的位置、备份方式、归档选项等信息。大多数数据库服务器只有一个 PostgreSQL 数据库集群,因此只有一个 stanza;而备份服务器通常会为每个需要备份的数据库集群分别配置一个 stanza。
命名 stanza 时,人们往往倾向于使用主集群名称,但更好的做法是根据集群所承载的数据库功能来命名。由于 stanza 名称会同时用于主库和所有副本,选择能描述集群实际功能的名称(如 app 或 dw)比使用本地集群名称(如 main 或 prod)更为合适。
TCP 保活计数选项(--tcp-keep-alive-count) 保活计数。
指定在判定连接已断开之前,允许丢失的 TCP 保活消息数量。
此选项仅适用于支持 TCP_KEEPCNT 套接字选项的系统。
allowed : [ 1 , 32 ]
example : --tcp-keep-alive-count=3
TCP 保活空闲时间选项(--tcp-keep-alive-idle) 保活空闲时间。
指定网络无活动后,操作系统发送 TCP 保活消息前的等待时间(单位:秒)。
此选项仅适用于支持 TCP_KEEPIDLE 套接字选项的系统。
allowed : [ 1 , 3600 ]
example : --tcp-keep-alive-idle=60
TCP 保活间隔选项(--tcp-keep-alive-interval) 保活间隔时间。
指定未收到确认的 TCP 保活消息在重传前的等待时间(单位:秒)。
此选项仅适用于支持 TCP_KEEPINTVL 套接字选项的系统。
allowed : [ 1 , 900 ]
example : --tcp-keep-alive-interval=30
TLSv1.2 加密套件选项(--tls-cipher-12) 允许使用的 TLSv1.2 加密套件。
pgBackRest 客户端与服务端之间的所有 TLS 连接均已加密。默认情况下,与对象存储(如 S3)的连接也会加密。
注意: 任何传输连接的最低安全级别要求为 TLSv1.2。
可根据需要调整所接受的加密套件。示例值是合理的选择,除非有特定的安全要求。若未设置(默认),则使用底层 OpenSSL 库的默认值。
example : --tls-cipher-12=HIGH:MEDIUM:+3DES:!aNULL
TLSv1.3 加密套件选项(--tls-cipher-13) 允许使用的 TLSv1.3 加密套件。
pgBackRest 客户端与服务端之间的所有 TLS 连接均已加密。默认情况下,与对象存储(如 S3)的连接也会加密。
注意: 任何传输连接的最低安全级别要求为 TLSv1.2。
可根据需要调整所接受的加密套件。若未设置(默认),则使用底层 OpenSSL 库的默认值。
example : --tls-cipher-13=TLS_AES_256_GCM_SHA384:TLS_CHACHA20_POLY1305_SHA256
日志选项 控制台日志级别选项(--log-level-console) 控制台日志级别。
支持以下日志级别:
off - 不输出任何日志(不推荐)error - 仅记录错误warn - 记录警告和错误info - 记录信息、警告和错误detail - 记录详细信息、普通信息、警告和错误debug - 记录调试信息、详细信息、普通信息、警告和错误trace - 记录追踪信息(非常详细的调试输出)、调试信息、普通信息、警告和错误default : warn
example : --log-level-console=error
文件日志级别选项(--log-level-file) 文件日志级别。
支持以下日志级别:
off - 不输出任何日志(不推荐)error - 仅记录错误warn - 记录警告和错误info - 记录信息、警告和错误detail - 记录详细信息、普通信息、警告和错误debug - 记录调试信息、详细信息、普通信息、警告和错误trace - 记录追踪信息(非常详细的调试输出)、调试信息、普通信息、警告和错误default : info
example : --log-level-file=debug
标准错误日志级别选项(--log-level-stderr) stderr 日志级别。
指定哪些日志级别的输出将写入 stderr 而非 stdout(由 log-level-console 指定)。写入 stderr 的日志不包含时间戳和进程信息。
支持以下日志级别:
off - 不输出任何日志(不推荐)error - 仅记录错误warn - 记录警告和错误info - 记录信息、警告和错误detail - 记录详细信息、普通信息、警告和错误debug - 记录调试信息、详细信息、普通信息、警告和错误trace - 记录追踪信息(非常详细的调试输出)、调试信息、普通信息、警告和错误default : off
example : --log-level-stderr=error
日志路径选项(--log-path) 日志文件的存储路径。
pgBackRest 将日志文件存储在此路径下。注意,若 log-level-file=off,则无需配置日志路径。
default : /var/log/pgbackrest
example : --log-path=/backup/db/log
子进程日志选项(--log-subprocess) 启用子进程日志记录。
为当前进程创建的所有子进程启用文件日志,日志级别由 log-level-file 指定。
default : n
example : --log-subprocess
日志时间戳选项(--log-timestamp) 启用日志时间戳。
在控制台和文件日志中启用时间戳。在某些特殊场景(如生成文档)下,此选项会被禁用。
default : y
example : --no -log-timestamp
维护者选项 强制指定 PostgreSQL 版本选项(--pg-version-force) 强制指定 PostgreSQL 版本。
使用指定的 PostgreSQL 版本,而非通过读取 pg_control 或 WAL 头部自动检测到的版本。此选项主要用于 PostgreSQL 分支版本或开发版本,这些版本的控制文件版本号可能与正式发布版本不同。PostgreSQL 通过 server_version_num 报告的版本必须与强制指定的版本一致。
警告:
使用此选项时请务必谨慎,因为 pg_control 和 WAL 头部仍将按照指定版本所对应的官方 PostgreSQL 格式进行解析。若分支版本或开发版本修改了 pgBackRest 所依赖字段的格式,将导致不可预期的行为。通常情况下,此选项仅在分支版本将所有自定义结构成员追加在标准 PostgreSQL 成员之后 时才能正常工作。
example : --pg-version-force=15
仓库选项 Azure 仓库容器选项(--repo-azure-container) Azure 仓库容器。
用于存储仓库的 Azure 容器。
可通过设置 repo-path=/ 将 pgBackRest 仓库存储在容器根目录,但通常建议指定一个前缀路径(如 /repo),以便日志及其他 Azure 生成的内容也能存储在同一容器中。
example : --repo1-azure-container=pg-backup
Azure 仓库密钥类型选项(--repo-azure-key-type) Azure 仓库密钥类型。
支持以下授权类型:
shared - 共享密钥sas - 共享访问签名auto - 使用 Azure 托管标识自动授权default : shared
example : --repo1-azure-key-type=sas
Azure 仓库 URI 风格选项(--repo-azure-uri-style) Azure URI 风格。
支持以下 URI 风格:
host - 连接到 account.endpoint 主机。path - 连接到 endpoint 主机,并在 URI 中添加账户名前缀。default : host
example : --repo1-azure-uri-style=path
仓库加密类型选项(--repo-cipher-type) 仓库加密算法。
支持以下加密类型:
none - 仓库不加密aes-256-cbc - 使用 256 位密钥的高级加密标准注意,即使仓库类型(如 S3)本身支持加密,pgBackRest 的加密操作也始终在客户端执行。
default : none
example : --repo1-cipher-type=aes-256-cbc
GCS 仓库存储桶选项(--repo-gcs-bucket) GCS 仓库存储桶。
用于存储仓库的 GCS 存储桶。
可通过设置 repo-path=/ 将 pgBackRest 仓库存储在存储桶根目录,但通常建议指定一个前缀路径(如 /repo),以便日志及其他 GCS 生成的内容也能存储在同一存储桶中。
example : --repo1-gcs-bucket=/pg-backup
GCS 仓库端点选项(--repo-gcs-endpoint) GCS 仓库端点。
连接存储服务所使用的端点地址。可更新为本地 GCS 服务器或其他备用端点。
default : storage.googleapis.com
example : --repo1-gcs-endpoint=localhost
GCS 仓库密钥类型选项(--repo-gcs-key-type) GCS 仓库密钥类型。
支持以下授权类型:
auto - 使用实例服务账号授权。service - 使用本地存储的服务账号密钥。token - 用于本地测试,例如 fakegcs。当 repo-gcs-key-type=service 时,认证令牌续期时将重新加载凭据。
default : service
example : --repo1-gcs-key-type=auto
GCS 仓库项目 ID 选项(--repo-gcs-user-project) GCS 项目 ID。
用于确定请求计费方的 GCS 项目 ID。
example : --repo1-gcs-user-project=my-project
仓库主机选项(--repo-host) 远程操作时的仓库主机。
若备份和归档均写入本地挂载的文件系统,则无需此设置。
example : --repo1-host=repo1.domain.com
已弃用名称:backup-host
仓库主机证书颁发机构文件选项(--repo-host-ca-file) 仓库主机证书颁发机构文件。
使用非系统默认的 CA 文件连接仓库主机。
example : --repo1-host-ca-file=/etc/pki/tls/certs/ca-bundle.crt
仓库主机证书颁发机构路径选项(--repo-host-ca-path) 仓库主机证书颁发机构路径。
使用非系统默认的 CA 路径连接仓库主机。
example : --repo1-host-ca-path=/etc/pki/tls/certs
仓库主机证书文件选项(--repo-host-cert-file) 仓库主机证书文件。
发送给仓库主机以证明客户端身份。
example : --repo1-host-cert-file=/path/to/client.crt
仓库主机命令选项(--repo-host-cmd) 仓库主机上的 pgBackRest 命令。
仅当本地主机与仓库主机上的 pgBackRest 命令路径不同时才需要配置。若未定义,仓库主机命令将与本地命令保持一致。
default : [ path of executed pgbackrest binary]
example : --repo1-host-cmd=/usr/lib/backrest/bin/pgbackrest
已弃用名称:backup-cmd
仓库主机配置文件选项(--repo-host-config) pgBackRest 仓库主机配置文件。
设置仓库主机上配置文件的路径。仅当仓库主机的配置文件路径与本地配置文件路径不同时才需要配置。
default : CFGOPTDEF_CONFIG_PATH "/" PROJECT_CONFIG_FILE
example : --repo1-host-config=/conf/pgbackrest/pgbackrest.conf
已弃用名称:backup-config
仓库主机配置包含路径选项(--repo-host-config-include-path) pgBackRest 仓库主机配置包含路径。
设置仓库主机上配置包含路径的位置。仅当仓库主机的配置包含路径与本地配置包含路径不同时才需要配置。
default : CFGOPTDEF_CONFIG_PATH "/" PROJECT_CONFIG_INCLUDE_PATH
example : --repo1-host-config-include-path=/conf/pgbackrest/conf.d
仓库主机配置路径选项(--repo-host-config-path) pgBackRest 仓库主机配置路径。
设置仓库主机上配置路径的位置。仅当仓库主机的配置路径与本地配置路径不同时才需要配置。
default : CFGOPTDEF_CONFIG_PATH
example : --repo1-host-config-path=/conf/pgbackrest
仓库主机密钥文件选项(--repo-host-key-file) 仓库主机密钥文件。
用于证明客户端证书由其所有者发送。
example : --repo1-host-key-file=/path/to/client.key
仓库主机端口选项(--repo-host-port) 设置了 repo-host 时仓库主机使用的端口。
通过此选项为仓库主机协议指定非默认端口。
注意: 当 repo-host-type=ssh 时,repo-host-port 没有默认值,端口号由 cmd-ssh 指定的命令配置决定。
default (depending on repo-host-type) :
tls - 8432
allowed : [ 0 , 65535 ]
example : --repo1-host-port=25
已弃用名称:backup-ssh-port
仓库主机协议类型选项(--repo-host-type) 仓库主机协议类型。
支持以下协议类型:
ssh - 安全 Shell。tls - pgBackRest TLS 服务器。default : ssh
example : --repo1-host-type=tls
仓库主机用户选项(--repo-host-user) 设置了 repo-host 时仓库主机使用的用户。
定义在仓库主机上执行操作所使用的用户。建议使用专用用户(如 pgbackrest),而非 postgres 用户。若 PostgreSQL 运行在仓库主机上,可将 postgres 用户加入 pgbackrest 组,使其拥有仓库的读权限,同时避免意外损坏仓库内容。
default : pgbackrest
example : --repo1-host-user=repo-user
已弃用名称:backup-user
仓库路径选项(--repo-path) 备份和归档的存储路径。
仓库是 pgBackRest 存储备份和归档 WAL 段的位置。
提前估算所需空间可能较为困难。建议先执行几次备份,记录不同类型备份(全量/增量/差异)的大小,并测量每日产生的 WAL 数据量,以此粗略估算所需空间。随着数据库规模增长,实际需求也会随之变化。
default : /var/lib/pgbackrest
example : --repo1-path=/backup/db/backrest
S3 仓库存储桶选项(--repo-s3-bucket) S3 仓库存储桶。
用于存储仓库的 S3 存储桶。
可通过设置 repo-path=/ 将 pgBackRest 仓库存储在存储桶根目录,但通常建议指定一个前缀路径(如 /repo),以便日志及其他 AWS 生成的内容也能存储在同一存储桶中。
example : --repo1-s3-bucket=pg-backup
S3 仓库端点选项(--repo-s3-endpoint) S3 仓库端点。
AWS 端点应与所选区域匹配。
对于自定义或测试配置,可使用 repo-storage-ca-file、repo-storage-ca-path、repo-storage-host、repo-storage-port 和 repo-storage-verify-tls 等选项。
example : --repo1-s3-endpoint=s3.amazonaws.com
S3 仓库密钥类型选项(--repo-s3-key-type) S3 仓库密钥类型。
支持以下类型:
shared - 共享密钥auto - 自动获取临时凭据web-id - 自动获取 Web 身份凭据default : shared
example : --repo1-s3-key-type=auto
S3 仓库 KMS 密钥 ID 选项(--repo-s3-kms-key-id) S3 仓库 KMS 密钥。
使用指定的 AWS 密钥管理服务密钥启用 S3 服务端加密。
example : --repo1-s3-kms-key-id=bceb4f13-6939-4be3-910d-df54dee817b7
S3 仓库区域选项(--repo-s3-region) S3 仓库区域。
存储桶所在的 AWS 区域。
example : --repo1-s3-region=us-east-1
S3 仓库请求方付费选项(--repo-s3-requester-pays) S3 仓库请求方付费。
启用 S3 请求方付费功能。
default : n
example : --no -repo1-s3-requester-pays
S3 仓库角色选项(--repo-s3-role) S3 仓库角色。
当 repo-s3-key-type=auto 时,用于获取临时凭据的 AWS 角色名称(非完整 ARN)。
example : --repo1-s3-role=authrole
S3 仓库 URI 风格选项(--repo-s3-uri-style) S3 URI 风格。
支持以下 URI 风格:
host - 连接到 bucket.endpoint 主机。path - 连接到 endpoint 主机,并在 URI 中添加存储桶名前缀。default : host
example : --repo1-s3-uri-style=path
SFTP 仓库主机选项(--repo-sftp-host) SFTP 仓库主机。
存放仓库的 SFTP 主机。
example : --repo1-sftp-host=sftprepo.domain
SFTP 仓库主机指纹选项(--repo-sftp-host-fingerprint) SFTP 仓库主机指纹。
SFTP 仓库主机指纹的生成方式应与 repo-sftp-host-key-hash-type 一致。可通过以下命令生成指纹:awk '{print $2}' ssh_host_xxx_key.pub | base64 -d | (md5sum or sha1sum) -b。SSH 主机密钥通常位于 /etc/ssh 目录下。
example : --repo1-sftp-host-fingerprint=f84e172dfead7aeeeae6c1fdfb5aa8cf
SFTP 主机密钥检查类型选项(--repo-sftp-host-key-check-type) SFTP 主机密钥检查类型。
支持以下 SFTP 主机密钥检查类型:
strict - pgBackRest 不会自动将主机密钥添加到 ~/.ssh/known_hosts 文件,并拒绝连接主机密钥已更改或不在已知主机文件中的主机。此选项要求用户手动添加所有新主机。accept-new - pgBackRest 会自动将新主机密钥添加到用户的已知主机文件,但不允许连接主机密钥已更改的主机。fingerprint - pgBackRest 将主机密钥与 repo-sftp-host-fingerprint 选项指定的指纹进行比对验证。none - 不执行主机密钥检查。default : strict
example : --repo1-sftp-host-key-check-type=accept-new
SFTP 仓库主机密钥哈希类型选项(--repo-sftp-host-key-hash-type) SFTP 仓库主机密钥哈希类型。
声明在 SSH 启动时用于计算远程系统主机密钥摘要的哈希算法。较新版本的 libssh2 除支持 md5 和 sha1 外,还支持 sha256。
example : --repo1-sftp-host-key-hash-type=sha256
SFTP 仓库主机端口选项(--repo-sftp-host-port) SFTP 仓库主机端口。
default : 22
allowed : [ 1 , 65535 ]
example : --repo1-sftp-host-port=22
SFTP 仓库主机用户选项(--repo-sftp-host-user) SFTP 仓库主机用户。
存放仓库的主机上使用的用户。
example : --repo1-sftp-host-user=pg-backup
SFTP 已知主机文件选项(--repo-sftp-known-host) SFTP 已知主机文件。
认证时用于搜索 SFTP 主机匹配的已知主机文件。若未指定,pgBackRest 默认搜索 ~/.ssh/known_hosts、~/.ssh/known_hosts2、/etc/ssh/ssh_known_hosts 和 /etc/ssh/ssh_known_hosts2。若配置了一个或多个文件路径,pgBackRest 将仅在这些文件中搜索匹配项。文件路径必须是完整路径或以波浪号开头的路径。此选项可多次指定以搜索多个已知主机文件。使用已知主机文件检查时,不得指定 repo-sftp-host-fingerprint。另请参阅 repo-sftp-host-check-type 选项。
example : --repo1-sftp-known-host=/home/postgres/.ssh/known_hosts
SFTP 仓库私钥文件选项(--repo-sftp-private-key-file) SFTP 私钥文件。
用于认证的 SFTP 私钥文件。
example : --repo1-sftp-private-key-file=~/.ssh/id_ed25519
SFTP 仓库公钥文件选项(--repo-sftp-public-key-file) SFTP 公钥文件。
用于认证的 SFTP 公钥文件。若编译时使用 OpenSSL,此项为可选;若使用其他库,则为必填项。
example : --repo1-sftp-public-key-file=~/.ssh/id_ed25519.pub
仓库存储 CA 文件选项(--repo-storage-ca-file) 仓库存储 CA 文件。
使用非系统默认的 CA 文件验证存储(如 S3、Azure)证书。
example : --repo1-storage-ca-file=/etc/pki/tls/certs/ca-bundle.crt
已弃用名称:repo-azure-ca-file, repo-s3-ca-file
仓库存储 TLS CA 路径选项(--repo-storage-ca-path) 仓库存储 CA 路径。
使用非系统默认的 CA 路径验证存储(如 S3、Azure)证书。
example : --repo1-storage-ca-path=/etc/pki/tls/certs
已弃用名称:repo-azure-ca-path, repo-s3-ca-path
仓库存储主机选项(--repo-storage-host) 仓库存储主机。
连接到存储(如 S3、Azure)端点以外的主机,通常用于测试场景。
example : --repo1-storage-host=127.0.0.1
已弃用名称:repo-azure-host, repo-s3-host
仓库存储端口选项(--repo-storage-port) 仓库存储端口。
连接存储(如 S3、Azure)端点(或指定主机)时使用的端口。
default : 443
allowed : [ 1 , 65535 ]
example : --repo1-storage-port=9000
已弃用名称:repo-azure-port, repo-s3-port
仓库存储标签选项(--repo-storage-tag) 仓库存储标签。
指定在仓库为对象存储(如 S3)时添加到对象上的标签,可多次指定以添加多个标签。
pgBackRest 不提供修改这些标签的功能,因此请在运行 stanza-create 之前确认标签设置正确,以确保整个仓库的标签统一。
example : --repo1-storage-tag=key1=value1
仓库存储上传分块大小选项(--repo-storage-upload-chunk-size) 仓库存储上传分块大小。
S3 等对象存储在文件过大无法存入内存时,支持分块上传。即使文件可以存入内存,限制上传时的内存用量也能提高内存效率。
较大的分块大小通常能带来更好的性能,因为它可以减少上传请求次数,并允许更多文件在单次请求中完成上传而无需分块。缺点是内存占用更高,且由于分块缓冲区必须按进程分配,process-max 值越大,整体内存消耗越高。
注意,有效的分块大小因存储类型和平台而异。例如,AWS S3 的最小分块大小为 5MiB。各存储类型对分块大小的术语叫法不同:AWS S3 称为"part size",GCS 称为"chunk size",Azure 称为"block size",查询最小/最大值时请注意使用对应术语。
若文件大于 1GiB(PostgreSQL 默认创建的最大文件大小),分块大小将逐步增大,直至达到允许的最大值,以完成文件上传。
default (depending on repo-type) :
azure - 4MiB
gcs - 4MiB
s3 - 5MiB
allow range (depending on repo-type) :
azure - [4MiB, 1GiB]
gcs - [4MiB, 1GiB]
s3 - [5MiB, 1GiB]
example : --repo1-storage-upload-chunk-size=16MiB
仓库存储证书验证选项(--repo-storage-verify-tls) 仓库存储证书验证。
控制是否验证存储(如 S3、Azure)服务器的 TLS 证书。仅在测试场景或使用自签名证书时才应禁用验证。
default : y
example : --no -repo1-storage-verify-tls
已弃用名称:repo-azure-verify-tls, repo-s3-verify-ssl, repo-s3-verify-tls
仓库类型选项(--repo-type) 仓库使用的存储类型。
支持以下仓库类型:
azure - Azure Blob 存储服务cifs - 类似 posix,但禁用链接和目录 fsyncgcs - Google 云存储posix - 符合 POSIX 标准的文件系统s3 - AWS 简单存储服务sftp - 安全文件传输协议当使用 NFS 挂载作为 posix 类型仓库时,pgBackRest 适用与 PostgreSQL 文档中相同的规则,详见 Creating a Database Cluster - File Systems 。
default : posix
example : --repo1-type=cifs
Stanza 选项 PostgreSQL 数据库选项(--pg-database) PostgreSQL 数据库。
连接 PostgreSQL 时使用的数据库名称。默认值通常适用,但某些安装环境可能不包含此数据库。
注意,出于历史兼容性原因,PGDATABASE 环境变量的设置将被忽略。
default : postgres
example : --pg1-database=backupdb
PostgreSQL 主机选项(--pg-host) 远程操作时的 PostgreSQL 主机。
用于 PostgreSQL 主机与仓库主机不同时的备份场景。
example : --pg1-host=db.domain.com
已弃用名称:db-host
PostgreSQL 主机证书颁发机构文件选项(--pg-host-ca-file) PostgreSQL 主机证书颁发机构文件。
使用非系统默认的 CA 文件连接 PostgreSQL 主机。
example : --pg1-host-ca-file=/etc/pki/tls/certs/ca-bundle.crt
PostgreSQL 主机证书颁发机构路径选项(--pg-host-ca-path) PostgreSQL 主机证书颁发机构路径。
使用非系统默认的 CA 路径连接 PostgreSQL 主机。
example : --pg1-host-ca-path=/etc/pki/tls/certs
PostgreSQL 主机证书文件选项(--pg-host-cert-file) PostgreSQL 主机证书文件。
发送给 PostgreSQL 主机以证明客户端身份。
example : --pg1-host-cert-file=/path/to/client.crt
PostgreSQL 主机命令选项(--pg-host-cmd) PostgreSQL 主机上的 pgBackRest 命令。
仅当本地主机与 PostgreSQL 主机上的 pgBackRest 命令路径不同时才需要配置。若未定义,PostgreSQL 主机命令将与本地命令保持一致。
default : [ path of executed pgbackrest binary]
example : --pg1-host-cmd=/usr/lib/backrest/bin/pgbackrest
已弃用名称:db-cmd
PostgreSQL 主机配置文件选项(--pg-host-config) pgBackRest 数据库主机配置文件。
设置 PostgreSQL 主机上配置文件的路径。仅当 PostgreSQL 主机的配置文件路径与本地配置文件路径不同时才需要配置。
default : CFGOPTDEF_CONFIG_PATH "/" PROJECT_CONFIG_FILE
example : --pg1-host-config=/conf/pgbackrest/pgbackrest.conf
已弃用名称:db-config
PostgreSQL 主机配置包含路径选项(--pg-host-config-include-path) pgBackRest 数据库主机配置包含路径。
设置 PostgreSQL 主机上配置包含路径的位置。仅当 PostgreSQL 主机的配置包含路径与本地配置包含路径不同时才需要配置。
default : CFGOPTDEF_CONFIG_PATH "/" PROJECT_CONFIG_INCLUDE_PATH
example : --pg1-host-config-include-path=/conf/pgbackrest/conf.d
PostgreSQL 主机配置路径选项(--pg-host-config-path) pgBackRest 数据库主机配置路径。
设置 PostgreSQL 主机上配置路径的位置。仅当 PostgreSQL 主机的配置路径与本地配置路径不同时才需要配置。
default : CFGOPTDEF_CONFIG_PATH
example : --pg1-host-config-path=/conf/pgbackrest
PostgreSQL 主机密钥文件选项(--pg-host-key-file) PostgreSQL 主机密钥文件。
用于证明客户端证书由其所有者发送。
example : --pg1-host-key-file=/path/to/client.key
PostgreSQL 主机端口选项(--pg-host-port) 设置了 pg-host 时 PostgreSQL 主机使用的端口。
通过此选项为 PostgreSQL 主机协议指定非默认端口。
注意: 当 pg-host-type=ssh 时,pg-host-port 没有默认值,端口号由 cmd-ssh 指定的命令配置决定。
default (depending on pg-host-type) :
tls - 8432
allowed : [ 0 , 65535 ]
example : --pg1-host-port=25
已弃用名称:db-ssh-port
PostgreSQL 主机协议类型选项(--pg-host-type) PostgreSQL 主机协议类型。
支持以下协议类型:
ssh - 安全 Shell。tls - pgBackRest TLS 服务器。default : ssh
example : --pg1-host-type=tls
PostgreSQL 主机用户选项(--pg-host-user) 设置了 pg-host 时 PostgreSQL 主机的登录用户。
该用户同时也是远程 pgBackRest 进程的所有者,并负责发起与 PostgreSQL 的连接。为确保正常工作,此用户应是 PostgreSQL 数据库集群的所有者,通常为 postgres(默认值)。
default : postgres
example : --pg1-host-user=db_owner
已弃用名称:db-user
PostgreSQL 路径选项(--pg-path) PostgreSQL 数据目录。
此路径应与 PostgreSQL 报告的 data_directory 一致。尽管可以从多处读取该值,但建议显式配置,以防在恢复或离线备份场景中这些资源不可用。
pg-path 选项在每次在线备份时都会与 PostgreSQL 报告的值进行校验,因此应始终保持最新。
example : --pg1-path=/data/db
已弃用名称:db-path
PostgreSQL 端口选项(--pg-port) PostgreSQL 端口。
PostgreSQL 运行的端口号。大多数 PostgreSQL 集群使用默认端口,通常无需指定此项。
default : 5432
allowed : [ 0 , 65535 ]
example : --pg1-port=6543
已弃用名称:db-port
PostgreSQL Socket 路径选项(--pg-socket-path) PostgreSQL Unix Socket 路径。
PostgreSQL 启动时指定的 Unix Socket 目录。pgBackRest 会自动查找操作系统的标准位置,通常无需配置此项,除非通过 postgresql.conf 中的 unix_socket_directories 显式修改了 Socket 目录。
example : --pg1-socket-path=/var/run/postgresql
已弃用名称:db-socket-path
PostgreSQL 数据库用户选项(--pg-user) PostgreSQL 数据库用户。
连接 PostgreSQL 时使用的数据库用户名。若未指定,pgBackRest 将使用本地操作系统用户或 PGUSER 环境变量。
example : --pg1-user=backupuser
28.3.17 - 启动命令(start) pgBackRest start 命令选项与行为参考。
原始页面: pgBackRest Command Docs: start
如果 pgBackRest 进程之前已通过 stop 命令停止,可使用 start 命令重新允许它们运行。注意,此命令不会立即启动任何 pgBackRest 进程,只是解除运行限制。详情与示例请参见 启动与停止
通用选项 配置文件选项(--config) pgBackRest 配置文件。
使用此选项可以指定非默认的配置文件。
default : CFGOPTDEF_CONFIG_PATH "/" PROJECT_CONFIG_FILE
example : --config=/conf/pgbackrest/pgbackrest.conf
配置包含路径选项(--config-include-path) 附加 pgBackRest 配置文件的路径。
该路径下扩展名为 .conf 的配置文件将与主配置文件合并,形成统一的配置文件。
default : CFGOPTDEF_CONFIG_PATH "/" PROJECT_CONFIG_INCLUDE_PATH
example : --config-include-path=/conf/pgbackrest/conf.d
配置基础路径选项(--config-path) pgBackRest 配置文件的基础路径。
此设置用于覆盖 --config 和 --config-include-path 选项的默认基础路径,但若这两个选项已在命令行中显式指定,则此设置不生效。
例如,仅传入 --config-path=/conf/pgbackrest 时,--config 的默认值将变为 /conf/pgbackrest/pgbackrest.conf,--config-include-path 的默认值将变为 /conf/pgbackrest/conf.d。
default : CFGOPTDEF_CONFIG_PATH
example : --config-path=/conf/pgbackrest
锁文件路径选项(--lock-path) 锁文件的存储路径。
pgBackRest 使用锁文件防止并发执行相互冲突的操作,此选项指定锁文件的存放位置。
default : /tmp/pgbackrest
example : --lock-path=/backup/db/lock
中性 umask 选项(--neutral-umask) 使用中性 umask。
将 umask 设置为 0000,以便以合理的权限创建仓库中的文件。目录的默认权限为 0750,文件的默认权限为 0640。锁文件和日志目录的目录及文件权限分别为 0770 和 0660。
如需使用运行用户自身的 umask,请在配置文件中设置 neutral-umask=n,或在命令行中使用 --no-neutral-umask。
default : y
example : --no -neutral-umask
进程优先级选项(--priority) 设置进程优先级。
定义内核调度器为进程分配的优先级(即 niceness 值)。正值降低优先级,负值提高优先级。大多数情况下,进程没有权限提高自身优先级。
allowed : [ -20 , 19 ]
example : --priority=19
Stanza 选项(--stanza) 定义 stanza。
stanza 是 pgBackRest 中用于标识一个 PostgreSQL 集群备份配置的逻辑名称,包括集群位置、备份方式、归档选项等。大多数数据库主机只有一个 PostgreSQL 集群,因此只有一个 stanza;备份服务器则需要为每个待备份的集群分别配置一个 stanza。
命名 stanza 时,以主集群名称命名看似直观,但更好的做法是用集群所承载数据库的功能来命名。由于 stanza 名称会同时用于主库和所有副本,因此选择能描述集群实际用途的名称(如 app 或 dw)比使用本地集群名称(如 main 或 prod)更为合适。
日志选项 控制台日志级别选项(--log-level-console) 控制台日志的输出级别。
支持以下日志级别:
off - 不输出任何日志(不推荐)error - 仅记录错误warn - 记录警告和错误info - 记录信息、警告和错误detail - 记录详情、信息、警告和错误debug - 记录调试、详情、信息、警告和错误trace - 记录跟踪(非常详细的调试信息)、调试、信息、警告和错误default : warn
example : --log-level-console=error
文件日志级别选项(--log-level-file) 文件日志的输出级别。
支持以下日志级别:
off - 不输出任何日志(不推荐)error - 仅记录错误warn - 记录警告和错误info - 记录信息、警告和错误detail - 记录详情、信息、警告和错误debug - 记录调试、详情、信息、警告和错误trace - 记录跟踪(非常详细的调试信息)、调试、信息、警告和错误default : info
example : --log-level-file=debug
标准错误日志级别选项(--log-level-stderr) stderr 的日志输出级别。
指定哪些日志级别将输出到 stderr 而非 stdout(后者由 log-level-console 控制)。时间戳和进程信息不会输出到 stderr。
支持以下日志级别:
off - 不输出任何日志(不推荐)error - 仅记录错误warn - 记录警告和错误info - 记录信息、警告和错误detail - 记录详情、信息、警告和错误debug - 记录调试、详情、信息、警告和错误trace - 记录跟踪(非常详细的调试信息)、调试、信息、警告和错误default : off
example : --log-level-stderr=error
日志路径选项(--log-path) 日志文件的存储路径。
pgBackRest 将日志文件写入此路径。注意,若 log-level-file=off,则无需配置日志路径。
default : /var/log/pgbackrest
example : --log-path=/backup/db/log
日志时间戳选项(--log-timestamp) 在日志中启用时间戳。
在控制台和文件日志中启用时间戳输出。某些特殊场景(如生成文档时)会禁用此选项。
default : y
example : --no -log-timestamp
28.3.18 - 停止命令(stop) pgBackRest stop 命令选项与行为参考。
原始页面: pgBackRest Command Docs: stop
禁止任何新的 pgBackRest 进程运行。默认情况下,正在运行的进程将被允许正常完成。使用 --force 选项可强制终止正在运行的进程。
stop 命令执行完成后,此后尝试运行的 pgBackRest 进程将返回错误。详情与示例请参见 启动与停止
命令选项 强制停止选项(--force) 强制停止所有 pgBackRest 进程。
此选项会向所有正在运行的 pgBackRest 进程发送 TERM 信号,实现立即的优雅关闭。注意,这也会关闭由其他系统发起、但在当前系统上运行的远程进程。例如,若备份是在备份服务器上启动的,在数据库主机上运行 stop --force 将同时关闭备份服务器上的备份进程。
default : n
example : --force
通用选项 配置文件选项(--config) pgBackRest 配置文件。
使用此选项可以指定非默认的配置文件。
default : CFGOPTDEF_CONFIG_PATH "/" PROJECT_CONFIG_FILE
example : --config=/conf/pgbackrest/pgbackrest.conf
配置包含路径选项(--config-include-path) 附加 pgBackRest 配置文件的路径。
该路径下扩展名为 .conf 的配置文件将与主配置文件合并,形成统一的配置文件。
default : CFGOPTDEF_CONFIG_PATH "/" PROJECT_CONFIG_INCLUDE_PATH
example : --config-include-path=/conf/pgbackrest/conf.d
配置基础路径选项(--config-path) pgBackRest 配置文件的基础路径。
此设置用于覆盖 --config 和 --config-include-path 选项的默认基础路径,但若这两个选项已在命令行中显式指定,则此设置不生效。
例如,仅传入 --config-path=/conf/pgbackrest 时,--config 的默认值将变为 /conf/pgbackrest/pgbackrest.conf,--config-include-path 的默认值将变为 /conf/pgbackrest/conf.d。
default : CFGOPTDEF_CONFIG_PATH
example : --config-path=/conf/pgbackrest
锁文件路径选项(--lock-path) 锁文件的存储路径。
pgBackRest 使用锁文件防止并发执行相互冲突的操作,此选项指定锁文件的存放位置。
default : /tmp/pgbackrest
example : --lock-path=/backup/db/lock
中性 umask 选项(--neutral-umask) 使用中性 umask。
将 umask 设置为 0000,以便以合理的权限创建仓库中的文件。目录的默认权限为 0750,文件的默认权限为 0640。锁文件和日志目录的目录及文件权限分别为 0770 和 0660。
如需使用运行用户自身的 umask,请在配置文件中设置 neutral-umask=n,或在命令行中使用 --no-neutral-umask。
default : y
example : --no -neutral-umask
进程优先级选项(--priority) 设置进程优先级。
定义内核调度器为进程分配的优先级(即 niceness 值)。正值降低优先级,负值提高优先级。大多数情况下,进程没有权限提高自身优先级。
allowed : [ -20 , 19 ]
example : --priority=19
Stanza 选项(--stanza) 定义 stanza。
stanza 是 pgBackRest 中用于标识一个 PostgreSQL 集群备份配置的逻辑名称,包括集群位置、备份方式、归档选项等。大多数数据库主机只有一个 PostgreSQL 集群,因此只有一个 stanza;备份服务器则需要为每个待备份的集群分别配置一个 stanza。
命名 stanza 时,以主集群名称命名看似直观,但更好的做法是用集群所承载数据库的功能来命名。由于 stanza 名称会同时用于主库和所有副本,因此选择能描述集群实际用途的名称(如 app 或 dw)比使用本地集群名称(如 main 或 prod)更为合适。
日志选项 控制台日志级别选项(--log-level-console) 控制台日志的输出级别。
支持以下日志级别:
off - 不输出任何日志(不推荐)error - 仅记录错误warn - 记录警告和错误info - 记录信息、警告和错误detail - 记录详情、信息、警告和错误debug - 记录调试、详情、信息、警告和错误trace - 记录跟踪(非常详细的调试信息)、调试、信息、警告和错误default : warn
example : --log-level-console=error
文件日志级别选项(--log-level-file) 文件日志的输出级别。
支持以下日志级别:
off - 不输出任何日志(不推荐)error - 仅记录错误warn - 记录警告和错误info - 记录信息、警告和错误detail - 记录详情、信息、警告和错误debug - 记录调试、详情、信息、警告和错误trace - 记录跟踪(非常详细的调试信息)、调试、信息、警告和错误default : info
example : --log-level-file=debug
标准错误日志级别选项(--log-level-stderr) stderr 的日志输出级别。
指定哪些日志级别将输出到 stderr 而非 stdout(后者由 log-level-console 控制)。时间戳和进程信息不会输出到 stderr。
支持以下日志级别:
off - 不输出任何日志(不推荐)error - 仅记录错误warn - 记录警告和错误info - 记录信息、警告和错误detail - 记录详情、信息、警告和错误debug - 记录调试、详情、信息、警告和错误trace - 记录跟踪(非常详细的调试信息)、调试、信息、警告和错误default : off
example : --log-level-stderr=error
日志路径选项(--log-path) 日志文件的存储路径。
pgBackRest 将日志文件写入此路径。注意,若 log-level-file=off,则无需配置日志路径。
default : /var/log/pgbackrest
example : --log-path=/backup/db/log
日志时间戳选项(--log-timestamp) 在日志中启用时间戳。
在控制台和文件日志中启用时间戳输出。某些特殊场景(如生成文档时)会禁用此选项。
default : y
example : --no -log-timestamp
28.3.19 - 验证命令(verify) pgBackRest verify 命令的选项与行为参考。
原始页面: pgBackRest Command Docs: verify
verify 用于验证仓库中的备份和归档是否有效。
命令选项 输出格式选项(--output) 输出类型。
支持以下输出类型:
none — 不输出验证信息。text — 将验证信息输出到标准输出。default : none
example : --output=text
备份集选项(--set) 要验证的备份集。
验证与指定备份集关联的所有数据库文件和归档文件。
example : --set=20150131-153358F_20150131-153401I
详细输出选项(--verbose) 详细输出。
默认不启用详细输出,仅显示包含仓库错误的简要结果。设为 true 后,还将输出成功验证项的详细信息。
default : n
example : --verbose
通用选项 缓冲区大小选项(--buffer-size) I/O 操作的缓冲区大小。
该缓冲区用于复制、压缩、加密等操作。实际使用的缓冲区数量取决于具体选项,每种操作可能额外占用内存,例如 gz 压缩最多可额外使用 256KiB 内存。
允许的值为 16KiB、32KiB、64KiB、128KiB、256KiB、512KiB、1MiB、2MiB、4MiB、8MiB 和 16MiB。
default : 1MiB
example : --buffer-size=2MiB
pgBackRest 命令选项(--cmd) pgBackRest 命令。
pgBackRest 有时需要构造命令字符串,例如 restore 命令生成 restore_command 设置时。若未通过 cmd 选项显式指定,将使用当前 pgBackRest 进程所用的命令路径。
注意: 对 pgBackRest 命令进行包装可能导致不可预期的行为,不建议使用。
default : [ path of executed pgbackrest binary]
example : --cmd=/var/lib/pgsql/bin/pgbackrest_wrapper.sh
SSH 客户端命令选项(--cmd-ssh) SSH 客户端命令。
如需使用特定的 SSH 客户端,或 ssh 命令不在 $PATH 中,可通过此选项指定。
default : ssh
example : --cmd-ssh=/usr/bin/ssh
网络压缩级别选项(--compress-level-network) 网络压缩级别。
当 compress-type=none 且命令不在仓库所在主机上执行时,此选项设置网络传输的压缩级别,以减少网络流量。若 compress-type 不等于 none,则忽略此设置,改用 compress-level,避免对文件进行二次压缩。
default : 1
allowed : [ -5 , 12 ]
example : --compress-level-network=1
配置文件选项(--config) pgBackRest 配置文件。
通过此选项可指定非默认路径的配置文件。
default : CFGOPTDEF_CONFIG_PATH "/" PROJECT_CONFIG_FILE
example : --config=/conf/pgbackrest/pgbackrest.conf
配置包含路径选项(--config-include-path) 附加配置文件的目录路径。
该目录下扩展名为 .conf 的文件将与 pgBackRest 主配置文件合并,共同构成最终的配置。
default : CFGOPTDEF_CONFIG_PATH "/" PROJECT_CONFIG_INCLUDE_PATH
example : --config-include-path=/conf/pgbackrest/conf.d
配置基础路径选项(--config-path) pgBackRest 配置文件的基础路径。
此设置覆盖 --config 和 --config-include-path 的默认基础路径,前提是这两个选项未在命令行中显式指定。
例如,仅传入 --config-path=/conf/pgbackrest 时,--config 的默认值将变为 /conf/pgbackrest/pgbackrest.conf,--config-include-path 的默认值将变为 /conf/pgbackrest/conf.d。
default : CFGOPTDEF_CONFIG_PATH
example : --config-path=/conf/pgbackrest
I/O 超时选项(--io-timeout) I/O 超时。
连接、读写操作的超时时间(秒)。
注意,整个读写操作不必在此超时内完成,但必须持续有进展,哪怕每次只传输一个字节。
default : 1m
allowed : [ 100ms, 1h]
example : --io-timeout=120
中性 umask 选项(--neutral-umask) 使用中性 umask。
将 umask 设为 0000,确保仓库中的文件以合理的权限创建。默认目录模式为 0750,文件模式为 0640;锁目录和日志目录的目录模式为 0770,文件模式为 0660。
如需沿用执行用户自身的 umask,请在配置文件中设置 neutral-umask=n,或在命令行中使用 --no-neutral-umask。
default : y
example : --no -neutral-umask
进程优先级选项(--priority) 设置进程优先级。
指定内核调度器为该进程分配的 niceness 值。正值降低优先级,负值提高优先级。大多数情况下,进程没有权限自行提升优先级。
allowed : [ -20 , 19 ]
example : --priority=19
最大进程数选项(--process-max) 压缩与传输使用的最大进程数。
每个进程并行执行压缩和传输操作,可加快命令执行速度。但不宜将 process-max 设置过高,以免影响数据库性能。
default : 1
allowed : [ 1 , 999 ]
example : --process-max=4
协议超时选项(--protocol-timeout) 协议超时。
设置本地或远程进程在协议层等待新消息的超时时间(秒),防止进程无限期挂起。
注意: protocol-timeout 的值必须大于 db-timeout。
default : 31m
allowed : [ 100ms, 7d]
example : --protocol-timeout=630
保活选项(--sck-keep-alive) 启用 keep-alive。
在套接字连接上启用 keep-alive 消息。
default : y
example : --no -sck-keep-alive
Stanza 选项(--stanza) 定义 stanza。
stanza 是 pgBackRest 中用于标识一个 PostgreSQL 集群备份配置的逻辑名称,定义了集群的位置、备份方式、归档选项等。大多数数据库主机只有一个 PostgreSQL 集群,因此只有一个 stanza;备份服务器则会为每个需要备份的集群各配置一个 stanza。
stanza 名称很容易直接使用主库集群名,但更好的做法是用名称描述集群中所包含的数据库内容。由于该名称同时用于主库和所有副本,选择能体现集群实际用途的名称(如 app 或 dw)比使用本地集群名称(如 main 或 prod)更为合适。
TCP 保活计数选项(--tcp-keep-alive-count) Keep-alive 计数。
指定在判定连接断开之前,允许丢失的 TCP keep-alive 消息数量。
此选项仅在系统支持 TCP_KEEPCNT 套接字选项时有效。
allowed : [ 1 , 32 ]
example : --tcp-keep-alive-count=3
TCP 保活空闲时间选项(--tcp-keep-alive-idle) Keep-alive 空闲时间。
指定在无网络活动达到多少秒后,操作系统开始发送 TCP keep-alive 消息。
此选项仅在系统支持 TCP_KEEPIDLE 套接字选项时有效。
allowed : [ 1 , 3600 ]
example : --tcp-keep-alive-idle=60
TCP 保活间隔选项(--tcp-keep-alive-interval) Keep-alive 间隔时间。
指定未收到确认的 TCP keep-alive 消息重新发送前的等待秒数。
此选项仅在系统支持 TCP_KEEPINTVL 套接字选项时有效。
allowed : [ 1 , 900 ]
example : --tcp-keep-alive-interval=30
TLSv1.2 加密套件选项(--tls-cipher-12) 允许的 TLSv1.2 加密套件。
pgBackRest 客户端与服务端之间的所有 TLS 连接均已加密,默认情况下与对象存储(如 S3)的连接也会加密。
注意: 所有传输连接的最低安全级别为 TLSv1.2。
如有需要,可调整允许的加密套件。示例中的配置是合理的选择,除非有特定安全要求。若未设置(默认),则使用底层 OpenSSL 库的默认值。
example : --tls-cipher-12=HIGH:MEDIUM:+3DES:!aNULL
TLSv1.3 加密套件选项(--tls-cipher-13) 允许的 TLSv1.3 加密套件。
pgBackRest 客户端与服务端之间的所有 TLS 连接均已加密,默认情况下与对象存储(如 S3)的连接也会加密。
注意: 所有传输连接的最低安全级别为 TLSv1.2。
如有需要,可调整允许的加密套件。若未设置(默认),则使用底层 OpenSSL 库的默认值。
example : --tls-cipher-13=TLS_AES_256_GCM_SHA384:TLS_CHACHA20_POLY1305_SHA256
日志选项 控制台日志级别选项(--log-level-console) 控制台日志级别。
支持以下日志级别:
off — 不记录任何日志(不推荐)error — 仅记录错误warn — 记录警告和错误info — 记录信息、警告和错误detail — 记录详情、信息、警告和错误debug — 记录调试、详情、信息、警告和错误trace — 记录跟踪(极详细的调试信息)、调试、信息、警告和错误default : warn
example : --log-level-console=error
文件日志级别选项(--log-level-file) 文件日志级别。
支持以下日志级别:
off — 不记录任何日志(不推荐)error — 仅记录错误warn — 记录警告和错误info — 记录信息、警告和错误detail — 记录详情、信息、警告和错误debug — 记录调试、详情、信息、警告和错误trace — 记录跟踪(极详细的调试信息)、调试、信息、警告和错误default : info
example : --log-level-file=debug
标准错误日志级别选项(--log-level-stderr) stderr 日志级别。
指定哪些级别的日志输出到 stderr 而非 stdout(由 log-level-console 控制)。时间戳和进程信息不会输出到 stderr。
支持以下日志级别:
off — 不记录任何日志(不推荐)error — 仅记录错误warn — 记录警告和错误info — 记录信息、警告和错误detail — 记录详情、信息、警告和错误debug — 记录调试、详情、信息、警告和错误trace — 记录跟踪(极详细的调试信息)、调试、信息、警告和错误default : off
example : --log-level-stderr=error
日志路径选项(--log-path) 日志文件存储路径。
pgBackRest 将日志文件保存到此路径。注意,若 log-level-file=off,则无需配置此项。
default : /var/log/pgbackrest
example : --log-path=/backup/db/log
子进程日志选项(--log-subprocess) 启用子进程日志记录。
为该进程创建的所有子进程启用文件日志记录,使用 log-level-file 指定的日志级别。
default : n
example : --log-subprocess
日志时间戳选项(--log-timestamp) 在日志中启用时间戳。
在控制台和文件日志中输出时间戳。某些特殊场景(如生成文档)下会禁用此选项。
default : y
example : --no -log-timestamp
维护者选项 强制指定 PostgreSQL 版本选项(--pg-version-force) 强制指定 PostgreSQL 版本。
使用指定的 PostgreSQL 版本,而不是从 pg_control 或 WAL 头部自动检测到的版本。此选项主要用于 PostgreSQL 分支版本或开发版本——这些版本中,自动检测到的值可能与正式发布版本号不同。PostgreSQL 通过 server_version_num 报告的版本号必须与强制指定的版本一致。
警告: 请谨慎使用此选项。启用后,pg_control 和 WAL 头部将按照指定版本(即官方 PostgreSQL 发布版本)的预期格式解析。若分支或开发版本修改了 pgBackRest 所依赖字段的格式,将导致不可预期的行为。通常,只有当分支版本将所有自定义结构成员追加在标准 PostgreSQL 成员之后时,此选项才能正常工作。
example : --pg-version-force=15
仓库选项 指定仓库选项(--repo) 指定仓库。
指定命令操作的目标仓库。
例如,可通过此选项指定从特定仓库执行恢复,而非由 pgBackRest 自动选择。
allowed : [ 1 , 256 ]
example : --repo=1
Azure 仓库容器选项(--repo-azure-container) Azure 仓库容器。
用于存储仓库的 Azure 容器。
pgBackRest 仓库可通过设置 repo-path=/ 存储在容器根目录,但通常建议指定一个前缀(如 /repo),这样日志及其他 Azure 生成的内容也可存放在同一容器中。
example : --repo1-azure-container=pg-backup
Azure 仓库密钥类型选项(--repo-azure-key-type) Azure 仓库密钥类型。
支持以下授权类型:
shared — 共享密钥sas — 共享访问签名auto — 使用 Azure 托管标识自动授权default : shared
example : --repo1-azure-key-type=sas
Azure 仓库 URI 风格选项(--repo-azure-uri-style) Azure URI 风格。
支持以下 URI 风格:
host — 连接到 account.endpoint 主机。path — 连接到 endpoint 主机,并在 URI 中添加账户前缀。default : host
example : --repo1-azure-uri-style=path
仓库加密类型选项(--repo-cipher-type) 仓库加密算法。
支持以下加密类型:
none — 不加密aes-256-cbc — 256 位密钥的 AES 加密标准注意,即使仓库存储类型(如 S3)本身支持加密,pgBackRest 的加密始终在客户端执行。
default : none
example : --repo1-cipher-type=aes-256-cbc
GCS 仓库存储桶选项(--repo-gcs-bucket) GCS 仓库存储桶。
用于存储仓库的 GCS 存储桶。
pgBackRest 仓库可通过设置 repo-path=/ 存储在存储桶根目录,但通常建议指定一个前缀(如 /repo),这样日志及其他 GCS 生成的内容也可存放在同一存储桶中。
example : --repo1-gcs-bucket=/pg-backup
GCS 仓库端点选项(--repo-gcs-endpoint) GCS 仓库端点。
用于连接存储服务的端点地址,可替换为本地 GCS 服务器或其他备用端点。
default : storage.googleapis.com
example : --repo1-gcs-endpoint=localhost
GCS 仓库密钥类型选项(--repo-gcs-key-type) GCS 仓库密钥类型。
支持以下授权类型:
auto — 使用实例服务账号授权。service — 使用本地存储的服务账号密钥。token — 用于本地测试,如 fakegcs。当 repo-gcs-key-type=service 时,认证令牌续期时会重新加载身份凭据。
default : service
example : --repo1-gcs-key-type=auto
GCS 仓库项目 ID 选项(--repo-gcs-user-project) GCS 项目 ID。
用于确定请求计费归属的 GCS 项目 ID。
example : --repo1-gcs-user-project=my-project
仓库主机选项(--repo-host) 远程操作时的仓库主机。
若备份和归档存储在本地挂载的文件系统中,则无需此设置。
example : --repo1-host=repo1.domain.com
已弃用名称:backup-host
仓库主机证书颁发机构文件选项(--repo-host-ca-file) 仓库主机证书颁发机构文件。
连接仓库主机时,使用指定的 CA 文件替代系统默认值。
example : --repo1-host-ca-file=/etc/pki/tls/certs/ca-bundle.crt
仓库主机证书颁发机构路径选项(--repo-host-ca-path) 仓库主机证书颁发机构路径。
连接仓库主机时,使用指定的 CA 路径替代系统默认值。
example : --repo1-host-ca-path=/etc/pki/tls/certs
仓库主机证书文件选项(--repo-host-cert-file) 仓库主机证书文件。
向仓库主机发送此证书以证明客户端身份。
example : --repo1-host-cert-file=/path/to/client.crt
仓库主机命令选项(--repo-host-cmd) 仓库主机上的 pgBackRest 命令。
仅当仓库主机上的 pgBackRest 命令路径与本地不同时才需要配置。若未定义,将沿用本地命令路径。
default : [ path of executed pgbackrest binary]
example : --repo1-host-cmd=/usr/lib/backrest/bin/pgbackrest
已弃用名称:backup-cmd
仓库主机配置文件选项(--repo-host-config) pgBackRest 仓库主机配置文件。
设置仓库主机上配置文件的路径。仅当仓库主机的配置文件路径与本地不同时才需要配置。
default : CFGOPTDEF_CONFIG_PATH "/" PROJECT_CONFIG_FILE
example : --repo1-host-config=/conf/pgbackrest/pgbackrest.conf
已弃用名称:backup-config
仓库主机配置包含路径选项(--repo-host-config-include-path) pgBackRest 仓库主机配置包含路径。
设置仓库主机上配置包含路径的位置。仅当仓库主机的配置包含路径与本地不同时才需要配置。
default : CFGOPTDEF_CONFIG_PATH "/" PROJECT_CONFIG_INCLUDE_PATH
example : --repo1-host-config-include-path=/conf/pgbackrest/conf.d
仓库主机配置路径选项(--repo-host-config-path) pgBackRest 仓库主机配置路径。
设置仓库主机上配置路径的位置。仅当仓库主机的配置路径与本地不同时才需要配置。
default : CFGOPTDEF_CONFIG_PATH
example : --repo1-host-config-path=/conf/pgbackrest
仓库主机密钥文件选项(--repo-host-key-file) 仓库主机密钥文件。
用于证明客户端证书由其所有者发送。
example : --repo1-host-key-file=/path/to/client.key
仓库主机端口选项(--repo-host-port) repo-host 已设置时的仓库主机端口。
通过此选项为仓库主机协议指定非默认端口。
注意: 当 repo-host-type=ssh 时,repo-host-port 没有默认值,端口由 cmd-ssh 所指定命令的配置决定。
default (depending on repo-host-type) :
tls - 8432
allowed : [ 0 , 65535 ]
example : --repo1-host-port=25
已弃用名称:backup-ssh-port
仓库主机协议类型选项(--repo-host-type) 仓库主机协议类型。
支持以下协议类型:
ssh — 安全外壳协议。tls — pgBackRest TLS 服务器。default : ssh
example : --repo1-host-type=tls
仓库主机用户选项(--repo-host-user) repo-host 已设置时的仓库主机用户。
定义在仓库主机上执行操作所使用的用户。建议使用专用用户(如 pgbackrest)而非 postgres。若 PostgreSQL 运行在仓库主机上,可将 postgres 用户加入 pgbackrest 组,使其对仓库拥有读取权限,同时避免意外损坏仓库内容。
default : pgbackrest
example : --repo1-host-user=repo-user
已弃用名称:backup-user
仓库路径选项(--repo-path) 备份和归档的存储路径。
仓库是 pgBackRest 存储备份和归档 WAL 段的位置。
预先估算所需空间可能比较困难。建议先执行几次备份,分别记录全量、增量、差异备份的大小,并统计每天的 WAL 生成量,从而大致估算所需空间。随着数据库的演进,空间需求也会持续变化。
default : /var/lib/pgbackrest
example : --repo1-path=/backup/db/backrest
S3 仓库存储桶选项(--repo-s3-bucket) S3 仓库存储桶。
用于存储仓库的 S3 存储桶。
pgBackRest 仓库可通过设置 repo-path=/ 存储在存储桶根目录,但通常建议指定一个前缀(如 /repo),这样日志及其他 AWS 生成的内容也可存放在同一存储桶中。
example : --repo1-s3-bucket=pg-backup
S3 仓库端点选项(--repo-s3-endpoint) S3 仓库端点。
AWS 端点应与存储桶所在区域匹配。
自定义或测试配置时,repo-storage-ca-file、repo-storage-ca-path、repo-storage-host、repo-storage-port 和 repo-storage-verify-tls 等选项可能有所帮助。
example : --repo1-s3-endpoint=s3.amazonaws.com
S3 仓库密钥类型选项(--repo-s3-key-type) S3 仓库密钥类型。
支持以下类型:
shared — 共享密钥auto — 自动获取临时凭据web-id — 自动获取 Web 身份凭据default : shared
example : --repo1-s3-key-type=auto
S3 仓库 KMS 密钥 ID 选项(--repo-s3-kms-key-id) S3 仓库 KMS 密钥。
使用指定的 AWS KMS 密钥启用 S3 服务端加密。
example : --repo1-s3-kms-key-id=bceb4f13-6939-4be3-910d-df54dee817b7
S3 仓库区域选项(--repo-s3-region) S3 仓库区域。
存储桶所在的 AWS 区域。
example : --repo1-s3-region=us-east-1
S3 仓库请求方付费选项(--repo-s3-requester-pays) S3 仓库请求方付费。
启用 S3 请求方付费功能。
default : n
example : --no -repo1-s3-requester-pays
S3 仓库角色选项(--repo-s3-role) S3 仓库角色。
当 repo-s3-key-type=auto 时,用于获取临时凭据的 AWS 角色名称(非完整 ARN)。
example : --repo1-s3-role=authrole
S3 仓库 URI 风格选项(--repo-s3-uri-style) S3 URI 风格。
支持以下 URI 风格:
host — 连接到 bucket.endpoint 主机。path — 连接到 endpoint 主机,并在 URI 中添加存储桶前缀。default : host
example : --repo1-s3-uri-style=path
SFTP 仓库主机选项(--repo-sftp-host) SFTP 仓库主机。
存放仓库的 SFTP 主机地址。
example : --repo1-sftp-host=sftprepo.domain
SFTP 仓库主机指纹选项(--repo-sftp-host-fingerprint) SFTP 仓库主机指纹。
指纹的生成方式须与 repo-sftp-host-key-hash-type 保持一致。可通过以下命令生成:awk '{print $2}' ssh_host_xxx_key.pub | base64 -d | (md5sum or sha1sum) -b。SSH 主机密钥通常位于 /etc/ssh 目录下。
example : --repo1-sftp-host-fingerprint=f84e172dfead7aeeeae6c1fdfb5aa8cf
SFTP 主机密钥检查类型选项(--repo-sftp-host-key-check-type) SFTP 主机密钥检查类型。
支持以下检查类型:
strict — pgBackRest 不会自动将主机密钥添加到 ~/.ssh/known_hosts,并拒绝连接密钥已变更或不在已知主机文件中的主机。此选项要求手动添加所有新主机。accept-new — pgBackRest 自动将新主机密钥添加到已知主机文件,但不允许连接密钥已变更的主机。fingerprint — 根据 repo-sftp-host-fingerprint 指定的指纹验证主机密钥。none — 不执行主机密钥检查。default : strict
example : --repo1-sftp-host-key-check-type=accept-new
SFTP 仓库主机密钥哈希类型选项(--repo-sftp-host-key-hash-type) SFTP 仓库主机密钥哈希类型。
声明 SSH 握手时计算远程主机密钥摘要所用的哈希算法。较新版本的 libssh2 在 md5 和 sha1 之外还支持 sha256。
example : --repo1-sftp-host-key-hash-type=sha256
SFTP 仓库主机端口选项(--repo-sftp-host-port) SFTP 仓库主机端口。
default : 22
allowed : [ 1 , 65535 ]
example : --repo1-sftp-host-port=22
SFTP 仓库主机用户选项(--repo-sftp-host-user) SFTP 仓库主机用户。
存储仓库的主机上对应的用户名。
example : --repo1-sftp-host-user=pg-backup
SFTP 已知主机文件选项(--repo-sftp-known-host) SFTP 已知主机文件。
认证时用于匹配 SFTP 主机的已知主机文件。若未指定,pgBackRest 默认搜索 ~/.ssh/known_hosts、~/.ssh/known_hosts2、/etc/ssh/ssh_known_hosts 和 /etc/ssh/ssh_known_hosts2。若指定了一个或多个文件路径,pgBackRest 将仅在这些文件中查找匹配项。路径必须为完整路径或以波浪号(~)开头的路径。此选项可多次传入以指定多个文件。使用已知主机文件检查时,不得同时指定 repo-sftp-host-fingerprint。另请参阅 repo-sftp-host-check-type 选项。
example : --repo1-sftp-known-host=/home/postgres/.ssh/known_hosts
SFTP 仓库私钥文件选项(--repo-sftp-private-key-file) SFTP 私钥文件。
用于认证的 SFTP 私钥文件路径。
example : --repo1-sftp-private-key-file=~/.ssh/id_ed25519
SFTP 仓库公钥文件选项(--repo-sftp-public-key-file) SFTP 公钥文件。
用于认证的 SFTP 公钥文件路径。若编译时链接的是 OpenSSL,则此项可选;若链接的是其他库,则为必填。
example : --repo1-sftp-public-key-file=~/.ssh/id_ed25519.pub
仓库存储 CA 文件选项(--repo-storage-ca-file) 仓库存储 CA 文件。
连接对象存储(如 S3、Azure)时,使用指定的 CA 文件替代系统默认值。
example : --repo1-storage-ca-file=/etc/pki/tls/certs/ca-bundle.crt
已弃用名称:repo-azure-ca-file, repo-s3-ca-file
仓库存储 TLS CA 路径选项(--repo-storage-ca-path) 仓库存储 CA 路径。
连接对象存储(如 S3、Azure)时,使用指定的 CA 路径替代系统默认值。
example : --repo1-storage-ca-path=/etc/pki/tls/certs
已弃用名称:repo-azure-ca-path, repo-s3-ca-path
仓库存储主机选项(--repo-storage-host) 仓库存储主机。
连接到非标准存储端点(如 S3、Azure)的主机地址,通常用于测试。
example : --repo1-storage-host=127.0.0.1
已弃用名称:repo-azure-host, repo-s3-host
仓库存储端口选项(--repo-storage-port) 仓库存储端口。
连接对象存储端点(或指定主机)时使用的端口。
default : 443
allowed : [ 1 , 65535 ]
example : --repo1-storage-port=9000
已弃用名称:repo-azure-port, repo-s3-port
仓库存储标签选项(--repo-storage-tag) 仓库存储标签。
当仓库使用对象存储(如 S3)时,为对象添加的标签。此选项可多次指定以添加多个标签。
pgBackRest 不提供修改已有标签的功能,因此请在执行 stanza-create 之前确认标签设置正确,以保证整个仓库的标签一致性。
example : --repo1-storage-tag=key1=value1
仓库存储上传分块大小选项(--repo-storage-upload-chunk-size) 仓库存储上传分块大小。
S3 等对象存储在文件过大无法整体载入内存时,支持分块上传。即使文件能放入内存,限制单次上传的内存用量也更为高效。
较大的块大小通常有助于提升性能,因为它能减少上传请求次数,在单个请求中传输更多数据。但代价是内存占用更高,且块缓冲区按进程分配,process-max 越大,总内存消耗越多。
不同存储类型和平台对块大小的有效范围要求不同。例如,AWS S3 的最小块大小为 5MiB。各存储类型对此的术语也有差异:AWS S3 称为 “part size”,GCS 称为 “chunk size”,Azure 称为 “block size”。
若文件超过 1GiB(PostgreSQL 默认的单文件上限),块大小将自动逐步增大直至允许的最大值,以确保文件能够上传完成。
default (depending on repo-type) :
azure - 4MiB
gcs - 4MiB
s3 - 5MiB
allow range (depending on repo-type) :
azure - [4MiB, 1GiB]
gcs - [4MiB, 1GiB]
s3 - [5MiB, 1GiB]
example : --repo1-storage-upload-chunk-size=16MiB
仓库存储证书验证选项(--repo-storage-verify-tls) 仓库存储证书验证。
控制是否验证对象存储(如 S3、Azure)服务器的 TLS 证书。仅在测试或使用自签名证书等特殊场景下才应禁用验证。
default : y
example : --no -repo1-storage-verify-tls
已弃用名称:repo-azure-verify-tls, repo-s3-verify-ssl, repo-s3-verify-tls
仓库目标时间选项(--repo-target-time) 仓库目标时间。
指定读取版本化存储上仓库时所参照的时间点,从而访问某一历史时刻的仓库状态,用于恢复因误操作或恶意软件导致删除或损坏的数据。
S3、GCS 和 Azure 均支持版本化存储,但通常默认未启用。除启用版本控制外,还可以考虑为 S3 启用对象锁定,为 GCS 或 Azure 启用软删除。
使用 repo-target-time 时,必须同时指定 repo 选项。并非所有仓库类型都支持版本控制,通常针对单个仓库进行恢复最为合理。
注意,时间戳比较使用 <= 关系,且提供的时间戳中的毫秒部分会被截断。
example : --repo-target-time=2024-08-08 12:12:12+00
仓库类型选项(--repo-type) 仓库使用的存储类型。
支持以下仓库类型:
azure — Azure Blob 存储服务cifs — 类似 posix,但禁用链接和目录 fsyncgcs — Google Cloud 存储posix — 符合 POSIX 规范的文件系统s3 — AWS 简单存储服务sftp — 安全文件传输协议将 NFS 挂载用作 posix 类型仓库时,适用于 pgBackRest 的规则与 PostgreSQL 文档中的描述相同,详见 Creating a Database Cluster - File Systems 。
default : posix
example : --repo1-type=cifs
28.3.20 - 版本命令(version) pgBackRest version 命令的选项与行为参考。
原始页面: pgBackRest Command Docs: version
显示已安装的 pgBackRest 版本。
命令选项 输出格式选项(--output) 输出类型。
支持以下输出类型:
text — 以文本形式显示已安装的 pgBackRest 版本。num — 以整数形式显示已安装的 pgBackRest 版本。default : text
example : --output=num
28.4 - 配置参考 pgBackRest 完整配置参考,涵盖归档、备份、仓库、云存储等所有配置项。
原始页面: https://pgbackrest.org/configuration.html
简介 pgBackRest 可以完全通过命令行参数使用,但当配置较为复杂或需要设置大量选项时,使用配置文件更为实用。配置文件的默认路径为 /etc/pgbackrest/pgbackrest.conf。若该路径下不存在配置文件,则会检查旧的默认路径 /etc/pgbackrest.conf。
以下是支持的选项类型:
String(字符串) :文本字符串,常见用途包括标识符、密码等。
命令行示例:--stanza=demorepo1-cipher-pass=zWaf6XtpjIVZC5444yXB...
Path(路径) :用于唯一标识目录结构中某个位置。路径必须以 / 开头,不允许使用双斜杠 //,且末尾不应有 /。
命令行示例:--repo1-path=/var/lib/pgbackrestrepo1-path=/var/lib/pgbackrest
Boolean(布尔值) :启用或禁用某个选项。参数值只接受 y 或 n。
命令行示例:--start-fast、--no-start-fast、--start-fast=y、--start-fast=nstart-fast=y、start-fast=n
Integer(整数) :用于端口号、保留策略/重试次数、并行进程数等。
命令行示例:--compress-level=3pg1-port=5432
Size(大小) :用于缓冲区大小、磁盘用量等。大小可以字节(默认)或 KiB、MiB、GiB、TiB、PiB 为单位,倍数为 1024 的幂次。例如,不区分大小写的值 5GiB(或 5GB、5g)等同于 5368709120。不允许使用小数值(如 2.5GiB),请改用 2560MiB。
命令行示例:--archive-get-queue-max=1GiBbuffer-size=2MiB
Time(时间) :以秒为单位的时间值。
命令行示例:--io-timeout=90db-timeout=600
List(列表) :该选项可指定多次。
命令行示例:--db-exclude=db1 --db-exclude=db2 --db-exclude=db5db-exclude=db1 db-exclude=db2 db-exclude=db5
Key/Value(键值对) :该选项可以 key=value 的形式指定多次。
命令行示例:--tablespace-map=ts_01=/db/ts_01 --tablespace-map=ts_02=/db/ts_02tablespace-map=ts_01=/db/ts_01 tablespace-map=ts_02=/db/ts_02
归档选项 archive 部分定义了 archive-push 和 archive-get 命令的选项。
异步归档选项(--archive-async) 以异步方式推送/获取 WAL 段。
为 archive-push 和 archive-get 命令启用异步操作。
异步操作效率更高,可复用连接并利用并行处理优势。详情请参阅 spool-path、archive-get-queue-max 和 archive-push-queue-max 选项。
default: n
example: archive-async=y
最大 archive-get 队列大小选项(--archive-get-queue-max) archive-get 队列的最大容量。
启用 archive-async 时,指定 archive-get 队列的最大大小。队列存储在 spool-path 中,用于加速向 PostgreSQL 提供 WAL。
default: 128MiB
allowed: [0B, 4PiB]
example: archive-get-queue-max=1GiB
重试缺失 WAL 段选项(--archive-missing-retry) 重试缺失的 WAL 段。
在异步模式下,对之前由 archive-get 命令报告为缺失的 WAL 段进行重试。这可以防止将缓冲区路径中来自先前恢复操作的通知文件用于当前操作,从而避免在尚未达到一致性时导致恢复失败。
禁用此选项可让 PostgreSQL 更可靠地识别归档中 WAL 的末尾,从而切换到从主库进行流式复制。若持续启用重试,连续不断的 WAL 归档流会导致 PostgreSQL 继续从归档获取 WAL,而不是切换到流式复制。
禁用此选项时,务必确保 stanza 的缓冲区路径为空。若在恢复时配置了缓冲区路径,restore 命令会自动清空该路径;否则需要用户手动清空。
default: y
example: archive-missing-retry=n
最大 archive-push 队列大小选项(--archive-push-queue-max) PostgreSQL 归档队列的最大大小。
达到限制后,将发生以下情况:
pgBackRest 会通知 PostgreSQL WAL 已成功归档,然后将其丢弃 。 会在 PostgreSQL 日志中输出一条警告。 若发生此情况,归档日志流将被中断,此后将无法执行 PITR。需要执行新的备份才能恢复完整的恢复能力。
在异步模式下,整个队列将被清空,以防止在队列再次超出限制之前出现短暂的 WAL 写入。
此功能的目的是防止日志卷被写满——日志卷写满会导致 PostgreSQL 完全停止。宁可丢失备份,也好过让 PostgreSQL 宕机。
allowed: [0B, 4PiB]
example: archive-push-queue-max=1TiB
已弃用名称:archive-queue-max
归档超时选项(--archive-timeout) 归档超时时间。
设置等待每个 WAL 段到达 pgBackRest 归档仓库的最长时间(秒)。该超时适用于 check 和 backup 命令等待备份一致性所需的 WAL 段完成归档的场景。
default: 1m
allowed: [100ms, 1d]
example: archive-timeout=30
备份选项 backup 部分定义了与备份相关的设置。
备份注解选项(--annotation) 为备份附加用户自定义键值对注解。
用户可为备份附加信息性键值对。此选项可多次使用,以添加多条注解。
注解会在 info 命令通过 --set 指定备份时以文本形式输出,并始终出现在 JSON 输出中。
example: annotation=source="Sunday backup for website database"
归档检查选项(--archive-check) 在备份完成前检查 WAL 段是否已存在于归档中。
检查使备份一致所需的所有 WAL 段是否都已存在于 WAL 归档中。除非使用了其他归档方式,否则建议保留默认值。
若启用了 archive-copy,则必须同时启用此选项。
default: y
example: archive-check=n
归档复制选项(--archive-copy) 将保证一致性所需的 WAL 段复制到备份中。
此选项较为严格,通过将保证备份一致性所需的 WAL 段直接存储在备份中,防止因 WAL 段归档损坏而导致问题。WAL 段仍会存储在归档中,因此该选项会占用额外空间。
使用此选项时,最好让 archive-push 和 backup 命令使用相同的 compress-type(如 lz4)。否则,WAL 段需要使用备份所用的 compress-type 重新压缩,根据备份期间生成的 WAL 量,这可能代价较高。
恢复时,WAL 段将出现在 pg_xlog/pg_wal 中,PostgreSQL 会优先使用它们,而不是调用 restore_command。
若启用了 archive-copy,则必须同时启用 archive-check 选项。
default: n
example: archive-copy=y
归档模式检查选项(--archive-mode-check) 检查 PostgreSQL 的 archive_mode 设置。
默认启用,此选项禁止 PostgreSQL 使用 archive_mode=always。
从备库推送的 WAL 段在逻辑上可能与从主库推送的 WAL 段相同,但校验和不同。为避免冲突,建议禁止来自多个来源的归档。
注意:
若禁用此选项,则必须确保只有一个归档进程通过 archive-push 命令向仓库写入数据。
default: y
example: archive-mode-check=n
从备库备份选项(--backup-standby) 从备库执行备份。
启用从备库备份,以降低主库负载。此选项要求同时配置主库和备库主机。
支持以下模式:
y - 备份必须从备库执行。prefer - 优先从备库备份,若备库不可用则从主库备份。n - 仅从主库备份。default: n
example: backup-standby=y
页面校验和选项(--checksum-page) 验证数据页面校验和。
指示 pgBackRest 在备份集群时验证所有数据页面的校验和。当集群启用了数据页面校验和时,此选项会自动启用。
校验和验证失败不会中止备份,而是会在日志中(以及使用默认设置时在控制台中)输出警告,并将无效页面列表存储在备份的清单文件(manifest)中。
example: checksum-page=n
路径/文件排除选项(--exclude) 从备份中排除路径或文件。
所有排除路径均相对于 $PGDATA。若排除路径以 / 结尾,则仅排除指定目录中的文件,例如 --exclude=junk/ 将排除 $PGDATA/junk 目录中的所有文件,但保留该目录本身。若排除路径不以 / 结尾,则文件名可以精确匹配该排除路径,或匹配在其后追加 / 的路径,例如 --exclude=junk 将排除 $PGDATA/junk 目录及其所有文件。
请谨慎使用此功能——非常容易误排除关键内容而导致备份不一致。务必测试你的恢复流程!
所有被排除的文件都会以 info 级别记录到日志中,并附带排除规则。请务必审查被排除文件的列表,确认没有意外排除任何内容。
注意:
delta 恢复中不遵守排除规则。备份中被排除的文件/目录在 delta 恢复时将被删除 。
不建议使用此选项来排除 PostgreSQL 日志文件。可以通过 PostgreSQL 的 log_directory 设置将日志移出 PGDATA 目录,这还有一个好处,即恢复后日志仍可保留。
可以在命令行或配置文件中指定多个排除规则。
example: exclude=junk/
自动过期选项(--expire-auto) 在成功备份后自动执行 expire 命令。
此设置默认启用。禁用时请谨慎,因为这将导致所有备份和归档被无限期保留,可能耗尽仓库空间。禁用后需定期手动执行 expire 命令以防止此情况发生。
default: y
example: expire-auto=y
清单保存阈值选项(--manifest-save-threshold) 备份期间保存清单文件(manifest)的阈值。
定义备份过程中清单文件的保存频率。定期保存清单文件非常重要,因为它存储了校验和信息,使断点续传功能能够高效工作。实际使用的阈值为备份大小的 1% 与 manifest-save-threshold 中的较大值。
default: 1GiB
allowed: [1B, 1TiB]
example: manifest-save-threshold=8GiB
断点续传选项(--resume) 允许从失败的备份处断点续传。
定义是否启用断点续传功能。断点续传可以大幅减少在相同类型的上一次备份失败后重新执行备份所需的时间。但它也增加了复杂性,因此在不需要此功能的环境中可以选择禁用。
default: y
example: resume=n
快速启动选项(--start-fast) 强制执行检查点以快速启动备份。
通过强制执行检查点(向备份启动函数的 fast 参数传入 y),使备份立即开始,而不是等待下一个常规检查点。
default: n
example: start-fast=y
通用选项 general 部分定义了许多命令共用的选项。
缓冲区大小选项(--buffer-size) I/O 操作的缓冲区大小。
用于复制、压缩、加密及其他操作的缓冲区大小。实际使用的缓冲区数量取决于具体选项,每个操作可能会使用额外内存,例如 gz 压缩可能额外使用 256KiB 内存。
允许的值为:16KiB、32KiB、64KiB、128KiB、256KiB、512KiB、1MiB、2MiB、4MiB、8MiB 和 16MiB。
default: 1MiB
example: buffer-size=2MiB
pgBackRest 命令选项(--cmd) pgBackRest 可执行文件路径。
pgBackRest 在某些情况下需要生成命令字符串,例如 restore 命令生成 restore_command 设置时。此时将使用运行 pgBackRest 进程的命令,除非显式提供了 cmd 选项。
注意:
对 pgBackRest 命令进行包装可能导致不可预期的行为,不建议这样做。
default: [path of executed pgbackrest binary]
example: cmd=/var/lib/pgsql/bin/pgbackrest_wrapper.sh
SSH 客户端命令选项(--cmd-ssh) SSH 客户端命令。
当需要使用特定的 SSH 客户端,或 ssh 命令不在 $PATH 中时,使用此选项指定 SSH 客户端命令。
default: ssh
example: cmd-ssh=/usr/bin/ssh
压缩选项(--compress) 启用文件压缩。
备份文件与命令行压缩工具兼容。
此选项已弃用,请改用 compress-type 选项。
default: y
example: compress=n
压缩级别选项(--compress-level) 文件压缩级别。
当 compress-type 不等于 none 或使用(已弃用的)compress=y 时,设置文件压缩所使用的级别。
default (depending on compress-type):
bz2 - 9
gz - 6
lz4 - 1
zst - 3
allow range (depending on compress-type):
bz2 - [1, 9]
gz - [-1, 9]
lz4 - [-5, 12]
zst - [-7, 22]
example: compress-level=9
网络压缩级别选项(--compress-level-network) 网络传输压缩级别。
当 compress-type=none 且命令不在与仓库相同的主机上运行时,设置网络传输的压缩级别,以减少网络流量。当 compress-type 不等于 none 时,此设置将被忽略,改用 compress-level,从而只对文件压缩一次。
default: 1
allowed: [-5, 12]
example: compress-level-network=1
压缩类型选项(--compress-type) 文件压缩类型。
支持以下压缩类型:
none - 不压缩bz2 - bzip2 压缩格式gz - gzip 压缩格式lz4 - lz4 压缩格式(并非所有平台均可用)zst - Zstandard 压缩格式(并非所有平台均可用)default: gz
example: compress-type=none
数据库超时选项(--db-timeout) 数据库查询超时时间。
设置对数据库执行查询的超时时间(秒)。这包括备份启动/停止函数,这些函数各自可能耗费相当长的时间。因此,除非确信这些函数会快速返回(例如设置了 start-fast=y 且数据库集群在备份期间不会生成大量 WAL 段),否则应将此超时设置得较大。
注意:
db-timeout 选项的值必须小于 protocol-timeout 选项的值。
default: 30m
allowed: [100ms, 7d]
example: db-timeout=600
Delta 选项(--delta) 使用校验和进行恢复或备份。
执行恢复时,默认情况下 PostgreSQL 数据目录和表空间目录应已存在但为空。启用此选项后将使用校验和执行 delta 恢复。
执行备份时,此选项将使用校验和而非时间戳来判断文件是否需要复制。
default: n
example: delta=y
I/O 超时选项(--io-timeout) I/O 超时时间。
用于连接及读写操作的超时时间(秒)。
注意,整个读写操作不需要在此超时时间内完成,但必须有一定 进展,哪怕只是传输了一个字节。
default: 1m
allowed: [100ms, 1h]
example: io-timeout=120
锁文件路径选项(--lock-path) 锁文件存储路径。
pgBackRest 将锁文件存放在此路径下,以防止并发运行相互冲突的操作。
default: /tmp/pgbackrest
example: lock-path=/backup/db/lock
中性 umask 选项(--neutral-umask) 使用中性 umask。
将 umask 设置为 0000,以便以合理的方式创建仓库中的文件权限。默认目录权限为 0750,默认文件权限为 0640。锁文件和日志目录的目录权限和文件权限分别设置为 0770 和 0660。
若要使用运行用户自身的 umask,请在配置文件中指定 neutral-umask=n,或在命令行中使用 --no-neutral-umask。
default: y
example: neutral-umask=n
设置进程优先级选项(--priority) 设置进程优先级(nice 值)。
定义内核调度器为进程分配的优先级(即 nice 值)。正值降低优先级,负值提高优先级。大多数情况下,进程没有权限提高自身优先级。
allowed: [-20, 19]
example: priority=19
最大进程数选项(--process-max) 用于压缩/传输的最大进程数。
每个进程都会执行压缩和传输操作以加快命令运行速度,但不要将 process-max 设置得过高,以免影响数据库性能。
default: 1
allowed: [1, 999]
example: process-max=4
协议超时选项(--protocol-timeout) 协议超时时间。
设置本地或远程进程在协议层等待接收新消息的超时时间(秒),以防止进程无限期地等待消息。
注意:
protocol-timeout 选项的值必须大于 db-timeout 选项的值。
default: 31m
allowed: [100ms, 7d]
example: protocol-timeout=630
保持连接活跃选项(--sck-keep-alive) 启用 keep-alive。
在套接字连接上启用 keep-alive 消息。
default: y
example: sck-keep-alive=n
缓冲区路径选项(--spool-path) 临时数据存储路径。
此路径用于存储异步 archive-push 和 archive-get 命令的数据。
异步 archive-push 命令在成功将 WAL 存储到归档后,会向缓冲区路径写入确认信息(失败时写入错误信息),以便前台进程快速通知 PostgreSQL。确认文件非常小(成功时为零字节,错误时为几百字节)。
异步 archive-get 命令会将 WAL 缓存到缓冲区路径,以便在 PostgreSQL 请求时快速提供。当缓冲区路径与 pg_xlog/pg_wal 在同一文件系统上时,文件传输效率最高。但不建议将缓冲区路径放置在 pg_xlog/pg_wal 目录内部 ,这可能会给 pg_rewind 等 PostgreSQL 工具带来问题。
存储在缓冲区路径中的数据并非严格意义上的临时数据,因为它可以且应该在系统重启后保留。但缓冲区路径中的数据丢失也不会造成问题——pgBackRest 只需重新检查每个 WAL 段,以确保 archive-push 操作安全归档,并为 archive-get 重建队列。
缓冲区路径应位于本地 Posix 兼容文件系统上,而非 NFS 或 CIFS 等远程文件系统。
default: /var/spool/pgbackrest
example: spool-path=/backup/db/spool
keep-alive 计数选项(--tcp-keep-alive-count) keep-alive 探测包数量。
指定在连接被认为断开之前,可以丢失的 TCP keep-alive 消息数量。
此选项在支持 TCP_KEEPCNT 套接字选项的系统上可用。
allowed: [1, 32]
example: tcp-keep-alive-count=3
keep-alive 空闲时间选项(--tcp-keep-alive-idle) keep-alive 空闲等待时间。
指定在没有网络活动的情况下,操作系统发送 TCP keep-alive 消息之前的等待时间(秒)。
此选项在支持 TCP_KEEPIDLE 套接字选项的系统上可用。
allowed: [1, 3600]
example: tcp-keep-alive-idle=60
keep-alive 间隔选项(--tcp-keep-alive-interval) keep-alive 重传间隔时间。
指定在未收到确认的情况下,TCP keep-alive 消息被重新发送之前的等待时间(秒)。
此选项在支持 TCP_KEEPINTVL 套接字选项的系统上可用。
allowed: [1, 900]
example: tcp-keep-alive-interval=30
TLSv1.2 密码套件选项(--tls-cipher-12) 允许的 TLSv1.2 密码套件。
pgBackRest 客户端与服务端之间的所有 TLS 连接均已加密。默认情况下,连接到对象存储(如 S3)也会加密。
注意:
任何传输连接的最低安全级别为 TLSv1.2。
可以根据需要调整可接受的密码套件。除非有特定的安全要求,示例中的值是合理的选择。若未设置(默认),则使用底层 OpenSSL 库的默认值。
example: tls-cipher-12=HIGH:MEDIUM:+3DES:!aNULL
TLSv1.3 密码套件选项(--tls-cipher-13) 允许的 TLSv1.3 密码套件。
pgBackRest 客户端与服务端之间的所有 TLS 连接均已加密。默认情况下,连接到对象存储(如 S3)也会加密。
注意:
任何传输连接的最低安全级别为 TLSv1.2。
可以根据需要调整可接受的密码套件。若未设置(默认),则使用底层 OpenSSL 库的默认值。
example: tls-cipher-13=TLS_AES_256_GCM_SHA384:TLS_CHACHA20_POLY1305_SHA256
日志选项 log 部分定义了与日志相关的设置。
注意:
Trace 级别日志可能会暴露密钥和密码等敏感信息,请谨慎使用!
控制台日志级别选项(--log-level-console) 控制台日志级别。
支持以下日志级别:
off - 不记录任何日志(不推荐)error - 仅记录错误warn - 记录警告和错误info - 记录信息、警告和错误detail - 记录详细信息、信息、警告和错误debug - 记录调试、详细信息、信息、警告和错误trace - 记录追踪(非常详细的调试)、调试、信息、警告和错误default: warn
example: log-level-console=error
文件日志级别选项(--log-level-file) 文件日志级别。
支持以下日志级别:
off - 不记录任何日志(不推荐)error - 仅记录错误warn - 记录警告和错误info - 记录信息、警告和错误detail - 记录详细信息、信息、警告和错误debug - 记录调试、详细信息、信息、警告和错误trace - 记录追踪(非常详细的调试)、调试、信息、警告和错误default: info
example: log-level-file=debug
标准错误日志级别选项(--log-level-stderr) stderr 日志级别。
指定哪些日志级别将输出到 stderr 而不是 stdout(由 log-level-console 指定)。输出到 stderr 的日志不包含时间戳和进程信息。
支持以下日志级别:
off - 不记录任何日志(不推荐)error - 仅记录错误warn - 记录警告和错误info - 记录信息、警告和错误detail - 记录详细信息、信息、警告和错误debug - 记录调试、详细信息、信息、警告和错误trace - 记录追踪(非常详细的调试)、调试、信息、警告和错误default: off
example: log-level-stderr=error
日志路径选项(--log-path) 日志文件存储路径。
pgBackRest 将日志文件存放在此路径下。注意,若 log-level-file=off,则不需要日志路径。
default: /var/log/pgbackrest
example: log-path=/backup/db/log
子进程日志选项(--log-subprocess) 启用子进程日志记录。
为此进程创建的所有子进程启用文件日志记录,日志级别由 log-level-file 指定。
default: n
example: log-subprocess=y
日志时间戳选项(--log-timestamp) 启用日志时间戳。
在控制台和文件日志中启用时间戳。此选项在生成文档等特殊情况下会被禁用。
default: y
example: log-timestamp=n
维护者选项 维护者选项旨在支持 PostgreSQL 分支版本。正确的设置应由分支维护者确定,然后告知该分支的用户。
警告:
不当使用这些选项可能导致意外行为或数据损坏。
分支维护者有责任使用所需选项测试 pgBackRest 的兼容性。pgBackRest 不保证与任何分支版本的兼容性。
检查 WAL 头部中的 PostgreSQL 版本/ID。
默认启用,此选项会将 WAL 头部与 PostgreSQL 版本和系统标识符进行比对,以确保 WAL 被复制到正确的 stanza。这是在检查 pg_control 与 stanza 的匹配性、以及验证 WAL 来自 pg_control 所在的同一 PostgreSQL 数据目录之外的额外校验。
因此,禁用此检查相对安全,但仅在必要时才应禁用,例如 WAL 已加密的情况。
default: y
example: archive-header-check=n
检查 PostgreSQL 页头。
默认启用,此选项添加页头检查。
除非必要(例如页面已加密),否则应避免禁用此选项。
default: y
example: page-header-check=n
强制 PostgreSQL 版本选项(--pg-version-force) 强制指定 PostgreSQL 版本。
使用指定的 PostgreSQL 版本,而不是通过读取 pg_control 或 WAL 头部自动检测的版本。主要适用于 PostgreSQL 分支版本或开发版本,这些版本中的值可能与发行版本不同。PostgreSQL 通过 server_version_num 报告的版本必须与强制指定的版本匹配。
警告:
使用此选项时请谨慎,因为 pg_control 和 WAL 头部仍将按照指定版本的预期格式(即官方开源 PostgreSQL 版本的格式)进行读取。如果分支或开发版本更改了 pgBackRest 所依赖字段的格式,将导致意外行为。总体而言,此选项只有在分支将所有自定义结构成员添加在标准 PostgreSQL 成员之后 时,才能按预期工作。
example: pg-version-force=15
仓库选项 repository 部分定义了用于配置仓库的选项。
索引 :所有 repo- 选项均带有索引,以支持配置多个仓库。例如,单个仓库通过 repo1-path、repo1-host 等选项进行配置。若配置了多个仓库且命令未指定 --repo 选项,则按优先级从高到低依次操作各仓库(例如先 repo1 再 repo2)。
repo-retention-* 选项定义备份的保留时长。过期操作仅在完整备份数量超过允许的保留数量时才会发生。换言之,若 repo1-retention-full-type 设置为 count(默认),且 repo1-retention-full 设置为 2,则必须存在 3 个完整备份才会使最旧的备份过期。若 repo1-retention-full-type 设置为 time,则 repo1-retention-full 表示天数,只有当全量备份的累计天数超过此值时才会触发过期。请确保始终为"保留数量 + 1"个备份预留足够的存储空间。
Azure 仓库账户选项(--repo-azure-account) Azure 仓库账户。
用于存储仓库的 Azure 账户。
example: repo1-azure-account=pg-backup
Azure 仓库容器选项(--repo-azure-container) Azure 仓库容器。
用于存储仓库的 Azure 容器。
通过设置 repo-path=/,pgBackRest 仓库可以存储在容器根目录下,但通常最好指定一个前缀(如 /repo),以便日志和其他 Azure 生成的内容也能存储在该容器中。
example: repo1-azure-container=pg-backup
Azure 仓库端点选项(--repo-azure-endpoint) Azure 仓库端点。
用于连接 Blob 服务的端点。除非使用 Azure Government,否则默认值通常是正确的。
对于自定义/测试配置,repo-storage-ca-file、repo-storage-ca-path、repo-storage-host、repo-storage-port 和 repo-storage-verify-tls 等选项可能很有用。
default: blob.core.windows.net
example: repo1-azure-endpoint=blob.core.usgovcloudapi.net
Azure 仓库密钥选项(--repo-azure-key) Azure 仓库密钥。
根据 repo-azure-key-type 选项的设置,此选项为共享密钥或共享访问签名。
example: repo1-azure-key=T+9+aov82qNhrcXSNGZCzm9mjd4d75/oxxOr6r1JVpgTLA==
Azure 仓库密钥类型选项(--repo-azure-key-type) Azure 仓库密钥类型。
支持以下授权类型:
shared - 共享密钥sas - 共享访问签名auto - 使用 Azure 托管标识自动授权default: shared
example: repo1-azure-key-type=sas
Azure 仓库 URI 风格选项(--repo-azure-uri-style) Azure URI 风格。
支持以下 URI 风格:
host - 连接到 account.endpoint 主机。path - 连接到 endpoint 主机,并在 URI 中添加账户前缀。default: host
example: repo1-azure-uri-style=path
块增量备份选项(--repo-block) 启用块级增量备份。
块级备份通过将文件拆分为可独立备份的块,实现更细粒度的备份。这可以节省仓库空间,并在 delta 恢复时提升性能,因为可以直接获取单个块而无需从仓库读取整个文件。
注意:
必须先启用 repo-bundle 选项,才能启用 repo-block。
文件的块大小根据文件大小和存在时间确定。通常,较旧/较大的文件会获得更大的块大小。若文件足够旧,则不会使用块级增量备份。
块级增量备份在为所有备份类型(包括全量备份)启用时效率最高。这会使全量备份稍大,但后续的差异备份和增量备份可以利用全量备份生成的块映射来节省空间。
default: n
example: repo1-block=y
仓库包(Bundle)选项(--repo-bundle) 在仓库中将文件打包。
将较小的文件打包(合并)在一起,以减少写入仓库的文件总数。写入更少的文件通常效率更高,尤其是在 S3 等对象存储上。此外,零字节文件不会被存储(清单文件中除外),从而节省时间和空间。
default: n
example: repo1-bundle=y
仓库包大小限制选项(--repo-bundle-limit) 文件包的大小上限。
指定将被纳入包中的文件大小上限。超过此大小的文件将单独存储。
打包后的文件在备份断点续传时无法被复用,因此此选项控制哪些文件可以断点续传——较高的值意味着可续传的文件更少。
default: 2MiB
allowed: [8KiB, 1PiB]
example: repo1-bundle-limit=10MiB
仓库包目标大小选项(--repo-bundle-size) 文件包的目标大小。
定义添加到单个包中的文件总大小上限。大多数包会小于此大小,但某些包可能略大,因此不要将此选项设置为文件系统允许的最大值。
通常不建议将此选项设置得过高,因为重试时需要重新执行整个包的操作。
default: 20MiB
allowed: [1MiB, 1PiB]
example: repo1-bundle-size=10MiB
仓库加密密码选项(--repo-cipher-pass) 仓库加密密码。
用于加密/解密仓库文件的密码。
example: repo1-cipher-pass=zWaf6XtpjIVZC5444yXB+cgFDFl7MxGlgkZSaoPvTGirhPygu4jOKOXf9LO4vjfO
仓库加密类型选项(--repo-cipher-type) 仓库加密算法类型。
支持以下加密类型:
none - 仓库不加密aes-256-cbc - 256 位密钥长度的高级加密标准注意,即使仓库类型(如 S3)支持加密,加密操作始终在客户端执行。
default: none
example: repo1-cipher-type=aes-256-cbc
GCS 仓库存储桶选项(--repo-gcs-bucket) GCS 仓库存储桶。
用于存储仓库的 GCS 存储桶。
通过设置 repo-path=/,pgBackRest 仓库可以存储在存储桶根目录下,但通常最好指定一个前缀(如 /repo),以便日志和其他 GCS 生成的内容也能存储在该存储桶中。
example: repo1-gcs-bucket=/pg-backup
GCS 仓库端点选项(--repo-gcs-endpoint) GCS 仓库端点。
用于连接存储服务的端点。可以更新为使用本地 GCS 服务器或备用端点。
default: storage.googleapis.com
example: repo1-gcs-endpoint=localhost
GCS 仓库密钥选项(--repo-gcs-key) GCS 仓库密钥。
根据 repo-gcs-key-type 选项的设置,此选项为令牌或服务密钥文件。
example: repo1-gcs-key=/etc/pgbackrest/gcs-key.json
GCS 仓库密钥类型选项(--repo-gcs-key-type) GCS 仓库密钥类型。
支持以下授权类型:
auto - 使用实例服务账户授权。service - 使用本地存储的服务账户密钥。token - 用于本地测试,例如 fakegcs。当 repo-gcs-key-type=service 时,身份验证令牌续期时将重新加载凭据。
default: service
example: repo1-gcs-key-type=auto
GCS 仓库项目 ID 选项(--repo-gcs-user-project) GCS 项目 ID。
用于确定请求计费的 GCS 项目 ID。
example: repo1-gcs-user-project=my-project
仓库硬链接选项(--repo-hardlink) 在仓库中为备份之间的文件创建硬链接。
为差异备份和增量备份中的文件与其对应的全量备份启用硬链接。这在文件系统层面使每个备份看起来都像一个全量备份。但请注意,修改硬链接的文件会影响集合中的所有备份。
default: n
example: repo1-hardlink=y
已弃用名称:hardlink
仓库主机选项(--repo-host) 远程操作时的仓库主机。
若备份和归档到本地挂载的文件系统,则不需要此设置。
example: repo1-host=repo1.domain.com
已弃用名称:backup-host
仓库主机证书颁发机构文件选项(--repo-host-ca-file) 仓库主机证书颁发机构文件。
连接到仓库主机时,使用非系统默认的 CA 文件。
example: repo1-host-ca-file=/etc/pki/tls/certs/ca-bundle.crt
仓库主机证书颁发机构路径选项(--repo-host-ca-path) 仓库主机证书颁发机构路径。
连接到仓库主机时,使用非系统默认的 CA 路径。
example: repo1-host-ca-path=/etc/pki/tls/certs
仓库主机证书文件选项(--repo-host-cert-file) 仓库主机证书文件。
发送给仓库主机以证明客户端身份。
example: repo1-host-cert-file=/path/to/client.crt
仓库主机命令选项(--repo-host-cmd) 仓库主机上的 pgBackRest 命令路径。
仅当本地主机和仓库主机上的 pgBackRest 命令路径不同时才需要设置。若未定义,仓库主机命令将与本地命令相同。
default: [path of executed pgbackrest binary]
example: repo1-host-cmd=/usr/lib/backrest/bin/pgbackrest
已弃用名称:backup-cmd
仓库主机配置选项(--repo-host-config) 仓库主机上的 pgBackRest 配置文件路径。
设置仓库主机上配置文件的位置。仅当仓库主机上的配置文件与本地配置文件位于不同位置时才需要设置。
default: CFGOPTDEF_CONFIG_PATH "/" PROJECT_CONFIG_FILE
example: repo1-host-config=/conf/pgbackrest/pgbackrest.conf
已弃用名称:backup-config
仓库主机配置包含路径选项(--repo-host-config-include-path) 仓库主机上的 pgBackRest 配置包含路径。
设置仓库主机上配置包含路径的位置。仅当仓库主机上的配置包含路径与本地配置包含路径位于不同位置时才需要设置。
default: CFGOPTDEF_CONFIG_PATH "/" PROJECT_CONFIG_INCLUDE_PATH
example: repo1-host-config-include-path=/conf/pgbackrest/conf.d
仓库主机配置路径选项(--repo-host-config-path) 仓库主机上的 pgBackRest 配置路径。
设置仓库主机上配置路径的位置。仅当仓库主机上的配置路径与本地配置路径位于不同位置时才需要设置。
default: CFGOPTDEF_CONFIG_PATH
example: repo1-host-config-path=/conf/pgbackrest
仓库主机密钥文件选项(--repo-host-key-file) 仓库主机密钥文件。
证明客户端证书由所有者发送。
example: repo1-host-key-file=/path/to/client.key
仓库主机端口选项(--repo-host-port) 仓库主机端口。
设置 repo-host 时,使用此选项为仓库主机协议指定非默认端口。
注意:
当 repo-host-type=ssh 时,repo-host-port 没有默认值。此时端口将使用 cmd-ssh 指定命令所配置的端口。
default (depending on repo-host-type):
tls - 8432
allowed: [0, 65535]
example: repo1-host-port=25
已弃用名称:backup-ssh-port
仓库主机协议类型选项(--repo-host-type) 仓库主机协议类型。
支持以下协议类型:
ssh - 安全外壳协议(Secure Shell)。tls - pgBackRest TLS 服务端。default: ssh
example: repo1-host-type=tls
仓库主机用户选项(--repo-host-user) 仓库主机登录用户。
设置 repo-host 时,定义在仓库主机上执行操作的用户。最好不要使用 postgres 用户,而是使用 pgbackrest 等其他用户。若 PostgreSQL 运行在仓库主机上,可以将 postgres 用户加入 pgbackrest 组,使其对仓库拥有读取权限,同时避免意外损坏仓库内容。
default: pgbackrest
example: repo1-host-user=repo-user
已弃用名称:backup-user
仓库路径选项(--repo-path) 备份和归档的存储路径。
仓库是 pgBackRest 存储备份和归档 WAL 段的地方。
提前估算所需空间可能比较困难。最好的方法是先执行一些备份,然后记录不同类型备份(全量/增量/差异)的大小,并测量每天生成的 WAL 量。这可以让你对所需空间有一个大致了解,当然随着数据库的增长,需求也会随时间变化。
default: /var/lib/pgbackrest
example: repo1-path=/backup/db/backrest
归档保留选项(--repo-retention-archive) 保留连续 WAL 归档所对应的备份数量。
注意:
使备份保持一致性所需的 WAL 段,无论此选项如何配置,在备份过期之前都会始终保留。
若未设置此值且 repo-retention-full-type 为 count(默认),则归档过期策略将默认使用与 repo-retention-archive-type 对应的 repo-retention-full(或 repo-retention-diff)值(若类型为 full 或 diff)。这将确保 WAL 仅在对应备份已过期后才过期。若 repo-retention-full-type 为 time,则此值将默认删除早于满足 repo-retention-full 设置后所保留的最旧全量备份的归档。
若 repo-retention-archive-type 设置为 incr,则必须设置此选项。若磁盘空间紧张,可以结合 repo-retention-archive-type 使用此选项来积极清理 WAL 段。但这样做会使具有已过期 WAL 的备份无法执行 PITR,因此不 推荐这样做。
allowed: [1, 9999999]
example: repo1-retention-archive=2
已弃用名称:retention-archive
归档保留类型选项(--repo-retention-archive-type) WAL 归档保留所依据的备份类型。
若设置为 full,pgBackRest 将为 repo-retention-archive 定义的全量备份数量保留归档日志。若设置为 diff(差异),pgBackRest 将为 repo-retention-archive 定义的全量备份和差异备份数量保留归档日志,即若最近一次备份是全量备份,则在计算 repo-retention 时将其视为差异备份。若设置为 incr(增量),pgBackRest 将为 repo-retention-archive 定义的全量、差异和增量备份数量保留归档日志。建议保留此设置的默认值——默认行为仅在全量备份过期时才清理 WAL。
default: full
example: repo1-retention-archive-type=diff
已弃用名称:retention-archive-type
差异备份保留选项(--repo-retention-diff) 保留的差异备份数量。
差异备份过期时,与该差异备份关联的所有增量备份也会一并过期。若未定义此选项,则所有差异备份将保留至其依赖的全量备份过期为止。
注意,在计算过期时,全量备份也会被计入差异备份的数量。这在大多数情况下会略微减少需要保留的差异备份数量。
allowed: [1, 9999999]
example: repo1-retention-diff=3
已弃用名称:retention-diff
全量备份保留选项(--repo-retention-full) 全量备份保留数量或时间。
全量备份过期时,与该全量备份关联的所有差异和增量备份也会一并过期。若未定义此选项,将发出警告。若希望永久保留,可将此选项设置为最大值。
allowed: [1, 9999999]
example: repo1-retention-full=2
已弃用名称:retention-full
全量备份保留类型选项(--repo-retention-full-type) 全量备份的保留类型。
确定 repo-retention-full 设置表示时间周期(天数)还是要保留的全量备份数量。
若设置为 time,则早于 repo-retention-full 天数的全量备份将从仓库中删除,前提是至少还存在另一个满足或超过 repo-retention-full 设置的备份。例如,若 repo-retention-full 为 30(天),且存在两个全量备份:一个 25 天前,一个 35 天前,则不会过期任何全量备份,因为使 35 天前的备份过期将只剩下 25 天前的备份,违反了在过期较旧备份之前至少保留一个 30 天备份的策略。早于保留的最旧全量备份的归档 WAL 将自动过期,除非显式设置了 repo-retention-archive-type 和 repo-retention-archive。
若设置为 count,则超过 repo-retention-full 数量的全量备份将过期。例如,若 repo-retention-full 为 4,完成第五个全量备份后,最旧的全量备份将过期,使数量保持在 4 个。
注意,备份必须成功完成后才会纳入保留计算。例如,若 repo-retention-full-type 为 count 且 repo-retention-full 为 2,则必须有 3 个完整的全量备份,最旧的才会过期。
default: count
example: repo1-retention-full-type=time
备份历史保留选项(--repo-retention-history) 备份历史清单的保留天数。
备份完成时,备份清单文件(manifest)的副本将存储在 backup.history 路径中。默认情况下,这些文件永不过期,因为它们对数据分析(例如测量备份和 WAL 的增长趋势)很有价值。
设置 repo-retention-history 以定义保留备份历史清单的天数。未过期的备份始终保留在备份历史中。指定 repo-retention-history=0 仅为未过期的备份保留备份历史。
当全量备份历史清单过期时,与该全量备份关联的所有差异和增量备份历史清单也会一并过期。
allowed: [0, 9999999]
example: repo1-retention-history=365
S3 仓库存储桶选项(--repo-s3-bucket) S3 仓库存储桶。
用于存储仓库的 S3 存储桶。
通过设置 repo-path=/,pgBackRest 仓库可以存储在存储桶根目录下,但通常最好指定一个前缀(如 /repo),以便日志和其他 AWS 生成的内容也能存储在该存储桶中。
example: repo1-s3-bucket=pg-backup
S3 仓库端点选项(--repo-s3-endpoint) S3 仓库端点。
AWS 端点应与所选区域匹配。
对于自定义/测试配置,repo-storage-ca-file、repo-storage-ca-path、repo-storage-host、repo-storage-port 和 repo-storage-verify-tls 等选项可能很有用。
example: repo1-s3-endpoint=s3.amazonaws.com
S3 仓库访问密钥选项(--repo-s3-key) S3 仓库访问密钥。
用于访问此存储桶的 AWS 密钥。
example: repo1-s3-key=AKIAIOSFODNN7EXAMPLE
S3 仓库秘密访问密钥选项(--repo-s3-key-secret) S3 仓库秘密访问密钥。
用于访问此存储桶的 AWS 秘密密钥。
example: repo1-s3-key-secret=wJalrXUtnFEMI/K7MDENG/bPxRfiCYEXAMPLEKEY
S3 仓库密钥类型选项(--repo-s3-key-type) S3 仓库密钥类型。
支持以下类型:
shared - 共享密钥auto - 自动获取临时凭据web-id - 自动获取 Web 身份凭据default: shared
example: repo1-s3-key-type=auto
S3 仓库 KMS 密钥 ID 选项(--repo-s3-kms-key-id) S3 仓库 KMS 密钥。
使用指定的 AWS 密钥管理服务密钥启用 S3 服务端加密。
example: repo1-s3-kms-key-id=bceb4f13-6939-4be3-910d-df54dee817b7
S3 仓库区域选项(--repo-s3-region) S3 仓库区域。
创建存储桶所在的 AWS 区域。
example: repo1-s3-region=us-east-1
S3 仓库请求者付费选项(--repo-s3-requester-pays) S3 请求者付费模式。
启用 S3 请求者付费模式。
default: n
example: repo1-s3-requester-pays=n
S3 仓库角色选项(--repo-s3-role) S3 仓库 IAM 角色。
当 repo-s3-key-type=auto 时,用于获取临时凭据的 AWS 角色名称(非完整 ARN)。
example: repo1-s3-role=authrole
S3 仓库 SSE 客户密钥选项(--repo-s3-sse-customer-key) S3 仓库 SSE 客户密钥。
使用指定的客户密钥启用 S3 服务端加密。
example: repo1-s3-sse-customer-key=bceb4f13-6939-4be3-910d-df54dee817b7
S3 仓库安全令牌选项(--repo-s3-token) S3 仓库安全令牌。
与临时凭据一起使用的 AWS 安全令牌。
example: repo1-s3-token=AQoDYXdzEPT//////////wEXAMPLEtc764bNrC9SAPBSM22 ...
S3 仓库 URI 风格选项(--repo-s3-uri-style) S3 URI 风格。
支持以下 URI 风格:
host - 连接到 bucket.endpoint 主机。path - 连接到 endpoint 主机,并在 URI 中添加存储桶前缀。default: host
example: repo1-s3-uri-style=path
SFTP 仓库主机选项(--repo-sftp-host) SFTP 仓库主机。
包含仓库的 SFTP 主机。
example: repo1-sftp-host=sftprepo.domain
SFTP 仓库主机指纹选项(--repo-sftp-host-fingerprint) SFTP 仓库主机指纹。
SFTP 仓库主机指纹的生成方式应与 repo-sftp-host-key-hash-type 匹配。可通过 awk '{print $2}' ssh_host_xxx_key.pub | base64 -d | (md5sum or sha1sum) -b 生成指纹。SSH 主机密钥通常位于 /etc/ssh 目录中。
example: repo1-sftp-host-fingerprint=f84e172dfead7aeeeae6c1fdfb5aa8cf
SFTP 主机密钥检查类型选项(--repo-sftp-host-key-check-type) SFTP 主机密钥检查类型。
支持以下 SFTP 主机密钥检查类型:
strict - pgBackRest 永远不会自动将主机密钥添加到 ~/.ssh/known_hosts 文件中,并拒绝连接到主机密钥已更改或在已知主机文件中未找到的主机。此选项要求用户手动添加所有新主机。accept-new - pgBackRest 会自动将新主机密钥添加到用户的已知主机文件中,但不允许连接到主机密钥已更改的主机。fingerprint - pgBackRest 将根据 repo-sftp-host-fingerprint 选项指定的指纹检查主机密钥。none - 不执行主机密钥检查。default: strict
example: repo1-sftp-host-key-check-type=accept-new
SFTP 仓库主机密钥哈希类型选项(--repo-sftp-host-key-hash-type) SFTP 仓库主机密钥哈希类型。
声明在 SSH 启动时用于计算远程系统主机密钥摘要的哈希类型。较新版本的 libssh2 除 md5 和 sha1 外,还支持 sha256。
example: repo1-sftp-host-key-hash-type=sha256
SFTP 仓库主机端口选项(--repo-sftp-host-port) SFTP 仓库主机端口。
default: 22
allowed: [1, 65535]
example: repo1-sftp-host-port=22
SFTP 仓库主机用户选项(--repo-sftp-host-user) SFTP 仓库主机用户。
用于存储仓库的主机上的用户。
example: repo1-sftp-host-user=pg-backup
SFTP 已知主机文件选项(--repo-sftp-known-host) SFTP 已知主机文件。
身份验证期间,在此文件中搜索 SFTP 主机匹配项。若未指定,pgBackRest 默认搜索 ~/.ssh/known_hosts、~/.ssh/known_hosts2、/etc/ssh/ssh_known_hosts 和 /etc/ssh/ssh_known_hosts2。若配置了一个或多个文件路径,pgBackRest 将在这些路径中搜索匹配项。文件路径必须是完整路径或以波浪号开头的路径。此选项可以多次传入,以指定多个已知主机文件进行搜索。要使用已知主机文件检查,不得指定 repo-sftp-host-fingerprint。另请参阅 repo-sftp-host-check-type 选项。
example: repo1-sftp-known-host=/home/postgres/.ssh/known_hosts
SFTP 仓库私钥文件选项(--repo-sftp-private-key-file) SFTP 私钥文件。
用于身份验证的 SFTP 私钥文件。
example: repo1-sftp-private-key-file=~/.ssh/id_ed25519
SFTP 仓库私钥密码选项(--repo-sftp-private-key-passphrase) SFTP 私钥密码。
用于访问私钥的密码。在创建 SSH 公钥/私钥对时,这是一个可选功能。
example: repo1-sftp-private-key-passphrase=BeSureToGenerateAndUseASecurePassphrase
SFTP 仓库公钥文件选项(--repo-sftp-public-key-file) SFTP 公钥文件。
用于身份验证的 SFTP 公钥文件。若针对 OpenSSL 编译,此项为可选;若针对其他库编译,则为必填。
example: repo1-sftp-public-key-file=~/.ssh/id_ed25519.pub
仓库存储 CA 文件选项(--repo-storage-ca-file) 仓库存储 CA 文件。
连接存储(如 S3、Azure)时,使用非系统默认的 CA 文件。
example: repo1-storage-ca-file=/etc/pki/tls/certs/ca-bundle.crt
已弃用名称:repo-azure-ca-file、repo-s3-ca-file
仓库存储 TLS CA 路径选项(--repo-storage-ca-path) 仓库存储 CA 路径。
连接存储(如 S3、Azure)时,使用非系统默认的 CA 路径。
example: repo1-storage-ca-path=/etc/pki/tls/certs
已弃用名称:repo-azure-ca-path、repo-s3-ca-path
仓库存储主机选项(--repo-storage-host) 仓库存储主机。
连接到存储(如 S3、Azure)端点之外的其他主机。通常用于测试。
example: repo1-storage-host=127.0.0.1
已弃用名称:repo-azure-host、repo-s3-host
仓库存储端口选项(--repo-storage-port) 仓库存储端口。
连接到存储(如 S3、Azure)端点(或指定主机)时使用的端口。
default: 443
allowed: [1, 65535]
example: repo1-storage-port=9000
已弃用名称:repo-azure-port、repo-s3-port
仓库存储标签选项(--repo-storage-tag) 仓库存储标签。
当仓库为对象存储(如 S3)时,指定添加到对象上的标签。可重复使用此选项以添加多个标签。
pgBackRest 没有提供修改这些标签的功能,因此请在运行 stanza-create 之前正确设置,以确保整个仓库的标签统一。
example: repo1-storage-tag=key1=value1
仓库存储上传块大小选项(--repo-storage-upload-chunk-size) 仓库存储上传块大小。
当文件过大无法完全存储在内存中时,S3 等对象存储允许分块上传文件。即使文件可以存储在内存中,限制上传所用的内存量也更为高效。
较大的块大小通常可以提升性能,因为它会减少上传请求次数,并允许在单个请求中上传更多文件而非分块上传。缺点是内存使用量会更高——由于块缓冲区需要按进程分配,较大的 process-max 值将导致整体内存消耗更多。
请注意,有效的块大小因存储类型和平台而异。例如,AWS S3 的最小块大小为 5MiB。块大小的术语因存储类型而异,因此在搜索最小/最大值时,AWS S3 使用"part size",GCS 使用"chunk size",Azure 使用"block size"。
若文件大于 1GiB(PostgreSQL 默认创建的最大文件大小),则块大小将逐步增加直至允许的最大值,以完成文件上传。
default (depending on repo-type):
azure - 4MiB
gcs - 4MiB
s3 - 5MiB
allow range (depending on repo-type):
azure - [4MiB, 1GiB]
gcs - [4MiB, 1GiB]
s3 - [5MiB, 1GiB]
example: repo1-storage-upload-chunk-size=16MiB
仓库存储证书验证选项(--repo-storage-verify-tls) 仓库存储证书验证。
启用或禁用对存储(如 S3、Azure)服务端 TLS 证书的验证。禁用此选项仅应用于测试场景或使用自签名证书的情况。
default: y
example: repo1-storage-verify-tls=n
已弃用名称:repo-azure-verify-tls、repo-s3-verify-ssl、repo-s3-verify-tls
仓库符号链接选项(--repo-symlink) 在仓库中创建符号链接。
启用 latest 和表空间符号链接的创建。这些符号链接在使用快照进行原地恢复时最为有用,这是一种不常见的使用场景。
此功能对绝大多数用户可能没有实际用途,但出于历史兼容性原因仍默认启用。对于不支持符号链接的类 Posix 存储,禁用符号链接可能是有益的。
default: y
example: repo1-symlink=n
仓库目标时间选项(--repo-target-time) 仓库的目标时间点。
目标时间定义了命令用于读取版本化存储上仓库的时间点。这允许命令以某个历史时间点的视角读取仓库,以恢复被用户误操作或恶意软件删除或损坏的数据。
版本化存储由 S3、GCS 和 Azure 支持,但通常默认不启用。除了启用版本控制外,为 S3 启用对象锁定,以及为 GCS 或 Azure 启用软删除也可能很有用。
指定 repo-target-time 选项时,必须同时提供 repo 选项。通常并非所有仓库类型都支持版本控制,一般建议针对单个仓库进行恢复。
注意,与存储时间戳的比较为小于等于(<=)所提供的时间戳,且提供的时间戳中的毫秒部分将被截断。
example: repo-target-time=2024-08-08 12:12:12+00
仓库类型选项(--repo-type) 仓库使用的存储类型。
支持以下仓库类型:
azure - Azure Blob 存储服务cifs - 类似 posix,但禁用链接和目录 fsyncgcs - Google Cloud Storageposix - 符合 Posix 规范的文件系统s3 - AWS 简单存储服务(Simple Storage Service)sftp - 安全文件传输协议(SFTP)当使用 NFS 挂载作为 posix 仓库时,适用于 pgBackRest 的规则与 PostgreSQL 文档中描述的相同,请参阅 Creating a Database Cluster - File Systems
default: posix
example: repo1-type=cifs
恢复选项 restore 部分定义了用于恢复备份的设置。
归档模式选项(--archive-mode) 在已恢复的集群上保留或禁用归档。
此选项允许在已恢复的集群上保留或禁用归档。当集群必须被提升以执行某些操作,但不打算成为新的主库时,此选项很有用。在这种情况下,不应从该集群向仓库推送 WAL。
支持以下模式:
off - 通过设置 archive_mode=off 禁用归档。preserve - 保留当前的 archive_mode 设置。注意 :此选项在 PostgreSQL 12 以下版本不可用。
default: preserve
example: archive-mode=off
排除数据库选项(--db-exclude) 排除指定数据库进行恢复。
被排除的数据库将以稀疏零填充文件的形式恢复,以节省空间,同时仍允许 PostgreSQL 执行恢复。恢复完成后,这些数据库将无法访问,但可以使用 drop database 命令将其删除。此选项可以多次传入,以指定多个要排除的数据库。
与 --db-include 选项一起使用时,--db-exclude 仅适用于标准系统数据库(template0、template1 和 postgres)。
example: db-exclude=db_main
包含数据库选项(--db-include) 仅恢复指定的数据库。
此功能允许仅恢复选定的数据库。未明确包含的数据库将以稀疏零填充文件的形式恢复,以节省空间,同时仍允许 PostgreSQL 执行恢复。恢复完成后,未包含的数据库将无法访问,但可以使用 drop database 命令将其删除。
注意:
内置数据库(template0、template1 和 postgres)始终会被恢复,除非被明确排除。
此选项可以多次传入,以指定多个要包含的数据库。
详细信息和注意事项请参阅 选择性数据库恢复
example: db-include=db_main
链接全部选项(--link-all) 恢复所有符号链接。
默认情况下,符号链接的目录和文件在 $PGDATA 中被恢复为普通目录和文件。这是因为在不同于原始备份执行的系统上,将符号链接恢复到其原始目标位置可能不安全。此选项将完全按照原始系统中的状态恢复所有符号链接。
default: n
example: link-all=y
链接映射选项(--link-map) 修改符号链接的目标路径。
允许在恢复时更改符号链接的目标文件或路径。当恢复目标系统的存储布局与原始备份系统不同时,此选项很有用。
example: link-map=pg_xlog=/data/xlog
恢复选项设置(--recovery-option) 在 postgresql.auto.conf 或 recovery.conf 中设置选项。
有关 postgresql.auto.conf 或 recovery.conf 选项的详情,请参阅 Server Configuration
对于 PostgreSQL >= 12,选项将写入 postgresql.auto.conf。对于所有其他版本,选项将写入 recovery.conf。
注意:
restore_command 选项将自动生成,但可以通过此选项覆盖。请谨慎指定自定义 restore_command,因为 pgBackRest 本身已设计为处理此项。目标恢复选项(recovery_target_name、recovery_target_time 等)由 pgBackRest 自动生成,不应通过此选项设置。
由于 pgBackRest 在写入 postgresql.auto.conf 或 recovery.conf 文件后不会启动 PostgreSQL,因此在手动重启之前,始终可以编辑/检查 postgresql.auto.conf 或 recovery.conf。
example: recovery-option=primary_conninfo=db.mydomain.com
表空间映射选项(--tablespace-map) 将表空间恢复到指定目录。
在恢复期间将表空间移动到新位置。当副本或升级后的系统挂载点不同时,此功能很有用。
表空间位置不存储在 pg_tablespace 中,因此可以随意移动表空间。但不建议将表空间移动到 data_directory,这可能会导致问题。有关移动表空间的更多信息,Moving Tablespaces
example: tablespace-map=ts_01=/db/ts_01
所有表空间映射选项(--tablespace-map-all) 将所有表空间恢复到指定目录。
默认情况下,表空间被恢复到其原始位置。可以使用 tablespace-map 选项为每个表空间单独修改此行为,但有时将所有表空间一次性重新映射到新目录更为方便。这在开发或测试环境中尤为有用,因为这些环境的存储布局可能与生产环境不同。
指定的路径将作为父路径,用于创建备份中的所有表空间。
注意:
备份启动后创建的表空间将不会被映射。若需要表空间映射,请在创建表空间后执行新的备份。
example: tablespace-map-all=/data/tablespace
服务端选项 server 部分定义了用于配置 TLS 服务端的选项。
TLS 服务端地址选项(--tls-server-address) TLS 服务端监听地址。
服务端监听客户端请求的 IP 地址。
default: localhost
example: tls-server-address=*
TLS 服务端授权客户端选项(--tls-server-auth) TLS 服务端授权客户端列表。
服务端通过验证客户端证书,将客户端证书 CN(Common Name,通用名称)与 tls-server-auth 选项配置的列表进行比对,来完成客户端授权。
可以通过向 tls-server-auth 选项提供逗号分隔的列表,为一个客户端 CN 授权多个 stanza;也可以通过指定 tls-server-auth=client-cn=* 授权所有 stanza。客户端 CN 不支持通配符。
example: tls-server-auth=client-cn=stanza1,stanza2
TLS 服务端证书颁发机构选项(--tls-server-ca-file) TLS 服务端证书颁发机构文件。
验证客户端证书是否由受信任的证书颁发机构签名。
example: tls-server-ca-file=/path/to/server.ca
TLS 服务端证书选项(--tls-server-cert-file) TLS 服务端证书文件。
发送给客户端以展示服务端身份。
example: tls-server-cert-file=/path/to/server.crt
TLS 服务端密钥选项(--tls-server-key-file) TLS 服务端密钥文件。
证明服务端证书由所有者发送。
example: tls-server-key-file=/path/to/server.key
TLS 服务端端口选项(--tls-server-port) TLS 服务端监听端口。
服务端监听客户端请求的端口。
default: 8432
allowed: [1, 65535]
example: tls-server-port=8000
Stanza 选项 stanza(stanza 是 pgBackRest 中用于标识一个 PostgreSQL 集群备份配置的逻辑名称)定义了特定 PostgreSQL 数据库集群的备份配置。stanza 部分必须定义数据库集群路径,若数据库集群为远程,则还需定义主机/用户信息。此外,任何全局配置部分均可被覆盖,以定义 stanza 特定的设置。
索引 :所有 pg- 选项均带有索引,以支持配置多个 PostgreSQL 主机。例如,单个主库通过 pg1-path、pg1-port 等选项进行配置。若配置了备库,则在仓库主机上将 pg- 选项索引为 pg2-(如 pg2-host、pg2-path 等)。
PostgreSQL 数据库选项(--pg-database) 连接 PostgreSQL 时使用的数据库名称。
默认值通常是最佳选择,但某些安装可能不包含此数据库。
注意,出于历史兼容性原因,PGDATABASE 环境变量的设置将被忽略。
default: postgres
example: pg1-database=backupdb
PostgreSQL 主机选项(--pg-host) 远程操作时的 PostgreSQL 主机。
用于 PostgreSQL 主机与仓库主机不同的备份场景。
example: pg1-host=db.domain.com
已弃用名称:db-host
PostgreSQL 主机证书颁发机构文件选项(--pg-host-ca-file) PostgreSQL 主机证书颁发机构文件。
连接到 PostgreSQL 主机时,使用非系统默认的 CA 文件。
example: pg1-host-ca-file=/etc/pki/tls/certs/ca-bundle.crt
PostgreSQL 主机证书颁发机构路径选项(--pg-host-ca-path) PostgreSQL 主机证书颁发机构路径。
连接到 PostgreSQL 主机时,使用非系统默认的 CA 路径。
example: pg1-host-ca-path=/etc/pki/tls/certs
PostgreSQL 主机证书文件选项(--pg-host-cert-file) PostgreSQL 主机证书文件。
发送给 PostgreSQL 主机以证明客户端身份。
example: pg1-host-cert-file=/path/to/client.crt
PostgreSQL 主机命令选项(--pg-host-cmd) PostgreSQL 主机上的 pgBackRest 命令路径。
仅当本地主机和 PostgreSQL 主机上的 pgBackRest 命令路径不同时才需要设置。若未定义,PostgreSQL 主机命令将与本地命令相同。
default: [path of executed pgbackrest binary]
example: pg1-host-cmd=/usr/lib/backrest/bin/pgbackrest
已弃用名称:db-cmd
PostgreSQL 主机配置选项(--pg-host-config) PostgreSQL 主机上的 pgBackRest 配置文件路径。
设置 PostgreSQL 主机上配置文件的位置。仅当 PostgreSQL 主机上的配置文件与本地配置文件位于不同位置时才需要设置。
default: CFGOPTDEF_CONFIG_PATH "/" PROJECT_CONFIG_FILE
example: pg1-host-config=/conf/pgbackrest/pgbackrest.conf
已弃用名称:db-config
PostgreSQL 主机配置包含路径选项(--pg-host-config-include-path) PostgreSQL 主机上的 pgBackRest 配置包含路径。
设置 PostgreSQL 主机上配置包含路径的位置。仅当 PostgreSQL 主机上的配置包含路径与本地配置包含路径位于不同位置时才需要设置。
default: CFGOPTDEF_CONFIG_PATH "/" PROJECT_CONFIG_INCLUDE_PATH
example: pg1-host-config-include-path=/conf/pgbackrest/conf.d
PostgreSQL 主机配置路径选项(--pg-host-config-path) PostgreSQL 主机上的 pgBackRest 配置路径。
设置 PostgreSQL 主机上配置路径的位置。仅当 PostgreSQL 主机上的配置路径与本地配置路径位于不同位置时才需要设置。
default: CFGOPTDEF_CONFIG_PATH
example: pg1-host-config-path=/conf/pgbackrest
PostgreSQL 主机密钥文件选项(--pg-host-key-file) PostgreSQL 主机密钥文件。
证明客户端证书由所有者发送。
example: pg1-host-key-file=/path/to/client.key
PostgreSQL 主机端口选项(--pg-host-port) PostgreSQL 主机端口。
设置 pg-host 时,使用此选项为 PostgreSQL 主机协议指定非默认端口。
注意:
当 pg-host-type=ssh 时,pg-host-port 没有默认值。此时端口将使用 cmd-ssh 指定命令所配置的端口。
default (depending on pg-host-type):
tls - 8432
allowed: [0, 65535]
example: pg1-host-port=25
已弃用名称:db-ssh-port
PostgreSQL 主机协议类型选项(--pg-host-type) PostgreSQL 主机协议类型。
支持以下协议类型:
ssh - 安全外壳协议(Secure Shell)。tls - pgBackRest TLS 服务端。default: ssh
example: pg1-host-type=tls
PostgreSQL 主机用户选项(--pg-host-user) PostgreSQL 主机登录用户。
设置 pg-host 时,指定此用户。该用户还将拥有远程 pgBackRest 进程,并将发起到 PostgreSQL 的连接。为使其正常工作,该用户应为 PostgreSQL 数据库集群的所有者,通常为 postgres(即默认值)。
default: postgres
example: pg1-host-user=db_owner
已弃用名称:db-user
PostgreSQL 路径选项(--pg-path) PostgreSQL 数据目录。
应与 PostgreSQL 报告的 data_directory 相同。尽管可以从多处读取此值,但为防止在恢复或离线备份场景中这些资源不可用,建议在配置文件中明确设置。
每次在线备份时,pg-path 选项都会与 PostgreSQL 报告的值进行比对,因此应始终保持最新。
example: pg1-path=/data/db
已弃用名称:db-path
PostgreSQL 端口选项(--pg-port) PostgreSQL 端口。
PostgreSQL 运行的端口。由于大多数 PostgreSQL 集群使用默认端口,通常不需要指定此选项。
default: 5432
allowed: [0, 65535]
example: pg1-port=6543
已弃用名称:db-port
PostgreSQL Unix 套接字路径选项(--pg-socket-path) PostgreSQL Unix 套接字目录路径。
启动 PostgreSQL 时指定的 Unix 套接字目录。pgBackRest 会自动查找操作系统的标准位置,因此通常不需要指定此设置,除非通过 postgresql.conf 中的 unix_socket_directories 显式修改了套接字目录。
example: pg1-socket-path=/var/run/postgresql
已弃用名称:db-socket-path
PostgreSQL 数据库用户选项(--pg-user) 连接 PostgreSQL 时使用的数据库用户名。
若未指定,pgBackRest 将使用本地操作系统用户或 PGUSER 进行连接。
example: pg1-user=backupuser
28.6 - 常见问题解答 关于 pgBackRest 备份、恢复、配置与故障排查的常见问题解答。
原始页面: https://pgbackrest.org/faq.html
简介 常见问题解答旨在针对一些具体问题提供详细说明,这些问题可能未在用户指南、配置参考或命令参考中涵盖。如果在此处找不到您的问题,pgBackRest 在 GitHub 上的 Issues List
遇到"could not find WAL segment"错误该怎么办? 此错误可能有多种原因,包括但不限于:
archive_command 配置错误pgBackRest 配置文件配置错误 网络或权限问题 第三方产品(如 S3、Swift 或 MinIO)配置问题 大量 WAL 积压等待归档 建议按以下步骤排查:
检查 PostgreSQL 中的 archive_command 配置 检查每台主机上的 pgBackRest 配置(例如,pg* 系列选项应配置在仓库主机上,repo* 系列选项应配置在数据库主机上) 使用比配置文件(或默认值)更大的 --archive-timeout 值运行 check 命令,判断 WAL 队列是否需要更长时间才能清空。若系统产生大量 WAL,可考虑配置 异步归档 如何手动清除一个备份集? 可以使用 --set 选项手动使某个全量备份集过期,详见 命令参考:expire
如何为每个命令独立配置选项? pgBackRest 支持在配置文件中为每个命令单独设置选项。 配置集群 stanza
例如,可以针对每个命令分别优化 process-max 选项:
[global]
# 未被覆盖时的通用配置
process-max = 2
[global:backup]
# 备份时使用更多核心
process-max = 4
[global:restore]
# 恢复时使用全部核心
process-max = 8
[global:archive-push]
# 归档推送时使用更多核心
process-max = 3
[global:archive-get]
# 归档获取时使用较少核心
process-max = 1
S3 存储桶名称中可以使用点号(句点)吗? 不可以。RFC-2818 不允许通配符匹配点号(.),因此 S3 存储桶名称不得包含点号。若存储桶名称中含有点号,将会出现类似"unable to find hostname ‘my.backup.bucket.s3.amazonaws.com’ in certificate common name or subject alternative names"的错误。
在哪里可以找到旧版本 pgBackRest 的软件包? apt.postgresql.org 旧版本归档 快照
为什么当 backup-standby=y 且备库宕机时,备份会失败? 从备库执行备份,初衷通常是减轻主库的压力。因此,当备库宕机时将备份切换到主库往往适得其反——系统已出现故障,不建议此时再增加主库负担。只要有相对新鲜的备份,备份本身并不紧迫;更重要的是保持 WAL 归档持续进行。等系统恢复稳定后再补做备份,时间仍然充裕。
如果确实需要立即执行备份,可以增加备库数量,或移除 backup-standby 配置。也可以在命令行使用 --no-backup-standby 临时覆盖,无需修改配置文件即可执行一次性备份。
是否应该将仓库部署在备库主机上? 不应该。同时配置了主库和备库时,pgBackRest 的配置文件应保持对称,以便在故障切换后无缝衔接。若配置不对称,故障切换后需要手动修改配置,否则可能引发更多问题。
详情请参阅用户指南中的 专用仓库主机
基于时间的时间点恢复(PITR)似乎不起作用,为什么? 使用基于时间的 PITR 时,最常见的错误是忘记选择目标时间点之前的备份集。若未指定 --set 选项,pgBackRest 会从 --target= 所指定的时间点往前查找可用的备份集;若找不到合适的备份集,则默认使用最新备份。然而,若最新备份的时间晚于目标时间,PostgreSQL 会认为 --target= 指定的时间无效而忽略它,最终恢复到可用的最新时间点。
要使用 --set 选项,请先运行 info 命令查看备份列表,找到停止时间戳早于目标时间的备份集,然后在执行恢复时指定 --set=BACKUP_LABEL,其中 BACKUP_LABEL 为所选备份集的标签。
详情请参阅用户指南中的 时间点恢复
WAL 归档文件的后缀是什么含义? 该后缀是用于验证文件完整性的 SHA1 校验和,不可省略。
不同备份类型(全量、差异、增量)的恢复时间是否有差异? 各种备份类型所需的恢复时间相同。恢复操作依据清单文件(manifest)检索文件,对于增量备份或差异备份,该清单可能引用之前备份中的文件。尽管创建 备份所需时间因类型而异,但恢复时间主要取决于数据库大小(在磁盘 I/O、网络 I/O 等条件相同的情况下)。
如何将备份导出到网络隔离的环境中使用? pgBackRest 不仅使用仓库存储备份和 WAL 归档,还依赖仓库维护压缩、加密、文件捆绑等功能所需的关键元数据。因此,除非满足非常严格且特定的条件,否则单纯复制备份文件和部分 WAL 文件通常行不通。
如果目的是创建一个可转移的自包含数据库副本(例如通过 USB 传输),可以采用如下变通方法:使用启用了 --archive-copybackup 命令,确保所需的 WAL 段随备份一同存储;然后使用 --type=none--pg1-path=/your/target/path 执行恢复。这将生成一个已恢复的 PostgreSQL 数据目录,所有必要的 WAL 文件已就位于 pg_wal 中,效果类似于 pg_basebackup 的输出结果。
之后可将该目录复制到另一台系统,PostgreSQL 无需访问 pgBackRest 仓库即可从中启动。
请注意,从此备份恢复不会产生时间线切换,这意味着新集群不应向导出源所在的原始仓库推送 WAL。若新集群处于网络隔离环境中,这一点通常不成问题。
28.7 - 项目指标 pgBackRest 项目代码覆盖率指标与质量统计。
原始页面: https://pgbackrest.org/metric.html
代码覆盖率 pgBackRest 致力于对 /src 目录下的核心 C 代码实现完整的函数、分支和行覆盖。
函数覆盖率和行覆盖率均已达到 100%,无任何例外。
分支覆盖率排除了宏内部的分支和 assert() 调用。宏有专属的单元测试,因此无需在每处调用时都进行测试。assert 断言不要求完整的分支覆盖,因为它们测试的是应当始终为真的条件。
目录 函数 分支 行 build/common 26/26 (100.00%) 68/68 (100.00%) 247/247 (100.00%) build/config 39/39 (100.00%) 558/558 (100.00%) 1160/1160 (100.00%) build/error 6/6 (100.00%) 26/26 (100.00%) 78/78 (100.00%) build/help 13/13 (100.00%) 134/134 (100.00%) 262/262 (100.00%) build/postgres 8/8 (100.00%) 60/60 (100.00%) 151/151 (100.00%) command 15/15 (100.00%) 92/92 (100.00%) 182/182 (100.00%) command/annotate 1/1 (100.00%) 12/12 (100.00%) 30/30 (100.00%) command/archive 15/15 (100.00%) 104/104 (100.00%) 200/200 (100.00%) command/archive/get 9/9 (100.00%) 200/200 (100.00%) 433/433 (100.00%) command/archive/push 12/12 (100.00%) 130/130 (100.00%) 348/348 (100.00%) command/backup 50/50 (100.00%) 790/790 (100.00%) 1643/1643 (100.00%) command/check 13/13 (100.00%) 106/106 (100.00%) 214/214 (100.00%) command/control 4/4 (100.00%) 34/34 (100.00%) 48/48 (100.00%) command/expire 10/10 (100.00%) 256/256 (100.00%) 373/373 (100.00%) command/help 8/8 (100.00%) 178/178 (100.00%) 283/283 (100.00%) command/info 15/15 (100.00%) 412/412 (100.00%) 709/709 (100.00%) command/local 1/1 (100.00%) — 4/4 (100.00%) command/remote 1/1 (100.00%) 6/6 (100.00%) 18/18 (100.00%) command/repo 9/9 (100.00%) 110/110 (100.00%) 205/205 (100.00%) command/restore 37/37 (100.00%) 726/726 (100.00%) 1350/1350 (100.00%) command/server 6/6 (100.00%) 24/24 (100.00%) 79/79 (100.00%) command/stanza 5/5 (100.00%) 106/106 (100.00%) 125/125 (100.00%) command/verify 22/22 (100.00%) 356/356 (100.00%) 721/721 (100.00%) common 145/145 (100.00%) 614/614 (100.00%) 1335/1335 (100.00%) common/compress 12/12 (100.00%) 24/24 (100.00%) 80/80 (100.00%) common/compress/bz2 13/13 (100.00%) 20/20 (100.00%) 123/123 (100.00%) common/compress/gz 13/13 (100.00%) 26/26 (100.00%) 118/118 (100.00%) common/compress/lz4 15/15 (100.00%) 24/24 (100.00%) 116/116 (100.00%) common/compress/zst 13/13 (100.00%) 12/12 (100.00%) 96/96 (100.00%) common/crypto 32/32 (100.00%) 88/88 (100.00%) 424/424 (100.00%) common/error 33/33 (100.00%) 62/62 (100.00%) 178/178 (100.00%) common/io 60/60 (100.00%) 180/180 (100.00%) 513/513 (100.00%) common/io/filter 31/31 (100.00%) 92/92 (100.00%) 276/276 (100.00%) common/io/http 58/58 (100.00%) 284/284 (100.00%) 677/677 (100.00%) common/io/socket 28/28 (100.00%) 110/110 (100.00%) 337/337 (100.00%) common/io/tls 37/37 (100.00%) 122/122 (100.00%) 409/409 (100.00%) common/type 334/334 (100.00%) 916/916 (100.00%) 3107/3107 (100.00%) config 91/91 (100.00%) 1001/1002 (99.90%) 1612/1612 (100.00%) db 23/23 (100.00%) 94/94 (100.00%) 301/301 (100.00%) info 93/93 (100.00%) 936/936 (100.00%) 2030/2030 (100.00%) postgres 36/36 (100.00%) 126/126 (100.00%) 329/329 (100.00%) postgres/interface 4/4 (100.00%) 10/10 (100.00%) 35/35 (100.00%) protocol 60/60 (100.00%) 264/264 (100.00%) 858/858 (100.00%) storage 63/63 (100.00%) 278/278 (100.00%) 707/707 (100.00%) storage/azure 25/25 (100.00%) 148/148 (100.00%) 437/437 (100.00%) storage/cifs 2/2 (100.00%) — 6/6 (100.00%) storage/gcs 34/34 (100.00%) 184/184 (100.00%) 581/581 (100.00%) storage/posix 28/28 (100.00%) 167/168 (99.40%) 325/325 (100.00%) storage/remote 38/38 (100.00%) 128/128 (100.00%) 572/572 (100.00%) storage/s3 30/30 (100.00%) 194/194 (100.00%) 625/625 (100.00%) storage/sftp 32/32 (100.00%) 400/400 (100.00%) 712/712 (100.00%) 合计 1708/1708 (100.00%) 10992/10994 (99.98%) 25782/25782 (100.00%)
/test/src/module 中的 C 单元测试模块同样实现了完整的函数覆盖率和行覆盖率,但不包含在上述报告中。
29 - PG Exporter 1.2 中文文档 高级 PostgreSQL 与 PgBouncer 监控指标导出器
为 Prometheus / Victoria 打造的极致 PostgreSQL 监控体验:超过 600+ 监控指标、声明式配置 与 动态规划 能力。
快速上手 GitHub 在线演示
功能特性 特性 描述 全指标覆盖 监控 PostgreSQL(10-18+)与 pgBouncer(1.8-1.25+),全指标覆盖 声明式配置 通过 YAML 配置文件定义自定义指标,精细控制超时、缓存和跳过条件 采集器定制 使用声明式 YAML 配置定义自己的指标,支持动态查询规划 自动发现 自动发现并监控 PostgreSQL 实例中的多个数据库 动态规划 根据 PostgreSQL 版本、扩展和服务器特性自动调整指标采集策略 生产就绪 在真实环境中经过 6 年以上、12K+ 核心的实战检验,具备企业级可靠性 健康检查 提供全面的 HTTP 端点用于服务健康检查和流量路由,支持主从检测 智能缓存 内置缓存机制,可配置 TTL,减少数据库负载并提升性能 扩展感知 原生支持 pg_stat_statements、pg_wait_sampling、citus、timescaledb
版本信息 当前稳定版本:v1.2.1 默认配置支持:PostgreSQL 10-18+ Legacy 配置支持:PostgreSQL 9.1-9.6 (使用 legacy/ 配置包) PgBouncer 支持:1.8-1.25+ 完整版本历史见 发布注记 。
设计逻辑 pg_exporter 的核心设计取向是「本地优先 + 可声明 + 可演进」:
本地优先连接:未显式指定 URL 时默认使用 postgresql:///?sslmode=disable,适配同机部署场景 声明式采集:指标由 YAML 采集器定义驱动,行为可通过 ttl、timeout、tags、fatal 精细控制 动态规划:运行时依据版本、角色、扩展与标签自动选择采集器分支 可持续运行:默认非阻塞启动,目标不可达时也可先启动 HTTP 端点,待数据库恢复后自动恢复采集 热重载能力:支持 POST/GET /reload 与 SIGHUP 信号重载(非 Windows 额外支持 SIGUSR1) 健康探针分离:健康端点基于后台探测缓存,避免每次探针请求都阻塞数据库 管理面可收敛:/reload、/explain、/stat 会暴露配置与运行态信息,生产环境建议结合 --web.config.file 启用认证/TLS,或仅在内网暴露 快速安装 PG Exporter 提供多种 安装方式
docker run -d --name pg_exporter -p 9630:9630 -e PG_EXPORTER_URL = "postgres://user:pass@host:5432/postgres" pgsty/pg_exporter:latest # 基于 RPM 的系统
sudo tee /etc/yum.repos.d/pigsty-infra.repo > /dev/null <<-'EOF'
[pigsty-infra]
name=Pigsty Infra for $basearch
baseurl=https://repo.pigsty.io/yum/infra/$basearch
enabled = 1
gpgcheck = 0
module_hotfixes=1
EOF
sudo yum makecache;
sudo yum install -y pg_exporter sudo tee /etc/apt/sources.list.d/pigsty-infra.list > /dev/null <<EOF
deb [trusted=yes] https://repo.pigsty.io/apt/infra generic main
EOF
sudo apt update;
sudo apt install -y pg-exporter wget https://github.com/pgsty/pg_exporter/releases/download/v1.2.1/pg_exporter-1.2.1.linux-amd64.tar.gz
tar -xf pg_exporter-1.2.1.linux-amd64.tar.gz
sudo install pg_exporter-1.2.1.linux-amd64/pg_exporter /usr/bin/
sudo install pg_exporter-1.2.1.linux-amd64/pg_exporter.yml /etc/pg_exporter.yml # 从源码构建
git clone https://github.com/pgsty/pg_exporter.git
cd pg_exporter
make build 快速开始 几分钟内即可启动 PG Exporter,参见 快速上手 :
# 最小可用启动(本地优先默认 URL)
pg_exporter
# 或显式指定目标
PG_EXPORTER_URL = 'postgres://user:pass@localhost:5432/postgres' pg_exporter
# 访问指标
curl http://localhost:9630/metrics
# 在线重载配置(推荐 POST)
curl -X POST http://localhost:9630/reload
在线演示 通过在线演示环境体验 PG Exporter 的实际效果:https://g.pgsty.com
演示展示了由 PG Exporter 监控的真实 PostgreSQL 集群,包含:
使用 Grafana 的实时指标可视化 多个 PostgreSQL 版本和配置 扩展特定的指标和监控 由 Pigsty 驱动的完整可观测性堆栈 社区与支持 开源协议 PG Exporter 是基于 Apache License 2.0 许可的开源软件。
Copyright 2018-2026 © 冯若航 / rh@vonng.com
29.1 - 快速上手 几分钟内启动并运行 PG Exporter
PG Exporter 是一款先进的 PostgreSQL 与 pgBouncer 指标导出器,专为 Prometheus 设计。本指南将帮助您快速启动并运行。
前置条件 在开始之前,请确保您具备:
PostgreSQL 10+ 或 pgBouncer 1.8+ 实例用于监控 具有适当监控权限的用户账户 Prometheus 兼容系统(用于指标抓取) 对 PostgreSQL 连接字符串的基本了解 版本信息 当前稳定版本:v1.2.1 默认配置支持 PostgreSQL 10-18+;PostgreSQL 9.1-9.6 需使用 legacy/ 配置包 支持 pgBouncer 1.8-1.25+ 设计逻辑 pg_exporter 的运行逻辑可以概括为三点:
本地优先连接:当没有传入 --url / PG_EXPORTER_URL 时,默认回退到 postgresql:///?sslmode=disable 声明式采集:所有业务指标来自 YAML 采集器,运行时按版本/角色/标签动态选择分支 可持续运行:默认非阻塞启动,目标库暂时不可达时也先启动 HTTP 端点,并在后台持续恢复健康状态 快速开始 最快速地启动 PG Exporter:
# 示例:Linux amd64 安装(其他平台请替换对应发布文件)
wget https://github.com/pgsty/pg_exporter/releases/download/v1.2.1/pg_exporter-1.2.1.linux-amd64.tar.gz
tar -xf pg_exporter-1.2.1.linux-amd64.tar.gz
sudo install pg_exporter-1.2.1.linux-amd64/pg_exporter /usr/bin/
sudo install pg_exporter-1.2.1.linux-amd64/pg_exporter.yml /etc/pg_exporter.yml
# 使用默认 URL(本地优先)运行
pg_exporter
# 或显式指定 PostgreSQL / PgBouncer URL
PG_EXPORTER_URL = 'postgres://user:pass@localhost:5432/postgres' pg_exporter
# 验证指标是否可用
curl http://localhost:9630/metrics
基本概念 连接字符串 PG Exporter 使用标准的 PostgreSQL 连接 URL:
postgres://[user][:password]@[host][:port]/[database][?param=value]
示例:
默认回退 URL(未显式指定时):postgresql:///?sslmode=disable 本地 PostgreSQL:postgres:///postgres 带认证的远程连接:postgres://monitor:password@db.example.com:5432/postgres 使用 SSL:postgres://user:pass@host/db?sslmode=require pgBouncer:postgres://pgbouncer:password@localhost:6432/pgbouncer URL 来源优先级(高到低):
--url 命令行参数PG_EXPORTER_URL 环境变量PGURL 环境变量PG_EXPORTER_URL_FILE 指向文件的内容默认 postgresql:///?sslmode=disable 内置指标 PG Exporter 开箱即用提供以下核心内置指标:
指标 类型 描述 pg_upGauge 如果导出器能够连接到 PostgreSQL 则为 1,否则为 0 pg_versionGauge PostgreSQL 服务器版本号 pg_in_recoveryGauge 如果服务器处于恢复模式(从库)则为 1,主库则为 0 pg_exporter_build_infoGauge 导出器版本和构建信息
此外还会暴露 pg_exporter_* 自监控指标(可通过 --disable-intro 关闭)。
配置文件 所有其他指标(600+)都在 pg_exporter.yml 配置文件中定义。默认情况下,PG Exporter 会按以下顺序查找此文件:
通过 --config 标志指定的路径 PG_EXPORTER_CONFIG 环境变量中的路径当前目录(./pg_exporter.yml) 系统配置文件(/etc/pg_exporter.yml) 系统配置目录(/etc/pg_exporter/) 首次监控设置 步骤 1:创建监控用户 创建一个专用的 PostgreSQL 用户用于监控:
-- 创建登录用户(示例名:monitor)
CREATE USER monitor WITH PASSWORD 'secure_password' ;
-- 授予必要权限
GRANT pg_monitor TO monitor ;
GRANT CONNECT ON DATABASE postgres TO monitor ;
-- 对于 PostgreSQL 10+,内置 pg_monitor 角色提供监控视图读取权限
-- 对于更早版本,您可能需要额外的授权
步骤 2:测试连接 验证导出器能够连接到您的数据库:
# 设置连接 URL
export PG_EXPORTER_URL = 'postgres://monitor:secure_password@localhost:5432/postgres'
# 以干运行模式运行以测试配置
pg_exporter --dry-run
步骤 3:运行导出器 启动 PG Exporter:
# 使用默认设置运行
pg_exporter
# 或使用自定义标志
pg_exporter \
--url= 'postgres://monitor:secure_password@localhost:5432/postgres' \
--web.listen-address= ':9630' \
--log.level= info
步骤 4:配置 Prometheus 在您的 prometheus.yml 中将 PG Exporter 添加为目标:
scrape_configs :
- job_name : 'postgresql'
static_configs :
- targets : [ 'localhost:9630' ]
labels :
instance : 'postgres-primary'
步骤 5:验证指标 检查指标是否正在被采集:
# 查看原始指标
curl http://localhost:9630/metrics | grep pg_
# 检查导出器统计信息
curl http://localhost:9630/stat
# 查看当前查询规划
curl http://localhost:9630/explain
提示
/reload、/stat、/explain 都属于管理端点。生产环境建议配合 --web.config.file 启用认证/TLS,或仅通过内网访问。
自动发现模式 PG Exporter 可以自动发现并监控 PostgreSQL 实例中的所有数据库:
# 启用自动发现(默认行为)
pg_exporter --auto-discovery
# 排除特定数据库
pg_exporter --auto-discovery \
--exclude-database= "template0,template1,postgres"
# 仅包含特定数据库
pg_exporter --auto-discovery \
--include-database= "app_db,analytics_db"
当启用自动发现时:
集群级指标(1xx-5xx)每个实例采集一次 数据库级指标(6xx-8xx)为每个发现的数据库采集 指标使用 datname 标签来区分不同的数据库 监控 pgBouncer 要监控 pgBouncer 而不是 PostgreSQL:
# 连接到 pgBouncer 管理数据库
PG_EXPORTER_URL = 'postgres://pgbouncer:password@localhost:6432/pgbouncer' \
pg_exporter --config= /etc/pg_exporter.yml
导出器会自动检测 pgBouncer 并:
使用 pgbouncer 命名空间作为指标前缀 执行 pgBouncer 专用采集器(9xx 系列) 提供 pgBouncer 专用的健康检查 使用 Docker 在容器中运行 PG Exporter:
docker run -d \
--name pg_exporter \
-p 9630:9630 \
-e PG_EXPORTER_URL = "postgres://user:pass@host.docker.internal:5432/postgres" \
pgsty/pg_exporter:latest
使用自定义配置:
docker run -d \
--name pg_exporter \
-p 9630:9630 \
-v /path/to/pg_exporter.yml:/etc/pg_exporter.yml \
-e PG_EXPORTER_URL = "postgres://user:pass@db:5432/postgres" \
pgsty/pg_exporter:latest
健康检查 PG Exporter 为负载均衡器和编排器提供健康检查端点:
# 基本健康检查
curl http://localhost:9630/up
# 返回:连接正常返回 200,否则返回 503(响应体通常为 primary/replica/starting/down)
# 主库检测
curl http://localhost:9630/primary
# 返回:主库返回 200,从库返回 404,未知返回 503
# 从库检测
curl http://localhost:9630/replica
# 返回:从库返回 200,主库返回 404,未知返回 503
热重载 pg_exporter 支持在线重载采集器配置,无需重启进程:
# 推荐:POST
curl -X POST http://localhost:9630/reload
# 兼容:GET
curl http://localhost:9630/reload
# 或使用信号触发(Unix)
pkill -HUP pg_exporter
# 非 Windows 还可以使用
pkill -USR1 pg_exporter
故障排查 连接问题 # 使用详细日志测试
pg_exporter --log.level= debug --dry-run
# 检查服务器规划
pg_exporter --explain
权限错误 确保监控用户具有必要的权限:
-- 检查当前权限
SELECT * FROM pg_roles WHERE rolname = 'monitor' ;
-- 如需要,授予额外权限
GRANT USAGE ON SCHEMA pg_catalog TO monitor ;
GRANT SELECT ON ALL TABLES IN SCHEMA pg_catalog TO monitor ;
抓取缓慢 如果抓取超时:
检查慢查询:curl http://localhost:9630/stat 在配置中调整采集器超时 对昂贵的查询使用缓存(在采集器配置中设置 ttl) 如果不需要,禁用昂贵的采集器 下一步 29.2 - 安装指南 如何下载和安装 PG Exporter
PG Exporter 提供多种安装方式以适应不同的部署场景。本指南涵盖了各平台的所有可用安装选项及详细说明。
Pigsty 最简单的使用 pg_exporter 的方式是使用 Pigsty ,这是一个完整的 PostgreSQL 发行版,内置了基于 pg_exporter、Prometheus 和 Grafana 的可观测性最佳实践。您甚至不需要了解 pg_exporter 的任何细节,它会直接为您提供所有指标和仪表盘面板。
curl -fsSL https://repo.pigsty.io/get | bash; cd ~/pigsty;
发布版本 您也可以直接从 GitHub 发布页面 下载 pg_exporter 软件包(RPM/DEB/Tarball):
v1.2.1 发布文件:
您可以直接使用操作系统的包管理器(rpm/dpkg)安装,或者将二进制文件放入 $PATH 中。当前归档文件还会附带 pg_exporter.yml、package/pg_exporter.default、package/pg_exporter.service 与 LICENSE,便于按 tarball 手工部署。
软件仓库 pg_exporter 软件包也可以在 pigsty-infra
YUM 适用于 RHEL、RockyLinux、CentOS、Alma Linux、OracleLinux 等 EL 系发行版:
sudo tee /etc/yum.repos.d/pigsty-infra.repo > /dev/null <<-'EOF'
[pigsty-infra]
name=Pigsty Infra for $basearch
baseurl=https://repo.pigsty.io/yum/infra/$basearch
enabled = 1
gpgcheck = 0
module_hotfixes=1
EOF
sudo yum makecache;
sudo yum install -y pg_exporter
APT 适用于 Debian、Ubuntu 及兼容的 Linux 发行版:
sudo tee /etc/apt/sources.list.d/pigsty-infra.list > /dev/null <<EOF
deb [trusted=yes] https://repo.pigsty.io/apt/infra generic main
EOF
sudo apt update;
sudo apt install -y pg-exporter
Docker 我们在 Docker Hub 上提供了 amd64 和 arm64 架构的预构建镜像:pgsty/pg_exporter 。
# 基本用法
docker run -d \
--name pg_exporter \
-p 9630:9630 \
-e PG_EXPORTER_URL = "postgres://user:password@host:5432/postgres" \
pgsty/pg_exporter:latest
# 使用自定义配置
docker run -d \
--name pg_exporter \
-p 9630:9630 \
-v /path/to/pg_exporter.yml:/etc/pg_exporter.yml:ro \
-e PG_EXPORTER_CONFIG = "/etc/pg_exporter.yml" \
-e PG_EXPORTER_URL = "postgres://user:password@host:5432/postgres" \
pgsty/pg_exporter:latest
# 启用自动发现
docker run -d \
--name pg_exporter \
-p 9630:9630 \
-e PG_EXPORTER_URL = "postgres://user:password@host:5432/postgres" \
-e PG_EXPORTER_AUTO_DISCOVERY = "true" \
-e PG_EXPORTER_EXCLUDE_DATABASE = "template0,template1" \
pgsty/pg_exporter:latest
注意
当前 Docker 镜像基于 scratch。如果您使用 sslmode=verify-ca 或 verify-full 连接远程 PostgreSQL,请显式挂载 CA 证书(例如 sslrootcert 或系统 CA bundle),否则 TLS 校验可能无法完成。
二进制安装 pg_exporter 可以作为独立的二进制文件安装。从发布页面下载适合您平台的 tarball,解压后将二进制文件放入 $PATH 即可使用。
兼容性 当前默认配置支持 PostgreSQL 10 及以上版本。
对于 EOL 旧版本 PostgreSQL,可以使用仓库内置的 legacy/ 配置包进行兼容监控。
PostgreSQL 版本 支持状态 10 ~ 18+ ✅ 完全支持(默认配置) 9.1 ~ 9.6 ⚠️ 使用 legacy/pg_exporter.yml 9.0 及更早 ❌ 不支持
启用 Legacy 配置示例:
make conf9
PG_EXPORTER_CONFIG = legacy/pg_exporter.yml pg_exporter
pg_exporter 支持 pgBouncer 1.8+(v1.8 是第一个支持 SHOW 命令的版本)。
pgBouncer 版本 支持状态 1.8.x ~ 1.25+ ✅ 完全支持 1.8.x 之前 ⚠️ 无指标
29.3 - 配置参考 PG Exporter 的配置选项与采集器定义
PG Exporter 使用强大而灵活的配置系统,允许您定义自定义指标、控制采集行为并优化性能。本指南涵盖了从基础设置到高级自定义的所有配置方面。
指标采集器 PG Exporter 使用声明式的 YAML 配置系统,为指标采集提供极大的灵活性和控制能力。本指南涵盖了为您的特定监控需求配置 PG Exporter 的所有方面。
配置概述 PG Exporter 的配置以 采集器 为核心 —— 每个采集器是一个独立的指标查询及其关联元数据。配置可以是:
单一的 YAML 文件(pg_exporter.yml) 包含多个 YAML 文件的目录(按字母顺序合并) 通过命令行或环境变量指定的自定义路径 配置加载 PG Exporter 按以下顺序搜索配置:
命令行参数:--config=/path/to/config 环境变量:PG_EXPORTER_CONFIG=/path/to/config 当前目录:./pg_exporter.yml 系统配置文件:/etc/pg_exporter.yml 系统配置目录:/etc/pg_exporter/ 目录模式说明:
仅加载该目录下的 .yml / .yaml 文件(非递归) 按文件名字典序合并;同名采集器以后加载者覆盖先前定义 如果目录中有 YAML 文件但全部解析失败,导出器会直接返回错误而不是静默忽略 采集器结构 每个采集器是 YAML 配置中的一个顶级对象,具有唯一名称和多种属性:
collector_branch_name : # 此采集器的唯一标识符
name : metric_namespace # 指标前缀(默认为分支名称)
desc : "采集器描述" # 人类可读的描述
query : | # 要执行的 SQL 查询
SELECT column1, column2
FROM table
# 执行控制
ttl : 10 # 缓存生存时间(秒)
timeout : 0.1 # 查询超时(秒)
fatal : false # 如果为 true,失败将导致整个抓取失败
skip : false # 如果为 true,禁用此采集器
# 版本兼容性
min_version : 100000 # 最小 PostgreSQL 版本(包含)
max_version : 999999 # 最大 PostgreSQL 版本(不包含)
# 执行标签
tags : [ cluster, primary] # 执行条件
# 谓词查询(可选)
predicate_queries :
- name : "check_function"
predicate_query : |
SELECT EXISTS (...)
# 指标定义
metrics :
- column_name :
usage : GAUGE # GAUGE、COUNTER、LABEL 或 DISCARD
rename : metric_name # 可选:重命名指标
description : "帮助文本" # 指标描述
default : 0 # NULL 时的默认值
scale : 1000 # 值的缩放因子
配置校验约束(v1.2.1):
每个 metrics 列表项必须且只能定义一个列映射 每个采集器至少要有一个 GAUGE 或 COUNTER 列 usage 仅支持 GAUGE / COUNTER / LABEL / DISCARD指标名、标签名会在加载阶段进行 Prometheus 规则校验,非法配置会直接报错 常量标签会在加载阶段检查冲突;它们不能与查询标签重名,也不能与内置动态标签 datname / query 冲突 如果使用单行内联 metrics 写法,description 建议始终使用双引号包裹,避免 YAML 歧义 核心配置元素 采集器分支名称 顶级键在整个配置中唯一标识一个采集器:
pg_stat_database : # 必须唯一
name : pg_db # 实际的指标命名空间
查询定义 检索指标的 SQL 查询:
query : |
SELECT
datname,
numbackends,
xact_commit,
xact_rollback,
blks_read,
blks_hit
FROM pg_stat_database
WHERE datname NOT IN ('template0', 'template1')
指标类型 查询结果中的每一列必须映射到一个指标类型:
用途 描述 示例 GAUGE可上下波动的瞬时值 当前连接数 COUNTER只增不减的累计值 总事务数 LABEL用作 Prometheus 标签 数据库名称 DISCARD忽略此列 内部值
缓存控制(TTL) ttl 参数控制结果缓存:
# 快速查询 - 最小缓存
pg_stat_activity :
ttl : 1 # 缓存 1 秒
# 昂贵查询 - 较长缓存
pg_table_bloat :
ttl : 3600 # 缓存 1 小时
最佳实践:
将 TTL 设置为小于您的抓取间隔 对昂贵的查询使用较长的 TTL TTL 为 0 表示禁用缓存 超时控制 防止查询运行时间过长:
timeout : 0.1 # 默认 100ms
timeout : 1.0 # 复杂查询使用 1 秒
timeout : -1 # 禁用超时(不推荐)
版本兼容性 控制哪些 PostgreSQL 版本可以运行此采集器:
min_version : 100000 # PostgreSQL 10.0+
max_version : 140000 # 低于 PostgreSQL 14.0
版本号使用 PostgreSQL 内部 server_version_num 规则:
100000 表示 10.0130200 表示 13.2160100 表示 16.190600 表示 9.6(Legacy 配置场景)标签系统 标签控制采集器的执行时机和位置:
内置标签 标签 描述 cluster每个 PostgreSQL 集群执行一次 primary / master仅在主服务器上执行 standby / replica仅在从服务器上执行 pgbouncer仅用于 pgBouncer 连接
前缀标签 前缀 示例 描述 dbname:dbname:postgres仅在特定数据库上执行 username:username:monitor仅使用特定用户时执行 extension:extension:pg_stat_statements仅当扩展已安装时执行 schema:schema:public仅当模式存在时执行 not:not:slow当导出器没有该标签时执行
自定义标签 向导出器传递自定义标签:
pg_exporter --tag= "production,critical"
然后在配置中使用:
expensive_metrics :
tags : [ critical] # 仅在有 'critical' 标签时运行
谓词查询 在执行主查询之前进行条件检查:
predicate_queries :
- name : "检查 pg_stat_statements"
predicate_query : |
SELECT EXISTS (
SELECT 1 FROM pg_extension
WHERE extname = 'pg_stat_statements'
)
只有当所有谓词返回 true 时,主查询才会执行。
指标定义 基本定义 metrics :
- numbackends :
usage : GAUGE
description : "已连接的后端进程数"
高级选项 metrics :
- checkpoint_write_time :
usage : COUNTER
rename : write_time # 重命名指标
scale : 0.001 # 将毫秒转换为秒
default : 0 # NULL 时使用 0
description : "检查点写入时间(秒)"
采集器组织 PG Exporter 自带预先组织好的采集器:
范围 类别 描述 0xx 文档 示例和文档 1xx 基础 服务器信息、设置、元数据 2xx 复制 复制、槽位、接收器 3xx 持久化 I/O、检查点、WAL 4xx 活动 连接、锁、查询 5xx 进度 Vacuum、索引创建进度 6xx 数据库 每数据库统计 7xx 对象 表、索引、函数 8xx 可选 昂贵/可选指标 9xx pgBouncer 连接池指标 10xx+ 扩展 扩展特定指标
实际示例 简单的 Gauge 采集器 pg_connections :
desc : "当前数据库连接"
query : |
SELECT
count(*) as total,
count(*) FILTER (WHERE state = 'active') as active,
count(*) FILTER (WHERE state = 'idle') as idle,
count(*) FILTER (WHERE state = 'idle in transaction') as idle_in_transaction
FROM pg_stat_activity
WHERE pid != pg_backend_pid()
ttl : 1
metrics :
- total : {usage: GAUGE, description : "总连接数" }
- active : {usage: GAUGE, description : "活跃连接数" }
- idle : {usage: GAUGE, description : "空闲连接数" }
- idle_in_transaction : {usage: GAUGE, description : "事务中空闲连接数" }
带标签的 Counter pg_table_stats :
desc : "表统计信息"
query : |
SELECT
schemaname,
tablename,
n_tup_ins,
n_tup_upd,
n_tup_del,
n_live_tup,
n_dead_tup
FROM pg_stat_user_tables
ttl : 10
metrics :
- schemaname : {usage : LABEL}
- tablename : {usage : LABEL}
- n_tup_ins : {usage: COUNTER, description : "插入的元组数" }
- n_tup_upd : {usage: COUNTER, description : "更新的元组数" }
- n_tup_del : {usage: COUNTER, description : "删除的元组数" }
- n_live_tup : {usage: GAUGE, description : "活跃元组数" }
- n_dead_tup : {usage: GAUGE, description : "死亡元组数" }
版本特定采集器 pg_wal_stats :
desc : "WAL 统计信息(PG 14+)"
min_version : 140000
query : |
SELECT
wal_records,
wal_bytes,
wal_buffers_full,
wal_write_time,
wal_sync_time
FROM pg_stat_wal
ttl : 10
tags : [ cluster]
metrics :
- wal_records : {usage : COUNTER}
- wal_bytes : {usage : COUNTER}
- wal_buffers_full : {usage : COUNTER}
- wal_write_time : {usage: COUNTER, scale : 0.001 }
- wal_sync_time : {usage: COUNTER, scale : 0.001 }
扩展依赖采集器 pg_stat_statements_metrics :
desc : "查询性能统计"
tags : [ extension:pg_stat_statements]
query : |
SELECT
sum(calls) as total_calls,
sum(total_exec_time) as total_time,
sum(mean_exec_time * calls) / sum(calls) as mean_time
FROM pg_stat_statements
ttl : 60
metrics :
- total_calls : {usage : COUNTER}
- total_time : {usage: COUNTER, scale : 0.001 }
- mean_time : {usage: GAUGE, scale : 0.001 }
自定义采集器 创建自己的指标 在配置目录中创建新的 YAML 文件: # /etc/pg_exporter/custom_metrics.yml
app_metrics :
desc : "应用特定指标"
query : |
SELECT
(SELECT count(*) FROM users WHERE active = true) as active_users,
(SELECT count(*) FROM orders WHERE created_at > NOW() - '1 hour'::interval) as recent_orders,
(SELECT avg(processing_time) FROM jobs WHERE completed_at > NOW() - '5 minutes'::interval) as avg_job_time
ttl : 30
metrics :
- active_users : {usage: GAUGE, description : "当前活跃用户数" }
- recent_orders : {usage: GAUGE, description : "最近一小时的订单数" }
- avg_job_time : {usage: GAUGE, description : "平均作业处理时间" }
测试您的采集器: pg_exporter --explain --config= /etc/pg_exporter/
条件指标 使用谓词查询实现条件指标:
partition_metrics :
desc : "分区表指标"
predicate_queries :
- name : "检查是否使用了分区"
predicate_query : |
SELECT EXISTS (
SELECT 1 FROM pg_class
WHERE relkind = 'p' LIMIT 1
)
query : |
SELECT
parent.relname as parent_table,
count(*) as partition_count,
sum(pg_relation_size(child.oid)) as total_size
FROM pg_inherits
JOIN pg_class parent ON parent.oid = pg_inherits.inhparent
JOIN pg_class child ON child.oid = pg_inherits.inhrelid
WHERE parent.relkind = 'p'
GROUP BY parent.relname
ttl : 300
metrics :
- parent_table : {usage : LABEL}
- partition_count : {usage : GAUGE}
- total_size : {usage : GAUGE}
性能优化 查询优化技巧 使用适当的 TTL 值 :
快速查询:1-10 秒 中等查询:10-60 秒 昂贵查询:300-3600 秒 设置合理的超时 :
默认:100ms 复杂查询:500ms-1s 生产环境中不要禁用超时 使用集群级标签 :
tags : [ cluster] # 每集群运行一次,而不是每数据库
禁用昂贵的采集器 :
pg_table_bloat :
skip : true # 如果不需要则禁用
监控采集器性能 检查采集器执行统计:
# 查看采集器统计
curl http://localhost:9630/stat
# 检查哪些采集器较慢
curl http://localhost:9630/metrics | grep pg_exporter_collector_duration
配置故障排查 验证配置 # 干运行 - 显示解析后的配置
pg_exporter --dry-run
# 解释 - 显示计划的查询
pg_exporter --explain
常见问题 问题 解决方案 指标缺失 检查标签和版本兼容性 抓取缓慢 增加 TTL、添加超时、禁用昂贵查询 内存使用高 减少结果集大小,使用 LIMIT 权限错误 验证监控用户的查询权限
调试日志 启用调试日志进行故障排查:
pg_exporter --log.level= debug
29.4 - API 参考 PG Exporter 的 HTTP API 端点参考
PG Exporter 提供全面的 REST API,用于指标采集、健康检查、流量路由和运维控制。所有端点都通过配置的端口(默认:9630)以 HTTP/HTTPS 方式暴露。
端点概览 指标端点 GET /metrics 暴露所有采集指标的主端点,格式为 Prometheus 格式。
请求 curl http://localhost:9630/metrics
响应 # HELP pg_up last scrape was able to connect to the server: 1 for yes, 0 for no
# TYPE pg_up gauge
pg_up 1
# HELP pg_version server version number
# TYPE pg_version gauge
pg_version 140000
# HELP pg_in_recovery server is in recovery mode? 1 for yes 0 for no
# TYPE pg_in_recovery gauge
pg_in_recovery 0
# HELP pg_exporter_build_info A metric with a constant '1' value labeled with version, revision, branch, goversion, builddate, goos, and goarch from which pg_exporter was built.
# TYPE pg_exporter_build_info gauge
pg_exporter_build_info{version="1.2.1",branch="main",revision="<git-sha>",builddate="<build-date>",goversion="go1.26.1",goos="linux",goarch="amd64"} 1
# ... 更多指标
响应格式 指标遵循 Prometheus 暴露格式:
# HELP <metric_name> <description>
# TYPE <metric_name> <type>
<metric_name>{<label_name>="<label_value>",...} <value> <timestamp>
健康检查 健康检查端点提供多种方式来监控 PG Exporter 和目标数据库的状态。
GET /up 简单的存活检查(基于后台探针缓存状态,不会在每次 HTTP 请求时主动探测数据库)。
响应码 状态码 状态 描述 200 OK 目标可用(primary/replica) 503 Service Unavailable 目标不可用(down/starting/unknown)
示例 # 检查服务是否正常
curl -I http://localhost:9630/up
HTTP/1.1 200 OK
Content-Type: text/plain; charset = utf-8
GET /health /up 的别名,行为相同。
curl http://localhost:9630/health
GET /liveness Kubernetes 存活探针端点。
# 存活探针配置
livenessProbe :
httpGet :
path : /liveness
port : 9630
initialDelaySeconds : 30
periodSeconds : 10
GET /readiness Kubernetes 就绪探针端点。
# 就绪探针配置
readinessProbe :
httpGet :
path : /readiness
port : 9630
initialDelaySeconds : 5
periodSeconds : 5
流量路由 这些端点专为负载均衡器和代理设计,根据服务器角色路由流量。
GET /primary 检查服务器是否为主库(primary)实例。
响应码 状态码 状态 描述 200 OK 服务器是主库且接受写入 404 Not Found 服务器不是主库(是从库) 503 Service Unavailable 服务器不可用(down/starting/unknown)
别名 /leader/master/read-write/rw示例 # 检查服务器是否为主库
curl -I http://localhost:9630/primary
# 在 HAProxy 配置中使用
backend pg_primary
option httpchk GET /primary
server pg1 10.0.0.1:5432 check port 9630
server pg2 10.0.0.2:5432 check port 9630
GET /replica 检查服务器是否为从库(standby)实例。
响应码 状态码 状态 描述 200 OK 服务器是从库且处于恢复状态 404 Not Found 服务器不是从库(是主库) 503 Service Unavailable 服务器不可用(down/starting/unknown)
别名 /slave 仍兼容,但建议优先使用 /replica。
示例 # 检查服务器是否为从库
curl -I http://localhost:9630/replica
# 在负载均衡器配置中使用
backend pg_replicas
option httpchk GET /replica
server pg2 10.0.0.2:5432 check port 9630
server pg3 10.0.0.3:5432 check port 9630
GET /read 检查服务器是否可以处理读流量(主库和从库都可以)。
响应码 状态码 状态 描述 200 OK 服务器正常运行且可以处理读请求 503 Service Unavailable 服务器不可用(down/starting/unknown)
示例 # 检查服务器是否可以处理读请求
curl -I http://localhost:9630/read
# 将读流量路由到任何可用服务器
backend pg_read
option httpchk GET /read
server pg1 10.0.0.1:5432 check port 9630
server pg2 10.0.0.2:5432 check port 9630
server pg3 10.0.0.3:5432 check port 9630
运维端点 GET /reload / POST /reload 在不重启导出器的情况下重新加载配置。
请求 # 推荐 POST
curl -X POST http://localhost:9630/reload
# 兼容 GET
curl http://localhost:9630/reload
响应 响应码 状态码 状态 描述 200 OK 配置重新加载成功 500 Internal Server Error 重新加载失败(返回 fail to reload: ...) 405 Method Not Allowed 非 GET/POST 方法(Allow: GET, POST)
使用场景 更新采集器定义 更改查询参数 修改缓存 TTL 值 添加或移除采集器 注意
重载会刷新采集器配置和查询计划;如需修改进程级参数(例如监听地址、CLI 参数),仍需重启导出器。
安全建议
/reload、/explain、/stat 都属于管理端点。若 exporter 不仅在本机或可信内网使用,建议通过 --web.config.file 启用认证/TLS,或在反向代理 / 防火墙层限制访问。
GET /explain 显示所有已配置采集器的查询执行规划信息。
请求 curl http://localhost:9630/explain
响应 ##
# SYNOPSIS
# pg.pg_primary_only_*
#
# DESCRIPTION
# PostgreSQL basic information (on primary)
#
# OPTIONS
# Tags [cluster, primary]
# TTL 1
# Priority 110
# Timeout 100ms
# Fatal true
# Version 100000 ~ higher
# Source pg_exporter.yml
...
GET /stat 显示运行时统计信息,包括采集器执行时间和成功/失败计数。
请求 curl http://localhost:9630/stat
响应 name total hit error skip metric ttl/s duration/ms
pg 12 0 0 0 15 1 4.231000
pg_db 12 11 0 0 28 10 0.153000
pg_activity 12 0 1 0 8 0 7.842000
...
此端点对于识别慢速或有问题的采集器非常有用。
在负载均衡器中使用 HAProxy 配置示例 # 主库后端 - 用于写流量
backend pg_primary
mode tcp
option httpchk GET /primary
http-check expect status 200
server pg1 10.0.0.1:5432 check port 9630 inter 3000 fall 2 rise 2
server pg2 10.0.0.2:5432 check port 9630 inter 3000 fall 2 rise 2 backup
# 从库后端 - 用于读流量
backend pg_replicas
mode tcp
balance roundrobin
option httpchk GET /replica
http-check expect status 200
server pg2 10.0.0.2:5432 check port 9630 inter 3000 fall 2 rise 2
server pg3 10.0.0.3:5432 check port 9630 inter 3000 fall 2 rise 2
# 读后端 - 用于任何可以处理读请求的服务器
backend pg_read
mode tcp
balance leastconn
option httpchk GET /read
http-check expect status 200
server pg1 10.0.0.1:5432 check port 9630 inter 3000 fall 2 rise 2
server pg2 10.0.0.2:5432 check port 9630 inter 3000 fall 2 rise 2
server pg3 10.0.0.3:5432 check port 9630 inter 3000 fall 2 rise 2
Nginx 配置示例 upstream pg_primary {
server 10.0.0.1 : 5432 ;
server 10.0.0.2 : 5432 backup ;
}
upstream pg_replicas {
server 10.0.0.2 : 5432 ;
server 10.0.0.3 : 5432 ;
}
server {
listen 5432 ;
location / {
proxy_pass http://pg_primary ;
health_check uri=/primary port=9630 ;
}
}
29.5 - 部署指南 生产环境部署策略与最佳实践
本指南涵盖生产环境的部署策略、最佳实践和实际配置。
pg_exporter 本身可以通过以下方式配置:
命令行参数 (优先级较高)环境变量 (优先级较低)指标采集器通过 YAML 配置文件(目录/文件)进行配置:
/etc/pg_exporter.yml(默认)/etc/pg_exporter/(包含多个文件的目录)配置文件使用 YAML 格式,由 采集器定义 组成,指定要采集的指标以及如何采集。
部署设计逻辑 pg_exporter 在生产环境中的关键设计取舍如下:
本地优先:默认 URL 为 postgresql:///?sslmode=disable,适配同机部署 先可观测后可连接:默认非阻塞启动,目标库暂时不可达时也先暴露 HTTP 端点 可控失败策略:设置 --fail-fast 后,启动阶段目标不可达会直接失败退出 在线变更:支持 POST/GET /reload 与 SIGHUP 触发热重载(非 Windows 额外支持 SIGUSR1) 健康探针解耦:/up 等端点基于后台探测缓存,避免探针风暴影响数据库 管理面默认同口暴露:/reload、/explain、/stat 建议通过 --web.config.file 保护,或仅在可信网络中开放 命令行参数 所有配置选项都可以通过命令行标志指定:
pg_exporter \
--url= "postgres://user:pass@localhost:5432/postgres" \
--config= "/etc/pg_exporter/pg_exporter.yml" \
--web.listen-address= ":9630" \
--auto-discovery \
--exclude-database= "template0,template1" \
--log.level= "info"
运行 pg_exporter --help 获取完整的可用标志列表:
Flags:
-h, --[ no-] help 显示上下文相关帮助(也可尝试 --help-long 和 --help-man)。
-u, --url= URL postgres 目标 URL
-c, --config= CONFIG 配置目录或文件路径
--web.listen-address= :9630 ...
暴露指标和 Web 界面的地址。可重复指定多个地址。示例:` :9100` 或 ` [ ::1] :9100` 用于 http,` vsock://:9100` 用于 vsock
--web.config.file= "" 可启用 TLS 或认证的配置文件路径。参见:https://github.com/prometheus/exporter-toolkit/blob/master/docs/web-configuration.md
-l, --label= "" 常量标签:逗号分隔的 label = value 项 ( $PG_EXPORTER_LABEL )
-t, --tag= "" 标签,逗号分隔的服务器标签 ( $PG_EXPORTER_TAG )
-C, --[ no-] disable-cache 强制不使用缓存 ( $PG_EXPORTER_DISABLE_CACHE )
-m, --[ no-] disable-intro 禁用内部/导出器自监控指标(仅暴露查询指标)( $PG_EXPORTER_DISABLE_INTRO )
-a, --[ no-] auto-discovery 自动抓取目标服务器上的所有数据库 ( $PG_EXPORTER_AUTO_DISCOVERY )
-x, --exclude-database= "template0,template1,postgres"
启用自动发现时排除的数据库 ( $PG_EXPORTER_EXCLUDE_DATABASE )
-i, --include-database= "" 启用自动发现时包含的数据库 ( $PG_EXPORTER_INCLUDE_DATABASE )
-n, --namespace= "" 内置指标的前缀,默认为 ( pg| pgbouncer) ( $PG_EXPORTER_NAMESPACE )
-f, --[ no-] fail-fast 启动时立即失败而不是等待 ( $PG_EXPORTER_FAIL_FAST )
-T, --connect-timeout= 100 连接超时(毫秒),默认 100 ( $PG_EXPORTER_CONNECT_TIMEOUT )
-P, --web.telemetry-path= "/metrics"
暴露指标的 URL 路径 ( $PG_EXPORTER_TELEMETRY_PATH )
-D, --[ no-] dry-run 干运行并打印原始配置
-E, --[ no-] explain 解释服务器计划的查询
--log.level= "info" 日志级别:debug| info| warn| error
--log.format= "logfmt" 日志格式:logfmt| json
--[ no-] version 显示应用程序版本
环境变量 所有命令行参数都有对应的环境变量:
PG_EXPORTER_URL = 'postgresql:///?sslmode=disable'
PG_EXPORTER_CONFIG = /etc/pg_exporter.yml
PG_EXPORTER_LABEL = ""
PG_EXPORTER_TAG = ""
PG_EXPORTER_DISABLE_CACHE = false
PG_EXPORTER_AUTO_DISCOVERY = true
PG_EXPORTER_EXCLUDE_DATABASE = "template0,template1,postgres"
PG_EXPORTER_INCLUDE_DATABASE = ""
PG_EXPORTER_NAMESPACE = "pg"
PG_EXPORTER_FAIL_FAST = false
PG_EXPORTER_CONNECT_TIMEOUT = 100
PG_EXPORTER_TELEMETRY_PATH = "/metrics"
PG_EXPORTER_OPTS = '--log.level=info'
pg_exporter
除 PG_EXPORTER_URL 外,还支持:
PGURL:作为连接 URL 的兼容环境变量PG_EXPORTER_URL_FILE:从文件中读取连接 URL(适合容器 Secret)建议
如果 exporter 需要暴露到共享网络,而不仅是本机或内网,请优先配置 --web.config.file 为 /metrics 和管理端点启用认证/TLS;否则任何能访问该端口的用户都可以读取 /explain、/stat,并触发 /reload。
部署架构 最简单的部署方式是每个 PostgreSQL 实例配置一个导出器:
┌─────────────┐ ┌──────────────┐ ┌────────────┐
│ Prometheus │────▶│ PG Exporter │────▶│ PostgreSQL │
└─────────────┘ └──────────────┘ └────────────┘
:9630 :5432
多数据库环境 使用自动发现来监控多个数据库(默认启用):
┌─────────────┐ ┌────────────────┐ ┌────────────┐
│ Prometheus │────▶│ PG Exporter │────▶│ PostgreSQL │
└─────────────┘ │ 启用自动发现 │ │ ├─ db1 │
│ │ │ ├─ db2 │
└────────────────┘ │ └─ db3 │
└────────────┘
生产配置 PostgreSQL 用户设置 创建一个具有最小必要权限的专用监控用户:
-- 创建监控角色
CREATE ROLE monitor WITH LOGIN PASSWORD 'strong_password' CONNECTION LIMIT 5 ;
-- 授予必要权限
GRANT pg_monitor TO monitor ; -- PostgreSQL 10+ 内置角色
GRANT CONNECT ON DATABASE postgres TO monitor ;
-- 对于特定数据库
GRANT CONNECT ON DATABASE app_db TO monitor ;
GRANT USAGE ON SCHEMA public TO monitor ;
-- 扩展监控的额外权限
GRANT SELECT ON ALL TABLES IN SCHEMA pg_catalog TO monitor ;
GRANT SELECT ON ALL SEQUENCES IN SCHEMA pg_catalog TO monitor ;
连接安全 使用 SSL/TLS # 带 SSL 的连接字符串
PG_EXPORTER_URL = 'postgres://monitor:password@db.example.com:5432/postgres?sslmode=require&sslcert=/path/to/client.crt&sslkey=/path/to/client.key&sslrootcert=/path/to/ca.crt'
使用 .pgpass 文件 # 创建 .pgpass 文件
echo "db.example.com:5432:*:monitor:password" > ~/.pgpass
chmod 600 ~/.pgpass
# 在 URL 中不使用密码
PG_EXPORTER_URL = 'postgres://monitor@db.example.com:5432/postgres'
Systemd 服务配置 完整的生产环境 systemd 设置:
[Unit]
Description = Prometheus exporter for PostgreSQL/Pgbouncer server metrics
Documentation = https://pigsty.io/docs/pg_exporter
After = network.target
[Service]
EnvironmentFile = -/etc/default/pg_exporter
User = prometheus
ExecStart = /usr/bin/pg_exporter $PG_EXPORTER_OPTS
Restart = on-failure
[Install]
WantedBy = multi-user.target
环境文件 /etc/default/pg_exporter:
PG_EXPORTER_URL = 'postgres://:5432/?sslmode=disable'
PG_EXPORTER_CONFIG = /etc/pg_exporter.yml
PG_EXPORTER_LABEL = ""
PG_EXPORTER_TAG = ""
PG_EXPORTER_DISABLE_CACHE = false
PG_EXPORTER_AUTO_DISCOVERY = true
PG_EXPORTER_EXCLUDE_DATABASE = "template0,template1,postgres"
PG_EXPORTER_INCLUDE_DATABASE = ""
PG_EXPORTER_NAMESPACE = "pg"
PG_EXPORTER_FAIL_FAST = false
PG_EXPORTER_CONNECT_TIMEOUT = 100
PG_EXPORTER_TELEMETRY_PATH = "/metrics"
PG_EXPORTER_OPTS = '--log.level=info'
这里的 /etc/default/pg_exporter 是包安装后的环境文件示例;如果需要,也可以自行追加 PG_EXPORTER_DISABLE_INTRO=false 等额外环境变量。如果完全不设置 PG_EXPORTER_URL,二进制自身仍会回退到 postgresql:///?sslmode=disable 的本地优先默认连接串。
服务管理 启动和停止服务 # 启动服务
sudo systemctl start pg_exporter
# 停止服务
sudo systemctl stop pg_exporter
# 重启服务
sudo systemctl restart pg_exporter
# 查看服务状态
sudo systemctl status pg_exporter
# 设置开机自启
sudo systemctl enable pg_exporter
查看日志 # 实时查看日志
journalctl -u pg_exporter -f
# 查看最近的日志
journalctl -u pg_exporter --since "1 hour ago"
# 查看错误日志
journalctl -u pg_exporter -p err
Docker 部署 基本 Docker 运行 docker run -d \
--name pg_exporter \
--restart unless-stopped \
-p 9630:9630 \
-e PG_EXPORTER_URL = "postgres://user:pass@host:5432/postgres" \
pgsty/pg_exporter:latest
如果容器以远程 TLS 模式连接 PostgreSQL,记得额外挂载 sslrootcert 或系统 CA bundle。当前官方镜像基于 scratch,不会自带通用系统证书。
Docker Compose version : '3.8'
services :
pg_exporter :
image : pgsty/pg_exporter:latest
container_name : pg_exporter
restart : unless-stopped
ports :
- "9630:9630"
environment :
- PG_EXPORTER_URL=postgres://monitor:password@postgres:5432/postgres
- PG_EXPORTER_AUTO_DISCOVERY=true
- PG_EXPORTER_EXCLUDE_DATABASE=template0,template1
volumes :
- ./pg_exporter.yml:/etc/pg_exporter.yml:ro
depends_on :
- postgres
Kubernetes 部署 Deployment 示例 apiVersion : apps/v1
kind : Deployment
metadata :
name : pg-exporter
labels :
app : pg-exporter
spec :
replicas : 1
selector :
matchLabels :
app : pg-exporter
template :
metadata :
labels :
app : pg-exporter
annotations :
prometheus.io/scrape : "true"
prometheus.io/port : "9630"
spec :
containers :
- name : pg-exporter
image : pgsty/pg_exporter:latest
ports :
- containerPort : 9630
env :
- name : PG_EXPORTER_URL
valueFrom :
secretKeyRef :
name : pg-credentials
key : connection-url
- name : PG_EXPORTER_AUTO_DISCOVERY
value : "true"
livenessProbe :
httpGet :
path : /liveness
port : 9630
initialDelaySeconds : 30
periodSeconds : 10
readinessProbe :
httpGet :
path : /readiness
port : 9630
initialDelaySeconds : 5
periodSeconds : 5
resources :
limits :
cpu : 200m
memory : 256Mi
requests :
cpu : 100m
memory : 128Mi
Service 示例 apiVersion : v1
kind : Service
metadata :
name : pg-exporter
labels :
app : pg-exporter
spec :
ports :
- port : 9630
targetPort : 9630
name : metrics
selector :
app : pg-exporter
Prometheus 配置 静态配置 scrape_configs :
- job_name : 'postgresql'
static_configs :
- targets :
- 'pg-exporter-1:9630'
- 'pg-exporter-2:9630'
- 'pg-exporter-3:9630'
服务发现 scrape_configs :
- job_name : 'postgresql'
kubernetes_sd_configs :
- role : pod
relabel_configs :
- source_labels : [ __meta_kubernetes_pod_label_app]
regex : pg-exporter
action : keep
- source_labels : [ __meta_kubernetes_pod_ip]
target_label : __address__
replacement : ${1}:9630
监控与告警 推荐的告警规则 groups :
- name : pg_exporter
rules :
# 导出器宕机告警
- alert : PgExporterDown
expr : up{job="postgresql"} == 0
for : 5m
labels :
severity : critical
annotations :
summary : "PG Exporter 宕机"
description : "{{ $labels.instance }} 的 PG Exporter 已宕机超过 5 分钟"
# 数据库连接失败告警
- alert : PostgreSQLDown
expr : pg_up == 0
for : 1m
labels :
severity : critical
annotations :
summary : "PostgreSQL 连接失败"
description : "无法连接到 {{ $labels.instance }} 上的 PostgreSQL"
# 抓取时间过长告警
- alert : PgExporterSlowScrape
expr : pg_exporter_scrape_duration > 30
for : 5m
labels :
severity : warning
annotations :
summary : "PG Exporter 抓取缓慢"
description : "{{ $labels.instance }} 的抓取时间超过 30 秒"
29.6 - 发布注记 PG Exporter 版本发布历史
pg_exporter 的最新稳定版本是 v1.2.1
v1.2.1 v1.2.1 是一次轻量维护版本,重点放在发布工程、配置包一致性与文档/元数据刷新上,不引入新的采集器语义或运行时行为变更。
变更摘要:
刷新构建链:发布流程与 Docker 构建基础镜像升级到 Go 1.26.1 统一配置样式:将当前配置与 Legacy 配置中的内联 description 统一改为双引号写法,并重新生成合并后的 pg_exporter.yml / legacy/pg_exporter.yml 增加配置一致性测试:新增 split/merged config 等价性校验,以及内联指标描述风格检查,减少配置漂移风险 刷新打包元数据:RPM / DEB 描述中的支持范围更新为 PostgreSQL 9.x - 18+ 与 pgBouncer 1.8 - 1.25+,并更新 Pigsty 文档入口链接 校验和
2cbe7a78a0dde8a6155a543232af883de6623531c9f6ea0951ddc30dc7514649 pg-exporter_1.2.1-1_amd64.deb
e70e09974ad52ba607b176b63c300610e37f44fe67d249aa9ef364bd58352585 pg-exporter_1.2.1-1_arm64.deb
4e6c7fae85e7fe2e62c3d66c388b5f3db57b5e95e85f43ce648d21b792d83d87 pg-exporter_1.2.1-1_ppc64le.deb
30103629e8c5c1ee5589addadb37fcb07b43179c8a19f80c016a0ed8d7ac2a47 pg_exporter-1.2.1-1.aarch64.rpm
01b4dd32b20bca8612f71f0edf3557dfa92fc85f669d3260f627d34ce102b517 pg_exporter-1.2.1-1.ppc64le.rpm
5afb4f14aa71b256cdfc93d6cc6da8a7052427d6f1c1b71900bf2593b196de50 pg_exporter-1.2.1-1.x86_64.rpm
45e71c6017beffabf2873841d374b5de40eb499dd768d6db1208d7cc6295bcf5 pg_exporter-1.2.1.darwin-amd64.tar.gz
d3035cc6a023fe1bad5443a7c1d5c8189b3d807d165f131f88566b5c35476259 pg_exporter-1.2.1.darwin-arm64.tar.gz
14d3f83de4377e5363611d2ae4eef9470a85d7518784c06b8a8c0f63b6e0a340 pg_exporter-1.2.1.linux-amd64.tar.gz
71082081e7aaf1cf15c941c310d03da49cf9971205274aad7dae21a126bc4fe1 pg_exporter-1.2.1.linux-arm64.tar.gz
cba30919b8d2945be199a4a346eb2891c88fd7a1d6c3482c1006442f4f6109e7 pg_exporter-1.2.1.linux-ppc64le.tar.gz
6fe528a242f0bbd3b89cd8b2697f48905b5c4b1398abfb3305193808c01738e9 pg_exporter-1.2.1.windows-amd64.tar.gz
https://github.com/pgsty/pg_exporter/releases/tag/v1.2.1
v1.2.0 v1.2.0 是一次聚焦稳定性与兼容性的中版本更新,覆盖启动流程、热重载、健康检查、配置校验与 Legacy 支持。
新功能:
支持配置热重载:新增平台相关的信号重载(SIGHUP / SIGUSR1),并强化 POST /reload 工作流,可在不重启进程情况下更新配置与查询计划 启动流程改为非阻塞:即使目标库预检失败,也会先启动 HTTP 服务,便于监控系统先接入后恢复 新增 PostgreSQL 9.1-9.6 Legacy 配置套件:提供 legacy/ 配置目录与 make conf9 目标,便于 EOL 老版本平滑接入 健康检查机制重构:引入缓存健康快照与周期探测,读写角色类健康端点行为更一致,重载期间更平滑 工程链路增强:Release 工作流增加 go test 与 go vet,并升级构建链到 Go 1.26.0 Bug 修复:
修复多处配置解析边界问题:拒绝非法 metrics 定义、无效目录加载失败场景可正确报错,并补齐运行时回退逻辑 修复命令行布尔参数解析:正确处理 --flag=false 风格传参,避免被误判为启用 修复 /explain 输出与渲染安全性:调整内容类型并改用更安全的模板渲染路径 修复谓词查询与连接 URL 处理细节:增强 BOOL/BOOLEAN 条件支持、完善 dbname 查询参数解析与 URL 脱敏输出 修复自动发现目标移除时的资源释放行为:异步关闭已移除数据库连接,降低采集阻塞风险 修复指标与标签校验细节:补齐常量标签冲突检查、默认值缩放处理与若干 Prometheus 规则校验 校验和
https://github.com/pgsty/pg_exporter/releases/download/v1.2.0/checksums.txt
26e7a052e730b412bbbe5f49846f951b89650f1f95c2466d5d486923f0825f64 pg-exporter_1.2.0-1_amd64.deb
4ec219135c49708d010af7b8a7553b8008f630574e1d4cfc7642fbf951eefafe pg-exporter_1.2.0-1_arm64.deb
5b2cc00e2c3e2ffd9eb0ab1a4f5e937dd68f3a69a14423a74d4de3d7cf29283e pg-exporter_1.2.0-1_ppc64le.deb
d536d41a92e8aa85ae3935715d1bf0463208b1e614eae73543f1472ca8a7e0d4 pg_exporter-1.2.0-1.aarch64.rpm
b7a1daa225f8ca4de6d227e6004330589295d924accd221892ebe14f191fe35c pg_exporter-1.2.0-1.ppc64le.rpm
28bf7d85862510675c64ff5181d216c6a068a23ffa56dc4bb9e6b82165ff99b5 pg_exporter-1.2.0-1.x86_64.rpm
51c3b3d18089d888a54a6b3e7ecb0620dc0da04c81471a0b7aaa88c1677ddb8c pg_exporter-1.2.0.darwin-amd64.tar.gz
3ba1c7adea9c926afd3054ba18cc43e665e420a495bfcfd2248242c49a67b077 pg_exporter-1.2.0.darwin-arm64.tar.gz
9e1ec6c15e6b2aaadbe27a27053ee1ec289bdd012c19ca6371de738fa5f8843e pg_exporter-1.2.0.linux-amd64.tar.gz
9e18849693ccda313979db0a230cb81acfe4199364feb6ce3e72d1a89fbfb809 pg_exporter-1.2.0.linux-arm64.tar.gz
6e28489685d0bd1fdabcb71474f64f559ade199b871666954323bae9dc01465f pg_exporter-1.2.0.linux-ppc64le.tar.gz
9e9beac619fe2c614a77bc3334bc4b80df9db355bf95845eb4b11674ddad52d9 pg_exporter-1.2.0.windows-amd64.tar.gz
https://github.com/pgsty/pg_exporter/releases/tag/v1.2.0
v1.1.2 小版本更新,修复 pg_timeline 配置问题,使用最新 Go 依赖构建。
校验和
https://github.com/pgsty/pg_exporter/releases/download/v1.1.2/checksums.txt
8cddd57a843914a3145a80a3220bc875047b9bcac0664357c01ba86485436236 pg-exporter_1.1.2-1_amd64.deb
f5b25a8ae5c022867a54c17ba1c6493eba20dcb292340460390289336df24f04 pg-exporter_1.1.2-1_arm64.deb
4da2c287f6717681b25befda0d59a89b9d1b258281ce94f3a6bc21d02f70c83c pg-exporter_1.1.2-1_ppc64le.deb
b26355f3c1a5b8a147291a51e2d7ada204deed6d52877c146a8b3e499defa5e8 pg_exporter-1.1.2-1.aarch64.rpm
42ef89716ba99dd918b0e9c77ef3236129d613f68bb8ae5929668a5a2596cca5 pg_exporter-1.1.2-1.ppc64le.rpm
a8f4a2d5c7b6701c7bac788a7ed7183b6c4b74a334326cd389f3a695fb77675d pg_exporter-1.1.2-1.x86_64.rpm
775f5ea3188a6acb1327c001c4ba9a0651424c3bb37d800e6f67972c904c4750 pg_exporter-1.1.2.darwin-amd64.tar.gz
7f2bbcc2db1e16dc78c3edd8e67e20e4ec81f2972c8c37135cba6f6afbf91003 pg_exporter-1.1.2.darwin-arm64.tar.gz
33c34b1f9ef6b6e7615f241a95059a8137a2337a454930b668180a9329d12b98 pg_exporter-1.1.2.linux-amd64.tar.gz
2b91a5818d780e38692ab6446cacb496695e67388676c18012be582e8ddfbdd8 pg_exporter-1.1.2.linux-arm64.tar.gz
adcb5f229f4a5d641f6430b9a2dfb0377a2e4310efad242730867d6cdf5e27ee pg_exporter-1.1.2.linux-ppc64le.tar.gz
90b7c7e4b2b94936b5faa3cf2d35509b62ebc0d60b3afe1abaaf03efcd415a4a pg_exporter-1.1.2.windows-amd64.tar.gz
https://github.com/pgsty/pg_exporter/releases/tag/v1.1.2
v1.1.1 小版本更新,新增采集器和 Bug 修复。
新功能:
新增 pg_timeline 采集器,用于时间线监控 新增 pg_sub_16 采集器分支,排除订阅中的并行操作(PostgreSQL 16+ 兼容性) Bug 修复:
修复:为 pg_recv 采集器的 slotname 添加 coalesce 以处理 NULL 值 校验和
https://github.com/pgsty/pg_exporter/releases/download/v1.1.1/checksums.txt
fd5ee96511676fc11b975115a4870ed0c811056519f79ad7f24ab7ec538fa278 pg-exporter_1.1.1-1_amd64.deb
b90a08d16a6e4707d82f8f3ae282cb76acb331de607e7544532fd0b774b7aa27 pg-exporter_1.1.1-1_arm64.deb
163955f59a71da48901ffa26bb2f2db0712d31d8aeb1ab3fa463683f719a6d3a pg-exporter_1.1.1-1_ppc64le.deb
cf4f8bc12bb8a2d1e55553f891fd31c43324e4348249727972eb44f82cd4e6c8 pg_exporter-1.1.1-1.aarch64.rpm
5a425b2f61f308b32f2d107372830c34eb685bfb312ee787f11877a20f1c4a2e pg_exporter-1.1.1-1.ppc64le.rpm
23606ccea565368971ac2e7f39766455b507021f09457bcf61db13cb10501a16 pg_exporter-1.1.1-1.x86_64.rpm
ce74624eba92573318f50764cee4f355fa1f35697d209f70a4240f8f9d976188 pg_exporter-1.1.1.darwin-amd64.tar.gz
35fba12521dbdcc54a3792278ed4822e4ca9e951665b5e53dff7c2a0f7014ae3 pg_exporter-1.1.1.darwin-arm64.tar.gz
7699bdef15dd306289645beee8d40a123ca75dc988e46d89cdd75a1c1f650bef pg_exporter-1.1.1.linux-amd64.tar.gz
f4baba59d27a8eb67f0c5209fed7b9f00f78db796e583cc3487701e7803671c6 pg_exporter-1.1.1.linux-arm64.tar.gz
810c3817c27358fa667714f8bfe8d52840a7ea010035e29547919ccb7c9fa781 pg_exporter-1.1.1.linux-ppc64le.tar.gz
3f6df693b3eb92fdaeaeccf99ea7e5977b2c65028a4f00bdfabbc0405b9f5f93 pg_exporter-1.1.1.windows-amd64.tar.gz
https://github.com/pgsty/pg_exporter/releases/tag/v1.1.1
v1.1.0 使用 Go 1.25.5 和最新依赖构建,采集器更新:
采集器变更:
pg_setting:针对 PG10-18 兼容性进行重大重构,支持 missing_ok新增 13 个指标:max_parallel_workers、max_parallel_workers_per_gather、max_parallel_maintenance_workers、shared_buffers、maintenance_work_mem、effective_cache_size、fsync、full_page_writes、autovacuum、autovacuum_max_workers、checkpoint_timeout、checkpoint_completion_target、hot_standby、synchronous_commit、io_method 将 work_memory_size 重命名为 work_mem min_version 从 9.6 改为 10,显式 ::int 类型转换 pg_size:修复日志目录大小检测,使用 logging_collector 检查代替路径模式匹配pg_table:性能优化,用 JOIN 替换 LATERAL 子查询以提升查询性能;修复 tuples 和 frozenxid 指标类型从 COUNTER 改为 GAUGE;超时从 1s 增加到 2spg_vacuuming:新增 PG17 采集器分支,包含新指标 indexes_total、indexes_processed、dead_tuple_bytes 用于索引 vacuum 进度跟踪pg_query:超时从 1s 增加到 2s 以应对高负载场景pg_io:修复 reuses 描述中的拼写错误(“in reused” -> “is reused”)pg_checkpointer:修复 pg_checkpointer_10 描述(“9.4+” -> “9.4-17”)pg_db_confl:修复 pg_db_confl_15 描述(“9.1 - 16” -> “9.1 - 15”)pg_db、pg_indexing、pg_clustering、pg_backup 格式对齐修复其他变更:
校验和
https://github.com/pgsty/pg_exporter/releases/download/v1.0.3/checksums.txt
9c65f43e76213bb8a49d1eab2c76a27d9ab694e67bc79f0ad12769ea362b5ca2 pg-exporter_1.1.0-1_amd64.deb
bcd2cacb4febc5fb92f9eda8e733c161c8c6721416e16ec91a773503241c972d pg-exporter_1.1.0-1_arm64.deb
2c9d4a9cb06d07af0b6dd9dd6e568af073dc9f6775abde63b45f0aae34d171b1 pg-exporter_1.1.0-1_ppc64le.deb
2934ab5b0fb16dca5a96ec1e8f230e32c72b30ca076b5e5ddf8ec553c821f7b8 pg_exporter-1.1.0-1.aarch64.rpm
3c9955f31ba93532cc7f95ff60b0658f4b6eca6a827710e2f70c0716b34eab43 pg_exporter-1.1.0-1.ppc64le.rpm
9fdefbd8e7660dcb130207901a27762e0a381857ba8cf12b63184744f92dea05 pg_exporter-1.1.0-1.x86_64.rpm
7159002016754309e0ed625a9a48049d21177883fa11d1e448eb7655ceb690cc pg_exporter-1.1.0.darwin-amd64.tar.gz
7d55ac5cda0b1fd8ffbd5e76b9c1c1784ac8e353104a206caaadce89adda6d65 pg_exporter-1.1.0.darwin-arm64.tar.gz
8211ec24277554b9b1a36920d7865153e21c2621031d3d08f22d94cdd2ddf02f pg_exporter-1.1.0.linux-amd64.tar.gz
d17ab7f9bf04442e642483d432d005d25bb62e0c9caa73cb7e69ee19eb89b3ae pg_exporter-1.1.0.linux-arm64.tar.gz
c074aeb345cc30f7b6e16aa153ae3d9a12789e4425987590c3fd77c4e68a40b6 pg_exporter-1.1.0.linux-ppc64le.tar.gz
13d653e2abb023ce9526bdc2815135b82f49c044d237030f3f56b09fb016fcb7 pg_exporter-1.1.0.windows-amd64.tar.gz
https://github.com/pgsty/pg_exporter/releases/tag/v1.1.0
v1.0.3 使用 Go 1.25.4 和最新依赖构建 修复 #80 与 libpq 环境变量冲突 由 @kadaffy 将 auto-discovery 默认值改为 true 校验和
https://github.com/pgsty/pg_exporter/releases/download/v1.0.3/checksums.txt
7efa1a77dfd5b94813c32c7ac015b1d479b1f04fb958f6b1ed5af333e354d015 pg-exporter_1.0.3-1_amd64.deb
41e18bf18eba2ab90ac371bfb46e9152da9fe628ebd8e26766cac08325eb3b07 pg-exporter_1.0.3-1_arm64.deb
7da8ed738d254c120d42aa51d6137f84e7f4e3188bc764d4f9a1438220363a43 pg-exporter_1.0.3-1_ppc64le.deb
a214b555981156da7b7d248b1f728f8ac88a07ac8f77a66c5d8e43b40670d6b4 pg_exporter-1.0.3-1.aarch64.rpm
d876fc66e208612ebffe3c43dabce88b088d915f92584260d710b85a3a131413 pg_exporter-1.0.3-1.ppc64le.rpm
75f62d314fec50c836c534996c884d25ecea77810ab33e7ba0e9c4b783e775b4 pg_exporter-1.0.3-1.x86_64.rpm
47829a19707284bcee1b8dc47cc7d0172398bb533e6b4043950f787486712769 pg_exporter-1.0.3.darwin-amd64.tar.gz
38b6ccb72315cadea542b1f2a7b7022d0e8d48ffd4ab177bb69a0a909b99af6b pg_exporter-1.0.3.darwin-arm64.tar.gz
36e8dff84d61a7593ff1fcec567ca4ffeaecd0be2f9eabd227ceac71b12a919a pg_exporter-1.0.3.linux-amd64.tar.gz
6477e8ef873773a09c4f39a29444f21b5b2c71e717e52ca425bcc8e8e5448791 pg_exporter-1.0.3.linux-arm64.tar.gz
a083b51ebed2b280e2eaa0f19558494e7fa6f122a0a86a1d117206fcd090820c pg_exporter-1.0.3.linux-ppc64le.tar.gz
a1f9b27b7190f478726d96f270a72d9dc4d3f2bcc3b0326b7c4a2607e62ea588 pg_exporter-1.0.3.windows-amd64.tar.gz
https://github.com/pgsty/pg_exporter/releases/tag/v1.0.3
v1.0.2 使用 Go 1.25.0 和最新依赖构建 专属网站和主页:https://exp.pgsty.com 使用 goreleaser 通过 CI/CD 流水线发布更多操作系统/架构:新增 Windows amd64 支持 新增 Linux ppc64le 支持 校验和
https://github.com/pgsty/pg_exporter/releases/download/v1.0.2/checksums.txt
683bf97f22173f2f2ec319a88e136939c2958a1f5ced4f4aa09a1357fc1c44c5 pg-exporter_1.0.2-1_amd64.deb
f62d479a92be2d03211c162b8419f968cea87ceef5b1f25f2bcd390e0b72ccb5 pg-exporter_1.0.2-1_arm64.deb
e1bbfc5a4c1b93e6f92bc7adcb4364583ab763e76e156aa5c979d6d1040f4c7a pg-exporter_1.0.2-1_ppc64le.deb
f51d5b45448e6bbec3467d1d1dc049b1e16976f723af713c4262541ac55a039c pg_exporter-1.0.2-1.aarch64.rpm
18380011543674e4c48b2410266b41165974d780cbc8918fc562152ba623939e pg_exporter-1.0.2-1.ppc64le.rpm
198372d894b9598c166a0e91ca36d3c9271cb65298415f63dbffcf6da611f2bb pg_exporter-1.0.2-1.x86_64.rpm
cbe7e07df6d180507c830cdab4cf86d40ccd62774723946307b5331d4270477d pg_exporter-1.0.2.darwin-amd64.tar.gz
20c4a35fa244287766c1d1a19cd2e393b3fa451a96a81e5635401e69bef04b97 pg_exporter-1.0.2.darwin-arm64.tar.gz
d742111185f6a89fff34bfd304b851c8eb7a8e38444f0220786e11ed1934eff1 pg_exporter-1.0.2.linux-amd64.tar.gz
0b1f4c97c1089c4767d92eb22419b8f29c9f46fb90ddfd1e8514cc42dc41054f pg_exporter-1.0.2.linux-arm64.tar.gz
895083fd2c7fc5409cc1a2dbaaef1e47ac7aa6a3fd5db2359012922d90bcdcc3 pg_exporter-1.0.2.linux-ppc64le.tar.gz
5f751228e7120604af9a482fb70197489fa633c38a0f2b6a3489393fbc6a10aa pg_exporter-1.0.2.windows-amd64.tar.gz
https://github.com/pgsty/pg_exporter/releases/tag/v1.0.2
v1.0.1 新增 DockerHub 镜像:pgsty/pg_exporter 升级 Go 依赖到最新版本,使用 Go 1.24.5 构建 默认禁用 pg_tsdb_hypertable 采集器,因为 timescaledb 目录已变更 校验和
d5e2d6a656eef0ae1b29cd49695f9773 pg_exporter-1.0.1-1.aarch64.rpm
cb01bb78d7b216a235363e9342803cb3 pg_exporter-1.0.1-1.x86_64.rpm
67093a756b04845f69ad333b6d458e81 pg_exporter-v1.0.1.darwin-amd64.tar.gz
2d3fdc10045d1cf494b9c1ee7f94f127 pg_exporter-v1.0.1.darwin-arm64.tar.gz
e242314461becfa99c3978ae72838ab0 pg_exporter-v1.0.1.linux-amd64.tar.gz
63de91da9ef711a53718bc60b89c82a6 pg_exporter-v1.0.1.linux-arm64.tar.gz
718f6afc004089f12c1ca6553f9b9ba5 pg-exporter_1.0.1_amd64.deb
57da7a8005cdf91ba8c1fb348e0d7367 pg-exporter_1.0.1_arm64.deb
https://github.com/pgsty/pg_exporter/releases/tag/v1.0.1
v1.0.0 新增 PostgreSQL 18 指标支持
新采集器分支 pg_wal_18:移除 write、sync、write_time、sync_time 指标 移至 pg_stat_io 新采集器分支 pg_checkpointer_18:新指标 num_done 新指标 slru_written 新采集器分支 pg_db_18:新指标 parallel_workers_to_launch 新指标 parallel_workers_launched 新采集器分支 pg_table_18:table_parallel_workers_to_launchtable_parallel_workers_launched 新采集器分支 pg_io_18:新增 WAL 统计系列 新指标 read_bytes 新指标 write_bytes 新指标 extend_bytes 移除 op_bytes(因为是固定值) 新采集器分支 pg_vacuuming_18: 8637bc1a05b93eedfbfd3816cca468dd pg_exporter-1.0.0-1.aarch64.rpm
a28c4c0dcdd3bf412268a2dbff79f5b9 pg_exporter-1.0.0-1.x86_64.rpm
229129209b8e6bc356c28043c7c22359 pg_exporter-v1.0.0.darwin-amd64.tar.gz
d941c2c28301269e62a8853c93facf12 pg_exporter-v1.0.0.darwin-arm64.tar.gz
5bbb94db46cacca4075d4c341c54db37 pg_exporter-v1.0.0.linux-amd64.tar.gz
da9ad428a50546a507a542d808f1c0fa pg_exporter-v1.0.0.linux-arm64.tar.gz
0fa2395d9d7a43ab87e5c87e5b06ffcc pg-exporter_1.0.0_amd64.deb
fed56f8a37e30cc59e85f03c81fce3f5 pg-exporter_1.0.0_arm64.deb
https://github.com/pgsty/pg_exporter/releases/tag/v1.0.0
v0.9.0 默认采集器
新增 timescaledb 超表指标采集器 新增 citus 分布式节点指标采集器 新增 pg_wait_sampling 等待事件采集器 pg_slot 全面改进:新增 16/17 pg_replication_slot 指标允许 pg_slot 采集器从 16/17 开始在从库上运行 重构 pg_wait 采集器,从所有进程聚合 限制 pg_clustering、pg_indexing、pg_vacuuming 只在主库运行 将所有 reset_time 标记为 GAUGE 而非 COUNTER 修复 pg_recovery_prefetch_skip_fpw 类型从 GAUGE 改为 COUNTER 修复 pg_recv.state 类型从 LABEL 改为 GAUGE 采集器格式改为紧凑模式 新增默认指标 pg_exporter_build_info / pgbouncer_exporter_build_info 为 pg_meta 采集器新增 server_encoding 为 pg_setting 采集器新增 12 个设置指标:wal_block_size segment_size wal_segment_size wal_level wal_log_hints work_mem hugepage_count hugepage_status max_wal_size min_wal_size max_slot_wal_keep_size 导出器代码库
使用最小 PG 版本后缀规范化采集器分支名称 为二进制包添加许可证文件 将 pgsty/pg_exporter 仓库移至 pgsty/pg_exporter 重构 server.go 以降低 Compatible 和 PostgresPrecheck 复杂度 使用额外数字前缀重命名指标采集器以便排序 升级依赖到最新版本 在所有非致命采集器之前执行致命采集器,快速失败 https://github.com/pgsty/pg_exporter/releases/tag/v0.9.0
v0.8.1 https://github.com/pgsty/pg_exporter/releases/tag/v0.8.1
v0.8.0 新增 PgBouncer 1.24 新指标支持(stat、pool、database) 修复:310-pg_size.yml 在日志目录设置不正确时失败 #64 ,由 @Süleyman Vurucu 贡献 使用最新 Go 1.24 构建并升级所有依赖 使用标准 log/slog 重构日志,替代 go-kit 完整变更日志 :https://github.com/pgsty/pg_exporter/compare/v0.7.1…v0.8.0https://github.com/pgsty/pg_exporter/releases/tag/v0.8.0
v0.7.1 使用 dependabot 进行例行更新
功能:支持将配置指定为 Reader,由 @ringerc 在 #62 贡献 升级 golang.org/x/crypto 从 0.21.0 到 0.31.0,由 @dependabot 在 #63 贡献 修复一些拼写错误 完整变更日志 :https://github.com/pgsty/pg_exporter/compare/v0.7.0…v0.7.1https://github.com/pgsty/pg_exporter/releases/tag/v0.7.1
v0.7.0 为最新 Go 版本重构代码库。
https://github.com/pgsty/pg_exporter/releases/tag/v0.7.0
v0.6.0 https://github.com/pgsty/pg_exporter/releases/tag/v0.6.0
v0.5.0 导出器增强
使用 nfpm 构建 rpm 和 deb 新增 column.default,当指标值为 NULL 时替换 新增 column.scale,当指标值为浮点/整数时乘以缩放因子(例如微秒转秒) 修复 /stat 端点输出 新增 Docker 容器 pgsty/pg_exporter 指标采集器
将 bgwriter 和 pg_wal 时间单位缩放为秒 移除 pg_class 采集器,将其移至 pg_table 和 pg_index 为 pg_table 新增 pg_class 指标 为 pg_index 新增 pg_class 指标 默认启用 pg_table_size 将 pg_query、pg_db、pg_bgwriter、pg_ssl、pgbouncer_stat 时间指标缩放为秒 https://github.com/pgsty/pg_exporter/releases/tag/v0.5.0
v0.4.1 更新默认采集器在对象监控中省略 citus 和 timescaledb 模式 避免重复的 pg_statio 元组 支持 pgbouncer v1.16 Bug 修复:pg_repl 采集器在 pg 12 上重叠 新参数:-T connect-timeout PG_EXPORTER_CONNECT_TIMEOUT
这在监控远程 Postgres 实例时很有用 现在 pg_exporter.yaml 在 rpm 包中重命名为 pg_exporter.yml https://github.com/pgsty/pg_exporter/releases/tag/v0.4.1
v0.4.0 新增 PG 14 支持 默认指标配置全面改进(但您仍可使用旧配置) 新增 auto-discovery、include-database 和 exclude-database 选项 新增多数据库监控实现(使用 auto-discovery = on) https://github.com/pgsty/pg_exporter/releases/tag/v0.4.0
v0.3.2 修复 shadow DSN 边界情况 修复拼写错误和文档 https://github.com/pgsty/pg_exporter/releases/tag/v0.3.2
v0.3.1 修复默认配置问题(特别是低于 13 的版本)
设置 primary_conninfo 在 PG13 之前不存在 为 pg_func 采集器添加 funcid 标签以避免函数名重复标签 修复版本字符串为 pg_exporter https://github.com/pgsty/pg_exporter/releases/tag/v0.3.1
v0.3.0 https://github.com/pgsty/pg_exporter/releases/tag/v0.3.0
更改默认配置,支持 PostgreSQL 13 新指标(pg_slru、pg_shmem、pg_query13、pg_backup 等) 新增一系列用于健康/恢复状态检查的 REST API 新增一个带有假 pg_up 0 指标的虚拟服务器,在 PgExporter 初始化之前提供服务 如果未指定 sslmode,向 URL 添加 sslmode=disable 修复拼写错误和 Bug v0.2.0 新增 yum 包和 Linux 服务定义 在查询配置中新增 ‘skip’ 标志 修复 pgbouncer_up 指标 新增配置重载支持 https://github.com/pgsty/pg_exporter/releases/tag/v0.2.0
v0.1.2 修复 pgbouncer_up 指标 新增动态配置重载 移除 ‘shard’ 相关逻辑 在默认设置中添加 ‘bulky’ 模式 https://github.com/pgsty/pg_exporter/releases/tag/v0.1.2
v0.1.1 修复 pg_exporter 在启动时如果任何查询失败会挂起的 Bug。
https://github.com/pgsty/pg_exporter/releases/tag/v0.1.1
v0.1.0 可以工作了,看起来不错。
https://github.com/pgsty/pg_exporter/releases/tag/v0.1.0
v0.0.4 在真实生产环境中测试了大约 2 周,200+ 节点。看起来不错!
https://github.com/pgsty/pg_exporter/releases/tag/v0.0.4
v0.0.3 v0.0.3 发布,在生产环境中测试
此版本已在生产环境中测试。
这个项目仍在快速发展中,如果您想在生产中使用,请谨慎尝试。
https://github.com/pgsty/pg_exporter/releases/tag/v0.0.3
v0.0.2 现在可以尝试了
https://github.com/pgsty/pg_exporter/releases/tag/v0.0.2
v0.0.1 新增 pgbouncer 模式
https://github.com/pgsty/pg_exporter/releases/tag/v0.0.1
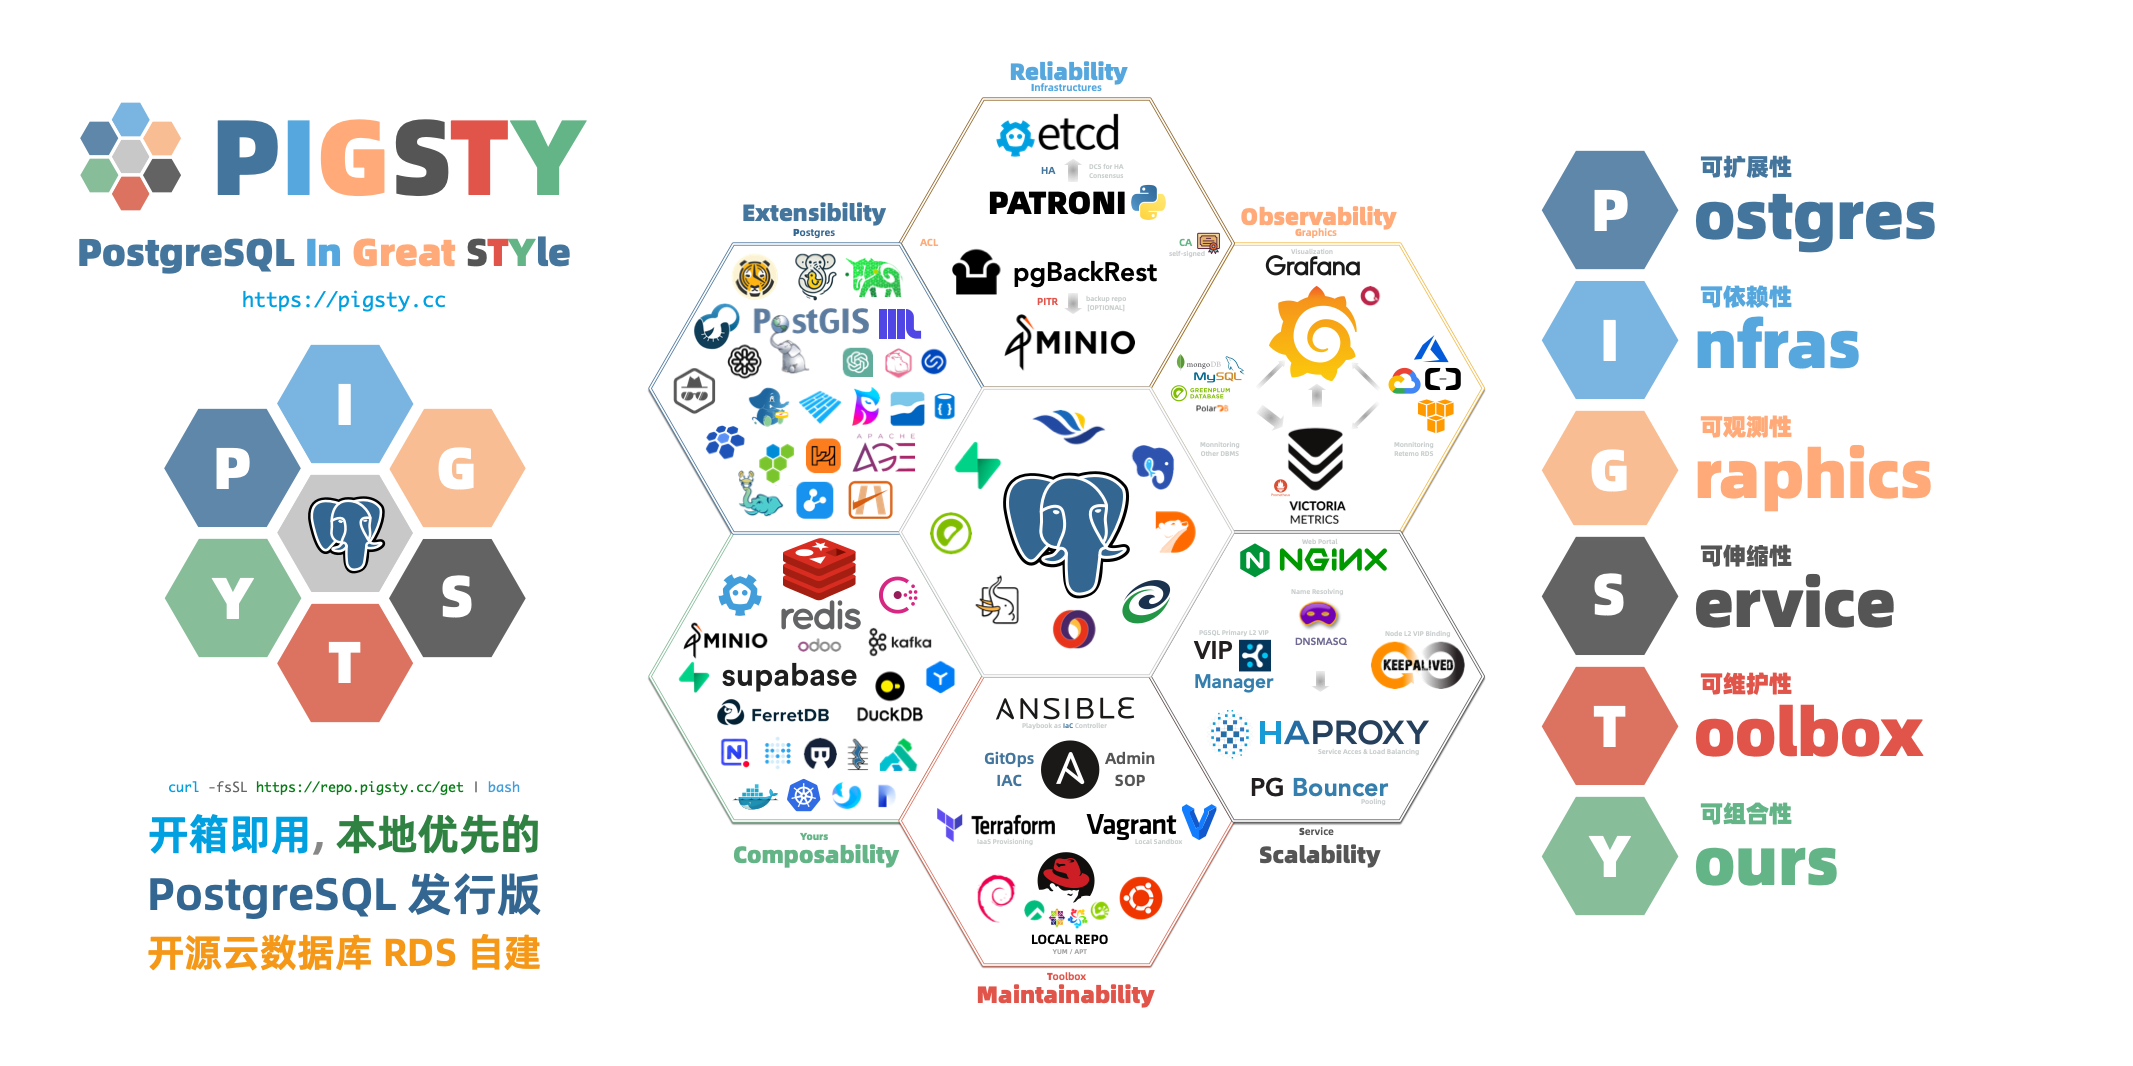
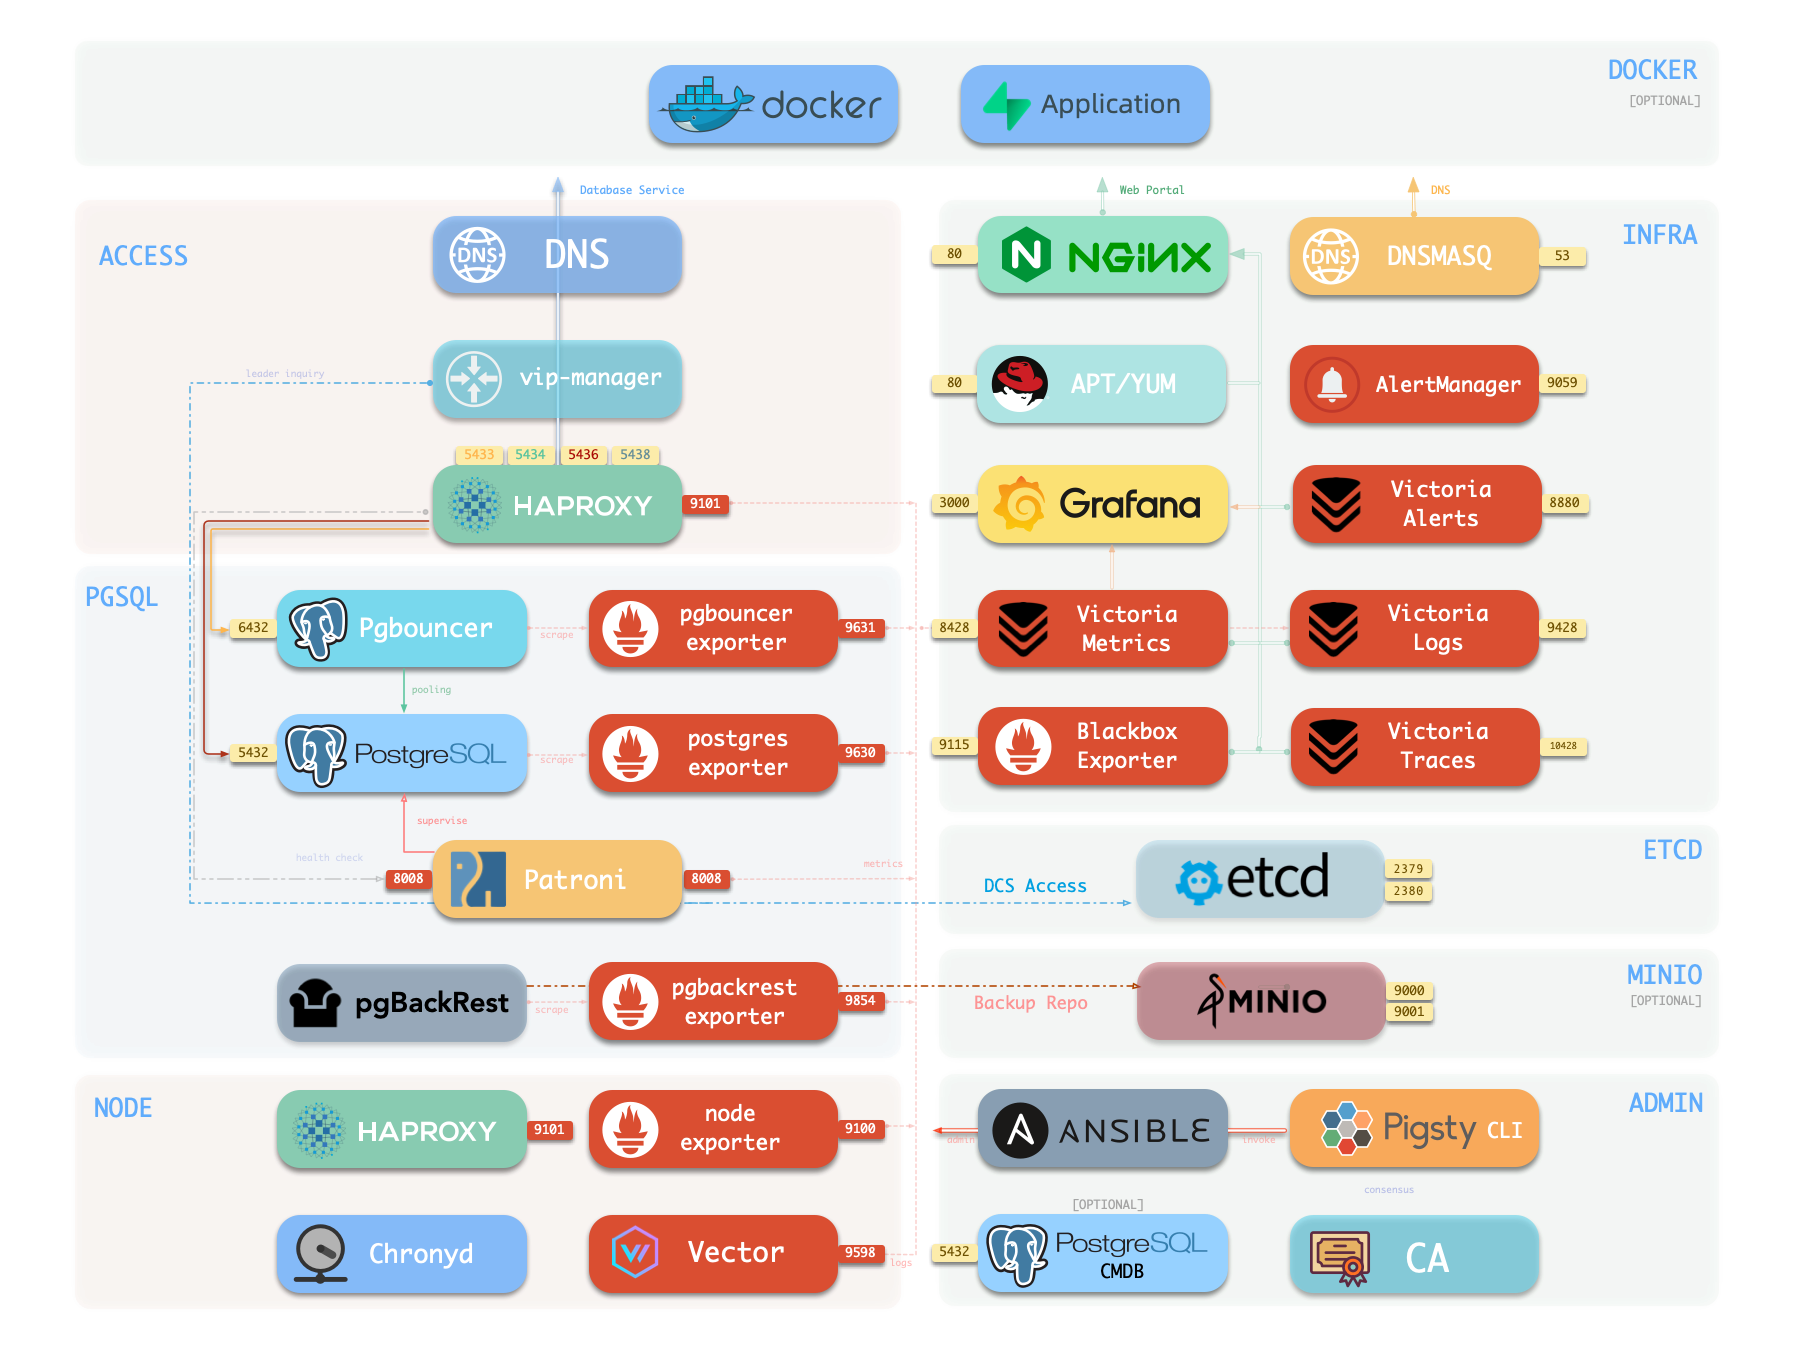
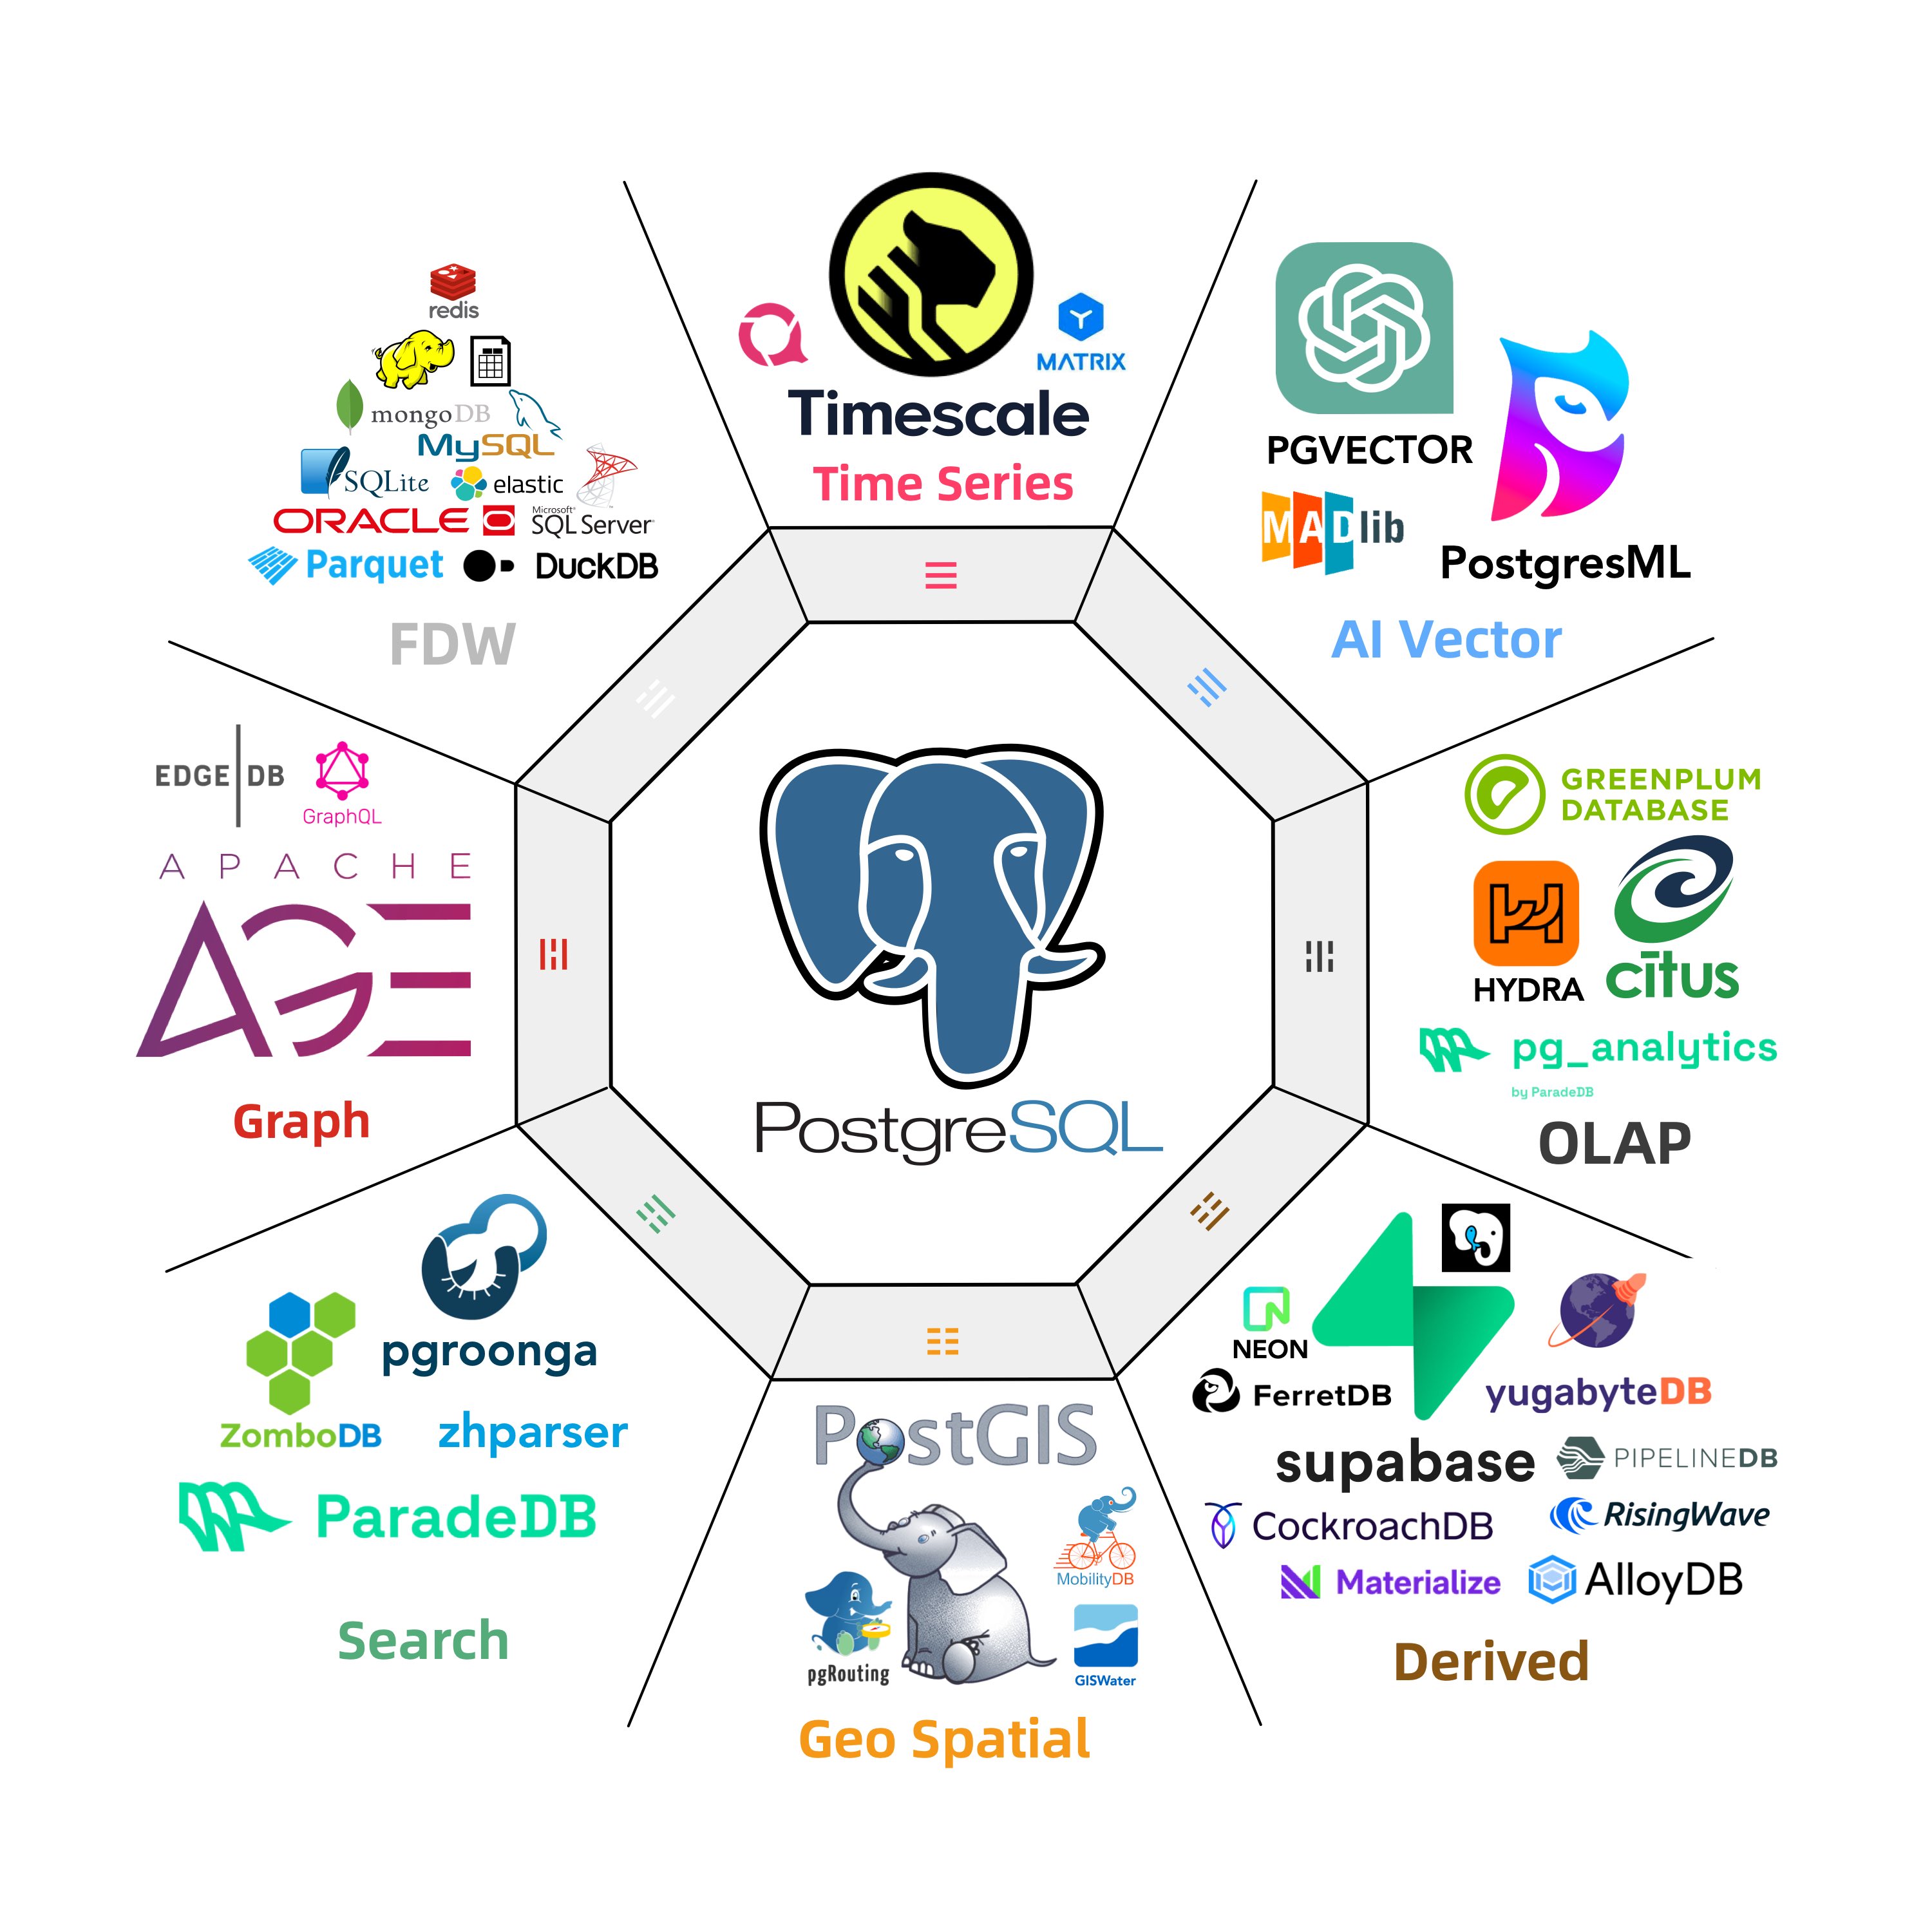
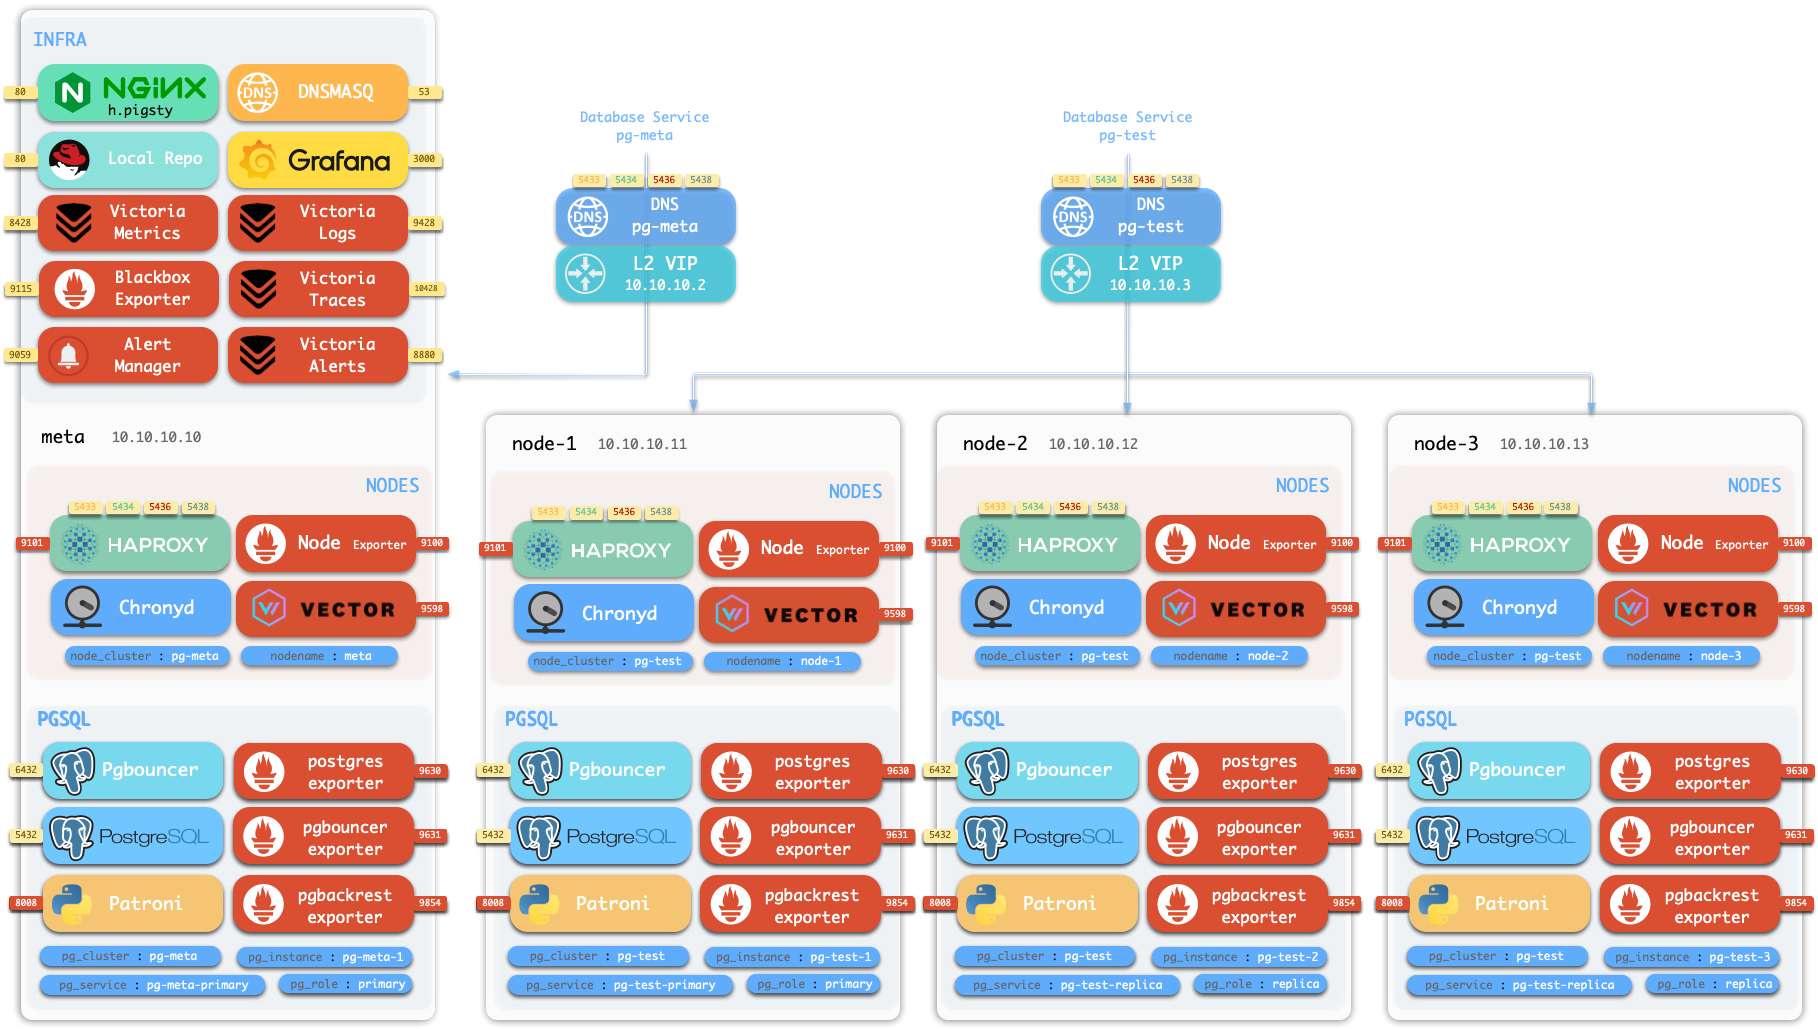


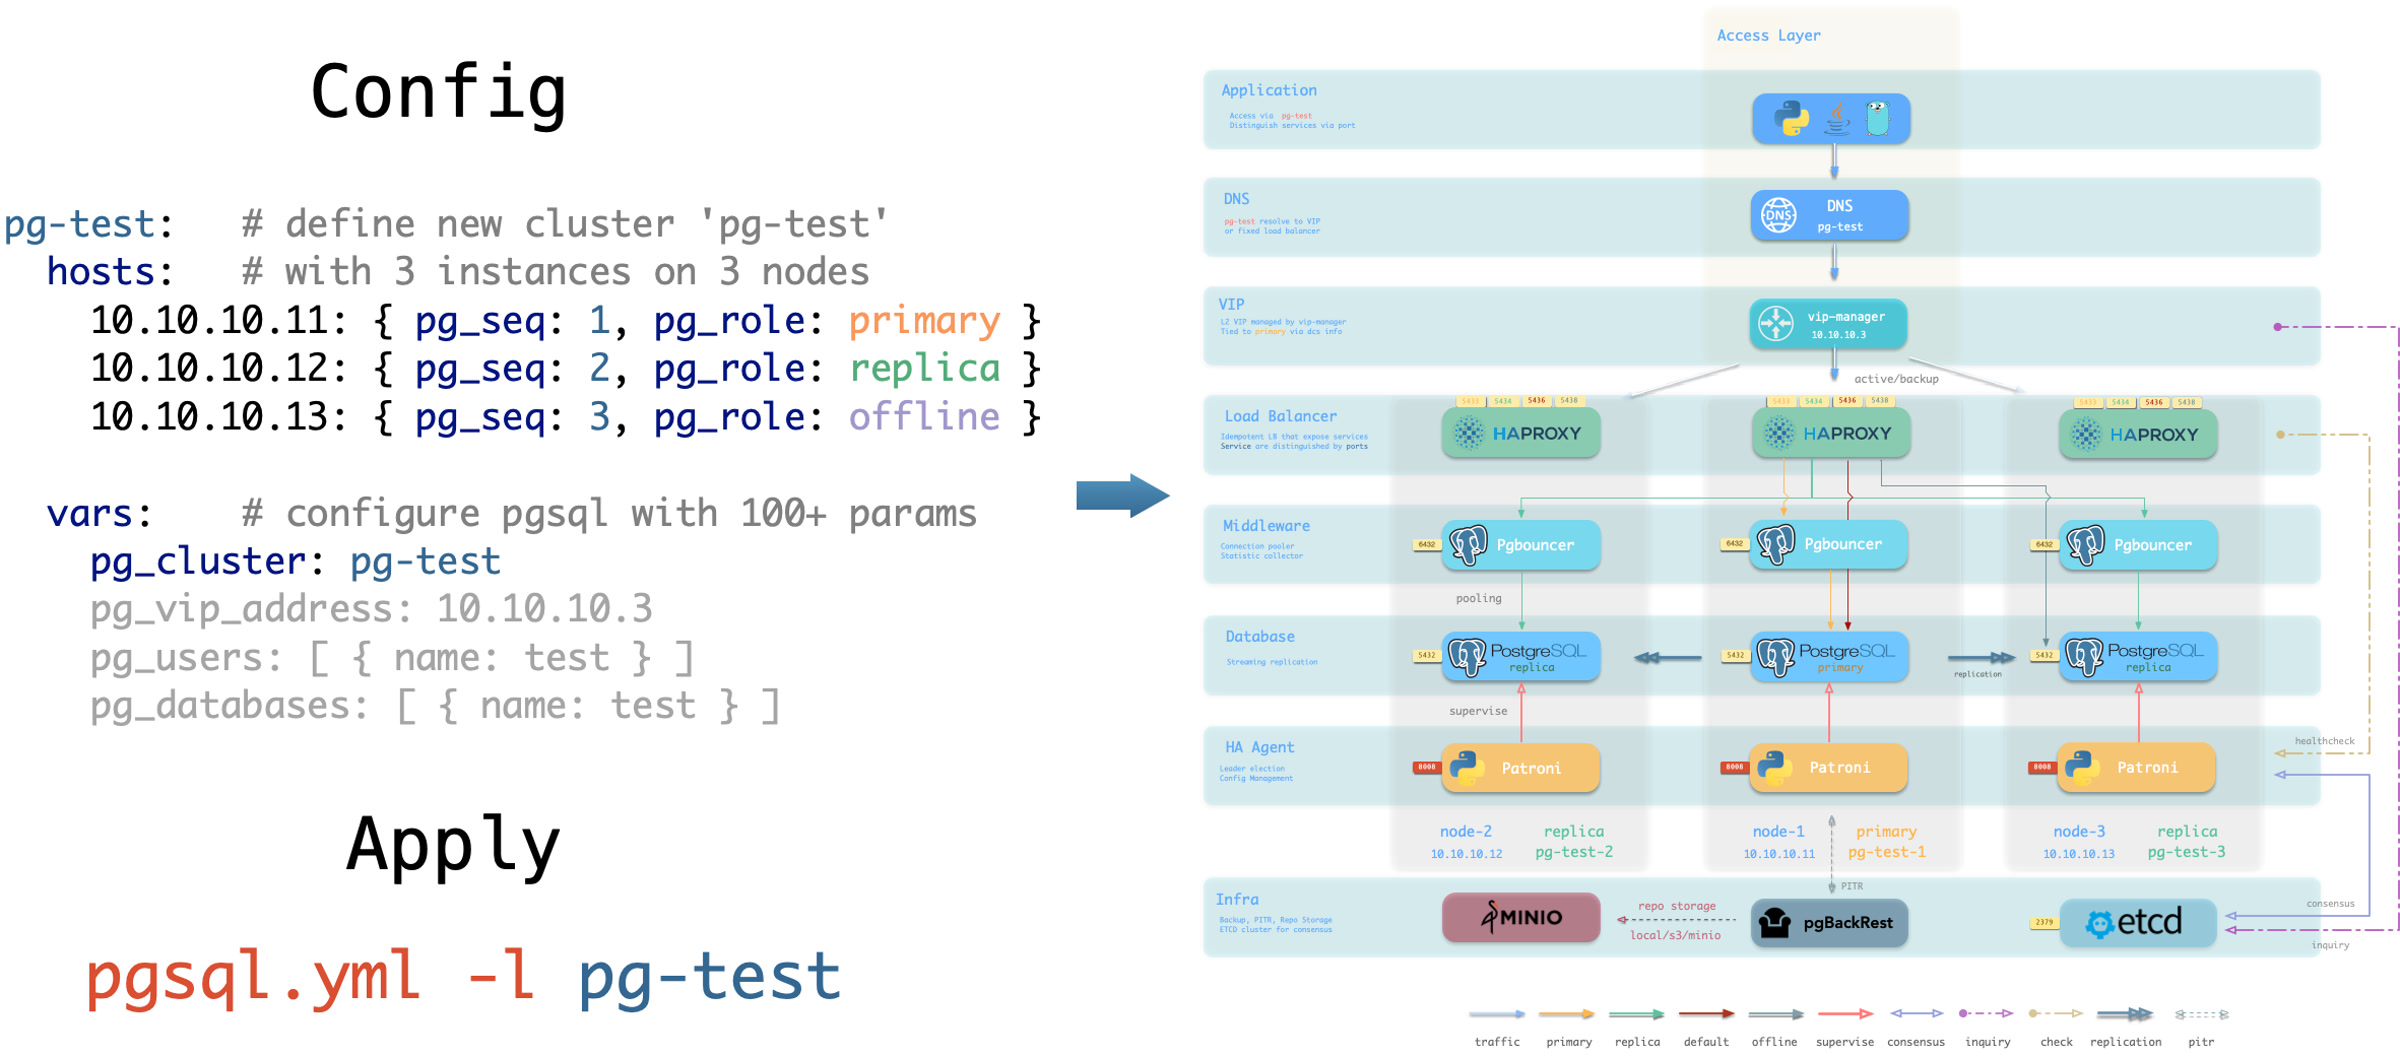


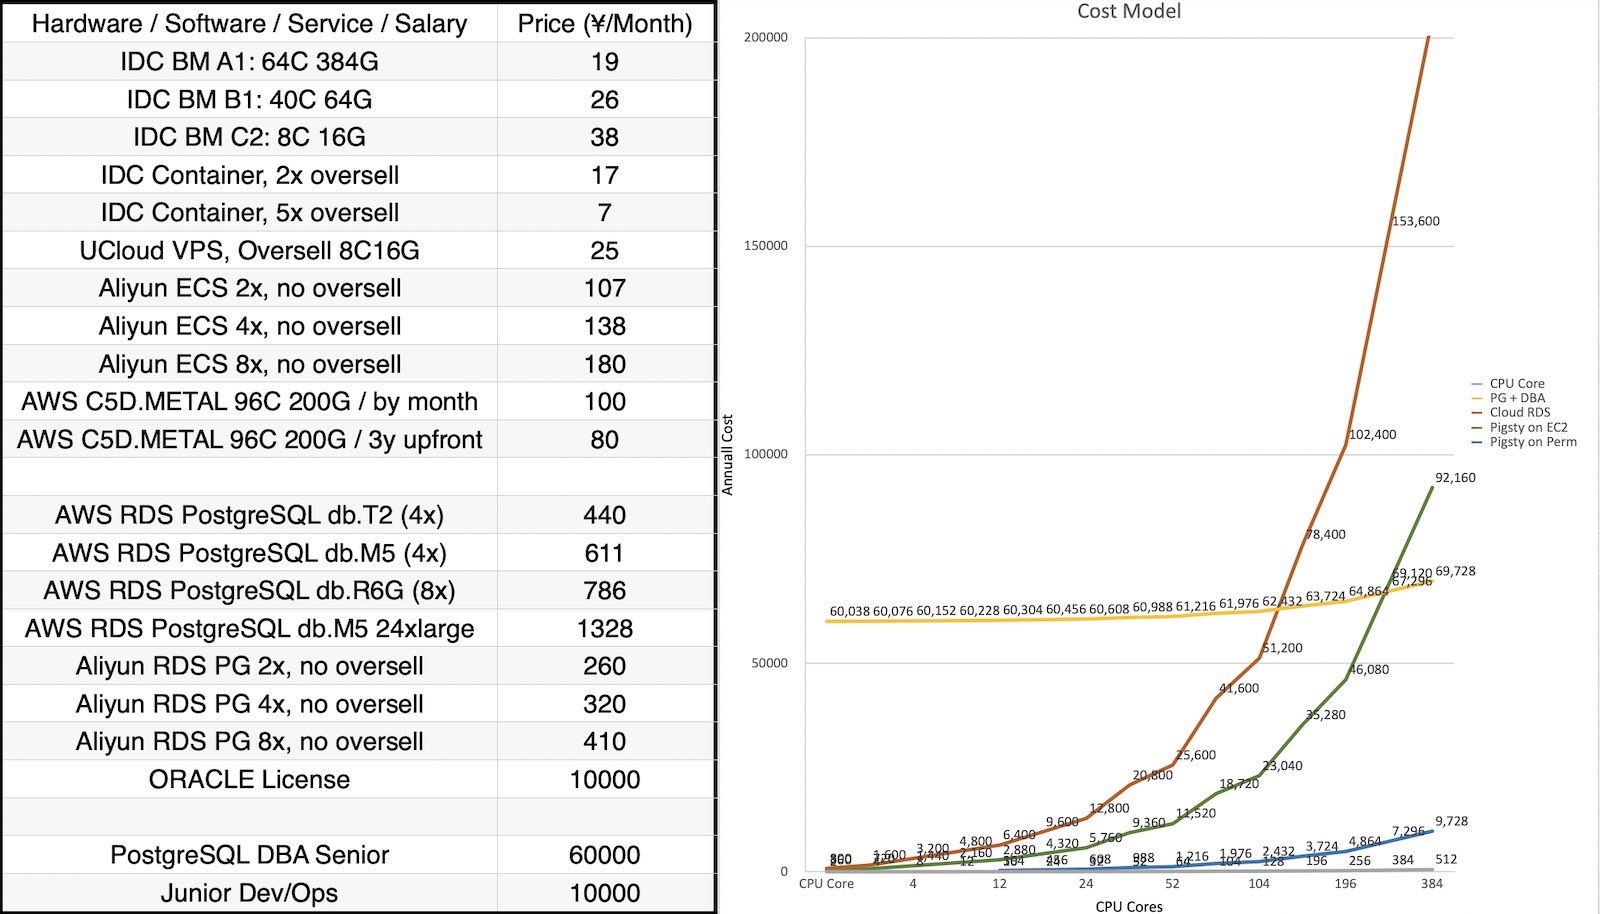


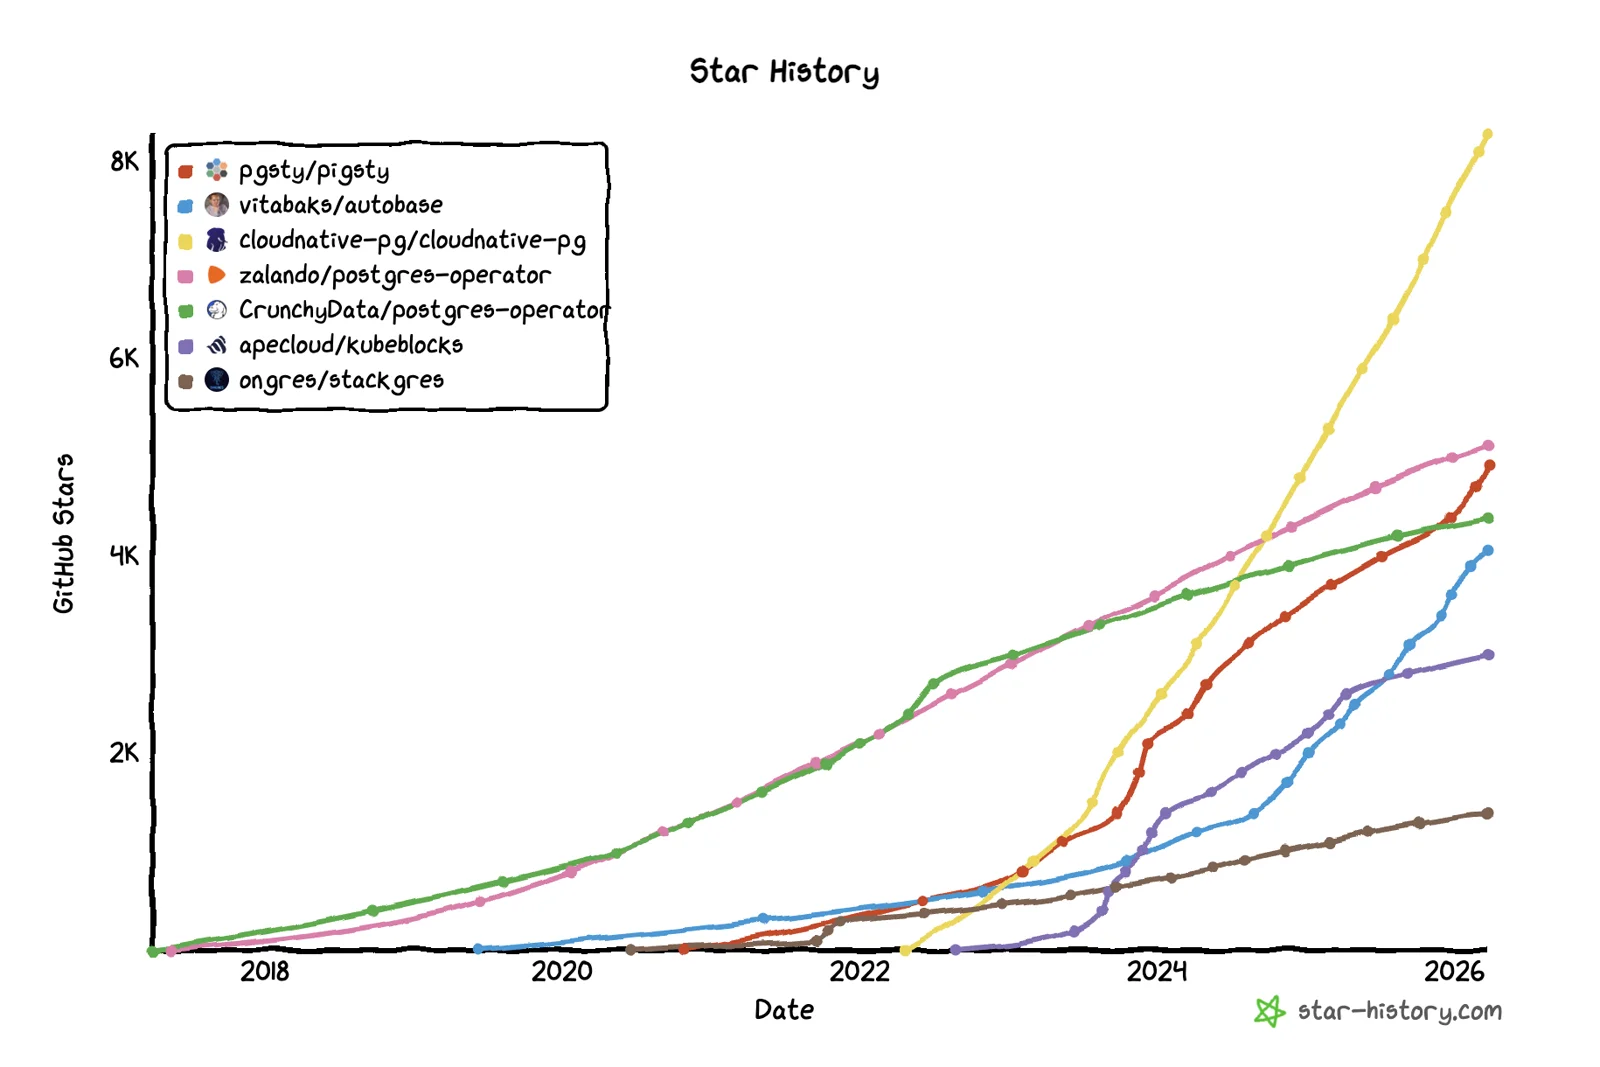
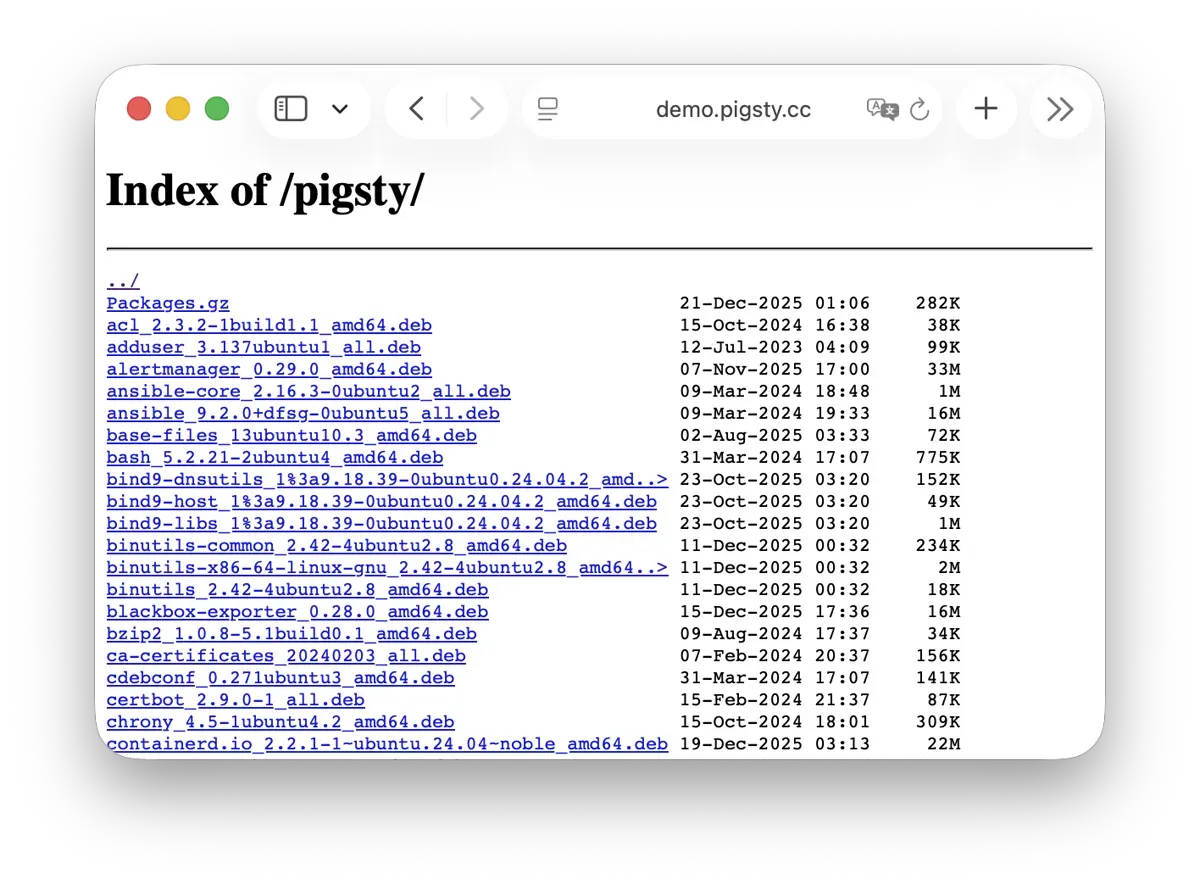

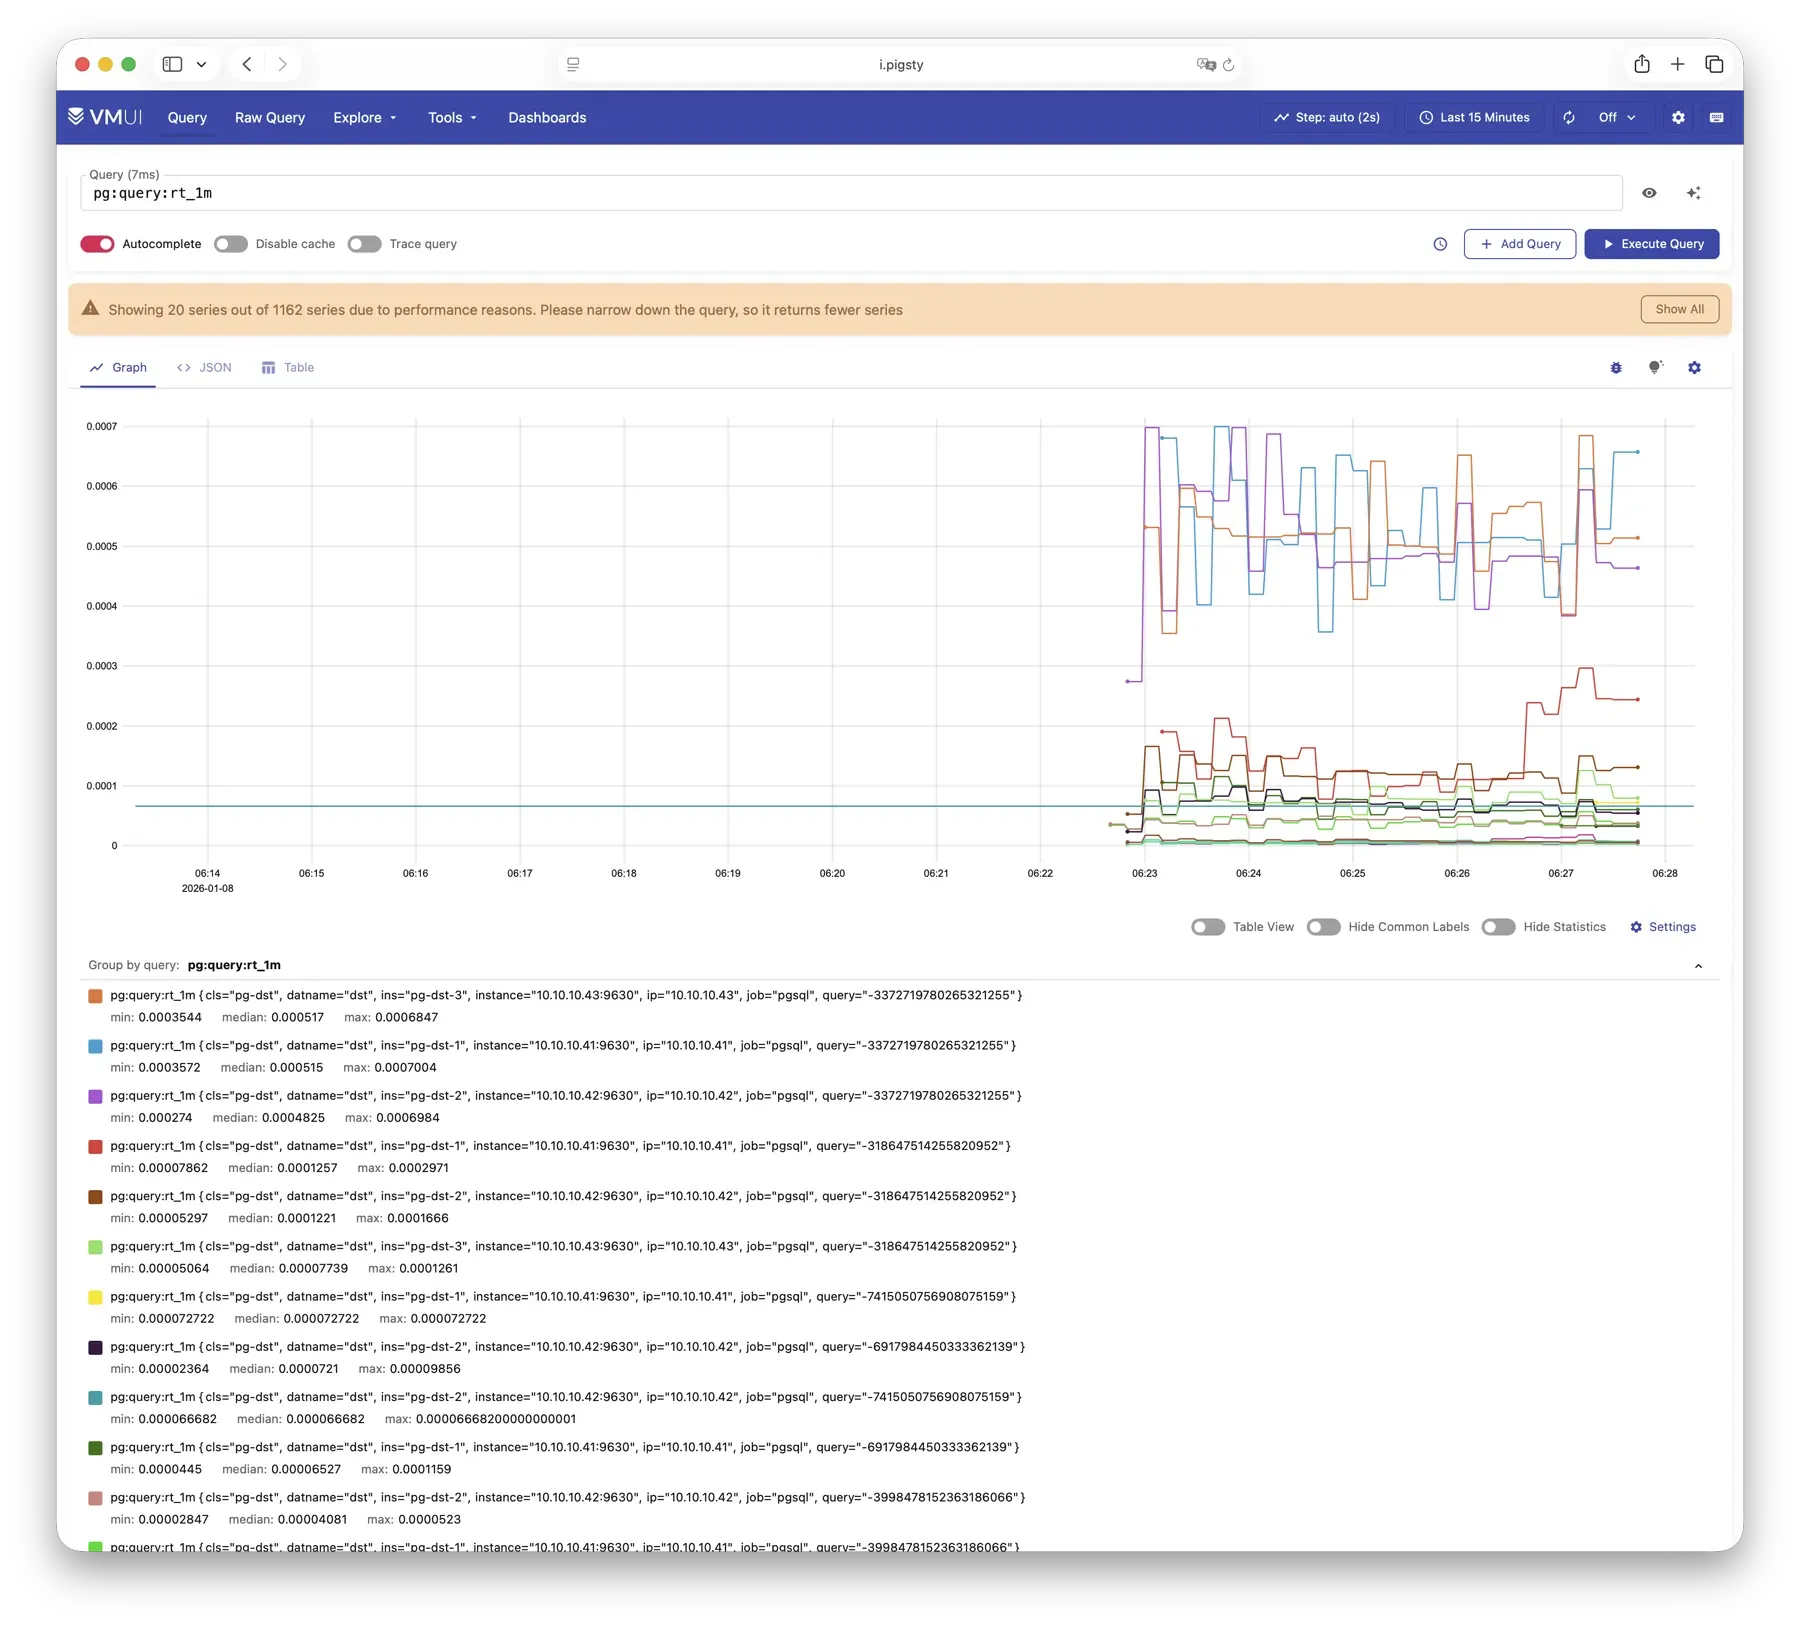
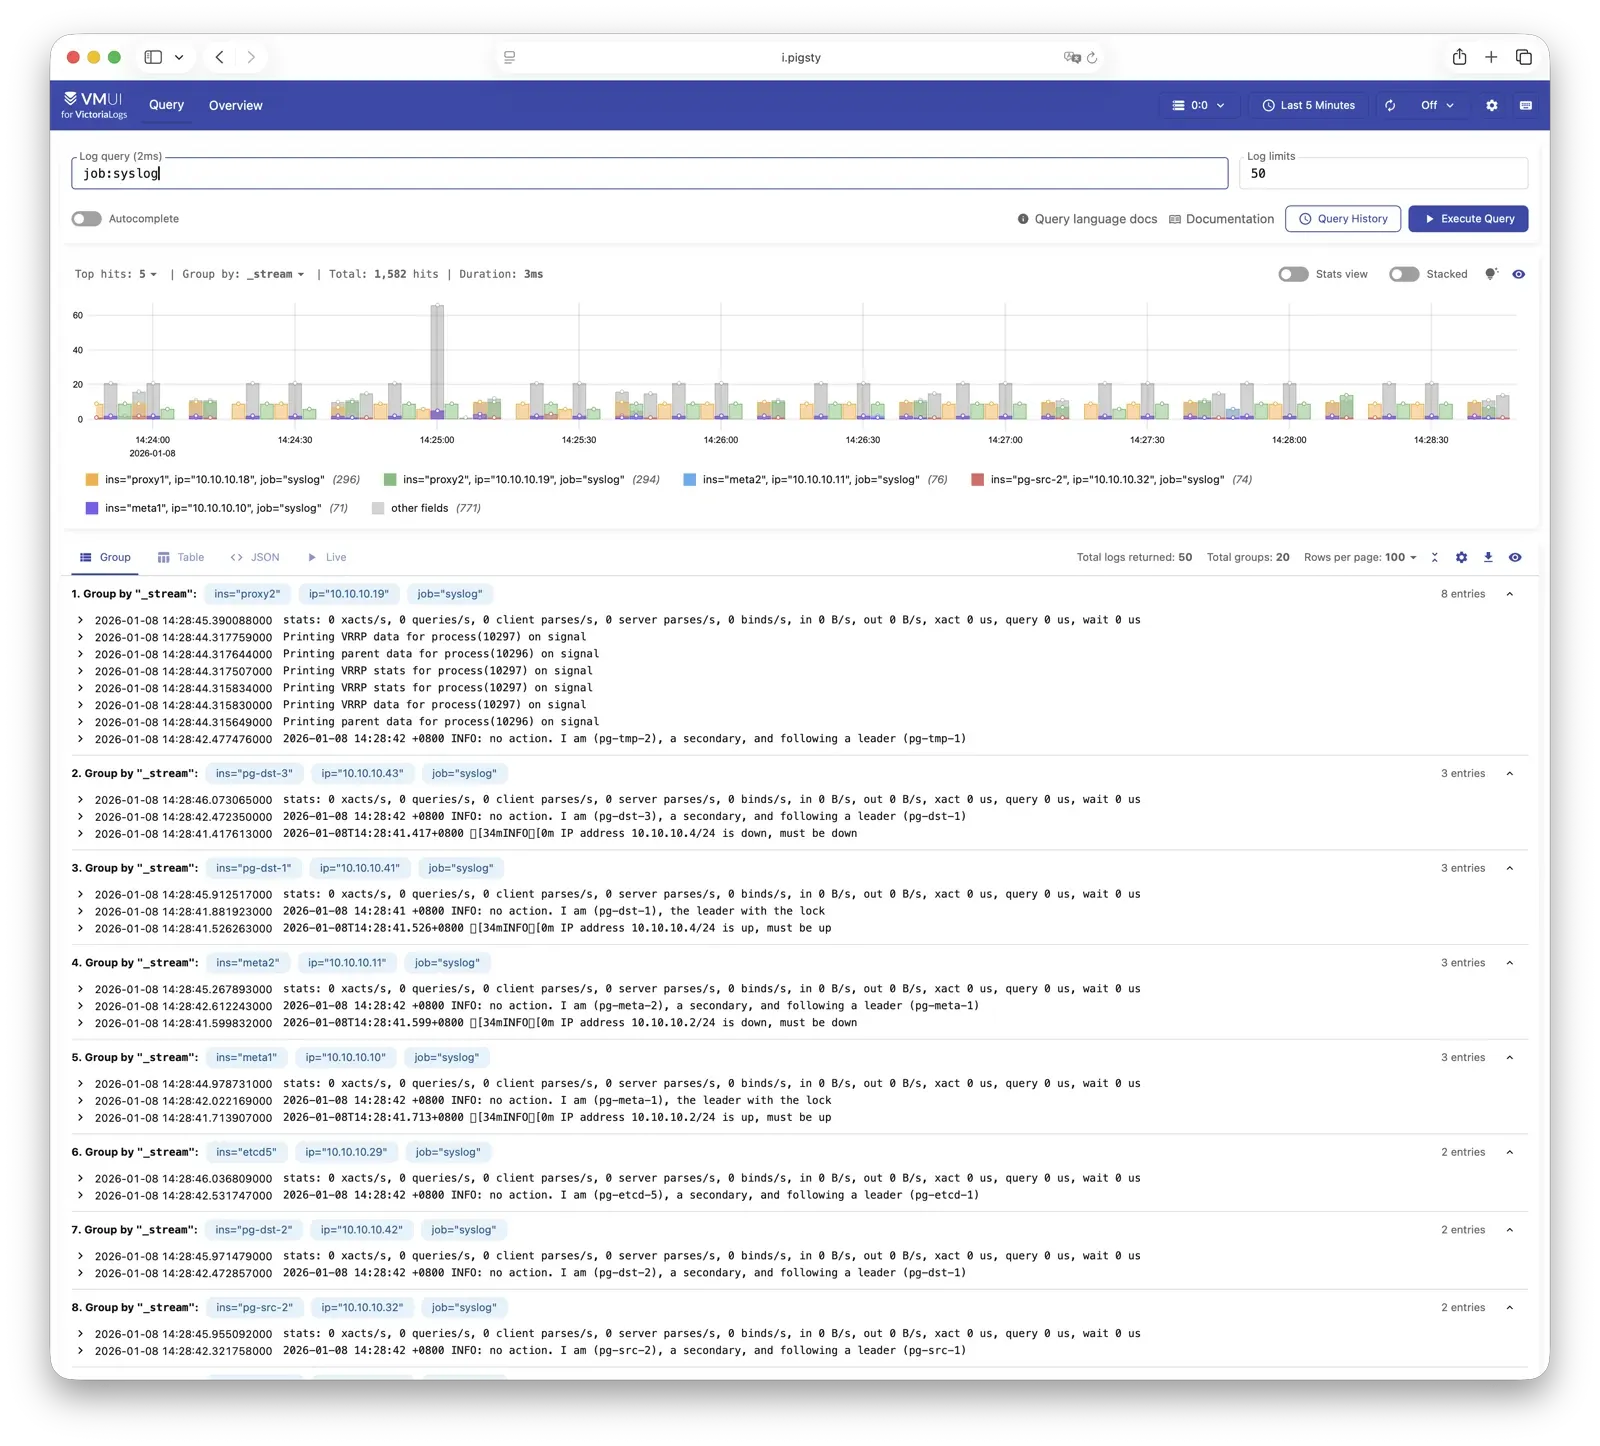
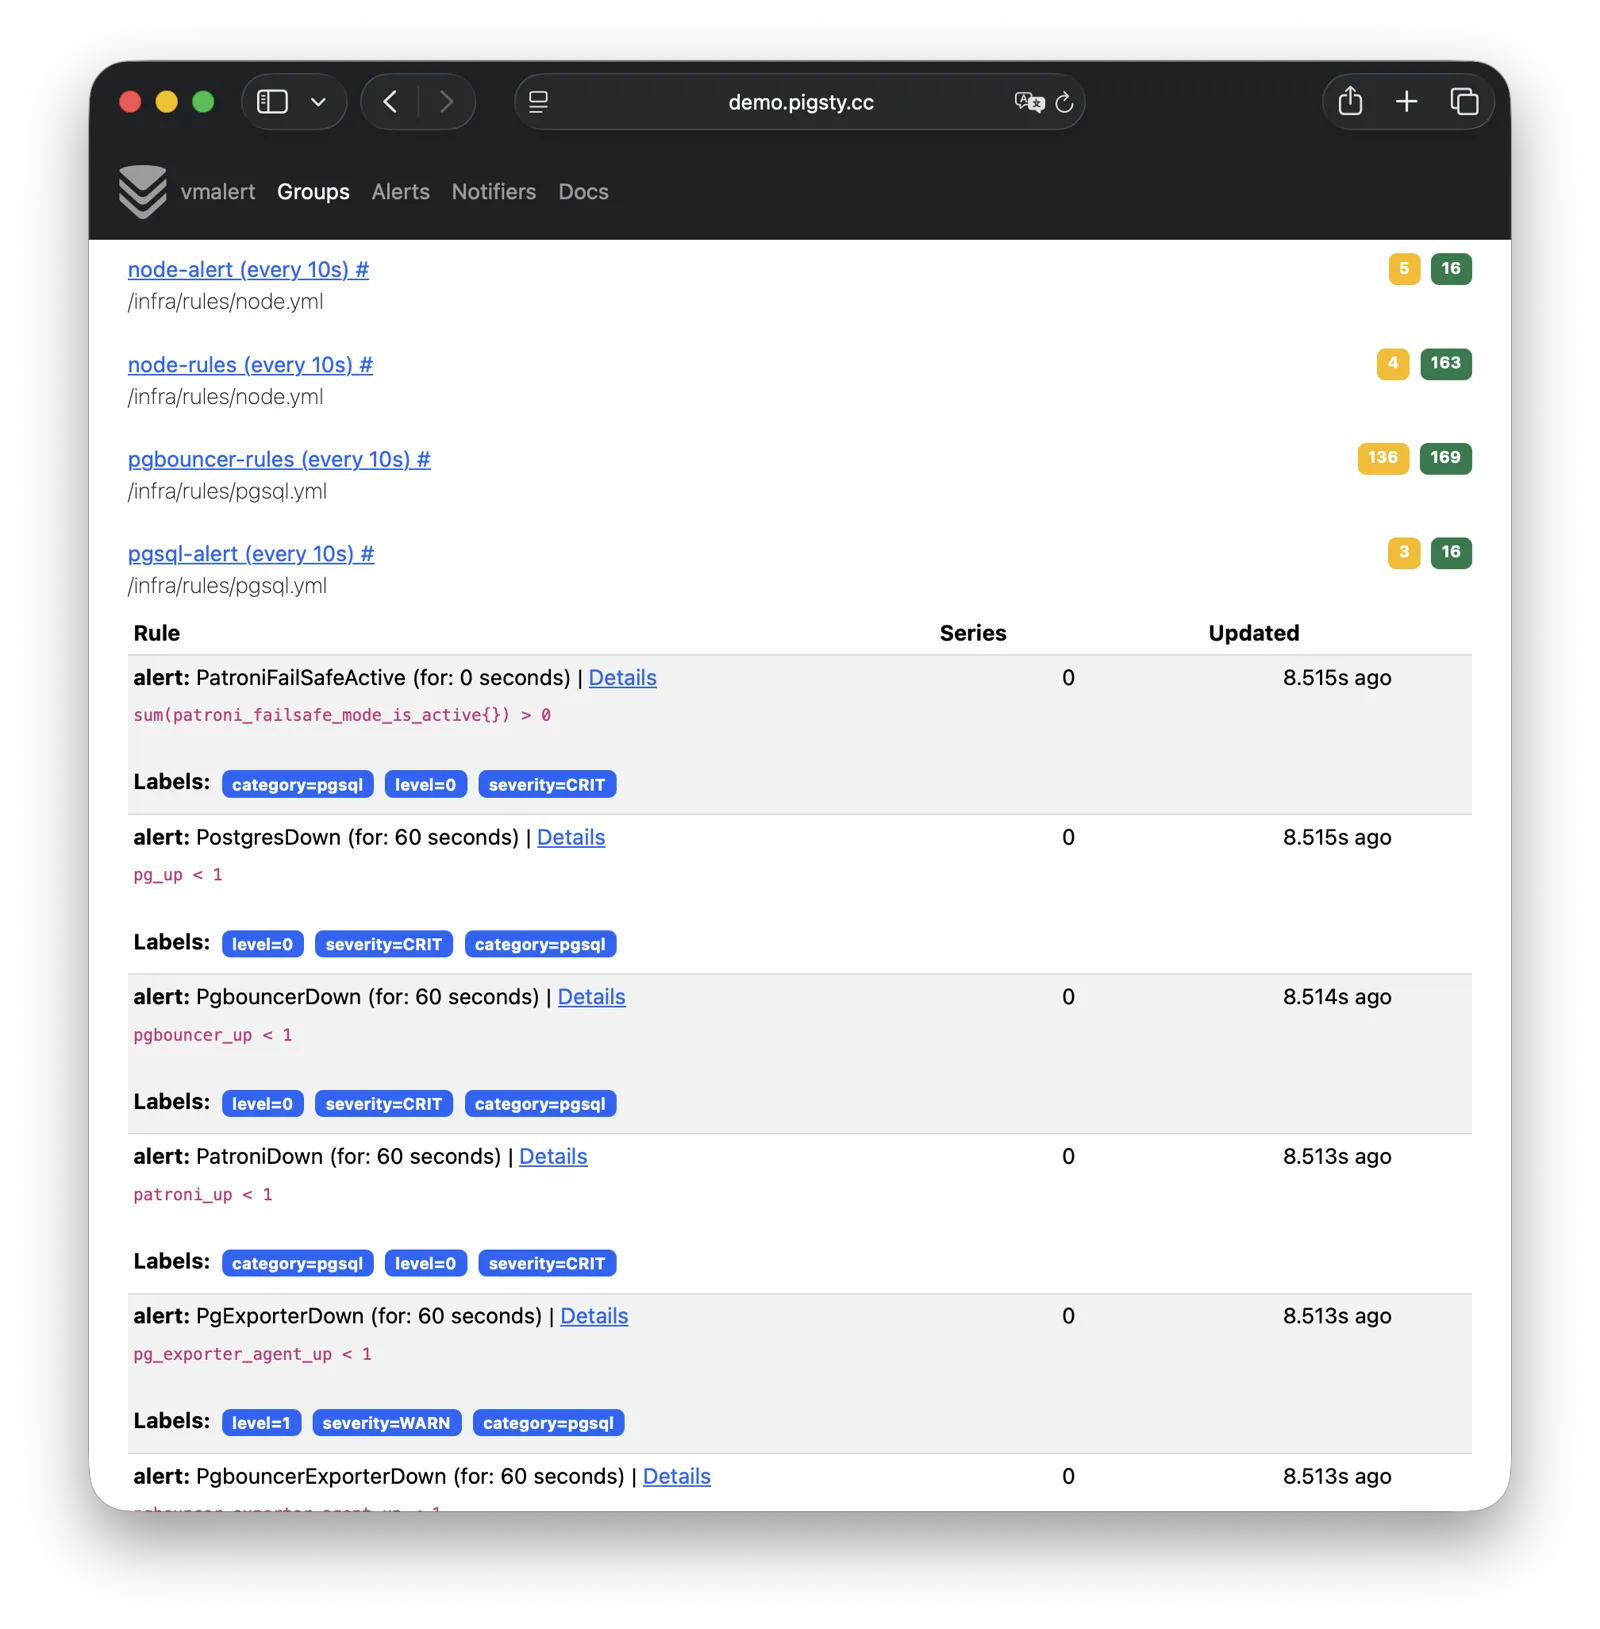
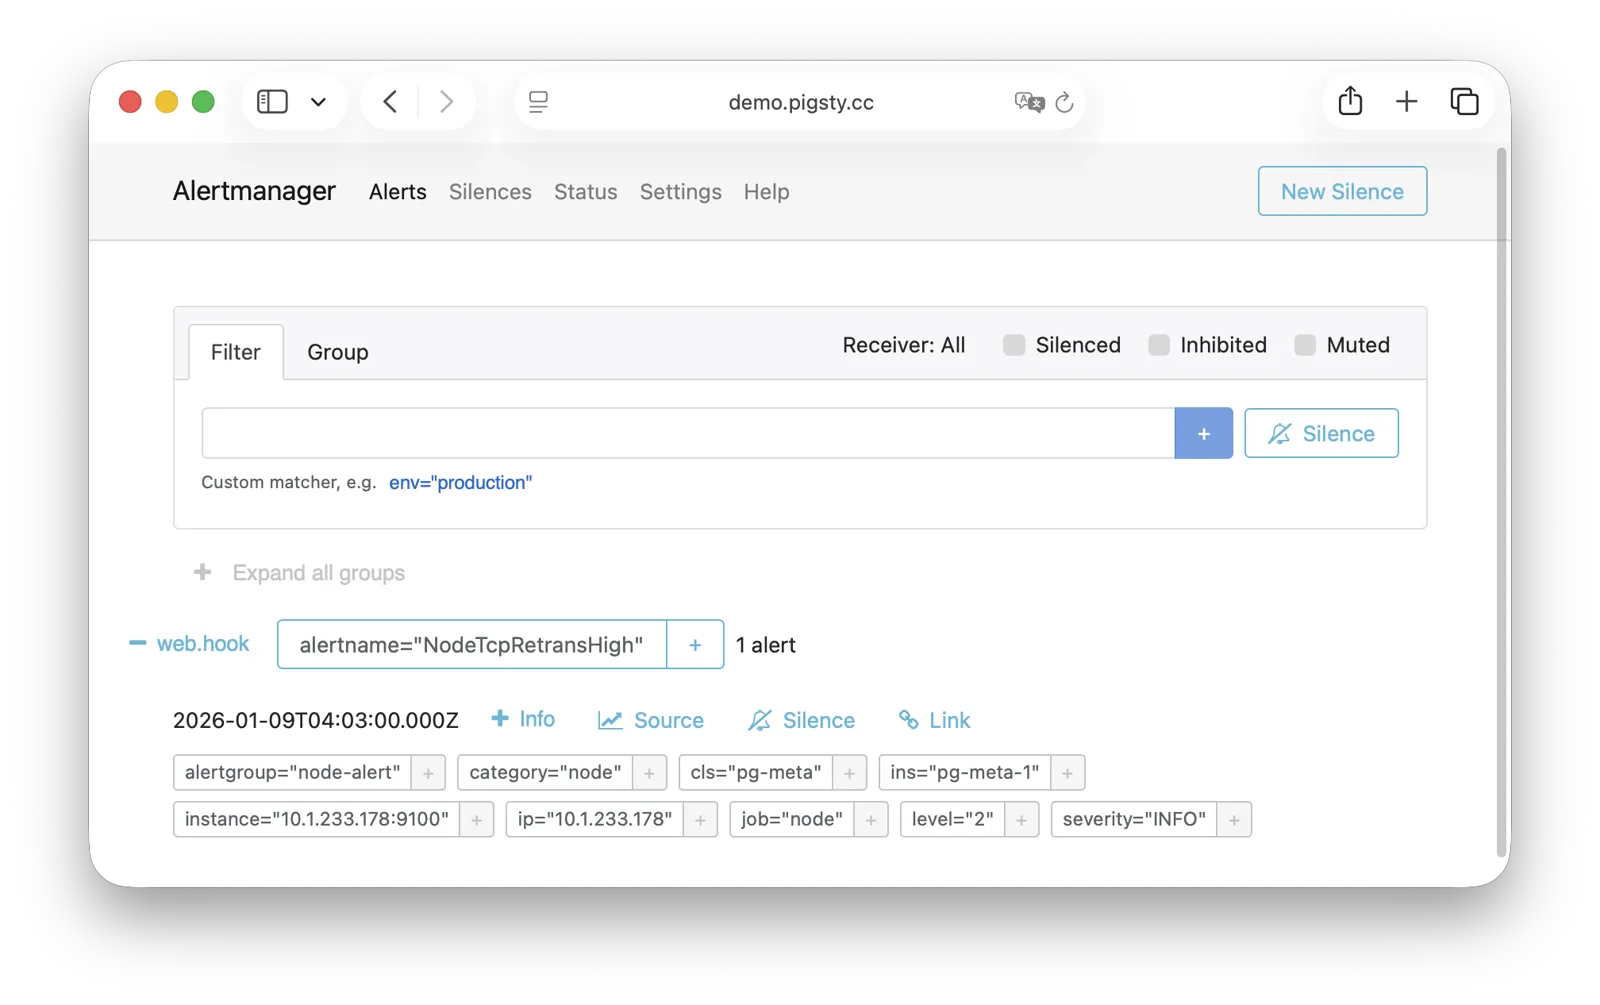
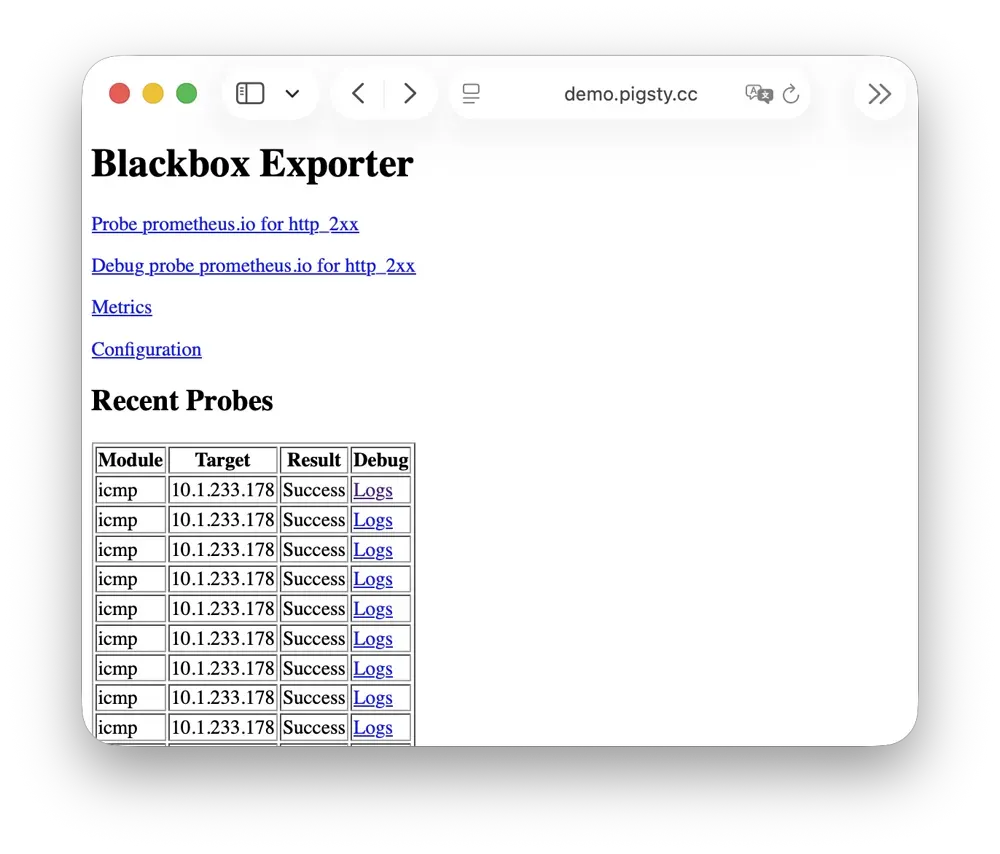
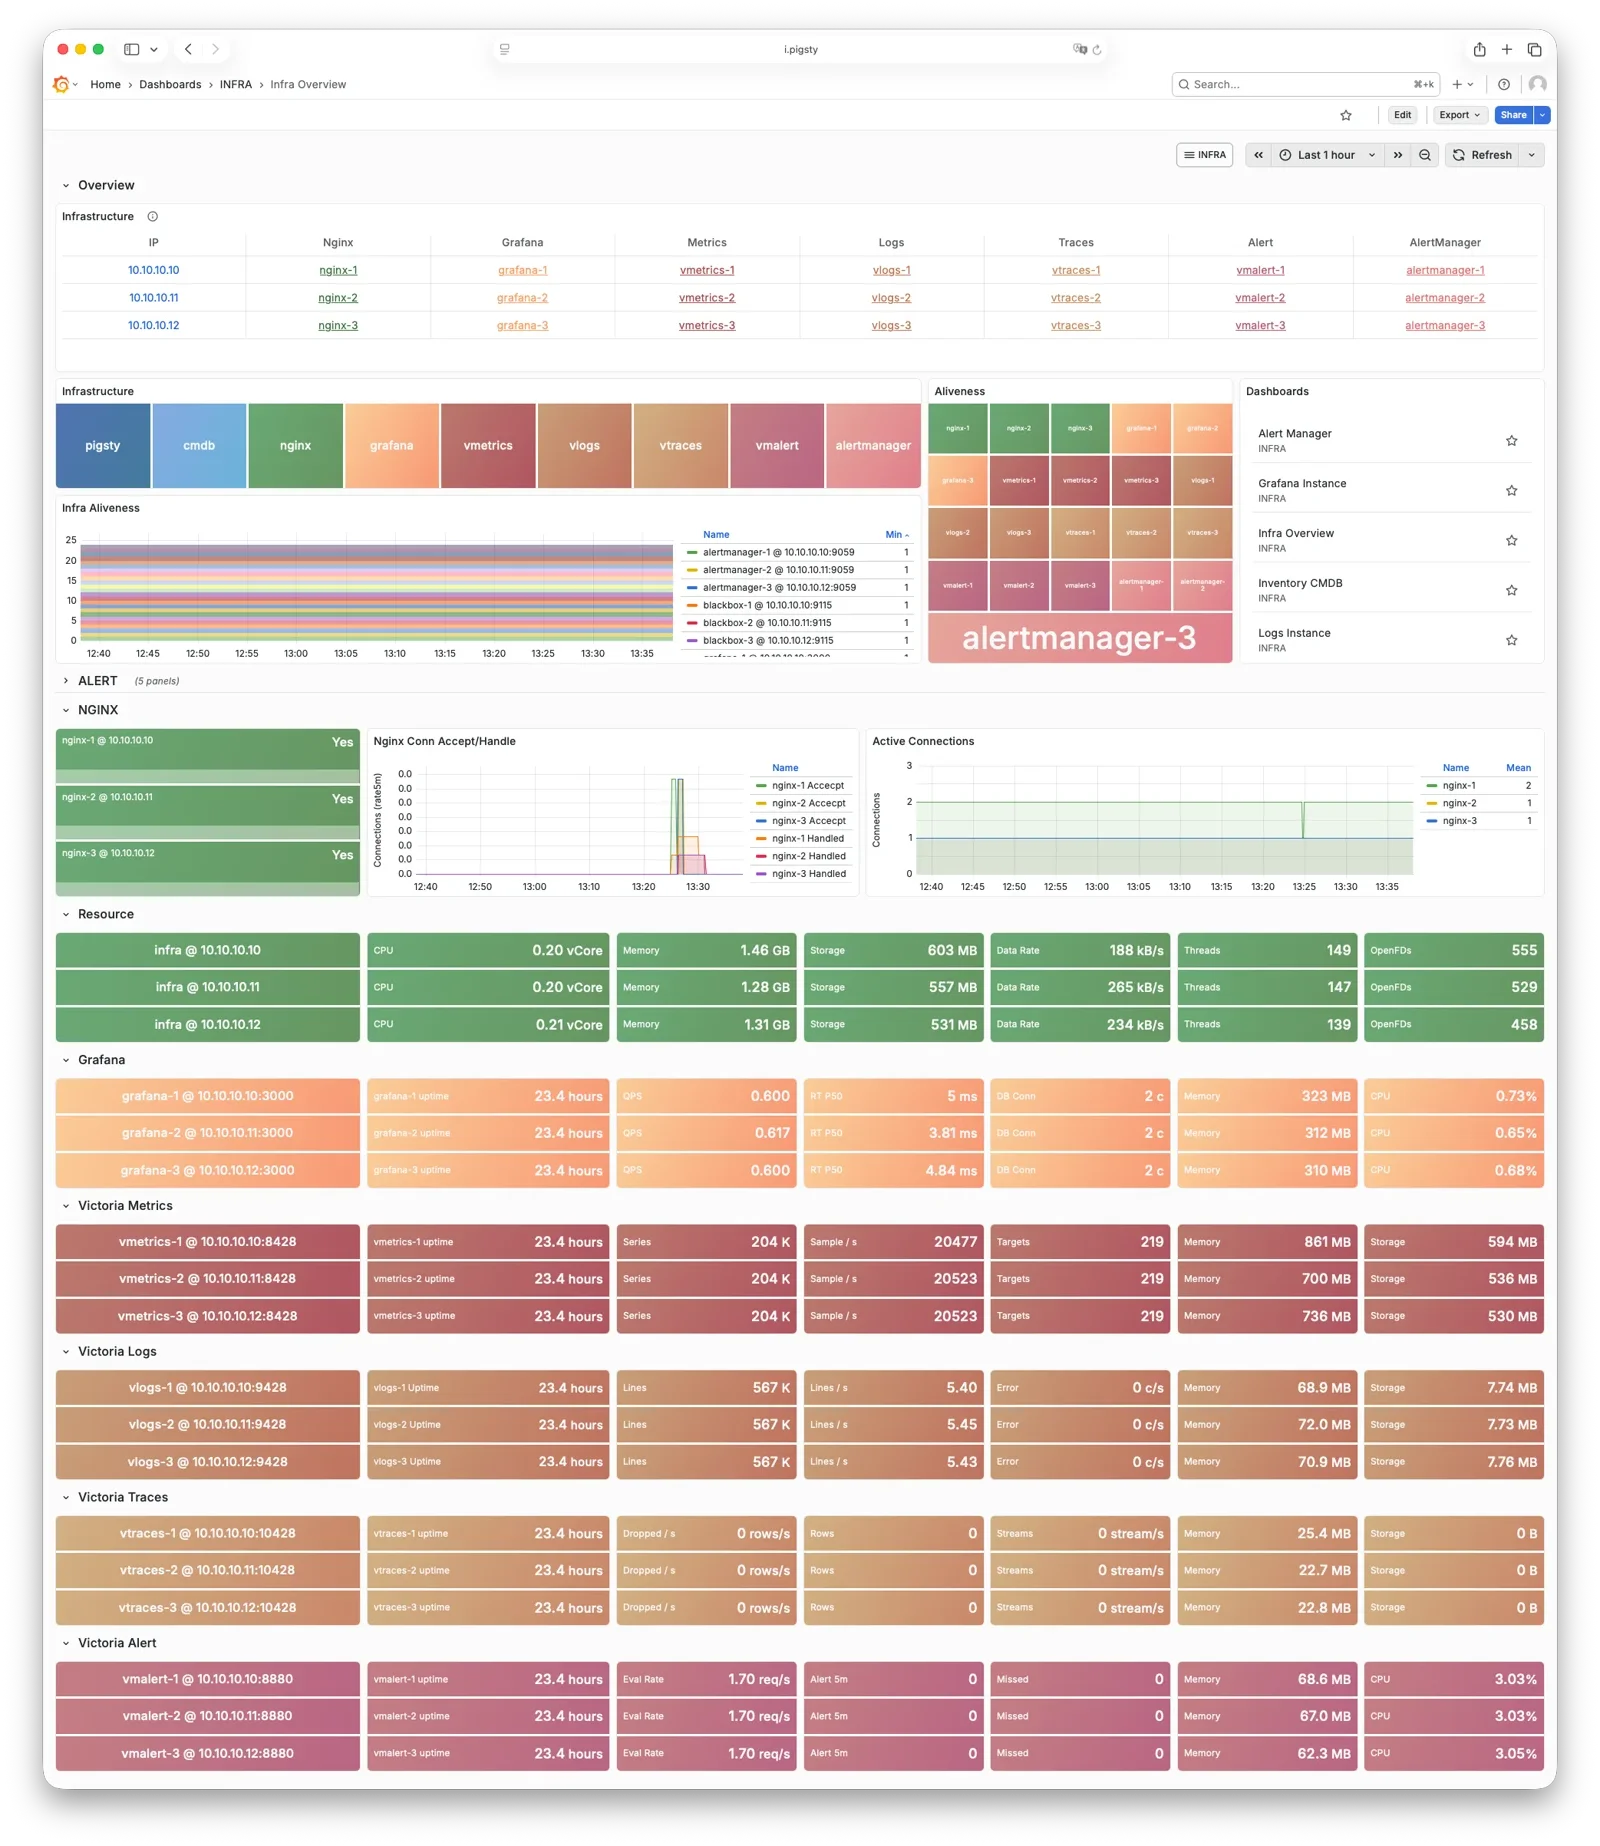

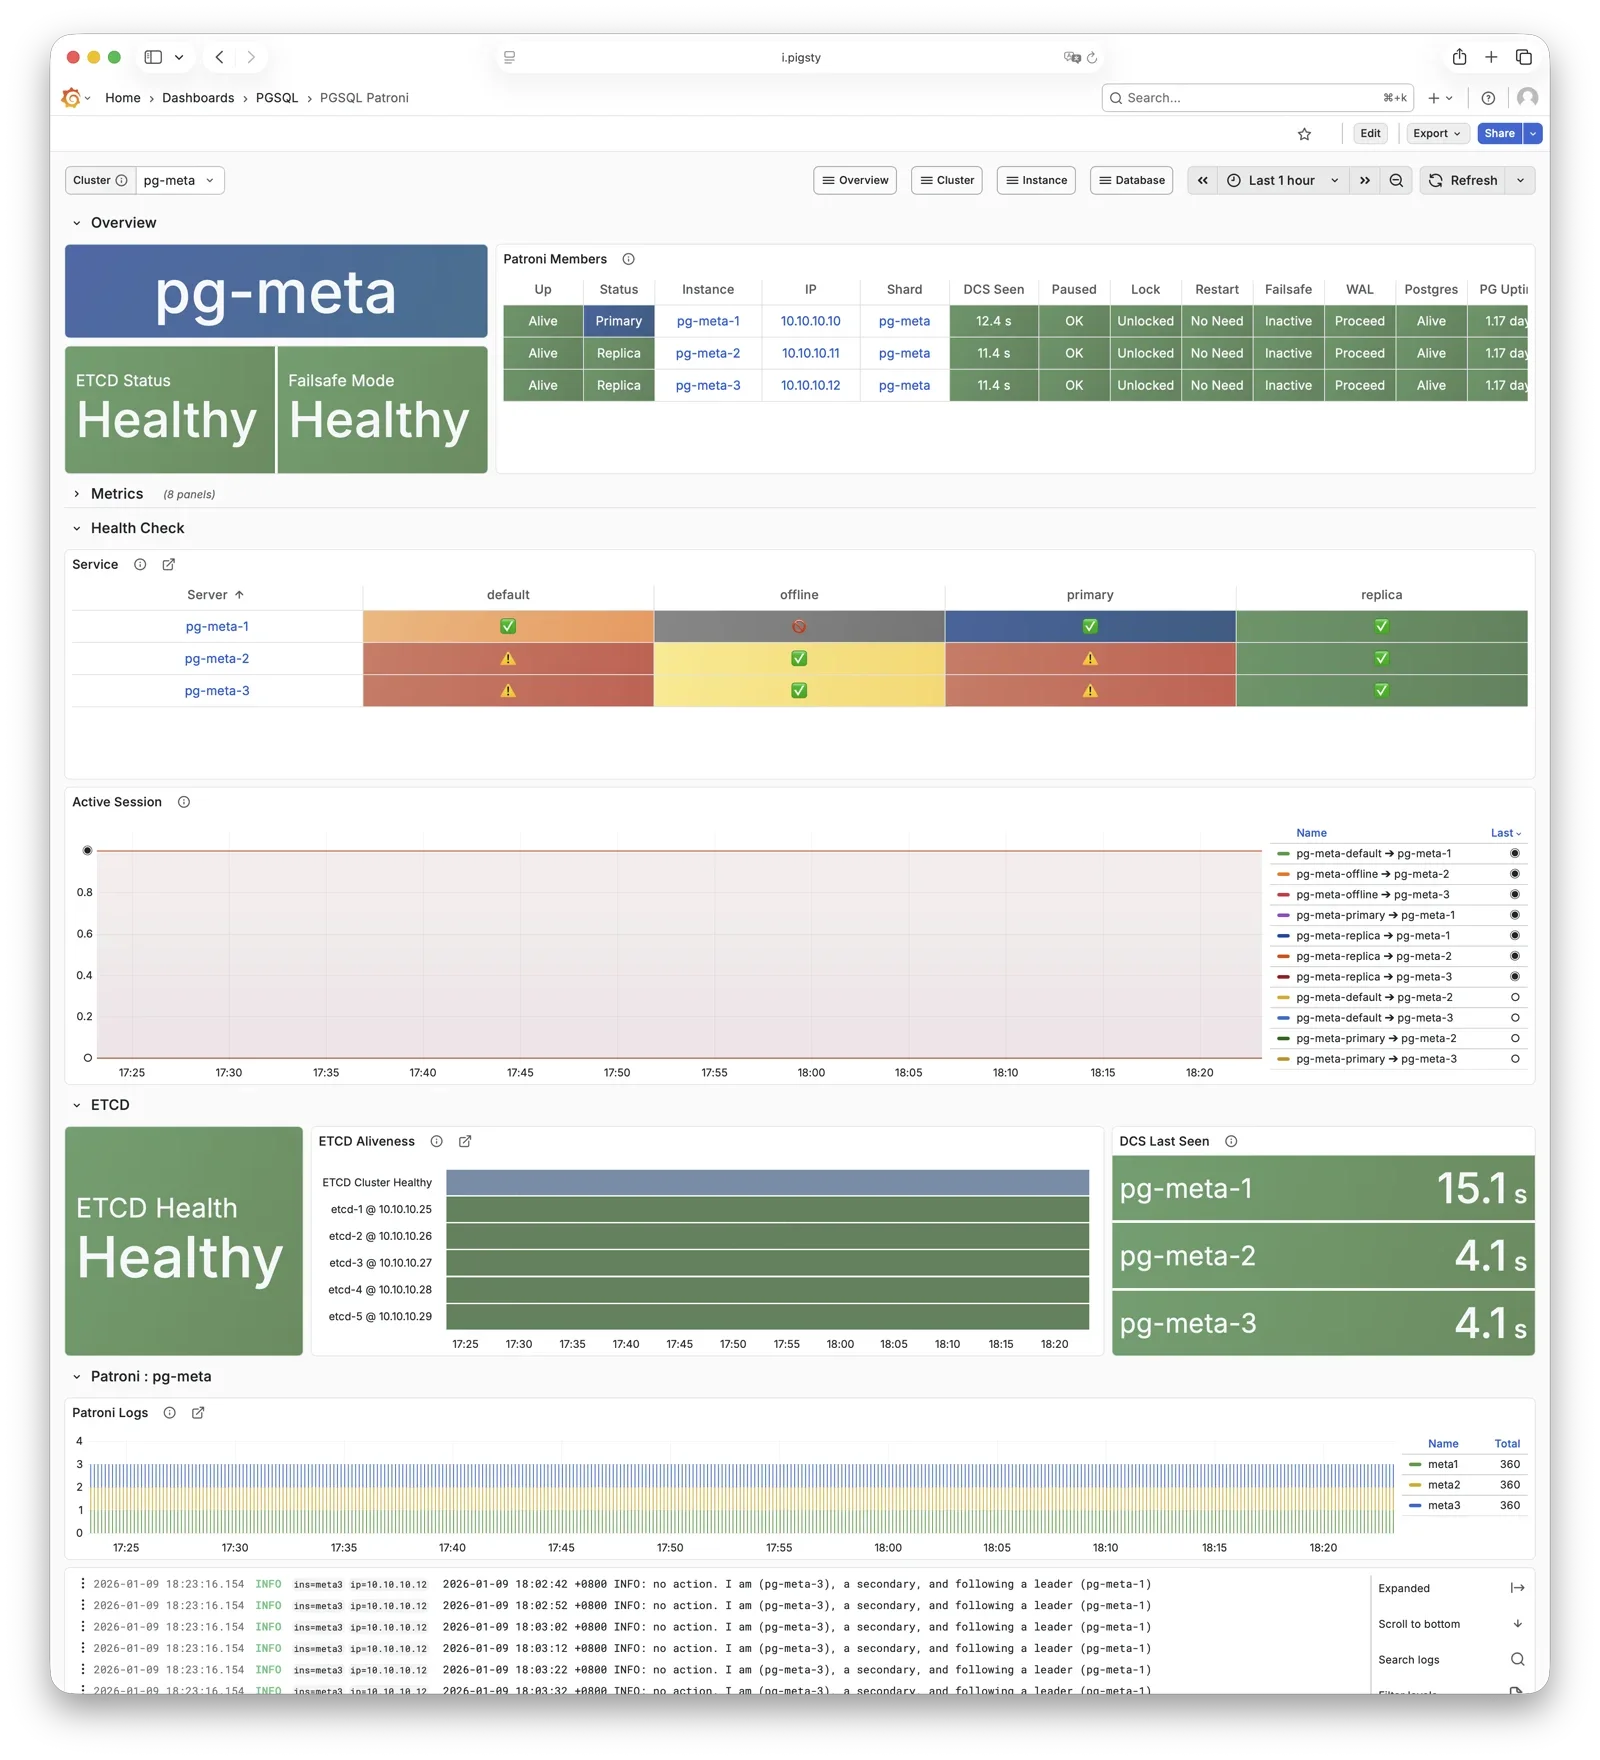
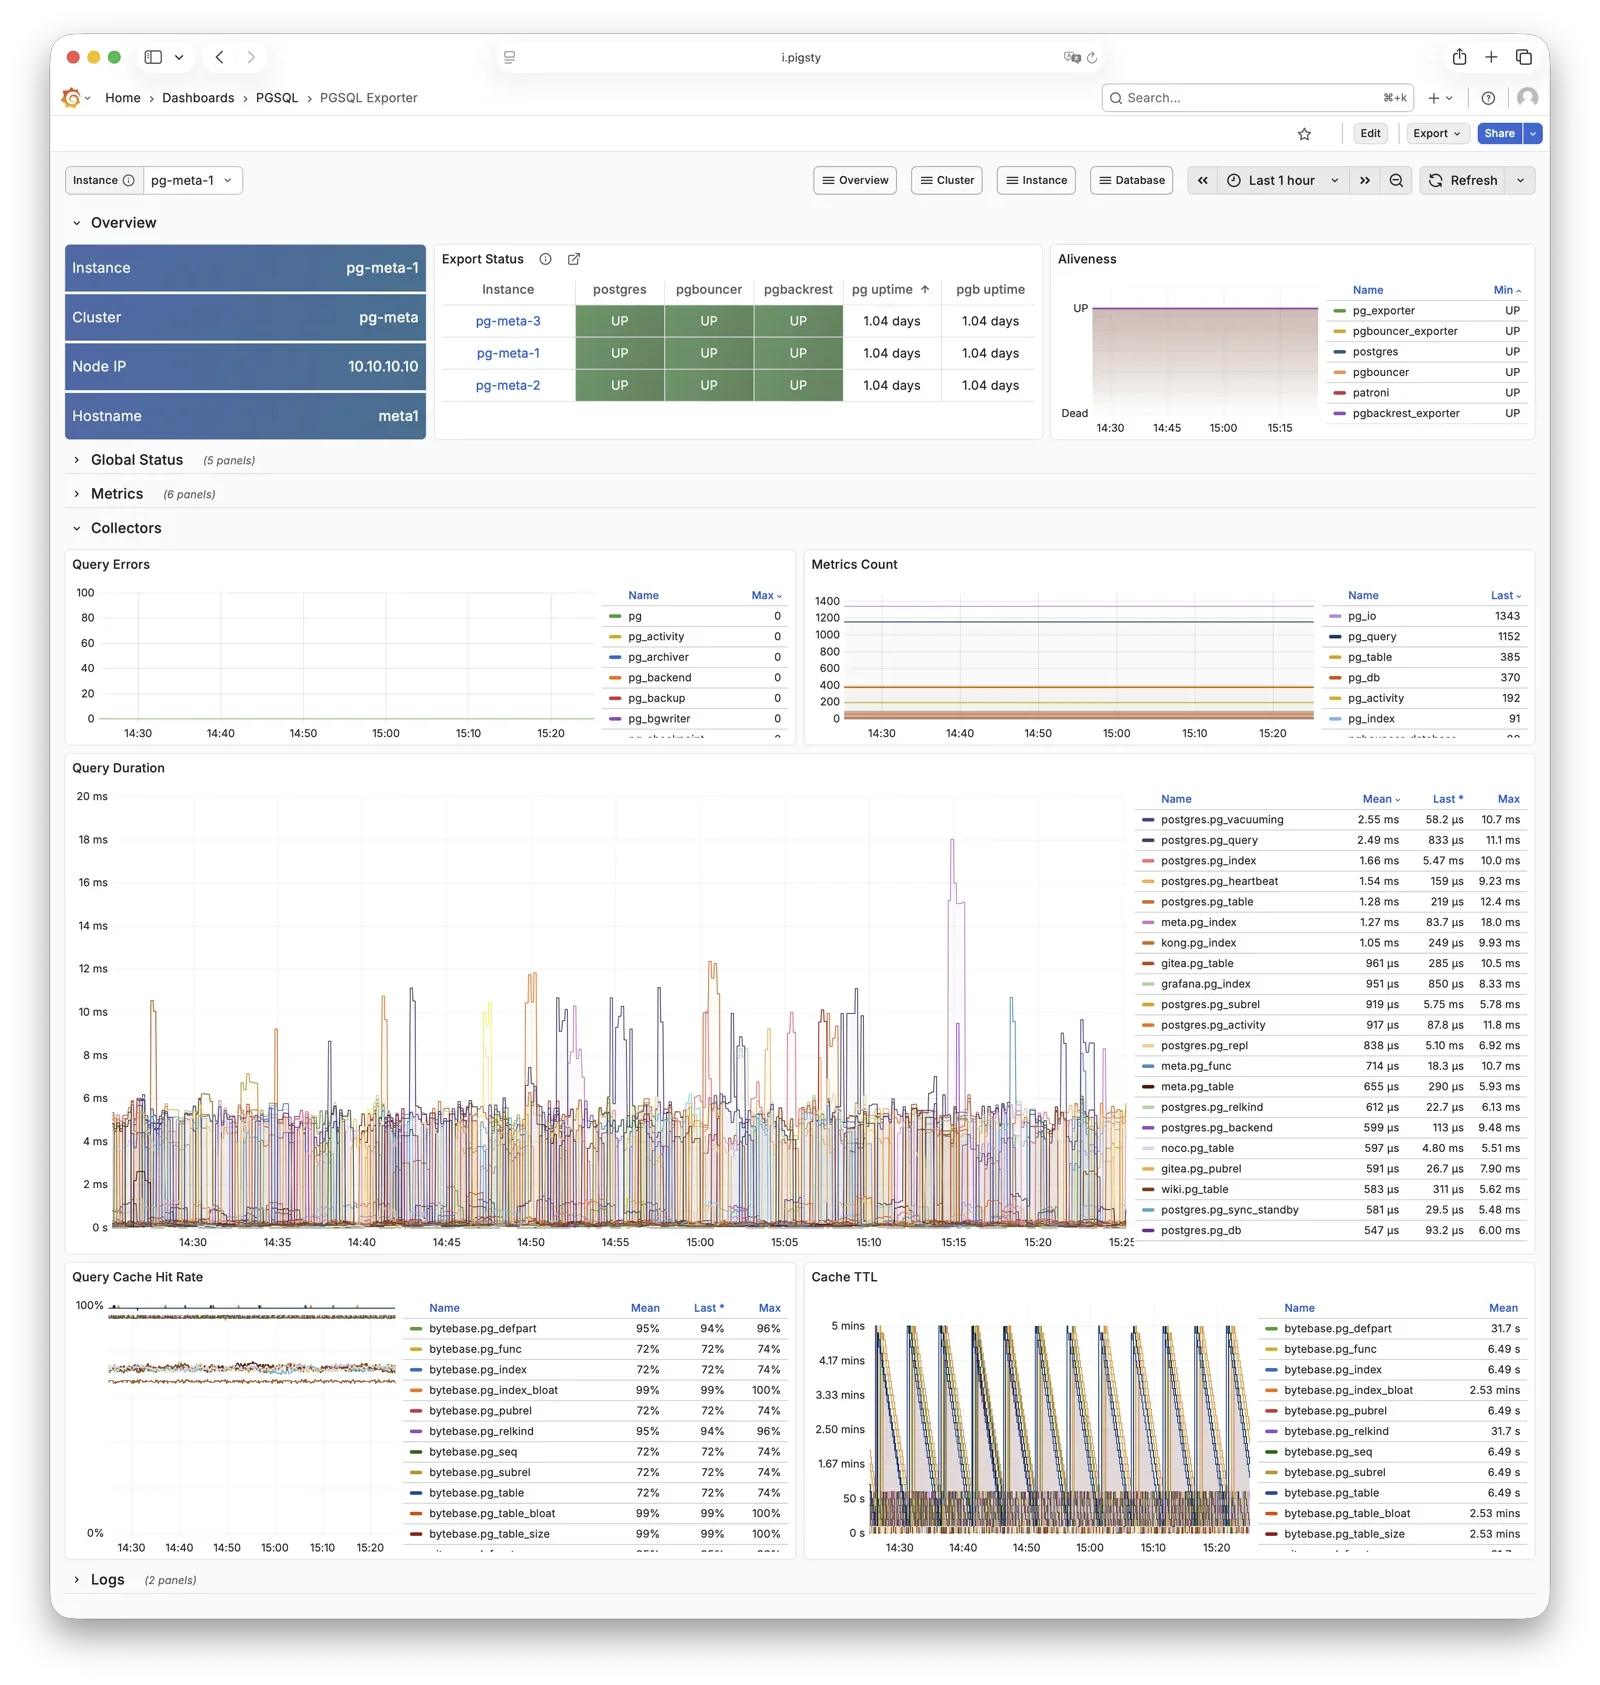


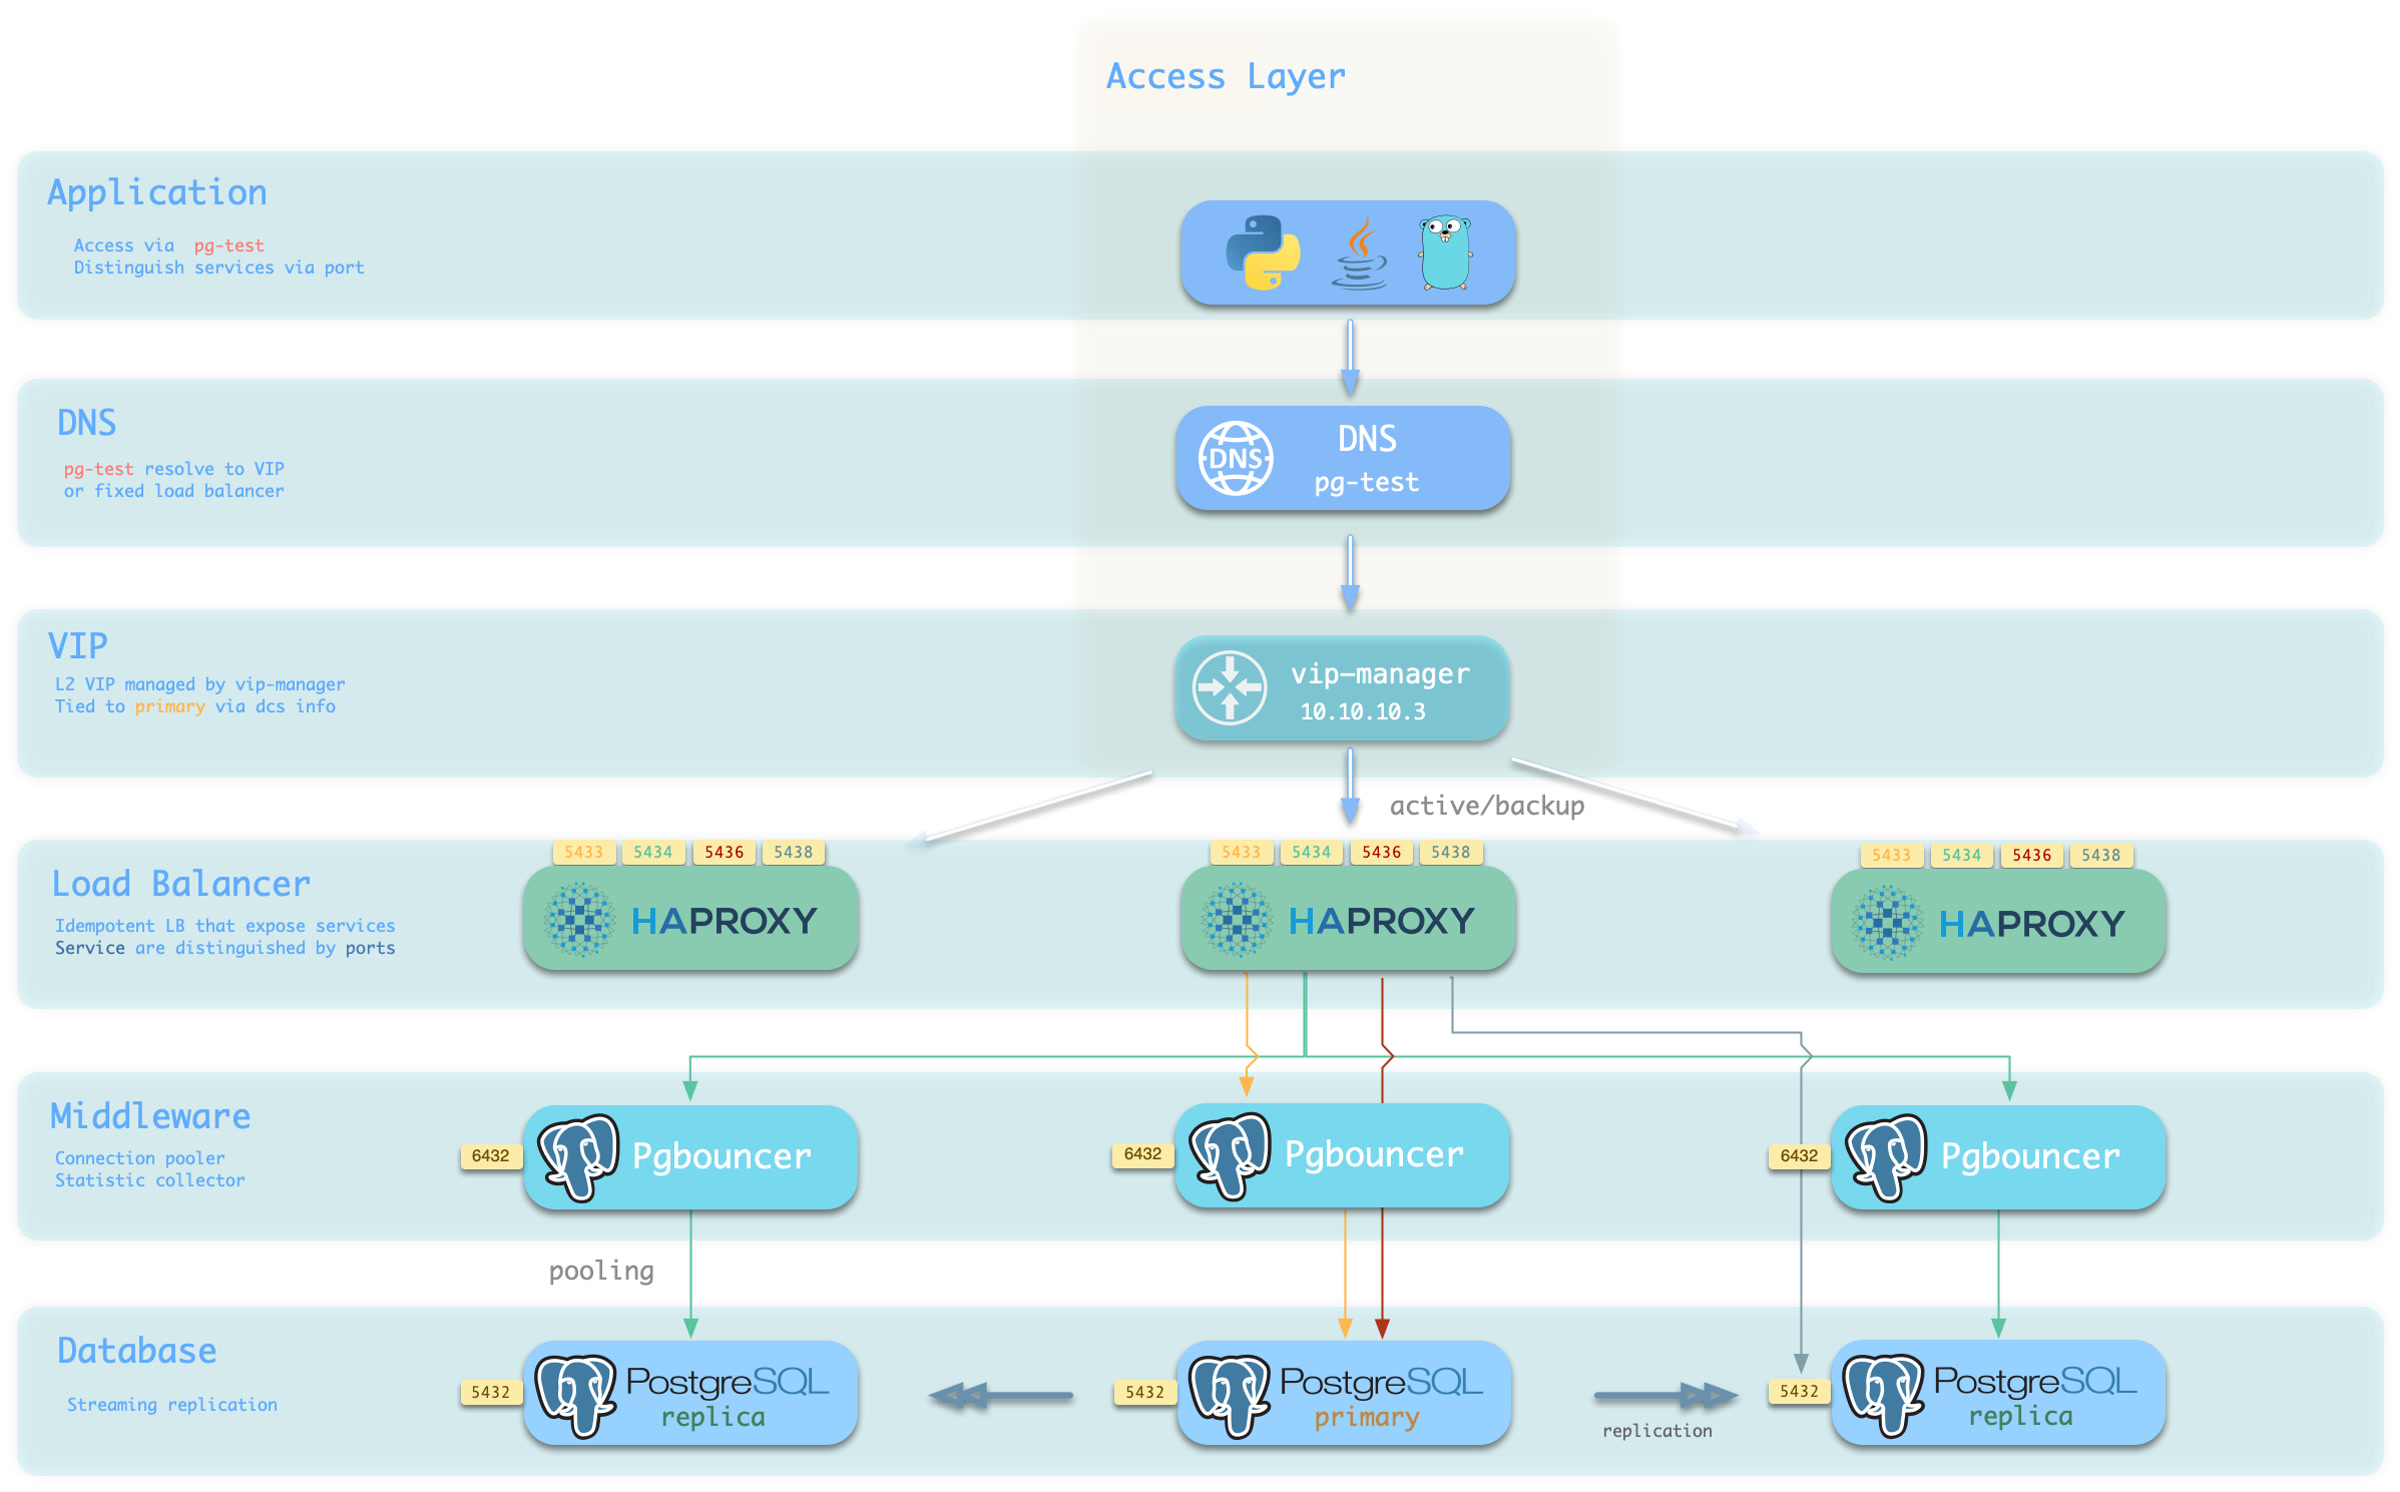
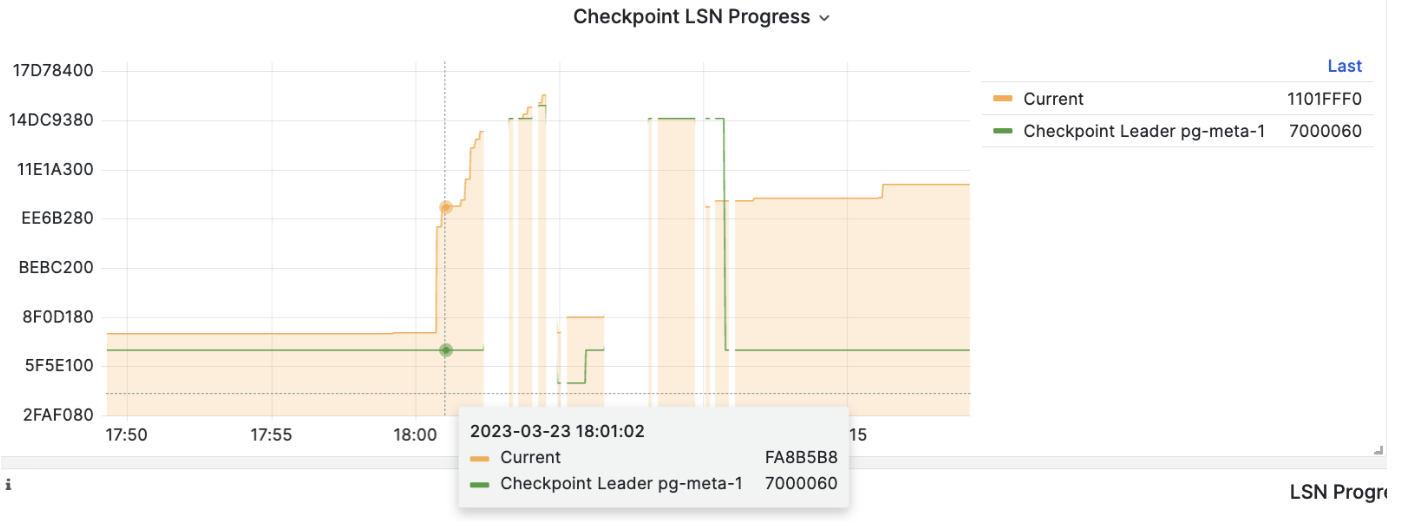


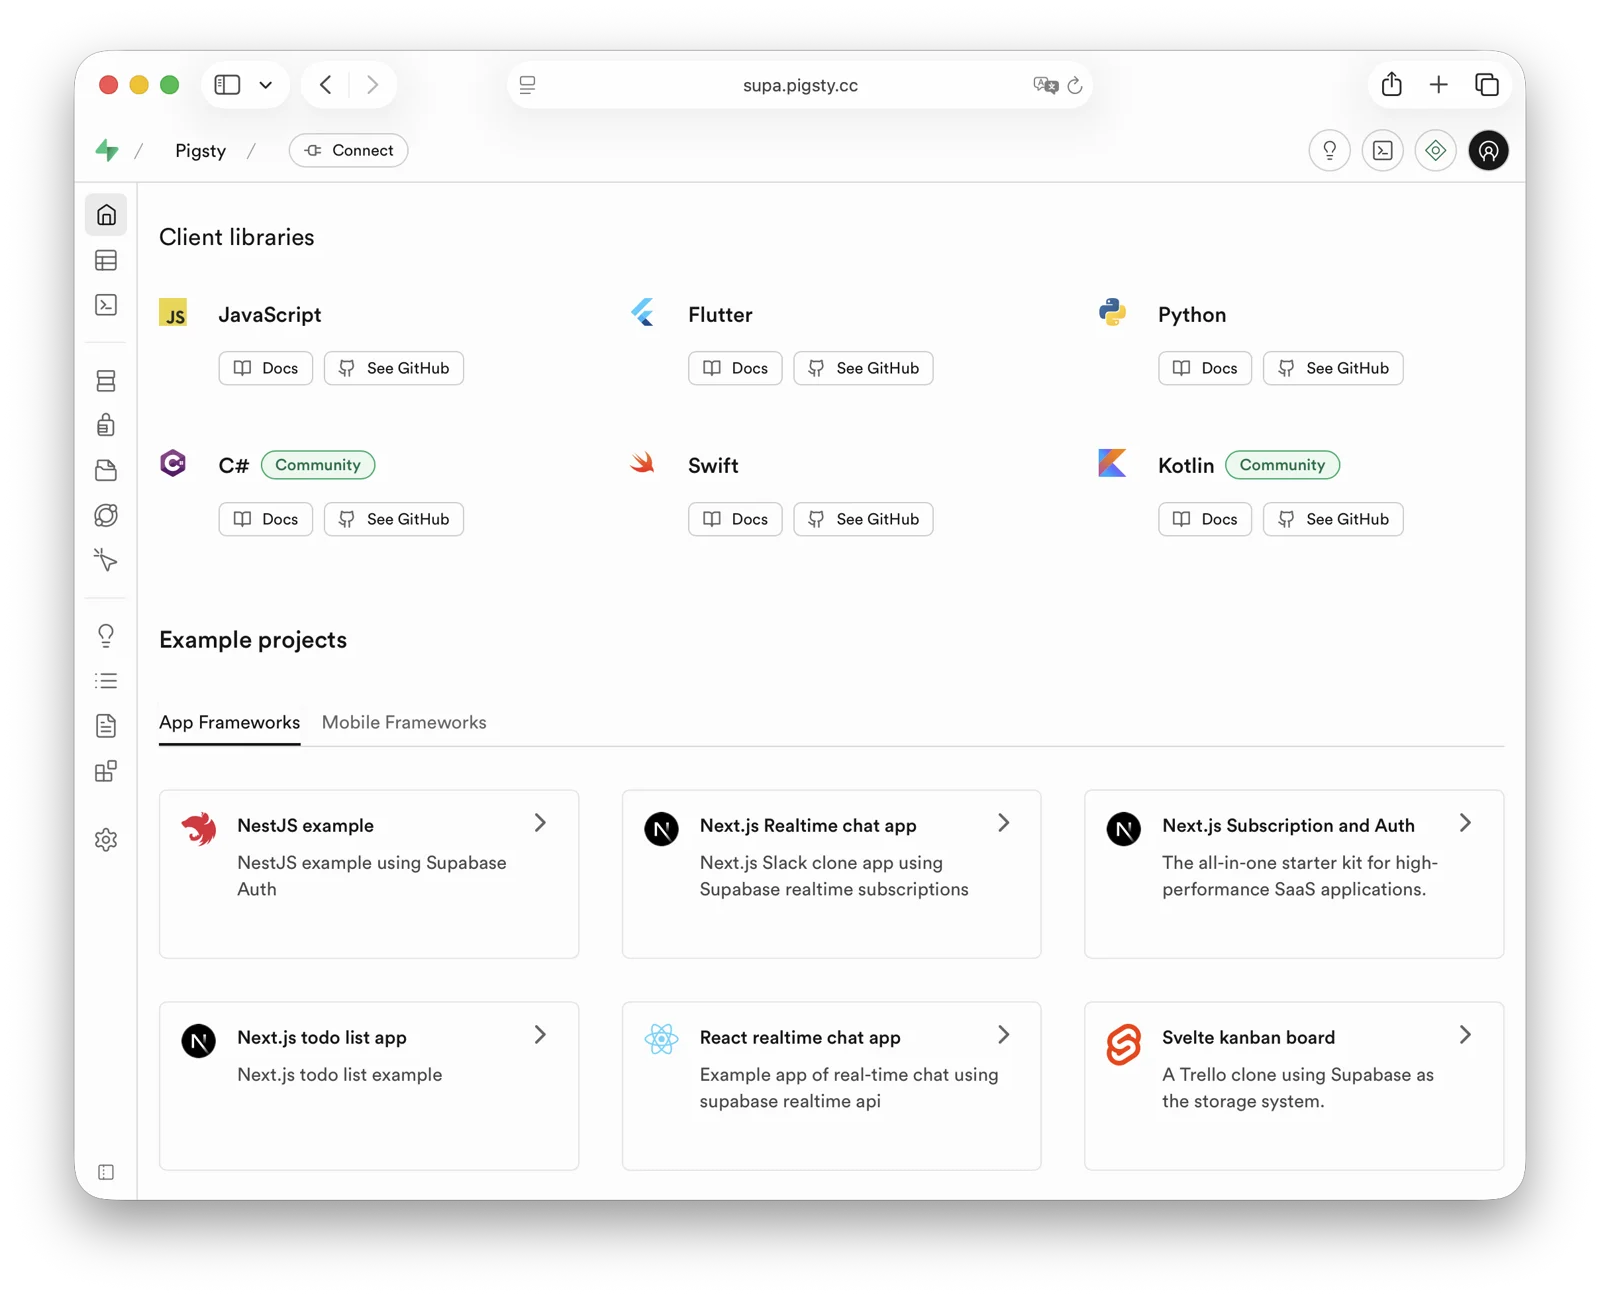
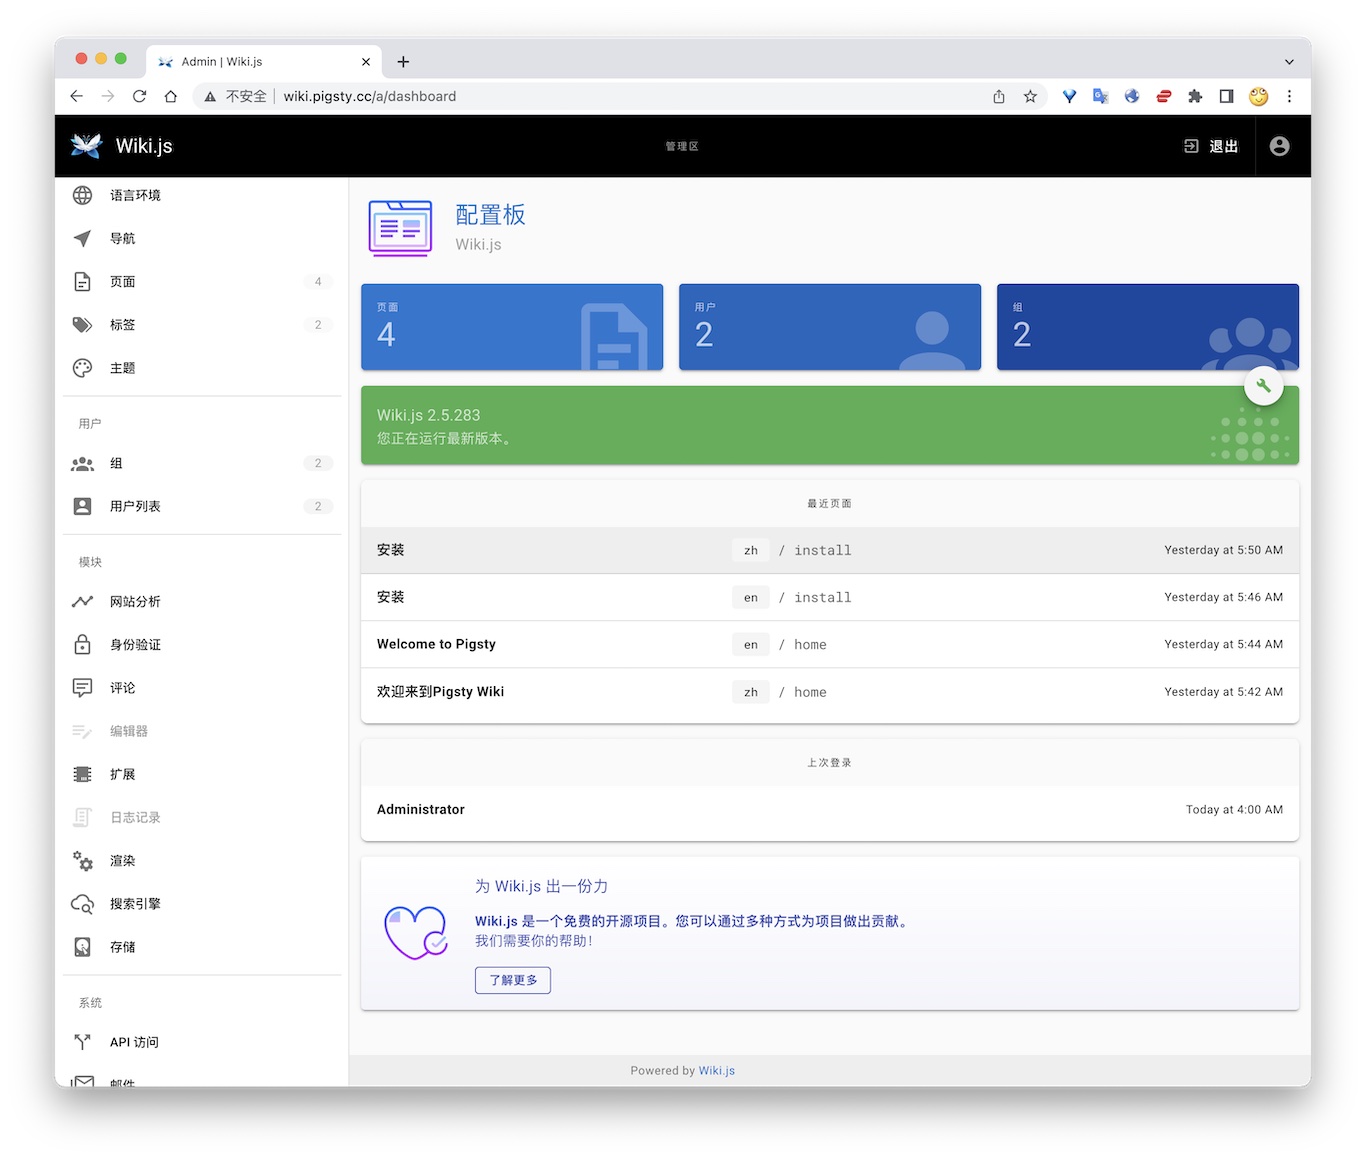
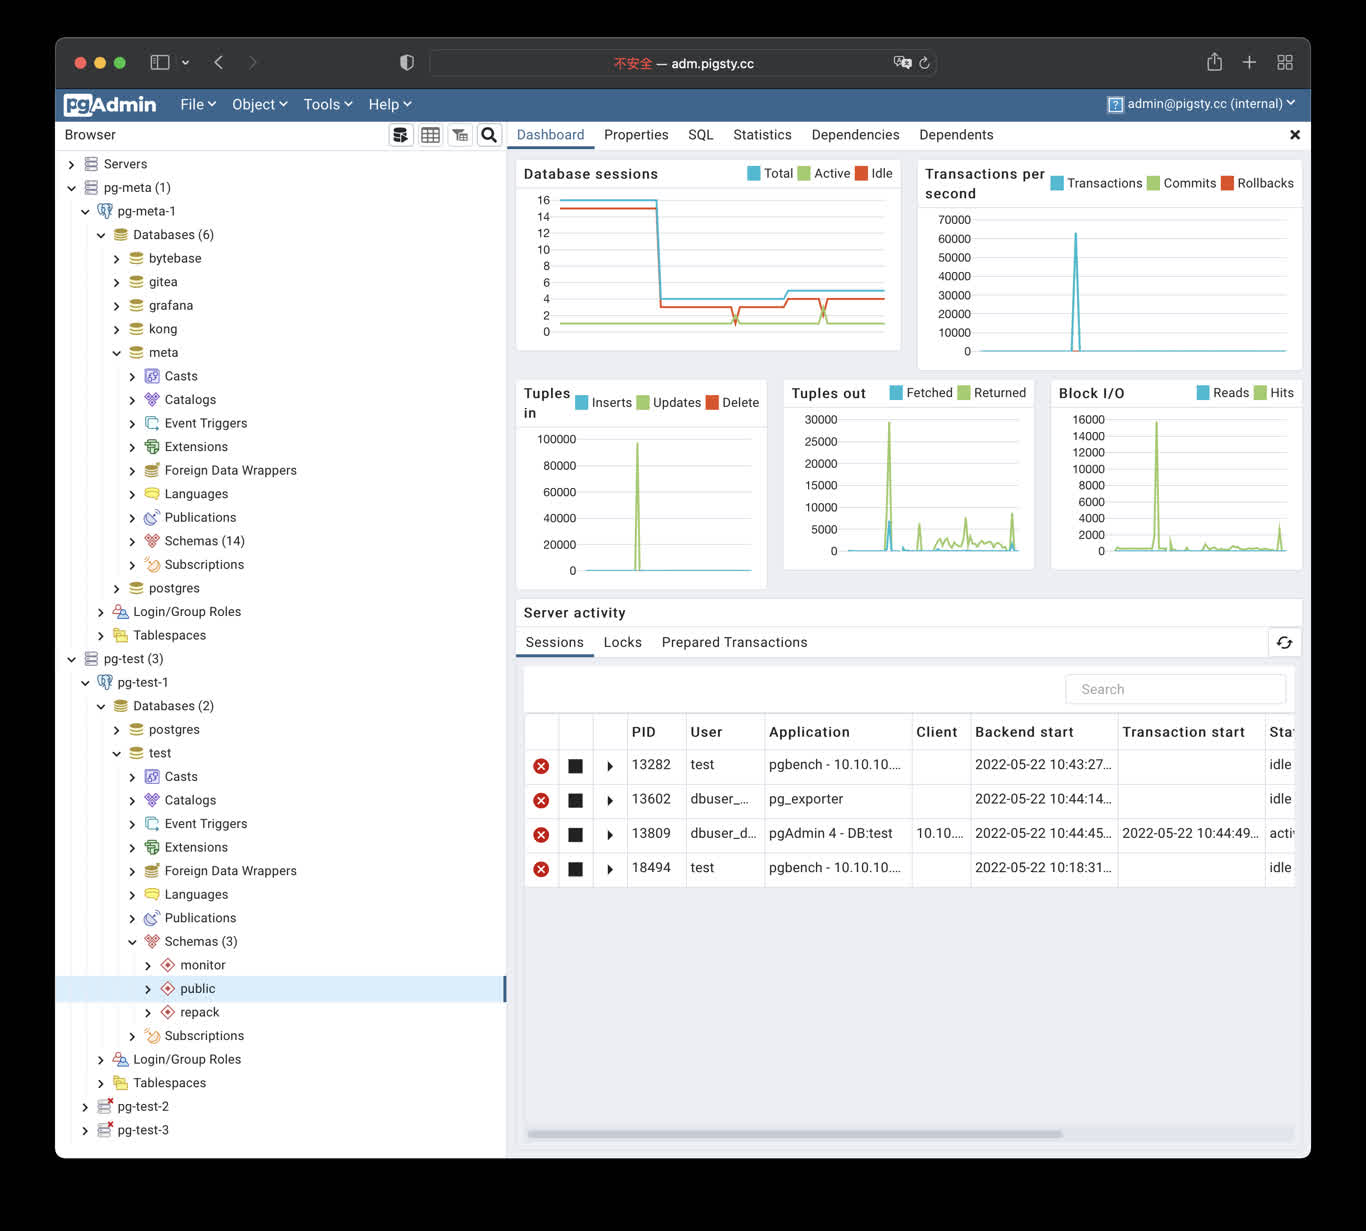
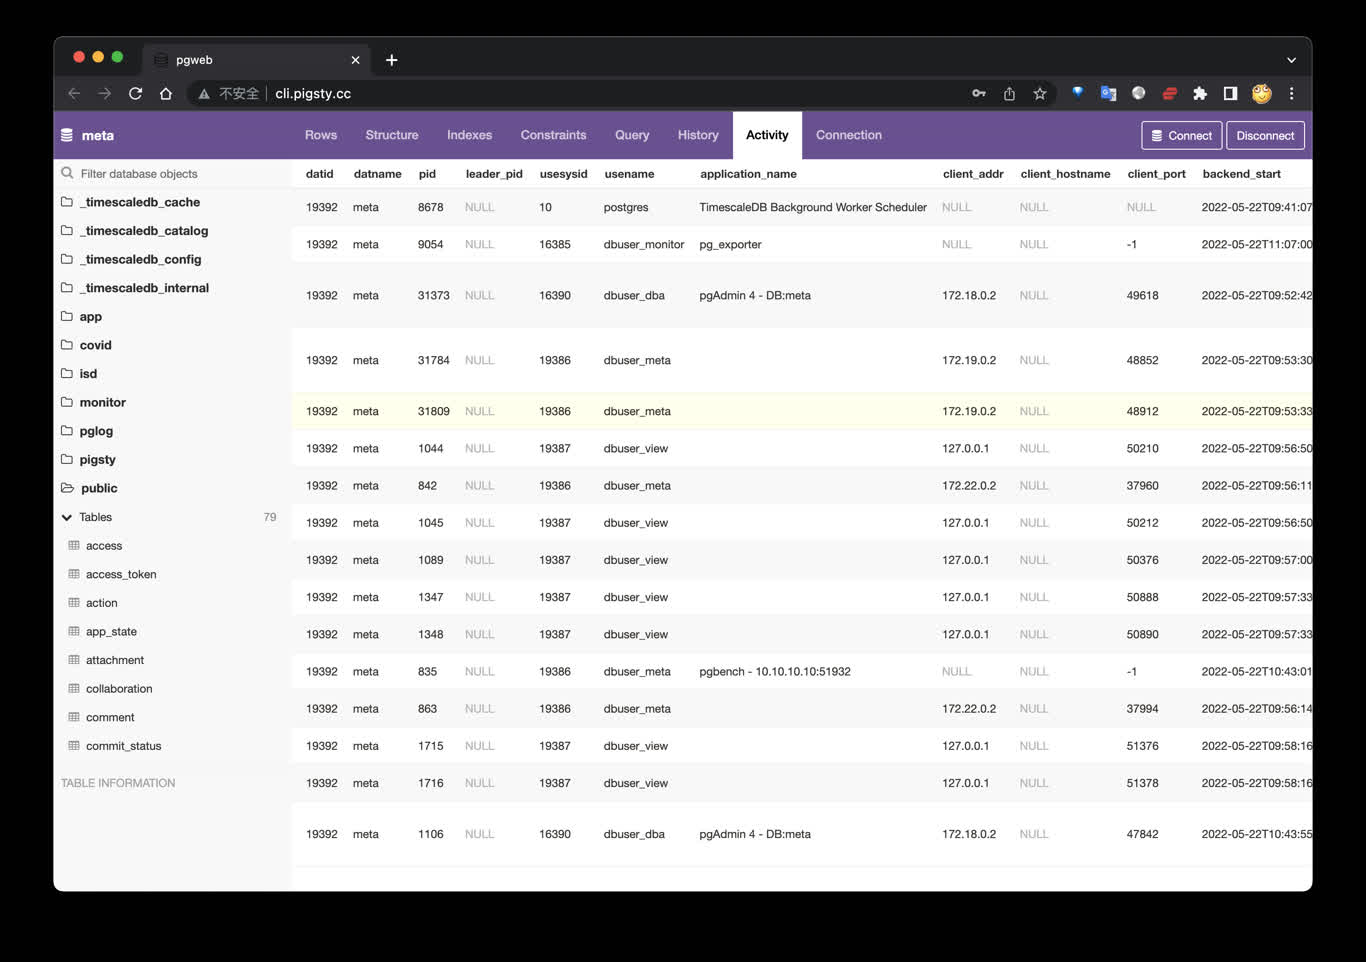
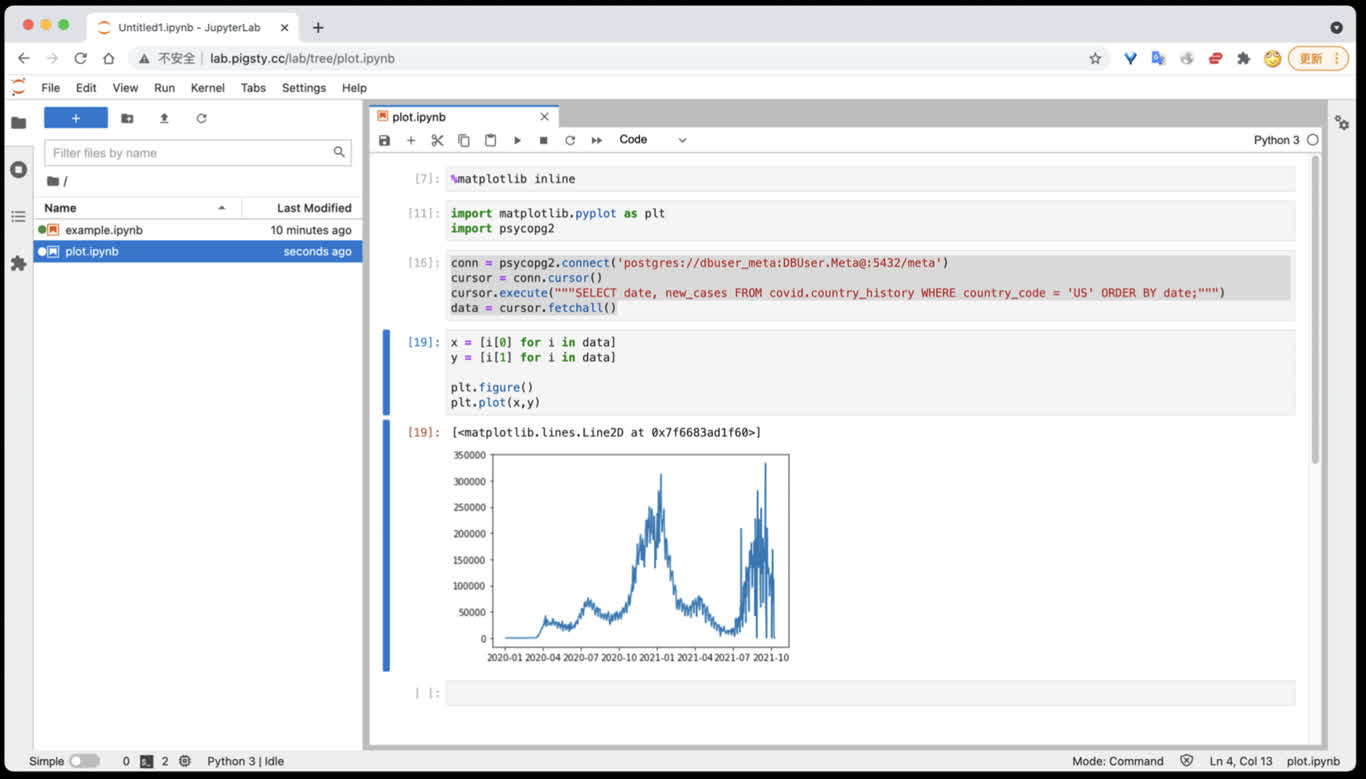
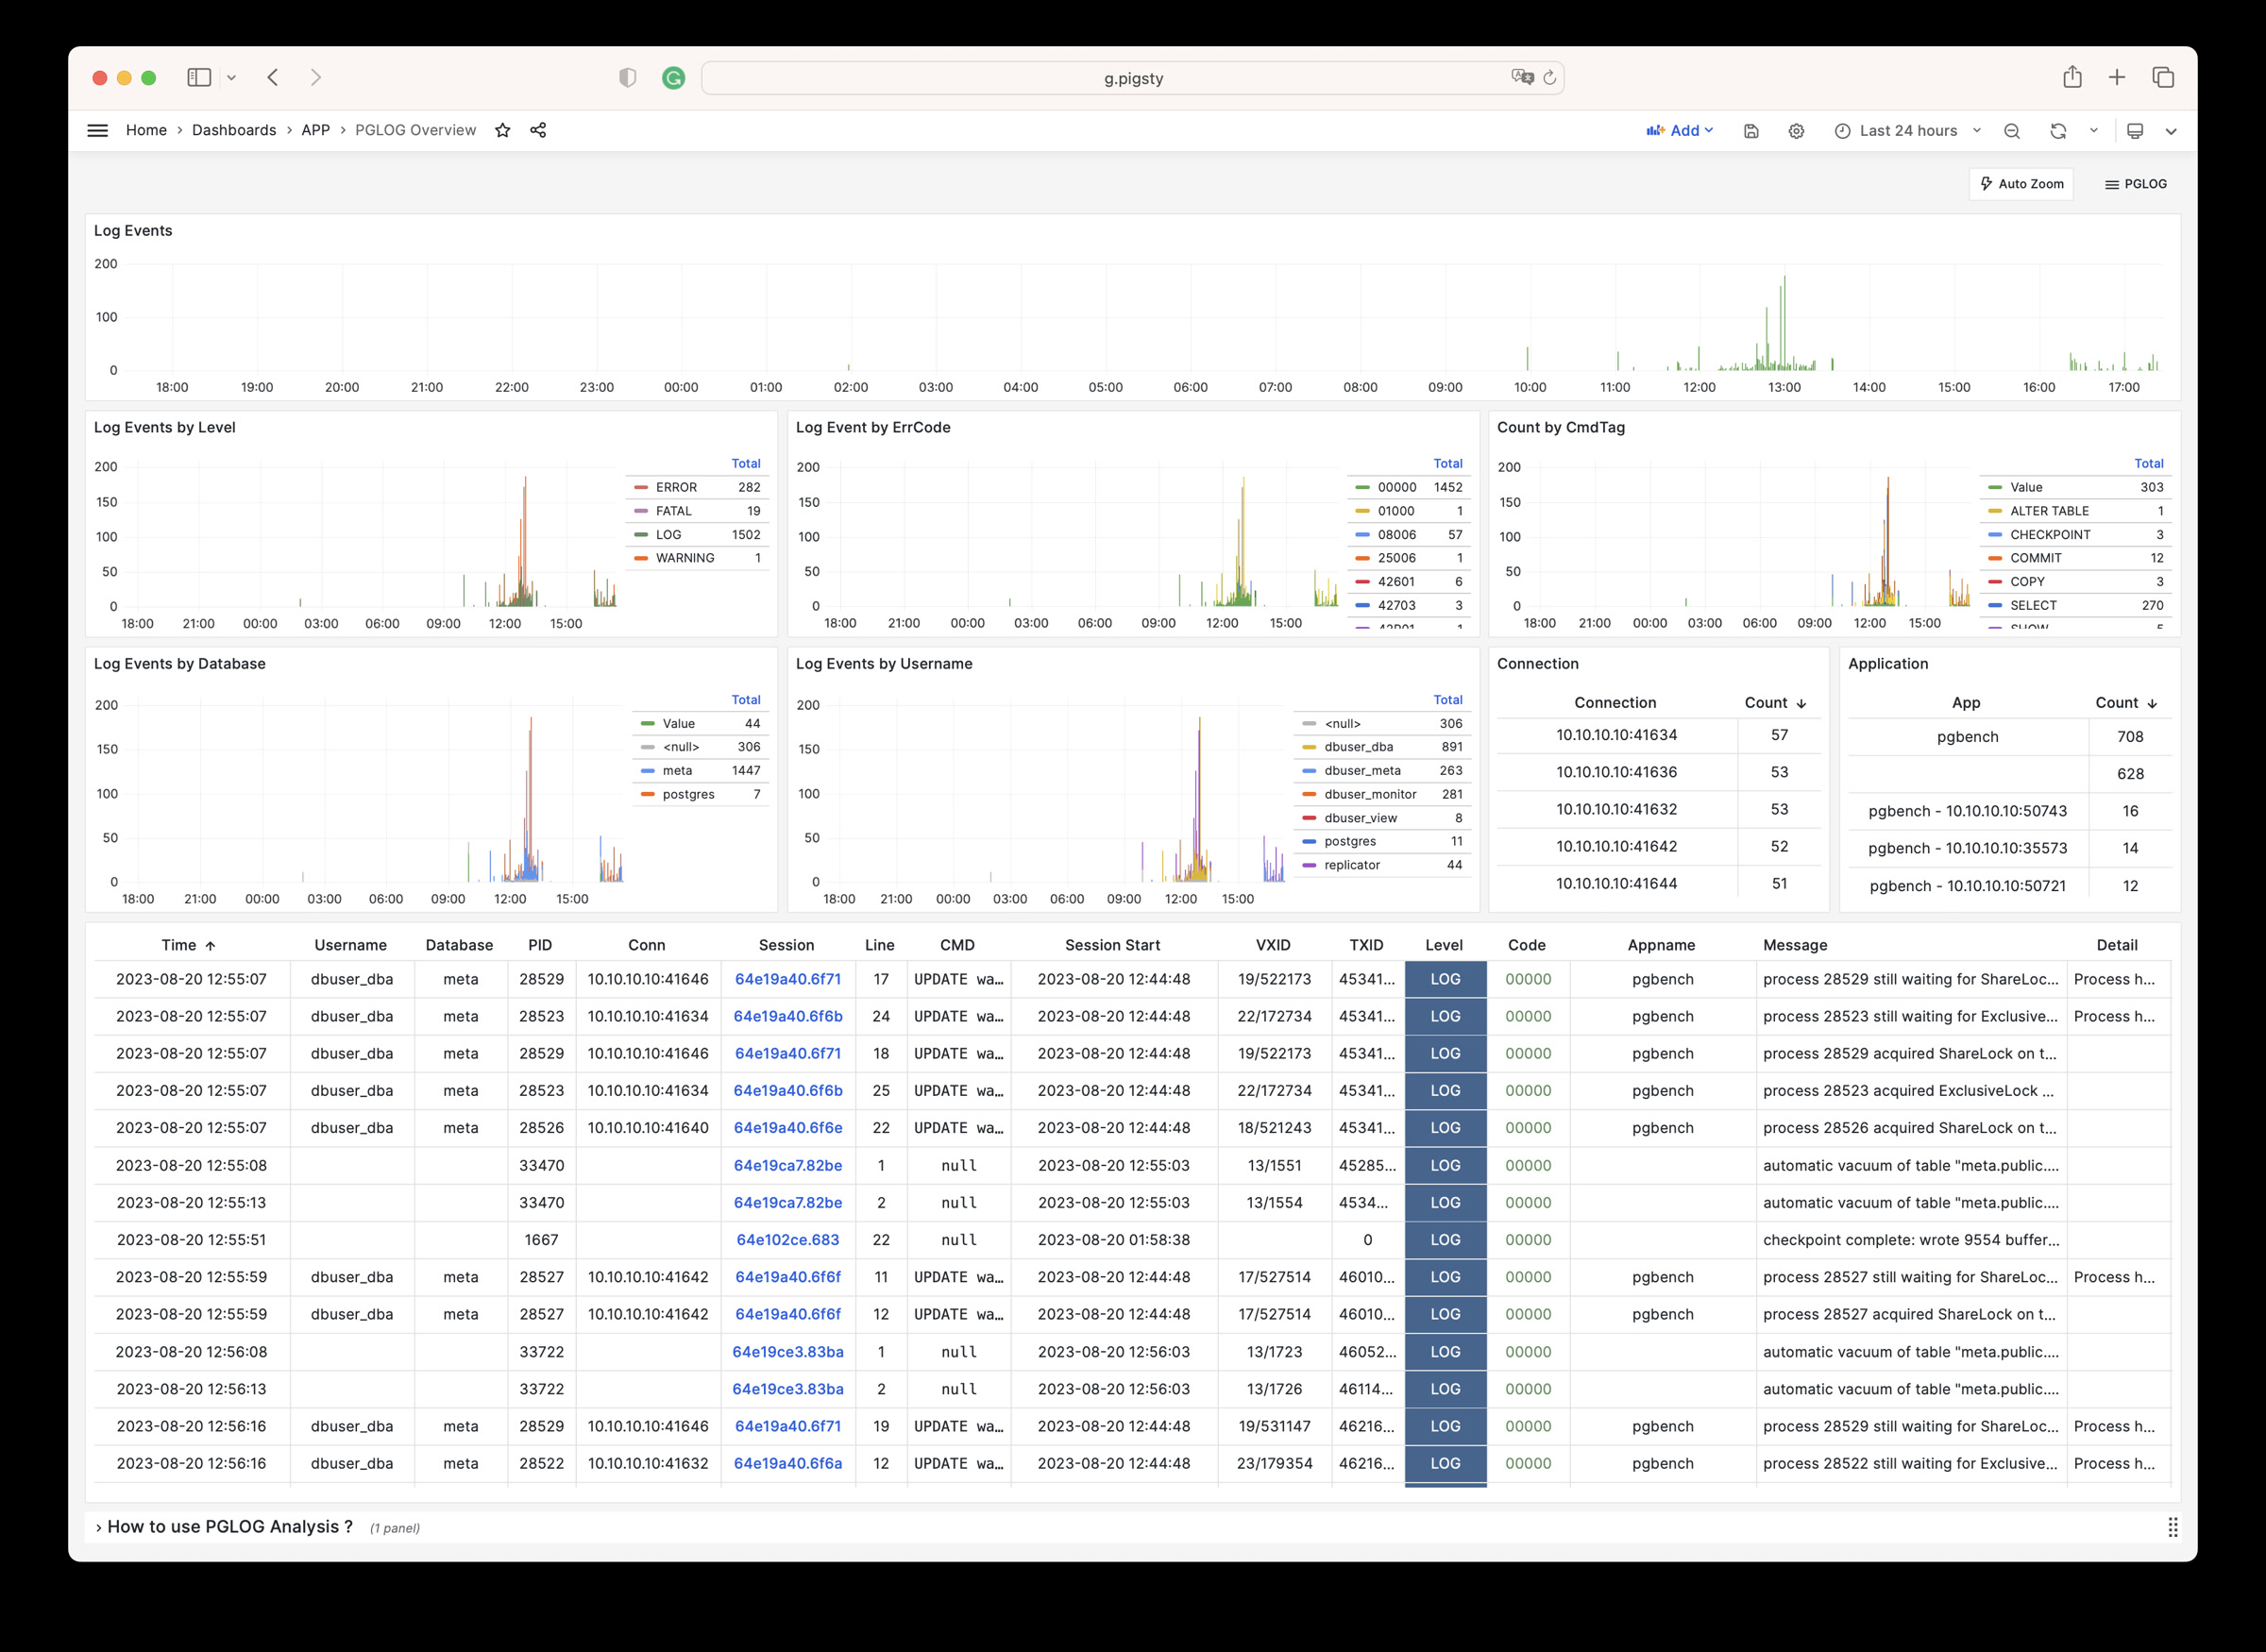
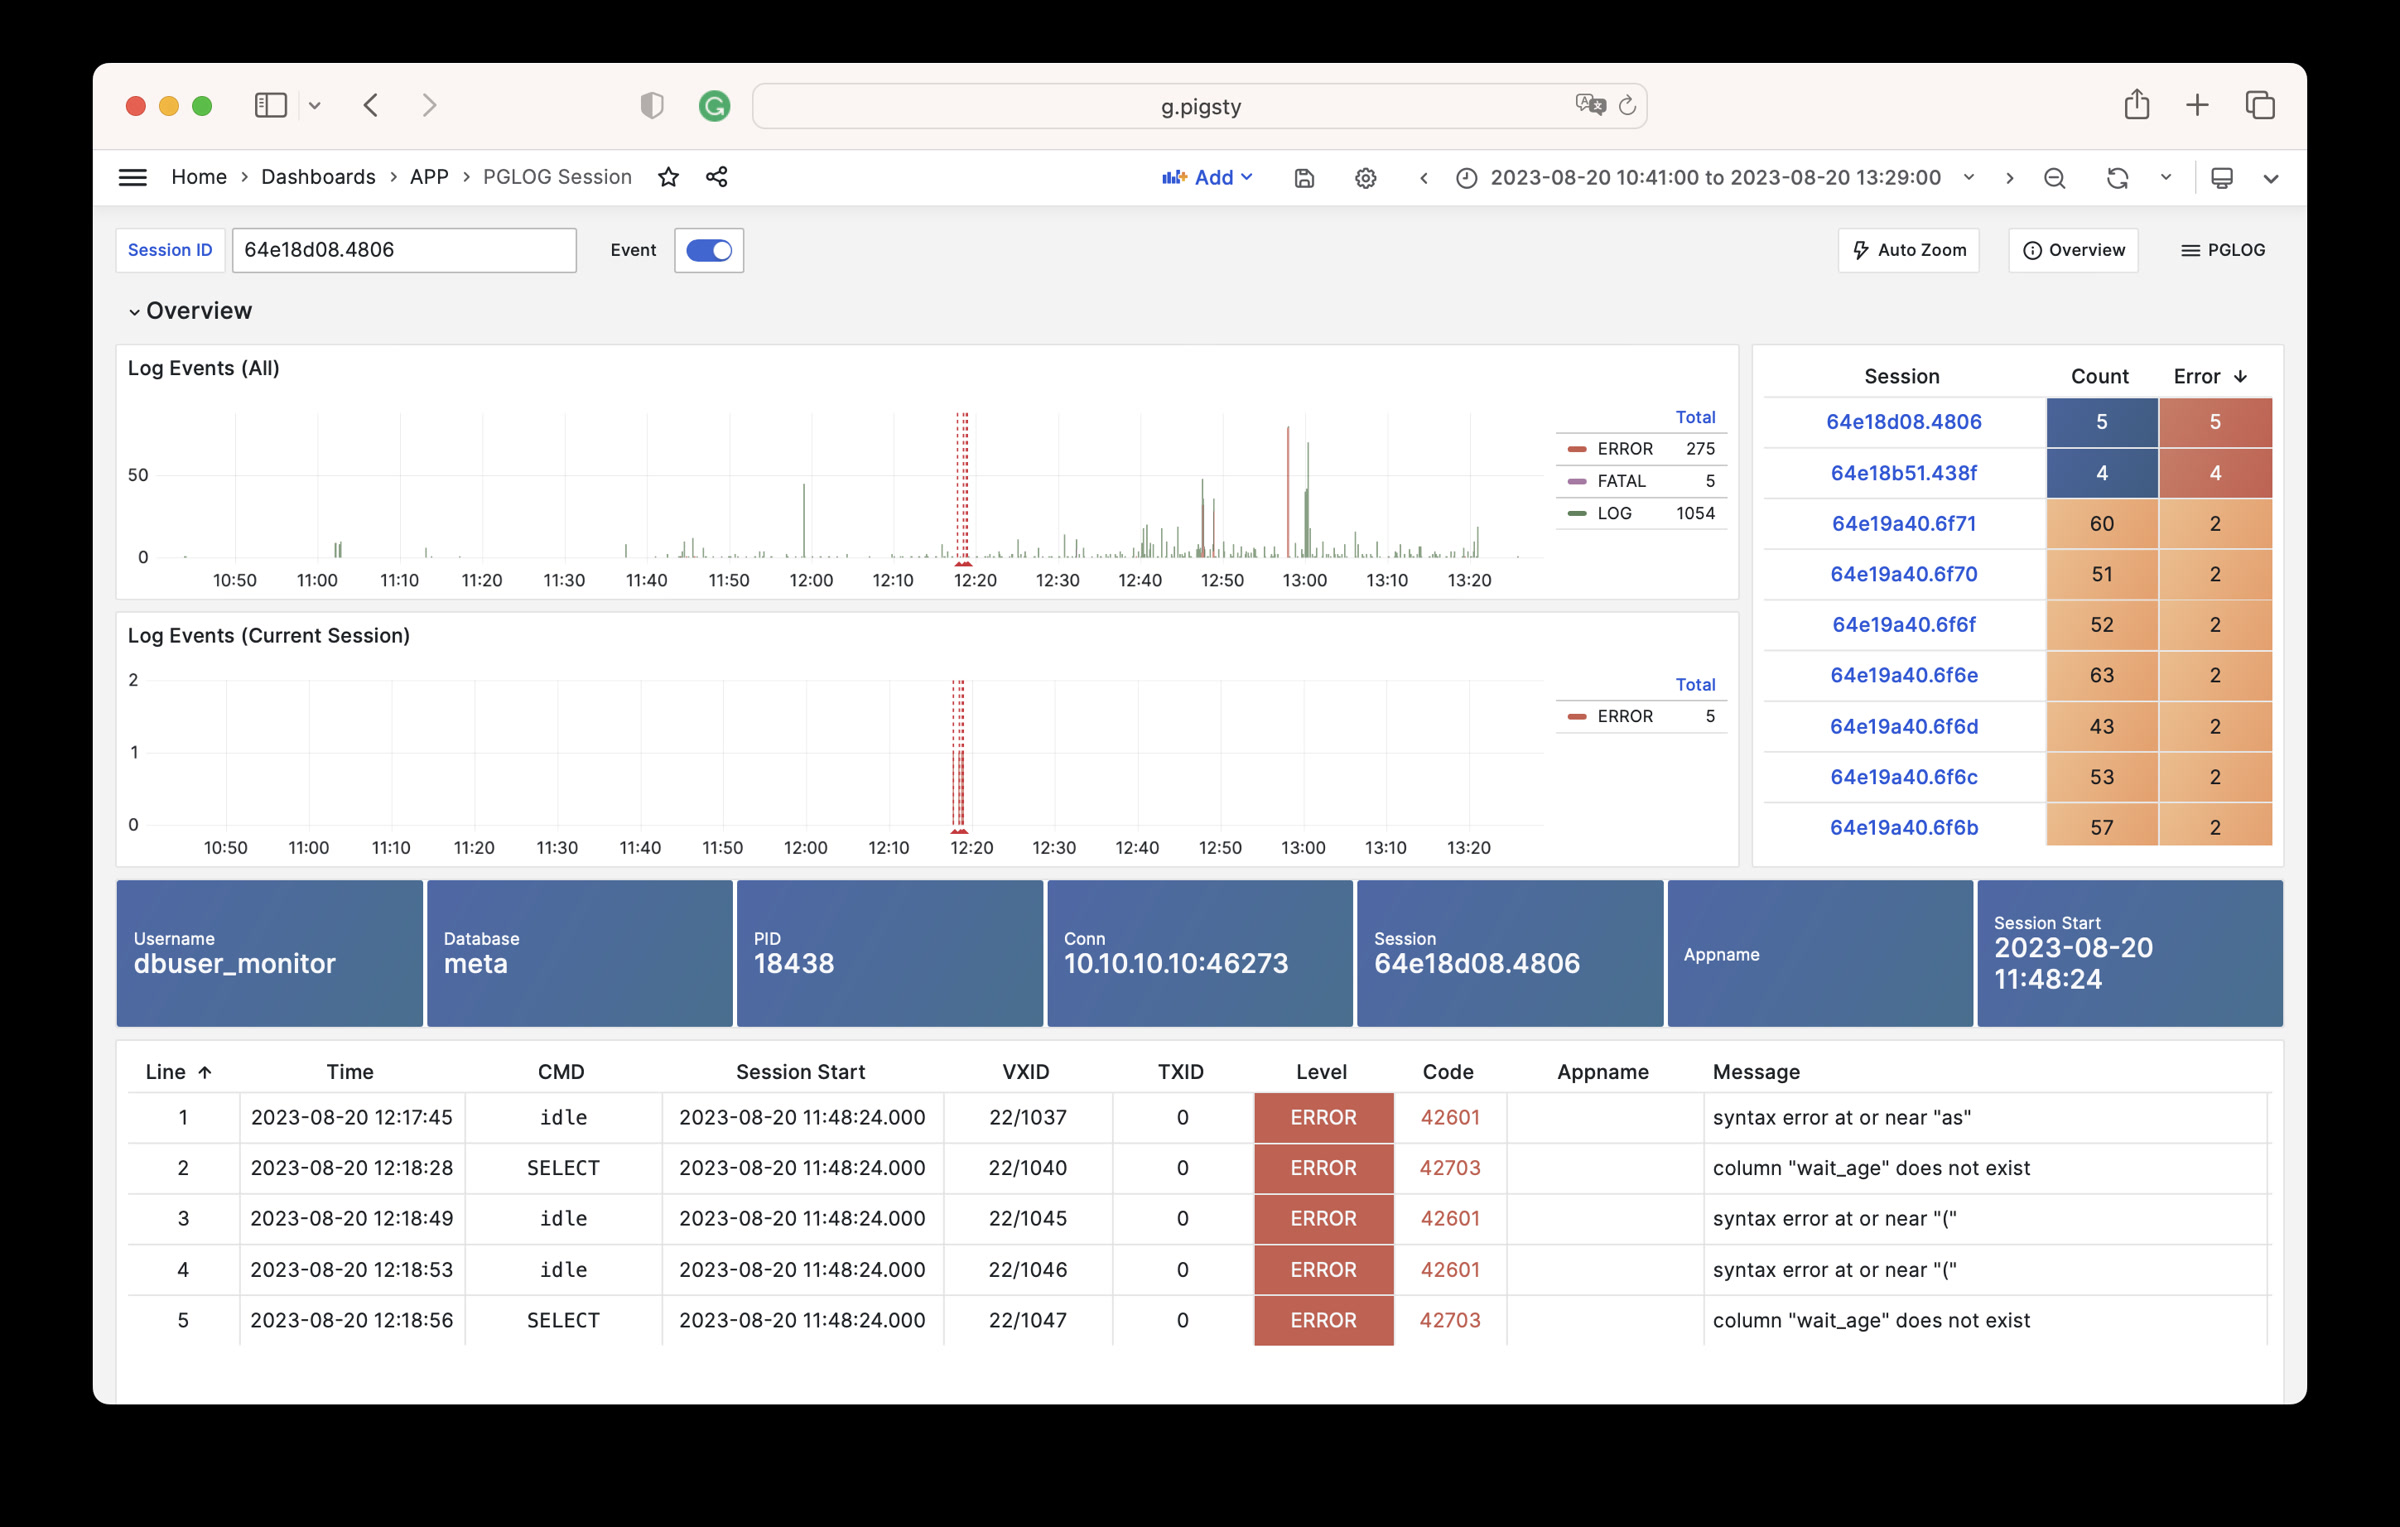
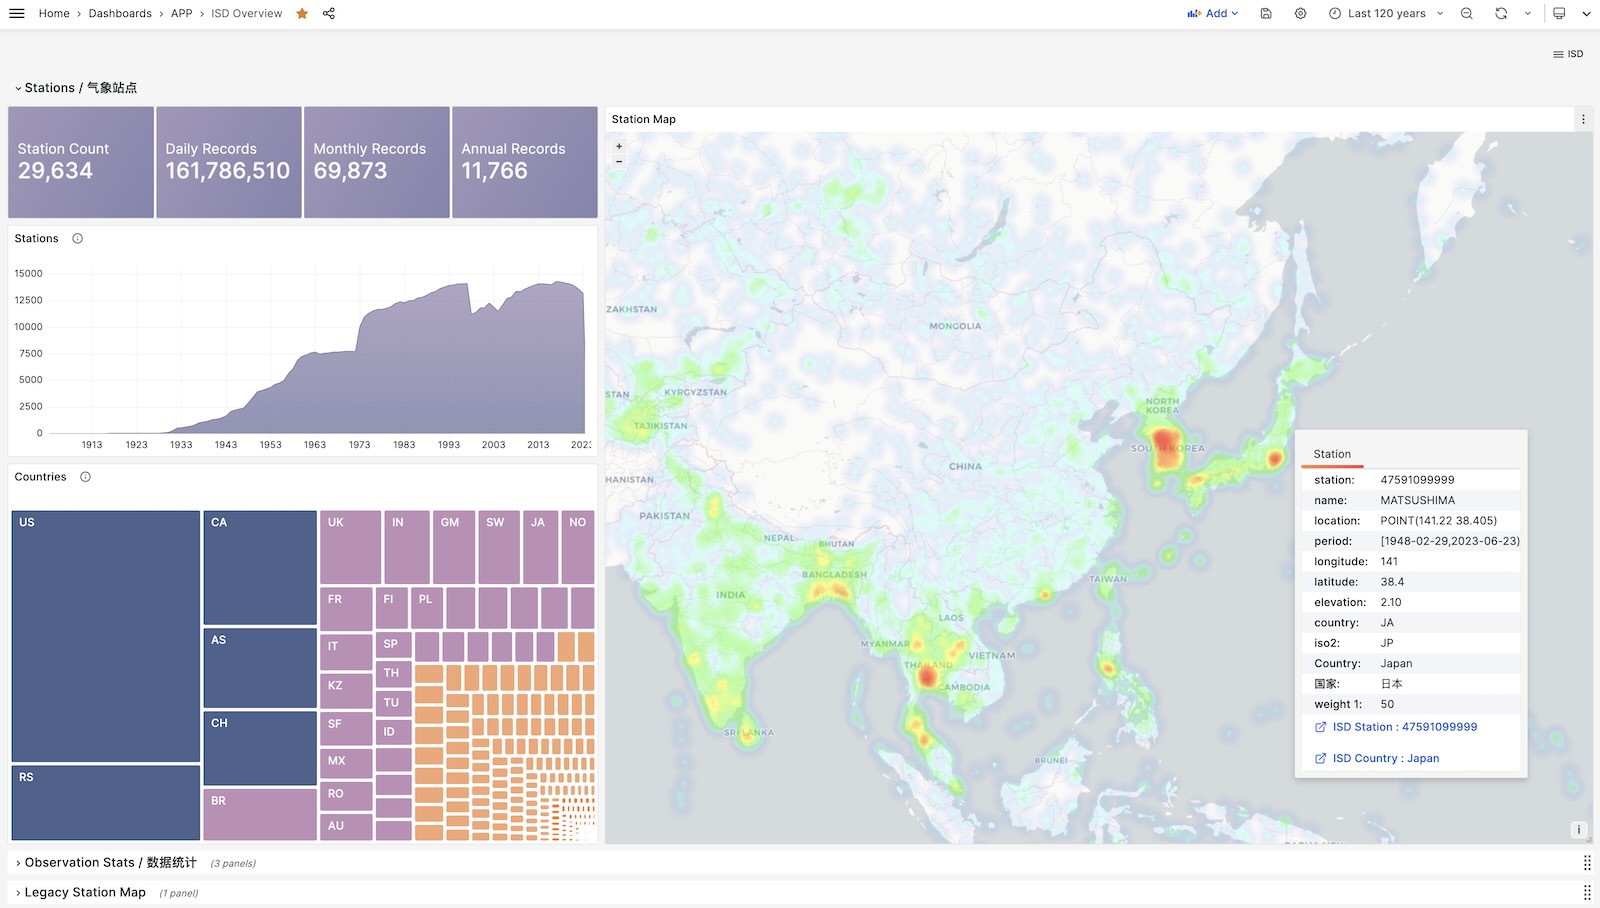
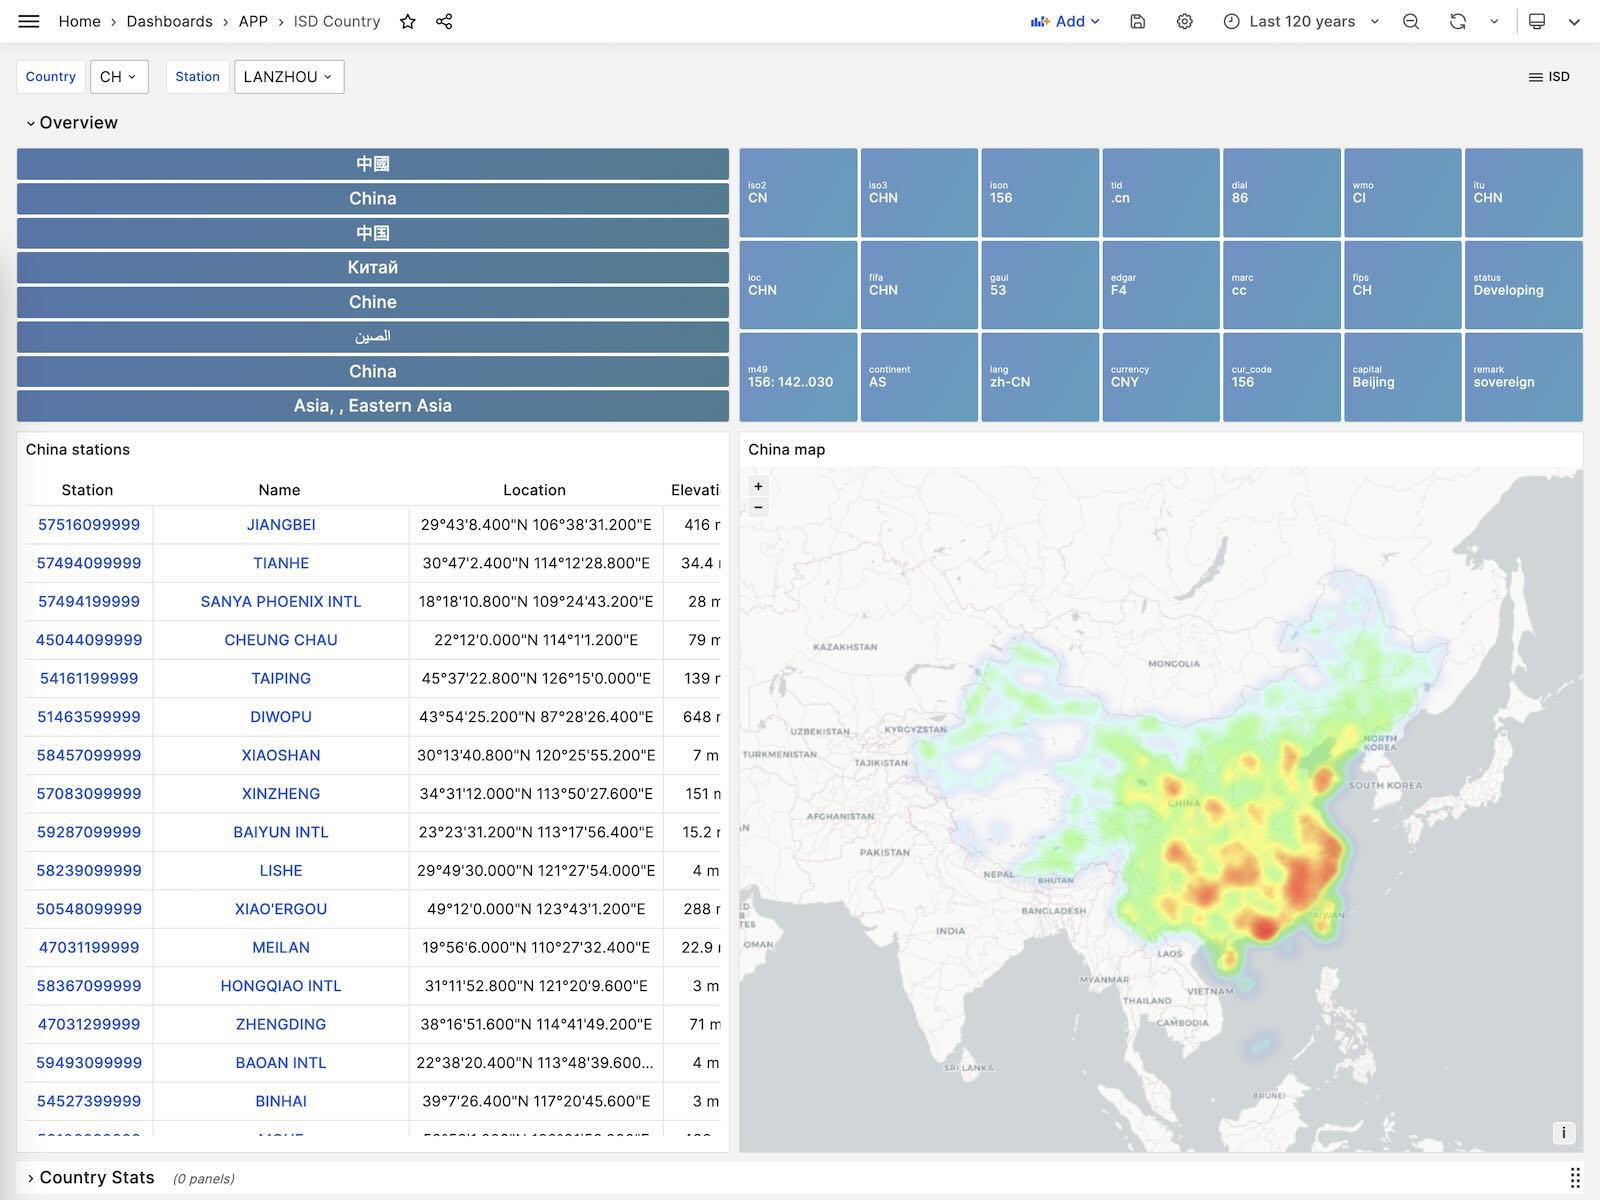
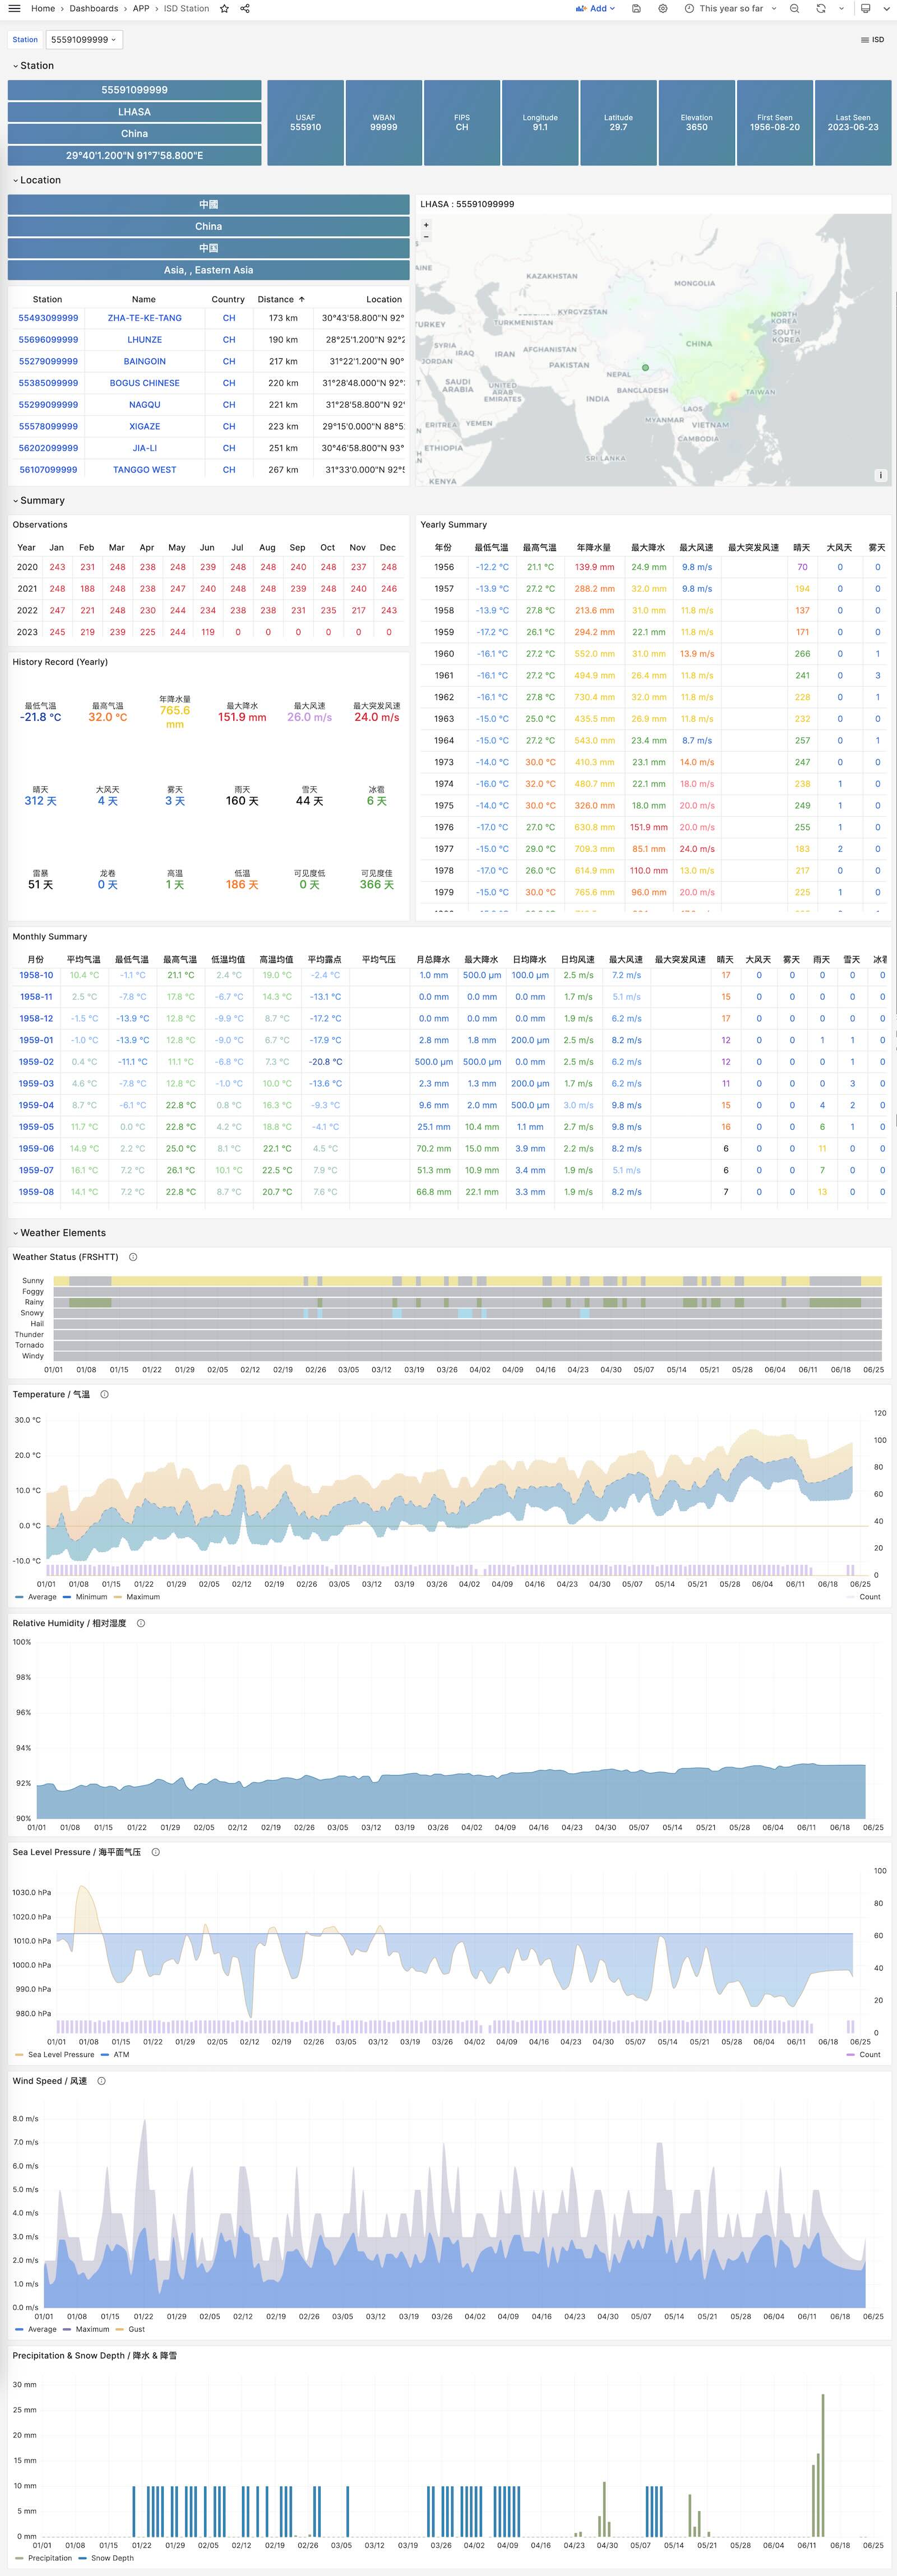


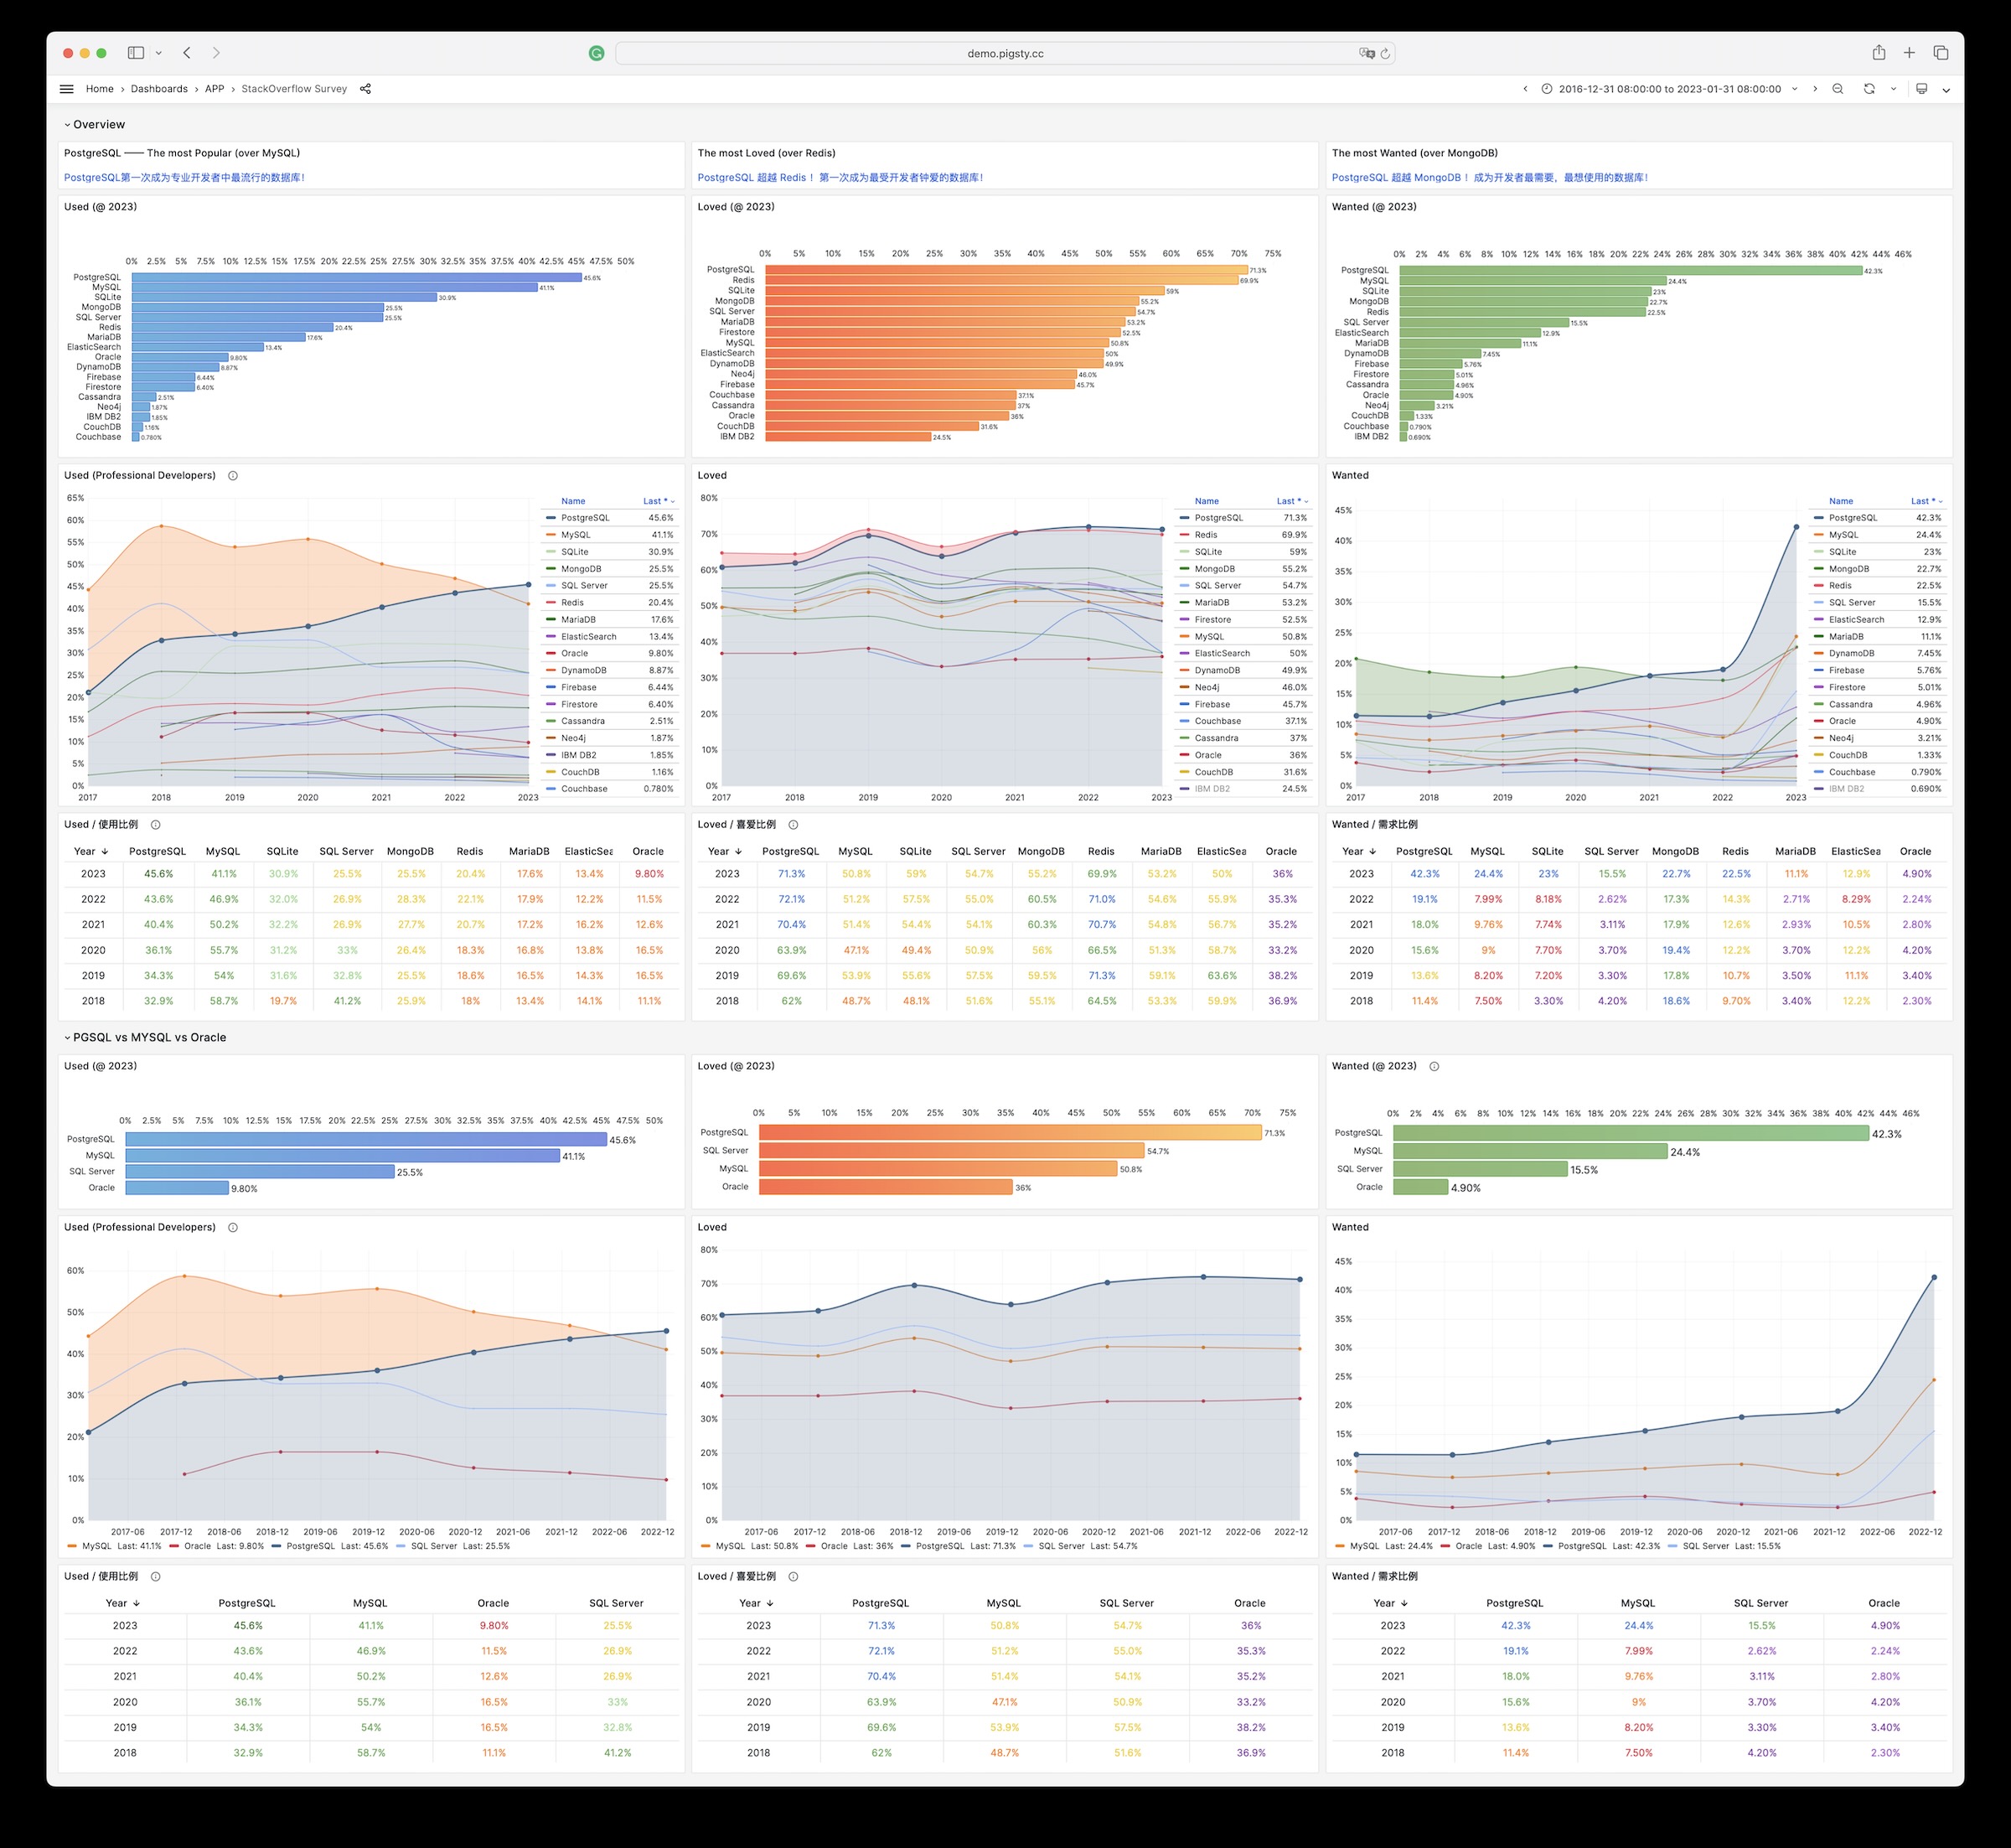
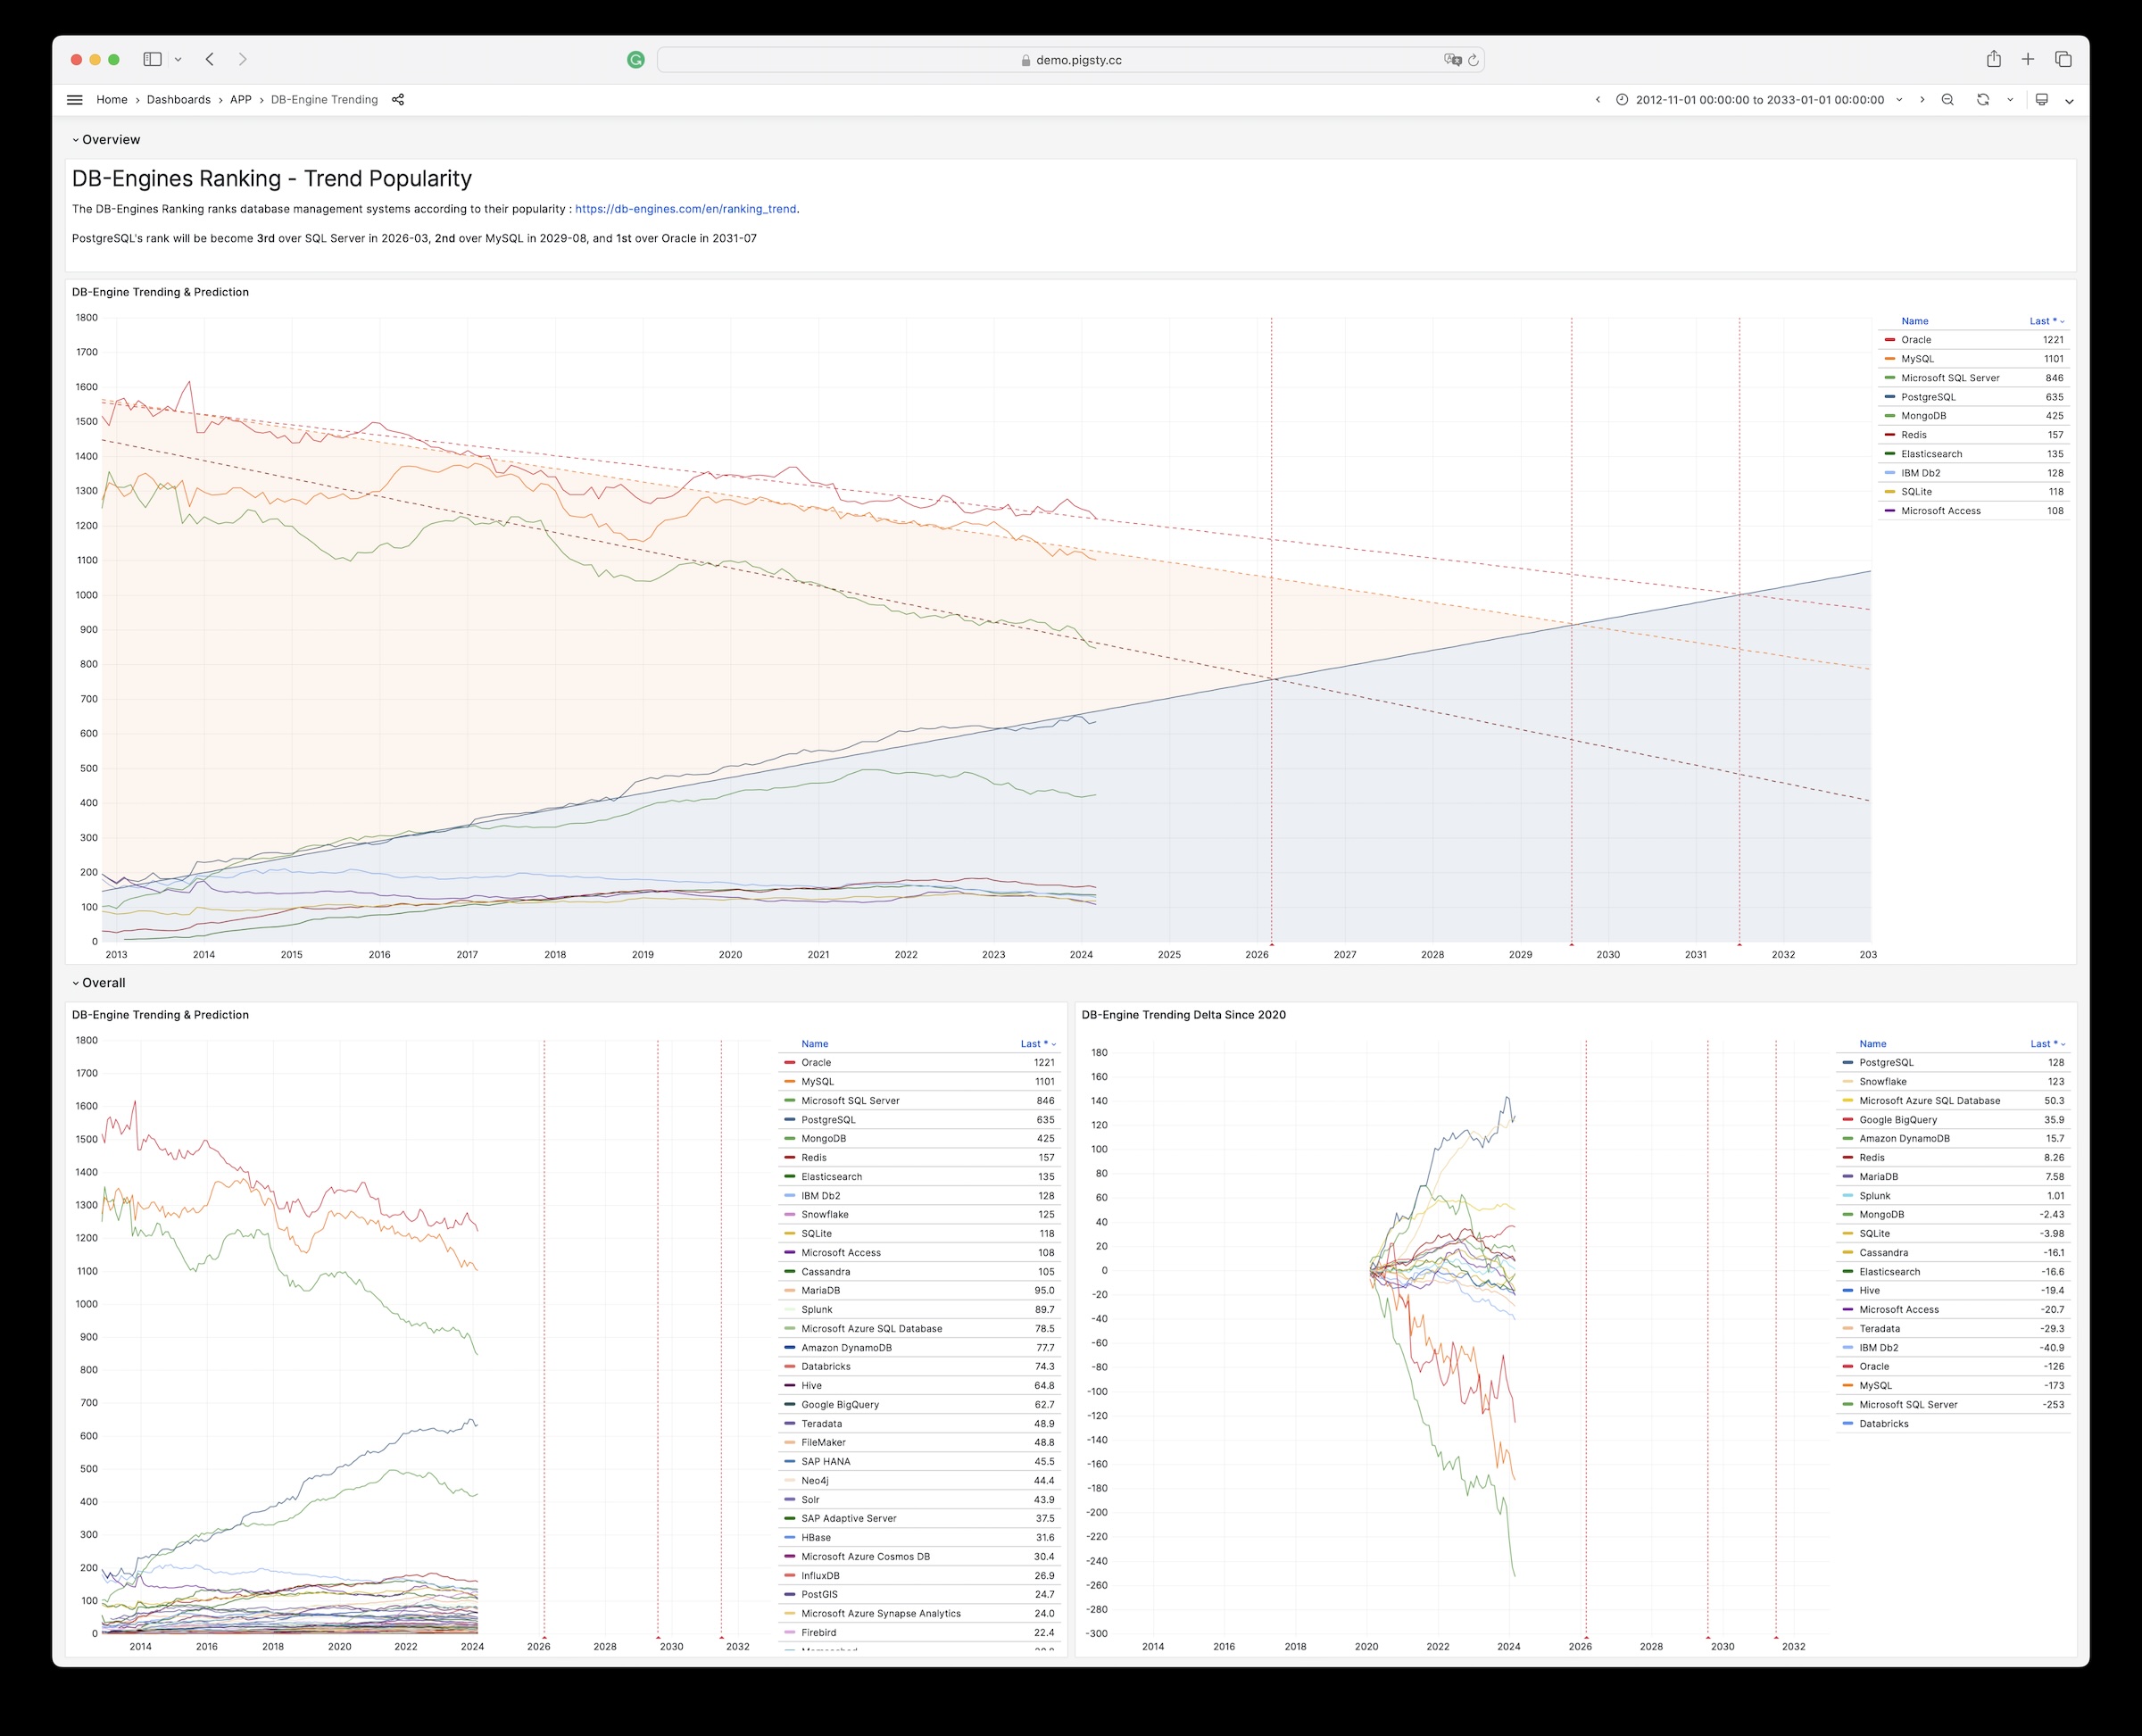


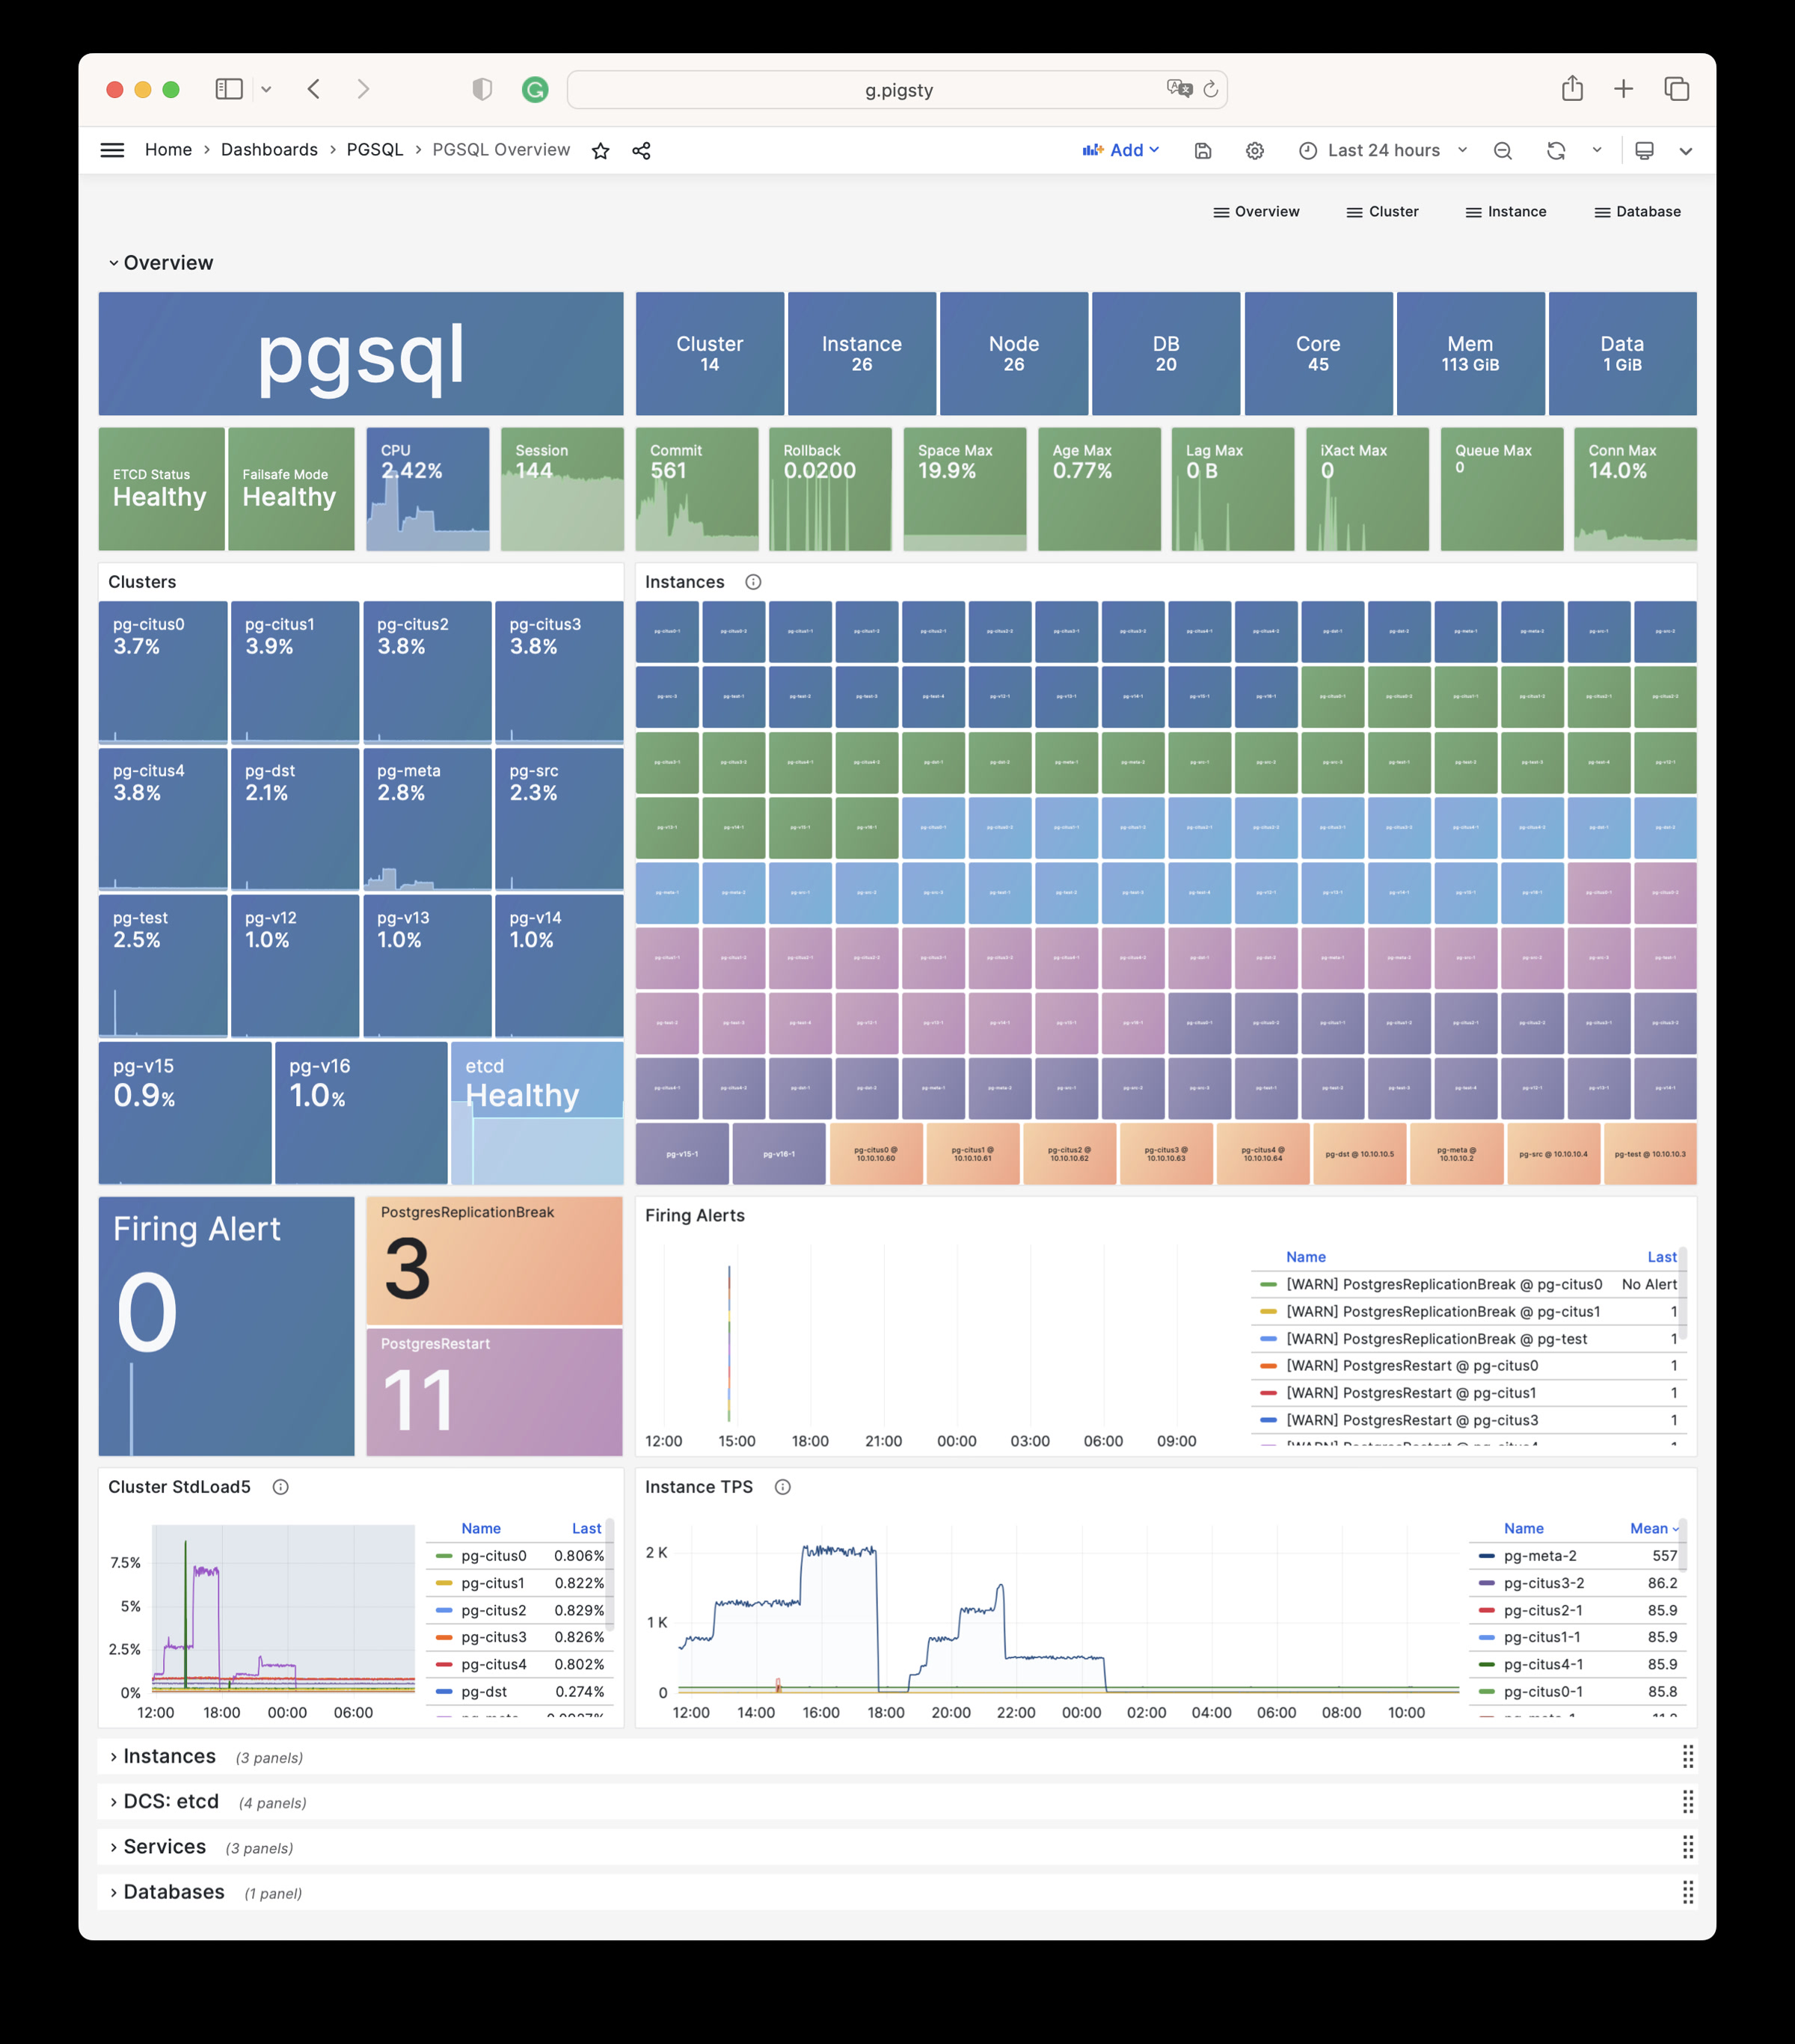

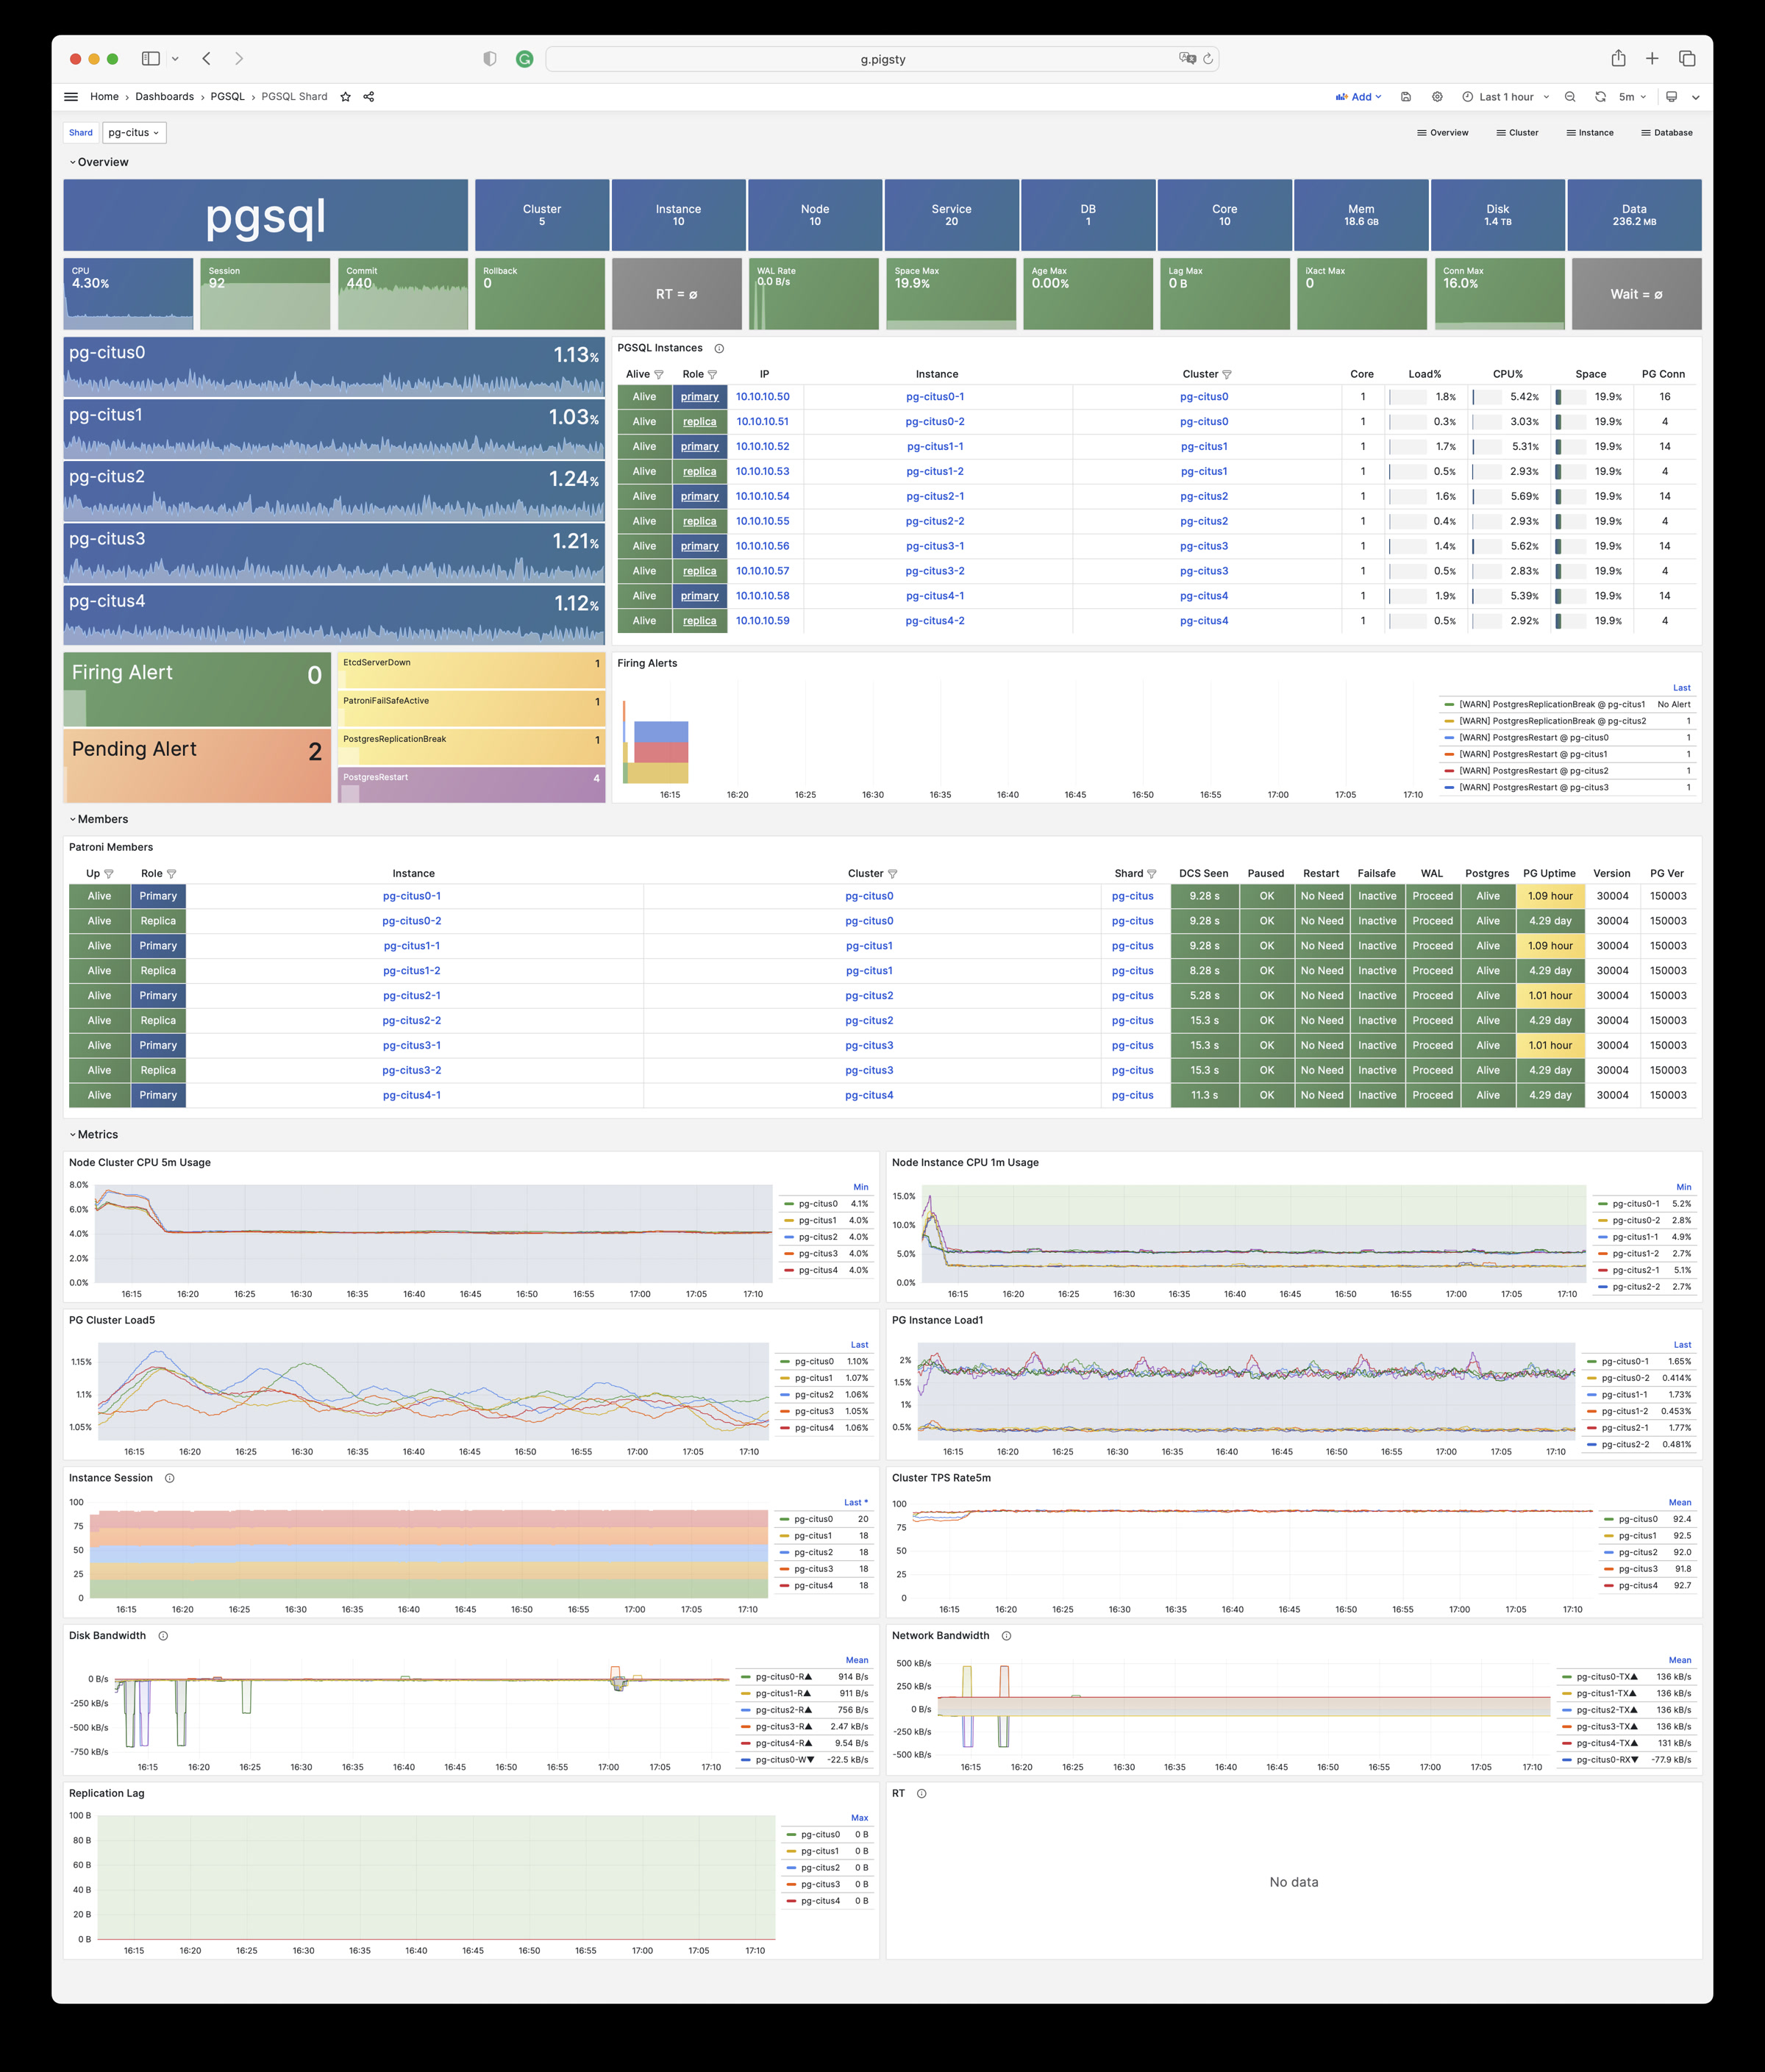
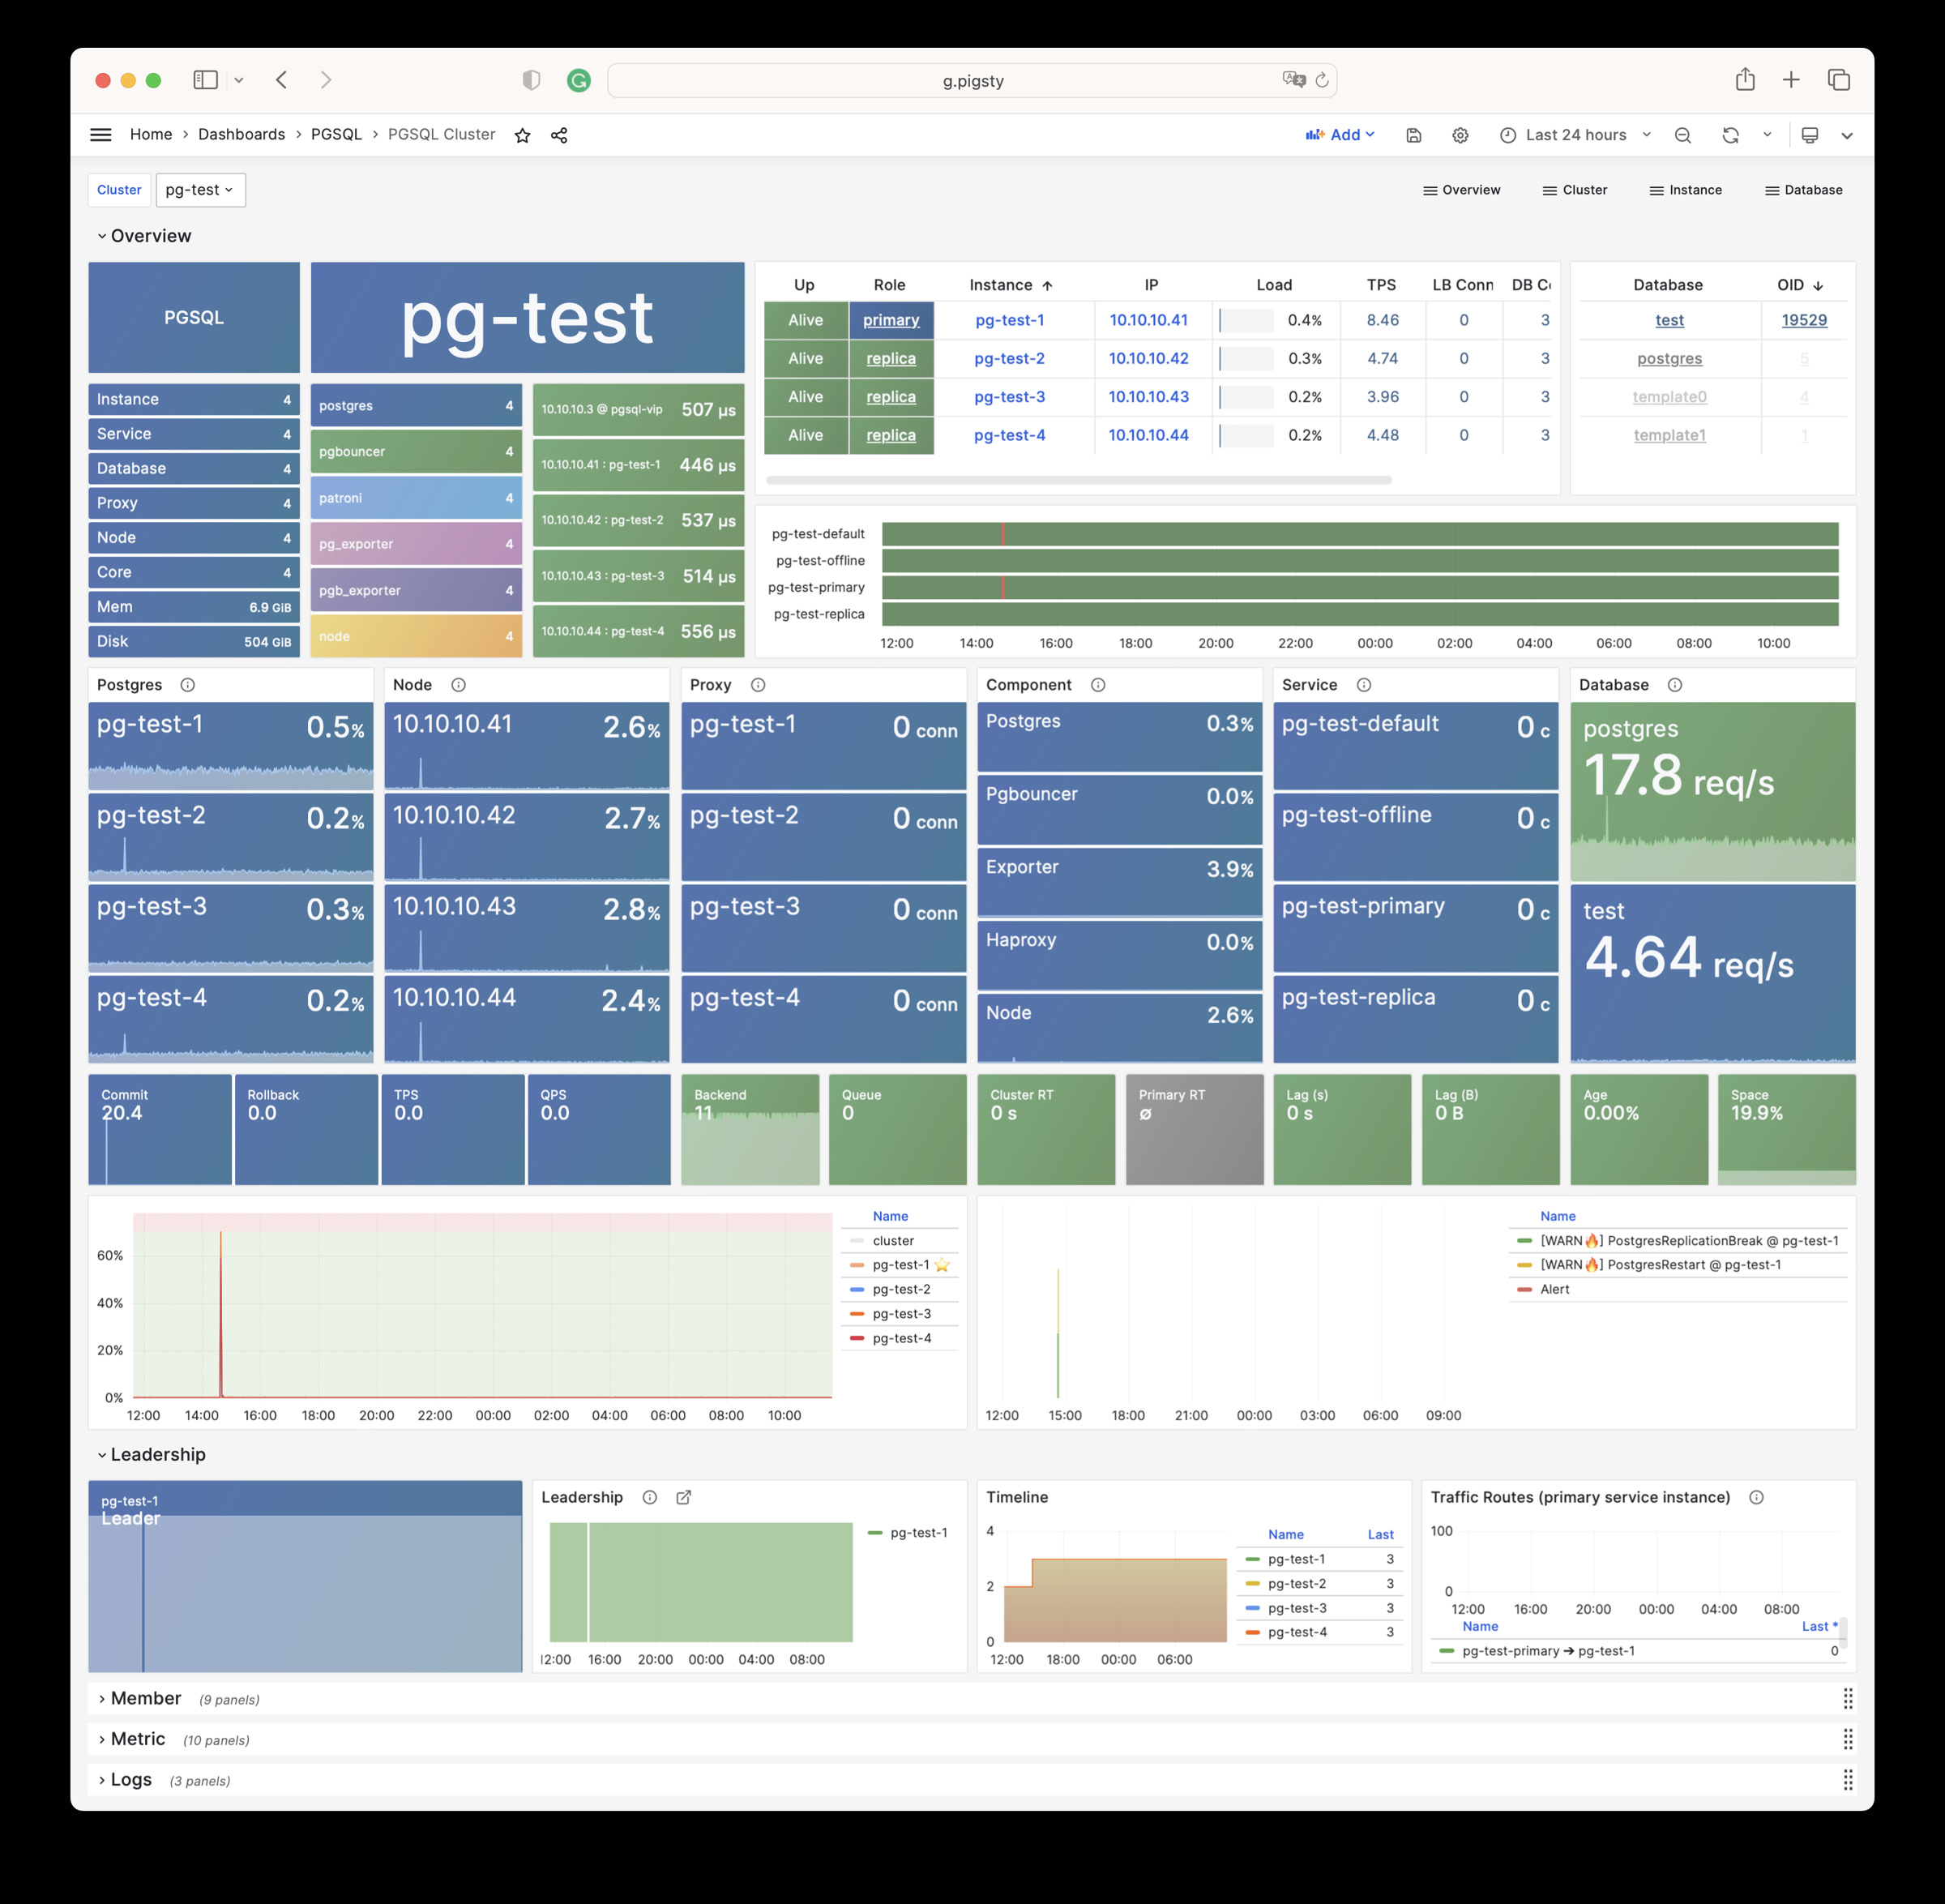


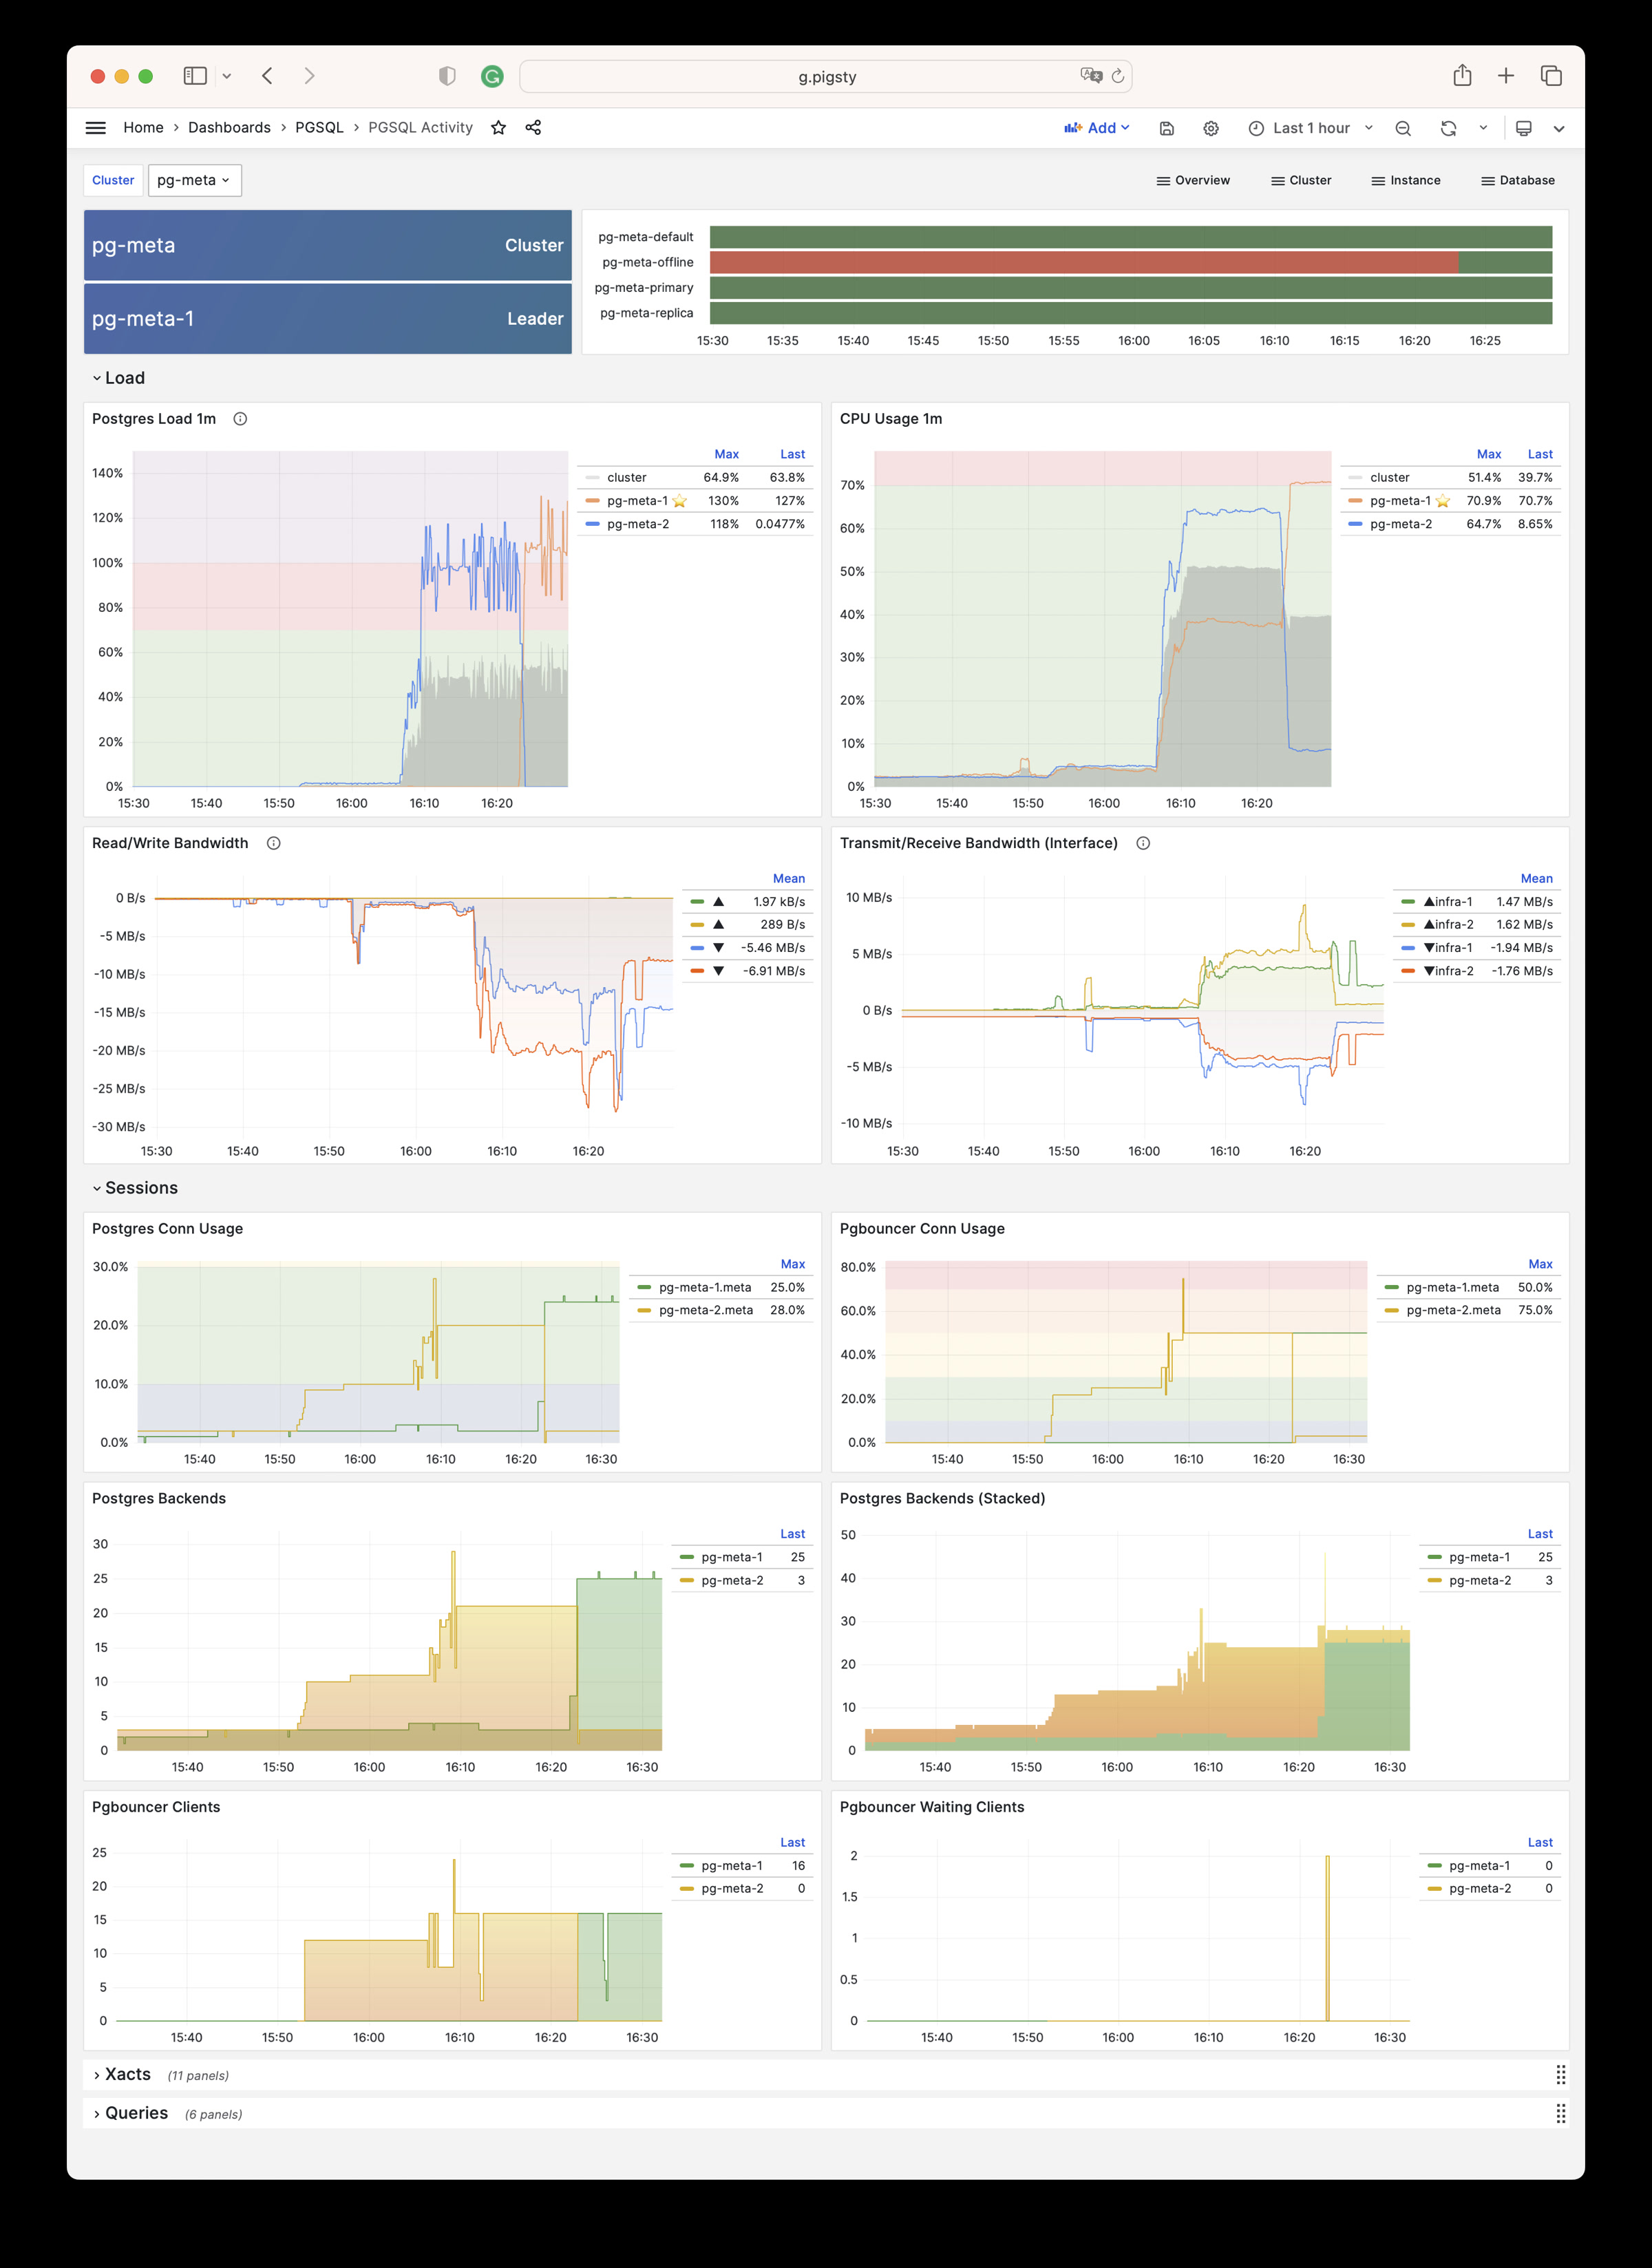
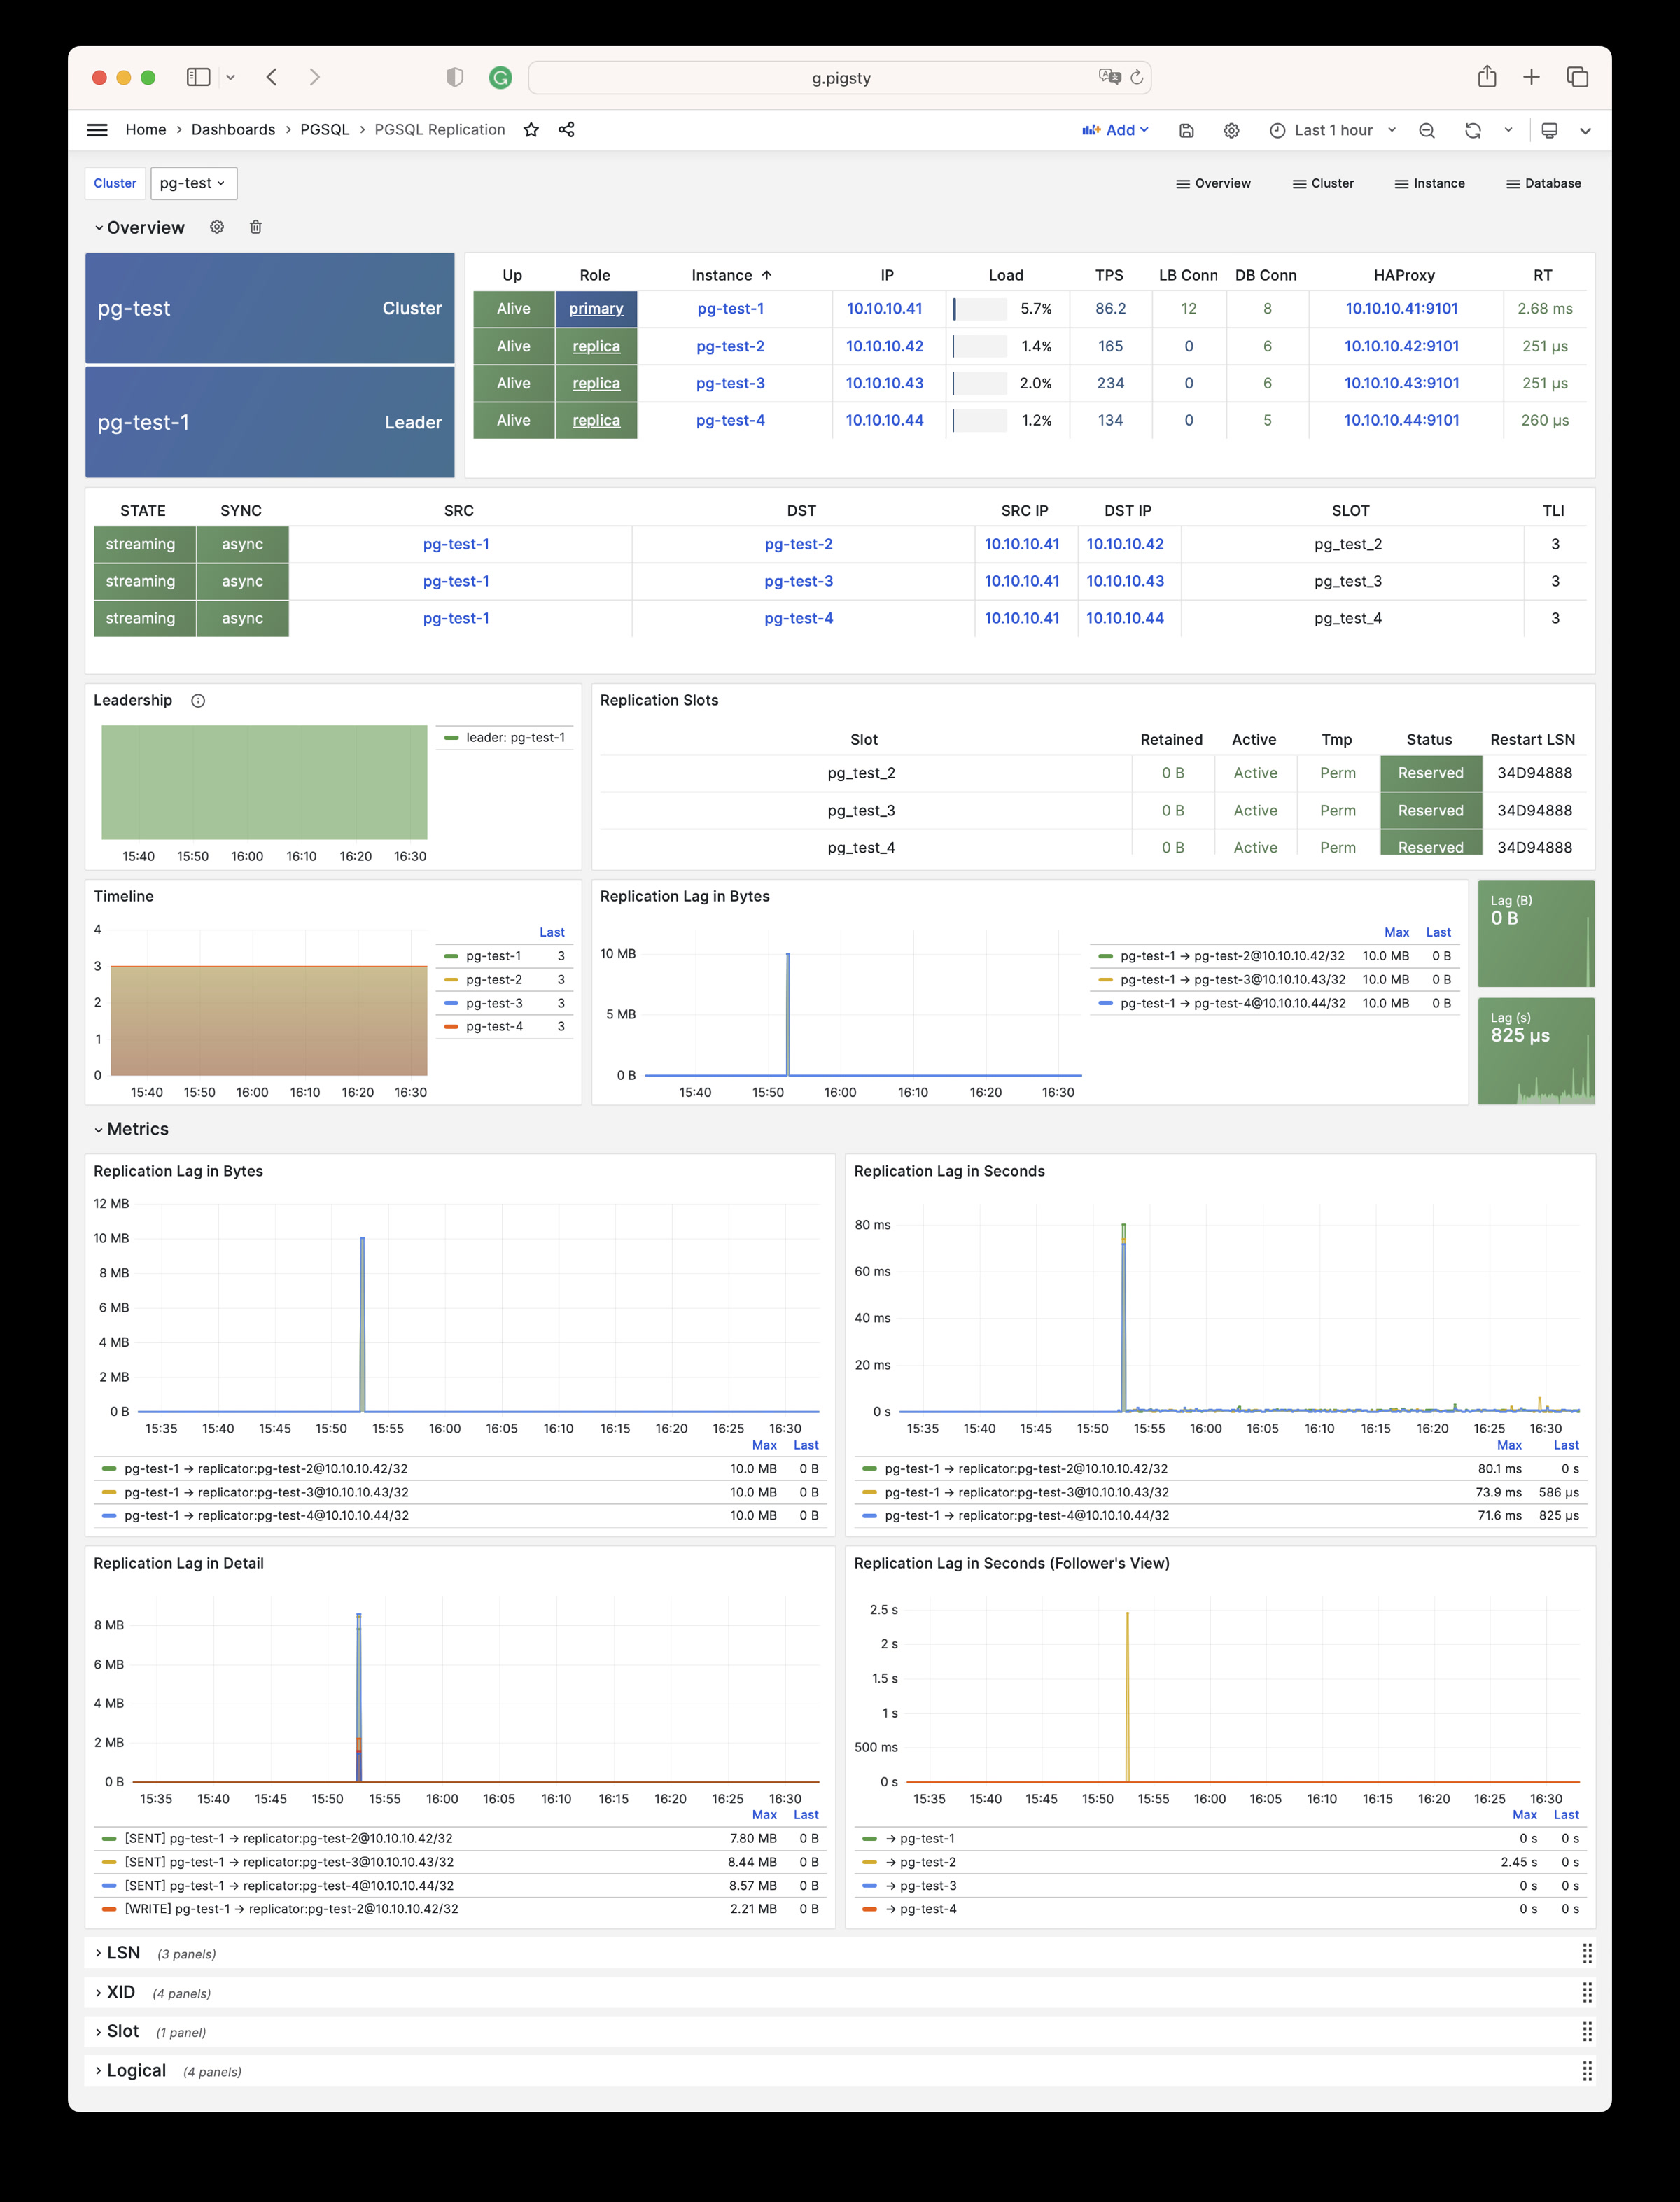

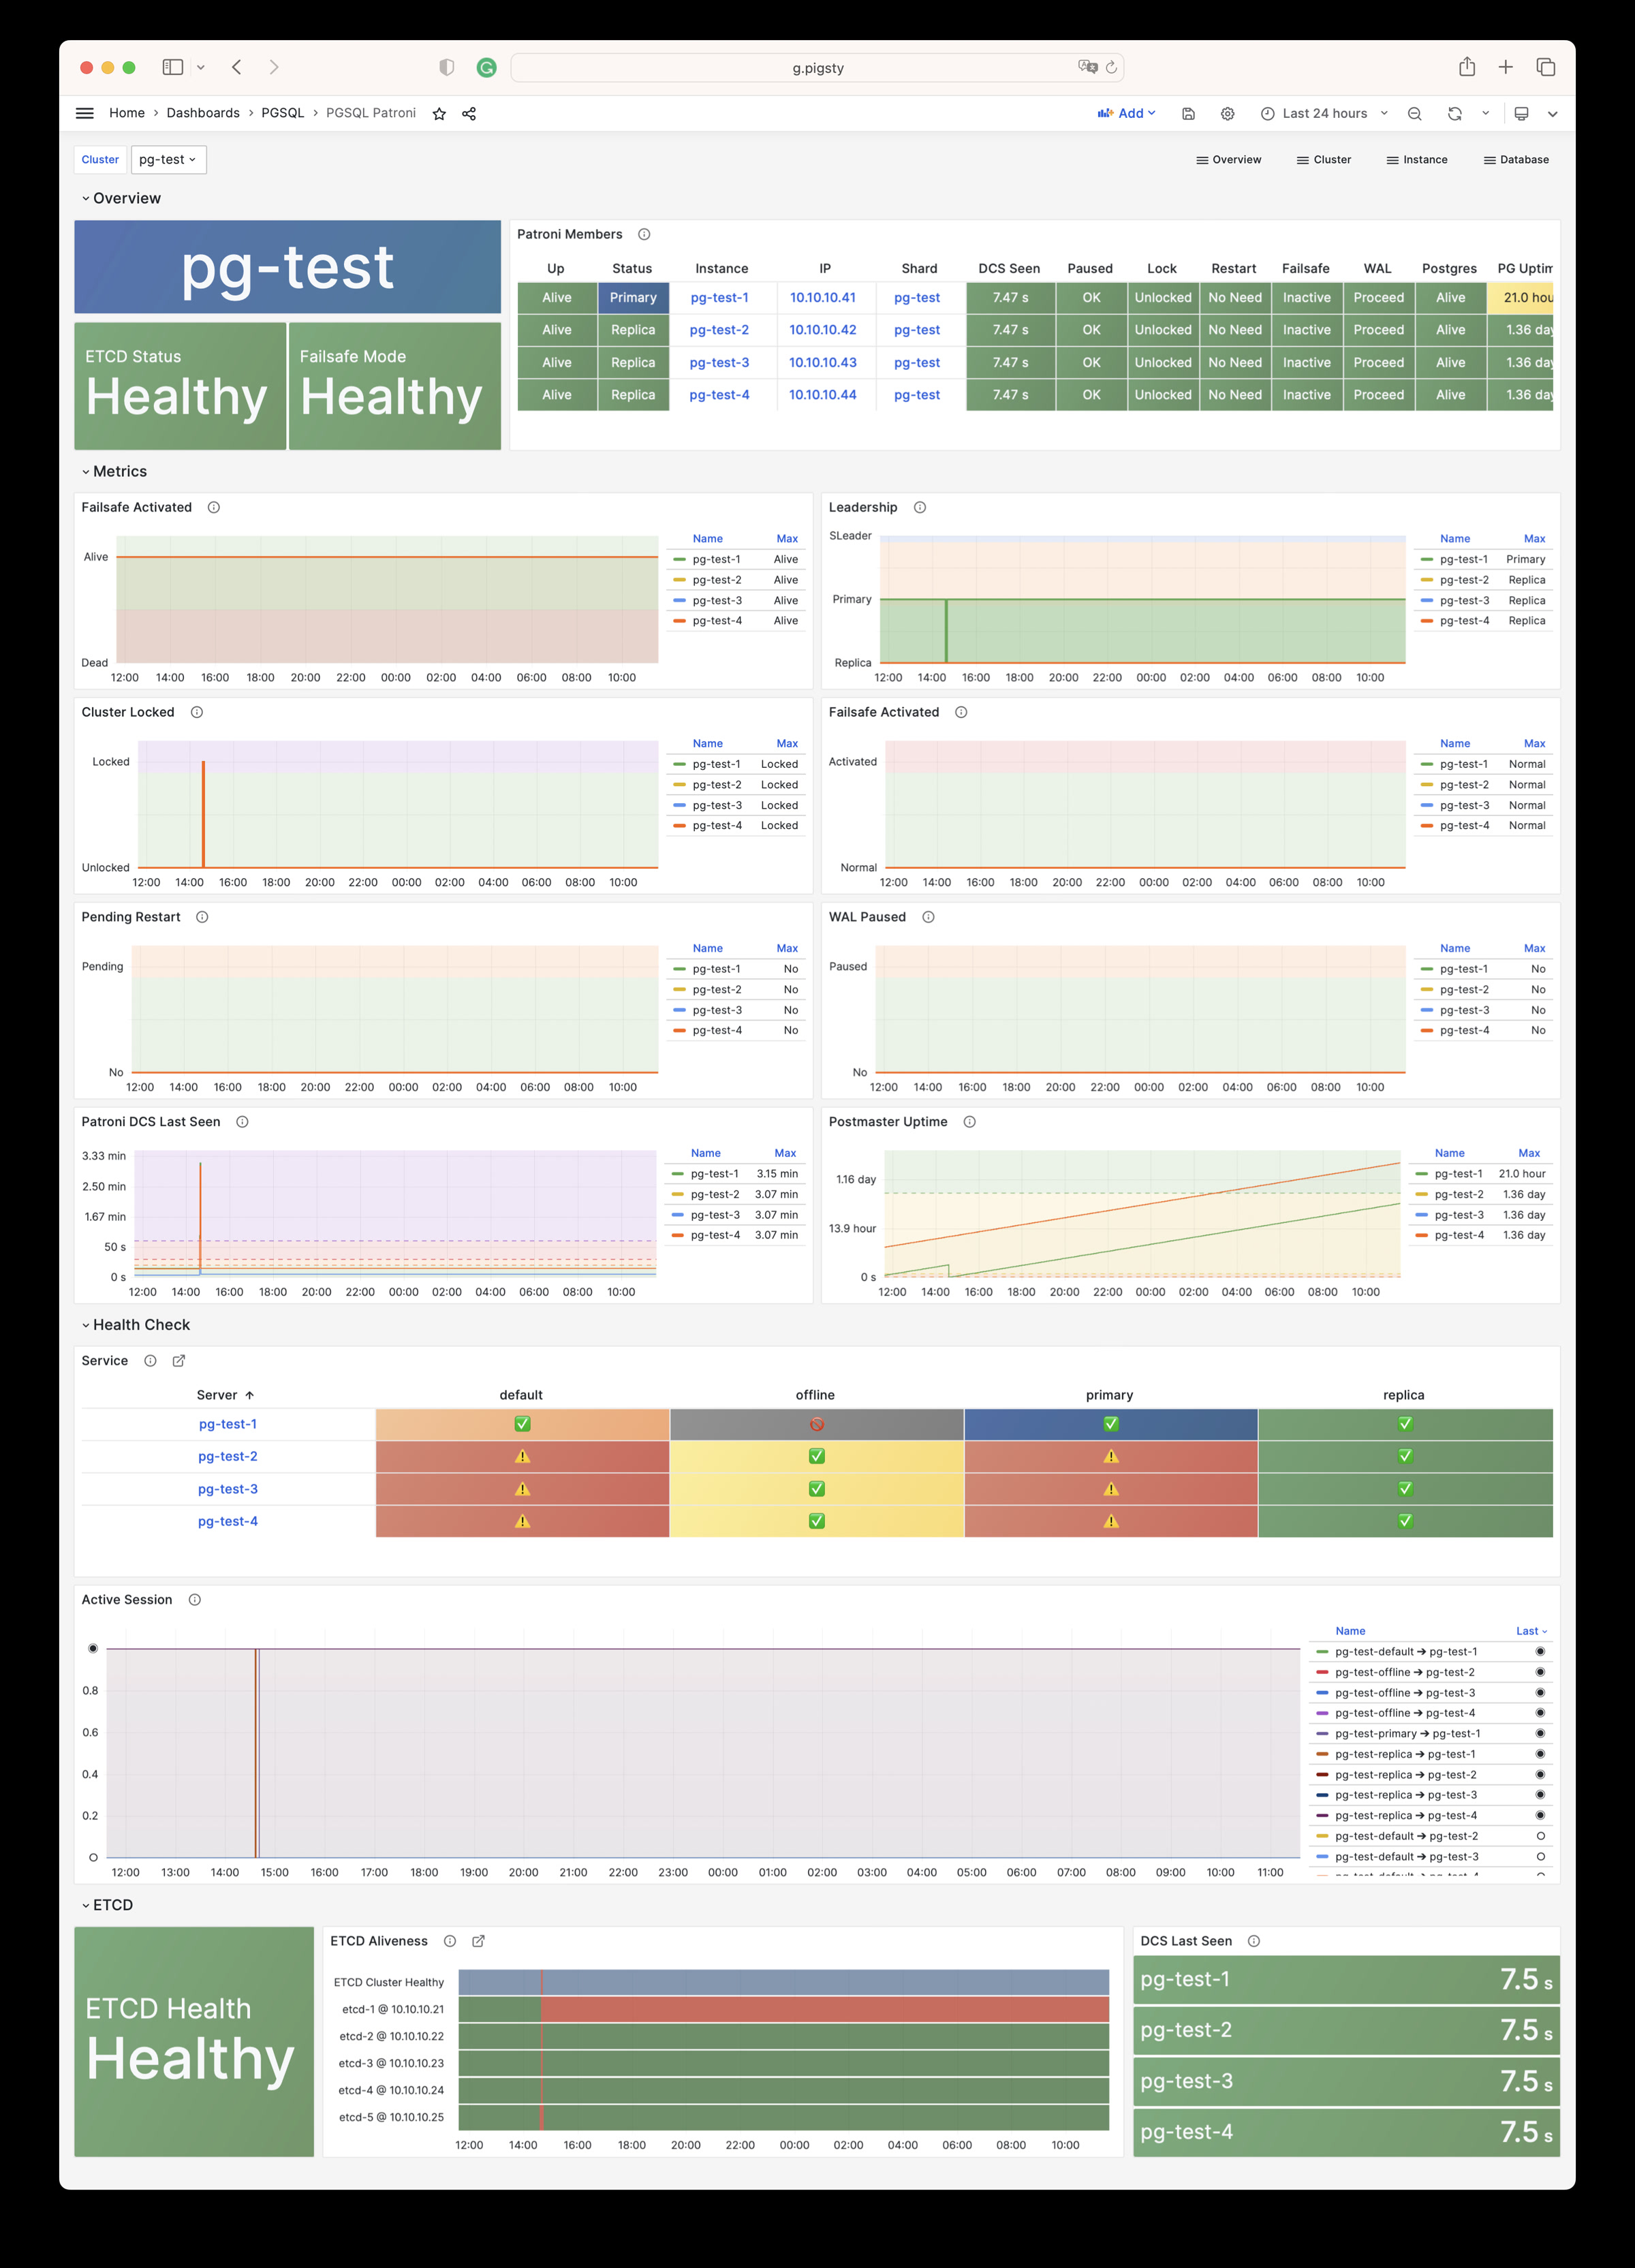
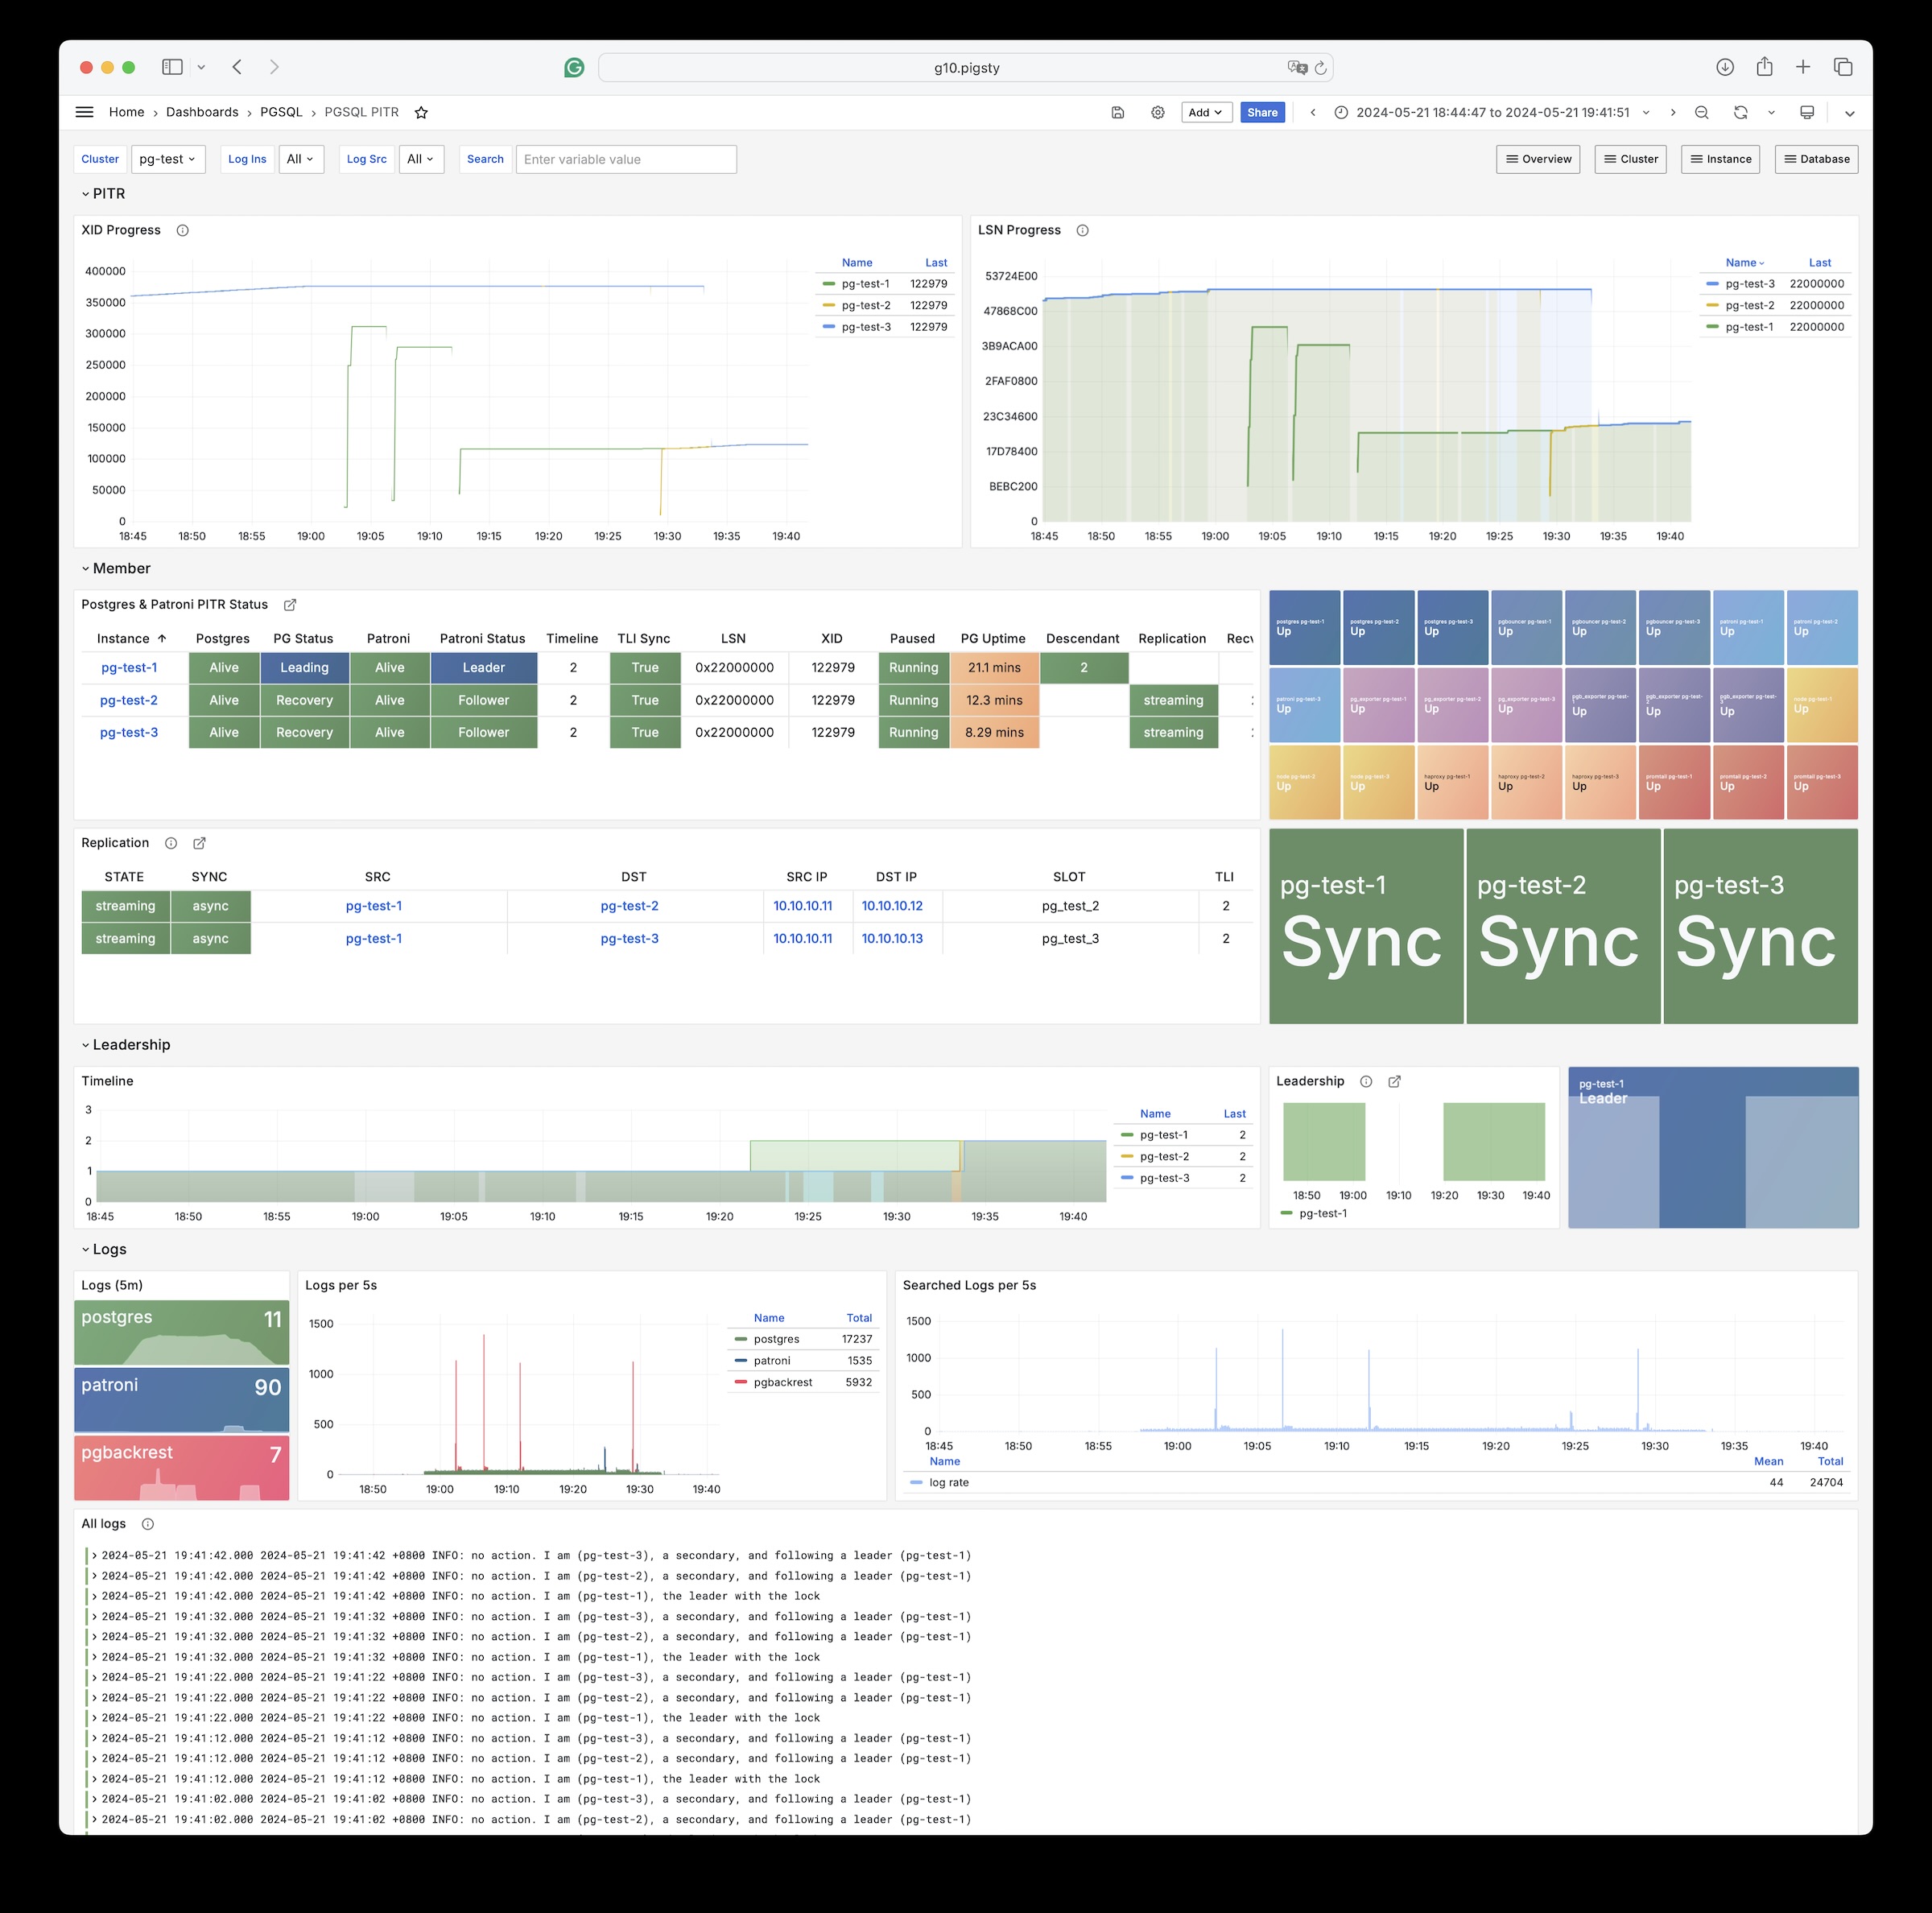
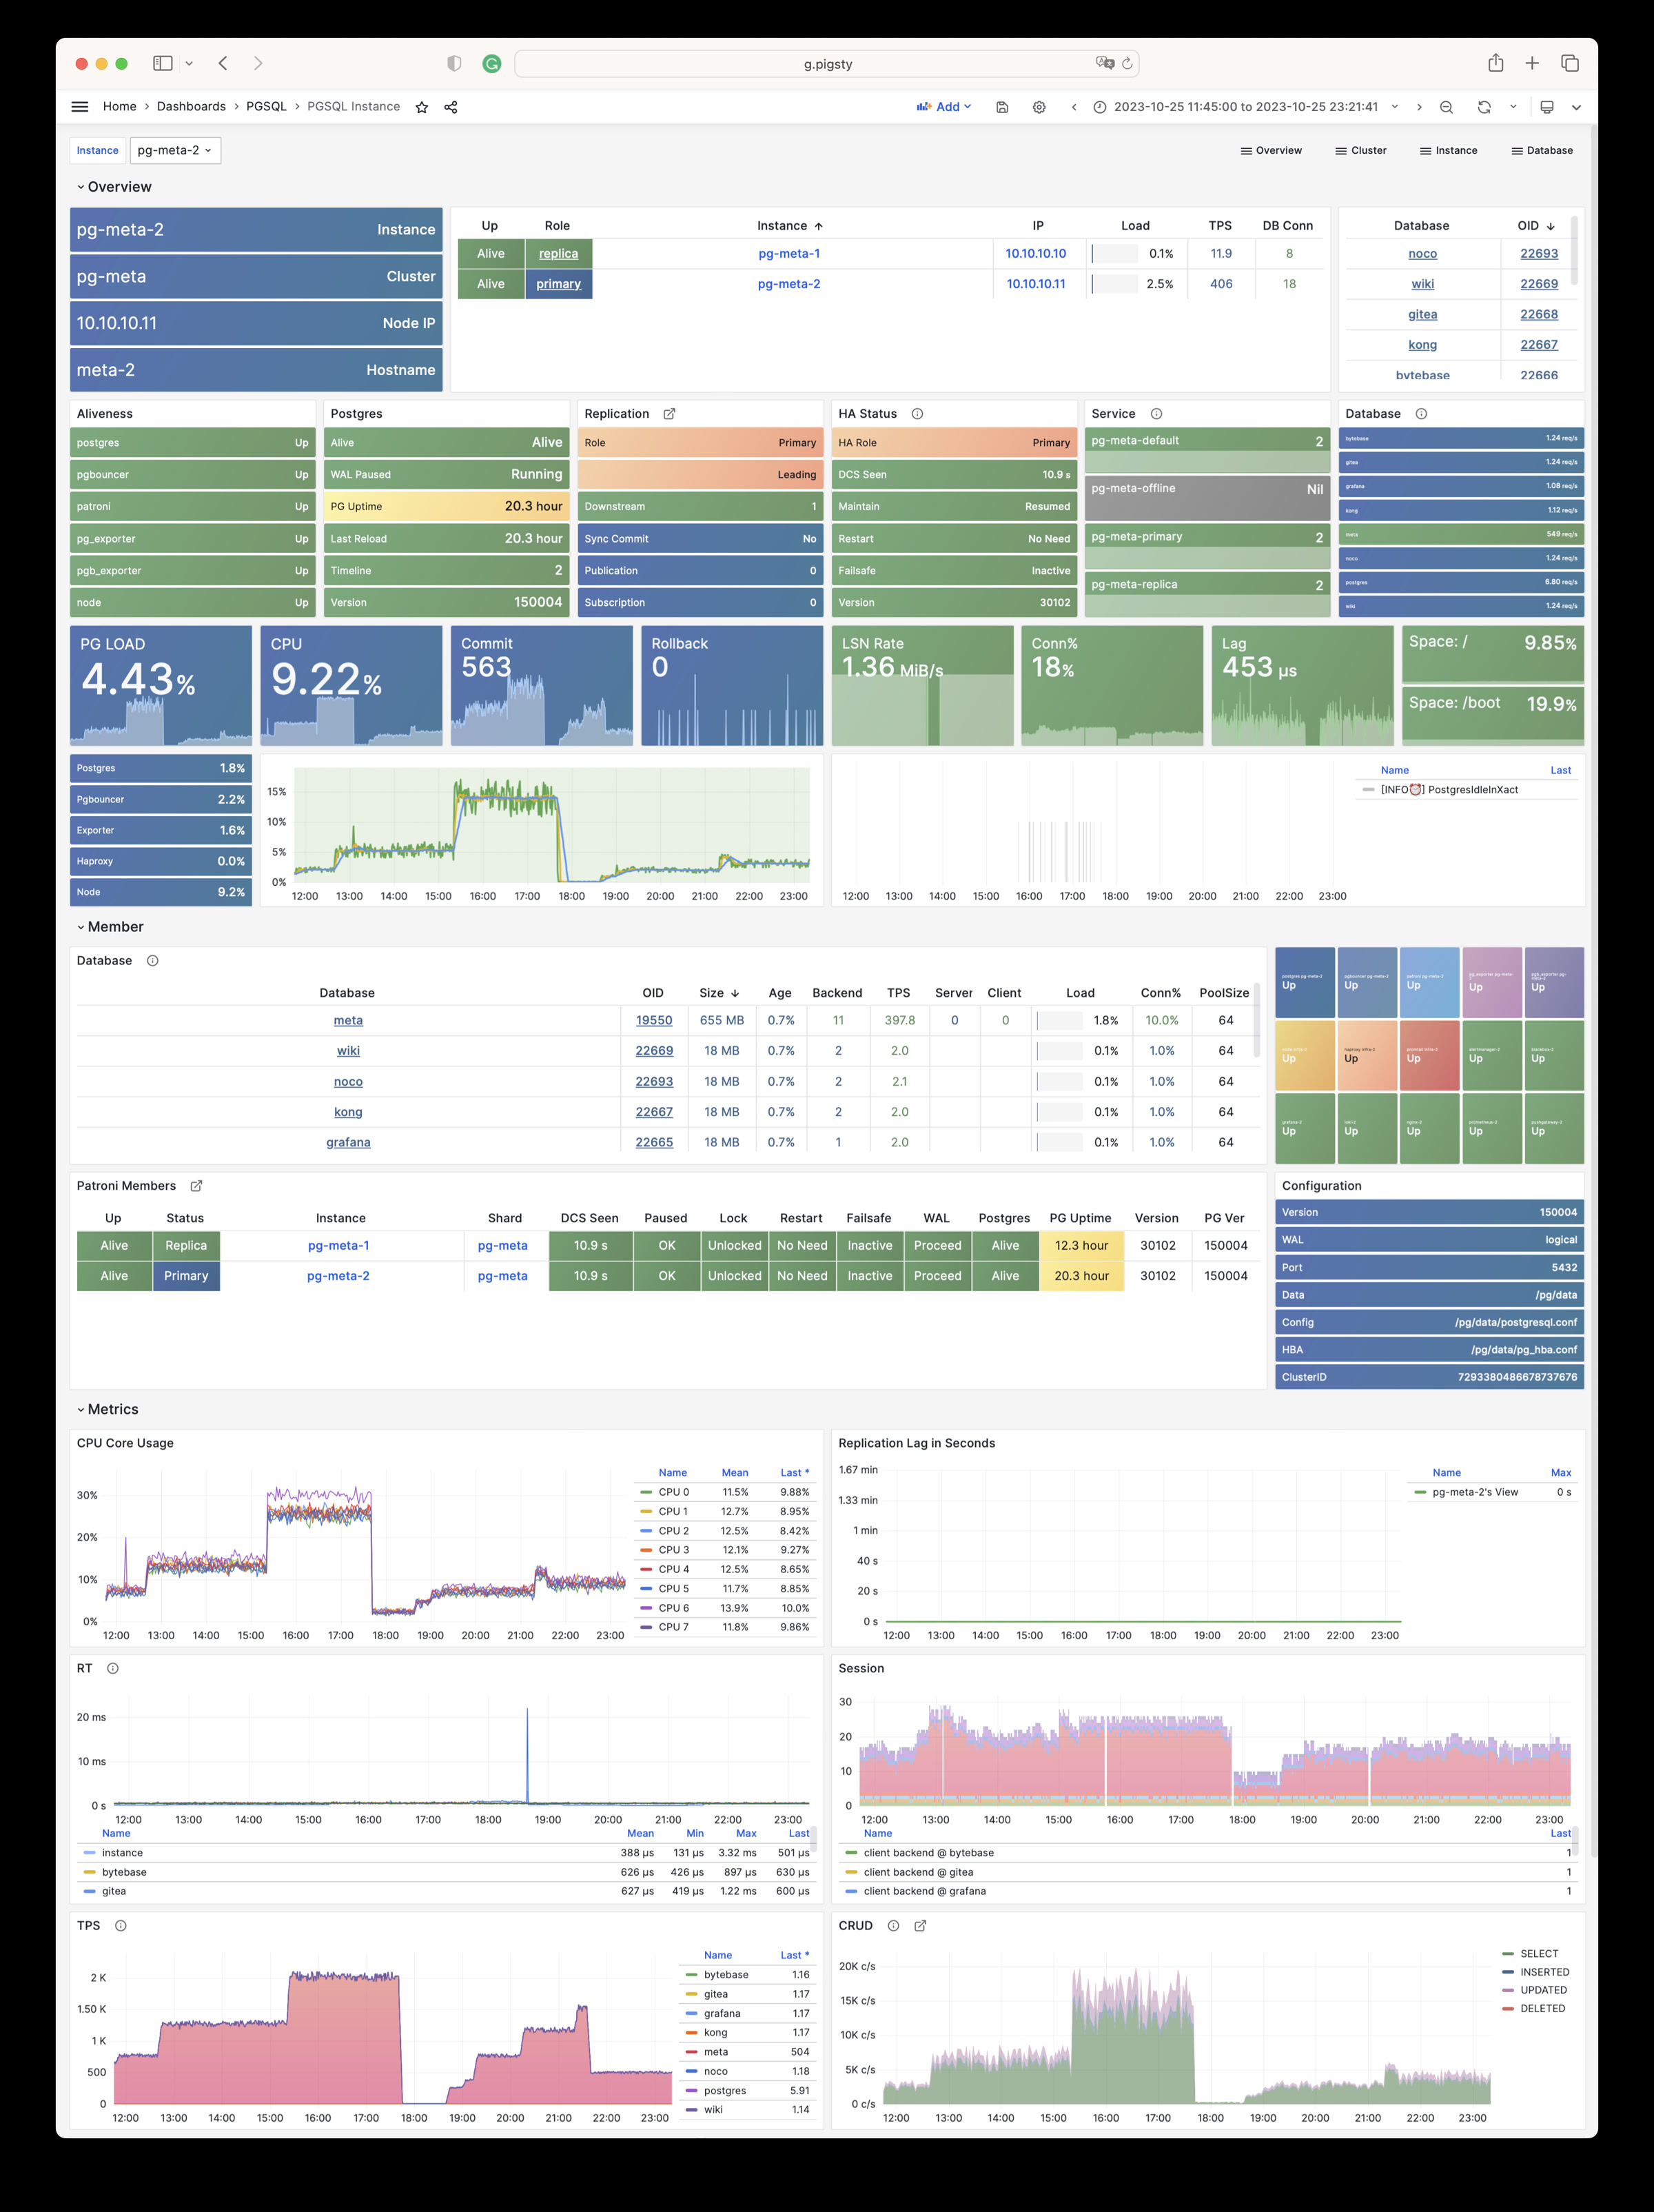
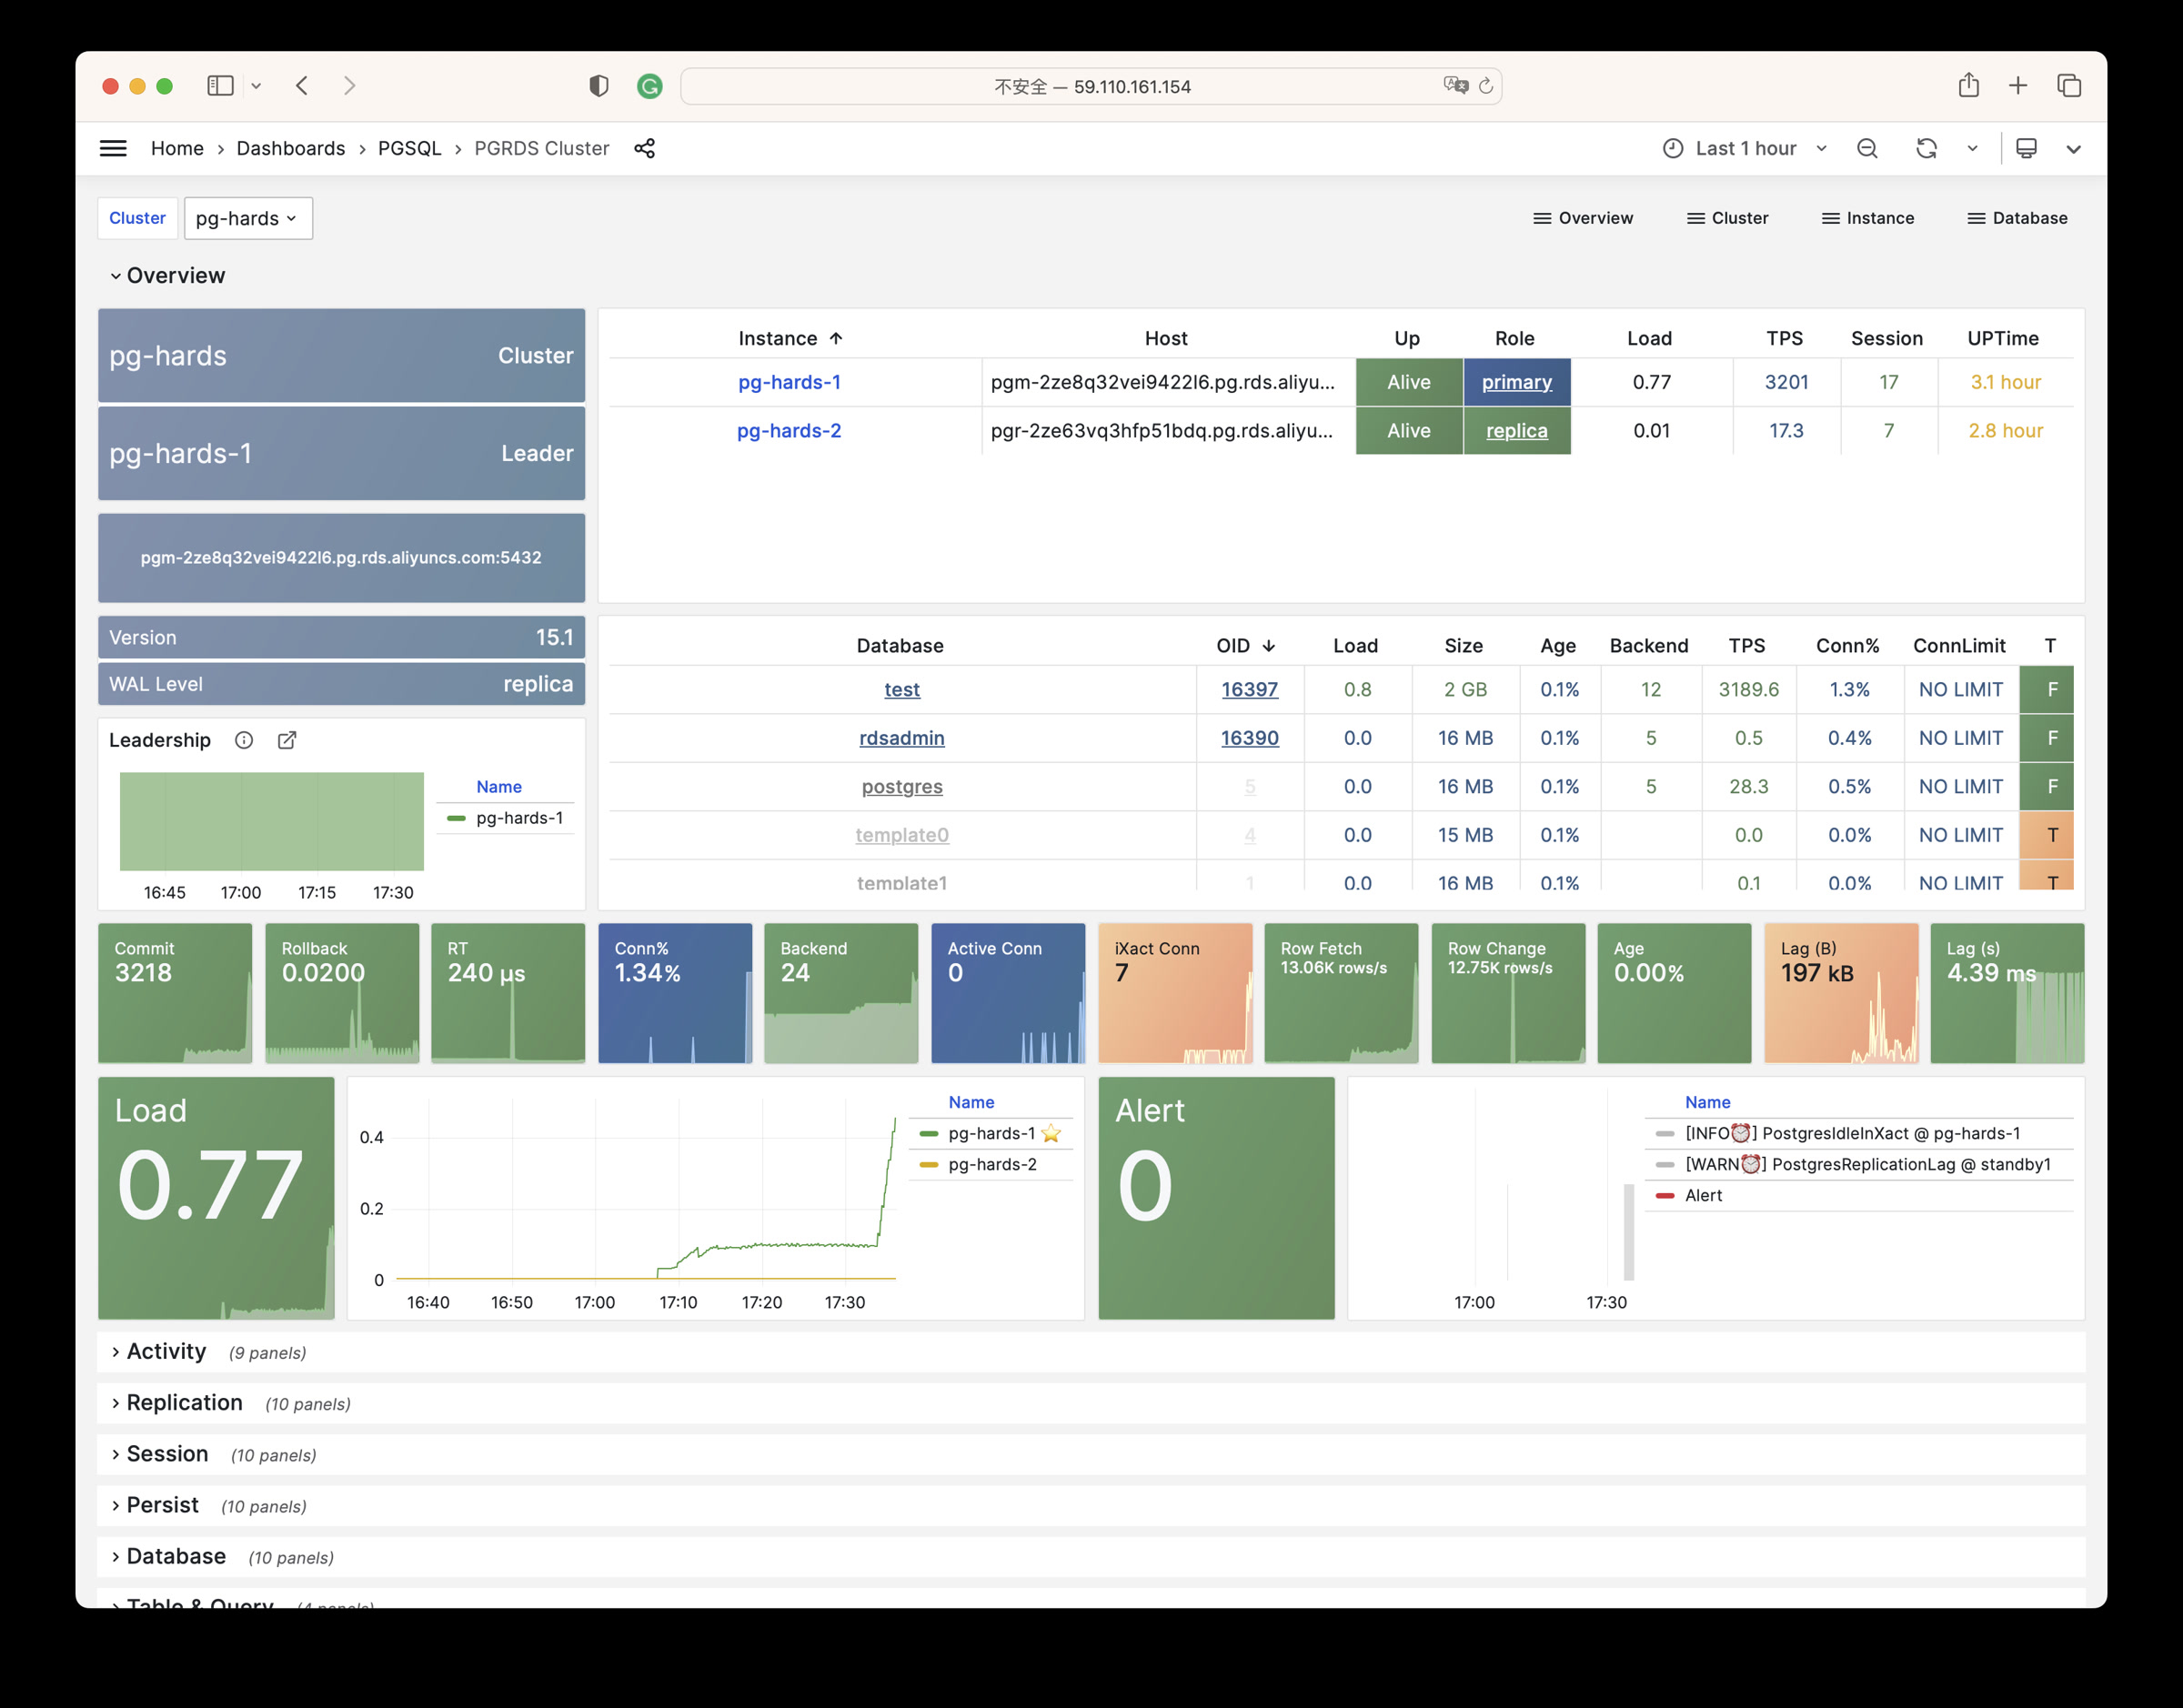

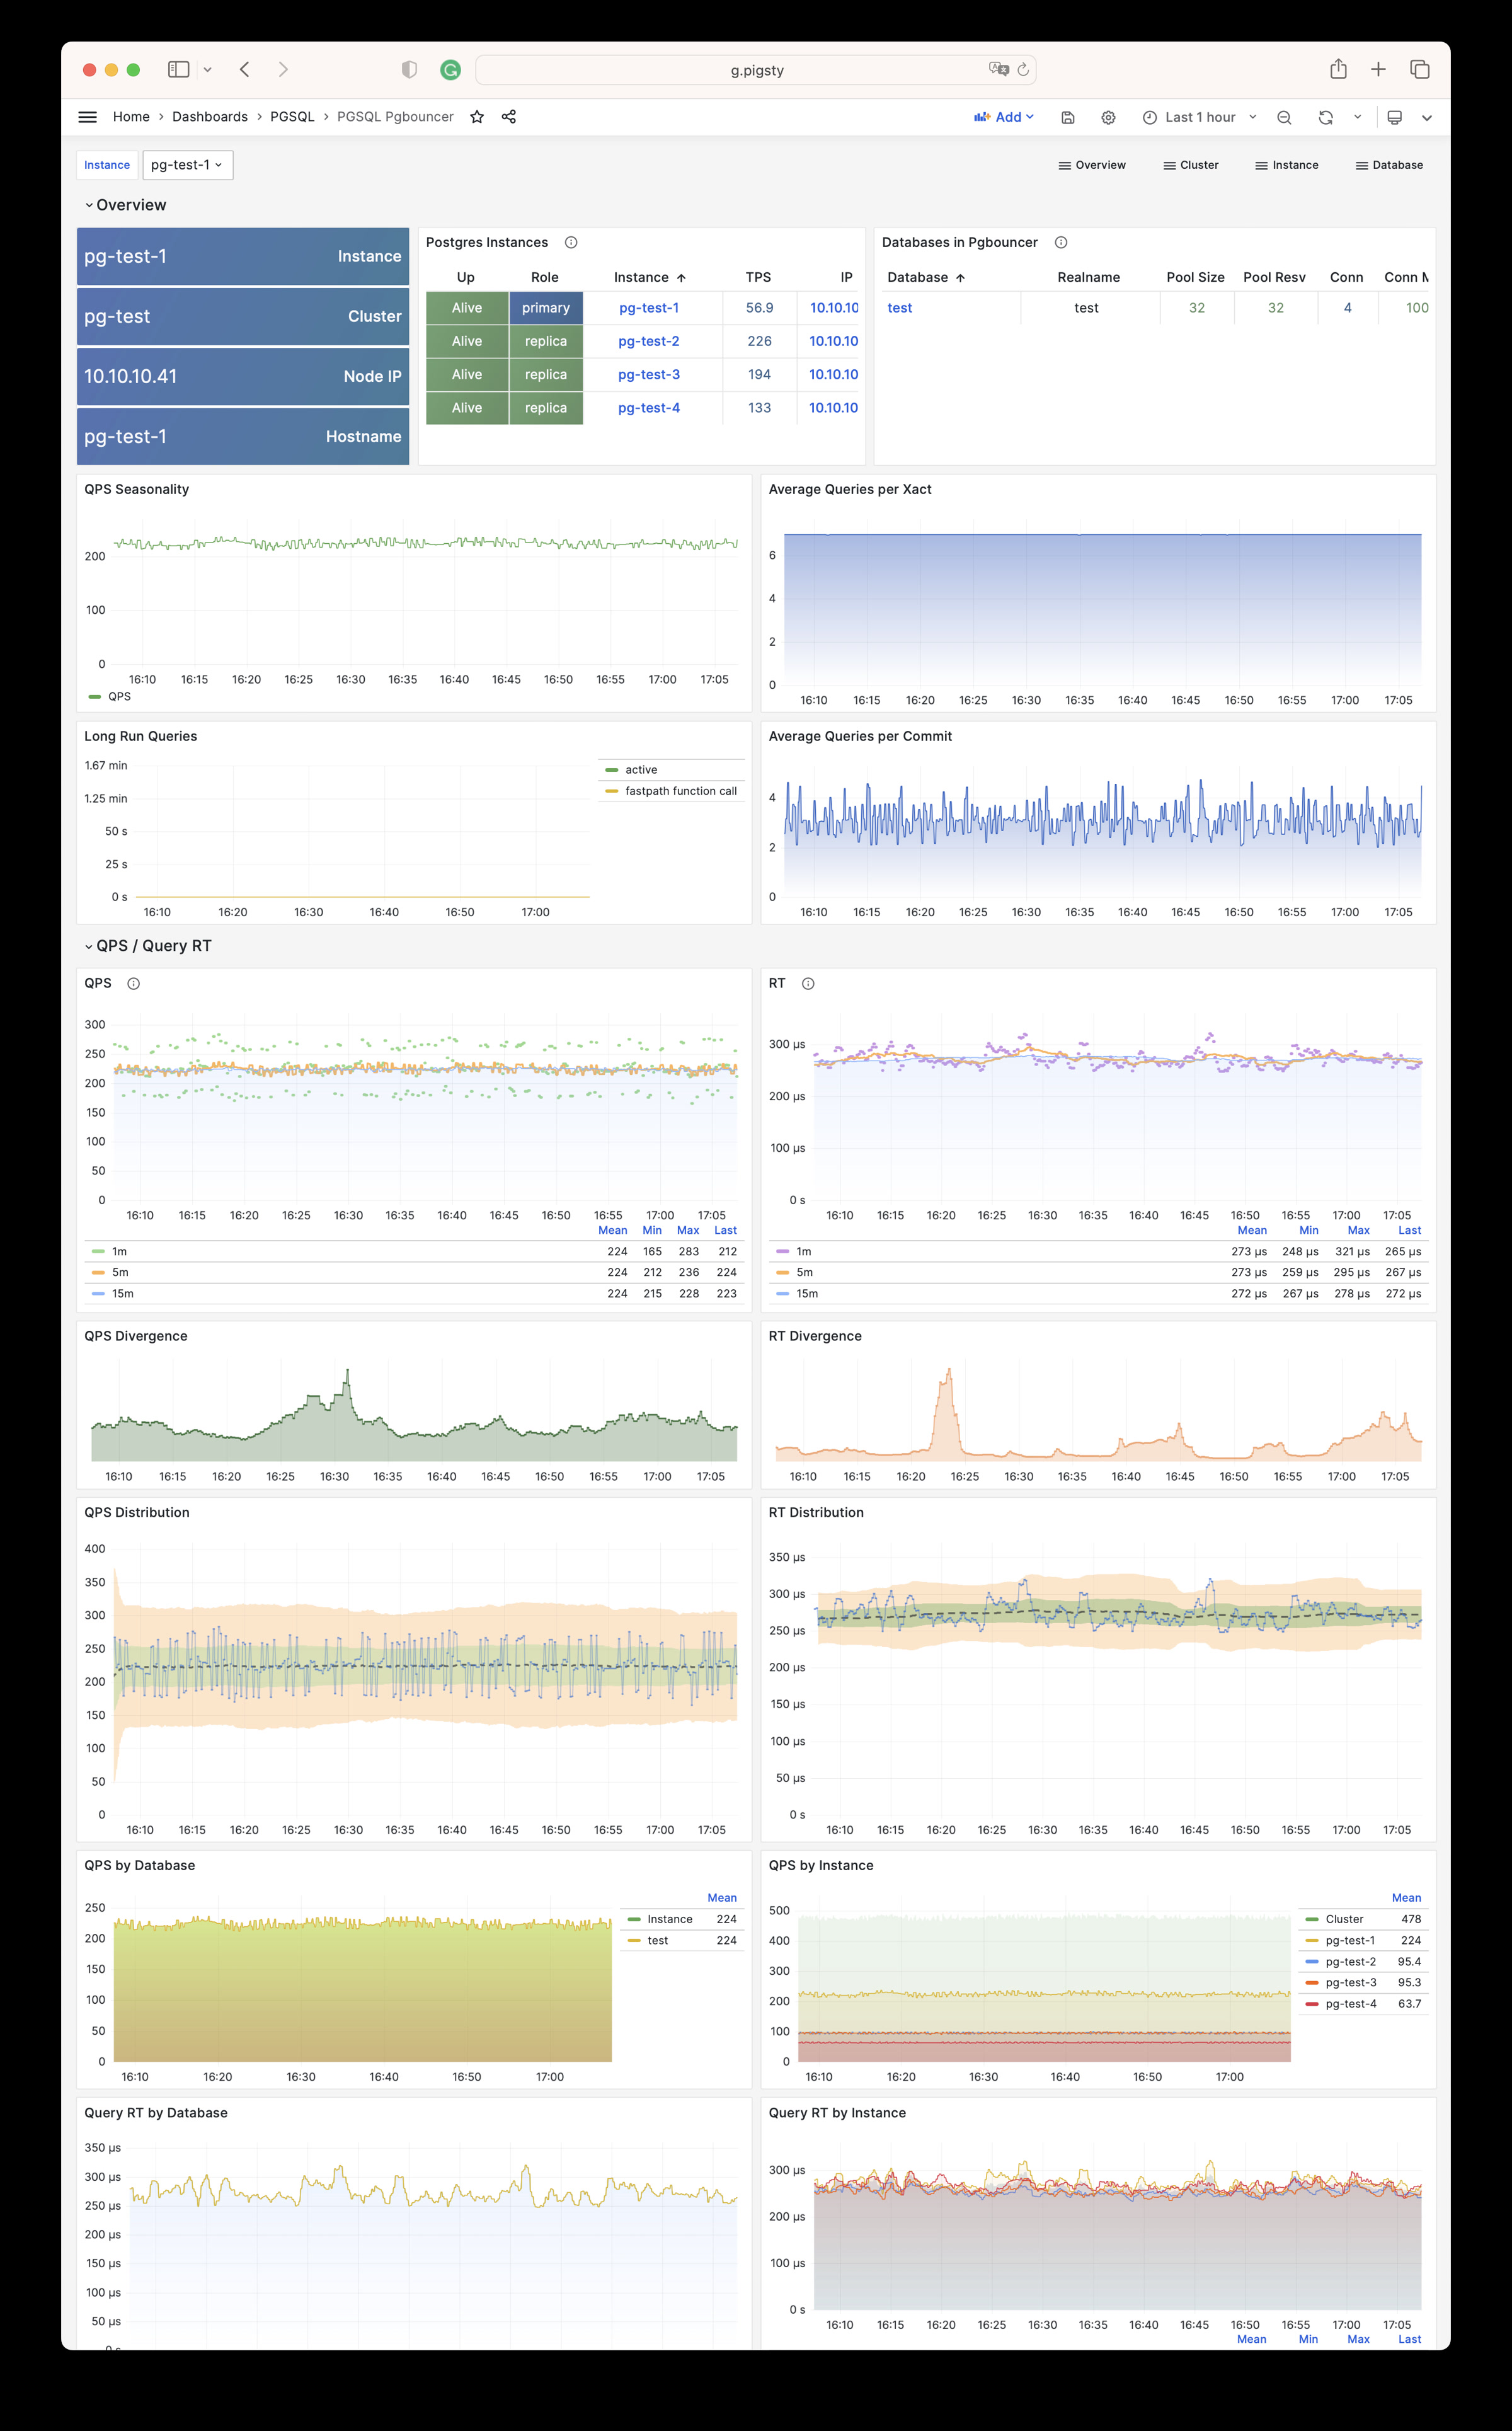

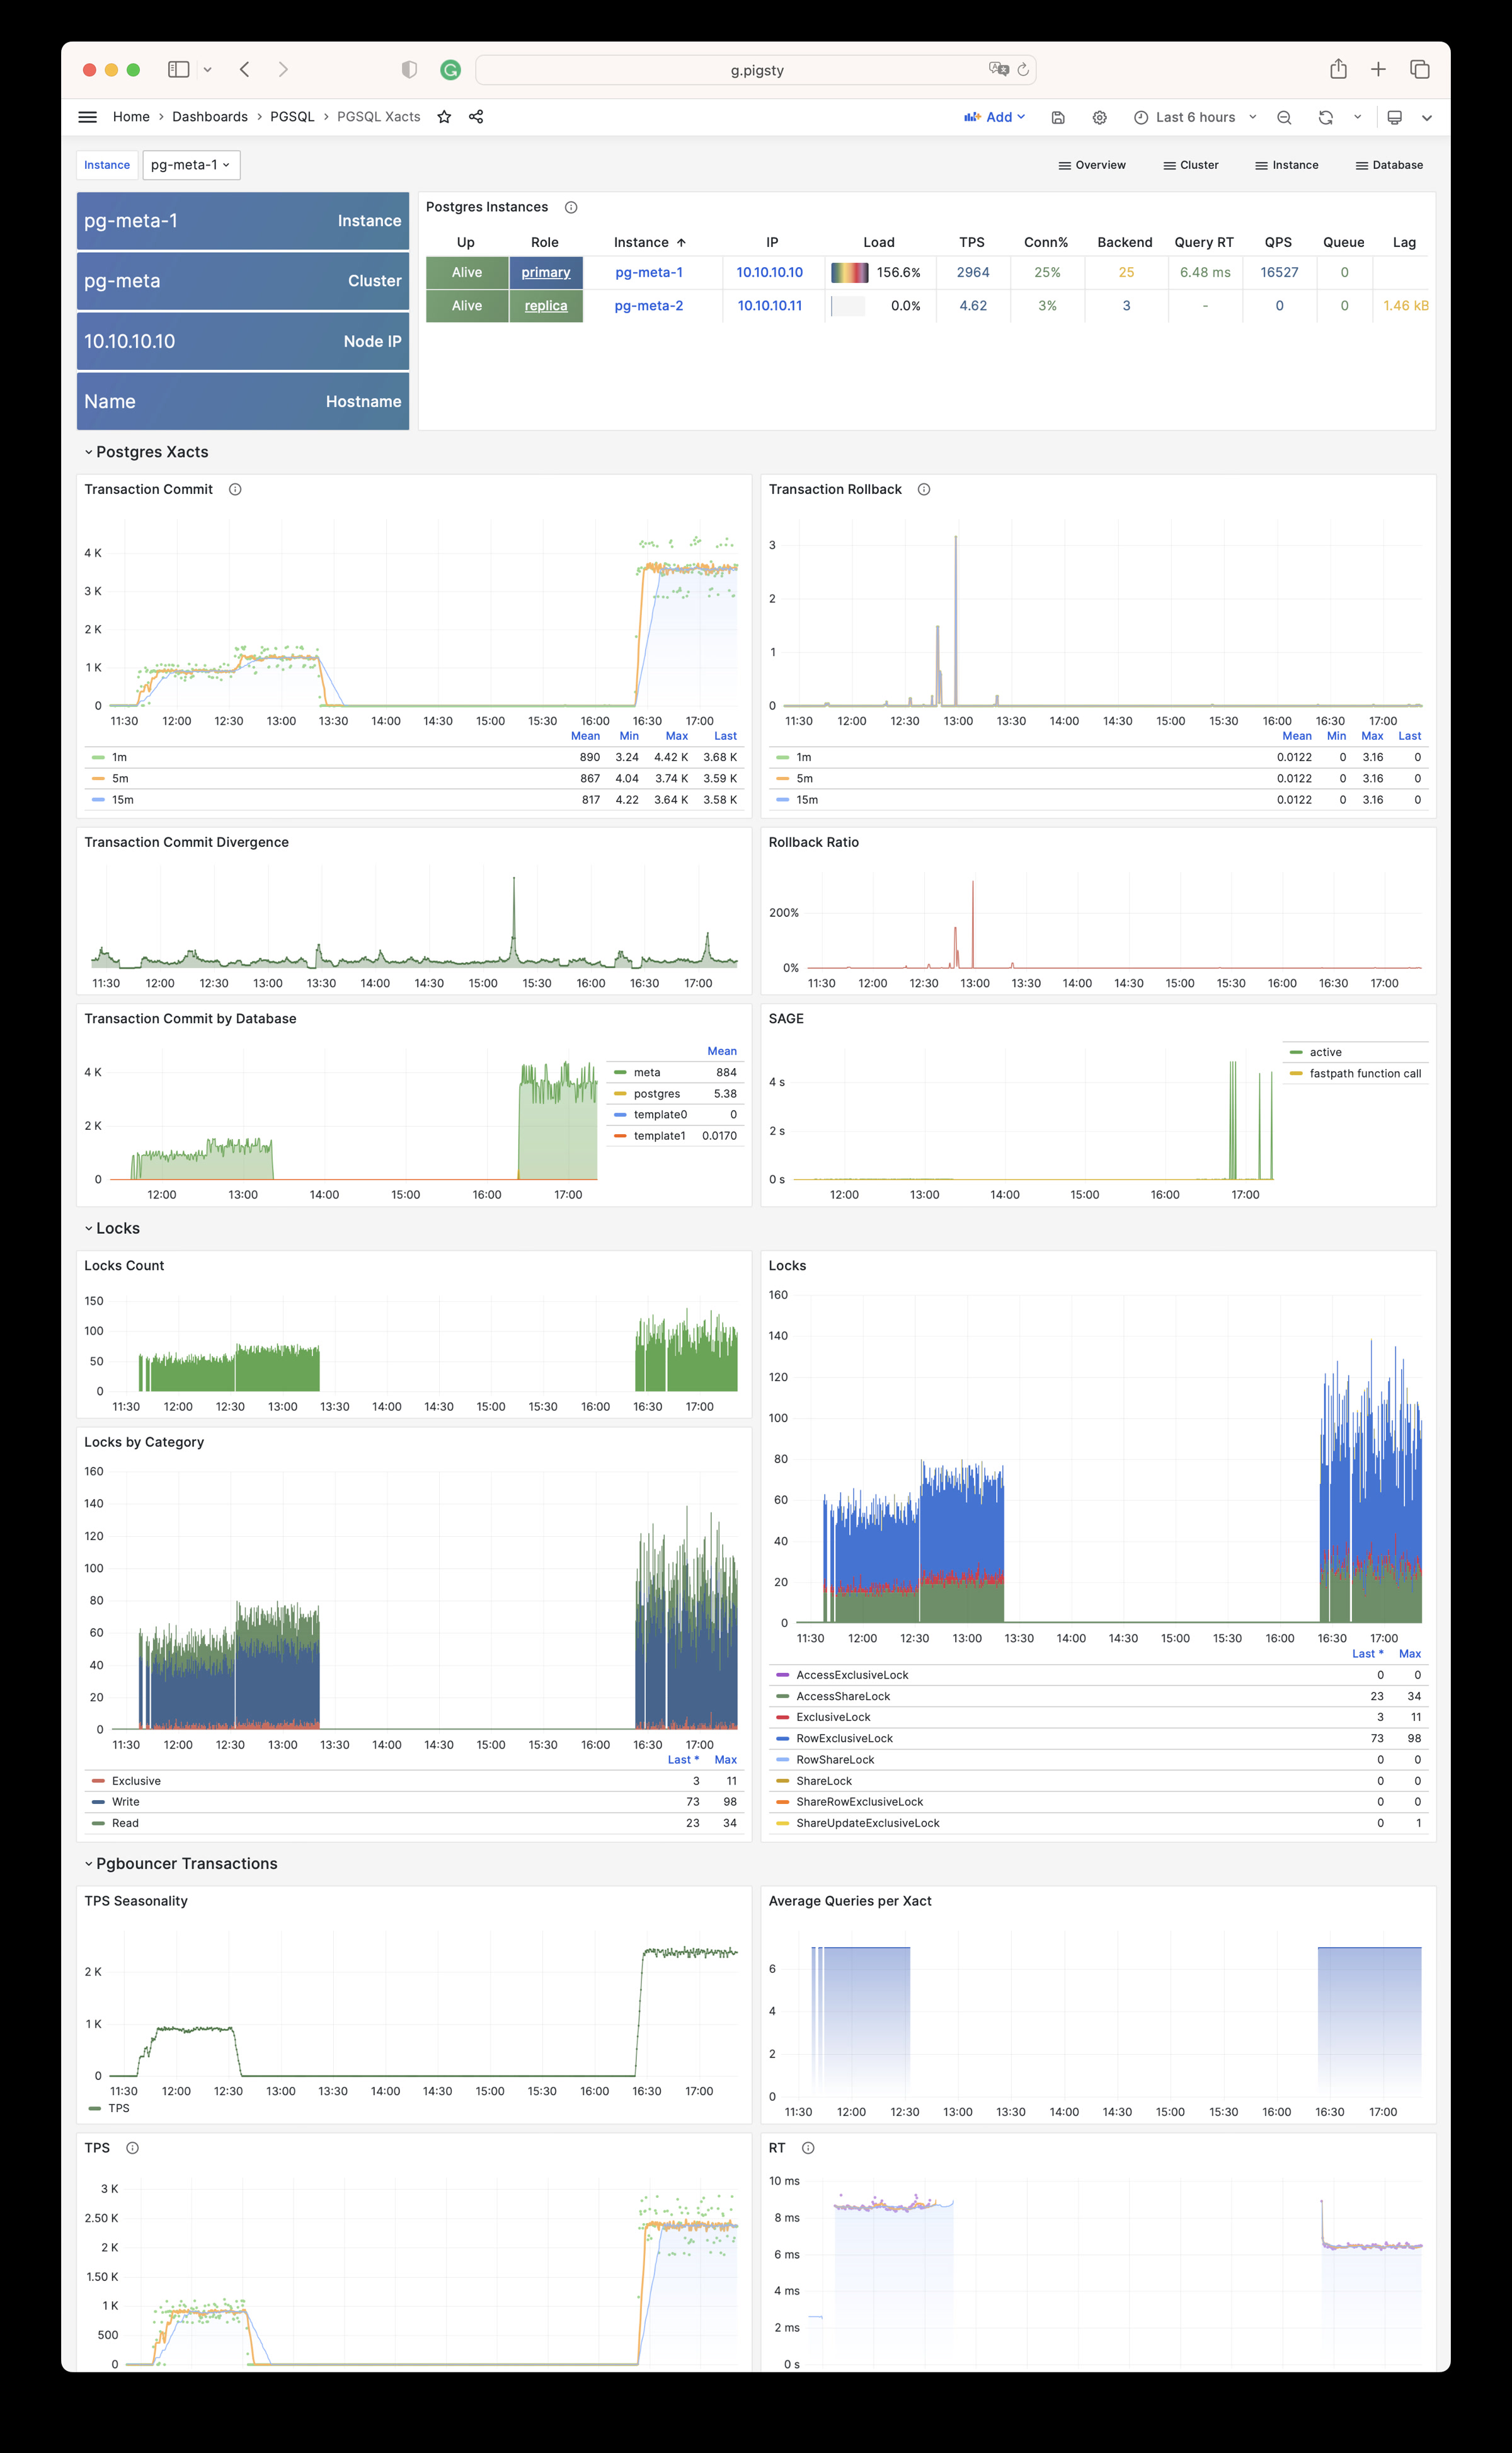

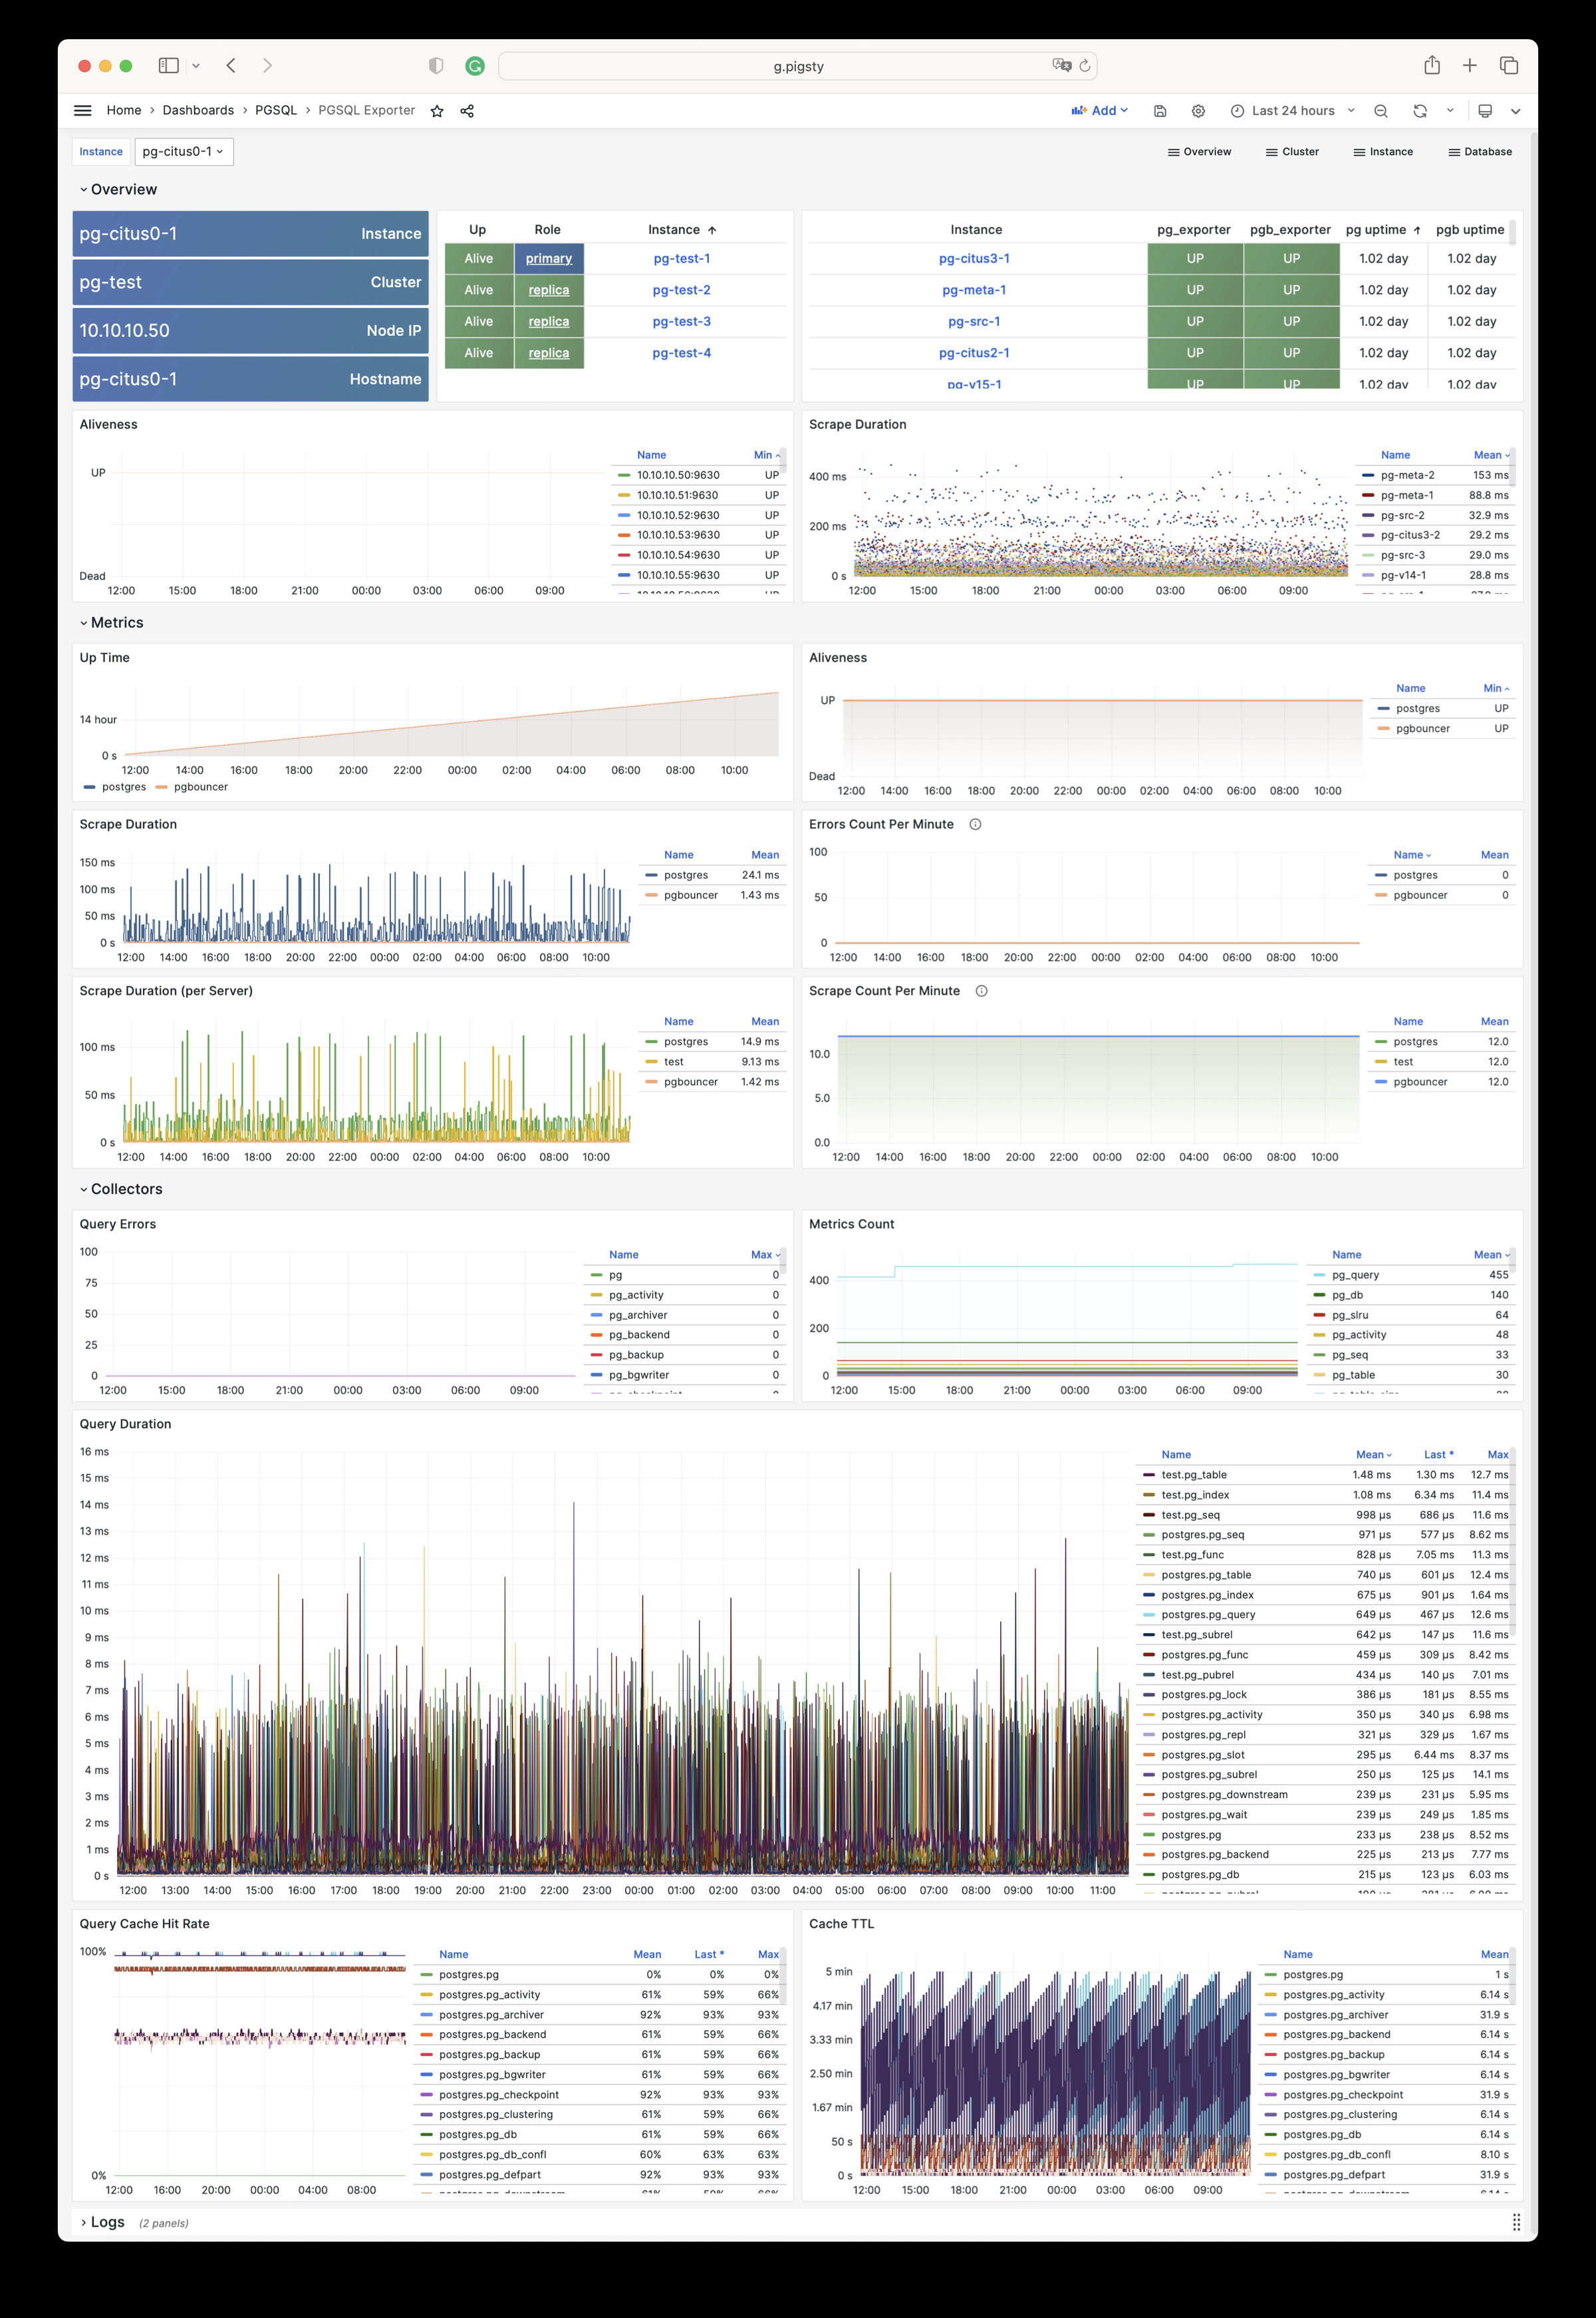
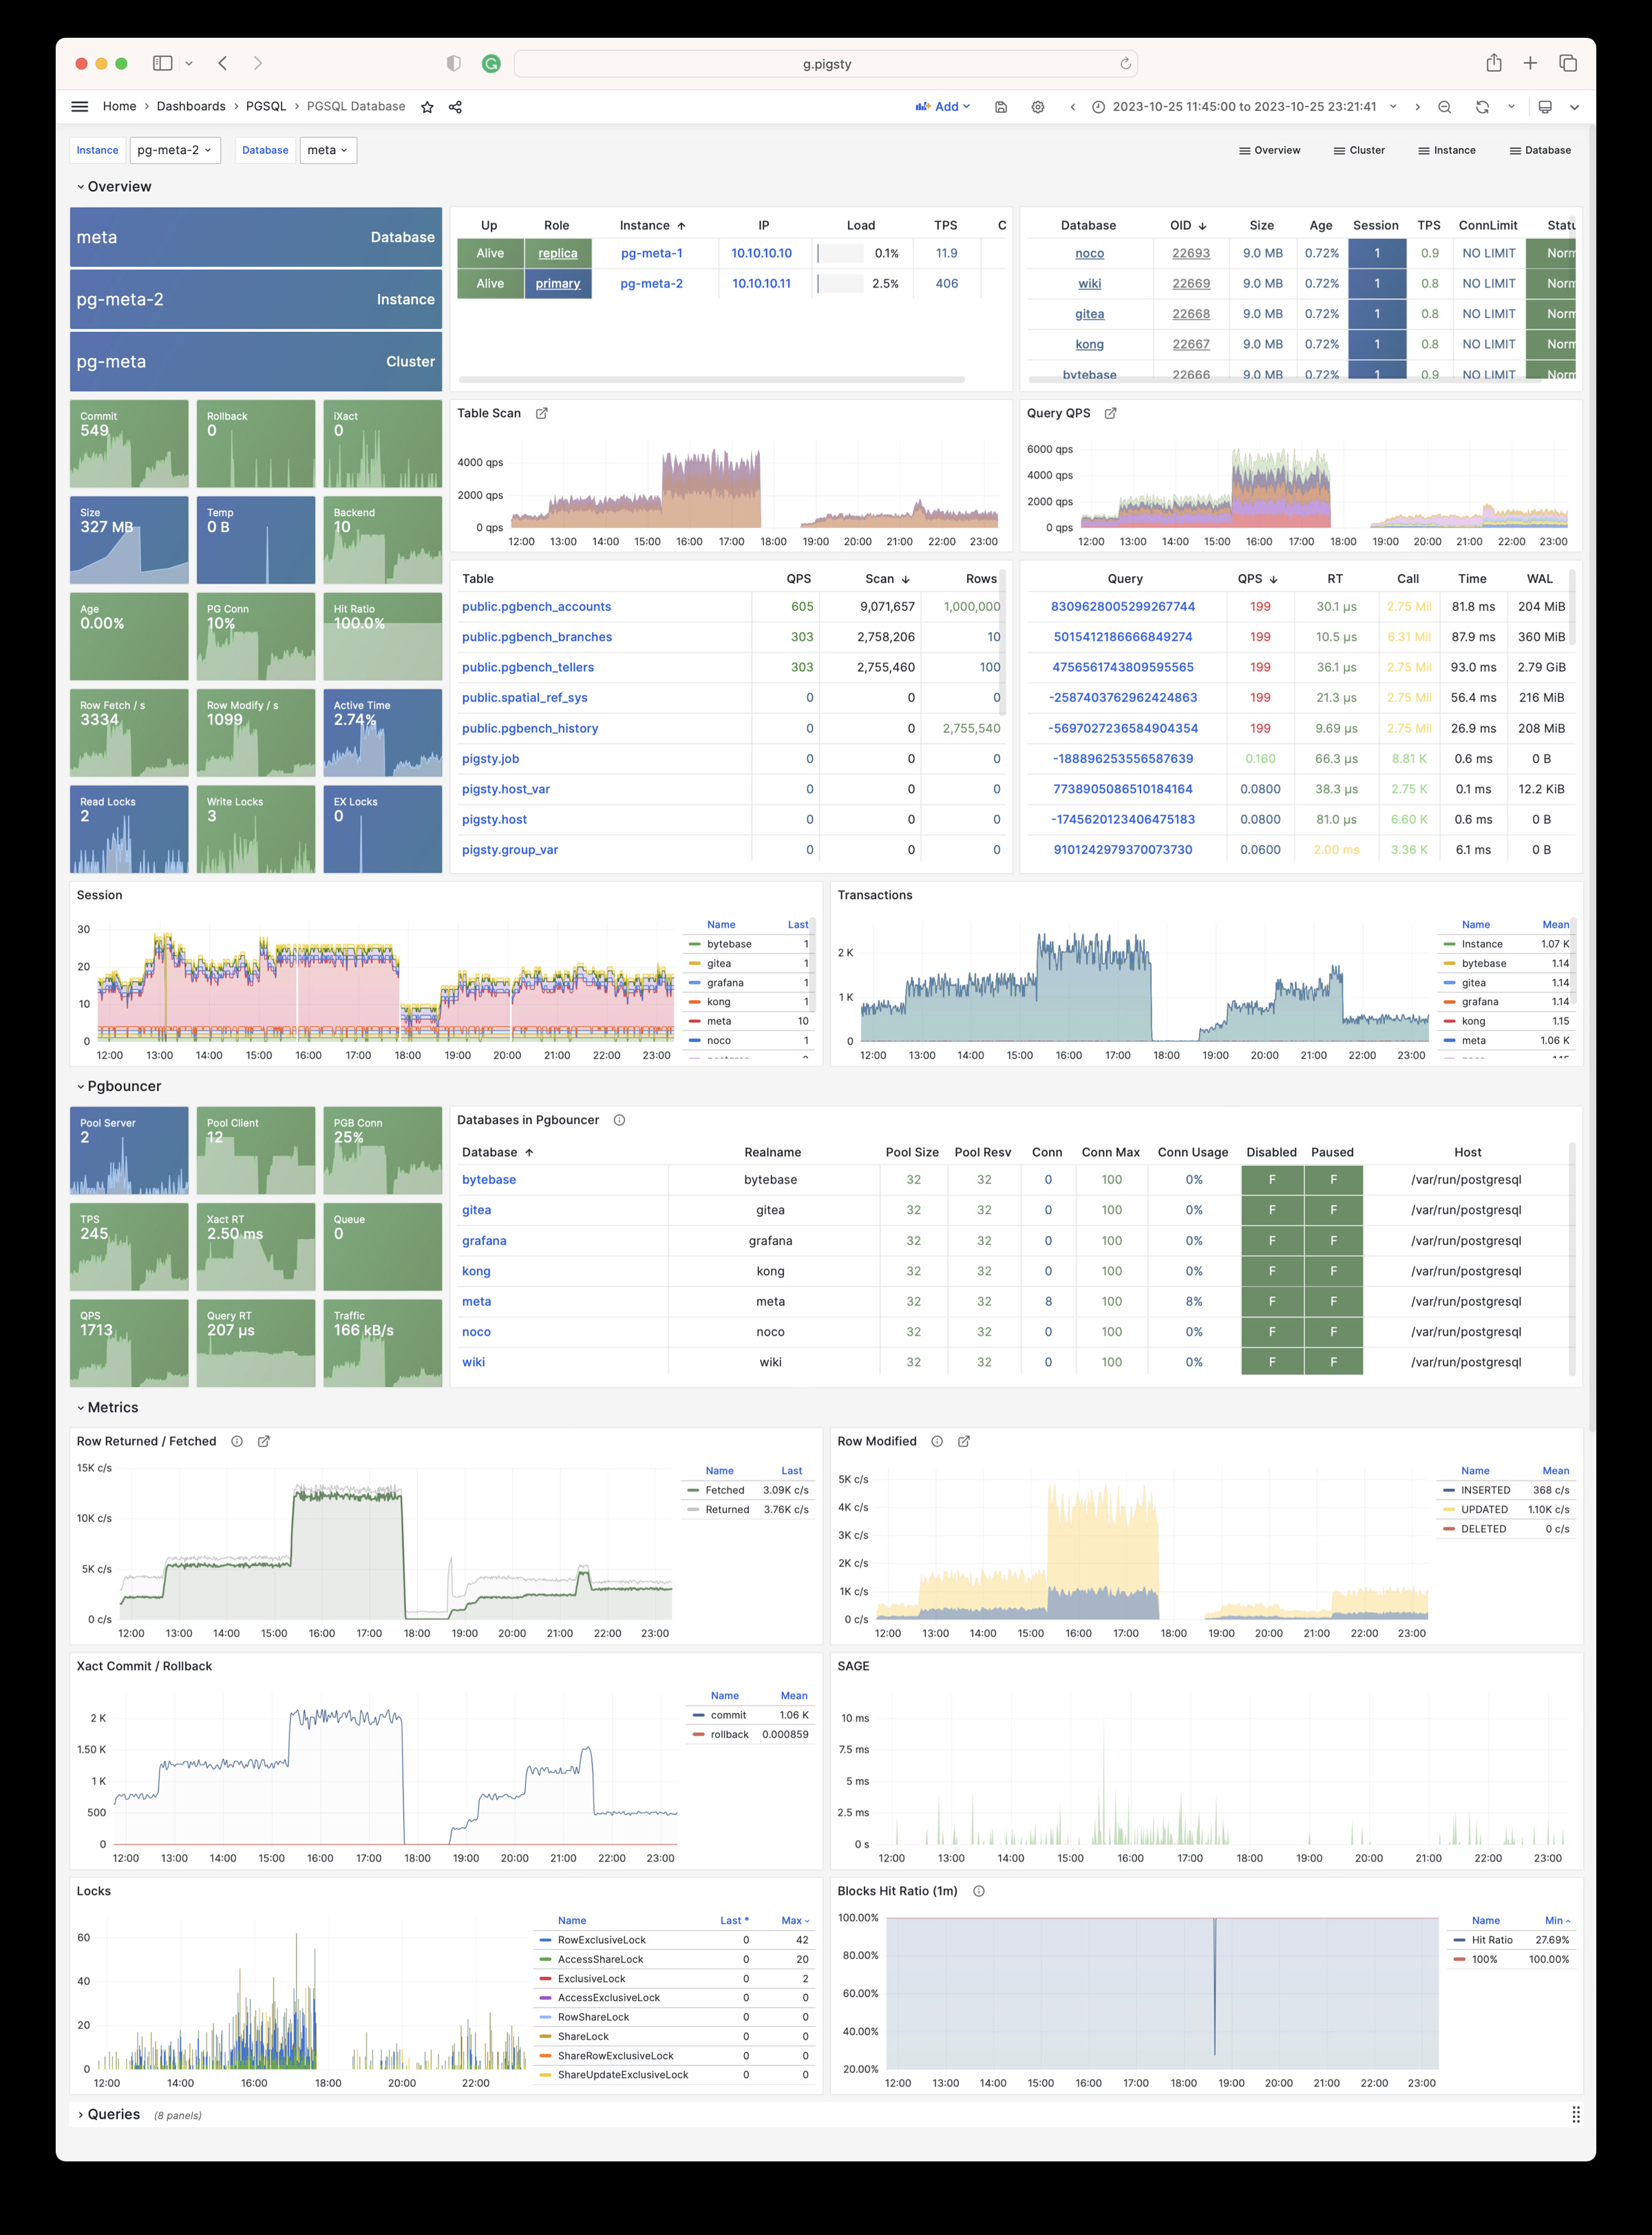
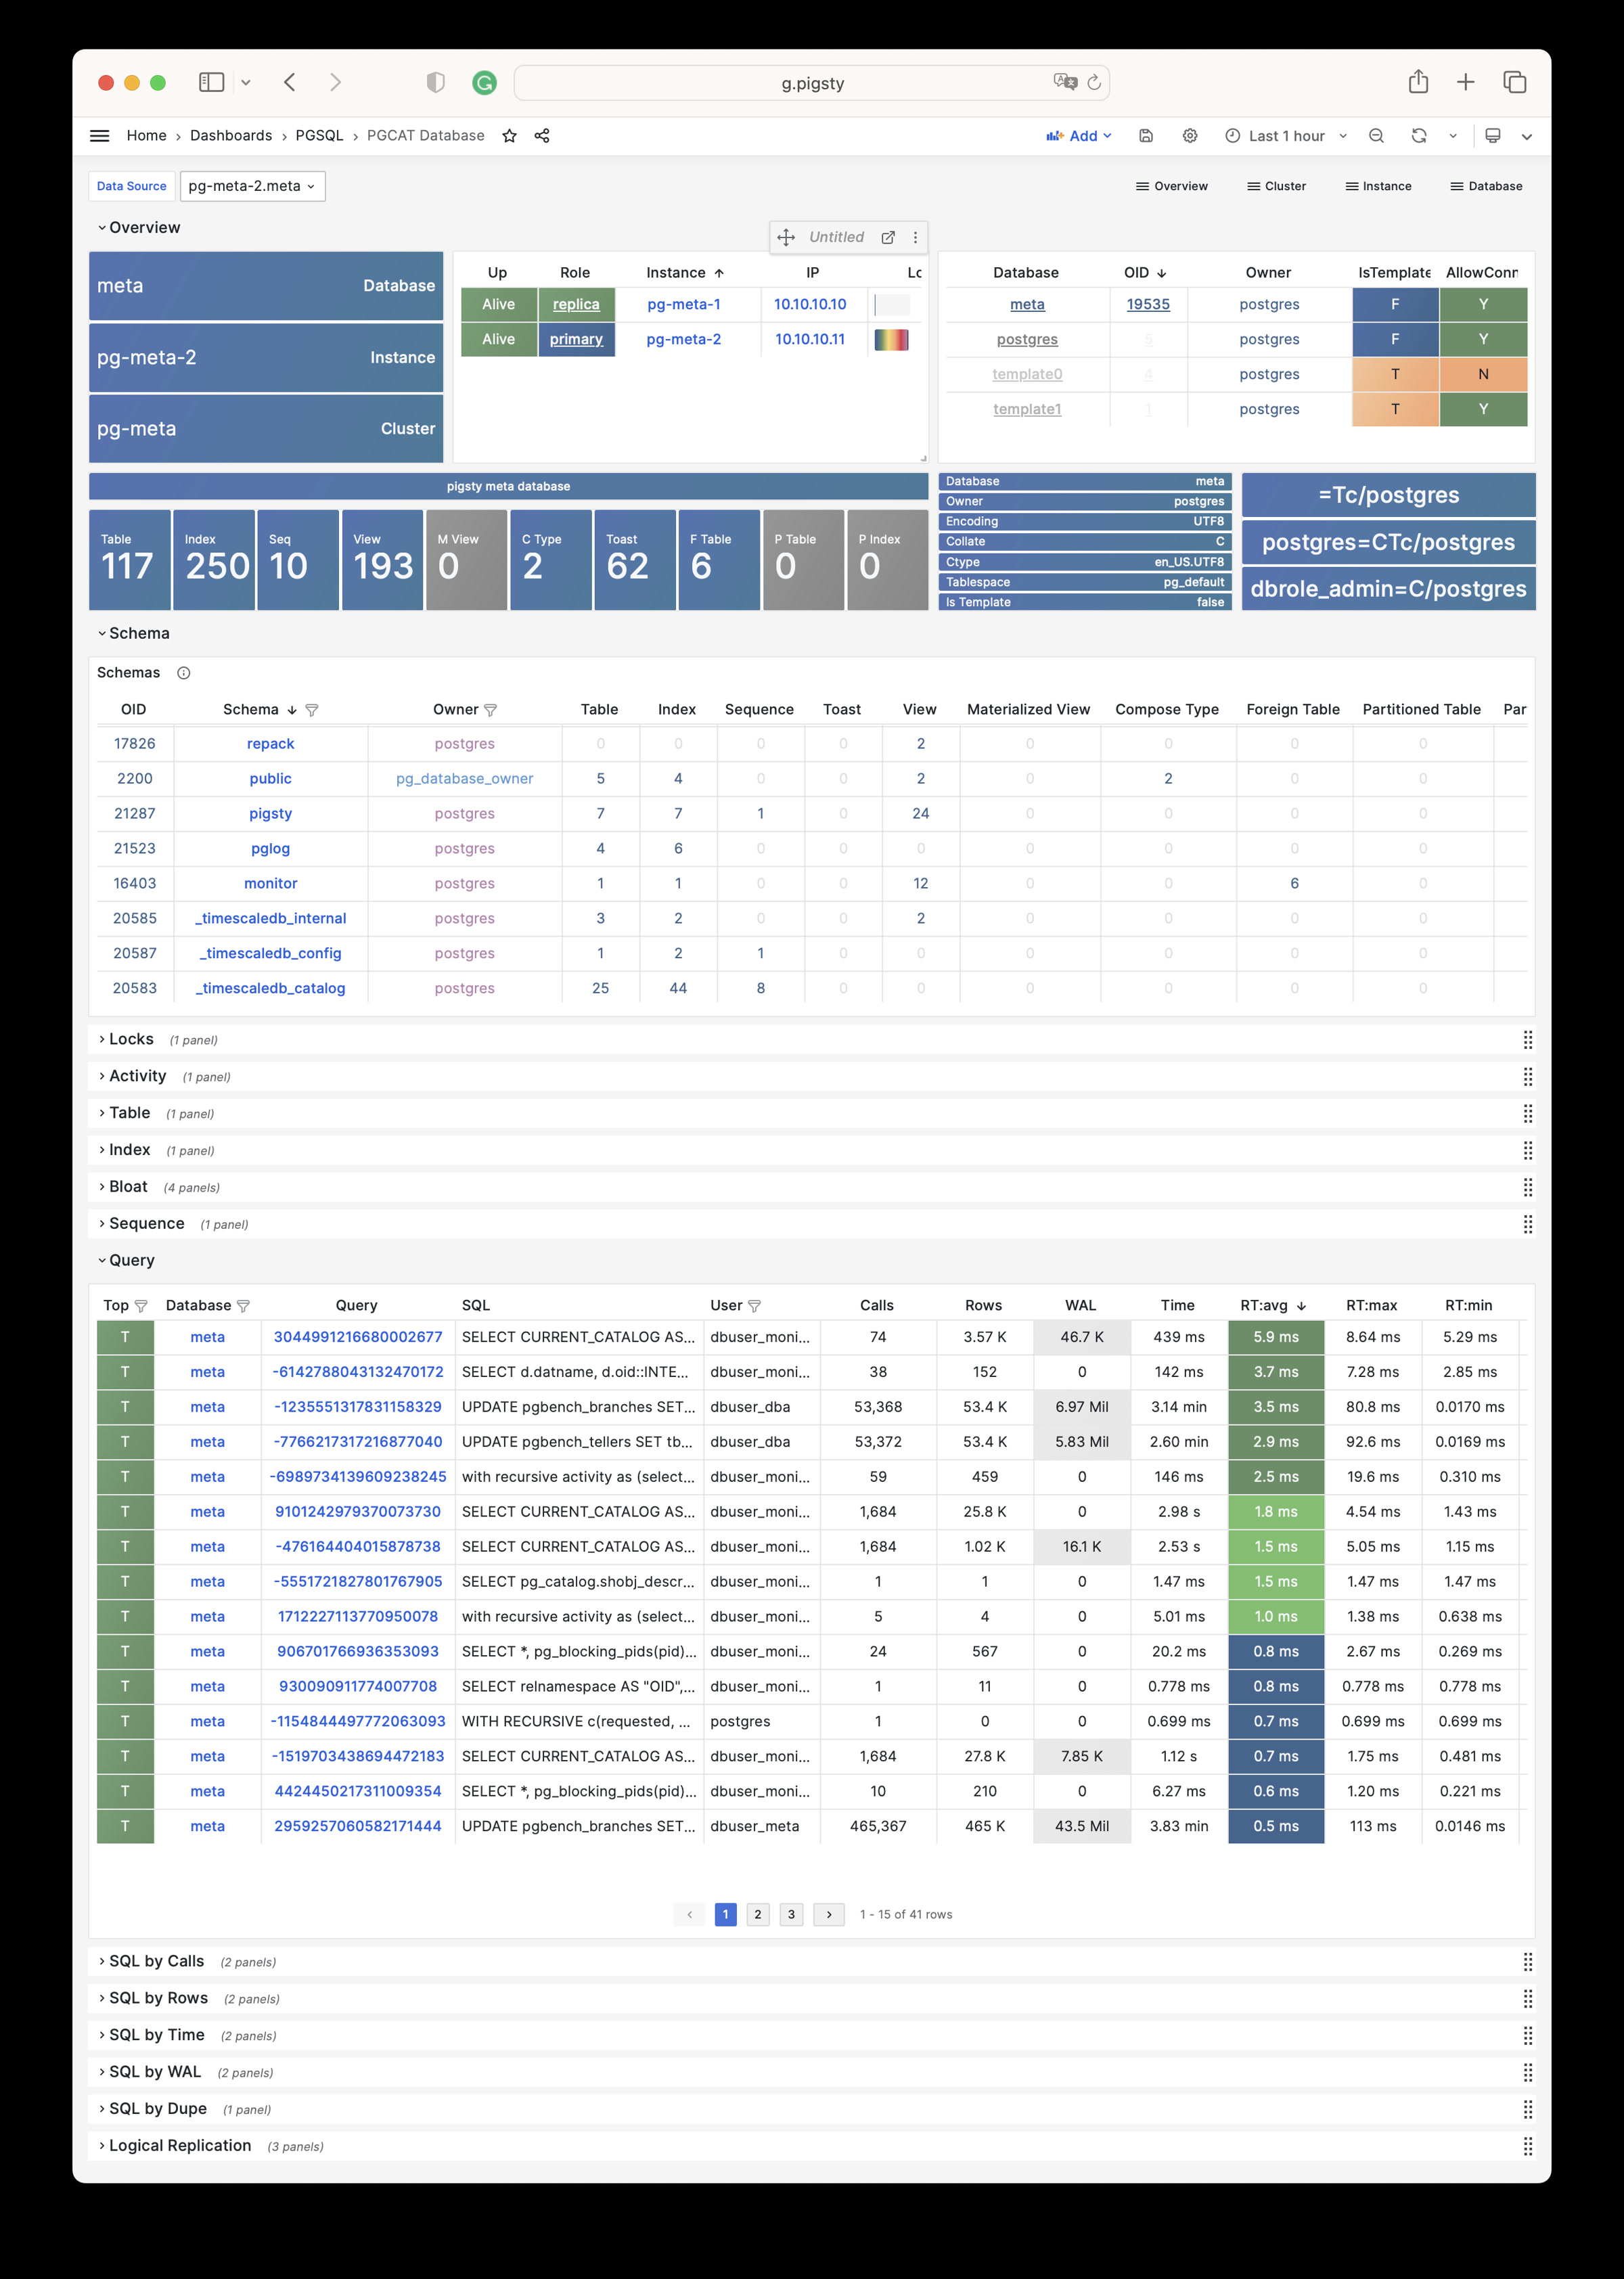
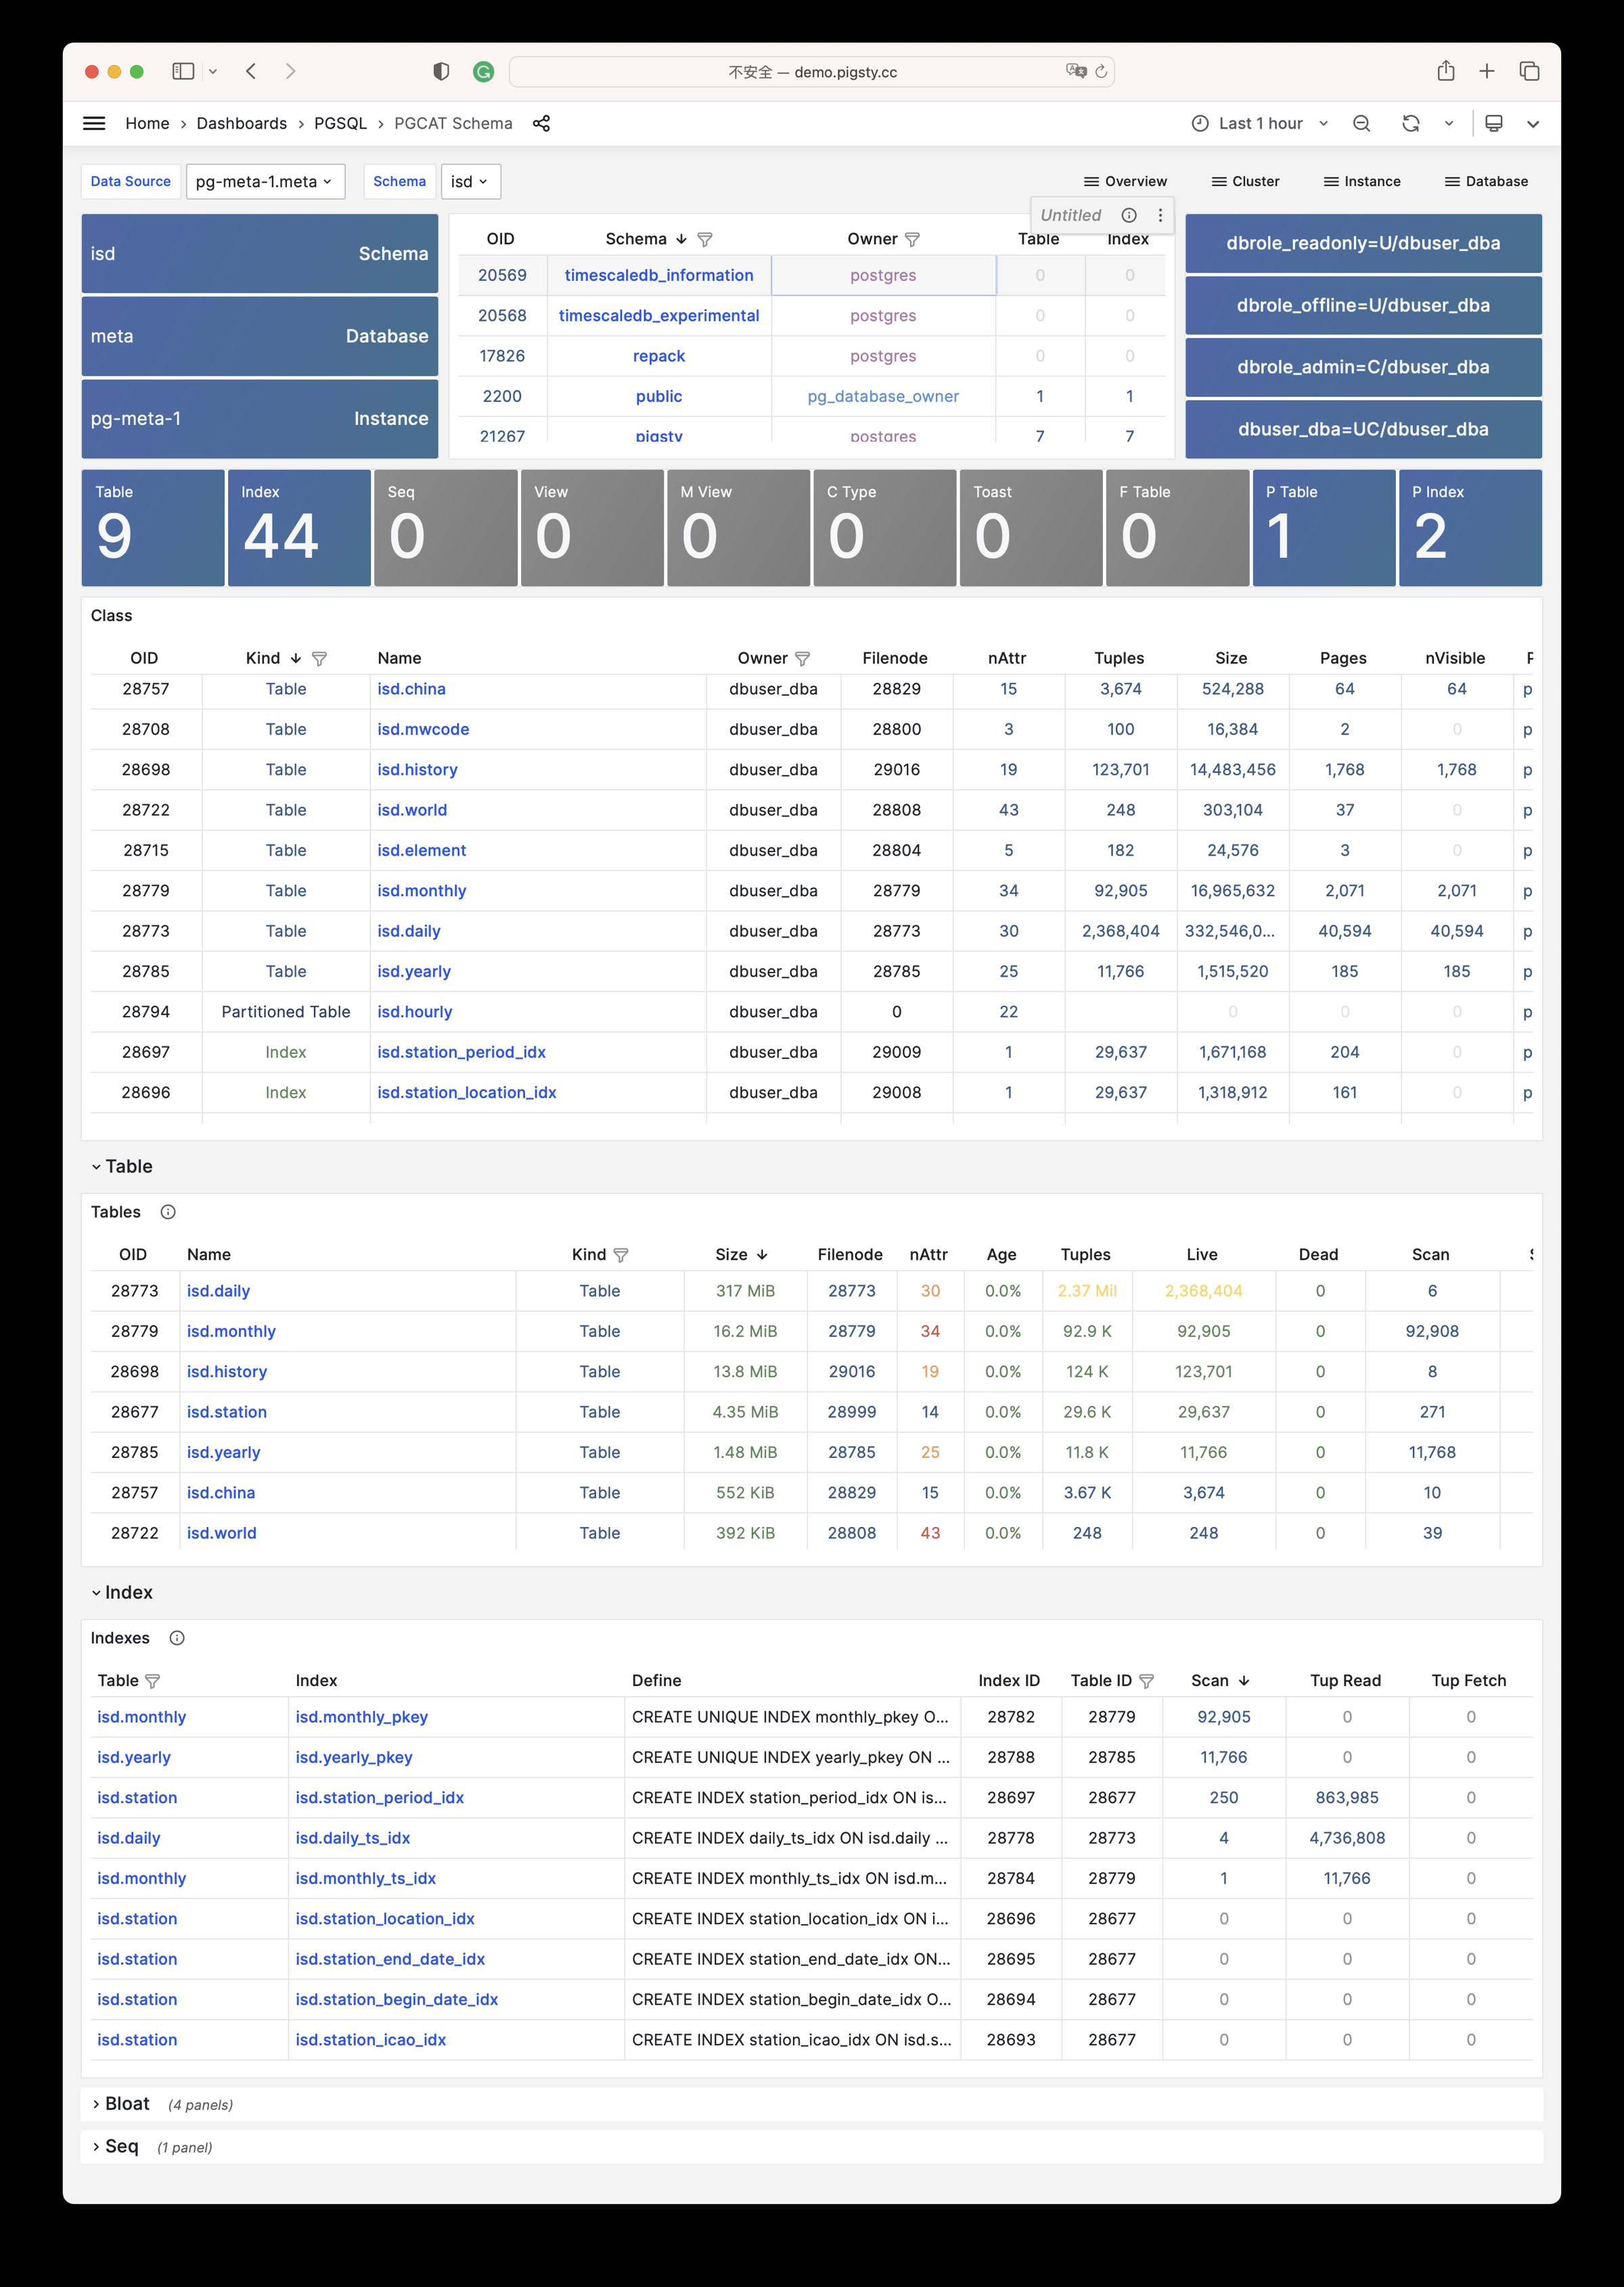
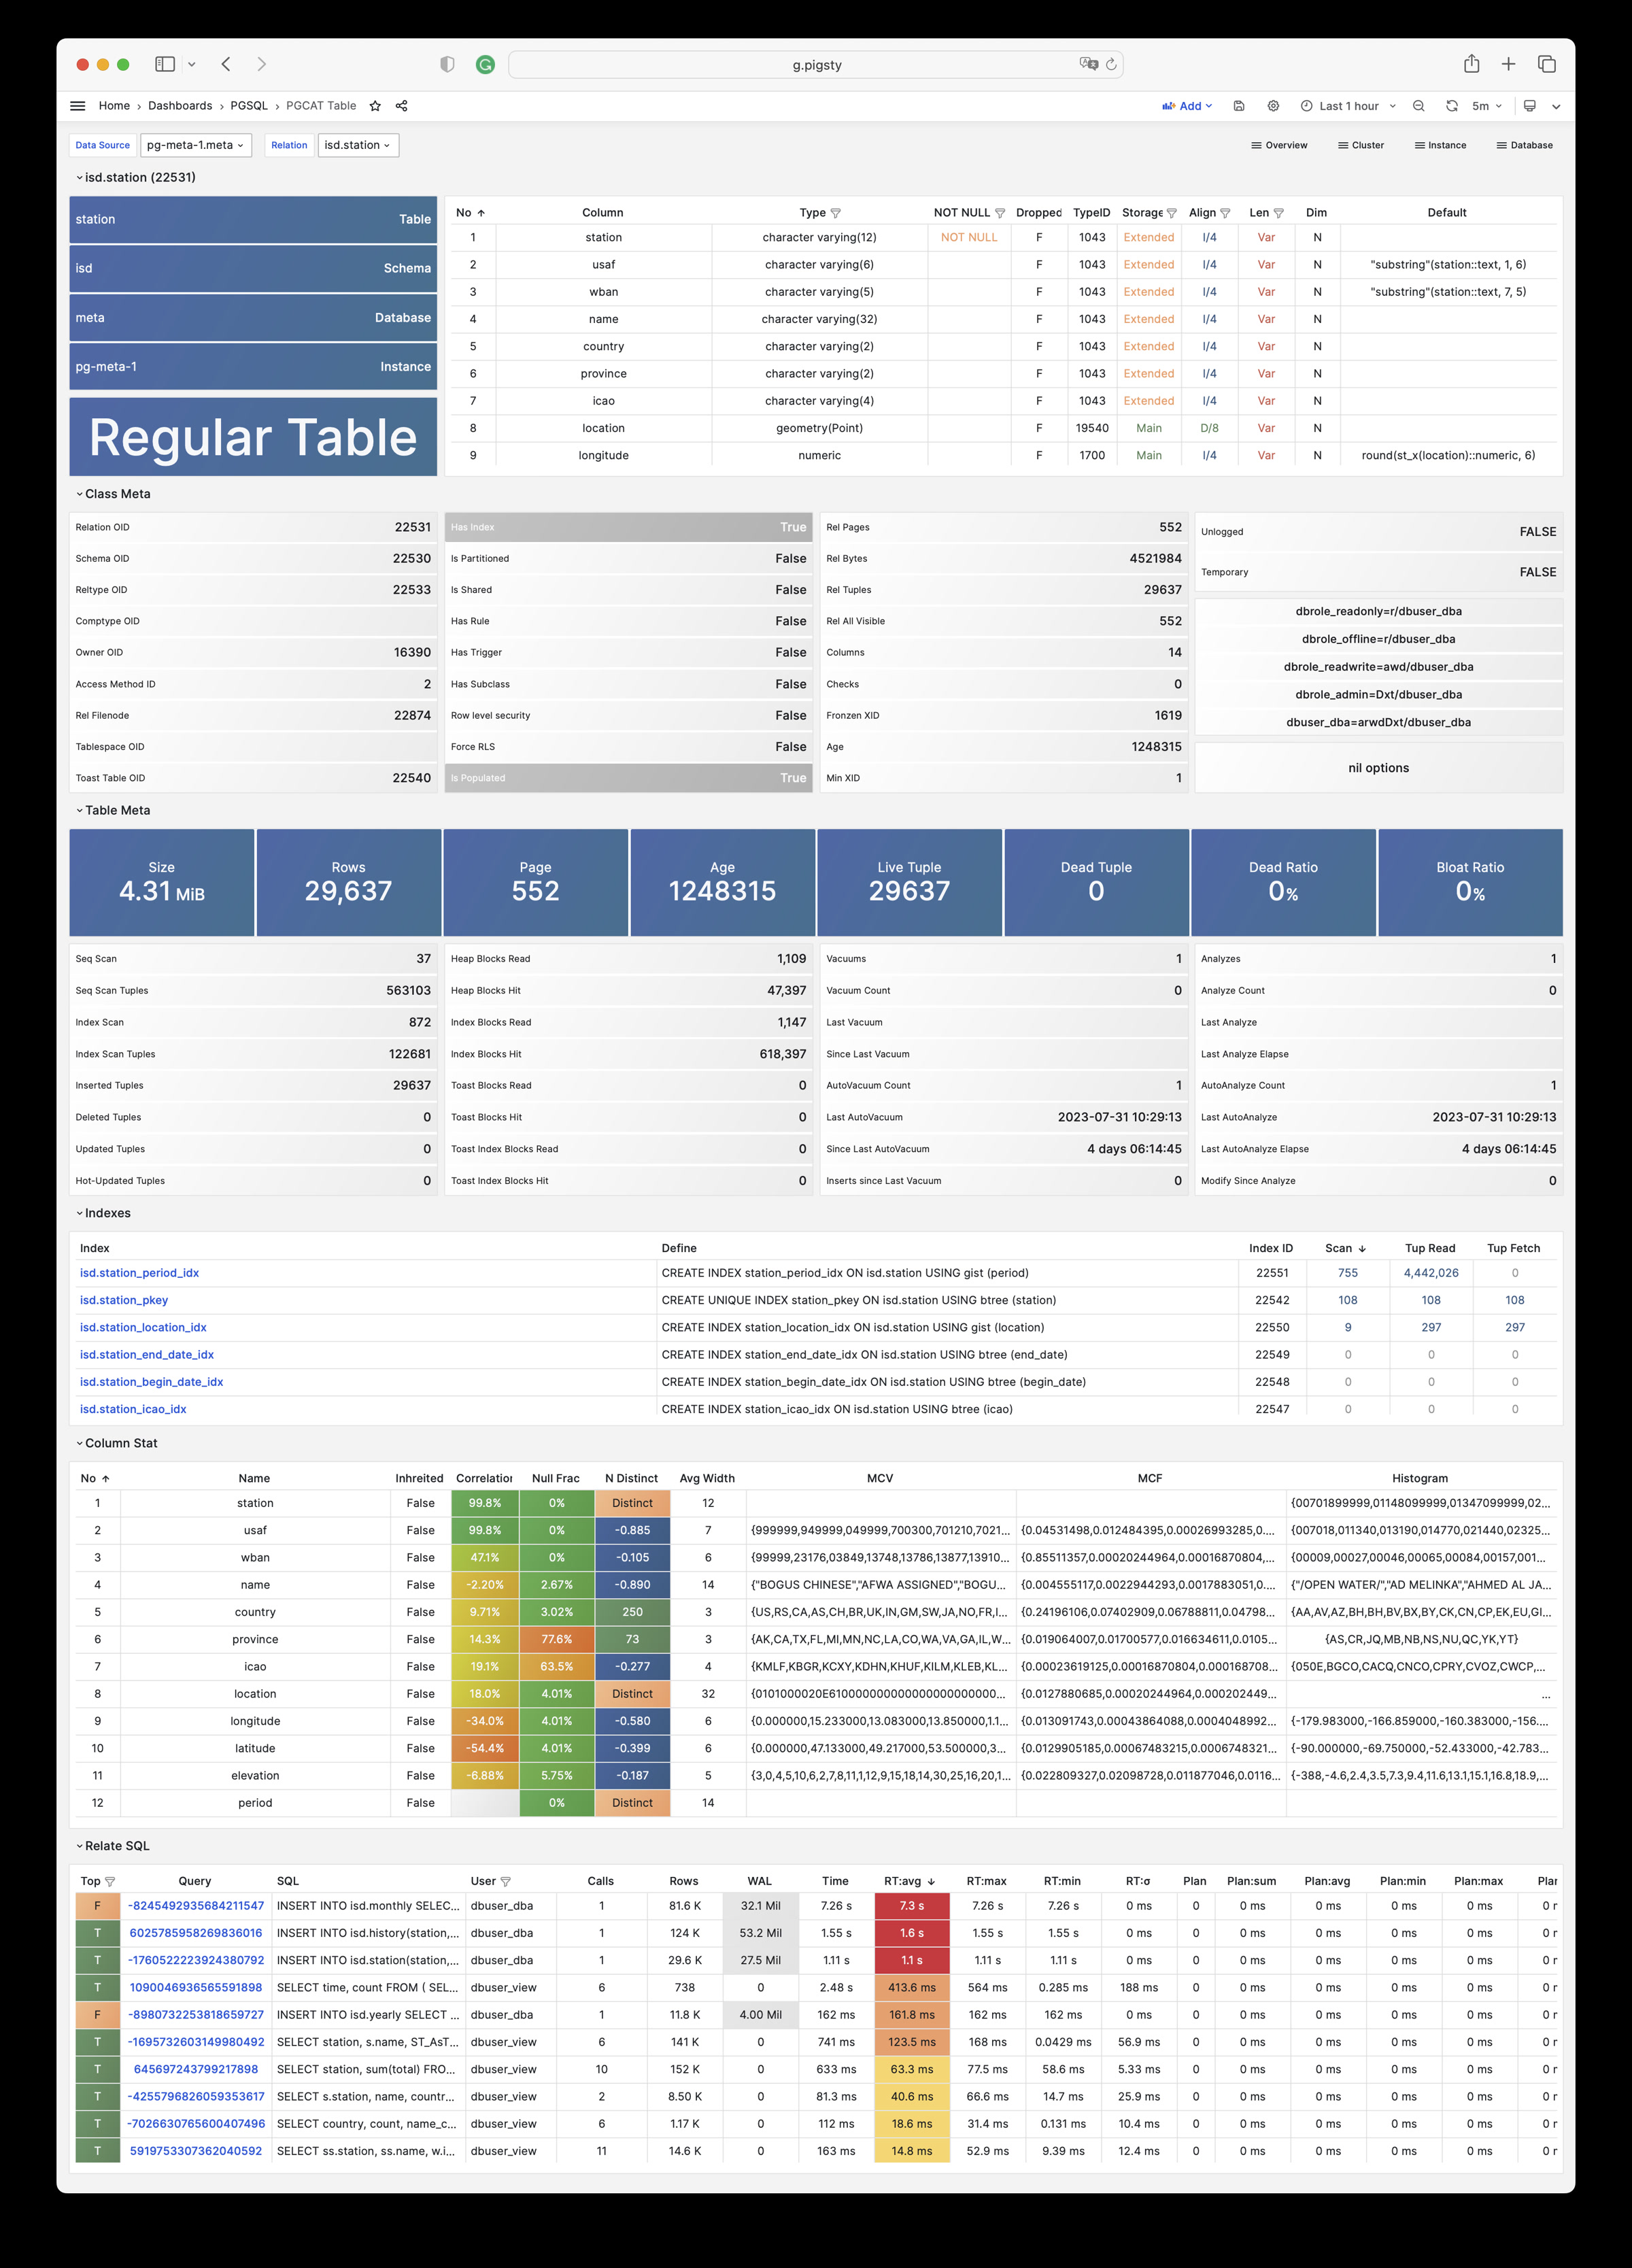
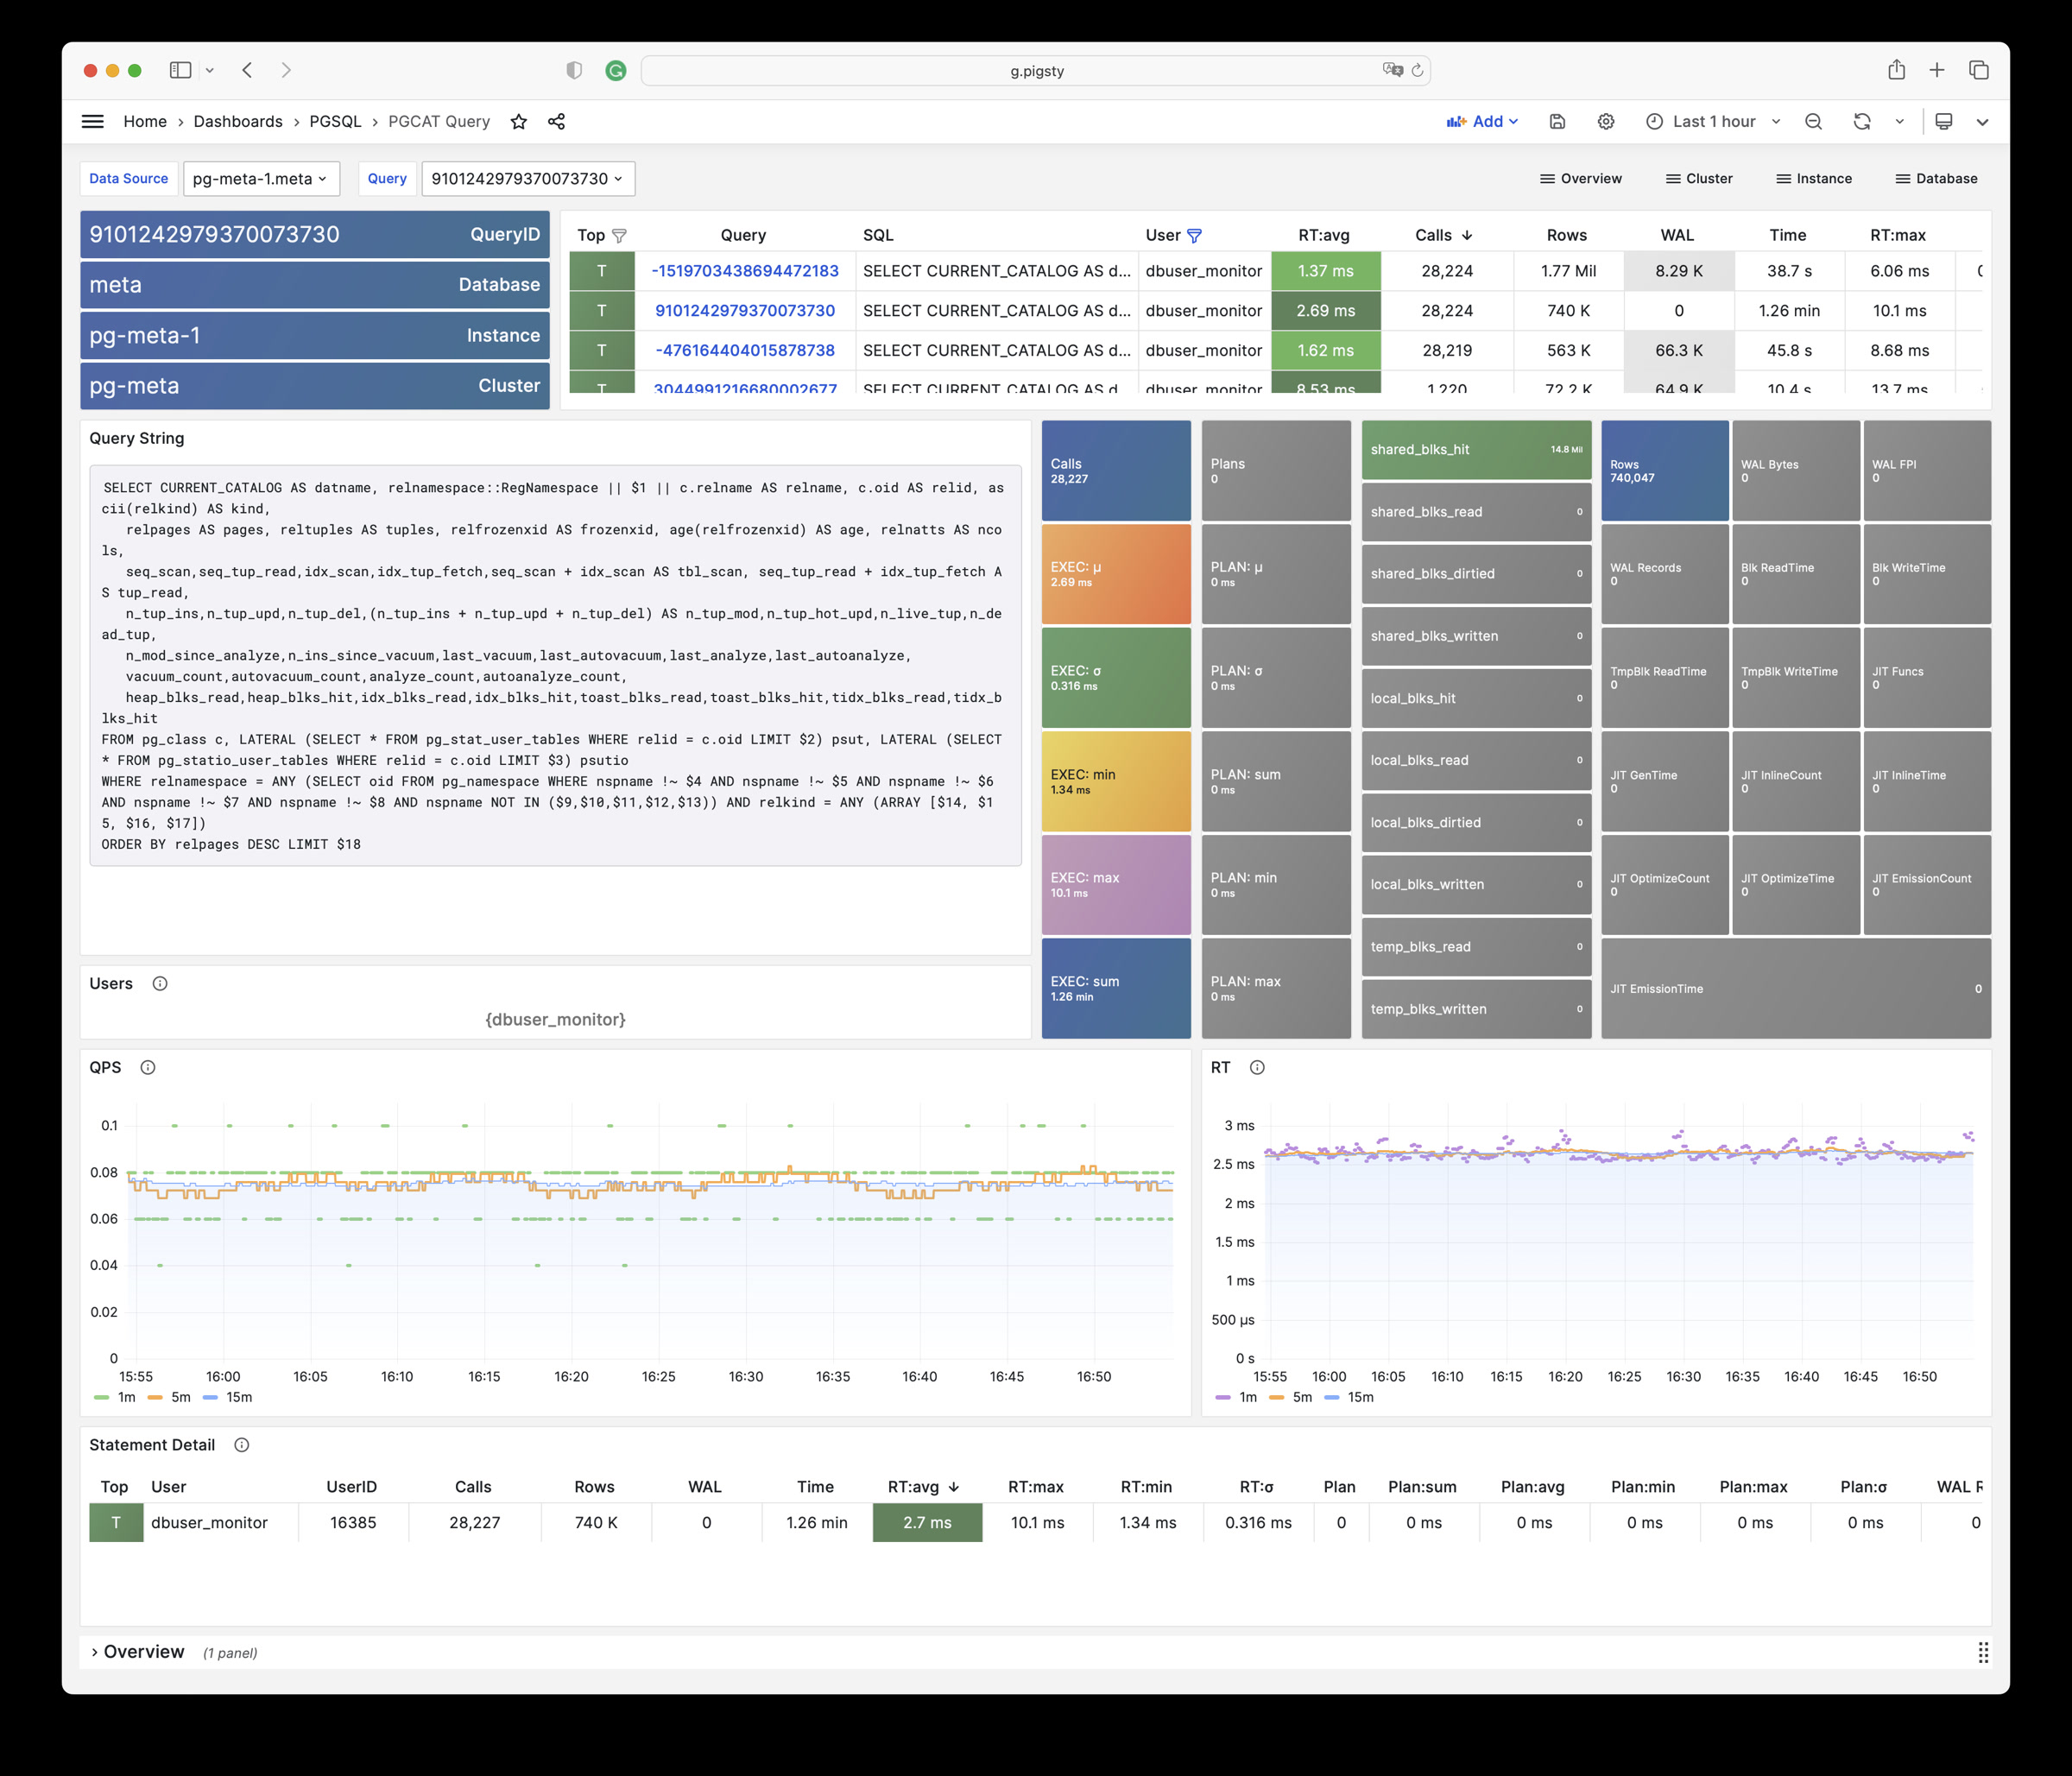
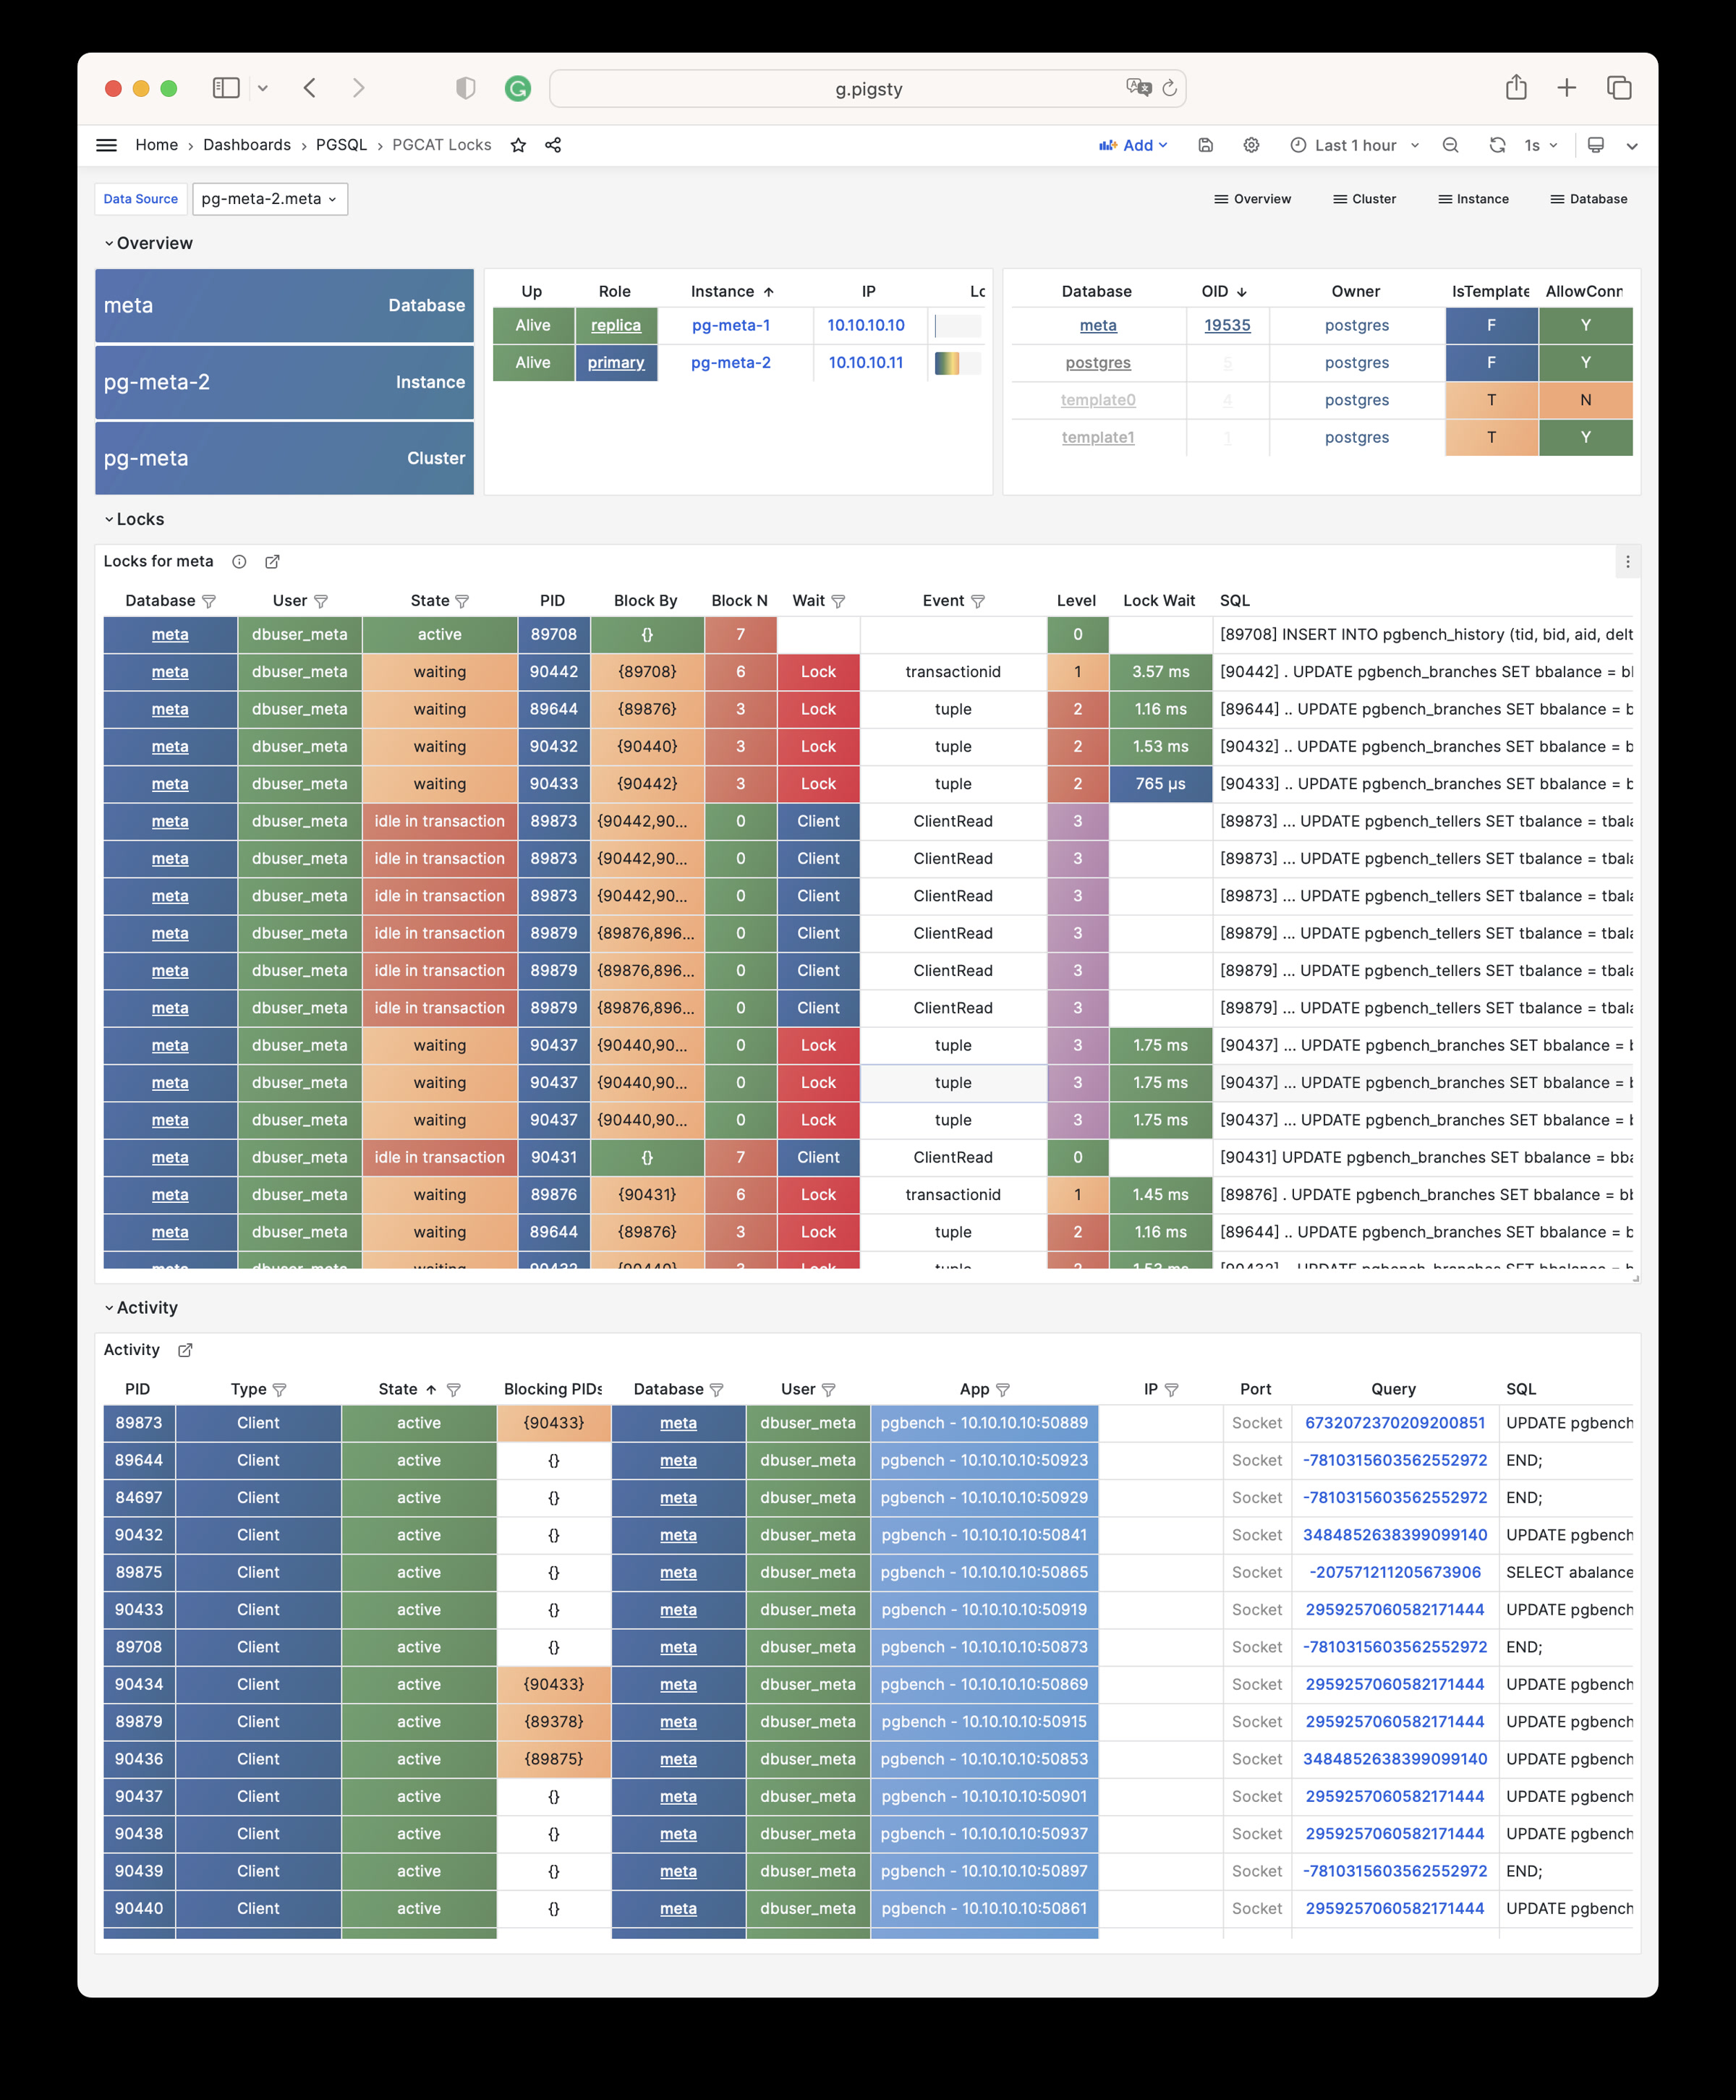

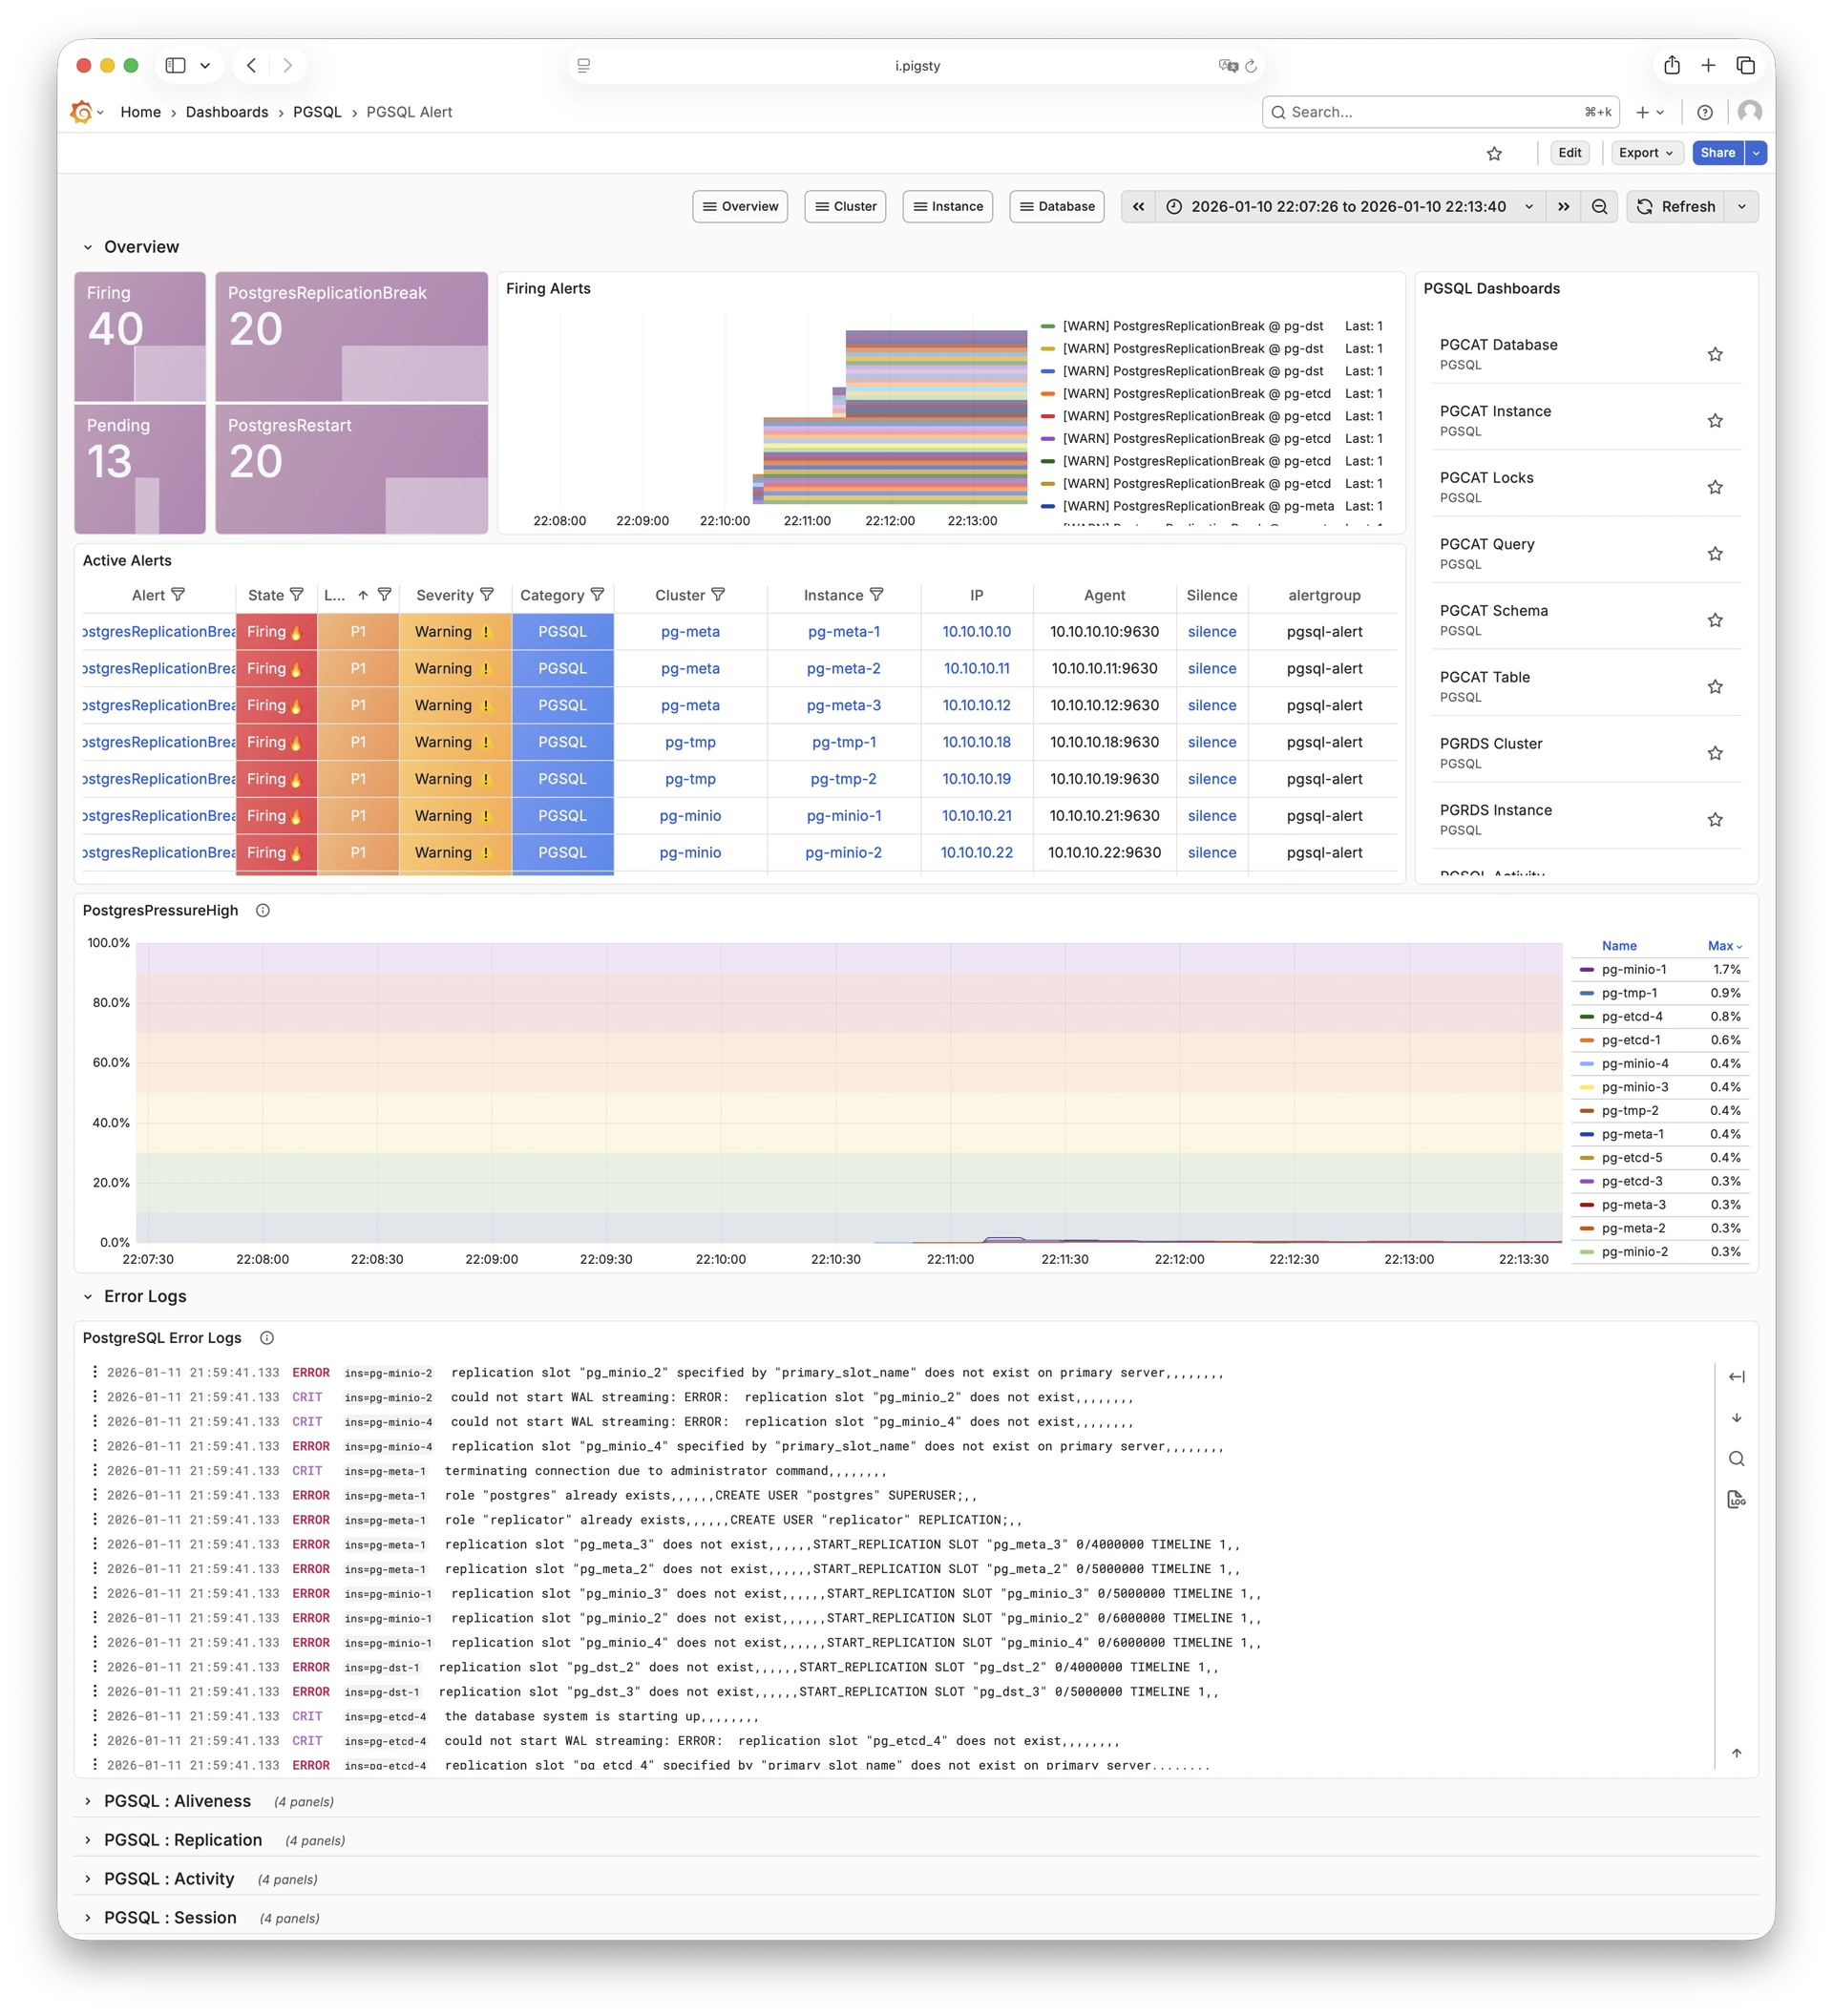

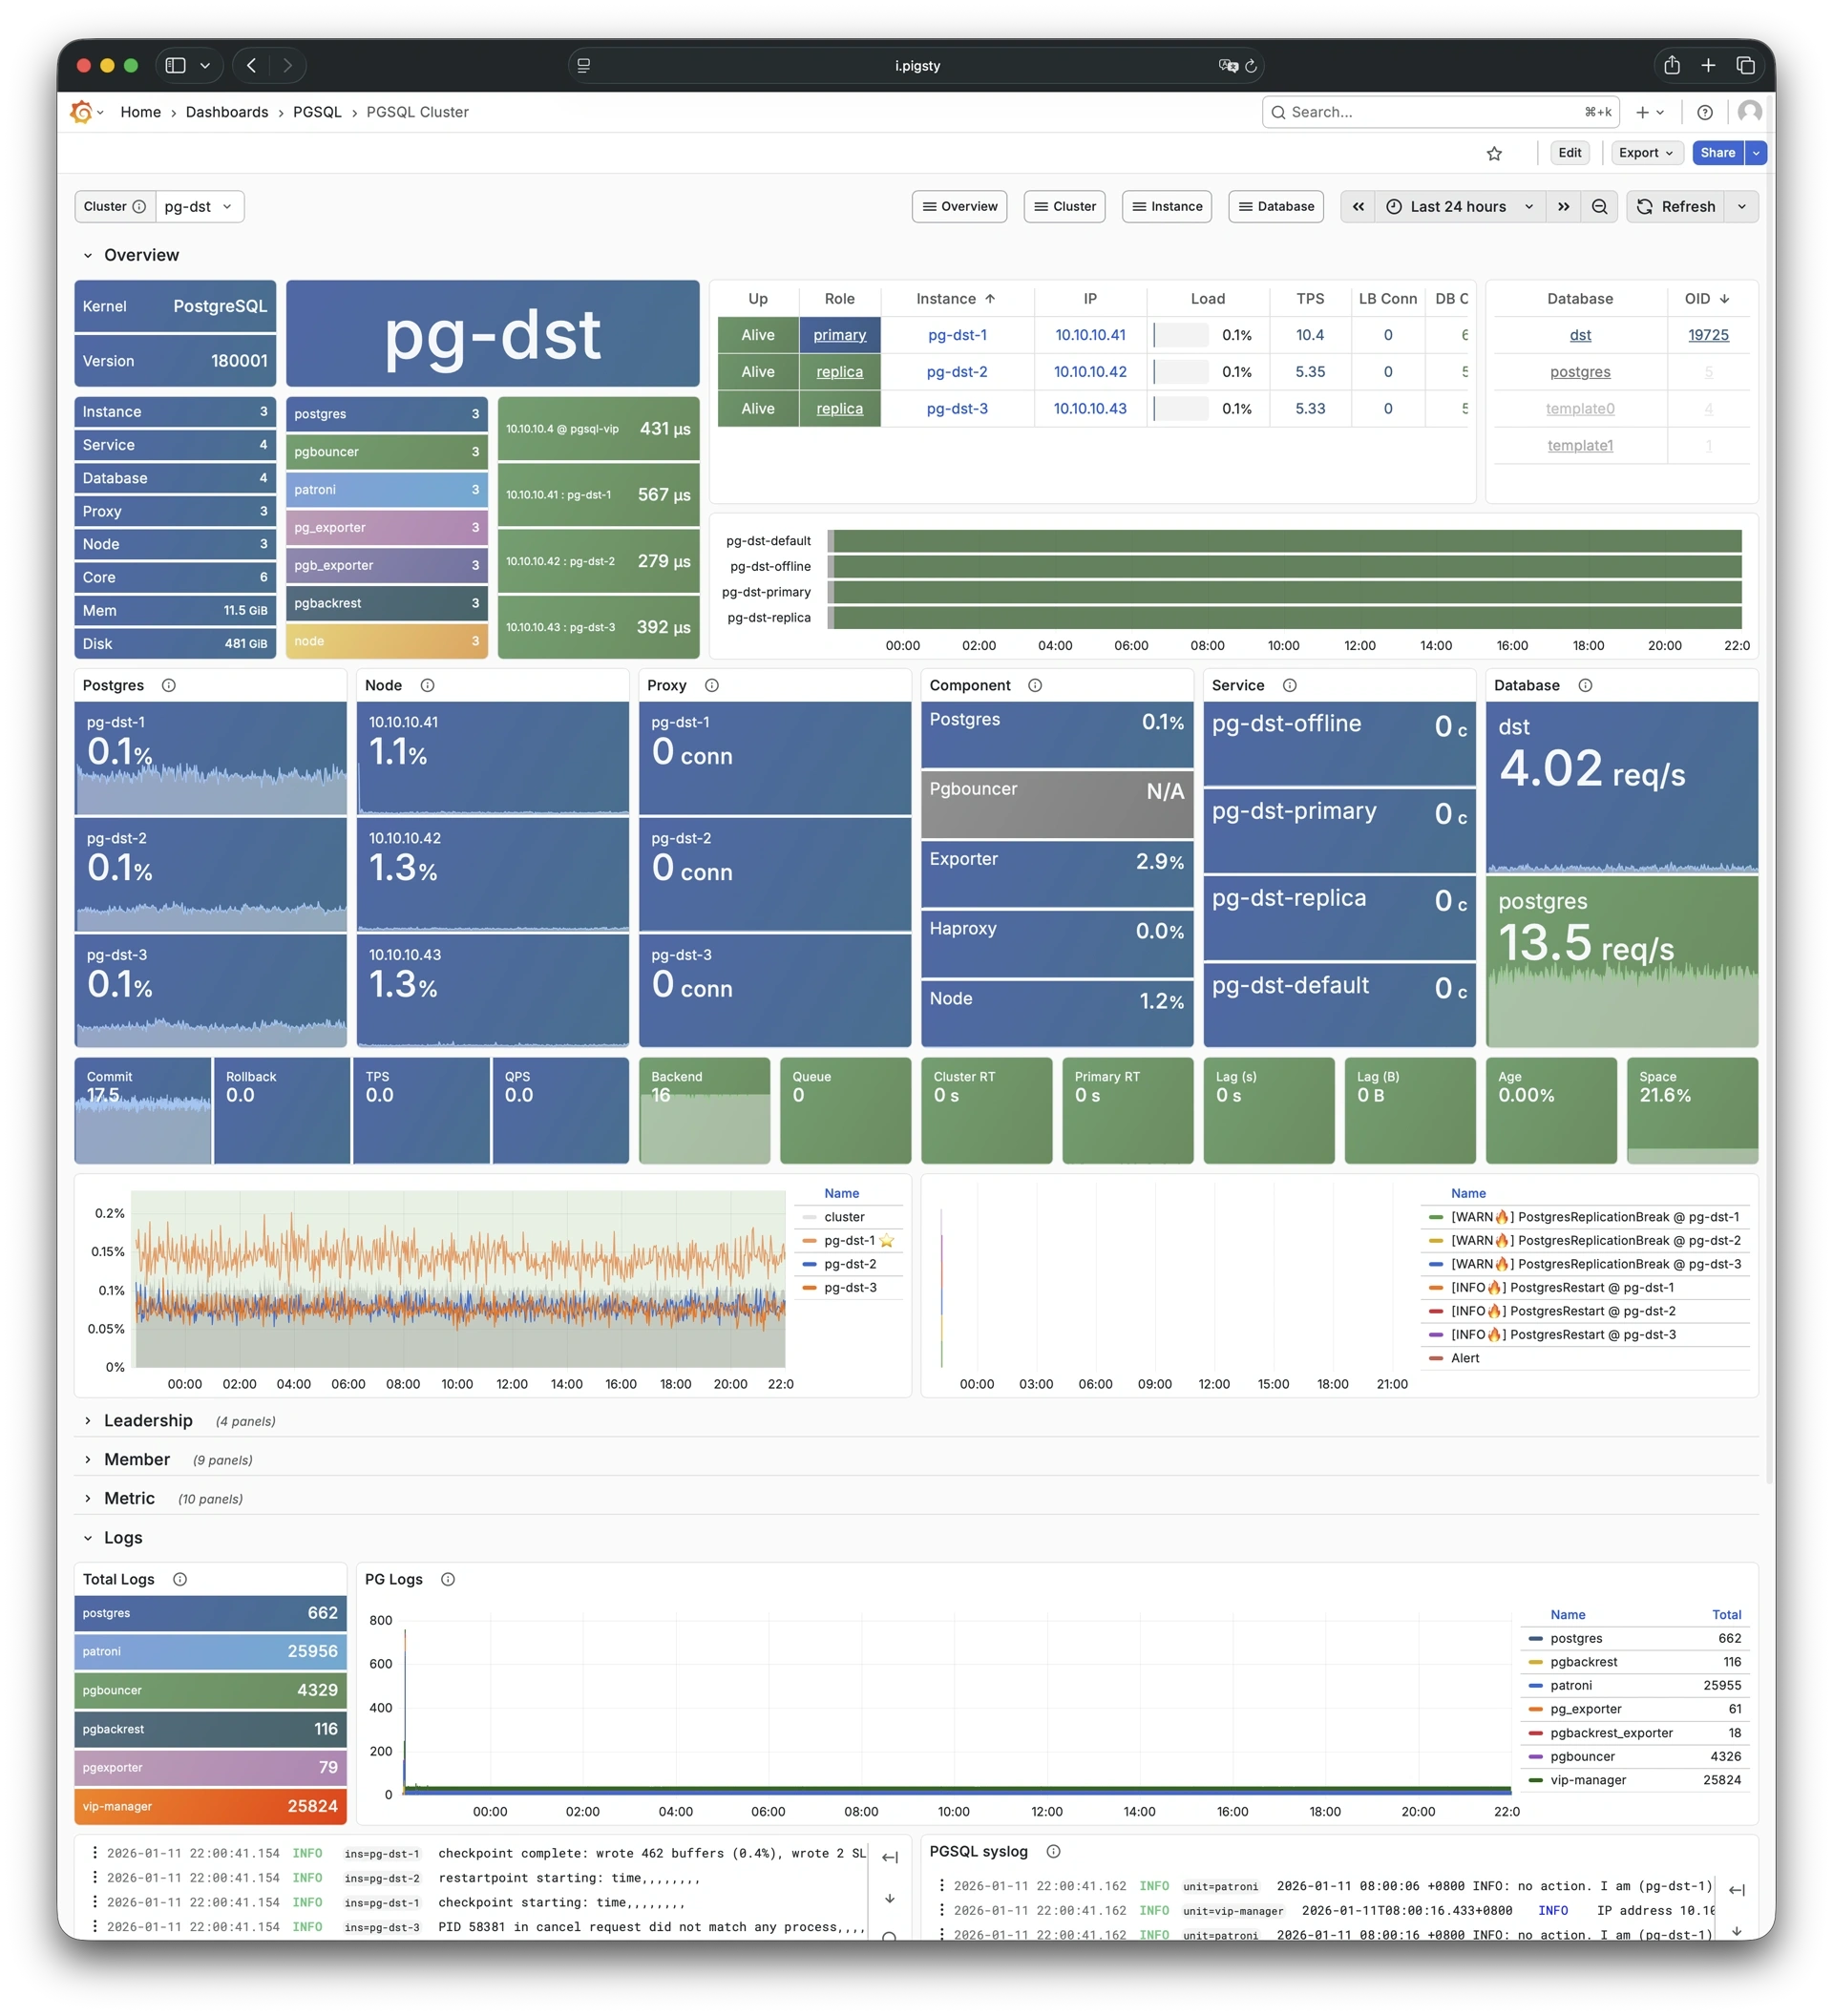
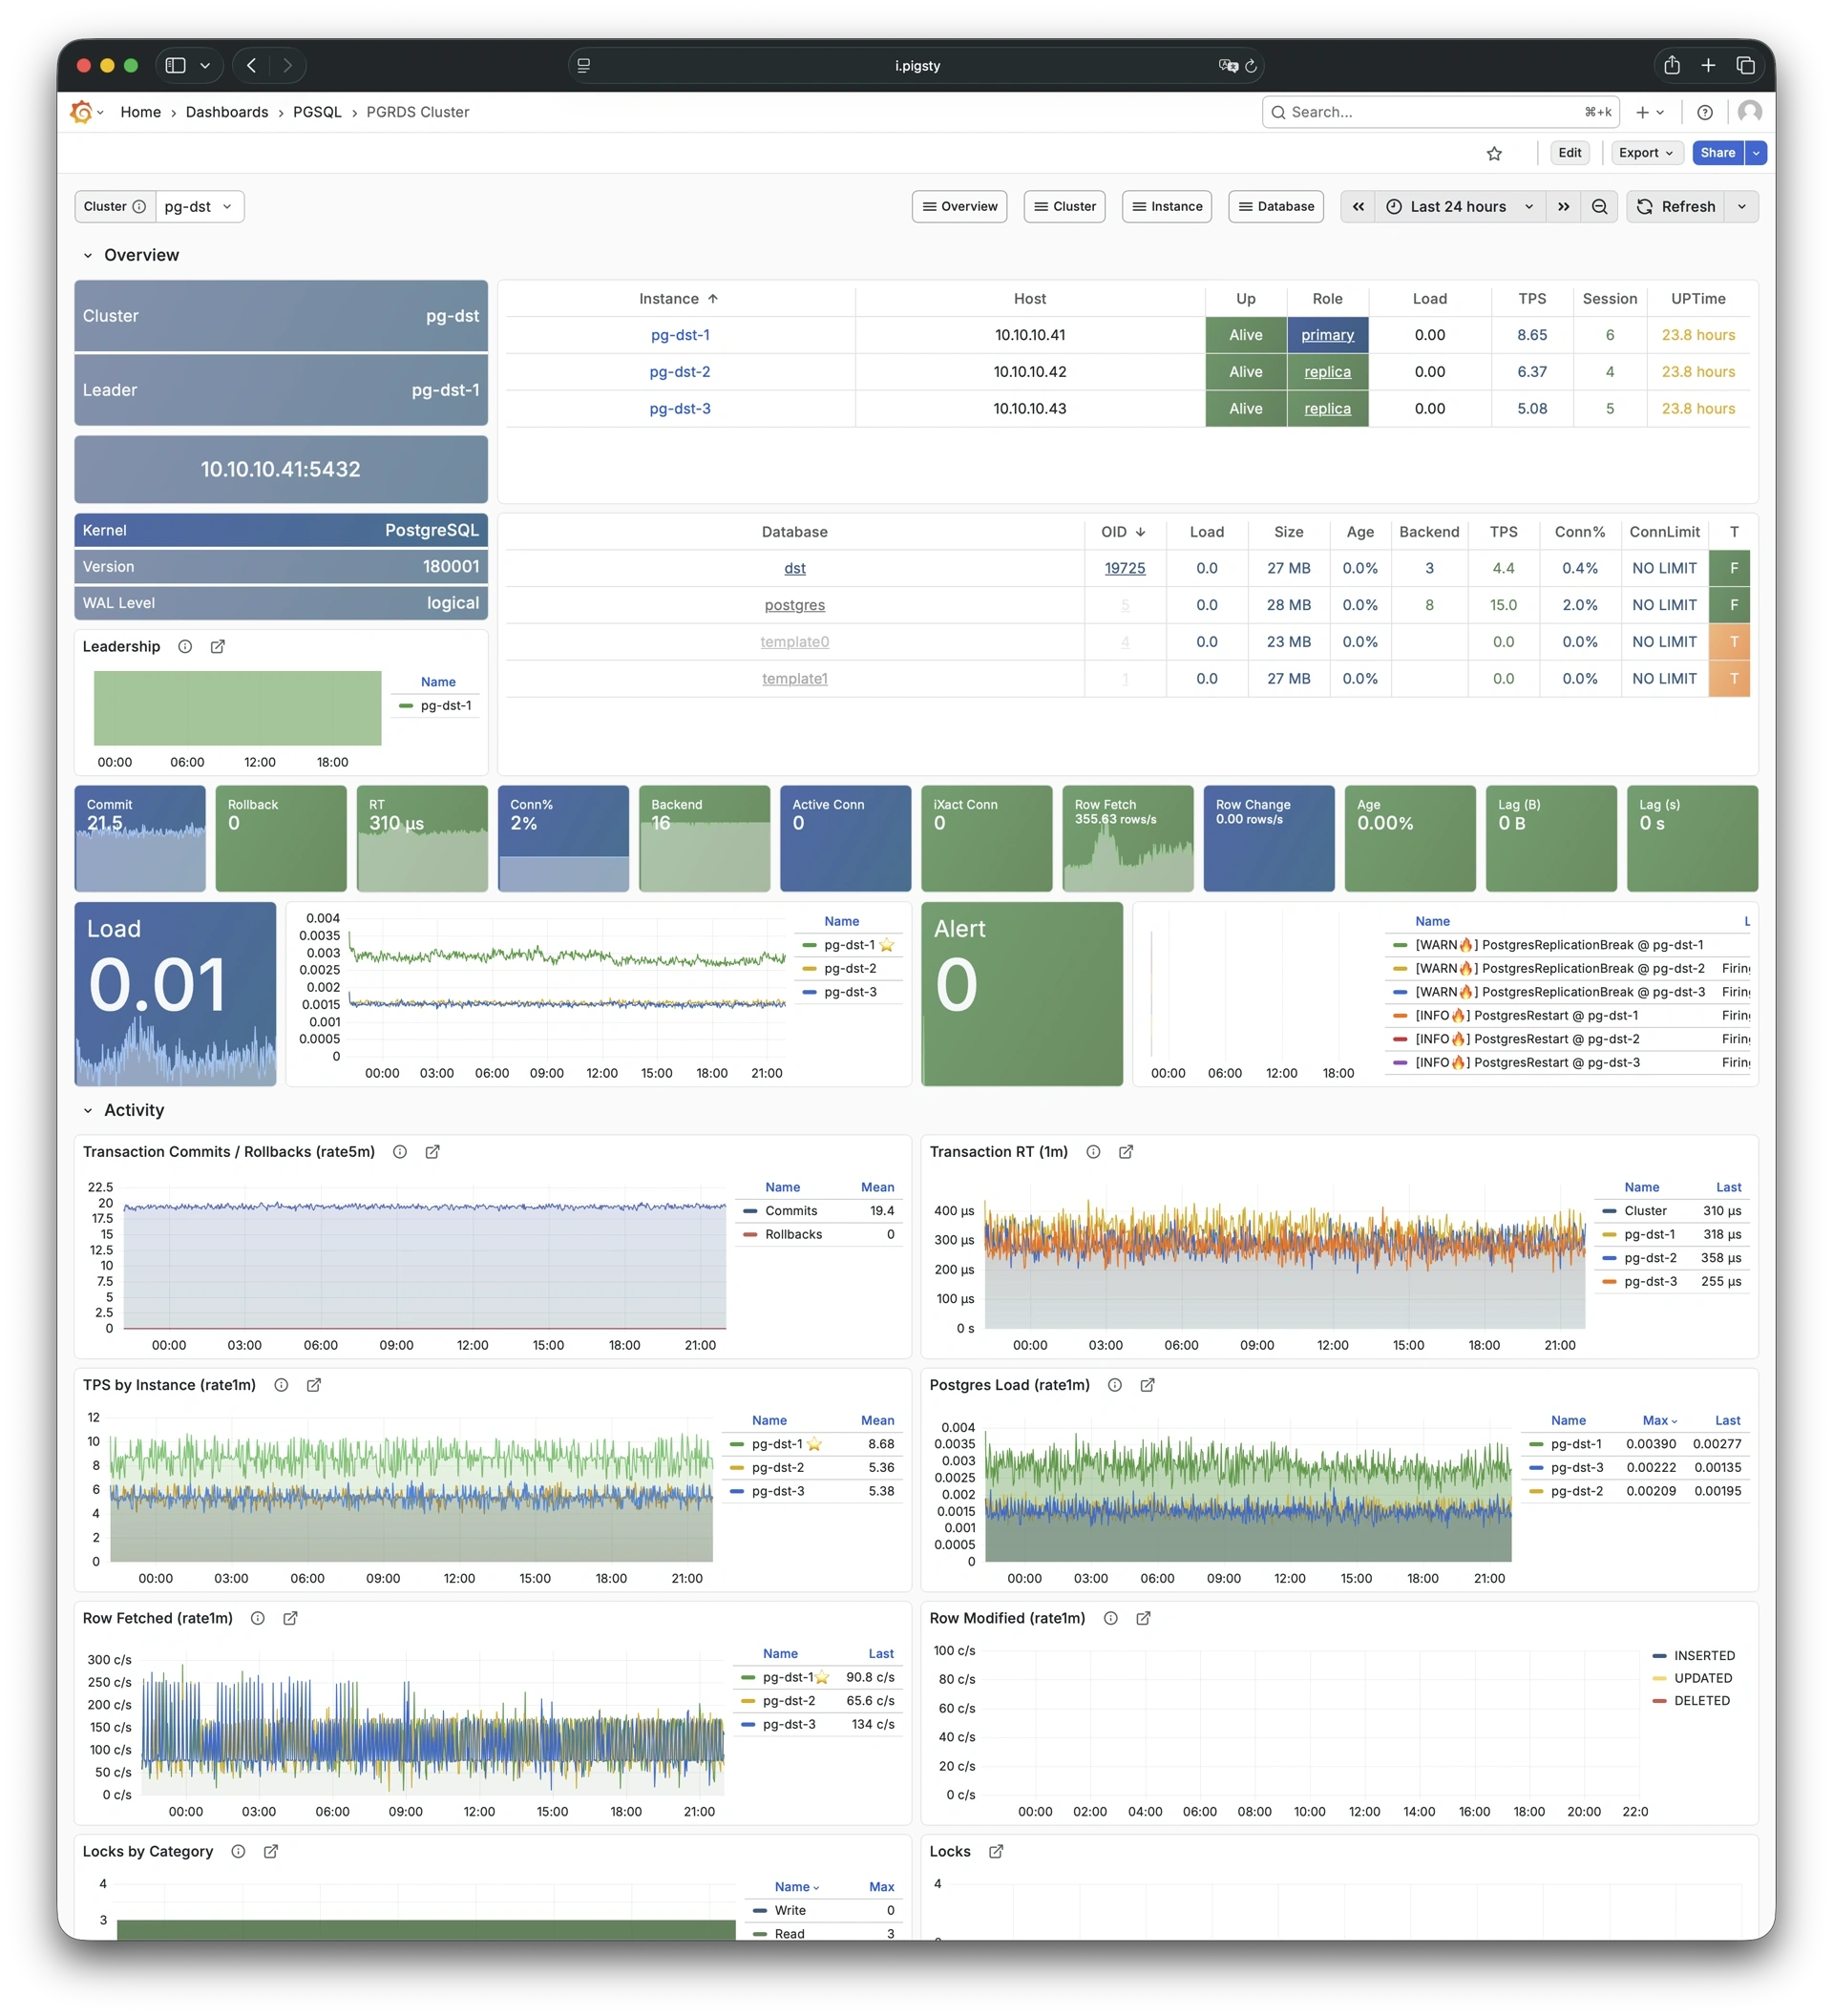
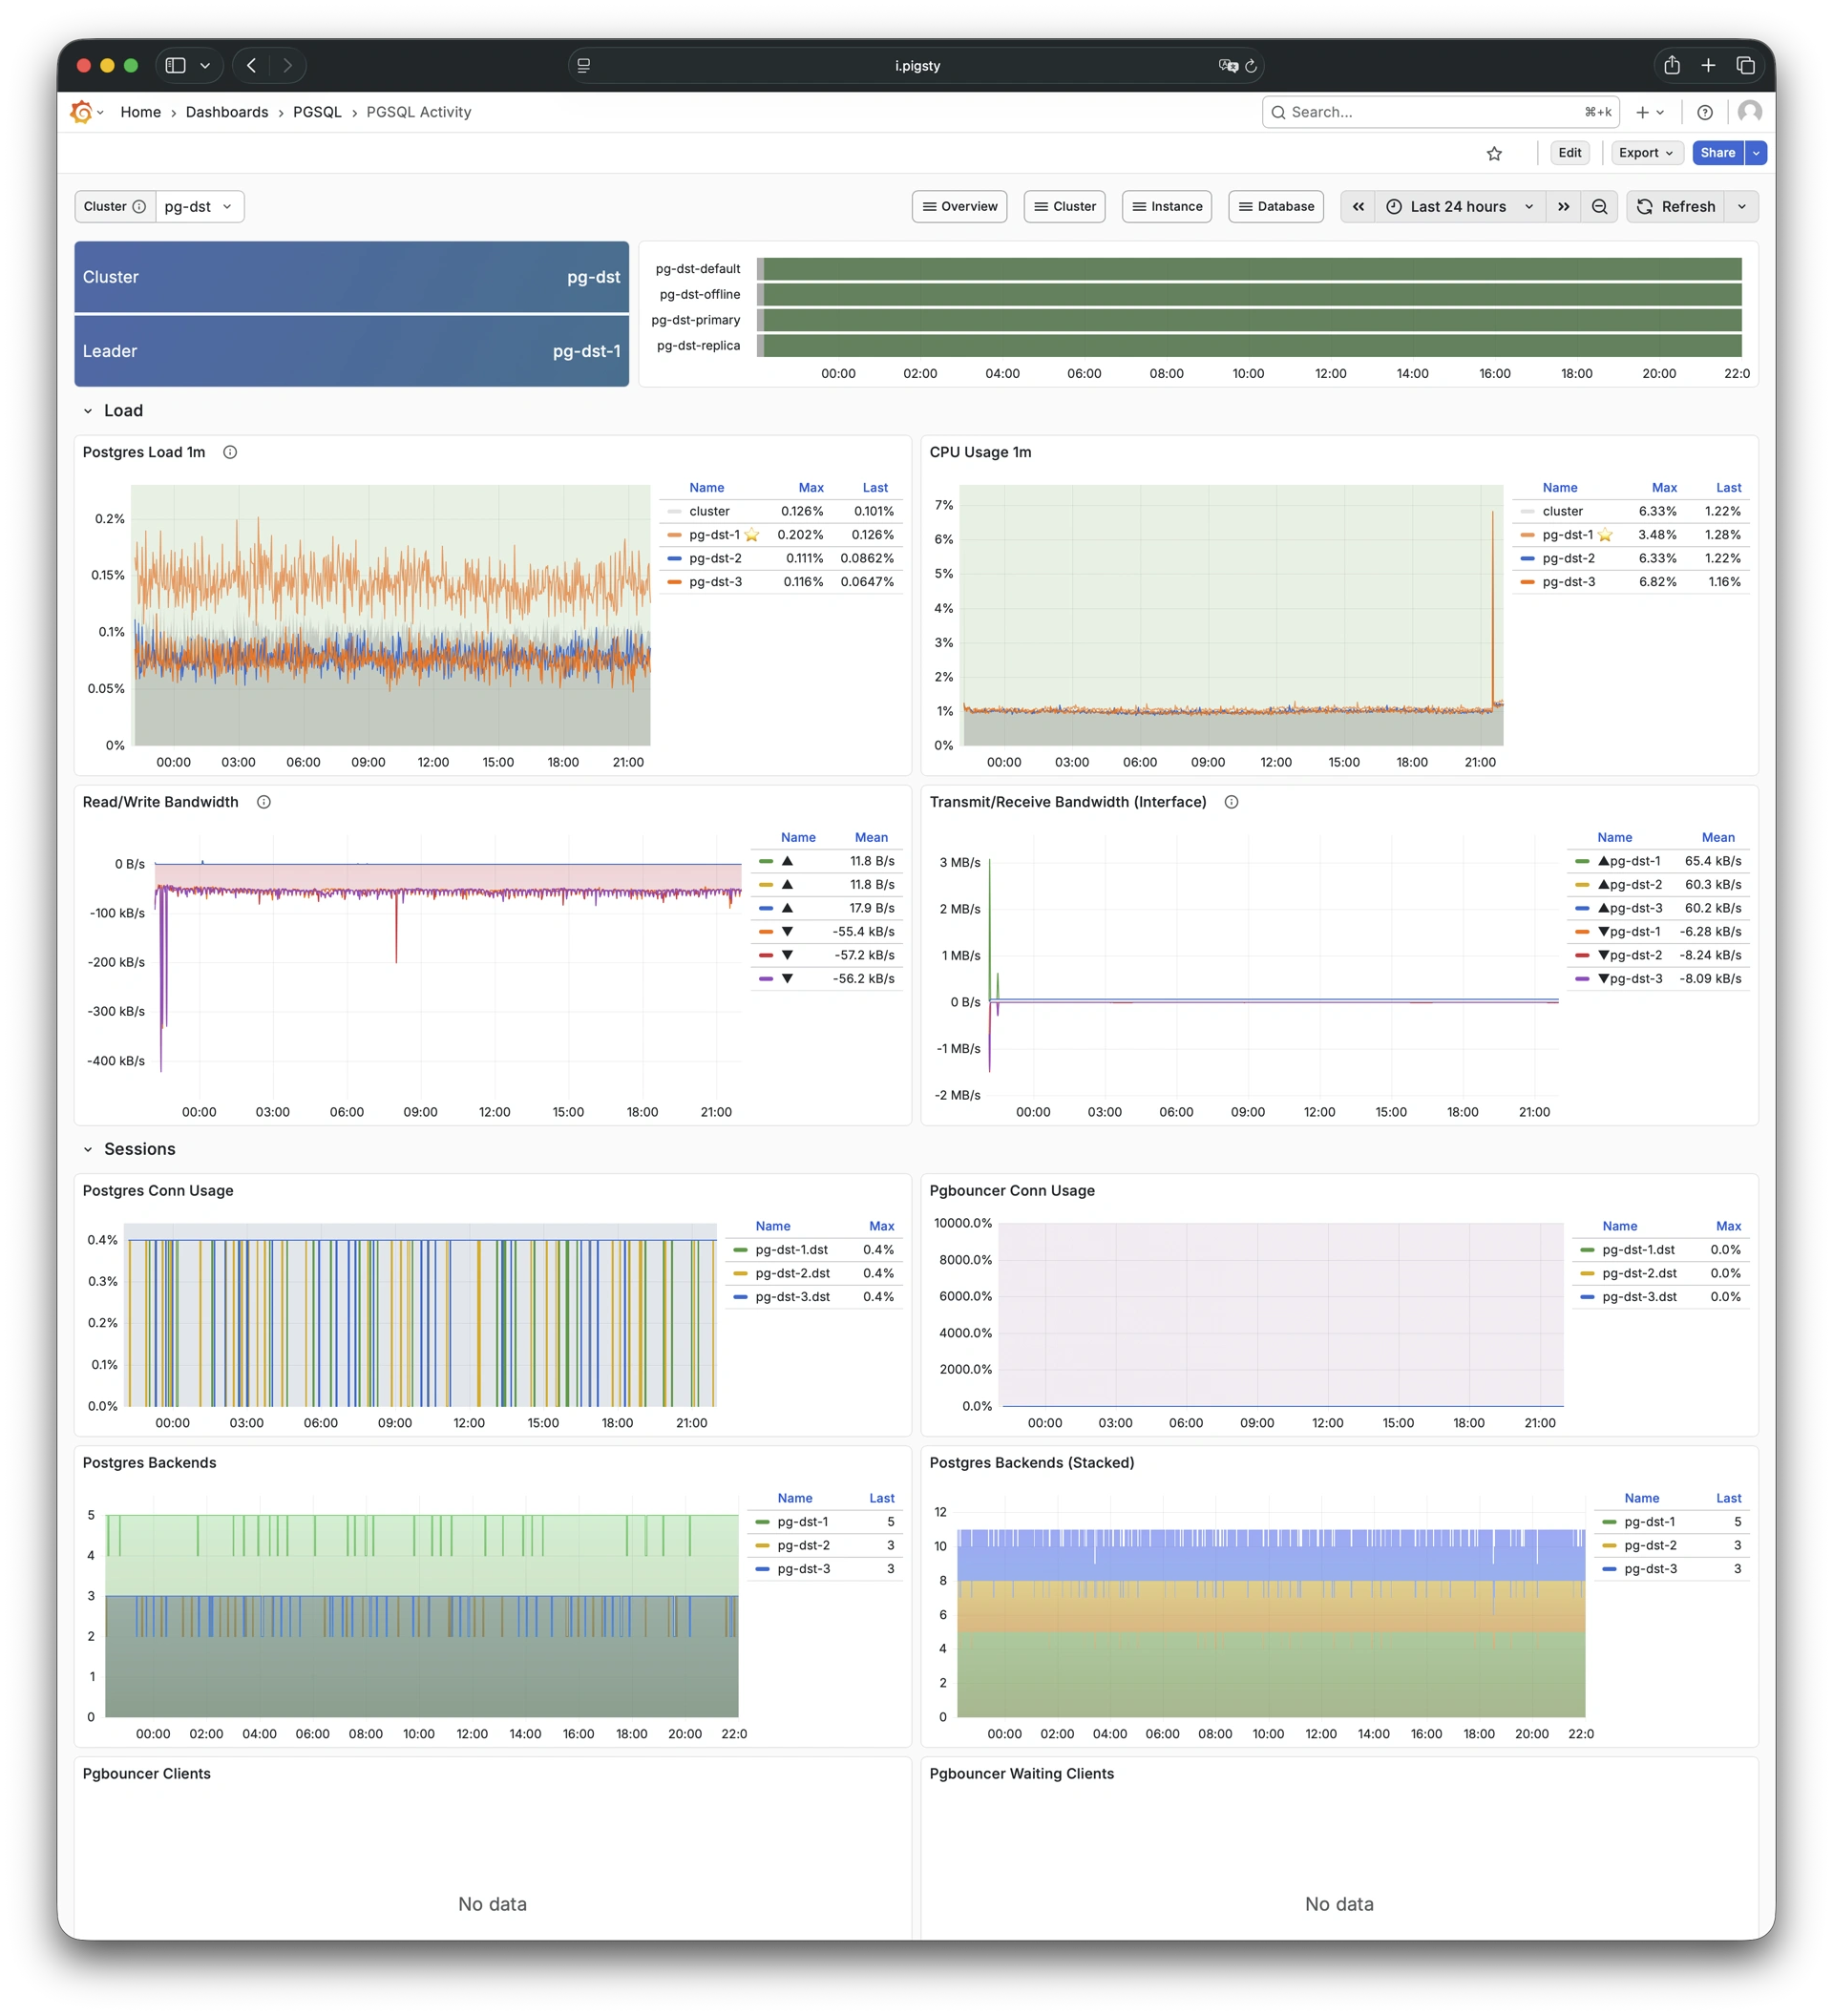
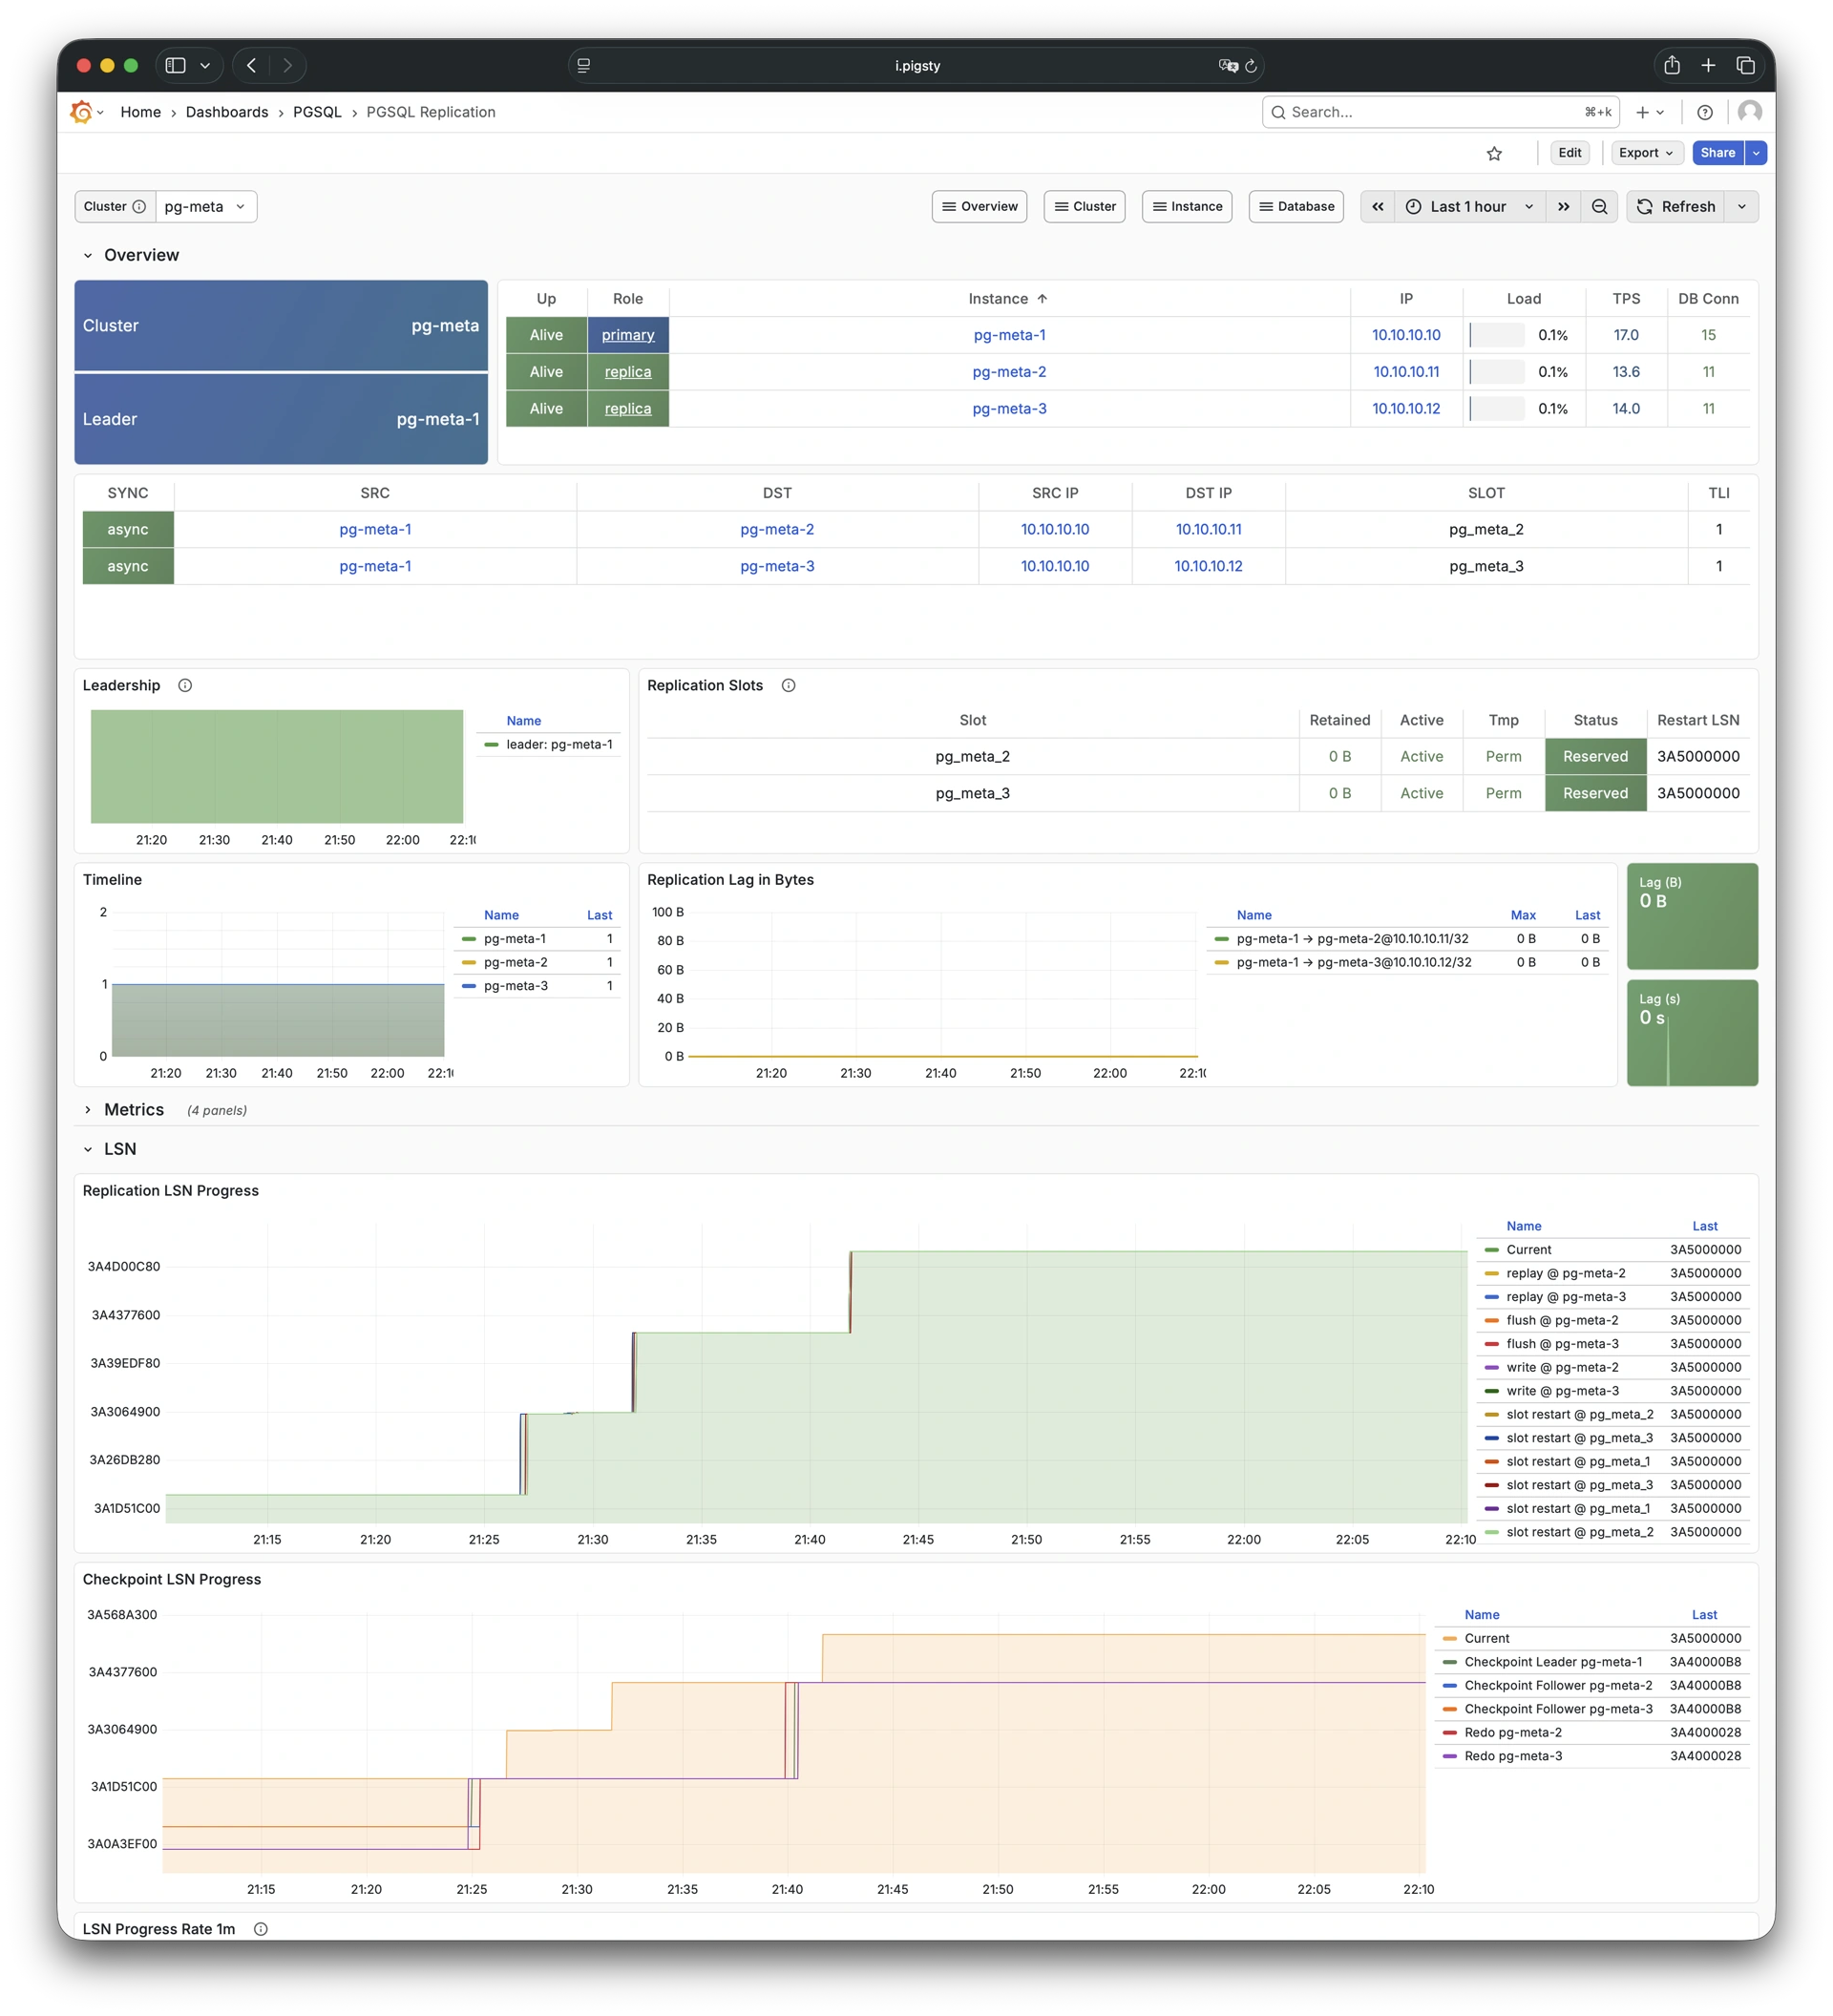

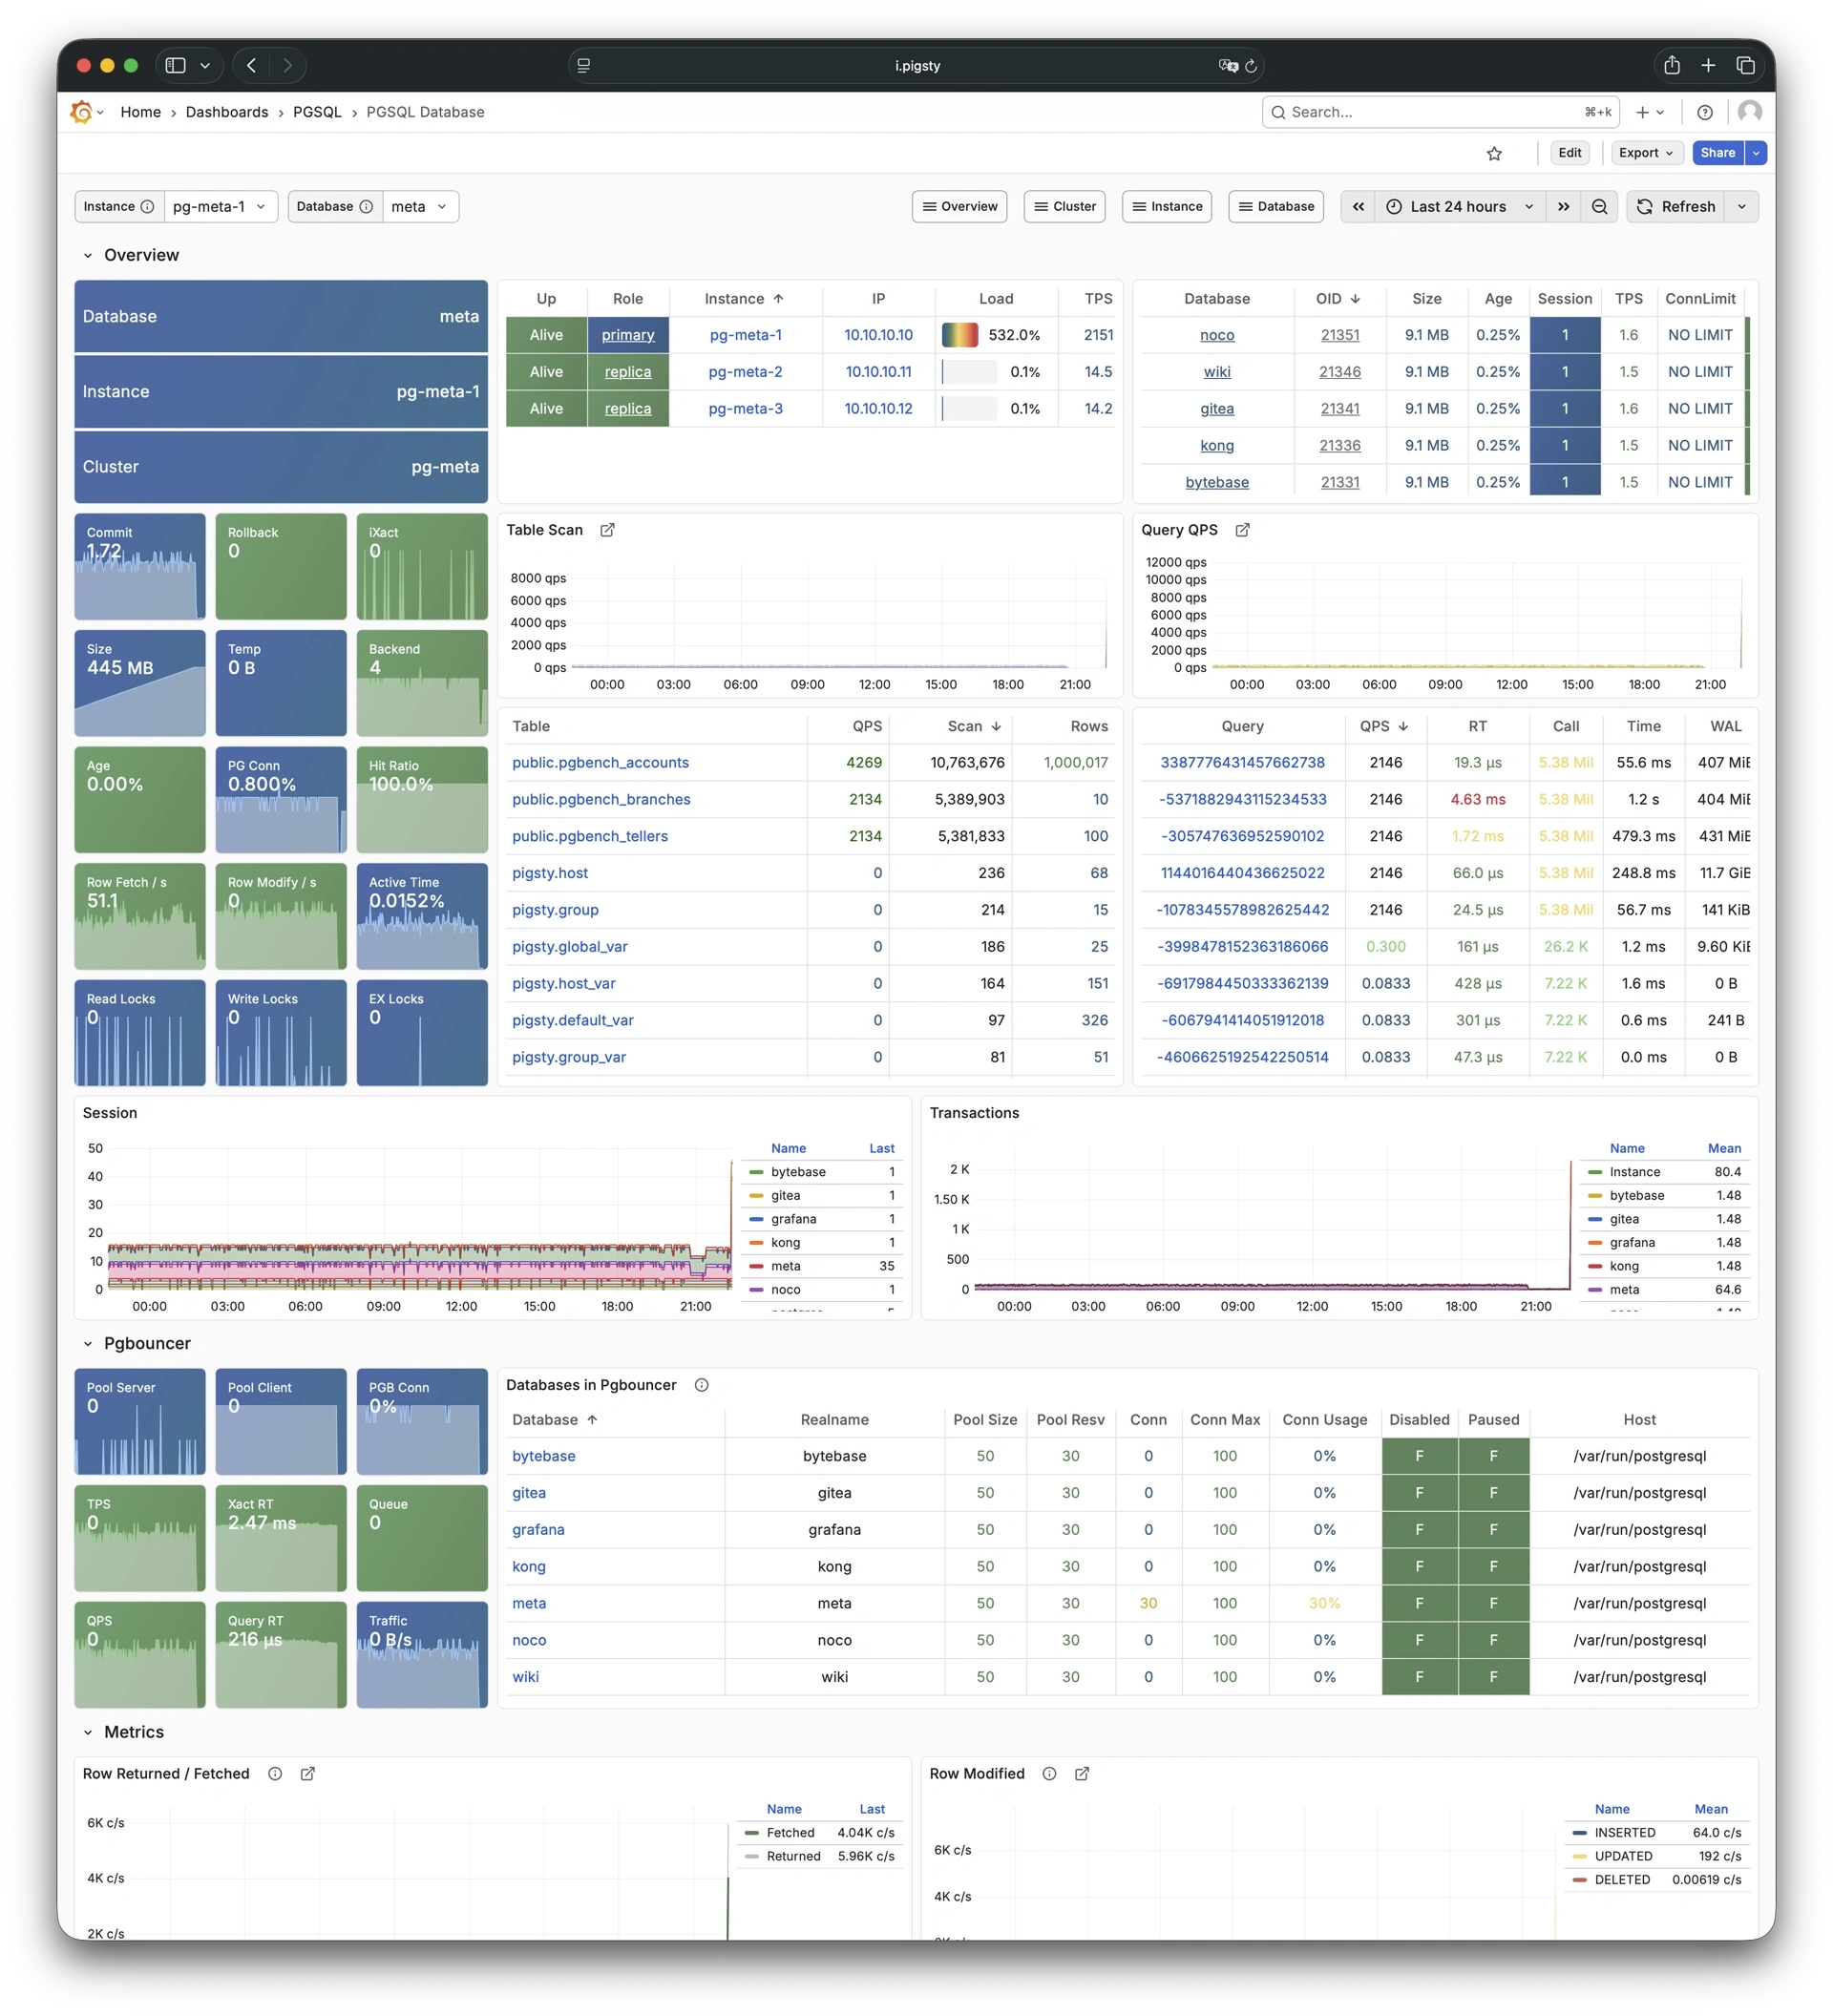
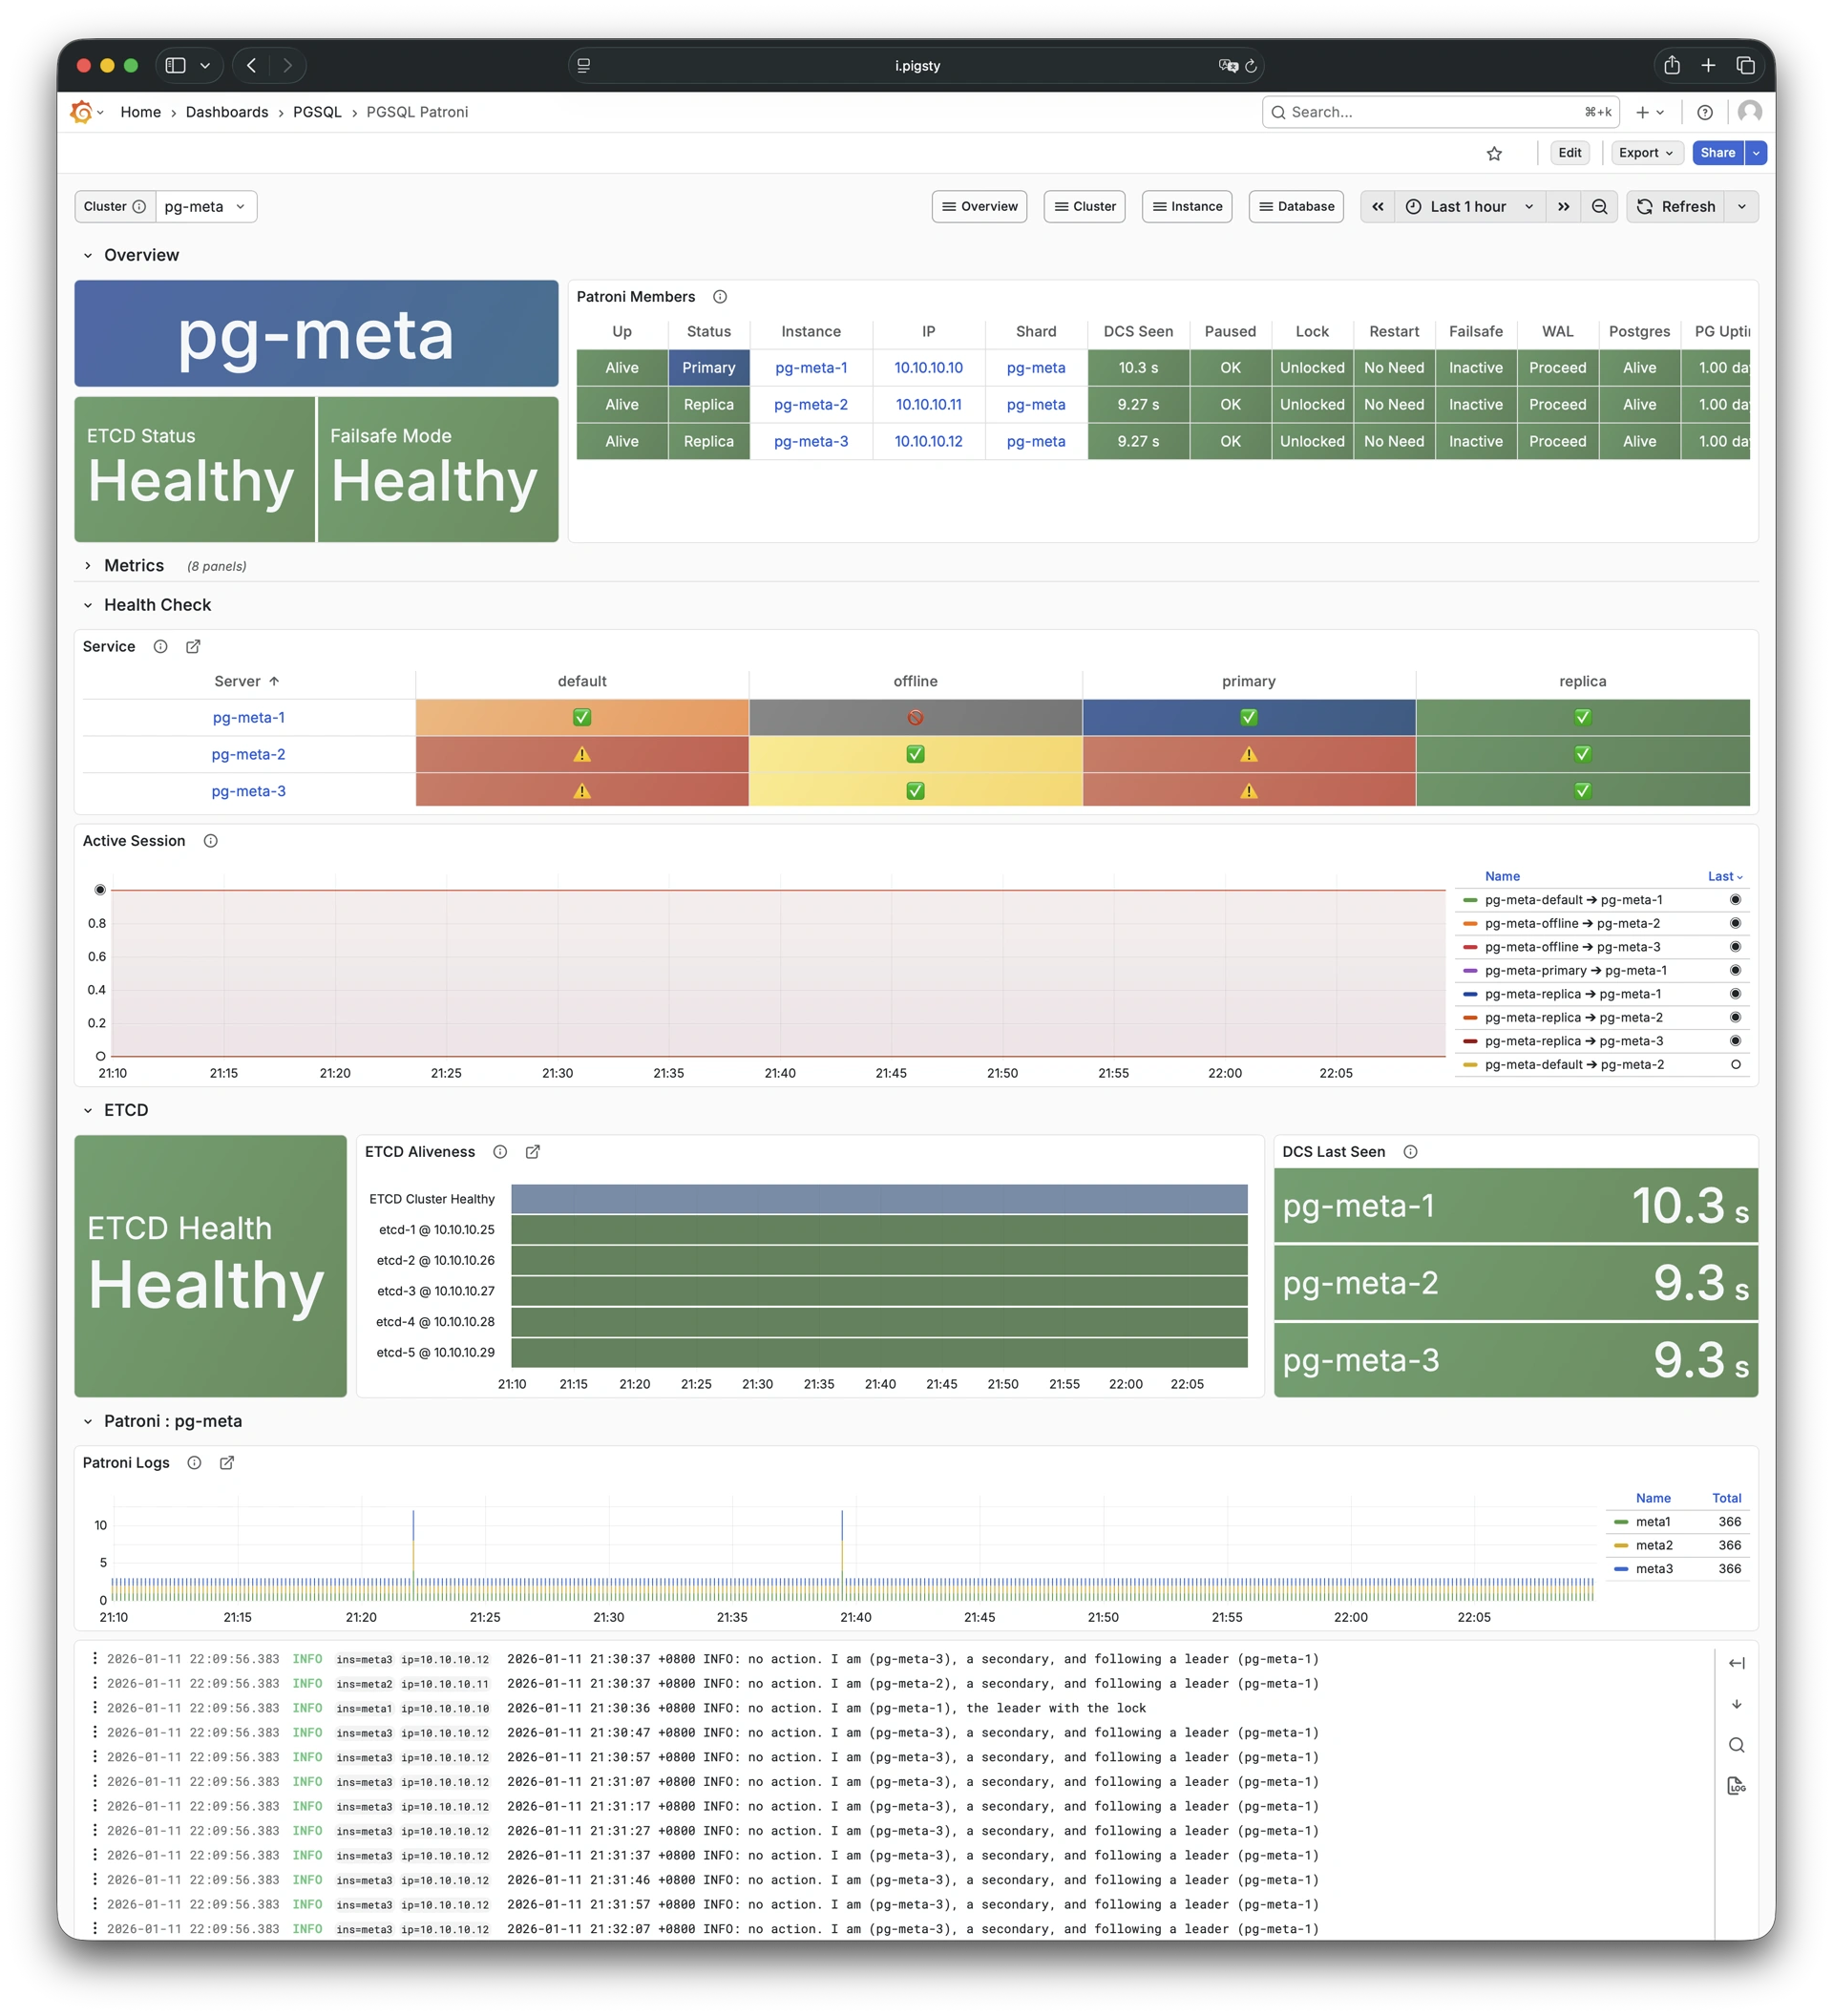
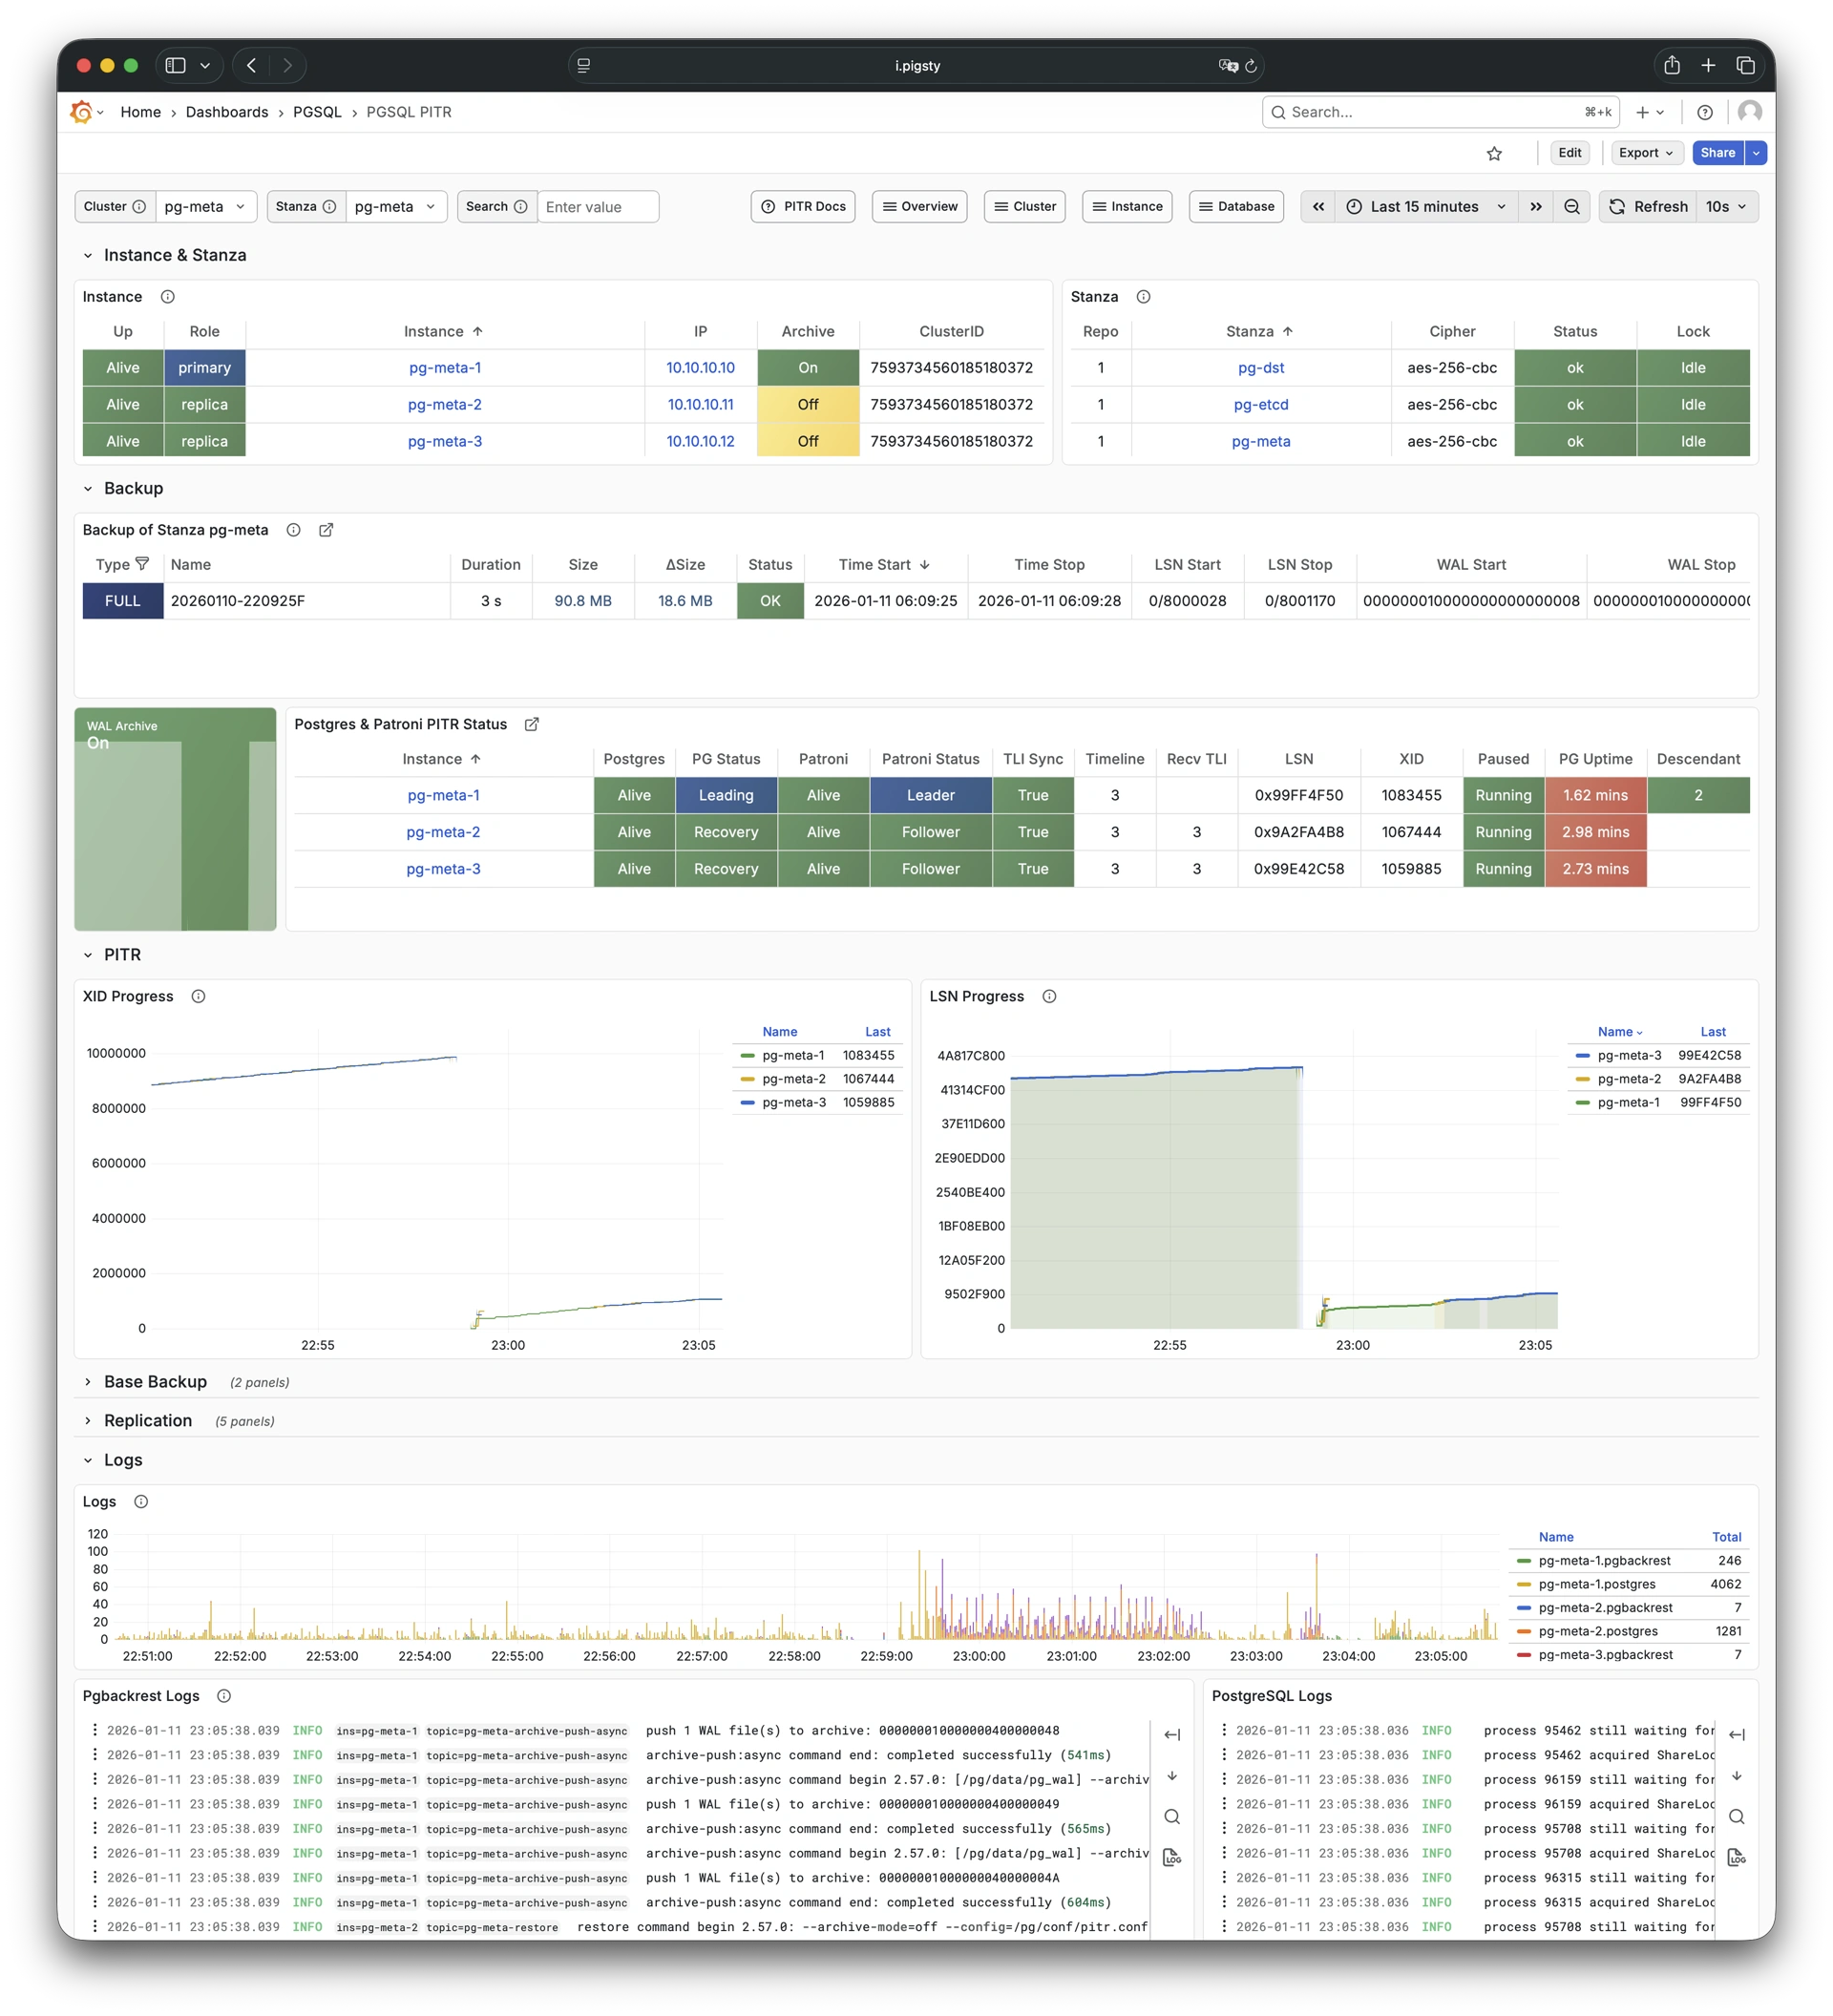
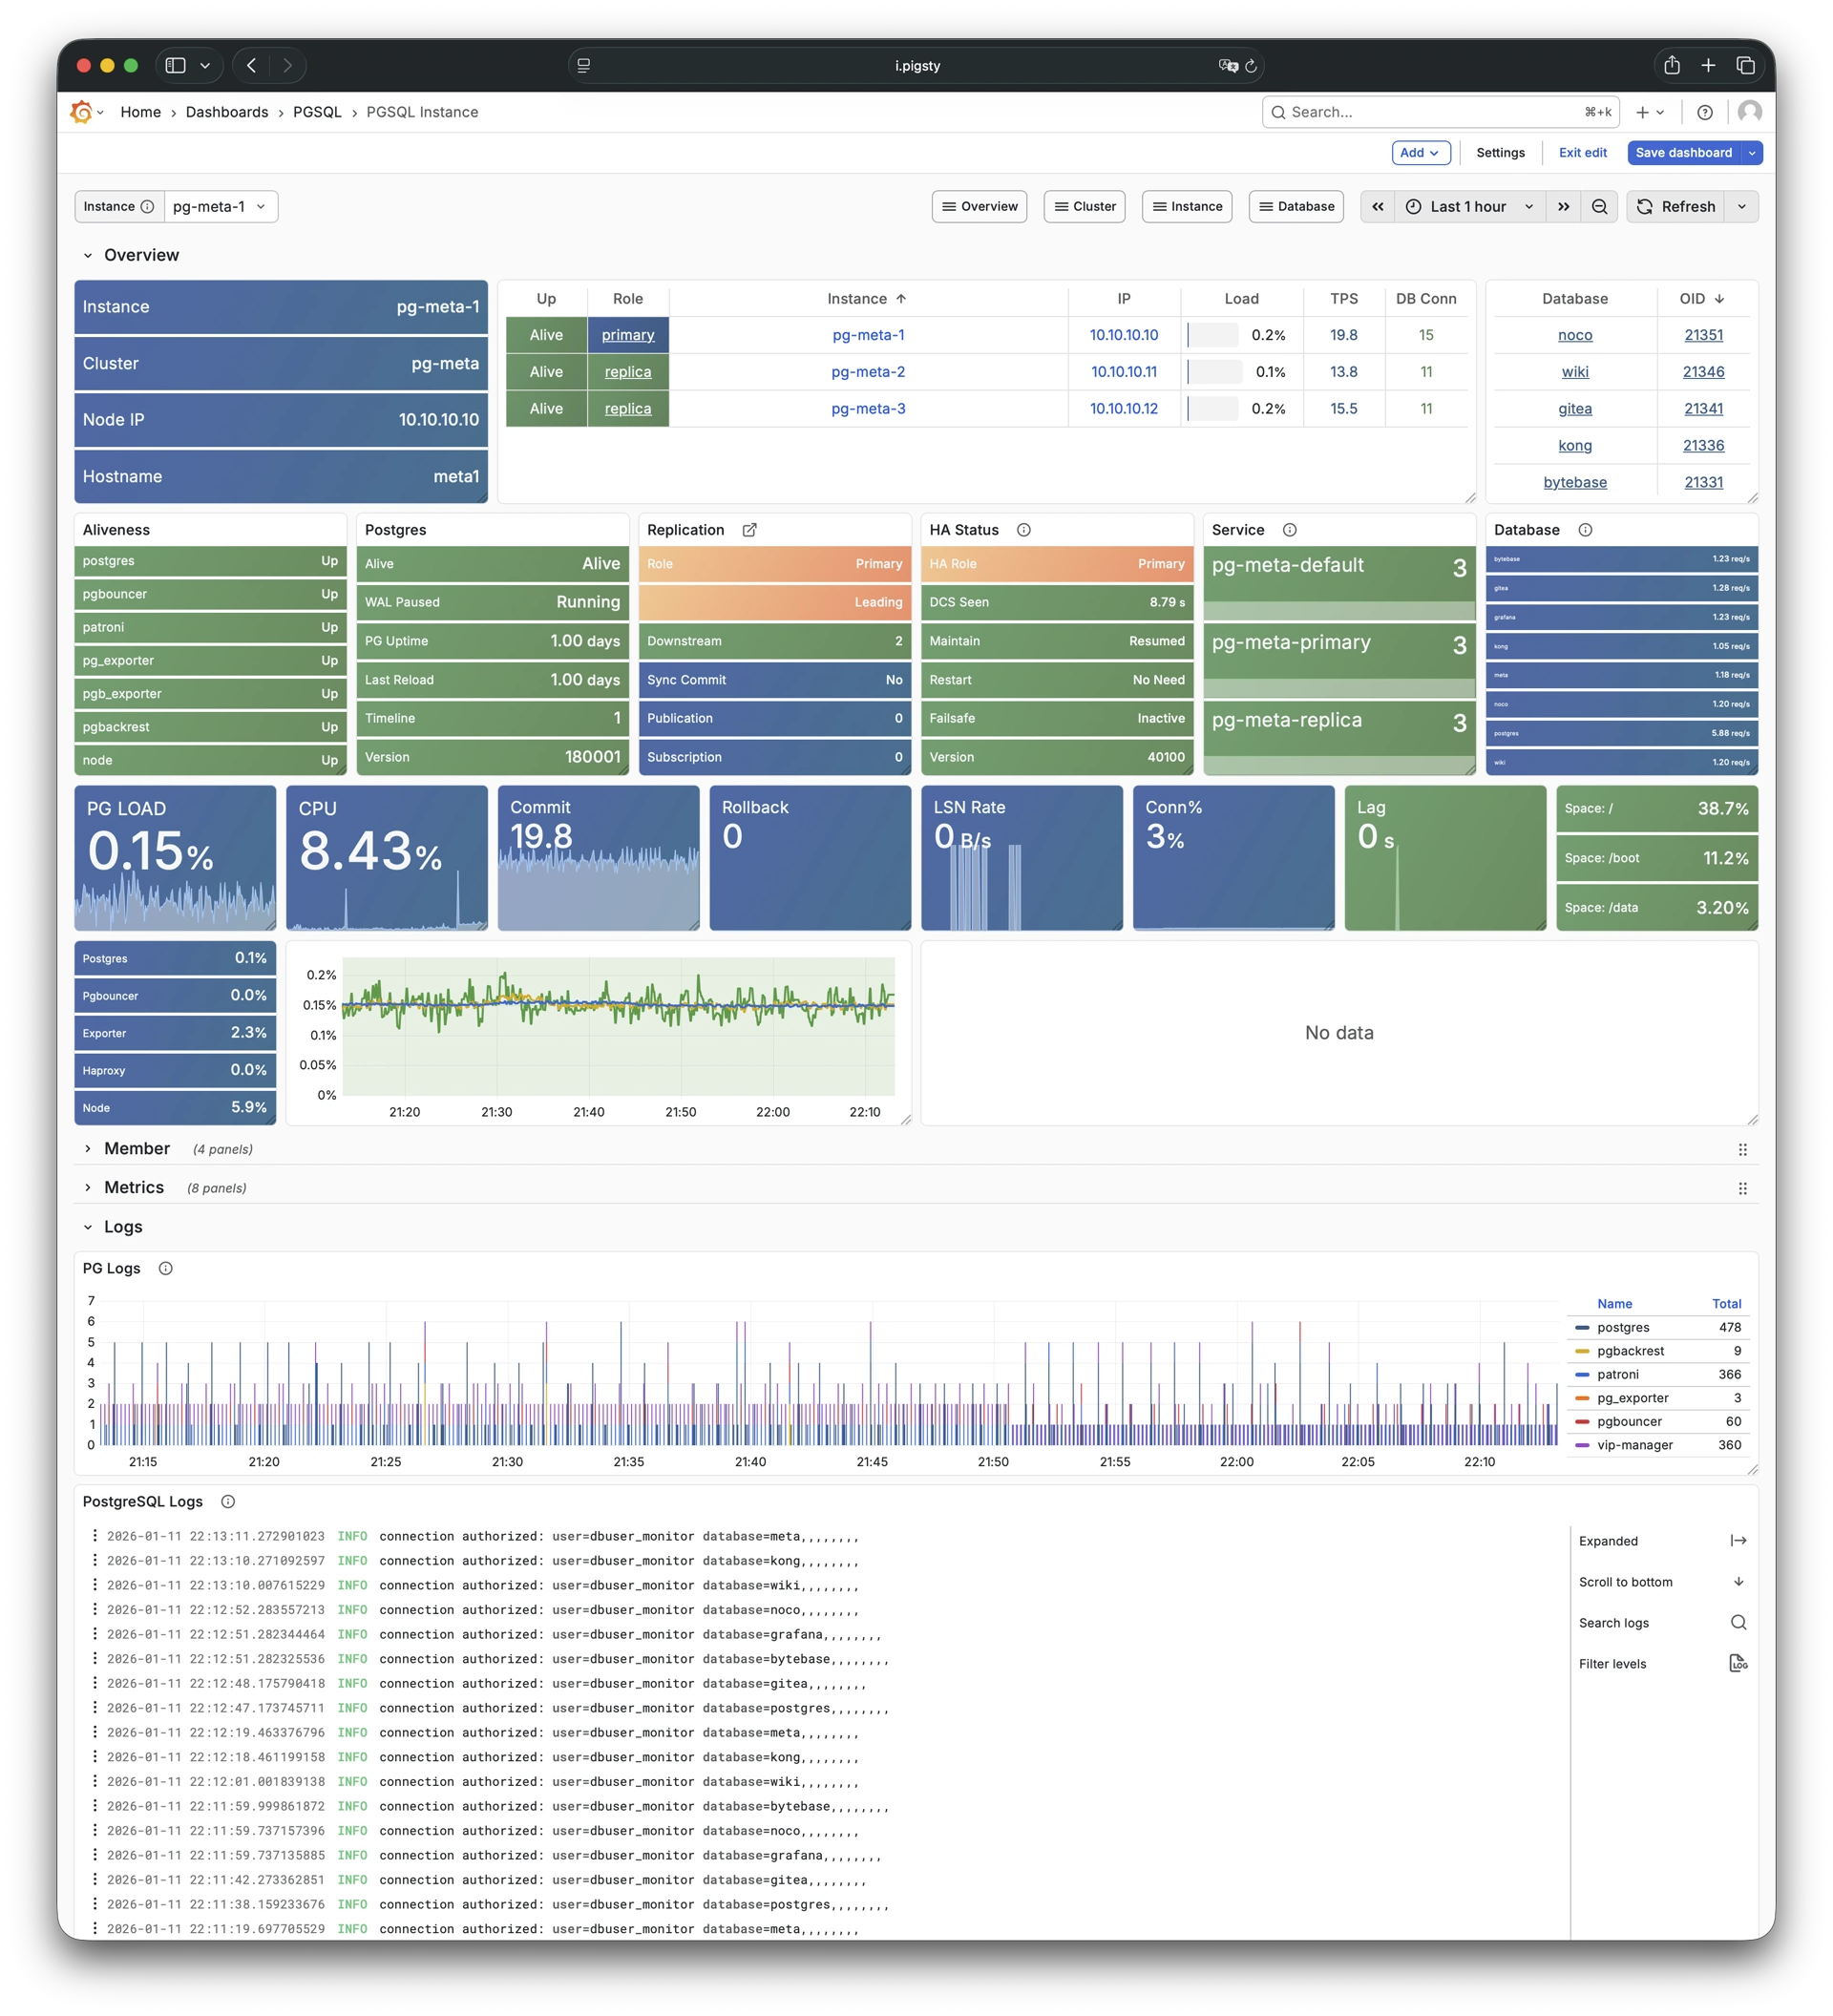
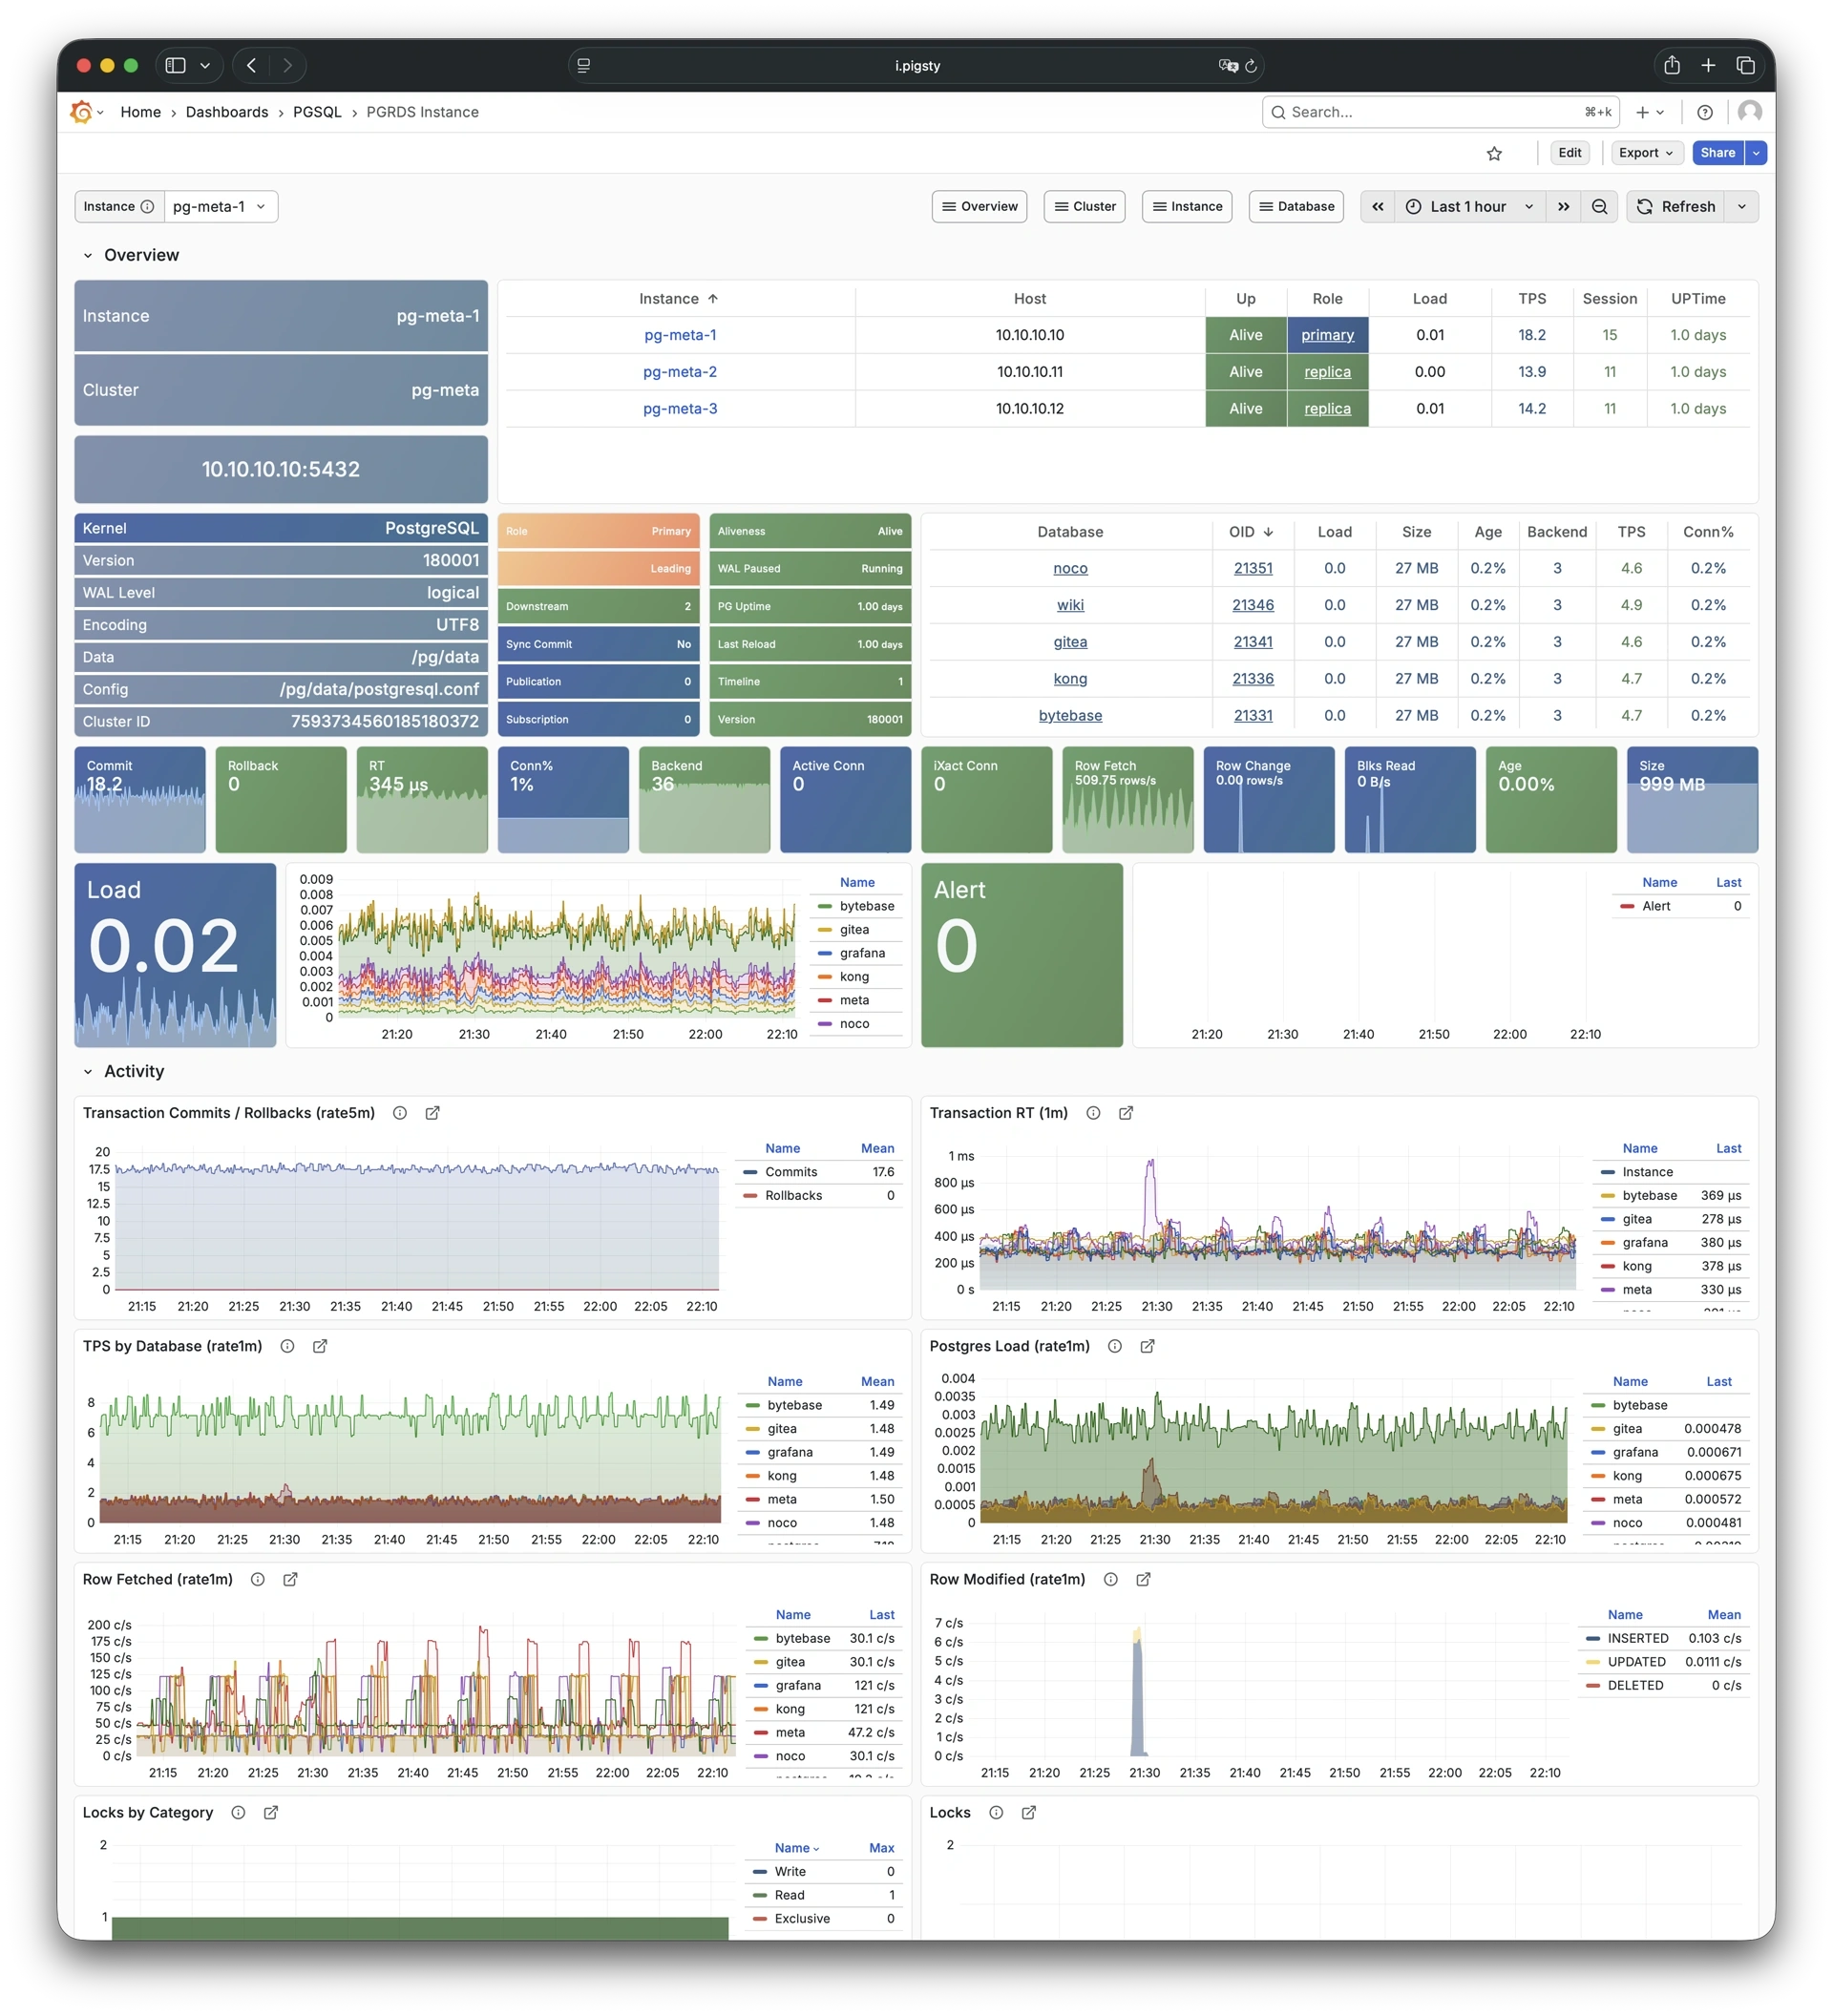
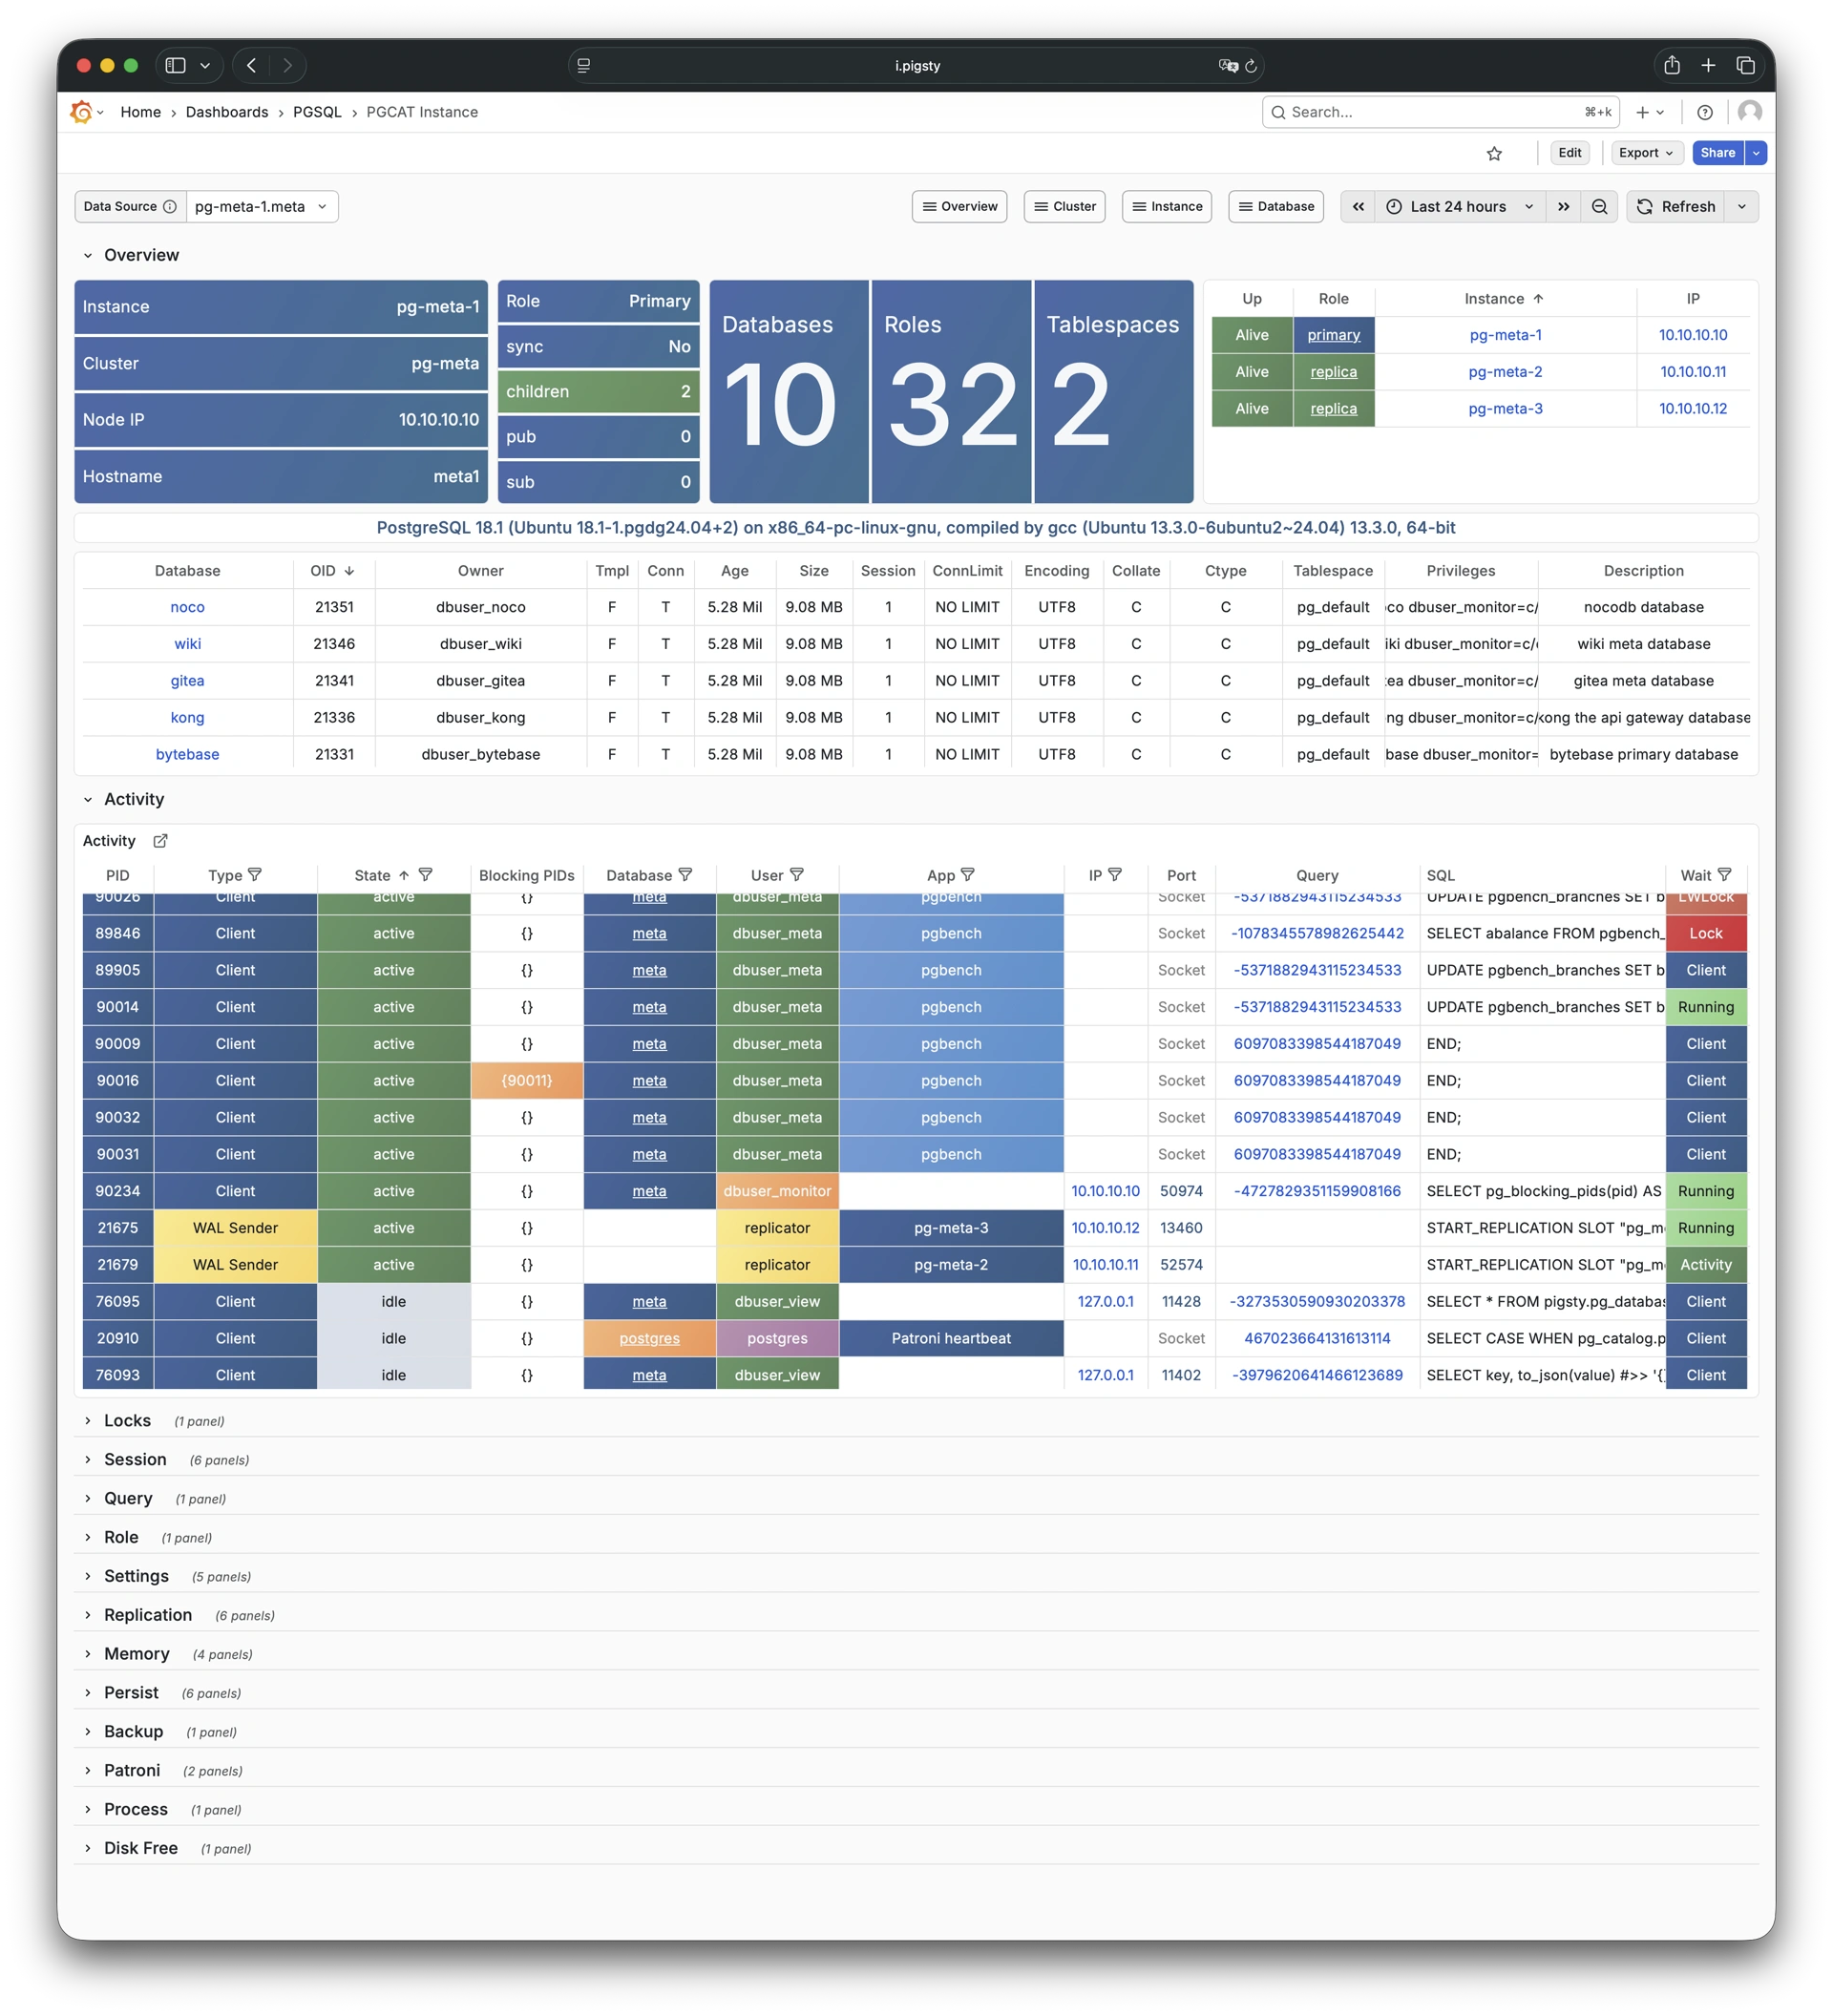
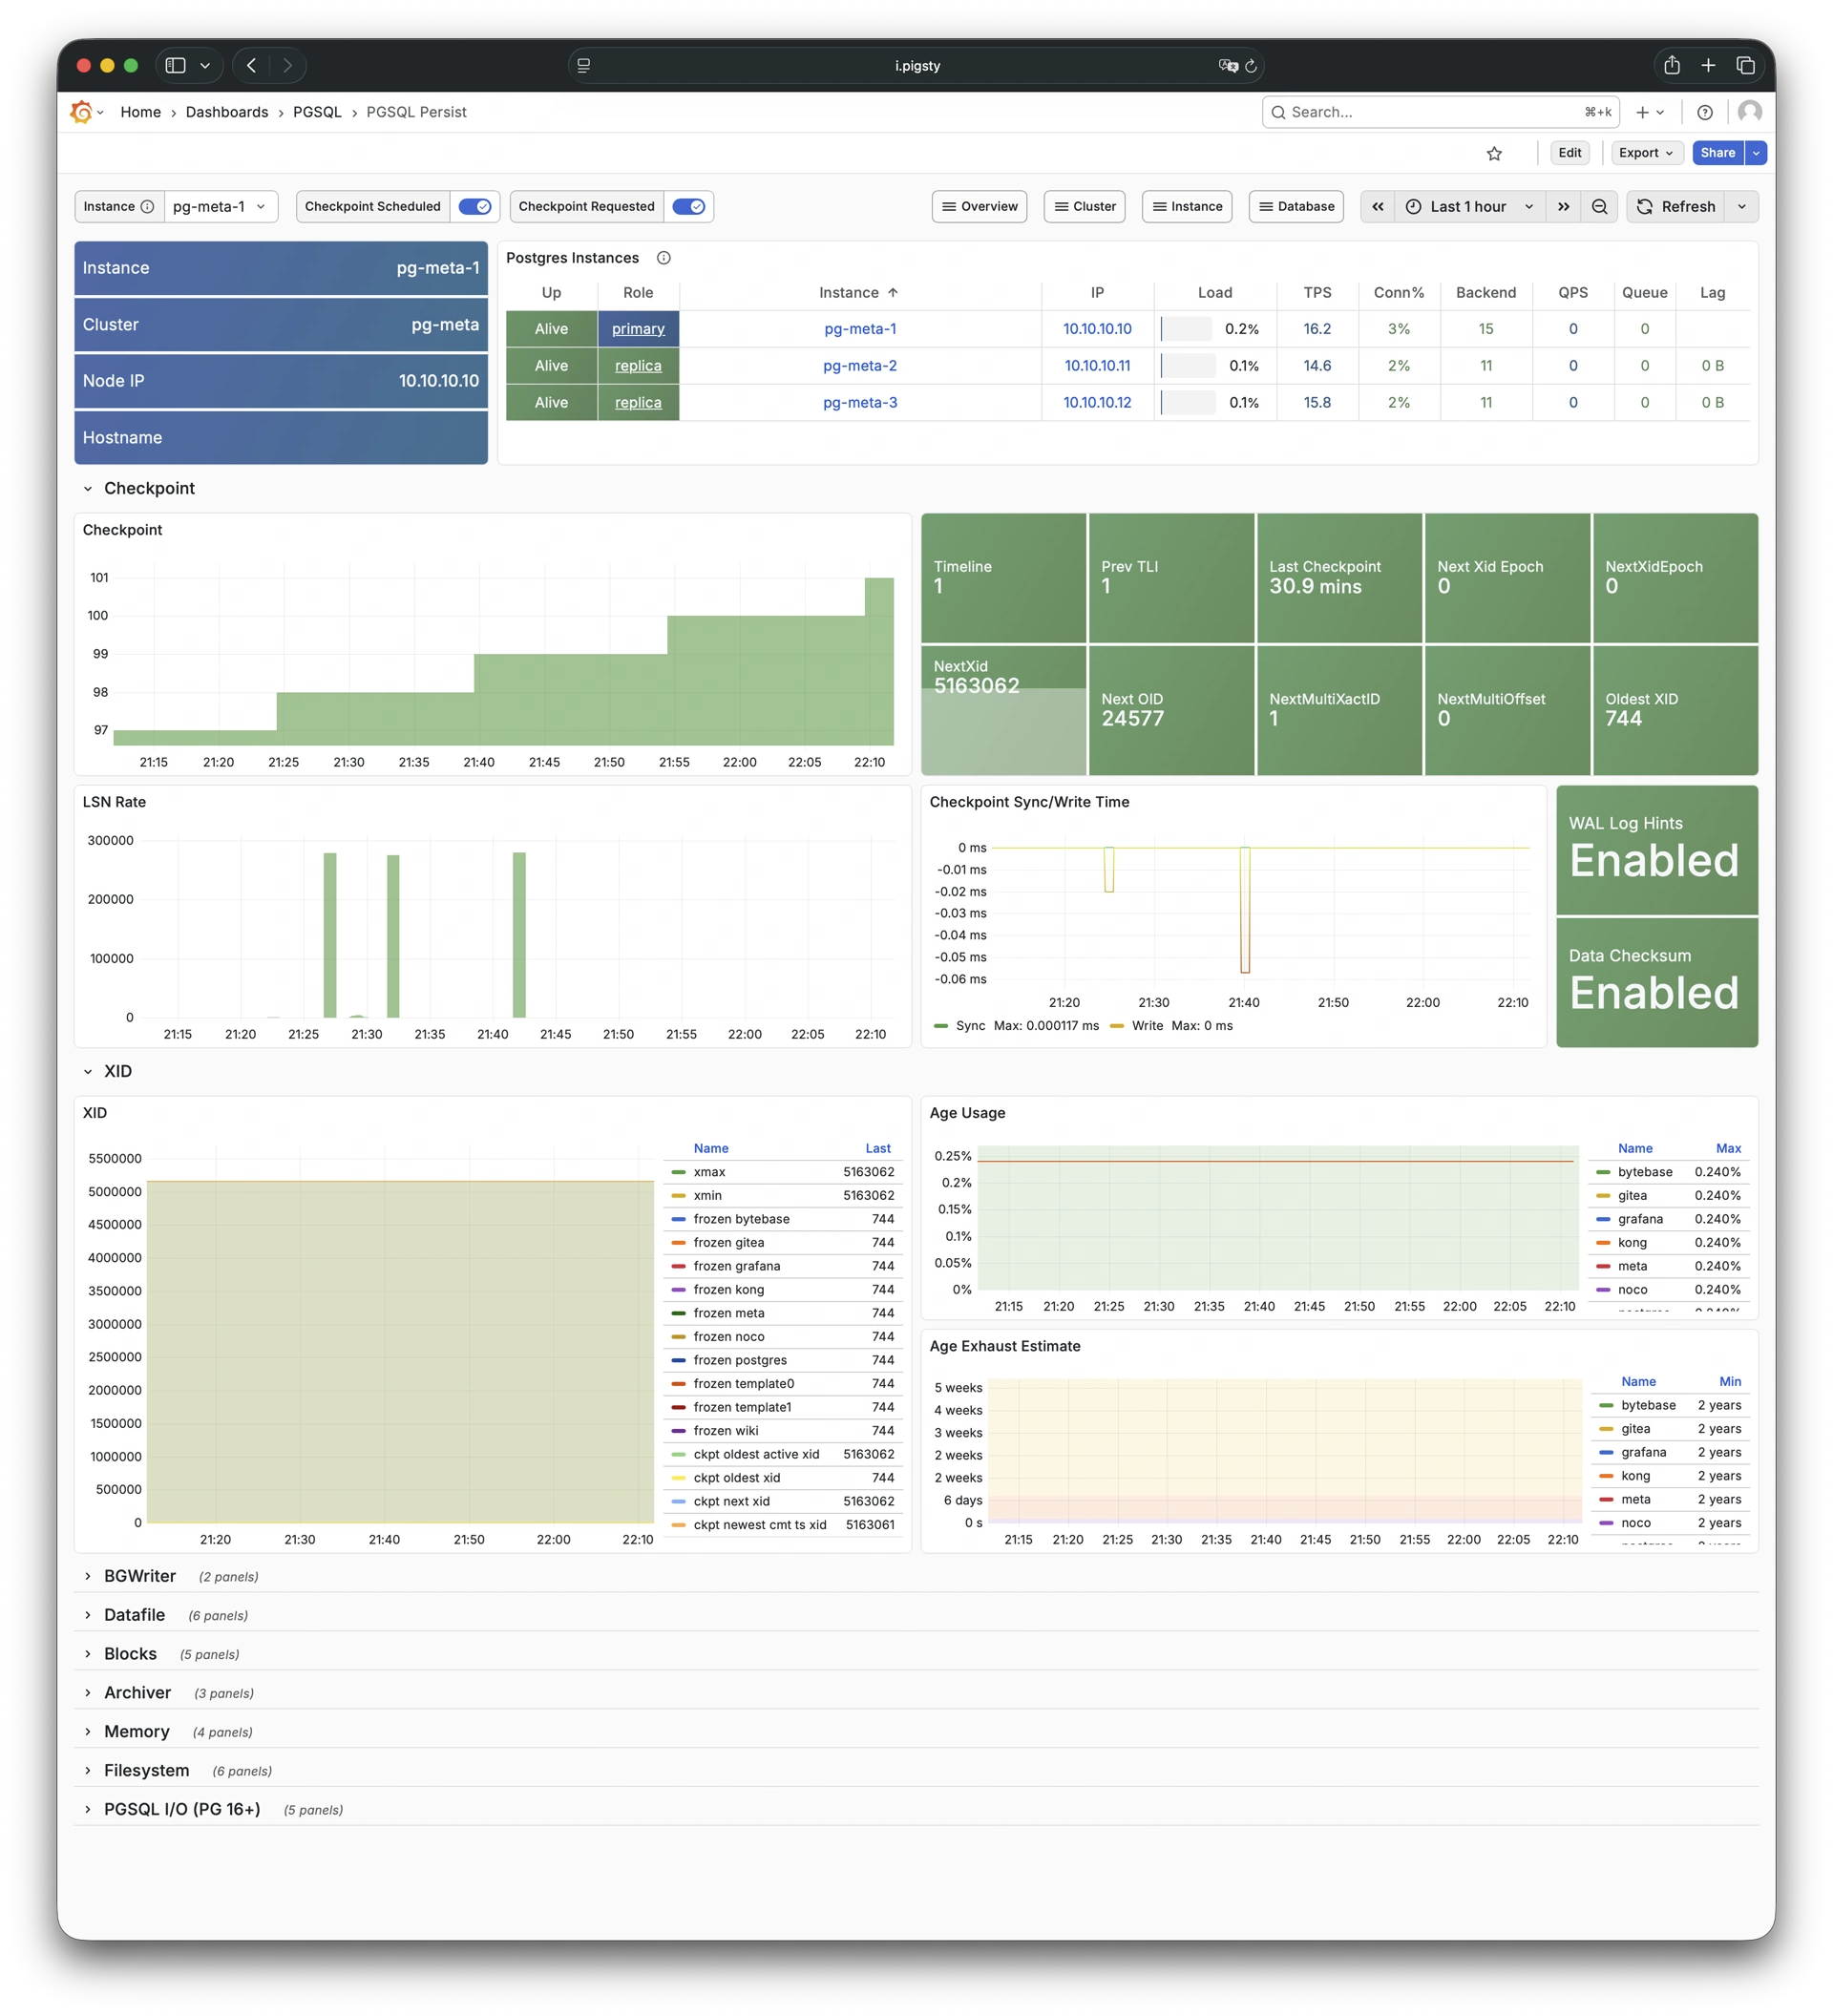
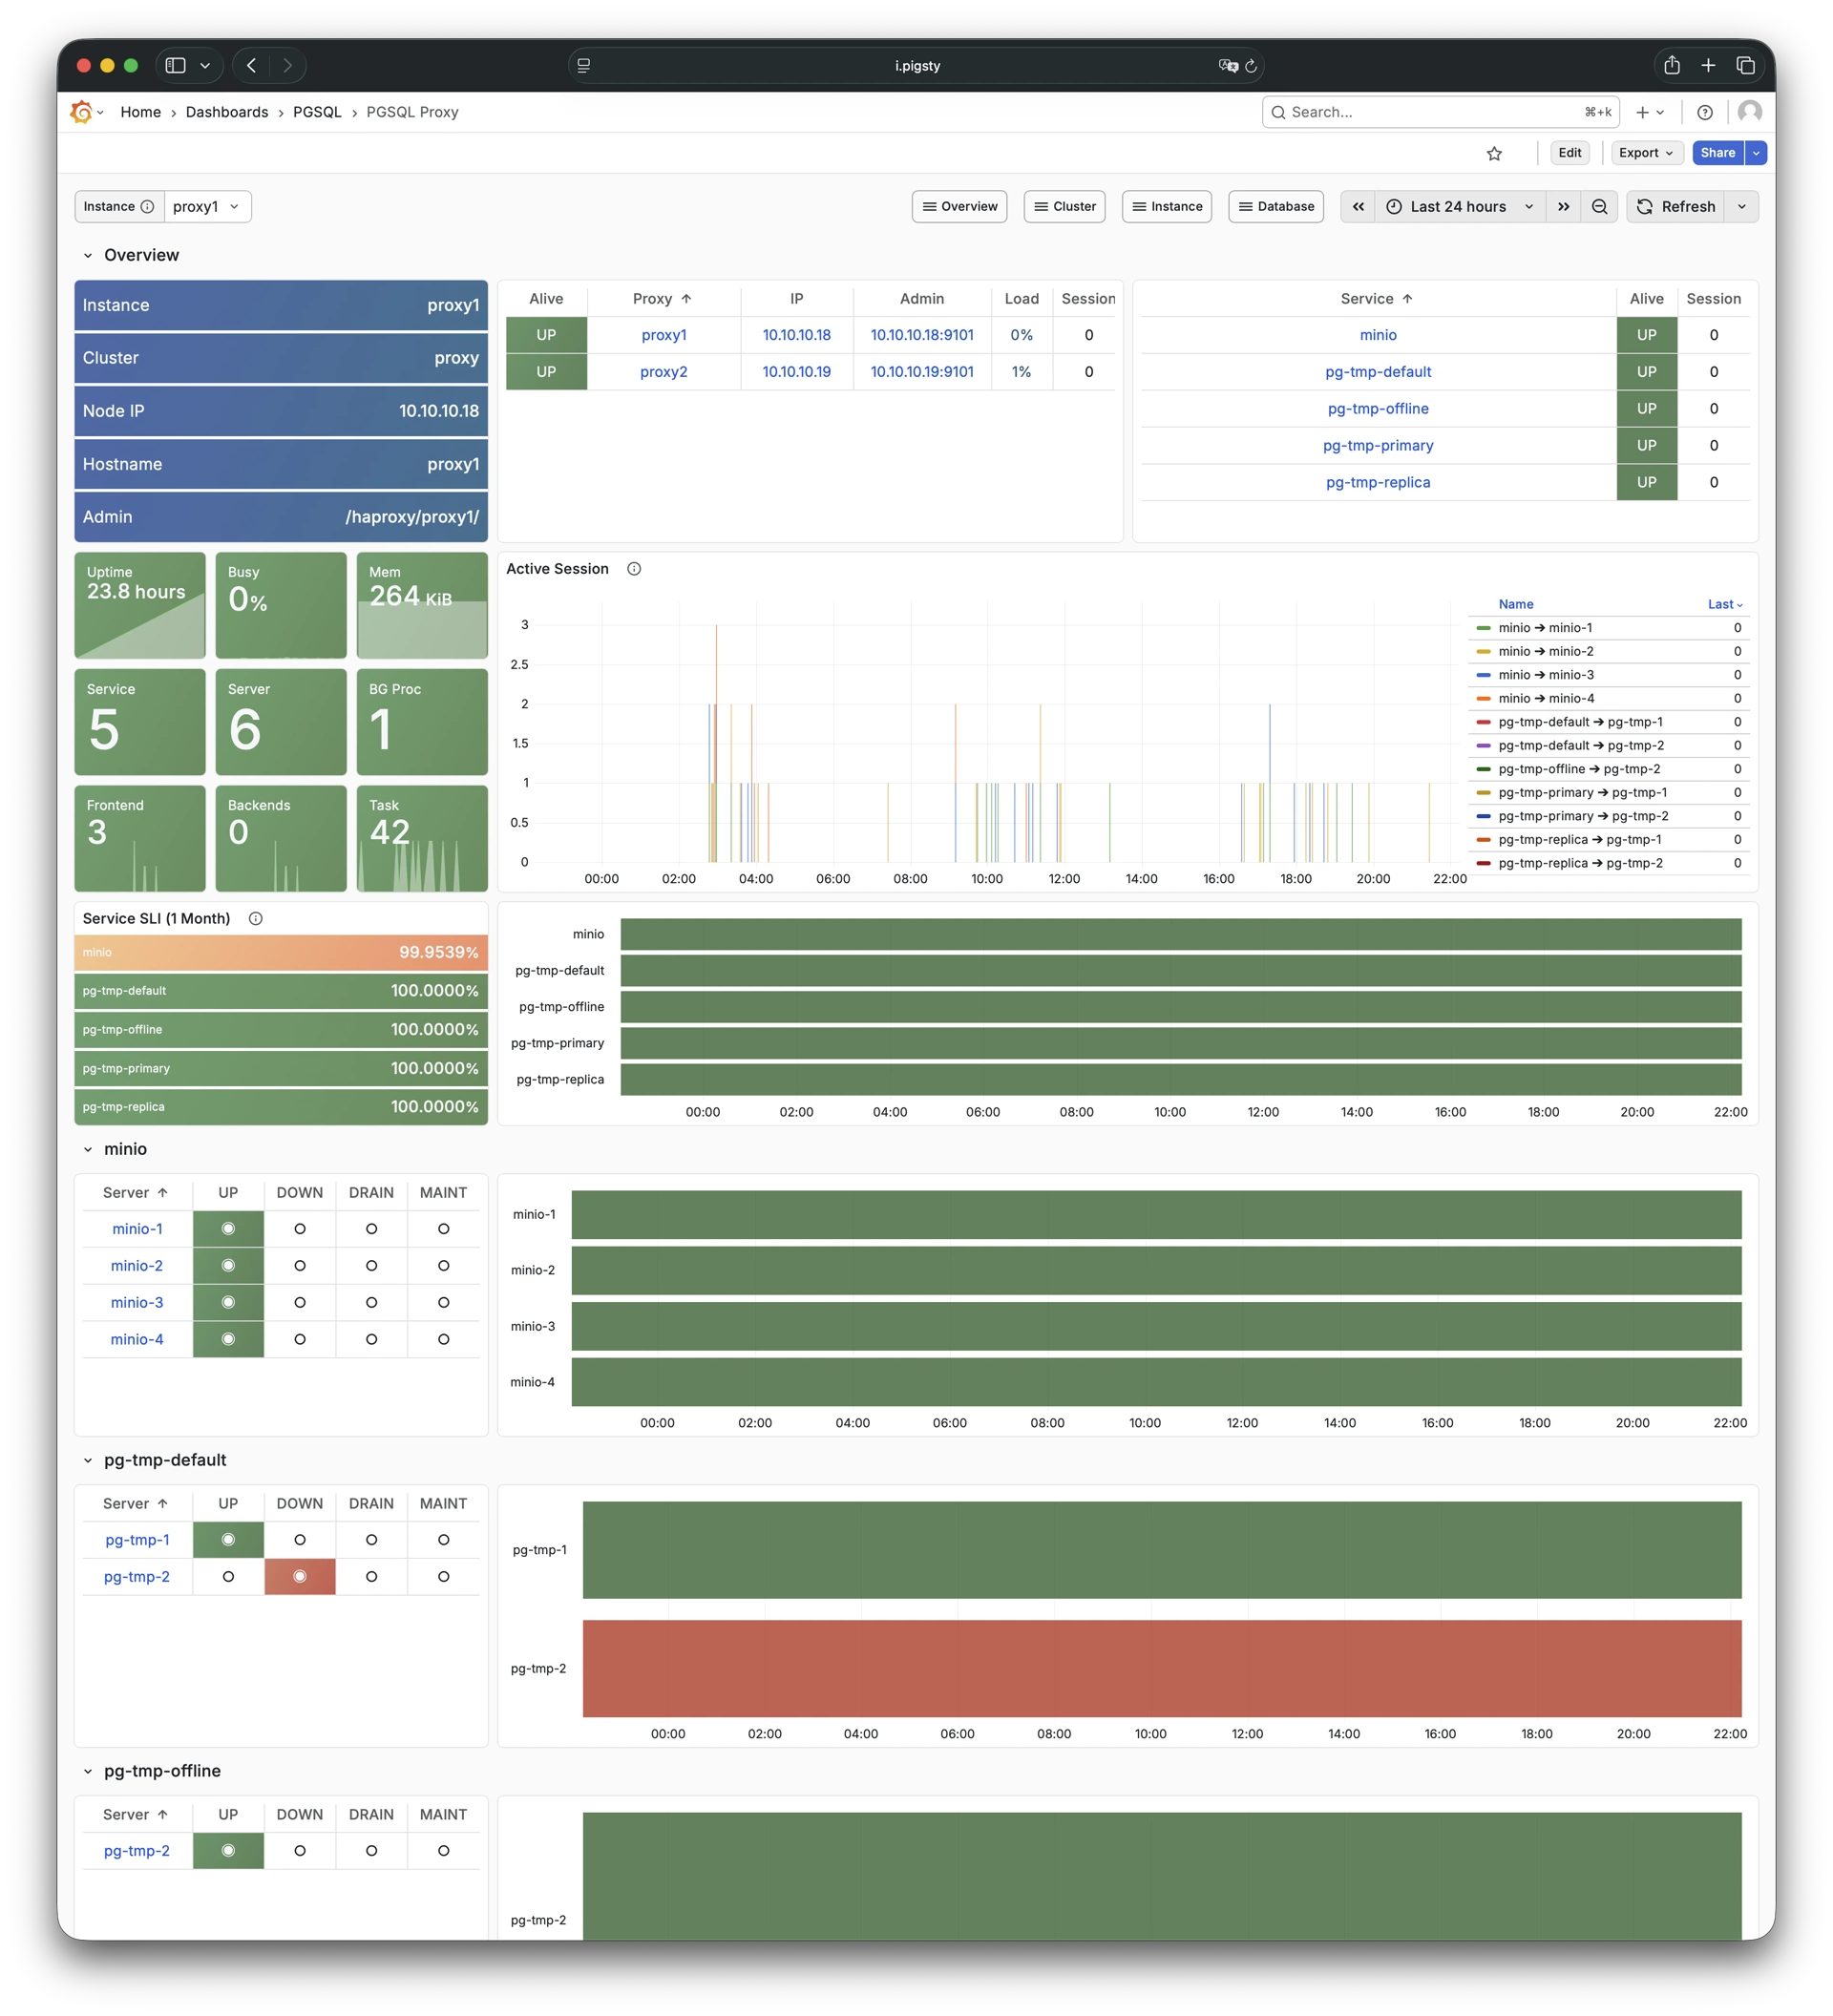
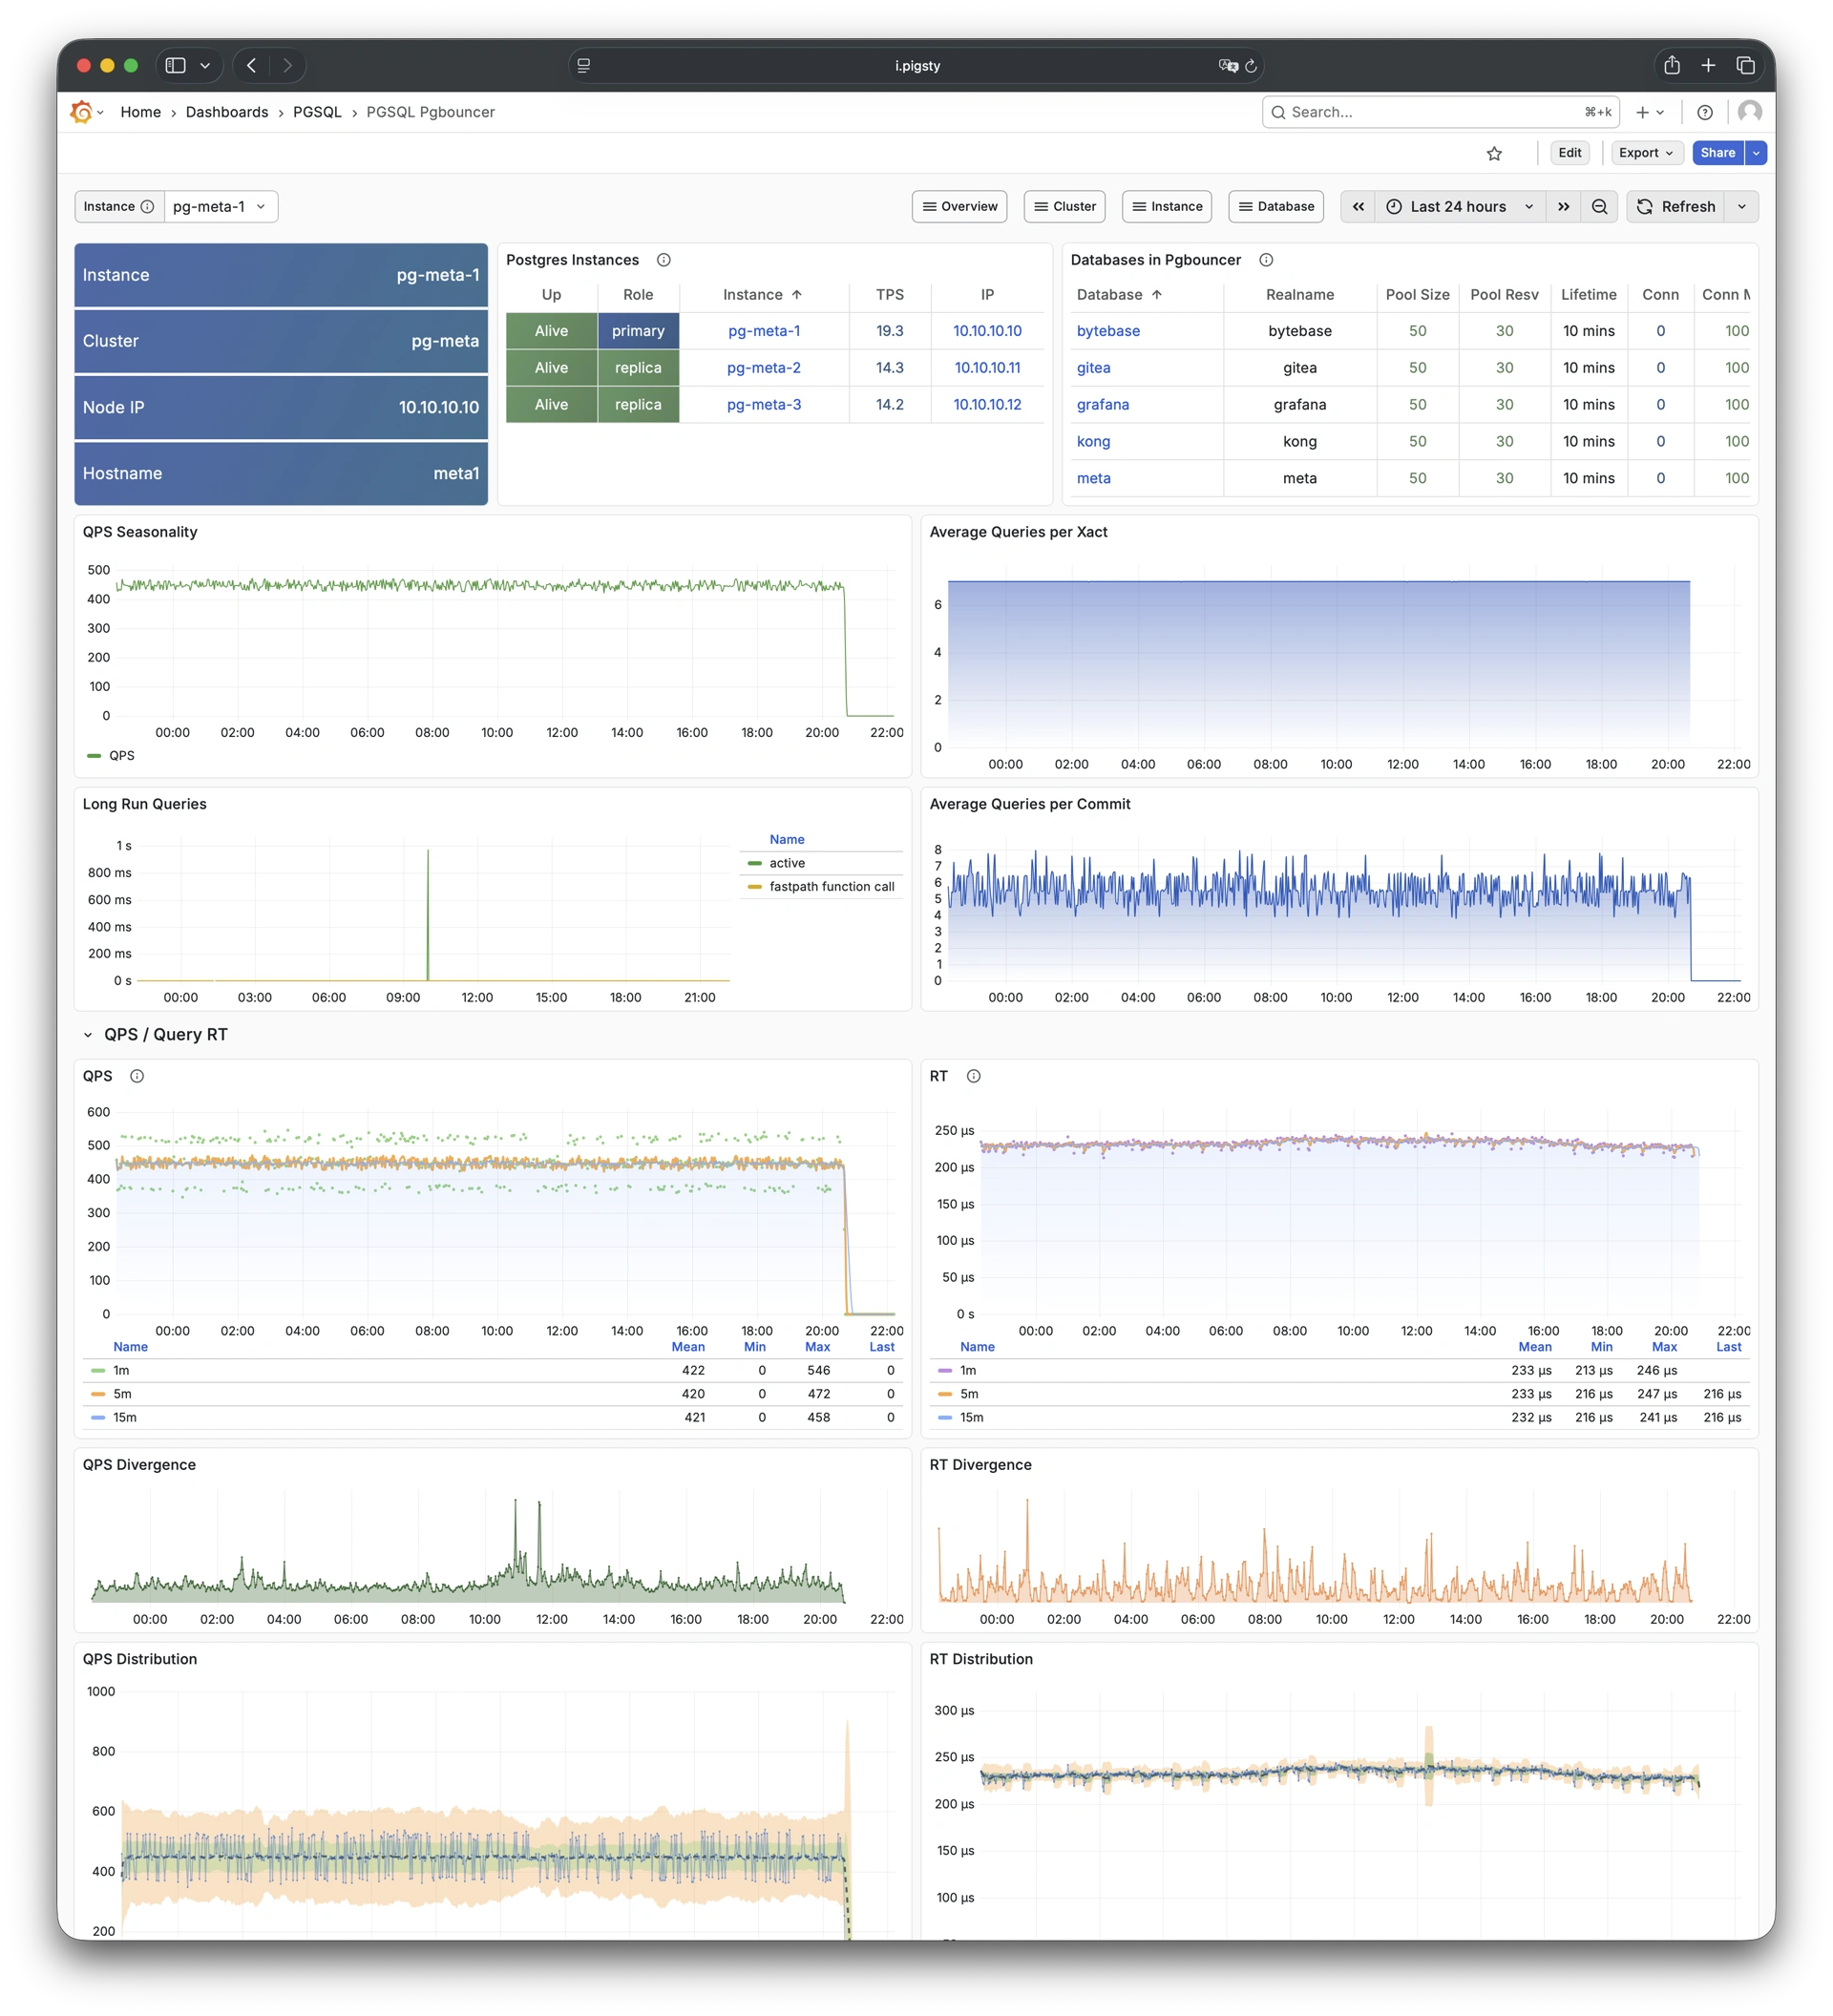
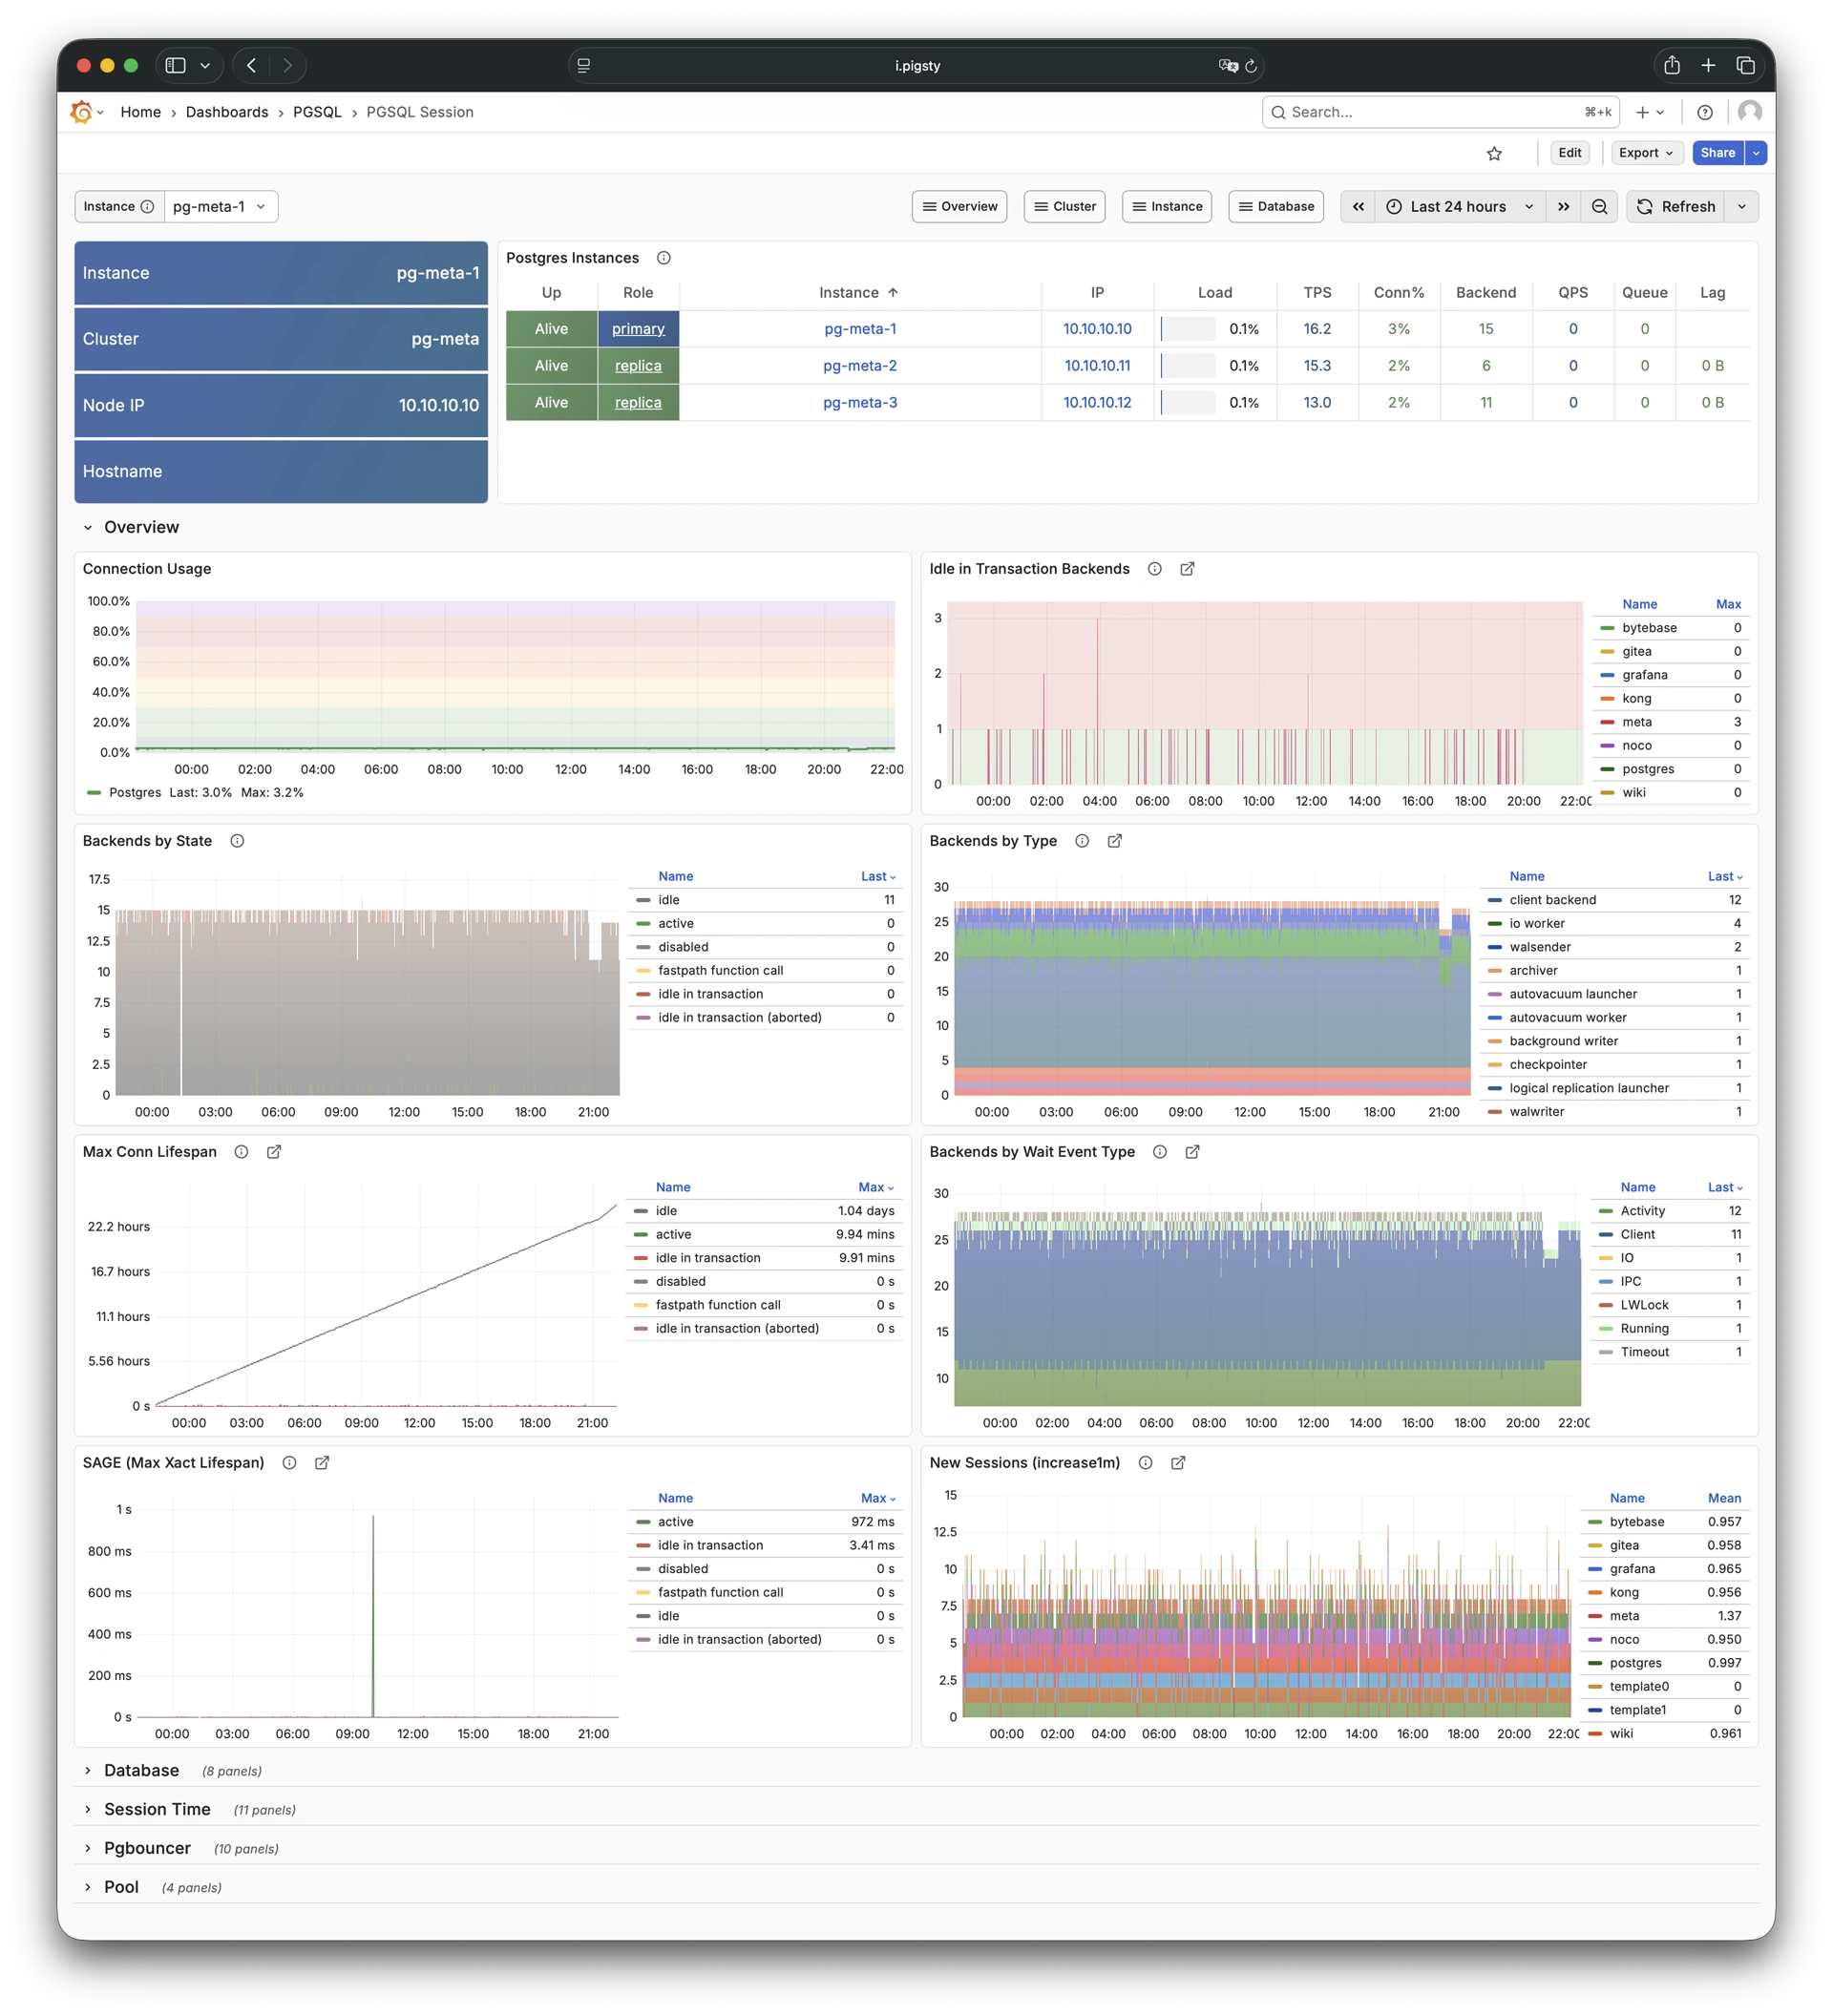
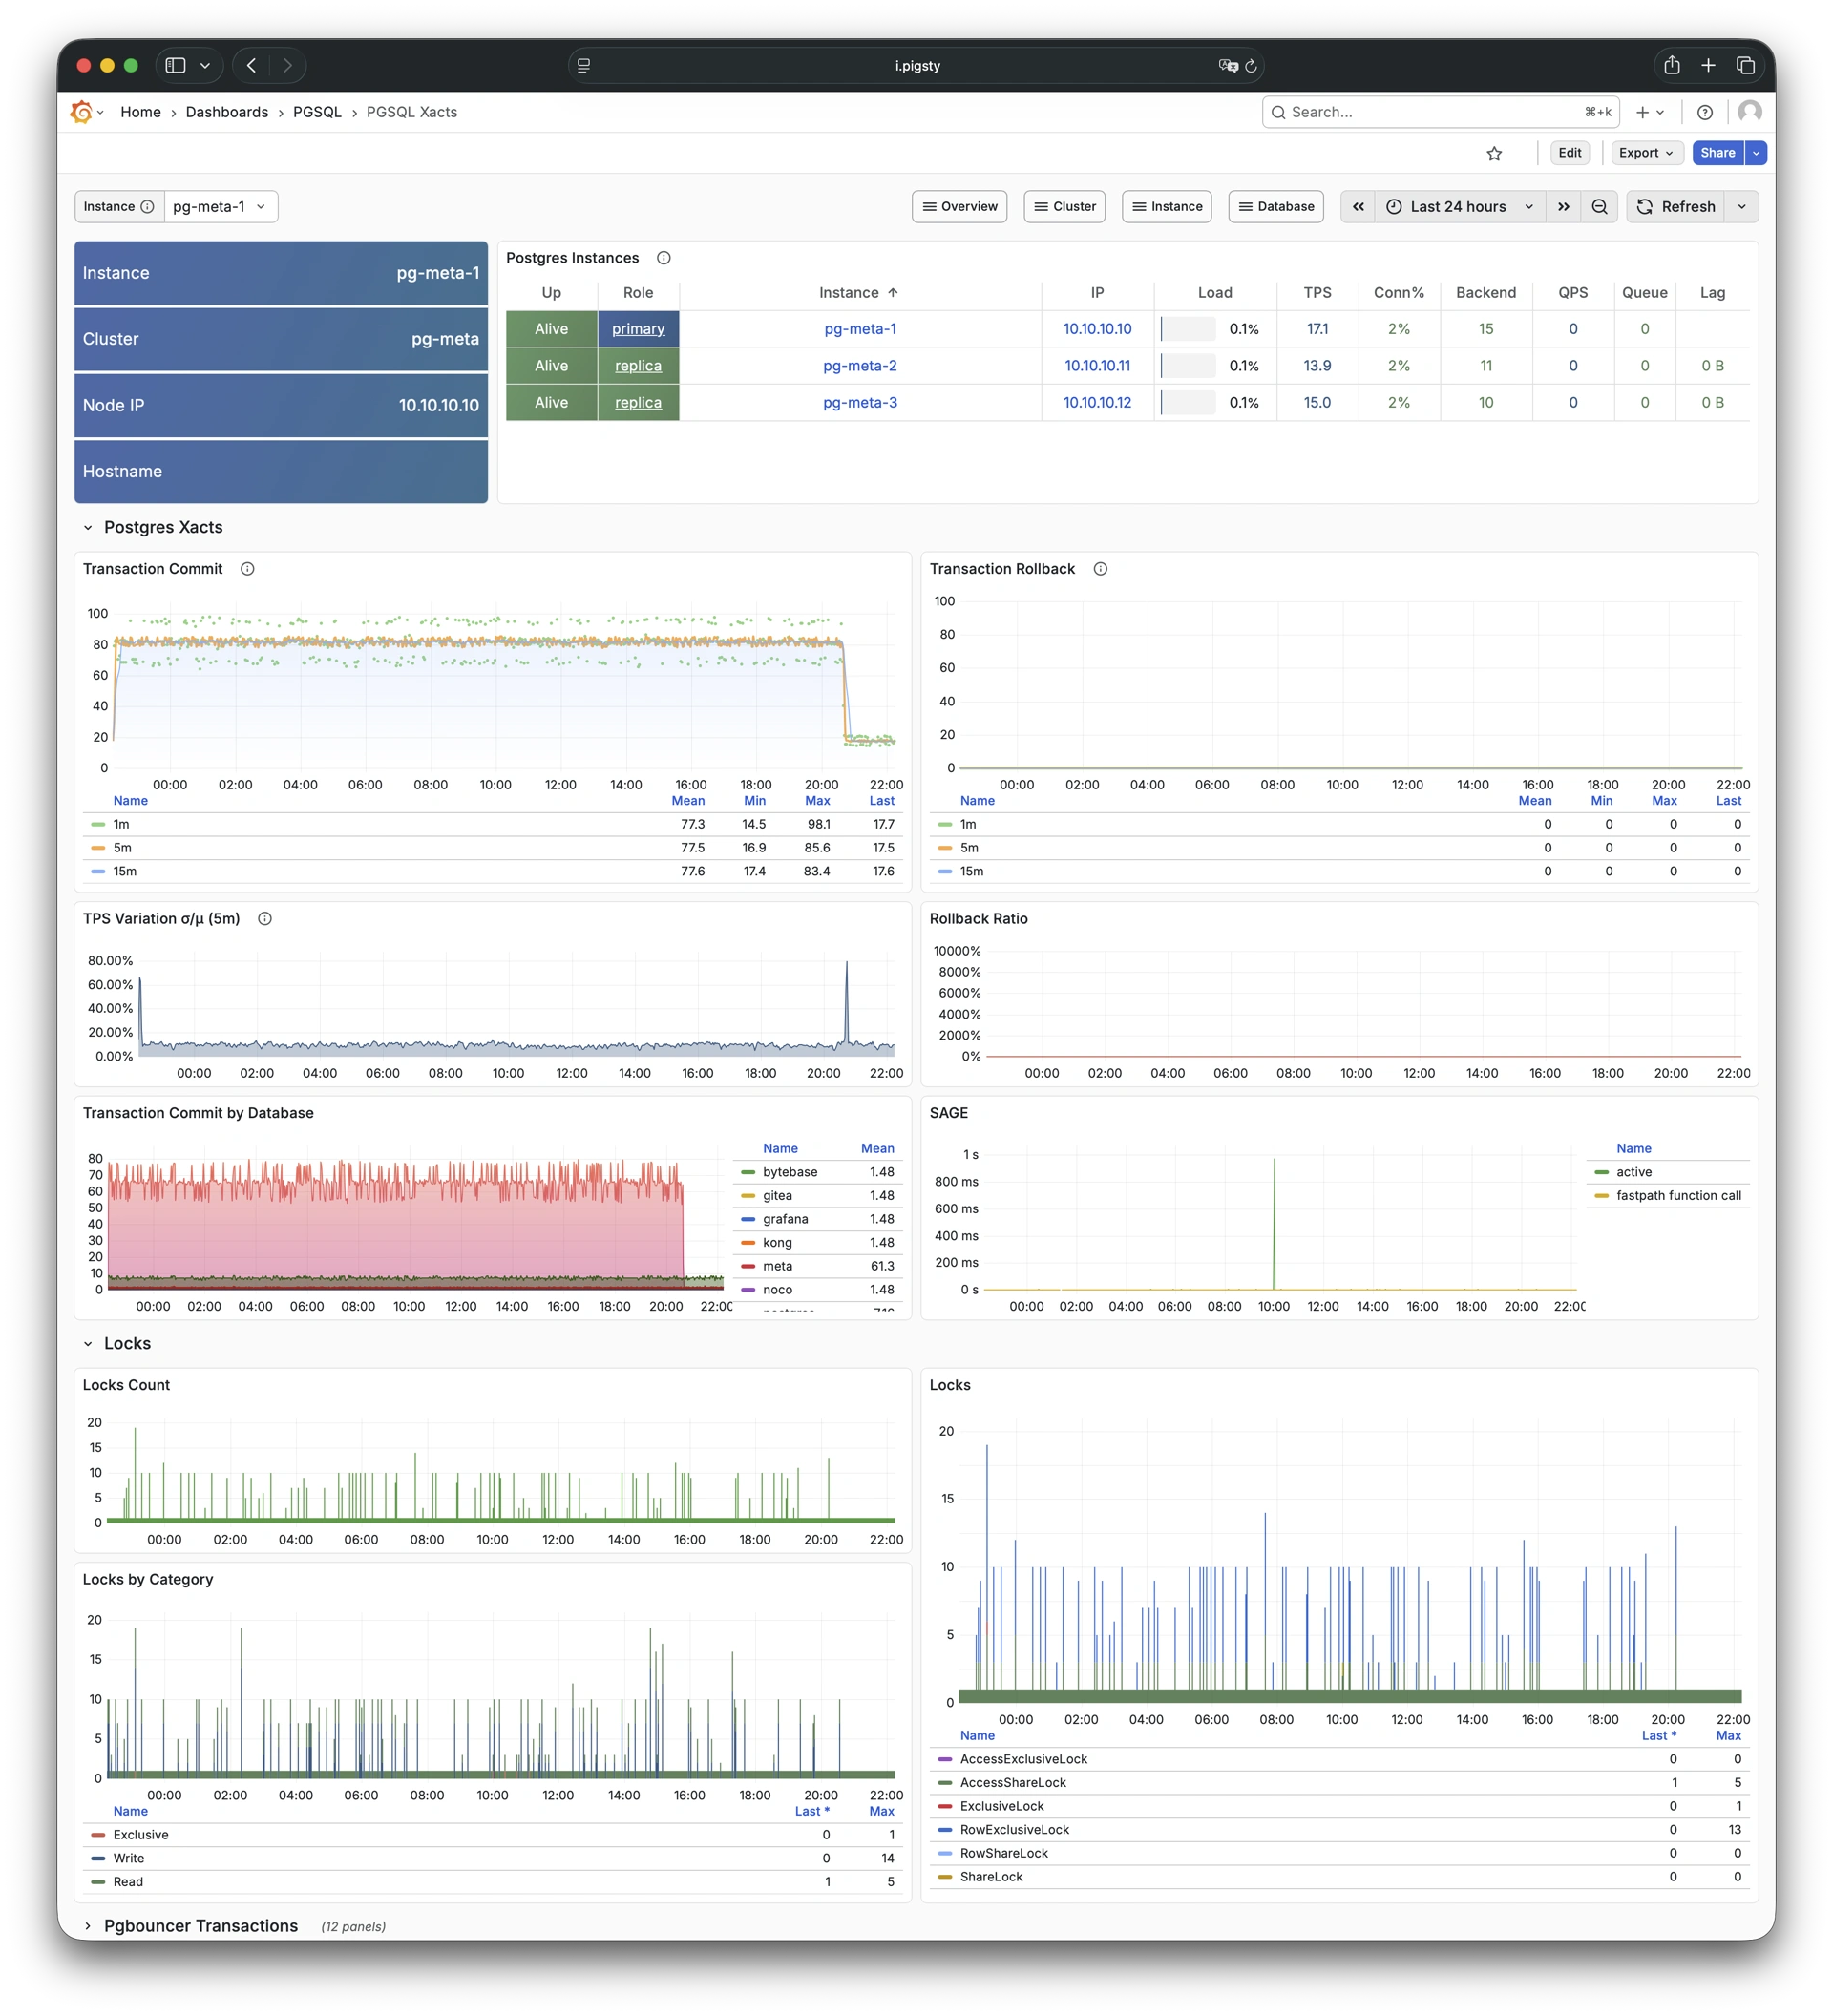
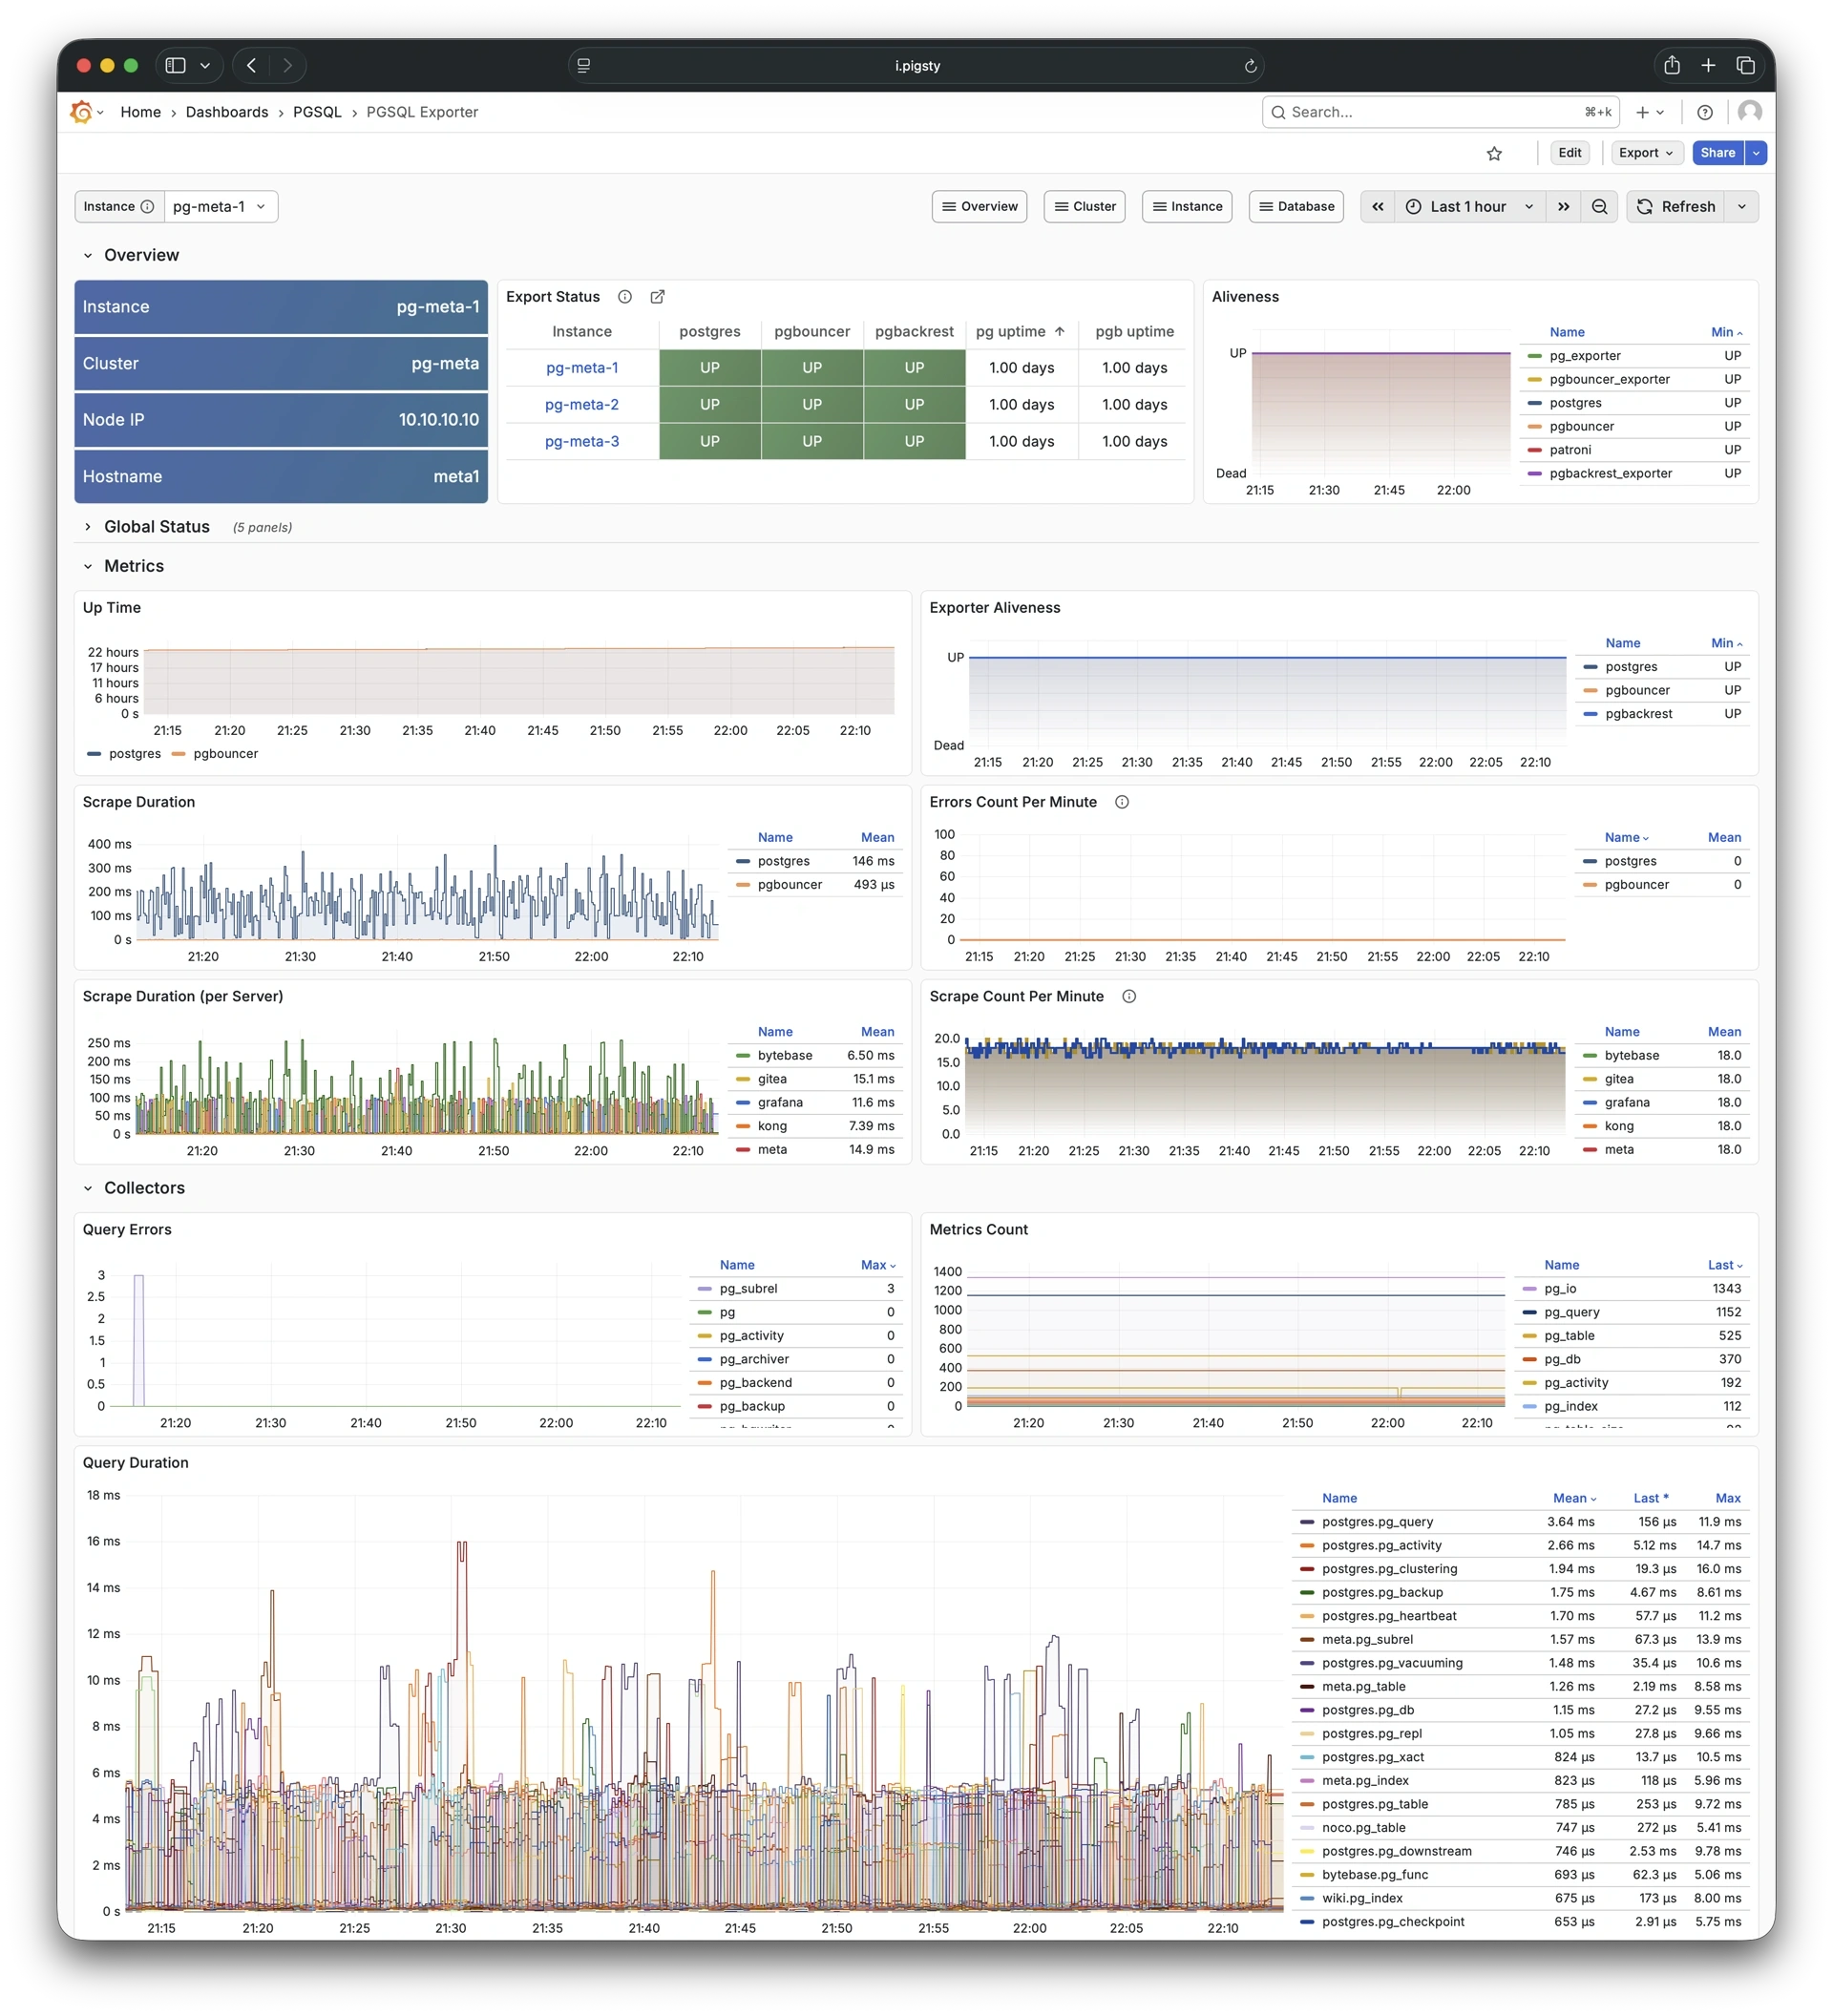
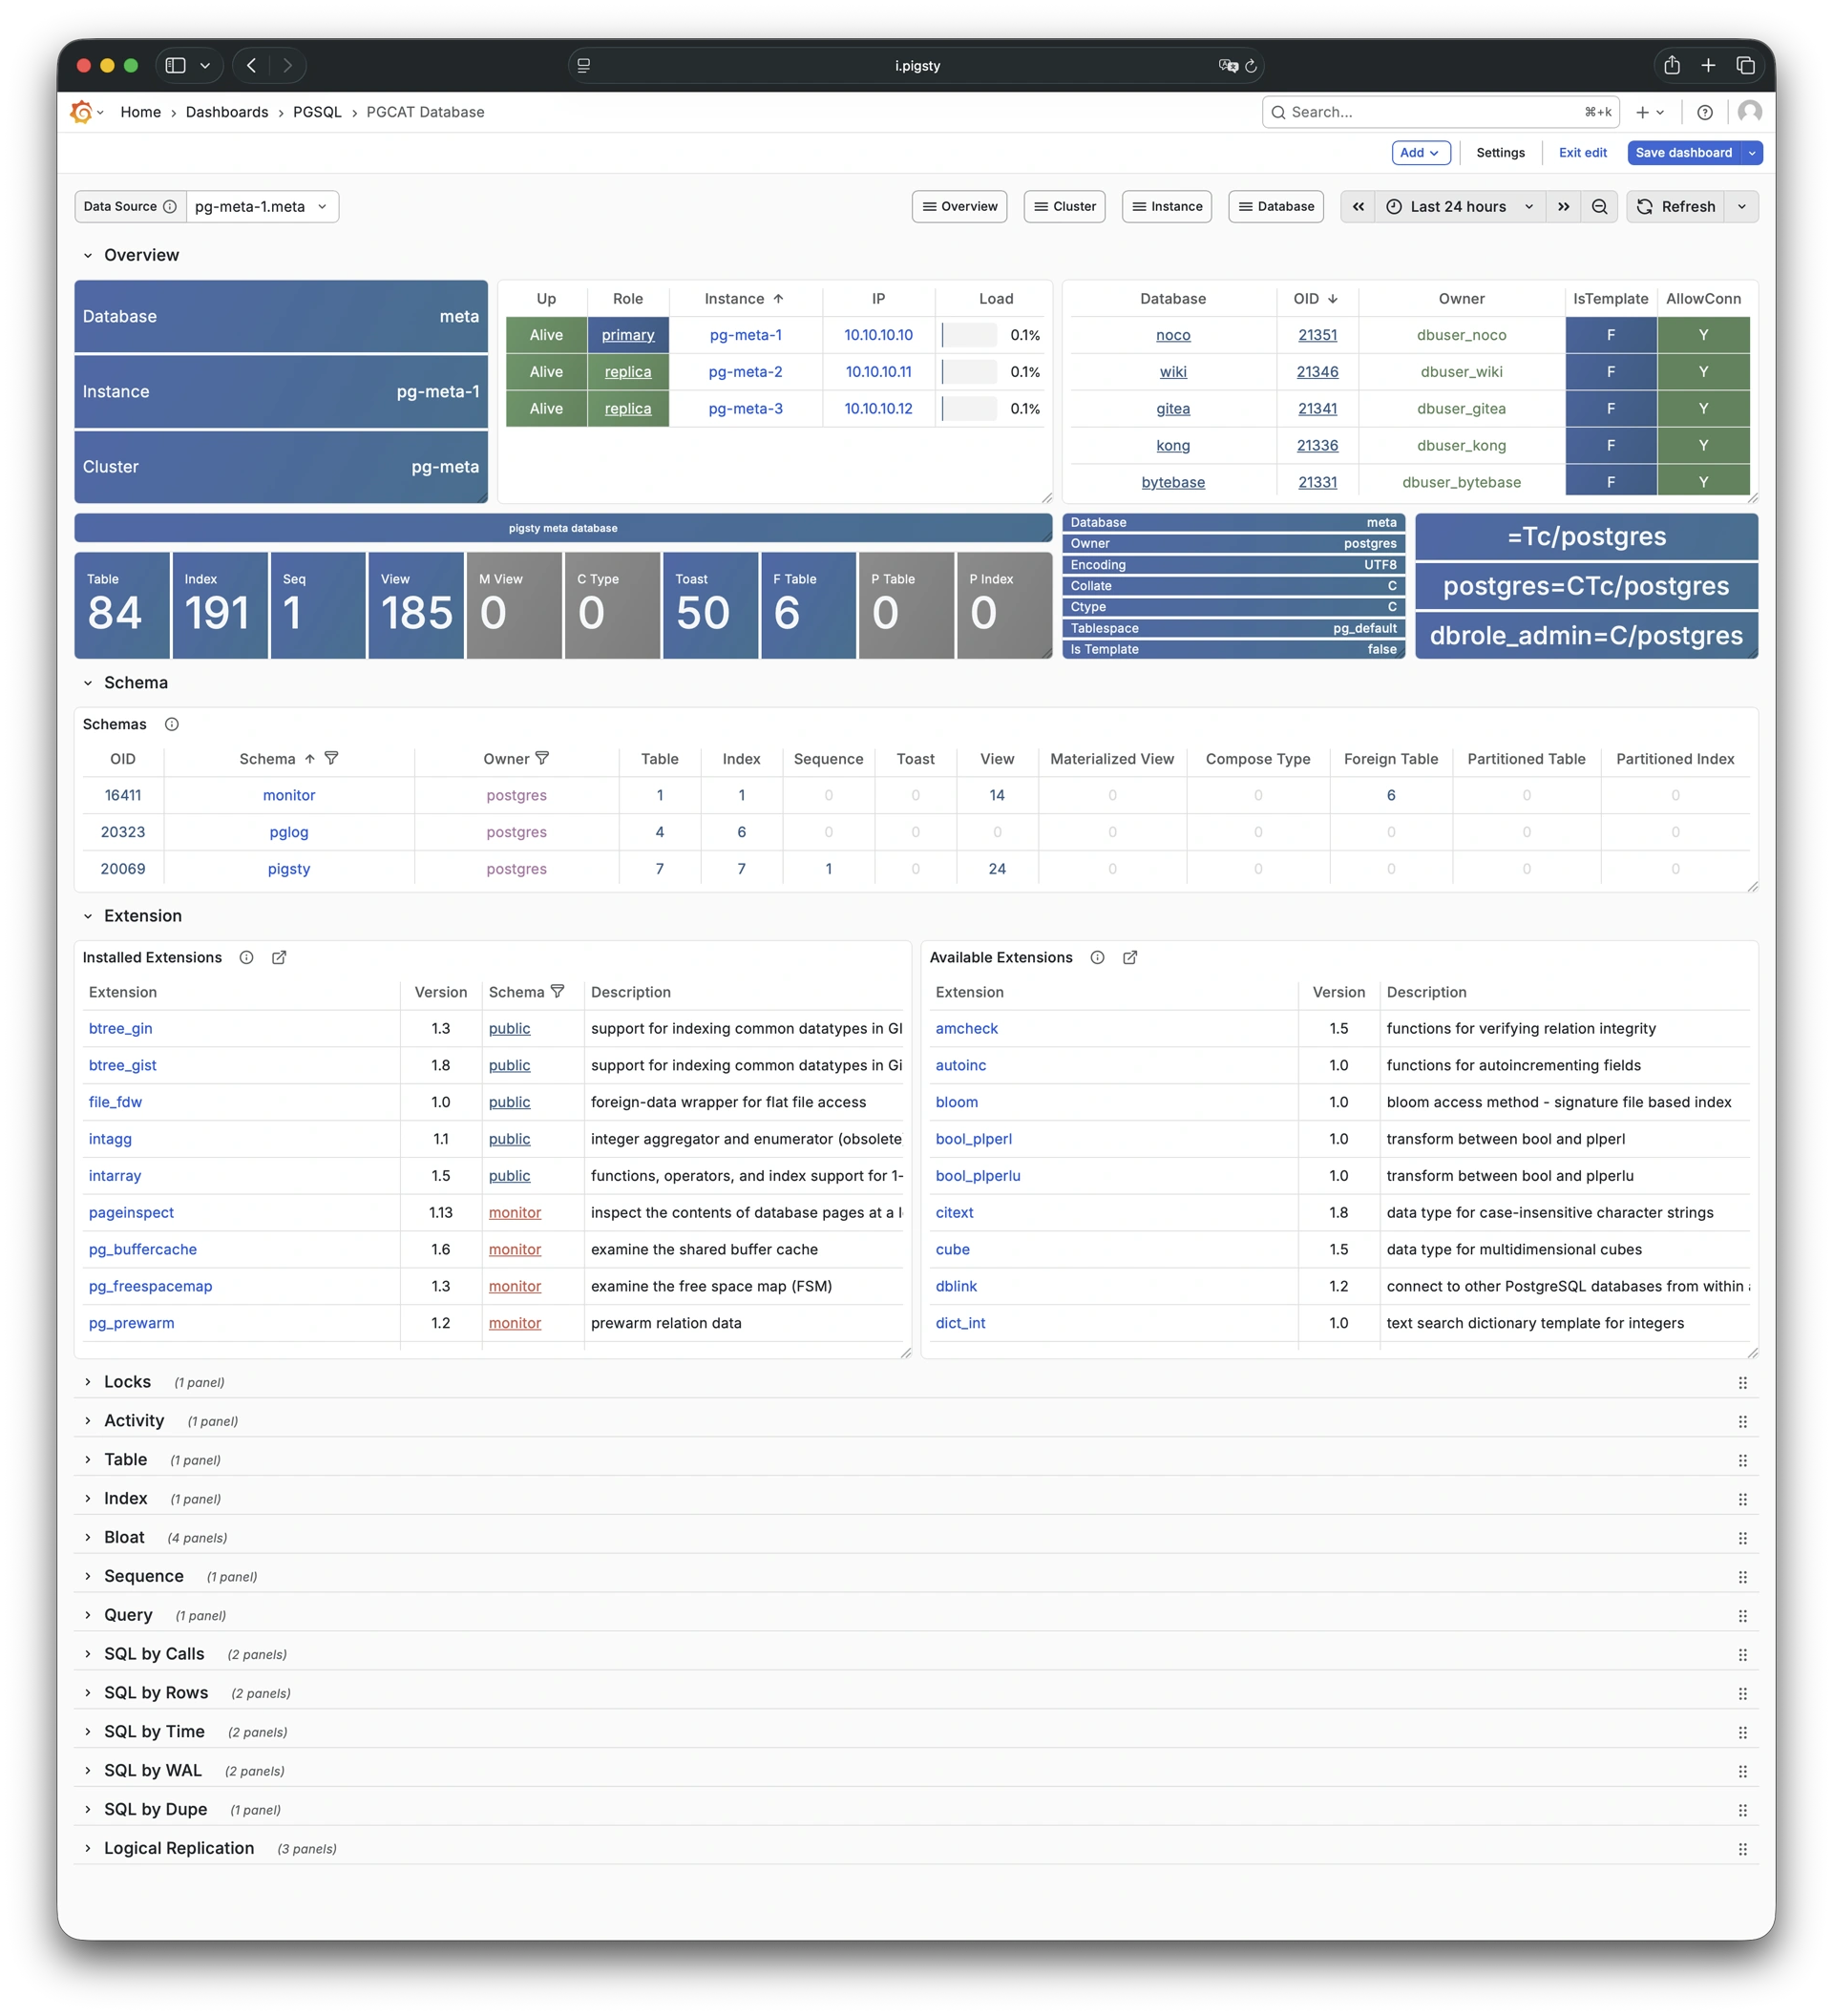
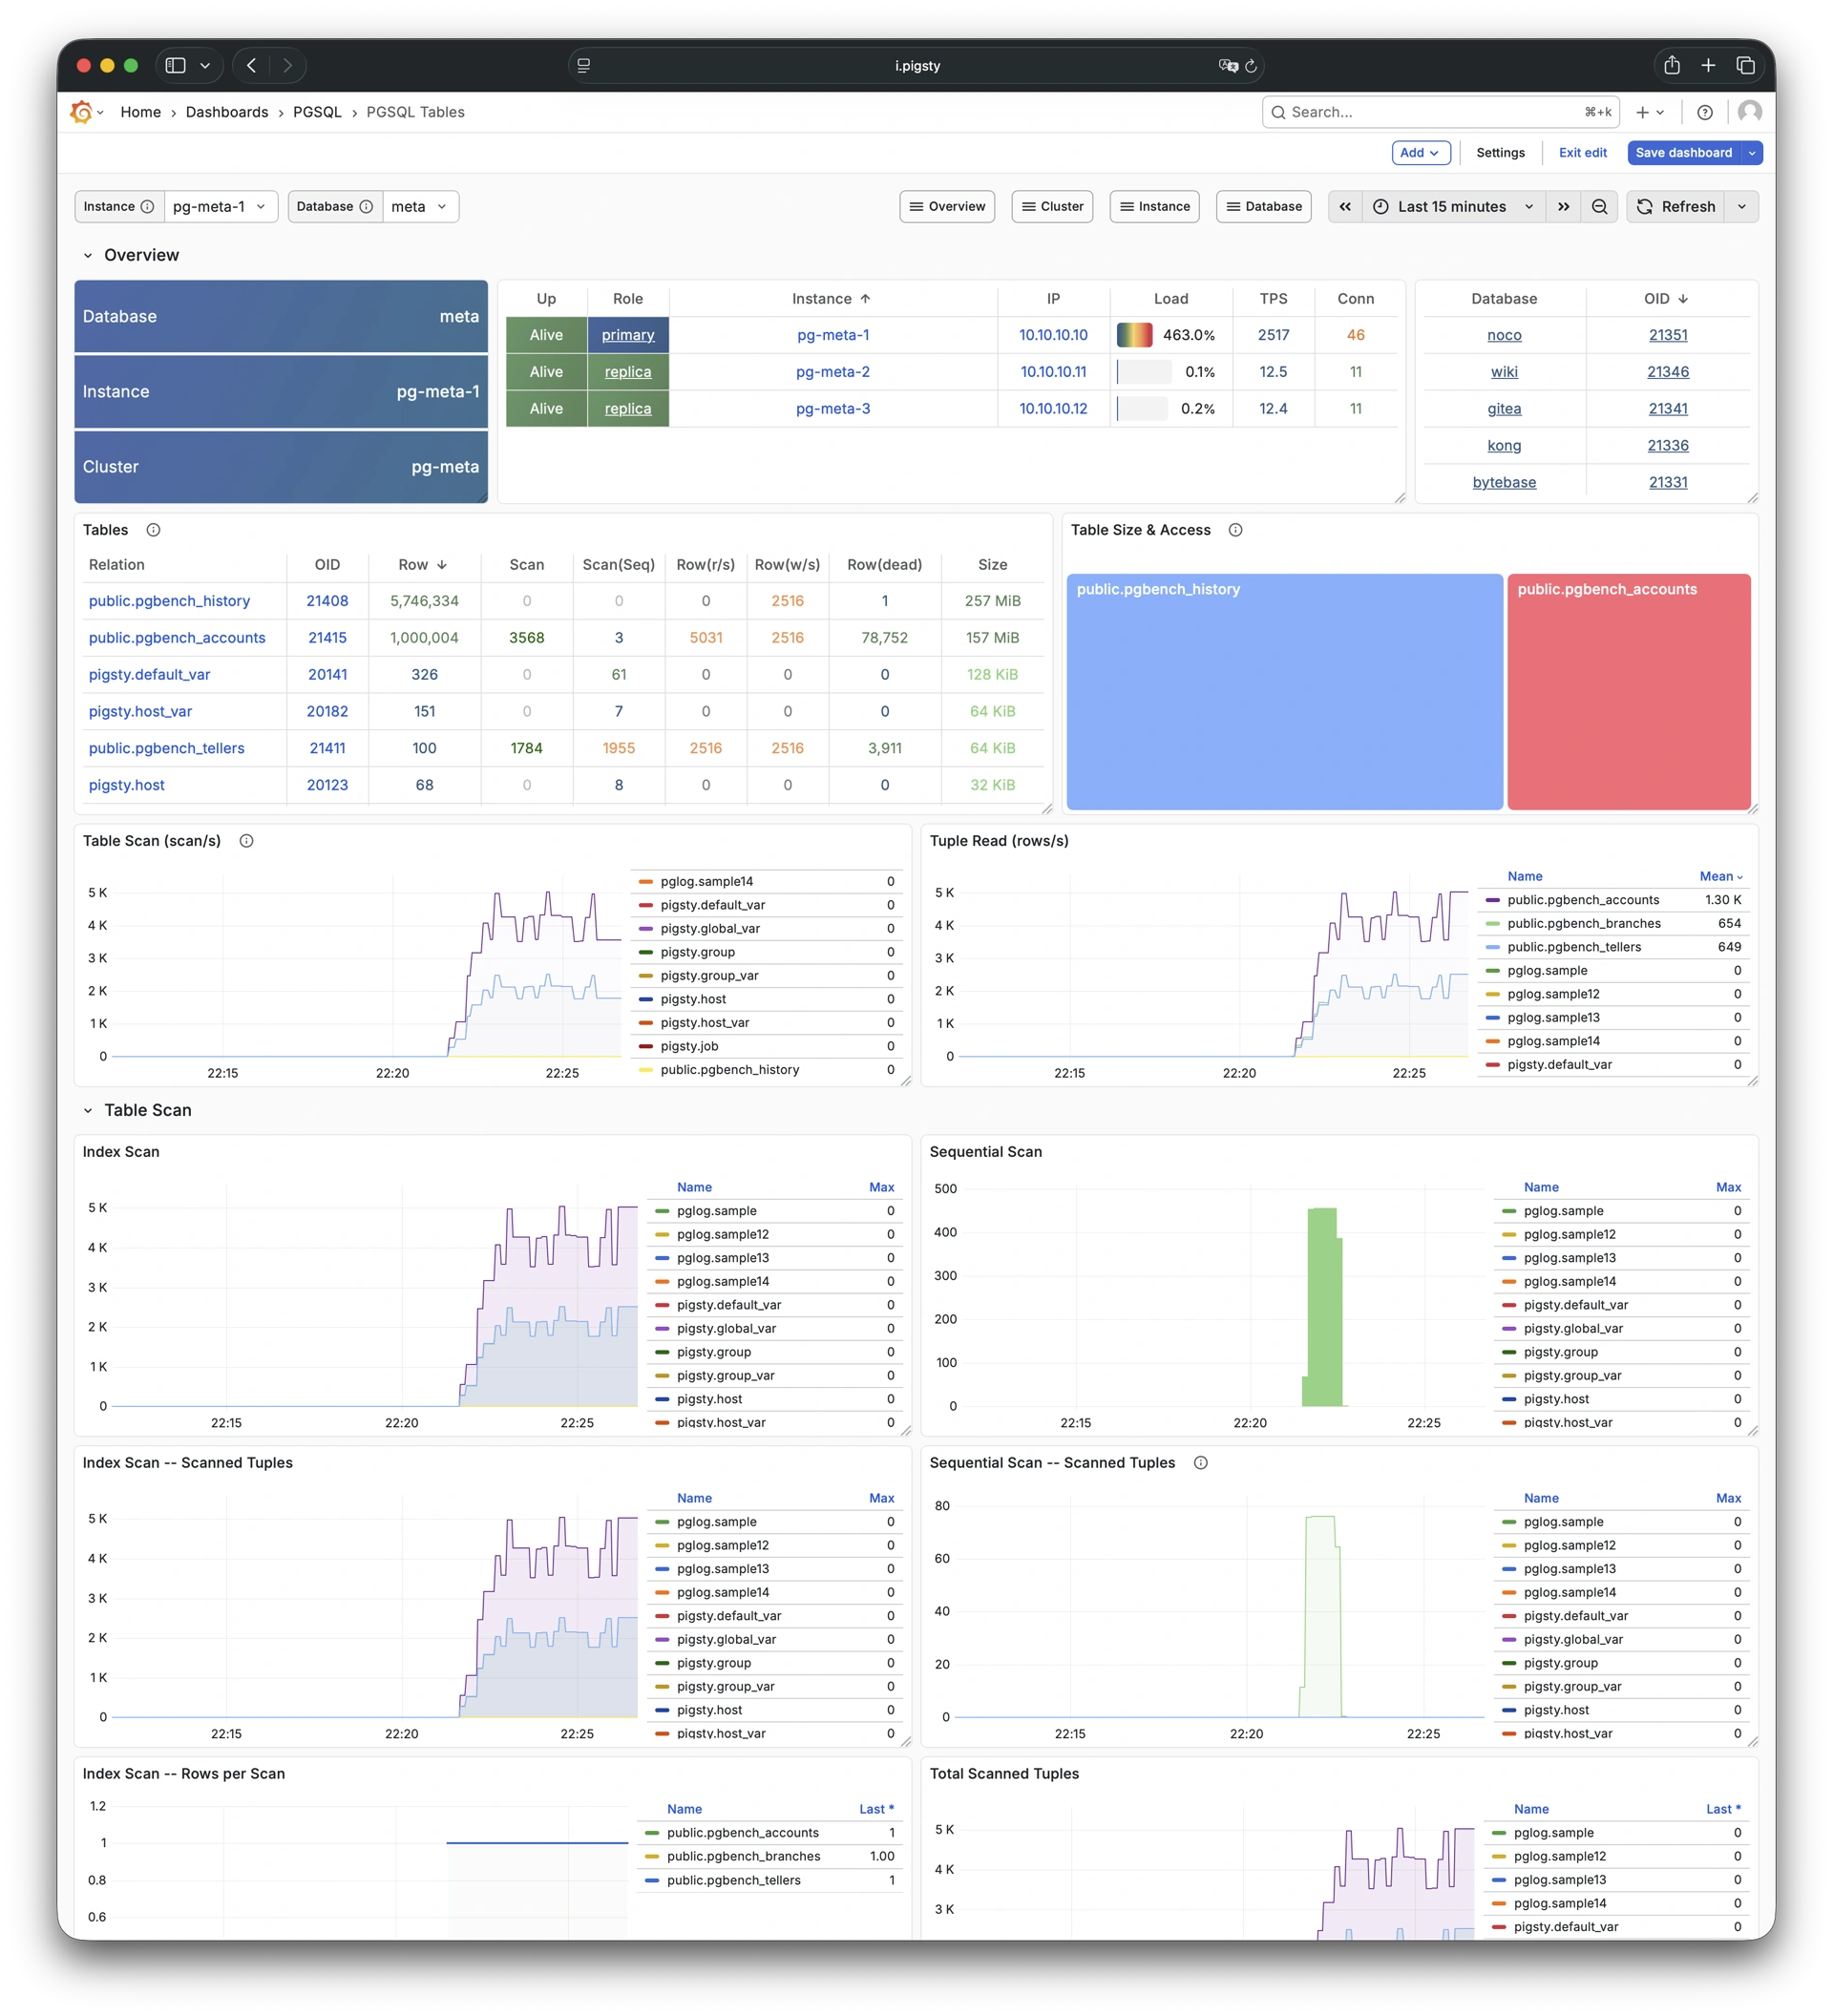
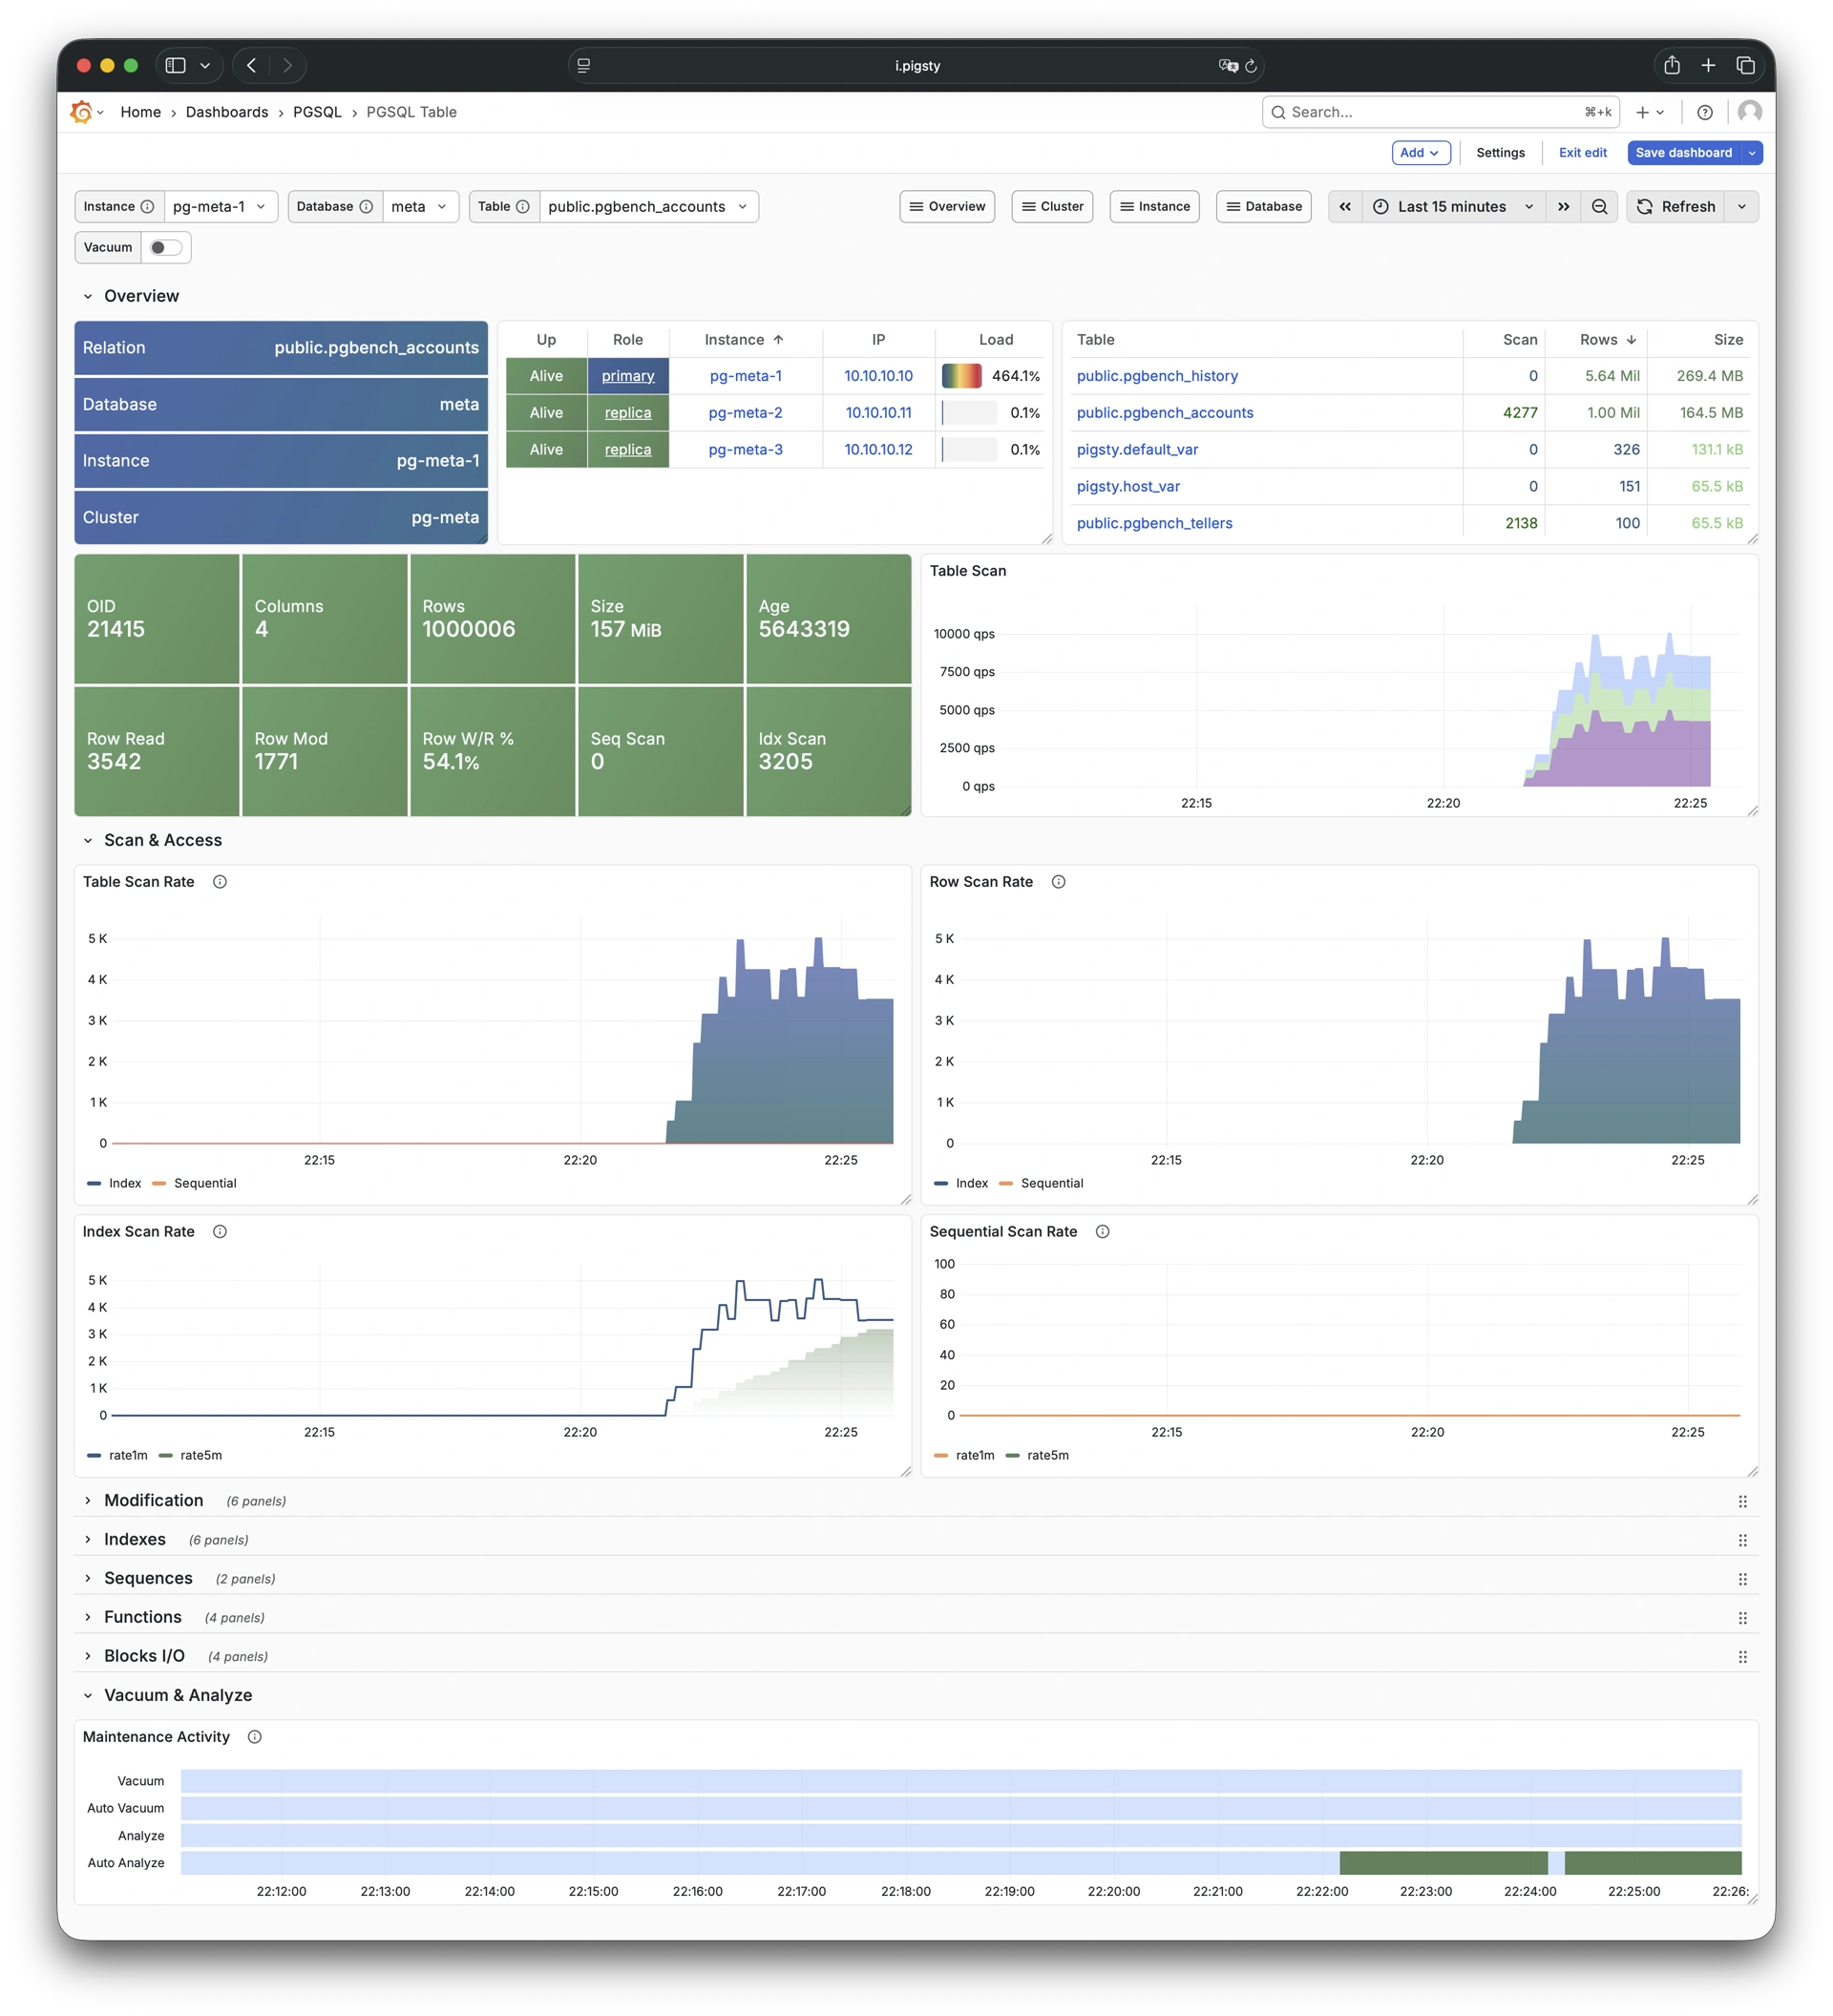
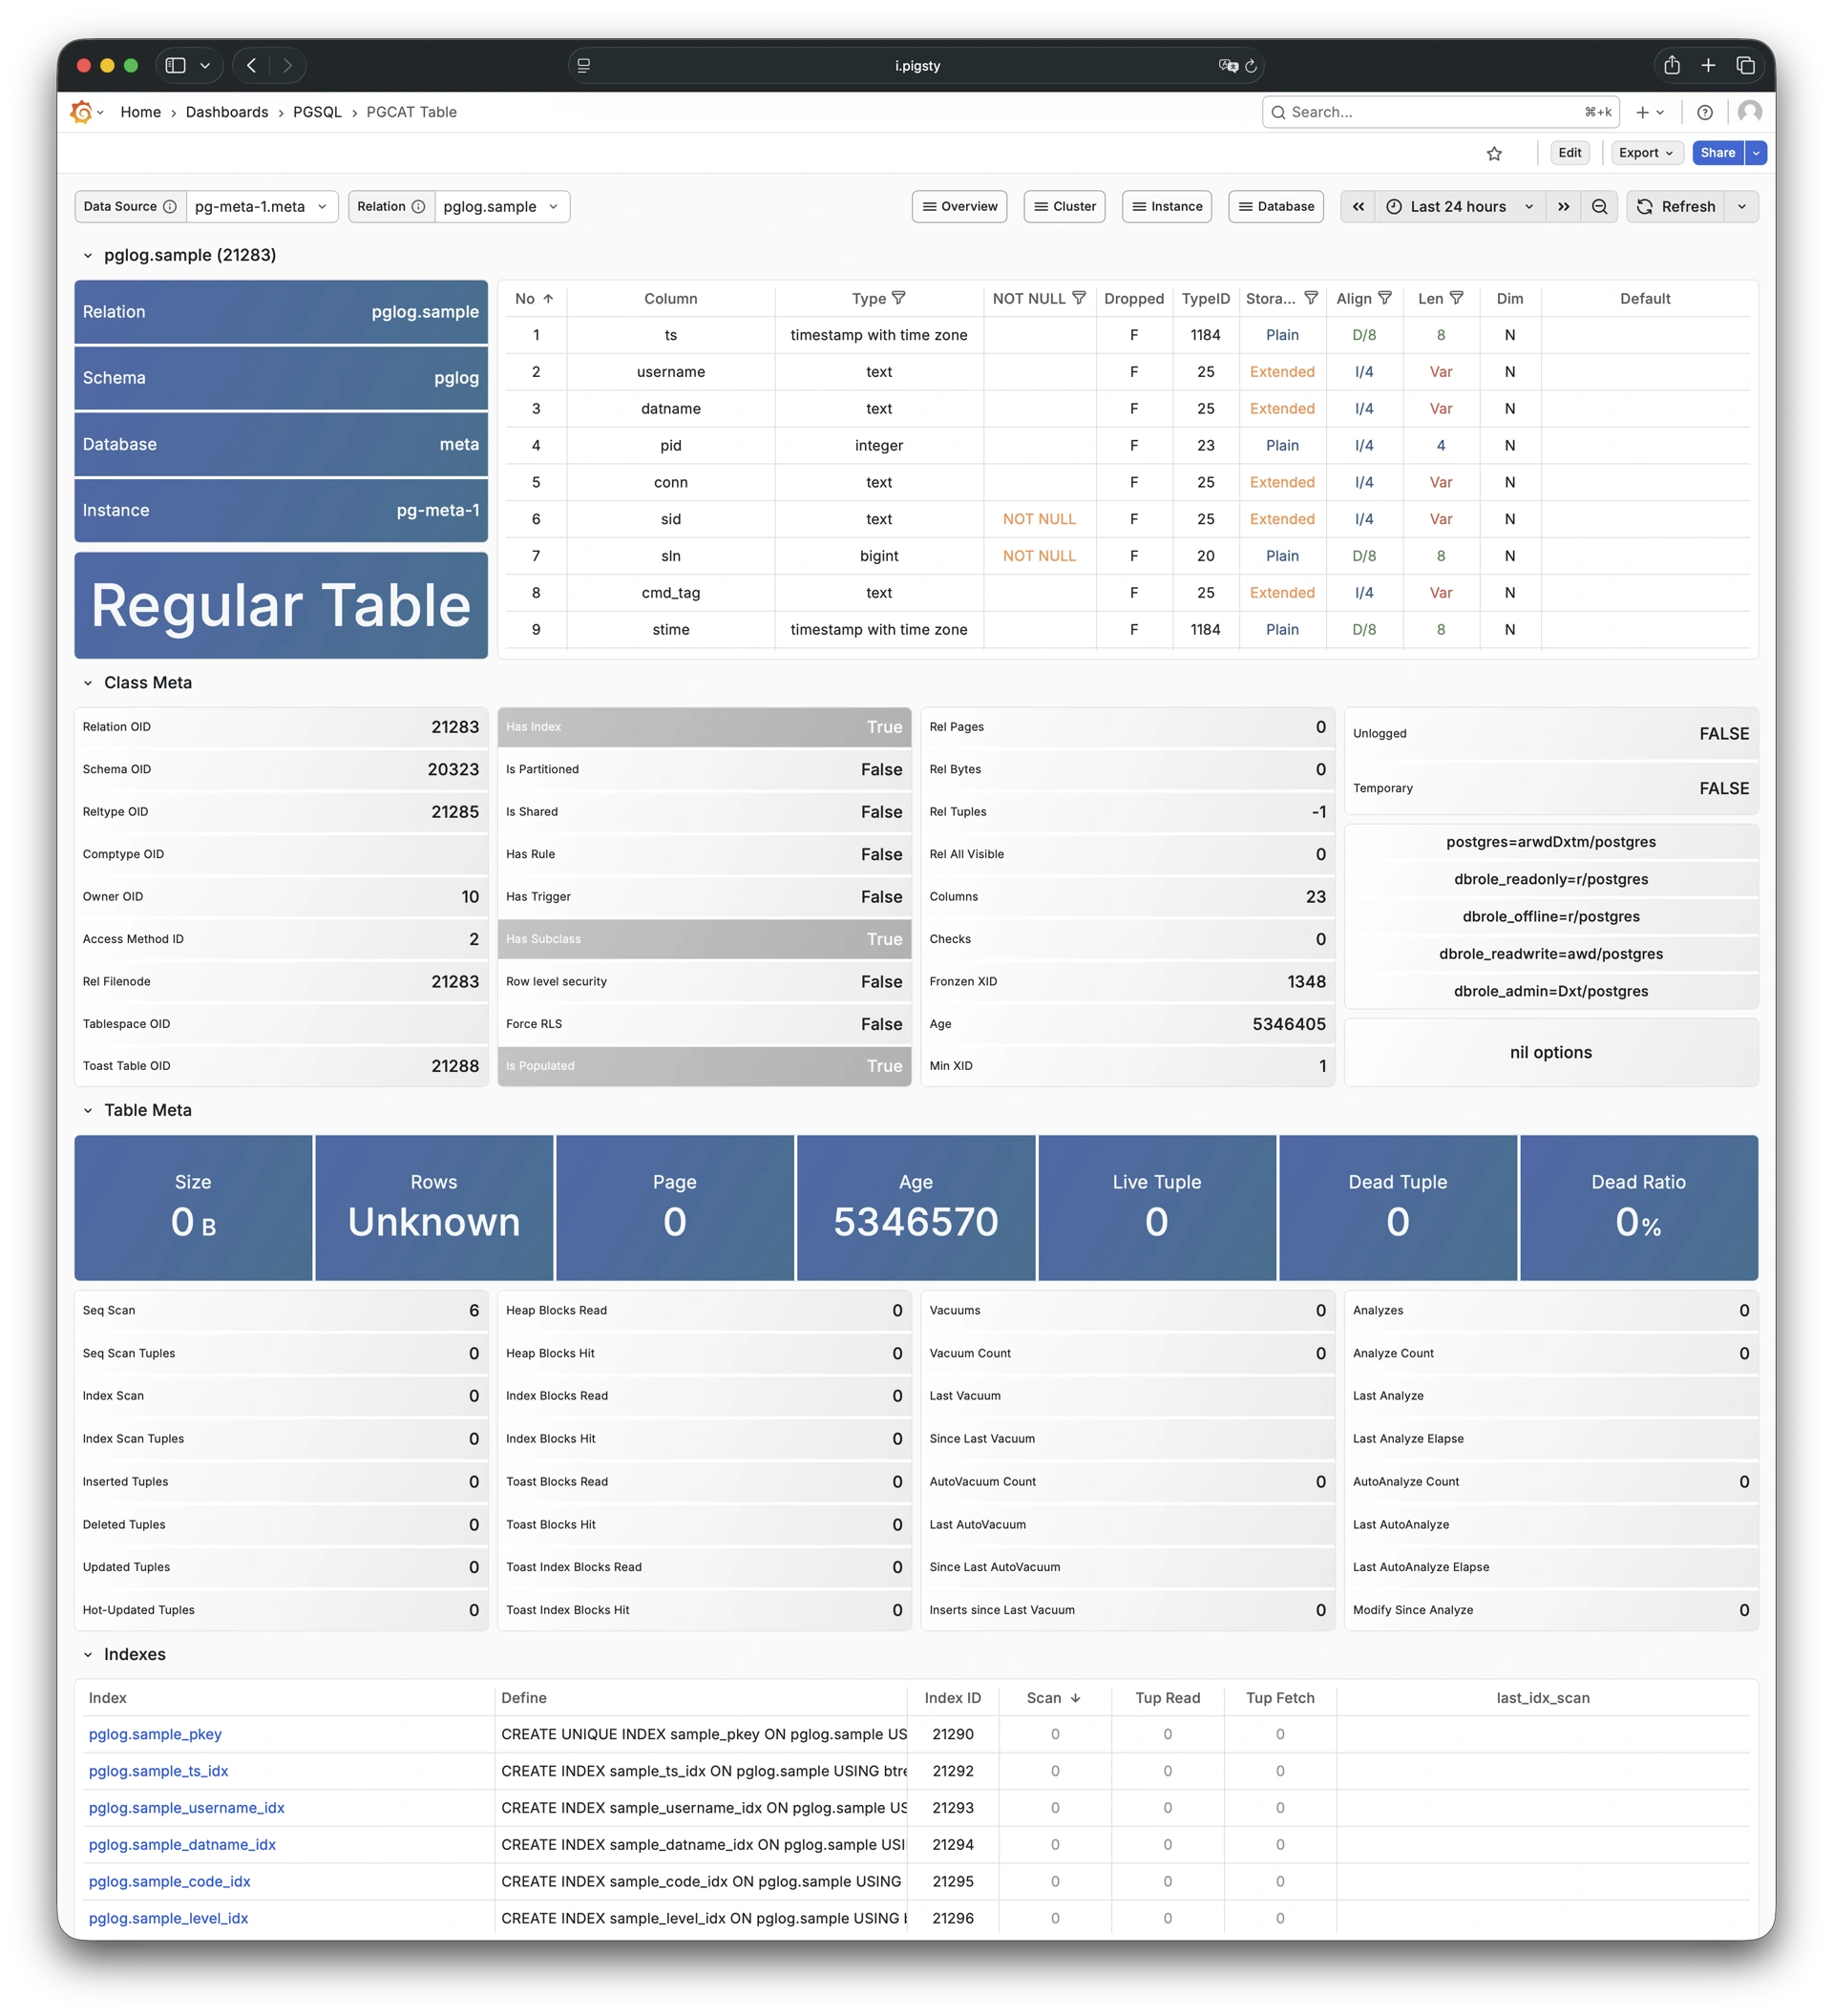
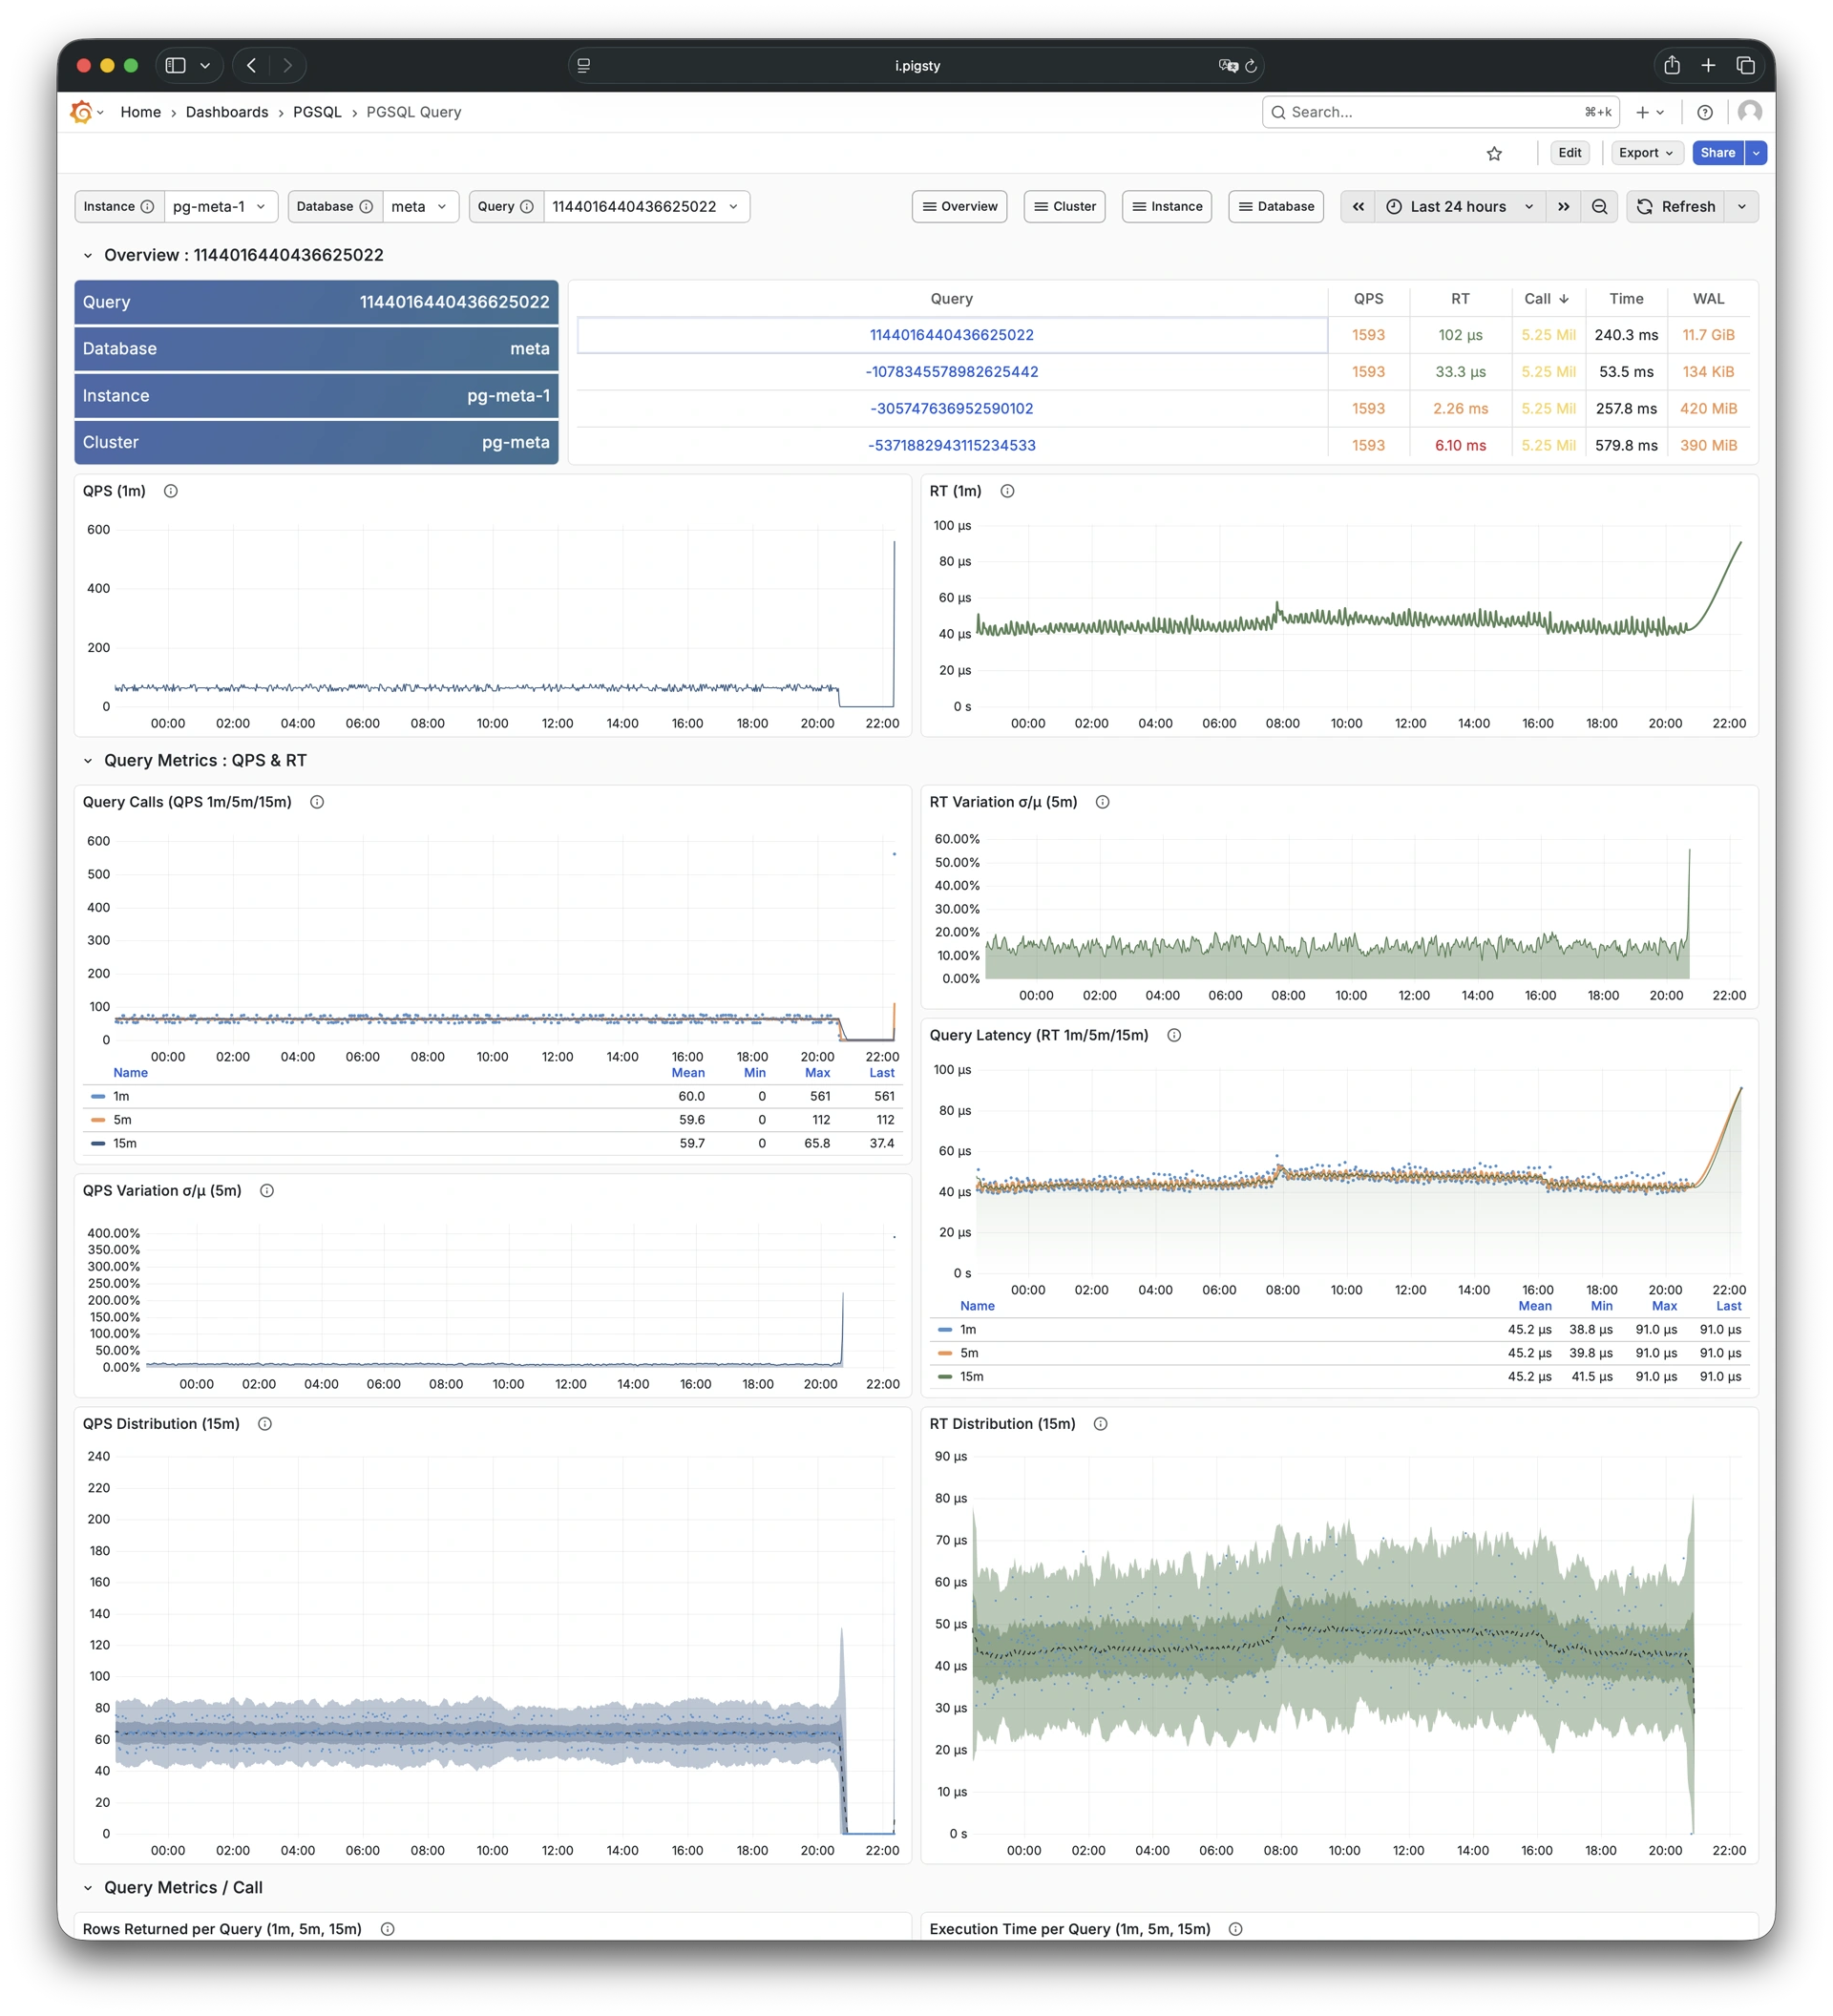
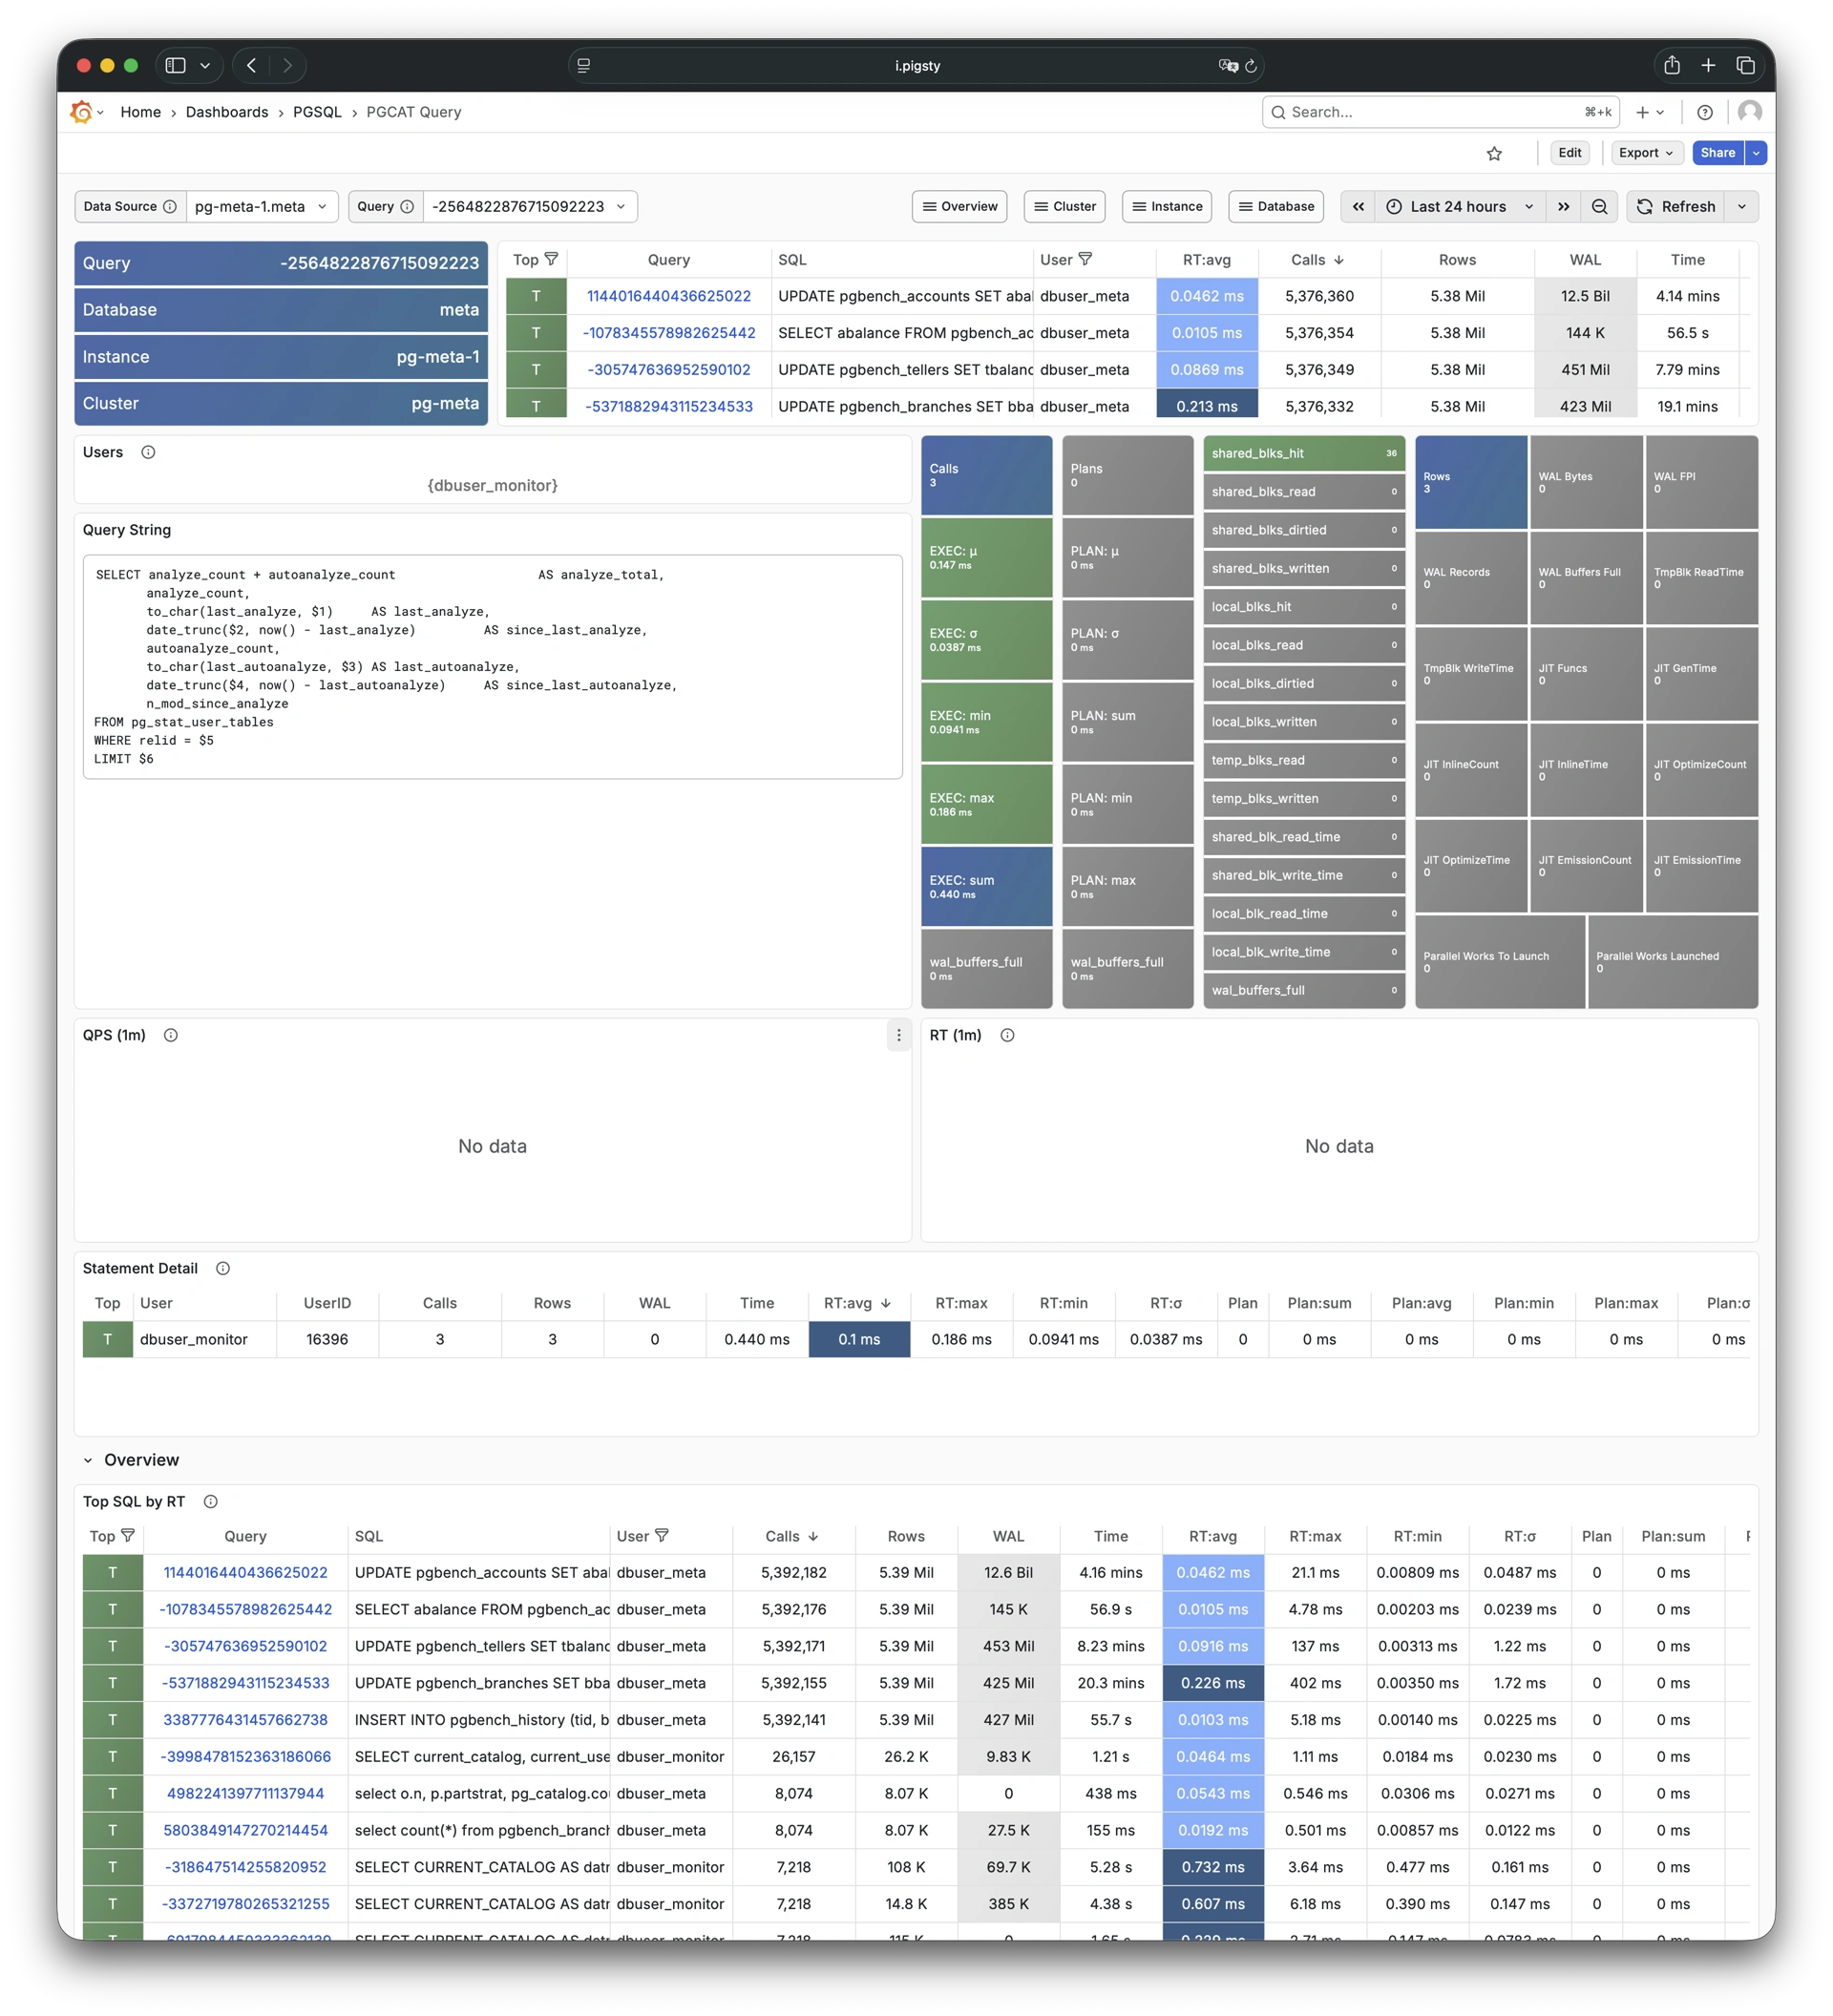
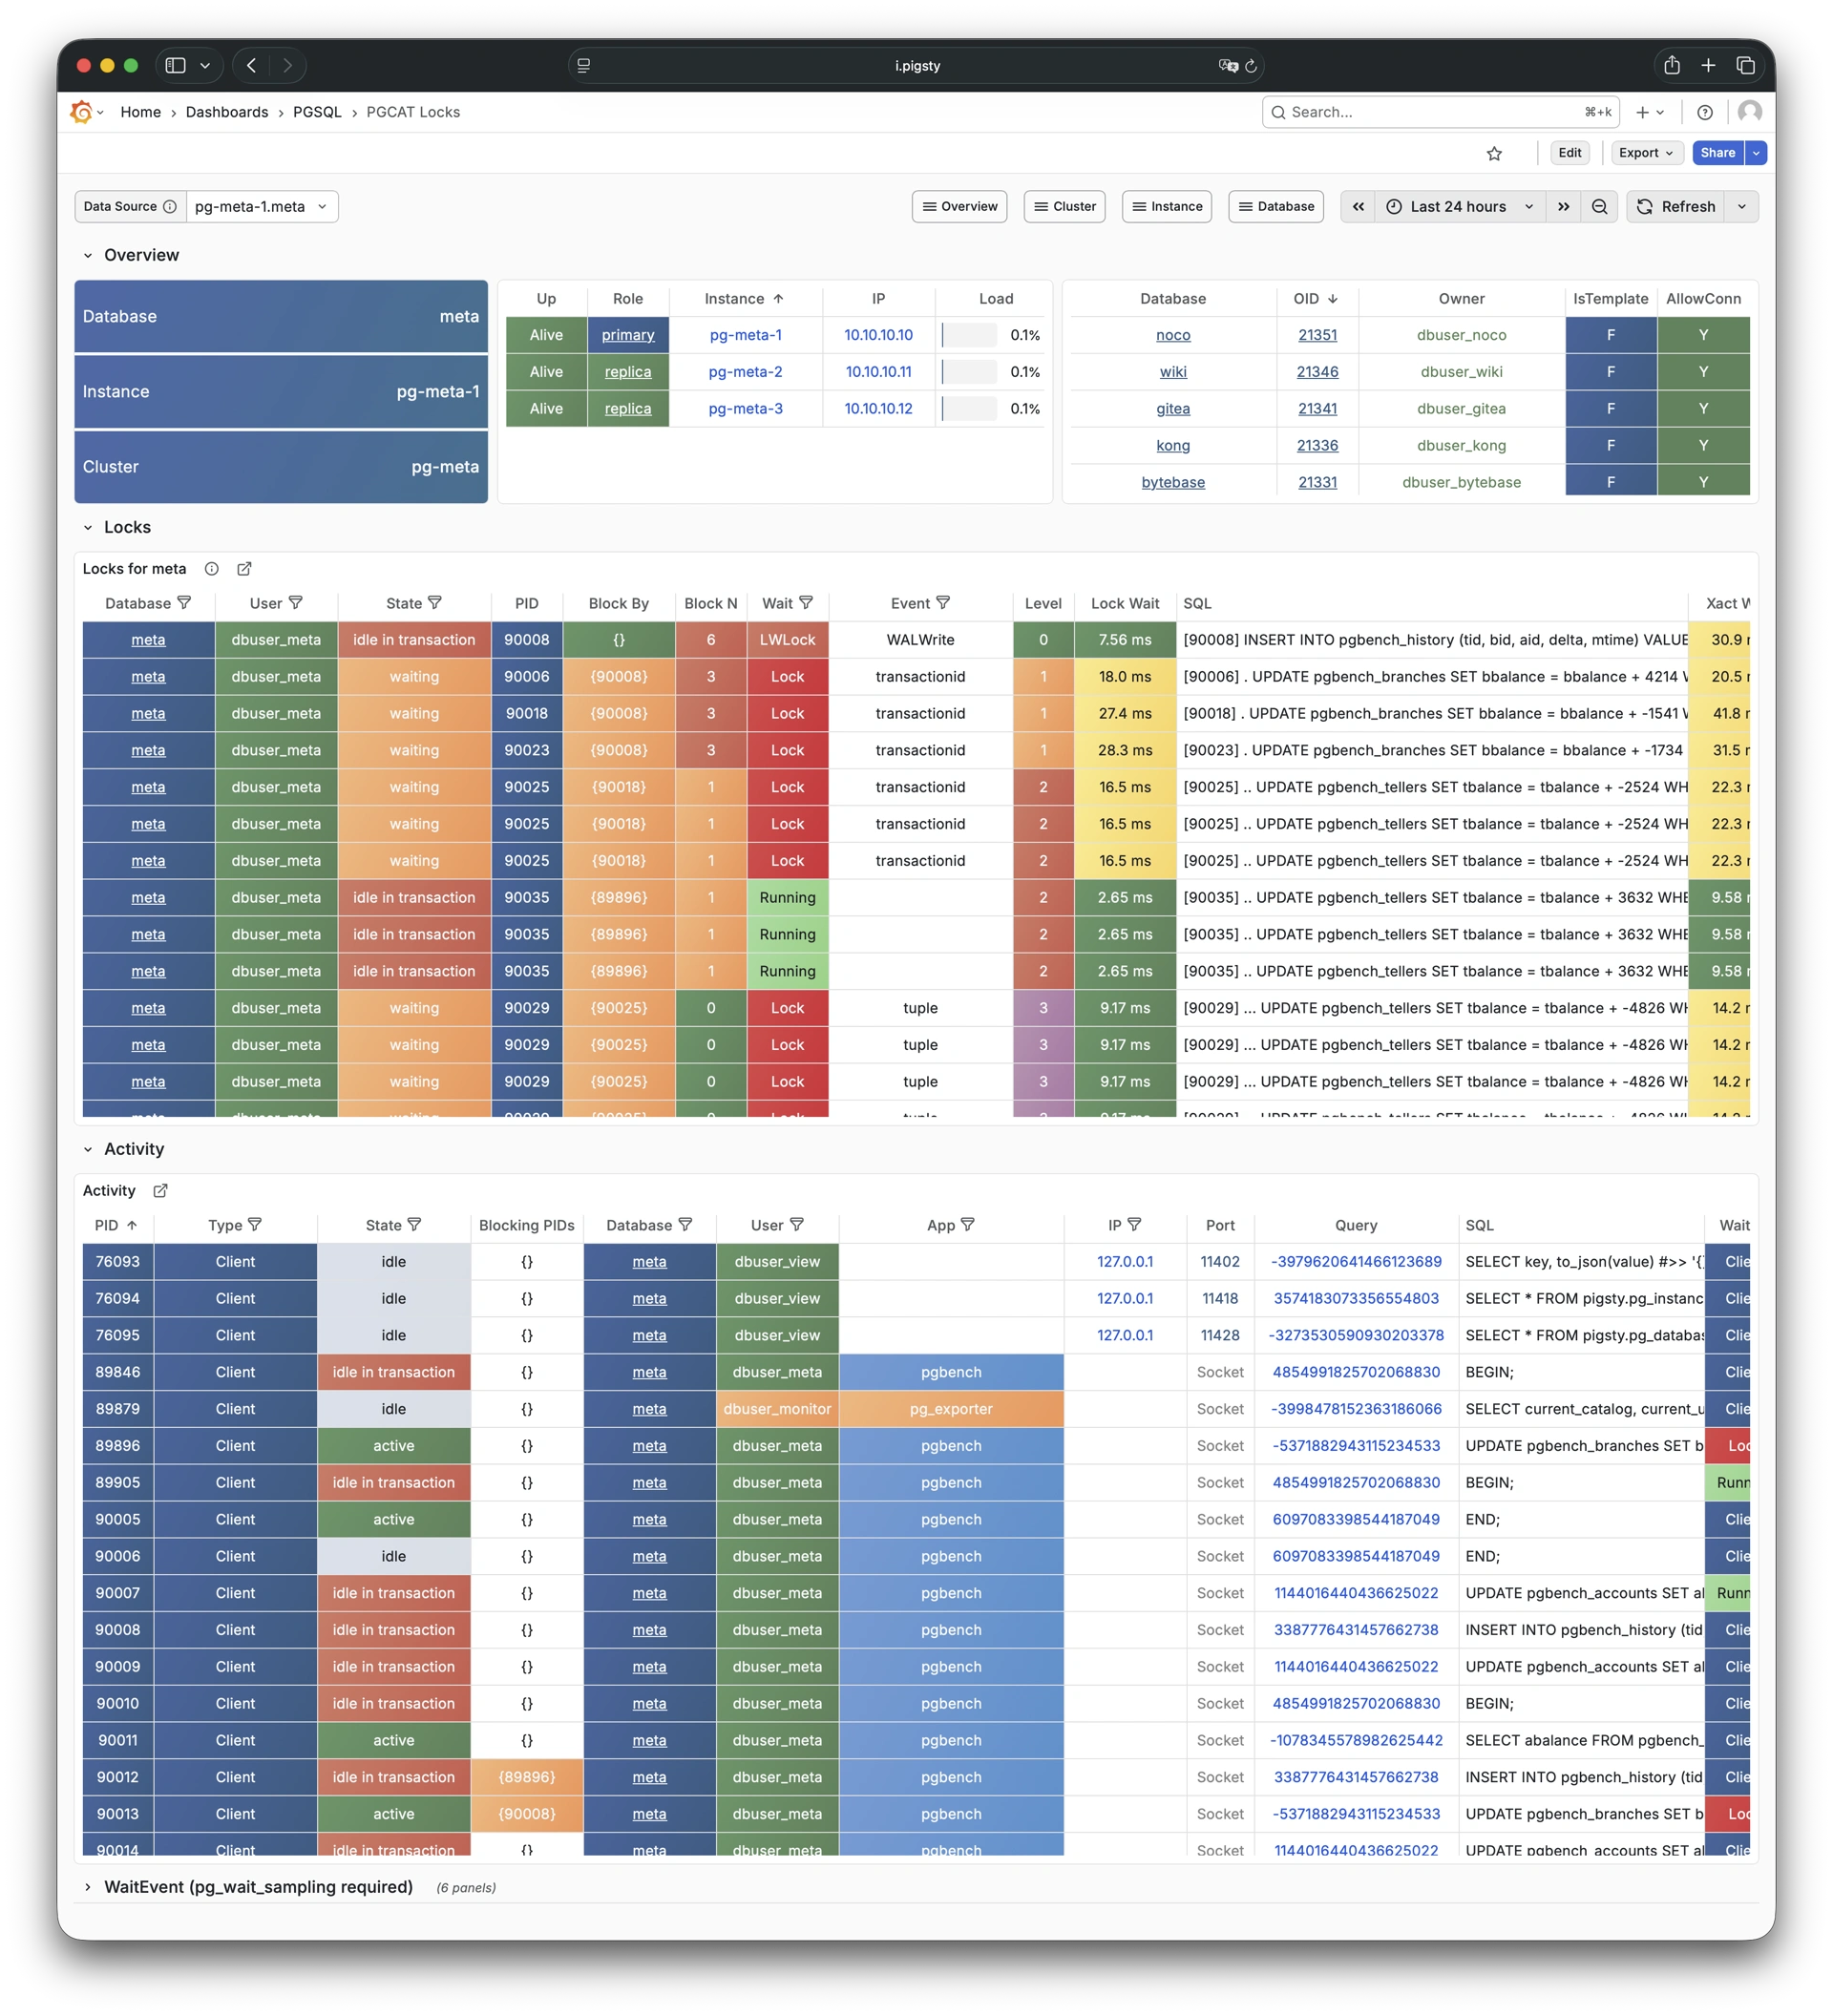
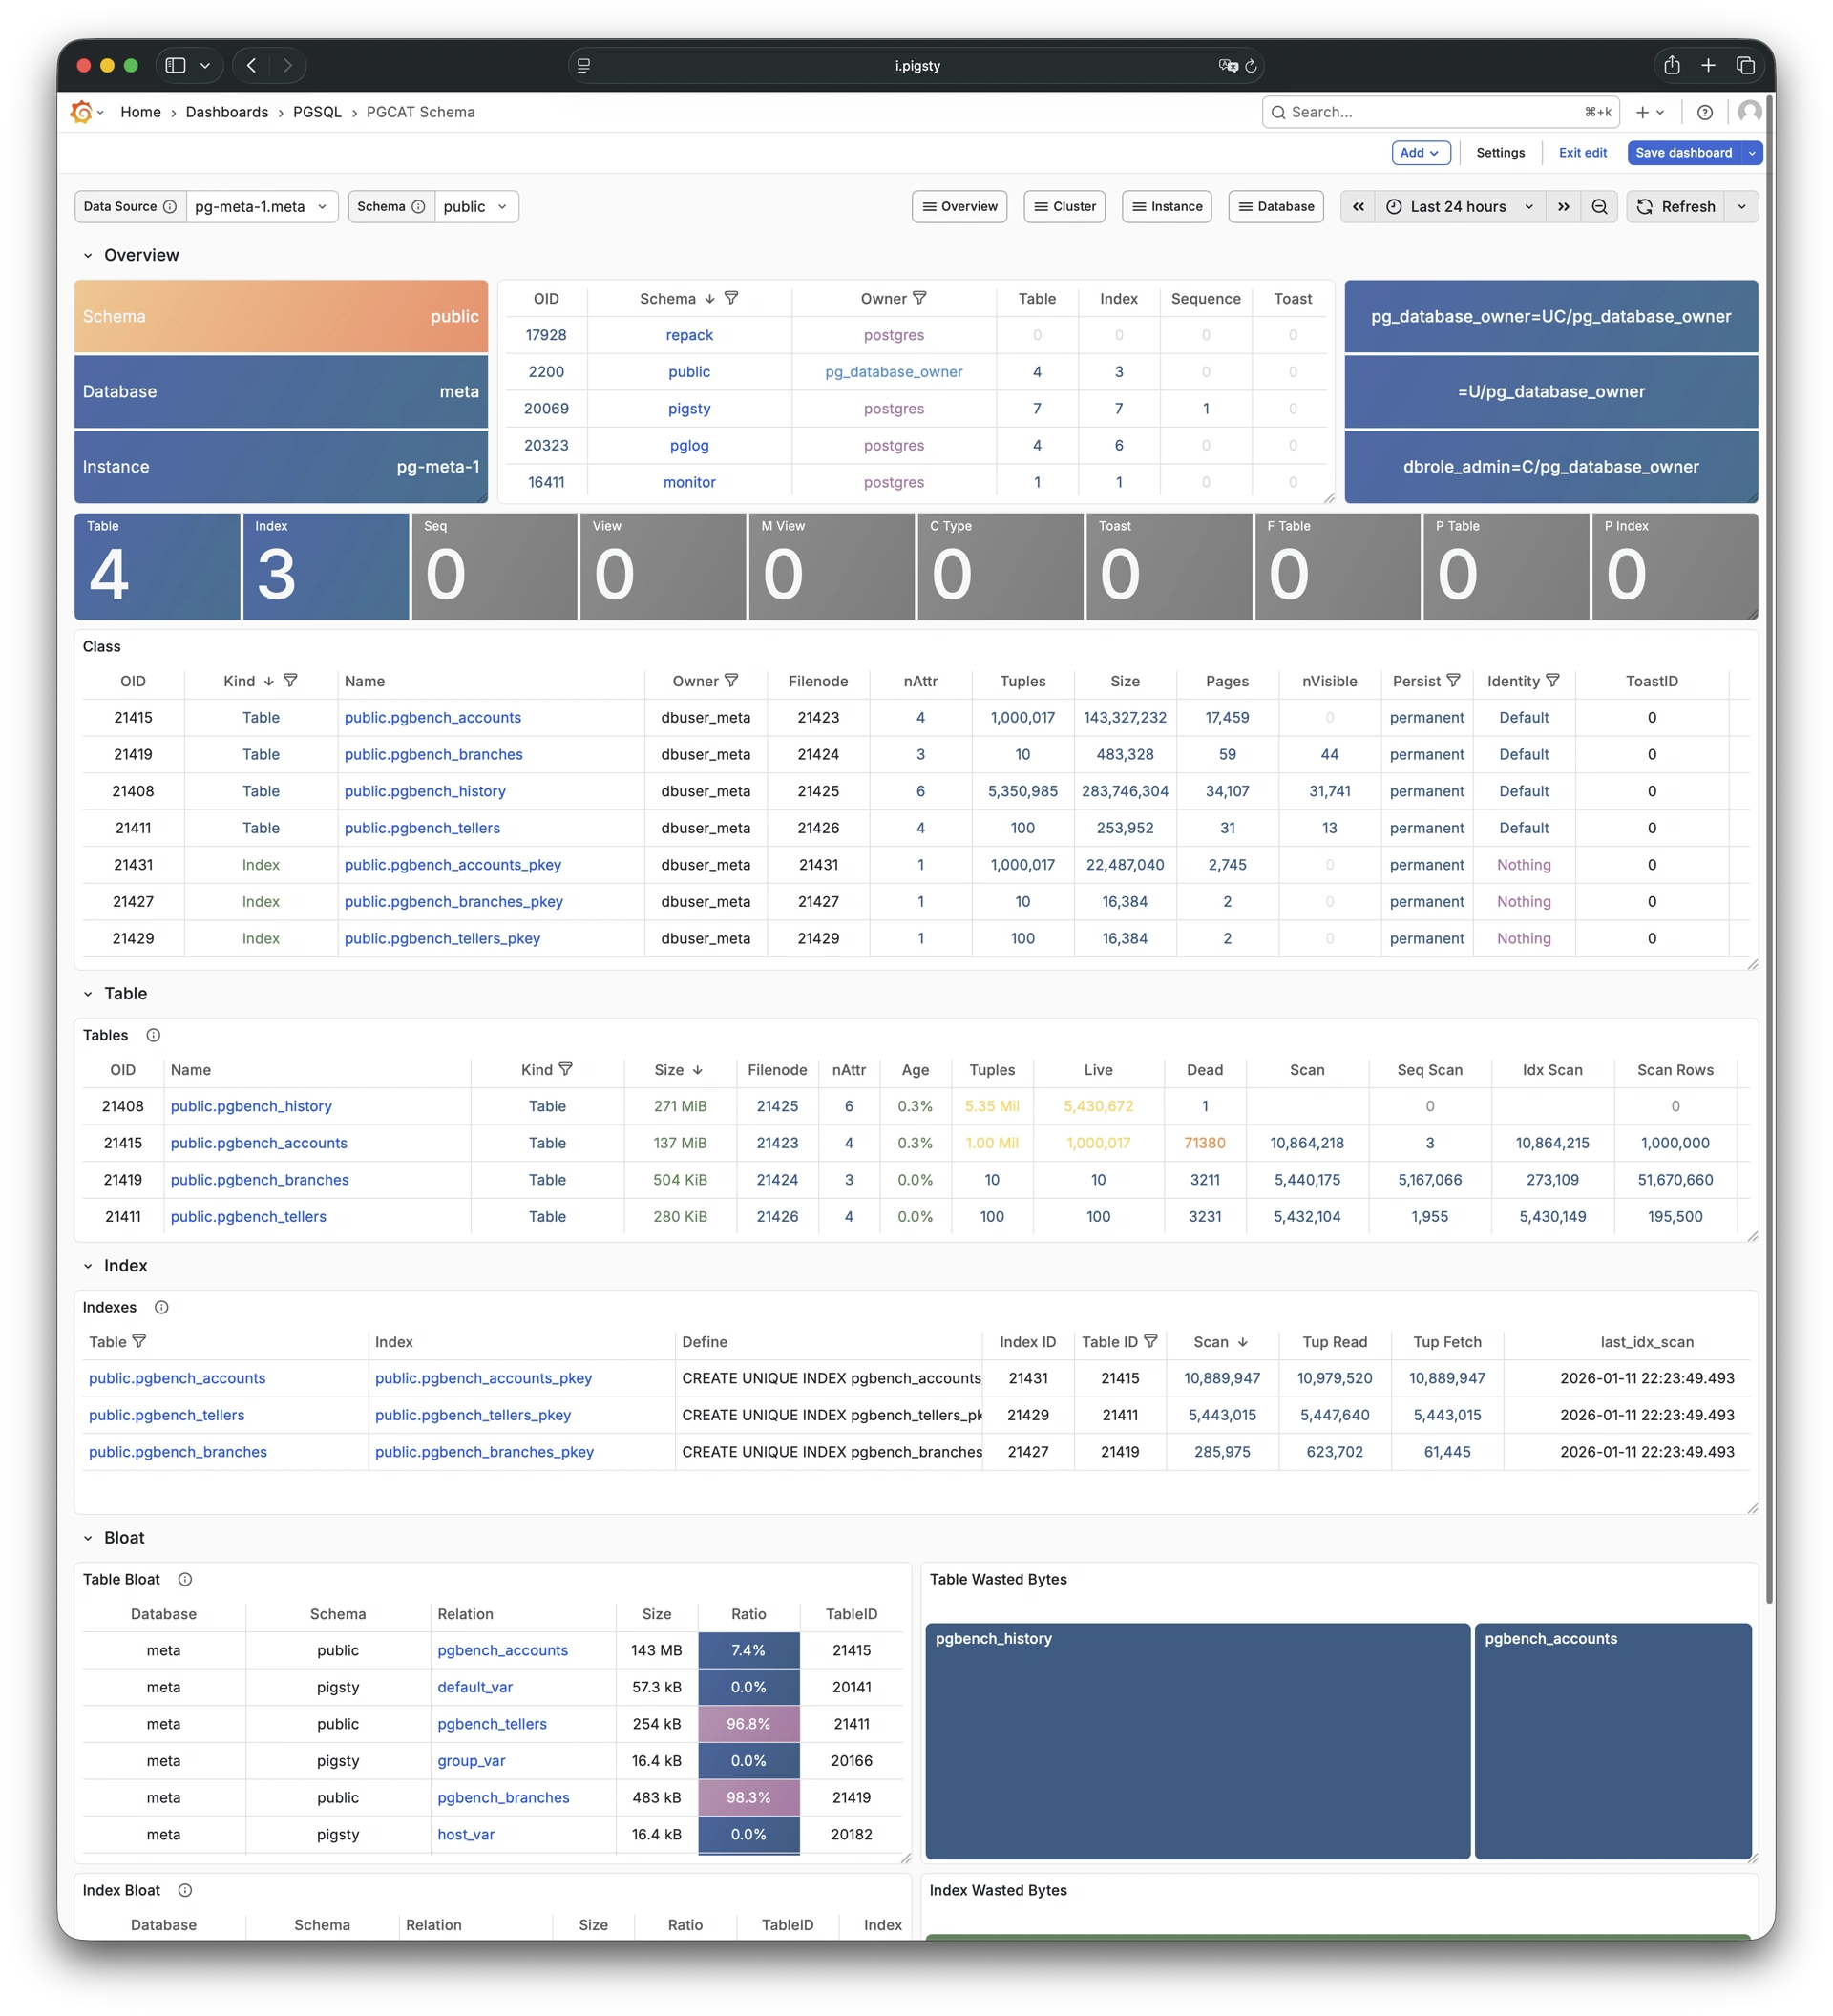


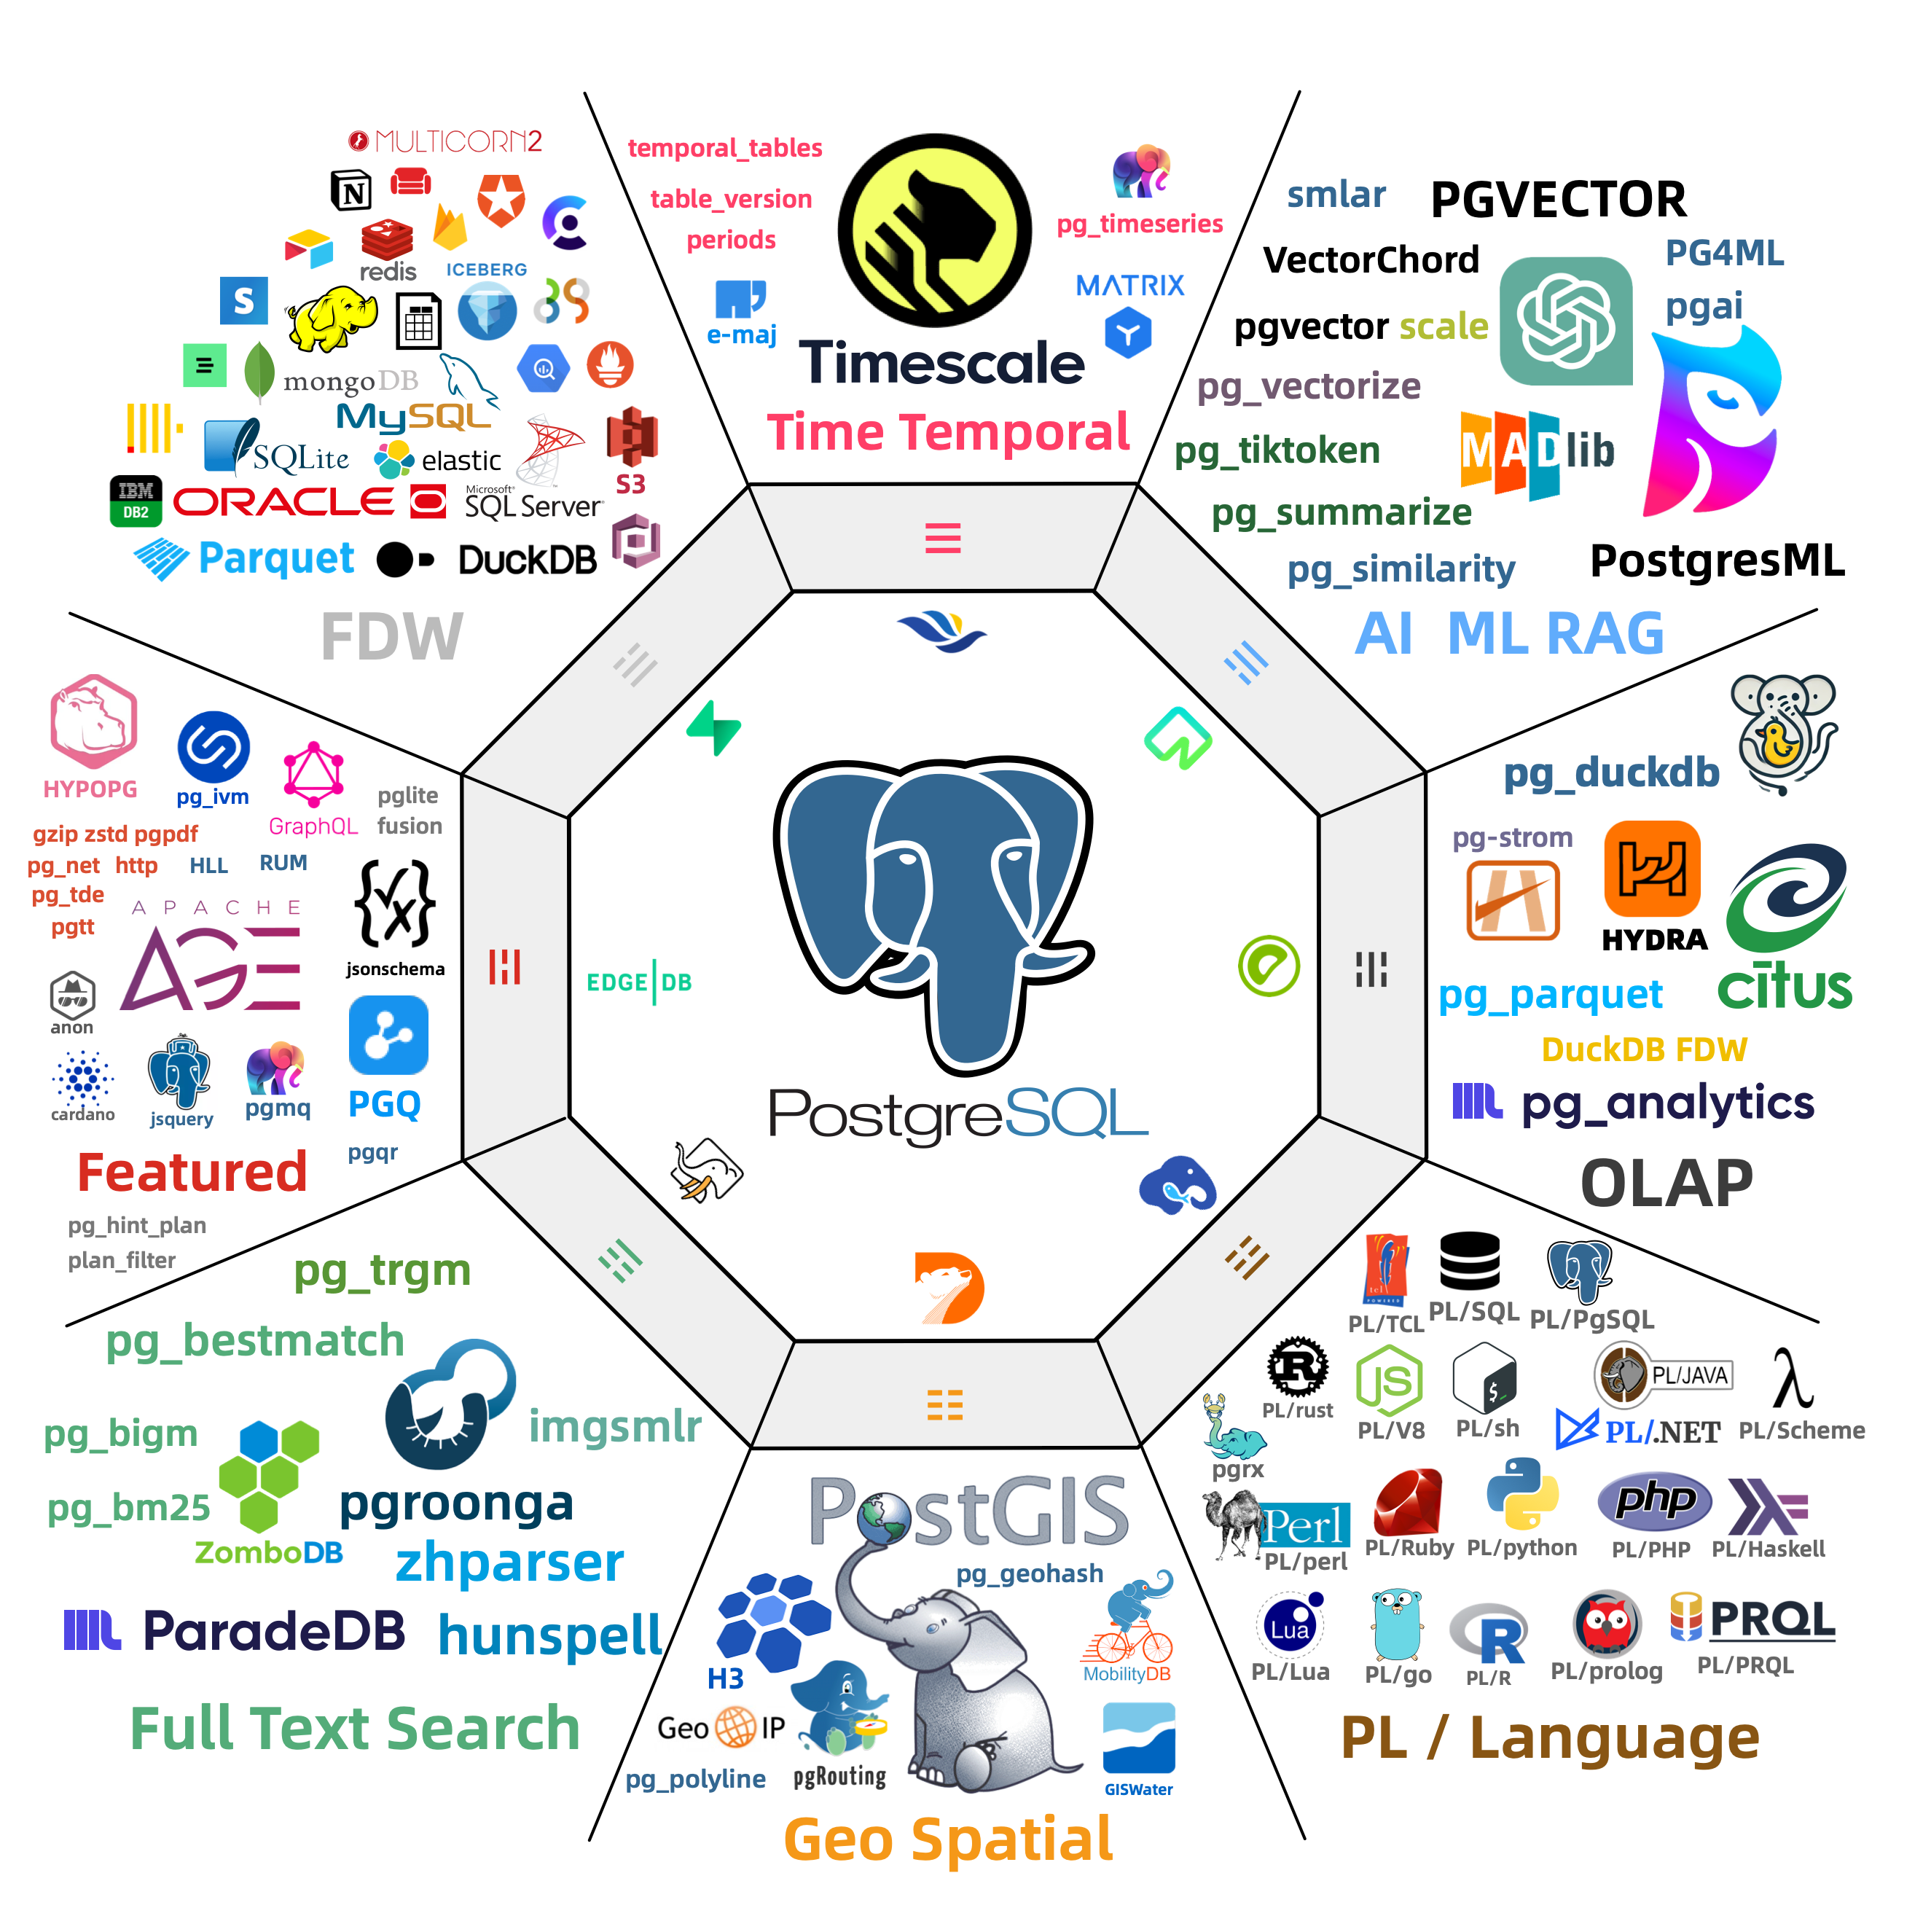

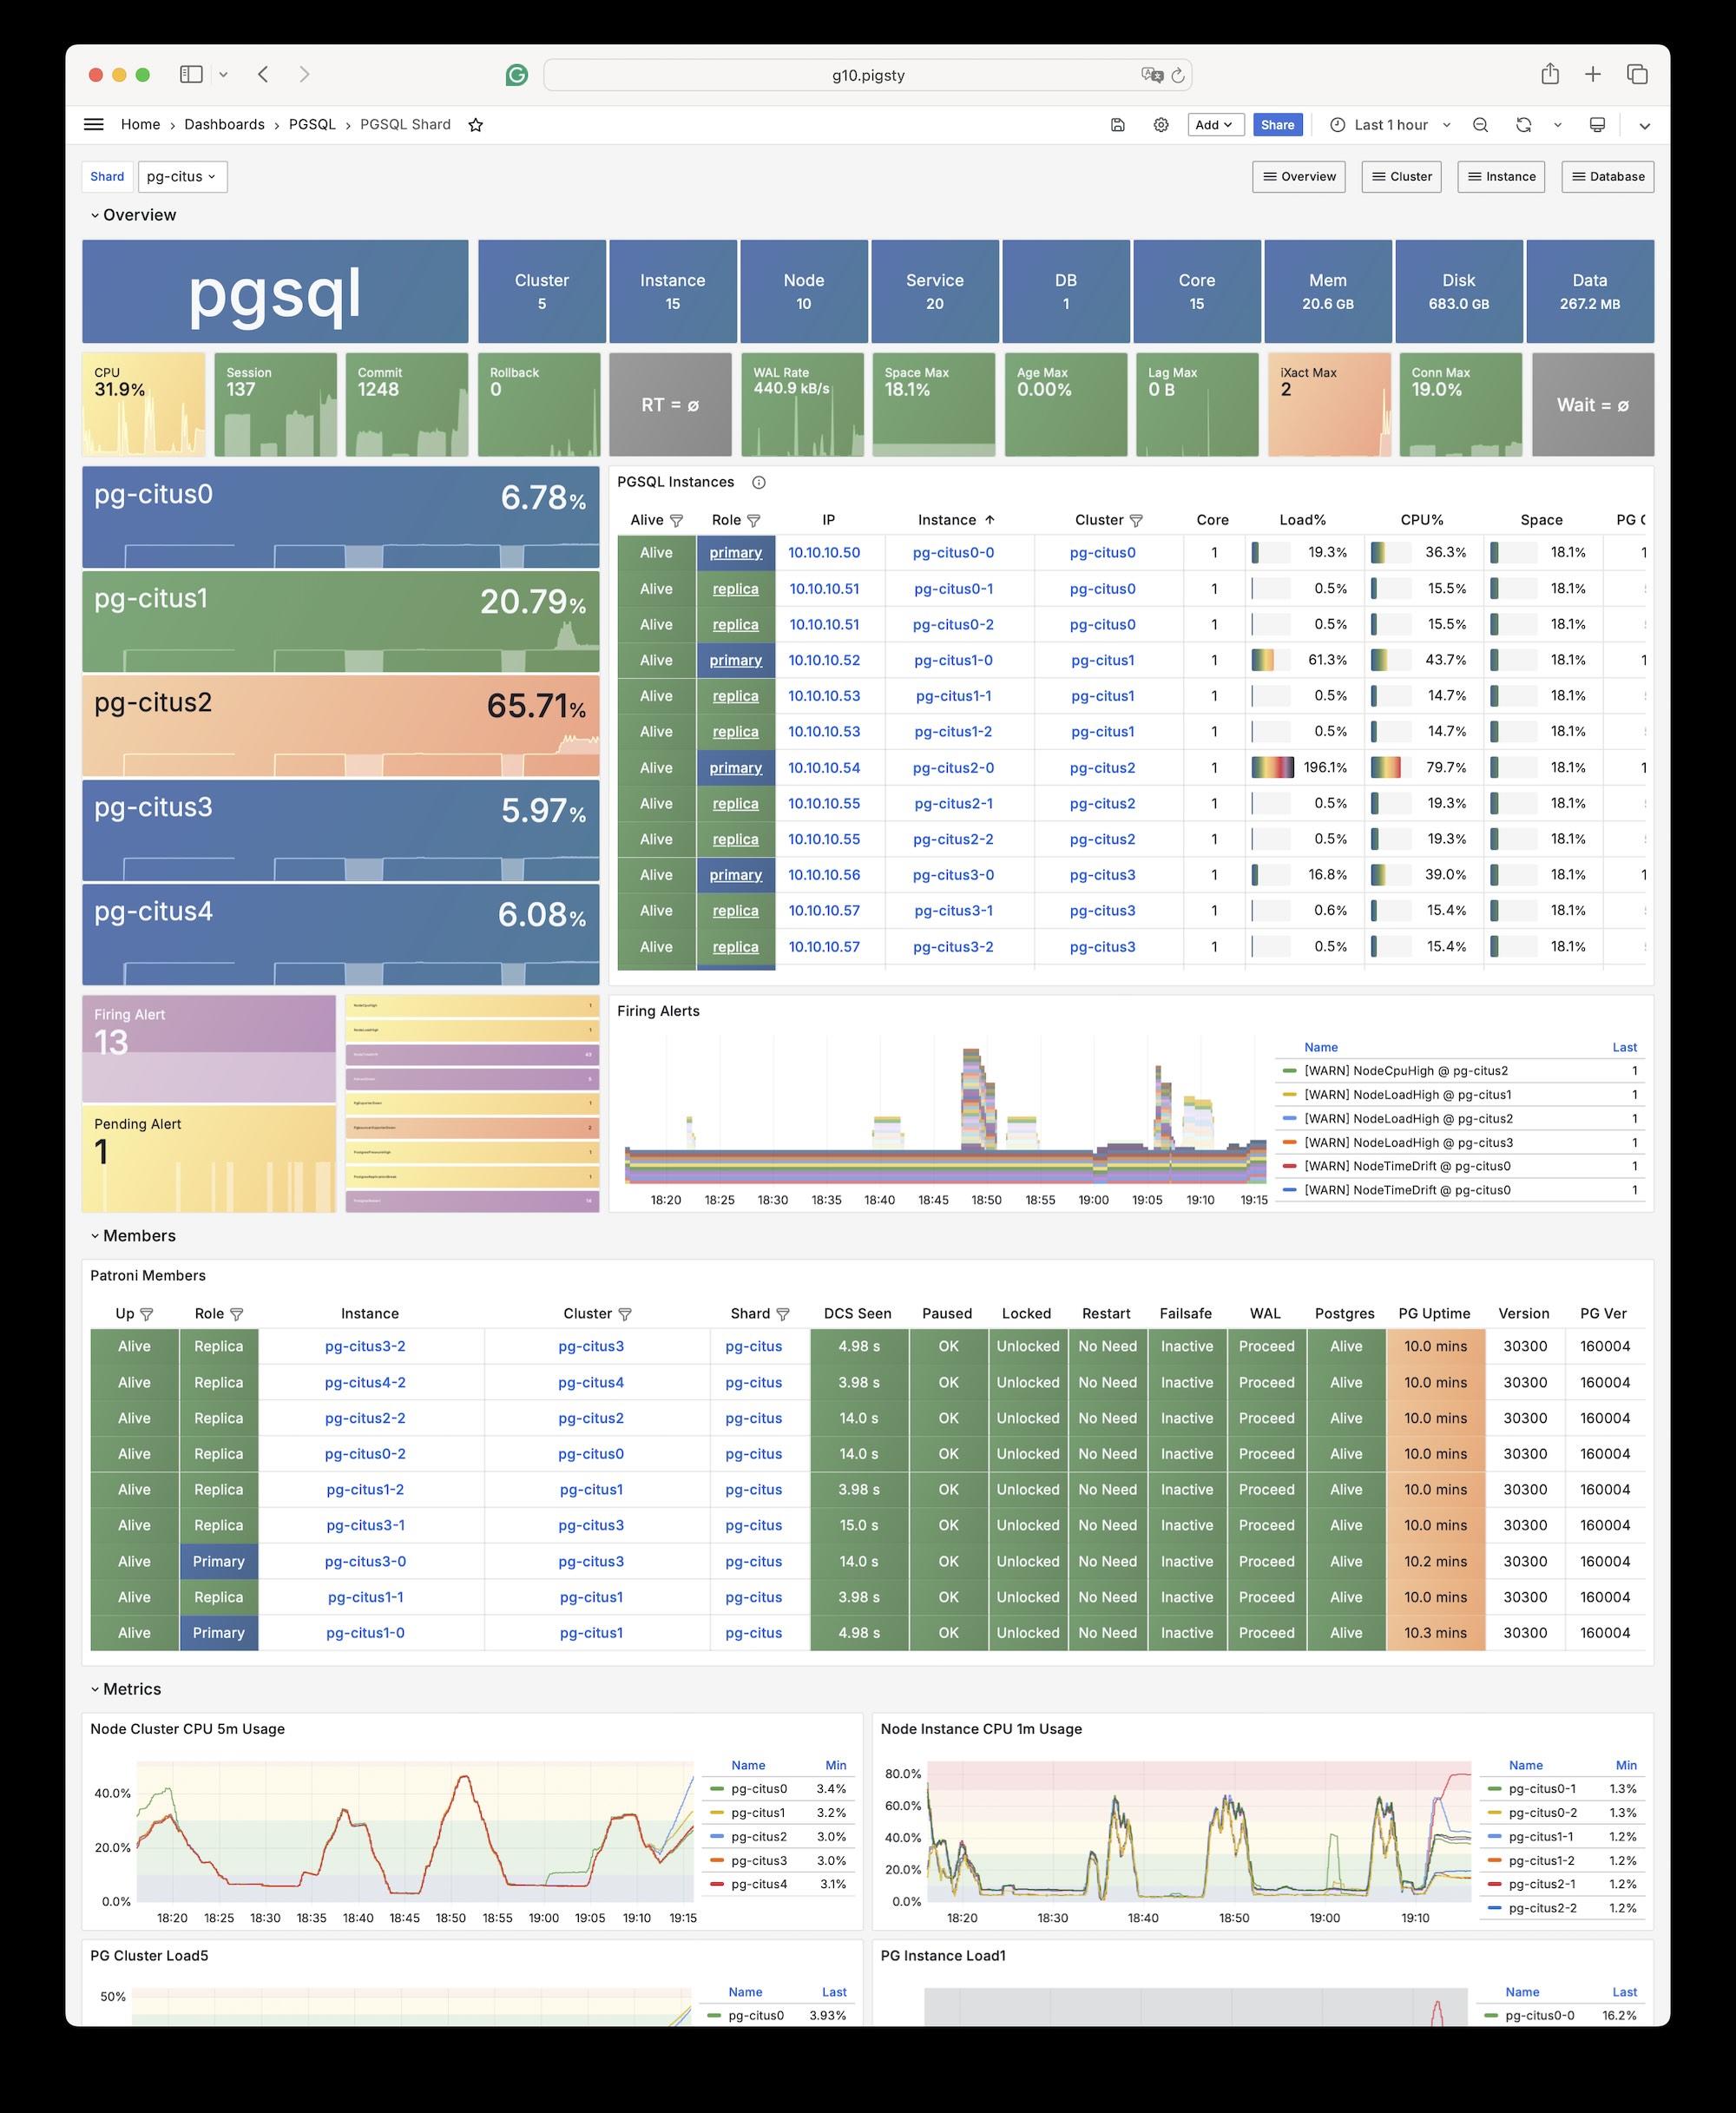


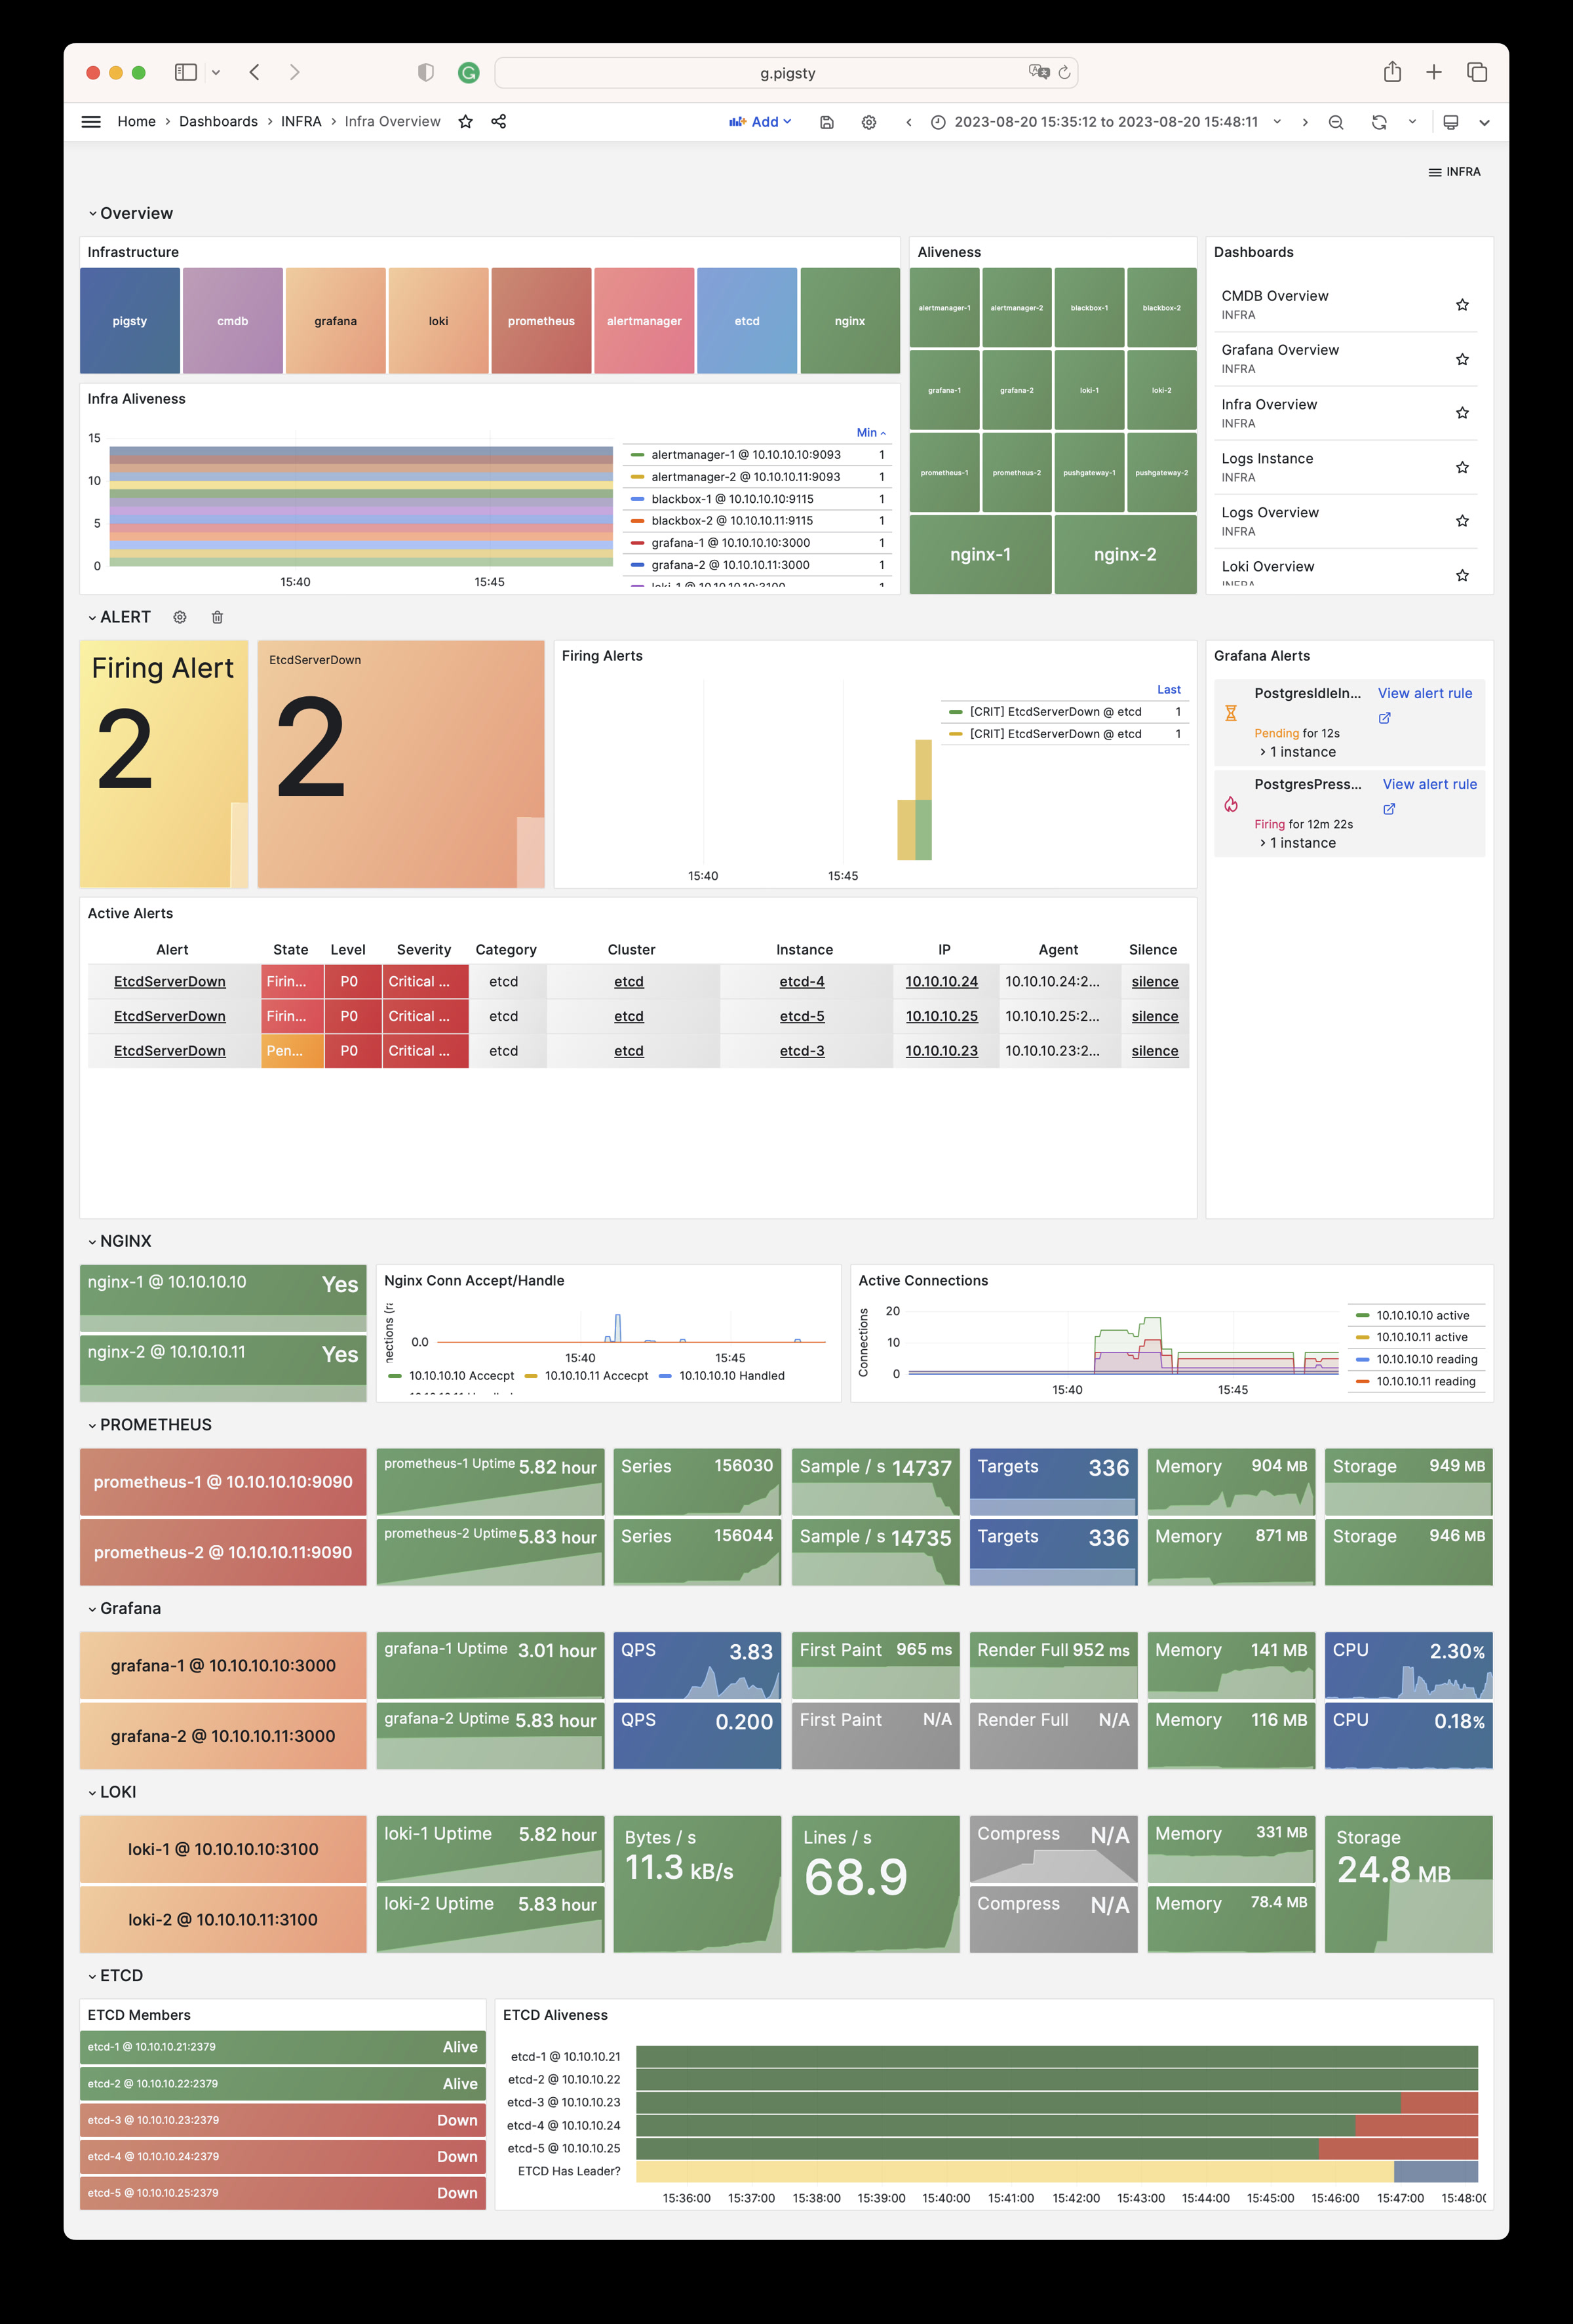
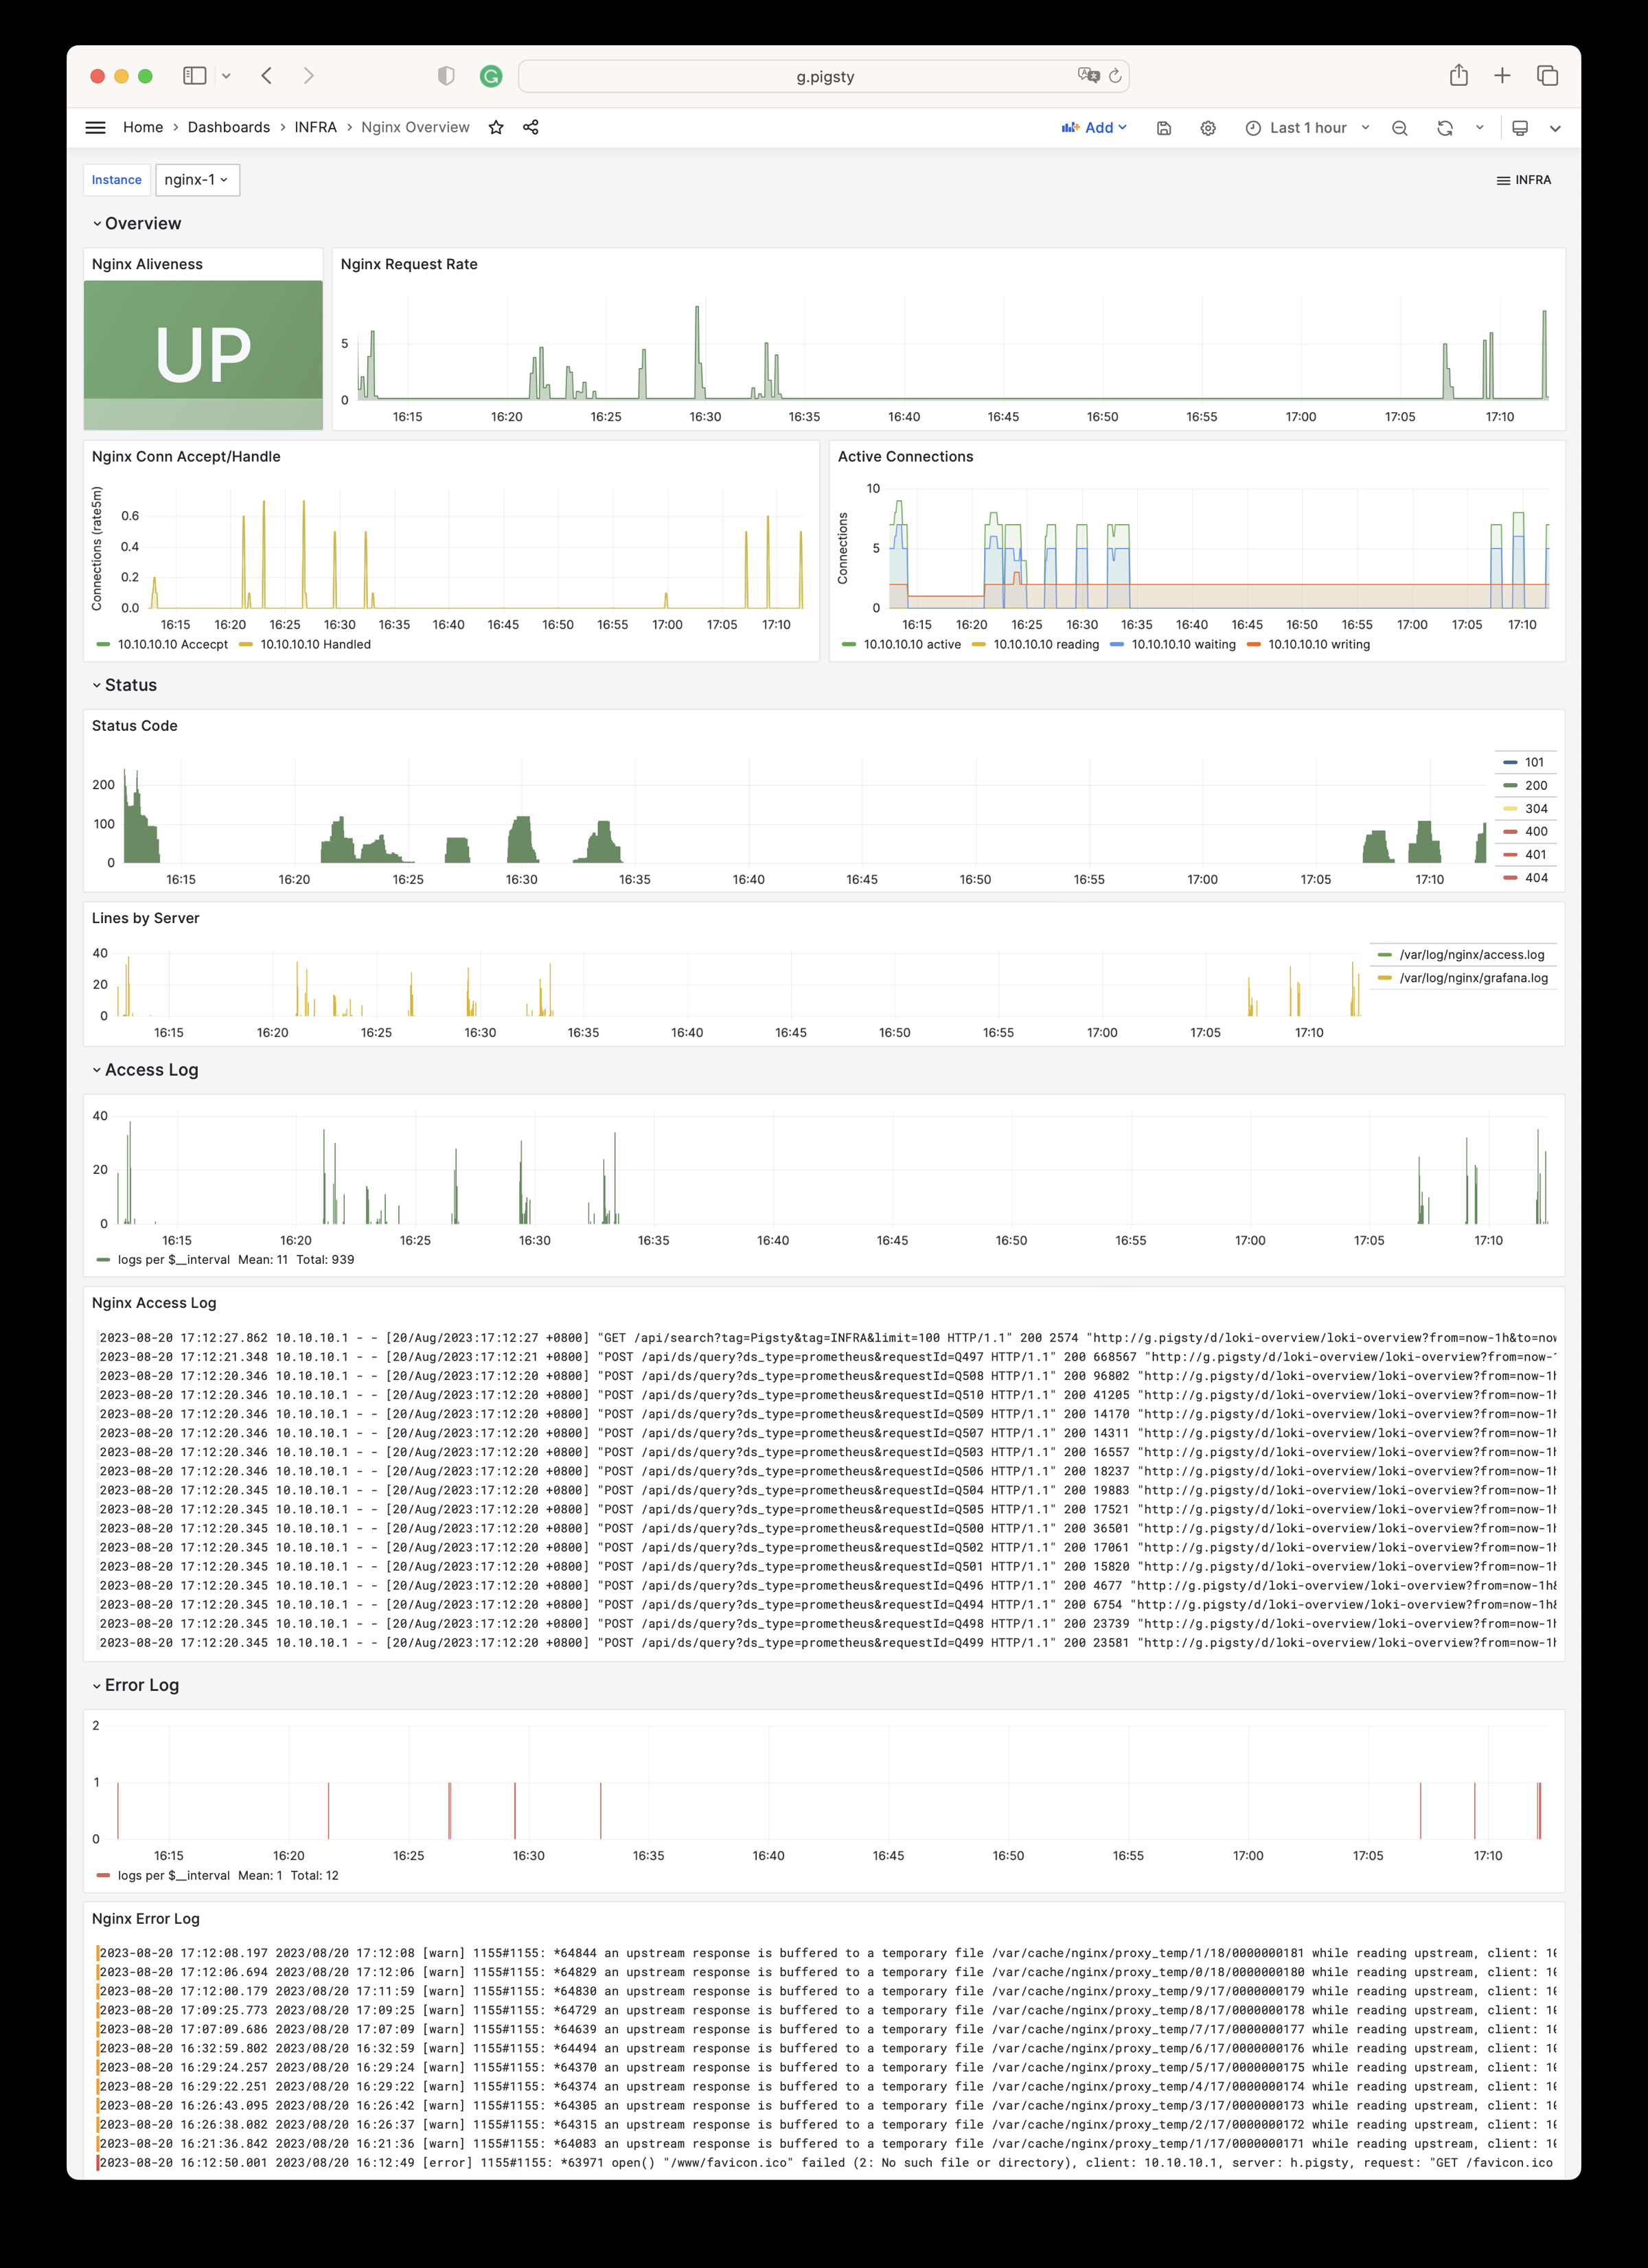
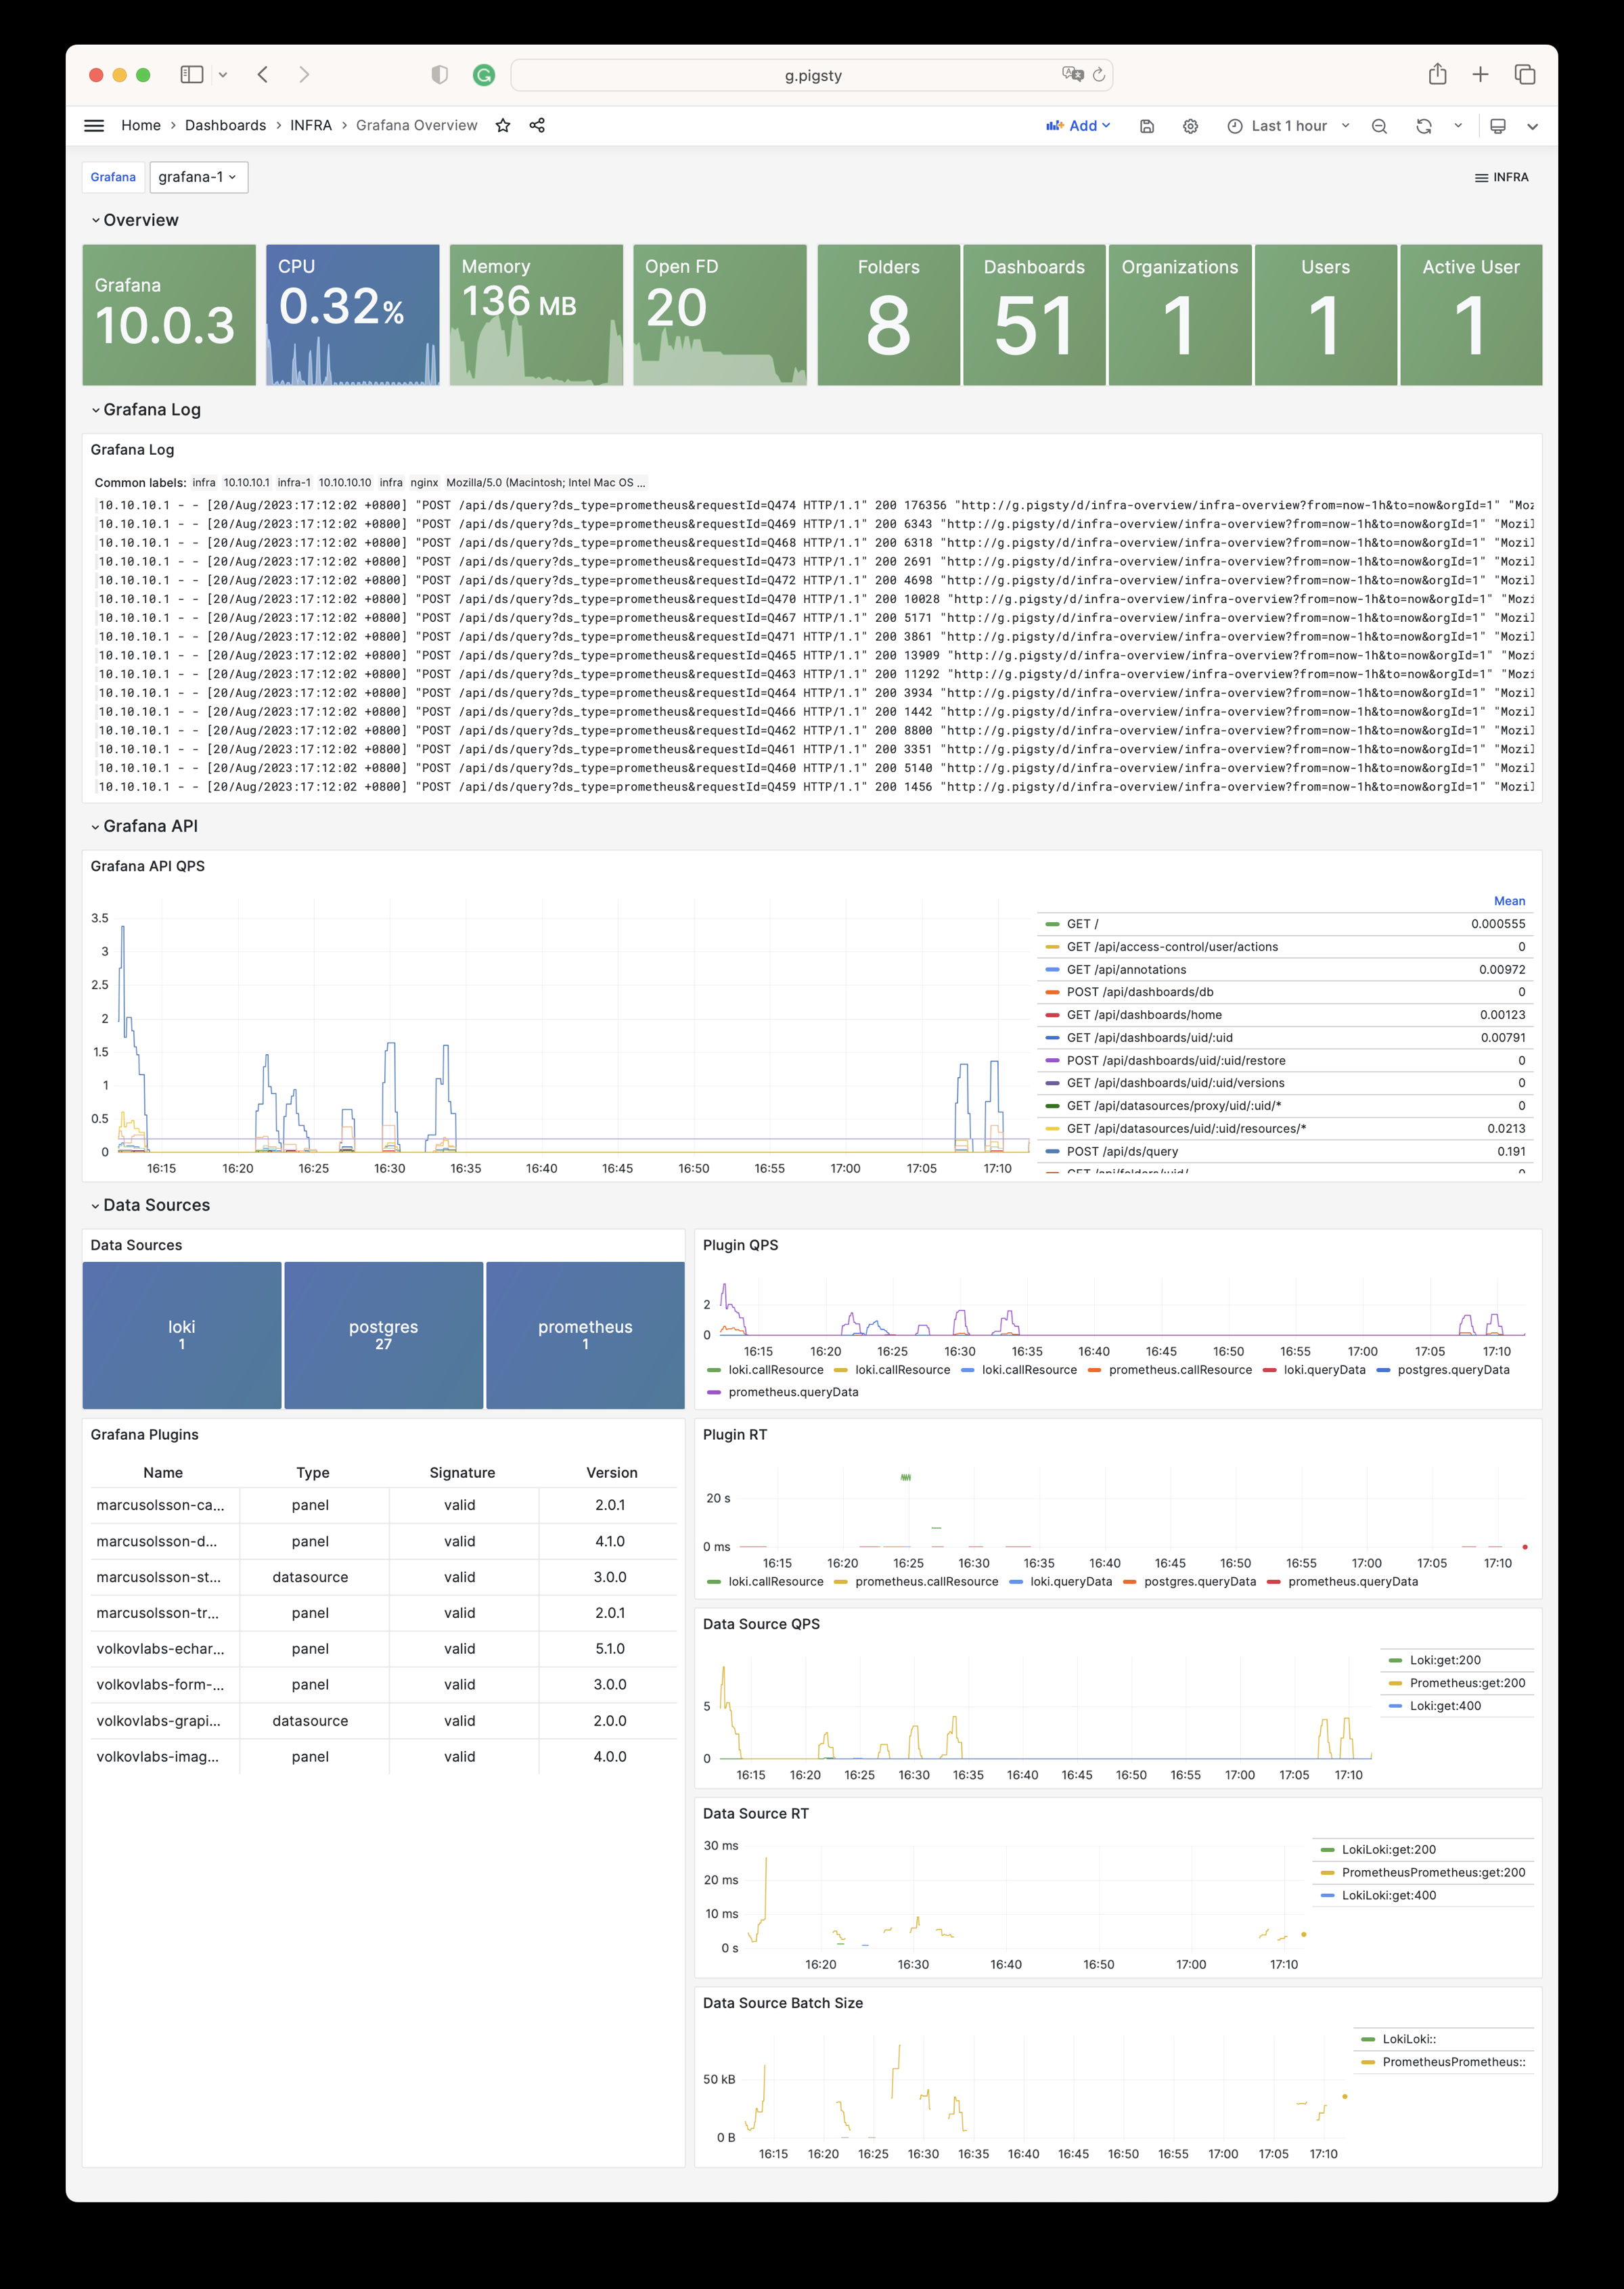
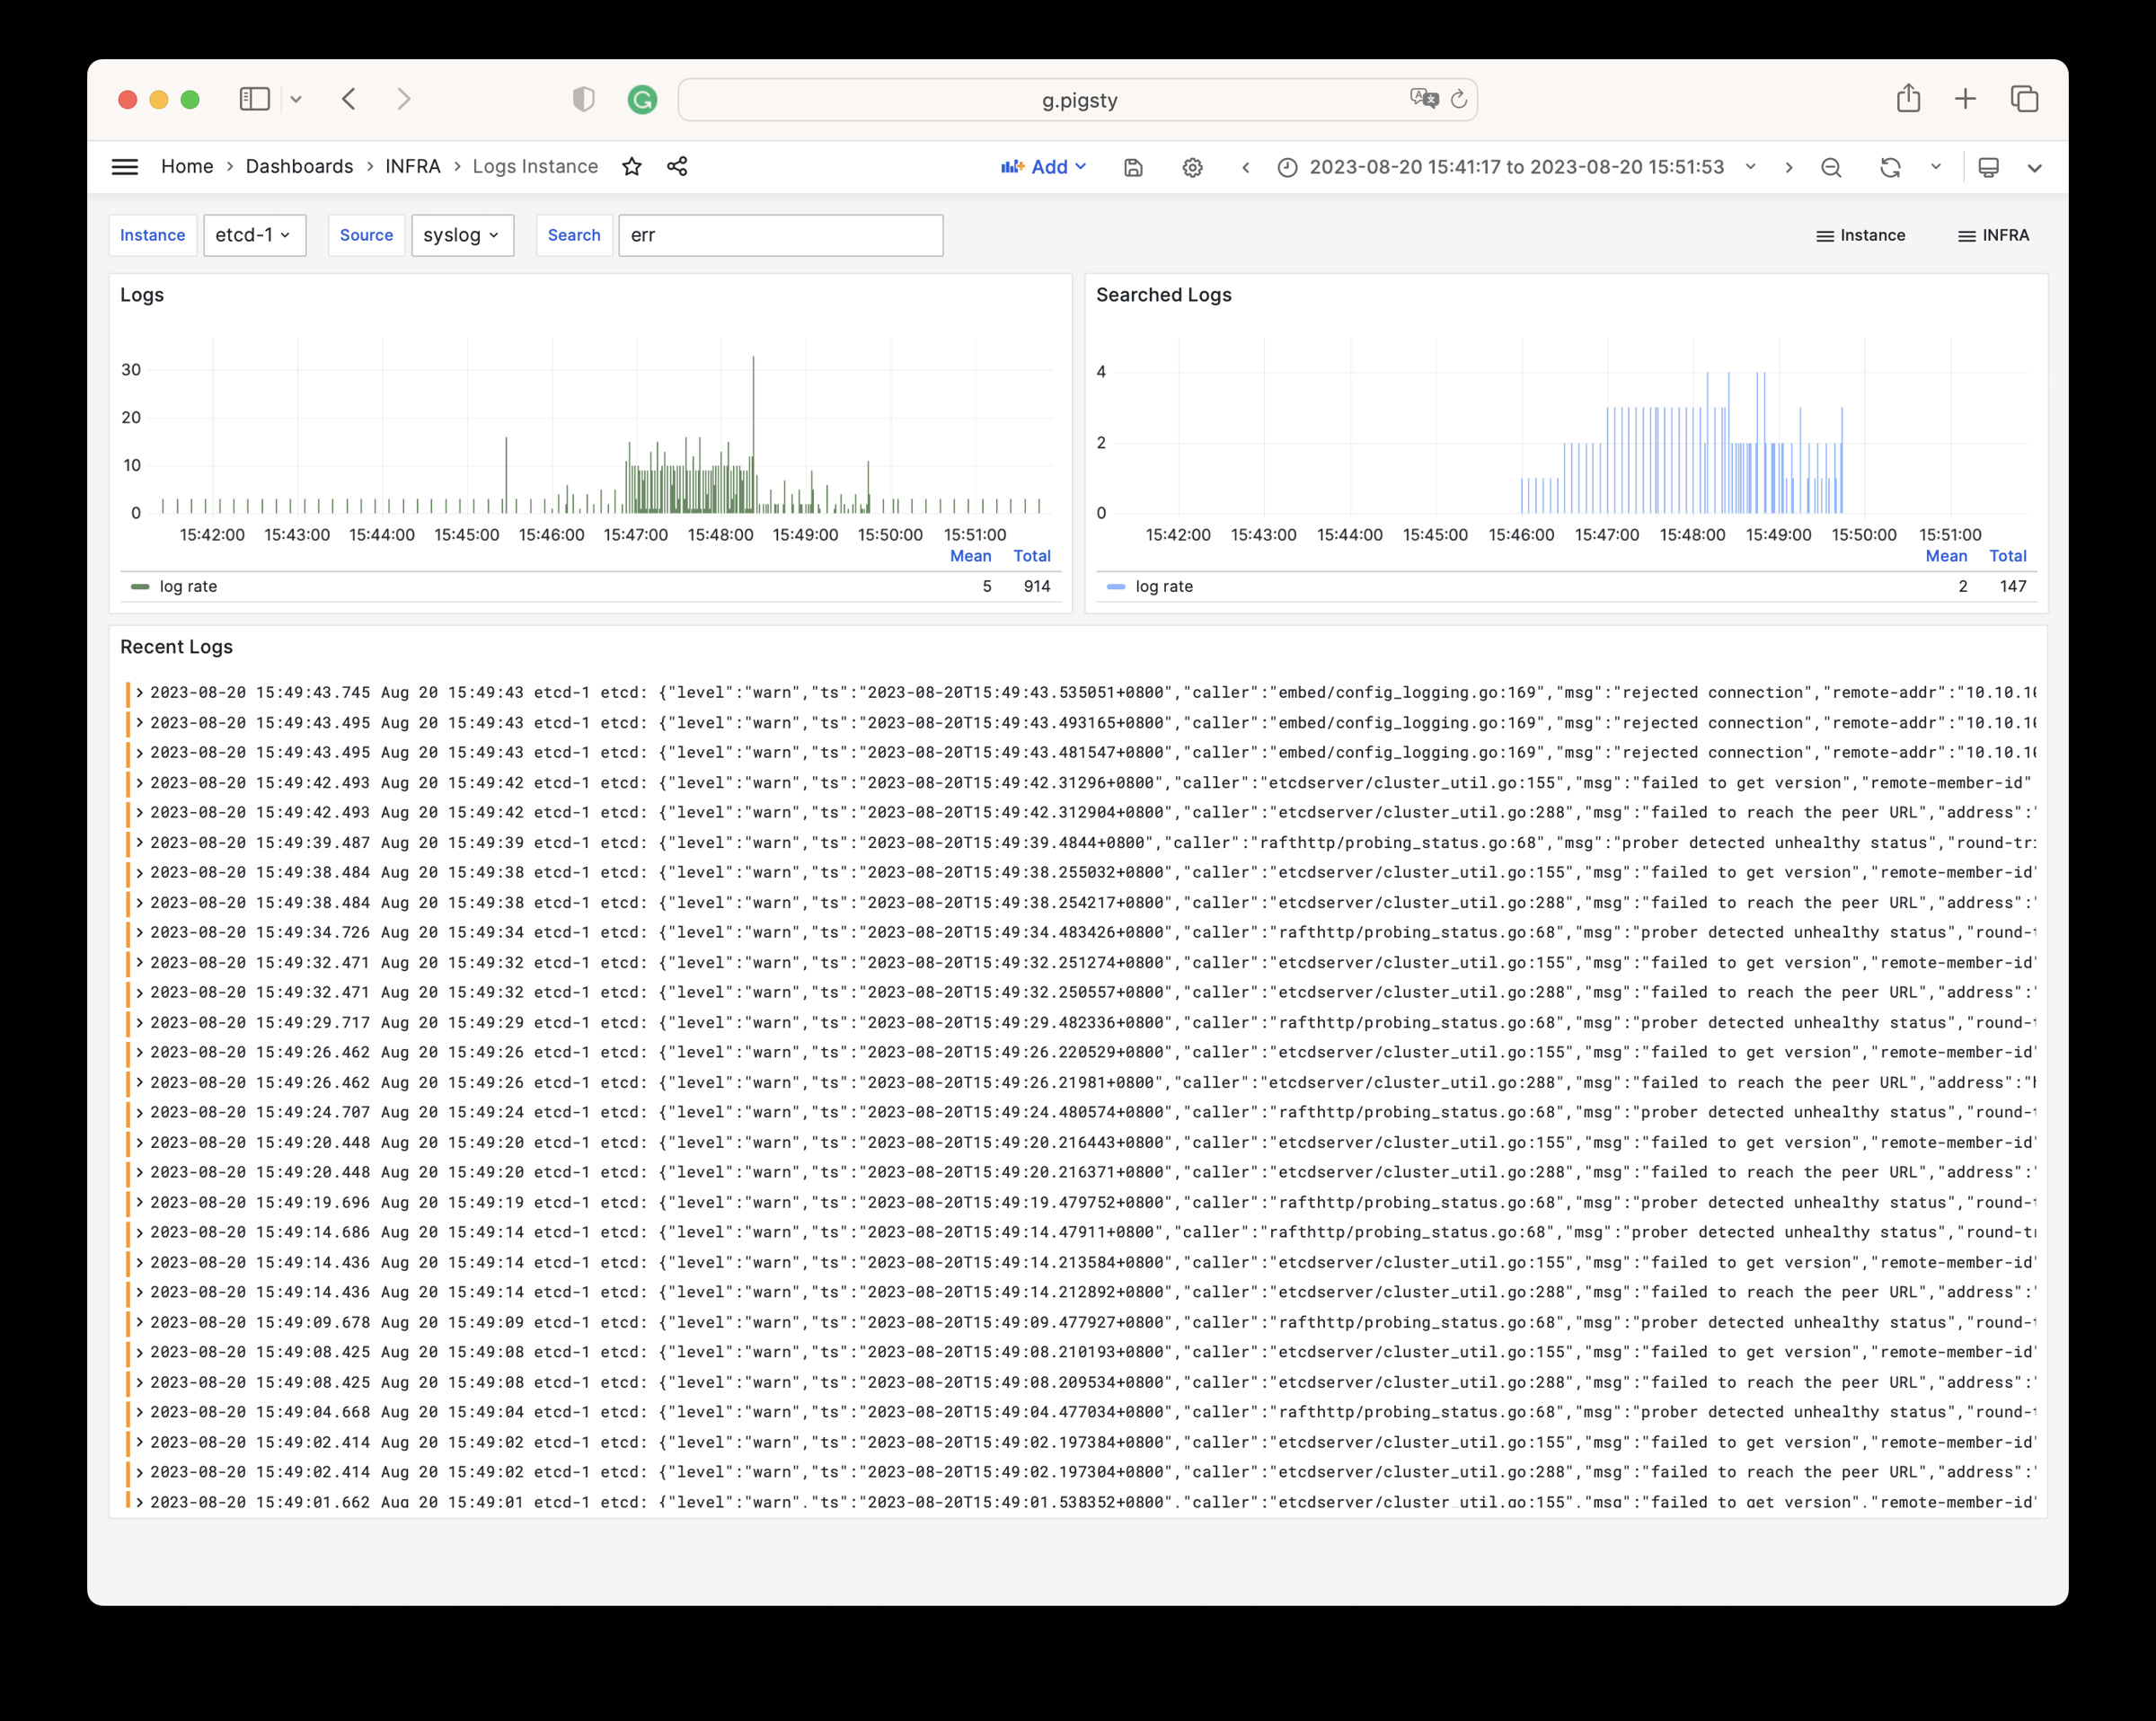
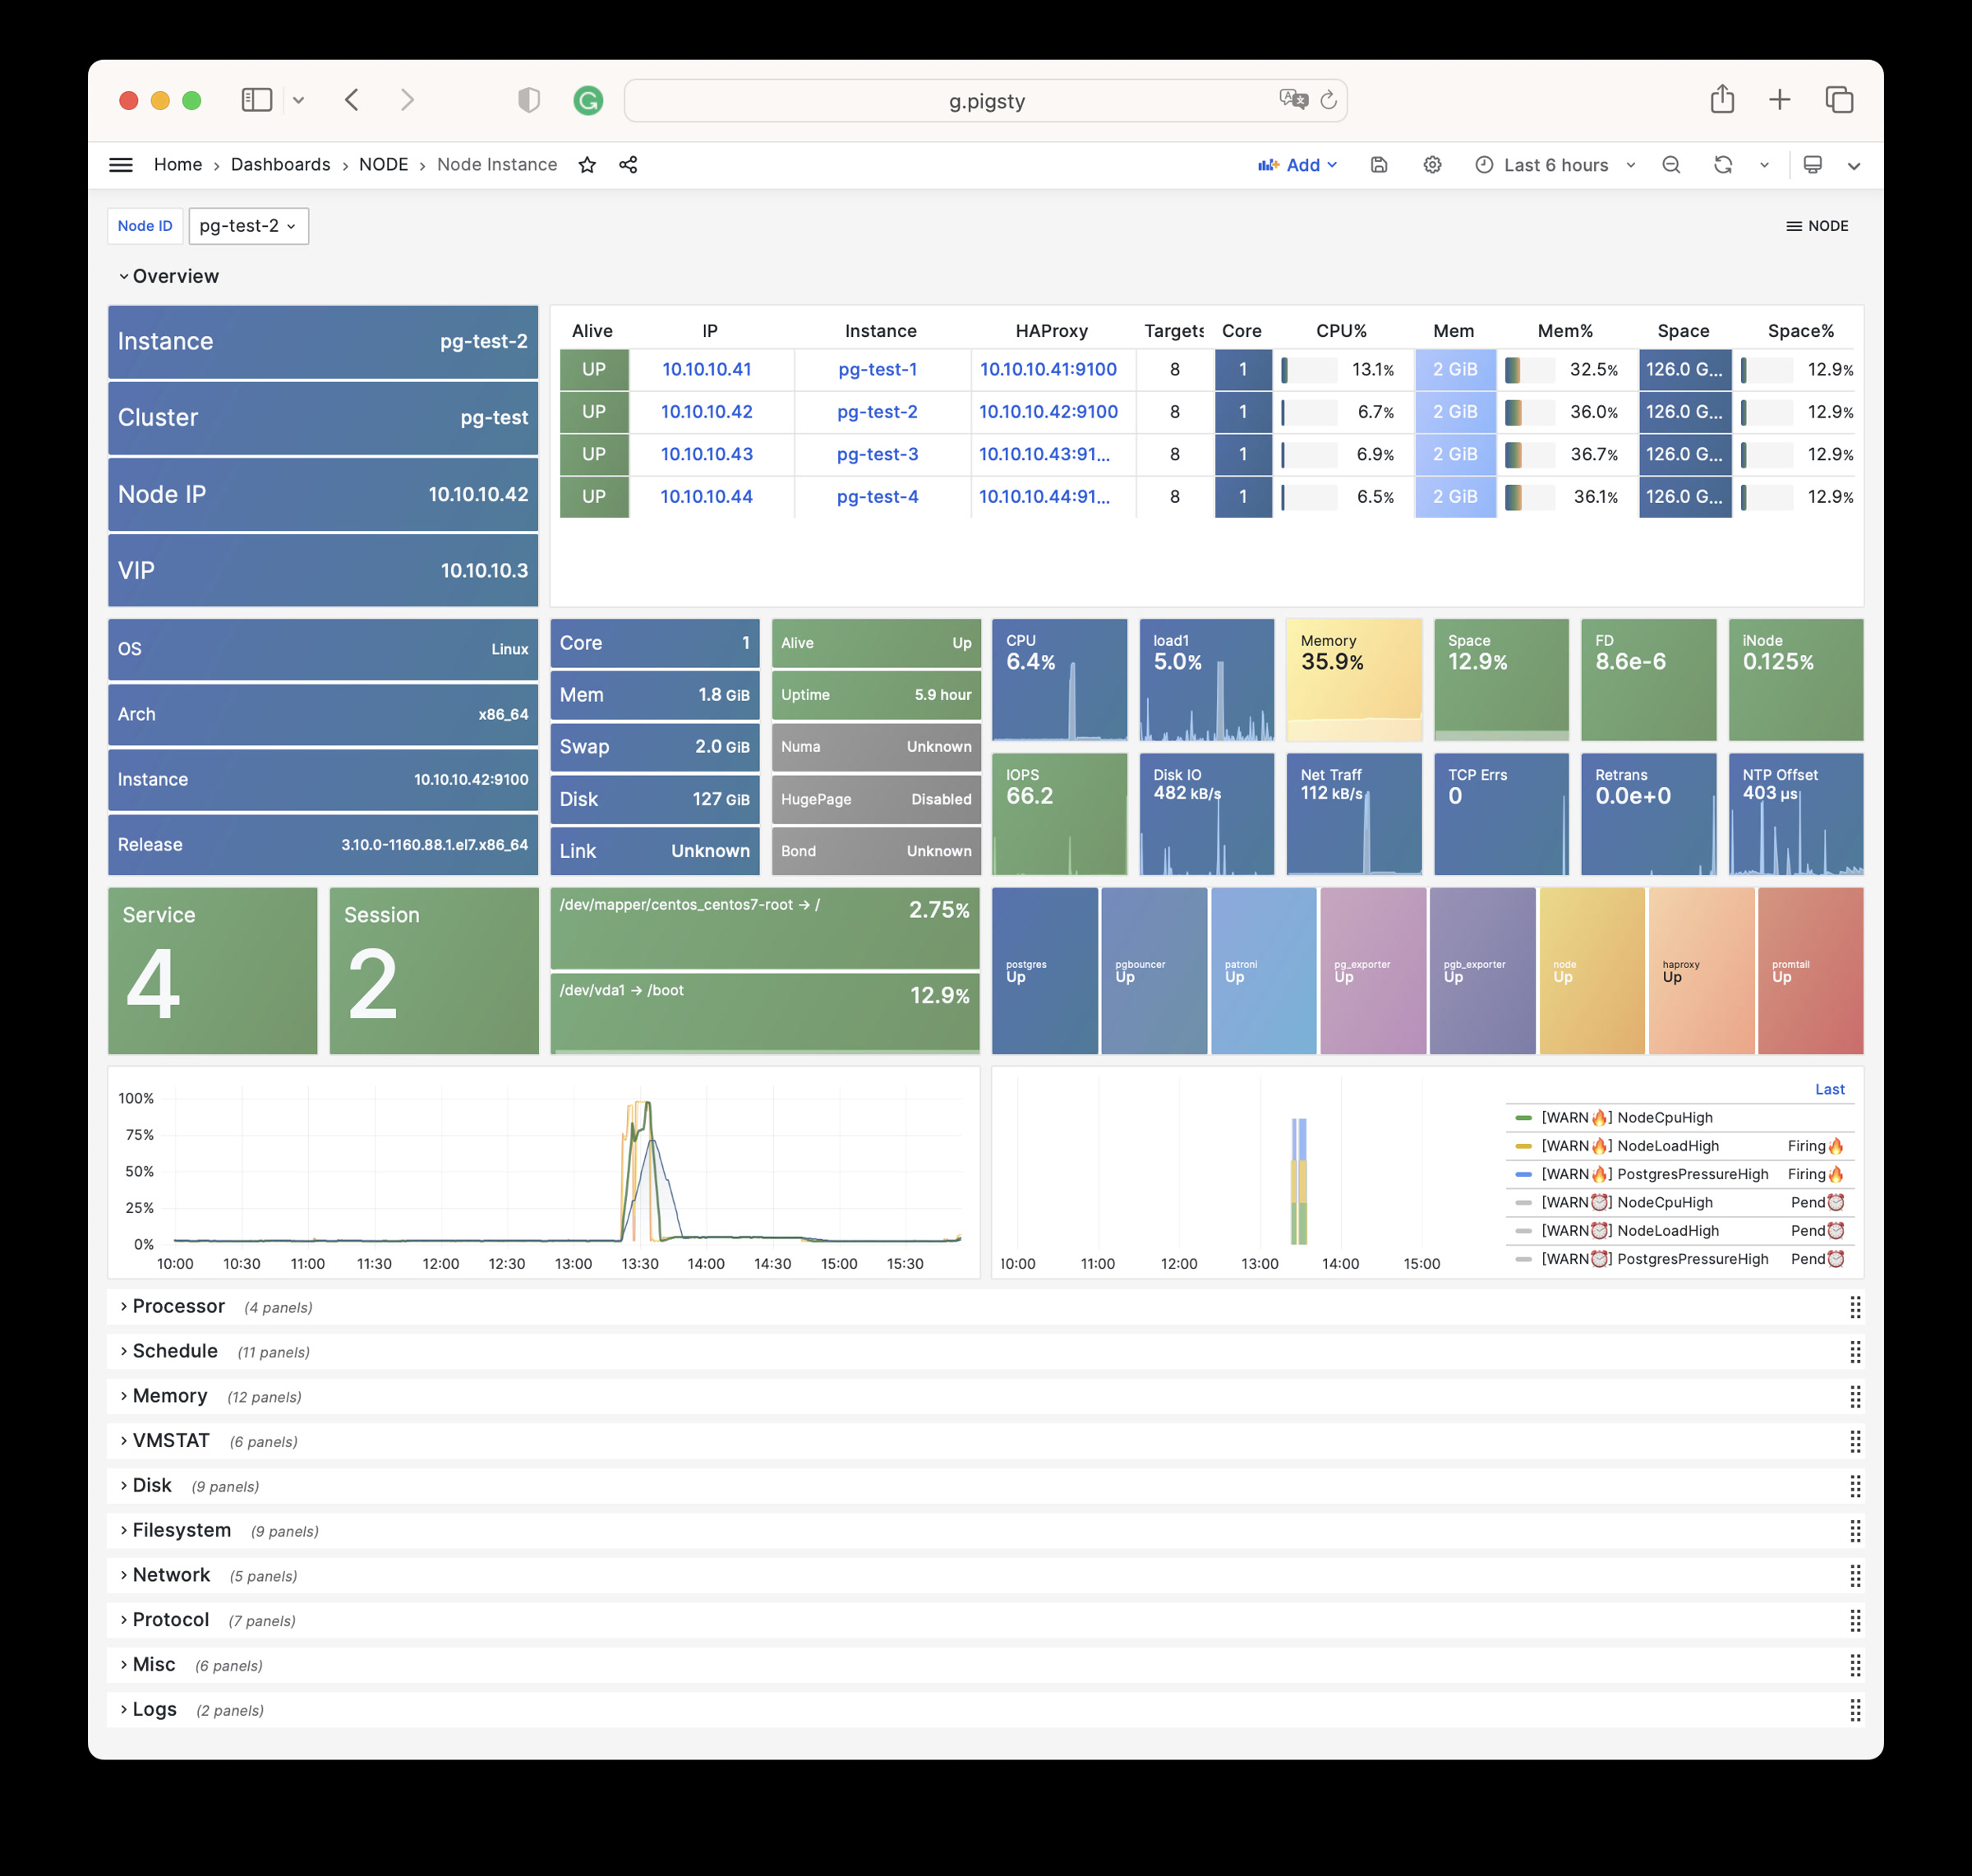
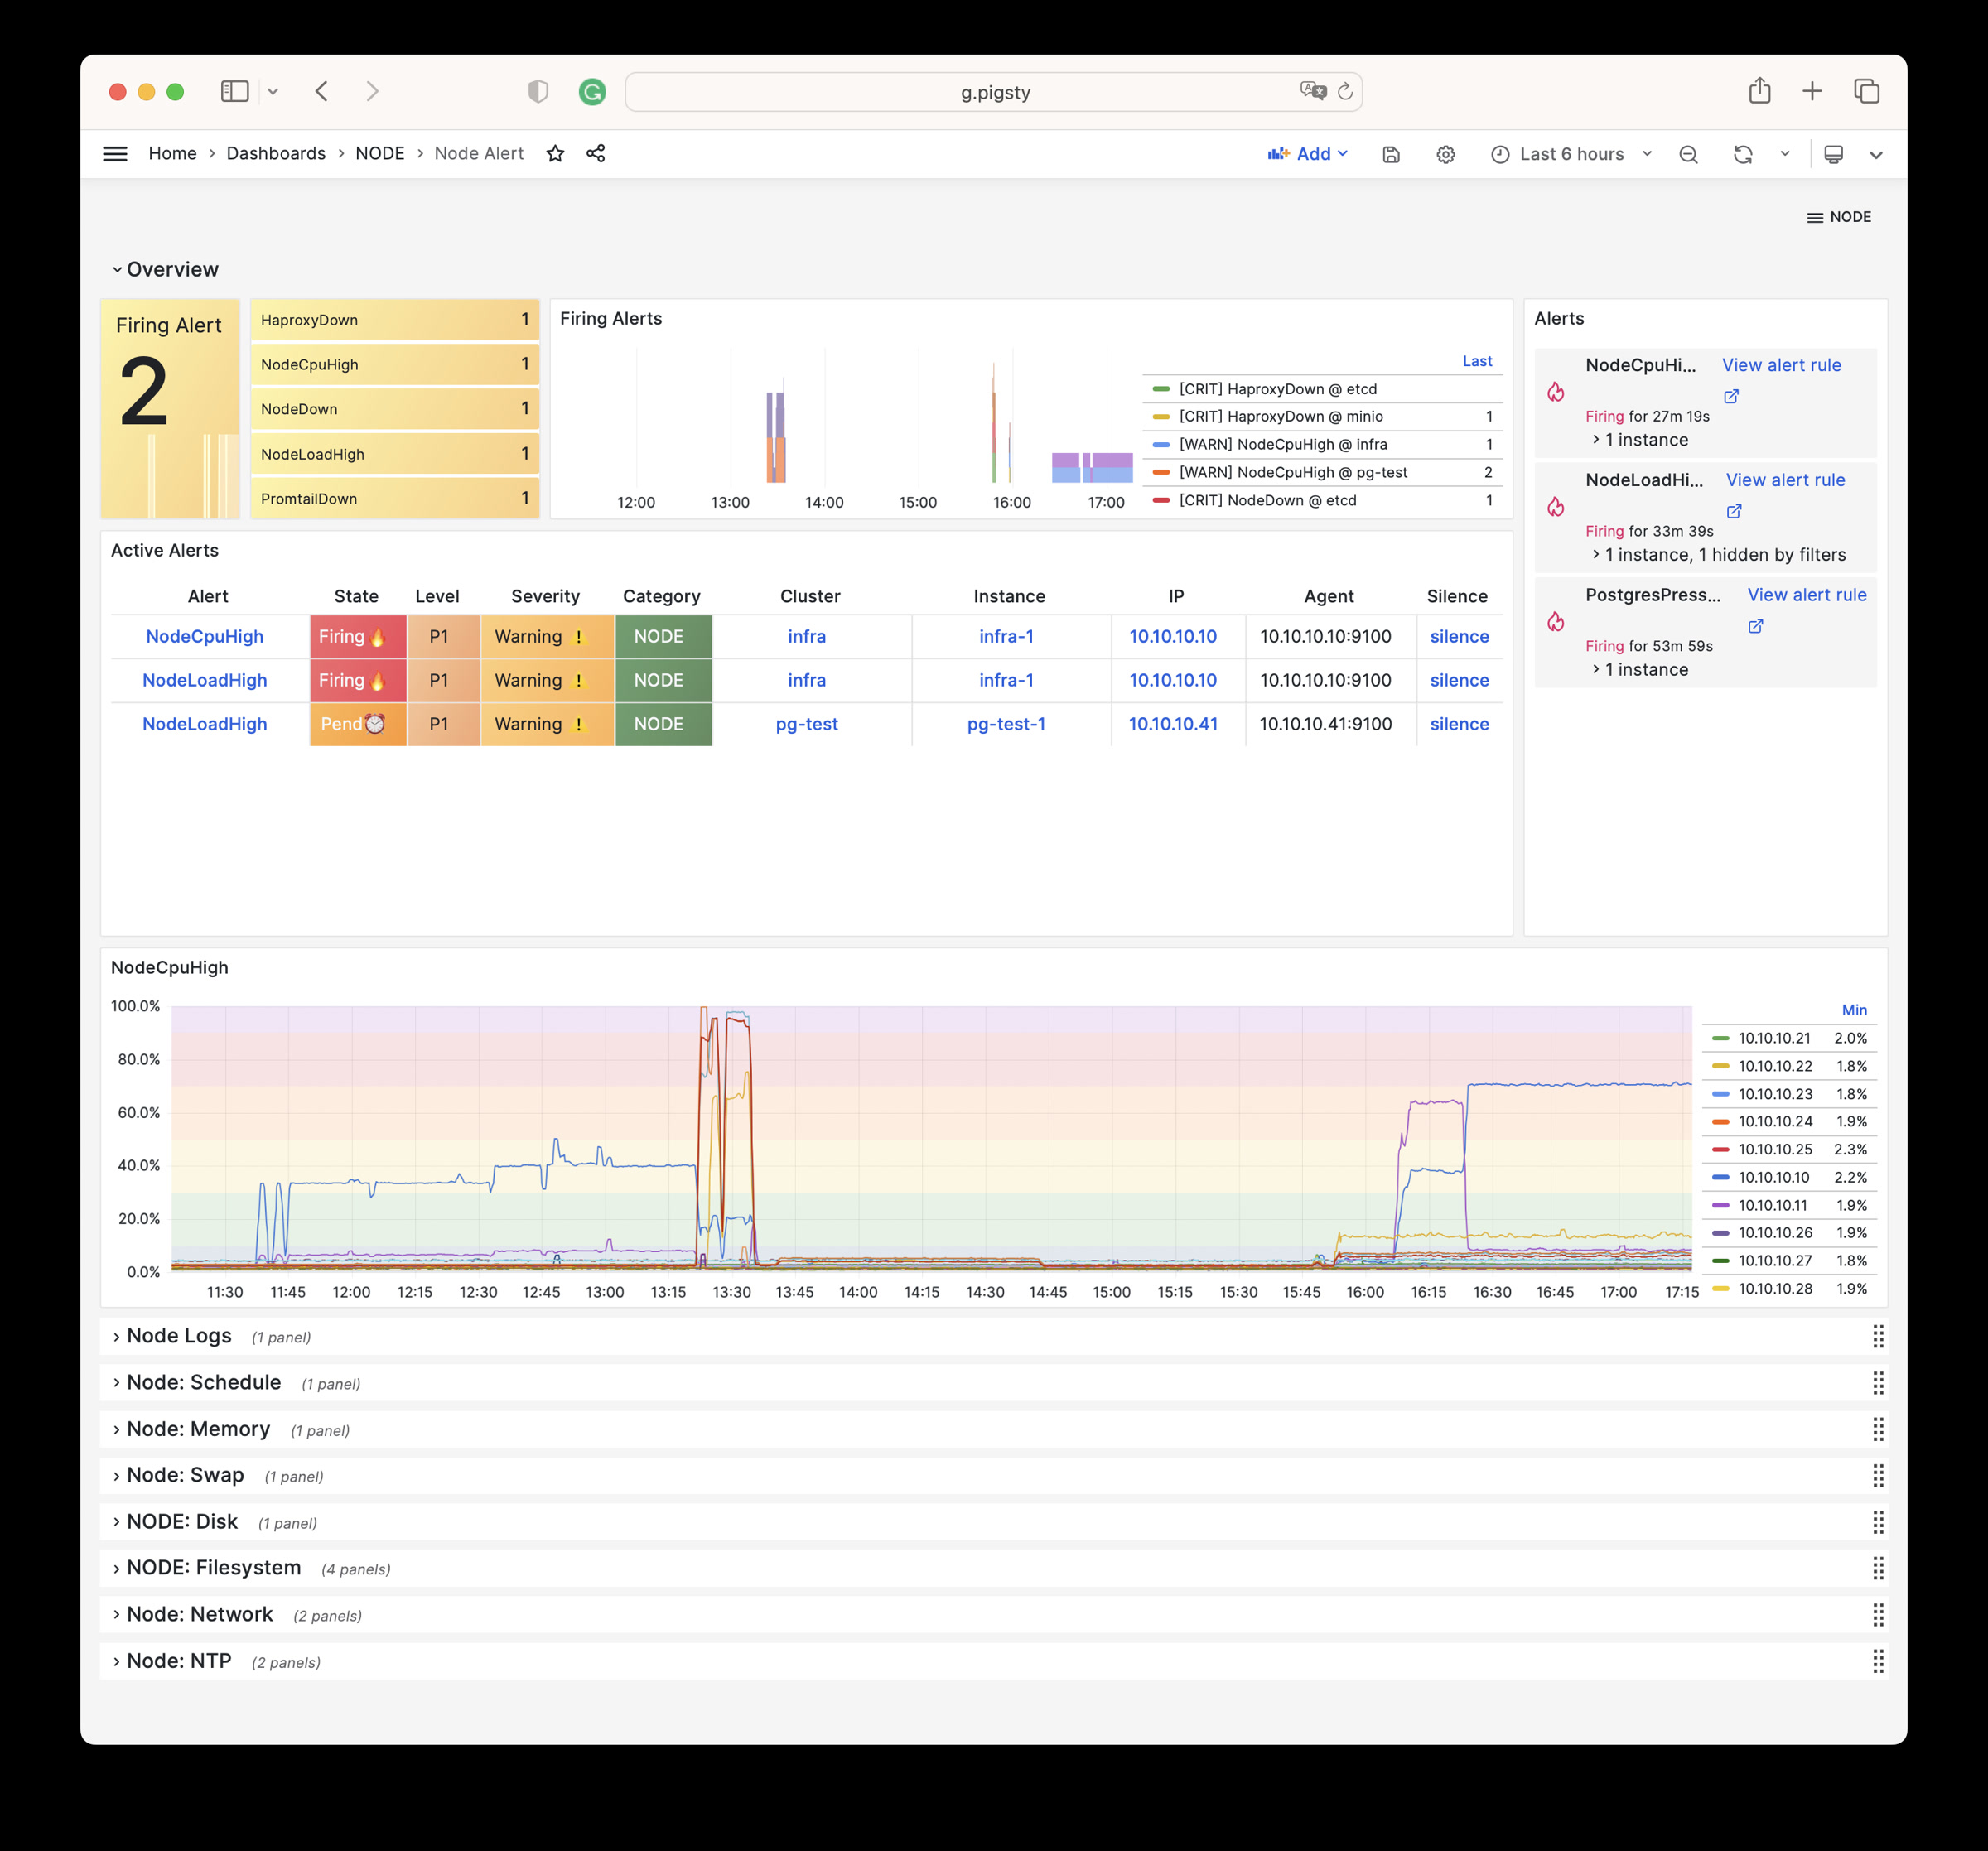
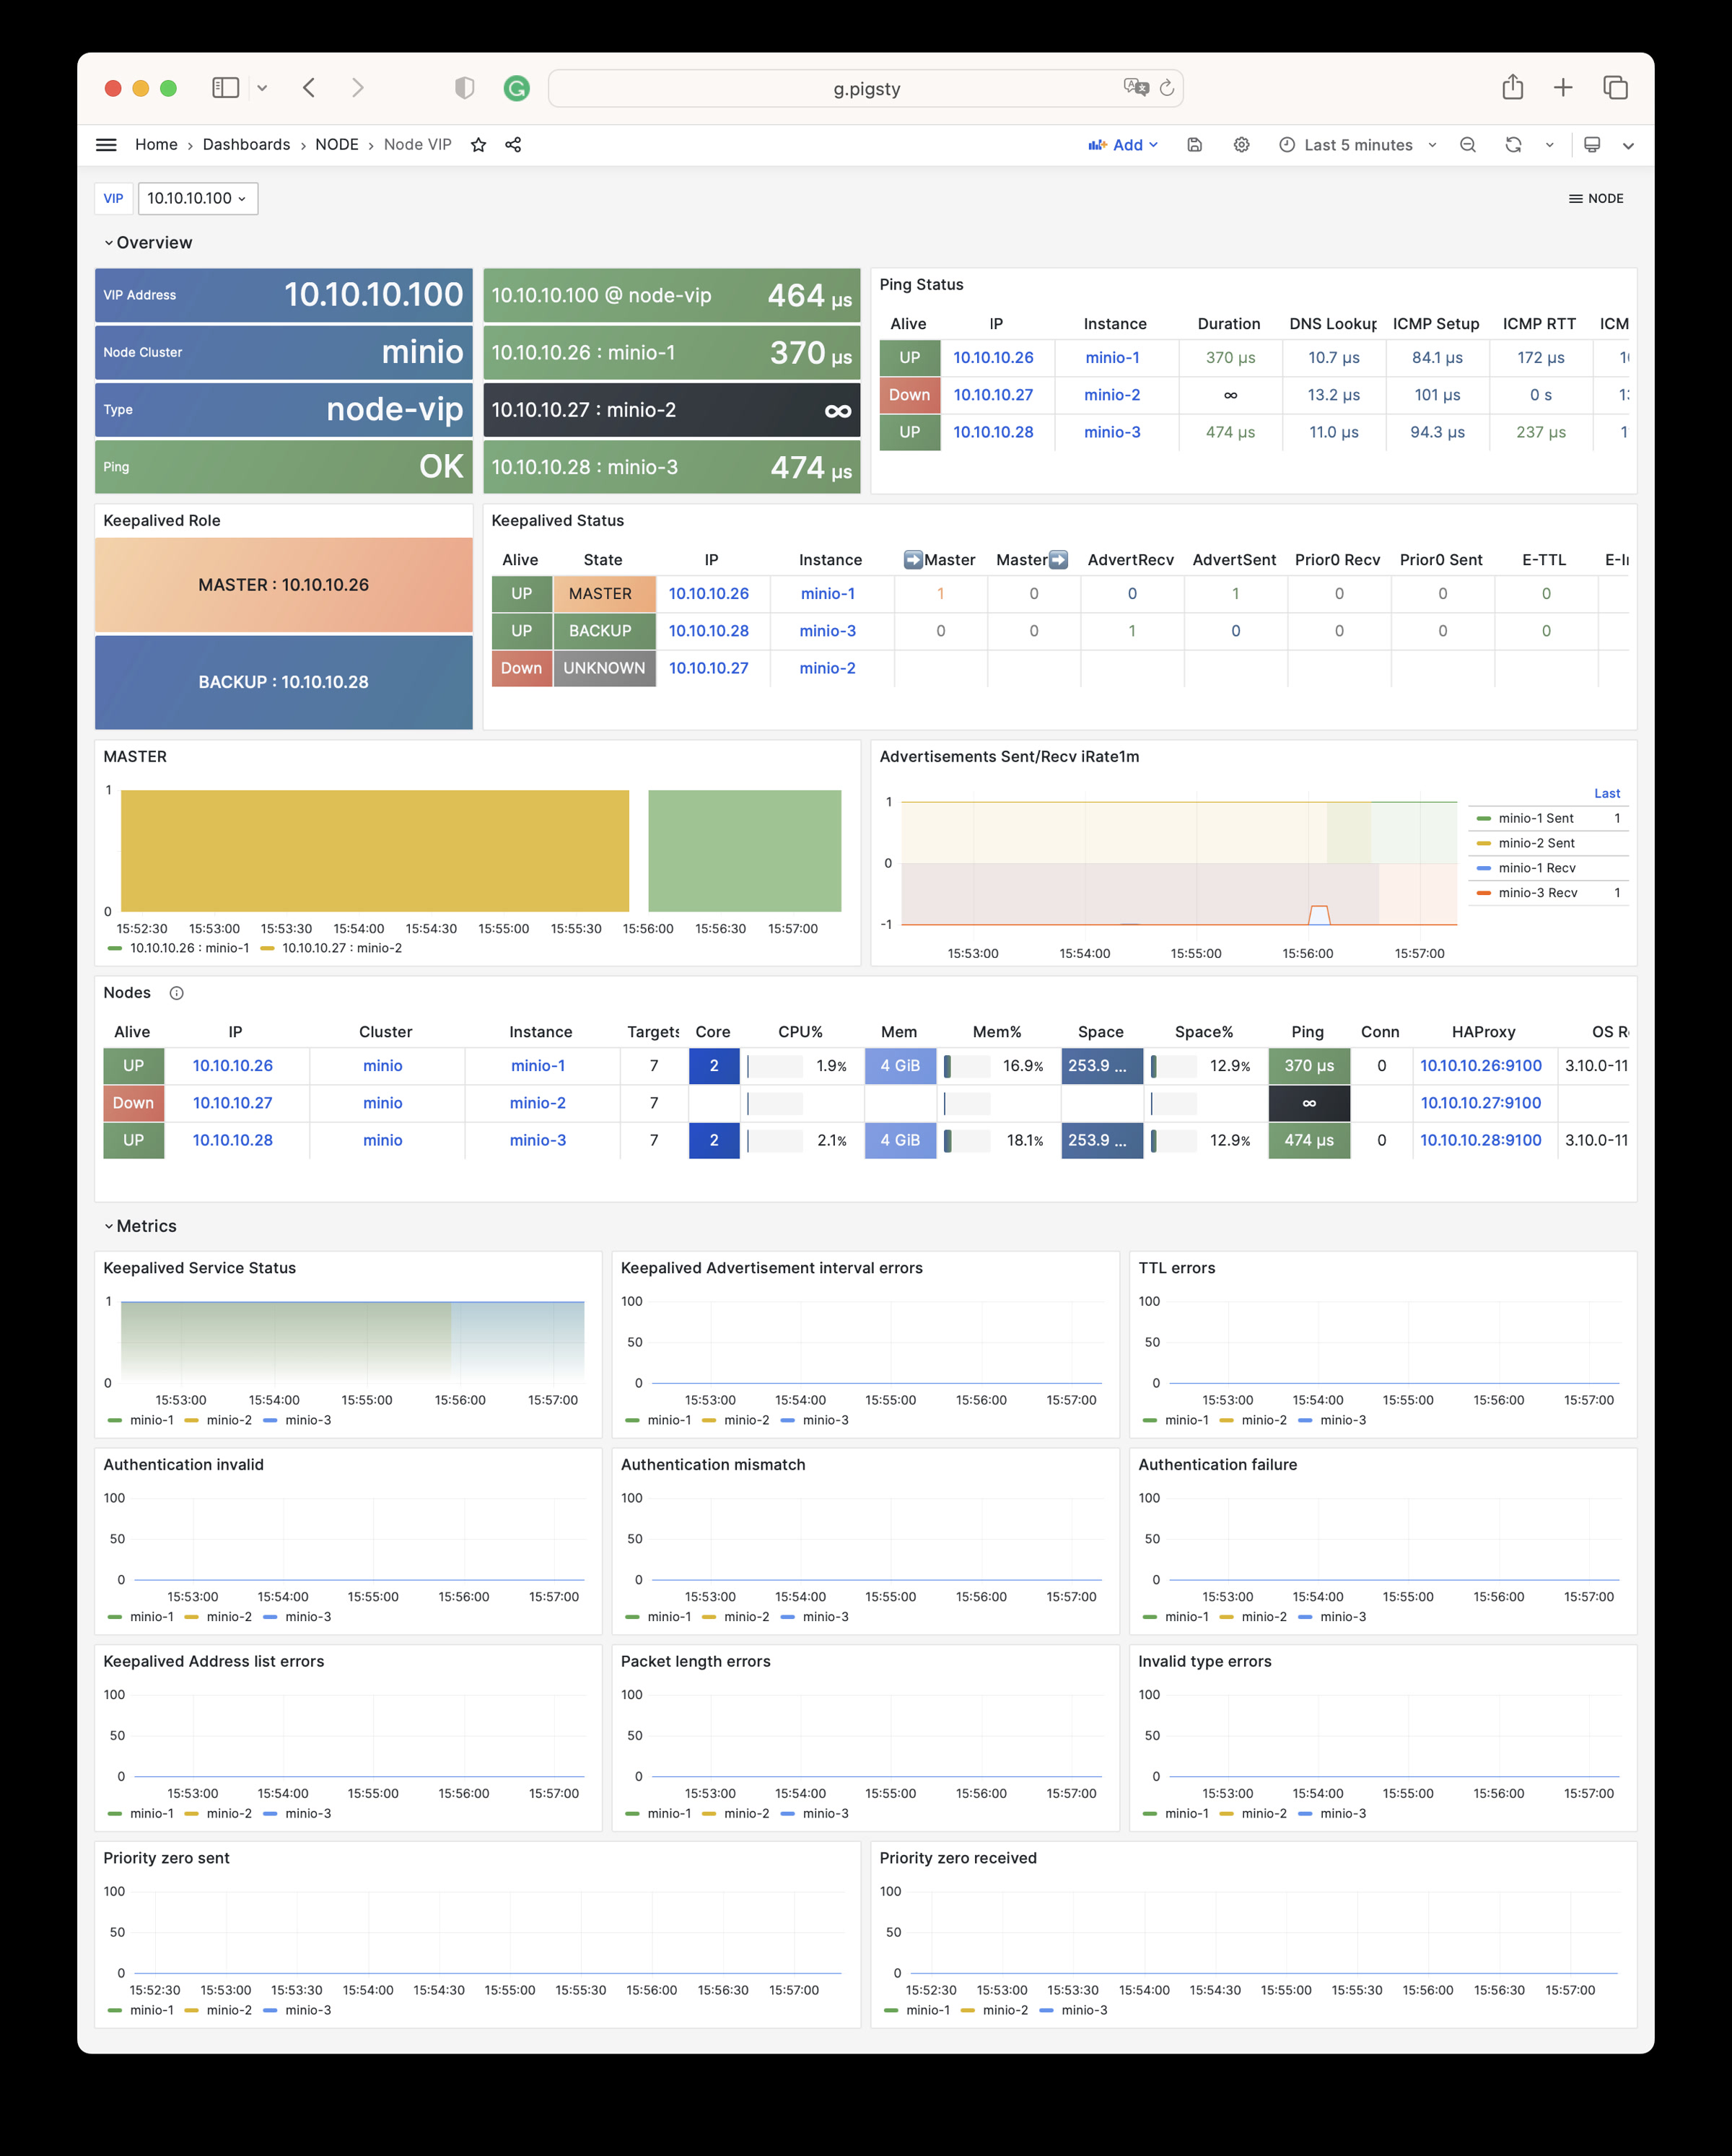
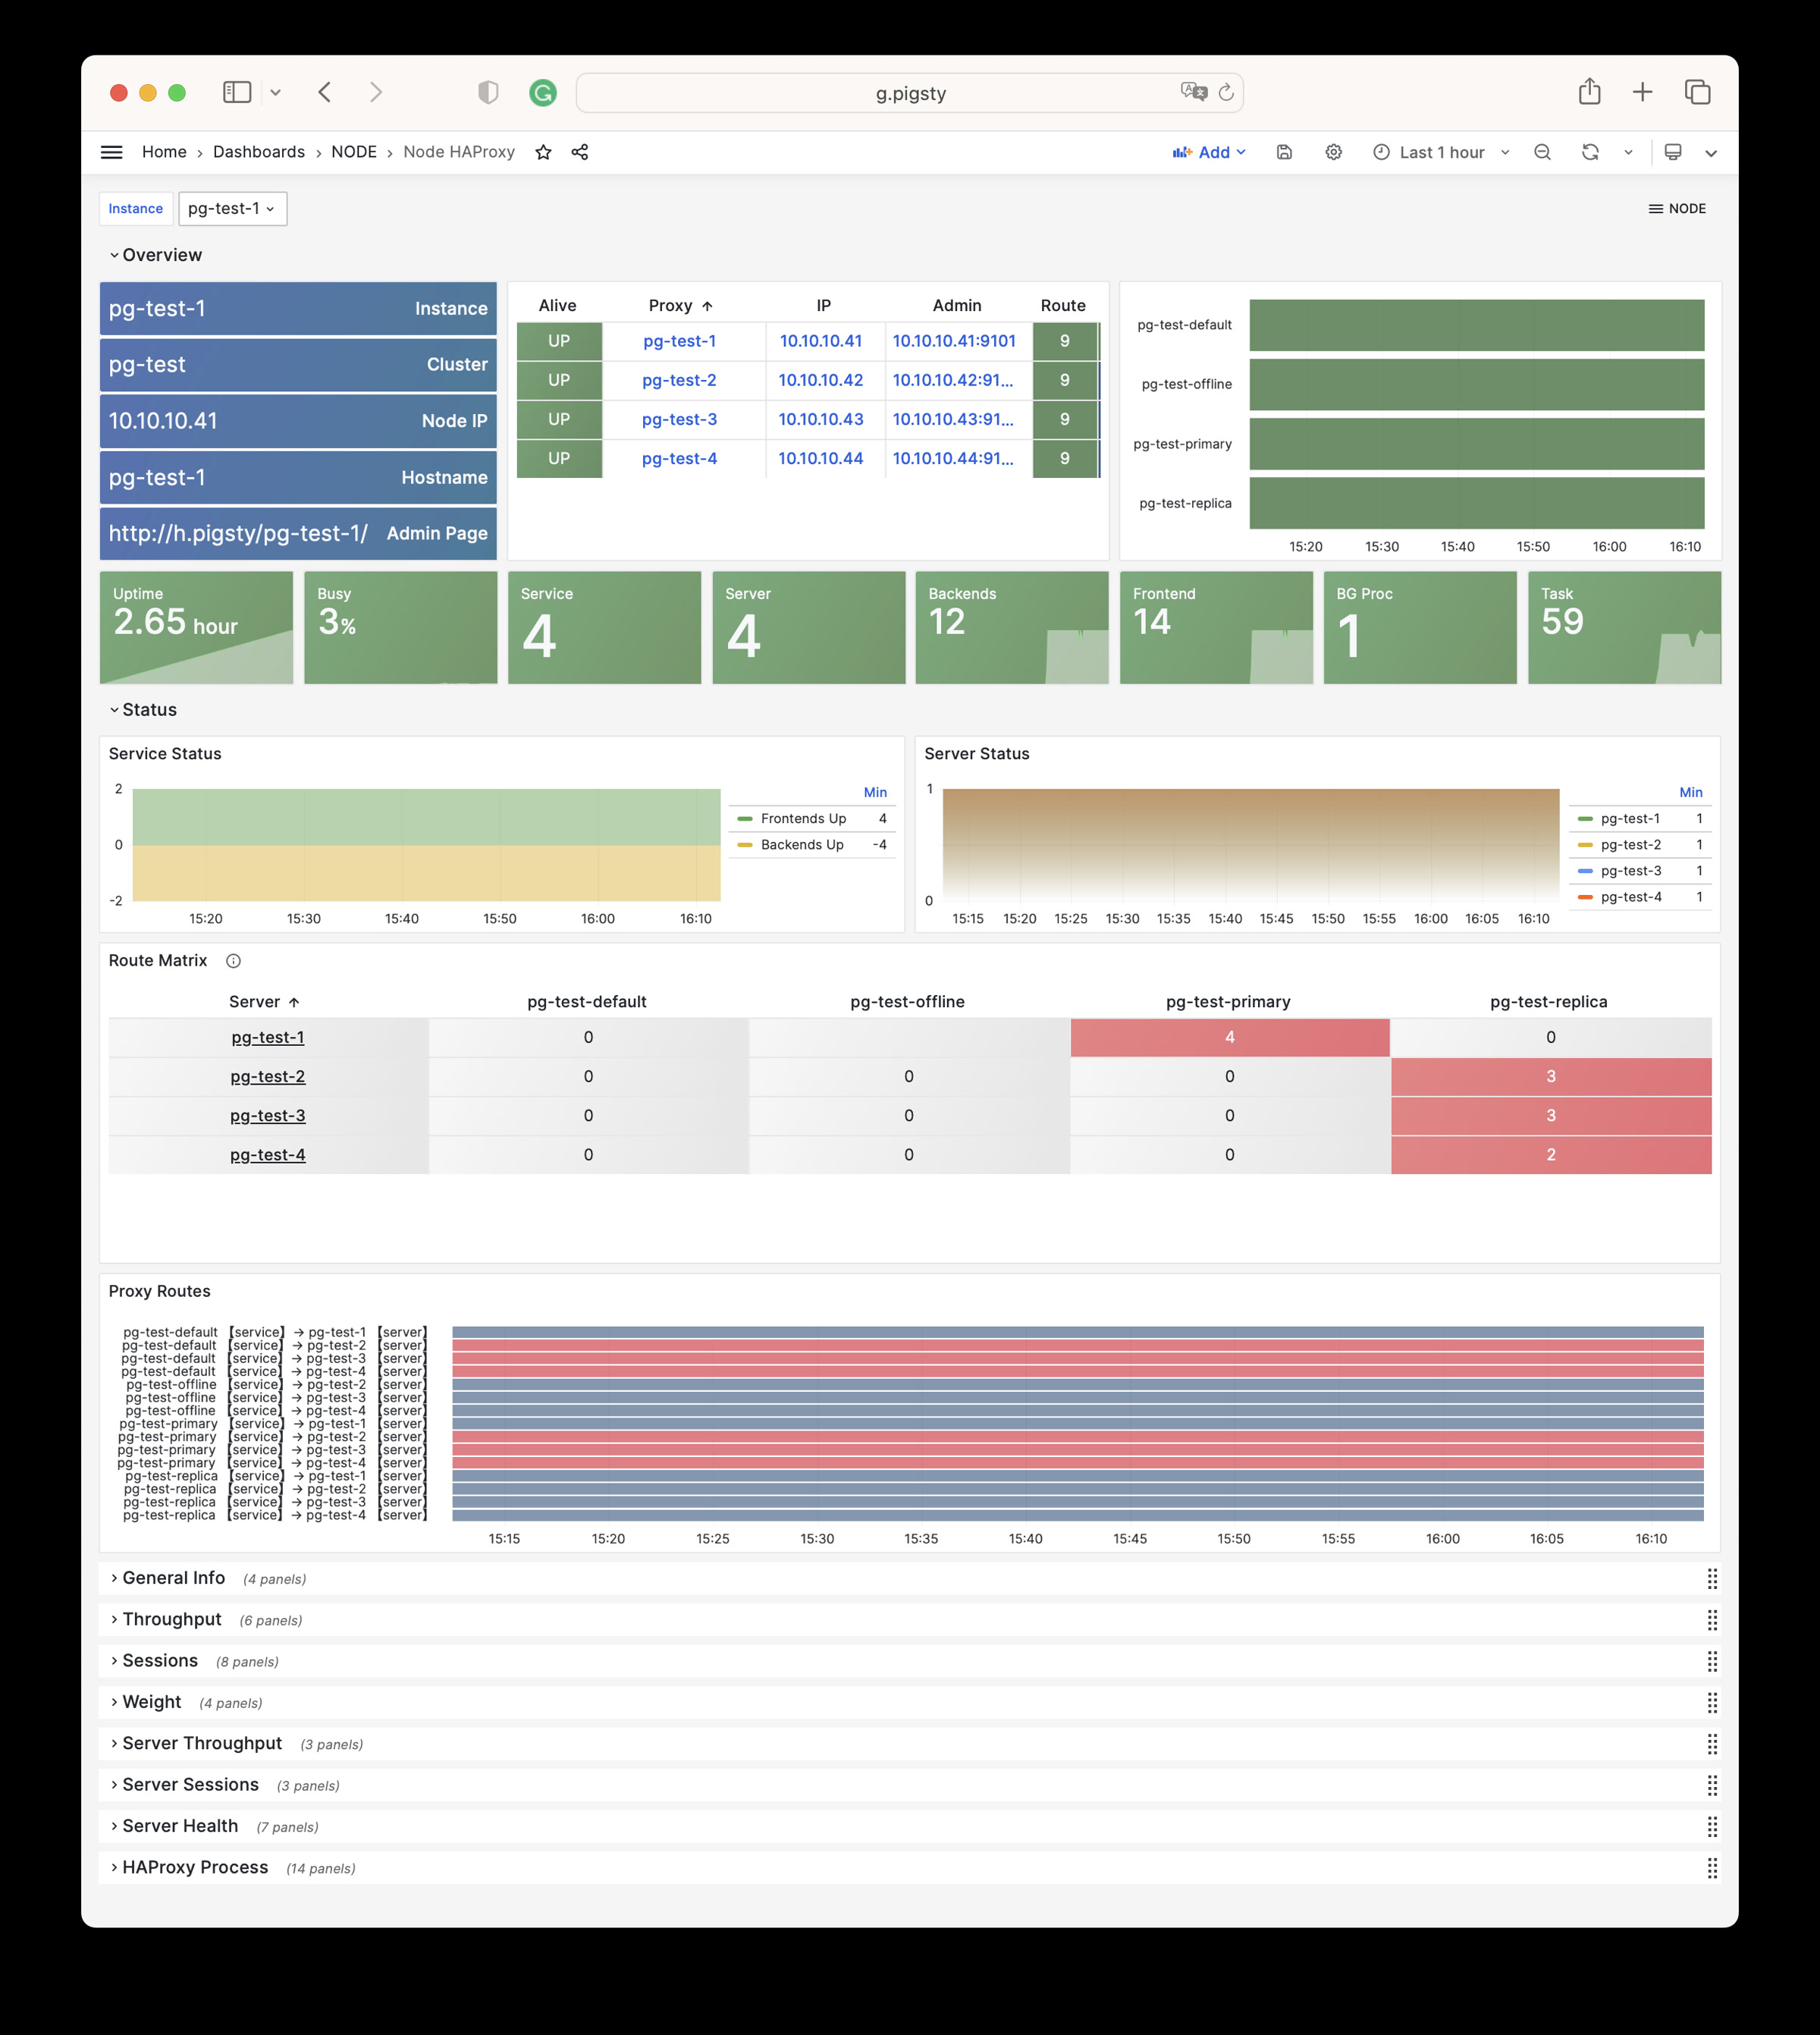

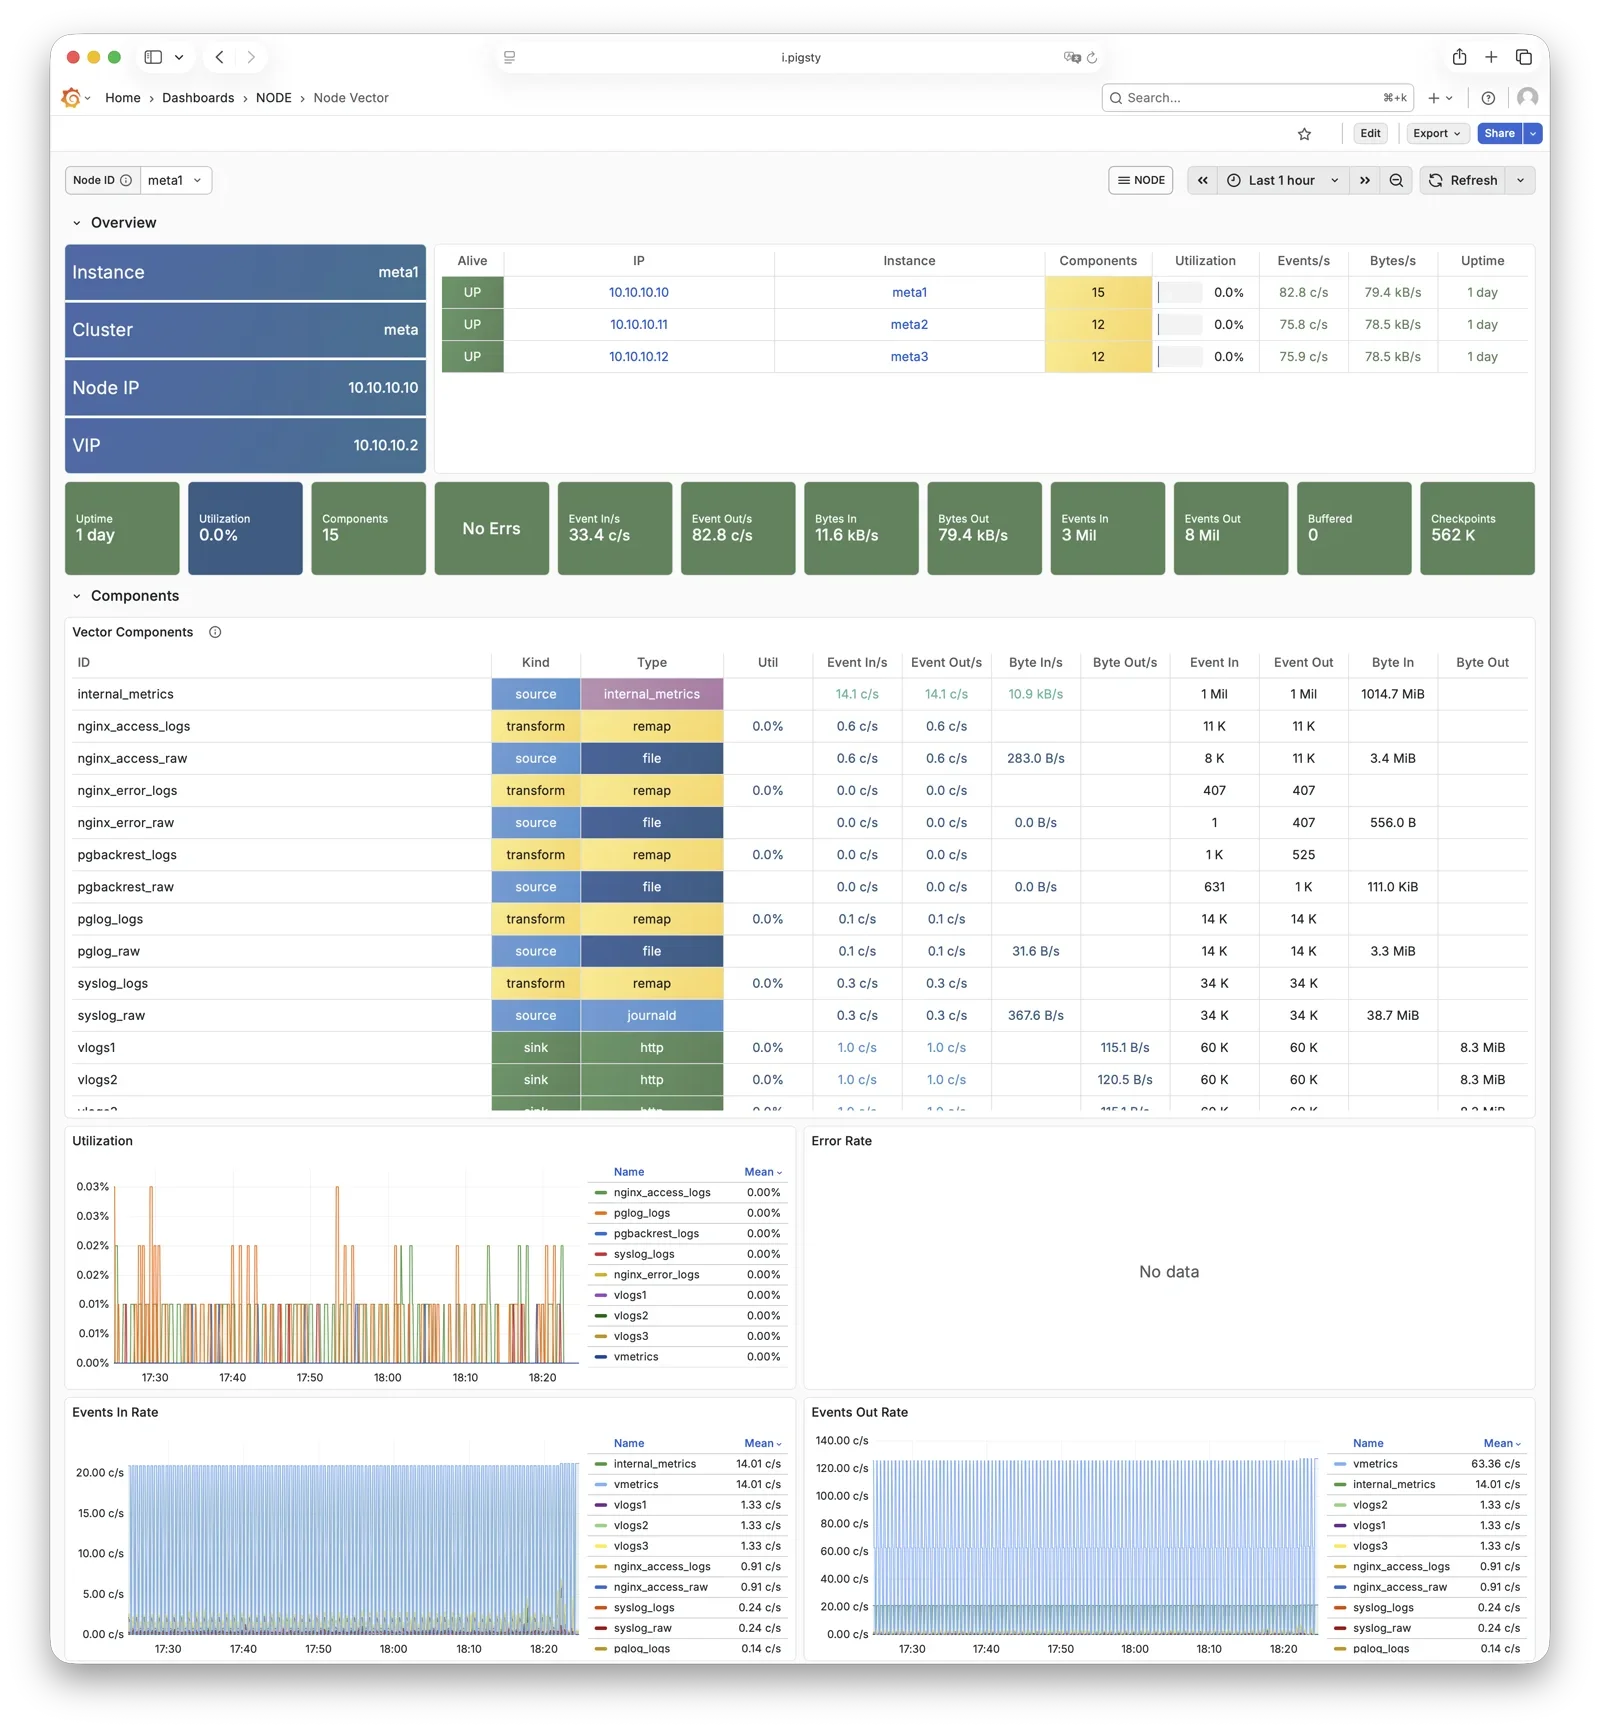


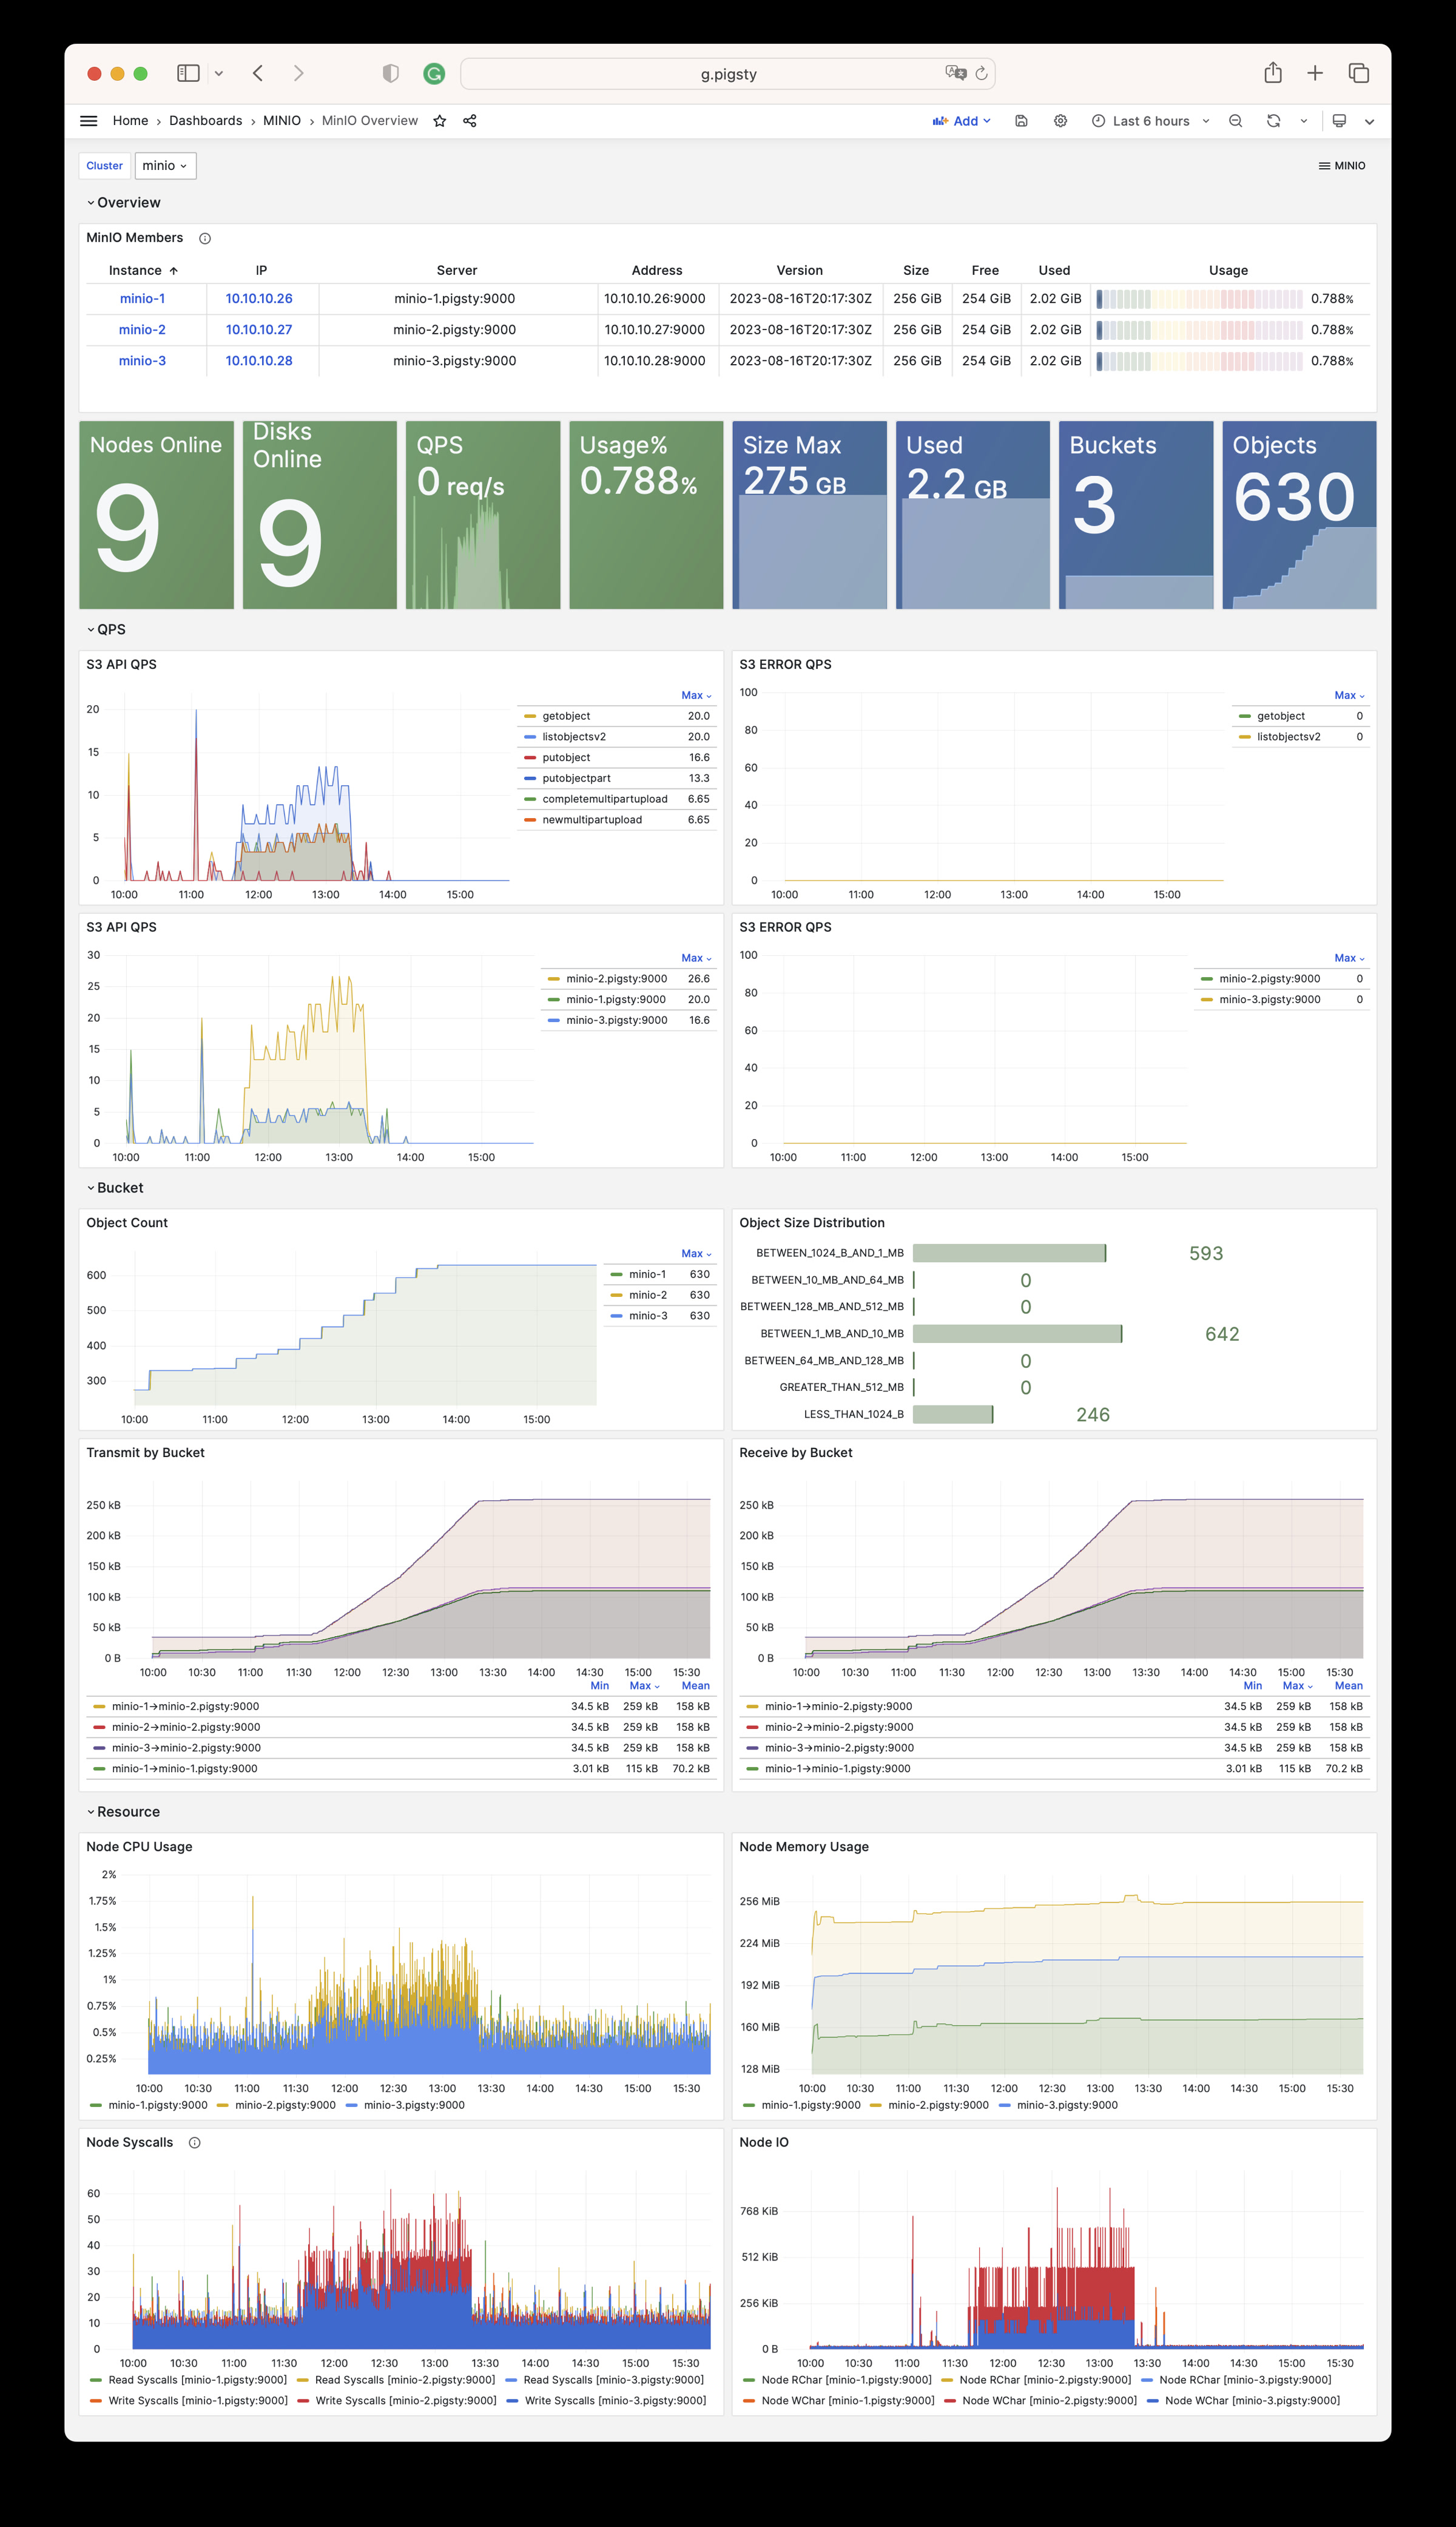

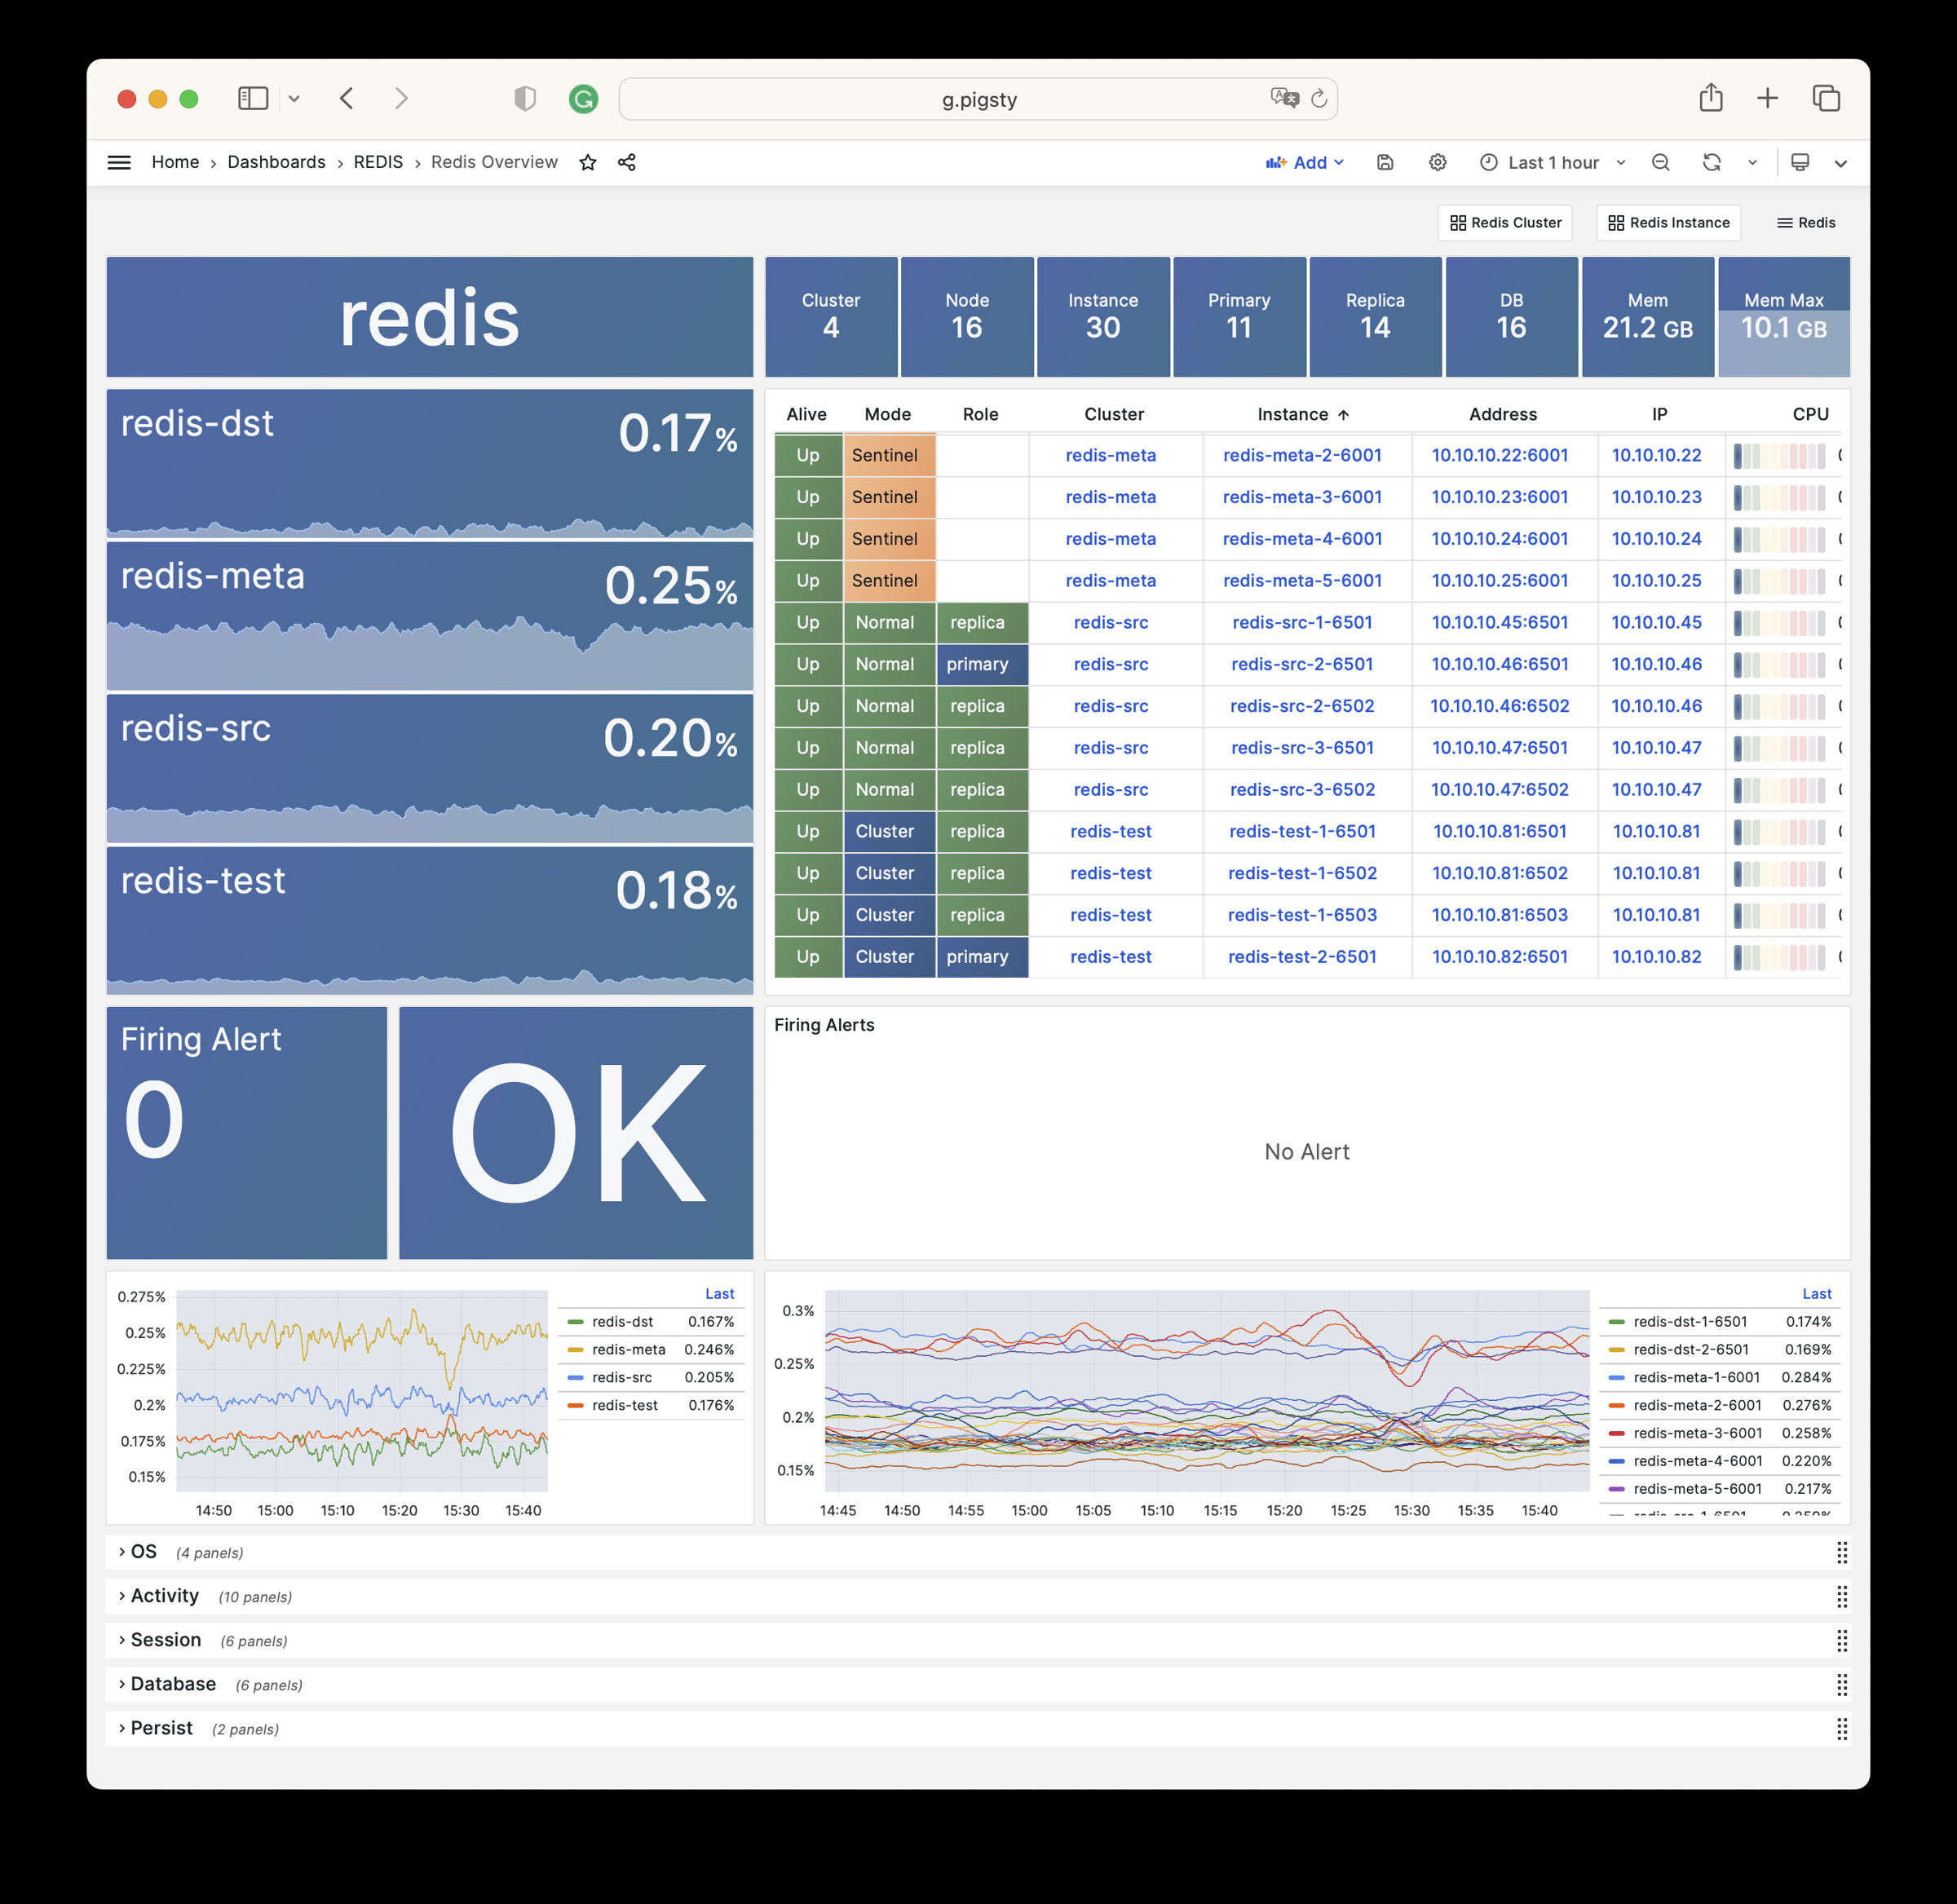
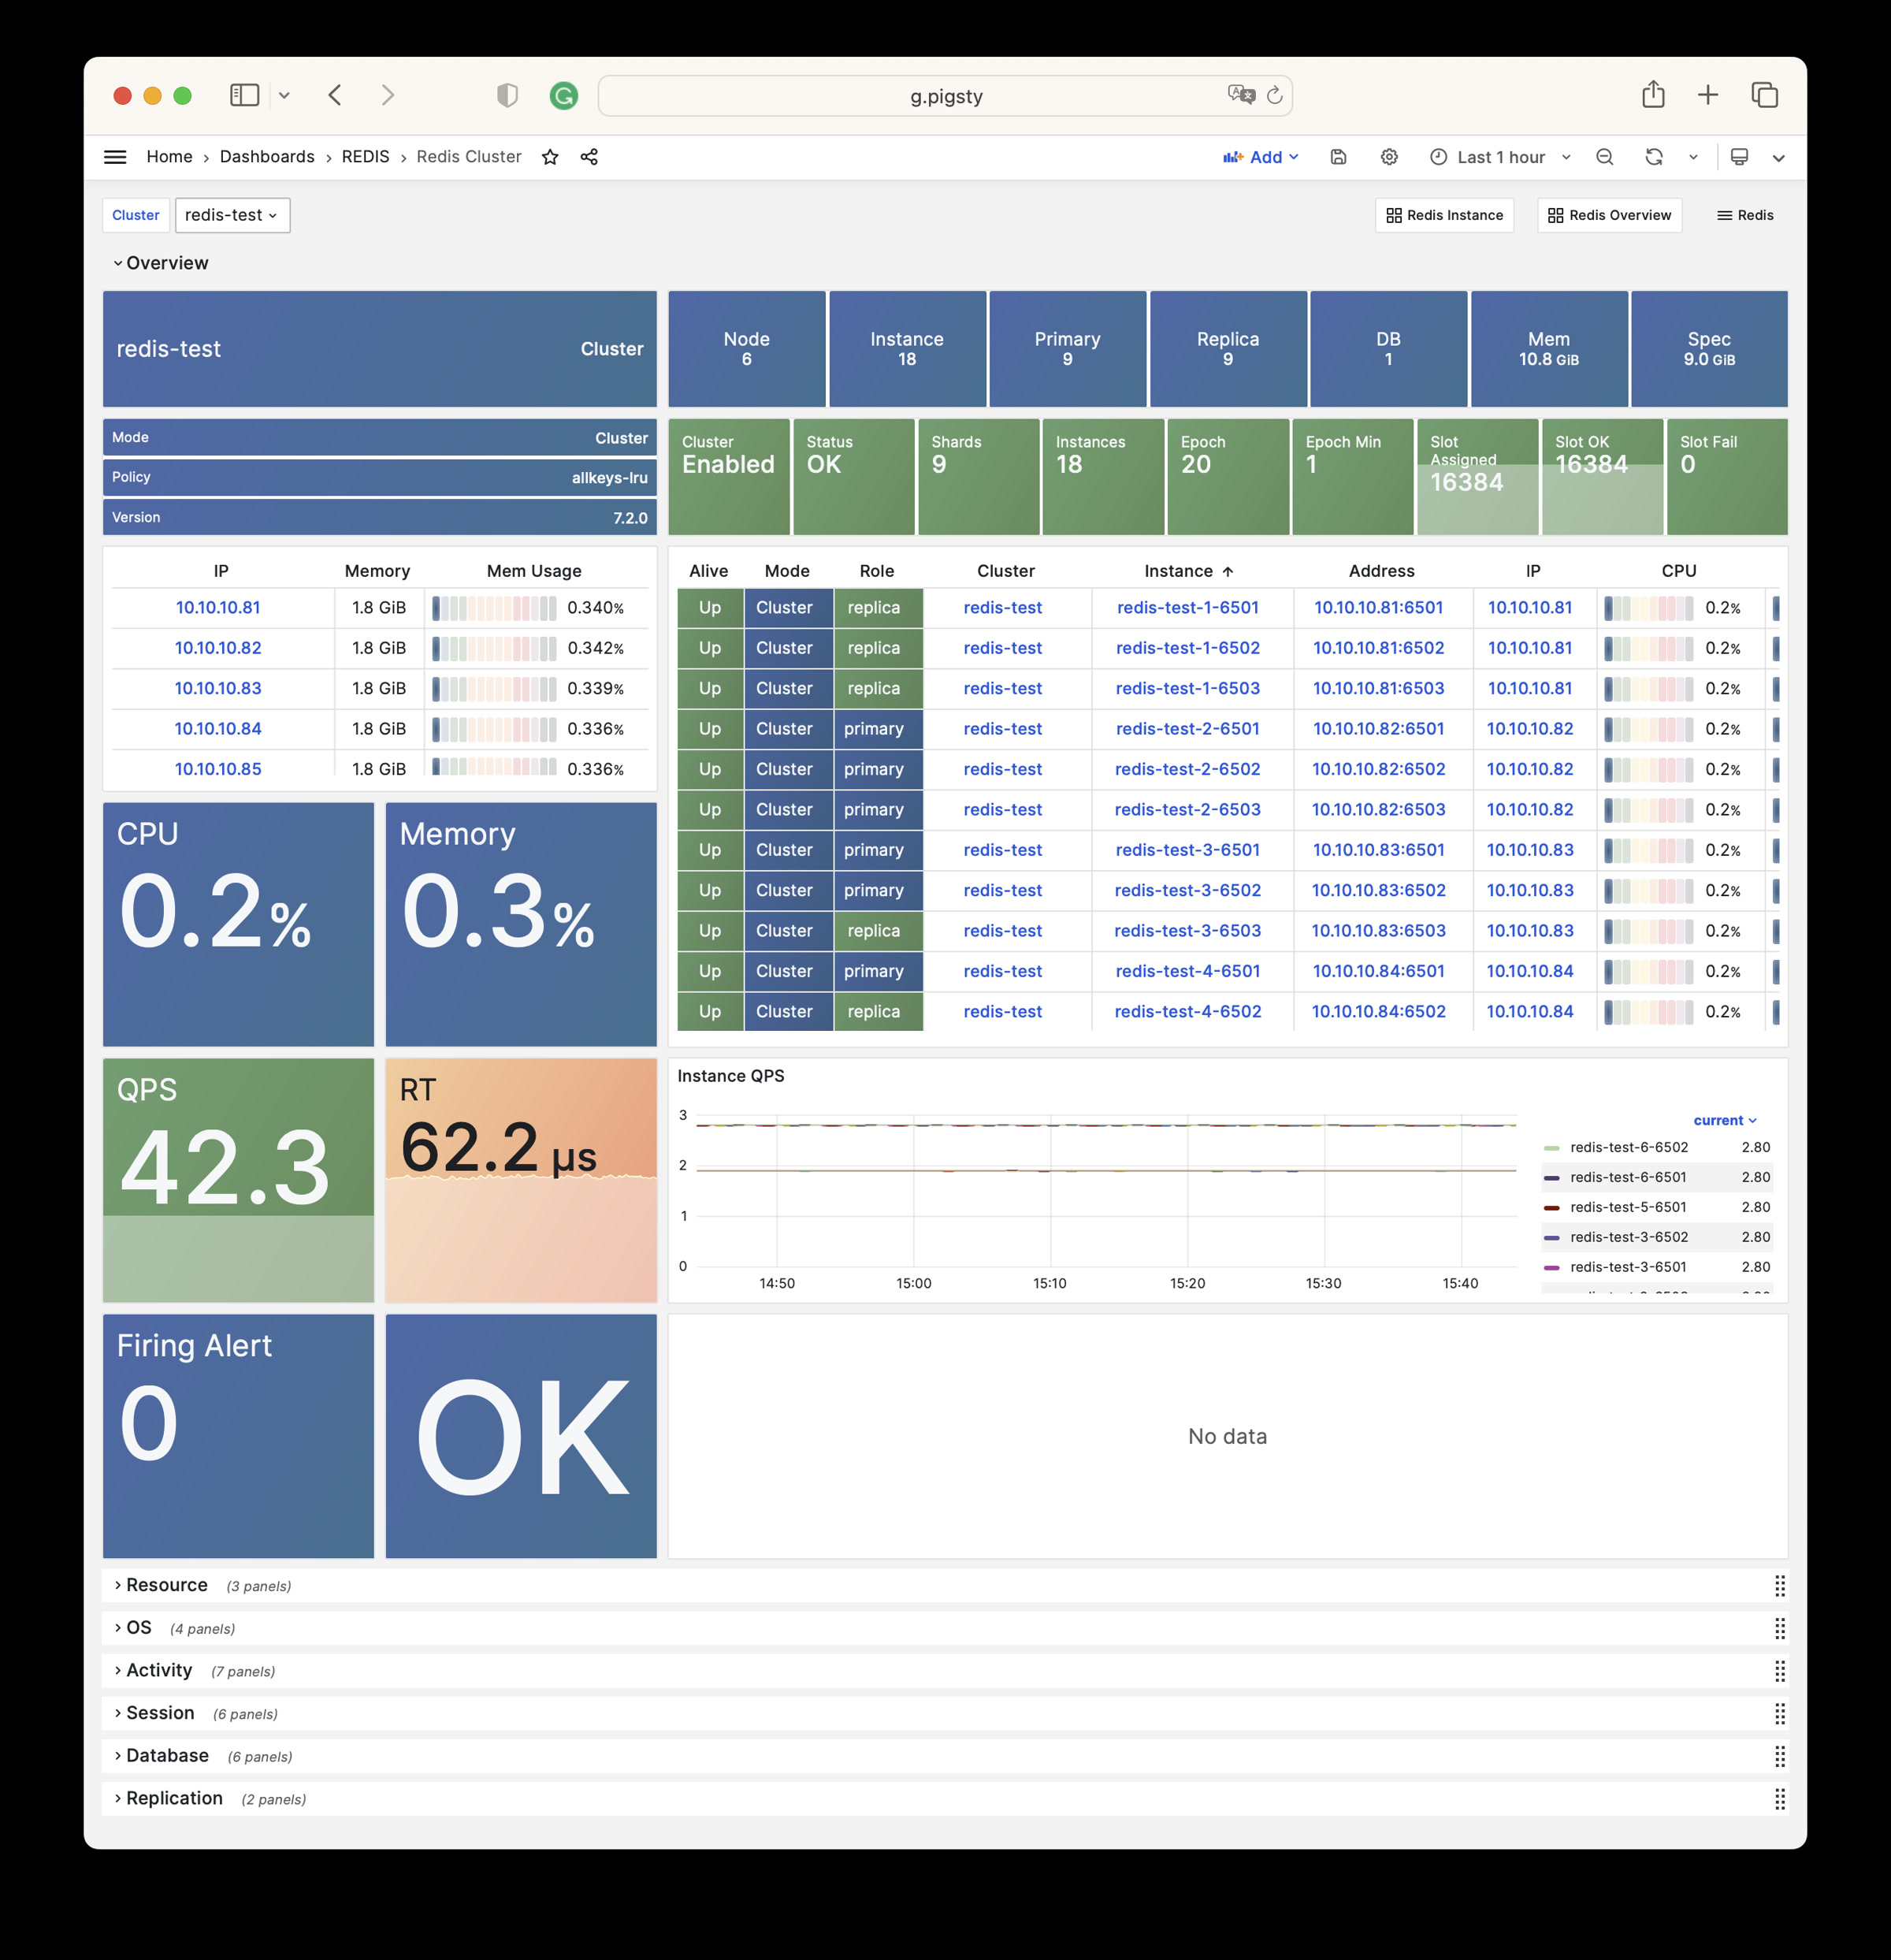
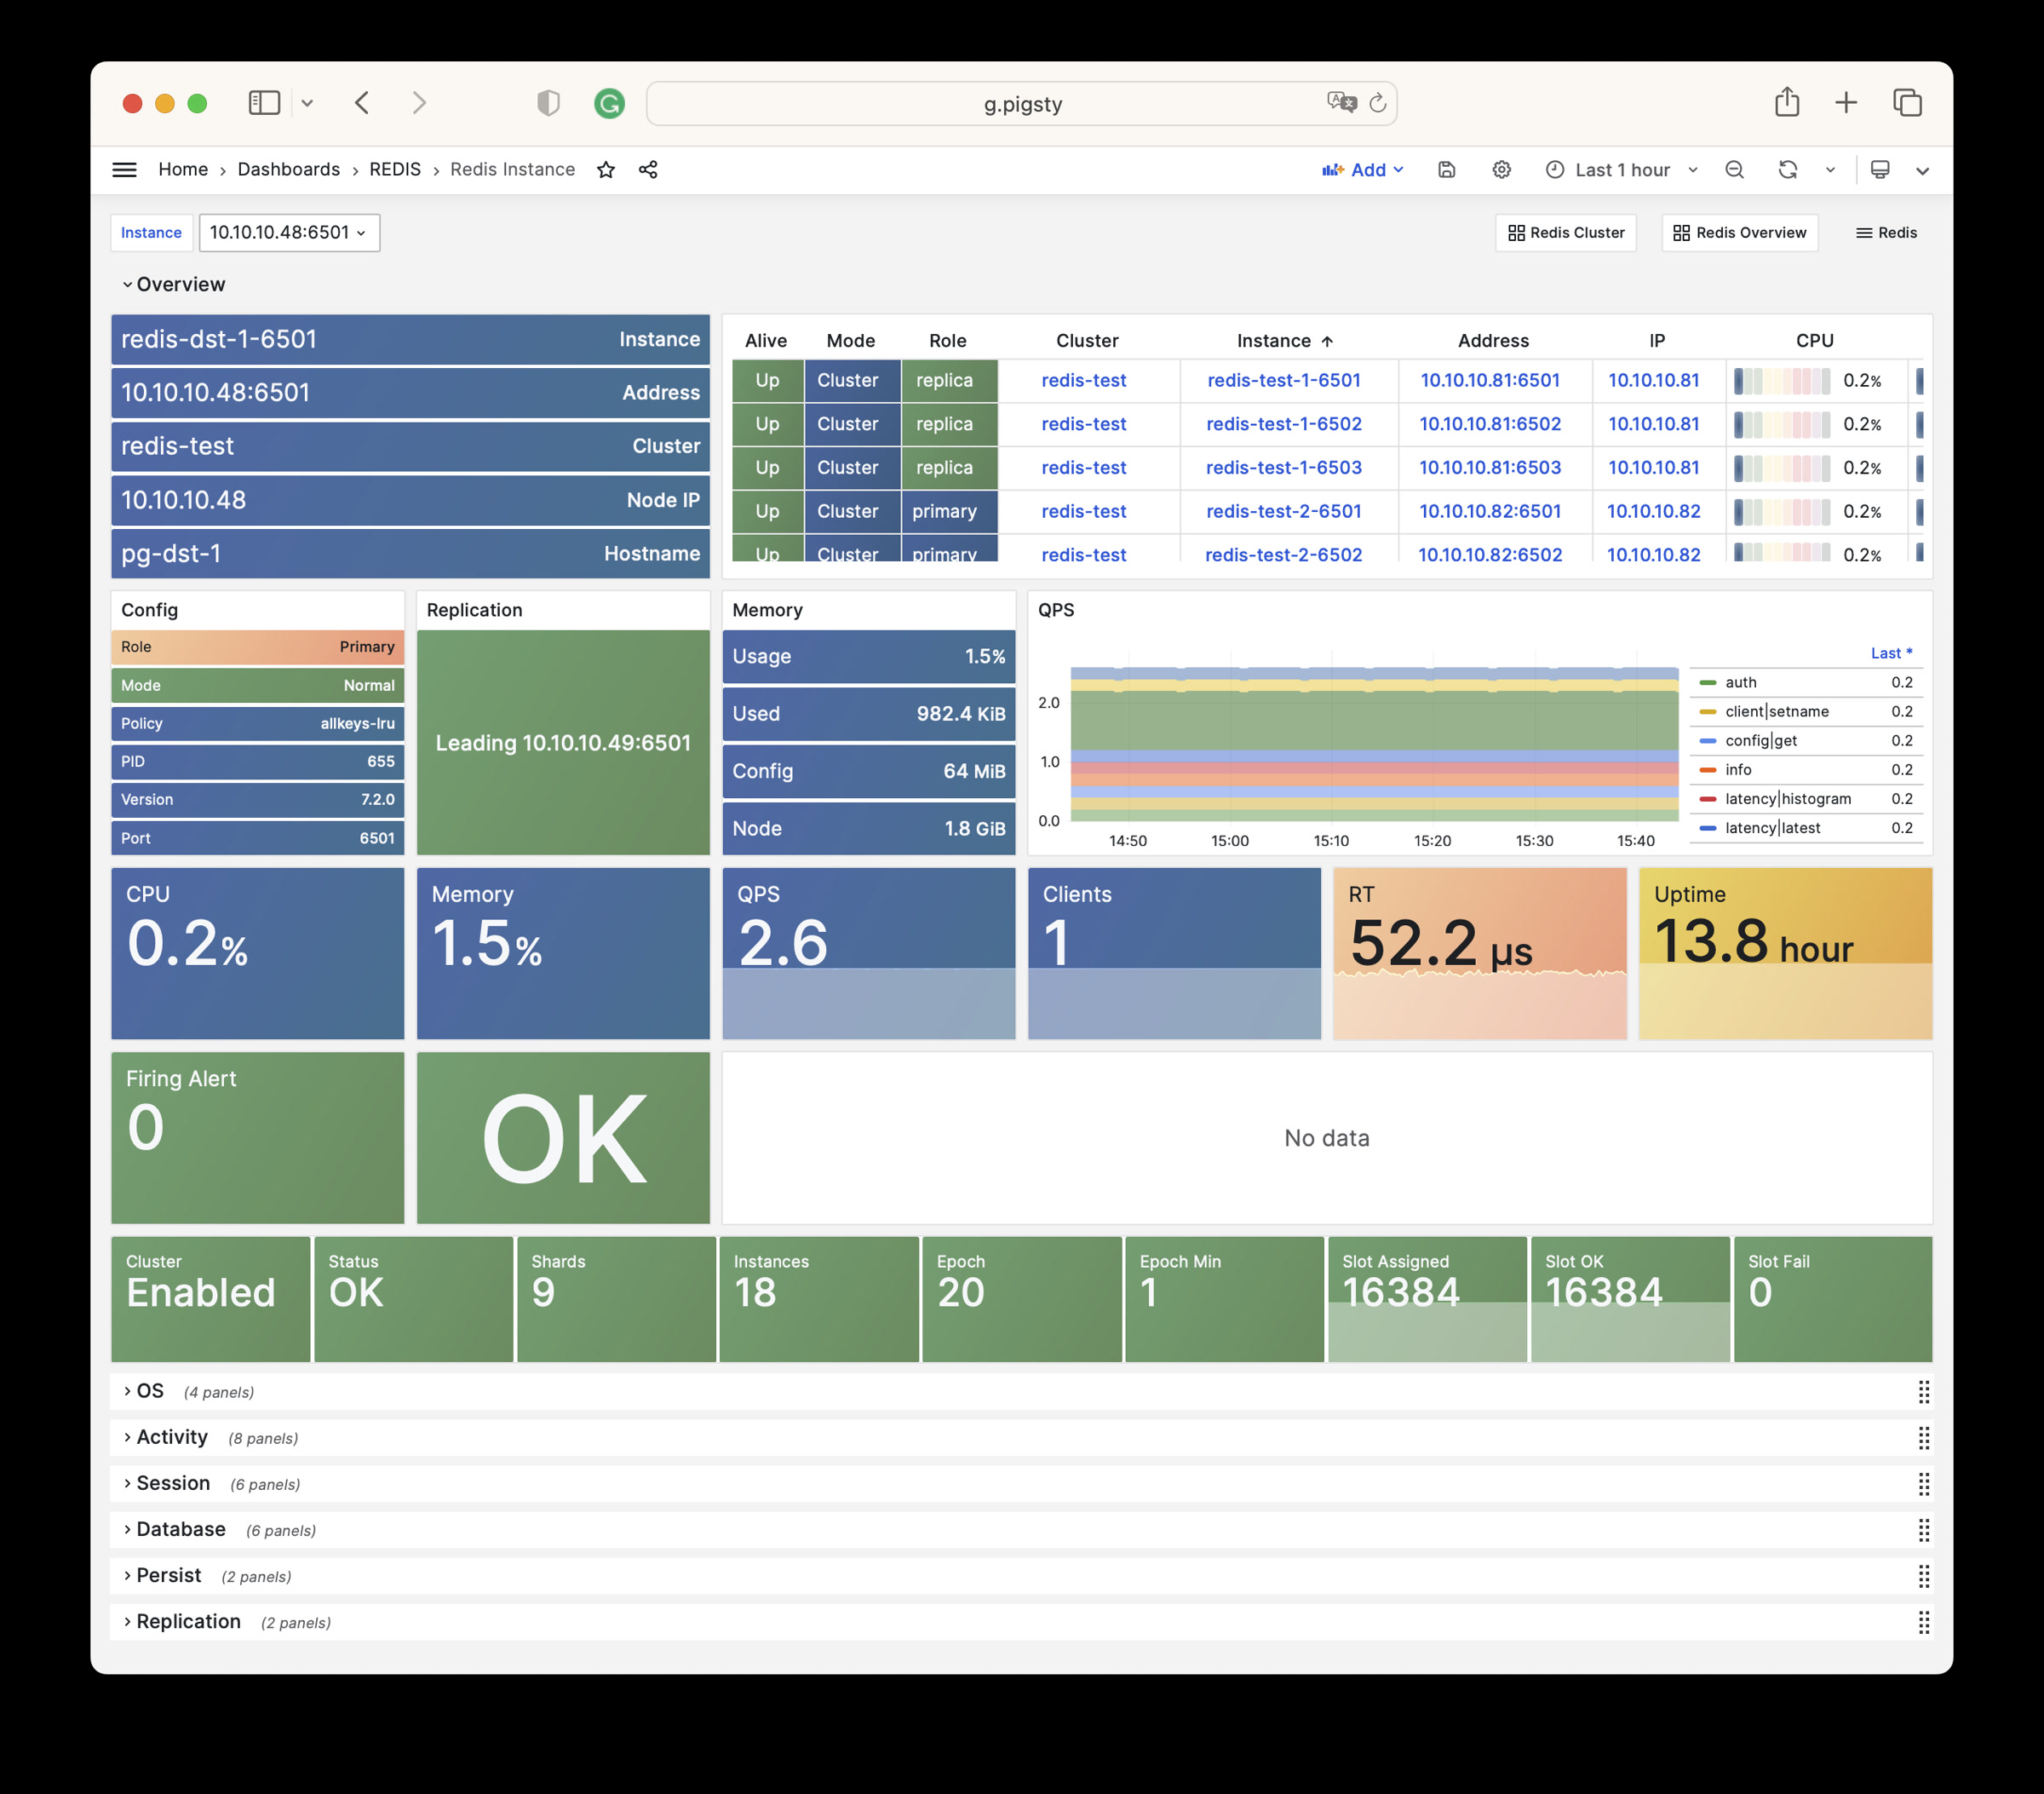

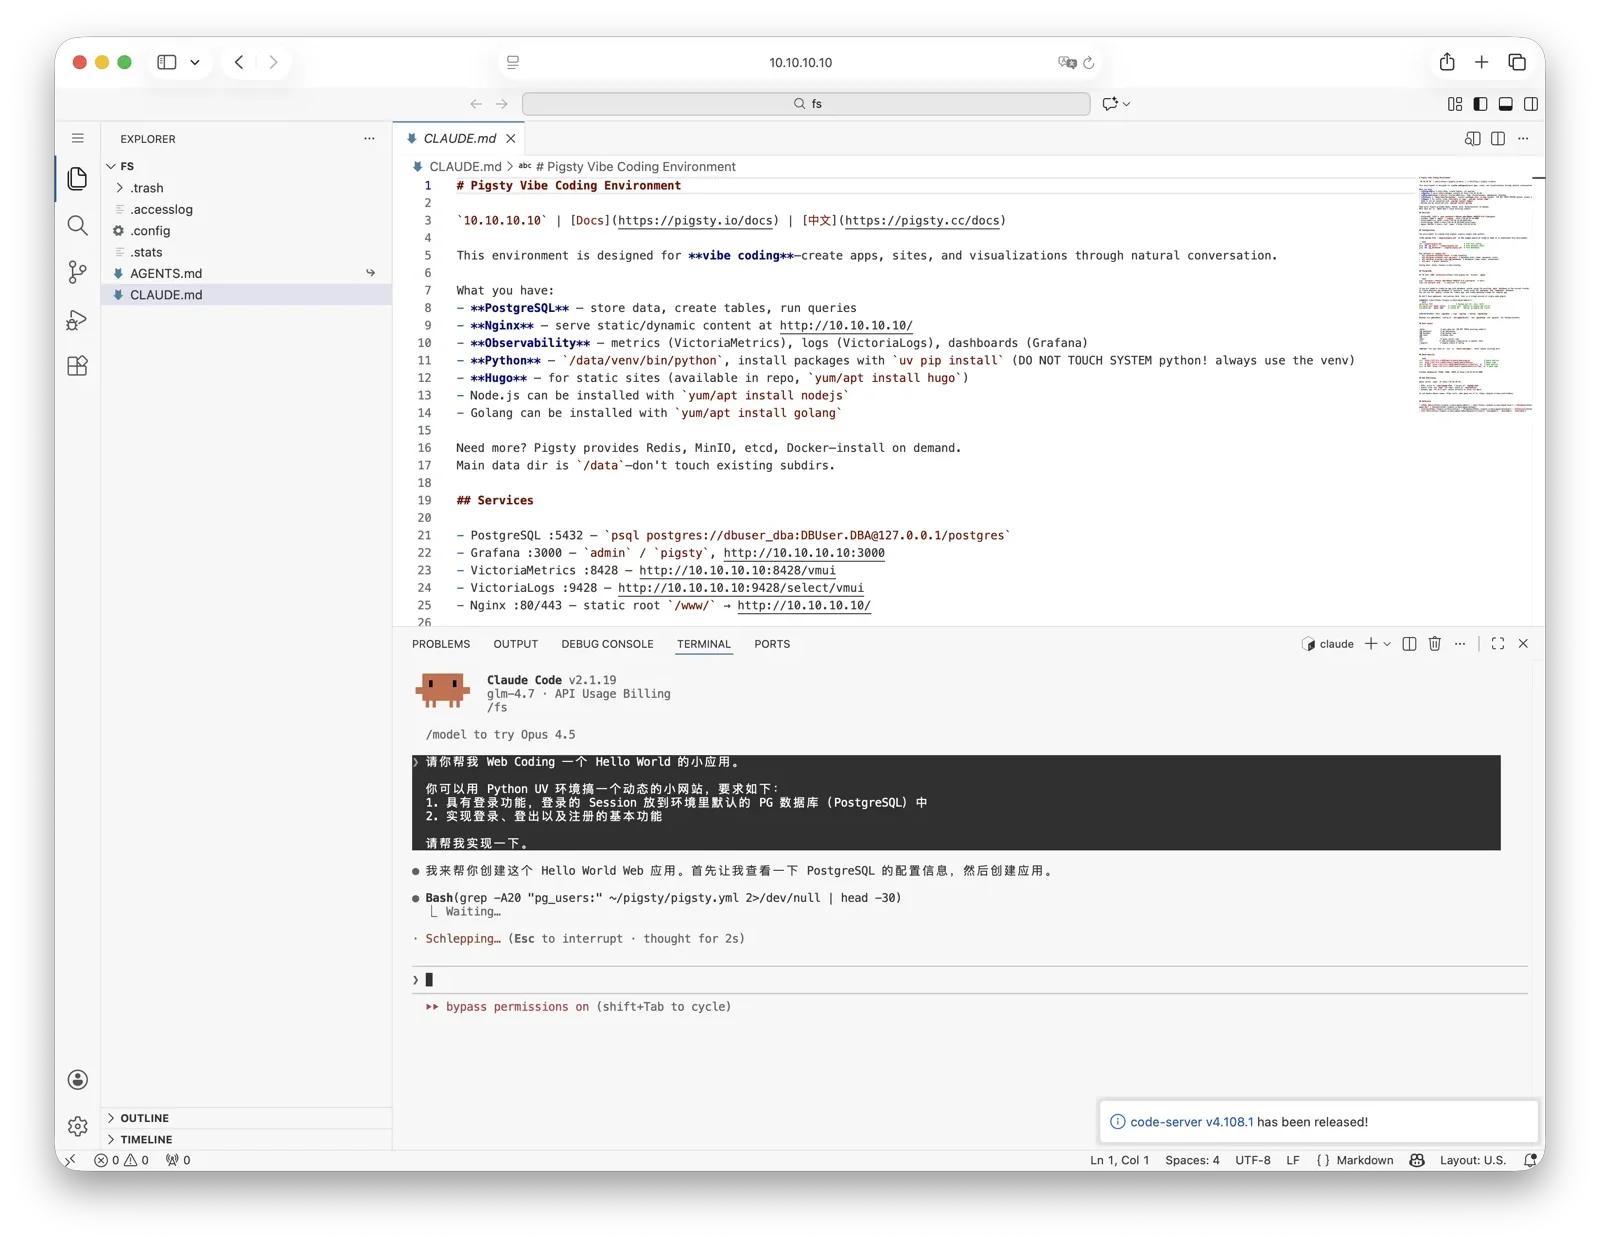
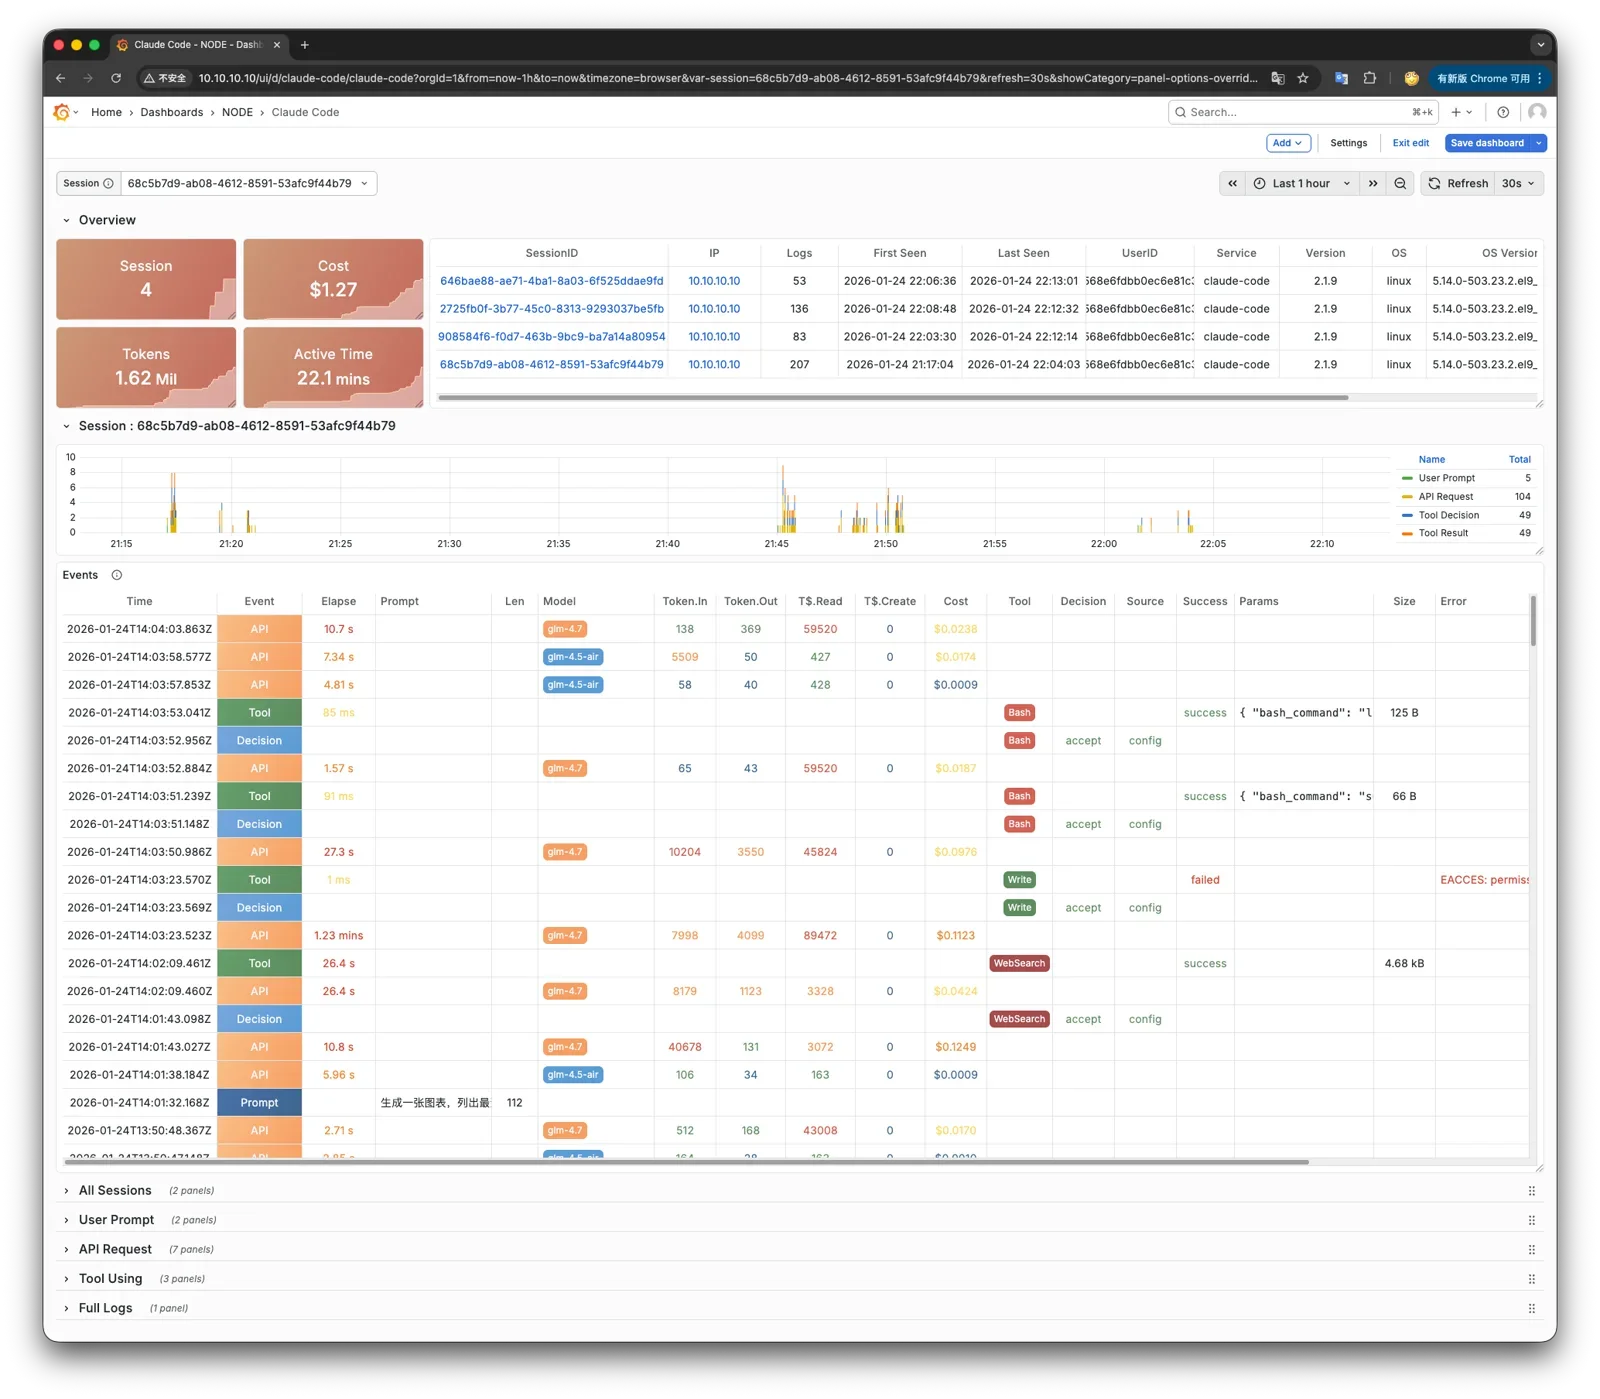
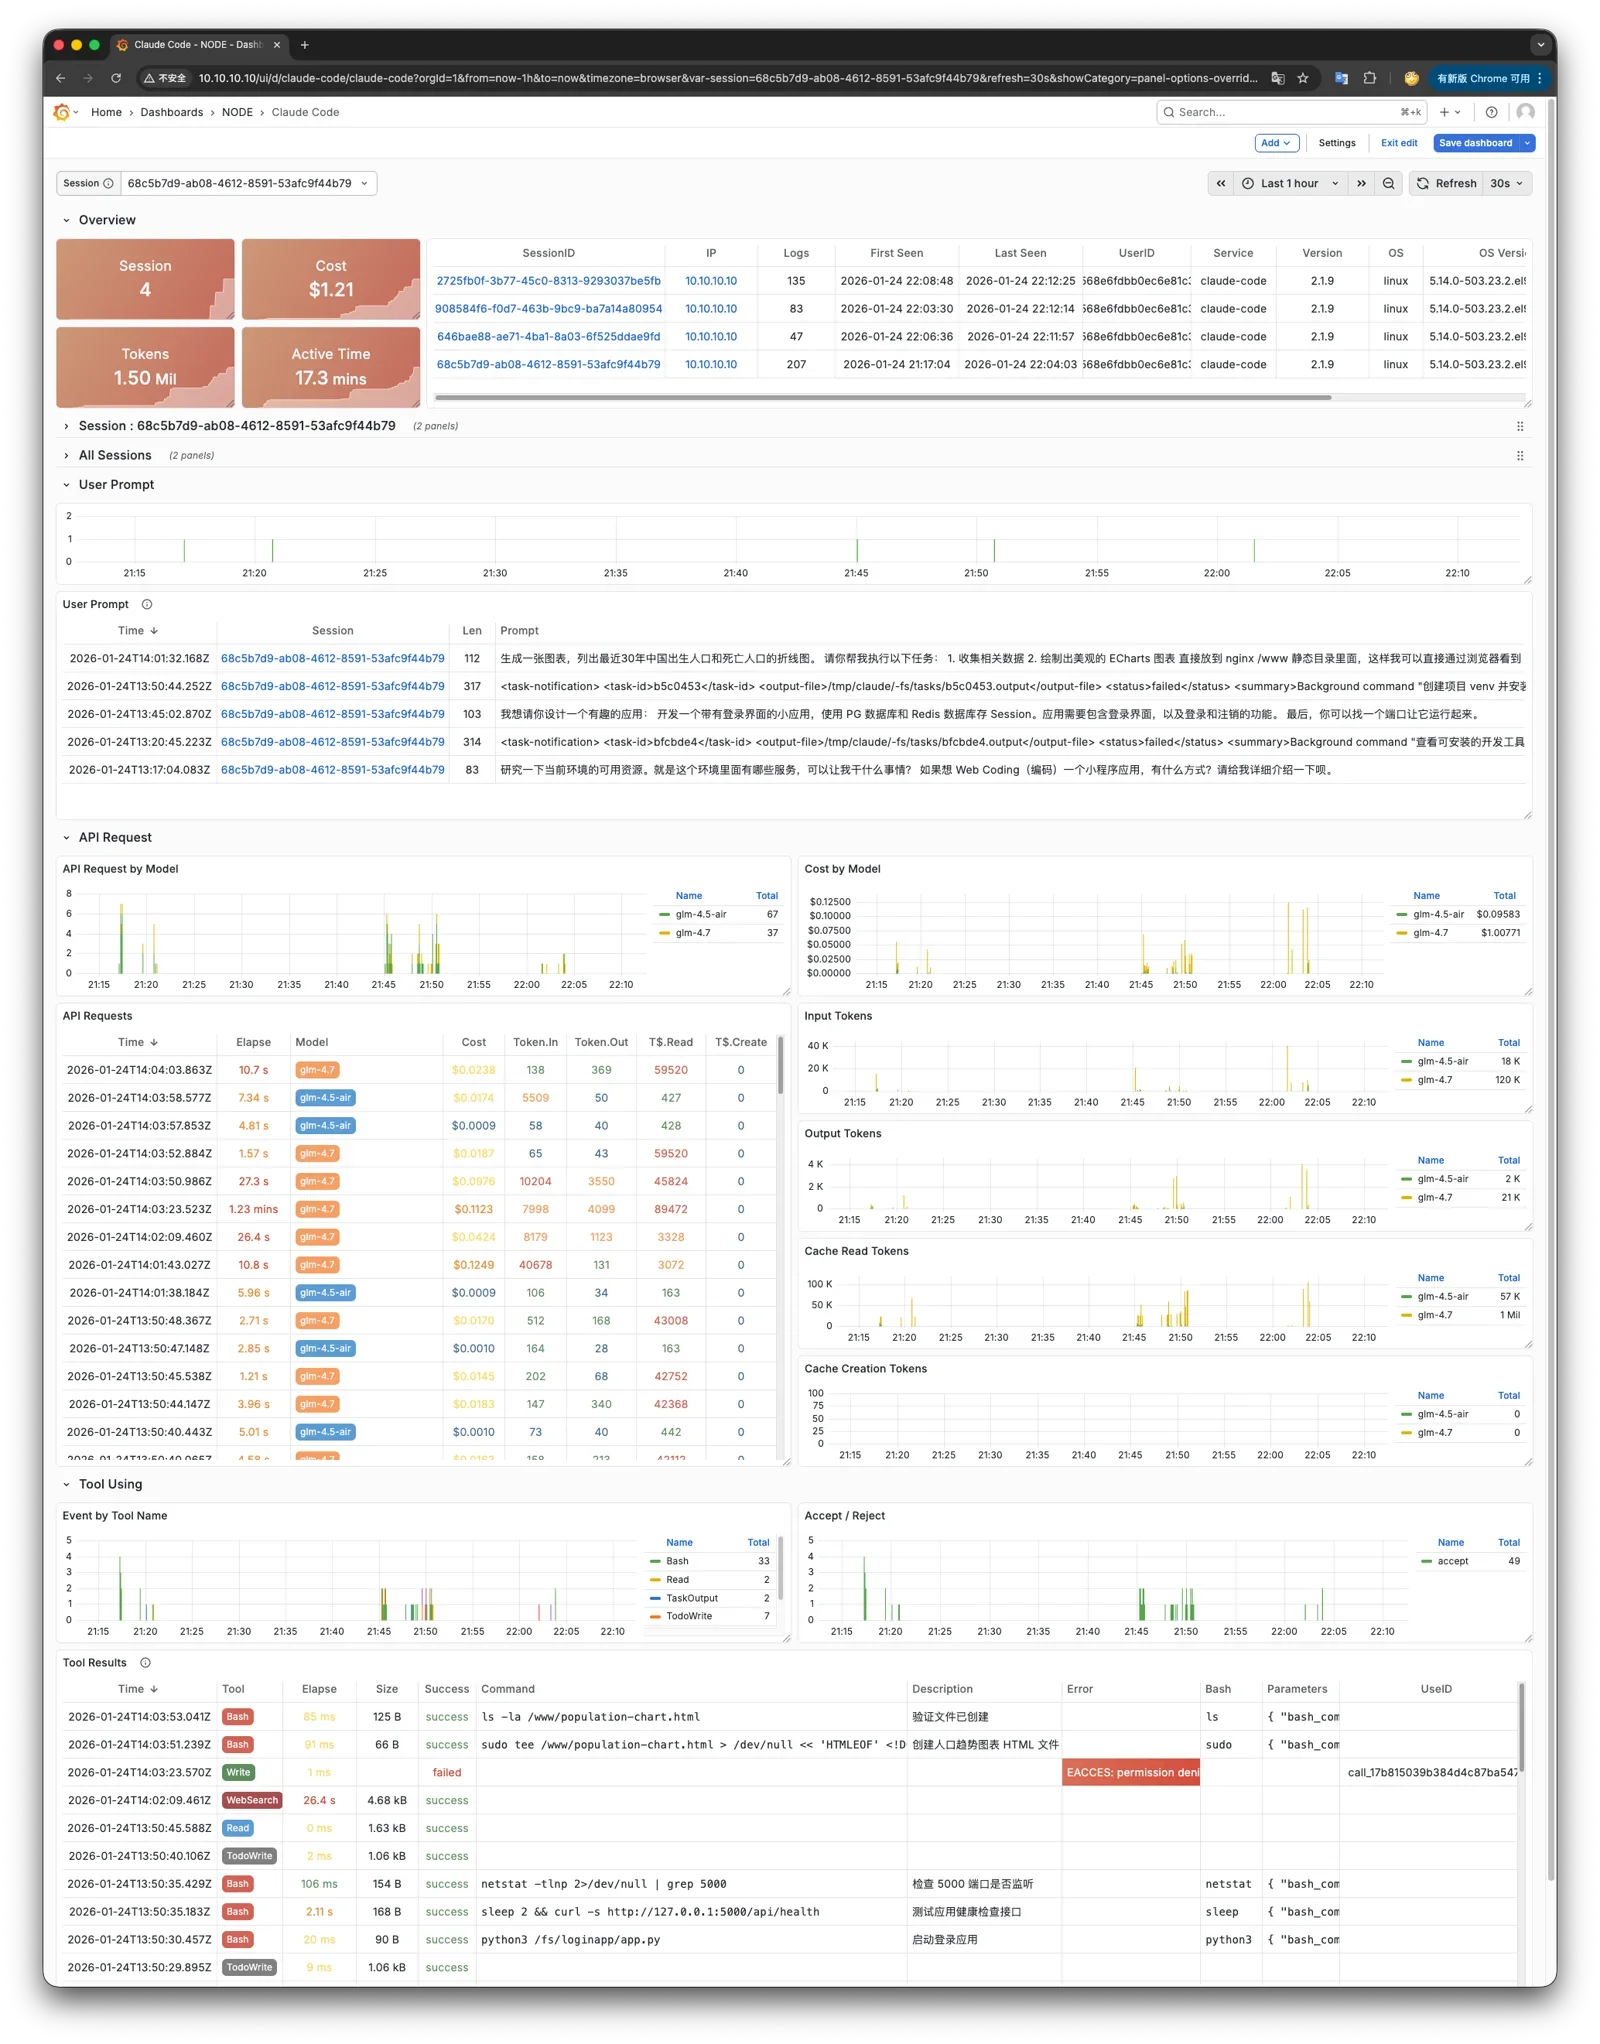
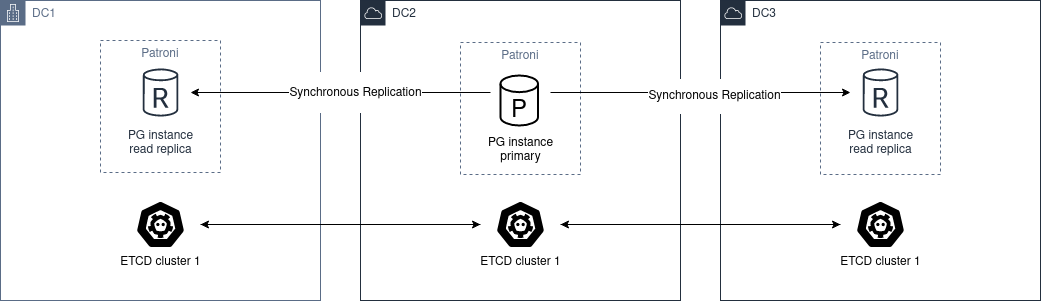
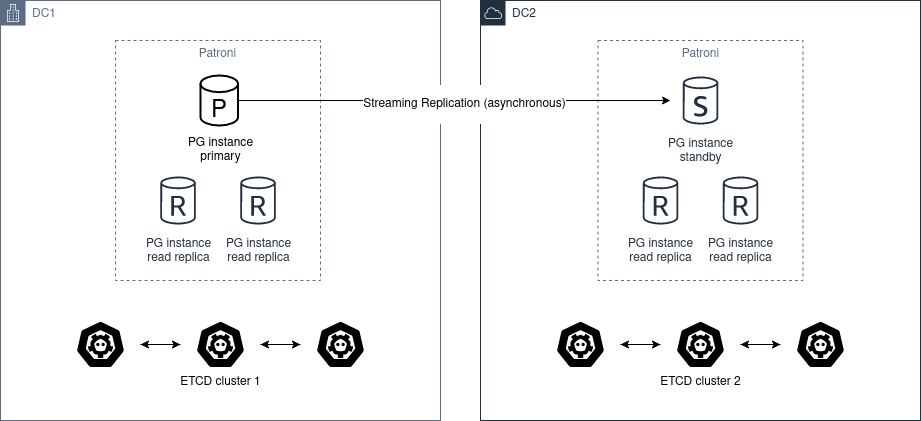